Embed Size (px)
Citation preview

Section 3 – Gliding
Annex C
Official Observer
& Pilot Guide
2014 Edition
valid from 1 October 2014

ii
FEDERATION AERONAUTIQUE INTERNATIONALE MSI - Avenue de Rhodanie 54 – CH-1007 Lausanne – Switzerland
Copyright 2014 All rights reserved. Copyright in this document is owned by the Fédération Aéronautique Internationale (FAI). Any person acting on behalf of the FAI or one of its Members is hereby authorized to copy, print, and distribute this document, subject to the following conditions: 1. The document may be used for information only and may not be
exploited for commercial purposes. 2. Any copy of this document or portion thereof must include this
copyright notice. Note that any product, process or technology described in the document may be the subject of other Intellectual Property rights reserved by the Fédération Aéronautique Internationale or other entities and is not licensed hereunder.

iii
Rights to FAI international sporting events All international sporting events organised wholly or partly under the rules of the Fédération Aéronautique Inter-
nationale (FAI) Sporting Code1 are termed FAI International Sporting Events
2. Under the FAI Statutes
3, FAI owns
and controls all rights relating to FAI International Sporting Events. FAI Members4 shall, within their national terri-
tories5, enforce FAI ownership of FAI International Sporting Events and require them to be registered in the FAI
Sporting Calendar6. An event organiser who wishes to exploit rights to any commercial activity at such events shall
seek prior agreement with FAI. The rights owned by FAI which may, by agreement, be transferred to event organ-
isers include, but are not limited to advertising at or for FAI events, use of the event name or logo for merchan-
dising purposes and use of any sound, image, program and/or data, whether recorded electronically or otherwise
or transmitted in real time. This includes specifically all rights to the use of any material, electronic or other –
including software – that forms part of any method or system for judging, scoring, performance evaluation or infor-
mation utilised in any FAI International Sporting Event7.
Each FAI Air Sport Commission8 may negotiate agreements, with FAI Members or other entities authorised by the
appropriate FAI Member, for the transfer of all or parts of the rights to any FAI International Sporting Event (except
World Air Games events9) in the discipline
10, for which it is responsible
11 or waive the rights. Any such agreement
or waiver, after approval by the appropriate Air Sport Commission President, shall be signed by FAI Officers12
.
Any person or legal entity that accepts responsibility for organising an FAI Sporting Event, whether or not by
written agreement, in doing so also accepts the proprietary rights of FAI as stated above. Where no transfer of
rights has been agreed in writing, FAI shall retain all rights to the event. Regardless of any agreement or transfer
of rights, FAI shall have, free of charge for its own archival and/or promotional use, full access to any sound and/or
visual images of any FAI Sporting Event. The FAI also reserves the right to arrange at its own expense for any and
all parts of any event to be recorded, filmed and/or photographed for such use, without payment to the organiser.
1 FAI Statutes, Chapter 1, para 1.6
2 FAI Sporting Code, General Section, Chapter 3, para 3.1.3
3 FAI Statutes, Chapter 1, para 1.8.1
4 FAI Statutes, Chapter 2, paras 2.1.1, 2.4.2, 2.5.2 and 2.7.2
5 FAI Bylaws, Chapter 1, para 1.2.1
6 FAI Statutes, Chapter 2, para 2.4.2.2.5
7 FAI Bylaws, Chapter 1, para 1.2.2 to 1.2.5
8 FAI Statutes, Chapter 5, paras 5.1.1, 5.2, 5.2.3 and 5.2.3.3
9 FAI Sporting Code, General Section, Chapter 3, para 3.1.7
10 FAI Sporting Code, General Section, Chapter 1, paras 1.2 and 1.4
11 FAI Statutes, Chapter 5, para 5.2.3.3.7
12 FAI Bylaws, Chapter 6, para 6.1.2.1.3

iv
TABLE of CONTENTS
General
1.1 Purpose of Annex ....................................... 1
1.2 The Sporting Code ..................................... 1
1.3 The National Airsport Control ..................... 1
1.4 NAC recommended practices..................... 1
1.5 Official Observer duties .............................. 2
1.6 A word on processing claims ...................... 2
1.7 National records ......................................... 2
1.8 Measurement accuracy and precision ........ 2
Height problems
2.1 Loss of height – duration claims ................. 3
2.2 The 1% rule ............................................... 3
Table A, max allowed height loss .............. 3
2.3 Height penalty – distances over 100 km ..... 3
2.4 Height measurement using GPS altitude ... 4
2.5 Measurement of absolute pressure –
the altitude correction formula ................ 4
Task considerations
3.1 Pilot preparation ........................................ 4
3.2 Hints for the Silver badge flight ................... 4
3.3 Common badge errors ............................... 5
3.4 Notes on declarations ................................. 5
3.5 Internet declarations for badges ................. 6
3.6 Flight into the observation zone.................. 6
3.7 Claiming more than one soaring
performance ............................................ 7
3.8 Abandoned turn points and other
declared task problems ........................... 7
3.9 Three TP distance task .............................. 7
3.10 Free record flights ..................................... 7
3.11 Limit on declared TPs ................................. 7
Start and finish considerations
4.1 Start / finish evidence ................................. 8
4.2 Start and finish options .............................. 8
4.3 Starting examples ....................................... 8
4.4 Finishing examples ..................................... 8
4.5 The virtual finish option .............................. 9
Barographic evidence
5.1 Barograph data ........................................... 9
5.2 Trace continuity ......................................... 9
Position recorders and
IGC-approved flight recorders
6.1 Position recorders .................................... 10
6.2 PR file format & testing- ............................ 10
6.3 Flight recorders ........................................ 11
6.4 Flight recorder declarations ...................... 11
6.5 Pilot and glider data ................................... 12
6.6 Sampling rate settings .............................. 12
6.7 Missed fixes .............................................. 12
6.8 Barograph calibration requirements ......... 12
Flight recorders – installation
7.1 Fitting the FR to the glider ........................ 13
7.2 Installation checks by an OO .................... 13
Flight recorders – pilot actions
8.1 Witness of take-off and landing .............. 14
8.2 Observation zone considerations .......... 14
8.3 After flight ............................................... 14
Flight recorders – OO actions
9.1 Downloading the flight data file............... 14
9.2 Potential data download problems ......... 15
9.3 OO’s copy of the data ............................. 15
9.4 FR manufacturer’s codes ....................... 15
Flight recorders – data analysis
10.1 Security checking ................................... 15
10.2 OO support ............................................. 16
10.3 Flight evaluation software ....................... 16
10.4 Evaluation of flight data .......................... 16
10.5 Data anomalies ..................................... 16
FR barograph calibration
11.1 Initial setup ............................................. 17
11.2 Preparation ............................................. 17
11.3 Calibration .............................................. 17
Sample barograph calibration table ........ 18
11.4 Recording of calibration data .................. 19
Mechanical baros – flight preparation
12.1 Pre-flight ................................................ 19
12.2 In-flight .................................................. 19
12.3 Post-flight .............................................. 20
12.4 Release point not evident ....................... 20
12.5 Duration evaluation ............................... 20
12.6 Height gain evaluation ........................... 21
12.7 Correcting data for instrument error ....... 21
12.8 Absolute height evaluation .................... 21
Mechanical barographs – calibration
13.1 Preparation ............................................. 22
13.2 Calibration .............................................. 22
13.3 Calibration graph .................................... 22
Motor gliders
14.1 MoP record for motor gliders ................. 23
14.2 MoP recording systems ......................... 23
14.3 ENL figures – engine off ......................... 23
14.4 ENL figures – engine on ......................... 24
14.5 ENL analysis .......................................... 24
14.6 Sample ENL systems data ..................... 24
Appendices
1 Common conversion factors .................... 26
2 Documentation for FAI badges ................ 27
3 Badge or record flight procedures
flowchart ............................................... 28
4 Flight declaration form .............................. 29
5 Principles of GPS ...................................... 30
Index ........................................................ 32

SC3 Annex C 2014 v


SC3 Annex C 1 2014
Official Observer & Pilot Guide
___________________________________________________________________
GENERAL 1.1 Purpose of this Annex The Annex has been prepared to assist pilots and Official Observers (OOs)
to interpret the rules in the Sporting Code for gliders and motor gliders. It amplifies these rules, gives guidance
on how to comply with them, and recommends procedures for the operation of equipment used to provide evi-
dence for flights. Suggested improvements to the text of the Annex will always be seriously considered. Send
proposed amendments to the IGC Sporting Code committee chairman (e-mail below in 1.2), preferably in the
format used in the text. Changes do not require formal IGC approval, as the Annex is informational in nature.
A vertical line to the right of any paragraph indicates a substantial change in the text from the previous Annex.
Each new issue will also contain many minor editorial changes that are not so marked.
1.2 The Sporting Code The Code covers all badge and record types and allows the pilot to gather flight
evidence in alternate ways with various data recording equipment. As a result, although clarity and simplicity is
the goal, how one is to respond to the Code requirements may be confusing. If you think that any text in the Code
is capable of more than one interpretation, the most straightforward interpretation is the correct one. If you find
any part of the text unclear, pass your concern to the IGC Sporting Code committee. Questions on the Code
rules may be sent to the Sporting Code committee chairman at <[email protected]>.
Misinterpretation of the Code may arise by reading a portion of text in isolation, without referring to the precisely
worded definitions of the terms being used. For example, Chapter 2 specifies the distances required for various
badge legs, but how these distances are to be achieved are defined in Chapter 1.4.3 to 1.4.6.
1.3 The National Airsport Control (NAC) The NAC is the organisation that administers FAI air sports in
its country. It may delegate to another organisation such as a national gliding association that part of its sporting
powers. In the Code and this Annex, “NAC” means the NAC or its delegated organisation. Its responsibilities are:
a. to maintain control of its national Claims Officer, OOs, data analysts and barograph calibration labs,
b. to have final responsibility for the flight analysis process, integrity, and accuracy of data that it ratifies.
c. to issue and maintain a list of position recorders (PRs) that it accepts, may hold a national turn point list,
may modify IGC record forms to incorporate national-only record types, and maintain a badge claim form.
d. to maintain registers of national badge leg, badge, record, and FAI diploma flight achievement.
e. to transmit to the FAI data on completed Diamond badges and Diploma flights.
1.4 NAC recommended practices
a. OO appointment and training NACs should establish requirements for becoming an OO such as holding
a badge leg or having an association with the sport for some minimum time. NACs often find it useful to
maintain guidance materials, self-help tests, etc. to assist new OOs gain knowledge of the Code and allow
experienced OOs to stay current on new rules.
b. OO control and tracking As a minimum, each NAC should maintain a list of its current OOs and their
contact information, enabling the distribution of information on changes to badge and record procedures or
national factors that will influence badge and record flights. A more sophisticated database may be devel-
oped to provide tracking of an OO’s activity, types of claims certified, and other information.
c. Preliminary claim review In the interest of efficient processing of record and badge claims, a NAC may
allow specified persons to perform a “first look” review of e-mailed flight data and pertinent scanned docu-
ments, if any, such as a paper declaration. This preliminary review can be performed at the level of the
Claims Officer or a NAC-appointed data analyst. Badge claims may also be pre-screened at the club level
by an experienced OO, which can reduce a Claims Officer’s workload by minimizing claim errors.

SC3 Annex C 2 2014
A “first look” may be submitted within hours after landing. However, this in no way substitutes for the OO’s
submission of a claim package including the original of all recorded data, a completed application form, and
each applicable certificate. (See SC3-5.3.5)
d. NAC jurisdiction The relationship between an “organizing NAC” and a “controlling NAC” is given in
SC3-1.0.4. A record claim by a foreign pilot must be certified by an OO (either local or foreign) who has
been approved in writing by the host country’s (controlling) NAC. The IGC recommends this OO send the
claim to the controlling NAC for a check of compliance with national aeronautical rules that in turn will
forward the claim to the organizing NAC.
A foreign OO wishing to ratify badge claims should apply to the host NAC for permission to act within its
jurisdiction. Simple e-mail communication between the host NAC’s National Claims Officer and the foreign
OO is suggested. The host NAC may establish some minimum level of local knowledge for approval.
e. Position Recorder approval If a PR has been used, its status should be checked by both the host and
controlling NACs. Clearly, the claim may be approved if both NACs have approved the device and the
conditions of approval are similar. In any other case, the NACs should confer and the controlling NAC may
proceed as it sees fit.
1.5 Official Observer duties The OO has the responsibility of being the FAI’s “field representative”. The
OO ensures that the flight is controlled in accordance with the Sporting Code requirements, and that evidence is
gathered and prepared in such a manner that later study of it by a disinterested examiner, usually the national
Claims Officer, will leave no doubt that the claimed achievement was met. The function of the OO is first, to verify
that a pilot has completed what is claimed, and second, to certify that the claim matches the Code requirements
for a given badge, diploma, or record.
The OO must act independently and without favour, and be familiar with the definitions in Chapter 1 of the Sport-
ing Code. The ability to correctly interpret the Code is important – it is even more important for the OO to pay
careful attention to detail and have the integrity to never approve a claim unless satisfied it is correct and com-
plete, and to reject or refer to higher authority a claim that does not appear to fulfill the rules. The Code standards
are the foundation of recognized achievement in soaring, so a rejected “almost good enough” flight will be a valu-
able experience for the pilot.
1.6 A word on processing claims The introductory philosophy on page 1 of the Code states: “When pro-
cessing the evidence supplied, OOs and the NAC should ensure that these rules are applied in the spirit of fair
play and competition.” The ratification process determines if the claimed task conforms to the rules. Incorrect or
incomplete evidence can often be corrected – pilot-input data in flight recorders is an example (see para 6.4). At
times, although the evidence presented cannot support the stated claim, the pilot may not have realised that it is
sufficient for another category of badge or record. National Claims Officers and OO are encouraged to take the
position that, while ensuring the rules are met, their goal is to make awards, not turn them down for minor errors
or oversights that do not affect the proof of a soaring performance.
1.7 National records With the exception of a Continental record or a multi-place record claim (SC3-3.1.2b),
a World record must first be ratified as a national record. A NAC may have additional record types or classes and
accept different forms of evidence for them; but a national record that leads to a claim for a world record must
conform fully to the Code.
1.8 Measurement accuracy and precision
a. Precision errors Do not introduce more precision to a calculated value than the recording devices used
can detect. A device may display values to a larger number of significant figures than its sensor can detect.
A barograph having a digital readout may show altitude values to the nearest metre, but its pressure sen-
sor may only be capable of resolving height to within about 20 metres (especially at high altitudes). As a
result, the FR pressure height readout value is not valid to this level of accuracy. The reverse case is a
sensor or processor that is more precise than its data readout; for example, a digital clock that displays
time to the nearest minute while its internal counter is operating to the microsecond.
b. Badge distance calculation First, find the course distance by using evaluation software set to the
WGS84 earth model or by calculating the sum of course “leg” distances, each determined by the FAI World
Distance Calculator, set to the WGS 84 earth model. This calculator may be used online or downloaded
from <www.fai.org/how-to-set-a-record/121-cia/34839-world-distance-calculator>. Next, determine whether
SC3 Annex C 3 2014
a loss-of-height penalty and/or cylinder correction applies; if so, find their sum. Finally, calculate the official
distance = course distance – (LoH penalty + cylinder corrections). See also SC3-1.3.9, 4.4.2 and 4.4.3.
c. Measurement accuracy Badge claims are certified for performances that exceed a specified minimum,
so distance calculations to two decimal places are sufficient. Similarly, corrections for instrument error are
not needed when gain of height, based on digitally recorded pressure altitudes, indicates the badge mini-
mum was exceeded by at least 100 metres.
d. Conversion factor misuse Exact conversion factors should be used in all intermediate calculations, but
round the final result to the precision of the least accurate data. Stating that a distance was “about 1100
feet” infers that it could be anywhere between 1050 and 1150 feet. Only the first three figures are signifi-
cant, therefore the phrase “about 1100 feet (335.3 metres)” is nonsensical – this conversion to metric has
improved the precision of the value to four significant figures. Such misuse by OOs is often seen on altitude
gain claims. This conversion example should be rounded off to 335 metres.
e. Altitude accuracy Dynamic pressure errors, errors associated with reading barograms (stand-alone or
incorporated in the FR), producing a barograph calibration trace, and (if necessary) drawing a calibration
graph – all these introduce uncertainty in the precise height achieved, regardless of calculations to the
metre. The resulting gain or absolute altitude value should be rounded off to the nearest 10 metres. This
satisfies the 1% accuracy requirement for Silver gains, and is proportionately better for other badges. This
does not mean that 1% can be added to the barograph reading to accept a marginal flight. If a second set
of barographic data were recorded, the worse case height reading is to be taken as the performance.
HEIGHT PROBLEMS
2.1 Loss of height for duration claims For the Silver and Gold duration task, exceeding a 1000m loss of
height (900m using GPS altitude from a PR) will invalidate the claim (see SC3-4.4.3c). When a duration claim is
conducted under an OO’s continual attention, no barograph is required, but the loss of height from the release
altitude (as certified by the tow pilot or launch supervisor) to the landing must be clearly less than 1000m.
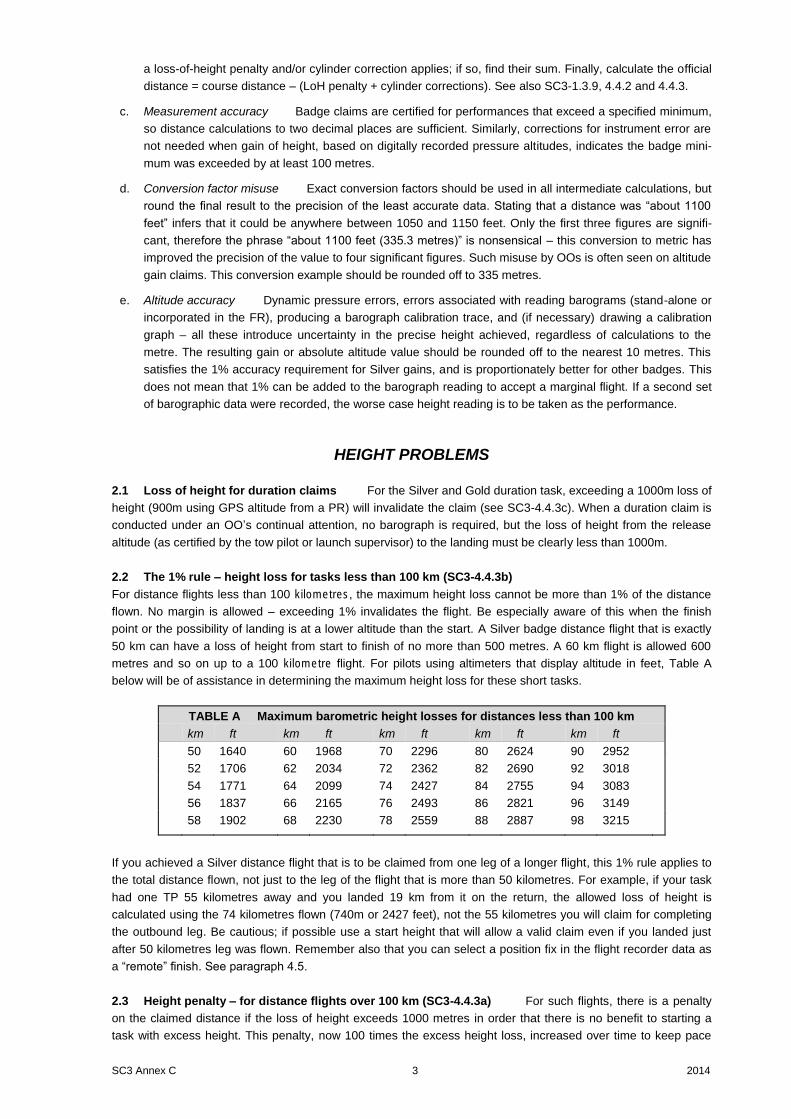
2.2 The 1% rule – height loss for tasks less than 100 km (SC3-4.4.3b)
For distance flights less than 100 kilometres, the maximum height loss cannot be more than 1% of the distance
flown. No margin is allowed – exceeding 1% invalidates the flight. Be especially aware of this when the finish
point or the possibility of landing is at a lower altitude than the start. A Silver badge distance flight that is exactly
50 km can have a loss of height from start to finish of no more than 500 metres. A 60 km flight is allowed 600
metres and so on up to a 100 kilometre flight. For pilots using altimeters that display altitude in feet, Table A
below will be of assistance in determining the maximum height loss for these short tasks.
TABLE A Maximum barometric height losses for distances less than 100 km
km ft km ft km ft km ft km ft
50 1640 60 1968 70 2296 80 2624 90 2952
52 1706 62 2034 72 2362 82 2690 92 3018
54 1771 64 2099 74 2427 84 2755 94 3083
56 1837 66 2165 76 2493 86 2821 96 3149
58 1902 68 2230 78 2559 88 2887 98 3215
If you achieved a Silver distance flight that is to be claimed from one leg of a longer flight, this 1% rule applies to
the total distance flown, not just to the leg of the flight that is more than 50 kilometres. For example, if your task
had one TP 55 kilometres away and you landed 19 km from it on the return, the allowed loss of height is
calculated using the 74 kilometres flown (740m or 2427 feet), not the 55 kilometres you will claim for completing
the outbound leg. Be cautious; if possible use a start height that will allow a valid claim even if you landed just
after 50 kilometres leg was flown. Remember also that you can select a position fix in the flight recorder data as
a “remote” finish. See paragraph 4.5.
2.3 Height penalty – for distance flights over 100 km (SC3-4.4.3a) For such flights, there is a penalty
on the claimed distance if the loss of height exceeds 1000 metres in order that there is no benefit to starting a
task with excess height. This penalty, now 100 times the excess height loss, increased over time to keep pace

SC3 Annex C 4 2014
with the increasing performance of gliders. If the loss of height on your flight was 1257 metres, for example, then
the distance flown is reduced by 100 times 257 metres or 25.7 kilometres.
2.4 Height measurement using PR evidence Some GPS units can record both pressure and GPS alti-
tude. Where pressure altitude is not recorded, GPS height from a PR is sufficient for Silver and Gold badge
claims given a margin of 100m over the limits to gain of height (SC3-2.1.1 and 2.1.2) for Silver and Gold altitude,
and 100m under the loss of height for Silver and Gold distance and duration claims (SC3-4.4.3). For example, a
Gold altitude claim would require a GPS height gain of at least 3100m, and a 65 km flight would require a loss of
GPS height of no more than ([65 km x 1%] - 100m) or 550m. For pilots using altimeters that display altitude in
feet, refer to Table A above, subtracting an additional 328 feet, to determine the maximum height loss when GPS
height evidence is used.
2.5 Measurement of absolute pressure – the altitude correction formula (SC3-4.4.5)
To make this correction, the OO must determine the “standard altitude” for the airfield at the time the flight is
made. This can be done by recording the airfield elevation indicated on an altimeter when it is set to 29.92 "Hg or
1013.2 millibars. Averaging several altimeters will give greater accuracy. Alternately, the nearest weather station
(within the same air mass) will be able to provide its station pressure at the time of the flight and its elevation.
Converting the station pressure to altitude from the ICAO Standard Atmosphere table will allow the correction to
be calculated. The formula is best understood by considering it in two steps:
a. Corrected altitude = measured altitude (from the barogram) + correction
b. Correction = field elevation – standard altitude (with altimeter set at 29.92"/1013 mb), or
= weather station elevation – station pressure (converted to height)
If the atmospheric pressure is below Standard at the time of the flight, the correction will be negative and the
corrected altitude will be less than the measured altitude; resulting in the barograph “reading” too high.
TASK CONSIDERATIONS 3.1 Pilot preparation The most valuable thing you can do to meet the requirements of a task is to carefully
prepare for the intended flight. Lack of preparation may seriously delay or even cancel your planned flight, may
result in the missing evidence that accounts for most rejected claims, and demonstrates a less than professional
attitude towards your flying. Your preparation of impeccable evidence requires some care and time. Time is
always in short supply on the morning of the big flight, so anticipate the day and plan for it during the off-season –
this will go a long way towards your success.
a. Study the current Sporting Code to understand the requirements for the intended task (the Chapter 1 task
table is a particularly useful aid), and discuss your planned flight with the OO. The popular On-Line-Contest
rules and scoring will not necessarily result a badge leg being achieved. For example, flying cross-country
with no TPs declared and then having the OLC score a random leg as being over 50 km does not qualify
as a Silver distance flight. Refer to the Appendix 2 documentation checklist also.
b. Be completely familiar with your flight recorder and the loading of the declaration and turn point data. Prac-
tice with the recorder on local flights before trusting yourself to use it correctly for a badge flight.
c. Have only the current badge, record, and other flight forms on hand. Store all the task-planning documents
in a separate folder and keep it handy. Record forms are available on the IGC web site.
d. Plan several tasks for different meteorological conditions and have them loaded in your FR or available on
your computer. Finally, prepare and use a task checklist.
3.2 Hints for Silver badge leg flights The Silver distance flight is the “leaving the nest” adventure. It is
intended to be a solitary accomplishment; the “no-help-or-guidance” note in SC3-2.1.1a means even help from
other Silver distance hopefuls that day, and it means no team flying.
a. Consider flying the Silver distance as one leg of a 3TP distance flight. See 3.9 for an example.
b. Any TP achieved using a cylinder OZ will result in an OZ distance correction. The official distance of the
claimed leg must be at least 50 km, which is the distance flown after subtracting any loss of height penalty
and 500m for each crossing of a cylinder OZ boundary (SC3-1.3.7).

SC3 Annex C 5 2014
c. The big problems associated with the Silver duration flight are:
• Boredom Boredom will cause loss of concentration and thermalling skills. Set a series of “mini-
tasks” for yourself: an efficient climb, using every bit of some weak lift, a 10 kilometre goal flight, etc.
• Reluctance to fly away from the field You cannot stay up if you don’t go to the lift. Fly five to ten kilo-
metres from the field – the club single-seat glider can go that far. Then get high and stay high.
• A full bladder or dehydration This is not a choice; do not allow yourself to become dehydrated to
avoid the distraction of a full bladder. When you feel thirsty, you are already dehydrated. Drink excess
fluids first thing in the morning to become fully hydrated then empty your bladder shortly before take-off.
Fully hydrating before flight will delay the need for fluids. Carry sufficient water for the temperature con-
ditions and have a workable method of urine disposal.
3.3 Common badge errors OOs must reject many claims as a result of common errors of pilots trying their
first badge flights. Here are some flight preparation or execution factors that can result in your claim failing:
a. You did not get a briefing on the usual task pitfalls before you attempted a specific task, then flew it with no
planning and expected that an OO would see how to make the flight fit the badge requirements afterwards.
b. You did not complete an Internet or paper declaration when using a PR for a distance flight.
c. You did not know the maximum height you could be towed to on an under-100 km distance task. This is
particularly important if it is possible that the landing could be at a lower elevation than your take-off point.
d. You declared a start point but did not fly into its observation zone before you began your task.
e. You are a beginner in the use of the FR and did not practice using it to make sure you got into the OZ of
your intended TP, or your FR was configured to sound a TP entry alert for a cylinder OZ, so you turned
away on course at the start before entering a needed sector OZ.
f. After the flight, the OO was not available so you took the FR out of the glider and gave it to him later that
day. (See para 7.2 – the OO must have control of the FR after landing until the flight data is downloaded.)
g. Your OO did not keep a copy of your flight file and the original was contaminated in the process of being
converted to an .igc file using SeeYou, for example. (A file stored on the OLC website will not validate.)
3.4 Notes on declarations If you are new to FRs in general or to a particular FR or linked device, make
some practice flights before a badge attempt; it is the best way to avoid declaration problems. Enter a declaration
each time, and check it carefully post-flight to make sure the correct data appears where it belongs in the .igc file.
The structure of FR declarations is described in 6.4. Consider the following:
a. No declaration is required for duration or gain of height badge flights that use only a PR or a stand-alone
barograph for evidence (SC3-1.42), or for a straight distance flight so long as no pre-declared start or finish
point is used (SC3-1.4.3).
b. Even if more than one FR is installed in a glider, there is one and only one valid declaration. A declaration
is by definition a pre-flight document per SC3-1.1.2 and 4.2. However, each flight data set must reconcile
favorably with all others. A difference in the declaration between these FRs could be grounds for refusing
any claim from the flight.
c. A pilot using an FR/flight computer system may be rushed before take-off and confuse its “declaration” and
“navigation” functions. If you wish to make a “last minute” change to a badge task, writing a new Internet or
paper declaration will avoid possible FR data input errors (see 3.5). Note the timing warning in para 6.4a.
An Internet or paper declaration is always required when using a PR, but a declaration input into an FR is
the only acceptable form of evidence for record flights.
d. Do not to abbreviate the names of way points unless the abbreviation is included in a published list of way
points. This is required so there is no confusion as to the precise way point that an abbreviation refers to.
Wherever possible, latitude and longitude coordinates should be used to identify a way point and, when
used, these coordinates become the official location of that way point.
e. Compatibility problems can arise between an FR linked to a third-party PDA or flight computer. The end
result may be a flawed declaration, and it could be difficult or impossible to determine whether the FR, the
software, or user procedures are responsible. If a flawed declaration appears to be due to a fault or anom-
aly in the FR, report it to the GFAC chairman <[email protected]> promptly.

SC3 Annex C 6 2014
3.5 Internet declarations for badges When a PR is capable of registering a pre-flight declaration per
SC3-4.2.1a to 1e, the pilot may use this option. This method is more secure than a paper declaration as a time
stamp is added to the computer-based document when it is created. The following internet-based alternatives
offer similar security and are convenient enough to be completed from a smart phone on the launch grid.
a. The pilot may e-mail the declaration to the OO or fill an on-line form residing on a national or local website.
The declaration shall include the OO’s name and identifying number. Once transmitted, the internet-based
declaration becomes a secure document, as the website host or ISP holds the authoritative copy.
b. The official time of an e-mailed declaration is the date/time stamp on the copy received by the OO. The
time it takes for an e-mail to be transmitted is variable, so the pilot should take this delay into account when
preparing for the flight. The OO should verify with the pilot that the document was received and is valid. A
declaration uploaded to a web site is more direct and ideally, the site could also post an e-mail confirmation
back to the pilot.
c. The OO must be satisfied that the declaration is valid by inspecting the computer-generated dates of cre-
ation and modification of the documents. Following that, all electronic documentation including the .igc file,
shall be submitted to the NAC Claims Officer by means the NAC has approved. At the discretion of the
NAC, claims may be submitted in hard copy, as e-mail attachments, or by uploading documentation to an
NAC-specified website.
3.6 Flight into the observation zone A way point is reached only when the pilot has evidence of being
within its observation zone, or that a start or finish line has been crossed. Either the sector or the cylinder OZ
may be used for a turn point on a given flight, but the cylinder OZ cannot be used as a start and/or finish OZ. The
cylinder OZ may have some advantages given that only distance from the turn point is a factor (not position also)
– but this OZ could severely limit a pilot’s opportunity to achieve a TP if it were under weather, for example.
Below are three tracks into a turn point. Pilot A just makes it into the 0.5 km radius cylinder OZ and must accept a
1 km distance penalty at this turn point. Pilot B records points within the cylinder and the sector OZs. Pilot C
makes a wide turn around the TP but could also have made a 180 degree turn just after entering it. The pilot can
fly any distance beyond the TP in a sector OZ – a very useful point to remember if it is not soarable near the TP.
3.7 Claiming more than one soaring performance A flight may satisfy the requirements for more than
one badge leg or record. Planning such a task begins with the selection of turn points that accomplish your chief
objective but provide for an alternate or additional claim as well. This may allow you to make useful in-flight
decisions on course selection and is especially useful for Gold / Diamond Goal distance flights. Examine the
declared course below (club/A/B/C/club). If this flight is completed, the following badge tasks can be claimed:
a. Diamond distance – 515 km
(club/A/B/C/club) SC3-1.4.5

SC3 Annex C 7 2014
b. Diamond Goal distance – 346 km (A/B/C/A)
as required by SC3-1.4.6b(ii). A-club-C is
just an indirect way of completing the A-C
leg of the triangle flight. If flown in the
reverse direction, it would meet the 3TP
distance definition of SC3-1.4.9b.
c. Silver distance – If the pilot abandoned the
flight more than 50 km on the way towards A
and then returned, Silver distance is achieved
by claiming the furthest point from the club
as the virtual finish.
3.8 Abandoned turn points and other declared task problems (SC3-1.4.1a)
A failed declared task may still fulfill the requirements of another soaring performance – rather than focusing on
the failure, look for what was achieved. For example, a free record may be possible if any declared way point had
been missed. A flawed distance-to-a-goal record attempt can be evaluated as straight distance for badge or
Diploma purposes. A 3TP distance is viable task in its own right or claimed when a declared closed course is
marred by one or more of the following problems (SC3-1.4.5 refers):
a. any number of the declared turn points were achieved, but not in declared order.
b. the start and/or finish for an intended closed course was not achieved as required by SC3-1.4.6.
c. the declared start and finish points were achieved, but yield a disqualifying loss of height penalty; a start at
release and/or a finish at a finish fix will often solve this problem.
3.9 The 3TP distance task The 3TP distance task allows several options in both the declaration of the
way points and how they may be used. A maximum of five way points may be declared:
a. A start and a finish point. The start point may also be used as a turn point. The release or MoP stop may
also be the start point.
b. One, two, or three turn points, achievable in any order, allowing up to four legs to be summed for total dist-
ance. A single TP might be claimed for a “dog-leg” course or for a failed out-and-return course that was not
correctly “closed”. At least one TP must be achieved otherwise only straight distance can be claimed.
c. If all the TPs are flown in the declared sequence and the start and finish points are identical, a triangle
distance or speed task can also be claimed.
This is a good task for a Silver attempt. Using one of two TPs more than 50 km away is a popular option, with
start and finish planned at the home airport, and you can choose the better one to go to during the flight. Another
uses two TPs with the home airport near their mid-point so you are close to home for the entire flight. See 2.2 for
an example on how the loss of height limit applies to a Silver distance flight.
3.10 Free record flights (SC3-1.4.7) For free distance record flights, the way points are declared after the
flight is done. A normal declaration is still made before the flight that includes the usual non-flight information, but
task way points can be omitted. The pilot is free to fly anywhere between take-off and landing and, after the flight,
select fixes from the position evidence to be the declared way points of the soaring performance. See para 4.5
for details on selecting fixes. A free record flight may also be claimed from a failed declared flight or by extending
the turn position of a completed declared flight.
3.11 Limit on declared TPs You cannot have more TPs declared than the claimed task requires. For
example, an out-and-return (SC3-1.4.6a) must have only one declared TP, and a distance-to-a-goal (SC3-1.4.4)
flight can have none – neither can be claimed from a portion of a triangle or 3TP course. The Task Table at the
end of Chapter 1 of the Code will assist your planning. Note that the 10 kilometre restriction on TP spacing only
applies to record tasks; it does not apply if you plan to claim a triangle task for a badge flight.

SC3 Annex C 8 2014
START and FINISH CONSIDERATIONS
4.1 Start / finish evidence The start and finish have three parameters associated with each of them:
The start position is where the release or
stopping the MoP took place or is the declared
start point. It is used in calculating the task
distance.
The finish position is where the landing or restarting
the MoP took place, the declared finish point OZ is
entered, or a virtual finish point fix is selected. It is
used in calculating the task distance.
The start time is the actual time of release or
MoP shut down, or at the exit of the OZ of the
start point or the time at a fix selected as a start.
The finish time is the actual time of landing or
MoP restart, or the time at the finish fix, or on enter-
ing the OZ of the finish point.
The start height
is measured at the same place as the start time.
The finish height
is measured at the same place as the finish time.
4.2 Start and finish options The start and finish of a badge or record flight are the places where mis-
takes may occur because of the several alternatives available. The start holds much potential for error or miscal-
culation of position or height that will negate the remainder of the flight. The Code gives several choices for
starting (SC3-1.2.8) and finishing (SC3-1.2.11). See also the Task Table at the end of SC3 Chapter 1.
a. The distance-to-a-goal task requires crossing a start line or leaving a start sector OZ within 1000 metres of
the start point and crossing the finish line or entering the finish OZ within 1000 metres of the finish point.
The cylinder OZ cannot be used for a start (SC3-1.2.5).
b. For the Diamond goal badge leg, any speed record, and any out-and-return or triangle distance record, the
start/finish requirements are identical but the start and finish points must be the same to “close” the course.
c. When any of the above courses is declared but no turn point is rounded, straight distance may be claimed
using a start at release or by the exit from any point of the start OZ, followed by any type of finish.
d. You must be aware of how much loss of height between start and finish you can incur before your planned
distance fails as a result of a height penalty.
4.3 Starting examples In the illustration below, Pilot A is towed about 4 km down track and starts from
the point of release. The task must be at least 4 km longer than required and cannot be a Diamond goal. Pilot B
releases, climbs in lift and then makes a start from the sector. Since he was not within 1 km of the start point he
can’t claim a Diamond goal. Pilot C releases, climbs and makes a start by crossing the 1 km long start line. He
can claim anything if he completes the task. A cylinder OZ is not shown because it cannot be used for a start.
4.4 Finishing examples In the illustration below, Pilot A lands without crossing the finish line or entering
the finish sector. He cannot claim a goal or closed circuit flight. He can choose any point on his circuit rather than
his landing position as his finish if it helps with the 1% rule. Pilot B crosses the finish line but does not enter the
sector. The point he crosses the line is his finish position and height. Pilot C enters the sector within 1 km of the
finish point. Any logged point within the 1 km radius sector can be used to determine the finish time and altitude
for a goal or closed circuit flight. If pilots B and C are on distance flights they can choose any logged point as
their finish point.
SC3 Annex C 9 2014
4.5 The “virtual” finish option A position (fix) from the FR data may be selected post-flight as an in-flight
finish point. A virtual finish allows the pilot to:
a. Use the same loss-of-height calculation for a distance flight in a pure glider as a motor glider that restarts
its MoP (the pure glider is not constrained to land in order to finish).
b. Establish a goal flight finish that is within the required 1000m of the goal even if the initial entry into the OZ
was greater than that. You could use the 1000m entry point to establish the loss of height for the flight.
c. Establish a finish point whose elevation does not incur a loss of height penalty.
d. Attain a valid finish then, for safety or convenience, land at a point outside the finish OZ.
To use a virtual finish effectively, you must plan for the possibility that it may be required. For example, you may
climb to any height before starting to allow for a safe height for an early departure on a task, but you will then
need to determine the lowest finish altitude that will incur no penalty. Similarly, if you are too low on nearing the
finish of a task that allows for little or no height penalty, you may pull up or thermal within the finish OZ until the
loss of height from the start drops to an acceptable value and use the time at this point as the finish time.
BAROGRAPH EVIDENCE
5.1 Barograph data A barograph records air pressure against time and is required for all badge and
record flights except for duration flights observed by an OO. All FRs incorporate a pressure recording barograph
(Appendix 5, para 1.5 refers). A stand-alone mechanical barograph is now usually used only in conjunction with
PRs. If an electronic barograph is used (only height data being recorded against time) on a flight for an altitude
claim, the pilot and OO should proceed as in using a mechanical barograph. The barogram can provide the
following data:
a. Altitude The barogram can be used to establish height, subject to the pressure errors noted in para
1.7e and corrections described in para 12.7. Calibration traces are usually recorded directly in
height, making this conversion unnecessary.
b. Continuity The barogram ensures that the recorded task is a single flight.
c. Duration The barogram may be used to determine the duration of a flight in the case where the OO
does not witness the landing provided that the OO calibrates of the barograph rotation rate.
5.2 Trace continuity (SC3-4.3.2) If the barograph drum stopped rotating, duration evidence would be
invalid if the barograph was also being used for time measurement. Normally, even a temporary stop will also in-
validate other evidence unless the OO can verify that critical data points and flight continuity are evident from the
working portion of the barogram. An interruption of the trace may limit the height gain that may be claimed, and
could invalidate continuity of flight evidence (see para 10.5b for FR missed fixes.

SC3 Annex C 10 2014
POSITION RECORDERS and IGC-APPROVED FLIGHT RECORDERS
6.1 Position Recorders (PRs) This type of recorder may be used for height and position evidence for
Silver and Gold badges in accordance with the SC3 Chapter 4 Appendix. PRs must be approved individually by
each NAC. Each type of PR must be approved by the NAC through a PR-approval document. Approval docu-
ments shall include any operating limitations needed to enable a given unit to conform to the Sporting Code.
NACs may approve a PR based on another NAC’s approval after checking that it complies with the current Code.
A NAC must be satisfied that the rules given in the above Appendix can be complied with before accepting a
model for use. See other items on the IGC web page for PRs such as a specimen PR approval document.
a. OO procedures Because PRs are not as secure as FRs, OOs should do all procedures and checks
carefully. Study the PR-approval document for the type of PR concerned, which gives advice on pre- and
after-flight procedures, downloading, and general security. Follow as much as possible the security check-
ing steps pertaining to FRs given in para 10.1. The data should be checked to see that general conditions
for the flight such as soaring altitudes reached, wind drift in thermals and speeds achieved, are similar to
the known conditions of the flight. Independent data for the positions of take-off and landing is required
either from an OO, or official Air Traffic or club log. These positions should closely compare with the posi-
tions recorded for take-off and landing in the .igc file.
b. Pilot procedures Pilots are advised to retain the flight data in the PR memory as long as possible, so
that in the event the OO has concerns about the flight, a further file download from the PR is still possible.
They are also advised to ensure that independent evidence of take-off and landing is available.
6.2 PR .igc file format and testing Because PRs are simpler than flight recorders, some non-vital data
fields may not be present. Pressure altitude in the .igc file is to be recorded as zero unless it is derived from a
pressure sensor (from which a calibration must be made following IGC procedures). The tests below should be
shown in the PR files, and files from an FR should be included for comparison.
a. Analysis The .igc file produced by the device should be capable of analysis by a recognised and public-
ally or commercially available analysis program. The files sent to GFAC must be able to demonstrate this.
The analysis program should be specified in the approval document.
b. Validation The method of ensuring the integrity of the .igc file should be specified in the approval docu-
ment, including details of the validation system that will identify any changes to the .igc format file made
after the initial download. Any changes detected after initial download will invalidate the data. In this event,
a further download should take place under close OO supervision and the .igc file analysed again.
c. Testing The recommended testing process is to conduct a number of test runs to compare the device
against an FR having “all flights” approval to see that there is no material difference in the results between
them.

SC3 Annex C 11 2014
The GFAC test for “predicted” fixes should be carried out to ensure that the PR only records fixes and
doesn’t generate them (A3 of the Chap 4 Appendix refers). Drive a vehicle containing a PR over a well-
marked 90 degree feature such as a road junction, to mark the feature on the .igc file. Where fix rate can
be changed, a fast fix rate such as one per second should be used. The feature is then approached again
at a high but safe speed. When nearly at the feature, the GPS antenna is disconnected or, for units with
internal antennas, the PR antenna is covered so that GPS signals are blocked (for instance by metal foil
used in cooking).
The .igc file must show that on the second run, no fixes were projected beyond the feature. In addition, the
GPS fixes at the right angle (the drive with the antenna connected can be repeated several times) should
be compared with the lat/long of the feature from Google Earth of the road or other junction to demonstrate
fix accuracy and that the WGS84 datum is used by the PR system.
The PR should be flown together with an FR and the data from the two .igc files compared. In particular,
the shape of the GPS altitude graph with time should be relatively smooth with no “spikes” or other short-
term variations.
d. Information for the GFAC Before issuing an approval for a PR, NACs must send the GFAC chairman
<[email protected]> the following information:
• the Internet link to the GPS unit operating manual,
• the proposed operating limitations,
• a copy of the download and .igc file validation,
• sample .igc files.
This will enable GFAC to provide the NAC with expert advice including information on the PR’s IGC file
structure and any SC3 requirement that may have been missed. The final approval data will be posted on
the IGC GNSS web page for PRs.
6.3 Flight recorders (FRs) The principles and technology related to the GPS system on which flight
recorders operate is outlined in Appendix 5. Full details of the IGC-approval process for FRs is in Chapter 1 of
Annex B to the Sporting Code. See <www.fai.org/gliding/sporting_code/sc3b>.
a. IGC-approval documents An FR must be operated in accordance with its IGC-approval (Appendix 4,
para 1.3). Pilots should obtain a copy for the FR they use, and study it and any user manual from the man-
ufacturer before flights that will need to be officially validated. Notice of initial issue or amendments to
existing IGC-approvals is posted on the e-mail mailing list <igcdiscuss@ fai.org> and on the international
newsgroup <rec.aviation.soaring>. The current version of all IGC-approval documents is available at
<www.fai.org/gliding/gnss/igc_approved_frs.pdf>.
b. IGC flight data file Data is in the IGC format in a file with a “.igc” suffix. Details of the .igc file format is
in Appendix 1 to the FAI/IGC document, Technical Specification for IGC-approved GNSS Flight Recorders.
See <www.fai.org/gliding/system/files/tech_spec_gnss.pdf>. An .igc file uses ASCII text characters and can
be viewed with any text editor, for instance to check the data that was input for the declaration.
c. Downloading Downloading after a flight is either to a computer or, with some FRs, direct to a storage
device such as a memory stick or card. Downloading to a computer should use the FR manufacturer's IGC-
XXX.DLL file together with the IGC Shell program (XXX is the 3-letter code for the FR manufacturer). Both
are freeware and available from the IGC GNSS web site, as is the FR manufacturer’s short program files
for older recorders that have no DLL file. Use the file data-xxx.exe for downloading, or for some recorders
that download initially in binary format, conv-xxx.exe for converting from binary to the .igc format.
d. Validation of .igc files The IGC electronic validation system (“Vali”) checks .igc files for integrity. The Vali
check ensures that the .igc file has originated from a serviceable and sealed FR and that it is exactly the
same as downloaded – if just one data character is changed, the check will fail. The check is made by
using the Vali function of the IGC Shell program together with the FR manufacturer’s IGC-XXX.DLL file in
the same directory (see c above). For older recorders where there is no DLL file, the FR short program file
vali-xxx.exe carries out the Vali function.
6.4 Flight recorder declarations (SC3-4.2) Flight recorders have the facility to enter the data required for a
flight declaration; this appears in the .igc file. Since FRs have both physical and electronic security (Appendix 5,

SC3 Annex C 12 2014
para 1.4) and an accurate real-time clock, the declaration does not need to be witnessed by an OO. An FR dec-
laration can be updated by a later one, or by a subsequent paper/internet declaration for badge flights.
a. Way point declaration An .igc file stores waypoint location on lines that start with the letter C (the
C-record). Where the FR has this capability and the pilot has entered such data, the date/time that the way
points were declared is shown in the first line of the C-record.
WARNING Some older types of FRs store the latest turn-on time as the waypoint declaration time. If
these FRs are switched on after a paper/internet declaration has been made, the declaration in the FR
becomes the “latest” one again – nullifying the written one. If you are making a last-minute paper/internet
declaration and you are unsure how the FR acts, make sure that the FR is ON at the time.
b. The “A” record The first line of an IGC file begins with an “A”, typically followed by a three-character
code for the recorder manufacturer, followed by the recorder’s three-character serial number. The A-record
in its entirety can be seen when the IGC file is viewed in text format.
WARNING When the “A” is followed immediately by an “X”, this indicates either (1) FR-recorded data
was amended and saved using software not subject to IGC approval; or (2) a Position Recorder was used,
in which case a written declaration is required (SC3 Chapter 4 Appendix A-5).
c. The header record The remainder of the declaration data is in the H (Header) record that starts on
the second line of a .igc file. H-record lines that list information on components within the FR begin with
“HF” and cannot be altered. The line beginning with “HFPLT” lists the pilot name, in newer FRs, a line
beginning with “HFCM2” is provided for the name of a crew member. The lines beginning with “HFGTY”
and “HFGID” are for glider type and identification, respectively.
For records, pilot(s) and the individual glider used must be correctly entered in the FR before take-off. How-
ever, if two pilots are aboard for a record claim, but an FR provides only one line for both names, enter the
name of the pilot-in-command followed by the second pilot/crew, shortening both names as needed.
A few older recorders allow the OO or pilot to enter H-record pilot and aircraft data after the flight. These
lines start with the letters HO (for OO entries) or HP (for pilot entries) and will not cause the data file to fail
the Vali check (para 6.2d above). Therefore, all data files must be reviewed by analysis software and in text
format, all H-record data required for declarations must appear in lines that start with the letters HF (not
any that start HO or HP), and the .igc file must pass the Vali check.
WARNING The HO and HP issue described above can result from transferring declaration data to an
FR using a device and/or software not subject to IGC approval. Test as needed to make sure any such
device and software are compatible with the FR in use.
6.5 Pilot and glider data Pilot and glider data stored in a PR or FR is not definitive until confirmed by the
OO from independent evidence taken at take-off and landing. When any shared FR is used, pilot and glider data
may be from a previous flight, so care must be taken to see that the pilot and glider data is accurate; however, an
error may be corrected by the OO for Silver and Gold badge claims.
6.6 Sampling rate settings (SC3-4.3.1) The GPS sampling rate is chosen through the set-up menu of
the FR. Most FRs allow the selection of a longer fix interval for flight between waypoints and a shorter interval for
use near waypoints. An interval of 20 seconds or less allows turns to be seen in flight analysis software. You
should determine how long it takes to fill the FR’s memory at a given setting. A faster setting should be used
near OZs. This is done automatically in some FRs, or after pressing the Pilot Event (PEV). A fast-fix interval of
1 or 2 seconds is recommended to ensure that a fix is recorded within an OZ.
6.7 Missed fixes Some fixes may be missed or be assessed as spurious (see para 10.5 for a description
of data anomalies). Where valid position data does not appear in the recording, the fixes must show pressure
altitude to prove flight continuity. Missed position fixes from an otherwise continuous trace that lowers the actual
sampling rate to less than once per minute (for example, because of short term attitude or GPS system anom-
alies) is normally acceptable provided that an intermediate landing and take-off was not possible.
6.8 Barograph calibration requirements Altitude and height gain claims require calibration data to be
applied to the critical altitudes in the flight performance concerned. Speed or distance claims need calibration
data for calculating the altitude difference of the glider at the start and finish points. Also, the NAC or FAI may

SC3 Annex C 13 2014
wish to compare pressure altitudes recorded on the FR at take-off and landing with atmospheric pressures
(QNH) recorded by a local meteorological office at the time of the flight.
Pilots are advised to have a calibration carried out as given by the manufacturer or a NAC-approved calibrator
before an FR is used on a record or badge flight. Barograph calibrations for use in assessing FAI badge and
record flights must be carried out by persons or organisations approved by your NAC, using approved equipment
and methodology. The .igc file of the calibration must be kept. For flight recorders, the calibration method is con-
tained in the approval document of each type of IGC-approved FR or, alternately, as here in Section 11. For
mechanical barographs, use the method given in Section 13.
a. Pressure units The metric unit used in measuring atmospheric pressure is the hectopascal (HPa). Milli-
bars (mb) are numerically the same as HPa. Inches of mercury ("Hg) also used. Calibrations must be to the
International Standard Atmosphere (ISA), the atmospheric temperature and pressure structure close to the
average real atmosphere at mid-latitudes and the standard for calibrating pressure altimeters used in air-
craft and by air traffic authorities worldwide. It assumes sea level conditions of 15°C and a pressure of 760
mm of mercury ( 29.92 inches or 1013.25 HPa/mb ). Above sea level, it assumes a constant temperature
lapse rate of 6.5°C per 1000 metres (2°C / 3.6°F per 1000 feet) rise in height, up to an altitude of 11,000
metres, above which the ISA assumes a constant temperature of -56.5°C.
b. Equipment accuracy Calibration equipment must be capable of holding the pressure in a vacuum
chamber steady within 0.35 HPa for about 2 minutes, and the overall accuracy of the pressure measuring
equipment should be within 0.70 HPa after taking temperature and other corrections into account.
c. Calibration period The required calibration period is given in SC3-4.4.4. If a barogram is being used
only to prove flight continuity (such as for a distance or duration claim), the barograph does not have to be
in calibration. Calibration is required if the start height or release height has to be verified.
FLIGHT RECORDERS – INSTALLATION
7.1 Fitting the flight data recorder to the glider Any limitations or conditions for a FR or PR installation
will be given in its approval document. For flight safety, the position of displays and operating buttons and con-
trols (including switching by touch-sensitive screens) used in single seat gliders should be close to sight lines
used for pilot lookout and scan for other aircraft.
a. Connection to ports and antenna Approval documents generally do not require the sealing of any
ports, plugs, or cable connections. If the FR is connected to the static port tubing (where allowed by its IGC
approval) the OO should ensure that there are no connections in the tubing that could allow alteration of
the static pressure and thereby give a false barograph reading. No attempt must be made to insert un-
authorised data into the FR or inject data into the antenna if it is accessible in flight.
b. Flight recorders using the Environmental Noise Level (ENL) system The FR must be placed so that
engine noise is clearly received when the engine is giving power. The FR should not be covered or insul-
ated, even if automatic gain would continue to ensure high ENL readings under power.
7.2 Installation checks by an OO There must be unambiguous evidence that every FR or PR present
in the glider for the flight concerned was correctly installed as in 7.1 above, and with either of two provisions
described in the FR’s IGC approval document. In summary, those provisions are:
a. Sealing At any date and time before the flight, an OO seals the FR to the glider structure in a manner
acceptable to the NAC. The seal must be applied and marked by the OO with initials or a symbol that
provides unambiguous proof after the flight that the seal has not been compromised and the OO must be
able to identify the seal afterwards.
b. Pre- or post-flight installation check On the date of flight, an OO performs either:
• a preflight check of the FR installation, noting the date and time it was performed. The glider must then
be under continual observation by the OO until it takes off on the claimed flight, or
• witnesses the landing and has the glider under continual observation until the FR installation is checked.
This is not only to ensure that the installation is in accordance with the rules, but also to ensure that
another FR has not been substituted before the data is downloaded to a computer after flight.

SC3 Annex C 14 2014
FLIGHT RECORDERS – PILOT ACTION
8.1 Independent evidence of take-off and landing The pilot must ensure that the time and point of take-
off and the landing has been witnessed and recorded for comparison with the FR or PR data. If not witnessed by
an OO, times may be confirmed by checking the official log of take-offs and landings, or by evidence from a
reliable witness that is countersigned later by an OO.
8.2 Observation zone considerations OZ type is not part of a flight declaration, even though the pilot
can select the OZ type to set into the FR. If the sector OZ was set into the FR and the pilot missed entering it at a
turn point, the soaring performance will still have been completed if the pilot was within the cylinder OZ, that is,
within 500 metres of the turn point. In this case the leg distance must be reduced in accordance with SC3-1.3.7.
Be aware that this could negate a badge flight that was within 1 or 2 km of the minimum distance for that badge
leg. Remember that a cylinder OZ cannot be used for a start/finish point.
SC3-4.5.2b defines valid fixes, but all fixes (valid or otherwise) in or near the OZ should be assessed. Between 5
and 10 valid fixes on both sides of the fix or fixes used for verifying presence in the OZ should be at the time
interval setting used for the OZ (the fast rate in FRs that have this facility). Some FRs mark OZ entry with a tone,
but only post-flight analysis of the .igc file can prove presence in the OZ. You should fly into the OZ for several
fixes before turning for the next leg. As GPS fixes may be lost at high bank angles, depending on the antenna
mounting, extreme maneuvers should be delayed until valid fixes have been recorded in the OZ.
8.3 After flight After the flight, the pilot must not alter the installation of or remove the FR (or any other
flight data recording equipment) until it is witnessed by an OO. Doing so compromises the OO’s control of the
flight. The OO’s control of the FR is not compromised if the pilot enters a new declaration prior to the flight or on
a subsequent flight if the first one fails.
FLIGHT RECORDERS & POSITION RECORDERS – OO ACTION
9.1 Downloading the flight data file The OO shall download the flight data file as soon as practicable
after landing, especially if the pilot, glider, or task is to change for the next flight. If a laptop computer is available
or the FR downloads directly to portable storage media such as a memory stick, the flight data may be down-
loaded at the glider without disturbing the installation of the FR. If this cannot be done, the OO shall check and
break any seal to the glider, and take the FR to a computer to download the flight data.
When more than one FR is carried, each must be checked to ensure that the last declaration, either in the FR or
written, applies to the flight.

SC3 Annex C 15 2014
If the OO is not familiar with the actions required, the pilot or another person may download the data while the
OO witnesses the process. Security is maintained by the coding embedded in the FR and in downloaded .igc
files that can be independently checked later through the IGC Vali program (see para 6.3d).
a. Data download method The method for each type of FR is given in its IGC approval document (6.3a)
that is available at <www.fai.org/gliding/gnss>. The FR types, their manufacturers, IGC approval dates and
a history of the use of GPS in IGC, are listed in <www.fai.org/gliding/system/files/ igc_approved_frs.pdf>.
b. IGC file name An .igc file has the format “YMDCXXXF.IGC”, where Y=year, M=month, D=day, C=manu-
facturer, XXX=FR serial number, and F = flight number of the day (full key, Appendix 1 to the IGC Flight
Recorder specification). Where an intermediate manufacturer's binary file is also produced, it will have the
name YMDCSSSF.XXX, where XXX is the IGC 3-letter code for the FR manufacturer. Where numbers
over 9 apply, such as in months and days, 10 is coded as A, 11 as B, etc. There is also a long file format
with data in the same sequence, such as 2009-05-21-XXX-SSS-01.IGC.
9.2 Potential data download problems Some programs other than the IGC download utilities are able to
download data from FRs. but they might not produce files that will pass the Vali check. Also, some older FRs do
not store separate .igc file header data for each flight but use the last data entered for previous .igc files in the FR
memory. To minimise the possibility of corrupt or inaccurate files, use the IGC utilities. After downloading the .igc
file, immediately check it with the Vali program. If there is a problem, go back to the FR and download again.
9.3 OO’s copy of the data A copy of the file(s) for the flight data – both the binary (if produced) and the .igc
file(s) – shall be retained by the OO. The OO may keep the data files for the flight on any storage media that the
pilot cannot access. The OO must be able to positively identify the flight data files as being from the flight
concerned. These files shall be retained by the OO for later checking and analysis under the procedures of the
authority validating the flight. Copies of all files must be forwarded by the OO to the validating authority, the OO
keeping the original files. If the FR produces a binary file, a valid .igc file can be re-created from the binary – this
can be critical if there is any difficulty with the .igc file first sent to the validating authority. The copies must be
kept by the OO at least until the flight has been validated.
9.4 FR manufacturer’s codes The GFAC allocates both one- and three-letter codes to manufacturers
of FRs. The current codes are in the table below. The one-letter code is used in the short .igc file name after the
three characters for the date (ex: 967L is 2009, June, 7, LX Navigation). The 3-letter code is used in the long
version of the file name above and also in the first line of the file itself. The definitive list is in the FR Specification
document, App 1, para 2.5.6, see <www.fai.org/gliding/gnss/tech_spec_gnss.asp>.
FLIGHT RECORDERS & POSITION RECORDERS– DATA ANALYSIS
10.1 Security checking The flight data downloaded by or under the supervision of an OO is the master file
to be retained by the OO on memory media. Checking the security of the file is the first step in data analysis. This
requires the appropriate software, available as “freeware” at the IGC website. With a successful security check,
copies of the master file can be created for evaluation, and – to avoid confusion – saved in a location separate
from the master file.
When a data file fails security, the cause could be a power surge during download, a download using software
other than the IGC-approved freeware, the FR’s internal security switch has been breached, or the data file was
amended during or after flight. In most cases, as long as the original data file is still resident in FR memory, a
fresh download can solve the problem, enabling claim review to proceed.
If a fresh download is not possible or it, too, fails security, the data file may be sent as an e-mail attachment to
the National Claims Officer or the GFAC chairman at <[email protected]>. If the cause of the failure can
be determined, the problem can in all likelihood be remedied for future flights. Although the flight can be evalu-
ated, no badge or record can be claimed without a data file that passes the required security.
Note: badge or record evaluation must use an exact copy of the OO’s master file, unchanged by any means.
Using common analysis software, it is possible to change and save task information in an amended data file that
will pass security. This can fool the casual reviewer, but is clearly shown in “L” records appearing at the end of
the data file, after the “G” record.
SC3 Annex C 16 2014
10.2 OO support At any time after the OO has checked data file security and verified that the data file is
complete, the OO may request and receive help if needed to evaluate the flight. Specifically:
a. the OO may turn to another OO for help with common problems encountered during flight evaluation, or
b. the OO may seek help from a NAC-appointed Data Analyst, The DA need not be an OO or approve badge
or record claims, but his or her technical expertise can be important for a detailed evaluation.
In either case, see SC3-4.5.6d and 6e for details.
10.3 Flight evaluation software In any flight evaluation software, a barograph presentation must be avail-
able showing both pressure and GPS altitude and, for motor gliders, MoP operation must be shown as part of the
vertical data displayed. The automatic functions of evaluation programs (such as waypoint OZ presence and
engine on/off thresholds) should be checked manually, inspecting the relevant data if there is any doubt whether
the particular automatic function positively identifies the threshold concerned.
10.4 Evaluation of flight data A GPS fix always has some uncertainty as described in Appendix 5 para 1.2
of this Annex. This uncertainty shall not be used for adjusting the likely place of a position fix for OZ validation
purposes. A valid fix shall always be taken to be at the center of any such circle of uncertainty.
Flight data is to be examined as a whole, and all fixes (valid or otherwise) must be taken into account, particularly
those in or near OZs. The data analyst approved by the NAC will then evaluate the flight. Analysis for flight vali-
dation will be through a program approved by the relevant NAC – see the gliding/ GNSS web site under “Soft-
ware”. A check of the rules and procedures by the OO include:
a. evidence of flight continuity and the shape of the flight course,
b. valid start and finish,
c. proof of presence in OZ (para 8.2 for fixes,
d. similarity of GPS and pressure altitude traces with time,
e. altitude difference and/or altitude penalty,
f. course distance and speed (SC3 rules),
g. electronic security (use of the Vali program).
When two FRs have recorded the flight, their ground tracks will appear nearly identical in analysis software, but
the fixes recorded will not be absolutely identical since the antennas of the two FRs are not in the same location,
they are not typically recording at exactly the same times, they may be accessing different satellites, and different
model FRs may be using different algorithms to process data.
10.5 Data anomalies In the event of an inconsistency, anomaly, or gap in the data, the NAC shall consult
specialists in the field to determine if there is a satisfactory explanation, and whether the flight performance may
be validated despite the anomaly. In the first instance, contact the chairman of GFAC and send the IGC and
other files concerned. If in doubt, the original file downloaded from the FR should be used and the analysis pro-
cess repeated. Try using a different program to analyse the .igc file, and also examine it in text format.
a. Complete loss of data The OO or analyst should approach all interruptions of FR recordings with
skeptical caution. If all FR data is lost for a period of time, other evidence must conclusively show that flight
continuity was maintained and, in the case of a motor glider, that the MoP was not operated during the
loss. The altitudes at beginning and end of the loss must be considered, together with other evidence such
as a second FR or barograph. Without such evidence, validation should not be given when data inter-
ruption is in excess of 5 minutes, and for motor gliders this period should not exceed 1 minute for pylon-
mounted MoPs and 20 seconds for non-pylon mounted MoPs.
b. Breaks in fixes and missed fixes Fix breaks or sidesteps should be investigated. Missed fixes are
assessed in the same way as a break in the trace of a mechanical barograph; one must judge if the evi-
dence of flight continuity remains incontrovertible. Analyse the time, altitude and position of the last and
next valid data. Lack of any data for 5 minutes would not normally invalidate a flight, but lack of any data
over 10 minutes would be questionable. In the case of an FR, pressure altitude data should continue to be
recorded and prove flight continuity, although without fixes the evidence of presence in an OZ will be lost.
c. Spurious fixes Spurious fixes may occur that show anomalous positions in a fix sequence, and must
be ignored in OZ validation. The indication that a fix is spurious is a large change of position that cannot be
explained by a likely change of ground speed. The diagram below shows that they are easy to see and
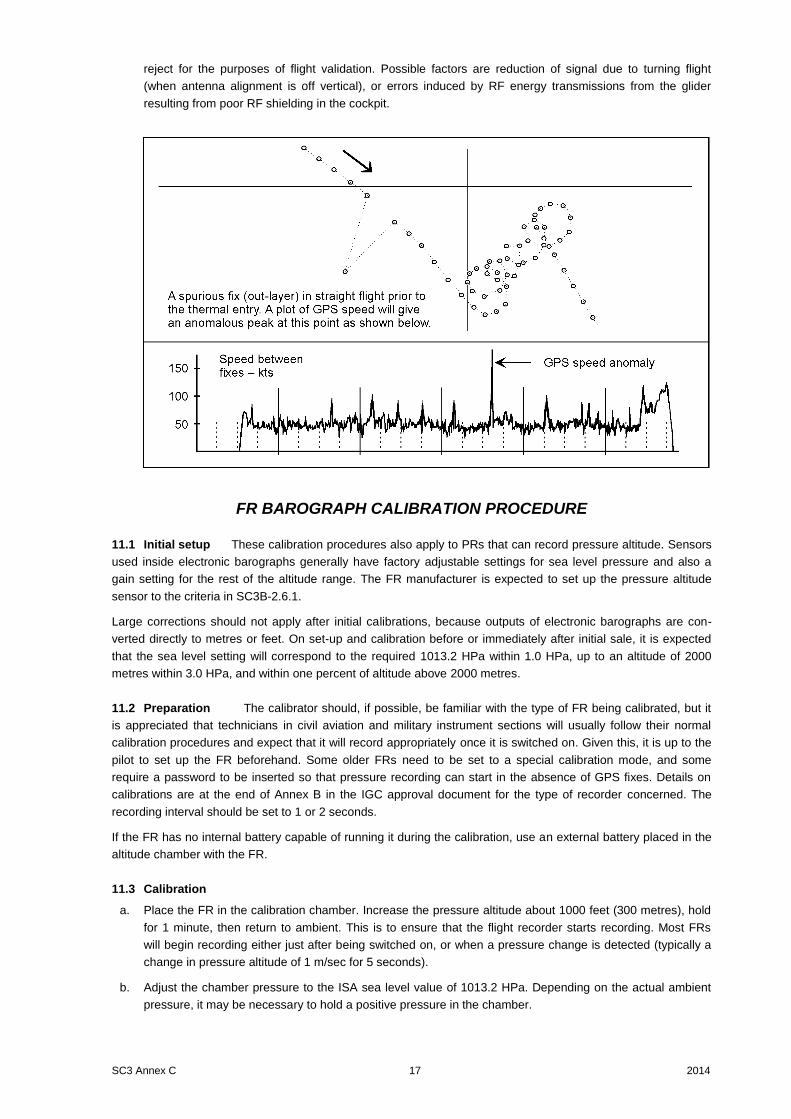
SC3 Annex C 17 2014
reject for the purposes of flight validation. Possible factors are reduction of signal due to turning flight
(when antenna alignment is off vertical), or errors induced by RF energy transmissions from the glider
resulting from poor RF shielding in the cockpit.
FR BAROGRAPH CALIBRATION PROCEDURE
11.1 Initial setup These calibration procedures also apply to PRs that can record pressure altitude. Sensors
used inside electronic barographs generally have factory adjustable settings for sea level pressure and also a
gain setting for the rest of the altitude range. The FR manufacturer is expected to set up the pressure altitude
sensor to the criteria in SC3B-2.6.1.
Large corrections should not apply after initial calibrations, because outputs of electronic barographs are con-
verted directly to metres or feet. On set-up and calibration before or immediately after initial sale, it is expected
that the sea level setting will correspond to the required 1013.2 HPa within 1.0 HPa, up to an altitude of 2000
metres within 3.0 HPa, and within one percent of altitude above 2000 metres.
11.2 Preparation The calibrator should, if possible, be familiar with the type of FR being calibrated, but it
is appreciated that technicians in civil aviation and military instrument sections will usually follow their normal
calibration procedures and expect that it will record appropriately once it is switched on. Given this, it is up to the
pilot to set up the FR beforehand. Some older FRs need to be set to a special calibration mode, and some
require a password to be inserted so that pressure recording can start in the absence of GPS fixes. Details on
calibrations are at the end of Annex B in the IGC approval document for the type of recorder concerned. The
recording interval should be set to 1 or 2 seconds.
If the FR has no internal battery capable of running it during the calibration, use an external battery placed in the
altitude chamber with the FR.
11.3 Calibration
a. Place the FR in the calibration chamber. Increase the pressure altitude about 1000 feet (300 metres), hold
for 1 minute, then return to ambient. This is to ensure that the flight recorder starts recording. Most FRs
will begin recording either just after being switched on, or when a pressure change is detected (typically a
change in pressure altitude of 1 m/sec for 5 seconds).
b. Adjust the chamber pressure to the ISA sea level value of 1013.2 HPa. Depending on the actual ambient
pressure, it may be necessary to hold a positive pressure in the chamber.

SC3 Annex C 18 2014
c. The actual calibration can now begin. If a metric calibration is being made, use intervals of 500 metres for
the first 2000 metres and 1000 metre steps thereafter. If using feet, use altitude steps of 1000 feet for the
first 6000 feet and 2000-foot steps thereafter. Hold each step for at least one minute. All calibration points,
including the 1013.2 HPa sea level datum, should be approached from a lower pressure altitude (by de-
creasing the pressure). After the maximum altitude has been reached, slowly reduce the chamber pressure
to ambient.
d. Download the .igc file of the calibration and use the data to produce a calibration table of altitudes against
corrections. A calibration table such as shown below should show the following information: recorder model
and serial number, place and date of calibration, type and serial number of the reference calibration equip-
ment, name and signature of the calibrating officer. Keep the .igc file for record purposes and supply it with
the calibration table when sent to other people.
Barograph calibration table
Flight recorder type / model / serial no. .............................................................
Name / place of calibration facility ....................................................................
Flight recorder calibrated against:
Reference manometer type / model / serial no. ................................................
on ................................ [date] in accordance with
FAI Sporting Code Section 3, Gliding, Annex C, Flight Recorder Calibration Procedure
QFE = 1010.1 HPa T = 14°C
The manometer readings have been corrected for temperature. As this is a FAI/IGC-
approved FR, the .igc calibration file is held on record at this facility.
Manometer FR reads Correction
(ft ref to 1013.2 HPa) (ft) (ft)
0 10 -10
1000 1005 -5
2000 2000 0
3000 2975 +25
4000 3950 +50
5000 4950 +50
6000 5920 +80
8000 7910 +90
10000 9910 +90
12000 11910 +90
14000 13890 +110
16000 15865 +135
18000 17860 +140
20000 19865 +135
22000 21885 +115
24000 23880 +120
26000 25925 +75
28000 27890 +110
30000 29875 +125
32000 31875 +125
34000 33925 +75
[ Name/Signature ] ................................................................ [date] ......................
Authorised calibrator for the National Aero Club of [country]
SC3 Annex C 19 2014
11.4 Recording of calibration data
a. After the calibration, the data file containing the pressure steps shall be transferred to a computer as if it
were flight data (SC3B-2.6.1). The stabilised pressure immediately before the altitude is changed shall be
taken as the appropriate value unless the calibrator certifies otherwise. The IGC-format calibration data file
will then be analysed, compared to the calibration pressure steps, and a correction table produced and
authenticated by a NAC-approved person, preferably the calibrator. The data file must be analysed and
authenticated by a NAC-approved person if the calibrator is not NAC-approved.
b. The correction table will list true ISA against indicated altitudes. The table can then be used to adjust criti-
cal pressure altitudes recorded during a soaring performance such as take-off, start and landing altitudes
for altitude differences, for comparison with independently recorded air pressure (QNH) readings, and low
and high points on gain-of-height and altitude claims.
c. Some FRs can display pressure altitude directly on a screen. This data cannot be used for calibration pur-
poses because it is unlikely that the figures will be the same as those recorded in the .igc file. Only the .igc
file data can be used in analysing altitudes on flights.
d. OOs responsible for validating later flights may wish to see the calibration file when assessing any claim
that is made with the instrument being calibrated. Therefore, a copy of the calibration .igc file must be
retained at least until the calibration becomes out of date. Retain the calibration at the calibration organis-
ation or, where calibration is at civil aviation and military instrument sections, the supervising OO should
retain the .igc file and the calibration table.
MECHANICAL BAROGRAPHS – FLIGHT PREPARATION
12.1 Pre-flight
a. For mechanical barographs, attach the foil or paper strip to the drum. Ensure it cannot slip on the drum if
held by tape rather than a hold-down bar. If foil, use a heavy-duty thickness, as thin foil may tear from the
handling it gets. If a flight is likely to require more than one rotation of the barograph, then the foil or paper
should be attached to the drum so that the recording needle can pass smoothly over the hold-down bar or
overlapping paper without interruption. More than one flight can be recorded on the barogram (example: a
relaunch for a task attempt). Paragraph 12.3d refers to multiple flight traces. If you use foil, smoke it evenly
and lightly, or it may tend to flake when disturbed. A small piece of solid camphor is ideal for smoking.
b. Attach the drum, ensuring that it is correctly keyed to the mechanism. Fully wind the spring. Check that the
rotation rate, if adjustable, is suitable for the flight. The 4-hour rate is preferred with a Winter barograph, as
it allows an accurate analysis of important elements of the trace such as the release and low points. The
2-hour rate can result in overlap of the trace, and the 10-hour rate compresses the trace so much a low
point “notch” may be unreadable. Pilots should test the actual running time of a barograph when set at the
faster rates to ensure that it will not run down and stop on a long flight.
c. Just prior to the flight, turn on the barograph, rotate the drum once to scribe a baseline trace for the day
which will be related to the airport elevation, and have the OO place an OO identification mark on the drum.
With the barograph ON and the recording needle positioned to minimize interference with the hold-down
bar, tape, or foil/paper edge, gently flick the recording needle up about 6mm (1/4 inch). Record the time
this “pre-flight timing mark” was made and leave the barograph ON. Finally, seal the barograph in such a
manner that no one can tamper with the trace, then initial or mark the seal.
d. The OO will check the storage of the barograph. It must be inaccessible to the pilot and any passenger.
Ensure that the barograph is placed so that a bump cannot turn it off, that the stowing process itself does
not switch it off, or that it isn’t stowed with the stylus side on the bottom, which could cause interruptions in
the trace. Leave the barograph on – the chief cause of barograph failure is “finger trouble”.
12.2 In-flight Ensure a clear low point is recorded on the barograph following the release. If the release
occurs in lift, dive the glider and/or open the spoilers for a short time to allow an obvious notch of about 50
metres or so to be easily visible on the trace (if you are too fast, the barograph will not have time to react). This
notch sets the low point of a wave flight, or the start height of a distance flight to determine if any height penalty is
to be applied. Failing to notch the trace is a common error at the start of the task because of the added pilot
workload that may occur at this time, yet it must be remembered.

SC3 Annex C 20 2014
The OO should record the take-off time, the tow release time (if possible), the tow plane landing time, and the
start time (if applicable) of the flight. Knowledge of tow duration is very useful in estimating starting altitude on a
barogram if a good notch is not present.
12.3 Post-flight
a. After landing, the pilot should let the barograph run for a few minutes to allow the landing site air pressure
to settle and be recorded clearly. The barograph should then be turned off so that handling shocks and
transportation will not confuse the trace.
b. An OO must then take charge of the barograph. The OO will carefully remove the drum and inspect the
barogram to verify that release and/or subsequent low point is shown clearly. If it is not, proceed to the
instructions in para 12.4 before continuing with the following steps.
c. Add the information to the barogram listed in SC3-5.3.3. Other data may be added such as: OO’s name
(print), badge leg or record being claimed, indication of release, low, high, and landing point, take-off site,
etc. (but do not let any mark touch the flight trace). Do not add any altitude values to the trace, they cannot
be accurately known until the barogram has been evaluated using the calibration graph.
d. If there is evidence of more than one flight on the barogram, the OO must be able to clearly identify each
part of the barogram and is to mark the part(s) subject to claims with the name(s) of the pilot(s). There
must be positive evidence to associate pilots making claims with the particular parts of the barogram, such
as from club launch and landing logs, or from other witnesses who saw the claimant(s) launch and land.
e. Smoked foil barograms must be “fixed” after the information is added. Coating the foil (while on the drum)
with a spray lacquer is a good method. Use a light first coat, as a heavy initial spray could obliterate the
trace. Test spray on an unused area of the barogram first.
f. After fixing, the OO evaluates the barogram for the heights of interest. This requires the use of a calibration
graph of the barograph prepared from a current calibration trace. If required by the Claims Officer, the
original calibration graph and its trace should be submitted with the claim – not a photocopy. This require-
ment may be waived by Claims Officers for badge height gains clearly in excess of the required minimum
and loss-of-height clearly below the allowed maximum. Finally, if the barograph is not being used for some
time, allow it to unwind as a kindness to the spring mechanism.
12.4 Evaluating a release point not evident on the barogram When the tow duration is not known to the
satisfaction of the OO and release is not evident on the barogram, distance and duration claims must be dis-
allowed. In other instances, the following procedure can be used to estimate the release time / altitude for any
badge claim. This is the most important reason why the pilot should ensure that the barogram is notched after
release, and why the OO should always closely monitor the beginning of each flight under their supervision.
With the barograph OFF and the barogram still attached to the drum, wind the barograph and reinstall the drum.
Manually rotate the drum so the recording needle is directly over the arc scribed at the pre-flight timing mark
(para 12.1c). If no timing mark was made, position the recording needle over the trace, where take-off appears
to have taken place.) Gather OO timing notes on take-off and release times, and calculate the elapsed time be-
tween the timing mark (if none, take-off) to release. Turn the barograph ON. After an elapsed time equal to the
observed flight duration of the tow, jog the stylus so that it marks across the flight trace. Turn the barograph off,
and return to para 12.3c to complete post-flight procedures.
12.5 Duration evaluation The barogram may be used to determine duration, and is required if direct timing
was not done because the OO was not present at the landing. In this case, the OO will proceed as follows:
a. Position the drum where the stylus can be carefully deflected to touch the trace at the glider release point.
Then rotate the drum down and make a small mark across the baseline. The barograph is then rewound
and restarted with the drum initially positioned as above, and timing begun with an accurate time piece.
The time is again noted when the drum has rotated to a position where the stylus meets the landing point
on the trace, and the duration determined. For rotation rate calibration, small marks may be added to the
trace at even time intervals by jogging the stylus point slightly.
b. If the release point is not evident on the barogram, time the trace from take-off to landing and subtract the
recorded tow duration. If the procedure used in para 12.4 above has been used to estimate the release
time on the barogram, the OO must disallow the claim if the duration does not clearly exceed 5 hours.

SC3 Annex C 21 2014
12.6 Height gain evaluation With the barograph calibration graph below (see para 13.3 on construction),
one may use dividers to determine pressure altitude, corrected for instrument error in the following manner:
a. Place a protective sheet of clear plastic over the flight barogram and, with a right triangle reference to
determine true vertical, place one divider point on the appropriate reference line and the other on the trace
at the low point to be evaluated. Transfer the divider measurement to the calibration graph below, as
shown at “a”, and read calibrated pressure altitude from the numbers displayed below the horizontal axis.
Repeat the process for the high point, as shown at “b”.
b. If pre- and post-flight baselines recorded at the same airfield are essentially the same, distance above the
appropriate reference line on the flight barogram, the above method is equally applicable for determining
gain of height and loss of height as well. If same-site pre- and post-flight baselines differ or the landing took
place at a location where the elevation is lower or higher than the take-off site, the height reached should
be measured from the start (take-off) pressure, and see para 12.7 below.
12.7 Correcting numeric altitude data for instrument error When FR or electronic barograph calibration
is done numerically, linear interpolation may be used to correct for instrument error and the result is “calibrated
pressure altitude.” In the example below, 492 feet (150 metres) was recorded by the FR before take-off where
the site elevation is actually 798 feet msl (243 metres).
Metric units English units
Lab altitude FR altitude Lab altitude FR altitude
0 30 0 98
X 150 X 492
609 641 2000 2100
X = 609 – (641–150) • ((609–0) / (641–30)) X = 2000 – (2100–492) • ((2000–0) / (2100–98))
X = 120 metres X = 394 feet
The same method can be applied to FR-recorded altitudes at release, start, low point, high point, and finish, but if
the pre- and post-flight baseline data points differ from actual field elevation(s) by more than 30 metres (100
feet), it would be preferable to calculate absolute altitudes following the guidance in para 2.5.
12.8 Absolute height evaluation for barograph and FR data The following is one method to correct baro-
graph or FR recorded data for both instrument error and nonstandard pressure, whether the latter is due to
diurnal pressure changes at the take-off and landing site or different air mass characteristics at separate take-off
and landing sites.
a. Use the appropriate method in para 2.5 or 12.7 to determine calibrated pressure altitude at the preflight
baseline. Subtract this figure from the elevation of the take-off site (a negative number may result). Note the
take-off time. Repeat this step for the post-flight baseline; jot down landing time. Determine whether the in-
flight event(s) to be evaluated occurred nearer take-off time or landing time, then:
b. For any event near take-off time, add the number found in (a) to the calibrated altitude for that event.
c. For any event near landing time, add the number found in (b) to the calibrated altitude for that event.

SC3 Annex C 22 2014
These calculations yield altitude corrected for both instrument error and non-standard pressure. This is sufficient
in most cases for badge and distance or speed record purposes, given that pressure corrections are based on
pre- and post-flight “baselines” recorded by a calibrated instrument at a known field elevation.
MECHANICAL BAROGRAPHS – CALIBRATION PROCEDURE 13.1 Preparation
a. Attach the appropriate recording medium to the barograph, making sure that it is in contact with the base
and surface of the drum and avoiding a spiral wind where applicable. For smoked foils, ensure the soot film
is not too thick as this will lead to a coarse, irregular trace. Wind the barograph, set it to its fastest rotation
rate, and inscribe a baseline (no baseline is required for the Peravia and Aerograf barographs).
b. When the barograph is placed in the vacuum chamber, a vibrator should be used if one is available to
apply low amplitude vibrations during calibration (about 0.1 mm or 0.004 inch peak-to-peak at approxi-
mately 20 Hz). This prevents system friction or linkage slack from affecting the trace.
c. Evacuate the chamber to the full range of the barograph, hold until the trace stabilizes, then return to ambi-
ent. This ensures the bellows and mechanical linkage are sound, and that a suitable trace is being made.
d. Adjust the chamber pressure to 1013.2 HPa. Depending on the actual ambient pressure, it may be neces-
sary to hold a positive pressure in the chamber.
13.2 Calibration
a. Proceed with the actual calibration using altitude steps of 1000 feet for the first 6000 feet and 2000-foot
steps thereafter. In metric, the intervals should be 500m for the first 2000m and 1000m steps thereafter.
Hold each step for at least two minutes. All calibration points, including the 1013.2 HPa reference, must be
approached from a lower pressure altitude (by decreasing the pressure). After maximum altitude has been
reached, slowly reduce chamber pressure to ambient.
b. A trace will resemble the one below, either with the information shown added, or printed on a separate
certificate that identifies the trace. If a smoked foil has been used, “fix” it with a thin coat of spray lacquer.
13.3 Calibration graph In order to evaluate heights from a barograph trace (see para 11.4), the OO will
need to prepare a calibration graph from the data on the calibration trace. Graphing programs are available to
output a best-fit graph from the calibration data points. If you are constructing the graph, use good quality graph
paper with fine graduations. A pair of dividers and a small plastic square is required.
a. Draw a horizontal line near the lower edge of the graph paper. For a double-needle barograph, this refer-
ence line represents the line scribed by the fixed needle during calibration; for a single-needle barograph,
this reference line represents the lower edge of the barograph’s calibration paper or foil. Starting with
0 feet MSL at far left, label the horizontal scale at a suitable scale (1 cm per 200m or 1 inch per 500 feet,
for example), with altitude increments increasing to the right. The graph may be “folded” (as shown below)
to fit a single sheet of graph paper.

SC3 Annex C 23 2014
b. Using a pair of dividers to measure the deflection of each step of the calibration trace, transfer these dis-
tances with the dividers to the calibration graph at the position corresponding to the appropriate pressure
values on the horizontal axis. Use the small plastic triangle to ensure that the divider is at right angles to
the baseline. Finally, draw a smooth line through these points, averaging any scatter in point position about
the line. For most barographs this line will be almost straight. Your graph will resemble the one below.
MOTOR GLIDERS
14.1 Means of Propulsion (MoP) record for motor gliders Unless the MoP is either sealed or inoperative,
an approved MoP recording system must be used. This system will be described in the approval document (6.3a)
for the particular type of flight recorder. For motor gliders in which the MoP produces substantial acoustic noise
when producing forward thrust, the Environmental Noise Level (ENL) system is used. Older FRs may have other
MoP recording systems, for instance using vibration sensors or microswitches, but these may have stated limit-
ations that make them less convenient to use than the ENL system.
ENL systems are self-contained inside the FR and need no external connections. An ENL value is recorded with
each fix and the system can be regarded as self-checking with each fix. The environmental noise at the FR can
be seen across the whole flight. Therefore, an engine run after the flight is not needed to validate the system.
ENL systems in new types of FRs are tested by the GFAC and adjusted until the system differentiates between
MoP operation and other noises produced in gliding flight.
14.2 MoP recording systems
a. Environmental Noise Level (ENL) system These systems produce ENL values between 000 and 999
(except the Cambridge 10, 20, and 25 that have a maximum ENL of 195). Analysis of the noise signature
represented by the ENL values enable the OO to determine whether the MoP was operated. In the .igc file
format, the three ENL digits are generally added at the end of the data stream for each fix. The system is
designed to emphasize engine noise while producing positive but low ENL values in normal quiet gliding
flight. More exact figures for the type of FR concerned are given in Annex B of its approval document.
b. Low noise engines – electric and others Some engine/propeller combinations do not produce enough
acoustic noise for ENL systems to record figures that are clearly above normal soaring noise levels. The
provisions of SC3 Annex B-1.4.2.4 then apply, requiring recording of an additional variable on the .igc file
that is proportional to engine RPM, using the RPM three-letter code as defined in the FR specification.
14.3 ENL figures – engine off ENL figures between 000 and 999, found during GFAC testing before IGC
approval, are listed in the approval document of the FR concerned. These figures are definitive; others given
below are approximations. Pilots should ensure that the FR to be used on a task to be claimed produces similar
figures; if not, the FR should be returned to its manufacturer to have the ENL system re-set.
a. Winch and aerotow launches ENL values are typically up to 300 for winch and 200 for aerotow may be
seen, depending on speed, whether canopy panel(s) are open, and any sideslip present.
b. In flight Values under about 100 indicate normal gliding flight. In a high-speed glide or in an aerodyn-
amically noisy glider, ENL may rise to 150. After launch, flight near powered aircraft should be avoided.
Spins and stall buffet produce higher ENL values, particularly if the engine doors vibrate due to disturbed

SC3 Annex C 24 2014
airflow at the stall – 500 has been recorded in a spin. If the engine is on a retractable pylon, a high ENL
reading will be shown when flying with the pylon up and engine off due to the high aerodynamic noise.
Warning Flight with canopy side vent(s) open can produce a low “organ pipe” note,
particularly at high speed or with sideslip, where ENL figures us high as 600 have been
recorded. If the glider is climbing, this can be assessed as engine running. Pilots should
avoid these conditions, and if loud cockpit noise is experienced during soaring flight,
change conditions to reduce it so that it only lasts for a short time.
c. Landing approach ENL values are higher on an approach from noise due to undercarriage, sideslip,
etc. because the glider is no longer aerodynamically clean. Short-term peaks due to specific actions such
as opening air brakes will be noted as well. ENL values of up to 400 have been recorded, although 200 is
more typical in an aerodynamically noisy glider, and 50 in a quiet machine.
d. Take-off and landing During ground contact at take-off and landing, short duration ENL “spikes” up to
about 600 have been recorded due to wheel noises or, on landing, initial contact with the ground.
14.4 ENL figures – engine on During engine running at climb power, an increase to over 700 ENL is
expected. Over 900 is typical for a two-stroke engine, and over 700 for a 4-stroke. Values over 900 have been
recorded with a two-stroke engine running at full power. During engine running, these high ENLs are produced
for a significant time during climbing flight and can therefore be attributed to engine running rather than soaring.
14.5 ENL analysis It is normally easy to see when an engine has been running. Other data, such as rates of
climb and ground speed, will indicate whether or not non-atmospheric energy is being added. Short term peaks in
ENL (10 seconds or so) may be due to the other factors mentioned above such as undercarriage and/or air brake
movement, sideslip, open direct vision panel/sideslip, the nearby passage of a powered aircraft, etc. If in doubt,
e-mail the .igc file to the GFAC chairman at <[email protected]> for further analysis and advice.
14.6 Sample ENL systems data ENL data is shown below, using the presentation from one of the many
analysis programs designed to work with the .igc file format. Here, the ENL values are shown as solid black bars
whose height correspond to the ENL values at each fix. They are synchronised with the barograph trace from the
FR pressure altitude sensor. A separate graph of speed with time is included, and this is helpful in identifying why
ENL values have varied during normal gliding flight, such as explaining higher ENL values at higher speeds.
ENL levels shown in black, overlaid on the altitude trace with GPS-derived groundspeed below.

SC3 Annex C 25 2014
ENL levels in black with altitude and groundspeed traces. From a flight with an engine run at launch
and two shorter engine run during the flight.

SC3 Annex C 26 2014
Appendix 1
COMMON CONVERSION FACTORS
DISTANCE 1
inch
=
25.4
millimetre (exactly)
foot = 0.3048 metre
mile (nautical) = 1852 metre (exactly)
kilometre = 3280.84 feet
mile (statute) = 5280 feet (exactly)
mile (statute) = 1.6093 kilometres
mile (nautical) = 1.1508 miles (statute)
SPEED 1 foot/second = 0.3048 metres/second
metre/sec = 3.6 kilometres/hour
metre/sec = 1.9438 knots
metre/sec = 2.2369 miles/hour
mile/hour = 1.6093 kilometres/hour
knot = 1.8520 kilometres/hour
knot = 1.1508 miles/hour
knot = 101.2686 feet/minute
mile/hour = 1.4667 feet/second
PRESSURE 1 atü = 15 psi (for tire pressure)
psi = 6.8948 kilopascals (KPa)
atmosphere = 101.3325 kilopascals
atmosphere = 1013.325 hectopascals (HPa) or millibars
atmosphere = 29.9213 inches Hg (0°C)
inch Hg (0°C) = 33.8639 millibars (mb)
millibar = 0.7501 millimetres Hg
VOLUME 1 gallon (Imp) = 1.2009 gallons (US)
gallon (US) = 3.7854 litres
gallon (Imp) = 4.5459 litres
MISC. 1 gallon (Imp) = 10 lbs water (15°C)
as a rough approximation:
100 ft/min = 1 knot = 0.5 metre/sec

SC3 Annex C 27 2014
Appendix 2
FAI BADGE DOCUMENTATION
Documentation required
is indicated by an asterisk * Flig
ht b
aro
gra
m
Ba
ro. c
alib
ratio
n c
ertific
ate
Diffe
rence
of h
eig
ht c
ertific
ate
Flig
ht d
ecla
ratio
n
La
nd
ing
ce
rtifica
te
Ae
roto
w/re
lease
ce
rtifica
te
Po
sitio
n e
vid
ence
Silver Height * * *
Silver/Gold Duration *1 * *2 *
Silver Distance * 5 * *3 * * *3
Gold/Diamond Height * * *
Gold/Diamond Distance * 5 * *4 * * *4
Diamond Goal * 5 * * * * *
Diploma Flights * 5 * *4 * * *4
Notes:
1. Not required if continually observed.
2. Required if landing not witnessed by OO.
3. Required if a declared departure or finishing point is used.
4. Not required for straight distance.
5. May be required if an accurate loss of height calculation is critical to the claim.
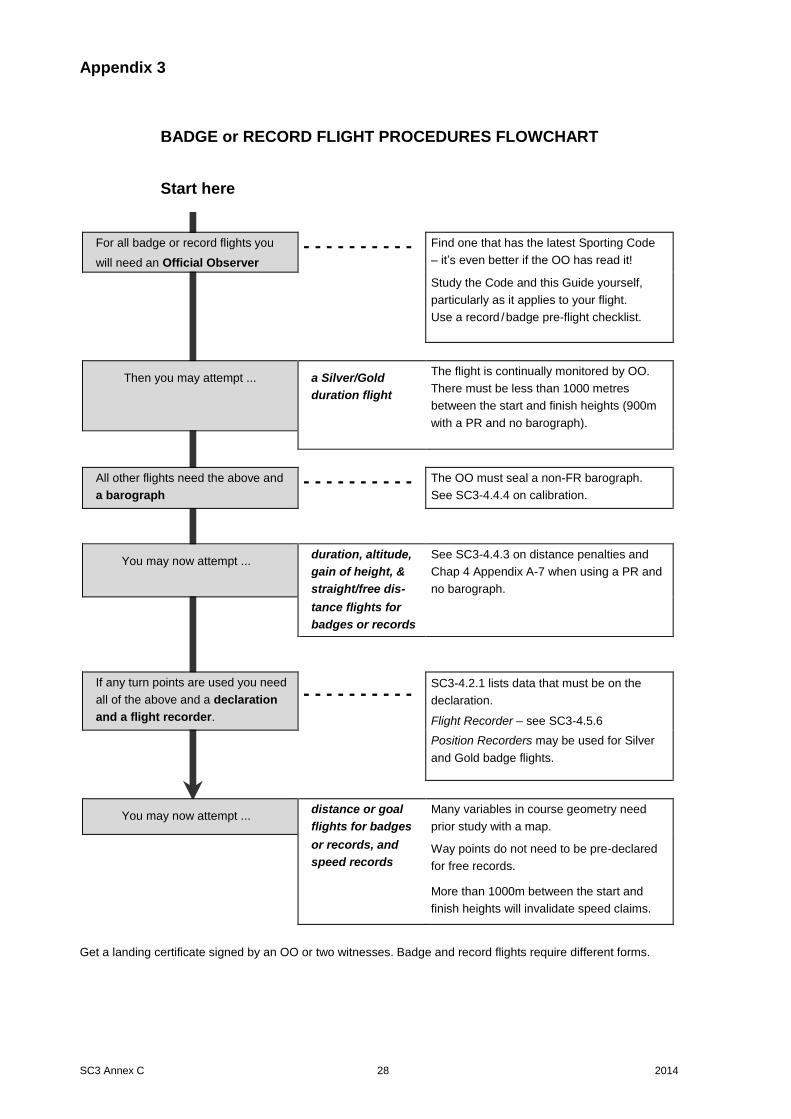
SC3 Annex C 28 2014
Appendix 3
BADGE or RECORD FLIGHT PROCEDURES FLOWCHART
Start here
For all badge or record flights you
will need an Official Observer
- - - - - - - - - - Find one that has the latest Sporting Code
– it’s even better if the OO has read it!
Study the Code and this Guide yourself,
particularly as it applies to your flight.
Use a record / badge pre-flight checklist.
Then you may attempt ... a Silver/Gold
duration flight
The flight is continually monitored by OO.
There must be less than 1000 metres
between the start and finish heights (900m
with a PR and no barograph).
All other flights need the above and
a barograph - - - - - - - - - - The OO must seal a non-FR barograph.
See SC3-4.4.4 on calibration.
You may now attempt ... duration, altitude,
gain of height, &
straight/free dis-
See SC3-4.4.3 on distance penalties and
Chap 4 Appendix A-7 when using a PR and
no barograph.
tance flights for
badges or records
If any turn points are used you need
all of the above and a declaration
and a flight recorder.
- - - - - - - - - - SC3-4.2.1 lists data that must be on the
declaration.
Flight Recorder – see SC3-4.5.6
Position Recorders may be used for Silver
and Gold badge flights.
You may now attempt ... distance or goal
flights for badges
Many variables in course geometry need
prior study with a map.
or records, and
speed records Way points do not need to be pre-declared
for free records.
More than 1000m between the start and
finish heights will invalidate speed claims.
Get a landing certificate signed by an OO or two witnesses. Badge and record flights require different forms.

SC3 Annex C 29 2014
Appendix 4
FLIGHT DECLARATION
If this declaration is being made to replace one in an FR, ensure that the time of this
declaration is after the time on the declaration stored in the FR being used. Warning: some
IGC-approved FRs make turn-on time of the FR the declaration time. If you are unsure, turn
on the FR before the time recorded on this declaration.
Date ........................................................ Time .....................................................
Pilot ................................................................................................................................ Name(s) (print)
(& crew)
................................................................................................................................ Signature of PiC
Glider .. ........................................................................................................................... Type & Registration
FR ............................................................... ...................................................... Type & Serial no. (main) (backup – if any)
Start PT ............................................................................ ................................................. Describe way points with an existing TP code/list name, or with coordinates
TP 1 ................................................................................................................................
TP 2 ................................................................................................................................
TP 3 / Goal / ................................................................................................................ or Finish PT
O.O. ............................................................................................ Name (print)
............................................................................................ Signature
I hereby certify that the above declaration was completed in my presence.

SC3 Annex C 30 2014
Appendix 5
Principles of Global Navigation Satellite Systems and GPS flight data recorders
GFAC chairman: <[email protected]>
IGC web site: <http://www.fai.org/gliding/gnss>
IGC GPS software site: <http://www.fai.org/gliding /gnss/freeware.asp>
There is extensive information on GNSS systems on the web.
1.1 Terminology The term Global Navigation Satellite System (GNSS) is a generic term for any satellite-
based system that enables receivers to display accurate position data on the earth’s surface. GNSS
includes the USA GPS system, Russian GLONASS, European Galileo, and any future system. IGC-
approved flight recorders (FRs) and position recorders (PRs) use the GPS system at present. A FR is a
sealed unit with a GPS receiver and capable of recording data including 3D fixes, time and other data, that
can be downloaded after flight in the .igc file format. A PR will lack some features and have no IGC
approval. The use of the English words “logger” or “data logger” is uncommon other languages, so the term
“flight recorder” is used by the FAI and IGC.
1.2 Position, height, and timing accuracy Average horizontal position error measured to date by GFAC
has been about 11.4m, based on thousands of samples. Tests are done by fitting FRs to vehicles, driving
over several accurately surveyed points close to 51N 001W and measuring the difference from the survey
data. If the points are limited to those with completely clear horizons, the average error lowers to about
7.5m. Since FRs are not usually checked by professional avionics engineers or installed in gliders to
commercial standards, the higher figure may be more typical. In any case, such figures are well within the
requirement for validation of OZ entry.
Vertical (altitude) accuracy is less than horizontal accuracy because of the angles of the position lines
needed for an altitude fix. At best, GPS altitude errors will be about twice those for horizontal position.
GFAC tests have shown that it is possible to have accurate fixes in lat/long, but poor accuracy in GPS
altitude, or even an obvious GPS altitude anomaly or complete altitude unlock. The latter would be indi-
cated in an .igc file by the GPS altitude figure showing zero or baseline.
FRs have an internal clock that maintains continuous date and time even when the FR is switched off or is
operating in pure pressure altitude mode due to any failure to receive GPS data. On receiving satellite sig-
nals, FRs maintain time to better than a nanosecond since GPS system operation uses very accurate time
differences in the receipt of signals from the satellites to calculate position on the surface of the earth.
1.3 Rules for the use of FRs and levels of IGC approval
Current rules are in the Sporting Code (SC3), its annexes (SC3A, B and C), in the IGC Specification for
IGC-approved GNSS Flight Recorders, and in other IGC documents and information. All are available on
the IGC web pages. Annex B contains the rules and procedures for the use of GNSS recorders. Each flight
recorder given IGC-approval is accorded a security level allocation and permitted usage as listed below:
a. IGC approval for all flights Flight recorders that comply with all provisions of the FR specification at
the time the approval document is issued and may be used for all record, diploma, and badge flights.
b. IGC approval for badge and diploma flights Flight recorders that do not fully comply with all the prov-
isions of the IGC specification. These may not be used for world records.
c. IGC approval for badge flights up to Diamond only Flight recorders with less rigorous standards than
either a or b (they may use an external GPS receiver, for example).
A list of these FRs is published on the gliding/gnss web page, with links to the IGC-approval documents for
each FR. Each document has an introductory section, manufacturer contact details, description of the hard-
ware, firmware and software, followed by “Conditions of Approval” that discusses connections to the FR,
security (physical and electronic), installation in the glider, motor glider aspects (if any), sealing require-
ments (if any), and methods for downloading and analysis of flight data. Two annexes follow, Annex A with
notes for pilots and FR owners, Annex B with notes for OOs and other people concerned with validating a
flight, including barograph calibrators.

SC3 Annex C 31 2014
1.4 Physical and electronic security
a. Physical security An internal security mechanism activates if the FR case is opened. A silver-
coloured tamper-evident manufacturer’s seal is normally fitted over one or more of the case-securing
screws.
b. Electronic security If the FR has been tampered with (such as by opening the case or attempt-
ing to do so), the internal security mechanism will erase the electronic key used to validate the integrity
of the .igc files. These files will continue to be produced, but will be marked as “unsecure” and will fail
the Vali test (6.2.d). Individual Vali programs originate from the FR manufacturers and are coded to
recognise the correct digital signature from each manufacturer’s FRs.
c. Other flight data checks Detection of alteration or artificial manufacture of data can also be helped
by analysing features that can be checked from independent sources. These include wind drift in ther-
mals, the ground level pressure for the time and places of take-off and landing, exact positions at take-
off and landing, comparison with other flight records from the day and locality concerned, etc. The
nearest meteorological office will have past records of ground level pressures, the wind structure with
altitude. These can be used for checking against flight data that is being investigated.
d. Flight recorder found to be unsealed If either physical or electronic security is found to have failed,
the FR must be returned to the manufacturer or his appointed agent for investigation and resealing. A
statement by the owner of the FR should be included on how the unit became unsealed.
1.5 Altitude sensing and recording
a. GPS altitude The GPS altitude computed and recorded in an FR is the vertical distance above the
WGS84 ellipsoid. Because of the difference to pressure altitude, GPS altitude figures must not be
used for gain/ loss of height or absolute altitude calculations, but may be used for evidence of flight
continuity if the pressure altitude trace has failed.
Position Recorders (see SC3, Chapter 4 Appendix), where they record altitude at all, may record alti-
tude above an approximate sea level surface known in the WGS84 manual as the WGS84 Geoid.
Some units that incorporate a pressure altitude sensor may mix GPS altitude and pressure altitude
data, for instance, in order to produce approximate height above ground.
b. Pressure altitude Pressure altitude, universally used in aviation, references the International Stand-
ard Atmosphere with a 1013.25 HPa sea level datum. As this is the IGC standard for measurement of
altitude, a pressure altitude sensor is also required within the FR. This enables pressure altitude
recording to continue in the event of GPS failure. The pressure altitude sensor in a FR is temperature
compensated and is set by the sensor and FR manufacturer to the Standard Atmosphere. A sea level
baseline setting and a setting for gain with altitude are usually available for adjustment. The FR
manufacturer should adjust these settings for minimum errors before sale (see para 11.1).

SC3 Annex C 32 2014
INDEX A
absolute altitude correction ............................... 2.5
accuracy of measurement ................................. 1.8
altitude
distance correction – 1% rule..................... 2.2
error ......................................................... 1.8d
GPS altitude use ........................................ 2.4
pressure sensing/recording .................. A5-1.5
approval documents, FR .................................. 6.3a
B
badges
required documentation .............................. A2
badge flight procedures flowchart ............... A3
common badge flight errors ....................... 3.3
distance calculation & accuracy ............ 1.8b, c
Silver badge flights ............................ 3.2, 3.7c
Silver badge tasks ..................................... 3.9
barogram
absolute altitude evaluation ..................... 12.8
continuity of trace .............................. 5.1b, 5.2
duration evaluation ........................... 5.1c, 12.5
height gain evaluation .............................. 12.6
interruption of trace ................................... 5.2
release point / time not evident .... 12.4, 12.5b
barograph
calibration – mechanical .......................... 13.2
calibration method – FR ........................... 11.3
electronic barograph use ........................... 5.1
instrument error altitude correction .......... 12.7
notching ........................................ 12.1b, 12.2
OO procedures ............................... 12.1, 12.3
preparation............................................... 12.1
storage ................................................... 12.1d
C
calibration
correcting for instrument error................... 12.7
flight recorder barograph .................. 6.8, 11.3
mechanical barograph ................................ 13
pressure units ........................................... 6.8a
claims
pre-screening ............................................ 1.3c
processing philosophy ................................ 1.6
closed course, start/finish ................................. 4.2
continuity of flight data ............................. 5.1b, 6.7
conversion factors .............................................. A1
cylinder observation zone ................. 3.2b, 3.4, 8.2
D
data analyst (DA) .......................................... 10.2b
data analysis software .................................... 10.3
declarations
content not definitive in FRs ............... 6.5, 8.1
data structure ............................................. 6.4
failure of declared task ............................... 3.8
general notes ............................................. 3.4
in flight recorder .......................................... 6.4
paper or internet .............. 3.3c, 3.4d, 3.5, 6.4a
validity of .................................................. 3.4b
distance calculation ..................................... 1.8b, c
documentation for badges .................................. A2
downloading from FRs ..................................... 6.3c
duration evaluation
from barograph ........................................ 12.5
no barograph used ..................................... 2.1
E
environmental noise level (ENL)
analysis .................................................... 14.5
ENL during various flight phases..... 14.3, 14.4
placement of FR ....................................... 7.1b
sample data ............................................. 14.6
F
finish
1000m requirement for goal flight ............. 4.2a
evidence ..................................................... 4.1
options, examples ............................... 4.2, 4.4
virtual finish options .................................... 4.5
flight data
anomalies ................................................. 10.5
analyst approval ..................................... 10.2b
copy of data to OO ..................................... 9.3
download problems ..................................... 9.2
flight evaluation ........................................ 10.4
.igc file format ........................................... 9.1b
independent of FR ..................................... 8.1
input errors ................................................. 6.5
loss of data .............................................. 10.5a
missed fixes ..................................... 6.7, 10.5b
“notching” the barograph ...... 12.1b, 12.2, 12.4
downloading FR data ................................. 9.1
validation ..........................6.3d, 10.3g, A5-1.4b
flight recorder
altitude sensing .................................... A5-1.5
approval documents ..................... 6.3a, A5-1.3
barograph calibration ....................... 6.8, A5-2
control by OO ............................... 7.2, 8.4, 9.1
data security ............................................. 10.1
electronic security, Vali program .............. 6.3d
fitting, sealing in glider ............................ 7, 9.1
fix rate, setting ............................................ 6.6
IGC approval levels .............................. A5-1.3
manufacture’s codes .................................. 9.4
pilot-input data............................................ 6.5
security, physical ................................. A5-1.4a
start/finish evidence ................................... 4.1
free record flights............................................. 3.10
G
goal, 1000m requirement ....................... 4.2a, 4.3b
GPS
accuracy ............................................... A5-1.2

SC3 Annex C 33 2012
height measurement for badges .................. 2.4 levels of approval ........................................ A5-1.3
H
height
absolute height evaluation ........................ 12.8
altitude correction formula .......................... 2.5
correcting for instrument error .................. 12.7
evaluation, mechanical baro ..................... 12.6
1% rule for under 100 km ........................... 2.2
measurement using GPS evidence ............ 2.4
penalty, over 100 km .................................. 2.3
release point not evident .......................... 12.4
I
identification marks, barograph ..................... 12.1c
IGC- approved flight recorder ............................ 6.3
IGC-approval documents ................................ 6.3a
IGC flight data file ............................................ 6.3b
internet (e-mail) declarations ............................. 3.5
L
landing certificate .............................................. A3
loss of height penalty ................................. 2.1 - 2.4
M
manufacturers codes for FRs ............................. 9.4
means of propulsion (MoP)
control, with MoP recorder ....................... 14.1
recording systems ................................... 14.2
start/finish of task ...................................... 4.2
measurement accuracy & precision .................. 1.8
MoP (see ENL) ................................................ 14.1
N
National Airsport Control
responsibilities ............................................ 1.3
recommended practices ............................. 1.4
national turn point lists ..................................... 1.3c
national records ................................................ 1.7
notching barographs ........................................ 12.2
O
observation zone
choice of OZ type ....................................... 3.2 flight path within .................................. 3.6, 8.2
FR sampling rate within ....................... 6.6, 8.2
Official Observer (OO)
barogram height evaluation ...................... 12.6
control of flight .......................... 8.1, 8.3, 12.3b
duties, general ............................................ 1.5
duties, FR installation ................................. 7.2
duties, FR data downloading ...................... 9.1
equipment sealing ................................... 7.2a
foreign OOs .............................................. 1.4d
no low point on barogram ......................... 12.4
position recorder actions ............................ 6.1
presence at event ..................... 7.2, 12.1, 12.2
support by others ..................................... 10.2
training, control of ........................... 1.3a, 1.3b
P
penalty, height (1% rule) .................................. 2.2
pilot actions
declared task not flown .............................. 3.8
entering FR declaration ..................... 3.1b, 6.4
FR fix interval setting ................................. 6.6
notching the barograph ............................ 12.2
observation zone procedures .................... 3.6
pre-flight preparation ................................. 3.1
take-off and landing witness ...................... 8.1
position recorders
file format and testing ................................ 6.2
OO and pilot procedures............................ 6.1
paper or internet declaration ...............3.3b, 3.5
R
real time clock in FRs .................................. A5-1.2
records
flight procedures flowchart .......................... A3
free .......................................................... 3.10
more than one in a flight ............................ 3.6
national ...................................................... 1.7
release point start ............................................. 4.3
S
sampling rate, FRs ............................................ 6.6
sealing methods, FRs ................... 7.2a, 9.1, 11.1c
sector observation zone ............. 3.3f, 3.5, 4.2a, 8.2
soaring performances for given course ............. 3.6
Sporting Code, comments on ........................... 1.2
spurious fixes ................................................. 10.5c
starting
evidence .................................................... 4.1
examples ................................................... 4.3
options ....................................................... 4.2
T
task
abandonment or failure .............................. 3.8
more than one in a flight ............................ 3.7
pilot preparation ......................................... 3.1
turn point
3TP distance .............................................. 3.9
number of TPs allowed ............................ 3.11
V
validation of flight data files ............................. 6.3d
virtual finish ....................................................... 4.5
W
way point codes .............................................. 3.4d
witness of take-off or landing ............................ 8.1