Embed Size (px)
Citation preview
Section 1Building the Set
Ch001-K80806.qxd 7/5/2006 2:15 PM Page 1

Ch001-K80806.qxd 7/5/2006 2:15 PM Page 2
3
Chapter 1The Basic Scenic Building Blocks
Let’s face it. There are really only two basic scenic forms that all sets are made from:vertical and horizontal. Of the two most basic and familiar forms, we call the verticalones flats and the horizontal ones platforms. Any variation of shape, structure, or designdoes not alter the fact that we have to have something vaguely horizontal for peopleto stand on and something sort of vertical behind them to create a believable envi-ronment to tell our stories. Even if you were to find the perfect location with the rightsize and shape of interior and you put your talent in front of one of those perfect walls,for our purposes it’s just an overbuilt flat.
In this chapter we discuss flats, platforms, and drops and backings.
Flats
Why a Flat?Why do they call these things flats? No one really knows for sure. A wall is one of themost familiar objects that flats are meant to represent. Walls aren’t the only thing thatflats can represent, but for this discussion we’ll use them as an example.
Perhaps for this reason, flats are quite often rectangular or square, to imitate a wall’sshape. Flats also create the illusion of a wall’s solidity but use less structure, cost less,and take less time to build. To get a better understanding of how this is achieved, let’slook at a flat more closely.
Ch001-K80806.qxd 7/5/2006 2:15 PM Page 3
The main difference between a wall and a flat derives from our need to make scenerylighter and more portable than a wall.Walls are meant to be permanent.Walls are oftenbuilt where they are meant to stand. They get stored in the structure they are holdingupright, right where you left them last (if not, you may be in big trouble). Quite oftenthe scenery is built somewhere other than where the scenery is used; it gets stored untilit’s needed, it gets loaded, transported, and then set up in its final location.To do all thiswe don’t build flats the way a wall is built; their construction is more compact, or flat.
Hmm. . . . Could this reveal the name’s origin? But before we get ahead of ourselves,let’s look at the types of flats. Flats can be grouped in two different ways: by their cov-ering and by their structure. We’ll start with the type of covering.
Covering: Soft Versus Hard FlatsFlats can be covered in two ways, with a hard material and with a soft material. Thesetypes of flats are named by the type of covering, i.e., hard-cover flats or soft-cover flats.Soft-cover flats are the ones the average person is most familiar with. Hard-cover flatsare more of an industry specialty.
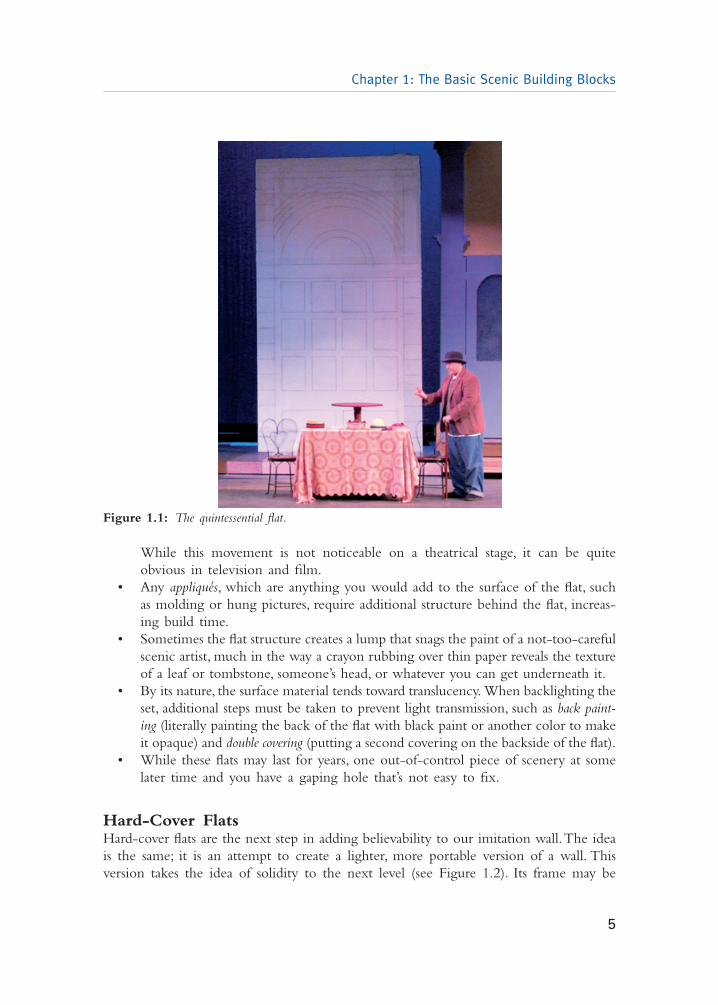
Soft-Cover FlatsWhether we’re talking about the type of flat you used in high school or the ones yousee on TV sitcoms when they go backstage, this type is pretty much thought of as thequintessential flat (see Figure 1.1). Its structure is not unlike that of an artist’s canvas, acloth covering stretched over a wooden frame.
Advantages of the Soft-Cover Flat
• It is light. It may look like a wall from the front, but the fabric covering addscomparatively little weight.
• Because of its weight, it can shift (move into place on stage) and be braced easily,making quick scene changes and setups possible.
• It is cheap. Depending on the type of covering, these flats are relatively inex-pensive to build and recover.
• Because the covering is similar to an artist’s canvas, it’s a medium that is easilypainted, allowing the scenic artist a variety of finishes.
• Because the covering is soft, it can be removed, stored, and restretched or replacedeasily, allowing the frame to be recycled.
Disadvantages of the Soft-Cover Flat
• Because of the soft covering, the flat works like a sail when air currents are dis-turbed nearby (e.g., someone walking behind it or slamming a door next to it).
Scenic Design and Lighting Techniques
4
Ch001-K80806.qxd 7/5/2006 2:15 PM Page 4
While this movement is not noticeable on a theatrical stage, it can be quiteobvious in television and film.
• Any appliqués, which are anything you would add to the surface of the flat, suchas molding or hung pictures, require additional structure behind the flat, increas-ing build time.
• Sometimes the flat structure creates a lump that snags the paint of a not-too-carefulscenic artist, much in the way a crayon rubbing over thin paper reveals the textureof a leaf or tombstone, someone’s head, or whatever you can get underneath it.
• By its nature, the surface material tends toward translucency. When backlighting theset, additional steps must be taken to prevent light transmission, such as back paint-ing (literally painting the back of the flat with black paint or another color to makeit opaque) and double covering (putting a second covering on the backside of the flat).
• While these flats may last for years, one out-of-control piece of scenery at somelater time and you have a gaping hole that’s not easy to fix.
Hard-Cover FlatsHard-cover flats are the next step in adding believability to our imitation wall.The ideais the same; it is an attempt to create a lighter, more portable version of a wall. Thisversion takes the idea of solidity to the next level (see Figure 1.2). Its frame may be
Chapter 1: The Basic Scenic Building Blocks
5
Figure 1.1: The quintessential flat.
Ch001-K80806.qxd 7/5/2006 2:15 PM Page 5
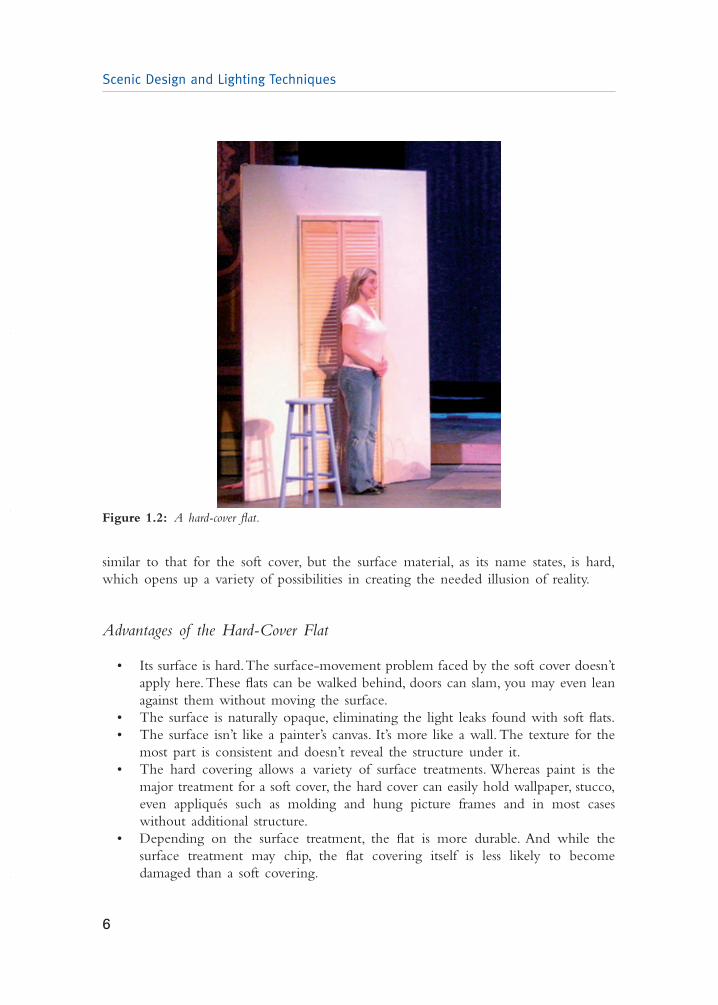
similar to that for the soft cover, but the surface material, as its name states, is hard,which opens up a variety of possibilities in creating the needed illusion of reality.
Advantages of the Hard-Cover Flat
• Its surface is hard.The surface-movement problem faced by the soft cover doesn’tapply here.These flats can be walked behind, doors can slam, you may even leanagainst them without moving the surface.
• The surface is naturally opaque, eliminating the light leaks found with soft flats.• The surface isn’t like a painter’s canvas. It’s more like a wall. The texture for the
most part is consistent and doesn’t reveal the structure under it.• The hard covering allows a variety of surface treatments. Whereas paint is the
major treatment for a soft cover, the hard cover can easily hold wallpaper, stucco,even appliqués such as molding and hung picture frames and in most caseswithout additional structure.
• Depending on the surface treatment, the flat is more durable. And while thesurface treatment may chip, the flat covering itself is less likely to becomedamaged than a soft covering.
Scenic Design and Lighting Techniques
6
Figure 1.2: A hard-cover flat.
Ch001-K80806.qxd 7/5/2006 2:15 PM Page 6
Disadvantages of the Hard-Cover Flat
• It is heavier. In a soft-cover flat, most of the weight is in its structure. In a hard-cover flat you may have the same structure, but the hard surface has added halfto twice the weight in some cases. The additional weight also makes the flatharder to shift and set up.
• It is more expensive. Depending on the type of covering, the surface materialsin a hard-cover flat are more prone to price increases.
• You can’t recover a hard-cover flat as easily as a soft-cover flat. It’s almost easierto make a new flat, especially if you’ve added a textured surface treatment suchas stucco.
Here is where the flat story can get a bit more complicated. As previously mentioned,there is an additional way to classify flats. This classification is according to the flat’sframe type. Let’s begin with that “quintessential flat” we spoke of earlier.
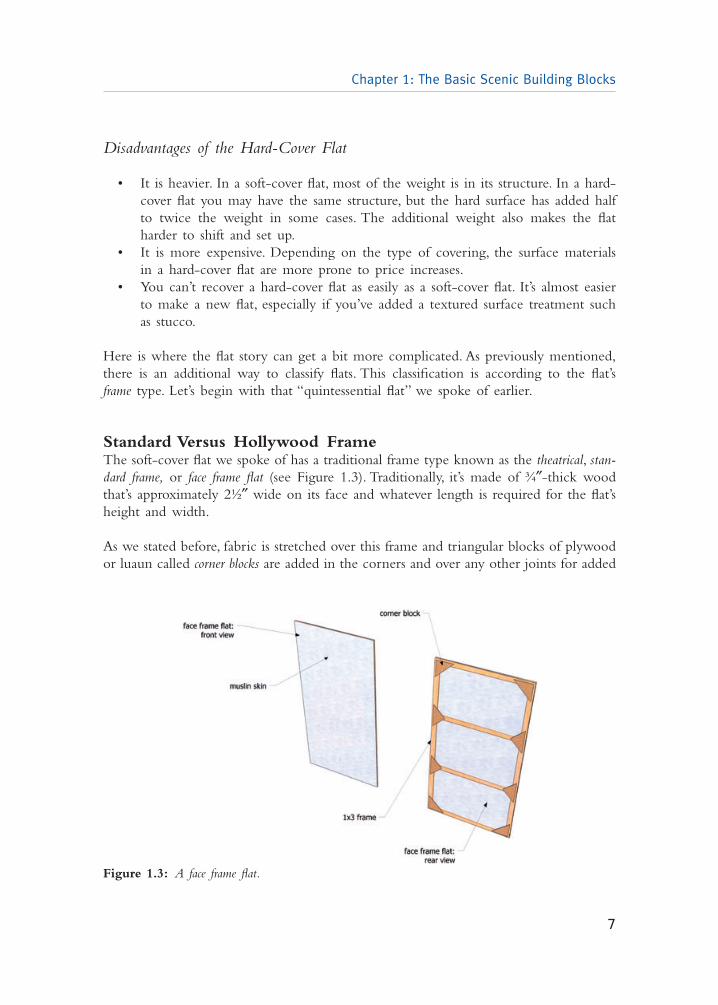
Standard Versus Hollywood FrameThe soft-cover flat we spoke of has a traditional frame type known as the theatrical, stan-dard frame, or face frame flat (see Figure 1.3). Traditionally, it’s made of ¾″-thick woodthat’s approximately 2½″ wide on its face and whatever length is required for the flat’sheight and width.
As we stated before, fabric is stretched over this frame and triangular blocks of plywoodor luaun called corner blocks are added in the corners and over any other joints for added
Chapter 1: The Basic Scenic Building Blocks
7
Figure 1.3: A face frame flat.
Ch001-K80806.qxd 7/5/2006 2:15 PM Page 7
rigidity. In this way the overall structure is approximately 1″ thick. However, and thisis where things get a little sticky, quite often this frame type is given a hard surface.Obviously doing this will increase the flat’s thickness by the thickness of the hard cover.As you may have guessed, we will call this type of flat a hard-cover standard flat.
Advantages of the Standard Frame
• It is thin. Even with a ¼″ hard cover increasing the flat’s thickness to approxi-mately l″, many flats can be stored back to back or face to face on edge in arelatively small space.
• Its thickness also makes it an ideal piece of scenery to fly, again allowing manypieces to be hung in a relatively small space.
• The thickness also allows it to be used in tighter spaces, even directly against astudio wall, without significantly reducing backstage passage.
Disadvantages of the Standard Frame
• It is thin. Even with a ¼″ hard cover increasing the flat’s thickness to approxi-mately 1¼″, it is nowhere near the thickness of a real wall. Additional pieces,called reveals, made of thin plywood or other materials must be added to createthe illusion of depth.
• It is thin. By its nature the frame, when standing upright, sits on only three-quarters of an inch of thickness at its base.This requires additional support, suchas stage braces, to keep the flat upright.The taller the flat, the more support needed.
• The thickness makes adding heavy door frames and window casements to theflats more difficult and often requires additional structure.
• The face frame structure requires additional support in the corners of the flat.As stated earlier we call these thin blocks of wood corner blocks. The mechanicaladvantage to using these relatively simple devices is great. Once added to a flatthey create resistance to the twisting of the joints, the place where structuralfailure is most likely. The trade-off is that the process of cutting corner blocksadds another step to the flat-making process. Similarly, fastening the corner blockadds yet another step.
Let’s Go to HollywoodThe other type of frame is alternately known as a studio or Hollywood flat frame (seeFigure 1.4). As you can guess, these flats are most widely used in the film and televi-sion industries. (Conversely, some people call standard flats Broadway flats. It makes senseif you realize that on Broadway, space is at a premium and quite often scenery is builtsomewhere else and transported on a truck to the theatre.)
Scenic Design and Lighting Techniques
8
Ch001-K80806.qxd 7/5/2006 2:15 PM Page 8
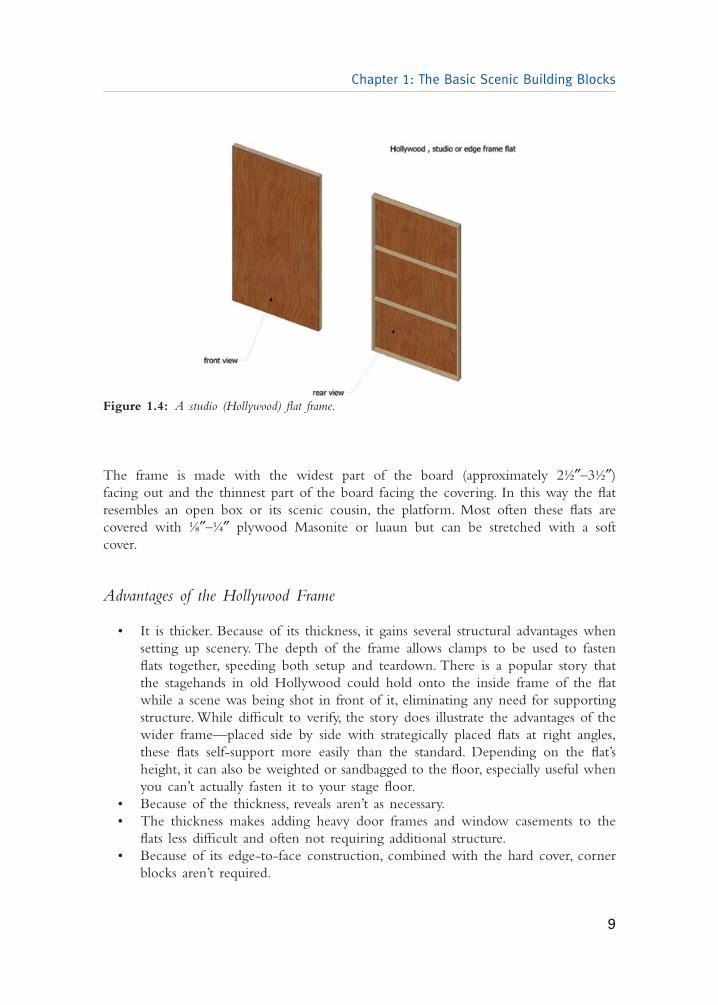
The frame is made with the widest part of the board (approximately 2½″–3½″) facing out and the thinnest part of the board facing the covering. In this way the flatresembles an open box or its scenic cousin, the platform. Most often these flats arecovered with ⅛″–¼″ plywood Masonite or luaun but can be stretched with a soft cover.
Advantages of the Hollywood Frame
• It is thicker. Because of its thickness, it gains several structural advantages whensetting up scenery. The depth of the frame allows clamps to be used to fastenflats together, speeding both setup and teardown. There is a popular story thatthe stagehands in old Hollywood could hold onto the inside frame of the flatwhile a scene was being shot in front of it, eliminating any need for supportingstructure. While difficult to verify, the story does illustrate the advantages of thewider frame—placed side by side with strategically placed flats at right angles,these flats self-support more easily than the standard. Depending on the flat’sheight, it can also be weighted or sandbagged to the floor, especially useful whenyou can’t actually fasten it to your stage floor.
• Because of the thickness, reveals aren’t as necessary.• The thickness makes adding heavy door frames and window casements to the
flats less difficult and often not requiring additional structure.• Because of its edge-to-face construction, combined with the hard cover, corner
blocks aren’t required.
Chapter 1: The Basic Scenic Building Blocks
9
Figure 1.4: A studio (Hollywood) flat frame.
Ch001-K80806.qxd 7/5/2006 2:15 PM Page 9
Disadvantages of the Hollywood Frame
• It is thicker. Because of its thickness it’s harder to store.Approximately three stan-dard flats on edge take up the same amount of space as one Hollywood-style flat.
• It is more expensive, since it takes more lumber to build. Because the boards inthe frame are assembled in an edge-to-face fashion, the lengths of lumber areslightly longer, and the hard covering, as we stated, increases the flat’s cost.
As you can see, the differences between the advantages and disadvantages of coveringand frame types aren’t that great. What it basically comes down to is your choicebetween the styles.We may think of one type of flat as the quintessential flat, but thereis no right or wrong choice between styles. How you use the flat, what kind of stageand storage space you have available, budget, and tools and skill levels available to youare all deciding factors that can help you make your choice.
Anatomy of a FlatNow let’s look at the parts of a flat.There are two basic sections to every flat: the frameand the covering. For ease of discussion we’ll again use the standard theatrical flat as ourexample.
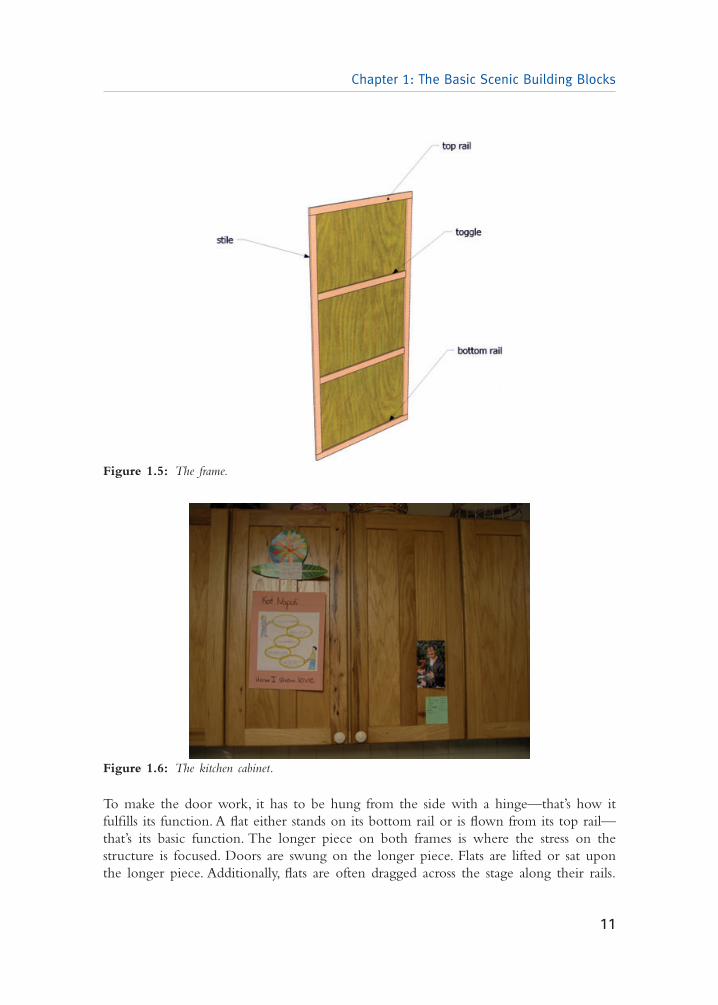
The frame is the skeleton of the flat (see Figure 1.5). The sturdiness of its structuredetermines how well it will hold whatever covering you choose. There are three mainparts of the flat’s frame: rails—the horizontal members at the top and bottom of theflat; stiles—the long vertical members that sit under the rails; and toggles—the horizon-tal members that sit between the stiles.
Flat Frame—RailsMost theatre terms seem strange; however, once you understand that the majority ofthe terms come from other professions, some of them start to make sense. If you lookat a text on making cabinets, you’ll find that the terms rails and stiles apply to roughlythe same corresponding pieces in your kitchen cabinet’s door. Rails are the pieces foundat the top and the bottom of the flat, and stiles are the vertical pieces. Each of thesepieces has a specific name:The rail on the top is the top rail, and the one on the bottomis the bottom rail. Occasionally, theatrical terms do make sense.
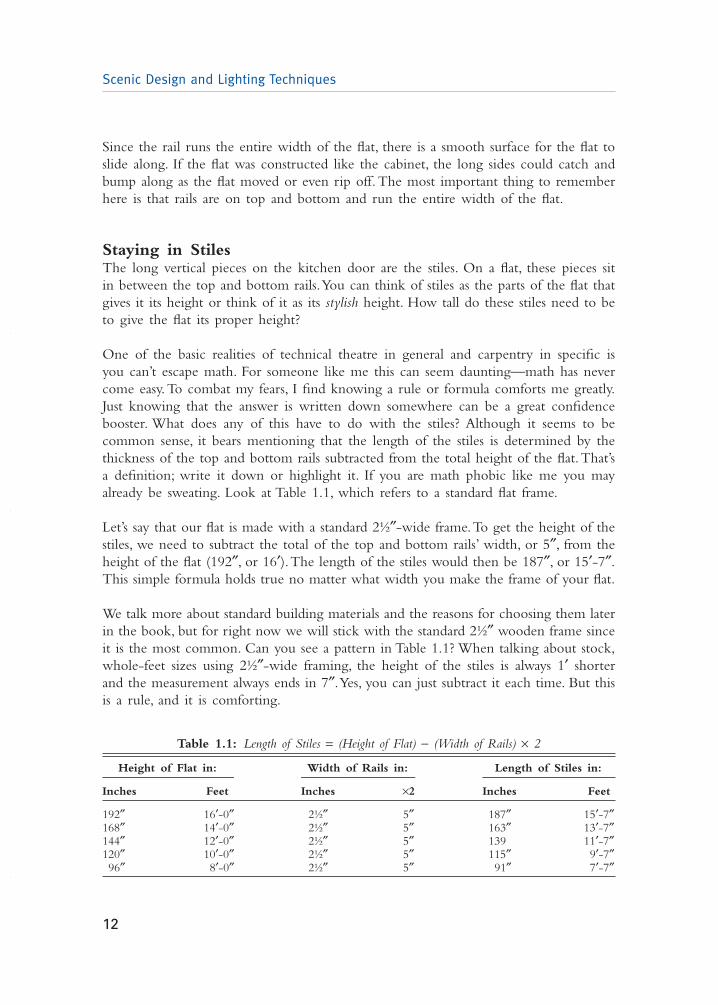
Think about your kitchen cabinet (see Figure 1.6). If you are a keen observer or arelooking at this picture, you will notice the difference between the flat and your cabinetdoor (clue: it’s not that the flat isn’t in your kitchen. I have often had flats in my kitchen).The rails on your cabinet door are inside the stiles. The rails on a flat run the entirewidth of the flat. What could the reason possibly be? Think again about that cabinetdoor (yes, I’m getting hungry too, but think about the door and not what’s inside it).
Scenic Design and Lighting Techniques
10
Ch001-K80806.qxd 7/5/2006 2:15 PM Page 10
Chapter 1: The Basic Scenic Building Blocks
11
Figure 1.5: The frame.
Figure 1.6: The kitchen cabinet.
To make the door work, it has to be hung from the side with a hinge—that’s how itfulfills its function. A flat either stands on its bottom rail or is flown from its top rail—that’s its basic function. The longer piece on both frames is where the stress on thestructure is focused. Doors are swung on the longer piece. Flats are lifted or sat uponthe longer piece. Additionally, flats are often dragged across the stage along their rails.
Ch001-K80806.qxd 7/5/2006 2:15 PM Page 11
Since the rail runs the entire width of the flat, there is a smooth surface for the flat toslide along. If the flat was constructed like the cabinet, the long sides could catch andbump along as the flat moved or even rip off. The most important thing to rememberhere is that rails are on top and bottom and run the entire width of the flat.
Staying in StilesThe long vertical pieces on the kitchen door are the stiles. On a flat, these pieces sitin between the top and bottom rails.You can think of stiles as the parts of the flat thatgives it its height or think of it as its stylish height. How tall do these stiles need to beto give the flat its proper height?
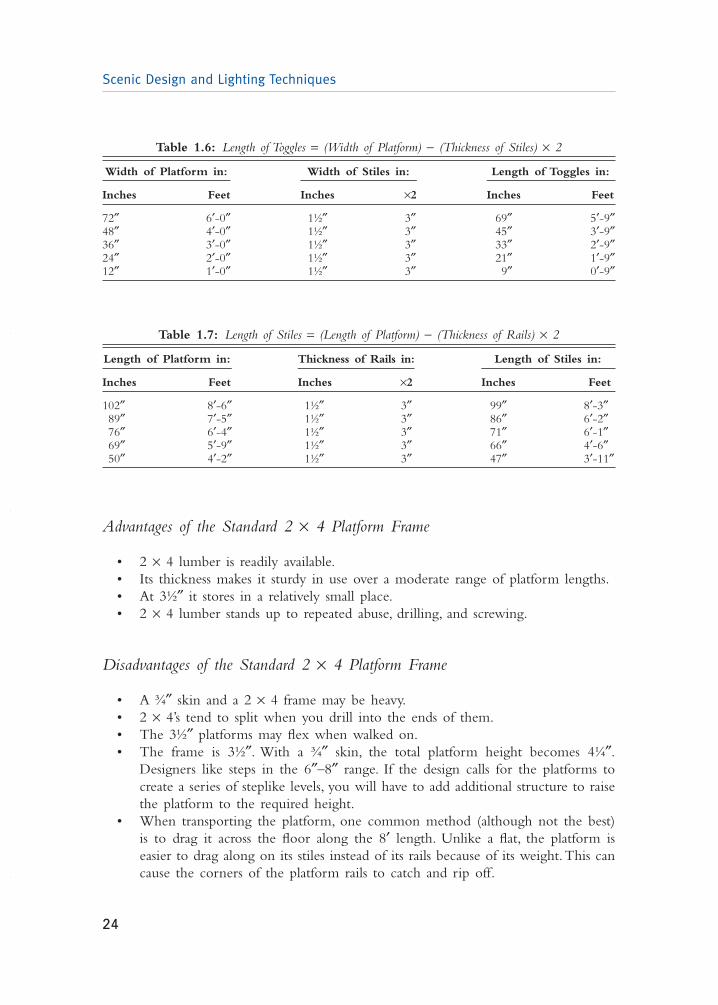
One of the basic realities of technical theatre in general and carpentry in specific isyou can’t escape math. For someone like me this can seem daunting—math has nevercome easy.To combat my fears, I find knowing a rule or formula comforts me greatly.Just knowing that the answer is written down somewhere can be a great confidencebooster. What does any of this have to do with the stiles? Although it seems to becommon sense, it bears mentioning that the length of the stiles is determined by thethickness of the top and bottom rails subtracted from the total height of the flat.That’sa definition; write it down or highlight it. If you are math phobic like me you mayalready be sweating. Look at Table 1.1, which refers to a standard flat frame.
Let’s say that our flat is made with a standard 2½″-wide frame.To get the height of thestiles, we need to subtract the total of the top and bottom rails’ width, or 5″, from theheight of the flat (192″, or 16′).The length of the stiles would then be 187″, or 15′-7″.This simple formula holds true no matter what width you make the frame of your flat.
We talk more about standard building materials and the reasons for choosing them laterin the book, but for right now we will stick with the standard 2½″ wooden frame sinceit is the most common. Can you see a pattern in Table 1.1? When talking about stock,whole-feet sizes using 2½″-wide framing, the height of the stiles is always 1′ shorterand the measurement always ends in 7″.Yes, you can just subtract it each time. But thisis a rule, and it is comforting.
Scenic Design and Lighting Techniques
12
Table 1.1: Length of Stiles = (Height of Flat) − (Width of Rails) × 2
Height of Flat in: Width of Rails in: Length of Stiles in:
Inches Feet Inches ×2 Inches Feet
192″ 16′-0″ 2½″ 5″ 187″ 15′-7″168″ 14′-0″ 2½″ 5″ 163″ 13′-7″144″ 12′-0″ 2½″ 5″ 139 11′-7″120″ 10′-0″ 2½″ 5″ 115″ 9′-7″96″ 8′-0″ 2½″ 5″ 91″ 7′-7″
Ch001-K80806.qxd 7/5/2006 2:15 PM Page 12
That helps us with the standard frame stiles. As you know, Hollywood is stylish too.Theformula for finding the height of stiles is still the same for a Hollywood flat, but therule is a little different. Take another look at the picture of the Hollywood flat (Figure1.4).You should see an obvious difference in the orientation of the framing members.For this example we are using the standard ¾″-thick rail we have shown in this illustration.
Now look at Table 1.2. This is basically the same thing, right? This time all you needto remember is that the measurement of the stiles is 1′ shorter and ends in 10½″.
Toggles Anyone?Toggles, as we stated before, are located between the stiles. These pieces are bestdescribed as the “spreader” of the flat. If you were to use a standard flat frame andstretch it with muslin, the frame itself would pull in along its sides like an hourglass asthe muslin shrinks. The toggles hold the rectangular shape of the flat against outsidestresses.
There is a similar formula for determining the length of a toggle in stock whole-feet-sized flats as for the length of the stiles. This time, substitute the width of the flat forthe height and the width of the stiles for the width of the rails (see Table 1.3).
Does Table 1.3 look familiar? How about Table 1.4? Again this formula can be appliedto any width of flat with any frame width.
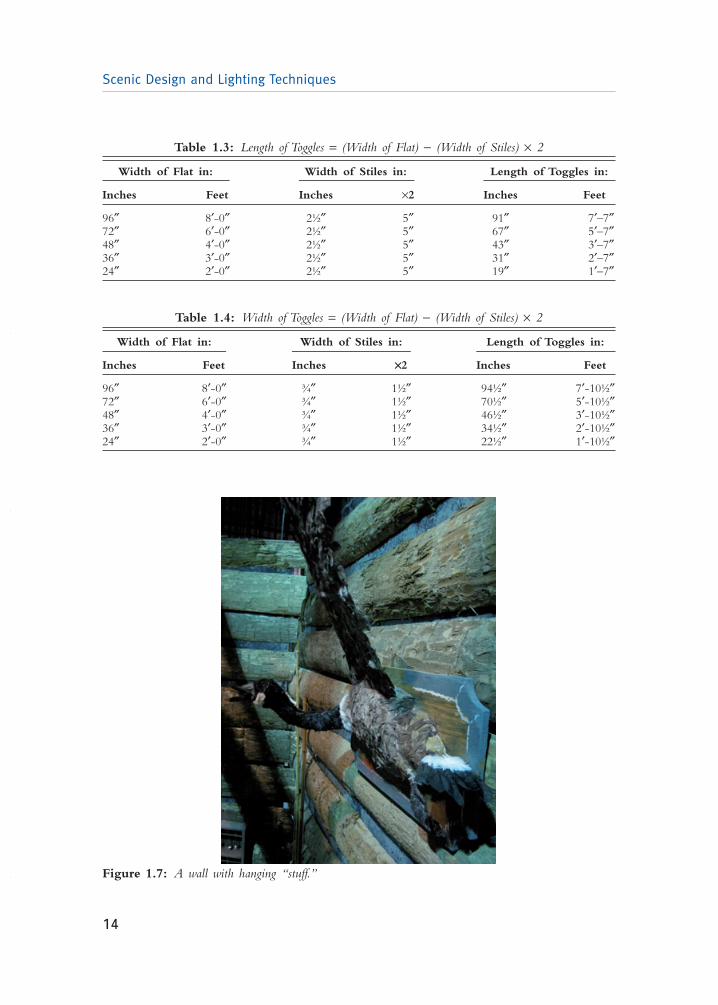
The toggle performs an additional function. The thing about walls is that when theyare in our homes we always want to stick stuff on them, like pictures, moldings, or lightfixtures, to make them look more interesting (see Figure 1.7). We’re sure you can see the difficulty in hanging a picture frame on a soft-covered flat. One alternative isto paint the decoration directly onto the surface of the flat. This approach can workwell if the style of the production is nonrealistic, but it isn’t appropriate for all productions.
Chapter 1: The Basic Scenic Building Blocks
13
Table 1.2: Length of Stiles = (Height of Flat) − (Width of Rails) × 2
Height of Flat in: Thickness of Rails in: Length of Stiles in:
Inches Feet Inches ×2 Inches Feet
192″ 16′-0″ ¾″ 1½″ 190-½″ 15′-10½″168″ 14′-0″ ¾″ 1½″ 166-½″ 13′-10½″144″ 12′-0″ ¾″ 1½″ 144-½″ 11′-10½″120″ 10′-0″ ¾″ 1½″ 118-½″ 9′-10½″96″ 8′-0″ ¾″ 1½″ 94-½″ 7′-10½″
Ch001-K80806.qxd 7/5/2006 2:15 PM Page 13
Scenic Design and Lighting Techniques
14
Table 1.3: Length of Toggles = (Width of Flat) − (Width of Stiles) × 2
Width of Flat in: Width of Stiles in: Length of Toggles in:
Inches Feet Inches ×2 Inches Feet
96″ 8′-0″ 2½″ 5″ 91″ 7′–7″72″ 6′-0″ 2½″ 5″ 67″ 5′–7″48″ 4′-0″ 2½″ 5″ 43″ 3′–7″36″ 3′-0″ 2½″ 5″ 31″ 2′–7″24″ 2′-0″ 2½″ 5″ 19″ 1′–7″
Figure 1.7: A wall with hanging “stuff.”
Table 1.4: Width of Toggles = (Width of Flat) − (Width of Stiles) × 2
Width of Flat in: Width of Stiles in: Length of Toggles in:
Inches Feet Inches ¥2 Inches Feet
96″ 8′-0″ ¾″ 1½″ 94½″ 7′-10½″72″ 6′-0″ ¾″ 1½″ 70½″ 5′-10½″48″ 4′-0″ ¾″ 1½″ 46½″ 3′-10½″36″ 3′-0″ ¾″ 1½″ 34½″ 2′-10½″24″ 2′-0″ ¾″ 1½″ 22½″ 1′-10½″
Ch001-K80806.qxd 7/5/2006 2:15 PM Page 14

When actual dimensional appliqués are required, the toggle supplies the additional struc-ture we need. Ideally, the designer has designated the locations of these appliqués sothat during the flat’s construction, toggles may be placed directly behind them. Togglesmay be retrofitted to an existing flat if necessary. Since they live between the stiles, it’sa simple matter to cut the toggle to fit and to corner-block it in.Well, at least it soundssimple.As we said before, ideally the designer knows where he or she wants the appliquébefore the construction period.
Along the same vein, a toggle provides a fastening surface when hard covering a flat.Plywood and other hard-covering materials generally come in 4′ × 8′ sheets. Unlessyou’re building a 4′ × 8′ flat there will be a seam where two sheets join. Unless backedand attached to a toggle, the seam will shift and flex as the flat is moved—potentiallyruining the surface treatment.
I’m Framed—Steel-Framed FlatsSteel flats are generally made from 1″ × 1″ 16-gauge mild steel box tube (see Figure 1.8).The term box tube may seem confusing. Because we generally use the term tube, wethink of an inner tube or some such donutlike shape or even a toilet paper tube shape.
Chapter 1: The Basic Scenic Building Blocks
15
Figure 1.8: A steel flat frame.
Ch001-K80806.qxd 7/5/2006 2:15 PM Page 15
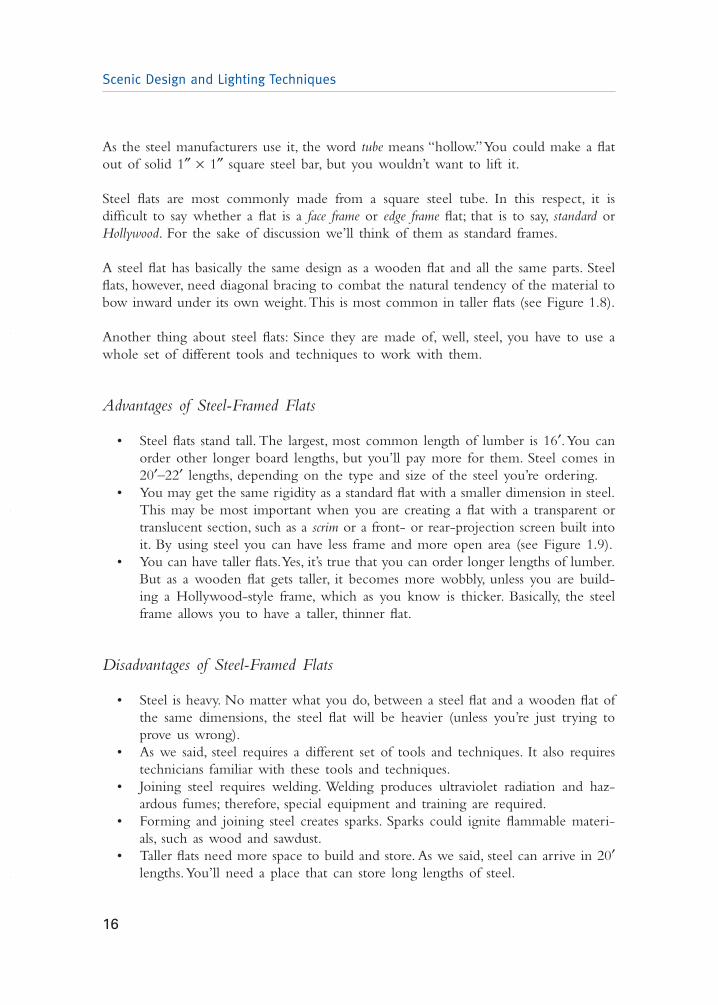
As the steel manufacturers use it, the word tube means “hollow.”You could make a flatout of solid 1″ × 1″ square steel bar, but you wouldn’t want to lift it.
Steel flats are most commonly made from a square steel tube. In this respect, it is difficult to say whether a flat is a face frame or edge frame flat; that is to say, standard orHollywood. For the sake of discussion we’ll think of them as standard frames.
A steel flat has basically the same design as a wooden flat and all the same parts. Steelflats, however, need diagonal bracing to combat the natural tendency of the material tobow inward under its own weight.This is most common in taller flats (see Figure 1.8).
Another thing about steel flats: Since they are made of, well, steel, you have to use awhole set of different tools and techniques to work with them.
Advantages of Steel-Framed Flats
• Steel flats stand tall. The largest, most common length of lumber is 16′.You canorder other longer board lengths, but you’ll pay more for them. Steel comes in20′–22′ lengths, depending on the type and size of the steel you’re ordering.
• You may get the same rigidity as a standard flat with a smaller dimension in steel.This may be most important when you are creating a flat with a transparent ortranslucent section, such as a scrim or a front- or rear-projection screen built intoit. By using steel you can have less frame and more open area (see Figure 1.9).
• You can have taller flats.Yes, it’s true that you can order longer lengths of lumber.But as a wooden flat gets taller, it becomes more wobbly, unless you are build-ing a Hollywood-style frame, which as you know is thicker. Basically, the steelframe allows you to have a taller, thinner flat.
Disadvantages of Steel-Framed Flats
• Steel is heavy. No matter what you do, between a steel flat and a wooden flat ofthe same dimensions, the steel flat will be heavier (unless you’re just trying toprove us wrong).
• As we said, steel requires a different set of tools and techniques. It also requirestechnicians familiar with these tools and techniques.
• Joining steel requires welding. Welding produces ultraviolet radiation and haz-ardous fumes; therefore, special equipment and training are required.
• Forming and joining steel creates sparks. Sparks could ignite flammable materi-als, such as wood and sawdust.
• Taller flats need more space to build and store. As we said, steel can arrive in 20′lengths.You’ll need a place that can store long lengths of steel.
Scenic Design and Lighting Techniques
16
Ch001-K80806.qxd 7/5/2006 2:15 PM Page 16
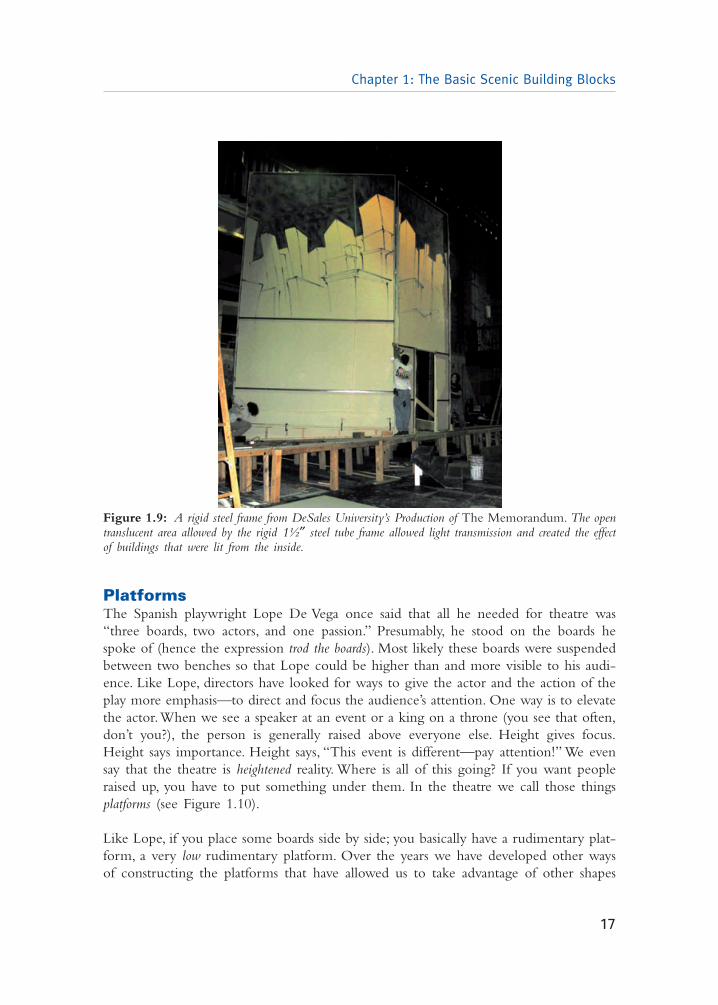
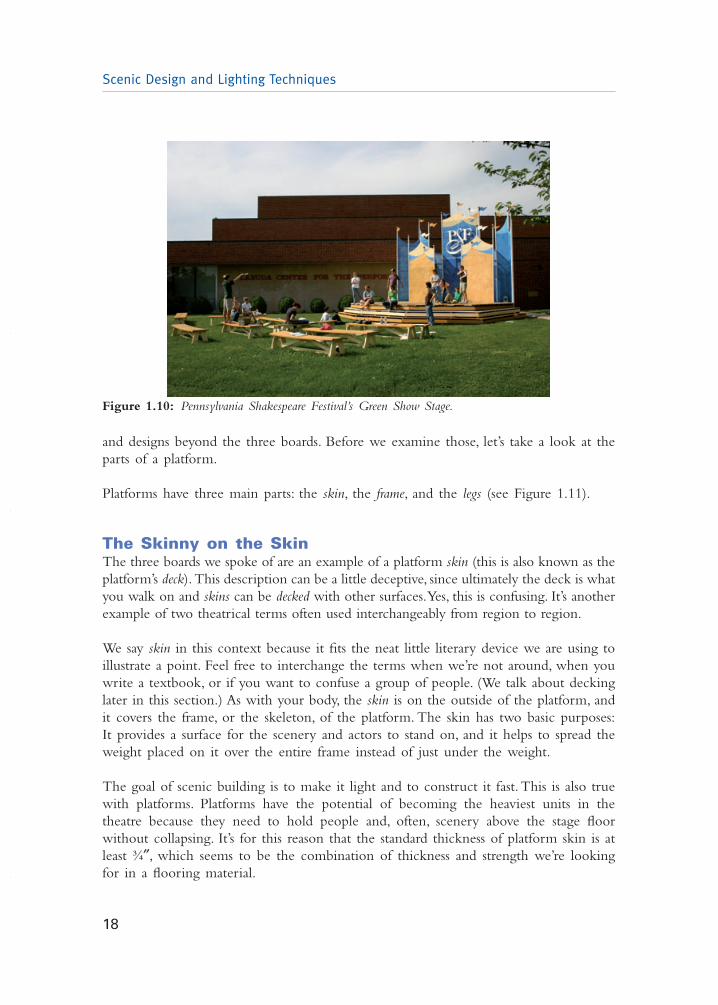
PlatformsThe Spanish playwright Lope De Vega once said that all he needed for theatre was“three boards, two actors, and one passion.” Presumably, he stood on the boards hespoke of (hence the expression trod the boards). Most likely these boards were suspendedbetween two benches so that Lope could be higher than and more visible to his audi-ence. Like Lope, directors have looked for ways to give the actor and the action of theplay more emphasis—to direct and focus the audience’s attention. One way is to elevatethe actor.When we see a speaker at an event or a king on a throne (you see that often,don’t you?), the person is generally raised above everyone else. Height gives focus.Height says importance. Height says, “This event is different—pay attention!” We evensay that the theatre is heightened reality. Where is all of this going? If you want peopleraised up, you have to put something under them. In the theatre we call those thingsplatforms (see Figure 1.10).
Like Lope, if you place some boards side by side; you basically have a rudimentary plat-form, a very low rudimentary platform. Over the years we have developed other waysof constructing the platforms that have allowed us to take advantage of other shapes
Chapter 1: The Basic Scenic Building Blocks
17
Figure 1.9: A rigid steel frame from DeSales University’s Production of The Memorandum. The opentranslucent area allowed by the rigid 1½″ steel tube frame allowed light transmission and created the effectof buildings that were lit from the inside.
Ch001-K80806.qxd 7/5/2006 2:15 PM Page 17
Scenic Design and Lighting Techniques
18
Figure 1.10: Pennsylvania Shakespeare Festival’s Green Show Stage.
and designs beyond the three boards. Before we examine those, let’s take a look at theparts of a platform.
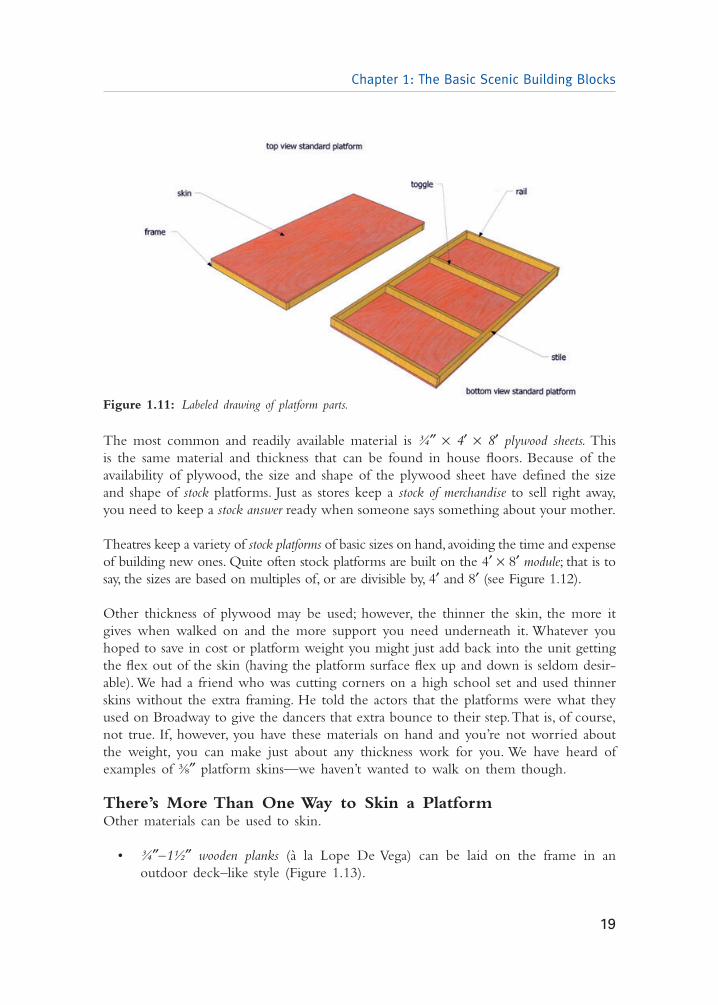
Platforms have three main parts: the skin, the frame, and the legs (see Figure 1.11).
The Skinny on the SkinThe three boards we spoke of are an example of a platform skin (this is also known as theplatform’s deck).This description can be a little deceptive, since ultimately the deck is whatyou walk on and skins can be decked with other surfaces.Yes, this is confusing. It’s anotherexample of two theatrical terms often used interchangeably from region to region.
We say skin in this context because it fits the neat little literary device we are using toillustrate a point. Feel free to interchange the terms when we’re not around, when youwrite a textbook, or if you want to confuse a group of people. (We talk about deckinglater in this section.) As with your body, the skin is on the outside of the platform, andit covers the frame, or the skeleton, of the platform. The skin has two basic purposes:It provides a surface for the scenery and actors to stand on, and it helps to spread theweight placed on it over the entire frame instead of just under the weight.
The goal of scenic building is to make it light and to construct it fast.This is also truewith platforms. Platforms have the potential of becoming the heaviest units in thetheatre because they need to hold people and, often, scenery above the stage floorwithout collapsing. It’s for this reason that the standard thickness of platform skin is atleast ¾″, which seems to be the combination of thickness and strength we’re lookingfor in a flooring material.
Ch001-K80806.qxd 7/5/2006 2:15 PM Page 18
The most common and readily available material is ¾″ × 4′ × 8′ plywood sheets. Thisis the same material and thickness that can be found in house floors. Because of theavailability of plywood, the size and shape of the plywood sheet have defined the sizeand shape of stock platforms. Just as stores keep a stock of merchandise to sell right away,you need to keep a stock answer ready when someone says something about your mother.
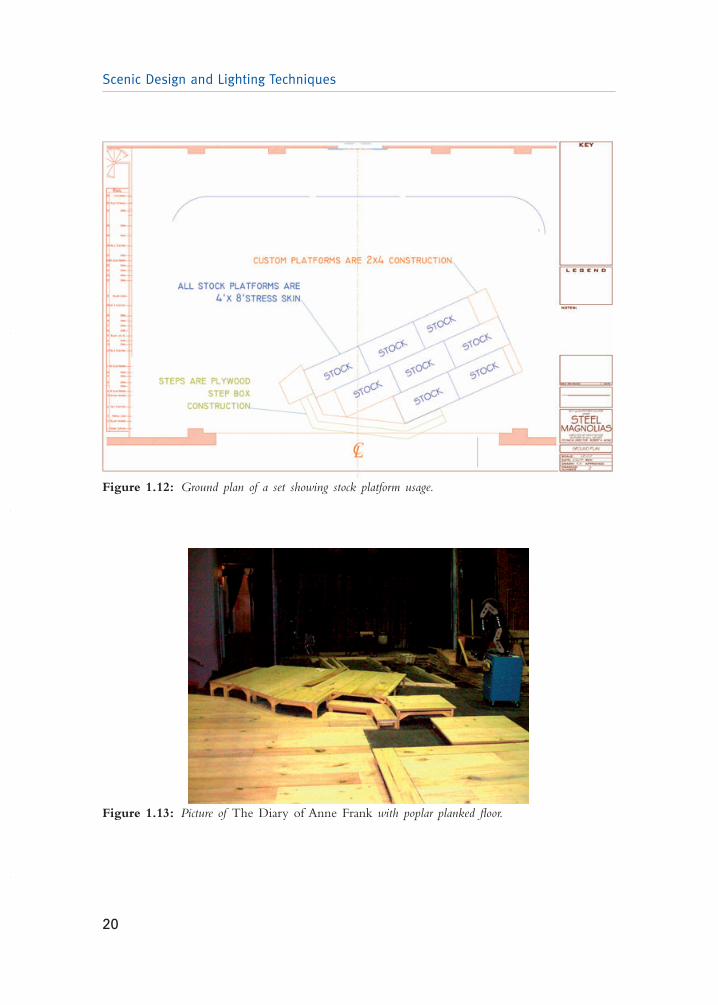
Theatres keep a variety of stock platforms of basic sizes on hand, avoiding the time and expenseof building new ones. Quite often stock platforms are built on the 4′ × 8′ module; that is tosay, the sizes are based on multiples of, or are divisible by, 4′ and 8′ (see Figure 1.12).
Other thickness of plywood may be used; however, the thinner the skin, the more itgives when walked on and the more support you need underneath it. Whatever youhoped to save in cost or platform weight you might just add back into the unit gettingthe flex out of the skin (having the platform surface flex up and down is seldom desir-able). We had a friend who was cutting corners on a high school set and used thinnerskins without the extra framing. He told the actors that the platforms were what theyused on Broadway to give the dancers that extra bounce to their step.That is, of course,not true. If, however, you have these materials on hand and you’re not worried aboutthe weight, you can make just about any thickness work for you. We have heard ofexamples of ⅜″ platform skins—we haven’t wanted to walk on them though.
There’s More Than One Way to Skin a PlatformOther materials can be used to skin.
• ¾″–1½″ wooden planks (à la Lope De Vega) can be laid on the frame in anoutdoor deck–like style (Figure 1.13).
Chapter 1: The Basic Scenic Building Blocks
19
Figure 1.11: Labeled drawing of platform parts.
Ch001-K80806.qxd 7/5/2006 2:15 PM Page 19
Scenic Design and Lighting Techniques
20
Figure 1.13: Picture of The Diary of Anne Frank with poplar planked floor.
Figure 1.12: Ground plan of a set showing stock platform usage.
Ch001-K80806.qxd 7/5/2006 2:15 PM Page 20
• In the same way, tongue-and-groove planks may be laid like a traditional hardwoodfloor.
• As a response to increased materials cost there is a movement now toward cheapercomposite/recycled wooden materials, such as OSB (oriented strand board) andMDF (medium-density fiberboard).We’ll discuss the properties of these when weget to building materials.
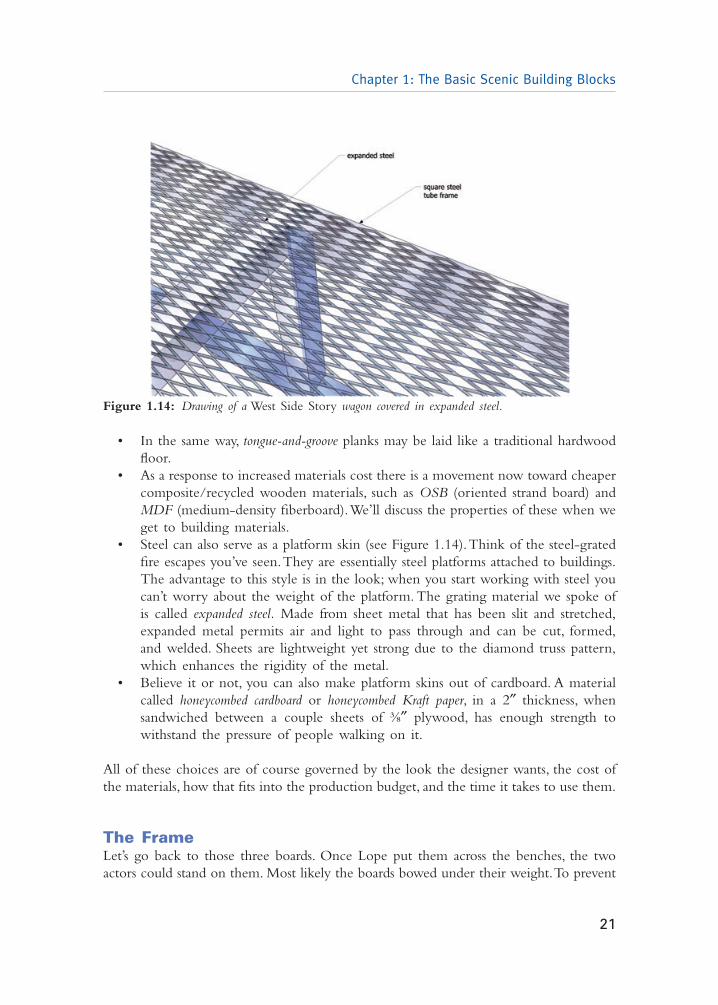
• Steel can also serve as a platform skin (see Figure 1.14).Think of the steel-gratedfire escapes you’ve seen.They are essentially steel platforms attached to buildings.The advantage to this style is in the look; when you start working with steel youcan’t worry about the weight of the platform. The grating material we spoke ofis called expanded steel. Made from sheet metal that has been slit and stretched,expanded metal permits air and light to pass through and can be cut, formed,and welded. Sheets are lightweight yet strong due to the diamond truss pattern,which enhances the rigidity of the metal.
• Believe it or not, you can also make platform skins out of cardboard. A materialcalled honeycombed cardboard or honeycombed Kraft paper, in a 2″ thickness, whensandwiched between a couple sheets of ⅜″ plywood, has enough strength towithstand the pressure of people walking on it.
All of these choices are of course governed by the look the designer wants, the cost ofthe materials, how that fits into the production budget, and the time it takes to use them.
The FrameLet’s go back to those three boards. Once Lope put them across the benches, the twoactors could stand on them. Most likely the boards bowed under their weight.To prevent
Chapter 1: The Basic Scenic Building Blocks
21
Figure 1.14: Drawing of a West Side Story wagon covered in expanded steel.
Ch001-K80806.qxd 7/5/2006 2:15 PM Page 21
this from happening, Lope’s carpenter would have had to put a frame under the boards.The frame, as we said, is the skeleton of the platform. It rests under the skin and supportsthe weight of the actor, scenery, etc. To prevent the platform from bowing under thisweight, several different frame styles have been devised, constructed primarily from woodand metal. All of the styles have the same basic parts in common.We start by looking atthese parts and then examine how their assembly adds strength in the different styles.
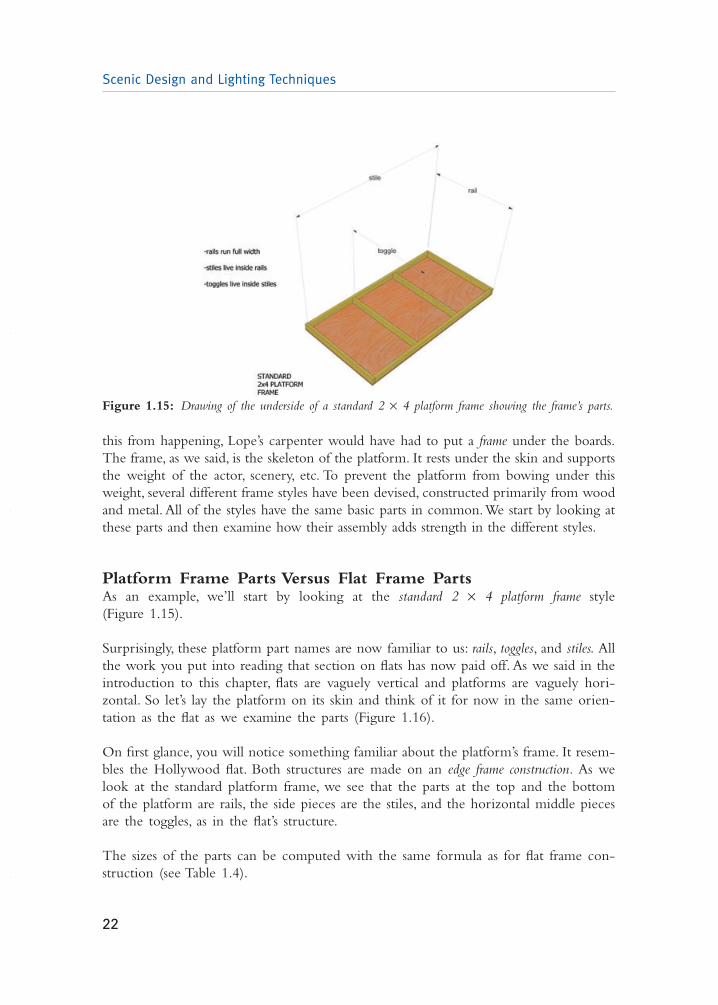
Platform Frame Parts Versus Flat Frame PartsAs an example, we’ll start by looking at the standard 2 × 4 platform frame style (Figure 1.15).
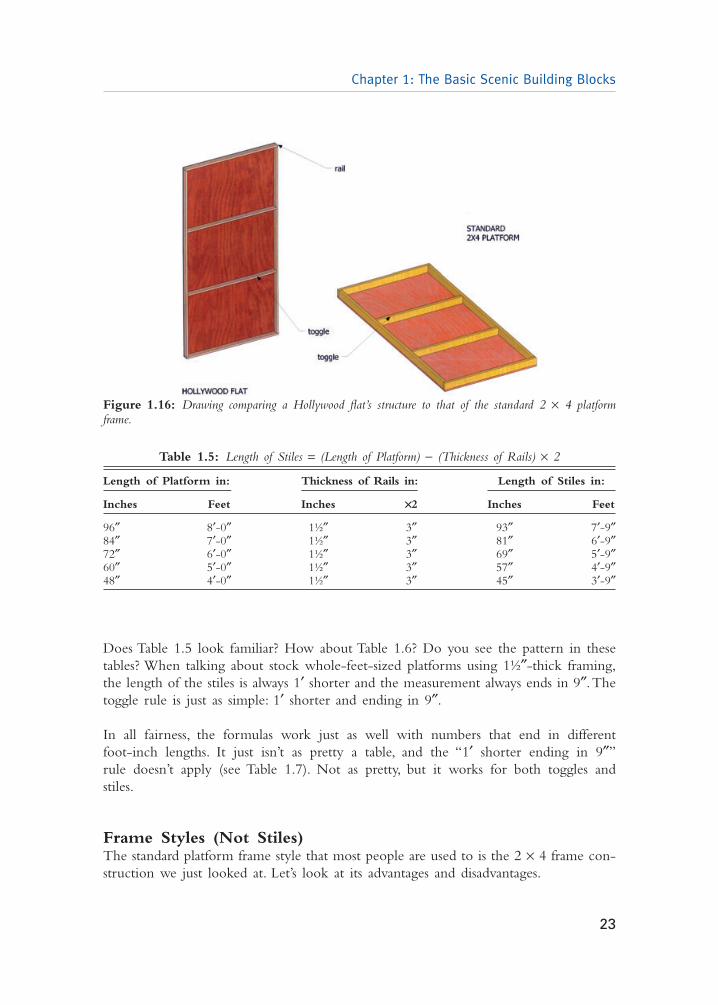
Surprisingly, these platform part names are now familiar to us: rails, toggles, and stiles. Allthe work you put into reading that section on flats has now paid off. As we said in theintroduction to this chapter, flats are vaguely vertical and platforms are vaguely hori-zontal. So let’s lay the platform on its skin and think of it for now in the same orien-tation as the flat as we examine the parts (Figure 1.16).
On first glance, you will notice something familiar about the platform’s frame. It resem-bles the Hollywood flat. Both structures are made on an edge frame construction. As welook at the standard platform frame, we see that the parts at the top and the bottomof the platform are rails, the side pieces are the stiles, and the horizontal middle piecesare the toggles, as in the flat’s structure.
The sizes of the parts can be computed with the same formula as for flat frame con-struction (see Table 1.4).
Scenic Design and Lighting Techniques
22
Figure 1.15: Drawing of the underside of a standard 2 × 4 platform frame showing the frame’s parts.
Ch001-K80806.qxd 7/5/2006 2:16 PM Page 22
Chapter 1: The Basic Scenic Building Blocks
23
Figure 1.16: Drawing comparing a Hollywood flat’s structure to that of the standard 2 × 4 platformframe.
Table 1.5: Length of Stiles = (Length of Platform) − (Thickness of Rails) × 2
Length of Platform in: Thickness of Rails in: Length of Stiles in:
Inches Feet Inches ¥2 Inches Feet
96″ 8′-0″ 1½″ 3″ 93″ 7′-9″84″ 7′-0″ 1½″ 3″ 81″ 6′-9″72″ 6′-0″ 1½″ 3″ 69″ 5′-9″60″ 5′-0″ 1½″ 3″ 57″ 4′-9″48″ 4′-0″ 1½″ 3″ 45″ 3′-9″
Does Table 1.5 look familiar? How about Table 1.6? Do you see the pattern in thesetables? When talking about stock whole-feet-sized platforms using 1½″-thick framing,the length of the stiles is always 1′ shorter and the measurement always ends in 9″.Thetoggle rule is just as simple: 1′ shorter and ending in 9″.
In all fairness, the formulas work just as well with numbers that end in different foot-inch lengths. It just isn’t as pretty a table, and the “1′ shorter ending in 9″”rule doesn’t apply (see Table 1.7). Not as pretty, but it works for both toggles and stiles.
Frame Styles (Not Stiles)The standard platform frame style that most people are used to is the 2 × 4 frame con-struction we just looked at. Let’s look at its advantages and disadvantages.
Ch001-K80806.qxd 7/5/2006 2:16 PM Page 23
Advantages of the Standard 2 × 4 Platform Frame
• 2 × 4 lumber is readily available.• Its thickness makes it sturdy in use over a moderate range of platform lengths.• At 3½″ it stores in a relatively small place.• 2 × 4 lumber stands up to repeated abuse, drilling, and screwing.
Disadvantages of the Standard 2 × 4 Platform Frame
• A ¾″ skin and a 2 × 4 frame may be heavy.• 2 × 4’s tend to split when you drill into the ends of them.• The 3½″ platforms may flex when walked on.• The frame is 3½″. With a ¾″ skin, the total platform height becomes 4¼″.
Designers like steps in the 6″–8″ range. If the design calls for the platforms tocreate a series of steplike levels, you will have to add additional structure to raisethe platform to the required height.
• When transporting the platform, one common method (although not the best)is to drag it across the floor along the 8′ length. Unlike a flat, the platform iseasier to drag along on its stiles instead of its rails because of its weight.This cancause the corners of the platform rails to catch and rip off.
Scenic Design and Lighting Techniques
24
Table 1.6: Length of Toggles = (Width of Platform) − (Thickness of Stiles) × 2
Width of Platform in: Width of Stiles in: Length of Toggles in:
Inches Feet Inches ×2 Inches Feet
72″ 6′-0″ 1½″ 3″ 69″ 5′-9″48″ 4′-0″ 1½″ 3″ 45″ 3′-9″36″ 3′-0″ 1½″ 3″ 33″ 2′-9″24″ 2′-0″ 1½″ 3″ 21″ 1′-9″12″ 1′-0″ 1½″ 3″ 9″ 0′-9″
Table 1.7: Length of Stiles = (Length of Platform) − (Thickness of Rails) × 2
Length of Platform in: Thickness of Rails in: Length of Stiles in:
Inches Feet Inches ×2 Inches Feet
102″ 8′-6″ 1½″ 3″ 99″ 8′-3″89″ 7′-5″ 1½″ 3″ 86″ 6′-2″76″ 6′-4″ 1½″ 3″ 71″ 6′-1″69″ 5′-9″ 1½″ 3″ 66″ 4′-6″50″ 4′-2″ 1½″ 3″ 47″ 3′-11″
Ch001-K80806.qxd 7/5/2006 2:16 PM Page 24
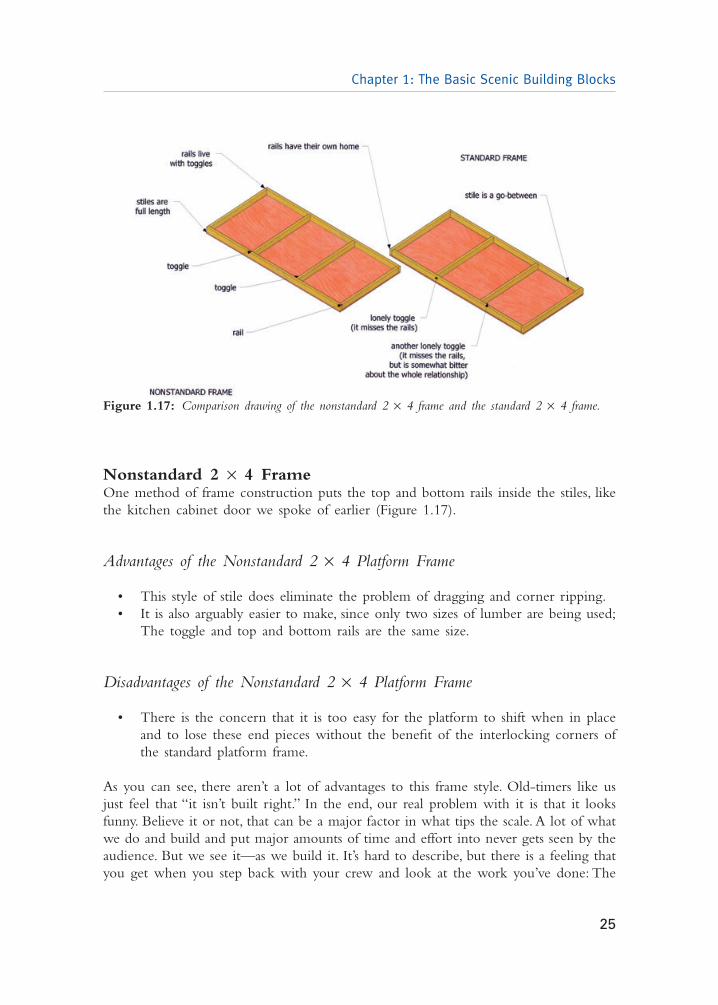
Nonstandard 2 × 4 FrameOne method of frame construction puts the top and bottom rails inside the stiles, likethe kitchen cabinet door we spoke of earlier (Figure 1.17).
Advantages of the Nonstandard 2 × 4 Platform Frame
• This style of stile does eliminate the problem of dragging and corner ripping.• It is also arguably easier to make, since only two sizes of lumber are being used;
The toggle and top and bottom rails are the same size.
Disadvantages of the Nonstandard 2 × 4 Platform Frame
• There is the concern that it is too easy for the platform to shift when in placeand to lose these end pieces without the benefit of the interlocking corners ofthe standard platform frame.
As you can see, there aren’t a lot of advantages to this frame style. Old-timers like usjust feel that “it isn’t built right.” In the end, our real problem with it is that it looksfunny. Believe it or not, that can be a major factor in what tips the scale. A lot of whatwe do and build and put major amounts of time and effort into never gets seen by theaudience. But we see it—as we build it. It’s hard to describe, but there is a feeling thatyou get when you step back with your crew and look at the work you’ve done: The
Chapter 1: The Basic Scenic Building Blocks
25
Figure 1.17: Comparison drawing of the nonstandard 2 × 4 frame and the standard 2 × 4 frame.
Ch001-K80806.qxd 7/5/2006 2:16 PM Page 25
well-placed toggles set in even rows, the evenly braced platform legs, the carefully cabledelectric, things you’ve taken the time and effort to do the right way because it’s theright way to do it. It’s one of the things that adds a professional quality to your work,whether the audience sees it or not.
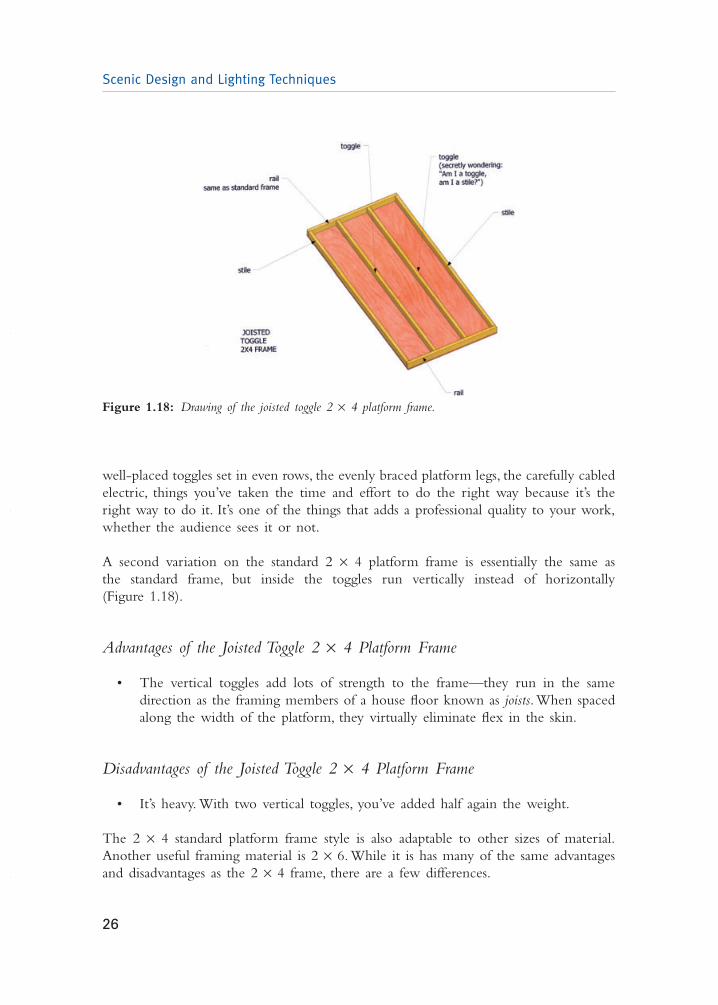
A second variation on the standard 2 × 4 platform frame is essentially the same as the standard frame, but inside the toggles run vertically instead of horizontally (Figure 1.18).
Advantages of the Joisted Toggle 2 × 4 Platform Frame
• The vertical toggles add lots of strength to the frame—they run in the samedirection as the framing members of a house floor known as joists.When spacedalong the width of the platform, they virtually eliminate flex in the skin.
Disadvantages of the Joisted Toggle 2 × 4 Platform Frame
• It’s heavy. With two vertical toggles, you’ve added half again the weight.
The 2 × 4 standard platform frame style is also adaptable to other sizes of material.Another useful framing material is 2 × 6. While it is has many of the same advantagesand disadvantages as the 2 × 4 frame, there are a few differences.
Scenic Design and Lighting Techniques
26
Figure 1.18: Drawing of the joisted toggle 2 × 4 platform frame.
Ch001-K80806.qxd 7/5/2006 2:16 PM Page 26
Advantages of the Standard 2 × 6 Platform Frame
• The 2 × 6 is also a readily available material.• The added 2″ difference allows longer platform lengths without flexing.• It stands up better to the repeated drilling and screwing and is generally more
durable.• The finished thickness of the platform and skin is 6¼″, which is in the step range
most designers look for.• It gives you more room to work with underneath.
Disadvantages of the Standard 2 × 6 Platform Frame
• It’s more expensive than 2 × 4.• It’s heavy.The extra 2″ doesn’t sound like much, but applied around the perime-
ter of the frame it can add just under twice the weight.
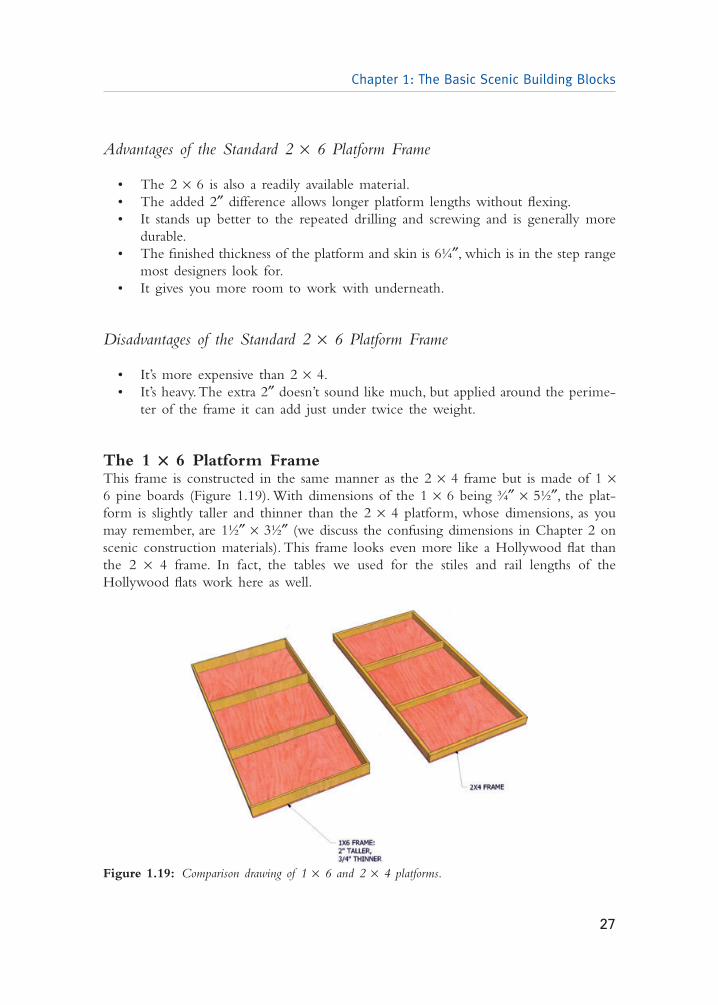
The 1 ¥ 6 Platform FrameThis frame is constructed in the same manner as the 2 × 4 frame but is made of 1 ×6 pine boards (Figure 1.19). With dimensions of the 1 × 6 being ¾″ × 5½″, the plat-form is slightly taller and thinner than the 2 × 4 platform, whose dimensions, as youmay remember, are 1½″ × 3½″ (we discuss the confusing dimensions in Chapter 2 onscenic construction materials). This frame looks even more like a Hollywood flat thanthe 2 × 4 frame. In fact, the tables we used for the stiles and rail lengths of the Hollywood flats work here as well.
Chapter 1: The Basic Scenic Building Blocks
27
Figure 1.19: Comparison drawing of 1 × 6 and 2 × 4 platforms.
Ch001-K80806.qxd 7/5/2006 2:16 PM Page 27
Advantages of the Standard 1 × 6 Platform Frame
• It is very light as compared to the 2 × 4 frame or its dimensional cousin, the 2 × 6 frame.
• Like the 2 × 6 frame, it may resist flexing better than a 2 × 4 frame.• Its total height—frame and skin—falls into a natural step height of 6¼″. In fact,
the 1 × 6 material may more easily be ripped down than 1½″ material to a widthof 5¼″, giving the platform a finished height of 6″.
Disadvantages of the Standard 1 × 6 Platform Frame
• While with care these platforms can last a long time, the reality is that mostpeople don’t take a lot of care with big or heavy things. The mentality is some-thing like this: “If it’s this heavy, then it can take care of itself—I’m outta here!” andthey slam it into a corner when the TD (technical director) has his or her backturned. The frame supports the platform well and is just as thick as it needs tobe for that purpose, but it doesn’t take the abuse a 2 × 4 frame can.
• The 1 × material needs to be chosen carefully to avoid large knots. Knots inlumber provide weak spots that can easily crack and split. While it’s true that 2× 4 materials are prone to knots as well, structurally you don’t have the sameproblem with them as you do with 1 × because of the additional ¾″ thickness.
All in all this is a good platform frame style. Next to the 2 × 4 frame this would bethe most widely used style, since, as we said, the goal of theatrical scenery is to bestrong and light and quickly constructed.
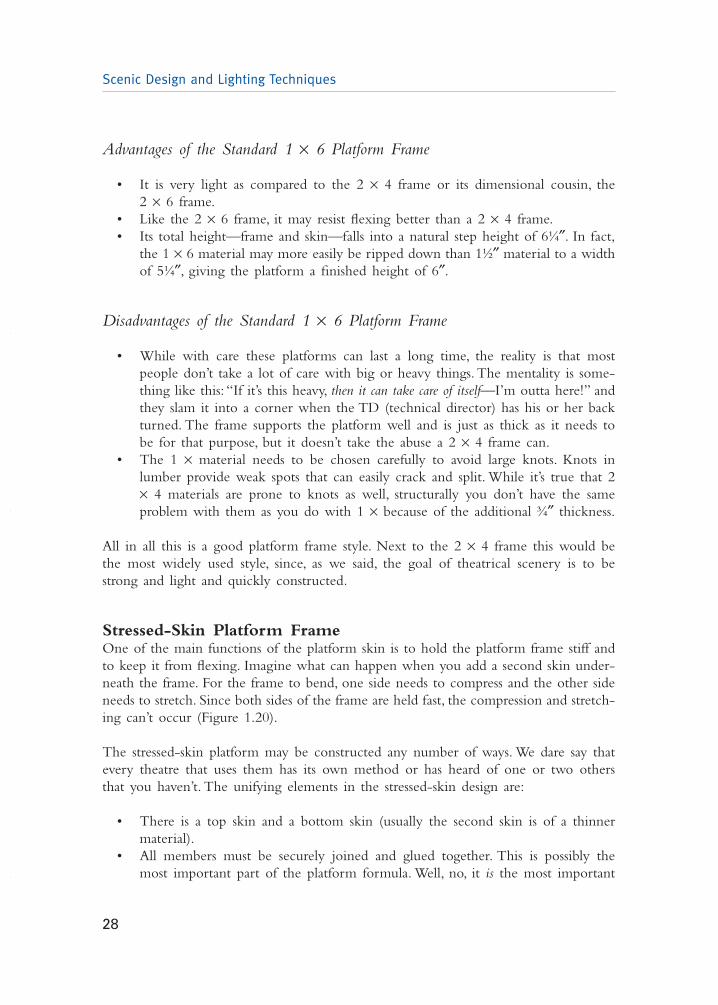
Stressed-Skin Platform FrameOne of the main functions of the platform skin is to hold the platform frame stiff andto keep it from flexing. Imagine what can happen when you add a second skin under-neath the frame. For the frame to bend, one side needs to compress and the other sideneeds to stretch. Since both sides of the frame are held fast, the compression and stretch-ing can’t occur (Figure 1.20).
The stressed-skin platform may be constructed any number of ways. We dare say thatevery theatre that uses them has its own method or has heard of one or two othersthat you haven’t. The unifying elements in the stressed-skin design are:
• There is a top skin and a bottom skin (usually the second skin is of a thinnermaterial).
• All members must be securely joined and glued together. This is possibly themost important part of the platform formula. Well, no, it is the most important
Scenic Design and Lighting Techniques
28
Ch001-K80806.qxd 7/5/2006 2:16 PM Page 28
part. Everyone says so.Well, almost everyone. Some people weren’t home and wehad to leave messages. But they’ll get back to us soon, and we both can guesswhat their answer will be.
Advantages of the Stressed-Skin Platform Frame
• The span of the platform may be greater while retaining a thin profile.• The underside of the platform is covered, which may be helpful if it’s visible to
the audience.• It takes up less room when stored.
Disadvantages of the Stressed-Skin Platform Frame
• Depending on its construction, it may be heavy. Adding a second skin, even athinner one, may add weight.
• You can’t get inside it. If you need to run wiring, plumbing, or flagpoles throughthe platform, it is more difficult to fish through two layers of skin.
• Legging is more difficult. Since the frame isn’t exposed, bolting the legs onbecomes impossible using conventional hardware.
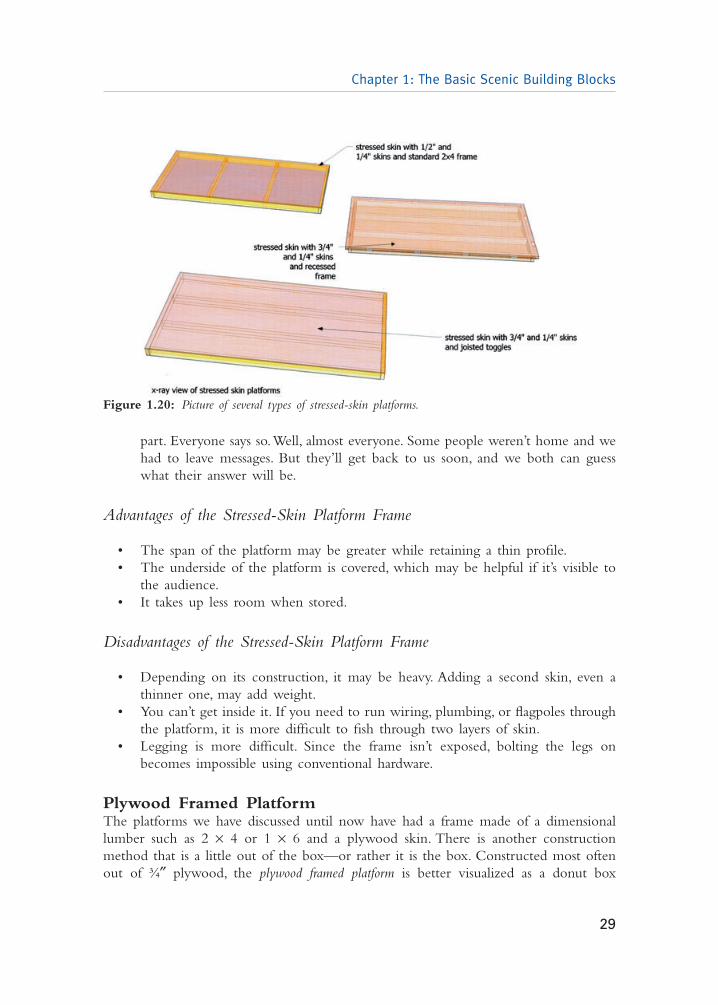
Plywood Framed PlatformThe platforms we have discussed until now have had a frame made of a dimensionallumber such as 2 × 4 or 1 × 6 and a plywood skin. There is another constructionmethod that is a little out of the box—or rather it is the box. Constructed most oftenout of ¾″ plywood, the plywood framed platform is better visualized as a donut box
Chapter 1: The Basic Scenic Building Blocks
29
Figure 1.20: Picture of several types of stressed-skin platforms.
Ch001-K80806.qxd 7/5/2006 2:16 PM Page 29
without a bottom (Figure 1.21).The sides of the box actually create the structure wherethe rails and stiles would normally be, similar to a 1 × 6 platform. Unlike a 1 × 6 plat-form, the sides extend all the way to the stage floor, the platform beneath them, orwhatever surface you are elevating away from; in effect becoming the platform’s legs.Toggles, placed in the same 2′ × 4′ spacing as on more conventional styles, also run tothe floor and may create additional legging for the platform.
Advantages of the Plywood Framed Platform
• The platform construction is fairly quick and simple; you’re basically making abox out of plywood.
• The style of the platform lends itself very nicely to step boxes: platforms 6–8″ ×10–12″ wide that can act as transitional steps between levels of platforms. Thiseliminates the need to work with tiny pieces of dimensional lumber, which couldsplit and crack whenever you put a fastener into them.
• Additionally, stair landings work nicely when made via this method. If the side ofthe platform facing the audience looks good enough, you won’t have to add addi-tional lumber or facing to keep the audience from seeing underneath the platform.
Disadvantages of the Plywood Framed Platform
• This method really doesn’t work well for platforms over 4′ high.• Plywood is heavy. A single sheet of common ¾″ plywood may weigh up to 75
pounds.To remedy this, you can cut several lightening holes in the material wherethe audience can’t see them, but this adds to the platform’s build time.
Scenic Design and Lighting Techniques
30
Figure 1.21: Drawing of a plywood framed platform.
Ch001-K80806.qxd 7/5/2006 2:16 PM Page 30

• Plywood is expensive. Depending on where you are, plywood is more often sub-jected to the market increases of the building trade than is dimensional lumber.Therefore, the more plywood in your project, the more it will cost.
Steel Platform Frame and Frame TypesThe steel platform frame follows a lot of the same principles as the wooden platformframe, with one important difference. It’s made of steel. Because it is made of steel, theframing members may be of a smaller dimension and still give similar support as athicker, wooden counterpart.
As you’ve probably figured out by now, two of the life aspirations of any platform areto lift things up so that we can see them and to keep these things from falling downto where we can’t. Remember what made the stressed-skin platform rigid? The struc-ture is arranged in such a way that the wooden frame can’t flex. Steel has less flexibil-ity than wood, so let’s look at how we can arrange a steel frame’s pieces. One usefulway to categorize steel frames is by the shape of the steel stock.
1 ¥ 3 to 1 ¥ 4 Square Steel Box Tube FrameAs we said when looked at steel flats, the term tube refers to the hollow nature of thesteel material. 1 × 3 and 1 × 4 steel tubes are rectangular tubes whose dimensions are,as you may have guessed, 1″ × 3″ and 1″ × 4″. The frame structure used with theseplatform materials are practically identical to the structure used in standard platformconstruction (Figure 1.22).
Chapter 1: The Basic Scenic Building Blocks
31
Figure 1.22: A drawing of a 1″ × 3″ × 12′ steel frame platform.
Ch001-K80806.qxd 7/5/2006 2:16 PM Page 31
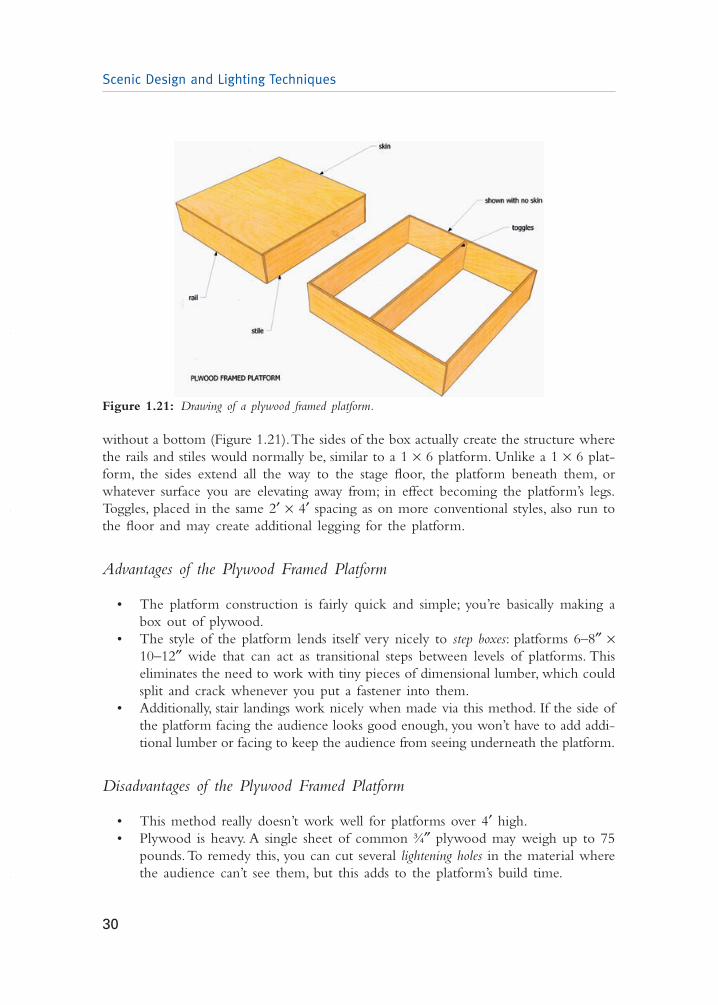
Advantages of the 1 × 3 Steel Platform Frame
• The process of joining steel differs, as we said, from the process of joining wood.Wood joints, while firm, are still somewhat flexible.Whether it is weather causingthe joints to expand and contract or pressure and stress from those careless stage-hands slamming the platforms around, wood joints may move, loosen, and pop.Steel, when welded, forms a rigid joint. Weather and stress won’t pop the joint;in fact, welded joints are stronger than the surrounding steel.
• As we said, the steel doesn’t flex. A 1 × 3 tube forms a narrow-profile frame thatmay easily span 6–8′ between legs (Figure 1.23).
Disadvantages of the 1 × 3 Steel Platform Frame
• Similar to the steel framed flat, whenever you use steel you need specialized tools,workspaces, and training to weld the parts together.
• Steel, as we said before, is heavy, and the 1 × 3 and 1 × 4 box tubes at 20–22′long need a lot of room to store.
• If you have to run rope or cables through the platform, steel is much harder todrill through than wood.
• Attaching the platform skin requires specialized fasteners to go through the steel.One type of fastener most commonly used is the self-tapping screw. Lookingremarkably like a drywall screw, these screws have a small drill point at their endsthat allows them to drill into the steel and cut their own threads into it.
Scenic Design and Lighting Techniques
32
Figure 1.23: Drawing of steel platforms used in DeSales University’s Production of A Christmas Carol.
Ch001-K80806.qxd 7/5/2006 2:16 PM Page 32
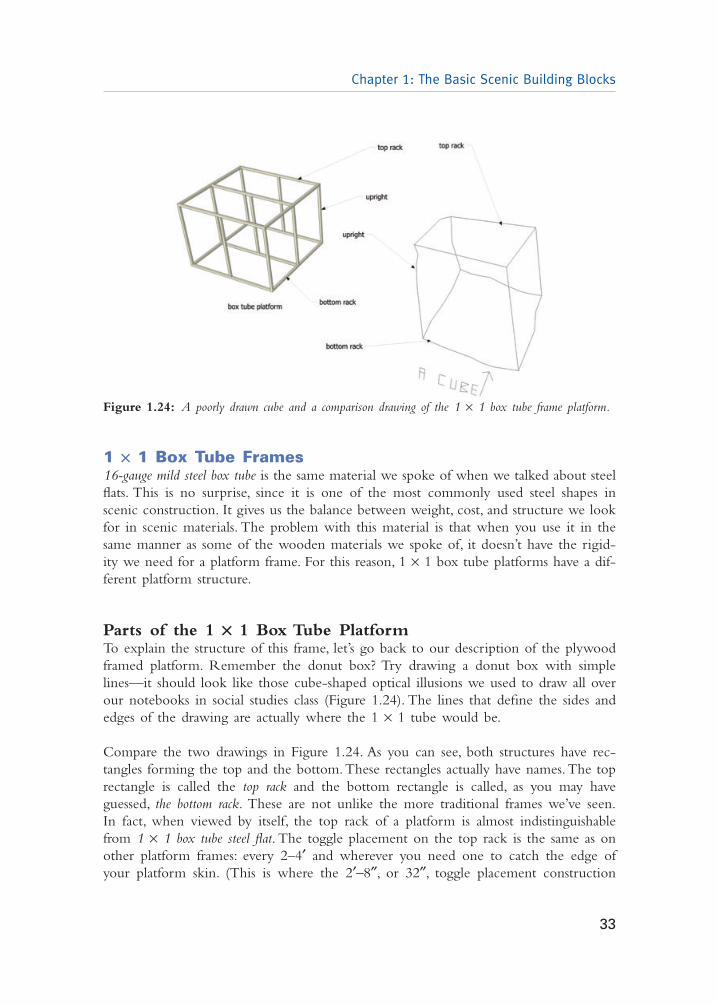
1 ¥ 1 Box Tube Frames16-gauge mild steel box tube is the same material we spoke of when we talked about steelflats. This is no surprise, since it is one of the most commonly used steel shapes inscenic construction. It gives us the balance between weight, cost, and structure we lookfor in scenic materials. The problem with this material is that when you use it in thesame manner as some of the wooden materials we spoke of, it doesn’t have the rigid-ity we need for a platform frame. For this reason, 1 × 1 box tube platforms have a dif-ferent platform structure.
Parts of the 1 ¥ 1 Box Tube PlatformTo explain the structure of this frame, let’s go back to our description of the plywoodframed platform. Remember the donut box? Try drawing a donut box with simplelines—it should look like those cube-shaped optical illusions we used to draw all overour notebooks in social studies class (Figure 1.24). The lines that define the sides andedges of the drawing are actually where the 1 × 1 tube would be.
Compare the two drawings in Figure 1.24. As you can see, both structures have rec-tangles forming the top and the bottom.These rectangles actually have names.The toprectangle is called the top rack and the bottom rectangle is called, as you may haveguessed, the bottom rack. These are not unlike the more traditional frames we’ve seen.In fact, when viewed by itself, the top rack of a platform is almost indistinguishablefrom 1 × 1 box tube steel flat. The toggle placement on the top rack is the same as onother platform frames: every 2–4′ and wherever you need one to catch the edge ofyour platform skin. (This is where the 2′–8″, or 32″, toggle placement construction
Chapter 1: The Basic Scenic Building Blocks
33
Figure 1.24: A poorly drawn cube and a comparison drawing of the 1 × 1 box tube frame platform.
Ch001-K80806.qxd 7/5/2006 2:16 PM Page 33
comes in handy. It’s a good balance of weight, structure, and cost and still hits the eightdoor sheet lines of plywood skins.)
The upright members of the platform frame you see in Figure 1.24 are known as theuprights. If you have trouble remembering this term, try this clever mnemonic device:“Uprights are upright.” The uprights on the donut box you drew would be the verticallines that hold the top and bottom racks apart. These vertical members, like the sidesof the plywood box frame, actually take the place of legs. Similar to the plywood boxframe, the toggles also need to extend to the platform’s lower rack, so uprights are usedunder them as well. (As you may have guessed, the bottom rack of the platform willlook very similar to the top rack; wherever there is an upright attached to the top, wehave to attach it to the bottom, and therefore toggle placement will be similar. Quiteoften it will be useful to use the top rack as a pattern for the bottom). The placementand number of the uprights are best determined by the amount of load placed on theplatform, but as a rule the uprights should be spaced between 8″ and 12″ apart. Themore weight, the closer the uprights.
Advantages of the 1 × 1 Box Tube Steel Platform Frame
• Just as with the other steel platform frames, the rigidity of the steel structureresists bending and can span wider distances than wood.
• It creates a strong open structure. Quite often the inside of these platforms maybe used as a prop staging area, or with trapdoors in the platform they may beused to make entrances and exits.
• If placed strategically, the uprights may serve as attaching points for facing.
Advantages of the 1 × 1 Box Tube Steel Platform Frame
• There’s a whole lot of parts and welding goin’ on. Figure for every piece thatgets cut, at least two welds are needed to join it to the rest of the frame.
• It is a very open structure. That may be what you are looking for in a particu-lar design, but unlike the plywood box frame, you must face every side that facesthe audience.
Drops and Backings: The Cloth, the Drops, the Backdrop,the Bedspread, and a Walk into a Spanish CourtyardRemember what Lope said? “Three boards, two actors, and one passion.” One versionof this quote goes, “Three boards, two actors, a cloth, and one passion.”We can’t find itanywhere to back it up, so if he didn’t say it, he should have, because that cloth isanother important building block: the drop. Drops are alternately known as backdrops or
Scenic Design and Lighting Techniques
34
Ch001-K80806.qxd 7/5/2006 2:16 PM Page 34
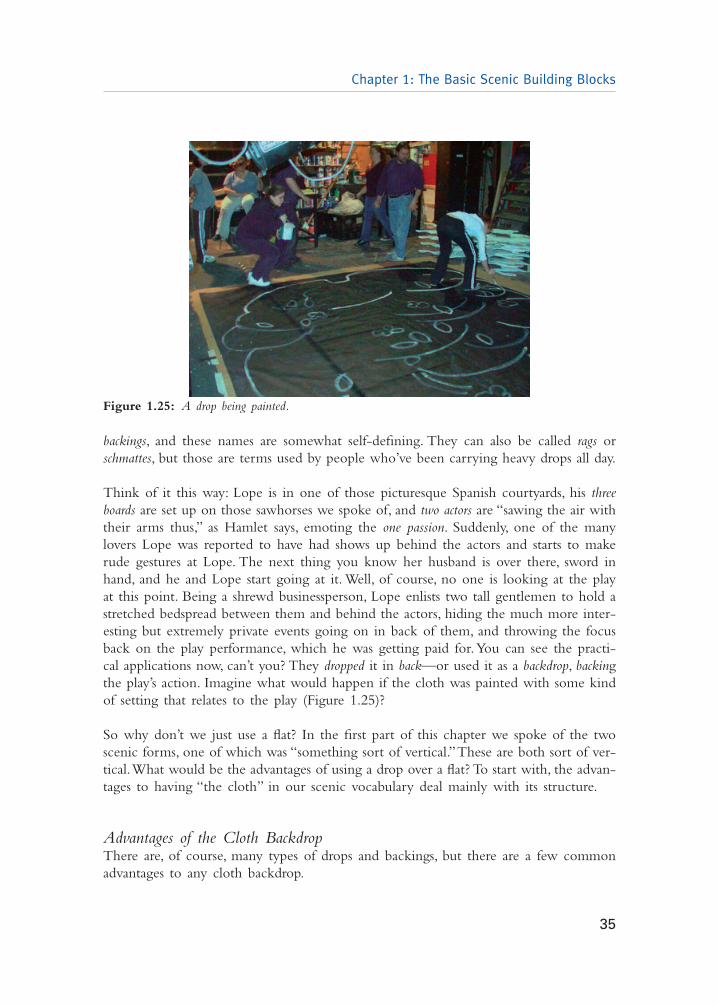
backings, and these names are somewhat self-defining. They can also be called rags orschmattes, but those are terms used by people who’ve been carrying heavy drops all day.
Think of it this way: Lope is in one of those picturesque Spanish courtyards, his threeboards are set up on those sawhorses we spoke of, and two actors are “sawing the air withtheir arms thus,” as Hamlet says, emoting the one passion. Suddenly, one of the manylovers Lope was reported to have had shows up behind the actors and starts to makerude gestures at Lope. The next thing you know her husband is over there, sword inhand, and he and Lope start going at it. Well, of course, no one is looking at the playat this point. Being a shrewd businessperson, Lope enlists two tall gentlemen to hold astretched bedspread between them and behind the actors, hiding the much more inter-esting but extremely private events going on in back of them, and throwing the focusback on the play performance, which he was getting paid for.You can see the practi-cal applications now, can’t you? They dropped it in back—or used it as a backdrop, backingthe play’s action. Imagine what would happen if the cloth was painted with some kindof setting that relates to the play (Figure 1.25)?
So why don’t we just use a flat? In the first part of this chapter we spoke of the twoscenic forms, one of which was “something sort of vertical.”These are both sort of ver-tical.What would be the advantages of using a drop over a flat? To start with, the advan-tages to having “the cloth” in our scenic vocabulary deal mainly with its structure.
Advantages of the Cloth BackdropThere are, of course, many types of drops and backings, but there are a few commonadvantages to any cloth backdrop.
Chapter 1: The Basic Scenic Building Blocks
35
Figure 1.25: A drop being painted.
Ch001-K80806.qxd 7/5/2006 2:16 PM Page 35
• It’s made of cloth. Unless the fabric is impossibly thick, it is thinner than a flat.The drop may be rolled, folded, and stored in much less space than a flat, allow-ing for a greater inventory of stock scenes.
• It weighs a lot less. If you compare a painted backdrop to the same-size flat orseries of flat structures, the backdrop will be much lighter.
• Depending on its size, it can be quite simple to put up or hang. If there is some-place to hang the drop and some way to get it up in the air, one person can feasibly do it by him-/herself.
• All of the foregoing characteristics make these units attractive scenery for touringcompanies.
Disadvantages of the Cloth BackdropThe structure of the cloth backdrop also poses some disadvantages.
• It’s made of cloth. As with a soft-covered flat, the drop works like a sail whenair currents are disturbed nearby, in fact even more so since, in essence, it is asail. (Common theatre lore says that the first stagehands were sailors because oftheir advanced sail-rigging/drop-rigging skills. Another theatre story states thatthese sailors gave their cues to one another with a series of whistles, which washow they communicated on ship.That explains the superstition about getting badluck when you whistle in a theatre; the fear would be getting a drop droppedon you by a confused scenic swab.The rough-and-tumble sailor connection alsoexplains why technicians always seem so rakishly good looking and exciting, likeJohnny Depp, Erroll Flynn, Keira Knightley, or Maureen O’Hara).
• Because of its structure, the drop is a two-dimensional unit. The scenery on thedrop, if meant to portray realistic images, needs to be very skillfully painted. Anyappliqués, as with soft-covered flats, like molding or hung pictures, require addi-tional structure behind the drop, increasing build time, and basically make thedrop a flat.
• You have to get it up in the air, somehow, for it to drop. Whether it is two ofLope’s stagehands, long bottom-heavy boom poles weighted down or bolted tothe floor, battens hung above the actors’ heads on ropes, pulleys, or a sophisticatedcounterweighted fly system, it has to be rigged safely to prevent it from fallingand injuring actors or, at the very least, revealing jealous husbands backstage.
Rags to Enrich UsLet’s start by separating the types of scenic cloths we use. A drop, while it’s most oftenused as a generic term for any hung cloth, is a term more correctly used to describesoft representational scenery; that is to say, the scenery is meant to stand in for something—a wall, a landscape, or an abstract image—that creates a mood that exemplifies or coun-terpoints the dramatic action. These are usually thought of as soft show-specific scenery,
Scenic Design and Lighting Techniques
36
Ch001-K80806.qxd 7/5/2006 2:16 PM Page 36
meaning they were created for the current production and tailored to its dramatic needs.
House drapes would be the opposite of this idea (not because they are in your house;that would be opposite as well, but not what we’re talking about). For our purposes,house drapes best describe other drapes in the theatre’s stock that are soft, neutral scenery,neutral enough to be used in any show. Part of this grouping’s job is similar to Lope’sbedspread; the cloth here prevents us from seeing things we’re not meant to see andfocuses the audience’s attention on the action.
But that isn’t all house drapes can do. Sometimes a neutral cloth with nothing paintedon it can be hung and lit so that we are almost able to see through it, or it can serveas a surface onto which light or images can be projected, creating a mood and atmo-sphere for the scene. In essence these cloths are still preventing us from seeing thingswe’re not supposed to see, and on the surface they don’t seem to look like anything;but it is their neutrality that helps them transform and focus the stage space.
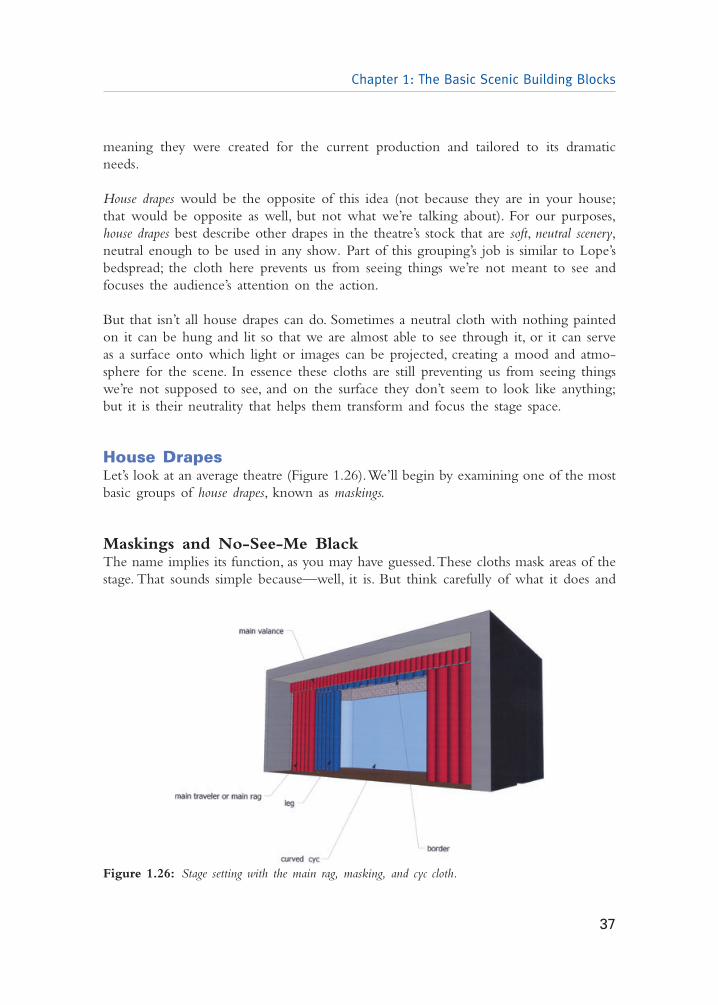
House DrapesLet’s look at an average theatre (Figure 1.26).We’ll begin by examining one of the mostbasic groups of house drapes, known as maskings.
Maskings and No-See-Me BlackThe name implies its function, as you may have guessed.These cloths mask areas of thestage. That sounds simple because—well, it is. But think carefully of what it does and
Chapter 1: The Basic Scenic Building Blocks
37
Figure 1.26: Stage setting with the main rag, masking, and cyc cloth.
Ch001-K80806.qxd 7/5/2006 2:16 PM Page 37
you may realize its potential. Look at a busy street corner. If you try to focus on justone area or one activity, you are constantly distracted by the large volume of stuff aroundyou. If you took both of your hands or a friend’s hands and with the fingers made asort of sideways “O” shape, like you were holding invisible binoculars, and held themin front of your eyes, you’d look strange; but the sides of your fingers and hands (oryour friend’s hands) mask the surrounding activities and allow you to focus on whatyou want to see.
But don’t just think of maskings as hiding the wings or back walls of the theatre. Thatidea keeps a more rectangular image in mind—and that is somewhat limiting. Maskingscan be hung anywhere. A better image to keep in mind is that of a stencil of a letterplaced onto a piece of paper. Imagine the letter is the area you wish to focus on. Thestencil creates the letter by blocking your spray paint and focuses the paint onto thepaper where you want the letter to be. Once you lift the stencil from the paper all yousee is the letter created from the shape of the stencil. That’s how masking works: Byitself it isn’t obvious, but what it does is.
One of the most common types of maskings used in the theatre is the stage black, orblacks as they are commonly known. Most often these cloths are black (duh!) velour, aheavy fabric with a nap. A nap in black fabric can often be very soft, warm, and quiterefreshing, but in this case we are referring to the little furry hairs of fabric that stickout of the cloth’s surface.This nap breaks up the surface of the fabric and almost sucksup light like a porous sponge. Dark objects absorb light and light-colored objects reflectlight. Black in the theatre scenic vocabulary says, “Don’t look at me” or “Pay no atten-tion to the man behind the curtain.” Quite often when dealing with a space we don’twant the audience to see, we get some “no-see-me black” fabric and tack it up overthe spot. Black in our visual vocabulary is the absence of light: No light means notimportant. It’s probably not surprising then that black maskings have been used by stagemagicians for years to direct or misdirect our attention.
FullnessFullness describes that uncomfortable feeling you had after dinner before you took thatnap in the blacks. When you awoke, you felt refreshed, but your button-fly jeans felt alittle tight. In these cases, you have a pair of pants you keep handy to change into thathave a pleated front with lots of extra fabric that hides your tummy.This describes full-ness in masking: making pleats or folds in the masking fabric. Fullness breaks up thevisual plane of the fabric and allows the curtain to absorb more light.These folds createa softer line as well as interesting highlights and shadows. Fullness is measured by thesefolds; if you use twice the amount of fabric as the finished width of the scenic cloth,you have created a drop with 100% fullness. Using 1½ times the amount of fabric isknown as 50% fullness. If your cloth is completely flat with no pleats, you have zerofullness.
Scenic Design and Lighting Techniques
38
Ch001-K80806.qxd 7/5/2006 2:16 PM Page 38
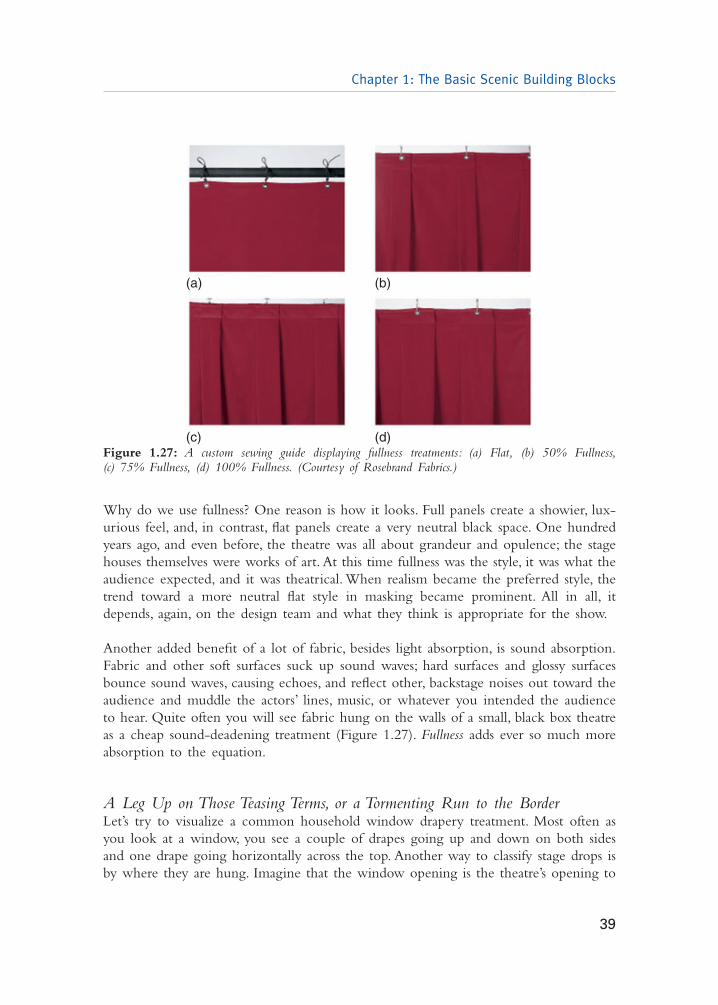
Why do we use fullness? One reason is how it looks. Full panels create a showier, lux-urious feel, and, in contrast, flat panels create a very neutral black space. One hundredyears ago, and even before, the theatre was all about grandeur and opulence; the stagehouses themselves were works of art. At this time fullness was the style, it was what theaudience expected, and it was theatrical. When realism became the preferred style, thetrend toward a more neutral flat style in masking became prominent. All in all, itdepends, again, on the design team and what they think is appropriate for the show.
Another added benefit of a lot of fabric, besides light absorption, is sound absorption.Fabric and other soft surfaces suck up sound waves; hard surfaces and glossy surfacesbounce sound waves, causing echoes, and reflect other, backstage noises out toward theaudience and muddle the actors’ lines, music, or whatever you intended the audienceto hear. Quite often you will see fabric hung on the walls of a small, black box theatreas a cheap sound-deadening treatment (Figure 1.27). Fullness adds ever so much moreabsorption to the equation.
A Leg Up on Those Teasing Terms, or a Tormenting Run to the BorderLet’s try to visualize a common household window drapery treatment. Most often asyou look at a window, you see a couple of drapes going up and down on both sidesand one drape going horizontally across the top. Another way to classify stage drops isby where they are hung. Imagine that the window opening is the theatre’s opening to
Chapter 1: The Basic Scenic Building Blocks
39
(a) (b)
(c) (d)Figure 1.27: A custom sewing guide displaying fullness treatments: (a) Flat, (b) 50% Fullness,(c) 75% Fullness, (d) 100% Fullness. (Courtesy of Rosebrand Fabrics.)
Ch001-K80806.qxd 7/5/2006 2:16 PM Page 39
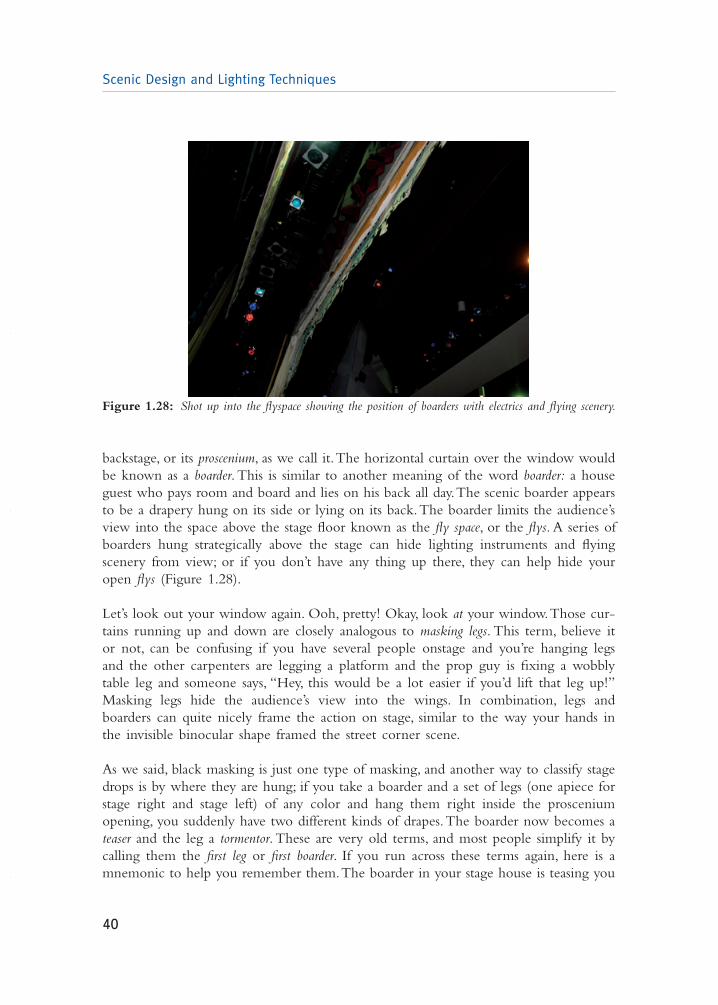
backstage, or its proscenium, as we call it.The horizontal curtain over the window wouldbe known as a boarder. This is similar to another meaning of the word boarder: a houseguest who pays room and board and lies on his back all day.The scenic boarder appearsto be a drapery hung on its side or lying on its back.The boarder limits the audience’sview into the space above the stage floor known as the fly space, or the flys. A series ofboarders hung strategically above the stage can hide lighting instruments and flyingscenery from view; or if you don’t have any thing up there, they can help hide youropen flys (Figure 1.28).
Let’s look out your window again. Ooh, pretty! Okay, look at your window.Those cur-tains running up and down are closely analogous to masking legs. This term, believe itor not, can be confusing if you have several people onstage and you’re hanging legsand the other carpenters are legging a platform and the prop guy is fixing a wobblytable leg and someone says, “Hey, this would be a lot easier if you’d lift that leg up!”Masking legs hide the audience’s view into the wings. In combination, legs and boarders can quite nicely frame the action on stage, similar to the way your hands inthe invisible binocular shape framed the street corner scene.
As we said, black masking is just one type of masking, and another way to classify stagedrops is by where they are hung; if you take a boarder and a set of legs (one apiece forstage right and stage left) of any color and hang them right inside the prosceniumopening, you suddenly have two different kinds of drapes.The boarder now becomes ateaser and the leg a tormentor. These are very old terms, and most people simplify it bycalling them the first leg or first boarder. If you run across these terms again, here is amnemonic to help you remember them.The boarder in your stage house is teasing you
Scenic Design and Lighting Techniques
40
Figure 1.28: Shot up into the flyspace showing the position of boarders with electrics and flying scenery.
Ch001-K80806.qxd 7/5/2006 2:16 PM Page 40
by lying around on his back, so you torment him by taking your leg and kicking himup to the flys, where he belongs. It’s not a simple mnemonic but it is a vivid image.
Keeping Tabs on the SightlinesThere is another type of back stage masking known as tab masking; this is another wayof hiding your theatre’s wing space. These drapes, like legs, boarders, and all their likehung cousins, may be full or flat; but unlike them, they are hung in a completely dif-ferent axis. Tabs are hung in the furthest offstage position in front of the wing spaceyou wish to hide and are perpendicular to the legs. In this way if you have a reallywide proscenium opening and the audience can see a little space between legs, youhave some scenic insurance coverage, since the tabs will fill in the gaps.
This masking is also particularly useful in stopping backstage light leaks from runningor crossing lights that are set up for safe backstage passage, as well as leaks caused if abackstage door to a lit hallway opens. Also, tabs help trap sound leaks from those leakyactors cramming their lines backstage.
Back in Black: Blackouts and Travelers (Sounds Like a Rock Ballad)If you take a bunch of legs and hang them side to side the entire way across the stage,you have created a backing known as a full-stage black. Now this term may be confus-ing, because your full-stage black may be made of flat blacks (or blacks without full-ness) making it a flat full-stage black; or conversely, if it has fullness it would be a fullfull-stage black. Some people avoid the entire mess and just call it a blackout drape.
These drapes are particularly useful if you want to hide one scene quickly or, as thename suggests, black out the stage by cutting off all the light behind it.You can manip-ulate them in two ways: flying and traveling. Flying, as we said, is the process of liftingthe drapes with a series of ropes and pulleys or a counterweight system. To travel acurtain, you tie it to a system of little hooks with wheels on top of them called carri-ers. These carriers carry the curtain inside a track called, oddly enough, a traveler track.Pull lines are connected, and the whole shootin’ match works just like those slide-ydrapes in your parlor window (you have to read this last sentence with a cowboyaccent—it’s also helpful to have your character spit when you come to the period).
Everybody Wants to Get into the Act—and Out of ItSimilarly, if you want to reveal the action at the top of the act or quickly exit at theend of an act, you may use another house drape, known as a main curtain or act curtain.Whenever you hear someone yell, “Curtain!” it’s this curtain they’re speaking of (alsowhen they say, “It’s curtains for you,” in 1920’s gangster films, they’re referring to this
Chapter 1: The Basic Scenic Building Blocks
41
Ch001-K80806.qxd 7/5/2006 2:16 PM Page 41

curtain coming in at the end of the act. The act in this case would mean your life—you get the picture.) These curtains, like everything else in theatre, have several names:main drape, grand drape, and even main rag. Main rag is possibly the nicest term used byanyone who has ever hung one of these, because they are heavy—really heavy. Sincethis is the first thing your audience sees, theatres want the grand drape to look luxu-rious and special; it’s made of thicker velour and lined with what amounts to a secondheavy curtain and is rarely made without fullness. As a result, it actually stops morelight and sound than a blackout curtain. Why aren’t blackout curtains made like this,then? They can be, but the expense of a grand drape is such that most theatres buyone and make it last as long as they can.
Most often these curtains are travelers, however; you will add a lot of flexibility to yourscenic vocabulary if you have a curtain that can fly as well as travel. Flying reveals say“Bam! Look at this!” and thrust you into the world of the play. Traveling reveals aresneakier and almost voyeuristic, since you are slowly shown and coaxed into the worldof the play.Traveling curtains rarely open as fast as flying curtains. Again, it’s the choiceof your production team to decide what works best for your production.
There are also quite a few styles of grand drapes to choose from, and the style of thedrape is mostly determined by the way it opens. The choice depends largely on thetypes of productions done in your theatre (Figure 1.29).
Cyc’ed You OutCyclorama is one of those theatre terms that have another meaning in the civilian world.MSN Encarta defines cyclorama as a “circular mural painted all the way around the walls
Scenic Design and Lighting Techniques
42
Figure 1.29: Grand-style drapes. (Courtesy of Rosebrand Fabrics.)
Ch001-K80806.qxd 7/5/2006 2:16 PM Page 42
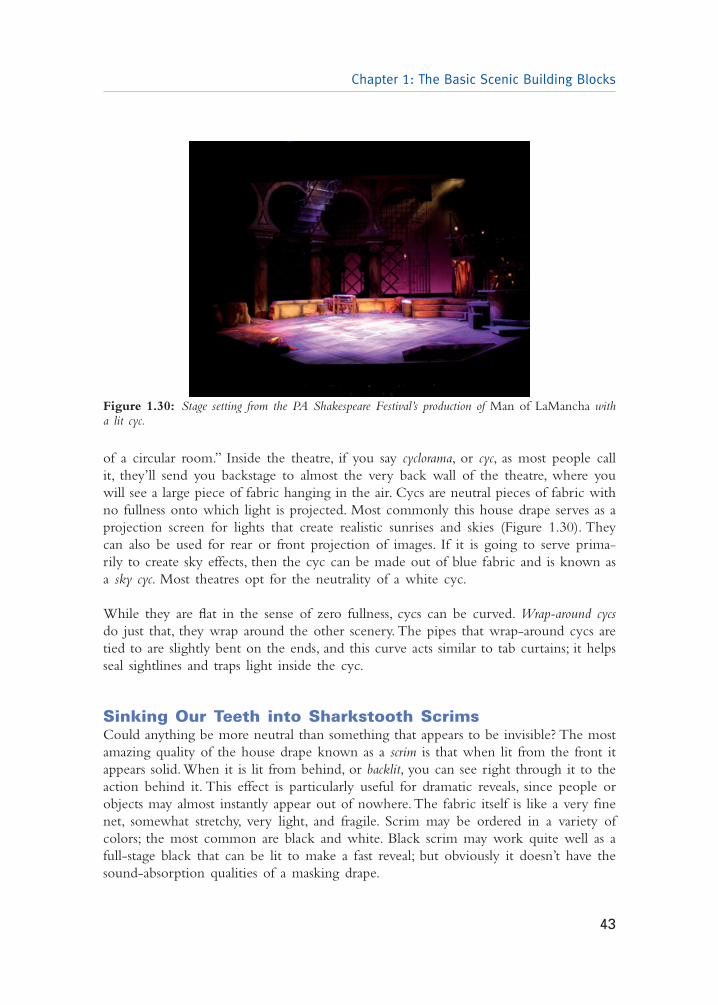
of a circular room.” Inside the theatre, if you say cyclorama, or cyc, as most people callit, they’ll send you backstage to almost the very back wall of the theatre, where youwill see a large piece of fabric hanging in the air. Cycs are neutral pieces of fabric withno fullness onto which light is projected. Most commonly this house drape serves as aprojection screen for lights that create realistic sunrises and skies (Figure 1.30). Theycan also be used for rear or front projection of images. If it is going to serve prima-rily to create sky effects, then the cyc can be made out of blue fabric and is known asa sky cyc. Most theatres opt for the neutrality of a white cyc.
While they are flat in the sense of zero fullness, cycs can be curved. Wrap-around cycsdo just that, they wrap around the other scenery. The pipes that wrap-around cycs aretied to are slightly bent on the ends, and this curve acts similar to tab curtains; it helpsseal sightlines and traps light inside the cyc.
Sinking Our Teeth into Sharkstooth ScrimsCould anything be more neutral than something that appears to be invisible? The mostamazing quality of the house drape known as a scrim is that when lit from the front itappears solid.When it is lit from behind, or backlit, you can see right through it to theaction behind it. This effect is particularly useful for dramatic reveals, since people orobjects may almost instantly appear out of nowhere.The fabric itself is like a very finenet, somewhat stretchy, very light, and fragile. Scrim may be ordered in a variety ofcolors; the most common are black and white. Black scrim may work quite well as afull-stage black that can be lit to make a fast reveal; but obviously it doesn’t have thesound-absorption qualities of a masking drape.
Chapter 1: The Basic Scenic Building Blocks
43
Figure 1.30: Stage setting from the PA Shakespeare Festival’s production of Man of LaMancha witha lit cyc.
Ch001-K80806.qxd 7/5/2006 2:16 PM Page 43
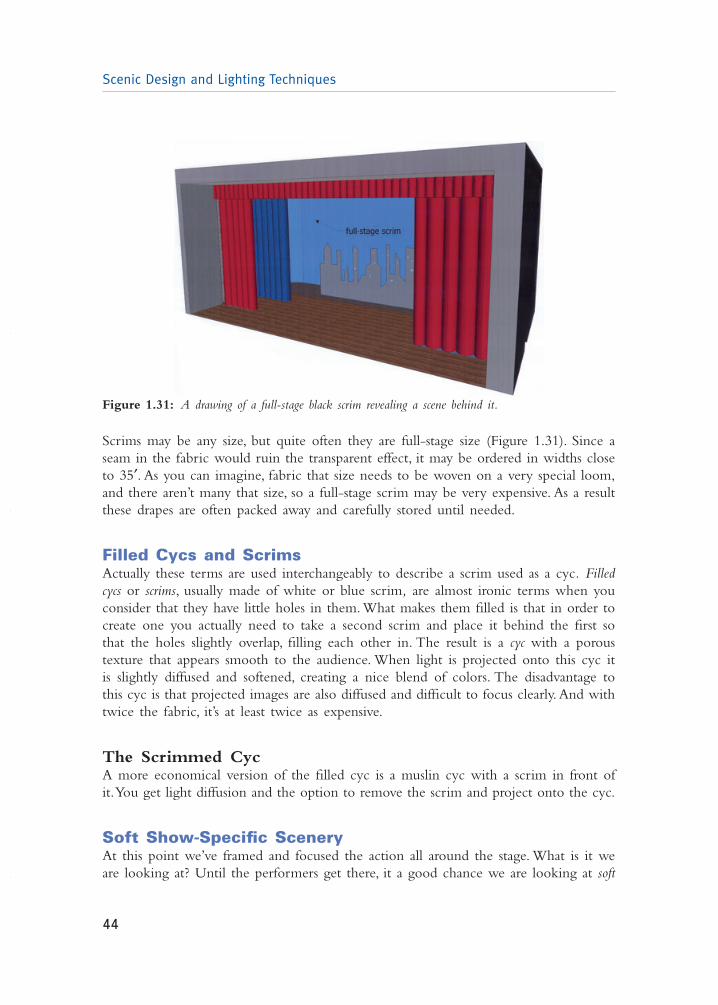
Scrims may be any size, but quite often they are full-stage size (Figure 1.31). Since aseam in the fabric would ruin the transparent effect, it may be ordered in widths closeto 35′. As you can imagine, fabric that size needs to be woven on a very special loom,and there aren’t many that size, so a full-stage scrim may be very expensive. As a resultthese drapes are often packed away and carefully stored until needed.
Filled Cycs and ScrimsActually these terms are used interchangeably to describe a scrim used as a cyc. Filledcycs or scrims, usually made of white or blue scrim, are almost ironic terms when youconsider that they have little holes in them.What makes them filled is that in order tocreate one you actually need to take a second scrim and place it behind the first sothat the holes slightly overlap, filling each other in. The result is a cyc with a poroustexture that appears smooth to the audience. When light is projected onto this cyc itis slightly diffused and softened, creating a nice blend of colors. The disadvantage tothis cyc is that projected images are also diffused and difficult to focus clearly. And withtwice the fabric, it’s at least twice as expensive.
The Scrimmed CycA more economical version of the filled cyc is a muslin cyc with a scrim in front ofit.You get light diffusion and the option to remove the scrim and project onto the cyc.
Soft Show-Specific SceneryAt this point we’ve framed and focused the action all around the stage. What is it weare looking at? Until the performers get there, it a good chance we are looking at soft
Scenic Design and Lighting Techniques
44
Figure 1.31: A drawing of a full-stage black scrim revealing a scene behind it.
Ch001-K80806.qxd 7/5/2006 2:16 PM Page 44
show-specific scenery (and perhaps after they arrive as well). As we said before, show-specific scenery has been designed for the current production and by its nature is rep-resentational of some location or emotion pertinent to the production. These drops may be classified in two ways, by their shape and by how they are manipulated.
Full-Stage Drops or BackdropsPainted drops are most often made of heavy muslin, although they may be made of any fabricyou can paint.The shape is quite often rectangular, similar to that of a full-stage black orscrim.This is what is most often thought of as the quintessential backdrop.At this point itwould be helpful to look at the anatomy of an average painted drop (Figure 1.32).
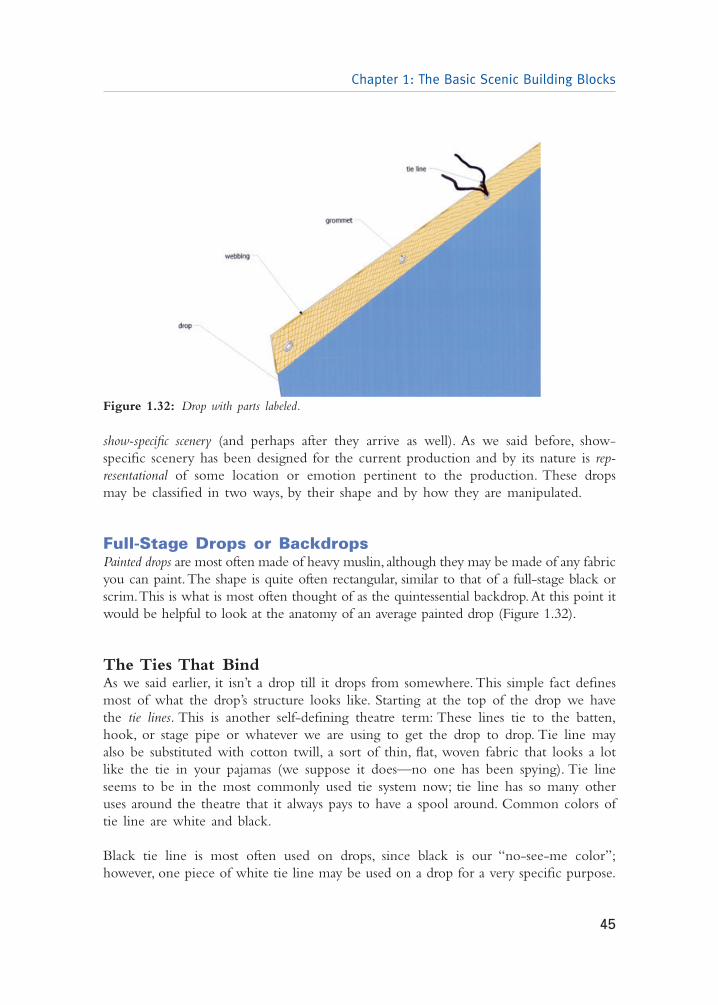
The Ties That BindAs we said earlier, it isn’t a drop till it drops from somewhere. This simple fact definesmost of what the drop’s structure looks like. Starting at the top of the drop we havethe tie lines. This is another self-defining theatre term: These lines tie to the batten,hook, or stage pipe or whatever we are using to get the drop to drop. Tie line mayalso be substituted with cotton twill, a sort of thin, flat, woven fabric that looks a lotlike the tie in your pajamas (we suppose it does—no one has been spying). Tie lineseems to be in the most commonly used tie system now; tie line has so many otheruses around the theatre that it always pays to have a spool around. Common colors oftie line are white and black.
Black tie line is most often used on drops, since black is our “no-see-me color”;however, one piece of white tie line may be used on a drop for a very specific purpose.
Chapter 1: The Basic Scenic Building Blocks
45
Figure 1.32: Drop with parts labeled.
Ch001-K80806.qxd 7/5/2006 2:16 PM Page 45
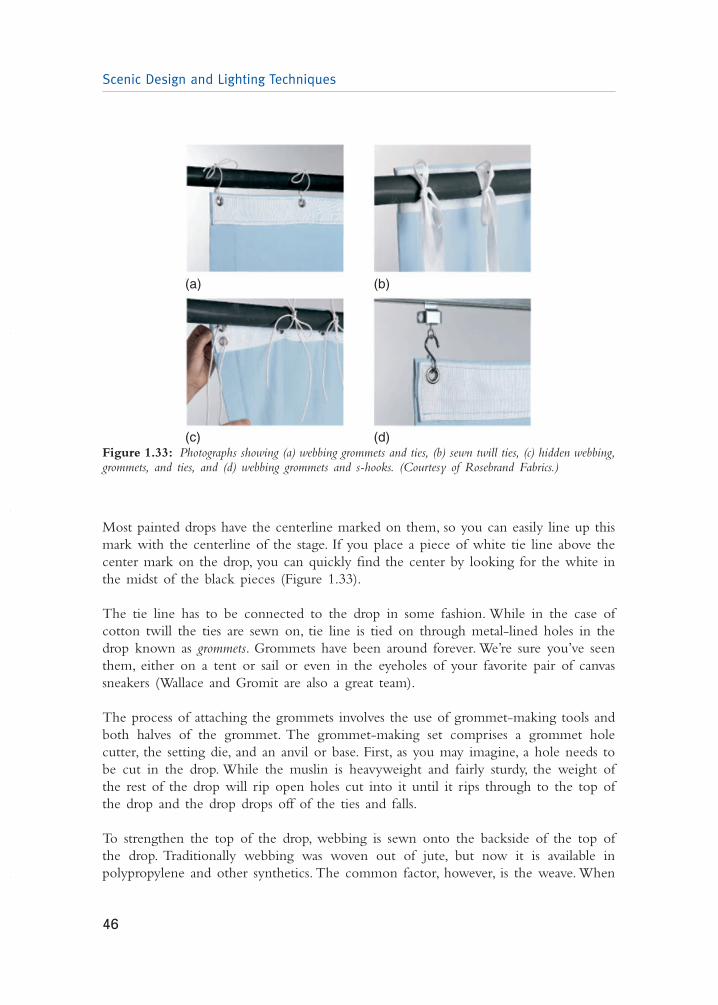
Most painted drops have the centerline marked on them, so you can easily line up thismark with the centerline of the stage. If you place a piece of white tie line above thecenter mark on the drop, you can quickly find the center by looking for the white inthe midst of the black pieces (Figure 1.33).
The tie line has to be connected to the drop in some fashion. While in the case ofcotton twill the ties are sewn on, tie line is tied on through metal-lined holes in thedrop known as grommets. Grommets have been around forever. We’re sure you’ve seenthem, either on a tent or sail or even in the eyeholes of your favorite pair of canvassneakers (Wallace and Gromit are also a great team).
The process of attaching the grommets involves the use of grommet-making tools andboth halves of the grommet. The grommet-making set comprises a grommet holecutter, the setting die, and an anvil or base. First, as you may imagine, a hole needs tobe cut in the drop. While the muslin is heavyweight and fairly sturdy, the weight ofthe rest of the drop will rip open holes cut into it until it rips through to the top ofthe drop and the drop drops off of the ties and falls.
To strengthen the top of the drop, webbing is sewn onto the backside of the top ofthe drop. Traditionally webbing was woven out of jute, but now it is available inpolypropylene and other synthetics. The common factor, however, is the weave. When
Scenic Design and Lighting Techniques
46
(a) (b)
(c) (d)Figure 1.33: Photographs showing (a) webbing grommets and ties, (b) sewn twill ties, (c) hidden webbing,grommets, and ties, and (d) webbing grommets and s-hooks. (Courtesy of Rosebrand Fabrics.)
Ch001-K80806.qxd 7/5/2006 2:16 PM Page 46
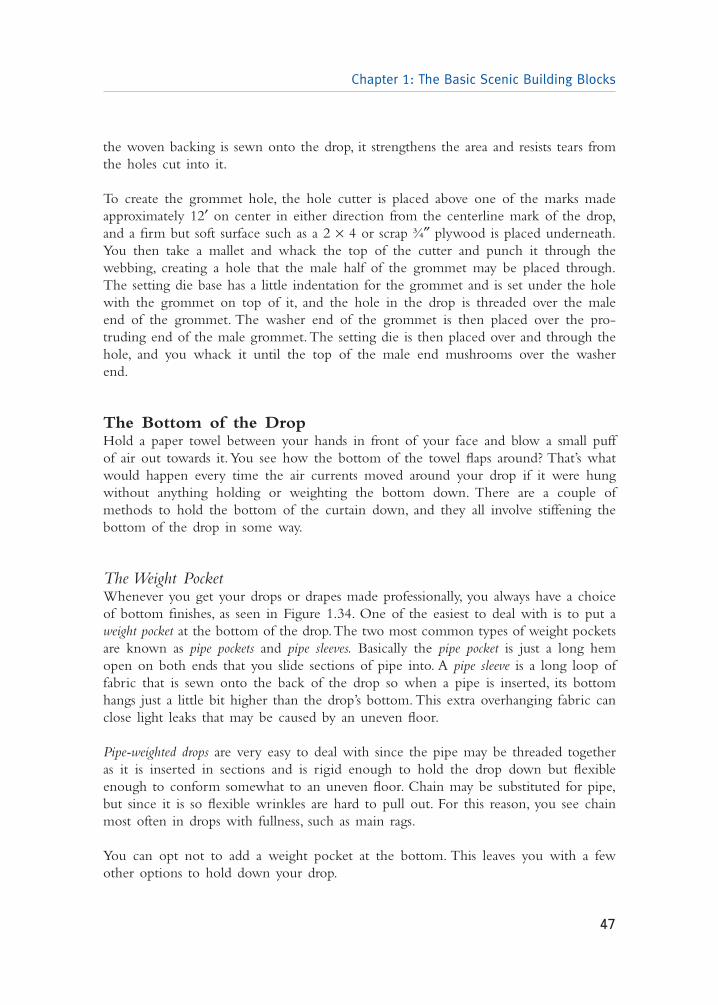
the woven backing is sewn onto the drop, it strengthens the area and resists tears fromthe holes cut into it.
To create the grommet hole, the hole cutter is placed above one of the marks madeapproximately 12′ on center in either direction from the centerline mark of the drop,and a firm but soft surface such as a 2 × 4 or scrap ¾″ plywood is placed underneath.You then take a mallet and whack the top of the cutter and punch it through thewebbing, creating a hole that the male half of the grommet may be placed through.The setting die base has a little indentation for the grommet and is set under the holewith the grommet on top of it, and the hole in the drop is threaded over the maleend of the grommet. The washer end of the grommet is then placed over the pro-truding end of the male grommet.The setting die is then placed over and through thehole, and you whack it until the top of the male end mushrooms over the washer end.
The Bottom of the DropHold a paper towel between your hands in front of your face and blow a small puffof air out towards it.You see how the bottom of the towel flaps around? That’s whatwould happen every time the air currents moved around your drop if it were hungwithout anything holding or weighting the bottom down. There are a couple ofmethods to hold the bottom of the curtain down, and they all involve stiffening thebottom of the drop in some way.
The Weight PocketWhenever you get your drops or drapes made professionally, you always have a choiceof bottom finishes, as seen in Figure 1.34. One of the easiest to deal with is to put aweight pocket at the bottom of the drop.The two most common types of weight pocketsare known as pipe pockets and pipe sleeves. Basically the pipe pocket is just a long hemopen on both ends that you slide sections of pipe into. A pipe sleeve is a long loop offabric that is sewn onto the back of the drop so when a pipe is inserted, its bottomhangs just a little bit higher than the drop’s bottom. This extra overhanging fabric canclose light leaks that may be caused by an uneven floor.
Pipe-weighted drops are very easy to deal with since the pipe may be threaded togetheras it is inserted in sections and is rigid enough to hold the drop down but flexibleenough to conform somewhat to an uneven floor. Chain may be substituted for pipe,but since it is so flexible wrinkles are hard to pull out. For this reason, you see chainmost often in drops with fullness, such as main rags.
You can opt not to add a weight pocket at the bottom. This leaves you with a fewother options to hold down your drop.
Chapter 1: The Basic Scenic Building Blocks
47
Ch001-K80806.qxd 7/5/2006 2:16 PM Page 47
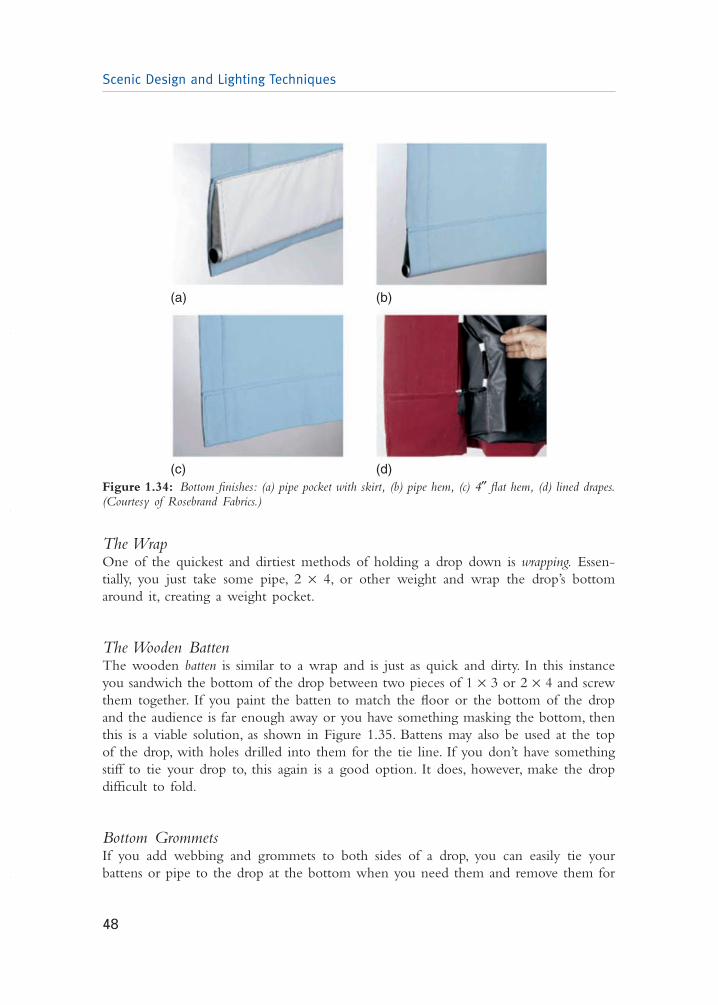
The WrapOne of the quickest and dirtiest methods of holding a drop down is wrapping. Essen-tially, you just take some pipe, 2 × 4, or other weight and wrap the drop’s bottomaround it, creating a weight pocket.
The Wooden BattenThe wooden batten is similar to a wrap and is just as quick and dirty. In this instanceyou sandwich the bottom of the drop between two pieces of 1 × 3 or 2 × 4 and screwthem together. If you paint the batten to match the floor or the bottom of the dropand the audience is far enough away or you have something masking the bottom, thenthis is a viable solution, as shown in Figure 1.35. Battens may also be used at the topof the drop, with holes drilled into them for the tie line. If you don’t have somethingstiff to tie your drop to, this again is a good option. It does, however, make the dropdifficult to fold.
Bottom GrommetsIf you add webbing and grommets to both sides of a drop, you can easily tie yourbattens or pipe to the drop at the bottom when you need them and remove them for
Scenic Design and Lighting Techniques
48
(a) (b)
(c) (d)Figure 1.34: Bottom finishes: (a) pipe pocket with skirt, (b) pipe hem, (c) 4″ flat hem, (d) lined drapes.(Courtesy of Rosebrand Fabrics.)
Ch001-K80806.qxd 7/5/2006 2:17 PM Page 48
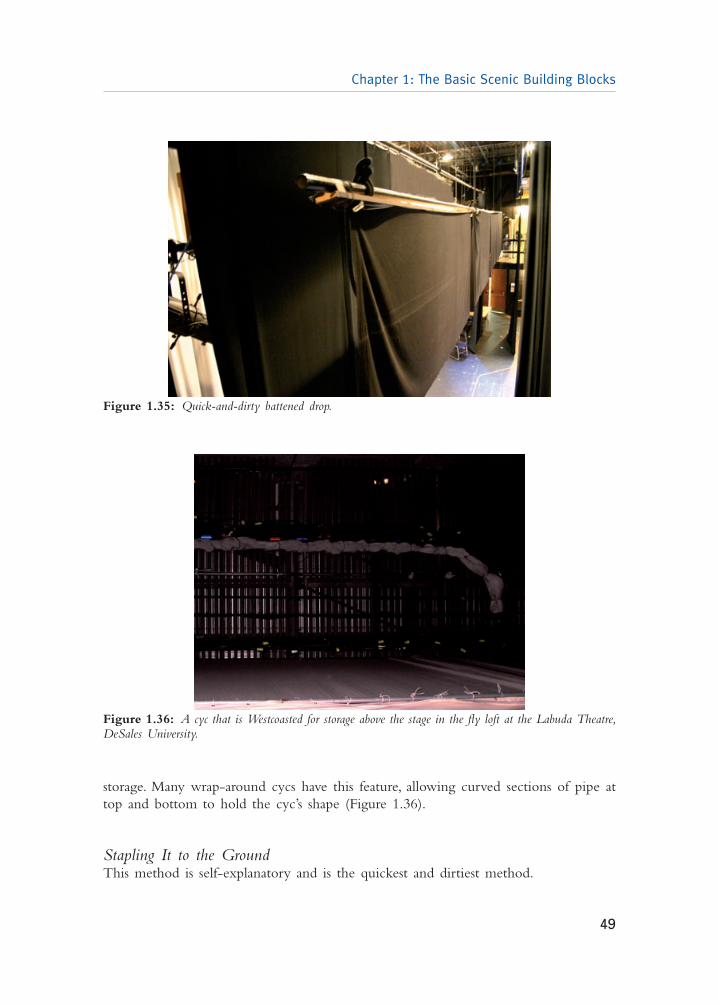
storage. Many wrap-around cycs have this feature, allowing curved sections of pipe attop and bottom to hold the cyc’s shape (Figure 1.36).
Stapling It to the GroundThis method is self-explanatory and is the quickest and dirtiest method.
Chapter 1: The Basic Scenic Building Blocks
49
Figure 1.35: Quick-and-dirty battened drop.
Figure 1.36: A cyc that is Westcoasted for storage above the stage in the fly loft at the Labuda Theatre,DeSales University.
Ch001-K80806.qxd 7/5/2006 2:17 PM Page 49

The Sides of the Drop: Slenderizing Your Sides to Drop WeightSo you have hung and weighted your painted drop using one of the approved methods.When you step back and look at it, the sides are all crinkly, floppy, and wavy.You say,“Thank goodness, I’ve read up on masking,” and you hang some right and left of thedrop.This may have taken care of the problem, or you may have had to move it becauseyou lost some of the image on the drop. What should you do?
A couple of things are possible.You may take some tie lines and some clamps and putsome tension in the sides of the drop by clamping onto the drop and tying one endof tie line to the clamps and one end to something else that won’t move. To pull thistight enough you may have to add a number of lines and loose passage around thedrop, and you certainly can’t fly it.You could add battens or side grommets and battens,effectively making a large soft-covered flat.
There’s a handy old trick that avoids complicated spider webs of tie line, clamps, grom-mets, etc. When you plan your drop, leave two feet of extra fabric on either side ofyour image.After you paint the drop, cut the drop into a big trapezoid shape by comingdown from the extra two feet of fabric at either side of the top edges with a straightcut toward the edge of the image at the bottom. Then hang and weight the drop. Thesides may be seamed if you wish and the puckers pulled taut by the drop’s shape (seeFigure 1.37).
The Cut DropOne of the most elegant, theatrical, and delicate pieces of soft scenery is the cut drop;and it is one of the biggest pains in the butt. Cut drops are similar to the painted drops
Scenic Design and Lighting Techniques
50
Figure 1.37: Small trapezoidal drop from The Gift of the Magi.
Ch001-K80806.qxd 7/5/2006 2:17 PM Page 50
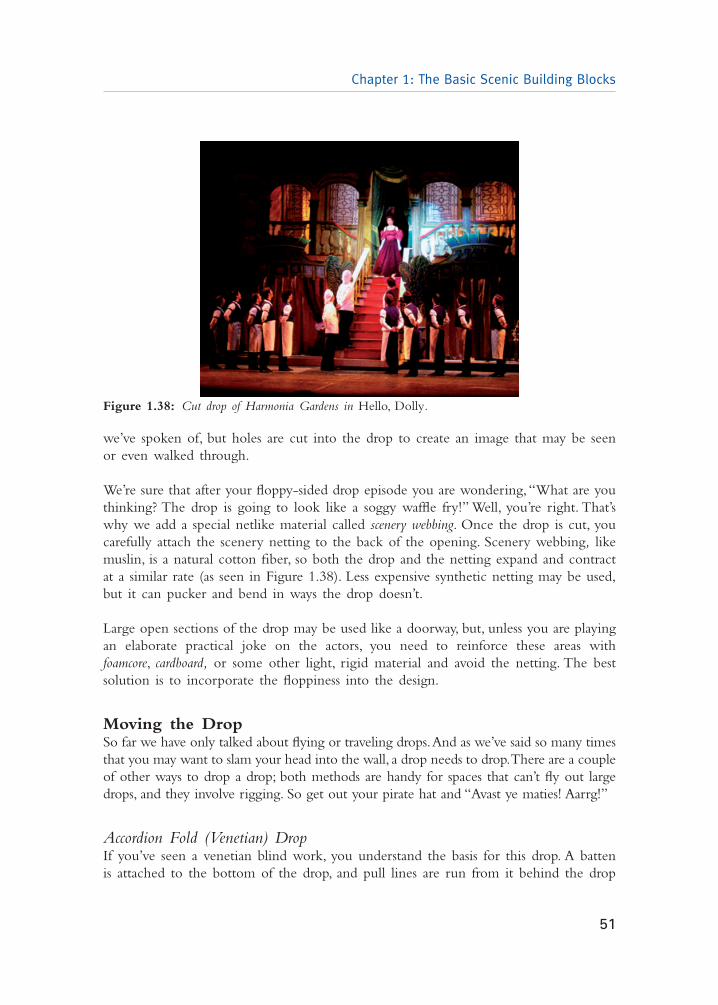
we’ve spoken of, but holes are cut into the drop to create an image that may be seenor even walked through.
We’re sure that after your floppy-sided drop episode you are wondering, “What are youthinking? The drop is going to look like a soggy waffle fry!” Well, you’re right. That’swhy we add a special netlike material called scenery webbing. Once the drop is cut, youcarefully attach the scenery netting to the back of the opening. Scenery webbing, likemuslin, is a natural cotton fiber, so both the drop and the netting expand and contractat a similar rate (as seen in Figure 1.38). Less expensive synthetic netting may be used,but it can pucker and bend in ways the drop doesn’t.
Large open sections of the drop may be used like a doorway, but, unless you are playingan elaborate practical joke on the actors, you need to reinforce these areas with foamcore, cardboard, or some other light, rigid material and avoid the netting. The bestsolution is to incorporate the floppiness into the design.
Moving the DropSo far we have only talked about flying or traveling drops.And as we’ve said so many timesthat you may want to slam your head into the wall, a drop needs to drop.There are a coupleof other ways to drop a drop; both methods are handy for spaces that can’t fly out largedrops, and they involve rigging. So get out your pirate hat and “Avast ye maties! Aarrg!”
Accordion Fold (Venetian) DropIf you’ve seen a venetian blind work, you understand the basis for this drop. A battenis attached to the bottom of the drop, and pull lines are run from it behind the drop
Chapter 1: The Basic Scenic Building Blocks
51
Figure 1.38: Cut drop of Harmonia Gardens in Hello, Dolly.
Ch001-K80806.qxd 7/5/2006 2:17 PM Page 51

through small curtain rings sewn to the back of the drop at regular intervals to keepthe lines from tangling. As the pull lines are pulled, they shorten the drop, lifting thedrop up and folding at the each curtain hook level as the lines slide through them.
If you don’t care about wrinkles in your drop, this is an easy drop to rig and doesn’trequire any flyspace. As a result it may work quite nicely as a small reveal curtain undera platform or a doorway.
Roll DropThe roll drop is one of the oldest methods of taking a drop in and out of the audi-ence’s sight and possibly the coolest. A round tube, approximately 6″ in diameter, isattached to the bottom of the drop. This is the roll part of the drop, and it sticks outof the drop on either side to allow the pull lines to wrap around the roll.The in-and-out motion is controlled as the pull lines are pulled, and they coil and uncoil aroundthe roll.The resulting effect is a lot like a screen wipe on video: The image lowers intoview from the top, unfurling as it travels to the bottom.
Soft Show-Specific Scenery We’ve Seen SomewhereMany of the house drapes we spoke of have cousins in the show-specific world.Masking, while advantageous in some designs to be neutral, may also enhance the overalldesign by actually blending into the surrounding environment. Leaf drops and leafboarders are two good examples. A hybrid of the cut drop and masking leg, the leafdrop is basically a painted drop with details and edges scalloped out to simulate leaves.Turn this drop on its side and you have a leaf boarder (see Figure 1.39).
Scrims may also be treated like painted drops.When the painted side is lit it appears solid,but when backlit the effect is like looking through a solid object, as shown in Figure 1.40.
Main rags may be made for the production and painted with the show’s name or animage created for the show.These are referred to as the act curtains, or show curtains.Theshow-specific details on these curtains reveal the luxurious opulence the audience hascome to expect from the grand drape.
SummaryWe’ve talked about the basic building blocks of scenery: flats, platforms, and drops. Flatsmay be either hard or soft and have standard or Hollywood frames. Platforms have anynumber of frame styles; the most widely used are the standard and the stressed-skin.Almost all styles utilize a ¾″ plywood skin.Wood is the most common building mate-rial for both flats and platform frames, and two of the most popular cuts of woodenframing materials are 2 × 4 and 1 × 1 boards. Steel may also be used to constructframes, and 1 × 1 mild steel box tubes are among the most versatile of steel forms.
Scenic Design and Lighting Techniques
52
Ch001-K80806.qxd 7/5/2006 2:17 PM Page 52
Chapter 1: The Basic Scenic Building Blocks
53
Figure 1.39: Leaf drops and boarders mask, Act 2 of Philadelphia Story.
Figure 1.40: Painted scrim drop of Harmonia Gardens in Hello, Dolly.
Ch001-K80806.qxd 7/5/2006 2:17 PM Page 53
Drops may be classified as either house drapes or show specific. House drapes includemain rags, teasers and tormentors, masking legs and boarders, tabs, cycs, and scrims.Show-specific drops include the backdrop, painted drop, cut drop, roll drop, and venetian or accordion drop.They also include versions of their normally neutral cousins,the house drapes, such as painted scrims, show and act curtains, specially treated for thecurrent production. These drops are representational because they stand in for a placeor an emotion that relates to the performance.
These, as we said, are the building blocks. The rest of this text will deal with how toconstruct, move, paint, design, and light these elements.
Scenic Design and Lighting Techniques
54
Ch001-K80806.qxd 7/5/2006 2:17 PM Page 54