Embed Size (px)
Citation preview

10/12/2012
1
SEAT LEON CUP RACER 2016 BODY-SHELL MODIFICATIONS

2
Body-shell modifications
01 KIT 1 – AERO PACKAGE + COOLING PACKAGE
02 KIT 2 – FIA FT3 FUEL TANK
03 KIT 3 – SEQUENTIAL GEARBOX
This document resumes the body-shell modifications to adapt a 2014 or 2015 car to the
2016 specs depending on the kit(s) that is/are going to be installed. Even if only a single kit
is bought, it is strongly recommended to read the complete document and perform as
much modifications as possible to advance future updates.
SEAT LCR 2016
2016 BODY-SHELL MODIFICATIONS / SEAT Sport / 25/02/2016
3
Body-shell modifications
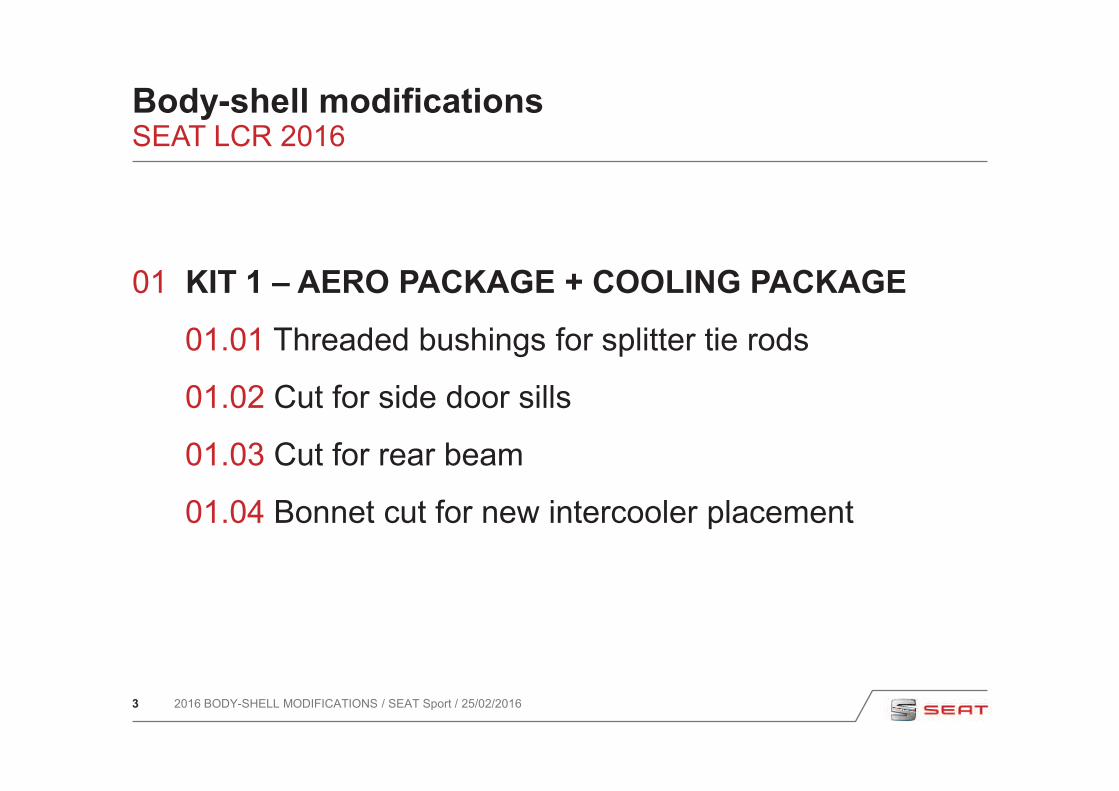
01 KIT 1 – AERO PACKAGE + COOLING PACKAGE
01.01 Threaded bushings for splitter tie rods
01.02 Cut for side door sills
01.03 Cut for rear beam
01.04 Bonnet cut for new intercooler placement
SEAT LCR 2016
2016 BODY-SHELL MODIFICATIONS / SEAT Sport / 25/02/2016
4
01 KIT 1 – AERO PACKAGE + COOLING PACKAGE
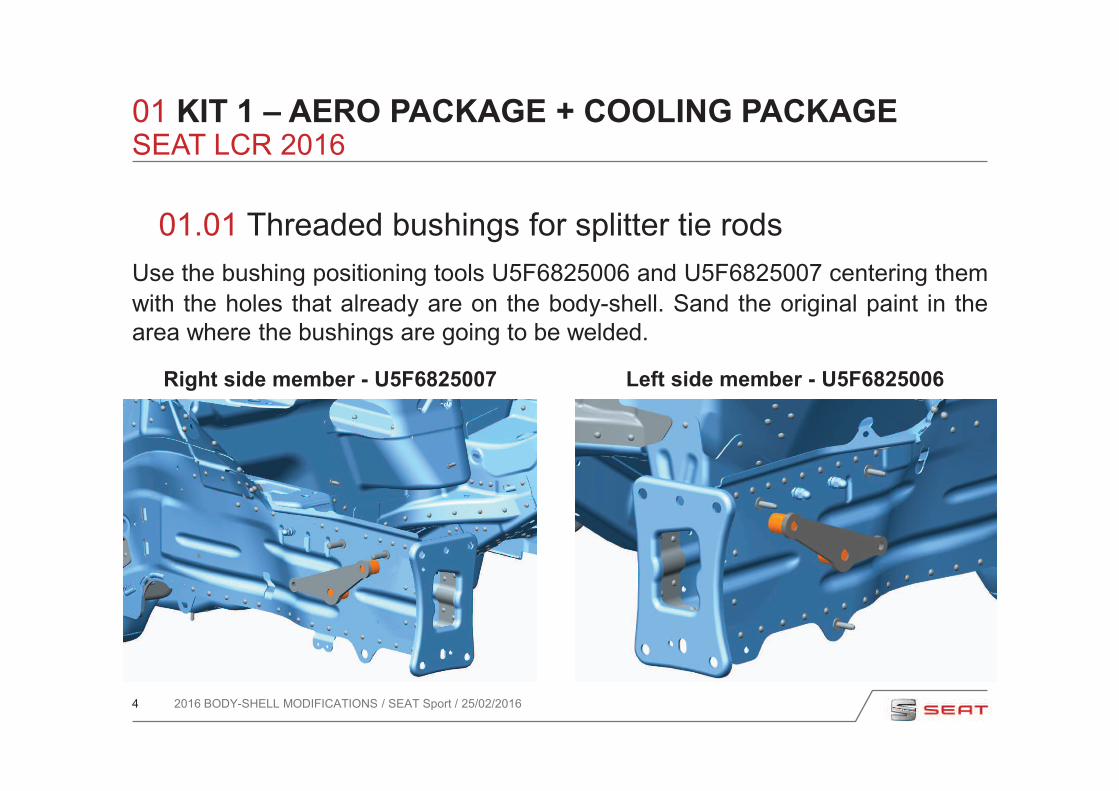
01.01 Threaded bushings for splitter tie rods
Use the bushing positioning tools U5F6825006 and U5F6825007 centering them
with the holes that already are on the body-shell. Sand the original paint in the
area where the bushings are going to be welded.
2016 BODY-SHELL MODIFICATIONS / SEAT Sport / 25/02/2016
Right side member - U5F6825007 Left side member - U5F6825006
SEAT LCR 2016

5
01 KIT 1 – AERO PACKAGE + COOLING PACKAGE
01.01 Threaded bushings for splitter tie rods
Using the tool, present the threaded bushing (5F6825416A) on its position and
fix it with some welding points. Disassemble the tool and proceed with the
contour welding. Finally paint again the area to prevent from corrosion.
2016 BODY-SHELL MODIFICATIONS / SEAT Sport / 25/02/2016
U5F6825006 with 5F6825416A bushing Final result
SEAT LCR 2016

6
01 KIT 1 – AERO PACKAGE + COOLING PACKAGE
01.02 Cut for side door sills
Mark the cut on the body-shell side trims in the front wheel arc area following the
drawings bellow. Do it symmetrically on the right side.
2016 BODY-SHELL MODIFICATIONS / SEAT Sport / 25/02/2016
Left side trim seen from lateral Left side trim seen from bellow
SEAT LCR 2016

7
01 KIT 1 – AERO PACKAGE + COOLING PACKAGE
01.02 Cut for side door sills
Cut the body-shell and paint it to prevent from corrosion.
2016 BODY-SHELL MODIFICATIONS / SEAT Sport / 25/02/2016
Right side trim cut finished Left side trim cut finished
SEAT LCR 2016
8
01 KIT 1 – AERO PACKAGE + COOLING PACKAGE
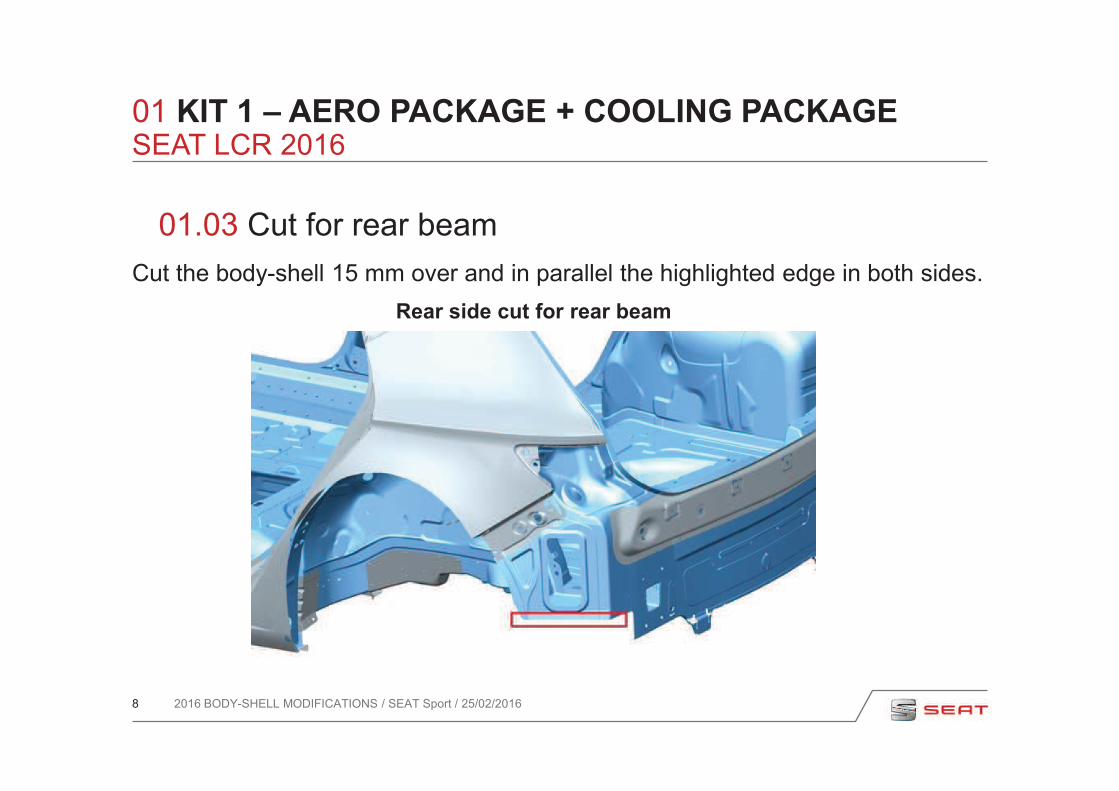
01.03 Cut for rear beam
Cut the body-shell 15 mm over and in parallel the highlighted edge in both sides.
2016 BODY-SHELL MODIFICATIONS / SEAT Sport / 25/02/2016
Rear side cut for rear beam
SEAT LCR 2016
9
01 KIT 1 – AERO PACKAGE + COOLING PACKAGE
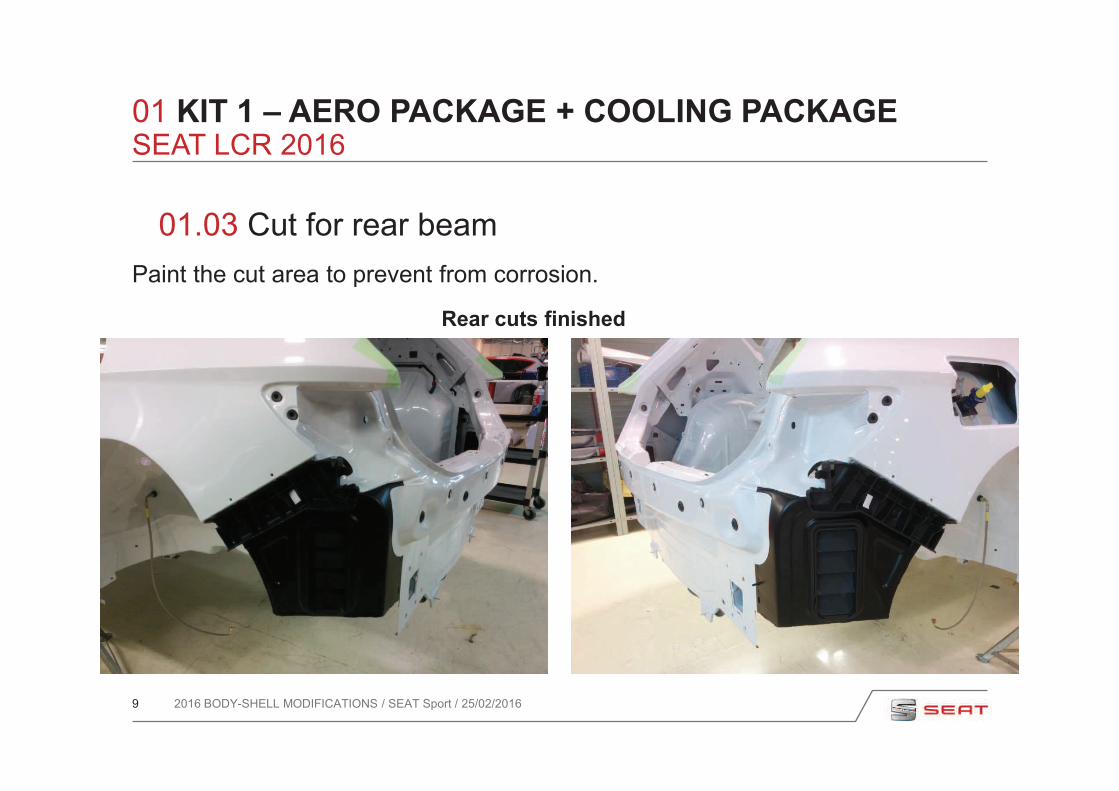
01.03 Cut for rear beam
Paint the cut area to prevent from corrosion.
2016 BODY-SHELL MODIFICATIONS / SEAT Sport / 25/02/2016
Rear cuts finished
SEAT LCR 2016
10
01 KIT 1 – AERO PACKAGE + COOLING PACKAGE
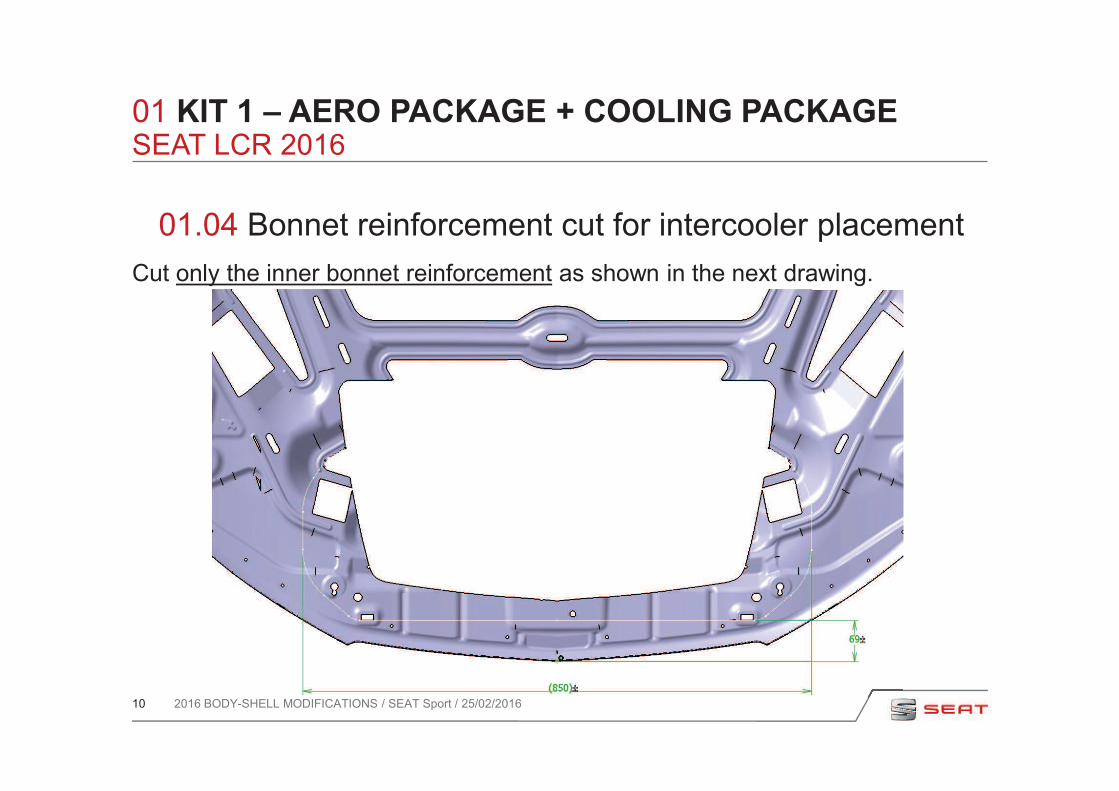
01.04 Bonnet reinforcement cut for intercooler placement
Cut only the inner bonnet reinforcement as shown in the next drawing.
2016 BODY-SHELL MODIFICATIONS / SEAT Sport / 25/02/2016
SEAT LCR 2016

11
01 KIT 1 – AERO PACKAGE + COOLING PACKAGE
01.04 Bonnet reinforcement cut for intercooler placement
Paint the cut area to prevent from corrosion.
2016 BODY-SHELL MODIFICATIONS / SEAT Sport / 25/02/2016
SEAT LCR 2016
12
02 KIT 2 – FIA FT3 FUEL TANK
02.01 Cut for fuel tank housing
02.02 New fuel tank supports welding
02.03 Hole for fuel line
02.04 Hole for ventilation hose
2016 BODY-SHELL MODIFICATIONS / SEAT Sport / 25/02/2016
Body-shell modifications SEAT LCR 2016
13
02 KIT 2 – FIA FT3 FUEL TANK
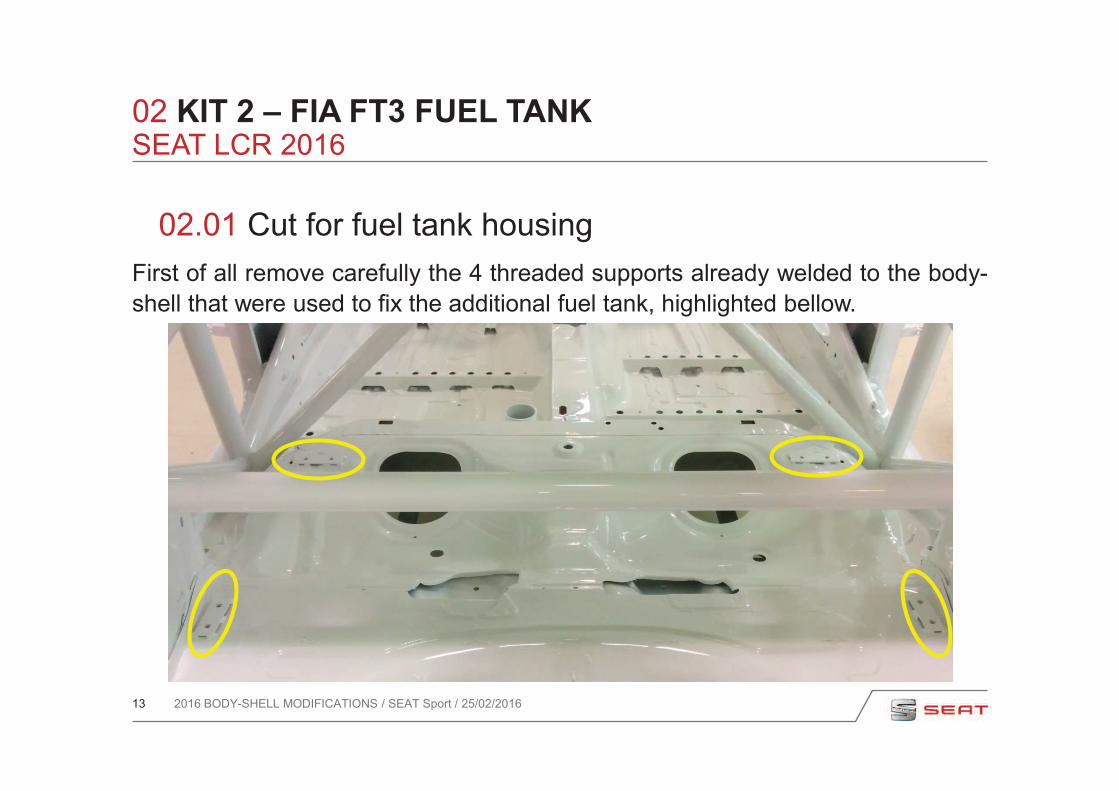
02.01 Cut for fuel tank housing
First of all remove carefully the 4 threaded supports already welded to the body-
shell that were used to fix the additional fuel tank, highlighted bellow.
2016 BODY-SHELL MODIFICATIONS / SEAT Sport / 25/02/2016
SEAT LCR 2016
14
02 KIT 2 – FIA FT3 FUEL TANK
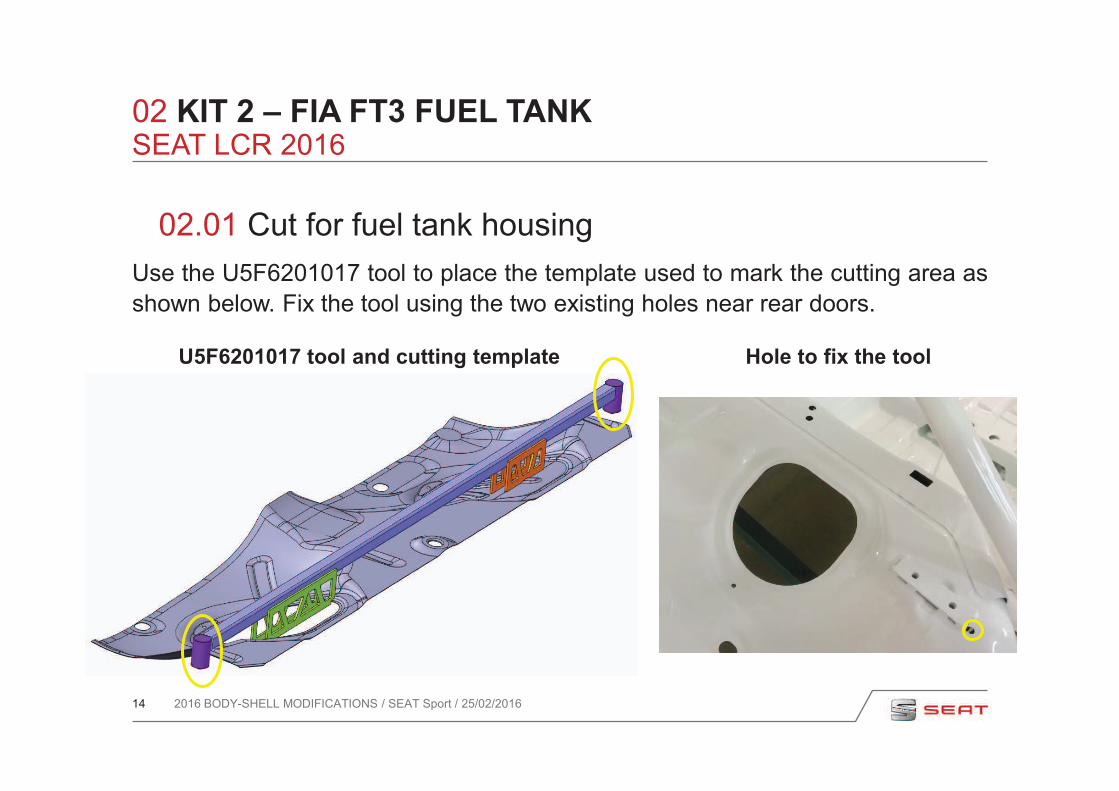
02.01 Cut for fuel tank housing
Use the U5F6201017 tool to place the template used to mark the cutting area as
shown below. Fix the tool using the two existing holes near rear doors.
2016 BODY-SHELL MODIFICATIONS / SEAT Sport / 25/02/2016
U5F6201017 tool and cutting template
SEAT LCR 2016
Hole to fix the tool

15
02 KIT 2 – FIA FT3 FUEL TANK
02.01 Cut for fuel tank housing
Mark the cut all around the template and then remove the tool. Now cut the
body-shell from the inner part of the mark.
2016 BODY-SHELL MODIFICATIONS / SEAT Sport / 25/02/2016
SEAT LCR 2016

16
02 KIT 2 – FIA FT3 FUEL TANK
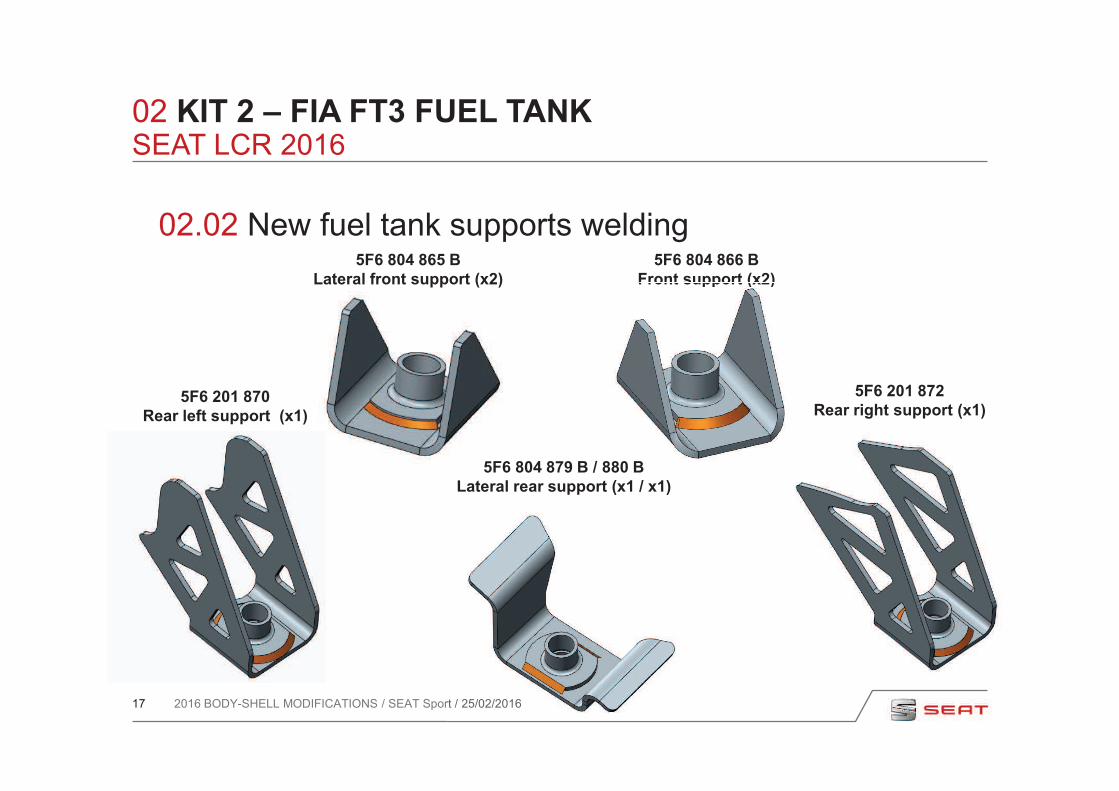
02.02 New fuel tank supports welding
For this job is necessary the tool U5F6201001A and the eight supports that have
to be welded to the body-shell.
2016 BODY-SHELL MODIFICATIONS / SEAT Sport / 25/02/2016
SEAT LCR 2016
U5F6201001A
17
02 KIT 2 – FIA FT3 FUEL TANK
02.02 New fuel tank supports welding
2016 BODY-SHELL MODIFICATIONS / SEAT Sport / 25/02/2016
SEAT LCR 2016
rt / 25/02/2016
5F6 804 879 B / 880 B
Lateral rear support (x1 / x1)
5F6 804 865 B
Lateral front support (x2)
5F6 80
5F6 804 866 B
Front support (x2)
880 B
Front support (x2)
5F6 201 870
Rear left support (x1)
5F6 201 872
Rear right support (x1)
18
02 KIT 2 – FIA FT3 FUEL TANK
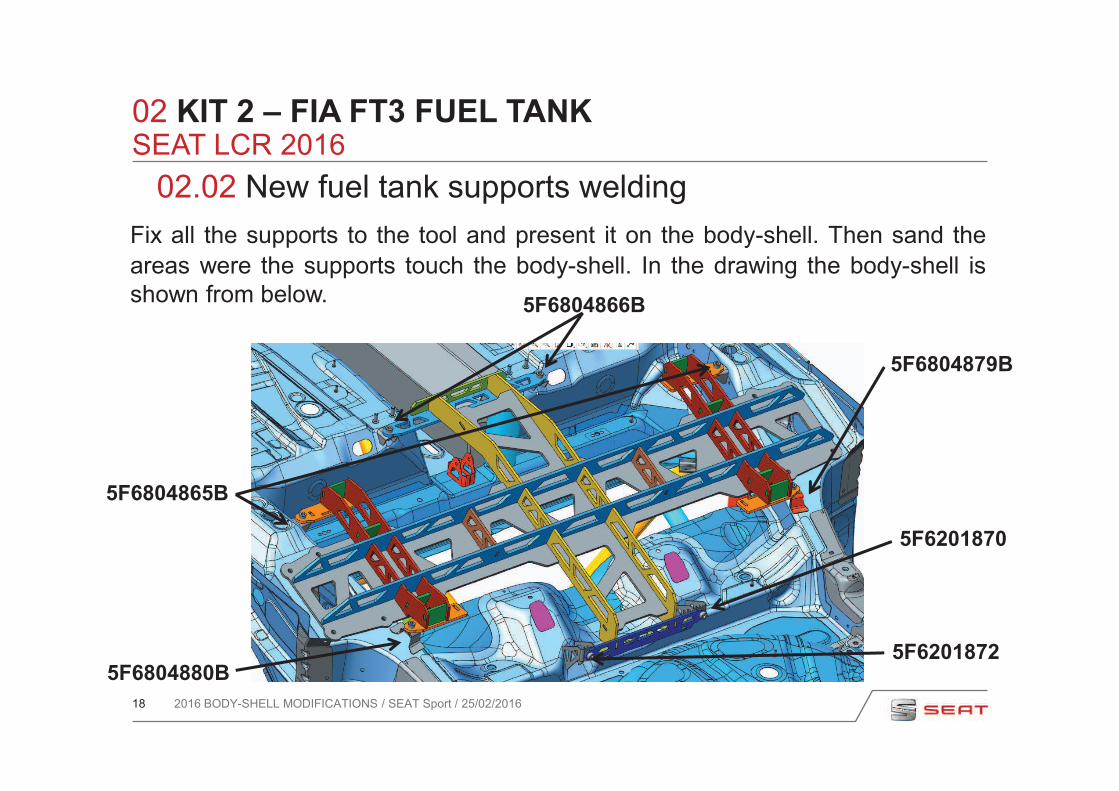
02.02 New fuel tank supports welding
Fix all the supports to the tool and present it on the body-shell. Then sand the
areas were the supports touch the body-shell. In the drawing the body-shell is
shown from below.
2016 BODY-SHELL MODIFICATIONS / SEAT Sport / 25/02/2016
SEAT LCR 2016
5F6804866B
5F6804865B
5F6804879B
5F6201870
5F6804880B 5F6201872
19
02 KIT 2 – FIA FT3 FUEL TANK
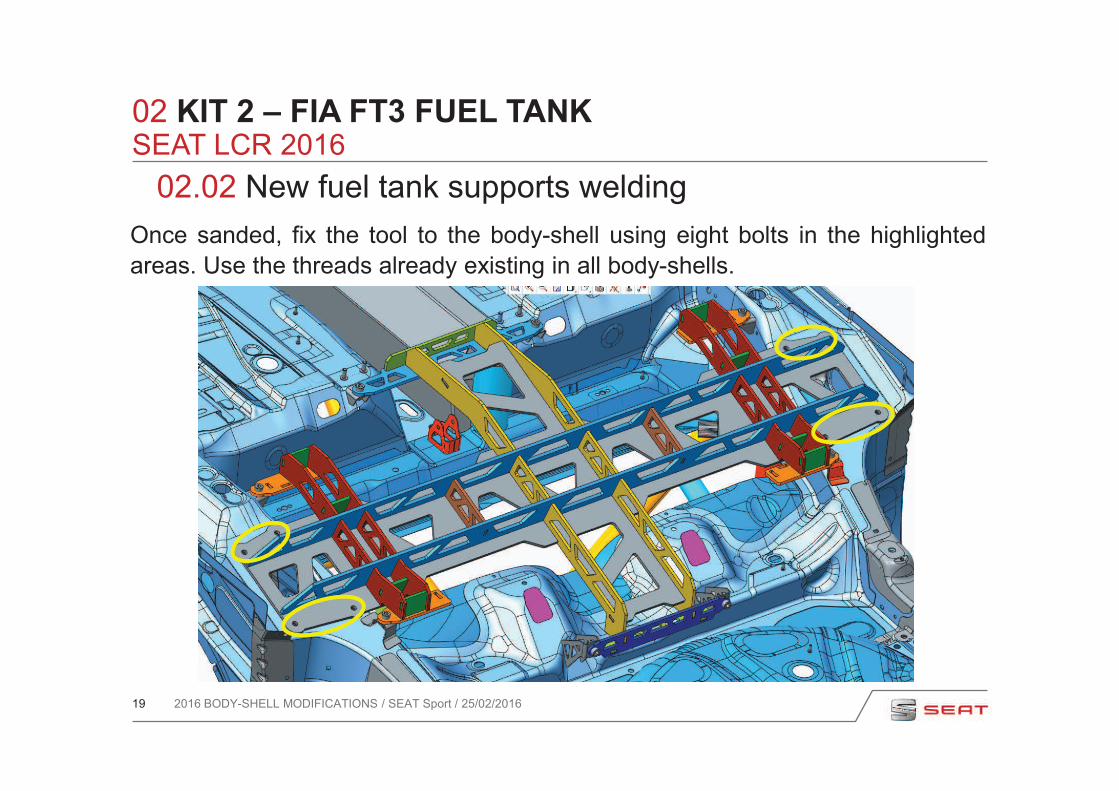
02.02 New fuel tank supports welding
Once sanded, fix the tool to the body-shell using eight bolts in the highlighted
areas. Use the threads already existing in all body-shells.
2016 BODY-SHELL MODIFICATIONS / SEAT Sport / 25/02/2016
SEAT LCR 2016

20
02 KIT 2 – FIA FT3 FUEL TANK
02.02 New fuel tank supports welding
Once the welding is finished remove the tool and paint to prevent from corrosion.
2016 BODY-SHELL MODIFICATIONS / SEAT Sport / 25/02/2016
SEAT LCR 2016

21
02 KIT 2 – FIA FT3 FUEL TANK
02.03 Hole for fuel line
A Ø21 mm hole has to be done 35 mm above the already existing hole for the
windscreen washer fluid hose under the dashboard next to the co-driver door.
2016 BODY-SHELL MODIFICATIONS / SEAT Sport / 25/02/2016
SEAT LCR 2016
35 mm
Inside view Outside view
22
02 KIT 2 – FIA FT3 FUEL TANK
02.03 Hole for fuel line
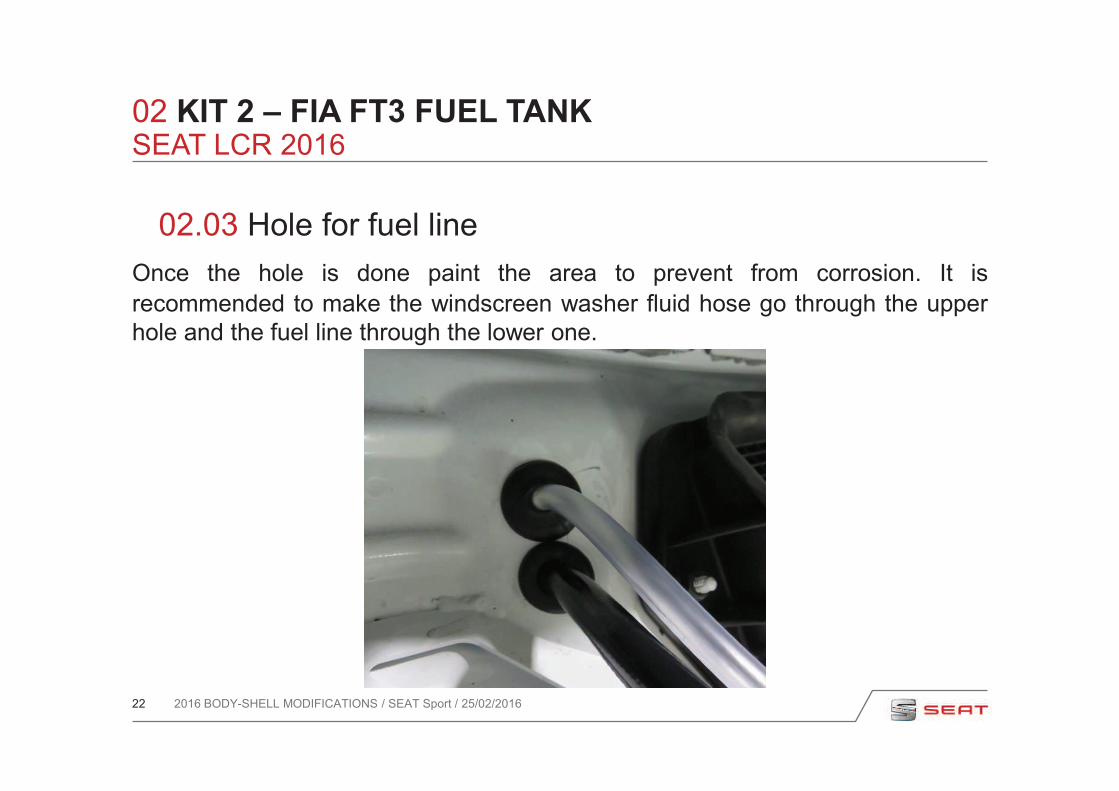
Once the hole is done paint the area to prevent from corrosion. It is
recommended to make the windscreen washer fluid hose go through the upper
hole and the fuel line through the lower one.
2016 BODY-SHELL MODIFICATIONS / SEAT Sport / 25/02/2016
SEAT LCR 2016
23
02 KIT 2 – FIA FT3 FUEL TANK
02.04 Hole for ventilation hose
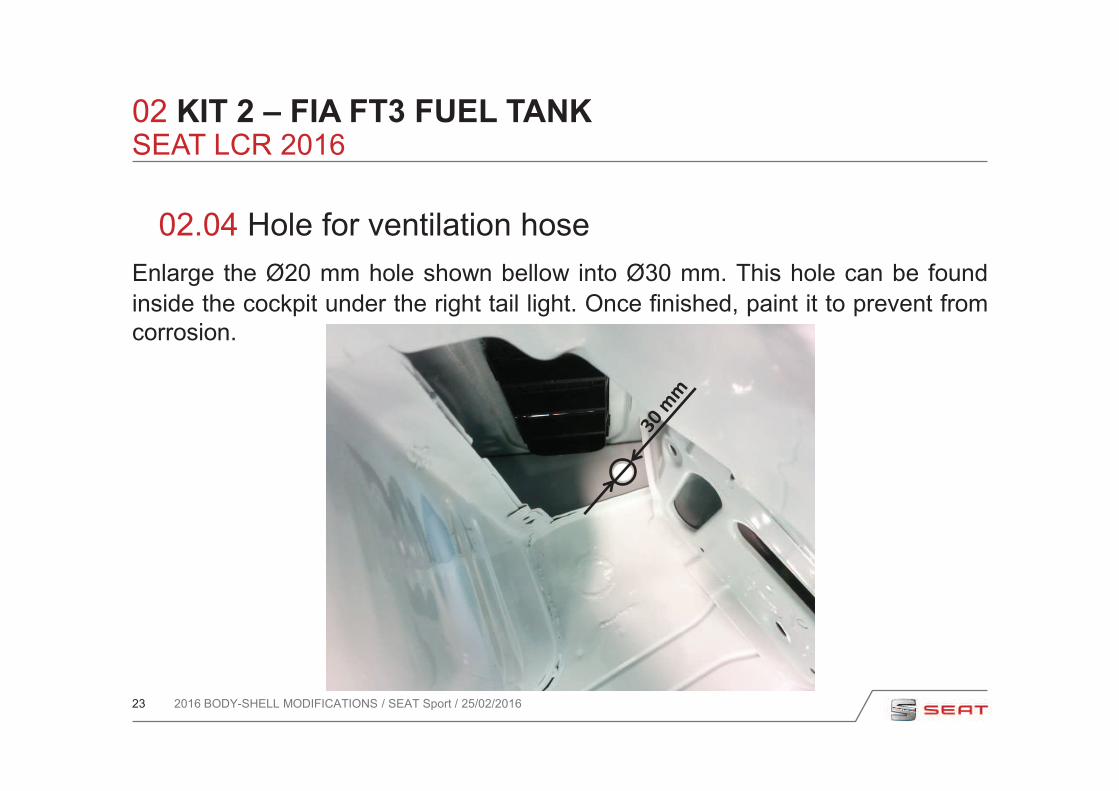
Enlarge the Ø20 mm hole shown bellow into Ø30 mm. This hole can be found
inside the cockpit under the right tail light. Once finished, paint it to prevent from
corrosion.
2016 BODY-SHELL MODIFICATIONS / SEAT Sport / 25/02/2016
SEAT LCR 2016

24
03 KIT 3 – SEQUENTIAL GEARBOX
03.01 Hole for clutch pipe
03.02 Holes for hand brake support
03.03 Front sub-frame modification
2016 BODY-SHELL MODIFICATIONS / SEAT Sport / 25/02/2016
Body-shell modifications SEAT LCR 2016

25
03 KIT 3 – SEQUENTIAL GEARBOX
2016 BODY-SHELL MODIFICATIONS / SEAT Sport / 25/02/2016
SEAT LCR 2016
03.01 Hole for clutch pipe
Do a Ø25 mm hole between the engine bay and the cockpit in the pedal box
area following the drawings bellow.

26
03 KIT 3 – SEQUENTIAL GEARBOX
2016 BODY-SHELL MODIFICATIONS / SEAT Sport / 25/02/2016
SEAT LCR 2016
03.02 Holes for hand brake support
Disassembly the control console and use the three existing holes as reference to
do the three extra holes needed.
27
03 KIT 3 – SEQUENTIAL GEARBOX
2016 BODY-SHELL MODIFICATIONS / SEAT Sport / 25/02/2016
SEAT LCR 2016
03.02 Holes for hand brake support
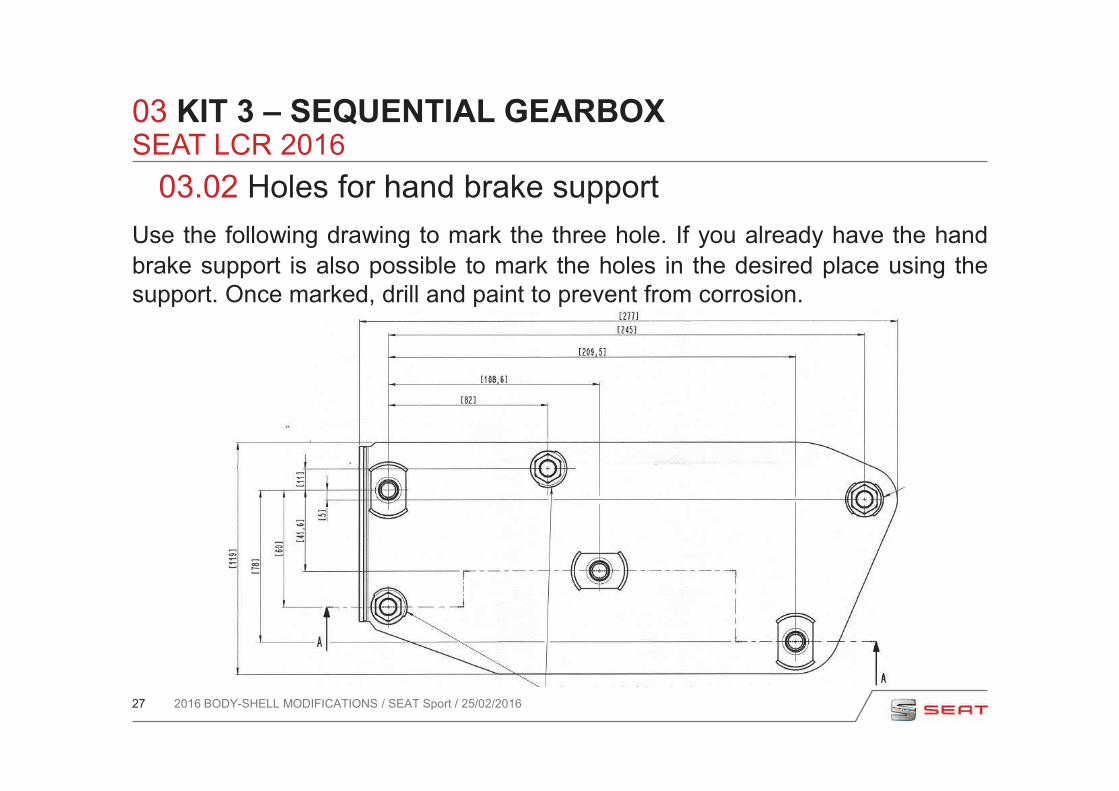
Use the following drawing to mark the three hole. If you already have the hand
brake support is also possible to mark the holes in the desired place using the
support. Once marked, drill and paint to prevent from corrosion.

28
03 KIT 3 – SEQUENTIAL GEARBOX
2016 BODY-SHELL MODIFICATIONS / SEAT Sport / 25/02/2016
SEAT LCR 2016
03.02 Holes for hand brake support
Result

29
03 KIT 3 – SEQUENTIAL GEARBOX
2016 BODY-SHELL MODIFICATIONS / SEAT Sport / 25/02/2016
SEAT LCR 2016
03.02 Holes for hand brake support
30
03 KIT 3 – SEQUENTIAL GEARBOX
2016 BODY-SHELL MODIFICATIONS / SEAT Sport / 25/02/2016
SEAT LCR 2016
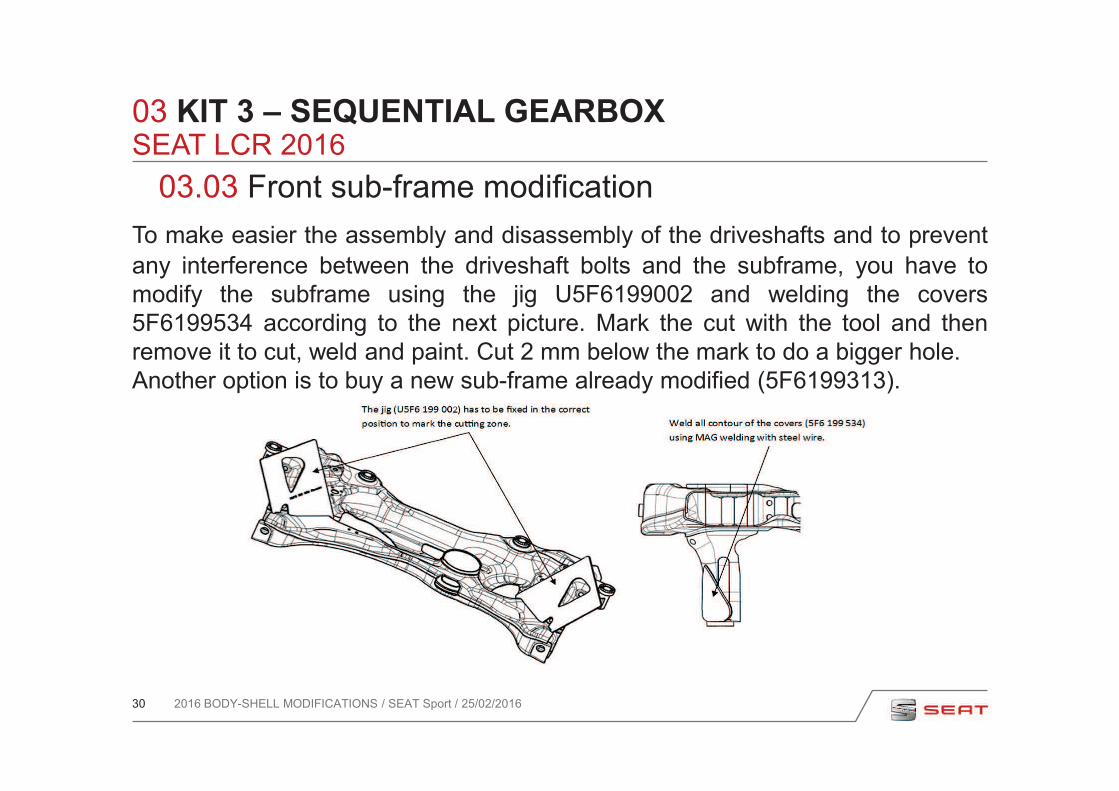
03.03 Front sub-frame modification
To make easier the assembly and disassembly of the driveshafts and to prevent
any interference between the driveshaft bolts and the subframe, you have to
modify the subframe using the jig U5F6199002 and welding the covers
5F6199534 according to the next picture. Mark the cut with the tool and then
remove it to cut, weld and paint. Cut 2 mm below the mark to do a bigger hole.
Another option is to buy a new sub-frame already modified (5F6199313). 2