Embed Size (px)
Citation preview

SDL Trados Training
Budapest
April 28 and May 1, 2007

The copyright belongs to Dipl.-Ing. Jerzy Czopik. No part of the document or the contents thereof may be reproduced in any way. You may not supply the material to any third party for commercial gain. All logos, names and trade marks used here are property of their respective owner. © 2007 Dipl.-Ing. Jerzy Czopik – SDL Trados Workbench Certified

Table of contents
1 Introduction......................................................................................................................................1 1.1 What is CAT? ...........................................................................................................................1 1.2 Text and segments...................................................................................................................1
2 SDL Trados 2007..............................................................................................................................2 2.1 Supported file formats ..............................................................................................................2 2.2 Trados modules........................................................................................................................2 2.3 Installing Trados .......................................................................................................................3
3 Preparing your PC for translating using SDL Trados 2007 .........................................................5 3.1 Preparing of Microsoft Word.....................................................................................................5 3.2 Creating a new translation memory..........................................................................................7 3.3 Settings in Translator's Workbench..........................................................................................8 3.4 Most important settings in Microsoft Word...............................................................................11
4 Trados commands.........................................................................................................................12 4.1 Main functions for translating .................................................................................................12 4.2 Additional functions for translating .........................................................................................13 4.3 Placeables and terms.............................................................................................................13
5 Preparing for translation...............................................................................................................14 5.1 File preparation ......................................................................................................................14 5.2 Folder structure ......................................................................................................................14 5.3 File analysis............................................................................................................................15 5.4 Interpreting the analysis results..............................................................................................16
6 Translating with Word ...................................................................................................................18 6.1 Translating Word files.............................................................................................................18 6.2 Translating tagged text with Word..........................................................................................18 6.3 Clean Up of translated files ....................................................................................................19
7 Using Tageditor for translation ....................................................................................................21 7.1 Translating Word, Excel, PowerPoint with Tageditor .............................................................22
7.1.1 Preparing files ...............................................................................................................22 7.1.2 Translating files .............................................................................................................23
8 Translating HTML, XML, AND SGML files – brief overview .......................................................24 8.1 Preparing files ........................................................................................................................24 8.2 Translating HTML files ...........................................................................................................24 8.3 Creating own ini file ................................................................................................................24
©2007 Dipl.-Ing. Jerzy Czopik Budapest, April 28 and May 1, 2007 i

9 Translating PageMaker, QuarkXPress and InDesign files, using Story Collectors................ 28 9.1 File preparation...................................................................................................................... 28 9.2 Installing Story Collectors ...................................................................................................... 29
9.2.1 PageMaker ................................................................................................................... 29 9.2.2 QuarkXPress ................................................................................................................ 30 9.2.3 InDesign ....................................................................................................................... 31
9.3 Using Story Collectors ........................................................................................................... 31 9.3.1 Exporting stories........................................................................................................... 31 9.3.2 Translating exported text .............................................................................................. 32 9.3.3 Importing stories........................................................................................................... 33
10 Translating InDesign CS2 files .................................................................................................... 34 10.1 Preparation ............................................................................................................................ 34 10.2 Translating............................................................................................................................. 34
11 Translating Framemaker files ...................................................................................................... 35 11.1 Preparation ............................................................................................................................ 35 11.2 Translating converted MIF files.............................................................................................. 36 11.3 Creating MIF files from translated files .................................................................................. 37 11.4 Translating of Interleaf/Quicksilver files ................................................................................. 38
12 Creating a Multiterm term base from an Excel sheet with terminology................................... 39 12.1 Preparing terminology list ...................................................................................................... 39 12.2 Converting Excel using Multiterm Convert............................................................................. 39 12.3 Importing converted Excel sheet into Multiterm..................................................................... 42 12.4 Setting up Workbench for terminology recognition ................................................................ 48
13 Help in case of problems ............................................................................................................. 49 13.1 Formatting marks (TAGs) ...................................................................................................... 49 13.2 ProZ.com ............................................................................................................................... 49 13.3 Yahoo TW_Users group ........................................................................................................ 49 13.4 SDL help centre ..................................................................................................................... 49 13.5 Contacting the author ............................................................................................................ 49
ii Budapest, April 28 and May 1, 2007 ©2007 Dipl.-Ing. Jerzy Czopik

1 Introduction
1.1 What is CAT?
CAT-programs, such as SDL Trados 2007, mean “Computer Assisted Translation” (this is where this abbreviation comes from). As the name suggests, they should be computer based helping tools for translators, but should not be considered as machine translation programs. CAT software does not translate on its own, but only uses translations (segments), which were previ-ously stored in a translation memory by a human. During the translation process the program compares the text with translation units, stored in the translation memory and suggests translation for it, according to a special algorithm. In ideal case the program finds an exact match and inserts it in the text to be translated, leaving the translator only with the necessity to review the translation. The comparison algorithm is the core secret of a CAT tool and is being held confidential by any CAT developer. To be able to compare the current text with the database the CAT program “segments” the text. My main aim for this training is to show you how to use this function and how to avoid shortcomings, caused by text segmentation.
1.2 Text and segments
Main element when translating a text using SDL Trados is a “segment”. Segment may be a single word, a word group or whole sentence or even a whole paragraph. The best segment is whole sentence. When working you should always try to put only whole sentences into your database. Storing “broken segments” is not very useful and in worst case may make your database useless. Sometimes however you will be forced to store single words in your database. Depending on the lan-guage you use you will also need to have multiple translations for a single word or phrase. This all needs much more attention, than simple storing of complete sentences.
©2007 Dipl.-Ing. Jerzy Czopik Budapest, April 28 and May 1, 2007 1

2 SDL Trados 2007
2.1 Supported file formats
Tagged text formats – HTM, HTML, JSP, ASP, ASPX, ASCX, INC, PHP, SGML, XML and XSL.
DTP formats – FrameMaker and FrameMaker + SGML tagged text format (MIF), Interleaf and QuickSilver tagged text format (IASCII), Ventura tagged text format (TXT), PageMaker tagged text format (TXT), QuarkXPress tagged text format (QSC), and InDesign tagged text format (ISC).
Office formats – Microsoft Word up to Word 2007, Microsoft RTF, Microsoft PowerPoint and Micro-soft Excel, Open Office and Star Office.
TRADOS formats – TRADOStag and Workbench RTF.
Windows executable files – EXE, DLL, OCX, and LNG.
Windows resource files – RC and DLG.
2.2 Trados modules
Workbench
Tageditor
T-Window for Clipboard
S-Taggers
Additional modules: Story Collectors
Multiterm
WinAlign
2 Budapest, April 28 and May 1, 2007 ©2007 Dipl.-Ing. Jerzy Czopik

2.3 Installing Trados
Trados is now provided as file download only. Save the download to any folder of your choice. After downloading the SDLTrados2007_FL_820.exe file execute it by double clicking on it. A welcome screen appears.
Click “Next“. You will see the unzip-screen, asking you for the destination folder. Chose any convenient folder.
Press next. The files will be unzipped and the installation process starts automatically. If you need to start it manually, go to the folder where you unzipped the files and execute the
Start.exe. Please note, that SDL Trados 2007 Freelance does not longer support the soft-lock license (your license file you had for previous versions), but needs to be activated online. The activation code may be found in your account (where you downloaded your copy of the software) under “Licenses”.
I will not describe the installation process in detail here, but will nevertheless give you some important hints. For best possible results chose the “Full installation”.
©2007 Dipl.-Ing. Jerzy Czopik Budapest, April 28 and May 1, 2007 3

Remember, that in the Freelance version you can only chose up to 5 languages during the installation. Once you have chosen your languages you cannot change them without uninstalling and reinstalling the product. To be on a safe side, chose all languages, that might be of interest for you.
Note:
Sublanguages, as English UK, English US, German Germany or German Switzerland are handled as one single language.
After the installation is finished, restart your PC. This is not a must, but makes sense.
If you wish to use Trados with Microsoft Word, you have to install the software in the following order: Install Microsoft Office first. Install any Office ad-ons, as for example Proofing Tool Kit. Then install SDL Trados. Install Multiterm as the latest part.
4 Budapest, April 28 and May 1, 2007 ©2007 Dipl.-Ing. Jerzy Czopik

3 Preparing your PC for translating using SDL Trados 2007
3.1 Preparing of Microsoft Word
(here Word 2003 as example)
After the installation has been completed check, if in C:\Documents and settings \Current user\Application data\Microsoft\Word\Startup1 a copy of TRADOS8.dot. If you have also installed the terminology management tool, called Multiterm, a corresponding template (MultiTerm7.dot) is installed in C:\Program files\Microsoft Office\OFFICE11\STARTUP. Start Word. In Word you should see a new icon, so called “Trados Flagman”. If Multiterm is installed, a MT toolbar can also be seen.
After you click the Trados Flagman Trados toolbar and Trados menu appear. With the first start of Word after the installation however the menu and toolbar might be visible at once.
This shows, that the software has been properly integrated with Word. Should Word be maximized, shrink its window by clicking the button, marked above with a green circle. Now you can start Workbench, the main Trados module. Click “Start”, “All programs”, “SDL Interna-
tional”, “SDL Trados 2007 Freelance” and select “Translator's Workbench”. Enter your user ID (free choice).
1 Current user oznacza nazwę użytkownika, aktualnie zalogowanego w systemie operacyjnym Windows
©2007 Dipl.-Ing. Jerzy Czopik Budapest, April 28 and May 1, 2007 5

Workbench starts in not maximized view. Now you see both Word and Workbench on your screen. Arrange the program windows so, that Workbench takes 1/3 of the screen in its upper part and Word 2/3 of the screen in its lower part. See the illustration below for an exemplary screen view.
Such arrangement of windows will make your work easier.
6 Budapest, April 28 and May 1, 2007 ©2007 Dipl.-Ing. Jerzy Czopik

3.2 Creating a new translation memory
In Translator's Workbench click File and select “New”.
Select languages for your translation memory. Leave all default settings selected. If you wish, you may additionally select “Used date” and “Usage counter”. Depending on the language select also “Allow multiple translations for identical source segments”. This is very important for languages, which have declination of words. Enter any information you wish into “Name”, “Copyright notice” and “Description”. These are descriptive fields and do not influence either the setup or the quality of your database. Click “Create”.
Chose the destination folder, enter the name for your translation memory and select “Save”. (This is a standard MS Windows dialogue.) Your TM has been created.
©2007 Dipl.-Ing. Jerzy Czopik Budapest, April 28 and May 1, 2007 7

3.3 Settings in Translator's Workbench
Click on “File” in Translator's Workbench and select “Setup”.
Chose “Segmentation rules”.
Here click “Users lists...”.
8 Budapest, April 28 and May 1, 2007 ©2007 Dipl.-Ing. Jerzy Czopik

The “Abbreviations” list allows you to teach Trados unknown abbreviations and is very useful. For example Trados does not recognize “temp.” as an abbreviation. To let the program not to stop after this abbreviation you may enter it on the list. Just write down “temp.” in the above field. You need to put in all abbreviations in lower case, regardless their correct spelling, and wit a dot. To enter the next abbrevia-tion, press + .
Click OK, to close the list, and OK again, if you wish to close the settings and save changes.
Please leave ALL other segmentation rules unchanged, unless you are asked to change them by your customer or have a valid reason to do so. If changing segmentation settings, please change only ONE setting at the time and check, if the effect of the change is as desired.
Now go to “Options” and select “Translation memory options”.
©2007 Dipl.-Ing. Jerzy Czopik Budapest, April 28 and May 1, 2007 9

Optimal settings for the “General” tab are shown above. Please observe, that the “Minimum match value” has been set to much lower value than the default one. A reduction of the default value is advisable, not necessarily as low as here, but I would not recommend a setting of more than 50%, as otherwise you will be loosing valuable matches from your TM. Also the “Copy source on no match” is an interesting setting. If activated, you can save time on entering numbers or placing tags, when working wit tagged text.
The “Penalties” should remain unchanged. The “Concordance” tab determines how the concordance search works. Concordance means searching in translation memory (current and reference) for a previous translation of a particular word or phrase. We shall speak about it during the training.
Now please select the “Tools” tab.
Make sure, that you have “Keep backup” selected. This will prevent you from loosing your work due to cleanup problems, as a copy of the file will be kept either in a desired location (if “Location” is selected and entered”) or in the same folder, where the cleaned file was (recommended setting).
10 Budapest, April 28 and May 1, 2007 ©2007 Dipl.-Ing. Jerzy Czopik

3.4 Most important settings in Microsoft Word
In Word go to Tools and select Option. On the view tab please make the following settings:
It is very important, that in the field “Formatting marks” you select “All”.
©2007 Dipl.-Ing. Jerzy Czopik Budapest, April 28 and May 1, 2007 11

4 Trados commands
4.1 Main functions for translating
Open
• Open/get
• Open Next no 100%/get
• Get Translation
• Restore Source
• Copy source
• Set/Close Next Open/Get
• Set Close Next no 100% Open Get
• Translate to Fuzzy
• Set / Close
• Close
•
12 Budapest, April 28 and May 1, 2007 ©2007 Dipl.-Ing. Jerzy Czopik

4.2 Additional functions for translating
Concordance
• Shrink segment
• Expand segment
• Add As New Translation
• Show other match
• /
4.3 Placeables and terms
Get Previous Placeable
• Get Current Placeable
• Get Next Placeable
• Get Previous Term
• Get Current Term
• Get Next Term
•
©2007 Dipl.-Ing. Jerzy Czopik Budapest, April 28 and May 1, 2007 13

5 Preparing for translation
5.1 File preparation
Of course you may start translating right away, but it is advisable to prepare files before. If you don’t, you will either need to do so during the translation process or end up with entering broken segments into your translation memory. File preparation includes removing all unnecessary line breaks, inserting indents, correcting formatting issues - we shall deal with this during the training.
5.2 Folder structure
Maintaining a good folder structure in your PC is very important. Some Trados project are even not possible without creating a very strict and defined folder structure. An example of a folder structure is shown below: D: Documents Customer A Project 1 Source Target Project 2 Source Target ... Customer B Project 1 Source Target Project 2 Source Target ... Translation memories Language pair 1 Technical Business Customer A Customer B ... Language pair 2 Technical Business Customer A Customer B ...
14 Budapest, April 28 and May 1, 2007 ©2007 Dipl.-Ing. Jerzy Czopik
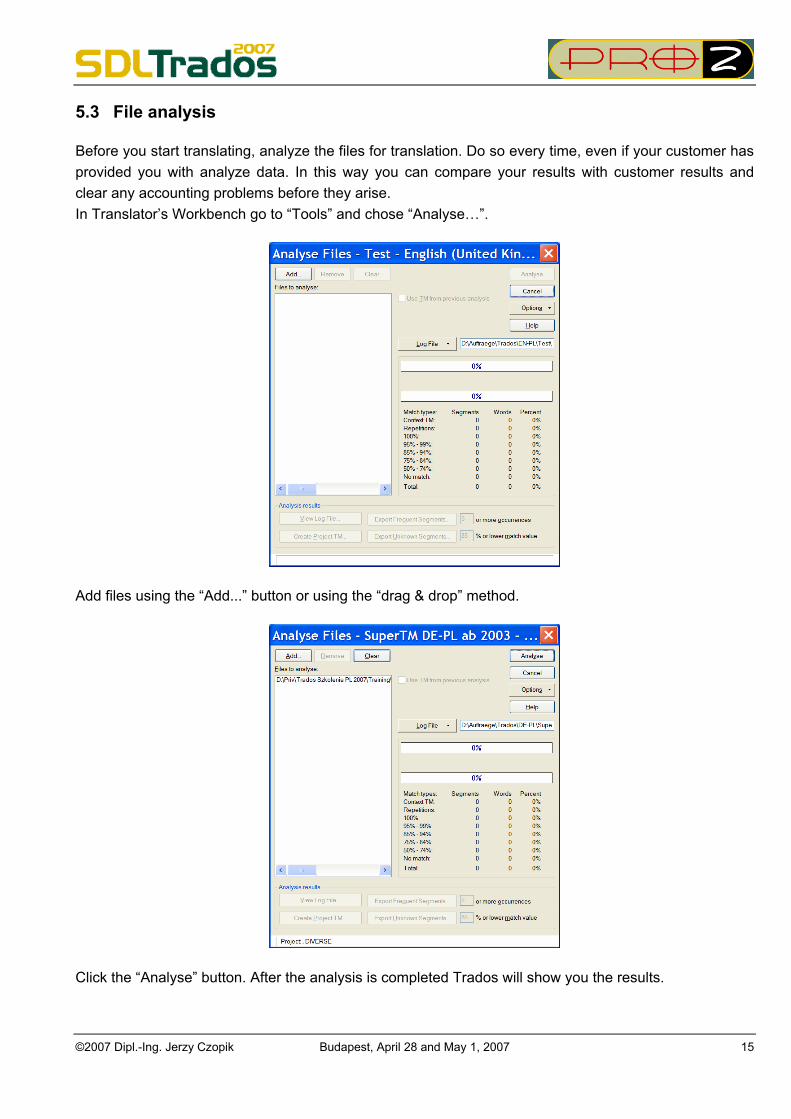
5.3 File analysis
Before you start translating, analyze the files for translation. Do so every time, even if your customer has provided you with analyze data. In this way you can compare your results with customer results and clear any accounting problems before they arise. In Translator’s Workbench go to “Tools” and chose “Analyse…”.
Add files using the “Add...” button or using the “drag & drop” method.
Click the “Analyse” button. After the analysis is completed Trados will show you the results.
©2007 Dipl.-Ing. Jerzy Czopik Budapest, April 28 and May 1, 2007 15

5.4 Interpreting the analysis results
The analysis delivers very important information about your text. Not only you can estimate how much work you will need to translate the text, but also can give your customer a detailed offer for your work. Due to a big importance of this particular point I would like to discuss it more detailed here. Beneath you see some analysis results.
Clicking on “View Log File...” shows you a file, where all previous results are stored. When you select the proper option in Translation Memory Options the log file is stored in the same location as your data base. It has the same name as your translation memory and the extension *.txt, so you can easily open it with Notepad.
Scroll down in this file to the results of the analysis. You will see something similar to the table below:
Match Types Segments Words Percent PlaceablesContext TM 0 0 0 0Repetitions 1 1 0 0100% 100 296 69 095% - 99% 15 19 4 085% - 94% 2 9 2 075% - 84% 4 17 4 050% - 74% 5 25 6 0No Match 9 64 15 0Total 136 431 100 0Chars/Word 6.38 Chars Total 2,754
16 Budapest, April 28 and May 1, 2007 ©2007 Dipl.-Ing. Jerzy Czopik

Interpretation of this results has main influence on the economical results of our work. If you misinterpret these results you may end up with much more work invested for translation, as you was paid for.
Note:
The analysis results alone, without having seen the analyzed files, shall never be the basis for your offer for the customer. The analyzed files may for example contain non-editable text portions, and when you give a fixed price for your translation without any additional information your customer will most probably assume, that you include also the translation for them.
Analysis results are influenced by the segmentation rules. Therefore do not analyze files with a TM not matching the language of the files. Also the penalties settings influence the results. Please also remem-ber, that bad formatting may influence the results, both to your advantage or disadvantage. That’s why seeing the text to be translated is very important.
As you see, the results are grouped in “Match types”. What are “Match types”?
Repetitions – means an exact repetition of the same segment within the analyzed texts. Repetitions are for example segments as “there are 2 books on the shelf” and „there are 22 books on the shelf”. The only difference is the number, which can be automatically substituted by the program. Repetitions must not necessarily have a corresponding match in the TM, see below. 100% match – this means, that your translation memory already contains a translation for this very segment. This means, that a 100% match must always exist in a database. Should our sentence “there are 2 books on the shelf” already been translated, so the first occurrence of this sentence in the text to be translated will count as a 100% match. Any following occurrence of this sentence (and also “there are 22 books on the shelf”) will count as repetition.
99-50% match – to calculate the match value a complicated algorithm is used. Put blatantly it means, that the program looks for similar sentences. For example the translation memory contains a translation for “there are 2 books on the shelf” and the text comes with “there are 5 albums on the shelf”. These sentences are quite similar, but not identical. The analysis results will show you such similarities broken down into five categories.
Matches under 75% are usually not very valuable. Therefore when preparing an offer for the customer you should always consider everything under 75% as no match.
Additionally you will get an information about the total number of words and characters. When comparing with other counting software please remember, that Trados does count words WITHOUT spaces.
Please do not believe the analysis results blindly. There might be a lot of other factors, influencing the time needed for translation, as for example numbers in balance sheets and similar. Please also do not trust the analysis results coming from the customer. Always verify it with your PC – there are differences between Trados versions and when some settings has been changed.
©2007 Dipl.-Ing. Jerzy Czopik Budapest, April 28 and May 1, 2007 17

6 Translating with Word You can use Word to translate either native Word files or tagged rtf files, as for example converted Framemaker documents. Depending on the file type, different preparations are to be done.
6.1 Translating Word files
Before you start translating, check the formatting of the original file. Check, if the corresponding styles do match the local formatting. If there is a mismatch, the risk of potential format changes is very high. Correct the styles to match local formatting. However, if there are a lot of styles in the documents you might even not be able to correct them all. In such case correct at least the document language in each style. Consider using Tageditor instead of Word, as this will save you a lot of work. In any case, when working with Word: change the document language to your target language, both in the styles and locally, by selecting the whole document ( ) and selecting the proper language from the Tools – Language – Chose language menu. Remove any unnecessary hard line breaks and soft line breaks. Remove multiple tabs, replace them by positioned tabs. Consider changing text formatted using tabs to a table, as this will ensure, that all will be kept properly together, even if the translation length does not match the length of the source text. Look at the images in the text. If there are any images placed over the text, but intended to part of the description (ie “Press the button ”), place them in line with text, as otherwise they will not match or in worst case might even be lost. If there are linked images in the text, avoid actualizing the links. This means you should also avoid cleaning the file in Workbench, as this will resize the images (which will not show, what you only see are red crosses instead of images), but the formatting of the document is lost. If there are text-boxes in the text, you will need to place the cursor in each of them separately to be able to translate the content of the text-box. Very often text-boxes have fixed size and are even grouped together. In such case you will need to ungroup and resize them, to be able to translate.
As Word files come mostly very bad formatted, the amount of work to prepare them for easy-going translation might be sometimes really huge. In such cases I would recommend to switch to Tageditor, as then you can forget almost everything about formatting.
6.2 Translating tagged text with Word
In this case there is almost no formatting in the file. Tags are formatted as internal or external tags and the rest of the file is plain-text. What you need to adapt is only the language of the file.
18 Budapest, April 28 and May 1, 2007 ©2007 Dipl.-Ing. Jerzy Czopik

6.3 Clean Up of translated files
After you have finished your translation you will have a bilingual file. Before you deliver it to your cus-tomer you may want to remove the source text from translated file. This process is called “cleaning”. To clean up the document use the command “Clean Up” from menu “Tools” in Translator's Workbench.
Add the files for cleanup using the “Add...” button or with drag & drop. Chose proper settings for “Changed translations” and start the clean up with the “Clean Up” button. Unfortunately this process has a lot of handicaps with Word files and often causes a file damage. This is because the Word document is converted to rtf and back. Therefore I do not recommend cleaning up with Translator’s Workbench. There is a better and faster method – a Word macro.
Note:
Although this macro does not damage formatting in documents it has a big limitation itself. It does NOT update your TM. So if you plan to use this macro for clean up keep a copy of a reviewed bilingual file for actualizing your TM. The file for delivery will be cleaned with Word macro and thus keep its formatting, while the copy will only be used to update the TM and may be deleted afterwards.
When you finish your translation and review the file start the cleanup with Word macro. In Word press + . You will see a list of macros, which are available in Word.
©2007 Dipl.-Ing. Jerzy Czopik Budapest, April 28 and May 1, 2007 19
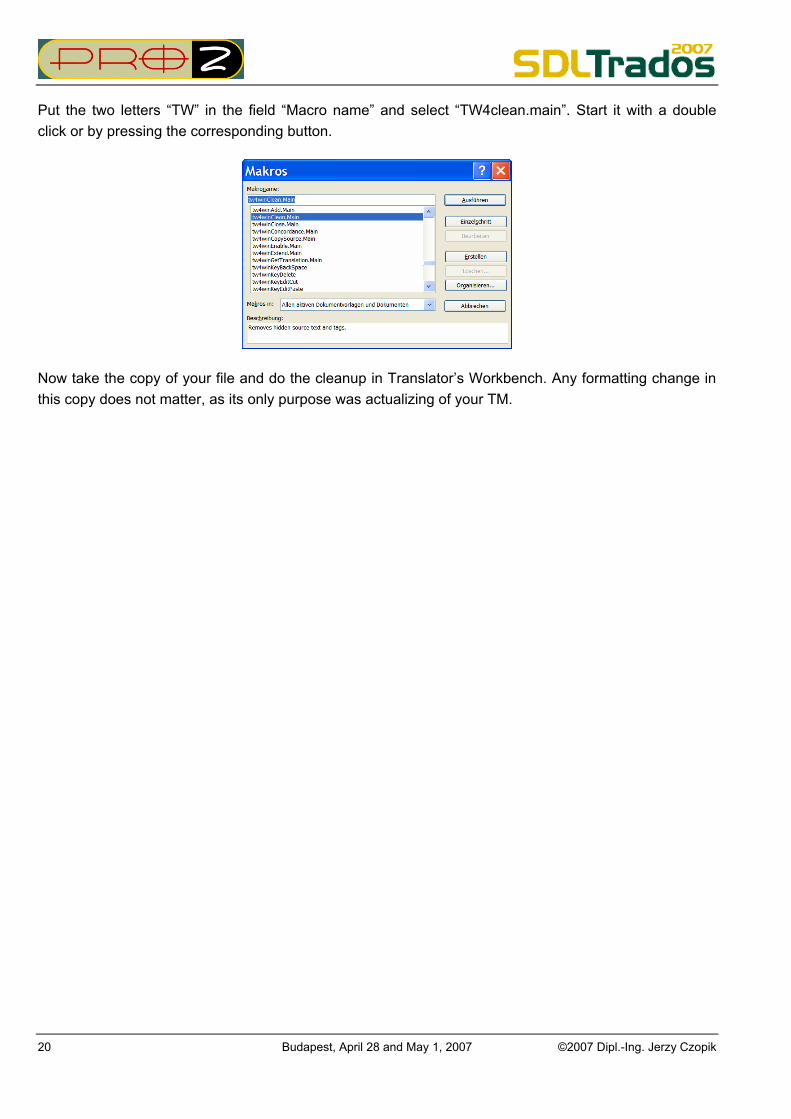
Put the two letters “TW” in the field “Macro name” and select “TW4clean.main”. Start it with a double click or by pressing the corresponding button.
Now take the copy of your file and do the cleanup in Translator’s Workbench. Any formatting change in this copy does not matter, as its only purpose was actualizing of your TM.
20 Budapest, April 28 and May 1, 2007 ©2007 Dipl.-Ing. Jerzy Czopik

7 Using Tageditor for translation Tageditor is now the main translation module in Trados and seems more and more to replace Word. Now you can translate all file types with Tageditor, so using Word is optional and makes sense for well formatted Word files and for tagged text files, which are in rtf-format.
Before we start translating with Tageditor, we need to check or change some settings. Tageditor offers the possibility to use Word spell-checker, so we will use it. To switch it on, in Tageditor chose Plug-ins from Tools menu. You will see this screen:
Make sure, that Word Spelling Checker is selected. You might also want to select some verifiers. The most important is the SDL Trados Generic Tag Veri-fier, which should always stay selected. After you're ready with the selection, click OK.
To use the spell-checker, we need one more setting. In Tageditor chose Options from Tools menu. In Options select the Spelling tab. You will see the following screen:
Depending on your needs, chose “Check spelling when closing segment” or “Check spelling before saving document as target”.
©2007 Dipl.-Ing. Jerzy Czopik Budapest, April 28 and May 1, 2007 21

Note:
Prior to using the spell-checker you have to install it in Word. You will only be able to use the languages, which are installed in Word. Tageditor always selects the spell-checker for current target language, so you do not need to change anything.
We need to change one more setting. To do so, click now on the tab Protection.
Using this settings you can toggle the tag and document protection according to your needs. When you are completely unsure about tags, leave the tag protection on. For fast and easy working with tagged files it is however recommendable to switch both tag and docu-ment protection completely off. This will allow you to modify the source document, when needed, and also makes placing, moving and removing tags much easier.
Note:
If you switch protection off, you must be very careful, when working with the document. Do not delete tags, when you are not sure what they are for. Do also not modify the source document, when you are not absolutely sure, what you are doing. Especially do not remove paragraph tags!
7.1 Translating Word, Excel, PowerPoint with Tageditor
7.1.1 Preparing files
Prepare files, as described in the Word section.
In case of Word however you will not necessarily need to adapt styles. Just check the files for unneces-sary line breaks. Place images belonging to the text in line with text. Also adapt tabs, as described before. When you translate with Tageditor, you can do some of these operations even after the translation is done. Before you convert Word file to ttx, you must check, if there are no page or section breaks inserted directly after the text, without the paragraph mark before them.
22 Budapest, April 28 and May 1, 2007 ©2007 Dipl.-Ing. Jerzy Czopik

In Word go to Tools, Options and select the View tab. Tick the box “Show all non-printable characters”, making so sure, that you will see paragraph marks, line breaks and section breaks. Then use the Search function, click on advanced and look for “manual page break” (^m) and “section break” (^b). When Word finds one of them, look how it is placed. If any of them follows directly after the last letter in the para-graph and is not preceded by a paragraph mark (the reversed-P sign, ¶), then insert the paragraph mark there. Otherwise your file will not convert back from ttx to Word. Also when a manual page break or a section break will follow directly after a table, without an empty paragraph before, the conversion back will be disturbed. You can save you a lot of work, as Tageditor will enter all text-boxes, so you do not need to ungroup and resize them prior to translation. After you are ready you might need to do so, depending on what was agreed with your customer.
In case or PowerPoint you should check, if the texts or even single words are not put in separate text boxes. If so, you need to reformat this, as otherwise you will find you translating single word without any context, which not necessarily will be even arranged as in the presentation. However, you may also go a little different way, which will be showed during the training. If there are any comments/notes in the presentation, ask your customer, if they are to be translated too. Tageditor opens also the notes, so if they are not to be translated, you should remove them.
Preparation of Excel files is similar to the others. Check, if there are sentences/words spread on many cells. If you are able to connect them, do so. Before you connect the cells, copy their content, as it will be overwritten by the content of the first cell. In case of doubt ask the customer. Hide all columns, which shall not be translated.
7.1.2 Translating files
The easiest way to open the file for translation in Tageditor is dragging it form Windows Explorer window (or any other file explorer software you might be using) on Tageditor window and dropping it there. Tageditor will then automatically chose the proper filter and open the file. After the file has been opened, press to save the file as ttx (this is the standard bilingual Tageditor file format).
Note:
Opening of large Excel or PowerPoint files may last very long. Do not cancel the process, even if it looks like nothing happens. It may take up to 30 minutes or longer, depending on your PC. To be sure, that the process does not hang, press to open the Task Manager (assuming, that you are working with Windows XP). In Task Manager click on the tab “Processes”. Locate the Tageditor process. If it con-sumes CPU power, the process is not stuck. Wait, until the file is opened.
The translation process is similar to that in Word.
After your translation is done, save the ttx file first. Then from menu File chose “Save target as…” to save your translated file in target format. Chose another name as the source file, as otherwise the file will be overwritten.
©2007 Dipl.-Ing. Jerzy Czopik Budapest, April 28 and May 1, 2007 23

8 Translating HTML, XML, AND SGML files – brief overview
8.1 Preparing files
The preparation is similar to what was describer for Word and other files. However, now you will need extra software or good knowledge in html to make changes. Usually we do not have neither such software, nor such knowledge, so a preparation of such files is not easy. The only possibility to correct formatting issues, such as unnecessary line breaks, will be during the translation. This is possible – but it is a demanding process.
8.2 Translating HTML files
Tageditor comes with a predefined set of ini files for translation, so usually you only need to open the html file in Tageditor and translate it. No other operations are necessary. Ini file is nothing else as an instruction for Tageditor how to treat the tags. For changing tag settings and modifying them refer to the File Format Reference Guide, which is pro-vided in Trados start menu, Documentation section.
8.3 Creating own ini file
You can create your own ini file. There is a Tag Settings Wizard, which can be started in Tageditor from Tools – Tag Settings Manager. In Tageditor chose Tag Settings Manager in Tools menu.
Click on new. On the next screen, simply click Next. There are 6 steps to follow.
24 Budapest, April 28 and May 1, 2007 ©2007 Dipl.-Ing. Jerzy Czopik

The following screen opens:
Enter the desired settings name and select the file type, for which you are creating the settings. Click next.
Click on Import. The file dialogue opens.
Navigate to the file, for which you want to create the settings and click on Open.
©2007 Dipl.-Ing. Jerzy Czopik Budapest, April 28 and May 1, 2007 25

Simply click OK. You will return to the screen from step 2. Click Next.
Step 3 does not need any changes.
In step 4 you can:
Classify tags as external, internal, or a placeholder.
Classify tags as always translatable or non-translatable.
Define translatable attributes within tags (for example, the ALT attribute within the IMG tag in HTML).
26 Budapest, April 28 and May 1, 2007 ©2007 Dipl.-Ing. Jerzy Czopik

Assign special formatting properties to text between specific tags (for example, headings or em-phasized text).
Add or remove tags from the list of elements.
Add conditions to determine when text is translatable.
Select one or more root elements. Refer to Trados File Format Reference Guide (file mentioned above) for more details on this settings.
Usually you will not need to change anything, so simply click Next.
Also do not change the settings in this step, but just click Next.
Here too do not change the viewer, but simply click on Finish.
This is a very easy way to create an own ini file. Unfortunately this will not work for all files you get. When accepting translations of such files, make sure, that your customer will provide you with the necessary ini file. The above is just an emergency solution.
©2007 Dipl.-Ing. Jerzy Czopik Budapest, April 28 and May 1, 2007 27

9 Translating PageMaker, QuarkXPress and InDesign files, using Story Collectors
9.1 File preparation
As with other files, you need to prepare also PM, QXP or INDD files. You can do this only if you have the corresponding application on your PC. Remove all unnecessary soft and hard returns, check text formatted with tabs and look at tables. Very often user tend to make tables with tabulator instead of using the corresponding table function.
Note:
If you see any tables in PageMaker, look very carefully at them. They will be either made using tabs or embedded objects, created with Adobe Table. In the first case you might consider placing text frames above the table grid and copying the table contents into them. However, this is a lot of work and does not make much sense for small tables. You can simply overwrite them by hand, to avoid getting broken segments into your TM. If the tables are embedded objects from Adobe Table, you will be able to edit them, but NOT in Trados! Trados does not support translating embedded objects. Be sure you have included the translation of such tables in your calculation, as otherwise you will loose a lot of time and get no payment for it.
28 Budapest, April 28 and May 1, 2007 ©2007 Dipl.-Ing. Jerzy Czopik

9.2 Installing Story Collectors
9.2.1 PageMaker
Copy all files, located in C:\Program files\SDL International\T2007_FL\FI\PM\ folder to the plug-ins folder in PageMaker installation folder. This is usually C:\Program files\Adobe\PageMaker n.n\RSRC\LANG\Plugins\, where n.n means the PM version and LANG means the PM installation language. The Trados Story Collector works with PageMaker 6.5 and 7.
After the Story Collector Files are copied and you start PageMaker, you will find the Story Collector in the menu Options – Plug-Ins.
©2007 Dipl.-Ing. Jerzy Czopik Budapest, April 28 and May 1, 2007 29

9.2.2 QuarkXPress
Copy all files, located in C:\Program files\SDL International\T2007_FL\FI\QXP\Version folder, where Version indicates the QXP version on your system, to the xtensions folder in QuarkXPress installation folder. This is usually C:\Program files\Quark\QuarkXPress Passport\XTension\.
After the Story Collector Files are copied and you start QuarkXPress, you will find an additional Trados menu.
30 Budapest, April 28 and May 1, 2007 ©2007 Dipl.-Ing. Jerzy Czopik

9.2.3 InDesign
Note:
Please note, that the Story Collector works ONLY with InDesign 2 and CS, but NOT with CS2! For translating InDesign CS2 files, refer to section Translating InDesign CS2 files on page 34.
Copy all files, located in C:\Program files\SDL International\T2007_FL\FI\IND\Version\ folder, where Version corresponds to your installed InDesign version (2.0 or CS), to the plug-ins folder in InDesign installation folder. This is usually C:\Programme\Adobe\InDesign 2.0 \Plug-ins\ (for InDesign 2.0, or in the corresponding folder for InDesign CS).
After the Story Collector Files are copied and you start InDesign, you will find an additional Trados menu.
9.3 Using Story Collectors
9.3.1 Exporting stories
All Story Collectors work in the same manner. In QuarkXPress or InDesign, you need to click the Trados menu and select Export to export the file content to tagged text. In PageMaker you go to Options – Plug-Ins, select Trados Story Collector and chose Export. The process for PageMaker is described as example below.
©2007 Dipl.-Ing. Jerzy Czopik Budapest, April 28 and May 1, 2007 31

After you have started the Story Collector, the following window appears:
The button Story Order helps you to arrange the stories in PageMaker (this means particularly text frames) in a rational order. The text frames might not necessarily be placed so, that you get all stories exported in the same order, as they appear in the document. However, this is not a must. You can also export stories in default order, this has no impact on the translation process.
Click or chose export to export all stories from the document.
Be sure to save your document after exporting the text, as otherwise you will not be able to import it back again.
Note:
Should you forget to save the document, just open the source file again, export the text using Story Collector once again, but choosing another name or location, then save the file and attempt to import the translated story back. This should work.
Note:
All graphics in line with text in PageMaker will be lost. Save a copy of your source file to be able to replace the graphics after your translation is done.
9.3.2 Translating exported text
After exporting the stories move the corresponding tagged file on Tageditor window. It will chose the proper filter and open the file. Translate the file as usual. After you are ready with the translation, save the file as ttx and save target text (menu File in Tageditor, Save Target as…). It is advisable not overwrite the source file, but to change the name.
32 Budapest, April 28 and May 1, 2007 ©2007 Dipl.-Ing. Jerzy Czopik

9.3.3 Importing stories
Open the DTP application. Start Story Collector and chose or press Import. Select the translated story. Make any changes as necessary. Save the file – it is advisable to save it under different name.
Note:
If the export or import process got stuck, the Story Collector will quit. But you will see the cursor moved to the story, which makes problems. Try to change it, for example copy the text into the story before or behind. If this does not help, you will need to delete this story and restart the process. In this way you can eliminate problematic stories. After you have translated all the contents of exported stories and imported them back, you can use the original source file to copy the missing stories. Then copy the text for example in Word and translate it there. This is maybe not the best way, but still allows you to get the whole text translated and saved in your TM.
©2007 Dipl.-Ing. Jerzy Czopik Budapest, April 28 and May 1, 2007 33

10 Translating InDesign CS2 files
10.1 Preparation
As usual look at unnecessary hard or soft returns, badly used indents, tabulators and so on. Save the prepared file. Then in InDesign from the menu File chose Export. Save the file as Adobe Interchange (inx) file.
10.2 Translating
Open the inx file in Tageditor. Translate it as usual.
Note:
If you need to modify source text in Tageditor (ttx file), ie cutting and pasting text fragments to avoid broken segments where an unnecessary hard return was placed, please note that you must not leave any segment empty. Where you cut text from leave at least one single space. Otherwise Tageditor will crash. Please also note, that this process is not working flawlessly at the moment. If you get an InDesign job assigned, test the exporting of inx and opening process before you give any fixed price offers. Do not only export and then open the exported inx, but make some translation opera-tions prior to opening the inx file in InDesign. The best way is to open the inx in Tageditor, translate the first two-three segments, move to the middle of the file, translate two more segments and then translate also some two or three segments at the end of the file. Then save the so prepared file as inx again and try to open it. If it works, so the whole process should be ok.
34 Budapest, April 28 and May 1, 2007 ©2007 Dipl.-Ing. Jerzy Czopik

11 Translating Framemaker files
11.1 Preparation
If you have Framemaker installed on your system, prepare the file as usual. Then save it. For translation you will need a mif file, so save the file in this format too. Create a folder structure in your project directory. You will need at least the following folders: D:\Project D:\Project\Source D:\Project\Target You cannot process Framemaker files without having at least this folder structure.
Open the S-Tagger for Framemaker.
Click on the Paths tab.
©2007 Dipl.-Ing. Jerzy Czopik Budapest, April 28 and May 1, 2007 35

Enter the paths into the corresponding fields, male sure that the boxes “Keep paths” “During session” and “Between sessions” are checked and chose the Convert MIF tab.
Click Convert MIF button. The file explorer window opens.
Select all MIFs for conversion and clik Open. The conversion process starts. The converted files are saved as rtf in your selected target folder.
11.2 Translating converted MIF files
As the converted files are saved as rtf, you can easily translate them in Word. For more details refer to the section Translating tagged text with Word on page 18. Be sure to translate all files, do not forget the ancillary file.
Note:
After translation is done save the rtf files with the same name! Do not change file names!
36 Budapest, April 28 and May 1, 2007 ©2007 Dipl.-Ing. Jerzy Czopik

11.3 Creating MIF files from translated files
You do not need to clean up the translated files. S-Tagger will convert also uncleaned files. Start S-Tagger again. The path settings are still the same, unless you changed them in the meantime. Check the proper settings and chose the Convert STF tab.
Click Convert STF. The file explorer tab open.
Select all files and click open. MIF files are created in your target folder. Open the MIF files in Framemaker and make all necessary changes. Save the MIF and then save as Framemaker.
Note:
If translating into languages using special diacritical characters, you will most probably need to change fonts in translated MIF or FM file to get those characters properly displayed and printed. You may use the Font Mapper for Framemaker for this purpose. Even if not very easy to use, the results pay for any effort.
©2007 Dipl.-Ing. Jerzy Czopik Budapest, April 28 and May 1, 2007 37

To be able to use this module you will need to create a Framemaker MIF file, containing all necessary fonts. You can do this only in case you own a copy of Framemaker.
11.4 Translating of Interleaf/Quicksilver files
This process is similar to the process for Framemaker. We use here S-Tagger for Interleaf and Font Mapper for Interleaf. Because Interleaf / Quicksilver is not very common, we shall not describe this process more detailed here.
38 Budapest, April 28 and May 1, 2007 ©2007 Dipl.-Ing. Jerzy Czopik

12 Creating a Multiterm term base from an Excel sheet with terminology
12.1 Preparing terminology list
In Excel create a list of vocabulary, consisting at least of two columns. In the first column place the target term, in the second column place the target term. You can use further columns to specify text attributes, as for example Project, Definition and so on. Make sure, that the columns have proper names. See the example below.
GERMAN POLISH Definition pulsmoduliert modulowane impulsowo
Stellsignal sygnał nastawczy
Reglersignal sygnał regulatora signal from regulating device
Umluftautomatik automatyka recyrkulacji powietrza
Panel panel Startzeit moment startu
12.2 Converting Excel using Multiterm Convert
Start Multiterm Convert. On the welcome screen click Next.
Leave New conversion session selected and click Next.
©2007 Dipl.-Ing. Jerzy Czopik Budapest, April 28 and May 1, 2007 39

Select Microsoft Excel format and click next.
Click on Browse and navigate to the Excel list you created. Select this list and click next.
Now select your source language, mark Index field and chose the corresponding language there.
40 Budapest, April 28 and May 1, 2007 ©2007 Dipl.-Ing. Jerzy Czopik

Repeat this procedure for your target language.
Note:
The above step is the most critical one for the whole process! If you forget to assign the proper index field to the language columns, the process will fail.
For the remaining columns chose either proper languages, if you are creating a multi lingual term base, or descriptive field. Click next.
Using the add button attach the available descriptive fields to the entry structure on the left side. Click next.
©2007 Dipl.-Ing. Jerzy Czopik Budapest, April 28 and May 1, 2007 41

Click next once again. The conversion process starts. After it is finished you need to click next and will then see a confirmation.
12.3 Importing converted Excel sheet into Multiterm
Start Multiterm. In the Termbase menu select Create termbase.
In the file explorer dialogue select the location for your term base. Termbase Wizard opens.
42 Budapest, April 28 and May 1, 2007 ©2007 Dipl.-Ing. Jerzy Czopik

Click next.
Select “Load an existing termbase definition file” and click browse. Navigate to the folder where you saved your converted Excel sheet and click open.
Click next.
Enter the desired name of your term base and click Next.
©2007 Dipl.-Ing. Jerzy Czopik Budapest, April 28 and May 1, 2007 43

In all above screens you do not need to change anything, click Next three times.
Click Finish.
44 Budapest, April 28 and May 1, 2007 ©2007 Dipl.-Ing. Jerzy Czopik

Your term base has been created.
Now you need to import the terms into your term base. Right click on the term base name.
Select Termbase Catalogue.
©2007 Dipl.-Ing. Jerzy Czopik Budapest, April 28 and May 1, 2007 45
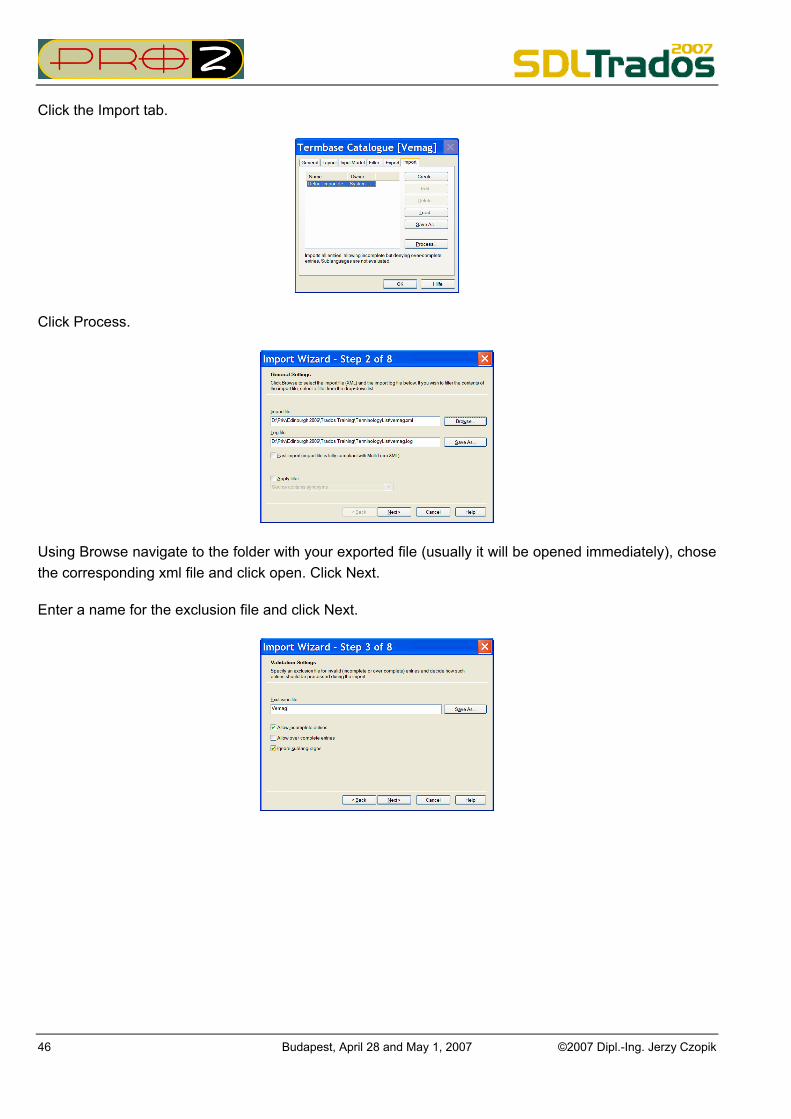
Click the Import tab.
Click Process.
Using Browse navigate to the folder with your exported file (usually it will be opened immediately), chose the corresponding xml file and click open. Click Next.
Enter a name for the exclusion file and click Next.
46 Budapest, April 28 and May 1, 2007 ©2007 Dipl.-Ing. Jerzy Czopik

Click again Next.
You will see the result.
Click next, then click Finish. Your term base is ready for use.
©2007 Dipl.-Ing. Jerzy Czopik Budapest, April 28 and May 1, 2007 47

12.4 Setting up Workbench for terminology recognition
From menu Options chose Term Recognition Options.
Click browse. Click on the green plus sign.
Select the term base you created and click OK.
Your term base will now be used when translating.
48 Budapest, April 28 and May 1, 2007 ©2007 Dipl.-Ing. Jerzy Czopik

13 Help in case of problems
13.1 Formatting marks (TAGs)
Should you encounter problems with TAGs and not know what they represent, look in the File Format Reference Guide, which is available in the SDL Trados 2007 Freelance program group, section Docu-mentation. However, information about Framemaker and Interleaf/Quicksilver TAGs is not to be found there, but in the help file to the corresponding S-Tagger module.
13.2 ProZ.com
On ProZ.com you will find a very active forum “SDL Trados Support”, where you can both active ask questions or browse the existing threads. The address of this forum is http://www.proz.com/forum/65.
13.3 Yahoo TW_Users group
Another valuable help source is the Yahoo group “TW_Users”. This is a private mailing list, not connected with SDL. To join send an email to [email protected].
13.4 SDL help centre
SDL may be found here http://sdl.custhelp.com/cgi-bin/sdl.cfg/php/enduser/std_alp.php. This is a huge database, containing a lot of helpful solution and available for free to anybody.
13.5 Contacting the author
If you wish, you may contact the author per email. My address is [email protected].
©2007 Dipl.-Ing. Jerzy Czopik Budapest, April 28 and May 1, 2007 49