Embed Size (px)
Citation preview

S C O T T K E L B Y ’ S L I G H T R O O M Q & A B O O K 2
Published by KelbyOne, LLC.
Copyright ©2017 by Scott Kelby
All rights reserved. No part of this eBook may be reproduced or transmitted in any form, by any means, electronic or mechanical, including photocopying, recording, or by any information storage and retrieval system, without written permission from the publisher, except for the inclusion of brief quotations in a review.
▼ Trademarks
Photoshop and Photoshop Lightroom are registered trademarks of Adobe Systems, Inc.
Macintosh, Mac, and Mac OS X are registered trademarks of Apple Inc.
Windows is a registered trademark of Microsoft Corporation.
▼ Warning and Disclaimer
This eBook is designed to provide information about Adobe Photoshop and Adobe Photo shop Lightroom for digital photographers. Every effort has been made to make this book as complete and as accurate as possible, but no warranty of fitness is implied.
THIS PRODUCT IS NOT ENDORSED OR SPONSORED BY ADOBE SYSTEMS INCORPO-RATED, PUBLISHER OF ADOBE PHOTOSHOP CC AND ADOBE PHOTOSHOP LIGHT-ROOM CC.
S C O T T K E L B Y ’ S L I G H T R O O M Q & A B O O K 3
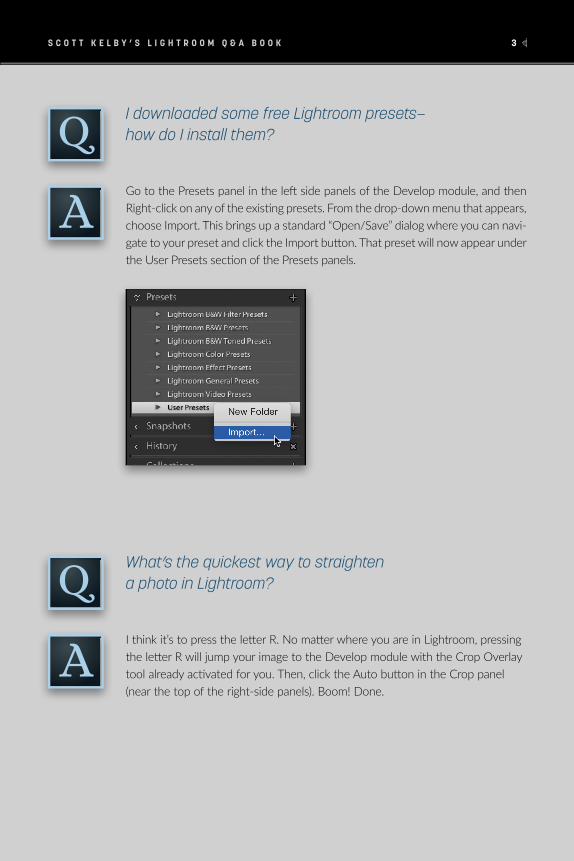
I downloaded some free Lightroom presets— how do I install them?
What’s the quickest way to straighten a photo in Lightroom?
Go to the Presets panel in the left side panels of the Develop module, and then Right-click on any of the existing presets. From the drop-down menu that appears, choose Import. This brings up a standard “Open/Save” dialog where you can navi-gate to your preset and click the Import button. That preset will now appear under the User Presets section of the Presets panels.
I think it’s to press the letter R. No matter where you are in Lightroom, pressing the letter R will jump your image to the Develop module with the Crop Overlay tool already activated for you. Then, click the Auto button in the Crop panel (near the top of the right-side panels). Boom! Done.

S C O T T K E L B Y ’ S L I G H T R O O M Q & A B O O K 4
I often like to see if my color images would make good black-and-white images. Is there a quick way to compare the color image to a black-and-white version?
One of my favorite keyboard shortcuts of all time is simply the letter V. This lets me see, in just one key, whether my current image would make a good black-and-white or not, as it does a Black & White conversion instantly. If I like the way it looks, I’m set. If I see it doesn’t make a good black-and-white, I just press V again and it’s back to the original color version
The first thing to do is contact the lab and ask if they have a special color profile they’d prefer you to use. You can download it and add it to Lightroom so when you export that image as a JPEG, it embeds that profile into the file. A number of labs will just have you use the sRGB color profile, and you can choose that in the Print Job panel in the Print module. In the Color Management section, under Profile, just choose sRGB before you click the Print to File button. By the way, I use mpix.com as my print lab—highly recom-mended! (They like regular ol’ 8-bit files with the sRGB color profile.)
I’m sending some shots in Lightroom to an online print lab. Is there any special way to prepare them?
S C O T T K E L B Y ’ S L I G H T R O O M Q & A B O O K 5
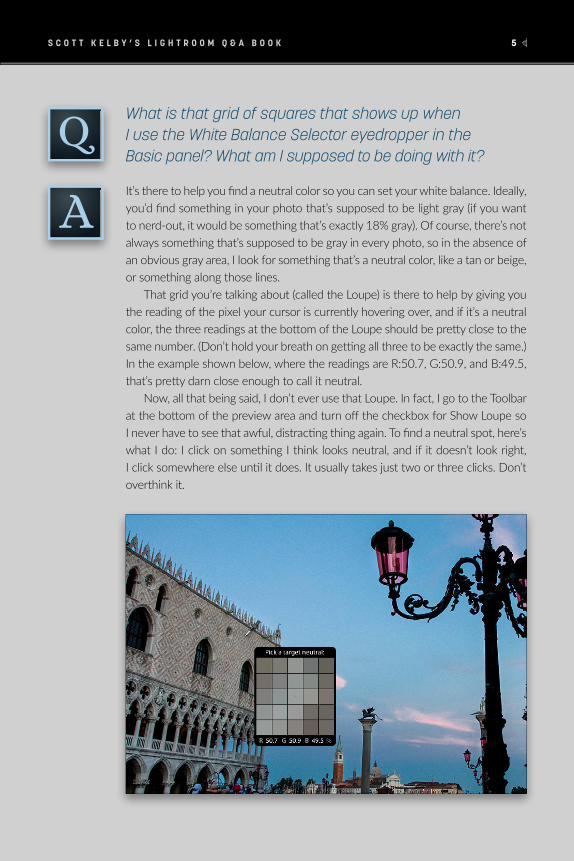
It’s there to help you find a neutral color so you can set your white balance. Ideally, you’d find something in your photo that’s supposed to be light gray (if you want to nerd-out, it would be something that’s exactly 18% gray). Of course, there’s not always something that’s supposed to be gray in every photo, so in the absence of an obvious gray area, I look for something that’s a neutral color, like a tan or beige, or something along those lines.
That grid you’re talking about (called the Loupe) is there to help by giving you the reading of the pixel your cursor is currently hovering over, and if it’s a neutral color, the three readings at the bottom of the Loupe should be pretty close to the same number. (Don’t hold your breath on getting all three to be exactly the same.) In the example shown below, where the readings are R:50.7, G:50.9, and B:49.5, that’s pretty darn close enough to call it neutral.
Now, all that being said, I don’t ever use that Loupe. In fact, I go to the Toolbar at the bottom of the preview area and turn off the checkbox for Show Loupe so I never have to see that awful, distracting thing again. To find a neutral spot, here’s what I do: I click on something I think looks neutral, and if it doesn’t look right, I click somewhere else until it does. It usually takes just two or three clicks. Don’t overthink it.
What is that grid of squares that shows up when I use the White Balance Selector eyedropper in the Basic panel? What am I supposed to be doing with it?
S C O T T K E L B Y ’ S L I G H T R O O M Q & A B O O K 6
Actually, there’s kind of a hidden way to get finer adjustments out of those single-arrow buttons in Quick Develop. Just hold the Shift key before you click the button, and it cuts the amount of the adjustment in half so you get finer control.
The buttons in the Library’s Quick Develop panel seem to move too much when I click on them—even the single-arrow button moves more than I want it to sometimes. If I want smaller adjustments, do I have to switch to the Develop module?
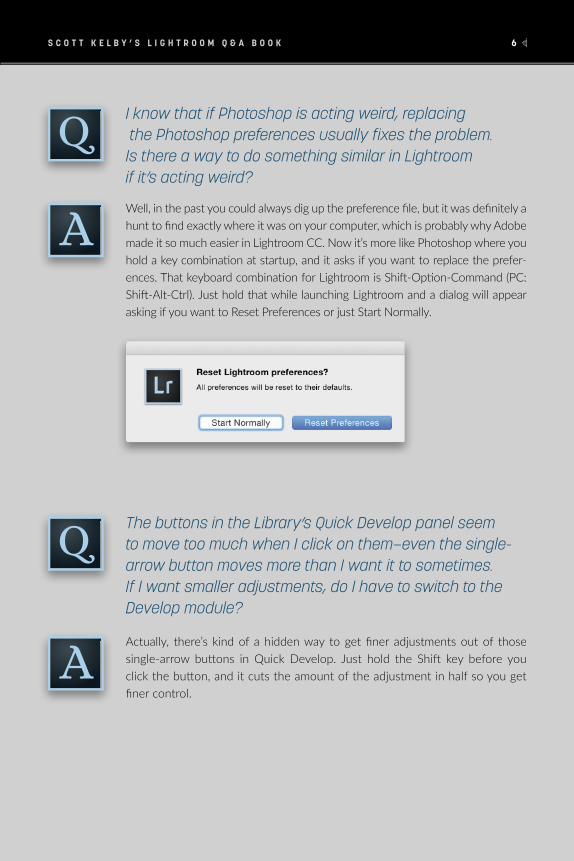
Well, in the past you could always dig up the preference file, but it was definitely a hunt to find exactly where it was on your computer, which is probably why Adobe made it so much easier in Lightroom CC. Now it’s more like Photoshop where you hold a key combination at startup, and it asks if you want to replace the prefer-ences. That keyboard combination for Lightroom is Shift-Option-Command (PC: Shift-Alt-Ctrl). Just hold that while launching Lightroom and a dialog will appear asking if you want to Reset Preferences or just Start Normally.
I know that if Photoshop is acting weird, replacing the Photoshop preferences usually fixes the problem. Is there a way to do something similar in Lightroom if it’s acting weird?
S C O T T K E L B Y ’ S L I G H T R O O M Q & A B O O K 7
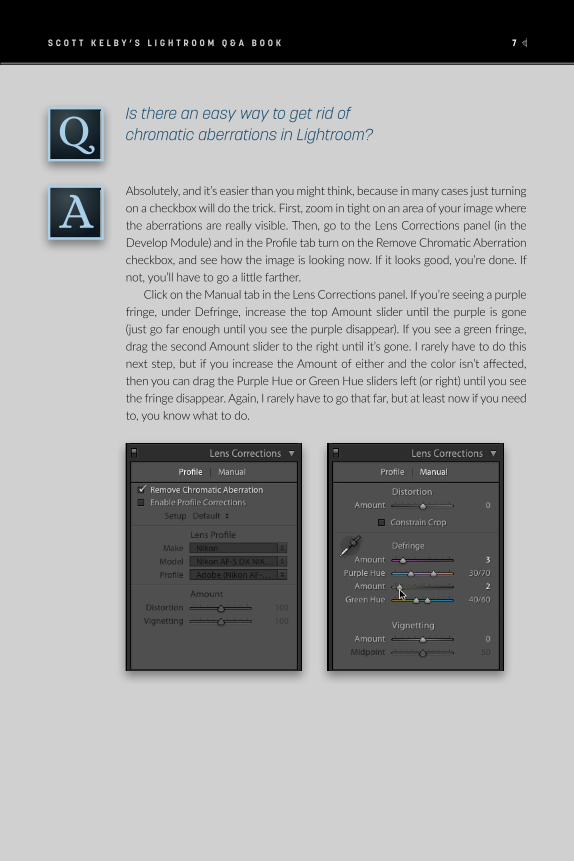
Absolutely, and it’s easier than you might think, because in many cases just turning on a checkbox will do the trick. First, zoom in tight on an area of your image where the aberrations are really visible. Then, go to the Lens Corrections panel (in the Develop Module) and in the Profile tab turn on the Remove Chromatic Aberration checkbox, and see how the image is looking now. If it looks good, you’re done. If not, you’ll have to go a little farther.
Click on the Manual tab in the Lens Corrections panel. If you’re seeing a purple fringe, under Defringe, increase the top Amount slider until the purple is gone (just go far enough until you see the purple disappear). If you see a green fringe, drag the second Amount slider to the right until it’s gone. I rarely have to do this next step, but if you increase the Amount of either and the color isn’t affected, then you can drag the Purple Hue or Green Hue sliders left (or right) until you see the fringe disappear. Again, I rarely have to go that far, but at least now if you need to, you know what to do.
Is there an easy way to get rid of chromatic aberrations in Lightroom?
S C O T T K E L B Y ’ S L I G H T R O O M Q & A B O O K 8
This is a really good question, and I’m going to suggest something different for two reasons: (1) If the image looks right to you onscreen, you shouldn’t have to make it artificially brighter than you think it should be to match your print—not to mention that this tends to increase any noise already present in your image, so I don’t recommend this route. (2) Darkening the screen will work, but one of the biggest selling points of today’s displays are those bright screens, so I don’t feel that working on a screen that’s darker than you think it should be is the answer either (although some folks will argue this point to death, but I can tell you I personally don’t like working on a darkened screen).
The Lightroom engineers realized both of those points (you shouldn’t have to mess with what looks right to you onscreen, and that most folks don’t like working with a darkened screen), plus they know that prints come out darker on paper than they appear on a bright, backlit glossy screen. So, they created a slider in the Print Job panel that lets you increase the brightness of your image, but only when it’s printing (or when you’re saving it as a JPEG from the Print Job panel to be printed at a lab). When you turn on the checkbox for Print Adjust-ment (at the bottom of the Print Job panel), and drag the Brightness slider to the right, it just brightens the image at printing (it doesn’t change how your image looks onscreen). Now, how far to the right should you drag that slider? It will take making a test print or two to find out the amount that works for your printer and your monitor, but once you know that amount, you can use it every time you print to that printer on that particular paper.
When I compare my prints to the same image I’m seeing in Lightroom, the prints are quite a bit darker. Should I increase the Exposure amount for these images or just darken my screen until they match?
S C O T T K E L B Y ’ S L I G H T R O O M Q & A B O O K 9
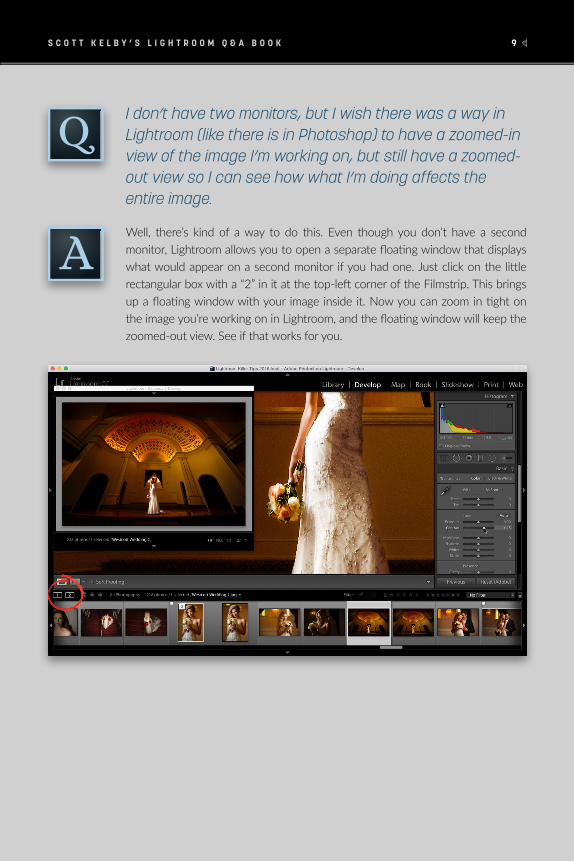
Well, there’s kind of a way to do this. Even though you don’t have a second monitor, Lightroom allows you to open a separate floating window that displays what would appear on a second monitor if you had one. Just click on the little rectangular box with a “2” in it at the top-left corner of the Filmstrip. This brings up a floating window with your image inside it. Now you can zoom in tight on the image you’re working on in Lightroom, and the floating window will keep the zoomed-out view. See if that works for you.
I don’t have two monitors, but I wish there was a way in Lightroom (like there is in Photoshop) to have a zoomed-in view of the image I’m working on, but still have a zoomed-out view so I can see how what I’m doing affects the entire image.
S C O T T K E L B Y ’ S L I G H T R O O M Q & A B O O K 1 0
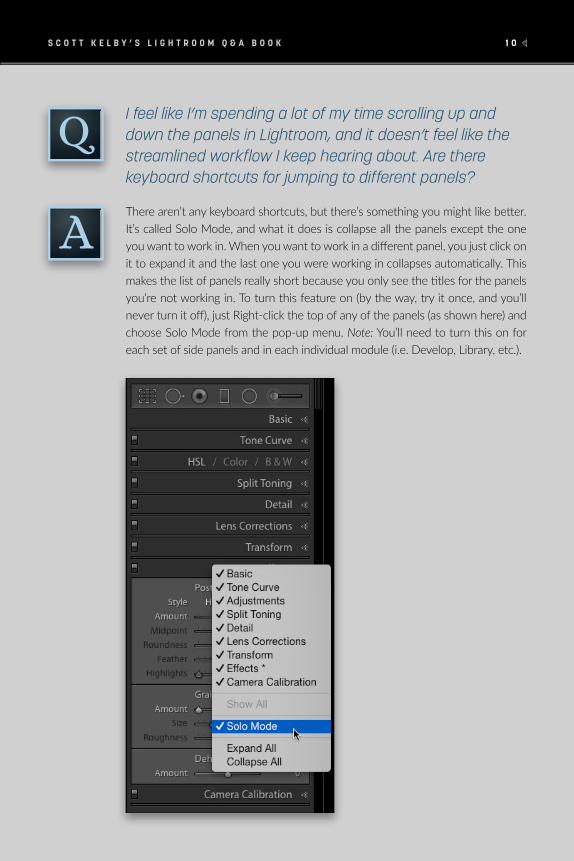
There aren’t any keyboard shortcuts, but there’s something you might like better. It’s called Solo Mode, and what it does is collapse all the panels except the one you want to work in. When you want to work in a different panel, you just click on it to expand it and the last one you were working in collapses automatically. This makes the list of panels really short because you only see the titles for the panels you’re not working in. To turn this feature on (by the way, try it once, and you’ll never turn it off), just Right-click the top of any of the panels (as shown here) and choose Solo Mode from the pop-up menu. Note: You’ll need to turn this on for each set of side panels and in each individual module (i.e. Develop, Library, etc.).
I feel like I’m spending a lot of my time scrolling up and down the panels in Lightroom, and it doesn’t feel like the streamlined workflow I keep hearing about. Are there keyboard shortcuts for jumping to different panels?

S C O T T K E L B Y ’ S L I G H T R O O M Q & A B O O K 1 1
Okay, there’s no official ruling on this, so I can only give you my opinion, but I think the vignette effect you get from the Effects panel (which is Post-Crop Vignetting, meaning that it automatically reapplies itself if you crop the image) is much better (has a better look) than the one in the Lens Corrections panel. I use the Lens Corrections panel for fixing vignetting problems, and not applying them as an effect. But hey, that’s just me. Anyway, another way that’s really great for creating a vignette effect is to use the Radial Filter (Shift-M) instead, and darken the Exposure amount outside the oval it creates. That way, you can have your vignette appear exactly where you want it in the image—not just on the edges. Give it a try and see what you think.
Is it better to apply a vignette in the Lens Corrections panel or in the Effects panel?
You bet! In the Library module, start by making the Filter Bar up top visible by pressing the Backslash key (\) on your keyboard (if you had it open already, this will just toggle it off, so press the Backslash key again to toggle it back on). Go to the Catalog panel (in the left side panels), and click on “All Photographs.” Now, click on the Metadata tab in the Filter Bar. Click on the header of the first column at the top left of the Metadata filter, and from the pop-up menu that appears, choose Smart Preview Status. It will display the number of images that have smart previews and how many don’t have smart previews. Click on “No Smart Preview” to display all those images. Now go under the Library menu, under Previews, and choose Build Smart Previews. If you only had one photo selected, Lightroom will ask if you want to build a smart preview for just that one image or for all of them. Click Build All and it will build smart previews for all your images that didn’t already have them. Easy peasy.
Is there any way for me to find out which of my images don’t have smart previews so I can create smart previews for them?
S C O T T K E L B Y ’ S L I G H T R O O M Q & A B O O K 1 2
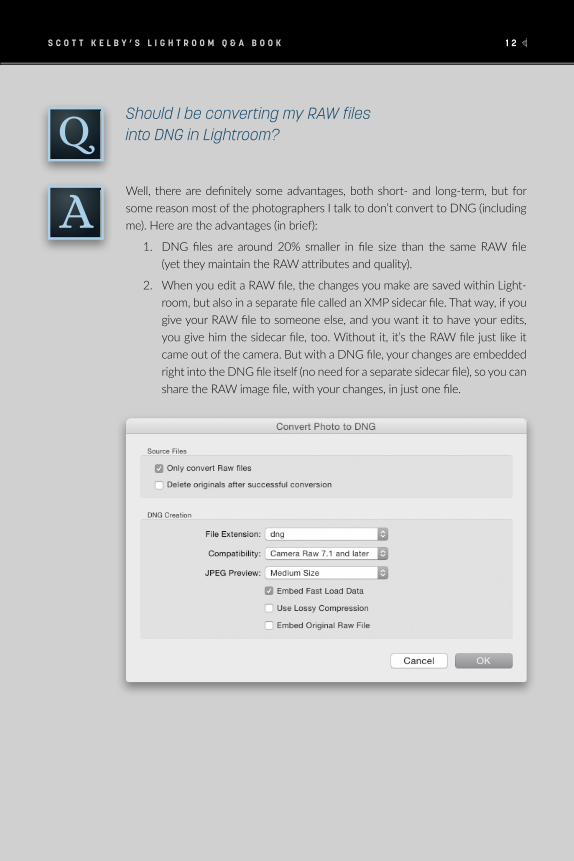
Well, there are definitely some advantages, both short- and long-term, but for some reason most of the photographers I talk to don’t convert to DNG (including me). Here are the advantages (in brief):
1. DNG files are around 20% smaller in file size than the same RAW file (yet they maintain the RAW attributes and quality).
2. When you edit a RAW file, the changes you make are saved within Light-room, but also in a separate file called an XMP sidecar file. That way, if you give your RAW file to someone else, and you want it to have your edits, you give him the sidecar file, too. Without it, it’s the RAW file just like it came out of the camera. But with a DNG file, your changes are embedded right into the DNG file itself (no need for a separate sidecar file), so you can share the RAW image file, with your changes, in just one file.
Should I be converting my RAW files into DNG in Lightroom?
S C O T T K E L B Y ’ S L I G H T R O O M Q & A B O O K 1 3
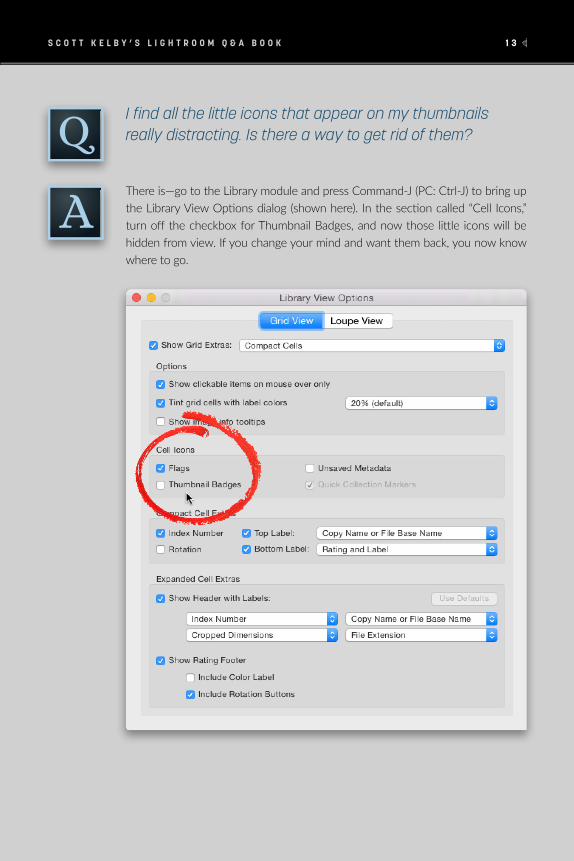
There is—go to the Library module and press Command-J (PC: Ctrl-J) to bring up the Library View Options dialog (shown here). In the section called “Cell Icons,” turn off the checkbox for Thumbnail Badges, and now those little icons will be hidden from view. If you change your mind and want them back, you now know where to go.
I find all the little icons that appear on my thumbnails really distracting. Is there a way to get rid of them?
S C O T T K E L B Y ’ S L I G H T R O O M Q & A B O O K 1 4
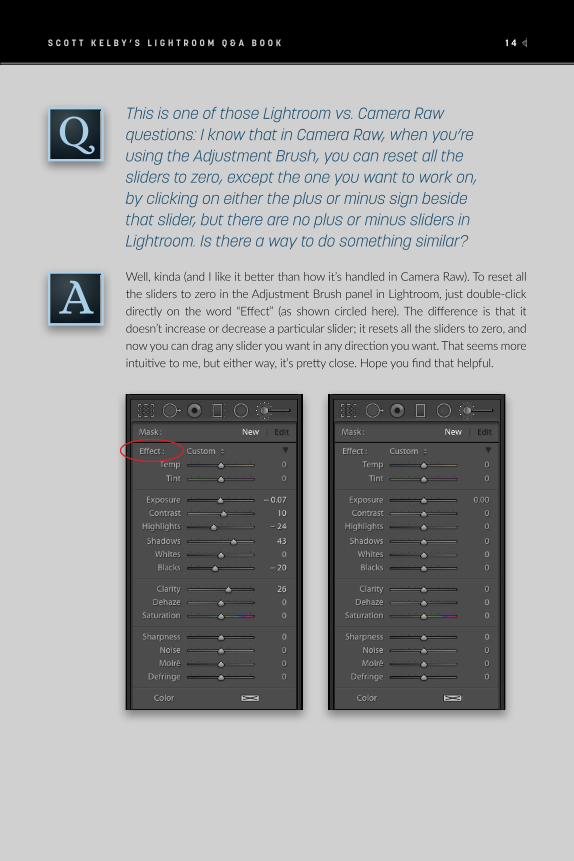
Well, kinda (and I like it better than how it’s handled in Camera Raw). To reset all the sliders to zero in the Adjustment Brush panel in Lightroom, just double-click directly on the word “Effect” (as shown circled here). The difference is that it doesn’t increase or decrease a particular slider; it resets all the sliders to zero, and now you can drag any slider you want in any direction you want. That seems more intuitive to me, but either way, it’s pretty close. Hope you find that helpful.
This is one of those Lightroom vs. Camera Raw questions: I know that in Camera Raw, when you’re using the Adjustment Brush, you can reset all the sliders to zero, except the one you want to work on, by clicking on either the plus or minus sign beside that slider, but there are no plus or minus sliders in Lightroom. Is there a way to do something similar?
S C O T T K E L B Y ’ S L I G H T R O O M Q & A B O O K 1 5
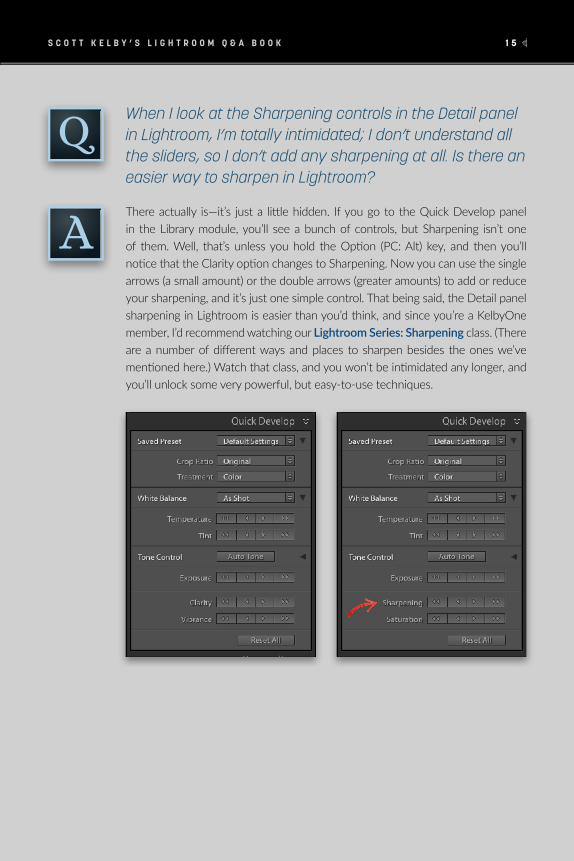
There actually is—it’s just a little hidden. If you go to the Quick Develop panel in the Library module, you’ll see a bunch of controls, but Sharpening isn’t one of them. Well, that’s unless you hold the Option (PC: Alt) key, and then you’ll notice that the Clarity option changes to Sharpening. Now you can use the single arrows (a small amount) or the double arrows (greater amounts) to add or reduce your sharpening, and it’s just one simple control. That being said, the Detail panel sharpening in Lightroom is easier than you’d think, and since you’re a KelbyOne member, I’d recommend watching our Lightroom Series: Sharpening class. (There are a number of different ways and places to sharpen besides the ones we’ve mentioned here.) Watch that class, and you won’t be intimidated any longer, and you’ll unlock some very powerful, but easy-to-use techniques.
When I look at the Sharpening controls in the Detail panel in Lightroom, I’m totally intimidated; I don’t understand all the sliders, so I don’t add any sharpening at all. Is there an easier way to sharpen in Lightroom?
S C O T T K E L B Y ’ S L I G H T R O O M Q & A B O O K 1 6
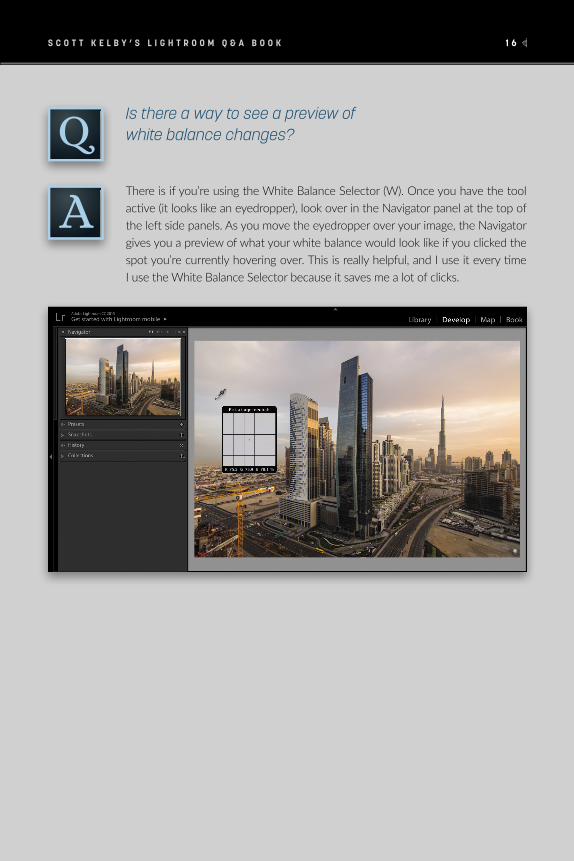
There is if you’re using the White Balance Selector (W). Once you have the tool active (it looks like an eyedropper), look over in the Navigator panel at the top of the left side panels. As you move the eyedropper over your image, the Navigator gives you a preview of what your white balance would look like if you clicked the spot you’re currently hovering over. This is really helpful, and I use it every time I use the White Balance Selector because it saves me a lot of clicks.
Is there a way to see a preview of white balance changes?
S C O T T K E L B Y ’ S L I G H T R O O M Q & A B O O K 1 7
That’s been in Lightroom since version 1, and it does something that’s actually kind of cool (well, for portraits anyway). It flips all the images horizontally, and the reason you’d ever want to do this is because people are used to seeing their image each day in the mirror, but when you shoot them, it’s not a flipped image (like the mirror), which is why so many people look at images of themselves and say, “That doesn’t look like me!” When you have Lightroom flip it, then they see the image the same way they see themselves in the mirror, so it looks right to them (and they think you’re a genius photographer, since you’re the only one that ever made them look “right”).
At the bottom of the View menu in the Library module it says, “Enable Mirror Image Mode.” What does that do?
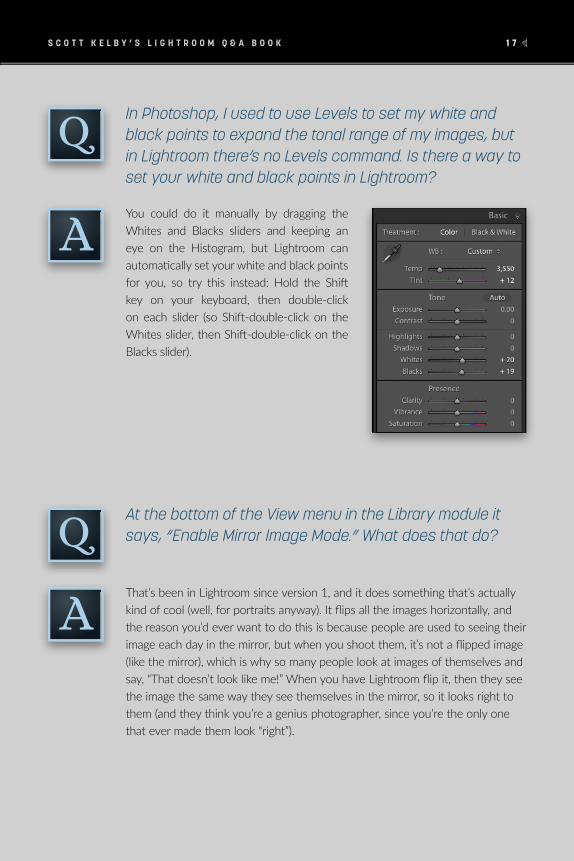
You could do it manually by dragging the Whites and Blacks sliders and keeping an eye on the Histogram, but Lightroom can automatically set your white and black points for you, so try this instead: Hold the Shift key on your keyboard, then double-click on each slider (so Shift-double-click on the Whites slider, then Shift-double-click on the Blacks slider).
In Photoshop, I used to use Levels to set my white and black points to expand the tonal range of my images, but in Lightroom there’s no Levels command. Is there a way to set your white and black points in Lightroom?
S C O T T K E L B Y ’ S L I G H T R O O M Q & A B O O K 1 8
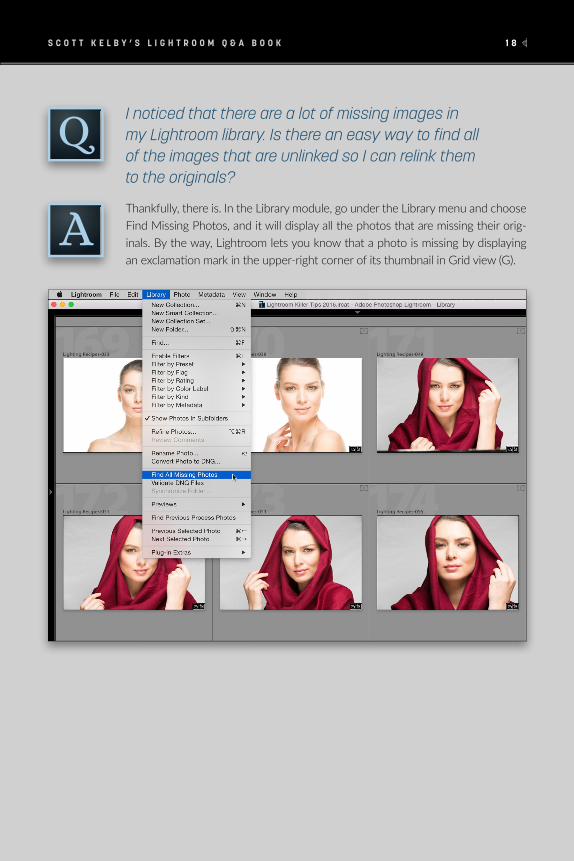
Thankfully, there is. In the Library module, go under the Library menu and choose Find Missing Photos, and it will display all the photos that are missing their orig-inals. By the way, Lightroom lets you know that a photo is missing by displaying an exclamation mark in the upper-right corner of its thumbnail in Grid view (G).
I noticed that there are a lot of missing images in my Lightroom library. Is there an easy way to find all of the images that are unlinked so I can relink them to the originals?
S C O T T K E L B Y ’ S L I G H T R O O M Q & A B O O K 1 9
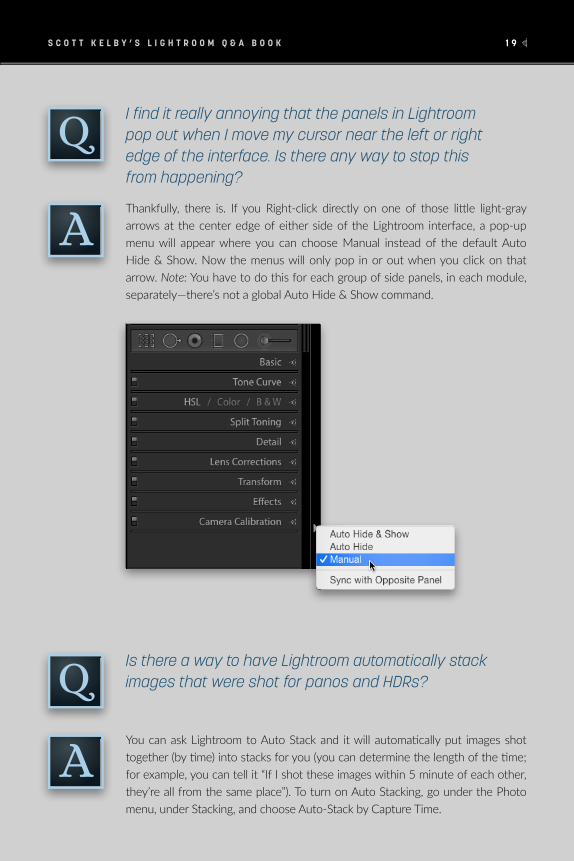
Thankfully, there is. If you Right-click directly on one of those little light-gray arrows at the center edge of either side of the Lightroom interface, a pop-up menu will appear where you can choose Manual instead of the default Auto Hide & Show. Now the menus will only pop in or out when you click on that arrow. Note: You have to do this for each group of side panels, in each module, separately—there’s not a global Auto Hide & Show command.
I find it really annoying that the panels in Lightroom pop out when I move my cursor near the left or right edge of the interface. Is there any way to stop this from happening?
Is there a way to have Lightroom automatically stack images that were shot for panos and HDRs?
You can ask Lightroom to Auto Stack and it will automatically put images shot together (by time) into stacks for you (you can determine the length of the time; for example, you can tell it “If I shot these images within 5 minute of each other, they’re all from the same place”). To turn on Auto Stacking, go under the Photo menu, under Stacking, and choose Auto-Stack by Capture Time.
S C O T T K E L B Y ’ S L I G H T R O O M Q & A B O O K 2 0
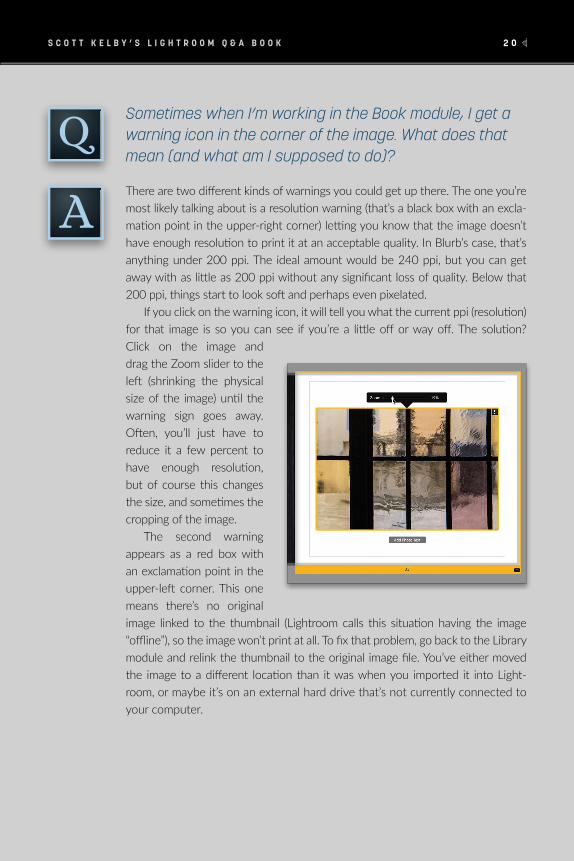
There are two different kinds of warnings you could get up there. The one you’re most likely talking about is a resolution warning (that’s a black box with an excla-mation point in the upper-right corner) letting you know that the image doesn’t have enough resolution to print it at an acceptable quality. In Blurb’s case, that’s anything under 200 ppi. The ideal amount would be 240 ppi, but you can get away with as little as 200 ppi without any significant loss of quality. Below that 200 ppi, things start to look soft and perhaps even pixelated.
If you click on the warning icon, it will tell you what the current ppi (resolution) for that image is so you can see if you’re a little off or way off. The solution? Click on the image and drag the Zoom slider to the left (shrinking the physical size of the image) until the warning sign goes away. Often, you’ll just have to reduce it a few percent to have enough resolution, but of course this changes the size, and sometimes the cropping of the image.
The second warning appears as a red box with an exclamation point in the upper-left corner. This one means there’s no original image linked to the thumbnail (Lightroom calls this situation having the image “offline”), so the image won’t print at all. To fix that problem, go back to the Library module and relink the thumbnail to the original image file. You’ve either moved the image to a different location than it was when you imported it into Light-room, or maybe it’s on an external hard drive that’s not currently connected to your computer.
Sometimes when I’m working in the Book module, I get a warning icon in the corner of the image. What does that mean (and what am I supposed to do)?
S C O T T K E L B Y ’ S L I G H T R O O M Q & A B O O K 2 1
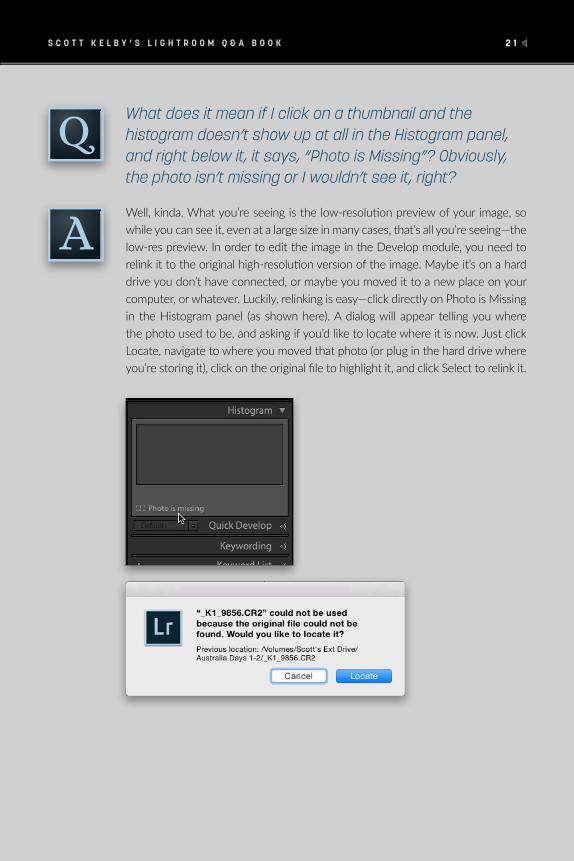
Well, kinda. What you’re seeing is the low-resolution preview of your image, so while you can see it, even at a large size in many cases, that’s all you’re seeing—the low-res preview. In order to edit the image in the Develop module, you need to relink it to the original high-resolution version of the image. Maybe it’s on a hard drive you don’t have connected, or maybe you moved it to a new place on your computer, or whatever. Luckily, relinking is easy—click directly on Photo is Missing in the Histogram panel (as shown here). A dialog will appear telling you where the photo used to be, and asking if you’d like to locate where it is now. Just click Locate, navigate to where you moved that photo (or plug in the hard drive where you’re storing it), click on the original file to highlight it, and click Select to relink it.
What does it mean if I click on a thumbnail and the histogram doesn’t show up at all in the Histogram panel, and right below it, it says, “Photo is Missing”? Obviously, the photo isn’t missing or I wouldn’t see it, right?

S C O T T K E L B Y ’ S L I G H T R O O M Q & A B O O K 2 2
You only see that longer list of choices when you’re working on a RAW image. If you’re working on a JPEG or TIFF image, you’ll only see Auto and Custom as your choices because the white balance you chose in the camera is already assigned to JPEGs and TIFFs. That doesn’t mean you can’t change the white balance for JPEGs or TIFFs—you absolutely can. Use the Tint and Temp sliders, as well as the White Balance Selector tool (W), or choose Auto white balance from the pop-up menu. The difference is you don’t get all those other choices like you would from a RAW image where the white balance preset isn’t already “baked in” (so to speak).
Why is it that sometimes in Lightroom when I go to the WB [white Balance] pop-up menu in the Basic panel, I get a list of a bunch of different white balance presets, and sometimes I only get two choices: Auto and Custom?
Well, you can get kinda close—it’s not dead on, but it’s definitely a blur. In the Develop module, grab the Adjustment Brush (K), double-click on the word “Effect” (top left of the Adjustment Brush panel) to reset all your sliders to zero, then drag the Sharpness slider all the way to the left to –100. Make sure the Auto Mask checkbox is turned off, and then paint, and the areas you paint will become a little blurred (and therein lies the bigger problem: even at –100, it’s definitely a bit blurry, but probably not as blurry as you’d like). If you want even more blur, Right-click on the adjustment pin in the image, and choose Duplicate. This will stack the Adjustment Brush settings creating a stronger blur.
Is there a way to get a Gaussian Blur effect inside Lightroom?

S C O T T K E L B Y ’ S L I G H T R O O M Q & A B O O K 2 3
Well, if by changing color you mean, “Can I change it to a different shade of gray, or white, or black?” then the answer is yes. Just enter Loupe view (E) then right-click out in that gray area around your photo. A pop-up menu will appear where you can choose from a few different background colors (as shown here).
Is there a way to change the color of the area around my photo in Loupe view?
There is for the Basic panel controls—just press the Period (.) on your keyboard and it toggles through all the different sliders. It also briefly brings up some text right over your image so you can clearly see which slider you’re adjusting.
Is there a shortcut I can use to get me quickly through the Develop module sliders?
S C O T T K E L B Y ’ S L I G H T R O O M Q & A B O O K 2 4
It’s just because, for whatever reason, Lightroom can’t figure out what make and model of lens you used when you took the image, which is odd, because Light-room reads the EXIF data from your camera that’s embedded into your image no problem—you see it all listed in the Metadata panel, including the make and model of your camera and lens. Go figure. Anyway, all you have to do to remedy Lightroom’s memory lapse is to tell it the make of your camera lens in the Profile tab of the Lens Corrections panel, and suddenly it wakes from its temporary amnesia and finds the model of your lens, and usually the exact lens profile to fix your lens problem (well, at least to fix most of it). Give that a try next time, and unless you used some exotic lens, you’ll most likely be all set.
When I go to the Lens Corrections panel and turn on Enable Profile Corrections, absolutely nothing happens. Why is that?
Think of collection sets simply as folders, just like the folders on your computer. You use folders on your computer to keep things organized, right? Same thing with collection sets. (If they had named them “collection folders” in the first place, we probably could have skipped this question altogether.) So, for exam-ple, if you took a vacation to Europe and wanted to keep your images from your trip organized by country, you could click on the + sign at the top right of the Collections panel, and choose Create Collection Set to create a collection set named “Europe 2017.” Then make collections of images from all the coun-tries you visited (e.g., Spain, Portugal, Italy, Greece, and Switzerland), and drag those into your Europe 2017 collection set so they’re all just one click away (look inside your Europe 2017 collection set to see the collections of all your countries). It’s just another tool for keeping your collections organized, and it’s a really handy one.
I’ve been using collections for a while now, but why would I ever need to use a collection set? What are they for?
S C O T T K E L B Y ’ S L I G H T R O O M Q & A B O O K 2 5
There sure is. You can turn this “feature” off by first getting the White Balance Selector tool, then going to the Toolbar at the bottom of the preview window just below your image (if you don’t see the Toolbar, press the letter T on your keyboard). You’ll see a checkbox turned on for Auto Dismiss, which is the feature that dismisses the tool immediately after you click it in your image. To turn that off (I sure would by the way), turn off the Auto Dismiss checkbox. Now you can click to your heart’s content and the tool will stay active the entire time. When you’re done with the tool, click in the circle where it lives in the Basic panel to put it back.
I like the White Balance Selector tool but it’s tedious using it because when I click it on my image, it immediately returns back to its home base in the Basic panel. If the first time I clicked wasn’t the perfect spot, I have to go get it again to click somewhere else. Is there a way to have it not snap back to the Basic panel?
It’s because when you press Command-E [PC: Ctrl-E] to take that image back into Photoshop, when the Edit Photo with Adobe Photoshop dialog appears, you have to choose Edit Original (rather than the default choice of Edit a Copy with Lightroom Adjustments). When you choose Edit Original, it keeps all the layers intact.
I heard that if you take an image from Lightroom over to Photoshop, add some layers in Photoshop, and save the file so it comes back to Lightroom, it keeps the layers in the file. But if I press Command-E [PC: Ctrl-E] to take that same image (which I know has layers) back over to Photoshop, the image is flattened (the layers are gone). How come?
S C O T T K E L B Y ’ S L I G H T R O O M Q & A B O O K 2 6
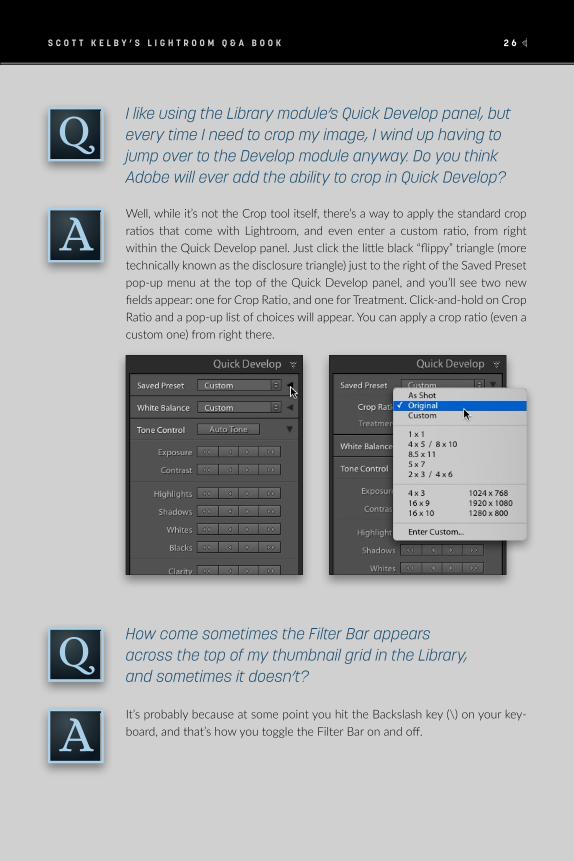
Well, while it’s not the Crop tool itself, there’s a way to apply the standard crop ratios that come with Lightroom, and even enter a custom ratio, from right within the Quick Develop panel. Just click the little black “flippy” triangle (more technically known as the disclosure triangle) just to the right of the Saved Preset pop-up menu at the top of the Quick Develop panel, and you’ll see two new fields appear: one for Crop Ratio, and one for Treatment. Click-and-hold on Crop Ratio and a pop-up list of choices will appear. You can apply a crop ratio (even a custom one) from right there.
I like using the Library module’s Quick Develop panel, but every time I need to crop my image, I wind up having to jump over to the Develop module anyway. Do you think Adobe will ever add the ability to crop in Quick Develop?
It’s probably because at some point you hit the Backslash key (\) on your key-board, and that’s how you toggle the Filter Bar on and off.
How come sometimes the Filter Bar appears across the top of my thumbnail grid in the Library, and sometimes it doesn’t?

S C O T T K E L B Y ’ S L I G H T R O O M Q & A B O O K 2 7
The larger outside circle with the thin line gives you an indication of how much feathering (edge softening) is applied to the brush. The further away the outer circle is from the inner circle, the more feathering that has been added, so at 100%, the edges are fully softened. If you go to the Spot Removal panel (right below the tool strip) and drag the Feather slider to the left to around 40% (as shown here in the second image below), you can see that the inner circle increases in size and gets closer to the outer circle. This means that there’s much less feathering and your brush has a somewhat harder edge. If you drag the Feather slider all the way down to 0%, now there’s just one circle because there’s no feathering, and you have a hard-edged brush.
When I use the Spot Removal tool, there are two circles—the larger outside one has a really thin line and the smaller inside one has a thicker line. What does this mean?
S C O T T K E L B Y ’ S L I G H T R O O M Q & A B O O K 2 8
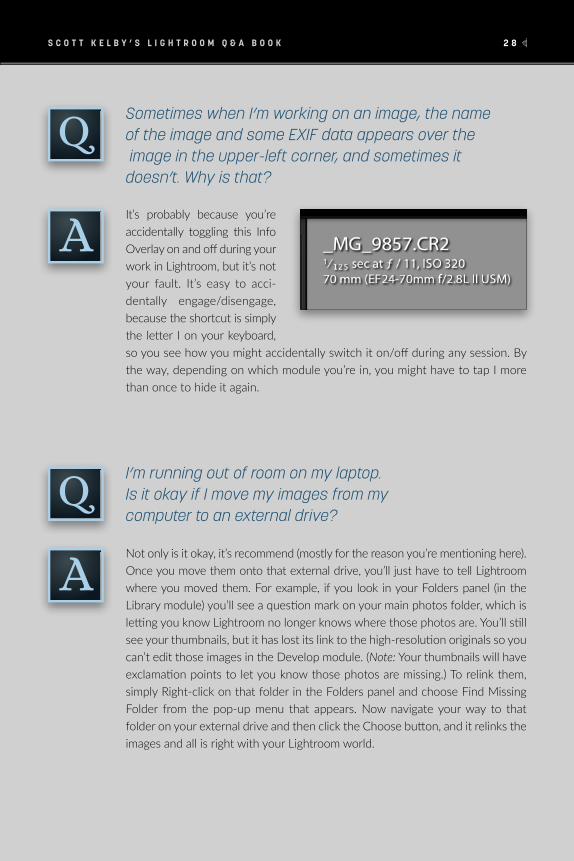
It’s probably because you’re accidentally toggling this Info Overlay on and off during your work in Lightroom, but it’s not your fault. It’s easy to acci-dentally engage/disengage, because the shortcut is simply the letter I on your keyboard, so you see how you might accidentally switch it on/off during any session. By the way, depending on which module you’re in, you might have to tap I more than once to hide it again.
Not only is it okay, it’s recommend (mostly for the reason you’re mentioning here). Once you move them onto that external drive, you’ll just have to tell Lightroom where you moved them. For example, if you look in your Folders panel (in the Library module) you’ll see a question mark on your main photos folder, which is letting you know Lightroom no longer knows where those photos are. You’ll still see your thumbnails, but it has lost its link to the high-resolution originals so you can’t edit those images in the Develop module. (Note: Your thumbnails will have exclamation points to let you know those photos are missing.) To relink them, simply Right-click on that folder in the Folders panel and choose Find Missing Folder from the pop-up menu that appears. Now navigate your way to that folder on your external drive and then click the Choose button, and it relinks the images and all is right with your Lightroom world.
Sometimes when I’m working on an image, the name of the image and some EXIF data appears over the image in the upper-left corner, and sometimes it doesn’t. Why is that?
I’m running out of room on my laptop. Is it okay if I move my images from my computer to an external drive?

S C O T T K E L B Y ’ S L I G H T R O O M Q & A B O O K 2 9
There is, and don’t feel bad because it’s not very obvious (to say the least). See where it says “Filter” over on the far right just above the Filmstrip, and next to that it says “Filters Off” in a pop-up menu? Well, just click once directly on the word “Filter” to the left of the pop-up menu and all of those filtering options will return. See, I told you it wasn’t obvious.
In the Filmstrip at the bottom of Lightroom, I used to be able to filter my images by pick flags, star ratings, and color labels but for some reason those options are now gone. Is there a way to bring them back?
S C O T T K E L B Y ’ S L I G H T R O O M Q & A B O O K 3 0
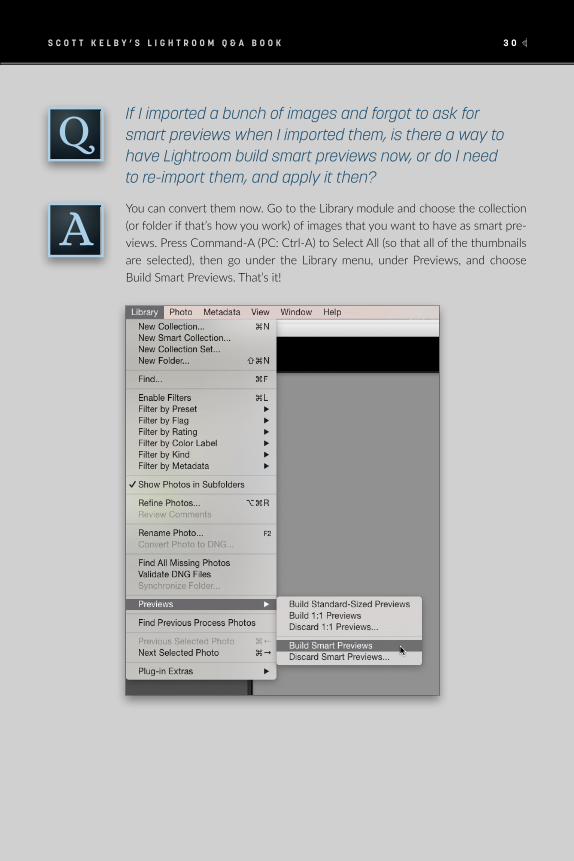
You can convert them now. Go to the Library module and choose the collection (or folder if that’s how you work) of images that you want to have as smart pre-views. Press Command-A (PC: Ctrl-A) to Select All (so that all of the thumbnails are selected), then go under the Library menu, under Previews, and choose Build Smart Previews. That’s it!
If I imported a bunch of images and forgot to ask for smart previews when I imported them, is there a way to have Lightroom build smart previews now, or do I need to re-import them, and apply it then?
S C O T T K E L B Y ’ S L I G H T R O O M Q & A B O O K 3 1
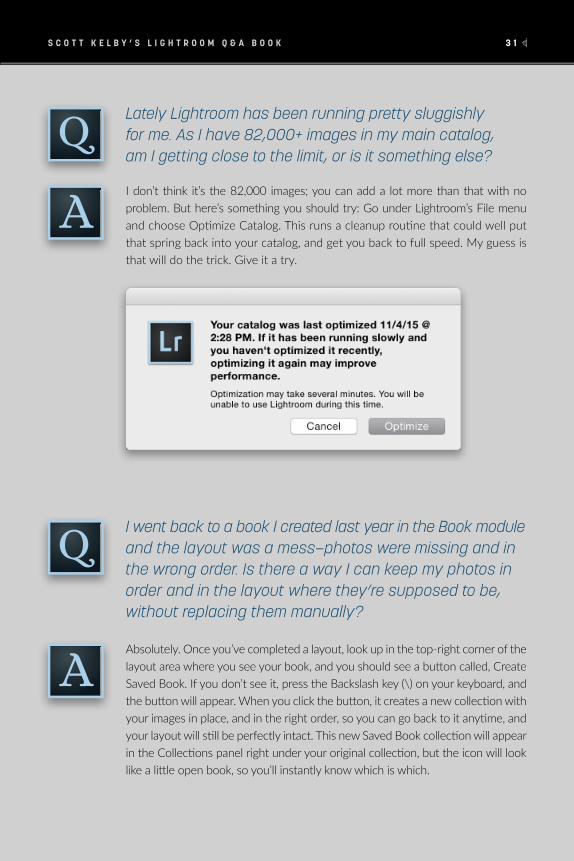
I don’t think it’s the 82,000 images; you can add a lot more than that with no problem. But here’s something you should try: Go under Lightroom’s File menu and choose Optimize Catalog. This runs a cleanup routine that could well put that spring back into your catalog, and get you back to full speed. My guess is that will do the trick. Give it a try.
Absolutely. Once you’ve completed a layout, look up in the top-right corner of the layout area where you see your book, and you should see a button called, Create Saved Book. If you don’t see it, press the Backslash key (\) on your keyboard, and the button will appear. When you click the button, it creates a new collection with your images in place, and in the right order, so you can go back to it anytime, and your layout will still be perfectly intact. This new Saved Book collection will appear in the Collections panel right under your original collection, but the icon will look like a little open book, so you’ll instantly know which is which.
Lately Lightroom has been running pretty sluggishly for me. As I have 82,000+ images in my main catalog, am I getting close to the limit, or is it something else?
I went back to a book I created last year in the Book module and the layout was a mess—photos were missing and in the wrong order. Is there a way I can keep my photos in order and in the layout where they’re supposed to be, without replacing them manually?
S C O T T K E L B Y ’ S L I G H T R O O M Q & A B O O K 3 2
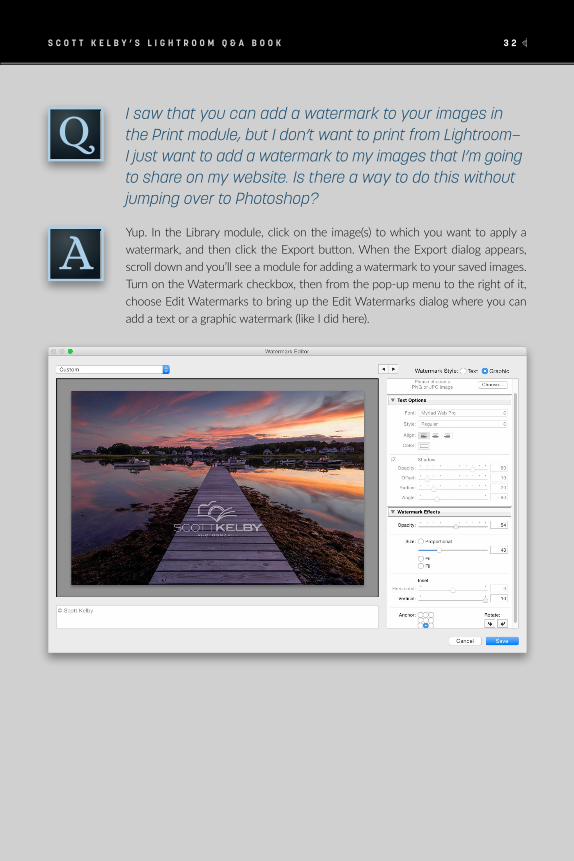
Yup. In the Library module, click on the image(s) to which you want to apply a watermark, and then click the Export button. When the Export dialog appears, scroll down and you’ll see a module for adding a watermark to your saved images. Turn on the Watermark checkbox, then from the pop-up menu to the right of it, choose Edit Watermarks to bring up the Edit Watermarks dialog where you can add a text or a graphic watermark (like I did here).
I saw that you can add a watermark to your images in the Print module, but I don’t want to print from Lightroom— I just want to add a watermark to my images that I’m going to share on my website. Is there a way to do this without jumping over to Photoshop?
S C O T T K E L B Y ’ S L I G H T R O O M Q & A B O O K 3 3
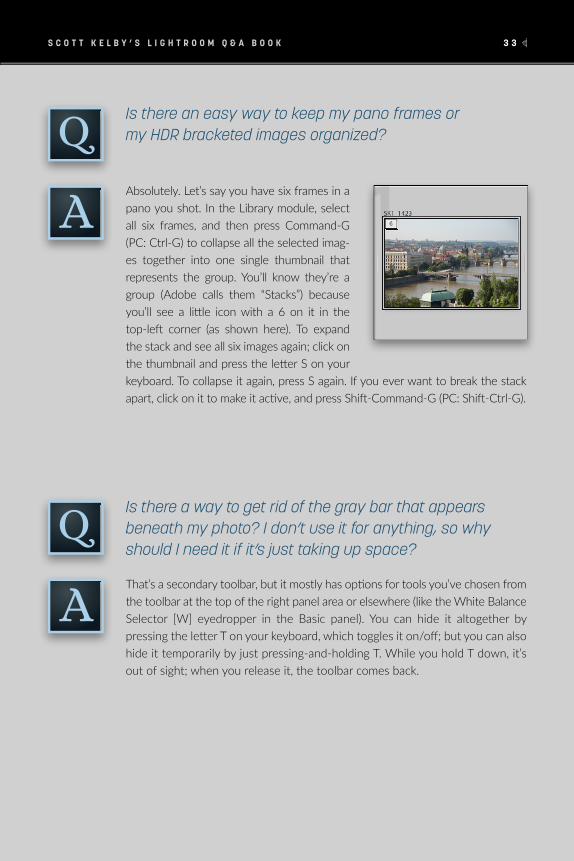
Absolutely. Let’s say you have six frames in a pano you shot. In the Library module, select all six frames, and then press Command-G (PC: Ctrl-G) to collapse all the selected imag-es together into one single thumbnail that represents the group. You’ll know they’re a group (Adobe calls them “Stacks”) because you’ll see a little icon with a 6 on it in the top-left corner (as shown here). To expand the stack and see all six images again; click on the thumbnail and press the letter S on your keyboard. To collapse it again, press S again. If you ever want to break the stack apart, click on it to make it active, and press Shift-Command-G (PC: Shift-Ctrl-G).
That’s a secondary toolbar, but it mostly has options for tools you’ve chosen from the toolbar at the top of the right panel area or elsewhere (like the White Balance Selector [W] eyedropper in the Basic panel). You can hide it altogether by pressing the letter T on your keyboard, which toggles it on/off; but you can also hide it temporarily by just pressing-and-holding T. While you hold T down, it’s out of sight; when you release it, the toolbar comes back.
Is there an easy way to keep my pano frames or my HDR bracketed images organized?
Is there a way to get rid of the gray bar that appears beneath my photo? I don’t use it for anything, so why should I need it if it’s just taking up space?
S C O T T K E L B Y ’ S L I G H T R O O M Q & A B O O K 3 4
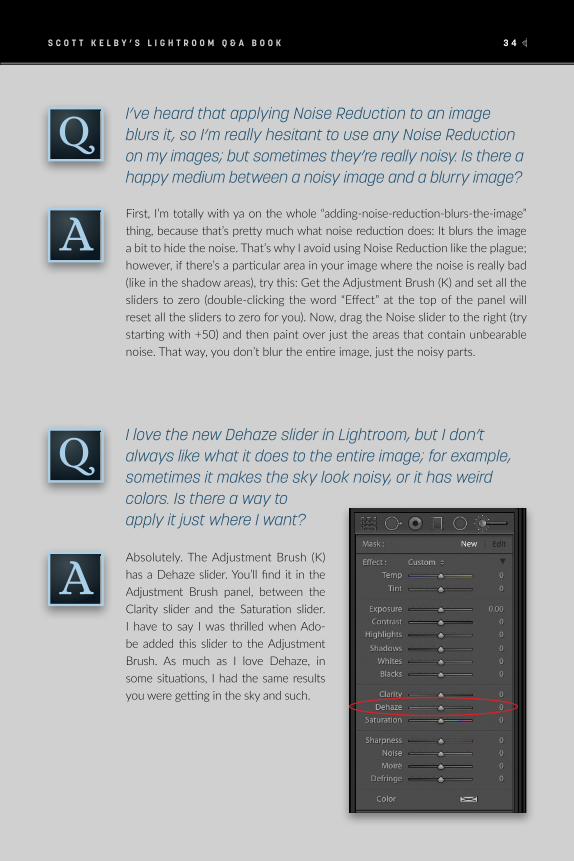
Absolutely. The Adjustment Brush (K) has a Dehaze slider. You’ll find it in the Adjustment Brush panel, between the Clarity slider and the Saturation slider. I have to say I was thrilled when Ado-be added this slider to the Adjustment Brush. As much as I love Dehaze, in some situations, I had the same results you were getting in the sky and such.
I love the new Dehaze slider in Lightroom, but I don’t always like what it does to the entire image; for example, sometimes it makes the sky look noisy, or it has weird colors. Is there a way to apply it just where I want?
First, I’m totally with ya on the whole “adding-noise-reduction-blurs-the-image” thing, because that’s pretty much what noise reduction does: It blurs the image a bit to hide the noise. That’s why I avoid using Noise Reduction like the plague; however, if there’s a particular area in your image where the noise is really bad (like in the shadow areas), try this: Get the Adjustment Brush (K) and set all the sliders to zero (double-clicking the word “Effect” at the top of the panel will reset all the sliders to zero for you). Now, drag the Noise slider to the right (try starting with +50) and then paint over just the areas that contain unbearable noise. That way, you don’t blur the entire image, just the noisy parts.
I’ve heard that applying Noise Reduction to an image blurs it, so I’m really hesitant to use any Noise Reduction on my images; but sometimes they’re really noisy. Is there a happy medium between a noisy image and a blurry image?
S C O T T K E L B Y ’ S L I G H T R O O M Q & A B O O K 3 5
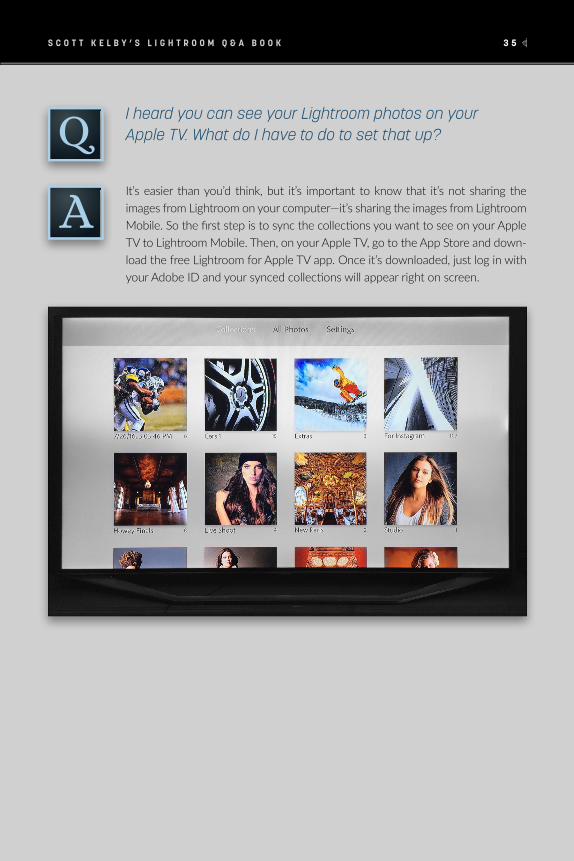
It’s easier than you’d think, but it’s important to know that it’s not sharing the images from Lightroom on your computer—it’s sharing the images from Lightroom Mobile. So the first step is to sync the collections you want to see on your Apple TV to Lightroom Mobile. Then, on your Apple TV, go to the App Store and down-load the free Lightroom for Apple TV app. Once it’s downloaded, just log in with your Adobe ID and your synced collections will appear right on screen.
I heard you can see your Lightroom photos on your Apple TV. What do I have to do to set that up?
S C O T T K E L B Y ’ S L I G H T R O O M Q & A B O O K 3 6
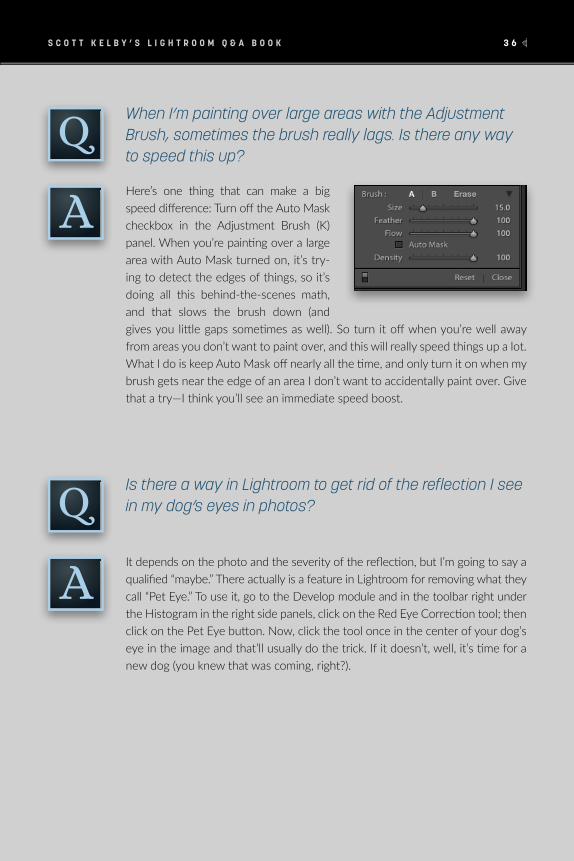
Here’s one thing that can make a big speed difference: Turn off the Auto Mask checkbox in the Adjustment Brush (K) panel. When you’re painting over a large area with Auto Mask turned on, it’s try-ing to detect the edges of things, so it’s doing all this behind-the-scenes math, and that slows the brush down (and gives you little gaps sometimes as well). So turn it off when you’re well away from areas you don’t want to paint over, and this will really speed things up a lot. What I do is keep Auto Mask off nearly all the time, and only turn it on when my brush gets near the edge of an area I don’t want to accidentally paint over. Give that a try—I think you’ll see an immediate speed boost.
It depends on the photo and the severity of the reflection, but I’m going to say a qualified “maybe.” There actually is a feature in Lightroom for removing what they call “Pet Eye.” To use it, go to the Develop module and in the toolbar right under the Histogram in the right side panels, click on the Red Eye Correction tool; then click on the Pet Eye button. Now, click the tool once in the center of your dog’s eye in the image and that’ll usually do the trick. If it doesn’t, well, it’s time for a new dog (you knew that was coming, right?).
When I’m painting over large areas with the Adjustment Brush, sometimes the brush really lags. Is there any way to speed this up?
Is there a way in Lightroom to get rid of the reflection I see in my dog’s eyes in photos?
S C O T T K E L B Y ’ S L I G H T R O O M Q & A B O O K 3 7
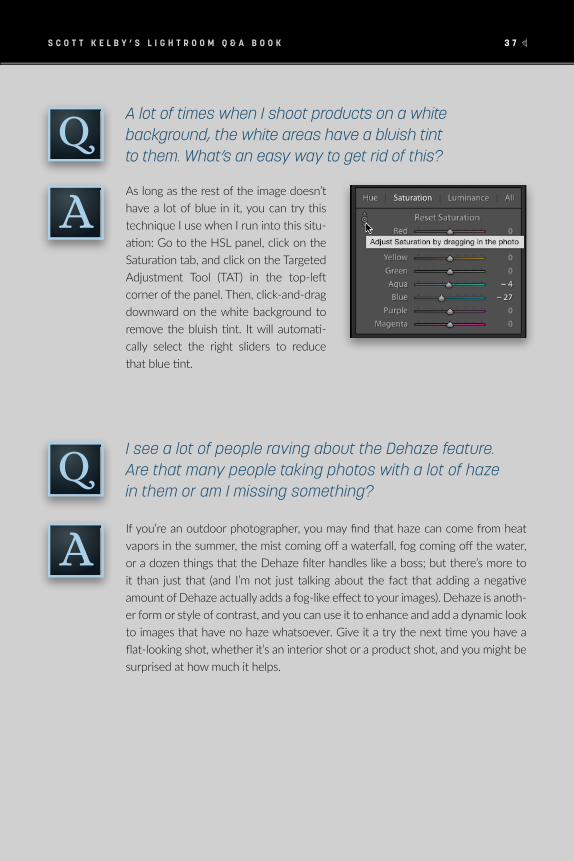
As long as the rest of the image doesn’t have a lot of blue in it, you can try this technique I use when I run into this situ-ation: Go to the HSL panel, click on the Saturation tab, and click on the Targeted Adjustment Tool (TAT) in the top-left corner of the panel. Then, click-and-drag downward on the white background to remove the bluish tint. It will automati-cally select the right sliders to reduce that blue tint.
If you’re an outdoor photographer, you may find that haze can come from heat vapors in the summer, the mist coming off a waterfall, fog coming off the water, or a dozen things that the Dehaze filter handles like a boss; but there’s more to it than just that (and I’m not just talking about the fact that adding a negative amount of Dehaze actually adds a fog-like effect to your images). Dehaze is anoth-er form or style of contrast, and you can use it to enhance and add a dynamic look to images that have no haze whatsoever. Give it a try the next time you have a flat-looking shot, whether it’s an interior shot or a product shot, and you might be surprised at how much it helps.
A lot of times when I shoot products on a white background, the white areas have a bluish tint to them. What’s an easy way to get rid of this?
I see a lot of people raving about the Dehaze feature. Are that many people taking photos with a lot of haze in them or am I missing something?
S C O T T K E L B Y ’ S L I G H T R O O M Q & A B O O K 3 8
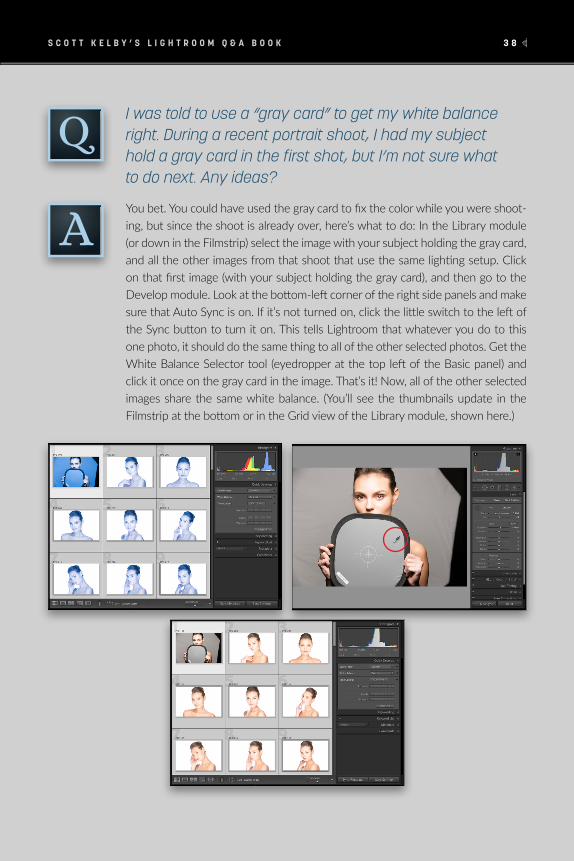
You bet. You could have used the gray card to fix the color while you were shoot-ing, but since the shoot is already over, here’s what to do: In the Library module (or down in the Filmstrip) select the image with your subject holding the gray card, and all the other images from that shoot that use the same lighting setup. Click on that first image (with your subject holding the gray card), and then go to the Develop module. Look at the bottom-left corner of the right side panels and make sure that Auto Sync is on. If it’s not turned on, click the little switch to the left of the Sync button to turn it on. This tells Lightroom that whatever you do to this one photo, it should do the same thing to all of the other selected photos. Get the White Balance Selector tool (eyedropper at the top left of the Basic panel) and click it once on the gray card in the image. That’s it! Now, all of the other selected images share the same white balance. (You’ll see the thumbnails update in the Filmstrip at the bottom or in the Grid view of the Library module, shown here.)
I was told to use a “gray card” to get my white balance right. During a recent portrait shoot, I had my subject hold a gray card in the first shot, but I’m not sure what to do next. Any ideas?
S C O T T K E L B Y ’ S L I G H T R O O M Q & A B O O K 3 9
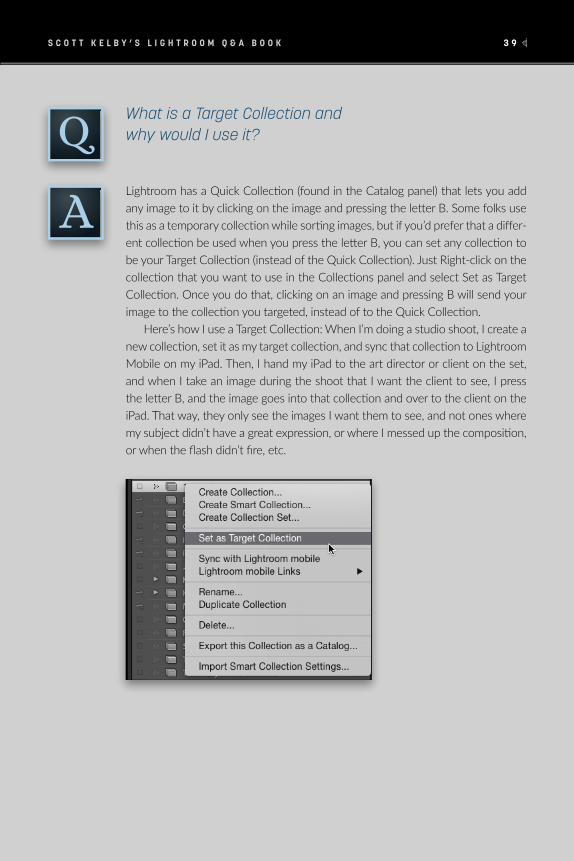
Lightroom has a Quick Collection (found in the Catalog panel) that lets you add any image to it by clicking on the image and pressing the letter B. Some folks use this as a temporary collection while sorting images, but if you’d prefer that a differ-ent collection be used when you press the letter B, you can set any collection to be your Target Collection (instead of the Quick Collection). Just Right-click on the collection that you want to use in the Collections panel and select Set as Target Collection. Once you do that, clicking on an image and pressing B will send your image to the collection you targeted, instead of to the Quick Collection.
Here’s how I use a Target Collection: When I’m doing a studio shoot, I create a new collection, set it as my target collection, and sync that collection to Lightroom Mobile on my iPad. Then, I hand my iPad to the art director or client on the set, and when I take an image during the shoot that I want the client to see, I press the letter B, and the image goes into that collection and over to the client on the iPad. That way, they only see the images I want them to see, and not ones where my subject didn’t have a great expression, or where I messed up the composition, or when the flash didn’t fire, etc.
What is a Target Collection and why would I use it?
S C O T T K E L B Y ’ S L I G H T R O O M Q & A B O O K 4 0
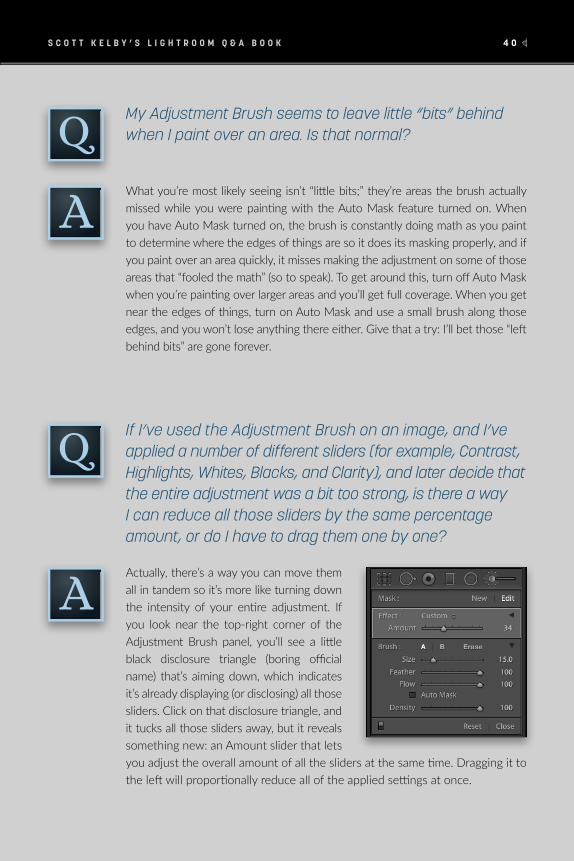
Actually, there’s a way you can move them all in tandem so it’s more like turning down the intensity of your entire adjustment. If you look near the top-right corner of the Adjustment Brush panel, you’ll see a little black disclosure triangle (boring official name) that’s aiming down, which indicates it’s already displaying (or disclosing) all those sliders. Click on that disclosure triangle, and it tucks all those sliders away, but it reveals something new: an Amount slider that lets you adjust the overall amount of all the sliders at the same time. Dragging it to the left will proportionally reduce all of the applied settings at once.
If I’ve used the Adjustment Brush on an image, and I’ve applied a number of different sliders (for example, Contrast, Highlights, Whites, Blacks, and Clarity), and later decide that the entire adjustment was a bit too strong, is there a way I can reduce all those sliders by the same percentage amount, or do I have to drag them one by one?
What you’re most likely seeing isn’t “little bits;” they’re areas the brush actually missed while you were painting with the Auto Mask feature turned on. When you have Auto Mask turned on, the brush is constantly doing math as you paint to determine where the edges of things are so it does its masking properly, and if you paint over an area quickly, it misses making the adjustment on some of those areas that “fooled the math” (so to speak). To get around this, turn off Auto Mask when you’re painting over larger areas and you’ll get full coverage. When you get near the edges of things, turn on Auto Mask and use a small brush along those edges, and you won’t lose anything there either. Give that a try: I’ll bet those “left behind bits” are gone forever.
My Adjustment Brush seems to leave little “bits” behind when I paint over an area. Is that normal?
S C O T T K E L B Y ’ S L I G H T R O O M Q & A B O O K 4 1
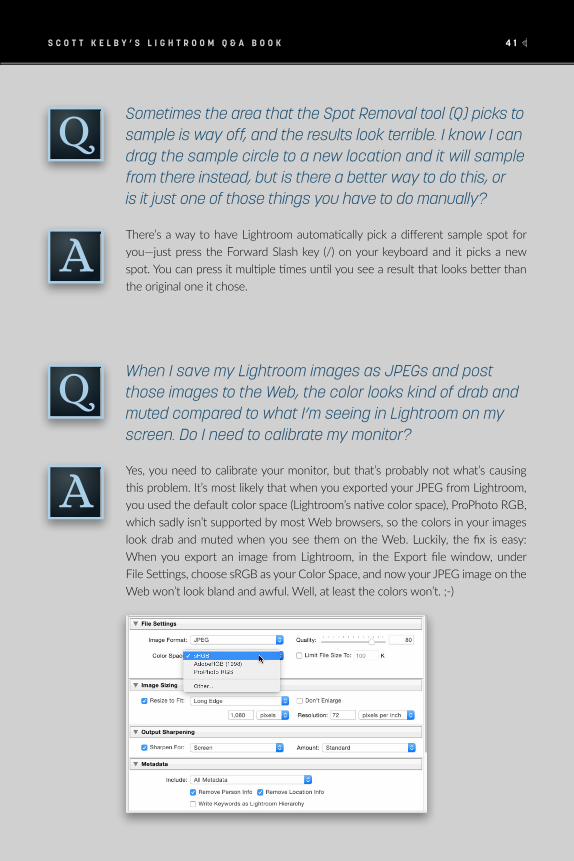
Yes, you need to calibrate your monitor, but that’s probably not what’s causing this problem. It’s most likely that when you exported your JPEG from Lightroom, you used the default color space (Lightroom’s native color space), ProPhoto RGB, which sadly isn’t supported by most Web browsers, so the colors in your images look drab and muted when you see them on the Web. Luckily, the fix is easy: When you export an image from Lightroom, in the Export file window, under File Settings, choose sRGB as your Color Space, and now your JPEG image on the Web won’t look bland and awful. Well, at least the colors won’t. ;-)
When I save my Lightroom images as JPEGs and post those images to the Web, the color looks kind of drab and muted compared to what I’m seeing in Lightroom on my screen. Do I need to calibrate my monitor?
There’s a way to have Lightroom automatically pick a different sample spot for you—just press the Forward Slash key (/) on your keyboard and it picks a new spot. You can press it multiple times until you see a result that looks better than the original one it chose.
Sometimes the area that the Spot Removal tool (Q) picks to sample is way off, and the results look terrible. I know I can drag the sample circle to a new location and it will sample from there instead, but is there a better way to do this, or is it just one of those things you have to do manually?
S C O T T K E L B Y ’ S L I G H T R O O M Q & A B O O K 4 2
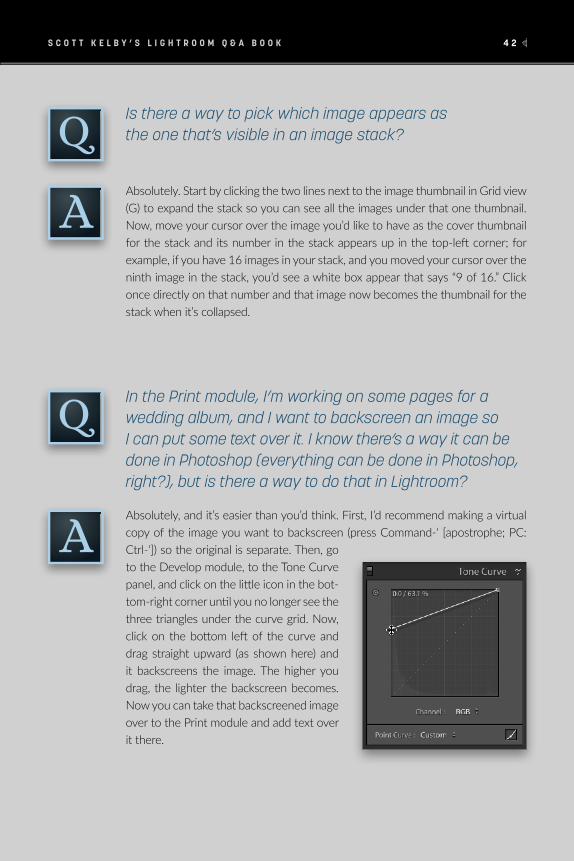
Absolutely, and it’s easier than you’d think. First, I’d recommend making a virtual copy of the image you want to backscreen (press Command-‘ [apostrophe; PC: Ctrl-‘]) so the original is separate. Then, go to the Develop module, to the Tone Curve panel, and click on the little icon in the bot-tom-right corner until you no longer see the three triangles under the curve grid. Now, click on the bottom left of the curve and drag straight upward (as shown here) and it backscreens the image. The higher you drag, the lighter the backscreen becomes. Now you can take that backscreened image over to the Print module and add text over it there.
In the Print module, I’m working on some pages for a wedding album, and I want to backscreen an image so I can put some text over it. I know there’s a way it can be done in Photoshop (everything can be done in Photoshop, right?), but is there a way to do that in Lightroom?
Absolutely. Start by clicking the two lines next to the image thumbnail in Grid view (G) to expand the stack so you can see all the images under that one thumbnail. Now, move your cursor over the image you’d like to have as the cover thumbnail for the stack and its number in the stack appears up in the top-left corner; for example, if you have 16 images in your stack, and you moved your cursor over the ninth image in the stack, you’d see a white box appear that says “9 of 16.” Click once directly on that number and that image now becomes the thumbnail for the stack when it’s collapsed.
Is there a way to pick which image appears as the one that’s visible in an image stack?
S C O T T K E L B Y ’ S L I G H T R O O M Q & A B O O K 4 3
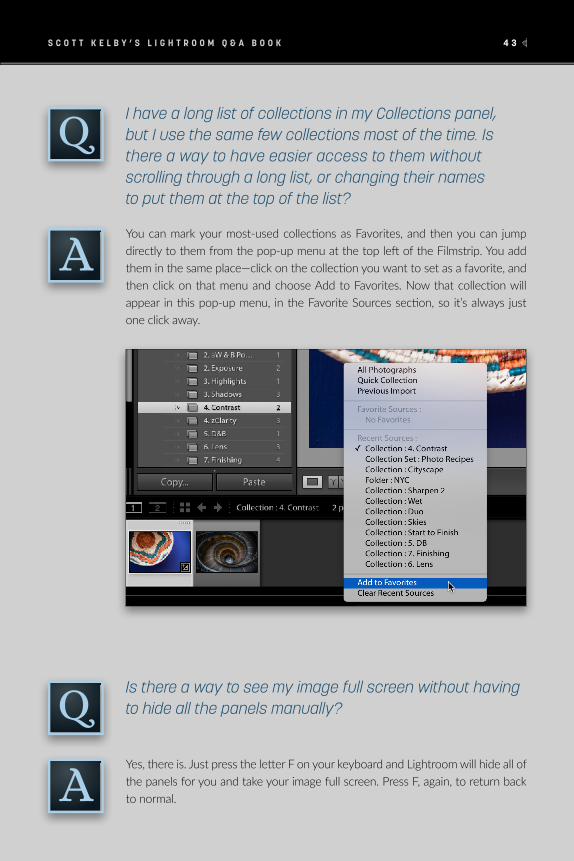
You can mark your most-used collections as Favorites, and then you can jump directly to them from the pop-up menu at the top left of the Filmstrip. You add them in the same place—click on the collection you want to set as a favorite, and then click on that menu and choose Add to Favorites. Now that collection will appear in this pop-up menu, in the Favorite Sources section, so it’s always just one click away.
I have a long list of collections in my Collections panel, but I use the same few collections most of the time. Is there a way to have easier access to them without scrolling through a long list, or changing their names to put them at the top of the list?
Yes, there is. Just press the letter F on your keyboard and Lightroom will hide all of the panels for you and take your image full screen. Press F, again, to return back to normal.
Is there a way to see my image full screen without having to hide all the panels manually?

S C O T T K E L B Y ’ S L I G H T R O O M Q & A B O O K 4 4
It’s a simple two-step process: (1) In the Library module, first go to the Catalog panel and click on All Photographs, so you’re searching your entire photo catalog. Then, hit the \ (Backslash) key on your keyboard, so the Filter Bar appears at the top of the thumbnail grid. Click on Metadata, and then click directly on the title at the top of the first column (it probably says “Date”) to bring up a pop-up menu of choices. Choose Copyright Status from this pop-up menu, and now in that first column it displays how many images you have, how many are copyrighted, and how many are unknown. Click on Unknown to have just your images that don’t have copyright embedded into them visible. Next, (2) press Command-A (PC: Ctrl-A) to Select All the images, then go to the Metadata panel and, from the Preset pop-up menu, choose your copyright. Instantly, all those selected images now have your copyright info embedded right into them.
How can I find the images in my Library that don’t have my copyright info embedded into them and, once I do, how would I add it now after the fact?
S C O T T K E L B Y ’ S L I G H T R O O M Q & A B O O K 4 5
There sure is. Go to the History panel, Right-click on the Convert to Black & White state and, from the pop-up menu that appears, choose Copy History Step Settings to Before. Now, your original black-and-white conversion becomes the Before image.
You bet. When you have the Adjustment Brush active, scroll down to the very bottom of the panel, and you’ll see a little toggle switch on the left. It’s in the up (on) position. Click on it to toggle it off, and it only turns off the visibility of the changes you made with the Adjustment Brush—everything else you did up until that point will still be visible, just the Adjustment Brush edits will all be hidden. When you’re done, click it again to toggle the visibility back on. n
If I convert an image to black and white, and then make some edits to it, when I do a before/after, the Before image returns to the color image instead of the black and white. So, it’s hard for me to compare my black-and-white edits to the original black-and-white conversion. Is there a way around this?
I know you can easily see a before/after of all your changes to an image, but is there a way to see a before/after of just a particular set of changes? Like if I use the Adjustment Brush, is there a way I can see what the image looked like before I used it?