Embed Size (px)
Citation preview

Schools Cash Office Academic Year End Guide 2019
Schools Cash Office Income Administration Software
Tucasi Ltd Wessex House Upper Market Street Eastleigh Hampshire SO50 9FD School Support - 02380 016564 Sales Team - 02380 016563 www.tucasi.com
Copyright Tucasi Ltd 2004 - 2019

SCO Academic Year End Guide 2019 2 Last revised 08-03-2019 v2.4.0.100
Contents
1. About this guide ................................................................................................................................................. 4
2. Schools Cash Office and GDPR compliance .......................................................................................................... 4
3. Set new term dates (Dinners and Extended day users only) ................................................................................. 5
4. Update Dinner money prices (Dinners users only) ............................................................................................... 6
5. Update Extended day prices (Extended day users only) ....................................................................................... 7
6. Check account balances for pupils leaving the school (All schools) ....................................................................... 8
7. Manage balances for Dinners/Extended day only ................................................................................................ 9
7.1. Remove any meals or sessions entered for leavers beyond their leaving date ............................................. 9
7.2. Refund balances for dinners and extended day ........................................................................................... 9
7.3. Write off balances for dinners and extended day .......................................................................................10
7.4. Transfer dinners and extended day balances to siblings .............................................................................10
8. Manage balances for pre-payment accounts (All schools) ...................................................................................11
8.1. Refund credit pre-payment account balances ............................................................................................11
8.2. Enter a payment for a pre-payment account debt ......................................................................................11
8.3. Transfer pre-payment account balances to siblings ....................................................................................11
8.4. Write off pre-payment account balances ...................................................................................................11
9. Manage account balances for Cafeteria account (Cashless catering schools only) ..............................................12
10. Delete leavers via the Accounts tab ....................................................................................................................13
11. Check Pupil IDs (All schools) ...............................................................................................................................14
12. Import leaving dates (All schools) .......................................................................................................................15
12.1. Create leaving data (schools without a dynamic link) .............................................................................15
12.2. Import the leaving dates into Schools Cash Office ..................................................................................15
12.3. Delete leavers (All schools) ....................................................................................................................16
13. Format Nursery class settings (schools with Nursery pupils only) ........................................................................17
14. Update SCO with new academic year data (All schools) ......................................................................................18
14.1. Schools with the SIMS dynamic link .......................................................................................................18
14.2. Schools without a dynamic link ..............................................................................................................18
15. Import Pupil Contact data (Schools using SCO Communications) ........................................................................20
15.1. Schools with the SIMS dynamic link .......................................................................................................20
15.2. Pupil contact import – schools without a dynamic link ...........................................................................20
16. Configure preferences (Dinner money and Extended day schools) ......................................................................21
16.1. Enter pupil preferences .........................................................................................................................21
16.2. Populate any meal or session choices for the future ..............................................................................21

SCO Academic Year End Guide 2019 3 Last revised 08-03-2019 v2.4.0.100
17. Update any cohort pupil sets .............................................................................................................................22
18. Delete empty classes (all schools) ......................................................................................................................22
19. Add new staff ....................................................................................................................................................22
20. Assign teachers to classes (Dinner money, Extended day and Parents evening users only) .................................22
21. SCO Dinner money startup class (Classroom edition users only) .........................................................................23
22. Delete staff that have left (All schools) ...............................................................................................................23
23. Manage duplicate pupils (All schools) .................................................................................................................24
23.1. Deciding which duplicate account to retain............................................................................................24
23.2. How to move the correct ID from one duplicate to another: ..................................................................24
23.3. Delete Duplicate pupils ..........................................................................................................................25
24. Restore deleted pupils .......................................................................................................................................25
25. Documentation and Support ..............................................................................................................................25
Document Change History
Date Details of Change

SCO Academic Year End Guide 2019 4 Last revised 08-03-2019 v2.4.0.100
1. About this guide
This guide will take you through setting up pupil and staff data in Schools Cash Office (SCO) ready for the new academic year. Not all sections/modules will be relevant to your school, but we recommend that you refer to each section of the guide and proceed with the required actions. Note that any references to ‘Dinner money’ relate to the Dinner money module as used by primary schools, not the cashless catering link used by secondary schools. This guide relates to SCO version 2.4.0.96 and later – to check you are on the latest version, in SCO click on the Income tab, under the Help button the installed version is displayed. If your version starts with 2.4 but is an earlier version than 2.4.0.96, please refer to http://tucasihelp.com/faqs/50.html for details on the latest upgrade. If your version starts with 2.3, you cannot use this guide. In SCO at the bottom of the screen click on Guides & Documentation, scroll to the bottom of the screen and follow the instructions in guides 1, 2, and 3 in the ACADEMIC YEAR END GUIDES section.
2. Schools Cash Office and GDPR compliance
As you will be aware, new regulations came into place from 25th May 2018 relating to how personal data should be handled under the new GDPR guidelines. At Tucasi we have reviewed our processes and the SCO software to ensure that we are compliant with the new regulations. We have distributed revised GDPR Contracts to all our customers which will act as an agreement to evidence that Tucasi have stated that they will only process your data in compliance with GDPR. This will also allow Tucasi to evidence that you have given Tucasi authority to process your data within the parameters of the Law. GDPR requires us to remove data from the database beyond there being no legitimate basis for holding it. Therefore, we ask schools to take responsibility to use correct workflow/processes to keep themselves GDPR compliant. This would mean, for example, ensuring pupils and staff who are no longer on roll at your school are deleted from the system in a timely manner, ideally during the academic year end process or soon after. Schools should ensure that completed school Trips are deleted in a timely manner during the academic or financial year end processes, as appropriate. The Banking screen should be cleared down during the academic or financial year end processes, as appropriate. This would apply even if you don’t currently use SCO to reconcile with your bank account. This document references processes to cover all the above requirements which we hope you will find useful. You may also be interested in the Tucasi news article relating to GDPR which you can find here: GDPR What This Means You can view the Tucasi Privacy Policy here: Tucasi Privacy Policy If you have any queries regarding GDPR compliance and Tucasi Schools Cash Office, please email [email protected].

SCO Academic Year End Guide 2019 5 Last revised 08-03-2019 v2.4.0.100
3. Set new term dates (Dinners and Extended day users only)
If you do not use the Dinners or Extended day modules, proceed to section 6. Enter new term dates and school holidays in the Dinners and/or Extended day modules, as follows: WARNING - Do not Change existing term dates – you should Add new term dates for the next year.
For Dinner money users
• Click on the Dinners tab (you must do this first to activate the following options)
• Click on the Configuration tab, select System options
• Under the General tab next to Set up term dates click Set up
• Scroll down to the bottom of the listed term dates, if necessary
• Click on Add and enter school open and school close dates
• Enter a Description such as Autumn 1
• Click on Done
• Repeat for each half term
• In the box below, enter any Day Closures for example Training or Bank Holidays
• Click on Done. Click on Done
• On the Dinners tab, click Settings, Term dates Check that the Term dates have been updated automatically. Click on Done
For Dinner Money users with Extended day
• If using Extended day, click on the Extended day tab, click Settings, Session dates
• If you want to use the standard term dates added above, click Merge standard term dates at the bottom of the screen to update the session dates
• Repeat the above for each Club that you have set up
• If your Extended day clubs are open during the school holiday, enter the Open and Close dates as applicable for each club
• Day closures will appear as an X in the Dinner money and Extended day screens
For Extended day users without the Dinner Money module
• Click on the Extended day tab, select the first club, click Settings, Session dates
• Scroll down to the bottom of the listed term dates, if necessary
• Click on Add and enter school open and school close dates
• Enter a Description such as Autumn 1
• Click on Done
• Repeat for each half term
• In the box below, enter any Day Closures for example Training or Bank Holidays
• Click on Done. Click on Done.
• Repeat the above for all clubs
Proceed to section 4

SCO Academic Year End Guide 2019 6 Last revised 08-03-2019 v2.4.0.100
4. Update Dinner money prices (Dinners users only)
If your school has a meal price increase starting in September, follow the steps below, otherwise proceed to section 5.
• On the Configuration tab, select System options, select the Dinners/Extended day tab
• Add a tick in Allow meal price changes for dates before today, click Done
• On the Dinners tab, select Settings, Meal codes
• Click Advanced price config
• Choose the appropriate meal code from the Select a meal code dropdown
• Make a note of the current From date and Price in case this is required later
• Click Add new
Note: this will position the previous price/s at the bottom of the list and enable a new top line for new pricing.
• Enter the required From date on the top line (this can be a date before today if you need to backdate meal prices)
• Leave the To date blank
• Enter the Price (pupil price)
• Enter the Price w/VAT (this is the price charged to adults and VAT is automatically calculated. This price can be overtyped if required)
• Change the Select a meal code dropdown to the next appropriate code
• Follow the above until all the codes have been amended
• Click Done
• Click Done again and then Close
The new prices will be effective from the date you selected. You can test this by scrolling to that date in the Dinners tab and enter a code against a pupil or member of staff.
Proceed to section 5

SCO Academic Year End Guide 2019 7 Last revised 08-03-2019 v2.4.0.100
5. Update Extended day prices (Extended day users only)
If your school has a price increase for Extended day clubs starting in September, follow the steps below, otherwise proceed to section 6.
• On the Configuration tab, select System options
• Select the Dinners/Extended Day tab
• Add a tick in Allow meal price changes for dates before today, click Done
• On the Extended day tab, select the relevant club
• Click on Settings, Session codes
• Click Advanced price config
• Choose the appropriate session code from the Select a session code dropdown
• Make a note of the current From date and Price in case this is required later
• Click Add new Note: this will position the previous price/s at the bottom of the list and enable a new top line for new pricing.
• Enter the required From date on the top line (this can be a date before today if you need to backdate session prices)
• Leave the To date blank
• Enter the Price (pupil price)
• Enter the Price w/VAT (this is the price charged to adults and VAT is automatically calculated. This price can be overtyped if required)
• Change the Select a session code dropdown to the next appropriate code
• Follow the above until all the codes have been amended
• Click Done
• Click Done again and then Close
• Repeat the above for each Club that you have set up
• The new prices will be effective from the date you have selected. You can test this by scrolling to that date in the Extended day club and enter a code against a pupil or member of staff
Proceed to section 6

SCO Academic Year End Guide 2019 8 Last revised 08-03-2019 v2.4.0.100
6. Check account balances for pupils leaving the school (All schools)
You will need to clear any account balances for leavers (both credit and/or debit balances). NB You do not need to remove pupils from trips before deleting them from SCO. To establish whether there are any pupils with accounts with a non-zero balance:
• In SCO, click on the Accounts tab
• Click on the Year column heading, this will sort the pupils by year group. Scroll down to the year group that is leaving school. Scan the columns on the right to check for any pupils with balances
Note: The number of columns visible on the Accounts tab depends on the modules licensed in SCO at your school, i.e. schools with no cashless catering link will not see the Cafeteria bal column. Similarly, schools with no Extended Day module won’t see columns such as Breakfast bal or ASC bal, etc.
You can export this screen to Excel for your records, if required (use the Export button at the bottom left of the screen in SCO). If there are no account balances for Leavers, proceed to section 10 Otherwise, proceed to section 7

SCO Academic Year End Guide 2019 9 Last revised 08-03-2019 v2.4.0.100
7. Manage balances for Dinners/Extended day only
If there are no Dinner or Extended day balances for Leavers, proceed to section 8. Dinner or Club credit balances for leavers can either be refunded back to the parent or transferred to a sibling’s account. Dinner or Club negative debt balances should either be collected, transferred to a sibling or written off.
7.1. Remove any meals or sessions entered for leavers beyond their leaving date
Before you start handling credit or debit balances for Leavers, ensure there are no meal or session codes entered beyond the pupil’s leaving date.
• In Dinners or Extended day click on Reports
• Click on the Statement Report
• Select Custom dates From the last day of term To (for example) December 2019
• Select Only show pupils with debt
• Select the relevant Class or Cohort
• Generate the report
• Scan through to ensure there are no codes entered for the future. If there are, delete them in SCO before handling any balances
7.2. Refund balances for dinners and extended day
To refund an online payment via WorldPay
If your online payments are credited direct to your Local Authority or a Caterer, you will need to contact them to request the refunds to the parents’ accounts. If your online payments are credited to your school bank account, you can refund credits back to the parent via your WorldPay account.
Access your Worldpay Account
• Browse to www.worldpay.com/uk
• Select Account login, Business Gateway account login (MAI) and login with your WorldPay username and password set up when you created your WorldPay account – your username will likely be in the format admin@[yourschoolpr] – after the @ symbol will be 12 characters
To search for transactions
• Click on Payments, enter the transaction number (you can find this in SCO on the transaction receipt), click on the Search button
To refund a payment via WorldPay
• Open the online transaction
• Scroll down until the Refund section is displayed
• To make a full refund, select the Refund button
• To make a partial refund, enter the required refund amount in the Amount box, then select the Refund button
• If the refund is successful, you will see the message Refund successful
• The payment status changes to Sent_For_Refund

SCO Academic Year End Guide 2019 10 Last revised 08-03-2019 v2.4.0.100
Record the online refund in SCO
• In SCO, go to the relevant item (Dinners or Extended day)
• Select the red Payment button
• Select the Refund option
• Select the Credit/debit option
• Enter the amount refunded
• In the Memo field enter narrative such as Refunded by WP and the WP transaction number
• Enter a credit/debit reference (this will show in the Check bank statement screen)
• Click on Done
For assistance with your WorldPay account, please contact WorldPay on 0330 333 1233. You will need to quote your Merchant Code (you should have this on original correspondence from WorldPay).
To refund by cash or cheque in school
• In SCO click on the appropriate module tab e.g. Dinners or Extended day
• Click on the red Payment button for the child with the credit balance
• Select the Refund option and the correct payment method (cash or cheque)
• The refund amount will automatically display
• Enter a Memo e.g. Child has left school (you can copy and paste this text for other refunds)
• Click Confirm refund, enter a reference when prompted if required
Proceed to section 7.3.
7.3. Write off balances for dinners and extended day
Writing off balances will not affect your Banking figures.
• In SCO click on the Dinners or Extended day tab
• Click on the Payment button, next to the relevant pupil
• Select Write off balance
• The amount is automatically entered and can’t be altered
• Enter a Reason for write off click Confirm write off
Proceed to section 7.4.
7.4. Transfer dinners and extended day balances to siblings
Transferring balances will not affect your Banking figures.
• In SCO click on the Dinners or Extended day tab
• On the right hand side of the screen, click on the Dinner money transfer or Pre-payment account transfer button
• Click the down arrow and select the From account
• Click the drop down and select the To account
• Enter the Amount, if you are transferring a negative/owing amount ensure you put a - before the figure (e.g. -10.00)
• Click OK
Proceed to section 8

SCO Academic Year End Guide 2019 11 Last revised 08-03-2019 v2.4.0.100
8. Manage balances for pre-payment accounts (All schools)
If there are no pre-payment account balances for Leavers, proceed to section 9. Any Pre-pay bal credit balances for pupils who have left school can either be refunded back to the parent or can be transferred to a sibling’s account. Any Pre-pay bal negative balances will need to be collected or written off.
8.1. Refund credit pre-payment account balances
• In SCO click on the Income tab
• Select Account Rebate
• Select the appropriate pupil/staff account name from the drop-down list and click OK
• Select the General pre-payment account when prompted
• Click the appropriate payment method to complete the refund
8.2. Enter a payment for a pre-payment account debt
• In SCO click on the Income tab
• Click on the Account deposit button
• Select the pupil account to add the payment
• Click OK
• Click the down arrow and select the General pre-payment account
• Enter the amount to deposit
• Select the relevant payment method - cash or cheque
8.3. Transfer pre-payment account balances to siblings
• In SCO click on the Income tab
• Click on the Account transfer button
• Click the down arrow and select General pre-payment account
• Click the down arrow and select the From account
• Click the drop down and select the To account
• Enter the Amount, if you are transferring a negative/owing amount ensure you put a - before the figure (eg -10.00)
• Click OK
8.4. Write off pre-payment account balances
You can write off the balance to allow deletion of the pupil. Please note there is no audit trail of this adjustment. If you didn’t do so earlier, export your screen to Excel before commencing this section for your records, if required (use the Export button at the bottom left of the screen in SCO).
SCO Academic Year End Guide 2019 12 Last revised 08-03-2019 v2.4.0.100
• In SCO click on the Accounts tab
• Right click on the Pre-pay bal column header
• Select Enable set account balances and click Yes
• The column will go yellow, you are able to change the relevant balances to zero
• Once you have amended the balances right-click on the header again and select Disable set account balances
• Select Yes to save the changes
• Click OK
Proceed to section 9
9. Manage account balances for Cafeteria account
(Cashless catering schools only)
If your school does not have a link with a cashless catering system, proceed to section 10. If your school is using the Tucasi SCO link with another cashless catering system (e.g. Cunninghams/ IMPACT, CRB, Nationwide/NRS, Vericool, Sharp, Uniware, Live Register etc.), you might see balances for Leavers in the Cafeteria bal column. These balances should be managed on your cashless catering system. Payments originally made online can subsequently be refunded via WorldPay (see section 7.2 – To refund an online payment via WorldPay). No transactions should be entered in Schools Cash Office against the pupils’ accounts. If you need to record the expenditure transactions in SCO for bank reconciliation purposes, we recommend that you use the Expenditure, Miscellaneous expenditure option. Once you have cleared any credit or debit balances for Leavers in your cashless catering system this will, in turn, update balances in Schools Cash Office. However, if you have already deleted the Leavers from the cashless system and there are still balances in SCO, you will have the option to remove Leavers in Schools Cash Office, despite them having Cafeteria balances. This is done later in the Academic Year End process. If there are no cashless catering refunds due for leavers, proceed to section 10
SCO Academic Year End Guide 2019 13 Last revised 08-03-2019 v2.4.0.100
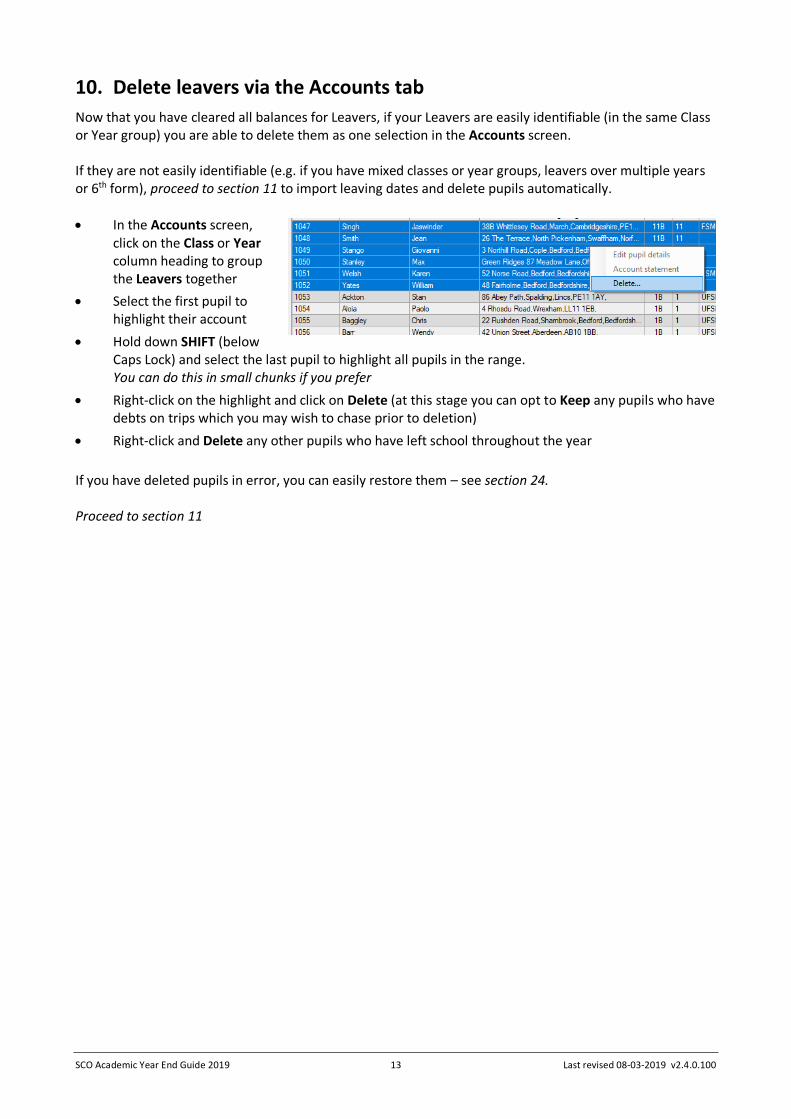
10. Delete leavers via the Accounts tab
Now that you have cleared all balances for Leavers, if your Leavers are easily identifiable (in the same Class or Year group) you are able to delete them as one selection in the Accounts screen. If they are not easily identifiable (e.g. if you have mixed classes or year groups, leavers over multiple years or 6th form), proceed to section 11 to import leaving dates and delete pupils automatically.
• In the Accounts screen, click on the Class or Year column heading to group the Leavers together
• Select the first pupil to highlight their account
• Hold down SHIFT (below Caps Lock) and select the last pupil to highlight all pupils in the range. You can do this in small chunks if you prefer
• Right-click on the highlight and click on Delete (at this stage you can opt to Keep any pupils who have debts on trips which you may wish to chase prior to deletion)
• Right-click and Delete any other pupils who have left school throughout the year
If you have deleted pupils in error, you can easily restore them – see section 24. Proceed to section 11
SCO Academic Year End Guide 2019 14 Last revised 08-03-2019 v2.4.0.100
11. Check Pupil IDs (All schools)
It is important to check which ID you have previously used to import the pupils from your MIS (MIS = Management Information System e.g. SIMS, Progresso, CMIS, Scholarpack, Bromcom, Arbor, PupilAsset, Integris G2). You will need this information later in the process.
• Click the Configuration tab and select System options
• Make a note of the option selected in Pupil ID field used for imports
It is important that ALL pupils have an ID in SCO, otherwise duplicate pupil accounts may be created when importing new data. All IDs must be entered before you import.
• In SCO, click on the Accounts tab
• Click on the Pupil ID column heading to sort by ID. Any blank IDs will appear at the top. (You may need to click the heading a couple of times for the blank IDs to appear at the top)
If you have any pupils without IDs you will need to add them in as follows:
• Right-click on the pupil’s name and click Edit pupil details
• Enter the ID in the Pupil ID field (this can be copied from your MIS pupil database)
• Click on Done
Please note that in SIMS the ID field is only available to users who are part of the Third Party Reporting group. You may wish to contact your MIS support team for further assistance. If you deleted pupils at section 10, proceed to section 13. Otherwise, proceed to section 12

SCO Academic Year End Guide 2019 15 Last revised 08-03-2019 v2.4.0.100
12. Import leaving dates (All schools)
If you are using SIMS, follow this section to see if the dynamic link is set up on your PC. If you are not using SIMS, proceed straight to section 12.1.
• In SCO, click on the Configuration tab
• Select Import from external system
• Select Import configuration
• Click on Dynamic link configuration. If the SIMS dynamic link status indicates Not installed, proceed to section 12.1
• If the SIMS dynamic link status indicates Installed and there is a username and password in the SIMS Login section of this screen, click on Cancel
• In the Data source column, next to the Leavers heading ensure SIMS Dynamic Link is selected
• In SCO, click on the Admin tab
• Select End of academic year, select Leavers import
NOTE: this import adds Leaving Dates to any pupils who have been marked as Leavers in SIMS for the current academic year, but does not delete pupils. Proceed to section 12.3 for instructions on deleting Leavers.
12.1. Create leaving data (schools without a dynamic link)
You will need to create a report containing the leaving dates for all pupils who left school either during or at the end of the academic year that has just finished. Contact your MIS support if you need assistance creating this report. The report should contain the following separate fields with identical field headings to that shown below. A filter should be added to ensure that you only select pupils who have left during this academic year.
Forename Surname DOB
One of PupilID or AdmissionNumber or UPN AddressLine RegGroup Year LeavingDate
Benjamin Able 01/01/2002 123456 45 Willow Way, AN1 2TW 11FC 11 20/07/2018
For the field containing the pupil IDs, select only one field - UPN or PupilID or AdmissionNumber as you noted earlier. The report should be generated and saved (from Excel) as a CSV (comma delimited) file and saved to a location on your computer that you can access. Ensure the Leaving date in your csv file is a date before today’s date - the leavers cannot be deleted from SCO until the day after the leaving date at the earliest.
12.2. Import the leaving dates into Schools Cash Office
• Ensure the csv file created above has been closed
• In SCO, click on the Admin tab
• Select End of academic year, select Leavers import
• Browse and select the above csv file you saved on your computer
SCO Academic Year End Guide 2019 16 Last revised 08-03-2019 v2.4.0.100
• A window will be displayed summarising the actions taken. Do not be alarmed that the screen lists all pupils in the Pupils to be modified column – this indicates that all pupils will be reviewed for a leaving date. Only those with a leaving date in the file above will be affected
• Click on the Confirm button. Click on Close
NOTE: this import adds Leaving Dates to any pupils who have been marked as Leavers in your MIS. Proceed to section 12.3 for instructions on deleting Leavers.
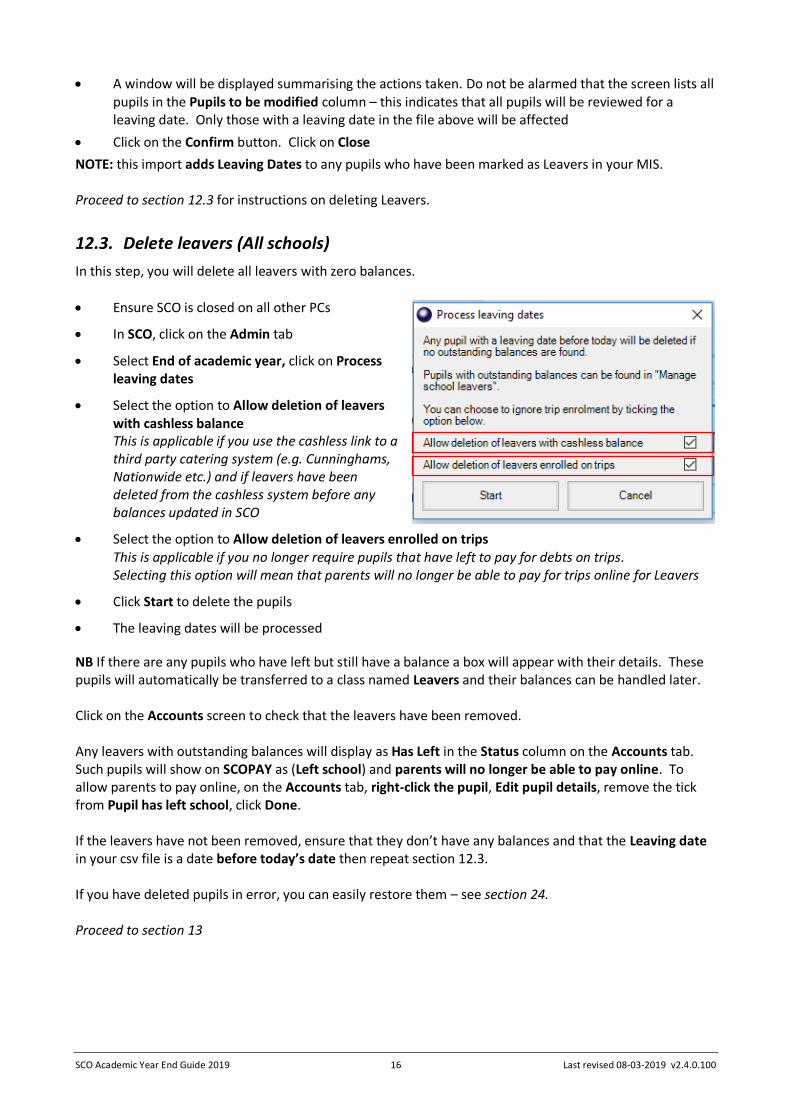
12.3. Delete leavers (All schools)
In this step, you will delete all leavers with zero balances.
• Ensure SCO is closed on all other PCs
• In SCO, click on the Admin tab
• Select End of academic year, click on Process leaving dates
• Select the option to Allow deletion of leavers with cashless balance This is applicable if you use the cashless link to a third party catering system (e.g. Cunninghams, Nationwide etc.) and if leavers have been deleted from the cashless system before any balances updated in SCO
• Select the option to Allow deletion of leavers enrolled on trips This is applicable if you no longer require pupils that have left to pay for debts on trips. Selecting this option will mean that parents will no longer be able to pay for trips online for Leavers
• Click Start to delete the pupils
• The leaving dates will be processed
NB If there are any pupils who have left but still have a balance a box will appear with their details. These pupils will automatically be transferred to a class named Leavers and their balances can be handled later. Click on the Accounts screen to check that the leavers have been removed. Any leavers with outstanding balances will display as Has Left in the Status column on the Accounts tab. Such pupils will show on SCOPAY as (Left school) and parents will no longer be able to pay online. To allow parents to pay online, on the Accounts tab, right-click the pupil, Edit pupil details, remove the tick from Pupil has left school, click Done. If the leavers have not been removed, ensure that they don’t have any balances and that the Leaving date in your csv file is a date before today’s date then repeat section 12.3. If you have deleted pupils in error, you can easily restore them – see section 24. Proceed to section 13

SCO Academic Year End Guide 2019 17 Last revised 08-03-2019 v2.4.0.100
13. Format Nursery class settings (schools with Nursery pupils only)
If you do not have Nursery pupils in your school proceed to next section. If you are going to import Nursery pupils into SCO and their Year Group in your MIS is marked as N1 or N2, you will need to import these as Year 15s in SCO. To do this, simply change the Default year group for imports setting:
• Click on the Configuration tab
• Click on System options
• Enter the Default year group for imports: as 15
• Click on Done
This will ensure that any pupils imported with a Year Group outside of 0-13, or a Year Group with an alphabetical character in the import file, will go into the Year 15 Year Group in SCO.
Proceed to next section

SCO Academic Year End Guide 2019 18 Last revised 08-03-2019 v2.4.0.100
14. Update SCO with new academic year data (All schools)
If your school does not have the SIMS dynamic link proceed to section 14.2. In this section you will import the data for the new academic year including new starters, existing pupils into their new classes and year groups/UFSM groups and Free school meal updates.
14.1. Schools with the SIMS dynamic link
The SIMS dynamic link will not import the new pupils into SCO until on or after the date they become On roll in SIMS. If you have auto-import set then this will happen automatically on the first day of term. We therefore recommend that you carry out this process after that date, otherwise refer to the separate guide How To Import PreAdmission Pupils. Ensure you do not carry out this process until the leaving date for your leavers has passed, otherwise they may be imported again.
• In SCO, click on the Admin tab
• Select End of academic year
• Select Pupil import
• In case of discrepancies, a Data discrepancies screen will appear to ensure no duplicates are imported
IMPORTANT: if you previously imported Pre-admissions with blank Pupil IDs, tick Merge with existing pupil without ID and click on Re-scan data.
• Ensure that any pupils marked as (New) in the Pupil accounts to be modified section are new to the school. Scroll down this column to check that existing pupils are not marked as (New)
• Click on the Confirm button
• Click Close
Proceed to section 15.
14.2. Schools without a dynamic link
This section will describe how to update your pupil data for the new academic year for new starters and existing pupils into new registration groups and other changed data. Contact your MIS support if you need assistance creating this report.
Prepare a report to update pupil data
A report containing the following separate fields for all pupils needs to be generated and saved (from Excel) as a CSV (comma delimited) file. IMPORTANT: the generated report must contain all the mandatory fields listed below with exact field names as indicated. You may need to manually rename or merge fields in Excel if your MIS does not automatically generate the required fields. For example, you may need to merge separate fields for “address” and “postcode” into an “AddressLine” field (search Help in Excel for instructions on how to concatenate fields).

SCO Academic Year End Guide 2019 19 Last revised 08-03-2019 v2.4.0.100
NB The column label for the Pupil ID MUST match the Pupil ID field set for imports in SCO you wrote down earlier.
If you have previously imported pupil data, you may already have a report with the following fields saved in your MIS.
Mandatory fields: Optional fields: Forename Notes Surname Gender Date of Birth Salutation Either UPN or PupilID or AdmissionNumber (this should match the Pupil ID field used for imports)
PupilPremiumIndicator
Year Taught In Reg Group AddressLine Eligible for Free Meals
The report should be generated and saved (from Excel) as a csv (comma delimited) file and saved to a location on your computer that you can access.
Import the data into Schools Cash Office
• In SCO, click on the Admin tab
• Select End of academic year
• Select Pupil import
• Browse and select the SCO Pupil Data csv file you saved
• A window will be displayed summarising the actions taken
• A Data discrepancies screen will appear to ensure no duplicates are imported
IMPORTANT: if you previously imported Pre-admissions with blank Pupil IDs, tick Merge with existing pupil without ID and click on Re-scan data.
• Ensure that any pupils marked as (New) in the Pupil accounts to be modified section are new to the school. Scroll down this column to check that existing pupils are not marked as (New)
• Click on the Confirm button.
• Click on Close
• Click on the Accounts tab and check that the leavers have been removed, new pupils imported and the remaining pupils are in their correct classes and year groups
• At the bottom left of the Accounts screen, below the Help button, check that the number of records matches the number of pupils on roll in your MIS
If any pupils have been duplicated, this can be handled later in section 23.
If you are using the Tucasi Communications module, proceed to section 15.
Otherwise, proceed to section 16

SCO Academic Year End Guide 2019 20 Last revised 08-03-2019 v2.4.0.100
15. Import Pupil Contact data (Schools using SCO Communications)
If you are not using the Tucasi SCO Communications module to send emails/texts proceed to section 16. If you are using the Tucasi SCO Communications module, but your school does not have the SIMS dynamic click proceed to section 15.2.
15.1. Schools with the SIMS dynamic link
• In SCO, click on the Configuration tab
• Select Import from external system, select Pupil contact import
• Review the details and click Confirm
• Once complete, click on the Communications tab, select Account contact report, select All dates, select Show accounts with no contact, click OK
• Review the data to ensure all contact details are displayed.
• Close the report.
Proceed to section 16
15.2. Pupil contact import – schools without a dynamic link
Prepare the Pupil contact import data
Pupil contact details (mobile numbers and email addresses) can be imported into SCO by preparing a file in your MIS. If you have previously imported pupil contact data, you may already have a report with the following fields saved in your MIS. Contact your MIS support if you need assistance creating this report. The required fields for the report MUST match the headings below:
Either UPN or PupilID or AdmissionNumber this should match the Pupil ID field used for imports
FirstName this is the contact first name, not the pupil
LastName this is the contact last name, not the pupil
MobileNumber this is the mobile number of the contact
EmailAddress this is the email address of the contact
PhoneNumber this is the phone number of the contact
Priority this is the contact priority assigned to the contact
ContactID ID of the Contact, although this field is optional
ParentalResponsibility this field is optional
The report should be generated and saved (from Excel) as a CSV (comma delimited) file and saved to a location on your computer that you can access. Ensure the file is closed before proceeding.
Import the file into SCO
• In SCO, click on the Configuration tab, select Import from external system
• Select Pupil contact import
• Browse and select the SCO Pupil Data csv file you saved above
• Review the details and click Confirm
• Once complete, click on the Communications tab, select Account contact report, select All dates, select Show accounts with no contact, click OK
• Review the data to ensure all contact details are displayed.
Proceed to next section

SCO Academic Year End Guide 2019 21 Last revised 08-03-2019 v2.4.0.100
16. Configure preferences (Dinner money and Extended day schools)
If you set default meal patterns for pupils (e.g. if they order in advance and you set Preferences in SCO) you will need to enter these for any new pupils. If you do not use Preferences for Dinner money or Extended day, proceed to section 17.
16.1. Enter pupil preferences
• On the Configuration tab click on Account configuration, Pupils
• Select the pupil and click on the Preferences tab
• Enter Preferences for Dinners and any Extended day clubs
• Enter preferences for all new pupils and delete preferences for any pupils no longer required
• Click Done
• Click Close
16.2. Populate any meal or session choices for the future
• In Dinners, click on Set meal preferences
• Select the required options
• Click on Done
• In Extended day, click on Set session preferences
• Select the required options
• Click on Done
• Repeat for any other clubs
Proceed to next section.

SCO Academic Year End Guide 2019 22 Last revised 08-03-2019 v2.4.0.100
17. Update any cohort pupil sets
If you do not use cohorts, proceed to next section.
• Click the Configuration tab
• Click Account configuration
• Click Cohorts
• Click the first cohort, add or remove pupils on the right hand side
• Repeat for other cohorts, click on Done
Proceed to next section
18. Delete empty classes (all schools)
After updating the pupil data, SCO may contain some ‘empty’ classes which can be deleted.
• Click the Configuration tab
• Click Account configuration
• Click Classes - empty classes will be displayed as having 0 pupils
• Click the empty class and select Delete class
• Click Yes
• Repeat for each class. Click Done
Proceed to next section
19. Add new staff
If you have previously added staff manually (via Configuration, Account configuration, Staff, Add new staff) repeat this to add any new staff. If you have previously imported staff with Staff IDs or via the SIMS link, repeat this process for new staff. On the import screen ensure only new staff are marked with [New] after their name, otherwise you will see duplicate staff. Proceed to next section
20. Assign teachers to classes (Dinner money, Extended day and Parents evening users only)
• Click on the Configuration tab
• Click Account configuration
• Click on Classes
• Click on the required class
• Click the down arrow next to Teacher name and select the appropriate teacher
• Repeat for each teacher, click on Done
Proceed to next section
SCO Academic Year End Guide 2019 23 Last revised 08-03-2019 v2.4.0.100
21. SCO Dinner money startup class (Classroom edition users only)
If your school does not use the SCO Classroom Edition, proceed to next section. If you are using the Classroom Edition and need to change the default class for each teacher, the teacher
will need to login to Classroom Edition via www.scopay.com/ClassroomWebapp with their own email address and change the setting:
• Select Order meal for today
• Select Control
• Select Settings
• Click the down arrow next to Show class on start-up: and select the required class
• Click on Save
Proceed to next section
22. Delete staff that have left (All schools)
Staff that have left can be deleted from the system if they have no account balance.
• Click on the Configuration tab
• Click on Account configuration
• Click on Staff
• Click on the staff member to delete and select Delete this staff
• Click on Yes
• Repeat for each staff member
• Click on Done
Proceed to next section

SCO Academic Year End Guide 2019 24 Last revised 08-03-2019 v2.4.0.100
23. Manage duplicate pupils (All schools)
Duplicate pupils occur if a pupil does not have a Pupil ID in SCO or a different Pupil ID was used when new pupil data was imported. It is possible to view a list of duplicate pupils by clicking on the Accounts tab:
We advise you not to use SCO until you have sorted out any duplicate pupils. If there are no duplicate pupils, proceed to section 24.
• Check the type of Pupil ID in SCO
• Click the Configuration tab and select System options
• Make a note of the option selected in Pupil ID field used for imports
23.1. Deciding which duplicate account to retain
Has the parent registered online?
For schools who have the SCO Online Payment module (SCOPAY) you must check that the pupil you wish to delete isn’t already linked up with a registered parent online.
• Click on the Accounts tab
• Check the Reg’d online? column
• Retain the pupil account that has a tick in the box
Which account has recent transactions against it?
• Click on the Accounts tab
• Double-click on the pupil account. An account statement will be displayed
• If no transactions have been entered against either of the duplicated pupils and you DO NOT have the SCO Online Payment module, retain the pupil with the correct Pupil ID
23.2. How to move the correct ID from one duplicate to another:
If you need to retain the pupil without the correct Pupil ID, you will need to transfer the Pupil ID as follows:
• Right-click on the pupil with the allocated Pupil ID, click on Edit pupil details
• Highlight the Pupil ID, cut the Pupil ID (Ctrl X or right-click and select Cut)
• Click on Done
• Right-click on the pupil without the correct Pupil ID, click on Edit pupil details
• Paste the Pupil ID (Ctrl V or right-click and select Paste)
• Click on Done
• Repeat for each duplicate pupil

SCO Academic Year End Guide 2019 25 Last revised 08-03-2019 v2.4.0.100
23.3. Delete Duplicate pupils
Once you have identified which pupils to delete, you can delete them via the Accounts tab:
• Right click on the pupil’s name
• Click on Delete, click on OK
At the bottom left of the Accounts screen, below the Help button, check that the number of records matches the number of pupils on roll in your MIS.
24. Restore deleted pupils
If pupils have been deleted in error, you can easily restore them:
• Click on the Admin tab
• Click on Database management
• Click on Restore deleted data
• Click on Pupils
• Select the relevant pupils to restore, click on Done
25. Documentation and Support
Congratulations! You have now completed the Academic year end process and SCO is now ready to use for the new academic year. If you have any queries, please contact:
Tucasi Customer Support Visit www.tucasi.com/support and click
02380 016564
In SCO click on Guides & Documentation
To import pupils marked as Pre-admission in your MIS: Refer to the guide How To Import PreAdmission Pupils
To carry out the Financial Year End Process,
including archiving trips and reconciling the Banking: Refer to the guide Financial Year End Guide
To change which items are available online and generate Online access letters for new starters:
Refer to the guide Quick Reference Guide Online Payments