Embed Size (px)
Citation preview

SCHOOL OF PHYSICS AND ASTRONOMY
FIRST YEAR LABORATORY PX 1223
Experimental Physics II
Academic Year 2011 – 2012
If found please return to: Email:

1
Welcome to part 2 of the 1st year laboratory, PX1223. This manual contains the experiment notes needed for this semester; it is expected that you may need to refer to the PX1123 for guidance on use of some equipment and advice with respect to report writing etc.. If you cannot find the information that you are looking for, please ask any member of the teaching team - your Head of Class or the demonstrators. Both manuals are available on Learning Central.

2
CONTENTS: I: Logistics of PX1223
Introduction 3
Assessment 4
Refreshments 4 Safety: Risk Assessment and Code of Practice 5 Code of Practice 6 II: Experiments
Timetable and list of experiments 7 Check list for experiments 8
Laboratory notes for experiments 9
III: Background notes
Introduction to electronics experiments 64 How to use a Vernier scale 71
DIARY and LONG REPORT checklist 74

3
I: Logistics of PX1223 INTRODUCTION There are 11 laboratory sessions in the Spring Semester They are designed to extend your skill in, and understanding of, the techniques of scientific measurement and to provide practical experience, where possible, of the material of the lecture courses. The majority of the work you will do in the laboratory will be experimental, and will be performed individually. All observations made during an experiment should be entered in your laboratory diary. Each week you will be allocated an experiment and you will normally be expected to complete this, performing appropriate calculations, drawing graphs etc., by 16:00hrs (4pm) on the day following that on which you did the experiment. It is essential that you put aside about ½ hour before you come to the practical class in order to read through the experimental notes associated with the practical that you will be undertaking. This will enable you to gain familiarity with what is expected of you, time to plan your experiment (which will save you time on the day) and very importantly a chance to think about the safety considerations that are required for your experimental work. You will be required to write up one experiment in the form of a formal report, which will be allocated towards the end of the semester. Formal reports should NOT be written in your lab. diary but electronically generated on sheets of paper that are either bound or stapled. Marked reports will be returned you with feedback and you should keep these as they and the feedback given on them should provide a basis for the reports you will have to write in subsequent years. ASSESSMENT OF PRACTICAL WORK The responsibility for handing your work in at the correct time is yours, and failure to do so will usually mean that your work will be marked for feedback pruposes, but that a mark of zero will be recorded. Exceptions to this rule will normally be made only for illness for which you have notified the School. If you do think you have another valid reason for missing the hand-in time, or for not attending the lab class in the first place, you should discuss this with the member of staff running the lab class or with the MO, Dr Carole Tucker. Each experiment and each report will be marked out of 20 in accordance with the scheme: 16 = very good performance; 14+ = first class level; 12 = competent 2i level performance; 10 = 2ii level; 8 = bare pass. Your module mark (see Undergraduate Handbook) will be made up as follows: Long report 33.3% Weekly lab diary marks 66.7% The experimental lab dairy notes of all experiments will be assessed with feedback weekly and the one long report will be assigned to you before the Easter vacation and given a % score. Your total

4
module marks will normally be obtained by expressing the total marks you obtain during the session as a percentage of the total which you could have obtained during the session. Exceptions will normally be made in the cases of absence due to illness for which a medical certificate has been supplied; absence for an unavoidable reason of which you notified a member of staff, difficulty with an experiment for reasons which were not your responsibility and which you discussed with the demonstrator. REFRESHMENT ARRANGEMENTS Tea, coffee and snacks, will be available in the laboratory about halfway through the afternoon. Tea and coffee: Payment for these must be made at the beginning of the semester and will cover the whole semester. Prices will be announced at the first laboratory class. Snacks/chocolate: Payment individually at the time of purchase.

5
SAFETY IN THE LABORATORY
Maintaining a safe working environment in the laboratory is paramount. The following points supplement those contained in "School of Physics Safety Regulations for Undergraduates", a copy of which was given to you when you registered in the School. 1. It is your responsibility to ensure that at all times you work in such a way as to ensure your
own safety and that of other persons in the laboratory. 2. The treatment of serious injuries must take precedence over all other action including the
containment or cleaning up of radioactive contamination. 3. None of the experiments in the laboratory is dangerous provided that normal practices are
followed. However, particular care should be exercised in those experiments involving cryogenic fluids, lasers and radioactive materials (Experiments 15, 18 and 6). Relevant safety information will be found in the scripts for these experiments.
4. If you are uncertain about any safety matter for any of the experiments, you MUST consult
a demonstrator. 5. All accidents must be reported to a laboratory supervisor or technician who will take the
necessary action. 6. After an accident a report form, which can be obtained from the technician, must be
completed and given to the laboratory supervisor. UNDERGRADUATE EXPERIMENT RISK ASSESSMENT
The experiments you will perform in the first year Physics Laboratory are relatively free of danger to health and safety. Nevertheless, an important element of your training in laboratory work will be to introduce you to the need to assess carefully any risks associated with a given experimental situation. As an aid towards this end, a sheet entitled Code of Practice for Teaching Laboratories follows. At the commencement of each experiment, you are asked to use the material on this sheet to arrive at a risk assessment of the experiment you are about to perform. A statement (which may, in some cases, be brief) of any risk(s) you perceive in the work should be recorded as an additional item in your laboratory diary account of the experiment.

6
SCHOOL OF PHYSICS & ASTRONOMY: CODE OF PRACTICE FOR TEACHING LABORATORIES
Electricity Supplies to circuits using voltages greater than 25V ac or 60V dc should be
"hardwired" via plugs and sockets. Supplies of 25Vac, 60V dc or less should be connected using 4 mm plugs and insulated leads, the only exceptions being"breadboards". It is forbidden to open 13 A plugs.
Chemicals Before handling chemicals, the relevant Chemical Risk Assessment forms must
be obtained and read carefully. Radioactive Gloves must be worn and tweezers used when handling. Sources Lasers Never look directly into a laser beam. Experiments should be arranged to
minimise reflected beams. X-Rays The X-ray generators in the teaching laboratories are inherently safe, but the
safety procedures given must be strictly followed. Waste Disposal "Sharps", ie, hypodermic needles, broken glass and sharp metal pieces should
be put in the yellow containers provided. Photographic chemicals may be washed down the drain with plenty of water. Other chemicals should be given to the Technician or Demonstrator for disposal.
Liquid Nitrogen Great care should be taken when using as contact with skin can cause "cold
burns". Goggles and gloves must be worn when pouring. Natural Gas Only approved apparatus can be connected to the gas supplies and these
should be turned off when not in use. Compressed Air This can be dangerous if mis-handled and should be used with care. Any
flexible tubing connected must be secured to stop it moving when the supply is turned on.
Gas Cylinders Must be properly secured by clamping to a bench or placed in cylinder
stands. The correct regulators must be fitted. Machines When using machines, eg, lathe and drill, eye protection must be worn and
guards in place. Long hair and loose clothing especially ties should be secured so that they cannot be caught in rotating parts. Machines can only be used under supervision.
Hand Tools Care should be taken when using tools and hands kept away from the cutting
edges. Hot Plates Can cause burns. The temperature should be checked before handling. Ultrasonic Baths Avoid direct bodily contact with the bath when in operation.
Vacuum If glassware is evacuated, implosion guarding must be used in Equipment order to contain the glass in the event of an accident.

7
II: EXPERIMENTS TIME TABLE AND LIST OF EXPERIMENTS
Week Experi- Title Page ment Spring Semester (PX1223) 1 12 Group Experiment: Air resistance 9
2 – 6 13 Radioactivity and Poisson statistics 10 (see list) 14 Measurement of e/m 16
15 Vibrations and resonance 20 16
17 Magnetic Fields and Electric Currents Writing formal reports
26 33
7 – 11 18 Geometric Optics and Lenses 37
(see list) 19 Planck’s constatnt 45 20 RC Circuits 49 21 X-ray Studies of Solids 56 22 Computer simulations and analysis 59

8
CHECKLIST • Read through notes on the experiment that you will be doing BEFORE coming to the practical
class. • Read carefully through any additional sections that might be useful in Section III – eg. use of
electronic equipment, statistics., and also the diary checklist given at the end of this manual. • Write a draft of the safety considerations that there might be associated with the practical, having read through the lab notes. • On turning up to the lab, listen carefully to any briefing that is given by your demonstrator: he/she
will give you tips on how to do the experiment as well as detailing any safety considerations relevant to your experiment.
• Write up the safety considerations and have your Risk Assessment signed off.. • Check that the size of any quantities that you have been asked to derive/calculate are sensible -
ie. are they the right order of magnitude? • Read through your account of your experiment before handing it in, checking that you have
included errors/error calculations, that you are quoting numbers to the correct number of significant figures and that you have included units.
• Staple any loose paper (eg. graphs, computer print-outs, questionnaires etc.) into your lab
book.

9
Experiment 12: Air resistance. (Group experiment)
Note: This experiment is carried out in pairs. You must keep a real time lab diary in the usual way – and hand it in at the end of the 4 hour session.
Equipment: 3 muffin cases, 1 m rule, stopwatch.
Safety: Students must not raise themselves (unreasonably) off the floor to gain extra height and must perform the experiment in the first year laboratory.
Outline With only a reminder of the important physics, you are asked to determine as much as you can about a very simple system: muffin cases falling vertically through the air. Some students may have come across this experiment before, however it is demanding in terms of both experimental skill and analysis - do not underestimate it.
Experimental skills • Making and recording basic measurements: heights and times (and their errors). • Making use of trial/survey experiments. • Careful experimental observation.
Wider Applications • Planes, trains and automobiles are all designed to reduce air resistance in order to go faster
and/or travel more efficiently. • The wider scientific field is that of fluid dynamics (the movement of fluids), a highly complex field
that includes the prediction of weather patterns and the processes of star formation.
1. Introduction The force due to air resistance (drag) acting on a body travelling through air is proportional to ?Av2 where ? is the air density; A is the cross sectional area of the body and v is the velocity through the air. The constant of proportionality is called (or at least is very closely related to) the “drag coefficient”. A special case is a body falling under the influence of gravity so that the downwards force acting upon it is constant (mg). Starting from rest and given sufficient time the downwards force and the drag reach equilibrium when the body is falling at its so called “terminal velocity”.
2. Experimental By a combination of experiment(s) and analysis discover as much as you can about the air resistance of the system in the four hour laboratory session.
Notes: • By dropping multiple cases together the mass can be increased without changing the cross
sectional area. • Take the density of air (ρ) to have a value of exactly 1.2 kg.m-3. • 75 muffin cases have a mass of 42 g (with an error of +/- 1 g). • Compared to normal teaching lab diaries, your notes will need to contain more procedural
information (since no instructions are available to refer to). • Demonstrators are available to bounce ideas off – not for telling you how to go about your
investigation.

10
Experiment 13: Radioactivity, counting statistics and half lives.
Important Safety Information
For this experiment you must receive training and your risk assessment must be checked by your demonstrator before you proceed with practical work.
Two radioactive sources are provided. These are both sealed to minimise the risk of leakage. When using radioactive materials, exposure should be minimised by: 1. limiting the amount of time exposed to the source; 2. maintaining a reasonable distance from the source; 3. washing your hands immediately after performing the experiment and certainly before consuming food and drink; In addition the Pa generator must always be used over the drip tray provided.
Outline The (effectively) constant radioactivity of a uranium oxide source is used to determine the correct operating voltage for a Geiger Muller (GM) tube. The GM tube is then used to perform two experiments: (i) measurement of background radiation and its analysis in terms of Poisson statistics, (ii) measurement of the (short) half-life of protactinium 234 (Pa234), an element in the decay series of uranium 238. Experimental skills • Safe handling of mildly radioactive material. • Setting up and use of Geiger Muller tubes. • Analysis of “counting experiment” data using Poisson statistics. • Determination of half-life values. Wider Applications • The mathematics of radioactive decay is common to many areas of physics, such as the charging
and discharging of capacitors • Counting experiments and their statistics are widespread in all sciences.
1. Introduction Radioactive decay is the process by which unstable atomic nuclei lose energy. In this process particles of radiation are emitted, the three main types being alpha (He nuclei), beta (electrons) and gamma (photons). Since the energy involved in nuclear processes is high the radiation is generally ionising. This property is exploited in the design of detectors of radiation but is also responsible for the danger associated with radioactive materials. The discovery of radioactive materials, by Henri Becquerel in 1896, lead to great advances in nuclear and other branches of physics. In one strand, it was realized that nuclei could not only break up (fission) but also join together (fusion) and that the fusion process was responsible to the power output of the Sun and the stars. This solved one of the great mysteries of science at the time - that power output based on gravitational forces implied a much shorter age for the Sun than that implied by the evidence of geology and evolution.
1.1 The mathematics of radioactive decay It was realized early that the radioactive decay of nuclei is a “stochastic” or random process, i.e. it is not possible to predict exactly when a nucleus would decay, instead, only a probability of it

11
decaying can be found. Following from this the rate of disintegration of a given nuclide is directly proportional to the number of nuclei N of that nuclide present at that time:
NdtdN
λ−= [1]
where ? is the decay constant. However, rather than deal with 'probability of decay per second', it is more usual to describe the rate of decay of a radioactive material by its characteristic half-life. This is defined as the average time T1/2 it would take for half the number of nuclei in the material to decay, or alternatively and as will be used as part of this experiment, for the decay rate to fall to one half of its original value.
1.2 The statistics of radioactive decay (Poisson statistics) Poisson distribution The measurement of radioactivity is a counting experiment; a detector counts the number of discrete events occurring in a fixed time interval. Very often with this type of experiment the data takes the form of a “Poisson distribution”. This is the second type of statistical data distribution examined in the first year laboratory, the normal or Gaussian distribution having been investigated in the autumn semester.
The Poisson distribution is the limiting case of a “binomial distribution” when the number of possible events is very large and the probability of any one event is very small. The normalised distribution is given by
x!ex
P(x)µµ −
= [2]
where P(x) is the probability of obtaining a value x, when the mean value is µ. The standard deviation for a Poisson distribution relates to the mean value and is given by s (x) = µ . This distribution is unlike the normal or Gaussian distribution in that it becomes highly asymmetrical as the mean value approaches zero.
Counting experiments: the “signal to noise” ratio In all counting experiments*, the “quality” of the data is expected to “improve” with increasing counting time and counts. This can be understood as follows: the mean number of counts in the experiment, µ, is the “signal” whilst statistical variations in this signal are represented by the standard deviation s (x) and can be thought of as “noise”. In Poisson statistics s (x) = µ therefore the signal/noise = µµµ =/ , i.e. the ratio increases with the square root of the number of counts. This is an often quoted and very important finding for understanding and designing experiments.
Put another way, if in a particular counting period an average of N counts are obtained, the associated standard deviation is √N (ignoring any errors introduced by timing uncertainties, etc). Clearly, the larger N the more precise the final result. For a given source and geometrical arrangement, however, N can be increased only by counting for longer periods of time.
* Counting experiments are wide ranging. For physicists, counting photons to acquire a spectrum (such as that emitted by a star) is a relatively common task that comes in this category but even the number of letters sent by Einstein in set intervals has been analysed in this way.
12
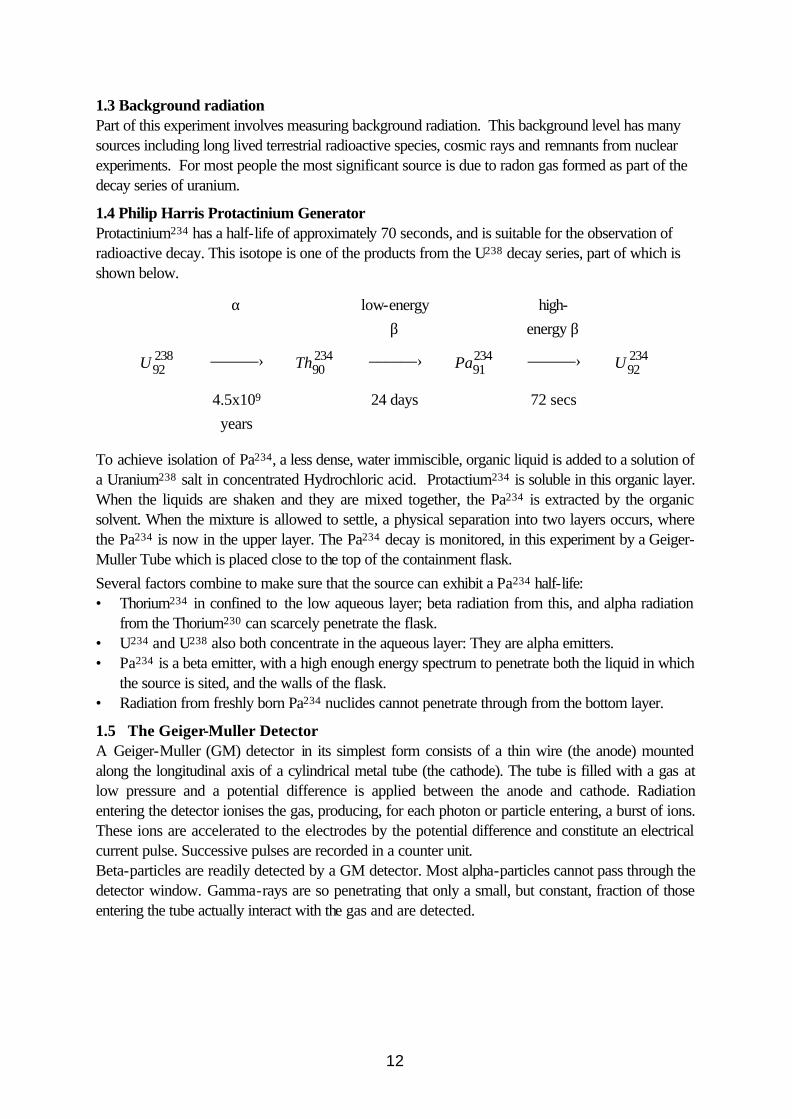
1.3 Background radiation Part of this experiment involves measuring background radiation. This background level has many sources including long lived terrestrial radioactive species, cosmic rays and remnants from nuclear experiments. For most people the most significant source is due to radon gas formed as part of the decay series of uranium.
1.4 Philip Harris Protactinium Generator Protactinium234 has a half-life of approximately 70 seconds, and is suitable for the observation of radioactive decay. This isotope is one of the products from the U238 decay series, part of which is shown below.
α low-energy β
high-energy β
23892U ––——› 234
90Th ––——› 23491Pa ––——› 234
92U
4.5x10⁹
years 24 days 72 secs
To achieve isolation of Pa234, a less dense, water immiscible, organic liquid is added to a solution of a Uranium238 salt in concentrated Hydrochloric acid. Protactium234 is soluble in this organic layer. When the liquids are shaken and they are mixed together, the Pa234 is extracted by the organic solvent. When the mixture is allowed to settle, a physical separation into two layers occurs, where the Pa234 is now in the upper layer. The Pa234 decay is monitored, in this experiment by a Geiger-Muller Tube which is placed close to the top of the containment flask. Several factors combine to make sure that the source can exhibit a Pa234 half-life: • Thorium234 in confined to the low aqueous layer; beta radiation from this, and alpha radiation
from the Thorium230 can scarcely penetrate the flask. • U234 and U238 also both concentrate in the aqueous layer: They are alpha emitters. • Pa234 is a beta emitter, with a high enough energy spectrum to penetrate both the liquid in which
the source is sited, and the walls of the flask. • Radiation from freshly born Pa234 nuclides cannot penetrate through from the bottom layer.
1.5 The Geiger-Muller Detector A Geiger-Muller (GM) detector in its simplest form consists of a thin wire (the anode) mounted along the longitudinal axis of a cylindrical metal tube (the cathode). The tube is filled with a gas at low pressure and a potential difference is applied between the anode and cathode. Radiation entering the detector ionises the gas, producing, for each photon or particle entering, a burst of ions. These ions are accelerated to the electrodes by the potential difference and constitute an electrical current pulse. Successive pulses are recorded in a counter unit. Beta-particles are readily detected by a GM detector. Most alpha-particles cannot pass through the detector window. Gamma-rays are so penetrating that only a small, but constant, fraction of those entering the tube actually interact with the gas and are detected.

13
Figure 1: Schematic diagram of Geiger-Muller characteristic
For a fixed radiation rate the number of pulses detected depends mainly on the potential difference between the electrodes as shown in figure 1. As the potential difference is increased from a low value the pulse rate increases until the potential difference reaches a range over which the pulse rate changes very little. This is called the (Geiger) plateau. At higher voltages a continuous discharge occurs. The usual recommended operating potential difference for a detector is approximately half way along the plateau. However, not being too close to the extremes of the plateau will suffice.
2. Experimental This experiment consists of three parts. In part 1 the operating characteristics of the Geiger-Muller detector are investigated; in part 2 background radiation is measured and analysed; in the final part, the half life of Protactinium234 is measured.
2.1 Setting up the detector Note: This section concerned with setting the detector up for later measurements. • First turn the counter on with the anode voltage set to 400 V to let it warm up for ~5 minutes. • Use the warming up period to understanding how to operate the counter: Set it to “counting”
and “start”. The unit should then display the cumulative counts. These counts can be zeroed using the “reset” button.
• Towards the end on the warm up procedure measure the background counts accumulated over a 10 s period - there should be something like 5 to 10 counts if the detector is working properly.
Now set the GM detector voltage to a minimum and place the UO2 ( "lollipop" ) close to the detector window. Slowly increase the voltage until counting starts. This is the starting potential. Record this voltage and count for one minute to give the count rate in counts per minute. Increase the voltage and count for one minute. Repeat this procedure until the maximum voltage available is applied. (This voltage will be less than that producing onset of continuous discharge.) Plot the characteristics.

14
2.2 Background radiation (+Poisson statistics) Due to the different sensitivities to different particles the measurement of background radiation by a Geiger Muller tube is not straightforward. However, comparative studies are possible and here the background detection rate is convenient for investigating the statistics of counting.
Measuring background radiation Poisson statistics involve counting events in defined time periods. Here the experiment involves noting the total count every 5 s for a period of 360 s - do not reset the counter every 5 s. This is quite intense so draw up a suitable table in advance that can be filled in during data collection.
• Perform the data collection (following which note any relevant observations).
Analysis using Poisson statistics The measured value required here (x in equation 2) is counts/time interval and will be an integer. The data collection methodology indicates that the smallest time interval that can be used is 5 s, however it is instructive to perform the analysis for both 5 s and 10 s intervals. (There is potential for confusion here so diary entries should be clear).
Data distributions • Tabulate the counts for each 5 s (and 10 s) time interval (x) and their frequency (f(x)). • Plot histograms (f(x) versus x) for both intervals, i.e. use separate plots. • Determine the mean counts/time interval and the number of data points for the two intervals use
these to determine “expected” Poisson distributions using equation 2*, plot the points on the same graphs as the experimental data.
• How do your results compare with the theoretical Poisson distribution? • What is the signal: noise ratio in both cases?
* Important note: equation 2 represents a normalised distribution.
2.3 The half-life of Pa234 This Generator is supplied in a sealed translucent container which is virtually chemically inert, and under normal circumstances is leak proof. For storage, the generator is packed in an outer container. Whilst in use the generator should be placed upside down, and after the experiment, the generator must be returned to its protective beaker. When not in use the generator must be stored with the plastic cap uppermost. Check your risk assessment and especially remember to use the disposable gloves and perform the experiment over plastic drip tray.

15
Figure 2. Arrangement of source and detector
• Remove the flask from the box. Shake the flask while holding it above the drip tray for a short
period of time (10 second will be enough) until the contents have completely mixed. • Replace the source upside down as shown in figure 2 and record the number of counts per unit
time. The easiest way to do this is to record the total number of counts (every 30 seconds) and work out the count rate afterwards. Continue until the count rate is roughly constant, i.e. for approximately 20 minutes.
• Plot a graph of count rate versus time. Remember to take background counts into consideration. Comment on the graph obtained.
• Finally, process your results to find the half-life of Protactinium-234. The half life can be found from the graph by measuring the time taken for the count rate (of Pa234) to fall by a half. If the count rate decreases exponentially to zero this task is easy, if not then you will have to decide which is the most sensible approach and explain what you decided and why.
• Repeat the experiment if there is time to do so.
16
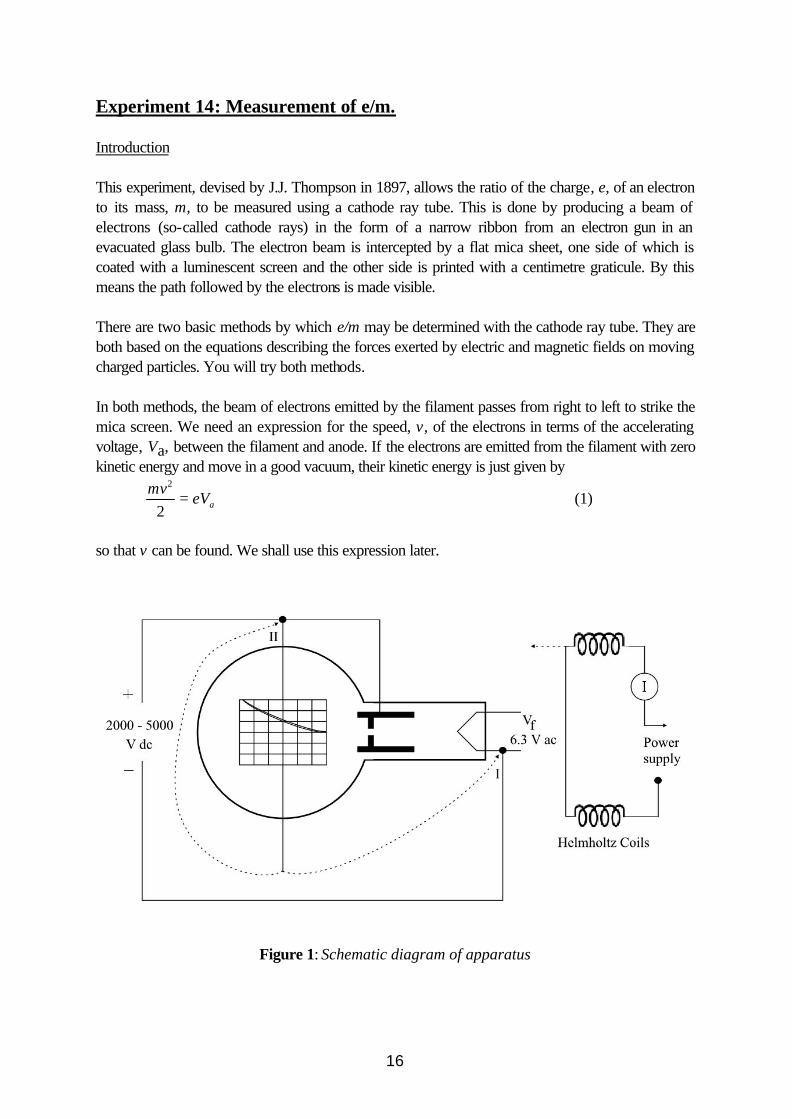
Experiment 14: Measurement of e/m. Introduction This experiment, devised by J.J. Thompson in 1897, allows the ratio of the charge, e, of an electron to its mass, m, to be measured using a cathode ray tube. This is done by producing a beam of electrons (so-called cathode rays) in the form of a narrow ribbon from an electron gun in an evacuated glass bulb. The electron beam is intercepted by a flat mica sheet, one side of which is coated with a luminescent screen and the other side is printed with a centimetre graticule. By this means the path followed by the electrons is made visible. There are two basic methods by which e/m may be determined with the cathode ray tube. They are both based on the equations describing the forces exerted by electric and magnetic fields on moving charged particles. You will try both methods. In both methods, the beam of electrons emitted by the filament passes from right to left to strike the mica screen. We need an expression for the speed, v, of the electrons in terms of the accelerating voltage, Va, between the filament and anode. If the electrons are emitted from the filament with zero kinetic energy and move in a good vacuum, their kinetic energy is just given by
aeVmv
=2
2
(1)
so that v can be found. We shall use this expression later.
Figure 1: Schematic diagram of apparatus

17
Take care! High voltages and delicate evacuated glassware are used in these experiments. PLEASE READ YOUR "CODE OF PRACTICE FOR TEACHlNG LABORATORIES" SHEET Method I - Electrostatic and Magnetic Deflection In this method, the lower deflector plate is connected to the point marked I in Figure 1. A magnetic field B is applied with "Helmholtz coils" (described below). If this magnetic field points out of the plane of the diagram, there will be a downward force on the electrons (use Fleming's left-hand rule) equal to BevFmagnetic =
where e is electron charge and v is their speed. At the same time, by connecting the plates so as to put a voltage VP across them (see diagram) an upward electrostatic force can be applied to the electrons, equal to
de
VEeF Pelectric ==
where E is the electric field between the plates and d is their distance apart. In this experiment, E and B are adjusted so that there is no net deflection of the electron beam, so that the magnetic and electric forces must balance:
Bevde
VP =
and this gives, with equation (1), an expression for e/m
22
2
2 dVBV
me
a
P=
In fact, with the connections as shown, because the lower deflector plate is connected to the cathode while the upper plate is connected to the anode, the plate voltage is equal to the accelerating voltage, VP = Va, so that the previous equation simplifies to
222 dB
Vme a=

18
Procedure For a range of anode voltages, adjust the current through the Helmholtz coils to reduce the electron deflection to zero. The magnetic field in each case is calculated as described below. Tabulate your values of Va, I and B. Plot Va against B2 and hence determine e/m. Estimate the precision of all your measurements and results. What do you think are the main sources of error? Your graph should, of course, be a straight line passing through the origin . Comment on any deviation from this. Method II - Magnetic Deflection onlv In this method, the lower deflector plate is connected to the point marked II in Figure 1 This means that the deflector plates are effectively not used in this experiment. If no compensating electric field is applied, the electron beam will be deflected into a circular path of radius r. Equating the magnetic force causing the deflection to the centripetal force gives
r
mvBev
2
=
Combining this with equation (1) therefore gives
22
2rB
Vme a=
The advantage of this method is that it does not depend on deflection plates. It is very difficult to make deflection plates which have a sufficiently uniform electric field between them, and this leads to a systematic error in the determination of e/m. The only disadvantage of using this formula is that the value of r must be measured. To do this you can use the following relation for circles passing through the origin (which is at the exit aperture of the anode) and the points (x, ±y) on the graticule:
( )
yyx
r2
22 +=
(Note: The origin of the graticule in some tubes is not exactly at the anode and a correction should therefore be made). Derive the above equation. Procedure

19
As in the first method, choose several values of anode voltage. It is then easiest to adjust the current through the Helmholtz coils to produce a particular, easily measurable, radius of the electron beam path. For example, you could make the beam always pass through the point (10.0, ±2.6) cm. The magnetic field is calculated as described below. Note down the values of x, ± y and r and tabulate your values of Va, ± I, ± B. Estimate the precision of all your measurements and results. Plot Va against B2. Choose another value of r and repeat. Repeat for further positive and negative values of r (To get both positive and negative deflections, you will need to reverse the Helmholtz coil current). Calculate e/m for each r and compare and comment on your results. Helmholtz Coils The magnetic field acting on the electrons is provided by a so-called Helmholtz pair of coils each of a radius R, with their centres separated by a distance equal to their radius R. Such a configuration gives a substantially uniform magnetic field in the central region of the coils. The magnetic field B can be calculated from the formula
RNI
B 023
54 µ
= or
RNI
B 0716.0 µ≈
where µ0 = 1.26 x 10⁻⁶ TmA-1 (or 4π x 10-7 henry metre-1) N = number of turns on each coil (320 turns of 22 swg enamelled copper wire in this case). I = current through the coils in ampere. The mean coil diameter is 13.6 cm in this case, so R = 0.068 m. The start of each coil is connected to the 4mm socket (A) on the side of the coil bobbin, and the finish to the 4mm socket (Z). For this experiment, in order that the field of the coils should add, connect the power supply to sockets A, with sockets Z interconnected. DO NOT EXCEED A COIL CURRENT OF l.5A FOR MORE THAN 10 MINUTES. FOR LONGER PERIODS OF TIME, DO NOT EXCEED 1.0A.

20
Experiment 15: Vibrations and Resonance 1. Introduction (a) Natural Vibrations Any vibrating system, if set into motion and then left to itself, will vibrate at its natural frequency. If there is no way in which the system can lose energy, the vibrations will continue indefinitely. For harmonic vibrations the displacement y(t) at time t is given by ftAty π2cos)( = [1] Here A is the constant displacement amplitude of the vibration and f is the vibration frequency. f = 1/τ where τ is the period of vibration. The time variation has been taken for simplicity as cos 2πft. This assumes that the displacement is maximum at t = 0. If the system does lose energy, the amplitude of the vibrations decreases with time until finally they cease (Figure 1). Equation (1) then takes the form fttAty π2cos)()( = [2] where the amplitude varies with time. In most cases A(t) decreases
Figure 1: Damped oscillations
exponentially with time as
−
=τλt
AtA exp)0()( [3]
where the magnitude of λ determines the rate of decrease of the amplitude. Such a system is said to be damped. Clearly one measure of the damping is λ. Another very common one is the quality factor

21
Q = 2π x energy stored at start of a cycle
energy lost during that cycle
Obviously small damping corresponds to large Q and clearly Q and λ are related. It may be shown that Q = π/λ; thus equation (3) may be written as
−=
τπ
Qt
AtA exp)0()( [4]
(b) Forced vibrations and resonance When a vibrating system has a periodic driving force applied to it, it is set into forced vibration at the frequency of the driving force but not necessarily in phase with it. When the driving frequency is at, or near, the natural frequency of the system the displacement amplitude of the vibrations becomes large. This is called resonance. The resonance can be sharp or broad, depending upon the damping of the system (Figure 2) and thus the sharpness of resonance depends upon the value of Q.
Figure 2: Response as a function of frequency
The Q-value may be determined from the displacement resonance curve (see Appendix I and Figure 3).

22
Figure 3. The resonance curve (c) Application to electrical circuits The above general ideas apply to all vibrating systems. They are conveniently illustrated by electrical circuits containing inductors and capacitors. The Q-value of such a circuit will depend upon the inductance and capacitance of the circuit, because the values of these determine the ability of the circuit to store energy, and also upon the circuit resistance, because this determines the energy loss per cycle. Circuits containing inductors and capacitors inevitably contain resistance, if only that of the windings of the inductors, and hence inevitably exhibit damping. 2. Experimental procedure 2.1 Damped natural vibrations Connect the circuit shown in Figure 4 using R = 85 Ω, C = 0.01 µF and L = 0.1 H
Figure 4: Basic circuit for electrical oscillations
This is the basic circuit for electrical oscillations. If in some way an electric current is started in the circuit it will flow back and forth at the natural frequency (f) of the circuit where
2
1)(2
1
LCf
π=
So for C = 0.01 µF and L = 0.1 H, f = 5 kHz. Electrical oscillations of this frequency can be started in the circuit by first charging C from some external supply and then disconnecting the supply to allow oscillations to occur. If the charging of C, followed by disconnection of the supply, is repeated periodically the oscillations can be displayed on an oscilloscope. The repeated charging of C is achieved by the use of a square wave generator running at about 100 Hz fed to the capacitor as in Figure 5

23
Figure 5: Pulsed circuit
The oscilloscope time-base controls should initially be set to 1ms per division and the volts cm control to 5 V/cm. Adjust the trigger level control to obtain a stable display. For R = 85 Ω measure Q by measuring the change in amplitude after a suitable number (n) of cycles of oscillation. In equation [4] t = nτ and
−=
Qn
AnA πτ
exp)0()( A n
A( )( )
τ0
= exp - (πn/Q)
Examine the effect on the oscillations of changing R and calculate the corresponding values of Q. It may be shown that for the circuit of Figure 5, Q = (L/C)½/Rcirc where Rcirc is the circuit resistance. Calculate Rcirc from the measured value of Q. To what do you ascribe the difference between this and the value of R? Justify your theory quantitatively by measuring the resistance of all the circuit elements? Examine the effect on the oscillations of changing C. 2.2 Forced vibration and resonance Connect the circuit of Figure 6. Set R = 85 Ω and C = 0.01 µf. Display the oscillations. Vary the frequency of the generator and, by alternately displaying the circuit oscillations and the generator signal, show that the frequency of the circuit oscillations is the same as the driving frequency. Study the variation of the amplitude of oscillations with frequency and estimate the resonant frequency of the circuit.
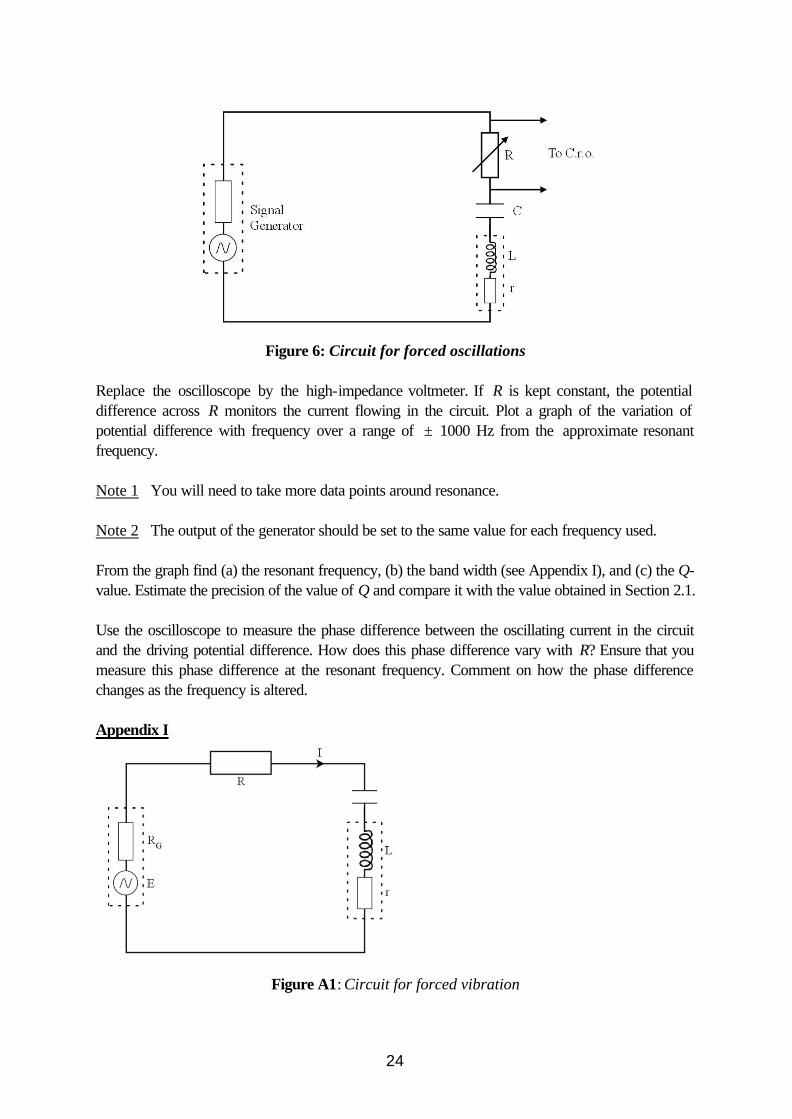
24
Figure 6: Circuit for forced oscillations
Replace the oscilloscope by the high-impedance voltmeter. If R is kept constant, the potential difference across R monitors the current flowing in the circuit. Plot a graph of the variation of potential difference with frequency over a range of ± 1000 Hz from the approximate resonant frequency. Note 1 You will need to take more data points around resonance. Note 2 The output of the generator should be set to the same value for each frequency used. From the graph find (a) the resonant frequency, (b) the band width (see Appendix I), and (c) the Q-value. Estimate the precision of the value of Q and compare it with the value obtained in Section 2.1. Use the oscilloscope to measure the phase difference between the oscillating current in the circuit and the driving potential difference. How does this phase difference vary with R? Ensure that you measure this phase difference at the resonant frequency. Comment on how the phase difference changes as the frequency is altered. Appendix I
Figure A1: Circuit for forced vibration

25
The alternating current in Figure A1 is given by
21
22 )1
()(
−+++
=
CLrRR
Ei
G ϖϖ
For given R, RG and r, i is a maximum (see Figure A2) when
01
=−C
Lϖ
ϖ
ie, for ( ) 2
1
1
LCres =ϖ
or 2
1)(2
12 LC
f resππ
ϖ==
Note: fres is independent of circuit resistance.
Figure A2: The resonance curve
At resonance the potential difference across R is rRR
ER
G ++

26
Experiment 16: Magnetic Fields and Electric Currents.
Equipment List: Current balance, rheostat (a coil of wire with a slider used to vary its effective resistance), Weir p.s.u., multi-meter (rated to 10 A), small magnetic compass, A4 paper.
Safety. The current balance may spark. The resistor can get VERY hot over time.
Outline The shape of the magnetic field lines in the vicinity of two separated permanent magnets and around a current carrying wire is investigated using small magnetic compasses. The force on a current carrying wire passing through the magnetic field of permanent magnets is then investigated using a “current balance” and used to obtain a value for the size of the magnetic field. The experiment illustrates the properties introduction to magnetic materials and essential concepts of electromagnetic theory.
Experimental skills • Make and record measurements of magnetic field lines. • Familiarity with the magnitude of magnetic fields generated by electrical currents and permanent
magnets. • Experience of the effect of stray magnetic fields in a laboratory environment. • Application of vector cross products to real situations. • Use of ballast resistor to limit current flowing in circuit.
Historical perspective and wider applications Magnetic materials: the use of lodestone as a crude magnetic compass dates to ~1000 BC. Electromagnetism: In 1819 in Copenhagen Hans Oersted discovered, almost by accident, that a compass needle can be influenced by a nearby electrical current. This was the birth of electromagnetism, one of the most important fields in both science and engineering, with profound influence on modern life: • Michael Faraday discovered electromagnetic induction and developed the idea of a field for
dealing action at a distance effects. • These ideas led to delopment of the dynamo, motor and transformer. • James Clerk Maxwell put the field ideas into mathematical form and predicted electromagnetic
waves. • Einstein’s consideration of the need for relative motion led to the theory of relativity.
1. Introduction Magnetic fields can arise from magnetic materials and from moving charges. This experiment is concerned with examining both such fields and also the forces resulting from the interaction between magnetic fields and moving charges (due to a current flowing through a wire).
1.1 Magnetic fields Magnetic fields are vectors and therefore have both a direction and a magnitude (or strength). They are produced by magnetic objects or by moving charges. The oldest known magnetic field is that due to the Earth and this leads to the concept of poles and the first way of defining the direction of the field. , i.e. a “North pole” will point to the Earth’s North pole (which since opposite poles attract magnetically must itself be a South pole).
• The direction of a magnetic field is defined to be that in which a North pole will move.

27
• Magnetic compasses point in the direction of a magnetic field, i.e. towards a magnetic south pole.
Magnetic fields can vary wildly in both magnitude and direction as a function of position, are therefore mathematically complex, and are often visualised by way of “field lines”. These are constructed by using arrows to indicate the direction of the field at various points and then connected by lines. The number of lines used must be limited and this is done in such a way that the density of the lines in the vicinity of a point gives an indication of the relative strength of the field. An example, representing a bar magnet, is shown in Figure 1. The permanent magnets used here are similar to the one shown except that their poles are wider than their length.
Figure 1: Magnetic field lines in the vicinity of a bar magnet [1]
Figure 1 also hints at another important property of magnetic field lines. Unlike electric or gravitational field lines they form loops. This relates to the fact that there is no such thing as a magnetic monopole.
1.2 Electromagnetic theory (and vector cross products) Electromagnetic theory gives the magnetic force, F, exerted on a charge, q, moving with velocity, v, in a magnetic field as
F = qv x B (N) [1]
At the same time the magnetic field generated by a point charge moving with velocity v is
[ ]rvB ×=2
0
4 r
q
π
µ (tesla, T) [2]
where r is the vector from the point charge to the point at which the field is determined and µ0 is the permittivity of free space (µ0 = 4p x 10-7 H/m or 1.26 x 10⁻⁶ TmA-1). These definitions are given as vector cross products, so although students may be more familiar with the use of Flemings left and right hand rule for determining directions here it makes more sense to use the more general rules for dealing with vectors. The case is illustrated for two vectors a and b is shown in Figure 2.
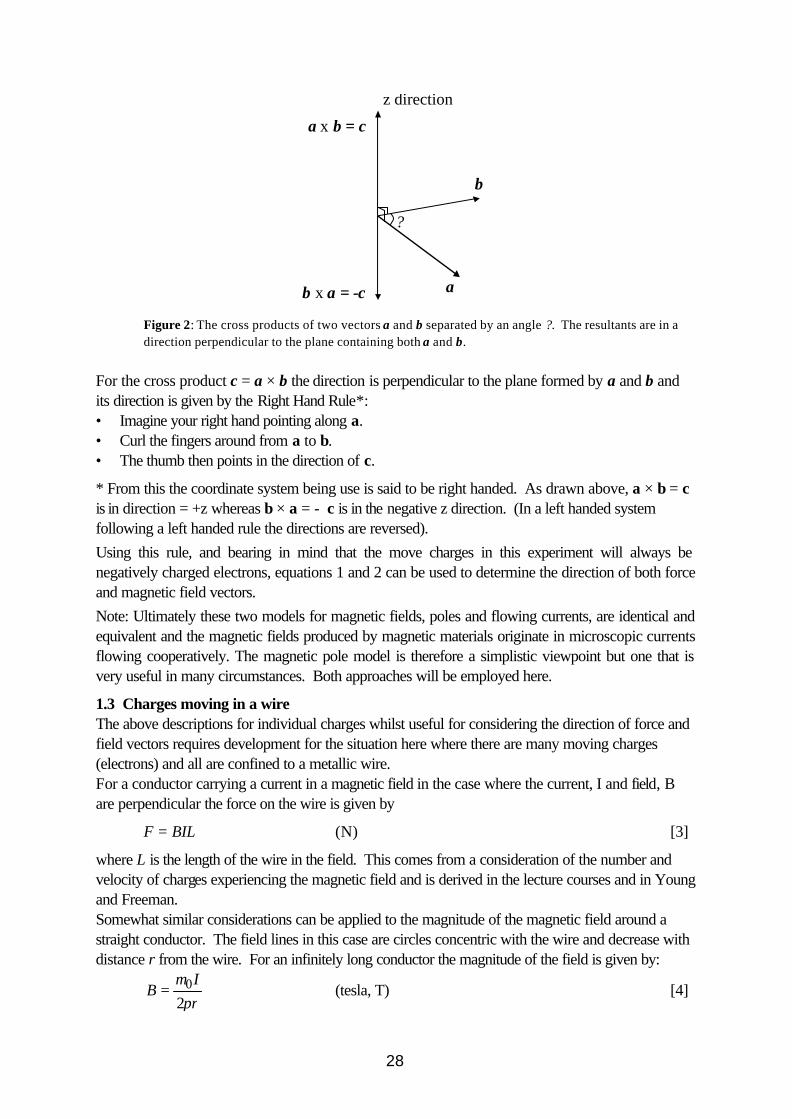
28
a
b
a x b = c
b x a = -c
?
z direction
Figure 2: The cross products of two vectors a and b separated by an angle ?. The resultants are in a direction perpendicular to the plane containing both a and b.
For the cross product c = a × b the direction is perpendicular to the plane formed by a and b and its direction is given by the Right Hand Rule*: • Imagine your right hand pointing along a. • Curl the fingers around from a to b. • The thumb then points in the direction of c.
* From this the coordinate system being use is said to be right handed. As drawn above, a × b = c is in direction = +z whereas b × a = - c is in the negative z direction. (In a left handed system following a left handed rule the directions are reversed). Using this rule, and bearing in mind that the move charges in this experiment will always be negatively charged electrons, equations 1 and 2 can be used to determine the direction of both force and magnetic field vectors. Note: Ultimately these two models for magnetic fields, poles and flowing currents, are identical and equivalent and the magnetic fields produced by magnetic materials originate in microscopic currents flowing cooperatively. The magnetic pole model is therefore a simplistic viewpoint but one that is very useful in many circumstances. Both approaches will be employed here.
1.3 Charges moving in a wire The above descriptions for individual charges whilst useful for considering the direction of force and field vectors requires development for the situation here where there are many moving charges (electrons) and all are confined to a metallic wire. For a conductor carrying a current in a magnetic field in the case where the current, I and field, B are perpendicular the force on the wire is given by
F = BIL (N) [3]
where L is the length of the wire in the field. This comes from a consideration of the number and velocity of charges experiencing the magnetic field and is derived in the lecture courses and in Young and Freeman. Somewhat similar considerations can be applied to the magnitude of the magnetic field around a straight conductor. The field lines in this case are circles concentric with the wire and decrease with distance r from the wire. For an infinitely long conductor the magnitude of the field is given by:
rI
Bπ
µ2
0= (tesla, T) [4]

29
Magnetic field lines due to a current in a wire are shown in Figure 3.
currentcarryingwire
magneticfieldlines
Figure 3. Magnetic field lines surrounding a current carrying wire. For the direction of the field lines shown the current is in a direction out of the page.
2. Experimental
2.1 Apparatus (the current balance) The equipment, shown part assembled in Figure 4, consists of a copper frame (scribed on one side) which balances on two pivot edges. A break in the frame, in the region of the pointer, ensures that any current flowing between the pivots only passes through one “arm” of the frame. The pointer can be positioned in the opening of a support that restricts its movement. The current carrying arm is placed in the magnetic field centrally between the poles of strong permanent magnets mounted on mild steel yokes. With this arrangement, the current, magnetic field and movement of the wire are all at right angles and so equation 3 applies.
Figure 4: Frame mounted on centrally positioned pivot edges. The pointer is to the left and is shown within the support. Current flows only through the arm on the right, passing between the poles of permanent magnets.

30
Electrical circuit: The copper frame has a very low resistance (~0.2 O) so to protect the power supply unit and the equipment (from high currents) a ballast resistance of ~5 O should be placed in series with the frame. The variable resistor (rheostat) provided is a suitable ballast (in terms of resistance value and current capacity). The rheostat has three terminals and a maximum resistance of ~10 O. To obtain a resistance of ~5O simply move the top slider half way along the coil and make sure to use the top and one of the bottom connectors. The power supply unit (dc output) and an ammeter set to its 10 A range and also in-series completes the circuit.
When required use the dial on the poser supply unit to set the current.
IMPORTANT: Currents must not be allowed to exceed 2.5 A and reduce the current to zero between measurements.
Magnets: When making calculations it will be assumed that the “magnets” are exactly 5 cm in length, have no “edge effects”. No “edge effects” implies that the magnetic field confined to the region directly between the poles - in reality it spreads a little. This is addressed again in section 2.2. Weights: In this experiment, small pieces of photocopier paper (cut up using scissors) will be used. A figure of merit for paper is its areal mass density and the photocopier paper used by the School is indicated to be 80 g/m2. Measurements show that this figure is accurate to +/- 1% and so the areal density should be written as 80.0 +/- 0.8 g/m2. This accuracy is more than sufficient for the purposes of this experiment. Since the wire frame balances on a pivot, forces on the frame should be considered as moments. However if masses are added on the same section of the frame that passes through the magnets, the distance from the points of application of the force to the pivot is the same and it is sufficient to only consider forces. Field line measurements: Early experiments examine the shape of (permanent) magnetic field lines and small magnetic compasses are used for this purpose.
2.2 The magnetic field lines associated with permanent magnets The nature of the magnetic field surrounding a single permanent bar magnet with a similar geometry to that used in this experiment is shown in figure 1. This part of the experiment examines the more complicated case of: (i) two such magnets separated by a fixed gap; (ii) two such magnets separated by the same extent but mounted on a “U” shaped yoke. Set up • On a fresh piece of A4 paper place the two magnets, centrally and with N pole facing S so that
they attract first of all separated by the wooden block. The wooden block is not magnetic and so has no effect on observations).
• Trace around the magnets so that they can be re-positioned if moved accidentally. Experiment • Use the small compass to determine the direction of the field lines* in the vicinity of the magnets:
find the direction of the field line at a point, draw an arrow in the position of the compass, move the compass along in the direction of the field line and repeat. Concentrate on one side of the magnet and take enough measurements to illustrate symmetry and to generate a reasonably accurate impression of the field lines (as in Figure 1).

31
• Repeat the process for the same magnets separated by a “U” shaped yoke (the magnets should still be oriented N-S and the wooden block should be removed).
• Describe and attempt to account for the difference between the two cases. *A useful point to note: after being disturbed the compass needle exhibits a damped oscillation, whose frequency increases with field strength.
2.3 Oersted’s experiment (A classic experiment of physics) Reminder: Oersted’s experiment, that started the field of electromagnetism, was simply the observation that currents travelling through wires affected a magnetic compass in its vicinity. Here the effect will be used to confirm the cross product expression given in equation 2. Set up • The equipment should be set up as shown in Figure 4, although the magnets are not required at
this stage and it is not important for the frame to be balanced, it can be held horizontal using the support (shown on the left).
• Connect the power supply unit using the dc output: Use red wires to connect the current balance to the positive output and black wires to the negative output (this will help when determining the direction of charge flow) and pass the current through an ammeter on its 10 A range.
Experiment • Place the small compass close to the frame (as close as possible without touching) and confirm,
such as by increasing the current to 2.5 A and then decreasing it again in different positions around the wire, that the current has an effect on the compass. This, in essence, was Oersted’s experiment. Take care, the wire will spark.
Whilst a movement of the compass needle due to the current in the wire should be obvious it is true that the effect is weak. Most notably the contribution due to the current is competing with the Earth’s magnetic field (which varies with position but is in the range 30-60 µT) and with that due to the steel in the bench system.
• Use estimates and observations to decide the origin of the largest contribution to the field experienced by a compass when it is as close as possible to the wire carrying a current of 2.5 A.
• Passing a current of 2.5 A through the wire for short periods, and with reference to Figure 2, use the compass to determine the direction of the magnetic field. Confirm, through consideration of the direction of current/charge flow, that the direction is as predicted by equation 2. (Demonstrators will expect to see a suitably labelled diagram here).
2.4 Investigation of a force on a current carrying wire in a magnetic field The current I (A) and length L (m) of wire in the field can be varied independently and the magnetic force F (N) measured by balancing it against the force due to known masses in the gravitational field. The magnetic field B (T) is determined by the strength of the permanent magnets and their separation and has a constant value that is measured in this experiment. Once the magnetic field strength has been found the apparatus is used as a mass balance to measure (relatively small) masses. Set up

32
• Connect the voltage source, the rheostat, the ammeter and the balance in series. The rheostat is a coil of wire with a slider used to vary its effective resistance. It is a useful way of controlling current in this experiment.
• The next objective is to balance the frame with no magnetic forces acting on it. To aid this one side of each frame has been finely scribed. Locate the scribed grooves on the balance with the pointer between the balance indicator (this will limit the movement of the frame). Finely balance the frame by moving the small metal rider along the frame (best done with tweezers, but bear in mibd they are magnetic).
• Position the magnet so that the frame lies centrally between the “magnet’s” pole-pieces. • Pass a current through the frame, ensuring that the current is such that the arm is raised. This
upwards force will later be counterbalanced by weights placed on the same section of the arm that passes through the magnet.
Experiment • Cut out a square or rectangle of paper, measure its dimensions and place it on the balance. • Increase the current until the beam is balanced. • Repeat the previous steps using different or additional areas of paper. • Plot a suitable graph and use it to show that F is proportional to I and to calculate the magnetic
field, B for the magnets used. Note: Clearly it is important that the frame and rider do not move during the course of the experiment. If they move or are suspected to have moved it will be necessary to rebalance the system with no masses and no current flowing. References 1. http://hyperphysics.phy-astr.gsu.edu/hbase/magnetic/elemag.html (accessed 2/11/10)

33
Experiment 17: Writing Formal Reports At the end of PX1123 you wrote a Formal Report on one of the experiments you had performed during the semester. These will have been thoroughly marked and lots of feedback comments given. These will be handed back to you now....... You will be required to write and submit another such report (after the Easter vacation) for PX1223 – it is expected that you will have taken on board the feedback given and can greatly improve upon your first attempt. This session is to assist with that process, so that you have a much clearer idea of what will be expected of your future formal reports (in 2nd year lab and your 3rd year long project). So part 1 is to read appendix 1 - a reminder of the details given on report writing inthe PX1123 lab manual (it was obvious who hadn’t read this last time!). In part 2 you’ll be given a mock report – absolutely full of common mistakes. You are to go through this, mark it and make a list of all the errors. Your lab supervisor will then discuss these with you. Check them against the advice given in section 1. For part 3, you will be given 3 real reports to mark and rank in quality order. And finally, you should reread your own PX1123 report and understand the feedback you’ve been given. Ask for explanation – we want you to do a really good job next time! If you are uncertain as to how to use certain word-processing tools (for example an equation editor), this is a good opportunity to ask. APPENDIX 1. Advice on writing up formal reports of experiments and their results. AIM: to PRESENT the results of your work The person marking your full report is interested in your description of the experiment. They are not concerned with the actual measurements or quality of the results but are concerned with the way these are presented in the report. You should aim to present a clear, concise, report of the experiment you have performed, at a level able to be understood by a fellow 1st Year student, who does not have expert knowledge of your experiment. An example of a full report and further advice are given in PX1123 manual. Very importantly, your report must be original and not a copy of any part of the notes provided with the experiment. It should be a report of what you did; not of what you would like to have done or of what you think you should have done. That said, credit will be given for discussions on how one might extend and improve an experiment, and what might be done if the experiment were to be repeated. It is normal practise in writing scientific papers to omit all details of calculations, and you should also do this. Providing your report includes a statement of the basic theory which you used, together with a record of your experimental observations (summarized if appropriate) and the parameters which you obtain as a result of your calculations, it will be possible for anyone who so wishes to check the calculations you perform. The principles of report writing are simple: give the report a sensible structure; write in proper, concise English; use the past tense passive voice, for example "... the potentiometer was balanced
34
...". The following structure is suggested. It is not mandatory, but you are strongly recommended to adopt it.
1) Follow the title with an abstract. Head this section “Abstract". • An abstract is a very brief (~50-100 words) synopsis of the experiment performed. An example is "The speed of sound in a gas has been measured using the standing wave cavity method for one gas (air) for a range of temperatures near room temperature and for gases of different molecular weights (air, argon, carbon dioxide) at room temperature. The speed in air near room temperature was found to be proportional to T½, where T is the gas temperature in Kelvin, and the ratio Cp/Cv for air, argon and carbon dioxide at room temperature was found to be 1.402 ± 0.003, 1.668 ± 0.003 and 1.300 ± 0.003 respectively".
2) Follow the abstract, on a separate page, with an introduction to the experiment.
Head this section “Introduction”. • Here, you should state the purpose of the experiment, and outline the principles upon which it was based (put some background physics in here). This section is often the most difficult to write. On many occasions it is convenient to draft all the rest of the report and write this last. Remember that the reader will, in general, not be as familiar with the subject matter as the author. Start with a brief general survey of the particular area of physics under investigation before plunging into details of the work performed.
• Important formulae and equations to be used later in the report can often, with advantage, be mentioned in the introduction as, by showing what quantities are to be measured, their presence helps in the understanding of the experiment. Formulae or equations should only be quoted at this stage. Derivations of formulae or equations should be given either by references to sources, for example text books, or in full in appendices. References should be given in the way described below.
3) Follow this with a description of the experimental procedure. Head this “Experimental Procedure”. • Write the experimental procedure as concisely as possible: give only the essentials, but do mention any difficulties you experienced and how they were overcome. Division of the description of the experimental procedure into sections, each one dealing with the measurement of one quantity, is often convenient. If the introduction to the experiment has been well designed this division will occur naturally. Relegate any matters which can be treated separately, such as proofs of formulae, to numbered appendices. Give references in the way described below. • All diagrams, graphs or figures should be labelled as figures. Give each a consecutive number (as Figure 1 etc.), a brief title and, where possible, a brief caption. Give each group or table of measurements a number (as Table 1 etc.) and a brief title, and use the numbers for reference from the text e.g. “the data in Figure 1 exhibits a straight….”

35
4) Follow this section with the results of the experiment, discussion of them and comments. Head this “Results and discussion”.
• The result of the experiment can be stated quite briefly as "The value of X obtained was N + σ (N) UNITS". For example "The viscosity of water at 20°C was found to be (1.002 ± 0.001) x 10-3 N M-2 s". • Discussion of the result, or of measurements, method etc., can be cross-referenced by quoting the figure, table or report section numbers.
• Generally only show results in one form, usually either a table or a graph. For instance DON’T give a table of results and then show a graph of the exact same data. However if you have multiple sets of similar graphical results, then a summary table can be useful.
5) Follow this section with your conclusions. Head this “Conclusions”. • The conclusions should restate, concisely, what you have achieved including the results and associated uncertainties. Point the way forward for how you believe the experiment could be improved
6) Follow this section with references. Head this “References” or “Bibliography”. • The last section of the main body of the report is the bibliography, or list of references. It is essential to provide references. There are two main styles used (along with many subtle variations) to detail references. In the Harvard method, the name of the first author along with the year of publication is inserted in the text, with full details given, in alphabetical order, at the end of the document. The second style, favoured here is known as the Vancouver approach, is slightly different. At the point in your report at which you wish to make the reference, insert a number in square brackets, e.g. [1]. Numbers should start with [1] and be in the order in which they appear in the report. References should be given in the reference or bibliography section, and should be listed in the order in which they appear in the report. (Whatever referencing system you adopt, be consistent!) Where referencing a book, give the author list, title, publisher, place published, year and if relevant, page number eg. [1] H.D. Young, R.A. Freedman, University Physics, Pearson, San Francisco, 2004. In the case of a journal paper, give the author list, title of article, journal title, vol no., page no.s, year. e.g. [2] M.S. Bigelow, N.N. Lepeshkin & R.W. Boyd, “Ultra-slow and superluminal light propagation in solids at room temperature”, Journal of Physics: Condensed Matter, 16, pp.1321-1340, 2004.

36
In the case of a webpage (note: use webpages carefully as information is sometimes incorrect), give title, institution responsible, web address, and very importantly the date on which the website was accessed eg. [3] “How Hearing Works”, HowStuffWorks inc., http://science.howstuffworks.com/hearing.htm, accessed 13th July 2008 7) Follow this section with any appendices. Head this “Appendices”. • Use the appendices to treat matters of detail which are not essential to the main part of the report, but that help to clarify or expand on points made. Give each appendix a different number to help cross referencing from other parts of the report and note that to be useful appendices must be mentioned in the main body of the report.
Health Warning: In subsequent years it may be necessary to develop this standard report layout to deal with complex experiments or series of experiments, so best get on top of it now.

37
Experiment 18: Geometric optics: Imaging with thin convex lenses
Safety • The light source used is a relatively low power 40 W incandescent bulb. However, in using
lenses the light may be focused to produce high power densities with potential to damage the eye. Therefore never look through lenses towards the light source.
• The light bulb is contained and shielded within a black housing which will become hot after extended use. Therefore take care not to touch the housing.
• The lenses are made from glass and may break if dropped. If this occurs do not attempt to clean up, instead call the demonstrator, supervisors or lab technician.
Experimental skills • The experiment makes use of an optical bench that allows for the precise positioning and fixing
of optical components. This essential for many optical experiments, where the alignment of optical components can be critical.
• Experiments in optics are different from most other types. This is due to the fact that an optical beam is required to pass through or interact with a number of optical components that consequently need to be carefully aligned. This is a skill that benefits from patience and practice - this experiment provides a (relatively forgiving) introduction.
• As with any optics experiment, avoid touching the optical surfaces as much as possible. • An introduction to the use of “sign conventions”. These (there is more than one) determine
whether values are positive or negative and so are vital in using optics equations correctly.
Wider Applications • Imaging systems are ubiquitous: the eye, camera’s, microscopes, telescopes etc.
Apparatus 1.5 m optical bench with Vernier scale, 40 W shielded incandescent light source, various optical holders, lenses, filters, plates and screens.
Outline Using thin, bi-convex, spherical glass lenses this experiment provides an introduction to the principles of geometric optics, lenses and imaging. The approach is to perform a variety of experiments (all involving image formation) to obtain the values of parameters that characterise the lenses used. Imperfections (aberrations) in the images are an important concern when lenses are used but are not considered here.
1. Introduction 1.1 Geometric optics Geometric optics (or ray optics) considers the propagation of light in terms of rays, i.e. a single line or narrow beam of light, through different media. It is a very useful way to consider optical systems especially when imaging is involved.
Geometric optics is based on the consideration that light rays: • propagate in a rectilinear (straight-line) path in homogeneous (uniform) medium • change direction and/or may split in two (through refraction and reflection) at the interface or
boundary with a dissimilar medium (here only two media are considered: glass and air).
Although powerful in understanding the geometric aspects of optical systems, such as imaging and aberrations (faults in images) it does not account for effects such as diffraction and interference.
38
1.2 The interface between two media: refractive index and Snell’s law The two media of concern here are air and glass and the parameter that characterizes their optical property as far as geometric optics (and lenses) is concerned is their refractive index, n. Refractive index, n relates to the speed of light in media and is defined
medium a in light of speedvacuum a in light of speed
n = [1]
By definition the refractive index of a perfect vacuum is unity (i.e. exactly one). The refractive index bears a close relationship to relative permittivity, er and can be understood to result from the interaction between matter and light’s electric and magnetic fields. Light incident upon a boundary between media with different refractive indexes will be reflected and transmitted. In addition, the transmitted light may be “refracted”, i.e. it changes direction as described by Snell’s law.
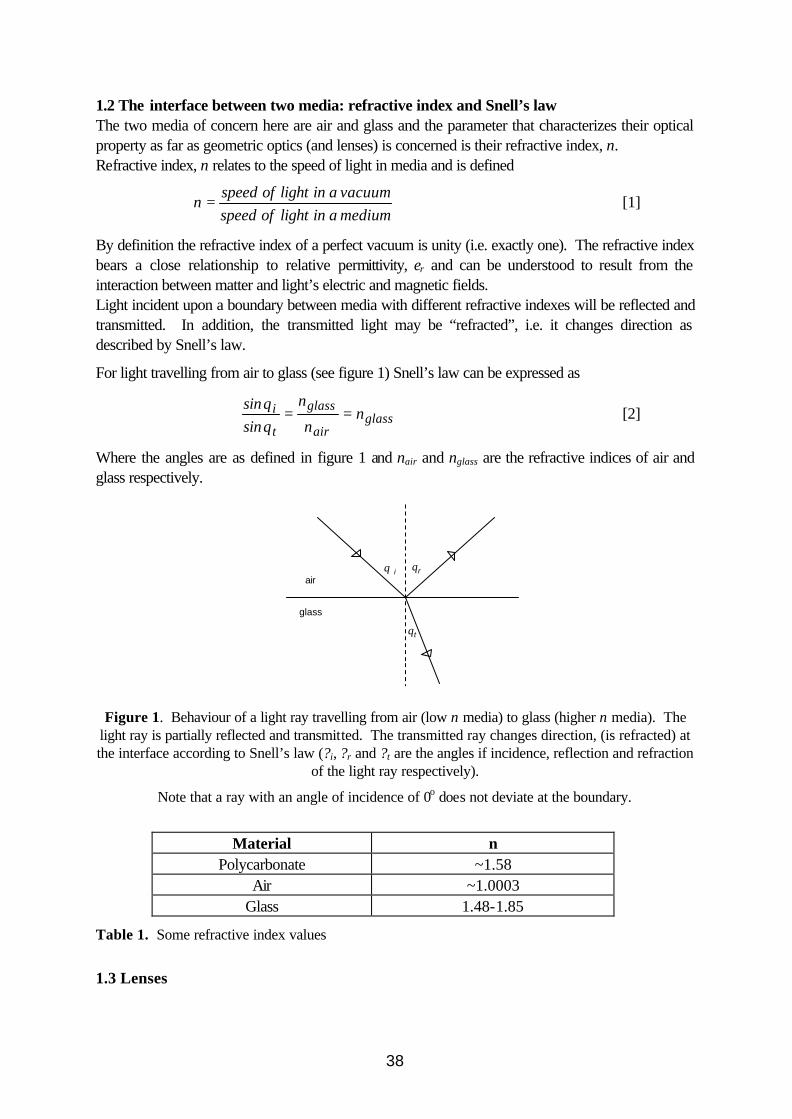
For light travelling from air to glass (see figure 1) Snell’s law can be expressed as
glassair
glass
t
i nn
n
sinsin
==θθ
[2]
Where the angles are as defined in figure 1 and nair and nglass are the refractive indices of air and glass respectively.
θr
θt
θ iair
glass
Figure 1. Behaviour of a light ray travelling from air (low n media) to glass (higher n media). The
light ray is partially reflected and transmitted. The transmitted ray changes direction, (is refracted) at the interface according to Snell’s law (?i, ?r and ?t are the angles if incidence, reflection and refraction
of the light ray respectively).
Note that a ray with an angle of incidence of 0o does not deviate at the boundary.
Material n
Polycarbonate ~1.58 Air ~1.0003
Glass 1.48-1.85
Table 1. Some refractive index values
1.3 Lenses
39
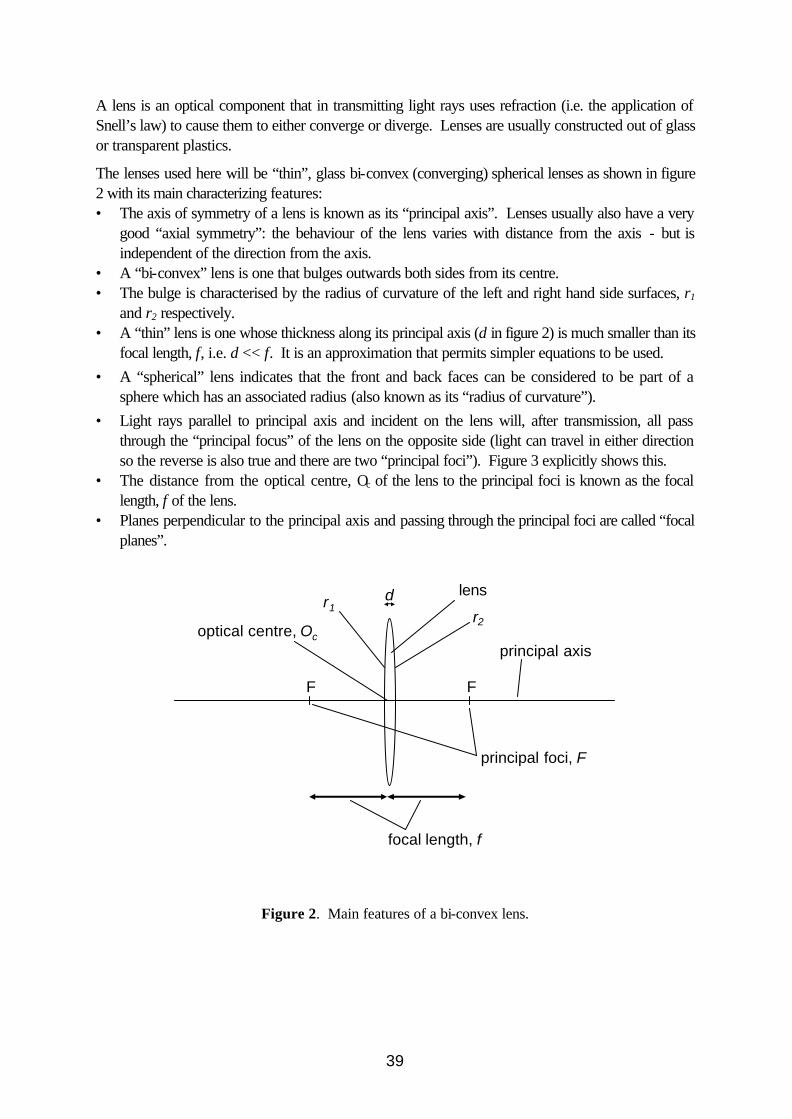
A lens is an optical component that in transmitting light rays uses refraction (i.e. the application of Snell’s law) to cause them to either converge or diverge. Lenses are usually constructed out of glass or transparent plastics.
The lenses used here will be “thin”, glass bi-convex (converging) spherical lenses as shown in figure 2 with its main characterizing features: • The axis of symmetry of a lens is known as its “principal axis”. Lenses usually also have a very
good “axial symmetry”: the behaviour of the lens varies with distance from the axis - but is independent of the direction from the axis.
• A “bi-convex” lens is one that bulges outwards both sides from its centre. • The bulge is characterised by the radius of curvature of the left and right hand side surfaces, r1
and r2 respectively. • A “thin” lens is one whose thickness along its principal axis (d in figure 2) is much smaller than its
focal length, f, i.e. d << f. It is an approximation that permits simpler equations to be used. • A “spherical” lens indicates that the front and back faces can be considered to be part of a
sphere which has an associated radius (also known as its “radius of curvature”). • Light rays parallel to principal axis and incident on the lens will, after transmission, all pass
through the “principal focus” of the lens on the opposite side (light can travel in either direction so the reverse is also true and there are two “principal foci”). Figure 3 explicitly shows this.
• The distance from the optical centre, Oc of the lens to the principal foci is known as the focal length, f of the lens.
• Planes perpendicular to the principal axis and passing through the principal foci are called “focal planes”.
F F
optical centre, Oc
principal axis
focal length, f
d
principal foci, F
lensr1
r2
Figure 2. Main features of a bi-convex lens.
40
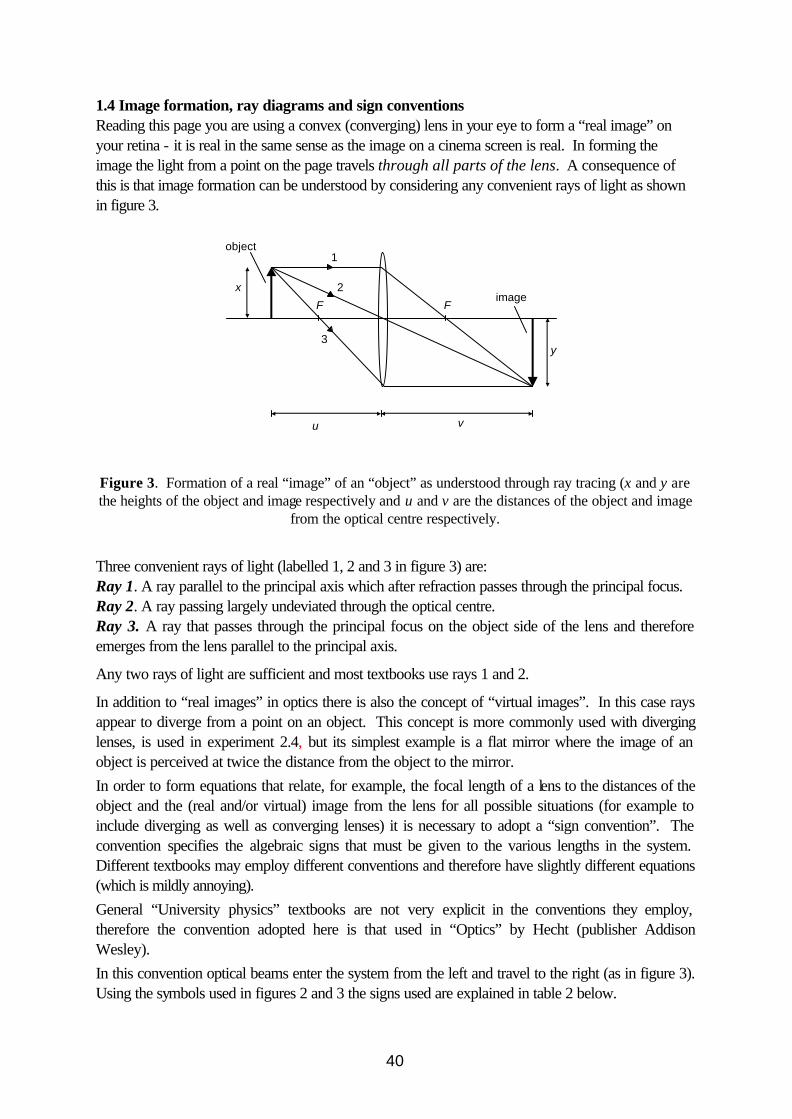
1.4 Image formation, ray diagrams and sign conventions Reading this page you are using a convex (converging) lens in your eye to form a “real image” on your retina - it is real in the same sense as the image on a cinema screen is real. In forming the image the light from a point on the page travels through all parts of the lens. A consequence of this is that image formation can be understood by considering any convenient rays of light as shown in figure 3.
F F
object
image
u v
x
y
1
2
3
Figure 3. Formation of a real “image” of an “object” as understood through ray tracing (x and y are the heights of the object and image respectively and u and v are the distances of the object and image
from the optical centre respectively.
Three convenient rays of light (labelled 1, 2 and 3 in figure 3) are: Ray 1. A ray parallel to the principal axis which after refraction passes through the principal focus. Ray 2. A ray passing largely undeviated through the optical centre. Ray 3. A ray that passes through the principal focus on the object side of the lens and therefore emerges from the lens parallel to the principal axis.
Any two rays of light are sufficient and most textbooks use rays 1 and 2.
In addition to “real images” in optics there is also the concept of “virtual images”. In this case rays appear to diverge from a point on an object. This concept is more commonly used with diverging lenses, is used in experiment 2.4, but its simplest example is a flat mirror where the image of an object is perceived at twice the distance from the object to the mirror. In order to form equations that relate, for example, the focal length of a lens to the distances of the object and the (real and/or virtual) image from the lens for all possible situations (for example to include diverging as well as converging lenses) it is necessary to adopt a “sign convention”. The convention specifies the algebraic signs that must be given to the various lengths in the system. Different textbooks may employ different conventions and therefore have slightly different equations (which is mildly annoying). General “University physics” textbooks are not very explicit in the conventions they employ, therefore the convention adopted here is that used in “Optics” by Hecht (publisher Addison Wesley). In this convention optical beams enter the system from the left and travel to the right (as in figure 3). Using the symbols used in figures 2 and 3 the signs used are explained in table 2 below.
41
Quantity Sign
+ -
u real object virtual object
v real object virtual object
f converging lens diverging lens
x erect object inverted object
y erect image inverted image
Magnification (m = x/y) erect image inverted image
r boundary left of Oc boundary right of Oc
Table 2. Meanings associated with the signs of thin lens parameters
Using this convention and by considering “similar triangles” in figure 3 it can be shown that:
the linear magnification uv
xy
m −== [3]
and that fvu111
=+ [4]
Equation 4 is known as the “thin lens equation” or the “Gaussian lens equation”. Another useful equation, which relates the focal length, f to the radii of curvature, rl and r2, of the surfaces of the (thin) lens and the refractive index, n, of the material from which it is made is the lens maker’s equation:
( )
−−=
r
1
r
11n
f1
21 [5]
Note that for the bi-convex lens shown in figures 2 and 3 under this convention the first radius is positive and the second is negative.
2. Experimental
Reminder: Take care when handling optical components: The lenses are made from glass and may break if dropped. If this occurs do not attempt to clean up, instead call the demonstrator, supervisors or lab technician. In addition hold lenses at their edges and above the benches when mounting into their holders.
Experiment 2.1 Image formation (and determination of focal length) This experiment examines the conditions for producing and the nature of an image of an object (a cross hair on a screen) through a single bi-convex, thin, spherical glass lens. • First measure the dimensions of the cross-hair on the clear slide (the horizontal will be used to
calculate the magnification of images produced). • Accurately position the lamp at 0 cm and the clear slide with cross hair at 20 cm (this is close
enough for a reasonable throughput of light whilst avoiding images of the filament in the bulb).
42
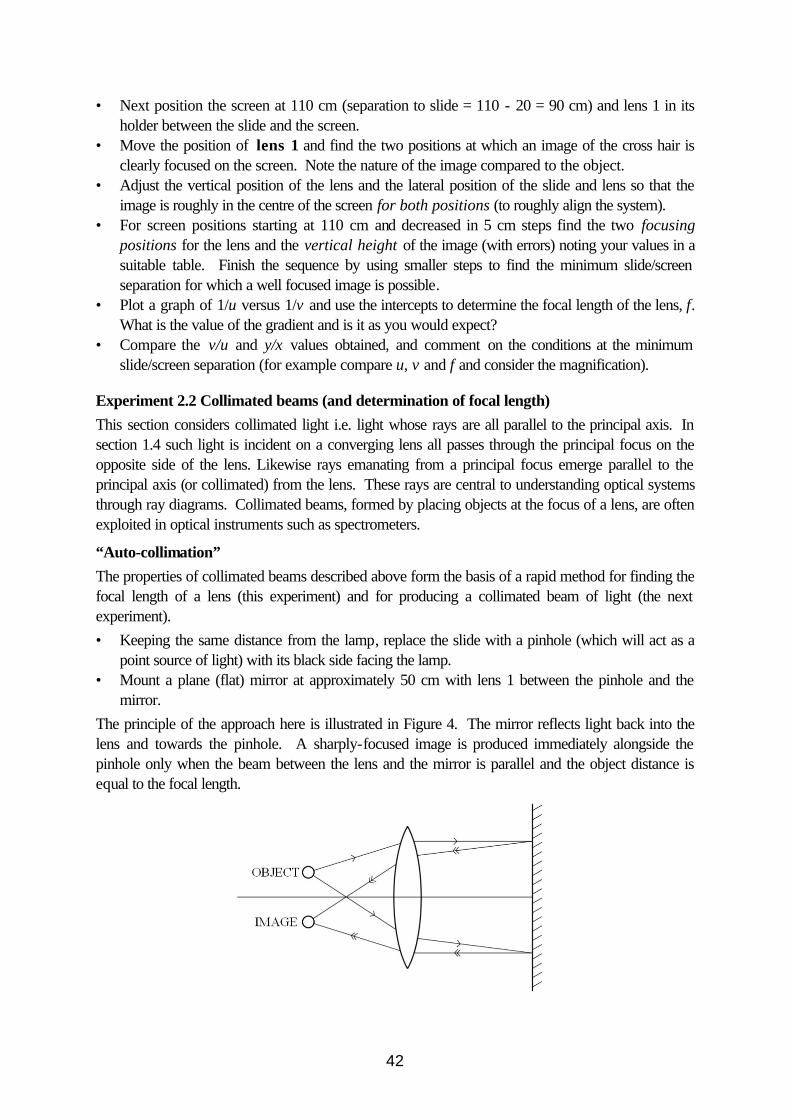
• Next position the screen at 110 cm (separation to slide = 110 - 20 = 90 cm) and lens 1 in its holder between the slide and the screen.
• Move the position of lens 1 and find the two positions at which an image of the cross hair is clearly focused on the screen. Note the nature of the image compared to the object.
• Adjust the vertical position of the lens and the lateral position of the slide and lens so that the image is roughly in the centre of the screen for both positions (to roughly align the system).
• For screen positions starting at 110 cm and decreased in 5 cm steps find the two focusing positions for the lens and the vertical height of the image (with errors) noting your values in a suitable table. Finish the sequence by using smaller steps to find the minimum slide/screen separation for which a well focused image is possible.
• Plot a graph of 1/u versus 1/v and use the intercepts to determine the focal length of the lens, f. What is the value of the gradient and is it as you would expect?
• Compare the v/u and y/x values obtained, and comment on the conditions at the minimum slide/screen separation (for example compare u, v and f and consider the magnification).
Experiment 2.2 Collimated beams (and determination of focal length) This section considers collimated light i.e. light whose rays are all parallel to the principal axis. In section 1.4 such light is incident on a converging lens all passes through the principal focus on the opposite side of the lens. Likewise rays emanating from a principal focus emerge parallel to the principal axis (or collimated) from the lens. These rays are central to understanding optical systems through ray diagrams. Collimated beams, formed by placing objects at the focus of a lens, are often exploited in optical instruments such as spectrometers.
“Auto-collimation” The properties of collimated beams described above form the basis of a rapid method for finding the focal length of a lens (this experiment) and for producing a collimated beam of light (the next experiment). • Keeping the same distance from the lamp, replace the slide with a pinhole (which will act as a
point source of light) with its black side facing the lamp. • Mount a plane (flat) mirror at approximately 50 cm with lens 1 between the pinhole and the
mirror. The principle of the approach here is illustrated in Figure 4. The mirror reflects light back into the lens and towards the pinhole. A sharply-focused image is produced immediately alongside the pinhole only when the beam between the lens and the mirror is parallel and the object distance is equal to the focal length.

43
Figure 4 Focal length determination by “auto-collimation”
• Adjust the position of the lens in order to obtain a sharply focused image of the pinhole next to the actual pinhole.
• Find the focal length of lens 1 and compare your value with that from Section 2.1.
Experiment 2.3 Measurements with a collimated beam Here a collimated beam is used to allow a quick determination of focal length using the pinhole aperture. • With the pinhole as the object use the method of Section 2.2, with lens 1, to collimate the light.
Position adjustments may need to be made in order to observe the reflected image. Once found the positions of the pinhole and lens 1 (it’s a good idea to make a note of them) along the bench must not be changed again during the experiment.
• Remove the mirror and instead after lens 1 place a second lens holder and then a screen. With no lens in the second holder it is likely that a number of images of the pinhole will appear on the screen - this is a consequence of a combination of the light source that consists of an extended and non-uniform filament and the larger hole now being used. However, the light may still be considered to be collimated (the separation of the images should not change as the screen is moved although the size of each image will).
• Place lens 2 in the holder and move the screen in order to determine its focal length, f. To convince yourself that the light is collimated and the separation between the two lenses does not matter, repeat this for the second lens at positions of 60cm and 90cm on the optical bench (f should not change).
• Repeat for lens 3.
Experiment 2.4 Radius of curvature of a lens (+ determination of refractive index)
There are a wide variety of experiments that can be performed to examine the properties of lenses. The following (slightly quirky) example is included since it is a convenient way of determining the radius of curvature of convex lenses and knowledge of this value allows the refractive index of the material used to be determined. The principal of the measurement is shown in figure 5. A source S of light (a pinhole again) transmits lights onto a lens. However, as introduced in section 1.2 although most light is transmitted some is reflected (for an air/glass boundary ~5% can be reflected) enough to form a visible “return” image alongside the source (or object). The condition for forming a return image (shown in figure 5) is a separation, u, between source and lens such that following refraction at the first (left hand side) air/glass boundary the light rays are incident normal/perpendicular to on the second (glass/air) boundary. Then at the same time (i) the main, transmitted part of the beam forms a virtual image at C and (ii) the reflected beam retraces its path back to and forms an image at the source. Here although use is made of the reflection calculations are based on the formation of a virtual image (i.e. relating to light refracted through both interfaces). Since a virtual image is formed at C, the sign convention dictates that v is negative, however C is at the centre of curvature for the r.h.s. boundary and that magnitude of v is the radius of curvature (for a thin lens).

44
Figure 5: Condition for forming a reflected image at the source (light rays are normally incident on second boundary and retrace their path back to the source). Under these conditions (and for a thin
lens) the virtual image is at the centre of curvature of the rhs boundary.
Perform the following for all three lenses: • Place the pinhole (acting as source S) a suitable distance from the lamp. • With the mirror removed position the lens to obtain a “return” image of the pinhole close to the
pinhole. • Measure u and calculate the virtual image distance v using equation 4 (remember that v is
negative). • Find the radius of curvature of the other surface of the lens in a similar way. • Use the fact that v is equal in magnitude to the radius of curvature of the appropriate surface of
the lens to calculate the refractive index of the lens material.
45
Experiment 19: Measurement of Planck’s constant Aim: to determine h, Planck’s constant, using the blackbody radiation from a filament bulb. 1. Introduction This experiment consists of two parts. In the first part the temperature of the light bulb filament is determined as a function of the filament resistance using the Stefan-Boltzmann law: in the second part the intensity of radiation emitted at a particular frequency is measured as a function of filament temperature and using the Planck blackbody radiation law the constant h is determined. 2. Background An ideal surface that absorbs ALL wavelengths of radiation incident upon it is also the ‘best’ possible emitter of electromagnetic radiation. Such a surface is called a blackbody and the radiation emitted by it is called blackbody radiation. The study of blackbody radiation led to a revolution in physics, introducing the era of ‘modern’ physics with Planck’s quanta (packets of energy, hf ), which Einstein subsequently used to explain the photoelectric effect. Further reading – University Physics, Young and Freedman, Pearson, San Francisco; Wiley + Principles of Physics p496. The Planck radiation law, which Planck derived assuming that the oscillator energy could only be in packets of hf, describes the intensity distribution of blackbody radiation:
( ) ( )( )1exp
25
2
−=
kThc
hcI
λλ
πλ (1)
Where h is Planck’s constant, c is the speed of light, k is Boltzmann’s constant, T is the absolute temperature in Kelvin and ? is the wavelength. We will measure the intensity emitted by a light bulb filament at a given wavelength as a function of the temperature of the light bulb filament. Taking the ratio of two measurements we obtain:
1exp
1exp
1
2
2
1
−
−
=
kThc
kThc
II
λ
λ (2)
For conditions like those we will employ in the experiment where hc/? >> kT this is simplified to equation (3).

46
=
1
2
2
1
exp
exp
kThc
kThc
II
λ
λ and so
−=
122
1 11ln
TTkhc
II
λ (3)
Then, knowing the speed of light (2.998×10⁸ ms-1), the wavelength of light we have detected and Boltzmann’s constant (1.381×10⁻²³ JK-1 ) we can determine h by plotting an appropriate straight line graph. To determine the temperature of the light bulb filament we will make use of one of the empirical (based on experiment or observation) laws that was determined before Planck’s Radiation Law (and which can be derived from it). The Stefan-Boltzmann law describes how the power emitted, P, by a blackbody depends on temperature, T:
4TAP σ= (4)
where A is the area of the emitter and s is a fundamental physical constant. We also assume that the resistance of the lamp filament is related to the temperature according to:
0
0RT
RT ×= γ (5)
where ? is an unknown and R0 is the resistance at a known temperature, T0. The Stefan-Boltzmann law can then be rewritten as:
γ4CRP = (6) where C is a combination of the constants. By plotting an appropriate straight line graph of measurements of P and R we can determine ?. We can make the further simplifying assumption that the electrical power supplied to the light bulb is proportional to the power emitted by the light bulb filament and this allows us to determine the unknown ? using measurements of the current supplied to the bulb, I, and the voltage dropped across it, V, to determine both the power P (V×I) and also R (V / I). Using a measurement of the resistance of the light bulb filament at room temperature and a mercury in glass thermometer to measure room temperature and knowing ? we can determine the temperature of the filament from the measured resistance using equation (5). 3.1 Procedure: Resistance vs Temperature
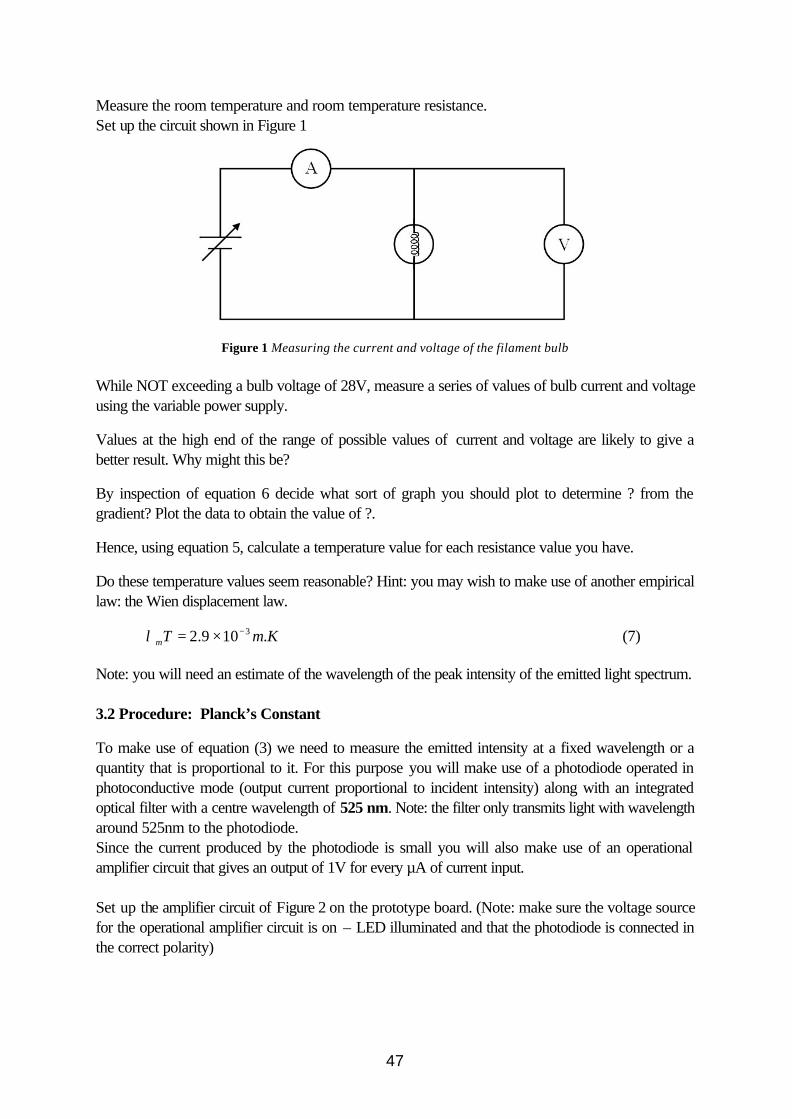
47
Measure the room temperature and room temperature resistance. Set up the circuit shown in Figure 1
Figure 1 Measuring the current and voltage of the filament bulb
While NOT exceeding a bulb voltage of 28V, measure a series of values of bulb current and voltage using the variable power supply.
Values at the high end of the range of possible values of current and voltage are likely to give a better result. Why might this be?
By inspection of equation 6 decide what sort of graph you should plot to determine ? from the gradient? Plot the data to obtain the value of ?.
Hence, using equation 5, calculate a temperature value for each resistance value you have.
Do these temperature values seem reasonable? Hint: you may wish to make use of another empirical law: the Wien displacement law.
KmTm .109.2 3−×=λ (7)
Note: you will need an estimate of the wavelength of the peak intensity of the emitted light spectrum. 3.2 Procedure: Planck’s Constant
To make use of equation (3) we need to measure the emitted intensity at a fixed wavelength or a quantity that is proportional to it. For this purpose you will make use of a photodiode operated in photoconductive mode (output current proportional to incident intensity) along with an integrated optical filter with a centre wavelength of 525 nm. Note: the filter only transmits light with wavelength around 525nm to the photodiode. Since the current produced by the photodiode is small you will also make use of an operational amplifier circuit that gives an output of 1V for every µA of current input. Set up the amplifier circuit of Figure 2 on the prototype board. (Note: make sure the voltage source for the operational amplifier circuit is on – LED illuminated and that the photodiode is connected in the correct polarity)
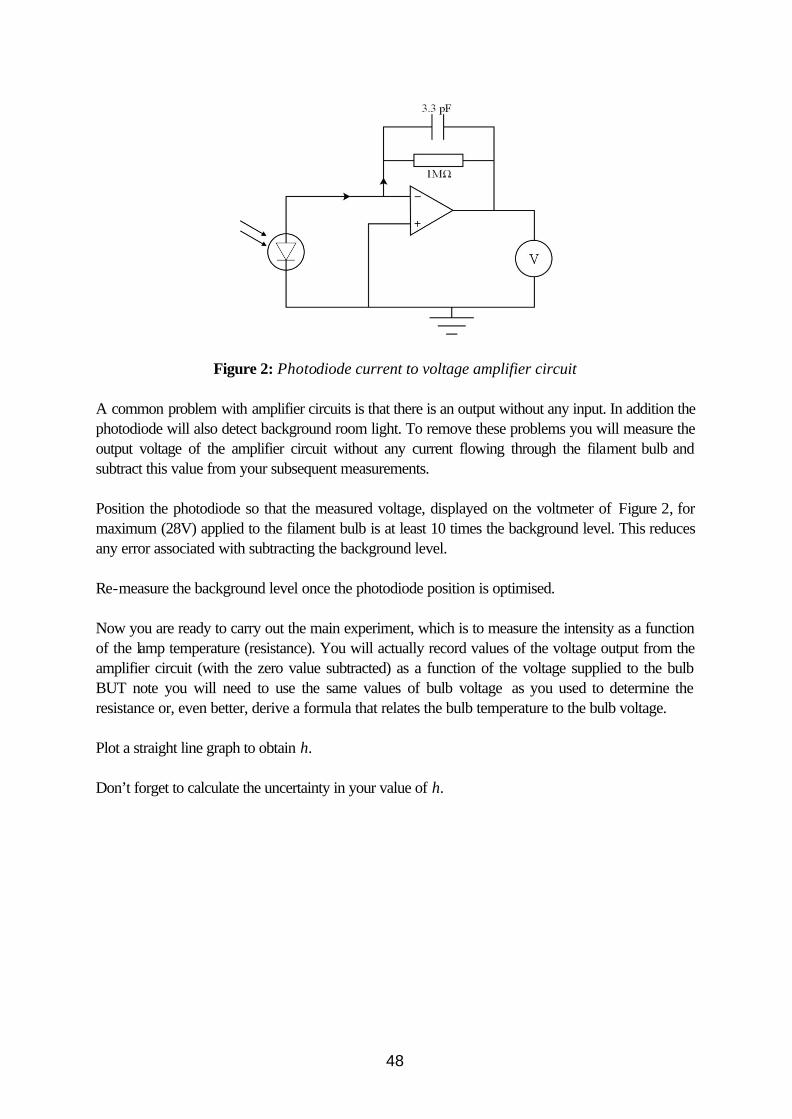
48
Figure 2: Photodiode current to voltage amplifier circuit
A common problem with amplifier circuits is that there is an output without any input. In addition the photodiode will also detect background room light. To remove these problems you will measure the output voltage of the amplifier circuit without any current flowing through the filament bulb and subtract this value from your subsequent measurements. Position the photodiode so that the measured voltage, displayed on the voltmeter of Figure 2, for maximum (28V) applied to the filament bulb is at least 10 times the background level. This reduces any error associated with subtracting the background level. Re-measure the background level once the photodiode position is optimised. Now you are ready to carry out the main experiment, which is to measure the intensity as a function of the lamp temperature (resistance). You will actually record values of the voltage output from the amplifier circuit (with the zero value subtracted) as a function of the voltage supplied to the bulb BUT note you will need to use the same values of bulb voltage as you used to determine the resistance or, even better, derive a formula that relates the bulb temperature to the bulb voltage. Plot a straight line graph to obtain h. Don’t forget to calculate the uncertainty in your value of h.
49
Experiment 20: RC circuits 1. Introduction. Capacitors and resistors often occur in circuits together. These circuits are known as RC circuits. In RC circuits the capacitive reactance and resistance combine to produce circuit impedance. The reactance and resistance cause the current and voltage to be out of phase with each other. The study of current and voltage in RC circuits is the subject of this experiment. You will begin by simulating the circuits on the computer in order to understand the basic concepts involved. You will then apply your understanding to the study of real-life RC circuits. Aims: • To understand the voltage, current, resistance and impedance relationships in series RC circuits. • To investigate the phase angle between circuit voltage and current in series RC circuits and to measure phase angle using an oscilloscope. • To become familiar with Lissajous figures and to use them to calibrate a variable-frequency oscillator. Write up your diary for this experiment in just the same way as you would for any of the other experiments. Record clearly any readings you take. Try and interpret results whenever possible. If you make printouts of any circuits, STICK them securely into your lab. book and make sure it is clear as to what they refer to. 2. Important Concepts. You are advised to read reference [1] or [2]. The main concepts, relevant to this experiment, are summarized here. An ac (alternating current) source supplies sinusoidally varying potential difference or current. In the UK the mains electricity system uses a frequency of 50Hz. To represent such varying voltages and currents we use vector (or phasor) diagrams. The instantaneous value of a quantity is represented by the projection onto a horizontal axis of a vector with a length equal to the amplitude of the quantity. The vector is assumed to rotate anticlockwise with constant angular velocity corresponding to the angular frequency of the quantity involved. [1]: H.D. Young & R.A. Freedman, University Physics, Pearson, San Francisco pp1181-1195 (or thereabouts!) [2]: In an ac circuit with only resistors, the current and voltage are in phase. This means that they vary in the same way with time, so that both reach their maximum and minimum values at the same time. The current and voltage phasors are therefore parallel and rotate together. The current and voltage amplitudes are related by V=IR. When an ac current is applied to capacitors, the instantaneous current is proportional to the rate of change of voltage. The capacitor voltage and current are out of phase by a quarter of a cycle or 90
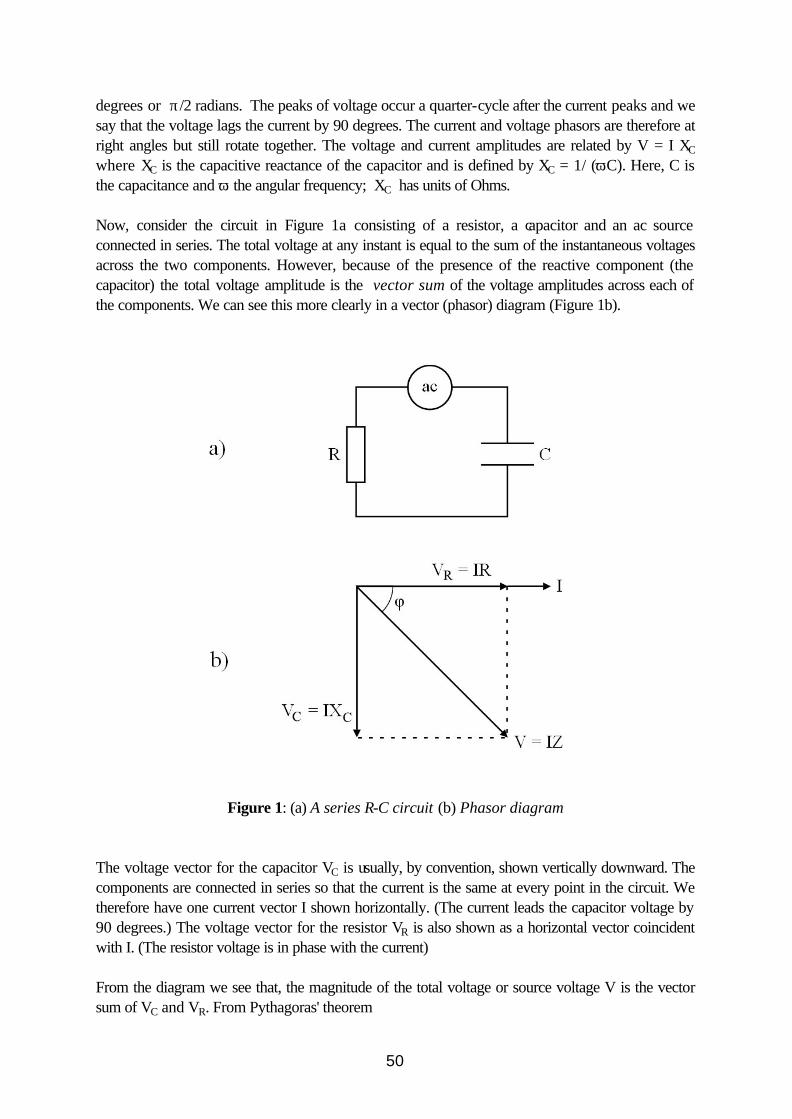
50
degrees or π/2 radians. The peaks of voltage occur a quarter-cycle after the current peaks and we say that the voltage lags the current by 90 degrees. The current and voltage phasors are therefore at right angles but still rotate together. The voltage and current amplitudes are related by V = I XC where XC is the capacitive reactance of the capacitor and is defined by XC = 1/ (ωC). Here, C is the capacitance and ω the angular frequency; XC has units of Ohms. Now, consider the circuit in Figure 1a consisting of a resistor, a capacitor and an ac source connected in series. The total voltage at any instant is equal to the sum of the instantaneous voltages across the two components. However, because of the presence of the reactive component (the capacitor) the total voltage amplitude is the vector sum of the voltage amplitudes across each of the components. We can see this more clearly in a vector (phasor) diagram (Figure 1b).
Figure 1: (a) A series R-C circuit (b) Phasor diagram The voltage vector for the capacitor VC is usually, by convention, shown vertically downward. The components are connected in series so that the current is the same at every point in the circuit. We therefore have one current vector I shown horizontally. (The current leads the capacitor voltage by 90 degrees.) The voltage vector for the resistor VR is also shown as a horizontal vector coincident with I. (The resistor voltage is in phase with the current) From the diagram we see that, the magnitude of the total voltage or source voltage V is the vector sum of VC and VR. From Pythagoras' theorem
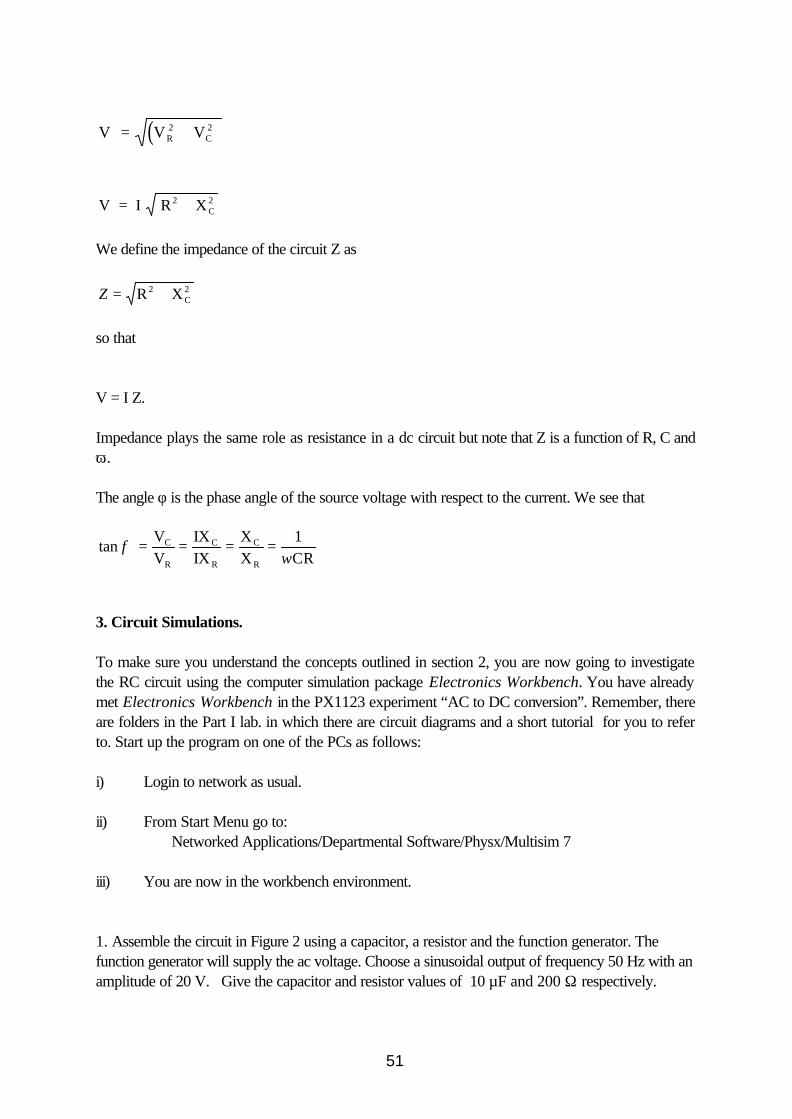
51
( )V = V VR2
C2+
V = I R X2C+ 2
We define the impedance of the circuit Z as
Z = +R X2C2
so that V = I Z. Impedance plays the same role as resistance in a dc circuit but note that Z is a function of R, C and ω. The angle φ is the phase angle of the source voltage with respect to the current. We see that
tan =VV
IXIX
XX CR
C
R
C
R
C
R
φω
= = =1
3. Circuit Simulations. To make sure you understand the concepts outlined in section 2, you are now going to investigate the RC circuit using the computer simulation package Electronics Workbench. You have already met Electronics Workbench in the PX1123 experiment “AC to DC conversion”. Remember, there are folders in the Part I lab. in which there are circuit diagrams and a short tutorial for you to refer to. Start up the program on one of the PCs as follows: i) Login to network as usual. ii) From Start Menu go to: Networked Applications/Departmental Software/Physx/Multisim 7 iii) You are now in the workbench environment. 1. Assemble the circuit in Figure 2 using a capacitor, a resistor and the function generator. The function generator will supply the ac voltage. Choose a sinusoidal output of frequency 50 Hz with an amplitude of 20 V. Give the capacitor and resistor values of 10 µF and 200 Ω respectively.
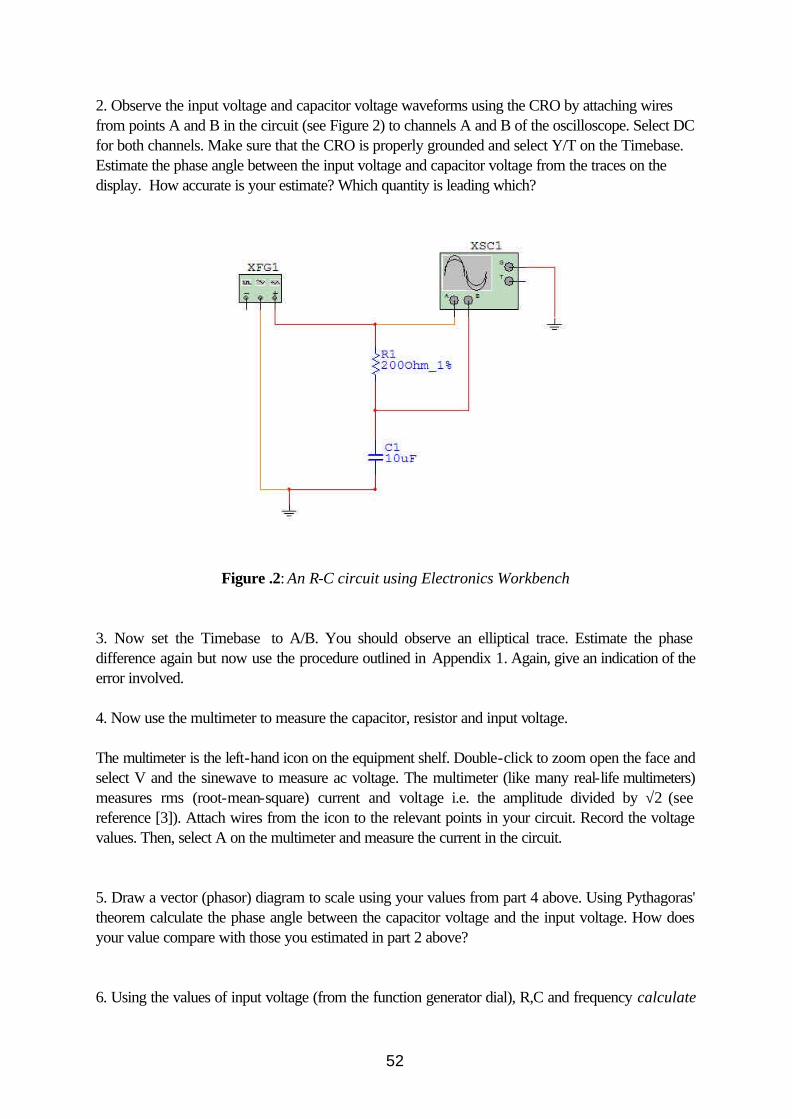
52
2. Observe the input voltage and capacitor voltage waveforms using the CRO by attaching wires from points A and B in the circuit (see Figure 2) to channels A and B of the oscilloscope. Select DC for both channels. Make sure that the CRO is properly grounded and select Y/T on the Timebase. Estimate the phase angle between the input voltage and capacitor voltage from the traces on the display. How accurate is your estimate? Which quantity is leading which?
Figure .2: An R-C circuit using Electronics Workbench 3. Now set the Timebase to A/B. You should observe an elliptical trace. Estimate the phase difference again but now use the procedure outlined in Appendix 1. Again, give an indication of the error involved. 4. Now use the multimeter to measure the capacitor, resistor and input voltage. The multimeter is the left-hand icon on the equipment shelf. Double-click to zoom open the face and select V and the sinewave to measure ac voltage. The multimeter (like many real-life multimeters) measures rms (root-mean-square) current and voltage i.e. the amplitude divided by √2 (see reference [3]). Attach wires from the icon to the relevant points in your circuit. Record the voltage values. Then, select A on the multimeter and measure the current in the circuit. 5. Draw a vector (phasor) diagram to scale using your values from part 4 above. Using Pythagoras' theorem calculate the phase angle between the capacitor voltage and the input voltage. How does your value compare with those you estimated in part 2 above? 6. Using the values of input voltage (from the function generator dial), R,C and frequency calculate
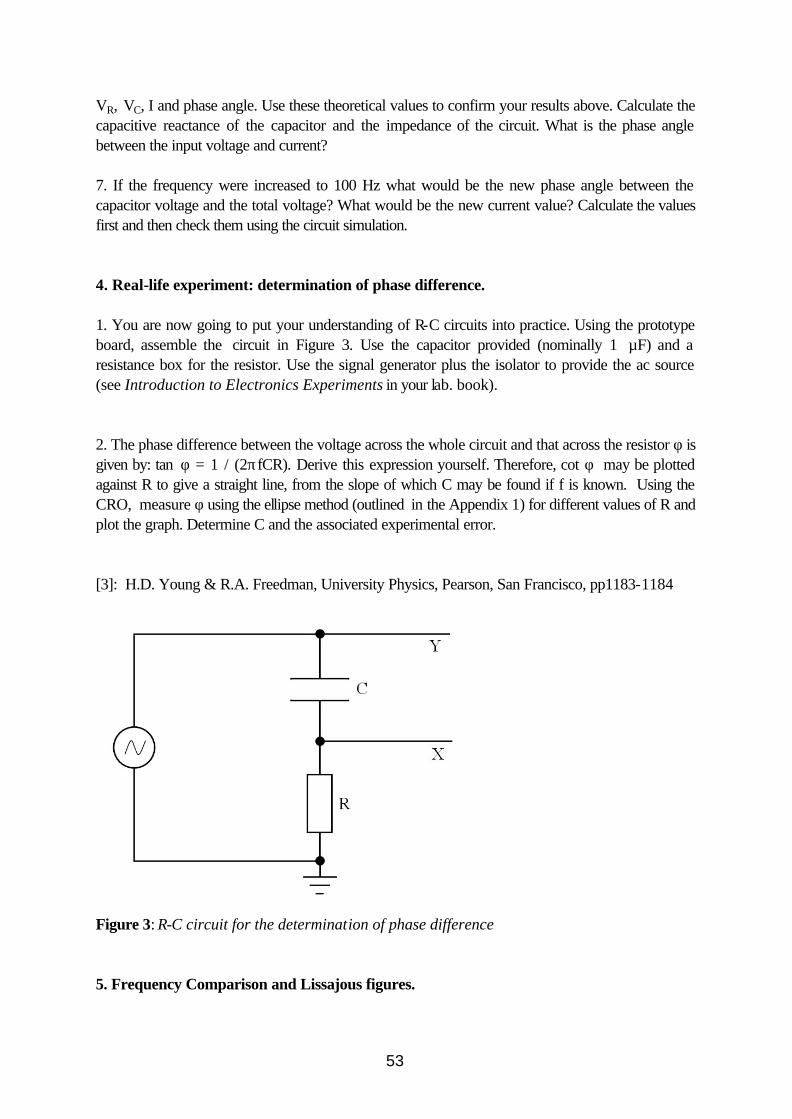
53
VR, VC, I and phase angle. Use these theoretical values to confirm your results above. Calculate the capacitive reactance of the capacitor and the impedance of the circuit. What is the phase angle between the input voltage and current? 7. If the frequency were increased to 100 Hz what would be the new phase angle between the capacitor voltage and the total voltage? What would be the new current value? Calculate the values first and then check them using the circuit simulation. 4. Real-life experiment: determination of phase difference. 1. You are now going to put your understanding of R-C circuits into practice. Using the prototype board, assemble the circuit in Figure 3. Use the capacitor provided (nominally 1 µF) and a resistance box for the resistor. Use the signal generator plus the isolator to provide the ac source (see Introduction to Electronics Experiments in your lab. book). 2. The phase difference between the voltage across the whole circuit and that across the resistor φ is given by: tan φ = 1 / (2πfCR). Derive this expression yourself. Therefore, cot φ may be plotted against R to give a straight line, from the slope of which C may be found if f is known. Using the CRO, measure φ using the ellipse method (outlined in the Appendix 1) for different values of R and plot the graph. Determine C and the associated experimental error. [3]: H.D. Young & R.A. Freedman, University Physics, Pearson, San Francisco, pp1183-1184
Figure 3: R-C circuit for the determination of phase difference 5. Frequency Comparison and Lissajous figures.

54
If signals whose frequencies are expressible as a ratio of two small integers are applied to each pair of deflector plates of the CRO, characteristic traces known as Lissajous figures are obtained. The elliptical traces you have already generated to measure phase difference are in fact Lissajous figures. In this case, the frequencies were the same for both signals so the ratio was unity. More complicated traces are obtained for higher ratios. Lissajous figures can be used to determine the frequency of one signal in terms of another which is known. Apply the ac output from the prototype board (or use the multi-tap transformer) to one channel of the oscilloscope. Then apply the output of suitable amplitude from the variable-frequency oscillator to the other channel, choosing initially a frequency of 50 Hz. Disable the internal time-axis by selecting MODE X-Y. Adjust the frequency of the oscillator to obtain a stationary elliptical trace and note the frequency, according to the oscillator, at which this occurs. Increase the frequency to about 100 Hz to obtain a figure-of-eight and again record the frequency according to the oscillator. Repeat in steps of 50 Hz to 500 Hz. Plot a graph of expected frequency against recorded frequency. From your graph, comment on the accuracy of the oscillator scale. How could you use your graph to calibrate the oscillator? Appendix:A1: Measurement of phase angles with the oscilloscope. If potential differences are applied to the X and Y plates of the CRO, we have for the movement of the spot on the screen
x = A sin (ωt) ; y = B sin (ωt - φ ) where φ is the phase angle. In general this represents an ellipse, as shown in Figure A1. Putting y = 0, we have, B sin (ωt - φ ) = 0, so that ωt = φ and x = A sin φ. From the diagram we see that for y = 0, x = ON' = ON = A sin φ. The maximum value of x is A = OA = OA', so that ON = OA sin φ. Hence,
sin φ = NN' / AA' . AA' is the difference between the two extreme x values of the ellipse, and NN' is the length given by the intersection of the ellipse with the x axis. Note: These are distances e.g. A to A’ and NOT A x A’. Both of these quantities can thus be obtained from the CRO trace. Measurement may be made easier by using a piece of graph paper as a rule.
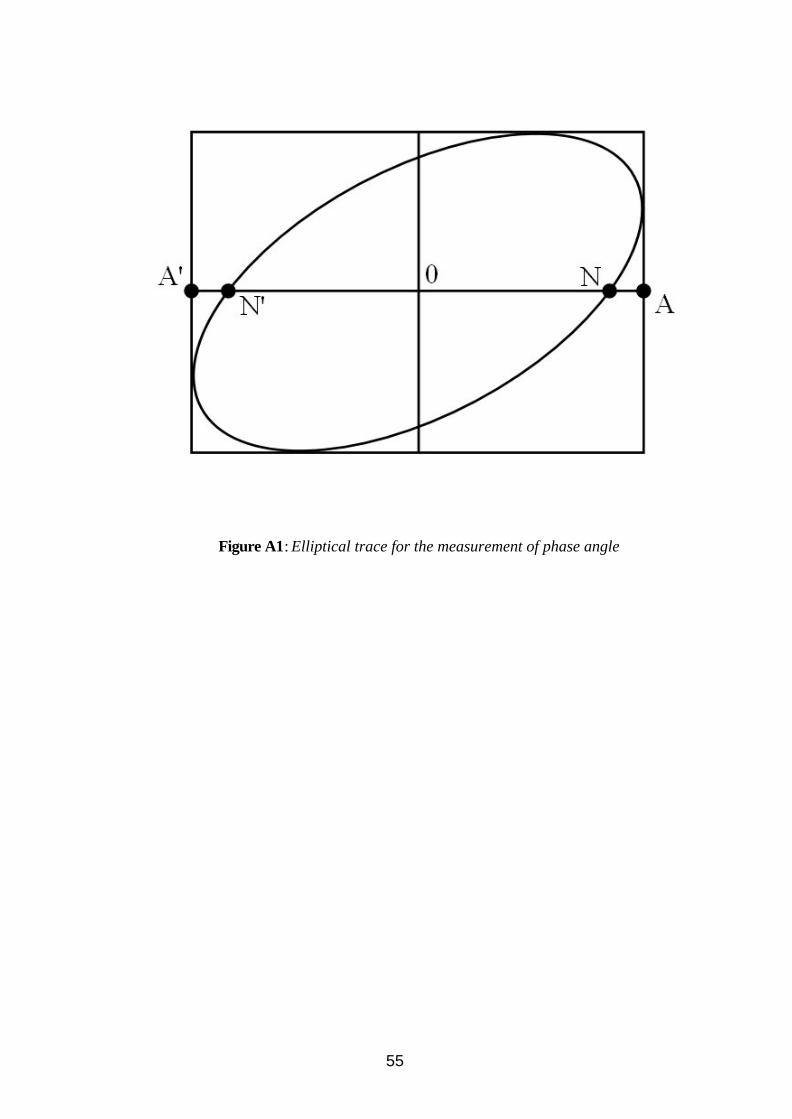
55
Figure A1: Elliptical trace for the measurement of phase angle

56
Experiment 21: X-ray Studies of Solids
Safety Aspects: Intense X-ray beams are harmful to human tissue. This source is relatively low intensity and the protective cover of the equipment is interlocked such that the X-ray beam is switched off when the cover is opened. 1. Introduction A powerful method of studying the atomic-scale structure of solids is that of X-ray diffraction. X-rays are electromagnetic radiation, but of shorter wavelength than light, and X-ray diffraction has many similarities with optical diffraction. In this experiment (a) a high-precision value for the lattice parameter of potassium chloride is obtained (Section 3), (b) the effect of ion size on lattice parameter is investigated (Section 4) and (c) the atomic mass unit and Avogadro constant are measured. The crystals used in the experiment are of sodium chloride, potassium chloride and rubidium chloride. All these crystallise in a face-centred cubic atomic arrangement. In the crystal structures of, for example, potassium chloride and sodium chloride, the potassium ions in potassium chloride occupy the same positions relative to the chlorine ions as do the sodium ions in sodium chloride. The potassium ion contains more electrons than the sodium ion and its diameter is slightly greater than that of the sodium ion. Consequently the lattice parameter of the atomic arrangement of potassium chloride is slightly greater than that of sodium chloride. One unit cell of the face-centred cubic atomic arrangement is shown in Figure 1. Each unit cell
contains 4? ions and 4 ? ions.
Figure 1: Face-centred-cubic ion arrangement. ? and ? represent different ion types. "a" is
the cubic lattice parameter.
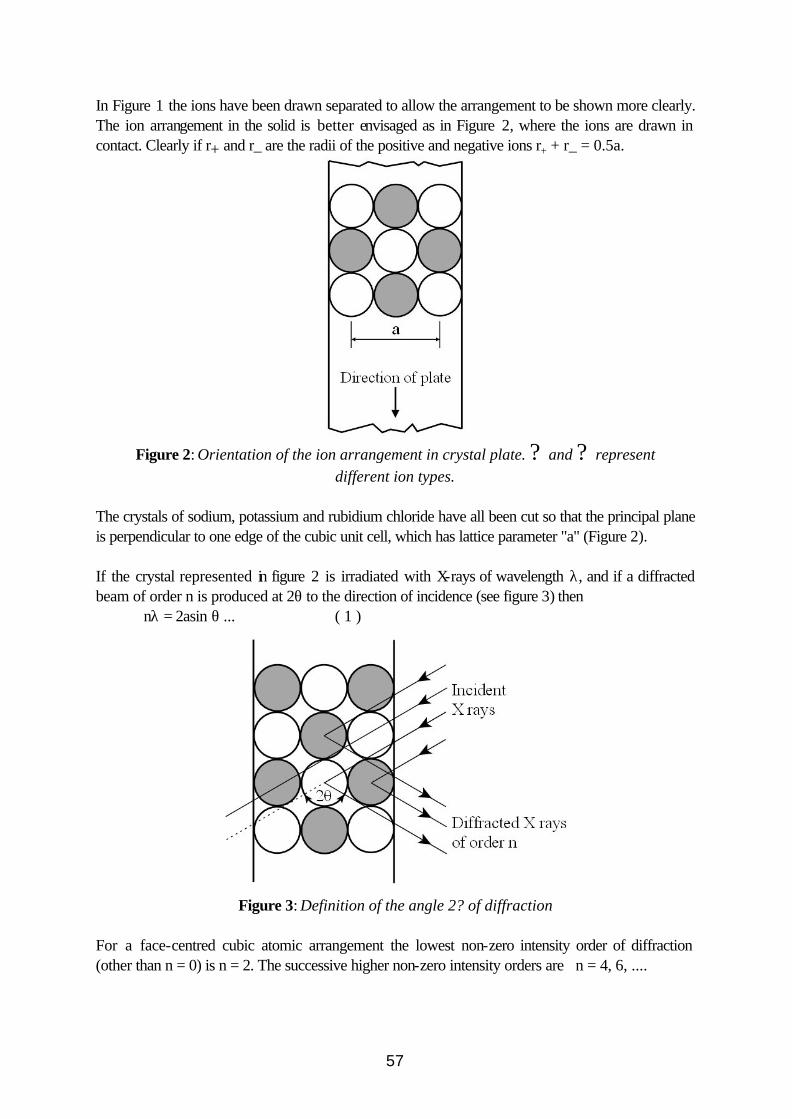
57
In Figure 1 the ions have been drawn separated to allow the arrangement to be shown more clearly. The ion arrangement in the solid is better envisaged as in Figure 2, where the ions are drawn in contact. Clearly if r+ and r_ are the radii of the positive and negative ions r+ + r_ = 0.5a.
Figure 2: Orientation of the ion arrangement in crystal plate. ? and ? represent
different ion types.
The crystals of sodium, potassium and rubidium chloride have all been cut so that the principal plane is perpendicular to one edge of the cubic unit cell, which has lattice parameter "a" (Figure 2). If the crystal represented in figure 2 is irradiated with X-rays of wavelength λ, and if a diffracted beam of order n is produced at 2θ to the direction of incidence (see figure 3) then nλ = 2asin θ ... ( 1 )
Figure 3: Definition of the angle 2? of diffraction
For a face-centred cubic atomic arrangement the lowest non-zero intensity order of diffraction (other than n = 0) is n = 2. The successive higher non-zero intensity orders are n = 4, 6, ....

58
2 The X-ray apparatus This is the same as for the X-ray experiment in PX1123. In the present experiment all measurements are made with the 1 mm slot diffracted-beam collimator in position 18 and a nickel filter in position 17. The X-radiation involved is therefore essentially monochromatic, of wavelength 0.154 nm. 3. Determination of lattice parameter for potassium chloride Mount the potassium chloride crystal on the apparatus.
The crystals are very fragile; handle them with care Perform a preliminary experiment to obtain a reasonably precise value of 2θ for the n = 2 maximum. Hence calculate approximate positions for the n = 4 and n = 6 maxima. Now make measurements to determine, by a graphical method, the positions of these three maxima as precisely as you can. Calculate the best value and associated error for the lattice parameter.
[Note: d
d (cosec θ) = - cosec θ cot θ ]
4. The effect of ion size on lattice parameter Mount the sodium chloride crystal on the apparatus. Find the position of the n = 2 maximum and hence calculate the lattice parameter. Repeat this procedure for rubidium chloride. Calculate the radii of the positive ions (sodium, potassium and rubidium) on the assumption that the radius of the chlorine ion is 0.181 nm. 5. The atomic mass unit and the Avogadro constant The atomic masses of potassium and chlorine are 39.1 mu and 35.5 mu respectively, where mu is the atomic mass unit. There are 4 K and 4 Cl atoms in a face-centred-cubic unit cell. The density ρ of potassium chloride is therefore given by:
3
6.744a
mu×=ρ ,
where a is the lattice parameter already determined. Weigh the potassium chloride crystal on the semi-automatic balance provided and carefully measure its dimensions with a travelling microscope. Determine ρ and hence mu. Finally, calculate the Avogadro constant.

59
Experiment 22: Computer Error Simulations and Analysis Outline The autumn semester introduced random errors (from repeated measurement and from straight line graphs) and the propagation of errors (through techniques of partial differentials and adding in “quadrature”). Having used these concepts for a while, this session revisits the underlying concepts using new and existing Python computing skills.
Experimental (and computing) skills • Understanding the statistical analysis of data. • Use of statistical computing tools.
Wider Applications This experiment illustrates the unseen statistics behind all practical physics • In advanced applications the statistical analysis of data is all handled by computers. • This section explores the nature of least squares fitting and provides an introduction to
alternative numerical approaches.
1. Introduction The experiment “Statistics of experimental data (Gaussian Distribution)” performed during the autumn semester (PX1123) introduced you to some of the underlying foundations of the analysis of random errors. Here the subject is revisited. But, by making use of a computer (and Python programming), to both generate and analyse data much faster progress can be made. After reconsidering the error associated with repeated measurements of a single point, the session moves on to consider the treatment of error propagation (the combination of errors) and the “least squares” analysis of straight line data.
Session 1. Evolution of errors with repeated measurement with a normal distribution. 2. Error propagation (making sense of adding in quadrature) 3. The statistics of straight line graphs
Quick Reminder: the nature of experimental measurements (see section III.2 of PX1123 lab manual for full treatments) • Repeated measurements usually result in a normal distribution around a mean value. • With a reasonably large number of repeats “standard errors” represent the uncertainty in
determined values. • For y(x) when x is varied the data points can be considered as very similar to repeats with the
points distributed above and below the “best fit line”.
2. Experiments It will be a good idea to have access to the website during the course of the session. This should be one of your “favourites” but if it is not:
https://alexandria.astro.cf.ac.uk/Joomla-python/ Quick Python reminder – relevant syntax is present in week 2 and 3 (Arrays, Vector Algebra and Graph Plotting) of the taught computing course.

60
2.1. Normal/Gaussian statistics of repeated measurements Section 2.1 will be based on the simulation of repeated measurements of two timed events, A and B both measured with a stopwatch. Suppose that: • For the sake of the simulations the true values of A and B are 2.0 s and 3.0 s exactly. • The standard deviation* that characterises both measurements is 0.2 s.
*The standard deviation parameterises the spread in values that are obtained and so is also said to characterise (parameterise) the precision of the measurement.
2.1.1 Distributions for A and B The first step is to create arrays of points for A and B randomly generated from ideal normal distributions. The first point in each array then corresponds to the first measurement etc. Provided these arrays are only created once the subsequent analysis can be cross compared. To achieve this arrays for A and B will be created in the Spyder console. This does not exclude creating programmes in the editor because they can (and are normally) executed in the console and so can call on arrays that exist there.
Creating arrays This will be done using the normal() function. As given in the object explorer the defaults for this are:
normal(loc=0,scale = 1.0,size =1 value)
where loc is the mean value of the distribution, scale is the standard deviation and size is the number of points.
Do the following: • Create n = 1000 point arrays for A and B (labelled as A and B) • Create and print out a single (20 bin is appropriate) histogram including both A and B and
comment on the range of values for each and any overlap between the distributions. • Perform a statistical analysis of A to find the mean, standard deviation and standard error. • Transfer these to the editor and save the code as a (very) simple programme – it is worth it as it
will be used a few times today. Since this runs in the “Console” it can call on the A array generated earlier. Do not write a function to generate A in the programme as this will overwrite it.
• Change the array name in the programme to analyse the B array. • Consider the appropriate parameter to use as the errors in A and B, state their values (with
errors – as usual) and state whether they agree with the accepted/known values of A and B.
2.1.2 Error propagation (adding in quadrature) Students have been required to combine errors based on the outcomes of partial differentiation (which hopefully makes sense) and addition in quadrature (which hasn’t yet been justified). The aim here is to justify the addition in quadrature. The addition and multiplication of two values (A and B) will be considered and their errors will be taken to be their standard deviations. (A large number of points (n) will be used so standard errors are more appropriate however since the two are linked by a factor of (n-1)0.5 this will not affect the interpretation or error propagation).

61
Addition of A and B (Sum, S=A+B) Reminder: error propagation for P = A + B
Partial differentiation gives and
Or and Combining the (or ?P) contributions in quadrature gives the familiar
Here a distribution of n (=1000) measurements of S = A + B will be generated, i.e. the first value of S is the first measurement of A is added to the first of B and generally for the ith term Si = Ai +Bi. In this way some errors/deviations from the true value will reinforce positively or negatively and some will tend to cancel. This is as would be expected in a real experiment.
• Add the arrays A and B together to create the S array. • Plot a histogram and perform a statistical analysis of S to find its mean and standard deviation. • Compare the mean of S with the expected value and its standard deviation with the error in S
calculated (in the usual way) using the standard deviations in A and B as their errors.
Multiplication of A and B (product, P = AB) Reminder: error propagation for P = AB
Partial differentiation gives and
Or and Combining the (or ?P) contributions in quadrature
Dividing by P2 = (AB)2 gives the familiar
Here a distribution of n (=1000) measurements of P = AB will be generated, i.e. the first value of P is the first measurement of A is multiplied with the first of B and generally for the ith term Si = Ai.Bi. Again, some errors/deviations from the true value will reinforce positively or negatively and some will tend to cancel. • Use the same arrays for A and B as before. • Multiply the A and B arrays together to produce P. • Plot a histogram and perform a statistical analysis of P to find its mean and standard deviation. • Compare the mean of S with the expected value and its standard deviation with the error in S
calculated in the usual way.
2.1.3 Evolution of mean standard deviation and standard error The aim here is to illustrate the difference between standard deviation and standard error and their suitability in representing the random error in measurements.
The A array of 1000 points generated at the start of this section will again be used and should not be overwritten. The approach will mimic an experiment in which the number of measurements is gradually increased and the mean, standard deviation and standard error evolve.
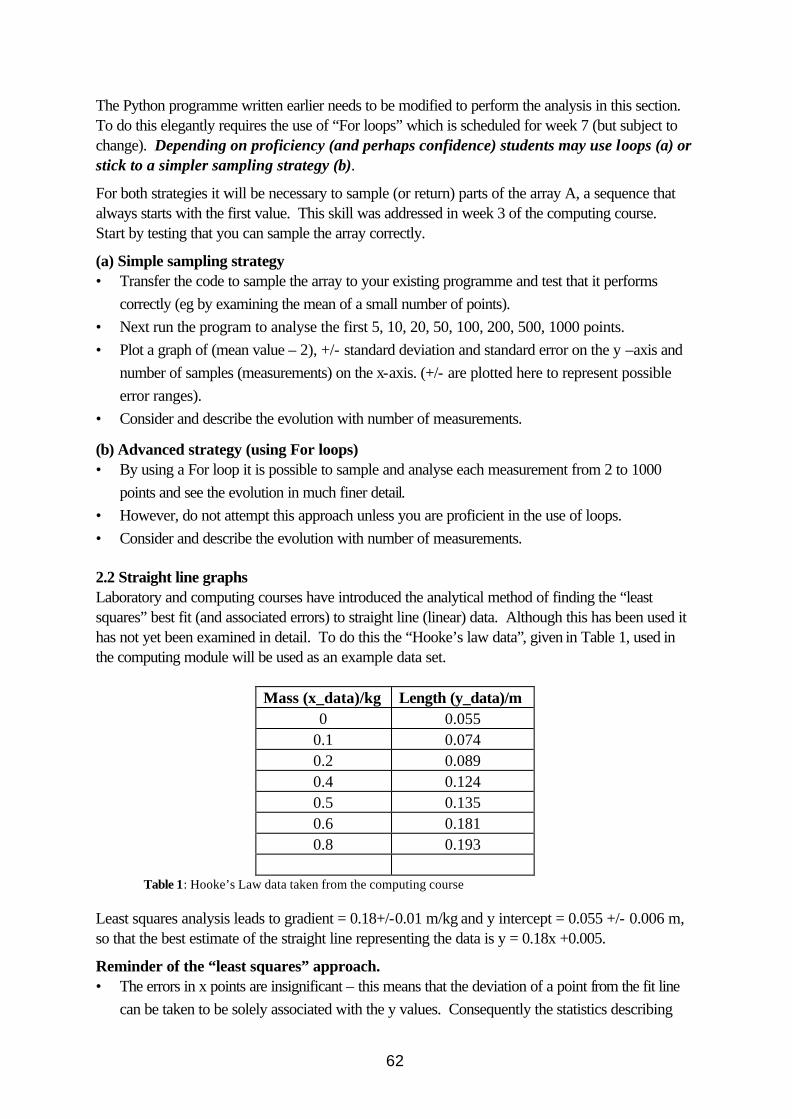
62
The Python programme written earlier needs to be modified to perform the analysis in this section. To do this elegantly requires the use of “For loops” which is scheduled for week 7 (but subject to change). Depending on proficiency (and perhaps confidence) students may use loops (a) or stick to a simpler sampling strategy (b).
For both strategies it will be necessary to sample (or return) parts of the array A, a sequence that always starts with the first value. This skill was addressed in week 3 of the computing course. Start by testing that you can sample the array correctly.
(a) Simple sampling strategy • Transfer the code to sample the array to your existing programme and test that it performs
correctly (eg by examining the mean of a small number of points). • Next run the program to analyse the first 5, 10, 20, 50, 100, 200, 500, 1000 points. • Plot a graph of (mean value – 2), +/- standard deviation and standard error on the y –axis and
number of samples (measurements) on the x-axis. (+/- are plotted here to represent possible error ranges).
• Consider and describe the evolution with number of measurements.
(b) Advanced strategy (using For loops) • By using a For loop it is possible to sample and analyse each measurement from 2 to 1000
points and see the evolution in much finer detail. • However, do not attempt this approach unless you are proficient in the use of loops. • Consider and describe the evolution with number of measurements.
2.2 Straight line graphs Laboratory and computing courses have introduced the analytical method of finding the “least squares” best fit (and associated errors) to straight line (linear) data. Although this has been used it has not yet been examined in detail. To do this the “Hooke’s law data”, given in Table 1, used in the computing module will be used as an example data set.
Mass (x_data)/kg Length (y_data)/m 0 0.055
0.1 0.074 0.2 0.089 0.4 0.124 0.5 0.135 0.6 0.181 0.8 0.193
Table 1: Hooke’s Law data taken from the computing course
Least squares analysis leads to gradient = 0.18+/-0.01 m/kg and y intercept = 0.055 +/- 0.006 m, so that the best estimate of the straight line representing the data is y = 0.18x +0.005.
Reminder of the “least squares” approach. • The errors in x points are insignificant – this means that the deviation of a point from the fit line
can be taken to be solely associated with the y values. Consequently the statistics describing

63
this situation are essentially the same as those describing repeated measurements of a single point.
• The (random) errors characterising the y data points are all the same (and can be described by a standard deviation) – this means that all points have equal importance or “weight”.
• The best fit line must pass through the mean of the x and y data values (x_mean and y_mean respectively).
• Since the errors in x points are insignificant the difference between the best fit line and the data points is characterised by the difference between the corresponding y values, known as “residuals”. The values of m and c when the square of the residuals is minimised is the best fit line.
Note: the least squares method of obtaining best fits is not limited to straight line data although it is then more difficult or impossible to find analytical expressions and it is often necessary to resort to numerical techniques (through use of a computer).
The approach for investigating least squares fitting of straight line graphs A set of straight lines all passing through the mean of the x and y data values but having different gradients (including the best fit gradient) will be generated. The square of the residuals will be calculated for each line and plotted against gradient.
Guided be the known best fit we’ll consider the quality of fits for gradients of m = 0.18 +/- 0.05 m/kg, i.e. in the range 0.13 to 0.23 m/kg in 0.01 m/kg steps.
Do the following In the Spyder console: • Generate arrays of x and y data points, call these x_data and y_data. • Find the mean of the measured x and y points. • For m = 0.18 m/kg (we’ll start with the best fit gradient) calculate an array of points for the
corresponding straight line based on the x_data points. • Generate an array of the difference between the y data points and the y best line points. These
values are the residuals. • Square the residuals and find their sum and record this in a table in your diary. • Transfer the working code to the editor to create and save a little programme. • Repeat* the calculation for all the required gradients. • Plot a graph of sums of the squares of residuals versus gradient. • Describe its form. * This could also be done using a loop.
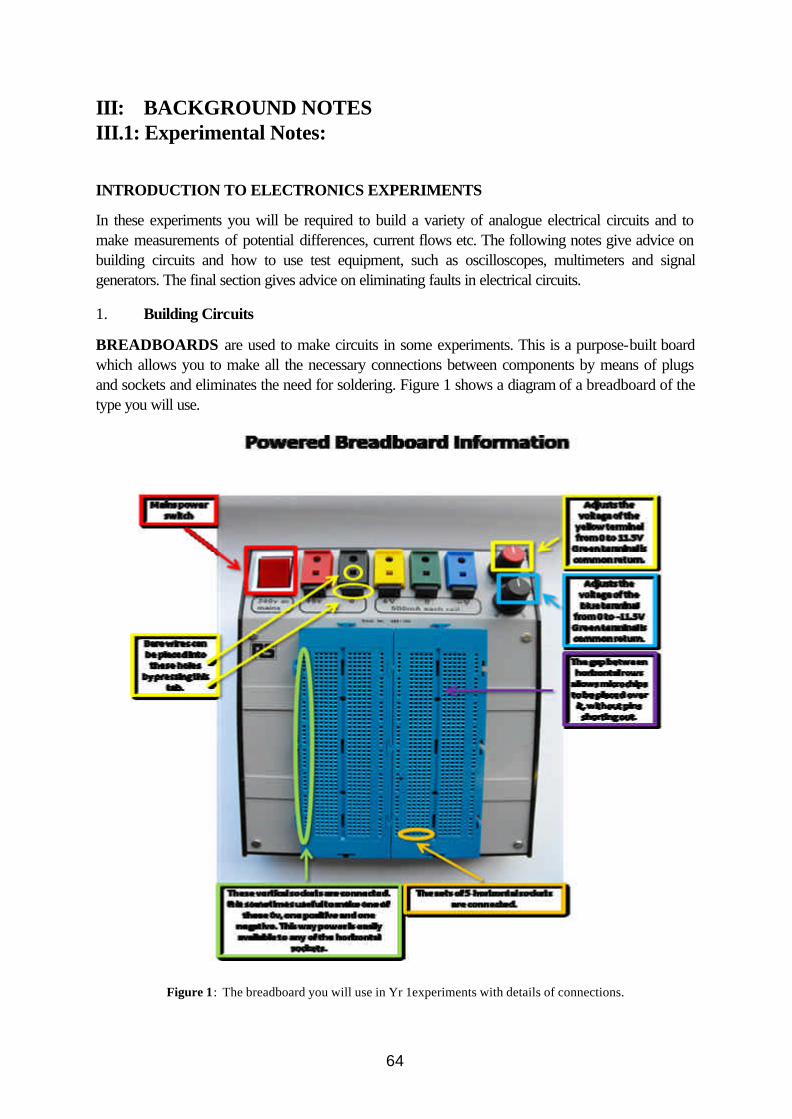
64
III: BACKGROUND NOTES III.1: Experimental Notes:
INTRODUCTION TO ELECTRONICS EXPERIMENTS
In these experiments you will be required to build a variety of analogue electrical circuits and to make measurements of potential differences, current flows etc. The following notes give advice on building circuits and how to use test equipment, such as oscilloscopes, multimeters and signal generators. The final section gives advice on eliminating faults in electrical circuits.
1. Building Circuits
BREADBOARDS are used to make circuits in some experiments. This is a purpose-built board which allows you to make all the necessary connections between components by means of plugs and sockets and eliminates the need for soldering. Figure 1 shows a diagram of a breadboard of the type you will use.
Figure 1: The breadboard you will use in Yr 1experiments with details of connections.

65
At the top of the breadboard are a set of connections which can be connected by 4mm connectors or by bare wire if the tab highlighted is pushed in. There is a choice of having a variable DC voltage or a constant voltage given by the yellow/green/blue and red/black respectively. The green plug is the ground socket, and the range of voltages offered by the variable power supply is between
11.5V. The grid of blue sockets has its own methodical set up too. Sets of 5 horizontal sockets are connected within themselves, but are independent of the sets above and below. Furthermore sockets within a vertical column are connected, as there are four of these vertical sets, it can be useful to set one to 0V, one to positive voltages and one to negative voltages. As a result, you must think about the points at which you connect a wire, as it needs to be in the appropriate row or column in order to complete the circuit. You are advised to construct circuits so that they resemble as near as possible the circuit diagrams in the script. You will find this of great benefit when trying to locate faults. Note that two interconnecting wires are indicated by a dot placed at their intersection in a circuit diagram. Wires which simply cross each other are not connected. 2. The Oscilloscope The basic functions of the scope are shown in Figure 2. Most of the functions are self explanatory. In addition, you should note the following: (i) VOLTS/DIV. Ensure that the central yellow knob is turned fully clockwise to the CAL
position. The markings then represent VOLTS/cm. (ii) AC-DC-GND SWITCH. The normal setting of this switch should be to the DC position.
The input is then directly coupled to the input amplifier of the scope. When switched to GND the input is shorted to ground and the scope displays zero volts. When the switch is set to AC, a capacitor is introduced between the input and input amplifier. The capacitor blocks dc but passes ac. It is useful for displaying ripple voltages which are superimposed on large dc voltages.
(iii) TRIGGER LEVEL. This controls the scope's ability to reproduce a steady trace on the
screen. If the trace flickers, first check that the switch above the CH2 input (INT TRIG) is set to either CH1 or CH2, depending on which channel you are using to display your signal. Next check that the TRIGGER LEVEL is set to AUTO: first set the SWEEP MODE on AUTO and then rotate the knob marked LEVEL until the trace becomes steady (probably best in the LOCK position). If the trace still continues to flicker, the signal is probably too small to operate the internal circuit and your only recourse is to amplify the signal further.
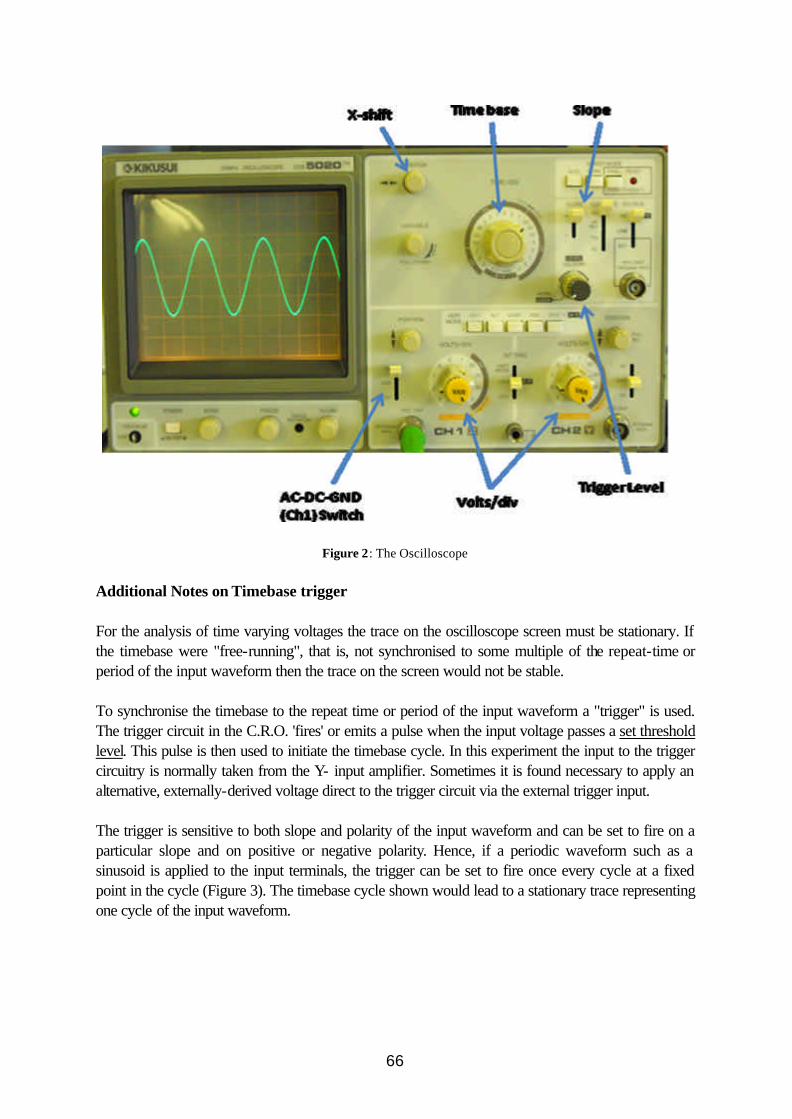
66
Figure 2: The Oscilloscope
Additional Notes on Timebase trigger For the analysis of time varying voltages the trace on the oscilloscope screen must be stationary. If the timebase were "free-running", that is, not synchronised to some multiple of the repeat-time or period of the input waveform then the trace on the screen would not be stable. To synchronise the timebase to the repeat time or period of the input waveform a "trigger" is used. The trigger circuit in the C.R.O. 'fires' or emits a pulse when the input voltage passes a set threshold level. This pulse is then used to initiate the timebase cycle. In this experiment the input to the trigger circuitry is normally taken from the Y- input amplifier. Sometimes it is found necessary to apply an alternative, externally-derived voltage direct to the trigger circuit via the external trigger input. The trigger is sensitive to both slope and polarity of the input waveform and can be set to fire on a particular slope and on positive or negative polarity. Hence, if a periodic waveform such as a sinusoid is applied to the input terminals, the trigger can be set to fire once every cycle at a fixed point in the cycle (Figure 3). The timebase cycle shown would lead to a stationary trace representing one cycle of the input waveform.

67
Figure 3: Understanding the timebase
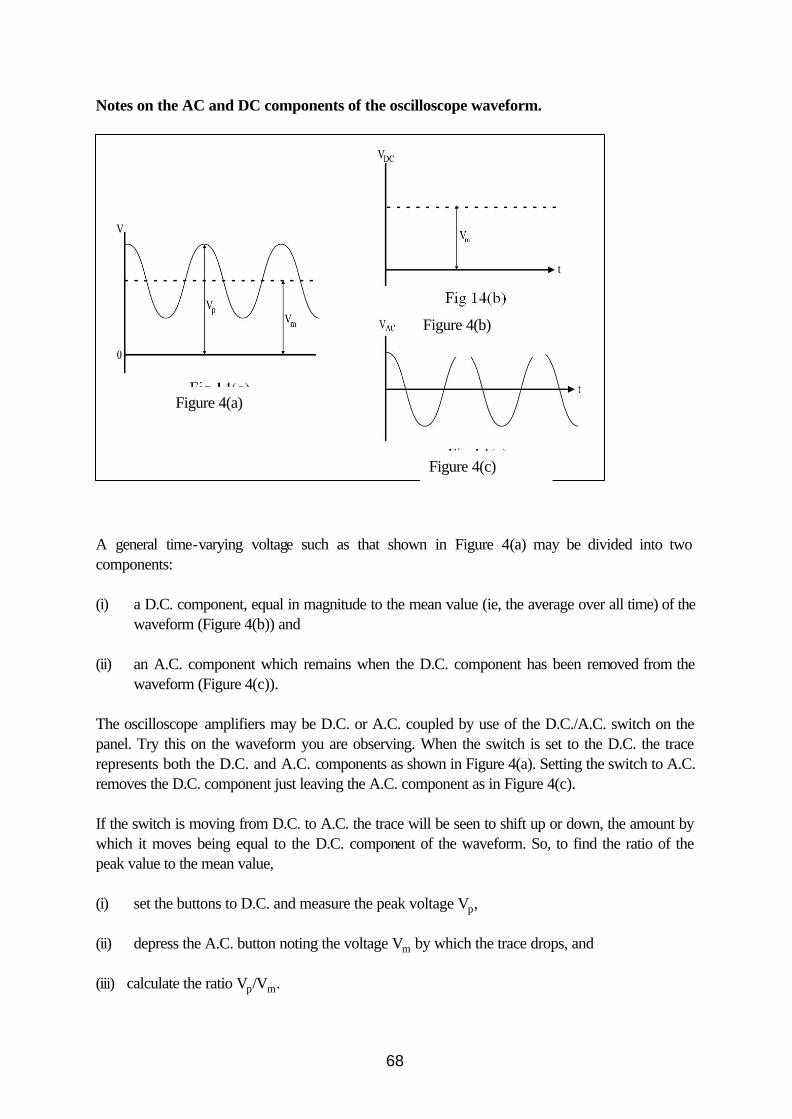
68
Notes on the AC and DC components of the oscilloscope waveform.
A general time-varying voltage such as that shown in Figure 4(a) may be divided into two components: (i) a D.C. component, equal in magnitude to the mean value (ie, the average over all time) of the
waveform (Figure 4(b)) and (ii) an A.C. component which remains when the D.C. component has been removed from the
waveform (Figure 4(c)). The oscilloscope amplifiers may be D.C. or A.C. coupled by use of the D.C./A.C. switch on the panel. Try this on the waveform you are observing. When the switch is set to the D.C. the trace represents both the D.C. and A.C. components as shown in Figure 4(a). Setting the switch to A.C. removes the D.C. component just leaving the A.C. component as in Figure 4(c). If the switch is moving from D.C. to A.C. the trace will be seen to shift up or down, the amount by which it moves being equal to the D.C. component of the waveform. So, to find the ratio of the peak value to the mean value, (i) set the buttons to D.C. and measure the peak voltage Vp, (ii) depress the A.C. button noting the voltage Vm by which the trace drops, and (iii) calculate the ratio Vp/Vm.
Figure 4(a)
Figure 4(b)
Figure 4(c)
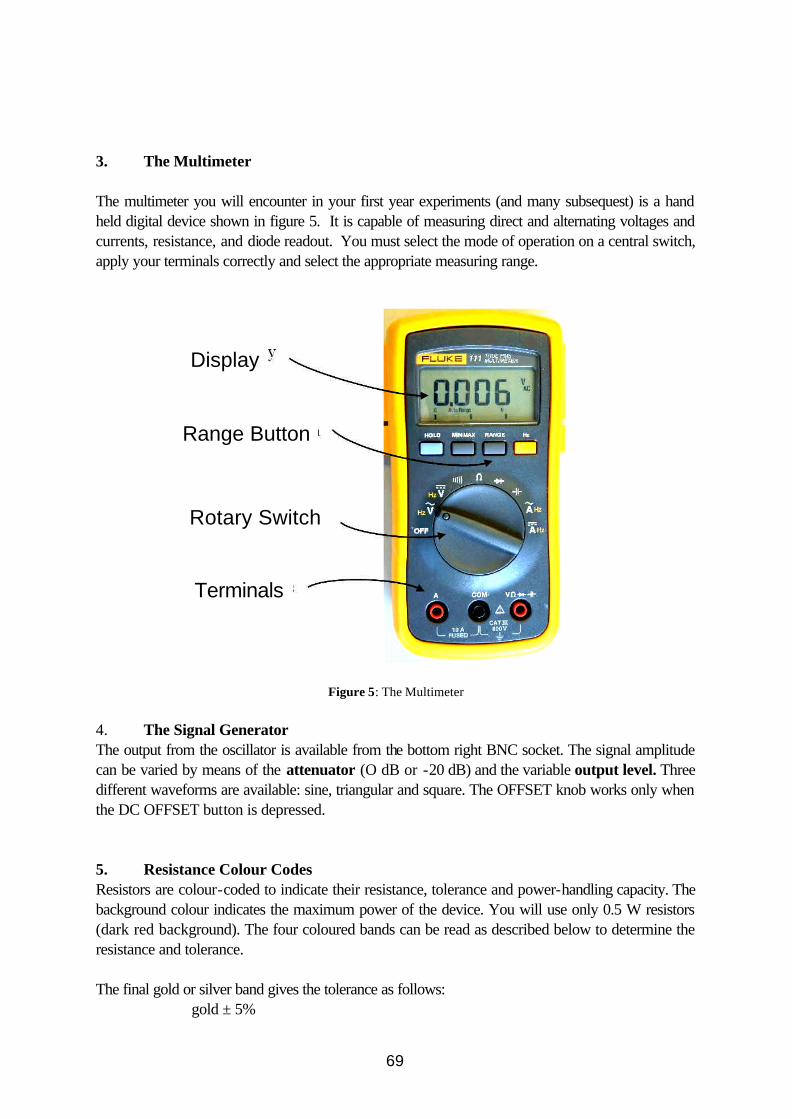
69
3. The Multimeter The multimeter you will encounter in your first year experiments (and many subsequest) is a hand held digital device shown in figure 5. It is capable of measuring direct and alternating voltages and currents, resistance, and diode readout. You must select the mode of operation on a central switch, apply your terminals correctly and select the appropriate measuring range.
Figure 5: The Multimeter
4. The Signal Generator The output from the oscillator is available from the bottom right BNC socket. The signal amplitude can be varied by means of the attenuator (O dB or -20 dB) and the variable output level. Three different waveforms are available: sine, triangular and square. The OFFSET knob works only when the DC OFFSET button is depressed. 5. Resistance Colour Codes Resistors are colour-coded to indicate their resistance, tolerance and power-handling capacity. The background colour indicates the maximum power of the device. You will use only 0.5 W resistors (dark red background). The four coloured bands can be read as described below to determine the resistance and tolerance. The final gold or silver band gives the tolerance as follows: gold ± 5%
Terminals
Rotary Switch
Range Button
Display

70
silver ± 10%
Digit
Colour Multiplier No. of zeros
silver 0.01 -2 gold 0.1 -1 0 black 1 0 1 brown 10 1 2 red 100 2 3 orange 1 k 3 4 yellow 10 k 4 5 green 100 k 5 6 blue 1 M 6 7 violet 10 M 7 8 grey 9 white
Table 1.1: Resistor colour-codes Example: red-yellow-orange-gold is a 24 kΩ, 5% resistor. 6. Finding Faults in Electronic Circuits During the course of the laboratory work you will probably encounter practical difficulties. You should always try to solve these problems yourself, but if you are unable then you should call on the assistance of the demonstrator. Occasionally, a circuit will fail to operate because of a faulty component, but more often than not problems arise from the incorrect use of test equipment, the omission of power supplies from circuits, or the use of broken test leads. Faults are not usually apparent to the naked eye, but they may be detected quite easily by following a systematic checking procedure such as that outlined below. If after following these procedures your circuit still doesn't work, then DO NOT HESITATE TO ASK THE DEMONSTRATOR FOR HELP. (i) Ensure that you understand how to use each piece of test equipment. If in doubt, consult the
demonstrator. (ii) Examine the circuit for any obvious faults. Is the circuit identical to the circuit diagram in the
script? Are the components the correct values? Are there any loose wires or connectors which could short out part of the circuit?
(iii) The fault may lie in the circuit itself, in the signal generator which supplies the input signal, or in
the measuring equipment. Switch on the power supply to the circuit and apply the input signal. Use both channels of a double-beam scope to measure simultaneously the input and output

71
signals of the circuit. Check at this stage to see whether the scope leads are faulty. Ensuring that you do not earth any signals (see next section), connect the scope to the input and output of the test circuit. If there is no input signal, disconnect the signal generator and test it on its own. If the generator functions only when disconnected from the circuit, it implies that the fault lies in the circuit and that it is possibly some type of short circuit, most likely associated with incorrect earthing. If there is an input signal but no output signal, the fault lies in the circuit.
(iv) A common fault which occurs when using more than one piece of mains-powered equipment
is the incorrect connection of earth lines. ALL EARTHS MUST BE CONNECTED TO A COMMON POINT, otherwise the signal may be shorted out.
(v) If you have established that the fault lies in the circuitry, use your scope to examine the
passage of the signal through the circuit. Components which you regard as faulty should be isolated or removed from the circuit for further testing.
(vi) If you trace a fault to a piece of mains-powered equipment, DO NOT ATTEMPT TO
REPAIR THE FAULT YOURSELF. Report the fault to the demonstrator or technician and ask for replacement equipment.
HOW TO USE A VERNIER SCALE
Vernier scales are used on many measuring instruments including the travelling microscope that we will use in the laboratory. We will begin by looking at the general principle of a vernier scale and then look at the particular scale we will use. Figure 5 shows a vernier scale reading zero. Note that the 10 divisions of the vernier have the same length as 9 divisions of the main scale. If the smallest division on the main scale is 1mm then the smallest scale on the vernier must be 0.9mm. This vernier would then have a precision of 0.1mm and results should be quoted to ±0.1mm.
10 0 Main scale
Vernier 0
Figure 5: Vernier Scale Let us see how it works. Examine figure 6. The position of the zero on the vernier scale gives us the reading. Here it is just beyond 2mm so the first part of the reading is 2mm. The second part (to the nearest 0.1mm) is read off at the first point at which the lines on the main scale and the vernier coincide. Here it is the 4th mark on the vernier (don’t count the zero mark). The reading is therefore 2.4 mm.

72
0
10 0
Figure 6: using the vernier
To see why examine figure 7, which is an alternative version of figure 6.
x
0
1 0
D1
D2
Figure 7: why a vernier works
In essence we have been finding the distance X, which is simply given by: X = D1 – D2 = 4×1mm - 4×0.9mm = 4 ×0.1mm = 0.4mm So that is the general principle. Let us see how the travelling microscope scale works. In this case the smallest division on the main scale is 1mm, which implies that the smallest division on the vernier is 49/50 mm = 0.02 mm As an example the reading in figure 1.8 is 113.68mm.
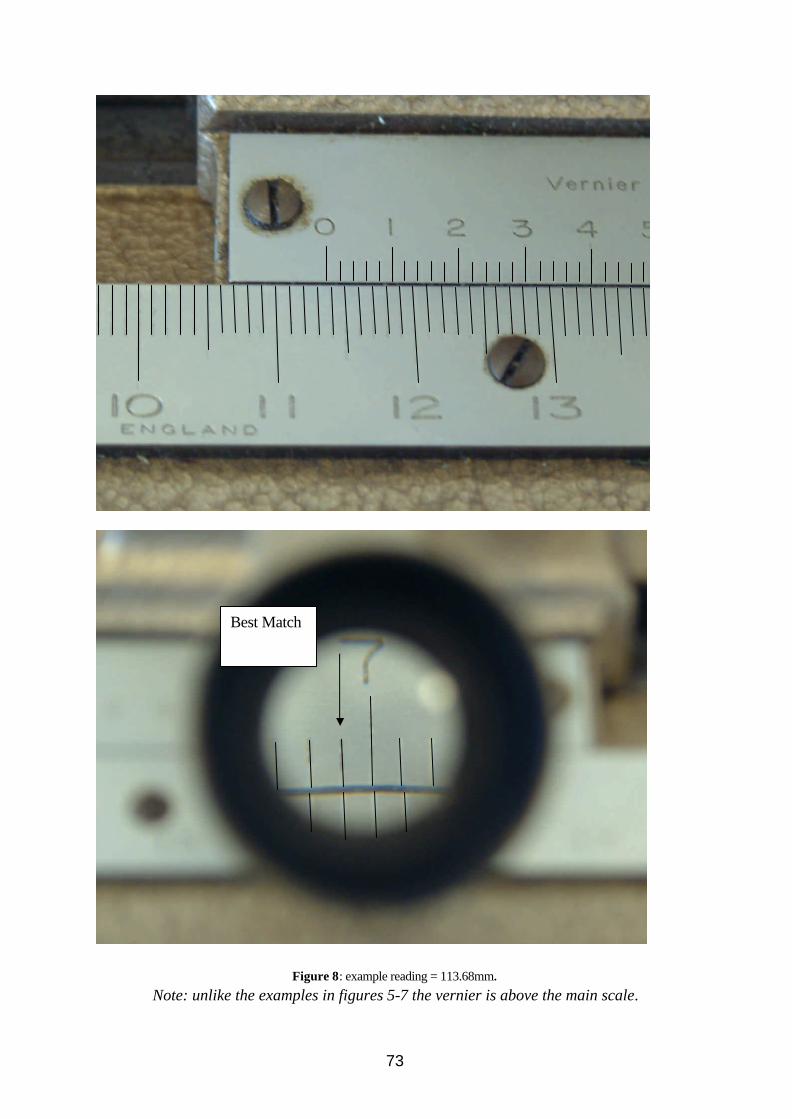
73
Figure 8: example reading = 113.68mm. Note: unlike the examples in figures 5-7 the vernier is above the main scale.
Best Match

74
DIARY (LAB BOOK) CHECKLIST Date Experiment Title and Number Risk Analysis Brief Introduction Brief description of what you did and how you did it Results (indicating errors in readings) Graphs (where applicable) Error calculations Final statement of results with errors Discussion/Conclusion (including a comparison with accepted results if applicable) FULL ACCOUNT (REPORT) CHECKLIST Date Experiment Title and Number Abstract Introduction Method Results: Use graphs – and don’t forget to describe them. Indication of how errors were determined Final results with errors Discussion Conclusion (including a comparison with accepted results if applicable) Use Appendices if necessary A risk assessment is unnecessary.