Embed Size (px)
Citation preview

PUBLICSAP Open Server and SDK for SAP Adaptive Server Enterprise 16.0 SP04Document Version: 1.0 – 2020-12-10
SAP Open Server and Open Client Configuration Guide for Windows
© 2
020
SAP
SE o
r an
SAP affi
liate
com
pany
. All r
ight
s re
serv
ed.
THE BEST RUN

Content
1 About Open Client and Open Server. . . . . . . . . . . . . . . . . . . . . . . . . . . . . . . . . . . . . . . . . . . . . . 6
2 Configuration Overview. . . . . . . . . . . . . . . . . . . . . . . . . . . . . . . . . . . . . . . . . . . . . . . . . . . . . . . 72.1 Initializing Open Client and Open Server. . . . . . . . . . . . . . . . . . . . . . . . . . . . . . . . . . . . . . . . . . . . . 72.2 Making a Connection from Open Client. . . . . . . . . . . . . . . . . . . . . . . . . . . . . . . . . . . . . . . . . . . . . . 82.3 Listening for a Request in Open Server. . . . . . . . . . . . . . . . . . . . . . . . . . . . . . . . . . . . . . . . . . . . . . 8
3 Configuring Basic Tasks for Open Client and Open Server. . . . . . . . . . . . . . . . . . . . . . . . . . . . . 9
4 Configuration Information Required for Open Client. . . . . . . . . . . . . . . . . . . . . . . . . . . . . . . . .10
5 Configuring Open Client. . . . . . . . . . . . . . . . . . . . . . . . . . . . . . . . . . . . . . . . . . . . . . . . . . . . . . 13
6 Configuration Information Required for Open Server. . . . . . . . . . . . . . . . . . . . . . . . . . . . . . . . 15
7 Configuring Open Server. . . . . . . . . . . . . . . . . . . . . . . . . . . . . . . . . . . . . . . . . . . . . . . . . . . . . . 17
8 Configuring Open Client for SAP Failover. . . . . . . . . . . . . . . . . . . . . . . . . . . . . . . . . . . . . . . . . 198.1 Adding a hafailover Line to the sql.ini File. . . . . . . . . . . . . . . . . . . . . . . . . . . . . . . . . . . . . . . . . . . . 198.2 Modifying an Application with Client-Library Calls. . . . . . . . . . . . . . . . . . . . . . . . . . . . . . . . . . . . . 208.3 Using isql with SAP HA Failover. . . . . . . . . . . . . . . . . . . . . . . . . . . . . . . . . . . . . . . . . . . . . . . . . . .21
9 Directory Service. . . . . . . . . . . . . . . . . . . . . . . . . . . . . . . . . . . . . . . . . . . . . . . . . . . . . . . . . . . 239.1 LDAP Directory Services. . . . . . . . . . . . . . . . . . . . . . . . . . . . . . . . . . . . . . . . . . . . . . . . . . . . . . . 239.2 LDAP Directory Services Versus the Interface File. . . . . . . . . . . . . . . . . . . . . . . . . . . . . . . . . . . . . 249.3 Server Objects and Attributes. . . . . . . . . . . . . . . . . . . . . . . . . . . . . . . . . . . . . . . . . . . . . . . . . . . 269.4 Directory Drivers. . . . . . . . . . . . . . . . . . . . . . . . . . . . . . . . . . . . . . . . . . . . . . . . . . . . . . . . . . . . 269.5 How Applications Use a Directory Service. . . . . . . . . . . . . . . . . . . . . . . . . . . . . . . . . . . . . . . . . . . 27
How Applications Use LDAP Directory Services. . . . . . . . . . . . . . . . . . . . . . . . . . . . . . . . . . . . 289.6 Enabling LDAP Directory Services. . . . . . . . . . . . . . . . . . . . . . . . . . . . . . . . . . . . . . . . . . . . . . . . 29
Specifying Multiple Directory Services with LDAP. . . . . . . . . . . . . . . . . . . . . . . . . . . . . . . . . . . 30Importing Microsoft Active Directory Schema. . . . . . . . . . . . . . . . . . . . . . . . . . . . . . . . . . . . . . 31
9.7 Connecting to LDAP using SSL/TLS. . . . . . . . . . . . . . . . . . . . . . . . . . . . . . . . . . . . . . . . . . . . . . . 32
10 Security Services. . . . . . . . . . . . . . . . . . . . . . . . . . . . . . . . . . . . . . . . . . . . . . . . . . . . . . . . . . . 3310.1 Network-based Security. . . . . . . . . . . . . . . . . . . . . . . . . . . . . . . . . . . . . . . . . . . . . . . . . . . . . . . 33
Security Mechanisms. . . . . . . . . . . . . . . . . . . . . . . . . . . . . . . . . . . . . . . . . . . . . . . . . . . . . . .33Security Drivers. . . . . . . . . . . . . . . . . . . . . . . . . . . . . . . . . . . . . . . . . . . . . . . . . . . . . . . . . . .34Security Services. . . . . . . . . . . . . . . . . . . . . . . . . . . . . . . . . . . . . . . . . . . . . . . . . . . . . . . . . .34
10.2 How Applications Use Security Services. . . . . . . . . . . . . . . . . . . . . . . . . . . . . . . . . . . . . . . . . . . . 38
2 PUBLICSAP Open Server and Open Client Configuration Guide for Windows
Content

Client-Library and Security Services. . . . . . . . . . . . . . . . . . . . . . . . . . . . . . . . . . . . . . . . . . . . 39Server-Library and Security Services. . . . . . . . . . . . . . . . . . . . . . . . . . . . . . . . . . . . . . . . . . . . 39
10.3 Configuring Tasks to Use a Security Service. . . . . . . . . . . . . . . . . . . . . . . . . . . . . . . . . . . . . . . . . 4010.4 Data Protection in SAP Open Client and Open Server. . . . . . . . . . . . . . . . . . . . . . . . . . . . . . . . . . . 40
11 ocscfg Utility. . . . . . . . . . . . . . . . . . . . . . . . . . . . . . . . . . . . . . . . . . . . . . . . . . . . . . . . . . . . . . 4411.1 Starting ocscfg. . . . . . . . . . . . . . . . . . . . . . . . . . . . . . . . . . . . . . . . . . . . . . . . . . . . . . . . . . . . . .4411.2 Setting Environment Variables. . . . . . . . . . . . . . . . . . . . . . . . . . . . . . . . . . . . . . . . . . . . . . . . . . . 45
Setting the SYBASE Environment Variables. . . . . . . . . . . . . . . . . . . . . . . . . . . . . . . . . . . . . . . 45Setting Environment Variables Other Than SYBASE. . . . . . . . . . . . . . . . . . . . . . . . . . . . . . . . . 46Clearing Environment Variables Other Than SYBASE. . . . . . . . . . . . . . . . . . . . . . . . . . . . . . . . 46
11.3 Configuring a Directory Driver. . . . . . . . . . . . . . . . . . . . . . . . . . . . . . . . . . . . . . . . . . . . . . . . . . . 47Adding a Directory Driver Entry . . . . . . . . . . . . . . . . . . . . . . . . . . . . . . . . . . . . . . . . . . . . . . . 47Modifying an Existing Directory Driver Entry. . . . . . . . . . . . . . . . . . . . . . . . . . . . . . . . . . . . . . .48Deleting a Directory Driver Entry. . . . . . . . . . . . . . . . . . . . . . . . . . . . . . . . . . . . . . . . . . . . . . . 49Activating a Directory Driver. . . . . . . . . . . . . . . . . . . . . . . . . . . . . . . . . . . . . . . . . . . . . . . . . . 49
11.4 Configuring a Security Driver. . . . . . . . . . . . . . . . . . . . . . . . . . . . . . . . . . . . . . . . . . . . . . . . . . . . 49Adding a Security Driver Entry. . . . . . . . . . . . . . . . . . . . . . . . . . . . . . . . . . . . . . . . . . . . . . . . 50Modifying an Existing Security Driver Entry. . . . . . . . . . . . . . . . . . . . . . . . . . . . . . . . . . . . . . . 50Deleting a Security Driver Entry. . . . . . . . . . . . . . . . . . . . . . . . . . . . . . . . . . . . . . . . . . . . . . . . 51Setting the Default Security Driver. . . . . . . . . . . . . . . . . . . . . . . . . . . . . . . . . . . . . . . . . . . . . . 51
12 dsedit Utility. . . . . . . . . . . . . . . . . . . . . . . . . . . . . . . . . . . . . . . . . . . . . . . . . . . . . . . . . . . . . . .5212.1 Using dsedit. . . . . . . . . . . . . . . . . . . . . . . . . . . . . . . . . . . . . . . . . . . . . . . . . . . . . . . . . . . . . . . . 52
Opening a Session. . . . . . . . . . . . . . . . . . . . . . . . . . . . . . . . . . . . . . . . . . . . . . . . . . . . . . . . . 5312.2 Adding a Server to the Directory Services. . . . . . . . . . . . . . . . . . . . . . . . . . . . . . . . . . . . . . . . . . . 55
Adding a Server to the Directory Service Using dsedit. . . . . . . . . . . . . . . . . . . . . . . . . . . . . . . . 5512.3 Making and Modifying Server Entries. . . . . . . . . . . . . . . . . . . . . . . . . . . . . . . . . . . . . . . . . . . . . . 56
Server Attributes. . . . . . . . . . . . . . . . . . . . . . . . . . . . . . . . . . . . . . . . . . . . . . . . . . . . . . . . . . 57Adding a Server Entry. . . . . . . . . . . . . . . . . . . . . . . . . . . . . . . . . . . . . . . . . . . . . . . . . . . . . . 58Modifying a Server Entry. . . . . . . . . . . . . . . . . . . . . . . . . . . . . . . . . . . . . . . . . . . . . . . . . . . . 58Renaming a Server Entry. . . . . . . . . . . . . . . . . . . . . . . . . . . . . . . . . . . . . . . . . . . . . . . . . . . . 59Deleting Entries. . . . . . . . . . . . . . . . . . . . . . . . . . . . . . . . . . . . . . . . . . . . . . . . . . . . . . . . . . . 59
12.4 Using the Ping Command. . . . . . . . . . . . . . . . . . . . . . . . . . . . . . . . . . . . . . . . . . . . . . . . . . . . . . 5912.5 Copying Server Entries. . . . . . . . . . . . . . . . . . . . . . . . . . . . . . . . . . . . . . . . . . . . . . . . . . . . . . . . 60
Copying Entries Within a Session. . . . . . . . . . . . . . . . . . . . . . . . . . . . . . . . . . . . . . . . . . . . . . 60Copying Entries Between Sessions. . . . . . . . . . . . . . . . . . . . . . . . . . . . . . . . . . . . . . . . . . . . . 61
12.6 Exiting dsedit. . . . . . . . . . . . . . . . . . . . . . . . . . . . . . . . . . . . . . . . . . . . . . . . . . . . . . . . . . . . . . . 61
13 Troubleshooting with dsedit . . . . . . . . . . . . . . . . . . . . . . . . . . . . . . . . . . . . . . . . . . . . . . . . . . 6213.1 Troubleshooting Connection Failures. . . . . . . . . . . . . . . . . . . . . . . . . . . . . . . . . . . . . . . . . . . . . . 62
If dsedit Fails. . . . . . . . . . . . . . . . . . . . . . . . . . . . . . . . . . . . . . . . . . . . . . . . . . . . . . . . . . . . . 63
SAP Open Server and Open Client Configuration Guide for WindowsContent PUBLIC 3

If dsedit Succeeds but Other Applications Fail. . . . . . . . . . . . . . . . . . . . . . . . . . . . . . . . . . . . . 6313.2 Commonly Asked Questions. . . . . . . . . . . . . . . . . . . . . . . . . . . . . . . . . . . . . . . . . . . . . . . . . . . . 64
14 Environment Variables. . . . . . . . . . . . . . . . . . . . . . . . . . . . . . . . . . . . . . . . . . . . . . . . . . . . . . . 6514.1 Environment Variables Used for Connection. . . . . . . . . . . . . . . . . . . . . . . . . . . . . . . . . . . . . . . . . 6514.2 Environment Variables Used for Localization. . . . . . . . . . . . . . . . . . . . . . . . . . . . . . . . . . . . . . . . . 6614.3 Environment Variables Used for Configuration. . . . . . . . . . . . . . . . . . . . . . . . . . . . . . . . . . . . . . . .66
15 Configuration Files. . . . . . . . . . . . . . . . . . . . . . . . . . . . . . . . . . . . . . . . . . . . . . . . . . . . . . . . . . 6815.1 The libtcl.cfg and libtcl64.cfg Files. . . . . . . . . . . . . . . . . . . . . . . . . . . . . . . . . . . . . . . . . . . . . . . . 69
Layout of libtcl.cfg . . . . . . . . . . . . . . . . . . . . . . . . . . . . . . . . . . . . . . . . . . . . . . . . . . . . . . . . .6915.2 The sql.ini File. . . . . . . . . . . . . . . . . . . . . . . . . . . . . . . . . . . . . . . . . . . . . . . . . . . . . . . . . . . . . . .76
sql.ini Entries. . . . . . . . . . . . . . . . . . . . . . . . . . . . . . . . . . . . . . . . . . . . . . . . . . . . . . . . . . . . .77sql.ini Examples. . . . . . . . . . . . . . . . . . . . . . . . . . . . . . . . . . . . . . . . . . . . . . . . . . . . . . . . . . .78Multiple Connection Service Entries. . . . . . . . . . . . . . . . . . . . . . . . . . . . . . . . . . . . . . . . . . . . 79
15.3 The ocs.cfg File. . . . . . . . . . . . . . . . . . . . . . . . . . . . . . . . . . . . . . . . . . . . . . . . . . . . . . . . . . . . . 80
16 Localization. . . . . . . . . . . . . . . . . . . . . . . . . . . . . . . . . . . . . . . . . . . . . . . . . . . . . . . . . . . . . . . 8116.1 Environment Variables Used During Localization. . . . . . . . . . . . . . . . . . . . . . . . . . . . . . . . . . . . . . 8116.2 Localization Files. . . . . . . . . . . . . . . . . . . . . . . . . . . . . . . . . . . . . . . . . . . . . . . . . . . . . . . . . . . . 8216.3 The Locales Directory. . . . . . . . . . . . . . . . . . . . . . . . . . . . . . . . . . . . . . . . . . . . . . . . . . . . . . . . . 83
The locales.dat File. . . . . . . . . . . . . . . . . . . . . . . . . . . . . . . . . . . . . . . . . . . . . . . . . . . . . . . . 83Localized Message Files. . . . . . . . . . . . . . . . . . . . . . . . . . . . . . . . . . . . . . . . . . . . . . . . . . . . . 85
16.4 The Charsets Directory. . . . . . . . . . . . . . . . . . . . . . . . . . . . . . . . . . . . . . . . . . . . . . . . . . . . . . . . 86Collating Sequence Files. . . . . . . . . . . . . . . . . . . . . . . . . . . . . . . . . . . . . . . . . . . . . . . . . . . . 86Unicode Conversion Files. . . . . . . . . . . . . . . . . . . . . . . . . . . . . . . . . . . . . . . . . . . . . . . . . . . . 87
16.5 The ini Directory. . . . . . . . . . . . . . . . . . . . . . . . . . . . . . . . . . . . . . . . . . . . . . . . . . . . . . . . . . . . . 87The objectid.dat File. . . . . . . . . . . . . . . . . . . . . . . . . . . . . . . . . . . . . . . . . . . . . . . . . . . . . . . .87
17 Secure Sockets Layer in Open Client and Open Server. . . . . . . . . . . . . . . . . . . . . . . . . . . . . . . 8917.1 SSL Handshake. . . . . . . . . . . . . . . . . . . . . . . . . . . . . . . . . . . . . . . . . . . . . . . . . . . . . . . . . . . . . 8917.2 SSL Security Levels and Security Mechanisms. . . . . . . . . . . . . . . . . . . . . . . . . . . . . . . . . . . . . . . 9017.3 Validating a Server by its Certificate. . . . . . . . . . . . . . . . . . . . . . . . . . . . . . . . . . . . . . . . . . . . . . . 91
Common Name Validation in an SDC Environment. . . . . . . . . . . . . . . . . . . . . . . . . . . . . . . . . . 91The Trusted Roots File. . . . . . . . . . . . . . . . . . . . . . . . . . . . . . . . . . . . . . . . . . . . . . . . . . . . . . 92
17.4 Requesting and Authorizing SSL Certificates Using Keytool and ExportPrivateKey Utility. . . . . . . . . . 93Creating a Self-signed Root Certificate. . . . . . . . . . . . . . . . . . . . . . . . . . . . . . . . . . . . . . . . . . .94Creating a Private Key and a Certificate Request for Server. . . . . . . . . . . . . . . . . . . . . . . . . . . . 96Converting a Certificate Request to a CA-signed Server Certificate. . . . . . . . . . . . . . . . . . . . . . . 98Encrypting the Server Private Key in PKCS8 Format. . . . . . . . . . . . . . . . . . . . . . . . . . . . . . . . . 99Appending Private Key to the Server Certificate. . . . . . . . . . . . . . . . . . . . . . . . . . . . . . . . . . . 100
17.5 FIPS 140-2 Compliance for Password Encryption. . . . . . . . . . . . . . . . . . . . . . . . . . . . . . . . . . . . . 10017.6 Configuring Cipher Suites for SAP Open Server and Open Client. . . . . . . . . . . . . . . . . . . . . . . . . . 100
4 PUBLICSAP Open Server and Open Client Configuration Guide for Windows
Content

Configure Cipher Suites for Open Client. . . . . . . . . . . . . . . . . . . . . . . . . . . . . . . . . . . . . . . . . 101Configure Cipher Suites for SAP Open Server. . . . . . . . . . . . . . . . . . . . . . . . . . . . . . . . . . . . . 102
SAP Open Server and Open Client Configuration Guide for WindowsContent PUBLIC 5
1 About Open Client and Open Server
Open Client provides an application programming interface (API) and Net-Library, which allows communications between SAP Adaptive Server Enterprise and SAP Open Server applications, customer applications, third-party products, and other SAP products.
SAP Open Server provides the tools and interfaces needed to create custom servers. Like Open Client, a programming API and Net-Library enable communications with clients and other servers. In addition, SAP Open Server provides routines that:
● Handle multiple client connections● Schedule interactions with clients● Handle error conditions● Perform other functions required from a server
See the following documents for detailed information about Open Client and SAP Open Server:
● Open Client Client-Library/C Reference Manual● Open Client DB-Library/C Reference Manual● Open Server Server-Library/C Reference Manual
6 PUBLICSAP Open Server and Open Client Configuration Guide for Windows
About Open Client and Open Server

2 Configuration Overview
Open Client and Open Server software requires specific information to function correctly. Configuration is the process of setting up your system to make this information available.
Open Client and Open Server use configuration information to:
● Initialize the Open Client or Open Server application● Establish a connection with SAP ASE or an Open Server application. Clients and servers communicate
through a connection. For a client application to connect to a server application, the server application must be listening for the client connection request.
NoteTo ensure that your application has access to the most recent features, set the version to CS_CURRENT_VERSION.
Related Information
Initializing Open Client and Open Server [page 7]Making a Connection from Open Client [page 8]Listening for a Request in Open Server [page 8]
2.1 Initializing Open Client and Open Server
Sets up the initialization process.
Procedure
1. Use the SYBASE environment variable to determine the location of the installation directory.2. Use the locale-specific POSIX environment variables LC_*, LANG, LC_ALL, and LC_COLLATE and the
locales.dat file to determine what language, character set, and collating sequence the application uses.
3. Use the libtcl.cfg file to load the directory driver and security driver, as required.
SAP Open Server and Open Client Configuration Guide for WindowsConfiguration Overview PUBLIC 7

2.2 Making a Connection from Open Client
Use the DSQUERY to make a connection from Open Client.
Procedure
1. Use the DSQUERY environment variable to determine the name of the target server.2. Uses the sql.ini file or a directory service to obtain the address of the target server.
NoteOpen Client uses DSQUERY only if the Open Client application does not specify the name of the server.
2.3 Listening for a Request in Open Server
Use DSLISTEN to listen for a request in Open Server.
Procedure
1. Use the DSLISTEN environment variable to determine the name of the Open Server application.2. Use the sql.ini file or a directory service to obtain the Open Server application’s address.
NoteUse DSLISTEN only if the Open Server application does not specify a server during initialization.
8 PUBLICSAP Open Server and Open Client Configuration Guide for Windows
Configuration Overview

3 Configuring Basic Tasks for Open Client and Open Server
You must complete some basic configuration tasks for an Open Client and Open Server product to initialize the application and make a connection.
Procedure
1. Set environment variables to specify a target’s default server and initial localization values.The values of DSQUERY and DSLISTEN are used, respectively, if the Open Client and Open Server applications do not explicitly specify a server name.
2. Ensure that the target server’s address is available.3. Configure your network driver, if needed.
There are additional tasks if you are using one of:○ A directory service○ Security services○ Custom localization values in addition to or instead of initial localization values
NoteThe following chapters provide configuration instructions. Refer to the configuration chapter appropriate to your installation.
Next Steps
Proceed with the instructions where appropriate to complete the configuration.
SAP Open Server and Open Client Configuration Guide for WindowsConfiguring Basic Tasks for Open Client and Open Server PUBLIC 9

4 Configuration Information Required for Open Client
All Open Client applications require these basic configuration information obtained during initialization and connection.
● Location of the installation directory● Locale name● Localized message and character set files● Target server name● Network address of the target server● Security mechanism to be used
NoteExcept where noted, information in this topic applies to both DB Library and Client-Library.
Specifically, DB-Library does not use environment variables to determine initial localization values and does not examine the libtcl.cfg file; however, it does examine the SYBASE and DSQUERY environment variables.
For more information on DB-Library, see the Open Client DB-Library/C Reference Manual.
Location of the installation Directory as Defined by the SYBASE Environment Variable.
In a heterogeneous environment that uses applications built for versions 10.x and later, you must explicitly set the SYBASE, SYBASE_OCS, and PATH environment variables at the command prompt, to point to the current version of the Open Client and Open Server installation.
For example, for applications using version 15.5 products installed in C:\SYBASE, open a command prompt and set the following environment variables:
set SYBASE=C:\SYBASE
set SYBASE_OCS=OCS-15_0
set PATH=%PATH%;%SYBASE%\%SYBASE_OCS%\bin; %SYBASE%\%SYBASE_OCS%\dll
10 PUBLICSAP Open Server and Open Client Configuration Guide for Windows
Configuration Information Required for Open Client

Locale Name
Open Client uses the values of the following POSIX environment variables as locale names (does not apply to DB-Library):
● LC_ALL● LANG, if LC_ALL is not defined
Open Client later uses this value to obtain localization information from the locales.dat file. If LC_ALL, LANG, and sLanguage are not defined, Open Client uses “default” as the locale name.
Localized Message and Character Set Files
Open Client looks in the locales.dat file for an entry whose name matches the locale name determined in the previous step. Then, it loads the localized messages and character set files specified in the locales.dat file.
Name of the Target Server
Open Client obtains the name of the target server from one of the following sources, in the order listed:
1. The client application, which can provide the server name in the call to ct_connect (or dbopen)2. The DSQUERY environment variable, if the application does not specify the target server3. The default name SYBASE, if DSQUERY is not set
The Network Address of the Target Server
Open Client gets the address(es) of the target server from the directory service or from the sql.ini file:
● Directory service – Open Client looks for an entry in the [NT_DIRECTORY] section of libtcl.cfg file to determine where to look for the server address information. The setting of the CS_DS_PROVIDER property determines which [NT_DIRECTORY] entry the application searches for or defaults to the first entry of the [NT_DIRECTORY] section.
● sql.ini file – if a directory service is not used or if it is used and fails, Open Client searches for the SERVERNAME entry in sql.ini that matches the name, and uses the corresponding target address.In a heterogeneous environment that uses applications built for versions 10.x and later, you can still maintain a single sql.ini file by passing the address file name to each application, for example:
isql -Usa -P -Sconnect50 -Ic:\sybase\ini\sql.ini
SAP Open Server and Open Client Configuration Guide for WindowsConfiguration Information Required for Open Client PUBLIC 11
Security Mechanism to be Used
(Does not apply to DB-Library) If the client application requests network-based security services, Open Client looks in the [SECURITY] section of libtcl.cfg to determine which security driver to use.
12 PUBLICSAP Open Server and Open Client Configuration Guide for Windows
Configuration Information Required for Open Client
5 Configuring Open Client
Complete these tasks to enable Open Client to successfully initialize your client application and respond to connection requests.
Procedure
1. Set environment variables.a. Set the LC_ALL or LANG environment variable to the desired locale name. The locale name you specify
must correspond to an entry in locales.dat.
If you do not set LC_ALL or LANG, make sure that the “default” entry in locales.dat reflects the localization values your applications will use.
Verify that you have localization files that match the language, character set, and collating sequence specified in the locales file.
b. Set localization files.
If your application uses custom localization values, set the LC_ALL, LC_COLLATE, LC_TYPE, LC_MESSAGE, or LC_TIME environment variable to the locale name.
If you do not know which environment variable your application uses, set all the environment variables to the locale name you want.
c. Set the DSQUERY environment variable to the name of the target server.
If the client application names the target server, you do not need to set DSQUERY. If DSQUERY is not set and the application does not name the server, Open Client uses the server name “SYBASE.”
2. Use the ocscfg utility to configure the directory and security drivers.
3. Configuring sql.ini.
Make an entry for the target server in sql.ini using dsedit.
Verify that there is an entry in sql.ini whose SERVERNAME element corresponds with the value of the DSQUERY environment variable.
Related Information
Localization [page 81]Directory Service [page 23]ocscfg Utility [page 44]dsedit Utility [page 52]Environment Variables [page 65]Configuration Files [page 68]
SAP Open Server and Open Client Configuration Guide for WindowsConfiguring Open Client PUBLIC 13

The libtcl.cfg and libtcl64.cfg Files [page 69]The sql.ini File [page 76]
14 PUBLICSAP Open Server and Open Client Configuration Guide for Windows
Configuring Open Client

6 Configuration Information Required for Open Server
All Open Server applications require these basic configuration information obtained during initialization and connection.
● Location of the installation directory● Locale name● Localized message and character set files● Name of the target server● Target server’s network address
Location of the installation Directory as Defined by the SYBASE Environment Variable
In a heterogeneous environment that uses applications built for versions 10.x and later, you must explicitly set the SYBASE, SYBASE_OCS, and PATH environment variables at the command prompt, to point to the current version of the Open Client and Open Server installation.
For example, for applications using 15.5 products installed in C:\SYBASE, open a command prompt and set the following environment variables:
set SYBASE=C:\SYBASE
set SYBASE_OCS=OCS-15_0
set PATH=%PATH%;%SYBASE%\%SYBASE_OCS%\bin; %SYBASE%\%SYBASE_OCS%\dll
Locale Name
Open Server uses the values of the following POSIX environment variables as locale names:
● LC_ALL● LANG, if LC_ALL is not defined
Open Server later uses this value to obtain localization information from the locales.dat file. If neither environment variable is defined, Open Server uses “default” as the locale name.
SAP Open Server and Open Client Configuration Guide for WindowsConfiguration Information Required for Open Server PUBLIC 15

Localized Message and Character Set Files
Open Server looks in the locales.dat file for an entry whose name matches the locale name determined in step 2. Open Server then loads the localized messages and character set files specified in the locales.dat file.
Name of the Target Server
Open Server obtains the name of the Open Server application from one of the following sources, in the order listed:
1. The Open Server application, which can provide the server name in the call to srv_init2. The DSLISTEN environment variable, if the application does not specify its name3. The default name SYBASE, if DSLISTEN is not set
Target Server’s Network Address
Open Server gets the target server’s addresses from the directory service or from sql.ini:
● Directory service – Open Server looks for an entry in the [NT_DIRECTORY] section of the libtcl.cfg file to determine where to look up server address information. The setting of the CS_DS_PROVIDER property determines which [NT_DIRECTORY] entry the application searches for, or defaults to the first entry of the [NT_DIRECTORY] section.
● sql.ini file – if a directory service is not used, or if it is used and fails, Open Server searches for the SERVERNAME entry in sql.ini that matches the name as determined in step 4 and uses the corresponding target address.In a heterogeneous environment that uses applications built for releases 10.0.x and later, you can maintain a single sql.ini file by passing the address file name explicitly to each application, for example:
isql -Usa -P -Sconnect50 -Ic:\sybase\ini\sql.ini
When a client requests a connection that uses a network-based security mechanism, Open Server looks up the corresponding security driver in the [SECURITY] section of libtcl.cfg.
16 PUBLICSAP Open Server and Open Client Configuration Guide for Windows
Configuration Information Required for Open Server

7 Configuring Open Server
Complete these tasks to enable Open Server to successfully initialize your server application and respond to connection requests.
Procedure
1. Configure sql.ini:
a. Make an entry for the server’s name and directory in sql.ini using dsedit.b. Verify that there is an entry in sql.ini whose SERVERNAME element corresponds with the value of
the DSLISTEN environment variable.2. Configure Registry:
a. Open System in Control Panel.b. Click Environment Variables on the Advanced tab.c. Edit the following system variables:
○ DSLISTEN to set the value to the name of the Open Server application, as listed in sql.ini or directory service.
○ DSQUERY to set the value to the name of the target server, as listed in sql.ini or directory service.
d. Click OK in the Environment Variables window to set the new values.3. Set environment variables:
a. Set the LC_ALL or LANG environment variable to the desired locale name.
The locale name you specify must correspond to an entry in locales.dat. If you do not set LC_ALL or LANG, make sure that the “default” entry in locales.dat reflects the localization values your applications will use.
Verify that you have localization files that match the language, character set, and collating sequence specified in locales.
b. If your application uses custom localization values, set the LC_ALL, LC_COLLATE, LC_TYPE, LC_MESSAGE, or LC_TIME environment variable to the locale name.If you do not know which environment variable your application uses, set all the environment variables to the desired locale name.
c. Set the DSLISTEN environment variable to the name of the Open Server application.If the name of the Open Server application is coded into the application, you do not need to set DSLISTEN. If DSLISTEN is not set and the application does not name the server, Open Server uses the server name “SYBASE.”
d. If the Open Server application acts as a gateway application, set the DSQUERY environment variable to the name of the target server.
4. Configure the Drivers:a. Use the ocscfg utility to configure the network, directory, and security drivers.
SAP Open Server and Open Client Configuration Guide for WindowsConfiguring Open Server PUBLIC 17
Related Information
Directory Service [page 23]Localization [page 81]dsedit Utility [page 52]ocscfg Utility [page 44]Configuration Files [page 68]Environment Variables [page 65]The sql.ini File [page 76]The libtcl.cfg and libtcl64.cfg Files [page 69]
18 PUBLICSAP Open Server and Open Client Configuration Guide for Windows
Configuring Open Server

8 Configuring Open Client for SAP Failover
The SAP Failover feature is documented in the Using SAP Failover in a High Availability System. Use the procedures provided to configure your Open Client applications to connect to the secondary companion during failover.
NoteDB-Library does not support HA Failover. Embedded SQL (ESQL) for C and COBOL supports HA Failover starting with version 12.5.
Related Information
Adding a hafailover Line to the sql.ini File [page 19]Modifying an Application with Client-Library Calls [page 20]Using isql with SAP HA Failover [page 21]
8.1 Adding a hafailover Line to the sql.ini File
Step to add a hafailover line to interface file.
Context
Clients with the failover property automatically reconnect to the secondary companion when the primary companion crashes or when you issue shutdown or shutdown with nowait, triggering failover.
Procedure
To give a client the failover property, you must add a line labeled “hafailover” to the sql.ini file to provide the information necessary for the client to connect to the secondary companion. You can add this line using either a file editor or the dsedit utility.
The following is a sql.ini entry for a symmetric configuration between the “MONEY1” and “PERSONNEL1” companions:
[MONEY1]
SAP Open Server and Open Client Configuration Guide for WindowsConfiguring Open Client for SAP Failover PUBLIC 19

master=TCP,FN1,9835 query=TCP,FN1,9835 hafailover=PERSONNEL1
[PERSONNEL1] master=TCP,HUM1,7586 query=TCP,HUM1,7586 hafailover=MONEY1
NoteClient applications must resend any queries that were interrupted by failover. Other information specific to the connection, such as cursor declarations, also need to be restored.
Related Information
Configuring Open Client [page 13]
8.2 Modifying an Application with Client-Library Calls
You must modify any application written with Client-Library calls before it can work with SAP's Failover software.
Context
An application installed in a cluster must be able to run on both the primary and secondary companions. If you install an application that requires a parallel configuration, the secondary companion must also be configured for parallel processing so it can run the application during failover.
Procedure
1. Set the CS_HAFAILOVER property using the ct_config and ct_con_props Client-Library API calls. Legal values for the property are CS_TRUE and CS_FALSE. The default value is CS_FALSE. You can set this property at either the context or the connection level.
The following is an example of setting the property at the context level:
CS_BOOL bhafailover = CS_TRUE; retcode = ct_config(context, CS_SET, CS_HAFAILOVER, &bhafailover, CS_UNUSED, NULL);
The following shows the property set at the connection level:
20 PUBLICSAP Open Server and Open Client Configuration Guide for Windows
Configuring Open Client for SAP Failover

CS_BOOL bhafailover = CS_FALSE; retcode = ct_con_props(connection, CS_SET, CS_HAFAILOVER, &bhafailover, CS_UNUSED, NULL);
2. Handle failover messages. As soon as the companion begins to go down, clients receive an informational message that failover is about to occur. Treat this as an informational message in the client error handlers.
3. Confirm failover configuration. Once you have set the failover property and the sql.ini file has a valid entry for the secondary companion server, the connection becomes a failover connection, and the client reconnects appropriately.
However, if the failover property is set but the sql.ini file does not have an entry for the hafailover server (or vice-versa), it does not become a failover connection. Instead, it is a normal non-high availability connection with the failover property turned off. You must check the failover property to know whether or not the connection is a failover connection. You can do this by calling ct_con_props with an <action> of CS_GET.
4. Check return codes. When a successful failover occurs, calls to ct_results and ct_send return CS_RET_HAFAILOVER depending on the type of connection:○ On a synchronous connection, the API call returns CS_RET_HAFAILOVER directly.○ On an asynchronous connection, the API returns CS_PENDING and the callback function returns
CS_RET_HAFAILOVER.
Depending on the return code, the application can do the required processing, such as sending the next command to be executed.
5. Restore option values. Any set options that you have configured for this client connection (for example, set role) were lost when the client disconnected from the primary companion. Reset these options in the failed over connection.
6. Rebuild your applications, linking them with the libraries included with the failover software.
NoteYou cannot connect clients with the failover property (for example, isql -Q) until you issue sp_companion resume. If you do try to reconnect them after issuing sp_companion prepare_failback, the client hangs until you issue sp_companion resume.
8.3 Using isql with SAP HA Failover
Use isql to connect to a primary server with failover capability.
Procedure
1. Choose a primary server that has a secondary companion server specified in its sql.ini file entry.
2. Use the -Q command-line option.
SAP Open Server and Open Client Configuration Guide for WindowsConfiguring Open Client for SAP Failover PUBLIC 21

If your sql.ini file contained the example entry given in Adding a hafailover Line to the sql.ini File, you can use isql with failover:
isql -S PERSONNEL1 -Q
Related Information
Adding a hafailover Line to the sql.ini File [page 19]
22 PUBLICSAP Open Server and Open Client Configuration Guide for Windows
Configuring Open Client for SAP Failover

9 Directory Service
Client-Library and Server-Library applications use directory services to keep track of information about servers.
A directory service manages the creation, modification, and retrieval of information about network entities. As an alternative to sql.ini, Client-Library and Server-Library applications use a directory service to obtain information about servers.
The advantage of using a directory service is that you do not need to update multiple sql.ini files when a new server is added to your network or when a server moves to a new address.
Different platforms use different directory service providers; in Microsoft Windows, you can use Windows Registry and LDAP.
NoteDB-Library supports only LDAP directory service.
Related Information
LDAP Directory Services [page 23]LDAP Directory Services Versus the Interface File [page 24]Server Objects and Attributes [page 26]Directory Drivers [page 26]How Applications Use a Directory Service [page 27]Enabling LDAP Directory Services [page 29]Connecting to LDAP using SSL/TLS [page 32]
9.1 LDAP Directory Services
Lightweight Directory Access Protocol (LDAP) is used to access directory listings. A directory listing, or service, provides a directory of names, profile information, and machine addresses for every user and resource on the network. It can be used to manage user accounts and network permissions.
LDAP servers are typically hierarchical in design and provide fast lookups of resources. LDAP can be used as a replacement to the traditional sql.ini file to store and retrieve information about servers.
Any type of LDAP service, whether it is an actual server or a gateway to other LDAP services, is called an LDAP server. An LDAP driver calls LDAP client libraries to establish connections to an LDAP server. The LDAP driver and client libraries define the communication protocol, such as whether encryption is enabled, and the
SAP Open Server and Open Client Configuration Guide for WindowsDirectory Service PUBLIC 23

contents of messages exchanged between clients and servers. Messages are operators, such as client requests for read, write, and queries, and server responses, including data-format information.
9.2 LDAP Directory Services Versus the Interface File
LDAP directory services are a convenient alternative to the typical sql.ini file, which stores server information in a “flat” file. As a result, any changes to server information in the sql.ini file need to be updated on each machine (client and server) in the enterprise.
With LDAP directory services, the integration of user, resource, and security information in a centralized repository makes administration of resource information much easier. In addition, LDAP services provide:
● A single, hierarchical view of information, such as users, software, resources, networks, files● A single sign-on for servers and distributed enterprise applications● User login and role information for access control to sensitive data
User roles can be assigned to a single individual, such as the system administrator, or to large groups of users, such as accounting department personnel. Roles determine what information and servers users can access, and what, if any, read and write permission they possess. Multiple users with the same user role can be multiplexed to a few server connections, saving resources and increasing scalability.
Versus LDAP Directory Services
sql.ini File Directory Services
Platform-specific Platform-independent
Specific to each installation Centralized and hierarchical
Contains separate master and query entries Contains one entry for each server that is accessed by both clients and servers
Cannot store metadata about the server Stores metadata about the server
The traditional sql.ini file specifying a TCP connection and a failover machine looks like this:
[MONEY] master=TCP, huey, 5000query=TCP, huey, 5000hafailover=PERSONEL[PERSONEL]master=TCP, huey, 5000query=TCP, huey, 5000 hafailover=MONEY
An example of an LDAP entry with TCP and a failover machine looks like this:
dn: sybaseServername=foobar, dc=sybase,dc=com objectClass: sybaseServersybaseVersion: 15501sybaseServername: foobarsybaseService: ASEsybaseStatus: 4
24 PUBLICSAP Open Server and Open Client Configuration Guide for Windows
Directory Service

sybaseAddress: TCP#1#foobar 5000sybaseRetryCount: 12sybaseRetryDelay: 30 sybaseHAServernam: secondary
All entries in the LDAP directory service are called entities. Each entity has a distinguished name (DN) and is stored in a hierarchical tree structure based on its DN. This tree is called the directory information tree (DIT). Client connections specify where to begin the search of an LDAP server by specifying a DIT base during connection.
LDAP Entry Definitions
Attribute Name Value Type Description
sybaseVersion Integer Server version number.
sybaseServername Character string Server name.
sybaseService Character string Service type: SAP Adaptive Server Enterprise.
sybaseStatus Integer Status: 1 = Active, 2 = Stopped, 3 = Failed, 4 = Unknown.
sybaseAddress String Each entry in the address string is separated by the # character. Each server address includes:
● Protocol: TCP, NAMEDPIPE.● The value of the sybaseStatus.● Address: any valid address for the protocol type.
sybaseSecurity (optional) String Security OID (object ID).
sybaseRetryCount Integer This attribute is mapped to CS_RETRY_COUNT, which specifies the number of times that ct_connect retries the sequence of network addresses associated with a server name.
sybaseRetryDelay Integer This attribute is mapped to CS_LOOP_DELAY, which specifies the delay, in seconds, that ct_connect waits before retrying the entire sequence of addresses.
sybaseHAservername (optional)
String A secondary server for failover protection.
SAP provides LDAP directory schema in %SYBASE%\%SYBASE_OCS%\ini for the following LDAP services:
● sybase.schema - it contains the directory schema to be used with OpenLDAP servers.● sybase-schema.conf - it contains the directory schema but in a Netscape-specific syntax.● sybase.ldf - it contains directory schema in Unicode format for a Microsoft Active Directory.
In the previous example, the entity describes an Adaptive Server named “foobar” listening on a TCP connection with a port number of 5000. This entity also specifies a retry count of 12 (times) and a retry delay of 30 (seconds). sybaseRetryCount and sybaseRetryDelay map to CS_RETRY_COUNT and CS_LOOP_DELAY, respectively. When Client-Library finds an address where a server responds, the login dialog begins between Client-Library and the server. Client-Library does not retry any other addresses if the login attempt fails.
SAP Open Server and Open Client Configuration Guide for WindowsDirectory Service PUBLIC 25

The most important entity is the address attribute, which contains the information for how to set up a connection to the server and how the server listens for incoming connections. For entries to be usable by different SAP products on different platforms, the Protocol field and the Address field in an address attribute (for example, “TCP” and “foobar 5000”) should be in a platform and product independent form.
Since LDAP supports multiple entries for each attribute, each address attribute must contain the address of a single server, including protocol, access type, and address. See sybaseAddress in the LDAP Entry Definitions table.
The following example is an LDAP entry for a Microsoft Windows server listening on two addresses, with different connection protocols:
sybaseAddress = TCP#1#TOEJAM 4444 sybaseAddress = NAMEPIPE#1#\pipe\sybase\query
Each entry in the address field is separated by the # character. The LDAP Entry Definitions table defines the values for each field in the address attribute.
9.3 Server Objects and Attributes
The directory service must contain information about servers accessed by your Open Client.
A directory service identifies a server entry as a directory object. Each directory object has a unique set of attributes. You can create, view, and modify server object entries with dsedit.
Related Information
dsedit Utility [page 52]
9.4 Directory Drivers
Open Client and Open Server software uses a directory driver to retrieve information from a directory service.
A directory driver is a dynamically-linked library that provides Open Client and Open Server software with a generic interface to a specific directory service. SAP provides a directory driver for each supported directory service.
Directory drivers are listed in the libtcl.cfg file.
Related Information
The libtcl.cfg and libtcl64.cfg Files [page 69]
26 PUBLICSAP Open Server and Open Client Configuration Guide for Windows
Directory Service

9.5 How Applications Use a Directory Service
Client-Library, Server-Library, and DB-Library determine whether to use a directory service or sql.ini.
1. If the Client-Library or the Server-Library application specifies a directory driver, Client-Library by calling ct_con_props (CS_SET, CS_DS_PROVIDER) and Server-Library by calling srv_props (CS_SET, SRV_DS_PROVIDER), the application checks in the [DIRECTORY] section of libtcl.cfg for a matching driver and loads that driver.
NoteStep 1 does not apply to DB-Library application. Use steps 2 and 3 for specifying directory service for DB-Library.
2. If the client application does not specify a directory driver, Client-Library, Server-Library, and DB-Library loads the directory driver listed by the first entry in the [DIRECTORY] section of libtcl.cfg.
3. Client-Library, Server-Library, and DB-Library fall back and use sql.ini to obtain the server’s address if any of the following are true:○ libtcl.cfg does not exist.○ There are no entries in the [DIRECTORY] section of libtcl.cfg.○ The specified directory driver fails to load.○ libtcl*.cfg is overridden at the context level when the CS_IFILE property is set with ct_config.
You use the libtcl*.cfg file to specify the LDAP server name, port number, DIT base, user name, and password to authenticate the connection to an LDAP server.
What you should know about the libtcl*.cfg file:
● Values specified in the libtcl*.cfg file serve as the defaults for the CS_* property, which is set with the ct_con_props routine. You can override these values by explicitly setting the ct_con_props routine for that specific connection.
● If you do not specify either the password or the user name in the libtcl*.cfg file, the connection is anonymous.
● If the password begins with an “0x,” the connection properties assume that the password is encrypted.● On 64-bit platforms, Open Client and Open Server contain both 32-bit and 64-bit binaries. You should edit
both the libtcl.cfg and the libtcl64.cfg files to ensure compatibility between 32-bit and 64-bit applications.
The libtcl*.cfg file is located in %SYBASE%\%SYBASE_OCS%\ini.
Related Information
How Applications Use LDAP Directory Services [page 28]
The libtcl.cfg and libtcl64.cfg Files [page 69]Encrypting the Password [page 72]
SAP Open Server and Open Client Configuration Guide for WindowsDirectory Service PUBLIC 27

9.5.1 How Applications Use LDAP Directory Services
To use LDAP features, you must install and configure an LDAP server according to the vendor-supplied instructions. SAP does not provide the LDAP server. SAP provides Netscape LDAP SDK client libraries and SAP Open Client and Open Server includes an LDAP driver, located in %SYBASE%\%SYBASE_OCS%\dll.
The Netscape LDAP SDK library is located in %SYBASE%\%SYBASE_OCS%\lib3p and the environment variable is PATH.
When the LDAP driver connects to the LDAP server, the server establishes the connection based on two authentication methods—anonymous access, and user name and password authentication.
● Anonymous access – does not require any authentication information; therefore, you do not have to set any properties. Anonymous access is typically used for read-only privileges.
● User name and password – can be specified in the libtcl.cfg file (libtcl64.cfg file for 64-bit platforms) as an extension to the LDAP URL or set with property calls to Client-Library. The user name and password that are passed to the LDAP server, using ctlib, are separate and distinct from the user name and password used to log in to Adaptive Server. SAP strongly recommends that you use user name and password authentication.
Related Information
Authentication [page 28]
The libtcl.cfg and libtcl64.cfg Files [page 69]
9.5.1.1 Authentication
A client application creates a connection to an LDAP server using the host name and port number or IP address. This connection is called a “bind” and can be unsecured or have user name and password authentication. The type of access allowed is determined by the server.
Anonymous connections
A connection in which authentication is not required is called an anonymous connection. LDAP and Netscape Directory Services default to allow anonymous connections.
Anonymous access:
● Does not require any authentication information, such as a password, to establish a connection.● Does not require that any additional properties be set to make a connection.● Is generally read access only.
28 PUBLICSAP Open Server and Open Client Configuration Guide for Windows
Directory Service

User name and password authentication
For access permissions that allow write capabilities, SAP recommends the use of basic security. User names and passwords can provide a basic level of security for a connection to the LDAP server. You can store user names and passwords in the libtcl.cfg file on 32-bit platforms and libtcl64.cfg file on 64-bit platforms, or set them with Client-Library properties.
Related Information
Configuration Files [page 68]
9.6 Enabling LDAP Directory Services
LDAP is only supported with reentrant libraries. You must use isql_r, instead of isql, when connecting to a server using LDAP directory services.
Procedure
1. Configure the LDAP server according to the vendor-supplied documentation.2. Add the LDAP library directory to your path for your platform.
For example:
PATH=%PATH%:%SYBASE%\%SYBASE_OCS%\lib3p
3. Configure the libtcl*.cfg file to use directory services.
Use any standard ASCII text editor to:○ Remove the semicolon (;) comment markers from the beginning of the LDAP URL lines in the
libtcl*.cfg file under the [DIRECTORY] entry.○ Add the LDAP URL under the [DIRECTORY] entry. See the LDAP Entry Definitions table for supported
LDAP URL values.
NoteThe LDAP URL must be on a single line.
ldap=libsybdldap.dll ldap://<host>:<port>/ditbase??scope???? bindname=username password
SAP Open Server and Open Client Configuration Guide for WindowsDirectory Service PUBLIC 29
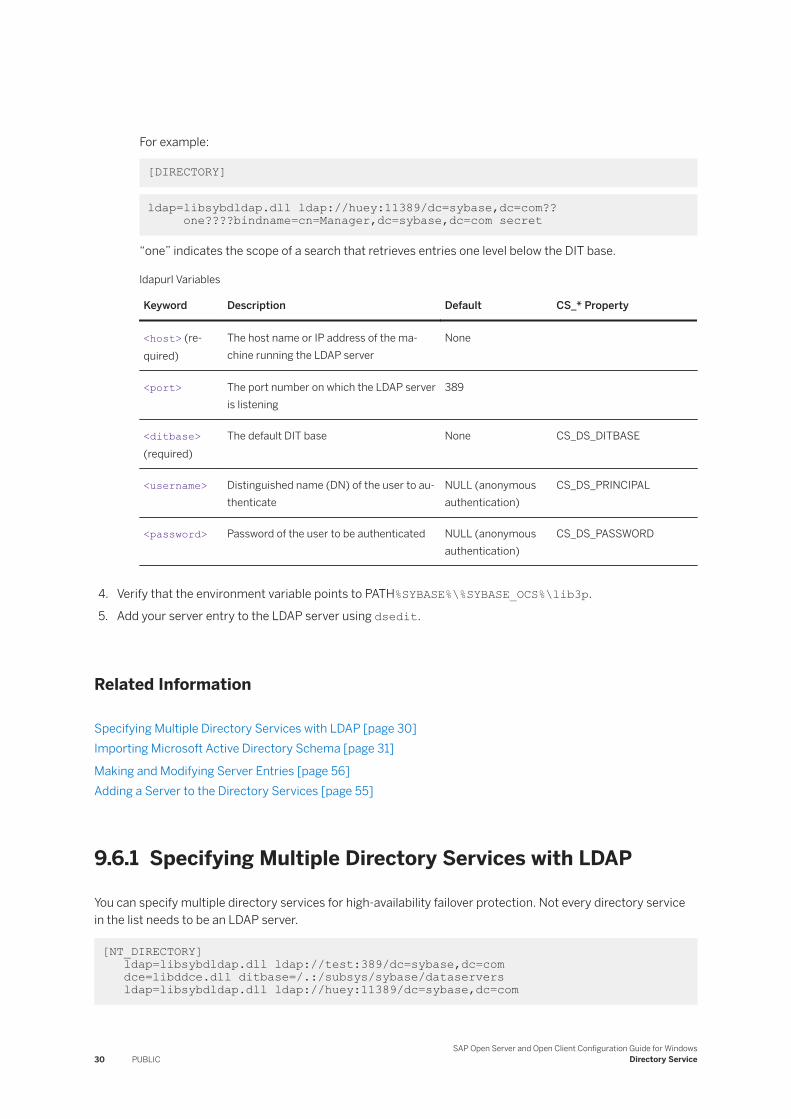
For example:
[DIRECTORY]
ldap=libsybdldap.dll ldap://huey:11389/dc=sybase,dc=com?? one????bindname=cn=Manager,dc=sybase,dc=com secret
“one” indicates the scope of a search that retrieves entries one level below the DIT base.
ldapurl Variables
Keyword Description Default CS_* Property
<host> (required)
The host name or IP address of the machine running the LDAP server
None
<port> The port number on which the LDAP server is listening
389
<ditbase> (required)
The default DIT base None CS_DS_DITBASE
<username> Distinguished name (DN) of the user to authenticate
NULL (anonymous authentication)
CS_DS_PRINCIPAL
<password> Password of the user to be authenticated NULL (anonymous authentication)
CS_DS_PASSWORD
4. Verify that the environment variable points to PATH%SYBASE%\%SYBASE_OCS%\lib3p.
5. Add your server entry to the LDAP server using dsedit.
Related Information
Specifying Multiple Directory Services with LDAP [page 30]Importing Microsoft Active Directory Schema [page 31]
Making and Modifying Server Entries [page 56]Adding a Server to the Directory Services [page 55]
9.6.1 Specifying Multiple Directory Services with LDAP
You can specify multiple directory services for high-availability failover protection. Not every directory service in the list needs to be an LDAP server.
[NT_DIRECTORY] ldap=libsybdldap.dll ldap://test:389/dc=sybase,dc=com dce=libddce.dll ditbase=/.:/subsys/sybase/dataservers ldap=libsybdldap.dll ldap://huey:11389/dc=sybase,dc=com
30 PUBLICSAP Open Server and Open Client Configuration Guide for Windows
Directory Service
In this example, if the connection to test:389 fails, the connection fails over to the DCE driver with the specified DIT base. If this also fails, a connection to the LDAP server on huey:11389 is attempted. Different vendors employ different DIT-base formats. See the Open Client Client-Library/C Reference Manual.
9.6.2 Importing Microsoft Active Directory Schema
You can import sybase.ldf into the Active Directory (AD) or into an Active Directory Application Mode (ADAM) instance using the ldifde.exe command provided in the ADAM installation.
Procedure
To import the directory schema, run ldifde.exe from the ADAM installation using this syntax:
ldifde -i -u -f sybase.ldf -s server:port -b <username> <domain> <password> -j . -c "cn=Configuration,dc=X" #configurationNamingContext
Related Information
Creating a Container for Server Entries [page 31]
9.6.2.1 Creating a Container for Server Entries
After you have successfully imported the schema into the Active Directory, create a container for the server entries and set appropriate read and write permissions for the container and its child objects.
Procedure
1. For example, create a container with a relative distinguished name (RDN) “CN=SybaseServers” in the root of the Active Directory for domain “mycompany.com” to store and retrieve server entries. The root distinguished name (rootDN) for this container is reflected in the libtcl.cfg file as:
ldap=libsybdldap.dll ldap://localhost:389/ cn=SybaseServers,dc=mycompany,dc=com??...
SAP Open Server and Open Client Configuration Guide for WindowsDirectory Service PUBLIC 31
If you create a dedicated user account name “Manager” with password “secret” in the Active Directory to add and modify server entries, the complete entry in the libtcl.cfg file is:
ldap=libsybdldap.dll ldap://localhost:389/cn=SybaseServers,dc=mycompany,dc=com????bindname=cn=Manager,cn=Users,dc=mycompany, dc=com?secret
2. Set the appropriate read and write permissions and then use utility programs such as dscp or dsedit to store, view, and modify server entries in the Active Directory.
NoteFor more information about extending an Active Directory schema, search for “Extending the Schema” on the Microsoft Web site.
9.7 Connecting to LDAP using SSL/TLS
You can set up a secure connection to an LDAP directory server using SSL or TLS on all supported platforms.
Procedure
To set up a secure connection between a client and an LDAP Directory Server, use either of:
○ Establish a secure connection to the secure port of the LDAP server (typically port number 636) by entering this syntax in the libtcl.cfg file:
[NT_DIRECTORY] ldap=libsybdldap.dllldaps:// huey:636/dc=sybase,dc=com???? bindname=cn=Manager,dc=Sybase,dc=com?secret
If no port number is specified with ldaps://, port number 636 is used by default.○ Upgrade a normal connection (typically port number 389 of the LDAP Server) to a secure, using
StartTLS. To upgrade the connection, enter this in the libtcl.cfg file:
[NT_DIRECTORY] ldap=libsybdldap.dll starttlsldap:// huey:389/dc=sybase,dc=com???? bindname=cn=Manager,dc=Sybase,dc=com?secret
If no port number is specified with ldap://, port number 389 is used by default.
For more information, see the Open Client Client-Library/C Reference Manual.
32 PUBLICSAP Open Server and Open Client Configuration Guide for Windows
Directory Service
10 Security Services
Client-Library and Server-Library applications use the security services provided by third-party security software to authenticate users and protect data transmitted between machines on a network.
Related Information
Network-based Security [page 33]How Applications Use Security Services [page 38]Configuring Tasks to Use a Security Service [page 40]Data Protection in SAP Open Client and Open Server [page 40]
10.1 Network-based Security
In a distributed client/server computing environment, intruders can view or tamper with confidential data. To counteract this possibility, network-based security takes advantage of third-party distributed security software to authenticate users and protect data transmitted between machines on a network.
Related Information
Security Mechanisms [page 33]Security Drivers [page 34]Security Services [page 34]
10.1.1 Security Mechanisms
SAP defines a security mechanism as external software that provides security services for a connection.
Different platforms can use different security mechanisms.
Both Microsoft Windows NT LAN Manager (SSPI) and Kerberos provide security services for servers and clients on Microsoft Windows.
You can specify the security mechanisms that a server supports in sql.ini or a directory service:
● The optional secmech line in an sql.ini entry specifies the security mechanisms that a server supports.
SAP Open Server and Open Client Configuration Guide for WindowsSecurity Services PUBLIC 33

● The optional secmech attribute in a directory service entry describes the security mechanisms that a server supports.
When a client gets the server’s address, it can verify that the server supports the security mechanism that the client is using:
● If there is a secmech line or attribute and security mechanisms are listed, then only those security mechanisms are allowed.
● If there is no secmech line or attribute, then all security mechanisms are allowed.● If there is a secmech line or attribute but no security mechanisms are listed, then the server does not
support any security mechanisms.
10.1.2 Security Drivers
SAP provides security drivers that allow Client-Library and Server-Library to communicate with the security mechanism. Each security driver maps a generic interface to the security provider’s interface.
To use a security mechanism on a connection, both items below must be true:
● The client and server must use compatible security drivers.For example, a client using a Microsoft Windows LAN Manager driver requires a server using a Microsoft Windows LAN Manager driver.
● The client application must request services by setting connection properties before connecting to the server.
10.1.3 Security Services
Each security mechanism provides a set of security services used to establish a secure connection between a client and a server. Each security service addresses a particular security concern.
Security services consist of:
● Authentication services, and● Per-packet security services.
See the Open Client Client-Library/C Reference Manual for a complete discussion of security services.
Client-Library applications set connection properties to request a mechanism’s services. Open Server applications read the properties of a client thread to determine which services are being performed.
Related Information
LAN Manager Security Services [page 35]Kerberos Security Services [page 35]
34 PUBLICSAP Open Server and Open Client Configuration Guide for Windows
Security Services

10.1.3.1 LAN Manager Security Services
Windows LAN Manager provides these security services.
● Network authentication based on LAN Manager user namespace● Data integrity● Replay detection● Out-of-sequence detection
10.1.3.2 Kerberos Security Services
The Kerberos security mechanism provides these services.
● Network authentication● Mutual authentication● Data integrity● Data confidentiality● Replay detection● Out-of-sequence detection● Credential delegation
For a description of these security services, see the Open Client Client-Library/C Reference Manual.
Related Information
Configuring CyberSafe Kerberos [page 35]Configuring MIT Kerberos [page 36]Establishing a Connection with a Remote Server Using Credential Delegation [page 37]Using Windows Security SSPI [page 38]
Client-Library and Security Services [page 39]
10.1.3.2.1 Configuring CyberSafe Kerberos
These considerations apply specifically to client applications that use CyberSafe Kerberos security services.
Procedure
1. Install the CyberSafe Kerberos software on your system for Open Client and Open Server 12.5 or later.
SAP Open Server and Open Client Configuration Guide for WindowsSecurity Services PUBLIC 35

The gssapi32.dll file must be in the library path while running your Client-Library application. SAP does not provide this DLL, but it is included with some CyberSafe Kerberos products. If this DLL is not included with your CyberSafe Kerberos product, contact CyberSafe Kerberos to obtain their GSS-API library.
2. Configure the security section of the libtcl.cfg configuration file.
3. Set the desired security features using ct_con_props. If you want to use the default credentials, do not set any credential properties.
4. Verify that the application has a preexisting user credential to connect to the server. In other words, the user of the application must log in to CyberSafe Kerberos before running the client application. To do so, use the single sign-on feature or the CyberSafe kinit utility.
5. If a user name is supplied, it must match the user’s preexisting credential. If a user name is not supplied, Client-Library connects to the server using the user name associated with the user’s CyberSafe Kerberos credential.
6. The following environment variables set the paths to the credentials cache file, configuration file, and realms file. If the corresponding file is located in a non-default directory, set the environment variable to the file’s full path:○ CSFC5CCNAME – credentials cache file○ CSFC5CONFIG – configuration file○ CSFC5REALMS – realms file
For more information, refer to your CyberSafe Kerberos documentation.
No extra flags are required when compiling your Client-Library applications to use CyberSafe Kerberos security services.
7. Once you have configured Open Client and Open Server and CyberSafe Kerberos, use the following command (without -U and -P arguments) to test your configuration:
isql -V
NoteSome tasks described here require you to use the CyberSafe Kerberos administration tools. See your CyberSafe Kerberos documentation for information.
10.1.3.2.2 Configuring MIT Kerberos
Configure MIT Kerberos using the libtcl.cfg configuration file.
Procedure
1. Install and configure the MIT software on your system, version 2.6.5 or later.2. Configure the security section of the libtcl.cfg configuration file.
3. Set the desired security features using ct_con_props, or use the default credentials by not setting credential properties.
36 PUBLICSAP Open Server and Open Client Configuration Guide for Windows
Security Services

4. Verify that the application has a preexisting user credential to connect to the server. In other words, the user of the application must log in to the Kerberos environment using the kinit utility, before running the client application.If a user name is supplied, it must match the user’s preexisting credential. If a user name is not supplied, Client-Library connects to the server using the user name associated with the user’s credential.
The environment variable KRB5CCNAME, sets the path to the credentials cache file. If the corresponding file is located in a non-default directory, set the environment variable to the file’s full path.
For more information, refer to your documentation.5. The MIT GSS library, gssapi32.dll, must be specified in the libtcl.cfg file using the libgss keyword.
SAP recommends providing the full path to the Kerberos driver.
No extra flags are required when compiling your Client-Library applications to use Kerberos security services.
Once you have configured Open Client and Open Server and Kerberos, you can use isql to test your configuration.
10.1.3.2.3 Establishing a Connection with a Remote Server Using Credential Delegation
The Kerberos security driver supports credential delegation when using the MIT Kerberos Generic Security Services (GSS) library. This allows you to set up an Open Server gateway application that uses the delegated client credentials when establishing a connection with a remote server.
Procedure
This is an example of a call sequence you can employ when using credential delegation. The ctos example in $SYBASE/OCS-15_0/sample/srvlibrary/connect.c contains an example of the properties mentioned here.○ The client application requests for credential delegation and forwards the credential to the gateway
connection using:
ct_con_props(..., CS_SET, SRV_SEC_DELEGATION, ...)
○ The connection handler of the gateway application checks whether the client requested credential delegation:
if (srv_thread_props(..., CS_GET, SRV_T_SEC_DELEGATION, ...)) {...}
○ The connection handler retrieves the delegated client credentials:
srv_thread_props(..., CS_GET, SRV_T_SEC_DELEGCRED, ...)
SAP Open Server and Open Client Configuration Guide for WindowsSecurity Services PUBLIC 37

○ The client application sets the delegated credentials in the Client-Library connection structure for use in connecting to the remote server:
ct_con_props(..., CS_SET, CS_SEC_CREDENTIALS, ...)
○ The client application attempts to connect to the remote server using ct_connect.You can also request for credential delegation using the isql and bcp option -Vd. For more information, see the Open Client and Open Server Programmers Supplement for Microsoft Windows.For detailed information on using credential delegation, see the Open Server Server-Library/C Reference Manual and the Open Client Client-Library/C Reference Manual.
10.1.3.2.4 Using Windows Security SSPI
If Kerberos support is provided by the Microsoft Windows Security Support Provider Interface (SSPI).
Procedure
Edit the csfkrb5 entry in the libtcl.cfg file to specify the libsspiwrapper.dll as the GSS library.
For example:
csfkrb5=LIBSKRB secbase=@REALM libgss=C:\sybase\OCS-15_0\lib3p\libsspiwrapper.dll
10.2 How Applications Use Security Services
Client-Library and Server-Library applications can use a security mechanism to perform authentication and per-packet security services. The security mechanism behaves like a clearinghouse through which Client-Library and Server-Library validate information.
If an Open Client application requests authentication services, the following occurs:
1. Client-Library validates the login with the security mechanism. The security mechanism returns a login record, or token. The security mechanism creates the login token based on which security services are requested.
2. Client-Library establishes a transport connection with the Open Server application and sends its login token.
3. Server-Library authenticates the client’s login token with the security mechanism. If the login is valid, the Open Server application establishes a secure connection.
If an Open Client application requests per-packet security services, the following occurs:
1. Client-Library uses the security mechanism to prepare the data packet to send to the Open Server application. Depending on which security services are requested, the security mechanism might encrypt the data or create a cryptographic signature associated with the data.
38 PUBLICSAP Open Server and Open Client Configuration Guide for Windows
Security Services
2. Client-Library sends the data packet to the Open Server application.3. When Open Server receives the data packet, it uses the security mechanism to perform any required
decryption and validation.
See Security Features in the Open Client Client-Library/C Reference Manual for a detailed explanation of the Client-Library’s security features.
Related Information
Client-Library and Security Services [page 39]Server-Library and Security Services [page 39]
10.2.1 Client-Library and Security Services
You can set connection properties in Open Client applications to request a security mechanism’s services.
Client-Library determines which security mechanism and services to use on the connection:
1. If the client application names a security driver, Client-Library checks in libtcl.cfg for a matching driver and loads that driver.
2. If the client application does not name a security driver, Client-Library loads the first security driver listed in libtcl.cfg.
3. If libtcl.cfg does not list a security driver, the server authenticates the user if the user supplies the correct password.
10.2.2 Server-Library and Security Services
Open Server applications can read the properties of a client connection request to determine which security mechanism to use and which services to perform.
By default, an Open Server application supports the security mechanisms listed in libtcl.cfg. Administrators can further restrict the list of supported mechanisms by adding a secmech attribute to the server’s directory entry or a secmech line to the Open Server application’s sql.ini file entry.
When an Open Client application requests a security session from an Open Server application, the following occurs:
1. Server-Library reads the security token that was sent with the client connection request. The security token contains the object identifier for the security mechanism that the client uses.
2. If the Open Server application’s sql.ini entry or directory service entry lists the secmech line/attribute, Server-Library searches the secmech line/attribute for a value corresponding to the object identifier specified in the security token. If a matching value is not found, the connection request is rejected.
3. Server-Library searches objectid.dat to match the object identifier with the local name of the security mechanism.
SAP Open Server and Open Client Configuration Guide for WindowsSecurity Services PUBLIC 39
4. Server-Library loads the security driver associated with the local name of the security mechanism.The security driver is listed in libtcl.cfg.
Related Information
Configuration Files [page 68]The objectid.dat File [page 87]
10.3 Configuring Tasks to Use a Security Service
To allow your Open Client and Open Server application to use a security service, you must configure a security driver using the ocscfg utility.
Procedure
Optionally, to restrict the security mechanisms that a server supports, do one of the following:○ If your application uses the sql.ini file, use the dsedit utility to add a secmech line in the server’s
sql.ini file entry.○ If your application uses a directory service, use the dsedit utility to add the secmech attribute to the
server’s directory service entry.
10.4 Data Protection in SAP Open Client and Open Server
SAP Open Client and Open Server is an open API that provides the technical enablement and infrastructure to allow you to build applications.
It is the responsibility of the application developer to ensure that the application being built conforms to the legal requirements of data protection. However, SAP Open Client and Open Server offer functionality that helps application developers ensure compliance.
Introduction to Data Protection
Data protection is associated with numerous legal requirements and privacy concerns. In addition to compliance with general data privacy acts, it is necessary to consider compliance with industry-specific legislation in different countries. This section describes the specific features and functions that SAP Open Client and Open Server provides to support compliance with the relevant legal requirements and data privacy.
40 PUBLICSAP Open Server and Open Client Configuration Guide for Windows
Security Services

This section and any other sections in this guide do not give any advice on whether these features and functions are the best method to support company, industry, regional or country-specific requirements. Furthermore, this guide does not give any advice or recommendations with regard to additional features that would be required in a particular environment; decisions related to data protection must be made on a case-by-case basis and under consideration of the given system landscape and the applicable legal requirements.
NoteIn the majority of cases, compliance with data privacy laws is not a product feature. SAP software supports data privacy by providing security features and specific functions relevant to data protection, such as functions for the simplified blocking and deletion of personal data. SAP does not provide legal advice in any form. The definitions and other terms used in this guide are not taken from any given legal source.
Glossary
Term Definition
Blocking A method of restricting access to data for which the primary business purpose has ended.
Business Purpose A legal, contractual, or in other form justified reason for the processing of personal data. The assumption is that any purpose has an end that is usually already defined when the purpose starts.
Consent The action of the data subject confirming that the usage of his or her personal data shall be allowed for a given purpose. A consent functionality allows the storage of a consent record in relation to a specific purpose and shows if a data subject has granted, withdrawn, or denied consent.
Deletion Deletion of personal data so that the data is no longer available.
End of business Date where the business with a data subject ends, for example the order is completed, the subscription is canceled, or the last bill is settled.
End of purpose (EoP) End of purpose and start of blocking period. The point in time, when the primary processing purpose ends (e.g. contract is fulfilled).
End of purpose (EoP) check A method of identifying the point in time for a data set when the processing of personal data is no longer required for the primary business purpose. After the EoP has been reached, the data is blocked and can only be accessed by users with special authorization (for example, tax auditors).
SAP Open Server and Open Client Configuration Guide for WindowsSecurity Services PUBLIC 41

Term Definition
Personal data Any information relating to an identified or identifiable natural person ("data subject"). An identifiable natural person is one who can be identified, directly or indirectly, in particular by reference to an identifier such as a name, an identification number, location data, an online identifier or to one or more factors specific to the physical, physiological, genetic, mental, economic, cultural, or social identity of that natural person.
Residence period The period of time between the end of business and the end of purpose (EoP) for a data set during which the data remains in the database and can be used in case of subsequent processes related to the original purpose. At the end of the longest configured residence period, the data is blocked or deleted. The residence period is part of the overall retention period.
Retention period The period of time between the end of the last business activity involving a specific object (for example, a business partner) and the deletion of the corresponding data, subject to applicable laws. The retention period is a combination of the residence period and the blocking period.
Sensitive personal data A category of personal data that usually includes the following type of information:
● Special categories of personal data, such as data revealing racial or ethnic origin, political opinions, religious or philosophical beliefs, trade union membership, genetic data, biometric data, data concerning health or sex life or sexual orientation, or personal data concerning bank and credit accounts.
● Personal data subject to professional secrecy● Personal data relating to criminal or administrative of
fenses● Personal data concerning insurances and bank or credit
card accounts
Where-used check (WUC) A process designed to ensure data integrity in the case of potential blocking of business partner data. An application's where-used check (WUC) determines if there is any dependent data for a certain business partner in the database. If dependent data exists, this means the data is still required for business activities. Therefore, the blocking of business partners referenced in the data is prevented.
42 PUBLICSAP Open Server and Open Client Configuration Guide for Windows
Security Services

SAP Open Client and Open Server Approach to Data Protection
Many data protection requirements depend on how the business semantics or context of the data stored and processed by the application built using SAP Open Client and Open Server are understood.
NoteUsing capabilities to communicate with other data sources, applications built using SAP Open Client and Open Server may also be used to process data that is stored in other systems.
In applications built using SAP Open Client and Open Server, the business semantics of data are part of the application definition and implementation. SAP Open Client and Open Server provides a set of infrastructure framework APIs for establishing open client/server connections. It is therefore the application that "knows," for example, which tables in a database contain sensitive personal data, or how business level objects, such as sales orders, are stored. Applications built on top of SAP Open Client and Open Server are therefore responsible for implementing compliance requirements for their specific use case.
Applications built using SAP Open Client and Open Server can take advantage of the following security-related features to implement general security requirements that are also required for data protection and privacy:
Aspect of Data Protection and Privacy SAP Open Server and Open Client Feature More Information
Access control SAP Open Client and Open Server take advantage of third-party security software for:
● Authentication● Authorization● Data encryption (for example, network com
munication, password policy)
● Section Secure Sockets Layer in Open Client and Open Server [page 89]
● Section Network-based Security [page 33]
● Section Security Features in the Client-Library/C Reference Manual
Transmission control/communication security
Support for encrypted communication on all internal and external channels
● Section Secure Sockets Layer in Open Client and Open Server [page 89]
● Section Network-based Security [page 33]
Availability control SAP Open Client provides availability control through failover
Section Configuring Open Client for SAP Failover [page 19]
CautionThe extent to which data protection is ensured depends on secure system operation. Network security, security note implementation, adequate logging of system changes, and appropriate usage of the system are the basic technical requirements for compliance with data privacy legislation and other legislation.
SAP Open Server and Open Client Configuration Guide for WindowsSecurity Services PUBLIC 43

11 ocscfg Utility
The ocscfg utility allows you to configure your local machine.
You can set three types of configuration information with ocscfg:
● Environment variables● Directory drivers● Security drivers
NoteYou can also access dsedit while configuring directory services.
Related Information
Starting ocscfg [page 44]Setting Environment Variables [page 45]Configuring a Directory Driver [page 47]Configuring a Security Driver [page 49]
dsedit Utility [page 52]
11.1 Starting ocscfg
You can start ocscfg from Program Manager, the DOS prompt, or the File Manager. You can also start ocscfg from the Start menu or Windows Explorer.
Procedure
1. Choose one of to start ocscfg:
○ From Program Manager, double-click its icon in the SAP program group and from the prompt, enter:
ocscfg
○ From the File Manager,1. Go to %SYBASE%\%SYBASE_OCS%\bin, where %SYBASE% is the installation directory.2. Double-click the ocscfg.exe file.
44 PUBLICSAP Open Server and Open Client Configuration Guide for Windows
ocscfg Utility
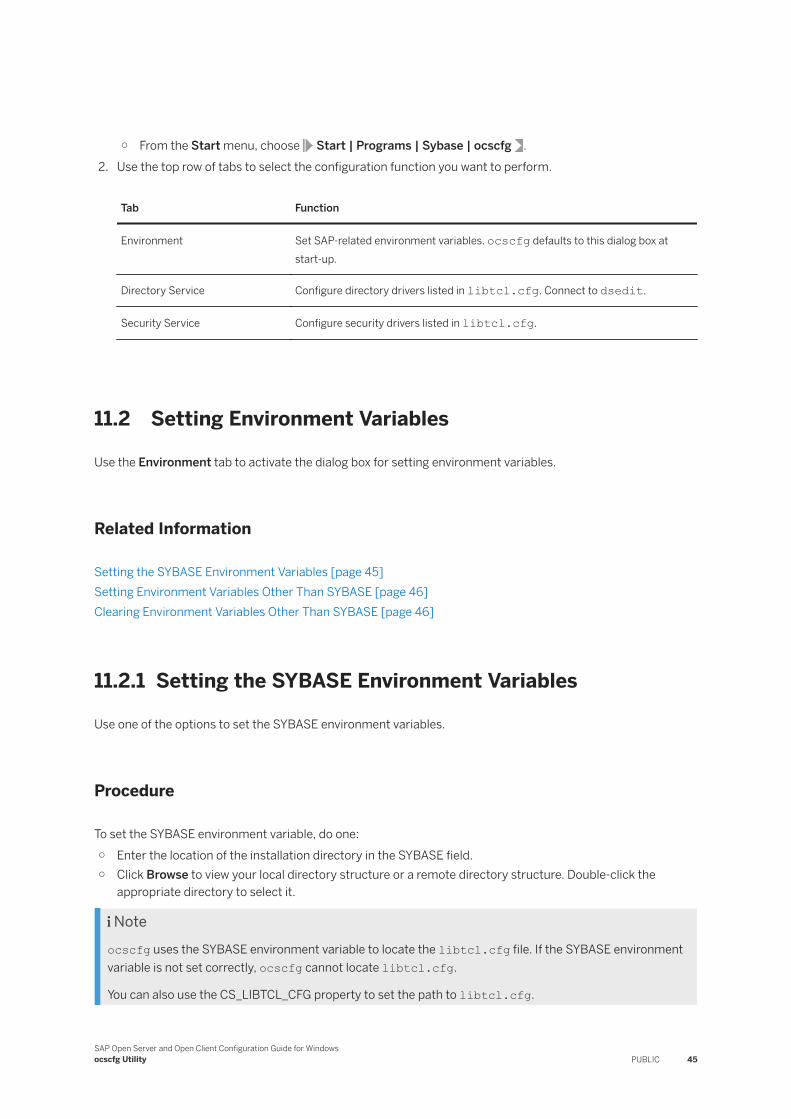
○ From the Start menu, choose Start | Programs | Sybase | ocscfg .2. Use the top row of tabs to select the configuration function you want to perform.
Tab Function
Environment Set SAP-related environment variables. ocscfg defaults to this dialog box at start-up.
Directory Service Configure directory drivers listed in libtcl.cfg. Connect to dsedit.
Security Service Configure security drivers listed in libtcl.cfg.
11.2 Setting Environment Variables
Use the Environment tab to activate the dialog box for setting environment variables.
Related Information
Setting the SYBASE Environment Variables [page 45]Setting Environment Variables Other Than SYBASE [page 46]Clearing Environment Variables Other Than SYBASE [page 46]
11.2.1 Setting the SYBASE Environment Variables
Use one of the options to set the SYBASE environment variables.
Procedure
To set the SYBASE environment variable, do one:○ Enter the location of the installation directory in the SYBASE field.○ Click Browse to view your local directory structure or a remote directory structure. Double-click the
appropriate directory to select it.
Noteocscfg uses the SYBASE environment variable to locate the libtcl.cfg file. If the SYBASE environment variable is not set correctly, ocscfg cannot locate libtcl.cfg.
You can also use the CS_LIBTCL_CFG property to set the path to libtcl.cfg.
SAP Open Server and Open Client Configuration Guide for Windowsocscfg Utility PUBLIC 45

Starting with 15.7 ESD #4, you can also use the SYBOCS_TCL_CFG environment variable to specify the full path to libtcl.cfg.
11.2.2 Setting Environment Variables Other Than SYBASE
Instructions to set environment variable other than SYBASE.
Procedure
1. Select the appropriate environment variable in the Environment Variables dialog box. The name you select appears in the Variable Name dialog box.
2. Enter the value for the selected environment variable in the Value dialog box.3. Click Set.
Related Information
Environment Variables [page 65]
11.2.3 Clearing Environment Variables Other Than SYBASE
Instructions to clear environment variables other than SYBASE.
Procedure
1. Select the appropriate environment variable name in the Environment Variables dialog box. The name you select appears in the Variable Name dialog box.
2. Click Clear.
46 PUBLICSAP Open Server and Open Client Configuration Guide for Windows
ocscfg Utility

11.3 Configuring a Directory Driver
Use the ocscfg utility to configure a directory driver.
Procedure
Click the Directory Services tab to display the dialog box for configuring directory drivers.The ocscfg utility displays the location of libtcl.cfg, the driver configuration file, at the top of the dialog box.
Related Information
Adding a Directory Driver Entry [page 47]Modifying an Existing Directory Driver Entry [page 48]Deleting a Directory Driver Entry [page 49]Activating a Directory Driver [page 49]
11.3.1 Adding a Directory Driver Entry
Instructions to add a directory driver entry.
Procedure
1. Select your platform from the Platform dialog box.2. Click Add at the bottom of the dialog box.
The Add Directory Service Entry dialog box appears.3. Enter the directory service name in the Directory Service Name dialog box. You can name this element
anything as long as it:
○ Contains only letters, numbers, and underscore characters○ Has a maximum of 64 characters
4. Select a driver from the Directory Service Driver dialog box.5. Enter a DIT base value in the Directory Service DIT base box. The DIT base is the location where the
directory service begins its search for the server entry.6. Click OK.
SAP Open Server and Open Client Configuration Guide for Windowsocscfg Utility PUBLIC 47
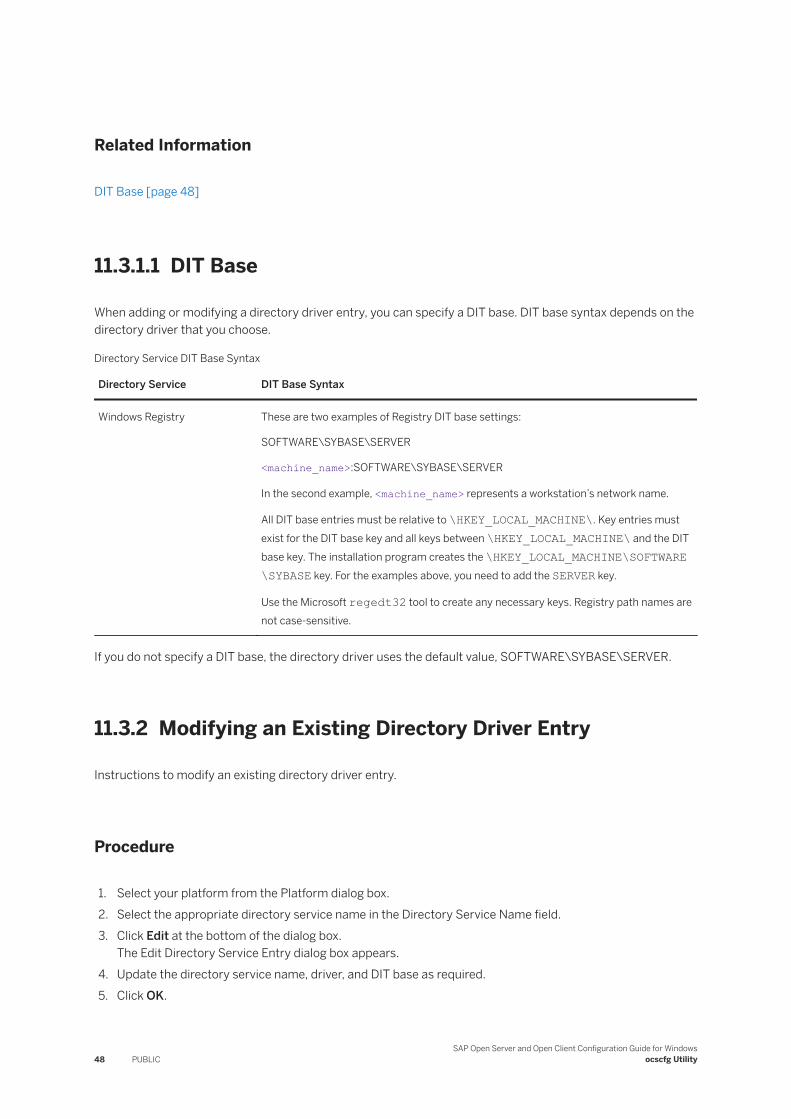
Related Information
DIT Base [page 48]
11.3.1.1 DIT Base
When adding or modifying a directory driver entry, you can specify a DIT base. DIT base syntax depends on the directory driver that you choose.
Directory Service DIT Base Syntax
Directory Service DIT Base Syntax
Windows Registry These are two examples of Registry DIT base settings:
SOFTWARE\SYBASE\SERVER
<machine_name>:SOFTWARE\SYBASE\SERVER
In the second example, <machine_name> represents a workstation’s network name.
All DIT base entries must be relative to \HKEY_LOCAL_MACHINE\. Key entries must exist for the DIT base key and all keys between \HKEY_LOCAL_MACHINE\ and the DIT base key. The installation program creates the \HKEY_LOCAL_MACHINE\SOFTWARE\SYBASE key. For the examples above, you need to add the SERVER key.
Use the Microsoft regedt32 tool to create any necessary keys. Registry path names are not case-sensitive.
If you do not specify a DIT base, the directory driver uses the default value, SOFTWARE\SYBASE\SERVER.
11.3.2 Modifying an Existing Directory Driver Entry
Instructions to modify an existing directory driver entry.
Procedure
1. Select your platform from the Platform dialog box.2. Select the appropriate directory service name in the Directory Service Name field.3. Click Edit at the bottom of the dialog box.
The Edit Directory Service Entry dialog box appears.4. Update the directory service name, driver, and DIT base as required.5. Click OK.
48 PUBLICSAP Open Server and Open Client Configuration Guide for Windows
ocscfg Utility

11.3.3 Deleting a Directory Driver Entry
Instructions to delete a directory driver entry.
Procedure
1. Select your platform from the Platform dialog box.2. Select the appropriate directory service name in the Directory Service Name field.3. Click Delete.
11.3.4 Activating a Directory Driver
ocscfg displays the active directory driver in the Active Directory Service box. The first driver listed is the active driver.
Procedure
1. Select the appropriate directory service name in the Directory Service Name field.2. Click Set Active.
11.4 Configuring a Security Driver
Use the Security Service tab to configure a security driver.
Procedure
Click the Security Service tab to display the dialog box for configuring security drivers.The ocscfg utility displays the location of libtcl.cfg, the driver configuration file, at the top of the dialog box.
Related Information
Adding a Security Driver Entry [page 50]
SAP Open Server and Open Client Configuration Guide for Windowsocscfg Utility PUBLIC 49

Modifying an Existing Security Driver Entry [page 50]Deleting a Security Driver Entry [page 51]Setting the Default Security Driver [page 51]
11.4.1 Adding a Security Driver Entry
Perform these steps to add a security driver entry.
Procedure
1. Select your platform from the Platform dialog box.2. Click Add.
The Add Security Service Entry dialog box appears.3. Type the security service name in the Local Name dialog box.
The local name of the security service must correspond to an entry in objectid.dat.
4. Select a driver from the Security Service Driver box.5. Click OK.
Related Information
The objectid.dat File [page 87]
11.4.2 Modifying an Existing Security Driver Entry
Perform these steps to modify an existing security driver entry.
Procedure
1. Select your platform from the Platform dialog box.2. Select the appropriate security service name in the Local Name field.3. Click the Edit button at the bottom of the dialog box.
The Edit Security Service Entry dialog box appears.4. Update the security service name and driver as required.5. Click OK.
50 PUBLICSAP Open Server and Open Client Configuration Guide for Windows
ocscfg Utility

11.4.3 Deleting a Security Driver Entry
Perform these steps to delete a security driver entry.
Procedure
1. Select your platform from the Platform dialog box.2. Select the appropriate security service name in the Local Name field.3. Click Delete.
11.4.4 Setting the Default Security Driver
The ocscfg utility displays the default security driver in the Default Local Name field. The first driver listed is the default driver.
Procedure
1. Select the appropriate security service name in the Local Name field.2. Click Set Default.
SAP Open Server and Open Client Configuration Guide for Windowsocscfg Utility PUBLIC 51

12 dsedit Utility
The dsedit utility enables you to configure a directory service or sql.ini.
Related Information
Using dsedit [page 52]Adding a Server to the Directory Services [page 55]Making and Modifying Server Entries [page 56]Using the Ping Command [page 59]Copying Server Entries [page 60]Exiting dsedit [page 61]
12.1 Using dsedit
You can start dsedit from its program icon, the DOS prompt, or the File Manager. You can also start dsedit from the Start menu or Explorer.
Procedure
Choose one of the following methods to start dsedit:
○ To start dsedit from its program icon, double-click the dsedit icon in the SAP program group.○ To start dsedit from the DOS prompt, enter:
dsedit
You can specify the following command line arguments:
Argument Description
-d dsname Specifies which directory service to connect to. <dsname> is the local name of the directory service, as listed in the libtcl.cfg file.
If you do not specify the -d dsname argument, dsedit presents a list of directory service options in the first dialog box.
52 PUBLICSAP Open Server and Open Client Configuration Guide for Windows
dsedit Utility

Argument Description
-l path Specifies the path to the libtcl.cfg file, if other than %SYBASE%\%SYBASE_OCS%\ini.
Use this argument only if you want to use a libtcl.cfg file other than the one located in %SYBASE%\%SYBASE_OCS%\ini.
○ To start dsedit through the File Manager or Explorer:1. Go to the %SYBASE%\%SYBASE_OCS%\bin directory.2. Double-click dsedit.exe.
○ To start dsedit from the Start menu, choose Start | Programs | Sybase | dsedit .
Related Information
Opening a Session [page 53]
12.1.1 Opening a Session
The Select Directory Service dialog box allows you to open a session with a directory service.
Context
You can open a session using one of:
● Any directory service that has a driver listed in libtcl.cfg● sql.ini
Procedure
To open a session, do one of the following:○ In the DS Name box, double-click the local name of the directory service to which you want to connect.○ Click the local name of the directory service to which you want to connect and click OK.
Notedsedit uses the SYBASE environment variable to locate libtcl.cfg. If you do not set the SYBASE environment variable correctly, dsedit will not locate libtcl.cfg.
The session number and local name of the directory service appear in the header bar.
SAP Open Server and Open Client Configuration Guide for Windowsdsedit Utility PUBLIC 53
Related Information
Opening Additional Sessions [page 54]Activating Sessions [page 54]
12.1.1.1 Opening Additional Sessions
The dsedit utility allows you to have multiple sessions open.
Procedure
1. Choose Open Directory Service from the File menu.The Select Directory Service box appears.
2. Double-click the local name of the directory service to which you want to be connected, or click the directory service name and click OK.
Results
Opening multiple sessions allows you to copy entries between directory services.
Related Information
Copying Server Entries [page 60]
12.1.1.2 Activating Sessions
You must activate a session before you can work in it.
Procedure
To activate a session, do one of:
○ Click in the session window.○ Choose the session from the Window menu.
54 PUBLICSAP Open Server and Open Client Configuration Guide for Windows
dsedit Utility

The top dsedit header bar shows which session is active.
12.2 Adding a Server to the Directory Services
dsedit is a graphical utility that allows you to add, delete and modify servers in the libtcl*.cfg and sql.ini files.
Before you can add, delete, or modify an LDAP server entry, you must add the LDAP URL to the libtcl*.cfg file.
CautionMost LDAP servers have an ldapadd utility for adding directory entries. SAP recommends that you use dsedit instead, as it has built-in semantic checks that generic tools do not provide.
Related Information
Adding a Server to the Directory Service Using dsedit [page 55]
The libtcl.cfg and libtcl64.cfg Files [page 69]
12.2.1 Adding a Server to the Directory Service Using dsedit
Use dsedit to add server to the directory service.
Procedure
1. From the Microsoft Windows task bar, select Start | Programs | Sybase | dsedit .
2. Select LDAP from the list of servers, and click OK.3. Click Add New Server Entry.4. Enter:
○ The server name – required.○ Security mechanism – optional.
A list of security mechanism OIDs are located in %SYBASE%\ini\objectid.dat.○ HA server name – optional. This is the name of the High Availability Failover server, if you have one.
5. Click Add New Network Transport.
○ Select the transport type from the drop-down list.
SAP Open Server and Open Client Configuration Guide for Windowsdsedit Utility PUBLIC 55

○ Enter the host name.○ Enter the port number.
6. Click OK twice to exit the dsedit utility.
Results
To view the server entries, enter the following URL in a supported Web browser :
ldap://<host>:<port>/ditbase??one
For example:
ldap://huey:11389/dc=sybase,dc=com??one
NoteMicrosoft Internet Explorer does not recognize LDAP URLs.
12.3 Making and Modifying Server Entries
Use directory service or sql.ini to add, modify, rename, and delete server entries associated with that session.
Procedure
1. Open a session with a directory service or sql.ini, you can add, modify, rename, and delete server entries associated with that session.The server entries associated with the session appear in the Server dialog box.
2. Click a server entry to select it.
Each server entry is made up of a set of attributes. The attributes and attribute values of a server entry appear on the right side of the dialog box.
Related Information
Server Attributes [page 57]Adding a Server Entry [page 58]Modifying a Server Entry [page 58]Renaming a Server Entry [page 59]
56 PUBLICSAP Open Server and Open Client Configuration Guide for Windows
dsedit Utility
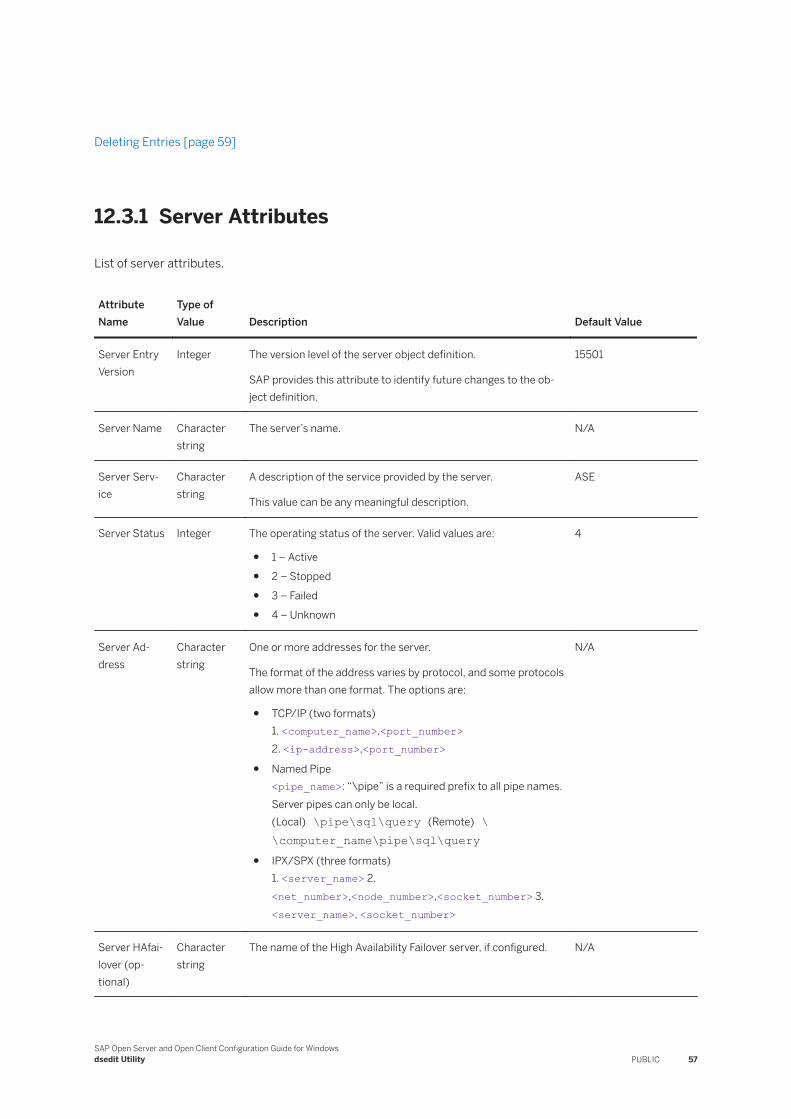
Deleting Entries [page 59]
12.3.1 Server Attributes
List of server attributes.
Attribute Name
Type of Value Description Default Value
Server Entry Version
Integer The version level of the server object definition.
SAP provides this attribute to identify future changes to the object definition.
15501
Server Name Character string
The server’s name. N/A
Server Service
Character string
A description of the service provided by the server.
This value can be any meaningful description.
ASE
Server Status Integer The operating status of the server. Valid values are:
● 1 – Active● 2 – Stopped● 3 – Failed● 4 – Unknown
4
Server Address
Character string
One or more addresses for the server.
The format of the address varies by protocol, and some protocols allow more than one format. The options are:
● TCP/IP (two formats)1. <computer_name>,<port_number>2. <ip-address>,<port_number>
● Named Pipe<pipe_name>: “\pipe” is a required prefix to all pipe names. Server pipes can only be local.(Local) \pipe\sql\query (Remote) \\computer_name\pipe\sql\query
● IPX/SPX (three formats)1. <server_name> 2. <net_number>,<node_number>,<socket_number> 3. <server_name>, <socket_number>
N/A
Server HAfailover (optional)
Character string
The name of the High Availability Failover server, if configured. N/A
SAP Open Server and Open Client Configuration Guide for Windowsdsedit Utility PUBLIC 57
Attribute Name
Type of Value Description Default Value
Server Security (optional)
Character string
Object identifier strings (OID) that specify the security mechanisms supported by the server. This attribute is optional. If it is omitted, the Open Server allows clients to connect with any security mechanism for which the Open Server has a corresponding security driver. (See Server Library and security services for process details.)
See objectid.dat for more information about object identifier strings.
N/A
12.3.2 Adding a Server Entry
Learn how to add a server entry.
Procedure
1. Choose Add from the Server Object menu.The Input Server Name box appears.
2. Type a server name in the Server Name dialog box.3. Click OK.
The server entry appears in the Server dialog box.4. To specify an address for the server, you must modify the entry.
12.3.3 Modifying a Server Entry
Learn how to modify a server entry.
Procedure
1. Click a server entry in the Server dialog box.2. Click the attribute you want to modify in the Attributes dialog box.3. Choose Modify Attribute from the Server Object menu.
A dialog box appears, showing the current value of the attribute.4. Enter a new value for the attribute or select a value from the drop-down list.
See the Server Attributes table for a description of each attribute.
58 PUBLICSAP Open Server and Open Client Configuration Guide for Windows
dsedit Utility
5. Click OK.
12.3.4 Renaming a Server Entry
Learn how to rename a server entry.
Procedure
1. Click a server entry in the Server dialog box.2. Choose Rename from the Server Object menu.
The Input Server Name box appears.3. Enter a new name for the server entry in the Server Name dialog box.4. Click OK.
12.3.5 Deleting Entries
Delete server entres using the Sever Object menu.
Procedure
1. Click a server entry in the Server dialog box.2. Choose Delete from the Server Object menu.
12.4 Using the Ping Command
Use the ping command to verify your network connection.
Procedure
1. Click a server entry in the Server dialog box.2. Select the Ping command from the Server Object menu. The Ping dialog box appears.3. Click the address you want to ping.
SAP Open Server and Open Client Configuration Guide for Windowsdsedit Utility PUBLIC 59

4. Click Ping.
Results
A message box notifies you whether the connection is successful or if the connection fails.
Related Information
Troubleshooting Connection Failures [page 62]
12.5 Copying Server Entries
The dsedit utility allows you to copy server entries within a session and between sessions. This includes copying entries from an sql.ini file to a directory service.
Related Information
Copying Entries Within a Session [page 60]Copying Entries Between Sessions [page 61]
12.5.1 Copying Entries Within a Session
Learn how to copy entries within a session.
Procedure
1. Click one or more server entries in the Server dialog box. Use the Shift key to select multiple entries.2. Click the Copy button (below the menu bar), or choose Copy from the Edit menu.3. Click the Paste button (below the menu bar) or choose Paste from the Edit menu.
dsedit appends the copied server entries with a version number of _<n>. You can rename the copied server entries using the Rename command in the Server Object menu.
60 PUBLICSAP Open Server and Open Client Configuration Guide for Windows
dsedit Utility

Related Information
Renaming a Server Entry [page 59]
12.5.2 Copying Entries Between Sessions
Use the directory service or sql.ini, open a session to which you want the entries copied.
Procedure
1. To open a session, choose Open Directory Service from the File menu.2. Click one or more server entries in the Server box of the session from which you want the entries copied.
Use the Shift key to select multiple entries.3. To copy the server entries, click Copy, or choose Copy from the Edit menu. To cut the server entries, click
Cut, or choose Cut from the Edit menu.4. Activate the session to which you want to paste the server entries.5. Click Paste, or choose Paste from the Edit menu.
You can rename the copied server entries using the Rename command in the Server Object menu.
Related Information
Opening Additional Sessions [page 54]Activating Sessions [page 54]Renaming a Server Entry [page 59]
12.6 Exiting dsedit
Choose Exit from the File menu to exit dsedit.
SAP Open Server and Open Client Configuration Guide for Windowsdsedit Utility PUBLIC 61

13 Troubleshooting with dsedit
Use dsedit, SAP’s directory services utilities, to test the network connection between a Client-Library application and an Adaptive Server, or Open Server application.
dsedit allows you to verify that your Net-Library software has been installed correctly and that you can connect to an Adaptive Server, or an Open Server application. dsedit mimics the interaction of the Client-Library ct_connect routine and Net-Library but does not require a valid user name on an Adaptive Server or an Open Server application.
You can run dsedit anytime after the Net-Library installation is complete.
To test a server connection, ping the server using dsedit.
Related Information
Troubleshooting Connection Failures [page 62]Commonly Asked Questions [page 64]
dsedit Utility [page 52]
13.1 Troubleshooting Connection Failures
If your application fails to connect to a server, run dsedit. Reviewing the messages that dsedit displays may provide you with enough information to solve the problem.
Some types of problems are not diagnosed by dsedit; these are usually problems in your Adaptive Server or Open Server setup, rather than in a Net-Library-to-network-software connection.
Related Information
If dsedit Fails [page 63]If dsedit Succeeds but Other Applications Fail [page 63]
If dsedit Succeeds but Other Applications Fail [page 63]
62 PUBLICSAP Open Server and Open Client Configuration Guide for Windows
Troubleshooting with dsedit

13.1.1 If dsedit Fails
If dsedit does not make a successful connection, ensure that all the basic Net-Library requirements have been met.
● Adaptive Server or Open Server is running on a server machine.● A network hardware connection exists between your PC and the server machine.● Your PC meets minimum hardware and software requirements.● The network vendor’s software is installed and running on your PC.● The connection information in sql.ini is correct.
If these requirements have been met, determine the point at which dsedit failed by reviewing the messages it displays.
If dsedit cannot connect to a server, it displays a message box.
If dsedit finds the connection information but notifies you that the server is not responding:
● Verify that the server is running. If you have access to the machine running the server, try using isql to log in to the server. Otherwise, ask your system administrator to verify that the server you need is running.
● Verify that the networking software and hardware are properly configured. For example, check connectors, plugs, and so on, and confirm that your network software is running.
● Check for any network error messages displayed in the message boxes, or check the system event log for errors.
● Ask your system administrator to verify that your connection information provides the correct values to connect to the machine running the server, or use the utilities provided with your network software to verify this.
If you cannot resolve the problem yourself, have your designated SAP support contact call SAP Technical Support to report the problem.
13.1.2 If dsedit Succeeds but Other Applications Fail
Workaround if dsedit does not report any errors but your other applications fail to run.
● Verify whether your application uses the default server. If it passes a server name in the ct_connect routine, make sure you selected the corresponding server from the dsedit list before you tested the connection.
● Verify that you have a valid user login name for Adaptive Server or the Open Server application, and that your permissions on databases and tables are consistent with the permissions required to run your applications.
● Use the isql utility to verify that you can access your Adaptive Server or Open Server application. isql is described in Open Client and Open Server Programmers Supplement.
● On the machine that is running Adaptive Server or the Open Server application, use isql to verify that the databases and tables used by your application exist. If you do not have access to the machine running Adaptive Server or the Open Server application, or if you are unfamiliar with isql, ask your database administrator to check for you.
SAP Open Server and Open Client Configuration Guide for WindowsTroubleshooting with dsedit PUBLIC 63

13.2 Commonly Asked Questions
List of common problems and questions.
Questions Answers
I just got a new version of one of the DLLs supplied by SAP. Why does my software still exhibit the old behavior?
Verify that only one copy of the DLL exists on your machine. If you find a second DLL with the same name, check your path to see which directory is listed first; you may be inadvertently loading the older version of the DLL.
Why does cs_ctx_alloc fail? Open sybinit.err to find a detailed description about why cs_ctx_alloc failed. sybinit.err is in the directory in which the application resides.
Why does ct_init fail? Open the sybinit.err file to find a detailed description about why cs_init failed. You can find this file in the directory in which the application resides.
Verify that all of the drivers listed in libtcl.cfg are installed, and that the path to the files is listed in wsybset.bat.
When running isql or dsedit, why do I get a “File Error” stating that it cannot find a DLL that is not one supplied by SAP?
The DLL is probably a network vendor DLL, and the message may mean that your network is not installed properly.
64 PUBLICSAP Open Server and Open Client Configuration Guide for Windows
Troubleshooting with dsedit

14 Environment Variables
Environment variables that contain configuration information.
Related Information
Environment Variables Used for Connection [page 65]Environment Variables Used for Localization [page 66]Environment Variables Used for Configuration [page 66]
14.1 Environment Variables Used for Connection
Open Client and Open Server use these environment variables during the connection process.
Variable Value Default Used By
DSLISTEN The name of the Open Server application, as listed in sql.ini or directory service.
If DSLISTEN is not set, Open Server uses the default value “SYBASE.”
SYBASE Open Server.
Uses DSLISTEN only if the Open Server application does not specify a server during initialization.
DSQUERY The name of the target server, as listed in sql.ini or directory service.
If DSQUERY is not set, Open Client uses the default value “SYBASE.”
SYBASE Open Client.
Uses DSQUERY only if the Open Client application does not specify the name of the server.
SYBASE The location of the installation directory.
Home directory of the “sybase” user
Open Client and Open Server.
SYBASE_ OCS Home directory for the Open Client and Open Server products.
OCS-15_0 Open Client and Open Server.
PATH The directory paths that Open Client and Open Server products search to find executables and DLLs.
Executables Open Client and Open Server.
SAP Open Server and Open Client Configuration Guide for WindowsEnvironment Variables PUBLIC 65

14.2 Environment Variables Used for Localization
Open Client and Open Server use these environment variables during localization.
Environment Variable Set It to a Locale Name That Indicates Used During
LC_ALL Language, character set, and collating sequence to use for messages, datatype conversions, and sorting.
Initial localization, custom localization
LANG Language, character set, and collating sequence to use for messages, datatype conversions, and sorting.
Open Client and Open Server products search for LANG if they cannot find LC_ALL.
Initial localization
LC_COLLATE Collating sequence (sort order) to use when sorting and comparing character data.
Custom localization
LC_CTYPE Character set to use for datatype conversions. Custom localization
LC_MESSAGE Language to use for messages. Custom localization
LC_TIME Date and time data representation to use for a datetime string, such as date and time formats, names in the native language, and month and day abbreviations.
Custom localization
The LC_* environment variables are POSIX standard environment variables and can be used by non-SAP applications. Verify that the locales.dat file lists the same locale names as are used by the environment variables of the non-SAP application.
14.3 Environment Variables Used for Configuration
Open Client and Open Server products use these environment variables during the configuration process.
Environment Variable Description Used During
SYBOCS_CFG Overrides the %SYBASE%\%SYBASE_OCS%\ini\ocs.cfg default external configuration file path.
Runtime
66 PUBLICSAP Open Server and Open Client Configuration Guide for Windows
Environment Variables

Environment Variable Description Used During
SYBOCS_DBVERSION Externally configures the DB-Library version level at runtime. DB-Library uses this variable to retrieve the environment variable at the DB-Library initialization stage and store the environment variable value as the version level.
For more information, see the Open Client DB-Library/C Reference Manual.
Runtime
SYBOCS_DEBUG_FLAGS Enables specific diagnostic subsystems. You can enable multiple debug options by specifying a comma-delimited list of flags in the variable.
For information about debugging, see the Open Client Client-Library/C Reference Manual.
Runtime
SYBOCS_DEBUG_ LOGFILE Specifies the log file where the diagnostics are recorded. If you do not set this, messages are written to stdout.
See the Open Client Client-Library/C Reference Manual.
Runtime
SYBOCS_TCL_CFG Sets the full path name of the libtcl.cfg and libtcl64.cfg files. For example:
setenv SYBOCS_TCL_CFG c:\joe\libtcl.cfg
Runtime
SAP Open Server and Open Client Configuration Guide for WindowsEnvironment Variables PUBLIC 67

15 Configuration Files
The files that Open Client and Open Server products use to obtain configuration information.
Configuration files are created during installation at a default location in the installation directory structure.
Names and Locations for Configuration Files
File Name Description LocationFor More Information
libtcl.cfg The driver configuration file contains information regarding directory, security, and network drivers and any required initialization information.
%SYBASE%\ %SYBASE_OCS%\ini
NoteUse the CS_LIBTCL_CFG property or the SYBOCS_TCL_CFG environment variable to specify an alternate path to libtcl.cfg file.
See The libtcl.cfg and libtcl64.cfg File.
Also see the Open Client and Open Server Common Libraries Reference Manual.
sql.ini This file contains network and security information for each server listed in the file. It is also used as a backup to the libtcl.cfg file.
%SYBASE%\ini See The sql.ini File.
objectid.dat
The object identifiers file maps global object identifiers to local names for character set, collating sequence, and security mechanisms.
%SYBASE%\ini See Localization.
ocs.cfg The runtime configuration file allows you to change certain Open Client application values at runtime.
%SYBASE%\%SYBASE_OCS%\ini See The ocs.cfg File.
Related Information
The libtcl.cfg and libtcl64.cfg Files [page 69]The sql.ini File [page 76]The ocs.cfg File [page 80]
Localization [page 81]The libtcl.cfg and libtcl64.cfg Files [page 69]The sql.ini File [page 76]The ocs.cfg File [page 80]
68 PUBLICSAP Open Server and Open Client Configuration Guide for Windows
Configuration Files

15.1 The libtcl.cfg and libtcl64.cfg Files
The libtcl.cfg and the libtcl64.cfg files (collectively, libtcl*.cfg file) are the driver configuration files.
These files contain information about two types of drivers used by Open Client and Open Server products:
● Directory drivers● Security drivers
A driver is a library that provides Open Client and Open Server software with a generic interface to an external service provider. This allows Open Client and Open Server to support multiple service providers.
Open Client and Open Server reads libtcl*.cfg when loading a network, directory, or security driver. An entry in libtcl.cfg provides Open Client and Open Server products with the name of the driver and its initialization information.
The purpose of the libtcl*.cfg files is to provide configuration information such as driver, directory, and security services for Open Client and Open Server and for Open Client and Open Server-based applications. Both libtcl.cfg and libtcl64.cfg are provided on 64-bit platforms. 32-bit applications (on 64-bit platforms), such as dsedit and srvbuild, look up the libtcl.cfg file, while 64-bit applications look up the libtcl64.cfg file for configuration information.
The libtcl*.cfg file determines whether the sql.ini file or LDAP directory services should be used. If LDAP is specified in the libtcl*.cfg file, the sql.ini file is ignored unless the application specifically overrides the libtcl*.cfg file by passing the -I parameter while connecting to a server.
Related Information
Layout of libtcl.cfg [page 69]
15.1.1 Layout of libtcl.cfg
libtcl.cfg is divided into sections, one for each type of driver.
ocscfg creates the section headings as follows:
Section Heading Description
NT_DIRECTORY Lists the Microsoft Windows directory driver
SECURITY Lists the Microsoft Windows security driver
NoteThe sections do not have to be in a specific order.
SAP Open Server and Open Client Configuration Guide for WindowsConfiguration Files PUBLIC 69

Related Information
Directory Drivers [page 70]For LDAP entries in the DIRECTORY Section [page 71]Security Drivers [page 73]libtcl.cfg Example [page 76]
15.1.1.1 Directory Drivers
Information on syntax for directory drivers.
The syntax for a directory driver entry:
<provider>=<driver> <ditbase>
where:
● <provider> is a local name of the directory service. You can name this element anything as long as it contains only letters, numbers, and underscores and has a maximum of 64 characters.
● <driver> is the name of the Microsoft Windows Registry driver called LIBSYBDREG. The default location for drivers is in %SYBASE%\%SYBASE_OCS%\dll.
● <ditbase> is where the directory service begins its search for the server entry. The syntax for <ditbase> depends on the directory service provider:
Directory Service DIT Base Syntax
Microsoft Windows Registry Following are two examples of Registry DIT base settings:
ditbase=SOFTWARE\SYBASE\SERVER
ditbase=<machine_name>:SOFTWARE\SYBASE\SERVER
In the second example, <machine_name> represents a workstation’s network name.
All DIT base entries must be relative to \HKEY_LOCAL_MACHINE\. Key entries must exist for the DIT base key and all keys between \HKEY_LOCAL_MACHINE\ and the DIT base key.
Use the Microsoft regedt32 tool to create any other necessary keys. Registry entries are not case-sensitive.
If you use DCE directory services, DIT base information in the libtcl.cfg file uses this syntax:
ditbase=/.:/dce_cell_name
For example:
ditbase=/.:/subsys/sybase/dataservers
70 PUBLICSAP Open Server and Open Client Configuration Guide for Windows
Configuration Files

15.1.1.2 For LDAP entries in the DIRECTORY Section
In its simplest form, LDAP directory services are specified in this format.
[DIRECTORY] ldap=libsybdldap.dll <ldapurl>
where the <ldapurl> is defined as:
ldap://<host:port/ditbase>
The following LDAP entry, using these same attributes, is an anonymous connection and only works only if the LDAP server allows read-only access.
ldap=libsybdldap.dll ldap://test:389/dc=sybase,dc=com
You can specify a user name and password in the libtcl*.cfg file as extensions to the LDAP URL to enable password authentication at connection time.
To set the user name, enter:
if (ct_con_props(conn, CS_SET, CS_DS_PRINCIPAL, <ldapprincipal>, strlen(<ldapprincipal>), (CS_INT *)NULL) != CS_SUCCEED) { ... }
To set the password, enter:
if (ct_con_props(conn, CS_SET, CS_DS_PASSWORD, <ldappassword>, strlen(<ldappassword>), (CS_INT *)NULL) != CS_SUCCEED) { ... }
Related Information
Encrypting the Password [page 72]
SAP Open Server and Open Client Configuration Guide for WindowsConfiguration Files PUBLIC 71

15.1.1.2.1 Encrypting the Password
Entries in the libtcl.cfg and libtcl64.cfg files are in human-readable format. SAP provides a pwdcrypt utility for basic password encryption.
Context
pwdcrypt is a simple algorithm that, when applied to keyboard input, generates an encrypted value that can be substituted for the password. pwdcrypt is located in %SYBASE%\%SYBASE_OCS%\bin.
Procedure
1. From the Open Client and Open Server (OCS) directory, enter at your command prompt:
bin/pwdcrypt
2. Enter your password twice when prompted. pwdcrypt generates an encrypted password, for example:
0x01312a775ab9d5c71f99f05f7712d2cded2i8d0ae1ce78868d0e8669313d1bc4c706
3. Copy and paste the encrypted password into the libtcl*.cfg file using any standard ASCII-text editor. Before encryption, the file entry appears as follows:
NoteThe LDAP URL must be on a single line.
ldap=libsybdldap.dll ldap://dolly/dc=sybase,dc=com????bindname=cn=Manager,dc=sybase, dc=com?secret
4. Replace the password with the encrypted string:
ldap=libsybdldap.dll ldap://dolly/dc=sybase,dc=com????bindname=cn=Manager,dc=sybase,dc=com? 0x01312a775ab9d5c71f99f05f7712d2cded2i8d0ae1ce78868d0e8669313d1bc4c706
CautionEven if your password is encrypted, you should still protect it using file-system security.
72 PUBLICSAP Open Server and Open Client Configuration Guide for Windows
Configuration Files

15.1.1.3 Security Drivers
Information on syntax for a security driver.
Following is the syntax for a security driver entry:
<provider>=<driver init_string>
where:
● <provider> is the local name for the security mechanism. The local name of the security mechanism listed in the object identifiers file, %SYBASE%\ini\objectid.dat.
● <driver> is the name of the driver. The default location for drivers is in %SYBASE%\%SYBASE_OCS%\dll. The possible <driver> values are:
Driver Name Description
libsybsmssp.dll Microsoft Windows LAN Manager driver
libsybskrb.dll Kerberos security driver
● <init_string> is an initialization string for the security driver. This element is optional. The value for <init_string> varies by driver.For the Kerberos driver, <init_string> specifies the optional qualifier for the security principal names. The syntax for <init_string> is as follows, where <realm> is the value to append to a principal name if the realm information is not available. If the realm name does not start with an “at” sign (@), a forward slash (/) is inserted between the principal name and the realm information.
secbase=<realm>
Related Information
Using Security Service Initialization Syntax [page 74]Using DCE Security Service Initialization Syntax [page 75]
The objectid.dat File [page 87]
SAP Open Server and Open Client Configuration Guide for WindowsConfiguration Files PUBLIC 73

15.1.1.3.1 Using Security Service Initialization Syntax
Open Client and Open Server support the Kerberos security driver.
Procedure
To use the Kerberos security driver, perform one of:○ Use the ocscfg utility to make an addition to the Security Services.○ Edit the libtcl.cfg directly in the %SYBASE%\%SYBASE_OCS%\ini directory.
Related Information
Using the ocscfg utility [page 74]Editing libtcl.cfg [page 75]
15.1.1.3.1.1 Using the ocscfg utility
Use the ocscfg to add the security services.
Procedure
1. Navigate to the Security Services tab and click Add. Complete the dialog box:○ Local Name: Enter csfkrb5, or the name you assigned to the Kerberos driver in the objectid.dat
file.○ Security Service Driver: Choose LIBSYBSKRB from the Security Service Init String menu.
2. When you have entered these two items, click OK. The entry should now appear in the dialog box on the Security Services tab.
74 PUBLICSAP Open Server and Open Client Configuration Guide for Windows
Configuration Files
15.1.1.3.1.2 Editing libtcl.cfg
You can edit the libtcl.cfg to add the security driver.
Procedure
If you prefer to edit the libtcl.cfg file directly, set the provider value for the Kerberos security driver to csfkrb5, or to the value you assigned to the Kerberos security driver in the objectid.dat file. Set the driver value to LIBSYBSKRB. You need to provide an initialization string in the libtcl.cfg of the form:
secbase=@<your_realm_name>
where your_realm_name is the realm where your Kerberos principal is located. This entry is required on Microsoft Windows. For example:
[SECURITY] csfkrb5=LIBSYBSKRB secbase=@SYBASE_CYBER_REALM
Related Information
Localization [page 81]
15.1.1.3.2 Using DCE Security Service Initialization Syntax
Learn how to use DCE security service initialization syntax.
Procedure
If you use DCE security service, initialization string information in the libtcl.cfg file uses this syntax:
secbase=/.../<dce_cell_name>
For example:
secbase=/.../dsatestcell
SAP Open Server and Open Client Configuration Guide for WindowsConfiguration Files PUBLIC 75

15.1.1.4 libtcl.cfg Example
Use ocscfg to configure drivers in the libtcl.cfg file.
[NT_DIRECTORY] ntreg_dsa=LIBDREG ditbase=software\sybase\serverdsa
[SECURITY] NTLM=LIBSMSSP
Related Information
ocscfg Utility [page 44]
15.2 The sql.ini File
The sql.ini file contains information about the network locations of servers.
Open Client and Open Server use sql.ini as a limited-function directory service. sql.ini also serves as a default if an external directory service fails. By default, Open Client and Open Server products look for sql.ini in the %SYBASE%\ini directory.
● Open Client uses the network information provided by the query line of a sql.ini file entry to connect to the server.
● Open Server uses the network information provided by the master line of a sql.ini file entry to listen for client connection requests.
An application can specify a different location for Open Client and Open Server products to look for sql.ini. See ct_config in the Open Client Client-Library/C Reference Manual and srv_props in the Open Server Server-Library/C Reference Manual for more information. Use dsedit to edit sql.ini.
Related Information
sql.ini Entries [page 77]sql.ini Examples [page 78]Multiple Connection Service Entries [page 79]
dsedit Utility [page 52]
76 PUBLICSAP Open Server and Open Client Configuration Guide for Windows
Configuration Files
15.2.1 sql.ini Entries
Details of sql.ini entries define the service type and secmech.
A sql.ini file entry has the form:
[<SERVERNAME>] <service_type>=<driver>,<address>secmech=<mechanism1>,...,<mechanismn>
where:
● <SERVERNAME> is an alias by which Open Client or Open Server recognizes which sql.ini entry to read. <SERVERNAME> must begin with a letter (ASCII a-z, A-Z); can contain letters, numbers, and underscores only; and have a maximum of 11 characters.
● <service_type> specifies the type of connection.For Microsoft Windows, the options for <service_type> are:○ “master” for a master line, which is used by server applications to listen for client queries.○ “query” for a query line, which is used by client applications to find servers.
The master line and the query line of a sql.ini entry contain identical information. dsedit creates both types of lines for each entry. The resulting entry can be used by both clients and servers.
● <driver> is the name of the network driver to use for the connection. A list of network drivers are:
Driver Description
NLWNSCK Winsock TCP/IP driver
NLMSNMP Named Pipes driver
NLNWLINK SPX/IPX driver
● <address> is the network address for the specified server. The format of the address information depends on the network protocol used for the connection. The options for <address> are:
Protocol Format(s) Examples
TCP/IP Two formats:
1. <computer_name>,<port_number>
2. <ip-address port_number>
TEST,8877 130.214.30.25,8877
Named Pipe <pipe_name>: “\pipe” is a required prefix to all pipe names. Server pipes can only be local.
(Local) \pipe\sql\query (Remote) \\computer_name\pipe\sql\query
SAP Open Server and Open Client Configuration Guide for WindowsConfiguration Files PUBLIC 77

Protocol Format(s) Examples
IPX/SPX Three formats:
1. <server_name> 2. <net_number>,<node_number>,<socket_number> 3. <server_name>, <socket_number>
TEST 16,1,83BD TEST,83BD
● “secmech” is the identifier used to list the security mechanisms that a server supports. The “secmech” line is optional.
● <mechanism1,..., mechanism> are the security mechanisms that a server supports. You can specify multiple security mechanisms by using a comma (“,”) as a separator.A security mechanism is listed as its object identifier. An object identifier is a globally unique series of numbers that maps to the local name for a security mechanism in the global object identifiers file.
Related Information
Security Mechanisms [page 33]The objectid.dat File [page 87]
15.2.2 sql.ini Examples
List of sql.ini examples for each protocol.
Protocol Example
TCP/IP [SYBASE] master=NLWNSCK,TEST,8877 query=NLWNSCK,TEST,8877
Named Pipe [SYBASE] master=NLMSNMP,\PIPE\SQL\`QUERY query=NLMSNMP,\\TEST\PIPE\SQL\`UERY
78 PUBLICSAP Open Server and Open Client Configuration Guide for Windows
Configuration Files

15.2.3 Multiple Connection Service Entries
A server can listen for clients over multiple networks. Clients can connect to servers over multiple networks at runtime.
Related Information
Listening Servers Over Multiple Networks [page 79]Connecting Clients Over Multiple Networks [page 79]
15.2.3.1 Listening Servers Over Multiple Networks
Edit the server’s sql.ini file to listen over multiple networks by creating multiple “master” entries, one for each network the server will listen on.
Procedure
For example, the server “MYSERVER” has the following sql.ini entry:
MYSERVER master = NLWNSCK,mercury,1234 master = NLNWLINK,my_mercury_spx
When a server parses sql.ini and sees the server name MYSERVER, it listens at the TCP/IP address “mercury,1234” for incoming TCP/IP connections and at the SPX bindery address “my_mercury_spx” for incoming IPX/SPX connections.
15.2.3.2 Connecting Clients Over Multiple Networks
Connecting clients over multiple networks using sql.ini file.
Procedure
Edit the client’s sql.ini file to connect over multiple networks by creating multiple “query” entries, one for each network to which the client will connect. For example, the server “SERVER99” has the following “query” services in its sql.ini entry:
SERVER99
SAP Open Server and Open Client Configuration Guide for WindowsConfiguration Files PUBLIC 79
query = NLWNSCK,mercury,1234 query = NLWNSCK,plato,9876 query = NLMSNMP,\\plato\pipe\sql\query query = NLNWLINK,my_mercury_spx
An Open Client application tries to connect first to the server at “mercury,1234.” If that attempt fails, it tries the server at “plato,9876.” If that attempt fails, it tries the server at “\\plato\pipe\sql\query” using the Named Pipes protocol. As a final attempt, it tries the server at “my_mercury_spx” using the IPX/SPX protocol. If the final attempt fails, Open Client returns an error.
15.3 The ocs.cfg File
The ocs.cfg runtime configuration file is used by Client-Library applications.
Using the ocs.cfg file, Client-Library applications can set:
● Property values● Server option values● Server capabilities● Debugging options
By using ocs.cfg, applications eliminate the need to call routines to set values; therefore, the application’s settings can be changed without recompiling the code.
Client-Library does not read ocs.cfg by default. The application must set properties to enable Client-Library to use this file.
See Using the Open Client and Open Server Runtime Configuration File in the Open Client Client-Library/C Reference Manual for information about the file syntax and the properties that can be set in the file.
For more information on syntax, see the Open Client Client-Library/C Reference Manual.
80 PUBLICSAP Open Server and Open Client Configuration Guide for Windows
Configuration Files

16 Localization
Localization is the process of initializing an application so that it executes using a specific language and related cultural conventions.
For a discussion of programming issues related to localization, see the Open Client and Open Server International Developers Guide.
Open Client and Open Server applications can localize in two ways:
● Using initial localization values● Using both initial localization values and custom localization values
All Open Client and Open Server applications use initial localization values, which are determined at runtime.
In addition, an Open Client and Open Server application can use custom localization values if a need exists to localize at a specific point during the application’s execution. Custom localization values override the initial localization values that are set up at runtime.
Related Information
Environment Variables Used During Localization [page 81]Localization Files [page 82]The Locales Directory [page 83]The Charsets Directory [page 86]The ini Directory [page 87]
16.1 Environment Variables Used During Localization
Open Client and Open Server use environment variables to determine which locale name to look for in locales.dat.
When setting up initial localization values, Open Client and Open Server search for the following environment variables:
● LC_ALL● LANG, if LC_ALL is not set
When setting up custom localization values, Open Client and Open Server may also search for one or more of the following environment variables:
● LC_ALL● LC_COLLATE● LC_TYPE
SAP Open Server and Open Client Configuration Guide for WindowsLocalization PUBLIC 81

● LC_MESSAGE● LC_TIME
See the Open Client and Open Server International Developers Guide for more information about what environment variables an application uses during custom localization.
Before running a localized application:
● Make sure the locales.dat file contains an entry which reflects the localization values the application will use. If it does not, add an appropriate entry.
● Make sure that the localization files that your application will use are installed:○ Localized message files are located in the %SYBASE%\locales\message directory.○ Collating sequence files are located in the %SYBASE%\charsets directory.
Open Client and Open Server products come with the localization files to support one language, and one or more character sets and sort orders.
Related Information
Environment Variables [page 65]
16.2 Localization Files
At runtime, Open Client and Open Server applications load localization information from external files.
Three directories in the %SYBASE% release directory contain these files:
● The locales directory contains:○ The locales.dat file, which maps locale names to languages, character sets, and collating
sequences○ The message subdirectory, which contains localized error messages for Open Client and Open Server,
organized by language name.○ language_name subdirectories, which are included to provide compatibility with previous versions of
Open Client and Open Server software. These directories contain localized message files organized by character set.
○ unicode directory, which contains error message files for system management utilities.● The charsets directory contains a subdirectory for each supported character set. Each subdirectory
contains sort and conversion files for the character set.● The ini directory contains:
○ The objectid.dat file, which maps a global identifier for an object to local platform-specific names.All Open Client and Open Server products include files to support at least one language and one or more character sets and collating sequences. During installation, these files are loaded into the home directory structure in the correct locations.When configuring an Open Client or Open Server application, you must verify that the above directories contain the correct files for your site and application.
82 PUBLICSAP Open Server and Open Client Configuration Guide for Windows
Localization

16.3 The Locales Directory
The locales directory contains files that your application uses to load localization information. It also contains language-specific message files.
Related Information
The locales.dat File [page 83]Localized Message Files [page 85]
16.3.1 The locales.dat File
Located in the %SYBASE%\locales directory, locales.dat provides platform-specific locale information in a SAP proprietary format. This file associates locale names with languages, character sets and collating sequences.
CautionIf you plan to use isql, which uses iso_1 as its client character set default when talking to a server, modify the character sets to prevent data corruption by performing one of the following:
● Add a new entry to the section of the locales.dat file, such as isql.german.cp850, and call isql with option -J isql.
● Set LANG=isql, to change the client character set to cp850.● Issue a command like mode con cp SELECT=1250 before calling isql, so that the display character
set is changed to iso_1.
Open Client and Open Server applications use locales.dat to determine what localization information to load. The locales.dat file directs Open Client and Open Server applications to localization information, but it does not contain actual localized messages or character set information.
locales.dat contains platform-specific sections, each of which contains predefined locale definition entries. These entries vary by platform, but all sections include an entry defining a “default” locale.
Locale definition entries have the form:
locale = <locale_name, language_name, charset_name [,sortorder_name]>
where:
● <locale_name> is the name of the locale definition. The default values for <locale_name> are vendor-specified and based on POSIX terminology. Comments at the end of locales.dat list POSIX values for locale names.
● <language_name> is the subdirectory name by which SAP products recognize the language.● <charset_name> is the subdirectory name by which SAP products recognize the character set.
SAP Open Server and Open Client Configuration Guide for WindowsLocalization PUBLIC 83

● (optional) <sortorder_name> is the file name by which SAP products recognize the collating sequence.
The following locales.dat file entry specifies a French locale. Because no sort order is specified, the default sort order “binary” is used with this locale:
locale = fr.FR.88591, french, iso_1
locales.dat file sample
The following portion of a locales.dat file illustrates a platform-specific section in a locales.dat file:
[NT] locale = enu, us_english, cp1252locale = fra, french, cp1252locale = deu, german, cp1252 locale = default, us_english, cp1252
Related Information
Editing locales.dat [page 84]
Localization Files [page 82]
16.3.1.1 Editing locales.dat
If the predefined entries in locales.dat do not meet your needs, use a text editor to edit the file.
Context
Before you edit, make a copy of the original locales.dat. The copy will help you solve any problems with the edited version. Also, review the entries for your platform to see if an entry already exists.
Edit locales.dat to:
● Change the “default” locale definition.● Add a locale definition.● Match a locale name used by non-SAP software. For example, the SAP predefined locale name is “fr”:
locale = fr, french, iso_1
If a non-SAP application requires a value of “french” for the LC_ALL environment variable, change the locale name to:
locale = french, french, iso_1
84 PUBLICSAP Open Server and Open Client Configuration Guide for Windows
Localization
To add a new entry to locales.dat or to change an existing entry:
Procedure
1. Choose a value for <locale_name>.
2. Determine the value for <language_name>.
When a language module is installed, a subdirectory for the language is created in the locales\message directory of the directory tree. <language_name> must correspond to this subdirectory’s name.
3. Determine the value for <charset_name>.
When a language module is installed, subdirectories for each supported character set are created in the charsets directory of the directory tree. <charset_name> must correspond to one of these subdirectory names.
4. Determine the value for <sortorder_name> if you want a sort order other than binary.
The charsets\charset_name subdirectory contains the sort order (*.srt) files for the character set. <sortorder_name> must correspond to one of these file names (without the .srt).
5. In the appropriate platform-specific section of the locales.dat file, enter or change the appropriate entry.
6. After you make the change, update localization environment variables (LC_ALL, LC_CTYPE, LC_MESSAGE, LC_TIME, LANG) as appropriate.
7. If you have added a new locale name and you want existing applications to use this new name in cs_locale calls, edit and recompile the applications as appropriate.
NoteYou need not have to delete entries from locales.dat, even if applications no longer use them. If you decide to delete an entry, make sure no application uses it.
16.3.2 Localized Message Files
Localized message files contain product messages in a particular language.
These message files (the *.loc files in the %SYBASE%\locales\message\ language_name directories) enable Open Client and Open Server applications to generate messages in a variety of languages.
CautionDo not edit localized message files.
All Open Client and Open Server products include English (us_english) message files. Your products may also include files to support additional languages.
If you purchase and install a new language module, the installation process adds a language_name subdirectory containing message files in the new language.
SAP Open Server and Open Client Configuration Guide for WindowsLocalization PUBLIC 85

Message file names sometimes vary by platform, but most resemble the following names:
● cslib.loc – CS-Library messages● ctlib.loc – Client-Library messages● oslib.loc – Server-Library messages● blklib.loc – Bulk Library messages● bcp.loc – Bulk Copy messages● esql.loc – Embedded SQL messages
All Open Client and Open Server message files use the Unicode ISO 10646 UTF-8 character set.
Open Client and Open Server products convert messages from UTF-8 to other character sets as needed.
16.4 The Charsets Directory
The charsets directory contains collating sequence files for each supported character set and a unicode directory, which contains conversion files used by Unilib.
Related Information
Collating Sequence Files [page 86]Unicode Conversion Files [page 87]
16.4.1 Collating Sequence Files
The order in which a system sorts characters is called its collating sequence or sort order.
Open Client and Open Server products include files to support a variety of collating sequences. These files, located in the %SYBASE%\charsets directory, can vary by platform but generally include the following:
● binary.srt● dictionary.srt● noaccents.srt● nocase.srt● nocasepref.srt
CautionDo not edit collating files.
Collating sequences are specified in locales.dat entries. If a locales.dat entry does not specify a collating sequence, then a binary sort order is used with the locale.
86 PUBLICSAP Open Server and Open Client Configuration Guide for Windows
Localization

For more information about collating sequences, see the Open Client and Open Server International Developers Guide.
16.4.2 Unicode Conversion Files
Unicode conversion files contain conversion configuration information in Unicode character set (ISO 10646) in UTF-8 form. These conversion files are available for each character set supported by the product.
16.5 The ini Directory
The ini directory contains the global object identifiers file (objectid.dat).
Related Information
The objectid.dat File [page 87]
16.5.1 The objectid.dat File
The global object identifiers file, called objectid.dat, associates a unique global object identifier with the local name of an object.
An object identifier is a series of non-negative integer values separated by a dot. An object identifier is based on a naming tree defined by the international standards bodies CCITT and ISO.
Location of objectid.dat
objectid.dat is located in the Sybase_home\locales directory.
objectid.dat Sections and Entries
objectid.dat contains a section for each class of object.
Object class entries have the form:
[<Object Class>]
SAP Open Server and Open Client Configuration Guide for WindowsLocalization PUBLIC 87

<object_identifier> <local_name1>, ..., <local_namen>
where:
● <Object Class> is the section identifier.● <object_identifier> is the globally unique object identifier.● <local_name1,..., local_namen> are the local names associated with the object identifier, separated
by a comma.
An objectid.dat Example
The following portion of an objectid.dat file illustrates sections in objectid.dat:
[charset] 1.3.6.1.4.1.897.4.9.1.1 = iso_1 1.3.6.1.4.1.897.4.9.1.2 = cp850 1.3.6.1.4.1.897.4.9.1.3 = cp437 1.3.6.1.4.1.897.4.9.1.4 = roman8 1.3.6.1.4.1.897.4.9.1.5 = mac[collate] 1.3.6.1.4.1.897.4.9.3.50 = binary 1.3.6.1.4.1.897.4.9.3.51 = dictionary 1.3.6.1.4.1.897.4.9.3.52 = nocase 1.3.6.1.4.1.897.4.9.3.53 = nocasepref 1.3.6.1.4.1.897.4.9.3.54 = noaccents[secmech] 1.3.6.1.4.1.897.4.6.1 = dce, dcesecmech 1.3.6.1.4.1.897.4.6.3 = NTLM, N, ntsecmech 1.3.6.1.4.1.897.4.6.6 = csfkrb5, kerberos
NoteIf you change the local name of an object, use a text editor to edit objectid.dat accordingly.
88 PUBLICSAP Open Server and Open Client Configuration Guide for Windows
Localization

17 Secure Sockets Layer in Open Client and Open Server
The SSL support for Open Client and Open Server description and some system configuration tasks that are required to use the SSL protocol.
Related Information
SSL Handshake [page 89]SSL Security Levels and Security Mechanisms [page 90]Validating a Server by its Certificate [page 91]Requesting and Authorizing SSL Certificates Using Keytool and ExportPrivateKey Utility [page 93]FIPS 140-2 Compliance for Password Encryption [page 100]Configuring Cipher Suites for SAP Open Server and Open Client [page 100]
Security Services [page 33]
17.1 SSL Handshake
SSL is an industry standard for sending wire- or socket-level encrypted data over client-to-server and server-to-server connections.
Before the SSL connection is established, the server and the client exchange a series of I/O round trips to negotiate and agree upon a secure encrypted session. This is called the “SSL handshake.”
When a client application requests a connection, the SSL-enabled server presents its certificate to prove its identity before data is transmitted. Essentially, the SSL handshake consists of the following steps:
● The client sends a connection request to the server. The request includes the SSL (or Transport Layer Security, TLS) options that the client supports.
● The server returns its certificate and a list of supported CipherSuites, which includes SSL/TLS support options, the algorithms used for key exchange, and digital signatures.
● A secure, encrypted session is established when both client and server have agreed upon a CipherSuite.
For more specific information about the SSL handshake and the SSL/TLS protocol, see the Internet Engineering Task Force Web site .
For a list of CipherSuites that Open Client and Open Server support, see the Open Client Client Library/C Reference Manual.
SAP Open Server and Open Client Configuration Guide for WindowsSecure Sockets Layer in Open Client and Open Server PUBLIC 89

17.2 SSL Security Levels and Security Mechanisms
Details of security level and security mechanisms for SSL in Open Client and Open Server.
Security Levels
SSL provides several levels of security in Open Client and Open Server:
● When establishing a connection to an SSL-enabled server, the server authenticates itself—proves that it is the server you intended to contact—and an encrypted SSL session begins before any data is transmitted.
● Once the SSL session is established, user name and password are transmitted over a secure, encrypted connection.
● A comparison of the server certificate’s digital signature can determine if any information received from the server was modified in transit.
SSL filter as a Security Mechanism
When establishing a connection to an SSL-enabled Adaptive Server, the SSL security mechanism is specified as a filter on the master and query lines in the sql.ini file. SSL is used as an Open Client and Open Server protocol layer that sits on top of the TCP/IP connection.
The SSL filter is different from other security mechanisms, such as DCE and Kerberos, which are defined with SECMECH (security mechanism) lines in the sql.ini file. The master and query lines determine the security protocols that are enforced for the connection.
A typical sql.ini file on Microsoft Windows using SSL looks like this:
[SERVER] master=TCP,<hostname>,<address1>, ssl query=TCP,<hostname>,<address1>, ssl
where hostname is the name of the server to which the client is connecting, and address1 is the port number of the host machine. All connection attempts to a master or query entry in the sql.ini file with an SSL filter must support the SSL protocol. A server can be configured to accept SSL connections and have other connections that accept plain text (unencrypted data) or use other security mechanisms.
For example, an Adaptive Server sql.ini file that supports both SSL-based connections and plain-text connections looks like this:
[SYBSRV1] master=NLWNSCK,<hostname>,2748,ssl query=NLWNSCK,<hostname>,2748,ssl master=NLWNSCK,<hostname>,2749 query=NLWNSCK,<hostname>,2749
In this example, the SSL security service is specified on port number 2748. On SYBSRV1, Adaptive Server listens for clear text on port number 2749, which is without any security mechanism or security filter.
90 PUBLICSAP Open Server and Open Client Configuration Guide for Windows
Secure Sockets Layer in Open Client and Open Server

17.3 Validating a Server by its Certificate
Any Open Client and Open Server connection to an SSL-enabled server requires that the server have a certificate file, which consists of the server’s certificate and an encrypted private key. The certificate must also be digitally signed by a Certificate of Authority (CA).
Open Client applications establish a socket connection to Adaptive Server similarly to the way that existing client connections are established. Before any user data is transmitted, an SSL handshake occurs on the socket when the network transport-level connect call completes on the client side and the accept call completes on the server side.
To make a successful connection to an SSL-enabled server:
● The SSL-enabled server must present its certificate when the client application makes a connection request.
● The client application must recognize the CA that signed the certificate. A list of all “trusted” CAs is in the trusted roots file.
● For connections to SSL-enabled servers, the common name in the server’s certificate must match the server name in the sql.ini file as well.
When establishing a connection to an SSL-enabled Adaptive Server, Adaptive Server loads its own encoded certificates file at start-up from %SYBASE%\%SYBASE_ASE%\certificates\servername.crt. The <servername> is the name of the Adaptive Server as specified on the command line when starting the server with the -S flag or from the server’s environment variable DSLISTEN.
Other types of servers may store their certificate in a different location. See the vendor-supplied documentation for the location of your server’s certificate.
Related Information
Common Name Validation in an SDC Environment [page 91]The Trusted Roots File [page 92]
The Trusted Roots File [page 92]
17.3.1 Common Name Validation in an SDC Environment
The default behavior for SSL validation in Open Client and Open Server is to compare the common name in the server’s certificate with the server name specified by ct_connect().
In a shared disk cluster (SDC) environment, a client may specify the SSL certificate common name independent of the server name or the SDC instance name. A client may connect to an SDC by its cluster name—which represents multiple server instances—or to a specific server instance.
Open Client and Open Server supports common name validation in an SDC environment. This allows the Adaptive Server SSL certificate common name to be different from the server or cluster name by allowing the client to use the transport address to specify the common name used in the certificate validation. The
SAP Open Server and Open Client Configuration Guide for WindowsSecure Sockets Layer in Open Client and Open Server PUBLIC 91

transport address can be specified in one of the directory services like the interfaces file, LDAP or NT registry, or through the connection property CS_SERVERADDR.
Syntax
This is the syntax of the server entries for the SSL-enabled Adaptive Server and cluster for Microsoft Windows:
[CLUSTERSSL] query=tcp,hostname1,5000, ssl="CN=name1"query=tcp,hostname2,5000, ssl="CN=name2"query=tcp,hostname3,5000, ssl="CN=name3"query=tcp,hostname4,5000, ssl="CN=name4"[ASESSL1]master=tcp,hostname1,5000, ssl="CN=name1"query=tcp,hostname1,5000, ssl="CN=name1"[ASESSL2]master=tcp,hostname2,5000, ssl="CN=name2"query=tcp,hostname2,5000, ssl="CN=name2"[ASESSL3]master=tcp,hostname3,5000, ssl="CN=name3"query=tcp,hostname3,5000, ssl"CN=name3"[ASESSL4]master=tcp,hostname4,5000, ssl="CN=name4" query=tcp,hostname4,5000, ssl="CN=name4"
17.3.2 The Trusted Roots File
The list of known and trusted CAs is maintained in the trusted roots file.
The trusted roots file is similar in format to a certificate file, except that it contains certificates for CAs known to the entity (client applications, servers, network resources, and so on). The system security officer adds and deletes CAs using a standard ASCII-text editor.
The trusted roots file for Open Client and Open Server is located in %SYBASE%\ini\trusted.txt.
Currently, the recognized CAs are Thawte, Entrust, Baltimore, VeriSign and RSA.
By default, Adaptive Server stores its own trusted roots file in %SYBASE%\%SYBASE_ASE%\certificates\servername.txt.
Both Open Client and Open Server allow you to specify an alternate location for the trusted roots file:
● Open Client:
ct_con_props (connection, CS_SET, CS_PROP_SSL_CA, “<SYBASEhome>\ini\trusted.txt”, CS_NULLTERM, NULL);
where <SYBASEhome> is the installation directory. CS_PROP_SSL_CA can be set at the context level using ct_config, or at the connection level using ct_con_props.
● Open Server:
srv_props (context, CS_SET, SRV_S_CERT_AUTH, “<SYBASEhome>\ini\trusted.txt”, CS_NULLTERM, NULL);
92 PUBLICSAP Open Server and Open Client Configuration Guide for Windows
Secure Sockets Layer in Open Client and Open Server
where <SYBASEhome> is the installation directory.
bcp and isql utilities also allow you to specify an alternative location for the trusted roots file.The parameter -x is included in the syntax, allowing you to specify an alternative location for the trusted.txt file.
17.4 Requesting and Authorizing SSL Certificates Using Keytool and ExportPrivateKey Utility
Use the ExportPrivateKey utility to encrypt a server private key in Public-Key Cryptography Standards (PKCS) 8 format.
To generate an SSL certificate, use keytool (a key and certificate management tool) with ExportPrivateKey utility. The process of creating an SSL certificate involves multiple steps. Some steps, such as generating a key pair, exporting certificate, and creating a root certificate require you to use the keytool, whereas encrypting a server private key in PKCS8 format requires the ExportPrivateKey utility.
The ExportPrivateKey utility is bundled with the SAP ASE installer and is installed at $SYBASE/$SYBASE_OCS/bin. The keytool is also provided with the SAP ASE installer. The utility can be used to create SSL certificates with Java Runtime Environment (JRE) version 7 or later.
NoteWhile using the ExportPrivateKey utility with the keytool, it is recommended to provide the full directory path to the keytool. For Windows, use %SYBASE%\Shared\<SAPJRE version 7 or later>\bin\keytool.
Related Information
Creating a Self-signed Root Certificate [page 94]Creating a Private Key and a Certificate Request for Server [page 96]Converting a Certificate Request to a CA-signed Server Certificate [page 98]Encrypting the Server Private Key in PKCS8 Format [page 99]Appending Private Key to the Server Certificate [page 100]
SAP Open Server and Open Client Configuration Guide for WindowsSecure Sockets Layer in Open Client and Open Server PUBLIC 93

17.4.1 Creating a Self-signed Root Certificate
Generating a self-signed root certificate involves creating a key pair and exporting the certificate from the keystore to a text file.
Procedure
1. Create a key pair (public-private keys). The private key is then used to sign the certificate. Run the following command:
keytool -genkeypair -alias ca -keyalg RSA -keysize 1024 -dname "cn=TestCA, o=SAP, l=Dublin, st=CA, c=US, ou=Support" -keypass sap123 -ext bc:c -validity 3650 -keystore ca.jks -storepass sap123
After the successful execution of this command, a key pair is created for CA and is stored in the keystore (ca.jks).
2. Export the certificate from the keystore (ca.jks) to a text file (trusted.txt). Run the following command:
keytool -exportcert -alias ca -file trusted.txt -keystore ca.jks -storepass sap123 -rfc
After the successful execution of this command, the certificate is exported to a text file.3. Create the trusted roots file, server.txt:
○ UNIX:
cp trusted.txt $SYBASE/$SYBASE_ASE/certificates/server.txt
○ Windows:
copy trusted.txt %SYBASE%\%SYBASE_ASE%\certificates\server.txt
Related Information
Generate Key Pair Using genkeypair Option [page 95]Export Certificate Using exportcert Option [page 95]
94 PUBLICSAP Open Server and Open Client Configuration Guide for Windows
Secure Sockets Layer in Open Client and Open Server

17.4.1.1 Generate Key Pair Using genkeypair Option
Use the genkeypair option of keytool to generate a key pair and store it in the keystore.
A sample command to generate a key pair is as follows:
keytool -genkeypair -alias ca -keyalg RSA -keysize 1024 -dname "cn=TestCA, o=SAP, l=Dublin, st=CA, c=US, ou=Support" -keypass sap123 -ext bc:c -validity 3650 -keystore ca.jks -storepass sap123
Where
● -genkeypair – The keytool command to generate a public key and an associated private key.● -alias – The alias (ca) to access the keystore (ca.jks). The keystore stores the key pair. Each entry in
the keystore is identified by a unique name or an alias.● -keyalg – The name of the algorithm (RSA) used to generate the key pair.● -keysize – The size (1024 bits) of the generated key pair.● -dname – Specifies the X.500 distinguished name to be associated with the alias. It is used as the issuer
and subject fields in the self-signed certificate. In this example, the values are as follows:○ (common name) cn=TestCA○ (organization) o=SAP○ (locality) l=Dublin○ (state) st=CA○ (country) c=US○ (organization unit) ou=Support
● -keypass – The password (sap123) to recover the key pair. If you do not specify the option on the command line, keytool will first attempt to use the keystore password to recover the private key, and if it fails, will then prompt you for the private key password.
● -ext – Denotes an X.509 certificate extension (BasicContraints:critical).● -validity – Certificate validity (3650 days)● -keystore – The keystore (ca.jks) that stores the key pair.● -storepass – The password (sap123) to access the keystore.
After the successful execution of this command, a key pair is created for the CA and stored in the keystore (ca.jks).
17.4.1.2 Export Certificate Using exportcert Option
Use the exportcert option of keytool to export a certificate from the keystore.
A sample command to export a certificate from the keystore (ca.jks) to a text file (trusted.txt) is as follows:
keytool -exportcert -alias ca -file trusted.txt -keystore ca.jks -storepass sap123 -rfc
Where
SAP Open Server and Open Client Configuration Guide for WindowsSecure Sockets Layer in Open Client and Open Server PUBLIC 95

● -exportcert – The keytool command to export a certificate.● -alias – The alias (ca) to access the keystore (ca.jks).● -file – The text file (trusted.txt) that contains the exported certificate.● -keystore – The keystore (ca.jks) that stores the key pair.● -storepass – The password (sap123) to access the keystore (ca.jks).● -rfc – Indicates that the certificate is exported in PEM format.
17.4.2 Creating a Private Key and a Certificate Request for Server
Generate a key pair and a certificate request for a server.
Procedure
1. Create a key pair for the server by running the following command:
keytool -genkeypair -alias server -keyalg RSA -keysize 1024 -dname "cn=<server>, o=SAP, l=Dublin, st=CA, c=US" -keypass sybase -ext bc:c -validity 3650 -keystore server.jks -storepass sybase
After the successful execution of this command, a key pair is created for the server and is stored in the server keystore as server.jks.
2. Generate a certificate request for a server. Run the following command:
For Open Server 15.7 and later version:
keytool -certreq -alias server -file <server>.req -keypass sybase -keystore server.jks -storepass sybase
For Open Server 15.5 and earlier versions:
keytool -certreq -alias server -sigalg SHA1withRSA -file <server>.req -keypass sybase -keystore server.jks -storepass sybase
A successful execution of this command generates a certificate request file (file <server>.req).
Related Information
Generate Key Pair For Server Using genkeypair Option [page 97]Generate a Certificate Request For Server Using certreq Option [page 97]
96 PUBLICSAP Open Server and Open Client Configuration Guide for Windows
Secure Sockets Layer in Open Client and Open Server

17.4.2.1 Generate Key Pair For Server Using genkeypair Option
Use the genkeypair option of keytool to generate a key pair for the server and store the key pair in the server keystore.
A sample command to generate a key pair is as follows:
keytool -genkeypair -alias server -keyalg RSA -keysize 1024 -dname "cn=<server>, o=SAP, l=Dublin, st=CA, c=US" -keypass sybase -ext bc:c -validity 3650 -keystore server.jks -storepass sybase
Where
● -genkeypair – The keytool command to generate a public key and an associated private key.● -alias – The alias (server) to access the keystore (server.jks). The keystore stores the key pair. Each
entry in the keystore is identified by a unique name or an alias.● -keyalg – The name of the algorithm (RSA) used to generate the key pair.● -keysize – The size (1024 bits) of the generated key pair.● -dname – Specifies the server (server) for which a key pair is being generated. Other values are as
follows:○ (common name) cn=server○ (organization) o=SAP○ (locality) l=Dublin○ (state) st=CA○ (country) c=US○ (organization unit) ou=Support
● -keypass – The password (sybase) to recover the key pair. If you do not specify the option on the command line, keytool will first attempt to use the keystore password to recover the private key, and if it fails, will then prompt you for the private key password.
● -ext – Denotes an X.509 certificate extension (BasicContraints:critical).● -validity – Certificate validity (3650 days)● -keystore – The keystore (server.jks) that stores the server key pair.● -storepass – The password (sybase) to access the server keystore.
A successful execution of this command creates a key pair for the server, which is stored in the server keystore (server.jks).
17.4.2.2 Generate a Certificate Request For Server Using certreq Option
Use the certreq option of keytool to generate a certificate request for the server.
A sample command to generate a certificate request for the server is as follows:
keytool -certreq -alias server -file <server>.req -keypass sybase -keystore server.jks -storepass sybase
SAP Open Server and Open Client Configuration Guide for WindowsSecure Sockets Layer in Open Client and Open Server PUBLIC 97

Where
● -certreq – The keytool command to generate a certificate request for a server.● -alias – The alias (server) to access the server keystore (server.jks).● -file <server>.req – Generated certificate request file for the server.● -keypass – The password (sybase) to access the key pair.● -keystore – The server keystore (server.jks).● -storepass – The password (sybase) to access the server keystore.
17.4.3 Converting a Certificate Request to a CA-signed Server Certificate
Generate a server certificate signed by CA.
Procedure
Generate a certificate as a response to a certificate request file by running the following command:
For Open Server 15.7 and later version:
keytool -gencert -rfc -infile <server>.req -outfile <server>.crt -alias ca -ext bc:c -keystore ca.jks - storepass sap123
For Open Server 15.5 and earlier versions:
keytool -gencert -rfc -infile <server>.req -outfile <server>.crt -alias ca -sigalg SHA1withRSA -ext bc:c -keystore ca.jks -storepass sap123
Related Information
Convert a Certificate Request to a CA-signed Server Certificate [page 98]
17.4.3.1 Convert a Certificate Request to a CA-signed Server Certificate
Use the gencert option of keytool to accept a certificate request file as an input and generate a server certificate signed by a CA.
A sample command to generate a CA-signed certificate is as follows:
keytool -gencert -rfc -infile <server>.req -outfile <server>.crt -alias ca -ext bc:c -keystore ca.jks -storepass sap123
98 PUBLICSAP Open Server and Open Client Configuration Guide for Windows
Secure Sockets Layer in Open Client and Open Server

Where
● -gencert – Generate a certificate as a response to a certificate request file.● -infile – The input file is the certificate request file (<server>.req).● -outfile – The output file is the server certificate (<server>.crt).● -alias – The alias (ca) to access the keystore.● -ext – Denotes an X.509 certificate extension (bc:c).● -keystore – The CA keystore (ca.jks).● -storepass – The password (sap123) to access the CA keystore.
17.4.4 Encrypting the Server Private Key in PKCS8 Format
Use the ExportPrivateKey.jar utility to extract the server private key from the server keystore and then encrypt the key in Public-Key Cryptography Standards (PKCS) 8 format.
Procedure
Set <CLASSPATH> environment variable to $SYBASE/$SYBASE_OCS/bin/ExportPrivateKey.jar, and run the following command:
java com.sap.security.ExportPrivateKey -keystore server.jks -alias server -file <server>.prk -storepass sybase
Related Information
Encrypt the Server's Private Key in PKCS8 Format [page 99]
17.4.4.1 Encrypt the Server's Private Key in PKCS8 Format
Use the ExportPrivateKey utility to encrypt a server's private key in PKCS8 format.
java com.sap.security.ExportPrivateKey -keystore server.jks -alias server -file <server>.prk -storepass sybase
Where
● java com.sap.security.ExportPrivateKey – The command to encrypt the server private key in PKCS8 format using the ExportPrivateKey utility.
● -keystore – The server keystore (server.jks).
SAP Open Server and Open Client Configuration Guide for WindowsSecure Sockets Layer in Open Client and Open Server PUBLIC 99

● -alias – The alias (server) to access the keystore.● -file – The generated file that stores the encrypted private key.● -storepass – The password (sybase) to access the server keystore.
17.4.5 Appending Private Key to the Server Certificate
Append the generated private key to the server certificate.
Procedure
Run the following command to append the generated private key (<server>.prk) to the server certificate (<server>.crt).
cat <server>.prk >> <server>.crt
17.5 FIPS 140-2 Compliance for Password Encryption
Encryption of login and remote passwords in SAP Open Server and Open Client is accomplished with the SAP Common Crypto Library (CCL).
SAP Open Server and Open Client use CCL to provide SSL and cryptographic services, such as SSL and TLS connection creation, certificate management, and data encryption and decryption. CCL complies with the Federal Information Processing Standard (FIPS) 140-2.
17.6 Configuring Cipher Suites for SAP Open Server and Open Client
Follow the instructions provided in this section to configure cipher suites for the SAP Open Server and Open Client.
Related Information
Configure Cipher Suites for Open Client [page 101]Configure Cipher Suites for SAP Open Server [page 102]
100 PUBLICSAP Open Server and Open Client Configuration Guide for Windows
Secure Sockets Layer in Open Client and Open Server

17.6.1 Configure Cipher Suites for Open Client
You can configure cipher suites for Open Client using the following options:
● Use the runtime configuration file.● Add the required code to the application itself using the CS_PROP_SSL_CIPHER property.
Related Information
Configuring Cipher Suites Using the Runtime Configuration File [page 101]Configuring Cipher Suites Using the CS_PROP_SSL_CIPHER Property [page 102]
17.6.1.1 Configuring Cipher Suites Using the Runtime Configuration File
To specify the name of the runtime configuration file, you can either set the SYBOCS_CFG environment variable or use the CS_CONFIG_FILE property.
Set the SYBOCS_CFG environment variable:
On Windows platform, the default configuration file is located at %SYBASE%\%SYBASE_OCS%\ini\ocs.cfg.
Use the <SYBOCS_CFG> environment variable to specify the custom configuration file to be used; it overrides the default configuration file, ocs.cfg. Now run the following commands to set the environment variable:
● For Windows platform: set SYBOCS_CFG=<configuration file path>
Use the CS_CONFIG_FILE property to specify the name and the location of the configuration file:
You can also specify the name of the configuration file in the CS_CONFIG_FILE property. In the following example, myocs.cfg file is added to the CS_CONFIG_FILE property:
retcode = ct_con_props(conn, CS_SET, CS_CONFIG_FILE, “myocs.cfg”, CS_NULLTERM, NULL);if (retcode != CS_SUCCEED){... handle the error ... }
After you have defined the configuration file, you can use the following format in the configuration file to set your preferred cipher suites:
[section name] CS_PROP_SSL_CIPHER = <list of comma-separated cipher suites>
Here, section name refers to the CS_APPNAME property set at the context level that specifies the section of the file to read values from. An example of the configuration file used for the isql utility is as follows:
[isql]
SAP Open Server and Open Client Configuration Guide for WindowsSecure Sockets Layer in Open Client and Open Server PUBLIC 101

CS_PROP_SSL_CIPHER = TLS_RSA_WITH_AES_256_GCM_SHA384,TLS_RSA_WITH_AES_256_CBC_SHA
After you have updated the configuration file with the required cipher suites, recompile and restart the application.
NoteRecompilation is required only when you use the CS_CONFIG_FILE property to specify the name of the configuration file; it's not a mandatory step while using the SYBOCS_CFG environment variable to specify the name of the configuration file.
To update the cipher suites for the applications that are already deployed, you need to follow similar steps.
17.6.1.2 Configuring Cipher Suites Using the CS_PROP_SSL_CIPHER Property
To configure the required cipher suites using the CS_PROP_SSL_CIPHER property, add the cipher suites in the application code. For example:
ret = ct_con_props(conn, CS_SET, CS_PROP_SSL_CIPHER,“TLS_RSA_WITH_AES_256_GCM_SHA384,TLS_RSA_WITH_AES_256_CBC_SHA”,CS_NULLTERM, NULL);if (ret != CS_SUCCEED){... handle the error ... }
Now re-compile and restart the program.
17.6.2 Configure Cipher Suites for SAP Open Server
You can update the cipher suites for the SAP Open Server (Server-Library application) using the following options:
● Configure cipher suites using the SYBOCS_SRV_CIPHER property.● Configure cipher suites using the SRV_S_SSL_CIPHER property.
Related Information
Configuring Cipher Suites Using the SYBOCS_SRV_CIPHER Property [page 103]Configuring Cipher Suites Using the SRV_S_SSL_CIPHER Property [page 103]
102 PUBLICSAP Open Server and Open Client Configuration Guide for Windows
Secure Sockets Layer in Open Client and Open Server
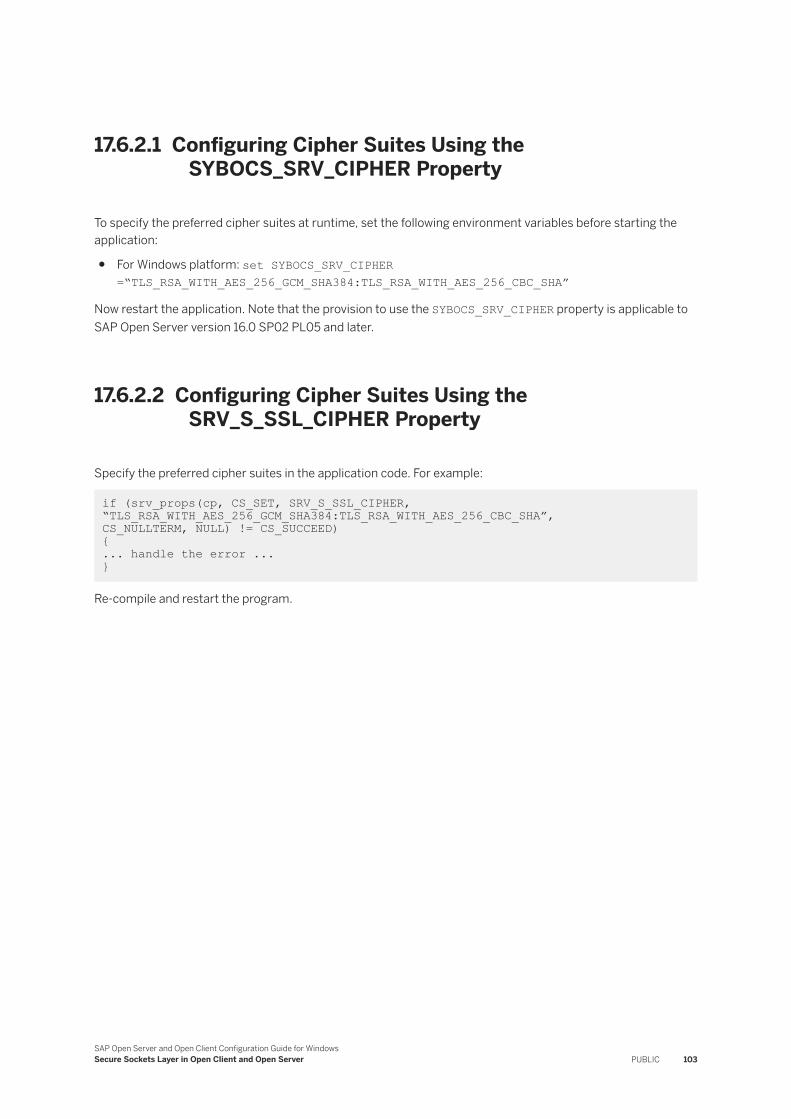
17.6.2.1 Configuring Cipher Suites Using the SYBOCS_SRV_CIPHER Property
To specify the preferred cipher suites at runtime, set the following environment variables before starting the application:
● For Windows platform: set SYBOCS_SRV_CIPHER =“TLS_RSA_WITH_AES_256_GCM_SHA384:TLS_RSA_WITH_AES_256_CBC_SHA”
Now restart the application. Note that the provision to use the SYBOCS_SRV_CIPHER property is applicable to SAP Open Server version 16.0 SP02 PL05 and later.
17.6.2.2 Configuring Cipher Suites Using the SRV_S_SSL_CIPHER Property
Specify the preferred cipher suites in the application code. For example:
if (srv_props(cp, CS_SET, SRV_S_SSL_CIPHER, “TLS_RSA_WITH_AES_256_GCM_SHA384:TLS_RSA_WITH_AES_256_CBC_SHA”,CS_NULLTERM, NULL) != CS_SUCCEED){... handle the error ... }
Re-compile and restart the program.
SAP Open Server and Open Client Configuration Guide for WindowsSecure Sockets Layer in Open Client and Open Server PUBLIC 103

Important Disclaimers and Legal Information
HyperlinksSome links are classified by an icon and/or a mouseover text. These links provide additional information.About the icons:
● Links with the icon : You are entering a Web site that is not hosted by SAP. By using such links, you agree (unless expressly stated otherwise in your agreements with SAP) to this:
● The content of the linked-to site is not SAP documentation. You may not infer any product claims against SAP based on this information.● SAP does not agree or disagree with the content on the linked-to site, nor does SAP warrant the availability and correctness. SAP shall not be liable for any
damages caused by the use of such content unless damages have been caused by SAP's gross negligence or willful misconduct.
● Links with the icon : You are leaving the documentation for that particular SAP product or service and are entering a SAP-hosted Web site. By using such links, you agree that (unless expressly stated otherwise in your agreements with SAP) you may not infer any product claims against SAP based on this information.
Videos Hosted on External PlatformsSome videos may point to third-party video hosting platforms. SAP cannot guarantee the future availability of videos stored on these platforms. Furthermore, any advertisements or other content hosted on these platforms (for example, suggested videos or by navigating to other videos hosted on the same site), are not within the control or responsibility of SAP.
Beta and Other Experimental FeaturesExperimental features are not part of the officially delivered scope that SAP guarantees for future releases. This means that experimental features may be changed by SAP at any time for any reason without notice. Experimental features are not for productive use. You may not demonstrate, test, examine, evaluate or otherwise use the experimental features in a live operating environment or with data that has not been sufficiently backed up.The purpose of experimental features is to get feedback early on, allowing customers and partners to influence the future product accordingly. By providing your feedback (e.g. in the SAP Community), you accept that intellectual property rights of the contributions or derivative works shall remain the exclusive property of SAP.
Example CodeAny software coding and/or code snippets are examples. They are not for productive use. The example code is only intended to better explain and visualize the syntax and phrasing rules. SAP does not warrant the correctness and completeness of the example code. SAP shall not be liable for errors or damages caused by the use of example code unless damages have been caused by SAP's gross negligence or willful misconduct.
Gender-Related LanguageWe try not to use gender-specific word forms and formulations. As appropriate for context and readability, SAP may use masculine word forms to refer to all genders.
104 PUBLICSAP Open Server and Open Client Configuration Guide for Windows
Important Disclaimers and Legal Information

SAP Open Server and Open Client Configuration Guide for WindowsImportant Disclaimers and Legal Information PUBLIC 105
www.sap.com/contactsap
© 2020 SAP SE or an SAP affiliate company. All rights reserved.
No part of this publication may be reproduced or transmitted in any form or for any purpose without the express permission of SAP SE or an SAP affiliate company. The information contained herein may be changed without prior notice.
Some software products marketed by SAP SE and its distributors contain proprietary software components of other software vendors. National product specifications may vary.
These materials are provided by SAP SE or an SAP affiliate company for informational purposes only, without representation or warranty of any kind, and SAP or its affiliated companies shall not be liable for errors or omissions with respect to the materials. The only warranties for SAP or SAP affiliate company products and services are those that are set forth in the express warranty statements accompanying such products and services, if any. Nothing herein should be construed as constituting an additional warranty.
SAP and other SAP products and services mentioned herein as well as their respective logos are trademarks or registered trademarks of SAP SE (or an SAP affiliate company) in Germany and other countries. All other product and service names mentioned are the trademarks of their respective companies.
Please see https://www.sap.com/about/legal/trademark.html for additional trademark information and notices.
THE BEST RUN