Embed Size (px)
Citation preview
PUBLIC
Installation Guide
SAP NetWeaverCompositionEnvironment 71 SR5 ‒Developer EditionTarget Audience
n System administrators
n Technology consultants
Document version 101 ‒ 05162008
Document History
Version Date Description
101 5162008 SR5
240 PUBLIC 05162008
Table of Contents
Chapter 1 About This Document 5
Chapter 2 Installing SAP NetWeaver CE Developer Edition 7
Chapter 3 Installing SAP NetWeaver Developer Studio 13
Chapter 4 Installing Additional Components (Optional) 19
Chapter 5 Installing SAP Memory Analyzer (Optional) 23
Chapter 6 Post-Installation Activities 27
Chapter 7 Additional Information 3171 Transporting Self-Developed Software Component Archives (SCA) into the
System 3172 Troubleshooting ‒ Repairing an Inconsistent SAP MaxDB Installation 3173 Restarting the SAP MaxDB Server Manually 3274 Restarting the MS SQL Server Manually 3375 Configuration Templates 3376 Uninstalling SAP NetWeaver Composition Environment 34
05162008 PUBLIC 340
440 PUBLIC 05162008
1 About This Document
1 About This Document
This document explains how to install an SAP NetWeaver Composition Environment system asdeveloper editionFor more information about SAP NetWeaver Composition Environment in general seehttpsdnsapcomirjsdnnw-ce
SAP Notes for the Installation
Make sure you have read the latest version of SAP Note 953763 before you start the installationThis SAP Note contains the most recent information on the installation as well as corrections to theinstallation documentation Make sure that you have the up-to-date version of each SAP Note whichyou can find on SAP Service Marketplace at httpservicesapcomnotes
Installation Process
1 Decide what you want to installn SAP NetWeaver Composition Environment Developer Edition [page 7]n additional components [page 19] (optional) such asl Composition Toolsl Adobe Document Services
l Composite Voicel IDE Update Site
n SAP NetWeaver Developer Studio [page 13]n SAP Memory Analyzer [page 23] (optional)
2 You start the installation3 You perform the post-installation steps [page 27]4 Further documentationn If you are a system administrator refer to httphelpsapcomnwce Administratorsrsquo
Guide It contains information about how to configure and administer your systemn If you are a developer refer to httphelpsapcomnwce Developerrsquos Guide It provides
guidelines for developing applications using the SAP NetWeaver CE5 Additional informationn Transporting Self-developed Software Component Archives (SCA) into the System [page 31]n Troubleshooting ‒ Repairing an Inconsistent SAP MaxDB Installation [page 31]n Restarting the SAP MaxDB Server Manually [page 32]n Restarting the MS SQL Server Manually [page 33]n Configuration Templates [page 33]
05162008 PUBLIC 540
1 About This Document
n Uninstalling SAP NetWeaver Composition Environment [page 34]
More Information
Master Guide - SAP NetWeaver Composition Environment 71 available athttpwwwsdnsapcomirjsdnnw-ce
640 PUBLIC 05162008
2 Installing SAP NetWeaver CE Developer Edition
2 Installing SAP NetWeaver CE DeveloperEdition
This section provides information about the steps that you have to perform to install SAP NetWeaverComposition Environment as a development system (Windows 32-bit only)
Hardware and Software Requirements for Development SystemsBefore starting the installation make sure you meet the hardware and software requirements foryour operating system (OS) and the SAP NetWeaver CE systemConsider the following information
n For supported operating system releases see the Product Availability Matrix on SAP ServiceMarketplace at httpservicesapcompam
n Contact your OS vendor for the latest OS patches
If you want to install an SAP NetWeaver CE development system the host must meet the followingrequirements
Requirement Type Requirement
HardwareCaution
Development systems can be installed on 32-bitWindows only
n 10 GB free disk spacen Min 1 CPU with 3 GHzn 2 GB RAM (minimum)n Paging file size 2x RAM
To check the paging file size
1 Right-clickMy Computer and choose Properties
2 Choose Advanced Performance Settings
3 If required in section Virtual Memory chooseChange
Software Supported Operating SystemsMicrosoft Windows XP Professional SP2 (or higher)(32-bit)
CautionEnglish version only
Supported Databases
05162008 PUBLIC 740
2 Installing SAP NetWeaver CE Developer Edition
Requirement Type Requirement
n SAP MaxDB 76
NoteThe SAP MaxDB software is installed with theSAP NetWeaver CE system
n MS SQL Server 2005 SP1 (or higher)
NoteIf you want to use the MS SQL Server databaseyou have to install it before installing SAPNetWeaver CE
JDK versionSUN JDK 150_11 (or higher)You can download this version from the SUN Website
Note
If you want to install additional components (optional) [page 19] you need the same hardware and softwarerequirements as stated above plus an additional 2 GB RAM
Preparing the Installation DVDMake sure you have the installation DVD for SAP NetWeaver Composition Environment 71 availableYou can also download the installation DVD from SAP Service Marketplace athttpservicesapcomswdc Download SAP Installations and Upgrades Entry by Application Group
SAP NetWeaver SAP NETWEAVER SAP NetWeaver CE 71 If you download the installation DVD note that the DVDmay be split into several archives In thiscase you have to unpack these archives to one folder after the download
Preparations for the MS SQL Server DatabaseBefore installing your SAP NetWeaver CE development system onWindows andMS SQL Server makesure that your MS SQL Server database meets the following requirementsBefore starting the installation check the following
n The default collation of your database server is SQL_Latin1_General_CP850_BIN21 Start the SQL Server Management Studio2 Connect to your server3 Right-click the server and in the context menu choose Properties4 Check the server collation on the general page5 If the server collation differs from SQL_Latin1_General_CP850_BIN2 you have to reinstall it
or use a different MS SQL Server Instance
840 PUBLIC 05162008
2 Installing SAP NetWeaver CE Developer Edition
n SQL Server logins are enabled1 Start the SQL Server Management Studio2 Connect to your server3 Right-click the server and in the context menu choose Properties4 Switch to the security page
Under Server Authentication make sure that the entry SQL Server and Windows Authentication modeis selected
Note
If onlyWindows Authentication mode is selected change it to SQL Server and Windows Authentication modeand restart the server for the changes to take effect
n TCP protocol is enabled and your server is able to communicate on the TCP port1 Start the SQL Server Configuration Manager under Start All Programs MS SQL Server 2005
Configuration Tools 2 Go to SQL Server 2005 Network Configuration in the left pane and select your instance3 In the right pane make sure that Protocol TCPIP is set to enabled
If this is not the case refer to theMS SQL Server Books Online to configure the TCPIP connectionproperly
Installing a Development SystemThis procedure tells you how to install an SAP system with SAPinst SAPinst includes a SAPinst GUIand a GUI server which both use Java This section describes an installation where SAPinst SAPinstGUI and the GUI server are running on the same hostNote the following information about SAPinst
n When you start SAPinst SAPinst GUI and the GUI server also start SAPinst GUI connects to theGUI server with a secure SSL connection and the GUI server connects to SAPinst
n SAPinst normally creates the installation directory sapinst_instdir where it keeps its logfiles and which is located directly in the Program Files directory If SAPinst is not able to createsapinst_instdir there it tries to create sapinst_instdir in the directory defined by theenvironment variable TEMP
Recommendation
We recommend that you keep all installation directories until the system is completely andcorrectly installed
n SAPinst creates a subdirectory for each installation option calledltsapinst_instdirgtltinstallation_option_directorygt which is located in ProgramFiles
n The SAPinst Self-Extractor extracts the executables to a temporary directory (TEMP TMP TMPDIR orSystemRoot) These executables are deleted after SAPinst has stopped running
05162008 PUBLIC 940
2 Installing SAP NetWeaver CE Developer Edition
Directories called sapinst_exexxxxxxxxxx sometimes remain in the temporary directory Youcan safely delete them The temporary directory also contains the SAPinst Self-Extractor log filedev_selfexout which might be useful if an error occurs
Caution
If SAPinst cannot find a temporary directory the installation terminates with the error FCO-00058
n If you want to terminate SAPinst and the SAPinst Self-Extractor choose one of the followingoptionsl Right-click the icon for the SAPinst output window located in theWindows tray and choose Exitl Click the icon for the SAPinst output window located in the Windows tray and choose File
Exit
PrerequisitesYou are logged on as a user with administration rights to install the SAPinst tool and the SAP system
Note
When installing from a network share make sure that everyone has read access to this share Theinstallation routine creates users such as ltsidgtadm (for example ce1adm) During the installationSAPinst does a user switch to this user If the newly created user does not have permissions to thenetwork share where the installation is running from the installation will fail
Procedure
1 Insert the SAP Installation Master DVD into your DVD drive or mount it locally2 Start SAPinst from the SAP Installation Master DVD by double-clicking sapinstexe from the
following path ltDVD drivegtDATA_UNITSIM_WIN_ltplatformgt_ltdatabasegt3 In theWelcome screen choose the required SAPinst installation option from the tree structure
Note
If SAPinst prompts you to log off from your system log off and log on againSAPinst restarts automaticallyChoose Continue Old Installation
4 Choose whether you want to run the installation in Typicalmode or in CustommodeIf you select Typical the installation wizard provides automatic default settings and you only haveto respond to a small selection of prompts The rest is set by default If you select Custom you haveto respond to all prompts
Note
If you want to install the offline documentation for SAP NetWeaver CE you need to chooseCustommode
1040 PUBLIC 05162008
2 Installing SAP NetWeaver CE Developer Edition
5 Follow the screens and enter the required parameters
Note
For more information about the input parameters and information about restrictions forpasswords position the cursor on the required parameter and press F1
After you have entered all requested input parameters SAPinst displays the Parameter Summaryscreen This screen shows both the parameters that you entered and those that SAPinst set bydefault If required you can revise the parameters before starting the installation
6 To start the installation choose Start SAPinst starts the installation and displays the progress ofthe installation When the installation has successfully been completed SAPinst shows the dialogExecution of ltOption_Namegt has been completed successfully
Note
You can install the update site (for SAP Developer Studio) on a development system only (singleinstance system)
05162008 PUBLIC 1140
This page is intentionally left blank
3 Installing SAP NetWeaver Developer Studio
3 Installing SAP NetWeaver DeveloperStudio
SAP NetWeaver Developer Studio is based on the open development platform Eclipse It includesthe standard Eclipse features and SAP features The SAP NetWeaver development documentationassumes that you are familiar with Eclipse and how to develop Java applications with itFor more information see httphelpsapcomnwce SAP NetWeaver Library SAP NetWeaverDevelopersrsquo Guide SAP FeaturesSAP NetWeaver Developer Studio provides several features for composing and developing businessapplications You can select the features according to the components you have installed on your ASJava of the Composition Environment The Developer Studio has the following features
n SAP NetWeaver Developer Studio Java EEProvides the toolset for Java EE-compliant developmentAS Java component required Java Application Server
n SAP NetWeaver Developer Studio Development Infrastructure ClientProvides the toolset necessary to work the SAP component model It provides functionality towork locally or in a teamDepending on feature SAP NetWeaver Developer Studio Java EEAS Java component required Java Application Server Optionally SAP NetWeaverDevelopment Infrastructure (NWDI) as part of an SAP NetWeaver 70 system
n SAP NetWeaver Developer Studio Web Dynpro User InterfacesProvides the toolset to develop user interfaces with Web Dynpro for JavaDepending on features SAP NetWeaver Developer Studio Java EE SAP NetWeaver DeveloperStudio Development Infrastructure ClientAS Java component required Java Application Server Optionally Adobe Document Services
n SAP NetWeaver Developer Studio Composition ToolsProvides the toolset to develop composite applicationsDepending on features SAP NetWeaver Developer Studio Java EE SAP NetWeaver DeveloperStudioWebDynpro User Interfaces SAPNetWeaver Developer Studio Development InfrastructureClientAS Java component required Composition Platform Optionally Adobe Document Services
05162008 PUBLIC 1340
3 Installing SAP NetWeaver Developer Studio
Installation Recommendations
Depending on your system landscape we recommend that you install the SAP NetWeaver DeveloperStudio as follows
n Central AS Java with update siteWhen you have a central AS Java we recommend that this server provides an update site Thismakes sure that the SAP NetWeaver Developer Studio you install has the version that matchesthe application serverYou can check the availability of a local update site by going to the following URL in your Webbrowserhttplthostgtlthttpportgtupdatesite
Example
httpdev_server_0150000updatesite
Note
Make sure that the update site is properly installed and that the post-installation activities forthe update site have already been performedMore informationPost-Installation Activities [page 27] section Configuring the IDE Update Site
n Developer WorkplaceIf you want to install the AS Java and the Developer Studio on a single workstation you can usethe following sourcesl SAP NetWeaver Developer Studio Update Site (recommended)
SAP provides a central update site The update site can be found athttpsnwdssapcomswdcdownloadsupdatesnetweavernwdsceTo access the update site you need an SAP Service Marketplace user and password (S user)
l DVDUse the DVD you installed the AS Java from to make sure the Developer Studio and the AS Javahave the same version Once the Developer Studio is installed from a DVD the update manageris always looking on the DVD for updates Therefore you can only update the Developer Studiowhen you have a DVD with a new release The Developer Studio Update Guide containsthe information how to instruct the developer to look for updates on the Developer StudioUpdate Site rather than on the DVD
In the following installation procedure we only use the term Update Site The installation steps arethe same regardless if you decided to install the Developer Studio from the SAP update site or theupdate site on your AS Java
1440 PUBLIC 05162008
3 Installing SAP NetWeaver Developer Studio
Caution
Do only use your Update Site on the AS Java or the SAP Update Site Using other update sites likethe Eclipse update site can lead to a version mismatch of features and undesired results
PrerequisitesCheck the hardware and software requirements necessary for the installation of SAP NetWeaverDeveloper Studio
Requirement Type Requirement
HardwareNote
SAP NetWeaver Developer Studio can be installedon a 32-bit platform only
n 1 GB free disk spacen 1 CPU with 3 GHz (minimum)n 2 GB RAM (minimum)n Paging file size 2x RAMTo check paging file size
1 Choose Windows Start button and choose ControlPanel reg System
2 Choose tab Advanced and choose Settings in thePerformance pane
3 Choose tab Advanced in the Performance Options dialogwindowThe current page size is displayed in the Virtualmemory pane To change the page size value chooseChange enable the Custom size radio button and enterthe new value in the input field Initial size (MB)
Software Supported Operating SystemsMicrosoft Windows XP Professional SP2 (orhigher)(32-bit)JDK versionSUN JDK 150_11 (or higher)You can download this version from the SUNweb site
The installation process begins with preparation steps that are dependent on the installation methodDVD or update site The following installation steps are independent of the installation method
Preparation ‒ Installing the Developer Studio from a DVD
1 Start SAPinst from the SAP Installation Master DVD by double-clicking sapinstexe from thefollowing path ltDVD drivegtDATA_UNITSIM_WIN_I386_ltdata_basegt
SAPinst GUI starts automatically by displaying theWelcome screen2 In theWelcome screen choose the installation option SAP NetWeaver Developer Studio
05162008 PUBLIC 1540
3 Installing SAP NetWeaver Developer Studio
3 Choose Next and follow the on-screen instructions
Preparation ‒ Installing the Developer Studio from an Update Site
1 Start your Web browser and connect to the update site2 Download NWDS_platformzip
This zip file contains the SAP NetWeaver Developer Studio Platform Installer3 Unzip NWDS_platformzip to a temporary folder on your local disk drive4 Navigate to the temporary folder5 Run the installer IDESetupexe contained in the zip
Installing the Developer Studio from DVD and Update SiteFollow the on-screen instructions of the installation toolDuring the installation dialog you are asked for the update site location Always accept thepreconfigured URL that points to the update site that is correct for the installation location (DVDor update site) you selectedThe Developer Studio is started automatically when the installation dialog is finished During startupyou are asked for the workspace folder for the Developer Studio
Caution
If you already had a Developer Studio installed on this client you need to specify a differentworkspace than the one you used for the previously installed Developer Studio version This is alsotrue if you have uninstalled the previous version already Uninstalling a Developer Studio doesnot remove the content you created in the workspace folder that includes the preferences of theDeveloper Studio and maybe projects you stored locally
The next prompt during start up is to confirm the network connections On the network connectionpreference page you can specify if you connect to the Internet directly or you can configure yourproxy The network connection settings must be configured so that the Developer Studio can connectto the update site There can be misleading error messages if the proxy settings are not correctThe installer installs the kernel of the Developer Studio The kernel contains Eclipse and a few SAPadditions but is not equipped with the SAP features necessary for the Composition EnvironmentTo install the required SAP features you have to install the SAP features with the following updateprocedure
Selecting and Installing Features
1 The available features are displayedThe Updates dialog window displays the main node of the features Open the main node andyou see the available main features
2 Choose the main features you want to install
1640 PUBLIC 05162008
3 Installing SAP NetWeaver Developer Studio
Note
Make sure that the component required for the selected feature is installed on the AS Java
3 Accept the license agreement4 In the screen Optional Features choose Next
Caution
Never deselect an optional feature This can cause a malfunction of the Developer Studio
5 In the Install screen choose FinishThe features are being downloaded
6 Choose Install All to verify the feature installation7 Restart the Developer Studio for the updates to take effect
Recommendation
We recommend that you start the Developer Studio with the shortcuts that were created onyour desktop or in the StartmenuTo get to the SAP documentation in the Developer Studio open the application and choose fromthe menu bar Help Help Contents SAP NetWeaver CE Developer Studio Documentation
The installation of the Developer Studio is now completed
Additional ActivitiesOnce the Developer Studio is installed you can add update and remove installed features at any time
Adding Features to an Installed Developer Studio
You can add features any time
1 Choose Help Software Updates Find and Install 2 Choose Search for new features to install3 Enable the displayed update site
Recommendation
We recommend that you do not change the update site to avoid version inconsistencies
4 Continue with step Selecting and Installing Main Features as described above
Updating Installed Features
1 Choose Help Software Updates Find and Install 2 Choose Search for updates of currently installed features3 Follow the on-screen instructions
05162008 PUBLIC 1740
3 Installing SAP NetWeaver Developer Studio
As of SP03 SAP NetWeaver Developer Studio uses the IDE Update Site to keep itself up-to-date
1 Choose Help Software Updates Find and Install 2 Choose Search for updates of currently installed features3 Follow the on-screen instructions
Note
The configuration wizard task Configuration and Mirroring of local NWDS Update Site has to be run aftereach patch or update of the IDE update site component on AS JavaFormore information about how to run the configuration wizard see Post-Installation Activities [page 27]
More InformationUpdate Guide ‒ SAP NetWeaver Composition Environment 71 ‒ Update to SPltxxgt available athttpwwwsdnsapcomirjsdnnw-ce
Uninstalling Features
1 To uninstall features choose Help Software Updates Manage Configuration 2 In the Product Configuration window choose Show Disabled Features3 Open the node SAP NetWeaver Developer Studio and its subnode
The features are displayed with its status enabled or disabled4 To change the status of feature select the feature and choose Enable or Disable (depending on
the current status)To uninstall a feature it has to be set to status disabled
5 Restart the SAP NetWeaver Developer Studio to apply the status change
Note
To uninstall all old version features (after the update) choose Help Software Updates UninstallDisabled Features
1840 PUBLIC 05162008
4 Installing Additional Components (Optional)
4 Installing Additional Components(Optional)
You can install the following additional components
n Composition Toolsn Adobe Document Services
n Composite Voicen IDE Update Site
PrerequisitesYou need to meet the same hardware and software requirements as for your already installeddevelopment system plus an additional 2 GB RAMThe Composition Tools and Composite Voice component make use of the Visual Composer VisualComposer is a Web browser based tool to model user interfaces To run Visual Composer thefollowing programsmust be installed on the client computer fromwhich you access Visual Composer
n Microsoft Internet Explorer 60 SP1 or highern Adobe SVG Viewer 30
n Microsoft XML Parser 40 or higher
Note
n Before installing additional components you need to stop all application servers manually
n Before installing additional components and in the case that you made changes to the defaulttemplate settings see SAP Note 953763
Prerequisites for SAP MaxDB
n Make sure that the Application Server Java and its corresponding database is runningYou can stop and start the system using the shortcuts under Start All Programs SAP NetWeaverComposition Environment 71 Application Server JxxltSAPSIDgt
n During the installation of additional components entries are written into the log area of thedatabase To avoid that the log is running full during the installation make sure that your backupstrategy is already active and an initial data backup was successfulWhen you want to establish your backup strategy after installing additional components you canturn on the special log mode AutoOverwrite using the Database Manager GUI This interrupts theexisting backup history You have to run a complete backup to start the history again
05162008 PUBLIC 1940
4 Installing Additional Components (Optional)
ProcedureThis procedure tells you how to install an SAP system with SAPinst SAPinst includes a GUI and aGUI server both using Java This section describes an installation where SAPinst SAPinst GUI andthe GUI server are running on the same hostNote the following information about SAPinst
n When you start SAPinst SAPinst GUI and the GUI server also start SAPinst GUI connects to theGUI server with a secure SSL connection and the GUI server connects to SAPinst
n SAPinst creates the installation directory sapinst_instdir where it keeps its log files Theinstallation directory is located directly in the Program Files directory If SAPinst is not able tocreate sapinst_instdir there it tries to create sapinst_instdir in the directory defined by theenvironment variable TEMP
Recommendation
We recommend that you keep all installation directories until the system is completely andcorrectly installed
n SAPinst creates a subdirectory for each installation option calledltsapinst_instdirgtltinstallation_option_directorygt which is located in ProgramFiles
n The SAPinst Self-Extractor extracts the executables to a temporary directory (TEMP TMP TMPDIR orSystemRoot) These executables are deleted after SAPinst has stopped runningDirectories called sapinst_exexxxxxxxxxx sometimes remain in the temporary directory Youcan safely delete them The temporary directory also contains the SAPinst Self-Extractor log filedev_selfexout which might be useful if an error occurs
Caution
If SAPinst cannot find a temporary directory the installation terminates with the error FCO-00058
n If you want to terminate SAPinst and the SAPinst Self-Extractor choose one of the followingoptionsl Right-click the icon for the SAPinst output window located in theWindows tray and choose Exitl Click the icon for the SAPinst output window located in the Windows tray and choose File
Exit
PrerequisitesYou are logged on as a user with administration rights to install the SAPinst tool and the SAP system
Note
When installing from a network share make sure that everyone has read access to this share Theinstallation routine creates users such as ltsidgtadm (for example ce1adm) During the installationSAPinst does a user switch to this user If the newly created user does not have permissions to thenetwork share where the installation is running from the installation will fail
2040 PUBLIC 05162008
4 Installing Additional Components (Optional)
Procedure
1 Insert the SAP Installation Master DVD into your DVD drive or mount it locally2 Start SAPinst from the SAP Installation Master DVD by double-clicking sapinstexe from the
following path ltDVD drivegtDATA_UNITSIM_WIN_ltplatformgt_ltdatabasegtSAPinst GUI starts automatically by displaying theWelcome screen
3 In theWelcome screen choose the required SAPinst installation option from the tree structure
Note
If SAPinst prompts you to log off from your system log off and log on againSAPinst restarts automaticallyChoose Continue Old Installation
4 Choose whether you want to run the installation in Typicalmode or in CustommodeIf you select Typical the installation wizard provides automatic default settings and you only haveto respond to a small selection of prompts The rest is set by default If you select Custom you haveto respond to all prompts
Note
If you want to install the offline documentation for SAP NetWeaver CE you need to chooseCustommodeAfter the installation you can access the offline documentation by choosing Start All ProgramsSAP NetWeaver Composition Environment ltSAPSIDgt
5 Follow the screens and enter the required parameters
Note
For more information about the input parameters and information about restrictions forpasswords position the cursor on the required parameter and press F1
After you have entered all requested input parameters SAPinst displays the Parameter Summaryscreen This screen shows both the parameters that you entered and those that SAPinst set bydefault If required you can revise the parameters before starting the installation
6 To start the installation choose Start SAPinst starts the installation and displays the progress ofthe installation When the installation has successfully been completed SAPinst shows the dialogExecution of ltService_Namegt has been completed successfully
Note
After installing additional components you need to perform some post-installation activities [page 27] toget the system up amp running
05162008 PUBLIC 2140
This page is intentionally left blank
5 Installing SAP Memory Analyzer (Optional)
5 Installing SAP Memory Analyzer(Optional)
SAP Memory Analyzer helps you to analyze Java heap dumps easily find big chunks of memory orcomplex memory aggregation patterns in your data structures and identify who is keeping thismemory alive New and innovative analysis techniques support the user with a fast and powerfulfeature setThe tool (Eclipse RCP application) was developed to analyze real productive heap dumps whichtend to get enormous in size with hundreds of millions of objects Performance low resourceconsumption and especially the newly developed innovative analysis techniques make it a helpfultool even to small application heap dumpsYou can install SAP Memory Analyzer as an additional tool
This procedure tells you how to install an SAP system with SAPinst SAPinst includes a GUI and aGUI server both using Java This section describes an installation where SAPinst SAPinst GUI andthe GUI server are running on the same hostNote the following information about SAPinst
n When you start SAPinst SAPinst GUI and the GUI server also start SAPinst GUI connects to theGUI server with a secure SSL connection and the GUI server connects to SAPinst
n SAPinst creates the installation directory sapinst_instdir where it keeps its log files Theinstallation directory is located directly in the Program Files directory If SAPinst is not able tocreate sapinst_instdir there it tries to create sapinst_instdir in the directory defined by theenvironment variable TEMP
Recommendation
We recommend that you keep all installation directories until the system is completely andcorrectly installed
n SAPinst creates a subdirectory for each installation service calledltsapinst_instdirgtltinstallation_service_directorygt which is located in ProgramFiles
n The SAPinst Self-Extractor extracts the executables to a temporary directory (TEMP TMP TMPDIR orSystemRoot) These executables are deleted after SAPinst has stopped runningDirectories called sapinst_exexxxxxxxxxx sometimes remain in the temporary directory Youcan safely delete them The temporary directory also contains the SAPinst Self-Extractor log filedev_selfexout which might be useful if an error occurs
05162008 PUBLIC 2340
5 Installing SAP Memory Analyzer (Optional)
Caution
If SAPinst cannot find a temporary directory the installation terminates with the error FCO-00058
n If you want to terminate SAPinst and the SAPinst Self-Extractor choose one of the followingoptionsl Right-click the icon for the SAPinst output window located in theWindows tray and choose Exitl Click the icon for the SAPinst output window located in the Windows tray and choose File
Exit
PrerequisitesYou are logged on as a user with administration rights to install the SAPinst tool and the SAP system
Note
When installing from a network share make sure that everyone has read access to this share Theinstallation routine creates users such as ltsidgtadm (for example ce1adm) During the installationSAPinst performs a user switch to this user If the newly created user does not have permissions tothe network share where the installation is running from the installation will fail
Procedure
1 Insert the SAP Installation Master DVD into your DVD drive or mount it locally2 Start SAPinst from the SAP Installation Master DVD by double-clicking sapinstexe from the
following path ltDVD drivegtDATA_UNITSIM_WIN_ltplatformgt_ltdatabasegtSAPinst GUI starts automatically by displaying theWelcome screen
3 In theWelcome screen choose the required SAPinst installation option from the tree structure
Note
If SAPinst prompts you to log off from your system log off and log on againSAPinst restarts automaticallyChoose Continue Old Installation
4 Choose whether you want to run the installation in Typicalmode or in CustommodeIf you select Typical the installation wizard provides automatic default settings and you only haveto respond to a small selection of prompts The rest is set by default If you select Custom you haveto respond to all prompts
Note
If you want to install the offline documentation for SAP NetWeaver CE you need to chooseCustommodeAfter the installation you can access the offline documentation by choosing Start All ProgramsSAP NetWeaver Composition Environment ltSAPSIDgt
2440 PUBLIC 05162008
5 Installing SAP Memory Analyzer (Optional)
5 Follow the screens and enter the required parameters
Note
For more information about the input parameters and information about restrictions forpasswords position the cursor on the required parameter and press F1
After you have entered all requested input parameters SAPinst displays the Parameter Summaryscreen This screen shows both the parameters that you entered and those that SAPinst set bydefault If required you can revise the parameters before starting the installation
6 To start the installation choose Start SAPinst starts the installation and displays the progress ofthe installation When the installation has successfully been completed SAPinst shows the dialogExecution of ltOption_Namegt has been completed successfully
05162008 PUBLIC 2540
This page is intentionally left blank
6 Post-Installation Activities
6 Post-Installation Activities
This section describes the steps that you have to perform after the installation has finished successfully
Running the Configuration Wizard (Optional)
Note
You can run the configuration wizard only once and only directly after installing and patchingyour SAP system
For SAP NetWeaver CE you need to run the following configuration tasks
n Configuration of Services Registry Webservice Destinations
n When you have installed the IDE Update Site componentConfiguration and Mirroring of local NWDSUpdate Site
n When you have installed the Adobe Document Services component Initial setup ADS in CE
When you have an NWDI installation on another SAP NetWeaver 70 system you can perform thefollowing configuration tasks
n Change Management Service (CMS) Create an Application Skeleton
n Change Management Service (CMS) Modify a Software Component
To run the configuration wizard proceed as follows
1 After SAPinst has finished open the SAP NetWeaver Administrator by entering the following URLin a browser httplthostgtlthttp_portgtnwa
2 Log on as user j2ee_admin3 In the SAP NetWeaver Administrator choose Configuration Management Scenarios Configuration
Wizard 4 Select the appropriate configuration task in the list and choose Start5 Follow the on-screen instructions6 After the configuration wizard has finished successfully restart your SAP system
Configuring the IDE Update Site
1 In the Configuration Wizard select the task Configuration and Mirroring of local NWDS Update Site in thelist and choose Start
2 Follow the on-screen instructions
05162008 PUBLIC 2740
6 Post-Installation Activities
Provide the credentials for the source update site location The default URL is the central SAPupdate site You can also use your installation DVD as source update site which makes themirror process much faster To use the DVD as source update site you have to specify the URLfileltdvd_drivegtIDE
3 After the configuration wizard has finished successfully restart your SAP systemThe data of the source update site location is now mirrored to your server
Enabling Adobe Document ServicesIf you have installed SAP NetWeaver Composition Environment with the Adobe DocumentServices add-on in the developer edition on aWindows platform you must complete the followingpost-installation steps to enable the add-on In case you have installed an AS Java cluster applythe procedure to the central host as well as to all other hosts where additional application serverinstances are running
1 Using the SAP Management Console stop the AS Java systemFormore information about starting and stopping SAP systems see httphelpsapcomnwce
Administratorrsquos Guide Administration of SAP NetWeaver CE General System Administration AS Java(Application Server Java)
2 From the Startmenu open Control Panel Administrative Tools Computer Management Services andApplications Services
3 Select SAPltSIDgt_ltInstance_Numbergt (for example SAPCE1_00) and open Properties from thecontext menu
4 On the Log On tab page enable the Local System account indicator5 Repeat the above steps for the second SAPltSIDgt_ltInstance_Numbergt service that you see in the list6 Start the AS Java system
Adobe LiveCycle Designer
For more information about how to install and configure the Adobe LiveCycle Designer see SAPNote 962763
Enabling Services RegistryYou must apply additional configuration steps to enable Services Registry after you have installed anSAP NetWeaver Composition Environment system containing the following components
n Java Application Server and Composition Platformn Java Application Server and Adobe Document Services
To enable Services Registry you must apply the following configuration templates to your systemCE_Complete_Stack_development_full
2840 PUBLIC 05162008
6 Post-Installation Activities
Note
For more information about what configuration templates are available see Configuration Templates[page 33]For more information about applying configuration templates see httphelpsapcomnwce
SAP NetWeaver Composition Environment Library Administratorrsquos Guide Configuration of SAP NetWeaver CEInitial System Configuration AS Java Configuration Activating a Configuration Template
See also
httphelpsapcomnwce SAP NetWeaver Composition Environment Library Developerrsquos GuideDeveloping and Composing Applications Consuming Enterprise Services Searching for Services Services RegistryTasks Searching amp Browsing Service Definitions Configuring the Services Registry
Configuring the Portal in SAP NetWeaver CEAfter installing the portal in SAP NetWeaver CE a number of deactivated or irrelevant tools aredisplayed in the UI To display the correct portals tools for CE proceed as follows
1 Open a browser and log on to your portal as an administrator2 In the same browser session enter the following URL
httplthostgtlthttpportgtirjservletprtportalprtrootcomsapportal
contentlayersContentLayersTool
where lthostgt is the host name of your server and lthttpportgt is the port number of your server3 In the Portal Mode Configuration Tool choose Activate Development Mode to restore the portal tools
and content that are assigned to the development mode4 Restart or refresh your browser5 In the SAP Management Console restart the server
You may then continue with the mandatory and optional configuration steps as described inhttphelpsapcomnwce SAP NetWeaver Composition Environment Library Administratorrsquos Guide
Configuration of SAP NetWeaver Composition Environment Configuration for CE Additional Components Configuringthe Portal
Changing the Password for the Internet Communication Manager (ICM)You can monitor and manage the Internet Communication Manager (ICM) from the command lineprogramAfter the installation of your SAP NetWeaver CE system has successfully finished you need to changethe ICM password manually To do so proceed as follows
1 Log on at operating system level to the computer where the ICM is running2 Start the program icmon with icmon ndasha profile=ltinstance_profilegt to maintain the
authentication file (default authfiletxt)3 Choose a to add a user4 Choose c to change the password of the existing user
05162008 PUBLIC 2940
6 Post-Installation Activities
5 Choose s to save your settings
Further Configuration StepsAfter installing your SAP NetWeaver CE system and performing the post-installation steps to get thesystem up amp running you may need to perform further configuration stepsRefer to the following documentation to proceed with your tasks
n If you are a system administrator refer to httphelpsapcomnwce Administratorrsquos Guide It contains information about how to configure and administer your system
n If you are a developer refer to httphelpsapcomnwce Developerrsquos Guide It providesguidelines for developing applications using the SAP NetWeaver CE
Note
The SAP NetWeaver CE documentation is also available offline as a part of your installation To accessit choose Start All Programs SAP NetWeaver Composition Environment 10 Documentation
3040 PUBLIC 05162008
7 Additional Information
7 Additional Information
The following section provides additional information about the installation of SAP NetWeaverComposition Environment
71 Transporting Self-Developed Software ComponentArchives (SCA) into the System
PrerequisitesYou have developed your own Software Component Archives (SCA) and want to transport theminto your SAP NetWeaver CE system
ProcedureTo transport your SCAs to the SAP NetWeaver CE system proceed as follows
1 Download the update file from httpservicesapcomswdc Download Support Packages andPatches Entry by Application Group SAP NetWeaver SAP NETWEAVER SAP NETWEAVER CE71 Support Package Stacks
2 From an empty directory run the update tool updateltIDgtexe
Note
If the tool displays descriptions such as Applying Support Packages you can ignore them
3 In the dialog screens specify the directory where your SCAs are located4 Follow the on-screen instructions
Only valid for MaxDB
72 Troubleshooting ‒ Repairing an Inconsistent SAP MaxDBInstallation
PrerequisitesDuring the preinstallation phase the installation tool checks the Microsoft Windows registry foralready installed SAP MaxDB softwareIf the registry key is found but there is no software on the hard drive you receive the followingmessage
05162008 PUBLIC 3140
7 Additional Information73 Restarting the SAP MaxDB Server Manually
The existing MaxDB software is not consistent Check the file system and registry
The most common reason for this inconsistency is the manual deletion of the software from the filesystem without using the specified tools
ProcedureTo repair this inconsistency proceed as follows
1 Choose Start Control Panel Administrative Tools Services 2 Make sure the services SAPDBWWW SAPDB and XServer are stopped3 Choose Start Run and run the command regedit4 Go to My ComputerHKEY_LOCAL_MACHINESOFTWARESAPSAP DBTech Key IndepPrograms
The key contains a path to a foldera) Check if this folder exists on the file systemb) Note down the value of Key IndepPrograms for later usage (see step 7)
If the path does not exist in the file system delete the key SAP DBTech5 Delete the following keys
n My ComputerHKEY_LOCAL_MACHINESYSTEMCurrentControlSetServicesSAP DBTech-
n My ComputerHKEY_LOCAL_MACHINESYSTEMCurrentControlSetServicesSAPDBWWW
n My ComputerHKEY_LOCAL_MACHINESYSTEMCurrentControlSetServicesXServer
6 Choose Start Control Panel System Advanced Environment Variables System Variables Path 7 Delete the following paths from the variable
n ltIndepProgramsgtbin
n ltIndepProgramsgtpgm
8 Reboot your computer
End of MaxDB
Only valid for MaxDB
73 Restarting the SAP MaxDB Server Manually
If after a reboot the database server is not running automatically you need to restart the SAP MaxDBserver manually
Production SystemsTo restart the SAP MaxDB server manually proceed as follows
1 Open a command prompt and enter the following command net start sapdbwww
ORChoose Start All Programs Administrative Tools Services Double-click on SAP DB WWW andchoose Start
2 Open the SAP Management Console and choose SAP Systems ltSAPSIDgt ltmachine namegt
3240 PUBLIC 05162008
7 Additional Information74 Restarting the MS SQL Server Manually
3 Enter the master password and choose Logon4 Choose Online When the database server is online you can restart the engine
Development SystemsTo restart the SAP MaxDB server manually choose Start All Programs SAP NetWeaver CompositionEnvironment CE Application Server ltSAPSIDgt Start Application Server End of MaxDB
Only valid for MS SQL Server
74 Restarting the MS SQL Server Manually
If after a reboot the database server is not running automatically you need to restart the MS SQLServer manually
Procedure
1 Choose Start All Programs Administrative Tools Services 2 Look for the service named SQL Server ltnamegt where ltnamegt is MSSQLSERVER for the default
instance or ltinstance namegt for a named instance3 If the service status is not started right-click the service and choose Start in the context menu4 To insure the service is started automatically after each system restart right-click it and choose
Properties Select Automatic as the startup type
End of MS SQL Server
75 Configuration Templates
Configuration templates contain the predefined instance configuration for specific scenarios Theyare automatically applied according to the installation option you have selected The templatesare designed to optimize system performance by applying certain configuration to the Java VirtualMachine and the application server as well as by applying startup filters to AS Java services andapplications to start only those relevant for the selected installation optionsThe following table provides information about the available templates with SAP NetWeaverComposition Environment In the template name replace the ltsystem_modegt parameter bydevelopment (for the templates relevant to systems installed in developmentmode) or production (forthe templates relevant to systems installed in productivemode)
05162008 PUBLIC 3340
7 Additional Information76 Uninstalling SAP NetWeaver Composition Environment
Configuration Template Selected Installation Options
CE_Java_EE_ltsystem_modegt_full Java Application Server Installation
CE_Composition_Environment_ltsystem_modegt_full Java Application Server Installation + CompositionPlatform Installation
CE_Adobe_Document_Service_ltsystem_modegt_full Java Application Server Installation + AdobeDocument Services Add-on Installation
CE_Composite_Voice_ltsystem_modegt_full Java Application Server Installation + Voice Add-onInstallation
CE_Complete_Stack_ltsystem_modegt_full Java Application Server Installation + CompositionPlatform Installation + Adobe Document ServicesAdd-on Installation + Voice Add-on Installation
If your selection cannot be mapped to one of the combinations in the above table the templateCE_Complete_Stack_ltsystem_modegt_full is applied It starts all applications and services neededto run the complete stackYou canmanually apply a different configuration template if youwant to switch to another installationoption For example by changing from template CE_Complete_Stack_ltsystem_modegt_full toCE_Java_EE_ltsystem_modegt_full you achieve shorter startup times and less memory consumptionbut also less functionality since not all applications and services are runningFor more information about applying configuration templates see httphelpsapcomnwce
Administratorrsquos Guide Configuration of SAP NetWeaver CE Initial System Configuration AS Java ConfigurationActivating a Configuration Template
Note
Make sure that you do not apply a development template to a productive system or vice versa
76 Uninstalling SAP NetWeaver Composition Environment
You have to uninstall all components of the SAP NetWeaver Composition Environment separatelythat is SAP NetWeaver CE and SAP NetWeaver Developer StudioYou can uninstall your SAP NetWeaver CE system in different ways
Uninstalling SAP NetWeaver CEWindows Choose Start Control Panel Add Remove programs SAP SystemltSAPSIDgt
Uninstalling SAP NetWeaver CE Using SAPinst
1 Insert the SAP Installation Master DVD into your DVD drive or mount it locally
3440 PUBLIC 05162008
7 Additional Information76 Uninstalling SAP NetWeaver Composition Environment
2 Start SAPinst from the SAP Installation Master DVD as described in the section Installing SAPNetWeaver Composition Environment
3 In theWelcome screen choose Uninstall SAP System or Single Instances from the tree structure4 Follow the on-screen instructions
Uninstalling SAP NetWeaver Developer Studio
Prerequisites
Before uninstalling SAP NetWeaver Developer Studio consider the following
n All additionally installed features and plug-ins that were installed to the same folder as DeveloperStudio for example by using the Eclipse Update Manager will also be removed
n There may be other directories and files in the installation directory notablyltinstall_dirgteclipseworkspace ltinstall_dirgteclipselinks andltinstall_dirgteclipseconfiguration that contain important data The files and folder aswell as the existing workspaces are retained when the product is uninstalled
Procedure
To uninstall SAP NetWeaver Developer Studio proceed as described above You can use either oneof the options
Uninstalling the SAP Management ConsoleSince all SAP systems use the SAP Management Console there is no uninstallation option for theSAP Management Console with SAPinst If you are sure that you do not need the SAP ManagementConsole any more you can remove it using Start Control Panel Add Remove programs
05162008 PUBLIC 3540
Typographic Conventions
Example Description
lt gt Angle brackets indicate that you replace these words or characters with appropriateentries to make entries in the system for example ldquoEnter your ltUser Namegtrdquo
Arrows separating the parts of a navigation path for example menu options
Example Emphasized words or expressions
Example Words or characters that you enter in the system exactly as they appear in thedocumentation
Example Textual cross-references to an internet address for example httpwwwsapcom
example Quicklinks added to the internet address of a homepage to enable quick access tospecific content on the Web
123456 Hyperlink to an SAP Note for example SAP Note 123456
Example n Words or characters quoted from the screen These include field labels screen titlespushbutton labels menu names and menu options
n Cross-references to other documentation or published works
Example n Output on the screen following a user action for example messagesn Source code or syntax quoted directly from a programn File and directory names and their paths names of variables and parameters and
names of installation upgrade and database tools
EXAMPLE Technical names of system objects These include report names program namestransaction codes database table names and key concepts of a programming languagewhen they are surrounded by body text for example SELECT and INCLUDE
EXAMPLE Keys on the keyboard
3640 PUBLIC 05162008
SAP AGDietmar-Hopp-Allee 16
69190 WalldorfGermany
T +4918 0534 34 34F +4918 0534 34 20
wwwsapcom
copy Copyright 2008 SAP AG All rights reserved
No part of this publication may be reproduced or transmitted in any form or for any purpose without the express permissionof SAP AG The information contained herein may be changed without prior noticeSome software products marketed by SAP AG and its distributors contain proprietary software components of othersoftware vendors
No part of this publication may be reproduced or transmitted in any form or for any purpose without the express permissionof SAP AG The information contained herein may be changed without prior noticeSome software products marketed by SAP AG and its distributors contain proprietary software components of othersoftware vendorsMicrosoft Windows Excel Outlook and PowerPoint are registered trademarks of Microsoft CorporationIBM DB2 DB2 Universal Database OS2 Parallel Sysplex MVSESA AIX S390 AS400 OS390 OS400 iSeries pSeriesxSeries zSeries System i System i5 System p System p5 System x System z System z9 zOS AFP Intelligent MinerWebSphere Netfinity Tivoli Informix i5OS POWER POWER5 POWER5+ OpenPower and PowerPC are trademarks orregistered trademarks of IBM CorporationAdobe the Adobe logo Acrobat PostScript and Reader are either trademarks or registered trademarks of Adobe SystemsIncorporated in the United States andor other countriesOracle is a registered trademark of Oracle CorporationUNIX XOpen OSF1 and Motif are registered trademarks of the Open GroupCitrix ICA Program Neighborhood MetaFrame WinFrame VideoFrame and MultiWin are trademarks or registeredtrademarks of Citrix Systems IncHTML XML XHTML and W3C are trademarks or registered trademarks of W3Creg World Wide Web ConsortiumMassachusetts Institute of TechnologyJava is a registered trademark of Sun Microsystems IncJavaScript is a registered trademark of Sun Microsystems Inc used under license for technology invented and implementedby NetscapeSAP R3 xApps xApp SAP NetWeaver Duet PartnerEdge ByDesign SAP Business ByDesign and other SAP productsand services mentioned herein as well as their respective logos are trademarks or registered trademarks of SAP AG inGermany and in several other countries all over the world All other product and service names mentioned are thetrademarks of their respective companies Data contained in this document serves informational purposes only Nationalproduct specifications may varyThese materials are subject to change without notice These materials are provided by SAP AG and its affiliated companies(SAP Group) for informational purposes only without representation or warranty of any kind and SAP Group shall notbe liable for errors or omissions with respect to the materials The only warranties for SAP Group products and services arethose that are set forth in the express warranty statements accompanying such products and services if any Nothing hereinshould be construed as constituting an additional warranty
This document was created using stylesheet 2006-12-31 (V51beta [= 60 for E3]) and XSLT processor SAXON 652 fromMichael Kay (httpsaxonsfnet) XSLT version 1
05162008 PUBLIC 3740
DisclaimerSome components of this product are based on Javatrade Any code change in these components may cause unpredictable andsevere malfunctions and is therefore expressly prohibited as is any decompilation of these componentsAny Javatrade Source Code delivered with this product is only to be used by SAPrsquos Support Services and may not be modified oraltered in any way
Documentation in the SAP Service MarketplaceYou can find this document at the following address httpsservicesapcominstguides
3840 PUBLIC 05162008
This page is intentionally left blank
SAP AGDietmar-Hopp-Allee 1669190 WalldorfGermanyT +4918 0534 34 34F +4918 0534 34 20wwwsapcom
copy Copyright 2008 SAP AG All rights reservedNo part of this publication may be reproduced or transmitted in any form or for any purpose without the express permission of SAP AG The information contained herein may bechanged without prior notice

1 About This Document
1 About This Document
This document explains how to install an SAP NetWeaver Composition Environment system asdeveloper editionFor more information about SAP NetWeaver Composition Environment in general seehttpsdnsapcomirjsdnnw-ce
SAP Notes for the Installation
Make sure you have read the latest version of SAP Note 953763 before you start the installationThis SAP Note contains the most recent information on the installation as well as corrections to theinstallation documentation Make sure that you have the up-to-date version of each SAP Note whichyou can find on SAP Service Marketplace at httpservicesapcomnotes
Installation Process
1 Decide what you want to installn SAP NetWeaver Composition Environment Developer Edition [page 7]n additional components [page 19] (optional) such asl Composition Toolsl Adobe Document Services
l Composite Voicel IDE Update Site
n SAP NetWeaver Developer Studio [page 13]n SAP Memory Analyzer [page 23] (optional)
2 You start the installation3 You perform the post-installation steps [page 27]4 Further documentationn If you are a system administrator refer to httphelpsapcomnwce Administratorsrsquo
Guide It contains information about how to configure and administer your systemn If you are a developer refer to httphelpsapcomnwce Developerrsquos Guide It provides
guidelines for developing applications using the SAP NetWeaver CE5 Additional informationn Transporting Self-developed Software Component Archives (SCA) into the System [page 31]n Troubleshooting ‒ Repairing an Inconsistent SAP MaxDB Installation [page 31]n Restarting the SAP MaxDB Server Manually [page 32]n Restarting the MS SQL Server Manually [page 33]n Configuration Templates [page 33]
05162008 PUBLIC 540
1 About This Document
n Uninstalling SAP NetWeaver Composition Environment [page 34]
More Information
Master Guide - SAP NetWeaver Composition Environment 71 available athttpwwwsdnsapcomirjsdnnw-ce
640 PUBLIC 05162008
2 Installing SAP NetWeaver CE Developer Edition
2 Installing SAP NetWeaver CE DeveloperEdition
This section provides information about the steps that you have to perform to install SAP NetWeaverComposition Environment as a development system (Windows 32-bit only)
Hardware and Software Requirements for Development SystemsBefore starting the installation make sure you meet the hardware and software requirements foryour operating system (OS) and the SAP NetWeaver CE systemConsider the following information
n For supported operating system releases see the Product Availability Matrix on SAP ServiceMarketplace at httpservicesapcompam
n Contact your OS vendor for the latest OS patches
If you want to install an SAP NetWeaver CE development system the host must meet the followingrequirements
Requirement Type Requirement
HardwareCaution
Development systems can be installed on 32-bitWindows only
n 10 GB free disk spacen Min 1 CPU with 3 GHzn 2 GB RAM (minimum)n Paging file size 2x RAM
To check the paging file size
1 Right-clickMy Computer and choose Properties
2 Choose Advanced Performance Settings
3 If required in section Virtual Memory chooseChange
Software Supported Operating SystemsMicrosoft Windows XP Professional SP2 (or higher)(32-bit)
CautionEnglish version only
Supported Databases
05162008 PUBLIC 740
2 Installing SAP NetWeaver CE Developer Edition
Requirement Type Requirement
n SAP MaxDB 76
NoteThe SAP MaxDB software is installed with theSAP NetWeaver CE system
n MS SQL Server 2005 SP1 (or higher)
NoteIf you want to use the MS SQL Server databaseyou have to install it before installing SAPNetWeaver CE
JDK versionSUN JDK 150_11 (or higher)You can download this version from the SUN Website
Note
If you want to install additional components (optional) [page 19] you need the same hardware and softwarerequirements as stated above plus an additional 2 GB RAM
Preparing the Installation DVDMake sure you have the installation DVD for SAP NetWeaver Composition Environment 71 availableYou can also download the installation DVD from SAP Service Marketplace athttpservicesapcomswdc Download SAP Installations and Upgrades Entry by Application Group
SAP NetWeaver SAP NETWEAVER SAP NetWeaver CE 71 If you download the installation DVD note that the DVDmay be split into several archives In thiscase you have to unpack these archives to one folder after the download
Preparations for the MS SQL Server DatabaseBefore installing your SAP NetWeaver CE development system onWindows andMS SQL Server makesure that your MS SQL Server database meets the following requirementsBefore starting the installation check the following
n The default collation of your database server is SQL_Latin1_General_CP850_BIN21 Start the SQL Server Management Studio2 Connect to your server3 Right-click the server and in the context menu choose Properties4 Check the server collation on the general page5 If the server collation differs from SQL_Latin1_General_CP850_BIN2 you have to reinstall it
or use a different MS SQL Server Instance
840 PUBLIC 05162008
2 Installing SAP NetWeaver CE Developer Edition
n SQL Server logins are enabled1 Start the SQL Server Management Studio2 Connect to your server3 Right-click the server and in the context menu choose Properties4 Switch to the security page
Under Server Authentication make sure that the entry SQL Server and Windows Authentication modeis selected
Note
If onlyWindows Authentication mode is selected change it to SQL Server and Windows Authentication modeand restart the server for the changes to take effect
n TCP protocol is enabled and your server is able to communicate on the TCP port1 Start the SQL Server Configuration Manager under Start All Programs MS SQL Server 2005
Configuration Tools 2 Go to SQL Server 2005 Network Configuration in the left pane and select your instance3 In the right pane make sure that Protocol TCPIP is set to enabled
If this is not the case refer to theMS SQL Server Books Online to configure the TCPIP connectionproperly
Installing a Development SystemThis procedure tells you how to install an SAP system with SAPinst SAPinst includes a SAPinst GUIand a GUI server which both use Java This section describes an installation where SAPinst SAPinstGUI and the GUI server are running on the same hostNote the following information about SAPinst
n When you start SAPinst SAPinst GUI and the GUI server also start SAPinst GUI connects to theGUI server with a secure SSL connection and the GUI server connects to SAPinst
n SAPinst normally creates the installation directory sapinst_instdir where it keeps its logfiles and which is located directly in the Program Files directory If SAPinst is not able to createsapinst_instdir there it tries to create sapinst_instdir in the directory defined by theenvironment variable TEMP
Recommendation
We recommend that you keep all installation directories until the system is completely andcorrectly installed
n SAPinst creates a subdirectory for each installation option calledltsapinst_instdirgtltinstallation_option_directorygt which is located in ProgramFiles
n The SAPinst Self-Extractor extracts the executables to a temporary directory (TEMP TMP TMPDIR orSystemRoot) These executables are deleted after SAPinst has stopped running
05162008 PUBLIC 940
2 Installing SAP NetWeaver CE Developer Edition
Directories called sapinst_exexxxxxxxxxx sometimes remain in the temporary directory Youcan safely delete them The temporary directory also contains the SAPinst Self-Extractor log filedev_selfexout which might be useful if an error occurs
Caution
If SAPinst cannot find a temporary directory the installation terminates with the error FCO-00058
n If you want to terminate SAPinst and the SAPinst Self-Extractor choose one of the followingoptionsl Right-click the icon for the SAPinst output window located in theWindows tray and choose Exitl Click the icon for the SAPinst output window located in the Windows tray and choose File
Exit
PrerequisitesYou are logged on as a user with administration rights to install the SAPinst tool and the SAP system
Note
When installing from a network share make sure that everyone has read access to this share Theinstallation routine creates users such as ltsidgtadm (for example ce1adm) During the installationSAPinst does a user switch to this user If the newly created user does not have permissions to thenetwork share where the installation is running from the installation will fail
Procedure
1 Insert the SAP Installation Master DVD into your DVD drive or mount it locally2 Start SAPinst from the SAP Installation Master DVD by double-clicking sapinstexe from the
following path ltDVD drivegtDATA_UNITSIM_WIN_ltplatformgt_ltdatabasegt3 In theWelcome screen choose the required SAPinst installation option from the tree structure
Note
If SAPinst prompts you to log off from your system log off and log on againSAPinst restarts automaticallyChoose Continue Old Installation
4 Choose whether you want to run the installation in Typicalmode or in CustommodeIf you select Typical the installation wizard provides automatic default settings and you only haveto respond to a small selection of prompts The rest is set by default If you select Custom you haveto respond to all prompts
Note
If you want to install the offline documentation for SAP NetWeaver CE you need to chooseCustommode
1040 PUBLIC 05162008
2 Installing SAP NetWeaver CE Developer Edition
5 Follow the screens and enter the required parameters
Note
For more information about the input parameters and information about restrictions forpasswords position the cursor on the required parameter and press F1
After you have entered all requested input parameters SAPinst displays the Parameter Summaryscreen This screen shows both the parameters that you entered and those that SAPinst set bydefault If required you can revise the parameters before starting the installation
6 To start the installation choose Start SAPinst starts the installation and displays the progress ofthe installation When the installation has successfully been completed SAPinst shows the dialogExecution of ltOption_Namegt has been completed successfully
Note
You can install the update site (for SAP Developer Studio) on a development system only (singleinstance system)
05162008 PUBLIC 1140
This page is intentionally left blank
3 Installing SAP NetWeaver Developer Studio
3 Installing SAP NetWeaver DeveloperStudio
SAP NetWeaver Developer Studio is based on the open development platform Eclipse It includesthe standard Eclipse features and SAP features The SAP NetWeaver development documentationassumes that you are familiar with Eclipse and how to develop Java applications with itFor more information see httphelpsapcomnwce SAP NetWeaver Library SAP NetWeaverDevelopersrsquo Guide SAP FeaturesSAP NetWeaver Developer Studio provides several features for composing and developing businessapplications You can select the features according to the components you have installed on your ASJava of the Composition Environment The Developer Studio has the following features
n SAP NetWeaver Developer Studio Java EEProvides the toolset for Java EE-compliant developmentAS Java component required Java Application Server
n SAP NetWeaver Developer Studio Development Infrastructure ClientProvides the toolset necessary to work the SAP component model It provides functionality towork locally or in a teamDepending on feature SAP NetWeaver Developer Studio Java EEAS Java component required Java Application Server Optionally SAP NetWeaverDevelopment Infrastructure (NWDI) as part of an SAP NetWeaver 70 system
n SAP NetWeaver Developer Studio Web Dynpro User InterfacesProvides the toolset to develop user interfaces with Web Dynpro for JavaDepending on features SAP NetWeaver Developer Studio Java EE SAP NetWeaver DeveloperStudio Development Infrastructure ClientAS Java component required Java Application Server Optionally Adobe Document Services
n SAP NetWeaver Developer Studio Composition ToolsProvides the toolset to develop composite applicationsDepending on features SAP NetWeaver Developer Studio Java EE SAP NetWeaver DeveloperStudioWebDynpro User Interfaces SAPNetWeaver Developer Studio Development InfrastructureClientAS Java component required Composition Platform Optionally Adobe Document Services
05162008 PUBLIC 1340
3 Installing SAP NetWeaver Developer Studio
Installation Recommendations
Depending on your system landscape we recommend that you install the SAP NetWeaver DeveloperStudio as follows
n Central AS Java with update siteWhen you have a central AS Java we recommend that this server provides an update site Thismakes sure that the SAP NetWeaver Developer Studio you install has the version that matchesthe application serverYou can check the availability of a local update site by going to the following URL in your Webbrowserhttplthostgtlthttpportgtupdatesite
Example
httpdev_server_0150000updatesite
Note
Make sure that the update site is properly installed and that the post-installation activities forthe update site have already been performedMore informationPost-Installation Activities [page 27] section Configuring the IDE Update Site
n Developer WorkplaceIf you want to install the AS Java and the Developer Studio on a single workstation you can usethe following sourcesl SAP NetWeaver Developer Studio Update Site (recommended)
SAP provides a central update site The update site can be found athttpsnwdssapcomswdcdownloadsupdatesnetweavernwdsceTo access the update site you need an SAP Service Marketplace user and password (S user)
l DVDUse the DVD you installed the AS Java from to make sure the Developer Studio and the AS Javahave the same version Once the Developer Studio is installed from a DVD the update manageris always looking on the DVD for updates Therefore you can only update the Developer Studiowhen you have a DVD with a new release The Developer Studio Update Guide containsthe information how to instruct the developer to look for updates on the Developer StudioUpdate Site rather than on the DVD
In the following installation procedure we only use the term Update Site The installation steps arethe same regardless if you decided to install the Developer Studio from the SAP update site or theupdate site on your AS Java
1440 PUBLIC 05162008
3 Installing SAP NetWeaver Developer Studio
Caution
Do only use your Update Site on the AS Java or the SAP Update Site Using other update sites likethe Eclipse update site can lead to a version mismatch of features and undesired results
PrerequisitesCheck the hardware and software requirements necessary for the installation of SAP NetWeaverDeveloper Studio
Requirement Type Requirement
HardwareNote
SAP NetWeaver Developer Studio can be installedon a 32-bit platform only
n 1 GB free disk spacen 1 CPU with 3 GHz (minimum)n 2 GB RAM (minimum)n Paging file size 2x RAMTo check paging file size
1 Choose Windows Start button and choose ControlPanel reg System
2 Choose tab Advanced and choose Settings in thePerformance pane
3 Choose tab Advanced in the Performance Options dialogwindowThe current page size is displayed in the Virtualmemory pane To change the page size value chooseChange enable the Custom size radio button and enterthe new value in the input field Initial size (MB)
Software Supported Operating SystemsMicrosoft Windows XP Professional SP2 (orhigher)(32-bit)JDK versionSUN JDK 150_11 (or higher)You can download this version from the SUNweb site
The installation process begins with preparation steps that are dependent on the installation methodDVD or update site The following installation steps are independent of the installation method
Preparation ‒ Installing the Developer Studio from a DVD
1 Start SAPinst from the SAP Installation Master DVD by double-clicking sapinstexe from thefollowing path ltDVD drivegtDATA_UNITSIM_WIN_I386_ltdata_basegt
SAPinst GUI starts automatically by displaying theWelcome screen2 In theWelcome screen choose the installation option SAP NetWeaver Developer Studio
05162008 PUBLIC 1540
3 Installing SAP NetWeaver Developer Studio
3 Choose Next and follow the on-screen instructions
Preparation ‒ Installing the Developer Studio from an Update Site
1 Start your Web browser and connect to the update site2 Download NWDS_platformzip
This zip file contains the SAP NetWeaver Developer Studio Platform Installer3 Unzip NWDS_platformzip to a temporary folder on your local disk drive4 Navigate to the temporary folder5 Run the installer IDESetupexe contained in the zip
Installing the Developer Studio from DVD and Update SiteFollow the on-screen instructions of the installation toolDuring the installation dialog you are asked for the update site location Always accept thepreconfigured URL that points to the update site that is correct for the installation location (DVDor update site) you selectedThe Developer Studio is started automatically when the installation dialog is finished During startupyou are asked for the workspace folder for the Developer Studio
Caution
If you already had a Developer Studio installed on this client you need to specify a differentworkspace than the one you used for the previously installed Developer Studio version This is alsotrue if you have uninstalled the previous version already Uninstalling a Developer Studio doesnot remove the content you created in the workspace folder that includes the preferences of theDeveloper Studio and maybe projects you stored locally
The next prompt during start up is to confirm the network connections On the network connectionpreference page you can specify if you connect to the Internet directly or you can configure yourproxy The network connection settings must be configured so that the Developer Studio can connectto the update site There can be misleading error messages if the proxy settings are not correctThe installer installs the kernel of the Developer Studio The kernel contains Eclipse and a few SAPadditions but is not equipped with the SAP features necessary for the Composition EnvironmentTo install the required SAP features you have to install the SAP features with the following updateprocedure
Selecting and Installing Features
1 The available features are displayedThe Updates dialog window displays the main node of the features Open the main node andyou see the available main features
2 Choose the main features you want to install
1640 PUBLIC 05162008
3 Installing SAP NetWeaver Developer Studio
Note
Make sure that the component required for the selected feature is installed on the AS Java
3 Accept the license agreement4 In the screen Optional Features choose Next
Caution
Never deselect an optional feature This can cause a malfunction of the Developer Studio
5 In the Install screen choose FinishThe features are being downloaded
6 Choose Install All to verify the feature installation7 Restart the Developer Studio for the updates to take effect
Recommendation
We recommend that you start the Developer Studio with the shortcuts that were created onyour desktop or in the StartmenuTo get to the SAP documentation in the Developer Studio open the application and choose fromthe menu bar Help Help Contents SAP NetWeaver CE Developer Studio Documentation
The installation of the Developer Studio is now completed
Additional ActivitiesOnce the Developer Studio is installed you can add update and remove installed features at any time
Adding Features to an Installed Developer Studio
You can add features any time
1 Choose Help Software Updates Find and Install 2 Choose Search for new features to install3 Enable the displayed update site
Recommendation
We recommend that you do not change the update site to avoid version inconsistencies
4 Continue with step Selecting and Installing Main Features as described above
Updating Installed Features
1 Choose Help Software Updates Find and Install 2 Choose Search for updates of currently installed features3 Follow the on-screen instructions
05162008 PUBLIC 1740
3 Installing SAP NetWeaver Developer Studio
As of SP03 SAP NetWeaver Developer Studio uses the IDE Update Site to keep itself up-to-date
1 Choose Help Software Updates Find and Install 2 Choose Search for updates of currently installed features3 Follow the on-screen instructions
Note
The configuration wizard task Configuration and Mirroring of local NWDS Update Site has to be run aftereach patch or update of the IDE update site component on AS JavaFormore information about how to run the configuration wizard see Post-Installation Activities [page 27]
More InformationUpdate Guide ‒ SAP NetWeaver Composition Environment 71 ‒ Update to SPltxxgt available athttpwwwsdnsapcomirjsdnnw-ce
Uninstalling Features
1 To uninstall features choose Help Software Updates Manage Configuration 2 In the Product Configuration window choose Show Disabled Features3 Open the node SAP NetWeaver Developer Studio and its subnode
The features are displayed with its status enabled or disabled4 To change the status of feature select the feature and choose Enable or Disable (depending on
the current status)To uninstall a feature it has to be set to status disabled
5 Restart the SAP NetWeaver Developer Studio to apply the status change
Note
To uninstall all old version features (after the update) choose Help Software Updates UninstallDisabled Features
1840 PUBLIC 05162008
4 Installing Additional Components (Optional)
4 Installing Additional Components(Optional)
You can install the following additional components
n Composition Toolsn Adobe Document Services
n Composite Voicen IDE Update Site
PrerequisitesYou need to meet the same hardware and software requirements as for your already installeddevelopment system plus an additional 2 GB RAMThe Composition Tools and Composite Voice component make use of the Visual Composer VisualComposer is a Web browser based tool to model user interfaces To run Visual Composer thefollowing programsmust be installed on the client computer fromwhich you access Visual Composer
n Microsoft Internet Explorer 60 SP1 or highern Adobe SVG Viewer 30
n Microsoft XML Parser 40 or higher
Note
n Before installing additional components you need to stop all application servers manually
n Before installing additional components and in the case that you made changes to the defaulttemplate settings see SAP Note 953763
Prerequisites for SAP MaxDB
n Make sure that the Application Server Java and its corresponding database is runningYou can stop and start the system using the shortcuts under Start All Programs SAP NetWeaverComposition Environment 71 Application Server JxxltSAPSIDgt
n During the installation of additional components entries are written into the log area of thedatabase To avoid that the log is running full during the installation make sure that your backupstrategy is already active and an initial data backup was successfulWhen you want to establish your backup strategy after installing additional components you canturn on the special log mode AutoOverwrite using the Database Manager GUI This interrupts theexisting backup history You have to run a complete backup to start the history again
05162008 PUBLIC 1940
4 Installing Additional Components (Optional)
ProcedureThis procedure tells you how to install an SAP system with SAPinst SAPinst includes a GUI and aGUI server both using Java This section describes an installation where SAPinst SAPinst GUI andthe GUI server are running on the same hostNote the following information about SAPinst
n When you start SAPinst SAPinst GUI and the GUI server also start SAPinst GUI connects to theGUI server with a secure SSL connection and the GUI server connects to SAPinst
n SAPinst creates the installation directory sapinst_instdir where it keeps its log files Theinstallation directory is located directly in the Program Files directory If SAPinst is not able tocreate sapinst_instdir there it tries to create sapinst_instdir in the directory defined by theenvironment variable TEMP
Recommendation
We recommend that you keep all installation directories until the system is completely andcorrectly installed
n SAPinst creates a subdirectory for each installation option calledltsapinst_instdirgtltinstallation_option_directorygt which is located in ProgramFiles
n The SAPinst Self-Extractor extracts the executables to a temporary directory (TEMP TMP TMPDIR orSystemRoot) These executables are deleted after SAPinst has stopped runningDirectories called sapinst_exexxxxxxxxxx sometimes remain in the temporary directory Youcan safely delete them The temporary directory also contains the SAPinst Self-Extractor log filedev_selfexout which might be useful if an error occurs
Caution
If SAPinst cannot find a temporary directory the installation terminates with the error FCO-00058
n If you want to terminate SAPinst and the SAPinst Self-Extractor choose one of the followingoptionsl Right-click the icon for the SAPinst output window located in theWindows tray and choose Exitl Click the icon for the SAPinst output window located in the Windows tray and choose File
Exit
PrerequisitesYou are logged on as a user with administration rights to install the SAPinst tool and the SAP system
Note
When installing from a network share make sure that everyone has read access to this share Theinstallation routine creates users such as ltsidgtadm (for example ce1adm) During the installationSAPinst does a user switch to this user If the newly created user does not have permissions to thenetwork share where the installation is running from the installation will fail
2040 PUBLIC 05162008
4 Installing Additional Components (Optional)
Procedure
1 Insert the SAP Installation Master DVD into your DVD drive or mount it locally2 Start SAPinst from the SAP Installation Master DVD by double-clicking sapinstexe from the
following path ltDVD drivegtDATA_UNITSIM_WIN_ltplatformgt_ltdatabasegtSAPinst GUI starts automatically by displaying theWelcome screen
3 In theWelcome screen choose the required SAPinst installation option from the tree structure
Note
If SAPinst prompts you to log off from your system log off and log on againSAPinst restarts automaticallyChoose Continue Old Installation
4 Choose whether you want to run the installation in Typicalmode or in CustommodeIf you select Typical the installation wizard provides automatic default settings and you only haveto respond to a small selection of prompts The rest is set by default If you select Custom you haveto respond to all prompts
Note
If you want to install the offline documentation for SAP NetWeaver CE you need to chooseCustommodeAfter the installation you can access the offline documentation by choosing Start All ProgramsSAP NetWeaver Composition Environment ltSAPSIDgt
5 Follow the screens and enter the required parameters
Note
For more information about the input parameters and information about restrictions forpasswords position the cursor on the required parameter and press F1
After you have entered all requested input parameters SAPinst displays the Parameter Summaryscreen This screen shows both the parameters that you entered and those that SAPinst set bydefault If required you can revise the parameters before starting the installation
6 To start the installation choose Start SAPinst starts the installation and displays the progress ofthe installation When the installation has successfully been completed SAPinst shows the dialogExecution of ltService_Namegt has been completed successfully
Note
After installing additional components you need to perform some post-installation activities [page 27] toget the system up amp running
05162008 PUBLIC 2140
This page is intentionally left blank
5 Installing SAP Memory Analyzer (Optional)
5 Installing SAP Memory Analyzer(Optional)
SAP Memory Analyzer helps you to analyze Java heap dumps easily find big chunks of memory orcomplex memory aggregation patterns in your data structures and identify who is keeping thismemory alive New and innovative analysis techniques support the user with a fast and powerfulfeature setThe tool (Eclipse RCP application) was developed to analyze real productive heap dumps whichtend to get enormous in size with hundreds of millions of objects Performance low resourceconsumption and especially the newly developed innovative analysis techniques make it a helpfultool even to small application heap dumpsYou can install SAP Memory Analyzer as an additional tool
This procedure tells you how to install an SAP system with SAPinst SAPinst includes a GUI and aGUI server both using Java This section describes an installation where SAPinst SAPinst GUI andthe GUI server are running on the same hostNote the following information about SAPinst
n When you start SAPinst SAPinst GUI and the GUI server also start SAPinst GUI connects to theGUI server with a secure SSL connection and the GUI server connects to SAPinst
n SAPinst creates the installation directory sapinst_instdir where it keeps its log files Theinstallation directory is located directly in the Program Files directory If SAPinst is not able tocreate sapinst_instdir there it tries to create sapinst_instdir in the directory defined by theenvironment variable TEMP
Recommendation
We recommend that you keep all installation directories until the system is completely andcorrectly installed
n SAPinst creates a subdirectory for each installation service calledltsapinst_instdirgtltinstallation_service_directorygt which is located in ProgramFiles
n The SAPinst Self-Extractor extracts the executables to a temporary directory (TEMP TMP TMPDIR orSystemRoot) These executables are deleted after SAPinst has stopped runningDirectories called sapinst_exexxxxxxxxxx sometimes remain in the temporary directory Youcan safely delete them The temporary directory also contains the SAPinst Self-Extractor log filedev_selfexout which might be useful if an error occurs
05162008 PUBLIC 2340
5 Installing SAP Memory Analyzer (Optional)
Caution
If SAPinst cannot find a temporary directory the installation terminates with the error FCO-00058
n If you want to terminate SAPinst and the SAPinst Self-Extractor choose one of the followingoptionsl Right-click the icon for the SAPinst output window located in theWindows tray and choose Exitl Click the icon for the SAPinst output window located in the Windows tray and choose File
Exit
PrerequisitesYou are logged on as a user with administration rights to install the SAPinst tool and the SAP system
Note
When installing from a network share make sure that everyone has read access to this share Theinstallation routine creates users such as ltsidgtadm (for example ce1adm) During the installationSAPinst performs a user switch to this user If the newly created user does not have permissions tothe network share where the installation is running from the installation will fail
Procedure
1 Insert the SAP Installation Master DVD into your DVD drive or mount it locally2 Start SAPinst from the SAP Installation Master DVD by double-clicking sapinstexe from the
following path ltDVD drivegtDATA_UNITSIM_WIN_ltplatformgt_ltdatabasegtSAPinst GUI starts automatically by displaying theWelcome screen
3 In theWelcome screen choose the required SAPinst installation option from the tree structure
Note
If SAPinst prompts you to log off from your system log off and log on againSAPinst restarts automaticallyChoose Continue Old Installation
4 Choose whether you want to run the installation in Typicalmode or in CustommodeIf you select Typical the installation wizard provides automatic default settings and you only haveto respond to a small selection of prompts The rest is set by default If you select Custom you haveto respond to all prompts
Note
If you want to install the offline documentation for SAP NetWeaver CE you need to chooseCustommodeAfter the installation you can access the offline documentation by choosing Start All ProgramsSAP NetWeaver Composition Environment ltSAPSIDgt
2440 PUBLIC 05162008
5 Installing SAP Memory Analyzer (Optional)
5 Follow the screens and enter the required parameters
Note
For more information about the input parameters and information about restrictions forpasswords position the cursor on the required parameter and press F1
After you have entered all requested input parameters SAPinst displays the Parameter Summaryscreen This screen shows both the parameters that you entered and those that SAPinst set bydefault If required you can revise the parameters before starting the installation
6 To start the installation choose Start SAPinst starts the installation and displays the progress ofthe installation When the installation has successfully been completed SAPinst shows the dialogExecution of ltOption_Namegt has been completed successfully
05162008 PUBLIC 2540
This page is intentionally left blank
6 Post-Installation Activities
6 Post-Installation Activities
This section describes the steps that you have to perform after the installation has finished successfully
Running the Configuration Wizard (Optional)
Note
You can run the configuration wizard only once and only directly after installing and patchingyour SAP system
For SAP NetWeaver CE you need to run the following configuration tasks
n Configuration of Services Registry Webservice Destinations
n When you have installed the IDE Update Site componentConfiguration and Mirroring of local NWDSUpdate Site
n When you have installed the Adobe Document Services component Initial setup ADS in CE
When you have an NWDI installation on another SAP NetWeaver 70 system you can perform thefollowing configuration tasks
n Change Management Service (CMS) Create an Application Skeleton
n Change Management Service (CMS) Modify a Software Component
To run the configuration wizard proceed as follows
1 After SAPinst has finished open the SAP NetWeaver Administrator by entering the following URLin a browser httplthostgtlthttp_portgtnwa
2 Log on as user j2ee_admin3 In the SAP NetWeaver Administrator choose Configuration Management Scenarios Configuration
Wizard 4 Select the appropriate configuration task in the list and choose Start5 Follow the on-screen instructions6 After the configuration wizard has finished successfully restart your SAP system
Configuring the IDE Update Site
1 In the Configuration Wizard select the task Configuration and Mirroring of local NWDS Update Site in thelist and choose Start
2 Follow the on-screen instructions
05162008 PUBLIC 2740
6 Post-Installation Activities
Provide the credentials for the source update site location The default URL is the central SAPupdate site You can also use your installation DVD as source update site which makes themirror process much faster To use the DVD as source update site you have to specify the URLfileltdvd_drivegtIDE
3 After the configuration wizard has finished successfully restart your SAP systemThe data of the source update site location is now mirrored to your server
Enabling Adobe Document ServicesIf you have installed SAP NetWeaver Composition Environment with the Adobe DocumentServices add-on in the developer edition on aWindows platform you must complete the followingpost-installation steps to enable the add-on In case you have installed an AS Java cluster applythe procedure to the central host as well as to all other hosts where additional application serverinstances are running
1 Using the SAP Management Console stop the AS Java systemFormore information about starting and stopping SAP systems see httphelpsapcomnwce
Administratorrsquos Guide Administration of SAP NetWeaver CE General System Administration AS Java(Application Server Java)
2 From the Startmenu open Control Panel Administrative Tools Computer Management Services andApplications Services
3 Select SAPltSIDgt_ltInstance_Numbergt (for example SAPCE1_00) and open Properties from thecontext menu
4 On the Log On tab page enable the Local System account indicator5 Repeat the above steps for the second SAPltSIDgt_ltInstance_Numbergt service that you see in the list6 Start the AS Java system
Adobe LiveCycle Designer
For more information about how to install and configure the Adobe LiveCycle Designer see SAPNote 962763
Enabling Services RegistryYou must apply additional configuration steps to enable Services Registry after you have installed anSAP NetWeaver Composition Environment system containing the following components
n Java Application Server and Composition Platformn Java Application Server and Adobe Document Services
To enable Services Registry you must apply the following configuration templates to your systemCE_Complete_Stack_development_full
2840 PUBLIC 05162008
6 Post-Installation Activities
Note
For more information about what configuration templates are available see Configuration Templates[page 33]For more information about applying configuration templates see httphelpsapcomnwce
SAP NetWeaver Composition Environment Library Administratorrsquos Guide Configuration of SAP NetWeaver CEInitial System Configuration AS Java Configuration Activating a Configuration Template
See also
httphelpsapcomnwce SAP NetWeaver Composition Environment Library Developerrsquos GuideDeveloping and Composing Applications Consuming Enterprise Services Searching for Services Services RegistryTasks Searching amp Browsing Service Definitions Configuring the Services Registry
Configuring the Portal in SAP NetWeaver CEAfter installing the portal in SAP NetWeaver CE a number of deactivated or irrelevant tools aredisplayed in the UI To display the correct portals tools for CE proceed as follows
1 Open a browser and log on to your portal as an administrator2 In the same browser session enter the following URL
httplthostgtlthttpportgtirjservletprtportalprtrootcomsapportal
contentlayersContentLayersTool
where lthostgt is the host name of your server and lthttpportgt is the port number of your server3 In the Portal Mode Configuration Tool choose Activate Development Mode to restore the portal tools
and content that are assigned to the development mode4 Restart or refresh your browser5 In the SAP Management Console restart the server
You may then continue with the mandatory and optional configuration steps as described inhttphelpsapcomnwce SAP NetWeaver Composition Environment Library Administratorrsquos Guide
Configuration of SAP NetWeaver Composition Environment Configuration for CE Additional Components Configuringthe Portal
Changing the Password for the Internet Communication Manager (ICM)You can monitor and manage the Internet Communication Manager (ICM) from the command lineprogramAfter the installation of your SAP NetWeaver CE system has successfully finished you need to changethe ICM password manually To do so proceed as follows
1 Log on at operating system level to the computer where the ICM is running2 Start the program icmon with icmon ndasha profile=ltinstance_profilegt to maintain the
authentication file (default authfiletxt)3 Choose a to add a user4 Choose c to change the password of the existing user
05162008 PUBLIC 2940
6 Post-Installation Activities
5 Choose s to save your settings
Further Configuration StepsAfter installing your SAP NetWeaver CE system and performing the post-installation steps to get thesystem up amp running you may need to perform further configuration stepsRefer to the following documentation to proceed with your tasks
n If you are a system administrator refer to httphelpsapcomnwce Administratorrsquos Guide It contains information about how to configure and administer your system
n If you are a developer refer to httphelpsapcomnwce Developerrsquos Guide It providesguidelines for developing applications using the SAP NetWeaver CE
Note
The SAP NetWeaver CE documentation is also available offline as a part of your installation To accessit choose Start All Programs SAP NetWeaver Composition Environment 10 Documentation
3040 PUBLIC 05162008
7 Additional Information
7 Additional Information
The following section provides additional information about the installation of SAP NetWeaverComposition Environment
71 Transporting Self-Developed Software ComponentArchives (SCA) into the System
PrerequisitesYou have developed your own Software Component Archives (SCA) and want to transport theminto your SAP NetWeaver CE system
ProcedureTo transport your SCAs to the SAP NetWeaver CE system proceed as follows
1 Download the update file from httpservicesapcomswdc Download Support Packages andPatches Entry by Application Group SAP NetWeaver SAP NETWEAVER SAP NETWEAVER CE71 Support Package Stacks
2 From an empty directory run the update tool updateltIDgtexe
Note
If the tool displays descriptions such as Applying Support Packages you can ignore them
3 In the dialog screens specify the directory where your SCAs are located4 Follow the on-screen instructions
Only valid for MaxDB
72 Troubleshooting ‒ Repairing an Inconsistent SAP MaxDBInstallation
PrerequisitesDuring the preinstallation phase the installation tool checks the Microsoft Windows registry foralready installed SAP MaxDB softwareIf the registry key is found but there is no software on the hard drive you receive the followingmessage
05162008 PUBLIC 3140
7 Additional Information73 Restarting the SAP MaxDB Server Manually
The existing MaxDB software is not consistent Check the file system and registry
The most common reason for this inconsistency is the manual deletion of the software from the filesystem without using the specified tools
ProcedureTo repair this inconsistency proceed as follows
1 Choose Start Control Panel Administrative Tools Services 2 Make sure the services SAPDBWWW SAPDB and XServer are stopped3 Choose Start Run and run the command regedit4 Go to My ComputerHKEY_LOCAL_MACHINESOFTWARESAPSAP DBTech Key IndepPrograms
The key contains a path to a foldera) Check if this folder exists on the file systemb) Note down the value of Key IndepPrograms for later usage (see step 7)
If the path does not exist in the file system delete the key SAP DBTech5 Delete the following keys
n My ComputerHKEY_LOCAL_MACHINESYSTEMCurrentControlSetServicesSAP DBTech-
n My ComputerHKEY_LOCAL_MACHINESYSTEMCurrentControlSetServicesSAPDBWWW
n My ComputerHKEY_LOCAL_MACHINESYSTEMCurrentControlSetServicesXServer
6 Choose Start Control Panel System Advanced Environment Variables System Variables Path 7 Delete the following paths from the variable
n ltIndepProgramsgtbin
n ltIndepProgramsgtpgm
8 Reboot your computer
End of MaxDB
Only valid for MaxDB
73 Restarting the SAP MaxDB Server Manually
If after a reboot the database server is not running automatically you need to restart the SAP MaxDBserver manually
Production SystemsTo restart the SAP MaxDB server manually proceed as follows
1 Open a command prompt and enter the following command net start sapdbwww
ORChoose Start All Programs Administrative Tools Services Double-click on SAP DB WWW andchoose Start
2 Open the SAP Management Console and choose SAP Systems ltSAPSIDgt ltmachine namegt
3240 PUBLIC 05162008
7 Additional Information74 Restarting the MS SQL Server Manually
3 Enter the master password and choose Logon4 Choose Online When the database server is online you can restart the engine
Development SystemsTo restart the SAP MaxDB server manually choose Start All Programs SAP NetWeaver CompositionEnvironment CE Application Server ltSAPSIDgt Start Application Server End of MaxDB
Only valid for MS SQL Server
74 Restarting the MS SQL Server Manually
If after a reboot the database server is not running automatically you need to restart the MS SQLServer manually
Procedure
1 Choose Start All Programs Administrative Tools Services 2 Look for the service named SQL Server ltnamegt where ltnamegt is MSSQLSERVER for the default
instance or ltinstance namegt for a named instance3 If the service status is not started right-click the service and choose Start in the context menu4 To insure the service is started automatically after each system restart right-click it and choose
Properties Select Automatic as the startup type
End of MS SQL Server
75 Configuration Templates
Configuration templates contain the predefined instance configuration for specific scenarios Theyare automatically applied according to the installation option you have selected The templatesare designed to optimize system performance by applying certain configuration to the Java VirtualMachine and the application server as well as by applying startup filters to AS Java services andapplications to start only those relevant for the selected installation optionsThe following table provides information about the available templates with SAP NetWeaverComposition Environment In the template name replace the ltsystem_modegt parameter bydevelopment (for the templates relevant to systems installed in developmentmode) or production (forthe templates relevant to systems installed in productivemode)
05162008 PUBLIC 3340
7 Additional Information76 Uninstalling SAP NetWeaver Composition Environment
Configuration Template Selected Installation Options
CE_Java_EE_ltsystem_modegt_full Java Application Server Installation
CE_Composition_Environment_ltsystem_modegt_full Java Application Server Installation + CompositionPlatform Installation
CE_Adobe_Document_Service_ltsystem_modegt_full Java Application Server Installation + AdobeDocument Services Add-on Installation
CE_Composite_Voice_ltsystem_modegt_full Java Application Server Installation + Voice Add-onInstallation
CE_Complete_Stack_ltsystem_modegt_full Java Application Server Installation + CompositionPlatform Installation + Adobe Document ServicesAdd-on Installation + Voice Add-on Installation
If your selection cannot be mapped to one of the combinations in the above table the templateCE_Complete_Stack_ltsystem_modegt_full is applied It starts all applications and services neededto run the complete stackYou canmanually apply a different configuration template if youwant to switch to another installationoption For example by changing from template CE_Complete_Stack_ltsystem_modegt_full toCE_Java_EE_ltsystem_modegt_full you achieve shorter startup times and less memory consumptionbut also less functionality since not all applications and services are runningFor more information about applying configuration templates see httphelpsapcomnwce
Administratorrsquos Guide Configuration of SAP NetWeaver CE Initial System Configuration AS Java ConfigurationActivating a Configuration Template
Note
Make sure that you do not apply a development template to a productive system or vice versa
76 Uninstalling SAP NetWeaver Composition Environment
You have to uninstall all components of the SAP NetWeaver Composition Environment separatelythat is SAP NetWeaver CE and SAP NetWeaver Developer StudioYou can uninstall your SAP NetWeaver CE system in different ways
Uninstalling SAP NetWeaver CEWindows Choose Start Control Panel Add Remove programs SAP SystemltSAPSIDgt
Uninstalling SAP NetWeaver CE Using SAPinst
1 Insert the SAP Installation Master DVD into your DVD drive or mount it locally
3440 PUBLIC 05162008
7 Additional Information76 Uninstalling SAP NetWeaver Composition Environment
2 Start SAPinst from the SAP Installation Master DVD as described in the section Installing SAPNetWeaver Composition Environment
3 In theWelcome screen choose Uninstall SAP System or Single Instances from the tree structure4 Follow the on-screen instructions
Uninstalling SAP NetWeaver Developer Studio
Prerequisites
Before uninstalling SAP NetWeaver Developer Studio consider the following
n All additionally installed features and plug-ins that were installed to the same folder as DeveloperStudio for example by using the Eclipse Update Manager will also be removed
n There may be other directories and files in the installation directory notablyltinstall_dirgteclipseworkspace ltinstall_dirgteclipselinks andltinstall_dirgteclipseconfiguration that contain important data The files and folder aswell as the existing workspaces are retained when the product is uninstalled
Procedure
To uninstall SAP NetWeaver Developer Studio proceed as described above You can use either oneof the options
Uninstalling the SAP Management ConsoleSince all SAP systems use the SAP Management Console there is no uninstallation option for theSAP Management Console with SAPinst If you are sure that you do not need the SAP ManagementConsole any more you can remove it using Start Control Panel Add Remove programs
05162008 PUBLIC 3540
Typographic Conventions
Example Description
lt gt Angle brackets indicate that you replace these words or characters with appropriateentries to make entries in the system for example ldquoEnter your ltUser Namegtrdquo
Arrows separating the parts of a navigation path for example menu options
Example Emphasized words or expressions
Example Words or characters that you enter in the system exactly as they appear in thedocumentation
Example Textual cross-references to an internet address for example httpwwwsapcom
example Quicklinks added to the internet address of a homepage to enable quick access tospecific content on the Web
123456 Hyperlink to an SAP Note for example SAP Note 123456
Example n Words or characters quoted from the screen These include field labels screen titlespushbutton labels menu names and menu options
n Cross-references to other documentation or published works
Example n Output on the screen following a user action for example messagesn Source code or syntax quoted directly from a programn File and directory names and their paths names of variables and parameters and
names of installation upgrade and database tools
EXAMPLE Technical names of system objects These include report names program namestransaction codes database table names and key concepts of a programming languagewhen they are surrounded by body text for example SELECT and INCLUDE
EXAMPLE Keys on the keyboard
3640 PUBLIC 05162008
SAP AGDietmar-Hopp-Allee 16
69190 WalldorfGermany
T +4918 0534 34 34F +4918 0534 34 20
wwwsapcom
copy Copyright 2008 SAP AG All rights reserved
No part of this publication may be reproduced or transmitted in any form or for any purpose without the express permissionof SAP AG The information contained herein may be changed without prior noticeSome software products marketed by SAP AG and its distributors contain proprietary software components of othersoftware vendors
No part of this publication may be reproduced or transmitted in any form or for any purpose without the express permissionof SAP AG The information contained herein may be changed without prior noticeSome software products marketed by SAP AG and its distributors contain proprietary software components of othersoftware vendorsMicrosoft Windows Excel Outlook and PowerPoint are registered trademarks of Microsoft CorporationIBM DB2 DB2 Universal Database OS2 Parallel Sysplex MVSESA AIX S390 AS400 OS390 OS400 iSeries pSeriesxSeries zSeries System i System i5 System p System p5 System x System z System z9 zOS AFP Intelligent MinerWebSphere Netfinity Tivoli Informix i5OS POWER POWER5 POWER5+ OpenPower and PowerPC are trademarks orregistered trademarks of IBM CorporationAdobe the Adobe logo Acrobat PostScript and Reader are either trademarks or registered trademarks of Adobe SystemsIncorporated in the United States andor other countriesOracle is a registered trademark of Oracle CorporationUNIX XOpen OSF1 and Motif are registered trademarks of the Open GroupCitrix ICA Program Neighborhood MetaFrame WinFrame VideoFrame and MultiWin are trademarks or registeredtrademarks of Citrix Systems IncHTML XML XHTML and W3C are trademarks or registered trademarks of W3Creg World Wide Web ConsortiumMassachusetts Institute of TechnologyJava is a registered trademark of Sun Microsystems IncJavaScript is a registered trademark of Sun Microsystems Inc used under license for technology invented and implementedby NetscapeSAP R3 xApps xApp SAP NetWeaver Duet PartnerEdge ByDesign SAP Business ByDesign and other SAP productsand services mentioned herein as well as their respective logos are trademarks or registered trademarks of SAP AG inGermany and in several other countries all over the world All other product and service names mentioned are thetrademarks of their respective companies Data contained in this document serves informational purposes only Nationalproduct specifications may varyThese materials are subject to change without notice These materials are provided by SAP AG and its affiliated companies(SAP Group) for informational purposes only without representation or warranty of any kind and SAP Group shall notbe liable for errors or omissions with respect to the materials The only warranties for SAP Group products and services arethose that are set forth in the express warranty statements accompanying such products and services if any Nothing hereinshould be construed as constituting an additional warranty
This document was created using stylesheet 2006-12-31 (V51beta [= 60 for E3]) and XSLT processor SAXON 652 fromMichael Kay (httpsaxonsfnet) XSLT version 1
05162008 PUBLIC 3740
DisclaimerSome components of this product are based on Javatrade Any code change in these components may cause unpredictable andsevere malfunctions and is therefore expressly prohibited as is any decompilation of these componentsAny Javatrade Source Code delivered with this product is only to be used by SAPrsquos Support Services and may not be modified oraltered in any way
Documentation in the SAP Service MarketplaceYou can find this document at the following address httpsservicesapcominstguides
3840 PUBLIC 05162008
This page is intentionally left blank
SAP AGDietmar-Hopp-Allee 1669190 WalldorfGermanyT +4918 0534 34 34F +4918 0534 34 20wwwsapcom
copy Copyright 2008 SAP AG All rights reservedNo part of this publication may be reproduced or transmitted in any form or for any purpose without the express permission of SAP AG The information contained herein may bechanged without prior notice
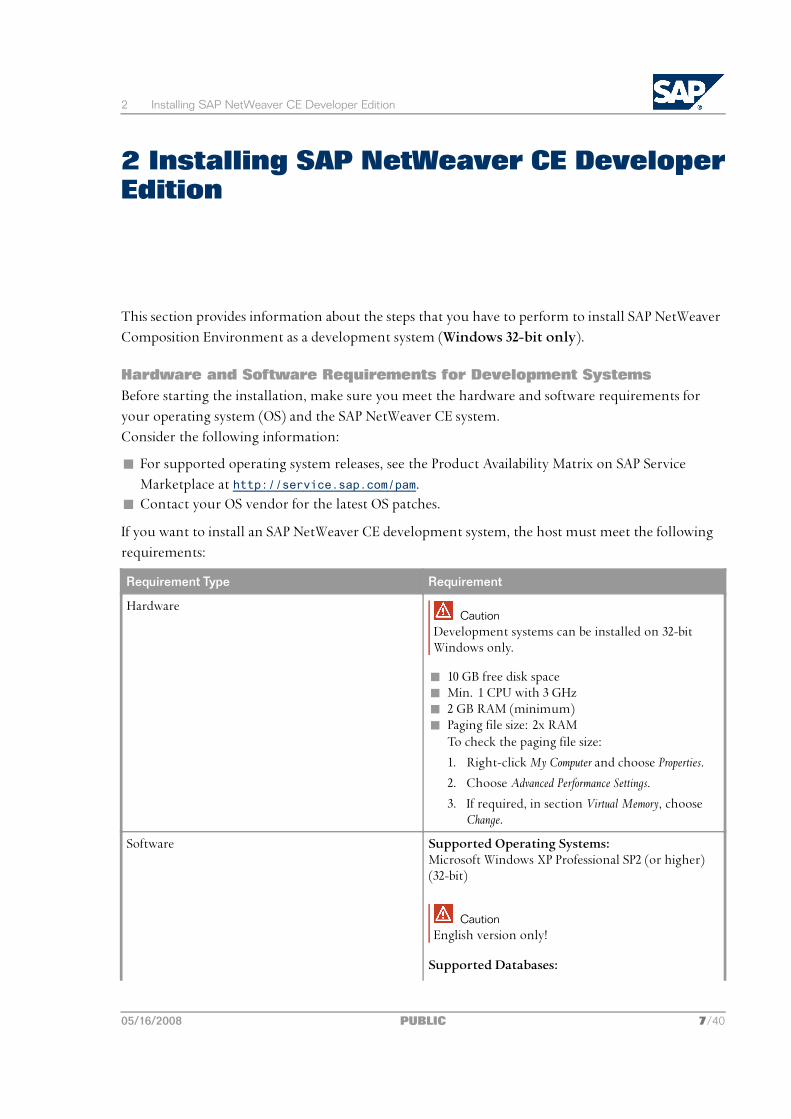
2 Installing SAP NetWeaver CE Developer Edition
2 Installing SAP NetWeaver CE DeveloperEdition
This section provides information about the steps that you have to perform to install SAP NetWeaverComposition Environment as a development system (Windows 32-bit only)
Hardware and Software Requirements for Development SystemsBefore starting the installation make sure you meet the hardware and software requirements foryour operating system (OS) and the SAP NetWeaver CE systemConsider the following information
n For supported operating system releases see the Product Availability Matrix on SAP ServiceMarketplace at httpservicesapcompam
n Contact your OS vendor for the latest OS patches
If you want to install an SAP NetWeaver CE development system the host must meet the followingrequirements
Requirement Type Requirement
HardwareCaution
Development systems can be installed on 32-bitWindows only
n 10 GB free disk spacen Min 1 CPU with 3 GHzn 2 GB RAM (minimum)n Paging file size 2x RAM
To check the paging file size
1 Right-clickMy Computer and choose Properties
2 Choose Advanced Performance Settings
3 If required in section Virtual Memory chooseChange
Software Supported Operating SystemsMicrosoft Windows XP Professional SP2 (or higher)(32-bit)
CautionEnglish version only
Supported Databases
05162008 PUBLIC 740
2 Installing SAP NetWeaver CE Developer Edition
Requirement Type Requirement
n SAP MaxDB 76
NoteThe SAP MaxDB software is installed with theSAP NetWeaver CE system
n MS SQL Server 2005 SP1 (or higher)
NoteIf you want to use the MS SQL Server databaseyou have to install it before installing SAPNetWeaver CE
JDK versionSUN JDK 150_11 (or higher)You can download this version from the SUN Website
Note
If you want to install additional components (optional) [page 19] you need the same hardware and softwarerequirements as stated above plus an additional 2 GB RAM
Preparing the Installation DVDMake sure you have the installation DVD for SAP NetWeaver Composition Environment 71 availableYou can also download the installation DVD from SAP Service Marketplace athttpservicesapcomswdc Download SAP Installations and Upgrades Entry by Application Group
SAP NetWeaver SAP NETWEAVER SAP NetWeaver CE 71 If you download the installation DVD note that the DVDmay be split into several archives In thiscase you have to unpack these archives to one folder after the download
Preparations for the MS SQL Server DatabaseBefore installing your SAP NetWeaver CE development system onWindows andMS SQL Server makesure that your MS SQL Server database meets the following requirementsBefore starting the installation check the following
n The default collation of your database server is SQL_Latin1_General_CP850_BIN21 Start the SQL Server Management Studio2 Connect to your server3 Right-click the server and in the context menu choose Properties4 Check the server collation on the general page5 If the server collation differs from SQL_Latin1_General_CP850_BIN2 you have to reinstall it
or use a different MS SQL Server Instance
840 PUBLIC 05162008
2 Installing SAP NetWeaver CE Developer Edition
n SQL Server logins are enabled1 Start the SQL Server Management Studio2 Connect to your server3 Right-click the server and in the context menu choose Properties4 Switch to the security page
Under Server Authentication make sure that the entry SQL Server and Windows Authentication modeis selected
Note
If onlyWindows Authentication mode is selected change it to SQL Server and Windows Authentication modeand restart the server for the changes to take effect
n TCP protocol is enabled and your server is able to communicate on the TCP port1 Start the SQL Server Configuration Manager under Start All Programs MS SQL Server 2005
Configuration Tools 2 Go to SQL Server 2005 Network Configuration in the left pane and select your instance3 In the right pane make sure that Protocol TCPIP is set to enabled
If this is not the case refer to theMS SQL Server Books Online to configure the TCPIP connectionproperly
Installing a Development SystemThis procedure tells you how to install an SAP system with SAPinst SAPinst includes a SAPinst GUIand a GUI server which both use Java This section describes an installation where SAPinst SAPinstGUI and the GUI server are running on the same hostNote the following information about SAPinst
n When you start SAPinst SAPinst GUI and the GUI server also start SAPinst GUI connects to theGUI server with a secure SSL connection and the GUI server connects to SAPinst
n SAPinst normally creates the installation directory sapinst_instdir where it keeps its logfiles and which is located directly in the Program Files directory If SAPinst is not able to createsapinst_instdir there it tries to create sapinst_instdir in the directory defined by theenvironment variable TEMP
Recommendation
We recommend that you keep all installation directories until the system is completely andcorrectly installed
n SAPinst creates a subdirectory for each installation option calledltsapinst_instdirgtltinstallation_option_directorygt which is located in ProgramFiles
n The SAPinst Self-Extractor extracts the executables to a temporary directory (TEMP TMP TMPDIR orSystemRoot) These executables are deleted after SAPinst has stopped running
05162008 PUBLIC 940
2 Installing SAP NetWeaver CE Developer Edition
Directories called sapinst_exexxxxxxxxxx sometimes remain in the temporary directory Youcan safely delete them The temporary directory also contains the SAPinst Self-Extractor log filedev_selfexout which might be useful if an error occurs
Caution
If SAPinst cannot find a temporary directory the installation terminates with the error FCO-00058
n If you want to terminate SAPinst and the SAPinst Self-Extractor choose one of the followingoptionsl Right-click the icon for the SAPinst output window located in theWindows tray and choose Exitl Click the icon for the SAPinst output window located in the Windows tray and choose File
Exit
PrerequisitesYou are logged on as a user with administration rights to install the SAPinst tool and the SAP system
Note
When installing from a network share make sure that everyone has read access to this share Theinstallation routine creates users such as ltsidgtadm (for example ce1adm) During the installationSAPinst does a user switch to this user If the newly created user does not have permissions to thenetwork share where the installation is running from the installation will fail
Procedure
1 Insert the SAP Installation Master DVD into your DVD drive or mount it locally2 Start SAPinst from the SAP Installation Master DVD by double-clicking sapinstexe from the
following path ltDVD drivegtDATA_UNITSIM_WIN_ltplatformgt_ltdatabasegt3 In theWelcome screen choose the required SAPinst installation option from the tree structure
Note
If SAPinst prompts you to log off from your system log off and log on againSAPinst restarts automaticallyChoose Continue Old Installation
4 Choose whether you want to run the installation in Typicalmode or in CustommodeIf you select Typical the installation wizard provides automatic default settings and you only haveto respond to a small selection of prompts The rest is set by default If you select Custom you haveto respond to all prompts
Note
If you want to install the offline documentation for SAP NetWeaver CE you need to chooseCustommode
1040 PUBLIC 05162008
2 Installing SAP NetWeaver CE Developer Edition
5 Follow the screens and enter the required parameters
Note
For more information about the input parameters and information about restrictions forpasswords position the cursor on the required parameter and press F1
After you have entered all requested input parameters SAPinst displays the Parameter Summaryscreen This screen shows both the parameters that you entered and those that SAPinst set bydefault If required you can revise the parameters before starting the installation
6 To start the installation choose Start SAPinst starts the installation and displays the progress ofthe installation When the installation has successfully been completed SAPinst shows the dialogExecution of ltOption_Namegt has been completed successfully
Note
You can install the update site (for SAP Developer Studio) on a development system only (singleinstance system)
05162008 PUBLIC 1140
This page is intentionally left blank
3 Installing SAP NetWeaver Developer Studio
3 Installing SAP NetWeaver DeveloperStudio
SAP NetWeaver Developer Studio is based on the open development platform Eclipse It includesthe standard Eclipse features and SAP features The SAP NetWeaver development documentationassumes that you are familiar with Eclipse and how to develop Java applications with itFor more information see httphelpsapcomnwce SAP NetWeaver Library SAP NetWeaverDevelopersrsquo Guide SAP FeaturesSAP NetWeaver Developer Studio provides several features for composing and developing businessapplications You can select the features according to the components you have installed on your ASJava of the Composition Environment The Developer Studio has the following features
n SAP NetWeaver Developer Studio Java EEProvides the toolset for Java EE-compliant developmentAS Java component required Java Application Server
n SAP NetWeaver Developer Studio Development Infrastructure ClientProvides the toolset necessary to work the SAP component model It provides functionality towork locally or in a teamDepending on feature SAP NetWeaver Developer Studio Java EEAS Java component required Java Application Server Optionally SAP NetWeaverDevelopment Infrastructure (NWDI) as part of an SAP NetWeaver 70 system
n SAP NetWeaver Developer Studio Web Dynpro User InterfacesProvides the toolset to develop user interfaces with Web Dynpro for JavaDepending on features SAP NetWeaver Developer Studio Java EE SAP NetWeaver DeveloperStudio Development Infrastructure ClientAS Java component required Java Application Server Optionally Adobe Document Services
n SAP NetWeaver Developer Studio Composition ToolsProvides the toolset to develop composite applicationsDepending on features SAP NetWeaver Developer Studio Java EE SAP NetWeaver DeveloperStudioWebDynpro User Interfaces SAPNetWeaver Developer Studio Development InfrastructureClientAS Java component required Composition Platform Optionally Adobe Document Services
05162008 PUBLIC 1340
3 Installing SAP NetWeaver Developer Studio
Installation Recommendations
Depending on your system landscape we recommend that you install the SAP NetWeaver DeveloperStudio as follows
n Central AS Java with update siteWhen you have a central AS Java we recommend that this server provides an update site Thismakes sure that the SAP NetWeaver Developer Studio you install has the version that matchesthe application serverYou can check the availability of a local update site by going to the following URL in your Webbrowserhttplthostgtlthttpportgtupdatesite
Example
httpdev_server_0150000updatesite
Note
Make sure that the update site is properly installed and that the post-installation activities forthe update site have already been performedMore informationPost-Installation Activities [page 27] section Configuring the IDE Update Site
n Developer WorkplaceIf you want to install the AS Java and the Developer Studio on a single workstation you can usethe following sourcesl SAP NetWeaver Developer Studio Update Site (recommended)
SAP provides a central update site The update site can be found athttpsnwdssapcomswdcdownloadsupdatesnetweavernwdsceTo access the update site you need an SAP Service Marketplace user and password (S user)
l DVDUse the DVD you installed the AS Java from to make sure the Developer Studio and the AS Javahave the same version Once the Developer Studio is installed from a DVD the update manageris always looking on the DVD for updates Therefore you can only update the Developer Studiowhen you have a DVD with a new release The Developer Studio Update Guide containsthe information how to instruct the developer to look for updates on the Developer StudioUpdate Site rather than on the DVD
In the following installation procedure we only use the term Update Site The installation steps arethe same regardless if you decided to install the Developer Studio from the SAP update site or theupdate site on your AS Java
1440 PUBLIC 05162008
3 Installing SAP NetWeaver Developer Studio
Caution
Do only use your Update Site on the AS Java or the SAP Update Site Using other update sites likethe Eclipse update site can lead to a version mismatch of features and undesired results
PrerequisitesCheck the hardware and software requirements necessary for the installation of SAP NetWeaverDeveloper Studio
Requirement Type Requirement
HardwareNote
SAP NetWeaver Developer Studio can be installedon a 32-bit platform only
n 1 GB free disk spacen 1 CPU with 3 GHz (minimum)n 2 GB RAM (minimum)n Paging file size 2x RAMTo check paging file size
1 Choose Windows Start button and choose ControlPanel reg System
2 Choose tab Advanced and choose Settings in thePerformance pane
3 Choose tab Advanced in the Performance Options dialogwindowThe current page size is displayed in the Virtualmemory pane To change the page size value chooseChange enable the Custom size radio button and enterthe new value in the input field Initial size (MB)
Software Supported Operating SystemsMicrosoft Windows XP Professional SP2 (orhigher)(32-bit)JDK versionSUN JDK 150_11 (or higher)You can download this version from the SUNweb site
The installation process begins with preparation steps that are dependent on the installation methodDVD or update site The following installation steps are independent of the installation method
Preparation ‒ Installing the Developer Studio from a DVD
1 Start SAPinst from the SAP Installation Master DVD by double-clicking sapinstexe from thefollowing path ltDVD drivegtDATA_UNITSIM_WIN_I386_ltdata_basegt
SAPinst GUI starts automatically by displaying theWelcome screen2 In theWelcome screen choose the installation option SAP NetWeaver Developer Studio
05162008 PUBLIC 1540
3 Installing SAP NetWeaver Developer Studio
3 Choose Next and follow the on-screen instructions
Preparation ‒ Installing the Developer Studio from an Update Site
1 Start your Web browser and connect to the update site2 Download NWDS_platformzip
This zip file contains the SAP NetWeaver Developer Studio Platform Installer3 Unzip NWDS_platformzip to a temporary folder on your local disk drive4 Navigate to the temporary folder5 Run the installer IDESetupexe contained in the zip
Installing the Developer Studio from DVD and Update SiteFollow the on-screen instructions of the installation toolDuring the installation dialog you are asked for the update site location Always accept thepreconfigured URL that points to the update site that is correct for the installation location (DVDor update site) you selectedThe Developer Studio is started automatically when the installation dialog is finished During startupyou are asked for the workspace folder for the Developer Studio
Caution
If you already had a Developer Studio installed on this client you need to specify a differentworkspace than the one you used for the previously installed Developer Studio version This is alsotrue if you have uninstalled the previous version already Uninstalling a Developer Studio doesnot remove the content you created in the workspace folder that includes the preferences of theDeveloper Studio and maybe projects you stored locally
The next prompt during start up is to confirm the network connections On the network connectionpreference page you can specify if you connect to the Internet directly or you can configure yourproxy The network connection settings must be configured so that the Developer Studio can connectto the update site There can be misleading error messages if the proxy settings are not correctThe installer installs the kernel of the Developer Studio The kernel contains Eclipse and a few SAPadditions but is not equipped with the SAP features necessary for the Composition EnvironmentTo install the required SAP features you have to install the SAP features with the following updateprocedure
Selecting and Installing Features
1 The available features are displayedThe Updates dialog window displays the main node of the features Open the main node andyou see the available main features
2 Choose the main features you want to install
1640 PUBLIC 05162008
3 Installing SAP NetWeaver Developer Studio
Note
Make sure that the component required for the selected feature is installed on the AS Java
3 Accept the license agreement4 In the screen Optional Features choose Next
Caution
Never deselect an optional feature This can cause a malfunction of the Developer Studio
5 In the Install screen choose FinishThe features are being downloaded
6 Choose Install All to verify the feature installation7 Restart the Developer Studio for the updates to take effect
Recommendation
We recommend that you start the Developer Studio with the shortcuts that were created onyour desktop or in the StartmenuTo get to the SAP documentation in the Developer Studio open the application and choose fromthe menu bar Help Help Contents SAP NetWeaver CE Developer Studio Documentation
The installation of the Developer Studio is now completed
Additional ActivitiesOnce the Developer Studio is installed you can add update and remove installed features at any time
Adding Features to an Installed Developer Studio
You can add features any time
1 Choose Help Software Updates Find and Install 2 Choose Search for new features to install3 Enable the displayed update site
Recommendation
We recommend that you do not change the update site to avoid version inconsistencies
4 Continue with step Selecting and Installing Main Features as described above
Updating Installed Features
1 Choose Help Software Updates Find and Install 2 Choose Search for updates of currently installed features3 Follow the on-screen instructions
05162008 PUBLIC 1740
3 Installing SAP NetWeaver Developer Studio
As of SP03 SAP NetWeaver Developer Studio uses the IDE Update Site to keep itself up-to-date
1 Choose Help Software Updates Find and Install 2 Choose Search for updates of currently installed features3 Follow the on-screen instructions
Note
The configuration wizard task Configuration and Mirroring of local NWDS Update Site has to be run aftereach patch or update of the IDE update site component on AS JavaFormore information about how to run the configuration wizard see Post-Installation Activities [page 27]
More InformationUpdate Guide ‒ SAP NetWeaver Composition Environment 71 ‒ Update to SPltxxgt available athttpwwwsdnsapcomirjsdnnw-ce
Uninstalling Features
1 To uninstall features choose Help Software Updates Manage Configuration 2 In the Product Configuration window choose Show Disabled Features3 Open the node SAP NetWeaver Developer Studio and its subnode
The features are displayed with its status enabled or disabled4 To change the status of feature select the feature and choose Enable or Disable (depending on
the current status)To uninstall a feature it has to be set to status disabled
5 Restart the SAP NetWeaver Developer Studio to apply the status change
Note
To uninstall all old version features (after the update) choose Help Software Updates UninstallDisabled Features
1840 PUBLIC 05162008
4 Installing Additional Components (Optional)
4 Installing Additional Components(Optional)
You can install the following additional components
n Composition Toolsn Adobe Document Services
n Composite Voicen IDE Update Site
PrerequisitesYou need to meet the same hardware and software requirements as for your already installeddevelopment system plus an additional 2 GB RAMThe Composition Tools and Composite Voice component make use of the Visual Composer VisualComposer is a Web browser based tool to model user interfaces To run Visual Composer thefollowing programsmust be installed on the client computer fromwhich you access Visual Composer
n Microsoft Internet Explorer 60 SP1 or highern Adobe SVG Viewer 30
n Microsoft XML Parser 40 or higher
Note
n Before installing additional components you need to stop all application servers manually
n Before installing additional components and in the case that you made changes to the defaulttemplate settings see SAP Note 953763
Prerequisites for SAP MaxDB
n Make sure that the Application Server Java and its corresponding database is runningYou can stop and start the system using the shortcuts under Start All Programs SAP NetWeaverComposition Environment 71 Application Server JxxltSAPSIDgt
n During the installation of additional components entries are written into the log area of thedatabase To avoid that the log is running full during the installation make sure that your backupstrategy is already active and an initial data backup was successfulWhen you want to establish your backup strategy after installing additional components you canturn on the special log mode AutoOverwrite using the Database Manager GUI This interrupts theexisting backup history You have to run a complete backup to start the history again
05162008 PUBLIC 1940
4 Installing Additional Components (Optional)
ProcedureThis procedure tells you how to install an SAP system with SAPinst SAPinst includes a GUI and aGUI server both using Java This section describes an installation where SAPinst SAPinst GUI andthe GUI server are running on the same hostNote the following information about SAPinst
n When you start SAPinst SAPinst GUI and the GUI server also start SAPinst GUI connects to theGUI server with a secure SSL connection and the GUI server connects to SAPinst
n SAPinst creates the installation directory sapinst_instdir where it keeps its log files Theinstallation directory is located directly in the Program Files directory If SAPinst is not able tocreate sapinst_instdir there it tries to create sapinst_instdir in the directory defined by theenvironment variable TEMP
Recommendation
We recommend that you keep all installation directories until the system is completely andcorrectly installed
n SAPinst creates a subdirectory for each installation option calledltsapinst_instdirgtltinstallation_option_directorygt which is located in ProgramFiles
n The SAPinst Self-Extractor extracts the executables to a temporary directory (TEMP TMP TMPDIR orSystemRoot) These executables are deleted after SAPinst has stopped runningDirectories called sapinst_exexxxxxxxxxx sometimes remain in the temporary directory Youcan safely delete them The temporary directory also contains the SAPinst Self-Extractor log filedev_selfexout which might be useful if an error occurs
Caution
If SAPinst cannot find a temporary directory the installation terminates with the error FCO-00058
n If you want to terminate SAPinst and the SAPinst Self-Extractor choose one of the followingoptionsl Right-click the icon for the SAPinst output window located in theWindows tray and choose Exitl Click the icon for the SAPinst output window located in the Windows tray and choose File
Exit
PrerequisitesYou are logged on as a user with administration rights to install the SAPinst tool and the SAP system
Note
When installing from a network share make sure that everyone has read access to this share Theinstallation routine creates users such as ltsidgtadm (for example ce1adm) During the installationSAPinst does a user switch to this user If the newly created user does not have permissions to thenetwork share where the installation is running from the installation will fail
2040 PUBLIC 05162008
4 Installing Additional Components (Optional)
Procedure
1 Insert the SAP Installation Master DVD into your DVD drive or mount it locally2 Start SAPinst from the SAP Installation Master DVD by double-clicking sapinstexe from the
following path ltDVD drivegtDATA_UNITSIM_WIN_ltplatformgt_ltdatabasegtSAPinst GUI starts automatically by displaying theWelcome screen
3 In theWelcome screen choose the required SAPinst installation option from the tree structure
Note
If SAPinst prompts you to log off from your system log off and log on againSAPinst restarts automaticallyChoose Continue Old Installation
4 Choose whether you want to run the installation in Typicalmode or in CustommodeIf you select Typical the installation wizard provides automatic default settings and you only haveto respond to a small selection of prompts The rest is set by default If you select Custom you haveto respond to all prompts
Note
If you want to install the offline documentation for SAP NetWeaver CE you need to chooseCustommodeAfter the installation you can access the offline documentation by choosing Start All ProgramsSAP NetWeaver Composition Environment ltSAPSIDgt
5 Follow the screens and enter the required parameters
Note
For more information about the input parameters and information about restrictions forpasswords position the cursor on the required parameter and press F1
After you have entered all requested input parameters SAPinst displays the Parameter Summaryscreen This screen shows both the parameters that you entered and those that SAPinst set bydefault If required you can revise the parameters before starting the installation
6 To start the installation choose Start SAPinst starts the installation and displays the progress ofthe installation When the installation has successfully been completed SAPinst shows the dialogExecution of ltService_Namegt has been completed successfully
Note
After installing additional components you need to perform some post-installation activities [page 27] toget the system up amp running
05162008 PUBLIC 2140
This page is intentionally left blank
5 Installing SAP Memory Analyzer (Optional)
5 Installing SAP Memory Analyzer(Optional)
SAP Memory Analyzer helps you to analyze Java heap dumps easily find big chunks of memory orcomplex memory aggregation patterns in your data structures and identify who is keeping thismemory alive New and innovative analysis techniques support the user with a fast and powerfulfeature setThe tool (Eclipse RCP application) was developed to analyze real productive heap dumps whichtend to get enormous in size with hundreds of millions of objects Performance low resourceconsumption and especially the newly developed innovative analysis techniques make it a helpfultool even to small application heap dumpsYou can install SAP Memory Analyzer as an additional tool
This procedure tells you how to install an SAP system with SAPinst SAPinst includes a GUI and aGUI server both using Java This section describes an installation where SAPinst SAPinst GUI andthe GUI server are running on the same hostNote the following information about SAPinst
n When you start SAPinst SAPinst GUI and the GUI server also start SAPinst GUI connects to theGUI server with a secure SSL connection and the GUI server connects to SAPinst
n SAPinst creates the installation directory sapinst_instdir where it keeps its log files Theinstallation directory is located directly in the Program Files directory If SAPinst is not able tocreate sapinst_instdir there it tries to create sapinst_instdir in the directory defined by theenvironment variable TEMP
Recommendation
We recommend that you keep all installation directories until the system is completely andcorrectly installed
n SAPinst creates a subdirectory for each installation service calledltsapinst_instdirgtltinstallation_service_directorygt which is located in ProgramFiles
n The SAPinst Self-Extractor extracts the executables to a temporary directory (TEMP TMP TMPDIR orSystemRoot) These executables are deleted after SAPinst has stopped runningDirectories called sapinst_exexxxxxxxxxx sometimes remain in the temporary directory Youcan safely delete them The temporary directory also contains the SAPinst Self-Extractor log filedev_selfexout which might be useful if an error occurs
05162008 PUBLIC 2340
5 Installing SAP Memory Analyzer (Optional)
Caution
If SAPinst cannot find a temporary directory the installation terminates with the error FCO-00058
n If you want to terminate SAPinst and the SAPinst Self-Extractor choose one of the followingoptionsl Right-click the icon for the SAPinst output window located in theWindows tray and choose Exitl Click the icon for the SAPinst output window located in the Windows tray and choose File
Exit
PrerequisitesYou are logged on as a user with administration rights to install the SAPinst tool and the SAP system
Note
When installing from a network share make sure that everyone has read access to this share Theinstallation routine creates users such as ltsidgtadm (for example ce1adm) During the installationSAPinst performs a user switch to this user If the newly created user does not have permissions tothe network share where the installation is running from the installation will fail
Procedure
1 Insert the SAP Installation Master DVD into your DVD drive or mount it locally2 Start SAPinst from the SAP Installation Master DVD by double-clicking sapinstexe from the
following path ltDVD drivegtDATA_UNITSIM_WIN_ltplatformgt_ltdatabasegtSAPinst GUI starts automatically by displaying theWelcome screen
3 In theWelcome screen choose the required SAPinst installation option from the tree structure
Note
If SAPinst prompts you to log off from your system log off and log on againSAPinst restarts automaticallyChoose Continue Old Installation
4 Choose whether you want to run the installation in Typicalmode or in CustommodeIf you select Typical the installation wizard provides automatic default settings and you only haveto respond to a small selection of prompts The rest is set by default If you select Custom you haveto respond to all prompts
Note
If you want to install the offline documentation for SAP NetWeaver CE you need to chooseCustommodeAfter the installation you can access the offline documentation by choosing Start All ProgramsSAP NetWeaver Composition Environment ltSAPSIDgt
2440 PUBLIC 05162008
5 Installing SAP Memory Analyzer (Optional)
5 Follow the screens and enter the required parameters
Note
For more information about the input parameters and information about restrictions forpasswords position the cursor on the required parameter and press F1
After you have entered all requested input parameters SAPinst displays the Parameter Summaryscreen This screen shows both the parameters that you entered and those that SAPinst set bydefault If required you can revise the parameters before starting the installation
6 To start the installation choose Start SAPinst starts the installation and displays the progress ofthe installation When the installation has successfully been completed SAPinst shows the dialogExecution of ltOption_Namegt has been completed successfully
05162008 PUBLIC 2540
This page is intentionally left blank
6 Post-Installation Activities
6 Post-Installation Activities
This section describes the steps that you have to perform after the installation has finished successfully
Running the Configuration Wizard (Optional)
Note
You can run the configuration wizard only once and only directly after installing and patchingyour SAP system
For SAP NetWeaver CE you need to run the following configuration tasks
n Configuration of Services Registry Webservice Destinations
n When you have installed the IDE Update Site componentConfiguration and Mirroring of local NWDSUpdate Site
n When you have installed the Adobe Document Services component Initial setup ADS in CE
When you have an NWDI installation on another SAP NetWeaver 70 system you can perform thefollowing configuration tasks
n Change Management Service (CMS) Create an Application Skeleton
n Change Management Service (CMS) Modify a Software Component
To run the configuration wizard proceed as follows
1 After SAPinst has finished open the SAP NetWeaver Administrator by entering the following URLin a browser httplthostgtlthttp_portgtnwa
2 Log on as user j2ee_admin3 In the SAP NetWeaver Administrator choose Configuration Management Scenarios Configuration
Wizard 4 Select the appropriate configuration task in the list and choose Start5 Follow the on-screen instructions6 After the configuration wizard has finished successfully restart your SAP system
Configuring the IDE Update Site
1 In the Configuration Wizard select the task Configuration and Mirroring of local NWDS Update Site in thelist and choose Start
2 Follow the on-screen instructions
05162008 PUBLIC 2740
6 Post-Installation Activities
Provide the credentials for the source update site location The default URL is the central SAPupdate site You can also use your installation DVD as source update site which makes themirror process much faster To use the DVD as source update site you have to specify the URLfileltdvd_drivegtIDE
3 After the configuration wizard has finished successfully restart your SAP systemThe data of the source update site location is now mirrored to your server
Enabling Adobe Document ServicesIf you have installed SAP NetWeaver Composition Environment with the Adobe DocumentServices add-on in the developer edition on aWindows platform you must complete the followingpost-installation steps to enable the add-on In case you have installed an AS Java cluster applythe procedure to the central host as well as to all other hosts where additional application serverinstances are running
1 Using the SAP Management Console stop the AS Java systemFormore information about starting and stopping SAP systems see httphelpsapcomnwce
Administratorrsquos Guide Administration of SAP NetWeaver CE General System Administration AS Java(Application Server Java)
2 From the Startmenu open Control Panel Administrative Tools Computer Management Services andApplications Services
3 Select SAPltSIDgt_ltInstance_Numbergt (for example SAPCE1_00) and open Properties from thecontext menu
4 On the Log On tab page enable the Local System account indicator5 Repeat the above steps for the second SAPltSIDgt_ltInstance_Numbergt service that you see in the list6 Start the AS Java system
Adobe LiveCycle Designer
For more information about how to install and configure the Adobe LiveCycle Designer see SAPNote 962763
Enabling Services RegistryYou must apply additional configuration steps to enable Services Registry after you have installed anSAP NetWeaver Composition Environment system containing the following components
n Java Application Server and Composition Platformn Java Application Server and Adobe Document Services
To enable Services Registry you must apply the following configuration templates to your systemCE_Complete_Stack_development_full
2840 PUBLIC 05162008
6 Post-Installation Activities
Note
For more information about what configuration templates are available see Configuration Templates[page 33]For more information about applying configuration templates see httphelpsapcomnwce
SAP NetWeaver Composition Environment Library Administratorrsquos Guide Configuration of SAP NetWeaver CEInitial System Configuration AS Java Configuration Activating a Configuration Template
See also
httphelpsapcomnwce SAP NetWeaver Composition Environment Library Developerrsquos GuideDeveloping and Composing Applications Consuming Enterprise Services Searching for Services Services RegistryTasks Searching amp Browsing Service Definitions Configuring the Services Registry
Configuring the Portal in SAP NetWeaver CEAfter installing the portal in SAP NetWeaver CE a number of deactivated or irrelevant tools aredisplayed in the UI To display the correct portals tools for CE proceed as follows
1 Open a browser and log on to your portal as an administrator2 In the same browser session enter the following URL
httplthostgtlthttpportgtirjservletprtportalprtrootcomsapportal
contentlayersContentLayersTool
where lthostgt is the host name of your server and lthttpportgt is the port number of your server3 In the Portal Mode Configuration Tool choose Activate Development Mode to restore the portal tools
and content that are assigned to the development mode4 Restart or refresh your browser5 In the SAP Management Console restart the server
You may then continue with the mandatory and optional configuration steps as described inhttphelpsapcomnwce SAP NetWeaver Composition Environment Library Administratorrsquos Guide
Configuration of SAP NetWeaver Composition Environment Configuration for CE Additional Components Configuringthe Portal
Changing the Password for the Internet Communication Manager (ICM)You can monitor and manage the Internet Communication Manager (ICM) from the command lineprogramAfter the installation of your SAP NetWeaver CE system has successfully finished you need to changethe ICM password manually To do so proceed as follows
1 Log on at operating system level to the computer where the ICM is running2 Start the program icmon with icmon ndasha profile=ltinstance_profilegt to maintain the
authentication file (default authfiletxt)3 Choose a to add a user4 Choose c to change the password of the existing user
05162008 PUBLIC 2940
6 Post-Installation Activities
5 Choose s to save your settings
Further Configuration StepsAfter installing your SAP NetWeaver CE system and performing the post-installation steps to get thesystem up amp running you may need to perform further configuration stepsRefer to the following documentation to proceed with your tasks
n If you are a system administrator refer to httphelpsapcomnwce Administratorrsquos Guide It contains information about how to configure and administer your system
n If you are a developer refer to httphelpsapcomnwce Developerrsquos Guide It providesguidelines for developing applications using the SAP NetWeaver CE
Note
The SAP NetWeaver CE documentation is also available offline as a part of your installation To accessit choose Start All Programs SAP NetWeaver Composition Environment 10 Documentation
3040 PUBLIC 05162008
7 Additional Information
7 Additional Information
The following section provides additional information about the installation of SAP NetWeaverComposition Environment
71 Transporting Self-Developed Software ComponentArchives (SCA) into the System
PrerequisitesYou have developed your own Software Component Archives (SCA) and want to transport theminto your SAP NetWeaver CE system
ProcedureTo transport your SCAs to the SAP NetWeaver CE system proceed as follows
1 Download the update file from httpservicesapcomswdc Download Support Packages andPatches Entry by Application Group SAP NetWeaver SAP NETWEAVER SAP NETWEAVER CE71 Support Package Stacks
2 From an empty directory run the update tool updateltIDgtexe
Note
If the tool displays descriptions such as Applying Support Packages you can ignore them
3 In the dialog screens specify the directory where your SCAs are located4 Follow the on-screen instructions
Only valid for MaxDB
72 Troubleshooting ‒ Repairing an Inconsistent SAP MaxDBInstallation
PrerequisitesDuring the preinstallation phase the installation tool checks the Microsoft Windows registry foralready installed SAP MaxDB softwareIf the registry key is found but there is no software on the hard drive you receive the followingmessage
05162008 PUBLIC 3140
7 Additional Information73 Restarting the SAP MaxDB Server Manually
The existing MaxDB software is not consistent Check the file system and registry
The most common reason for this inconsistency is the manual deletion of the software from the filesystem without using the specified tools
ProcedureTo repair this inconsistency proceed as follows
1 Choose Start Control Panel Administrative Tools Services 2 Make sure the services SAPDBWWW SAPDB and XServer are stopped3 Choose Start Run and run the command regedit4 Go to My ComputerHKEY_LOCAL_MACHINESOFTWARESAPSAP DBTech Key IndepPrograms
The key contains a path to a foldera) Check if this folder exists on the file systemb) Note down the value of Key IndepPrograms for later usage (see step 7)
If the path does not exist in the file system delete the key SAP DBTech5 Delete the following keys
n My ComputerHKEY_LOCAL_MACHINESYSTEMCurrentControlSetServicesSAP DBTech-
n My ComputerHKEY_LOCAL_MACHINESYSTEMCurrentControlSetServicesSAPDBWWW
n My ComputerHKEY_LOCAL_MACHINESYSTEMCurrentControlSetServicesXServer
6 Choose Start Control Panel System Advanced Environment Variables System Variables Path 7 Delete the following paths from the variable
n ltIndepProgramsgtbin
n ltIndepProgramsgtpgm
8 Reboot your computer
End of MaxDB
Only valid for MaxDB
73 Restarting the SAP MaxDB Server Manually
If after a reboot the database server is not running automatically you need to restart the SAP MaxDBserver manually
Production SystemsTo restart the SAP MaxDB server manually proceed as follows
1 Open a command prompt and enter the following command net start sapdbwww
ORChoose Start All Programs Administrative Tools Services Double-click on SAP DB WWW andchoose Start
2 Open the SAP Management Console and choose SAP Systems ltSAPSIDgt ltmachine namegt
3240 PUBLIC 05162008
7 Additional Information74 Restarting the MS SQL Server Manually
3 Enter the master password and choose Logon4 Choose Online When the database server is online you can restart the engine
Development SystemsTo restart the SAP MaxDB server manually choose Start All Programs SAP NetWeaver CompositionEnvironment CE Application Server ltSAPSIDgt Start Application Server End of MaxDB
Only valid for MS SQL Server
74 Restarting the MS SQL Server Manually
If after a reboot the database server is not running automatically you need to restart the MS SQLServer manually
Procedure
1 Choose Start All Programs Administrative Tools Services 2 Look for the service named SQL Server ltnamegt where ltnamegt is MSSQLSERVER for the default
instance or ltinstance namegt for a named instance3 If the service status is not started right-click the service and choose Start in the context menu4 To insure the service is started automatically after each system restart right-click it and choose
Properties Select Automatic as the startup type
End of MS SQL Server
75 Configuration Templates
Configuration templates contain the predefined instance configuration for specific scenarios Theyare automatically applied according to the installation option you have selected The templatesare designed to optimize system performance by applying certain configuration to the Java VirtualMachine and the application server as well as by applying startup filters to AS Java services andapplications to start only those relevant for the selected installation optionsThe following table provides information about the available templates with SAP NetWeaverComposition Environment In the template name replace the ltsystem_modegt parameter bydevelopment (for the templates relevant to systems installed in developmentmode) or production (forthe templates relevant to systems installed in productivemode)
05162008 PUBLIC 3340
7 Additional Information76 Uninstalling SAP NetWeaver Composition Environment
Configuration Template Selected Installation Options
CE_Java_EE_ltsystem_modegt_full Java Application Server Installation
CE_Composition_Environment_ltsystem_modegt_full Java Application Server Installation + CompositionPlatform Installation
CE_Adobe_Document_Service_ltsystem_modegt_full Java Application Server Installation + AdobeDocument Services Add-on Installation
CE_Composite_Voice_ltsystem_modegt_full Java Application Server Installation + Voice Add-onInstallation
CE_Complete_Stack_ltsystem_modegt_full Java Application Server Installation + CompositionPlatform Installation + Adobe Document ServicesAdd-on Installation + Voice Add-on Installation
If your selection cannot be mapped to one of the combinations in the above table the templateCE_Complete_Stack_ltsystem_modegt_full is applied It starts all applications and services neededto run the complete stackYou canmanually apply a different configuration template if youwant to switch to another installationoption For example by changing from template CE_Complete_Stack_ltsystem_modegt_full toCE_Java_EE_ltsystem_modegt_full you achieve shorter startup times and less memory consumptionbut also less functionality since not all applications and services are runningFor more information about applying configuration templates see httphelpsapcomnwce
Administratorrsquos Guide Configuration of SAP NetWeaver CE Initial System Configuration AS Java ConfigurationActivating a Configuration Template
Note
Make sure that you do not apply a development template to a productive system or vice versa
76 Uninstalling SAP NetWeaver Composition Environment
You have to uninstall all components of the SAP NetWeaver Composition Environment separatelythat is SAP NetWeaver CE and SAP NetWeaver Developer StudioYou can uninstall your SAP NetWeaver CE system in different ways
Uninstalling SAP NetWeaver CEWindows Choose Start Control Panel Add Remove programs SAP SystemltSAPSIDgt
Uninstalling SAP NetWeaver CE Using SAPinst
1 Insert the SAP Installation Master DVD into your DVD drive or mount it locally
3440 PUBLIC 05162008
7 Additional Information76 Uninstalling SAP NetWeaver Composition Environment
2 Start SAPinst from the SAP Installation Master DVD as described in the section Installing SAPNetWeaver Composition Environment
3 In theWelcome screen choose Uninstall SAP System or Single Instances from the tree structure4 Follow the on-screen instructions
Uninstalling SAP NetWeaver Developer Studio
Prerequisites
Before uninstalling SAP NetWeaver Developer Studio consider the following
n All additionally installed features and plug-ins that were installed to the same folder as DeveloperStudio for example by using the Eclipse Update Manager will also be removed
n There may be other directories and files in the installation directory notablyltinstall_dirgteclipseworkspace ltinstall_dirgteclipselinks andltinstall_dirgteclipseconfiguration that contain important data The files and folder aswell as the existing workspaces are retained when the product is uninstalled
Procedure
To uninstall SAP NetWeaver Developer Studio proceed as described above You can use either oneof the options
Uninstalling the SAP Management ConsoleSince all SAP systems use the SAP Management Console there is no uninstallation option for theSAP Management Console with SAPinst If you are sure that you do not need the SAP ManagementConsole any more you can remove it using Start Control Panel Add Remove programs
05162008 PUBLIC 3540
Typographic Conventions
Example Description
lt gt Angle brackets indicate that you replace these words or characters with appropriateentries to make entries in the system for example ldquoEnter your ltUser Namegtrdquo
Arrows separating the parts of a navigation path for example menu options
Example Emphasized words or expressions
Example Words or characters that you enter in the system exactly as they appear in thedocumentation
Example Textual cross-references to an internet address for example httpwwwsapcom
example Quicklinks added to the internet address of a homepage to enable quick access tospecific content on the Web
123456 Hyperlink to an SAP Note for example SAP Note 123456
Example n Words or characters quoted from the screen These include field labels screen titlespushbutton labels menu names and menu options
n Cross-references to other documentation or published works
Example n Output on the screen following a user action for example messagesn Source code or syntax quoted directly from a programn File and directory names and their paths names of variables and parameters and
names of installation upgrade and database tools
EXAMPLE Technical names of system objects These include report names program namestransaction codes database table names and key concepts of a programming languagewhen they are surrounded by body text for example SELECT and INCLUDE
EXAMPLE Keys on the keyboard
3640 PUBLIC 05162008
SAP AGDietmar-Hopp-Allee 16
69190 WalldorfGermany
T +4918 0534 34 34F +4918 0534 34 20
wwwsapcom
copy Copyright 2008 SAP AG All rights reserved
No part of this publication may be reproduced or transmitted in any form or for any purpose without the express permissionof SAP AG The information contained herein may be changed without prior noticeSome software products marketed by SAP AG and its distributors contain proprietary software components of othersoftware vendors
No part of this publication may be reproduced or transmitted in any form or for any purpose without the express permissionof SAP AG The information contained herein may be changed without prior noticeSome software products marketed by SAP AG and its distributors contain proprietary software components of othersoftware vendorsMicrosoft Windows Excel Outlook and PowerPoint are registered trademarks of Microsoft CorporationIBM DB2 DB2 Universal Database OS2 Parallel Sysplex MVSESA AIX S390 AS400 OS390 OS400 iSeries pSeriesxSeries zSeries System i System i5 System p System p5 System x System z System z9 zOS AFP Intelligent MinerWebSphere Netfinity Tivoli Informix i5OS POWER POWER5 POWER5+ OpenPower and PowerPC are trademarks orregistered trademarks of IBM CorporationAdobe the Adobe logo Acrobat PostScript and Reader are either trademarks or registered trademarks of Adobe SystemsIncorporated in the United States andor other countriesOracle is a registered trademark of Oracle CorporationUNIX XOpen OSF1 and Motif are registered trademarks of the Open GroupCitrix ICA Program Neighborhood MetaFrame WinFrame VideoFrame and MultiWin are trademarks or registeredtrademarks of Citrix Systems IncHTML XML XHTML and W3C are trademarks or registered trademarks of W3Creg World Wide Web ConsortiumMassachusetts Institute of TechnologyJava is a registered trademark of Sun Microsystems IncJavaScript is a registered trademark of Sun Microsystems Inc used under license for technology invented and implementedby NetscapeSAP R3 xApps xApp SAP NetWeaver Duet PartnerEdge ByDesign SAP Business ByDesign and other SAP productsand services mentioned herein as well as their respective logos are trademarks or registered trademarks of SAP AG inGermany and in several other countries all over the world All other product and service names mentioned are thetrademarks of their respective companies Data contained in this document serves informational purposes only Nationalproduct specifications may varyThese materials are subject to change without notice These materials are provided by SAP AG and its affiliated companies(SAP Group) for informational purposes only without representation or warranty of any kind and SAP Group shall notbe liable for errors or omissions with respect to the materials The only warranties for SAP Group products and services arethose that are set forth in the express warranty statements accompanying such products and services if any Nothing hereinshould be construed as constituting an additional warranty
This document was created using stylesheet 2006-12-31 (V51beta [= 60 for E3]) and XSLT processor SAXON 652 fromMichael Kay (httpsaxonsfnet) XSLT version 1
05162008 PUBLIC 3740
DisclaimerSome components of this product are based on Javatrade Any code change in these components may cause unpredictable andsevere malfunctions and is therefore expressly prohibited as is any decompilation of these componentsAny Javatrade Source Code delivered with this product is only to be used by SAPrsquos Support Services and may not be modified oraltered in any way
Documentation in the SAP Service MarketplaceYou can find this document at the following address httpsservicesapcominstguides
3840 PUBLIC 05162008
This page is intentionally left blank
SAP AGDietmar-Hopp-Allee 1669190 WalldorfGermanyT +4918 0534 34 34F +4918 0534 34 20wwwsapcom
copy Copyright 2008 SAP AG All rights reservedNo part of this publication may be reproduced or transmitted in any form or for any purpose without the express permission of SAP AG The information contained herein may bechanged without prior notice
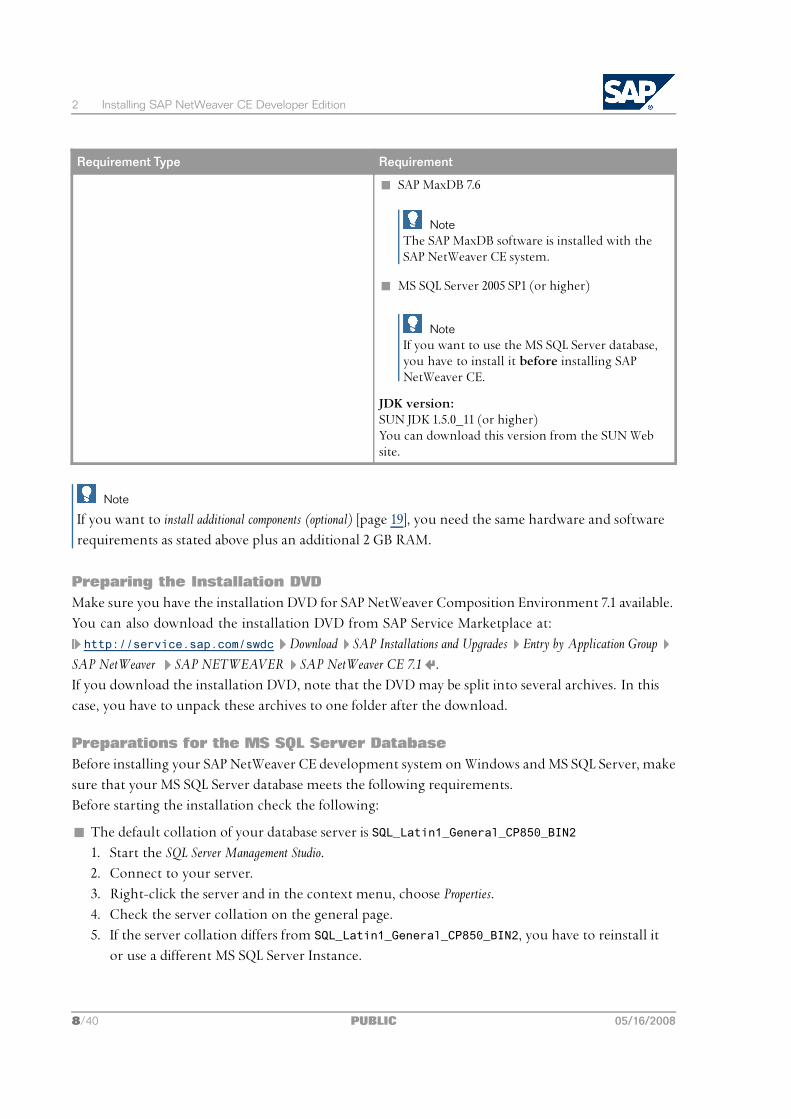
2 Installing SAP NetWeaver CE Developer Edition
Requirement Type Requirement
n SAP MaxDB 76
NoteThe SAP MaxDB software is installed with theSAP NetWeaver CE system
n MS SQL Server 2005 SP1 (or higher)
NoteIf you want to use the MS SQL Server databaseyou have to install it before installing SAPNetWeaver CE
JDK versionSUN JDK 150_11 (or higher)You can download this version from the SUN Website
Note
If you want to install additional components (optional) [page 19] you need the same hardware and softwarerequirements as stated above plus an additional 2 GB RAM
Preparing the Installation DVDMake sure you have the installation DVD for SAP NetWeaver Composition Environment 71 availableYou can also download the installation DVD from SAP Service Marketplace athttpservicesapcomswdc Download SAP Installations and Upgrades Entry by Application Group
SAP NetWeaver SAP NETWEAVER SAP NetWeaver CE 71 If you download the installation DVD note that the DVDmay be split into several archives In thiscase you have to unpack these archives to one folder after the download
Preparations for the MS SQL Server DatabaseBefore installing your SAP NetWeaver CE development system onWindows andMS SQL Server makesure that your MS SQL Server database meets the following requirementsBefore starting the installation check the following
n The default collation of your database server is SQL_Latin1_General_CP850_BIN21 Start the SQL Server Management Studio2 Connect to your server3 Right-click the server and in the context menu choose Properties4 Check the server collation on the general page5 If the server collation differs from SQL_Latin1_General_CP850_BIN2 you have to reinstall it
or use a different MS SQL Server Instance
840 PUBLIC 05162008
2 Installing SAP NetWeaver CE Developer Edition
n SQL Server logins are enabled1 Start the SQL Server Management Studio2 Connect to your server3 Right-click the server and in the context menu choose Properties4 Switch to the security page
Under Server Authentication make sure that the entry SQL Server and Windows Authentication modeis selected
Note
If onlyWindows Authentication mode is selected change it to SQL Server and Windows Authentication modeand restart the server for the changes to take effect
n TCP protocol is enabled and your server is able to communicate on the TCP port1 Start the SQL Server Configuration Manager under Start All Programs MS SQL Server 2005
Configuration Tools 2 Go to SQL Server 2005 Network Configuration in the left pane and select your instance3 In the right pane make sure that Protocol TCPIP is set to enabled
If this is not the case refer to theMS SQL Server Books Online to configure the TCPIP connectionproperly
Installing a Development SystemThis procedure tells you how to install an SAP system with SAPinst SAPinst includes a SAPinst GUIand a GUI server which both use Java This section describes an installation where SAPinst SAPinstGUI and the GUI server are running on the same hostNote the following information about SAPinst
n When you start SAPinst SAPinst GUI and the GUI server also start SAPinst GUI connects to theGUI server with a secure SSL connection and the GUI server connects to SAPinst
n SAPinst normally creates the installation directory sapinst_instdir where it keeps its logfiles and which is located directly in the Program Files directory If SAPinst is not able to createsapinst_instdir there it tries to create sapinst_instdir in the directory defined by theenvironment variable TEMP
Recommendation
We recommend that you keep all installation directories until the system is completely andcorrectly installed
n SAPinst creates a subdirectory for each installation option calledltsapinst_instdirgtltinstallation_option_directorygt which is located in ProgramFiles
n The SAPinst Self-Extractor extracts the executables to a temporary directory (TEMP TMP TMPDIR orSystemRoot) These executables are deleted after SAPinst has stopped running
05162008 PUBLIC 940
2 Installing SAP NetWeaver CE Developer Edition
Directories called sapinst_exexxxxxxxxxx sometimes remain in the temporary directory Youcan safely delete them The temporary directory also contains the SAPinst Self-Extractor log filedev_selfexout which might be useful if an error occurs
Caution
If SAPinst cannot find a temporary directory the installation terminates with the error FCO-00058
n If you want to terminate SAPinst and the SAPinst Self-Extractor choose one of the followingoptionsl Right-click the icon for the SAPinst output window located in theWindows tray and choose Exitl Click the icon for the SAPinst output window located in the Windows tray and choose File
Exit
PrerequisitesYou are logged on as a user with administration rights to install the SAPinst tool and the SAP system
Note
When installing from a network share make sure that everyone has read access to this share Theinstallation routine creates users such as ltsidgtadm (for example ce1adm) During the installationSAPinst does a user switch to this user If the newly created user does not have permissions to thenetwork share where the installation is running from the installation will fail
Procedure
1 Insert the SAP Installation Master DVD into your DVD drive or mount it locally2 Start SAPinst from the SAP Installation Master DVD by double-clicking sapinstexe from the
following path ltDVD drivegtDATA_UNITSIM_WIN_ltplatformgt_ltdatabasegt3 In theWelcome screen choose the required SAPinst installation option from the tree structure
Note
If SAPinst prompts you to log off from your system log off and log on againSAPinst restarts automaticallyChoose Continue Old Installation
4 Choose whether you want to run the installation in Typicalmode or in CustommodeIf you select Typical the installation wizard provides automatic default settings and you only haveto respond to a small selection of prompts The rest is set by default If you select Custom you haveto respond to all prompts
Note
If you want to install the offline documentation for SAP NetWeaver CE you need to chooseCustommode
1040 PUBLIC 05162008
2 Installing SAP NetWeaver CE Developer Edition
5 Follow the screens and enter the required parameters
Note
For more information about the input parameters and information about restrictions forpasswords position the cursor on the required parameter and press F1
After you have entered all requested input parameters SAPinst displays the Parameter Summaryscreen This screen shows both the parameters that you entered and those that SAPinst set bydefault If required you can revise the parameters before starting the installation
6 To start the installation choose Start SAPinst starts the installation and displays the progress ofthe installation When the installation has successfully been completed SAPinst shows the dialogExecution of ltOption_Namegt has been completed successfully
Note
You can install the update site (for SAP Developer Studio) on a development system only (singleinstance system)
05162008 PUBLIC 1140
This page is intentionally left blank
3 Installing SAP NetWeaver Developer Studio
3 Installing SAP NetWeaver DeveloperStudio
SAP NetWeaver Developer Studio is based on the open development platform Eclipse It includesthe standard Eclipse features and SAP features The SAP NetWeaver development documentationassumes that you are familiar with Eclipse and how to develop Java applications with itFor more information see httphelpsapcomnwce SAP NetWeaver Library SAP NetWeaverDevelopersrsquo Guide SAP FeaturesSAP NetWeaver Developer Studio provides several features for composing and developing businessapplications You can select the features according to the components you have installed on your ASJava of the Composition Environment The Developer Studio has the following features
n SAP NetWeaver Developer Studio Java EEProvides the toolset for Java EE-compliant developmentAS Java component required Java Application Server
n SAP NetWeaver Developer Studio Development Infrastructure ClientProvides the toolset necessary to work the SAP component model It provides functionality towork locally or in a teamDepending on feature SAP NetWeaver Developer Studio Java EEAS Java component required Java Application Server Optionally SAP NetWeaverDevelopment Infrastructure (NWDI) as part of an SAP NetWeaver 70 system
n SAP NetWeaver Developer Studio Web Dynpro User InterfacesProvides the toolset to develop user interfaces with Web Dynpro for JavaDepending on features SAP NetWeaver Developer Studio Java EE SAP NetWeaver DeveloperStudio Development Infrastructure ClientAS Java component required Java Application Server Optionally Adobe Document Services
n SAP NetWeaver Developer Studio Composition ToolsProvides the toolset to develop composite applicationsDepending on features SAP NetWeaver Developer Studio Java EE SAP NetWeaver DeveloperStudioWebDynpro User Interfaces SAPNetWeaver Developer Studio Development InfrastructureClientAS Java component required Composition Platform Optionally Adobe Document Services
05162008 PUBLIC 1340
3 Installing SAP NetWeaver Developer Studio
Installation Recommendations
Depending on your system landscape we recommend that you install the SAP NetWeaver DeveloperStudio as follows
n Central AS Java with update siteWhen you have a central AS Java we recommend that this server provides an update site Thismakes sure that the SAP NetWeaver Developer Studio you install has the version that matchesthe application serverYou can check the availability of a local update site by going to the following URL in your Webbrowserhttplthostgtlthttpportgtupdatesite
Example
httpdev_server_0150000updatesite
Note
Make sure that the update site is properly installed and that the post-installation activities forthe update site have already been performedMore informationPost-Installation Activities [page 27] section Configuring the IDE Update Site
n Developer WorkplaceIf you want to install the AS Java and the Developer Studio on a single workstation you can usethe following sourcesl SAP NetWeaver Developer Studio Update Site (recommended)
SAP provides a central update site The update site can be found athttpsnwdssapcomswdcdownloadsupdatesnetweavernwdsceTo access the update site you need an SAP Service Marketplace user and password (S user)
l DVDUse the DVD you installed the AS Java from to make sure the Developer Studio and the AS Javahave the same version Once the Developer Studio is installed from a DVD the update manageris always looking on the DVD for updates Therefore you can only update the Developer Studiowhen you have a DVD with a new release The Developer Studio Update Guide containsthe information how to instruct the developer to look for updates on the Developer StudioUpdate Site rather than on the DVD
In the following installation procedure we only use the term Update Site The installation steps arethe same regardless if you decided to install the Developer Studio from the SAP update site or theupdate site on your AS Java
1440 PUBLIC 05162008
3 Installing SAP NetWeaver Developer Studio
Caution
Do only use your Update Site on the AS Java or the SAP Update Site Using other update sites likethe Eclipse update site can lead to a version mismatch of features and undesired results
PrerequisitesCheck the hardware and software requirements necessary for the installation of SAP NetWeaverDeveloper Studio
Requirement Type Requirement
HardwareNote
SAP NetWeaver Developer Studio can be installedon a 32-bit platform only
n 1 GB free disk spacen 1 CPU with 3 GHz (minimum)n 2 GB RAM (minimum)n Paging file size 2x RAMTo check paging file size
1 Choose Windows Start button and choose ControlPanel reg System
2 Choose tab Advanced and choose Settings in thePerformance pane
3 Choose tab Advanced in the Performance Options dialogwindowThe current page size is displayed in the Virtualmemory pane To change the page size value chooseChange enable the Custom size radio button and enterthe new value in the input field Initial size (MB)
Software Supported Operating SystemsMicrosoft Windows XP Professional SP2 (orhigher)(32-bit)JDK versionSUN JDK 150_11 (or higher)You can download this version from the SUNweb site
The installation process begins with preparation steps that are dependent on the installation methodDVD or update site The following installation steps are independent of the installation method
Preparation ‒ Installing the Developer Studio from a DVD
1 Start SAPinst from the SAP Installation Master DVD by double-clicking sapinstexe from thefollowing path ltDVD drivegtDATA_UNITSIM_WIN_I386_ltdata_basegt
SAPinst GUI starts automatically by displaying theWelcome screen2 In theWelcome screen choose the installation option SAP NetWeaver Developer Studio
05162008 PUBLIC 1540
3 Installing SAP NetWeaver Developer Studio
3 Choose Next and follow the on-screen instructions
Preparation ‒ Installing the Developer Studio from an Update Site
1 Start your Web browser and connect to the update site2 Download NWDS_platformzip
This zip file contains the SAP NetWeaver Developer Studio Platform Installer3 Unzip NWDS_platformzip to a temporary folder on your local disk drive4 Navigate to the temporary folder5 Run the installer IDESetupexe contained in the zip
Installing the Developer Studio from DVD and Update SiteFollow the on-screen instructions of the installation toolDuring the installation dialog you are asked for the update site location Always accept thepreconfigured URL that points to the update site that is correct for the installation location (DVDor update site) you selectedThe Developer Studio is started automatically when the installation dialog is finished During startupyou are asked for the workspace folder for the Developer Studio
Caution
If you already had a Developer Studio installed on this client you need to specify a differentworkspace than the one you used for the previously installed Developer Studio version This is alsotrue if you have uninstalled the previous version already Uninstalling a Developer Studio doesnot remove the content you created in the workspace folder that includes the preferences of theDeveloper Studio and maybe projects you stored locally
The next prompt during start up is to confirm the network connections On the network connectionpreference page you can specify if you connect to the Internet directly or you can configure yourproxy The network connection settings must be configured so that the Developer Studio can connectto the update site There can be misleading error messages if the proxy settings are not correctThe installer installs the kernel of the Developer Studio The kernel contains Eclipse and a few SAPadditions but is not equipped with the SAP features necessary for the Composition EnvironmentTo install the required SAP features you have to install the SAP features with the following updateprocedure
Selecting and Installing Features
1 The available features are displayedThe Updates dialog window displays the main node of the features Open the main node andyou see the available main features
2 Choose the main features you want to install
1640 PUBLIC 05162008
3 Installing SAP NetWeaver Developer Studio
Note
Make sure that the component required for the selected feature is installed on the AS Java
3 Accept the license agreement4 In the screen Optional Features choose Next
Caution
Never deselect an optional feature This can cause a malfunction of the Developer Studio
5 In the Install screen choose FinishThe features are being downloaded
6 Choose Install All to verify the feature installation7 Restart the Developer Studio for the updates to take effect
Recommendation
We recommend that you start the Developer Studio with the shortcuts that were created onyour desktop or in the StartmenuTo get to the SAP documentation in the Developer Studio open the application and choose fromthe menu bar Help Help Contents SAP NetWeaver CE Developer Studio Documentation
The installation of the Developer Studio is now completed
Additional ActivitiesOnce the Developer Studio is installed you can add update and remove installed features at any time
Adding Features to an Installed Developer Studio
You can add features any time
1 Choose Help Software Updates Find and Install 2 Choose Search for new features to install3 Enable the displayed update site
Recommendation
We recommend that you do not change the update site to avoid version inconsistencies
4 Continue with step Selecting and Installing Main Features as described above
Updating Installed Features
1 Choose Help Software Updates Find and Install 2 Choose Search for updates of currently installed features3 Follow the on-screen instructions
05162008 PUBLIC 1740
3 Installing SAP NetWeaver Developer Studio
As of SP03 SAP NetWeaver Developer Studio uses the IDE Update Site to keep itself up-to-date
1 Choose Help Software Updates Find and Install 2 Choose Search for updates of currently installed features3 Follow the on-screen instructions
Note
The configuration wizard task Configuration and Mirroring of local NWDS Update Site has to be run aftereach patch or update of the IDE update site component on AS JavaFormore information about how to run the configuration wizard see Post-Installation Activities [page 27]
More InformationUpdate Guide ‒ SAP NetWeaver Composition Environment 71 ‒ Update to SPltxxgt available athttpwwwsdnsapcomirjsdnnw-ce
Uninstalling Features
1 To uninstall features choose Help Software Updates Manage Configuration 2 In the Product Configuration window choose Show Disabled Features3 Open the node SAP NetWeaver Developer Studio and its subnode
The features are displayed with its status enabled or disabled4 To change the status of feature select the feature and choose Enable or Disable (depending on
the current status)To uninstall a feature it has to be set to status disabled
5 Restart the SAP NetWeaver Developer Studio to apply the status change
Note
To uninstall all old version features (after the update) choose Help Software Updates UninstallDisabled Features
1840 PUBLIC 05162008
4 Installing Additional Components (Optional)
4 Installing Additional Components(Optional)
You can install the following additional components
n Composition Toolsn Adobe Document Services
n Composite Voicen IDE Update Site
PrerequisitesYou need to meet the same hardware and software requirements as for your already installeddevelopment system plus an additional 2 GB RAMThe Composition Tools and Composite Voice component make use of the Visual Composer VisualComposer is a Web browser based tool to model user interfaces To run Visual Composer thefollowing programsmust be installed on the client computer fromwhich you access Visual Composer
n Microsoft Internet Explorer 60 SP1 or highern Adobe SVG Viewer 30
n Microsoft XML Parser 40 or higher
Note
n Before installing additional components you need to stop all application servers manually
n Before installing additional components and in the case that you made changes to the defaulttemplate settings see SAP Note 953763
Prerequisites for SAP MaxDB
n Make sure that the Application Server Java and its corresponding database is runningYou can stop and start the system using the shortcuts under Start All Programs SAP NetWeaverComposition Environment 71 Application Server JxxltSAPSIDgt
n During the installation of additional components entries are written into the log area of thedatabase To avoid that the log is running full during the installation make sure that your backupstrategy is already active and an initial data backup was successfulWhen you want to establish your backup strategy after installing additional components you canturn on the special log mode AutoOverwrite using the Database Manager GUI This interrupts theexisting backup history You have to run a complete backup to start the history again
05162008 PUBLIC 1940
4 Installing Additional Components (Optional)
ProcedureThis procedure tells you how to install an SAP system with SAPinst SAPinst includes a GUI and aGUI server both using Java This section describes an installation where SAPinst SAPinst GUI andthe GUI server are running on the same hostNote the following information about SAPinst
n When you start SAPinst SAPinst GUI and the GUI server also start SAPinst GUI connects to theGUI server with a secure SSL connection and the GUI server connects to SAPinst
n SAPinst creates the installation directory sapinst_instdir where it keeps its log files Theinstallation directory is located directly in the Program Files directory If SAPinst is not able tocreate sapinst_instdir there it tries to create sapinst_instdir in the directory defined by theenvironment variable TEMP
Recommendation
We recommend that you keep all installation directories until the system is completely andcorrectly installed
n SAPinst creates a subdirectory for each installation option calledltsapinst_instdirgtltinstallation_option_directorygt which is located in ProgramFiles
n The SAPinst Self-Extractor extracts the executables to a temporary directory (TEMP TMP TMPDIR orSystemRoot) These executables are deleted after SAPinst has stopped runningDirectories called sapinst_exexxxxxxxxxx sometimes remain in the temporary directory Youcan safely delete them The temporary directory also contains the SAPinst Self-Extractor log filedev_selfexout which might be useful if an error occurs
Caution
If SAPinst cannot find a temporary directory the installation terminates with the error FCO-00058
n If you want to terminate SAPinst and the SAPinst Self-Extractor choose one of the followingoptionsl Right-click the icon for the SAPinst output window located in theWindows tray and choose Exitl Click the icon for the SAPinst output window located in the Windows tray and choose File
Exit
PrerequisitesYou are logged on as a user with administration rights to install the SAPinst tool and the SAP system
Note
When installing from a network share make sure that everyone has read access to this share Theinstallation routine creates users such as ltsidgtadm (for example ce1adm) During the installationSAPinst does a user switch to this user If the newly created user does not have permissions to thenetwork share where the installation is running from the installation will fail
2040 PUBLIC 05162008
4 Installing Additional Components (Optional)
Procedure
1 Insert the SAP Installation Master DVD into your DVD drive or mount it locally2 Start SAPinst from the SAP Installation Master DVD by double-clicking sapinstexe from the
following path ltDVD drivegtDATA_UNITSIM_WIN_ltplatformgt_ltdatabasegtSAPinst GUI starts automatically by displaying theWelcome screen
3 In theWelcome screen choose the required SAPinst installation option from the tree structure
Note
If SAPinst prompts you to log off from your system log off and log on againSAPinst restarts automaticallyChoose Continue Old Installation
4 Choose whether you want to run the installation in Typicalmode or in CustommodeIf you select Typical the installation wizard provides automatic default settings and you only haveto respond to a small selection of prompts The rest is set by default If you select Custom you haveto respond to all prompts
Note
If you want to install the offline documentation for SAP NetWeaver CE you need to chooseCustommodeAfter the installation you can access the offline documentation by choosing Start All ProgramsSAP NetWeaver Composition Environment ltSAPSIDgt
5 Follow the screens and enter the required parameters
Note
For more information about the input parameters and information about restrictions forpasswords position the cursor on the required parameter and press F1
After you have entered all requested input parameters SAPinst displays the Parameter Summaryscreen This screen shows both the parameters that you entered and those that SAPinst set bydefault If required you can revise the parameters before starting the installation
6 To start the installation choose Start SAPinst starts the installation and displays the progress ofthe installation When the installation has successfully been completed SAPinst shows the dialogExecution of ltService_Namegt has been completed successfully
Note
After installing additional components you need to perform some post-installation activities [page 27] toget the system up amp running
05162008 PUBLIC 2140
This page is intentionally left blank
5 Installing SAP Memory Analyzer (Optional)
5 Installing SAP Memory Analyzer(Optional)
SAP Memory Analyzer helps you to analyze Java heap dumps easily find big chunks of memory orcomplex memory aggregation patterns in your data structures and identify who is keeping thismemory alive New and innovative analysis techniques support the user with a fast and powerfulfeature setThe tool (Eclipse RCP application) was developed to analyze real productive heap dumps whichtend to get enormous in size with hundreds of millions of objects Performance low resourceconsumption and especially the newly developed innovative analysis techniques make it a helpfultool even to small application heap dumpsYou can install SAP Memory Analyzer as an additional tool
This procedure tells you how to install an SAP system with SAPinst SAPinst includes a GUI and aGUI server both using Java This section describes an installation where SAPinst SAPinst GUI andthe GUI server are running on the same hostNote the following information about SAPinst
n When you start SAPinst SAPinst GUI and the GUI server also start SAPinst GUI connects to theGUI server with a secure SSL connection and the GUI server connects to SAPinst
n SAPinst creates the installation directory sapinst_instdir where it keeps its log files Theinstallation directory is located directly in the Program Files directory If SAPinst is not able tocreate sapinst_instdir there it tries to create sapinst_instdir in the directory defined by theenvironment variable TEMP
Recommendation
We recommend that you keep all installation directories until the system is completely andcorrectly installed
n SAPinst creates a subdirectory for each installation service calledltsapinst_instdirgtltinstallation_service_directorygt which is located in ProgramFiles
n The SAPinst Self-Extractor extracts the executables to a temporary directory (TEMP TMP TMPDIR orSystemRoot) These executables are deleted after SAPinst has stopped runningDirectories called sapinst_exexxxxxxxxxx sometimes remain in the temporary directory Youcan safely delete them The temporary directory also contains the SAPinst Self-Extractor log filedev_selfexout which might be useful if an error occurs
05162008 PUBLIC 2340
5 Installing SAP Memory Analyzer (Optional)
Caution
If SAPinst cannot find a temporary directory the installation terminates with the error FCO-00058
n If you want to terminate SAPinst and the SAPinst Self-Extractor choose one of the followingoptionsl Right-click the icon for the SAPinst output window located in theWindows tray and choose Exitl Click the icon for the SAPinst output window located in the Windows tray and choose File
Exit
PrerequisitesYou are logged on as a user with administration rights to install the SAPinst tool and the SAP system
Note
When installing from a network share make sure that everyone has read access to this share Theinstallation routine creates users such as ltsidgtadm (for example ce1adm) During the installationSAPinst performs a user switch to this user If the newly created user does not have permissions tothe network share where the installation is running from the installation will fail
Procedure
1 Insert the SAP Installation Master DVD into your DVD drive or mount it locally2 Start SAPinst from the SAP Installation Master DVD by double-clicking sapinstexe from the
following path ltDVD drivegtDATA_UNITSIM_WIN_ltplatformgt_ltdatabasegtSAPinst GUI starts automatically by displaying theWelcome screen
3 In theWelcome screen choose the required SAPinst installation option from the tree structure
Note
If SAPinst prompts you to log off from your system log off and log on againSAPinst restarts automaticallyChoose Continue Old Installation
4 Choose whether you want to run the installation in Typicalmode or in CustommodeIf you select Typical the installation wizard provides automatic default settings and you only haveto respond to a small selection of prompts The rest is set by default If you select Custom you haveto respond to all prompts
Note
If you want to install the offline documentation for SAP NetWeaver CE you need to chooseCustommodeAfter the installation you can access the offline documentation by choosing Start All ProgramsSAP NetWeaver Composition Environment ltSAPSIDgt
2440 PUBLIC 05162008
5 Installing SAP Memory Analyzer (Optional)
5 Follow the screens and enter the required parameters
Note
For more information about the input parameters and information about restrictions forpasswords position the cursor on the required parameter and press F1
After you have entered all requested input parameters SAPinst displays the Parameter Summaryscreen This screen shows both the parameters that you entered and those that SAPinst set bydefault If required you can revise the parameters before starting the installation
6 To start the installation choose Start SAPinst starts the installation and displays the progress ofthe installation When the installation has successfully been completed SAPinst shows the dialogExecution of ltOption_Namegt has been completed successfully
05162008 PUBLIC 2540
This page is intentionally left blank
6 Post-Installation Activities
6 Post-Installation Activities
This section describes the steps that you have to perform after the installation has finished successfully
Running the Configuration Wizard (Optional)
Note
You can run the configuration wizard only once and only directly after installing and patchingyour SAP system
For SAP NetWeaver CE you need to run the following configuration tasks
n Configuration of Services Registry Webservice Destinations
n When you have installed the IDE Update Site componentConfiguration and Mirroring of local NWDSUpdate Site
n When you have installed the Adobe Document Services component Initial setup ADS in CE
When you have an NWDI installation on another SAP NetWeaver 70 system you can perform thefollowing configuration tasks
n Change Management Service (CMS) Create an Application Skeleton
n Change Management Service (CMS) Modify a Software Component
To run the configuration wizard proceed as follows
1 After SAPinst has finished open the SAP NetWeaver Administrator by entering the following URLin a browser httplthostgtlthttp_portgtnwa
2 Log on as user j2ee_admin3 In the SAP NetWeaver Administrator choose Configuration Management Scenarios Configuration
Wizard 4 Select the appropriate configuration task in the list and choose Start5 Follow the on-screen instructions6 After the configuration wizard has finished successfully restart your SAP system
Configuring the IDE Update Site
1 In the Configuration Wizard select the task Configuration and Mirroring of local NWDS Update Site in thelist and choose Start
2 Follow the on-screen instructions
05162008 PUBLIC 2740
6 Post-Installation Activities
Provide the credentials for the source update site location The default URL is the central SAPupdate site You can also use your installation DVD as source update site which makes themirror process much faster To use the DVD as source update site you have to specify the URLfileltdvd_drivegtIDE
3 After the configuration wizard has finished successfully restart your SAP systemThe data of the source update site location is now mirrored to your server
Enabling Adobe Document ServicesIf you have installed SAP NetWeaver Composition Environment with the Adobe DocumentServices add-on in the developer edition on aWindows platform you must complete the followingpost-installation steps to enable the add-on In case you have installed an AS Java cluster applythe procedure to the central host as well as to all other hosts where additional application serverinstances are running
1 Using the SAP Management Console stop the AS Java systemFormore information about starting and stopping SAP systems see httphelpsapcomnwce
Administratorrsquos Guide Administration of SAP NetWeaver CE General System Administration AS Java(Application Server Java)
2 From the Startmenu open Control Panel Administrative Tools Computer Management Services andApplications Services
3 Select SAPltSIDgt_ltInstance_Numbergt (for example SAPCE1_00) and open Properties from thecontext menu
4 On the Log On tab page enable the Local System account indicator5 Repeat the above steps for the second SAPltSIDgt_ltInstance_Numbergt service that you see in the list6 Start the AS Java system
Adobe LiveCycle Designer
For more information about how to install and configure the Adobe LiveCycle Designer see SAPNote 962763
Enabling Services RegistryYou must apply additional configuration steps to enable Services Registry after you have installed anSAP NetWeaver Composition Environment system containing the following components
n Java Application Server and Composition Platformn Java Application Server and Adobe Document Services
To enable Services Registry you must apply the following configuration templates to your systemCE_Complete_Stack_development_full
2840 PUBLIC 05162008
6 Post-Installation Activities
Note
For more information about what configuration templates are available see Configuration Templates[page 33]For more information about applying configuration templates see httphelpsapcomnwce
SAP NetWeaver Composition Environment Library Administratorrsquos Guide Configuration of SAP NetWeaver CEInitial System Configuration AS Java Configuration Activating a Configuration Template
See also
httphelpsapcomnwce SAP NetWeaver Composition Environment Library Developerrsquos GuideDeveloping and Composing Applications Consuming Enterprise Services Searching for Services Services RegistryTasks Searching amp Browsing Service Definitions Configuring the Services Registry
Configuring the Portal in SAP NetWeaver CEAfter installing the portal in SAP NetWeaver CE a number of deactivated or irrelevant tools aredisplayed in the UI To display the correct portals tools for CE proceed as follows
1 Open a browser and log on to your portal as an administrator2 In the same browser session enter the following URL
httplthostgtlthttpportgtirjservletprtportalprtrootcomsapportal
contentlayersContentLayersTool
where lthostgt is the host name of your server and lthttpportgt is the port number of your server3 In the Portal Mode Configuration Tool choose Activate Development Mode to restore the portal tools
and content that are assigned to the development mode4 Restart or refresh your browser5 In the SAP Management Console restart the server
You may then continue with the mandatory and optional configuration steps as described inhttphelpsapcomnwce SAP NetWeaver Composition Environment Library Administratorrsquos Guide
Configuration of SAP NetWeaver Composition Environment Configuration for CE Additional Components Configuringthe Portal
Changing the Password for the Internet Communication Manager (ICM)You can monitor and manage the Internet Communication Manager (ICM) from the command lineprogramAfter the installation of your SAP NetWeaver CE system has successfully finished you need to changethe ICM password manually To do so proceed as follows
1 Log on at operating system level to the computer where the ICM is running2 Start the program icmon with icmon ndasha profile=ltinstance_profilegt to maintain the
authentication file (default authfiletxt)3 Choose a to add a user4 Choose c to change the password of the existing user
05162008 PUBLIC 2940
6 Post-Installation Activities
5 Choose s to save your settings
Further Configuration StepsAfter installing your SAP NetWeaver CE system and performing the post-installation steps to get thesystem up amp running you may need to perform further configuration stepsRefer to the following documentation to proceed with your tasks
n If you are a system administrator refer to httphelpsapcomnwce Administratorrsquos Guide It contains information about how to configure and administer your system
n If you are a developer refer to httphelpsapcomnwce Developerrsquos Guide It providesguidelines for developing applications using the SAP NetWeaver CE
Note
The SAP NetWeaver CE documentation is also available offline as a part of your installation To accessit choose Start All Programs SAP NetWeaver Composition Environment 10 Documentation
3040 PUBLIC 05162008
7 Additional Information
7 Additional Information
The following section provides additional information about the installation of SAP NetWeaverComposition Environment
71 Transporting Self-Developed Software ComponentArchives (SCA) into the System
PrerequisitesYou have developed your own Software Component Archives (SCA) and want to transport theminto your SAP NetWeaver CE system
ProcedureTo transport your SCAs to the SAP NetWeaver CE system proceed as follows
1 Download the update file from httpservicesapcomswdc Download Support Packages andPatches Entry by Application Group SAP NetWeaver SAP NETWEAVER SAP NETWEAVER CE71 Support Package Stacks
2 From an empty directory run the update tool updateltIDgtexe
Note
If the tool displays descriptions such as Applying Support Packages you can ignore them
3 In the dialog screens specify the directory where your SCAs are located4 Follow the on-screen instructions
Only valid for MaxDB
72 Troubleshooting ‒ Repairing an Inconsistent SAP MaxDBInstallation
PrerequisitesDuring the preinstallation phase the installation tool checks the Microsoft Windows registry foralready installed SAP MaxDB softwareIf the registry key is found but there is no software on the hard drive you receive the followingmessage
05162008 PUBLIC 3140
7 Additional Information73 Restarting the SAP MaxDB Server Manually
The existing MaxDB software is not consistent Check the file system and registry
The most common reason for this inconsistency is the manual deletion of the software from the filesystem without using the specified tools
ProcedureTo repair this inconsistency proceed as follows
1 Choose Start Control Panel Administrative Tools Services 2 Make sure the services SAPDBWWW SAPDB and XServer are stopped3 Choose Start Run and run the command regedit4 Go to My ComputerHKEY_LOCAL_MACHINESOFTWARESAPSAP DBTech Key IndepPrograms
The key contains a path to a foldera) Check if this folder exists on the file systemb) Note down the value of Key IndepPrograms for later usage (see step 7)
If the path does not exist in the file system delete the key SAP DBTech5 Delete the following keys
n My ComputerHKEY_LOCAL_MACHINESYSTEMCurrentControlSetServicesSAP DBTech-
n My ComputerHKEY_LOCAL_MACHINESYSTEMCurrentControlSetServicesSAPDBWWW
n My ComputerHKEY_LOCAL_MACHINESYSTEMCurrentControlSetServicesXServer
6 Choose Start Control Panel System Advanced Environment Variables System Variables Path 7 Delete the following paths from the variable
n ltIndepProgramsgtbin
n ltIndepProgramsgtpgm
8 Reboot your computer
End of MaxDB
Only valid for MaxDB
73 Restarting the SAP MaxDB Server Manually
If after a reboot the database server is not running automatically you need to restart the SAP MaxDBserver manually
Production SystemsTo restart the SAP MaxDB server manually proceed as follows
1 Open a command prompt and enter the following command net start sapdbwww
ORChoose Start All Programs Administrative Tools Services Double-click on SAP DB WWW andchoose Start
2 Open the SAP Management Console and choose SAP Systems ltSAPSIDgt ltmachine namegt
3240 PUBLIC 05162008
7 Additional Information74 Restarting the MS SQL Server Manually
3 Enter the master password and choose Logon4 Choose Online When the database server is online you can restart the engine
Development SystemsTo restart the SAP MaxDB server manually choose Start All Programs SAP NetWeaver CompositionEnvironment CE Application Server ltSAPSIDgt Start Application Server End of MaxDB
Only valid for MS SQL Server
74 Restarting the MS SQL Server Manually
If after a reboot the database server is not running automatically you need to restart the MS SQLServer manually
Procedure
1 Choose Start All Programs Administrative Tools Services 2 Look for the service named SQL Server ltnamegt where ltnamegt is MSSQLSERVER for the default
instance or ltinstance namegt for a named instance3 If the service status is not started right-click the service and choose Start in the context menu4 To insure the service is started automatically after each system restart right-click it and choose
Properties Select Automatic as the startup type
End of MS SQL Server
75 Configuration Templates
Configuration templates contain the predefined instance configuration for specific scenarios Theyare automatically applied according to the installation option you have selected The templatesare designed to optimize system performance by applying certain configuration to the Java VirtualMachine and the application server as well as by applying startup filters to AS Java services andapplications to start only those relevant for the selected installation optionsThe following table provides information about the available templates with SAP NetWeaverComposition Environment In the template name replace the ltsystem_modegt parameter bydevelopment (for the templates relevant to systems installed in developmentmode) or production (forthe templates relevant to systems installed in productivemode)
05162008 PUBLIC 3340
7 Additional Information76 Uninstalling SAP NetWeaver Composition Environment
Configuration Template Selected Installation Options
CE_Java_EE_ltsystem_modegt_full Java Application Server Installation
CE_Composition_Environment_ltsystem_modegt_full Java Application Server Installation + CompositionPlatform Installation
CE_Adobe_Document_Service_ltsystem_modegt_full Java Application Server Installation + AdobeDocument Services Add-on Installation
CE_Composite_Voice_ltsystem_modegt_full Java Application Server Installation + Voice Add-onInstallation
CE_Complete_Stack_ltsystem_modegt_full Java Application Server Installation + CompositionPlatform Installation + Adobe Document ServicesAdd-on Installation + Voice Add-on Installation
If your selection cannot be mapped to one of the combinations in the above table the templateCE_Complete_Stack_ltsystem_modegt_full is applied It starts all applications and services neededto run the complete stackYou canmanually apply a different configuration template if youwant to switch to another installationoption For example by changing from template CE_Complete_Stack_ltsystem_modegt_full toCE_Java_EE_ltsystem_modegt_full you achieve shorter startup times and less memory consumptionbut also less functionality since not all applications and services are runningFor more information about applying configuration templates see httphelpsapcomnwce
Administratorrsquos Guide Configuration of SAP NetWeaver CE Initial System Configuration AS Java ConfigurationActivating a Configuration Template
Note
Make sure that you do not apply a development template to a productive system or vice versa
76 Uninstalling SAP NetWeaver Composition Environment
You have to uninstall all components of the SAP NetWeaver Composition Environment separatelythat is SAP NetWeaver CE and SAP NetWeaver Developer StudioYou can uninstall your SAP NetWeaver CE system in different ways
Uninstalling SAP NetWeaver CEWindows Choose Start Control Panel Add Remove programs SAP SystemltSAPSIDgt
Uninstalling SAP NetWeaver CE Using SAPinst
1 Insert the SAP Installation Master DVD into your DVD drive or mount it locally
3440 PUBLIC 05162008
7 Additional Information76 Uninstalling SAP NetWeaver Composition Environment
2 Start SAPinst from the SAP Installation Master DVD as described in the section Installing SAPNetWeaver Composition Environment
3 In theWelcome screen choose Uninstall SAP System or Single Instances from the tree structure4 Follow the on-screen instructions
Uninstalling SAP NetWeaver Developer Studio
Prerequisites
Before uninstalling SAP NetWeaver Developer Studio consider the following
n All additionally installed features and plug-ins that were installed to the same folder as DeveloperStudio for example by using the Eclipse Update Manager will also be removed
n There may be other directories and files in the installation directory notablyltinstall_dirgteclipseworkspace ltinstall_dirgteclipselinks andltinstall_dirgteclipseconfiguration that contain important data The files and folder aswell as the existing workspaces are retained when the product is uninstalled
Procedure
To uninstall SAP NetWeaver Developer Studio proceed as described above You can use either oneof the options
Uninstalling the SAP Management ConsoleSince all SAP systems use the SAP Management Console there is no uninstallation option for theSAP Management Console with SAPinst If you are sure that you do not need the SAP ManagementConsole any more you can remove it using Start Control Panel Add Remove programs
05162008 PUBLIC 3540
Typographic Conventions
Example Description
lt gt Angle brackets indicate that you replace these words or characters with appropriateentries to make entries in the system for example ldquoEnter your ltUser Namegtrdquo
Arrows separating the parts of a navigation path for example menu options
Example Emphasized words or expressions
Example Words or characters that you enter in the system exactly as they appear in thedocumentation
Example Textual cross-references to an internet address for example httpwwwsapcom
example Quicklinks added to the internet address of a homepage to enable quick access tospecific content on the Web
123456 Hyperlink to an SAP Note for example SAP Note 123456
Example n Words or characters quoted from the screen These include field labels screen titlespushbutton labels menu names and menu options
n Cross-references to other documentation or published works
Example n Output on the screen following a user action for example messagesn Source code or syntax quoted directly from a programn File and directory names and their paths names of variables and parameters and
names of installation upgrade and database tools
EXAMPLE Technical names of system objects These include report names program namestransaction codes database table names and key concepts of a programming languagewhen they are surrounded by body text for example SELECT and INCLUDE
EXAMPLE Keys on the keyboard
3640 PUBLIC 05162008
SAP AGDietmar-Hopp-Allee 16
69190 WalldorfGermany
T +4918 0534 34 34F +4918 0534 34 20
wwwsapcom
copy Copyright 2008 SAP AG All rights reserved
No part of this publication may be reproduced or transmitted in any form or for any purpose without the express permissionof SAP AG The information contained herein may be changed without prior noticeSome software products marketed by SAP AG and its distributors contain proprietary software components of othersoftware vendors
No part of this publication may be reproduced or transmitted in any form or for any purpose without the express permissionof SAP AG The information contained herein may be changed without prior noticeSome software products marketed by SAP AG and its distributors contain proprietary software components of othersoftware vendorsMicrosoft Windows Excel Outlook and PowerPoint are registered trademarks of Microsoft CorporationIBM DB2 DB2 Universal Database OS2 Parallel Sysplex MVSESA AIX S390 AS400 OS390 OS400 iSeries pSeriesxSeries zSeries System i System i5 System p System p5 System x System z System z9 zOS AFP Intelligent MinerWebSphere Netfinity Tivoli Informix i5OS POWER POWER5 POWER5+ OpenPower and PowerPC are trademarks orregistered trademarks of IBM CorporationAdobe the Adobe logo Acrobat PostScript and Reader are either trademarks or registered trademarks of Adobe SystemsIncorporated in the United States andor other countriesOracle is a registered trademark of Oracle CorporationUNIX XOpen OSF1 and Motif are registered trademarks of the Open GroupCitrix ICA Program Neighborhood MetaFrame WinFrame VideoFrame and MultiWin are trademarks or registeredtrademarks of Citrix Systems IncHTML XML XHTML and W3C are trademarks or registered trademarks of W3Creg World Wide Web ConsortiumMassachusetts Institute of TechnologyJava is a registered trademark of Sun Microsystems IncJavaScript is a registered trademark of Sun Microsystems Inc used under license for technology invented and implementedby NetscapeSAP R3 xApps xApp SAP NetWeaver Duet PartnerEdge ByDesign SAP Business ByDesign and other SAP productsand services mentioned herein as well as their respective logos are trademarks or registered trademarks of SAP AG inGermany and in several other countries all over the world All other product and service names mentioned are thetrademarks of their respective companies Data contained in this document serves informational purposes only Nationalproduct specifications may varyThese materials are subject to change without notice These materials are provided by SAP AG and its affiliated companies(SAP Group) for informational purposes only without representation or warranty of any kind and SAP Group shall notbe liable for errors or omissions with respect to the materials The only warranties for SAP Group products and services arethose that are set forth in the express warranty statements accompanying such products and services if any Nothing hereinshould be construed as constituting an additional warranty
This document was created using stylesheet 2006-12-31 (V51beta [= 60 for E3]) and XSLT processor SAXON 652 fromMichael Kay (httpsaxonsfnet) XSLT version 1
05162008 PUBLIC 3740
DisclaimerSome components of this product are based on Javatrade Any code change in these components may cause unpredictable andsevere malfunctions and is therefore expressly prohibited as is any decompilation of these componentsAny Javatrade Source Code delivered with this product is only to be used by SAPrsquos Support Services and may not be modified oraltered in any way
Documentation in the SAP Service MarketplaceYou can find this document at the following address httpsservicesapcominstguides
3840 PUBLIC 05162008
This page is intentionally left blank
SAP AGDietmar-Hopp-Allee 1669190 WalldorfGermanyT +4918 0534 34 34F +4918 0534 34 20wwwsapcom
copy Copyright 2008 SAP AG All rights reservedNo part of this publication may be reproduced or transmitted in any form or for any purpose without the express permission of SAP AG The information contained herein may bechanged without prior notice

2 Installing SAP NetWeaver CE Developer Edition
n SQL Server logins are enabled1 Start the SQL Server Management Studio2 Connect to your server3 Right-click the server and in the context menu choose Properties4 Switch to the security page
Under Server Authentication make sure that the entry SQL Server and Windows Authentication modeis selected
Note
If onlyWindows Authentication mode is selected change it to SQL Server and Windows Authentication modeand restart the server for the changes to take effect
n TCP protocol is enabled and your server is able to communicate on the TCP port1 Start the SQL Server Configuration Manager under Start All Programs MS SQL Server 2005
Configuration Tools 2 Go to SQL Server 2005 Network Configuration in the left pane and select your instance3 In the right pane make sure that Protocol TCPIP is set to enabled
If this is not the case refer to theMS SQL Server Books Online to configure the TCPIP connectionproperly
Installing a Development SystemThis procedure tells you how to install an SAP system with SAPinst SAPinst includes a SAPinst GUIand a GUI server which both use Java This section describes an installation where SAPinst SAPinstGUI and the GUI server are running on the same hostNote the following information about SAPinst
n When you start SAPinst SAPinst GUI and the GUI server also start SAPinst GUI connects to theGUI server with a secure SSL connection and the GUI server connects to SAPinst
n SAPinst normally creates the installation directory sapinst_instdir where it keeps its logfiles and which is located directly in the Program Files directory If SAPinst is not able to createsapinst_instdir there it tries to create sapinst_instdir in the directory defined by theenvironment variable TEMP
Recommendation
We recommend that you keep all installation directories until the system is completely andcorrectly installed
n SAPinst creates a subdirectory for each installation option calledltsapinst_instdirgtltinstallation_option_directorygt which is located in ProgramFiles
n The SAPinst Self-Extractor extracts the executables to a temporary directory (TEMP TMP TMPDIR orSystemRoot) These executables are deleted after SAPinst has stopped running
05162008 PUBLIC 940
2 Installing SAP NetWeaver CE Developer Edition
Directories called sapinst_exexxxxxxxxxx sometimes remain in the temporary directory Youcan safely delete them The temporary directory also contains the SAPinst Self-Extractor log filedev_selfexout which might be useful if an error occurs
Caution
If SAPinst cannot find a temporary directory the installation terminates with the error FCO-00058
n If you want to terminate SAPinst and the SAPinst Self-Extractor choose one of the followingoptionsl Right-click the icon for the SAPinst output window located in theWindows tray and choose Exitl Click the icon for the SAPinst output window located in the Windows tray and choose File
Exit
PrerequisitesYou are logged on as a user with administration rights to install the SAPinst tool and the SAP system
Note
When installing from a network share make sure that everyone has read access to this share Theinstallation routine creates users such as ltsidgtadm (for example ce1adm) During the installationSAPinst does a user switch to this user If the newly created user does not have permissions to thenetwork share where the installation is running from the installation will fail
Procedure
1 Insert the SAP Installation Master DVD into your DVD drive or mount it locally2 Start SAPinst from the SAP Installation Master DVD by double-clicking sapinstexe from the
following path ltDVD drivegtDATA_UNITSIM_WIN_ltplatformgt_ltdatabasegt3 In theWelcome screen choose the required SAPinst installation option from the tree structure
Note
If SAPinst prompts you to log off from your system log off and log on againSAPinst restarts automaticallyChoose Continue Old Installation
4 Choose whether you want to run the installation in Typicalmode or in CustommodeIf you select Typical the installation wizard provides automatic default settings and you only haveto respond to a small selection of prompts The rest is set by default If you select Custom you haveto respond to all prompts
Note
If you want to install the offline documentation for SAP NetWeaver CE you need to chooseCustommode
1040 PUBLIC 05162008
2 Installing SAP NetWeaver CE Developer Edition
5 Follow the screens and enter the required parameters
Note
For more information about the input parameters and information about restrictions forpasswords position the cursor on the required parameter and press F1
After you have entered all requested input parameters SAPinst displays the Parameter Summaryscreen This screen shows both the parameters that you entered and those that SAPinst set bydefault If required you can revise the parameters before starting the installation
6 To start the installation choose Start SAPinst starts the installation and displays the progress ofthe installation When the installation has successfully been completed SAPinst shows the dialogExecution of ltOption_Namegt has been completed successfully
Note
You can install the update site (for SAP Developer Studio) on a development system only (singleinstance system)
05162008 PUBLIC 1140
This page is intentionally left blank
3 Installing SAP NetWeaver Developer Studio
3 Installing SAP NetWeaver DeveloperStudio
SAP NetWeaver Developer Studio is based on the open development platform Eclipse It includesthe standard Eclipse features and SAP features The SAP NetWeaver development documentationassumes that you are familiar with Eclipse and how to develop Java applications with itFor more information see httphelpsapcomnwce SAP NetWeaver Library SAP NetWeaverDevelopersrsquo Guide SAP FeaturesSAP NetWeaver Developer Studio provides several features for composing and developing businessapplications You can select the features according to the components you have installed on your ASJava of the Composition Environment The Developer Studio has the following features
n SAP NetWeaver Developer Studio Java EEProvides the toolset for Java EE-compliant developmentAS Java component required Java Application Server
n SAP NetWeaver Developer Studio Development Infrastructure ClientProvides the toolset necessary to work the SAP component model It provides functionality towork locally or in a teamDepending on feature SAP NetWeaver Developer Studio Java EEAS Java component required Java Application Server Optionally SAP NetWeaverDevelopment Infrastructure (NWDI) as part of an SAP NetWeaver 70 system
n SAP NetWeaver Developer Studio Web Dynpro User InterfacesProvides the toolset to develop user interfaces with Web Dynpro for JavaDepending on features SAP NetWeaver Developer Studio Java EE SAP NetWeaver DeveloperStudio Development Infrastructure ClientAS Java component required Java Application Server Optionally Adobe Document Services
n SAP NetWeaver Developer Studio Composition ToolsProvides the toolset to develop composite applicationsDepending on features SAP NetWeaver Developer Studio Java EE SAP NetWeaver DeveloperStudioWebDynpro User Interfaces SAPNetWeaver Developer Studio Development InfrastructureClientAS Java component required Composition Platform Optionally Adobe Document Services
05162008 PUBLIC 1340
3 Installing SAP NetWeaver Developer Studio
Installation Recommendations
Depending on your system landscape we recommend that you install the SAP NetWeaver DeveloperStudio as follows
n Central AS Java with update siteWhen you have a central AS Java we recommend that this server provides an update site Thismakes sure that the SAP NetWeaver Developer Studio you install has the version that matchesthe application serverYou can check the availability of a local update site by going to the following URL in your Webbrowserhttplthostgtlthttpportgtupdatesite
Example
httpdev_server_0150000updatesite
Note
Make sure that the update site is properly installed and that the post-installation activities forthe update site have already been performedMore informationPost-Installation Activities [page 27] section Configuring the IDE Update Site
n Developer WorkplaceIf you want to install the AS Java and the Developer Studio on a single workstation you can usethe following sourcesl SAP NetWeaver Developer Studio Update Site (recommended)
SAP provides a central update site The update site can be found athttpsnwdssapcomswdcdownloadsupdatesnetweavernwdsceTo access the update site you need an SAP Service Marketplace user and password (S user)
l DVDUse the DVD you installed the AS Java from to make sure the Developer Studio and the AS Javahave the same version Once the Developer Studio is installed from a DVD the update manageris always looking on the DVD for updates Therefore you can only update the Developer Studiowhen you have a DVD with a new release The Developer Studio Update Guide containsthe information how to instruct the developer to look for updates on the Developer StudioUpdate Site rather than on the DVD
In the following installation procedure we only use the term Update Site The installation steps arethe same regardless if you decided to install the Developer Studio from the SAP update site or theupdate site on your AS Java
1440 PUBLIC 05162008
3 Installing SAP NetWeaver Developer Studio
Caution
Do only use your Update Site on the AS Java or the SAP Update Site Using other update sites likethe Eclipse update site can lead to a version mismatch of features and undesired results
PrerequisitesCheck the hardware and software requirements necessary for the installation of SAP NetWeaverDeveloper Studio
Requirement Type Requirement
HardwareNote
SAP NetWeaver Developer Studio can be installedon a 32-bit platform only
n 1 GB free disk spacen 1 CPU with 3 GHz (minimum)n 2 GB RAM (minimum)n Paging file size 2x RAMTo check paging file size
1 Choose Windows Start button and choose ControlPanel reg System
2 Choose tab Advanced and choose Settings in thePerformance pane
3 Choose tab Advanced in the Performance Options dialogwindowThe current page size is displayed in the Virtualmemory pane To change the page size value chooseChange enable the Custom size radio button and enterthe new value in the input field Initial size (MB)
Software Supported Operating SystemsMicrosoft Windows XP Professional SP2 (orhigher)(32-bit)JDK versionSUN JDK 150_11 (or higher)You can download this version from the SUNweb site
The installation process begins with preparation steps that are dependent on the installation methodDVD or update site The following installation steps are independent of the installation method
Preparation ‒ Installing the Developer Studio from a DVD
1 Start SAPinst from the SAP Installation Master DVD by double-clicking sapinstexe from thefollowing path ltDVD drivegtDATA_UNITSIM_WIN_I386_ltdata_basegt
SAPinst GUI starts automatically by displaying theWelcome screen2 In theWelcome screen choose the installation option SAP NetWeaver Developer Studio
05162008 PUBLIC 1540
3 Installing SAP NetWeaver Developer Studio
3 Choose Next and follow the on-screen instructions
Preparation ‒ Installing the Developer Studio from an Update Site
1 Start your Web browser and connect to the update site2 Download NWDS_platformzip
This zip file contains the SAP NetWeaver Developer Studio Platform Installer3 Unzip NWDS_platformzip to a temporary folder on your local disk drive4 Navigate to the temporary folder5 Run the installer IDESetupexe contained in the zip
Installing the Developer Studio from DVD and Update SiteFollow the on-screen instructions of the installation toolDuring the installation dialog you are asked for the update site location Always accept thepreconfigured URL that points to the update site that is correct for the installation location (DVDor update site) you selectedThe Developer Studio is started automatically when the installation dialog is finished During startupyou are asked for the workspace folder for the Developer Studio
Caution
If you already had a Developer Studio installed on this client you need to specify a differentworkspace than the one you used for the previously installed Developer Studio version This is alsotrue if you have uninstalled the previous version already Uninstalling a Developer Studio doesnot remove the content you created in the workspace folder that includes the preferences of theDeveloper Studio and maybe projects you stored locally
The next prompt during start up is to confirm the network connections On the network connectionpreference page you can specify if you connect to the Internet directly or you can configure yourproxy The network connection settings must be configured so that the Developer Studio can connectto the update site There can be misleading error messages if the proxy settings are not correctThe installer installs the kernel of the Developer Studio The kernel contains Eclipse and a few SAPadditions but is not equipped with the SAP features necessary for the Composition EnvironmentTo install the required SAP features you have to install the SAP features with the following updateprocedure
Selecting and Installing Features
1 The available features are displayedThe Updates dialog window displays the main node of the features Open the main node andyou see the available main features
2 Choose the main features you want to install
1640 PUBLIC 05162008
3 Installing SAP NetWeaver Developer Studio
Note
Make sure that the component required for the selected feature is installed on the AS Java
3 Accept the license agreement4 In the screen Optional Features choose Next
Caution
Never deselect an optional feature This can cause a malfunction of the Developer Studio
5 In the Install screen choose FinishThe features are being downloaded
6 Choose Install All to verify the feature installation7 Restart the Developer Studio for the updates to take effect
Recommendation
We recommend that you start the Developer Studio with the shortcuts that were created onyour desktop or in the StartmenuTo get to the SAP documentation in the Developer Studio open the application and choose fromthe menu bar Help Help Contents SAP NetWeaver CE Developer Studio Documentation
The installation of the Developer Studio is now completed
Additional ActivitiesOnce the Developer Studio is installed you can add update and remove installed features at any time
Adding Features to an Installed Developer Studio
You can add features any time
1 Choose Help Software Updates Find and Install 2 Choose Search for new features to install3 Enable the displayed update site
Recommendation
We recommend that you do not change the update site to avoid version inconsistencies
4 Continue with step Selecting and Installing Main Features as described above
Updating Installed Features
1 Choose Help Software Updates Find and Install 2 Choose Search for updates of currently installed features3 Follow the on-screen instructions
05162008 PUBLIC 1740
3 Installing SAP NetWeaver Developer Studio
As of SP03 SAP NetWeaver Developer Studio uses the IDE Update Site to keep itself up-to-date
1 Choose Help Software Updates Find and Install 2 Choose Search for updates of currently installed features3 Follow the on-screen instructions
Note
The configuration wizard task Configuration and Mirroring of local NWDS Update Site has to be run aftereach patch or update of the IDE update site component on AS JavaFormore information about how to run the configuration wizard see Post-Installation Activities [page 27]
More InformationUpdate Guide ‒ SAP NetWeaver Composition Environment 71 ‒ Update to SPltxxgt available athttpwwwsdnsapcomirjsdnnw-ce
Uninstalling Features
1 To uninstall features choose Help Software Updates Manage Configuration 2 In the Product Configuration window choose Show Disabled Features3 Open the node SAP NetWeaver Developer Studio and its subnode
The features are displayed with its status enabled or disabled4 To change the status of feature select the feature and choose Enable or Disable (depending on
the current status)To uninstall a feature it has to be set to status disabled
5 Restart the SAP NetWeaver Developer Studio to apply the status change
Note
To uninstall all old version features (after the update) choose Help Software Updates UninstallDisabled Features
1840 PUBLIC 05162008
4 Installing Additional Components (Optional)
4 Installing Additional Components(Optional)
You can install the following additional components
n Composition Toolsn Adobe Document Services
n Composite Voicen IDE Update Site
PrerequisitesYou need to meet the same hardware and software requirements as for your already installeddevelopment system plus an additional 2 GB RAMThe Composition Tools and Composite Voice component make use of the Visual Composer VisualComposer is a Web browser based tool to model user interfaces To run Visual Composer thefollowing programsmust be installed on the client computer fromwhich you access Visual Composer
n Microsoft Internet Explorer 60 SP1 or highern Adobe SVG Viewer 30
n Microsoft XML Parser 40 or higher
Note
n Before installing additional components you need to stop all application servers manually
n Before installing additional components and in the case that you made changes to the defaulttemplate settings see SAP Note 953763
Prerequisites for SAP MaxDB
n Make sure that the Application Server Java and its corresponding database is runningYou can stop and start the system using the shortcuts under Start All Programs SAP NetWeaverComposition Environment 71 Application Server JxxltSAPSIDgt
n During the installation of additional components entries are written into the log area of thedatabase To avoid that the log is running full during the installation make sure that your backupstrategy is already active and an initial data backup was successfulWhen you want to establish your backup strategy after installing additional components you canturn on the special log mode AutoOverwrite using the Database Manager GUI This interrupts theexisting backup history You have to run a complete backup to start the history again
05162008 PUBLIC 1940
4 Installing Additional Components (Optional)
ProcedureThis procedure tells you how to install an SAP system with SAPinst SAPinst includes a GUI and aGUI server both using Java This section describes an installation where SAPinst SAPinst GUI andthe GUI server are running on the same hostNote the following information about SAPinst
n When you start SAPinst SAPinst GUI and the GUI server also start SAPinst GUI connects to theGUI server with a secure SSL connection and the GUI server connects to SAPinst
n SAPinst creates the installation directory sapinst_instdir where it keeps its log files Theinstallation directory is located directly in the Program Files directory If SAPinst is not able tocreate sapinst_instdir there it tries to create sapinst_instdir in the directory defined by theenvironment variable TEMP
Recommendation
We recommend that you keep all installation directories until the system is completely andcorrectly installed
n SAPinst creates a subdirectory for each installation option calledltsapinst_instdirgtltinstallation_option_directorygt which is located in ProgramFiles
n The SAPinst Self-Extractor extracts the executables to a temporary directory (TEMP TMP TMPDIR orSystemRoot) These executables are deleted after SAPinst has stopped runningDirectories called sapinst_exexxxxxxxxxx sometimes remain in the temporary directory Youcan safely delete them The temporary directory also contains the SAPinst Self-Extractor log filedev_selfexout which might be useful if an error occurs
Caution
If SAPinst cannot find a temporary directory the installation terminates with the error FCO-00058
n If you want to terminate SAPinst and the SAPinst Self-Extractor choose one of the followingoptionsl Right-click the icon for the SAPinst output window located in theWindows tray and choose Exitl Click the icon for the SAPinst output window located in the Windows tray and choose File
Exit
PrerequisitesYou are logged on as a user with administration rights to install the SAPinst tool and the SAP system
Note
When installing from a network share make sure that everyone has read access to this share Theinstallation routine creates users such as ltsidgtadm (for example ce1adm) During the installationSAPinst does a user switch to this user If the newly created user does not have permissions to thenetwork share where the installation is running from the installation will fail
2040 PUBLIC 05162008
4 Installing Additional Components (Optional)
Procedure
1 Insert the SAP Installation Master DVD into your DVD drive or mount it locally2 Start SAPinst from the SAP Installation Master DVD by double-clicking sapinstexe from the
following path ltDVD drivegtDATA_UNITSIM_WIN_ltplatformgt_ltdatabasegtSAPinst GUI starts automatically by displaying theWelcome screen
3 In theWelcome screen choose the required SAPinst installation option from the tree structure
Note
If SAPinst prompts you to log off from your system log off and log on againSAPinst restarts automaticallyChoose Continue Old Installation
4 Choose whether you want to run the installation in Typicalmode or in CustommodeIf you select Typical the installation wizard provides automatic default settings and you only haveto respond to a small selection of prompts The rest is set by default If you select Custom you haveto respond to all prompts
Note
If you want to install the offline documentation for SAP NetWeaver CE you need to chooseCustommodeAfter the installation you can access the offline documentation by choosing Start All ProgramsSAP NetWeaver Composition Environment ltSAPSIDgt
5 Follow the screens and enter the required parameters
Note
For more information about the input parameters and information about restrictions forpasswords position the cursor on the required parameter and press F1
After you have entered all requested input parameters SAPinst displays the Parameter Summaryscreen This screen shows both the parameters that you entered and those that SAPinst set bydefault If required you can revise the parameters before starting the installation
6 To start the installation choose Start SAPinst starts the installation and displays the progress ofthe installation When the installation has successfully been completed SAPinst shows the dialogExecution of ltService_Namegt has been completed successfully
Note
After installing additional components you need to perform some post-installation activities [page 27] toget the system up amp running
05162008 PUBLIC 2140
This page is intentionally left blank
5 Installing SAP Memory Analyzer (Optional)
5 Installing SAP Memory Analyzer(Optional)
SAP Memory Analyzer helps you to analyze Java heap dumps easily find big chunks of memory orcomplex memory aggregation patterns in your data structures and identify who is keeping thismemory alive New and innovative analysis techniques support the user with a fast and powerfulfeature setThe tool (Eclipse RCP application) was developed to analyze real productive heap dumps whichtend to get enormous in size with hundreds of millions of objects Performance low resourceconsumption and especially the newly developed innovative analysis techniques make it a helpfultool even to small application heap dumpsYou can install SAP Memory Analyzer as an additional tool
This procedure tells you how to install an SAP system with SAPinst SAPinst includes a GUI and aGUI server both using Java This section describes an installation where SAPinst SAPinst GUI andthe GUI server are running on the same hostNote the following information about SAPinst
n When you start SAPinst SAPinst GUI and the GUI server also start SAPinst GUI connects to theGUI server with a secure SSL connection and the GUI server connects to SAPinst
n SAPinst creates the installation directory sapinst_instdir where it keeps its log files Theinstallation directory is located directly in the Program Files directory If SAPinst is not able tocreate sapinst_instdir there it tries to create sapinst_instdir in the directory defined by theenvironment variable TEMP
Recommendation
We recommend that you keep all installation directories until the system is completely andcorrectly installed
n SAPinst creates a subdirectory for each installation service calledltsapinst_instdirgtltinstallation_service_directorygt which is located in ProgramFiles
n The SAPinst Self-Extractor extracts the executables to a temporary directory (TEMP TMP TMPDIR orSystemRoot) These executables are deleted after SAPinst has stopped runningDirectories called sapinst_exexxxxxxxxxx sometimes remain in the temporary directory Youcan safely delete them The temporary directory also contains the SAPinst Self-Extractor log filedev_selfexout which might be useful if an error occurs
05162008 PUBLIC 2340
5 Installing SAP Memory Analyzer (Optional)
Caution
If SAPinst cannot find a temporary directory the installation terminates with the error FCO-00058
n If you want to terminate SAPinst and the SAPinst Self-Extractor choose one of the followingoptionsl Right-click the icon for the SAPinst output window located in theWindows tray and choose Exitl Click the icon for the SAPinst output window located in the Windows tray and choose File
Exit
PrerequisitesYou are logged on as a user with administration rights to install the SAPinst tool and the SAP system
Note
When installing from a network share make sure that everyone has read access to this share Theinstallation routine creates users such as ltsidgtadm (for example ce1adm) During the installationSAPinst performs a user switch to this user If the newly created user does not have permissions tothe network share where the installation is running from the installation will fail
Procedure
1 Insert the SAP Installation Master DVD into your DVD drive or mount it locally2 Start SAPinst from the SAP Installation Master DVD by double-clicking sapinstexe from the
following path ltDVD drivegtDATA_UNITSIM_WIN_ltplatformgt_ltdatabasegtSAPinst GUI starts automatically by displaying theWelcome screen
3 In theWelcome screen choose the required SAPinst installation option from the tree structure
Note
If SAPinst prompts you to log off from your system log off and log on againSAPinst restarts automaticallyChoose Continue Old Installation
4 Choose whether you want to run the installation in Typicalmode or in CustommodeIf you select Typical the installation wizard provides automatic default settings and you only haveto respond to a small selection of prompts The rest is set by default If you select Custom you haveto respond to all prompts
Note
If you want to install the offline documentation for SAP NetWeaver CE you need to chooseCustommodeAfter the installation you can access the offline documentation by choosing Start All ProgramsSAP NetWeaver Composition Environment ltSAPSIDgt
2440 PUBLIC 05162008
5 Installing SAP Memory Analyzer (Optional)
5 Follow the screens and enter the required parameters
Note
For more information about the input parameters and information about restrictions forpasswords position the cursor on the required parameter and press F1
After you have entered all requested input parameters SAPinst displays the Parameter Summaryscreen This screen shows both the parameters that you entered and those that SAPinst set bydefault If required you can revise the parameters before starting the installation
6 To start the installation choose Start SAPinst starts the installation and displays the progress ofthe installation When the installation has successfully been completed SAPinst shows the dialogExecution of ltOption_Namegt has been completed successfully
05162008 PUBLIC 2540
This page is intentionally left blank
6 Post-Installation Activities
6 Post-Installation Activities
This section describes the steps that you have to perform after the installation has finished successfully
Running the Configuration Wizard (Optional)
Note
You can run the configuration wizard only once and only directly after installing and patchingyour SAP system
For SAP NetWeaver CE you need to run the following configuration tasks
n Configuration of Services Registry Webservice Destinations
n When you have installed the IDE Update Site componentConfiguration and Mirroring of local NWDSUpdate Site
n When you have installed the Adobe Document Services component Initial setup ADS in CE
When you have an NWDI installation on another SAP NetWeaver 70 system you can perform thefollowing configuration tasks
n Change Management Service (CMS) Create an Application Skeleton
n Change Management Service (CMS) Modify a Software Component
To run the configuration wizard proceed as follows
1 After SAPinst has finished open the SAP NetWeaver Administrator by entering the following URLin a browser httplthostgtlthttp_portgtnwa
2 Log on as user j2ee_admin3 In the SAP NetWeaver Administrator choose Configuration Management Scenarios Configuration
Wizard 4 Select the appropriate configuration task in the list and choose Start5 Follow the on-screen instructions6 After the configuration wizard has finished successfully restart your SAP system
Configuring the IDE Update Site
1 In the Configuration Wizard select the task Configuration and Mirroring of local NWDS Update Site in thelist and choose Start
2 Follow the on-screen instructions
05162008 PUBLIC 2740
6 Post-Installation Activities
Provide the credentials for the source update site location The default URL is the central SAPupdate site You can also use your installation DVD as source update site which makes themirror process much faster To use the DVD as source update site you have to specify the URLfileltdvd_drivegtIDE
3 After the configuration wizard has finished successfully restart your SAP systemThe data of the source update site location is now mirrored to your server
Enabling Adobe Document ServicesIf you have installed SAP NetWeaver Composition Environment with the Adobe DocumentServices add-on in the developer edition on aWindows platform you must complete the followingpost-installation steps to enable the add-on In case you have installed an AS Java cluster applythe procedure to the central host as well as to all other hosts where additional application serverinstances are running
1 Using the SAP Management Console stop the AS Java systemFormore information about starting and stopping SAP systems see httphelpsapcomnwce
Administratorrsquos Guide Administration of SAP NetWeaver CE General System Administration AS Java(Application Server Java)
2 From the Startmenu open Control Panel Administrative Tools Computer Management Services andApplications Services
3 Select SAPltSIDgt_ltInstance_Numbergt (for example SAPCE1_00) and open Properties from thecontext menu
4 On the Log On tab page enable the Local System account indicator5 Repeat the above steps for the second SAPltSIDgt_ltInstance_Numbergt service that you see in the list6 Start the AS Java system
Adobe LiveCycle Designer
For more information about how to install and configure the Adobe LiveCycle Designer see SAPNote 962763
Enabling Services RegistryYou must apply additional configuration steps to enable Services Registry after you have installed anSAP NetWeaver Composition Environment system containing the following components
n Java Application Server and Composition Platformn Java Application Server and Adobe Document Services
To enable Services Registry you must apply the following configuration templates to your systemCE_Complete_Stack_development_full
2840 PUBLIC 05162008
6 Post-Installation Activities
Note
For more information about what configuration templates are available see Configuration Templates[page 33]For more information about applying configuration templates see httphelpsapcomnwce
SAP NetWeaver Composition Environment Library Administratorrsquos Guide Configuration of SAP NetWeaver CEInitial System Configuration AS Java Configuration Activating a Configuration Template
See also
httphelpsapcomnwce SAP NetWeaver Composition Environment Library Developerrsquos GuideDeveloping and Composing Applications Consuming Enterprise Services Searching for Services Services RegistryTasks Searching amp Browsing Service Definitions Configuring the Services Registry
Configuring the Portal in SAP NetWeaver CEAfter installing the portal in SAP NetWeaver CE a number of deactivated or irrelevant tools aredisplayed in the UI To display the correct portals tools for CE proceed as follows
1 Open a browser and log on to your portal as an administrator2 In the same browser session enter the following URL
httplthostgtlthttpportgtirjservletprtportalprtrootcomsapportal
contentlayersContentLayersTool
where lthostgt is the host name of your server and lthttpportgt is the port number of your server3 In the Portal Mode Configuration Tool choose Activate Development Mode to restore the portal tools
and content that are assigned to the development mode4 Restart or refresh your browser5 In the SAP Management Console restart the server
You may then continue with the mandatory and optional configuration steps as described inhttphelpsapcomnwce SAP NetWeaver Composition Environment Library Administratorrsquos Guide
Configuration of SAP NetWeaver Composition Environment Configuration for CE Additional Components Configuringthe Portal
Changing the Password for the Internet Communication Manager (ICM)You can monitor and manage the Internet Communication Manager (ICM) from the command lineprogramAfter the installation of your SAP NetWeaver CE system has successfully finished you need to changethe ICM password manually To do so proceed as follows
1 Log on at operating system level to the computer where the ICM is running2 Start the program icmon with icmon ndasha profile=ltinstance_profilegt to maintain the
authentication file (default authfiletxt)3 Choose a to add a user4 Choose c to change the password of the existing user
05162008 PUBLIC 2940
6 Post-Installation Activities
5 Choose s to save your settings
Further Configuration StepsAfter installing your SAP NetWeaver CE system and performing the post-installation steps to get thesystem up amp running you may need to perform further configuration stepsRefer to the following documentation to proceed with your tasks
n If you are a system administrator refer to httphelpsapcomnwce Administratorrsquos Guide It contains information about how to configure and administer your system
n If you are a developer refer to httphelpsapcomnwce Developerrsquos Guide It providesguidelines for developing applications using the SAP NetWeaver CE
Note
The SAP NetWeaver CE documentation is also available offline as a part of your installation To accessit choose Start All Programs SAP NetWeaver Composition Environment 10 Documentation
3040 PUBLIC 05162008
7 Additional Information
7 Additional Information
The following section provides additional information about the installation of SAP NetWeaverComposition Environment
71 Transporting Self-Developed Software ComponentArchives (SCA) into the System
PrerequisitesYou have developed your own Software Component Archives (SCA) and want to transport theminto your SAP NetWeaver CE system
ProcedureTo transport your SCAs to the SAP NetWeaver CE system proceed as follows
1 Download the update file from httpservicesapcomswdc Download Support Packages andPatches Entry by Application Group SAP NetWeaver SAP NETWEAVER SAP NETWEAVER CE71 Support Package Stacks
2 From an empty directory run the update tool updateltIDgtexe
Note
If the tool displays descriptions such as Applying Support Packages you can ignore them
3 In the dialog screens specify the directory where your SCAs are located4 Follow the on-screen instructions
Only valid for MaxDB
72 Troubleshooting ‒ Repairing an Inconsistent SAP MaxDBInstallation
PrerequisitesDuring the preinstallation phase the installation tool checks the Microsoft Windows registry foralready installed SAP MaxDB softwareIf the registry key is found but there is no software on the hard drive you receive the followingmessage
05162008 PUBLIC 3140
7 Additional Information73 Restarting the SAP MaxDB Server Manually
The existing MaxDB software is not consistent Check the file system and registry
The most common reason for this inconsistency is the manual deletion of the software from the filesystem without using the specified tools
ProcedureTo repair this inconsistency proceed as follows
1 Choose Start Control Panel Administrative Tools Services 2 Make sure the services SAPDBWWW SAPDB and XServer are stopped3 Choose Start Run and run the command regedit4 Go to My ComputerHKEY_LOCAL_MACHINESOFTWARESAPSAP DBTech Key IndepPrograms
The key contains a path to a foldera) Check if this folder exists on the file systemb) Note down the value of Key IndepPrograms for later usage (see step 7)
If the path does not exist in the file system delete the key SAP DBTech5 Delete the following keys
n My ComputerHKEY_LOCAL_MACHINESYSTEMCurrentControlSetServicesSAP DBTech-
n My ComputerHKEY_LOCAL_MACHINESYSTEMCurrentControlSetServicesSAPDBWWW
n My ComputerHKEY_LOCAL_MACHINESYSTEMCurrentControlSetServicesXServer
6 Choose Start Control Panel System Advanced Environment Variables System Variables Path 7 Delete the following paths from the variable
n ltIndepProgramsgtbin
n ltIndepProgramsgtpgm
8 Reboot your computer
End of MaxDB
Only valid for MaxDB
73 Restarting the SAP MaxDB Server Manually
If after a reboot the database server is not running automatically you need to restart the SAP MaxDBserver manually
Production SystemsTo restart the SAP MaxDB server manually proceed as follows
1 Open a command prompt and enter the following command net start sapdbwww
ORChoose Start All Programs Administrative Tools Services Double-click on SAP DB WWW andchoose Start
2 Open the SAP Management Console and choose SAP Systems ltSAPSIDgt ltmachine namegt
3240 PUBLIC 05162008
7 Additional Information74 Restarting the MS SQL Server Manually
3 Enter the master password and choose Logon4 Choose Online When the database server is online you can restart the engine
Development SystemsTo restart the SAP MaxDB server manually choose Start All Programs SAP NetWeaver CompositionEnvironment CE Application Server ltSAPSIDgt Start Application Server End of MaxDB
Only valid for MS SQL Server
74 Restarting the MS SQL Server Manually
If after a reboot the database server is not running automatically you need to restart the MS SQLServer manually
Procedure
1 Choose Start All Programs Administrative Tools Services 2 Look for the service named SQL Server ltnamegt where ltnamegt is MSSQLSERVER for the default
instance or ltinstance namegt for a named instance3 If the service status is not started right-click the service and choose Start in the context menu4 To insure the service is started automatically after each system restart right-click it and choose
Properties Select Automatic as the startup type
End of MS SQL Server
75 Configuration Templates
Configuration templates contain the predefined instance configuration for specific scenarios Theyare automatically applied according to the installation option you have selected The templatesare designed to optimize system performance by applying certain configuration to the Java VirtualMachine and the application server as well as by applying startup filters to AS Java services andapplications to start only those relevant for the selected installation optionsThe following table provides information about the available templates with SAP NetWeaverComposition Environment In the template name replace the ltsystem_modegt parameter bydevelopment (for the templates relevant to systems installed in developmentmode) or production (forthe templates relevant to systems installed in productivemode)
05162008 PUBLIC 3340
7 Additional Information76 Uninstalling SAP NetWeaver Composition Environment
Configuration Template Selected Installation Options
CE_Java_EE_ltsystem_modegt_full Java Application Server Installation
CE_Composition_Environment_ltsystem_modegt_full Java Application Server Installation + CompositionPlatform Installation
CE_Adobe_Document_Service_ltsystem_modegt_full Java Application Server Installation + AdobeDocument Services Add-on Installation
CE_Composite_Voice_ltsystem_modegt_full Java Application Server Installation + Voice Add-onInstallation
CE_Complete_Stack_ltsystem_modegt_full Java Application Server Installation + CompositionPlatform Installation + Adobe Document ServicesAdd-on Installation + Voice Add-on Installation
If your selection cannot be mapped to one of the combinations in the above table the templateCE_Complete_Stack_ltsystem_modegt_full is applied It starts all applications and services neededto run the complete stackYou canmanually apply a different configuration template if youwant to switch to another installationoption For example by changing from template CE_Complete_Stack_ltsystem_modegt_full toCE_Java_EE_ltsystem_modegt_full you achieve shorter startup times and less memory consumptionbut also less functionality since not all applications and services are runningFor more information about applying configuration templates see httphelpsapcomnwce
Administratorrsquos Guide Configuration of SAP NetWeaver CE Initial System Configuration AS Java ConfigurationActivating a Configuration Template
Note
Make sure that you do not apply a development template to a productive system or vice versa
76 Uninstalling SAP NetWeaver Composition Environment
You have to uninstall all components of the SAP NetWeaver Composition Environment separatelythat is SAP NetWeaver CE and SAP NetWeaver Developer StudioYou can uninstall your SAP NetWeaver CE system in different ways
Uninstalling SAP NetWeaver CEWindows Choose Start Control Panel Add Remove programs SAP SystemltSAPSIDgt
Uninstalling SAP NetWeaver CE Using SAPinst
1 Insert the SAP Installation Master DVD into your DVD drive or mount it locally
3440 PUBLIC 05162008
7 Additional Information76 Uninstalling SAP NetWeaver Composition Environment
2 Start SAPinst from the SAP Installation Master DVD as described in the section Installing SAPNetWeaver Composition Environment
3 In theWelcome screen choose Uninstall SAP System or Single Instances from the tree structure4 Follow the on-screen instructions
Uninstalling SAP NetWeaver Developer Studio
Prerequisites
Before uninstalling SAP NetWeaver Developer Studio consider the following
n All additionally installed features and plug-ins that were installed to the same folder as DeveloperStudio for example by using the Eclipse Update Manager will also be removed
n There may be other directories and files in the installation directory notablyltinstall_dirgteclipseworkspace ltinstall_dirgteclipselinks andltinstall_dirgteclipseconfiguration that contain important data The files and folder aswell as the existing workspaces are retained when the product is uninstalled
Procedure
To uninstall SAP NetWeaver Developer Studio proceed as described above You can use either oneof the options
Uninstalling the SAP Management ConsoleSince all SAP systems use the SAP Management Console there is no uninstallation option for theSAP Management Console with SAPinst If you are sure that you do not need the SAP ManagementConsole any more you can remove it using Start Control Panel Add Remove programs
05162008 PUBLIC 3540
Typographic Conventions
Example Description
lt gt Angle brackets indicate that you replace these words or characters with appropriateentries to make entries in the system for example ldquoEnter your ltUser Namegtrdquo
Arrows separating the parts of a navigation path for example menu options
Example Emphasized words or expressions
Example Words or characters that you enter in the system exactly as they appear in thedocumentation
Example Textual cross-references to an internet address for example httpwwwsapcom
example Quicklinks added to the internet address of a homepage to enable quick access tospecific content on the Web
123456 Hyperlink to an SAP Note for example SAP Note 123456
Example n Words or characters quoted from the screen These include field labels screen titlespushbutton labels menu names and menu options
n Cross-references to other documentation or published works
Example n Output on the screen following a user action for example messagesn Source code or syntax quoted directly from a programn File and directory names and their paths names of variables and parameters and
names of installation upgrade and database tools
EXAMPLE Technical names of system objects These include report names program namestransaction codes database table names and key concepts of a programming languagewhen they are surrounded by body text for example SELECT and INCLUDE
EXAMPLE Keys on the keyboard
3640 PUBLIC 05162008
SAP AGDietmar-Hopp-Allee 16
69190 WalldorfGermany
T +4918 0534 34 34F +4918 0534 34 20
wwwsapcom
copy Copyright 2008 SAP AG All rights reserved
No part of this publication may be reproduced or transmitted in any form or for any purpose without the express permissionof SAP AG The information contained herein may be changed without prior noticeSome software products marketed by SAP AG and its distributors contain proprietary software components of othersoftware vendors
No part of this publication may be reproduced or transmitted in any form or for any purpose without the express permissionof SAP AG The information contained herein may be changed without prior noticeSome software products marketed by SAP AG and its distributors contain proprietary software components of othersoftware vendorsMicrosoft Windows Excel Outlook and PowerPoint are registered trademarks of Microsoft CorporationIBM DB2 DB2 Universal Database OS2 Parallel Sysplex MVSESA AIX S390 AS400 OS390 OS400 iSeries pSeriesxSeries zSeries System i System i5 System p System p5 System x System z System z9 zOS AFP Intelligent MinerWebSphere Netfinity Tivoli Informix i5OS POWER POWER5 POWER5+ OpenPower and PowerPC are trademarks orregistered trademarks of IBM CorporationAdobe the Adobe logo Acrobat PostScript and Reader are either trademarks or registered trademarks of Adobe SystemsIncorporated in the United States andor other countriesOracle is a registered trademark of Oracle CorporationUNIX XOpen OSF1 and Motif are registered trademarks of the Open GroupCitrix ICA Program Neighborhood MetaFrame WinFrame VideoFrame and MultiWin are trademarks or registeredtrademarks of Citrix Systems IncHTML XML XHTML and W3C are trademarks or registered trademarks of W3Creg World Wide Web ConsortiumMassachusetts Institute of TechnologyJava is a registered trademark of Sun Microsystems IncJavaScript is a registered trademark of Sun Microsystems Inc used under license for technology invented and implementedby NetscapeSAP R3 xApps xApp SAP NetWeaver Duet PartnerEdge ByDesign SAP Business ByDesign and other SAP productsand services mentioned herein as well as their respective logos are trademarks or registered trademarks of SAP AG inGermany and in several other countries all over the world All other product and service names mentioned are thetrademarks of their respective companies Data contained in this document serves informational purposes only Nationalproduct specifications may varyThese materials are subject to change without notice These materials are provided by SAP AG and its affiliated companies(SAP Group) for informational purposes only without representation or warranty of any kind and SAP Group shall notbe liable for errors or omissions with respect to the materials The only warranties for SAP Group products and services arethose that are set forth in the express warranty statements accompanying such products and services if any Nothing hereinshould be construed as constituting an additional warranty
This document was created using stylesheet 2006-12-31 (V51beta [= 60 for E3]) and XSLT processor SAXON 652 fromMichael Kay (httpsaxonsfnet) XSLT version 1
05162008 PUBLIC 3740
DisclaimerSome components of this product are based on Javatrade Any code change in these components may cause unpredictable andsevere malfunctions and is therefore expressly prohibited as is any decompilation of these componentsAny Javatrade Source Code delivered with this product is only to be used by SAPrsquos Support Services and may not be modified oraltered in any way
Documentation in the SAP Service MarketplaceYou can find this document at the following address httpsservicesapcominstguides
3840 PUBLIC 05162008
This page is intentionally left blank
SAP AGDietmar-Hopp-Allee 1669190 WalldorfGermanyT +4918 0534 34 34F +4918 0534 34 20wwwsapcom
copy Copyright 2008 SAP AG All rights reservedNo part of this publication may be reproduced or transmitted in any form or for any purpose without the express permission of SAP AG The information contained herein may bechanged without prior notice
2 Installing SAP NetWeaver CE Developer Edition
5 Follow the screens and enter the required parameters
Note
For more information about the input parameters and information about restrictions forpasswords position the cursor on the required parameter and press F1
After you have entered all requested input parameters SAPinst displays the Parameter Summaryscreen This screen shows both the parameters that you entered and those that SAPinst set bydefault If required you can revise the parameters before starting the installation
6 To start the installation choose Start SAPinst starts the installation and displays the progress ofthe installation When the installation has successfully been completed SAPinst shows the dialogExecution of ltOption_Namegt has been completed successfully
Note
You can install the update site (for SAP Developer Studio) on a development system only (singleinstance system)
05162008 PUBLIC 1140
This page is intentionally left blank
3 Installing SAP NetWeaver Developer Studio
3 Installing SAP NetWeaver DeveloperStudio
SAP NetWeaver Developer Studio is based on the open development platform Eclipse It includesthe standard Eclipse features and SAP features The SAP NetWeaver development documentationassumes that you are familiar with Eclipse and how to develop Java applications with itFor more information see httphelpsapcomnwce SAP NetWeaver Library SAP NetWeaverDevelopersrsquo Guide SAP FeaturesSAP NetWeaver Developer Studio provides several features for composing and developing businessapplications You can select the features according to the components you have installed on your ASJava of the Composition Environment The Developer Studio has the following features
n SAP NetWeaver Developer Studio Java EEProvides the toolset for Java EE-compliant developmentAS Java component required Java Application Server
n SAP NetWeaver Developer Studio Development Infrastructure ClientProvides the toolset necessary to work the SAP component model It provides functionality towork locally or in a teamDepending on feature SAP NetWeaver Developer Studio Java EEAS Java component required Java Application Server Optionally SAP NetWeaverDevelopment Infrastructure (NWDI) as part of an SAP NetWeaver 70 system
n SAP NetWeaver Developer Studio Web Dynpro User InterfacesProvides the toolset to develop user interfaces with Web Dynpro for JavaDepending on features SAP NetWeaver Developer Studio Java EE SAP NetWeaver DeveloperStudio Development Infrastructure ClientAS Java component required Java Application Server Optionally Adobe Document Services
n SAP NetWeaver Developer Studio Composition ToolsProvides the toolset to develop composite applicationsDepending on features SAP NetWeaver Developer Studio Java EE SAP NetWeaver DeveloperStudioWebDynpro User Interfaces SAPNetWeaver Developer Studio Development InfrastructureClientAS Java component required Composition Platform Optionally Adobe Document Services
05162008 PUBLIC 1340
3 Installing SAP NetWeaver Developer Studio
Installation Recommendations
Depending on your system landscape we recommend that you install the SAP NetWeaver DeveloperStudio as follows
n Central AS Java with update siteWhen you have a central AS Java we recommend that this server provides an update site Thismakes sure that the SAP NetWeaver Developer Studio you install has the version that matchesthe application serverYou can check the availability of a local update site by going to the following URL in your Webbrowserhttplthostgtlthttpportgtupdatesite
Example
httpdev_server_0150000updatesite
Note
Make sure that the update site is properly installed and that the post-installation activities forthe update site have already been performedMore informationPost-Installation Activities [page 27] section Configuring the IDE Update Site
n Developer WorkplaceIf you want to install the AS Java and the Developer Studio on a single workstation you can usethe following sourcesl SAP NetWeaver Developer Studio Update Site (recommended)
SAP provides a central update site The update site can be found athttpsnwdssapcomswdcdownloadsupdatesnetweavernwdsceTo access the update site you need an SAP Service Marketplace user and password (S user)
l DVDUse the DVD you installed the AS Java from to make sure the Developer Studio and the AS Javahave the same version Once the Developer Studio is installed from a DVD the update manageris always looking on the DVD for updates Therefore you can only update the Developer Studiowhen you have a DVD with a new release The Developer Studio Update Guide containsthe information how to instruct the developer to look for updates on the Developer StudioUpdate Site rather than on the DVD
In the following installation procedure we only use the term Update Site The installation steps arethe same regardless if you decided to install the Developer Studio from the SAP update site or theupdate site on your AS Java
1440 PUBLIC 05162008
3 Installing SAP NetWeaver Developer Studio
Caution
Do only use your Update Site on the AS Java or the SAP Update Site Using other update sites likethe Eclipse update site can lead to a version mismatch of features and undesired results
PrerequisitesCheck the hardware and software requirements necessary for the installation of SAP NetWeaverDeveloper Studio
Requirement Type Requirement
HardwareNote
SAP NetWeaver Developer Studio can be installedon a 32-bit platform only
n 1 GB free disk spacen 1 CPU with 3 GHz (minimum)n 2 GB RAM (minimum)n Paging file size 2x RAMTo check paging file size
1 Choose Windows Start button and choose ControlPanel reg System
2 Choose tab Advanced and choose Settings in thePerformance pane
3 Choose tab Advanced in the Performance Options dialogwindowThe current page size is displayed in the Virtualmemory pane To change the page size value chooseChange enable the Custom size radio button and enterthe new value in the input field Initial size (MB)
Software Supported Operating SystemsMicrosoft Windows XP Professional SP2 (orhigher)(32-bit)JDK versionSUN JDK 150_11 (or higher)You can download this version from the SUNweb site
The installation process begins with preparation steps that are dependent on the installation methodDVD or update site The following installation steps are independent of the installation method
Preparation ‒ Installing the Developer Studio from a DVD
1 Start SAPinst from the SAP Installation Master DVD by double-clicking sapinstexe from thefollowing path ltDVD drivegtDATA_UNITSIM_WIN_I386_ltdata_basegt
SAPinst GUI starts automatically by displaying theWelcome screen2 In theWelcome screen choose the installation option SAP NetWeaver Developer Studio
05162008 PUBLIC 1540
3 Installing SAP NetWeaver Developer Studio
3 Choose Next and follow the on-screen instructions
Preparation ‒ Installing the Developer Studio from an Update Site
1 Start your Web browser and connect to the update site2 Download NWDS_platformzip
This zip file contains the SAP NetWeaver Developer Studio Platform Installer3 Unzip NWDS_platformzip to a temporary folder on your local disk drive4 Navigate to the temporary folder5 Run the installer IDESetupexe contained in the zip
Installing the Developer Studio from DVD and Update SiteFollow the on-screen instructions of the installation toolDuring the installation dialog you are asked for the update site location Always accept thepreconfigured URL that points to the update site that is correct for the installation location (DVDor update site) you selectedThe Developer Studio is started automatically when the installation dialog is finished During startupyou are asked for the workspace folder for the Developer Studio
Caution
If you already had a Developer Studio installed on this client you need to specify a differentworkspace than the one you used for the previously installed Developer Studio version This is alsotrue if you have uninstalled the previous version already Uninstalling a Developer Studio doesnot remove the content you created in the workspace folder that includes the preferences of theDeveloper Studio and maybe projects you stored locally
The next prompt during start up is to confirm the network connections On the network connectionpreference page you can specify if you connect to the Internet directly or you can configure yourproxy The network connection settings must be configured so that the Developer Studio can connectto the update site There can be misleading error messages if the proxy settings are not correctThe installer installs the kernel of the Developer Studio The kernel contains Eclipse and a few SAPadditions but is not equipped with the SAP features necessary for the Composition EnvironmentTo install the required SAP features you have to install the SAP features with the following updateprocedure
Selecting and Installing Features
1 The available features are displayedThe Updates dialog window displays the main node of the features Open the main node andyou see the available main features
2 Choose the main features you want to install
1640 PUBLIC 05162008
3 Installing SAP NetWeaver Developer Studio
Note
Make sure that the component required for the selected feature is installed on the AS Java
3 Accept the license agreement4 In the screen Optional Features choose Next
Caution
Never deselect an optional feature This can cause a malfunction of the Developer Studio
5 In the Install screen choose FinishThe features are being downloaded
6 Choose Install All to verify the feature installation7 Restart the Developer Studio for the updates to take effect
Recommendation
We recommend that you start the Developer Studio with the shortcuts that were created onyour desktop or in the StartmenuTo get to the SAP documentation in the Developer Studio open the application and choose fromthe menu bar Help Help Contents SAP NetWeaver CE Developer Studio Documentation
The installation of the Developer Studio is now completed
Additional ActivitiesOnce the Developer Studio is installed you can add update and remove installed features at any time
Adding Features to an Installed Developer Studio
You can add features any time
1 Choose Help Software Updates Find and Install 2 Choose Search for new features to install3 Enable the displayed update site
Recommendation
We recommend that you do not change the update site to avoid version inconsistencies
4 Continue with step Selecting and Installing Main Features as described above
Updating Installed Features
1 Choose Help Software Updates Find and Install 2 Choose Search for updates of currently installed features3 Follow the on-screen instructions
05162008 PUBLIC 1740
3 Installing SAP NetWeaver Developer Studio
As of SP03 SAP NetWeaver Developer Studio uses the IDE Update Site to keep itself up-to-date
1 Choose Help Software Updates Find and Install 2 Choose Search for updates of currently installed features3 Follow the on-screen instructions
Note
The configuration wizard task Configuration and Mirroring of local NWDS Update Site has to be run aftereach patch or update of the IDE update site component on AS JavaFormore information about how to run the configuration wizard see Post-Installation Activities [page 27]
More InformationUpdate Guide ‒ SAP NetWeaver Composition Environment 71 ‒ Update to SPltxxgt available athttpwwwsdnsapcomirjsdnnw-ce
Uninstalling Features
1 To uninstall features choose Help Software Updates Manage Configuration 2 In the Product Configuration window choose Show Disabled Features3 Open the node SAP NetWeaver Developer Studio and its subnode
The features are displayed with its status enabled or disabled4 To change the status of feature select the feature and choose Enable or Disable (depending on
the current status)To uninstall a feature it has to be set to status disabled
5 Restart the SAP NetWeaver Developer Studio to apply the status change
Note
To uninstall all old version features (after the update) choose Help Software Updates UninstallDisabled Features
1840 PUBLIC 05162008
4 Installing Additional Components (Optional)
4 Installing Additional Components(Optional)
You can install the following additional components
n Composition Toolsn Adobe Document Services
n Composite Voicen IDE Update Site
PrerequisitesYou need to meet the same hardware and software requirements as for your already installeddevelopment system plus an additional 2 GB RAMThe Composition Tools and Composite Voice component make use of the Visual Composer VisualComposer is a Web browser based tool to model user interfaces To run Visual Composer thefollowing programsmust be installed on the client computer fromwhich you access Visual Composer
n Microsoft Internet Explorer 60 SP1 or highern Adobe SVG Viewer 30
n Microsoft XML Parser 40 or higher
Note
n Before installing additional components you need to stop all application servers manually
n Before installing additional components and in the case that you made changes to the defaulttemplate settings see SAP Note 953763
Prerequisites for SAP MaxDB
n Make sure that the Application Server Java and its corresponding database is runningYou can stop and start the system using the shortcuts under Start All Programs SAP NetWeaverComposition Environment 71 Application Server JxxltSAPSIDgt
n During the installation of additional components entries are written into the log area of thedatabase To avoid that the log is running full during the installation make sure that your backupstrategy is already active and an initial data backup was successfulWhen you want to establish your backup strategy after installing additional components you canturn on the special log mode AutoOverwrite using the Database Manager GUI This interrupts theexisting backup history You have to run a complete backup to start the history again
05162008 PUBLIC 1940
4 Installing Additional Components (Optional)
ProcedureThis procedure tells you how to install an SAP system with SAPinst SAPinst includes a GUI and aGUI server both using Java This section describes an installation where SAPinst SAPinst GUI andthe GUI server are running on the same hostNote the following information about SAPinst
n When you start SAPinst SAPinst GUI and the GUI server also start SAPinst GUI connects to theGUI server with a secure SSL connection and the GUI server connects to SAPinst
n SAPinst creates the installation directory sapinst_instdir where it keeps its log files Theinstallation directory is located directly in the Program Files directory If SAPinst is not able tocreate sapinst_instdir there it tries to create sapinst_instdir in the directory defined by theenvironment variable TEMP
Recommendation
We recommend that you keep all installation directories until the system is completely andcorrectly installed
n SAPinst creates a subdirectory for each installation option calledltsapinst_instdirgtltinstallation_option_directorygt which is located in ProgramFiles
n The SAPinst Self-Extractor extracts the executables to a temporary directory (TEMP TMP TMPDIR orSystemRoot) These executables are deleted after SAPinst has stopped runningDirectories called sapinst_exexxxxxxxxxx sometimes remain in the temporary directory Youcan safely delete them The temporary directory also contains the SAPinst Self-Extractor log filedev_selfexout which might be useful if an error occurs
Caution
If SAPinst cannot find a temporary directory the installation terminates with the error FCO-00058
n If you want to terminate SAPinst and the SAPinst Self-Extractor choose one of the followingoptionsl Right-click the icon for the SAPinst output window located in theWindows tray and choose Exitl Click the icon for the SAPinst output window located in the Windows tray and choose File
Exit
PrerequisitesYou are logged on as a user with administration rights to install the SAPinst tool and the SAP system
Note
When installing from a network share make sure that everyone has read access to this share Theinstallation routine creates users such as ltsidgtadm (for example ce1adm) During the installationSAPinst does a user switch to this user If the newly created user does not have permissions to thenetwork share where the installation is running from the installation will fail
2040 PUBLIC 05162008
4 Installing Additional Components (Optional)
Procedure
1 Insert the SAP Installation Master DVD into your DVD drive or mount it locally2 Start SAPinst from the SAP Installation Master DVD by double-clicking sapinstexe from the
following path ltDVD drivegtDATA_UNITSIM_WIN_ltplatformgt_ltdatabasegtSAPinst GUI starts automatically by displaying theWelcome screen
3 In theWelcome screen choose the required SAPinst installation option from the tree structure
Note
If SAPinst prompts you to log off from your system log off and log on againSAPinst restarts automaticallyChoose Continue Old Installation
4 Choose whether you want to run the installation in Typicalmode or in CustommodeIf you select Typical the installation wizard provides automatic default settings and you only haveto respond to a small selection of prompts The rest is set by default If you select Custom you haveto respond to all prompts
Note
If you want to install the offline documentation for SAP NetWeaver CE you need to chooseCustommodeAfter the installation you can access the offline documentation by choosing Start All ProgramsSAP NetWeaver Composition Environment ltSAPSIDgt
5 Follow the screens and enter the required parameters
Note
For more information about the input parameters and information about restrictions forpasswords position the cursor on the required parameter and press F1
After you have entered all requested input parameters SAPinst displays the Parameter Summaryscreen This screen shows both the parameters that you entered and those that SAPinst set bydefault If required you can revise the parameters before starting the installation
6 To start the installation choose Start SAPinst starts the installation and displays the progress ofthe installation When the installation has successfully been completed SAPinst shows the dialogExecution of ltService_Namegt has been completed successfully
Note
After installing additional components you need to perform some post-installation activities [page 27] toget the system up amp running
05162008 PUBLIC 2140
This page is intentionally left blank
5 Installing SAP Memory Analyzer (Optional)
5 Installing SAP Memory Analyzer(Optional)
SAP Memory Analyzer helps you to analyze Java heap dumps easily find big chunks of memory orcomplex memory aggregation patterns in your data structures and identify who is keeping thismemory alive New and innovative analysis techniques support the user with a fast and powerfulfeature setThe tool (Eclipse RCP application) was developed to analyze real productive heap dumps whichtend to get enormous in size with hundreds of millions of objects Performance low resourceconsumption and especially the newly developed innovative analysis techniques make it a helpfultool even to small application heap dumpsYou can install SAP Memory Analyzer as an additional tool
This procedure tells you how to install an SAP system with SAPinst SAPinst includes a GUI and aGUI server both using Java This section describes an installation where SAPinst SAPinst GUI andthe GUI server are running on the same hostNote the following information about SAPinst
n When you start SAPinst SAPinst GUI and the GUI server also start SAPinst GUI connects to theGUI server with a secure SSL connection and the GUI server connects to SAPinst
n SAPinst creates the installation directory sapinst_instdir where it keeps its log files Theinstallation directory is located directly in the Program Files directory If SAPinst is not able tocreate sapinst_instdir there it tries to create sapinst_instdir in the directory defined by theenvironment variable TEMP
Recommendation
We recommend that you keep all installation directories until the system is completely andcorrectly installed
n SAPinst creates a subdirectory for each installation service calledltsapinst_instdirgtltinstallation_service_directorygt which is located in ProgramFiles
n The SAPinst Self-Extractor extracts the executables to a temporary directory (TEMP TMP TMPDIR orSystemRoot) These executables are deleted after SAPinst has stopped runningDirectories called sapinst_exexxxxxxxxxx sometimes remain in the temporary directory Youcan safely delete them The temporary directory also contains the SAPinst Self-Extractor log filedev_selfexout which might be useful if an error occurs
05162008 PUBLIC 2340
5 Installing SAP Memory Analyzer (Optional)
Caution
If SAPinst cannot find a temporary directory the installation terminates with the error FCO-00058
n If you want to terminate SAPinst and the SAPinst Self-Extractor choose one of the followingoptionsl Right-click the icon for the SAPinst output window located in theWindows tray and choose Exitl Click the icon for the SAPinst output window located in the Windows tray and choose File
Exit
PrerequisitesYou are logged on as a user with administration rights to install the SAPinst tool and the SAP system
Note
When installing from a network share make sure that everyone has read access to this share Theinstallation routine creates users such as ltsidgtadm (for example ce1adm) During the installationSAPinst performs a user switch to this user If the newly created user does not have permissions tothe network share where the installation is running from the installation will fail
Procedure
1 Insert the SAP Installation Master DVD into your DVD drive or mount it locally2 Start SAPinst from the SAP Installation Master DVD by double-clicking sapinstexe from the
following path ltDVD drivegtDATA_UNITSIM_WIN_ltplatformgt_ltdatabasegtSAPinst GUI starts automatically by displaying theWelcome screen
3 In theWelcome screen choose the required SAPinst installation option from the tree structure
Note
If SAPinst prompts you to log off from your system log off and log on againSAPinst restarts automaticallyChoose Continue Old Installation
4 Choose whether you want to run the installation in Typicalmode or in CustommodeIf you select Typical the installation wizard provides automatic default settings and you only haveto respond to a small selection of prompts The rest is set by default If you select Custom you haveto respond to all prompts
Note
If you want to install the offline documentation for SAP NetWeaver CE you need to chooseCustommodeAfter the installation you can access the offline documentation by choosing Start All ProgramsSAP NetWeaver Composition Environment ltSAPSIDgt
2440 PUBLIC 05162008
5 Installing SAP Memory Analyzer (Optional)
5 Follow the screens and enter the required parameters
Note
For more information about the input parameters and information about restrictions forpasswords position the cursor on the required parameter and press F1
After you have entered all requested input parameters SAPinst displays the Parameter Summaryscreen This screen shows both the parameters that you entered and those that SAPinst set bydefault If required you can revise the parameters before starting the installation
6 To start the installation choose Start SAPinst starts the installation and displays the progress ofthe installation When the installation has successfully been completed SAPinst shows the dialogExecution of ltOption_Namegt has been completed successfully
05162008 PUBLIC 2540
This page is intentionally left blank
6 Post-Installation Activities
6 Post-Installation Activities
This section describes the steps that you have to perform after the installation has finished successfully
Running the Configuration Wizard (Optional)
Note
You can run the configuration wizard only once and only directly after installing and patchingyour SAP system
For SAP NetWeaver CE you need to run the following configuration tasks
n Configuration of Services Registry Webservice Destinations
n When you have installed the IDE Update Site componentConfiguration and Mirroring of local NWDSUpdate Site
n When you have installed the Adobe Document Services component Initial setup ADS in CE
When you have an NWDI installation on another SAP NetWeaver 70 system you can perform thefollowing configuration tasks
n Change Management Service (CMS) Create an Application Skeleton
n Change Management Service (CMS) Modify a Software Component
To run the configuration wizard proceed as follows
1 After SAPinst has finished open the SAP NetWeaver Administrator by entering the following URLin a browser httplthostgtlthttp_portgtnwa
2 Log on as user j2ee_admin3 In the SAP NetWeaver Administrator choose Configuration Management Scenarios Configuration
Wizard 4 Select the appropriate configuration task in the list and choose Start5 Follow the on-screen instructions6 After the configuration wizard has finished successfully restart your SAP system
Configuring the IDE Update Site
1 In the Configuration Wizard select the task Configuration and Mirroring of local NWDS Update Site in thelist and choose Start
2 Follow the on-screen instructions
05162008 PUBLIC 2740
6 Post-Installation Activities
Provide the credentials for the source update site location The default URL is the central SAPupdate site You can also use your installation DVD as source update site which makes themirror process much faster To use the DVD as source update site you have to specify the URLfileltdvd_drivegtIDE
3 After the configuration wizard has finished successfully restart your SAP systemThe data of the source update site location is now mirrored to your server
Enabling Adobe Document ServicesIf you have installed SAP NetWeaver Composition Environment with the Adobe DocumentServices add-on in the developer edition on aWindows platform you must complete the followingpost-installation steps to enable the add-on In case you have installed an AS Java cluster applythe procedure to the central host as well as to all other hosts where additional application serverinstances are running
1 Using the SAP Management Console stop the AS Java systemFormore information about starting and stopping SAP systems see httphelpsapcomnwce
Administratorrsquos Guide Administration of SAP NetWeaver CE General System Administration AS Java(Application Server Java)
2 From the Startmenu open Control Panel Administrative Tools Computer Management Services andApplications Services
3 Select SAPltSIDgt_ltInstance_Numbergt (for example SAPCE1_00) and open Properties from thecontext menu
4 On the Log On tab page enable the Local System account indicator5 Repeat the above steps for the second SAPltSIDgt_ltInstance_Numbergt service that you see in the list6 Start the AS Java system
Adobe LiveCycle Designer
For more information about how to install and configure the Adobe LiveCycle Designer see SAPNote 962763
Enabling Services RegistryYou must apply additional configuration steps to enable Services Registry after you have installed anSAP NetWeaver Composition Environment system containing the following components
n Java Application Server and Composition Platformn Java Application Server and Adobe Document Services
To enable Services Registry you must apply the following configuration templates to your systemCE_Complete_Stack_development_full
2840 PUBLIC 05162008
6 Post-Installation Activities
Note
For more information about what configuration templates are available see Configuration Templates[page 33]For more information about applying configuration templates see httphelpsapcomnwce
SAP NetWeaver Composition Environment Library Administratorrsquos Guide Configuration of SAP NetWeaver CEInitial System Configuration AS Java Configuration Activating a Configuration Template
See also
httphelpsapcomnwce SAP NetWeaver Composition Environment Library Developerrsquos GuideDeveloping and Composing Applications Consuming Enterprise Services Searching for Services Services RegistryTasks Searching amp Browsing Service Definitions Configuring the Services Registry
Configuring the Portal in SAP NetWeaver CEAfter installing the portal in SAP NetWeaver CE a number of deactivated or irrelevant tools aredisplayed in the UI To display the correct portals tools for CE proceed as follows
1 Open a browser and log on to your portal as an administrator2 In the same browser session enter the following URL
httplthostgtlthttpportgtirjservletprtportalprtrootcomsapportal
contentlayersContentLayersTool
where lthostgt is the host name of your server and lthttpportgt is the port number of your server3 In the Portal Mode Configuration Tool choose Activate Development Mode to restore the portal tools
and content that are assigned to the development mode4 Restart or refresh your browser5 In the SAP Management Console restart the server
You may then continue with the mandatory and optional configuration steps as described inhttphelpsapcomnwce SAP NetWeaver Composition Environment Library Administratorrsquos Guide
Configuration of SAP NetWeaver Composition Environment Configuration for CE Additional Components Configuringthe Portal
Changing the Password for the Internet Communication Manager (ICM)You can monitor and manage the Internet Communication Manager (ICM) from the command lineprogramAfter the installation of your SAP NetWeaver CE system has successfully finished you need to changethe ICM password manually To do so proceed as follows
1 Log on at operating system level to the computer where the ICM is running2 Start the program icmon with icmon ndasha profile=ltinstance_profilegt to maintain the
authentication file (default authfiletxt)3 Choose a to add a user4 Choose c to change the password of the existing user
05162008 PUBLIC 2940
6 Post-Installation Activities
5 Choose s to save your settings
Further Configuration StepsAfter installing your SAP NetWeaver CE system and performing the post-installation steps to get thesystem up amp running you may need to perform further configuration stepsRefer to the following documentation to proceed with your tasks
n If you are a system administrator refer to httphelpsapcomnwce Administratorrsquos Guide It contains information about how to configure and administer your system
n If you are a developer refer to httphelpsapcomnwce Developerrsquos Guide It providesguidelines for developing applications using the SAP NetWeaver CE
Note
The SAP NetWeaver CE documentation is also available offline as a part of your installation To accessit choose Start All Programs SAP NetWeaver Composition Environment 10 Documentation
3040 PUBLIC 05162008
7 Additional Information
7 Additional Information
The following section provides additional information about the installation of SAP NetWeaverComposition Environment
71 Transporting Self-Developed Software ComponentArchives (SCA) into the System
PrerequisitesYou have developed your own Software Component Archives (SCA) and want to transport theminto your SAP NetWeaver CE system
ProcedureTo transport your SCAs to the SAP NetWeaver CE system proceed as follows
1 Download the update file from httpservicesapcomswdc Download Support Packages andPatches Entry by Application Group SAP NetWeaver SAP NETWEAVER SAP NETWEAVER CE71 Support Package Stacks
2 From an empty directory run the update tool updateltIDgtexe
Note
If the tool displays descriptions such as Applying Support Packages you can ignore them
3 In the dialog screens specify the directory where your SCAs are located4 Follow the on-screen instructions
Only valid for MaxDB
72 Troubleshooting ‒ Repairing an Inconsistent SAP MaxDBInstallation
PrerequisitesDuring the preinstallation phase the installation tool checks the Microsoft Windows registry foralready installed SAP MaxDB softwareIf the registry key is found but there is no software on the hard drive you receive the followingmessage
05162008 PUBLIC 3140
7 Additional Information73 Restarting the SAP MaxDB Server Manually
The existing MaxDB software is not consistent Check the file system and registry
The most common reason for this inconsistency is the manual deletion of the software from the filesystem without using the specified tools
ProcedureTo repair this inconsistency proceed as follows
1 Choose Start Control Panel Administrative Tools Services 2 Make sure the services SAPDBWWW SAPDB and XServer are stopped3 Choose Start Run and run the command regedit4 Go to My ComputerHKEY_LOCAL_MACHINESOFTWARESAPSAP DBTech Key IndepPrograms
The key contains a path to a foldera) Check if this folder exists on the file systemb) Note down the value of Key IndepPrograms for later usage (see step 7)
If the path does not exist in the file system delete the key SAP DBTech5 Delete the following keys
n My ComputerHKEY_LOCAL_MACHINESYSTEMCurrentControlSetServicesSAP DBTech-
n My ComputerHKEY_LOCAL_MACHINESYSTEMCurrentControlSetServicesSAPDBWWW
n My ComputerHKEY_LOCAL_MACHINESYSTEMCurrentControlSetServicesXServer
6 Choose Start Control Panel System Advanced Environment Variables System Variables Path 7 Delete the following paths from the variable
n ltIndepProgramsgtbin
n ltIndepProgramsgtpgm
8 Reboot your computer
End of MaxDB
Only valid for MaxDB
73 Restarting the SAP MaxDB Server Manually
If after a reboot the database server is not running automatically you need to restart the SAP MaxDBserver manually
Production SystemsTo restart the SAP MaxDB server manually proceed as follows
1 Open a command prompt and enter the following command net start sapdbwww
ORChoose Start All Programs Administrative Tools Services Double-click on SAP DB WWW andchoose Start
2 Open the SAP Management Console and choose SAP Systems ltSAPSIDgt ltmachine namegt
3240 PUBLIC 05162008
7 Additional Information74 Restarting the MS SQL Server Manually
3 Enter the master password and choose Logon4 Choose Online When the database server is online you can restart the engine
Development SystemsTo restart the SAP MaxDB server manually choose Start All Programs SAP NetWeaver CompositionEnvironment CE Application Server ltSAPSIDgt Start Application Server End of MaxDB
Only valid for MS SQL Server
74 Restarting the MS SQL Server Manually
If after a reboot the database server is not running automatically you need to restart the MS SQLServer manually
Procedure
1 Choose Start All Programs Administrative Tools Services 2 Look for the service named SQL Server ltnamegt where ltnamegt is MSSQLSERVER for the default
instance or ltinstance namegt for a named instance3 If the service status is not started right-click the service and choose Start in the context menu4 To insure the service is started automatically after each system restart right-click it and choose
Properties Select Automatic as the startup type
End of MS SQL Server
75 Configuration Templates
Configuration templates contain the predefined instance configuration for specific scenarios Theyare automatically applied according to the installation option you have selected The templatesare designed to optimize system performance by applying certain configuration to the Java VirtualMachine and the application server as well as by applying startup filters to AS Java services andapplications to start only those relevant for the selected installation optionsThe following table provides information about the available templates with SAP NetWeaverComposition Environment In the template name replace the ltsystem_modegt parameter bydevelopment (for the templates relevant to systems installed in developmentmode) or production (forthe templates relevant to systems installed in productivemode)
05162008 PUBLIC 3340
7 Additional Information76 Uninstalling SAP NetWeaver Composition Environment
Configuration Template Selected Installation Options
CE_Java_EE_ltsystem_modegt_full Java Application Server Installation
CE_Composition_Environment_ltsystem_modegt_full Java Application Server Installation + CompositionPlatform Installation
CE_Adobe_Document_Service_ltsystem_modegt_full Java Application Server Installation + AdobeDocument Services Add-on Installation
CE_Composite_Voice_ltsystem_modegt_full Java Application Server Installation + Voice Add-onInstallation
CE_Complete_Stack_ltsystem_modegt_full Java Application Server Installation + CompositionPlatform Installation + Adobe Document ServicesAdd-on Installation + Voice Add-on Installation
If your selection cannot be mapped to one of the combinations in the above table the templateCE_Complete_Stack_ltsystem_modegt_full is applied It starts all applications and services neededto run the complete stackYou canmanually apply a different configuration template if youwant to switch to another installationoption For example by changing from template CE_Complete_Stack_ltsystem_modegt_full toCE_Java_EE_ltsystem_modegt_full you achieve shorter startup times and less memory consumptionbut also less functionality since not all applications and services are runningFor more information about applying configuration templates see httphelpsapcomnwce
Administratorrsquos Guide Configuration of SAP NetWeaver CE Initial System Configuration AS Java ConfigurationActivating a Configuration Template
Note
Make sure that you do not apply a development template to a productive system or vice versa
76 Uninstalling SAP NetWeaver Composition Environment
You have to uninstall all components of the SAP NetWeaver Composition Environment separatelythat is SAP NetWeaver CE and SAP NetWeaver Developer StudioYou can uninstall your SAP NetWeaver CE system in different ways
Uninstalling SAP NetWeaver CEWindows Choose Start Control Panel Add Remove programs SAP SystemltSAPSIDgt
Uninstalling SAP NetWeaver CE Using SAPinst
1 Insert the SAP Installation Master DVD into your DVD drive or mount it locally
3440 PUBLIC 05162008
7 Additional Information76 Uninstalling SAP NetWeaver Composition Environment
2 Start SAPinst from the SAP Installation Master DVD as described in the section Installing SAPNetWeaver Composition Environment
3 In theWelcome screen choose Uninstall SAP System or Single Instances from the tree structure4 Follow the on-screen instructions
Uninstalling SAP NetWeaver Developer Studio
Prerequisites
Before uninstalling SAP NetWeaver Developer Studio consider the following
n All additionally installed features and plug-ins that were installed to the same folder as DeveloperStudio for example by using the Eclipse Update Manager will also be removed
n There may be other directories and files in the installation directory notablyltinstall_dirgteclipseworkspace ltinstall_dirgteclipselinks andltinstall_dirgteclipseconfiguration that contain important data The files and folder aswell as the existing workspaces are retained when the product is uninstalled
Procedure
To uninstall SAP NetWeaver Developer Studio proceed as described above You can use either oneof the options
Uninstalling the SAP Management ConsoleSince all SAP systems use the SAP Management Console there is no uninstallation option for theSAP Management Console with SAPinst If you are sure that you do not need the SAP ManagementConsole any more you can remove it using Start Control Panel Add Remove programs
05162008 PUBLIC 3540
Typographic Conventions
Example Description
lt gt Angle brackets indicate that you replace these words or characters with appropriateentries to make entries in the system for example ldquoEnter your ltUser Namegtrdquo
Arrows separating the parts of a navigation path for example menu options
Example Emphasized words or expressions
Example Words or characters that you enter in the system exactly as they appear in thedocumentation
Example Textual cross-references to an internet address for example httpwwwsapcom
example Quicklinks added to the internet address of a homepage to enable quick access tospecific content on the Web
123456 Hyperlink to an SAP Note for example SAP Note 123456
Example n Words or characters quoted from the screen These include field labels screen titlespushbutton labels menu names and menu options
n Cross-references to other documentation or published works
Example n Output on the screen following a user action for example messagesn Source code or syntax quoted directly from a programn File and directory names and their paths names of variables and parameters and
names of installation upgrade and database tools
EXAMPLE Technical names of system objects These include report names program namestransaction codes database table names and key concepts of a programming languagewhen they are surrounded by body text for example SELECT and INCLUDE
EXAMPLE Keys on the keyboard
3640 PUBLIC 05162008
SAP AGDietmar-Hopp-Allee 16
69190 WalldorfGermany
T +4918 0534 34 34F +4918 0534 34 20
wwwsapcom
copy Copyright 2008 SAP AG All rights reserved
No part of this publication may be reproduced or transmitted in any form or for any purpose without the express permissionof SAP AG The information contained herein may be changed without prior noticeSome software products marketed by SAP AG and its distributors contain proprietary software components of othersoftware vendors
No part of this publication may be reproduced or transmitted in any form or for any purpose without the express permissionof SAP AG The information contained herein may be changed without prior noticeSome software products marketed by SAP AG and its distributors contain proprietary software components of othersoftware vendorsMicrosoft Windows Excel Outlook and PowerPoint are registered trademarks of Microsoft CorporationIBM DB2 DB2 Universal Database OS2 Parallel Sysplex MVSESA AIX S390 AS400 OS390 OS400 iSeries pSeriesxSeries zSeries System i System i5 System p System p5 System x System z System z9 zOS AFP Intelligent MinerWebSphere Netfinity Tivoli Informix i5OS POWER POWER5 POWER5+ OpenPower and PowerPC are trademarks orregistered trademarks of IBM CorporationAdobe the Adobe logo Acrobat PostScript and Reader are either trademarks or registered trademarks of Adobe SystemsIncorporated in the United States andor other countriesOracle is a registered trademark of Oracle CorporationUNIX XOpen OSF1 and Motif are registered trademarks of the Open GroupCitrix ICA Program Neighborhood MetaFrame WinFrame VideoFrame and MultiWin are trademarks or registeredtrademarks of Citrix Systems IncHTML XML XHTML and W3C are trademarks or registered trademarks of W3Creg World Wide Web ConsortiumMassachusetts Institute of TechnologyJava is a registered trademark of Sun Microsystems IncJavaScript is a registered trademark of Sun Microsystems Inc used under license for technology invented and implementedby NetscapeSAP R3 xApps xApp SAP NetWeaver Duet PartnerEdge ByDesign SAP Business ByDesign and other SAP productsand services mentioned herein as well as their respective logos are trademarks or registered trademarks of SAP AG inGermany and in several other countries all over the world All other product and service names mentioned are thetrademarks of their respective companies Data contained in this document serves informational purposes only Nationalproduct specifications may varyThese materials are subject to change without notice These materials are provided by SAP AG and its affiliated companies(SAP Group) for informational purposes only without representation or warranty of any kind and SAP Group shall notbe liable for errors or omissions with respect to the materials The only warranties for SAP Group products and services arethose that are set forth in the express warranty statements accompanying such products and services if any Nothing hereinshould be construed as constituting an additional warranty
This document was created using stylesheet 2006-12-31 (V51beta [= 60 for E3]) and XSLT processor SAXON 652 fromMichael Kay (httpsaxonsfnet) XSLT version 1
05162008 PUBLIC 3740
DisclaimerSome components of this product are based on Javatrade Any code change in these components may cause unpredictable andsevere malfunctions and is therefore expressly prohibited as is any decompilation of these componentsAny Javatrade Source Code delivered with this product is only to be used by SAPrsquos Support Services and may not be modified oraltered in any way
Documentation in the SAP Service MarketplaceYou can find this document at the following address httpsservicesapcominstguides
3840 PUBLIC 05162008
This page is intentionally left blank
SAP AGDietmar-Hopp-Allee 1669190 WalldorfGermanyT +4918 0534 34 34F +4918 0534 34 20wwwsapcom
copy Copyright 2008 SAP AG All rights reservedNo part of this publication may be reproduced or transmitted in any form or for any purpose without the express permission of SAP AG The information contained herein may bechanged without prior notice

This page is intentionally left blank
3 Installing SAP NetWeaver Developer Studio
3 Installing SAP NetWeaver DeveloperStudio
SAP NetWeaver Developer Studio is based on the open development platform Eclipse It includesthe standard Eclipse features and SAP features The SAP NetWeaver development documentationassumes that you are familiar with Eclipse and how to develop Java applications with itFor more information see httphelpsapcomnwce SAP NetWeaver Library SAP NetWeaverDevelopersrsquo Guide SAP FeaturesSAP NetWeaver Developer Studio provides several features for composing and developing businessapplications You can select the features according to the components you have installed on your ASJava of the Composition Environment The Developer Studio has the following features
n SAP NetWeaver Developer Studio Java EEProvides the toolset for Java EE-compliant developmentAS Java component required Java Application Server
n SAP NetWeaver Developer Studio Development Infrastructure ClientProvides the toolset necessary to work the SAP component model It provides functionality towork locally or in a teamDepending on feature SAP NetWeaver Developer Studio Java EEAS Java component required Java Application Server Optionally SAP NetWeaverDevelopment Infrastructure (NWDI) as part of an SAP NetWeaver 70 system
n SAP NetWeaver Developer Studio Web Dynpro User InterfacesProvides the toolset to develop user interfaces with Web Dynpro for JavaDepending on features SAP NetWeaver Developer Studio Java EE SAP NetWeaver DeveloperStudio Development Infrastructure ClientAS Java component required Java Application Server Optionally Adobe Document Services
n SAP NetWeaver Developer Studio Composition ToolsProvides the toolset to develop composite applicationsDepending on features SAP NetWeaver Developer Studio Java EE SAP NetWeaver DeveloperStudioWebDynpro User Interfaces SAPNetWeaver Developer Studio Development InfrastructureClientAS Java component required Composition Platform Optionally Adobe Document Services
05162008 PUBLIC 1340
3 Installing SAP NetWeaver Developer Studio
Installation Recommendations
Depending on your system landscape we recommend that you install the SAP NetWeaver DeveloperStudio as follows
n Central AS Java with update siteWhen you have a central AS Java we recommend that this server provides an update site Thismakes sure that the SAP NetWeaver Developer Studio you install has the version that matchesthe application serverYou can check the availability of a local update site by going to the following URL in your Webbrowserhttplthostgtlthttpportgtupdatesite
Example
httpdev_server_0150000updatesite
Note
Make sure that the update site is properly installed and that the post-installation activities forthe update site have already been performedMore informationPost-Installation Activities [page 27] section Configuring the IDE Update Site
n Developer WorkplaceIf you want to install the AS Java and the Developer Studio on a single workstation you can usethe following sourcesl SAP NetWeaver Developer Studio Update Site (recommended)
SAP provides a central update site The update site can be found athttpsnwdssapcomswdcdownloadsupdatesnetweavernwdsceTo access the update site you need an SAP Service Marketplace user and password (S user)
l DVDUse the DVD you installed the AS Java from to make sure the Developer Studio and the AS Javahave the same version Once the Developer Studio is installed from a DVD the update manageris always looking on the DVD for updates Therefore you can only update the Developer Studiowhen you have a DVD with a new release The Developer Studio Update Guide containsthe information how to instruct the developer to look for updates on the Developer StudioUpdate Site rather than on the DVD
In the following installation procedure we only use the term Update Site The installation steps arethe same regardless if you decided to install the Developer Studio from the SAP update site or theupdate site on your AS Java
1440 PUBLIC 05162008
3 Installing SAP NetWeaver Developer Studio
Caution
Do only use your Update Site on the AS Java or the SAP Update Site Using other update sites likethe Eclipse update site can lead to a version mismatch of features and undesired results
PrerequisitesCheck the hardware and software requirements necessary for the installation of SAP NetWeaverDeveloper Studio
Requirement Type Requirement
HardwareNote
SAP NetWeaver Developer Studio can be installedon a 32-bit platform only
n 1 GB free disk spacen 1 CPU with 3 GHz (minimum)n 2 GB RAM (minimum)n Paging file size 2x RAMTo check paging file size
1 Choose Windows Start button and choose ControlPanel reg System
2 Choose tab Advanced and choose Settings in thePerformance pane
3 Choose tab Advanced in the Performance Options dialogwindowThe current page size is displayed in the Virtualmemory pane To change the page size value chooseChange enable the Custom size radio button and enterthe new value in the input field Initial size (MB)
Software Supported Operating SystemsMicrosoft Windows XP Professional SP2 (orhigher)(32-bit)JDK versionSUN JDK 150_11 (or higher)You can download this version from the SUNweb site
The installation process begins with preparation steps that are dependent on the installation methodDVD or update site The following installation steps are independent of the installation method
Preparation ‒ Installing the Developer Studio from a DVD
1 Start SAPinst from the SAP Installation Master DVD by double-clicking sapinstexe from thefollowing path ltDVD drivegtDATA_UNITSIM_WIN_I386_ltdata_basegt
SAPinst GUI starts automatically by displaying theWelcome screen2 In theWelcome screen choose the installation option SAP NetWeaver Developer Studio
05162008 PUBLIC 1540
3 Installing SAP NetWeaver Developer Studio
3 Choose Next and follow the on-screen instructions
Preparation ‒ Installing the Developer Studio from an Update Site
1 Start your Web browser and connect to the update site2 Download NWDS_platformzip
This zip file contains the SAP NetWeaver Developer Studio Platform Installer3 Unzip NWDS_platformzip to a temporary folder on your local disk drive4 Navigate to the temporary folder5 Run the installer IDESetupexe contained in the zip
Installing the Developer Studio from DVD and Update SiteFollow the on-screen instructions of the installation toolDuring the installation dialog you are asked for the update site location Always accept thepreconfigured URL that points to the update site that is correct for the installation location (DVDor update site) you selectedThe Developer Studio is started automatically when the installation dialog is finished During startupyou are asked for the workspace folder for the Developer Studio
Caution
If you already had a Developer Studio installed on this client you need to specify a differentworkspace than the one you used for the previously installed Developer Studio version This is alsotrue if you have uninstalled the previous version already Uninstalling a Developer Studio doesnot remove the content you created in the workspace folder that includes the preferences of theDeveloper Studio and maybe projects you stored locally
The next prompt during start up is to confirm the network connections On the network connectionpreference page you can specify if you connect to the Internet directly or you can configure yourproxy The network connection settings must be configured so that the Developer Studio can connectto the update site There can be misleading error messages if the proxy settings are not correctThe installer installs the kernel of the Developer Studio The kernel contains Eclipse and a few SAPadditions but is not equipped with the SAP features necessary for the Composition EnvironmentTo install the required SAP features you have to install the SAP features with the following updateprocedure
Selecting and Installing Features
1 The available features are displayedThe Updates dialog window displays the main node of the features Open the main node andyou see the available main features
2 Choose the main features you want to install
1640 PUBLIC 05162008
3 Installing SAP NetWeaver Developer Studio
Note
Make sure that the component required for the selected feature is installed on the AS Java
3 Accept the license agreement4 In the screen Optional Features choose Next
Caution
Never deselect an optional feature This can cause a malfunction of the Developer Studio
5 In the Install screen choose FinishThe features are being downloaded
6 Choose Install All to verify the feature installation7 Restart the Developer Studio for the updates to take effect
Recommendation
We recommend that you start the Developer Studio with the shortcuts that were created onyour desktop or in the StartmenuTo get to the SAP documentation in the Developer Studio open the application and choose fromthe menu bar Help Help Contents SAP NetWeaver CE Developer Studio Documentation
The installation of the Developer Studio is now completed
Additional ActivitiesOnce the Developer Studio is installed you can add update and remove installed features at any time
Adding Features to an Installed Developer Studio
You can add features any time
1 Choose Help Software Updates Find and Install 2 Choose Search for new features to install3 Enable the displayed update site
Recommendation
We recommend that you do not change the update site to avoid version inconsistencies
4 Continue with step Selecting and Installing Main Features as described above
Updating Installed Features
1 Choose Help Software Updates Find and Install 2 Choose Search for updates of currently installed features3 Follow the on-screen instructions
05162008 PUBLIC 1740
3 Installing SAP NetWeaver Developer Studio
As of SP03 SAP NetWeaver Developer Studio uses the IDE Update Site to keep itself up-to-date
1 Choose Help Software Updates Find and Install 2 Choose Search for updates of currently installed features3 Follow the on-screen instructions
Note
The configuration wizard task Configuration and Mirroring of local NWDS Update Site has to be run aftereach patch or update of the IDE update site component on AS JavaFormore information about how to run the configuration wizard see Post-Installation Activities [page 27]
More InformationUpdate Guide ‒ SAP NetWeaver Composition Environment 71 ‒ Update to SPltxxgt available athttpwwwsdnsapcomirjsdnnw-ce
Uninstalling Features
1 To uninstall features choose Help Software Updates Manage Configuration 2 In the Product Configuration window choose Show Disabled Features3 Open the node SAP NetWeaver Developer Studio and its subnode
The features are displayed with its status enabled or disabled4 To change the status of feature select the feature and choose Enable or Disable (depending on
the current status)To uninstall a feature it has to be set to status disabled
5 Restart the SAP NetWeaver Developer Studio to apply the status change
Note
To uninstall all old version features (after the update) choose Help Software Updates UninstallDisabled Features
1840 PUBLIC 05162008
4 Installing Additional Components (Optional)
4 Installing Additional Components(Optional)
You can install the following additional components
n Composition Toolsn Adobe Document Services
n Composite Voicen IDE Update Site
PrerequisitesYou need to meet the same hardware and software requirements as for your already installeddevelopment system plus an additional 2 GB RAMThe Composition Tools and Composite Voice component make use of the Visual Composer VisualComposer is a Web browser based tool to model user interfaces To run Visual Composer thefollowing programsmust be installed on the client computer fromwhich you access Visual Composer
n Microsoft Internet Explorer 60 SP1 or highern Adobe SVG Viewer 30
n Microsoft XML Parser 40 or higher
Note
n Before installing additional components you need to stop all application servers manually
n Before installing additional components and in the case that you made changes to the defaulttemplate settings see SAP Note 953763
Prerequisites for SAP MaxDB
n Make sure that the Application Server Java and its corresponding database is runningYou can stop and start the system using the shortcuts under Start All Programs SAP NetWeaverComposition Environment 71 Application Server JxxltSAPSIDgt
n During the installation of additional components entries are written into the log area of thedatabase To avoid that the log is running full during the installation make sure that your backupstrategy is already active and an initial data backup was successfulWhen you want to establish your backup strategy after installing additional components you canturn on the special log mode AutoOverwrite using the Database Manager GUI This interrupts theexisting backup history You have to run a complete backup to start the history again
05162008 PUBLIC 1940
4 Installing Additional Components (Optional)
ProcedureThis procedure tells you how to install an SAP system with SAPinst SAPinst includes a GUI and aGUI server both using Java This section describes an installation where SAPinst SAPinst GUI andthe GUI server are running on the same hostNote the following information about SAPinst
n When you start SAPinst SAPinst GUI and the GUI server also start SAPinst GUI connects to theGUI server with a secure SSL connection and the GUI server connects to SAPinst
n SAPinst creates the installation directory sapinst_instdir where it keeps its log files Theinstallation directory is located directly in the Program Files directory If SAPinst is not able tocreate sapinst_instdir there it tries to create sapinst_instdir in the directory defined by theenvironment variable TEMP
Recommendation
We recommend that you keep all installation directories until the system is completely andcorrectly installed
n SAPinst creates a subdirectory for each installation option calledltsapinst_instdirgtltinstallation_option_directorygt which is located in ProgramFiles
n The SAPinst Self-Extractor extracts the executables to a temporary directory (TEMP TMP TMPDIR orSystemRoot) These executables are deleted after SAPinst has stopped runningDirectories called sapinst_exexxxxxxxxxx sometimes remain in the temporary directory Youcan safely delete them The temporary directory also contains the SAPinst Self-Extractor log filedev_selfexout which might be useful if an error occurs
Caution
If SAPinst cannot find a temporary directory the installation terminates with the error FCO-00058
n If you want to terminate SAPinst and the SAPinst Self-Extractor choose one of the followingoptionsl Right-click the icon for the SAPinst output window located in theWindows tray and choose Exitl Click the icon for the SAPinst output window located in the Windows tray and choose File
Exit
PrerequisitesYou are logged on as a user with administration rights to install the SAPinst tool and the SAP system
Note
When installing from a network share make sure that everyone has read access to this share Theinstallation routine creates users such as ltsidgtadm (for example ce1adm) During the installationSAPinst does a user switch to this user If the newly created user does not have permissions to thenetwork share where the installation is running from the installation will fail
2040 PUBLIC 05162008
4 Installing Additional Components (Optional)
Procedure
1 Insert the SAP Installation Master DVD into your DVD drive or mount it locally2 Start SAPinst from the SAP Installation Master DVD by double-clicking sapinstexe from the
following path ltDVD drivegtDATA_UNITSIM_WIN_ltplatformgt_ltdatabasegtSAPinst GUI starts automatically by displaying theWelcome screen
3 In theWelcome screen choose the required SAPinst installation option from the tree structure
Note
If SAPinst prompts you to log off from your system log off and log on againSAPinst restarts automaticallyChoose Continue Old Installation
4 Choose whether you want to run the installation in Typicalmode or in CustommodeIf you select Typical the installation wizard provides automatic default settings and you only haveto respond to a small selection of prompts The rest is set by default If you select Custom you haveto respond to all prompts
Note
If you want to install the offline documentation for SAP NetWeaver CE you need to chooseCustommodeAfter the installation you can access the offline documentation by choosing Start All ProgramsSAP NetWeaver Composition Environment ltSAPSIDgt
5 Follow the screens and enter the required parameters
Note
For more information about the input parameters and information about restrictions forpasswords position the cursor on the required parameter and press F1
After you have entered all requested input parameters SAPinst displays the Parameter Summaryscreen This screen shows both the parameters that you entered and those that SAPinst set bydefault If required you can revise the parameters before starting the installation
6 To start the installation choose Start SAPinst starts the installation and displays the progress ofthe installation When the installation has successfully been completed SAPinst shows the dialogExecution of ltService_Namegt has been completed successfully
Note
After installing additional components you need to perform some post-installation activities [page 27] toget the system up amp running
05162008 PUBLIC 2140
This page is intentionally left blank
5 Installing SAP Memory Analyzer (Optional)
5 Installing SAP Memory Analyzer(Optional)
SAP Memory Analyzer helps you to analyze Java heap dumps easily find big chunks of memory orcomplex memory aggregation patterns in your data structures and identify who is keeping thismemory alive New and innovative analysis techniques support the user with a fast and powerfulfeature setThe tool (Eclipse RCP application) was developed to analyze real productive heap dumps whichtend to get enormous in size with hundreds of millions of objects Performance low resourceconsumption and especially the newly developed innovative analysis techniques make it a helpfultool even to small application heap dumpsYou can install SAP Memory Analyzer as an additional tool
This procedure tells you how to install an SAP system with SAPinst SAPinst includes a GUI and aGUI server both using Java This section describes an installation where SAPinst SAPinst GUI andthe GUI server are running on the same hostNote the following information about SAPinst
n When you start SAPinst SAPinst GUI and the GUI server also start SAPinst GUI connects to theGUI server with a secure SSL connection and the GUI server connects to SAPinst
n SAPinst creates the installation directory sapinst_instdir where it keeps its log files Theinstallation directory is located directly in the Program Files directory If SAPinst is not able tocreate sapinst_instdir there it tries to create sapinst_instdir in the directory defined by theenvironment variable TEMP
Recommendation
We recommend that you keep all installation directories until the system is completely andcorrectly installed
n SAPinst creates a subdirectory for each installation service calledltsapinst_instdirgtltinstallation_service_directorygt which is located in ProgramFiles
n The SAPinst Self-Extractor extracts the executables to a temporary directory (TEMP TMP TMPDIR orSystemRoot) These executables are deleted after SAPinst has stopped runningDirectories called sapinst_exexxxxxxxxxx sometimes remain in the temporary directory Youcan safely delete them The temporary directory also contains the SAPinst Self-Extractor log filedev_selfexout which might be useful if an error occurs
05162008 PUBLIC 2340
5 Installing SAP Memory Analyzer (Optional)
Caution
If SAPinst cannot find a temporary directory the installation terminates with the error FCO-00058
n If you want to terminate SAPinst and the SAPinst Self-Extractor choose one of the followingoptionsl Right-click the icon for the SAPinst output window located in theWindows tray and choose Exitl Click the icon for the SAPinst output window located in the Windows tray and choose File
Exit
PrerequisitesYou are logged on as a user with administration rights to install the SAPinst tool and the SAP system
Note
When installing from a network share make sure that everyone has read access to this share Theinstallation routine creates users such as ltsidgtadm (for example ce1adm) During the installationSAPinst performs a user switch to this user If the newly created user does not have permissions tothe network share where the installation is running from the installation will fail
Procedure
1 Insert the SAP Installation Master DVD into your DVD drive or mount it locally2 Start SAPinst from the SAP Installation Master DVD by double-clicking sapinstexe from the
following path ltDVD drivegtDATA_UNITSIM_WIN_ltplatformgt_ltdatabasegtSAPinst GUI starts automatically by displaying theWelcome screen
3 In theWelcome screen choose the required SAPinst installation option from the tree structure
Note
If SAPinst prompts you to log off from your system log off and log on againSAPinst restarts automaticallyChoose Continue Old Installation
4 Choose whether you want to run the installation in Typicalmode or in CustommodeIf you select Typical the installation wizard provides automatic default settings and you only haveto respond to a small selection of prompts The rest is set by default If you select Custom you haveto respond to all prompts
Note
If you want to install the offline documentation for SAP NetWeaver CE you need to chooseCustommodeAfter the installation you can access the offline documentation by choosing Start All ProgramsSAP NetWeaver Composition Environment ltSAPSIDgt
2440 PUBLIC 05162008
5 Installing SAP Memory Analyzer (Optional)
5 Follow the screens and enter the required parameters
Note
For more information about the input parameters and information about restrictions forpasswords position the cursor on the required parameter and press F1
After you have entered all requested input parameters SAPinst displays the Parameter Summaryscreen This screen shows both the parameters that you entered and those that SAPinst set bydefault If required you can revise the parameters before starting the installation
6 To start the installation choose Start SAPinst starts the installation and displays the progress ofthe installation When the installation has successfully been completed SAPinst shows the dialogExecution of ltOption_Namegt has been completed successfully
05162008 PUBLIC 2540
This page is intentionally left blank
6 Post-Installation Activities
6 Post-Installation Activities
This section describes the steps that you have to perform after the installation has finished successfully
Running the Configuration Wizard (Optional)
Note
You can run the configuration wizard only once and only directly after installing and patchingyour SAP system
For SAP NetWeaver CE you need to run the following configuration tasks
n Configuration of Services Registry Webservice Destinations
n When you have installed the IDE Update Site componentConfiguration and Mirroring of local NWDSUpdate Site
n When you have installed the Adobe Document Services component Initial setup ADS in CE
When you have an NWDI installation on another SAP NetWeaver 70 system you can perform thefollowing configuration tasks
n Change Management Service (CMS) Create an Application Skeleton
n Change Management Service (CMS) Modify a Software Component
To run the configuration wizard proceed as follows
1 After SAPinst has finished open the SAP NetWeaver Administrator by entering the following URLin a browser httplthostgtlthttp_portgtnwa
2 Log on as user j2ee_admin3 In the SAP NetWeaver Administrator choose Configuration Management Scenarios Configuration
Wizard 4 Select the appropriate configuration task in the list and choose Start5 Follow the on-screen instructions6 After the configuration wizard has finished successfully restart your SAP system
Configuring the IDE Update Site
1 In the Configuration Wizard select the task Configuration and Mirroring of local NWDS Update Site in thelist and choose Start
2 Follow the on-screen instructions
05162008 PUBLIC 2740
6 Post-Installation Activities
Provide the credentials for the source update site location The default URL is the central SAPupdate site You can also use your installation DVD as source update site which makes themirror process much faster To use the DVD as source update site you have to specify the URLfileltdvd_drivegtIDE
3 After the configuration wizard has finished successfully restart your SAP systemThe data of the source update site location is now mirrored to your server
Enabling Adobe Document ServicesIf you have installed SAP NetWeaver Composition Environment with the Adobe DocumentServices add-on in the developer edition on aWindows platform you must complete the followingpost-installation steps to enable the add-on In case you have installed an AS Java cluster applythe procedure to the central host as well as to all other hosts where additional application serverinstances are running
1 Using the SAP Management Console stop the AS Java systemFormore information about starting and stopping SAP systems see httphelpsapcomnwce
Administratorrsquos Guide Administration of SAP NetWeaver CE General System Administration AS Java(Application Server Java)
2 From the Startmenu open Control Panel Administrative Tools Computer Management Services andApplications Services
3 Select SAPltSIDgt_ltInstance_Numbergt (for example SAPCE1_00) and open Properties from thecontext menu
4 On the Log On tab page enable the Local System account indicator5 Repeat the above steps for the second SAPltSIDgt_ltInstance_Numbergt service that you see in the list6 Start the AS Java system
Adobe LiveCycle Designer
For more information about how to install and configure the Adobe LiveCycle Designer see SAPNote 962763
Enabling Services RegistryYou must apply additional configuration steps to enable Services Registry after you have installed anSAP NetWeaver Composition Environment system containing the following components
n Java Application Server and Composition Platformn Java Application Server and Adobe Document Services
To enable Services Registry you must apply the following configuration templates to your systemCE_Complete_Stack_development_full
2840 PUBLIC 05162008
6 Post-Installation Activities
Note
For more information about what configuration templates are available see Configuration Templates[page 33]For more information about applying configuration templates see httphelpsapcomnwce
SAP NetWeaver Composition Environment Library Administratorrsquos Guide Configuration of SAP NetWeaver CEInitial System Configuration AS Java Configuration Activating a Configuration Template
See also
httphelpsapcomnwce SAP NetWeaver Composition Environment Library Developerrsquos GuideDeveloping and Composing Applications Consuming Enterprise Services Searching for Services Services RegistryTasks Searching amp Browsing Service Definitions Configuring the Services Registry
Configuring the Portal in SAP NetWeaver CEAfter installing the portal in SAP NetWeaver CE a number of deactivated or irrelevant tools aredisplayed in the UI To display the correct portals tools for CE proceed as follows
1 Open a browser and log on to your portal as an administrator2 In the same browser session enter the following URL
httplthostgtlthttpportgtirjservletprtportalprtrootcomsapportal
contentlayersContentLayersTool
where lthostgt is the host name of your server and lthttpportgt is the port number of your server3 In the Portal Mode Configuration Tool choose Activate Development Mode to restore the portal tools
and content that are assigned to the development mode4 Restart or refresh your browser5 In the SAP Management Console restart the server
You may then continue with the mandatory and optional configuration steps as described inhttphelpsapcomnwce SAP NetWeaver Composition Environment Library Administratorrsquos Guide
Configuration of SAP NetWeaver Composition Environment Configuration for CE Additional Components Configuringthe Portal
Changing the Password for the Internet Communication Manager (ICM)You can monitor and manage the Internet Communication Manager (ICM) from the command lineprogramAfter the installation of your SAP NetWeaver CE system has successfully finished you need to changethe ICM password manually To do so proceed as follows
1 Log on at operating system level to the computer where the ICM is running2 Start the program icmon with icmon ndasha profile=ltinstance_profilegt to maintain the
authentication file (default authfiletxt)3 Choose a to add a user4 Choose c to change the password of the existing user
05162008 PUBLIC 2940
6 Post-Installation Activities
5 Choose s to save your settings
Further Configuration StepsAfter installing your SAP NetWeaver CE system and performing the post-installation steps to get thesystem up amp running you may need to perform further configuration stepsRefer to the following documentation to proceed with your tasks
n If you are a system administrator refer to httphelpsapcomnwce Administratorrsquos Guide It contains information about how to configure and administer your system
n If you are a developer refer to httphelpsapcomnwce Developerrsquos Guide It providesguidelines for developing applications using the SAP NetWeaver CE
Note
The SAP NetWeaver CE documentation is also available offline as a part of your installation To accessit choose Start All Programs SAP NetWeaver Composition Environment 10 Documentation
3040 PUBLIC 05162008
7 Additional Information
7 Additional Information
The following section provides additional information about the installation of SAP NetWeaverComposition Environment
71 Transporting Self-Developed Software ComponentArchives (SCA) into the System
PrerequisitesYou have developed your own Software Component Archives (SCA) and want to transport theminto your SAP NetWeaver CE system
ProcedureTo transport your SCAs to the SAP NetWeaver CE system proceed as follows
1 Download the update file from httpservicesapcomswdc Download Support Packages andPatches Entry by Application Group SAP NetWeaver SAP NETWEAVER SAP NETWEAVER CE71 Support Package Stacks
2 From an empty directory run the update tool updateltIDgtexe
Note
If the tool displays descriptions such as Applying Support Packages you can ignore them
3 In the dialog screens specify the directory where your SCAs are located4 Follow the on-screen instructions
Only valid for MaxDB
72 Troubleshooting ‒ Repairing an Inconsistent SAP MaxDBInstallation
PrerequisitesDuring the preinstallation phase the installation tool checks the Microsoft Windows registry foralready installed SAP MaxDB softwareIf the registry key is found but there is no software on the hard drive you receive the followingmessage
05162008 PUBLIC 3140
7 Additional Information73 Restarting the SAP MaxDB Server Manually
The existing MaxDB software is not consistent Check the file system and registry
The most common reason for this inconsistency is the manual deletion of the software from the filesystem without using the specified tools
ProcedureTo repair this inconsistency proceed as follows
1 Choose Start Control Panel Administrative Tools Services 2 Make sure the services SAPDBWWW SAPDB and XServer are stopped3 Choose Start Run and run the command regedit4 Go to My ComputerHKEY_LOCAL_MACHINESOFTWARESAPSAP DBTech Key IndepPrograms
The key contains a path to a foldera) Check if this folder exists on the file systemb) Note down the value of Key IndepPrograms for later usage (see step 7)
If the path does not exist in the file system delete the key SAP DBTech5 Delete the following keys
n My ComputerHKEY_LOCAL_MACHINESYSTEMCurrentControlSetServicesSAP DBTech-
n My ComputerHKEY_LOCAL_MACHINESYSTEMCurrentControlSetServicesSAPDBWWW
n My ComputerHKEY_LOCAL_MACHINESYSTEMCurrentControlSetServicesXServer
6 Choose Start Control Panel System Advanced Environment Variables System Variables Path 7 Delete the following paths from the variable
n ltIndepProgramsgtbin
n ltIndepProgramsgtpgm
8 Reboot your computer
End of MaxDB
Only valid for MaxDB
73 Restarting the SAP MaxDB Server Manually
If after a reboot the database server is not running automatically you need to restart the SAP MaxDBserver manually
Production SystemsTo restart the SAP MaxDB server manually proceed as follows
1 Open a command prompt and enter the following command net start sapdbwww
ORChoose Start All Programs Administrative Tools Services Double-click on SAP DB WWW andchoose Start
2 Open the SAP Management Console and choose SAP Systems ltSAPSIDgt ltmachine namegt
3240 PUBLIC 05162008
7 Additional Information74 Restarting the MS SQL Server Manually
3 Enter the master password and choose Logon4 Choose Online When the database server is online you can restart the engine
Development SystemsTo restart the SAP MaxDB server manually choose Start All Programs SAP NetWeaver CompositionEnvironment CE Application Server ltSAPSIDgt Start Application Server End of MaxDB
Only valid for MS SQL Server
74 Restarting the MS SQL Server Manually
If after a reboot the database server is not running automatically you need to restart the MS SQLServer manually
Procedure
1 Choose Start All Programs Administrative Tools Services 2 Look for the service named SQL Server ltnamegt where ltnamegt is MSSQLSERVER for the default
instance or ltinstance namegt for a named instance3 If the service status is not started right-click the service and choose Start in the context menu4 To insure the service is started automatically after each system restart right-click it and choose
Properties Select Automatic as the startup type
End of MS SQL Server
75 Configuration Templates
Configuration templates contain the predefined instance configuration for specific scenarios Theyare automatically applied according to the installation option you have selected The templatesare designed to optimize system performance by applying certain configuration to the Java VirtualMachine and the application server as well as by applying startup filters to AS Java services andapplications to start only those relevant for the selected installation optionsThe following table provides information about the available templates with SAP NetWeaverComposition Environment In the template name replace the ltsystem_modegt parameter bydevelopment (for the templates relevant to systems installed in developmentmode) or production (forthe templates relevant to systems installed in productivemode)
05162008 PUBLIC 3340
7 Additional Information76 Uninstalling SAP NetWeaver Composition Environment
Configuration Template Selected Installation Options
CE_Java_EE_ltsystem_modegt_full Java Application Server Installation
CE_Composition_Environment_ltsystem_modegt_full Java Application Server Installation + CompositionPlatform Installation
CE_Adobe_Document_Service_ltsystem_modegt_full Java Application Server Installation + AdobeDocument Services Add-on Installation
CE_Composite_Voice_ltsystem_modegt_full Java Application Server Installation + Voice Add-onInstallation
CE_Complete_Stack_ltsystem_modegt_full Java Application Server Installation + CompositionPlatform Installation + Adobe Document ServicesAdd-on Installation + Voice Add-on Installation
If your selection cannot be mapped to one of the combinations in the above table the templateCE_Complete_Stack_ltsystem_modegt_full is applied It starts all applications and services neededto run the complete stackYou canmanually apply a different configuration template if youwant to switch to another installationoption For example by changing from template CE_Complete_Stack_ltsystem_modegt_full toCE_Java_EE_ltsystem_modegt_full you achieve shorter startup times and less memory consumptionbut also less functionality since not all applications and services are runningFor more information about applying configuration templates see httphelpsapcomnwce
Administratorrsquos Guide Configuration of SAP NetWeaver CE Initial System Configuration AS Java ConfigurationActivating a Configuration Template
Note
Make sure that you do not apply a development template to a productive system or vice versa
76 Uninstalling SAP NetWeaver Composition Environment
You have to uninstall all components of the SAP NetWeaver Composition Environment separatelythat is SAP NetWeaver CE and SAP NetWeaver Developer StudioYou can uninstall your SAP NetWeaver CE system in different ways
Uninstalling SAP NetWeaver CEWindows Choose Start Control Panel Add Remove programs SAP SystemltSAPSIDgt
Uninstalling SAP NetWeaver CE Using SAPinst
1 Insert the SAP Installation Master DVD into your DVD drive or mount it locally
3440 PUBLIC 05162008
7 Additional Information76 Uninstalling SAP NetWeaver Composition Environment
2 Start SAPinst from the SAP Installation Master DVD as described in the section Installing SAPNetWeaver Composition Environment
3 In theWelcome screen choose Uninstall SAP System or Single Instances from the tree structure4 Follow the on-screen instructions
Uninstalling SAP NetWeaver Developer Studio
Prerequisites
Before uninstalling SAP NetWeaver Developer Studio consider the following
n All additionally installed features and plug-ins that were installed to the same folder as DeveloperStudio for example by using the Eclipse Update Manager will also be removed
n There may be other directories and files in the installation directory notablyltinstall_dirgteclipseworkspace ltinstall_dirgteclipselinks andltinstall_dirgteclipseconfiguration that contain important data The files and folder aswell as the existing workspaces are retained when the product is uninstalled
Procedure
To uninstall SAP NetWeaver Developer Studio proceed as described above You can use either oneof the options
Uninstalling the SAP Management ConsoleSince all SAP systems use the SAP Management Console there is no uninstallation option for theSAP Management Console with SAPinst If you are sure that you do not need the SAP ManagementConsole any more you can remove it using Start Control Panel Add Remove programs
05162008 PUBLIC 3540
Typographic Conventions
Example Description
lt gt Angle brackets indicate that you replace these words or characters with appropriateentries to make entries in the system for example ldquoEnter your ltUser Namegtrdquo
Arrows separating the parts of a navigation path for example menu options
Example Emphasized words or expressions
Example Words or characters that you enter in the system exactly as they appear in thedocumentation
Example Textual cross-references to an internet address for example httpwwwsapcom
example Quicklinks added to the internet address of a homepage to enable quick access tospecific content on the Web
123456 Hyperlink to an SAP Note for example SAP Note 123456
Example n Words or characters quoted from the screen These include field labels screen titlespushbutton labels menu names and menu options
n Cross-references to other documentation or published works
Example n Output on the screen following a user action for example messagesn Source code or syntax quoted directly from a programn File and directory names and their paths names of variables and parameters and
names of installation upgrade and database tools
EXAMPLE Technical names of system objects These include report names program namestransaction codes database table names and key concepts of a programming languagewhen they are surrounded by body text for example SELECT and INCLUDE
EXAMPLE Keys on the keyboard
3640 PUBLIC 05162008
SAP AGDietmar-Hopp-Allee 16
69190 WalldorfGermany
T +4918 0534 34 34F +4918 0534 34 20
wwwsapcom
copy Copyright 2008 SAP AG All rights reserved
No part of this publication may be reproduced or transmitted in any form or for any purpose without the express permissionof SAP AG The information contained herein may be changed without prior noticeSome software products marketed by SAP AG and its distributors contain proprietary software components of othersoftware vendors
No part of this publication may be reproduced or transmitted in any form or for any purpose without the express permissionof SAP AG The information contained herein may be changed without prior noticeSome software products marketed by SAP AG and its distributors contain proprietary software components of othersoftware vendorsMicrosoft Windows Excel Outlook and PowerPoint are registered trademarks of Microsoft CorporationIBM DB2 DB2 Universal Database OS2 Parallel Sysplex MVSESA AIX S390 AS400 OS390 OS400 iSeries pSeriesxSeries zSeries System i System i5 System p System p5 System x System z System z9 zOS AFP Intelligent MinerWebSphere Netfinity Tivoli Informix i5OS POWER POWER5 POWER5+ OpenPower and PowerPC are trademarks orregistered trademarks of IBM CorporationAdobe the Adobe logo Acrobat PostScript and Reader are either trademarks or registered trademarks of Adobe SystemsIncorporated in the United States andor other countriesOracle is a registered trademark of Oracle CorporationUNIX XOpen OSF1 and Motif are registered trademarks of the Open GroupCitrix ICA Program Neighborhood MetaFrame WinFrame VideoFrame and MultiWin are trademarks or registeredtrademarks of Citrix Systems IncHTML XML XHTML and W3C are trademarks or registered trademarks of W3Creg World Wide Web ConsortiumMassachusetts Institute of TechnologyJava is a registered trademark of Sun Microsystems IncJavaScript is a registered trademark of Sun Microsystems Inc used under license for technology invented and implementedby NetscapeSAP R3 xApps xApp SAP NetWeaver Duet PartnerEdge ByDesign SAP Business ByDesign and other SAP productsand services mentioned herein as well as their respective logos are trademarks or registered trademarks of SAP AG inGermany and in several other countries all over the world All other product and service names mentioned are thetrademarks of their respective companies Data contained in this document serves informational purposes only Nationalproduct specifications may varyThese materials are subject to change without notice These materials are provided by SAP AG and its affiliated companies(SAP Group) for informational purposes only without representation or warranty of any kind and SAP Group shall notbe liable for errors or omissions with respect to the materials The only warranties for SAP Group products and services arethose that are set forth in the express warranty statements accompanying such products and services if any Nothing hereinshould be construed as constituting an additional warranty
This document was created using stylesheet 2006-12-31 (V51beta [= 60 for E3]) and XSLT processor SAXON 652 fromMichael Kay (httpsaxonsfnet) XSLT version 1
05162008 PUBLIC 3740
DisclaimerSome components of this product are based on Javatrade Any code change in these components may cause unpredictable andsevere malfunctions and is therefore expressly prohibited as is any decompilation of these componentsAny Javatrade Source Code delivered with this product is only to be used by SAPrsquos Support Services and may not be modified oraltered in any way
Documentation in the SAP Service MarketplaceYou can find this document at the following address httpsservicesapcominstguides
3840 PUBLIC 05162008
This page is intentionally left blank
SAP AGDietmar-Hopp-Allee 1669190 WalldorfGermanyT +4918 0534 34 34F +4918 0534 34 20wwwsapcom
copy Copyright 2008 SAP AG All rights reservedNo part of this publication may be reproduced or transmitted in any form or for any purpose without the express permission of SAP AG The information contained herein may bechanged without prior notice
3 Installing SAP NetWeaver Developer Studio
Caution
Do only use your Update Site on the AS Java or the SAP Update Site Using other update sites likethe Eclipse update site can lead to a version mismatch of features and undesired results
PrerequisitesCheck the hardware and software requirements necessary for the installation of SAP NetWeaverDeveloper Studio
Requirement Type Requirement
HardwareNote
SAP NetWeaver Developer Studio can be installedon a 32-bit platform only
n 1 GB free disk spacen 1 CPU with 3 GHz (minimum)n 2 GB RAM (minimum)n Paging file size 2x RAMTo check paging file size
1 Choose Windows Start button and choose ControlPanel reg System
2 Choose tab Advanced and choose Settings in thePerformance pane
3 Choose tab Advanced in the Performance Options dialogwindowThe current page size is displayed in the Virtualmemory pane To change the page size value chooseChange enable the Custom size radio button and enterthe new value in the input field Initial size (MB)
Software Supported Operating SystemsMicrosoft Windows XP Professional SP2 (orhigher)(32-bit)JDK versionSUN JDK 150_11 (or higher)You can download this version from the SUNweb site
The installation process begins with preparation steps that are dependent on the installation methodDVD or update site The following installation steps are independent of the installation method
Preparation ‒ Installing the Developer Studio from a DVD
1 Start SAPinst from the SAP Installation Master DVD by double-clicking sapinstexe from thefollowing path ltDVD drivegtDATA_UNITSIM_WIN_I386_ltdata_basegt
SAPinst GUI starts automatically by displaying theWelcome screen2 In theWelcome screen choose the installation option SAP NetWeaver Developer Studio
05162008 PUBLIC 1540
3 Installing SAP NetWeaver Developer Studio
3 Choose Next and follow the on-screen instructions
Preparation ‒ Installing the Developer Studio from an Update Site
1 Start your Web browser and connect to the update site2 Download NWDS_platformzip
This zip file contains the SAP NetWeaver Developer Studio Platform Installer3 Unzip NWDS_platformzip to a temporary folder on your local disk drive4 Navigate to the temporary folder5 Run the installer IDESetupexe contained in the zip
Installing the Developer Studio from DVD and Update SiteFollow the on-screen instructions of the installation toolDuring the installation dialog you are asked for the update site location Always accept thepreconfigured URL that points to the update site that is correct for the installation location (DVDor update site) you selectedThe Developer Studio is started automatically when the installation dialog is finished During startupyou are asked for the workspace folder for the Developer Studio
Caution
If you already had a Developer Studio installed on this client you need to specify a differentworkspace than the one you used for the previously installed Developer Studio version This is alsotrue if you have uninstalled the previous version already Uninstalling a Developer Studio doesnot remove the content you created in the workspace folder that includes the preferences of theDeveloper Studio and maybe projects you stored locally
The next prompt during start up is to confirm the network connections On the network connectionpreference page you can specify if you connect to the Internet directly or you can configure yourproxy The network connection settings must be configured so that the Developer Studio can connectto the update site There can be misleading error messages if the proxy settings are not correctThe installer installs the kernel of the Developer Studio The kernel contains Eclipse and a few SAPadditions but is not equipped with the SAP features necessary for the Composition EnvironmentTo install the required SAP features you have to install the SAP features with the following updateprocedure
Selecting and Installing Features
1 The available features are displayedThe Updates dialog window displays the main node of the features Open the main node andyou see the available main features
2 Choose the main features you want to install
1640 PUBLIC 05162008
3 Installing SAP NetWeaver Developer Studio
Note
Make sure that the component required for the selected feature is installed on the AS Java
3 Accept the license agreement4 In the screen Optional Features choose Next
Caution
Never deselect an optional feature This can cause a malfunction of the Developer Studio
5 In the Install screen choose FinishThe features are being downloaded
6 Choose Install All to verify the feature installation7 Restart the Developer Studio for the updates to take effect
Recommendation
We recommend that you start the Developer Studio with the shortcuts that were created onyour desktop or in the StartmenuTo get to the SAP documentation in the Developer Studio open the application and choose fromthe menu bar Help Help Contents SAP NetWeaver CE Developer Studio Documentation
The installation of the Developer Studio is now completed
Additional ActivitiesOnce the Developer Studio is installed you can add update and remove installed features at any time
Adding Features to an Installed Developer Studio
You can add features any time
1 Choose Help Software Updates Find and Install 2 Choose Search for new features to install3 Enable the displayed update site
Recommendation
We recommend that you do not change the update site to avoid version inconsistencies
4 Continue with step Selecting and Installing Main Features as described above
Updating Installed Features
1 Choose Help Software Updates Find and Install 2 Choose Search for updates of currently installed features3 Follow the on-screen instructions
05162008 PUBLIC 1740
3 Installing SAP NetWeaver Developer Studio
As of SP03 SAP NetWeaver Developer Studio uses the IDE Update Site to keep itself up-to-date
1 Choose Help Software Updates Find and Install 2 Choose Search for updates of currently installed features3 Follow the on-screen instructions
Note
The configuration wizard task Configuration and Mirroring of local NWDS Update Site has to be run aftereach patch or update of the IDE update site component on AS JavaFormore information about how to run the configuration wizard see Post-Installation Activities [page 27]
More InformationUpdate Guide ‒ SAP NetWeaver Composition Environment 71 ‒ Update to SPltxxgt available athttpwwwsdnsapcomirjsdnnw-ce
Uninstalling Features
1 To uninstall features choose Help Software Updates Manage Configuration 2 In the Product Configuration window choose Show Disabled Features3 Open the node SAP NetWeaver Developer Studio and its subnode
The features are displayed with its status enabled or disabled4 To change the status of feature select the feature and choose Enable or Disable (depending on
the current status)To uninstall a feature it has to be set to status disabled
5 Restart the SAP NetWeaver Developer Studio to apply the status change
Note
To uninstall all old version features (after the update) choose Help Software Updates UninstallDisabled Features
1840 PUBLIC 05162008
4 Installing Additional Components (Optional)
4 Installing Additional Components(Optional)
You can install the following additional components
n Composition Toolsn Adobe Document Services
n Composite Voicen IDE Update Site
PrerequisitesYou need to meet the same hardware and software requirements as for your already installeddevelopment system plus an additional 2 GB RAMThe Composition Tools and Composite Voice component make use of the Visual Composer VisualComposer is a Web browser based tool to model user interfaces To run Visual Composer thefollowing programsmust be installed on the client computer fromwhich you access Visual Composer
n Microsoft Internet Explorer 60 SP1 or highern Adobe SVG Viewer 30
n Microsoft XML Parser 40 or higher
Note
n Before installing additional components you need to stop all application servers manually
n Before installing additional components and in the case that you made changes to the defaulttemplate settings see SAP Note 953763
Prerequisites for SAP MaxDB
n Make sure that the Application Server Java and its corresponding database is runningYou can stop and start the system using the shortcuts under Start All Programs SAP NetWeaverComposition Environment 71 Application Server JxxltSAPSIDgt
n During the installation of additional components entries are written into the log area of thedatabase To avoid that the log is running full during the installation make sure that your backupstrategy is already active and an initial data backup was successfulWhen you want to establish your backup strategy after installing additional components you canturn on the special log mode AutoOverwrite using the Database Manager GUI This interrupts theexisting backup history You have to run a complete backup to start the history again
05162008 PUBLIC 1940
4 Installing Additional Components (Optional)
ProcedureThis procedure tells you how to install an SAP system with SAPinst SAPinst includes a GUI and aGUI server both using Java This section describes an installation where SAPinst SAPinst GUI andthe GUI server are running on the same hostNote the following information about SAPinst
n When you start SAPinst SAPinst GUI and the GUI server also start SAPinst GUI connects to theGUI server with a secure SSL connection and the GUI server connects to SAPinst
n SAPinst creates the installation directory sapinst_instdir where it keeps its log files Theinstallation directory is located directly in the Program Files directory If SAPinst is not able tocreate sapinst_instdir there it tries to create sapinst_instdir in the directory defined by theenvironment variable TEMP
Recommendation
We recommend that you keep all installation directories until the system is completely andcorrectly installed
n SAPinst creates a subdirectory for each installation option calledltsapinst_instdirgtltinstallation_option_directorygt which is located in ProgramFiles
n The SAPinst Self-Extractor extracts the executables to a temporary directory (TEMP TMP TMPDIR orSystemRoot) These executables are deleted after SAPinst has stopped runningDirectories called sapinst_exexxxxxxxxxx sometimes remain in the temporary directory Youcan safely delete them The temporary directory also contains the SAPinst Self-Extractor log filedev_selfexout which might be useful if an error occurs
Caution
If SAPinst cannot find a temporary directory the installation terminates with the error FCO-00058
n If you want to terminate SAPinst and the SAPinst Self-Extractor choose one of the followingoptionsl Right-click the icon for the SAPinst output window located in theWindows tray and choose Exitl Click the icon for the SAPinst output window located in the Windows tray and choose File
Exit
PrerequisitesYou are logged on as a user with administration rights to install the SAPinst tool and the SAP system
Note
When installing from a network share make sure that everyone has read access to this share Theinstallation routine creates users such as ltsidgtadm (for example ce1adm) During the installationSAPinst does a user switch to this user If the newly created user does not have permissions to thenetwork share where the installation is running from the installation will fail
2040 PUBLIC 05162008
4 Installing Additional Components (Optional)
Procedure
1 Insert the SAP Installation Master DVD into your DVD drive or mount it locally2 Start SAPinst from the SAP Installation Master DVD by double-clicking sapinstexe from the
following path ltDVD drivegtDATA_UNITSIM_WIN_ltplatformgt_ltdatabasegtSAPinst GUI starts automatically by displaying theWelcome screen
3 In theWelcome screen choose the required SAPinst installation option from the tree structure
Note
If SAPinst prompts you to log off from your system log off and log on againSAPinst restarts automaticallyChoose Continue Old Installation
4 Choose whether you want to run the installation in Typicalmode or in CustommodeIf you select Typical the installation wizard provides automatic default settings and you only haveto respond to a small selection of prompts The rest is set by default If you select Custom you haveto respond to all prompts
Note
If you want to install the offline documentation for SAP NetWeaver CE you need to chooseCustommodeAfter the installation you can access the offline documentation by choosing Start All ProgramsSAP NetWeaver Composition Environment ltSAPSIDgt
5 Follow the screens and enter the required parameters
Note
For more information about the input parameters and information about restrictions forpasswords position the cursor on the required parameter and press F1
After you have entered all requested input parameters SAPinst displays the Parameter Summaryscreen This screen shows both the parameters that you entered and those that SAPinst set bydefault If required you can revise the parameters before starting the installation
6 To start the installation choose Start SAPinst starts the installation and displays the progress ofthe installation When the installation has successfully been completed SAPinst shows the dialogExecution of ltService_Namegt has been completed successfully
Note
After installing additional components you need to perform some post-installation activities [page 27] toget the system up amp running
05162008 PUBLIC 2140
This page is intentionally left blank
5 Installing SAP Memory Analyzer (Optional)
5 Installing SAP Memory Analyzer(Optional)
SAP Memory Analyzer helps you to analyze Java heap dumps easily find big chunks of memory orcomplex memory aggregation patterns in your data structures and identify who is keeping thismemory alive New and innovative analysis techniques support the user with a fast and powerfulfeature setThe tool (Eclipse RCP application) was developed to analyze real productive heap dumps whichtend to get enormous in size with hundreds of millions of objects Performance low resourceconsumption and especially the newly developed innovative analysis techniques make it a helpfultool even to small application heap dumpsYou can install SAP Memory Analyzer as an additional tool
This procedure tells you how to install an SAP system with SAPinst SAPinst includes a GUI and aGUI server both using Java This section describes an installation where SAPinst SAPinst GUI andthe GUI server are running on the same hostNote the following information about SAPinst
n When you start SAPinst SAPinst GUI and the GUI server also start SAPinst GUI connects to theGUI server with a secure SSL connection and the GUI server connects to SAPinst
n SAPinst creates the installation directory sapinst_instdir where it keeps its log files Theinstallation directory is located directly in the Program Files directory If SAPinst is not able tocreate sapinst_instdir there it tries to create sapinst_instdir in the directory defined by theenvironment variable TEMP
Recommendation
We recommend that you keep all installation directories until the system is completely andcorrectly installed
n SAPinst creates a subdirectory for each installation service calledltsapinst_instdirgtltinstallation_service_directorygt which is located in ProgramFiles
n The SAPinst Self-Extractor extracts the executables to a temporary directory (TEMP TMP TMPDIR orSystemRoot) These executables are deleted after SAPinst has stopped runningDirectories called sapinst_exexxxxxxxxxx sometimes remain in the temporary directory Youcan safely delete them The temporary directory also contains the SAPinst Self-Extractor log filedev_selfexout which might be useful if an error occurs
05162008 PUBLIC 2340
5 Installing SAP Memory Analyzer (Optional)
Caution
If SAPinst cannot find a temporary directory the installation terminates with the error FCO-00058
n If you want to terminate SAPinst and the SAPinst Self-Extractor choose one of the followingoptionsl Right-click the icon for the SAPinst output window located in theWindows tray and choose Exitl Click the icon for the SAPinst output window located in the Windows tray and choose File
Exit
PrerequisitesYou are logged on as a user with administration rights to install the SAPinst tool and the SAP system
Note
When installing from a network share make sure that everyone has read access to this share Theinstallation routine creates users such as ltsidgtadm (for example ce1adm) During the installationSAPinst performs a user switch to this user If the newly created user does not have permissions tothe network share where the installation is running from the installation will fail
Procedure
1 Insert the SAP Installation Master DVD into your DVD drive or mount it locally2 Start SAPinst from the SAP Installation Master DVD by double-clicking sapinstexe from the
following path ltDVD drivegtDATA_UNITSIM_WIN_ltplatformgt_ltdatabasegtSAPinst GUI starts automatically by displaying theWelcome screen
3 In theWelcome screen choose the required SAPinst installation option from the tree structure
Note
If SAPinst prompts you to log off from your system log off and log on againSAPinst restarts automaticallyChoose Continue Old Installation
4 Choose whether you want to run the installation in Typicalmode or in CustommodeIf you select Typical the installation wizard provides automatic default settings and you only haveto respond to a small selection of prompts The rest is set by default If you select Custom you haveto respond to all prompts
Note
If you want to install the offline documentation for SAP NetWeaver CE you need to chooseCustommodeAfter the installation you can access the offline documentation by choosing Start All ProgramsSAP NetWeaver Composition Environment ltSAPSIDgt
2440 PUBLIC 05162008
5 Installing SAP Memory Analyzer (Optional)
5 Follow the screens and enter the required parameters
Note
For more information about the input parameters and information about restrictions forpasswords position the cursor on the required parameter and press F1
After you have entered all requested input parameters SAPinst displays the Parameter Summaryscreen This screen shows both the parameters that you entered and those that SAPinst set bydefault If required you can revise the parameters before starting the installation
6 To start the installation choose Start SAPinst starts the installation and displays the progress ofthe installation When the installation has successfully been completed SAPinst shows the dialogExecution of ltOption_Namegt has been completed successfully
05162008 PUBLIC 2540
This page is intentionally left blank
6 Post-Installation Activities
6 Post-Installation Activities
This section describes the steps that you have to perform after the installation has finished successfully
Running the Configuration Wizard (Optional)
Note
You can run the configuration wizard only once and only directly after installing and patchingyour SAP system
For SAP NetWeaver CE you need to run the following configuration tasks
n Configuration of Services Registry Webservice Destinations
n When you have installed the IDE Update Site componentConfiguration and Mirroring of local NWDSUpdate Site
n When you have installed the Adobe Document Services component Initial setup ADS in CE
When you have an NWDI installation on another SAP NetWeaver 70 system you can perform thefollowing configuration tasks
n Change Management Service (CMS) Create an Application Skeleton
n Change Management Service (CMS) Modify a Software Component
To run the configuration wizard proceed as follows
1 After SAPinst has finished open the SAP NetWeaver Administrator by entering the following URLin a browser httplthostgtlthttp_portgtnwa
2 Log on as user j2ee_admin3 In the SAP NetWeaver Administrator choose Configuration Management Scenarios Configuration
Wizard 4 Select the appropriate configuration task in the list and choose Start5 Follow the on-screen instructions6 After the configuration wizard has finished successfully restart your SAP system
Configuring the IDE Update Site
1 In the Configuration Wizard select the task Configuration and Mirroring of local NWDS Update Site in thelist and choose Start
2 Follow the on-screen instructions
05162008 PUBLIC 2740
6 Post-Installation Activities
Provide the credentials for the source update site location The default URL is the central SAPupdate site You can also use your installation DVD as source update site which makes themirror process much faster To use the DVD as source update site you have to specify the URLfileltdvd_drivegtIDE
3 After the configuration wizard has finished successfully restart your SAP systemThe data of the source update site location is now mirrored to your server
Enabling Adobe Document ServicesIf you have installed SAP NetWeaver Composition Environment with the Adobe DocumentServices add-on in the developer edition on aWindows platform you must complete the followingpost-installation steps to enable the add-on In case you have installed an AS Java cluster applythe procedure to the central host as well as to all other hosts where additional application serverinstances are running
1 Using the SAP Management Console stop the AS Java systemFormore information about starting and stopping SAP systems see httphelpsapcomnwce
Administratorrsquos Guide Administration of SAP NetWeaver CE General System Administration AS Java(Application Server Java)
2 From the Startmenu open Control Panel Administrative Tools Computer Management Services andApplications Services
3 Select SAPltSIDgt_ltInstance_Numbergt (for example SAPCE1_00) and open Properties from thecontext menu
4 On the Log On tab page enable the Local System account indicator5 Repeat the above steps for the second SAPltSIDgt_ltInstance_Numbergt service that you see in the list6 Start the AS Java system
Adobe LiveCycle Designer
For more information about how to install and configure the Adobe LiveCycle Designer see SAPNote 962763
Enabling Services RegistryYou must apply additional configuration steps to enable Services Registry after you have installed anSAP NetWeaver Composition Environment system containing the following components
n Java Application Server and Composition Platformn Java Application Server and Adobe Document Services
To enable Services Registry you must apply the following configuration templates to your systemCE_Complete_Stack_development_full
2840 PUBLIC 05162008
6 Post-Installation Activities
Note
For more information about what configuration templates are available see Configuration Templates[page 33]For more information about applying configuration templates see httphelpsapcomnwce
SAP NetWeaver Composition Environment Library Administratorrsquos Guide Configuration of SAP NetWeaver CEInitial System Configuration AS Java Configuration Activating a Configuration Template
See also
httphelpsapcomnwce SAP NetWeaver Composition Environment Library Developerrsquos GuideDeveloping and Composing Applications Consuming Enterprise Services Searching for Services Services RegistryTasks Searching amp Browsing Service Definitions Configuring the Services Registry
Configuring the Portal in SAP NetWeaver CEAfter installing the portal in SAP NetWeaver CE a number of deactivated or irrelevant tools aredisplayed in the UI To display the correct portals tools for CE proceed as follows
1 Open a browser and log on to your portal as an administrator2 In the same browser session enter the following URL
httplthostgtlthttpportgtirjservletprtportalprtrootcomsapportal
contentlayersContentLayersTool
where lthostgt is the host name of your server and lthttpportgt is the port number of your server3 In the Portal Mode Configuration Tool choose Activate Development Mode to restore the portal tools
and content that are assigned to the development mode4 Restart or refresh your browser5 In the SAP Management Console restart the server
You may then continue with the mandatory and optional configuration steps as described inhttphelpsapcomnwce SAP NetWeaver Composition Environment Library Administratorrsquos Guide
Configuration of SAP NetWeaver Composition Environment Configuration for CE Additional Components Configuringthe Portal
Changing the Password for the Internet Communication Manager (ICM)You can monitor and manage the Internet Communication Manager (ICM) from the command lineprogramAfter the installation of your SAP NetWeaver CE system has successfully finished you need to changethe ICM password manually To do so proceed as follows
1 Log on at operating system level to the computer where the ICM is running2 Start the program icmon with icmon ndasha profile=ltinstance_profilegt to maintain the
authentication file (default authfiletxt)3 Choose a to add a user4 Choose c to change the password of the existing user
05162008 PUBLIC 2940
6 Post-Installation Activities
5 Choose s to save your settings
Further Configuration StepsAfter installing your SAP NetWeaver CE system and performing the post-installation steps to get thesystem up amp running you may need to perform further configuration stepsRefer to the following documentation to proceed with your tasks
n If you are a system administrator refer to httphelpsapcomnwce Administratorrsquos Guide It contains information about how to configure and administer your system
n If you are a developer refer to httphelpsapcomnwce Developerrsquos Guide It providesguidelines for developing applications using the SAP NetWeaver CE
Note
The SAP NetWeaver CE documentation is also available offline as a part of your installation To accessit choose Start All Programs SAP NetWeaver Composition Environment 10 Documentation
3040 PUBLIC 05162008
7 Additional Information
7 Additional Information
The following section provides additional information about the installation of SAP NetWeaverComposition Environment
71 Transporting Self-Developed Software ComponentArchives (SCA) into the System
PrerequisitesYou have developed your own Software Component Archives (SCA) and want to transport theminto your SAP NetWeaver CE system
ProcedureTo transport your SCAs to the SAP NetWeaver CE system proceed as follows
1 Download the update file from httpservicesapcomswdc Download Support Packages andPatches Entry by Application Group SAP NetWeaver SAP NETWEAVER SAP NETWEAVER CE71 Support Package Stacks
2 From an empty directory run the update tool updateltIDgtexe
Note
If the tool displays descriptions such as Applying Support Packages you can ignore them
3 In the dialog screens specify the directory where your SCAs are located4 Follow the on-screen instructions
Only valid for MaxDB
72 Troubleshooting ‒ Repairing an Inconsistent SAP MaxDBInstallation
PrerequisitesDuring the preinstallation phase the installation tool checks the Microsoft Windows registry foralready installed SAP MaxDB softwareIf the registry key is found but there is no software on the hard drive you receive the followingmessage
05162008 PUBLIC 3140
7 Additional Information73 Restarting the SAP MaxDB Server Manually
The existing MaxDB software is not consistent Check the file system and registry
The most common reason for this inconsistency is the manual deletion of the software from the filesystem without using the specified tools
ProcedureTo repair this inconsistency proceed as follows
1 Choose Start Control Panel Administrative Tools Services 2 Make sure the services SAPDBWWW SAPDB and XServer are stopped3 Choose Start Run and run the command regedit4 Go to My ComputerHKEY_LOCAL_MACHINESOFTWARESAPSAP DBTech Key IndepPrograms
The key contains a path to a foldera) Check if this folder exists on the file systemb) Note down the value of Key IndepPrograms for later usage (see step 7)
If the path does not exist in the file system delete the key SAP DBTech5 Delete the following keys
n My ComputerHKEY_LOCAL_MACHINESYSTEMCurrentControlSetServicesSAP DBTech-
n My ComputerHKEY_LOCAL_MACHINESYSTEMCurrentControlSetServicesSAPDBWWW
n My ComputerHKEY_LOCAL_MACHINESYSTEMCurrentControlSetServicesXServer
6 Choose Start Control Panel System Advanced Environment Variables System Variables Path 7 Delete the following paths from the variable
n ltIndepProgramsgtbin
n ltIndepProgramsgtpgm
8 Reboot your computer
End of MaxDB
Only valid for MaxDB
73 Restarting the SAP MaxDB Server Manually
If after a reboot the database server is not running automatically you need to restart the SAP MaxDBserver manually
Production SystemsTo restart the SAP MaxDB server manually proceed as follows
1 Open a command prompt and enter the following command net start sapdbwww
ORChoose Start All Programs Administrative Tools Services Double-click on SAP DB WWW andchoose Start
2 Open the SAP Management Console and choose SAP Systems ltSAPSIDgt ltmachine namegt
3240 PUBLIC 05162008
7 Additional Information74 Restarting the MS SQL Server Manually
3 Enter the master password and choose Logon4 Choose Online When the database server is online you can restart the engine
Development SystemsTo restart the SAP MaxDB server manually choose Start All Programs SAP NetWeaver CompositionEnvironment CE Application Server ltSAPSIDgt Start Application Server End of MaxDB
Only valid for MS SQL Server
74 Restarting the MS SQL Server Manually
If after a reboot the database server is not running automatically you need to restart the MS SQLServer manually
Procedure
1 Choose Start All Programs Administrative Tools Services 2 Look for the service named SQL Server ltnamegt where ltnamegt is MSSQLSERVER for the default
instance or ltinstance namegt for a named instance3 If the service status is not started right-click the service and choose Start in the context menu4 To insure the service is started automatically after each system restart right-click it and choose
Properties Select Automatic as the startup type
End of MS SQL Server
75 Configuration Templates
Configuration templates contain the predefined instance configuration for specific scenarios Theyare automatically applied according to the installation option you have selected The templatesare designed to optimize system performance by applying certain configuration to the Java VirtualMachine and the application server as well as by applying startup filters to AS Java services andapplications to start only those relevant for the selected installation optionsThe following table provides information about the available templates with SAP NetWeaverComposition Environment In the template name replace the ltsystem_modegt parameter bydevelopment (for the templates relevant to systems installed in developmentmode) or production (forthe templates relevant to systems installed in productivemode)
05162008 PUBLIC 3340
7 Additional Information76 Uninstalling SAP NetWeaver Composition Environment
Configuration Template Selected Installation Options
CE_Java_EE_ltsystem_modegt_full Java Application Server Installation
CE_Composition_Environment_ltsystem_modegt_full Java Application Server Installation + CompositionPlatform Installation
CE_Adobe_Document_Service_ltsystem_modegt_full Java Application Server Installation + AdobeDocument Services Add-on Installation
CE_Composite_Voice_ltsystem_modegt_full Java Application Server Installation + Voice Add-onInstallation
CE_Complete_Stack_ltsystem_modegt_full Java Application Server Installation + CompositionPlatform Installation + Adobe Document ServicesAdd-on Installation + Voice Add-on Installation
If your selection cannot be mapped to one of the combinations in the above table the templateCE_Complete_Stack_ltsystem_modegt_full is applied It starts all applications and services neededto run the complete stackYou canmanually apply a different configuration template if youwant to switch to another installationoption For example by changing from template CE_Complete_Stack_ltsystem_modegt_full toCE_Java_EE_ltsystem_modegt_full you achieve shorter startup times and less memory consumptionbut also less functionality since not all applications and services are runningFor more information about applying configuration templates see httphelpsapcomnwce
Administratorrsquos Guide Configuration of SAP NetWeaver CE Initial System Configuration AS Java ConfigurationActivating a Configuration Template
Note
Make sure that you do not apply a development template to a productive system or vice versa
76 Uninstalling SAP NetWeaver Composition Environment
You have to uninstall all components of the SAP NetWeaver Composition Environment separatelythat is SAP NetWeaver CE and SAP NetWeaver Developer StudioYou can uninstall your SAP NetWeaver CE system in different ways
Uninstalling SAP NetWeaver CEWindows Choose Start Control Panel Add Remove programs SAP SystemltSAPSIDgt
Uninstalling SAP NetWeaver CE Using SAPinst
1 Insert the SAP Installation Master DVD into your DVD drive or mount it locally
3440 PUBLIC 05162008
7 Additional Information76 Uninstalling SAP NetWeaver Composition Environment
2 Start SAPinst from the SAP Installation Master DVD as described in the section Installing SAPNetWeaver Composition Environment
3 In theWelcome screen choose Uninstall SAP System or Single Instances from the tree structure4 Follow the on-screen instructions
Uninstalling SAP NetWeaver Developer Studio
Prerequisites
Before uninstalling SAP NetWeaver Developer Studio consider the following
n All additionally installed features and plug-ins that were installed to the same folder as DeveloperStudio for example by using the Eclipse Update Manager will also be removed
n There may be other directories and files in the installation directory notablyltinstall_dirgteclipseworkspace ltinstall_dirgteclipselinks andltinstall_dirgteclipseconfiguration that contain important data The files and folder aswell as the existing workspaces are retained when the product is uninstalled
Procedure
To uninstall SAP NetWeaver Developer Studio proceed as described above You can use either oneof the options
Uninstalling the SAP Management ConsoleSince all SAP systems use the SAP Management Console there is no uninstallation option for theSAP Management Console with SAPinst If you are sure that you do not need the SAP ManagementConsole any more you can remove it using Start Control Panel Add Remove programs
05162008 PUBLIC 3540
Typographic Conventions
Example Description
lt gt Angle brackets indicate that you replace these words or characters with appropriateentries to make entries in the system for example ldquoEnter your ltUser Namegtrdquo
Arrows separating the parts of a navigation path for example menu options
Example Emphasized words or expressions
Example Words or characters that you enter in the system exactly as they appear in thedocumentation
Example Textual cross-references to an internet address for example httpwwwsapcom
example Quicklinks added to the internet address of a homepage to enable quick access tospecific content on the Web
123456 Hyperlink to an SAP Note for example SAP Note 123456
Example n Words or characters quoted from the screen These include field labels screen titlespushbutton labels menu names and menu options
n Cross-references to other documentation or published works
Example n Output on the screen following a user action for example messagesn Source code or syntax quoted directly from a programn File and directory names and their paths names of variables and parameters and
names of installation upgrade and database tools
EXAMPLE Technical names of system objects These include report names program namestransaction codes database table names and key concepts of a programming languagewhen they are surrounded by body text for example SELECT and INCLUDE
EXAMPLE Keys on the keyboard
3640 PUBLIC 05162008
SAP AGDietmar-Hopp-Allee 16
69190 WalldorfGermany
T +4918 0534 34 34F +4918 0534 34 20
wwwsapcom
copy Copyright 2008 SAP AG All rights reserved
No part of this publication may be reproduced or transmitted in any form or for any purpose without the express permissionof SAP AG The information contained herein may be changed without prior noticeSome software products marketed by SAP AG and its distributors contain proprietary software components of othersoftware vendors
No part of this publication may be reproduced or transmitted in any form or for any purpose without the express permissionof SAP AG The information contained herein may be changed without prior noticeSome software products marketed by SAP AG and its distributors contain proprietary software components of othersoftware vendorsMicrosoft Windows Excel Outlook and PowerPoint are registered trademarks of Microsoft CorporationIBM DB2 DB2 Universal Database OS2 Parallel Sysplex MVSESA AIX S390 AS400 OS390 OS400 iSeries pSeriesxSeries zSeries System i System i5 System p System p5 System x System z System z9 zOS AFP Intelligent MinerWebSphere Netfinity Tivoli Informix i5OS POWER POWER5 POWER5+ OpenPower and PowerPC are trademarks orregistered trademarks of IBM CorporationAdobe the Adobe logo Acrobat PostScript and Reader are either trademarks or registered trademarks of Adobe SystemsIncorporated in the United States andor other countriesOracle is a registered trademark of Oracle CorporationUNIX XOpen OSF1 and Motif are registered trademarks of the Open GroupCitrix ICA Program Neighborhood MetaFrame WinFrame VideoFrame and MultiWin are trademarks or registeredtrademarks of Citrix Systems IncHTML XML XHTML and W3C are trademarks or registered trademarks of W3Creg World Wide Web ConsortiumMassachusetts Institute of TechnologyJava is a registered trademark of Sun Microsystems IncJavaScript is a registered trademark of Sun Microsystems Inc used under license for technology invented and implementedby NetscapeSAP R3 xApps xApp SAP NetWeaver Duet PartnerEdge ByDesign SAP Business ByDesign and other SAP productsand services mentioned herein as well as their respective logos are trademarks or registered trademarks of SAP AG inGermany and in several other countries all over the world All other product and service names mentioned are thetrademarks of their respective companies Data contained in this document serves informational purposes only Nationalproduct specifications may varyThese materials are subject to change without notice These materials are provided by SAP AG and its affiliated companies(SAP Group) for informational purposes only without representation or warranty of any kind and SAP Group shall notbe liable for errors or omissions with respect to the materials The only warranties for SAP Group products and services arethose that are set forth in the express warranty statements accompanying such products and services if any Nothing hereinshould be construed as constituting an additional warranty
This document was created using stylesheet 2006-12-31 (V51beta [= 60 for E3]) and XSLT processor SAXON 652 fromMichael Kay (httpsaxonsfnet) XSLT version 1
05162008 PUBLIC 3740
DisclaimerSome components of this product are based on Javatrade Any code change in these components may cause unpredictable andsevere malfunctions and is therefore expressly prohibited as is any decompilation of these componentsAny Javatrade Source Code delivered with this product is only to be used by SAPrsquos Support Services and may not be modified oraltered in any way
Documentation in the SAP Service MarketplaceYou can find this document at the following address httpsservicesapcominstguides
3840 PUBLIC 05162008
This page is intentionally left blank
SAP AGDietmar-Hopp-Allee 1669190 WalldorfGermanyT +4918 0534 34 34F +4918 0534 34 20wwwsapcom
copy Copyright 2008 SAP AG All rights reservedNo part of this publication may be reproduced or transmitted in any form or for any purpose without the express permission of SAP AG The information contained herein may bechanged without prior notice
3 Installing SAP NetWeaver Developer Studio
Note
Make sure that the component required for the selected feature is installed on the AS Java
3 Accept the license agreement4 In the screen Optional Features choose Next
Caution
Never deselect an optional feature This can cause a malfunction of the Developer Studio
5 In the Install screen choose FinishThe features are being downloaded
6 Choose Install All to verify the feature installation7 Restart the Developer Studio for the updates to take effect
Recommendation
We recommend that you start the Developer Studio with the shortcuts that were created onyour desktop or in the StartmenuTo get to the SAP documentation in the Developer Studio open the application and choose fromthe menu bar Help Help Contents SAP NetWeaver CE Developer Studio Documentation
The installation of the Developer Studio is now completed
Additional ActivitiesOnce the Developer Studio is installed you can add update and remove installed features at any time
Adding Features to an Installed Developer Studio
You can add features any time
1 Choose Help Software Updates Find and Install 2 Choose Search for new features to install3 Enable the displayed update site
Recommendation
We recommend that you do not change the update site to avoid version inconsistencies
4 Continue with step Selecting and Installing Main Features as described above
Updating Installed Features
1 Choose Help Software Updates Find and Install 2 Choose Search for updates of currently installed features3 Follow the on-screen instructions
05162008 PUBLIC 1740
3 Installing SAP NetWeaver Developer Studio
As of SP03 SAP NetWeaver Developer Studio uses the IDE Update Site to keep itself up-to-date
1 Choose Help Software Updates Find and Install 2 Choose Search for updates of currently installed features3 Follow the on-screen instructions
Note
The configuration wizard task Configuration and Mirroring of local NWDS Update Site has to be run aftereach patch or update of the IDE update site component on AS JavaFormore information about how to run the configuration wizard see Post-Installation Activities [page 27]
More InformationUpdate Guide ‒ SAP NetWeaver Composition Environment 71 ‒ Update to SPltxxgt available athttpwwwsdnsapcomirjsdnnw-ce
Uninstalling Features
1 To uninstall features choose Help Software Updates Manage Configuration 2 In the Product Configuration window choose Show Disabled Features3 Open the node SAP NetWeaver Developer Studio and its subnode
The features are displayed with its status enabled or disabled4 To change the status of feature select the feature and choose Enable or Disable (depending on
the current status)To uninstall a feature it has to be set to status disabled
5 Restart the SAP NetWeaver Developer Studio to apply the status change
Note
To uninstall all old version features (after the update) choose Help Software Updates UninstallDisabled Features
1840 PUBLIC 05162008
4 Installing Additional Components (Optional)
4 Installing Additional Components(Optional)
You can install the following additional components
n Composition Toolsn Adobe Document Services
n Composite Voicen IDE Update Site
PrerequisitesYou need to meet the same hardware and software requirements as for your already installeddevelopment system plus an additional 2 GB RAMThe Composition Tools and Composite Voice component make use of the Visual Composer VisualComposer is a Web browser based tool to model user interfaces To run Visual Composer thefollowing programsmust be installed on the client computer fromwhich you access Visual Composer
n Microsoft Internet Explorer 60 SP1 or highern Adobe SVG Viewer 30
n Microsoft XML Parser 40 or higher
Note
n Before installing additional components you need to stop all application servers manually
n Before installing additional components and in the case that you made changes to the defaulttemplate settings see SAP Note 953763
Prerequisites for SAP MaxDB
n Make sure that the Application Server Java and its corresponding database is runningYou can stop and start the system using the shortcuts under Start All Programs SAP NetWeaverComposition Environment 71 Application Server JxxltSAPSIDgt
n During the installation of additional components entries are written into the log area of thedatabase To avoid that the log is running full during the installation make sure that your backupstrategy is already active and an initial data backup was successfulWhen you want to establish your backup strategy after installing additional components you canturn on the special log mode AutoOverwrite using the Database Manager GUI This interrupts theexisting backup history You have to run a complete backup to start the history again
05162008 PUBLIC 1940
4 Installing Additional Components (Optional)
ProcedureThis procedure tells you how to install an SAP system with SAPinst SAPinst includes a GUI and aGUI server both using Java This section describes an installation where SAPinst SAPinst GUI andthe GUI server are running on the same hostNote the following information about SAPinst
n When you start SAPinst SAPinst GUI and the GUI server also start SAPinst GUI connects to theGUI server with a secure SSL connection and the GUI server connects to SAPinst
n SAPinst creates the installation directory sapinst_instdir where it keeps its log files Theinstallation directory is located directly in the Program Files directory If SAPinst is not able tocreate sapinst_instdir there it tries to create sapinst_instdir in the directory defined by theenvironment variable TEMP
Recommendation
We recommend that you keep all installation directories until the system is completely andcorrectly installed
n SAPinst creates a subdirectory for each installation option calledltsapinst_instdirgtltinstallation_option_directorygt which is located in ProgramFiles
n The SAPinst Self-Extractor extracts the executables to a temporary directory (TEMP TMP TMPDIR orSystemRoot) These executables are deleted after SAPinst has stopped runningDirectories called sapinst_exexxxxxxxxxx sometimes remain in the temporary directory Youcan safely delete them The temporary directory also contains the SAPinst Self-Extractor log filedev_selfexout which might be useful if an error occurs
Caution
If SAPinst cannot find a temporary directory the installation terminates with the error FCO-00058
n If you want to terminate SAPinst and the SAPinst Self-Extractor choose one of the followingoptionsl Right-click the icon for the SAPinst output window located in theWindows tray and choose Exitl Click the icon for the SAPinst output window located in the Windows tray and choose File
Exit
PrerequisitesYou are logged on as a user with administration rights to install the SAPinst tool and the SAP system
Note
When installing from a network share make sure that everyone has read access to this share Theinstallation routine creates users such as ltsidgtadm (for example ce1adm) During the installationSAPinst does a user switch to this user If the newly created user does not have permissions to thenetwork share where the installation is running from the installation will fail
2040 PUBLIC 05162008
4 Installing Additional Components (Optional)
Procedure
1 Insert the SAP Installation Master DVD into your DVD drive or mount it locally2 Start SAPinst from the SAP Installation Master DVD by double-clicking sapinstexe from the
following path ltDVD drivegtDATA_UNITSIM_WIN_ltplatformgt_ltdatabasegtSAPinst GUI starts automatically by displaying theWelcome screen
3 In theWelcome screen choose the required SAPinst installation option from the tree structure
Note
If SAPinst prompts you to log off from your system log off and log on againSAPinst restarts automaticallyChoose Continue Old Installation
4 Choose whether you want to run the installation in Typicalmode or in CustommodeIf you select Typical the installation wizard provides automatic default settings and you only haveto respond to a small selection of prompts The rest is set by default If you select Custom you haveto respond to all prompts
Note
If you want to install the offline documentation for SAP NetWeaver CE you need to chooseCustommodeAfter the installation you can access the offline documentation by choosing Start All ProgramsSAP NetWeaver Composition Environment ltSAPSIDgt
5 Follow the screens and enter the required parameters
Note
For more information about the input parameters and information about restrictions forpasswords position the cursor on the required parameter and press F1
After you have entered all requested input parameters SAPinst displays the Parameter Summaryscreen This screen shows both the parameters that you entered and those that SAPinst set bydefault If required you can revise the parameters before starting the installation
6 To start the installation choose Start SAPinst starts the installation and displays the progress ofthe installation When the installation has successfully been completed SAPinst shows the dialogExecution of ltService_Namegt has been completed successfully
Note
After installing additional components you need to perform some post-installation activities [page 27] toget the system up amp running
05162008 PUBLIC 2140
This page is intentionally left blank
5 Installing SAP Memory Analyzer (Optional)
5 Installing SAP Memory Analyzer(Optional)
SAP Memory Analyzer helps you to analyze Java heap dumps easily find big chunks of memory orcomplex memory aggregation patterns in your data structures and identify who is keeping thismemory alive New and innovative analysis techniques support the user with a fast and powerfulfeature setThe tool (Eclipse RCP application) was developed to analyze real productive heap dumps whichtend to get enormous in size with hundreds of millions of objects Performance low resourceconsumption and especially the newly developed innovative analysis techniques make it a helpfultool even to small application heap dumpsYou can install SAP Memory Analyzer as an additional tool
This procedure tells you how to install an SAP system with SAPinst SAPinst includes a GUI and aGUI server both using Java This section describes an installation where SAPinst SAPinst GUI andthe GUI server are running on the same hostNote the following information about SAPinst
n When you start SAPinst SAPinst GUI and the GUI server also start SAPinst GUI connects to theGUI server with a secure SSL connection and the GUI server connects to SAPinst
n SAPinst creates the installation directory sapinst_instdir where it keeps its log files Theinstallation directory is located directly in the Program Files directory If SAPinst is not able tocreate sapinst_instdir there it tries to create sapinst_instdir in the directory defined by theenvironment variable TEMP
Recommendation
We recommend that you keep all installation directories until the system is completely andcorrectly installed
n SAPinst creates a subdirectory for each installation service calledltsapinst_instdirgtltinstallation_service_directorygt which is located in ProgramFiles
n The SAPinst Self-Extractor extracts the executables to a temporary directory (TEMP TMP TMPDIR orSystemRoot) These executables are deleted after SAPinst has stopped runningDirectories called sapinst_exexxxxxxxxxx sometimes remain in the temporary directory Youcan safely delete them The temporary directory also contains the SAPinst Self-Extractor log filedev_selfexout which might be useful if an error occurs
05162008 PUBLIC 2340
5 Installing SAP Memory Analyzer (Optional)
Caution
If SAPinst cannot find a temporary directory the installation terminates with the error FCO-00058
n If you want to terminate SAPinst and the SAPinst Self-Extractor choose one of the followingoptionsl Right-click the icon for the SAPinst output window located in theWindows tray and choose Exitl Click the icon for the SAPinst output window located in the Windows tray and choose File
Exit
PrerequisitesYou are logged on as a user with administration rights to install the SAPinst tool and the SAP system
Note
When installing from a network share make sure that everyone has read access to this share Theinstallation routine creates users such as ltsidgtadm (for example ce1adm) During the installationSAPinst performs a user switch to this user If the newly created user does not have permissions tothe network share where the installation is running from the installation will fail
Procedure
1 Insert the SAP Installation Master DVD into your DVD drive or mount it locally2 Start SAPinst from the SAP Installation Master DVD by double-clicking sapinstexe from the
following path ltDVD drivegtDATA_UNITSIM_WIN_ltplatformgt_ltdatabasegtSAPinst GUI starts automatically by displaying theWelcome screen
3 In theWelcome screen choose the required SAPinst installation option from the tree structure
Note
If SAPinst prompts you to log off from your system log off and log on againSAPinst restarts automaticallyChoose Continue Old Installation
4 Choose whether you want to run the installation in Typicalmode or in CustommodeIf you select Typical the installation wizard provides automatic default settings and you only haveto respond to a small selection of prompts The rest is set by default If you select Custom you haveto respond to all prompts
Note
If you want to install the offline documentation for SAP NetWeaver CE you need to chooseCustommodeAfter the installation you can access the offline documentation by choosing Start All ProgramsSAP NetWeaver Composition Environment ltSAPSIDgt
2440 PUBLIC 05162008
5 Installing SAP Memory Analyzer (Optional)
5 Follow the screens and enter the required parameters
Note
For more information about the input parameters and information about restrictions forpasswords position the cursor on the required parameter and press F1
After you have entered all requested input parameters SAPinst displays the Parameter Summaryscreen This screen shows both the parameters that you entered and those that SAPinst set bydefault If required you can revise the parameters before starting the installation
6 To start the installation choose Start SAPinst starts the installation and displays the progress ofthe installation When the installation has successfully been completed SAPinst shows the dialogExecution of ltOption_Namegt has been completed successfully
05162008 PUBLIC 2540
This page is intentionally left blank
6 Post-Installation Activities
6 Post-Installation Activities
This section describes the steps that you have to perform after the installation has finished successfully
Running the Configuration Wizard (Optional)
Note
You can run the configuration wizard only once and only directly after installing and patchingyour SAP system
For SAP NetWeaver CE you need to run the following configuration tasks
n Configuration of Services Registry Webservice Destinations
n When you have installed the IDE Update Site componentConfiguration and Mirroring of local NWDSUpdate Site
n When you have installed the Adobe Document Services component Initial setup ADS in CE
When you have an NWDI installation on another SAP NetWeaver 70 system you can perform thefollowing configuration tasks
n Change Management Service (CMS) Create an Application Skeleton
n Change Management Service (CMS) Modify a Software Component
To run the configuration wizard proceed as follows
1 After SAPinst has finished open the SAP NetWeaver Administrator by entering the following URLin a browser httplthostgtlthttp_portgtnwa
2 Log on as user j2ee_admin3 In the SAP NetWeaver Administrator choose Configuration Management Scenarios Configuration
Wizard 4 Select the appropriate configuration task in the list and choose Start5 Follow the on-screen instructions6 After the configuration wizard has finished successfully restart your SAP system
Configuring the IDE Update Site
1 In the Configuration Wizard select the task Configuration and Mirroring of local NWDS Update Site in thelist and choose Start
2 Follow the on-screen instructions
05162008 PUBLIC 2740
6 Post-Installation Activities
Provide the credentials for the source update site location The default URL is the central SAPupdate site You can also use your installation DVD as source update site which makes themirror process much faster To use the DVD as source update site you have to specify the URLfileltdvd_drivegtIDE
3 After the configuration wizard has finished successfully restart your SAP systemThe data of the source update site location is now mirrored to your server
Enabling Adobe Document ServicesIf you have installed SAP NetWeaver Composition Environment with the Adobe DocumentServices add-on in the developer edition on aWindows platform you must complete the followingpost-installation steps to enable the add-on In case you have installed an AS Java cluster applythe procedure to the central host as well as to all other hosts where additional application serverinstances are running
1 Using the SAP Management Console stop the AS Java systemFormore information about starting and stopping SAP systems see httphelpsapcomnwce
Administratorrsquos Guide Administration of SAP NetWeaver CE General System Administration AS Java(Application Server Java)
2 From the Startmenu open Control Panel Administrative Tools Computer Management Services andApplications Services
3 Select SAPltSIDgt_ltInstance_Numbergt (for example SAPCE1_00) and open Properties from thecontext menu
4 On the Log On tab page enable the Local System account indicator5 Repeat the above steps for the second SAPltSIDgt_ltInstance_Numbergt service that you see in the list6 Start the AS Java system
Adobe LiveCycle Designer
For more information about how to install and configure the Adobe LiveCycle Designer see SAPNote 962763
Enabling Services RegistryYou must apply additional configuration steps to enable Services Registry after you have installed anSAP NetWeaver Composition Environment system containing the following components
n Java Application Server and Composition Platformn Java Application Server and Adobe Document Services
To enable Services Registry you must apply the following configuration templates to your systemCE_Complete_Stack_development_full
2840 PUBLIC 05162008
6 Post-Installation Activities
Note
For more information about what configuration templates are available see Configuration Templates[page 33]For more information about applying configuration templates see httphelpsapcomnwce
SAP NetWeaver Composition Environment Library Administratorrsquos Guide Configuration of SAP NetWeaver CEInitial System Configuration AS Java Configuration Activating a Configuration Template
See also
httphelpsapcomnwce SAP NetWeaver Composition Environment Library Developerrsquos GuideDeveloping and Composing Applications Consuming Enterprise Services Searching for Services Services RegistryTasks Searching amp Browsing Service Definitions Configuring the Services Registry
Configuring the Portal in SAP NetWeaver CEAfter installing the portal in SAP NetWeaver CE a number of deactivated or irrelevant tools aredisplayed in the UI To display the correct portals tools for CE proceed as follows
1 Open a browser and log on to your portal as an administrator2 In the same browser session enter the following URL
httplthostgtlthttpportgtirjservletprtportalprtrootcomsapportal
contentlayersContentLayersTool
where lthostgt is the host name of your server and lthttpportgt is the port number of your server3 In the Portal Mode Configuration Tool choose Activate Development Mode to restore the portal tools
and content that are assigned to the development mode4 Restart or refresh your browser5 In the SAP Management Console restart the server
You may then continue with the mandatory and optional configuration steps as described inhttphelpsapcomnwce SAP NetWeaver Composition Environment Library Administratorrsquos Guide
Configuration of SAP NetWeaver Composition Environment Configuration for CE Additional Components Configuringthe Portal
Changing the Password for the Internet Communication Manager (ICM)You can monitor and manage the Internet Communication Manager (ICM) from the command lineprogramAfter the installation of your SAP NetWeaver CE system has successfully finished you need to changethe ICM password manually To do so proceed as follows
1 Log on at operating system level to the computer where the ICM is running2 Start the program icmon with icmon ndasha profile=ltinstance_profilegt to maintain the
authentication file (default authfiletxt)3 Choose a to add a user4 Choose c to change the password of the existing user
05162008 PUBLIC 2940
6 Post-Installation Activities
5 Choose s to save your settings
Further Configuration StepsAfter installing your SAP NetWeaver CE system and performing the post-installation steps to get thesystem up amp running you may need to perform further configuration stepsRefer to the following documentation to proceed with your tasks
n If you are a system administrator refer to httphelpsapcomnwce Administratorrsquos Guide It contains information about how to configure and administer your system
n If you are a developer refer to httphelpsapcomnwce Developerrsquos Guide It providesguidelines for developing applications using the SAP NetWeaver CE
Note
The SAP NetWeaver CE documentation is also available offline as a part of your installation To accessit choose Start All Programs SAP NetWeaver Composition Environment 10 Documentation
3040 PUBLIC 05162008
7 Additional Information
7 Additional Information
The following section provides additional information about the installation of SAP NetWeaverComposition Environment
71 Transporting Self-Developed Software ComponentArchives (SCA) into the System
PrerequisitesYou have developed your own Software Component Archives (SCA) and want to transport theminto your SAP NetWeaver CE system
ProcedureTo transport your SCAs to the SAP NetWeaver CE system proceed as follows
1 Download the update file from httpservicesapcomswdc Download Support Packages andPatches Entry by Application Group SAP NetWeaver SAP NETWEAVER SAP NETWEAVER CE71 Support Package Stacks
2 From an empty directory run the update tool updateltIDgtexe
Note
If the tool displays descriptions such as Applying Support Packages you can ignore them
3 In the dialog screens specify the directory where your SCAs are located4 Follow the on-screen instructions
Only valid for MaxDB
72 Troubleshooting ‒ Repairing an Inconsistent SAP MaxDBInstallation
PrerequisitesDuring the preinstallation phase the installation tool checks the Microsoft Windows registry foralready installed SAP MaxDB softwareIf the registry key is found but there is no software on the hard drive you receive the followingmessage
05162008 PUBLIC 3140
7 Additional Information73 Restarting the SAP MaxDB Server Manually
The existing MaxDB software is not consistent Check the file system and registry
The most common reason for this inconsistency is the manual deletion of the software from the filesystem without using the specified tools
ProcedureTo repair this inconsistency proceed as follows
1 Choose Start Control Panel Administrative Tools Services 2 Make sure the services SAPDBWWW SAPDB and XServer are stopped3 Choose Start Run and run the command regedit4 Go to My ComputerHKEY_LOCAL_MACHINESOFTWARESAPSAP DBTech Key IndepPrograms
The key contains a path to a foldera) Check if this folder exists on the file systemb) Note down the value of Key IndepPrograms for later usage (see step 7)
If the path does not exist in the file system delete the key SAP DBTech5 Delete the following keys
n My ComputerHKEY_LOCAL_MACHINESYSTEMCurrentControlSetServicesSAP DBTech-
n My ComputerHKEY_LOCAL_MACHINESYSTEMCurrentControlSetServicesSAPDBWWW
n My ComputerHKEY_LOCAL_MACHINESYSTEMCurrentControlSetServicesXServer
6 Choose Start Control Panel System Advanced Environment Variables System Variables Path 7 Delete the following paths from the variable
n ltIndepProgramsgtbin
n ltIndepProgramsgtpgm
8 Reboot your computer
End of MaxDB
Only valid for MaxDB
73 Restarting the SAP MaxDB Server Manually
If after a reboot the database server is not running automatically you need to restart the SAP MaxDBserver manually
Production SystemsTo restart the SAP MaxDB server manually proceed as follows
1 Open a command prompt and enter the following command net start sapdbwww
ORChoose Start All Programs Administrative Tools Services Double-click on SAP DB WWW andchoose Start
2 Open the SAP Management Console and choose SAP Systems ltSAPSIDgt ltmachine namegt
3240 PUBLIC 05162008
7 Additional Information74 Restarting the MS SQL Server Manually
3 Enter the master password and choose Logon4 Choose Online When the database server is online you can restart the engine
Development SystemsTo restart the SAP MaxDB server manually choose Start All Programs SAP NetWeaver CompositionEnvironment CE Application Server ltSAPSIDgt Start Application Server End of MaxDB
Only valid for MS SQL Server
74 Restarting the MS SQL Server Manually
If after a reboot the database server is not running automatically you need to restart the MS SQLServer manually
Procedure
1 Choose Start All Programs Administrative Tools Services 2 Look for the service named SQL Server ltnamegt where ltnamegt is MSSQLSERVER for the default
instance or ltinstance namegt for a named instance3 If the service status is not started right-click the service and choose Start in the context menu4 To insure the service is started automatically after each system restart right-click it and choose
Properties Select Automatic as the startup type
End of MS SQL Server
75 Configuration Templates
Configuration templates contain the predefined instance configuration for specific scenarios Theyare automatically applied according to the installation option you have selected The templatesare designed to optimize system performance by applying certain configuration to the Java VirtualMachine and the application server as well as by applying startup filters to AS Java services andapplications to start only those relevant for the selected installation optionsThe following table provides information about the available templates with SAP NetWeaverComposition Environment In the template name replace the ltsystem_modegt parameter bydevelopment (for the templates relevant to systems installed in developmentmode) or production (forthe templates relevant to systems installed in productivemode)
05162008 PUBLIC 3340
7 Additional Information76 Uninstalling SAP NetWeaver Composition Environment
Configuration Template Selected Installation Options
CE_Java_EE_ltsystem_modegt_full Java Application Server Installation
CE_Composition_Environment_ltsystem_modegt_full Java Application Server Installation + CompositionPlatform Installation
CE_Adobe_Document_Service_ltsystem_modegt_full Java Application Server Installation + AdobeDocument Services Add-on Installation
CE_Composite_Voice_ltsystem_modegt_full Java Application Server Installation + Voice Add-onInstallation
CE_Complete_Stack_ltsystem_modegt_full Java Application Server Installation + CompositionPlatform Installation + Adobe Document ServicesAdd-on Installation + Voice Add-on Installation
If your selection cannot be mapped to one of the combinations in the above table the templateCE_Complete_Stack_ltsystem_modegt_full is applied It starts all applications and services neededto run the complete stackYou canmanually apply a different configuration template if youwant to switch to another installationoption For example by changing from template CE_Complete_Stack_ltsystem_modegt_full toCE_Java_EE_ltsystem_modegt_full you achieve shorter startup times and less memory consumptionbut also less functionality since not all applications and services are runningFor more information about applying configuration templates see httphelpsapcomnwce
Administratorrsquos Guide Configuration of SAP NetWeaver CE Initial System Configuration AS Java ConfigurationActivating a Configuration Template
Note
Make sure that you do not apply a development template to a productive system or vice versa
76 Uninstalling SAP NetWeaver Composition Environment
You have to uninstall all components of the SAP NetWeaver Composition Environment separatelythat is SAP NetWeaver CE and SAP NetWeaver Developer StudioYou can uninstall your SAP NetWeaver CE system in different ways
Uninstalling SAP NetWeaver CEWindows Choose Start Control Panel Add Remove programs SAP SystemltSAPSIDgt
Uninstalling SAP NetWeaver CE Using SAPinst
1 Insert the SAP Installation Master DVD into your DVD drive or mount it locally
3440 PUBLIC 05162008
7 Additional Information76 Uninstalling SAP NetWeaver Composition Environment
2 Start SAPinst from the SAP Installation Master DVD as described in the section Installing SAPNetWeaver Composition Environment
3 In theWelcome screen choose Uninstall SAP System or Single Instances from the tree structure4 Follow the on-screen instructions
Uninstalling SAP NetWeaver Developer Studio
Prerequisites
Before uninstalling SAP NetWeaver Developer Studio consider the following
n All additionally installed features and plug-ins that were installed to the same folder as DeveloperStudio for example by using the Eclipse Update Manager will also be removed
n There may be other directories and files in the installation directory notablyltinstall_dirgteclipseworkspace ltinstall_dirgteclipselinks andltinstall_dirgteclipseconfiguration that contain important data The files and folder aswell as the existing workspaces are retained when the product is uninstalled
Procedure
To uninstall SAP NetWeaver Developer Studio proceed as described above You can use either oneof the options
Uninstalling the SAP Management ConsoleSince all SAP systems use the SAP Management Console there is no uninstallation option for theSAP Management Console with SAPinst If you are sure that you do not need the SAP ManagementConsole any more you can remove it using Start Control Panel Add Remove programs
05162008 PUBLIC 3540
Typographic Conventions
Example Description
lt gt Angle brackets indicate that you replace these words or characters with appropriateentries to make entries in the system for example ldquoEnter your ltUser Namegtrdquo
Arrows separating the parts of a navigation path for example menu options
Example Emphasized words or expressions
Example Words or characters that you enter in the system exactly as they appear in thedocumentation
Example Textual cross-references to an internet address for example httpwwwsapcom
example Quicklinks added to the internet address of a homepage to enable quick access tospecific content on the Web
123456 Hyperlink to an SAP Note for example SAP Note 123456
Example n Words or characters quoted from the screen These include field labels screen titlespushbutton labels menu names and menu options
n Cross-references to other documentation or published works
Example n Output on the screen following a user action for example messagesn Source code or syntax quoted directly from a programn File and directory names and their paths names of variables and parameters and
names of installation upgrade and database tools
EXAMPLE Technical names of system objects These include report names program namestransaction codes database table names and key concepts of a programming languagewhen they are surrounded by body text for example SELECT and INCLUDE
EXAMPLE Keys on the keyboard
3640 PUBLIC 05162008
SAP AGDietmar-Hopp-Allee 16
69190 WalldorfGermany
T +4918 0534 34 34F +4918 0534 34 20
wwwsapcom
copy Copyright 2008 SAP AG All rights reserved
No part of this publication may be reproduced or transmitted in any form or for any purpose without the express permissionof SAP AG The information contained herein may be changed without prior noticeSome software products marketed by SAP AG and its distributors contain proprietary software components of othersoftware vendors
No part of this publication may be reproduced or transmitted in any form or for any purpose without the express permissionof SAP AG The information contained herein may be changed without prior noticeSome software products marketed by SAP AG and its distributors contain proprietary software components of othersoftware vendorsMicrosoft Windows Excel Outlook and PowerPoint are registered trademarks of Microsoft CorporationIBM DB2 DB2 Universal Database OS2 Parallel Sysplex MVSESA AIX S390 AS400 OS390 OS400 iSeries pSeriesxSeries zSeries System i System i5 System p System p5 System x System z System z9 zOS AFP Intelligent MinerWebSphere Netfinity Tivoli Informix i5OS POWER POWER5 POWER5+ OpenPower and PowerPC are trademarks orregistered trademarks of IBM CorporationAdobe the Adobe logo Acrobat PostScript and Reader are either trademarks or registered trademarks of Adobe SystemsIncorporated in the United States andor other countriesOracle is a registered trademark of Oracle CorporationUNIX XOpen OSF1 and Motif are registered trademarks of the Open GroupCitrix ICA Program Neighborhood MetaFrame WinFrame VideoFrame and MultiWin are trademarks or registeredtrademarks of Citrix Systems IncHTML XML XHTML and W3C are trademarks or registered trademarks of W3Creg World Wide Web ConsortiumMassachusetts Institute of TechnologyJava is a registered trademark of Sun Microsystems IncJavaScript is a registered trademark of Sun Microsystems Inc used under license for technology invented and implementedby NetscapeSAP R3 xApps xApp SAP NetWeaver Duet PartnerEdge ByDesign SAP Business ByDesign and other SAP productsand services mentioned herein as well as their respective logos are trademarks or registered trademarks of SAP AG inGermany and in several other countries all over the world All other product and service names mentioned are thetrademarks of their respective companies Data contained in this document serves informational purposes only Nationalproduct specifications may varyThese materials are subject to change without notice These materials are provided by SAP AG and its affiliated companies(SAP Group) for informational purposes only without representation or warranty of any kind and SAP Group shall notbe liable for errors or omissions with respect to the materials The only warranties for SAP Group products and services arethose that are set forth in the express warranty statements accompanying such products and services if any Nothing hereinshould be construed as constituting an additional warranty
This document was created using stylesheet 2006-12-31 (V51beta [= 60 for E3]) and XSLT processor SAXON 652 fromMichael Kay (httpsaxonsfnet) XSLT version 1
05162008 PUBLIC 3740
DisclaimerSome components of this product are based on Javatrade Any code change in these components may cause unpredictable andsevere malfunctions and is therefore expressly prohibited as is any decompilation of these componentsAny Javatrade Source Code delivered with this product is only to be used by SAPrsquos Support Services and may not be modified oraltered in any way
Documentation in the SAP Service MarketplaceYou can find this document at the following address httpsservicesapcominstguides
3840 PUBLIC 05162008
This page is intentionally left blank
SAP AGDietmar-Hopp-Allee 1669190 WalldorfGermanyT +4918 0534 34 34F +4918 0534 34 20wwwsapcom
copy Copyright 2008 SAP AG All rights reservedNo part of this publication may be reproduced or transmitted in any form or for any purpose without the express permission of SAP AG The information contained herein may bechanged without prior notice
3 Installing SAP NetWeaver Developer Studio
As of SP03 SAP NetWeaver Developer Studio uses the IDE Update Site to keep itself up-to-date
1 Choose Help Software Updates Find and Install 2 Choose Search for updates of currently installed features3 Follow the on-screen instructions
Note
The configuration wizard task Configuration and Mirroring of local NWDS Update Site has to be run aftereach patch or update of the IDE update site component on AS JavaFormore information about how to run the configuration wizard see Post-Installation Activities [page 27]
More InformationUpdate Guide ‒ SAP NetWeaver Composition Environment 71 ‒ Update to SPltxxgt available athttpwwwsdnsapcomirjsdnnw-ce
Uninstalling Features
1 To uninstall features choose Help Software Updates Manage Configuration 2 In the Product Configuration window choose Show Disabled Features3 Open the node SAP NetWeaver Developer Studio and its subnode
The features are displayed with its status enabled or disabled4 To change the status of feature select the feature and choose Enable or Disable (depending on
the current status)To uninstall a feature it has to be set to status disabled
5 Restart the SAP NetWeaver Developer Studio to apply the status change
Note
To uninstall all old version features (after the update) choose Help Software Updates UninstallDisabled Features
1840 PUBLIC 05162008
4 Installing Additional Components (Optional)
4 Installing Additional Components(Optional)
You can install the following additional components
n Composition Toolsn Adobe Document Services
n Composite Voicen IDE Update Site
PrerequisitesYou need to meet the same hardware and software requirements as for your already installeddevelopment system plus an additional 2 GB RAMThe Composition Tools and Composite Voice component make use of the Visual Composer VisualComposer is a Web browser based tool to model user interfaces To run Visual Composer thefollowing programsmust be installed on the client computer fromwhich you access Visual Composer
n Microsoft Internet Explorer 60 SP1 or highern Adobe SVG Viewer 30
n Microsoft XML Parser 40 or higher
Note
n Before installing additional components you need to stop all application servers manually
n Before installing additional components and in the case that you made changes to the defaulttemplate settings see SAP Note 953763
Prerequisites for SAP MaxDB
n Make sure that the Application Server Java and its corresponding database is runningYou can stop and start the system using the shortcuts under Start All Programs SAP NetWeaverComposition Environment 71 Application Server JxxltSAPSIDgt
n During the installation of additional components entries are written into the log area of thedatabase To avoid that the log is running full during the installation make sure that your backupstrategy is already active and an initial data backup was successfulWhen you want to establish your backup strategy after installing additional components you canturn on the special log mode AutoOverwrite using the Database Manager GUI This interrupts theexisting backup history You have to run a complete backup to start the history again
05162008 PUBLIC 1940
4 Installing Additional Components (Optional)
ProcedureThis procedure tells you how to install an SAP system with SAPinst SAPinst includes a GUI and aGUI server both using Java This section describes an installation where SAPinst SAPinst GUI andthe GUI server are running on the same hostNote the following information about SAPinst
n When you start SAPinst SAPinst GUI and the GUI server also start SAPinst GUI connects to theGUI server with a secure SSL connection and the GUI server connects to SAPinst
n SAPinst creates the installation directory sapinst_instdir where it keeps its log files Theinstallation directory is located directly in the Program Files directory If SAPinst is not able tocreate sapinst_instdir there it tries to create sapinst_instdir in the directory defined by theenvironment variable TEMP
Recommendation
We recommend that you keep all installation directories until the system is completely andcorrectly installed
n SAPinst creates a subdirectory for each installation option calledltsapinst_instdirgtltinstallation_option_directorygt which is located in ProgramFiles
n The SAPinst Self-Extractor extracts the executables to a temporary directory (TEMP TMP TMPDIR orSystemRoot) These executables are deleted after SAPinst has stopped runningDirectories called sapinst_exexxxxxxxxxx sometimes remain in the temporary directory Youcan safely delete them The temporary directory also contains the SAPinst Self-Extractor log filedev_selfexout which might be useful if an error occurs
Caution
If SAPinst cannot find a temporary directory the installation terminates with the error FCO-00058
n If you want to terminate SAPinst and the SAPinst Self-Extractor choose one of the followingoptionsl Right-click the icon for the SAPinst output window located in theWindows tray and choose Exitl Click the icon for the SAPinst output window located in the Windows tray and choose File
Exit
PrerequisitesYou are logged on as a user with administration rights to install the SAPinst tool and the SAP system
Note
When installing from a network share make sure that everyone has read access to this share Theinstallation routine creates users such as ltsidgtadm (for example ce1adm) During the installationSAPinst does a user switch to this user If the newly created user does not have permissions to thenetwork share where the installation is running from the installation will fail
2040 PUBLIC 05162008
4 Installing Additional Components (Optional)
Procedure
1 Insert the SAP Installation Master DVD into your DVD drive or mount it locally2 Start SAPinst from the SAP Installation Master DVD by double-clicking sapinstexe from the
following path ltDVD drivegtDATA_UNITSIM_WIN_ltplatformgt_ltdatabasegtSAPinst GUI starts automatically by displaying theWelcome screen
3 In theWelcome screen choose the required SAPinst installation option from the tree structure
Note
If SAPinst prompts you to log off from your system log off and log on againSAPinst restarts automaticallyChoose Continue Old Installation
4 Choose whether you want to run the installation in Typicalmode or in CustommodeIf you select Typical the installation wizard provides automatic default settings and you only haveto respond to a small selection of prompts The rest is set by default If you select Custom you haveto respond to all prompts
Note
If you want to install the offline documentation for SAP NetWeaver CE you need to chooseCustommodeAfter the installation you can access the offline documentation by choosing Start All ProgramsSAP NetWeaver Composition Environment ltSAPSIDgt
5 Follow the screens and enter the required parameters
Note
For more information about the input parameters and information about restrictions forpasswords position the cursor on the required parameter and press F1
After you have entered all requested input parameters SAPinst displays the Parameter Summaryscreen This screen shows both the parameters that you entered and those that SAPinst set bydefault If required you can revise the parameters before starting the installation
6 To start the installation choose Start SAPinst starts the installation and displays the progress ofthe installation When the installation has successfully been completed SAPinst shows the dialogExecution of ltService_Namegt has been completed successfully
Note
After installing additional components you need to perform some post-installation activities [page 27] toget the system up amp running
05162008 PUBLIC 2140
This page is intentionally left blank
5 Installing SAP Memory Analyzer (Optional)
5 Installing SAP Memory Analyzer(Optional)
SAP Memory Analyzer helps you to analyze Java heap dumps easily find big chunks of memory orcomplex memory aggregation patterns in your data structures and identify who is keeping thismemory alive New and innovative analysis techniques support the user with a fast and powerfulfeature setThe tool (Eclipse RCP application) was developed to analyze real productive heap dumps whichtend to get enormous in size with hundreds of millions of objects Performance low resourceconsumption and especially the newly developed innovative analysis techniques make it a helpfultool even to small application heap dumpsYou can install SAP Memory Analyzer as an additional tool
This procedure tells you how to install an SAP system with SAPinst SAPinst includes a GUI and aGUI server both using Java This section describes an installation where SAPinst SAPinst GUI andthe GUI server are running on the same hostNote the following information about SAPinst
n When you start SAPinst SAPinst GUI and the GUI server also start SAPinst GUI connects to theGUI server with a secure SSL connection and the GUI server connects to SAPinst
n SAPinst creates the installation directory sapinst_instdir where it keeps its log files Theinstallation directory is located directly in the Program Files directory If SAPinst is not able tocreate sapinst_instdir there it tries to create sapinst_instdir in the directory defined by theenvironment variable TEMP
Recommendation
We recommend that you keep all installation directories until the system is completely andcorrectly installed
n SAPinst creates a subdirectory for each installation service calledltsapinst_instdirgtltinstallation_service_directorygt which is located in ProgramFiles
n The SAPinst Self-Extractor extracts the executables to a temporary directory (TEMP TMP TMPDIR orSystemRoot) These executables are deleted after SAPinst has stopped runningDirectories called sapinst_exexxxxxxxxxx sometimes remain in the temporary directory Youcan safely delete them The temporary directory also contains the SAPinst Self-Extractor log filedev_selfexout which might be useful if an error occurs
05162008 PUBLIC 2340
5 Installing SAP Memory Analyzer (Optional)
Caution
If SAPinst cannot find a temporary directory the installation terminates with the error FCO-00058
n If you want to terminate SAPinst and the SAPinst Self-Extractor choose one of the followingoptionsl Right-click the icon for the SAPinst output window located in theWindows tray and choose Exitl Click the icon for the SAPinst output window located in the Windows tray and choose File
Exit
PrerequisitesYou are logged on as a user with administration rights to install the SAPinst tool and the SAP system
Note
When installing from a network share make sure that everyone has read access to this share Theinstallation routine creates users such as ltsidgtadm (for example ce1adm) During the installationSAPinst performs a user switch to this user If the newly created user does not have permissions tothe network share where the installation is running from the installation will fail
Procedure
1 Insert the SAP Installation Master DVD into your DVD drive or mount it locally2 Start SAPinst from the SAP Installation Master DVD by double-clicking sapinstexe from the
following path ltDVD drivegtDATA_UNITSIM_WIN_ltplatformgt_ltdatabasegtSAPinst GUI starts automatically by displaying theWelcome screen
3 In theWelcome screen choose the required SAPinst installation option from the tree structure
Note
If SAPinst prompts you to log off from your system log off and log on againSAPinst restarts automaticallyChoose Continue Old Installation
4 Choose whether you want to run the installation in Typicalmode or in CustommodeIf you select Typical the installation wizard provides automatic default settings and you only haveto respond to a small selection of prompts The rest is set by default If you select Custom you haveto respond to all prompts
Note
If you want to install the offline documentation for SAP NetWeaver CE you need to chooseCustommodeAfter the installation you can access the offline documentation by choosing Start All ProgramsSAP NetWeaver Composition Environment ltSAPSIDgt
2440 PUBLIC 05162008
5 Installing SAP Memory Analyzer (Optional)
5 Follow the screens and enter the required parameters
Note
For more information about the input parameters and information about restrictions forpasswords position the cursor on the required parameter and press F1
After you have entered all requested input parameters SAPinst displays the Parameter Summaryscreen This screen shows both the parameters that you entered and those that SAPinst set bydefault If required you can revise the parameters before starting the installation
6 To start the installation choose Start SAPinst starts the installation and displays the progress ofthe installation When the installation has successfully been completed SAPinst shows the dialogExecution of ltOption_Namegt has been completed successfully
05162008 PUBLIC 2540
This page is intentionally left blank
6 Post-Installation Activities
6 Post-Installation Activities
This section describes the steps that you have to perform after the installation has finished successfully
Running the Configuration Wizard (Optional)
Note
You can run the configuration wizard only once and only directly after installing and patchingyour SAP system
For SAP NetWeaver CE you need to run the following configuration tasks
n Configuration of Services Registry Webservice Destinations
n When you have installed the IDE Update Site componentConfiguration and Mirroring of local NWDSUpdate Site
n When you have installed the Adobe Document Services component Initial setup ADS in CE
When you have an NWDI installation on another SAP NetWeaver 70 system you can perform thefollowing configuration tasks
n Change Management Service (CMS) Create an Application Skeleton
n Change Management Service (CMS) Modify a Software Component
To run the configuration wizard proceed as follows
1 After SAPinst has finished open the SAP NetWeaver Administrator by entering the following URLin a browser httplthostgtlthttp_portgtnwa
2 Log on as user j2ee_admin3 In the SAP NetWeaver Administrator choose Configuration Management Scenarios Configuration
Wizard 4 Select the appropriate configuration task in the list and choose Start5 Follow the on-screen instructions6 After the configuration wizard has finished successfully restart your SAP system
Configuring the IDE Update Site
1 In the Configuration Wizard select the task Configuration and Mirroring of local NWDS Update Site in thelist and choose Start
2 Follow the on-screen instructions
05162008 PUBLIC 2740
6 Post-Installation Activities
Provide the credentials for the source update site location The default URL is the central SAPupdate site You can also use your installation DVD as source update site which makes themirror process much faster To use the DVD as source update site you have to specify the URLfileltdvd_drivegtIDE
3 After the configuration wizard has finished successfully restart your SAP systemThe data of the source update site location is now mirrored to your server
Enabling Adobe Document ServicesIf you have installed SAP NetWeaver Composition Environment with the Adobe DocumentServices add-on in the developer edition on aWindows platform you must complete the followingpost-installation steps to enable the add-on In case you have installed an AS Java cluster applythe procedure to the central host as well as to all other hosts where additional application serverinstances are running
1 Using the SAP Management Console stop the AS Java systemFormore information about starting and stopping SAP systems see httphelpsapcomnwce
Administratorrsquos Guide Administration of SAP NetWeaver CE General System Administration AS Java(Application Server Java)
2 From the Startmenu open Control Panel Administrative Tools Computer Management Services andApplications Services
3 Select SAPltSIDgt_ltInstance_Numbergt (for example SAPCE1_00) and open Properties from thecontext menu
4 On the Log On tab page enable the Local System account indicator5 Repeat the above steps for the second SAPltSIDgt_ltInstance_Numbergt service that you see in the list6 Start the AS Java system
Adobe LiveCycle Designer
For more information about how to install and configure the Adobe LiveCycle Designer see SAPNote 962763
Enabling Services RegistryYou must apply additional configuration steps to enable Services Registry after you have installed anSAP NetWeaver Composition Environment system containing the following components
n Java Application Server and Composition Platformn Java Application Server and Adobe Document Services
To enable Services Registry you must apply the following configuration templates to your systemCE_Complete_Stack_development_full
2840 PUBLIC 05162008
6 Post-Installation Activities
Note
For more information about what configuration templates are available see Configuration Templates[page 33]For more information about applying configuration templates see httphelpsapcomnwce
SAP NetWeaver Composition Environment Library Administratorrsquos Guide Configuration of SAP NetWeaver CEInitial System Configuration AS Java Configuration Activating a Configuration Template
See also
httphelpsapcomnwce SAP NetWeaver Composition Environment Library Developerrsquos GuideDeveloping and Composing Applications Consuming Enterprise Services Searching for Services Services RegistryTasks Searching amp Browsing Service Definitions Configuring the Services Registry
Configuring the Portal in SAP NetWeaver CEAfter installing the portal in SAP NetWeaver CE a number of deactivated or irrelevant tools aredisplayed in the UI To display the correct portals tools for CE proceed as follows
1 Open a browser and log on to your portal as an administrator2 In the same browser session enter the following URL
httplthostgtlthttpportgtirjservletprtportalprtrootcomsapportal
contentlayersContentLayersTool
where lthostgt is the host name of your server and lthttpportgt is the port number of your server3 In the Portal Mode Configuration Tool choose Activate Development Mode to restore the portal tools
and content that are assigned to the development mode4 Restart or refresh your browser5 In the SAP Management Console restart the server
You may then continue with the mandatory and optional configuration steps as described inhttphelpsapcomnwce SAP NetWeaver Composition Environment Library Administratorrsquos Guide
Configuration of SAP NetWeaver Composition Environment Configuration for CE Additional Components Configuringthe Portal
Changing the Password for the Internet Communication Manager (ICM)You can monitor and manage the Internet Communication Manager (ICM) from the command lineprogramAfter the installation of your SAP NetWeaver CE system has successfully finished you need to changethe ICM password manually To do so proceed as follows
1 Log on at operating system level to the computer where the ICM is running2 Start the program icmon with icmon ndasha profile=ltinstance_profilegt to maintain the
authentication file (default authfiletxt)3 Choose a to add a user4 Choose c to change the password of the existing user
05162008 PUBLIC 2940
6 Post-Installation Activities
5 Choose s to save your settings
Further Configuration StepsAfter installing your SAP NetWeaver CE system and performing the post-installation steps to get thesystem up amp running you may need to perform further configuration stepsRefer to the following documentation to proceed with your tasks
n If you are a system administrator refer to httphelpsapcomnwce Administratorrsquos Guide It contains information about how to configure and administer your system
n If you are a developer refer to httphelpsapcomnwce Developerrsquos Guide It providesguidelines for developing applications using the SAP NetWeaver CE
Note
The SAP NetWeaver CE documentation is also available offline as a part of your installation To accessit choose Start All Programs SAP NetWeaver Composition Environment 10 Documentation
3040 PUBLIC 05162008
7 Additional Information
7 Additional Information
The following section provides additional information about the installation of SAP NetWeaverComposition Environment
71 Transporting Self-Developed Software ComponentArchives (SCA) into the System
PrerequisitesYou have developed your own Software Component Archives (SCA) and want to transport theminto your SAP NetWeaver CE system
ProcedureTo transport your SCAs to the SAP NetWeaver CE system proceed as follows
1 Download the update file from httpservicesapcomswdc Download Support Packages andPatches Entry by Application Group SAP NetWeaver SAP NETWEAVER SAP NETWEAVER CE71 Support Package Stacks
2 From an empty directory run the update tool updateltIDgtexe
Note
If the tool displays descriptions such as Applying Support Packages you can ignore them
3 In the dialog screens specify the directory where your SCAs are located4 Follow the on-screen instructions
Only valid for MaxDB
72 Troubleshooting ‒ Repairing an Inconsistent SAP MaxDBInstallation
PrerequisitesDuring the preinstallation phase the installation tool checks the Microsoft Windows registry foralready installed SAP MaxDB softwareIf the registry key is found but there is no software on the hard drive you receive the followingmessage
05162008 PUBLIC 3140
7 Additional Information73 Restarting the SAP MaxDB Server Manually
The existing MaxDB software is not consistent Check the file system and registry
The most common reason for this inconsistency is the manual deletion of the software from the filesystem without using the specified tools
ProcedureTo repair this inconsistency proceed as follows
1 Choose Start Control Panel Administrative Tools Services 2 Make sure the services SAPDBWWW SAPDB and XServer are stopped3 Choose Start Run and run the command regedit4 Go to My ComputerHKEY_LOCAL_MACHINESOFTWARESAPSAP DBTech Key IndepPrograms
The key contains a path to a foldera) Check if this folder exists on the file systemb) Note down the value of Key IndepPrograms for later usage (see step 7)
If the path does not exist in the file system delete the key SAP DBTech5 Delete the following keys
n My ComputerHKEY_LOCAL_MACHINESYSTEMCurrentControlSetServicesSAP DBTech-
n My ComputerHKEY_LOCAL_MACHINESYSTEMCurrentControlSetServicesSAPDBWWW
n My ComputerHKEY_LOCAL_MACHINESYSTEMCurrentControlSetServicesXServer
6 Choose Start Control Panel System Advanced Environment Variables System Variables Path 7 Delete the following paths from the variable
n ltIndepProgramsgtbin
n ltIndepProgramsgtpgm
8 Reboot your computer
End of MaxDB
Only valid for MaxDB
73 Restarting the SAP MaxDB Server Manually
If after a reboot the database server is not running automatically you need to restart the SAP MaxDBserver manually
Production SystemsTo restart the SAP MaxDB server manually proceed as follows
1 Open a command prompt and enter the following command net start sapdbwww
ORChoose Start All Programs Administrative Tools Services Double-click on SAP DB WWW andchoose Start
2 Open the SAP Management Console and choose SAP Systems ltSAPSIDgt ltmachine namegt
3240 PUBLIC 05162008
7 Additional Information74 Restarting the MS SQL Server Manually
3 Enter the master password and choose Logon4 Choose Online When the database server is online you can restart the engine
Development SystemsTo restart the SAP MaxDB server manually choose Start All Programs SAP NetWeaver CompositionEnvironment CE Application Server ltSAPSIDgt Start Application Server End of MaxDB
Only valid for MS SQL Server
74 Restarting the MS SQL Server Manually
If after a reboot the database server is not running automatically you need to restart the MS SQLServer manually
Procedure
1 Choose Start All Programs Administrative Tools Services 2 Look for the service named SQL Server ltnamegt where ltnamegt is MSSQLSERVER for the default
instance or ltinstance namegt for a named instance3 If the service status is not started right-click the service and choose Start in the context menu4 To insure the service is started automatically after each system restart right-click it and choose
Properties Select Automatic as the startup type
End of MS SQL Server
75 Configuration Templates
Configuration templates contain the predefined instance configuration for specific scenarios Theyare automatically applied according to the installation option you have selected The templatesare designed to optimize system performance by applying certain configuration to the Java VirtualMachine and the application server as well as by applying startup filters to AS Java services andapplications to start only those relevant for the selected installation optionsThe following table provides information about the available templates with SAP NetWeaverComposition Environment In the template name replace the ltsystem_modegt parameter bydevelopment (for the templates relevant to systems installed in developmentmode) or production (forthe templates relevant to systems installed in productivemode)
05162008 PUBLIC 3340
7 Additional Information76 Uninstalling SAP NetWeaver Composition Environment
Configuration Template Selected Installation Options
CE_Java_EE_ltsystem_modegt_full Java Application Server Installation
CE_Composition_Environment_ltsystem_modegt_full Java Application Server Installation + CompositionPlatform Installation
CE_Adobe_Document_Service_ltsystem_modegt_full Java Application Server Installation + AdobeDocument Services Add-on Installation
CE_Composite_Voice_ltsystem_modegt_full Java Application Server Installation + Voice Add-onInstallation
CE_Complete_Stack_ltsystem_modegt_full Java Application Server Installation + CompositionPlatform Installation + Adobe Document ServicesAdd-on Installation + Voice Add-on Installation
If your selection cannot be mapped to one of the combinations in the above table the templateCE_Complete_Stack_ltsystem_modegt_full is applied It starts all applications and services neededto run the complete stackYou canmanually apply a different configuration template if youwant to switch to another installationoption For example by changing from template CE_Complete_Stack_ltsystem_modegt_full toCE_Java_EE_ltsystem_modegt_full you achieve shorter startup times and less memory consumptionbut also less functionality since not all applications and services are runningFor more information about applying configuration templates see httphelpsapcomnwce
Administratorrsquos Guide Configuration of SAP NetWeaver CE Initial System Configuration AS Java ConfigurationActivating a Configuration Template
Note
Make sure that you do not apply a development template to a productive system or vice versa
76 Uninstalling SAP NetWeaver Composition Environment
You have to uninstall all components of the SAP NetWeaver Composition Environment separatelythat is SAP NetWeaver CE and SAP NetWeaver Developer StudioYou can uninstall your SAP NetWeaver CE system in different ways
Uninstalling SAP NetWeaver CEWindows Choose Start Control Panel Add Remove programs SAP SystemltSAPSIDgt
Uninstalling SAP NetWeaver CE Using SAPinst
1 Insert the SAP Installation Master DVD into your DVD drive or mount it locally
3440 PUBLIC 05162008
7 Additional Information76 Uninstalling SAP NetWeaver Composition Environment
2 Start SAPinst from the SAP Installation Master DVD as described in the section Installing SAPNetWeaver Composition Environment
3 In theWelcome screen choose Uninstall SAP System or Single Instances from the tree structure4 Follow the on-screen instructions
Uninstalling SAP NetWeaver Developer Studio
Prerequisites
Before uninstalling SAP NetWeaver Developer Studio consider the following
n All additionally installed features and plug-ins that were installed to the same folder as DeveloperStudio for example by using the Eclipse Update Manager will also be removed
n There may be other directories and files in the installation directory notablyltinstall_dirgteclipseworkspace ltinstall_dirgteclipselinks andltinstall_dirgteclipseconfiguration that contain important data The files and folder aswell as the existing workspaces are retained when the product is uninstalled
Procedure
To uninstall SAP NetWeaver Developer Studio proceed as described above You can use either oneof the options
Uninstalling the SAP Management ConsoleSince all SAP systems use the SAP Management Console there is no uninstallation option for theSAP Management Console with SAPinst If you are sure that you do not need the SAP ManagementConsole any more you can remove it using Start Control Panel Add Remove programs
05162008 PUBLIC 3540
Typographic Conventions
Example Description
lt gt Angle brackets indicate that you replace these words or characters with appropriateentries to make entries in the system for example ldquoEnter your ltUser Namegtrdquo
Arrows separating the parts of a navigation path for example menu options
Example Emphasized words or expressions
Example Words or characters that you enter in the system exactly as they appear in thedocumentation
Example Textual cross-references to an internet address for example httpwwwsapcom
example Quicklinks added to the internet address of a homepage to enable quick access tospecific content on the Web
123456 Hyperlink to an SAP Note for example SAP Note 123456
Example n Words or characters quoted from the screen These include field labels screen titlespushbutton labels menu names and menu options
n Cross-references to other documentation or published works
Example n Output on the screen following a user action for example messagesn Source code or syntax quoted directly from a programn File and directory names and their paths names of variables and parameters and
names of installation upgrade and database tools
EXAMPLE Technical names of system objects These include report names program namestransaction codes database table names and key concepts of a programming languagewhen they are surrounded by body text for example SELECT and INCLUDE
EXAMPLE Keys on the keyboard
3640 PUBLIC 05162008
SAP AGDietmar-Hopp-Allee 16
69190 WalldorfGermany
T +4918 0534 34 34F +4918 0534 34 20
wwwsapcom
copy Copyright 2008 SAP AG All rights reserved
No part of this publication may be reproduced or transmitted in any form or for any purpose without the express permissionof SAP AG The information contained herein may be changed without prior noticeSome software products marketed by SAP AG and its distributors contain proprietary software components of othersoftware vendors
No part of this publication may be reproduced or transmitted in any form or for any purpose without the express permissionof SAP AG The information contained herein may be changed without prior noticeSome software products marketed by SAP AG and its distributors contain proprietary software components of othersoftware vendorsMicrosoft Windows Excel Outlook and PowerPoint are registered trademarks of Microsoft CorporationIBM DB2 DB2 Universal Database OS2 Parallel Sysplex MVSESA AIX S390 AS400 OS390 OS400 iSeries pSeriesxSeries zSeries System i System i5 System p System p5 System x System z System z9 zOS AFP Intelligent MinerWebSphere Netfinity Tivoli Informix i5OS POWER POWER5 POWER5+ OpenPower and PowerPC are trademarks orregistered trademarks of IBM CorporationAdobe the Adobe logo Acrobat PostScript and Reader are either trademarks or registered trademarks of Adobe SystemsIncorporated in the United States andor other countriesOracle is a registered trademark of Oracle CorporationUNIX XOpen OSF1 and Motif are registered trademarks of the Open GroupCitrix ICA Program Neighborhood MetaFrame WinFrame VideoFrame and MultiWin are trademarks or registeredtrademarks of Citrix Systems IncHTML XML XHTML and W3C are trademarks or registered trademarks of W3Creg World Wide Web ConsortiumMassachusetts Institute of TechnologyJava is a registered trademark of Sun Microsystems IncJavaScript is a registered trademark of Sun Microsystems Inc used under license for technology invented and implementedby NetscapeSAP R3 xApps xApp SAP NetWeaver Duet PartnerEdge ByDesign SAP Business ByDesign and other SAP productsand services mentioned herein as well as their respective logos are trademarks or registered trademarks of SAP AG inGermany and in several other countries all over the world All other product and service names mentioned are thetrademarks of their respective companies Data contained in this document serves informational purposes only Nationalproduct specifications may varyThese materials are subject to change without notice These materials are provided by SAP AG and its affiliated companies(SAP Group) for informational purposes only without representation or warranty of any kind and SAP Group shall notbe liable for errors or omissions with respect to the materials The only warranties for SAP Group products and services arethose that are set forth in the express warranty statements accompanying such products and services if any Nothing hereinshould be construed as constituting an additional warranty
This document was created using stylesheet 2006-12-31 (V51beta [= 60 for E3]) and XSLT processor SAXON 652 fromMichael Kay (httpsaxonsfnet) XSLT version 1
05162008 PUBLIC 3740
DisclaimerSome components of this product are based on Javatrade Any code change in these components may cause unpredictable andsevere malfunctions and is therefore expressly prohibited as is any decompilation of these componentsAny Javatrade Source Code delivered with this product is only to be used by SAPrsquos Support Services and may not be modified oraltered in any way
Documentation in the SAP Service MarketplaceYou can find this document at the following address httpsservicesapcominstguides
3840 PUBLIC 05162008
This page is intentionally left blank
SAP AGDietmar-Hopp-Allee 1669190 WalldorfGermanyT +4918 0534 34 34F +4918 0534 34 20wwwsapcom
copy Copyright 2008 SAP AG All rights reservedNo part of this publication may be reproduced or transmitted in any form or for any purpose without the express permission of SAP AG The information contained herein may bechanged without prior notice
4 Installing Additional Components (Optional)
ProcedureThis procedure tells you how to install an SAP system with SAPinst SAPinst includes a GUI and aGUI server both using Java This section describes an installation where SAPinst SAPinst GUI andthe GUI server are running on the same hostNote the following information about SAPinst
n When you start SAPinst SAPinst GUI and the GUI server also start SAPinst GUI connects to theGUI server with a secure SSL connection and the GUI server connects to SAPinst
n SAPinst creates the installation directory sapinst_instdir where it keeps its log files Theinstallation directory is located directly in the Program Files directory If SAPinst is not able tocreate sapinst_instdir there it tries to create sapinst_instdir in the directory defined by theenvironment variable TEMP
Recommendation
We recommend that you keep all installation directories until the system is completely andcorrectly installed
n SAPinst creates a subdirectory for each installation option calledltsapinst_instdirgtltinstallation_option_directorygt which is located in ProgramFiles
n The SAPinst Self-Extractor extracts the executables to a temporary directory (TEMP TMP TMPDIR orSystemRoot) These executables are deleted after SAPinst has stopped runningDirectories called sapinst_exexxxxxxxxxx sometimes remain in the temporary directory Youcan safely delete them The temporary directory also contains the SAPinst Self-Extractor log filedev_selfexout which might be useful if an error occurs
Caution
If SAPinst cannot find a temporary directory the installation terminates with the error FCO-00058
n If you want to terminate SAPinst and the SAPinst Self-Extractor choose one of the followingoptionsl Right-click the icon for the SAPinst output window located in theWindows tray and choose Exitl Click the icon for the SAPinst output window located in the Windows tray and choose File
Exit
PrerequisitesYou are logged on as a user with administration rights to install the SAPinst tool and the SAP system
Note
When installing from a network share make sure that everyone has read access to this share Theinstallation routine creates users such as ltsidgtadm (for example ce1adm) During the installationSAPinst does a user switch to this user If the newly created user does not have permissions to thenetwork share where the installation is running from the installation will fail
2040 PUBLIC 05162008
4 Installing Additional Components (Optional)
Procedure
1 Insert the SAP Installation Master DVD into your DVD drive or mount it locally2 Start SAPinst from the SAP Installation Master DVD by double-clicking sapinstexe from the
following path ltDVD drivegtDATA_UNITSIM_WIN_ltplatformgt_ltdatabasegtSAPinst GUI starts automatically by displaying theWelcome screen
3 In theWelcome screen choose the required SAPinst installation option from the tree structure
Note
If SAPinst prompts you to log off from your system log off and log on againSAPinst restarts automaticallyChoose Continue Old Installation
4 Choose whether you want to run the installation in Typicalmode or in CustommodeIf you select Typical the installation wizard provides automatic default settings and you only haveto respond to a small selection of prompts The rest is set by default If you select Custom you haveto respond to all prompts
Note
If you want to install the offline documentation for SAP NetWeaver CE you need to chooseCustommodeAfter the installation you can access the offline documentation by choosing Start All ProgramsSAP NetWeaver Composition Environment ltSAPSIDgt
5 Follow the screens and enter the required parameters
Note
For more information about the input parameters and information about restrictions forpasswords position the cursor on the required parameter and press F1
After you have entered all requested input parameters SAPinst displays the Parameter Summaryscreen This screen shows both the parameters that you entered and those that SAPinst set bydefault If required you can revise the parameters before starting the installation
6 To start the installation choose Start SAPinst starts the installation and displays the progress ofthe installation When the installation has successfully been completed SAPinst shows the dialogExecution of ltService_Namegt has been completed successfully
Note
After installing additional components you need to perform some post-installation activities [page 27] toget the system up amp running
05162008 PUBLIC 2140
This page is intentionally left blank
5 Installing SAP Memory Analyzer (Optional)
5 Installing SAP Memory Analyzer(Optional)
SAP Memory Analyzer helps you to analyze Java heap dumps easily find big chunks of memory orcomplex memory aggregation patterns in your data structures and identify who is keeping thismemory alive New and innovative analysis techniques support the user with a fast and powerfulfeature setThe tool (Eclipse RCP application) was developed to analyze real productive heap dumps whichtend to get enormous in size with hundreds of millions of objects Performance low resourceconsumption and especially the newly developed innovative analysis techniques make it a helpfultool even to small application heap dumpsYou can install SAP Memory Analyzer as an additional tool
This procedure tells you how to install an SAP system with SAPinst SAPinst includes a GUI and aGUI server both using Java This section describes an installation where SAPinst SAPinst GUI andthe GUI server are running on the same hostNote the following information about SAPinst
n When you start SAPinst SAPinst GUI and the GUI server also start SAPinst GUI connects to theGUI server with a secure SSL connection and the GUI server connects to SAPinst
n SAPinst creates the installation directory sapinst_instdir where it keeps its log files Theinstallation directory is located directly in the Program Files directory If SAPinst is not able tocreate sapinst_instdir there it tries to create sapinst_instdir in the directory defined by theenvironment variable TEMP
Recommendation
We recommend that you keep all installation directories until the system is completely andcorrectly installed
n SAPinst creates a subdirectory for each installation service calledltsapinst_instdirgtltinstallation_service_directorygt which is located in ProgramFiles
n The SAPinst Self-Extractor extracts the executables to a temporary directory (TEMP TMP TMPDIR orSystemRoot) These executables are deleted after SAPinst has stopped runningDirectories called sapinst_exexxxxxxxxxx sometimes remain in the temporary directory Youcan safely delete them The temporary directory also contains the SAPinst Self-Extractor log filedev_selfexout which might be useful if an error occurs
05162008 PUBLIC 2340
5 Installing SAP Memory Analyzer (Optional)
Caution
If SAPinst cannot find a temporary directory the installation terminates with the error FCO-00058
n If you want to terminate SAPinst and the SAPinst Self-Extractor choose one of the followingoptionsl Right-click the icon for the SAPinst output window located in theWindows tray and choose Exitl Click the icon for the SAPinst output window located in the Windows tray and choose File
Exit
PrerequisitesYou are logged on as a user with administration rights to install the SAPinst tool and the SAP system
Note
When installing from a network share make sure that everyone has read access to this share Theinstallation routine creates users such as ltsidgtadm (for example ce1adm) During the installationSAPinst performs a user switch to this user If the newly created user does not have permissions tothe network share where the installation is running from the installation will fail
Procedure
1 Insert the SAP Installation Master DVD into your DVD drive or mount it locally2 Start SAPinst from the SAP Installation Master DVD by double-clicking sapinstexe from the
following path ltDVD drivegtDATA_UNITSIM_WIN_ltplatformgt_ltdatabasegtSAPinst GUI starts automatically by displaying theWelcome screen
3 In theWelcome screen choose the required SAPinst installation option from the tree structure
Note
If SAPinst prompts you to log off from your system log off and log on againSAPinst restarts automaticallyChoose Continue Old Installation
4 Choose whether you want to run the installation in Typicalmode or in CustommodeIf you select Typical the installation wizard provides automatic default settings and you only haveto respond to a small selection of prompts The rest is set by default If you select Custom you haveto respond to all prompts
Note
If you want to install the offline documentation for SAP NetWeaver CE you need to chooseCustommodeAfter the installation you can access the offline documentation by choosing Start All ProgramsSAP NetWeaver Composition Environment ltSAPSIDgt
2440 PUBLIC 05162008
5 Installing SAP Memory Analyzer (Optional)
5 Follow the screens and enter the required parameters
Note
For more information about the input parameters and information about restrictions forpasswords position the cursor on the required parameter and press F1
After you have entered all requested input parameters SAPinst displays the Parameter Summaryscreen This screen shows both the parameters that you entered and those that SAPinst set bydefault If required you can revise the parameters before starting the installation
6 To start the installation choose Start SAPinst starts the installation and displays the progress ofthe installation When the installation has successfully been completed SAPinst shows the dialogExecution of ltOption_Namegt has been completed successfully
05162008 PUBLIC 2540
This page is intentionally left blank
6 Post-Installation Activities
6 Post-Installation Activities
This section describes the steps that you have to perform after the installation has finished successfully
Running the Configuration Wizard (Optional)
Note
You can run the configuration wizard only once and only directly after installing and patchingyour SAP system
For SAP NetWeaver CE you need to run the following configuration tasks
n Configuration of Services Registry Webservice Destinations
n When you have installed the IDE Update Site componentConfiguration and Mirroring of local NWDSUpdate Site
n When you have installed the Adobe Document Services component Initial setup ADS in CE
When you have an NWDI installation on another SAP NetWeaver 70 system you can perform thefollowing configuration tasks
n Change Management Service (CMS) Create an Application Skeleton
n Change Management Service (CMS) Modify a Software Component
To run the configuration wizard proceed as follows
1 After SAPinst has finished open the SAP NetWeaver Administrator by entering the following URLin a browser httplthostgtlthttp_portgtnwa
2 Log on as user j2ee_admin3 In the SAP NetWeaver Administrator choose Configuration Management Scenarios Configuration
Wizard 4 Select the appropriate configuration task in the list and choose Start5 Follow the on-screen instructions6 After the configuration wizard has finished successfully restart your SAP system
Configuring the IDE Update Site
1 In the Configuration Wizard select the task Configuration and Mirroring of local NWDS Update Site in thelist and choose Start
2 Follow the on-screen instructions
05162008 PUBLIC 2740
6 Post-Installation Activities
Provide the credentials for the source update site location The default URL is the central SAPupdate site You can also use your installation DVD as source update site which makes themirror process much faster To use the DVD as source update site you have to specify the URLfileltdvd_drivegtIDE
3 After the configuration wizard has finished successfully restart your SAP systemThe data of the source update site location is now mirrored to your server
Enabling Adobe Document ServicesIf you have installed SAP NetWeaver Composition Environment with the Adobe DocumentServices add-on in the developer edition on aWindows platform you must complete the followingpost-installation steps to enable the add-on In case you have installed an AS Java cluster applythe procedure to the central host as well as to all other hosts where additional application serverinstances are running
1 Using the SAP Management Console stop the AS Java systemFormore information about starting and stopping SAP systems see httphelpsapcomnwce
Administratorrsquos Guide Administration of SAP NetWeaver CE General System Administration AS Java(Application Server Java)
2 From the Startmenu open Control Panel Administrative Tools Computer Management Services andApplications Services
3 Select SAPltSIDgt_ltInstance_Numbergt (for example SAPCE1_00) and open Properties from thecontext menu
4 On the Log On tab page enable the Local System account indicator5 Repeat the above steps for the second SAPltSIDgt_ltInstance_Numbergt service that you see in the list6 Start the AS Java system
Adobe LiveCycle Designer
For more information about how to install and configure the Adobe LiveCycle Designer see SAPNote 962763
Enabling Services RegistryYou must apply additional configuration steps to enable Services Registry after you have installed anSAP NetWeaver Composition Environment system containing the following components
n Java Application Server and Composition Platformn Java Application Server and Adobe Document Services
To enable Services Registry you must apply the following configuration templates to your systemCE_Complete_Stack_development_full
2840 PUBLIC 05162008
6 Post-Installation Activities
Note
For more information about what configuration templates are available see Configuration Templates[page 33]For more information about applying configuration templates see httphelpsapcomnwce
SAP NetWeaver Composition Environment Library Administratorrsquos Guide Configuration of SAP NetWeaver CEInitial System Configuration AS Java Configuration Activating a Configuration Template
See also
httphelpsapcomnwce SAP NetWeaver Composition Environment Library Developerrsquos GuideDeveloping and Composing Applications Consuming Enterprise Services Searching for Services Services RegistryTasks Searching amp Browsing Service Definitions Configuring the Services Registry
Configuring the Portal in SAP NetWeaver CEAfter installing the portal in SAP NetWeaver CE a number of deactivated or irrelevant tools aredisplayed in the UI To display the correct portals tools for CE proceed as follows
1 Open a browser and log on to your portal as an administrator2 In the same browser session enter the following URL
httplthostgtlthttpportgtirjservletprtportalprtrootcomsapportal
contentlayersContentLayersTool
where lthostgt is the host name of your server and lthttpportgt is the port number of your server3 In the Portal Mode Configuration Tool choose Activate Development Mode to restore the portal tools
and content that are assigned to the development mode4 Restart or refresh your browser5 In the SAP Management Console restart the server
You may then continue with the mandatory and optional configuration steps as described inhttphelpsapcomnwce SAP NetWeaver Composition Environment Library Administratorrsquos Guide
Configuration of SAP NetWeaver Composition Environment Configuration for CE Additional Components Configuringthe Portal
Changing the Password for the Internet Communication Manager (ICM)You can monitor and manage the Internet Communication Manager (ICM) from the command lineprogramAfter the installation of your SAP NetWeaver CE system has successfully finished you need to changethe ICM password manually To do so proceed as follows
1 Log on at operating system level to the computer where the ICM is running2 Start the program icmon with icmon ndasha profile=ltinstance_profilegt to maintain the
authentication file (default authfiletxt)3 Choose a to add a user4 Choose c to change the password of the existing user
05162008 PUBLIC 2940
6 Post-Installation Activities
5 Choose s to save your settings
Further Configuration StepsAfter installing your SAP NetWeaver CE system and performing the post-installation steps to get thesystem up amp running you may need to perform further configuration stepsRefer to the following documentation to proceed with your tasks
n If you are a system administrator refer to httphelpsapcomnwce Administratorrsquos Guide It contains information about how to configure and administer your system
n If you are a developer refer to httphelpsapcomnwce Developerrsquos Guide It providesguidelines for developing applications using the SAP NetWeaver CE
Note
The SAP NetWeaver CE documentation is also available offline as a part of your installation To accessit choose Start All Programs SAP NetWeaver Composition Environment 10 Documentation
3040 PUBLIC 05162008
7 Additional Information
7 Additional Information
The following section provides additional information about the installation of SAP NetWeaverComposition Environment
71 Transporting Self-Developed Software ComponentArchives (SCA) into the System
PrerequisitesYou have developed your own Software Component Archives (SCA) and want to transport theminto your SAP NetWeaver CE system
ProcedureTo transport your SCAs to the SAP NetWeaver CE system proceed as follows
1 Download the update file from httpservicesapcomswdc Download Support Packages andPatches Entry by Application Group SAP NetWeaver SAP NETWEAVER SAP NETWEAVER CE71 Support Package Stacks
2 From an empty directory run the update tool updateltIDgtexe
Note
If the tool displays descriptions such as Applying Support Packages you can ignore them
3 In the dialog screens specify the directory where your SCAs are located4 Follow the on-screen instructions
Only valid for MaxDB
72 Troubleshooting ‒ Repairing an Inconsistent SAP MaxDBInstallation
PrerequisitesDuring the preinstallation phase the installation tool checks the Microsoft Windows registry foralready installed SAP MaxDB softwareIf the registry key is found but there is no software on the hard drive you receive the followingmessage
05162008 PUBLIC 3140
7 Additional Information73 Restarting the SAP MaxDB Server Manually
The existing MaxDB software is not consistent Check the file system and registry
The most common reason for this inconsistency is the manual deletion of the software from the filesystem without using the specified tools
ProcedureTo repair this inconsistency proceed as follows
1 Choose Start Control Panel Administrative Tools Services 2 Make sure the services SAPDBWWW SAPDB and XServer are stopped3 Choose Start Run and run the command regedit4 Go to My ComputerHKEY_LOCAL_MACHINESOFTWARESAPSAP DBTech Key IndepPrograms
The key contains a path to a foldera) Check if this folder exists on the file systemb) Note down the value of Key IndepPrograms for later usage (see step 7)
If the path does not exist in the file system delete the key SAP DBTech5 Delete the following keys
n My ComputerHKEY_LOCAL_MACHINESYSTEMCurrentControlSetServicesSAP DBTech-
n My ComputerHKEY_LOCAL_MACHINESYSTEMCurrentControlSetServicesSAPDBWWW
n My ComputerHKEY_LOCAL_MACHINESYSTEMCurrentControlSetServicesXServer
6 Choose Start Control Panel System Advanced Environment Variables System Variables Path 7 Delete the following paths from the variable
n ltIndepProgramsgtbin
n ltIndepProgramsgtpgm
8 Reboot your computer
End of MaxDB
Only valid for MaxDB
73 Restarting the SAP MaxDB Server Manually
If after a reboot the database server is not running automatically you need to restart the SAP MaxDBserver manually
Production SystemsTo restart the SAP MaxDB server manually proceed as follows
1 Open a command prompt and enter the following command net start sapdbwww
ORChoose Start All Programs Administrative Tools Services Double-click on SAP DB WWW andchoose Start
2 Open the SAP Management Console and choose SAP Systems ltSAPSIDgt ltmachine namegt
3240 PUBLIC 05162008
7 Additional Information74 Restarting the MS SQL Server Manually
3 Enter the master password and choose Logon4 Choose Online When the database server is online you can restart the engine
Development SystemsTo restart the SAP MaxDB server manually choose Start All Programs SAP NetWeaver CompositionEnvironment CE Application Server ltSAPSIDgt Start Application Server End of MaxDB
Only valid for MS SQL Server
74 Restarting the MS SQL Server Manually
If after a reboot the database server is not running automatically you need to restart the MS SQLServer manually
Procedure
1 Choose Start All Programs Administrative Tools Services 2 Look for the service named SQL Server ltnamegt where ltnamegt is MSSQLSERVER for the default
instance or ltinstance namegt for a named instance3 If the service status is not started right-click the service and choose Start in the context menu4 To insure the service is started automatically after each system restart right-click it and choose
Properties Select Automatic as the startup type
End of MS SQL Server
75 Configuration Templates
Configuration templates contain the predefined instance configuration for specific scenarios Theyare automatically applied according to the installation option you have selected The templatesare designed to optimize system performance by applying certain configuration to the Java VirtualMachine and the application server as well as by applying startup filters to AS Java services andapplications to start only those relevant for the selected installation optionsThe following table provides information about the available templates with SAP NetWeaverComposition Environment In the template name replace the ltsystem_modegt parameter bydevelopment (for the templates relevant to systems installed in developmentmode) or production (forthe templates relevant to systems installed in productivemode)
05162008 PUBLIC 3340
7 Additional Information76 Uninstalling SAP NetWeaver Composition Environment
Configuration Template Selected Installation Options
CE_Java_EE_ltsystem_modegt_full Java Application Server Installation
CE_Composition_Environment_ltsystem_modegt_full Java Application Server Installation + CompositionPlatform Installation
CE_Adobe_Document_Service_ltsystem_modegt_full Java Application Server Installation + AdobeDocument Services Add-on Installation
CE_Composite_Voice_ltsystem_modegt_full Java Application Server Installation + Voice Add-onInstallation
CE_Complete_Stack_ltsystem_modegt_full Java Application Server Installation + CompositionPlatform Installation + Adobe Document ServicesAdd-on Installation + Voice Add-on Installation
If your selection cannot be mapped to one of the combinations in the above table the templateCE_Complete_Stack_ltsystem_modegt_full is applied It starts all applications and services neededto run the complete stackYou canmanually apply a different configuration template if youwant to switch to another installationoption For example by changing from template CE_Complete_Stack_ltsystem_modegt_full toCE_Java_EE_ltsystem_modegt_full you achieve shorter startup times and less memory consumptionbut also less functionality since not all applications and services are runningFor more information about applying configuration templates see httphelpsapcomnwce
Administratorrsquos Guide Configuration of SAP NetWeaver CE Initial System Configuration AS Java ConfigurationActivating a Configuration Template
Note
Make sure that you do not apply a development template to a productive system or vice versa
76 Uninstalling SAP NetWeaver Composition Environment
You have to uninstall all components of the SAP NetWeaver Composition Environment separatelythat is SAP NetWeaver CE and SAP NetWeaver Developer StudioYou can uninstall your SAP NetWeaver CE system in different ways
Uninstalling SAP NetWeaver CEWindows Choose Start Control Panel Add Remove programs SAP SystemltSAPSIDgt
Uninstalling SAP NetWeaver CE Using SAPinst
1 Insert the SAP Installation Master DVD into your DVD drive or mount it locally
3440 PUBLIC 05162008
7 Additional Information76 Uninstalling SAP NetWeaver Composition Environment
2 Start SAPinst from the SAP Installation Master DVD as described in the section Installing SAPNetWeaver Composition Environment
3 In theWelcome screen choose Uninstall SAP System or Single Instances from the tree structure4 Follow the on-screen instructions
Uninstalling SAP NetWeaver Developer Studio
Prerequisites
Before uninstalling SAP NetWeaver Developer Studio consider the following
n All additionally installed features and plug-ins that were installed to the same folder as DeveloperStudio for example by using the Eclipse Update Manager will also be removed
n There may be other directories and files in the installation directory notablyltinstall_dirgteclipseworkspace ltinstall_dirgteclipselinks andltinstall_dirgteclipseconfiguration that contain important data The files and folder aswell as the existing workspaces are retained when the product is uninstalled
Procedure
To uninstall SAP NetWeaver Developer Studio proceed as described above You can use either oneof the options
Uninstalling the SAP Management ConsoleSince all SAP systems use the SAP Management Console there is no uninstallation option for theSAP Management Console with SAPinst If you are sure that you do not need the SAP ManagementConsole any more you can remove it using Start Control Panel Add Remove programs
05162008 PUBLIC 3540
Typographic Conventions
Example Description
lt gt Angle brackets indicate that you replace these words or characters with appropriateentries to make entries in the system for example ldquoEnter your ltUser Namegtrdquo
Arrows separating the parts of a navigation path for example menu options
Example Emphasized words or expressions
Example Words or characters that you enter in the system exactly as they appear in thedocumentation
Example Textual cross-references to an internet address for example httpwwwsapcom
example Quicklinks added to the internet address of a homepage to enable quick access tospecific content on the Web
123456 Hyperlink to an SAP Note for example SAP Note 123456
Example n Words or characters quoted from the screen These include field labels screen titlespushbutton labels menu names and menu options
n Cross-references to other documentation or published works
Example n Output on the screen following a user action for example messagesn Source code or syntax quoted directly from a programn File and directory names and their paths names of variables and parameters and
names of installation upgrade and database tools
EXAMPLE Technical names of system objects These include report names program namestransaction codes database table names and key concepts of a programming languagewhen they are surrounded by body text for example SELECT and INCLUDE
EXAMPLE Keys on the keyboard
3640 PUBLIC 05162008
SAP AGDietmar-Hopp-Allee 16
69190 WalldorfGermany
T +4918 0534 34 34F +4918 0534 34 20
wwwsapcom
copy Copyright 2008 SAP AG All rights reserved
No part of this publication may be reproduced or transmitted in any form or for any purpose without the express permissionof SAP AG The information contained herein may be changed without prior noticeSome software products marketed by SAP AG and its distributors contain proprietary software components of othersoftware vendors
No part of this publication may be reproduced or transmitted in any form or for any purpose without the express permissionof SAP AG The information contained herein may be changed without prior noticeSome software products marketed by SAP AG and its distributors contain proprietary software components of othersoftware vendorsMicrosoft Windows Excel Outlook and PowerPoint are registered trademarks of Microsoft CorporationIBM DB2 DB2 Universal Database OS2 Parallel Sysplex MVSESA AIX S390 AS400 OS390 OS400 iSeries pSeriesxSeries zSeries System i System i5 System p System p5 System x System z System z9 zOS AFP Intelligent MinerWebSphere Netfinity Tivoli Informix i5OS POWER POWER5 POWER5+ OpenPower and PowerPC are trademarks orregistered trademarks of IBM CorporationAdobe the Adobe logo Acrobat PostScript and Reader are either trademarks or registered trademarks of Adobe SystemsIncorporated in the United States andor other countriesOracle is a registered trademark of Oracle CorporationUNIX XOpen OSF1 and Motif are registered trademarks of the Open GroupCitrix ICA Program Neighborhood MetaFrame WinFrame VideoFrame and MultiWin are trademarks or registeredtrademarks of Citrix Systems IncHTML XML XHTML and W3C are trademarks or registered trademarks of W3Creg World Wide Web ConsortiumMassachusetts Institute of TechnologyJava is a registered trademark of Sun Microsystems IncJavaScript is a registered trademark of Sun Microsystems Inc used under license for technology invented and implementedby NetscapeSAP R3 xApps xApp SAP NetWeaver Duet PartnerEdge ByDesign SAP Business ByDesign and other SAP productsand services mentioned herein as well as their respective logos are trademarks or registered trademarks of SAP AG inGermany and in several other countries all over the world All other product and service names mentioned are thetrademarks of their respective companies Data contained in this document serves informational purposes only Nationalproduct specifications may varyThese materials are subject to change without notice These materials are provided by SAP AG and its affiliated companies(SAP Group) for informational purposes only without representation or warranty of any kind and SAP Group shall notbe liable for errors or omissions with respect to the materials The only warranties for SAP Group products and services arethose that are set forth in the express warranty statements accompanying such products and services if any Nothing hereinshould be construed as constituting an additional warranty
This document was created using stylesheet 2006-12-31 (V51beta [= 60 for E3]) and XSLT processor SAXON 652 fromMichael Kay (httpsaxonsfnet) XSLT version 1
05162008 PUBLIC 3740
DisclaimerSome components of this product are based on Javatrade Any code change in these components may cause unpredictable andsevere malfunctions and is therefore expressly prohibited as is any decompilation of these componentsAny Javatrade Source Code delivered with this product is only to be used by SAPrsquos Support Services and may not be modified oraltered in any way
Documentation in the SAP Service MarketplaceYou can find this document at the following address httpsservicesapcominstguides
3840 PUBLIC 05162008
This page is intentionally left blank
SAP AGDietmar-Hopp-Allee 1669190 WalldorfGermanyT +4918 0534 34 34F +4918 0534 34 20wwwsapcom
copy Copyright 2008 SAP AG All rights reservedNo part of this publication may be reproduced or transmitted in any form or for any purpose without the express permission of SAP AG The information contained herein may bechanged without prior notice

This page is intentionally left blank
5 Installing SAP Memory Analyzer (Optional)
5 Installing SAP Memory Analyzer(Optional)
SAP Memory Analyzer helps you to analyze Java heap dumps easily find big chunks of memory orcomplex memory aggregation patterns in your data structures and identify who is keeping thismemory alive New and innovative analysis techniques support the user with a fast and powerfulfeature setThe tool (Eclipse RCP application) was developed to analyze real productive heap dumps whichtend to get enormous in size with hundreds of millions of objects Performance low resourceconsumption and especially the newly developed innovative analysis techniques make it a helpfultool even to small application heap dumpsYou can install SAP Memory Analyzer as an additional tool
This procedure tells you how to install an SAP system with SAPinst SAPinst includes a GUI and aGUI server both using Java This section describes an installation where SAPinst SAPinst GUI andthe GUI server are running on the same hostNote the following information about SAPinst
n When you start SAPinst SAPinst GUI and the GUI server also start SAPinst GUI connects to theGUI server with a secure SSL connection and the GUI server connects to SAPinst
n SAPinst creates the installation directory sapinst_instdir where it keeps its log files Theinstallation directory is located directly in the Program Files directory If SAPinst is not able tocreate sapinst_instdir there it tries to create sapinst_instdir in the directory defined by theenvironment variable TEMP
Recommendation
We recommend that you keep all installation directories until the system is completely andcorrectly installed
n SAPinst creates a subdirectory for each installation service calledltsapinst_instdirgtltinstallation_service_directorygt which is located in ProgramFiles
n The SAPinst Self-Extractor extracts the executables to a temporary directory (TEMP TMP TMPDIR orSystemRoot) These executables are deleted after SAPinst has stopped runningDirectories called sapinst_exexxxxxxxxxx sometimes remain in the temporary directory Youcan safely delete them The temporary directory also contains the SAPinst Self-Extractor log filedev_selfexout which might be useful if an error occurs
05162008 PUBLIC 2340
5 Installing SAP Memory Analyzer (Optional)
Caution
If SAPinst cannot find a temporary directory the installation terminates with the error FCO-00058
n If you want to terminate SAPinst and the SAPinst Self-Extractor choose one of the followingoptionsl Right-click the icon for the SAPinst output window located in theWindows tray and choose Exitl Click the icon for the SAPinst output window located in the Windows tray and choose File
Exit
PrerequisitesYou are logged on as a user with administration rights to install the SAPinst tool and the SAP system
Note
When installing from a network share make sure that everyone has read access to this share Theinstallation routine creates users such as ltsidgtadm (for example ce1adm) During the installationSAPinst performs a user switch to this user If the newly created user does not have permissions tothe network share where the installation is running from the installation will fail
Procedure
1 Insert the SAP Installation Master DVD into your DVD drive or mount it locally2 Start SAPinst from the SAP Installation Master DVD by double-clicking sapinstexe from the
following path ltDVD drivegtDATA_UNITSIM_WIN_ltplatformgt_ltdatabasegtSAPinst GUI starts automatically by displaying theWelcome screen
3 In theWelcome screen choose the required SAPinst installation option from the tree structure
Note
If SAPinst prompts you to log off from your system log off and log on againSAPinst restarts automaticallyChoose Continue Old Installation
4 Choose whether you want to run the installation in Typicalmode or in CustommodeIf you select Typical the installation wizard provides automatic default settings and you only haveto respond to a small selection of prompts The rest is set by default If you select Custom you haveto respond to all prompts
Note
If you want to install the offline documentation for SAP NetWeaver CE you need to chooseCustommodeAfter the installation you can access the offline documentation by choosing Start All ProgramsSAP NetWeaver Composition Environment ltSAPSIDgt
2440 PUBLIC 05162008
5 Installing SAP Memory Analyzer (Optional)
5 Follow the screens and enter the required parameters
Note
For more information about the input parameters and information about restrictions forpasswords position the cursor on the required parameter and press F1
After you have entered all requested input parameters SAPinst displays the Parameter Summaryscreen This screen shows both the parameters that you entered and those that SAPinst set bydefault If required you can revise the parameters before starting the installation
6 To start the installation choose Start SAPinst starts the installation and displays the progress ofthe installation When the installation has successfully been completed SAPinst shows the dialogExecution of ltOption_Namegt has been completed successfully
05162008 PUBLIC 2540
This page is intentionally left blank
6 Post-Installation Activities
6 Post-Installation Activities
This section describes the steps that you have to perform after the installation has finished successfully
Running the Configuration Wizard (Optional)
Note
You can run the configuration wizard only once and only directly after installing and patchingyour SAP system
For SAP NetWeaver CE you need to run the following configuration tasks
n Configuration of Services Registry Webservice Destinations
n When you have installed the IDE Update Site componentConfiguration and Mirroring of local NWDSUpdate Site
n When you have installed the Adobe Document Services component Initial setup ADS in CE
When you have an NWDI installation on another SAP NetWeaver 70 system you can perform thefollowing configuration tasks
n Change Management Service (CMS) Create an Application Skeleton
n Change Management Service (CMS) Modify a Software Component
To run the configuration wizard proceed as follows
1 After SAPinst has finished open the SAP NetWeaver Administrator by entering the following URLin a browser httplthostgtlthttp_portgtnwa
2 Log on as user j2ee_admin3 In the SAP NetWeaver Administrator choose Configuration Management Scenarios Configuration
Wizard 4 Select the appropriate configuration task in the list and choose Start5 Follow the on-screen instructions6 After the configuration wizard has finished successfully restart your SAP system
Configuring the IDE Update Site
1 In the Configuration Wizard select the task Configuration and Mirroring of local NWDS Update Site in thelist and choose Start
2 Follow the on-screen instructions
05162008 PUBLIC 2740
6 Post-Installation Activities
Provide the credentials for the source update site location The default URL is the central SAPupdate site You can also use your installation DVD as source update site which makes themirror process much faster To use the DVD as source update site you have to specify the URLfileltdvd_drivegtIDE
3 After the configuration wizard has finished successfully restart your SAP systemThe data of the source update site location is now mirrored to your server
Enabling Adobe Document ServicesIf you have installed SAP NetWeaver Composition Environment with the Adobe DocumentServices add-on in the developer edition on aWindows platform you must complete the followingpost-installation steps to enable the add-on In case you have installed an AS Java cluster applythe procedure to the central host as well as to all other hosts where additional application serverinstances are running
1 Using the SAP Management Console stop the AS Java systemFormore information about starting and stopping SAP systems see httphelpsapcomnwce
Administratorrsquos Guide Administration of SAP NetWeaver CE General System Administration AS Java(Application Server Java)
2 From the Startmenu open Control Panel Administrative Tools Computer Management Services andApplications Services
3 Select SAPltSIDgt_ltInstance_Numbergt (for example SAPCE1_00) and open Properties from thecontext menu
4 On the Log On tab page enable the Local System account indicator5 Repeat the above steps for the second SAPltSIDgt_ltInstance_Numbergt service that you see in the list6 Start the AS Java system
Adobe LiveCycle Designer
For more information about how to install and configure the Adobe LiveCycle Designer see SAPNote 962763
Enabling Services RegistryYou must apply additional configuration steps to enable Services Registry after you have installed anSAP NetWeaver Composition Environment system containing the following components
n Java Application Server and Composition Platformn Java Application Server and Adobe Document Services
To enable Services Registry you must apply the following configuration templates to your systemCE_Complete_Stack_development_full
2840 PUBLIC 05162008
6 Post-Installation Activities
Note
For more information about what configuration templates are available see Configuration Templates[page 33]For more information about applying configuration templates see httphelpsapcomnwce
SAP NetWeaver Composition Environment Library Administratorrsquos Guide Configuration of SAP NetWeaver CEInitial System Configuration AS Java Configuration Activating a Configuration Template
See also
httphelpsapcomnwce SAP NetWeaver Composition Environment Library Developerrsquos GuideDeveloping and Composing Applications Consuming Enterprise Services Searching for Services Services RegistryTasks Searching amp Browsing Service Definitions Configuring the Services Registry
Configuring the Portal in SAP NetWeaver CEAfter installing the portal in SAP NetWeaver CE a number of deactivated or irrelevant tools aredisplayed in the UI To display the correct portals tools for CE proceed as follows
1 Open a browser and log on to your portal as an administrator2 In the same browser session enter the following URL
httplthostgtlthttpportgtirjservletprtportalprtrootcomsapportal
contentlayersContentLayersTool
where lthostgt is the host name of your server and lthttpportgt is the port number of your server3 In the Portal Mode Configuration Tool choose Activate Development Mode to restore the portal tools
and content that are assigned to the development mode4 Restart or refresh your browser5 In the SAP Management Console restart the server
You may then continue with the mandatory and optional configuration steps as described inhttphelpsapcomnwce SAP NetWeaver Composition Environment Library Administratorrsquos Guide
Configuration of SAP NetWeaver Composition Environment Configuration for CE Additional Components Configuringthe Portal
Changing the Password for the Internet Communication Manager (ICM)You can monitor and manage the Internet Communication Manager (ICM) from the command lineprogramAfter the installation of your SAP NetWeaver CE system has successfully finished you need to changethe ICM password manually To do so proceed as follows
1 Log on at operating system level to the computer where the ICM is running2 Start the program icmon with icmon ndasha profile=ltinstance_profilegt to maintain the
authentication file (default authfiletxt)3 Choose a to add a user4 Choose c to change the password of the existing user
05162008 PUBLIC 2940
6 Post-Installation Activities
5 Choose s to save your settings
Further Configuration StepsAfter installing your SAP NetWeaver CE system and performing the post-installation steps to get thesystem up amp running you may need to perform further configuration stepsRefer to the following documentation to proceed with your tasks
n If you are a system administrator refer to httphelpsapcomnwce Administratorrsquos Guide It contains information about how to configure and administer your system
n If you are a developer refer to httphelpsapcomnwce Developerrsquos Guide It providesguidelines for developing applications using the SAP NetWeaver CE
Note
The SAP NetWeaver CE documentation is also available offline as a part of your installation To accessit choose Start All Programs SAP NetWeaver Composition Environment 10 Documentation
3040 PUBLIC 05162008
7 Additional Information
7 Additional Information
The following section provides additional information about the installation of SAP NetWeaverComposition Environment
71 Transporting Self-Developed Software ComponentArchives (SCA) into the System
PrerequisitesYou have developed your own Software Component Archives (SCA) and want to transport theminto your SAP NetWeaver CE system
ProcedureTo transport your SCAs to the SAP NetWeaver CE system proceed as follows
1 Download the update file from httpservicesapcomswdc Download Support Packages andPatches Entry by Application Group SAP NetWeaver SAP NETWEAVER SAP NETWEAVER CE71 Support Package Stacks
2 From an empty directory run the update tool updateltIDgtexe
Note
If the tool displays descriptions such as Applying Support Packages you can ignore them
3 In the dialog screens specify the directory where your SCAs are located4 Follow the on-screen instructions
Only valid for MaxDB
72 Troubleshooting ‒ Repairing an Inconsistent SAP MaxDBInstallation
PrerequisitesDuring the preinstallation phase the installation tool checks the Microsoft Windows registry foralready installed SAP MaxDB softwareIf the registry key is found but there is no software on the hard drive you receive the followingmessage
05162008 PUBLIC 3140
7 Additional Information73 Restarting the SAP MaxDB Server Manually
The existing MaxDB software is not consistent Check the file system and registry
The most common reason for this inconsistency is the manual deletion of the software from the filesystem without using the specified tools
ProcedureTo repair this inconsistency proceed as follows
1 Choose Start Control Panel Administrative Tools Services 2 Make sure the services SAPDBWWW SAPDB and XServer are stopped3 Choose Start Run and run the command regedit4 Go to My ComputerHKEY_LOCAL_MACHINESOFTWARESAPSAP DBTech Key IndepPrograms
The key contains a path to a foldera) Check if this folder exists on the file systemb) Note down the value of Key IndepPrograms for later usage (see step 7)
If the path does not exist in the file system delete the key SAP DBTech5 Delete the following keys
n My ComputerHKEY_LOCAL_MACHINESYSTEMCurrentControlSetServicesSAP DBTech-
n My ComputerHKEY_LOCAL_MACHINESYSTEMCurrentControlSetServicesSAPDBWWW
n My ComputerHKEY_LOCAL_MACHINESYSTEMCurrentControlSetServicesXServer
6 Choose Start Control Panel System Advanced Environment Variables System Variables Path 7 Delete the following paths from the variable
n ltIndepProgramsgtbin
n ltIndepProgramsgtpgm
8 Reboot your computer
End of MaxDB
Only valid for MaxDB
73 Restarting the SAP MaxDB Server Manually
If after a reboot the database server is not running automatically you need to restart the SAP MaxDBserver manually
Production SystemsTo restart the SAP MaxDB server manually proceed as follows
1 Open a command prompt and enter the following command net start sapdbwww
ORChoose Start All Programs Administrative Tools Services Double-click on SAP DB WWW andchoose Start
2 Open the SAP Management Console and choose SAP Systems ltSAPSIDgt ltmachine namegt
3240 PUBLIC 05162008
7 Additional Information74 Restarting the MS SQL Server Manually
3 Enter the master password and choose Logon4 Choose Online When the database server is online you can restart the engine
Development SystemsTo restart the SAP MaxDB server manually choose Start All Programs SAP NetWeaver CompositionEnvironment CE Application Server ltSAPSIDgt Start Application Server End of MaxDB
Only valid for MS SQL Server
74 Restarting the MS SQL Server Manually
If after a reboot the database server is not running automatically you need to restart the MS SQLServer manually
Procedure
1 Choose Start All Programs Administrative Tools Services 2 Look for the service named SQL Server ltnamegt where ltnamegt is MSSQLSERVER for the default
instance or ltinstance namegt for a named instance3 If the service status is not started right-click the service and choose Start in the context menu4 To insure the service is started automatically after each system restart right-click it and choose
Properties Select Automatic as the startup type
End of MS SQL Server
75 Configuration Templates
Configuration templates contain the predefined instance configuration for specific scenarios Theyare automatically applied according to the installation option you have selected The templatesare designed to optimize system performance by applying certain configuration to the Java VirtualMachine and the application server as well as by applying startup filters to AS Java services andapplications to start only those relevant for the selected installation optionsThe following table provides information about the available templates with SAP NetWeaverComposition Environment In the template name replace the ltsystem_modegt parameter bydevelopment (for the templates relevant to systems installed in developmentmode) or production (forthe templates relevant to systems installed in productivemode)
05162008 PUBLIC 3340
7 Additional Information76 Uninstalling SAP NetWeaver Composition Environment
Configuration Template Selected Installation Options
CE_Java_EE_ltsystem_modegt_full Java Application Server Installation
CE_Composition_Environment_ltsystem_modegt_full Java Application Server Installation + CompositionPlatform Installation
CE_Adobe_Document_Service_ltsystem_modegt_full Java Application Server Installation + AdobeDocument Services Add-on Installation
CE_Composite_Voice_ltsystem_modegt_full Java Application Server Installation + Voice Add-onInstallation
CE_Complete_Stack_ltsystem_modegt_full Java Application Server Installation + CompositionPlatform Installation + Adobe Document ServicesAdd-on Installation + Voice Add-on Installation
If your selection cannot be mapped to one of the combinations in the above table the templateCE_Complete_Stack_ltsystem_modegt_full is applied It starts all applications and services neededto run the complete stackYou canmanually apply a different configuration template if youwant to switch to another installationoption For example by changing from template CE_Complete_Stack_ltsystem_modegt_full toCE_Java_EE_ltsystem_modegt_full you achieve shorter startup times and less memory consumptionbut also less functionality since not all applications and services are runningFor more information about applying configuration templates see httphelpsapcomnwce
Administratorrsquos Guide Configuration of SAP NetWeaver CE Initial System Configuration AS Java ConfigurationActivating a Configuration Template
Note
Make sure that you do not apply a development template to a productive system or vice versa
76 Uninstalling SAP NetWeaver Composition Environment
You have to uninstall all components of the SAP NetWeaver Composition Environment separatelythat is SAP NetWeaver CE and SAP NetWeaver Developer StudioYou can uninstall your SAP NetWeaver CE system in different ways
Uninstalling SAP NetWeaver CEWindows Choose Start Control Panel Add Remove programs SAP SystemltSAPSIDgt
Uninstalling SAP NetWeaver CE Using SAPinst
1 Insert the SAP Installation Master DVD into your DVD drive or mount it locally
3440 PUBLIC 05162008
7 Additional Information76 Uninstalling SAP NetWeaver Composition Environment
2 Start SAPinst from the SAP Installation Master DVD as described in the section Installing SAPNetWeaver Composition Environment
3 In theWelcome screen choose Uninstall SAP System or Single Instances from the tree structure4 Follow the on-screen instructions
Uninstalling SAP NetWeaver Developer Studio
Prerequisites
Before uninstalling SAP NetWeaver Developer Studio consider the following
n All additionally installed features and plug-ins that were installed to the same folder as DeveloperStudio for example by using the Eclipse Update Manager will also be removed
n There may be other directories and files in the installation directory notablyltinstall_dirgteclipseworkspace ltinstall_dirgteclipselinks andltinstall_dirgteclipseconfiguration that contain important data The files and folder aswell as the existing workspaces are retained when the product is uninstalled
Procedure
To uninstall SAP NetWeaver Developer Studio proceed as described above You can use either oneof the options
Uninstalling the SAP Management ConsoleSince all SAP systems use the SAP Management Console there is no uninstallation option for theSAP Management Console with SAPinst If you are sure that you do not need the SAP ManagementConsole any more you can remove it using Start Control Panel Add Remove programs
05162008 PUBLIC 3540
Typographic Conventions
Example Description
lt gt Angle brackets indicate that you replace these words or characters with appropriateentries to make entries in the system for example ldquoEnter your ltUser Namegtrdquo
Arrows separating the parts of a navigation path for example menu options
Example Emphasized words or expressions
Example Words or characters that you enter in the system exactly as they appear in thedocumentation
Example Textual cross-references to an internet address for example httpwwwsapcom
example Quicklinks added to the internet address of a homepage to enable quick access tospecific content on the Web
123456 Hyperlink to an SAP Note for example SAP Note 123456
Example n Words or characters quoted from the screen These include field labels screen titlespushbutton labels menu names and menu options
n Cross-references to other documentation or published works
Example n Output on the screen following a user action for example messagesn Source code or syntax quoted directly from a programn File and directory names and their paths names of variables and parameters and
names of installation upgrade and database tools
EXAMPLE Technical names of system objects These include report names program namestransaction codes database table names and key concepts of a programming languagewhen they are surrounded by body text for example SELECT and INCLUDE
EXAMPLE Keys on the keyboard
3640 PUBLIC 05162008
SAP AGDietmar-Hopp-Allee 16
69190 WalldorfGermany
T +4918 0534 34 34F +4918 0534 34 20
wwwsapcom
copy Copyright 2008 SAP AG All rights reserved
No part of this publication may be reproduced or transmitted in any form or for any purpose without the express permissionof SAP AG The information contained herein may be changed without prior noticeSome software products marketed by SAP AG and its distributors contain proprietary software components of othersoftware vendors
No part of this publication may be reproduced or transmitted in any form or for any purpose without the express permissionof SAP AG The information contained herein may be changed without prior noticeSome software products marketed by SAP AG and its distributors contain proprietary software components of othersoftware vendorsMicrosoft Windows Excel Outlook and PowerPoint are registered trademarks of Microsoft CorporationIBM DB2 DB2 Universal Database OS2 Parallel Sysplex MVSESA AIX S390 AS400 OS390 OS400 iSeries pSeriesxSeries zSeries System i System i5 System p System p5 System x System z System z9 zOS AFP Intelligent MinerWebSphere Netfinity Tivoli Informix i5OS POWER POWER5 POWER5+ OpenPower and PowerPC are trademarks orregistered trademarks of IBM CorporationAdobe the Adobe logo Acrobat PostScript and Reader are either trademarks or registered trademarks of Adobe SystemsIncorporated in the United States andor other countriesOracle is a registered trademark of Oracle CorporationUNIX XOpen OSF1 and Motif are registered trademarks of the Open GroupCitrix ICA Program Neighborhood MetaFrame WinFrame VideoFrame and MultiWin are trademarks or registeredtrademarks of Citrix Systems IncHTML XML XHTML and W3C are trademarks or registered trademarks of W3Creg World Wide Web ConsortiumMassachusetts Institute of TechnologyJava is a registered trademark of Sun Microsystems IncJavaScript is a registered trademark of Sun Microsystems Inc used under license for technology invented and implementedby NetscapeSAP R3 xApps xApp SAP NetWeaver Duet PartnerEdge ByDesign SAP Business ByDesign and other SAP productsand services mentioned herein as well as their respective logos are trademarks or registered trademarks of SAP AG inGermany and in several other countries all over the world All other product and service names mentioned are thetrademarks of their respective companies Data contained in this document serves informational purposes only Nationalproduct specifications may varyThese materials are subject to change without notice These materials are provided by SAP AG and its affiliated companies(SAP Group) for informational purposes only without representation or warranty of any kind and SAP Group shall notbe liable for errors or omissions with respect to the materials The only warranties for SAP Group products and services arethose that are set forth in the express warranty statements accompanying such products and services if any Nothing hereinshould be construed as constituting an additional warranty
This document was created using stylesheet 2006-12-31 (V51beta [= 60 for E3]) and XSLT processor SAXON 652 fromMichael Kay (httpsaxonsfnet) XSLT version 1
05162008 PUBLIC 3740
DisclaimerSome components of this product are based on Javatrade Any code change in these components may cause unpredictable andsevere malfunctions and is therefore expressly prohibited as is any decompilation of these componentsAny Javatrade Source Code delivered with this product is only to be used by SAPrsquos Support Services and may not be modified oraltered in any way
Documentation in the SAP Service MarketplaceYou can find this document at the following address httpsservicesapcominstguides
3840 PUBLIC 05162008
This page is intentionally left blank
SAP AGDietmar-Hopp-Allee 1669190 WalldorfGermanyT +4918 0534 34 34F +4918 0534 34 20wwwsapcom
copy Copyright 2008 SAP AG All rights reservedNo part of this publication may be reproduced or transmitted in any form or for any purpose without the express permission of SAP AG The information contained herein may bechanged without prior notice
5 Installing SAP Memory Analyzer (Optional)
5 Follow the screens and enter the required parameters
Note
For more information about the input parameters and information about restrictions forpasswords position the cursor on the required parameter and press F1
After you have entered all requested input parameters SAPinst displays the Parameter Summaryscreen This screen shows both the parameters that you entered and those that SAPinst set bydefault If required you can revise the parameters before starting the installation
6 To start the installation choose Start SAPinst starts the installation and displays the progress ofthe installation When the installation has successfully been completed SAPinst shows the dialogExecution of ltOption_Namegt has been completed successfully
05162008 PUBLIC 2540
This page is intentionally left blank
6 Post-Installation Activities
6 Post-Installation Activities
This section describes the steps that you have to perform after the installation has finished successfully
Running the Configuration Wizard (Optional)
Note
You can run the configuration wizard only once and only directly after installing and patchingyour SAP system
For SAP NetWeaver CE you need to run the following configuration tasks
n Configuration of Services Registry Webservice Destinations
n When you have installed the IDE Update Site componentConfiguration and Mirroring of local NWDSUpdate Site
n When you have installed the Adobe Document Services component Initial setup ADS in CE
When you have an NWDI installation on another SAP NetWeaver 70 system you can perform thefollowing configuration tasks
n Change Management Service (CMS) Create an Application Skeleton
n Change Management Service (CMS) Modify a Software Component
To run the configuration wizard proceed as follows
1 After SAPinst has finished open the SAP NetWeaver Administrator by entering the following URLin a browser httplthostgtlthttp_portgtnwa
2 Log on as user j2ee_admin3 In the SAP NetWeaver Administrator choose Configuration Management Scenarios Configuration
Wizard 4 Select the appropriate configuration task in the list and choose Start5 Follow the on-screen instructions6 After the configuration wizard has finished successfully restart your SAP system
Configuring the IDE Update Site
1 In the Configuration Wizard select the task Configuration and Mirroring of local NWDS Update Site in thelist and choose Start
2 Follow the on-screen instructions
05162008 PUBLIC 2740
6 Post-Installation Activities
Provide the credentials for the source update site location The default URL is the central SAPupdate site You can also use your installation DVD as source update site which makes themirror process much faster To use the DVD as source update site you have to specify the URLfileltdvd_drivegtIDE
3 After the configuration wizard has finished successfully restart your SAP systemThe data of the source update site location is now mirrored to your server
Enabling Adobe Document ServicesIf you have installed SAP NetWeaver Composition Environment with the Adobe DocumentServices add-on in the developer edition on aWindows platform you must complete the followingpost-installation steps to enable the add-on In case you have installed an AS Java cluster applythe procedure to the central host as well as to all other hosts where additional application serverinstances are running
1 Using the SAP Management Console stop the AS Java systemFormore information about starting and stopping SAP systems see httphelpsapcomnwce
Administratorrsquos Guide Administration of SAP NetWeaver CE General System Administration AS Java(Application Server Java)
2 From the Startmenu open Control Panel Administrative Tools Computer Management Services andApplications Services
3 Select SAPltSIDgt_ltInstance_Numbergt (for example SAPCE1_00) and open Properties from thecontext menu
4 On the Log On tab page enable the Local System account indicator5 Repeat the above steps for the second SAPltSIDgt_ltInstance_Numbergt service that you see in the list6 Start the AS Java system
Adobe LiveCycle Designer
For more information about how to install and configure the Adobe LiveCycle Designer see SAPNote 962763
Enabling Services RegistryYou must apply additional configuration steps to enable Services Registry after you have installed anSAP NetWeaver Composition Environment system containing the following components
n Java Application Server and Composition Platformn Java Application Server and Adobe Document Services
To enable Services Registry you must apply the following configuration templates to your systemCE_Complete_Stack_development_full
2840 PUBLIC 05162008
6 Post-Installation Activities
Note
For more information about what configuration templates are available see Configuration Templates[page 33]For more information about applying configuration templates see httphelpsapcomnwce
SAP NetWeaver Composition Environment Library Administratorrsquos Guide Configuration of SAP NetWeaver CEInitial System Configuration AS Java Configuration Activating a Configuration Template
See also
httphelpsapcomnwce SAP NetWeaver Composition Environment Library Developerrsquos GuideDeveloping and Composing Applications Consuming Enterprise Services Searching for Services Services RegistryTasks Searching amp Browsing Service Definitions Configuring the Services Registry
Configuring the Portal in SAP NetWeaver CEAfter installing the portal in SAP NetWeaver CE a number of deactivated or irrelevant tools aredisplayed in the UI To display the correct portals tools for CE proceed as follows
1 Open a browser and log on to your portal as an administrator2 In the same browser session enter the following URL
httplthostgtlthttpportgtirjservletprtportalprtrootcomsapportal
contentlayersContentLayersTool
where lthostgt is the host name of your server and lthttpportgt is the port number of your server3 In the Portal Mode Configuration Tool choose Activate Development Mode to restore the portal tools
and content that are assigned to the development mode4 Restart or refresh your browser5 In the SAP Management Console restart the server
You may then continue with the mandatory and optional configuration steps as described inhttphelpsapcomnwce SAP NetWeaver Composition Environment Library Administratorrsquos Guide
Configuration of SAP NetWeaver Composition Environment Configuration for CE Additional Components Configuringthe Portal
Changing the Password for the Internet Communication Manager (ICM)You can monitor and manage the Internet Communication Manager (ICM) from the command lineprogramAfter the installation of your SAP NetWeaver CE system has successfully finished you need to changethe ICM password manually To do so proceed as follows
1 Log on at operating system level to the computer where the ICM is running2 Start the program icmon with icmon ndasha profile=ltinstance_profilegt to maintain the
authentication file (default authfiletxt)3 Choose a to add a user4 Choose c to change the password of the existing user
05162008 PUBLIC 2940
6 Post-Installation Activities
5 Choose s to save your settings
Further Configuration StepsAfter installing your SAP NetWeaver CE system and performing the post-installation steps to get thesystem up amp running you may need to perform further configuration stepsRefer to the following documentation to proceed with your tasks
n If you are a system administrator refer to httphelpsapcomnwce Administratorrsquos Guide It contains information about how to configure and administer your system
n If you are a developer refer to httphelpsapcomnwce Developerrsquos Guide It providesguidelines for developing applications using the SAP NetWeaver CE
Note
The SAP NetWeaver CE documentation is also available offline as a part of your installation To accessit choose Start All Programs SAP NetWeaver Composition Environment 10 Documentation
3040 PUBLIC 05162008
7 Additional Information
7 Additional Information
The following section provides additional information about the installation of SAP NetWeaverComposition Environment
71 Transporting Self-Developed Software ComponentArchives (SCA) into the System
PrerequisitesYou have developed your own Software Component Archives (SCA) and want to transport theminto your SAP NetWeaver CE system
ProcedureTo transport your SCAs to the SAP NetWeaver CE system proceed as follows
1 Download the update file from httpservicesapcomswdc Download Support Packages andPatches Entry by Application Group SAP NetWeaver SAP NETWEAVER SAP NETWEAVER CE71 Support Package Stacks
2 From an empty directory run the update tool updateltIDgtexe
Note
If the tool displays descriptions such as Applying Support Packages you can ignore them
3 In the dialog screens specify the directory where your SCAs are located4 Follow the on-screen instructions
Only valid for MaxDB
72 Troubleshooting ‒ Repairing an Inconsistent SAP MaxDBInstallation
PrerequisitesDuring the preinstallation phase the installation tool checks the Microsoft Windows registry foralready installed SAP MaxDB softwareIf the registry key is found but there is no software on the hard drive you receive the followingmessage
05162008 PUBLIC 3140
7 Additional Information73 Restarting the SAP MaxDB Server Manually
The existing MaxDB software is not consistent Check the file system and registry
The most common reason for this inconsistency is the manual deletion of the software from the filesystem without using the specified tools
ProcedureTo repair this inconsistency proceed as follows
1 Choose Start Control Panel Administrative Tools Services 2 Make sure the services SAPDBWWW SAPDB and XServer are stopped3 Choose Start Run and run the command regedit4 Go to My ComputerHKEY_LOCAL_MACHINESOFTWARESAPSAP DBTech Key IndepPrograms
The key contains a path to a foldera) Check if this folder exists on the file systemb) Note down the value of Key IndepPrograms for later usage (see step 7)
If the path does not exist in the file system delete the key SAP DBTech5 Delete the following keys
n My ComputerHKEY_LOCAL_MACHINESYSTEMCurrentControlSetServicesSAP DBTech-
n My ComputerHKEY_LOCAL_MACHINESYSTEMCurrentControlSetServicesSAPDBWWW
n My ComputerHKEY_LOCAL_MACHINESYSTEMCurrentControlSetServicesXServer
6 Choose Start Control Panel System Advanced Environment Variables System Variables Path 7 Delete the following paths from the variable
n ltIndepProgramsgtbin
n ltIndepProgramsgtpgm
8 Reboot your computer
End of MaxDB
Only valid for MaxDB
73 Restarting the SAP MaxDB Server Manually
If after a reboot the database server is not running automatically you need to restart the SAP MaxDBserver manually
Production SystemsTo restart the SAP MaxDB server manually proceed as follows
1 Open a command prompt and enter the following command net start sapdbwww
ORChoose Start All Programs Administrative Tools Services Double-click on SAP DB WWW andchoose Start
2 Open the SAP Management Console and choose SAP Systems ltSAPSIDgt ltmachine namegt
3240 PUBLIC 05162008
7 Additional Information74 Restarting the MS SQL Server Manually
3 Enter the master password and choose Logon4 Choose Online When the database server is online you can restart the engine
Development SystemsTo restart the SAP MaxDB server manually choose Start All Programs SAP NetWeaver CompositionEnvironment CE Application Server ltSAPSIDgt Start Application Server End of MaxDB
Only valid for MS SQL Server
74 Restarting the MS SQL Server Manually
If after a reboot the database server is not running automatically you need to restart the MS SQLServer manually
Procedure
1 Choose Start All Programs Administrative Tools Services 2 Look for the service named SQL Server ltnamegt where ltnamegt is MSSQLSERVER for the default
instance or ltinstance namegt for a named instance3 If the service status is not started right-click the service and choose Start in the context menu4 To insure the service is started automatically after each system restart right-click it and choose
Properties Select Automatic as the startup type
End of MS SQL Server
75 Configuration Templates
Configuration templates contain the predefined instance configuration for specific scenarios Theyare automatically applied according to the installation option you have selected The templatesare designed to optimize system performance by applying certain configuration to the Java VirtualMachine and the application server as well as by applying startup filters to AS Java services andapplications to start only those relevant for the selected installation optionsThe following table provides information about the available templates with SAP NetWeaverComposition Environment In the template name replace the ltsystem_modegt parameter bydevelopment (for the templates relevant to systems installed in developmentmode) or production (forthe templates relevant to systems installed in productivemode)
05162008 PUBLIC 3340
7 Additional Information76 Uninstalling SAP NetWeaver Composition Environment
Configuration Template Selected Installation Options
CE_Java_EE_ltsystem_modegt_full Java Application Server Installation
CE_Composition_Environment_ltsystem_modegt_full Java Application Server Installation + CompositionPlatform Installation
CE_Adobe_Document_Service_ltsystem_modegt_full Java Application Server Installation + AdobeDocument Services Add-on Installation
CE_Composite_Voice_ltsystem_modegt_full Java Application Server Installation + Voice Add-onInstallation
CE_Complete_Stack_ltsystem_modegt_full Java Application Server Installation + CompositionPlatform Installation + Adobe Document ServicesAdd-on Installation + Voice Add-on Installation
If your selection cannot be mapped to one of the combinations in the above table the templateCE_Complete_Stack_ltsystem_modegt_full is applied It starts all applications and services neededto run the complete stackYou canmanually apply a different configuration template if youwant to switch to another installationoption For example by changing from template CE_Complete_Stack_ltsystem_modegt_full toCE_Java_EE_ltsystem_modegt_full you achieve shorter startup times and less memory consumptionbut also less functionality since not all applications and services are runningFor more information about applying configuration templates see httphelpsapcomnwce
Administratorrsquos Guide Configuration of SAP NetWeaver CE Initial System Configuration AS Java ConfigurationActivating a Configuration Template
Note
Make sure that you do not apply a development template to a productive system or vice versa
76 Uninstalling SAP NetWeaver Composition Environment
You have to uninstall all components of the SAP NetWeaver Composition Environment separatelythat is SAP NetWeaver CE and SAP NetWeaver Developer StudioYou can uninstall your SAP NetWeaver CE system in different ways
Uninstalling SAP NetWeaver CEWindows Choose Start Control Panel Add Remove programs SAP SystemltSAPSIDgt
Uninstalling SAP NetWeaver CE Using SAPinst
1 Insert the SAP Installation Master DVD into your DVD drive or mount it locally
3440 PUBLIC 05162008
7 Additional Information76 Uninstalling SAP NetWeaver Composition Environment
2 Start SAPinst from the SAP Installation Master DVD as described in the section Installing SAPNetWeaver Composition Environment
3 In theWelcome screen choose Uninstall SAP System or Single Instances from the tree structure4 Follow the on-screen instructions
Uninstalling SAP NetWeaver Developer Studio
Prerequisites
Before uninstalling SAP NetWeaver Developer Studio consider the following
n All additionally installed features and plug-ins that were installed to the same folder as DeveloperStudio for example by using the Eclipse Update Manager will also be removed
n There may be other directories and files in the installation directory notablyltinstall_dirgteclipseworkspace ltinstall_dirgteclipselinks andltinstall_dirgteclipseconfiguration that contain important data The files and folder aswell as the existing workspaces are retained when the product is uninstalled
Procedure
To uninstall SAP NetWeaver Developer Studio proceed as described above You can use either oneof the options
Uninstalling the SAP Management ConsoleSince all SAP systems use the SAP Management Console there is no uninstallation option for theSAP Management Console with SAPinst If you are sure that you do not need the SAP ManagementConsole any more you can remove it using Start Control Panel Add Remove programs
05162008 PUBLIC 3540
Typographic Conventions
Example Description
lt gt Angle brackets indicate that you replace these words or characters with appropriateentries to make entries in the system for example ldquoEnter your ltUser Namegtrdquo
Arrows separating the parts of a navigation path for example menu options
Example Emphasized words or expressions
Example Words or characters that you enter in the system exactly as they appear in thedocumentation
Example Textual cross-references to an internet address for example httpwwwsapcom
example Quicklinks added to the internet address of a homepage to enable quick access tospecific content on the Web
123456 Hyperlink to an SAP Note for example SAP Note 123456
Example n Words or characters quoted from the screen These include field labels screen titlespushbutton labels menu names and menu options
n Cross-references to other documentation or published works
Example n Output on the screen following a user action for example messagesn Source code or syntax quoted directly from a programn File and directory names and their paths names of variables and parameters and
names of installation upgrade and database tools
EXAMPLE Technical names of system objects These include report names program namestransaction codes database table names and key concepts of a programming languagewhen they are surrounded by body text for example SELECT and INCLUDE
EXAMPLE Keys on the keyboard
3640 PUBLIC 05162008
SAP AGDietmar-Hopp-Allee 16
69190 WalldorfGermany
T +4918 0534 34 34F +4918 0534 34 20
wwwsapcom
copy Copyright 2008 SAP AG All rights reserved
No part of this publication may be reproduced or transmitted in any form or for any purpose without the express permissionof SAP AG The information contained herein may be changed without prior noticeSome software products marketed by SAP AG and its distributors contain proprietary software components of othersoftware vendors
No part of this publication may be reproduced or transmitted in any form or for any purpose without the express permissionof SAP AG The information contained herein may be changed without prior noticeSome software products marketed by SAP AG and its distributors contain proprietary software components of othersoftware vendorsMicrosoft Windows Excel Outlook and PowerPoint are registered trademarks of Microsoft CorporationIBM DB2 DB2 Universal Database OS2 Parallel Sysplex MVSESA AIX S390 AS400 OS390 OS400 iSeries pSeriesxSeries zSeries System i System i5 System p System p5 System x System z System z9 zOS AFP Intelligent MinerWebSphere Netfinity Tivoli Informix i5OS POWER POWER5 POWER5+ OpenPower and PowerPC are trademarks orregistered trademarks of IBM CorporationAdobe the Adobe logo Acrobat PostScript and Reader are either trademarks or registered trademarks of Adobe SystemsIncorporated in the United States andor other countriesOracle is a registered trademark of Oracle CorporationUNIX XOpen OSF1 and Motif are registered trademarks of the Open GroupCitrix ICA Program Neighborhood MetaFrame WinFrame VideoFrame and MultiWin are trademarks or registeredtrademarks of Citrix Systems IncHTML XML XHTML and W3C are trademarks or registered trademarks of W3Creg World Wide Web ConsortiumMassachusetts Institute of TechnologyJava is a registered trademark of Sun Microsystems IncJavaScript is a registered trademark of Sun Microsystems Inc used under license for technology invented and implementedby NetscapeSAP R3 xApps xApp SAP NetWeaver Duet PartnerEdge ByDesign SAP Business ByDesign and other SAP productsand services mentioned herein as well as their respective logos are trademarks or registered trademarks of SAP AG inGermany and in several other countries all over the world All other product and service names mentioned are thetrademarks of their respective companies Data contained in this document serves informational purposes only Nationalproduct specifications may varyThese materials are subject to change without notice These materials are provided by SAP AG and its affiliated companies(SAP Group) for informational purposes only without representation or warranty of any kind and SAP Group shall notbe liable for errors or omissions with respect to the materials The only warranties for SAP Group products and services arethose that are set forth in the express warranty statements accompanying such products and services if any Nothing hereinshould be construed as constituting an additional warranty
This document was created using stylesheet 2006-12-31 (V51beta [= 60 for E3]) and XSLT processor SAXON 652 fromMichael Kay (httpsaxonsfnet) XSLT version 1
05162008 PUBLIC 3740
DisclaimerSome components of this product are based on Javatrade Any code change in these components may cause unpredictable andsevere malfunctions and is therefore expressly prohibited as is any decompilation of these componentsAny Javatrade Source Code delivered with this product is only to be used by SAPrsquos Support Services and may not be modified oraltered in any way
Documentation in the SAP Service MarketplaceYou can find this document at the following address httpsservicesapcominstguides
3840 PUBLIC 05162008
This page is intentionally left blank
SAP AGDietmar-Hopp-Allee 1669190 WalldorfGermanyT +4918 0534 34 34F +4918 0534 34 20wwwsapcom
copy Copyright 2008 SAP AG All rights reservedNo part of this publication may be reproduced or transmitted in any form or for any purpose without the express permission of SAP AG The information contained herein may bechanged without prior notice

This page is intentionally left blank
6 Post-Installation Activities
6 Post-Installation Activities
This section describes the steps that you have to perform after the installation has finished successfully
Running the Configuration Wizard (Optional)
Note
You can run the configuration wizard only once and only directly after installing and patchingyour SAP system
For SAP NetWeaver CE you need to run the following configuration tasks
n Configuration of Services Registry Webservice Destinations
n When you have installed the IDE Update Site componentConfiguration and Mirroring of local NWDSUpdate Site
n When you have installed the Adobe Document Services component Initial setup ADS in CE
When you have an NWDI installation on another SAP NetWeaver 70 system you can perform thefollowing configuration tasks
n Change Management Service (CMS) Create an Application Skeleton
n Change Management Service (CMS) Modify a Software Component
To run the configuration wizard proceed as follows
1 After SAPinst has finished open the SAP NetWeaver Administrator by entering the following URLin a browser httplthostgtlthttp_portgtnwa
2 Log on as user j2ee_admin3 In the SAP NetWeaver Administrator choose Configuration Management Scenarios Configuration
Wizard 4 Select the appropriate configuration task in the list and choose Start5 Follow the on-screen instructions6 After the configuration wizard has finished successfully restart your SAP system
Configuring the IDE Update Site
1 In the Configuration Wizard select the task Configuration and Mirroring of local NWDS Update Site in thelist and choose Start
2 Follow the on-screen instructions
05162008 PUBLIC 2740
6 Post-Installation Activities
Provide the credentials for the source update site location The default URL is the central SAPupdate site You can also use your installation DVD as source update site which makes themirror process much faster To use the DVD as source update site you have to specify the URLfileltdvd_drivegtIDE
3 After the configuration wizard has finished successfully restart your SAP systemThe data of the source update site location is now mirrored to your server
Enabling Adobe Document ServicesIf you have installed SAP NetWeaver Composition Environment with the Adobe DocumentServices add-on in the developer edition on aWindows platform you must complete the followingpost-installation steps to enable the add-on In case you have installed an AS Java cluster applythe procedure to the central host as well as to all other hosts where additional application serverinstances are running
1 Using the SAP Management Console stop the AS Java systemFormore information about starting and stopping SAP systems see httphelpsapcomnwce
Administratorrsquos Guide Administration of SAP NetWeaver CE General System Administration AS Java(Application Server Java)
2 From the Startmenu open Control Panel Administrative Tools Computer Management Services andApplications Services
3 Select SAPltSIDgt_ltInstance_Numbergt (for example SAPCE1_00) and open Properties from thecontext menu
4 On the Log On tab page enable the Local System account indicator5 Repeat the above steps for the second SAPltSIDgt_ltInstance_Numbergt service that you see in the list6 Start the AS Java system
Adobe LiveCycle Designer
For more information about how to install and configure the Adobe LiveCycle Designer see SAPNote 962763
Enabling Services RegistryYou must apply additional configuration steps to enable Services Registry after you have installed anSAP NetWeaver Composition Environment system containing the following components
n Java Application Server and Composition Platformn Java Application Server and Adobe Document Services
To enable Services Registry you must apply the following configuration templates to your systemCE_Complete_Stack_development_full
2840 PUBLIC 05162008
6 Post-Installation Activities
Note
For more information about what configuration templates are available see Configuration Templates[page 33]For more information about applying configuration templates see httphelpsapcomnwce
SAP NetWeaver Composition Environment Library Administratorrsquos Guide Configuration of SAP NetWeaver CEInitial System Configuration AS Java Configuration Activating a Configuration Template
See also
httphelpsapcomnwce SAP NetWeaver Composition Environment Library Developerrsquos GuideDeveloping and Composing Applications Consuming Enterprise Services Searching for Services Services RegistryTasks Searching amp Browsing Service Definitions Configuring the Services Registry
Configuring the Portal in SAP NetWeaver CEAfter installing the portal in SAP NetWeaver CE a number of deactivated or irrelevant tools aredisplayed in the UI To display the correct portals tools for CE proceed as follows
1 Open a browser and log on to your portal as an administrator2 In the same browser session enter the following URL
httplthostgtlthttpportgtirjservletprtportalprtrootcomsapportal
contentlayersContentLayersTool
where lthostgt is the host name of your server and lthttpportgt is the port number of your server3 In the Portal Mode Configuration Tool choose Activate Development Mode to restore the portal tools
and content that are assigned to the development mode4 Restart or refresh your browser5 In the SAP Management Console restart the server
You may then continue with the mandatory and optional configuration steps as described inhttphelpsapcomnwce SAP NetWeaver Composition Environment Library Administratorrsquos Guide
Configuration of SAP NetWeaver Composition Environment Configuration for CE Additional Components Configuringthe Portal
Changing the Password for the Internet Communication Manager (ICM)You can monitor and manage the Internet Communication Manager (ICM) from the command lineprogramAfter the installation of your SAP NetWeaver CE system has successfully finished you need to changethe ICM password manually To do so proceed as follows
1 Log on at operating system level to the computer where the ICM is running2 Start the program icmon with icmon ndasha profile=ltinstance_profilegt to maintain the
authentication file (default authfiletxt)3 Choose a to add a user4 Choose c to change the password of the existing user
05162008 PUBLIC 2940
6 Post-Installation Activities
5 Choose s to save your settings
Further Configuration StepsAfter installing your SAP NetWeaver CE system and performing the post-installation steps to get thesystem up amp running you may need to perform further configuration stepsRefer to the following documentation to proceed with your tasks
n If you are a system administrator refer to httphelpsapcomnwce Administratorrsquos Guide It contains information about how to configure and administer your system
n If you are a developer refer to httphelpsapcomnwce Developerrsquos Guide It providesguidelines for developing applications using the SAP NetWeaver CE
Note
The SAP NetWeaver CE documentation is also available offline as a part of your installation To accessit choose Start All Programs SAP NetWeaver Composition Environment 10 Documentation
3040 PUBLIC 05162008
7 Additional Information
7 Additional Information
The following section provides additional information about the installation of SAP NetWeaverComposition Environment
71 Transporting Self-Developed Software ComponentArchives (SCA) into the System
PrerequisitesYou have developed your own Software Component Archives (SCA) and want to transport theminto your SAP NetWeaver CE system
ProcedureTo transport your SCAs to the SAP NetWeaver CE system proceed as follows
1 Download the update file from httpservicesapcomswdc Download Support Packages andPatches Entry by Application Group SAP NetWeaver SAP NETWEAVER SAP NETWEAVER CE71 Support Package Stacks
2 From an empty directory run the update tool updateltIDgtexe
Note
If the tool displays descriptions such as Applying Support Packages you can ignore them
3 In the dialog screens specify the directory where your SCAs are located4 Follow the on-screen instructions
Only valid for MaxDB
72 Troubleshooting ‒ Repairing an Inconsistent SAP MaxDBInstallation
PrerequisitesDuring the preinstallation phase the installation tool checks the Microsoft Windows registry foralready installed SAP MaxDB softwareIf the registry key is found but there is no software on the hard drive you receive the followingmessage
05162008 PUBLIC 3140
7 Additional Information73 Restarting the SAP MaxDB Server Manually
The existing MaxDB software is not consistent Check the file system and registry
The most common reason for this inconsistency is the manual deletion of the software from the filesystem without using the specified tools
ProcedureTo repair this inconsistency proceed as follows
1 Choose Start Control Panel Administrative Tools Services 2 Make sure the services SAPDBWWW SAPDB and XServer are stopped3 Choose Start Run and run the command regedit4 Go to My ComputerHKEY_LOCAL_MACHINESOFTWARESAPSAP DBTech Key IndepPrograms
The key contains a path to a foldera) Check if this folder exists on the file systemb) Note down the value of Key IndepPrograms for later usage (see step 7)
If the path does not exist in the file system delete the key SAP DBTech5 Delete the following keys
n My ComputerHKEY_LOCAL_MACHINESYSTEMCurrentControlSetServicesSAP DBTech-
n My ComputerHKEY_LOCAL_MACHINESYSTEMCurrentControlSetServicesSAPDBWWW
n My ComputerHKEY_LOCAL_MACHINESYSTEMCurrentControlSetServicesXServer
6 Choose Start Control Panel System Advanced Environment Variables System Variables Path 7 Delete the following paths from the variable
n ltIndepProgramsgtbin
n ltIndepProgramsgtpgm
8 Reboot your computer
End of MaxDB
Only valid for MaxDB
73 Restarting the SAP MaxDB Server Manually
If after a reboot the database server is not running automatically you need to restart the SAP MaxDBserver manually
Production SystemsTo restart the SAP MaxDB server manually proceed as follows
1 Open a command prompt and enter the following command net start sapdbwww
ORChoose Start All Programs Administrative Tools Services Double-click on SAP DB WWW andchoose Start
2 Open the SAP Management Console and choose SAP Systems ltSAPSIDgt ltmachine namegt
3240 PUBLIC 05162008
7 Additional Information74 Restarting the MS SQL Server Manually
3 Enter the master password and choose Logon4 Choose Online When the database server is online you can restart the engine
Development SystemsTo restart the SAP MaxDB server manually choose Start All Programs SAP NetWeaver CompositionEnvironment CE Application Server ltSAPSIDgt Start Application Server End of MaxDB
Only valid for MS SQL Server
74 Restarting the MS SQL Server Manually
If after a reboot the database server is not running automatically you need to restart the MS SQLServer manually
Procedure
1 Choose Start All Programs Administrative Tools Services 2 Look for the service named SQL Server ltnamegt where ltnamegt is MSSQLSERVER for the default
instance or ltinstance namegt for a named instance3 If the service status is not started right-click the service and choose Start in the context menu4 To insure the service is started automatically after each system restart right-click it and choose
Properties Select Automatic as the startup type
End of MS SQL Server
75 Configuration Templates
Configuration templates contain the predefined instance configuration for specific scenarios Theyare automatically applied according to the installation option you have selected The templatesare designed to optimize system performance by applying certain configuration to the Java VirtualMachine and the application server as well as by applying startup filters to AS Java services andapplications to start only those relevant for the selected installation optionsThe following table provides information about the available templates with SAP NetWeaverComposition Environment In the template name replace the ltsystem_modegt parameter bydevelopment (for the templates relevant to systems installed in developmentmode) or production (forthe templates relevant to systems installed in productivemode)
05162008 PUBLIC 3340
7 Additional Information76 Uninstalling SAP NetWeaver Composition Environment
Configuration Template Selected Installation Options
CE_Java_EE_ltsystem_modegt_full Java Application Server Installation
CE_Composition_Environment_ltsystem_modegt_full Java Application Server Installation + CompositionPlatform Installation
CE_Adobe_Document_Service_ltsystem_modegt_full Java Application Server Installation + AdobeDocument Services Add-on Installation
CE_Composite_Voice_ltsystem_modegt_full Java Application Server Installation + Voice Add-onInstallation
CE_Complete_Stack_ltsystem_modegt_full Java Application Server Installation + CompositionPlatform Installation + Adobe Document ServicesAdd-on Installation + Voice Add-on Installation
If your selection cannot be mapped to one of the combinations in the above table the templateCE_Complete_Stack_ltsystem_modegt_full is applied It starts all applications and services neededto run the complete stackYou canmanually apply a different configuration template if youwant to switch to another installationoption For example by changing from template CE_Complete_Stack_ltsystem_modegt_full toCE_Java_EE_ltsystem_modegt_full you achieve shorter startup times and less memory consumptionbut also less functionality since not all applications and services are runningFor more information about applying configuration templates see httphelpsapcomnwce
Administratorrsquos Guide Configuration of SAP NetWeaver CE Initial System Configuration AS Java ConfigurationActivating a Configuration Template
Note
Make sure that you do not apply a development template to a productive system or vice versa
76 Uninstalling SAP NetWeaver Composition Environment
You have to uninstall all components of the SAP NetWeaver Composition Environment separatelythat is SAP NetWeaver CE and SAP NetWeaver Developer StudioYou can uninstall your SAP NetWeaver CE system in different ways
Uninstalling SAP NetWeaver CEWindows Choose Start Control Panel Add Remove programs SAP SystemltSAPSIDgt
Uninstalling SAP NetWeaver CE Using SAPinst
1 Insert the SAP Installation Master DVD into your DVD drive or mount it locally
3440 PUBLIC 05162008
7 Additional Information76 Uninstalling SAP NetWeaver Composition Environment
2 Start SAPinst from the SAP Installation Master DVD as described in the section Installing SAPNetWeaver Composition Environment
3 In theWelcome screen choose Uninstall SAP System or Single Instances from the tree structure4 Follow the on-screen instructions
Uninstalling SAP NetWeaver Developer Studio
Prerequisites
Before uninstalling SAP NetWeaver Developer Studio consider the following
n All additionally installed features and plug-ins that were installed to the same folder as DeveloperStudio for example by using the Eclipse Update Manager will also be removed
n There may be other directories and files in the installation directory notablyltinstall_dirgteclipseworkspace ltinstall_dirgteclipselinks andltinstall_dirgteclipseconfiguration that contain important data The files and folder aswell as the existing workspaces are retained when the product is uninstalled
Procedure
To uninstall SAP NetWeaver Developer Studio proceed as described above You can use either oneof the options
Uninstalling the SAP Management ConsoleSince all SAP systems use the SAP Management Console there is no uninstallation option for theSAP Management Console with SAPinst If you are sure that you do not need the SAP ManagementConsole any more you can remove it using Start Control Panel Add Remove programs
05162008 PUBLIC 3540
Typographic Conventions
Example Description
lt gt Angle brackets indicate that you replace these words or characters with appropriateentries to make entries in the system for example ldquoEnter your ltUser Namegtrdquo
Arrows separating the parts of a navigation path for example menu options
Example Emphasized words or expressions
Example Words or characters that you enter in the system exactly as they appear in thedocumentation
Example Textual cross-references to an internet address for example httpwwwsapcom
example Quicklinks added to the internet address of a homepage to enable quick access tospecific content on the Web
123456 Hyperlink to an SAP Note for example SAP Note 123456
Example n Words or characters quoted from the screen These include field labels screen titlespushbutton labels menu names and menu options
n Cross-references to other documentation or published works
Example n Output on the screen following a user action for example messagesn Source code or syntax quoted directly from a programn File and directory names and their paths names of variables and parameters and
names of installation upgrade and database tools
EXAMPLE Technical names of system objects These include report names program namestransaction codes database table names and key concepts of a programming languagewhen they are surrounded by body text for example SELECT and INCLUDE
EXAMPLE Keys on the keyboard
3640 PUBLIC 05162008
SAP AGDietmar-Hopp-Allee 16
69190 WalldorfGermany
T +4918 0534 34 34F +4918 0534 34 20
wwwsapcom
copy Copyright 2008 SAP AG All rights reserved
No part of this publication may be reproduced or transmitted in any form or for any purpose without the express permissionof SAP AG The information contained herein may be changed without prior noticeSome software products marketed by SAP AG and its distributors contain proprietary software components of othersoftware vendors
No part of this publication may be reproduced or transmitted in any form or for any purpose without the express permissionof SAP AG The information contained herein may be changed without prior noticeSome software products marketed by SAP AG and its distributors contain proprietary software components of othersoftware vendorsMicrosoft Windows Excel Outlook and PowerPoint are registered trademarks of Microsoft CorporationIBM DB2 DB2 Universal Database OS2 Parallel Sysplex MVSESA AIX S390 AS400 OS390 OS400 iSeries pSeriesxSeries zSeries System i System i5 System p System p5 System x System z System z9 zOS AFP Intelligent MinerWebSphere Netfinity Tivoli Informix i5OS POWER POWER5 POWER5+ OpenPower and PowerPC are trademarks orregistered trademarks of IBM CorporationAdobe the Adobe logo Acrobat PostScript and Reader are either trademarks or registered trademarks of Adobe SystemsIncorporated in the United States andor other countriesOracle is a registered trademark of Oracle CorporationUNIX XOpen OSF1 and Motif are registered trademarks of the Open GroupCitrix ICA Program Neighborhood MetaFrame WinFrame VideoFrame and MultiWin are trademarks or registeredtrademarks of Citrix Systems IncHTML XML XHTML and W3C are trademarks or registered trademarks of W3Creg World Wide Web ConsortiumMassachusetts Institute of TechnologyJava is a registered trademark of Sun Microsystems IncJavaScript is a registered trademark of Sun Microsystems Inc used under license for technology invented and implementedby NetscapeSAP R3 xApps xApp SAP NetWeaver Duet PartnerEdge ByDesign SAP Business ByDesign and other SAP productsand services mentioned herein as well as their respective logos are trademarks or registered trademarks of SAP AG inGermany and in several other countries all over the world All other product and service names mentioned are thetrademarks of their respective companies Data contained in this document serves informational purposes only Nationalproduct specifications may varyThese materials are subject to change without notice These materials are provided by SAP AG and its affiliated companies(SAP Group) for informational purposes only without representation or warranty of any kind and SAP Group shall notbe liable for errors or omissions with respect to the materials The only warranties for SAP Group products and services arethose that are set forth in the express warranty statements accompanying such products and services if any Nothing hereinshould be construed as constituting an additional warranty
This document was created using stylesheet 2006-12-31 (V51beta [= 60 for E3]) and XSLT processor SAXON 652 fromMichael Kay (httpsaxonsfnet) XSLT version 1
05162008 PUBLIC 3740
DisclaimerSome components of this product are based on Javatrade Any code change in these components may cause unpredictable andsevere malfunctions and is therefore expressly prohibited as is any decompilation of these componentsAny Javatrade Source Code delivered with this product is only to be used by SAPrsquos Support Services and may not be modified oraltered in any way
Documentation in the SAP Service MarketplaceYou can find this document at the following address httpsservicesapcominstguides
3840 PUBLIC 05162008
This page is intentionally left blank
SAP AGDietmar-Hopp-Allee 1669190 WalldorfGermanyT +4918 0534 34 34F +4918 0534 34 20wwwsapcom
copy Copyright 2008 SAP AG All rights reservedNo part of this publication may be reproduced or transmitted in any form or for any purpose without the express permission of SAP AG The information contained herein may bechanged without prior notice
6 Post-Installation Activities
6 Post-Installation Activities
This section describes the steps that you have to perform after the installation has finished successfully
Running the Configuration Wizard (Optional)
Note
You can run the configuration wizard only once and only directly after installing and patchingyour SAP system
For SAP NetWeaver CE you need to run the following configuration tasks
n Configuration of Services Registry Webservice Destinations
n When you have installed the IDE Update Site componentConfiguration and Mirroring of local NWDSUpdate Site
n When you have installed the Adobe Document Services component Initial setup ADS in CE
When you have an NWDI installation on another SAP NetWeaver 70 system you can perform thefollowing configuration tasks
n Change Management Service (CMS) Create an Application Skeleton
n Change Management Service (CMS) Modify a Software Component
To run the configuration wizard proceed as follows
1 After SAPinst has finished open the SAP NetWeaver Administrator by entering the following URLin a browser httplthostgtlthttp_portgtnwa
2 Log on as user j2ee_admin3 In the SAP NetWeaver Administrator choose Configuration Management Scenarios Configuration
Wizard 4 Select the appropriate configuration task in the list and choose Start5 Follow the on-screen instructions6 After the configuration wizard has finished successfully restart your SAP system
Configuring the IDE Update Site
1 In the Configuration Wizard select the task Configuration and Mirroring of local NWDS Update Site in thelist and choose Start
2 Follow the on-screen instructions
05162008 PUBLIC 2740
6 Post-Installation Activities
Provide the credentials for the source update site location The default URL is the central SAPupdate site You can also use your installation DVD as source update site which makes themirror process much faster To use the DVD as source update site you have to specify the URLfileltdvd_drivegtIDE
3 After the configuration wizard has finished successfully restart your SAP systemThe data of the source update site location is now mirrored to your server
Enabling Adobe Document ServicesIf you have installed SAP NetWeaver Composition Environment with the Adobe DocumentServices add-on in the developer edition on aWindows platform you must complete the followingpost-installation steps to enable the add-on In case you have installed an AS Java cluster applythe procedure to the central host as well as to all other hosts where additional application serverinstances are running
1 Using the SAP Management Console stop the AS Java systemFormore information about starting and stopping SAP systems see httphelpsapcomnwce
Administratorrsquos Guide Administration of SAP NetWeaver CE General System Administration AS Java(Application Server Java)
2 From the Startmenu open Control Panel Administrative Tools Computer Management Services andApplications Services
3 Select SAPltSIDgt_ltInstance_Numbergt (for example SAPCE1_00) and open Properties from thecontext menu
4 On the Log On tab page enable the Local System account indicator5 Repeat the above steps for the second SAPltSIDgt_ltInstance_Numbergt service that you see in the list6 Start the AS Java system
Adobe LiveCycle Designer
For more information about how to install and configure the Adobe LiveCycle Designer see SAPNote 962763
Enabling Services RegistryYou must apply additional configuration steps to enable Services Registry after you have installed anSAP NetWeaver Composition Environment system containing the following components
n Java Application Server and Composition Platformn Java Application Server and Adobe Document Services
To enable Services Registry you must apply the following configuration templates to your systemCE_Complete_Stack_development_full
2840 PUBLIC 05162008
6 Post-Installation Activities
Note
For more information about what configuration templates are available see Configuration Templates[page 33]For more information about applying configuration templates see httphelpsapcomnwce
SAP NetWeaver Composition Environment Library Administratorrsquos Guide Configuration of SAP NetWeaver CEInitial System Configuration AS Java Configuration Activating a Configuration Template
See also
httphelpsapcomnwce SAP NetWeaver Composition Environment Library Developerrsquos GuideDeveloping and Composing Applications Consuming Enterprise Services Searching for Services Services RegistryTasks Searching amp Browsing Service Definitions Configuring the Services Registry
Configuring the Portal in SAP NetWeaver CEAfter installing the portal in SAP NetWeaver CE a number of deactivated or irrelevant tools aredisplayed in the UI To display the correct portals tools for CE proceed as follows
1 Open a browser and log on to your portal as an administrator2 In the same browser session enter the following URL
httplthostgtlthttpportgtirjservletprtportalprtrootcomsapportal
contentlayersContentLayersTool
where lthostgt is the host name of your server and lthttpportgt is the port number of your server3 In the Portal Mode Configuration Tool choose Activate Development Mode to restore the portal tools
and content that are assigned to the development mode4 Restart or refresh your browser5 In the SAP Management Console restart the server
You may then continue with the mandatory and optional configuration steps as described inhttphelpsapcomnwce SAP NetWeaver Composition Environment Library Administratorrsquos Guide
Configuration of SAP NetWeaver Composition Environment Configuration for CE Additional Components Configuringthe Portal
Changing the Password for the Internet Communication Manager (ICM)You can monitor and manage the Internet Communication Manager (ICM) from the command lineprogramAfter the installation of your SAP NetWeaver CE system has successfully finished you need to changethe ICM password manually To do so proceed as follows
1 Log on at operating system level to the computer where the ICM is running2 Start the program icmon with icmon ndasha profile=ltinstance_profilegt to maintain the
authentication file (default authfiletxt)3 Choose a to add a user4 Choose c to change the password of the existing user
05162008 PUBLIC 2940
6 Post-Installation Activities
5 Choose s to save your settings
Further Configuration StepsAfter installing your SAP NetWeaver CE system and performing the post-installation steps to get thesystem up amp running you may need to perform further configuration stepsRefer to the following documentation to proceed with your tasks
n If you are a system administrator refer to httphelpsapcomnwce Administratorrsquos Guide It contains information about how to configure and administer your system
n If you are a developer refer to httphelpsapcomnwce Developerrsquos Guide It providesguidelines for developing applications using the SAP NetWeaver CE
Note
The SAP NetWeaver CE documentation is also available offline as a part of your installation To accessit choose Start All Programs SAP NetWeaver Composition Environment 10 Documentation
3040 PUBLIC 05162008
7 Additional Information
7 Additional Information
The following section provides additional information about the installation of SAP NetWeaverComposition Environment
71 Transporting Self-Developed Software ComponentArchives (SCA) into the System
PrerequisitesYou have developed your own Software Component Archives (SCA) and want to transport theminto your SAP NetWeaver CE system
ProcedureTo transport your SCAs to the SAP NetWeaver CE system proceed as follows
1 Download the update file from httpservicesapcomswdc Download Support Packages andPatches Entry by Application Group SAP NetWeaver SAP NETWEAVER SAP NETWEAVER CE71 Support Package Stacks
2 From an empty directory run the update tool updateltIDgtexe
Note
If the tool displays descriptions such as Applying Support Packages you can ignore them
3 In the dialog screens specify the directory where your SCAs are located4 Follow the on-screen instructions
Only valid for MaxDB
72 Troubleshooting ‒ Repairing an Inconsistent SAP MaxDBInstallation
PrerequisitesDuring the preinstallation phase the installation tool checks the Microsoft Windows registry foralready installed SAP MaxDB softwareIf the registry key is found but there is no software on the hard drive you receive the followingmessage
05162008 PUBLIC 3140
7 Additional Information73 Restarting the SAP MaxDB Server Manually
The existing MaxDB software is not consistent Check the file system and registry
The most common reason for this inconsistency is the manual deletion of the software from the filesystem without using the specified tools
ProcedureTo repair this inconsistency proceed as follows
1 Choose Start Control Panel Administrative Tools Services 2 Make sure the services SAPDBWWW SAPDB and XServer are stopped3 Choose Start Run and run the command regedit4 Go to My ComputerHKEY_LOCAL_MACHINESOFTWARESAPSAP DBTech Key IndepPrograms
The key contains a path to a foldera) Check if this folder exists on the file systemb) Note down the value of Key IndepPrograms for later usage (see step 7)
If the path does not exist in the file system delete the key SAP DBTech5 Delete the following keys
n My ComputerHKEY_LOCAL_MACHINESYSTEMCurrentControlSetServicesSAP DBTech-
n My ComputerHKEY_LOCAL_MACHINESYSTEMCurrentControlSetServicesSAPDBWWW
n My ComputerHKEY_LOCAL_MACHINESYSTEMCurrentControlSetServicesXServer
6 Choose Start Control Panel System Advanced Environment Variables System Variables Path 7 Delete the following paths from the variable
n ltIndepProgramsgtbin
n ltIndepProgramsgtpgm
8 Reboot your computer
End of MaxDB
Only valid for MaxDB
73 Restarting the SAP MaxDB Server Manually
If after a reboot the database server is not running automatically you need to restart the SAP MaxDBserver manually
Production SystemsTo restart the SAP MaxDB server manually proceed as follows
1 Open a command prompt and enter the following command net start sapdbwww
ORChoose Start All Programs Administrative Tools Services Double-click on SAP DB WWW andchoose Start
2 Open the SAP Management Console and choose SAP Systems ltSAPSIDgt ltmachine namegt
3240 PUBLIC 05162008
7 Additional Information74 Restarting the MS SQL Server Manually
3 Enter the master password and choose Logon4 Choose Online When the database server is online you can restart the engine
Development SystemsTo restart the SAP MaxDB server manually choose Start All Programs SAP NetWeaver CompositionEnvironment CE Application Server ltSAPSIDgt Start Application Server End of MaxDB
Only valid for MS SQL Server
74 Restarting the MS SQL Server Manually
If after a reboot the database server is not running automatically you need to restart the MS SQLServer manually
Procedure
1 Choose Start All Programs Administrative Tools Services 2 Look for the service named SQL Server ltnamegt where ltnamegt is MSSQLSERVER for the default
instance or ltinstance namegt for a named instance3 If the service status is not started right-click the service and choose Start in the context menu4 To insure the service is started automatically after each system restart right-click it and choose
Properties Select Automatic as the startup type
End of MS SQL Server
75 Configuration Templates
Configuration templates contain the predefined instance configuration for specific scenarios Theyare automatically applied according to the installation option you have selected The templatesare designed to optimize system performance by applying certain configuration to the Java VirtualMachine and the application server as well as by applying startup filters to AS Java services andapplications to start only those relevant for the selected installation optionsThe following table provides information about the available templates with SAP NetWeaverComposition Environment In the template name replace the ltsystem_modegt parameter bydevelopment (for the templates relevant to systems installed in developmentmode) or production (forthe templates relevant to systems installed in productivemode)
05162008 PUBLIC 3340
7 Additional Information76 Uninstalling SAP NetWeaver Composition Environment
Configuration Template Selected Installation Options
CE_Java_EE_ltsystem_modegt_full Java Application Server Installation
CE_Composition_Environment_ltsystem_modegt_full Java Application Server Installation + CompositionPlatform Installation
CE_Adobe_Document_Service_ltsystem_modegt_full Java Application Server Installation + AdobeDocument Services Add-on Installation
CE_Composite_Voice_ltsystem_modegt_full Java Application Server Installation + Voice Add-onInstallation
CE_Complete_Stack_ltsystem_modegt_full Java Application Server Installation + CompositionPlatform Installation + Adobe Document ServicesAdd-on Installation + Voice Add-on Installation
If your selection cannot be mapped to one of the combinations in the above table the templateCE_Complete_Stack_ltsystem_modegt_full is applied It starts all applications and services neededto run the complete stackYou canmanually apply a different configuration template if youwant to switch to another installationoption For example by changing from template CE_Complete_Stack_ltsystem_modegt_full toCE_Java_EE_ltsystem_modegt_full you achieve shorter startup times and less memory consumptionbut also less functionality since not all applications and services are runningFor more information about applying configuration templates see httphelpsapcomnwce
Administratorrsquos Guide Configuration of SAP NetWeaver CE Initial System Configuration AS Java ConfigurationActivating a Configuration Template
Note
Make sure that you do not apply a development template to a productive system or vice versa
76 Uninstalling SAP NetWeaver Composition Environment
You have to uninstall all components of the SAP NetWeaver Composition Environment separatelythat is SAP NetWeaver CE and SAP NetWeaver Developer StudioYou can uninstall your SAP NetWeaver CE system in different ways
Uninstalling SAP NetWeaver CEWindows Choose Start Control Panel Add Remove programs SAP SystemltSAPSIDgt
Uninstalling SAP NetWeaver CE Using SAPinst
1 Insert the SAP Installation Master DVD into your DVD drive or mount it locally
3440 PUBLIC 05162008
7 Additional Information76 Uninstalling SAP NetWeaver Composition Environment
2 Start SAPinst from the SAP Installation Master DVD as described in the section Installing SAPNetWeaver Composition Environment
3 In theWelcome screen choose Uninstall SAP System or Single Instances from the tree structure4 Follow the on-screen instructions
Uninstalling SAP NetWeaver Developer Studio
Prerequisites
Before uninstalling SAP NetWeaver Developer Studio consider the following
n All additionally installed features and plug-ins that were installed to the same folder as DeveloperStudio for example by using the Eclipse Update Manager will also be removed
n There may be other directories and files in the installation directory notablyltinstall_dirgteclipseworkspace ltinstall_dirgteclipselinks andltinstall_dirgteclipseconfiguration that contain important data The files and folder aswell as the existing workspaces are retained when the product is uninstalled
Procedure
To uninstall SAP NetWeaver Developer Studio proceed as described above You can use either oneof the options
Uninstalling the SAP Management ConsoleSince all SAP systems use the SAP Management Console there is no uninstallation option for theSAP Management Console with SAPinst If you are sure that you do not need the SAP ManagementConsole any more you can remove it using Start Control Panel Add Remove programs
05162008 PUBLIC 3540
Typographic Conventions
Example Description
lt gt Angle brackets indicate that you replace these words or characters with appropriateentries to make entries in the system for example ldquoEnter your ltUser Namegtrdquo
Arrows separating the parts of a navigation path for example menu options
Example Emphasized words or expressions
Example Words or characters that you enter in the system exactly as they appear in thedocumentation
Example Textual cross-references to an internet address for example httpwwwsapcom
example Quicklinks added to the internet address of a homepage to enable quick access tospecific content on the Web
123456 Hyperlink to an SAP Note for example SAP Note 123456
Example n Words or characters quoted from the screen These include field labels screen titlespushbutton labels menu names and menu options
n Cross-references to other documentation or published works
Example n Output on the screen following a user action for example messagesn Source code or syntax quoted directly from a programn File and directory names and their paths names of variables and parameters and
names of installation upgrade and database tools
EXAMPLE Technical names of system objects These include report names program namestransaction codes database table names and key concepts of a programming languagewhen they are surrounded by body text for example SELECT and INCLUDE
EXAMPLE Keys on the keyboard
3640 PUBLIC 05162008
SAP AGDietmar-Hopp-Allee 16
69190 WalldorfGermany
T +4918 0534 34 34F +4918 0534 34 20
wwwsapcom
copy Copyright 2008 SAP AG All rights reserved
No part of this publication may be reproduced or transmitted in any form or for any purpose without the express permissionof SAP AG The information contained herein may be changed without prior noticeSome software products marketed by SAP AG and its distributors contain proprietary software components of othersoftware vendors
No part of this publication may be reproduced or transmitted in any form or for any purpose without the express permissionof SAP AG The information contained herein may be changed without prior noticeSome software products marketed by SAP AG and its distributors contain proprietary software components of othersoftware vendorsMicrosoft Windows Excel Outlook and PowerPoint are registered trademarks of Microsoft CorporationIBM DB2 DB2 Universal Database OS2 Parallel Sysplex MVSESA AIX S390 AS400 OS390 OS400 iSeries pSeriesxSeries zSeries System i System i5 System p System p5 System x System z System z9 zOS AFP Intelligent MinerWebSphere Netfinity Tivoli Informix i5OS POWER POWER5 POWER5+ OpenPower and PowerPC are trademarks orregistered trademarks of IBM CorporationAdobe the Adobe logo Acrobat PostScript and Reader are either trademarks or registered trademarks of Adobe SystemsIncorporated in the United States andor other countriesOracle is a registered trademark of Oracle CorporationUNIX XOpen OSF1 and Motif are registered trademarks of the Open GroupCitrix ICA Program Neighborhood MetaFrame WinFrame VideoFrame and MultiWin are trademarks or registeredtrademarks of Citrix Systems IncHTML XML XHTML and W3C are trademarks or registered trademarks of W3Creg World Wide Web ConsortiumMassachusetts Institute of TechnologyJava is a registered trademark of Sun Microsystems IncJavaScript is a registered trademark of Sun Microsystems Inc used under license for technology invented and implementedby NetscapeSAP R3 xApps xApp SAP NetWeaver Duet PartnerEdge ByDesign SAP Business ByDesign and other SAP productsand services mentioned herein as well as their respective logos are trademarks or registered trademarks of SAP AG inGermany and in several other countries all over the world All other product and service names mentioned are thetrademarks of their respective companies Data contained in this document serves informational purposes only Nationalproduct specifications may varyThese materials are subject to change without notice These materials are provided by SAP AG and its affiliated companies(SAP Group) for informational purposes only without representation or warranty of any kind and SAP Group shall notbe liable for errors or omissions with respect to the materials The only warranties for SAP Group products and services arethose that are set forth in the express warranty statements accompanying such products and services if any Nothing hereinshould be construed as constituting an additional warranty
This document was created using stylesheet 2006-12-31 (V51beta [= 60 for E3]) and XSLT processor SAXON 652 fromMichael Kay (httpsaxonsfnet) XSLT version 1
05162008 PUBLIC 3740
DisclaimerSome components of this product are based on Javatrade Any code change in these components may cause unpredictable andsevere malfunctions and is therefore expressly prohibited as is any decompilation of these componentsAny Javatrade Source Code delivered with this product is only to be used by SAPrsquos Support Services and may not be modified oraltered in any way
Documentation in the SAP Service MarketplaceYou can find this document at the following address httpsservicesapcominstguides
3840 PUBLIC 05162008
This page is intentionally left blank
SAP AGDietmar-Hopp-Allee 1669190 WalldorfGermanyT +4918 0534 34 34F +4918 0534 34 20wwwsapcom
copy Copyright 2008 SAP AG All rights reservedNo part of this publication may be reproduced or transmitted in any form or for any purpose without the express permission of SAP AG The information contained herein may bechanged without prior notice
6 Post-Installation Activities
Note
For more information about what configuration templates are available see Configuration Templates[page 33]For more information about applying configuration templates see httphelpsapcomnwce
SAP NetWeaver Composition Environment Library Administratorrsquos Guide Configuration of SAP NetWeaver CEInitial System Configuration AS Java Configuration Activating a Configuration Template
See also
httphelpsapcomnwce SAP NetWeaver Composition Environment Library Developerrsquos GuideDeveloping and Composing Applications Consuming Enterprise Services Searching for Services Services RegistryTasks Searching amp Browsing Service Definitions Configuring the Services Registry
Configuring the Portal in SAP NetWeaver CEAfter installing the portal in SAP NetWeaver CE a number of deactivated or irrelevant tools aredisplayed in the UI To display the correct portals tools for CE proceed as follows
1 Open a browser and log on to your portal as an administrator2 In the same browser session enter the following URL
httplthostgtlthttpportgtirjservletprtportalprtrootcomsapportal
contentlayersContentLayersTool
where lthostgt is the host name of your server and lthttpportgt is the port number of your server3 In the Portal Mode Configuration Tool choose Activate Development Mode to restore the portal tools
and content that are assigned to the development mode4 Restart or refresh your browser5 In the SAP Management Console restart the server
You may then continue with the mandatory and optional configuration steps as described inhttphelpsapcomnwce SAP NetWeaver Composition Environment Library Administratorrsquos Guide
Configuration of SAP NetWeaver Composition Environment Configuration for CE Additional Components Configuringthe Portal
Changing the Password for the Internet Communication Manager (ICM)You can monitor and manage the Internet Communication Manager (ICM) from the command lineprogramAfter the installation of your SAP NetWeaver CE system has successfully finished you need to changethe ICM password manually To do so proceed as follows
1 Log on at operating system level to the computer where the ICM is running2 Start the program icmon with icmon ndasha profile=ltinstance_profilegt to maintain the
authentication file (default authfiletxt)3 Choose a to add a user4 Choose c to change the password of the existing user
05162008 PUBLIC 2940
6 Post-Installation Activities
5 Choose s to save your settings
Further Configuration StepsAfter installing your SAP NetWeaver CE system and performing the post-installation steps to get thesystem up amp running you may need to perform further configuration stepsRefer to the following documentation to proceed with your tasks
n If you are a system administrator refer to httphelpsapcomnwce Administratorrsquos Guide It contains information about how to configure and administer your system
n If you are a developer refer to httphelpsapcomnwce Developerrsquos Guide It providesguidelines for developing applications using the SAP NetWeaver CE
Note
The SAP NetWeaver CE documentation is also available offline as a part of your installation To accessit choose Start All Programs SAP NetWeaver Composition Environment 10 Documentation
3040 PUBLIC 05162008
7 Additional Information
7 Additional Information
The following section provides additional information about the installation of SAP NetWeaverComposition Environment
71 Transporting Self-Developed Software ComponentArchives (SCA) into the System
PrerequisitesYou have developed your own Software Component Archives (SCA) and want to transport theminto your SAP NetWeaver CE system
ProcedureTo transport your SCAs to the SAP NetWeaver CE system proceed as follows
1 Download the update file from httpservicesapcomswdc Download Support Packages andPatches Entry by Application Group SAP NetWeaver SAP NETWEAVER SAP NETWEAVER CE71 Support Package Stacks
2 From an empty directory run the update tool updateltIDgtexe
Note
If the tool displays descriptions such as Applying Support Packages you can ignore them
3 In the dialog screens specify the directory where your SCAs are located4 Follow the on-screen instructions
Only valid for MaxDB
72 Troubleshooting ‒ Repairing an Inconsistent SAP MaxDBInstallation
PrerequisitesDuring the preinstallation phase the installation tool checks the Microsoft Windows registry foralready installed SAP MaxDB softwareIf the registry key is found but there is no software on the hard drive you receive the followingmessage
05162008 PUBLIC 3140
7 Additional Information73 Restarting the SAP MaxDB Server Manually
The existing MaxDB software is not consistent Check the file system and registry
The most common reason for this inconsistency is the manual deletion of the software from the filesystem without using the specified tools
ProcedureTo repair this inconsistency proceed as follows
1 Choose Start Control Panel Administrative Tools Services 2 Make sure the services SAPDBWWW SAPDB and XServer are stopped3 Choose Start Run and run the command regedit4 Go to My ComputerHKEY_LOCAL_MACHINESOFTWARESAPSAP DBTech Key IndepPrograms
The key contains a path to a foldera) Check if this folder exists on the file systemb) Note down the value of Key IndepPrograms for later usage (see step 7)
If the path does not exist in the file system delete the key SAP DBTech5 Delete the following keys
n My ComputerHKEY_LOCAL_MACHINESYSTEMCurrentControlSetServicesSAP DBTech-
n My ComputerHKEY_LOCAL_MACHINESYSTEMCurrentControlSetServicesSAPDBWWW
n My ComputerHKEY_LOCAL_MACHINESYSTEMCurrentControlSetServicesXServer
6 Choose Start Control Panel System Advanced Environment Variables System Variables Path 7 Delete the following paths from the variable
n ltIndepProgramsgtbin
n ltIndepProgramsgtpgm
8 Reboot your computer
End of MaxDB
Only valid for MaxDB
73 Restarting the SAP MaxDB Server Manually
If after a reboot the database server is not running automatically you need to restart the SAP MaxDBserver manually
Production SystemsTo restart the SAP MaxDB server manually proceed as follows
1 Open a command prompt and enter the following command net start sapdbwww
ORChoose Start All Programs Administrative Tools Services Double-click on SAP DB WWW andchoose Start
2 Open the SAP Management Console and choose SAP Systems ltSAPSIDgt ltmachine namegt
3240 PUBLIC 05162008
7 Additional Information74 Restarting the MS SQL Server Manually
3 Enter the master password and choose Logon4 Choose Online When the database server is online you can restart the engine
Development SystemsTo restart the SAP MaxDB server manually choose Start All Programs SAP NetWeaver CompositionEnvironment CE Application Server ltSAPSIDgt Start Application Server End of MaxDB
Only valid for MS SQL Server
74 Restarting the MS SQL Server Manually
If after a reboot the database server is not running automatically you need to restart the MS SQLServer manually
Procedure
1 Choose Start All Programs Administrative Tools Services 2 Look for the service named SQL Server ltnamegt where ltnamegt is MSSQLSERVER for the default
instance or ltinstance namegt for a named instance3 If the service status is not started right-click the service and choose Start in the context menu4 To insure the service is started automatically after each system restart right-click it and choose
Properties Select Automatic as the startup type
End of MS SQL Server
75 Configuration Templates
Configuration templates contain the predefined instance configuration for specific scenarios Theyare automatically applied according to the installation option you have selected The templatesare designed to optimize system performance by applying certain configuration to the Java VirtualMachine and the application server as well as by applying startup filters to AS Java services andapplications to start only those relevant for the selected installation optionsThe following table provides information about the available templates with SAP NetWeaverComposition Environment In the template name replace the ltsystem_modegt parameter bydevelopment (for the templates relevant to systems installed in developmentmode) or production (forthe templates relevant to systems installed in productivemode)
05162008 PUBLIC 3340
7 Additional Information76 Uninstalling SAP NetWeaver Composition Environment
Configuration Template Selected Installation Options
CE_Java_EE_ltsystem_modegt_full Java Application Server Installation
CE_Composition_Environment_ltsystem_modegt_full Java Application Server Installation + CompositionPlatform Installation
CE_Adobe_Document_Service_ltsystem_modegt_full Java Application Server Installation + AdobeDocument Services Add-on Installation
CE_Composite_Voice_ltsystem_modegt_full Java Application Server Installation + Voice Add-onInstallation
CE_Complete_Stack_ltsystem_modegt_full Java Application Server Installation + CompositionPlatform Installation + Adobe Document ServicesAdd-on Installation + Voice Add-on Installation
If your selection cannot be mapped to one of the combinations in the above table the templateCE_Complete_Stack_ltsystem_modegt_full is applied It starts all applications and services neededto run the complete stackYou canmanually apply a different configuration template if youwant to switch to another installationoption For example by changing from template CE_Complete_Stack_ltsystem_modegt_full toCE_Java_EE_ltsystem_modegt_full you achieve shorter startup times and less memory consumptionbut also less functionality since not all applications and services are runningFor more information about applying configuration templates see httphelpsapcomnwce
Administratorrsquos Guide Configuration of SAP NetWeaver CE Initial System Configuration AS Java ConfigurationActivating a Configuration Template
Note
Make sure that you do not apply a development template to a productive system or vice versa
76 Uninstalling SAP NetWeaver Composition Environment
You have to uninstall all components of the SAP NetWeaver Composition Environment separatelythat is SAP NetWeaver CE and SAP NetWeaver Developer StudioYou can uninstall your SAP NetWeaver CE system in different ways
Uninstalling SAP NetWeaver CEWindows Choose Start Control Panel Add Remove programs SAP SystemltSAPSIDgt
Uninstalling SAP NetWeaver CE Using SAPinst
1 Insert the SAP Installation Master DVD into your DVD drive or mount it locally
3440 PUBLIC 05162008
7 Additional Information76 Uninstalling SAP NetWeaver Composition Environment
2 Start SAPinst from the SAP Installation Master DVD as described in the section Installing SAPNetWeaver Composition Environment
3 In theWelcome screen choose Uninstall SAP System or Single Instances from the tree structure4 Follow the on-screen instructions
Uninstalling SAP NetWeaver Developer Studio
Prerequisites
Before uninstalling SAP NetWeaver Developer Studio consider the following
n All additionally installed features and plug-ins that were installed to the same folder as DeveloperStudio for example by using the Eclipse Update Manager will also be removed
n There may be other directories and files in the installation directory notablyltinstall_dirgteclipseworkspace ltinstall_dirgteclipselinks andltinstall_dirgteclipseconfiguration that contain important data The files and folder aswell as the existing workspaces are retained when the product is uninstalled
Procedure
To uninstall SAP NetWeaver Developer Studio proceed as described above You can use either oneof the options
Uninstalling the SAP Management ConsoleSince all SAP systems use the SAP Management Console there is no uninstallation option for theSAP Management Console with SAPinst If you are sure that you do not need the SAP ManagementConsole any more you can remove it using Start Control Panel Add Remove programs
05162008 PUBLIC 3540
Typographic Conventions
Example Description
lt gt Angle brackets indicate that you replace these words or characters with appropriateentries to make entries in the system for example ldquoEnter your ltUser Namegtrdquo
Arrows separating the parts of a navigation path for example menu options
Example Emphasized words or expressions
Example Words or characters that you enter in the system exactly as they appear in thedocumentation
Example Textual cross-references to an internet address for example httpwwwsapcom
example Quicklinks added to the internet address of a homepage to enable quick access tospecific content on the Web
123456 Hyperlink to an SAP Note for example SAP Note 123456
Example n Words or characters quoted from the screen These include field labels screen titlespushbutton labels menu names and menu options
n Cross-references to other documentation or published works
Example n Output on the screen following a user action for example messagesn Source code or syntax quoted directly from a programn File and directory names and their paths names of variables and parameters and
names of installation upgrade and database tools
EXAMPLE Technical names of system objects These include report names program namestransaction codes database table names and key concepts of a programming languagewhen they are surrounded by body text for example SELECT and INCLUDE
EXAMPLE Keys on the keyboard
3640 PUBLIC 05162008
SAP AGDietmar-Hopp-Allee 16
69190 WalldorfGermany
T +4918 0534 34 34F +4918 0534 34 20
wwwsapcom
copy Copyright 2008 SAP AG All rights reserved
No part of this publication may be reproduced or transmitted in any form or for any purpose without the express permissionof SAP AG The information contained herein may be changed without prior noticeSome software products marketed by SAP AG and its distributors contain proprietary software components of othersoftware vendors
No part of this publication may be reproduced or transmitted in any form or for any purpose without the express permissionof SAP AG The information contained herein may be changed without prior noticeSome software products marketed by SAP AG and its distributors contain proprietary software components of othersoftware vendorsMicrosoft Windows Excel Outlook and PowerPoint are registered trademarks of Microsoft CorporationIBM DB2 DB2 Universal Database OS2 Parallel Sysplex MVSESA AIX S390 AS400 OS390 OS400 iSeries pSeriesxSeries zSeries System i System i5 System p System p5 System x System z System z9 zOS AFP Intelligent MinerWebSphere Netfinity Tivoli Informix i5OS POWER POWER5 POWER5+ OpenPower and PowerPC are trademarks orregistered trademarks of IBM CorporationAdobe the Adobe logo Acrobat PostScript and Reader are either trademarks or registered trademarks of Adobe SystemsIncorporated in the United States andor other countriesOracle is a registered trademark of Oracle CorporationUNIX XOpen OSF1 and Motif are registered trademarks of the Open GroupCitrix ICA Program Neighborhood MetaFrame WinFrame VideoFrame and MultiWin are trademarks or registeredtrademarks of Citrix Systems IncHTML XML XHTML and W3C are trademarks or registered trademarks of W3Creg World Wide Web ConsortiumMassachusetts Institute of TechnologyJava is a registered trademark of Sun Microsystems IncJavaScript is a registered trademark of Sun Microsystems Inc used under license for technology invented and implementedby NetscapeSAP R3 xApps xApp SAP NetWeaver Duet PartnerEdge ByDesign SAP Business ByDesign and other SAP productsand services mentioned herein as well as their respective logos are trademarks or registered trademarks of SAP AG inGermany and in several other countries all over the world All other product and service names mentioned are thetrademarks of their respective companies Data contained in this document serves informational purposes only Nationalproduct specifications may varyThese materials are subject to change without notice These materials are provided by SAP AG and its affiliated companies(SAP Group) for informational purposes only without representation or warranty of any kind and SAP Group shall notbe liable for errors or omissions with respect to the materials The only warranties for SAP Group products and services arethose that are set forth in the express warranty statements accompanying such products and services if any Nothing hereinshould be construed as constituting an additional warranty
This document was created using stylesheet 2006-12-31 (V51beta [= 60 for E3]) and XSLT processor SAXON 652 fromMichael Kay (httpsaxonsfnet) XSLT version 1
05162008 PUBLIC 3740
DisclaimerSome components of this product are based on Javatrade Any code change in these components may cause unpredictable andsevere malfunctions and is therefore expressly prohibited as is any decompilation of these componentsAny Javatrade Source Code delivered with this product is only to be used by SAPrsquos Support Services and may not be modified oraltered in any way
Documentation in the SAP Service MarketplaceYou can find this document at the following address httpsservicesapcominstguides
3840 PUBLIC 05162008
This page is intentionally left blank
SAP AGDietmar-Hopp-Allee 1669190 WalldorfGermanyT +4918 0534 34 34F +4918 0534 34 20wwwsapcom
copy Copyright 2008 SAP AG All rights reservedNo part of this publication may be reproduced or transmitted in any form or for any purpose without the express permission of SAP AG The information contained herein may bechanged without prior notice
6 Post-Installation Activities
5 Choose s to save your settings
Further Configuration StepsAfter installing your SAP NetWeaver CE system and performing the post-installation steps to get thesystem up amp running you may need to perform further configuration stepsRefer to the following documentation to proceed with your tasks
n If you are a system administrator refer to httphelpsapcomnwce Administratorrsquos Guide It contains information about how to configure and administer your system
n If you are a developer refer to httphelpsapcomnwce Developerrsquos Guide It providesguidelines for developing applications using the SAP NetWeaver CE
Note
The SAP NetWeaver CE documentation is also available offline as a part of your installation To accessit choose Start All Programs SAP NetWeaver Composition Environment 10 Documentation
3040 PUBLIC 05162008
7 Additional Information
7 Additional Information
The following section provides additional information about the installation of SAP NetWeaverComposition Environment
71 Transporting Self-Developed Software ComponentArchives (SCA) into the System
PrerequisitesYou have developed your own Software Component Archives (SCA) and want to transport theminto your SAP NetWeaver CE system
ProcedureTo transport your SCAs to the SAP NetWeaver CE system proceed as follows
1 Download the update file from httpservicesapcomswdc Download Support Packages andPatches Entry by Application Group SAP NetWeaver SAP NETWEAVER SAP NETWEAVER CE71 Support Package Stacks
2 From an empty directory run the update tool updateltIDgtexe
Note
If the tool displays descriptions such as Applying Support Packages you can ignore them
3 In the dialog screens specify the directory where your SCAs are located4 Follow the on-screen instructions
Only valid for MaxDB
72 Troubleshooting ‒ Repairing an Inconsistent SAP MaxDBInstallation
PrerequisitesDuring the preinstallation phase the installation tool checks the Microsoft Windows registry foralready installed SAP MaxDB softwareIf the registry key is found but there is no software on the hard drive you receive the followingmessage
05162008 PUBLIC 3140
7 Additional Information73 Restarting the SAP MaxDB Server Manually
The existing MaxDB software is not consistent Check the file system and registry
The most common reason for this inconsistency is the manual deletion of the software from the filesystem without using the specified tools
ProcedureTo repair this inconsistency proceed as follows
1 Choose Start Control Panel Administrative Tools Services 2 Make sure the services SAPDBWWW SAPDB and XServer are stopped3 Choose Start Run and run the command regedit4 Go to My ComputerHKEY_LOCAL_MACHINESOFTWARESAPSAP DBTech Key IndepPrograms
The key contains a path to a foldera) Check if this folder exists on the file systemb) Note down the value of Key IndepPrograms for later usage (see step 7)
If the path does not exist in the file system delete the key SAP DBTech5 Delete the following keys
n My ComputerHKEY_LOCAL_MACHINESYSTEMCurrentControlSetServicesSAP DBTech-
n My ComputerHKEY_LOCAL_MACHINESYSTEMCurrentControlSetServicesSAPDBWWW
n My ComputerHKEY_LOCAL_MACHINESYSTEMCurrentControlSetServicesXServer
6 Choose Start Control Panel System Advanced Environment Variables System Variables Path 7 Delete the following paths from the variable
n ltIndepProgramsgtbin
n ltIndepProgramsgtpgm
8 Reboot your computer
End of MaxDB
Only valid for MaxDB
73 Restarting the SAP MaxDB Server Manually
If after a reboot the database server is not running automatically you need to restart the SAP MaxDBserver manually
Production SystemsTo restart the SAP MaxDB server manually proceed as follows
1 Open a command prompt and enter the following command net start sapdbwww
ORChoose Start All Programs Administrative Tools Services Double-click on SAP DB WWW andchoose Start
2 Open the SAP Management Console and choose SAP Systems ltSAPSIDgt ltmachine namegt
3240 PUBLIC 05162008
7 Additional Information74 Restarting the MS SQL Server Manually
3 Enter the master password and choose Logon4 Choose Online When the database server is online you can restart the engine
Development SystemsTo restart the SAP MaxDB server manually choose Start All Programs SAP NetWeaver CompositionEnvironment CE Application Server ltSAPSIDgt Start Application Server End of MaxDB
Only valid for MS SQL Server
74 Restarting the MS SQL Server Manually
If after a reboot the database server is not running automatically you need to restart the MS SQLServer manually
Procedure
1 Choose Start All Programs Administrative Tools Services 2 Look for the service named SQL Server ltnamegt where ltnamegt is MSSQLSERVER for the default
instance or ltinstance namegt for a named instance3 If the service status is not started right-click the service and choose Start in the context menu4 To insure the service is started automatically after each system restart right-click it and choose
Properties Select Automatic as the startup type
End of MS SQL Server
75 Configuration Templates
Configuration templates contain the predefined instance configuration for specific scenarios Theyare automatically applied according to the installation option you have selected The templatesare designed to optimize system performance by applying certain configuration to the Java VirtualMachine and the application server as well as by applying startup filters to AS Java services andapplications to start only those relevant for the selected installation optionsThe following table provides information about the available templates with SAP NetWeaverComposition Environment In the template name replace the ltsystem_modegt parameter bydevelopment (for the templates relevant to systems installed in developmentmode) or production (forthe templates relevant to systems installed in productivemode)
05162008 PUBLIC 3340
7 Additional Information76 Uninstalling SAP NetWeaver Composition Environment
Configuration Template Selected Installation Options
CE_Java_EE_ltsystem_modegt_full Java Application Server Installation
CE_Composition_Environment_ltsystem_modegt_full Java Application Server Installation + CompositionPlatform Installation
CE_Adobe_Document_Service_ltsystem_modegt_full Java Application Server Installation + AdobeDocument Services Add-on Installation
CE_Composite_Voice_ltsystem_modegt_full Java Application Server Installation + Voice Add-onInstallation
CE_Complete_Stack_ltsystem_modegt_full Java Application Server Installation + CompositionPlatform Installation + Adobe Document ServicesAdd-on Installation + Voice Add-on Installation
If your selection cannot be mapped to one of the combinations in the above table the templateCE_Complete_Stack_ltsystem_modegt_full is applied It starts all applications and services neededto run the complete stackYou canmanually apply a different configuration template if youwant to switch to another installationoption For example by changing from template CE_Complete_Stack_ltsystem_modegt_full toCE_Java_EE_ltsystem_modegt_full you achieve shorter startup times and less memory consumptionbut also less functionality since not all applications and services are runningFor more information about applying configuration templates see httphelpsapcomnwce
Administratorrsquos Guide Configuration of SAP NetWeaver CE Initial System Configuration AS Java ConfigurationActivating a Configuration Template
Note
Make sure that you do not apply a development template to a productive system or vice versa
76 Uninstalling SAP NetWeaver Composition Environment
You have to uninstall all components of the SAP NetWeaver Composition Environment separatelythat is SAP NetWeaver CE and SAP NetWeaver Developer StudioYou can uninstall your SAP NetWeaver CE system in different ways
Uninstalling SAP NetWeaver CEWindows Choose Start Control Panel Add Remove programs SAP SystemltSAPSIDgt
Uninstalling SAP NetWeaver CE Using SAPinst
1 Insert the SAP Installation Master DVD into your DVD drive or mount it locally
3440 PUBLIC 05162008
7 Additional Information76 Uninstalling SAP NetWeaver Composition Environment
2 Start SAPinst from the SAP Installation Master DVD as described in the section Installing SAPNetWeaver Composition Environment
3 In theWelcome screen choose Uninstall SAP System or Single Instances from the tree structure4 Follow the on-screen instructions
Uninstalling SAP NetWeaver Developer Studio
Prerequisites
Before uninstalling SAP NetWeaver Developer Studio consider the following
n All additionally installed features and plug-ins that were installed to the same folder as DeveloperStudio for example by using the Eclipse Update Manager will also be removed
n There may be other directories and files in the installation directory notablyltinstall_dirgteclipseworkspace ltinstall_dirgteclipselinks andltinstall_dirgteclipseconfiguration that contain important data The files and folder aswell as the existing workspaces are retained when the product is uninstalled
Procedure
To uninstall SAP NetWeaver Developer Studio proceed as described above You can use either oneof the options
Uninstalling the SAP Management ConsoleSince all SAP systems use the SAP Management Console there is no uninstallation option for theSAP Management Console with SAPinst If you are sure that you do not need the SAP ManagementConsole any more you can remove it using Start Control Panel Add Remove programs
05162008 PUBLIC 3540
Typographic Conventions
Example Description
lt gt Angle brackets indicate that you replace these words or characters with appropriateentries to make entries in the system for example ldquoEnter your ltUser Namegtrdquo
Arrows separating the parts of a navigation path for example menu options
Example Emphasized words or expressions
Example Words or characters that you enter in the system exactly as they appear in thedocumentation
Example Textual cross-references to an internet address for example httpwwwsapcom
example Quicklinks added to the internet address of a homepage to enable quick access tospecific content on the Web
123456 Hyperlink to an SAP Note for example SAP Note 123456
Example n Words or characters quoted from the screen These include field labels screen titlespushbutton labels menu names and menu options
n Cross-references to other documentation or published works
Example n Output on the screen following a user action for example messagesn Source code or syntax quoted directly from a programn File and directory names and their paths names of variables and parameters and
names of installation upgrade and database tools
EXAMPLE Technical names of system objects These include report names program namestransaction codes database table names and key concepts of a programming languagewhen they are surrounded by body text for example SELECT and INCLUDE
EXAMPLE Keys on the keyboard
3640 PUBLIC 05162008
SAP AGDietmar-Hopp-Allee 16
69190 WalldorfGermany
T +4918 0534 34 34F +4918 0534 34 20
wwwsapcom
copy Copyright 2008 SAP AG All rights reserved
No part of this publication may be reproduced or transmitted in any form or for any purpose without the express permissionof SAP AG The information contained herein may be changed without prior noticeSome software products marketed by SAP AG and its distributors contain proprietary software components of othersoftware vendors
No part of this publication may be reproduced or transmitted in any form or for any purpose without the express permissionof SAP AG The information contained herein may be changed without prior noticeSome software products marketed by SAP AG and its distributors contain proprietary software components of othersoftware vendorsMicrosoft Windows Excel Outlook and PowerPoint are registered trademarks of Microsoft CorporationIBM DB2 DB2 Universal Database OS2 Parallel Sysplex MVSESA AIX S390 AS400 OS390 OS400 iSeries pSeriesxSeries zSeries System i System i5 System p System p5 System x System z System z9 zOS AFP Intelligent MinerWebSphere Netfinity Tivoli Informix i5OS POWER POWER5 POWER5+ OpenPower and PowerPC are trademarks orregistered trademarks of IBM CorporationAdobe the Adobe logo Acrobat PostScript and Reader are either trademarks or registered trademarks of Adobe SystemsIncorporated in the United States andor other countriesOracle is a registered trademark of Oracle CorporationUNIX XOpen OSF1 and Motif are registered trademarks of the Open GroupCitrix ICA Program Neighborhood MetaFrame WinFrame VideoFrame and MultiWin are trademarks or registeredtrademarks of Citrix Systems IncHTML XML XHTML and W3C are trademarks or registered trademarks of W3Creg World Wide Web ConsortiumMassachusetts Institute of TechnologyJava is a registered trademark of Sun Microsystems IncJavaScript is a registered trademark of Sun Microsystems Inc used under license for technology invented and implementedby NetscapeSAP R3 xApps xApp SAP NetWeaver Duet PartnerEdge ByDesign SAP Business ByDesign and other SAP productsand services mentioned herein as well as their respective logos are trademarks or registered trademarks of SAP AG inGermany and in several other countries all over the world All other product and service names mentioned are thetrademarks of their respective companies Data contained in this document serves informational purposes only Nationalproduct specifications may varyThese materials are subject to change without notice These materials are provided by SAP AG and its affiliated companies(SAP Group) for informational purposes only without representation or warranty of any kind and SAP Group shall notbe liable for errors or omissions with respect to the materials The only warranties for SAP Group products and services arethose that are set forth in the express warranty statements accompanying such products and services if any Nothing hereinshould be construed as constituting an additional warranty
This document was created using stylesheet 2006-12-31 (V51beta [= 60 for E3]) and XSLT processor SAXON 652 fromMichael Kay (httpsaxonsfnet) XSLT version 1
05162008 PUBLIC 3740
DisclaimerSome components of this product are based on Javatrade Any code change in these components may cause unpredictable andsevere malfunctions and is therefore expressly prohibited as is any decompilation of these componentsAny Javatrade Source Code delivered with this product is only to be used by SAPrsquos Support Services and may not be modified oraltered in any way
Documentation in the SAP Service MarketplaceYou can find this document at the following address httpsservicesapcominstguides
3840 PUBLIC 05162008
This page is intentionally left blank
SAP AGDietmar-Hopp-Allee 1669190 WalldorfGermanyT +4918 0534 34 34F +4918 0534 34 20wwwsapcom
copy Copyright 2008 SAP AG All rights reservedNo part of this publication may be reproduced or transmitted in any form or for any purpose without the express permission of SAP AG The information contained herein may bechanged without prior notice
7 Additional Information
7 Additional Information
The following section provides additional information about the installation of SAP NetWeaverComposition Environment
71 Transporting Self-Developed Software ComponentArchives (SCA) into the System
PrerequisitesYou have developed your own Software Component Archives (SCA) and want to transport theminto your SAP NetWeaver CE system
ProcedureTo transport your SCAs to the SAP NetWeaver CE system proceed as follows
1 Download the update file from httpservicesapcomswdc Download Support Packages andPatches Entry by Application Group SAP NetWeaver SAP NETWEAVER SAP NETWEAVER CE71 Support Package Stacks
2 From an empty directory run the update tool updateltIDgtexe
Note
If the tool displays descriptions such as Applying Support Packages you can ignore them
3 In the dialog screens specify the directory where your SCAs are located4 Follow the on-screen instructions
Only valid for MaxDB
72 Troubleshooting ‒ Repairing an Inconsistent SAP MaxDBInstallation
PrerequisitesDuring the preinstallation phase the installation tool checks the Microsoft Windows registry foralready installed SAP MaxDB softwareIf the registry key is found but there is no software on the hard drive you receive the followingmessage
05162008 PUBLIC 3140
7 Additional Information73 Restarting the SAP MaxDB Server Manually
The existing MaxDB software is not consistent Check the file system and registry
The most common reason for this inconsistency is the manual deletion of the software from the filesystem without using the specified tools
ProcedureTo repair this inconsistency proceed as follows
1 Choose Start Control Panel Administrative Tools Services 2 Make sure the services SAPDBWWW SAPDB and XServer are stopped3 Choose Start Run and run the command regedit4 Go to My ComputerHKEY_LOCAL_MACHINESOFTWARESAPSAP DBTech Key IndepPrograms
The key contains a path to a foldera) Check if this folder exists on the file systemb) Note down the value of Key IndepPrograms for later usage (see step 7)
If the path does not exist in the file system delete the key SAP DBTech5 Delete the following keys
n My ComputerHKEY_LOCAL_MACHINESYSTEMCurrentControlSetServicesSAP DBTech-
n My ComputerHKEY_LOCAL_MACHINESYSTEMCurrentControlSetServicesSAPDBWWW
n My ComputerHKEY_LOCAL_MACHINESYSTEMCurrentControlSetServicesXServer
6 Choose Start Control Panel System Advanced Environment Variables System Variables Path 7 Delete the following paths from the variable
n ltIndepProgramsgtbin
n ltIndepProgramsgtpgm
8 Reboot your computer
End of MaxDB
Only valid for MaxDB
73 Restarting the SAP MaxDB Server Manually
If after a reboot the database server is not running automatically you need to restart the SAP MaxDBserver manually
Production SystemsTo restart the SAP MaxDB server manually proceed as follows
1 Open a command prompt and enter the following command net start sapdbwww
ORChoose Start All Programs Administrative Tools Services Double-click on SAP DB WWW andchoose Start
2 Open the SAP Management Console and choose SAP Systems ltSAPSIDgt ltmachine namegt
3240 PUBLIC 05162008
7 Additional Information74 Restarting the MS SQL Server Manually
3 Enter the master password and choose Logon4 Choose Online When the database server is online you can restart the engine
Development SystemsTo restart the SAP MaxDB server manually choose Start All Programs SAP NetWeaver CompositionEnvironment CE Application Server ltSAPSIDgt Start Application Server End of MaxDB
Only valid for MS SQL Server
74 Restarting the MS SQL Server Manually
If after a reboot the database server is not running automatically you need to restart the MS SQLServer manually
Procedure
1 Choose Start All Programs Administrative Tools Services 2 Look for the service named SQL Server ltnamegt where ltnamegt is MSSQLSERVER for the default
instance or ltinstance namegt for a named instance3 If the service status is not started right-click the service and choose Start in the context menu4 To insure the service is started automatically after each system restart right-click it and choose
Properties Select Automatic as the startup type
End of MS SQL Server
75 Configuration Templates
Configuration templates contain the predefined instance configuration for specific scenarios Theyare automatically applied according to the installation option you have selected The templatesare designed to optimize system performance by applying certain configuration to the Java VirtualMachine and the application server as well as by applying startup filters to AS Java services andapplications to start only those relevant for the selected installation optionsThe following table provides information about the available templates with SAP NetWeaverComposition Environment In the template name replace the ltsystem_modegt parameter bydevelopment (for the templates relevant to systems installed in developmentmode) or production (forthe templates relevant to systems installed in productivemode)
05162008 PUBLIC 3340
7 Additional Information76 Uninstalling SAP NetWeaver Composition Environment
Configuration Template Selected Installation Options
CE_Java_EE_ltsystem_modegt_full Java Application Server Installation
CE_Composition_Environment_ltsystem_modegt_full Java Application Server Installation + CompositionPlatform Installation
CE_Adobe_Document_Service_ltsystem_modegt_full Java Application Server Installation + AdobeDocument Services Add-on Installation
CE_Composite_Voice_ltsystem_modegt_full Java Application Server Installation + Voice Add-onInstallation
CE_Complete_Stack_ltsystem_modegt_full Java Application Server Installation + CompositionPlatform Installation + Adobe Document ServicesAdd-on Installation + Voice Add-on Installation
If your selection cannot be mapped to one of the combinations in the above table the templateCE_Complete_Stack_ltsystem_modegt_full is applied It starts all applications and services neededto run the complete stackYou canmanually apply a different configuration template if youwant to switch to another installationoption For example by changing from template CE_Complete_Stack_ltsystem_modegt_full toCE_Java_EE_ltsystem_modegt_full you achieve shorter startup times and less memory consumptionbut also less functionality since not all applications and services are runningFor more information about applying configuration templates see httphelpsapcomnwce
Administratorrsquos Guide Configuration of SAP NetWeaver CE Initial System Configuration AS Java ConfigurationActivating a Configuration Template
Note
Make sure that you do not apply a development template to a productive system or vice versa
76 Uninstalling SAP NetWeaver Composition Environment
You have to uninstall all components of the SAP NetWeaver Composition Environment separatelythat is SAP NetWeaver CE and SAP NetWeaver Developer StudioYou can uninstall your SAP NetWeaver CE system in different ways
Uninstalling SAP NetWeaver CEWindows Choose Start Control Panel Add Remove programs SAP SystemltSAPSIDgt
Uninstalling SAP NetWeaver CE Using SAPinst
1 Insert the SAP Installation Master DVD into your DVD drive or mount it locally
3440 PUBLIC 05162008
7 Additional Information76 Uninstalling SAP NetWeaver Composition Environment
2 Start SAPinst from the SAP Installation Master DVD as described in the section Installing SAPNetWeaver Composition Environment
3 In theWelcome screen choose Uninstall SAP System or Single Instances from the tree structure4 Follow the on-screen instructions
Uninstalling SAP NetWeaver Developer Studio
Prerequisites
Before uninstalling SAP NetWeaver Developer Studio consider the following
n All additionally installed features and plug-ins that were installed to the same folder as DeveloperStudio for example by using the Eclipse Update Manager will also be removed
n There may be other directories and files in the installation directory notablyltinstall_dirgteclipseworkspace ltinstall_dirgteclipselinks andltinstall_dirgteclipseconfiguration that contain important data The files and folder aswell as the existing workspaces are retained when the product is uninstalled
Procedure
To uninstall SAP NetWeaver Developer Studio proceed as described above You can use either oneof the options
Uninstalling the SAP Management ConsoleSince all SAP systems use the SAP Management Console there is no uninstallation option for theSAP Management Console with SAPinst If you are sure that you do not need the SAP ManagementConsole any more you can remove it using Start Control Panel Add Remove programs
05162008 PUBLIC 3540
Typographic Conventions
Example Description
lt gt Angle brackets indicate that you replace these words or characters with appropriateentries to make entries in the system for example ldquoEnter your ltUser Namegtrdquo
Arrows separating the parts of a navigation path for example menu options
Example Emphasized words or expressions
Example Words or characters that you enter in the system exactly as they appear in thedocumentation
Example Textual cross-references to an internet address for example httpwwwsapcom
example Quicklinks added to the internet address of a homepage to enable quick access tospecific content on the Web
123456 Hyperlink to an SAP Note for example SAP Note 123456
Example n Words or characters quoted from the screen These include field labels screen titlespushbutton labels menu names and menu options
n Cross-references to other documentation or published works
Example n Output on the screen following a user action for example messagesn Source code or syntax quoted directly from a programn File and directory names and their paths names of variables and parameters and
names of installation upgrade and database tools
EXAMPLE Technical names of system objects These include report names program namestransaction codes database table names and key concepts of a programming languagewhen they are surrounded by body text for example SELECT and INCLUDE
EXAMPLE Keys on the keyboard
3640 PUBLIC 05162008
SAP AGDietmar-Hopp-Allee 16
69190 WalldorfGermany
T +4918 0534 34 34F +4918 0534 34 20
wwwsapcom
copy Copyright 2008 SAP AG All rights reserved
No part of this publication may be reproduced or transmitted in any form or for any purpose without the express permissionof SAP AG The information contained herein may be changed without prior noticeSome software products marketed by SAP AG and its distributors contain proprietary software components of othersoftware vendors
No part of this publication may be reproduced or transmitted in any form or for any purpose without the express permissionof SAP AG The information contained herein may be changed without prior noticeSome software products marketed by SAP AG and its distributors contain proprietary software components of othersoftware vendorsMicrosoft Windows Excel Outlook and PowerPoint are registered trademarks of Microsoft CorporationIBM DB2 DB2 Universal Database OS2 Parallel Sysplex MVSESA AIX S390 AS400 OS390 OS400 iSeries pSeriesxSeries zSeries System i System i5 System p System p5 System x System z System z9 zOS AFP Intelligent MinerWebSphere Netfinity Tivoli Informix i5OS POWER POWER5 POWER5+ OpenPower and PowerPC are trademarks orregistered trademarks of IBM CorporationAdobe the Adobe logo Acrobat PostScript and Reader are either trademarks or registered trademarks of Adobe SystemsIncorporated in the United States andor other countriesOracle is a registered trademark of Oracle CorporationUNIX XOpen OSF1 and Motif are registered trademarks of the Open GroupCitrix ICA Program Neighborhood MetaFrame WinFrame VideoFrame and MultiWin are trademarks or registeredtrademarks of Citrix Systems IncHTML XML XHTML and W3C are trademarks or registered trademarks of W3Creg World Wide Web ConsortiumMassachusetts Institute of TechnologyJava is a registered trademark of Sun Microsystems IncJavaScript is a registered trademark of Sun Microsystems Inc used under license for technology invented and implementedby NetscapeSAP R3 xApps xApp SAP NetWeaver Duet PartnerEdge ByDesign SAP Business ByDesign and other SAP productsand services mentioned herein as well as their respective logos are trademarks or registered trademarks of SAP AG inGermany and in several other countries all over the world All other product and service names mentioned are thetrademarks of their respective companies Data contained in this document serves informational purposes only Nationalproduct specifications may varyThese materials are subject to change without notice These materials are provided by SAP AG and its affiliated companies(SAP Group) for informational purposes only without representation or warranty of any kind and SAP Group shall notbe liable for errors or omissions with respect to the materials The only warranties for SAP Group products and services arethose that are set forth in the express warranty statements accompanying such products and services if any Nothing hereinshould be construed as constituting an additional warranty
This document was created using stylesheet 2006-12-31 (V51beta [= 60 for E3]) and XSLT processor SAXON 652 fromMichael Kay (httpsaxonsfnet) XSLT version 1
05162008 PUBLIC 3740
DisclaimerSome components of this product are based on Javatrade Any code change in these components may cause unpredictable andsevere malfunctions and is therefore expressly prohibited as is any decompilation of these componentsAny Javatrade Source Code delivered with this product is only to be used by SAPrsquos Support Services and may not be modified oraltered in any way
Documentation in the SAP Service MarketplaceYou can find this document at the following address httpsservicesapcominstguides
3840 PUBLIC 05162008
This page is intentionally left blank
SAP AGDietmar-Hopp-Allee 1669190 WalldorfGermanyT +4918 0534 34 34F +4918 0534 34 20wwwsapcom
copy Copyright 2008 SAP AG All rights reservedNo part of this publication may be reproduced or transmitted in any form or for any purpose without the express permission of SAP AG The information contained herein may bechanged without prior notice
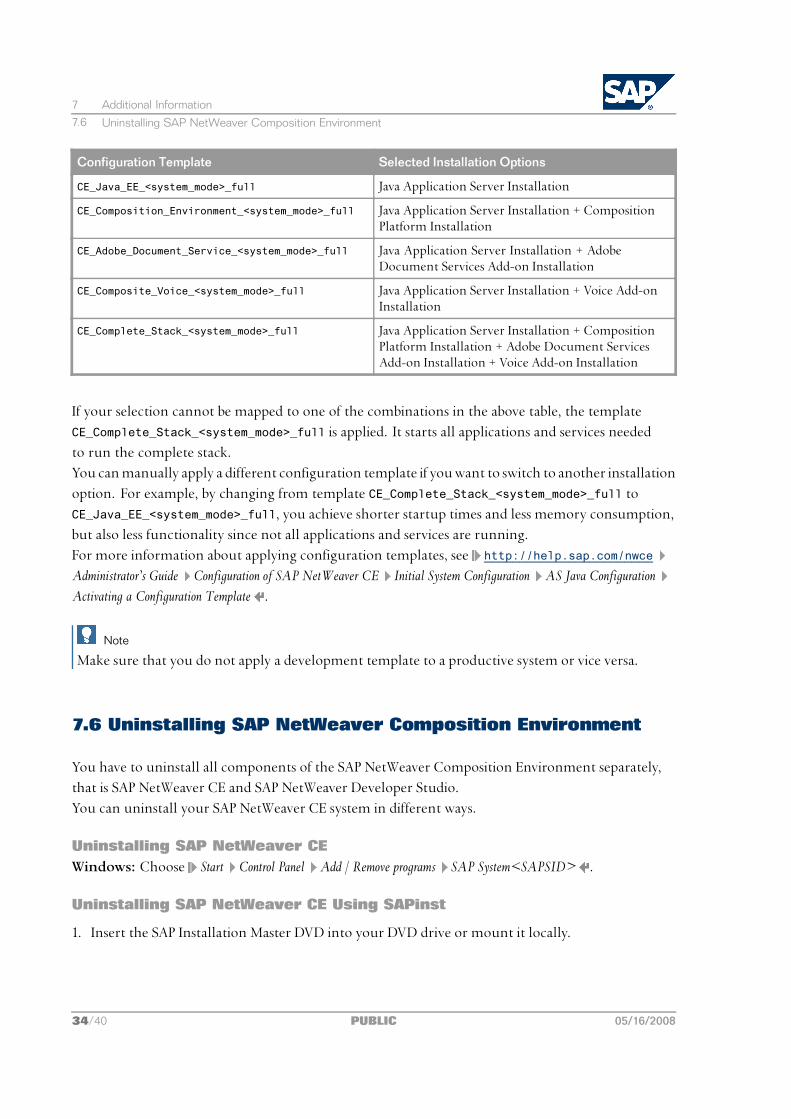
7 Additional Information76 Uninstalling SAP NetWeaver Composition Environment
2 Start SAPinst from the SAP Installation Master DVD as described in the section Installing SAPNetWeaver Composition Environment
3 In theWelcome screen choose Uninstall SAP System or Single Instances from the tree structure4 Follow the on-screen instructions
Uninstalling SAP NetWeaver Developer Studio
Prerequisites
Before uninstalling SAP NetWeaver Developer Studio consider the following
n All additionally installed features and plug-ins that were installed to the same folder as DeveloperStudio for example by using the Eclipse Update Manager will also be removed
n There may be other directories and files in the installation directory notablyltinstall_dirgteclipseworkspace ltinstall_dirgteclipselinks andltinstall_dirgteclipseconfiguration that contain important data The files and folder aswell as the existing workspaces are retained when the product is uninstalled
Procedure
To uninstall SAP NetWeaver Developer Studio proceed as described above You can use either oneof the options
Uninstalling the SAP Management ConsoleSince all SAP systems use the SAP Management Console there is no uninstallation option for theSAP Management Console with SAPinst If you are sure that you do not need the SAP ManagementConsole any more you can remove it using Start Control Panel Add Remove programs
05162008 PUBLIC 3540
Typographic Conventions
Example Description
lt gt Angle brackets indicate that you replace these words or characters with appropriateentries to make entries in the system for example ldquoEnter your ltUser Namegtrdquo
Arrows separating the parts of a navigation path for example menu options
Example Emphasized words or expressions
Example Words or characters that you enter in the system exactly as they appear in thedocumentation
Example Textual cross-references to an internet address for example httpwwwsapcom
example Quicklinks added to the internet address of a homepage to enable quick access tospecific content on the Web
123456 Hyperlink to an SAP Note for example SAP Note 123456
Example n Words or characters quoted from the screen These include field labels screen titlespushbutton labels menu names and menu options
n Cross-references to other documentation or published works
Example n Output on the screen following a user action for example messagesn Source code or syntax quoted directly from a programn File and directory names and their paths names of variables and parameters and
names of installation upgrade and database tools
EXAMPLE Technical names of system objects These include report names program namestransaction codes database table names and key concepts of a programming languagewhen they are surrounded by body text for example SELECT and INCLUDE
EXAMPLE Keys on the keyboard
3640 PUBLIC 05162008
SAP AGDietmar-Hopp-Allee 16
69190 WalldorfGermany
T +4918 0534 34 34F +4918 0534 34 20
wwwsapcom
copy Copyright 2008 SAP AG All rights reserved
No part of this publication may be reproduced or transmitted in any form or for any purpose without the express permissionof SAP AG The information contained herein may be changed without prior noticeSome software products marketed by SAP AG and its distributors contain proprietary software components of othersoftware vendors
No part of this publication may be reproduced or transmitted in any form or for any purpose without the express permissionof SAP AG The information contained herein may be changed without prior noticeSome software products marketed by SAP AG and its distributors contain proprietary software components of othersoftware vendorsMicrosoft Windows Excel Outlook and PowerPoint are registered trademarks of Microsoft CorporationIBM DB2 DB2 Universal Database OS2 Parallel Sysplex MVSESA AIX S390 AS400 OS390 OS400 iSeries pSeriesxSeries zSeries System i System i5 System p System p5 System x System z System z9 zOS AFP Intelligent MinerWebSphere Netfinity Tivoli Informix i5OS POWER POWER5 POWER5+ OpenPower and PowerPC are trademarks orregistered trademarks of IBM CorporationAdobe the Adobe logo Acrobat PostScript and Reader are either trademarks or registered trademarks of Adobe SystemsIncorporated in the United States andor other countriesOracle is a registered trademark of Oracle CorporationUNIX XOpen OSF1 and Motif are registered trademarks of the Open GroupCitrix ICA Program Neighborhood MetaFrame WinFrame VideoFrame and MultiWin are trademarks or registeredtrademarks of Citrix Systems IncHTML XML XHTML and W3C are trademarks or registered trademarks of W3Creg World Wide Web ConsortiumMassachusetts Institute of TechnologyJava is a registered trademark of Sun Microsystems IncJavaScript is a registered trademark of Sun Microsystems Inc used under license for technology invented and implementedby NetscapeSAP R3 xApps xApp SAP NetWeaver Duet PartnerEdge ByDesign SAP Business ByDesign and other SAP productsand services mentioned herein as well as their respective logos are trademarks or registered trademarks of SAP AG inGermany and in several other countries all over the world All other product and service names mentioned are thetrademarks of their respective companies Data contained in this document serves informational purposes only Nationalproduct specifications may varyThese materials are subject to change without notice These materials are provided by SAP AG and its affiliated companies(SAP Group) for informational purposes only without representation or warranty of any kind and SAP Group shall notbe liable for errors or omissions with respect to the materials The only warranties for SAP Group products and services arethose that are set forth in the express warranty statements accompanying such products and services if any Nothing hereinshould be construed as constituting an additional warranty
This document was created using stylesheet 2006-12-31 (V51beta [= 60 for E3]) and XSLT processor SAXON 652 fromMichael Kay (httpsaxonsfnet) XSLT version 1
05162008 PUBLIC 3740
DisclaimerSome components of this product are based on Javatrade Any code change in these components may cause unpredictable andsevere malfunctions and is therefore expressly prohibited as is any decompilation of these componentsAny Javatrade Source Code delivered with this product is only to be used by SAPrsquos Support Services and may not be modified oraltered in any way
Documentation in the SAP Service MarketplaceYou can find this document at the following address httpsservicesapcominstguides
3840 PUBLIC 05162008
This page is intentionally left blank
SAP AGDietmar-Hopp-Allee 1669190 WalldorfGermanyT +4918 0534 34 34F +4918 0534 34 20wwwsapcom
copy Copyright 2008 SAP AG All rights reservedNo part of this publication may be reproduced or transmitted in any form or for any purpose without the express permission of SAP AG The information contained herein may bechanged without prior notice
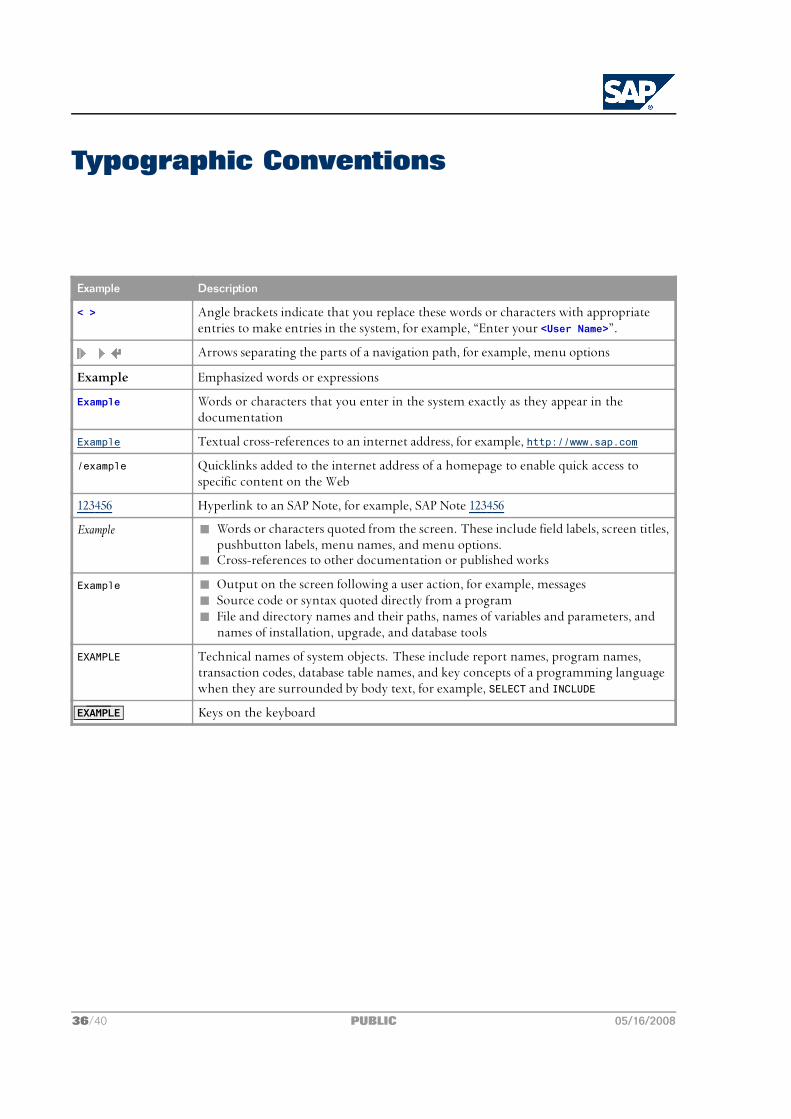