Embed Size (px)
Citation preview

User Guide PUBLIC
SAP BusinessObjects IntercompanyDocument Version: 7.5 – 2017-02-10
SAP BusinessObjects Intercompany User Guide

Content
1 Document History. . . . . . . . . . . . . . . . . . . . . . . . . . . . . . . . . . . . . . . . . . . . . . . . . . . . . . . . . . . . . . 5
2 Introduction to SAP BusinessObjects Intercompany. . . . . . . . . . . . . . . . . . . . . . . . . . . . . . . . . . . .62.1 Introduction to the documentation. . . . . . . . . . . . . . . . . . . . . . . . . . . . . . . . . . . . . . . . . . . . . . . . . . . 62.2 If you encounter a problem. . . . . . . . . . . . . . . . . . . . . . . . . . . . . . . . . . . . . . . . . . . . . . . . . . . . . . . . .7
3 General interface information. . . . . . . . . . . . . . . . . . . . . . . . . . . . . . . . . . . . . . . . . . . . . . . . . . . . . 83.1 Languages. . . . . . . . . . . . . . . . . . . . . . . . . . . . . . . . . . . . . . . . . . . . . . . . . . . . . . . . . . . . . . . . . . . . 8
To select the application language. . . . . . . . . . . . . . . . . . . . . . . . . . . . . . . . . . . . . . . . . . . . . . . . . 83.2 Saving changes in the database. . . . . . . . . . . . . . . . . . . . . . . . . . . . . . . . . . . . . . . . . . . . . . . . . . . . . 83.3 Navigation bar. . . . . . . . . . . . . . . . . . . . . . . . . . . . . . . . . . . . . . . . . . . . . . . . . . . . . . . . . . . . . . . . . .83.4 Navigation in list boxes. . . . . . . . . . . . . . . . . . . . . . . . . . . . . . . . . . . . . . . . . . . . . . . . . . . . . . . . . . . 9
4 General user tasks. . . . . . . . . . . . . . . . . . . . . . . . . . . . . . . . . . . . . . . . . . . . . . . . . . . . . . . . . . . . . 104.1 Logging in to the application. . . . . . . . . . . . . . . . . . . . . . . . . . . . . . . . . . . . . . . . . . . . . . . . . . . . . . . 10
To log in to the application. . . . . . . . . . . . . . . . . . . . . . . . . . . . . . . . . . . . . . . . . . . . . . . . . . . . . . 104.2 Changing your user information. . . . . . . . . . . . . . . . . . . . . . . . . . . . . . . . . . . . . . . . . . . . . . . . . . . . . 114.3 Filters. . . . . . . . . . . . . . . . . . . . . . . . . . . . . . . . . . . . . . . . . . . . . . . . . . . . . . . . . . . . . . . . . . . . . . . 11
Balances page display filters. . . . . . . . . . . . . . . . . . . . . . . . . . . . . . . . . . . . . . . . . . . . . . . . . . . . 12Ad hoc page filters. . . . . . . . . . . . . . . . . . . . . . . . . . . . . . . . . . . . . . . . . . . . . . . . . . . . . . . . . . . 14
5 The reconciliation process. . . . . . . . . . . . . . . . . . . . . . . . . . . . . . . . . . . . . . . . . . . . . . . . . . . . . . . 155.1 Starting the reconciliation process. . . . . . . . . . . . . . . . . . . . . . . . . . . . . . . . . . . . . . . . . . . . . . . . . . .155.2 Balances pages. . . . . . . . . . . . . . . . . . . . . . . . . . . . . . . . . . . . . . . . . . . . . . . . . . . . . . . . . . . . . . . . 16
Detail by partners page. . . . . . . . . . . . . . . . . . . . . . . . . . . . . . . . . . . . . . . . . . . . . . . . . . . . . . . . 16Detail by parent accounts page. . . . . . . . . . . . . . . . . . . . . . . . . . . . . . . . . . . . . . . . . . . . . . . . . . .17Detail by transaction currencies page. . . . . . . . . . . . . . . . . . . . . . . . . . . . . . . . . . . . . . . . . . . . . . 17Detail by child accounts page. . . . . . . . . . . . . . . . . . . . . . . . . . . . . . . . . . . . . . . . . . . . . . . . . . . . 17
5.3 Creating and opening balances. . . . . . . . . . . . . . . . . . . . . . . . . . . . . . . . . . . . . . . . . . . . . . . . . . . . . 18To select a declaring company. . . . . . . . . . . . . . . . . . . . . . . . . . . . . . . . . . . . . . . . . . . . . . . . . . . 19To select a period. . . . . . . . . . . . . . . . . . . . . . . . . . . . . . . . . . . . . . . . . . . . . . . . . . . . . . . . . . . . 19To create or open a balance row. . . . . . . . . . . . . . . . . . . . . . . . . . . . . . . . . . . . . . . . . . . . . . . . . . 19
5.4 Entering amounts in balances. . . . . . . . . . . . . . . . . . . . . . . . . . . . . . . . . . . . . . . . . . . . . . . . . . . . . .20Journal account resets. . . . . . . . . . . . . . . . . . . . . . . . . . . . . . . . . . . . . . . . . . . . . . . . . . . . . . . . 20Attaching a standard comment to a balance. . . . . . . . . . . . . . . . . . . . . . . . . . . . . . . . . . . . . . . . . 21Attaching a file to a balance. . . . . . . . . . . . . . . . . . . . . . . . . . . . . . . . . . . . . . . . . . . . . . . . . . . . . 22Entering a comment for a balance. . . . . . . . . . . . . . . . . . . . . . . . . . . . . . . . . . . . . . . . . . . . . . . . 23Communicating with the partner via statuses and actions. . . . . . . . . . . . . . . . . . . . . . . . . . . . . . . 24
2 P U B L I CSAP BusinessObjects Intercompany User Guide
Content

Resetting and removing balances. . . . . . . . . . . . . . . . . . . . . . . . . . . . . . . . . . . . . . . . . . . . . . . . .245.5 Freezing a company balance. . . . . . . . . . . . . . . . . . . . . . . . . . . . . . . . . . . . . . . . . . . . . . . . . . . . . . .25
Freezing the balances of a company and its partners. . . . . . . . . . . . . . . . . . . . . . . . . . . . . . . . . . . 26Company-partner relationships. . . . . . . . . . . . . . . . . . . . . . . . . . . . . . . . . . . . . . . . . . . . . . . . . . 26
5.6 Entering invoice amounts. . . . . . . . . . . . . . . . . . . . . . . . . . . . . . . . . . . . . . . . . . . . . . . . . . . . . . . . . 28To enter an invoice. . . . . . . . . . . . . . . . . . . . . . . . . . . . . . . . . . . . . . . . . . . . . . . . . . . . . . . . . . . 28Invoice updates. . . . . . . . . . . . . . . . . . . . . . . . . . . . . . . . . . . . . . . . . . . . . . . . . . . . . . . . . . . . . 29Invoice comments. . . . . . . . . . . . . . . . . . . . . . . . . . . . . . . . . . . . . . . . . . . . . . . . . . . . . . . . . . . 30Invoice standard comments. . . . . . . . . . . . . . . . . . . . . . . . . . . . . . . . . . . . . . . . . . . . . . . . . . . . .31Attaching a file to an invoice. . . . . . . . . . . . . . . . . . . . . . . . . . . . . . . . . . . . . . . . . . . . . . . . . . . . 32Why match invoices?. . . . . . . . . . . . . . . . . . . . . . . . . . . . . . . . . . . . . . . . . . . . . . . . . . . . . . . . . 33
5.7 Tracking progress via emails. . . . . . . . . . . . . . . . . . . . . . . . . . . . . . . . . . . . . . . . . . . . . . . . . . . . . . .37To start or stop receiving detailed emails. . . . . . . . . . . . . . . . . . . . . . . . . . . . . . . . . . . . . . . . . . . 37
5.8 Tracking progress via reports. . . . . . . . . . . . . . . . . . . . . . . . . . . . . . . . . . . . . . . . . . . . . . . . . . . . . . 37Report contents. . . . . . . . . . . . . . . . . . . . . . . . . . . . . . . . . . . . . . . . . . . . . . . . . . . . . . . . . . . . . 38Deleting reports. . . . . . . . . . . . . . . . . . . . . . . . . . . . . . . . . . . . . . . . . . . . . . . . . . . . . . . . . . . . . 40
5.9 Exporting financial data. . . . . . . . . . . . . . . . . . . . . . . . . . . . . . . . . . . . . . . . . . . . . . . . . . . . . . . . . . 40Exporting journals. . . . . . . . . . . . . . . . . . . . . . . . . . . . . . . . . . . . . . . . . . . . . . . . . . . . . . . . . . . 40Exporting balances. . . . . . . . . . . . . . . . . . . . . . . . . . . . . . . . . . . . . . . . . . . . . . . . . . . . . . . . . . . 42Exporting balances to Financial Consolidation. . . . . . . . . . . . . . . . . . . . . . . . . . . . . . . . . . . . . . . . 44Exporting invoices. . . . . . . . . . . . . . . . . . . . . . . . . . . . . . . . . . . . . . . . . . . . . . . . . . . . . . . . . . . 45
6 Administration of the application. . . . . . . . . . . . . . . . . . . . . . . . . . . . . . . . . . . . . . . . . . . . . . . . . 476.1 Managing database connections. . . . . . . . . . . . . . . . . . . . . . . . . . . . . . . . . . . . . . . . . . . . . . . . . . . . 47
Managing database user connections. . . . . . . . . . . . . . . . . . . . . . . . . . . . . . . . . . . . . . . . . . . . . .47Managing connections to different databases. . . . . . . . . . . . . . . . . . . . . . . . . . . . . . . . . . . . . . . . 47Database maintenance. . . . . . . . . . . . . . . . . . . . . . . . . . . . . . . . . . . . . . . . . . . . . . . . . . . . . . . . 48
6.2 Defining the database structure. . . . . . . . . . . . . . . . . . . . . . . . . . . . . . . . . . . . . . . . . . . . . . . . . . . . 48Starting and stopping the reconciliation process. . . . . . . . . . . . . . . . . . . . . . . . . . . . . . . . . . . . . . 49The database structure. . . . . . . . . . . . . . . . . . . . . . . . . . . . . . . . . . . . . . . . . . . . . . . . . . . . . . . .50Metadata. . . . . . . . . . . . . . . . . . . . . . . . . . . . . . . . . . . . . . . . . . . . . . . . . . . . . . . . . . . . . . . . . . 51Periods. . . . . . . . . . . . . . . . . . . . . . . . . . . . . . . . . . . . . . . . . . . . . . . . . . . . . . . . . . . . . . . . . . . 52Currencies. . . . . . . . . . . . . . . . . . . . . . . . . . . . . . . . . . . . . . . . . . . . . . . . . . . . . . . . . . . . . . . . . 57Company groups. . . . . . . . . . . . . . . . . . . . . . . . . . . . . . . . . . . . . . . . . . . . . . . . . . . . . . . . . . . . 62Companies. . . . . . . . . . . . . . . . . . . . . . . . . . . . . . . . . . . . . . . . . . . . . . . . . . . . . . . . . . . . . . . . 63Users. . . . . . . . . . . . . . . . . . . . . . . . . . . . . . . . . . . . . . . . . . . . . . . . . . . . . . . . . . . . . . . . . . . . 67User groups. . . . . . . . . . . . . . . . . . . . . . . . . . . . . . . . . . . . . . . . . . . . . . . . . . . . . . . . . . . . . . . . 74Account groups. . . . . . . . . . . . . . . . . . . . . . . . . . . . . . . . . . . . . . . . . . . . . . . . . . . . . . . . . . . . . 75Materiality values. . . . . . . . . . . . . . . . . . . . . . . . . . . . . . . . . . . . . . . . . . . . . . . . . . . . . . . . . . . . 79Journal accounts. . . . . . . . . . . . . . . . . . . . . . . . . . . . . . . . . . . . . . . . . . . . . . . . . . . . . . . . . . . . 80Accounts. . . . . . . . . . . . . . . . . . . . . . . . . . . . . . . . . . . . . . . . . . . . . . . . . . . . . . . . . . . . . . . . . . 82Standard comments. . . . . . . . . . . . . . . . . . . . . . . . . . . . . . . . . . . . . . . . . . . . . . . . . . . . . . . . . .90
SAP BusinessObjects Intercompany User GuideContent P U B L I C 3

Forced agreements. . . . . . . . . . . . . . . . . . . . . . . . . . . . . . . . . . . . . . . . . . . . . . . . . . . . . . . . . . . 91Templates for data import and export. . . . . . . . . . . . . . . . . . . . . . . . . . . . . . . . . . . . . . . . . . . . . 95Importing data. . . . . . . . . . . . . . . . . . . . . . . . . . . . . . . . . . . . . . . . . . . . . . . . . . . . . . . . . . . . . 121Exporting metadata. . . . . . . . . . . . . . . . . . . . . . . . . . . . . . . . . . . . . . . . . . . . . . . . . . . . . . . . . . 131Consulting import and export results. . . . . . . . . . . . . . . . . . . . . . . . . . . . . . . . . . . . . . . . . . . . . 135
6.3 General administrative tasks. . . . . . . . . . . . . . . . . . . . . . . . . . . . . . . . . . . . . . . . . . . . . . . . . . . . . . 135Freezing and unfreezing company balances. . . . . . . . . . . . . . . . . . . . . . . . . . . . . . . . . . . . . . . . .135Invoice matching. . . . . . . . . . . . . . . . . . . . . . . . . . . . . . . . . . . . . . . . . . . . . . . . . . . . . . . . . . . .138Email. . . . . . . . . . . . . . . . . . . . . . . . . . . . . . . . . . . . . . . . . . . . . . . . . . . . . . . . . . . . . . . . . . . . 143Statuses. . . . . . . . . . . . . . . . . . . . . . . . . . . . . . . . . . . . . . . . . . . . . . . . . . . . . . . . . . . . . . . . . .147Reconciliations. . . . . . . . . . . . . . . . . . . . . . . . . . . . . . . . . . . . . . . . . . . . . . . . . . . . . . . . . . . . . 152Difference calculation type. . . . . . . . . . . . . . . . . . . . . . . . . . . . . . . . . . . . . . . . . . . . . . . . . . . . .153Categories. . . . . . . . . . . . . . . . . . . . . . . . . . . . . . . . . . . . . . . . . . . . . . . . . . . . . . . . . . . . . . . . 154Data entry period. . . . . . . . . . . . . . . . . . . . . . . . . . . . . . . . . . . . . . . . . . . . . . . . . . . . . . . . . . . 154Audit ID. . . . . . . . . . . . . . . . . . . . . . . . . . . . . . . . . . . . . . . . . . . . . . . . . . . . . . . . . . . . . . . . . . 155Default flow. . . . . . . . . . . . . . . . . . . . . . . . . . . . . . . . . . . . . . . . . . . . . . . . . . . . . . . . . . . . . . . 155Reports. . . . . . . . . . . . . . . . . . . . . . . . . . . . . . . . . . . . . . . . . . . . . . . . . . . . . . . . . . . . . . . . . . 156Purging balances and invoices. . . . . . . . . . . . . . . . . . . . . . . . . . . . . . . . . . . . . . . . . . . . . . . . . . 160Balance and invoice interface display. . . . . . . . . . . . . . . . . . . . . . . . . . . . . . . . . . . . . . . . . . . . . 161Deleting invoices by company, parent or child account. . . . . . . . . . . . . . . . . . . . . . . . . . . . . . . . . 163Decimals in balances. . . . . . . . . . . . . . . . . . . . . . . . . . . . . . . . . . . . . . . . . . . . . . . . . . . . . . . . . 164Archiving balances. . . . . . . . . . . . . . . . . . . . . . . . . . . . . . . . . . . . . . . . . . . . . . . . . . . . . . . . . . 165The application login page text. . . . . . . . . . . . . . . . . . . . . . . . . . . . . . . . . . . . . . . . . . . . . . . . . . 166Digit grouping symbols. . . . . . . . . . . . . . . . . . . . . . . . . . . . . . . . . . . . . . . . . . . . . . . . . . . . . . . 166
7 Glossary. . . . . . . . . . . . . . . . . . . . . . . . . . . . . . . . . . . . . . . . . . . . . . . . . . . . . . . . . . . . . . . . . . . 168
4 P U B L I CSAP BusinessObjects Intercompany User Guide
Content

1 Document History
The following table provides an overview on the most important document changes in this documentation:
Table 1:
Version Date Description
1.00 January 2009 First version
1.01 September 2009 Updates for Support Package 06:
● Added information on importing metadata from SAP BusinessObjects Financial Consolidation.
● The To authorize the use of invoices topic explains the function of the Balance Update By Invoice Only in the Administration invoice settings.
● Removed references to data sources from the topic on Setting the connection to SAP BusinessObjects Financial Consolidation.
1.02 March 2009 ● Administrators can initialize a new period with data carried forward from a previous period. See Reusing data from a previous period in a new period.
● Administrators can import account flows from SAP BusinessObjects Financial Consolidation. See Account Flows.
● Administrators can start and stop email delivery. See Email delivery control.● You can now define the page orientation of a report. See To build a report.● Administrators can activate and deactivate accounts. See Deactivating or
activating an account.●
1.03 January 2011 Some columns of information in the user and account import files must use the English terms. See the Files for importing users and accounts section for more information.
Related Information
Importing metadata from SAP BusinessObjects Financial Consolidation [page 125]To authorize the use of invoices [page 142]Setting the connection to SAP BusinessObjects Financial Consolidation [page 105]Account flows [page 89]Reusing data from a previous period in a new period [page 131]Email delivery control [page 146]To build a report [page 39]Deactivating or activating an account [page 89]Files for importing users and accounts [page 123]
SAP BusinessObjects Intercompany User GuideDocument History P U B L I C 5

2 Introduction to SAP BusinessObjects Intercompany
SAP BusinessObjects Intercompany is a web application that enables you to manage the reconciliation process.
In the application, reconciliations are dealt with as follows:
● Peer-to-peer reconciliations are in real time. The head office does not validate peer-to-peer reconciliations; only the companies that perform the transactions are involved in reconciling the balances.
● Adjustments are made when necessary.● The head office ensures that the reconciliation process is trouble free, and acts as referee when differences
remain.● Amounts are integrated in the consolidation packages.
The reconciliation process works as follows:
● The Administrator configures the reconciliation process by configuring the database and connections, and then starts the process.
● Users of all profiles log in to the application to perform specific tasks in the reconciliation process.● At the end of the reconciliation process, the Administrator runs a forced agreement, then freezes balances.● Users then export the balance amounts and journals.
2.1 Introduction to the documentation
The user documentation offers general and in-depth information on the application.
There are four types of user:
● The Administrator defines the database objects.● Interactive Users add, modify, and delete balances and invoices, perform invoice matching, import and export
balances and invoices, and create reports and freeze companies.● Power Users monitor the progress of the companies within their scope of responsibility. Power users can also
export balances and invoices, build reports, and freeze and unfreeze companies.● View Users consult data and monitor how balances are progressing. View Users can also export balances and
invoices and build reports.
6 P U B L I CSAP BusinessObjects Intercompany User Guide
Introduction to SAP BusinessObjects Intercompany

Related Information
User profiles [page 68]
2.2 If you encounter a problem
If you do not find the answers you need in the documentation, inform the internal corporate correspondent. This correspondent groups questions and presents them to SAP Business Objects software support.
The correspondent must be able to provide the following information:
● The software version installed on your workstation● The computer environment used, for example, Web, Citrix, or Windows● The type of database and the version, for example, Oracle, MSSQL Server, or IBM DB2● The server and client workstation operating systems● The network connection, such as RNIS, WAN, or LAN, and any other software components used, such as
Internet Explorer, IIS, or Apache● The exact content of the messages that appeared on your screen when the error occurred● A description of what occurred and what action you were performing at the time● How you tried to solve the problem
Do not hesitate to send the correspondent any screen shots, reports, error messages, or any other element to help solve the problem.
SAP BusinessObjects Intercompany User GuideIntroduction to SAP BusinessObjects Intercompany P U B L I C 7

3 General interface information
The application offers shortcuts and links to help you move easily and quickly between tabs and pages.
3.1 Languages
The Administrator assigns a default language that affects all text components of the web site pages, for example, tabs, commands, windows, and online help, and all of the names and descriptions stored in the database. Users can change the language.
3.1.1 To select the application language
Procedure
1. Click the Language link.
The Language dialog box appears.2. Click the language you want to apply.
The dialog box closes and the web page text is changed to the language you selected.
3.2 Saving changes in the database
Once you have created an object, the Update button replaces the Create button and is used to save any changes you make including:
● changes made to an object● balances entered
3.3 Navigation bar
The navigation bar consist of the following tabs that correspond to the main functions in the application:
● Balances, for all users● Import/Export, for Administrators and Interactive Users
8 P U B L I CSAP BusinessObjects Intercompany User Guide
General interface information

● Reports, for all users● Administration, for Administrators
3.4 Navigation in list boxes
In the selection lists, the following icons enable you to:
Table 2:
Return to the first page
Return to the previous page
Go to the next page
Go to the last page
SAP BusinessObjects Intercompany User GuideGeneral interface information P U B L I C 9

4 General user tasks
This section explains how to:
● log in to the application● change your user information● delete objects● work with filters
4.1 Logging in to the application
Once the Administrator has started the reconciliation process, users log in to the application using the user name and password assigned to them by the Administrator.
NoteIf the reconciliation process is not running, you cannot connect to the application.
NoteThe Administrator assigns a language to each user. When a user connects to the application, the application opens in the language that has been assigned to that particular user. Users can change the language.
Related Information
Languages [page 8]
4.1.1 To log in to the application
Procedure
1. Enter the Internet address provided by the Administrator in your web browser.2. Enter your user name and password.
NoteThe password is case sensitive, however the user name is not, for example you can enter it indiscriminately in uppercase or lowercase letters.
10 P U B L I CSAP BusinessObjects Intercompany User Guide
General user tasks
3. Click Log On.
NoteIf you have problems connecting, contact your Administrator.
○ If this is not the first time you have logged in, the Balances tab appears displaying the balances.○ If you are logging in for the first time, you need to change your password and then select a period.
4. Select the company on which you want to work by clicking to the right of the current company name.
NoteTo log out of the application, click the Log off link.
4.2 Changing your user information
In Administration Your Profile , users can change the following information about themselves:
● Name● Password● Email address● Phone and fax numbers● Address● Some users can also choose whether they want to receive detailed emails.
Users also have the following options:
● store the last balances page used in the memory.● display the code and description of objects displayed in the balances page.
Related Information
Tracking progress via emails [page 37]
4.3 Filters
Users create filters to customize the information on a page. At any time these restrictions can be deactivated so that all application objects appear on screen.
A Balance page display filter for a specific company can be saved and affects the Balance page view every time a user opens the page, until the filter is deactivated. An ad hoc filter uses the Search options when available to limit the informations shown on a page.
SAP BusinessObjects Intercompany User GuideGeneral user tasks P U B L I C 11

The filter lasts only as long as the user views the page before changing to another page.
4.3.1 Balances page display filters
Users create filters to customize the options displayed in the Balances pages. At any time the restrictions can be deactivated so that all application objects appear on screen.
NoteThe filters defined are applied to the current company and period.
NoteWhen the filters are activated, Filtered appears to the right of the Filter button on the balances page.
Related Information
Account groups [page 75]
4.3.1.1 To set a Balances page filter
Procedure
1. Click Filter in the navigation bar.
2. To filter by a Status in currency pages and when entering child amounts, click and select a status.3. To filter by a Group Status in partner and parent account pages, select one of the following:
○ Agreed○ Not Agreed
4. To filter by a Matching Difference in the Group currency, select >= or <= and enter a threshold amount.
5. To set the Partner with which the current company performed the transaction, click and select a company code.
6. To filter by accounts affected by the transaction:
a. Click .b. Activate the accounts.c. Click Select.
7. To filter by an Account Group, click and select a group from the list.
12 P U B L I CSAP BusinessObjects Intercompany User Guide
General user tasks

8. To filter by the transaction currency, click and select the currency from the list.9. To filter by a partner's timestamp, for example when the partner last made changes to the balances in
question, activate one of the following:
○ Start/FinishSet the start and finish date and time.
○ Last HoursType the number of timestamp hours in a 24 hour period.
10. Click Apply.
4.3.1.2 To store the last balances page used in the memory
Procedure
1. In the Administration tab, click Your Profile.2. Activate Remember Last Balance Page.3. Click Update.
4.3.1.3 To activate code and description display in the Balances page navigation row
Context
To ensure that the navigation row is not too long, you can choose to display only the codes.
Procedure
1. In the Administration tab, click Your Profile.2. From the Balance Page Navigation Option list, select one of the following:
○ Show Code○ Show Description○ Show Both
3. Click Update.
SAP BusinessObjects Intercompany User GuideGeneral user tasks P U B L I C 13

4.3.1.4 To remove a filter and display all objects in the Balances page
Procedure
1. Click Filter in the navigation bar.2. Click Clear.
The filter is removed and all objects appear in the balances page.
4.3.1.5 Toggling between filters
To toggle filters in the balances page click the Toggle Filters link in the navigation bar.
NoteIf this link is not displayed, it means that no filters have been defined in the System Filter page.
4.3.2 Ad hoc page filters
Use ad hoc filters to select the objects you want to display in the current page. These filters are not stored in the memory.
For example, the user changes the page parameters and then navigates through the company pages, making changes and then saving the changes.
The filter is stored in the memory. When the user goes to Administration Metadata Currencies , the filter is gone.
4.3.2.1 To create an ad hoc filter
Procedure
1. In a page with the Search feature, select the criteria from the list or enter text in the relevant text boxes.
TipIf there is a long list of companies, and you want to find a company quickly, enter the first letters of the company's name.
2. Click Search.
14 P U B L I CSAP BusinessObjects Intercompany User Guide
General user tasks

5 The reconciliation process
During the reconciliation process, different users perform different tasks:
● Administrators import balances.● Interactive Users enter data and load the balances.● Power Users monitor the progress of the companies in their scope of responsibility by consulting balances
and using reports. Power also act as referees when two companies do not agree, for example by adding comments, and can freeze company balances.
● View Users consult data and monitor how balances are progressing by consulting balances and reports.
Related Information
User profiles [page 68]Balances pages [page 16]Importing data [page 121]
5.1 Starting the reconciliation process
Once the Administrator has configured the database, the reconciliation process can start.
NoteOnce the process is started, the Administrator cannot make any changes to the database structure.
The Administrator starts the process in two ways:
● automatically● manually
Users then have access to the database and are able to enter their data.
Related Information
Starting and stopping the reconciliation process [page 49]
SAP BusinessObjects Intercompany User GuideThe reconciliation process P U B L I C 15

5.2 Balances pages
There are two ways of loading balances:
● Manual data entry, which involves creating and entering an amount for a balance by the Administrator or Interactive User
● Import from a file by the Administrator or Interactive User
A balance is an amount entered in the database.
There are four types of pages:
● Detail by partners● Detail by parent accounts● Detail by transaction currencies● Detail by child accounts
You access these pages via the Balances tab.
The column headers and order are defined by the Administrator.
Related Information
Importing data [page 121]Entering amounts in balances [page 20]
5.2.1 Detail by partners page
The Detail by partners page offers an overview of how the current company and its partners are progressing with the reconciliation.
The Detail by partners page can include:
● the Partner Status column, which indicates the status of the relationship between your company and the partner. The status is either Agreed or Not Agreed.
● the Group Difference column, which indicates differences in User Group currency.● the Contact column. Click the envelope icon to contact the company.● the Balance Count column, which indicates the number of amounts entered.● the Company Timestamp column, which indicates when the balances were last changed.● the Their Timestamp column, which indicates when the partner's balances were last changed.
16 P U B L I CSAP BusinessObjects Intercompany User Guide
The reconciliation process

5.2.2 Detail by parent accounts page
The Detail by parent accounts page offers an overview of how the current company and the selected partner are progressing with the reconciliation for all of the accounts.
The Detail by parent accounts page can include:
● the Group Status column, which indicates the status of a particular parent account: this is either agreed or not agreed.
● the Group Amount column, which indicates amounts in User Group currency.● the Balance Count column, which indicates the number of amounts entered.● the Timestamp column, which indicates when the balances were last changed.
5.2.3 Detail by transaction currencies page
The Detail by transaction currencies page offers an overview of how the current company and the selected partner are progressing with the reconciliation for the selected account and all the transaction currencies.
The Detail by transaction currencies page can include:
● the Currency Code column, which indicates the transaction currency codes.● the Transaction Status column, which indicates the status of the balance.● the Transaction Amount column, which indicates the amounts expressed in transaction currency.● the Local Amount column, which indicates the amounts expressed in local currency.● the Group Amount column, which indicates the amounts expressed in User Group currency.● the Balance Count column, which indicates the number of amounts entered.● the Standard Comment column● the Comment column● the File column● the Timestamp column
Related Information
Status symbols and descriptions [page 147]
5.2.4 Detail by child accounts page
The Detail by child accounts page enables you to enter or consult amounts. It also displays the breakdown of the balances.
The Detail by child accounts page can include:
● The Side column, indicating the status of the current parent account.
SAP BusinessObjects Intercompany User GuideThe reconciliation process P U B L I C 17

● The Account Code column, which can contain references to SAP BusinessObjects Financial Consolidation account flows.
● The Transaction Amount and Local Amount columns, which enable you to enter balance amounts in transaction and local currency for each child account (depending on the Administrator's choice).
● The Group Amount column, which converts the local or transaction currency amounts, depending on the Administrator's choice, into the User Group currency.
● The Reset Transaction Journal and Reset Local Journal columns, which enable you to define changed amounts as original amounts. These columns are useful for calculating differences stored in the journal accounts.
● The Comment column that can indicate if a comment has been entered.● The File column that can indicate if a file has been attached.
NoteIf there are invoices in the database, the Invoices column appears.
Related Information
Matching invoices [page 153]Status symbols and descriptions [page 147]
5.3 Creating and opening balances
All users can view and export balances; however only Administrators and Interactive Users can import, create and modify balances. The Administrator defines the declaring companies and the periods to which each user has access.
To create or open balances, the Administrator or Interactive User selects the following:
● a declaring companyThe declaring company is the company the current user is working on.
● a periodThe period is the date to which the amounts are linked.
● a partner● an account● a currency
The transaction currency may be imposed by the Administrator. If this is the case, the Administrator or Interactive User must enter all the amounts in the transaction currency chosen by the Administrator.The Administrator or Interactive User can select another currency. If a default transaction currency has been defined by the Administrator, it appears in the Currency field.
When users log in for the first time, they must select a period and the company on which they want to work. The system memorizes the period and company selected for the next time users log in. However, users can change the period and company whenever required if there are several periods and/or companies available.
18 P U B L I CSAP BusinessObjects Intercompany User Guide
The reconciliation process

Related Information
Translating amounts [page 60]
5.3.1 To select a declaring company
Procedure
1. In the navigation bar, click to the right of the current company.2. In the Companies dialog box, select a company.
The balances page for the company appears.
5.3.2 To select a period
Procedure
1. In the navigation bar, click to the right of the current period.2. In the Periods dialog box, select a period.
The balances page for the period appears.
5.3.3 To create or open a balance row
Context
The Add/Access Balance button is only available when the reconciliation process is running.
Procedure
1. In the companies, partners or currencies pages, click Add/Access Balance.
Depending on which type of page you are in, the Partner and Account fields may already be filled in.
SAP BusinessObjects Intercompany User GuideThe reconciliation process P U B L I C 19
NoteIf the Currency field is already filled in, then the Administrator has chosen the transaction currency. You can select another currency to use when entering amounts.
2. Select the required objects.3. Click Create.
5.4 Entering amounts in balances
You enter amounts in the Detail by child accounts page. The Administrator previously defined how Group currency amounts are calculated on the basis of the amounts entered.
NoteCalculations are defined using absolute values; it is important to use the minus (-) sign for negative amounts.
Click Update to save the amounts entered in the database.
NoteIf the Administrator has authorized the use of invoices and activated Invoices Drive Balances in the
Administration Settings Invoice Settings , each time you click Update, a message appears indicating that the balance amounts and the sum of invoices linked to the balances no longer correspond.
Related Information
Detail by child accounts page [page 17]
5.4.1 Journal account resets
If an error is made when entering data, you can enter the correct amount and define it as the original amount. The correct amount is then taken into consideration when the difference is calculated.
When the Administrator has assigned each child account to a journal account, the following columns appear in the currency pages in which amounts are entered:
● Reset Transaction Journal● Reset Local Journal
This column appears when you can enter local currency amounts.
20 P U B L I CSAP BusinessObjects Intercompany User Guide
The reconciliation process

The original amount is the amount stored in the initial accounting system. The amount stored in the journal account, linked to the child account in which data is entered, is the difference between the first and last amounts saved in the database. The difference is called the adjustment amount.
Related Information
Journal accounts [page 80]
5.4.1.1 To reset a transaction journal amount
Procedure
1. In the page for entering amounts, enter the amount to be defined as the original amount in the Transaction Amount column.
2. Activate the Reset Transaction Journal column.3. Click Update.
5.4.2 Attaching a standard comment to a balance
Standard comments are pre-defined by the Administrator. The post-it icon indicates that a standard comment is attached.
To consult a standard comment, in the Comments column click the post-it icon displayed beside the child account with the comment you want to consult.
5.4.2.1 To attach a standard comment
Procedure
1. In the Standard Comment column, click the plus icon displayed beside the child account containing the amount to which you want to add the comment.
2. Select the required standard comment from the list.3. Click OK.4. Click Update.
The post-it icon appears in the Standard Comment column.
SAP BusinessObjects Intercompany User GuideThe reconciliation process P U B L I C 21

5.4.2.2 To delete a standard comment
Procedure
1. In the Standard Comments column, click the post-it icon displayed beside the child account with the comment you want to delete.
2. Select - from the list.3. Click OK.4. Click Update.
5.4.3 Attaching a file to a balance
NoteFiles in HTML format are not allowed.
The paperclip icon indicates that a file is attached.
To consult a file attached to a balance, in the File column click the paperclip icon. The file opens.
5.4.3.1 To attach a file to a balance
Procedure
1. In the File column, click the + icon displayed in the row of the child account to which you want to attach the file.
2. Click Browse.3. In the Choose file dialog box, select the relevant file.4. Click Open.5. Click Attach.
5.4.3.2 To delete an attached file from a balance
Procedure
1. In the File column, click the - icon.2. Click Delete.
22 P U B L I CSAP BusinessObjects Intercompany User Guide
The reconciliation process

5.4.4 Entering a comment for a balance
The Administrators, Interactive User, or Power User can enter a comment for each amount, for example to explain why an amount was entered or provide extra information about a particular balance.
The post-it icon indicates that a comment has been entered by the company and that it can be changed. The declaring company that entered the comment sees this icon.
The post-it icon with a little padlock indicates that a comment has been entered by the company and cannot be changed. The partner sees this icon.
To consult a comment entered for a balance, click a post-it icon displayed beside the child account containing the amount with the comment you want to consult. The dialog box enabling you to consult the comment appears.
NoteComments can be entered depending on the balance states and the setting defined by the Administrator. You can enter comments for certain states.
5.4.4.1 To enter a comment for a balance
Procedure
1. In the Comments column, click the plus icon displayed beside the child account containing the amount to which you want to add the comment.
2. Enter your comment.3. Click OK.4. In the balance page, click Update.
The post-it icon appears in the Comments column of the Detail by Child Accounts page.
5.4.4.2 To delete a comment entered for a balance
Procedure
1. In the Comments column, click the post-it icon displayed beside the child account with the comment you want to delete.
2. Delete the comment.3. Click OK.4. In the balance page, click Update.
The post-it icon disappears from the Comments column in the Detail by Child Accounts page.
SAP BusinessObjects Intercompany User GuideThe reconciliation process P U B L I C 23

5.4.5 Communicating with the partner via statuses and actions
Statuses and actions enable companies to communicate with each other regarding how the balances are progressing.
When you select a status, a dialog box appears and you select the action you want to perform.
For example, the Canadian Food company has requested the balances be reopened in order to change an amount. The UK Snacks company responds to this request. The UK Snacks user clicks the status. In the dialog box, UK Snacks accepts the balances be reopened so that Canadian Food can change their amount. The changes are saved. Another status replaces the first to indicate that UK Snacks accepted the request to reopen the balance.
If the necessary settings have been configured by the Administrator, each status change generates an automatic email to the company users enabling them to keep track of progress.
Related Information
Statuses and actions [page 150]Matching invoices [page 153]User Group statuses [page 148]Status symbols and descriptions [page 147]Tracking progress via emails [page 37]
5.4.5.1 To make a request or respond to a request
Procedure
1. In the page used for entering balances, click the company status icon.2. In the Action section of the Change Event panel, click the link corresponding to your response to the request.3. In the page for entering balances, click Update.
The previous status is replaced by a new status.
5.4.6 Resetting and removing balances
Certain users are authorized to reset or delete amounts, including:
● Administrators - authorized to change any balance in any company.● Interactive Users - authorized to change only the balances belonging to the companies to which they have
access.
24 P U B L I CSAP BusinessObjects Intercompany User Guide
The reconciliation process
NoteThe balances of frozen companies cannot be reset or removed.
Deleting and resetting a company's data is performed in a single action. This has the following impact:
● If the partners have not loaded the balances, all the amounts and balance rows are deleted.● If one or more partners have already loaded balances, only the amounts loaded by the declaring company are
reset. However, the balances and other amounts remain the same.
NoteThis action is performed when the reconciliation process is running.
Related Information
Authorizing Power Users to freeze companies with unmatched balances [page 136]
5.4.6.1 To reset or remove company balances
Procedure
1. In the Administration tab, select Companies under Metadata.2. Click the link for the company on which you want to perform the action.3. Click Reset/Remove Balances.
A confirmation message appears.4. Click OK.
5.5 Freezing a company balance
Once balances are frozen, no changes can be made to them.
Declaring companies are responsible for deciding when the balances are to be frozen once all of the work is complete and when the partners can no longer make any changes.
By default, any users, except View Users, can freeze their company balances if they have been agreed. However, if the Administrator defined the necessary configuration before starting the process, users can also freeze all their company balances whether they are agreed or not.
SAP BusinessObjects Intercompany User GuideThe reconciliation process P U B L I C 25

5.5.1 Freezing the balances of a company and its partners
If a balance is frozen, neither the declaring company nor any of its partners can change it.
NoteIf an error has been made, only Administrators can unfreeze company balances, unless the Administrator gives Power Users the right to freeze companies.
NoteIf the Administrator authorizes companies to freeze balances only when they have been agreed, the companies can freeze balances only in the Company Agreed To Differ and Partner Agreed To Differ states.
Related Information
Freezing a company balance [page 25]Authorizing Power Users to freeze companies with unmatched balances [page 136]Statuses [page 147]
5.5.1.1 To freeze the balances of a company and of all its partners
Procedure
1. Do one of the following:
○ Click the Balances tab.The Detail by partners page appears.
○ Select Administration Companies > [company to be frozen].The selected company's page appears.
2. Click Freeze Company.
A confirmation message appears.3. Click OK.
5.5.2 Company-partner relationships
If a balance is frozen, neither the declaring company nor its partner can change it.
26 P U B L I CSAP BusinessObjects Intercompany User Guide
The reconciliation process

For example, if a user freezes the balances belonging to company 01 and its partner 04, no further balances can be added for either company. On the other hand, this does not affect the balances entered relating to company 01 by its partner 08. Balances can still be added for both companies.
To freeze a company-partner pair, both companies must freeze their balances.
In another example, the US Mag company has frozen the company-partner pair, so the snowflake icon appears at the end of its line in the balance table. However, there is no icon in front of the US Music company on the balances page, which means that its balances are not frozen. As a result, the balances for the company-partner pair are only partially frozen.
The snowflake icon in front of the company code and name on the Balances page indicates that the US Music company has also frozen the company-partner pair. As a result, the balances for the company-partner pair are now frozen.
NoteYou must freeze balances before exporting them. If the balances for a company-partner pair have only been frozen by one company, only the balances belonging to that company are exported. The balances belonging to the company which did not perform a freeze operation are not exported.
5.5.2.1 To freeze/unfreeze the relationship between a company and a single partner
Procedure
1. Click the Balances tab.2. Click the required partner.
The parent account page appears.3. Click Freeze Relationship or Unfreeze Relationship.
A confirmation dialog box appears.4. Click OK.
5.5.2.2 To freeze/unfreeze the balances of a company against all its partners
Procedure
1. Click the Balances tab.2. Click Freeze Company or Unfreeze Company.
A confirmation dialog box appears.
SAP BusinessObjects Intercompany User GuideThe reconciliation process P U B L I C 27
3. Click OK.
NoteIf a relationship has been frozen by a company, and you then try to freeze the company, the partner relationship remains frozen.
5.6 Entering invoice amounts
All users can view and export invoices; however only Administrators and Interactive Users can import, create, delete, and modify invoices.
If the invoice reference already exists, the Administrators and Interactive Users can:
● replace the existing amount● add the new amount to the existing amount
If the Administrator previously specified that the creation of invoices would generate balances containing the sum of the invoice amounts, Administrators and Interactive Users can also automatically recalculate the balance based on the invoice amount.
When Administrators and Interactive Users import and manually enter invoices, the balances created contain amounts which are the sums of the invoices linked to the balances.
The balances are created for the same company, partner, transaction currency, and account as the corresponding invoices. You can access the invoices by navigating through the balances pages.
Related Information
Invoice matching [page 138]
5.6.1 To enter an invoice
Procedure
1. In the Detail by child accounts page used for entering balances, click in the invoice column.
NoteThe Invoice label can be customized. Another term may therefore appear here.
2. Click Add Invoice.
3. Click to add an invoice to another child account (other than the one open) in the Account field.
28 P U B L I CSAP BusinessObjects Intercompany User Guide
The reconciliation process

4. Enter the following information in the relevant fields:○ the invoice reference○ the invoice amount in the transaction currency○ the invoice amount in the local currency
5. Select Override or Aggregate.6. If you want the balance to be recalculated based on the invoice amount, select the Update Balance option.
NoteThis option only appears if the option has been selected in the Global Parameters menu.
7. Click Create.
The new invoice appears in the list.
5.6.2 Invoice updates
Once an invoice has been entered manually or imported, an Administrators or Interactive User can change the following information:
● the invoice reference● the child account to which it is assigned● the transaction amount● the local amount
For each invoice, the Administrator, Interactive User, or Power User can add, modify, or delete:
● a comment● a standard comment● a file
NoteIf the invoice is included in an invoice group, it cannot be changed and the link to the group is displayed.
If the Administrator has chosen to activate them, the fields below are also available to provide additional information on the invoices.
● The Invoice Group ID field specifies the group ID reference associated to the invoice. The Invoice Group ID field is not an editable field as it is system generated.
NoteThe Invoice Group ID field is only displayed if Invoice Level Matching has been activated.
● The following text type fields: Invoice Text 1, Invoice Text 2, Invoice Text 3, Invoice Text 4, Invoice Text 5.If the Administrator predefined the Invoice Text 1 and Invoice Text 2 fields, the user can use the list to select the predefined text required.
● The following amount type fields: Invoice Amount 1, Invoice Amount 2, Invoice Amount 3.● The following date type fields: Date Amount 1, Date Amount 2, Date Amount,3. A calendar is available beside
each date type field.
SAP BusinessObjects Intercompany User GuideThe reconciliation process P U B L I C 29

Related Information
Additional fields for invoices [page 140]Deleting invoices by company, parent or child account [page 163]Attaching a file to an invoice [page 32]Invoice comments [page 30]Balance and invoice interface display [page 161]
5.6.3 Invoice comments
Use a comment in an invoice to explain, for example, why an amount was entered or to provide extra information about a particular invoice.
The post-it icon indicates that a comment has been entered by a company and can be changed. The declaring company that entered the comment sees this icon.
The post-it icon with a little padlock indicates that a comment has been entered by a company and cannot be changed. The partner can see the icon.
5.6.3.1 To enter a comment for an invoice
Procedure
1. Select the Balances tab.2. Navigate through the balances to the Detail by child accounts page.3. In the Invoice Reference column, click the invoice to which you want to add a comment.
4. In the invoice edit page, click next to Comment.5. In the Comment field, enter your comment.6. Click OK.7. In the invoice page, click Update.
The post-it icon appears in the Comments column in the Invoices page.
5.6.3.2 To consult a comment entered for an invoice
Procedure
1. Select the Balances tab.2. Navigate through the balances to the Invoices page.
30 P U B L I CSAP BusinessObjects Intercompany User Guide
The reconciliation process
3. In the Invoice Reference column, select a reference.4. In the invoice edit page, click the post-it icon for the invoice whose comment you want to consult.
The comment appears.
5.6.3.3 To delete a comment entered for an invoice
Procedure
1. Select the Balances tab.2. Navigate through the balances to the Invoices page.3. In the Invoice Reference column, click the invoice whose comment you want to delete .4. In the invoice edit page, click the post-it icon.5. Delete the text in the text box.6. Click OK.7. In the invoice edit page, click Update.
The post-it icon disappears from the Comments field in the Invoices page.
5.6.4 Invoice standard comments
You can select a standard comment for each amount in an invoice. Comments are pre-defined by the Administrator.
Related Information
Freezing and unfreezing company balances [page 135]
5.6.4.1 To attach a standard comment to an invoice
Procedure
1. In the Invoices page, click the invoice to which you want to attach a standard comment.
2. In the invoice edit page, click next to Standard Comment.3. Select the required standard comment from the list.4. Click OK.5. In the invoice page, click Update.
SAP BusinessObjects Intercompany User GuideThe reconciliation process P U B L I C 31

The standard comment text appears in the Standard Comment column.
5.6.4.2 To delete a standard comment from an invoice
Procedure
1. In the Invoices page, click the invoice in which you want to delete a standard comment.
2. In the invoice edit page, click next to Standard Comment.3. Select - from the list.4. Click OK, then Update.
The standard comment text disappears from the Standard Comment column.
5.6.5 Attaching a file to an invoice
NoteFiles in HTML format are not allowed.
The paperclip icon indicates that a file is attached.
To consult a file attached to an invoice, in the File column of the Invoices for page, click the paperclip icon. The file opens.
5.6.5.1 To attach a file to an invoice
Procedure
1. In the Invoices page, click the invoice to which you want to attach a file.
2. In the invoice edit page, click next to File.3. Click Browse.4. In the Choose File dialog box, select the relevant file.5. Click Open.6. Click Attach.
32 P U B L I CSAP BusinessObjects Intercompany User Guide
The reconciliation process

5.6.5.2 To delete a file from an invoice
Procedure
1. In the File field of the Invoices page, click .2. Click Delete.
5.6.6 Why match invoices?
If the Administrator has authorized the use of invoices, an Administrator or Interactive User can match company invoices with those of the partner, making it easier to match the balances declared.
Matching invoices is not compulsory. However, it does enable you to understand why differences exist between the balances declared in the declaring company's accounts and those declared in the partner's accounts.
If the necessary settings have been configured by the Administrator, invoices can also be matched using the standard comments.
Related Information
Matching invoices [page 153]
5.6.6.1 Auto matching invoices
When importing invoices, the declaring company's invoices are compared to the partner's. The invoices matched automatically:
● have the same transaction reference● contain the same transaction amount
You can consult invoices via the data entry page for child accounts.
● The following icon tells you that the total of the invoices is equal to the balance in the child account:
● The following icon tells you that the total of the invoices differs from the balance in the child account:
SAP BusinessObjects Intercompany User GuideThe reconciliation process P U B L I C 33

5.6.6.1.1 To consult invoices for a currency transaction
Procedure
1. Select the Balances tab.2. Navigate through the balances to the Detail by child accounts page.3. In the Invoices column, click one of the following icons:
The Invoices page appears.
NoteIn this page, you can:
○ consult comments entered by the partner○ sort the Invoice Reference, Transaction Amount, and Local Amount columns
NoteCancel the sort by clicking the following icon:
○ delete the invoices○ display and hide the additional columns
Related Information
Detail by child accounts page [page 17]Deleting invoices by company, parent or child account [page 163]
5.6.6.2 Matching invoices manually
If some invoices were not matched during the automatic matching process being run, the Administrator or Interactive User can manually match the remaining invoices.
NoteEven if all of the invoices are not matched, this does not block the reconciliation process.
Manually matching the declaring company's invoices with those of the partner creates an invoice group.
34 P U B L I CSAP BusinessObjects Intercompany User Guide
The reconciliation process
NoteWhen performing this task, you can find that one declaring company's invoice corresponds to more than one of the partner's invoices or vice versa.
5.6.6.2.1 To match invoices manually
Procedure
1. Select the Balances tab.2. Navigate through the balances to the Detail by child accounts page.3. Click Match Invoices.
The Invoice Match page appears.
NoteIn this page, you can:
○ consult comments entered by the partner○ sort the Invoice Reference, Transaction Amount, and Local Amount columns
NoteCancel the sort by clicking the following icon:
○ delete the invoices○ display and hide the additional columns
The green check mark icon appears next to the invoices that have been matched. The red X icon appears next to the invoices that have not been matched. The invoices that do not have any particular status are unassigned.
4. Click the following icon corresponding to the invoice you want to match:
The Invoice Group page appears.
If an invoice group has not already been created, the Create button becomes available.5. Click Create.
NoteTo add other declaring company invoices or partner invoices to the group, click Modify Members.
6. Do one of the following:
SAP BusinessObjects Intercompany User GuideThe reconciliation process P U B L I C 35

○ In the Assigned column, select the invoices required.○ Click Assign All Ourside or Assign All Theirside to assign all the invoices for the company or the partner.○ To unassign all invoices to either the company or partner, click Un-Assign All Ourside or Un-Assign All
Theirside.7. Click Update.
If all of the invoice amounts have been matched, the green check mark icon appears next to the invoice group.
If all of the invoice amounts have not been matched, the red X icon appears next to the invoice group. You are able to see that there is still a variance. The status of the parent accounts is also unmatched.
NoteIf you did not select a partner invoice, the invoice group has a red X icon and the status of the parent accounts is also unmatched.
8. To match invoices using standard comments and apply the same standard comment to all the invoices in the group, in the Standard Comment column, click the post-it icon for your company.
9. In the dialog box used to select the standard comment, select the standard comment required.10. Click Close.
All the invoices belonging to your company now have the same standard comment. The partner must now perform the same operation and select the same standard comment for the invoices to be matched.
Related Information
Deleting invoices by company, parent or child account [page 163]
5.6.6.3 Matching invoices using standard comments
If activated by the Administrator, invoices can also be matched using their standard comments. To match the invoices, the same standard comment must be applied to all the invoices making up the invoice group.
If different standard comments are used for the invoices of the declaring company and those belonging to the partner, the group of invoices is considered as unmatched.
If the same standard comments are used for the invoices of the declaring company and those belonging to the partner, the group of invoices is considered as matched, even if differences exist.
Related Information
To match invoices manually [page 35]
36 P U B L I CSAP BusinessObjects Intercompany User Guide
The reconciliation process

5.7 Tracking progress via emails
To keep track of the progress made regarding the balances:
● Interactive Users and Administrators receive summary emails which provide a condensed report of the balance states.
● Any users authorized by the Administrator to receive detailed emails can decide whether or not they want to receive emails when connected to the application.Detailed emails inform the user of events such as the partner requesting a balance be removed. Thus informed, the user can connect to the application and respond to the partner by performing an action.
Related Information
Automatic detailed emails [page 143]
5.7.1 To start or stop receiving detailed emails
Procedure
1. In the Administration tab, click the Your Profile link.2. In the Your Profile page, activate or deactivate the Receive Detailed Emails option as required.
NoteIf you do not have this option, you have been assigned a user profile that is not authorized to receive detailed emails.
3. Click Update.
5.8 Tracking progress via reports
In order to analyze the differences and monitor the reconciliation process, all users can generate reports.
NoteThe reports available depend on the configuration defined by the user.
SAP BusinessObjects Intercompany User GuideThe reconciliation process P U B L I C 37

Related Information
Reports [page 156]
5.8.1 Report contents
You can define reports based on the following criteria:
Table 3:
Report component Description
Period The current period is selected by default. However, you can select another period.
Company The current company is selected by default. However, you can select another company.
Partner The partner with which the selected company performed transactions.
Transaction currency
Accounts Accounts affected by the transaction
Account group
Status A status is used in currency pages and in pages for entering amounts for child accounts
Group status The group status is used in partner pages and parent account pages
Reporting company
Company Group
Partner Company Group
Excluded Company Group In this case, the amounts assigned to the company's company groups are all displayed except those assigned to the company group selected in the Excluded Company Group field.
Excluded Partner Company Group In this case, the amounts assigned to the partner's company groups are all displayed except those assigned to the company group selected in the Excluded Partner Company Group field.
Difference Difference is for report types that have a calculated difference.
38 P U B L I CSAP BusinessObjects Intercompany User Guide
The reconciliation process

Report component Description
Start
Finish
Start and Finish define the period in which the balances were changed.
Format The format of the reports can be RPT, Excel, HTML, Word, Text, or PDF.
NoteThe Difference Analysis report also contains a column that displays the standard comments linked to the child account of the declaring company.
You can specify how information should be displayed in the Difference Analysis report, filtering by:
● account code● transaction currency● status
Related Information
Account groups [page 75]
5.8.1.1 To build a report
Procedure
1. In the Reports tab, click the link for the report type you want to display.2. Select the report contents.3. From the Format list, select the format you want to use.4. Select from the following page orientations:
○ Portrait ○ Landscape
5. Click Build.
The Cancel button appears enabling you to interrupt the process if necessary. Once the report has been built, a link appears at the bottom of the page.
6. Click the link.
The report appears.
SAP BusinessObjects Intercompany User GuideThe reconciliation process P U B L I C 39

5.8.2 Deleting reports
Users can delete the reports they have built.
The Administrator can also delete reports by date.
Related Information
To delete reports [page 160]
5.8.2.1 To delete a report
Procedure
1. Select the Reports tab.
All the reports that have been created for each report type are listed.2. Click the red X icon to the right of the report to delete the report.
A confirmation message appears.3. Click OK.
5.9 Exporting financial data
All users can export balance, invoice, and journal data. Only the Administrator can export companies, accounts, users, groups, and user group and group company relationships. Information on this type of export is described in the section called Exporting metadata.
Related Information
Exporting metadata [page 131]
5.9.1 Exporting journals
If the Administrator authorized the use of journal accounts, any user can export the amounts stored in the journal account to files. The file can then be imported into the source accounting system.
40 P U B L I CSAP BusinessObjects Intercompany User Guide
The reconciliation process

NoteYou must freeze a company's balances before you can export them.
Journal accounts are exported via an Administrator-defined template.
The export operation automatically generates a file. When the export is complete, the Summary page displays the results of the export.
Related Information
Consulting export results [page 134]Journal accounts [page 80]
5.9.1.1 To export journals
Procedure
1. In the Import/Export tab under Export Data, click Export Journals.2. From the Template list, select the template you want to use.3. To specify which companies' journal amounts are to be exported, activate Use Company Filter.
The Company and Filter Criteria (Company Code) fields appears.
4. Click to select companies.
TipIf you are exporting one company, or companies with a code that start with the same character, you can type the codes in the Filter Criteria field.
5. Click Export.
The file is exported and the Summary page appears displaying the results of the export.
Related Information
Consulting export results [page 134]
SAP BusinessObjects Intercompany User GuideThe reconciliation process P U B L I C 41

5.9.2 Exporting balances
Any user can export the amounts stored in the application database to a file that can then be imported into the consolidation system.
The types of balance export files are:
● Balances for general balance export templatesBalance exports use only the amounts stored in frozen child accounts.
● Subtotal Balances for subtotal balance export templatesSubtotal Balance exports use only the amounts stored in frozen parent accounts.
● Analysis Balances for analysis balance export templatesBalance exports use only the amounts stored in unfrozen child accounts for analysis.
● Analysis Subtotal Balances for subtotal analysis balance export templatesBalance exports use only the amounts stored in unfrozen parent accounts for analysis.
NoteEach type of balance export uses a specific template defined by the Administrator.
The export files can be filtered by:
● Companies● Partners● Reporting companies
When exporting balances or sub-totals, you can also specify that all of the periods should be taken into account. If this option is not activate, only the balances for the current period are exported.
Related Information
Balance templates [page 100]Exporting balances to Financial Consolidation [page 44]
5.9.2.1 To export balance amounts
Procedure
1. In the Import/Export tab, click the link for the relevant export type.2. Select a template.
3. To specify the companies whose amounts you want to export, activate Use Company Filter and click to select companies.
42 P U B L I CSAP BusinessObjects Intercompany User Guide
The reconciliation process

TipIf you are exporting one company, or companies with a code that start with the same character, you can type the codes in the Filter Criteria field.
4. To specify the partners whose amounts you want to export, activate Use Partner Filter and click to select partners.
TipIf you are exporting one company, or companies with a code that start with the same character, you can type the codes in the Filter Criteria field.
5. To specify the reporting companies whose amounts you want to export, activate Use Reporting Company
Filter and click to select reporting companies.
TipIf you are exporting one company, or companies with a code that start with the same character, you can type the codes in the Filter Criteria field.
6. To restrict the export data to companies or partners, choose the appropriate option in the Use Data Filter list:○ Ours exports data only for companies to whom you have access○ Theirs exports data only for partners of companies to whom you have access○ Both exports data for both companies and partners
NoteThis option is available only when the Administrator has activated Data Filter Enabled in the
Administration Settings Balance Settings menu.
7. To export balances or sub-totals for all periods, activate All Periods.
NoteDo not activate this option if you want to export balances only for the current period.
8. Click Export.
The file is exported and the Summary page appears displaying the results of the export.
Related Information
Consulting export results [page 134]Exporting balance amounts to Financial Consolidation [page 104]Balance templates [page 100]
SAP BusinessObjects Intercompany User GuideThe reconciliation process P U B L I C 43

5.9.3 Exporting balances to Financial Consolidation
Any user can export the amounts stored in a database directly to a Financial Consolidation database. The reconciliation process must be started before exporting balances to Financial Consolidation.
NoteWhen you export balance amounts to Financial Consolidation, only the local amount is exported; the transaction amount is not exported.
5.9.3.1 To export balance amounts to Financial Consolidation
Procedure
1. In the Import/Export tab, select Export Balances to SAP BusinessObjects Financial Consolidation.
NoteThe Data Source field is filled by default with the data source name set by the Administrator.
2. In the User Name field, type the name of the Financial Consolidation user.
NoteTo export balances to Financial Consolidation from the application, Financial Consolidation users must be declared as being allowed access to the application.
3. In the User Password field, type the Financial Consolidation password if there is one.4. To export the balance comments, activate Export Comments.
5. To specify the companies whose amounts you want to export, activate Use Company Filter, and click to select companies.
TipIf you are exporting one company, or companies with a code that start with the same character, you can type the codes in the Filter Criteria field.
6. To further filter the balance amounts exported, specify the partners whose amounts you want to export by
activating Use Partner Filter, and click to select partners.
TipIf you are exporting one company, or companies with a code that start with the same character, you can type the codes in the Filter Criteria field.
44 P U B L I CSAP BusinessObjects Intercompany User Guide
The reconciliation process

7. To specify the reporting companies whose amounts you want to export, activate Use Reporting Company
Filter, and click to select reporting companies.
TipIf you are exporting one company, or companies with a code that start with the same character, you can type the codes in the Filter Criteria field.
8. To export balance amounts for all periods, activate All Periods.9. Set the following Financial Consolidation options if necessary:
○ Delete Target Data BeforeHand○ Load Rows Containing Zero Value Amount
NoteYou cannot export balance amounts of 0 to Financial Consolidation unless you activate this option.
○ Replace Existing Amounts○ Execute Package Rules○ Execute Package Controls○ Publish The Package
10. To export account flows, select Use Account Flows and enter a Flow Delimiter.11. Click Export.
The balances are exported to Financial Consolidation and the Summary page appears displaying the results of the export.
Related Information
Consulting export results [page 134]
5.9.4 Exporting invoices
Any user can export invoices to a file.
NoteInvoices are exported via a template defined by the Administrator.
The export operation automatically generates a file.
SAP BusinessObjects Intercompany User GuideThe reconciliation process P U B L I C 45

5.9.4.1 To export invoices
Procedure
1. In the Import/Export tab, click Export Invoices.2. Select a template.
3. To specify the companies whose invoices you want to export, activate Use Company Filter and click to select companies.
TipIf you are exporting one company, or companies with a code that start with the same character, you can type the codes in the Filter Criteria field.
4. To specify the partners whose amounts you want to export, activate Use Partner Filter and click to select partners.
TipIf you are exporting one company, or companies with a code that start with the same character, you can type the codes in the Filter Criteria field.
5. To restrict the export data to companies or partners, choose the appropriate option in the Use Data Filter list:○ Ours exports data only for companies to whom you have access○ Theirs exports data only for partners of companies to whom you have access○ Both exports data for both companies and partners
Note
This option is available only when the Administrator has activated Data Filter Enabled in AdministrationSettings Balance Settings .
6. To export balance amounts for all periods, activate All Periods.7. Click Export.
The file is exported and the Summary page appears displaying the results of the export.
Related Information
Consulting export results [page 134]
46 P U B L I CSAP BusinessObjects Intercompany User Guide
The reconciliation process

6 Administration of the application
6.1 Managing database connections
This section explains how to:
● disconnect users and find out which users are logged on● manage database connections● maintain the database
6.1.1 Managing database user connections
Using the Logged on Users utility, the Administrator can tell which users are connected at a particular point in time and which periods they are working on.
The Administrator can disconnect all users (except other Administrators).
CautionAny users logged on when this happens may lose their work.
6.1.1.1 To disconnect users
Procedure
1. In the Administration tab, select Logged On Users.2. Click Log Non-Administrators off system.
A confirmation message appears.3. Click OK.
6.1.2 Managing connections to different databases
The Administrator can:
● assign several databases to the application.This operation is performed in the application control panel.
SAP BusinessObjects Intercompany User GuideAdministration of the application P U B L I C 47

● select the database that users can access in application.
NoteThe Administrator must stop the reconciliation process to change databases.
NoteThe Administrator can disconnect any other users that might be connected.
6.1.2.1 To set a database connection
Procedure
1. In the SAP BusinessObjects Administration Console, click Add.2. Enter the data source information3. Click Test Connection, then OK.4. Select the server and click Connect.
6.1.3 Database maintenance
If there are problems with performance or calculations, the Administrator can set up the following operations in Administration Maintenance :
● automatic recalculations of all of the amounts.The Recalc button is used to recalculate the balances if they have not been updated, for example after the currencies have been changed in the database. Amounts in the user group currency and differences can be recalculated for each balance. As a consequence, the states are also changed.
● refresh the list and update the processing percentage.
6.2 Defining the database structure
This section explains to Administrators how to configure the database structure.
NoteYou need to stop the reconciliation process, if it is running, before you make updates to the database.
48 P U B L I CSAP BusinessObjects Intercompany User Guide
Administration of the application

6.2.1 Starting and stopping the reconciliation process
CautionWhen the Administrator stops the process, all the users who are logged in are automatically logged out and may lose their work.
The Administrator can start and stop the process in two ways:
● Manually● Automatically
In this case, the process starts automatically on the start date specified. Users can then enter their balances. The process stops automatically on the end date specified. Only the Administrator then has access to the database.
CautionThe process must be stopped for the Administrator to be able to create or modify the application database structure. If the process is running, the metadata objects cannot be changed.
6.2.1.1 To manually start the reconciliation process
Procedure
1. In the Administration tab, select Process.2. Click Start.
6.2.1.2 To manually stop the reconciliation process
Procedure
1. In the Administration tab, select Process.2. Click Stop.
SAP BusinessObjects Intercompany User GuideAdministration of the application P U B L I C 49

6.2.1.3 To automatically start and stop the reconciliation process
Procedure
1. In the Administration tab, select System Process .2. If you are changing an existing reconciliation process, click Stop.3. In the Process Start Date field, do one of the following:
○ Enter the required date using a DD/MM/YYYY format.○ Click the calendar icon and choose the required date in the calendar that appears.
4. In the Process End Date field, do one of the following:
○ Enter the required date using a DD/MM/YYYY format.○ Click the calendar icon and choose the required date in the calendar that appears.
5. Click Start if this is the first time you are setting up the reconciliation process, or Update if you are updating an existing reconciliation process,.
6. Click Save.
The process starts and stops automatically on the dates specified.
6.2.2 The database structure
The Administrator defines all the objects that make up the database structure in the following order:
Table 4:
Database objects Optional
Periods
Currencies
Groups X
Companies
Users
User Groups
Account Groups
Materiality values X
Journal Accounts X
Accounts
Standard Comments X
Forced Agreement X
50 P U B L I CSAP BusinessObjects Intercompany User Guide
Administration of the application

6.2.3 Metadata
Metadata objects in the database include:
● users● user groups● companies● company groups
6.2.3.1 Creating metadata objects
Create metadata objects:
● by directly entering them manually● by importing them from files
Even if the majority of objects can be imported, it is necessary to enter certain objects to ensure metadata consistency.
NoteUsers and User Groups can be created and changed while the reconciliation process is running.
6.2.3.2 Deleting metadata objects
It is generally not possible to delete a metadata object if it is already linked to another object. For example, you cannot delete a currency if it has already been defined as the local currency for a company.
The Administrator can delete:
● one or more related metadata objects, like a currency, a company, or an account.● a group of related metadata objects, like all of the companies or all of the accounts.
6.2.3.2.1 To delete a metadata object
Procedure
1. Stop the reconciliation process.
2. In the page that lists the relevant metadata objects, for example, in Administration Currencies , click the red X icon to the right of the object that you want to delete.
A confirmation message appears.
SAP BusinessObjects Intercompany User GuideAdministration of the application P U B L I C 51

3. Click OK.4. Restart the reconciliation process.
6.2.3.2.2 To delete a group of related metadata objects
Procedure
1. Stop the reconciliation process.
2. In the page that lists the relevant metadata objects, for example, in Administration Currencies , click Purge Currencies.
A confirmation message appears.3. Click OK.4. Restart the reconciliation process.
6.2.3.3 Activating and deactivating a metadata object
You can authorize or deny the use of each metadata object in the balances.
CautionNo changes can be made if the reconciliation process is running and if balances exist.
You can activate or deactivate companies when the process is stopped, even if the existing balances have not been purged.
The icons in the Status column specify whether or not the company is active:
● The green check mark icon indicates that the company is active.● The red X indicates that the company is inactive.
To activate or deactivate an object, go to the object's page and do one of the following:
● check the Inactive box so that the object cannot be used in balances.● deactivate the Inactive box so that the object can be used in balances.
6.2.4 Periods
Periods are defined by a start date and an end date. These dates determine the period to which the amounts that are entered or imported for balances are linked.
The periods defined in the application should be the same as those used in the consolidation system to which the amounts are exported.
The following objects are linked to any given period:
52 P U B L I CSAP BusinessObjects Intercompany User Guide
Administration of the application

● Materiality thresholds● Currency rates● The Frozen status for companies
NoteIn a new database, the Administrator must create at least one period to have access to the application functions.
6.2.4.1 Period properties
The process start and end dates determine the period during which users can access the database to work on their balances. Before and after this period, only the Administrator has access to the database.
A period is characterized by the following properties:
● A nameThe name is compulsory. No two periods have the same name.
● A start date● An end date● A status
The status specifies whether the period is open, closed, archived or restored.● You can also specify if the rates used by default for the period are correct.
Related Information
Opening and closing periods [page 55]Archiving balances [page 165]Rates for new periods [page 54]
6.2.4.2 Creating periods
In a new database, the Administrator must create at least one period to have access to all the the application functions.
When you create a period, the materiality thresholds and rates are carried over from the previous period and applied to the new period.
When frozen companies are carried over to a new period, they are no longer frozen in the new period.
As soon as a period has been created, it can be selected in the navigation bar.
SAP BusinessObjects Intercompany User GuideAdministration of the application P U B L I C 53

6.2.4.2.1 To create a period
Procedure
1. In the Administration tab, select Periods.2. ClickAdd New.
The Create Period page appears.3. In the Code field, enter the name assigned to the period.4. In the Description box, enter a long name.5. In the Start and End fields, enter the dates or select them in the calendar using the calendar icon.6. Click Create.
The Status and Clear Warning fields appears.
Related Information
To confirm rates for a period [page 55]
6.2.4.3 Rates for new periods
When you create a period, the rates from the previous period are used by default. They are called estimated rates.
In the Periods page, in the Currency Rate Confirmed column, the red X icon indicates that the rates are estimated. The Administrator can:
● approve rates if they are correct for the new period.● in the case of incorrect rates, enter the correct rates for the period.
The rates can be confirmed:
● period by period● for all the periods at once
NoteThese operations are only applied to open periods.
Related Information
Currencies [page 57]
54 P U B L I CSAP BusinessObjects Intercompany User Guide
Administration of the application

6.2.4.3.1 To confirm rates for a period
Procedure
1. In the Administration tab, select Periods.2. Click the link for the estimated period that you want to confirm.
The selected period's page appears.3. Activate the box in the Clear Warning field.4. Click Update.
In the Periods page, the warning icon in the Currency Rates Confirmed column has disappeared for the period.
6.2.4.4 Opening and closing periods
The Administrator can:
● open periods so that users can enter balances.● close periods so that periods available to users are in read-only mode.
Once a period is closed, the Administrator can no longer make changes to the materiality thresholds, rate or company status, or freeze or unfreeze companies.
NotePeriods are not closed or opened definitively. When the Administrator opens a closed period, the companies frozen before the period was closed remain frozen. Once the period is reopened, the companies can be unfrozen.
When a period is created, it is open by default.
The Administrator can open and close:
● each period one by one● all the periods at once
Related Information
Freezing and unfreezing company balances [page 135]
SAP BusinessObjects Intercompany User GuideAdministration of the application P U B L I C 55

6.2.4.4.1 To open a period
Procedure
1. In the Administration tab, select Periods.2. Click the link for the period you want to open.
The selected period's page appears.3. Click Open Period.4. Click Update.
6.2.4.4.2 To open all of the periods at once
Procedure
1. In the Administration tab, select Periods.2. Click Open All Periods.
6.2.4.4.3 To close a period
Procedure
1. In the Administration tab, select Periods.2. Click the link for the period you want to close.
The selected period's page appears.3. Click Close Period.4. Click Update.
6.2.4.4.4 To close all the periods at once
Procedure
1. In the Administration tab, select Periods.2. Click Close All Periods.
56 P U B L I CSAP BusinessObjects Intercompany User Guide
Administration of the application

6.2.4.5 Deleting periods
The Administrator cannot delete a period while it is selected in the navigation bar.
If the Administrator tries to delete a period that is in use by another user, a warning message appears. The Administrator can find out which periods are in use by selecting Logged On Users in the Administration tab.
Related Information
Managing database user connections [page 47]Deleting metadata objects [page 51]
6.2.5 Currencies
When a company is created, the Administrator assigns it a currency. In the application, currencies are entered one by one.
The currencies the Administrator defines are:
● The User Group currency, used by the Head Office as a base currency.● The local currency or company currency.● The transaction currency, amounts entered in balances are expressed in the transaction currency.● The default currency, which appears by default when adding or accessing a balance. The users are free to
select another transaction currency.
The Administrator must follow the steps in the order listed below:
● Create the currencies by:○ entering them directly in the application.○ importing currencies contained in a .csv or .txt file using an import template.
● Define the User Group currency among all the currencies previously created.● Optionally, define the default transaction currency.● Define the mode for translating amounts.
The currencies are identical for all the periods. However, rates are specifically defined by period.
NoteWhen you create a period, the rates entered for the previous period are applied to the new period. You can then change the rates for the new period.
Related Information
Periods [page 52]
SAP BusinessObjects Intercompany User GuideAdministration of the application P U B L I C 57

The User Group Currency [page 60]Translating amounts [page 60]Currency templates [page 110]
6.2.5.1 Currency properties
A currency has the following properties:
● A currency code. The code is compulsory. No two currencies have the same code and each code must consist of a maximum of three characters.
● A description (optional)● Rates:
○ Opening Rate○ Average Rate○ Closing Rate
The rates are defined by period.All the rates are quoted against the User Group currency. They can be expressed using two valuation methods:○ Multiply
The local currency value is expressed on the basis of a variable quantity of the User Group currency. When you create a currency, the default valuation method is multiply.
○ DivideThe value of a unit of User Group currency is expressed on the basis of a variable quantity of the local currency.
● Inactive, when activated, means that the currency is not used for balances.● Divided Rate, when activated, the divide valuation method for the rates defined is used. By default, the
multiplication method is used.
NoteFor users who do not have Administrator rights, the Currencies information appears in read-only mode. Only the Administrator has read-write access to this page.
Related Information
Periods [page 52]
58 P U B L I CSAP BusinessObjects Intercompany User Guide
Administration of the application

6.2.5.1.1 To enter a currency
Procedure
1. In the navigation bar, click to the right of the current period.2. In the Periods dialog box, click the link for the period you want to apply.
NoteThe period you select is important because the currency rates you define are specific to that period.
3. In the Administration tab, select Currencies.4. In the Currencies page, click Add New.5. In the Create Currency page, enter the relevant information in the following fields:
○ Code○ Description○ Opening Rate○ Average Rate○ Closing Rate
NoteThe numbers you enter in the Opening Rate, Average Rate and Closing Rate fields should be greater than zero.
6. If you do not want the currency to be used in balances, activate Inactive.7. Click Create.8. To apply the divide valuation method, activate Divide.9. Click Update.
6.2.5.1.2 To copy existing rates for all currencies to open periods
Procedure
1. In the Administration tab, select Currencies.2. In the Currencies page, click Copy Rates To All Open Periods.
A confirmation message appears.3. Click OK.
SAP BusinessObjects Intercompany User GuideAdministration of the application P U B L I C 59

6.2.5.2 The User Group Currency
The User Group Currency is the reporting currency used by the Head Office as a base currency, against which all of the other currencies can be quoted.
The Administrator must select the User Group currency from the currencies in the database using the application. It cannot be imported.
NoteThe User Group currency can be changed or deleted later only if all of the balances in the database are deleted.
6.2.5.2.1 To define the User Group currency
Procedure
1. In the Administration tab, select Settings Metadata Settings .2. From the Group Currency list, select a transaction currency.
The transaction currency is the currency in which transactions are performed. Amounts entered in balances are expressed in the transaction currency.
3. Click to select a default currency.
The default transaction currency appears when adding or accessing a balance. However, the users are free to select another transaction currency.
The default transaction currency can be changed at any time by the Administrator.4. Click Update.
6.2.5.3 Translating amounts
The diagram below illustrates how transaction amounts are translated into User Group amounts.
60 P U B L I CSAP BusinessObjects Intercompany User Guide
Administration of the application

There are two ways of translating amounts in the application:
● All the amounts are translated from local currency amounts into the User Group currency. In this case, users can enter their amounts in the local currency and in the transaction currency.
● All the amounts are translated from transaction currency amounts into the User Group currency. In this case, users can only enter their amounts in the transaction currency.
You can request that amounts be calculated automatically in the local currency using amounts entered in the transaction currency.
NoteYou can also define a mode enabling you to select, for each parent account, which of the two translation modes should be used to translate the amounts.
NoteOnce chosen, the translation mode cannot be changed unless the process is stopped and the database contains no balances.
Related Information
The User Group Currency [page 60]
SAP BusinessObjects Intercompany User GuideAdministration of the application P U B L I C 61

6.2.5.3.1 To define the method for translating amounts
Procedure
1. In the Administration tab, select Settings Balance Settings .2. From the Group Amount Source list, select one of the following commands:
○ Local amount to Group amount - to translate local currency amounts into group currency amounts.○ Transaction amount to Group amount - to translate transaction currency amounts into group currency
amounts.○ Mixed Mode - to be able to select one of the two translation modes for each parent account.
3. If you want the local currency amounts to be automatically recalculated using transaction currency amounts, activate Auto Recalculate Local Amount.
NoteThis option is only available for Local amount to Group amount and Transaction amount to Group amount.
4. Click Update.
6.2.6 Company groups
Companies are grouped into company groups. For example, the Canadian Food and US Food companies make up the Food company group.
Creating a company group is optional.
A company group has a:
● unique code
NoteNo two company groups have the same code.
● name
You create company groups in the application by entering them manually or by importing them.
Once you have created the company groups, you can link them to companies:
● In the application via:○ the company page○ the company groups page
● Via an import
62 P U B L I CSAP BusinessObjects Intercompany User Guide
Administration of the application

Related Information
To add a company [page 66]To create a company group [page 63]Company templates [page 106]
6.2.6.1 To create a company group
Procedure
1. In the Administration tab, select Company groups.2. Click Add New.3. Enter the relevant information in the Code and Description fields.4. Click Create.
The Companies button appears.5. To link one or more companies to the current company group, click Companies.6. Check the boxes corresponding to the companies you want to link to the company group.7. Click Update.
6.2.7 Companies
A company can be linked to:
● a user group● a reporting company
The reporting company is the company to which the current company is assigned.
NoteIf you want to link a company to a reporting company, they must both have the same local currency.
● one or more company groups
You link companies to user groups:
● when you create the company● when you create a user group
Related Information
Company groups [page 62]
SAP BusinessObjects Intercompany User GuideAdministration of the application P U B L I C 63

User groups [page 74]
6.2.7.1 Declaring companies and partners
A declaring company enters balances that correspond to transactions with another company, the partner, entered in the system.
Declaring companies make requests to delete or change balances. The partner receives requests from the declaring company.
ExampleCompanies A and B exchange transactions, enter and then reconcile their balances
● From company A's point of view: A is the declaring company and B is the partner.● From company B's point of view: B is the declaring company and A is the partner.
6.2.7.2 Companies and reporting companies
A company becomes a reporting company when it exports, and thus reports, the balances to the consolidation system. A reporting company can be made up of one or more companies.
All the companies (companies and reporting companies) enter balances, but only the reporting companies export their balances (their own balances and those belonging to the companies linked to them) to the consolidation system.
6.2.7.3 Company properties
NoteIf you are not an Administrator, the company information appears as read-only content.
A company has the following properties:
● a unique code● a description● a Reporting Currency specifies the local currency used by the company● a Reporting Company specifies the reporting company to which the current company is assigned
Companies are not necessarily assigned to a reporting company.● one of the following states:
○ Active, which means that the company can be used in balances.○ Inactive, which means that the company cannot be used in balances.
The Inactive check box, when activated in the company's edit panel, means that balances cannot be entered for the company.
64 P U B L I CSAP BusinessObjects Intercompany User Guide
Administration of the application

NoteThe Administrator can activate or deactivate a company if the reconciliation process has been stopped.
○ Frozen, which means that the company balances and the balances belonging to all its partners cannot be changed.
NoteThe Frozen status is defined by period.
● the Frozen Time Stamp specifies the date and time that the balances of the current company were last frozen
The Reset/Remove Balances button is used to remove and reset balances. The Freeze Company button is used to freeze companies. The Company groups button opens a page in which you can assign the company to a company group. The User Groups button opens a page in which you can assign the company to a user group. The Delete Invoices button deletes all of the invoices for the current company.
NoteDelete Invoices is visible only when invoices exist in the database.
Company Contacts lists users who can be contacted if necessary.
Related Information
Defining users as company contacts [page 68]Deleting invoices by company, parent or child account [page 163]Freezing and unfreezing company balances [page 135]Resetting and removing balances [page 24]Periods [page 52]
6.2.7.4 Adding a company
The Administrator can add companies in two ways:
● by entering them directly in the application.● by importing companies contained in a .csv or .txt file using a template.
Related Information
Company templates [page 106]To add a company [page 66]
SAP BusinessObjects Intercompany User GuideAdministration of the application P U B L I C 65

6.2.7.4.1 To add a company
Procedure
1. In the Administration tab, select Companies.2. Click Add New.3. Enter a unique alphanumeric Code.4. Type a Description.5. From the Reporting Currency list, choose the local currency.6. Click Create.7. If you want to link the company to a reporting company or define the company as a reporting company, click
next to the Reporting Company field.8. Do one of the following:
○ Click the link for the reporting company you want to link to the company you are creating.
NoteIf you want to link a company to a reporting company, they must both have the same local currency.
○ Click the link for the current company to define it as the reporting company.9. If you want to link the current company to a company group, click Company Groups.
NoteYou can also link a company to a company group via the corresponding company group page.
10. Activate the box next to the company group or groups you want the company to be linked to.11. If you want to link the current company to a user group, click User Groups.
NoteYou can also link a company to a user group in the relevant User Group page.
12. Activate the box next to the relevant user group.13. Click Update.
Related Information
To create a company group [page 63]To create a User Group [page 74]
66 P U B L I CSAP BusinessObjects Intercompany User Guide
Administration of the application
6.2.7.5 Deleting companies
The following limitations apply to deleting companies:
● Only Administrators can delete companies.● A company cannot be deleted while it is a selection in the navigation bar.● If an Administrator tries to delete a company in use by another Administrator, a warning message appears
and the operation must be confirmed or canceled.● Company used in a balance cannot be deleted.
To delete the company metadata object, follow the instructions for deleting metadata objects.
Related Information
Deleting metadata objects [page 51]
6.2.8 Users
The Administrator links users to user groups to include them in the reconciliation process.
The Administrator creates users in two ways:
● by entering them directly in the application.● by importing user metadata contained in a .csv or .txt file using a template.
A user is linked to a user group, which defines the companies to which the user has access. A user can also be defined as a company contact.
Related Information
User groups [page 74]User templates [page 117]Defining users as company contacts [page 68]
6.2.8.1 User properties
A user is characterized by the following properties:
● an authentication modeUsers are authenticated by an integrated authentication, an LDAP directory, or a CMS server. For more information, see the SAP BusinessObjects Intercompany Administration Guide.
SAP BusinessObjects Intercompany User GuideAdministration of the application P U B L I C 67

● a unique alphanumeric code● a description● a user profile that specifies the functions to which the user has access.● a default language
This language is displayed by default when the user logs in, although the user can also change the displayed language at login.
● a password● an email address
The user can receive emails containing progress reports.● a telephone number● a mobile telephone number● a fax number● an address
Related Information
Automatic detailed emails [page 143]User profiles [page 68]
6.2.8.2 Defining users as company contacts
The Administrator can specify which user types are company contacts.
When a user group is created, all of the users belonging to the user types selected are automatically defined as company contacts.
6.2.8.2.1 To define users as company contacts
Procedure
1. In the Administration tab, select Emails.2. In the Can be company contact column, select the required user types.3. Click Update.
6.2.8.3 User profiles
User profiles enable you to define which functions users are able to access.
There are four user profiles in the application:
68 P U B L I CSAP BusinessObjects Intercompany User Guide
Administration of the application

● AdministratorThe Administrator profile can execute all functions, but the other profiles can only execute the functions as detailed in the tables below.
● Interactive User● Power User● View User
6.2.8.3.1 Functions by user profile
Table 5:
Functions Administrator Interactive User Power User View User
Account groups: create/modify/delete
X
Account groups: view X X X X
Balance attachments: add/modify/delete
X X X
Balance attachments: open X X X X
Balance comments: add/modify/delete
X X X
Balance comments: read X X X X
Balance reports: run X X X X
Balances: create X X
Balances: export balances/subtotal balances/analysis balances/analysis subtotal balances
X X X X
Balances: export to SAP BusinessObjects Financial Consolidation
X X X X
Balances: import X X
Balances: import bulk X
Balances: modify X X
Balances: purge (all periods) X
Balances: reset/remove (specific company)
X X
SAP BusinessObjects Intercompany User GuideAdministration of the application P U B L I C 69

Functions Administrator Interactive User Power User View User
Balances: view X X X X
Companies: create/modify/delete X
Companies: select and view X X X X
Currencies and rates: view X X X X
Currencies: create/modify/delete X
Currency rates: copy to all periods X
Database connection configuration X
Detailed emails: configure (states) X
user groups: create/modify/delete X
user groups: view X X X X
Filters: apply/clear X X X X
Forced agreements: enable/disable/rollback/run
X
Forced agreements: view X X X X
Freeze (specific) company X X X
Freeze/unfreeze (all) companies X
Freeze/unfreeze companies across periods
X
Global emails: send X
Global parameters: update X
User Groups: create/modify/delete X
Help file: view X X X X
Imports/exports (own) previous: consult/delete
X X X X
Imports/exports previous: consult/delete (all) previous
X
Intercompany license details: view X X X X
Interface configuration X
70 P U B L I CSAP BusinessObjects Intercompany User Guide
Administration of the application

Functions Administrator Interactive User Power User View User
Invoice additional fields: dd/modify/delete (text/amount/date fields)
X X
Invoice attachments: add/modify/delete
X X X
Invoice comments: add/modify/delete
X X X
Invoice details: modify (invoice reference/invoice account/txn and local amounts)
X X
Invoice matching functions: perform X X
Invoice reports: run X X X X
Invoice standard comments: add/modify/delete
X X X
Invoice text validation: create/modify/delete
X
Invoice text validation: view X X X X
Invoices (Child Account Invoice page): view
X X X X
Invoices (Edit Invoice page): view X X X X
Invoices (specific company): delete X X
Invoices Un-assigned / Un-matched / Agreed / Comment Matched (from Parent Account Invoice page): view
X X X X
Invoices: add/delete X X
Invoices: export X X X X
Invoices: import X X
Invoices: purge (all periods) X
Journal accounts: create/modify/delete
X
Journal accounts: view X X X X
SAP BusinessObjects Intercompany User GuideAdministration of the application P U B L I C 71

Functions Administrator Interactive User Power User View User
Journals: export X X X X
Journals: reset (manual/import) X X
Language: select X X X X
Login text configuration X
Maintenance: run X
Materiality: create/modify/delete X
Materiality: view X X X X
Metadata: export X
Metadata: import X
Period: select X X X X
Periods: open / close / archive / delete
X
Personal profile: update (except User Name and User Type)
X X X X
Reconciliation process: start/stop X
Report configuration X
Standard comments: add/modify/delete
X X X
Standard comments: create X
Standard comments: view X X X X
States: manage X
Summary email time configuration X
Summary emails: receive X X X
System health checks X
Template configuration X
Unfreeze (specific company) X X
Users logged on: view X
72 P U B L I CSAP BusinessObjects Intercompany User Guide
Administration of the application

Functions Administrator Interactive User Power User View User
Users: create/modify/delete X
Users: forced log off X
Working files (import/export/report): delete
X
Your Details: viewing X X X X
6.2.8.4 Creating users
Only the Administrator can create users.
In the application, users are entered one by one.
6.2.8.4.1 To create a user
Procedure
1. In the Administration tab, select Users.2. Click Add New.3. Enter the password.4. Enter a unique user code.5. Enter the Email Address, Telephone Number, Fax Number, Address and Mobile Number fields.6. From the User Profile list, select a profile.7. From the Default Language list, select a language.8. If you want the user to receive detailed emails, activate Receive Detailed Emails.9. Click Create.
Related Information
Addressees of detailed emails [page 145]
SAP BusinessObjects Intercompany User GuideAdministration of the application P U B L I C 73

6.2.9 User groups
The Administrator links companies and users together to create a user group. When users log in to enter balances, they can only access the companies defined in their user groups.
NoteAdministrator users have access to all of the companies.
Some users are automatically defined as company contacts.
A user group has the following properties:
● a unique code● a description● associated companies and users
Related Information
Defining users as company contacts [page 68]
6.2.9.1 Creating user groups
Only the Administrator can create user groups.
The Administrator can create user groups in two ways:
● by entering them directly in the application.● by importing user groups as metadata objects contained in a .csv or .txt file.
Related Information
User Group templates [page 120]
6.2.9.1.1 To create a User Group
Procedure
1. In the Administration tab, select User Groups.2. Click Add New.
74 P U B L I CSAP BusinessObjects Intercompany User Guide
Administration of the application

3. Enter the Code and Description.4. Click Create.
The Users and Companies buttons appear.5. To assign companies to the user group, click Companies.6. Activate the boxes next to the companies you want to assign to the user group.7. Click Update.8. To assign users to the user group, click Users.9. Activate the boxes next to the users you want to assign to the user group.10. Click Update.
6.2.10 Account groups
An account group is a group of accounts which have similar accounting characteristics.
There are three default top level account groups in the application:
● Profit and Loss (P&L)● Balance Sheet● Off Balance Sheet (Off BS)
Each parent account should be assigned to a top level account group.
A top level account group enables you to define the account sign that is linked to the group.
Table 6:
Parent Account Group Sign
P&L Expenses: -
Income: +
Balance sheet (BS) +
Off BS +
NoteCalculations are defined using absolute values, therefore it is important to place the minus (-) sign in front of negative amounts.
6.2.10.1 Account subgroups
Account subgroups enable you to apply additional restrictions to the information displayed in the balances via filters and in the reports. They use the same calculation type as the top level account group to which they are assigned.
SAP BusinessObjects Intercompany User GuideAdministration of the application P U B L I C 75

Parent accounts can be assigned to an account subgroup or a parent account group, or both.
ExampleTop Level Account Group with subgroups
The Balance Sheet Top Level Account Group is delivered with the application by default.
The Administrator then creates subgroups:
● Assets, which is the parent account group.● Fixed Assets and Work-in-Progress, which are subgroups belonging to Assets.
The Tangible Assets parent account is linked to the BS top level account group and to the Fixed Assets subgroup.
The Intangible Assets parent account is linked to the BS top level account group, to the Assets group and to the Fixed Assets subgroup.
The Finished Goods in Progress and Services in Progress parent accounts are linked to the BS top level account group, to the Assets group and to the Work-in-Progress subgroup.
In the balances and reports, you can choose to display different accounts depending on the account group selected:
● All of the accounts contained in the balance sheet top level account group appear: Tangible Assets, Intangible Assets, Finished Goods in Progress and Services in Progress.
● All of the accounts contained in the Assets account group appear: Intangible Assets, Finished Goods in Progress and Services in Progress. The Tangible Assets parent account does not appear because it is not linked to the Assets group.
● All of the accounts contained in the Fixed Assets subgroup are displayed: Tangible assets and Intangible assets.
76 P U B L I CSAP BusinessObjects Intercompany User Guide
Administration of the application

NoteThe Tangible Assets parent account appears if you select the Balance Sheet and Fixed Assets groups. However, it is not linked to the Assets group and does not appear if only this group is selected.
Related Information
Tracking progress via reports [page 37]
6.2.10.2 Account group properties
An account group has the following properties:
● a unique account code● a description of the account group● the Top Level Account Group to which the parent account group is assigned● the Parent Account Group to which the account group is assigned
NoteYou can only edit the Parent Account Group field if all balances have been purged from the database.
● a calculation type defined for the top level account group.
When you create parent accounts, the account groups defined are assigned to them.
Related Information
Parent accounts [page 84]Child account properties [page 85]
6.2.10.3 Creating account groups
The Administrator can create:
● Parent account groups, for example subgroups that are directly linked to one of the three default top level account groups delivered with the application.
● Account groups, for example subgroups that are directly linked to a parent account group.
To create a group of accounts, you should first of all create the corresponding parent account group.
SAP BusinessObjects Intercompany User GuideAdministration of the application P U B L I C 77

NoteYou cannot import account groups.
6.2.10.3.1 To create a parent account group
Procedure
1. In the Administration tab, select Account Groups.2. Click Add New.3. Enter an unique Account Group code and a description.
4. To select the Top Level Account Group, click and select the group to which you want to assign the group you are creating.
In the Top Level Account Group field, the selected group's name appears. In the Calculation Type field, the calculation defined for the Top Level Account Group selected appears in the dropdown list box and the box is deactivated.
5. Click Create.
6.2.10.3.2 To create an account group
Procedure
1. In the Administration tab, select Account Groups.2. Click Add New.3. Enter a unique Account Group code and a description.
4. To select the Top Level Account Group, click .
5. To select the Parent Account Group, click .
NoteYou can only edit this field if all balances have been purged from the database.
6. Select the parent account group to which you want to assign the account group you are creating.
In the Parent Account Group field, the selected group's name appears.
In the Calculation Type field, the calculation defined for the Top Level Account Group to which the parent account group is assigned appears in the list box, and the box is deactivated.
7. Click Create.
78 P U B L I CSAP BusinessObjects Intercompany User Guide
Administration of the application

In the Top Level Account Group field, the group's name appears.
6.2.11 Materiality values
A materiality threshold is expressed in group currency and determines whether a balance is reconciled. If the difference is below materiality, the balance is reconciled. If the difference is above materiality, the balance is not reconciled.
Each materiality threshold is set at an appropriate level for each parent account. For example, it can be set at 1,000 for increases in working capital accounts and 0 for cash flow accounts.
Materiality thresholds are defined by periods. As soon as you create the first period, the default materiality threshold values appear for Balance Sheet, Off Balance Sheet, and Profit and Loss for a parent account.
A materiality has the following properties:
● A unique materiality name● A materiality value
Materiality values can be changed at any time by the Administrator when the reconciliation process is not running.
Related Information
Accounts [page 82]Periods [page 52]
6.2.11.1 Creating a materiality
Materiality thresholds cannot be imported. The Administrator:
● Creates the required materiality threshold names and values.● Activates the materiality threshold.
NoteThis operation can only be performed when the reconciliation process is stopped and there are no balances in the database.
SAP BusinessObjects Intercompany User GuideAdministration of the application P U B L I C 79

6.2.11.1.1 To create a materiality
Procedure
1. In the navigation bar, click to the right of the current period to select the link for the period you want to use.
2. In the Administration tab, select Materialities.3. Click Add New.4. Enter a unique code and a description.5. In the Threshold field, type the relevant value.6. Click Create.
7. In the Administration tab, Settings Metadata Settings .8. Activate Materialities Threshold Defined.
NoteYou can only perform this operation when the reconciliation process is not running and there are no balances in the database.
9. Click Update.
6.2.12 Journal accounts
Journal accounts store the differences between the first and last amounts entered for child accounts. The differences can then be exported via a journal to the accounting system containing the original data.
The Administrator authorizes and forbids the creation of journal accounts. If the Administrator authorizes the creation of journals:
● each child account is linked to a journal account.
NoteSeveral child accounts can be assigned to the same journal account.
● journals can be exported to the source accounting system.
A journal account is characterized by the following properties:
● A unique journal account code● A journal account name
ExampleA balance contains the following amounts
● Transaction amount = 1,000
80 P U B L I CSAP BusinessObjects Intercompany User Guide
Administration of the application

● Local amount = 2,000
The amounts can be changed in the application:
● Transaction amount = 1,500● Local amount = 3,000
The following amounts are stored in the journal accounts:
● Transaction amount adjustment = 500 (1,500 - 1,000)● Local amount adjustment = 1,000 (3,000 - 2,000)
6.2.12.1 Journal account definition process
1. The Administrator authorizes the creation of journal accounts.2. The Administrator creates journal accounts.3. The Administrator assigns each child account to a journal account when creating the child accounts.
NoteJournal accounts are exported at the end of the reconciliation process.
Related Information
Authorizing the creation of journal accounts [page 81]Creating journal accounts [page 82]To create child accounts [page 86]
6.2.12.2 Authorizing the creation of journal accounts
The Administrator authorizes the creation of journal accounts.
NoteAn Administrator can only authorize or deny the creation of journal accounts when the process is stopped and there are no balances in the database.
SAP BusinessObjects Intercompany User GuideAdministration of the application P U B L I C 81

6.2.12.2.1 To authorize the creation of journal accounts
Procedure
1. In the Administration tab, select Settings Metadata Settings .2. Activate Journal Account Enabled.3. Click Update.
6.2.12.3 Creating journal accounts
Journal accounts are created by Administrators:
● by entering them directly in the application.● by importing journals as metadata in a .csv or .txt file.
As soon as you create journal accounts, additional columns appears in the balances.
Related Information
To create a journal account [page 82]Detail by child accounts page [page 17]Journal Account templates [page 121]
6.2.12.3.1 To create a journal account
Procedure
1. In the Administration tab, select Journal Accounts.2. Click Add New.3. Enter a unique code and description.4. Click Create.
6.2.13 Accounts
There are three types of account:
● child accounts
82 P U B L I CSAP BusinessObjects Intercompany User Guide
Administration of the application

● parent accounts● adjustment accounts
Parent accounts group together child accounts.
To create a parent account, and assign child accounts and another parent account to it:
● Create a parent account.● Create a second parent account.● Create a child account and assign it to the first parent account.● Create a child account and assign it to the second parent account.● Link the two parent accounts.
NoteOther child accounts can then be assigned to the parent account.
To link a parent account to child accounts and to link two parent accounts, all the objects need to have the same:
● Top Level Account Group and other account groups● Currency Rate● Materiality, if a materiality threshold has been defined● Translation mode, if it has not been previously defined for all the accounts
The Administrator creates accounts in two ways:
● by entering them directly in the application.● by importing accounts as metadata contained in a .csv or .txt file.
Related Information
Creating child accounts [page 86]Creating parent accounts [page 84]Forced agreements [page 91]Account templates [page 96]
SAP BusinessObjects Intercompany User GuideAdministration of the application P U B L I C 83

6.2.13.1 Parent accounts
A parent account groups together accounts used to reconcile intercompany transactions.
A parent account has the following properties:
● a unique account code● an account description● a top level account group● a currency rate type● optionally, a translation mode, if it has not been previously defined for all of the accounts● a materiality, if the Administrator previously decided that currency rates would be used● a positive or negative balance sign
This sign specifies to be assigned to amounts in the account currently open. To match invoices, you must specify the sign to be given to amounts in the account currently open.
● the applicable counterparty account
You must link parent accounts to:
● one or more child accounts● another parent account● one or more account groups.
Reconciliations are carried out using parent companies in the application.
The Administrator can select one of two reconciliation types.
Related Information
Reconciliations [page 152]Account groups [page 75]Currency properties [page 58]Translating amounts [page 60]Materiality values [page 79]
6.2.13.1.1 Creating parent accounts
The Administrator must create the parent accounts before:
● assigning child accounts to them● linking parent accounts to one another (in pairs)
84 P U B L I CSAP BusinessObjects Intercompany User Guide
Administration of the application

6.2.13.1.1.1 To create parent accounts
Procedure
1. In the Administration tab, select Accounts.2. Click Add New.3. Enter a unique code and a description.4. Select the relevant information from the Currency Rate Type and Top Level Account Group lists.5. If the Materiality list is activated, select a materiality.6. If the Group list is activated, select a mode.7. If the Balance Sign list is activated, select a sign.8. Click Create.9. Click Account Groups to select the account groups you want to link to the parent account.
6.2.13.2 Child accounts
Users enter amounts into child accounts. Child accounts must belong to parent accounts.
The balance in a child account can be broken down into different invoices.
Related Information
Invoice matching [page 138]
6.2.13.2.1 Child account properties
A child account has the following properties:
● a unique code● an account description● a link to a parent account● definitions for the following objects for the parent account to which the child accounts is linked, as well as for
the child accounts:○ a Top Level Account Group○ a Currency Rate Type○ if necessary, a materiality, if the Administrator previously decided that currency rates would be used.
If no amount translation mode has been previously defined for all the accounts, the child account uses the same mode as the parent account to which it is linked.
You link child accounts to:
SAP BusinessObjects Intercompany User GuideAdministration of the application P U B L I C 85

● a parent account● optionally, a journal account
To do so, the Administrator must have previously authorized the use of journal accounts and created them.
You can also specify whether the current parent account is used in balances.
Related Information
Currency properties [page 58]Matching invoices [page 153]Journal accounts [page 80]Account groups [page 75]Materiality values [page 79]
6.2.13.2.2 Creating child accounts
Once the parent accounts are created, the Administrator can create child accounts. The child accounts are linked to the parent accounts.
6.2.13.2.2.1 To create child accounts
Procedure
1. In the Administration tab, select Accounts.2. Click Add New.3. Enter a unique code and a description.4. Select the same information defined in the parent account from the Currency Rate Type and Top Level
Account Group lists.5. If the Materiality list is activated, select the same materiality limit as the parent account.
6. In the Parent Account field, click .
The Parent Account dialog box appears, listing all of the parent accounts that have the same currency rate, top level account group and materiality as those you selected.
7. Click the link for the parent account you want to assign the child account.
The selected parent account appears in the Parent Account field.
8. In the Journal Account field, click .
The Journal Account dialog box appears, listing the journal accounts defined in the database.
86 P U B L I CSAP BusinessObjects Intercompany User Guide
Administration of the application

9. Click the link for the journal account you want to assign the child account.
The journal account selected appears in the Journal Account field.10. Click Create.
The Materiality, Currency Rate, Top Level Account Group, Group Row Source and Balance Sign fields are grayed out. The linked parent company appears on the right of the page.
6.2.13.2.3 Linking child accounts to parent accounts
Once the parent and child accounts have been created, the Administrator can link the accounts via:
● the child account page● the parent account page
RestrictionParent and child accounts can only be linked if they use the same currency rate, top level account group, and materiality.
NoteIf forced agreement is authorized for a child account linked to a parent account, an adjustment account is created automatically and linked to the parent account.
Related Information
Forced agreements [page 91]
6.2.13.2.3.1 To link to a parent account in the child account page
Procedure
1. In the Administration tab, select Accounts.2. Click the link for the child account you want to assign to a parent account.
3. In the Parent Account field, click .
The Parent Account dialog box appears, listing all of the other parent accounts that have the same currency rate, top level account group, and materiality as the current child account.
4. Click the link for the parent account to which you want to assign the current child account.
SAP BusinessObjects Intercompany User GuideAdministration of the application P U B L I C 87

The selected parent account appears in the Parent Account field.5. Click Update.
6.2.13.2.3.2 To link a child account in the parent account page
Procedure
1. In the Administration tab, select Accounts.2. Click the link for the parent account.3. In the Child Accounts section, click Add Child Accounts.
The Child Accounts dialog box appears, listing all of the other child accounts that have the same currency rate, top level account group, and materiality as the current parent account.
4. Activate the box corresponding to the child account that you want to assign the parent account.5. Click OK.
In the parent account page, the child account you selected appears in the Child Accounts list.
6.2.13.3 Linking two parent accounts
After creating the parent and child accounts, the Administrator can link parent accounts.
6.2.13.3.1 To link parent accounts
Procedure
1. In the Administration tab, select Accounts.2. Click one of the two parent accounts you want to link.
3. In the Partner Account field, click .
The Partner Account dialog box appears, listing all of the parent accounts that do not have a partner and that have the same currency rate, top level account group, and materiality as the selected parent account.
4. Click the link for the parent account to which you want to link the current parent account.5. Click Update.
The partner account appears on the right of the page.
88 P U B L I CSAP BusinessObjects Intercompany User Guide
Administration of the application

6.2.13.4 Deleting a parent account
If the Administrator deletes a parent account:
● all the child accounts linked to it are also deleted.● the partner parent account linked to it can no longer be used.
To delete the parent account, click the red X on the row of the account in Administration Accounts .
6.2.13.5 Account flows
In SAP BusinessObjects Financial Consolidation, Account and Flow are two separated dimensions and the association of these two dimensions represents a indicator. A default account flow is defined by the Administrator.
When you import accounts into Intercompany, you can also import the flows linked to them. If you do so, the code of a given Intercompany account will be the result of the concatenation of the code of the corresponding Financial Consolidation account and the code of the flow linked to it as shown in the example below:
● P6000-F00● P6000-F99
When entering accounts, the separator used is the one defined in the template for importing accounts.
Balances that are associated with an Intercompany account containing a flow in its code can be directly imported into Financial Consolidation.
NoteBefore you export balances to Financial Consolidation, the balances must be frozen and you must have access to Financial Consolidation that allows you to modify data.
Related Information
Account templates [page 96]
6.2.13.6 Deactivating or activating an account
Context
Sometimes an Administrator wants to simply deactivate an account, instead of deleting it. An account can be deactivated, even if there are balances associated to it in the database. The Administrator does not need to purge or archive the database when an account is deactivated. When the account is deactivated, no balances can be entered for it.
SAP BusinessObjects Intercompany User GuideAdministration of the application P U B L I C 89

To deactivate or activate an account:
Procedure
1. In Administration Accounts , select the account to activate or deactivate.2. In the Edit account page, do one of the following:
○ Select Inactive to deactivate the account.○ Deselect Inactive to activate the account.
3. Click Update.The inactive account has a red X in the status column of the Accounts page.
6.2.14 Standard comments
Standard comments enable you to explain why an amount was entered for a balances or invoice.
For example, use VAT as a standard comment to explain differences due to VAT (Value-added tax) problems.
Standard comments can be used as criteria for matching invoices.
The Administrator can create predefine standard comments.
Related Information
Matching invoices using standard comments [page 36]Invoice matching [page 138]Entering a comment for a balance [page 23]Invoice comments [page 30]Communicating with the partner via statuses and actions [page 24]Attaching a standard comment to a balance [page 21]
6.2.14.1 To create pre-defined standard comment
Procedure
1. In the Administration tab, select Standard Comments.2. Click Add New.3. Enter a unique code and a description.4. From the Type list, select Balance or Invoice.
90 P U B L I CSAP BusinessObjects Intercompany User Guide
Administration of the application

NoteAs the term Invoice can be customized, it may have been replaced by another term in the list.
5. Click Create.
6.2.15 Forced agreements
A forced agreement enables an Administrator to adjust the remaining differences automatically at the end of the process. Forced agreements are not compulsory.
6.2.15.1 Setting up the forced agreement process
For forced agreements to run on all accounts simultaneously at the end of the process, the Administrator must do the following:
● Authorize use of the forced agreement process.● Designate, for each pair of parent accounts, the Forced Agreement Winner; the one that has entered the
correct amount.
When a child account is linked to a parent account, an adjustment account is created automatically and linked to the parent account. At the end of the cycle, once the forced agreement process has been run, the difference is stored in the adjustment account of the parent account and the balance is matched.
Adjustment accounts are automatically created when the forced agreement process is run. Their codes are made up of the name of the account adjusted plus an extension.
The extension:
● is defined by the Administrator.● is made up of a maximum of 8 characters.● is valid for all adjustment accounts.● can be changed at any time.
By default, when the forced agreement process is run, the balances entered for loser accounts which have a Partner Submitted status are deleted. However, the Administrator can decide to retain these balances.
Related Information
Forced agreements [page 91]Accounts [page 82]
SAP BusinessObjects Intercompany User GuideAdministration of the application P U B L I C 91

6.2.15.1.1 To authorize a forced agreement
Procedure
1. In the Administration tab, select Forced Agreement Settings.2. Activate Forced Agreement Enabled.
6.2.15.1.2 To designate the Forced Agreement Winner parent accounts
Procedure
1. In the Administration tab, select Accounts.2. Click the link for the parent account you want to designate as the Forced Agreement Winner.3. Activate Forced Agreement Winner.4. Click Update.
6.2.15.1.3 To define the adjustment account extension
Procedure
1. In the Administration tab, select Setting Metadata Settings .2. In the Adjustment Account Extension field, enter the text you want to define as the extension.
NoteThe extension field is limited to eight characters.
Related Information
To authorize a forced agreement [page 92]
92 P U B L I CSAP BusinessObjects Intercompany User Guide
Administration of the application

6.2.15.1.4 To retain loser accounts which have a Partner Submitted status
Procedure
1. In the Administration tab, select Forced Agreement Settings.2. From the Forced Agreement Behavior list, select Keep Partners.3. Click Update.
6.2.15.2 Running the forced agreement process
Administrators run this operation once the balances have been entered. The reconciliation process must be stopped when running forced agreements. Once the operation is performed, the process can be started again.
RestrictionThe forced agreement process should be the last operation performed on the balances as it may change the amounts.
Note
Once the process is finished, the Forced Agreement Run box is activated automatically in AdministrationForced Agreement Settings .
NoteIf there is a balance in the non-winning account but not in the winning account, the amount in the non-winning account is posted to the adjustment account on forced agreement.
Once the forced agreement process is complete, the Administrator can consult the log files containing the process history. If there is an error, the Administrator can restore the amounts as they were before the forced agreement process was run.
Related Information
To manually start the reconciliation process [page 49]To automatically start and stop the reconciliation process [page 50]
SAP BusinessObjects Intercompany User GuideAdministration of the application P U B L I C 93

6.2.15.2.1 To run the forced agreement process
Procedure
1. Stop the reconciliation process.2. In the navigation bar, click Period to select the period for which you want to run the forced agreement.3. In the Administration tab, select Run Forced Agreement.
NoteThis option is only available if the forced agreement process is authorized.
4. Click Run Forced Agreement.
Related Information
To authorize a forced agreement [page 92]
6.2.15.3 To restore data after running the forced agreement process
Procedure
1. In the Administration tab, select Roll Back Forced Agreement .
NoteThis option is only available if the forced agreement process is authorized.
2. Click Roll Back Forced Agreement.
Related Information
To authorize a forced agreement [page 92]
94 P U B L I CSAP BusinessObjects Intercompany User Guide
Administration of the application

6.2.15.4 To consult log files after running the forced agreement process
Procedure
1. In the Administration tab, select Settings Forced Agreement Settings .2. Click View History.
The Forced Agreement History page appears listing all of the processes that have been run.3. To display the adjustments made after a process was run, click the File Location link for the process.
6.2.16 Templates for data import and export
Only the Administrator can create templates. Templates match the data in a file from one database to another. Because a corporation can have branch offices or subsidiary companies with different database systems operating in different countries using different currencies, templates ease financial data entry and reconciliation, as well as master database maintenance of users, companies, and currencies.
NoteWhen an Administrator modifies an existing template fields, all templates based on these fields are automatically updated.
The following table lists the objects that are imported and exported, and which templates they use:
Table 7:
Object Import Export
Accounts X X
Account/Journal Account Relationships X X
Account Groups X
Balances X X
Analysis Balances X
Companies X X
Company Groups X X
Currencies X X
Invoices X X
SAP BusinessObjects Intercompany User GuideAdministration of the application P U B L I C 95

Object Import Export
Journals X
Journal Accounts X X
Subtotal Balance X
User/User Group Relationships X X
User Group/Company Relationships X X
User Groups X X
Users X X
The Administrator does the following so that data can be imported or exported:
● Configure the template fields for each object.● Configure a file template.
6.2.16.1 Template lists
Once the Administrator creates file templates, they are available in the template list for a specific category of import template. For example, when the Administrator saves a new company template, then goes to Import/Export Company Templates , the new template is listed.
NoteFor users who do not have Administrator rights, these objects appears in read-only mode.
The template lists include:
● The Code column lists the template names defined in the database.● The Description column lists the template descriptions defined in the database.● The Status column indicates whether the template can be used or not.
The green check mark indicates that the template is valid and can be used. If the red X appears, the template is invalid.
● The fourth column contains the delete icon. If you no longer need a template, click the delete X to remove the template.
6.2.16.2 Account templates
To create an account template, the Administrator needs to do the following:
● Configure the template fields.
96 P U B L I CSAP BusinessObjects Intercompany User Guide
Administration of the application

● Configure a file template that matches the file to import or the database to which a file is to be exported.
The following figure shows some of the fields available in a template, and how they need to correspond with items in an Excel worksheet.
6.2.16.2.1 Configuring the account template fields
The Administrator configures the template fields in Import/Export Account Template Fields .
Account import templates contain the following fields:
● IgnoreWhen certain fields in the import file cannot be processed by the application or the database to which the export file will be sent, the Administrator must use the Ignore field so that the system does not include the field.
● Account Code● Account Flow Code
If the accounts are linked to flows in the file, you will select the Use Account Flows option when you create the template, and enter the separator used in the import file in the Flow Delimiter field. The field is used with Partner Account Flow Code.
● Materiality CodeIf there is no materiality in the import file, either enter a default type field name or select a default materiality later when you create a template.
● Currency Rate TypeIf there is no currency rate in the file, either enter a default currency rate field name or select a default currency rate later when you create a template.
● Account Group Code● Account Description● Parent Account Code● Partner Account Code● Partner Account Flow Code
The field is used with Account Flow Code.● Account Status
The Account Status field displays for each reporting company whether or not it can be used in balances, or if it should be stored in the database for use at a later date.
SAP BusinessObjects Intercompany User GuideAdministration of the application P U B L I C 97

When you create the template in Import/Export Account Templates , you activate Import Status Information and define the active and inactive status indicators.
● Forced Agreement● Group Amount Source● Balance Sign
This field enables you to specify the sign to be assigned to amounts in the account currently open. To match invoices, you must specify the sign to be given to amounts in the account currently open.
Once the Administrator has populated the fields, templates can be created in Import/Export Account Templates .
6.2.16.2.2 Configuring an account template
Once the Administrator has populated the template field names in Import/Export Account Template Fields , templates can be created in Import/Export Account Templates .
The following fields are required:
● Account Code● Account Description● Currency Rate Type● Account Flow Code, if the accounts are linked to flows in the file
6.2.16.2.2.1 To configure an account file template
Procedure
1. In Import/Export Account Templates , click Add New.2. Type a unique code.3. Type a template description.4. From the Fields Per Line list, select the number of fields you want to include in the file.
NoteThis number determines how many fields appears in the window that are available when you click Define Fields.
5. Enter a character in the Field Delimiter that the file will use to separate the columns.6. Click Create.7. Click Define Fields.8. In the Field Definition page, select the fields that you want to include.
98 P U B L I CSAP BusinessObjects Intercompany User Guide
Administration of the application

NoteThe order of the fields must correspond to the file you are importing or to the database to which the file will be exported.
9. When you have selected the fields, click Update.10. From the Skip Lines list, select the number of lines in the top of the file that should not be imported or
exported.
For example, if you do not want to import the header row in the file, select 1. Only the second line onwards is imported.
11. If there are no materiality, translation or account group fields in the file, activate the following options and select values from the lists:○ Use Default Materiality Type○ Use Default Currency Rate Type○ Use Default Account Group
12. If the import file contains account flows, activate Use Account Flows and type in the Flow Delimiter field the character that is used for the account flow pairs in the import file.
13. Activate Import Status Information if you have a file that includes the Currency Status field.
You need to define the following status indicators:
○ Type an indicator in the Active Status Indicator text box if you have a template that includes the Currency Status field.
○ Type an indicator in the Inactive Status Indicator text box if you have a template that includes the Currency Status field.
14. If the forced agreement winners are included in the file, activate Import Forced Agreement Information and indicate in the Forced Agreement Winner Indicator field how the forced agreement winners are identified in the file.
15. Activate Use Account Sign to specify the sign to be assigned to amounts in the account currently open for positive and negative indicators.
16. Click Update.
The template is saved to the Account Templates list.
NoteThe Administrator can access the template in the Account Templates list at any time to update the details.
6.2.16.3 Account/Journal Account Relationships templates
Account/journal account relationship templates use the following fields:
● IgnoreWhen certain fields in the import file cannot be processed by the application or the database to which the export file will be sent, the Administrator must use the Ignore field so that the system does not include the field.
● Account Code
SAP BusinessObjects Intercompany User GuideAdministration of the application P U B L I C 99

● Journal Account Code
NoteYou need to import the journal accounts before you can import the user/user group relationships.
Related Information
To configure an import or export file template [page 109]Journal accounts [page 80]Accounts [page 82]
6.2.16.4 Account Group templates
Account group templates use the following fields:
● IgnoreWhen certain fields in the import file cannot be processed by the application or the database to which the export file will be sent, the Administrator must use the Ignore field so that the system does not include the field.
● Account Group Code● Account Group Description● Top Level Account Group Code● Parent Account Group Code
Related Information
To configure an import or export file template [page 109]Account groups [page 75]
6.2.16.5 Balance templates
To create a balance template the Administrator needs to do the following:
● Configure the template fields.● Configure a file template that matches the file to import or the database to which a file is to be exported.
NoteThe decimal symbol used depends on the application server's regional settings.
100 P U B L I CSAP BusinessObjects Intercompany User Guide
Administration of the application

The following figure shows some of the fields available in a template, and how they need to correspond with items in an Excel worksheet.
6.2.16.5.1 Configuring the balance template fields
The Administrator configures the template field names in Import/Export for the following types of balance files:
● Balance Import Template Fields for import templates● Balance Export Template Fields for general balance export templates
Balance exports use only the amounts stored in frozen child accounts.The template is also available for Analysis Balances exports that use only the amounts stored in unfrozen child accounts for analysis.
● Subtotal Balance Export Template Fields for subtotal balance export templatesSubtotal Balance exports use only the amounts stored in frozen parent accounts.The template is also available for Analysis Subtotal Balances exports that use only the amounts stored in unfrozen parent accounts for analysis.
Balance templates contain the following fields:
● IgnoreWhen certain fields in the import file cannot be processed by the application or database to which the export file will be sent, the Administrator must use the Ignore field so that the system does not include the field.
● Period Code● Company Code● Local Currency Code● Account Code● Partner Code● Transaction Currency Code
If there is no transaction currency in the import file, either enter a default transaction currency name in the field or enter a transaction currency in the Transaction Currency Code field when you create a template.
● Amount IndicatorIf there are transaction fields in the file for both the local currency and the transaction currency amount, you activate the Expect Two Lines Per Transaction option when you create a template.
● Amount
SAP BusinessObjects Intercompany User GuideAdministration of the application P U B L I C 101

If you use the Amount Indicator field in a template, the account field also needs to be included in the template.● Transaction Amount
This field is not used if the Amount Indicator field is used.● First analysis to Tenth analysis correspond to the fields in the import or export file that are not fields in the
application.For example, balances are exported to a file that is then used to import the balances into the consolidation system. In the consolidation system, Products is used as an object, but it is not an SAP BusinessObjects Intercompany field. You can enter Products in the First analysis field. You can then select the Products field in the import template.
● Account Flow CodeIf the accounts are linked to flows in the application and the flows and account codes are separate in the balance file, then you select the Use Account Flows option when creating the template, and enter a separator used in the file in the File Delimiter field.
NoteFor import file templates, the separator used must be identical to the one used in the account import file.
● Standard Comment CodeImported standard comments can be used as criteria for matching invoices. If the import file contains a standard comment which does not exist in the application, an error appears in the log file.
● Balance Comment
The following fields are also used in the Balance Export templates:
● Reporting Company Code● Category Code● Group Amount● Timestamp● Company Group Code
NoteIf a company is linked to several company groups, only the information for the first company group will be exported.
● Their Company Group Code● Their Reporting Company Code● Parent Account Code● Audit ID Code● Flow Code● Data Entry Period Code
The following fields are also used in the Subtotal Balance Export templates:
● Their Group Amount● Their Transaction Amount● Balance Status
102 P U B L I CSAP BusinessObjects Intercompany User Guide
Administration of the application

Related Information
Matching invoices [page 153]
6.2.16.5.2 Configuring a balance template
Once the Administrator has populated the template field names in Import/Export Balance Import Template Field Names , templates can be created in Import/Export.
The following fields are required:
● Company Code● Partner Code● Account Code● If there is no transaction currency in the file and no field name is specified, enter a transaction currency in the
Transaction Currency Code field.● If there are transaction fields in the file for both the local currency and the transaction currency amount,
activate the Expect Two Lines Per Transaction option and you need to include the Amount field in the template.
● If the accounts are linked to flows in the application and the flows and account codes are separate in the balance file, select the Use Account Flows option when creating the template, and enter a separator in the Flow Delimiter field.
6.2.16.5.2.1 To configure a balance file template
Procedure
1. In Import/Export, select one of the following:○ Balance Import Templates, to create an import template.○ Balance Export Templates or Subtotal Balance Export Template, to create an export template.
2. Click Add New.3. Type a unique code.4. Type a description.5. From the Fields Per Line list, select the number of fields you want to include in the file.
NoteThis number determines how many fields appears in the window that are available when you click Definite Fields.
6. Enter a character in the Field Delimiter text box that the file will use to separate the columns.7. Click Create.
SAP BusinessObjects Intercompany User GuideAdministration of the application P U B L I C 103

8. Click Define Fields.9. In the Field Definition page, select the fields that you want to include.
NoteThe order of the fields must correspond to the file you are importing or to the database to which the file will be exported.
10. When you have selected the fields, click Update.11. In the template, select the number of lines in the top of the file that should not be imported or exported from
the Skip Lines list.
For example, if you do not want to import the header row in the file, select 1. Only the second line onwards is imported.
12. Activate Expect Two Lines Per Transaction to enter the following:○ Local Amount Indicator, which must match the local amount indicator in the file.○ Transaction Amount Indicator which must match the transaction amount indicator in the file.
13. Activate Use Account Flows if there are flows linked to the accounts and type a Flow Deliminator.14. For import templates, activate Use Default Transaction Currency to specify a Default Transaction Currency.
NoteIf there is no transaction currency in the file, the currency specified in this field is used by default for all the amounts in the file.
15. For import templates, activate Use Default Transaction Amount to specify a Default Transaction Amount.
NoteIf there are no transaction currency amounts in the file, the amount specified in this field is used by default.
16. Click Update.
The template is saved to the applicable balance templates list.
NoteThe Administrator can update the templates in the balance templates lists at any time.
6.2.16.5.3 Exporting balance amounts to Financial Consolidation
Any user can export the amounts stored in the application database directly to an SAP BusinessObjects Financial Consolidation database. However, before balances can be exported the Administrator needs to set:
● a data source and web services URL● global parameters
104 P U B L I CSAP BusinessObjects Intercompany User Guide
Administration of the application

NoteTo export balances, the company or companies whose balances are to be exported must be frozen, and the reconciliation process must be running when exporting balances.
Related Information
Exporting balances to Financial Consolidation [page 44]Setting the SAP BusinessObjects Financial Consolidation parameters [page 106]Setting the connection to SAP BusinessObjects Financial Consolidation [page 105]
6.2.16.5.3.1 Setting the connection to SAP BusinessObjects Financial Consolidation
You must set the SAP BusinessObjects Financial Consolidation web services URL in order to import metadata to and export balance amounts from the application to SAP BusinessObjects Financial Consolidation.
The web services URL enables you to connect to the SAP BusinessObjects Financial Consolidation data source.
6.2.16.5.3.1.1 To set the web services URL to SAP BusinessObjects Financial Consolidation
Context
CautionStop the reconciliation process before executing the following steps.
Procedure
1. In the Administration tab, select Settings SAP BusinessObjects Financial Consolidation Settings .2. In the Discovery File URL text box, type the web services URL.3. Enter the default user code and password.4. Optionally, enter default metadata.5. Click Update.
SAP BusinessObjects Intercompany User GuideAdministration of the application P U B L I C 105
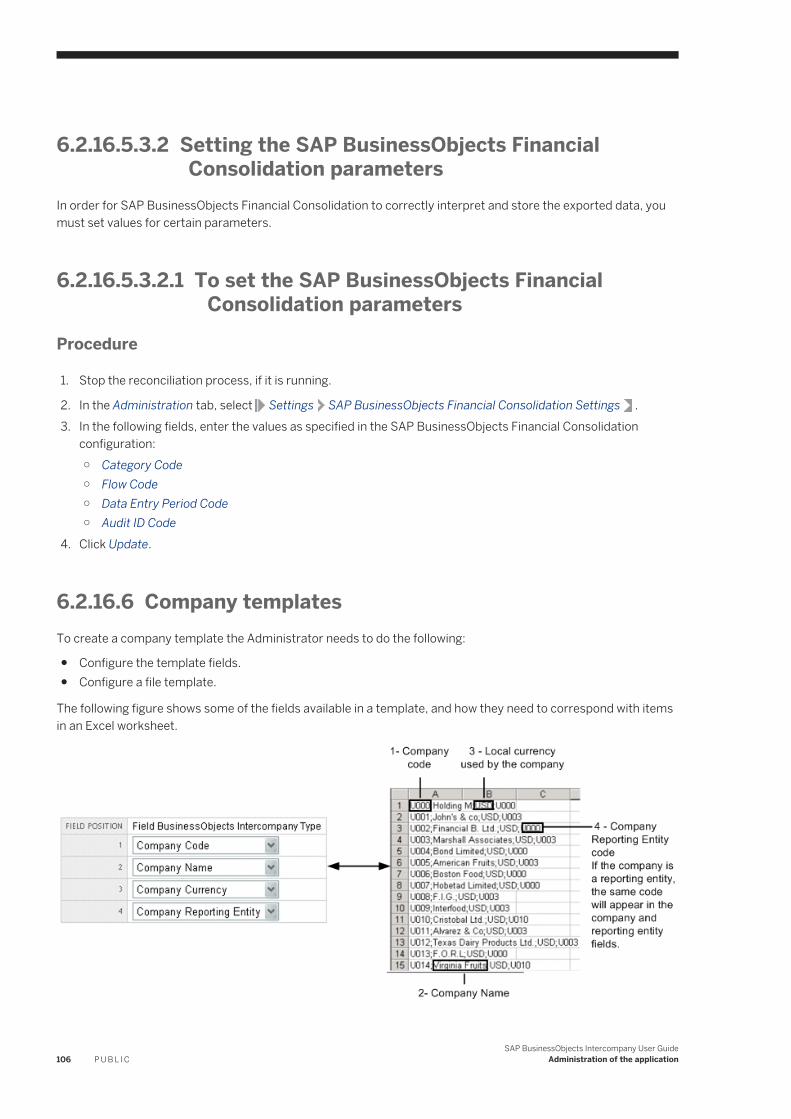
6.2.16.5.3.2 Setting the SAP BusinessObjects Financial Consolidation parameters
In order for SAP BusinessObjects Financial Consolidation to correctly interpret and store the exported data, you must set values for certain parameters.
6.2.16.5.3.2.1 To set the SAP BusinessObjects Financial Consolidation parameters
Procedure
1. Stop the reconciliation process, if it is running.
2. In the Administration tab, select Settings SAP BusinessObjects Financial Consolidation Settings .3. In the following fields, enter the values as specified in the SAP BusinessObjects Financial Consolidation
configuration:○ Category Code○ Flow Code○ Data Entry Period Code○ Audit ID Code
4. Click Update.
6.2.16.6 Company templatesTo create a company template the Administrator needs to do the following:
● Configure the template fields.● Configure a file template.
The following figure shows some of the fields available in a template, and how they need to correspond with items in an Excel worksheet.
106 P U B L I CSAP BusinessObjects Intercompany User Guide
Administration of the application

6.2.16.6.1 Configuring the company template fields
The Administrator configures the template fields in Import/Export Company Template Fields .
Company templates contain the following fields:
● IgnoreWhen the application or destination database does not need to process certain fields in the import file, the Administrator uses the Ignore field so that the import process ignores the correspoinding column in the file.
● Company Code● Company Group Code
If the company group is included in the file, activate the Import Company Groups option when you create the template in Import/Export Company Templates .
● Company Description● Reporting Company Code
If the reporting company is included in the file, activate the Import Reporting Companies option in the template.
● Currency Code● Company Status
The Company Status field displays for each reporting entity whether or not it can be used in balances or stored in the database for use at a later date.When you create the template in Import/Export Company Templates , you activate Import Status Information and define the active and inactive status indicators.
Once the Administrator has populated the fields, templates can be created in Import/Export Company Templates .
6.2.16.6.2 Configuring a company template
Once the Administrator has populated the template field names in Import/Export Company Template Fields , templates can be created in Import/Export Company Templates .
The following fields are required:
● Company Code● Company Description● Currency Code● Company Group Codes, if the company group is in the file● Reporting Company Code, if the reporting company is in the file
SAP BusinessObjects Intercompany User GuideAdministration of the application P U B L I C 107

6.2.16.6.2.1 To configure a company file template
Procedure
1. In Import/Export Company Templates , click Add New.2. Type a unique code.3. Type a description.4. From the Fields Per Line list, select the number of fields you want to include in the file.
NoteThis number determines how many fields appears in the window that are available when you click Define Fields.
5. Enter a character in the Field Delimiter that the file will use to separate the columns.6. Activate Import Company Groups if the company group field exists in the file.
If you activate this option, the company group field is available after you have defined the fields.
NoteOnce you have created the template with this option deactivated, you cannot return and activate it in the update mode.
7. Activate Import Reporting Company if you have a file that includes the Reporting Company Code field.
If you activate this option, the Reporting Company field is available after you have defined the fields.8. Click Create.9. Click Define Fields.10. In the Field Definition page, select the fields that you want to include.
NoteThe order of the fields must correspond to the file you are importing or to the database to which the file will be exported.
11. When you have selected the fields, click Update.12. In the template, select the number of lines in the top of the file that should not be imported or exported from
the Skip Lines list.
For example, if you do not want to import the header row in the file, select 1. Only the second line onwards is imported.
13. Activate Import Status Information if you have a file that includes the Currency Status field.
You need to define the following status indicators:
○ Type an indicator in the Active Status Indicator text box if you have a template that includes the Currency Status field.
○ Type an indicator in the Inactive Status Indicator text box if you have a template that includes the Currency Status field.
108 P U B L I CSAP BusinessObjects Intercompany User Guide
Administration of the application

14. Click Update.
The template is saved to the Company Templates list.
NoteThe Administrator can access the template in the Company Templates list at any time to update the details.
6.2.16.7 Company group templates
Company group templates use the following fields:
● IgnoreWhen certain fields in the import file cannot be processed by the application or the database to which the export file will be sent, the Administrator must use the Ignore field so that the system does not include the field.
● Company Group Code● Company Group Description
Related Information
Company groups [page 62]
6.2.16.7.1 To configure an import or export file template
Procedure
1. In Import/Export, select one of the following:
○ Import Account Groups or Export Account Groups.○ Import Company Group or Export Company Group○ Import User Group or Export User Group○ Import User/User Group Relationship or Export User/User Group Relationship○ Import User Group/Company Relationship or Export User Group/Company Relationship ○ Import Journal Accounts or Export Journal Accounts○ Import Account/Journal Account Relationship or Export Account/Journal Account Relationship
2. Click Add New.3. Type a unique code.4. Type a description.5. From the Fields Per Line list, select the number of fields you want to include in the file.
SAP BusinessObjects Intercompany User GuideAdministration of the application P U B L I C 109

NoteThis number determines how many fields appears in the window that are available when you click Define Fields.
6. Enter a character in the Field Delimiter that the file will use to separate the columns.7. Click Create.8. Click Define Fields.9. In the Field Definition page, select the fields that you want to include.
NoteThe order of the fields must correspond to the file you are importing or to the database to which the file will be exported.
10. When you have selected the fields, click Update.11. In the template, select the number of lines in the top of the file that should not be imported or exported from
the Skip Lines list.
For example, if you do not want to import the header row in the file, select 1. Only the second line onwards is imported.
12. Click Update.
The template is saved to the template list.
6.2.16.8 Currency templates
To create a currency template the Administrator needs to do the following:
● Configure the template fields for the currency.● Configure a file template that matches the file to import or the database to which a file is to be exported.
The following figure shows some of the fields available in a template, and how they need to correspond with items in an Excel worksheet.
110 P U B L I CSAP BusinessObjects Intercompany User Guide
Administration of the application

6.2.16.8.1 Configuring the currency template fields
The Administrator configures the template field names in Import/Export Currency Template Fields .
Currency templates contain the following fields:
● IgnoreWhen certain fields in the import file cannot be processed by the application or the database to which the export file will be sent, the Administrator must use the Ignore field so that the system does not include the field.
● Currency Code● Currency Description● Currency Opening Rate● Currency Average Rate● Currency Closing Rate● Currency Status● Currency Rate Type
Once the Administrator has populated the fields, templates can be created in Import/Export Currency Templates . The Administrator can update the currency template field name entries at any time.
6.2.16.8.2 Configuring a currency template
Once the Administrator has populated the template fields in Import/Export Currency Template Fields , templates can be created in Import/Export Currency Templates .
The following fields are required:
● Currency Code● Currency Description● Currency Opening Rate● Currency Average Rate
6.2.16.8.2.1 To configure a currency file template
Procedure
1. In Import/Export Currency Templates , click Add New.2. Type a unique code.3. Type a description.4. From the Fields Per Line list, select the number of fields you want to include in the file.
SAP BusinessObjects Intercompany User GuideAdministration of the application P U B L I C 111

NoteThis number determines how many fields appears in the window that are available when you click Define Fields.
5. Enter a character in the Field Delimiter box that the file will use to separate the columns.6. Activate Use Define Period to identify the period to which the currency rates are linked.7. Click Create.8. Click Define Fields.9. In the Field Definition page, select the fields that you want to include.
NoteThe order of the fields must correspond to the file you are importing or to the database to which the file will be exported.
10. When you have selected the fields, click Update.11. In the template, select the number of lines in the top of the file that should not be imported or exported from
the Skip Lines list.
For example, if you do not want to import the header row in the file, select 1. Only the second line onwards is imported.
12. Activate Import Status Information if you have a template that includes the Currency Status field and want to import the currency status information.
You need to define the following status indicators:
○ Type an indicator in the Active Status Indicator text box if you have a template that includes the Currency Status field.
○ Type an indicator in the Inactive Status Indicator text box if you have a template that includes the Currency Status field.
13. Activate Import Rate Type Information to define the valuation methods used for the currencies:○ In Multiply Indicator text box, type a character to represent rates using the multiply format.○ In Divide Indicator text box, type a character to represent rates using the divide format.
14. Click Update.
The template is saved to the Currency Templates list.
6.2.16.9 Invoice templates
To create an invoice template the Administrator needs to do the following:
● Configure the template fields.● Configure a file template that matches the file to import or the database to which a file is to be exported.
The following figure shows some of the fields available in a template, and how they need to correspond with items in an Excel worksheet.
112 P U B L I CSAP BusinessObjects Intercompany User Guide
Administration of the application

NoteThere may be certain fields in the file that cannot be processed by the application. If this is the case, users must use the Ignore field so that the system does not include the field.
6.2.16.9.1 Configuring the invoice template fields
The Administrator configures the template fields in Import/Export Invoice Template Fields .
Invoice templates contain the following fields:
● IgnoreWhen certain fields in the import file cannot be processed by the application or database to which the export file will be sent, the Administrator must use the Ignore field so that the system does not include the field.
● Period● Company Code● Local Currency Code● Account Code● Partner Code● Transaction Currency Code
If there is no transaction currency in the import file, either enter a default transaction currency name in the field or enter a transaction currency in the Transaction Currency Code field when you create a template.
● Local Amount● Transaction Amount● Standard Comment Code
Imported standard comments can be used as criteria for matching invoices. If the import file contains a standard comment which does not exist in the application, an error appears in the log file.
● Invoice Group ID● Invoice Reference
When importing or exporting an invoice that has no reference in the import file, you can assign a default reference to it.
● Invoice Text, Invoice Date and Invoice Amount fields are used for objects not mentioned in the field names above.
NoteIf an object in the import file does not exist in the application, an error can appear in the log file.
SAP BusinessObjects Intercompany User GuideAdministration of the application P U B L I C 113
● Invoice Comment
Related Information
Matching invoices [page 153]
6.2.16.9.2 Configuring an invoice template
Once the Administrator has populated the template fields in Import/Export Invoice Template Fields , templates can be created in Import/Export Invoice Templates .
The following fields are required:
● Company Code● Partner Code● Account Code● Invoice Reference● Transaction Amount● Transaction Currency Code
6.2.16.9.2.1 To configure an invoice file template
Procedure
1. In Import/Export Invoice Templates , click Add New.2. Type a unique code.3. Type a description.4. From the Fields Per Line list, select the number of fields you want to include in the file.
NoteThis number determines how many fields appears in the window that are available when you click Define Fields.
5. Enter a character in the Field Delimiter box that the file will use to separate the columns.6. Click Create.7. Click Define Fields.8. In the Field Definition page, select the fields that you want to include.
114 P U B L I CSAP BusinessObjects Intercompany User Guide
Administration of the application

NoteThe order of the fields must correspond to the file you are importing or to the database to which the file will be exported.
9. When you have selected the fields, click Update.10. In the template, select the number of lines in the top of the file that should not be imported or exported from
the Skip Lines list.
For example, if you do not want to import the header row in the file, select 1. Only the second line onwards is imported.
11. Activate Use Default Reference to import and assign a Default Reference to an invoice that has no reference in the file.
12. Click Update.
The template is saved to the Invoice Templates list.
6.2.16.10 Journal Export templates
A user selects a Journal Export template to export amounts stored in journal accounts to files, which can be imported into another accounting system.
6.2.16.10.1 Configuring the journal export template fields
The Administrator configures the template fields in Import/Export Journal Export Template Fields .
Journal templates contain the following fields:
● IgnoreWhen certain fields in the import file cannot be processed by the application or the database to which the export file will be sent, the Administrator must use the Ignore field so that the system does not include the field.
● Period Code● Company Code● Account Code ● Partner Code● Transaction Currency Code
If there is no transaction currency in the import file, either enter a default transaction currency name in the field or enter a transaction currency in the Transaction Currency Code field when you create a template.
● Local Amount Adjustment● Transaction Amount Adjustment● Original Local Amount● Original Transaction Amount● Journal Account Code
SAP BusinessObjects Intercompany User GuideAdministration of the application P U B L I C 115

6.2.16.10.2 Configuring a journal export template
Once the Administrator has populated the template fields in Import/Export Journal Export Template Fields , templates can be created in Import/Export Journal Export Templates .
The following fields are required:
● Company Code● Partner Code● Journal Account Code● Transaction Currency Code● At least one of the following fields must be used:
○ Transaction Amount Adjustment○ Local Amount Adjustment
6.2.16.10.2.1 To configure a journal export file template
Procedure
1. In Import/Export Journal Export Templates , click Add New.2. Type a unique code.3. Type a description.4. From the Fields Per Line list, select the number of fields you want to include in the file.
NoteThis number determines how many fields appears in the window that are available when you click Define Fields.
5. Enter a character in the Field Delimiter text box that the file will use to separate the columns.6. Click Create.7. Click Define Fields.8. In the Field Definition page, select the fields that you want to include.
NoteThe order of the fields must correspond to the file you are importing or to the database to which the file will be exported.
9. When you have selected the fields, click Update.10. In the template, select the number of lines in the top of the file that should not be imported or exported from
the Skip Lines list.
For example, if you do not want to import the header row in the file, select 1. Only the second line onwards is imported.
116 P U B L I CSAP BusinessObjects Intercompany User Guide
Administration of the application

11. Click Update.
The template is saved to the Journal Export Template list.
6.2.16.11 User templates
To create a user template the Administrator needs to do the following:
● Configure the template fields.● Configure a file template that matches the file to import or the database to which a file is to be exported.
The following figure shows some of the fields available in a template, and how they need to correspond with items in an Excel worksheet.
6.2.16.11.1 Configuring the user template fields
The Administrator configures the template field names in Import/Export User Template Fields .
User templates use the following fields:
● IgnoreWhen certain fields in the import file cannot be processed by the application or the database to which the export file will be sent, the Administrator must use the Ignore field so that the system does not include the field.
SAP BusinessObjects Intercompany User GuideAdministration of the application P U B L I C 117

● User Code● User Description● User Profile Code
The types of users, based on the application access rights, are:○ Administrator○ Interactive User○ Power User○ View User
● User Language● User Email Address● User Phone● User Fax● User Address● User Mobile● User Password
If there is no password in the file, type a default password in the User Password field. Alternatively, type a password in the Default Password field when you create a template.
● User Can Receive Detailed EmailsInclude this field in your template and file as a flag. Use 0 to indicate that the users should receive detailed emails, or a 1 to indicate that the user should not receive them.
● User External Login
Once the Administrator has populated the fields, templates can be created in Import/Export User Templates . The Administrator can update the user template field entries at any time.
Related Information
Addressees of detailed emails [page 145]
6.2.16.11.2 Configuring a user template
Once the Administrator has populated the template fields in Import/Export User Template Fields , templates can be created in Import/Export User Templates .
The following fields are required:
● User Code● User Description● User Profile Code● User Language● User Password
118 P U B L I CSAP BusinessObjects Intercompany User Guide
Administration of the application

6.2.16.11.2.1 To configure a user file template
Procedure
1. In Import/Export User Templates , click Add New.2. Type a unique code.3. Type a description.4. From the Fields Per Line list, select the number of fields you want to include in the file.
NoteThis number determines how many fields appears in the window that are available when you click Define Fields.
5. Enter a character in the Field Delimiter text box that the file will use to separate the columns.6. If you want to set a default password, in case there is no default password in the file, activate Use Default
Password box and enter in the Default Password text box.7. Click Create.8. Click Define Fields.9. In the Field Definition page, select the fields that you want to include.
NoteThe order of the fields must correspond to the file you are importing or to the database to which the file will be exported.
10. When you have selected the fields, click Update.11. From the Skip Lines list, select the number of lines in the top of the file that should not be imported or
exported.
For example, if you do not want to import the header row in the file, select 1. Only the second line onwards is imported.
12. Click Update.
The template is saved to the User Templates list.
6.2.16.12 User/User Group Relationship templates
User/user group relationship templates use the following fields:
● IgnoreWhen certain fields in the import file cannot be processed by the application or the database to which the export file will be sent, the Administrator must use the Ignore field so that the system does not include the field.
● User Code● User Group Code
SAP BusinessObjects Intercompany User GuideAdministration of the application P U B L I C 119

NoteYou need to import the user groups before you can import the user/user group relationships.
Related Information
To configure an import or export file template [page 109]User groups [page 74]Users [page 67]
6.2.16.13 User Group templates
The User Groups import involves the following tasks:
● Import the User Groups.● Link User Groups and users.● Link User Groups and companies.
User group templates use the following fields:
● IgnoreWhen certain fields in the import file cannot be processed by the application or the database to which the export file will be sent, the Administrator must use the Ignore field so that the system does not include the field.
● User Group Code● User Group Description
Related Information
To configure an import or export file template [page 109]User groups [page 74]
6.2.16.14 User Group/Company Relationship templates
User group/company relationship templates use the following fields:
● IgnoreWhen certain fields in the import file cannot be processed by the application or the database to which the export file will be sent, the Administrator must use the Ignore field so that the system does not include the field.
120 P U B L I CSAP BusinessObjects Intercompany User Guide
Administration of the application

● User Group Code● Company Code
NoteYou need to import the user groups before you can import the user group/company relationship file.
The user group/company relationship import file enables you to define which companies belong to which User Groups.
Related Information
To configure an import or export file template [page 109]User groups [page 74]Companies [page 63]
6.2.16.15 Journal Account templates
Journal accounts are imported in the following order:
● Import journal accounts to define the journal account codes and description.● Import the account/journal account relationships to define which journal accounts are linked to which
accounts.
Journal account templates use the following fields:
● IgnoreWhen certain fields in the import file cannot be processed by the application or the database to which the export file will be sent, the Administrator must use the Ignore field so that the system does not include the field.
● Journal Account Code● Journal Account Description
Related Information
To configure an import or export file template [page 109]Journal accounts [page 80]
6.2.17 Importing data
Instead of manually entering all of the metadata objects in the application, a group of related metadata objects in a .csv or .txt file is imported into the company database.
SAP BusinessObjects Intercompany User GuideAdministration of the application P U B L I C 121

If the import data does not match the fields existing in the company database, the Administrator creates templates that define how the data is entered into the database.
Before importing the data, verify that the import files are correctly formatted. The type of file you can import depends on your profile:
Table 8:
Import file Profile allowed to import the file
Currency Administrator
Company Administrator
Account Administrator
User Administrator
Company Group Administrator
User Group Administrator
User/User Group Relationships Administrator
User Group/Company Relationships Administrator
Account Groups Administrator
Journal Accounts Administrator
Account/Journal Account Relationships Administrator
Balance Administrator, Interactive User
Invoice Administrator, Interactive User
Bulk balance or invoice Administrator
To be able to import, the Administrator must specify:
● the name of the template to be used, if applicable● the language in which the descriptions are entered in the import file where applicable● the path to the import file
When the import is complete, the Summary page appears displaying the results of the import.
Related Information
To import balance amounts via an import template [page 127]Templates for data import and export [page 95]Import order [page 129]Consulting import results [page 130]
122 P U B L I CSAP BusinessObjects Intercompany User Guide
Administration of the application

6.2.17.1 Files for importing users and accounts
Before importing the data, verify that the import files are correctly formatted.
If you are importing users or accounts, some items must be in the English version. If the items are in other languages, the import will not be successful.
User import fields that must be in English
Table 9:
Field EN version
User Profile Code Administrator
InteractiveUser
PowerUser
ViewUser
User Language ChineseSimplified
Danish
Dutch
English
Finnish
French
German
Italian
Japanese
Korean
NorwegianBokmal
Polish
PortugueseBrazil
Russian
Spanish
Swedish
Turkish
SAP BusinessObjects Intercompany User GuideAdministration of the application P U B L I C 123

Account import fields that must be in English
Table 10:
Field EN version
Materiality Code OFFBALANCESHEET
PROFITANDLOSS
BALANCESHEET
Currency Rate Type Closing
Opening
Average
6.2.17.2 To import metadata objects using an import template
Procedure
1. In the Import/Export tab, select the type of import that is appropriate to your file.2. From the Template list, select a template.3. From the Language list, select the language used in the import file.
NoteA language is not required if you are importing Account/Journal Account Relationship, User Group/Company Relationship or User/User Group Relationship files.
4. To specify the path to the import file, do one of the following:○ Type the file path and name in the Source Data File field.○ Click Browse.
1. In the Choose file box, migrate to and then select the import file.2. Click Open.
5. Click Import.
NoteIf the import has been put in the import queue, you can cancel the import by clicking Cancel.
When the import is complete the Summary page appears displaying the results of the import.
Related Information
Templates for data import and export [page 95]
124 P U B L I CSAP BusinessObjects Intercompany User Guide
Administration of the application

Import queue [page 130]Consulting import results [page 130]To import metadata from SAP BusinessObjects Financial Consolidation [page 126]
6.2.17.3 Importing metadata from SAP BusinessObjects Financial Consolidation
You can import currency, company, and account metadata directly from SAP BusinessObjects Financial Consolidation . When you choose a metadata import item from the Import Metadata section in Import/Export tab, the application connects to SAP BusinessObjects Financial Consolidation and retrieves metadata to generate a list of objects you can select.
RememberBefore you import metadata, you need to set the web services URL connection to SAP BusinessObjects Financial Consolidation.
Currency and exchange rate metadada import
When you import the currency metadata, you can specify the conversion rate period and version to match the SAP BusinessObjects Financial Consolidation exchange rate table. The currency and period correspond to what you have selected in the application. The following table shows the mapping between the application and SAP BusinessObjects Financial Consolidation.
Table 11:
Intercompany Financial Consolidation
Currency Code Code
Description Long Description
If the currency already exists in the application, the exchange rate metadata is updated. If the currency does not exist in the application, the currency is created and then the rates are imported.
Company metadada import
The following table shows the mapping between the application and SAP BusinessObjects Financial Consolidation.
Table 12:
Intercompany Financial Consolidation
Company Code Code
SAP BusinessObjects Intercompany User GuideAdministration of the application P U B L I C 125

Intercompany Financial Consolidation
Description Long Description
Reporting Currency Currency
Account metadada import
When you import account metadata, you have to specify the account, materiality, and currency rate type that corresponds with the metadata in SAP BusinessObjects Financial Consolidation.
CautionYou must do a separate account import for each account group.
The following table shows the mapping between the application and SAP BusinessObjects Financial Consolidation.
Table 13:
Intercompany Financial Consolidation
Account Code Code
Description Long Description
Related Information
To set the web services URL to SAP BusinessObjects Financial Consolidation [page 105]
6.2.17.3.1 To import metadata from SAP BusinessObjects Financial Consolidation
Procedure
1. In the Import/Export tab, select one of the following:
○ Import Currencies From SAP BusinessObjects Financial ConsolidationSelect the conversion rate period and version that match the SAP BusinessObjects Financial Consolidation exchange rate table.
○ Import Companies From SAP BusinessObjects Financial Consolidation○ Import Accounts From SAP BusinessObjects Financial Consolidation
Specify the account group, materiality, and currency rate type that corresponds with the account to import from SAP BusinessObjects Financial Consolidation.
126 P U B L I CSAP BusinessObjects Intercompany User Guide
Administration of the application

CautionYou must do a separate account import for each account group.
2. Select the checkbox for each object you want to import.You can also select Assign All if you want to import all objects.
3. Click Import.A progress report appears that shows the metadata import progress. When the import is done, a summary page appears that shows the outcome, lines processed, number of errors, and a link to a log file.
Related Information
Importing metadata from SAP BusinessObjects Financial Consolidation [page 125]
6.2.17.4 To import balance amounts via an import template
Procedure
1. In the Import/Export tab, click one of the following:○ Import Balances if you are importing a file of balances○ Bulk Import Balance if you are importing a bulk balance file
2. From the Template list, select a template.3. Activate Reset Local Amount Journals to define the local currency amounts as original amounts.4. Activate Reset Transaction Amount Journals to define the transaction currency amounts as original amounts.5. To specify the path to the import file, do one of the following:
○ Type the file path and name in the Source Data File field.○ Click Browse.
1. In the Choose file box, migrate to and then select the import file.2. Click Open.
6. Click Import.
NoteIf the import has been put in the import queue, you can cancel the import by clicking Cancel.
When the import is complete the Summary page appears displaying the results of the import.
Related Information
Templates for data import and export [page 95]
SAP BusinessObjects Intercompany User GuideAdministration of the application P U B L I C 127

Import queue [page 130]Consulting import results [page 130]
6.2.17.5 Importing invoices
To import invoices:
● users must have a file containing the amounts to be imported.Invoices always contain positive amounts. To be able to match them, you must specify the sign to be used for amounts in all of the accounts.
● users must also select an import template created by the Administrator. A mapping between the application fields and the import file fields is defined by the Administrator in the import templates.
Related Information
Parent accounts [page 84]
6.2.17.5.1 Replacing or totaling invoice balances
When importing invoices that have already been imported into the application under the same reference, transaction currency, account, company and partner, you can specify whether or not:
● The imported amounts must replace the existing invoice amounts.● The amounts should be added to the existing invoice amounts.
NoteIf an identical invoice exists in the application and it is matched, it is not replaced or aggregated with the invoice in the import file.
6.2.17.5.2 To import invoices
Procedure
1. In the Import/Export tab, select one of the following:○ Import Invoices○ Bulk Import Invoices
2. From the Template list, select a template.3. To have the imported balances replace the existing balances, activate Override Existing.
128 P U B L I CSAP BusinessObjects Intercompany User Guide
Administration of the application

If you do not activate the option, the imported balances are added to existing balances.4. Activate Create/Update Balances if you want balances created for invoices that do not contain any amounts.
When you import invoices, balances are created even if the invoices do not contain any amounts. The default amount entered is 0. The balances are created for the same company, partner, transaction currency and account as the corresponding invoices.
Note
If the Administrator activated Invoices Drive Balances in Administration Settings Invoice Settings , the Create/Update Balance option is activated by default.
5. Select a date format from the list.6. Enter a Thousand Separator.7. Enter a Decimal Separator.8. To specify the path to the import file, do one of the following:
○ Type the file path and name in the Source Data File field.○ Click Browse.
1. In the Choose file box, migrate to and then select the import file.2. Click Open.
9. Click Import.
NoteIf the import has been put in the import queue, you can cancel the import by clicking Cancel.
When the import is complete the Summary page appears displaying the results of the import.
Related Information
Import queue [page 130]Consulting import results [page 130]
6.2.17.6 Import order
When setting up the database, an Administrator imports objects in the following order:
● Currencies● Company Groups (optional)● Companies when relevant, including reporting companies and company groups● Account Groups● Accounts● Journal Accounts (optional)● Account/Journal Account Relationships (optional)
SAP BusinessObjects Intercompany User GuideAdministration of the application P U B L I C 129

● Users● User Groups● User/User Group Relationships● User Group/Company Relationships
Balance and invoice transaction data is imported during the reconciliation process.
6.2.17.7 Consulting import results
The import Summary page includes:
● the Status field, which indicates whether or not the import was successful● the name of the template used● the Data File Path, which indicates the import file location● the Processed Line Count, which indicates the number of lines imported● the error count● The Log File Path
If there were errors, this line appears indicating the link to a file containing all of the errors found during the import.
You can consult this page at a later date at Import/Export Previous Imports/Exports .
6.2.17.8 Import queue
All the imports are placed in a queue. When one import finishes, the next one in the queue is started.
The following operations are considered as priorities:
● updating currencies● updating materiality thresholds● running the forced agreement process● archiving and restoring periods● copying rates
Import operations are also placed lower in the queue when another operation considered as a higher priority is being run. When a user runs an import operation, the Progress Report page appears, indicating the operation's position in the import queue.
Click Cancel to delete the import from the queue and cancel the import.
The Administrator can also delete imports from the queue by clicking the red X icon in the Administration Maintenance page.
130 P U B L I CSAP BusinessObjects Intercompany User Guide
Administration of the application

6.2.17.9 Reusing data from a previous period in a new period
Context
The Administrator can use the Initialize from Previous Period option to copy source period balance and invoice data from a previously created period to a new one.
To reuse data in a new period:
Procedure
1. Stop the reconciliation process.2. Create the period.3. In the Import/Export tab, click Initialize From Previous Period.4. Defining the following values:
○ Source Period○ Target Period○ Account Group filter (optional)○ Account filter (optional)○ Company filter (optional)
5. Click OK.
6. In Administration Statuses Edit Status page, activate Local Amount Editable and Transaction Amount Editable, so that users can import new invoices and balances after the initialization.
6.2.18 Exporting metadata
Before exporting the data files, verify that they are formatted to match the destination database.
The type of file you can export depends on your profile:
Table 14:
Export file Profile allowed to export the file
Companies Administrator
Accounts Administrator
Users Administrator
User Groups Administrator
User / User Group Relationships Administrator
SAP BusinessObjects Intercompany User GuideAdministration of the application P U B L I C 131

Export file Profile allowed to export the file
User Group / Company Relationships Administrator
Subtotal Balances Administrator, Interactive User, Power User, View User
Analysis Balances Administrator, Interactive User, Power User, View User
Analysis Subtotal Balances Administrator, Interactive User, Power User, View User
Balances Administrator, Interactive User, Power User, View User
Invoices Administrator, Interactive User, Power User, View User
Journals Administrator, Interactive User, Power User, View User
The information on exporting the following is in this section:
● Accounts● Account Groups● Account/Journal Account Relationships● Companies● Journal Accounts● Users● User Groups● User/User Group Relationships● User Group/Company Relationships
Information on exporting balance, invoice, and journal files is offered in the reconciliation process section called Exporting financial data.
Related Information
Exporting financial data [page 40]
6.2.18.1 Selecting the character set for exports
Two character sets can be used for export files:
● ASCII● Unicode
The Administrator specifies the set to be used before any exports are performed.
132 P U B L I CSAP BusinessObjects Intercompany User Guide
Administration of the application

6.2.18.1.1 To select the character set for exports
Procedure
1. In the Administration tab, select Settings Import/Export Settings .2. From the Export File Encoding list, select a set type.3. Click Update.
6.2.18.1.2 To export data
Procedure
1. In the Import/Export tab, select an export option.
NoteOnly an Administrator can export companies, accounts, users, user groups, user group relationships, or group company relationships. If you are exporting invoices, journals, or balances, go to the section in the documentation on exporting financial data.
2. Select a template.3. Select a language.4. If you are exporting currencies, enter thousand and decimal separators.
NoteThe separator should correspond to that used by the database that will receive the export data.
5. To filter the data exported, activate Use Filter, and click to select filter items.6. Click Export.
The file is exported and the Summary page appears displaying the results of the export.
Related Information
Exporting financial data [page 40]Consulting export results [page 134]
SAP BusinessObjects Intercompany User GuideAdministration of the application P U B L I C 133

6.2.18.2 Consulting export results
When you finish exporting a file, the Summary page appears. The Summary page includes the following information:
● The Status indicates the success of the export.● The Template● The Data File Path field displays a link to the log file generated by the export.● The Processed Line Count● The Error Count indicates the number of errors that occurred during the export.● The Log File Path
You can consult this page at a later date at Import/Export Previous Import/Export .
Related Information
Consulting import and export results [page 135]
6.2.18.3 Enabling the data filter for financial data exports
You can apply a data filter to exports to see:
● only your company data● only partner data where they have data declared against you● data for both your company and the partner.
You must enable the data filter in order to access it in the balance and invoice export pages.
6.2.18.3.1 To enable the data filter for balance and invoice exports
Procedure
1. In the Administration tab, select Settings Balance Settings .2. Activate Data Filter Enabled.3. Click Update.
The Use Data Filter field is now visible in the balance and invoice export pages.
134 P U B L I CSAP BusinessObjects Intercompany User Guide
Administration of the application

6.2.19 Consulting import and export results
A page containing the results of the import or export performed can be consulted as soon as the operation is complete. This page is stored in the application and can be consulted at any time.
6.2.19.1 To consult import or export results
Procedure
1. In the Import/Export tab, click Previous Imports/Exports.2. In the Start Date column, click the link for the import or export results you want to consult.3. In the Summary page, to consult the error log file click the error log link.
6.3 General administrative tasks
6.3.1 Freezing and unfreezing company balances
When the company balances are frozen, neither the declaring company nor the partner can change them.
Balances can be frozen or unfrozen in:
● balances pages● company pages
The Administrator can freeze all the balances for all the companies simultaneously and unfreeze the balances for a company if a user froze it by mistake.
6.3.1.1 Authorizing unmatched company balances to be frozen
Neither the declaring company nor the partner can access frozen balances. The declaring company decides when all of the work is complete and the partner can no longer make any changes.
NoteIf an error has been made, only Administrators can unfreeze company balances, unless the Administrator gives Power Users the right to freeze companies.
By default, only company balances that are agreed to can be frozen.
SAP BusinessObjects Intercompany User GuideAdministration of the application P U B L I C 135

The Administrator can also authorize users to freeze their company balances whether they have been agreed to or not.
NoteIf the Administrator authorizes companies to freeze their balances only when the balances are agreed to, the companies cannot do so when they have the Company Agreed To Differ and Partner Agreed To Differ statuses activated.
Related Information
Freezing company balances at the end of the reconciliation process [page 137]Statuses [page 147]
6.3.1.1.1 To authorize companies to freeze unmatched balances
Procedure
1. In the Administration tab, select Settings Balance Settings .2. Activate Unmatched Balance Freezing Allowed.3. Click Update.
6.3.1.2 Authorizing Power Users to freeze companies with unmatched balances
In Administration Settings Balance Settings , the Administrator can enable Power Users to freeze and unfreeze companies with unmatched balances, even if the Group Row Difference option is selected for Group Amount Matching, and the Unmatched Balance Freezing Allowed option is not activated.
6.3.1.2.1 To authorize Power Users to freeze and unfreeze unmatched balances
Procedure
1. In the Administration tab, select Settings Balance Settings .
136 P U B L I CSAP BusinessObjects Intercompany User Guide
Administration of the application

2. Activate Unmatched Balance Freezing by Power User Allowed.3. Click Update.
6.3.1.3 Freezing company balances at the end of the reconciliation process
At the end of the process, the Administrator freezes all of the balances, agreed or not, for all of the companies:
● for the current period● for all of the periods
Balances for the current period can be frozen or unfrozen, regardless of whether or not the reconciliation process is running.
Balances can be frozen or unfrozen for all of the periods only if:
● the reconciliation process is stopped● there are no users connected
NoteUnfreezing balances for all of the companies and periods enables you to recalculate the balances and take any changes into account, for example rate changes.
Related Information
Database maintenance [page 48]
6.3.1.3.1 To freeze all of the company balances
Procedure
1. In the Administration tab, select Companies.2. Click Freeze Companies.
A confirmation message appears.3. Click OK.
SAP BusinessObjects Intercompany User GuideAdministration of the application P U B L I C 137

6.3.1.3.2 To unfreeze company balances
Procedure
1. Do one of the following:○ Click the Balances tab.
The Detail by Partners page appears.
○ Select Administration Companies > [company to be unfrozen].The selected company's page appears.
2. Click Unfreeze Company.
A confirmation message appears.3. Click OK.
6.3.1.3.3 To freeze/unfreeze balances for all of the companies and periods
Procedure
1. Stop the reconciliation process.
2. Select Administration Periods .3. In the Periods page, click Freeze Companies or Unfreeze Companies.
A confirmation message appears.4. Click OK.
6.3.2 Invoice matching
If invoice matching is included in the application license, you can break down the balances in child accounts into different invoices.
This enables users to compare the invoices entered by the declaring company and the partner. Invoices enable you to analyze differences in greater detail. Even if the invoices are not matched, this does not block the reconciliation process.
6.3.2.1 Creating balances by importing/creating invoices
The Administrator authorizes the use of invoices in Administrator Settings Invoice Settings .
138 P U B L I CSAP BusinessObjects Intercompany User Guide
Administration of the application

Depending on the option activated by the Administrator in Invoice Matching, the balances linked to the invoices, which are imported or manually entered, are created differently.
Table 15:
Option Description
Invoices Create Zero Balances When you import invoices, balances are created, even if the invoices do not contain any amounts, with the default amount of 0.
The balances are created for the same company, partner, transaction currency and account as the corresponding invoices. You can access the invoices by navigating through the balances pages.
Invoices Drive Balances When you import or manually enter invoices, the balances created contain amounts which are the sums of the invoices linked to the balances.
The balances are created for the same company, partner, transaction currency and account as the corresponding invoices. You can access the invoices by navigating through the balances pages.
NoteIf the Administrator authorized the use of invoices and activated Invoices Drive Balances:
● each time a user updates the balances, a message appears indicating that the balance amounts and the sum of invoices linked to the balances no longer correspond.
● each time a user imports invoices, the user can optionally select Create/Update Balances.
Balance update by invoice only Activate this option to allow users to update balances only by invoice.
NoteThis option is available when you activate Invoices Drive Balances.
Invoices Match on Standard Comment Invoices are matched if they have the same standard comment.
Invoice Substitution Behaviour If an invoice which is created manually or imported already exists in the database, the user can choose to override the existing amount or aggregate it with the new amount. The Administrator sets the default option in the Invoice Settings.
NoteIf the Administrator does not activate the options described above, the invoices are loaded in the database but are not available in the application. No balances are created. You can only access the invoices when the relevant balances have been created.
SAP BusinessObjects Intercompany User GuideAdministration of the application P U B L I C 139

Related Information
Invoice templates [page 112]Matching invoices [page 153]Entering invoice amounts [page 28]
6.3.2.1.1 Authorizing invoices matching via standard comments
Only invoices which have the same standard comment may be matched. This means that the company and the partner have justified the differences between their invoices via the same standard comment. If the invoices have the same standard comment, they are matched even though differences exist.
Related Information
Statuses [page 147]Freezing and unfreezing company balances [page 135]
6.3.2.1.2 Additional fields for invoices
The Administrator can customize fields to provide more information on the invoice amounts.
By default, these fields are not available; the Administrator activates them. The Administrator can also predefine the content of two of these fields, called Invoice Text 1 and Invoice Text 2 by default.
NotePredefining these fields allows the invoice import to be validated. If the import file contains a text which does not exist in the application, an error appears in the log file.
The predefined texts can then be used:
● for each invoiceIn the Balance tab invoice pages, the lists for the Invoice Text 1 and Invoice Text 2 fields can be used to select their contents.
● when importing invoices
Related Information
Invoice templates [page 112]
140 P U B L I CSAP BusinessObjects Intercompany User Guide
Administration of the application

Invoice updates [page 29]To predefine the content of the Invoice Text 1 and 2 fields [page 141]To activate invoice fields [page 141]
6.3.2.1.2.1 To activate invoice fields
Procedure
1. Stop the reconciliation process.
2. In the Administration tab, select Settings Invoices for Child Account .3. In the Code column, click the link for the field you want to display.4. Activate Visible.5. Change the caption text, if necessary.6. Follow the same procedure for each field you want to display.7. Click Update.
Related Information
Balance and invoice interface display [page 161]
6.3.2.1.2.2 To predefine the content of the Invoice Text 1 and 2 fields
Procedure
1. Stop the reconciliation process.
2. In the Administration tab, select Settings Invoice Settings .3. Activate Invoice Text Validation.4. Click Update.
5. In the Administration tab, select Settings Invoice Text Validation .6. Click Add New.7. In the Text Valid Code field, type a unique text code.8. Enter a description.9. In the Text Valid Value field, type the text name that should appear in the invoice text lists in invoices.10. Select one or both options: Invoice Text 1 and Invoice Text 2.11. Click Create.
SAP BusinessObjects Intercompany User GuideAdministration of the application P U B L I C 141

6.3.2.1.2.3 To authorize the use of invoices
Procedure
1. In the Administration tab, select Settings Invoice Settings .2. Select Invoice Level Matching Enabled.3. Select one of the following options:
○ For the balances created by the invoice import to contain the amount 0, activate Invoices Create Zero Balances.
○ For the balances created by the invoice import to contain the sum of the corresponding invoices, select Invoices Drive Balances.
○ To have balances available as read-only, select Balance Update By Invoice Only. A balance will only then be updated by the creation of an invoice.You can use this setting if the Invoices Drive Balances is enabled.
NoteIf an invoice which is created manually or imported already exists in the database, the user can choose to override the existing amount or aggregate it with the new amount. The Administrator sets the default option beforehand from the Invoice Substitution Behaviour list.
4. For invoices to be matched if they have the same standard comment, activate Invoices Match on Standard Comments.
NoteYou must then create standard comments that users can select for their invoices.
5. If you want to use a term other than invoice, enter the chosen term:○ in the singular, in the Invoice Singular Caption.○ in the plural, in the Invoices Plural Caption.
By default, the term invoice, also in the plural, appears throughout the application. The Administrator can choose to use a different term. If this is the case, the Administrator must enter both the singular and the plural form. The terms chosen are taken into account throughout the application, for example in the reports and log files. The terms used must not exceed 32 characters.
6. Click Update.
Related Information
Freezing and unfreezing company balances [page 135]
142 P U B L I CSAP BusinessObjects Intercompany User Guide
Administration of the application

6.3.3 Email
There are two main categories of email:
● Global emails, which are sent by the Administrator to the company contacts required.● Emails sent to users in charge of entering data to help them to track the progress of invoices.
In this category, there are two types of email:○ Detailed Emails○ Summary Emails
The Administrator must specify the following email settings beforehand:
● the email address for:○ source of detailed and summary emails○ list of users who can receive summary emails
● the folder in which all the emails are stored
6.3.3.1 Global emails
The Administrator can send a global email at any time during the process whether it is stopped or not.
The email is sent to all the users:
● who are defined as company contacts● who have an email address
6.3.3.1.1 To send a global email
Procedure
1. In the Administration tab, select Send Global Email.2. In the Subject field, type the subject of the email.3. In the Text box, type the email text.4. Click Send.
6.3.3.2 Automatic detailed emails
Each time the status of a balance changes, the application can generate an automatic email.
These emails inform the declaring company and partner of any changes in the status of the current balance.
The Administrator:
SAP BusinessObjects Intercompany User GuideAdministration of the application P U B L I C 143

● decides which statuses generates an automatic email.● defines what is included in the mail.● specifies which users receive emails.
By default, every time the status of a balance changes, an automatic email is sent. However, the Administrator can choose not to send detailed emails for certain statuses. In this case, status information is not included in the summary emails either.
The Administrator defines the text that accompanies each status change indicated in the emails. The following information is available by default:
● the meaning of the status.● what the user should do.
Related Information
Statuses [page 147]
6.3.3.2.1 To define and activate automatic detailed emails
Procedure
1. In the Administration tab, select Statuses.2. Click the link for the relevant status.3. In the Email Message Line 1 and Email Message Line 2 text boxes, the default text that appears in the emails
appears. Change this text as necessary.4. Activate Send Email Notification to send the emails automatically.5. Click Update.
6.3.3.2.2 To stop emails being sent automatically for a status
Procedure
1. In the Administration tab, select Statuses.2. Click the link for the relevant status.3. Deactivate Send Email Notification.
NoteThe current status information is no longer included in the summary emails.
144 P U B L I CSAP BusinessObjects Intercompany User Guide
Administration of the application

4. Click Update.
6.3.3.2.3 Addressees of detailed emails
The Administrator specifies which types of user can receive detailed emails.
Users defined as recipients for detailed emails can choose not to receive them once logged in.
Related Information
To start or stop receiving detailed emails [page 37]
6.3.3.2.3.1 To select users that will receive detailed emails
Procedure
1. In the Administration tab, select Emails .2. In the Can receive detailed emails column, select the required user types.3. Click Update.4. In the Administration tab, select Users.5. Select the link for the user you want to activate to receive emails.6. Activate Receive Detailed Emails.7. Click Update.
6.3.3.3 Automatic summary emails
A summary email is a condensed form of a detailed email. It lists the status changes that have occurred since the last summary email was sent.
Note
If the Administrator has not activated Send Email Notification for a status in Administration Statuses , the status information is not included in the summary emails.
During the reconciliation process, the Administrator can send several summary emails per day. The Administrator defines at what times the emails are sent automatically.
Only users that meet the following conditions are able to receive summary emails:
SAP BusinessObjects Intercompany User GuideAdministration of the application P U B L I C 145

● The user type is Administrator, Interactive User, or Power User.● The user has an email address.
6.3.3.3.1 To define the times when summary emails are automatically sent
Procedure
1. In the Administration tab, select Emails .2. Click Create Email Event.
A new row appears.3. In the Summary Email Events section, select the hour and minutes for when you want the first summary email
to be sent automatically.4. Click Update.5. To send a second email automatically, repeat the procedure from step 2 as necessary.
6.3.3.4 Email delivery control
Context
The Administrator can stop and start email delivery to all users whether or not the reconciliation process is running. When the email delivery is deactivated, the Administrator can perform maintenance work and modify balances without the other users having to be bothered by needless amounts of emails.
NoteThe process should be stopped for any updates to the metadata.
To control email delivery:
Procedure
1. In the Administration tab, go the Email page.2. Click Stop Email Delivery.
The balances can now be modified by an Administrator.3. If you are going to update the metadata, stop the reconciliation process.4. When the modification is completed, go back to the Email page and click Start Email Delivery.
146 P U B L I CSAP BusinessObjects Intercompany User Guide
Administration of the application

6.3.4 Statuses
Balance and User Group statuses enable you to see how the reconciliation of balances is progressing.
All the statuses and User Groups of statuses delivered with are listed at Administration Statuses . The Administrator cannot create additional statuses; however, the existing statuses can be modified.
User Group statuses are used for partner and parent account pages. Balance statuses are used for currency rate pages and pages used to enter amounts in child accounts.
A status is characterized by the following properties:
● symbol● description, which can be defined● automatic emails when a status changes● comments attached to balances which have this status● default description
Related Information
Automatic detailed emails [page 143]
6.3.4.1 Status symbols and descriptions
Symbols identify the status of balances and user groups.
6.3.4.1.1 Balance statuses
Table 16:
Symbol Default description Description
Open A balance has been created but no amounts have been entered yet.
Agreed The balance is agreed.
Company Agreed To Differ If the declaring company does not want to correct its amount, it asks the partner to accept the difference.
Partner Agreed To Differ If the partner does not want to correct its amount, it asks the declaring company to accept the difference.
Agreed To Differ The company or partner accepts the difference.
SAP BusinessObjects Intercompany User GuideAdministration of the application P U B L I C 147

Symbol Default description Description
Unmatched The balance is not reconciled.
Company Reopened The balance was reconciled, but the declaring company requests it be reopened in order to make changes.
Partner Reopened The balance was reconciled, but the partner requests it be reopened in order to make changes.
Forced Unmatched A request for the balances to be reopened has been accepted.
Company Deleted The balance was not reconciled and the declaring company wants to delete it.
Partner Deleted The balance was not reconciled and the partner wants to delete it.
Company Submitted Only the company has entered amounts.
Partner Submitted Only the partner has entered amounts.
Forced Agreement The balance was reconciled automatically when the Administrator ran the forced agreement process.
NoteIf the Administrator authorized all the companies to freeze only agreed balances, the companies cannot freeze balances with Company Agreed To Differ and Partner Agreed To Differ statuses.
Related Information
Freezing and unfreezing company balances [page 135]
6.3.4.1.2 User Group statuses
The User Group statuses depend on the difference calculated.
When a materiality value has been defined:
● If the difference is greater than the materiality value set, the status is Unmatched.● If the difference is less than the materiality value set, the status is Agreed.
When no materiality value has been defined:
● If there is no difference, the status is Group Row Agreed.
148 P U B L I CSAP BusinessObjects Intercompany User Guide
Administration of the application

NoteThe Group Row Agreed status does not mean that no request has been made to change a balance.
● If there is a difference, other than 0, the status is Group Row Unmatched.
Table 17:
Symbol Default description Description
Group Row Agreed The balance is agreed.
No changes are required.
Group Row Unmatched The balance is not reconciled.
Changes must be made to match the balances. The companies must go to the currency and account pages to make the changes.
6.3.4.2 To change status labels
Procedure
1. In the Administration tab, select Statuses.2. Click the link for the status label you want to change.3. In the Description field, enter the relevant label.4. In the Email Message Line 1 text box, enter the text for the row in the email that explains the status.5. In the Email Message Line 2 text box, enter the text for the row in the email that explains what the user must
do.6. Activate Send Email Notification for an email to be sent automatically each time this status is used.7. To authorize modifications to the local amount for the current status, activate Local Amount Editable.
For each status, you can specify if the local amounts or transaction amounts or both can be modified for balances which have this status. By default, balance amount modifications are authorized for the following statuses but can be modified by the Administrator:
○ Open○ Unmatched○ Forced Unmatched○ Company Child Account Error○ Partner Child Account Error○ Company Submitted○ Partner Submitted
8. To authorize modifications to the transaction amount for the current status, activate Transaction Amount Editable.
9. If you want to authorize comments for the current status in the balances pages, activate Comment Editable.
SAP BusinessObjects Intercompany User GuideAdministration of the application P U B L I C 149

Comments are authorized via the statuses by default as long as the balance is not frozen or agreed. The Administrator can, however, change the default as required. If you do not want to authorize comments for the current status, deactivate Comment Editable.
10. Click Update.
6.3.4.3 Statuses and actions
An action is a response to a company or partner's request.
Statuses and actions alternate as follows:
● Starting status: request from the company/partner.● Action: response from the partner/company.● Status resulting from the action.
In each status's page, all of the actions and statuses resulting from the actions for the given status are listed.
A reconciliation mode is used when reconciling balances.
Related Information
Reconciliations [page 152]
6.3.4.3.1 Reconciliations without discrepancies
There are two possible scenarios:
● The declaring company and the partner enter the same amounts.● The difference between the amounts entered by both is less than or equal to the materiality value defined.
ExampleThe materiality value is USD 1,500.
The difference is USD 1,000. It is therefore below the materiality level.
Therefore the balance is agreed.
Table 18:
Company
Enters USD 10,000
Resulting status: Company Submitted
Partner
Enters: nothing
Resulting status: Partner Submitted
Enters: USD 9,000
150 P U B L I CSAP BusinessObjects Intercompany User Guide
Administration of the application

Resulting status: Agreed
6.3.4.3.2 Reconciliations with discrepancies
A situation can arise whereby the declaring company and partner do not immediately agree about how to deal with a non-reconciled balance.
ExampleThe materiality value is USD 500 (User Group currency)
The difference (USD 200) is below the materiality value. Therefore the balance is agreed.
Table 19:
Company
Amount entered 10,000 USD
Partner
Phase 1 Resulting status: Submitted Resulting status: Partner Submitted
Enters: 10,000 USD
Phase 2 Resulting status: Agreed
The balance is agreed.
Phase 3 The declaring company forgot to enter an amount. It requests that the balance be reopened.
Action: Reopen
Status: Company Reopen
Status: Partner Reopened
Phase 4 The partner accepts the request to reopen the balance.
Action: Accept
Status: Forced Unmatched
The balance is reopened.
The declaring company enters the amount it forgot (USD 200) and saves the balance.
Status: Agreed
Status: Agreed
6.3.4.3.3 Reopening agreed balances
When dealing with states generated from a reopened agreed balance, the Administrator can choose one of the following sequences of actions:
SAP BusinessObjects Intercompany User GuideAdministration of the application P U B L I C 151

● Agreed - Reopen - Company Reopened● Agreed - Reopen - Forced Unmatched
Related Information
Reconciliations [page 152]
6.3.4.3.3.1 To define the sequence of actions to be performed when an agreed balance is reopened
Procedure
1. Select Administration Settings Balance Settings .2. In the Status Transition section, select the required options.3. Click Update.
6.3.5 Reconciliations
The Administrator specifies how balances are reconciled.
This is useful when:
● a materiality value is being used● the amounts are entered in several transaction currencies for the same parent account
6.3.5.1 Reconciling balances in group currency
If several transaction currencies are used for the same parent account, amounts can be reconciled in two ways:
● If the total difference at group row level is greater than materiality, the status for the group row is Unmatched, even if the statuses of the balances in individual currencies are agreed. The total group row difference is more important than the individual balance states for each currency.For example, if materiality is set at 100 dollars and the reconciliation mode is Group Row Unmatched, the differences calculated in the two transaction currencies are both less than materiality. However, the status of the parent account remains unmatched since the total difference in the parent account is greater than the materiality threshold.
● If the balance status for each currency is Agreed, the status for the group row total is Agreed even if the difference at group row level is greater than materiality. Here, the individual currency balance statuses are more important than the total group row difference.
152 P U B L I CSAP BusinessObjects Intercompany User Guide
Administration of the application

For example, if materiality is set at 1000 dollars and the reconciliation mode is Balance Statuses, the differences calculated in the two balances are both less than materiality. The status of the parent account is Agreed even though the total difference is greater than the materiality threshold.
NoteIf only one transaction currency is used, the first method is applied. If there is no materiality threshold, neither method is use. The amount translation mode can then no longer be changed unless the process is stopped and there are no balances in the database.
6.3.5.2 Matching invoices
Matching invoices enables users to compare the invoices of the declaring company and the partner to analyze differences in greater detail. Even if the invoices are not matched, this does not block the reconciliation process.
Related Information
Why match invoices? [page 33]
6.3.5.2.1 To select the reconciliation mode
Procedure
1. In the Administration tab, select Settings Balance Settings .2. From the Group Amount Matching list, select the method required.3. Click Update.
Related Information
Invoice matching [page 138]
6.3.6 Difference calculation type
The Administrator selects the difference calculation type, which specifies how to calculate the difference between the company balance total and the partner balance total on the partner page.
SAP BusinessObjects Intercompany User GuideAdministration of the application P U B L I C 153

6.3.6.1 To set the difference calculation type
Procedure
1. In the Administration tab, select Settings Balance Settings .2. In the Total Difference Calculation list under Balance Matching, choose one of the following options:
○ Select Total Ourside + Total Theirside to have the partner balance total added to the company balance total.For example, if the partner balance total is expressed as a negative number, an expenditures account for example, the negative balance total is added to the positive balance total to obtain the total difference.
○ Select Sum Ourside - Theirside to have the partner balance total subtracted from the company balance total.
3. Click Update.
6.3.7 Categories
When the reconciliation process is not running, the Administrator defines the category for the amounts to be entered during the next process.
NoteThe settings for the parameter need to correspond to those contained in the consolidation system to which the amounts are exported at the end of the process.
6.3.7.1 To set the category
Procedure
1. In the Administration tab, select Settings SAP BusinessObjects Metadata Settings .2. Type an entry in Category.3. Click Update.
6.3.8 Data entry period
When the reconciliation process is not running, the Administrator defines the data entry period for the amounts to be entered during the next process.
154 P U B L I CSAP BusinessObjects Intercompany User Guide
Administration of the application

NoteThe settings for the parameter need to correspond to those contained in the consolidation system to which the amounts are exported at the end of the process.
6.3.8.1 To set the data entry period
Procedure
1. In the Administration tab, select Settings SAP BusinessObjects Metadata Settings .2. Type an entry in Data Entry Period Code.3. Click Update.
6.3.9 Audit ID
When the reconciliation process is not running, the Administrator defines the audit ID for the amounts to be entered during the next process.
NoteThe settings for the parameter need to correspond to those contained in the consolidation system to which the amounts are exported at the end of the process.
6.3.9.1 To set the audit ID
Procedure
1. In the Administration tab, select Settings SAP BusinessObjects Metadata Settings .2. Enter an Audit ID Code.3. Click Update.
6.3.10 Default flow
When the reconciliation process is not running, the Administrator defines the default flow for the amounts to be entered during the next process.
The Administrator can set a default flow if the accounts are not linked to flows in the application.
SAP BusinessObjects Intercompany User GuideAdministration of the application P U B L I C 155

NoteThe settings set for the following parameters need to correspond to those contained in the consolidation system to which the amounts are exported at the end of the process.
6.3.10.1 To set a flow
Procedure
1. In the Administration tab, select Settings SAP BusinessObjects Metadata Settings .2. Enter a Flow Code.3. Click Update.
6.3.11 Reports
In order to analyze the differences and monitor the reconciliation process, users generate reports.
The Administrator defines the:
● types of report can be used among all the report types available● information to display in each type of report● formats to make available● the display of the reports
Related Information
To delete reports [page 160]
6.3.11.1 Balance reports
The balance reports include:
● AuditThis report provides you with an overview of how declaring companies and partners are progressing with the reconciliation.
● Balance By Reporting CompanyThis report contains the same information as a Balance report, except that when several companies are included in the same reporting company, the amounts entered in the accounts by each one in local and group currency are totaled and arranged by reporting company.
156 P U B L I CSAP BusinessObjects Intercompany User Guide
Administration of the application

● BalanceAfter new balances have been imported, this report enables you to check that all of the amounts have been correctly imported. When exporting, this report enables you to check the amounts exported.
● Difference AnalysisThis report provides you with detailed information on amounts at various levels in order to help you understand why differences exist.
● Difference Analysis SummaryThis report has the same format as the Difference Analysis report, but shows only the difference at the parent account level. Child account, transaction/local and transaction difference columns are not included.
● ProgressThis report enables you to analyze the discrepancies that exist in the parent accounts and those that exist for each type of currency. It also provides you with an overview of the total difference in each accounting schedule.
● Progress By Parent AccountThis report enables you to analyze amounts in greater detail than in the Progress report: amounts are analyzed for each declaring company/partner pair for all parent company accounts where a discrepancy exists.
● Account By PartnerThis report contains the amounts entered in child accounts, arranged by partner. They appear in local and group currency.
● Parent Account By PartnerThis report contains the amounts calculated in the parent accounts, arranged by partner. They appear in local and group currency.
● Multi PeriodThis report enables you to compare the amounts by period. The maximum number of periods allowed is six.
6.3.11.2 Invoice reportsThe invoice reports include:
● Invoices by AccountThis report contains the amounts entered in the child accounts and the total invoices assigned to them, along with any differences found.
● Invoices by Parent AccountThis report contains the amounts entered in the parent accounts and the total invoices assigned to them, along with any differences found. All of the invoices assigned to the parent company's child accounts are taken into account.
● Matched InvoicesThis report contains a list of the matched invoices and specifies whether or not the invoices were reconciled manually or automatically.
● Unassigned Unmatched InvoicesThis report contains a list of the invoices which are unmatched or unassigned to an invoice group. The sub-totals and differences are also included in this report. For the partner, however only the amounts in the transaction currency are displayed.
● Detailed Unassigned Unmatched InvoicesThis report contains a list of the invoices which are unmatched or unassigned to an invoice group. The sub-totals and differences are also included in this report. For the partner, the following information is displayed: accounts, invoice references, amounts in the local currency and amounts in the transaction currency.
SAP BusinessObjects Intercompany User GuideAdministration of the application P U B L I C 157

6.3.11.3 Activating report types and columns
The Administrator defines:
● What types of report can be used by the users among all the report types available.● What information is displayed in each type of report. This includes selecting the column headers to be
included in the report.
6.3.11.3.1 To activate/deactivate a report type and columns
Procedure
1. In the Administration tab, select Reports.2. Click the link for the relevant report type.3. To make this format available to other users, activate Enabled.
To make this format unavailable to other users, deactivate Enabled.4. To select columns, activate the relevant boxes under the Visible Columns.5. Click Update.
6.3.11.4 Report formats
The Administrator selects from the formats users can use for reports:
● Excel● HTML● Text● PDF● Crystal Reports (RPT)● Word
6.3.11.4.1 To select a report format
Procedure
1. In the Administration tab, select Reports Report Formats .2. Activate formats to make them available to other users.
To make a format unavailable to other users, deactivate it.3. Click Update.
158 P U B L I CSAP BusinessObjects Intercompany User Guide
Administration of the application

6.3.11.5 Report interface styles
The Administrator defines how reports appear by selecting font characteristics for the following report elements:
● Title● Normal
The Normal element includes the user, group currency, period, declaring company, or partner, corresponding to the filters defined.
● HeadingsThis row contains the column headers.
● GrandTotalThis row contains all of the totals, such as total balances entered, total amounts in group currency, or total difference in group currency.
● High, Medium, and Low
NoteAll of the objects can be modified if necessary.
6.3.11.5.1 To define how reports are presented
Procedure
1. In the Administration tab, select Reports.2. Click the link for the object whose style you want to define.3. Select a font from the Font list.4. Select a font size from the Font Size list.
5. Click to change the Font Color.
6. Click to change the Background Color.7. Activate the following text settings as required:
○ Bold○ Italic○ Underlined
8. Select a text alignment.9. Click Update.
SAP BusinessObjects Intercompany User GuideAdministration of the application P U B L I C 159

6.3.11.6 To delete reports
Context
Administrators can delete reports by date.
Procedure
1. In the Administration tab, select Reports Delete .2. Click the calendar icon to select the creation date and time of the reports you want to delete.3. Click Update.
6.3.12 Purging balances and invoices
When work has been completed on the balances and invoices for one or more periods and the Administrator decides that the data is no longer needed, the Administrator can delete:
● the balances and invoices by period
NoteYou cannot delete balances without deleting the invoices.
● the invoices by period● all of the balances and invoices for all of the periods
TipTo purge all of the balances and invoices from the database, the Administrator must first close all of the periods.
Related Information
Opening and closing periods [page 55]
160 P U B L I CSAP BusinessObjects Intercompany User Guide
Administration of the application

6.3.12.1 To purge balances and invoices simultaneously
Procedure
1. Stop the reconciliation process.2. In the Administration tab, select Purge Balances/Invoices.3. To purge the balances for certain periods, select the periods in the Purge Balances column.4. Click Purge.
CautionThe data is permanently deleted from the database.
6.3.12.2 To purge invoices
Procedure
1. Stop the reconciliation process.2. In the Administration tab, select Purge Balances/Invoices.3. To purge invoices for certain periods, select the periods in the Purge Invoices column.4. Click Purge.
CautionThe data is permanently deleted from the database.
6.3.12.3 To purge balances and invoices for all of the periods
Procedure
1. Stop the reconciliation process.2. In the Administration tab, select Purge Balances/Invoices.3. Click Purge All.
6.3.13 Balance and invoice interface display
In the Views section of the Administration Settings page, the Administrator can change the default presentation of balance and invoice pages and columns, for example:
SAP BusinessObjects Intercompany User GuideAdministration of the application P U B L I C 161

● partners with which the declaring company has performed transactions in the Detail by partners page● all parent accounts used in company balances in the Detail by parent accounts page● all transaction currencies used in company balances in the Detail by transaction currencies page● all child accounts containing amounts in the Detail by child accounts page● all invoices belonging to a child account in the Invoices page of the child account● all invoices belonging to a parent account in the Invoice Match page● the groups of invoices in the Invoice group page● the invoice columns available to users in all invoice and balance pages● the Invoice assignment page in the Balances tab● the columns in the List of Invoices table
The Administrator defines the order in which the columns are displayed for each page and its interface appearance.
6.3.13.1 To define the column interface display
Procedure
1. In the Administration tab, select Settings.2. Click the link for the view whose columns you want to rearrange.3. Use the up arrow and down arrow icons to change the order of the columns.
NoteThis setting is not available when editing Invoice Edit view settings.
4. In the Code column, click the link for the column whose display you want to define.5. Change the code or description, if necessary.6. To change the column width, enter a number in the Width text box.
NoteThis setting is not available when editing Invoice Edit view settings.
7. Select one of the following column header alignments:○ Right○ Center○ Left
NoteThis setting is not available when editing Invoice Edit view settings.
8. If you do not want the column to be displayed, deactivate Visible.9. Click Update.
162 P U B L I CSAP BusinessObjects Intercompany User Guide
Administration of the application

6.3.14 Deleting invoices by company, parent or child account
Administrators and Interactive Users can delete invoices linked to:
● a company● a parent account● a child account
The Administrator can also purge all of the invoices.
Related Information
Purging balances and invoices [page 160]
6.3.14.1 To delete invoices by company
Procedure
1. In the Administration tab, select Companies.2. In the Companies page, click the link for the company whose invoices you want to delete.3. Click Delete Invoices.
A confirmation message appears.4. Click OK.
6.3.14.2 To delete invoices by parent account
Procedure
1. Select the Balances tab.2. Navigate through the balances to the Detail by child accounts page.3. Click Match Invoices.4. Do one of the following:
○ To delete all of the invoices linked to a parent account, click Delete.○ To delete a single invoice, click the red X icon.
A confirmation message appears.5. Click OK.
SAP BusinessObjects Intercompany User GuideAdministration of the application P U B L I C 163

NoteIf you have deleted all of the invoices, all of the invoice groups are also deleted. If you have not deleted all of the invoices and the deleted invoices belong to an invoice group, the group is unmatched. If the invoice groups do not contain any invoices belonging to the declaring company, they are deleted.
6.3.14.3 To delete invoices by child account
Procedure
1. Select the Balances tab.2. Navigate through the balances to the Detail by child accounts page.3. In the Invoices column, click one of the following icons:
4. Do one of the following:
○ To delete all of the invoices linked to a child account, click Delete.○ To delete a single invoice, click the red X icon.
A confirmation message appears.5. Click OK.
Results
NoteIf the deleted invoice belongs to an invoice group, the group is unmatched. If the invoice group does not contain any invoices belonging to the declaring company, it is deleted.
6.3.15 Decimals in balances
The Administrator decides whether or not the decimal figures in the balances are stored in the database.
If the Administrator decides to store the decimals, they appear in the Balances tab. If they are not stored, they are not displayed.
Figures with decimals appear as follows: 102.25.
Figures without decimals appear as follows: 102.
164 P U B L I CSAP BusinessObjects Intercompany User Guide
Administration of the application

6.3.15.1 To store decimals in the database
Procedure
1. In the Administration tab, select Settings Balance Settings .2. To store the decimals, deactivate Do Not Store Amount Decimal.
If you do not want to store the decimals, activate Do not store decimals.3. Click Update.
6.3.16 Archiving balances
When work has been completed on the balances for one or more periods, the Administrator can archive the balances by period for use at a later time. Archived periods cannot be viewed or accessed by other users.
The Administrator can restore the required balances by period at any time.
NoteThe period must be closed in order to be able to archive its balances.
Related Information
Opening and closing periods [page 55]
6.3.16.1 To archive balances by period
Procedure
1. In the Administration tab, select Periods.2. Select the closed period you want to archive.
NoteThe currently selected period cannot be archived. If you want to archive it, you must first select another period.
3. Click Archive Period.4. Click Update.
SAP BusinessObjects Intercompany User GuideAdministration of the application P U B L I C 165

6.3.16.2 To restore archived balances by period
Procedure
1. In the Administration tab, click Periods.2. Select the archived period you want to restore.3. Click Restore Period.4. Click Update.
6.3.17 The application login page text
The Administrator can customize the text that appears on the application login page, and choose to display it instead of the default text.
TipDisplay the Administrator email address in the login page. Use the following syntax:
<a class='DataLink' href='mailto:[email protected]'>[email protected]</a>
Do not forget to replace [email protected] with the correct address.
6.3.17.1 To display a customized login page text
Procedure
1. In the Administration tab, select Settings Login Text .2. In the data entry box at the top of the page, type in the text that you want to appear on the login page.3. Deactivate Replace With Default.
NoteTo replace the custom text with the default text, activate Replace With Default.
4. Click Update.
6.3.18 Digit grouping symbols
The Administrator activates the digit grouping symbol for balance and invoice amount export files.
166 P U B L I CSAP BusinessObjects Intercompany User Guide
Administration of the application

NoteThe symbol used is the one defined in the application server's regional options. For example:
● When the symbol defined on the server is a comma, the amounts appears as follows: 1,000,000.● When the Administrator decides that no symbol is to be used, the amounts appears as follows: 1000000.
6.3.18.1 To activate the digit grouping symbol
Procedure
1. In the Administration tab, select Settings Import/Export Settings .2. To use the symbol defined on the server when exporting amounts, activate Export Thousand Separators.
NoteIf you do not want to use the symbol defined on the server when exporting amounts, deactivate Export Thousand Separators.
3. Click Update.
SAP BusinessObjects Intercompany User GuideAdministration of the application P U B L I C 167

7 Glossary
The following terms are used in the application.
Term Definition
Account Object for which a transaction is performed. There are two types of account: parent accounts and child accounts.
Account Group Group of accounts. There are three account group levels: top level account group, parent account group and account group.
Actions An action is a response to a company or partner's request. Requests are made via statuses.
Balance Line in which an amount can be entered. A balance is created by specifying the declaring company, the partner, the parent account, or the transaction currency.
Bulk Import Balance There is no limit to the number of lines that can be imported in this way. Only the Administrator can perform this type of import when the process is stopped and all the users are logged off.
Child Account Data entry account, such as Goods in Progress or WIP, that depends on a parent account, for example Finished Goods in Progress.
Company Companies make up user groups. A company can be a declaring company, a partner or a reporting company.
Company Contact User assigned to a company via a user group.
Company Currency Local reporting currency assigned to each company. Synonym: Local Currency.
Partner Company that records the transactions performed with other companies. The declaring company enters balances. The difference between a declaring company (ours) and a partner (theirs) only depends on your point of view. The partner receives requests from the declaring company.
Declaring Company Company that records the transactions performed with other companies. The declaring company enters balances. The difference between a declaring company (ours) and a partner (theirs) only depends on your point of view. Declaring companies make requests to delete or change balances.
Detailed Email Email sent automatically each time a balance status changes.
Divide Valuation method which uses one unit of foreign currency as the base currency and calculates the equivalent amount in the national currency.
Company Group Group of similar companies that are involved in the same sector of activity.
168 P U B L I CSAP BusinessObjects Intercompany User Guide
Glossary

Term Definition
Filter Restricts the objects displayed. You can use filters to display certain objects on the current page. You can also use filters in the balances and reports.
Forced Agreement Process run by the Administrator at the end of the process to adjust the remaining differences automatically. The process can be reversed, for example the amounts that were stored in the database before the forced agreement process was run are restored.
Freezing Operation enabling you to prevent any changes being made to the balances. You can freeze the balances of one or more companies. To be able to export balances and subtotals, the balances containing the amounts to be exported must be frozen.
User Group Group of users and companies that enables you to determine which companies each user works on.
Group Currency Currency used by the headquarters or when reporting. All the amounts entered in local and/or in transaction currency are automatically translated into the group currency.
Journal Accounts Journal accounts store the differences between the first and last amounts entered for one or several child accounts. The differences can then be exported via a journal to the accounting system containing the original data.
Local Currency Local reporting currency assigned to each company. Synonym: Company Currency.
Materiality Amount expressed in the group currency enabling you to determine whether an amount is agreed or not. If the difference is below materiality, the balance is reconciled. If the difference is above materiality, the balance is not reconciled.
Multiply Valuation method which uses the national currency as the base currency and calculates the equivalent in a foreign currency.
Parent Account Account whose amount is the sum of the amounts entered in the child accounts assigned to it.
Period A period is defined by a start date and an end date. These dates determine the period to which the amounts that are entered or imported for balances are linked.
Purge Action enabling you to delete a group of objects, for example, all the currencies or all the balances.
Report Document used to display balance amounts.
Reporting Company Company which user groups together several companies.
Standard Comment Predefined comment entered by the Administrator providing an explanation for the amount.
Status Indicator specifying how the reconciliation process is progressing, such as Agreed To Differ or Agreed. For an
SAP BusinessObjects Intercompany User GuideGlossary P U B L I C 169

Term Definition
object, the indicator specifies whether or not it can be used in balances, such as active or inactive currency.
Summary Email Email containing a summary of the detailed emails. It lists the status changes that have occurred since the last summary email was sent.
Top Level Account Group Group of accounts which have similar accounting characteristics. The account group defines the sign to be used for the accounts.
Transaction Currency Currency used for transactions between the companies.
Unfreezing Action enabling you to make changes to balances. This action is performed after a freezing action.
170 P U B L I CSAP BusinessObjects Intercompany User Guide
Glossary

Important Disclaimers and Legal Information
Coding SamplesAny software coding and/or code lines / strings ("Code") included in this documentation are only examples and are not intended to be used in a productive system environment. The Code is only intended to better explain and visualize the syntax and phrasing rules of certain coding. SAP does not warrant the correctness and completeness of the Code given herein, and SAP shall not be liable for errors or damages caused by the usage of the Code, unless damages were caused by SAP intentionally or by SAP's gross negligence.
AccessibilityThe information contained in the SAP documentation represents SAP's current view of accessibility criteria as of the date of publication; it is in no way intended to be a binding guideline on how to ensure accessibility of software products. SAP in particular disclaims any liability in relation to this document. This disclaimer, however, does not apply in cases of willful misconduct or gross negligence of SAP. Furthermore, this document does not result in any direct or indirect contractual obligations of SAP.
Gender-Neutral LanguageAs far as possible, SAP documentation is gender neutral. Depending on the context, the reader is addressed directly with "you", or a gender-neutral noun (such as "sales person" or "working days") is used. If when referring to members of both sexes, however, the third-person singular cannot be avoided or a gender-neutral noun does not exist, SAP reserves the right to use the masculine form of the noun and pronoun. This is to ensure that the documentation remains comprehensible.
Internet HyperlinksThe SAP documentation may contain hyperlinks to the Internet. These hyperlinks are intended to serve as a hint about where to find related information. SAP does not warrant the availability and correctness of this related information or the ability of this information to serve a particular purpose. SAP shall not be liable for any damages caused by the use of related information unless damages have been caused by SAP's gross negligence or willful misconduct. All links are categorized for transparency (see: http://help.sap.com/disclaimer).
SAP BusinessObjects Intercompany User GuideImportant Disclaimers and Legal Information P U B L I C 171

go.sap.com/registration/contact.html
© 2017 SAP SE or an SAP affiliate company. All rights reserved.No part of this publication may be reproduced or transmitted in any form or for any purpose without the express permission of SAP SE or an SAP affiliate company. The information contained herein may be changed without prior notice.Some software products marketed by SAP SE and its distributors contain proprietary software components of other software vendors. National product specifications may vary.These materials are provided by SAP SE or an SAP affiliate company for informational purposes only, without representation or warranty of any kind, and SAP or its affiliated companies shall not be liable for errors or omissions with respect to the materials. The only warranties for SAP or SAP affiliate company products and services are those that are set forth in the express warranty statements accompanying such products and services, if any. Nothing herein should be construed as constituting an additional warranty.SAP and other SAP products and services mentioned herein as well as their respective logos are trademarks or registered trademarks of SAP SE (or an SAP affiliate company) in Germany and other countries. All other product and service names mentioned are the trademarks of their respective companies.Please see http://www.sap.com/corporate-en/legal/copyright/index.epx for additional trademark information and notices.


![SAP BusinessObjects Intercompany User Guide€¦ · Field sizes for invoice and balance templates ... Thousand separator symbols [page 221] What's New in SAP BusinessObjects Intercompany](https://img.pdfslide.us/doc/110x75/5bc3558109d3f2995e8c3ea8/sap-businessobjects-intercompany-user-guide-field-sizes-for-invoice-and-balance.jpg)