Embed Size (px)
Citation preview

Samsung Galaxy Tab Pro 10.1 DigitizerReplacement
Replacing a broken digitizer on a Samsung Galaxy Tab Pro 10.1
Written By: jeremiahmitchell87
Samsung Galaxy Tab Pro 10.1 Digitizer Replacement Draft: 2019-05-23Guide ID: 53751 -
This document was generated on 2019-09-17 11:08:56 PM (MST).
© iFixit — CC BY-NC-SA www.iFixit.com Page 1 of 8

INTRODUCTION
This guide was created to assist someone who has, of course, by no fault of their own damaged thedigitizer on their trusty tablet.
TOOLS:Heat Gun (1)Spudger (1)iFixit Opening Picks set of 6 (1)
Samsung Galaxy Tab Pro 10.1 Digitizer Replacement Draft: 2019-05-23Guide ID: 53751 -
This document was generated on 2019-09-17 11:08:56 PM (MST).
© iFixit — CC BY-NC-SA www.iFixit.com Page 2 of 8
Step 1 — Opening back case
As with most Samsung devices, the back is ready to be removed with a little bit of persuasion froma safe opening pry tool and a well placed fingernail.
Now that the back has been removed smoothly we can see the lovely inner workings of yourprecious device.
Samsung Galaxy Tab Pro 10.1 Digitizer Replacement Draft: 2019-05-23Guide ID: 53751 -
This document was generated on 2019-09-17 11:08:56 PM (MST).
© iFixit — CC BY-NC-SA www.iFixit.com Page 3 of 8
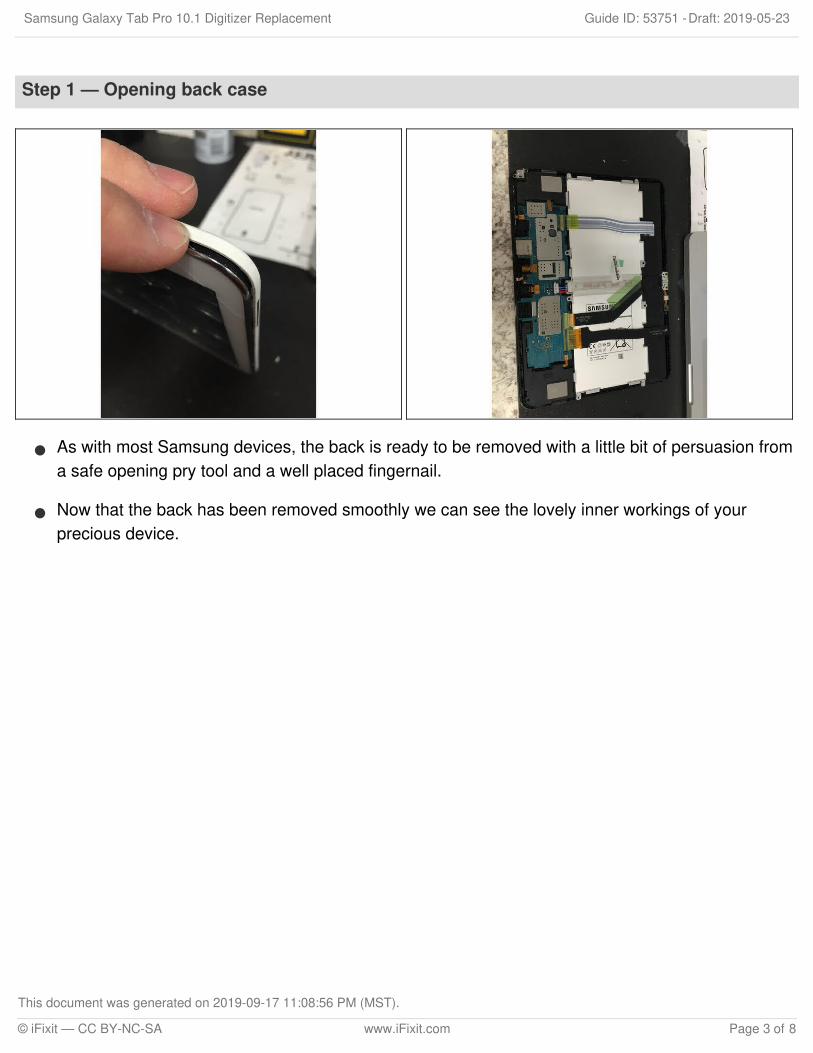
Step 2 — Disconnecting digitizer from motherboard
This is a very simple step that if done properly will save you a ton of aspirin...and if not, it willcreate a total mental meltdown.
The cable connecting the digitizer is the larger one on the right, or left depending on how you havethe tablet oriented...or whether you are in the northern or southern hemisphere.
Simply use the flat end of a spudger to gently lift the retainer from the connector. It should swingup and relieve the pressure from the ribbon cable to allow it to be removed.
Samsung Galaxy Tab Pro 10.1 Digitizer Replacement Draft: 2019-05-23Guide ID: 53751 -
This document was generated on 2019-09-17 11:08:56 PM (MST).
© iFixit — CC BY-NC-SA www.iFixit.com Page 4 of 8

Step 3 — Removing the digitizer
Now the fun begins. I, unfortunately, don't have the wonderfully amazing iOpener so I had to use aheat gun and a lot of patience.
Lucky for me, the digitizer was already more broken than our economy so I wasn't stressed aboutdamaging it more. I simply heated, pried gently, and repeated around the top and sides.
I saved the bottom, where the home button is, for last since I figured that there would be a smallflex cable connected somehow.
I continued the heating and gentle coercion on the screen until I could see the home button andadjacent flex cable. I used a spudger to keep the cable from pulling loose from the mid-frame whileI freed the digitizer from it's bonds and removed it from the device.
Samsung Galaxy Tab Pro 10.1 Digitizer Replacement Draft: 2019-05-23Guide ID: 53751 -
This document was generated on 2019-09-17 11:08:56 PM (MST).
© iFixit — CC BY-NC-SA www.iFixit.com Page 5 of 8

Step 4 — Replacing the digitizer
Now we are on the home stretch!Simply remove the inner screenprotector from the "underside" of thedigitizer, feed the flex cable whichwill connect to the motherboardthrough the respective opening, andpull the cover off of the double sidedtape and we are rockin' and rollin'.
After lining up the home buttonproperly and gently securing thedigitizer to the frame. I let it sit, facedown, for just a bit to give theadhesive a little time to grab hold.
Samsung Galaxy Tab Pro 10.1 Digitizer Replacement Draft: 2019-05-23Guide ID: 53751 -
This document was generated on 2019-09-17 11:08:56 PM (MST).
© iFixit — CC BY-NC-SA www.iFixit.com Page 6 of 8

Step 5 — Reconnect to motherboard
Ok, so you're still sane up to this point hopefully.
The next step is to reconnect the flex cable for the digitizer to the motherboard.
This is assuming that you didn't go all Bruce Banner on it in the first place and it is still functioningas prescribed.
Simply slide the flex cable into the connector gently until it stops. It will "bottom out" and you willknow that it is where it needs to go.
Finally, use a spudger or your fingertip to close the little lever that we flipped up earlier.
Remember, there was a small piece of tape that was covering both of the flex cables. Don't forgetto put that back down. It seems to be there as a kind of strain relief and might actually be valuable.
Samsung Galaxy Tab Pro 10.1 Digitizer Replacement Draft: 2019-05-23Guide ID: 53751 -
This document was generated on 2019-09-17 11:08:56 PM (MST).
© iFixit — CC BY-NC-SA www.iFixit.com Page 7 of 8
To reassemble your device, follow these instructions in reverse order.
Step 6 — Finishing steps
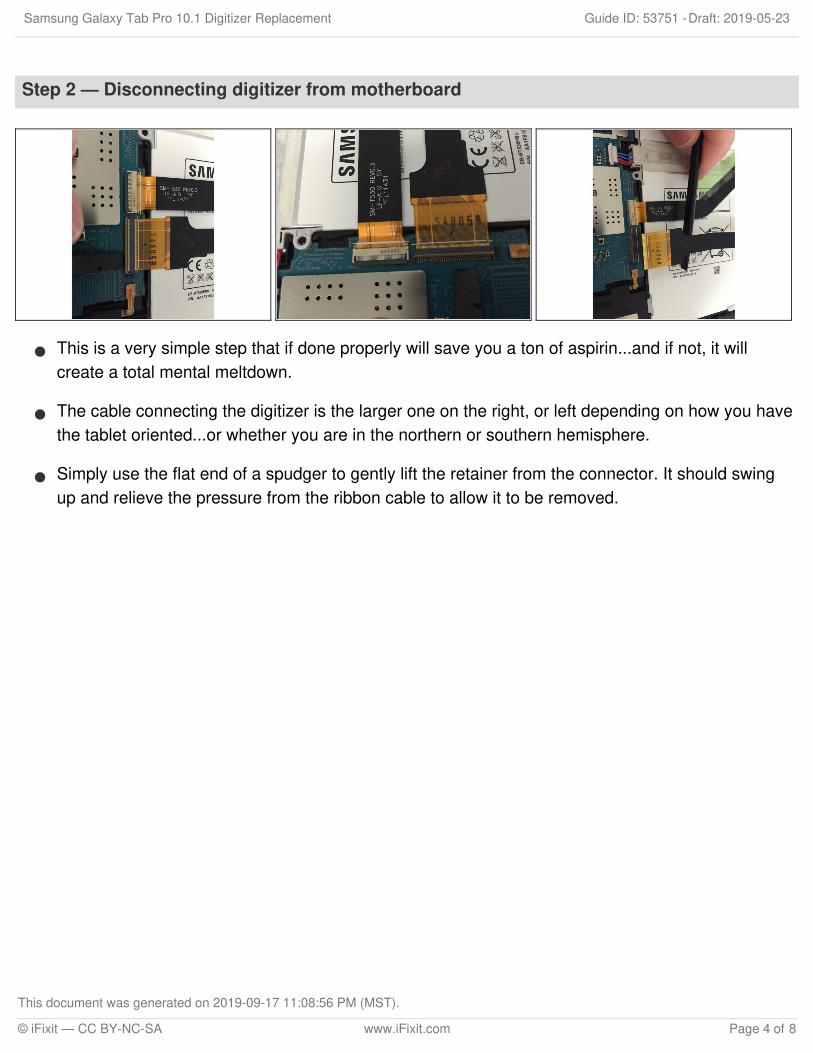
Well, here you are! You have successfully replaced the
As a closing note...I always like to add just a little bit of heat and clamp the screen with some lightduty hardware clamps...just to set the adhesive a little better but that's up to you.
Samsung Galaxy Tab Pro 10.1 Digitizer Replacement Draft: 2019-05-23Guide ID: 53751 -
This document was generated on 2019-09-17 11:08:56 PM (MST).
© iFixit — CC BY-NC-SA www.iFixit.com Page 8 of 8