Embed Size (px)
Citation preview
4-3. Factory Mode Adjustments
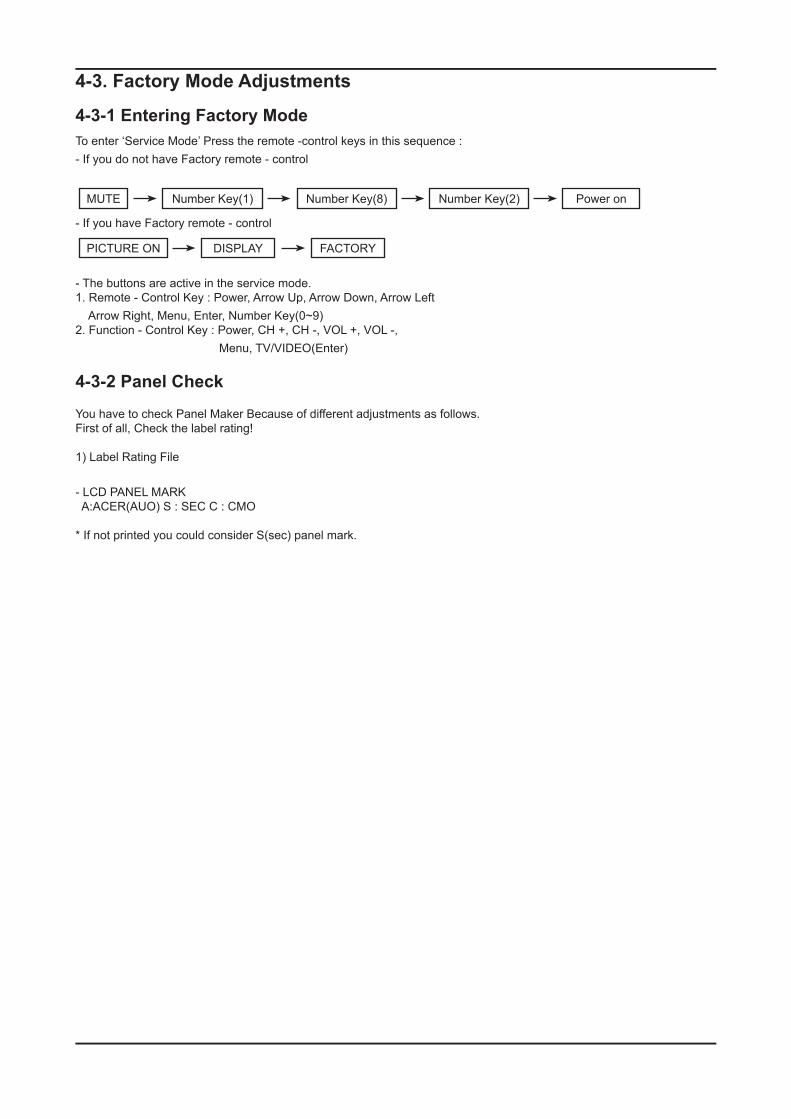
4-3-1 Entering Factory ModeTo enter ‘Service Mode’ Press the remote -control keys in this sequence :- If you do not have Factory remote - control
Number Key(1)MUTE Number Key(8) Number Key(2) Power on
- If you have Factory remote - control
DISPLAYPICTURE ON FACTORY
- The buttons are active in the service mode. 1. Remote - Control Key : Power, Arrow Up, Arrow Down, Arrow Left Arrow Right, Menu, Enter, Number Key(0~9) 2. Function - Control Key : Power, CH +, CH -, VOL +, VOL -, Menu, TV/VIDEO(Enter)
4-3-2 Panel Check You have to check Panel Maker Because of different adjustments as follows.First of all, Check the label rating! 1) Label Rating File
- LCD PANEL MARK A:ACER(AUO) S : SEC C : CMO * If not printed you could consider S(sec) panel mark.
4-3-3 Factory DataOptionADC/WBControlAdvanced : 0->0->0->0FBE3WB MovieEPA StandardCH_VDECYC_Delay AR_ADC CH_DP NR Sharpness Sharpness_LNA CE DIMMING LNA_Plus Tuner Status FRC PQ Others EEPROM RESET Expert TC905x7
DDR Margin
T-CHE7IBRC-0012 T-CHE7IBRS-0035 SDAL-4.2.27-0153 RFS:24_2G_64_512 T-CHE7IBRC 2009-03-03 FRCQ FW : 1008, CONFIG : 4900 Type : 40A1UF0E Model : UN40B7000 MAC EDID CALIB : AV,COMP,PC,HDMI Option : 0751 3014 500 Factory Data Ver : 486 DTP-AP-COMP-132 DTP-HIIG-0127 TLIB BR 2G 2009-03-03-01 DTP-BP-0135 Date of purchase
1.2.3.4.5.6.7.8.9.10.11.12.13.14.15.16.17.18.19.20.21.22.
23.
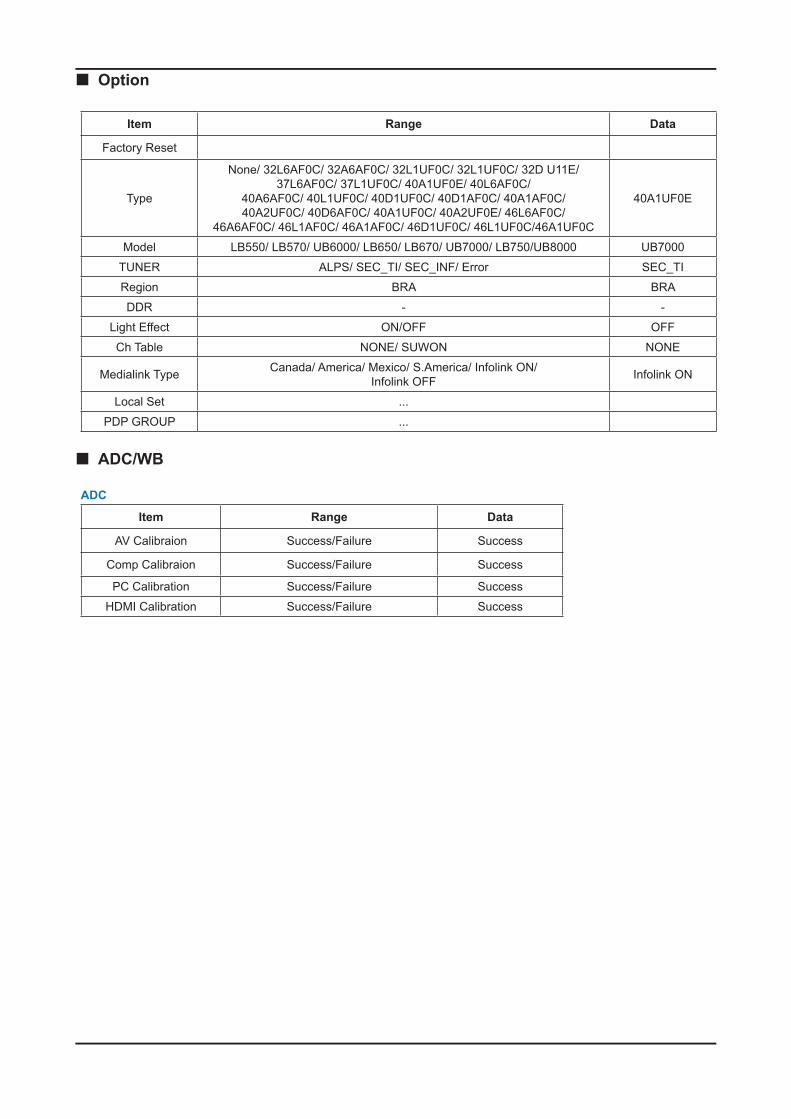
Option
Item Range Data
Factory Reset
Type
None/ 32L6AF0C/ 32A6AF0C/ 32L1UF0C/ 32L1UF0C/ 32D U11E/ 37L6AF0C/ 37L1UF0C/ 40A1UF0E/ 40L6AF0C/
40A6AF0C/ 40L1UF0C/ 40D1UF0C/ 40D1AF0C/ 40A1AF0C/40A2UF0C/ 40D6AF0C/ 40A1UF0C/ 40A2UF0E/ 46L6AF0C/
46A6AF0C/ 46L1AF0C/ 46A1AF0C/ 46D1UF0C/ 46L1UF0C/46A1UF0C
40A1UF0E
Model LB550/ LB570/ UB6000/ LB650/ LB670/ UB7000/ LB750/UB8000 UB7000
TUNER ALPS/ SEC_TI/ SEC_INF/ Error SEC_TI
Region BRA BRA
DDR - -
Light Effect ON/OFF OFF
Ch Table NONE/ SUWON NONE
Medialink Type Canada/ America/ Mexico/ S.America/ Infolink ON/ Infolink OFF Infolink ON
Local Set ...
PDP GROUP ...
ADC/WB
ADC
Item Range Data
AV Calibraion Success/Failure Success
Comp Calibraion Success/Failure Success
PC Calibration Success/Failure Success
HDMI Calibration Success/Failure Success

ADC Target
Item Range Data
1st_AV_Low1st_AV_High1st_AV_Delta
1st_COMP_Y_Low1st_COMP_Cb_Low1st_COMP_Cr_Low1st_COMP_Y_High
1st_COMP_Cb_High1st_COMP_Cr_High
1st_COMP_Delta1st_PC_R_Low1st_PC_G_Low1st_PC_B_Low1st_PC_R_High1st_PC_G_High1st_PC_B_High1st_PC_Delta
2nd_AV_R_Low2nd_AV_G_Low2nd_AV_B_Low2nd_AV_R_High2nd_AV_G_High2nd_AV_B_High2nd_AV_Delta
2nd_COMP_R_Low2nd_COMP_G_Low2nd_COMP_B_Low2nd_COMP_R_High2nd_COMP_G_High2nd_COMP_B_High2nd_COMP_Delta2nd_PC_R_Low2nd_PC_G_Low2nd_PC_B_Low2nd_PC_R_High2nd_PC_G_High2nd_PC_B_High2nd_PC_Delta
2nd_HDMI_R_Low2nd_HDMI_G_Low2nd_HDMI_B_Low2nd_HDMI_R_High2nd_HDMI_G_High2nd_HDMI_B_High2nd_HDMI_Delta
0~10200~1020
70~10200~10200~10200~10200~10200~1020
70~10200~10200~10200~10200~10200~1020
7124124124
102010201020
7124124124
102010201020
7124124124
102010201020
7124124124
102010201020
7
64880
164
512512940512512
1161616
100410041004
1444
940940940
1444
940940940
1444
940940940
1444
940940940
1
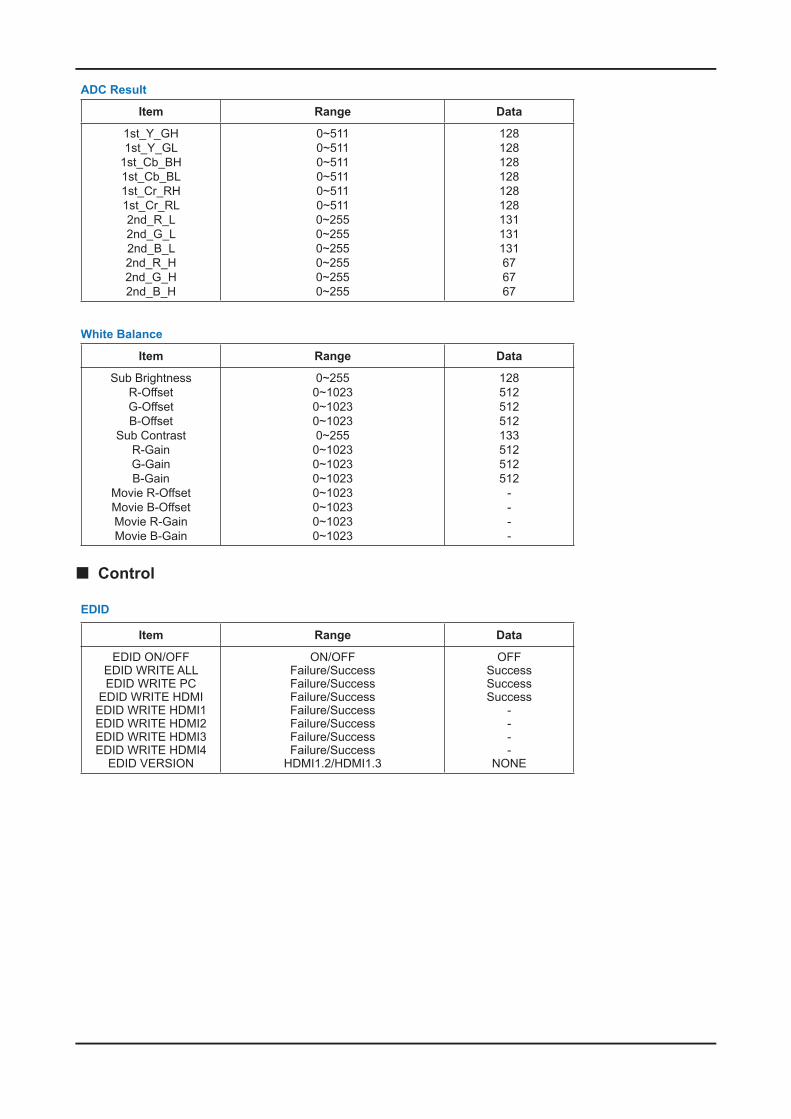
ADC Result
Item Range Data
1st_Y_GH1st_Y_GL
1st_Cb_BH1st_Cb_BL1st_Cr_RH1st_Cr_RL2nd_R_L2nd_G_L2nd_B_L2nd_R_H2nd_G_H2nd_B_H
0~5110~5110~5110~5110~5110~5110~2550~2550~2550~2550~2550~255
128128128128128128131131131676767
White Balance
Item Range Data
Sub BrightnessR-OffsetG-OffsetB-Offset
Sub ContrastR-GainG-GainB-Gain
Movie R-OffsetMovie B-OffsetMovie R-GainMovie B-Gain
0~2550~10230~10230~10230~255
0~10230~10230~10230~10230~10230~10230~1023
128512512512133512512512
----
Control
EDID
Item Range Data
EDID ON/OFFEDID WRITE ALLEDID WRITE PC
EDID WRITE HDMIEDID WRITE HDMI1EDID WRITE HDMI2EDID WRITE HDMI3EDID WRITE HDMI4
EDID VERSION
ON/OFFFailure/SuccessFailure/SuccessFailure/SuccessFailure/SuccessFailure/SuccessFailure/SuccessFailure/Success
HDMI1.2/HDMI1.3
OFFSuccessSuccessSuccess
----
NONE
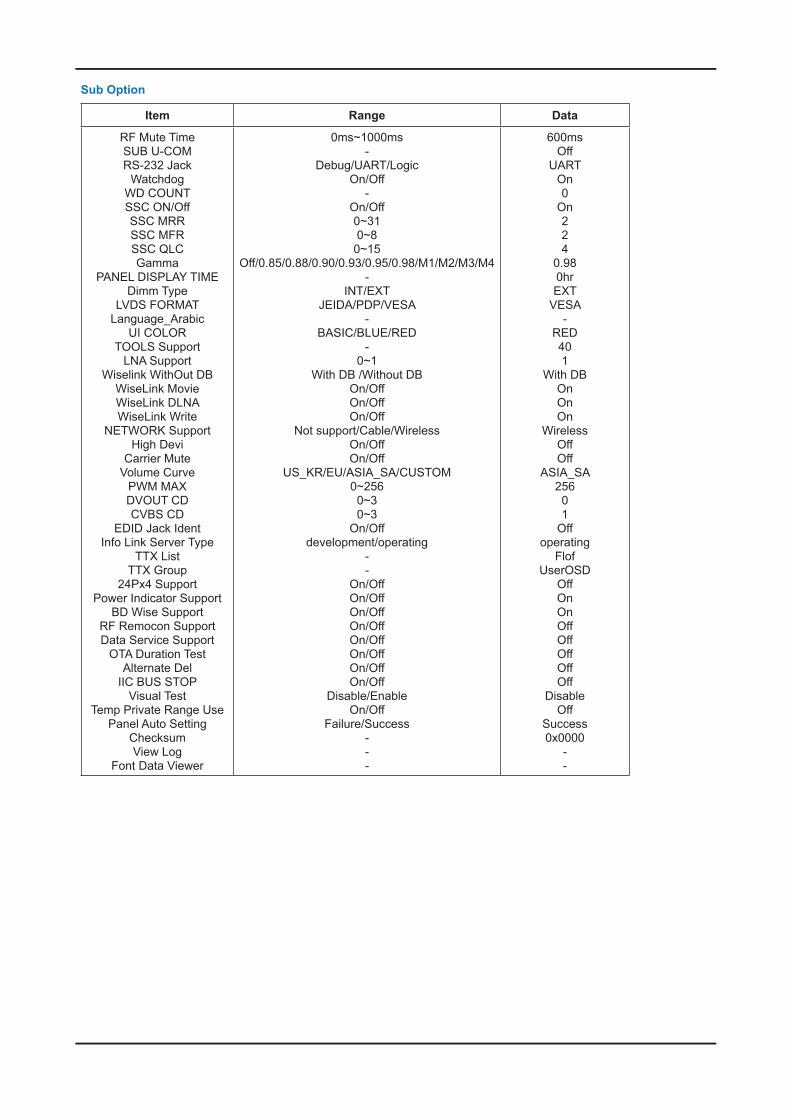
Sub Option
Item Range Data
RF Mute TimeSUB U-COMRS-232 Jack
WatchdogWD COUNTSSC ON/OffSSC MRRSSC MFRSSC QLCGamma
PANEL DISPLAY TIMEDimm Type
LVDS FORMATLanguage_Arabic
UI COLORTOOLS Support
LNA SupportWiselink WithOut DB
WiseLink MovieWiseLink DLNAWiseLink Write
NETWORK SupportHigh Devi
Carrier MuteVolume Curve
PWM MAXDVOUT CDCVBS CD
EDID Jack IdentInfo Link Server Type
TTX ListTTX Group
24Px4 SupportPower Indicator Support
BD Wise SupportRF Remocon SupportData Service Support
OTA Duration TestAlternate Del
IIC BUS STOPVisual Test
Temp Private Range UsePanel Auto Setting
ChecksumView Log
Font Data Viewer
0ms~1000ms-
Debug/UART/LogicOn/Off
-On/Off0~310~8
0~15Off/0.85/0.88/0.90/0.93/0.95/0.98/M1/M2/M3/M4
-INT/EXT
JEIDA/PDP/VESA-
BASIC/BLUE/RED-
0~1With DB /Without DB
On/OffOn/OffOn/Off
Not support/Cable/WirelessOn/OffOn/Off
US_KR/EU/ASIA_SA/CUSTOM0~256
0~30~3
On/Offdevelopment/operating
--
On/OffOn/OffOn/OffOn/OffOn/OffOn/OffOn/OffOn/Off
Disable/EnableOn/Off
Failure/Success---
600msOff
UARTOn0
On224
0.980hrEXT
VESA-
RED401
With DBOnOnOn
WirelessOffOff
ASIA_SA256
01
Offoperating
FlofUserOSD
OffOnOnOffOffOffOffOff
DisableOff
Success0x0000
--
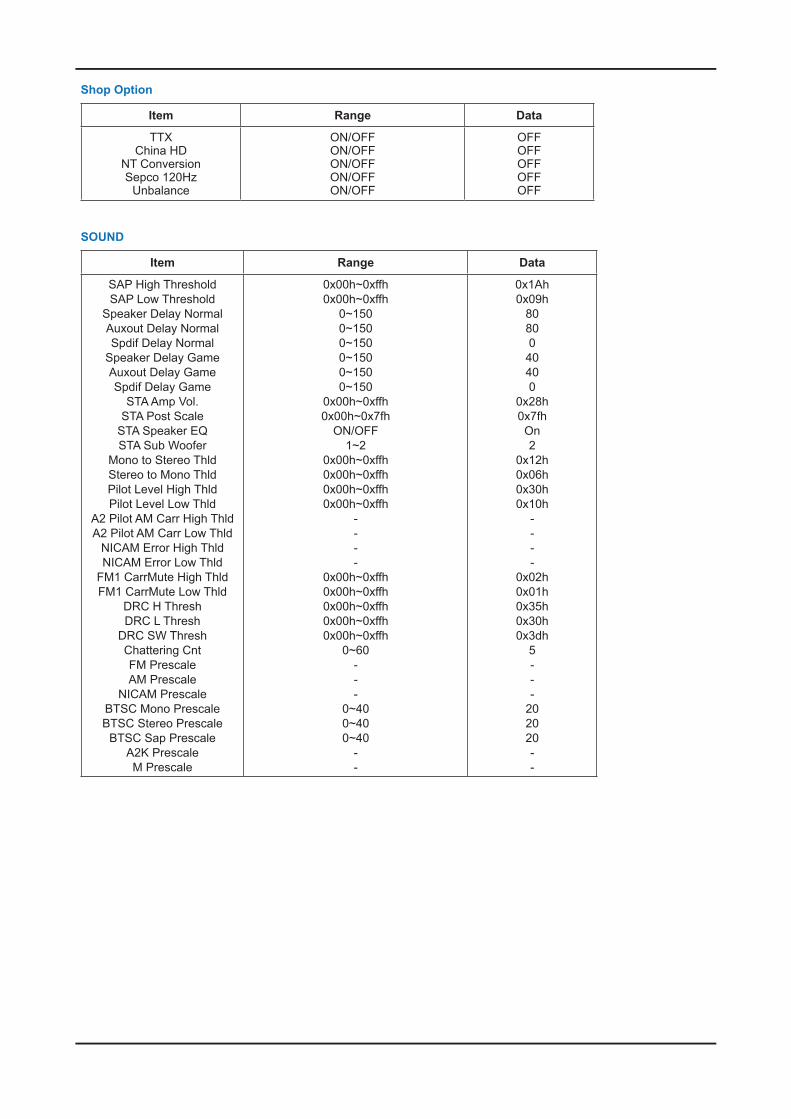
Shop Option
Item Range Data
TTXChina HD
NT ConversionSepco 120Hz
Unbalance
ON/OFFON/OFFON/OFFON/OFFON/OFF
OFFOFFOFFOFFOFF
SOUND
Item Range Data
SAP High ThresholdSAP Low Threshold
Speaker Delay NormalAuxout Delay NormalSpdif Delay Normal
Speaker Delay GameAuxout Delay GameSpdif Delay Game
STA Amp Vol.STA Post Scale
STA Speaker EQSTA Sub Woofer
Mono to Stereo ThldStereo to Mono ThldPilot Level High ThldPilot Level Low Thld
A2 Pilot AM Carr High ThldA2 Pilot AM Carr Low Thld
NICAM Error High ThldNICAM Error Low Thld
FM1 CarrMute High ThldFM1 CarrMute Low Thld
DRC H ThreshDRC L Thresh
DRC SW ThreshChattering CntFM PrescaleAM Prescale
NICAM PrescaleBTSC Mono PrescaleBTSC Stereo Prescale
BTSC Sap PrescaleA2K PrescaleM Prescale
0x00h~0xffh0x00h~0xffh
0~1500~1500~1500~1500~1500~150
0x00h~0xffh0x00h~0x7fh
ON/OFF1~2
0x00h~0xffh0x00h~0xffh0x00h~0xffh0x00h~0xffh
----
0x00h~0xffh0x00h~0xffh0x00h~0xffh0x00h~0xffh0x00h~0xffh
0~60---
0~400~400~40
--
0x1Ah0x09h
80800
40400
0x28h0x7fh
On2
0x12h0x06h0x30h0x10h
----
0x02h0x01h0x35h0x30h0x3dh
5---
202020--

Config Option
Item Range Data
Num of ATVNum of DTVNum of AV
Num of SVIDEONum of COMPNum of HDMI
Num of PCNum of SCART
Num of DVINum of OPTICAL Link
Num of MEDIANum of PANEL KEY
Num of USB PortMFT Offset
Select LCD/PDPHDMI/DVI SELIndicator LedWall Mount
Chelsea HV FlipNum Of Display
HDMI AV MUTE TIMEDVI/HDMI SOUNDHDMI HOT PLUG
HOTPLUG SWITCHINGHOT PLUG OFF HOLD TIME
HDMI FLT CNT SIGHDMI FLT CNT LOS
UNSTABLE BAN CNTHDMI Err CntHDMI ROBIN
HDMI CallbackHDMI CTS ThldHDMI CTS Cnt1
TMDS_EQ2_BoostTMDS_EQ2_GainTMDS_PLL_Loop
TMDS_CPREG_BLEEDHDMI EQ
HDMI SwitchTTX Group Delay
DVI SET TIME
1~20~20~30~30~30~40~10~20~1
00~10~80~2
50/62.5LCD/PDP
1~4ON/OFFON/OFFON/OFF
1~20~100
Auto/DVIDisable/Enable
Disable/Boot/Source0~20000~10000~1000
0~100000~10
ON/OFFON/OFF
0~150~150~70~30~30~1
AUTO/Low/Middle/High/StrongSIL9287/TMDS461
ON/OFF0~1000
1110141000162
62.5LCD
1OnOffOn2
40Auto
DisableBoot
1200ms600ms
3500ms
5OnOff811031
AUTOSIL9287
Off300ms
Test Pattern
Item Range Data
FBE Pattern SelFRC PATT_BeforeDDRFRC PATT_AfterDDR
LOGIC Pattern Sel
0~300~90~8
-
000-
Advanced
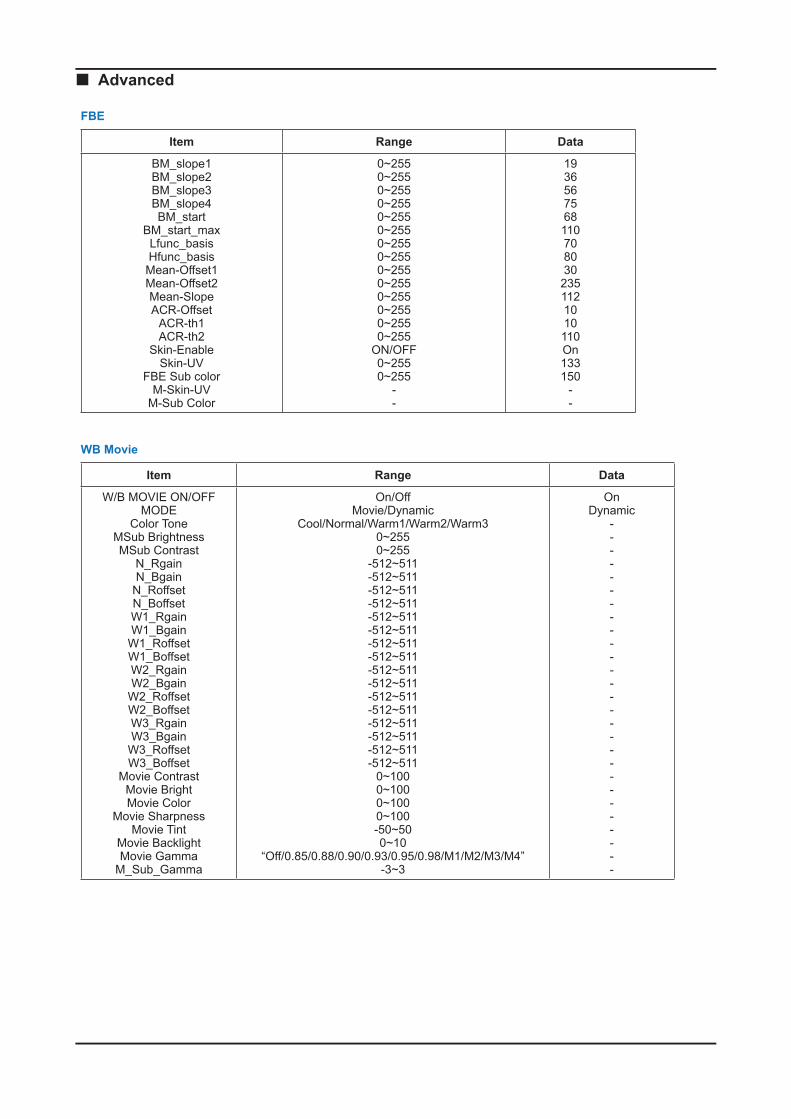
FBE
Item Range Data
BM_slope1BM_slope2BM_slope3BM_slope4BM_start
BM_start_maxLfunc_basisHfunc_basisMean-Offset1Mean-Offset2Mean-SlopeACR-Offset
ACR-th1ACR-th2
Skin-EnableSkin-UV
FBE Sub colorM-Skin-UV
M-Sub Color
0~2550~2550~2550~2550~2550~2550~2550~2550~2550~2550~2550~2550~2550~255
ON/OFF0~2550~255
--
1936567568110708030
2351121010110On133150
--
WB Movie
Item Range Data
W/B MOVIE ON/OFFMODE
Color ToneMSub BrightnessMSub Contrast
N_RgainN_Bgain
N_RoffsetN_BoffsetW1_RgainW1_Bgain
W1_RoffsetW1_BoffsetW2_RgainW2_Bgain
W2_RoffsetW2_BoffsetW3_RgainW3_Bgain
W3_RoffsetW3_Boffset
Movie ContrastMovie BrightMovie Color
Movie SharpnessMovie Tint
Movie BacklightMovie Gamma
M_Sub_Gamma
On/OffMovie/Dynamic
Cool/Normal/Warm1/Warm2/Warm30~2550~255
-512~511-512~511-512~511-512~511-512~511-512~511-512~511-512~511-512~511-512~511-512~511-512~511-512~511-512~511-512~511-512~511
0~1000~1000~1000~100-50~500~10
“Off/0.85/0.88/0.90/0.93/0.95/0.98/M1/M2/M3/M4”-3~3
OnDynamic
---------------------------
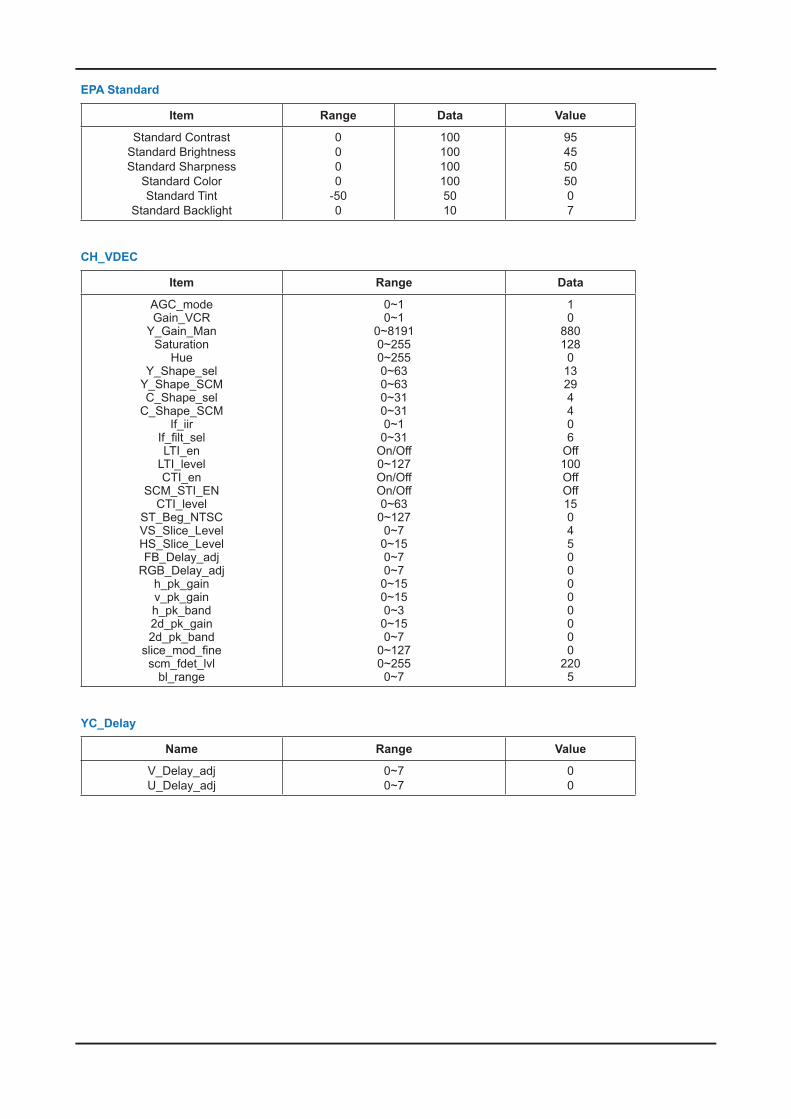
EPA Standard
Item Range Data Value
Standard ContrastStandard BrightnessStandard Sharpness
Standard ColorStandard Tint
Standard Backlight
0000
-500
1001001001005010
9545505007
CH_VDEC
Item Range Data
AGC_modeGain_VCR
Y_Gain_ManSaturation
HueY_Shape_sel
Y_Shape_SCMC_Shape_sel
C_Shape_SCMIf_iir
If_filt_selLTI_en
LTI_levelCTI_en
SCM_STI_ENCTI_level
ST_Beg_NTSCVS_Slice_LevelHS_Slice_LevelFB_Delay_adj
RGB_Delay_adjh_pk_gainv_pk_gainh_pk_band2d_pk_gain2d_pk_band
slice_mod_finescm_fdet_lvl
bl_range
0~10~1
0~81910~2550~2550~630~630~310~310~1
0~31On/Off0~127On/OffOn/Off0~63
0~1270~7
0~150~70~7
0~150~150~3
0~150~7
0~1270~255
0~7
10
880128
013294406
Off100OffOff1504500000000
2205
YC_Delay
Name Range Value
V_Delay_adjU_Delay_adj
0~70~7
00
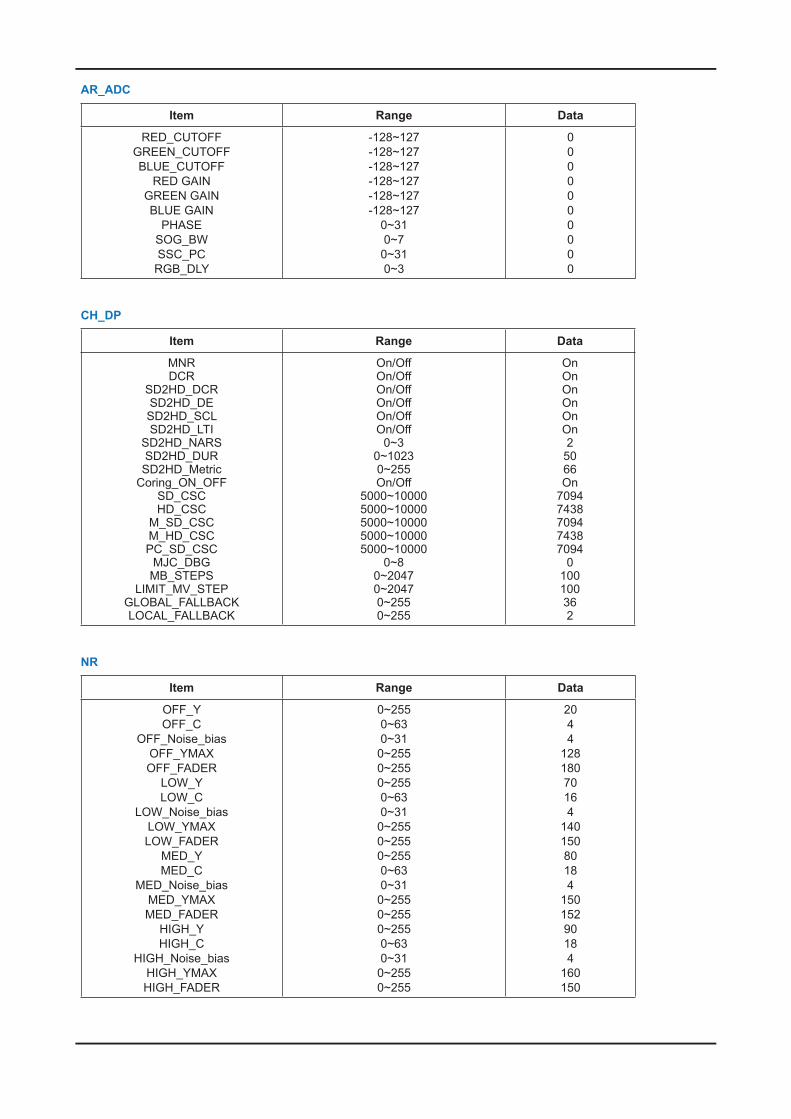
AR_ADC
Item Range Data
RED_CUTOFFGREEN_CUTOFFBLUE_CUTOFF
RED GAINGREEN GAINBLUE GAIN
PHASESOG_BWSSC_PC
RGB_DLY
-128~127-128~127-128~127-128~127-128~127-128~127
0~310~7
0~310~3
0000000000
CH_DP
Item Range Data
MNRDCR
SD2HD_DCRSD2HD_DESD2HD_SCLSD2HD_LTI
SD2HD_NARSSD2HD_DURSD2HD_Metric
Coring_ON_OFFSD_CSCHD_CSC
M_SD_CSCM_HD_CSCPC_SD_CSC
MJC_DBGMB_STEPS
LIMIT_MV_STEPGLOBAL_FALLBACKLOCAL_FALLBACK
On/OffOn/OffOn/OffOn/OffOn/OffOn/Off
0~30~10230~255On/Off
5000~100005000~100005000~100005000~100005000~10000
0~80~20470~20470~2550~255
OnOnOnOnOnOn2
5066On
70947438709474387094
0100100362
NR
Item Range Data
OFF_YOFF_C
OFF_Noise_biasOFF_YMAXOFF_FADER
LOW_YLOW_C
LOW_Noise_biasLOW_YMAXLOW_FADER
MED_YMED_C
MED_Noise_biasMED_YMAXMED_FADER
HIGH_YHIGH_C
HIGH_Noise_biasHIGH_YMAXHIGH_FADER
0~2550~630~31
0~2550~2550~2550~630~31
0~2550~2550~2550~630~31
0~2550~2550~2550~630~31
0~2550~255
2044
12818070164
14015080184
15015290184
160150

SHARPNESS
Item Range Data
Pre_GainH1Pre_GainH2Pre_GainH3Post_GainH1Post_GainH2Post_GainH3Post_GainV1Post_GainV2Post_GainV3
CTI_GainPre_LTIHSD_THHD_TH
NORMAL_LTIHNORMAL_LTIV
SD_LTIHSD_LTIV
PRE_CORINGPOST_CORING_HPOST_CORING_V
Pre_TOTPost_TOT
SP Sub Color
0~2550~2550~2550~2550~2550~2550~2550~2550~2550~150~63
0~2550~2550~630~630~630~63
0~2550~2550~2550~630~630~80
122520204030305030158
100132
88
1624222
323264
SHARPNESS_LNA
Item Range Data
S1_Pre_GainH1S1_Pre_GainH2S1_Pre_GainH3S1_Post_GainH1S1_Post_GainH2S1_Post_GainH3S1_Post_GainV1S1_Post_GainV2S1_Post_GainV3S2_Pre_GainH1S2_Pre_GainH2S2_Pre_GainH3S2_Post_GainH1S2_Post_GainH2S2_Post_GainH3S2_Post_GainV1S2_Post_GainV2S2_Post_GainV3S3_Pre_GainH1S3_Pre_GainH2S3_Pre_GainH3S3_Post_GainH1S3_Post_GainH2S3_Post_GainH3S3_Post_GainV1S3_Post_GainV2S3_Post_GainV3
0~2550~2550~2550~2550~2550~2550~2550~2550~2550~2550~2550~2550~2550~2550~2550~2550~2550~2550~2550~2550~2550~2550~2550~2550~2550~2550~255
485485
202010253253
102051211215
105
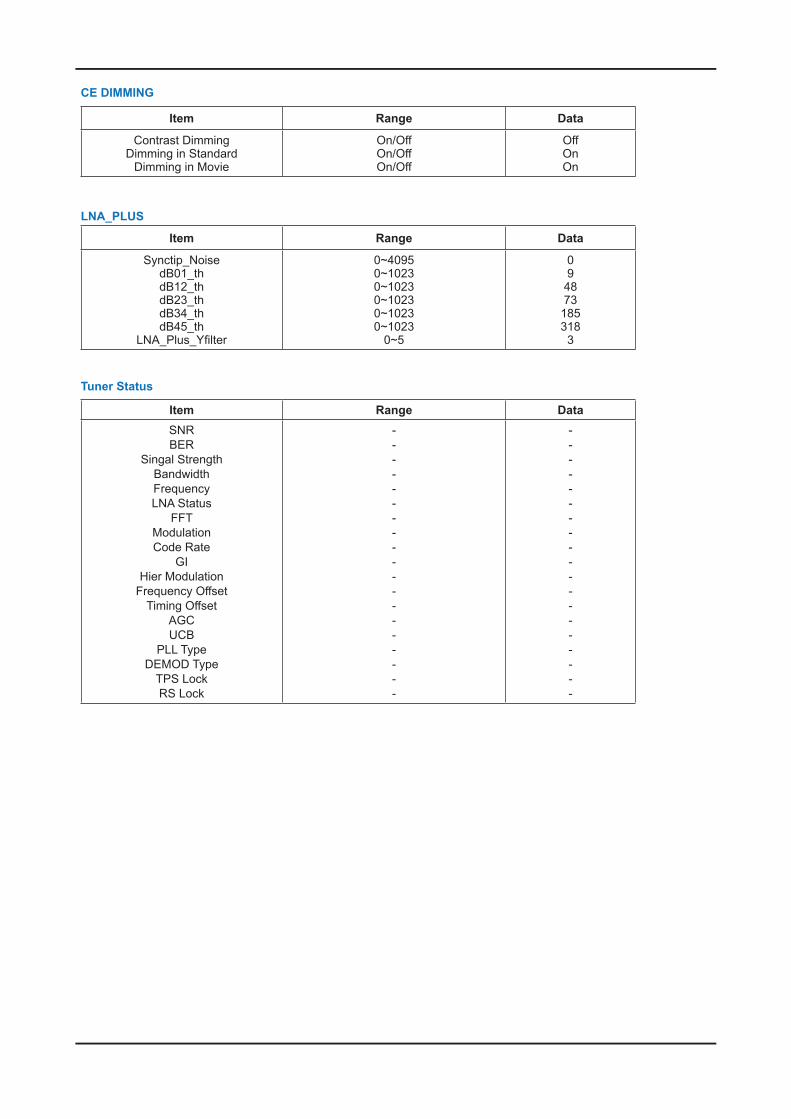
CE DIMMING
Item Range Data
Contrast DimmingDimming in Standard
Dimming in Movie
On/OffOn/OffOn/Off
OffOnOn
LNA_PLUS
Item Range Data
Synctip_NoisedB01_thdB12_thdB23_thdB34_thdB45_th
LNA_Plus_Yfilter
0~40950~10230~10230~10230~10230~1023
0~5
09
4873
185318
3
Tuner Status
Item Range DataSNRBER
Singal StrengthBandwidthFrequencyLNA Status
FFTModulationCode Rate
GIHier Modulation
Frequency OffsetTiming Offset
AGCUCB
PLL TypeDEMOD Type
TPS LockRS Lock
-------------------
-------------------
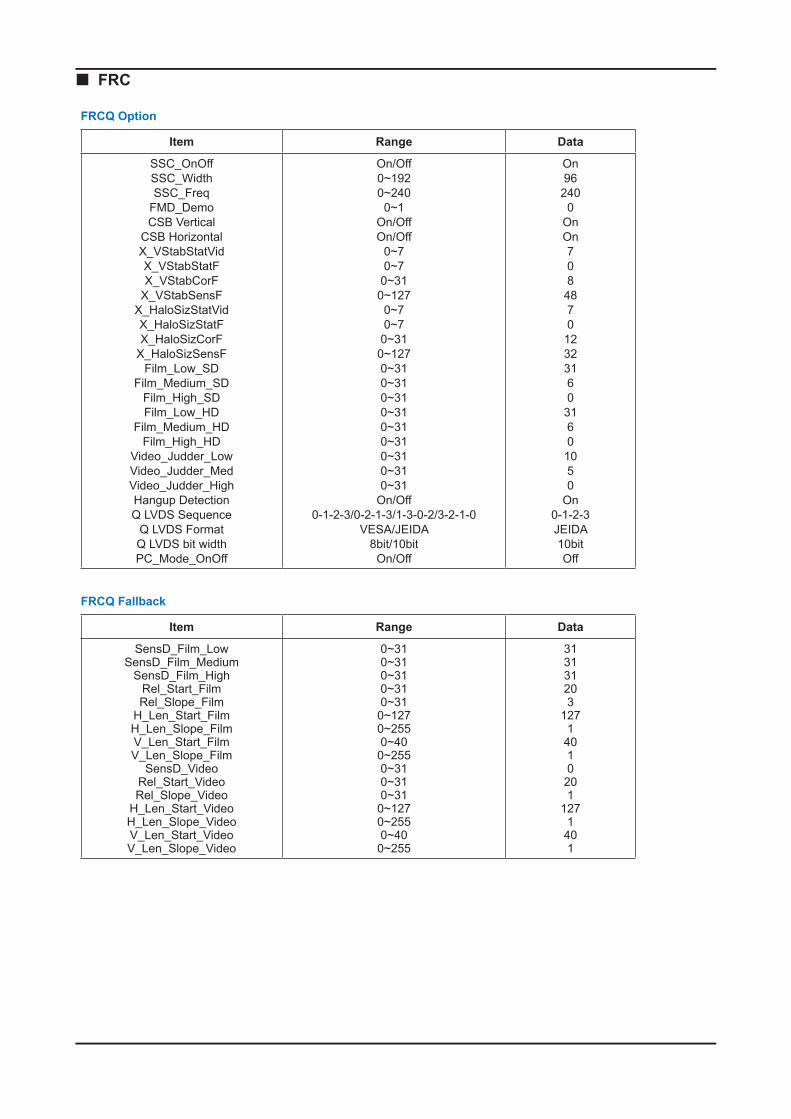
FRC
FRCQ Option
Item Range Data
SSC_OnOffSSC_WidthSSC_Freq
FMD_DemoCSB Vertical
CSB HorizontalX_VStabStatVidX_VStabStatFX_VStabCorF
X_VStabSensFX_HaloSizStatVidX_HaloSizStatFX_HaloSizCorF
X_HaloSizSensFFilm_Low_SD
Film_Medium_SDFilm_High_SDFilm_Low_HD
Film_Medium_HDFilm_High_HD
Video_Judder_LowVideo_Judder_MedVideo_Judder_HighHangup DetectionQ LVDS Sequence
Q LVDS FormatQ LVDS bit widthPC_Mode_OnOff
On/Off0~1920~240
0~1On/OffOn/Off
0~70~7
0~310~127
0~70~7
0~310~1270~310~310~310~310~310~310~310~310~31
On/Off0-1-2-3/0-2-1-3/1-3-0-2/3-2-1-0
VESA/JEIDA8bit/10bit
On/Off
On96
2400
OnOn708
4870
12323160
3160
1050
On0-1-2-3JEIDA10bitOff
FRCQ Fallback
Item Range Data
SensD_Film_LowSensD_Film_Medium
SensD_Film_HighRel_Start_FilmRel_Slope_Film
H_Len_Start_FilmH_Len_Slope_FilmV_Len_Start_FilmV_Len_Slope_Film
SensD_VideoRel_Start_VideoRel_Slope_Video
H_Len_Start_VideoH_Len_Slope_VideoV_Len_Start_VideoV_Len_Slope_Video
0~310~310~310~310~31
0~1270~2550~40
0~2550~310~310~31
0~1270~2550~40
0~255
313131203
1271
4010
201
1271
401
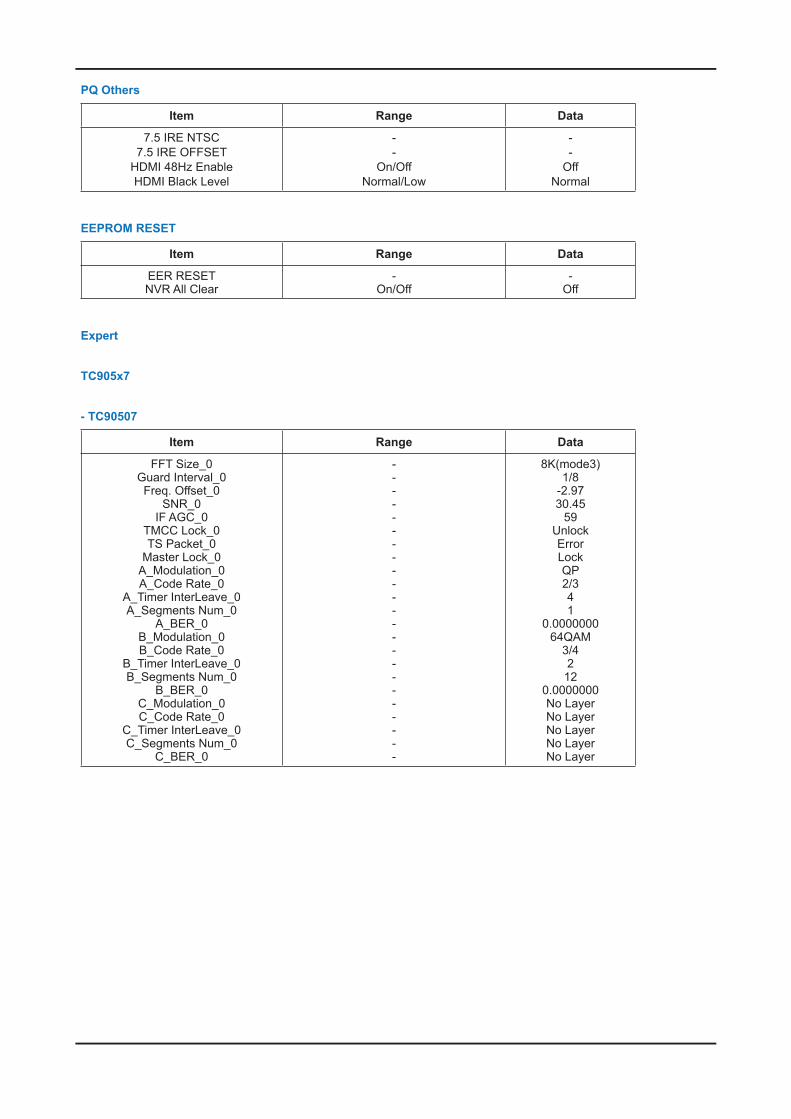
PQ Others
Item Range Data
7.5 IRE NTSC7.5 IRE OFFSET
HDMI 48Hz EnableHDMI Black Level
--
On/OffNormal/Low
--
OffNormal
EEPROM RESET
Item Range Data
EER RESETNVR All Clear
-On/Off
-Off
Expert
TC905x7
- TC90507
Item Range Data
FFT Size_0Guard Interval_0Freq. Offset_0
SNR_0IF AGC_0
TMCC Lock_0TS Packet_0
Master Lock_0A_Modulation_0A_Code Rate_0
A_Timer InterLeave_0A_Segments Num_0
A_BER_0B_Modulation_0B_Code Rate_0
B_Timer InterLeave_0B_Segments Num_0
B_BER_0C_Modulation_0C_Code Rate_0
C_Timer InterLeave_0C_Segments Num_0
C_BER_0
-----------------------
8K(mode3)1/8
-2.9730.45
59UnlockErrorLockQP2/341
0.0000000 64QAM
3/42
120.0000000 No LayerNo LayerNo LayerNo LayerNo Layer
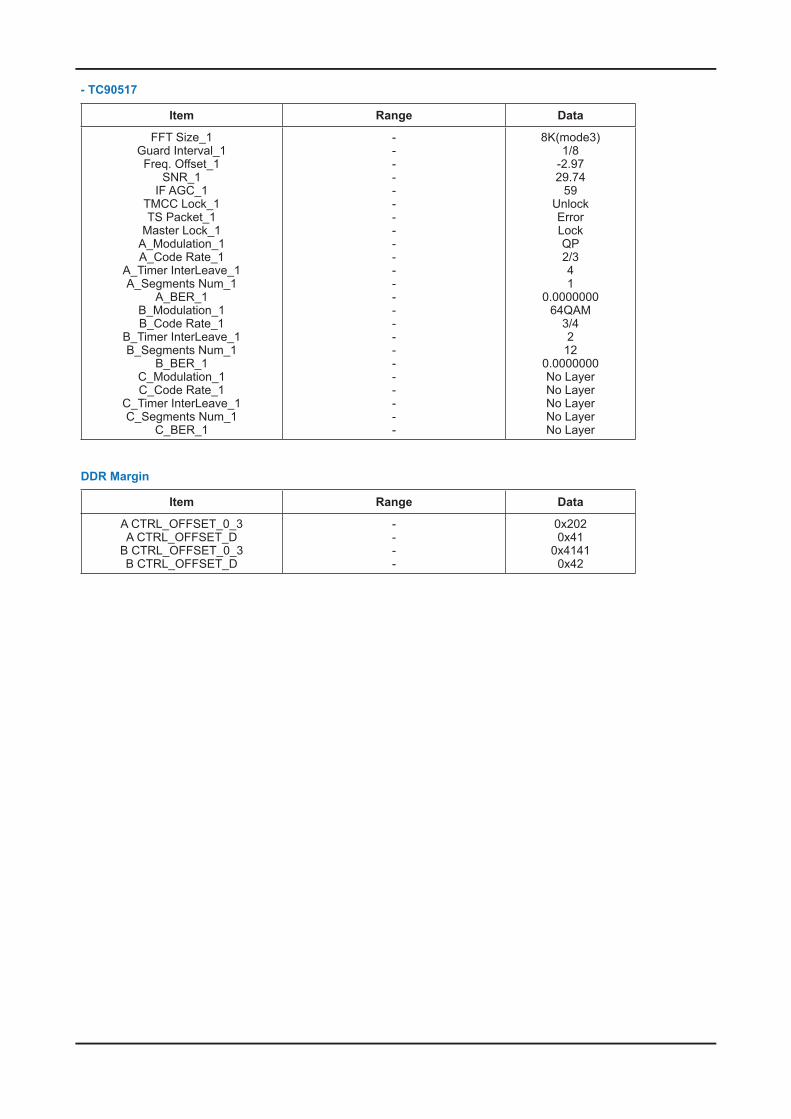
- TC90517
Item Range Data
FFT Size_1Guard Interval_1Freq. Offset_1
SNR_1IF AGC_1
TMCC Lock_1TS Packet_1
Master Lock_1A_Modulation_1A_Code Rate_1
A_Timer InterLeave_1A_Segments Num_1
A_BER_1B_Modulation_1B_Code Rate_1
B_Timer InterLeave_1B_Segments Num_1
B_BER_1C_Modulation_1C_Code Rate_1
C_Timer InterLeave_1C_Segments Num_1
C_BER_1
-----------------------
8K(mode3)1/8
-2.9729.74
59UnlockErrorLockQP2/341
0.0000000 64QAM
3/42
120.0000000 No LayerNo LayerNo LayerNo LayerNo Layer
DDR Margin
Item Range Data
A CTRL_OFFSET_0_3A CTRL_OFFSET_D
B CTRL_OFFSET_0_3B CTRL_OFFSET_D
----
0x2020x41
0x41410x42
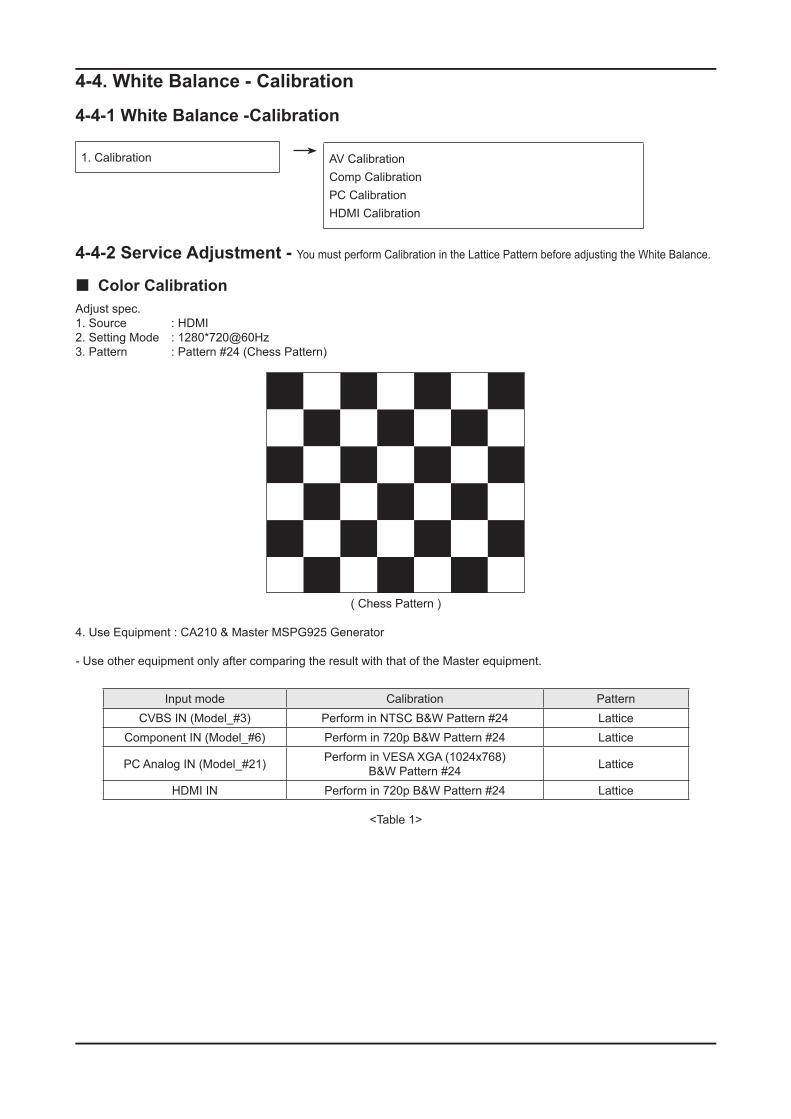
4-4. White Balance - Calibration
4-4-1 White Balance -Calibration
1. Calibration
AV CalibrationComp CalibrationPC CalibrationHDMI Calibration
4-4-2 Service Adjustment - You must perform Calibration in the Lattice Pattern before adjusting the White Balance.
Color CalibrationAdjust spec.1. Source : HDMI2. Setting Mode : 1280*720@60Hz3. Pattern : Pattern #24 (Chess Pattern)
( Chess Pattern )
4. Use Equipment : CA210 & Master MSPG925 Generator
- Use other equipment only after comparing the result with that of the Master equipment.
Input mode Calibration PatternCVBS IN (Model_#3) Perform in NTSC B&W Pattern #24 Lattice
Component IN (Model_#6) Perform in 720p B&W Pattern #24 Lattice
PC Analog IN (Model_#21) Perform in VESA XGA (1024x768)B&W Pattern #24 Lattice
HDMI IN Perform in 720p B&W Pattern #24 Lattice
<Table 1>
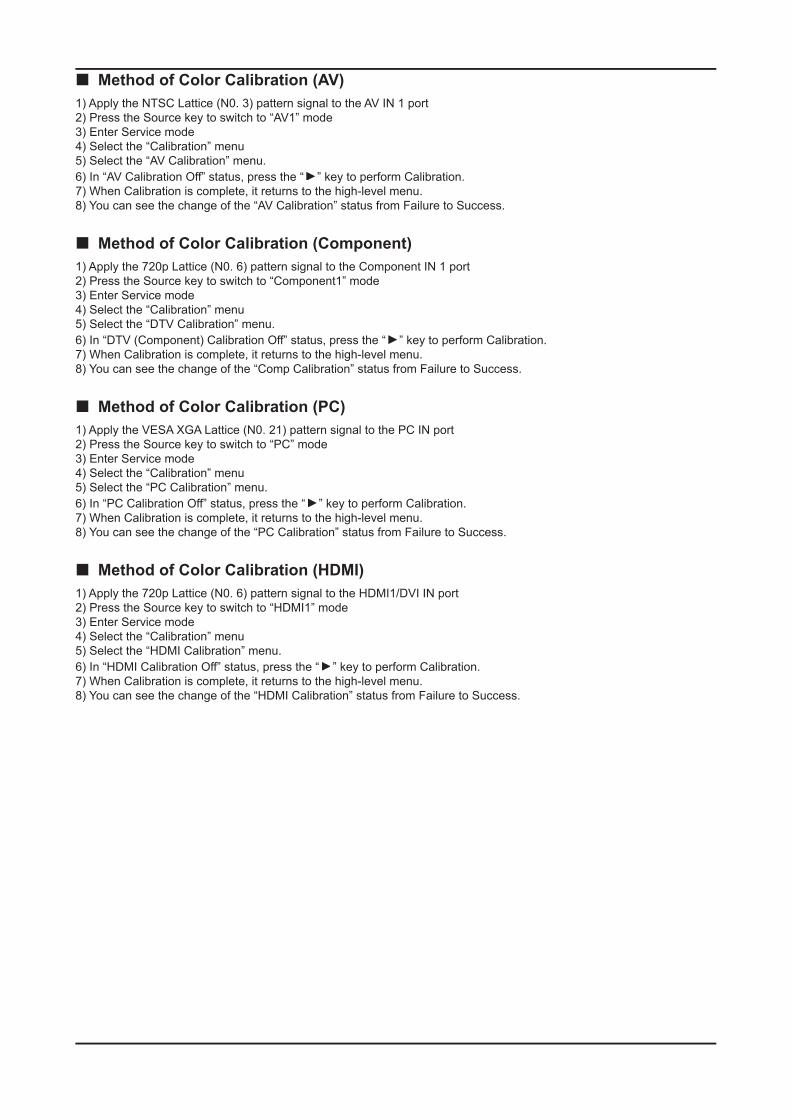
Method of Color Calibration (AV)1) Apply the NTSC Lattice (N0. 3) pattern signal to the AV IN 1 port2) Press the Source key to switch to “AV1” mode3) Enter Service mode4) Select the “Calibration” menu5) Select the “AV Calibration” menu.6) In “AV Calibration Off” status, press the “ ” key to perform Calibration.7) When Calibration is complete, it returns to the high-level menu.8) You can see the change of the “AV Calibration” status from Failure to Success.
Method of Color Calibration (Component)1) Apply the 720p Lattice (N0. 6) pattern signal to the Component IN 1 port2) Press the Source key to switch to “Component1” mode3) Enter Service mode4) Select the “Calibration” menu5) Select the “DTV Calibration” menu.6) In “DTV (Component) Calibration Off” status, press the “ ” key to perform Calibration.7) When Calibration is complete, it returns to the high-level menu.8) You can see the change of the “Comp Calibration” status from Failure to Success.
Method of Color Calibration (PC)1) Apply the VESA XGA Lattice (N0. 21) pattern signal to the PC IN port2) Press the Source key to switch to “PC” mode3) Enter Service mode4) Select the “Calibration” menu5) Select the “PC Calibration” menu.6) In “PC Calibration Off” status, press the “ ” key to perform Calibration.7) When Calibration is complete, it returns to the high-level menu.8) You can see the change of the “PC Calibration” status from Failure to Success.
Method of Color Calibration (HDMI)1) Apply the 720p Lattice (N0. 6) pattern signal to the HDMI1/DVI IN port2) Press the Source key to switch to “HDMI1” mode3) Enter Service mode4) Select the “Calibration” menu5) Select the “HDMI Calibration” menu.6) In “HDMI Calibration Off” status, press the “ ” key to perform Calibration.7) When Calibration is complete, it returns to the high-level menu.8) You can see the change of the “HDMI Calibration” status from Failure to Success.
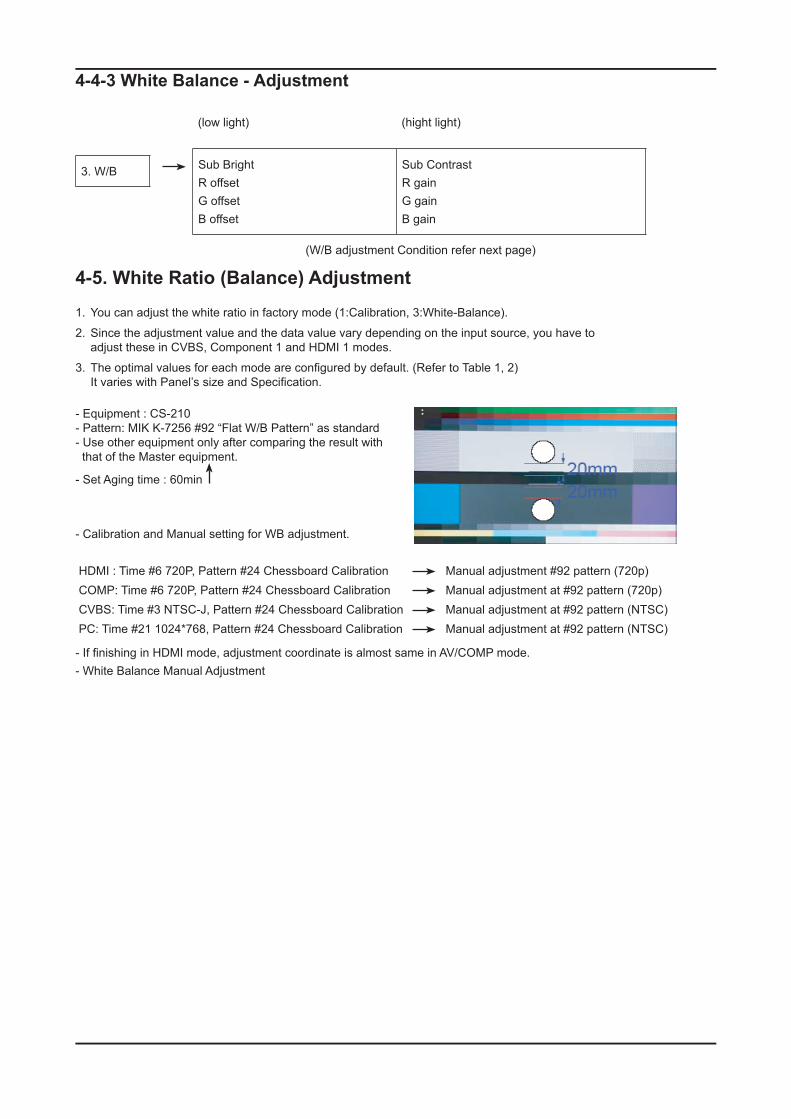
4-4-3 White Balance - Adjustment
3. W/B
(low light) (hight light)
Sub BrightR offsetG offsetB offset
Sub ContrastR gainG gainB gain
(W/B adjustment Condition refer next page)
4-5. White Ratio (Balance) Adjustment
You can adjust the white ratio in factory mode (1:Calibration, 3:White-Balance).
Since the adjustment value and the data value vary depending on the input source, you have to adjust these in CVBS, Component 1 and HDMI 1 modes.
The optimal values for each mode are configured by default. (Refer to Table 1, 2) It varies with Panel’s size and Specification.
1.
2.
3.
- Equipment : CS-210 - Pattern: MIK K-7256 #92 “Flat W/B Pattern” as standard - Use other equipment only after comparing the result with that of the Master equipment.
- Set Aging time : 60min
- Calibration and Manual setting for WB adjustment.
HDMI : Time #6 720P, Pattern #24 Chessboard Calibration Manual adjustment #92 pattern (720p) COMP: Time #6 720P, Pattern #24 Chessboard Calibration Manual adjustment at #92 pattern (720p) CVBS: Time #3 NTSC-J, Pattern #24 Chessboard Calibration Manual adjustment at #92 pattern (NTSC) PC: Time #21 1024*768, Pattern #24 Chessboard Calibration Manual adjustment at #92 pattern (NTSC)
- If finishing in HDMI mode, adjustment coordinate is almost same in AV/COMP mode.- White Balance Manual Adjustment
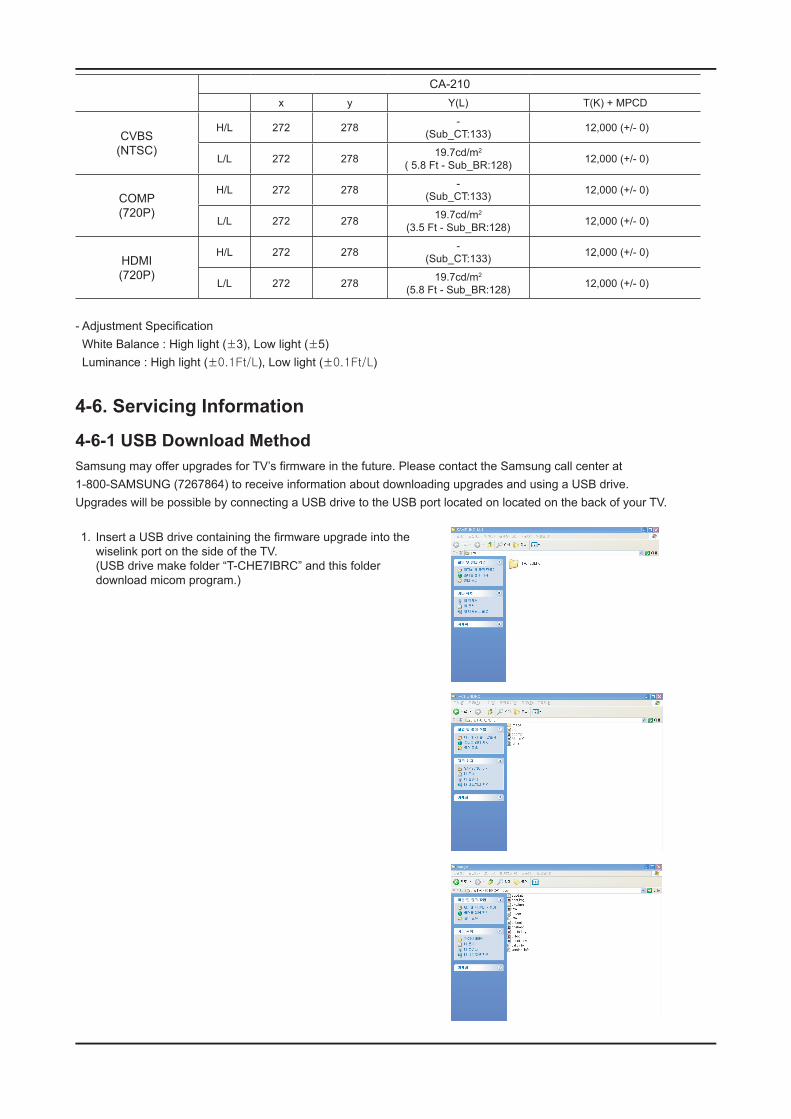
CA-210x y Y(L) T(K) + MPCD
CVBS(NTSC)
H/L 272 278 -(Sub_CT:133) 12,000 (+/- 0)
L/L 272 278 19.7cd/m2
( 5.8 Ft - Sub_BR:128) 12,000 (+/- 0)
COMP(720P)
H/L 272 278 -(Sub_CT:133) 12,000 (+/- 0)
L/L 272 278 19.7cd/m2
(3.5 Ft - Sub_BR:128) 12,000 (+/- 0)
HDMI(720P)
H/L 272 278 -(Sub_CT:133) 12,000 (+/- 0)
L/L 272 278 19.7cd/m2
(5.8 Ft - Sub_BR:128) 12,000 (+/- 0)
- Adjustment Specification White Balance : High light (±3), Low light (±5) Luminance : High light (±0.1Ft/L), Low light (±0.1Ft/L)
4-6. Servicing Information
4-6-1 USB Download MethodSamsung may offer upgrades for TV’s firmware in the future. Please contact the Samsung call center at1-800-SAMSUNG (7267864) to receive information about downloading upgrades and using a USB drive.Upgrades will be possible by connecting a USB drive to the USB port located on located on the back of your TV.
Insert a USB drive containing the firmware upgrade into the wiselink port on the side of the TV. (USB drive make folder “T-CHE7IBRC” and this folder download micom program.)
1.
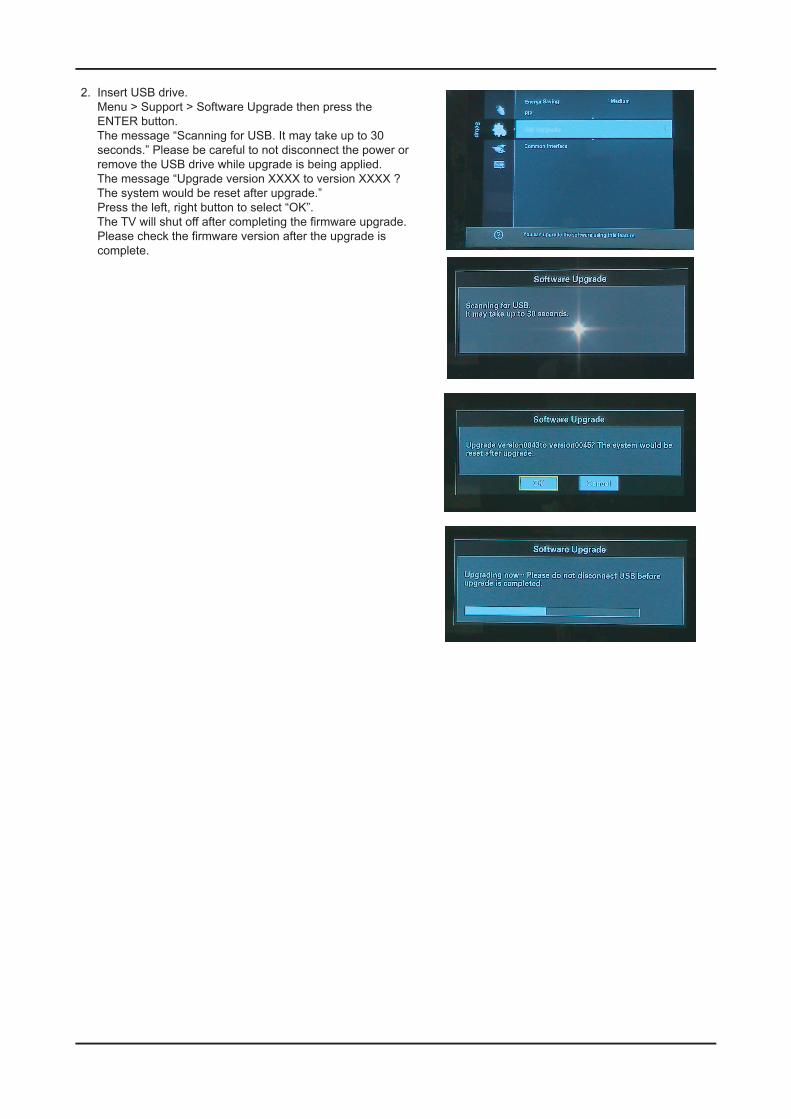
2. Insert USB drive. Menu > Support > Software Upgrade then press the ENTER button. The message “Scanning for USB. It may take up to 30 seconds.” Please be careful to not disconnect the power or remove the USB drive while upgrade is being applied. The message “Upgrade version XXXX to version XXXX ? The system would be reset after upgrade.” Press the left, right button to select “OK”. The TV will shut off after completing the firmware upgrade. Please check the firmware version after the upgrade is complete.
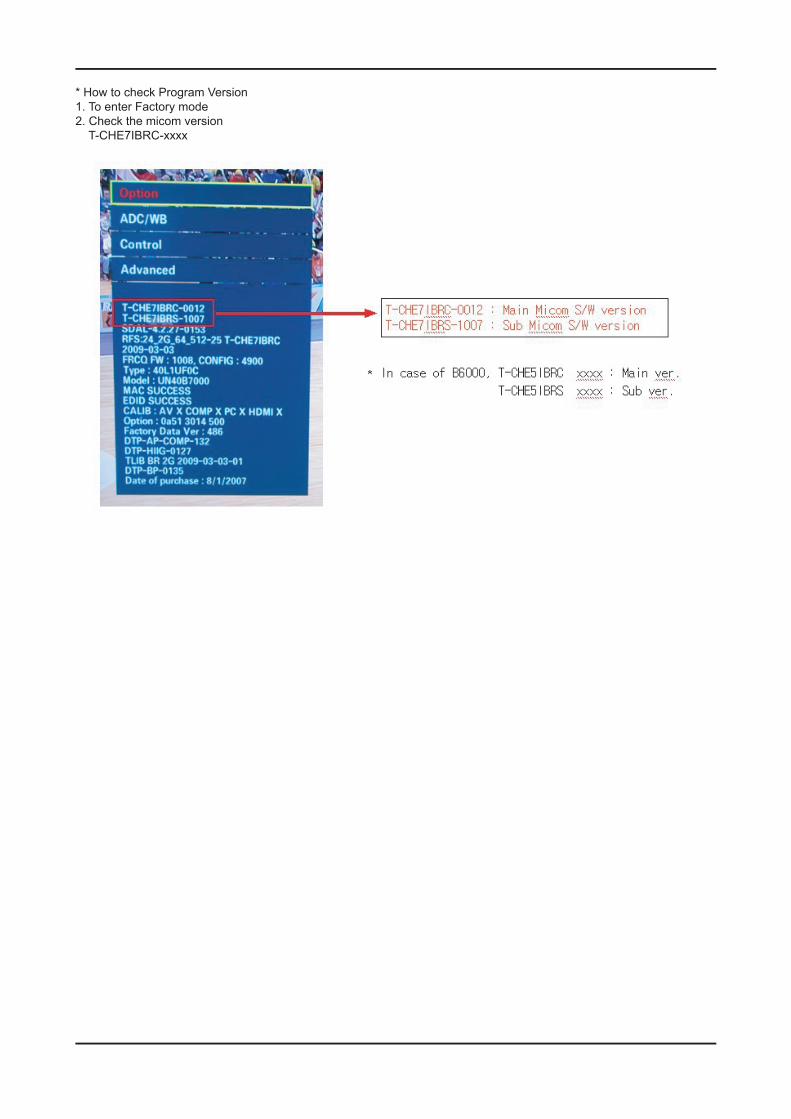
* How to check Program Version 1. To enter Factory mode 2. Check the micom version T-CHE7IBRC-xxxx
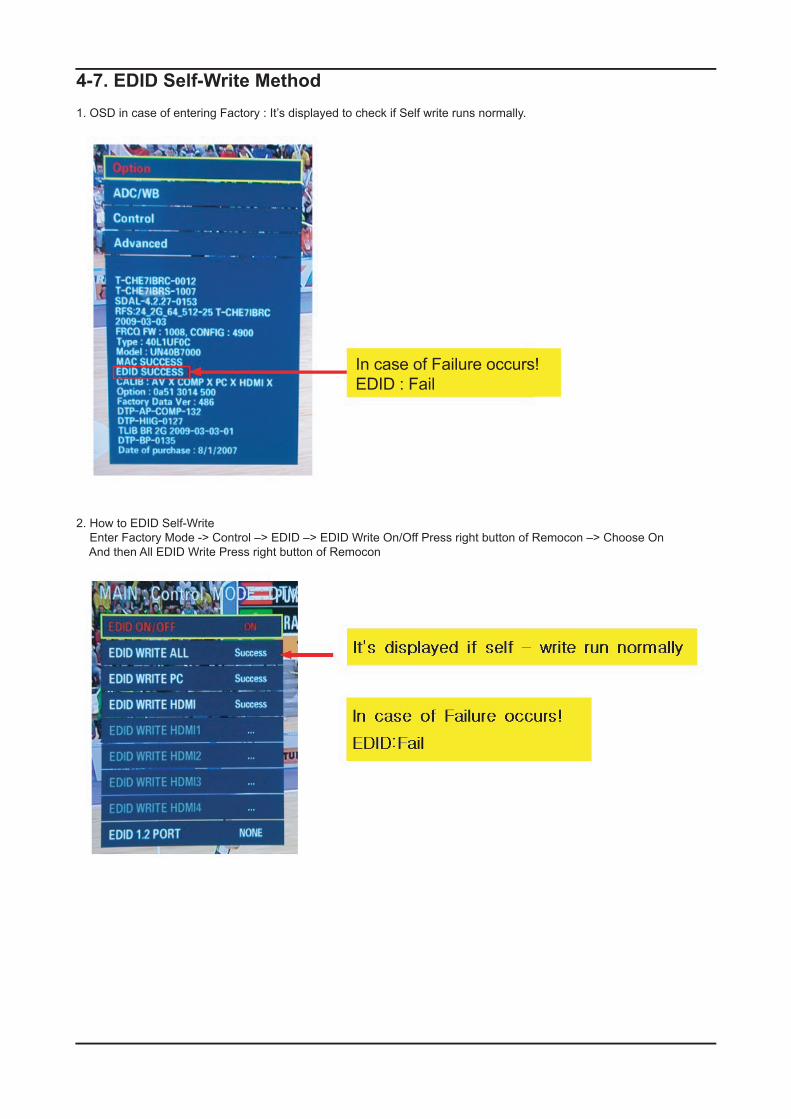
4-7. EDID Self-Write Method1. OSD in case of entering Factory : It’s displayed to check if Self write runs normally.
In case of Failure occurs!EDID : Fail
2. How to EDID Self-Write Enter Factory Mode -> Control –> EDID –> EDID Write On/Off Press right button of Remocon –> Choose On And then All EDID Write Press right button of Remocon
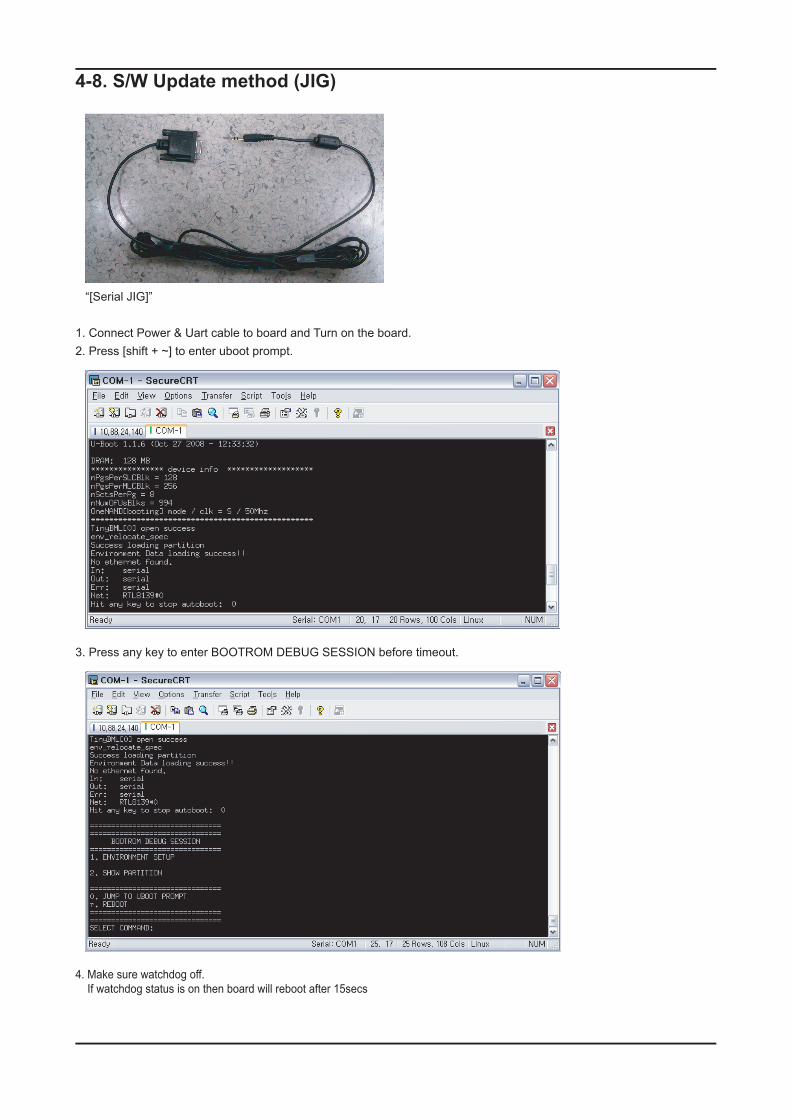
4-8. S/W Update method (JIG)
“[Serial JIG]”
1. Connect Power & Uart cable to board and Turn on the board.2. Press [shift + ~] to enter uboot prompt.
3. Press any key to enter BOOTROM DEBUG SESSION before timeout.
4. Make sure watchdog off. If watchdog status is on then board will reboot after 15secs
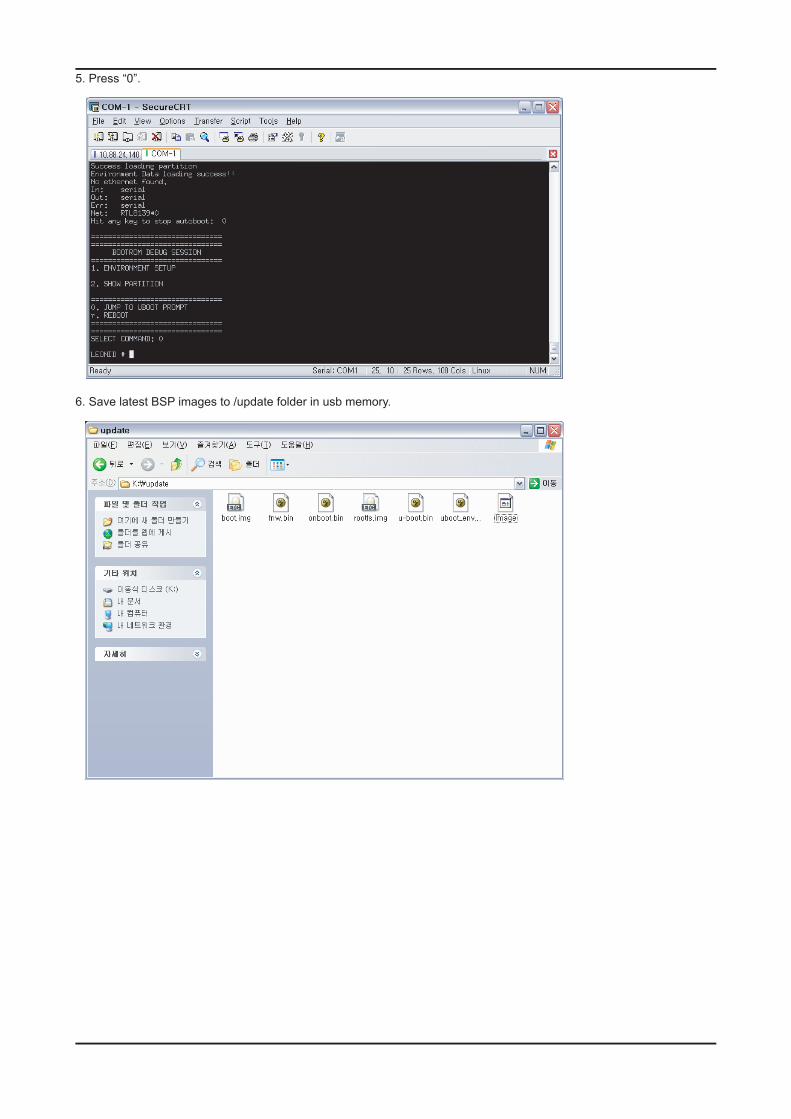
5. Press “0”.
6. Save latest BSP images to /update folder in usb memory.
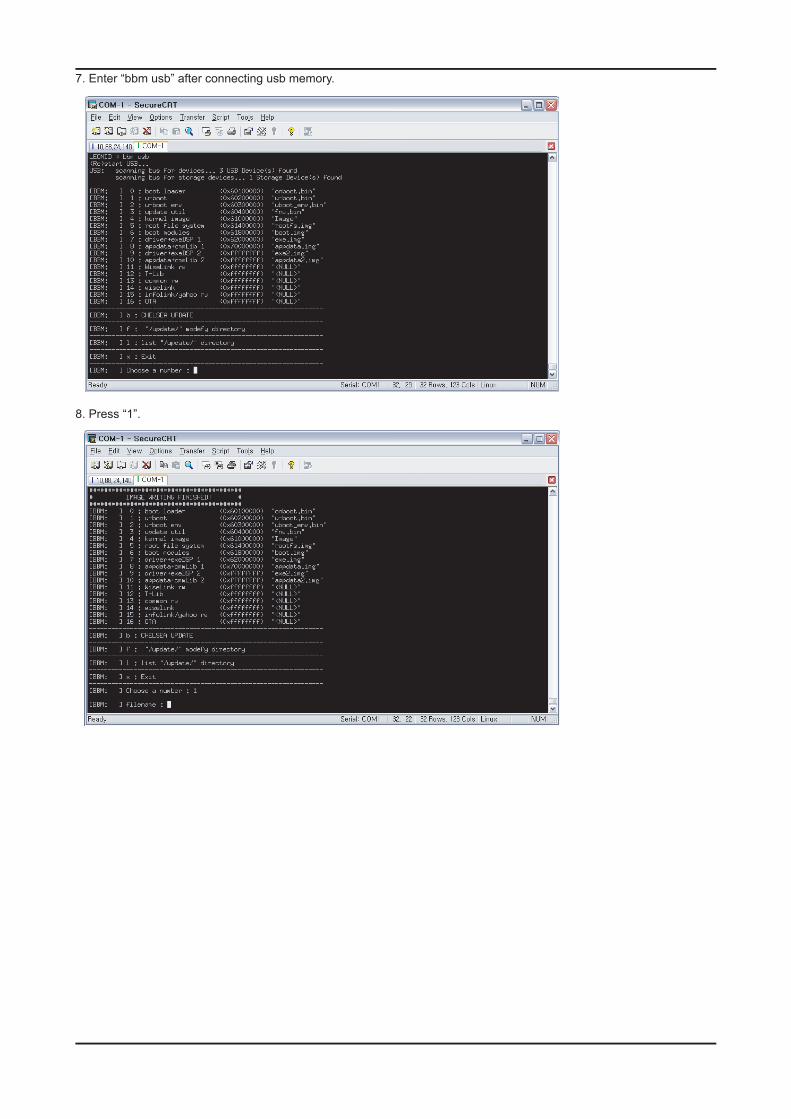
7. Enter “bbm usb” after connecting usb memory.
8. Press “1”.

9. Enter “u-boot.bin”.
10. Press “x” to return prompt menu.
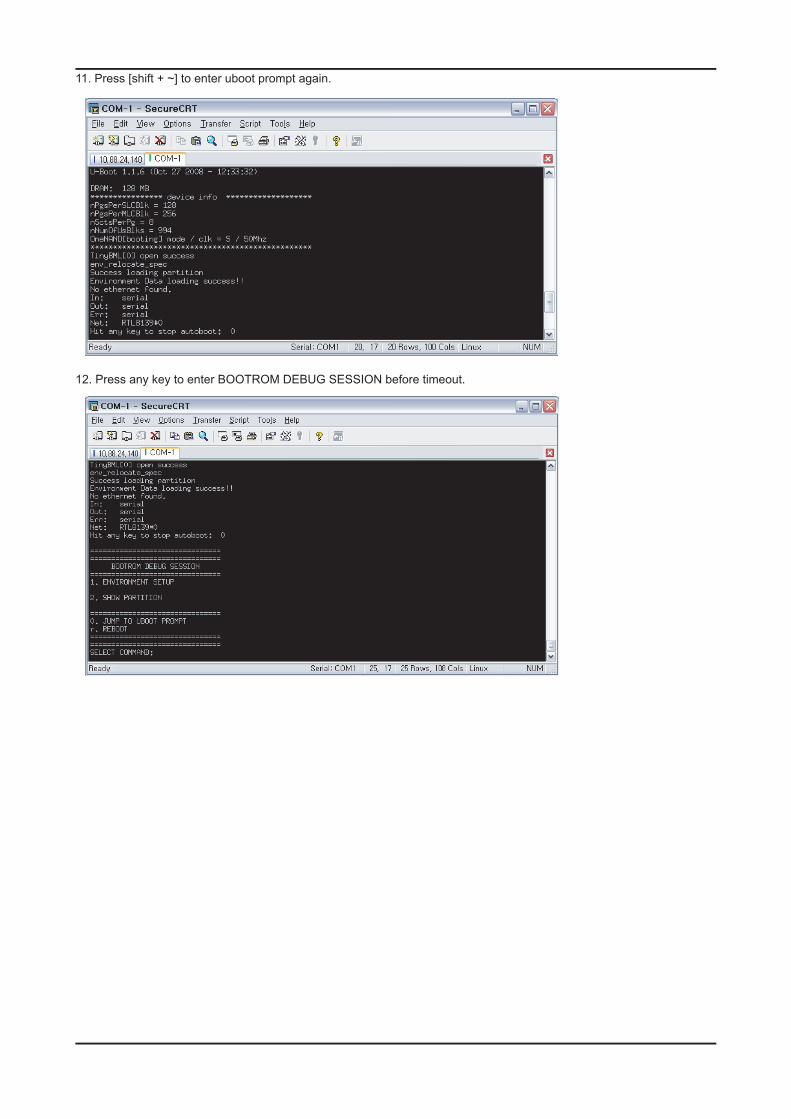
11. Press [shift + ~] to enter uboot prompt again.
12. Press any key to enter BOOTROM DEBUG SESSION before timeout.
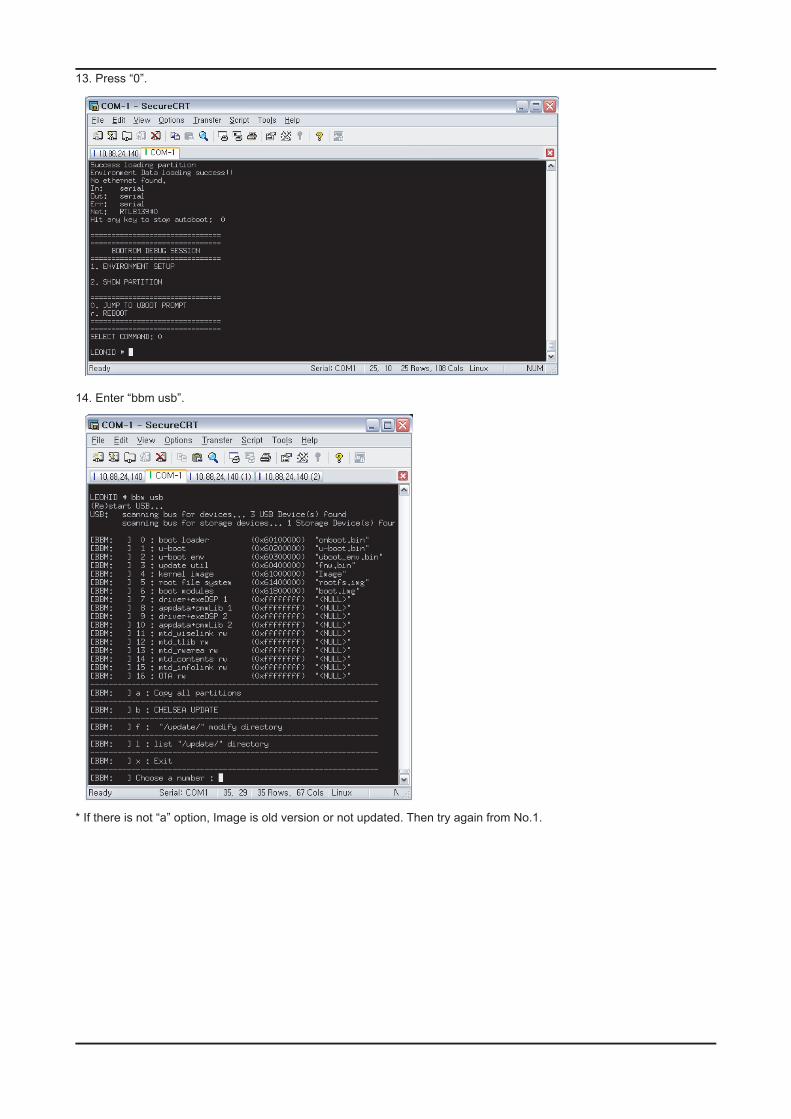
13. Press “0”.
14. Enter “bbm usb”.
* If there is not “a” option, Image is old version or not updated. Then try again from No.1.
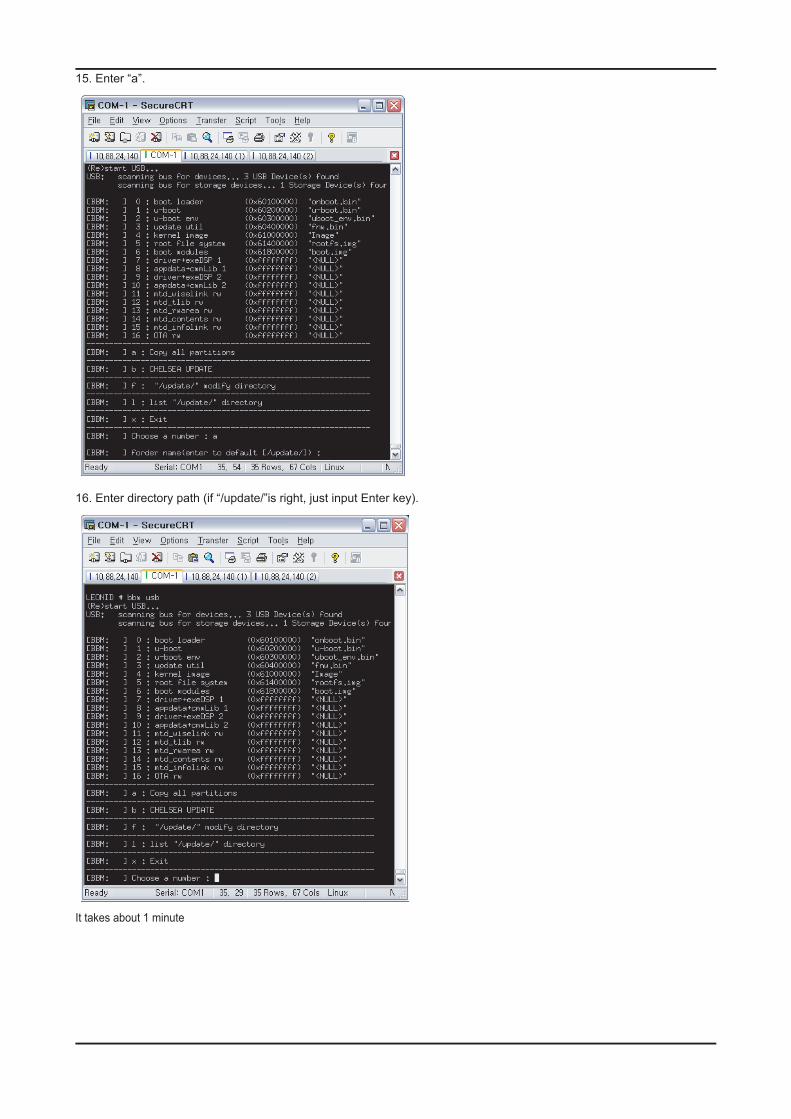
15. Enter “a”.
16. Enter directory path (if “/update/”is right, just input Enter key).
It takes about 1 minute
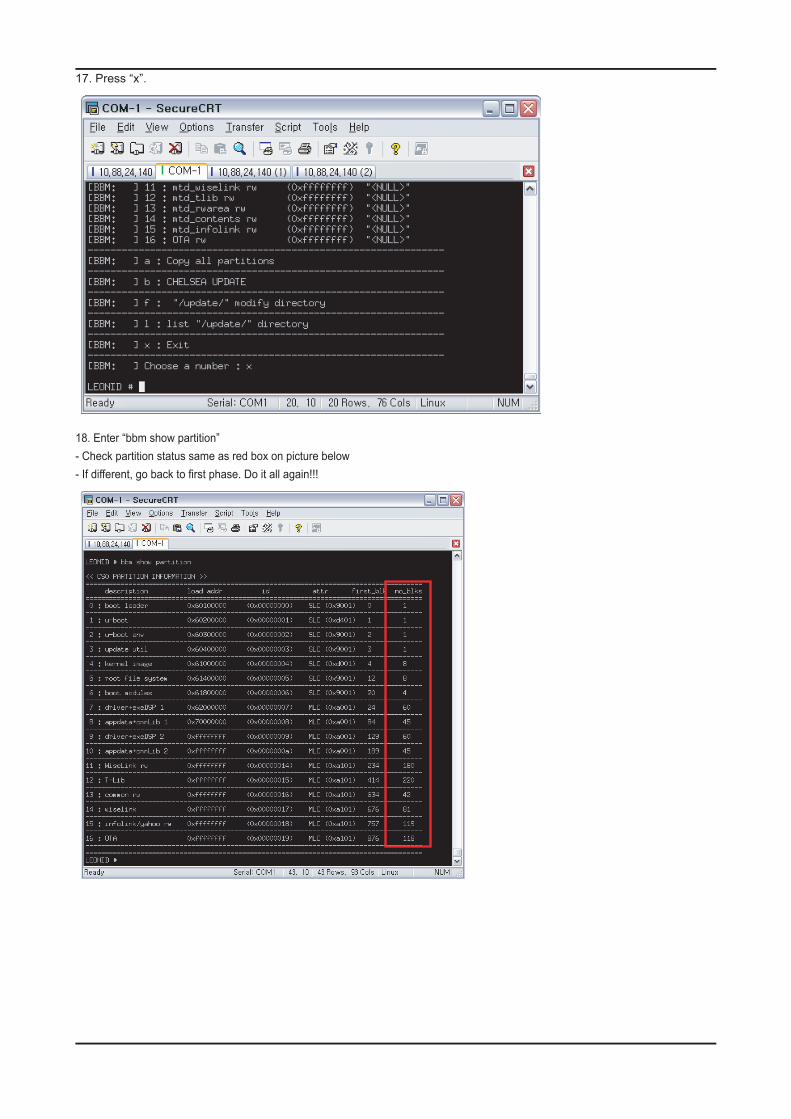
17. Press “x”.
18. Enter “bbm show partition”- Check partition status same as red box on picture below- If different, go back to first phase. Do it all again!!!
** After this, if you want to update BSP image except for partition format Then just press “b”instead of 8 ~ 15
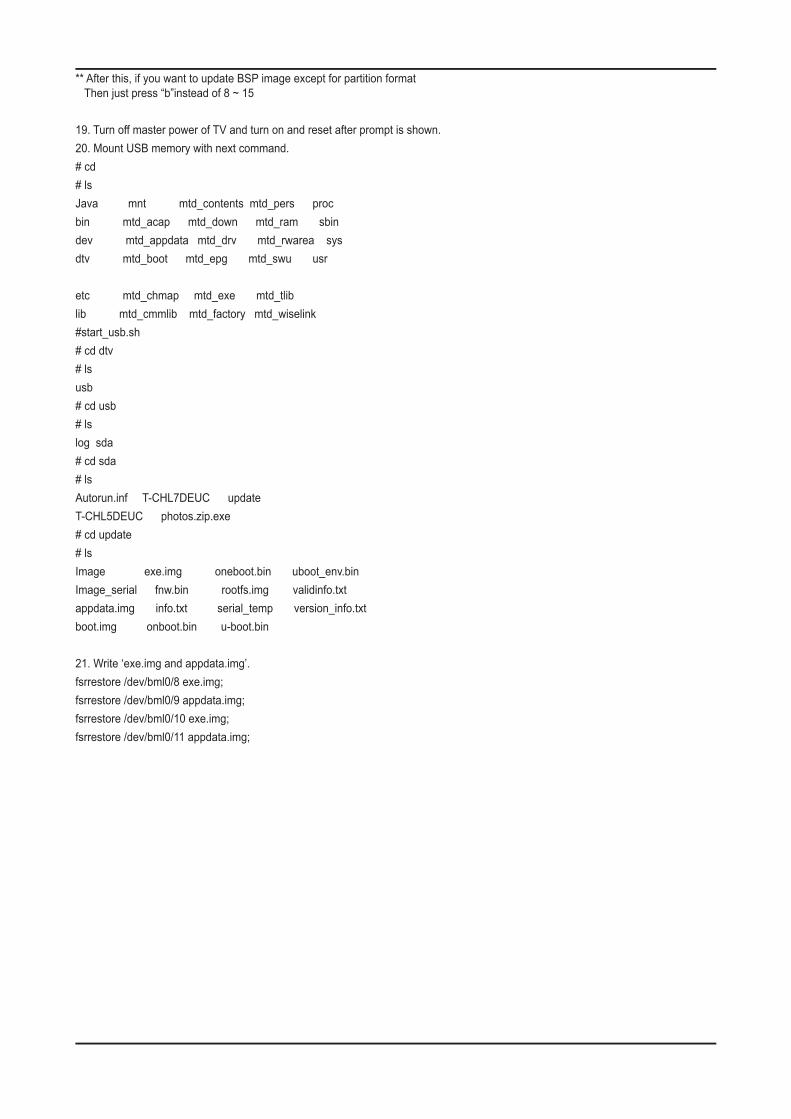
19. Turn off master power of TV and turn on and reset after prompt is shown. 20. Mount USB memory with next command.# cd# lsJava mnt mtd_contents mtd_pers procbin mtd_acap mtd_down mtd_ram sbindev mtd_appdata mtd_drv mtd_rwarea sysdtv mtd_boot mtd_epg mtd_swu usr
etc mtd_chmap mtd_exe mtd_tliblib mtd_cmmlib mtd_factory mtd_wiselink#start_usb.sh# cd dtv# lsusb# cd usb# lslog sda# cd sda # lsAutorun.inf T-CHL7DEUC updateT-CHL5DEUC photos.zip.exe# cd update# lsImage exe.img oneboot.bin uboot_env.binImage_serial fnw.bin rootfs.img validinfo.txtappdata.img info.txt serial_temp version_info.txtboot.img onboot.bin u-boot.bin
21. Write ‘exe.img and appdata.img’.fsrrestore /dev/bml0/8 exe.img;fsrrestore /dev/bml0/9 appdata.img;fsrrestore /dev/bml0/10 exe.img;fsrrestore /dev/bml0/11 appdata.img;
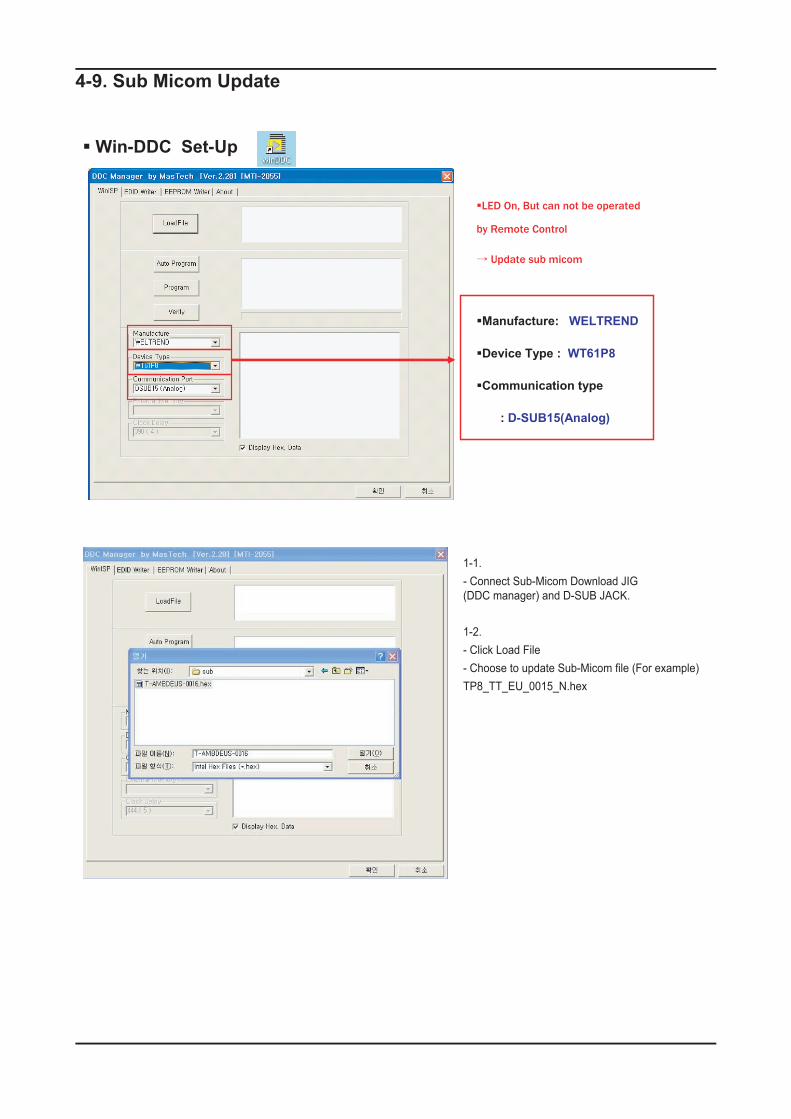
4-9. Sub Micom Update
Win-DDC Set-Up
LED On, But can not be operated
by Remote Control
→ Update sub micom
Manufacture: WELTREND
Device Type : WT61P8
Communication type
: D-SUB15(Analog)
1-1. - Connect Sub-Micom Download JIG (DDC manager) and D-SUB JACK.
1-2. - Click Load File - Choose to update Sub-Micom file (For example)TP8_TT_EU_0015_N.hex
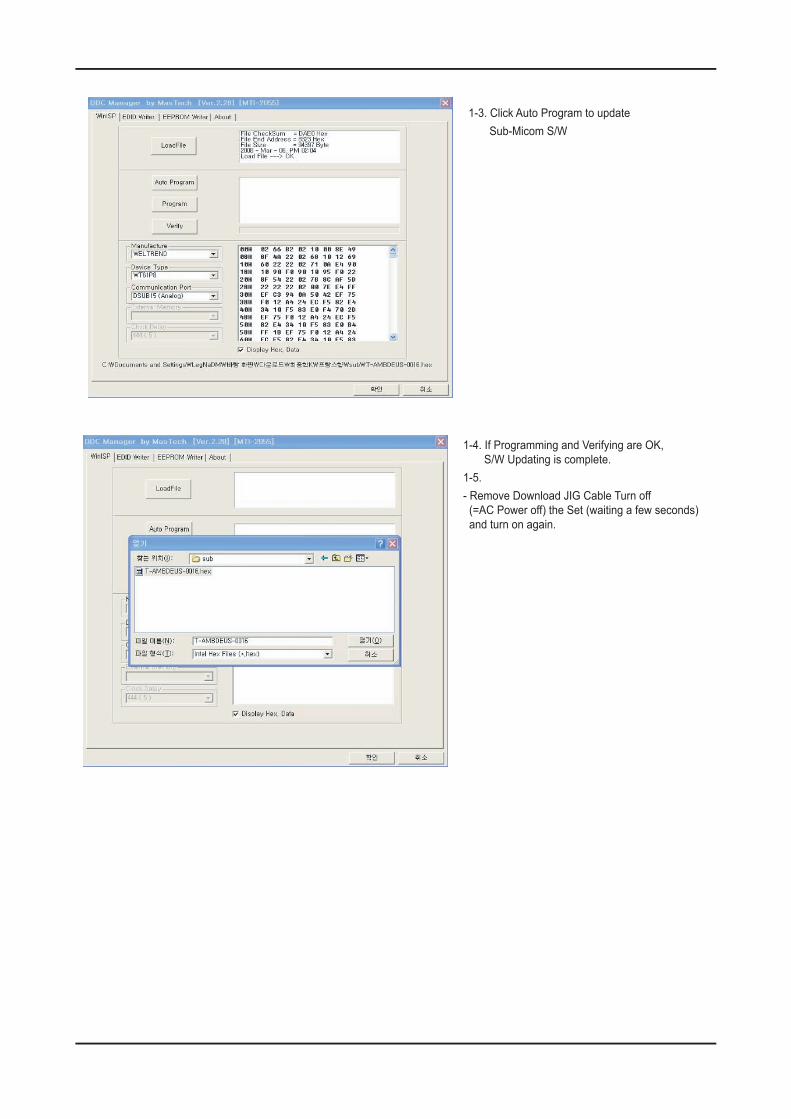
1-3. Click Auto Program to update Sub-Micom S/W
1-4. If Programming and Verifying are OK, S/W Updating is complete.1-5. - Remove Download JIG Cable Turn off (=AC Power off) the Set (waiting a few seconds) and turn on again.