Embed Size (px)
Citation preview
Sample Hands-On-Training™ Chapter – Review Copy Only Copyright ©2003 by lynda.com, Inc. All Rights Reserved. Reproduction and Distribution Strictly Prohibited. This electronically distributed Hands-On-Training™ document is for review purposes only and is intended for on-screen viewing only. Any printing, reproduction, copying, distribution, and/or transmission of this document are strictly prohibited without written consent from lynda.com, Inc. Contact Information Garo Green ([email protected]) Director of Publications lynda.com, Inc. PO Box 789 Ojai, California 93024 Phone: 805-646-7076 Fax: 805-640-9607 Notice of Rights All rights reserved. No part of this book may be reproduced or transmitted in any form by any means, electronic, mechanical, photocopying, recording, or otherwise, without the prior written permission of the lynda.com, Inc. For information on getting permission for reprints and excerpts, contact [email protected]. Notice of Liability The information in this book is distributed on an “As Is” basis, without warranty. While every precaution has been taken in the preparation of the book, neither the author nor Peachpit Press shall have any liability to any person or entity with respect to any loss or damage caused or alleged to be caused directly or indirectly by the instructions contained in this book or by the computer software and hardware products described in it. Trademarks Hands-On-Training is a registered trademark of lynda.com, Inc. Macromedia is a registered trademark. Macromedia Dreamweaver and Dreamweaver, and Macromedia Fireworks and Fireworks are registered trademarks of Macromedia, Inc., in the U.S. and/or other countries. Adobe Photoshop, Adobe Photoshop Elements 2, Adobe Acrobat 6, and Adobe After Effects 6 are registered trademarks of Adobe, Inc. QuickTime and the QuickTime logo are trademarks used under license. The QuickTime logo is registered in the U.S. and other countries.
| 42 |
Up until now, you have learned how to create aproject file. The project file holds references
to all your footage, but the composition iswhere you put this footage to use. Without
a composition, you cannot create anima-tion, video, graphics, or audio. Think ofthe composition as the instructionsthat tell After Effects what to do withyour footage and as the preview thatshows you how those instructionsare being executed.
In this chapter, you’ll get to knowexactly what a composition is. You’ll also see how to work with the Composition window—your main
visual window that provides manyoptions for working with the images
you compose.
4.The Composition
| What Is a Composition? | Starting a New Composition |
| Getting Footage into the Composition |
| Importing a Photoshop File as a Composition |
| Creating a Composition from Footage Settings |
chap_04
After Effects 6 H•O•T CD-ROM
4.The Composition | After Effects 6 H•O•T
04AE6_HOT(42-65).v1 8/8/03 10:03 AM Page 42
| 43 |
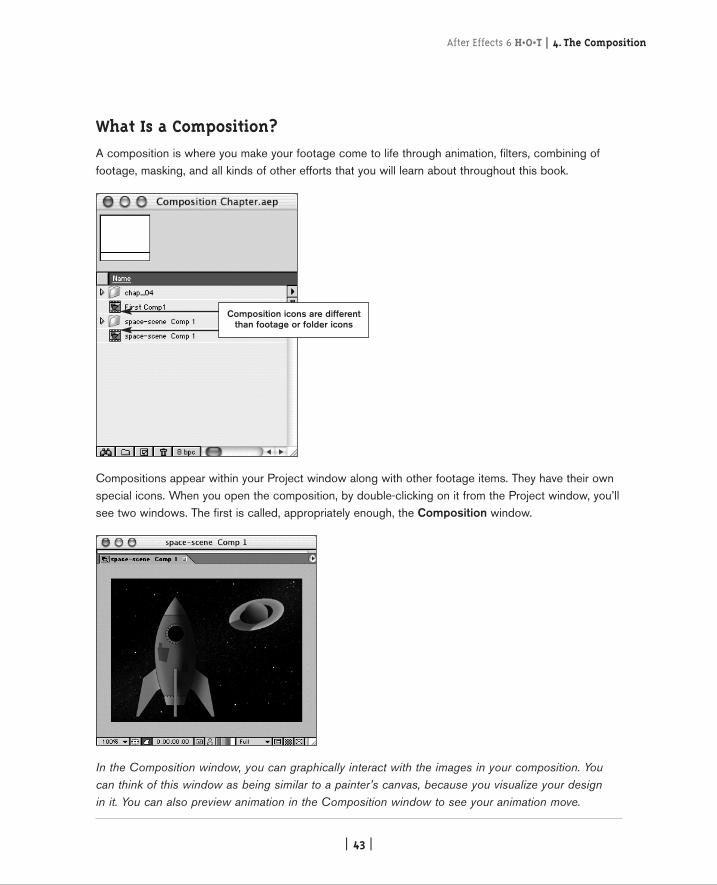
What Is a Composition?A composition is where you make your footage come to life through animation, filters, combining offootage, masking, and all kinds of other efforts that you will learn about throughout this book.
Compositions appear within your Project window along with other footage items. They have their ownspecial icons. When you open the composition, by double-clicking on it from the Project window, you’llsee two windows. The first is called, appropriately enough, the Composition window.
In the Composition window, you can graphically interact with the images in your composition. Youcan think of this window as being similar to a painter’s canvas, because you visualize your design in it. You can also preview animation in the Composition window to see your animation move.
After Effects 6 H•O•T | 4. The Composition
Composition icons are differentthan footage or folder icons
04AE6_HOT(42-65).v1 8/8/03 10:03 AM Page 43
| 44 |
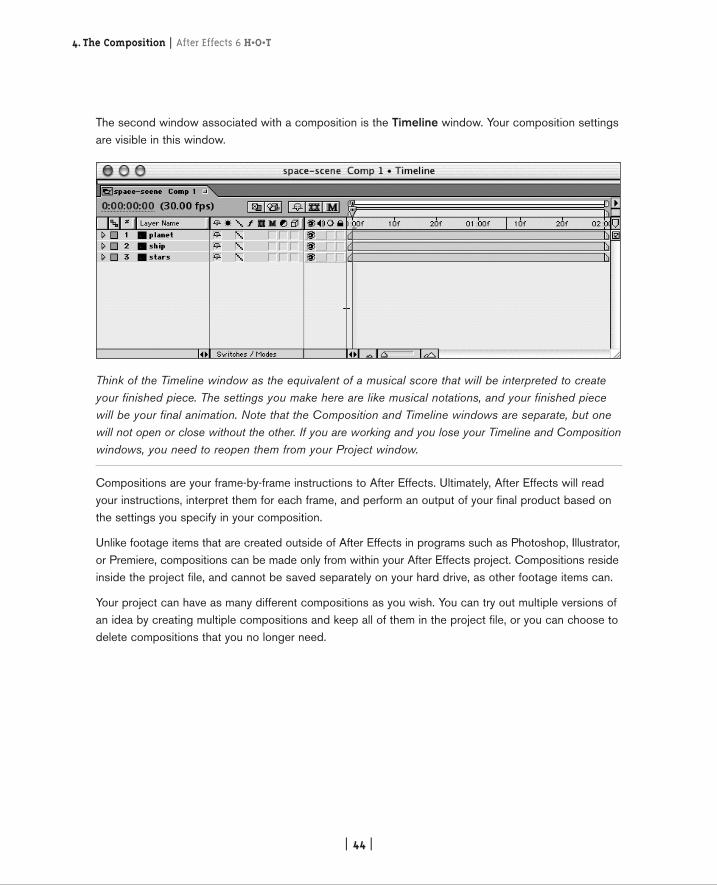
The second window associated with a composition is the Timeline window. Your composition settingsare visible in this window.
Think of the Timeline window as the equivalent of a musical score that will be interpreted to createyour finished piece. The settings you make here are like musical notations, and your finished piecewill be your final animation. Note that the Composition and Timeline windows are separate, but onewill not open or close without the other. If you are working and you lose your Timeline and Compositionwindows, you need to reopen them from your Project window.
Compositions are your frame-by-frame instructions to After Effects. Ultimately, After Effects will readyour instructions, interpret them for each frame, and perform an output of your final product based onthe settings you specify in your composition.
Unlike footage items that are created outside of After Effects in programs such as Photoshop, Illustrator,or Premiere, compositions can be made only from within your After Effects project. Compositions resideinside the project file, and cannot be saved separately on your hard drive, as other footage items can.
Your project can have as many different compositions as you wish. You can try out multiple versions ofan idea by creating multiple compositions and keep all of them in the project file, or you can choose todelete compositions that you no longer need.
4.The Composition | After Effects 6 H•O•T
04AE6_HOT(42-65).v1 8/8/03 10:03 AM Page 44
| 45 |
Composition Settings
Starting a composition requires that you define a few settings. In the following exercises, you will learnto define settings by using the Composition Settings window. When you set up a new composition,you’ll automatically see the Composition Settings window. It’s best to decide on all the options in theComposition Settings window early in your composition. Most of the options are obvious, and we’llexplain any terms that may be new to you.
1.
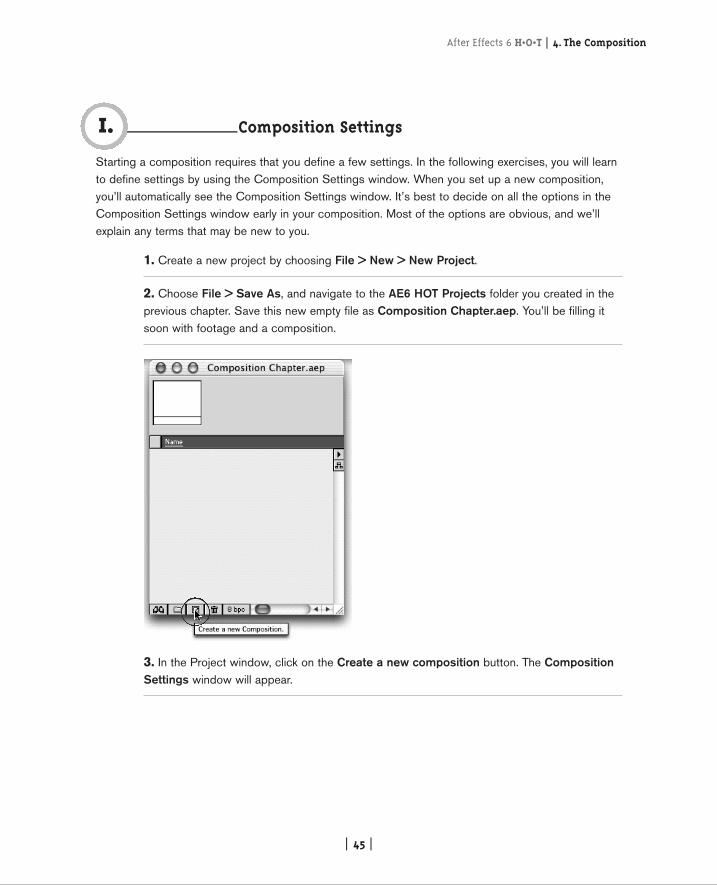
1. Create a new project by choosing File > New > New Project.
2. Choose File > Save As, and navigate to the AE6 HOT Projects folder you created in theprevious chapter. Save this new empty file as Composition Chapter.aep. You’ll be filling itsoon with footage and a composition.
3. In the Project window, click on the Create a new composition button. The CompositionSettings window will appear.
After Effects 6 H•O•T | 4. The Composition
04AE6_HOT(42-65).v1 8/8/03 10:03 AM Page 45
| 46 |
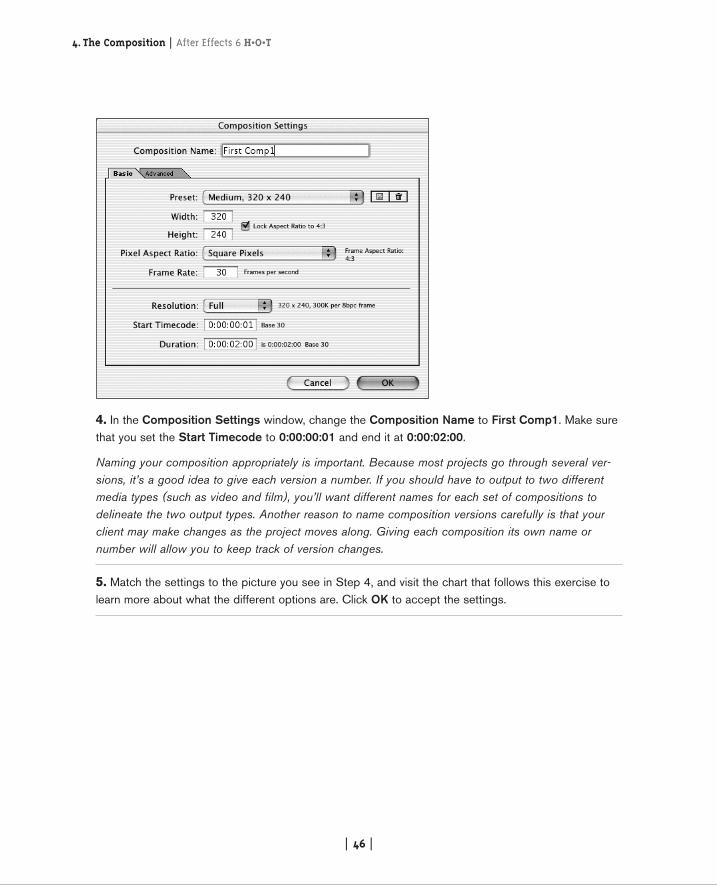
4. In the Composition Settings window, change the Composition Name to First Comp1. Make surethat you set the Start Timecode to 0:00:00:01 and end it at 0:00:02:00.
Naming your composition appropriately is important. Because most projects go through several ver-sions, it’s a good idea to give each version a number. If you should have to output to two differentmedia types (such as video and film), you’ll want different names for each set of compositions todelineate the two output types. Another reason to name composition versions carefully is that yourclient may make changes as the project moves along. Giving each composition its own name ornumber will allow you to keep track of version changes.
5. Match the settings to the picture you see in Step 4, and visit the chart that follows this exercise tolearn more about what the different options are. Click OK to accept the settings.
4.The Composition | After Effects 6 H•O•T
04AE6_HOT(42-65).v1 8/8/03 10:03 AM Page 46

| 47 |
Notice that two things happen: a Composition window and Timeline appear. You’ll get to work withthese two windows in the next exercise—hold tight!
6. Make sure First Comp1 is highlighted in the Project window, and choose Composition >Composition Settings, or use Cmd+K (Mac) or Ctrl+K (Windows).
The Composition Settings window reopens. If you ever need to change your composition settings,you can change them at any time. Leave them alone for now, and be sure to read the upcoming chart so you understand what they mean.
7. Save the project, and leave it open for the next exercise. You’ll be taking a short break to do somereading before getting going again so you can better understand the significance of what you just did.
After Effects 6 H•O•T | 4. The Composition
Compositionwindow
Timeline window
04AE6_HOT(42-65).v1 8/8/03 10:03 AM Page 47
| 48 |
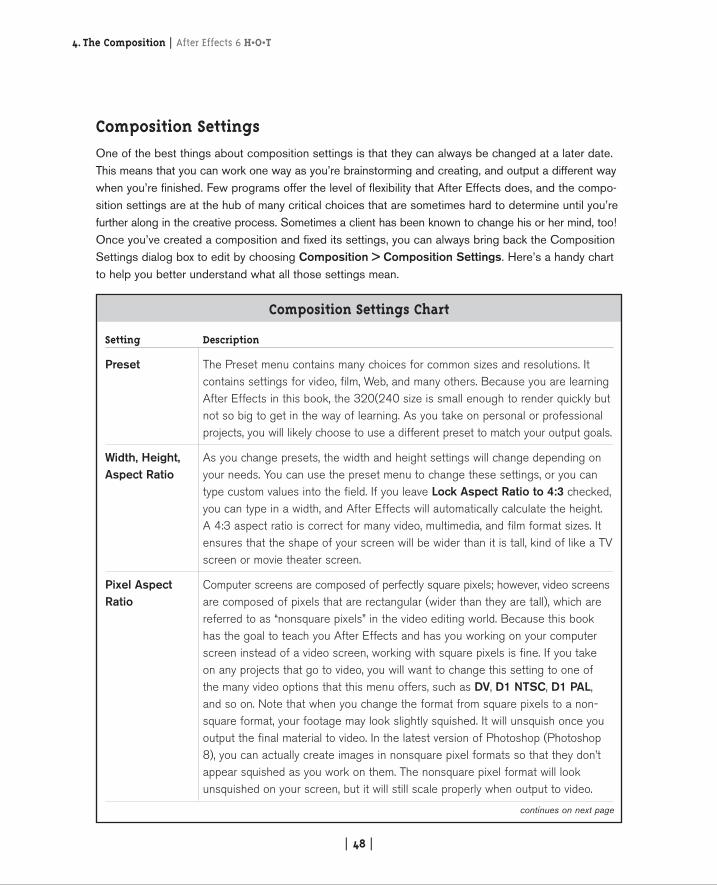
Composition SettingsOne of the best things about composition settings is that they can always be changed at a later date.This means that you can work one way as you’re brainstorming and creating, and output a different waywhen you’re finished. Few programs offer the level of flexibility that After Effects does, and the compo-sition settings are at the hub of many critical choices that are sometimes hard to determine until you’refurther along in the creative process. Sometimes a client has been known to change his or her mind, too!Once you’ve created a composition and fixed its settings, you can always bring back the CompositionSettings dialog box to edit by choosing Composition > Composition Settings. Here’s a handy chartto help you better understand what all those settings mean.
4.The Composition | After Effects 6 H•O•T
Composition Settings Chart
Setting Description
Preset The Preset menu contains many choices for common sizes and resolutions. Itcontains settings for video, film, Web, and many others. Because you are learningAfter Effects in this book, the 320(240 size is small enough to render quickly butnot so big to get in the way of learning. As you take on personal or professionalprojects, you will likely choose to use a different preset to match your output goals.
Width, Height, As you change presets, the width and height settings will change depending on Aspect Ratio your needs. You can use the preset menu to change these settings, or you can
type custom values into the field. If you leave Lock Aspect Ratio to 4:3 checked,you can type in a width, and After Effects will automatically calculate the height.A 4:3 aspect ratio is correct for many video, multimedia, and film format sizes. Itensures that the shape of your screen will be wider than it is tall, kind of like a TVscreen or movie theater screen.
Pixel Aspect Computer screens are composed of perfectly square pixels; however, video screensRatio are composed of pixels that are rectangular (wider than they are tall), which are
referred to as “nonsquare pixels” in the video editing world. Because this bookhas the goal to teach you After Effects and has you working on your computerscreen instead of a video screen, working with square pixels is fine. If you take on any projects that go to video, you will want to change this setting to one of the many video options that this menu offers, such as DV, D1 NTSC, D1 PAL,and so on. Note that when you change the format from square pixels to a non-square format, your footage may look slightly squished. It will unsquish once yououtput the final material to video. In the latest version of Photoshop (Photoshop8), you can actually create images in nonsquare pixel formats so that they don’tappear squished as you work on them. The nonsquare pixel format will lookunsquished on your screen, but it will still scale properly when output to video.
continues on next page
04AE6_HOT(42-65).v1 8/8/03 10:03 AM Page 48
| 49 |
After Effects 6 H•O•T | 4. The Composition
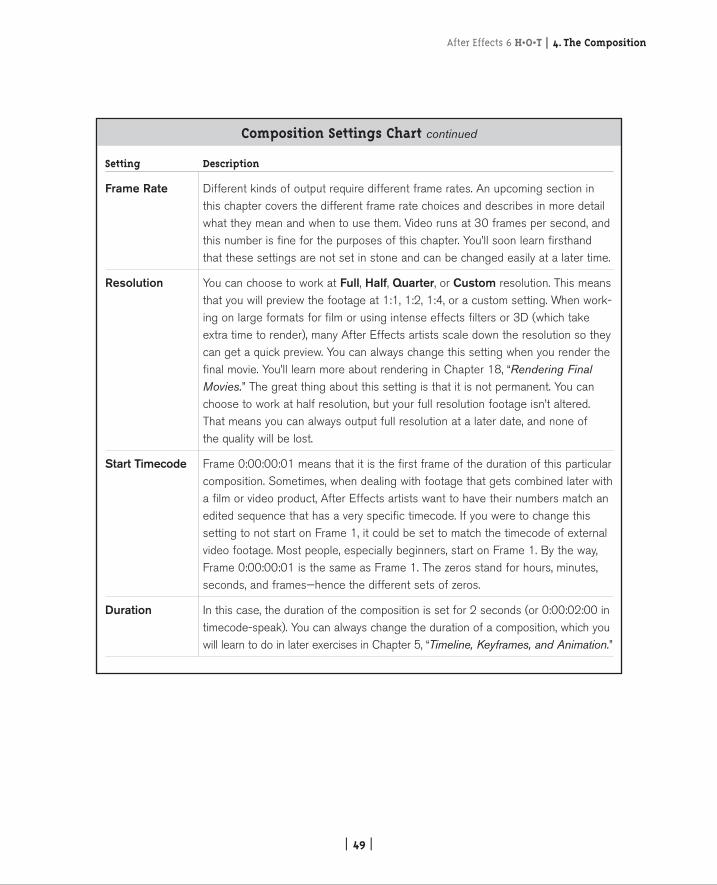
Composition Settings Chart continued
Setting Description
Frame Rate Different kinds of output require different frame rates. An upcoming section inthis chapter covers the different frame rate choices and describes in more detailwhat they mean and when to use them. Video runs at 30 frames per second, andthis number is fine for the purposes of this chapter. You’ll soon learn firsthandthat these settings are not set in stone and can be changed easily at a later time.
Resolution You can choose to work at Full, Half, Quarter, or Custom resolution. This meansthat you will preview the footage at 1:1, 1:2, 1:4, or a custom setting. When work-ing on large formats for film or using intense effects filters or 3D (which takeextra time to render), many After Effects artists scale down the resolution so theycan get a quick preview. You can always change this setting when you render thefinal movie. You’ll learn more about rendering in Chapter 18, “Rendering FinalMovies.” The great thing about this setting is that it is not permanent. You canchoose to work at half resolution, but your full resolution footage isn’t altered.That means you can always output full resolution at a later date, and none of the quality will be lost.
Start Timecode Frame 0:00:00:01 means that it is the first frame of the duration of this particularcomposition. Sometimes, when dealing with footage that gets combined later witha film or video product, After Effects artists want to have their numbers match anedited sequence that has a very specific timecode. If you were to change thissetting to not start on Frame 1, it could be set to match the timecode of externalvideo footage. Most people, especially beginners, start on Frame 1. By the way,Frame 0:00:00:01 is the same as Frame 1. The zeros stand for hours, minutes,seconds, and frames—hence the different sets of zeros.
Duration In this case, the duration of the composition is set for 2 seconds (or 0:00:02:00 intimecode-speak). You can always change the duration of a composition, which youwill learn to do in later exercises in Chapter 5, “Timeline, Keyframes, and Animation.”
04AE6_HOT(42-65).v1 8/8/03 10:03 AM Page 49
| 50 |
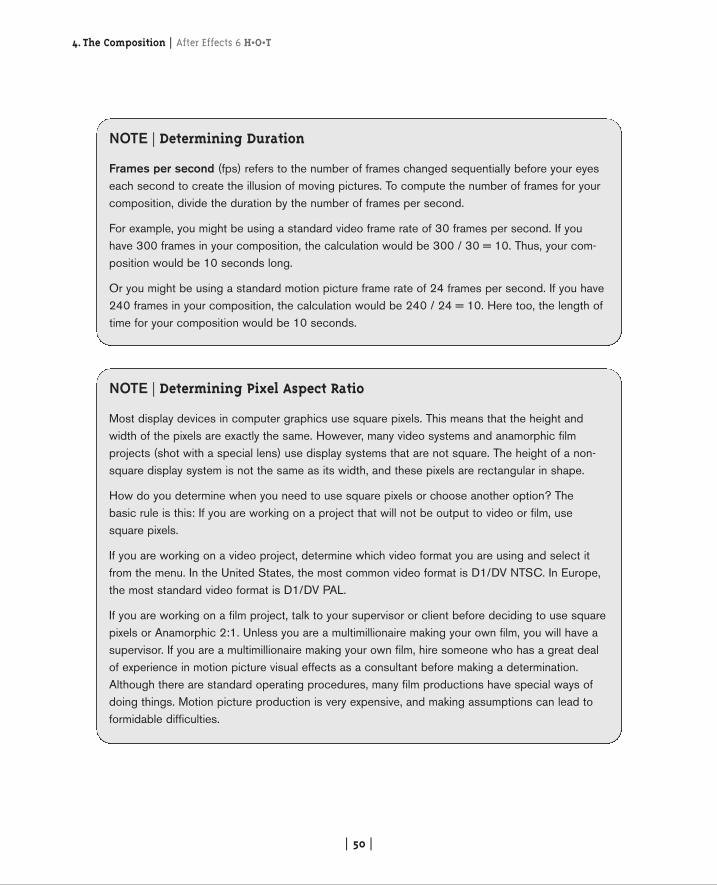
NOTE | Determining Pixel Aspect Ratio
Most display devices in computer graphics use square pixels. This means that the height andwidth of the pixels are exactly the same. However, many video systems and anamorphic filmprojects (shot with a special lens) use display systems that are not square. The height of a non-square display system is not the same as its width, and these pixels are rectangular in shape.
How do you determine when you need to use square pixels or choose another option? The basic rule is this: If you are working on a project that will not be output to video or film, usesquare pixels.
If you are working on a video project, determine which video format you are using and select itfrom the menu. In the United States, the most common video format is D1/DV NTSC. In Europe,the most standard video format is D1/DV PAL.
If you are working on a film project, talk to your supervisor or client before deciding to use squarepixels or Anamorphic 2:1. Unless you are a multimillionaire making your own film, you will have asupervisor. If you are a multimillionaire making your own film, hire someone who has a great dealof experience in motion picture visual effects as a consultant before making a determination.Although there are standard operating procedures, many film productions have special ways ofdoing things. Motion picture production is very expensive, and making assumptions can lead toformidable difficulties.
NOTE | Determining Duration
Frames per second (fps) refers to the number of frames changed sequentially before your eyeseach second to create the illusion of moving pictures. To compute the number of frames for yourcomposition, divide the duration by the number of frames per second.
For example, you might be using a standard video frame rate of 30 frames per second. If youhave 300 frames in your composition, the calculation would be 300 / 30 = 10. Thus, your com-position would be 10 seconds long.
Or you might be using a standard motion picture frame rate of 24 frames per second. If you have240 frames in your composition, the calculation would be 240 / 24 = 10. Here too, the length oftime for your composition would be 10 seconds.
4.The Composition | After Effects 6 H•O•T
04AE6_HOT(42-65).v1 8/8/03 10:03 AM Page 50
| 51 |
The Project SettingsIn the last chapter, you learned about a project and its significance to the After Effects workflow. Thatchapter didn’t cover the project settings because they relate more to compositions, even though theyalso relate to the project. The composition settings you just learned about affect individual shots withinyour project. It still might not be clear that a single project can contain numerous compositions. Thiswill become more clear as you continue through this chapter. The project settings affect all the compo-sitions you create, and they create global settings to the entire project. The composition settings createlocal settings to an individual composition.
To see the project settings for this (or any other) project, choose File > Project Settings. Don’t changethe settings, because you want to be on the default Timecode Base setting for the duration of this book.Still, it’s important to understand that these settings are here, and what they mean, for future projects.
Here’s a handy chart that describes what these settings mean:
NOTE | More About Timecode
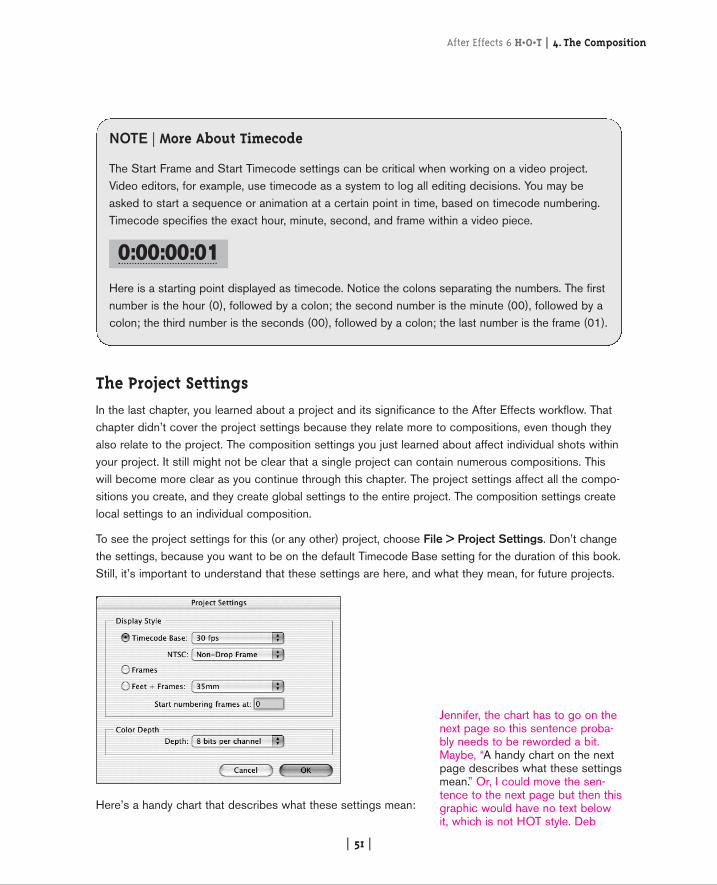
The Start Frame and Start Timecode settings can be critical when working on a video project.Video editors, for example, use timecode as a system to log all editing decisions. You may beasked to start a sequence or animation at a certain point in time, based on timecode numbering.Timecode specifies the exact hour, minute, second, and frame within a video piece.
Here is a starting point displayed as timecode. Notice the colons separating the numbers. The firstnumber is the hour (0), followed by a colon; the second number is the minute (00), followed by acolon; the third number is the seconds (00), followed by a colon; the last number is the frame (01).
After Effects 6 H•O•T | 4. The Composition
0:00:00:01
Jennifer, the chart has to go on thenext page so this sentence proba-bly needs to be reworded a bit.Maybe, “A handy chart on the nextpage describes what these settingsmean.” Or, I could move the sen-tence to the next page but then thisgraphic would have no text belowit, which is not HOT style. Deb
04AE6_HOT(42-65).v1 8/8/03 10:03 AM Page 51
| 52 |
4.The Composition | After Effects 6 H•O•T
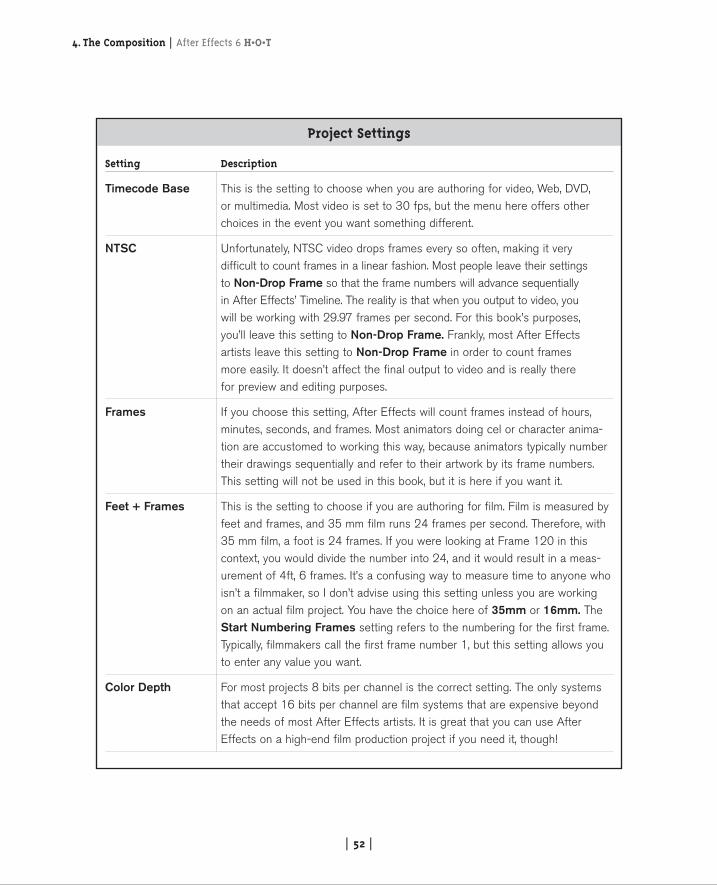
Project Settings
Setting Description
Timecode Base This is the setting to choose when you are authoring for video, Web, DVD, or multimedia. Most video is set to 30 fps, but the menu here offers otherchoices in the event you want something different.
NTSC Unfortunately, NTSC video drops frames every so often, making it very difficult to count frames in a linear fashion. Most people leave their settings to Non-Drop Frame so that the frame numbers will advance sequentially in After Effects’ Timeline. The reality is that when you output to video, you will be working with 29.97 frames per second. For this book’s purposes, you’ll leave this setting to Non-Drop Frame. Frankly, most After Effectsartists leave this setting to Non-Drop Frame in order to count frames more easily. It doesn’t affect the final output to video and is really there for preview and editing purposes.
Frames If you choose this setting, After Effects will count frames instead of hours,minutes, seconds, and frames. Most animators doing cel or character anima-tion are accustomed to working this way, because animators typically numbertheir drawings sequentially and refer to their artwork by its frame numbers.This setting will not be used in this book, but it is here if you want it.
Feet + Frames This is the setting to choose if you are authoring for film. Film is measured byfeet and frames, and 35 mm film runs 24 frames per second. Therefore, with35 mm film, a foot is 24 frames. If you were looking at Frame 120 in thiscontext, you would divide the number into 24, and it would result in a meas-urement of 4ft, 6 frames. It’s a confusing way to measure time to anyone whoisn’t a filmmaker, so I don’t advise using this setting unless you are workingon an actual film project. You have the choice here of 35mm or 16mm. TheStart Numbering Frames setting refers to the numbering for the first frame.Typically, filmmakers call the first frame number 1, but this setting allows youto enter any value you want.
Color Depth For most projects 8 bits per channel is the correct setting. The only systemsthat accept 16 bits per channel are film systems that are expensive beyondthe needs of most After Effects artists. It is great that you can use AfterEffects on a high-end film production project if you need it, though!
04AE6_HOT(42-65).v1 8/8/03 10:03 AM Page 52
| 53 |
Getting Footage into the Composition
Now that you’ve created and opened a composition, you’re probably wondering how to get it to dosomething. The first step is to bring some footage into it, and the next step is to learn to animate thatfootage. In this exercise, you will learn to bring footage into a composition. In the next chapter, you’lllearn how to animate footage in a Composition window. You cannot animate footage without a Timeline,and you cannot gain access to a Timeline without a composition. Understanding the relationship amongthe project, composition, and Timeline is key to understanding After Effects. This exercise should be a great help in unfolding the mystery of why you need all these things!
2.
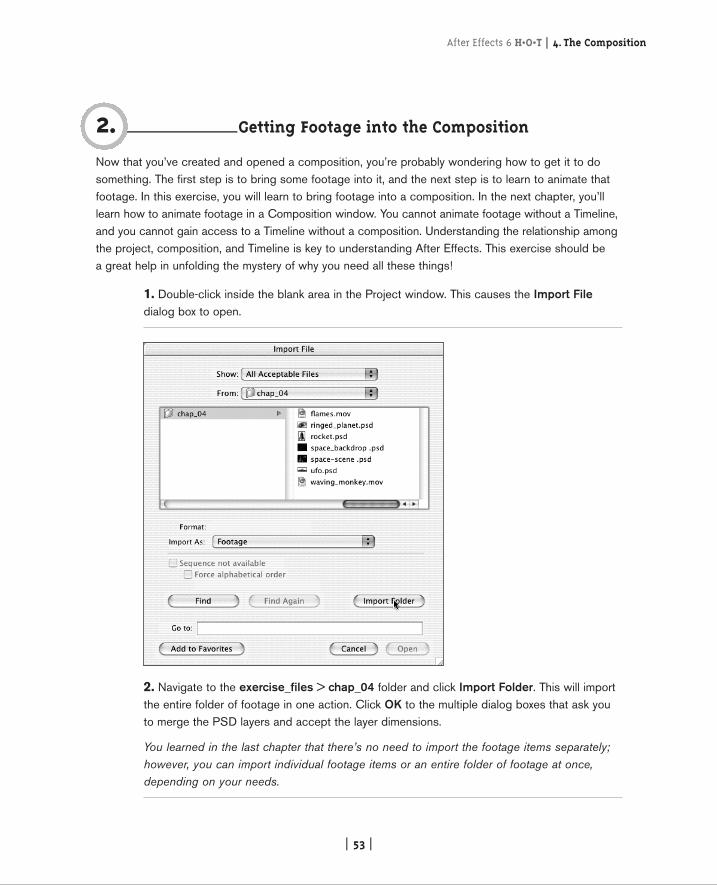
1. Double-click inside the blank area in the Project window. This causes the Import Filedialog box to open.
2. Navigate to the exercise_files > chap_04 folder and click Import Folder. This will importthe entire folder of footage in one action. Click OK to the multiple dialog boxes that ask youto merge the PSD layers and accept the layer dimensions.
You learned in the last chapter that there’s no need to import the footage items separately;however, you can import individual footage items or an entire folder of footage at once,depending on your needs.
After Effects 6 H•O•T | 4. The Composition
04AE6_HOT(42-65).v1 8/8/03 10:03 AM Page 53
| 54 |
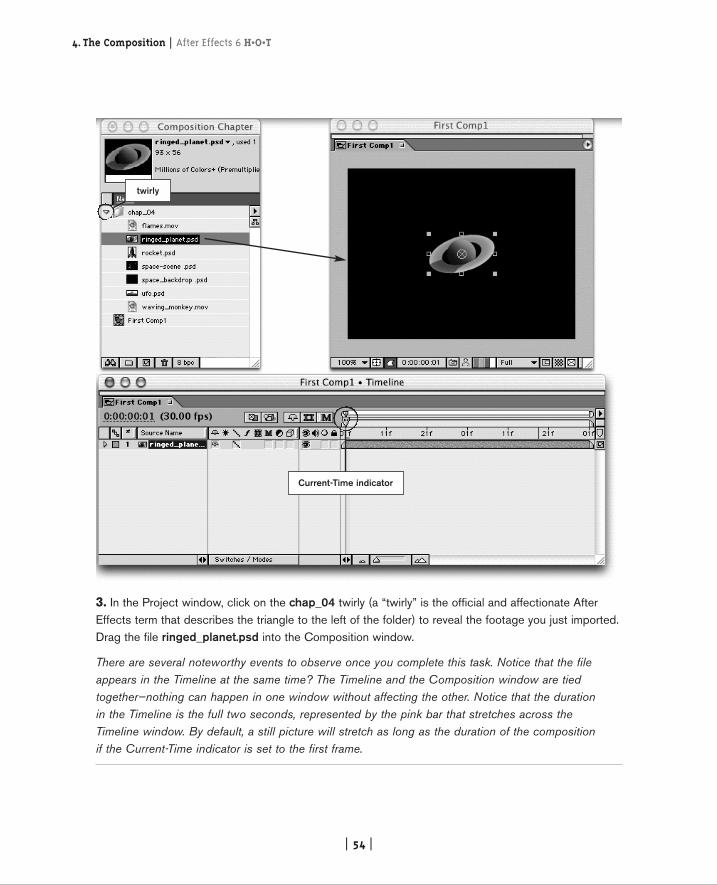
3. In the Project window, click on the chap_04 twirly (a “twirly” is the official and affectionate AfterEffects term that describes the triangle to the left of the folder) to reveal the footage you just imported.Drag the file ringed_planet.psd into the Composition window.
There are several noteworthy events to observe once you complete this task. Notice that the fileappears in the Timeline at the same time? The Timeline and the Composition window are tiedtogether—nothing can happen in one window without affecting the other. Notice that the duration in the Timeline is the full two seconds, represented by the pink bar that stretches across the Timeline window. By default, a still picture will stretch as long as the duration of the composition if the Current-Time indicator is set to the first frame.
4.The Composition | After Effects 6 H•O•T
twirly
Current-Time indicator
04AE6_HOT(42-65).v1 8/8/03 10:03 AM Page 54
| 55 |
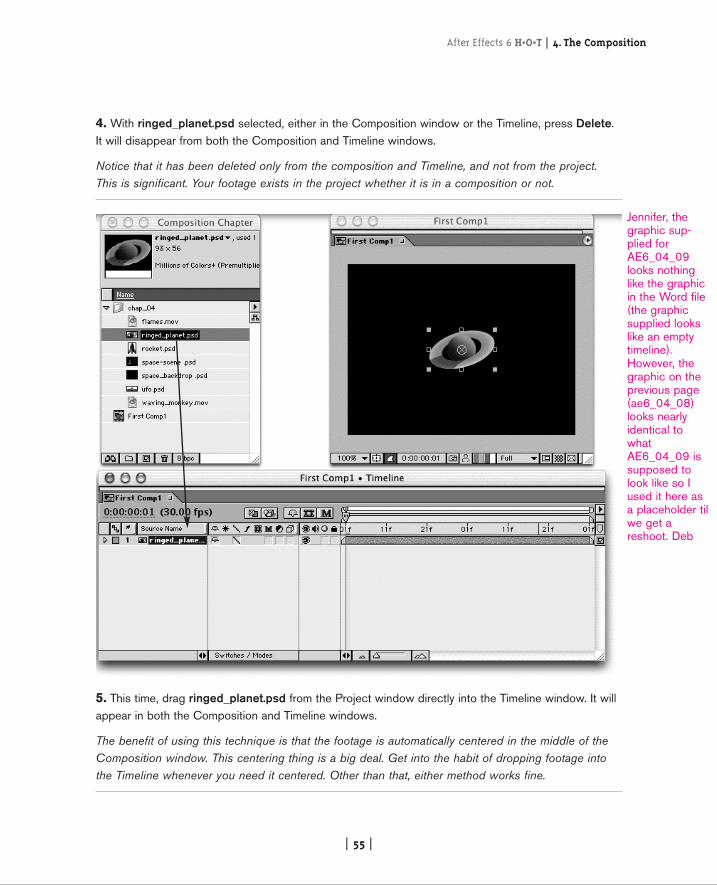
4. With ringed_planet.psd selected, either in the Composition window or the Timeline, press Delete.It will disappear from both the Composition and Timeline windows.
Notice that it has been deleted only from the composition and Timeline, and not from the project. This is significant. Your footage exists in the project whether it is in a composition or not.
5. This time, drag ringed_planet.psd from the Project window directly into the Timeline window. It willappear in both the Composition and Timeline windows.
The benefit of using this technique is that the footage is automatically centered in the middle of theComposition window. This centering thing is a big deal. Get into the habit of dropping footage intothe Timeline whenever you need it centered. Other than that, either method works fine.
After Effects 6 H•O•T | 4. The Composition
Jennifer, thegraphic sup-plied forAE6_04_09looks nothinglike the graphicin the Word file(the graphicsupplied lookslike an emptytimeline).However, thegraphic on theprevious page(ae6_04_08)looks nearlyidentical towhatAE6_04_09 issupposed tolook like so Iused it here asa placeholder tilwe get areshoot. Deb
04AE6_HOT(42-65).v1 8/8/03 10:03 AM Page 55
| 56 |
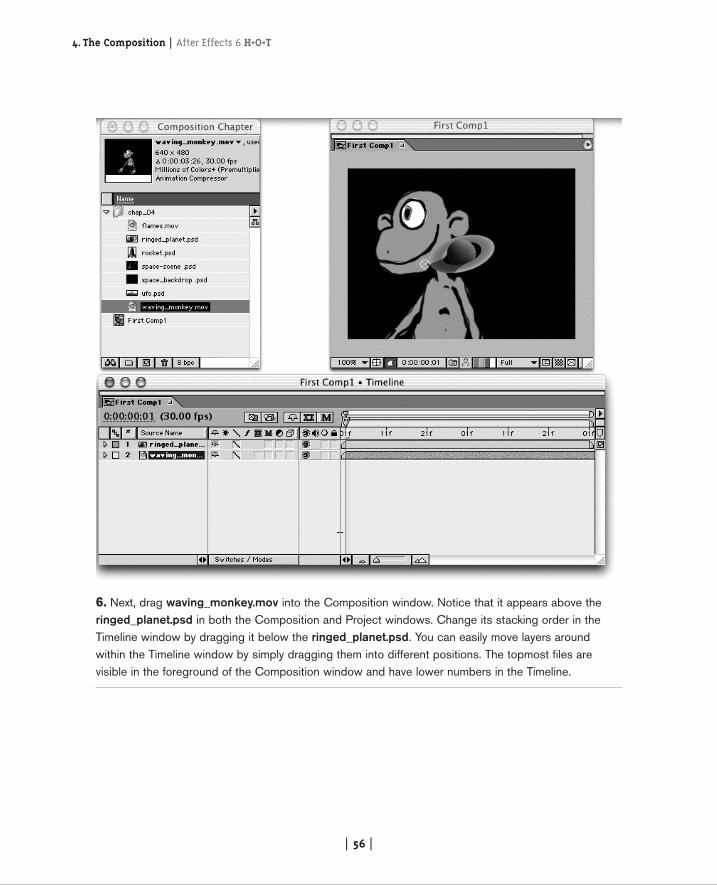
6. Next, drag waving_monkey.mov into the Composition window. Notice that it appears above theringed_planet.psd in both the Composition and Project windows. Change its stacking order in theTimeline window by dragging it below the ringed_planet.psd. You can easily move layers aroundwithin the Timeline window by simply dragging them into different positions. The topmost files arevisible in the foreground of the Composition window and have lower numbers in the Timeline.
4.The Composition | After Effects 6 H•O•T
04AE6_HOT(42-65).v1 8/8/03 10:03 AM Page 56
| 57 |
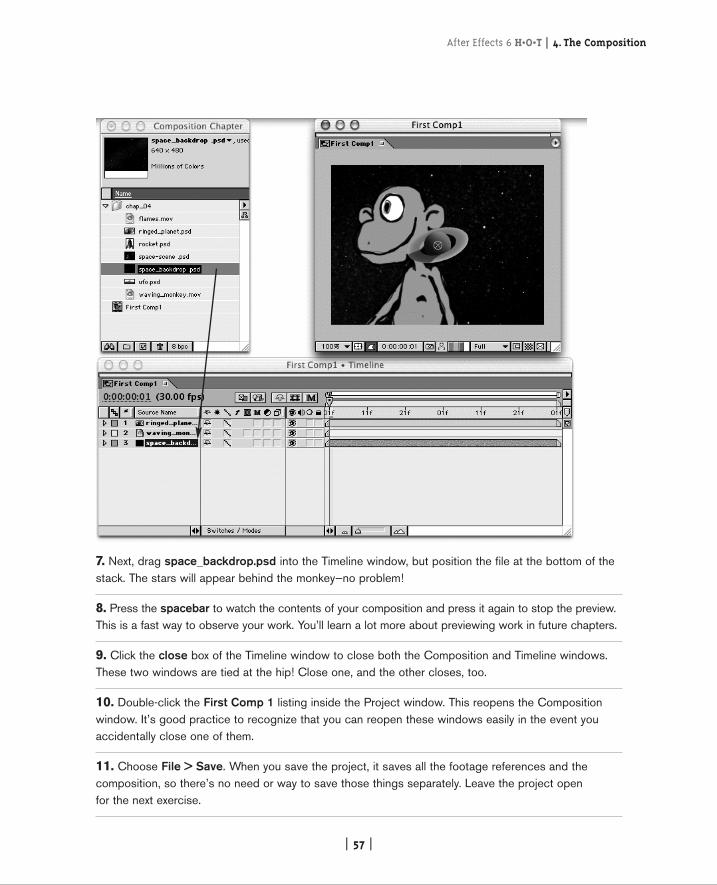
7. Next, drag space_backdrop.psd into the Timeline window, but position the file at the bottom of thestack. The stars will appear behind the monkey—no problem!
8. Press the spacebar to watch the contents of your composition and press it again to stop the preview.This is a fast way to observe your work. You’ll learn a lot more about previewing work in future chapters.
9. Click the close box of the Timeline window to close both the Composition and Timeline windows.These two windows are tied at the hip! Close one, and the other closes, too.
10. Double-click the First Comp 1 listing inside the Project window. This reopens the Compositionwindow. It’s good practice to recognize that you can reopen these windows easily in the event youaccidentally close one of them.
11. Choose File > Save. When you save the project, it saves all the footage references and thecomposition, so there’s no need or way to save those things separately. Leave the project open for the next exercise.
After Effects 6 H•O•T | 4. The Composition
04AE6_HOT(42-65).v1 8/8/03 10:03 AM Page 57
| 58 |
Importing a Photoshop File as a Composition
So far, you have learned how to create a composition from scratch and how to import footage into acomposition. Next, you’ll learn a great technique related to Photoshop files. The After Effects Timelinehas layers, and Photoshop files have layers. Wouldn’t it be cool if you could compose the layers inPhotoshop and have them appear that way inside After Effects? Well, you can, and this exerciseshows you how.
3.
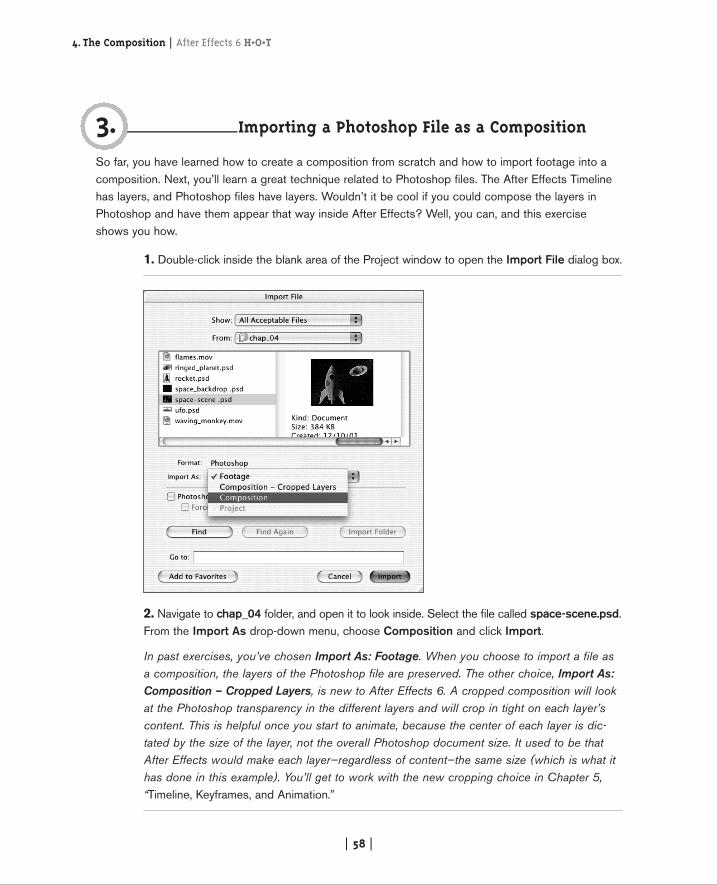
1. Double-click inside the blank area of the Project window to open the Import File dialog box.
2. Navigate to chap_04 folder, and open it to look inside. Select the file called space-scene.psd.From the Import As drop-down menu, choose Composition and click Import.
In past exercises, you’ve chosen Import As: Footage. When you choose to import a file asa composition, the layers of the Photoshop file are preserved. The other choice, Import As:Composition – Cropped Layers, is new to After Effects 6. A cropped composition will lookat the Photoshop transparency in the different layers and will crop in tight on each layer’scontent. This is helpful once you start to animate, because the center of each layer is dic-tated by the size of the layer, not the overall Photoshop document size. It used to be thatAfter Effects would make each layer—regardless of content—the same size (which is what ithas done in this example). You’ll get to work with the new cropping choice in Chapter 5,“Timeline, Keyframes, and Animation.”
4.The Composition | After Effects 6 H•O•T
04AE6_HOT(42-65).v1 8/8/03 10:03 AM Page 58
| 59 |
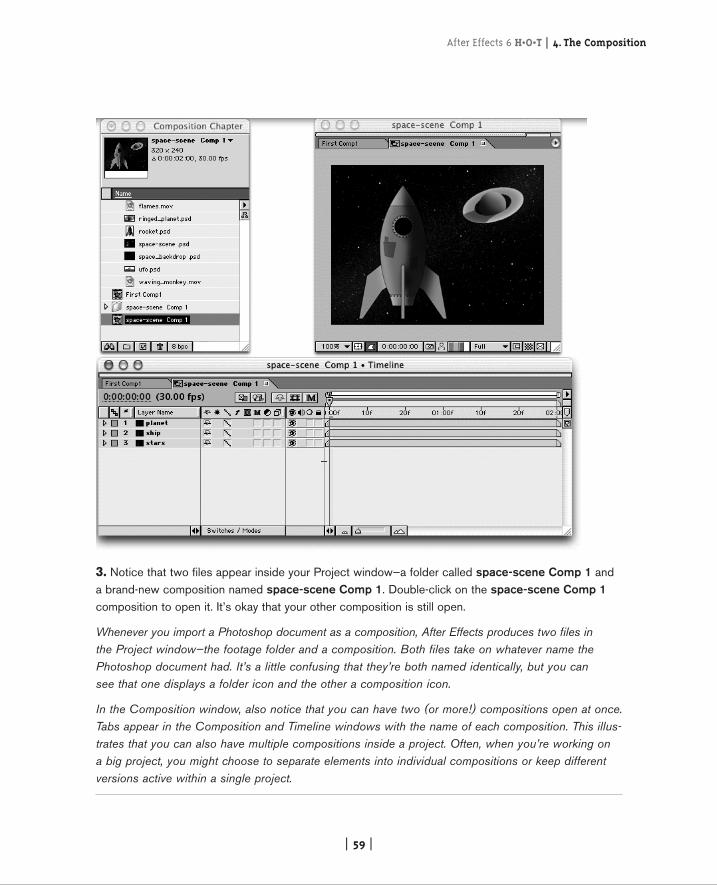
3. Notice that two files appear inside your Project window—a folder called space-scene Comp 1 anda brand-new composition named space-scene Comp 1. Double-click on the space-scene Comp 1composition to open it. It’s okay that your other composition is still open.
Whenever you import a Photoshop document as a composition, After Effects produces two files in the Project window—the footage folder and a composition. Both files take on whatever name thePhotoshop document had. It’s a little confusing that they’re both named identically, but you can see that one displays a folder icon and the other a composition icon.
In the Composition window, also notice that you can have two (or more!) compositions open at once.Tabs appear in the Composition and Timeline windows with the name of each composition. This illus-trates that you can also have multiple compositions inside a project. Often, when you’re working on a big project, you might choose to separate elements into individual compositions or keep differentversions active within a single project.
After Effects 6 H•O•T | 4. The Composition
04AE6_HOT(42-65).v1 8/8/03 10:03 AM Page 59
| 60 |
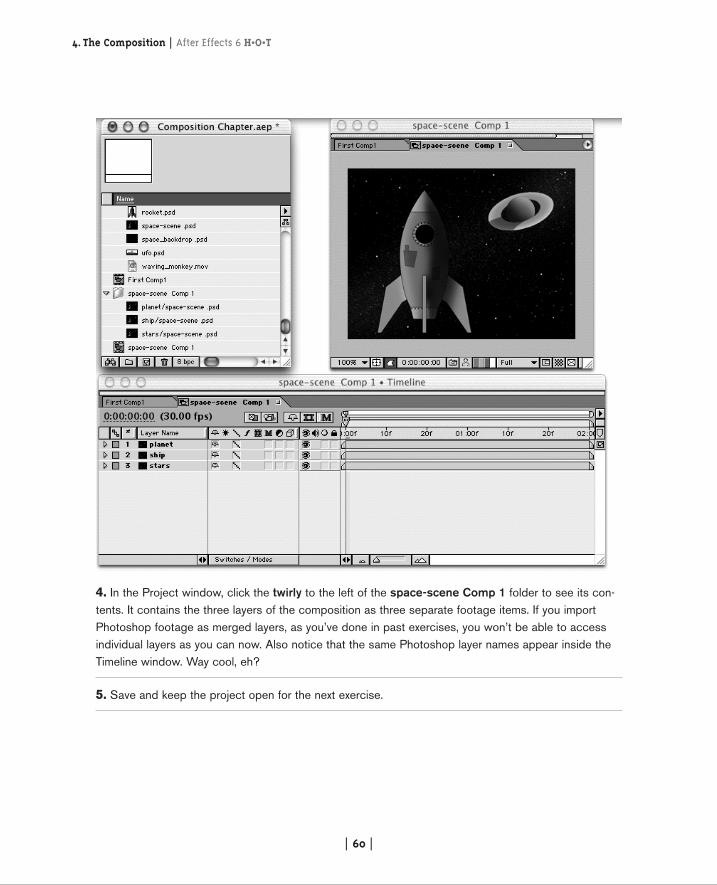
4. In the Project window, click the twirly to the left of the space-scene Comp 1 folder to see its con-tents. It contains the three layers of the composition as three separate footage items. If you importPhotoshop footage as merged layers, as you’ve done in past exercises, you won’t be able to accessindividual layers as you can now. Also notice that the same Photoshop layer names appear inside theTimeline window. Way cool, eh?
5. Save and keep the project open for the next exercise.
4.The Composition | After Effects 6 H•O•T
04AE6_HOT(42-65).v1 8/8/03 10:03 AM Page 60
| 61 |
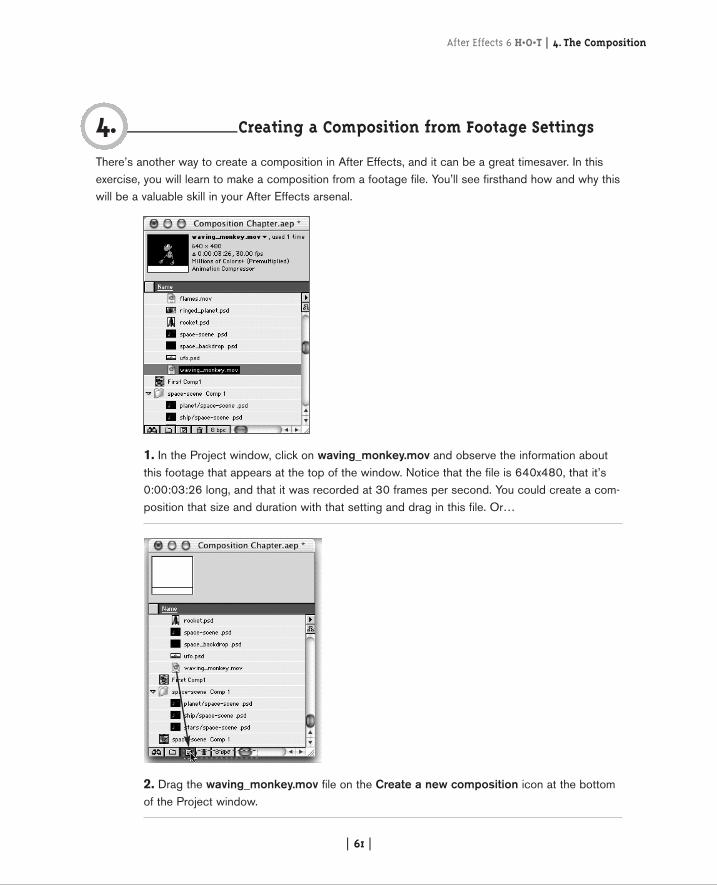
Creating a Composition from Footage Settings
There’s another way to create a composition in After Effects, and it can be a great timesaver. In thisexercise, you will learn to make a composition from a footage file. You’ll see firsthand how and why thiswill be a valuable skill in your After Effects arsenal.
4.
1. In the Project window, click on waving_monkey.mov and observe the information aboutthis footage that appears at the top of the window. Notice that the file is 640x480, that it’s0:00:03:26 long, and that it was recorded at 30 frames per second. You could create a com-position that size and duration with that setting and drag in this file. Or…
2. Drag the waving_monkey.mov file on the Create a new composition icon at the bottomof the Project window.
After Effects 6 H•O•T | 4. The Composition
04AE6_HOT(42-65).v1 8/8/03 10:03 AM Page 61
| 62 |
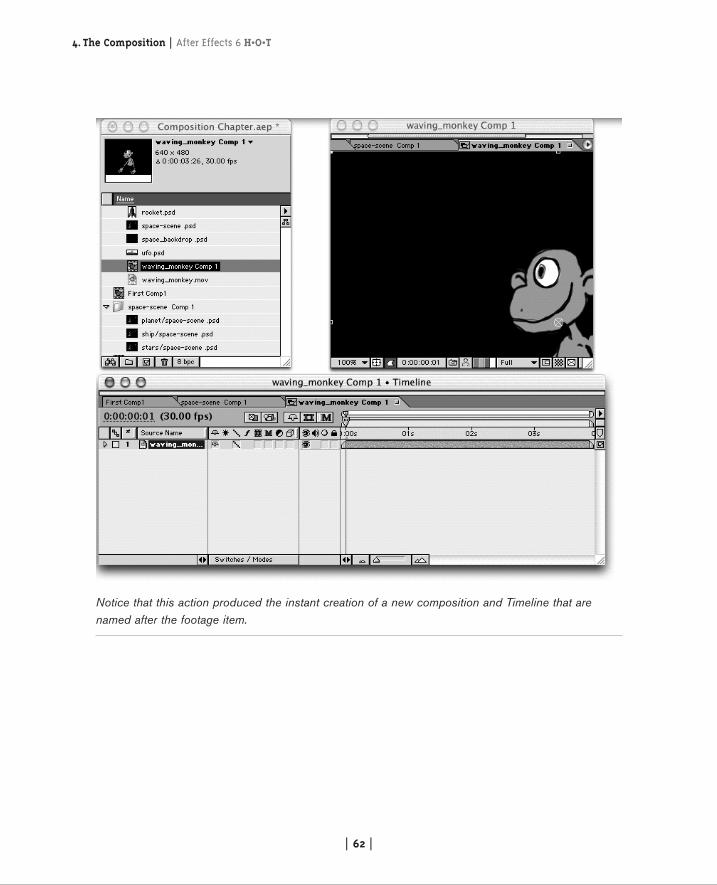
Notice that this action produced the instant creation of a new composition and Timeline that arenamed after the footage item.
4.The Composition | After Effects 6 H•O•T
04AE6_HOT(42-65).v1 8/8/03 10:03 AM Page 62

| 63 |
3. The item waving_monkey Comp 1 should be automatically selected in the Project window. If not,make sure it is selected and choose Composition > Composition Settings. The Composition Settingsdialog box will appear for this composition. Notice how the settings match the footage properties. ClickOK—you’re not really changing anything, just looking!
This is a great technique when you want one footage item to dictate the settings for a composition. It’sespecially useful with movie footage, which can vary in frames per second, timecode, and duration.
After Effects 6 H•O•T | 4. The Composition
04AE6_HOT(42-65).v1 8/8/03 10:03 AM Page 63
| 64 |
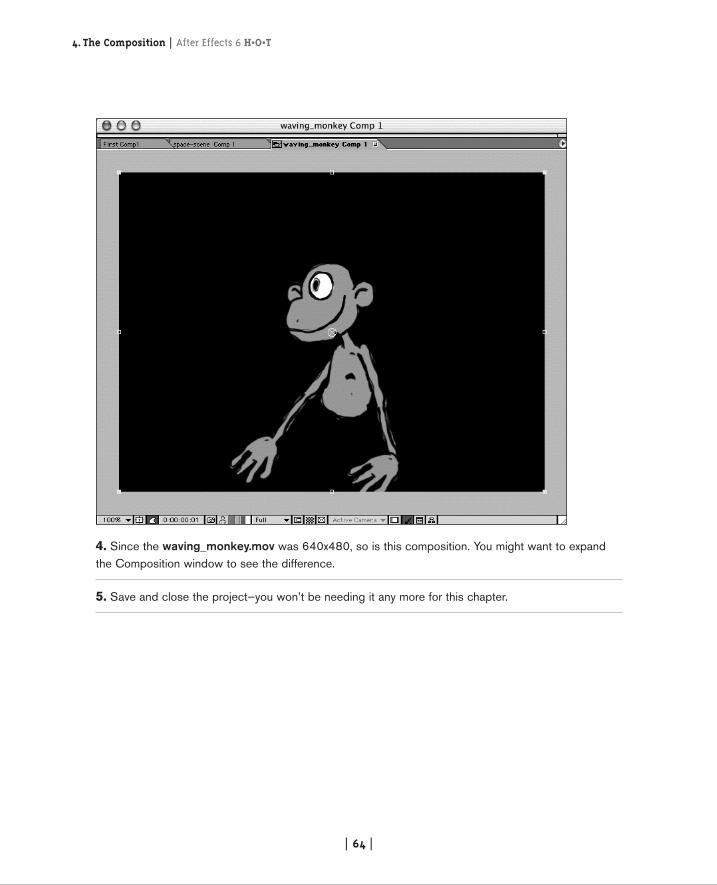
4. Since the waving_monkey.mov was 640x480, so is this composition. You might want to expandthe Composition window to see the difference.
5. Save and close the project—you won’t be needing it any more for this chapter.
4.The Composition | After Effects 6 H•O•T
04AE6_HOT(42-65).v1 8/8/03 10:03 AM Page 64
| 65 |
Test Yourself on This Chapter!Try this short review of this chapter and the previous one, to be sure that you know how to set up aproject and a composition without reading our directions. The following suggested steps are intention-ally vague to allow you to test your new knowledge. If you need a refresher on how to do any of thesetasks, reread the pertinent exercises in this chapter and Chapter 3, “The Project.”
A. Create a new project and save it to the AE6 HOT Projects folder you created in Chapter 3.
B. Import the artwork from the folder called chap_04.
C. Import a Photoshop file as a composition.
D. Create a composition using any of the methods taught in this chapter.
E. Drag the footage you imported from your Project window into the Timeline window.
F. Save and close the project.
That’s a wrap for this chapter. You’ve learned how to make a composition, which might not seem likemuch but is a very important part of learning After Effects. These steps were necessary skill buildersto get you ready to create animation. In the next chapter, you’ll be at the point where it all comestogether in the form of a moving composition! See you there.
After Effects 6 H•O•T | 4. The Composition
04AE6_HOT(42-65).v1 8/8/03 10:03 AM Page 65