Embed Size (px)
Citation preview

Professional user guidefor Sage One Accounting Standard and Sage One Accountant Edition
Sage One Accountant Edition
User Guide
Banking
Sales tax
Invoicing
Pro
ducts
and services
Pro
jects and
tasksO
ther inco
mes
Exp
ensesG
eneral jo
urnal entriesR
epo
rtingS
age O
ne A
ccountant
Ed
ition
Online paym
ent options
Setting
up
Sag
e One
Manag
ing
contacts

Sage One Accountant EditionUser Guide
1
Banking
Sales tax
Invoicing
Pro
ducts
and services
Pro
jects and
tasksO
ther inco
mes
Exp
ensesG
eneral jo
urnal entriesR
epo
rtingS
age O
ne A
ccountant
Ed
ition
Online paym
ent options
Setting
up
Sag
e One
Manag
ing
contacts
Manag
ing
contacts
Table of contentsSage One 2
Setting up Sage One 2
Managing contacts 4
Sales tax 6
Banking 7
Invoicing 14
Online payment options 20
Products and services 21
Projects and tasks 23
Other incomes 34
Expenses 35
General journal entries 36
Reporting 37
Sage One Accountant Edition 39
Overview 39
Managing clients 39
Accessing client books 46
Dashboard overview 48

Sage One Accountant EditionUser Guide
2
Banking
Sales tax
Invoicing
Pro
ducts
and services
Pro
jects and
tasksO
ther inco
mes
Exp
ensesG
eneral jo
urnal entriesR
epo
rtingS
age O
ne A
ccountant
Ed
ition
Online paym
ent options
Setting
up
Sag
e One
Manag
ing
contacts
Sales tax
Setting up Sage OneYour company settings are stored in the Settings Overview section. In this section you can add or modify information related to you, your business, and your subscriptions. When you first start using Sage One, it is a good idea to enter the information in this section. Among other things, this will ensure your invoices contain the correct information and your financial books have the correct fiscal end date for your financial statements. To access the Settings and a brief explanation of what each is, please follow the steps below.
1. From the top right-hand corner of the home screen, click Settings.
2. In Settings Overview you can select different options to set up your company information.
Your information: Your first name, last name, and email are stored here. The email address cannot be modified once your account is created, but you can modify your name.
Business information: Your business information is stored in this section, and that includes your business name, address, website, and telephone numbers.
Your subscriptions: This section contains information about your current subscription to Sage One. Offer codes can be entered in this section.
Administrators and collaborators: You can create additional users in this section. Your company can have two Administrator accounts including the business owner, which have access to everything in Sage One. Collaborators only have access to the Tasks area unless you assign them to a project.
Sage One Accounting Standard settings: Modify settings specific to your Sage One account.
1. Invoice settings: Add your company logo here and pick the invoice template you would like to use. Invoice terms and conditions can also be set here.
Return to table of contents
Oftentimes your clients will require guidance from you on what payment terms are most appropriate for the nature of their business. Consider things like cash flow, nature of work, and industry standards when making this type of recommendation.

Sage One Accountant EditionUser Guide
3Return to table of contents
Banking
Sales tax
Invoicing
Pro
ducts
and services
Pro
jects and
tasksO
ther inco
mes
Exp
ensesG
eneral jo
urnal entriesR
epo
rtingS
age O
ne A
ccountant
Ed
ition
Online paym
ent options
Setting
up
Sag
e One
Manag
ing
contacts
2. Online payments: Set up how you plan to receive online payments here. Options include Sage Payment Solutions and PayPalTM. (For more information, see Online payments options section.)
3. Financial settings: Set your fiscal end date here. This date is used for reports when running fiscal year reports.
4. Categories: Categories is what your accounts in your chart of accounts are called in Sage One. In this section, you can customize your chart of accounts. Existing accounts can be modified or deleted and new accounts can be added. Note that, by default, categories are organized in alphabetical order. However, if you update the listings to include a GL or account number at the beginning, they will be organized in numerical order.
5. Google DriveTM: This feature allows you to keep a copy of all the invoices you post in your Google Drive. You can link your Sage One account to an existing Google account. To use this feature:
a. Click Link Google Drive.
b. If you are currently logged on to a Google account, you can view the account name on the top right side of your browser. If you would like to use a different account, click the drop down and select Sign out. If this is the account you want to link, proceed to step C. If you are not logged on to a Google account, you will be prompted to choose an account to link to. Select the account you want to link Sage One to. Type in your password and Sign in.
c. Review what Sage One requires access to and click Accept.
d. Your Sage One account is now linked to a Google Drive. In Sage One, the email address that your account is linked to is listed. To unlink your email account, click Unlink Google Drive.
If at any time while using the software you require assistance, there is a Chat link on the top right side of the browser in Sage One. Click Chat to be connected for live technical support on Monday to Friday between 9 a.m.–8 p.m. ET.
Sage One Accountant EditionUser Guide
4
Banking
Sales tax
Invoicing
Pro
ducts
and services
Pro
jects and
tasksO
ther inco
mes
Exp
ensesG
eneral jo
urnal entriesR
epo
rtingS
age O
ne A
ccountant
Ed
ition
Online paym
ent options
Setting
up
Sag
e One
Manag
ing
contacts
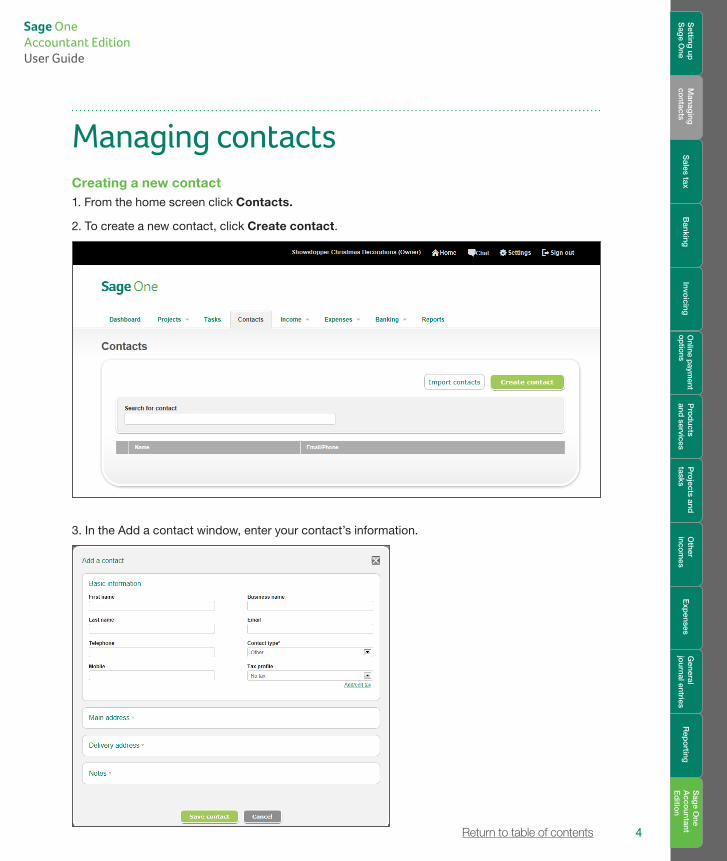
Managing contactsCreating a new contact1. From the home screen click Contacts.
2. To create a new contact, click Create contact.
Return to table of contents
3. In the Add a contact window, enter your contact’s information.

Sage One Accountant EditionUser Guide
5Return to table of contents
Banking
Sales tax
Invoicing
Pro
ducts
and services
Pro
jects and
tasksO
ther inco
mes
Exp
ensesG
eneral jo
urnal entriesR
epo
rtingS
age O
ne A
ccountant
Ed
ition
Online paym
ent options
Setting
up
Sag
e One
Manag
ing
contacts
4. The contact’s primary address can be entered in the Main Address section by expanding the section. If a contact has a separate mailing address, that address information can be entered in the Mailing Address section. Any additional information can be entered in the Notes section.
5. To save the contact, click Save contact.
To create a contact, you must enter a First name, Last name, or Business name. All other fields are optional.
Modifying a contactContact records can be modified at any time in Sage One.
1. From the home screen click Contacts.
2. Click a contact to select it.
3. Make the necessary changes and click Save contact.
Deleting a contact1. From the home screen click Contacts.
2. Click a contact to select it.
3. Click Delete this contact and confirm you want to delete the contact by clicking OK.
Importing contacts
Contacts can be imported from four different data sources: CSV from Outlook®, GmailTM, or Yahoo® or from your own CSV file.
1. Export your CSV file.
2. From the home screen, click Contacts, Import contacts.
Steps on how to export your contacts from the various sources are available in the Import contacts screen. Click the link for the source you are exporting from and follow the steps to export your contacts.
Contacts that are linked to an Invoice in Sage One cannot be deleted. To delete a contact linked to invoices, delete all the invoices first.
Sage One Accountant EditionUser Guide
6Return to table of contents
Banking
Sales tax
Invoicing
Pro
ducts
and services
Pro
jects and
tasksO
ther inco
mes
Exp
ensesG
eneral jo
urnal entriesR
epo
rtingS
age O
ne A
ccountant
Ed
ition
Online paym
ent options
Setting
up
Sag
e One
Manag
ing
contacts
Banking
Sales tax
Invoicing
Pro
ducts
and services
Pro
jects and
tasksO
ther inco
mes
Exp
ensesG
eneral jo
urnal entriesR
epo
rtingS
age O
ne A
ccountant
Ed
ition
Online paym
ent options
Setting
up
Sag
e One
Manag
ing
contacts
3. Click the CSV file you want to import (CSV from Outlook, CSV from Gmail, or CSV from Yahoo).
4. Browse to where your CSV file is saved by clicking Browse. Select the location of the file and click Open.
5. Select whether you want your duplicate contacts to be replaced or the new contact not to be imported and click Upload.
6. Once the import is completed, your list of contacts will be displayed.
7. Click your contacts to add additional information that may not have been imported if needed.
Your own CSV file (in the format of the template provided)
1. From the home screen, click Contacts, Import contacts.
2. Click Other.
3. Download the Sage One CSV template file by clicking that link.
4. Fill in the template with your contacts.
5. Save your CSV file then return to Sage One.
6. In the import screen browse to where your CSV file is saved by clicking Browse. Select the location of the file and click Open.
7. Select whether you want your duplicate contacts to be replaced or the new contact not to be imported and click Upload.
8. Once the import is completed, your list of contacts will be displayed.
9. Click your contacts to add additional information that may not have been imported if needed.
Sales taxTaxes can be added through the contact record. To add a tax:
1. From the home screen click Contacts.
2. Click Create contact.
If your contact list is coming from a source other than the ones listed, you can open the file and copy the information into the template columns. This will save on data entry time.

Sage One Accountant EditionUser Guide
7Return to table of contents
Banking
Sales tax
Invoicing
Pro
ducts
and services
Pro
jects and
tasksO
ther inco
mes
Exp
ensesG
eneral jo
urnal entriesR
epo
rtingS
age O
ne A
ccountant
Ed
ition
Online paym
ent options
Setting
up
Sag
e One
Manag
ing
contacts
3 To modify taxes, click Add/edit tax.
a. To create a new tax, add a tax profile name, tax rate, and category for the tax to be recorded in.
b. To modify an existing tax, click the Edit existing tax tab. Select the tax profile you would like to edit and make the necessary changes.
4. Click Save when done.
BankingThe banking feature in Sage One allows you to record transfers between accounts, see deposits, and review transactions hitting your bank account. You can also link your bank or credit card account in Sage One.
Linking Sage One to your online bank account1. To access this feature, from the home screen click Banking, Account list.
2. Select an account by clicking on the account.
3. Click Link with Online Bank.
4. Click Sounds good! to continue.

Sage One Accountant EditionUser Guide
8Return to table of contents
Banking
Sales tax
Invoicing
Pro
ducts
and services
Pro
jects and
tasksO
ther inco
mes
Exp
ensesG
eneral jo
urnal entriesR
epo
rtingS
age O
ne A
ccountant
Ed
ition
Online paym
ent options
Setting
up
Sag
e One
Manag
ing
contacts
5. If you have previously set up a linked bank account, select a bank account from the Existing bank drop down or click Select a different bank. If you have not previously set up a linked account, proceed to step 6.
6. Select your bank from the list of popular accounts or type in your bank name into the Search box and click Search. A list of banks will display. Select your bank by clicking on the bank name.

Sage One Accountant EditionUser Guide
9Return to table of contents
Banking
Sales tax
Invoicing
Pro
ducts
and services
Pro
jects and
tasksO
ther inco
mes
Exp
ensesG
eneral jo
urnal entriesR
epo
rtingS
age O
ne A
ccountant
Ed
ition
Online paym
ent options
Setting
up
Sag
e One
Manag
ing
contacts
Banking
Sales tax
Invoicing
Pro
ducts
and services
Pro
jects and
tasksO
ther inco
mes
Exp
ensesG
eneral jo
urnal entriesR
epo
rtingS
age O
ne A
ccountant
Ed
ition
Online paym
ent options
Setting
up
Sag
e One
Manag
ing
contacts
7. Enter your online banking credentials and click Add.
8. Sage One will connect with your bank account.

Sage One Accountant EditionUser Guide
10Return to table of contents
Banking
Sales tax
Invoicing
Pro
ducts
and services
Pro
jects and
tasksO
ther inco
mes
Exp
ensesG
eneral jo
urnal entriesR
epo
rtingS
age O
ne A
ccountant
Ed
ition
Online paym
ent options
Setting
up
Sag
e One
Manag
ing
contacts
Once they have connected, you will see a list of the accounts that have been successfully added. Click Close.
9. Select the account you want to sync with and click Continue.
10. Select a start from date that you want to import transactions from and click Finish. Note: Sage One can import transactions up to 90 days in the past.

Sage One Accountant EditionUser Guide
11Return to table of contents
Banking
Sales tax
Invoicing
Pro
ducts
and services
Pro
jects and
tasksO
ther inco
mes
Exp
ensesG
eneral jo
urnal entriesR
epo
rtingS
age O
ne A
ccountant
Ed
ition
Online paym
ent options
Setting
up
Sag
e One
Manag
ing
contacts
If you make a mistake when importing bank transactions, you can easily correct it. Simply delete the transaction created in Sage One. The bank transaction will appear in the list again, and you can post/match it appropriately.
11. You can then select which transactions you want to import into Sage One.
12. Select individual transactions and click Add to Sage One.
13. You can select the transactions you want to import and categorize the transaction. Leave atransaction uncategorized if you are unsure which account it should affect. Your accountant canlook through the uncategorized transaction and categorize it at a later date.
In most cases you will likely record the transaction as a new income/expense into Sage One. Thepayment can also be recorded against outstanding bills/invoices and as bank transfers. If you havealready recorded a bank transaction in Sage One, you can match it to avoid recording thetransaction a second time.
Sage One Accountant EditionUser Guide
12Return to table of contents
Banking
Sales tax
Invoicing
Pro
ducts
and services
Pro
jects and
tasksO
ther inco
mes
Exp
ensesG
eneral jo
urnal entriesR
epo
rtingS
age O
ne A
ccountant
Ed
ition
Online paym
ent options
Setting
up
Sag
e One
Manag
ing
contacts
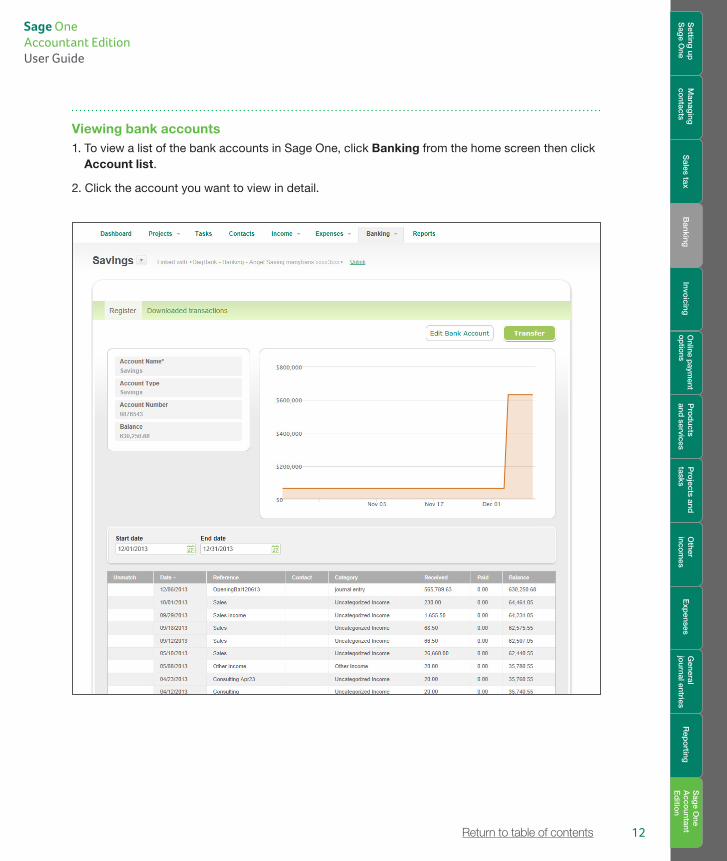
Viewing bank accounts1. To view a list of the bank accounts in Sage One, click Banking from the home screen then click
Account list.
2. Click the account you want to view in detail.
Sage One Accountant EditionUser Guide
13Return to table of contents
Banking
Sales tax
Invoicing
Pro
ducts
and services
Pro
jects and
tasksO
ther inco
mes
Exp
ensesG
eneral jo
urnal entriesR
epo
rtingS
age O
ne A
ccountant
Ed
ition
Online paym
ent options
Setting
up
Sag
e One
Manag
ing
contacts
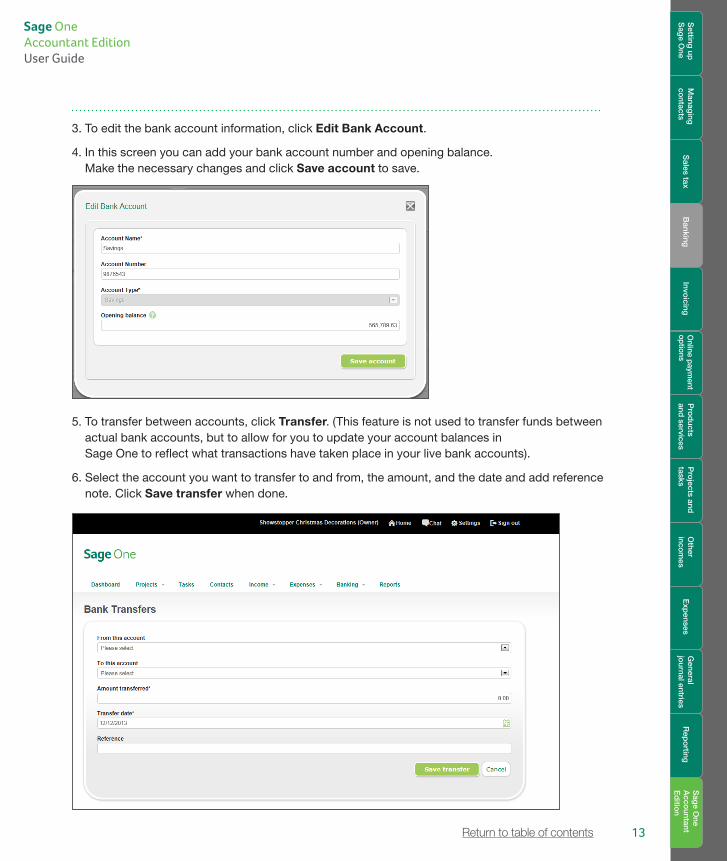
3. To edit the bank account information, click Edit Bank Account.
4. In this screen you can add your bank account number and opening balance.Make the necessary changes and click Save account to save.
5. To transfer between accounts, click Transfer. (This feature is not used to transfer funds between actual bank accounts, but to allow for you to update your account balances inSage One to reflect what transactions have taken place in your live bank accounts).
6. Select the account you want to transfer to and from, the amount, and the date and add referencenote. Click Save transfer when done.

Sage One Accountant EditionUser Guide
14Return to table of contents
Banking
Sales tax
Invoicing
Pro
ducts
and services
Pro
jects and
tasksO
ther inco
mes
Exp
ensesG
eneral jo
urnal entriesR
epo
rtingS
age O
ne A
ccountant
Ed
ition
Online paym
ent options
Setting
up
Sag
e One
Manag
ing
contacts
Invoicing
The Invoice list screen shows all invoices. Colour coding and sorting helps identify overdue, outstanding, drafts, and paid invoices. The list can be filtered by date, customer name, and status.
Creating an invoice:You can use products and services to speed up invoicing if you use similar descriptions on your invoices every time. You can also add billable tasks for projects worked on for this customer.
1. From the home screen, click Sales, Invoices.
2. Click Create invoice.
Sage One Accountant EditionUser Guide
15Return to table of contents
Banking
Sales tax
Invoicing
Pro
ducts
and services
Pro
jects and
tasksO
ther inco
mes
Exp
ensesG
eneral jo
urnal entriesR
epo
rtingS
age O
ne A
ccountant
Ed
ition
Online paym
ent options
Setting
up
Sag
e One
Manag
ing
contacts
3. Complete the invoice screen.
a. Search for a contact by typing in the first few characters in the customer name.
b. If you want to add a new contact, click the icon next to the field and complete the information required in the New contact screen.
c. Confirm the invoice date and due date.
d. Add a delivery address or check the Same as main address? checkbox if the delivery address is the same as the main address.
e. Fill in the description section of the invoice. If you are using a product or service that you use regularly, you can add it into Sage One using the steps in the Creating products and services section; otherwise, for one-off items, type details directly in the Description field. Items added into the products and services will auto-populate the Description field.
f. If you have set up online payments and want to allow your customer to pay online, check the Allow my customer to pay online checkbox.
g. Review the information for accuracy. If you would like to print or email the invoice, check the appropriate checkbox.
• If you selected the Print checkbox, when Save is clicked, a new window will open with the invoice in PDF. You can select the option to print from your browser. You can also use this option to review your invoice prior to emailing it.
• If you selected the Email checkbox, when Save is clicked, a pop-up window walks you through emailing the invoice. More details on this can be found in the Emailing an invoice to your client section of the user guide.
h. Click Save when done.

Sage One Accountant EditionUser Guide
16Return to table of contents
Banking
Sales tax
Invoicing
Pro
ducts
and services
Pro
jects and
tasksO
ther inco
mes
Exp
ensesG
eneral jo
urnal entriesR
epo
rtingS
age O
ne A
ccountant
Ed
ition
Online paym
ent options
Setting
up
Sag
e One
Manag
ing
contacts

Sage One Accountant EditionUser Guide
17Return to table of contents
Banking
Sales tax
Invoicing
Pro
ducts
and services
Pro
jects and
tasksO
ther inco
mes
Exp
ensesG
eneral jo
urnal entriesR
epo
rtingS
age O
ne A
ccountant
Ed
ition
Online paym
ent options
Setting
up
Sag
e One
Manag
ing
contacts
Emailing an invoice to your clientYour client will receive an email with a PDF of the invoice. If online payments are set up with Sage Payment Solutions or PayPalTM, the client can view and pay the invoice online. The payment will automatically update the status of the invoice in Sage One.
Manually recording a payment1. In the invoice screen, click the invoice you want to record a payment for.
2. In the Edit Invoice screen, click Pay Invoice.

Sage One Accountant EditionUser Guide
18Return to table of contents
Banking
Sales tax
Invoicing
Pro
ducts
and services
Pro
jects and
tasksO
ther inco
mes
Exp
ensesG
eneral jo
urnal entriesR
epo
rtingS
age O
ne A
ccountant
Ed
ition
Online paym
ent options
Setting
up
Sag
e One
Manag
ing
contacts
3. In the New invoice payment screen enter the information required and click Save when done.
Creating quotesYou can now easily create a quote and send it to a customer either by emailing or printing it. Once the quote has been accepted, it can be easily converted to an invoice. The quotes feature has the same intuitive interface as invoicing, and you can choose among three quote templates that match the invoice templates. Quotes can also be saved and copied to create new quotes.
1. From the home screen click Sales, Quotes.
2. Click Create quote.

Sage One Accountant EditionUser Guide
19Return to table of contents
Banking
Sales tax
Invoicing
Pro
ducts
and services
Pro
jects and
tasksO
ther inco
mes
Exp
ensesG
eneral jo
urnal entriesR
epo
rtingS
age O
ne A
ccountant
Ed
ition
Online paym
ent options
Setting
up
Sag
e One
Manag
ing
contacts
3. The screen looks similar to the Invoices screen. Add the necessary information as you would for an invoice. Click Save when done.
4. Use the same steps to send the quote to your client as you would to send an invoice.
Sage One Accountant EditionUser Guide
20Return to table of contents
Banking
Sales tax
Invoicing
Pro
ducts
and services
Pro
jects and
tasksO
ther inco
mes
Exp
ensesG
eneral jo
urnal entriesR
epo
rtingS
age O
ne A
ccountant
Ed
ition
Online paym
ent options
Setting
up
Sag
e One
Manag
ing
contacts
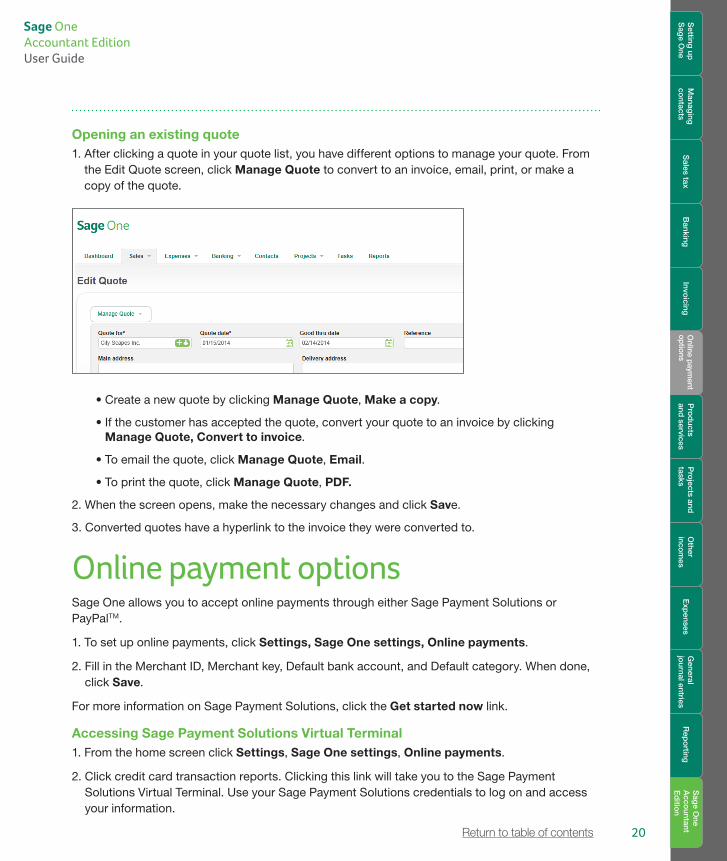
Opening an existing quote1. After clicking a quote in your quote list, you have different options to manage your quote. From
the Edit Quote screen, click Manage Quote to convert to an invoice, email, print, or make a copy of the quote.
• Create a new quote by clicking Manage Quote, Make a copy.
• If the customer has accepted the quote, convert your quote to an invoice by clicking Manage Quote, Convert to invoice.
• To email the quote, click Manage Quote, Email.
• To print the quote, click Manage Quote, PDF.
2. When the screen opens, make the necessary changes and click Save.
3. Converted quotes have a hyperlink to the invoice they were converted to.
Online payment optionsSage One allows you to accept online payments through either Sage Payment Solutions or PayPalTM.
1. To set up online payments, click Settings, Sage One settings, Online payments.
2. Fill in the Merchant ID, Merchant key, Default bank account, and Default category. When done, click Save.
For more information on Sage Payment Solutions, click the Get started now link.
Accessing Sage Payment Solutions Virtual Terminal1. From the home screen click Settings, Sage One settings, Online payments.
2. Click credit card transaction reports. Clicking this link will take you to the Sage Payment Solutions Virtual Terminal. Use your Sage Payment Solutions credentials to log on and access your information.

Sage One Accountant EditionUser Guide
21Return to table of contents
Banking
Sales tax
Invoicing
Pro
ducts
and services
Pro
jects and
tasksO
ther inco
mes
Exp
ensesG
eneral jo
urnal entriesR
epo
rtingS
age O
ne A
ccountant
Ed
ition
Online paym
ent options
Setting
up
Sag
e One
Manag
ing
contacts
Creating products and servicesThe ability to add products and services is a highly requested feature to Sage One. This feature uses a pick list concept rather than what would be normally termed as inventory. This feature allows users to store and retrieve frequently invoiced “items” so they do not have to retype the data repeatedly.
1. To access this feature, from the home screen click Sales, Products & Services.
2. Select either the Products or Services tab, depending on what you want to add.
3. Enter information into the fields as needed:
a. Description—Appears on invoice within description field on line item.
b. Category—In Sage One—U.S. Edition the Category field has no effect at the moment. This is because the US edition is currently using cash basis accounting, and the category for the invoice is set when the payment is received. In future releases, there are plans to allow both accrual/cash in the U.S., and when this is completed, the line item on the invoice will reflect the Category set within the item in Products & Services.
c. Cost Price (product only)—You can record the cost of an item for reference purposes. This cost has no effect on financial statements when a unit is sold.
d. Sale Price (product only)—Is used on the invoice in the Price/Rate field.
e. Rate (service only)—Is used on the invoice in the Price/Rate field.
f. Notes—Internal notes for the Sage One user, does not appear on the invoice.

Sage One Accountant EditionUser Guide
22Return to table of contents
Banking
Sales tax
Invoicing
Pro
ducts
and services
Pro
jects and
tasksO
ther inco
mes
Exp
ensesG
eneral jo
urnal entriesR
epo
rtingS
age O
ne A
ccountant
Ed
ition
Online paym
ent options
Setting
up
Sag
e One
Manag
ing
contacts
4. Click Save after you have entered your information.
5. To edit an existing Product or service, click the item to open the edit screen and make the necessary changes. When done, click Save.
New products and services can be also be added from the Invoice screen. Using the Create product and Create service links opens the dialog box shown above.
1. To add a product or service to the invoice, type the first few letters of the name of the item within the search dialog and the drop-down list that appears will filter the results based upon the search.
2. To add the item to the invoice, either select it from the list with the mouse or press Enter when only one item remains in the drop-down list.

Sage One Accountant EditionUser Guide
23Return to table of contents
Banking
Sales tax
Invoicing
Pro
ducts
and services
Pro
jects and
tasksO
ther inco
mes
Exp
ensesG
eneral jo
urnal entriesR
epo
rtingS
age O
ne A
ccountant
Ed
ition
Online paym
ent options
Setting
up
Sag
e One
Manag
ing
contacts
Projects and tasksUsing projects in Sage One allows you to better organize your work. The projects feature gives you the ability to do the following:
• Add team members: Give clients and employees access to the project without sharing.
• Assign tasks and track time: Assign tasks to yourself or team members. You can also track where time is being spent.
• Create messages and share files: Send messages and files to your team members.
• Stay organized: Assign income and expenses to a project.
Viewing your existing projects1. From the home screen, click Projects, Project List.
2. In this screen you can see all your existing projects, including completed and inactive projects (check the checkbox for either option).
3. You can also view projects that are assigned to a specific client by selecting that client’s name from the Client drop-down list.
4. To create a new project, follow the steps below.
Creating a project1. From the home screen, click Projects, Project List.
2. Click Create project to create a new project.

Sage One Accountant EditionUser Guide
24Return to table of contents
Banking
Sales tax
Invoicing
Pro
ducts
and services
Pro
jects and
tasksO
ther inco
mes
Exp
ensesG
eneral jo
urnal entriesR
epo
rtingS
age O
ne A
ccountant
Ed
ition
Online paym
ent options
Setting
up
Sag
e One
Manag
ing
contacts
Banking
Sales tax
Invoicing
Pro
ducts
and services
Pro
jects and
tasksO
ther inco
mes
Exp
ensesG
eneral jo
urnal entriesR
epo
rtingS
age O
ne A
ccountant
Ed
ition
Online paym
ent options
Setting
up
Sag
e One
Manag
ing
contacts
3. To use an existing contact, type in the first few characters of the name, and the field will autopopulate. If you would like to add a new client, click the icon next to the field. This will open a new screen for you to enter the client information in and click Save contact when done.

Sage One Accountant EditionUser Guide
25Return to table of contents
Banking
Sales tax
Invoicing
Pro
ducts
and services
Pro
jects and
tasksO
ther inco
mes
Exp
ensesG
eneral jo
urnal entriesR
epo
rtingS
age O
ne A
ccountant
Ed
ition
Online paym
ent options
Setting
up
Sag
e One
Manag
ing
contacts
4. Type in a project name and add a project description if you have one.
5. Three project statuses exist by default (Completed, In progress, Inactive). These can be selected by typing in the first few characters, and they will autopopulate. You can click Add or edit status, type in a new project status, and click Add to create a new status. Project statuses created by you can also be edited or deleted. To edit, simply type in the updated status name. When you are finished, click Save.
6. Enter a start date and due date for your project. Click the calendar icon to select a date from the calendar.
7. Enter estimated time in hours, estimated expenses, and estimated billable fees.
8. Click Save.
9. This will open up the Project Summary screen for the project you just created.

Sage One Accountant EditionUser Guide
26Return to table of contents
Banking
Sales tax
Invoicing
Pro
ducts
and services
Pro
jects and
tasksO
ther inco
mes
Exp
ensesG
eneral jo
urnal entriesR
epo
rtingS
age O
ne A
ccountant
Ed
ition
Online paym
ent options
Setting
up
Sag
e One
Manag
ing
contacts
Using projectsMembers can be added to your project. Members are people you collaborate with and you can assign tasks to, record discussions with, and shares files with. Members will receive an email notifying them that you have added them to the project. There are no limits to how many collaborators you can have.

Sage One Accountant EditionUser Guide
27Return to table of contents
Banking
Sales tax
Invoicing
Pro
ducts
and services
Pro
jects and
tasksO
ther inco
mes
Exp
ensesG
eneral jo
urnal entriesR
epo
rtingS
age O
ne A
ccountant
Ed
ition
Online paym
ent options
Setting
up
Sag
e One
Manag
ing
contacts
1. To use Projects, from the home screen, click Projects, Project list.
2. All your projects will be listed in the screen.

Sage One Accountant EditionUser Guide
28Return to table of contents
Banking
Sales tax
Invoicing
Pro
ducts
and services
Pro
jects and
tasksO
ther inco
mes
Exp
ensesG
eneral jo
urnal entriesR
epo
rtingS
age O
ne A
ccountant
Ed
ition
Online paym
ent options
Setting
up
Sag
e One
Manag
ing
contacts
3. Select the project to view the project details.
4. To add members to the project, click Invite user.
5. Type in the email address of the person you would like to invite, select Collaborator, and click Save & invite user.

Sage One Accountant EditionUser Guide
29Return to table of contents
Banking
Sales tax
Invoicing
Pro
ducts
and services
Pro
jects and
tasksO
ther inco
mes
Exp
ensesG
eneral jo
urnal entriesR
epo
rtingS
age O
ne A
ccountant
Ed
ition
Online paym
ent options
Setting
up
Sag
e One
Manag
ing
contacts
6. Sage One will send an email to the addresses you specified asking them to activate their account.
Below is the email a project member receives when he or she is added to the project.
Pro
jects and
tasks

Sage One Accountant EditionUser Guide
30Return to table of contents
Banking
Sales tax
Invoicing
Pro
ducts
and services
Pro
jects and
tasksO
ther inco
mes
Exp
ensesG
eneral jo
urnal entriesR
epo
rtingS
age O
ne A
ccountant
Ed
ition
Online paym
ent options
Setting
up
Sag
e One
Manag
ing
contacts
Using messages in projectsThe messaging feature is great for sharing information with team members that are part of the same project. The customers can also be added as team members so they can also contribute to the conversation, and all details are stored in one place, including files.
1. To access the messaging feature, from the home screen click Projects, Messages.
2. To post a message, click Post a message.
3. Add a subject, message, and attach files if needed. You can also select which team members can view the message. When you are finished, click Save message. The message will be emailed to all the team members you selected.

Sage One Accountant EditionUser Guide
31Return to table of contents
Banking
Sales tax
Invoicing
Pro
ducts
and services
Pro
jects and
tasksO
ther inco
mes
Exp
ensesG
eneral jo
urnal entriesR
epo
rtingS
age O
ne A
ccountant
Ed
ition
Online paym
ent options
Setting
up
Sag
e One
Manag
ing
contacts
Creating tasks for a project1. The task list shows the tasks for the project, due date, whether it’s completed or not, and if
invoiced, the invoice number.
2. You can assign a task to yourself or anyone else who is a member of the project in Sage One. You can set due dates and attach files related to the task. The task owners will receive an email notifying them that they have been assigned a task. Emails are sent to the task owners when they are overdue.
Below is the email a task owner receives when assigned a new task:
3. The task owner can click View task in Sage One to view the task.

Sage One Accountant EditionUser Guide
32Return to table of contents
Banking
Sales tax
Invoicing
Pro
ducts
and services
Pro
jects and
tasksO
ther inco
mes
Exp
ensesG
eneral jo
urnal entriesR
epo
rtingS
age O
ne A
ccountant
Ed
ition
Online paym
ent options
Setting
up
Sag
e One
Manag
ing
contacts
4. The task owners can only see the tasks assigned to them. They cannot access invoicing, expenses, banking, and so on. They can retrieve attached files as well as attach their own files, such as new logos, designs, and more that the business owner may want to review or share with the client. The task owner can also enter the time worked on the task and mark the task as complete.
Sage One Accountant EditionUser Guide
33Return to table of contents
Banking
Sales tax
Invoicing
Pro
ducts
and services
Pro
jects and
tasksO
ther inco
mes
Exp
ensesG
eneral jo
urnal entriesR
epo
rtingS
age O
ne A
ccountant
Ed
ition
Online paym
ent options
Setting
up
Sag
e One
Manag
ing
contacts
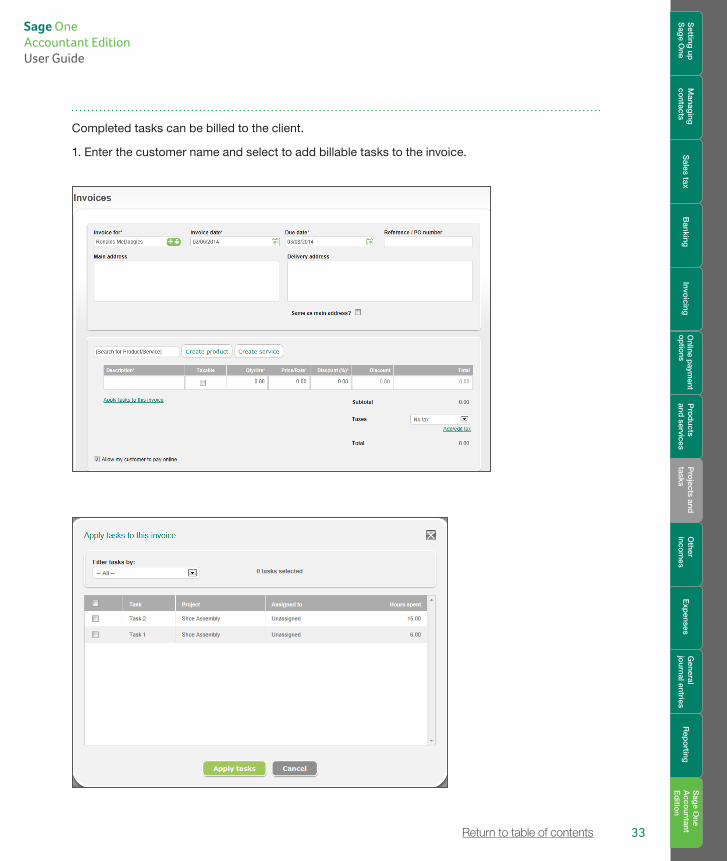
Completed tasks can be billed to the client.
1. Enter the customer name and select to add billable tasks to the invoice.

Sage One Accountant EditionUser Guide
34Return to table of contents
Banking
Sales tax
Invoicing
Pro
ducts
and services
Pro
jects and
tasksO
ther inco
mes
Exp
ensesG
eneral jo
urnal entriesR
epo
rtingS
age O
ne A
ccountant
Ed
ition
Online paym
ent options
Setting
up
Sag
e One
Manag
ing
contacts
Recording other income1. To record other income, click Sales, Other income.
2. Fill in the required fields and click Save payment.
3. To set up as recurring, click a previously entered income. You now have a recurring button. Click Recurring.

Sage One Accountant EditionUser Guide
35Return to table of contents
Banking
Sales tax
Invoicing
Pro
ducts
and services
Pro
jects and
tasksO
ther inco
mes
Exp
ensesG
eneral jo
urnal entriesR
epo
rtingS
age O
ne A
ccountant
Ed
ition
Online paym
ent options
Setting
up
Sag
e One
Manag
ing
contacts
4. Set the recurrence details and click Save. You can select days, weeks, or months as your recurrence timeframe.
Recording expensesCreating billsThis feature is great for recording bills that your company receives, such as utilities.
1. Click Expenses, Bills. Click Create bill to add a new bill.
2. Enter the details and click Save bill.
Sage One Accountant EditionUser Guide
36Return to table of contents
Banking
Sales tax
Invoicing
Pro
ducts
and services
Pro
jects and
tasksO
ther inco
mes
Exp
ensesG
eneral jo
urnal entriesR
epo
rtingS
age O
ne A
ccountant
Ed
ition
Online paym
ent options
Setting
up
Sag
e One
Manag
ing
contacts
Recording other expensesOther expenses is a great feature for recording expenses like gas, phone bills, and so on. You can set these up as recurring expenses to save time on data entry.
1. To record other expenses click Expenses, Other expense.
2. Fill in the required fields and click Save expense.
3. To set up as recurring, click a previously entered expense. You now have a recurring button. Click Recurring.
4. Set the recurrence details and click Save. You can select days, weeks, or months as your recurrence timeframe.
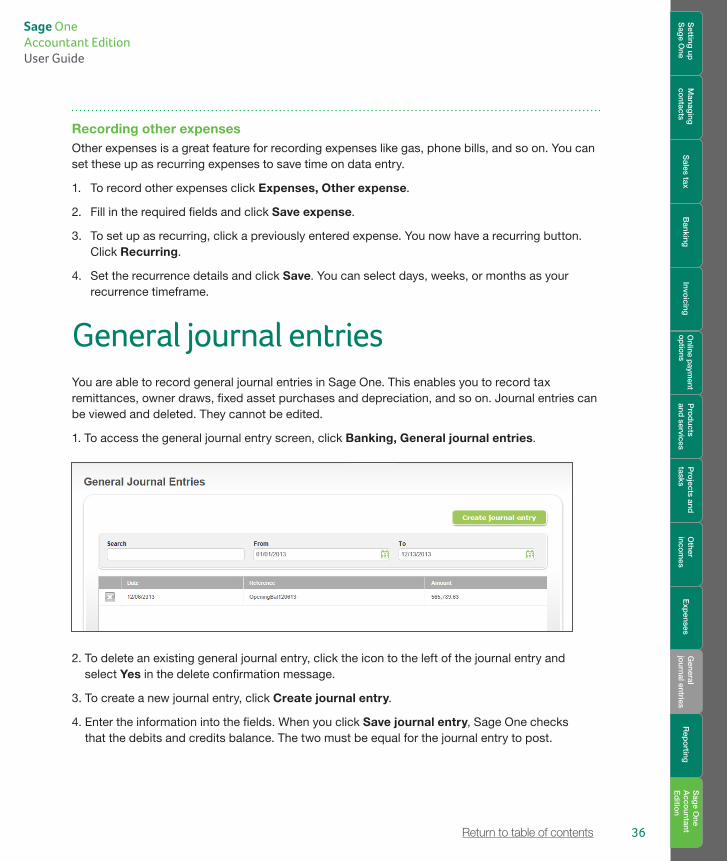
General journal entriesYou are able to record general journal entries in Sage One. This enables you to record tax remittances, owner draws, fixed asset purchases and depreciation, and so on. Journal entries can be viewed and deleted. They cannot be edited.
1. To access the general journal entry screen, click Banking, General journal entries.
2. To delete an existing general journal entry, click the icon to the left of the journal entry and select Yes in the delete confirmation message.
3. To create a new journal entry, click Create journal entry.
4. Enter the information into the fields. When you click Save journal entry, Sage One checks that the debits and credits balance. The two must be equal for the journal entry to post.

Sage One Accountant EditionUser Guide
37Return to table of contents
Banking
Sales tax
Invoicing
Pro
ducts
and services
Pro
jects and
tasksO
ther inco
mes
Exp
ensesG
eneral jo
urnal entriesR
epo
rtingS
age O
ne A
ccountant
Ed
ition
Online paym
ent options
Setting
up
Sag
e One
Manag
ing
contacts
Accessing reportsSage One offers a variety of reports for you. These include:
1. Profit and Loss Report: View your income against your expenses and see the net result.
2. Balance Sheet Report: View your asset and liability account balances.
3. Ages Invoices Report: View unpaid invoices; see who owes you and how much.
4. Aged Bills Report: View unpaid bills; see whom you owe and how much.
5. Trial Balance: View your category account balances.
6. General Ledger Report: View transactions entered by category.
7. Journal Entries: View a list of your general journal entries.
8. Sage Payment Solutions: If you are using Sage Payment Solutions, use this report to view credit card reports in the Sage Payment Solutions Virtual Terminal.
To access your reports, click the link in the section of the report you want to access. We will work through the Aged Invoices Report in our example.
1. From the home screen, click Reports.

Sage One Accountant EditionUser Guide
38Return to table of contents
Banking
Sales tax
Invoicing
Pro
ducts
and services
Pro
jects and
tasksO
ther inco
mes
Exp
ensesG
eneral jo
urnal entriesR
epo
rtingS
age O
ne A
ccountant
Ed
ition
Online paym
ent options
Setting
up
Sag
e One
Manag
ing
contacts
2. Click Aged invoices report.
3. When running reports, you have the option to set an “as of date” or a date range, depending on the report you are accessing. To change the date, click the calendar icon next to the date field and select a date, then click Update report.
4. If you would like to see a detailed breakdown, click the View the detailed report link. The link name changes to view the summary report. To go back to the summary view, click the View the summary report link.
The only reports that offer the option to view the report in detail on the screen are the Aged invoices report and the Aged bills report.
5. The report can be saved as a PDF file by clicking Save as PDF. If you want to modify your report, you have the option to Export to CSV by clicking that button. This option requires that your computer have Microsoft® Excel® or similar spreadsheet software installed. The report will open in Microsoft Excel, where you can modify it.
The General Ledger Report can be created for one account. In the Category drop down, select the account you want to view the report for, then select your date range for the report by clicking the calendar icon next to the From date and To date fields and click Update report. The summary of the account will be displayed in your browser. To export the report, follow the instructions mentioned above in Step 5.
Sage One Accountant EditionUser Guide
39Return to table of contents
Banking
Sales tax
Invoicing
Pro
ducts
and services
Pro
jects and
tasksO
ther inco
mes
Exp
ensesG
eneral jo
urnal entriesR
epo
rtingS
age O
ne A
ccountant
Ed
ition
Online paym
ent options
Setting
up
Sag
e One
Manag
ing
contacts
Sage One Accountant EditionOverview: How accounting professionals use Sage OneSage One Accountant Edition allows the accountant to use a single logon to access every client’s books from virtually anywhere. You don’t need to worry about getting an updated backup of your client’s Sage One data or going onsite to enter and review transactions. You are able to enter any type of transaction in real time, reducing downtime for your clients.
Inviting your clients to use Sage One from Sage One Accountant EditionIn Sage One Accountant Edition, you have the ability to invite new and/or existing clients to Sage One. Inviting an existing client gives you the ability to post in your client’s books simultaneously while your client is also working in Sage One. You don’t have to worry about your client entering transactions while you are working on his backup file. Everything is processed in real time.
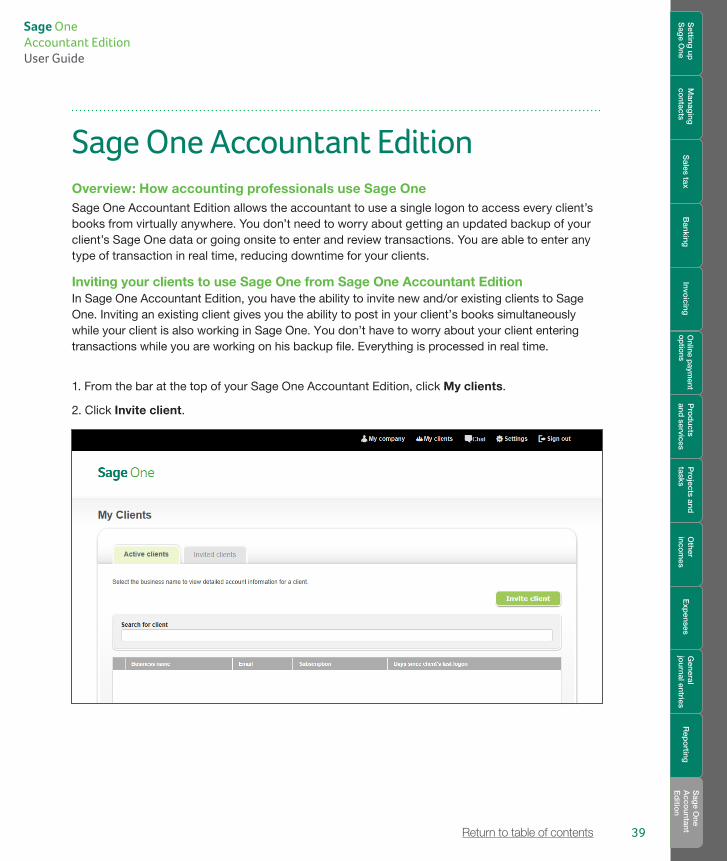
1. From the bar at the top of your Sage One Accountant Edition, click My clients.
2. Click Invite client.
Sag
e One
Acco
untant E
ditio
n
Sage One Accountant EditionUser Guide
40Return to table of contents
Banking
Sales tax
Invoicing
Pro
ducts
and services
Pro
jects and
tasksO
ther inco
mes
Exp
ensesG
eneral jo
urnal entriesR
epo
rtingS
age O
ne A
ccountant
Ed
ition
Online paym
ent options
Setting
up
Sag
e One
Manag
ing
contacts
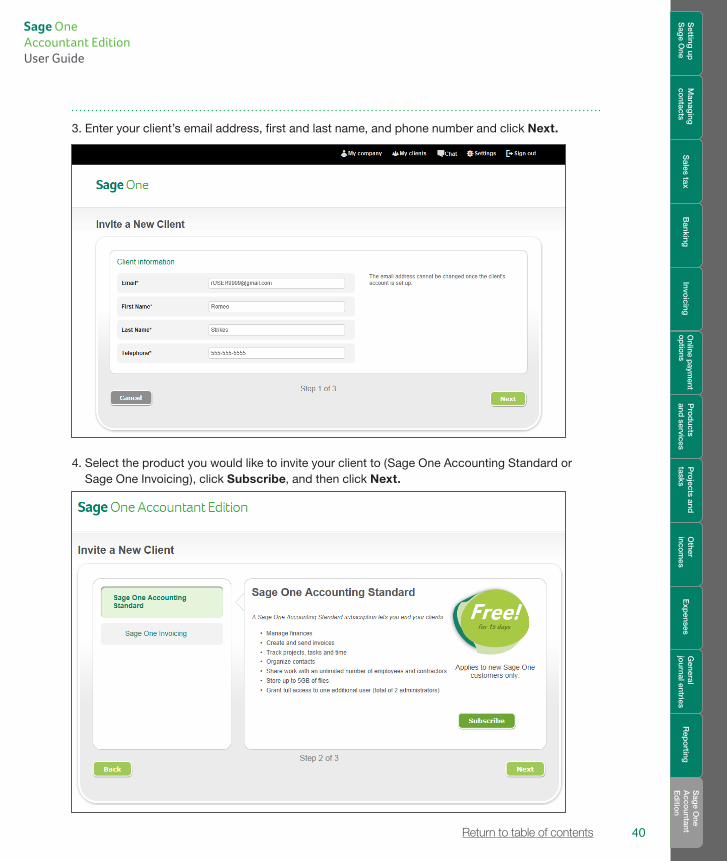
3. Enter your client’s email address, first and last name, and phone number and click Next.
4. Select the product you would like to invite your client to (Sage One Accounting Standard or Sage One Invoicing), click Subscribe, and then click Next.
Sag
e One
Acco
untant E
ditio
n

Sage One Accountant EditionUser Guide
41Return to table of contents
Banking
Sales tax
Invoicing
Pro
ducts
and services
Pro
jects and
tasksO
ther inco
mes
Exp
ensesG
eneral jo
urnal entriesR
epo
rtingS
age O
ne A
ccountant
Ed
ition
Online paym
ent options
Setting
up
Sag
e One
Manag
ing
contacts
5. Verify the information you have entered for your client is correct and click Invite client. When you click the Invite client button, the client receives an email inviting him to connect with the accountant.
To see a list of clients you have invited to Sage One but haven’t yet accepted, click the Invited clients tab. Here you have the option to resend the invite to your client.
Sag
e One
Acco
untant E
ditio
n

Sage One Accountant EditionUser Guide
42Return to table of contents
Banking
Sales tax
Invoicing
Pro
ducts
and services
Pro
jects and
tasksO
ther inco
mes
Exp
ensesG
eneral jo
urnal entriesR
epo
rtingS
age O
ne A
ccountant
Ed
ition
Online paym
ent options
Setting
up
Sag
e One
Manag
ing
contacts
What does my client see when I invite him to Sage One? 1. If your client does not have a Sage One account using the email address you sent the invite to,
he will receive the following invitation email:
2. If your client has a Sage One account using the email address you sent the invite to, he will receive the following invitation email.
Sag
e One
Acco
untant E
ditio
n

Sage One Accountant EditionUser Guide
43Return to table of contents
Banking
Sales tax
Invoicing
Pro
ducts
and services
Pro
jects and
tasksO
ther inco
mes
Exp
ensesG
eneral jo
urnal entriesR
epo
rtingS
age O
ne A
ccountant
Ed
ition
Online paym
ent options
Setting
up
Sag
e One
Manag
ing
contacts
3. When the client clicks the Activate your account button or the Connect button in the respective invitation email, he will be taken to the Your Invitation to Sage One page.
4. Once the client completes the form, he clicks the Continue button. If the email address is not already associated with a Sage One account, the client will be taken to the second step of creating a new Sage One account (screen shot below). If the email address is already associated with a Sage One account, the client will be taken to the regular logon page.
Sag
e One
Acco
untant E
ditio
n

Sage One Accountant EditionUser Guide
44Return to table of contents
Banking
Sales tax
Invoicing
Pro
ducts
and services
Pro
jects and
tasksO
ther inco
mes
Exp
ensesG
eneral jo
urnal entriesR
epo
rtingS
age O
ne A
ccountant
Ed
ition
Online paym
ent options
Setting
up
Sag
e One
Manag
ing
contacts
5. After the client accepts the invitation, the client will show up under the accountant’s Active clients list in Sage One Accountant Edition.
The client can choose to remove the accountant’s access to his books from the Your subscriptions page in Sage One under Settings by clicking Cancel Accountant. When asked to confirm cancelling the accountant, click OK.
Sag
e One
Acco
untant E
ditio
n

Sage One Accountant EditionUser Guide
45Return to table of contents
Banking
Sales tax
Invoicing
Pro
ducts
and services
Pro
jects and
tasksO
ther inco
mes
Exp
ensesG
eneral jo
urnal entriesR
epo
rtingS
age O
ne A
ccountant
Ed
ition
Online paym
ent options
Setting
up
Sag
e One
Manag
ing
contacts
Sag
e One
Acco
untant E
ditio
n

Sage One Accountant EditionUser Guide
46Return to table of contents
Banking
Sales tax
Invoicing
Pro
ducts
and services
Pro
jects and
tasksO
ther inco
mes
Exp
ensesG
eneral jo
urnal entriesR
epo
rtingS
age O
ne A
ccountant
Ed
ition
Online paym
ent options
Setting
up
Sag
e One
Manag
ing
contacts
6. The accountant will get an email notifying him that the client has removed his access, and the client will no longer show in the accountant’s Active clients list.
Accessing your clients’ books1. From the bar at the top of your Sage One Accountant Edition, click My clients.
2. In your Active clients list, click on a client. This opens up the client information page. In this screen, you can add notes on your client’s record by clicking Create Note or access your client’s books by clicking Access your client’s books.
Sag
e One
Acco
untant E
ditio
n

Sage One Accountant EditionUser Guide
47Return to table of contents
Banking
Sales tax
Invoicing
Pro
ducts
and services
Pro
jects and
tasksO
ther inco
mes
Exp
ensesG
eneral jo
urnal entriesR
epo
rtingS
age O
ne A
ccountant
Ed
ition
Online paym
ent options
Setting
up
Sag
e One
Manag
ing
contacts
3. When you click the Access your client’s books link, you are taken to your client’s home screen. Across the top of your browser window, Sage One notifies you of what company you are logged on to.
4. You can now enter transactions into your client’s Sage One account, run reports, and access all data they have entered. When you are finished, click the Click here to resume being… link at the top to return to your Sage One account.
5. This will return you to the My Clients screen in your Sage One account.
Sag
e One
Acco
untant E
ditio
n

Sage One Accountant EditionUser Guide
48Return to table of contents
Banking
Sales tax
Invoicing
Pro
ducts
and services
Pro
jects and
tasksO
ther inco
mes
Exp
ensesG
eneral jo
urnal entriesR
epo
rtingS
age O
ne A
ccountant
Ed
ition
Online paym
ent options
Setting
up
Sag
e One
Manag
ing
contacts
Dashboard overviewWhen you access your client’s books, you are taken to the Dashboard in Sage One. This screen gives you and your client an overview of how his business is doing, including his income, expense, and profit. You can see the top five unpaid invoices and top five quotes. These can be drilled down on to view the individual invoice/quote details.
You can also see the trend of your client’s bank account in graph form. Scroll over any point of the graph for exact dollar amounts.
Sag
e One
Acco
untant E
ditio
n

©2014 Sage Software, Inc. All rights reserved. Sage, the Sage logos, and the Sage product and service names mentioned herein are the registered trademarks or trademarks of Sage Software, Inc., or its affiliated entities. All other trademarks are the property of their respective owners. 14-34896 1/14
Sage6561 Irvine Center Drive Irvine, CA 92618-2301
866-996-7243
NA.Sage.com
Banking
Sales tax
Invoicing
Pro
ducts
and services
Pro
jects and
tasksO
ther inco
mes
Exp
ensesG
eneral jo
urnal entriesR
epo
rtingS
age O
ne A
ccountant
Ed
ition
Online paym
ent options
Setting
up
Sag
e One
Manag
ing
contacts
Sag
e One
Acco
untant E
ditio
n