Embed Size (px)
Citation preview
Sage 300 Construction
and Real Estate
MyAssistant User Guide
Version 18.1

NOTICE
This document and the Sage 300 Construction and Real Estate MyAssistant software may be used only in accordance with the accompanying Innovative Software Design End User License Agreement. You may not use, copy, modify, or transfer the Sage 300 Construction and Real Estate MyAssistant software or this documentation except as expressly provided in the license agreement. © 2018 Innovative Software Design. All rights reserved.
Table of Contents
Table of Contents
Introduction ............................................................................................................................................... 7
User Guide Objectives .............................................................................................................................. 7
Conventions Used in this Document ........................................................................................................ 7
Chapter 1 – Getting Started With MyAssistant ...................................................................... 8
How can MyAssistant be used?................................................................................................................ 8
General MyAssistant Concepts ................................................................................................................ 8
What is a Task?..................................................................................................................................... 8
What is a Condition? ............................................................................................................................. 9
What are Notifications? ......................................................................................................................... 9
Chapter 2 – MyAssistant Workflow ........................................................................................10
Chapter 3 – Tasks ...................................................................................................................12
What is a Task? ...................................................................................................................................... 12
Viewing Tasks ..................................................................................................................................... 12
Activating a Task .................................................................................................................................... 13
Activating a Prebuilt Task .................................................................................................................... 13
Creating a New Task ........................................................................................................................... 13
General Information ................................................................................................................................ 14
Selecting a Prebuilt Condition................................................................................................................. 15
Creating a new Condition ....................................................................................................................... 16
Customize Condition ............................................................................................................................... 17
Schedule – Time ..................................................................................................................................... 18
Schedule – Completion of Sage 300 CRE Process ............................................................................... 19
Data Folder(s) Selection ......................................................................................................................... 20
Email ....................................................................................................................................................... 21
The Address Bar ..................................................................................................................................... 21
Specify who an email is from .............................................................................................................. 22
Notification Table .................................................................................................................................... 23
Mail Merge Data...................................................................................................................................... 24
Attached Report ...................................................................................................................................... 24
Attaching Sage 300 CRE Reports .......................................................................................................... 25
Attaching Crystal Reports ....................................................................................................................... 26
Specifying Report Parameters ................................................................................................................ 27
Updatable Fields ..................................................................................................................................... 28
Customizing Preset Values ..................................................................................................................... 29
Additional Information ............................................................................................................................. 30
Table of Contents
Notification Options ................................................................................................................................. 31
Security Options...................................................................................................................................... 33
Running a Task for the First Time .......................................................................................................... 33
Chapter 4 – Notifications ........................................................................................................34
What is a Notification? ............................................................................................................................ 34
Interacting with the Notification Logs ...................................................................................................... 34
Viewing Notifications ........................................................................................................................... 34
Don’t Notify Again ............................................................................................................................... 34
Notify When True ................................................................................................................................ 34
Remind Me Again ................................................................................................................................ 34
Notifications from Conditions .................................................................................................................. 35
Chapter 5 – Explanation of buttons/menus ...........................................................................36
File Menu ................................................................................................................................................ 36
Home Tab ............................................................................................................................................... 37
View Tab ................................................................................................................................................. 38
Reports Tab ............................................................................................................................................ 39
Chapter 6 – MyAssistant Live Tile .........................................................................................41
What is the Live Tile? ............................................................................................................................. 41
To Do ...................................................................................................................................................... 41
My Notifications....................................................................................................................................... 42
Check For ............................................................................................................................................... 43
Options .................................................................................................................................................... 43
Chapter 7 – MyAssistant Alert ...............................................................................................44
MyAssistant Alert Icon ............................................................................................................................ 44
MyAssistant Action Center ...................................................................................................................... 45
Chapter 8 – MyAssistant QuickViewer ..................................................................................46
What is the QuickViewer? ....................................................................................................................... 46
Chapter 9 – Email Directories ................................................................................................47
What is an Email Directory? ................................................................................................................... 47
How Email Directories Work ................................................................................................................... 47
Types of Email Directories ...................................................................................................................... 47
Lookup Email Addresses in Sage 300 CRE ....................................................................................... 47
Lookup Email Addresses in a list that you provide ............................................................................. 47
Creating a new Email Directory .............................................................................................................. 48
Lookup Email Addresses in Sage 300 CRE ....................................................................................... 49
Selecting Fields in Sage 300 CRE ...................................................................................................... 50
Viewing the Field in Sage 300 CRE .................................................................................................... 51
Lookup Email Addresses in a list that you provide ............................................................................. 52
Table of Contents
View the Values from Sage 300 CRE ................................................................................................. 53
Associating An Email With A Value .................................................................................................... 54
Viewing Missing Values in Sage 300 CRE ......................................................................................... 55
Viewing the Field in Sage 300 CRE .................................................................................................... 56
List of all Email Directories .................................................................................................................. 56
Chapter 10 – Conditions .........................................................................................................57
What is a Condition? ............................................................................................................................... 57
How to Read a Condition ........................................................................................................................ 57
Check All ............................................................................................................................................. 57
Condition Expression .......................................................................................................................... 57
Creating a New Condition ................................................................................................................... 58
Copying Prebuilt Conditions ................................................................................................................ 59
Editing Conditions ............................................................................................................................... 60
Deleting a Condition ............................................................................................................................ 60
Functions ............................................................................................................................................. 60
Chapter 11 – MyAssistant Security ........................................................................................66
What is Security? .................................................................................................................................... 66
Types of Security .................................................................................................................................... 66
Record-Level Security ............................................................................................................................ 66
Feature-Based Security .......................................................................................................................... 67
Activating Security .................................................................................................................................. 68
MyAssistant Security in Sage MyCommunicator for Outlook ................................................................. 69
Chapter 12 – System Maintenance ........................................................................................70
MyAssistant Server Configuration Manger ............................................................................................. 70
Product Activation ............................................................................................................................... 70
MyAssistant Database Connection ..................................................................................................... 70
Sage 300 CRE Data Folders............................................................................................................... 70
Notification E-Mail Account ................................................................................................................. 70
Delivery Options .................................................................................................................................. 70
MyAssistant User Configuration Manager .............................................................................................. 71
Product Activation ............................................................................................................................... 71
Sage 300 CRE Data Folders............................................................................................................... 71
Your Settings ....................................................................................................................................... 71
View the MyAssistant Licensing Agreement ........................................................................................... 71
View your MyAssistant Version .............................................................................................................. 71
Backup your MyAssistant Database ....................................................................................................... 72
Chapter 13 – Sage MyCommunicator for Outlook ................................................................73

Table of Contents
What is Sage MyCommunicator for Outlook? ........................................................................................ 73
How does MyCommunicator work? ........................................................................................................ 73
Forwarding Notifications ......................................................................................................................... 75
Tracking Activity ...................................................................................................................................... 76
Updating Sage ........................................................................................................................................ 77
Getting Started
User Guide Page 7
Introduction
User Guide Objectives In addition to providing instructions on how to set up and use Sage 300 CRE MyAssistant, this guide will be available as a reference for a wide range of MyAssistant topics, including:
• How to set up a MyAssistant Task to monitor your business and push information to the people who need to see it
• What happens when a Task runs and sends Notifications
• How to use MyAssistant Conditions to specify what information to watch
• How to determine who will be notified / receive information
• How to set up and use MyAssistant Email Directories to send each person only their information
• How to set up MyAssistant for Sage MyCommunicator for Outlook users to allow them to track communication and update the Sage database, right from Microsoft Outlook
Conventions Used in this Document This document uses the following conventions:
• The names of screens, windows, fields, and other features displayed by the software are shown in bold type.
• Information you enter into the software is in bold type, as in the following example: Enter Miscellaneous in the Amount Type box.
• Names of keys are shown in capitals; for example, ENTER, TAB. A plus sign (+) between two key names indicates that you should press both keys at the same time; for example, SHIFT + TAB.
• The names of buttons you can click with your mouse are enclosed in bold type; for example, [OK] and [Post].
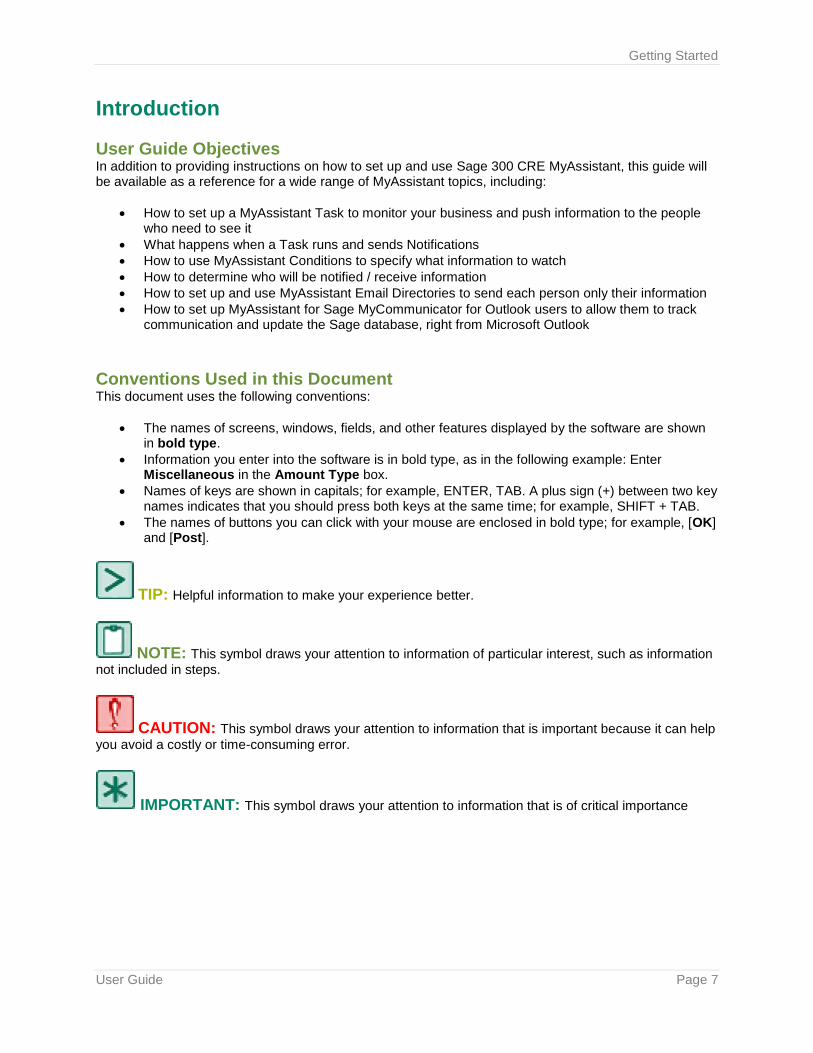
TIP: Helpful information to make your experience better.
NOTE: This symbol draws your attention to information of particular interest, such as information
not included in steps.
CAUTION: This symbol draws your attention to information that is important because it can help
you avoid a costly or time-consuming error.
IMPORTANT: This symbol draws your attention to information that is of critical importance
Getting Started
User Guide Page 8
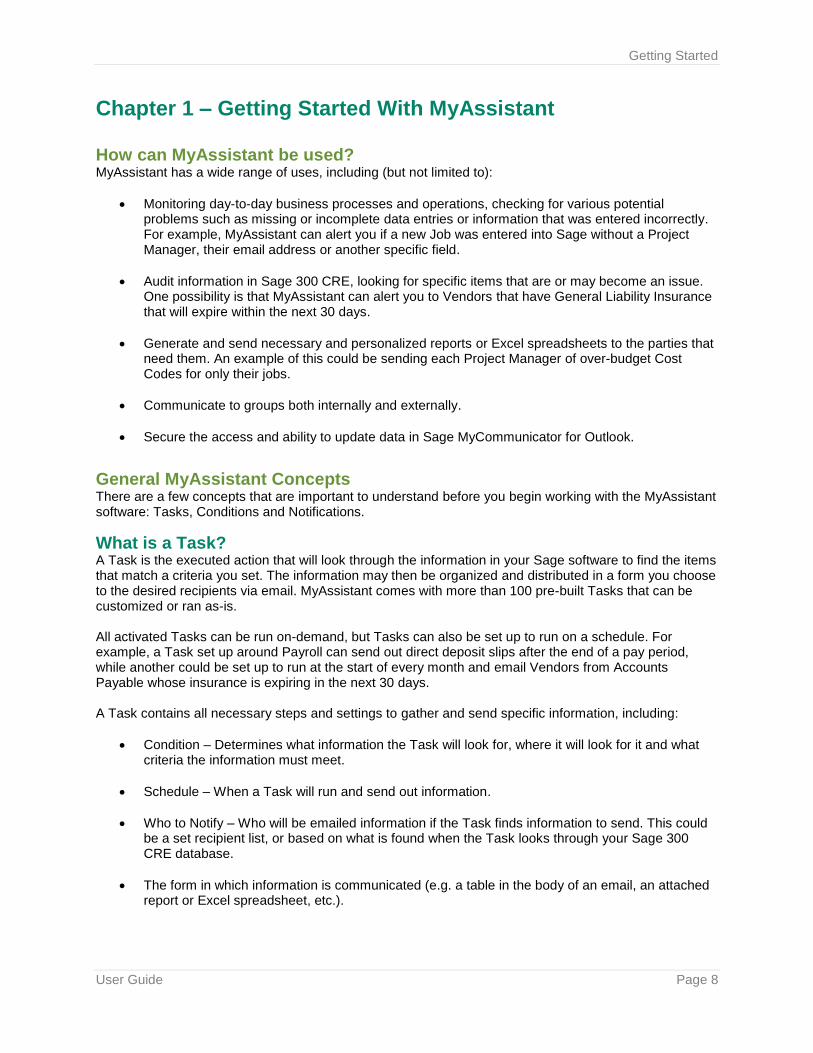
Chapter 1 – Getting Started With MyAssistant How can MyAssistant be used? MyAssistant has a wide range of uses, including (but not limited to):
• Monitoring day-to-day business processes and operations, checking for various potential problems such as missing or incomplete data entries or information that was entered incorrectly. For example, MyAssistant can alert you if a new Job was entered into Sage without a Project Manager, their email address or another specific field.
• Audit information in Sage 300 CRE, looking for specific items that are or may become an issue. One possibility is that MyAssistant can alert you to Vendors that have General Liability Insurance that will expire within the next 30 days.
• Generate and send necessary and personalized reports or Excel spreadsheets to the parties that need them. An example of this could be sending each Project Manager of over-budget Cost Codes for only their jobs.
• Communicate to groups both internally and externally.
• Secure the access and ability to update data in Sage MyCommunicator for Outlook.
General MyAssistant Concepts There are a few concepts that are important to understand before you begin working with the MyAssistant software: Tasks, Conditions and Notifications.
What is a Task? A Task is the executed action that will look through the information in your Sage software to find the items that match a criteria you set. The information may then be organized and distributed in a form you choose to the desired recipients via email. MyAssistant comes with more than 100 pre-built Tasks that can be customized or ran as-is. All activated Tasks can be run on-demand, but Tasks can also be set up to run on a schedule. For example, a Task set up around Payroll can send out direct deposit slips after the end of a pay period, while another could be set up to run at the start of every month and email Vendors from Accounts Payable whose insurance is expiring in the next 30 days. A Task contains all necessary steps and settings to gather and send specific information, including:
• Condition – Determines what information the Task will look for, where it will look for it and what criteria the information must meet.
• Schedule – When a Task will run and send out information.
• Who to Notify – Who will be emailed information if the Task finds information to send. This could be a set recipient list, or based on what is found when the Task looks through your Sage 300 CRE database.
• The form in which information is communicated (e.g. a table in the body of an email, an attached report or Excel spreadsheet, etc.).
Getting Started
User Guide Page 9
Also, while each Task can only look through one location in the Sage 300 database for one type of data, one Task can send multiple people information from the same location, but with the results personalized to each recipient (See Page 47 for more information). For more information about Tasks, including setup, please see page 12.
What is a Condition? A condition is the expression, or “rule,” that will be applied to your Sage 300 CRE database when the Task is run. In the Condition, you will specify the type of information that you want the Task to look for, where in your Sage 300 CRE database you want the Task to look for the information, and the circumstances that surround the information you want returned. For example, you can have a condition look through all JC Cost Code records for only the cost codes that are over-budget. There are two parts to a Condition:
• Check All: The type of record that MyAssistant is looking to return. Just like how each Task has only one Condition, each Condition has only one Check All. When creating your own Condition or selecting one that is pre-built into the software, consider what type of records you want to return when selecting your Check All.
• Condition Expression: The criteria and conditions MyAssistant will look for in your Sage 300 CRE database for the type of records selected. The expression is where you filter down the results to just the information you need, like returning a list of only vendors with expiring insurance instead of one with every vendor in your database.
For more information about Conditions, please see page 57.
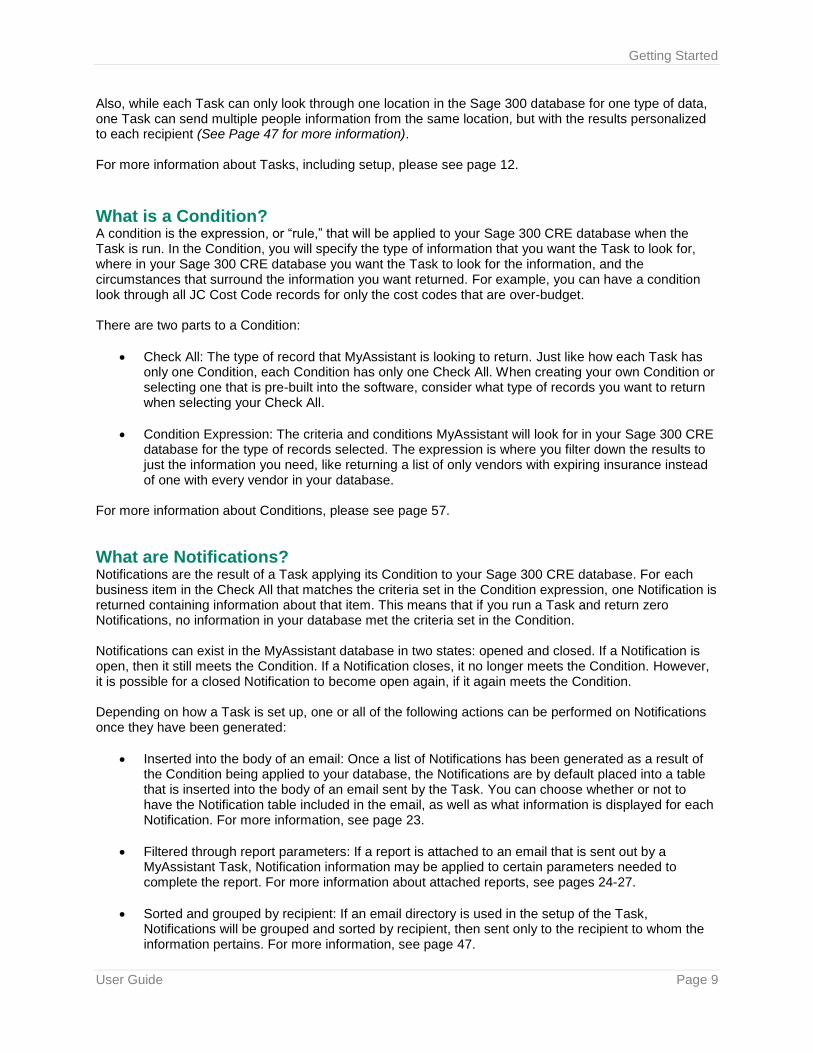
What are Notifications? Notifications are the result of a Task applying its Condition to your Sage 300 CRE database. For each business item in the Check All that matches the criteria set in the Condition expression, one Notification is returned containing information about that item. This means that if you run a Task and return zero Notifications, no information in your database met the criteria set in the Condition. Notifications can exist in the MyAssistant database in two states: opened and closed. If a Notification is open, then it still meets the Condition. If a Notification closes, it no longer meets the Condition. However, it is possible for a closed Notification to become open again, if it again meets the Condition. Depending on how a Task is set up, one or all of the following actions can be performed on Notifications once they have been generated:
• Inserted into the body of an email: Once a list of Notifications has been generated as a result of the Condition being applied to your database, the Notifications are by default placed into a table that is inserted into the body of an email sent by the Task. You can choose whether or not to have the Notification table included in the email, as well as what information is displayed for each Notification. For more information, see page 23.
• Filtered through report parameters: If a report is attached to an email that is sent out by a MyAssistant Task, Notification information may be applied to certain parameters needed to complete the report. For more information about attached reports, see pages 24-27.
• Sorted and grouped by recipient: If an email directory is used in the setup of the Task, Notifications will be grouped and sorted by recipient, then sent only to the recipient to whom the information pertains. For more information, see page 47.
Workflow
User Guide Page 10
Chapter 2 – MyAssistant Workflow There are two main steps in the MyAssistant Workflow: the Task Run process, and the Task Sending process. Each step is made up of smaller actions that occur behind the scenes at their appropriate time, with many taking place on the MyAssistant Server. Continue reading for a walkthrough of both workflows, as well as a visual diagram of the entire process put together.
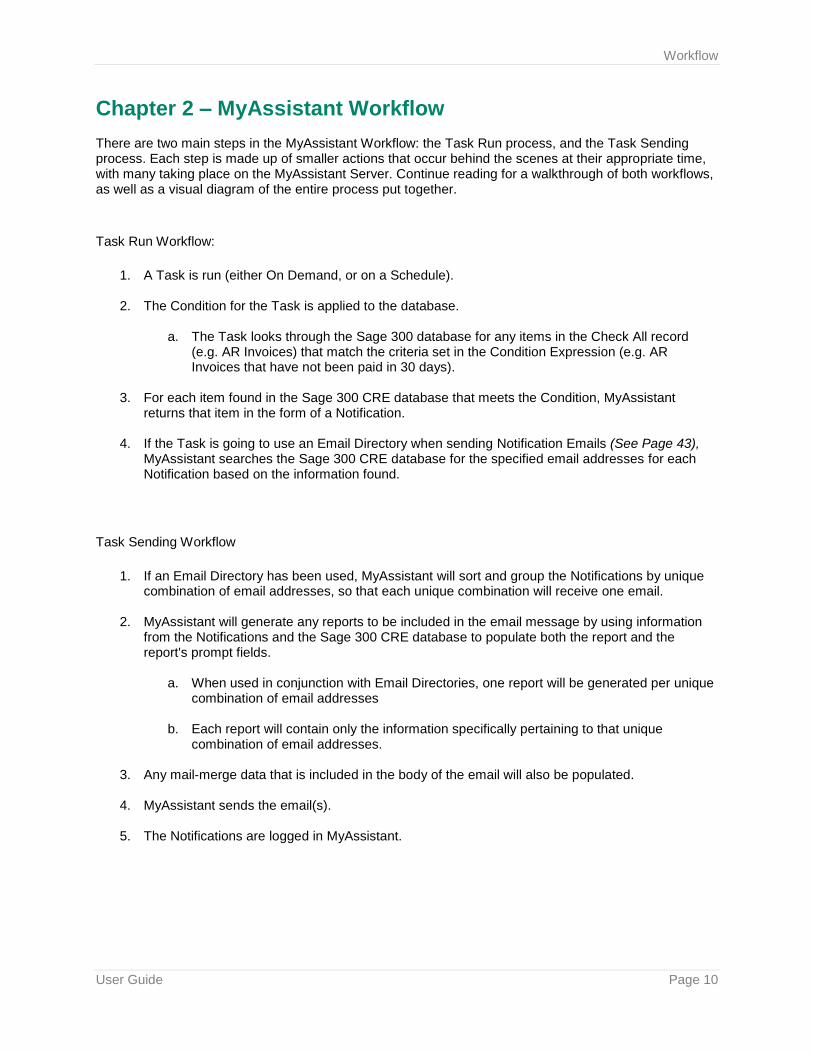
Task Run Workflow:
1. A Task is run (either On Demand, or on a Schedule).
2. The Condition for the Task is applied to the database.
a. The Task looks through the Sage 300 database for any items in the Check All record (e.g. AR Invoices) that match the criteria set in the Condition Expression (e.g. AR Invoices that have not been paid in 30 days).
3. For each item found in the Sage 300 CRE database that meets the Condition, MyAssistant returns that item in the form of a Notification.
4. If the Task is going to use an Email Directory when sending Notification Emails (See Page 43), MyAssistant searches the Sage 300 CRE database for the specified email addresses for each Notification based on the information found.
Task Sending Workflow
1. If an Email Directory has been used, MyAssistant will sort and group the Notifications by unique combination of email addresses, so that each unique combination will receive one email.
2. MyAssistant will generate any reports to be included in the email message by using information from the Notifications and the Sage 300 CRE database to populate both the report and the report's prompt fields.
a. When used in conjunction with Email Directories, one report will be generated per unique combination of email addresses
b. Each report will contain only the information specifically pertaining to that unique combination of email addresses.
3. Any mail-merge data that is included in the body of the email will also be populated.
4. MyAssistant sends the email(s).
5. The Notifications are logged in MyAssistant.
Workflow
User Guide Page 11
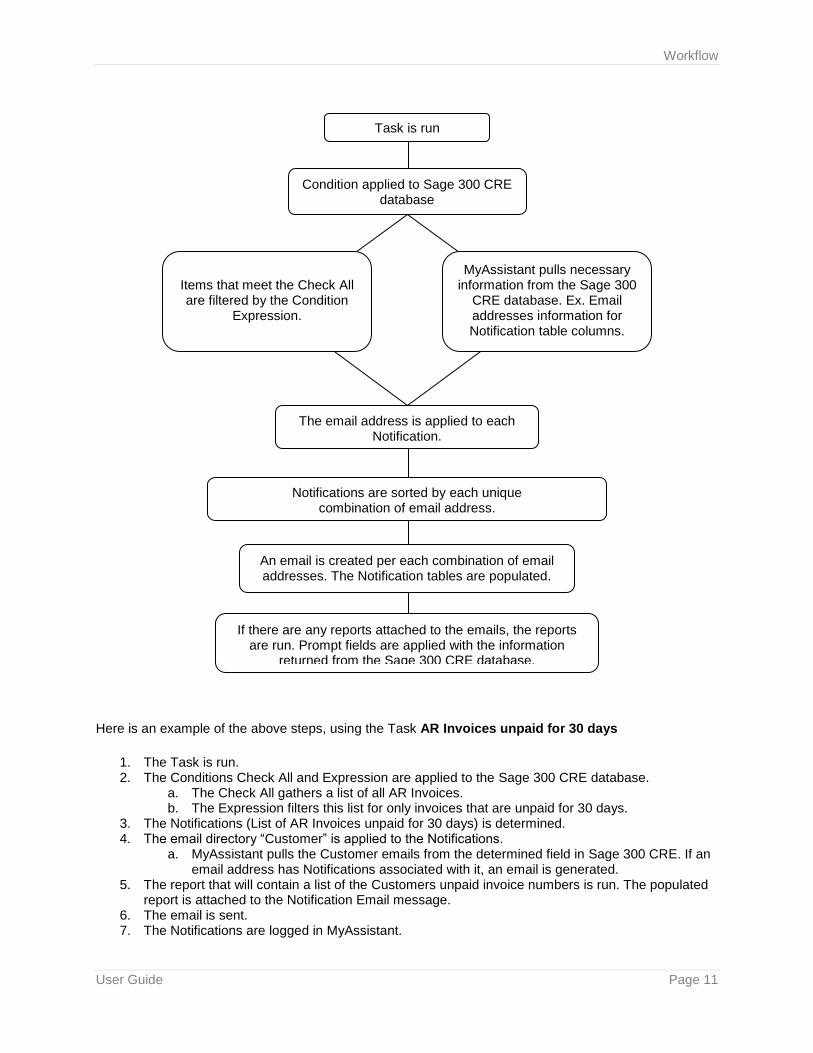
Here is an example of the above steps, using the Task AR Invoices unpaid for 30 days
1. The Task is run. 2. The Conditions Check All and Expression are applied to the Sage 300 CRE database.
a. The Check All gathers a list of all AR Invoices. b. The Expression filters this list for only invoices that are unpaid for 30 days.
3. The Notifications (List of AR Invoices unpaid for 30 days) is determined. 4. The email directory “Customer” is applied to the Notifications.
a. MyAssistant pulls the Customer emails from the determined field in Sage 300 CRE. If an email address has Notifications associated with it, an email is generated.
5. The report that will contain a list of the Customers unpaid invoice numbers is run. The populated report is attached to the Notification Email message.
6. The email is sent. 7. The Notifications are logged in MyAssistant.
Task is run
Condition applied to Sage 300 CRE database
Notifications are sorted by each unique combination of email address.
An email is created per each combination of email addresses. The Notification tables are populated.
If there are any reports attached to the emails, the reports are run. Prompt fields are applied with the information
returned from the Sage 300 CRE database.
The email address is applied to each Notification.
MyAssistant pulls necessary information from the Sage 300
CRE database. Ex. Email addresses information for Notification table columns.
Items that meet the Check All are filtered by the Condition
Expression.
Tasks
User Guide Page 12
Chapter 3 – Tasks
What is a Task? A Task contains all necessary steps and settings to gather and send specific information. A Task contains the following parts:
• Condition
• Schedule
• Who to Notify
• What Sage 300 CRE information to communicate
• What Reports and Inquiries will be available from this Task
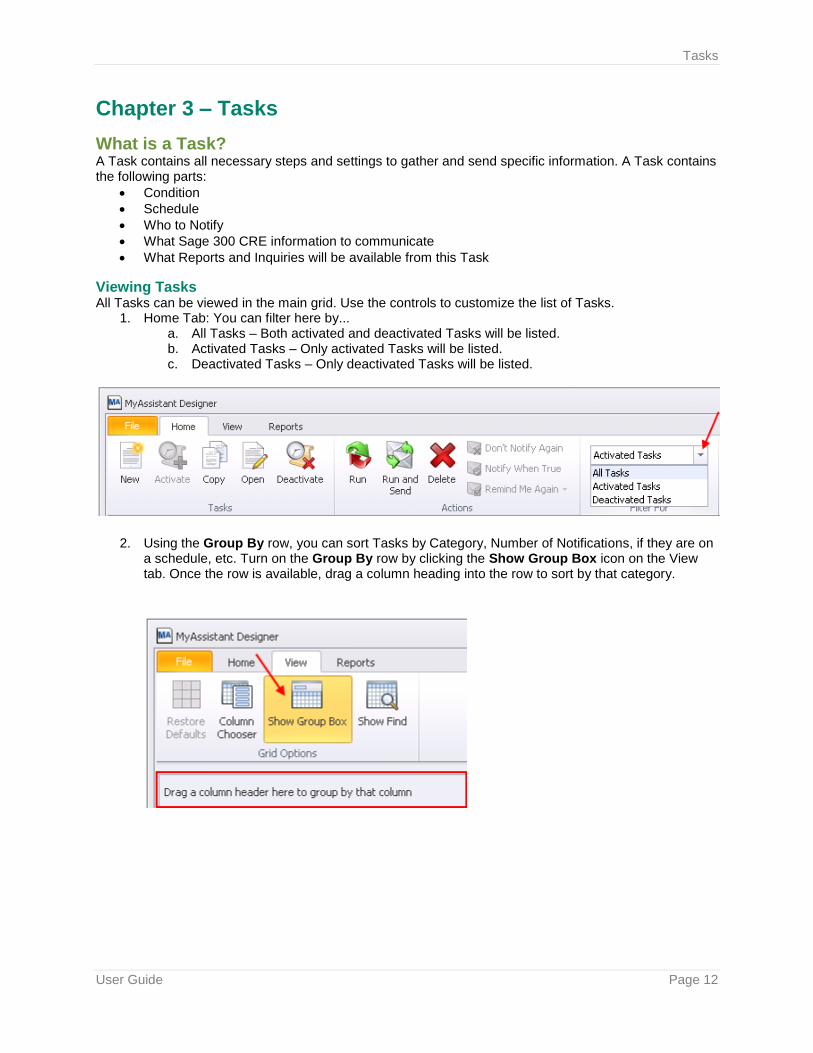
Viewing Tasks All Tasks can be viewed in the main grid. Use the controls to customize the list of Tasks.
1. Home Tab: You can filter here by... a. All Tasks – Both activated and deactivated Tasks will be listed. b. Activated Tasks – Only activated Tasks will be listed. c. Deactivated Tasks – Only deactivated Tasks will be listed.
2. Using the Group By row, you can sort Tasks by Category, Number of Notifications, if they are on a schedule, etc. Turn on the Group By row by clicking the Show Group Box icon on the View tab. Once the row is available, drag a column heading into the row to sort by that category.

Tasks
User Guide Page 13
Activating a Task When activating a Task, you will step through a Wizard to customize the Tasks settings to meet your specific needs. See below for the steps in activating a Task.
Activating a Prebuilt Task To open a prebuilt Task, select the Task by clicking on the Name and clicking Activate on the Home tab. Complete each step in the wizard that opens
Creating a New Task Can’t find a prebuilt Task that meets your needs? You can create one from scratch. Click [New] on the Home tab and a wizard will open that steps you through creating a Task from scratch.
Tasks
User Guide Page 14
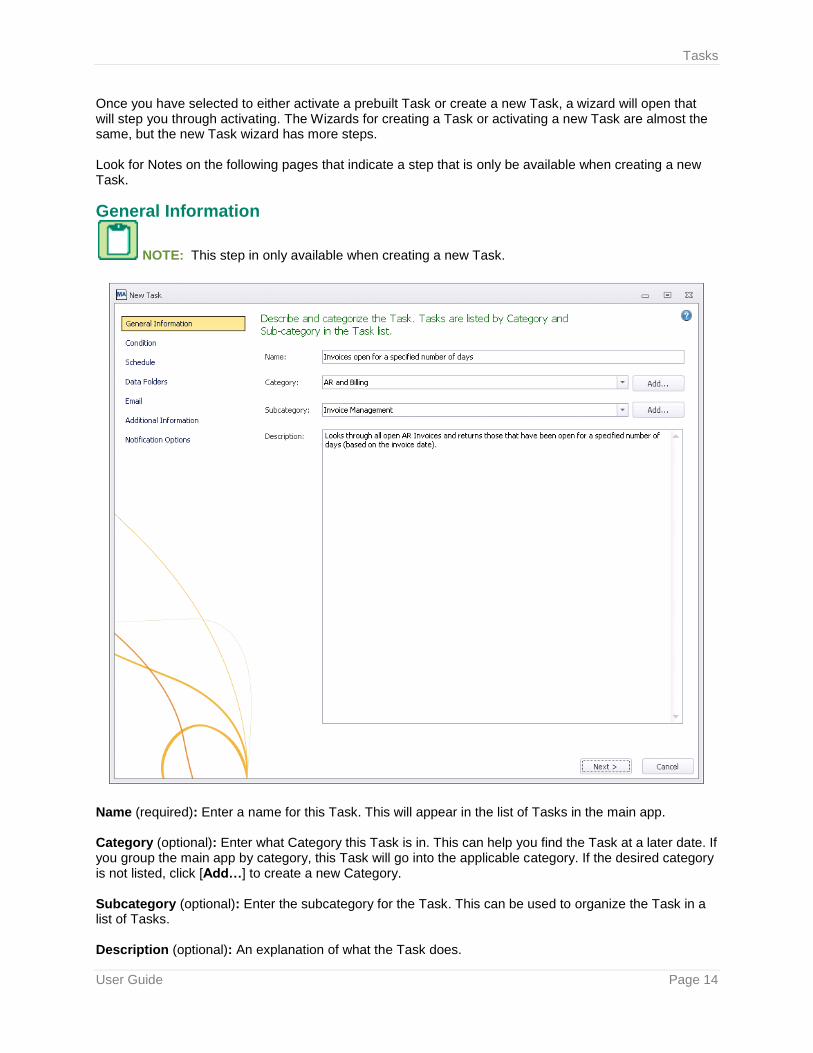
Once you have selected to either activate a prebuilt Task or create a new Task, a wizard will open that will step you through activating. The Wizards for creating a Task or activating a new Task are almost the same, but the new Task wizard has more steps. Look for Notes on the following pages that indicate a step that is only be available when creating a new Task.
General Information
NOTE: This step in only available when creating a new Task.
Name (required): Enter a name for this Task. This will appear in the list of Tasks in the main app. Category (optional): Enter what Category this Task is in. This can help you find the Task at a later date. If you group the main app by category, this Task will go into the applicable category. If the desired category is not listed, click [Add…] to create a new Category. Subcategory (optional): Enter the subcategory for the Task. This can be used to organize the Task in a list of Tasks. Description (optional): An explanation of what the Task does.
Tasks
User Guide Page 15
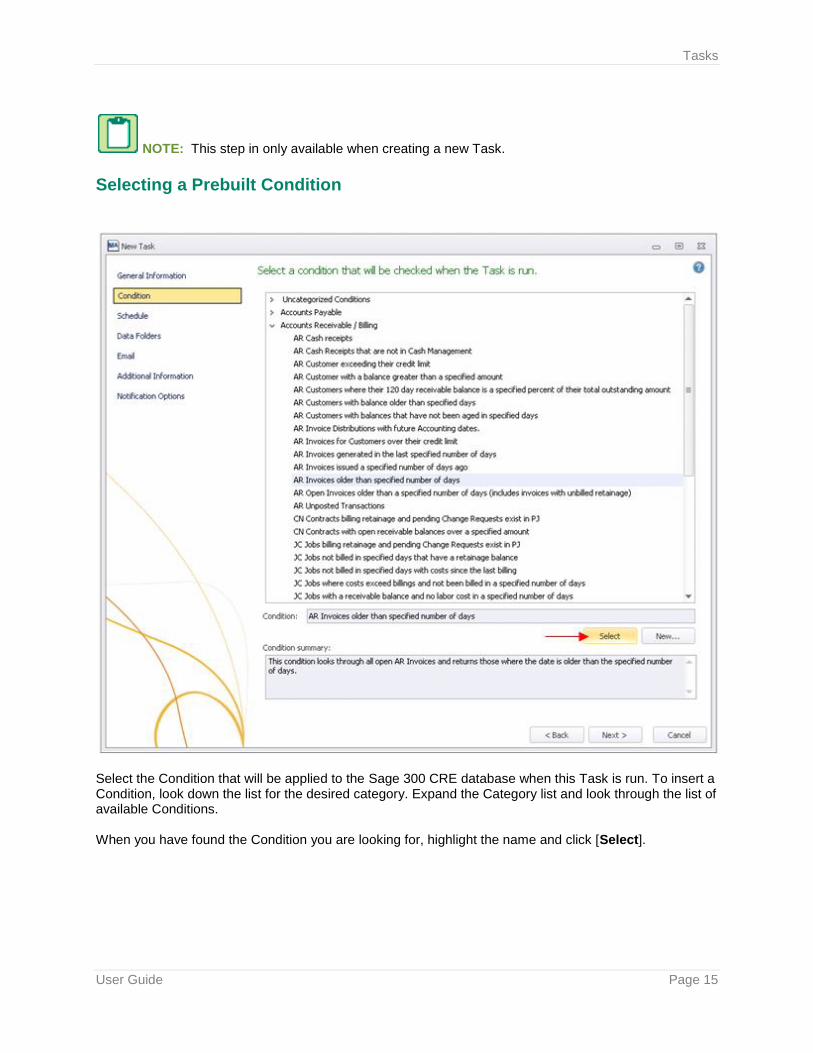
NOTE: This step in only available when creating a new Task.
Selecting a Prebuilt Condition
Select the Condition that will be applied to the Sage 300 CRE database when this Task is run. To insert a Condition, look down the list for the desired category. Expand the Category list and look through the list of available Conditions. When you have found the Condition you are looking for, highlight the name and click [Select].
Tasks
User Guide Page 16
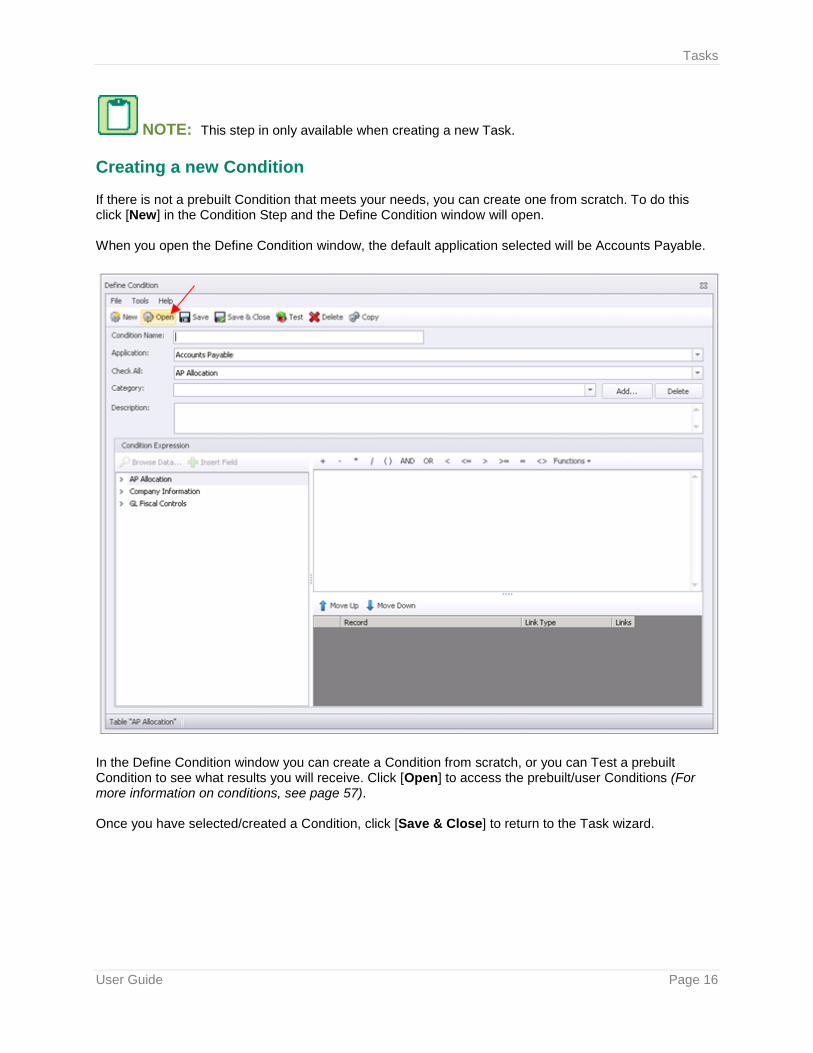
NOTE: This step in only available when creating a new Task.
Creating a new Condition If there is not a prebuilt Condition that meets your needs, you can create one from scratch. To do this click [New] in the Condition Step and the Define Condition window will open. When you open the Define Condition window, the default application selected will be Accounts Payable.
In the Define Condition window you can create a Condition from scratch, or you can Test a prebuilt Condition to see what results you will receive. Click [Open] to access the prebuilt/user Conditions (For more information on conditions, see page 57). Once you have selected/created a Condition, click [Save & Close] to return to the Task wizard.
Tasks
User Guide Page 17
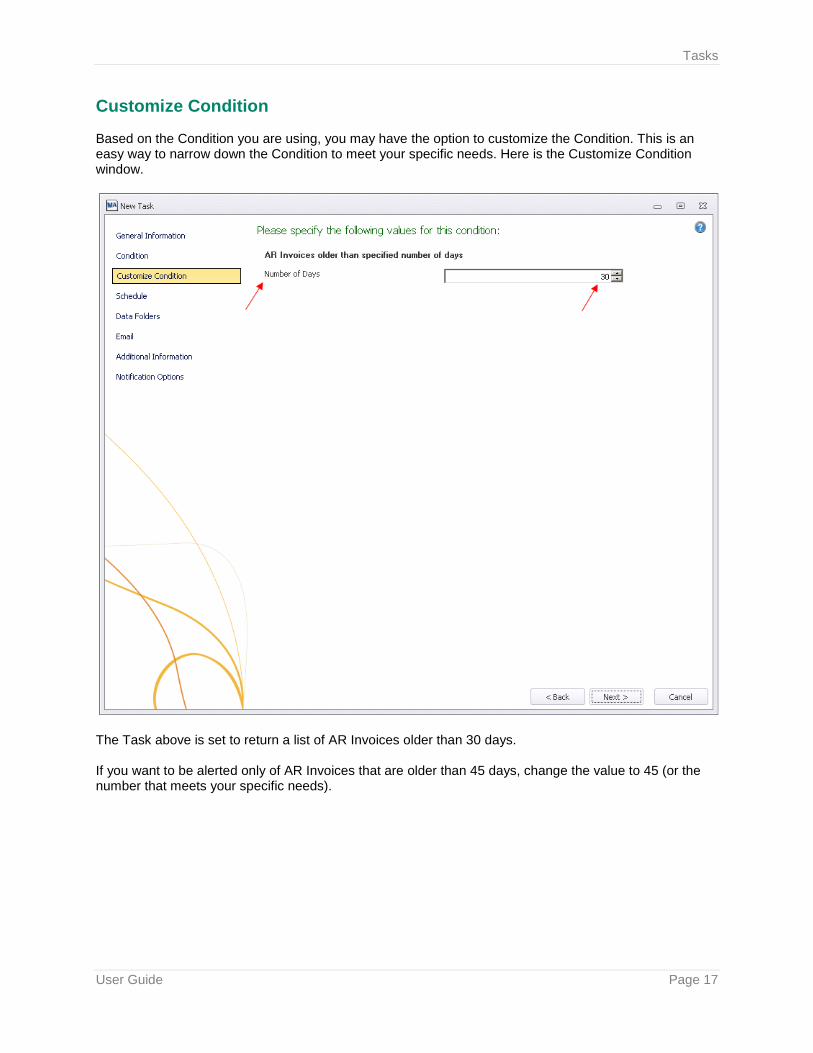
Customize Condition Based on the Condition you are using, you may have the option to customize the Condition. This is an easy way to narrow down the Condition to meet your specific needs. Here is the Customize Condition window.
The Task above is set to return a list of AR Invoices older than 30 days. If you want to be alerted only of AR Invoices that are older than 45 days, change the value to 45 (or the number that meets your specific needs).
Tasks
User Guide Page 18
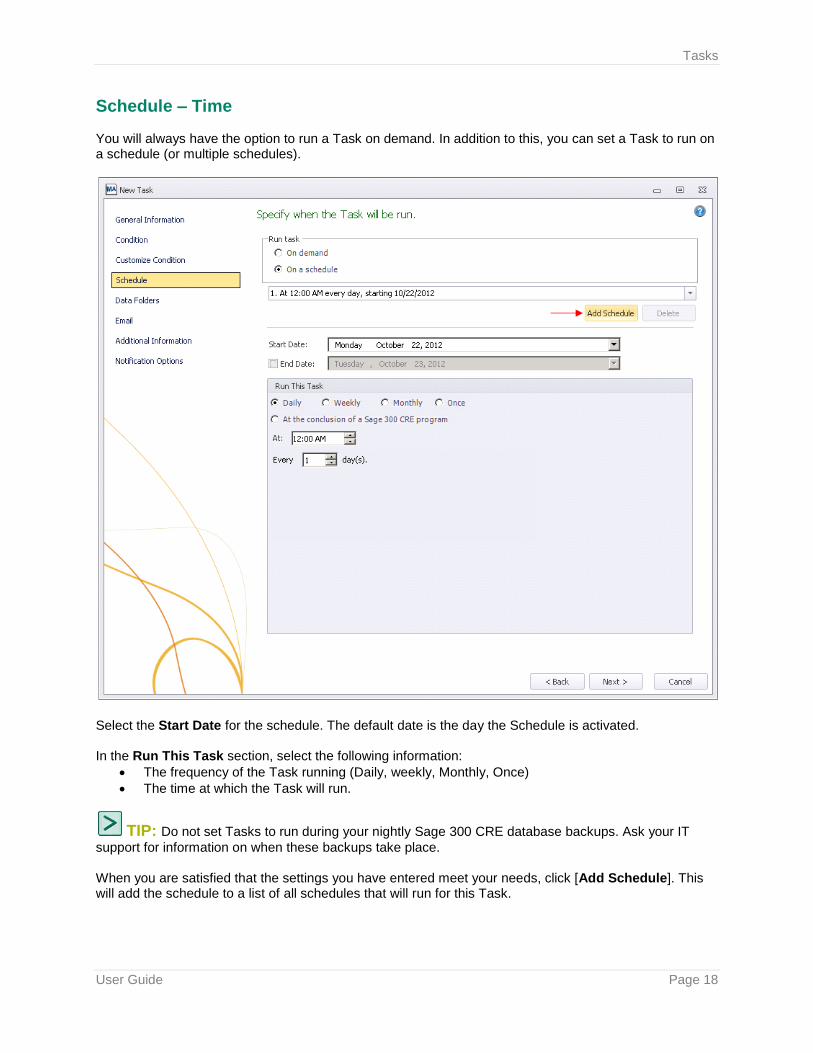
Schedule – Time You will always have the option to run a Task on demand. In addition to this, you can set a Task to run on a schedule (or multiple schedules).
Select the Start Date for the schedule. The default date is the day the Schedule is activated. In the Run This Task section, select the following information:
• The frequency of the Task running (Daily, weekly, Monthly, Once)
• The time at which the Task will run.
TIP: Do not set Tasks to run during your nightly Sage 300 CRE database backups. Ask your IT
support for information on when these backups take place.
When you are satisfied that the settings you have entered meet your needs, click [Add Schedule]. This will add the schedule to a list of all schedules that will run for this Task.

Tasks
User Guide Page 19
Schedule – Completion of Sage 300 CRE Process Another option on the Schedule step is setting the Task to run at the conclusion of a Sage 300 CRE program. To set the Task to this select At the conclusion of a Sage 300 CRE program.
When you select this option, you will see two lists. One contains a list of all Sage 300 CRE programs. The second is a list of all processes inside the applicable Sage 300 CRE program. When a user goes in and out of the specified process in Sage 300 CRE, the MyAssistant user will be alerted that there were changes made in Sage 300 CRE that apply to the MyAssistant Task (See Page 44). From there the user can determine what action to take (Run, Run and Send the Task, etc.). For the Task above, the user will be alerted that a Task is ready to be run due to changes in Sage 300 CRE when a user exits Adjust Receivables in Accounts Payable.
Tasks
User Guide Page 20
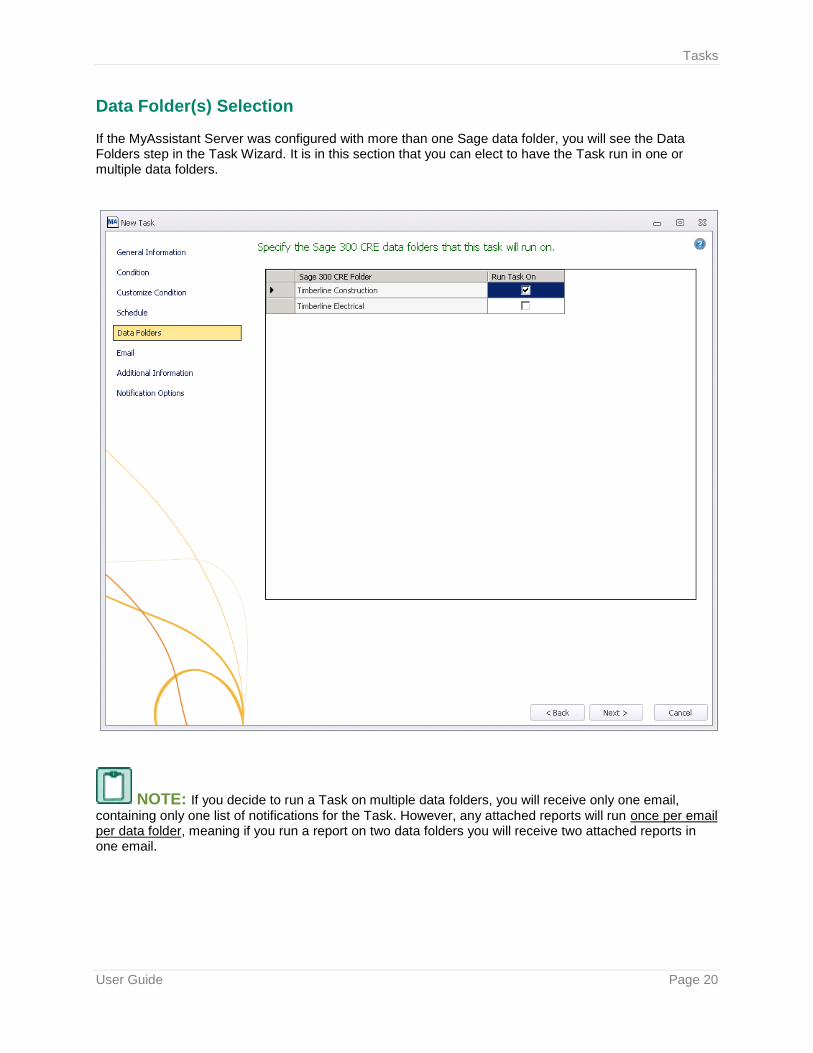
Data Folder(s) Selection If the MyAssistant Server was configured with more than one Sage data folder, you will see the Data Folders step in the Task Wizard. It is in this section that you can elect to have the Task run in one or multiple data folders.
NOTE: If you decide to run a Task on multiple data folders, you will receive only one email,
containing only one list of notifications for the Task. However, any attached reports will run once per email per data folder, meaning if you run a report on two data folders you will receive two attached reports in one email.
Tasks
User Guide Page 21
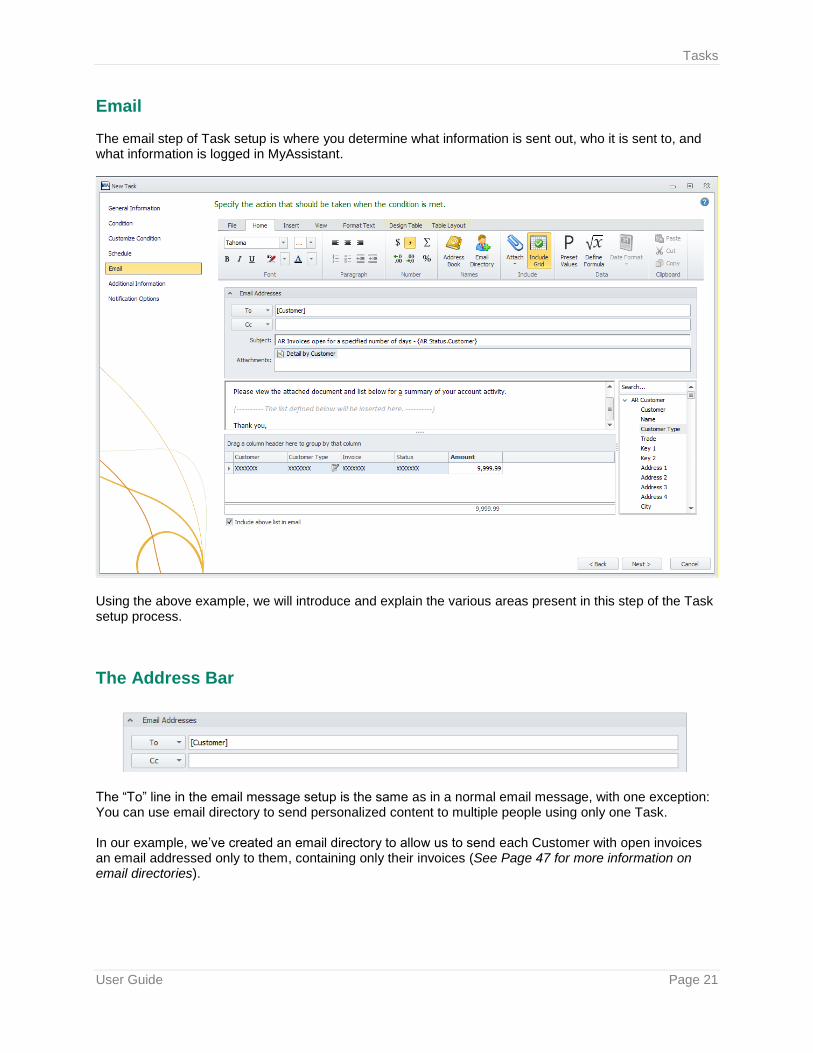
Email The email step of Task setup is where you determine what information is sent out, who it is sent to, and what information is logged in MyAssistant.
Using the above example, we will introduce and explain the various areas present in this step of the Task setup process.
The Address Bar
The “To” line in the email message setup is the same as in a normal email message, with one exception: You can use email directory to send personalized content to multiple people using only one Task. In our example, we’ve created an email directory to allow us to send each Customer with open invoices an email addressed only to them, containing only their invoices (See Page 47 for more information on email directories).
Tasks
User Guide Page 22
TIP: If you want to run a Task but not send out any emails, leave the “To” line of the email address
field blank. Even though no emails will be sent out, you will still be able to run the Task and see a list of notifications in MyAssistant.
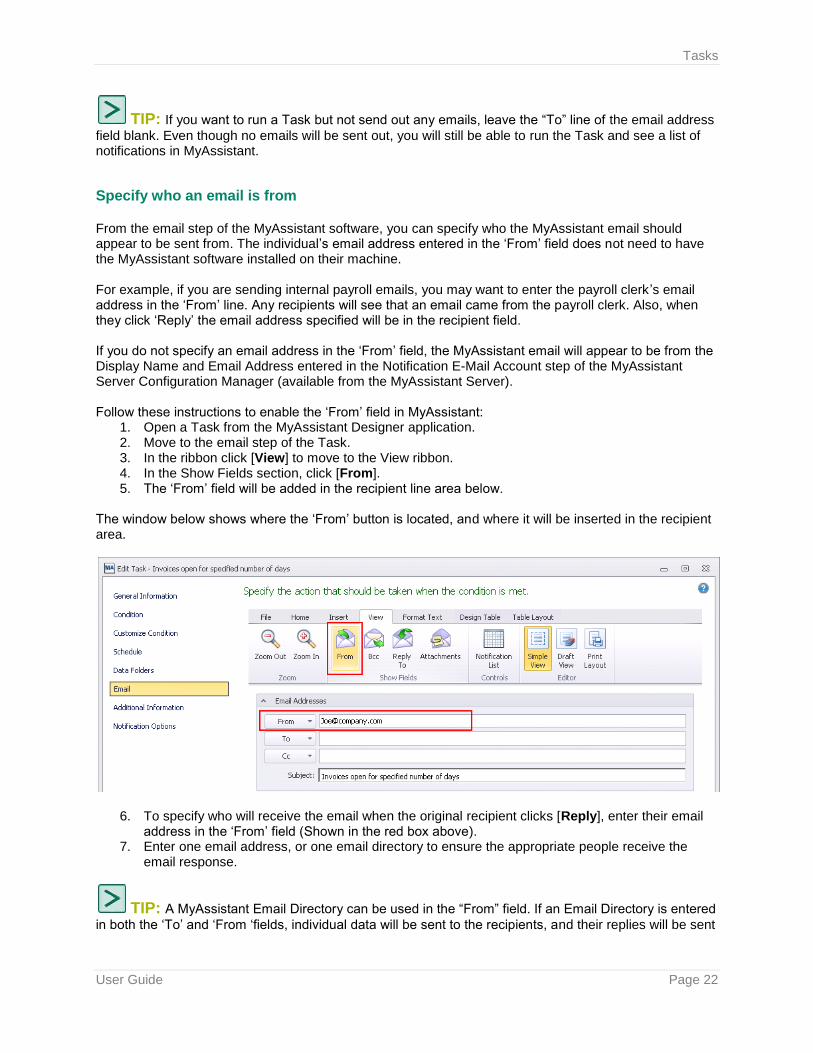
Specify who an email is from From the email step of the MyAssistant software, you can specify who the MyAssistant email should appear to be sent from. The individual’s email address entered in the ‘From’ field does not need to have the MyAssistant software installed on their machine. For example, if you are sending internal payroll emails, you may want to enter the payroll clerk ’s email address in the ‘From’ line. Any recipients will see that an email came from the payroll clerk. Also, when they click ‘Reply’ the email address specified will be in the recipient field. If you do not specify an email address in the ‘From’ field, the MyAssistant email will appear to be from the Display Name and Email Address entered in the Notification E-Mail Account step of the MyAssistant Server Configuration Manager (available from the MyAssistant Server). Follow these instructions to enable the ‘From’ field in MyAssistant:
1. Open a Task from the MyAssistant Designer application. 2. Move to the email step of the Task. 3. In the ribbon click [View] to move to the View ribbon. 4. In the Show Fields section, click [From]. 5. The ‘From’ field will be added in the recipient line area below.
The window below shows where the ‘From’ button is located, and where it will be inserted in the recipient area.
6. To specify who will receive the email when the original recipient clicks [Reply], enter their email address in the ‘From’ field (Shown in the red box above).
7. Enter one email address, or one email directory to ensure the appropriate people receive the email response.
TIP: A MyAssistant Email Directory can be used in the “From” field. If an Email Directory is entered
in both the ‘To’ and ‘From ‘fields, individual data will be sent to the recipients, and their replies will be sent
Tasks
User Guide Page 23
to the correct corresponding individual depending on the email directory selected. (See Page 47 for information on Email Directories)
Notification Table
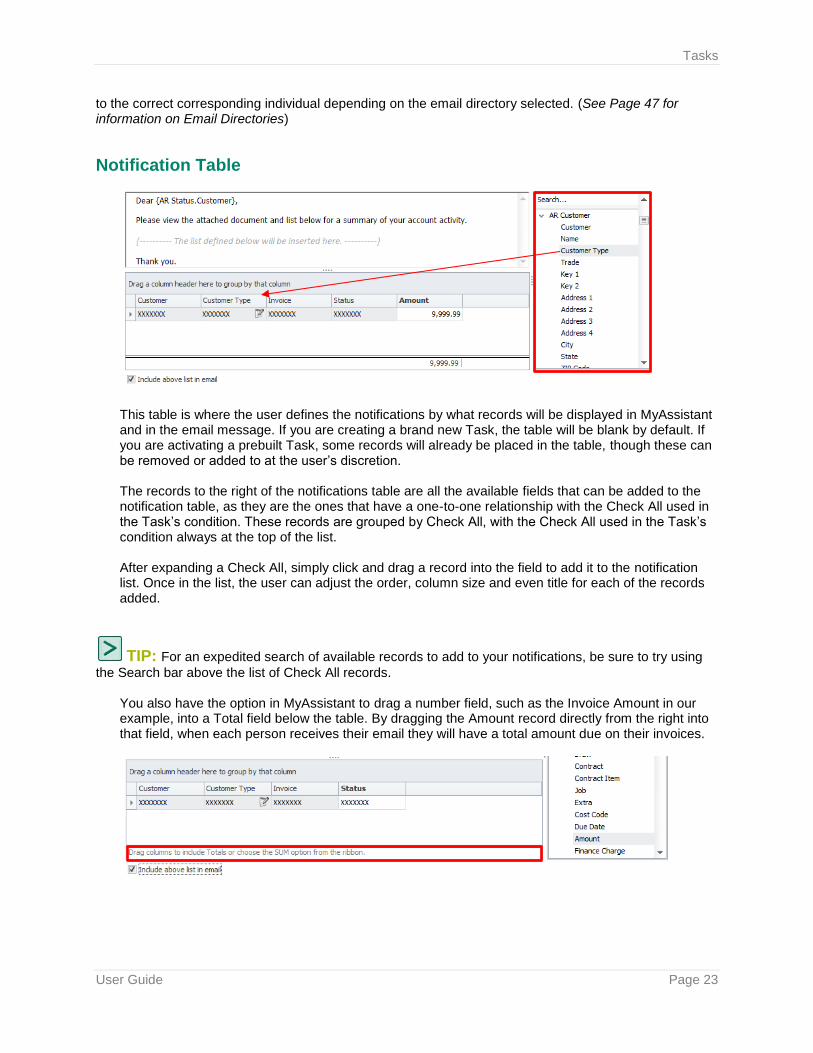
This table is where the user defines the notifications by what records will be displayed in MyAssistant and in the email message. If you are creating a brand new Task, the table will be blank by default. If you are activating a prebuilt Task, some records will already be placed in the table, though these can be removed or added to at the user’s discretion. The records to the right of the notifications table are all the available fields that can be added to the notification table, as they are the ones that have a one-to-one relationship with the Check All used in the Task’s condition. These records are grouped by Check All, with the Check All used in the Task’s condition always at the top of the list. After expanding a Check All, simply click and drag a record into the field to add it to the notification list. Once in the list, the user can adjust the order, column size and even title for each of the records added.
TIP: For an expedited search of available records to add to your notifications, be sure to try using
the Search bar above the list of Check All records.
You also have the option in MyAssistant to drag a number field, such as the Invoice Amount in our example, into a Total field below the table. By dragging the Amount record directly from the right into that field, when each person receives their email they will have a total amount due on their invoices.

Tasks
User Guide Page 24
Mail Merge Data
Mail merge is an option of incorporating user-specific data to create a more personalized message for the recipient. To add a field, simply select one from the field on the right (records are grouped by their check all) In our example, the incorporation of the {AR Status.Customer} record means the Customer’s ID will be included not only in the subject line, but also in the email message body. Mail merge data has been introduced into the body of the email, meaning that each Customer will receive an email with their name at the top. Mail merge data can be incorporated into the body of the email and the Subject line by dragging over any of the fields from the right side of the screen to personalize the Subject and email body for each recipient.
Attached Report
In MyAssistant, users have the ability to attach prebuilt Sage 300 CRE and Crystal Reports to their email messages. These reports, which run once per email message, will use notification data associated with the email to complete certain report prompts. When attached in a Task using an email directory, like in our example, each email sent by this Task will have a personalized attached report that contains a list of only the specific recipient’s overdue invoices.
CAUTION: When running a Task with an attached report but without using an email directory,
one report will be generated. With that, any personal data that the report extrapolates to fill a parameter will come solely from the first notification in the list.
Tasks
User Guide Page 25
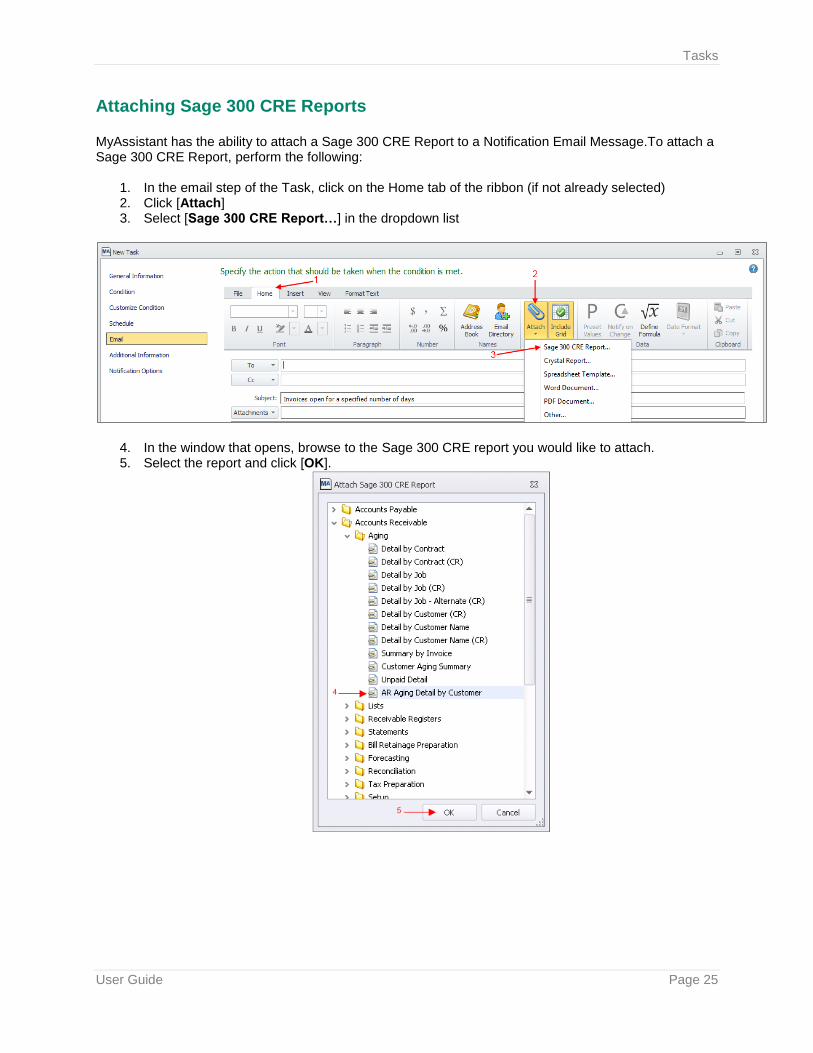
Attaching Sage 300 CRE Reports MyAssistant has the ability to attach a Sage 300 CRE Report to a Notification Email Message.To attach a Sage 300 CRE Report, perform the following:
1. In the email step of the Task, click on the Home tab of the ribbon (if not already selected) 2. Click [Attach] 3. Select [Sage 300 CRE Report…] in the dropdown list
4. In the window that opens, browse to the Sage 300 CRE report you would like to attach. 5. Select the report and click [OK].
Tasks
User Guide Page 26
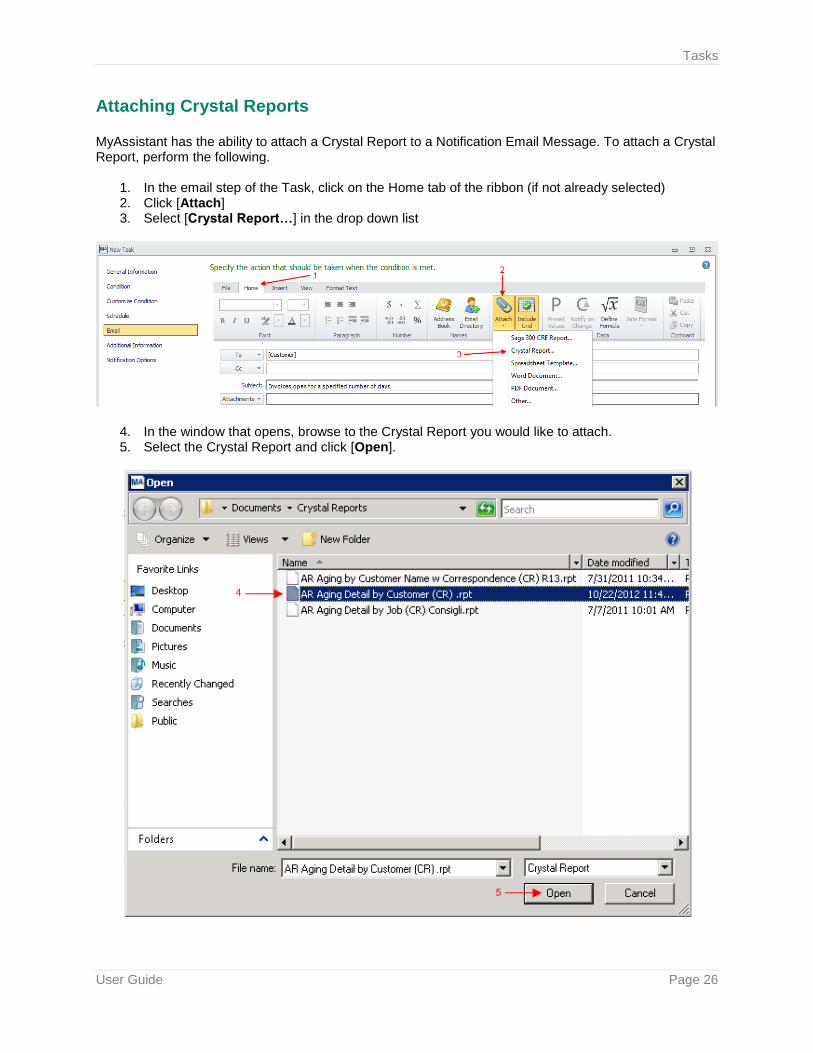
Attaching Crystal Reports MyAssistant has the ability to attach a Crystal Report to a Notification Email Message. To attach a Crystal Report, perform the following.
1. In the email step of the Task, click on the Home tab of the ribbon (if not already selected) 2. Click [Attach] 3. Select [Crystal Report…] in the drop down list
4. In the window that opens, browse to the Crystal Report you would like to attach. 5. Select the Crystal Report and click [Open].
Tasks
User Guide Page 27
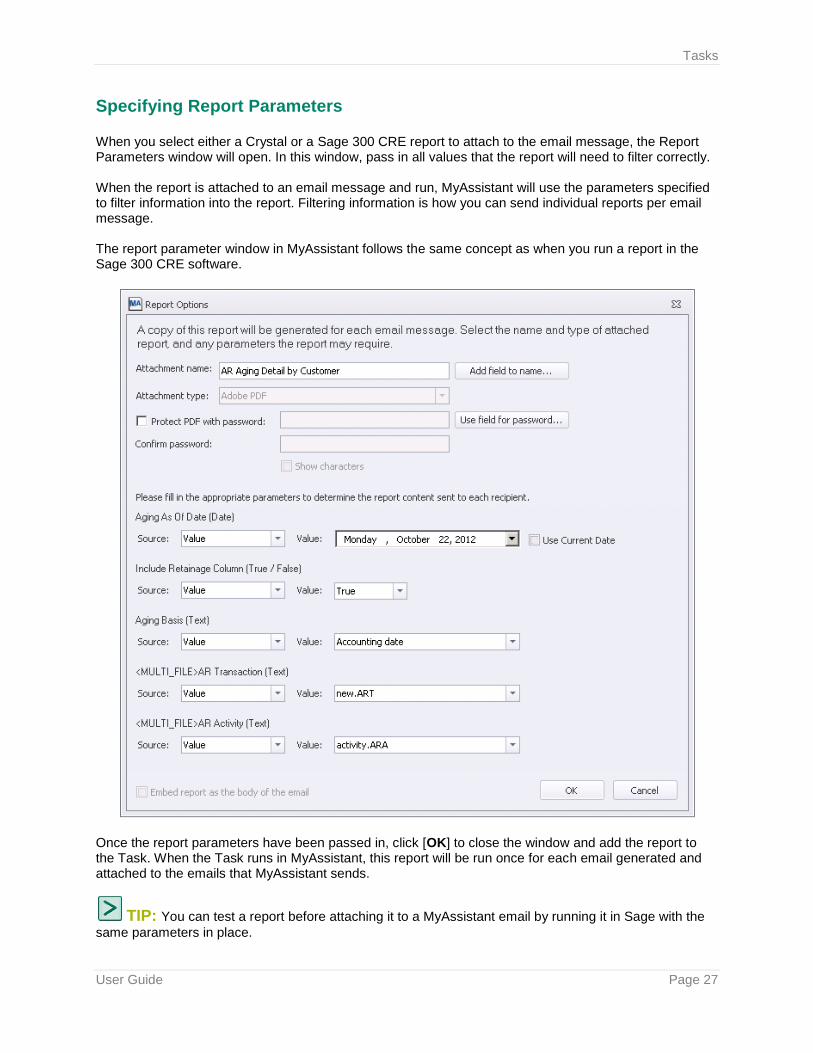
Specifying Report Parameters When you select either a Crystal or a Sage 300 CRE report to attach to the email message, the Report Parameters window will open. In this window, pass in all values that the report will need to filter correctly. When the report is attached to an email message and run, MyAssistant will use the parameters specified to filter information into the report. Filtering information is how you can send individual reports per email message. The report parameter window in MyAssistant follows the same concept as when you run a report in the Sage 300 CRE software.
Once the report parameters have been passed in, click [OK] to close the window and add the report to the Task. When the Task runs in MyAssistant, this report will be run once for each email generated and attached to the emails that MyAssistant sends.
TIP: You can test a report before attaching it to a MyAssistant email by running it in Sage with the
same parameters in place.

Tasks
User Guide Page 28
Attaching Excel Spreadsheet Templates You can add a MyAssistant Spreadsheet Template to create and attach an Excel workbook to any emails sent by the Task.
Updatable Fields
The Customer Type record in our notification table is different from the others in the notification table, because the notepad icon means that this record can be updated outside of the Accounts Receivable application with another Sage product (See page 73). If you were to click on the icon, a green check mark would be added to the notepad, indicating that the field could now be updated. In the state displayed, the field cannot be updated. Also, as evidenced by the lack of a notepad icon in any other field, it can be understood that not all fields can be updated outside of their parent Sage application – which ones can and which cannot is determined by Sage.
This checkbox allows you to send an email with or without the Notification table. If the box is checked to include the table in an email message, you will see text in the email body that reads: [-----The list defined below will be inserted here-----], indicating where the Notification table will be displayed in the email message. You can add text above and below the table. You can also add and remove the table from the email body with the “Include Grid” button available on the Home ribbon of this step.
Tasks
User Guide Page 29
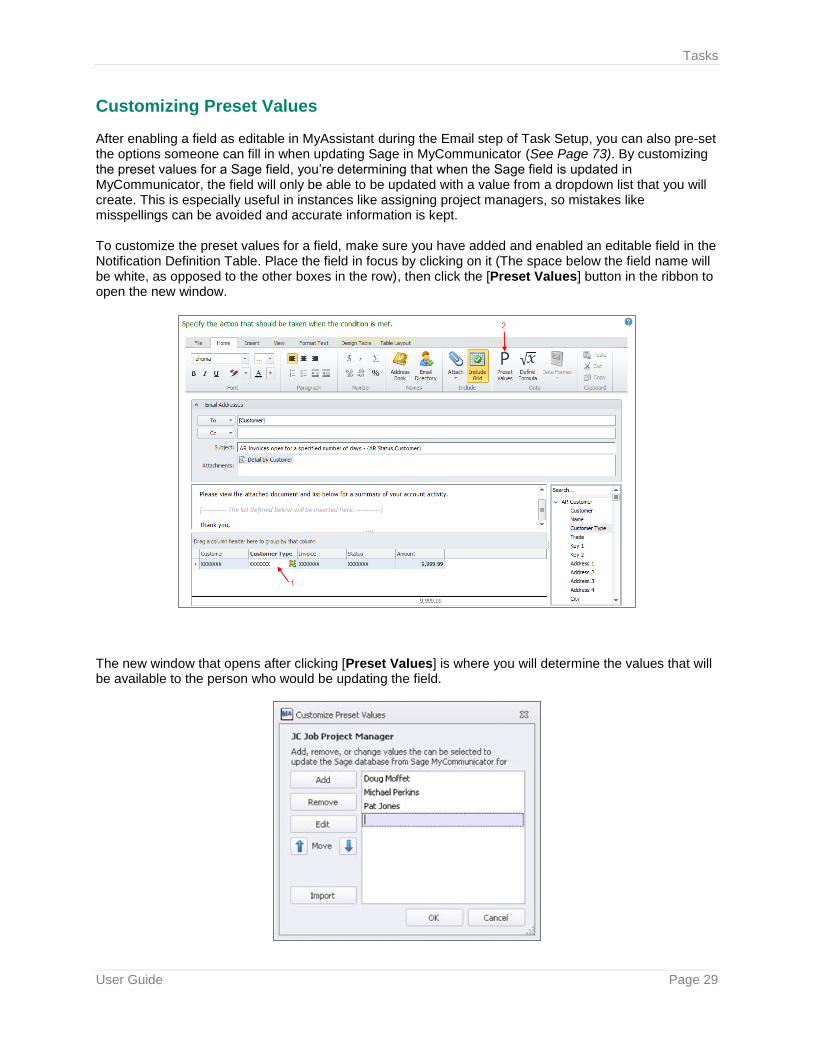
Customizing Preset Values After enabling a field as editable in MyAssistant during the Email step of Task Setup, you can also pre-set the options someone can fill in when updating Sage in MyCommunicator (See Page 73). By customizing the preset values for a Sage field, you’re determining that when the Sage field is updated in MyCommunicator, the field will only be able to be updated with a value from a dropdown list that you will create. This is especially useful in instances like assigning project managers, so mistakes like misspellings can be avoided and accurate information is kept. To customize the preset values for a field, make sure you have added and enabled an editable field in the Notification Definition Table. Place the field in focus by clicking on it (The space below the field name will be white, as opposed to the other boxes in the row), then click the [Preset Values] button in the ribbon to open the new window.
The new window that opens after clicking [Preset Values] is where you will determine the values that will be available to the person who would be updating the field.
Tasks
User Guide Page 30
For extra convenience, MyAssistant can import all current values for the field that are in the Sage database, but even then the imported list can still be customized – old values can be removed or changed, new values can be added as desired, and the order in which the values will appear can be completely rearranged.
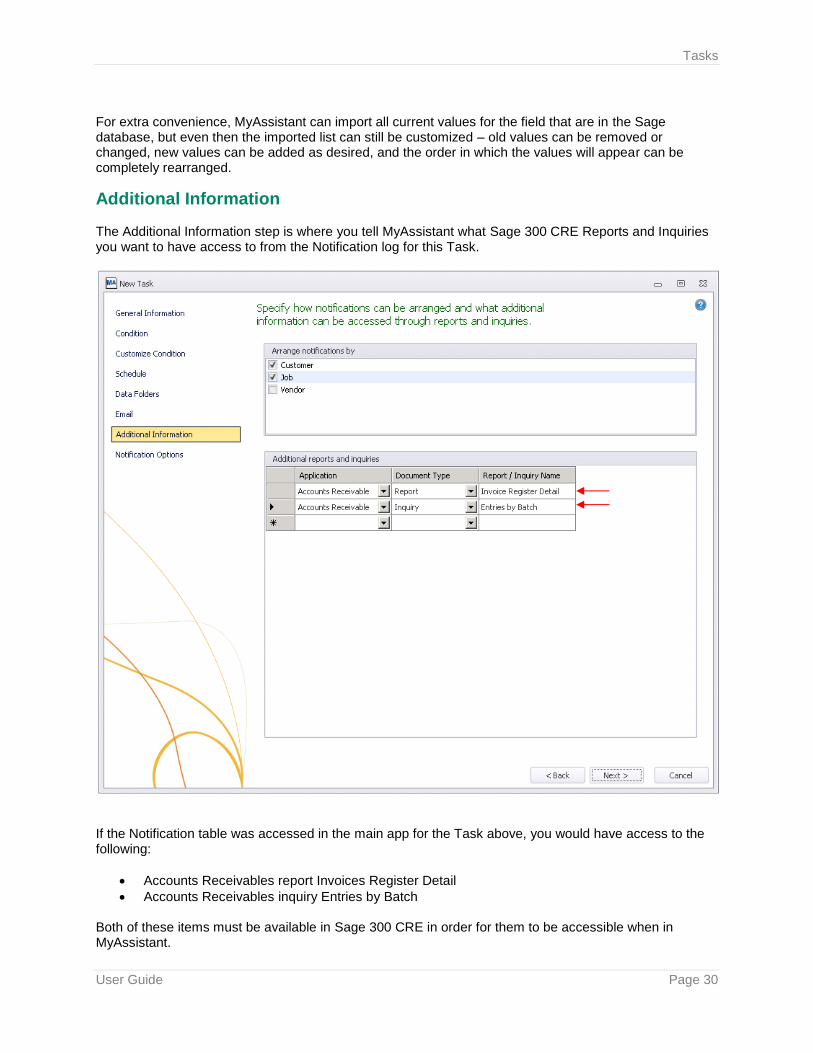
Additional Information The Additional Information step is where you tell MyAssistant what Sage 300 CRE Reports and Inquiries you want to have access to from the Notification log for this Task.
If the Notification table was accessed in the main app for the Task above, you would have access to the following:
• Accounts Receivables report Invoices Register Detail
• Accounts Receivables inquiry Entries by Batch Both of these items must be available in Sage 300 CRE in order for them to be accessible when in MyAssistant.
Tasks
User Guide Page 31
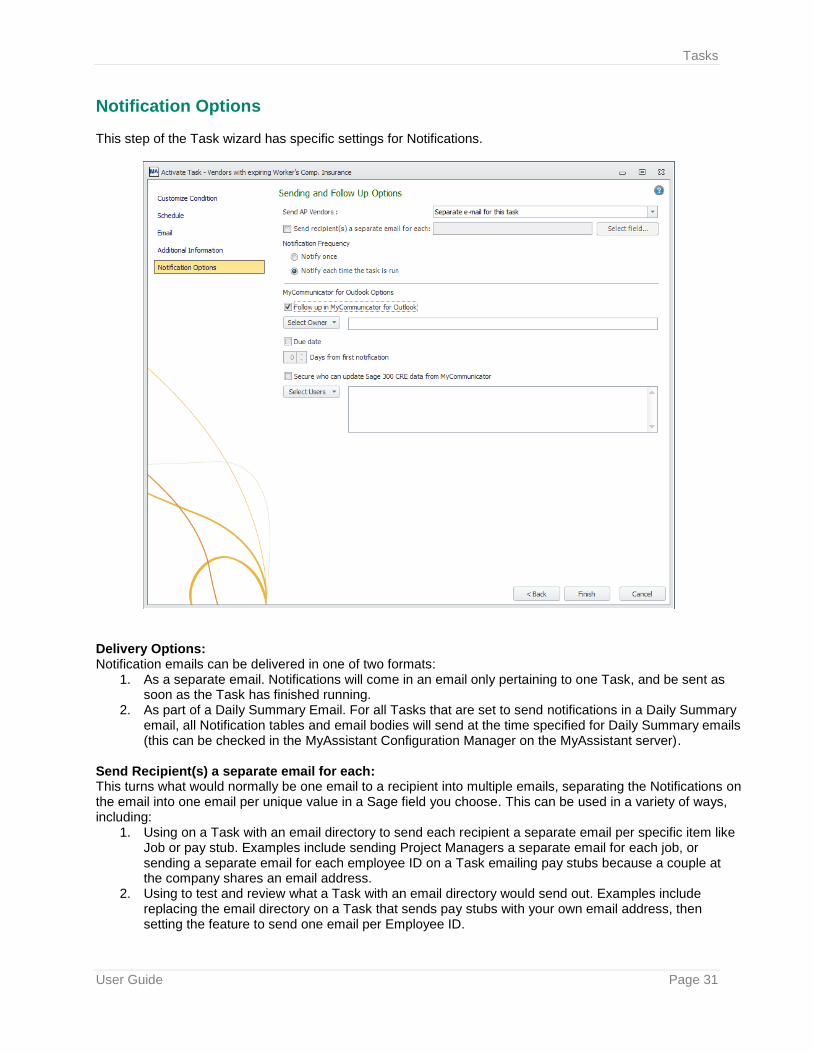
Notification Options This step of the Task wizard has specific settings for Notifications.
Delivery Options: Notification emails can be delivered in one of two formats:
1. As a separate email. Notifications will come in an email only pertaining to one Task, and be sent as soon as the Task has finished running.
2. As part of a Daily Summary Email. For all Tasks that are set to send notifications in a Daily Summary email, all Notification tables and email bodies will send at the time specified for Daily Summary emails (this can be checked in the MyAssistant Configuration Manager on the MyAssistant server).
Send Recipient(s) a separate email for each: This turns what would normally be one email to a recipient into multiple emails, separating the Notifications on the email into one email per unique value in a Sage field you choose. This can be used in a variety of ways, including:
1. Using on a Task with an email directory to send each recipient a separate email per specific item like Job or pay stub. Examples include sending Project Managers a separate email for each job, or sending a separate email for each employee ID on a Task emailing pay stubs because a couple at the company shares an email address.
2. Using to test and review what a Task with an email directory would send out. Examples include replacing the email directory on a Task that sends pay stubs with your own email address, then setting the feature to send one email per Employee ID.

Tasks
User Guide Page 32
Notification Frequency: You also can determine how often you want to be notified of each Notification associated with this Task. There are two options:
1. Notify Once: If this option is selected, you will be notified of each notification once. This means that for every additional time the Task runs after the first time, it will only contain new notifications that meet the condition. This does not mean that notifications you have already received are closed, only that you will not see them in any subsequent emails from this Task.
2. Notify each time the Task is run: If this is selected, all notifications that meet the condition will be sent out in every email message. The only time specific notifications stop appearing in emails is if they are marked Don’t Notify Again, or they no longer meet the condition.
Follow up in MyCommunicator for Outlook: Sage MyCommunicator for Outlook is a Microsoft Outlook plugin from Sage that is designed to further integrate your Sage 300 CRE data with Microsoft Outlook. With MyCommunicator, users will be able to:
• Access accounting and operations data
• Facilitate communication associated with business activity
• Track activity & accountability around completion of tasks
• Update project accounting data in Sage 300
By checking the box next to “Follow up in MyCommunicator for Outlook,” you are enabling any emails
sent by the Task to be read by the MyCommunicator software and triggered in a live grid view. Once in
the live view, actions such as logging and tracking activity around individual Notifications is possible (See
page 73 for more details).
In addition, there are several specific MyCommunicator functions that can be activated in this area:
Owner: An Owner can be assigned to each notification. A single person can be assigned as the owner of all of the notifications generated from the Task; or an MyAssistant Email Directory can be used to dynamically assign owners based the Sage data associated with each notification. For example, the Project Manager Email Directory can be used to assign each project manager the notifications for their jobs. Due Date: A Due Date can be assigned to notifications as they are generated. The Due Date can be calculated based on a specified number of days from the date of the original generation. Notifications can be grouped by Due Date across MyAssistant Tasks in MyCommunicator to see all items for a given date. Secure Users Who Can Update Sage: If you are working with MyCommunicator, there is a chance you may have enabled a field to be editable outside of Sage during the Email step of Task setup (See page 28). If this is the case, you may want to restrict who can update the information in your Sage database. Depending on your preferences, you can authorize a user to update Sage data in MyCommunicator by typing in their email address into the field, or by selecting them from your Microsoft Outlook address book. You also have the option of using an Email Directory to authorize users who can update Sage, which only lets them update the Sage information that is linked to them. This is an especially useful option when already using an email directory in Email step of Task Setup, but can be used separately from an Email Directory as well. (See page 47 for more information about Email Directories).

Tasks
User Guide Page 33
To secure the ability to update Sage to only users you wish to authorize, begin by checking the box next to “Secure who can update Sage 300 CRE data from MyCommunicator.” Once the box has been checked, you can choose to either manually type in the email addresses of the users you wish to authorize to update your Sage database in MyCommunicator, or select a contact from your address book or an email directory using the dropdown menu that appears from clicking the button [Select Users].
Security Options This final step will only appear if record-level security within MyAssistant has been turned on. When MyAssistant security has been enabled, users creating a new Task will be given the option of authorizing access to additional users or groups outside of the intended recipient(s) of the MyAssistant email.
Examples of when you might grant additional access to someone outside of the intended recipient(s) include granting a Project Manager access to the Task that sends out a letter and form to Vendors with expiring General Liability insurance, or granting a the Payroll group access to a Task that sends each employee their direct deposit pay stub (For more information on MyAssistant Security, see page 66).
Running a Task for the First Time When you click [Finish] at the bottom of the MyAssistant Task Wizard to close the newly activated Task for the first time, you will receive the following message:
If you wish to run the Task and send any Notification emails that were set up, click [Yes]. If you do not want to run the Task and send the associated notifications at this time, click [No].
Notifications
User Guide Page 34
Chapter 4 – Notifications
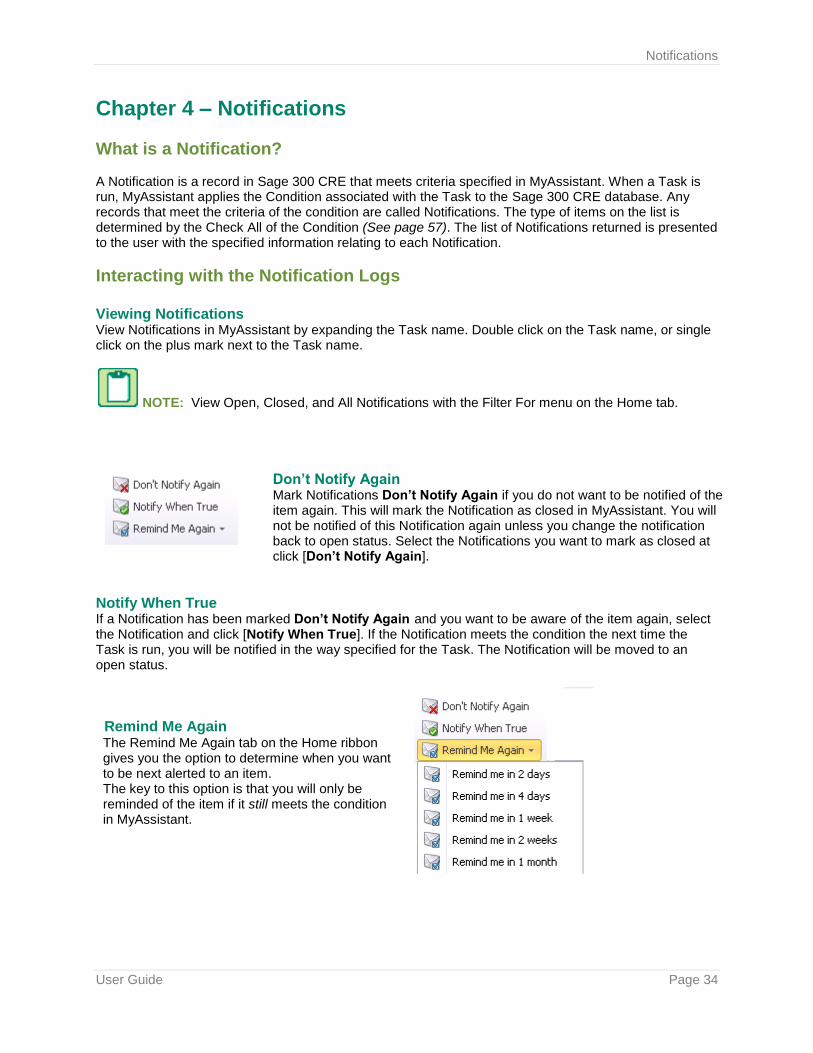
What is a Notification? A Notification is a record in Sage 300 CRE that meets criteria specified in MyAssistant. When a Task is run, MyAssistant applies the Condition associated with the Task to the Sage 300 CRE database. Any records that meet the criteria of the condition are called Notifications. The type of items on the list is determined by the Check All of the Condition (See page 57). The list of Notifications returned is presented to the user with the specified information relating to each Notification.
Interacting with the Notification Logs Viewing Notifications View Notifications in MyAssistant by expanding the Task name. Double click on the Task name, or single click on the plus mark next to the Task name.
NOTE: View Open, Closed, and All Notifications with the Filter For menu on the Home tab.
Notify When True If a Notification has been marked Don’t Notify Again and you want to be aware of the item again, select the Notification and click [Notify When True]. If the Notification meets the condition the next time the Task is run, you will be notified in the way specified for the Task. The Notification will be moved to an open status.
The Remind Me Again tab on the Home ribbon gives you the option to determine when you want to be next alerted to an item. The key to this option is that you will only be reminded of the item if it still meets the condition in MyAssistant.
Don’t Notify Again Mark Notifications Don’t Notify Again if you do not want to be notified of the item again. This will mark the Notification as closed in MyAssistant. You will not be notified of this Notification again unless you change the notification back to open status. Select the Notifications you want to mark as closed at click [Don’t Notify Again].
Remind Me Again
Notifications
User Guide Page 35
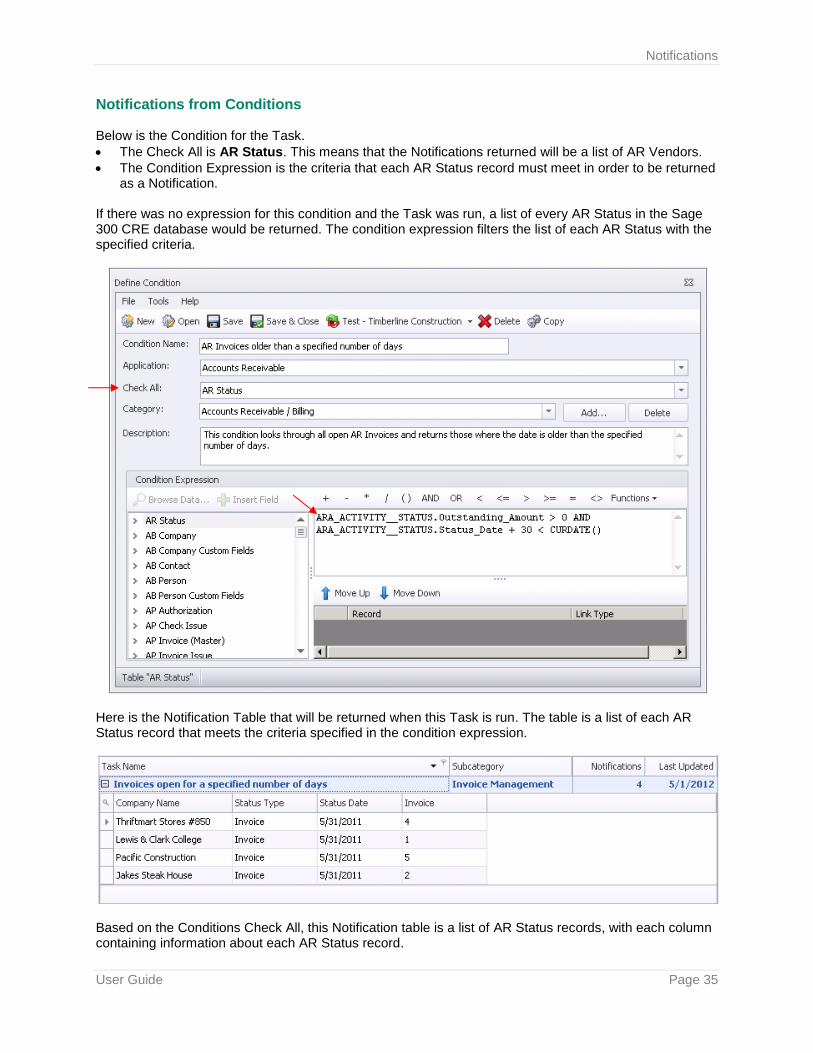
Notifications from Conditions Below is the Condition for the Task.
• The Check All is AR Status. This means that the Notifications returned will be a list of AR Vendors.
• The Condition Expression is the criteria that each AR Status record must meet in order to be returned as a Notification.
If there was no expression for this condition and the Task was run, a list of every AR Status in the Sage 300 CRE database would be returned. The condition expression filters the list of each AR Status with the specified criteria.
Here is the Notification Table that will be returned when this Task is run. The table is a list of each AR Status record that meets the criteria specified in the condition expression.
Based on the Conditions Check All, this Notification table is a list of AR Status records, with each column containing information about each AR Status record.

Explanation of buttons/menus
User Guide Page 36
Chapter 5 – Explanation of buttons/menus
File Menu
• New – Opens the Wizard used to create a new Task.
• Email Directories – Create or edit an Email Directory.
• Define Conditions – Create or edit Conditions.
• Options – Reactivate the software, reselect your Sage 300 CRE data folders, update your email address, and change MyAssistant Tile/desktop alert settings.
• Exit – Close the MyAssistant software.
Users – Setup Security for individual users. Groups – Put users into groups to grant access to full Notification lists for Tasks.
Help – Open the full help files for the MyAssistant software. About – Inforamtion on the MyAssistant version, the full MyAssistant licensing agreement. You can also update your MyAssistant activation.
Explanation of buttons/menus
User Guide Page 37
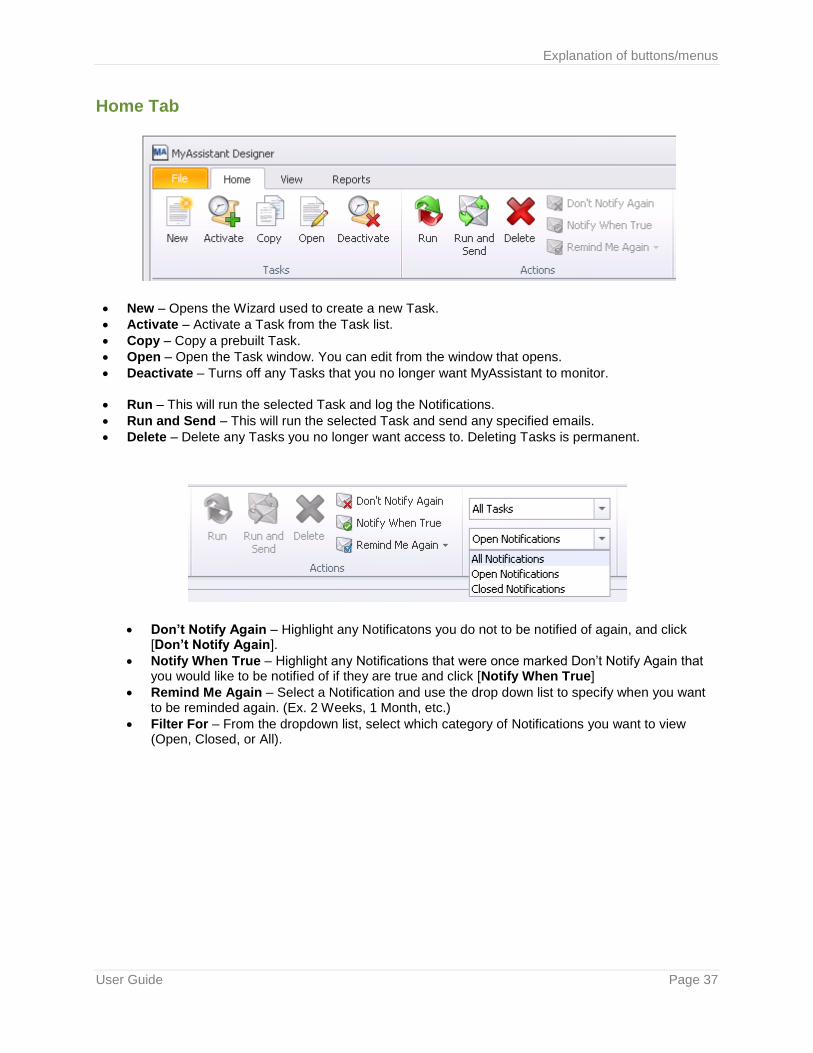
Home Tab
• New – Opens the Wizard used to create a new Task.
• Activate – Activate a Task from the Task list.
• Copy – Copy a prebuilt Task.
• Open – Open the Task window. You can edit from the window that opens.
• Deactivate – Turns off any Tasks that you no longer want MyAssistant to monitor.
• Run – This will run the selected Task and log the Notifications.
• Run and Send – This will run the selected Task and send any specified emails.
• Delete – Delete any Tasks you no longer want access to. Deleting Tasks is permanent.
• Don’t Notify Again – Highlight any Notificatons you do not to be notified of again, and click [Don’t Notify Again].
• Notify When True – Highlight any Notifications that were once marked Don’t Notify Again that you would like to be notified of if they are true and click [Notify When True]
• Remind Me Again – Select a Notification and use the drop down list to specify when you want to be reminded again. (Ex. 2 Weeks, 1 Month, etc.)
• Filter For – From the dropdown list, select which category of Notifications you want to view (Open, Closed, or All).
Explanation of buttons/menus
User Guide Page 38
View Tab
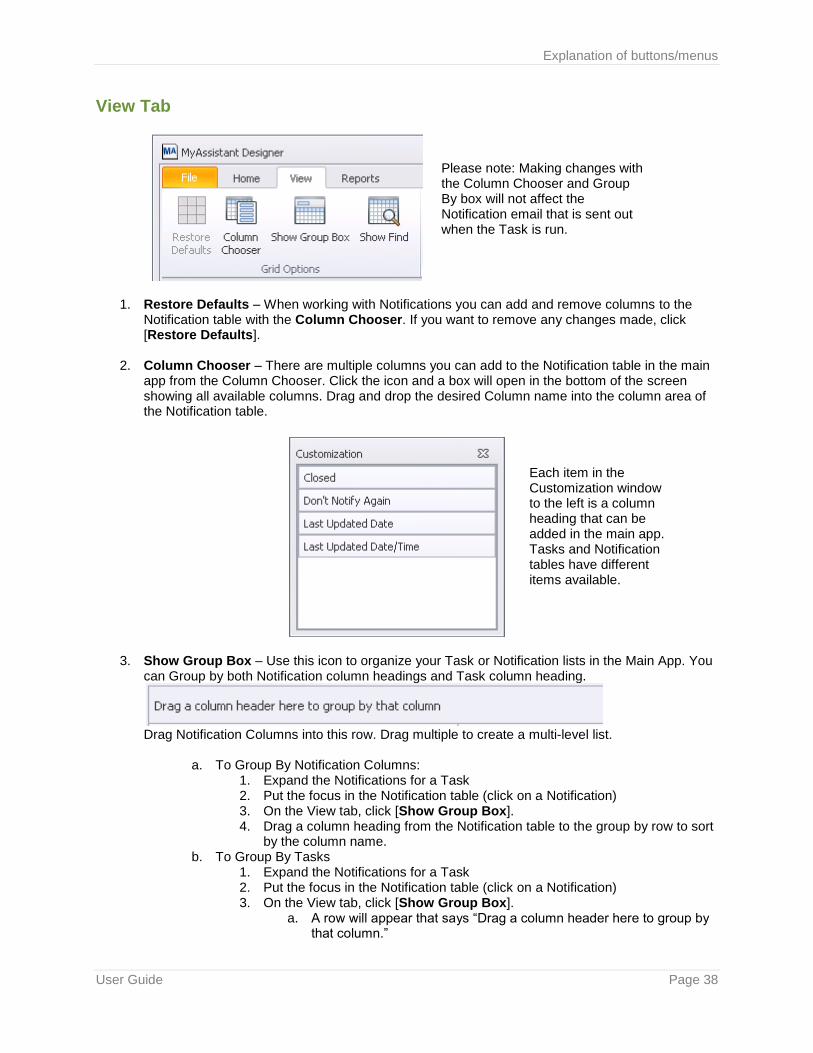
1. Restore Defaults – When working with Notifications you can add and remove columns to the Notification table with the Column Chooser. If you want to remove any changes made, click [Restore Defaults].
2. Column Chooser – There are multiple columns you can add to the Notification table in the main app from the Column Chooser. Click the icon and a box will open in the bottom of the screen showing all available columns. Drag and drop the desired Column name into the column area of the Notification table.
3. Show Group Box – Use this icon to organize your Task or Notification lists in the Main App. You can Group by both Notification column headings and Task column heading.
Drag Notification Columns into this row. Drag multiple to create a multi-level list.
a. To Group By Notification Columns: 1. Expand the Notifications for a Task 2. Put the focus in the Notification table (click on a Notification) 3. On the View tab, click [Show Group Box]. 4. Drag a column heading from the Notification table to the group by row to sort
by the column name. b. To Group By Tasks
1. Expand the Notifications for a Task 2. Put the focus in the Notification table (click on a Notification) 3. On the View tab, click [Show Group Box].
a. A row will appear that says “Drag a column header here to group by that column.”
Each item in the Customization window to the left is a column heading that can be added in the main app. Tasks and Notification tables have different items available.
Please note: Making changes with the Column Chooser and Group By box will not affect the Notification email that is sent out when the Task is run.
Explanation of buttons/menus
User Guide Page 39
4. Drag a column heading from the Notification table to this row to sort by the column name.
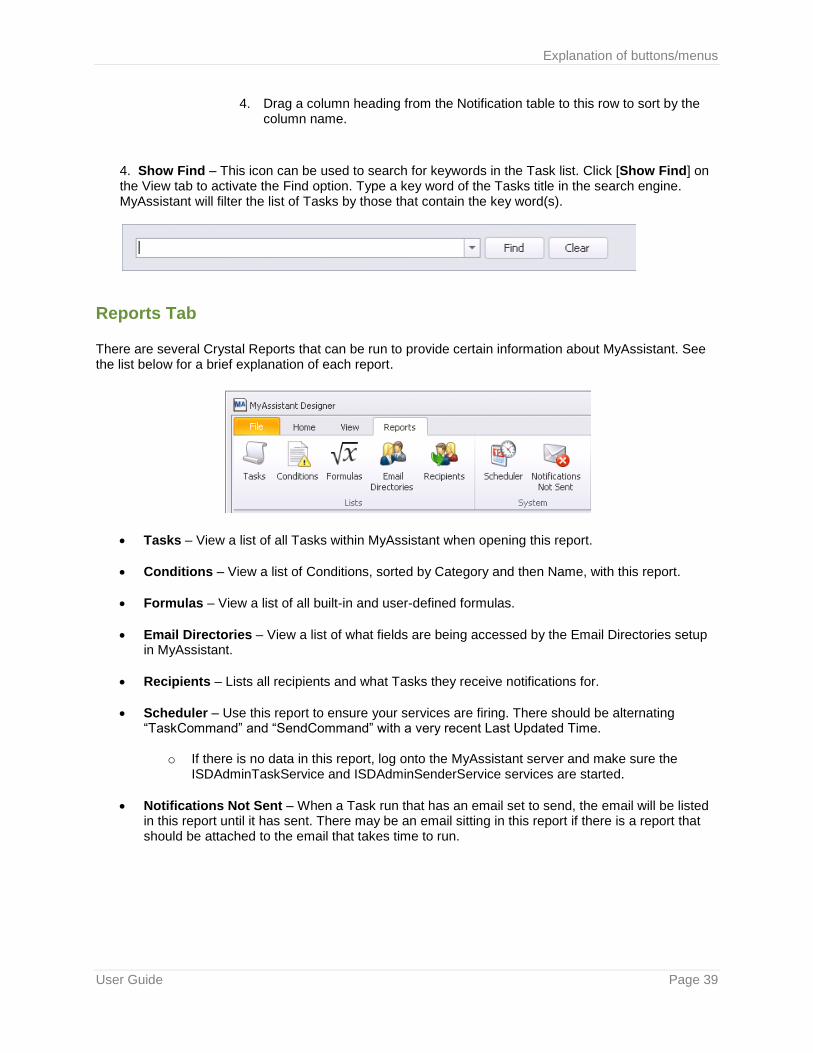
4. Show Find – This icon can be used to search for keywords in the Task list. Click [Show Find] on the View tab to activate the Find option. Type a key word of the Tasks title in the search engine. MyAssistant will filter the list of Tasks by those that contain the key word(s).
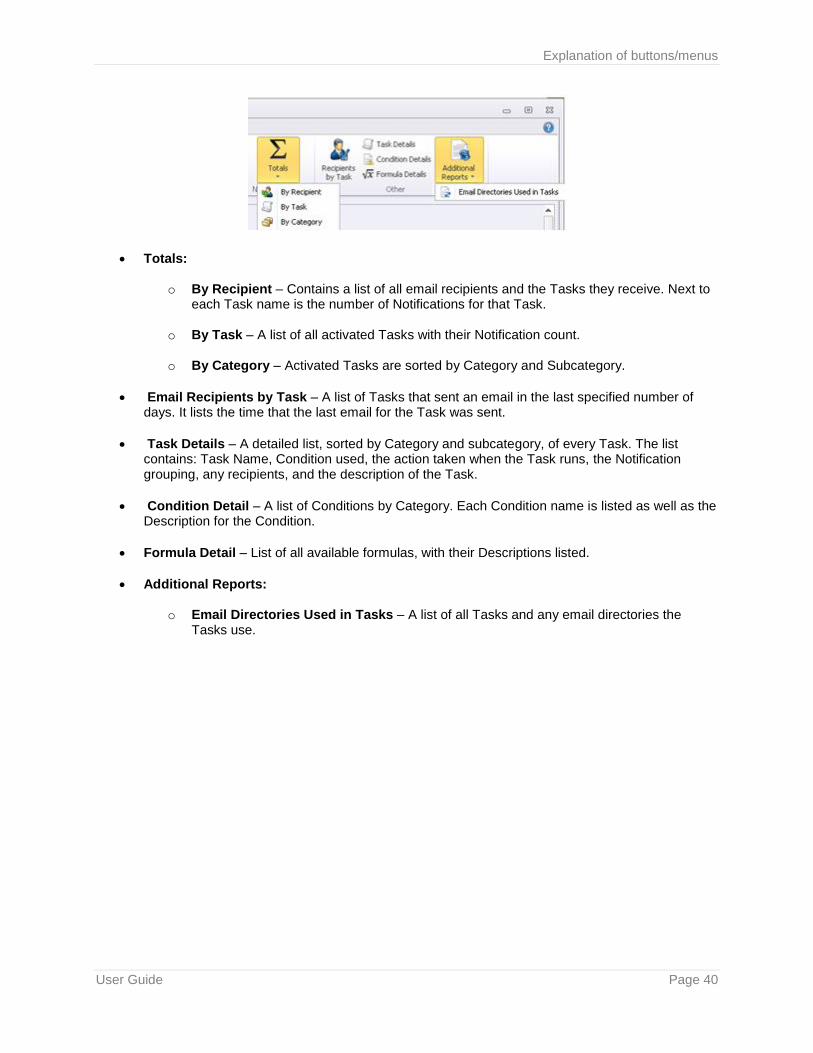
Reports Tab There are several Crystal Reports that can be run to provide certain information about MyAssistant. See the list below for a brief explanation of each report.
• Tasks – View a list of all Tasks within MyAssistant when opening this report.
• Conditions – View a list of Conditions, sorted by Category and then Name, with this report.
• Formulas – View a list of all built-in and user-defined formulas.
• Email Directories – View a list of what fields are being accessed by the Email Directories setup in MyAssistant.
• Recipients – Lists all recipients and what Tasks they receive notifications for.
• Scheduler – Use this report to ensure your services are firing. There should be alternating “TaskCommand” and “SendCommand” with a very recent Last Updated Time.
o If there is no data in this report, log onto the MyAssistant server and make sure the ISDAdminTaskService and ISDAdminSenderService services are started.
• Notifications Not Sent – When a Task run that has an email set to send, the email will be listed in this report until it has sent. There may be an email sitting in this report if there is a report that should be attached to the email that takes time to run.
Explanation of buttons/menus
User Guide Page 40
• Totals:
o By Recipient – Contains a list of all email recipients and the Tasks they receive. Next to each Task name is the number of Notifications for that Task.
o By Task – A list of all activated Tasks with their Notification count.
o By Category – Activated Tasks are sorted by Category and Subcategory.
• Email Recipients by Task – A list of Tasks that sent an email in the last specified number of days. It lists the time that the last email for the Task was sent.
• Task Details – A detailed list, sorted by Category and subcategory, of every Task. The list contains: Task Name, Condition used, the action taken when the Task runs, the Notification grouping, any recipients, and the description of the Task.
• Condition Detail – A list of Conditions by Category. Each Condition name is listed as well as the Description for the Condition.
• Formula Detail – List of all available formulas, with their Descriptions listed.
• Additional Reports:
o Email Directories Used in Tasks – A list of all Tasks and any email directories the Tasks use.
MyAssistant Live Tile
User Guide Page 41
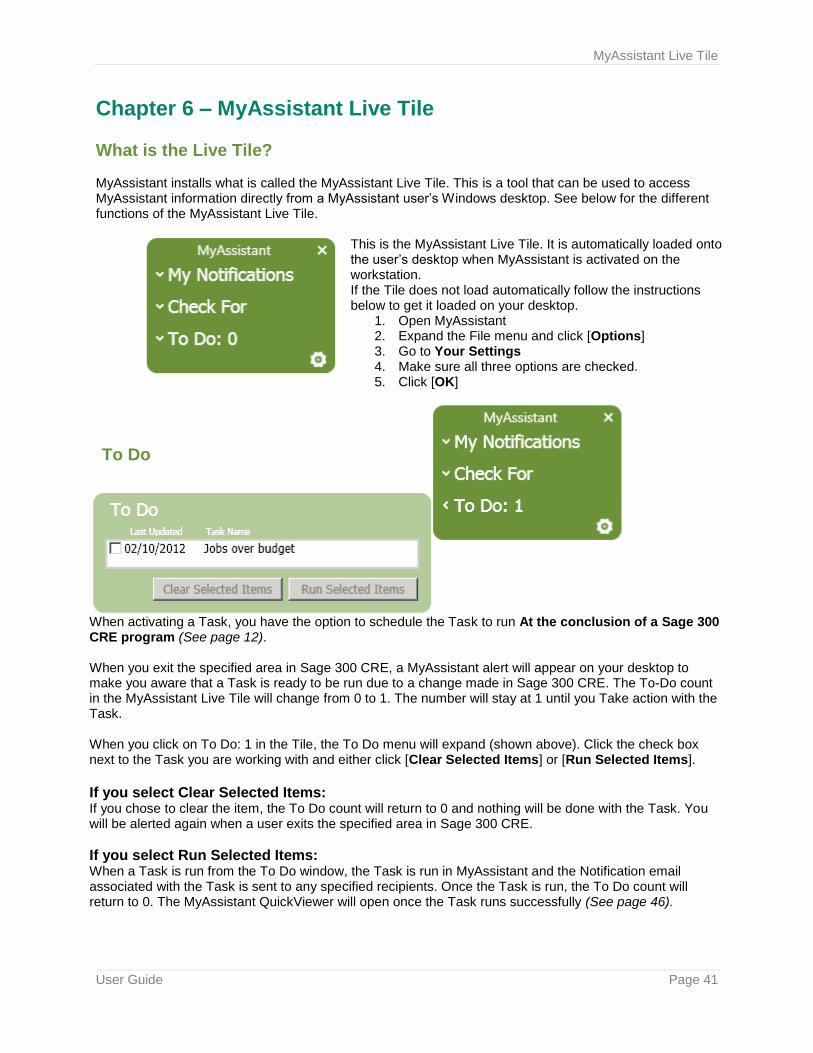
Chapter 6 – MyAssistant Live Tile What is the Live Tile? MyAssistant installs what is called the MyAssistant Live Tile. This is a tool that can be used to access MyAssistant information directly from a MyAssistant user’s W indows desktop. See below for the different functions of the MyAssistant Live Tile.
This is the MyAssistant Live Tile. It is automatically loaded onto the user’s desktop when MyAssistant is activated on the workstation. If the Tile does not load automatically follow the instructions below to get it loaded on your desktop.
1. Open MyAssistant 2. Expand the File menu and click [Options] 3. Go to Your Settings 4. Make sure all three options are checked. 5. Click [OK]
When activating a Task, you have the option to schedule the Task to run At the conclusion of a Sage 300 CRE program (See page 12). When you exit the specified area in Sage 300 CRE, a MyAssistant alert will appear on your desktop to make you aware that a Task is ready to be run due to a change made in Sage 300 CRE. The To-Do count in the MyAssistant Live Tile will change from 0 to 1. The number will stay at 1 until you Take action with the Task. When you click on To Do: 1 in the Tile, the To Do menu will expand (shown above). Click the check box next to the Task you are working with and either click [Clear Selected Items] or [Run Selected Items].
If you select Clear Selected Items: If you chose to clear the item, the To Do count will return to 0 and nothing will be done with the Task. You will be alerted again when a user exits the specified area in Sage 300 CRE.
If you select Run Selected Items: When a Task is run from the To Do window, the Task is run in MyAssistant and the Notification email associated with the Task is sent to any specified recipients. Once the Task is run, the To Do count will return to 0. The MyAssistant QuickViewer will open once the Task runs successfully (See page 46).
To Do

MyAssistant Live Tile
User Guide Page 42
My Notifications
The MyAssistant Live Tile gives you the ability to view the Notifications you have access to directly on your Windows desktop. Tasks that have open Notifications associated with them that you are enabled to see via MyAssistant Security will be in this list (for more information on MyAssistant Security, see page 66). To view Notifications for a specific Task, click [My Notifications] in the Tile. The My Notifications menu will expand with a list of all activated Tasks with open Notifications. Click on a Task to open the MyAssistant Quick Viewer with the Tasks Notifications (See page 46). Clicking on a Task will not run or send any information. Clicking the Task name opens a list of Notifications that were returned the last time the Task was run. You can see when the Notifications were last gathered by the Last Updated date listed by each Task name.

MyAssistant Live Tile
User Guide Page 43
Check For
The Live Tile gives you the ability to update your Notification list(s) from your Windows desktop. When you click [Check For] from the Live Tile, the Check For menu will expand, and all of the Tasks activated in MyAssistant will be listed. Beside each Task name is the date that the Notifications for the Task were last updated. To check for new Notifications for a Task, click the Task name from the Check For menu. A progress bar will appear in the Live Tile to let you know the Task is running. When the Task runs successfully, you will receive a confirmation message. After the confirmation window is closed, the MyAssistant QuickViewer will open with the updated Notifications listed (See page 46).
Options
1. If you do not want the MyAssistant Live Tile on the desktop, uncheck the top box.
2. If you do not want MyAssistant alerts to display in the System Tray, uncheck the bottom box (See page 44).
The gear icon on the MyAssistant Live Tile give you access to two MyAssistant settings:

MyAssistant Alert
User Guide Page 44
Chapter 7 – MyAssistant Alert
MyAssistant Alert Icon MyAssistant installs an Alert icon in your System Tray. This is the same location you may see an icon for your speaker volume. To view the MyAssistant Alert Icons menu single click on the icon in the System Tray.
Functions from the MyAssistant Alert Icon: 1. Open the full MyAssistant software. 2. Show your current alerts (Tasks ready to
be run due to changes in Sage 300 CRE).
3. Hide or show the Live Tile your Windows desktop.
4. Hide or show the MyAssistant Alerts in the System Tray.
This is the MyAssistant alert that will appear on screen when the user is prompted that a Task is ready to run due to changes in Sage 300 CRE (See page 12).
Tasks can be scheduled in MyAssistant to run at the completion of a Sage 300 CRE processes. When a user exits a specified area in Sage 300 CRE the MyAssistant user is prompted on their Windows desktop to run the Task based on changes made in Sage 300 CRE.
MyAssistant Alert
User Guide Page 45
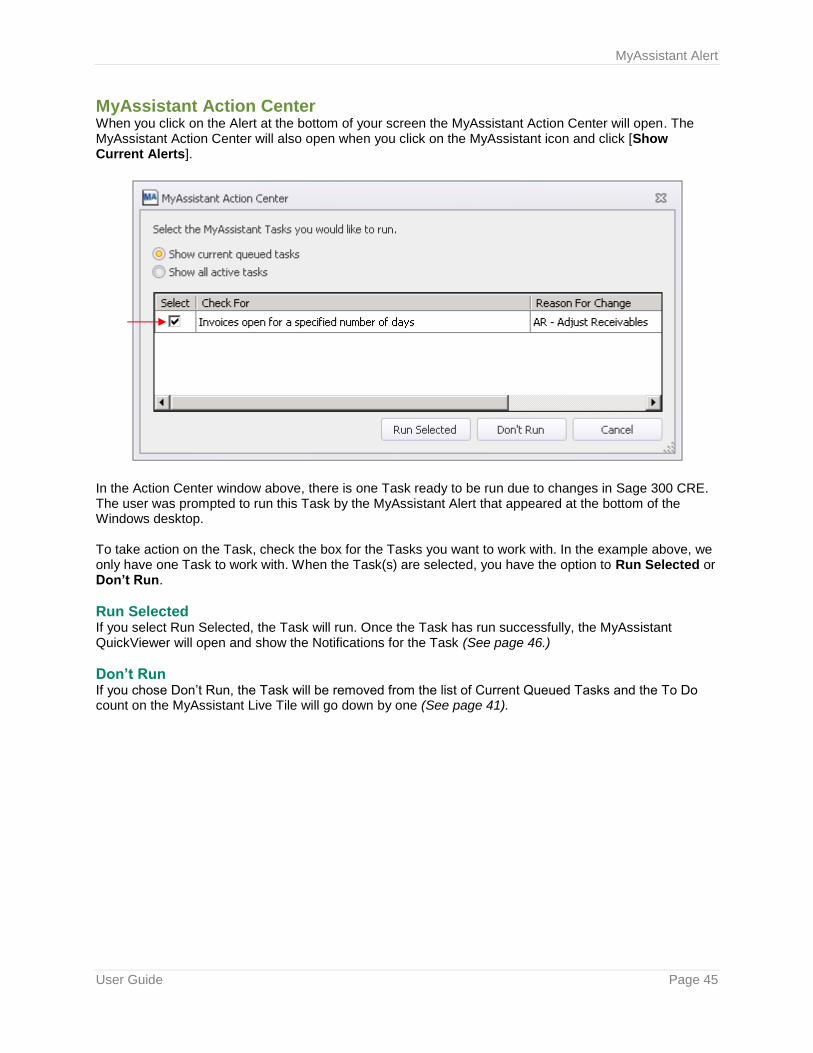
MyAssistant Action Center
When you click on the Alert at the bottom of your screen the MyAssistant Action Center will open. The MyAssistant Action Center will also open when you click on the MyAssistant icon and click [Show Current Alerts].
In the Action Center window above, there is one Task ready to be run due to changes in Sage 300 CRE. The user was prompted to run this Task by the MyAssistant Alert that appeared at the bottom of the Windows desktop. To take action on the Task, check the box for the Tasks you want to work with. In the example above, we only have one Task to work with. When the Task(s) are selected, you have the option to Run Selected or Don’t Run.
Run Selected If you select Run Selected, the Task will run. Once the Task has run successfully, the MyAssistant QuickViewer will open and show the Notifications for the Task (See page 46.)
Don’t Run If you chose Don’t Run, the Task will be removed from the list of Current Queued Tasks and the To Do count on the MyAssistant Live Tile will go down by one (See page 41).
QuickViewer
User Guide Page 46
Chapter 8 – MyAssistant QuickViewer
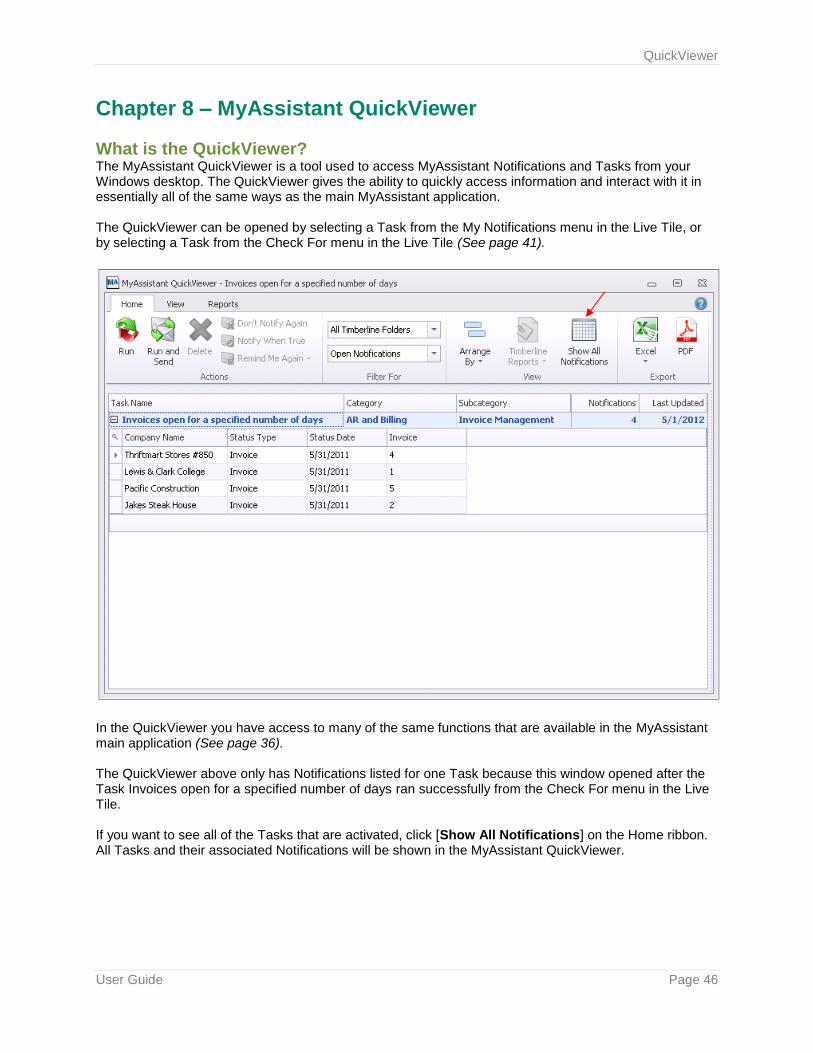
What is the QuickViewer? The MyAssistant QuickViewer is a tool used to access MyAssistant Notifications and Tasks from your Windows desktop. The QuickViewer gives the ability to quickly access information and interact with it in essentially all of the same ways as the main MyAssistant application. The QuickViewer can be opened by selecting a Task from the My Notifications menu in the Live Tile, or by selecting a Task from the Check For menu in the Live Tile (See page 41).
In the QuickViewer you have access to many of the same functions that are available in the MyAssistant main application (See page 36). The QuickViewer above only has Notifications listed for one Task because this window opened after the Task Invoices open for a specified number of days ran successfully from the Check For menu in the Live Tile. If you want to see all of the Tasks that are activated, click [Show All Notifications] on the Home ribbon. All Tasks and their associated Notifications will be shown in the MyAssistant QuickViewer.

Security
User Guide Page 47
Chapter 9 – Email Directories What is an Email Directory? Often people want to be sent just their information. For example, each Project Manager doesn’t need to see the status of all jobs, rather just their own. Most people believe the way to address this is to create an individual Tasks for each intended recipient. However, there’s a simpler way: Using an Email Directory. A MyAssistant Email Directory is used to send each recipient only their Notifications or attached reports.
How Email Directories Work Email directories are applied when MyAssistant Tasks run. When a Task runs, it first builds a list of Notifications that are Sage items that met the Condition. If an Email Directory is specified in the Task setup, MyAssistant will look up an email address as specified in the Email Directory setup, for each notification based its data. Consider the following example:
Notification Job Corresponding Contact
1 10 A
2 20 B
3 30 A
4 40 A
5 50 B
By using an Email Directory, Contact A will receive one email containing notifications 1, 3 and 4; while Contact B will receive one email containing notifications 2 and 5. When it is time to send, MyAssistant will send one email per unique email address containing only their corresponding Notifications. This means that MyAssistant can send each Project Manager only their over-budget jobs, using only one Task.
NOTE: When adding an Email Directory to a Task, the “Select Email Directory” window lists
Directories are set up to retrieve email addresses from a Sage database filed that can be linked to the Check All used in the Task’s Condition.
Types of Email Directories There are two types of Email Directories in MyAssistant, with the difference being how they look up email addresses.
Lookup Email Addresses in Sage 300 CRE This type of directory will pull email addresses directly from a field in the Sage 300 CRE database. For example, there is an email field on the JC Job record, e.g. “Project Manager Email,” MyAssistant can pull the email address from this field and use it in the Email Directory.
Lookup Email Addresses in a list that you provide This type of Email Directory associates one or more email addresses with a value in the Sage 300 CRE database. For example, MyAssistant can read the Project Manager name off the JC Job record and send Notifications to the email address you associated with the Project Manager’s name.

Security
User Guide Page 48
Creating a new Email Directory Before creating a new email directory, first determine which type of email directory will best meet your needs, and then check the list of prebuilt email directories to see if one already exists. To get started, open the “Define Email Directory” window by navigating to: File > Email Directories.
MyAssistant comes with the prebuilt Email Directories pictured above. To view and/or change any settings for an email directory, select it and click [Change].
Security
User Guide Page 49
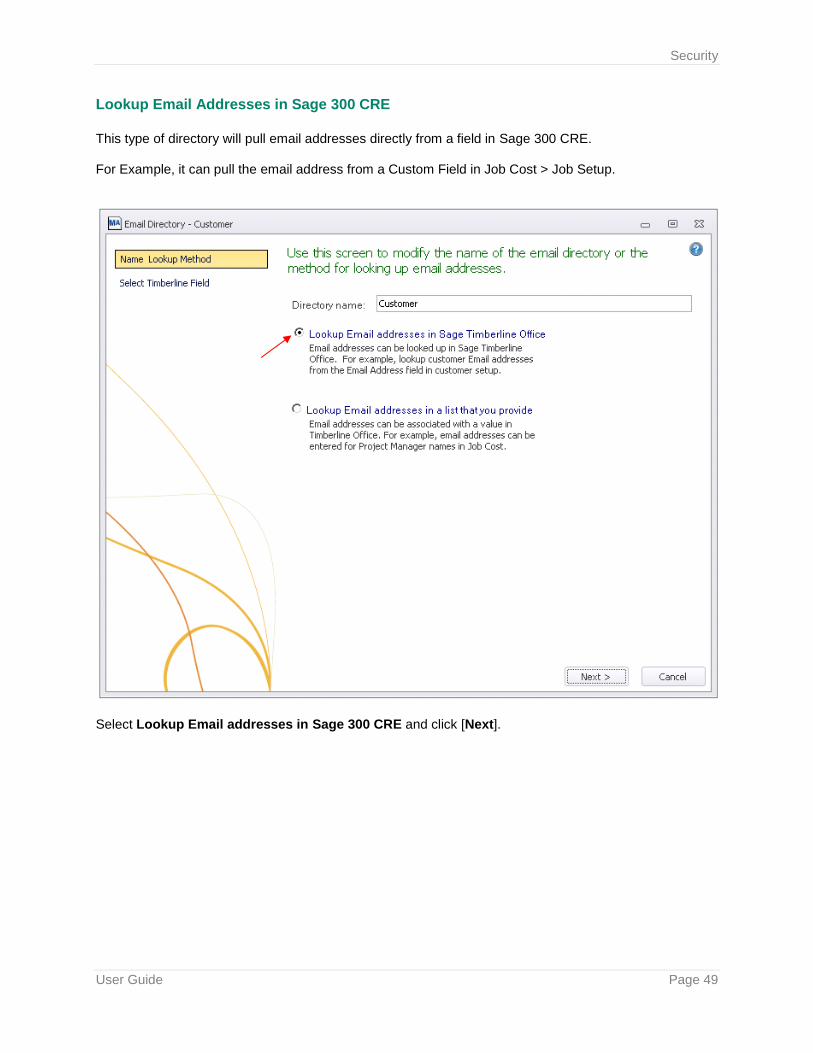
Lookup Email Addresses in Sage 300 CRE
This type of directory will pull email addresses directly from a field in Sage 300 CRE. For Example, it can pull the email address from a Custom Field in Job Cost > Job Setup.
Select Lookup Email addresses in Sage 300 CRE and click [Next].
Security
User Guide Page 50
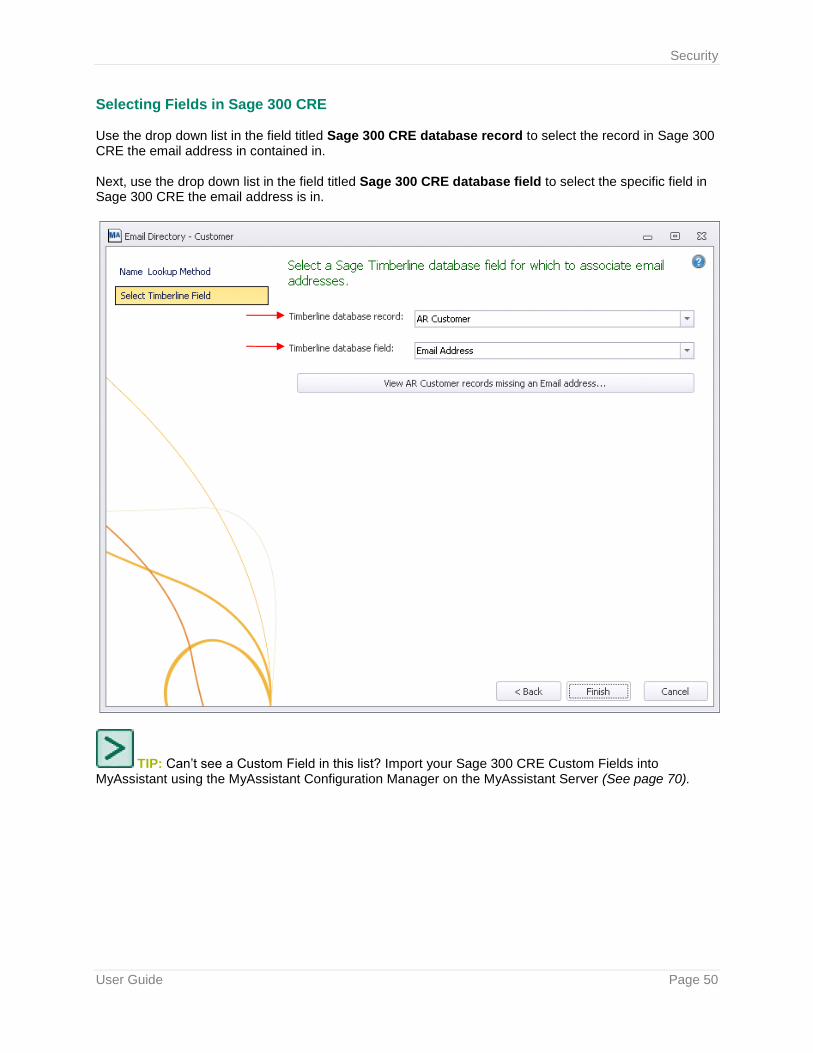
Selecting Fields in Sage 300 CRE Use the drop down list in the field titled Sage 300 CRE database record to select the record in Sage 300 CRE the email address in contained in. Next, use the drop down list in the field titled Sage 300 CRE database field to select the specific field in Sage 300 CRE the email address is in.
TIP: Can’t see a Custom Field in this list? Import your Sage 300 CRE Custom Fields into MyAssistant using the MyAssistant Configuration Manager on the MyAssistant Server (See page 70).
Security
User Guide Page 51
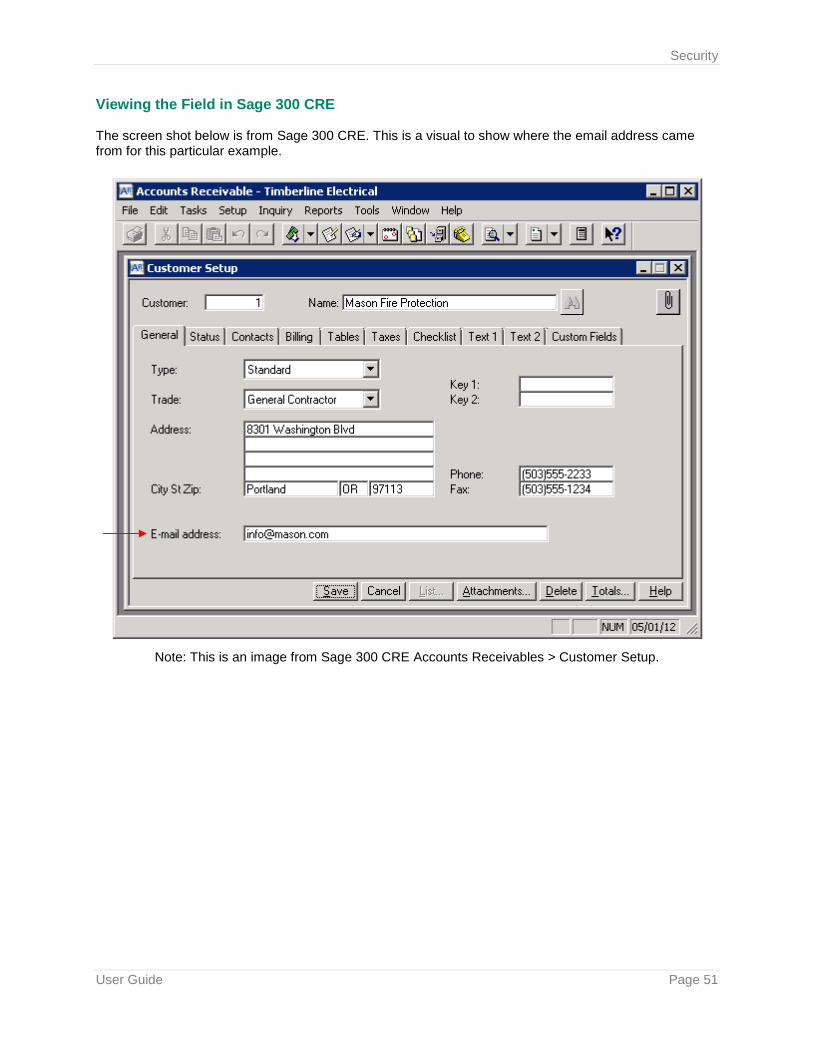
Viewing the Field in Sage 300 CRE The screen shot below is from Sage 300 CRE. This is a visual to show where the email address came from for this particular example.
Note: This is an image from Sage 300 CRE Accounts Receivables > Customer Setup.
Security
User Guide Page 52
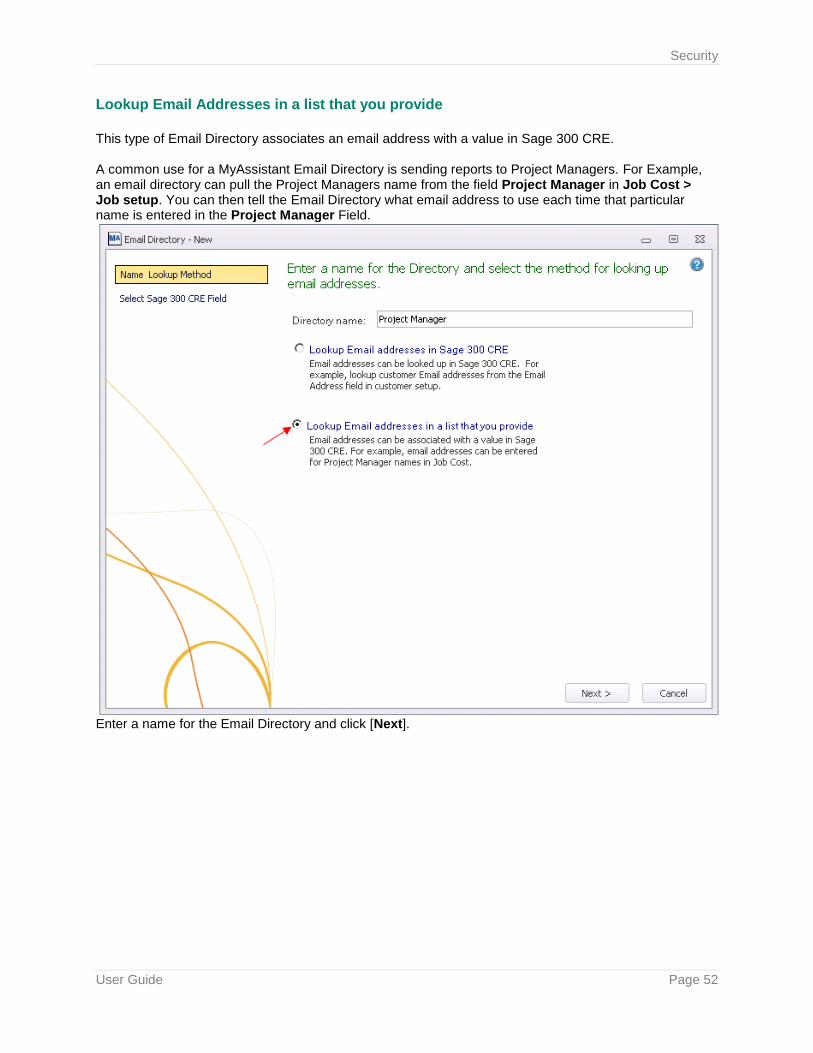
Lookup Email Addresses in a list that you provide
This type of Email Directory associates an email address with a value in Sage 300 CRE. A common use for a MyAssistant Email Directory is sending reports to Project Managers. For Example, an email directory can pull the Project Managers name from the field Project Manager in Job Cost > Job setup. You can then tell the Email Directory what email address to use each time that particular name is entered in the Project Manager Field.
Enter a name for the Email Directory and click [Next].
Security
User Guide Page 53
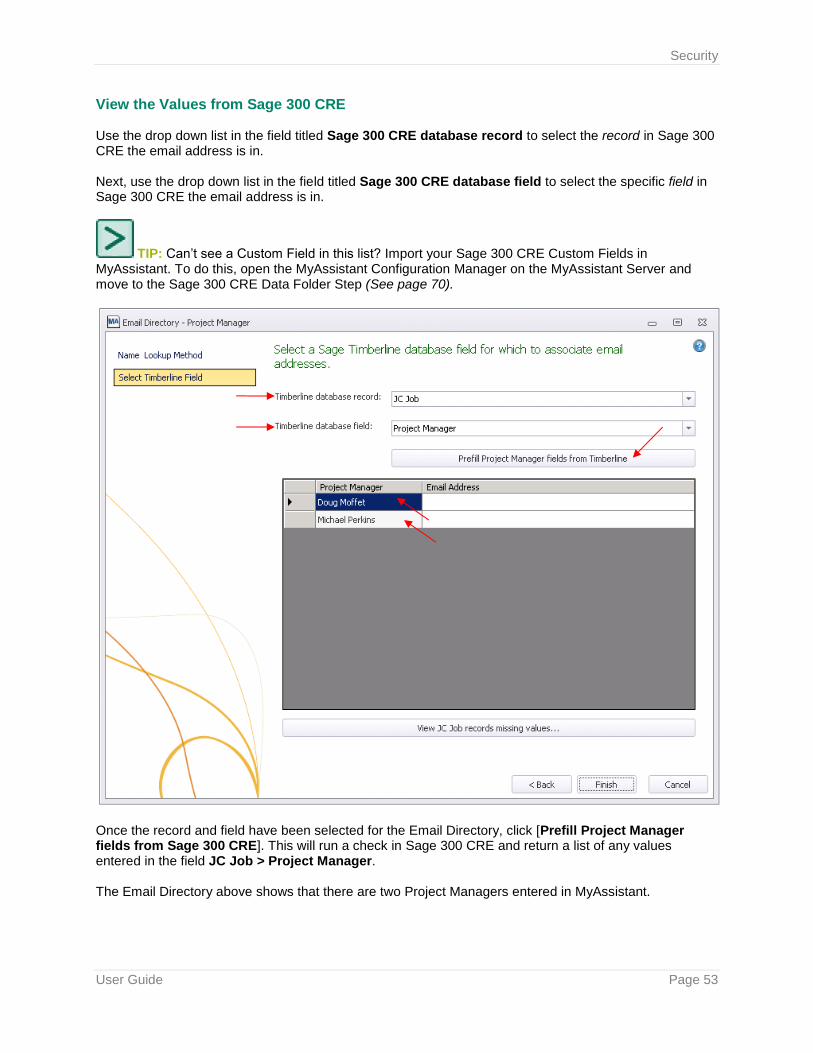
View the Values from Sage 300 CRE Use the drop down list in the field titled Sage 300 CRE database record to select the record in Sage 300 CRE the email address is in. Next, use the drop down list in the field titled Sage 300 CRE database field to select the specific field in Sage 300 CRE the email address is in.
TIP: Can’t see a Custom Field in this list? Import your Sage 300 CRE Custom Fields in MyAssistant. To do this, open the MyAssistant Configuration Manager on the MyAssistant Server and move to the Sage 300 CRE Data Folder Step (See page 70).
Once the record and field have been selected for the Email Directory, click [Prefill Project Manager fields from Sage 300 CRE]. This will run a check in Sage 300 CRE and return a list of any values entered in the field JC Job > Project Manager. The Email Directory above shows that there are two Project Managers entered in MyAssistant.
Security
User Guide Page 54
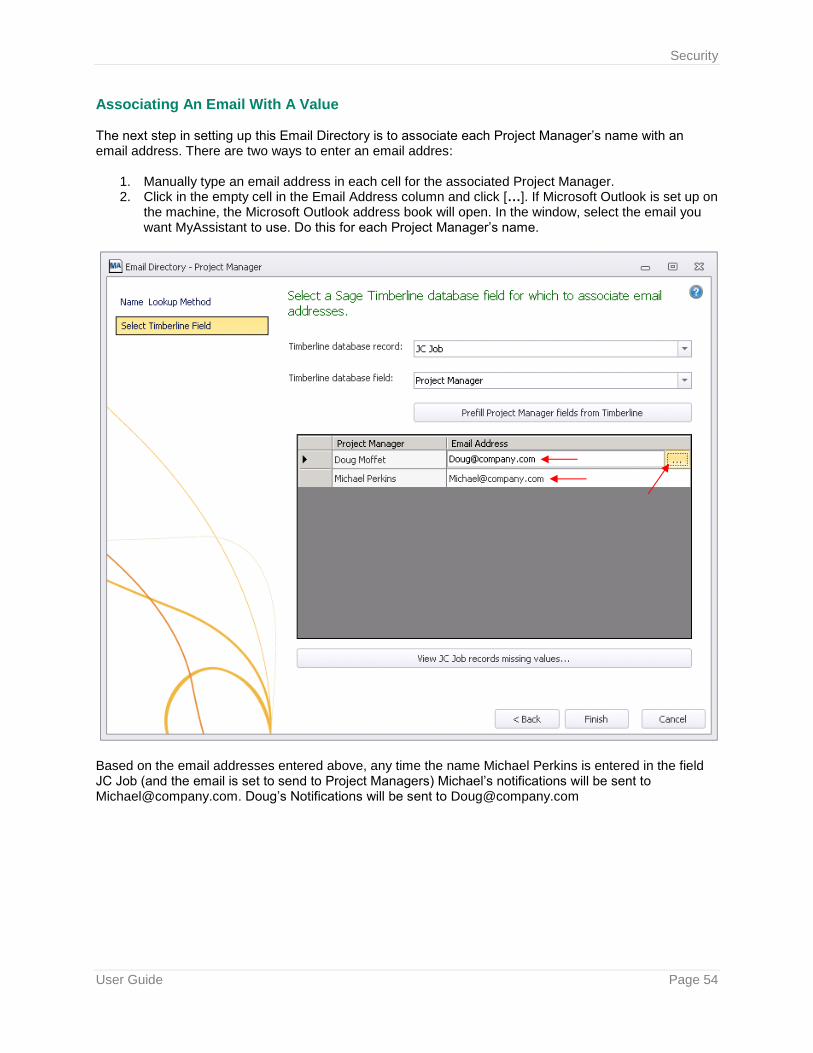
Associating An Email With A Value The next step in setting up this Email Directory is to associate each Project Manager’s name with an email address. There are two ways to enter an email addres:
1. Manually type an email address in each cell for the associated Project Manager. 2. Click in the empty cell in the Email Address column and click […]. If Microsoft Outlook is set up on
the machine, the Microsoft Outlook address book will open. In the window, select the email you want MyAssistant to use. Do this for each Project Manager’s name.
Based on the email addresses entered above, any time the name Michael Perkins is entered in the field JC Job (and the email is set to send to Project Managers) Michael’s notifications will be sent to [email protected]. Doug’s Notifications will be sent to [email protected]
Security
User Guide Page 55
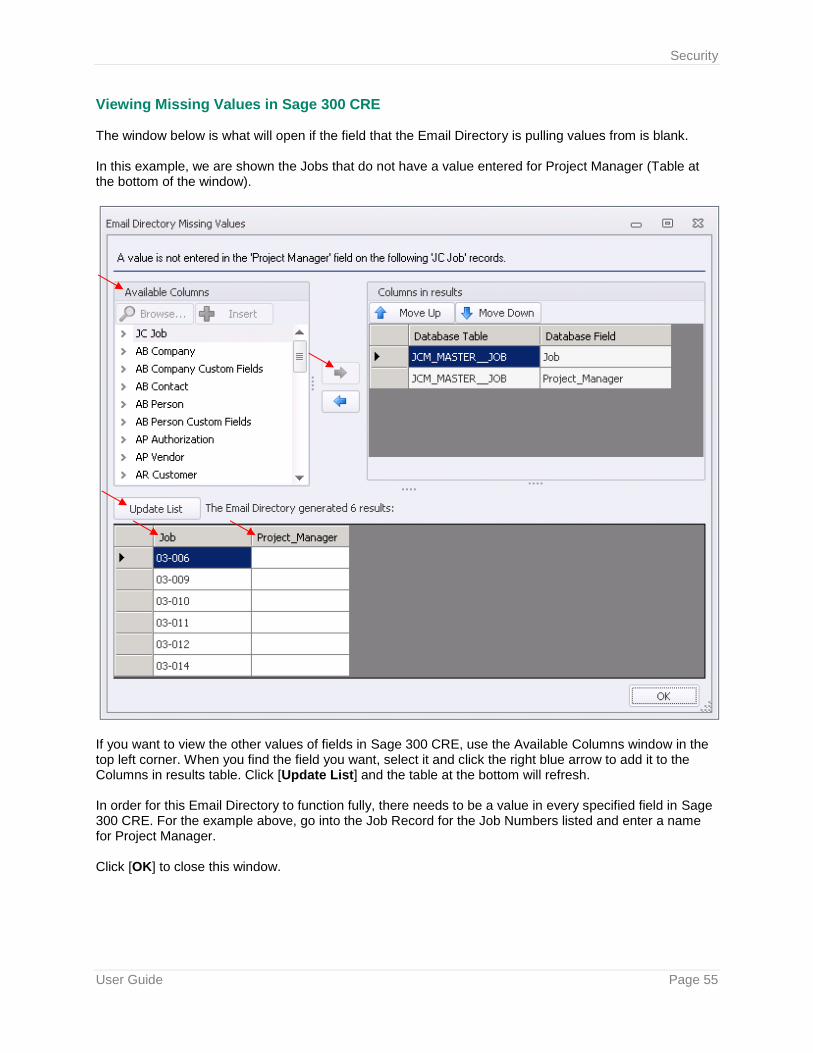
Viewing Missing Values in Sage 300 CRE The window below is what will open if the field that the Email Directory is pulling values from is blank. In this example, we are shown the Jobs that do not have a value entered for Project Manager (Table at the bottom of the window).
If you want to view the other values of fields in Sage 300 CRE, use the Available Columns window in the top left corner. When you find the field you want, select it and click the right blue arrow to add it to the Columns in results table. Click [Update List] and the table at the bottom will refresh. In order for this Email Directory to function fully, there needs to be a value in every specified field in Sage 300 CRE. For the example above, go into the Job Record for the Job Numbers listed and enter a name for Project Manager. Click [OK] to close this window.

Security
User Guide Page 56
Viewing the Field in Sage 300 CRE The screen shot below is from Sage 300 CRE. This is a visual to show where the Project Manager value came from in Sage 300 CRE.
Note: This is an image from Sage 300 CRE Job Cost > Job Setup.
List of all Email Directories When finished with setting up the Email Directory, click [Finish] in the Email Directory window.
The newly created Email Directory will now be in the list of all established Email Directories. If you need to make changes to any Email Directories, select the name and click [Change].

Security
User Guide Page 57
Chapter 10 – Conditions
What is a Condition? The condition defines what the task is looking for. It is a formula that always results in a true or false statement. A condition is made up of two parts; a “Check All” record and the condition expression. The “Check All” record is what you would like a list of; vendors, jobs, cost codes, etc. The condition expression is what you want to test that list for; vendors with expiring insurance, jobs that haven’t been billed in 40 days, cost codes over budget, etc.
How to Read a Condition MyAssistant Conditions define the situations you like monitored. The MyAssistant software comes with over 340 prebuilt Conditions that can be used as-is or copied and modified. The following outlines how to read or interpret a condition to determine if it will meet your needs. A condition has two parts:
• What Sage 300 CRE database records will be checked (Check All)
• What is checked for each record (Condition Expression)
Check All The first step in determining if a condition will meet your needs is to check the Sage 300 CRE record specified in the Check All field. When a condition is run, MyAssistant performs the test specified in the Condition Expression for each occurrence of the Sage 300 CRE database record specified in the Check All field. A notification is created when the test is true. For example, if JC Job is select in the Check All field, MyAssistant will execute the test specified in the Condition Expression and create one notification for each job that meets the condition.
Condition Expression The Condition Expression defines what is tested when the condition runs. The Condition Expression can be one or more logic statements that result in true or false. A logic statement can contain Sage 300 CRE database fields, specified values, functions and mathematical operands. Each logic statement is separated with an AND or an OR operand and can be grouped together with parenthesis. The Condition Expression is reviewed by stepping through each logic statement. The following may be included a logic statement:
• Sage 300 CRE database fields – Sage 300 CRE database are in double quotes. They are represented by “ “
• Specified Values – specified values are formatted based the type of data. Text values are specified with single quotes, dates are expressed as yyyy-mm-dd, numbers do not have quotes
• Functions – function include things such as CURDATE() to specify the current date, IS NULL is test for a blank date, etc. See the Function section later in this chapter for a definition of each function.
The following are a few sample logic statements that use Sage 300 CRE fields, functions, mathematical operands and specified values:
• “APM_MASTER__VENDOR”.”Type” = ‘Subcontractor’ This tests for the type being equal to Subcontractor. Use single quotes to specify the value of an alpha field.
• “APM_MASTER__VENDOR”.”Outstndg_Amount” > 10000 This tests for the Amount being greater than 10000. Do not use quotes to specify a number.
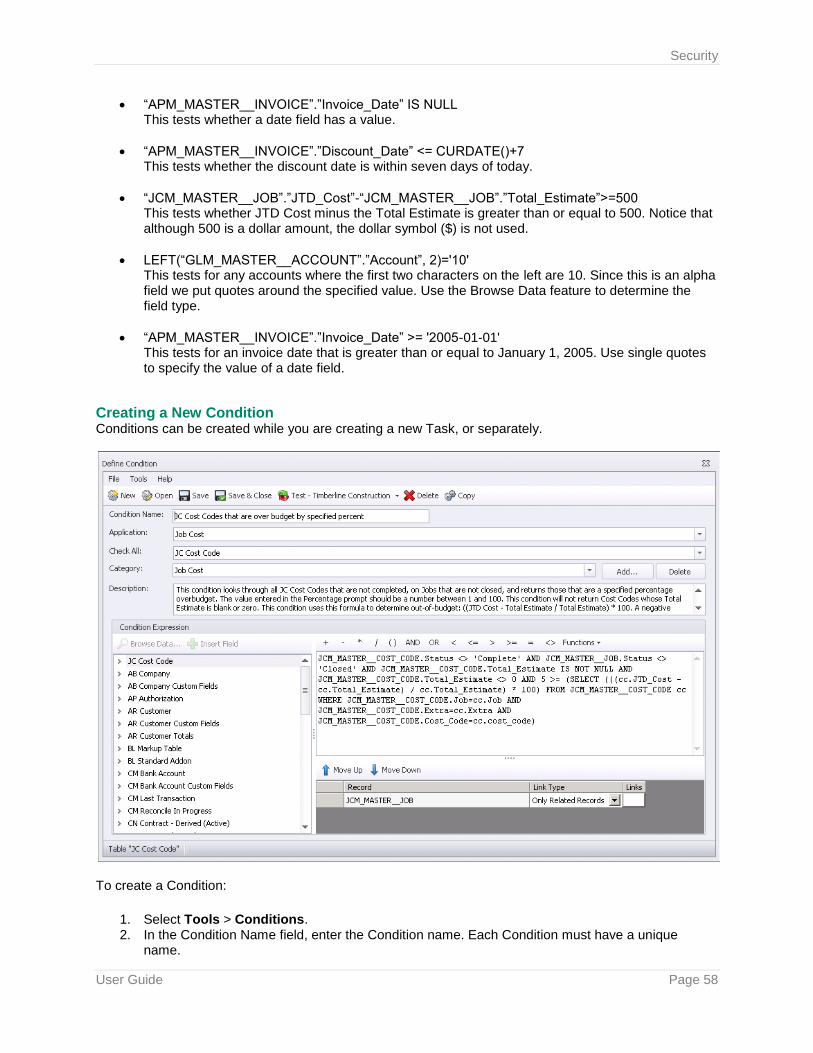
Security
User Guide Page 58
• “APM_MASTER__INVOICE”.”Invoice_Date” IS NULL This tests whether a date field has a value.
• “APM_MASTER__INVOICE”.”Discount_Date” <= CURDATE()+7 This tests whether the discount date is within seven days of today.
• “JCM_MASTER__JOB”.”JTD_Cost”-“JCM_MASTER__JOB”.”Total_Estimate”>=500 This tests whether JTD Cost minus the Total Estimate is greater than or equal to 500. Notice that although 500 is a dollar amount, the dollar symbol ($) is not used.
• LEFT(“GLM_MASTER__ACCOUNT”.”Account”, 2)='10' This tests for any accounts where the first two characters on the left are 10. Since this is an alpha field we put quotes around the specified value. Use the Browse Data feature to determine the field type.
• “APM_MASTER__INVOICE”.”Invoice_Date” >= '2005-01-01' This tests for an invoice date that is greater than or equal to January 1, 2005. Use single quotes to specify the value of a date field.
Creating a New Condition Conditions can be created while you are creating a new Task, or separately.
To create a Condition:
1. Select Tools > Conditions. 2. In the Condition Name field, enter the Condition name. Each Condition must have a unique
name.

Security
User Guide Page 59
3. From the Application dropdown list, select the application where you would find the information that MyAssistant should look through when applying this condition. Your selection here determines what Driving Records are available.
4. From the Check All dropdown list, select the record that MyAssistant should look through when running the condition. For example, if you would like to check each vendor for a specific situation, select “AP Vendor”.
5. From the Category dropdown list, select the Category to which you want this condition added. If you wish to create a new Category, click Add. Conditions that are not assigned a Category are listed in a group titled Uncategorized Conditions.
6. In the Description field, enter a description of the Condition. This description is displayed when you select a Condition while setting up a Task.
7. Enter your Condition statement(s) in the Condition Expression area.
A Condition can contain one or more logical statements, connected with "AND" and "OR". You can use the tree to the left of the expression to select database fields from the driving record or associated records. Database fields will appear in the expression statement in a "TABLE NAME"."Field name" format. (Both the table name and field name are surrounded by quotes and are case sensitive.) For example, the Accounts Payable vendor name would appear as: "APM_MASTER__VENDOR"."Vendor_Name". Please note that although “friendly” table names are listed in the tree to make it easier to find the table you are looking for, we must use the SQL format in the expression itself. Use the Browse Data button to make sure you are using the correct table. Often conditions check to see if something is zero or blank. Specifying that something is blank varies by data type:
• Number: Enter equals the number zero ( x = 0 ).
• Text: Enter two single quotes: ''.
• Date: Use the IS NULL function.
You can also enter a mathematical expression such as adding two fields together. For example, the following would subtract the AP tax amount from the invoice amount: "APM_MASTER__INVOICE"."Amount" - "APM_MASTER__INVOICE"."Tax" Please see the Functions section later in this chapter for more information.
Copying Prebuilt Conditions Some of the prebuilt Conditions included with MyAssistant will fit your needs right out of the box; others will need to be modified. It is not possible to change the condition expression of prebuilt Conditions, instead they must be copied, and then the copy may be modified. This keeps the original Condition intact so it is always available to reference or use. To customize a prebuilt Condition:
1. Click Tools > Conditions 2. Click Open 3. Select the Condition you would like to edit 4. Click OK 5. Click Copy in the toolbar 6. Enter a unique name for the Condition 7. Click OK 8. Modify the Condition 9. Click Save
Security
User Guide Page 60
Please note: When a prebuilt condition is copied, the condition expression uses the default value for any portion of the expression that may be customized.
Editing Conditions You may edit any custom Condition. In addition, you may copy a built-in Condition and make changes to the copy. To edit a Condition:
1. Click Tools > Conditions 2. Click Open 3. Select the Condition you would like to edit 4. Click OK
Please note: Editing a Condition will change the Condition for all Tasks that use that Condition. If you don’t want other Tasks using that Condition to be affected, copy the Condition and make the changes to the copy.
Deleting a Condition To Delete a Condition:
1. Make sure no Task is using the Condition you would like to delete. 2. Click Tools > Conditions. 3. Click Open. 4. Select the Condition you would like to delete. 5. Click OK. 6. Click Delete in the toolbar. A confirmation message will be displayed.
Please note: Prebuilt Conditions may not be deleted.
Functions Functions are built-in procedures or subroutines used to evaluate, make calculations on, or transform data. You can use one or more functions in the Condition Expression when you define a Condition. See below for a list of common functions and a brief description of each. IN - Test a field for multiple values The IN operator tests a given field against a list of values, and returns true if the field matches an item in the list. You can wrap an expression in the NOT() function to determine if a field is not one of the set of values. Syntax: IN (comma separated list) Examples:
1. To show all GL Accounts of type Current assets and Noncurrent assets: "GLM_MASTER__ACCOUNT"."Account_Type" IN ('Current assets','Noncurrent assets')
2. To show all GL Accounts that are not Suspense or Units accounts: NOT("GLM_MASTER__ACCOUNT"."Account_Type" IN ('Suspense','Units'))
CURDATE() - Current Date The CURDATE() function returns the current system date. This value can then be compared to other database date fields or can be part of an expression. Adding or subtracting a number from CURDATE()

Security
User Guide Page 61
changes the result by the specified number of days. Syntax: CURDATE() The function is used with no parameters. Examples:
1. To show all posted GL transactions for today: "GLT_CURRENT__TRANSACTION"."Accounting_Date" = CURDATE()
2. To show all JC Jobs that started in the last 7 days: "JCM_MASTER__JOB"."Actual_Start_Date" >= CURDATE() – 7
DAYOFMONTH() - Day of the month The DAYOFMONTH() function returns the day of the month (1 through 31) from the given date parameter. Syntax: DAYOFMONTH(<date>) The function takes one parameter, a date field. This can be a database field or the CURDATE() function. Examples:
1. To show posted JC transactions that occurred on the first day of any month: DAYOFMONTH("JCT_CURRENT__TRANSACTION"."Accounting_Date") = 1
2. This function could be combined with the MONTH() function to see if today is an employee’s employment anniversary date: MONTH("PRM_MASTER__EMPLOYEE"."Hire_Date") = MONTH(CURDATE()) AND DAYOFMONTH("PRM_MASTER__EMPLOYEE"."Hire_Date") = DAYOFMONTH(CURDATE())
DAYOFWEEK() - Day of the week The DAYOFWEEK() function returns the day of the week (1 through 7, Sunday is the first day of the week) from the given date parameter. Syntax: DAYOFWEEK(<date>) The function takes one parameter, a date field. This can be a database field or the CURDATE() function. Example:
1. To show AP Invoices that have an Invoice date that falls on a Monday: DAYOFWEEK("APM_MASTER__INVOICE"."Invoice_Date") = 2
MONTH() - Month of the year The Month() function returns the month of the year (1 through 12) from the given date parameter. Syntax: MONTH(<date>) The function takes one parameter, a date field. This can be a database field or the CURDATE() function. Examples:
1. To show any AP checks that were written in the month of June: Month("APM_MASTER__CHECK"."Check_Date") = 6
2. This function could be combined with the DAYOFMONTH() function to see if today is an employee’s employment anniversary date: MONTH("PRM_MASTER__EMPLOYEE"."Hire_Date") = MONTH(CURDATE()) AND DAYOFMONTH("PRM_MASTER__EMPLOYEE"."Hire_Date") = DAYOFMONTH(CURDATE())
Security
User Guide Page 62
YEAR() - Year The YEAR() function returns the year from the given date parameter. Syntax: YEAR(<date>) The function takes one parameter, a date field. This can be a database field or the CURDATE() function. Examples:
1. To find CM Transactions entered in the current year: YEAR("CMT_REGISTER__TRANSACTION"."Accounting_Date") = YEAR(CURDATE())
2. To find CM Transactions from last year that should be moved to the history file: YEAR("CMT_REGISTER__TRANSACTION"."Accounting_Date") = YEAR(CURDATE()) – 1
LENGTH() - Length of text The LENGTH() function returns the number of characters in a string of text. Syntax: LENGTH(<text>) The function takes one parameter, a text field, and returns the number of characters in it (including spaces). Example:
1. To show any JC Jobs with a description longer than 20 characters (which may not appear well on some reports): LENGTH("JCM_MASTER__JOB"."Description") > 20
CONCAT() - Concatenate The CONCAT() function puts two text fields together. Syntax: CONCAT(<text1>, <text2>) The function takes two parameters; both are text fields, and returns them joined together. Example:
1. For a JC Job record where Job=’03-001’ and Description=’NW Food Warehouse’, then using the function like this: CONCAT("JCM_MASTER__JOB"."Job", "JCM_MASTER__JOB"."Description") would return the value: 03-001NW Food Warehouse.
LTRIM() - Trim space characters from the left side of a text field The LTRIM() function removes preceding spaces from the beginning of a text field. Syntax: LTRIM(<text>) The function takes one parameter, a text field, and returns the text field with spaces at the beginning removed. Example:
1. This formula could be used to return records where a name was accidentally entered with a space in front of it (which would prevent that field from sorting correctly): LTRIM("APM_MASTER__VENDOR"."Name") <> "APM_MASTER__VENDOR"."Name"
RTRIM() - Trim space characters from the right side of a text field The RTRIM() function removes succeeding spaces from the end of a text field. Syntax: RTRIM(<text>)
Security
User Guide Page 63
The function takes one parameter, a text field, and returns the text field with spaces at the end removed. Example:
1. This formula could be used to return records where a name was accidentally entered with a space at the end of it: RTRIM("APM_MASTER__VENDOR"."Name") <> "APM_MASTER__VENDOR"."Name"
SUBSTRING() - Return a portion of a text field The SUBSTRING() function returns a specified amount of text from a specified position of the given text field. Syntax: SUBSTRING(<text>, starting position [, length]) The function can take 2 or 3 parameters.
• The first parameter is the text field to get a substring from
• The second parameter is the starting position of the substring (The first character of the text field is position 1)
• The third parameter is optional. It is the number of characters to get from the starting position. If this parameter is left out, the function will return text starting from the starting position all the way to the end of the text field. Examples:
1. If you know the prefix length of an account in GL is 9 characters (including dashes), and there was no suffix, you can use this function to get just the base account. If you wanted to show all posted transactions to base account 5120 (and the account format was xxx-xxxx-xxxx): SUBSTRING("GLT_CURRENT__TRANSACTION"."Account",10) = '5120'
2. In the same situation as above, but the account format contained a suffix that you wanted to ignore (xxx-xxxx-xxxx.xx): SUBSTRING("GLT_CURRENT__TRANSACTION"."Account",10,4) = '5120'
LOCATE() - Find a substring in a text field The LOCATE() function performs a case-sensitive search of a text field for a given string of text, and returns the position of the text being searched. If the text you are looking for is not found, then this function returns 0. Syntax: LOCATE(<text to find>, <field to search> [, starting position]) The function can take 2 or 3 parameters.
• The first parameter is the text you want to find.
• The second parameter is the text field you want to look in.
• The third parameter is optional. It is the position where you want to start looking (the first character is at position 1). If this field is left out, then it will start looking at the beginning of the text field. Examples:
1. If you want to show all AP Vendors that have "LLC" anywhere in their name: LOCATE('LLC', "APM_MASTER__VENDOR"."Name")
2. If you want to show all PM Properties that have the word "Garage" anywhere in the property name, except for properties that begin with the word "Garage": LOCATE('Garage', "PMP_PROPERTY__PROPERTY"."Name", 2)
Please note that in a condition you must always end up with a result of True or False so you will want to compare your Locate function to something. Since Locate returns a value of 0 if the text is not found you could write: LOCATE('Garage', "PMP_PROPERTY__PROPERTY"."Name", 2) > 0
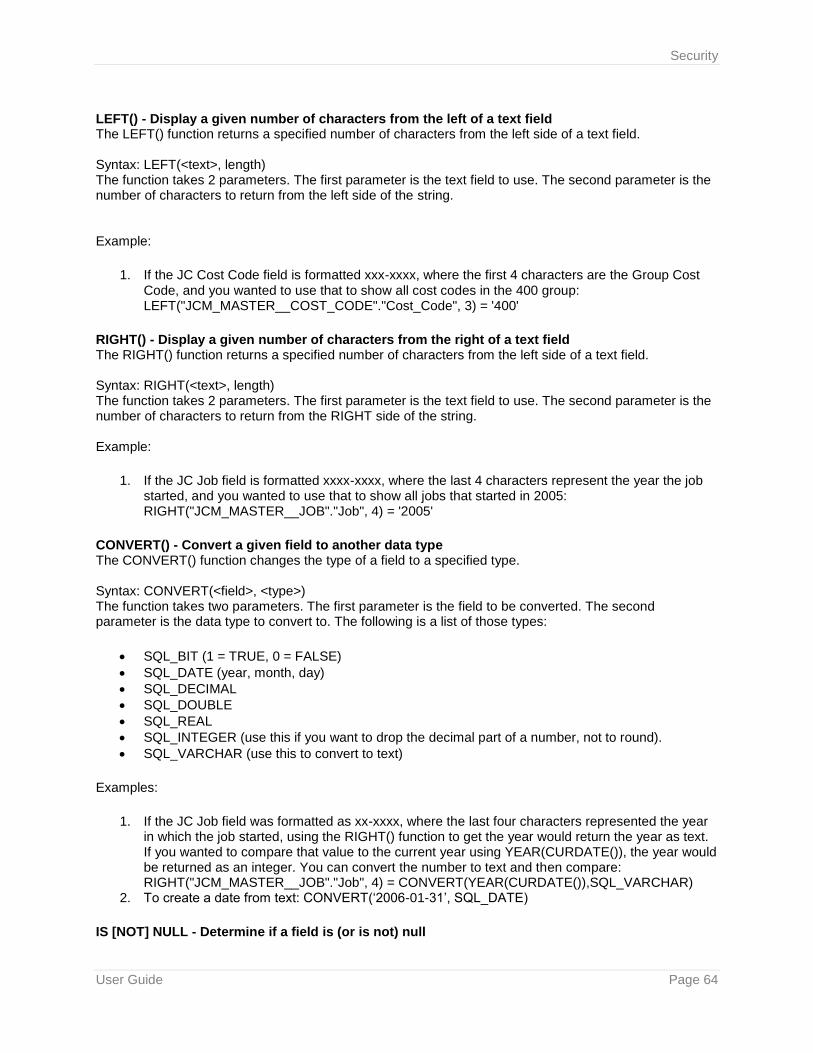
Security
User Guide Page 64
LEFT() - Display a given number of characters from the left of a text field The LEFT() function returns a specified number of characters from the left side of a text field. Syntax: LEFT(<text>, length) The function takes 2 parameters. The first parameter is the text field to use. The second parameter is the number of characters to return from the left side of the string. Example:
1. If the JC Cost Code field is formatted xxx-xxxx, where the first 4 characters are the Group Cost Code, and you wanted to use that to show all cost codes in the 400 group: LEFT("JCM_MASTER__COST_CODE"."Cost_Code", 3) = '400'
RIGHT() - Display a given number of characters from the right of a text field The RIGHT() function returns a specified number of characters from the left side of a text field. Syntax: RIGHT(<text>, length) The function takes 2 parameters. The first parameter is the text field to use. The second parameter is the number of characters to return from the RIGHT side of the string. Example:
1. If the JC Job field is formatted xxxx-xxxx, where the last 4 characters represent the year the job started, and you wanted to use that to show all jobs that started in 2005: RIGHT("JCM_MASTER__JOB"."Job", 4) = '2005'
CONVERT() - Convert a given field to another data type The CONVERT() function changes the type of a field to a specified type. Syntax: CONVERT(<field>, <type>) The function takes two parameters. The first parameter is the field to be converted. The second parameter is the data type to convert to. The following is a list of those types:
• SQL_BIT (1 = TRUE, 0 = FALSE)
• SQL_DATE (year, month, day)
• SQL_DECIMAL
• SQL_DOUBLE
• SQL_REAL
• SQL_INTEGER (use this if you want to drop the decimal part of a number, not to round).
• SQL_VARCHAR (use this to convert to text)
Examples:
1. If the JC Job field was formatted as xx-xxxx, where the last four characters represented the year in which the job started, using the RIGHT() function to get the year would return the year as text. If you wanted to compare that value to the current year using YEAR(CURDATE()), the year would be returned as an integer. You can convert the number to text and then compare: RIGHT("JCM_MASTER__JOB"."Job", 4) = CONVERT(YEAR(CURDATE()),SQL_VARCHAR)
2. To create a date from text: CONVERT(‘2006-01-31’, SQL_DATE)
IS [NOT] NULL - Determine if a field is (or is not) null
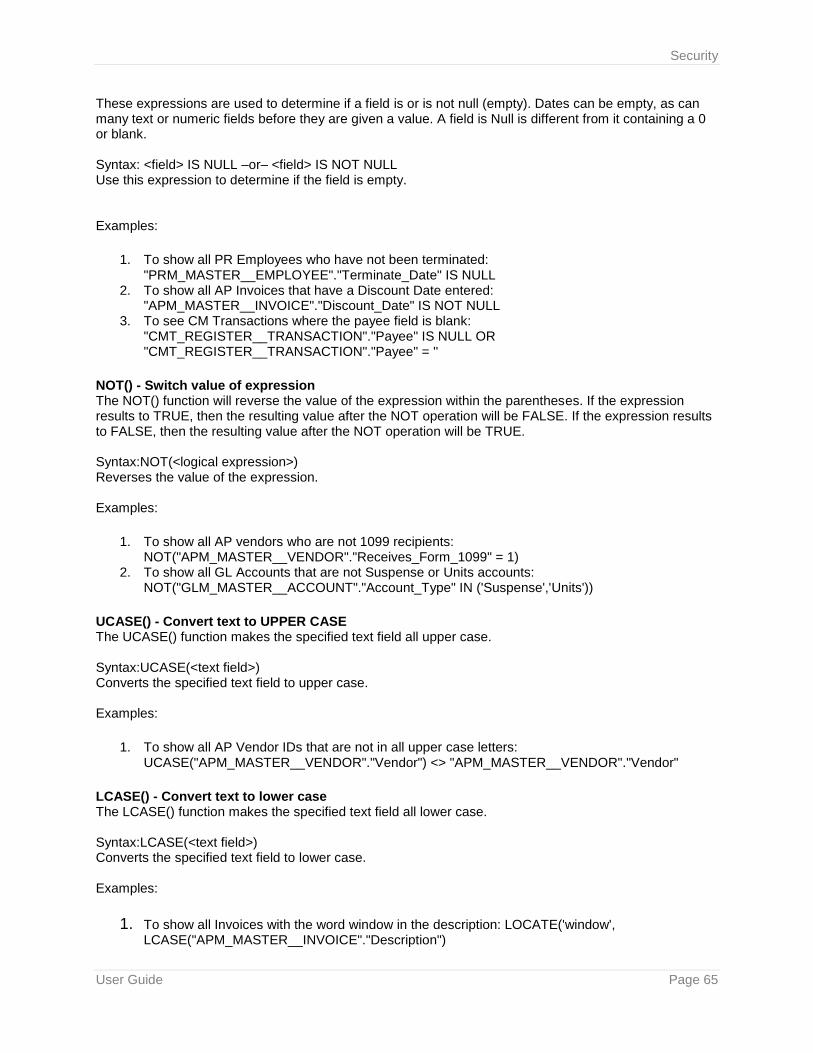
Security
User Guide Page 65
These expressions are used to determine if a field is or is not null (empty). Dates can be empty, as can many text or numeric fields before they are given a value. A field is Null is different from it containing a 0 or blank. Syntax: <field> IS NULL –or– <field> IS NOT NULL Use this expression to determine if the field is empty. Examples:
1. To show all PR Employees who have not been terminated: "PRM_MASTER__EMPLOYEE"."Terminate_Date" IS NULL
2. To show all AP Invoices that have a Discount Date entered: "APM_MASTER__INVOICE"."Discount_Date" IS NOT NULL
3. To see CM Transactions where the payee field is blank: "CMT_REGISTER__TRANSACTION"."Payee" IS NULL OR "CMT_REGISTER__TRANSACTION"."Payee" = ''
NOT() - Switch value of expression The NOT() function will reverse the value of the expression within the parentheses. If the expression results to TRUE, then the resulting value after the NOT operation will be FALSE. If the expression results to FALSE, then the resulting value after the NOT operation will be TRUE. Syntax:NOT(<logical expression>) Reverses the value of the expression. Examples:
1. To show all AP vendors who are not 1099 recipients: NOT("APM_MASTER__VENDOR"."Receives_Form_1099" = 1)
2. To show all GL Accounts that are not Suspense or Units accounts: NOT("GLM_MASTER__ACCOUNT"."Account_Type" IN ('Suspense','Units'))
UCASE() - Convert text to UPPER CASE The UCASE() function makes the specified text field all upper case. Syntax:UCASE(<text field>) Converts the specified text field to upper case. Examples:
1. To show all AP Vendor IDs that are not in all upper case letters: UCASE("APM_MASTER__VENDOR"."Vendor") <> "APM_MASTER__VENDOR"."Vendor"
LCASE() - Convert text to lower case The LCASE() function makes the specified text field all lower case. Syntax:LCASE(<text field>) Converts the specified text field to lower case. Examples:
1. To show all Invoices with the word window in the description: LOCATE('window', LCASE("APM_MASTER__INVOICE"."Description")

Security
User Guide Page 66
Chapter 11 – MyAssistant Security
What is Security? Enabling security limits the amount of data other employees using MyAssistant see, showing them only information that’s important to them. Furthermore, enabling security allows for more secure dissemination of personal information, like when sending out Direct Deposit pay stubs to employees when one or more is a MyAssistant user.
IMPORTANT: MyAssistant Security features can only be accessed, modified or
enabled/disabled via a MyAssistant Designer license.
Types of Security There are two types of MyAssistant Security: record-level security and feature-based security. Record-level security allows users to control who has access to each Task and its associated Notifications, effectively filtering all data so employees are only sent the information relevant to them. Securing feature functionality allows users to control system-wide who has permission to perform various activities in MyAssistant. For example, you may want your project managers to be able to mark a Notification Notify When True, but you don’t want them to be able to mark items Don’t Notify Again.
Record-Level Security When record-level security is enabled, a users’s access to Tasks and Notifications is determined in two places: the Assign Users window and the Task Setup Wizard. In the Assign Users window you can designate certain Windows users as Admin users, who will be able to see all Tasks and Notifications regardless of security settings. In the Task Setup Wizard, a user’s access to the Task and its Notifications when record-level security is enabled will be determined on the following factors:
1. Is the user an intended recipient? If a user’s email address was included in either the To, CC, BCC or Also Notify sections in the Email step of the Task Setup Wizard, they will be able to see all the Notifications generated by the Task.
2. Is the user’s email address part of an included email directory? If a user’s email address is part of an email directory used in a MyAssistant Task, they will be sent and have access to only the Notifications that are matched with his or her email address.
3. Has the user or a security group that the user belongs to been added in the To enable record-level security, click [Secure Tasks and Notifications] in the ribbon in the Assign Users window, then check the box in the popup window (pictured below) and click [OK].
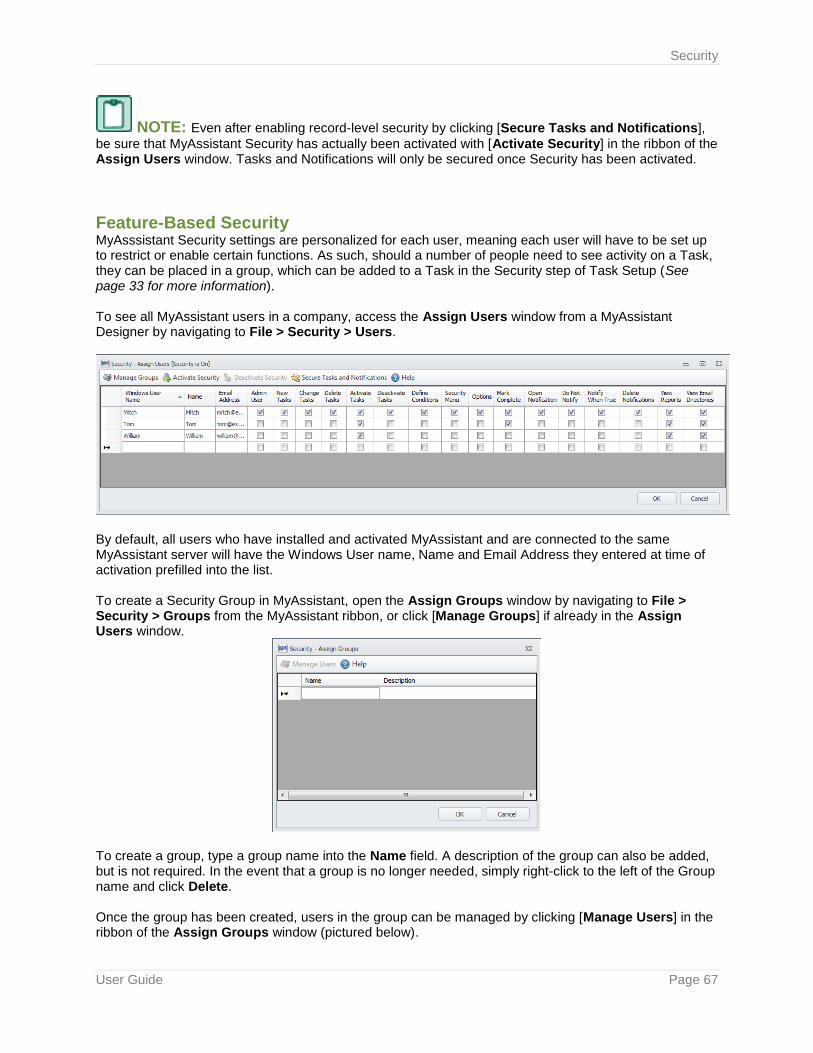
Security
User Guide Page 67
NOTE: Even after enabling record-level security by clicking [Secure Tasks and Notifications],
be sure that MyAssistant Security has actually been activated with [Activate Security] in the ribbon of the Assign Users window. Tasks and Notifications will only be secured once Security has been activated.
Feature-Based Security MyAsssistant Security settings are personalized for each user, meaning each user will have to be set up to restrict or enable certain functions. As such, should a number of people need to see activity on a Task, they can be placed in a group, which can be added to a Task in the Security step of Task Setup (See page 33 for more information). To see all MyAssistant users in a company, access the Assign Users window from a MyAssistant Designer by navigating to File > Security > Users.
By default, all users who have installed and activated MyAssistant and are connected to the same MyAssistant server will have the Windows User name, Name and Email Address they entered at time of activation prefilled into the list. To create a Security Group in MyAssistant, open the Assign Groups window by navigating to File > Security > Groups from the MyAssistant ribbon, or click [Manage Groups] if already in the Assign Users window.
To create a group, type a group name into the Name field. A description of the group can also be added, but is not required. In the event that a group is no longer needed, simply right-click to the left of the Group name and click Delete. Once the group has been created, users in the group can be managed by clicking [Manage Users] in the ribbon of the Assign Groups window (pictured below).
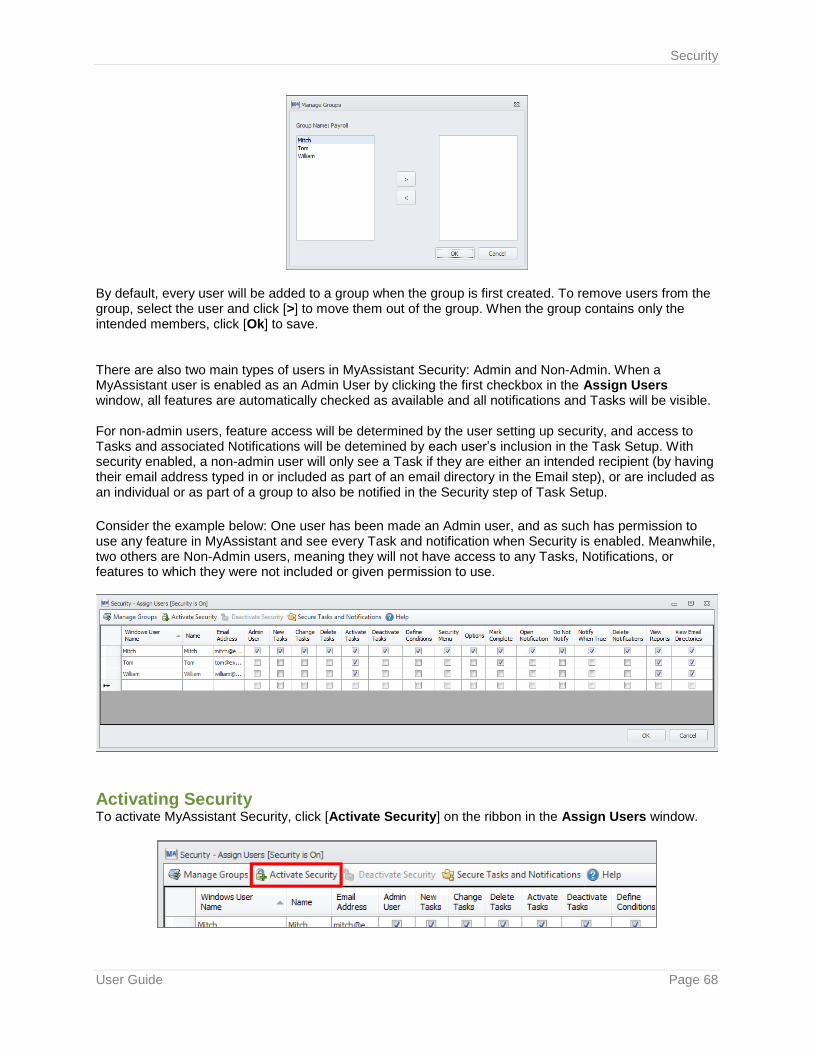
Security
User Guide Page 68
By default, every user will be added to a group when the group is first created. To remove users from the group, select the user and click [>] to move them out of the group. When the group contains only the intended members, click [Ok] to save. There are also two main types of users in MyAssistant Security: Admin and Non-Admin. When a MyAssistant user is enabled as an Admin User by clicking the first checkbox in the Assign Users window, all features are automatically checked as available and all notifications and Tasks will be visible. For non-admin users, feature access will be determined by the user setting up security, and access to Tasks and associated Notifications will be detemined by each user’s inclusion in the Task Setup. With security enabled, a non-admin user will only see a Task if they are either an intended recipient (by having their email address typed in or included as part of an email directory in the Email step), or are included as an individual or as part of a group to also be notified in the Security step of Task Setup.
Consider the example below: One user has been made an Admin user, and as such has permission to use any feature in MyAssistant and see every Task and notification when Security is enabled. Meanwhile, two others are Non-Admin users, meaning they will not have access to any Tasks, Notifications, or features to which they were not included or given permission to use.
Activating Security To activate MyAssistant Security, click [Activate Security] on the ribbon in the Assign Users window.

Security
User Guide Page 69
MyAssistant Security in Sage MyCommunicator for Outlook MyAssistant Security also affects the access to Tasks and Notifications in Sage MyCommunicator for Outlook, which works with MyAssistant to further integrate users’ Sage 300 CRE data with their email. Just like how record-level security can affect what Tasks and Notifications a user sees in MyAssistant, the same principle will apply in the Sage MyCommunicator Notification Log. Furthermore, the Mark Complete feature in MyCommunicator is enabled and disabled in the Assign Users window of MyAssistant Security. For more information on Sage MyCommunicator, see page 73. Some security functions in MyAssistant that are linked to MyCommunicator work independently of MyAssistant Security, and can be used even when Security is deactivated. For example, Tasks that are set up with fields marked as editable in MyCommunicator can still secure who is able to update Sage data without MyAssistant Security being activated. In fact, if a field is marked as editable but the box next to “Secure who can update Sage 300 CRE data from MyCommunicator” is left unchecked, anyone with access to the Notifications will be able to update Sage data.
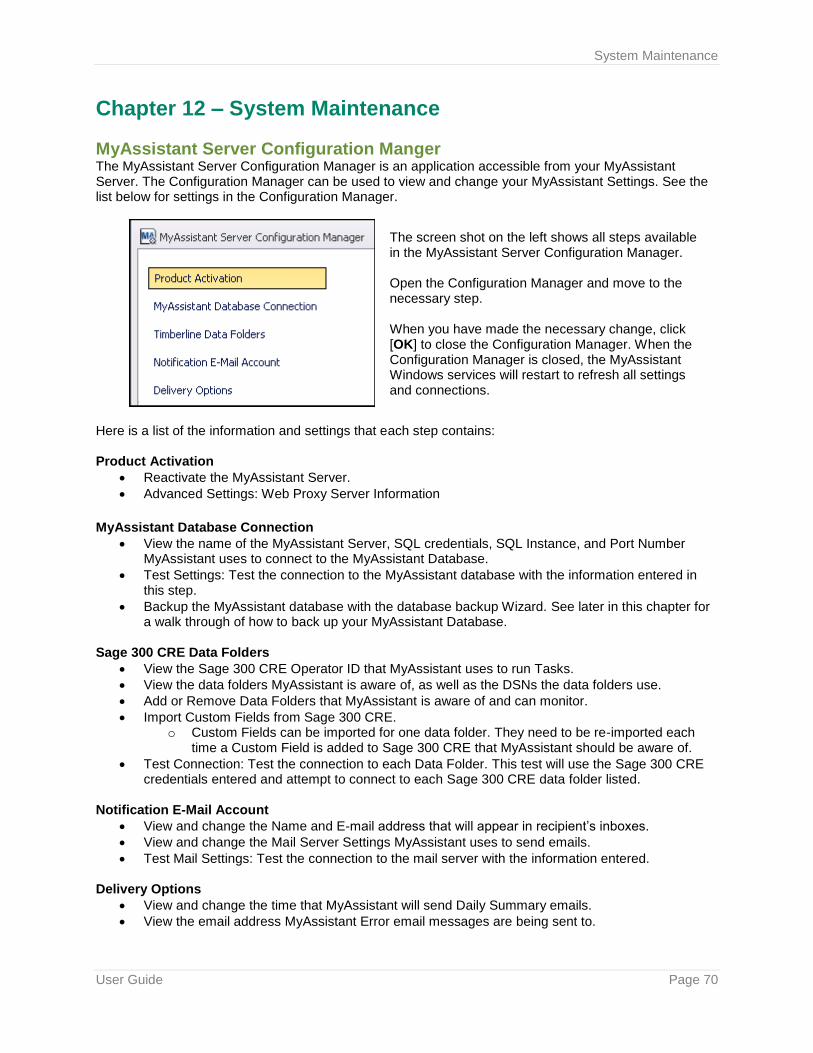
System Maintenance
User Guide Page 70
Chapter 12 – System Maintenance
MyAssistant Server Configuration Manger The MyAssistant Server Configuration Manager is an application accessible from your MyAssistant Server. The Configuration Manager can be used to view and change your MyAssistant Settings. See the list below for settings in the Configuration Manager.
The screen shot on the left shows all steps available in the MyAssistant Server Configuration Manager. Open the Configuration Manager and move to the necessary step. When you have made the necessary change, click [OK] to close the Configuration Manager. When the Configuration Manager is closed, the MyAssistant Windows services will restart to refresh all settings and connections.
Here is a list of the information and settings that each step contains: Product Activation
• Reactivate the MyAssistant Server.
• Advanced Settings: Web Proxy Server Information
MyAssistant Database Connection
• View the name of the MyAssistant Server, SQL credentials, SQL Instance, and Port Number MyAssistant uses to connect to the MyAssistant Database.
• Test Settings: Test the connection to the MyAssistant database with the information entered in this step.
• Backup the MyAssistant database with the database backup Wizard. See later in this chapter for a walk through of how to back up your MyAssistant Database.
Sage 300 CRE Data Folders
• View the Sage 300 CRE Operator ID that MyAssistant uses to run Tasks.
• View the data folders MyAssistant is aware of, as well as the DSNs the data folders use.
• Add or Remove Data Folders that MyAssistant is aware of and can monitor.
• Import Custom Fields from Sage 300 CRE. o Custom Fields can be imported for one data folder. They need to be re-imported each
time a Custom Field is added to Sage 300 CRE that MyAssistant should be aware of.
• Test Connection: Test the connection to each Data Folder. This test will use the Sage 300 CRE credentials entered and attempt to connect to each Sage 300 CRE data folder listed.
Notification E-Mail Account
• View and change the Name and E-mail address that will appear in recipient’s inboxes.
• View and change the Mail Server Settings MyAssistant uses to send emails.
• Test Mail Settings: Test the connection to the mail server with the information entered. Delivery Options
• View and change the time that MyAssistant will send Daily Summary emails.
• View the email address MyAssistant Error email messages are being sent to.
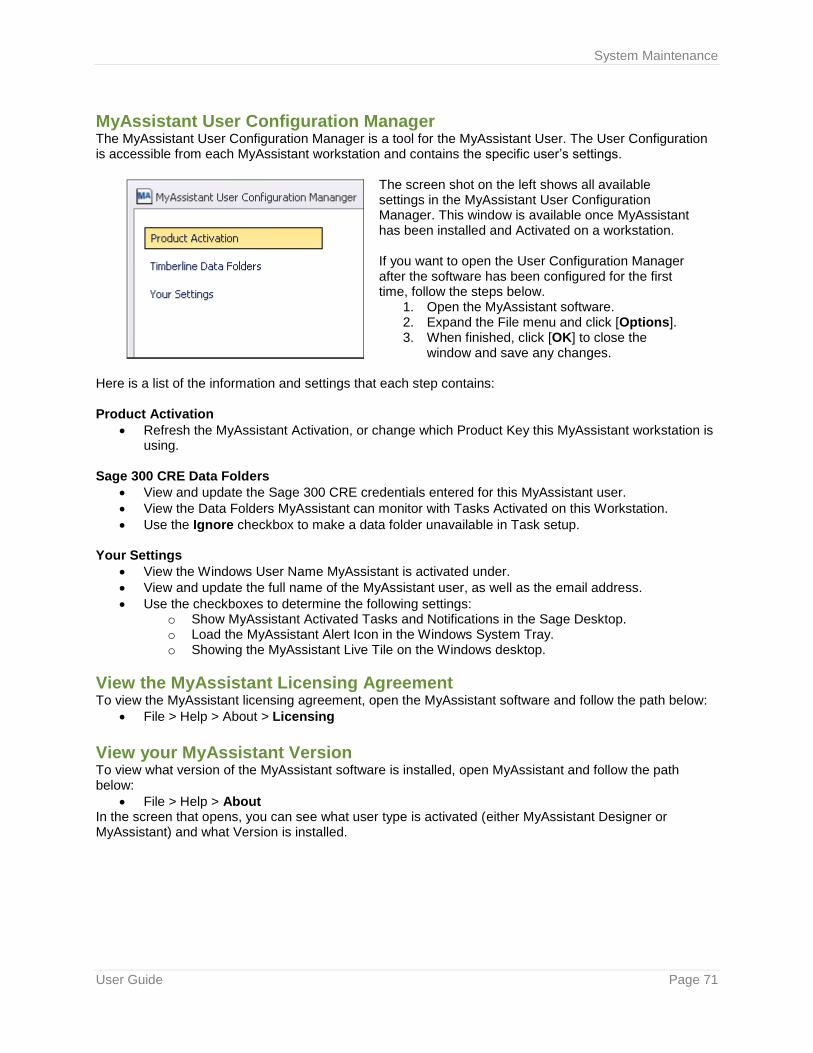
System Maintenance
User Guide Page 71
MyAssistant User Configuration Manager The MyAssistant User Configuration Manager is a tool for the MyAssistant User. The User Configuration is accessible from each MyAssistant workstation and contains the specific user’s settings.
The screen shot on the left shows all available settings in the MyAssistant User Configuration Manager. This window is available once MyAssistant has been installed and Activated on a workstation. If you want to open the User Configuration Manager after the software has been configured for the first time, follow the steps below.
1. Open the MyAssistant software. 2. Expand the File menu and click [Options]. 3. When finished, click [OK] to close the
window and save any changes. Here is a list of the information and settings that each step contains: Product Activation
• Refresh the MyAssistant Activation, or change which Product Key this MyAssistant workstation is using.
Sage 300 CRE Data Folders
• View and update the Sage 300 CRE credentials entered for this MyAssistant user.
• View the Data Folders MyAssistant can monitor with Tasks Activated on this Workstation.
• Use the Ignore checkbox to make a data folder unavailable in Task setup. Your Settings
• View the Windows User Name MyAssistant is activated under.
• View and update the full name of the MyAssistant user, as well as the email address.
• Use the checkboxes to determine the following settings: o Show MyAssistant Activated Tasks and Notifications in the Sage Desktop. o Load the MyAssistant Alert Icon in the Windows System Tray. o Showing the MyAssistant Live Tile on the Windows desktop.
View the MyAssistant Licensing Agreement To view the MyAssistant licensing agreement, open the MyAssistant software and follow the path below:
• File > Help > About > Licensing
View your MyAssistant Version To view what version of the MyAssistant software is installed, open MyAssistant and follow the path below:
• File > Help > About In the screen that opens, you can see what user type is activated (either MyAssistant Designer or MyAssistant) and what Version is installed.
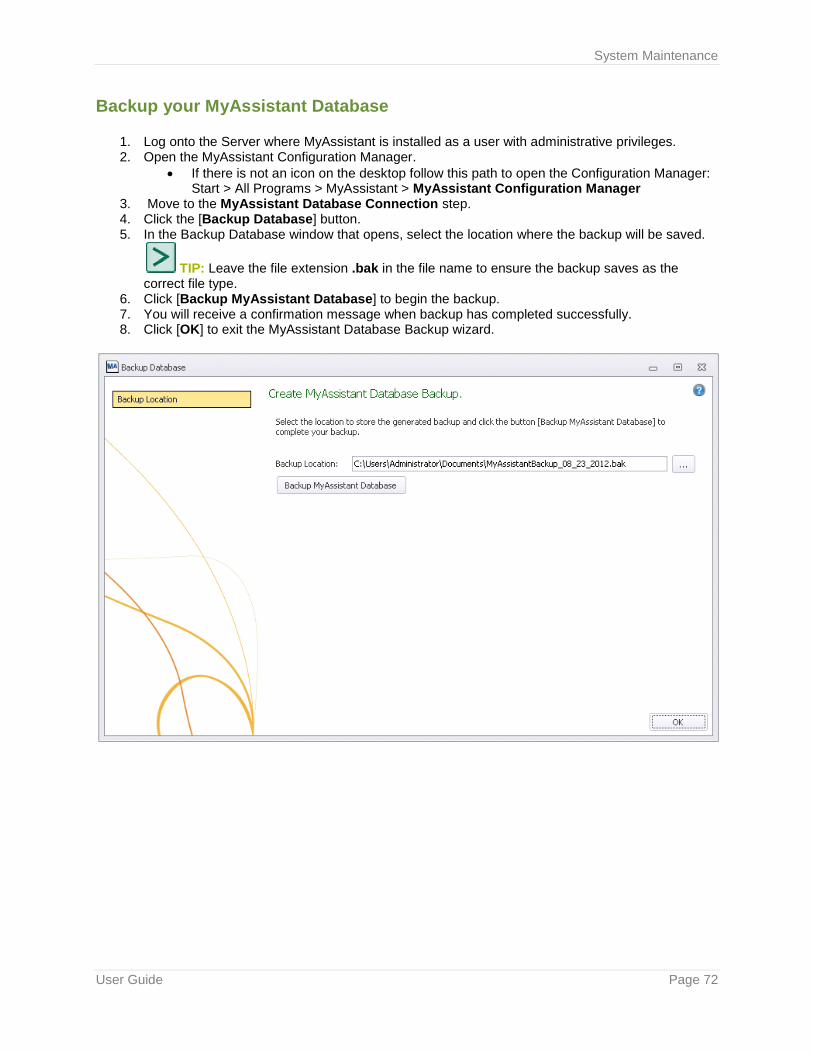
System Maintenance
User Guide Page 72
Backup your MyAssistant Database
1. Log onto the Server where MyAssistant is installed as a user with administrative privileges. 2. Open the MyAssistant Configuration Manager.
• If there is not an icon on the desktop follow this path to open the Configuration Manager: Start > All Programs > MyAssistant > MyAssistant Configuration Manager
3. Move to the MyAssistant Database Connection step. 4. Click the [Backup Database] button. 5. In the Backup Database window that opens, select the location where the backup will be saved.
TIP: Leave the file extension .bak in the file name to ensure the backup saves as the correct file type.
6. Click [Backup MyAssistant Database] to begin the backup. 7. You will receive a confirmation message when backup has completed successfully. 8. Click [OK] to exit the MyAssistant Database Backup wizard.

Sage MyCommunicator for Outlook
User Guide Page 73
Chapter 13 – Sage MyCommunicator for Outlook
What is Sage MyCommunicator for Outlook? MyCommunicator is a Microsoft Outlook plugin from Sage (sold separately) that will work with the MyAssistant software to further integrate your Sage 300 CRE data with your email. Through MyCommunicator, users will be able to:
• Access accounting and operations data
• Facilitate communication associated with business activity
• Track activity & accountability around completion of tasks
• Update project accounting data in Sage 300 –– all from within Microsoft Outlook.
How does MyCommunicator work? When a MyCommunicator user receives an email containing notifications from MyAssistant, they will be able to open that email in a live grid form, enabling the user to perform specific actions on individual notifications. Here is what a MyAssistant email looks like when it is sent to a normal Microsoft Outlook user:

Sage MyCommunicator for Outlook
User Guide Page 74
Now, here is the same MyAssistant email when it has been received and opened in a new window by someone with MyCommunicator installed:
With MyCommunicator, users now have the ability to select individual notifications from a list and perform actions specific only to those items.
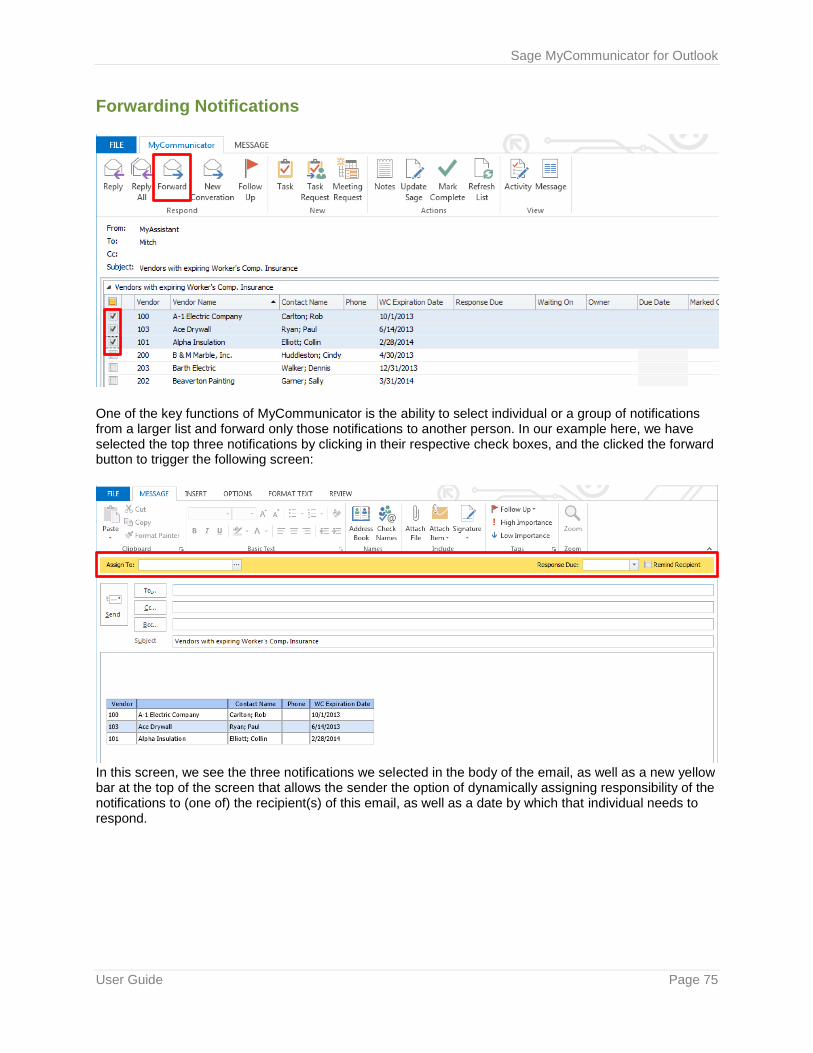
Sage MyCommunicator for Outlook
User Guide Page 75
Forwarding Notifications
One of the key functions of MyCommunicator is the ability to select individual or a group of notifications from a larger list and forward only those notifications to another person. In our example here, we have selected the top three notifications by clicking in their respective check boxes, and the clicked the forward button to trigger the following screen:
In this screen, we see the three notifications we selected in the body of the email, as well as a new yellow bar at the top of the screen that allows the sender the option of dynamically assigning responsibility of the notifications to (one of) the recipient(s) of this email, as well as a date by which that individual needs to respond.
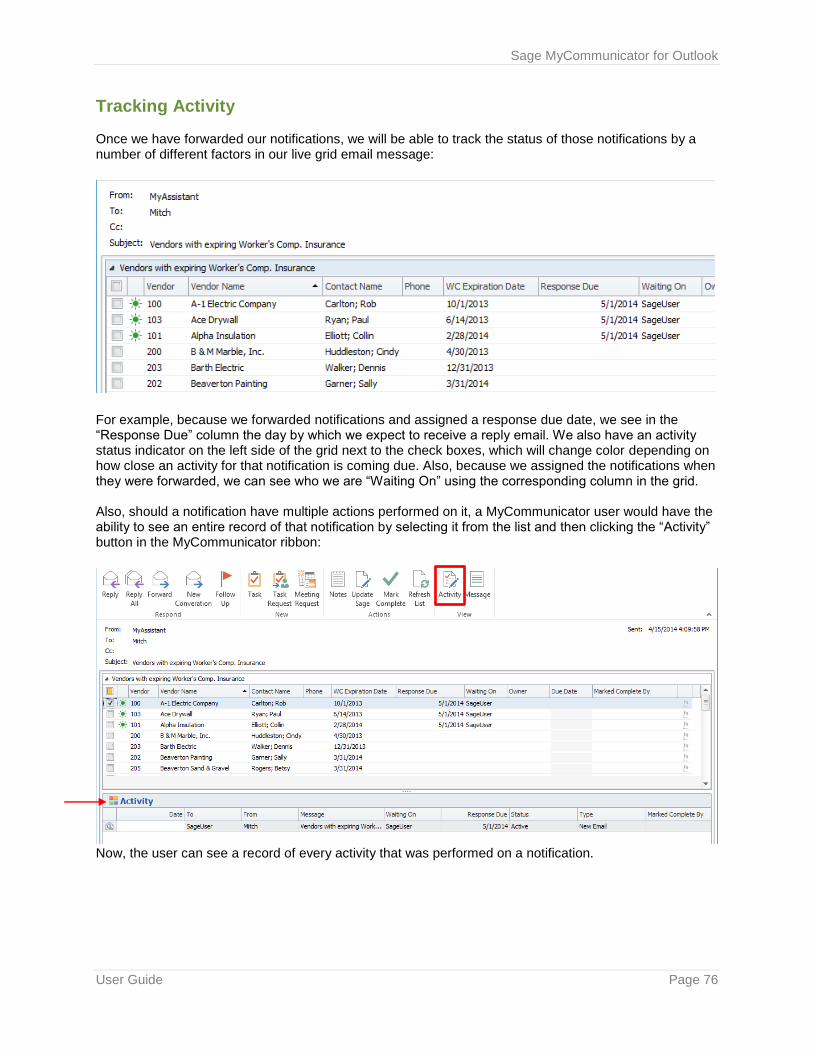
Sage MyCommunicator for Outlook
User Guide Page 76
Tracking Activity Once we have forwarded our notifications, we will be able to track the status of those notifications by a number of different factors in our live grid email message:
For example, because we forwarded notifications and assigned a response due date, we see in the “Response Due” column the day by which we expect to receive a reply email. We also have an activity status indicator on the left side of the grid next to the check boxes, which will change color depending on how close an activity for that notification is coming due. Also, because we assigned the notifications when they were forwarded, we can see who we are “Waiting On” using the corresponding column in the grid. Also, should a notification have multiple actions performed on it, a MyCommunicator user would have the ability to see an entire record of that notification by selecting it from the list and then clicking the “Activity” button in the MyCommunicator ribbon:
Now, the user can see a record of every activity that was performed on a notification.
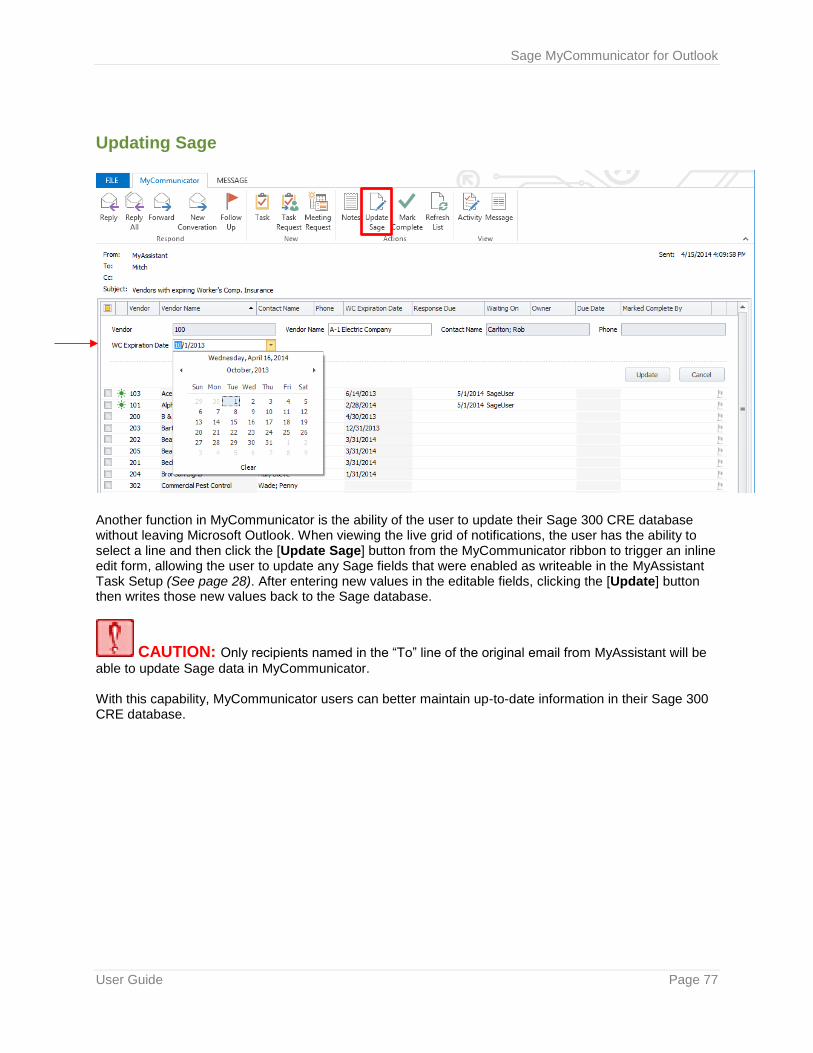
Sage MyCommunicator for Outlook
User Guide Page 77
Updating Sage
Another function in MyCommunicator is the ability of the user to update their Sage 300 CRE database without leaving Microsoft Outlook. When viewing the live grid of notifications, the user has the ability to select a line and then click the [Update Sage] button from the MyCommunicator ribbon to trigger an inline edit form, allowing the user to update any Sage fields that were enabled as writeable in the MyAssistant Task Setup (See page 28). After entering new values in the editable fields, clicking the [Update] button then writes those new values back to the Sage database.
CAUTION: Only recipients named in the “To” line of the original email from MyAssistant will be
able to update Sage data in MyCommunicator. With this capability, MyCommunicator users can better maintain up-to-date information in their Sage 300 CRE database.


![FROM SCALE TO REVENUE€¦ · QuickBooks Yes Sage 50 – US Edition (formerly Sage Peachtree) Yes Sage 100 ]Contractor (formerly Sage Master Builder) Yes Sage 100 ERP (formerly Sage](https://img.pdfslide.us/doc/110x75/5f70586f8b6ad8086367e0a5/from-scale-to-revenue-quickbooks-yes-sage-50-a-us-edition-formerly-sage-peachtree.jpg)