Embed Size (px)
Citation preview
Multimedia System
® S-presso
User GuideSoftware Information

i ii ii ii ii i
Copy r i ght © 2004 ASUSTeK COMPUTER INC . A l l R i ghts Rese rved .Copy r ight © 2004 ASUSTeK COMPUTER INC . A l l R i ghts Rese rved .Copy r ight © 2004 ASUSTeK COMPUTER INC . A l l R i ghts Rese rved .Copy r ight © 2004 ASUSTeK COMPUTER INC . A l l R i ghts Rese rved .Copy r ight © 2004 ASUSTeK COMPUTER INC . A l l R i ghts Rese rved .
No part of this manual, including the products and software described in it, may bereproduced, transmitted, transcribed, stored in a retrieval system, or translated into anylanguage in any form or by any means, except documentation kept by the purchaser forbackup purposes, without the express written permission of ASUSTeK COMPUTER INC.(“ASUS”).
Product warranty or service will not be extended if: (1) the product is repaired, modified oraltered, unless such repair, modification of alteration is authorized in writing by ASUS; or (2)the serial number of the product is defaced or missing.
ASUS PROVIDES THIS MANUAL “AS IS” WITHOUT WARRANTY OF ANY KIND, EITHER EXPRESSOR IMPLIED, INCLUDING BUT NOT LIMITED TO THE IMPLIED WARRANTIES OR CONDITIONS OFMERCHANTABILITY OR FITNESS FOR A PARTICULAR PURPOSE. IN NO EVENT SHALL ASUS, ITSDIRECTORS, OFFICERS, EMPLOYEES OR AGENTS BE LIABLE FOR ANY INDIRECT, SPECIAL,INCIDENTAL, OR CONSEQUENTIAL DAMAGES (INCLUDING DAMAGES FOR LOSS OF PROFITS,LOSS OF BUSINESS, LOSS OF USE OR DATA, INTERRUPTION OF BUSINESS AND THE LIKE),EVEN IF ASUS HAS BEEN ADVISED OF THE POSSIBILITY OF SUCH DAMAGES ARISING FROMANY DEFECT OR ERROR IN THIS MANUAL OR PRODUCT.
SPECIFICATIONS AND INFORMATION CONTAINED IN THIS MANUAL ARE FURNISHED FORINFORMATIONAL USE ONLY, AND ARE SUBJECT TO CHANGE AT ANY TIME WITHOUT NOTICE,AND SHOULD NOT BE CONSTRUED AS A COMMITMENT BY ASUS. ASUS ASSUMES NORESPONSIBILITY OR LIABILITY FOR ANY ERRORS OR INACCURACIES THAT MAY APPEAR INTHIS MANUAL, INCLUDING THE PRODUCTS AND SOFTWARE DESCRIBED IN IT.
Products and corporate names appearing in this manual may or may not be registeredtrademarks or copyrights of their respective companies, and are used only for identificationor explanation and to the owners’ benefit, without intent to infringe.
E1747E1747E1747E1747E1747
First Edit ion V1First Edit ion V1First Edit ion V1First Edit ion V1First Edit ion V1December December December December December 20042004200420042004

i i ii i ii i ii i ii i i
Table of contents
Notices ................................................................................................. v
Safety information .............................................................................. vi
Electrical safety ....................................................................... vi
Operation safety ..................................................................... vi
About this guide ................................................................................ vii
Chapter 1:Chapter 1:Chapter 1:Chapter 1:Chapter 1: Instant OnInstant OnInstant OnInstant OnInstant On
1.1 Installing Instant On.............................................................. 1-2
1.1.1 Requirements for installing to an empty harddisk drive (HDD) ..................................................... 1-2
1.1.2 Requirements for installing to an occupied HDD .... 1-2
1.1.3 Installation procedure ............................................. 1-3
1.2 Using Instant On ................................................................... 1-5
1.2.1 General Setup Menu ................................................ 1-6
1.2.2 Information ............................................................. 1-7
1.2.3 Picture properties ................................................... 1-7
1.3 Entertainment modes ........................................................... 1-9
1.3.1 TV (default mode) .................................................. 1-9
1.3.2 DVD/VCD.............................................................. 1-12
1.3.3 Music/MP3 ............................................................ 1-14
1.4.4 Radio (FM) ............................................................ 1-15
Chapter 2:Chapter 2:Chapter 2:Chapter 2:Chapter 2: Home TheaterHome TheaterHome TheaterHome TheaterHome Theater
2.1 Installing the TV/FM card drivers ......................................... 2-2
2.1.1 Using the installation CD ........................................ 2-2
2.1.2 Using the Windows® Found New HardwareWizard .................................................................... 2-3
2.2 Uninstalling the TV/FM card drivers ..................................... 2-5
2.3 Installing ASUS Home Theater .............................................. 2-6
2.4 Using the ASUS Front Panel Display (AFPD) utility .............. 2-8
2.5 Launching ASUS Home Theater ............................................ 2-9
2.6 Using ASUS Home Theater ................................................. 2-11

i vi vi vi vi v
Table of contents
2.7 Entertainment modes ......................................................... 2-13
2.7.1 TV ......................................................................... 2-13
2.7.2 DVD/VCD .............................................................. 2-18
2.7.3 Pictures ................................................................. 2-21
2.7.4 Videos ................................................................... 2-23
2.7.5 Music .................................................................... 2-25
2.7.6 Radio ..................................................................... 2-27
2.7.7 Setup .................................................................... 2-30
AppendixAppendixAppendixAppendixAppendix
A.1 Specifications ....................................................................... A-2
A.2 Using the remote controller ................................................. A-2
A.3 Remote controller layout ...................................................... A-3
A.4 Remote controller functions ................................................. A-4
A.1 System buttons ...................................................... A-4
A.2 Key table ................................................................ A-5
A.5 International TV systems and standards .............................. A-6
vvvvv
Notices
Federal Communications Commission StatementFederal Communications Commission StatementFederal Communications Commission StatementFederal Communications Commission StatementFederal Communications Commission Statement
This device complies with Part 15 of the FCC Rules. Operation is subjectto the following two conditions:
• This device may not cause harmful interference, and
• This device must accept any interference received includinginterference that may cause undesired operation.
This equipment has been tested and found to comply with the limits for aClass B digital device, pursuant to Part 15 of the FCC Rules. These limitsare designed to provide reasonable protection against harmfulinterference in a residential installation. This equipment generates, usesand can radiate radio frequency energy and, if not installed and used inaccordance with manufacturer’s instructions, may cause harmfulinterference to radio communications. However, there is no guaranteethat interference will not occur in a particular installation. If thisequipment does cause harmful interference to radio or televisionreception, which can be determined by turning the equipment off and on,the user is encouraged to try to correct the interference by one or moreof the following measures:
• Reorient or relocate the receiving antenna.
• Increase the separation between the equipment and receiver.
• Connect the equipment to an outlet on a circuit different from thatto which the receiver is connected.
• Consult the dealer or an experienced radio/TV technician for help.
CanadiaCanadiaCanadiaCanadiaCanadian Department of Communications Statemenn Department of Communications Statemenn Department of Communications Statemenn Department of Communications Statemenn Department of Communications Statementtttt
This digital apparatus does not exceed the Class B limits for radio noiseemissions from digital apparatus set out in the Radio InterferenceRegulations of the Canadian Department of Communications.
This class B digital apparatus complies with CanadianThis class B digital apparatus complies with CanadianThis class B digital apparatus complies with CanadianThis class B digital apparatus complies with CanadianThis class B digital apparatus complies with CanadianICES-003.ICES-003.ICES-003.ICES-003.ICES-003.
The use of shielded cables for connection of the monitor to thegraphics card is required to assure compliance with FCCregulations. Changes or modifications to this unit not expresslyapproved by the party responsible for compliance could void theuser’s authority to operate this equipment.

v iv iv iv iv i
Safety information
Electrical safetyElectrical safetyElectrical safetyElectrical safetyElectrical safety
• To prevent electrical shock hazard, disconnect the power cable fromthe electrical outlet before relocating the system.
• When adding or removing devices to or from the system, ensure thatthe power cables for the devices are unplugged before the signalcables are connected.
• If the power supply is broken, do not try to fix it by yourself. Contacta qualified service technician or your retailer.
Operation safetyOperation safetyOperation safetyOperation safetyOperation safety
• Before installing devices into the system, carefully read all thedocumentation that came with the package.
• Before using the product, make sure all cables are correctlyconnected and the power cables are not damaged. If you detect anydamage, contact your dealer immediately.
• To avoid short circuits, keep paper clips, screws, and staples awayfrom connectors, slots, sockets and circuitry.
• Avoid dust, humidity, and temperature extremes. Do not place theproduct in any area where it may become wet. Place the product on astable surface.
• If you encounter technical problems with the product, contact aqualified service technician or your retailer.
L ith ium-Ion Battery WarningLith ium-Ion Battery WarningLith ium-Ion Battery WarningLith ium-Ion Battery WarningLith ium-Ion Battery Warning
CAUTIONCAUTIONCAUTIONCAUTIONCAUTION: Danger of explosion if battery is incorrectly replaced.Replace only with the same or equivalent type recommended by themanufacturer. Dispose of used batteries according to themanufacturerís instructions.
VORSICHTVORSICHTVORSICHTVORSICHTVORSICHT: Explosionsgetahr bei unsachgemäßen Austausch derBatterie. Ersatz nur durch denselben oder einem vom Herstellerempfohlenem ähnljchen Typ. Entsorgung gebrauchter Batterien nachAngaben des Herstellers.
LASER PRODUCT WARNINGLASER PRODUCT WARNINGLASER PRODUCT WARNINGLASER PRODUCT WARNINGLASER PRODUCT WARNING
CLASS 1 LASER PRODUCTCLASS 1 LASER PRODUCTCLASS 1 LASER PRODUCTCLASS 1 LASER PRODUCTCLASS 1 LASER PRODUCT
v i iv i iv i iv i iv i i
Safeguards
About this guide
AudienceAudienceAudienceAudienceAudience
This guide provides general information and installation instructionsabout the ASUS S-presso. This guide is intended for experienced usersand integrators with hardware knowledge of personal computers.
How this guide is organizedHow this guide is organizedHow this guide is organizedHow this guide is organizedHow this guide is organized
1 .1 .1 .1 .1 . Chapter 1: Instant OnChapter 1: Instant OnChapter 1: Instant OnChapter 1: Instant OnChapter 1: Instant On
This chapter tells you how to install and use Instant OnInstant OnInstant OnInstant OnInstant On.
2 .2 .2 .2 .2 . Chapter 2: Home TheaterChapter 2: Home TheaterChapter 2: Home TheaterChapter 2: Home TheaterChapter 2: Home Theater
This chapter tells you how to install and use Home Theater .Home Theater .Home Theater .Home Theater .Home Theater .
3 .3 .3 .3 .3 . Append ixAppend ixAppend ixAppend ixAppend ix
The Appendix includes information on the remote controller, theASUS S-presso key table, and international TV systems andstandards.
v i i iv i i iv i i iv i i iv i i i
Conventions used in this guideConventions used in this guideConventions used in this guideConventions used in this guideConventions used in this guide
WARNING: WARNING: WARNING: WARNING: WARNING: Information to prevent injury to yourself whentrying to complete a task.
CAUTION: CAUTION: CAUTION: CAUTION: CAUTION: Information to prevent damage to thecomponents when trying to complete a task.
IMPORTANT: IMPORTANT: IMPORTANT: IMPORTANT: IMPORTANT: Instructions that you MUST follow to completea task.
NOTE: NOTE: NOTE: NOTE: NOTE: Tips and additional information to aid in completing atask.
Where to find more informationWhere to find more informationWhere to find more informationWhere to find more informationWhere to find more information
Refer to the following sources for additional information and for productand software updates.
1 .1 .1 .1 .1 . ASUS webs itesASUS webs itesASUS webs itesASUS webs itesASUS webs ites
The ASUS websites worldwide provide updated information onASUS hardware and software products. Refer to the ASUS contactinformation.
2 .2 .2 .2 .2 . Opt ional documentat ionOpt ional documentat ionOpt ional documentat ionOpt ional documentat ionOpt ional documentat ion
Your product package may include optional documentation, suchas warranty flyers, that may have been added by your dealer.These documents are not part of the standard package.
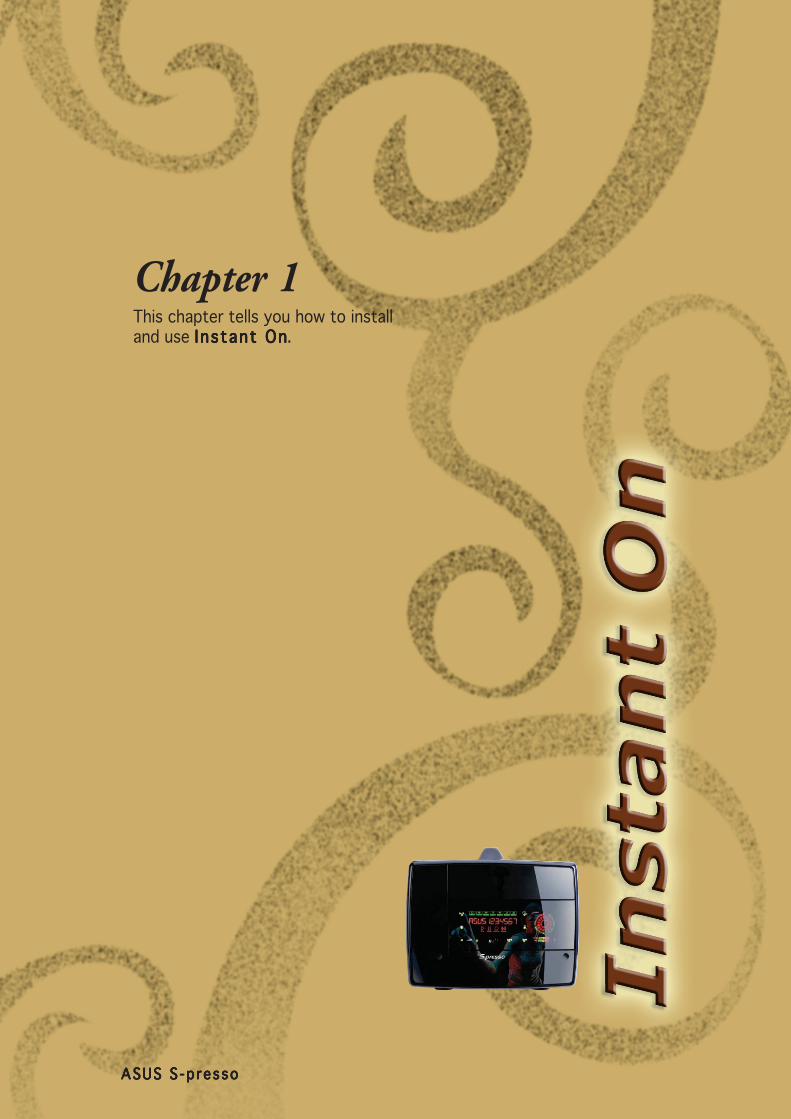
Chapter 1This chapter tells you how to installand use Instant OnInstant OnInstant OnInstant OnInstant On.
ASUS S-pressoASUS S-pressoASUS S-pressoASUS S-pressoASUS S-presso
1 - 21 - 21 - 21 - 21 - 2 Chapter 1 : Instant OnChapter 1 : Instant OnChapter 1 : Instant OnChapter 1 : Instant OnChapter 1 : Instant On
1.1 Installing Instant On
IMPORTANT!IMPORTANT!IMPORTANT!IMPORTANT!IMPORTANT!
• Insta l l I nstant On Insta l l I nstant On Insta l l I nstant On Insta l l I nstant On Insta l l I nstant On be fo rebe fo rebe fo rebe fo rebe fo re insta l l i ng an operat inginsta l l i ng an operat inginsta l l i ng an operat inginsta l l i ng an operat inginsta l l i ng an operat ingsystem in your hard d isk .system in your hard d isk .system in your hard d isk .system in your hard d isk .system in your hard d isk .
• Instant On Instant On Instant On Instant On Instant On does notdoes notdoes notdoes notdoes not support add-on or VGA support add-on or VGA support add-on or VGA support add-on or VGA support add-on or VGAca rds .ca rds .ca rds .ca rds .ca rds .
The S-presso system allows you to enjoy the features of consumerelectronics on a PC platform. Without entering the Windows® operatingsystem, you can watch TV, view DVD/VCD movies, and listen to FMradio/audio CD/MP3 files.
Because motherboard settings and hardware options vary, use thesetup procedures presented in this chapter for general referenceonly. Refer to your OS documentation for more information.
1.1.21.1.21.1.21.1.21.1.2 Requirements for installing to an occupiedRequirements for installing to an occupiedRequirements for installing to an occupiedRequirements for installing to an occupiedRequirements for installing to an occupiedHDDHDDHDDHDDHDD
1. Instant On installation CD
2. 200 MB free and unpartitioned hard disk space
• Clear the hard disk partition if Windows® and/or DOS alreadyoccupies 100% of the hard disk.
• In the BIOS setup, set the hard disk drive as P r imary IDEPr imary IDEPr imary IDEPr imary IDEPr imary IDEMas te rMas te rMas te rMas te rMas te r before installing Instant On.
Before insta l l i ng Instant ON:Before insta l l i ng Instant ON:Before insta l l i ng Instant ON:Before insta l l i ng Instant ON:Before insta l l i ng Instant ON:
••••• set the hard disk drive as Pr imary IDE MasterPr imary IDE MasterPr imary IDE MasterPr imary IDE MasterPr imary IDE Master in the BIOSsetup.
• set the HDD jumper to Maste r .Maste r .Maste r .Maste r .Maste r .
1.1.11.1.11.1.11.1.11.1.1 Requirements for installing to an empty Requirements for installing to an empty Requirements for installing to an empty Requirements for installing to an empty Requirements for installing to an empty hardhardhardhardharddisk drive (disk drive (disk drive (disk drive (disk drive (HDDHDDHDDHDDHDD)))))
1. Instant On installation CD
2. Empty and unpartitioned hard disk

1 - 31 - 31 - 31 - 31 - 3ASUS S-pressoASUS S-pressoASUS S-pressoASUS S-pressoASUS S-presso
2. The Instant On installationscreen appears.Choose your preferredlanguage.
3. The installation processbegins. A bar appears,indicating the progress of theinstallation.
4. Shut down your computer wheninstallation is complete.
1.1.31.1.31.1.31.1.31.1.3 Installation procedureInstallation procedureInstallation procedureInstallation procedureInstallation procedure
1. Boot your PC using the Instant On installation CD.
In the BIOS Boot Menu, set your optical drive as the 1st Boot1st Boot1st Boot1st Boot1st BootDev i ce Dev i ce Dev i ce Dev i ce Dev i ce priority.
The Instant On installation CD will automatically create a 200 MBpartition and install Instant On in it.
1 - 41 - 41 - 41 - 41 - 4 Chapter 1 : Instant OnChapter 1 : Instant OnChapter 1 : Instant OnChapter 1 : Instant OnChapter 1 : Instant On
To change the drive assignment in WindowsTo change the drive assignment in WindowsTo change the drive assignment in WindowsTo change the drive assignment in WindowsTo change the drive assignment in Windows®®®®® XP: XP: XP: XP: XP:
1. Go to Contro l Pane l Contro l Pane l Contro l Pane l Contro l Pane l Contro l Pane l -> Performance and Maintenance Performance and Maintenance Performance and Maintenance Performance and Maintenance Performance and Maintenance ->Admin istrat ive Tools Admin istrat ive Tools Admin istrat ive Tools Admin istrat ive Tools Admin istrat ive Tools -> Computer Management. Computer Management. Computer Management. Computer Management. Computer Management.
2. Use the Disk ManagementDisk ManagementDisk ManagementDisk ManagementDisk Management utility to change Windows® XPpartition as “CCCCC.” Instant On is marked as an unknown partition inWindows® XP. Find Instant On and assign a drive letter to it.
If you will install Windows® XP, Instant On will occupy the firstpartition of your hard disk so Windows® XP will be assigned toDrive D . To prevent the operating system from malfunctioning ifit is not in the default drive, change the drive assignmentfollowing the procedure below.

1 - 51 - 51 - 51 - 51 - 5ASUS S-pressoASUS S-pressoASUS S-pressoASUS S-pressoASUS S-presso
1.2 Using Instant On
Instant On is an application that allows you to watch TV, view DVD/VCD movies, and listen to the radio as well as CD/MP3 music withoutentering the Windows® operating system. Use the touch sensors onthe front panel, the remote controller, or keyboard keys to navigatethrough the Instant On functions.
• You need to install Instant On from the Instant On installationCD to use this feature. See page 1-2.
• For deta i led in format ion on the remote contro l le rFor deta i led in format ion on the remote contro l le rFor deta i led in format ion on the remote contro l le rFor deta i led in format ion on the remote contro l le rFor deta i led in format ion on the remote contro l le rand keyboard contro ls , refer to the Append ix .and keyboard contro ls , refer to the Append ix .and keyboard contro ls , refer to the Append ix .and keyboard contro ls , refer to the Append ix .and keyboard contro ls , refer to the Append ix .
To use Instant On:To use Instant On:To use Instant On:To use Instant On:To use Instant On:
1. Connect the S-presso powerplug and cable.
2. To power on, touch the Instant
On Power Power Power Power Power sensor ( ) for atleast five seconds, or press the
Power (Power (Power (Power (Power ( ))))) button on theremote controller.
P l a y/Pause P l a y/Pause P l a y/Pause P l a y/Pause P l a y/Pause
S top S top S top S top S top
Vo l ume down Vo l ume down Vo l ume down Vo l ume down Vo l ume down
Vo lume up Vo lume up Vo lume up Vo lume up Vo lume up
Rew ind Rew ind Rew ind Rew ind Rew ind
Opt i ca l d r i ve t r ay Opt i ca l d r i ve t r ay Opt i ca l d r i ve t r ay Opt i ca l d r i ve t r ay Opt i ca l d r i ve t r ay e j ec t but ton e j ec t but ton e j ec t but ton e j ec t but ton e j ec t but ton
I n s tant On power I n s tant On power I n s tant On power I n s tant On power I n s tant On power
Mode Mode Mode Mode Mode
Fo rwa rd Fo rwa rd Fo rwa rd Fo rwa rd Fo rwa rd

1 - 61 - 61 - 61 - 61 - 6 Chapter 1 : Instant OnChapter 1 : Instant OnChapter 1 : Instant OnChapter 1 : Instant OnChapter 1 : Instant On
4. To decrease volume, touch ( - )( - )( - )( - )( - ). To increase volume, touch ( + )( + )( + )( + )( + ).
5. To exit Instant On and turn off the system, press the Instant On
PowerPowerPowerPowerPower sensor ((((( ))))) for at least five seconds.
6. To exit Instant On and enter the Windows®operating system, press
PC (PC (PC (PC (PC ( ))))) on the remote controller.
Refer to Chapter 1 of the Hardware In format ionHardware In format ionHardware In format ionHardware In format ionHardware In format ion guide fordetailed descriptions of the S-presso LED panel.
• Instant On goes to TV mode by default.
• See page 1-8 for details on the different entertainmentmodes.
• If you do not touch the PLAY/PAUSEPLAY/PAUSEPLAY/PAUSEPLAY/PAUSEPLAY/PAUSE ( ) sensor toconfirm the mode, the system automatically reverts to theprevious mode.
3. To switch modes, press the appropriate button on the remotecontroller, or touch the Mode Mode Mode Mode Mode sensor in succession until the LEDpanel displays the mode you want. Touch the PLAY/PAUSEPLAY/PAUSEPLAY/PAUSEPLAY/PAUSEPLAY/PAUSE ( )sensor to confirm your choice.
1.2.11.2.11.2.11.2.11.2.1 General Setup MenuGeneral Setup MenuGeneral Setup MenuGeneral Setup MenuGeneral Setup Menu
To enter the General Setup Menu:
1. Press <Ctrl> + <D> on your keyboard, or More info (More info (More info (More info (More info ( ))))) then
OK (OK (OK (OK (OK ( ))))) on the remotecontroller.
2. Use the arrow keys on yourkeyboard or remote controllerto navigate through and setthe following items in thegeneral setup menu:
Language Select . Language Select . Language Select . Language Select . Language Select . Allowsyou to set the language forthe setup menu.
Date & T ime. Date & T ime. Date & T ime. Date & T ime. Date & T ime. Allows you to set the date and time.

1 - 71 - 71 - 71 - 71 - 7ASUS S-pressoASUS S-pressoASUS S-pressoASUS S-pressoASUS S-presso
You can configure this item only if your hardware supports TV outfunction.....
1.2.21.2.21.2.21.2.21.2.2 InformationInformationInformationInformationInformation
This item allows you to keep the onscreen display (OSD) on yourmonitor. To enable information display:
1. Press <Ctrl> + <D> on your keyboard, or More info (More info (More info (More info (More info ( ))))) then
OK (OK (OK (OK (OK ( ))))) on the remote controller to open the setup menu.
2. Use the arrow keys on your keyboard or remote controller to goto the Informat ion Informat ion Informat ion Informat ion Informat ion bar.
3. Press <Enter> on your keyboard, or OK (OK (OK (OK (OK ( ))))) on the remotecontroller.
S leep T imer .S leep T imer .S leep T imer .S leep T imer .S leep T imer . Allows you to set the period of time within whichInstant On automatically turns off.
1.2.31.2.31.2.31.2.31.2.3 Picture propertiesPicture propertiesPicture propertiesPicture propertiesPicture properties
To set the picture properties for TV, DVD/+-VR/VCD/SVCD:
1. Press <Ctrl> + <D> on your keyboard, or More info (More info (More info (More info (More info ( ))))) then
OK (OK (OK (OK (OK ( ))))) on the remote controller.
2. Use the arrow keys on your keyboard or remote controller to goto the P icture Propert ies P icture Propert ies P icture Propert ies P icture Propert ies P icture Propert ies bar.
3. Press <Enter> on your keyboard, or OK (OK (OK (OK (OK ( ))))) on the remotecontroller.
Update .Update .Update .Update .Update . Provides updates about Instant On. If no update is available,the following message appears: “There is no update available.InterVideo InstantON will return to the previous mode.”
Vers ion Informat ion.Vers ion Informat ion.Vers ion Informat ion.Vers ion Informat ion.Vers ion Informat ion. Provides informaton on the Instant Onversion.
Reset to Defau lt .Reset to Defau lt .Reset to Defau lt .Reset to Defau lt .Reset to Defau lt . Allows you to reset the system to the defaultsettings.
3. When done, press <Enter> on your keyboard, or OK ( OK ( OK ( OK ( OK ( ))))) on theremote controller.
4. To hide the menu screen, press <Ctrl> + <D> on your keyboard, or
More info (More info (More info (More info (More info ( ))))) on the remote controller.

1 - 81 - 81 - 81 - 81 - 8 Chapter 1 : Instant OnChapter 1 : Instant OnChapter 1 : Instant OnChapter 1 : Instant OnChapter 1 : Instant On
Choose Reset to Defau l tReset to Defau l tReset to Defau l tReset to Defau l tReset to Defau l t to reset all items to zero level.
6. When done, press <Enter> on your keyboard, or OK ( OK ( OK ( OK ( OK ( ))))) on theremote controller.
7. To hide the menu screen, press <Ctrl> + <D> on your keyboard, or
More info (More info (More info (More info (More info ( ))))) on the remote controller.
4. A setup screen appears,allowing you to set propertiesfor the following items:
• Hue
• Contrast
• Brightness
• Saturation5. Use the arrow keys on your
keyboard and remote controllerto set desired levels.

1 - 91 - 91 - 91 - 91 - 9ASUS S-pressoASUS S-pressoASUS S-pressoASUS S-pressoASUS S-presso
1.3 Entertainment modes
Instant On does not support Photo mode. To use this mode, referto Chapter 2 : Home TheaterChapter 2 : Home TheaterChapter 2 : Home TheaterChapter 2 : Home TheaterChapter 2 : Home Theater.
1.3.11.3.11.3.11.3.11.3.1 TV (default mode)TV (default mode)TV (default mode)TV (default mode)TV (default mode)
• Make sure that you have installed the TV/FM tuner card driverfrom the support CD that came with the system.
• For deta i led in format ion on the remote contro l le rFor deta i led in format ion on the remote contro l le rFor deta i led in format ion on the remote contro l le rFor deta i led in format ion on the remote contro l le rFor deta i led in format ion on the remote contro l le rand keyboard keys , refer to the Append ix .and keyboard keys , refer to the Append ix .and keyboard keys , refer to the Append ix .and keyboard keys , refer to the Append ix .and keyboard keys , refer to the Append ix .
TV setup menuTV setup menuTV setup menuTV setup menuTV setup menu
Genera l Setup, Information, P icture Propert ies. Genera l Setup, Information, P icture Propert ies. Genera l Setup, Information, P icture Propert ies. Genera l Setup, Information, P icture Propert ies. Genera l Setup, Information, P icture Propert ies. See pages1-6 to 1-8 for details.
A/V Input . A/V Input . A/V Input . A/V Input . A/V Input . Allows you to selectthe following:
• TV source - chooseAntenna to maximizechannels based on the TVarea. Choose Cable to scanavailable cable TV channels.
• TV system - set the TVaccording to the type of video input stream. Refer to theAppendix for detailed information on the TV system in yourcountry or region.

1 -101 -101 -101 -101 -10 Chapter 1 : Instant OnChapter 1 : Instant OnChapter 1 : Instant OnChapter 1 : Instant OnChapter 1 : Instant On
• Video input - choose from TV, Composite, or S-Video.
• Audio input - choose from Aux In, Line In, or With Video
Save Favor ite Channel .Save Favor ite Channel .Save Favor ite Channel .Save Favor ite Channel .Save Favor ite Channel .Allows you to save up to 12of your favorite channels foreasy access.
To save your favoritechannel:
1. Go to a TV channel.
2. Press <Ctrl> + <D> onyour keyboard, or Mo reMoreMoreMoreMore
in fo (in fo (in fo (in fo (in fo ( ))))) then OK ( OK ( OK ( OK ( OK ( ))))) on the remote controller to open the
setup menu.
3. Press the down arrow key on your keyboard or remotecontroller to go to the Save Favor ite Channel Save Favor ite Channel Save Favor ite Channel Save Favor ite Channel Save Favor ite Channel bar.
4. Press the right arrow key on your keyboard or remotecontroller to open the sub-menu ( ).
5. Use the arrow keys to assign a number for this channel.Press <Enter> on your keyboard or OK (OK (OK (OK (OK ( ))))) on the remotecontroller .
6. Press the left arrow key on your keyboard or remotecontroller to close the sub-menu.
7. To hide the menu screen, press <Ctrl> + <D> on your
keyboard, or More info (More info (More info (More info (More info ( ))))) on the remote controller.
Channel Scan. Channel Scan. Channel Scan. Channel Scan. Channel Scan. When using the TV mode for the first time, make sureyou scan the available channels in your area.
Do not interrupt or cancel the scanning process. You need to scanthe channels when you first use the TV mode.

1 -111 -111 -111 -111 -11ASUS S-pressoASUS S-pressoASUS S-pressoASUS S-pressoASUS S-presso
F ine Tun ing.F ine Tun ing.F ine Tun ing.F ine Tun ing.F ine Tun ing. Allows you to fine tune the TV display.
To use the Fine Tuning function:
1. Press <Ctrl> + <D> on your keyboard, or More info (More info (More info (More info (More info ( )))))
then OK ( OK ( OK ( OK ( OK ( ))))) on the remote controller to open the setupmenu.
2. Use the down arrow key on your keyboard or remotecontroller to go to the F ine Tun ing F ine Tun ing F ine Tun ing F ine Tun ing F ine Tun ing bar.
3. A message pops up, givingyou instructions on how touse this feature.
4. Press <Enter> on yourkeyboard, or OK (OK (OK (OK (OK ( ))))) onthe remote controller.
5. Use the left/right arrowkeys on your keyboard orremote controller to fine-tune the channel.
If the TV channel does not support SAP, set this item to M o n oM o n oM o n oM o n oM o n o.
Channel Mode.Channel Mode.Channel Mode.Channel Mode.Channel Mode. Allows you to set the channel mode to eitherFavorite Channel or Live Channel.
Prev ious Channel .Prev ious Channel .Prev ious Channel .Prev ious Channel .Prev ious Channel . Allows you to view the last channel before youshut down your system.
TV Area.TV Area.TV Area.TV Area.TV Area. Allows you to set your TV area.
MTS (Audio) .MTS (Audio) .MTS (Audio) .MTS (Audio) .MTS (Audio) . Allows you to set your audio to Stereo, Mono, orSecondary Audio Program.

1 -121 -121 -121 -121 -12 Chapter 1 : Instant OnChapter 1 : Instant OnChapter 1 : Instant OnChapter 1 : Instant OnChapter 1 : Instant On
1.3.21.3.21.3.21.3.21.3.2 DVD/VCDDVD/VCDDVD/VCDDVD/VCDDVD/VCD
Instant On supports the following video disc formats:
• DVD-Video
• DVD+VR
• DVD-VR
• Video CD
• SVCD
To use DVD mode:
1. Enable Instant On. See page 1-5 for details.
2. Switch to DVD DVD DVD DVD DVD mode. See page 1-6 for details.
3. Eject the optical drive tray by pressing the Opt ica l Dr ive TrayOpt ica l Dr ive TrayOpt ica l Dr ive TrayOpt ica l Dr ive TrayOpt ica l Dr ive TrayE jectE jectE jectE jectE ject button or the button on the remote controller.
4. Place the disc you want to play on the optical drive tray.
• If there is no disc in the optical drive, the monitor displays theabove image.
• There is no DVD region setting in Instant On. If the disc youinserted is not within the drive region in your system, thefollowing message appears: “Invalid Region Disc.”
6. Close the optical drive tray by pressing the Opt ica l Dr ive TrayOpt ica l Dr ive TrayOpt ica l Dr ive TrayOpt ica l Dr ive TrayOpt ica l Dr ive TrayE jectE jectE jectE jectE ject button or the button on the remote controller.
7. The movie automatically starts playing.
8. To rewind/fast forward, touch the / sensor or theappropriate keyboard/remote controller keys.
• You may rewind/forward up to the speed of 30x. The systemautomatically goes to normal playing mode after it reachesthe maximum speed.
• To go to the next/previous chapter, use the appropriatekeyboard/remote controller keys.
1 -131 -131 -131 -131 -13ASUS S-pressoASUS S-pressoASUS S-pressoASUS S-pressoASUS S-presso
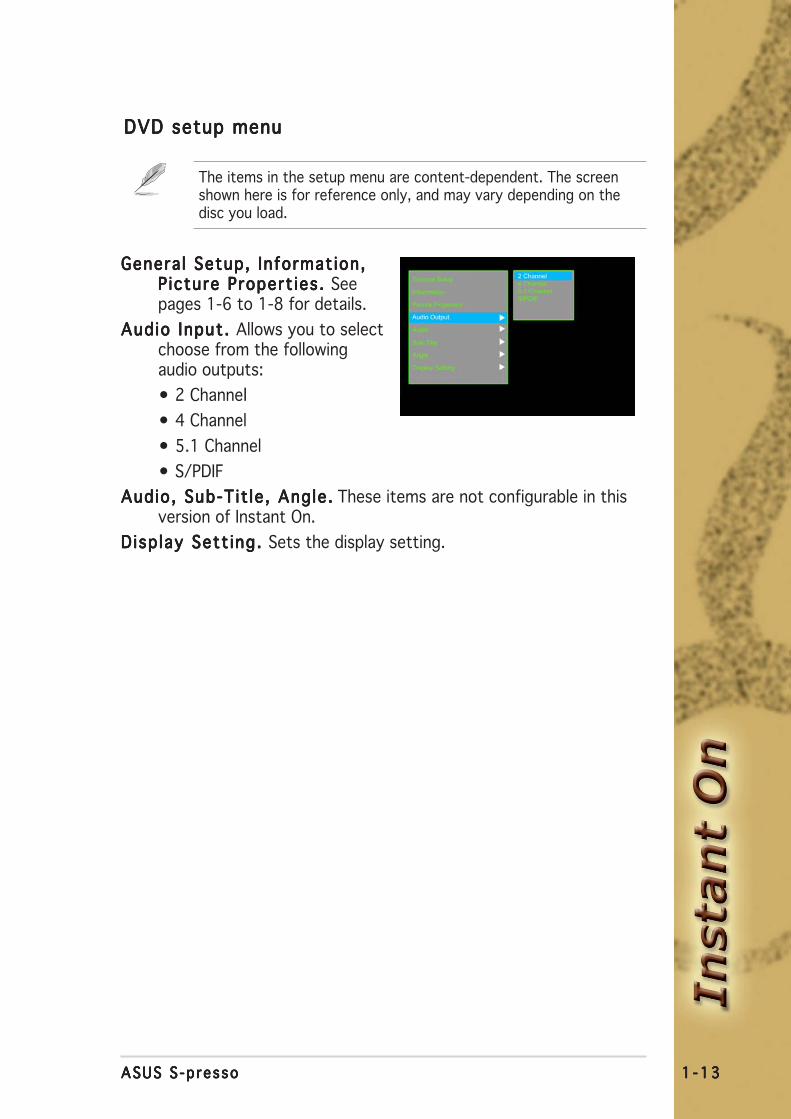
DVD setup menuDVD setup menuDVD setup menuDVD setup menuDVD setup menu
The items in the setup menu are content-dependent. The screenshown here is for reference only, and may vary depending on thedisc you load.
Genera l Setup, Informat ion,Genera l Setup, Informat ion,Genera l Setup, Informat ion,Genera l Setup, Informat ion,Genera l Setup, Informat ion,P icture Propert ies. P icture Propert ies. P icture Propert ies. P icture Propert ies. P icture Propert ies. Seepages 1-6 to 1-8 for details.
Audio Input. Audio Input. Audio Input. Audio Input. Audio Input. Allows you to selectchoose from the followingaudio outputs:
• 2 Channel
• 4 Channel
• 5.1 Channel
• S/PDIF
Audio, Sub-Tit le , Angle.Audio, Sub-Tit le , Angle.Audio, Sub-Tit le , Angle.Audio, Sub-Tit le , Angle.Audio, Sub-Tit le , Angle. These items are not configurable in thisversion of Instant On.
Disp lay Sett ing. D isp lay Sett ing. D isp lay Sett ing. D isp lay Sett ing. D isp lay Sett ing. Sets the display setting.
1 -141 -141 -141 -141 -14 Chapter 1 : Instant OnChapter 1 : Instant OnChapter 1 : Instant OnChapter 1 : Instant OnChapter 1 : Instant On
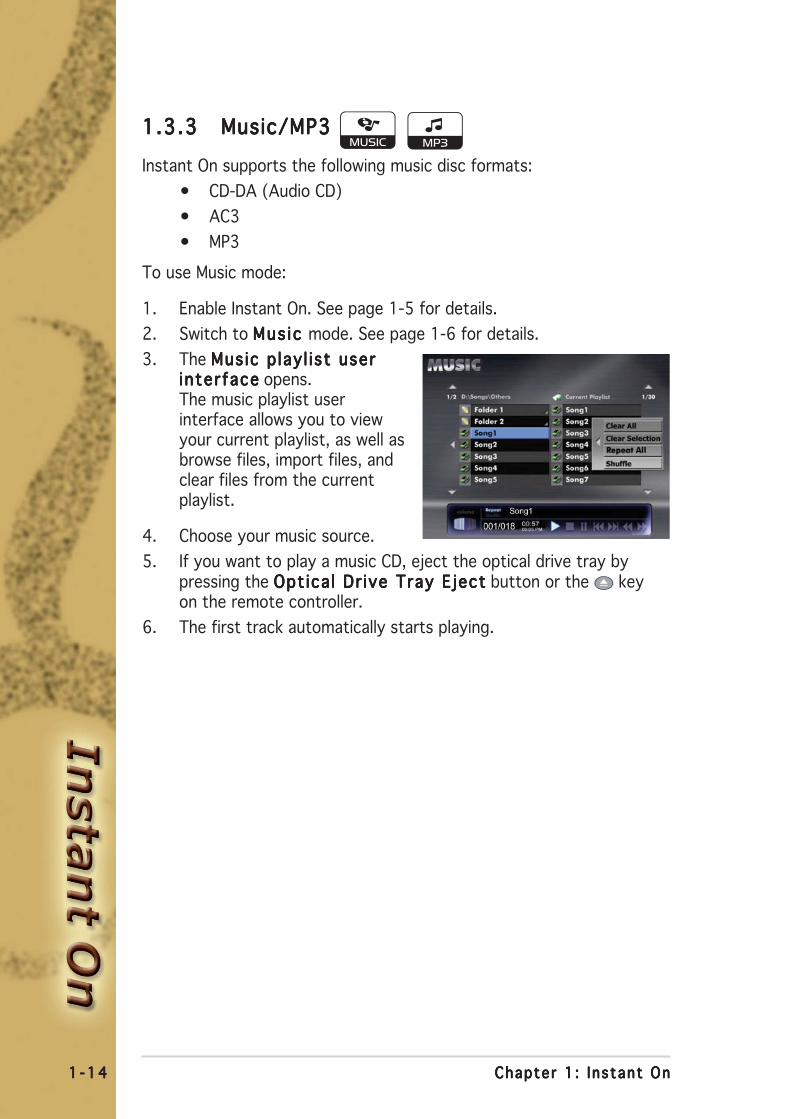
1.3.31.3.31.3.31.3.31.3.3 Music/MP3Music/MP3Music/MP3Music/MP3Music/MP3
Instant On supports the following music disc formats:
• CD-DA (Audio CD)
• AC3
• MP3
To use Music mode:
1. Enable Instant On. See page 1-5 for details.
2. Switch to Mus ic Mus ic Mus ic Mus ic Mus ic mode. See page 1-6 for details.
3. The Music p lay l ist userMusic p lay l ist userMusic p lay l ist userMusic p lay l ist userMusic p lay l ist userinterfaceinterfaceinterfaceinterfaceinterface opens.The music playlist userinterface allows you to viewyour current playlist, as well asbrowse files, import files, andclear files from the currentplaylist.
4. Choose your music source.
5. If you want to play a music CD, eject the optical drive tray bypressing the Opt ica l Dr ive Tray EjectOpt ica l Dr ive Tray EjectOpt ica l Dr ive Tray EjectOpt ica l Dr ive Tray EjectOpt ica l Dr ive Tray Eject button or the keyon the remote controller.
6. The first track automatically starts playing.
1 -151 -151 -151 -151 -15ASUS S-pressoASUS S-pressoASUS S-pressoASUS S-pressoASUS S-presso
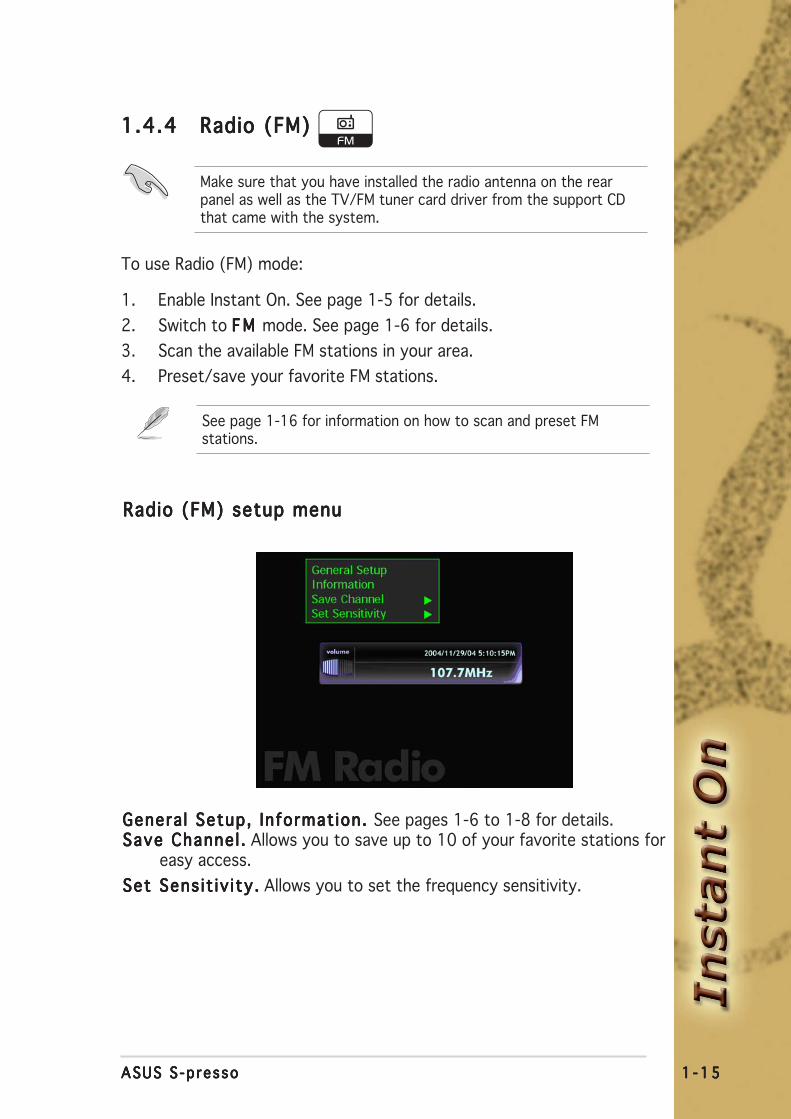
1.4.41.4.41.4.41.4.41.4.4 Radio (FM)Radio (FM)Radio (FM)Radio (FM)Radio (FM)
Make sure that you have installed the radio antenna on the rearpanel as well as the TV/FM tuner card driver from the support CDthat came with the system.
To use Radio (FM) mode:
1. Enable Instant On. See page 1-5 for details.
2. Switch to F M F M F M F M F M mode. See page 1-6 for details.
3. Scan the available FM stations in your area.
4. Preset/save your favorite FM stations.
See page 1-16 for information on how to scan and preset FMstations.
Radio (FM) setup menuRadio (FM) setup menuRadio (FM) setup menuRadio (FM) setup menuRadio (FM) setup menu
Genera l Setup, Informat ion. Genera l Setup, Informat ion. Genera l Setup, Informat ion. Genera l Setup, Informat ion. Genera l Setup, Informat ion. See pages 1-6 to 1-8 for details.Save Channel .Save Channel .Save Channel .Save Channel .Save Channel . Allows you to save up to 10 of your favorite stations for
easy access.
Set Sens it iv i ty .Set Sens it iv i ty .Set Sens it iv i ty .Set Sens it iv i ty .Set Sens it iv i ty . Allows you to set the frequency sensitivity.

1 -161 -161 -161 -161 -16 Chapter 1 : Instant OnChapter 1 : Instant OnChapter 1 : Instant OnChapter 1 : Instant OnChapter 1 : Instant On
To scan and preset an FM station:
1. Press / on the remotecontroller to scan available FMstations in your area.
To scan bacward/forwardby increments of 0.1 MHz,
press / on theremote controller.
2. Press <Ctrl> + <D> onyour keyboard, or More info (More info (More info (More info (More info ( ))))) on the
remote controller to open the setup menu.
3. Press the down arrow key on your keyboard or remotecontroller to go to the Save Channel Save Channel Save Channel Save Channel Save Channel bar.
4. Press the right arrow key on your keyboard or remotecontroller to open the sub-menu ( ).
5. Use the arrow keys to assign a number for this channel.Press <Enter> on your keyboard or OK (OK (OK (OK (OK ( ))))) on the remotecontroller .
6. Press the left arrow key on your keyboard or remotecontroller to close the sub-menu.
7. To hide the menu screen, press <Ctrl> + <D> on your
keyboard, or More info (More info (More info (More info (More info ( ))))) on the remote controller.

ASUS S-pressoASUS S-pressoASUS S-pressoASUS S-pressoASUS S-presso
Chapter 2This chapter tells you how to install and usethe Home Theater Home Theater Home Theater Home Theater Home Theater feature.

2 - 22 - 22 - 22 - 22 - 2 Chapter 2 : Start ing upChapter 2 : Start ing upChapter 2 : Start ing upChapter 2 : Start ing upChapter 2 : Start ing up
2.1 Installing the TV/FM card drivers
2.1.12.1.12.1.12.1.12.1.1 Using the installation CDUsing the installation CDUsing the installation CDUsing the installation CDUsing the installation CD
You need to install the TV/FM card drivers to your computer so youcan use the Home Theater feature of the S-presso system. To installthe card drivers:
1. Turn on your computer.
2. Windows® auto-detectsthe ASUS TV/FM card anddisplays the Found NewFound NewFound NewFound NewFound NewHardware WizardHardware WizardHardware WizardHardware WizardHardware Wizardwindow. Click Cance lCance lCance lCance lCance l.
3. Place the installation CD inyour optical drive.TheASUS TV/FM CardASUS TV/FM CardASUS TV/FM CardASUS TV/FM CardASUS TV/FM Cardinstallation wizard appearsand begins installing thedrivers in your computerClick Cance l Cance l Cance l Cance l Cance l if you wantto stop the installation.
If Auto runAuto runAuto runAuto runAuto run is not enabled in your computer, browse the contents ofthe installation CD to located the Setup .exeSetup .exeSetup .exeSetup .exeSetup .exe file. Double-clickSetup .exeSetup .exeSetup .exeSetup .exeSetup .exe to run the CD.
5. Click Finish after theinstallation wizard completesthe card drivers installation.

2 - 32 - 32 - 32 - 32 - 3ASUS S-pressoASUS S-pressoASUS S-pressoASUS S-pressoASUS S-presso
2.1.22.1.22.1.22.1.22.1.2 Using the WindowsUsing the WindowsUsing the WindowsUsing the WindowsUsing the Windows®®®®® Found New Hardware Found New Hardware Found New Hardware Found New Hardware Found New HardwareWizardWizardWizardWizardWizard
The Windows® Found New Hardware Wizard allows automaticinstallation of the TV/FM card drivers. Windows® auto-detects theTV/FM card hardware and installs the required drivers automaticallyusing the installation CD.
To install the card drivers using the Windows Found New HardwareWizard:
1. Turn on your computer.
2. Place the installation CD inthe optical drive.
3. Windows® auto-detectsthe ASUS TV/FM card anddisplays the Found NewFound NewFound NewFound NewFound NewHardware WizardHardware WizardHardware WizardHardware WizardHardware Wizardwindow. Select Insta l lI nsta l lI nsta l lI nsta l lI nsta l lthe hardwarethe hardwarethe hardwarethe hardwarethe hardwareautomat ica l lyautomat ica l lyautomat ica l lyautomat ica l lyautomat ica l ly(Recommended)(Recommended)(Recommended)(Recommended)(Recommended), thenclick NextNextNextNextNext.
4. Windows® searches for thecard driver, then installs itto your computer.
2 - 42 - 42 - 42 - 42 - 4 Chapter 2 : Start ing upChapter 2 : Start ing upChapter 2 : Start ing upChapter 2 : Start ing upChapter 2 : Start ing up
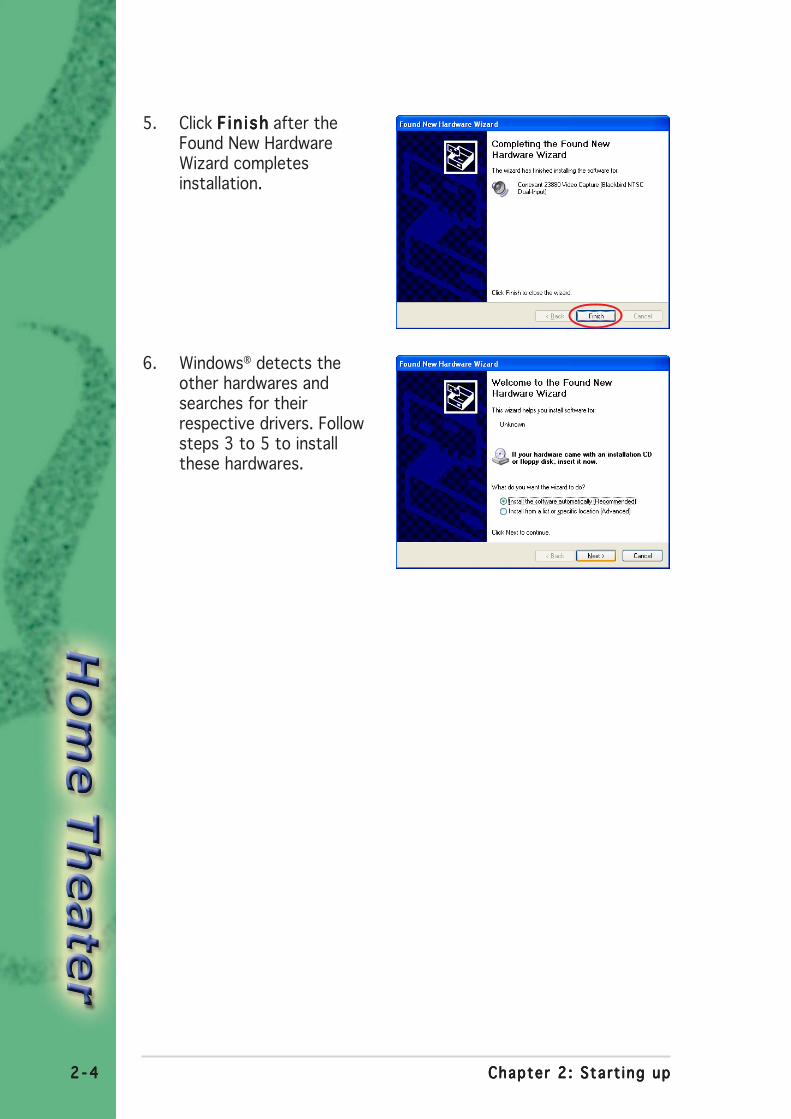
5. Click F in i shF in i shF in i shF in i shF in i sh after theFound New HardwareWizard completesinstallation.
6. Windows® detects theother hardwares andsearches for theirrespective drivers. Followsteps 3 to 5 to installthese hardwares.

2 - 52 - 52 - 52 - 52 - 5ASUS S-pressoASUS S-pressoASUS S-pressoASUS S-pressoASUS S-presso
2.2 Uninstalling the TV/FM card drivers
Follow these instructions to uninstall the TV/FM card drivers from yourcomputer.
1. Turn on your computer.
2. Place the installation CD to the optical drive.
3. Browse the contents of the installation CD to located theSetup.exeSetup.exeSetup.exeSetup.exeSetup.exe file. Double-click Setup.exeSetup.exeSetup.exeSetup.exeSetup.exe to run the CD.
3. A confirmation windowappears. Click O KO KO KO KO K.
4. The InstallShield Wizarduninstalls the card driversfrom your system. ClickF in i shF in i shF in i shF in i shF in i sh.
2 - 62 - 62 - 62 - 62 - 6 Chapter 2 : Start ing upChapter 2 : Start ing upChapter 2 : Start ing upChapter 2 : Start ing upChapter 2 : Start ing up
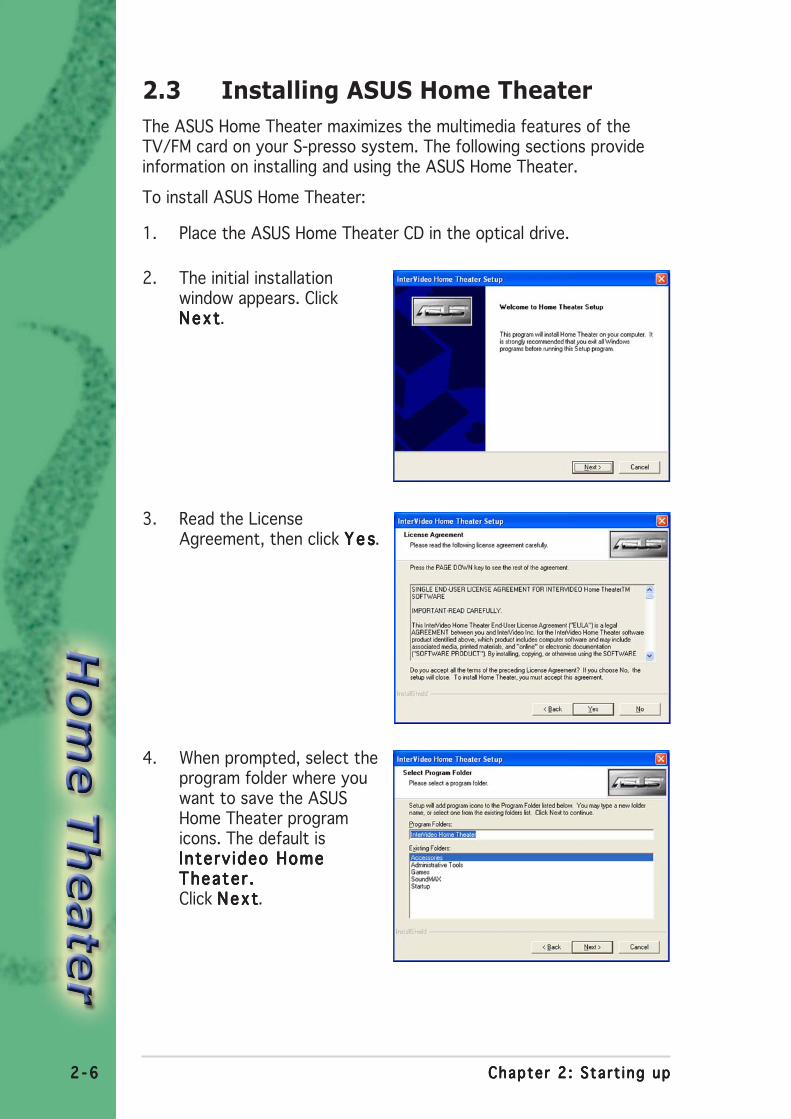
4. When prompted, select theprogram folder where youwant to save the ASUSHome Theater programicons. The default isInterv ideo HomeInterv ideo HomeInterv ideo HomeInterv ideo HomeInterv ideo HomeTheater .Theater .Theater .Theater .Theater .Click NextNextNextNextNext.
2.3 Installing ASUS Home Theater
The ASUS Home Theater maximizes the multimedia features of theTV/FM card on your S-presso system. The following sections provideinformation on installing and using the ASUS Home Theater.
To install ASUS Home Theater:
1. Place the ASUS Home Theater CD in the optical drive.
2. The initial installationwindow appears. ClickNextNextNextNextNext.
3. Read the LicenseAgreement, then click Y e sY e sY e sY e sY e s.

2 - 72 - 72 - 72 - 72 - 7ASUS S-pressoASUS S-pressoASUS S-pressoASUS S-pressoASUS S-presso
5. The Home Theaterapplication is copied intoyour system.
7. The F i le TypesF i le TypesF i le TypesF i le TypesF i le TypesAssoc iat ionAssoc iat ionAssoc iat ionAssoc iat ionAssoc iat ion windowappears. Select the mediafiles for which you wantHome Theater to be thedefault player.
7. The Setup CompleteSetup CompleteSetup CompleteSetup CompleteSetup Completewindow appears, indicatingthat Home Theater hasbeen installed.
Click Y e sY e sY e sY e sY e s to restart yourcomputer now or N oN oN oN oN o torestart later.
Click F in i shF in i shF in i shF in i shF in i sh.
6. The Setup Status Setup Status Setup Status Setup Status Setup Status windowappears, indicating theprogress of the installation.

2 - 82 - 82 - 82 - 82 - 8 Chapter 2 : Start ing upChapter 2 : Start ing upChapter 2 : Start ing upChapter 2 : Start ing upChapter 2 : Start ing up
2.4 Using the ASUS Front Panel Display(AFPD) utility
The ASUS Front Panel Display (AFPD) utility allows you to display andmonitor the CPU/system temperature, CPU/chassis fan performance,and voltage of the S-presso system on the LED panel.
To launch the ASUS Front Panel Display:
1. On the Windows� taskbar,double-click the AFPD icon.
2. The ASUS FPD Setupscreen appears.
3. Check the information thatyou want to display on theLED panel.
4. The information thenappears on the LED panel.
2 - 92 - 92 - 92 - 92 - 9ASUS S-pressoASUS S-pressoASUS S-pressoASUS S-pressoASUS S-presso
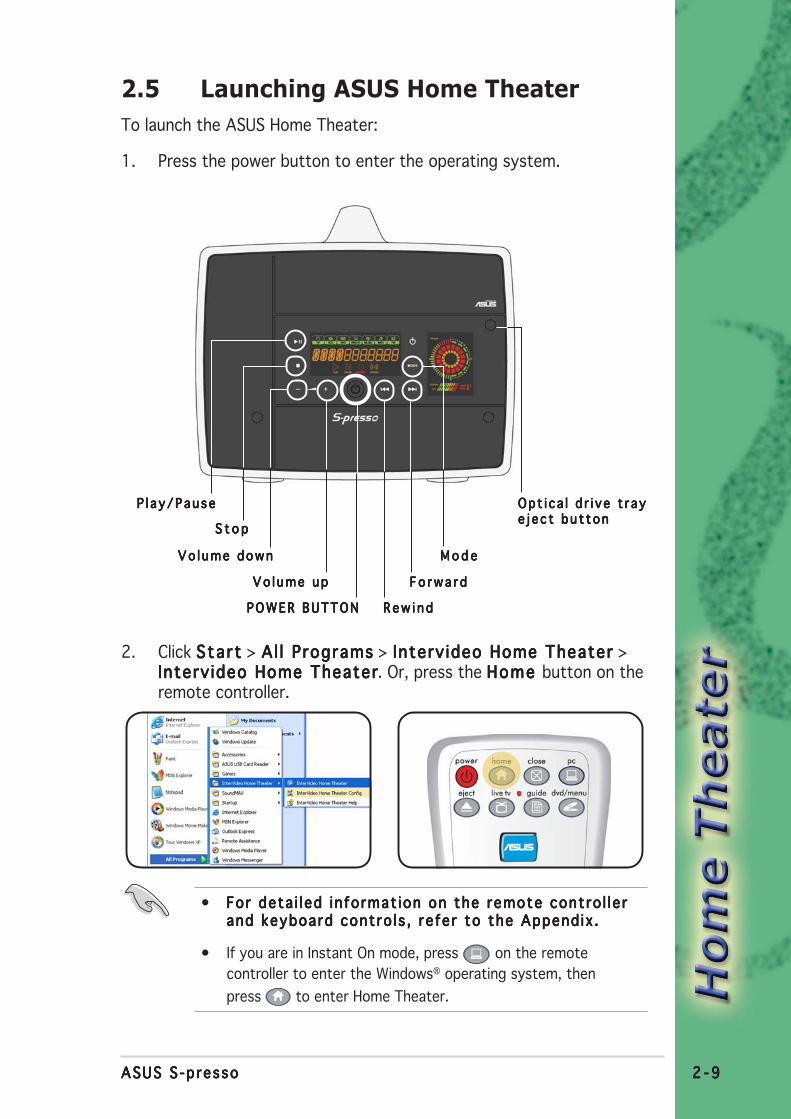
2.5 Launching ASUS Home Theater
To launch the ASUS Home Theater:
1. Press the power button to enter the operating system.
2. Click Sta r tSta r tSta r tSta r tSta r t > Al l ProgramsAl l ProgramsAl l ProgramsAl l ProgramsAl l Programs > Interv ideo Home TheaterInterv ideo Home TheaterInterv ideo Home TheaterInterv ideo Home TheaterInterv ideo Home Theater >Interv ideo Home TheaterInterv ideo Home TheaterInterv ideo Home TheaterInterv ideo Home TheaterInterv ideo Home Theater. Or, press the Home Home Home Home Home button on theremote controller.
Opt i ca l d r i ve t r ayOpt i ca l d r i ve t r ayOpt i ca l d r i ve t r ayOpt i ca l d r i ve t r ayOpt i ca l d r i ve t r aye j ec t bu t tone j ec t bu t tone j ec t bu t tone j ec t bu t tone j ec t bu t ton
M o d eM o d eM o d eM o d eM o d e
F o r w a r dF o r w a r dF o r w a r dF o r w a r dF o r w a r d
R e w i n dR e w i n dR e w i n dR e w i n dR e w i n d
P l a y/PauseP l a y/PauseP l a y/PauseP l a y/PauseP l a y/Pause
S t o pS t o pS t o pS t o pS t o p
Vo l ume downVo l ume downVo l ume downVo l ume downVo l ume down
Vo l ume upVo l ume upVo l ume upVo l ume upVo l ume up
POWER BUTTONPOWER BUTTONPOWER BUTTONPOWER BUTTONPOWER BUTTON
• For deta i led in format ion on the remote contro l le rFor deta i led in format ion on the remote contro l le rFor deta i led in format ion on the remote contro l le rFor deta i led in format ion on the remote contro l le rFor deta i led in format ion on the remote contro l le rand keyboard contro ls , refer to the Append ix .and keyboard contro ls , refer to the Append ix .and keyboard contro ls , refer to the Append ix .and keyboard contro ls , refer to the Append ix .and keyboard contro ls , refer to the Append ix .
• If you are in Instant On mode, press on the remote
controller to enter the Windows® operating system, then
press to enter Home Theater.
2 -102 -102 -102 -102 -10 Chapter 2 : Start ing upChapter 2 : Start ing upChapter 2 : Start ing upChapter 2 : Start ing upChapter 2 : Start ing up
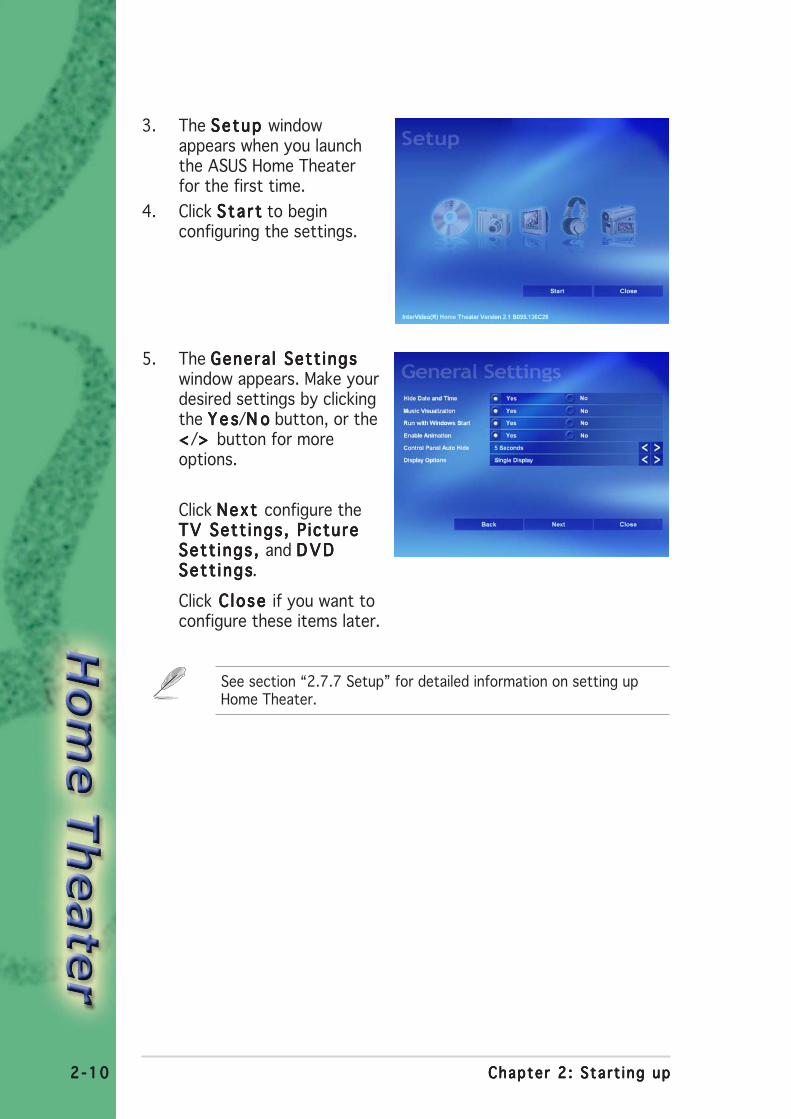
3. The Setup Setup Setup Setup Setup windowappears when you launchthe ASUS Home Theaterfor the first time.
4. Click Sta r tSta r tSta r tSta r tSta r t to beginconfiguring the settings.
5. The Genera l Sett ingsGenera l Sett ingsGenera l Sett ingsGenera l Sett ingsGenera l Sett ingswindow appears. Make yourdesired settings by clickingthe Y e sY e sY e sY e sY e s/N oN oN oN oN o button, or the<<<<</> > > > > button for moreoptions.
Click Next Next Next Next Next configure theTV Sett ings, P ictureTV Sett ings, P ictureTV Sett ings, P ictureTV Sett ings, P ictureTV Sett ings, P ictureSett ings, Sett ings, Sett ings, Sett ings, Sett ings, and D V DD V DD V DD V DD V DSett ingsSett ingsSett ingsSett ingsSett ings.
Click C lose C lose C lose C lose C lose if you want toconfigure these items later.
See section “2.7.7 Setup” for detailed information on setting upHome Theater.

2 -112 -112 -112 -112 -11ASUS S-pressoASUS S-pressoASUS S-pressoASUS S-pressoASUS S-presso
2.6 Using ASUS Home Theater
The ASUS Home Theater features a user-friendly interface thatintegrates all the multimedia functions of the TV/FM card. Thisapplication lets you watch TV, play a DVD/VCD movie, browse pictures,watch video clips, listen to audio files, or tune in to an FM radio stationin a single interface. This flexibility allows you to switch from oneentertainment mode to another without having to launch severalmultimedia applications.
Enterta inment mode buttonsEnterta inment mode buttonsEnterta inment mode buttonsEnterta inment mode buttonsEnterta inment mode buttons - Click on a bar to launch anentertainment mode.
SetupSetupSetupSetupSetup - Click this bar to display the setup window.
Computer account nameComputer account nameComputer account nameComputer account nameComputer account name- Displays the user currently usingthe application.
Window contro l buttonsWindow contro l buttonsWindow contro l buttonsWindow contro l buttonsWindow contro l buttons - Controls the Home Theater window.
Click to return to the Home Theater main window.
Click to return to the previous window.
Click to return to open the Help window.
Click to minimize the window.
Click to return the window to its previous size or to maximizethe window.
Click to exit Home Theater.
EntertainmentEntertainmentEntertainmentEntertainmentEntertainmentm o d em o d em o d em o d em o d ebu t t on sbu t t on sbu t t on sbu t t on sbu t t on s
U s e rU s e rU s e rU s e rU s e ra c coun ta c coun ta c coun ta c coun ta c coun tn a m en a m en a m en a m en a m e
W i n d o wW i n d o wW i n d o wW i n d o wW i n d o wc o n t r o lc o n t r o lc o n t r o lc o n t r o lc o n t r o lb u t t on sbu t t on sbu t t on sbu t t on sbu t t on s
S e t u pS e t u pS e t u pS e t u pS e t u pb u t t o nb u t t o nb u t t o nb u t t o nb u t t o n
W i n d o wW i n d o wW i n d o wW i n d o wW i n d o wc o n t r o lc o n t r o lc o n t r o lc o n t r o lc o n t r o lb u t t on sbu t t on sbu t t on sbu t t on sbu t t on s
Home Theater Main WindowHome Theater Main WindowHome Theater Main WindowHome Theater Main WindowHome Theater Main Window
For deta i led in format ion on the remote contro l le rFor deta i led in format ion on the remote contro l le rFor deta i led in format ion on the remote contro l le rFor deta i led in format ion on the remote contro l le rFor deta i led in format ion on the remote contro l le rand keyboard keys , refer to the Append ix .and keyboard keys , refer to the Append ix .and keyboard keys , refer to the Append ix .and keyboard keys , refer to the Append ix .and keyboard keys , refer to the Append ix .
2 -122 -122 -122 -122 -12 Chapter 2 : Start ing upChapter 2 : Start ing upChapter 2 : Start ing upChapter 2 : Start ing upChapter 2 : Start ing up
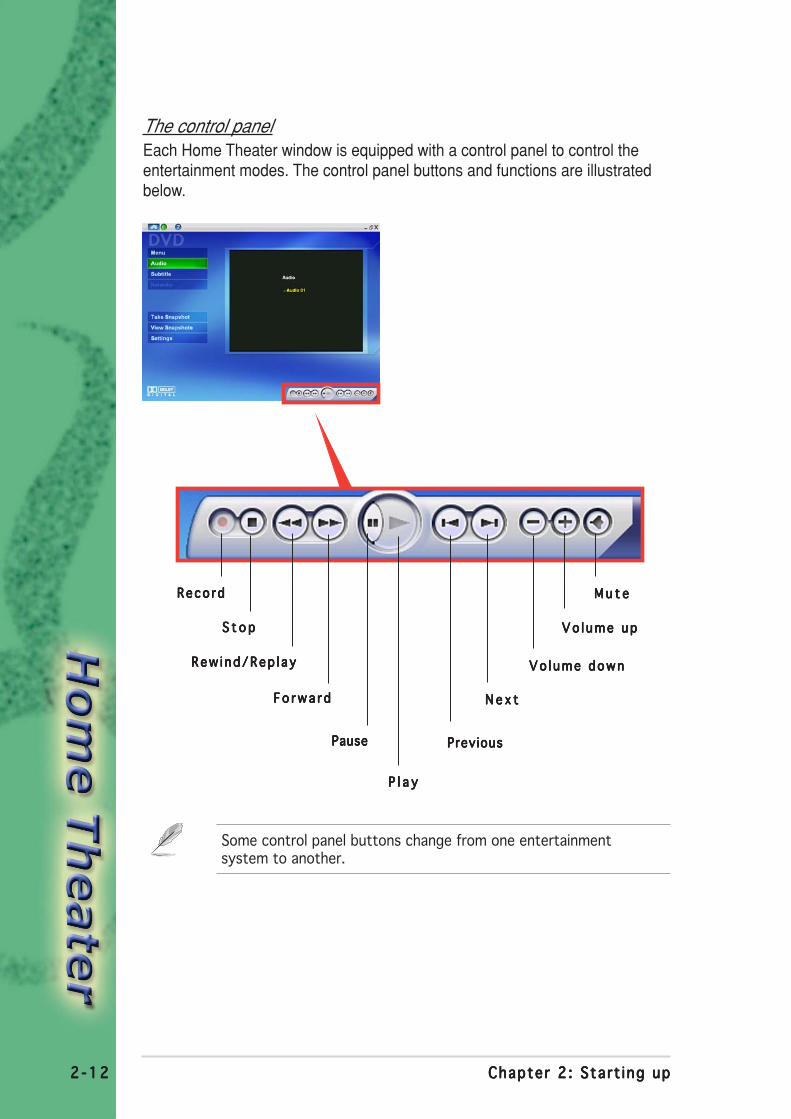
The control panelEach Home Theater window is equipped with a control panel to control theentertainment modes. The control panel buttons and functions are illustratedbelow.
Some control panel buttons change from one entertainmentsystem to another.
S t o pS t o pS t o pS t o pS t o p
P l a yP l a yP l a yP l a yP l a y
Rew ind/Rep l ayRew ind/Rep l ayRew ind/Rep l ayRew ind/Rep l ayRew ind/Rep l ay
Reco rdReco rdReco rdReco rdReco rd
F o r w a r dF o r w a r dF o r w a r dF o r w a r dF o r w a r d
M u t eM u t eM u t eM u t eM u t e
Vo l ume upVo l ume upVo l ume upVo l ume upVo l ume up
Vo l ume downVo l ume downVo l ume downVo l ume downVo l ume down
N e x tN e x tN e x tN e x tN e x t
PreviousPreviousPreviousPreviousPreviousPausePausePausePausePause
2 -132 -132 -132 -132 -13ASUS S-pressoASUS S-pressoASUS S-pressoASUS S-pressoASUS S-presso
2.7 Entertainment modes
On initial use, the ASUS Home Theater instructs you to autoscanavailable TV channels. Click the Set t i ngsSet t i ngsSet t i ngsSet t i ngsSet t i ngs button, then clickAutoscan Autoscan Autoscan Autoscan Autoscan to view the available channels. See “Settings” onpage 2-17 for details.
Time Shifting featureTime Shifting featureTime Shifting featureTime Shifting featureTime Shifting feature
Home Theater comes with the T imeshi ft ing T imeshi ft ing T imeshi ft ing T imeshi ft ing T imeshi ft ing feature that allows youto take a break from the program you are watching, then replay theprogram from where you left off, or jump back to live view.
To use Time Shifting:
1. Click the PausePausePausePausePause button on the Control Panel or press the SpaceSpaceSpaceSpaceSpaceBa rBa rBa rBa rBa r on your keyboard.
2. To replay the program from where you paused, click the PausePausePausePausePause orP l ay P l ay P l ay P l ay P l ay button, or press the Space Bar Space Bar Space Bar Space Bar Space Bar on your keyboard.
3. To return to live TV, click the S topStopStopStopStop button on the Control Panel
When you use the T ime Sh i f t ing T ime Sh i f t ing T ime Sh i f t ing T ime Sh i f t ing T ime Sh i f t ing feature, your system recordsthe live TV from where you clicked PausePausePausePausePause and saves ittemporarily in your hard disc. The slide bar on the Control Panelindicates how much video stream has been recorded.
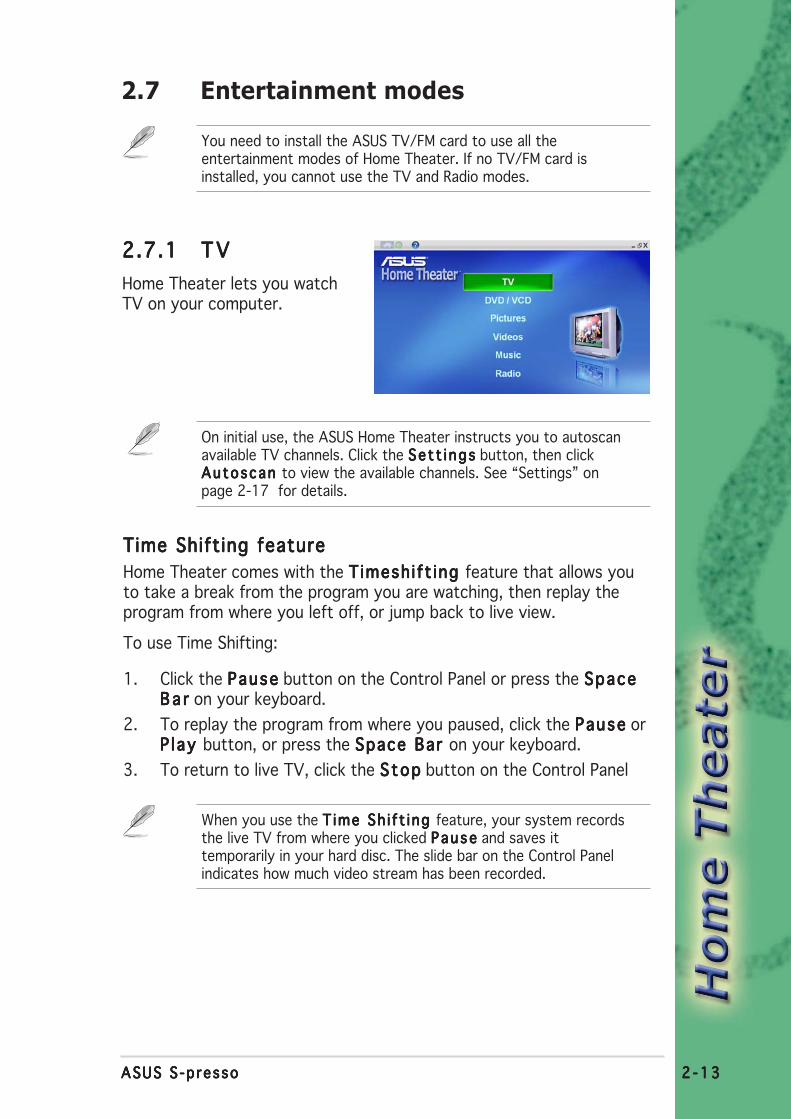
2.7.12.7.12.7.12.7.12.7.1 TVTVTVTVTV
Home Theater lets you watchTV on your computer.
You need to install the ASUS TV/FM card to use all theentertainment modes of Home Theater. If no TV/FM card isinstalled, you cannot use the TV and Radio modes.

2 -142 -142 -142 -142 -14 Chapter 2 : Start ing upChapter 2 : Start ing upChapter 2 : Start ing upChapter 2 : Start ing upChapter 2 : Start ing up
Sub-menusSub-menusSub-menusSub-menusSub-menus
The TV window has seven sub-menus. Change the TV channel by
clicking the Channe lChanne lChanne lChanne lChanne l buttons on the control panel or the button onthe remote controller. Double-click the screen for full-screen viewing.
Channe lChanne lChanne lChanne lChanne lb u t t on sbu t t on sbu t t on sbu t t on sbu t t on s
Home Theater automatically saves a recorded program in theWindows® My V ideos My V ideos My V ideos My V ideos My V ideos folder. Home Theater records TVprograms in InterVideo Media File format.
Closed Caption/TeleTextThe C losed Capt ionClosed Capt ionClosed Capt ionClosed Capt ionClosed Capt ion option is available only in the United States.This feature provides subtitles, if available. Te leTextTe leTextTe leTextTe leTextTe leText is available onlyin Europe. This is a service that provides additional information such asweather or program schedule, if available.
ScheduleThe Schedu le Schedu le Schedu le Schedu le Schedu le option allows you to set a schedule to record a TVprogram.
To create a recording schedule:
1. Click the Schedu leSchedu leSchedu leSchedu leSchedu le bar onthe T VT VT VT VT V menu. TheSchedu leSchedu leSchedu leSchedu leSchedu le window opens.
2. Click the Add Add Add Add Add bar.
GuideClick the Gu ideGu ideGu ideGu ideGu ide bar to open theTitanTV website. TitanTV is anElectronic Program Guide (EPG)that allows users to record andwatch TV right from the guide.Visit the Titan TV website fordetails.
2 -152 -152 -152 -152 -15ASUS S-pressoASUS S-pressoASUS S-pressoASUS S-pressoASUS S-presso
The TV recording feature requires a higher capacity HDD ifyou save a recorded program in high quality.
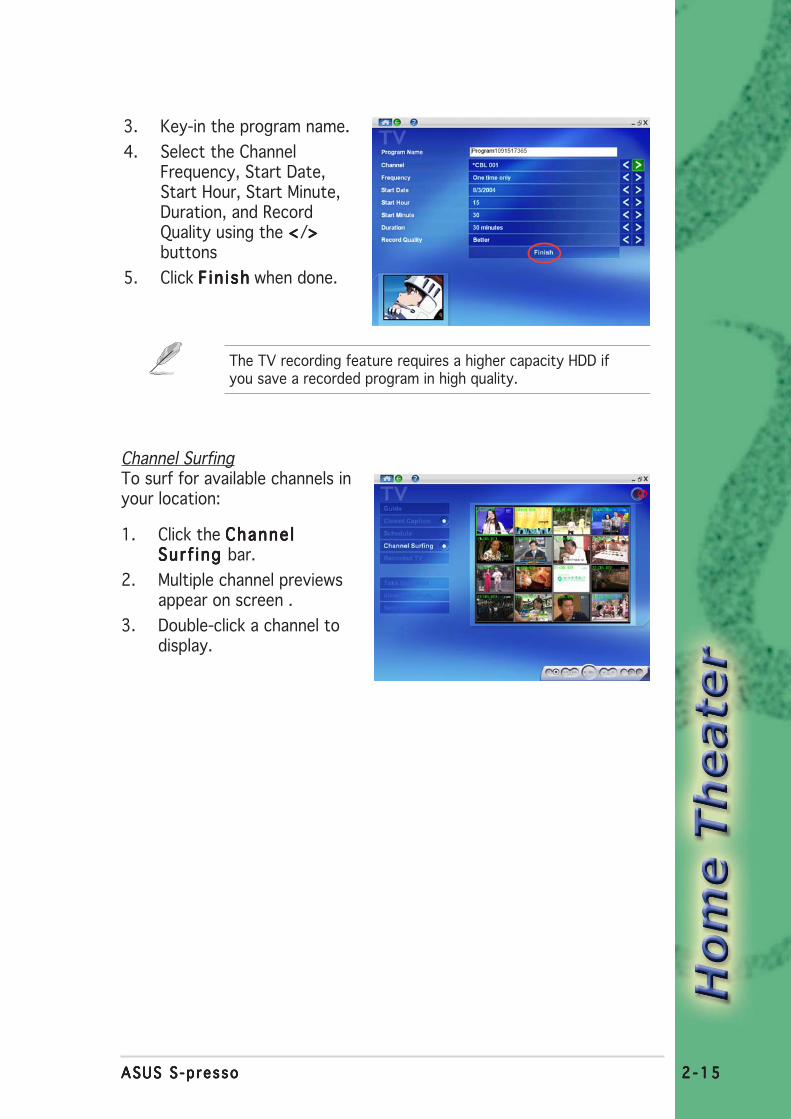
Channel SurfingTo surf for available channels inyour location:
1. Click the Channe lChanne lChanne lChanne lChanne lSurf ing Surf ing Surf ing Surf ing Surf ing bar.
2. Multiple channel previewsappear on screen .
3. Double-click a channel todisplay.
3. Key-in the program name.
4. Select the ChannelFrequency, Start Date,Start Hour, Start Minute,Duration, and RecordQuality using the <<<<</>>>>>buttons
5. Click F in i shF in i shF in i shF in i shF in i sh when done.

2 -162 -162 -162 -162 -16 Chapter 2 : Start ing upChapter 2 : Start ing upChapter 2 : Start ing upChapter 2 : Start ing upChapter 2 : Start ing up
Recorded TVThe Recorded TVRecorded TVRecorded TVRecorded TVRecorded TV option letsyou view, play, and organizerecorded TV programs.
Organize your recordedprograms by clicking the So r tSo r tSo r tSo r tSo r tBy NameBy NameBy NameBy NameBy Name/Date Date Date Date Date bars.
Double-click a thumbnail topreview a recorded program. Awindow displays a snapshot ofeach recorded program. Double-click the snapshot to startplaying in full-screen view.
Home Theater automatically saves a recorded program in theWindows® My V ideos My V ideos My V ideos My V ideos My V ideos folder. Home Theater records TVprograms in InterVideo Media File format.
P rev i ew w i ndowP rev i ew w i ndowP rev i ew w i ndowP rev i ew w i ndowP rev i ew w i ndow
Take a SnapshotHome Theater allows you to take a still photo from live TV or arecorded program.
Click the Take a Snapshot Take a Snapshot Take a Snapshot Take a Snapshot Take a Snapshot bar to take a still photo.
View a SnapshotClick the View SnapshotsView SnapshotsView SnapshotsView SnapshotsView Snapshots bar to view the photo.
Home Theater automatically saves snapshots in the Windows® M y M y M y M y M yP ic tu res P i c tu res P i c tu res P i c tu res P i c tu res folder in bitmap (*.bmp) format.

2 -172 -172 -172 -172 -17ASUS S-pressoASUS S-pressoASUS S-pressoASUS S-pressoASUS S-presso
SettingsTo change the TV settings:
1. Click the Sett ings Sett ings Sett ings Sett ings Sett ings bar.
2. Select the TV source(Cable/Antenna), inputsource (TV/ S-Video/Composite), record quality(Good/Better/Best), andTV Audio (Stereo/Mono/SAP). Click the <<<<</>>>>>buttons to view availableoptions.
3. Click to return to the TV main window.
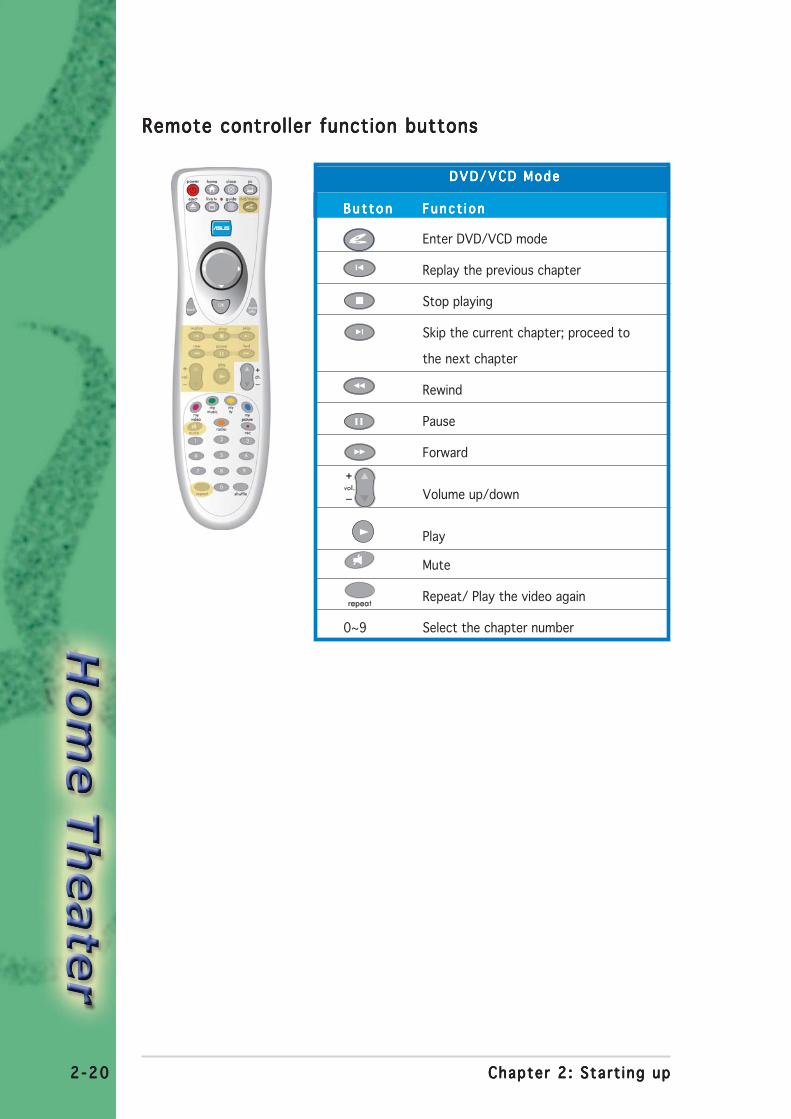
Remote controller function buttonsRemote controller function buttonsRemote controller function buttonsRemote controller function buttonsRemote controller function buttons
TV ModeTV ModeTV ModeTV ModeTV Mode
B u t t o nB u t t o nB u t t o nB u t t o nB u t t o n Func t i o nFunc t i o nFunc t i o nFunc t i o nFunc t i o n
Enter TV mode
Volume up/down
Channel up/down
Time Shifting
Live TV
Mute
Record TV
Shuffle between channels
0~9 Select the channel number
2 -182 -182 -182 -182 -18 Chapter 2 : Start ing upChapter 2 : Start ing upChapter 2 : Start ing upChapter 2 : Start ing upChapter 2 : Start ing up
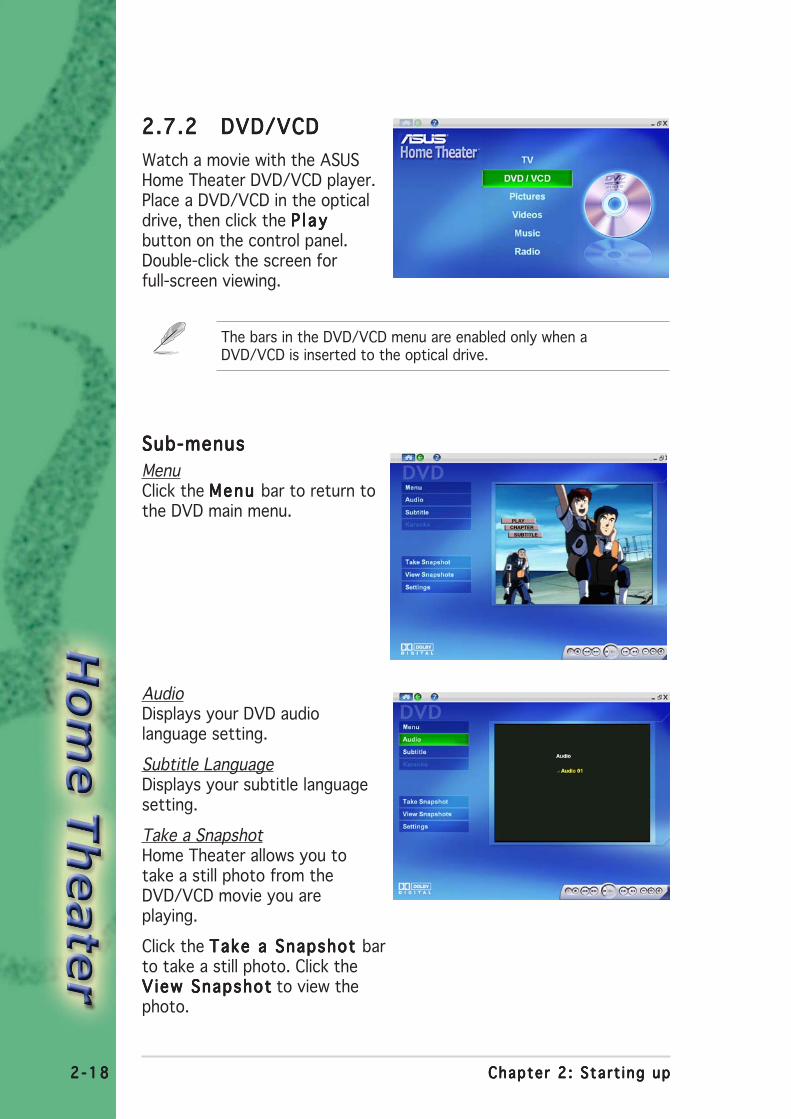
AudioDisplays your DVD audiolanguage setting.
Subtitle LanguageDisplays your subtitle languagesetting.
Take a SnapshotHome Theater allows you totake a still photo from theDVD/VCD movie you areplaying.
Click the Take a Snapshot Take a Snapshot Take a Snapshot Take a Snapshot Take a Snapshot barto take a still photo. Click theView SnapshotView SnapshotView SnapshotView SnapshotView Snapshot to view thephoto.
2.7.22.7.22.7.22.7.22.7.2 DVD/VCDDVD/VCDDVD/VCDDVD/VCDDVD/VCD
Watch a movie with the ASUSHome Theater DVD/VCD player.Place a DVD/VCD in the opticaldrive, then click the P l ayP l ayP l ayP l ayP l aybutton on the control panel.Double-click the screen forfull-screen viewing.
The bars in the DVD/VCD menu are enabled only when aDVD/VCD is inserted to the optical drive.
Sub-menusSub-menusSub-menusSub-menusSub-menus
MenuClick the Menu Menu Menu Menu Menu bar to return tothe DVD main menu.

2 -192 -192 -192 -192 -19ASUS S-pressoASUS S-pressoASUS S-pressoASUS S-pressoASUS S-presso
• Home Theater automatically saves snapshots in the Windows®
My P ic tu res My P ic tu res My P ic tu res My P ic tu res My P ic tu res folder in bitmap (*.bmp) format.
• This Home Theater version does not support Karaokefunction.
SettingsClick Sett ings Sett ings Sett ings Sett ings Sett ings to adjust theDVD/VCD player properties.
Audio Language.Audio Language.Audio Language.Audio Language.Audio Language. Select theDVD audio language. You mayselect an audio language if theDVD supports multilanguageaudio.
Subt it le Language. Subt it le Language. Subt it le Language. Subt it le Language. Subt it le Language. Allowsyou to select an available DVDsubtitle language.
Auto Resume.Auto Resume.Auto Resume.Auto Resume.Auto Resume. Allows you to resume watching a movie from thebeginning or from where you stopped.
Source .Source .Source .Source .Source . Displays the video input source.
Audio output.Audio output.Audio output.Audio output.Audio output. Allows you to set your audio output to analog ordigital (S/PDIF).
Speaker conf igurat ion.Speaker conf igurat ion.Speaker conf igurat ion.Speaker conf igurat ion.Speaker conf igurat ion. Home Theater automatically detects anddisplays your speaker configuration.
To change the DVD/VCD settings:
1. Click the Sett ings Sett ings Sett ings Sett ings Sett ings bar.
2. Make your desired settings by clicking the <<<<</>>>>> buttons to viewavailable options.
3. Click to return to the TV main window.
2 -202 -202 -202 -202 -20 Chapter 2 : Start ing upChapter 2 : Start ing upChapter 2 : Start ing upChapter 2 : Start ing upChapter 2 : Start ing up
B u t t o nB u t t o nB u t t o nB u t t o nB u t t o n Func t i o nFunc t i o nFunc t i o nFunc t i o nFunc t i o n
Enter DVD/VCD mode
Replay the previous chapter
Stop playing
Skip the current chapter; proceed to
the next chapter
Rewind
Pause
Forward
Volume up/down
Play
Mute
Repeat/ Play the video again
0~9 Select the chapter number
DVD/VCD ModeDVD/VCD ModeDVD/VCD ModeDVD/VCD ModeDVD/VCD Mode
Remote controller function buttonsRemote controller function buttonsRemote controller function buttonsRemote controller function buttonsRemote controller function buttons
2 -212 -212 -212 -212 -21ASUS S-pressoASUS S-pressoASUS S-pressoASUS S-pressoASUS S-presso
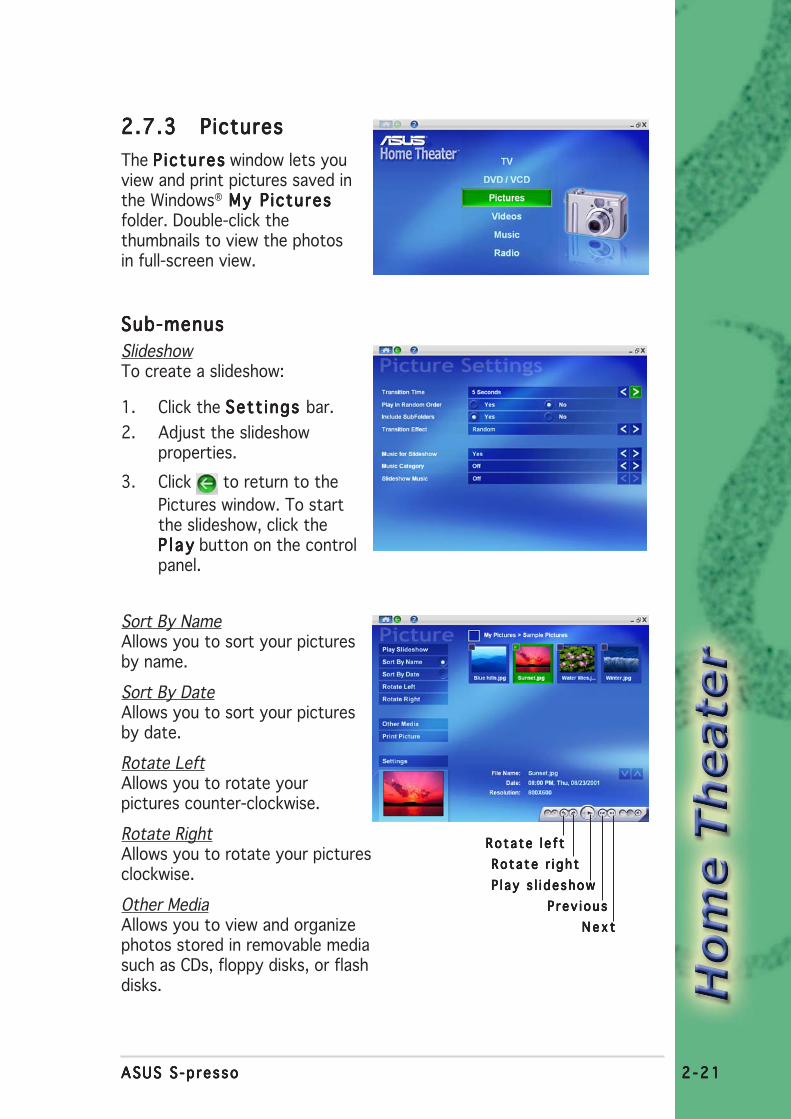
2.7.32.7.32.7.32.7.32.7.3 PicturesPicturesPicturesPicturesPictures
The P icturesP icturesP icturesP icturesP ictures window lets youview and print pictures saved inthe Windows® My P ictures My P ictures My P ictures My P ictures My P icturesfolder. Double-click thethumbnails to view the photosin full-screen view.
Sub-menusSub-menusSub-menusSub-menusSub-menus
SlideshowTo create a slideshow:
1. Click the Sett ings Sett ings Sett ings Sett ings Sett ings bar.
2. Adjust the slideshowproperties.
3. Click to return to the
Pictures window. To startthe slideshow, click theP l ayP l ayP l ayP l ayP l ay button on the controlpanel.
Ro ta te l e f t Ro ta te l e f t Ro ta te l e f t Ro ta te l e f t Ro ta te l e f t
Ro ta te r i gh t Ro ta te r i gh t Ro ta te r i gh t Ro ta te r i gh t Ro ta te r i gh t
P l ay s l i deshow P l ay s l i deshow P l ay s l i deshow P l ay s l i deshow P l ay s l i deshow
P r ev i ous P r ev i ous P r ev i ous P r ev i ous P r ev i ous
N e x tN e x tN e x tN e x tN e x t
Sort By NameAllows you to sort your picturesby name.
Sort By DateAllows you to sort your picturesby date.
Rotate LeftAllows you to rotate yourpictures counter-clockwise.
Rotate RightAllows you to rotate your picturesclockwise.
Other MediaAllows you to view and organizephotos stored in removable mediasuch as CDs, floppy disks, or flashdisks.
2 -222 -222 -222 -222 -22 Chapter 2 : Start ing upChapter 2 : Start ing upChapter 2 : Start ing upChapter 2 : Start ing upChapter 2 : Start ing up
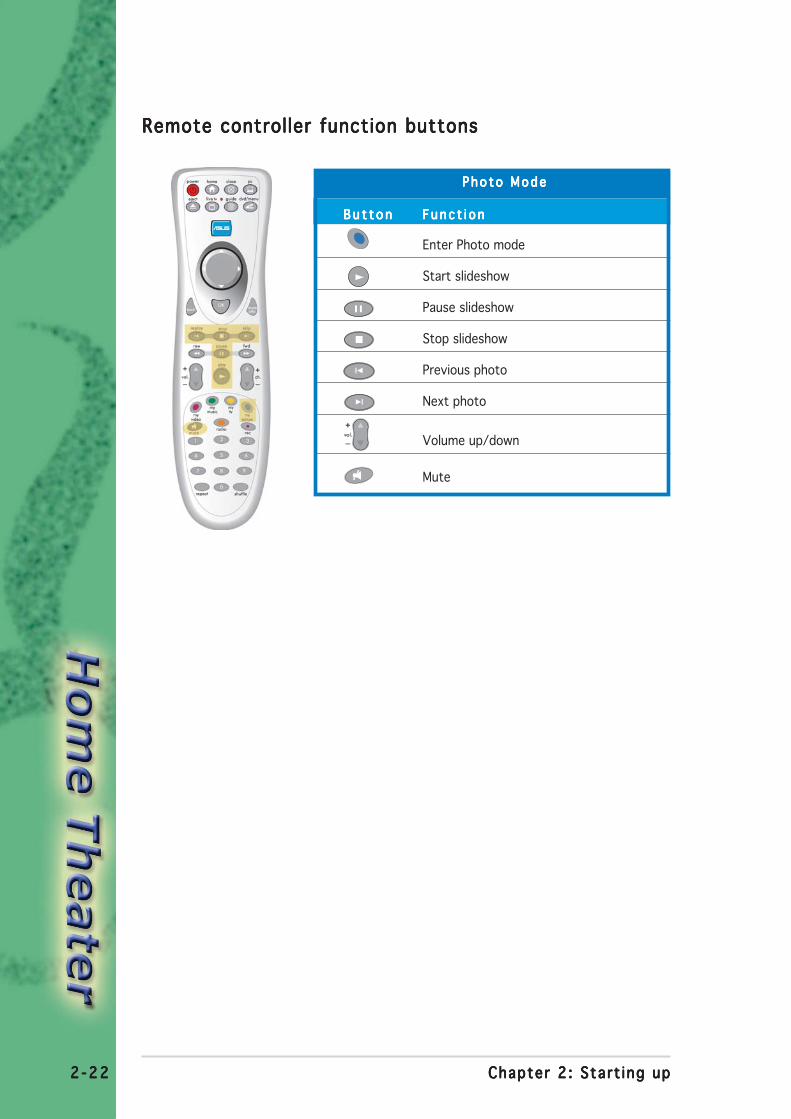
Remote controller function buttonsRemote controller function buttonsRemote controller function buttonsRemote controller function buttonsRemote controller function buttons
Photo ModePho to ModePho to ModePho to ModePho to Mode
B u t t o nB u t t o nB u t t o nB u t t o nB u t t o n Func t i o nFunc t i o nFunc t i o nFunc t i o nFunc t i o n
Enter Photo mode
Start slideshow
Pause slideshow
Stop slideshow
Previous photo
Next photo
Volume up/down
Mute

2 -232 -232 -232 -232 -23ASUS S-pressoASUS S-pressoASUS S-pressoASUS S-pressoASUS S-presso
Sub-menusSub-menusSub-menusSub-menusSub-menus
Sort By NameAllows you to sort your videoclips by name.
Sort By DateAllows you to sort your videoclips by date.
Other MediaAllows you to view and organizevideo clips stored in removablemedia such as CDs, floppy disks, or flash disks.
Take a SnapshotHome Theater allows you to take a still photo from live TV or arecorded program.
Click the Take a Snapshot Take a Snapshot Take a Snapshot Take a Snapshot Take a Snapshot bar to take a still photo.
View SnapshotsClick the View SnapshotsView SnapshotsView SnapshotsView SnapshotsView Snapshots bar to view the photo.
Home Theater automatically saves snapshots in the Windows® M y M y M y M y M yP ic tu res P i c tu res P i c tu res P i c tu res P i c tu res folder in bitmap (*.bmp) format.
2.7.42.7.42.7.42.7.42.7.4 VideosVideosVideosVideosVideos
View, play and organize yourvideo clips using the Videoswindow. The Videos windowdisplays the title and length ofvideo clips saved in theWindows® My V ideosMy VideosMy VideosMy VideosMy Videos folder.
The V ideo C l i psV ideo C l i psV ideo C l i psV ideo C l i psV ideo C l i ps window only lists video clips saved in theWindows® My V ideos My V ideos My V ideos My V ideos My V ideos folder.
2 -242 -242 -242 -242 -24 Chapter 2 : Start ing upChapter 2 : Start ing upChapter 2 : Start ing upChapter 2 : Start ing upChapter 2 : Start ing up
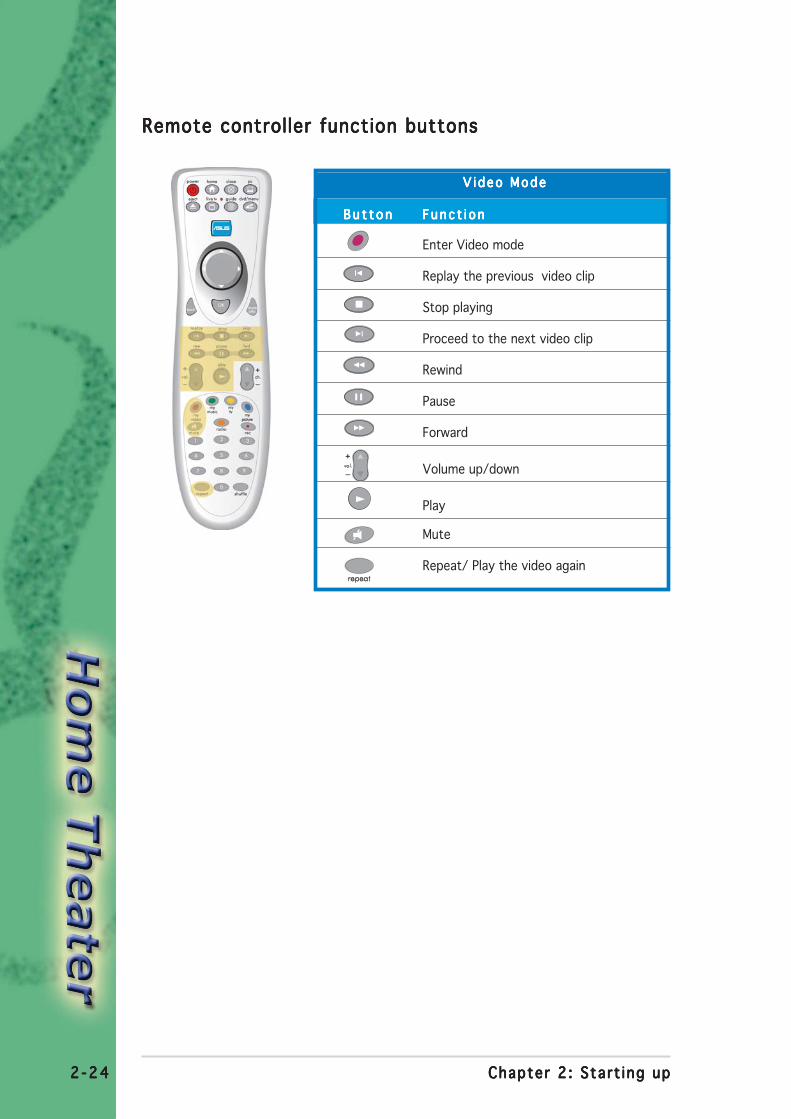
Remote controller function buttonsRemote controller function buttonsRemote controller function buttonsRemote controller function buttonsRemote controller function buttons
B u t t o nB u t t o nB u t t o nB u t t o nB u t t o n Func t i o nFunc t i o nFunc t i o nFunc t i o nFunc t i o n
Enter Video mode
Replay the previous video clip
Stop playing
Proceed to the next video clip
Rewind
Pause
Forward
Volume up/down
Play
Mute
Repeat/ Play the video again
V i deo ModeV i deo ModeV i deo ModeV i deo ModeV i deo Mode

2 -252 -252 -252 -252 -25ASUS S-pressoASUS S-pressoASUS S-pressoASUS S-pressoASUS S-presso
2.7.52.7.52.7.52.7.52.7.5 MusicMusicMusicMusicMusic
Home Theater lets you playaudio CD/DVD tracks, MP3 files,and radio recordings using theMus icMus icMus icMus icMus ic window.
Select My Mus ic My Mus ic My Mus ic My Mus ic My Mus ic to view andplay audio files or radiorecordings saved to your hard disk drive. Click My Mus icMy Mus icMy Mus icMy Mus icMy Mus ic to displayaudio CD/DVD tracks. Control the audio playback using the controlpanel buttons.The Mus ic Mus ic Mus ic Mus ic Mus ic window lists the title, album, artist, andgenre of available audio files.
Click the Rewind/ReplayRewind/ReplayRewind/ReplayRewind/ReplayRewind/Replay or Forward Forward Forward Forward Forward button on the control panel tochange the media browser ambience.
Home Theater onlylists the MP3 filessaved in theWindows® My Mus i cMy Mus i cMy Mus i cMy Mus i cMy Mus i cfolder.
Sub-menusSub-menusSub-menusSub-menusSub-menus
RepeatAllows you to play your selected music again and again.
ShuffleAllows you to listen to your selected music in random order.
Go to PlaylistAllows you to organize your music in the Playlist page.
Add to PlaylistAllows you to add your selected music to the Playlist.

2 -262 -262 -262 -262 -26 Chapter 2 : Start ing upChapter 2 : Start ing upChapter 2 : Start ing upChapter 2 : Start ing upChapter 2 : Start ing up
Remote controller function buttonsRemote controller function buttonsRemote controller function buttonsRemote controller function buttonsRemote controller function buttons
Mus i c (MP3/CD) ModeMus i c (MP3/CD) ModeMus i c (MP3/CD) ModeMus i c (MP3/CD) ModeMus i c (MP3/CD) Mode
B u t t o nB u t t o nB u t t o nB u t t o nB u t t o n Func t i o nFunc t i o nFunc t i o nFunc t i o nFunc t i o n
Enter Music mode
Replay the previous track
Stop playing
Skip the current track; play the next
Rewind
Pause
Forward
Volume up
Volume down
Play
Mute
Repeat/ Play from the first track
0~9 Select the track number
2 -272 -272 -272 -272 -27ASUS S-pressoASUS S-pressoASUS S-pressoASUS S-pressoASUS S-presso
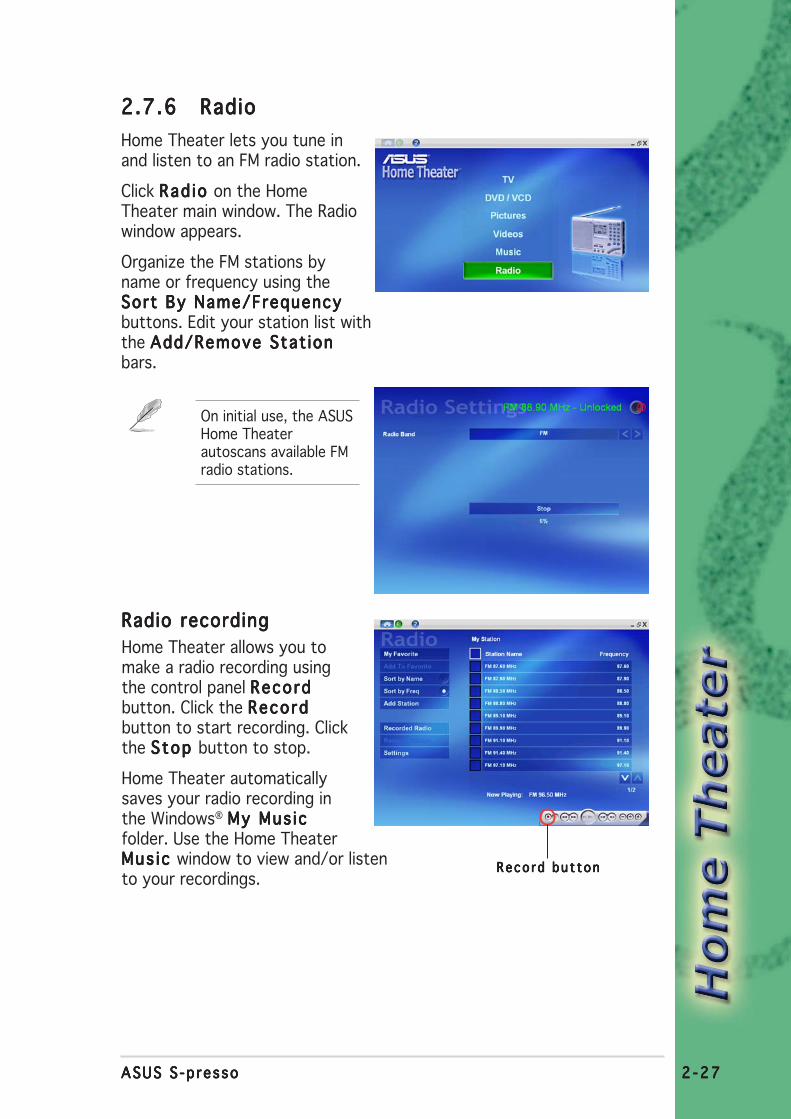
2.7.62.7.62.7.62.7.62.7.6 RadioRadioRadioRadioRadio
Home Theater lets you tune inand listen to an FM radio station.
Click Rad io Rad io Rad io Rad io Rad io on the HomeTheater main window. The Radiowindow appears.
Organize the FM stations byname or frequency using theSort By Name/FrequencySort By Name/FrequencySort By Name/FrequencySort By Name/FrequencySort By Name/Frequencybuttons. Edit your station list withthe Add/Remove Stat ionAdd/Remove Stat ionAdd/Remove Stat ionAdd/Remove Stat ionAdd/Remove Stat ionbars.
Radio recordingRadio recordingRadio recordingRadio recordingRadio recording
Home Theater allows you tomake a radio recording usingthe control panel RecordRecordRecordRecordRecordbutton. Click the RecordRecordRecordRecordRecordbutton to start recording. Clickthe Stop Stop Stop Stop Stop button to stop.
Home Theater automaticallysaves your radio recording inthe Windows® My Mus icMy Mus icMy Mus icMy Mus icMy Mus icfolder. Use the Home TheaterMus ic Mus ic Mus ic Mus ic Mus ic window to view and/or listento your recordings.
On initial use, the ASUSHome Theaterautoscans available FMradio stations.
Reco rd bu t tonReco rd bu t tonReco rd bu t tonReco rd bu t tonReco rd bu t ton

2 -282 -282 -282 -282 -28 Chapter 2 : Start ing upChapter 2 : Start ing upChapter 2 : Start ing upChapter 2 : Start ing upChapter 2 : Start ing up
Reco rd r ad i oReco rd r ad i oReco rd r ad i oReco rd r ad i oReco rd r ad i o
Tune down Tune down Tune down Tune down Tune down
Tune up Tune up Tune up Tune up Tune up
P l ay r ad i o P l ay r ad i o P l ay r ad i o P l ay r ad i o P l ay r ad i o
Scan up Scan up Scan up Scan up Scan up
Scan down Scan down Scan down Scan down Scan down
Vo lume up Vo lume up Vo lume up Vo lume up Vo lume up
Vo lume down Vo lume down Vo lume down Vo lume down Vo lume down
Mute Mute Mute Mute Mute
Recorded RadioAllows you to record radio shows, news, songs, or any piece from theradio.
Remove StationAllows you to remove a station from your station list. Click the checkbox beside the station name you want to remove, then click theRemove Stat ion Remove Stat ion Remove Stat ion Remove Stat ion Remove Stat ion bar
SettingsAllows you to choose your radio band. Choose FM or AM, then click theRescan FrequenciesRescan FrequenciesRescan FrequenciesRescan FrequenciesRescan Frequencies to find available radio stations.
Sub-menusSub-menusSub-menusSub-menusSub-menus
My FavoriteClick this bar to display yoursaved favorite FM radiostations.
Add to FavoriteAllows you to save your favoriteradio stations from the MyStation window. Simply click thecheck box beside the stationname you want to save, then clickAdd to Favor iteAdd to Favor iteAdd to Favor iteAdd to Favor iteAdd to Favor ite.
Sort by NameAllows you to sort radio stationsby name.
Sort by FrequencyAllows you to sort radio stationsby frequency.
Add StationAllows you to add a station to yourstation list.
The Home Theater version in your S-presso system only plays FMradio.

2 -292 -292 -292 -292 -29ASUS S-pressoASUS S-pressoASUS S-pressoASUS S-pressoASUS S-presso
Remote controller function buttonsRemote controller function buttonsRemote controller function buttonsRemote controller function buttonsRemote controller function buttons
B u t t o nB u t t o nB u t t o nB u t t o nB u t t o n Func t i o nFunc t i o nFunc t i o nFunc t i o nFunc t i o n
Enter Radio mode
Scan frequency down
Scan frequency up
Fine tuning (-)
Fine tuning (+)
Volume up/down
Next/previous preset station
Mute
Rad i o ( FM) ModeRad i o ( FM) ModeRad i o ( FM) ModeRad i o ( FM) ModeRad i o ( FM) Mode

2 -302 -302 -302 -302 -30 Chapter 2 : Start ing upChapter 2 : Start ing upChapter 2 : Start ing upChapter 2 : Start ing upChapter 2 : Start ing up
2.7.72.7.72.7.72.7.72.7.7 SetupSetupSetupSetupSetup
The Setup Setup Setup Setup Setup button allows you to configure Home Theater and themultimedia windows.
General SettingsGeneral SettingsGeneral SettingsGeneral SettingsGeneral Settings
This window lets youconfigure general HomeTheater settings.
Hide Date and TimeHide Date and TimeHide Date and TimeHide Date and TimeHide Date and Time.Allows you to display orhide the date and time.
Music Visual ization.Music Visual ization.Music Visual ization.Music Visual ization.Music Visual ization.Allows you to view musicvisualization while playingmusic files.
Run with Windows StartRun with Windows StartRun with Windows StartRun with Windows StartRun with Windows Start. Allows you to automatically launchHome Theater at the start of Windows®.
Enable Animation.Enable Animation.Enable Animation.Enable Animation.Enable Animation. Allows you to enable or disable animation.
Control Panel Auto Hide.Control Panel Auto Hide.Control Panel Auto Hide.Control Panel Auto Hide.Control Panel Auto Hide. Allows you to specify within how manyseconds the control panel will hide itself.
Display Options. Display Options. Display Options. Display Options. Display Options. Allows you to choose Single Display or MultipleDisplays.
TV settingsTV settingsTV settingsTV settingsTV settings
Use this window to adjustthe Home Theater TVproperties.
TV SourceTV SourceTV SourceTV SourceTV Source. Allows you toselect Cable or Antennaas the TV signal source.
Record Qual ityRecord Qual ityRecord Qual ityRecord Qual ityRecord Qual ity. Allowsyou to set your recordingquality to Good, Better,or Best.
TV AudioTV AudioTV AudioTV AudioTV Audio. Allows you to set your TV audio to Stereo or Mono.
Click NextNextNextNextNext to display the Picture settings window or C loseC loseC loseC loseC lose toreturn to the main Home Theater window.

2 -312 -312 -312 -312 -31ASUS S-pressoASUS S-pressoASUS S-pressoASUS S-pressoASUS S-presso
DVD/VCD settingsDVD/VCD settingsDVD/VCD settingsDVD/VCD settingsDVD/VCD settings
Adjust the DVD/VCD playersettings on this window. Seepage 2-19 for DVD/VCDsettings.
Click F in i shF in i shF in i shF in i shF in i sh to return to themain window.
Picture settingsPicture settingsPicture settingsPicture settingsPicture settings
Allows you to customizeyour picture viewing and tosetup a slideshow.
Click NextNextNextNextNext to display theDVD settings window orC loseC loseC loseC loseC lose to return to the mainwindow.
You may also modify the Home Theater configuration inWindows®. In the Windows® desktop, click S ta r t S ta r t S ta r t S ta r t S ta r t > A l lA l lA l lA l lA l lP rograms P rograms P rograms P rograms P rograms > Interv ideo Home Theater Interv ideo Home Theater Interv ideo Home Theater Interv ideo Home Theater Interv ideo Home Theater > I n te rv ideoInte rv ideoInte rv ideoInte rv ideoInte rv ideoHome Theater Conf igHome Theater Conf igHome Theater Conf igHome Theater Conf igHome Theater Conf ig. A Conf igurat ionConf igurat ionConf igurat ionConf igurat ionConf igurat ion windowappears. Change the Home Theater configuration as desired.

2 -322 -322 -322 -322 -32 Chapter 2 : Start ing upChapter 2 : Start ing upChapter 2 : Start ing upChapter 2 : Start ing upChapter 2 : Start ing up

ASUS S-pressoASUS S-pressoASUS S-pressoASUS S-pressoASUS S-presso
AppendixThe Appendix includes informationon the remote controller, the ASUSS-presso key table, andinternational TV systems andstandards.

A - 2A - 2A - 2A - 2A - 2 Append i xAppend i xAppend i xAppend i xAppend i x
A.1 Specifications
The ASUS remote controller allows you to operate the TV/FM card from adistance. Use the remote controller to navigate through Instant On and theASUS Home Theater windows.
A.2 Using the remote controller
To use the remote controller:
1. Install the remotecontroller batteries.
2. Insert the receiver USBplug to an available USBport in your computer.
3. Install the receiver at anunobscured location foroptimum operation.
4. Turn on your computer,then open the ASUS HomeTheater.
5. Navigate through theHome Theater windowsusing the remotecontroller.
*no t i n c l uded*no t i n c l uded*no t i n c l uded*no t i n c l uded*no t i n c l uded
2
4
5
3
Ope ra t i ng r angeOpe ra t i ng r angeOpe ra t i ng r angeOpe ra t i ng r angeOpe ra t i ng r ange 5 meters (max)
Powe r Sou r cePowe r Sou r cePowe r Sou r cePowe r Sou r cePowe r Sou r ce 3V (2 x “AAA” batteries)*
Rece i v e rRece i v e rRece i v e rRece i v e rRece i v e r USB infrared receiver (supplied)

A - 3A - 3A - 3A - 3A - 3ASUS S-pressoASUS S-pressoASUS S-pressoASUS S-pressoASUS S-presso
A.3 Remote controller layout

A - 4A - 4A - 4A - 4A - 4 Append i xAppend i xAppend i xAppend i xAppend i x
A.4 Remote controller functions
A.1A.1A.1A.1A.1 System buttonsSystem buttonsSystem buttonsSystem buttonsSystem buttons
B u t t o nB u t t o nB u t t o nB u t t o nB u t t o n Func t i o nFunc t i o nFunc t i o nFunc t i o nFunc t i o n
Activate Instant On
Launch Home Theater
Close Home Theater
Enter the operating system/Power on PC
Eject the optical drive tray
Enter Live TV mode
Open the Home Theater Guide screen
Open the DVD Menu screen
SYSTEM BUTTONSSYSTEM BUTTONSSYSTEM BUTTONSSYSTEM BUTTONSSYSTEM BUTTONS
A - 5A - 5A - 5A - 5A - 5ASUS S-pressoASUS S-pressoASUS S-pressoASUS S-pressoASUS S-presso
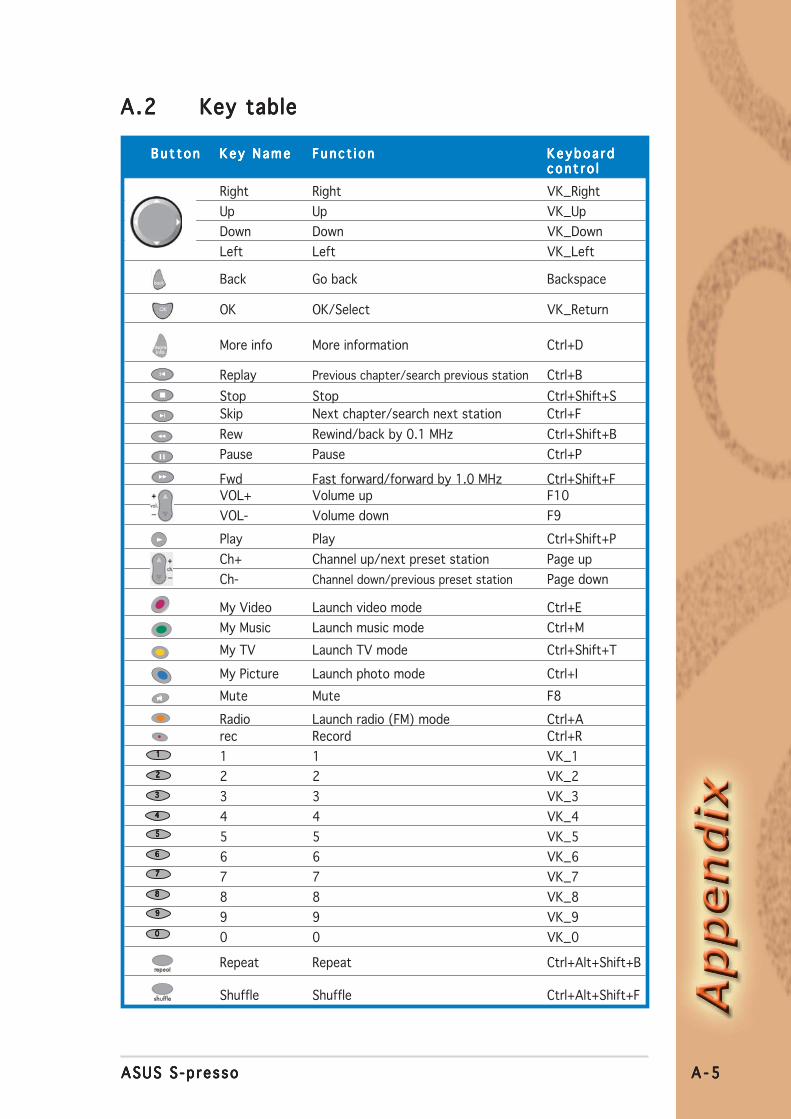
A.2A.2A.2A.2A.2 Key tableKey tableKey tableKey tableKey table
B u t t o nB u t t o nB u t t o nB u t t o nB u t t o n Key NameKey NameKey NameKey NameKey Name Func t i o nFunc t i o nFunc t i o nFunc t i o nFunc t i o n Keyboa r dKeyboa r dKeyboa r dKeyboa r dKeyboa r dc o n t r o lc o n t r o lc o n t r o lc o n t r o lc o n t r o l
Right Right VK_Right
Up Up VK_Up
Down Down VK_Down
Left Left VK_Left
Back Go back Backspace
OK OK/Select VK_Return
More info More information Ctrl+D
Replay Previous chapter/search previous station Ctrl+B
Stop Stop Ctrl+Shift+S
Skip Next chapter/search next station Ctrl+F
Rew Rewind/back by 0.1 MHz Ctrl+Shift+B
Pause Pause Ctrl+P
Fwd Fast forward/forward by 1.0 MHz Ctrl+Shift+FVOL+ Volume up F10
VOL- Volume down F9
Play Play Ctrl+Shift+P
Ch+ Channel up/next preset station Page up
Ch- Channel down/previous preset station Page down
My Video Launch video mode Ctrl+E
My Music Launch music mode Ctrl+M
My TV Launch TV mode Ctrl+Shift+T
My Picture Launch photo mode Ctrl+I
Mute Mute F8
Radio Launch radio (FM) mode Ctrl+A
rec Record Ctrl+R
1 1 VK_1
2 2 VK_2
3 3 VK_3
4 4 VK_4
5 5 VK_5
6 6 VK_6
7 7 VK_7
8 8 VK_8
9 9 VK_9
0 0 VK_0
Repeat Repeat Ctrl+Alt+Shift+B
Shuffle Shuffle Ctrl+Alt+Shift+F
11111
22222
33333
44444
55555
66666
77777
88888
99999
00000
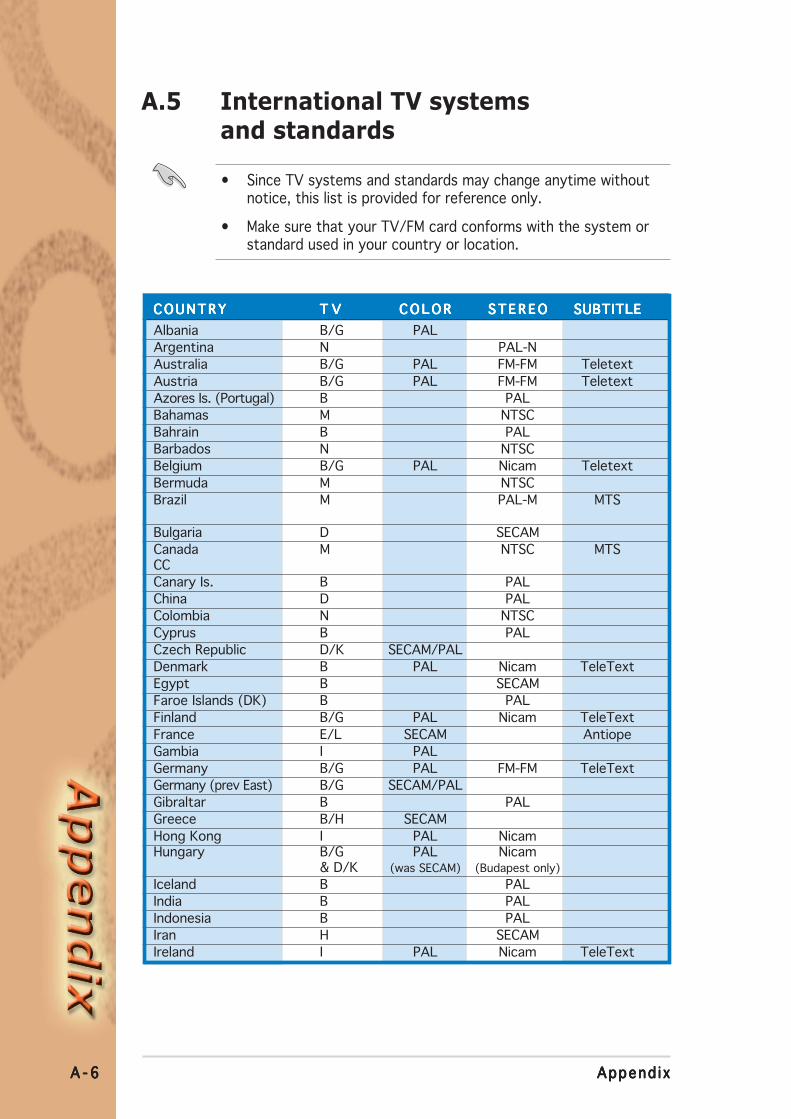
A - 6A - 6A - 6A - 6A - 6 Append i xAppend i xAppend i xAppend i xAppend i x
A.5 International TV systemsand standards
• Since TV systems and standards may change anytime withoutnotice, this list is provided for reference only.
• Make sure that your TV/FM card conforms with the system orstandard used in your country or location.
COUNTRYCOUNTRYCOUNTRYCOUNTRYCOUNTRY T VT VT VT VT V C O L O RC O L O RC O L O RC O L O RC O L O R STEREOSTEREOSTEREOSTEREOSTEREO SUBTITLESUBTITLESUBTITLESUBTITLESUBTITLE
Albania B/G PAL
Argentina N PAL-N
Australia B/G PAL FM-FM Teletext
Austria B/G PAL FM-FM Teletext
Azores Is. (Portugal) B PAL
Bahamas M NTSC
Bahrain B PAL
Barbados N NTSC
Belgium B/G PAL Nicam Teletext
Bermuda M NTSC
Brazil M PAL-M MTS
Bulgaria D SECAM
Canada M NTSC MTSCC
Canary Is. B PAL
China D PAL
Colombia N NTSC
Cyprus B PAL
Czech Republic D/K SECAM/PAL
Denmark B PAL Nicam TeleText
Egypt B SECAM
Faroe Islands (DK) B PAL
Finland B/G PAL Nicam TeleText
France E/L SECAM Antiope
Gambia I PAL
Germany B/G PAL FM-FM TeleText
Germany (prev East) B/G SECAM/PAL
Gibraltar B PAL
Greece B/H SECAM
Hong Kong I PAL NicamHungary B/G PAL Nicam
& D/K (was SECAM) (Budapest only)
Iceland B PAL
India B PAL
Indonesia B PAL
Iran H SECAM
Ireland I PAL Nicam TeleText

A - 7A - 7A - 7A - 7A - 7ASUS S-pressoASUS S-pressoASUS S-pressoASUS S-pressoASUS S-presso
COUNTRYCOUNTRYCOUNTRYCOUNTRYCOUNTRY T VT VT VT VT V C O L O RC O L O RC O L O RC O L O RC O L O R STEREOSTEREOSTEREOSTEREOSTEREO SUBTITLESUBTITLESUBTITLESUBTITLESUBTITLE
Israel B/G PAL Nicam TeleText
Italy B/G PAL FM/FM TeleText
Jamaica M SECAM
Japan M NTSC Matrix
Jordan B PAL
Kenya B PAL
Korea M NTSC
Luxembourg B/G PAL TeleText
Madeira B PAL
Madagascar B SECAM
Malaysia B PAL
Malta B/G PAL
Mauritius B SECAM
Mexico M NTSC MTS CC
Monaco L/G SECAM/PAL
Morocco B SECAM
Netherlands B/G PAL FM-FM TeleText
New Zealand B/G PAL Nicam TeleText
North Korea D/K? SECAM
Norway B/G PAL Nicam
Pakistan B PAL
Paraguay N PAL
Peru M NTSC
Philipines M NTSC
Poland D/K PAL Teletext
Portugal B/G PAL Nicam Teletext
Romania G PAL
Russia D/K SECAM
Saudi Arabia B SECAM
Seychelles I PAL
Singapore B PAL
South Africa I PAL
South Korea N NTSC
Spain B/G PAL Nicam
Sri Lanka B/G PAL
Sweden B/G PAL Nicam Teletext
Switzerland B/G PAL FM-FM TeleText
Tahiti KI SECAM
Taiwan M NTSC
Thailand B PAL
Trinidad M NTSC
Tunisia B SECAM
Turkey BPAL TeleText

A - 8A - 8A - 8A - 8A - 8 Append i xAppend i xAppend i xAppend i xAppend i x