Embed Size (px)
Citation preview

S-Drive Quick Reference Guide
S-Drive Quick Reference
Guide v2.1: Salesforce
Lightning
1. ‘S-Drive Folders’ Tab
You can access S-Drive tab in lightning experience from App
Launcher > S-Drive App > S-Drive Tab.
Figure 1
‘S-Drive’ tab has three main panels: Folders panel (Figure 2-1)
displays folder Figure 5structure. Toolbar panel (Figure 2-2)
includes buttons required for creating folders; uploading,
downloading, emailing, deleting, copying, and moving files and a
search box. Current Folder View / Search Results View (Figure 2-3)
displays all files and subfolders inside the selected folder or based
on a search accordingly. Actions column in the current folder view
has file and folder basis actions like Download, Share, Rename,
Edit Description, Copy URL to Clipboard, and Delete.
Figure 2
a. myDrive Folders
In order to switch to “myDrive” folders on the S-Drive Tab, use the
toggle button on the right-hand side of the toolbar menu, under
the search bar.
Figure 3
myDrive provides a new place to upload your files and create new
folders that are only visible to you and no one else in your
organization.
In myDrive, you can upload files, create folders, download or
delete files and folders, and perform cut/copy/paste options,
search for files in myDrive just as you do in S-Drive.
The main difference of myDrive is that this place is private only to
you. Therefore, you will not find any sharing related actions, such
as “Share”, “E-mail” and “Chatter” in myDrive.
Figure 4
To go back to S-Drive files, you can use the toggle button.
Note: The sharing settings of myDrive folders may change
depending on the settings on the object, if your admin has made
changes for your organization. See “Lightning User Guide” for
more information about myDrive folders.
b. Creating Folders
Click ‘New Folder’ button ( ) from the toolbar. Type the folder
name and then click ‘OK’ button to create a folder (Figure 5).
Folder names cannot be blank, cannot start with a space or a dot
and cannot contain characters such as ‘\’, ‘/’, ‘:’, ‘*’, ‘?’, ‘"’, ‘<’,
‘>’, ‘|’.
S-Drive Quick Reference Guide
2
Figure 5
c. Uploading Files
Click ‘Upload File(s)’ button ( ) from the toolbar. If not, it can be
enabled via S-Drive Configuration page, “Enable download”
configuration checkbox.
Select file(s) to upload by clicking ‘Add file(s)’ button ( ).
Browse and select files by clicking ‘Open’ button to add files to the
upload list. You can organize upload list using ‘Add file(s)’ ( )
and ‘Remove file(s)’ ( ) buttons. Click ‘Upload file(s)’ button (
) to start uploading selected files. Upload progress will be
displayed in the ‘Upload Progress Bar’. Status of the uploaded file
will be updated to ‘COMPLETED’ (Figure 6).
Note that Java and Flash upload managers have been deprecated
in since v1.28.
Figure 6
d. Uploading New Versions of a File
[This feature requires enabling versioning on the organization.
Refer to the S-Drive Installation Guide to enable Versioning for
your organization.] You can upload new version of file by clicking
"Item Actions" menu button ( ) under "Actions" column and
selecting "Upload New Version" action menu (Figure 7). Only
HTML Upload Manager supports version upload.
Figure 7
e. Previous Versions of a File
[This feature requires enabling versioning on the organization.
Refer to the S-Drive Installation Guide to enable Versioning for
your organization.] You can see previous versions of a file by
clicking "Item Actions" button under "Actions" column and
selecting "Previous Versions" action menu item from dropdown.
(Figure 8).
Figure 8

S-Drive Quick Reference Guide
3
You can set a version of a file as current version by clicking "Item
Actions" button under "Actions" column and selecting "Set
Current" action menu item from dropdown. (Figure 9)
Figure 9
f. Attaching Files from S-Drive Folders
Click ‘Attach from S-Drive Folders’ button to attach files from ‘S-
Drive Folders’ (Error! Reference source not found.).
This will bring the ‘S-Drive Folders’ screen with two additional
buttons: ‘Attach File(s)’ and ‘Cancel Attach’ (Error! Reference
source not found.). Once the ‘S-Drive Folders’ screen is opened
you can select files and click ‘Attach File(s)’ button to attach
selected files to the selected object as attachments. Attaching is a
copy process, so, copy of the attached file will be created for the
selected object. Only current file will be attached if you have
versions under the file.
Figure 10
g. Emailing Files
Select file(s) and then click ‘Send Email’ button ( ) to email
files. You can type a contact name into ‘To’ address or you can
select it searching over your contacts by clicking ‘Lookup’ button.
You can select or type ‘Additional To’, ‘CC’, and ‘BCC’ fields using
appropriate fields and buttons. ‘Attachment Expiration’ is used to
set the expiration time for the attached files. Default is ‘Never
Expires’. If you uncheck ‘Never Expires’, other options will appear.
For example, if you select 30 minutes for the attachment
expiration, recipients of the email will not be able to download
the attached files after 30 minutes of sending the email. You can
display and hide attachment details using ‘Details’ buttons. You
can remove individual attachments from email by clicking ( )
icon next to the file name in the ‘Details’ section. Type your
email’s subject and message body or select a preconfigured
template using "Select Template" button, then click ‘Send’ button
to send the email (Figure 11). You’ll get success message if mail is
sent correctly. Note that you cannot email folders.
Figure 11
h. Deleting Files/Folders
Select files/folders and then click ‘Delete File(s)’ button ( ) to
delete files or folders. You can delete files/folders one-by-one
using ‘Delete’ action menu item from the Actions column of the
selected file/folder or quick access delete button on action
column ( ).

S-Drive Quick Reference Guide
4
Figure 12
When you delete your files/folders they will be sent to “Recycle
Bin”. You can access recycled files/folders by clicking on the
“Recycle Bin” button which is at the bottom of the Folder’s Tree
(Figure 13).
Figure 13
When you navigate to Recycle Bin, you will see the list of files and
folders you have deleted. You can recover or delete the
files/folders in Recycle Bin. You can choose multiple items to
delete or recover at once. For these purposes you can use the
Toolbar menu buttons or the Actions menu (Figure 14).
Figure 14
You’ll be asked ‘Are you sure?’ after clicking ‘Delete’ button. Select
‘Yes’ option to delete files/folders. On Lightning Experience, you
can also delete folders that contain files or subfolders within
Salesforce Query Limits.
If you have versions under the current file, all versions of this file
will also be deleted.
When you recover files/folders they will be sent back to where
they were located before deletion. See “S-Drive Lightning User
Guide – Deleting Files/Folders” section for more information about
deleting files and folders.
i. Downloading Files
To download a single file with one click, select a file and then click
‘Download’ action menu item from the Actions column of the
selected file or quick download button on Actions column. Note
that on lightning component, you can also download folders with
sub files & folders.
Figure 15
S-Drive Quick Reference Guide
5
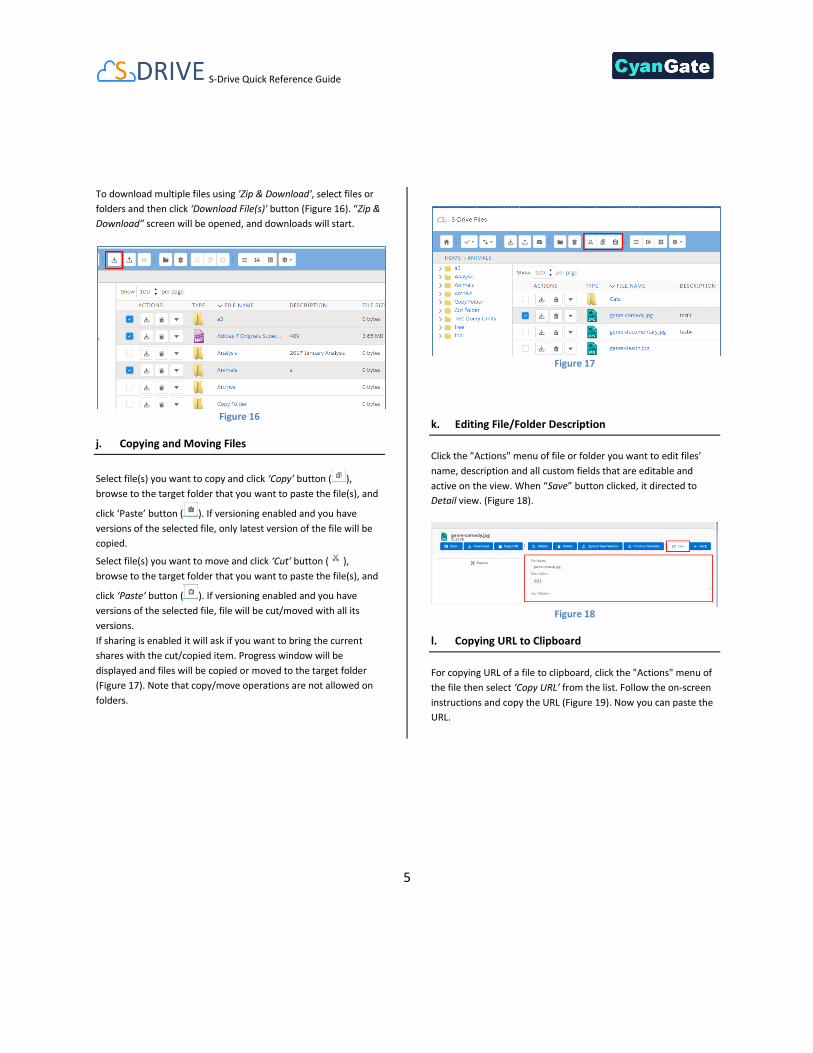
To download multiple files using 'Zip & Download', select files or
folders and then click ‘Download File(s)' button (Figure 16). “Zip &
Download” screen will be opened, and downloads will start.
Figure 16
j. Copying and Moving Files
Select file(s) you want to copy and click ‘Copy’ button ( ),
browse to the target folder that you want to paste the file(s), and
click ‘Paste’ button ( ). If versioning enabled and you have
versions of the selected file, only latest version of the file will be
copied.
Select file(s) you want to move and click ‘Cut’ button ( ),
browse to the target folder that you want to paste the file(s), and
click ‘Paste’ button ( ). If versioning enabled and you have
versions of the selected file, file will be cut/moved with all its
versions.
If sharing is enabled it will ask if you want to bring the current
shares with the cut/copied item. Progress window will be
displayed and files will be copied or moved to the target folder
(Figure 17). Note that copy/move operations are not allowed on
folders.
Figure 17
k. Editing File/Folder Description
Click the "Actions" menu of file or folder you want to edit files’
name, description and all custom fields that are editable and
active on the view. When “Save” button clicked, it directed to
Detail view. (Figure 18).
Figure 18
l. Copying URL to Clipboard
For copying URL of a file to clipboard, click the "Actions" menu of
the file then select ‘Copy URL’ from the list. Follow the on-screen
instructions and copy the URL (Figure 19). Now you can paste the
URL.

S-Drive Quick Reference Guide
6
Figure 19
m. Sharing Files & Folders
You can list shares on the file, add new shares for files and folders
to users/groups/roles etc., edit/delete current shares using
"Share" item menu action of the "Actions" menu (Figure 20). See
"S-Drive User Guide" for detailed information.
Figure 20
n. Searching S-Drive Folders
You can search for files and folders inside S-Drive Folders (Figure
21).
To start a search, type the search criteria to the right corner of S-
Drive Folders screen, into the search box and click Enter. You can
use wildcards, ‘* (multiple characters),? (single character)’ in
search keywords. For example: genre*, boo? etc.
When you perform a search in S-Drive folders, the search will also
be made for myDrive folders.
The results for both will be displayed in the same section with a
‘Search results: XX file(s). S-Drive: X myDrive: X ’ header. 'New
Folder', 'Upload File(s)', 'Paste' buttons are invisible in the search
results screen. You can go back to previous screen using ( )
button on top right, or you can go to home folder by clicking
‘Home’ link on the breadcrumb panel or Home button ( ) on
toolbar.
To navigate to the search results for myDrive folders, you can click
on myDrive button ( ). When clicked it will redirect you to
myDrive folders.
Figure 21
o. Switching Between View Types
S-Drive Lightning has three different view types. List, Thumbnail
and Grid. If ‘Preview and Thumbnail’ feature is enabled for S-Drive
Folders (S3Object), you can switch between view types (Figure
22). See S-Drive Advanced Configuration Guide for ‘Preview and
Thumbnail’ configuration.
Figure 22
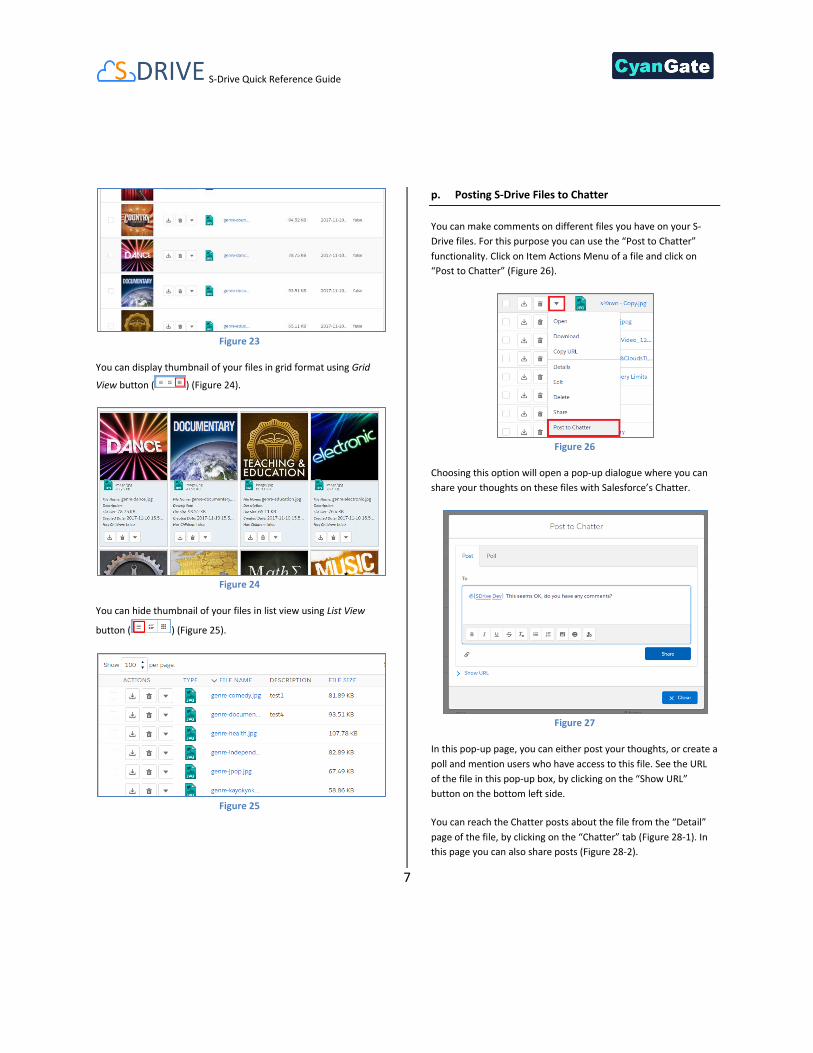
You can display thumbnail of your files in list format using
Thumbnail View button ( ) (Figure 23).
S-Drive Quick Reference Guide
7
Figure 23
You can display thumbnail of your files in grid format using Grid
View button ( ) (Figure 24).
Figure 24
You can hide thumbnail of your files in list view using List View
button ( ) (Figure 25).
Figure 25
p. Posting S-Drive Files to Chatter
You can make comments on different files you have on your S-
Drive files. For this purpose you can use the “Post to Chatter”
functionality. Click on Item Actions Menu of a file and click on
“Post to Chatter” (Figure 26).
Figure 26
Choosing this option will open a pop-up dialogue where you can
share your thoughts on these files with Salesforce’s Chatter.
Figure 27
In this pop-up page, you can either post your thoughts, or create a
poll and mention users who have access to this file. See the URL
of the file in this pop-up box, by clicking on the “Show URL”
button on the bottom left side.
You can reach the Chatter posts about the file from the “Detail”
page of the file, by clicking on the “Chatter” tab (Figure 28-1). In
this page you can also share posts (Figure 28-2).

S-Drive Quick Reference Guide
8
Figure 28
Here you can reach the Chatter Feed and view the posts and
comments about the file.
2. S-Drive Attachment Lightning Component
You can access S-Drive component in lightning experience record
page of an object (Account, Case, or My Custom Object). To get
more information please check S-Drive Advanced Configuration
Guide.
‘S-Drive’ component has three main panels: Folders panel (Figure
29-1) displays folder structure. Toolbar panel (Figure 29-2)
includes buttons required for creating folders; uploading,
downloading, emailing, deleting, copying, and moving files and a
search box. Current Folder View / Search Results View (Figure 29-
3) displays all files and subfolders inside the selected folder or
based on a search accordingly. Actions column in the current
folder view has file and folder basis actions like Download, Share,
Rename, Edit Description, Copy URL to Clipboard, and Delete.
Figure 29
a. Creating Folders
Click ‘New Folder’ button ( ) from the toolbar. Type the folder
name and then click ‘OK’ button to create a folder (Figure 30).
Folder names cannot be blank, cannot start with a space or a dot
and cannot contain ‘\’, ‘/’, ‘:’, ‘*’, ‘?’, ‘"’, ‘<’, ‘>’, ‘|’characters.
Figure 30
b. Uploading Files
Click ‘Upload File(s)’ button ( ) from the toolbar. If not, it can be
enabled via S-Drive Configuration page, “Enable download”
configuration checkbox.
Select file(s) to upload by clicking ‘Add file(s)’ button ( ).
Browse and select files by clicking ‘Open’ button to add files to the
upload list. You can organize upload list using ‘Add file(s)’ ( )
and ‘Remove file(s)’ ( ) buttons. Click ‘Upload file(s)’ button (
) to start uploading selected files. Upload progress will be
displayed in the ‘Upload Progress Bar’. Status of the uploaded file
will be updated to ‘COMPLETED’.
Note that Java and Flash upload managers has been deprecated in
since v1.28.

S-Drive Quick Reference Guide
9
Figure 31
c. Uploading New Versions of a File
[This feature requires enabling versioning on the organization.
Refer to the S-Drive Installation Guide to enable Versioning for
your organization.] You can upload new version of file by clicking
"Actions" menu button ( ) under "Actions" column and
selecting "Upload New Version" action menu (Figure 32). Only
HTML Upload Manager supports version upload.
Figure 32
d. Previous Versions of a File
[This feature requires enabling versioning on the organization.
Refer to the S-Drive Installation Guide to enable Versioning for
your organization.] You can see previous versions of a file by
clicking "Item Actions" button under "Actions" column and
selecting "Previous Versions" action menu item from dropdown.
(Figure 33).
Figure 33
You can set a previous version of file as current version by clicking
"Actions" button under "Actions" column and selecting "Set
Current" action menu item from dropdown. (Figure 34)
Figure 34
e. Emailing Files
Select file(s) and then click ‘Send Email’ button ( ) to email
files. You can type a contact name into ‘To’ address or you can
select it searching over your contacts by clicking ‘Lookup’ button.
You can select or type ‘Additional To’, ‘CC’, and ‘BCC’ fields using
appropriate fields and buttons. ‘Attachment Expiration’ is used to
set the expiration time for the attached files. Default is ‘Never
S-Drive Quick Reference Guide
10
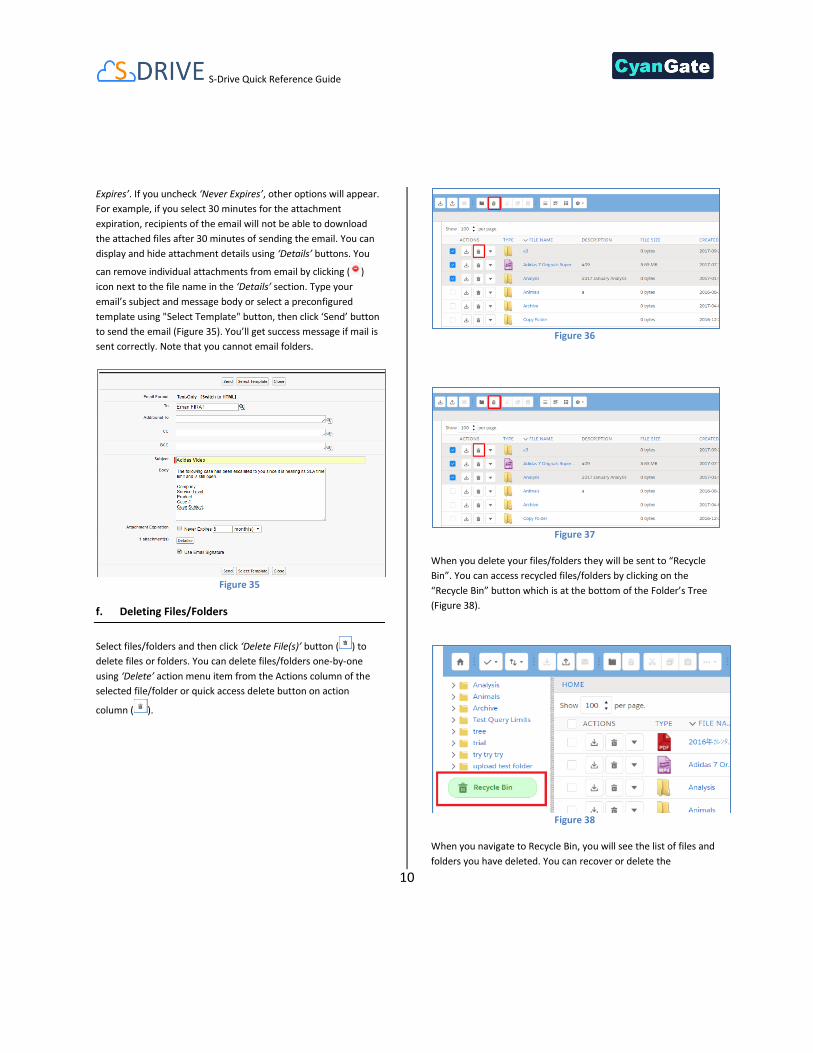
Expires’. If you uncheck ‘Never Expires’, other options will appear.
For example, if you select 30 minutes for the attachment
expiration, recipients of the email will not be able to download
the attached files after 30 minutes of sending the email. You can
display and hide attachment details using ‘Details’ buttons. You
can remove individual attachments from email by clicking ( )
icon next to the file name in the ‘Details’ section. Type your
email’s subject and message body or select a preconfigured
template using "Select Template" button, then click ‘Send’ button
to send the email (Figure 35). You’ll get success message if mail is
sent correctly. Note that you cannot email folders.
Figure 35
f. Deleting Files/Folders
Select files/folders and then click ‘Delete File(s)’ button ( ) to
delete files or folders. You can delete files/folders one-by-one
using ‘Delete’ action menu item from the Actions column of the
selected file/folder or quick access delete button on action
column ( ).
Figure 36
Figure 37
When you delete your files/folders they will be sent to “Recycle
Bin”. You can access recycled files/folders by clicking on the
“Recycle Bin” button which is at the bottom of the Folder’s Tree
(Figure 38).
Figure 38
When you navigate to Recycle Bin, you will see the list of files and
folders you have deleted. You can recover or delete the

S-Drive Quick Reference Guide
11
files/folders in Recycle Bin. You can choose multiple items to
delete or recover at once. For these purposes you can use the
Toolbar menu buttons or the Actions menu (Figure 39).
Figure 39
You’ll be asked ‘Are you sure?’ after clicking ‘Delete’ button. Select
‘Yes’ option to delete files/folders. On Lightning Experience, you
can also delete folders that contain files or subfolders within
Salesforce Query Limits.
If you have versions under the current file, all versions of this file
will also be deleted.
When you recover files/folders they will be sent back to where
they were located before deletion. See “S-Drive Lightning User
Guide – Deleting Files/Folders” section for more information about
deleting files and folders.
g. Downloading Files
To download a single file with one click, select a file and then click
‘Download’ action menu item from the Actions column of the
selected file or quick download button on Actions column (Figure
40). Note that on lightning component, you can also download
folders with sub files & folders.
Figure 40
To download multiple files using 'Zip & Download', select files or
folders and then click ‘Download File(s)' button (Figure 41). “Zip &
Download” screen will be opened and downloads will start.
Figure 41
h. Copying and Moving Files
Select file(s) you want to copy and click ‘Copy’ button ( ),
browse to the target folder that you want to paste the file(s), and
click ‘Paste’ button ( ). If versioning enabled and you have
versions of the selected file, only latest version of the file will be
copied.
Select file(s) you want to move and click ‘Cut’ button ( ),
browse to the target folder that you want to paste the file(s), and
click ‘Paste’ button ( ). If versioning enabled and you have
versions of the selected file, file will be cut/moved with all its
versions.
If sharing is enabled it will ask if you want to bring the current
shares with the cut/copied item. Progress window will be
displayed, and files will be copied or moved to the target folder

S-Drive Quick Reference Guide
12
(Figure 42). Note that copy/move operations are not allowed on
folders.
Figure 42
i. Editing File/Folder Description
Click the "Actions" menu of file or folder you want to edit files’
name, description and all custom fields that are editable and
active on the view. When “Save” button clicked, it directed to
Detail view. (Figure 43).
Figure 43
j. Copying URL to Clipboard
For copying URL of a file to clipboard, click the "Actions" menu of
the file then select ‘Copy URL’ from the list. Follow the on-screen
instructions and copy the URL (Figure 44). Now you can paste the
URL.
Figure 44
k. Searching in Attachment Files
You can search for files and folders inside S-Drive Folders (Figure
45).
To start a search, type the search criteria to the right corner of S-
Drive Attachment component screen, into the search box and
click Enter. You can use wildcards, ‘* (multiple characters),?
(single character)’ in search keywords. For example: genre*, boo?
etc.
Results are displayed in the same section with a ‘Search results:
XX file(s).’ header. 'New Folder', 'Upload File(s)', 'Paste' buttons
are invisible in the search results screen. You can go back to
previous screen using ( ) button on top right, or you can go
to home folder by clicking ‘Home’ link on the breadcrumb panel or
Home button ( ) on toolbar.
Figure 45
l. Switching Between View Types

S-Drive Quick Reference Guide
13
S-Drive Attachment component has three different view types.
List, Thumbnail and Grid. If ‘Preview and Thumbnail’ feature is
enabled for related object (i.e. AccountFile, CaseFile, or
MyCustomObjectFile), you can switch between view types (Figure
46). See S-Drive Advanced Configuration Guide for ‘Preview and
Thumbnail’ configuration.
Figure 46
You can display thumbnail of your files using Thumbnail View
button ( ) (Figure 47).
Figure 47
You can display your files in grid format using Grid View button (
) (Figure 48).
Figure 48
You can hide thumbnail of your files using List View button (
) (Figure 49).
Figure 49
m. Posting Attachment Files to Chatter
You can make comments on different files you have on your
attachment files. For this purpose, you can use the “Post to
Chatter” functionality. Click on Item Actions Menu of a file and
click on “Post to Chatter” (Figure 50).
Figure 50
Choosing this option will open a pop-up dialogue where you can
share your thoughts on these files with Salesforce’s Chatter.

S-Drive Quick Reference Guide
14
Figure 51
In this pop-up page, you can either post your thoughts, or create a
poll and mention users who have access to this file. See the URL
of the file in this pop-up box, by clicking on the “Show URL”
button on the bottom left side.
You can reach the Chatter posts about the file from the “Detail”
page of the file, by clicking on the “Chatter” tab (Figure 52-1). In
this page you can also share posts (Figure 52-2).
Figure 52
Here you can reach the Chatter Feed and view the posts and
comments about the file.
S-Drive Support
You can contact S-Drive Support team for any questions or problems that you couldn't solve using S-Drive documents: 1. Open a Ticket at Support Site: sdriveapp.com/support
2. Email: [email protected]
You can find up-to-date product information, documents, tutorial videos, tools in our web page: www.sdriveapp.com


![British Lightnings [Airdoc PostWWII 10]](https://img.pdfslide.us/doc/110x75/577cd3ce1a28ab9e78979573/british-lightnings-airdoc-postwwii-10.jpg)