Embed Size (px)
Citation preview

www.cyangate.com
S-Drive
Installation Guide
v2.0
Important Note
This installation guide contains basic information about S-Drive installation. Refer to the S-Drive Advanced Configuration Guide for advanced
installation/configuration topics and S-Drive User Guide for more information about using S-Drive product and S-Drive API calls.

1 All Rights Reserved - CyanGate LLC
Contents A. Installation ............................................................................................................................................ 2
B. Displaying "S-Drive" and "S-Drive Configuration" Tabs ........................................................................ 6
C. Activating S-Drive .................................................................................................................................. 8
D. S-Drive Attachments for Accounts, Cases, Contacts and Opportunities ............................................ 11
E. S-Drive Attachments for Lightning Experience for Accounts, Cases, Contacts and Opportunities .... 13
1. Account Attachments .................................................................................................................... 13
2. Case Attachments .......................................................................................................................... 20
3. Contact Attachments ..................................................................................................................... 27
4. Opportunity Attachments .............................................................................................................. 34
F. Upgrading S-Drive ............................................................................................................................... 41
1. 1.28 to 2.0 ...................................................................................................................................... 41
2. 1.26 or 1.27 to 2.0 Upgrade ........................................................................................................... 42
3. 1.24 or 1.25 to 2.0 .......................................................................................................................... 42
4. 1.23.11 or Older Versions to 2.0 .................................................................................................... 45
G. Minimum Policy Example .................................................................................................................... 46
H. S-Drive Advanced Configuration ......................................................................................................... 47
I. Troubleshooting Tips .......................................................................................................................... 48
J. S-Drive Support ................................................................................................................................... 49
2 All Rights Reserved - CyanGate LLC
A. Installation
1. Go to S-Drive Website (sdriveapp.com). Click "Get S-Drive" button. S-Drive Product Page will
be opened. And click "Get It Now" (Figure 2).
Figure 1
Figure 2
2. Click "Log In" to login using your Salesforce credentials. If you don't have a login, click "Continue
as Guest" to continue as a guest and apply for a free trial Salesforce account. Note that "even if
you plan to install S-Drive into your sandbox, first you need to login to the AppExchange using
your production credentials" (Figure 3).

3 All Rights Reserved - CyanGate LLC
Figure 3
3. After login you'll be asked where to install: "Install in production" or "Install in sandbox". Select
the appropriate option based on your needs (Figure 4).
Figure 4
4. Read the "terms and conditions" and then check "I have read and agree to the terms and
conditions" checkbox and click "Confirm and Install!" button. (Figure 5).

4 All Rights Reserved - CyanGate LLC
Figure 5
5. Login to your production (or sandbox organization based on your previous selections) account
again in the next screen.
6. Select "Install for All Users" and click "Install" button in the next screen (Figure 6).
Figure 6
7. Approve third-party access by checking "Yes, grant access to these third-party web sites"
option and clicking "Continue" button (Figure 7).

5 All Rights Reserved - CyanGate LLC
Figure 7
8. If you see "Install Complete" screen, click "Done" button (Figure 8). You can continue with the
'Displaying "S-Drive" and "S-Drive Configuration" Tabs' section.
Figure 8

6 All Rights Reserved - CyanGate LLC
B. Displaying "S-Drive" and "S-Drive Configuration" Tabs
1. To display "S-Drive" and "S-Drive Configuration" tabs in your custom app (e.g. "Sales" app), go
to User Menu on the top right corner and choose "My Settings” (Figure 9).
Figure 9
2. Under “Display & Layout” tab, click on "Customize My Tabs" button.
Figure 10
3. Select your custom app from the "Custom App" drop down menu (e.g. "Sales" app). Move "S-Drive" and "S-Drive Configuration" tabs from "Available Tabs" box to "Selected Tabs" box by selecting and clicking the right arrow as shown below. Click "Save" (Figure 11).

7 All Rights Reserved - CyanGate LLC
Figure 11
4. To display “S-Drive”, “S-Drive Configuration” and “S-Drive Advanced Search” tabs in Salesforce
Lightning, you need to click on “App Launcher” ( ) menu which is on the left corner of the
Salesforce page.
5. The App Launcher will be shown. You need to click on “S-Drive: Simple Secure Storage for
Salesforce Users” app (Figure 12).
Figure 12
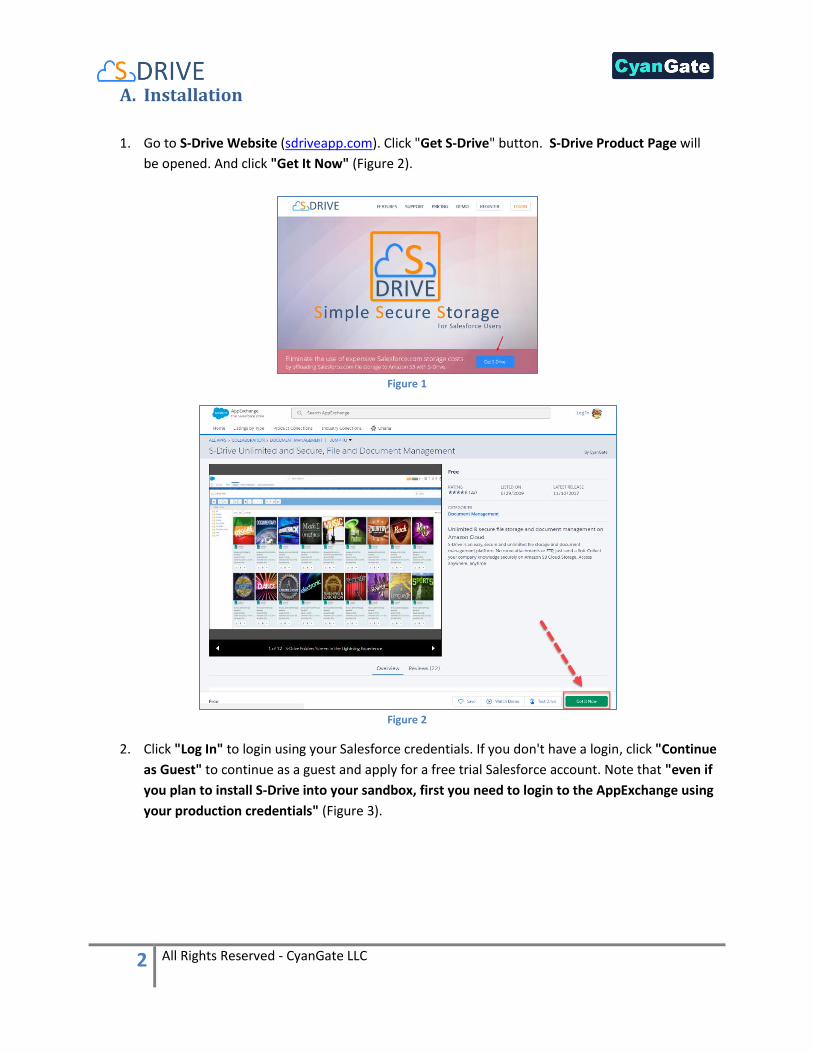
6. After clicking, you will return to your Home page in Salesforce, and you will be able to view the
S-Drive related tabs on top of the page.
8 All Rights Reserved - CyanGate LLC
Figure 13
C. Activating S-Drive
After completing installation and S-Drive tab configuration, click on the "S-Drive" tab.
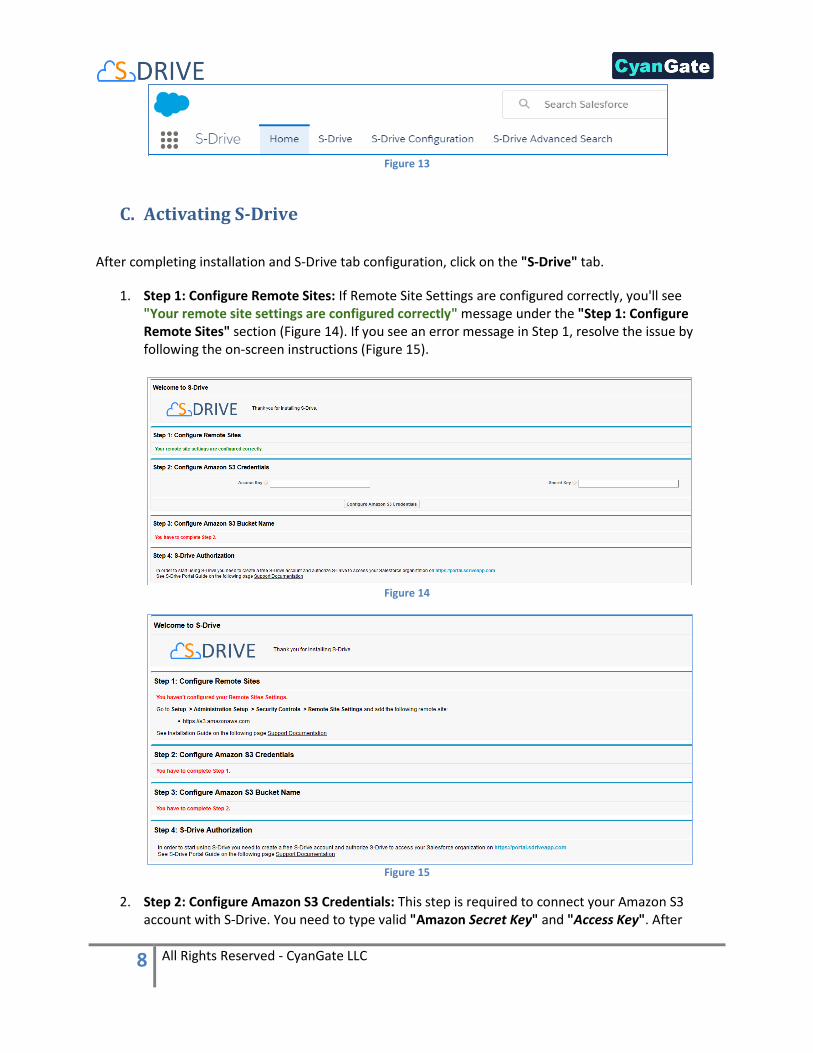
1. Step 1: Configure Remote Sites: If Remote Site Settings are configured correctly, you'll see "Your remote site settings are configured correctly" message under the "Step 1: Configure Remote Sites" section (Figure 14). If you see an error message in Step 1, resolve the issue by following the on-screen instructions (Figure 15).
Figure 14
Figure 15
2. Step 2: Configure Amazon S3 Credentials: This step is required to connect your Amazon S3 account with S-Drive. You need to type valid "Amazon Secret Key" and "Access Key". After
9 All Rights Reserved - CyanGate LLC
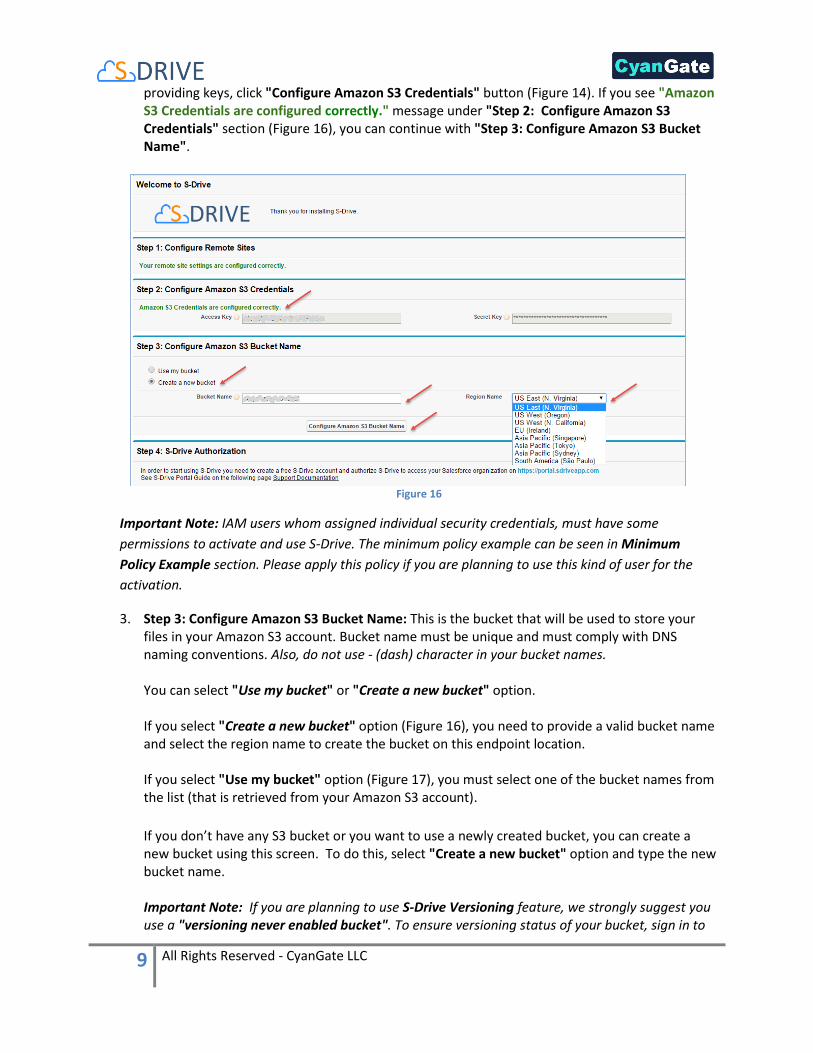
providing keys, click "Configure Amazon S3 Credentials" button (Figure 14). If you see "Amazon S3 Credentials are configured correctly." message under "Step 2: Configure Amazon S3 Credentials" section (Figure 16), you can continue with "Step 3: Configure Amazon S3 Bucket Name".
Figure 16
Important Note: IAM users whom assigned individual security credentials, must have some
permissions to activate and use S-Drive. The minimum policy example can be seen in Minimum
Policy Example section. Please apply this policy if you are planning to use this kind of user for the
activation.
3. Step 3: Configure Amazon S3 Bucket Name: This is the bucket that will be used to store your files in your Amazon S3 account. Bucket name must be unique and must comply with DNS naming conventions. Also, do not use - (dash) character in your bucket names. You can select "Use my bucket" or "Create a new bucket" option. If you select "Create a new bucket" option (Figure 16), you need to provide a valid bucket name and select the region name to create the bucket on this endpoint location. If you select "Use my bucket" option (Figure 17), you must select one of the bucket names from the list (that is retrieved from your Amazon S3 account).
If you don’t have any S3 bucket or you want to use a newly created bucket, you can create a new bucket using this screen. To do this, select "Create a new bucket" option and type the new bucket name. Important Note: If you are planning to use S-Drive Versioning feature, we strongly suggest you use a "versioning never enabled bucket". To ensure versioning status of your bucket, sign in to

10 All Rights Reserved - CyanGate LLC
your amazon console, find your bucket from S3 service and check bucket properties. If you selected "Create a new bucket " option, you can ignore this note as it will create a "versioning not enabled" bucket by default.
Click "Configure Amazon S3 Bucket Name" button (Figure 16) (Figure 17). If you see "Amazon S3 Bucket Name is configured correctly." message under "Step 3: Configure S3 Bucket Name" section (Figure 18), you can continue with "Step 4: S-Drive Authorization".
Figure 17
Figure 18
4. Step 4: S-Drive Authorization: You need to go to portal.sdriveapp.com to complete this step (Figure 18). Go to portal.sdriveapp.com and create a free S-Drive account and authorize S-Drive
11 All Rights Reserved - CyanGate LLC
to connect to your organization. For more information about creating free S-Drive account and connecting your organization to S-Drive, please refer to "S-Drive Portal Guide" document.
D. S-Drive Attachments for Accounts, Cases, Contacts and
Opportunities
Account, Case, Contact and Opportunity standard object files and override pages are bundled with
the S-Drive installation. If you’ll use S-Drive attachments for these standard objects as override, you
can use bundled objects and/or pages where appropriate. If you are planning to use S-Drive
Attachments for other standard/custom objects or as override/inline, please refer to the "S-Drive
Advanced Configuration Guide" document.
"Overriding the view of the object" means that the page will be used as an override to the standard
object page. In this case, 'S-Drive Attachments' will be a section at the end of the standard page
layout.
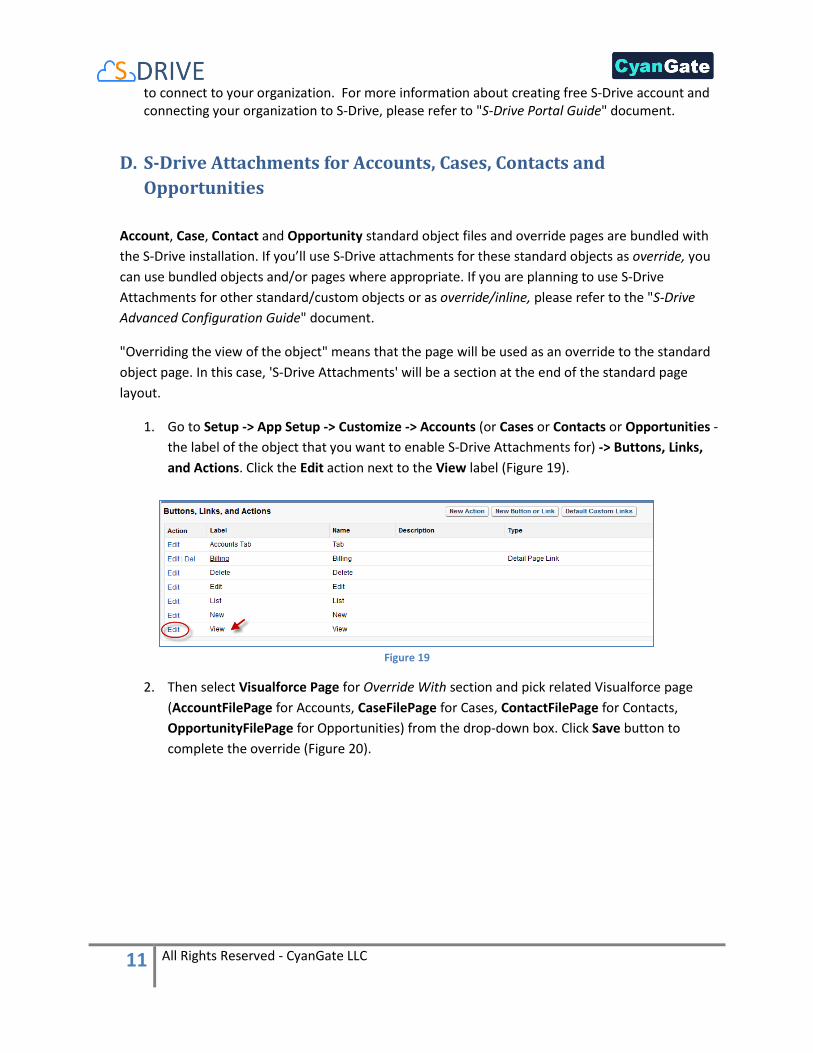
1. Go to Setup -> App Setup -> Customize -> Accounts (or Cases or Contacts or Opportunities -
the label of the object that you want to enable S-Drive Attachments for) -> Buttons, Links,
and Actions. Click the Edit action next to the View label (Figure 19).
Figure 19
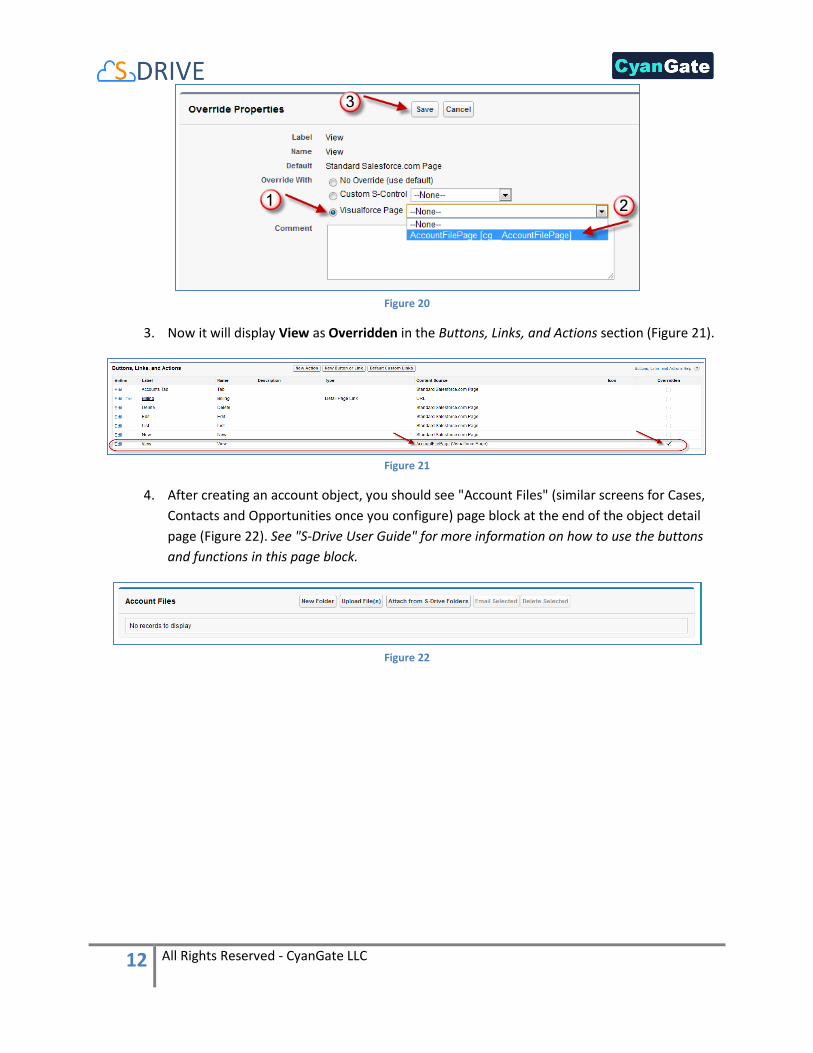
2. Then select Visualforce Page for Override With section and pick related Visualforce page
(AccountFilePage for Accounts, CaseFilePage for Cases, ContactFilePage for Contacts,
OpportunityFilePage for Opportunities) from the drop-down box. Click Save button to
complete the override (Figure 20).
12 All Rights Reserved - CyanGate LLC
Figure 20
3. Now it will display View as Overridden in the Buttons, Links, and Actions section (Figure 21).
Figure 21
4. After creating an account object, you should see "Account Files" (similar screens for Cases,
Contacts and Opportunities once you configure) page block at the end of the object detail
page (Figure 22). See "S-Drive User Guide" for more information on how to use the buttons
and functions in this page block.
Figure 22
13 All Rights Reserved - CyanGate LLC
E. S-Drive Attachments for Lightning Experience for Accounts, Cases,
Contacts and Opportunities
To display the S-Drive Attachments for Account, Case, Contact and Opportunity standard objects,
you need to edit each of these objects’ pages.
1. Account Attachments
If you want to use the S-Drive Attachment with an Account object:
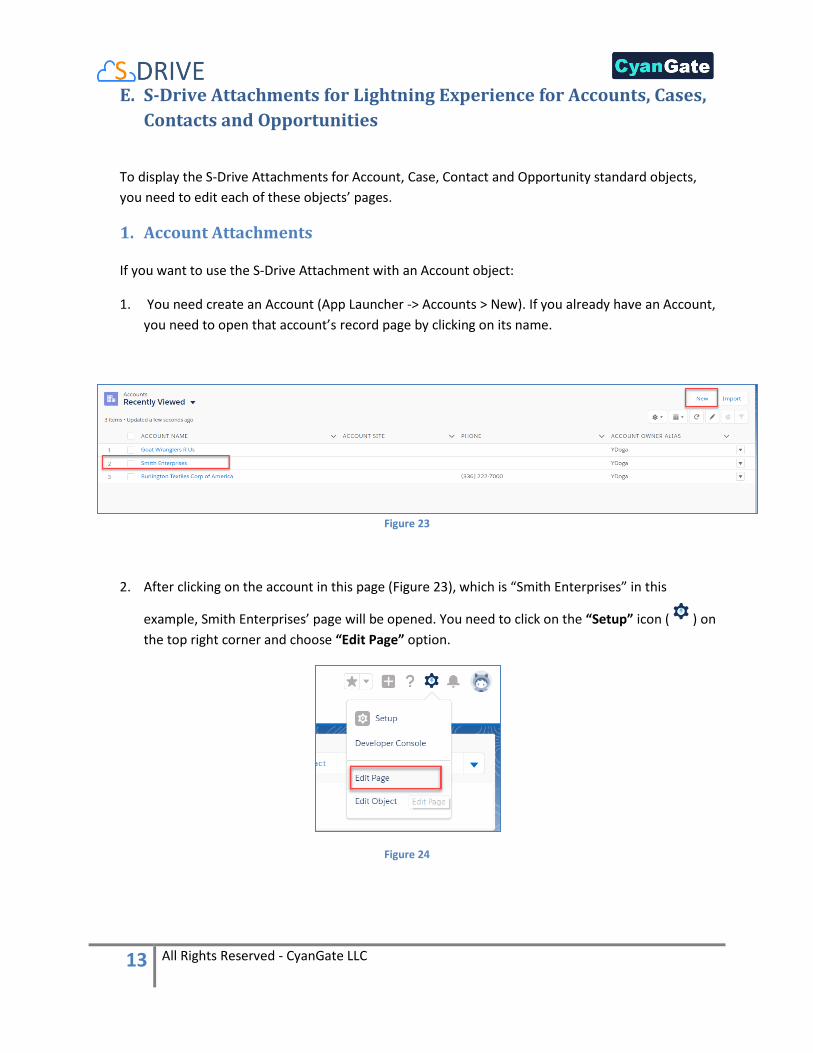
1. You need create an Account (App Launcher -> Accounts > New). If you already have an Account,
you need to open that account’s record page by clicking on its name.
Figure 23
2. After clicking on the account in this page (Figure 23), which is “Smith Enterprises” in this
example, Smith Enterprises’ page will be opened. You need to click on the “Setup” icon ( ) on
the top right corner and choose “Edit Page” option.
Figure 24

14 All Rights Reserved - CyanGate LLC
3. After clicking on “Edit Page” option, “Lightning App Builder – New Account Page” screen will be
shown. You will see “Lightning Components” section on the left-hand side. You need to scroll
down to see the “SDrive” component, under “Custom”.
Figure 25
4. Grab the SDrive component and drag it to the right side where you see the components of the
account page. Drop wherever you want the S-Drive component to be placed.

15 All Rights Reserved - CyanGate LLC
Figure 26
5. You need to edit the following required fields correctly, to create the Account Files (Figure 27).
You can also change the settings from a selection of checkboxes which include: Enable copy URL,
Enable delete, Enable download, Enable edit, Enable e-mail, Enable upload, Enable folders,
Enable private files. You can scroll down to see more settings about the S-Drive Attachment
component, such as showing folder tree component and breadcrumbs, which can be changed by
using the toolbar menu afterwards.
6. After clicking on “Save” button, you need to activate the page in order to use the S-Drive
component. You can click on “Activation” and choose “Assign as Org Default” or “Assign as App
Default” from the pop-up screen, in order to view the attachment component. Now, you should
see “Account Files” page block at the end of the account object record page. See "Lightning User
Guide" for more information on how to use the buttons and functions in this page block.

16 All Rights Reserved - CyanGate LLC
Figure 27
The component attributes shown in Figure 27 is discussed in this section in detail:
1. Title
This is the title of the page block inside the object page. You can set it to “Account Files”. This
field is optional and if you don’t provide a value for this field, it will be set as “S-Drive Files”.

17 All Rights Reserved - CyanGate LLC
2. Parent object name
This is the name of the object that the files will be attached to. For Account object, it will be
“Account”. As this is a standard object you will not append “__c” at the end of the parent object
name.
3. Object namespace prefix
This is the object’s namespace prefix that your Salesforce.com organization uses. As Account is a
standard object, you do not need to add an object namespace prefix. If your organization has a
namespace prefix and you created a custom object inside your organization, your object
namespace prefix is same with your organization namespace prefix. See “S-Drive Advanced
Configuration Guide” for more information about creating custom objects.
4. File object name
This is the name of the custom object file that we will be attaching to the object. This file object
will be holding the information regarding the attached files. As Account is a standard object, this
section will be filled as “AccountFile__c”.
5. File object namespace prefix
This is the file object’s namespace prefix that your Salesforce.com organization uses. If your
organization has a namespace prefix and you created this custom object file inside this
organization, your file namespace prefix is same with your organization namespace prefix. If this
file object belongs to a managed package, you need to use that managed package’s namespace
prefix. For this Account attachment, you need to set it as “cg__”.
6. Relationship field name
Master-detail relation used for selected standard object. You need to fill it in as “Account__r”.
7. Enable copy URL
This option is used to enable/disable “Copy URL” link in the page. There are two possible values
for this attribute: “true” or “false”. If the checkbox is checked, this means that the value is set to
true, and you will be able to see the “Copy URL” link for each asset. The default value for this
checkbox is checked.
8. Enable delete
This option is used to enable/disable “Delete” option for all attachments in the page. There are
two possible values for this attribute: “true” or “false”. If the checkbox is checked, this means
that the value is set to true, and you will be able to see the “Delete” link for each asset. The
default value for this checkbox is checked.
18 All Rights Reserved - CyanGate LLC
9. Enable download
This option is used to enable/disable “Download” option for all attachments in the page. There
are two possible values for this attribute: “true” or “false”. If the checkbox is checked, this
means that the value is set to true, and you will be able to see the “Download” link for each
asset. The default value for this checkbox is checked.
10. Enable edit
This option is used to enable/disable “Edit” option for all attachments in the page. There are
two possible values for this attribute: “true” or “false”. If the checkbox is checked, this means
that the value is set to true, and you will be able to see the “Edit” link for each asset. The default
value for this checkbox is checked.
11. Enable e-mail
This option is used to enable/disable “E-Mail” option for all attachments in the page. There are
two possible values for this attribute: “true” or “false”. If the checkbox is checked, this means
that the value is set to true, and you will be able to see the “E-Mail” link for each asset. The
default value for this checkbox is checked.
12. Default email address
You can use this option, if you want to set a default “Additional To” email address for sending
emails from your S-Drive Attachments. For example, if you select an Account S-Drive
Attachment for an account and click “Email” button, “Email Files” screen will be opened and
“Additional To” field will be filled with the email address you have provided here.
13. Enable upload
This option is used to enable/disable “Upload” option for all attachments in the page. There are
two possible values for this attribute: “true” or “false”. If the checkbox is checked, this means
that the value is set to true, and you will be able to see the “Upload File(s)” link for each asset.
The default value for this checkbox is checked.
14. Allowed file extensions
You can use this option, if you want to limit the file types to be uploaded into selected object’s
S-Drive attachments. Semicolon separated list of file extensions that are allowed to upload can
be written here. This attribute is optional and leaving this empty will allow all kind of files to be
uploaded. For example, “*.jpg, *.txt” will limit the files to be uploaded to jpg and txt files.
15. Enable folders
This option is used to enable/disable folder support for S-Drive attachments in the page. There
are two possible values for this attribute: “true” or “false”. If the checkbox is checked, this
19 All Rights Reserved - CyanGate LLC
means that the value is set to true, and you will be able to see the “New Folder” button. The
default value for this checkbox is checked. If the box is not checked, the “New Folder” button
will be removed from the toolbar section.
16. Enable private files
This option is used for enabling public/private file access to the S-Drive attachments and
commonly used to limit the customer portal users’ access to individual files. Set this attribute to
true by checking the checkbox, if you want to enable private/public flag. Setting the private flag
on a file hides the file from customer portal users. The default value for this checkbox is
unchecked.
17. Default sort field name
This option is used to order/sort S-Drive attachments based on a field. You need to set the name
of the field that should be used to order the list of files. For this example, it should be filled in as
“cg__File_Name__c”. You can change this option from the settings button located at the toolbar
of S-Drive attachments anytime. See “S-Drive Lightning User Guide” for more information about
using the S-Drive attachments.
18. Default sort order
This option is used to set the sort order direction of the S-Drive attachments. There are two
possible values for this attribute: “asc” or “desc”. The default value is “asc” which stands for
ascending. You can change this option from the settings button located at the toolbar of S-Drive
attachments anytime. See “S-Drive Lightning User Guide” for more information about using the
S-Drive attachments.
19. File number to be shown in a page
This option is to set the number of files to be shown in an attachment page. The default value
for this section is set to 100. If this value is set to ‘30’ and object has 91 total items, the files will
be displayed in 4 pages. You can change this option from the pagination setting located under
the toolbar of S-Drive attachments. See “S-Drive Lightning User Guide” for more information
about using the S-Drive attachments.
20. Default view type of file list table
This option is to set the default view type of the file list table. There are 3 options you can
choose: List, Thumbnail and Grid. You can change this option from the toolbar of S-Drive
attachments, and set it as default by using the settings button. See “S-Drive Lightning User
Guide” for more information about using the S-Drive attachments.
21. Show Folder Tree component
This option sets the default behavior of the folder tree component located on the left-hand side
of the S-Drive attachments page. You can choose to hide or show the Folder Tree component by
20 All Rights Reserved - CyanGate LLC
using the settings button on the toolbar of S-Drive attachments. See “S-Drive Lightning User
Guide” for more information about using the S-Drive attachments.
22. Show breadcrumb component
This option sets the default behavior of the breadcrumbs located on the left-hand side of the S-
Drive attachments page, above the folder tree component. You can choose to hide or show the
breadcrumbs by using the settings button on the toolbar of S-Drive attachments. See “S-Drive
Lightning User Guide” for more information about using the S-Drive attachments.
2. Case Attachments
If you want to use the S-Drive Attachment with a Case object:
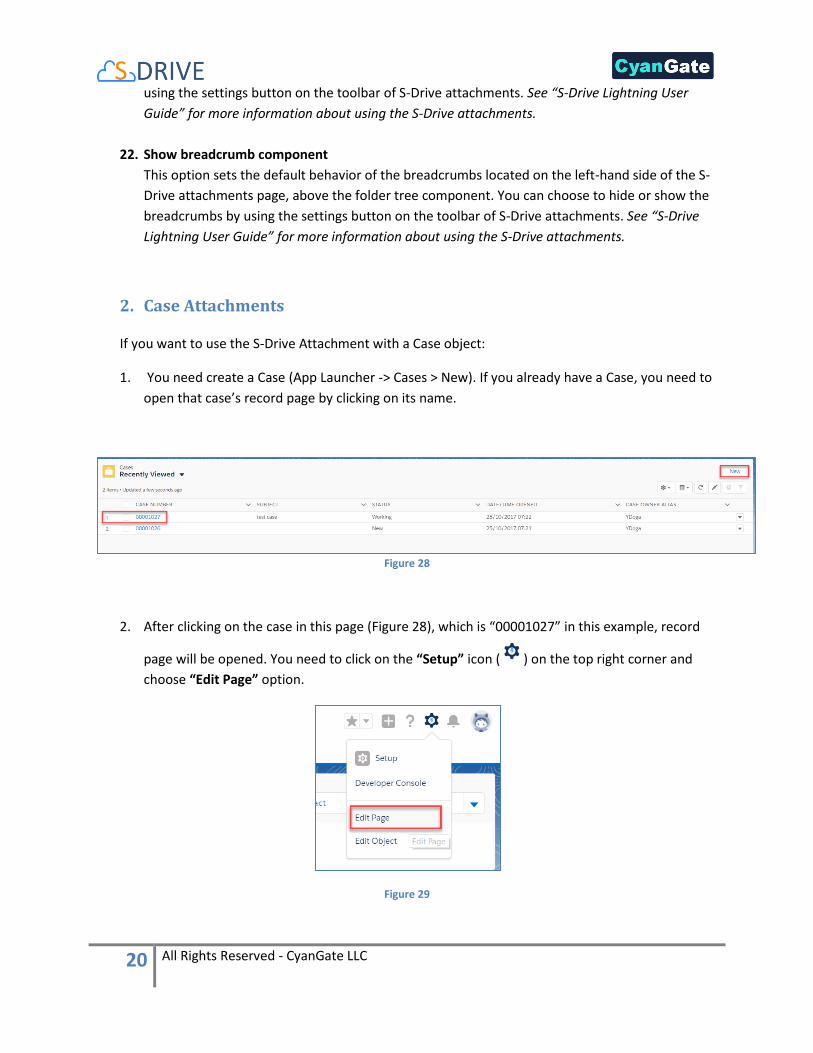
1. You need create a Case (App Launcher -> Cases > New). If you already have a Case, you need to
open that case’s record page by clicking on its name.
Figure 28
2. After clicking on the case in this page (Figure 28), which is “00001027” in this example, record
page will be opened. You need to click on the “Setup” icon ( ) on the top right corner and
choose “Edit Page” option.
Figure 29
21 All Rights Reserved - CyanGate LLC
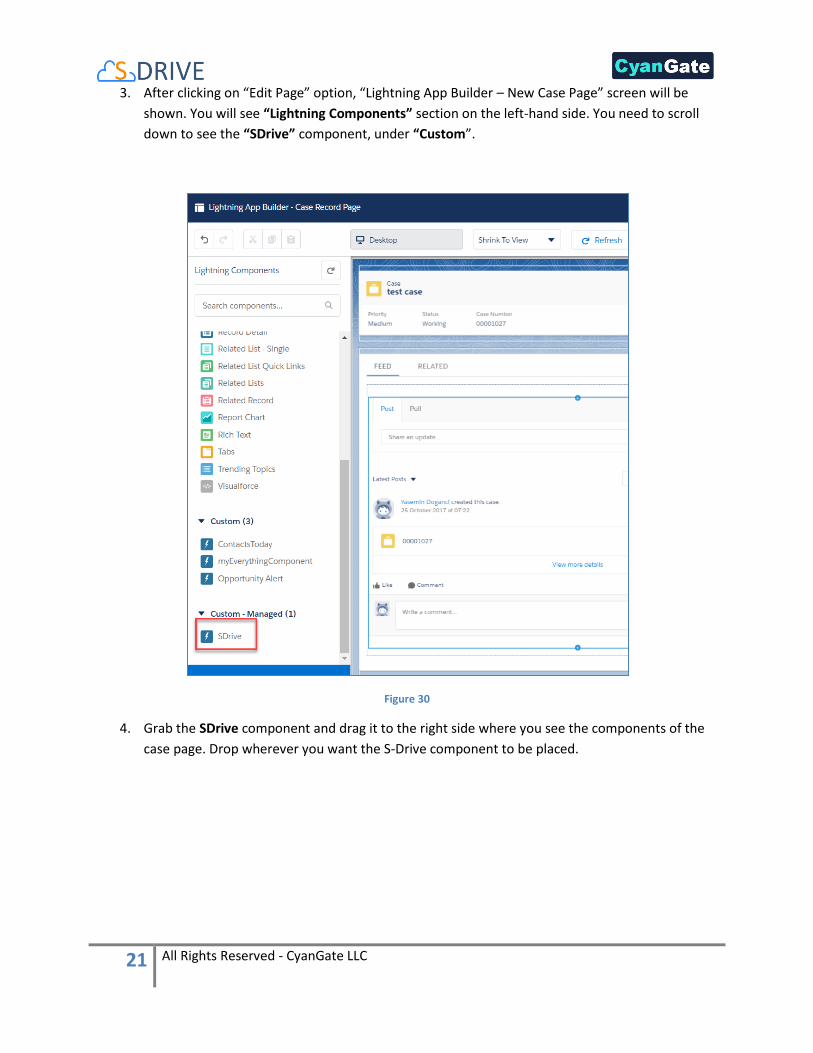
3. After clicking on “Edit Page” option, “Lightning App Builder – New Case Page” screen will be
shown. You will see “Lightning Components” section on the left-hand side. You need to scroll
down to see the “SDrive” component, under “Custom”.
Figure 30
4. Grab the SDrive component and drag it to the right side where you see the components of the
case page. Drop wherever you want the S-Drive component to be placed.

22 All Rights Reserved - CyanGate LLC
Figure 31
5. You need to edit the following required fields correctly, to create the Case Files (Figure 32). You
can also change the settings from a selection of checkboxes which include: Enable copy url,
Enable delete, Enable download, Enable edit, Enable e-mail, Enable upload, Enable folders,
Enable private files. You can scroll down to see more settings about the S-Drive Attachment
component, such as showing folder tree component and breadcrumbs, which can be changed by
using the toolbar menu afterwards.
6. After clicking on “Save” button, you need to activate the page to use the S-Drive component.
You can click on “Activation” and choose “Assign as Org Default” or “Assign as App Default”
from the pop-up screen, in order to view the attachment component. Now, you should see
“Case Files” page block at the end of the case object record page. See "Lightning User Guide" for
more information on how to use the buttons and functions in this page block.

23 All Rights Reserved - CyanGate LLC
Figure 32
The component attributes shown in Figure 32 is discussed in this section in detail:
1. Title
This is the title of the page block inside the object page. You can set it to “Case Files”. This field
is optional and if you don’t provide a value for this field, it will be set as “S-Drive Files”.
2. Parent object name
24 All Rights Reserved - CyanGate LLC
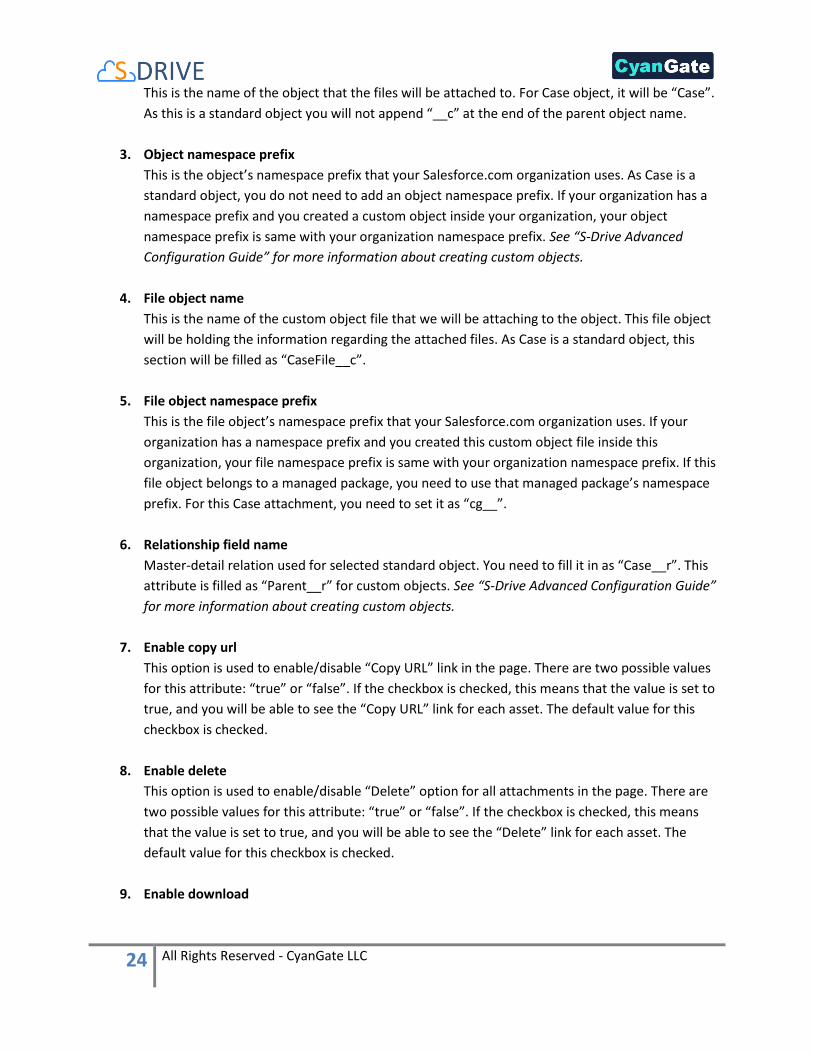
This is the name of the object that the files will be attached to. For Case object, it will be “Case”.
As this is a standard object you will not append “__c” at the end of the parent object name.
3. Object namespace prefix
This is the object’s namespace prefix that your Salesforce.com organization uses. As Case is a
standard object, you do not need to add an object namespace prefix. If your organization has a
namespace prefix and you created a custom object inside your organization, your object
namespace prefix is same with your organization namespace prefix. See “S-Drive Advanced
Configuration Guide” for more information about creating custom objects.
4. File object name
This is the name of the custom object file that we will be attaching to the object. This file object
will be holding the information regarding the attached files. As Case is a standard object, this
section will be filled as “CaseFile__c”.
5. File object namespace prefix
This is the file object’s namespace prefix that your Salesforce.com organization uses. If your
organization has a namespace prefix and you created this custom object file inside this
organization, your file namespace prefix is same with your organization namespace prefix. If this
file object belongs to a managed package, you need to use that managed package’s namespace
prefix. For this Case attachment, you need to set it as “cg__”.
6. Relationship field name
Master-detail relation used for selected standard object. You need to fill it in as “Case__r”. This
attribute is filled as “Parent__r” for custom objects. See “S-Drive Advanced Configuration Guide”
for more information about creating custom objects.
7. Enable copy url
This option is used to enable/disable “Copy URL” link in the page. There are two possible values
for this attribute: “true” or “false”. If the checkbox is checked, this means that the value is set to
true, and you will be able to see the “Copy URL” link for each asset. The default value for this
checkbox is checked.
8. Enable delete
This option is used to enable/disable “Delete” option for all attachments in the page. There are
two possible values for this attribute: “true” or “false”. If the checkbox is checked, this means
that the value is set to true, and you will be able to see the “Delete” link for each asset. The
default value for this checkbox is checked.
9. Enable download

25 All Rights Reserved - CyanGate LLC
This option is used to enable/disable “Download” option for all attachments in the page. There
are two possible values for this attribute: “true” or “false”. If the checkbox is checked, this
means that the value is set to true, and you will be able to see the “Download” link for each
asset. The default value for this checkbox is checked.
10. Enable edit
This option is used to enable/disable “Edit” option for all attachments in the page. There are
two possible values for this attribute: “true” or “false”. If the checkbox is checked, this means
that the value is set to true, and you will be able to see the “Edit” link for each asset. The default
value for this checkbox is checked.
11. Enable e-mail
This option is used to enable/disable “E-Mail” option for all attachments in the page. There are
two possible values for this attribute: “true” or “false”. If the checkbox is checked, this means
that the value is set to true, and you will be able to see the “E-Mail” link for each asset. The
default value for this checkbox is checked.
12. Default email address
You can use this option, if you want to set a default “Additional To” email address for sending
emails from your S-Drive Attachments. For example, if you select an Case S-Drive Attachment
for a case and click “Email” button, “Email Files” screen will be opened and “Additional To” field
will be filled with the email address you have provided here.
13. Enable upload
This option is used to enable/disable “Upload” option for all attachments in the page. There are
two possible values for this attribute: “true” or “false”. If the checkbox is checked, this means
that the value is set to true, and you will be able to see the “Upload File(s)” link for each asset.
The default value for this checkbox is checked.
14. Allowed file extensions
You can use this option, if you want to limit the file types to be uploaded into selected object’s
S-Drive attachments. Semicolon separated list of file extensions that are allowed to be uploaded
can be written here. This attribute is optional and leaving this empty will allow all kind of files to
be uploaded. For example, “*.jpg, *.txt” will limit the files to be uploaded to jpg and txt files.
15. Enable folders
This option is used to enable/disable folder support for S-Drive attachments in the page. There
are two possible values for this attribute: “true” or “false”. If the checkbox is checked, this
means that the value is set to true, and you will be able to see the “New Folder” button. The
default value for this checkbox is checked. If the box is not checked, the “New Folder” button

26 All Rights Reserved - CyanGate LLC
will be removed from the toolbar section.
16. Enable private files
This option is used for enabling public/private file access to the S-Drive attachments and
commonly used to limit the customer portal users’ access to individual files. Set this attribute to
true by checking the checkbox, if you want to enable private/public flag. Setting the private flag
on a file hides the file from customer portal users. The default value for this checkbox is
unchecked.
17. Default sort field name
This option is used to order/sort S-Drive attachments based on a field. You need to set the name
of the field that should be used to order the list of files. For this example, it should be filled in as
“cg__File_Name__c”. You can change this option from the settings button located at the toolbar
of S-Drive attachments anytime. See “S-Drive Lightning User Guide” for more information about
using the S-Drive attachments.
18. Default sort order
This option is used to set the sort order direction of the S-Drive attachments. There are two
possible values for this attribute: “asc” or “desc”. The default value is “asc” which stands for
ascending. You can change this option from the settings button located at the toolbar of S-Drive
attachments anytime. See “S-Drive Lightning User Guide” for more information about using the
S-Drive attachments.
19. File number to be shown in a page
This option is to set the number of files to be shown in an attachment page. The default value
for this section is set to 100. If this value is set to ‘30’ and object has 91 total items, the files will
be displayed in 4 pages. You can change this option from the pagination setting located under
the toolbar of S-Drive attachments. See “S-Drive Lightning User Guide” for more information
about using the S-Drive attachments.
20. Default view type of file list table
This option is to set the default view type of the file list table. There are 3 options you can
choose: List, Thumbnail and Grid. You can change this option from the toolbar of S-Drive
attachments, and set it as default by using the settings button. See “S-Drive Lightning User
Guide” for more information about using the S-Drive attachments.
21. Show Folder Tree component
This option sets the default behavior of the folder tree component located on the left-hand side
of the S-Drive attachments page. You can choose to hide or show the Folder Tree component by
using the settings button on the toolbar of S-Drive attachments. See “S-Drive Lightning User

27 All Rights Reserved - CyanGate LLC
Guide” for more information about using the S-Drive attachments.
22. Show breadcrumb component
This option sets the default behavior of the breadcrumbs located on the left-hand side of the S-
Drive attachments page, above the folder tree component. You can choose to hide or show the
breadcrumbs by using the settings button on the toolbar of S-Drive attachments. See “S-Drive
Lightning User Guide” for more information about using the S-Drive attachments.
3. Contact Attachments
If you want to use the S-Drive Attachment with a Contact object:
1. You need create a Contact (App Launcher -> Contacts > New). If you already have a Contact, you
need to open that contact’s record page by clicking on its name.
Figure 33
2. After clicking on the contact in this page (Figure 33), which is “Amanda Smith” in this example,
Amanda Smith’s page will be opened. You need to click on the “Setup” icon ( ) on the top
right corner and choose “Edit Page” option.
Figure 34

28 All Rights Reserved - CyanGate LLC
3. After clicking on “Edit Page” option, “Lightning App Builder – New Contact Page” screen will be
shown. You will see “Lightning Components” section on the left-hand side. You need to scroll
down to see the “SDrive” component, under “Custom”.
Figure 35
4. Grab the SDrive component and drag it to the right side where you see the components of the
contact page. Drop wherever you want the S-Drive component to be placed.

29 All Rights Reserved - CyanGate LLC
Figure 36
5. You need to edit the following required fields correctly, to create the Contact Files (Figure 37).
You can also change the settings from a selection of checkboxes which include: Enable copy url,
Enable delete, Enable download, Enable edit, Enable e-mail, Enable upload, Enable folders,
Enable private files. You can scroll down to see more settings about the S-Drive Attachment
component, such as showing folder tree component and breadcrumbs, which can be changed by
using the toolbar menu afterwards.
6. After clicking on “Save” button, you need to activate the page in order to use the S-Drive
component. You can click on “Activation” and choose “Assign as Org Default” or “Assign as App
Default” from the pop-up screen, in order to view the attachment component. Now, you should
see “Contact Files” page block at the end of the contact object record page. See "Lightning User
Guide" for more information on how to use the buttons and functions in this page block.

30 All Rights Reserved - CyanGate LLC
Figure 37
The component attributes shown in Figure 37 is discussed in this section in detail:
1. Title
This is the title of the page block inside the object page. You can set it to “Contact Files”. This
field is optional and if you don’t provide a value for this field, it will be set as “S-Drive Files”.

31 All Rights Reserved - CyanGate LLC
2. Parent object name
This is the name of the object that the files will be attached to. For Contact object, it will be
“Contact”. As this is a standard object you will not append “__c” at the end of the parent object
name.
3. Object namespace prefix
This is the object’s namespace prefix that your Salesforce.com organization uses. As Contact is a
standard object, you do not need to add an object namespace prefix. If your organization has a
namespace prefix and you created a custom object inside your organization, your object
namespace prefix is same with your organization namespace prefix. See “S-Drive Advanced
Configuration Guide” for more information about creating custom objects.
4. File object name
This is the name of the custom object file that we will be attaching to the object. This file object
will be holding the information regarding the attached files. As Contact is a standard object, this
section will be filled as “ContactFile__c”.
5. File object namespace prefix
This is the file object’s namespace prefix that your Salesforce.com organization uses. If your
organization has a namespace prefix and you created this custom object file inside this
organization, your file namespace prefix is same with your organization namespace prefix. If this
file object belongs to a managed package, you need to use that managed package’s namespace
prefix. For this Contact attachment, you need to set it as “cg__”.
6. Relationship field name
Master-detail relation used for selected standard object. You need to fill it in as “Contact __r”.
This attribute is filled as “Parent__r” for custom objects. See “S-Drive Advanced Configuration
Guide” for more information about creating custom objects.
7. Enable copy url
This option is used to enable/disable “Copy URL” link in the page. There are two possible values
for this attribute: “true” or “false”. If the checkbox is checked, this means that the value is set to
true, and you will be able to see the “Copy URL” link for each asset. The default value for this
checkbox is checked.
8. Enable delete
This option is used to enable/disable “Delete” option for all attachments in the page. There are
two possible values for this attribute: “true” or “false”. If the checkbox is checked, this means
that the value is set to true, and you will be able to see the “Delete” link for each asset. The

32 All Rights Reserved - CyanGate LLC
default value for this checkbox is checked.
9. Enable download
This option is used to enable/disable “Download” option for all attachments in the page. There
are two possible values for this attribute: “true” or “false”. If the checkbox is checked, this
means that the value is set to true, and you will be able to see the “Download” link for each
asset. The default value for this checkbox is checked.
10. Enable edit
This option is used to enable/disable “Edit” option for all attachments in the page. There are
two possible values for this attribute: “true” or “false”. If the checkbox is checked, this means
that the value is set to true, and you will be able to see the “Edit” link for each asset. The default
value for this checkbox is checked.
11. Enable e-mail
This option is used to enable/disable “E-Mail” option for all attachments in the page. There are
two possible values for this attribute: “true” or “false”. If the checkbox is checked, this means
that the value is set to true, and you will be able to see the “E-Mail” link for each asset. The
default value for this checkbox is checked.
12. Default email address
You can use this option, if you want to set a default “Additional To” email address for sending
emails from your S-Drive Attachments. For example, if you select an Contact S-Drive Attachment
for a contact and click “Email” button, “Email Files” screen will be opened and “Additional To”
field will be filled with the email address you have provided here.
13. Enable upload
This option is used to enable/disable “Upload” option for all attachments in the page. There are
two possible values for this attribute: “true” or “false”. If the checkbox is checked, this means
that the value is set to true, and you will be able to see the “Upload File(s)” link for each asset.
The default value for this checkbox is checked.
14. Allowed file extensions
You can use this option, if you want to limit the file types to be uploaded into selected object’s
S-Drive attachments. Semicolon separated list of file extensions that are allowed to be uploaded
can be written here. This attribute is optional and leaving this empty will allow all kind of files to
be uploaded. For example, “*.jpg, *.txt” will limit the files to be uploaded to jpg and txt files.
15. Enable folders
This option is used to enable/disable folder support for S-Drive attachments in the page. There

33 All Rights Reserved - CyanGate LLC
are two possible values for this attribute: “true” or “false”. If the checkbox is checked, this
means that the value is set to true, and you will be able to see the “New Folder” button. The
default value for this checkbox is checked. If the box is not checked, the “New Folder” button
will be removed from the toolbar section.
16. Enable private files
This option is used for enabling public/private file access to the S-Drive attachments and
commonly used to limit the customer portal users’ access to individual files. Set this attribute to
true by checking the checkbox, if you want to enable private/public flag. Setting the private flag
on a file hides the file from customer portal users. The default value for this checkbox is
unchecked.
17. Default sort field name
This option is used to order/sort S-Drive attachments based on a field. You need to set the name
of the field that should be used to order the list of files. For this example, it should be filled in as
“cg__File_Name__c”. You can change this option from the settings button located at the toolbar
of S-Drive attachments anytime. See “S-Drive Lightning User Guide” for more information about
using the S-Drive attachments.
18. Default sort order
This option is used to set the sort order direction of the S-Drive attachments. There are two
possible values for this attribute: “asc” or “desc”. The default value is “asc” which stands for
ascending. You can change this option from the settings button located at the toolbar of S-Drive
attachments anytime. See “S-Drive Lightning User Guide” for more information about using the
S-Drive attachments.
19. File number to be shown in a page
This option is to set the number of files to be shown in an attachment page. The default value
for this section is set to 100. If this value is set to ‘30’ and object has 91 total items, the files will
be displayed in 4 pages. You can change this option from the pagination setting located under
the toolbar of S-Drive attachments. See “S-Drive Lightning User Guide” for more information
about using the S-Drive attachments.
20. Default view type of file list table
This option is to set the default view type of the file list table. There are 3 options you can
choose: List, Thumbnail and Grid. You can change this option from the toolbar of S-Drive
attachments, and set it as default by using the settings button. See “S-Drive Lightning User
Guide” for more information about using the S-Drive attachments.
21. Show Folder Tree component
This option sets the default behavior of the folder tree component located on the left-hand side
34 All Rights Reserved - CyanGate LLC
of the S-Drive attachments page. You can choose to hide or show the Folder Tree component by
using the settings button on the toolbar of S-Drive attachments. See “S-Drive Lightning User
Guide” for more information about using the S-Drive attachments.
22. Show breadcrumb component
This option sets the default behavior of the breadcrumbs located on the left-hand side of the S-
Drive attachments page, above the folder tree component. You can choose to hide or show the
breadcrumbs by using the settings button on the toolbar of S-Drive attachments. See “S-Drive
Lightning User Guide” for more information about using the S-Drive attachments.
4. Opportunity Attachments
If you want to use the S-Drive Attachment with an Opportunity object:
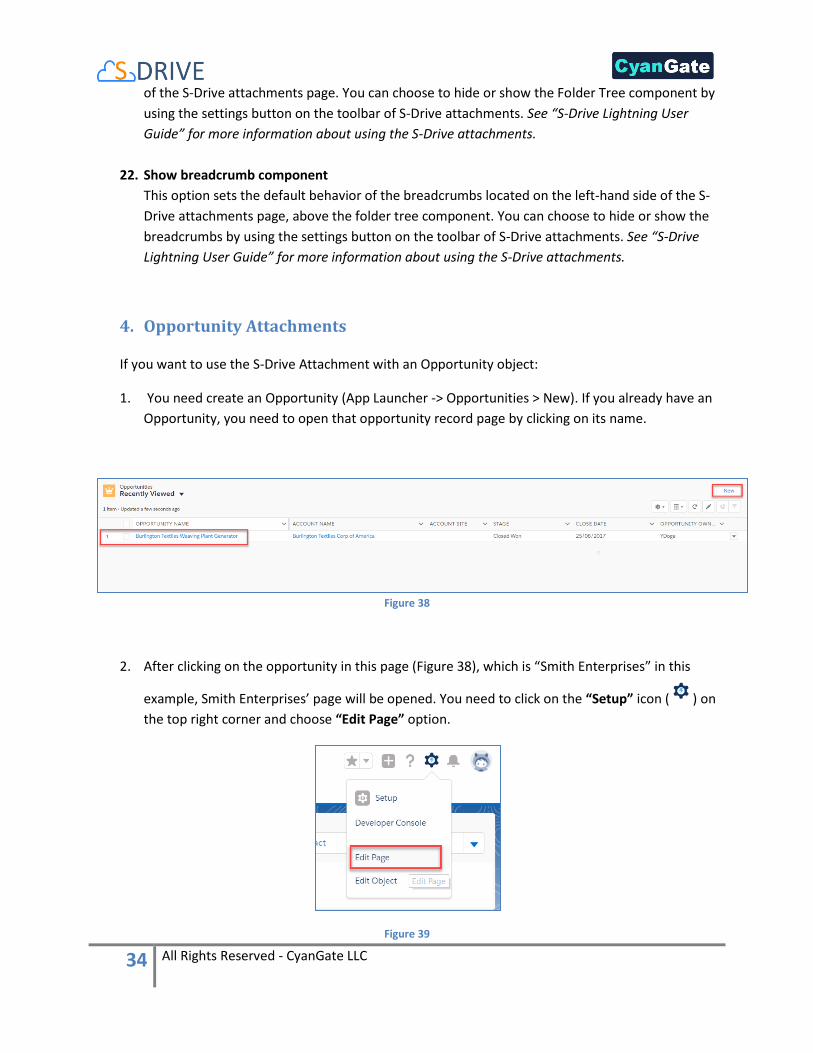
1. You need create an Opportunity (App Launcher -> Opportunities > New). If you already have an
Opportunity, you need to open that opportunity record page by clicking on its name.
Figure 38
2. After clicking on the opportunity in this page (Figure 38), which is “Smith Enterprises” in this
example, Smith Enterprises’ page will be opened. You need to click on the “Setup” icon ( ) on
the top right corner and choose “Edit Page” option.
Figure 39

35 All Rights Reserved - CyanGate LLC
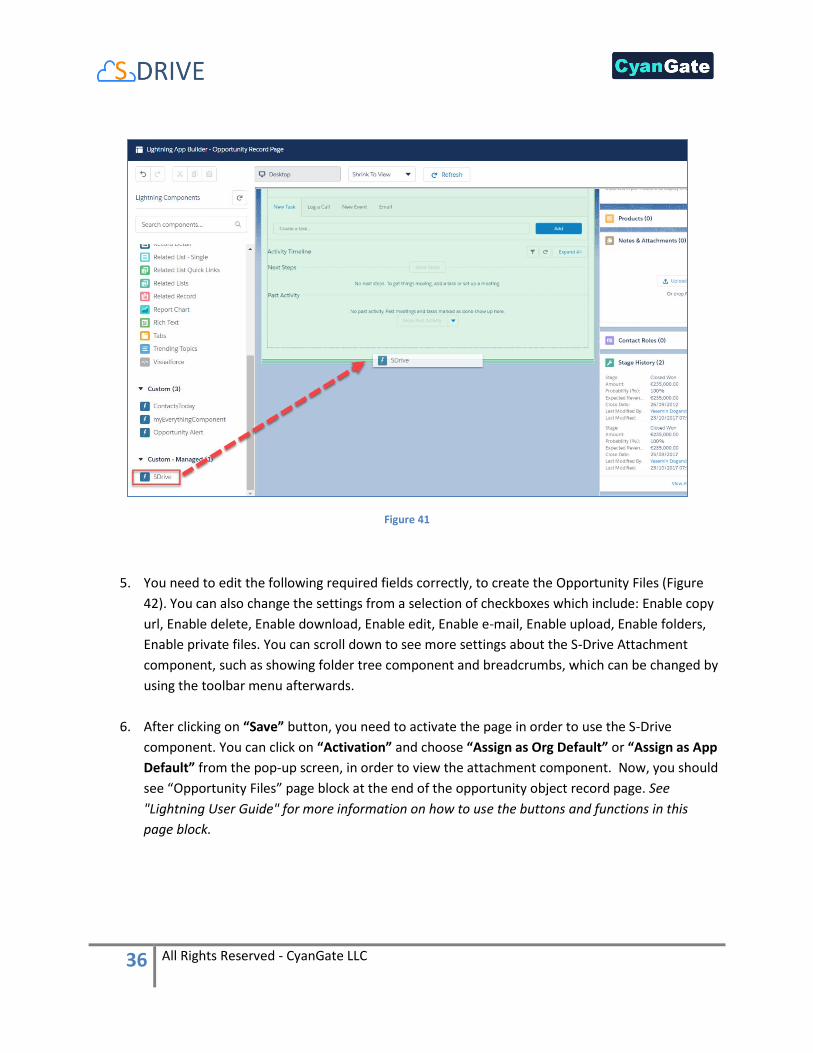
3. After clicking on “Edit Page” option, “Lightning App Builder – New Opportunity Page” screen will
be shown. You will see “Lightning Components” section on the left-hand side. You need to scroll
down to see the “SDrive” component, under “Custom”.
Figure 40
4. Grab the SDrive component and drag it to the right side where you see the components of the
opportunity page. Drop wherever you want the S-Drive component to be placed.
36 All Rights Reserved - CyanGate LLC
Figure 41
5. You need to edit the following required fields correctly, to create the Opportunity Files (Figure
42). You can also change the settings from a selection of checkboxes which include: Enable copy
url, Enable delete, Enable download, Enable edit, Enable e-mail, Enable upload, Enable folders,
Enable private files. You can scroll down to see more settings about the S-Drive Attachment
component, such as showing folder tree component and breadcrumbs, which can be changed by
using the toolbar menu afterwards.
6. After clicking on “Save” button, you need to activate the page in order to use the S-Drive
component. You can click on “Activation” and choose “Assign as Org Default” or “Assign as App
Default” from the pop-up screen, in order to view the attachment component. Now, you should
see “Opportunity Files” page block at the end of the opportunity object record page. See
"Lightning User Guide" for more information on how to use the buttons and functions in this
page block.
37 All Rights Reserved - CyanGate LLC
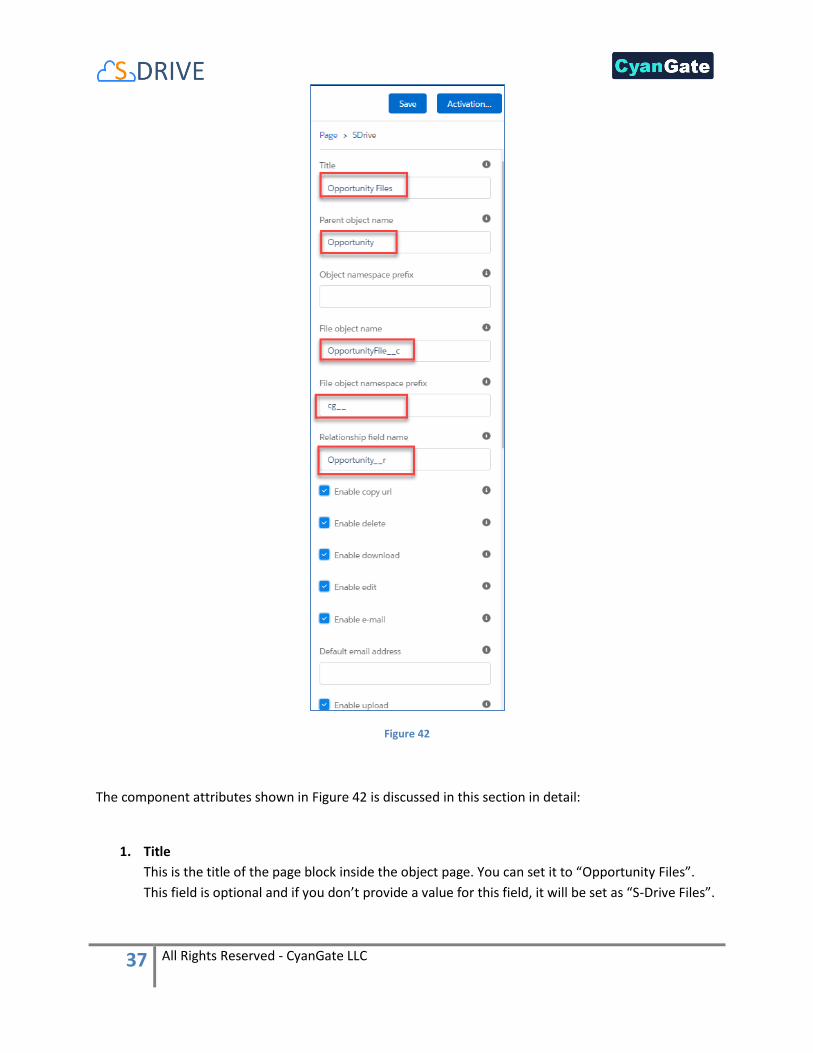
Figure 42
The component attributes shown in Figure 42 is discussed in this section in detail:
1. Title
This is the title of the page block inside the object page. You can set it to “Opportunity Files”.
This field is optional and if you don’t provide a value for this field, it will be set as “S-Drive Files”.

38 All Rights Reserved - CyanGate LLC
2. Parent object name
This is the name of the object that the files will be attached to. For Opportunity object, it will be
“Opportunity”. As this is a standard object you will not append “__c” at the end of the parent
object name.
3. Object namespace prefix
This is the object’s namespace prefix that your Salesforce.com organization uses. As Opportunity
is a standard object, you do not need to add an object namespace prefix. If your organization
has a namespace prefix and you created a custom object inside your organization, your object
namespace prefix is same with your organization namespace prefix. See “S-Drive Advanced
Configuration Guide” for more information about creating custom objects.
4. File object name
This is the name of the custom object file that we will be attaching to the object. This file object
will be holding the information regarding the attached files. As Opportunity is a standard object,
this section will be filled as “OpportunityFile__c”.
5. File object namespace prefix
This is the file object’s namespace prefix that your Salesforce.com organization uses. If your
organization has a namespace prefix and you created this custom object file inside this
organization, your file namespace prefix is same with your organization namespace prefix. If this
file object belongs to a managed package, you need to use that managed package’s namespace
prefix. For this Opportunity attachment, you need to set it as “cg__”.
6. Relationship field name
Master-detail relation used for selected standard object. You need to fill it in as “Opportunity
__r”. This attribute is filled as “Parent__r” for custom objects. See “S-Drive Advanced
Configuration Guide” for more information about creating custom objects.
7. Enable copy url
This option is used to enable/disable “Copy URL” link in the page. There are two possible values
for this attribute: “true” or “false”. If the checkbox is checked, this means that the value is set to
true, and you will be able to see the “Copy URL” link for each asset. The default value for this
checkbox is checked.
8. Enable delete
This option is used to enable/disable “Delete” option for all attachments in the page. There are
two possible values for this attribute: “true” or “false”. If the checkbox is checked, this means
that the value is set to true, and you will be able to see the “Delete” link for each asset. The
default value for this checkbox is checked.

39 All Rights Reserved - CyanGate LLC
9. Enable download
This option is used to enable/disable “Download” option for all attachments in the page. There
are two possible values for this attribute: “true” or “false”. If the checkbox is checked, this
means that the value is set to true, and you will be able to see the “Download” link for each
asset. The default value for this checkbox is checked.
10. Enable edit
This option is used to enable/disable “Edit” option for all attachments in the page. There are
two possible values for this attribute: “true” or “false”. If the checkbox is checked, this means
that the value is set to true, and you will be able to see the “Edit” link for each asset. The default
value for this checkbox is checked.
11. Enable e-mail
This option is used to enable/disable “E-Mail” option for all attachments in the page. There are
two possible values for this attribute: “true” or “false”. If the checkbox is checked, this means
that the value is set to true, and you will be able to see the “E-Mail” link for each asset. The
default value for this checkbox is checked.
12. Default email address
You can use this option, if you want to set a default “Additional To” email address for sending
emails from your S-Drive Attachments. For example, if you select an Opportunity S-Drive
Attachment for an opportunity and click “Email” button, “Email Files” screen will be opened and
“Additional To” field will be filled with the email address you have provided here.
13. Enable upload
This option is used to enable/disable “Upload” option for all attachments in the page. There are
two possible values for this attribute: “true” or “false”. If the checkbox is checked, this means
that the value is set to true, and you will be able to see the “Upload File(s)” link for each asset.
The default value for this checkbox is checked.
14. Allowed file extensions
You can use this option, if you want to limit the file types to be uploaded into selected object’s
S-Drive attachments. Semicolon separated list of file extensions that are allowed to be uploaded
can be written here. This attribute is optional and leaving this empty will allow all kind of files to
be uploaded. For example, “*.jpg, *.txt” will limit the files to be uploaded to jpg and txt files.
15. Enable folders
This option is used to enable/disable folder support for S-Drive attachments in the page. There
are two possible values for this attribute: “true” or “false”. If the checkbox is checked, this

40 All Rights Reserved - CyanGate LLC
means that the value is set to true, and you will be able to see the “New Folder” button. The
default value for this checkbox is checked. If the box is not checked, the “New Folder” button
will be removed from the toolbar section.
16. Enable private files
This option is used for enabling public/private file access to the S-Drive attachments and
commonly used to limit the customer portal users’ access to individual files. Set this attribute to
true by checking the checkbox, if you want to enable private/public flag. Setting the private flag
on a file hides the file from customer portal users. The default value for this checkbox is
unchecked.
17. Default sort field name
This option is used to order/sort S-Drive attachments based on a field. You need to set the name
of the field that should be used to order the list of files. For this example, it should be filled in as
“cg__File_Name__c”. You can change this option from the settings button located at the toolbar
of S-Drive attachments anytime. See “S-Drive Lightning User Guide” for more information about
using the S-Drive attachments.
18. Default sort order
This option is used to set the sort order direction of the S-Drive attachments. There are two
possible values for this attribute: “asc” or “desc”. The default value is “asc” which stands for
ascending. You can change this option from the settings button located at the toolbar of S-Drive
attachments anytime. See “S-Drive Lightning User Guide” for more information about using the
S-Drive attachments.
19. File number to be shown in a page
This option is to set the number of files to be shown in an attachment page. The default value
for this section is set to 100. If this value is set to ‘30’ and object has 91 total items, the files will
be displayed in 4 pages. You can change this option from the pagination setting located under
the toolbar of S-Drive attachments. See “S-Drive Lightning User Guide” for more information
about using the S-Drive attachments.
20. Default view type of file list table
This option is to set the default view type of the file list table. There are 3 options you can
choose: List, Thumbnail and Grid. You can change this option from the toolbar of S-Drive
attachments, and set it as default by using the settings button. See “S-Drive Lightning User
Guide” for more information about using the S-Drive attachments.
21. Show Folder Tree component
This option sets the default behavior of the folder tree component located on the left-hand side
of the S-Drive attachments page. You can choose to hide or show the Folder Tree component by
41 All Rights Reserved - CyanGate LLC
using the settings button on the toolbar of S-Drive attachments. See “S-Drive Lightning User
Guide” for more information about using the S-Drive attachments.
22. Show breadcrumb component
This option sets the default behavior of the breadcrumbs located on the left-hand side of the S-
Drive attachments page, above the folder tree component. You can choose to hide or show the
breadcrumbs by using the settings button on the toolbar of S-Drive attachments. See “S-Drive
Lightning User Guide” for more information about using the S-Drive attachments.
F. Upgrading S-Drive
1. 1.28 to 2.0
If you have S-Drive 1.28, you can upgrade to S-Drive 2.0 by following below steps.
1. Go to https://get.sdriveapp.com.
2. Click Get It Now button.
3. Select Log in to the AppExchange option.
4. Provide your login credentials and click Log in to Salesforce button.
5. Select Install in production or Install in sandbox based on your organization needs.
6. Read the terms and conditions and check I have read and agree to the terms and conditions
and click Confirm and Install! button.
7. Login to the installation org (production or sandbox) by providing your login credentials and click
Log in to Salesforce button.
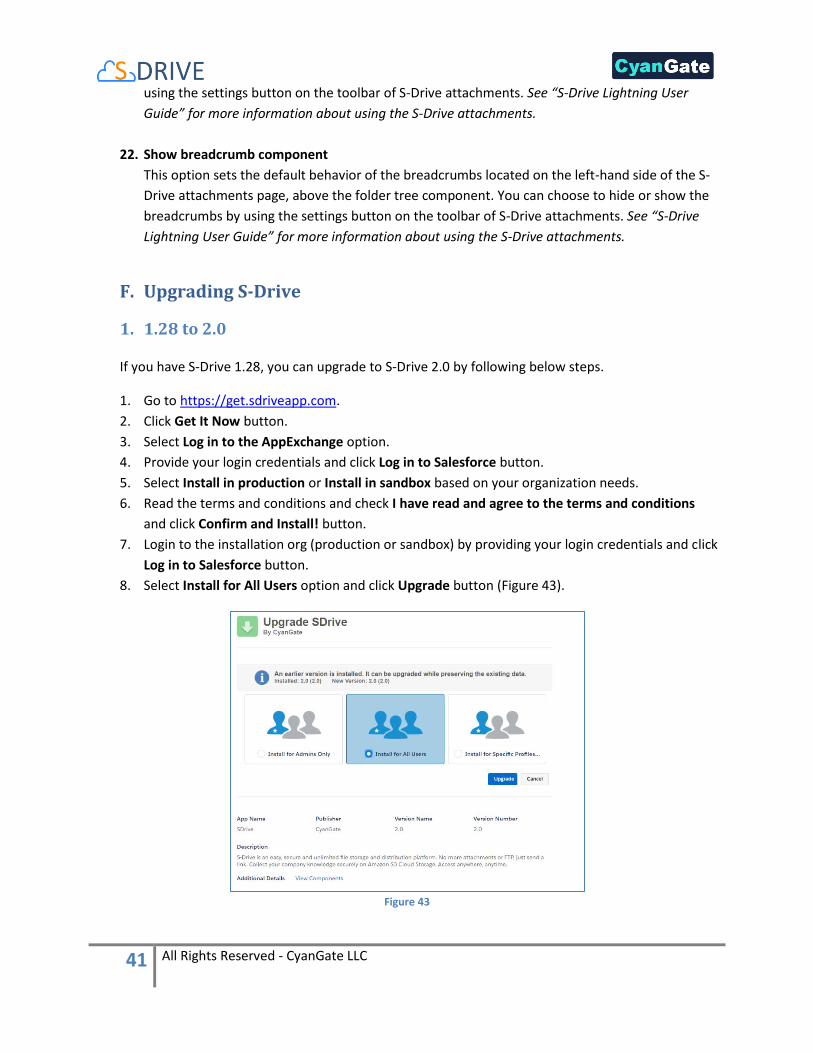
8. Select Install for All Users option and click Upgrade button (Figure 43).
Figure 43

42 All Rights Reserved - CyanGate LLC
9. Wait while S-Drive is being upgraded and make sure you see Upgrade Complete! message. Click
Done (Figure 44).
Figure 44
2. 1.26 or 1.27 to 2.0 Upgrade
You can upgrade S-Drive from get.sdriveapp.com. If you configured S-Drive for a custom object, you
must create four custom fields below to this custom object. Note that S-Drive automatically creates
these fields to out of the box objects (Account Files, Case Files, Opportunity Files, Contact Files). If
you do not use S-Drive for a custom object, you do not need to create these fields below.
i. Preview Key:
1. Field Type: Text
2. Field Label: Preview Key
3. Length: 255
4. Field Name: Preview_Key
ii. Thumbnail Key:
1. Field Type: Text
2. Field Label: Thumbnail Key
3. Length: 255
4. Field Name: Thumbnail_Key
iii. Preview Version Id:
1. Field Type: Text
2. Field Label: Preview Version Id
3. Length: 255
4. Field Name: Preview_Version_Id
iv. Thumbnail Version Id:
1. Field Type: Text
2. Field Label: Thumbnail Version Id
3. Length: 255
4. Field Name: Thumbnail_Version_Id
3. 1.24 or 1.25 to 2.0
If you have S-Drive 1.24, 1.25 or patch releases of these versions, you can upgrade to S-Drive 2.0 by
following below steps.
1. Go to https://get.sdriveapp.com.
2. Click Get It Now button.

43 All Rights Reserved - CyanGate LLC
3. Select Log in to the AppExchange option.
4. Provide your login credentials and click Log in to Salesforce button.
5. Select Install in production or Install in sandbox based on your organization needs.
6. Review What You Are Installing and Where You Are Installing sections, check I have read and
agree to the terms and conditions and click Confirm and Install! button.
7. Login to the installation org (production or sandbox) by providing your login credentials and click
Log in to Salesforce button.
8. Select Install for All Users option and click Upgrade button (Figure 45).
Figure 45
9. Wait while S-Drive is being upgraded and make sure you see Upgrade Complete! message. Click
Done (Figure 46).
Figure 46
10. If you already have custom objects from previous S-Drive version, you should add fields as
described in following steps:
a. Login to your Salesforce account.
b. Go to Setup -> Create -> Objects -> <Your Custom Object File>.
c. Go to Custom Fields & Relationships section.
d. Create following fields one by one by clicking New button and following on-screen
instructions.
Note: In each step you should check Visible checkbox for all Field-Level Security for
Profile fields.
i. Is Latest Version:
44 All Rights Reserved - CyanGate LLC
1. Field Type: Checkbox
2. Field Label: Is Latest Version
3. Default Value: Checked
4. Field Name: Is_Latest_Version
ii. Key:
1. Field Type: Text
2. Field Label: Key
3. Length: 255
4. Field Name: Key
iii. Version Description:
1. Field Type: Text
2. Field Label: Version Description
3. Length: 255
4. Field Name: Version_Description
iv. Version Id:
1. Field Type: Text
2. Field Label: Version Id
3. Length: 255
4. Field Name: Version_Id
v. Preview Key:
1. Field Type: Text
2. Field Label: Preview Key
3. Length: 255
4. Field Name: Preview_Key
vi. Thumbnail Key:
1. Field Type: Text
2. Field Label: Thumbnail Key
3. Length: 255
4. Field Name: Thumbnail_Key
vii. Preview Version Id:
1. Field Type: Text
2. Field Label: Preview Version Id
3. Length: 255
4. Field Name: Preview_Version_Id
viii. Thumbnail Version Id:
1. Field Type: Text
2. Field Label: Thumbnail Version Id
3. Length: 255
4. Field Name: Thumbnail_Version_Id
45 All Rights Reserved - CyanGate LLC
11. Open S-Drive Configuration tab, UpdateSDriveObjectsPage will be opened automatically. You
can also open this page from S-Drive Configuration Tab > General Settings Section > Click Here
to Update S-Drive Objects Link.
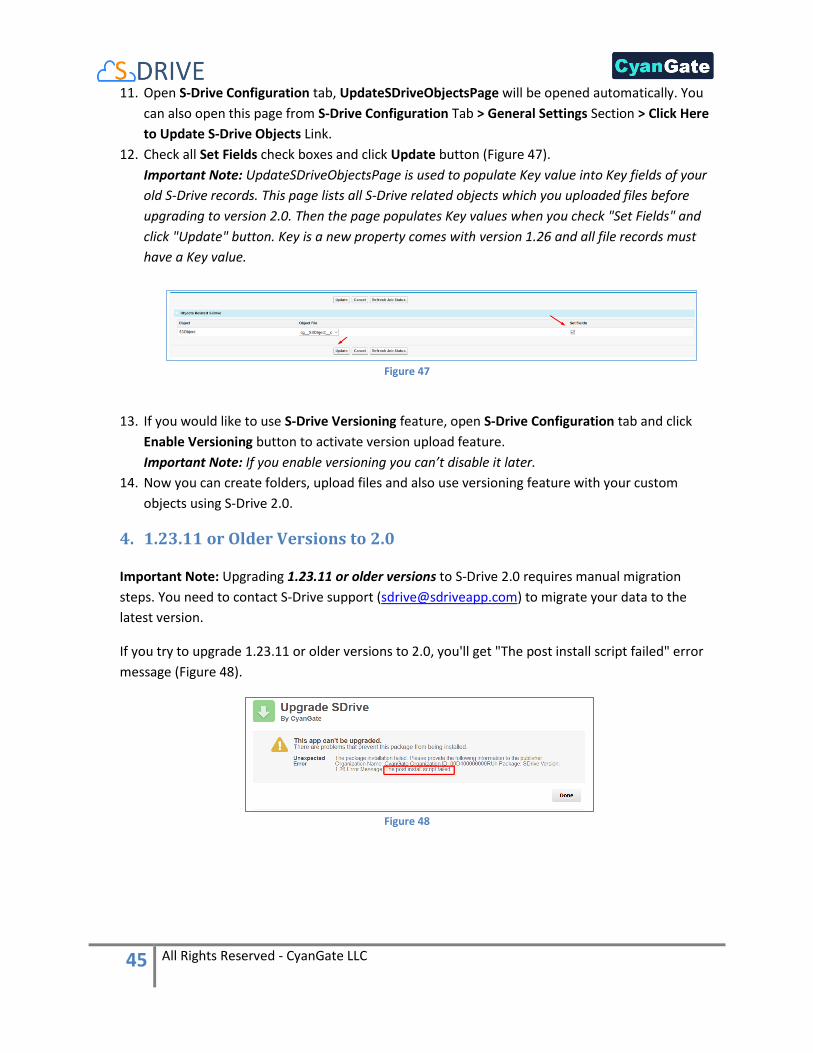
12. Check all Set Fields check boxes and click Update button (Figure 47).
Important Note: UpdateSDriveObjectsPage is used to populate Key value into Key fields of your
old S-Drive records. This page lists all S-Drive related objects which you uploaded files before
upgrading to version 2.0. Then the page populates Key values when you check "Set Fields" and
click "Update" button. Key is a new property comes with version 1.26 and all file records must
have a Key value.
Figure 47
13. If you would like to use S-Drive Versioning feature, open S-Drive Configuration tab and click
Enable Versioning button to activate version upload feature.
Important Note: If you enable versioning you can’t disable it later.
14. Now you can create folders, upload files and also use versioning feature with your custom
objects using S-Drive 2.0.
4. 1.23.11 or Older Versions to 2.0
Important Note: Upgrading 1.23.11 or older versions to S-Drive 2.0 requires manual migration
steps. You need to contact S-Drive support ([email protected]) to migrate your data to the
latest version.
If you try to upgrade 1.23.11 or older versions to 2.0, you'll get "The post install script failed" error
message (Figure 48).
Figure 48

46 All Rights Reserved - CyanGate LLC
G. Minimum Policy Example
To apply policy to your restricted user:
1. Sign in to AWS Management Console and click "IAM" from Services menu.
2. Click "Policies" on the dashboard and then click "Create Policy" button.
3. Select "Create Your Own Policy" on the screen.
4. Type name into "Policy Name" area. Copy contents of the below example and paste into "Policy
Document" area on AWS Console. Update sdrivebucket bucket name references in policy
document and click "Create Policy".
{
"Version": "2012-10-17",
"Statement": [
{
"Effect": "Allow",
"Action": [
"s3:*"
],
"Resource": [
"arn:aws:s3:::sdrivebucket/*" ]
},
{
"Effect": "Allow",
"Action": [
"s3:ListAllMyBuckets"
],
"Resource": [
"arn:aws:s3:::*"
]
},
{
"Effect": "Allow",
"Action": [
"s3:PutBucketCORS"
],
"Resource": [
"arn:aws:s3:::sdrivebucket" ]
},
{
"Effect": "Allow",
"Action": [
"s3:GetBucketLocation"
],
"Resource": [
"arn:aws:s3:::sdrivebucket" ]
}
]
}
5. Click "Users" on the dashboard and click on your user name. Then Click "Attach Policy" button
on the screen for the user that you use in S-Drive.
6. Find the policy which you created in #4 and click "Attach Policy" button.

47 All Rights Reserved - CyanGate LLC
H. S-Drive Advanced Configuration
Everything you need to start using S-Drive is in "S-Drive Installation Guide" and advanced topics for
installation/configuration are in "S-Drive Advanced Configuration Guide".
Here is the list of topics that you can find in S-Drive Advanced Configuration Guide:
- Activating S-Drive
- Configuring S-Drive Attachments for All Standard/Custom Objects
- Allowing Customer Portal Users to Upload Case Files from Customer Portal
- S-Drive Configuration
- Attachment Sync
- S-Drive Reports
- Applying Sharing Rules to S-Drive Files/Folders
- Applying Permissions to S-Drive Files/Folders through Profiles

48 All Rights Reserved - CyanGate LLC
I. Troubleshooting Tips
1. [Problem] I'm getting "Failed: Unauthorized endpoint, please check Setup->Security->Remote
site settings. endpoint = https://s3.amazonaws.com/?......." error.
[Solution] You forgot to set or deleted Remote Site Settings. Go to Setup -> Security -> Remote
Site Settings and add this site: https://s3.amazonaws.com
2. [Problem] My mail message contains "????" for some language-specific characters in email
clients (Outlook, Thunderbird etc.).
[Solution] Go to Setup -> Personal Setup -> My Personal Information -> Personal Information.
Edit User Detail and set Email Encoding to Unicode (UTF-8).
3. [Problem] Salesforce sharing is not working.
[Solution] Sharing is only supported for S-Drive Folders. Both, S-Drive Folders and S-Drive
Attachments are sharing-aware that means they will respect the sharing rules applied on S-Drive
objects.
4. [Problem] Percent character (%) is replaced with an underscore character (_) while
downloading.
[Solution] This is a technical limitation.
5. [Problem] Some special characters (e.g. ğ, ş, ı) can’t be typed into text fields on Apple
Macintosh.
[Solution] This is a limitation related to Flash Player’s Macintosh version. This issue will be
addressed in later releases.
6. [Problem] Special characters in file names are URL encoded for Firefox browser.
[Solution] This is a limitation of Firefox.
7. [Problem] If a sub folder is deleted parent folder's (+) sign stays there until clicked Home and
refreshed.
[Solution] You need to refresh the S-Drive tab.
8. [Problem] If folder has no sub folders, tree's folder icon is closed whether we click on it or not.
[Solution] This is only a visual problem and it will not affect the operation of the application.
9. [Problem] S-Drive tab for Lightning Experience is not visible after installation.
[Solution] Go to Setup->Profiles->Edit Your Profile->Tab Settings and then set S-Drive Tab to
“Default On”. This issue occurs if you install S-Drive 2.0 before deploying my domain. This is a
known issue of Salesforce. You can visit this link for further information.

49 All Rights Reserved - CyanGate LLC
J. S-Drive Support
You can contact S-Drive Support team for any questions or problems that you couldn't solve using S-
Drive documents:
1. Open a Ticket at Support Site: sdriveapp.com/support
2. Email: [email protected]
You can find up-to-date product information, documents, tutorial videos, tools in our web page:
www.sdriveapp.com