Embed Size (px)
Citation preview
Rudiments of Violin Playing Beginning Lessons and an Introduction to Violin Technique Allen Russell
Copyright: Allen Russell 2016

2
Note: Many of the exercises and language in this manual are not of my own invention, and plenty others are. I’ve made no attempt to “cite” or differentiate the origins of any of this material since, over the years, the ideas have organically grown into each other through use in lessons. Since the purpose of this manual is to provide quick, easy, and ordered access to the material I teach, it seems pointless to try. Paul Roland, Mimi Zweig, Otakar Ševčík, Shinichi Suzuki, Ed Kreitman, Jerry Franke, and Dr. Bernard Zinck have all informed my philosophy and teaching methods directly and indirectly.

3
Table of Contents:
1. Starting Violin Lessons p. 5 A. Deciding on the Right Size Instrument B. Taking Care of the Instrument C. Accessories D. Parts of the Violin
2. The Bow p.8 A. Parts of the bow B. Bowfingers C. “Tigerclaw, Duckbill” D. Bowhold hand shape/Making bowhold
o Ideas for Combating Tension E. Bowhold exercises- to Check the Posture of Hold and to Demonstrate Mechanics F. Shoulder Bowing- For Patterns and to Check Posture
3. Holding the Violin p. 12 A. Stance B. Putting up the violin C. Playing Position D. Position of Head
o Exercise for Holding Violin o A Note on Posture
E. Flying Pizzicato 4. Left Hand p.15
A. First Position B. Basic Left Hand Posture C. Rolling Pizz D. Left hand Pizz E. Putting Down/Lifting Fingers- Playing the Release
o Exercise for Putting Down Fingers i. Posture Checklist
o Lifting Fingers o Playing the Release
F. Shifting Exercise 1- the Shifting Mechanism (arm) and Maintaining Hand Shape o Posture Checklist
G. Tapping Exercise/tempo H. Shifting Exercise 2 - positions I. Pieces for Left Hand pizz (String Academy)
o Ants, Long Song 5. Using the Bow on the Violin p. 22
A. Square Arm When Bow is at Middle/Level of Elbow to Wrist B. First Touching Bow to String
o Hover bow- heavy pinkie- give bow to the string o Pronation/supination o A Note on Bowfingers Motion
C. Silent Rolling Bow Across Strings From Shoulder D. Silent Bow Placements-Points of bow- Tip, Middle, Balance Point, Frog

4
E. Bow Circles o Up Bow and Down Bow o Contrary Body Motion
F. Chicken Wing, Little Elbow—Stop Bows G. Keeping the Bow Straight
o Kreisler Highway/Sounding Points H. Double Stops I. Rolling Chord J. Moving the Bow on the String. Martelé, Detache, Legato strokes K. First Rhythms- counting along to a metronome
o Mississippi Hot Dog, Grasshopper (long short short) o Guiding the Student’s Bow for Them
L. Bowfingers at the Frog M. Moving Around the Bow
o Bow Speed-Relationship to Kreisler Highway and Sounding Points o Bow Wanderings o Long, Short Rhythm (staying in one part of the bow)
6. Using the Bow and Left Hand Together p. 31 A. Finger Before Bow B. “Bow the Fingerings,” not “Finger the Bowings.” C. Monkey Song D. See Saw E. A Note on Learning Coordination, F. Separate the Physical Actions Then Put Them Back Together. G. Correct Repetitions
*A Note on Physical Motion and Musical Style and Character
Looking Forward

5
1. STARTING VIOLIN LESSONS The teacher, parent and student all need to have a good working relationship. Parents of young students are required to attend lessons and to supervise daily home practice. The progress of the child is directly proportionate to the parents' commitment and involvement. Furthermore, children progress at different rates so we need to be understanding with the child if certain new concepts are taking time to learn. We have a “Parent/Student/Teacher Triangle” that, when done with commitment and enthusiasm on all parts, will absolutely yield the best results! 1A. DECIDING ON THE RIGHT SIZE INSTRUMENT: Have the teacher or luthier (violin service-person) help decide what size will be best for the student. Adults should use a full size instrument unless they are smaller than average build. The student’s left arm should be able to curve around the scroll and hang in a relaxed fashion. Too small is better than too big. This way, the student won’t have to adjust their posture to play. The bow should also be chosen to match the size of the violin and student. The student should be able to fully extend the arm while holding the bow and be able to touch the tip of the bow to the string. A little too long is better than a little too short, especially for young children. 1B. TAKING CARE OF THE INSTRUMENT: Violins are very delicate compared to other instruments. (So don’t…) Don’t assume that it is safe to treat it the same way you see someone else treating his or her guitar.
• Always loosen the bow when you are finished playing, tighten it again before playing (lefty loosey, righty tighty).
• Keep a cloth in the case to clean the rosin off the strings and the dust off the body.
• Change the strings periodically. • Make sure the bridge stays perpendicular to the top (face) of the
instrument. Sometimes they can warp and begin to bend forward. • NEVER leave the violin in a vehicle or unattended.
o In heat, the varnish can melt and peel, and the wood will warp and break.
o In cold, the wood will warp and become brittle, possibly shattering upon slight impact.

6
o Avoid abrupt changes in humidity. Keep a humidifier in the winter, but the best thing to do is to just let the instrument sit in the case to adapt for five minutes after coming in from the cold or heat.
1C. ACCESSORIES:
• Finger Tapes- Tapes placed on the fingerboard (1st, 3rd and 4th finger) to help fingers find the correct spot.
• High Dot- A marker that is put approximately halfway up the neck at the octave harmonic point. The high dot has a multitude of uses.
• Shoulder Rest: I prefer to use a shaped sponge as a shoulder rest with beginners. Professionals use anything from a sponge, to a Kun or other models of clip-on rests, to nothing but a cloth on the shoulder.
o The shoulder rest is a topic of much debate and it is my feeling that a student should feel free to explore his/her preferences, but keep close track of the reason for his/her choice. (Did you choose the Kun because it actually helps you balance the violin better, or just because you saw another student looking cool with one? Does the sponge really help you feel freer when playing, or does it actually make you raise your left shoulder, especially when attempting a shift or difficult passage?) I’ve changed my setup lots of times over the years. Don’t be afraid to experiment!
• Chinrests: Like shoulder rests, there are different shapes and styles of chin rests. Please consult your teacher before making any changes to the chinrest.
o The professional opinions on different types of chinrests can range from indifferent to extreme. Like the shoulder rest, you should feel free to experiment but have a good reason to decide to change.
• Practice Mirror: So much of what we do on the violin is invisible to us while we are in action, yet so much can be immediately corrected by looking. A practice mirror is essential.
• Metronome: Control over one’s physical actions exists in time; therefore rhythm is essential to the bow motions, but also to the left hand and posture. A metronome helps keep a beat in time for us to play along to.
• Assignment Notebook: Parents or (older) students will be expected to keep an assignment notebook for themselves.

7
1D. PARTS OF THE VIOLIN: Learn the names of the parts of the violin: Scroll, peg box, tuning pegs, nut, fingerboard, neck, strings, bridge, tailpiece, chinrest, button (end pin), top (face), F-holes, fine tuners, sound post, ribs, bottom (underside)

8
2. THE BOW
2A. THE PARTS OF THE BOW: (Frog, middle, tip, upper half, lower half, bow hair, button, and screw.) Tapes at tip, middle, balance point, frog. Tip:
Middle:
Frog:
2B. BASIC “BOWFINGERS” MOTION: The “bowfingers” motion is one of the most difficult techniques to learn and should be given lots of room to develop over a long period of time. It needs to happen naturally and with almost no physical effort on the part of the violinist.
• Try the motion of “Picking Lint off a Shirt,” it’s very much the same! 2C. “Tiger Claw, Duck Bill” Make a “tiger claw” shape with the right hand. Contact the thumb and middle finger, DON’T LET THEM STOP TOUCHING. Slowly extend fingers into a “duck bill” shape, then return to original “tiger claw” shape. Are the thumb and middle finger still touching? Make sure the wrist stays still while doing this exercise.
1. It is important to do this exercise slowly and quickly. For young students, parents can have “slow races” (who can go the slowest?).
2. 5 times slow/ 5 times fast

9
2D. BOWHOLD HAND SHAPE (Young children may start out with the beginner bow hold- thumb on the underside of the frog.)
1. Set bow down and hold right hand relaxed down at side next to waist- note the natural shape the hand takes when at ease.
2. Move thumb into the inside crook of the 3rd knuckle, making a circle. This is the basic hand shape of a good bow hold.
Now Make the Bowhold With the Bow: (Until the action becomes second nature) Either hold the bow at the middle with the left hand out in front while making the bow hold, or otherwise place the bow on the left shoulder at the upper middle to practice making the bow hold.
1. Drape fingers over bow. 2. Pinkie and thumb both contact at the tip of the finger. The cuticle of
the thumb can press lightly into the bow hair, this means the thumb is rounded. Fingers stay rounded, soft, and flexible.
3. Third finger drapes over the frog and covers the “dot” or middle of frog.
4. Second finger also drapes over the frog, comes around and may touch the other side of the thumb’s tip.
5. First finger contacts in between the second and third knuckle. 6. Rotate the hand inward. This rotation motion is called “pronation.” 7. Keep even spaces between fingers. 8. Keep rounded hand shape.
The wrist never goes below the base knuckles of the hand (until we get to string crossings), but instead the wrist stays even with and/or slightly above the hand and fingers.
The Thumb and Pinkie should be contacting at the tips with the cuticle of the thumb pushing lightly into the bow hair. The thumb is acting as the fulcrum, and the pinkie as the counter-balance. Keep this in mind while exploring the “pronation” rotation motion.
*Tension in the bow hold is a common problem for beginners. A quick way to temporarily combat this tension is to tap individual fingers on the bow while maintaining the bow hold.
• I have found that the BEST way to address tension in young students is to have them teach you while you imitate their mistakes- Take the violin from them, imitate their posture flaws, and make

10
them tell you what to do as well as physically correct the posture flaws. Afterwards, immediately give the violin back and have them attempt the action again on their own.
• Sometimes young students will tense up as you try to adjust their posture. It is often helpful to simply tell these students to, “Make the wrist soft as I change its shape” while adjusting its posture.
2E. BOW HOLD EXERCISES: (Windshield Wipers, Rocket Ship, and Chicken Wing)
• Windshield Wipers: Hold bow out in front of chest, level with shoulders, pointed straight up at the sky.
1. Rotate wrist (pronation motion again) so the tip is pointing to the left until the bow is parallel with the floor.
2. Feel the pinkie get heavy as the tip points to the left. 3. Rotate wrist the opposite way (this is called “supenation”) until
tip is again pointed at the sky. Notice how now the pinkie is not heavy anymore- the fingers are all holding the bow equally.
4. Rotate (supenate) until the tip is pointed all the way to the right and the bow is parallel to the floor. Feel the weight of the stick resting in the crook of the 1st finger.
5. Rotate (pronate) back to original position, with tip pointed up at the sky.
• Rocket Ship: Place bow on floor with the screw down and the tip pointed at the sky.
1. “Blast off” the rocket ship and slowly lift it up and land it on the top of the head, tip still pointing straight up.
2. Pause, or “press slow motion” as the hand passes in front of the face to make the “chicken wing.” This is an important part of bowing mechanics that we will cover in section 5.
3. “Blast off” from the top of the head, pause again to check “chicken wing” in front of face, then return the bow to the floor, contacting with the screw.
• Place the bow on different parts of the body (head, shoulder, nose, etc.) while keeping a good, rounded, relaxed hold.
• Shoulder bowing

11
2F. SHOULDER BOWING:
Shoulder bowing is useful at the very beginning to illustrate the physical motions that go into some of the basic strokes (that occur in the upper half) without the additional challenges of holding the violin on the shoulder and bowing the strings. For beginners and young children, use this to practice the beginning rhythm patterns.
• Place the bow on the shoulder at the middle-upper middle. Notice that this makes a square between the upper arm, forearm, bow and collarbones.
• Keep a round and relaxed bow hold while keeping the wrist even with the base knuckles of the hand (straight wrist).
• Bow rhythms by opening and closing the elbow.
*At first, students almost always bow from the shoulder instead of by opening and closing the elbow. The elbow should remain stationary in space while bowing in the upper half. If a student cannot correct this at first, try placing the elbow against a wall or solid surface to reinforce stillness. (I have had success correcting this problem by having the student play teacher on me, and then having them try again, this time looking into their practice mirror).

12
3. HOLDING THE VIOLIN 3A. STANCE: Stand up tall with shoulders squared and with the weight of the head balanced over shoulders. Bounce on knees, shift weight back and forth between both feet. A comfortable stance should come from balance. Sometimes students slouch forward or twist to the side involuntarily while playing- make sure to correct this as soon as it is noticed! Exercise for good posture:
3. “Imagine you are growing roots way down into the ground and keep swaying ever so slightly. Shoulders are pointing the same direction as feet. Imagine a length of string going from your tailbone, up your spine to the top of your head. Now, someone pulls the string from above your head straightening out your whole spine, making a ‘T’ with your shoulders. This is a comfortable, natural stance.”
3B. PUTTING UP THE VIOLIN:
1. Rest Position: Tuck the violin under the right arm with scroll angling upwards. Elbow goes on the chinrest. 2. Slide Base Knuckle (Magic X) up and down neck: Keep magic X even with neck. 3. Cover High Dot: Slide the hand up and cover the strings and high dot with fingers. 4. Statue of Liberty: Take violin out of rest position and hold it with a straight arm out in front of you, up above shoulder level. 5. Set Violin on Shoulder: Take right hand, find button on bottom of violin and help guide the instrument to your shoulder.
4. If the student “comes up to meet” the violin with the shoulder, or craning their neck to receive the violin, STOP. Take the instrument away. Tap it on the student’s shoulder and make sure they do not involuntarily react. When they are still, have them swivel their head to place the chin on the chinrest.

13
3C. PLAYING POSITION: The violin is balanced on the collarbone with the chin/jawbone contacting the chinrest. The shoulder rest/sponge helps balance the violin by pushing back against the shoulder. The weight of the head stops the violin from falling. The head weighs much more than the violin and is more than enough to keep it from falling. If the violin feels like it is going to fall then there is something wrong (it could be one of many things!) and the student should consult the teacher.
5. (Basically, the shoulder is passive and does not receive the weight of the head on the violin- this weight is held by the collar bone- the shoulder just exists to stabilize- different sized sponges and rests may be necessary to try out before deciding on one option. The lifelong violinist should be ready to question his/her shoulder rest/sponge situation from time to time as they progress.)
3D. POSITION OF THE HEAD:
The head can be anywhere from perpendicular to the floor to leaning slightly to the left. The contact point should be anywhere from the side of the jaw to the chin. The nose should point slightly off to the left, but not all the way over at the scroll.
The most important thing is that the head is at rest and not tense. Think of the way the head lies upon a pillow, it doesn’t smash the jaw down onto the pillow. Finally, as with shifting positions with the left hand, we need to know to release tension at certain points in the music. Tension will inevitably occur while holding the violin, either from the neck and back pushing down, or from the left shoulder and pectoral muscle pushing up. When this happens, have the student nod the head “yes” and “no” to release the tension.
*Note: some students learn this naturally, but others appear to have tension triggered by seemingly everything!
Exercise:
6. Have student answer a question that requires thinking while holding the violin on the shoulder. (Say name, age, do a simple math problem, recite address/phone number, etc.) By the time the student has had to actually apply him or herself mentally, they should be showing signs of tension in their posture. When this happens, have them first nod “yes” and “no”, then take the instrument down and repeat. Next time, have them walk to the other side of the room and fetch something! This helps their bodies become accustomed to holding the violin on their shoulders without causing involuntary tension.

14
*A NOTE ON POSTURE
Policing tension, especially in the chinrest/shoulder rest department can be a never-ending problem. Don’t go nuts trying to figure out the “perfect feel.” Don’t try to fill every inch of space with exact proportions of resistance from your rest/sponge/cloth combo. At some point, you have everything you need in terms of equipment and now it’s time for you to do the rest. You can use your mind to create the “pocket” or passive region for the violin to sit on. Comfort should come from balance. Ease of motion should confirm good balance, but involuntary tension or compensating will reveal imperfections to be corrected.
3E. FLYING PIZZICATO (“pizz”)- hand circles:
Exercise:
1. Hold the violin up in correct position. 2. Bring right hand over and hook first finger on the A string (give it a
little tug). 3. Pull finger off so that the string rebounds (not too hard!). This is
pizzicato. 4. Finally, as you pizz, gently make a large circle with your right hand,
moving it out and away from your body as if you were shooing a fly. This motion is useful for a few things that we will get into later.
5. Move body slightly in the opposite direction that your hand is moving in as you circle off. This contrary motion of the body is helpful in achieving an easy action.

15
4. LEFT HAND
1st, 3rd and 4th finger tapes (2nd finger tape is optional)
The Left hand has a few critical things to watch for in posture:
Knuckles: Base knuckle is 1, then toward tip of finger, 2 then last is 3.
For small children, show picture of how to practice with parents- parents need to help hold left hand while kids try to get the feel of putting down the fingers the right way.
4A. FIRST POSITION:
“Position” is how we keep track of where we are vertically, up and down the fingerboard of the violin. First finger is on first finger tape, second finger on second tape, third finger on third tape and fourth finger on fourth tape. This is first position. We don’t have frets or keys to help visualize the notes we are playing, so instead we keep close track of what position we are in. First position is our home base. When the hand moves up the neck to where the first finger is on the second tape, this is second position, and so on.

16
4B. BASIC LEFT HAND POSTURE:
*Hold hand relaxed at your side. This is the shape you should be using as a starting point for your left hand shape or frame. Think, “round hand and straight wrist floating on top of a ‘cloud’ that is the forearm.”
1. Wrist- straight and strong. Connected to forearm and hand. Does not move or adjust for fingers (in first through fourth position).
• Make sure that the wrist does not collapse either inward or outward. Often, students who are told not to collapse the wrist inward will overcompensate in the opposite direction.
2. Base Knuckle (Magic X) contacts the side of neck. Do not let it slip down too far or the wrist will be forced to collapse.
7. Put up your left hand and point the scroll into the practice mirror and note the angle of the row of base knuckles on the left hand. They should be parallel to the ground (and the wrist should be straight).
3. Thumb- contacts at 3rd knuckle. Helps to support the neck of the violin from the bottom but remains passive. DO NOT SQUEEZE.
8. Do not let the violin slip down into the crotch area between the lower thumb and hand (it’s like the “L” shaped support strut that you screw into the wall to hold a shelf- between the thumb and base knuckle).
9. Do not let the thumb point straight back towards the scroll.
4. Fingers- Make tunnels under fingers, put down and pick up from first knuckle. Loose fingers like octopus tentacles.
4C. ROLLING PIZZICATO:
Pluck all 4 strings by rolling 4th finger from low string to high string, letting each string ring. When doing this, make sure to keep left wrist straight. Bring Left elbow under (to the right of) the violin to reach the G string, and pull it to the left as you roll the 4th finger over the D, A, and E strings. Think about making a straight line from the elbow, through the wrist, to the Magic X and keeping it strong as you roll. This should help the wrist stay straight making the whole left arm, hand and 4th finger one mechanism.

17
4D. LEFT HAND PIZZICATO (Plucking):
1. Put up violin on shoulder 2. Bring left hand up over High Dot (Keep thumb under neck, pushing
up.) 3. Tap G string with 4th finger 4. Tug on G string with 4th finger 5. Tug and release the string with the 4th finger. This is called “Left
Hand Pizzicato.”
4E. PUTTING DOWN/LIFTING FINGERS:
Finger action- the tendons that move our fingers don’t just exist in our hand, but in our forearm too. The reason we need to keep a straight wrist with our left hand is to allow these tendons maximum ease of motion. Lifting the fingers is a different motion than putting them down. We use finger-tapping exercises to introduce this action.
Exercise for Putting Down Fingers:
(Do this with all 4 fingers- in first position with fingers being put down on their corresponding tapes.)
1. Touch finger to top of the string- don’t push string down, just touch the string as lightly as possible.
2. Push the string all the way down to the wood of the fingerboard and then let it all the way back up. Leave finger on string when done.
3. Bounce the string up and down like this 5 times. 4. Now use the finger to push the string halfway down to the wood.
Bounce the string up and down like this 5 times. 5. Do this action fast and slowly.
*Posture Checklist:
a. Make sure Finger Tunnels are round. b. Fingers are being put down from the Base knuckle. c. Base knuckle (Magic X) is even with the side of the
fingerboard. d. Thumb is moving passively with the hand and is not
squeezing. e. Wrist is straight and is not involuntarily collapsing inward or
outward because of putting fingers down.
NOTE: different amounts of pressure are used in different situations. The musical context should give clues as to how hard or softly the violinist should touch the strings.
18
Lifting Fingers
Lifting the fingers is an action that sometimes gets overlooked in students’ technique. Releasing a finger from a depressed position is NOT the same motion as putting it down. The impulse to lift the finger should come from the Base knuckle, the same as putting the finger down, and it needs to be able to release slowly as well as quickly. After the release, if the fingers release with a jerky, tense motion, they will shoot up or become hard. They should stay very close to the fingerboard, hovering just above the strings.
Playing the Release
“Playing the Release” goes for the head and the bow as well as the left hand. Like throwing a ball, playing the release is about timing. It should “feel” easy in your body, but still be mentally demanding to do with maximum accuracy. The best we can do is to identify the “triggers” (difficult fingering, bowing, shift, etc.) of our tension and impose a “release” at the time the trigger comes.
4F. SHIFTING EXERCISE 1 (Shifting with the arm, maintaining hand shape):
1. Slide magic x up and down neck (thumb moving along with ease) 2. Slide magic x up and down neck with all 4 fingers on A string making
tunnels 3. Slide magic x up and down neck with 1, 1+2, 1+2+3 and all 4 4. Slide magic X up and down neck with individual fingers
*Posture checklist for Left Hand in action: (big motions to small motions)
1. The impulse to move the hand and forearm comes from the bicep. The forearm, from the elbow to the wrist is what is moving the hand up and down the neck.
2. Wrist is straight while arm and hand are moving (no collapsing inward or outward). Hand should feel like it is “floating on a cloud.”
3. Magic X is gently touching the side of the neck. 4. Thumb is not squeezing (is freely moving with the hand). 5. Fingers are making tunnels and are loose, contacting at the
tips [tips of the fingers]. • After being able to do this basic action, use a metronome at different
speeds- faster to encourage faster, more accurate shifts, and slower to check posture.
19
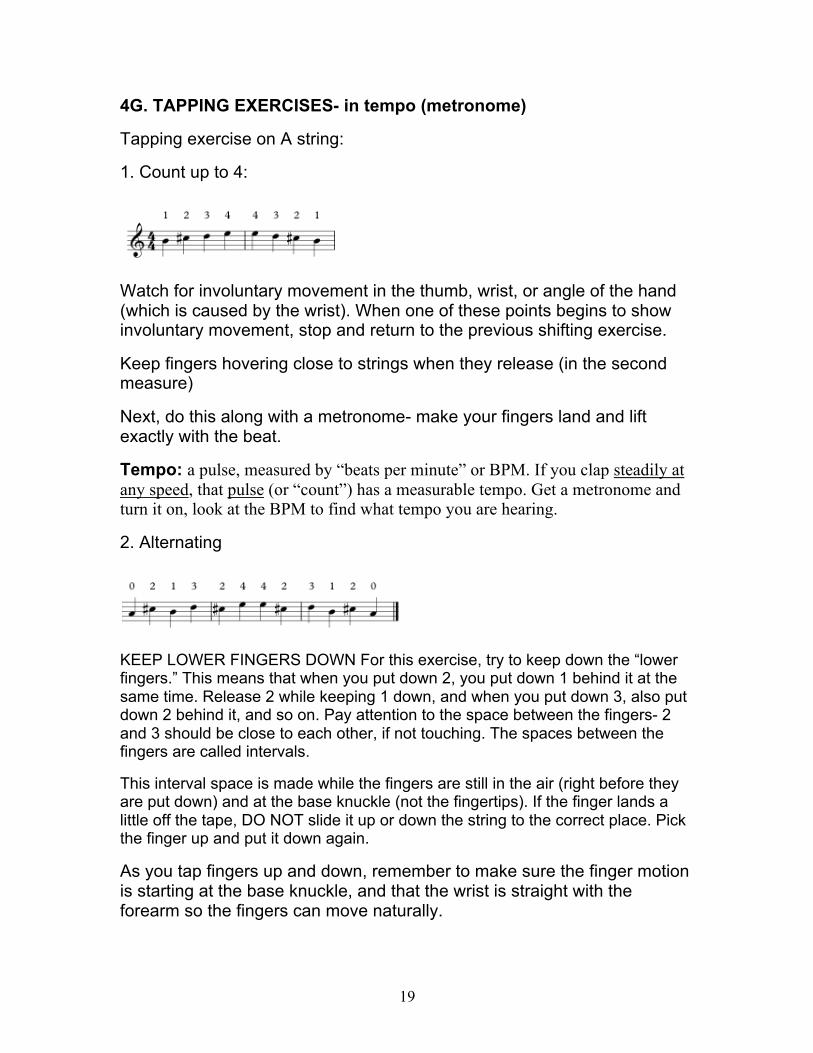
4G. TAPPING EXERCISES- in tempo (metronome)
Tapping exercise on A string:
1. Count up to 4:
Watch for involuntary movement in the thumb, wrist, or angle of the hand (which is caused by the wrist). When one of these points begins to show involuntary movement, stop and return to the previous shifting exercise.
Keep fingers hovering close to strings when they release (in the second measure)
Next, do this along with a metronome- make your fingers land and lift exactly with the beat.
Tempo: a pulse, measured by “beats per minute” or BPM. If you clap steadily at any speed, that pulse (or “count”) has a measurable tempo. Get a metronome and turn it on, look at the BPM to find what tempo you are hearing.
2. Alternating
KEEP LOWER FINGERS DOWN For this exercise, try to keep down the “lower fingers.” This means that when you put down 2, you put down 1 behind it at the same time. Release 2 while keeping 1 down, and when you put down 3, also put down 2 behind it, and so on. Pay attention to the space between the fingers- 2 and 3 should be close to each other, if not touching. The spaces between the fingers are called intervals.
This interval space is made while the fingers are still in the air (right before they are put down) and at the base knuckle (not the fingertips). If the finger lands a little off the tape, DO NOT slide it up or down the string to the correct place. Pick the finger up and put it down again.
As you tap fingers up and down, remember to make sure the finger motion is starting at the base knuckle, and that the wrist is straight with the forearm so the fingers can move naturally.

20
4H. SHIFTING EXERCISE 2: Positions
1. Replacing a finger with 1st finger 2. Slide all fingers up the neck so the 1st finger is on the 4th finger tape 3. Slide all fingers up the neck so the 1st finger is on the 3rd finger tape 4. Once the finger replacement is working, begin tapping fingers in both
positions
Later we will include finger tapping with this exercise.
*When shifting finger to finger we need to release the fingers a little to make shifting smooth. They should remain touching the string, but should let up just a little (so that the string is only half depressed) during the shift. Make sure the impulse to move the hand is coming from the bicep and that the wrist itself is straight the whole time. The left hand should feel like it is floating.
I. PIECES FOR LEFT HAND PIZZICATO (taken from MIMI ZWEIG):
Pizzicato- We have done rolling pizzicato, but now we are going to pizz individual strings.
1. Put violin up on shoulder. 2. Cover high dot with left hand. 3. Keep the hand round and the thumb hooked under the neck of the
violin while navigating the pizzicato. 4. Reach pinkie over to the lowest (G) string and tug on it. 5. Release while tugging on the string to make it rebound and sound
the pitch. This is pizzicato.

21
Pizzicato Songs:
1. Ants Song- EEE, AAA, DDD, GGG 2. Long Song- GDG, DAD, AEA
Ants Song:
Long Song:

22
5. USING THE BOW ON THE VIOLIN
*Note: You don’t need the Left hand to bow open strings, but keep it over the high dot with the thumb gently helping to support under the neck. Keep Left hand relaxed with loose fingers, but don’t let the fingers touch the strings. This will help reinforce good playing position both passively in the left hand shape, and by helping the violin to keep from drooping off the shoulder (which often causes the neck to squeeze to compensate).
5A. SQUARE ARM/LEVEL OF ELBOW
When resting the bow on the string at the middle, the student should be making a “square” shape between their bow, forearm, upper arm, and fingerboard (the bow should be contacting the string perpendicularly, making a right angle).
Check to make sure the student’s elbow is approximately on the same level as their wrist (students often have either a “lazy elbow” or otherwise hold it much too high)
*Note: Check stance to make sure student is NOT leaning awkwardly forward or to one side. Balance is VERY important at this point and if a student has to compensate in their arms and fingers for poor posture in their stance, they will not be able to consistently perform these techniques.
5B. FIRST TOUCHING BOW TO STRING:
1. Hover bow one inch above the A string- feel the weight of the stick in your pinkie.
2. Touch the hair to the string at the middle of the bow and let the weight go out of your pinkie, through the bow and hair, and into the string (the right arm should be making the square shape we just talked about).
3. Now the string is holding the bow, not you. You can now guide back and forth across the string, but never start holding the bow tightly. (Check bowhold)
a. Older student should experiment with the wrist rotation (pronation/supenation) that we introduced above. With few exceptions, these actions are used above the balance point (the upper 2/3 of the bow). Do not attempt pronation/supenation at the frog.

23
*Stop and do checks when bow hold seems tight:
1. Tap fingers individually on bow to release tension from right hand shape.
2. Try letting go of all fingers except thumb and middle finger. Move the bow little by little around the balance point with just the two fingers, and then replace the rest of the fingers in the correct bow hold. This helps check to make sure the string is holding the majority of the weight of the bow.
*A NOTE ON BOWFINGERS MOTION: Often children’s bow holds don’t develop the bowfingers motion early on because they don’t rotate bow hand toward the violin (pronation motion). You can show this by physically rotating their hand for them, then having them set the bow on the string and make a “windshield wiper” into the string (this will automatically make their hand rotate the right way if they know what to feel for). At this point they can be instructed to “drive the bow forwards and backwards across the string.”
5C. SILENT BOW ROLLING FROM SHOULDER. Place the bow on string at the middle. Moving the elbow first (from the shoulder muscle), gently rock the bow back and forth from the G string to the E string. Small children with less focus should only move from the D string to the E string (since it is easy to move the arm to far when reaching for the low G string). Wrist should not move before shoulder and elbow. Hand and forearm are passive (“empty wrist, hand is full of air”). “Big motions to small motions” is the principal again here, and this is a big motion (whole arm) with a small result (bow changing from one string to another). Make sure the student can see (get in front of the practice mirror) that their forearm, wrist, and hand are FOLLOWING the elbow and upper arm, never leading. *Students with more focus should also do wrist string crossings. Wrist crossings exist between two adjacent strings. Usually wrist crossings are for accessing an adjacent string for one note before returning to original string. Shoulder crossings are for moving from playing multiple notes on one string to playing multiple notes on another string.

24
5D. SILENT BOW PLACEMENTS- at tape markers (tip, middle, balance point, and frog)
1. Hold the bow an inch above the string, parallel to the ground. 2. Have student place the bow at the different points on the stick and
be picky about extra noise (be a little more forgiving out at the tip, it’s much more difficult to control!)
3. After silent placements become more natural, do silent placements to a pulse (metronome, parent clapping).
4. Lastly, start doing them fast as well as slow.
Combine with Silent Bow Rolling at different points in the bow. You will notice that when the bow is placed at tip, hand is furthest point from body, at frog, elbow is furthest point from body. Keep track of where your arm is in space as you move between the strings.
Do these fast, and slow and in rhythm.
5E. BOW CIRCLES Start with Silent Bow Placements. From any of the marked bow points, student will “Circle off” by drawing the bow all the way to the tip or frog, then continuing off the string and moving hand up into the air, making a circle motion. Do this with up bow and down bow motions from any of the 4 marked points.
Down Bow: Draw the bow to the right, and slightly out and away from the body.
Up Bow: Push the bow to the left, bringing the wrist in as though to scratch your nose with it. Perform bow circles off: From Frog From Balance Point From Middle From Tip Fast, and slow, and in rhythm.

25
We often end our pieces with a bow circle. Try performing bow circles with different musical effects, fast and deliberate for a brilliant effect, slowly for sad, etc. Contrary Body Motion Move body slightly in the opposite direction that your bow is moving in as you circle off, just like in the flying pizzicato. Since the bow arm often makes big motions, moving contrarily to help the motion is important (think of a pitcher winding up to throw a baseball).
5F. CHICKEN WING AND LITTLE ELBOW- Stop Bows
Between the balance point and the frog, the bow arm has to make a special combination of motions to keep the bow straight and balanced on the string that we call the “Chicken Wing” and “Little Elbow.” The Chicken Wing is the shape the wrist makes when bowing between the balance point and frog, and the Little Elbow is where the elbow seems to push the forearm up into the wrist, causing the chicken wing shape to occur.
Use Stop Bows, stopping at all points of the bow (tip, middle, balance point, frog)
1. Bow from middle to tip, to middle, to balance point, to frog (make chicken wing), to balance point (chicken wing starts disappearing), to middle (straight wrist again).
2. Repeat between balance point and frog to practice this motion. 3. Silent Bow placements- when at frog, make chicken wing.
5G. KEEPING THE BOW STRAIGHT: The student’s hand on the bow is described as the “car” and the space between the fingerboard and bridge is the “Kreisler Highway.” The Car drives on the highway and stays straight on the road. It can be harder to maintain this as the student draws longer bows, so describe the points of the bout of the violin as the “lane markers of the highway.” If you can keep your hand within the “lanes” of the highway, the car will always stay on the road.

26
Sounding Points Simon Fischer says there are 5 sounding points, but we will start with the main 3.
1. Close to the bridge- bow must be slow or else we will hear the tone overload into screeches. 2. Middle- normal starting place. 3. Close to the fingerboard- bow must move faster to avoid full tone breaking up. 5H. DOUBLE STOPS
Double Stops occur when the bow is drawn across 2 strings at once. When playing 2 strings at once, try using a slower bow and playing on the 1st and 2nd sounding points of the Kreisler highway.
1. Start at the balance point on the and do silent bow rolings 2. Place the bow at the frog on the A string 3. Take a Down bow- by the time you get to the middle, roll the bow
over to contact the E string too. Continue the down bow to the tip, playing both A and E strings simultaneously.
4. Circle bow off strings at the tip 5. Repeat starting on different strings (except the E string).
5I. ROLLING CHORD- CIRCLE OFF
1. Begin on the G string 2. Take a Down bow and roll over the D string and A string. When the
bow gets to the middle, the hairs should be contacting the A and E
27
string together. Continue past the middle to the tip sounding both the A and E string together.
3. Circle bow off strings at the tip (this is a “rolled chord”).
5J. MOVING THE BOW ON THE STRING- Martelé, Detaché, Legato There is a beginning, middle, and end to every note and on a bowed instrument. You are responsible for all three. Martelé- Release stroke. Sharp attack. End of note decays in volume as the bow loses speed and gently comes to a stop under its own weight.
10. Sometimes we put a stop at the end of a Martelé stroke making it more Marcato, which is a type of Martelé.
Detaché- Separate strokes for each note. Clean articulation, but not especially sharp or connected. Legato- Connected stroke. Notes are as connected to each other as possible. Bowfingers motion is needed to correctly accomplish this. Martelé Practice:
1. Place bow on string. 2. Pronate just a little (rotate from elbow/wrist). 3. Release pronation rotation as soon as you start the stroke. 4. The resulting feeling should be a normal, gentle, gliding stroke
that begins with just a little bite.
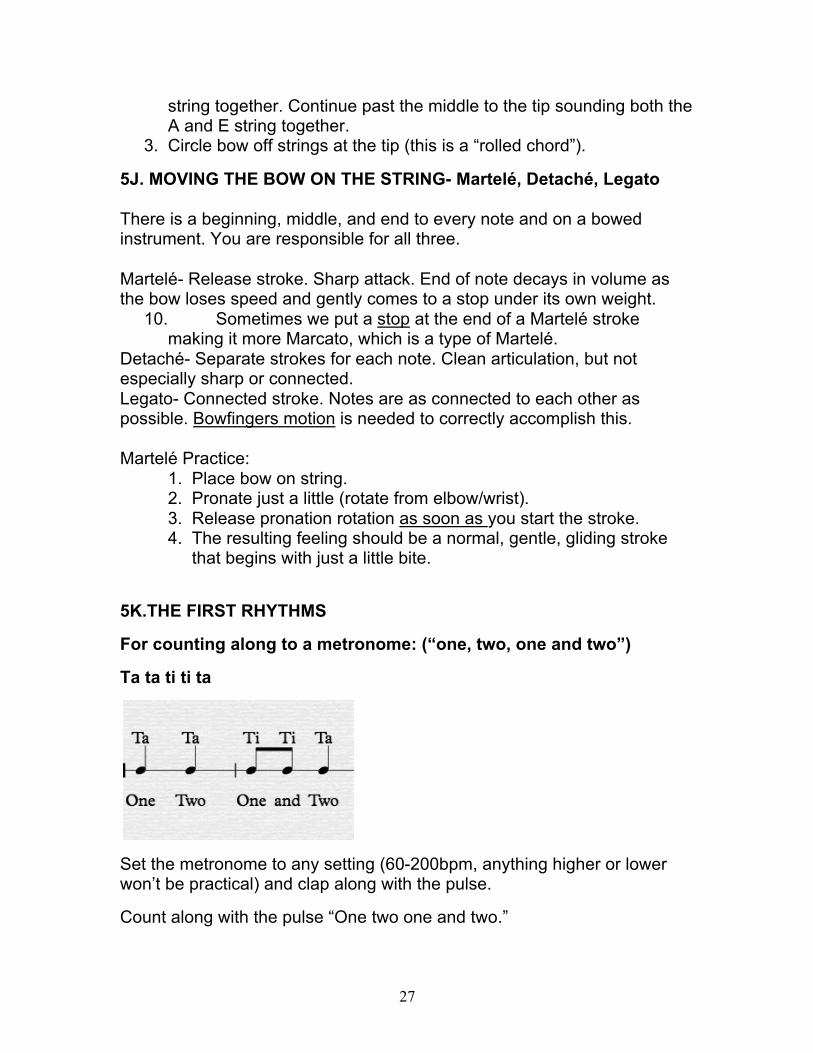
5K.THE FIRST RHYTHMS
For counting along to a metronome: (“one, two, one and two”)
Ta ta ti ti ta
Set the metronome to any setting (60-200bpm, anything higher or lower won’t be practical) and clap along with the pulse.
Count along with the pulse “One two one and two.”

28
For practicing bowing:
Tiri tiri ti ti
Ti tiri Ti tiri
Ti ti (stomp) ti
Bowing rhythms (no metronome at first):
1. Say rhythm out loud 2. Clap rhythms (no metronome) 3. Pantomiming a rhythm with hands (invisible violin) 4. Bow rhythm on open strings.
GUIDING THE STUDENTS BOW FOR THEM: Have right hand help keep the violin from slouching by placing hand under neck Have student make bowhold and place bow on string, then put your left hand over the students hand with 1st finger pressing down on stick above their hand. Make sure to bow between the correct tapes when helping them (so they absorb the correct “feel” and are able to replicate the motion when you let go).

29
5L. BOWFINGERS AT FROG
1. Place bow at frog. 2. Play bowing rhythms using nothing but finger motion. 3. Check that the wrist and arm are not helping the fingers move the
bow.
This exercise will make an ugly scrubbing sound when done right. Obviously this is not a musical sound, we are just trying to isolate the finger motion from the rest of the arm.
5M. MOVING AROUND THE BOW
Bow Speed:
The speed at which we draw the bow directly affects our tone, and is also necessary for bow choreography. Sometimes the bowing we are using makes us want to move from one part of the bow to another when we really need to stay in one place. Conversely, sometimes the bowing we are using makes it easy to stay in one part of the bow when we actually need to move to another part.
Relationship to Kreisler highway and Sounding Points:
The strings react differently to being bowed at different sounding points along the Kreisler Highway. The closer to the bridge we bow, the slower the bow needs to go. The closer to the fingerboard, the faster we can bow. This is useful because if we were to bow fast near the bridge, it would cause the sound to become scratchy and squeaky, too slow near the fingerboard will make the tone weak and liable to break up.
Bow Wanderings
(“Z bow”)- getting from one part of the bow to another smoothly
The pattern is: Long-short-long, using the same bow speed (but different amounts of bow) for both long and short strokes.

30
Frog to tip in 3 strokes: and back:
Frog-middle-balance point-tip / tip-balance point-middle-frog
-Now try frog to tip (and back) in 5 strokes, 7, 9, etc.
Draw the bow between the points in the following strokes: fast and slow, staccato and legato. Make sure to do this at different speeds, and at the different sounding points of the Kreisler highway.
*Note on Bow speed vs rhythm played:
If we perform the Z bowing in a steady rhythm, we need to use drastically different bow speeds. If we do Z bowing all with same bow speed, we get really long and really short strokes.
Staying in one part of the bow:
Long/short bowing- using the same amount of bow at different speeds so you stay within a designated section of the bow. (Middle-tip, Balance point-middle, etc.) Make sure you always return to the same point in the bow as you started.
Long/short/Long/short = Slow/fast/Slow/fast
Pronation/supenation also help to help keep the tone steady

31
6. USING THE BOW AND LEFT HAND TOGETHER
6A. FINGER BEFORE BOW
It is a common reflex for us to try to put the finger down on the string at the same time we move the bow to play the note. This is an error because the finger must obviously be down on the note before we can sound that note with the bow.
In the beginning we will be playing music in which the left hand always needs to be one step ahead of the bow. In Monkey Song, the fingers will need to be put down ahead of the bow stroke, and in the second half they will need to be released before the bow stroke.
Later, when we get into slurs, we will discuss how the left hand can also be responsible for playing rhythmically within a single bow stroke. For now, let’s stick with “Finger Before Bow.”
6B. “BOW THE FINGERINGS,” NOT “FINGER THE BOWINGS”
Since we practice “big motions into small motions,” and intonation is often the most microscopic component we work with, we need to view intonation as being affected by bigger motions (posture and bow motion) as much as being affected by our Left hand and fingers.
– Poor intonation should not affect bow motion and posture- this would be going backwards up the chain of Big motions to Small motions.
32
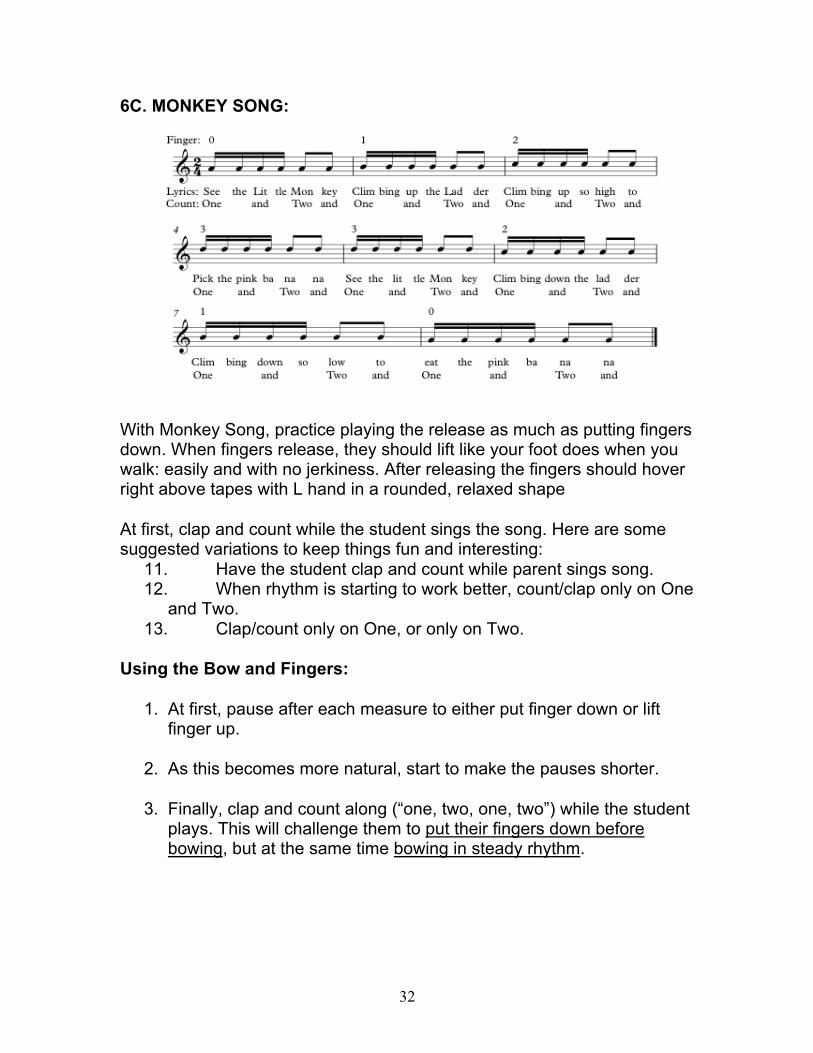
6C. MONKEY SONG:
With Monkey Song, practice playing the release as much as putting fingers down. When fingers release, they should lift like your foot does when you walk: easily and with no jerkiness. After releasing the fingers should hover right above tapes with L hand in a rounded, relaxed shape At first, clap and count while the student sings the song. Here are some suggested variations to keep things fun and interesting:
11. Have the student clap and count while parent sings song. 12. When rhythm is starting to work better, count/clap only on One
and Two. 13. Clap/count only on One, or only on Two.
Using the Bow and Fingers:
1. At first, pause after each measure to either put finger down or lift finger up.
2. As this becomes more natural, start to make the pauses shorter.
3. Finally, clap and count along (“one, two, one, two”) while the student
plays. This will challenge them to put their fingers down before bowing, but at the same time bowing in steady rhythm.

33
6D. SEE SAW:
The pattern in See Saw has its own difficulty. Going from one motion (repetitive string crossing) to another (bowing 6 times on one string with a finger down) while keeping time.
When Practicing See Saw:
1. Clap and sing rhythm (“see saw, see saw, 1,2,3,1,2,3 see saw”). 2. Pantomime in rhythm while parent/metronome claps rhythm. 3. Practice bow rolling and silent bow placements. 4. Play See Saw in the upper half of the bow with a pause after
measure 4 to put 1st finger down. As this becomes more natural, make the pause shorter, then take it away.
Watch to make sure the students right hand always moves at the correct time, and that the 1st finger is put down at the right time. Especially watch to make sure that putting the 1st finger down doesn’t throw off the rhythm of the right hand- we bow the fingerings, we don’t finger the bowings (meaning that the right hand should NEVER stop for the left hand to figure something out. If this happens, then the pattern needs to be made clear.)

34
6E. LEARNING COORDINATION
The value of separating the hands before putting them together:
Basically, when we talk about learning a piece of music on the violin we are talking about learning a specific choreography for bow and fingers- this choreography is also for the head and shoulders (to not tense up and impede the motion). Sometimes we need to “play the release” of our head on the violin, or the angle at which we are standing to maintain a balanced posture in motion (nodding “yes” and “no” while playing to release tension).
Understand that the “feeling” of playing with R and L hand together is a conglomerate of the “feeling” of playing them separately, one that becomes more natural after being correctly repeated a number of times. Everyone who has tried knows the feeling of attempting to play with both hands together and not being able to achieve the correct sound because some of the physical motions either fell apart mid-use or were just unclear. Sometimes all that is necessary is for the student to slow down long enough to think about what they are doing, but most of the time the student needs to look closer at the specific, unique combinations of actions that go into making each different piece of music.
6F. Separate the Physical Actions Then Put Them Back Together
1. Analyze- Identify the challenges in the music (string crossing, putting finger down, etc)
2. Separate the Physical Actions- a. Take away one hand or the other. Perform just the left hand action
or just the bow motion on open strings. b. Put in stops between the challenges like we did in Monkey Song
and See Saw. 3. Recombine- Put Left and Right hand back together. Perform the pattern
slowly and/or with pauses. 4. Refine- Once the student is able to play the pattern correctly, even slowly,
it is time for correct repetitions.
6G. Correct Repetitions
“Practice makes perfect” is kind of a misleading statement. “Perfect practice makes perfect” is better, but I like “Practice makes consistent” the best (since “perfection is the enemy of progress”). All philosophy aside, the practice session has not ended once the student has achieved success. We practice to learn a pattern or a piece, but once we have learned it we have to maintain it through practice. This is the difference between a good violinist and an okay one. A good violinist knows that once they have learned a pattern, they need to perform a number of correct repetitions to solidify it in their mind.

35
*A NOTE ON PHYSICAL MOTION AND MUSICAL STYLE AND CHARACTER:
Music is not notes and bowings. If you learn your pieces only this way you will end up making music that has no life or that doesn’t make sense. Part of the physical action required to play the violin is to associate your movements with the mood of the work. If the work is fiery and brilliant, you wouldn’t move the same as if it were soft and soothing. Look at opera singers and how they direct the mood and intention of the music in their bodies. We need to be able to work backwards from this in our practice. Great violinist Rachael Barton Pine gave a master class at UW Milwaukee once, and one bit of advice she gave was to practice the musical side of your piece by shutting yourself away where nobody can see/hear you and just OVERACT. Look in a mirror and just embarrass yourself by overdoing the music to a ridiculous extent so that when you’ve finished you can actually DIAL IT BACK from that and already be using everything you need to give the music all of its character.
Looking Forward:
DELVELOPING LEFT HAND AND BOW TOGETHER:
Scales/arpeggios
Finger patterns (Sevcik)
Tapping
Tapping while holding fingers
Shifting with finger patterns
Double stops/chords
Bowing Patterns
Sight Reading