Embed Size (px)
Citation preview

RTE for WIN32
Installation Manual (Rev.7.0)
Midas lab

RTE for WIN32 Installation Manual (Rev.7.0)
REVISION HISTORY
Date Revision Chapter Explanation of revision March 11,2000 4.0 RTE4W32 Ver.5.0 (First edition)
January 10,2002 4.1 Add Windows XP support (RTE4W32 Ver.5.05) October 29,2002 4.2 Add option button (RTE4W32 Ver.5.07)
December 1, 2003 4.3 Add support for the RTE-LAN/USB interface for the RTE-2000-TP (RTE4W32 Ver.5.11)
January 5,2006 5.0 Add support the RTE-2000H-TP(RTE4W32 Ver.6.00) July 30,2007 6.0 Add Windows Vista support (RTE4W32 Ver.7.00) June 1,2011 7.0 Add Windows 7 support (RTE4W32 Ver.8.00)
1
RTE for WIN32 Installation Manual (Rev.7.0)
---- CONTENTS ----
1. INTRODUCTION..................................................................................................................................... 5
1.1. INSTALLATION ........................................................................................................................... 5 1.2. UNINSTALLATION ...................................................................................................................... 6 1.3. DIFFERENCES BETWEEN WINDOWS 7/VISTA AND OTHER OPERATING SYSTEMS.......... 6 1.4. Support for Windows 7 64-bit version...................................................................................... 7
2. INSTALLATION PROCEDURE............................................................................................................... 8
3. UNINSTALLATION PROCEDURE ....................................................................................................... 11
4. PORT SETTING AND CONFIRMATION OF CONNECTION................................................................ 13
4.1. STATUS AFTER INSTALLATION.............................................................................................. 13 4.2. LICENSE KEY ........................................................................................................................... 13 4.3. CHECK RTE2 ............................................................................................................................ 14 4.4. SETTING FOR RTE-XXXX-IE, RTE-XXXX-TP, RTE-XXXX-NBD, OR RTE-XXXX-IDB/NBD ... 16 4.5. SETTING FOR RTE-XXXX-PC OR RTE-XXXX-CB .................................................................. 17 4.6. SETTING LICENSE KEY........................................................................................................... 18
5. DEVICE DRIVERS................................................................................................................................ 19
5.1. INSTALLING THE PC-CARD DRIVER IN THE WINDOWS 7 (32-bit) ENVIRONMENT........... 19 5.1.1. INSTALLING THE PC-CARD DRIVER IN THE WINDOWS 7 (32-BIT) ENVIRONMENT. 19 5.1.2. IF A DEVICE IS DELETED FROM THE DEVICE MANAGER .......................................... 22
5.2. INSTALLING THE PCI DRIVER IN THE WINDOWS 7 (32-bit) ENVIRONMENT ..................... 23 5.2.1. INSTALLING THE PCI DRIVER IN THE WINDOWS 7 (32-BIT) ENVIRONMENT ........... 23 5.2.2. IF A DEVICE IS DELETED FROM THE DEVICE MANAGER .......................................... 26
5.3. INSTALLING THE USB DRIVER IN THE WINDOWS 7 ENVIRONMENT ................................ 27 5.3.1. INSTALLING THE USB DRIVER IN THE WINDOWS 7 ENVIRONMENT ........................ 27 5.3.2. IF A DEVICE IS DELETED FROM THE DEVICE MANAGER .......................................... 29
5.4. INSTALLING THE PC-CARD DRIVER IN THE WINDOWS VISTA ENVIRONMENT ............... 30 5.4.1. WHEN THE PC-CARD INTERFACE IS INSERTED INTO THE SOCKET FOR THE FIRST
TIME .................................................................................................................................. 30 5.4.2. INSTALLING A DRIVER THAT HAS NOT YET BEEN INSTALLED................................. 33 5.4.3. IF A DEVICE IS DELETED FROM THE DEVICE MANAGER .......................................... 35
5.5. INSTALLING THE PCI DRIVER IN THE WINDOWS VISTA ..................................................... 36 5.5.1. WHEN WINDOWS IS STARTED AFTER THE PCI BOARD IS INSERTED INTO THE PCI
BUS SLOT FOR THE FIRST TIME................................................................................... 36 5.5.2. INSTALLING A DRIVER THAT HAS NOT YET BEEN INSTALLED................................. 39 5.5.3. IF A DEVICE IS DELETED FROM THE DEVICE MANAGER .......................................... 41
5.6. INSTALLING THE USB DRIVER IN THE WINDOWS VISTA ENVIRONMENT ........................ 42 5.6.1. WHEN THE RTE-2000(H)-TP IS CONNECTED TO THE HOST THROUGH USB FOR
THE FIRST TIME............................................................................................................... 42 5.6.2. INSTALLING THE DRIVER THAT HAS NOT YET BEEN INSTALLED............................ 43 5.6.3. WHEN THE DRIVER WAS DELETED FROM THE DEVICE MANAGER......................... 43
2
RTE for WIN32 Installation Manual (Rev.7.0)
5.7. INSTALLING THE PC-CARD DRIVER IN THE WINDOWS XP ENVIRONMENT..................... 44 5.7.1. WHEN THE PC-CARD INTERFACE IS INSERTED INTO THE SOCKET FOR THE FIRST
TIME .................................................................................................................................. 44 5.7.2. INSTALLING A DRIVER THAT HAS NOT YET BEEN INSTALLED................................. 46 5.7.3. IF A DEVICE IS DELETED FROM THE DEVICE MANAGER .......................................... 47 5.7.4. KMC PC-CARD DRIVER .................................................................................................. 48
5.8. INSTALLING THE PCI DRIVER IN THE WINDOWS XP........................................................... 52 5.8.1. WHEN WINDOWS IS STARTED AFTER THE PCI BOARD IS INSERTED INTO THE PCI
BUS SLOT FOR THE FIRST TIME................................................................................... 52 5.8.2. INSTALLING A DRIVER THAT HAS NOT YET BEEN INSTALLED................................. 54 5.8.3. IF A DEVICE IS DELETED FROM THE DEVICE MANAGER .......................................... 55
5.9. INSTALLING THE USB DRIVER IN THE WINDOWS XP ENVIRONMENT.............................. 56 5.9.1. WHEN THE RTE-2000(H)-TP IS CONNECTED TO THE HOST THROUGH USB FOR
THE FIRST TIME............................................................................................................... 56 5.9.2. INSTALLING THE DRIVER THAT HAS NOT YET BEEN INSTALLED............................ 56 5.9.3. WHEN THE DRIVER WAS DELETED FROM THE DEVICE MANAGER......................... 57
5.10. INSTALLING THE PC-CARD DRIVER IN THE WINDOWS 98 ENVIRONMENT...................... 58 5.10.1. WHEN THE PC-CARD INTERFACE IS INSERTED INTO THE SOCKET FOR THE FIRST
TIME .................................................................................................................................. 58 5.10.2. INSTALLING A DRIVER THAT HAS NOT YET BEEN INSTALLED................................. 61 5.10.3. IF A DEVICE IS DELETED FROM THE DEVICE MANAGER .......................................... 62
5.11. INSTALLING THE PCI DRIVER IN THE WINDOWS 98 ENVIRONMENT ................................ 63 5.11.1. WHEN WINDOWS IS STARTED AFTER THE PCI BOARD IS INSERTED INTO THE PCI
BUS SLOT FOR THE FIRST TIME................................................................................... 63 5.11.2. INSTALLING A DRIVER THAT HAS NOT YET BEEN INSTALLED................................. 66 5.11.3. IF A DEVICE IS DELETED FROM THE DEVICE MANAGER .......................................... 67
5.12. INSTALLING THE USB DRIVER IN THE WINDOWS 98 SECOND EDITION (SE) ENVIRONMENT ........................................................................................................................ 68
5.12.1. WHEN THE RTE-2000(H)-TP IS CONNECTED TO THE HOST THROUGH USB FOR THE FIRST TIME............................................................................................................... 68
5.12.2. INSTALLING THE DRIVER THAT HAS NOT YET BEEN INSTALLED............................ 70 5.12.3. WHEN THE DRIVER IS NOT CORRECTLY INSTALLED................................................. 70
5.13. INSTALLING THE PC-CARD DRIVER IN THE WINDOWS 2000 ENVIRONMENT.................. 72 5.13.1. WHEN THE PC-CARD INTERFACE IS INSERTED INTO THE SOCKET FOR THE FIRST
TIME .................................................................................................................................. 72 5.13.2. INSTALLING A DRIVER THAT HAS NOT YET BEEN INSTALLED................................. 75 5.13.3. IF A DEVICE IS DELETED FROM THE DEVICE MANAGER .......................................... 76 5.13.4. KMC PC-CARD DRIVER .................................................................................................. 77
5.14. INSTALLING THE PCI DRIVER IN THE WINDOWS 2000 ....................................................... 81 5.14.1. WHEN WINDOWS IS STARTED AFTER THE PCI BOARD IS INSERTED INTO THE PCI
BUS SLOT FOR THE FIRST TIME................................................................................... 81 5.14.2. INSTALLING A DRIVER THAT HAS NOT YET BEEN INSTALLED................................. 84 5.14.3. IF A DEVICE IS DELETED FROM THE DEVICE MANAGER .......................................... 85
5.15. INSTALLING THE USB DRIVER IN THE WINDOWS 2000 ENVIRONMENT .......................... 86 5.15.1. WHEN THE RTE-2000(H)-TP IS CONNECTED TO THE HOST THROUGH USB FOR
THE FIRST TIME............................................................................................................... 86 5.15.2. INSTALLING THE DRIVER THAT HAS NOT YET BEEN INSTALLED............................ 86
3

RTE for WIN32 Installation Manual (Rev.7.0)
5.15.3. WHEN THE DRIVER WAS DELETED FROM THE DEVICE MANAGER......................... 87 5.16. IDENTIFYING THE VERSION OF WINDOWS 95 ..................................................................... 88 5.17. INSTALLING THE PC-CARD DRIVER IN THE WINDOWS 95 (NON-OSR2) ENVIRONMENT88 5.18. INSTALLING THE PCI DRIVER IN THE WINDOWS 95 (NON-OSR2) ..................................... 90 5.19. INSTALLING THE PC-CARD DRIVER IN THE WINDOWS 95 (OSR2) ENVIRONMENT ........ 91 5.20. INSTALLING THE PCI DRIVER IN THE WINDOWS 95 (OSR2) ENVIRONMENT................... 95 5.21. INSTALLING RTE I/O DRIVER IN THE WINDOWS XP, WINDOWS 2000, or WINDOWS NT
4.0 ENVIRONMENT................................................................................................................... 99 5.22. INSTALLING RTE PC-CARD DRIVER IN THE WINDOWS NT 4.0 ENVIRONMENT............... 99 5.23. RESTRICTIONS ON PC-CARD INTERFACE IN WINDOWS NT 4.0 ENVIRONMENT............. 99 5.24. WHEN THE PC CARD CANNOT BE RECOGNIZED (WINDOWS 95/98) .............................. 101
5.24.1. WHEN THE NEW HARDWARE FOUND DIALOG BOX DOES NOT APPEAR ............. 101 5.24.2. IF THE PERSONAL COMPUTER BUZZES "BOO!" WHEN THE PC CARD IS INSERTED102
6. ERROR MESSAGES AND REQUIRED RESPONSES ...................................................................... 103
All product names mentioned in this document are trademarks of the respective companies.
This manual applies to RTE for WIN32 Version 7.00 and later. 4
RTE for WIN32 Installation Manual (Rev.7.0)
1. INTRODUCTION This manual explains how to install RTE for WIN32. RTE for WIN32 is designed to be
installed in a PC in which Windows Vista, Windows XP Professional, Windows XP Home Edition,
Windows 98, Windows 2000, Windows 95, or Windows NT 4.0 (x86) of Microsoft is already
installed. 60 Mbytes of disk space is required to install RTE for WIN32.
This software is common to all RTE series products. The information in this manual applies
to them in common. For settings specific to an individual product, refer to the applicable manual.
In this manual, if there is no notice, Windows XP means both Windows XP Professional and Windows XP Home Edition.
In this manual, Windows 7 collectively indicates both Windows 7 (32-bit) and Windows 7 (64-bit) unless there is a need for the distinction between the two versions.
Neither PC-Card interface for the Windows 2000/Windows NT 4.0 environment nor the PCI bus interface can be used with NEC-PC98 computers (except the NX series of computers).
Notes and restrictions on using USB connection - The supported operating systems are Windows 98 Second Edition
(SE), Windows 2000, and Windows XP, And Windows Vista. Windows 98, Windows 95, and Windows NT, which are older thanWindows 98 SE, are not supported.
- It is not recommended to use USB 1.1. This is because USB 1.1 isnot appropriate for efficient debugging since the debugger cannotrespond quickly in USB 1.1.
Notes and restrictions on using LAN connection - The supported operating systems are Windows 98 (including
Second Edition), Windows NT, Windows 2000, and Windows XP, and Windows Vista. Windows 95 is not supported.
1.1. INSTALLATION The RTE for WIN32 install CD-ROM is provided with a dedicated install command
(setup.exe). Use this command to install the DLL (dynamic link library) of RTE for WIN32. The
setup.exe command performs the following:
Copies rte4w32.dll and rte4w32.ini to the Windows directory(*1).
Creates a directory for RTE for WIN32, and copies the DLL and the relevant programs to
that directory.
Creates an RTE for WIN32 folder in Start menu and creates a Check RTE2 shortcut icon
within that folder.
The RTE I/O driver is installed in the Windows 7 (32-bit), Windows Vista, Windows XP,
Windows 2000, or Windows NT 4.0 environment. In the Windows NT 4.0 environment,
the RTE PC-Card driver is also installed (if selected).
In the Windows 7 (32-bit), Windows Vista, Windows XP or Windows 2000 environment,
the PC-Card driver, the PCI board driver, and the INF file is copied to RTE for WIN32
directory.
In the Windows 7, Windows Vista, Windows XP, Windows 2000 or Windows 98
environment, the USB driver and INF file are copied to the RTE for WIN32 directory.
5

RTE for WIN32 Installation Manual (Rev.7.0)
Try to create a dedicated directory for RTE for WIN32 as much as possible. If RTE for WIN32 is installed in a dedicated directory, it canbe uninstalled safely.
*1 : In Windows 7 or Windows Vista, the rte4w32v.ini file is created intothe Windows directory. And the rte4w32.ini file is created into thedirectory where RTE for WIN32 is installed. For details, see Section 1.3 DIFFERENCES BETWEEN WINDOWS 7/VISTA AND OTHEROPERATING SYSTEMS.
1.2. UNINSTALLATION RTE for WIN32 can be uninstalled, using the setup.exe command. To uninstall RTE for
WIN32, delete rte4w32.dll and rte4w32.ini(*1) from the Windows directory, and all files related to
the RTE from the RTE directory. Note, however, that rte4w32.lic and rte4w32.key under the
Windows directory is not deleted because it holds the registered license(*2).
In the Windows 7 (32-bit), Windows Vista, Windows XP, Windows 2000, or Windows NT 4.0
environment, the RTE I/O driver is deleted. And in the Windows NT 4.0 environment, the RTE
PC-Card driver is also deleted. (It is recommended that Windows NT be restarted after the
deletion of the RTE PC-Card driver.)
Do not save any file other than those saved during installation into theRTE directory. If there are any files other than those installed usingsetup.exe, the directory cannot be deleted and RTE for WIN32 cannotbe uninstalled normally.
Because the rte4w32.ini file is deleted when RTE for WIN32 isuninstalled, the address assignment for the ISA-BUS and C-BUSboards, as well as the IP address setting for LANBOX will be lost. Users are recommended, therefore, to record this information beforeuninstalling RTE for WIN32 and installing the new version.
*1 : In Windows 7 or Windows Vista, the rte4w32v.ini file in theWindows directory is deleted.
*2 : The license store files are generated into the RTE directory inWindows 7 or Windows Vista, so that if these two files exist uponthe unistallation of RTE for WIN32, the dialog box is shown toverify whether or not the files should be deleted.
For details, see Section 1.3 DIFFERENCES BETWEEN WINDOWS7/VISTA AND OTHER OPERATING SYSTEMS.
1.3. DIFFERENCES BETWEEN WINDOWS 7/VISTA AND OTHER OPERATING SYSTEMS Windows 7 and Windows Vista has the User Account Control (UAC) function that is active as
default. In order to use RTE for WIN32 like in other operating systems regardless of the UAC
function is active or non-active, please be notified that differences between Windows 7/Vista
and other operating systems are as follows.
RTE for WIN32 cannot be installed into the appropriate directories and sub directories for
VirtualStore. When Windows 7/Vista is in the default state, the appropriate directories are
C:\Windows, C:\Program Files and C:\ProgramData.
The rte4w32.ini file created into the Windows directory in other operating systems is
generated into the directory where RTE for WIN32 is installed in Windows 7/Vista.
Instead of the rte4w32.ini file, the rte4w32v.ini file is created into the Windows directory.
For other operating systems, the license store files (rte4w32.lic and rte4w32.key) are
generated into the Windows directory. However, in Windows 7/Vista, these files are
6

RTE for WIN32 Installation Manual (Rev.7.0)
created into the directory where RTE for WIN32 is installed. Therefore, if these two files
exist upon the uninstallation of RTE for WIN32, the dialog box is shown to verify whether
or not the files should be deleted.
Windows 7 is supported by Ver8.00.00 or the succeeding versions of RTE for WIN32. In
case that one of the older versions of RTE for WIN32 than Ver8.00.00 is installed to Windows 7,
uninstall it for the installation of its new version. If one of the older versions of RTE for WIN32
than Ver7.00.00 is installed to Windows 7, uninstall it for the installation of its new version in the
same manner as described below for Windows Vista.
Windows Vista is supported by Ver7.00.00 or the succeeding versions of RTE for WIN32. In
case that one of the older versions of RTE for WIN32 than Ver7.00.00 is installed, uninstall RTE
for WIN32 and then install it newly. When the UAC function of Windows Vista is active,
rte4w32.ini/rte4w32.lic/rte4w32.key (the rte4w32.lic and rte4w32.key files are generated only
when a license is registered) has been created in the VirtualStore of the Windows directory. As
these files in the VirtualStore are not deleted even if RTE for WIN32 is uninstalled, please delete
them manually.
1.4. Support for Windows 7 64-bit version There are the restrictions on supporting Windows 7 64-bit version as below.
Windows 7 64-bit version is supported by Ver8.00.00 or higher versions of RTE for WIN32.
Products connected via ISA-BUS, PCI-BUS and PC-CARD are not supported. RTE-xxxx-PC and RTE-xxxx-CB are not supported. 64 bit applications are not supported.
7
RTE for WIN32 Installation Manual (Rev.7.0)
2. INSTALLATION PROCEDURE To install RTE for WIN32, insert the RTE for WIN32 install CD-ROM in a drive, and execute
the \rte4w32\setup.exe command.
This command can be executed by double-clicking setup.exe in Explorer or form Run in the
Start menu.
In the Windows 7, Windows Vista, Windows XP, Windows 2000, or Windows NT 4.0
environment, log in with the administrator permission.
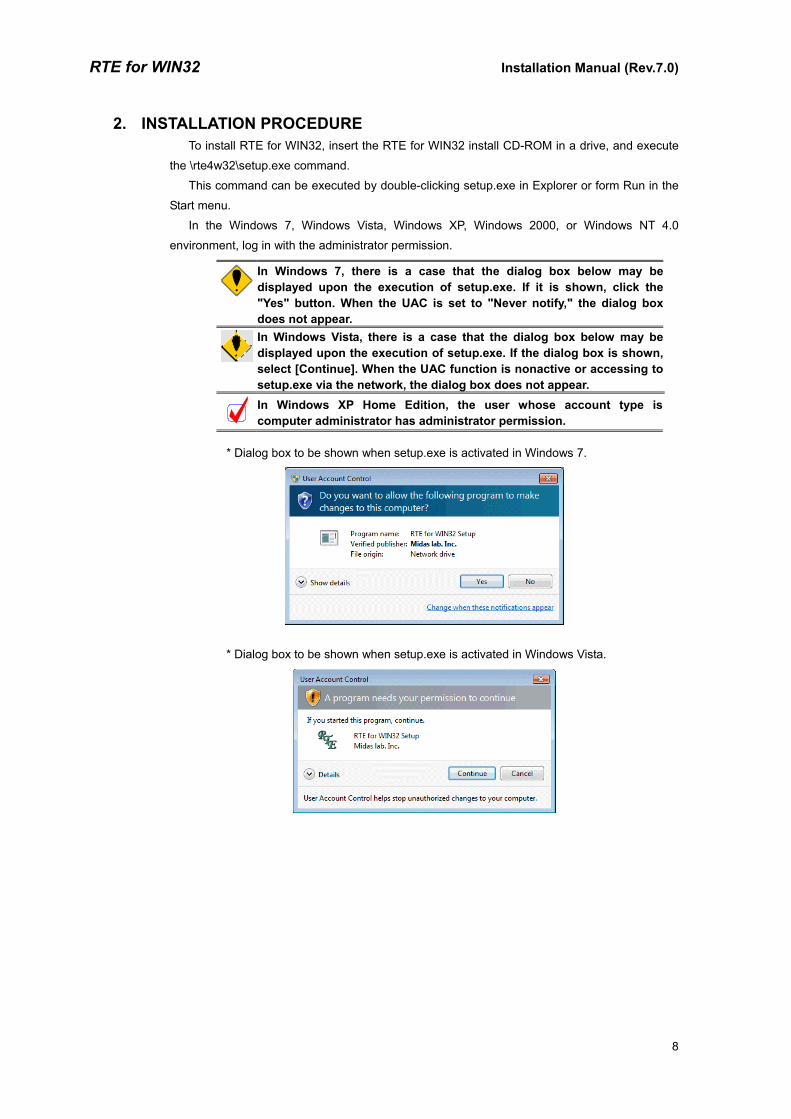
In Windows 7, there is a case that the dialog box below may bedisplayed upon the execution of setup.exe. If it is shown, click the "Yes" button. When the UAC is set to "Never notify," the dialog boxdoes not appear.
In Windows Vista, there is a case that the dialog box below may be displayed upon the execution of setup.exe. If the dialog box is shown,select [Continue]. When the UAC function is nonactive or accessing to setup.exe via the network, the dialog box does not appear.
In Windows XP Home Edition, the user whose account type iscomputer administrator has administrator permission.
* Dialog box to be shown when setup.exe is activated in Windows 7.
* Dialog box to be shown when setup.exe is activated in Windows Vista.
8

RTE for WIN32 Installation Manual (Rev.7.0)
<1> When setup.exe is executed, the following dialog box appears. Choose Install from this
dialog box.
If the host is running Windows NT 4.0 and has a PC-Card socket, the With PC-Card
Driver check box becomes active. To use the PC-Card interface in the Windows NT 4.0
environment, place a check mark in this check box.
The PC-Card interface can be used only with a PC/AT or compatible(DOS/V machine) that is running Windows 2000 or Windows NT 4.0. Itcannot be used with an NEC-PC98 computer (except the NX series of computers).
Address assignment is restricted if the PC-Card interface is used in the Windows NT 4.0 environment. For details, see Section 5.23. RESTRICTIONS ON PC-CARD INTERFACE IN WINDOWS NT 4.0ENVIRONMENT.
* Windows 7, Windows Vista, Windows XP, Windows 2000, Windows 95/98 or
Windows NT 4.0 (without PC-Card socket)
* Windows NT 4.0 (with PC-Card socket)
<2> Next, a dialog box will appear which lets you specify a directory in which you will install
RTE for WIN32. Specify a desired directory in the dialog box. If you choose OK,
installation begins, and the necessary files are copied to the specified directory.
Try to create a dedicated directory for RTE for WIN32 as much aspossible. If RTE for WIN32 is installed in a dedicated directory, it can be uninstalled safely.
Unable to be installed into the appropriate directories and subdirectories for VirtualStore in Windows 7 or Windows Vista. For details, see Section 1.3 DIFFERENCES BETWEEN WINDOWS 7/VISTA AND OTHER OPERATING SYSTEMS.
9

RTE for WIN32 Installation Manual (Rev.7.0)
If the following dialog box appears when the Install button is clicked, log in with an
administrator permission to execute setup.exe.
<3> Finally, an RTE for WIN32 folder is created on the desktop and a Check RTE2 icon is
created within that folder. At the same time, the RTE for Windows menu is added to the
Programs list, available from the Start menu. This completes the installation.
If the following dialog box appears, the RTE PC-Card driver is installed in the Windows
NT 4.0 environment. In this case, restart Windows NT.
10

RTE for WIN32 Installation Manual (Rev.7.0)
3. UNINSTALLATION PROCEDURE Insert the RTE for WIN32 install CD-ROM in a drive, and execute the \rte4w32\setup.exe
command. This command can be executed by double-clicking setup.exe in Explorer or from
Run in the Start menu.
In the Windows 7, Windows Vista, Windows XP, Windows 2000, or Windows NT 4.0
environment, log in with the administrator permission.
In Windows XP Home Edition, the user whose account type iscomputer administrator has administrator permission.
<1> When setup.exe is executed, the following dialog box appears. Choose Uninstall from
this dialog box. (Placing a check mark in the With PC-Card Driver check box has no
effect.)
<2> The name of a directory in which RTE for WIN32 has been installed is displayed.
If OK is chosen, all files installed using setup.exe are deleted from that directory, and
rte4w32.dll and rte4w32.ini are deleted from the Windows directory.
If the following dialog box appears when the Uninstall button is clicked, log in with the
administrator permission to execute setup.exe.
In other operating systems other than Windows 7 and Windows Vista,the rte4w32.lic and rte4w32.key files (under the Windows directory)saving license information are not deleted even when RTE for WIN32 isuninstalled. Therefore, it is unnecessary to re-register a license already-registered upon the re-installation of rte4w32. In Windows 7 or Windows Vista, when either of the rte4w32.lic file orthe rte4w32.key file exists, the dialog box is shown to confirm its deletion. If Not Delete is chosen, the directory where RTE for WIN32 isinstalled remains without deleted. For details, see Section 1.3DIFFERENCES BETWEEN WINDOWS 7/VISTA AND OTHER OPERATING SYSTEMS.
<3> Once RTE for WIN32 is uninstalled, if you want to install it again, follow the installation
procedure described in Chapter 2. INSTALLATION PROCEDURE again.
11

RTE for WIN32 Installation Manual (Rev.7.0)
Before attempting uninstallation, terminate all the applications that usean RTE. If RTE for WIN32 is uninstalled during the execution of anyapplication that is using an RTE, uninstallation may not be completednormally, sometimes resulting in an unexpected error in addition. If the RTE PC-Card driver has been used in the Windows NT 4.0 environment, it is recommended that Windows NT be restarted afterRTE for WIN32 has been uninstalled.
12

RTE for WIN32 Installation Manual (Rev.7.0)
4. PORT SETTING AND CONFIRMATION OF CONNECTION
4.1. STATUS AFTER INSTALLATION When RTE for WIN32 is installed, an icon (Check RTE2) is added to the RTE for WIN32
group file in the Start menu. Starting this program can set the RTE for WIN32 ports and confirm
connections.
Before starting a connection test, check the RTE system settings and connection with the
PC while referring to the Hardware User's Manual.
Be sure to run Check RTE2 once, after RTE for WIN32 is installed, thecommunication port and conditions are changed, or another RTE product is added.
If the latest version of RTE for WIN32 is installed over RTE for WIN32 of version 4.37 or earlier, a green Check RTE32 icon appears in the above group file. Do not use Check RTE32, however, because it does not have a license registration function. Instead, use Check RTE2.
4.2. LICENSE KEY Some products (such as VR5432-TP) require the setting of a license key to enable the use
of RTE for WIN32. The license key can be found next to the serial number on the license sheet
provided with the licensed product.
Input the license key and serial number in the Check RTE2 license dialog box (see Section
4.6. SETTING LICENSE KEY).
The license key must be set for each product.
13

RTE for WIN32 Installation Manual (Rev.7.0)
4.3. CHECK RTE2 When a user clicks Check RTE2, the following dialog box appears. Each item in this dialog
box is outlined below. For details, refer to the description of each product in the following
sections.
Products List : Used to select the product to be used.
RTE : Displays the product selected from the Products List tree.
I/F-1 : Used to select the type and communication port of an interface board. The parameters that can be selected for this item vary with the selected product.
I/F-2 : Used to select the I/O address of the interface board and the communication baud rate. The parameters that can be selected for this item vary with the selection made for I/F-1.
CH : Reserved for future function expansion.
Use RTE Shared Server : Reserved for future function expansion.
Reset RTE : When this button is clicked, RTE for WIN32 is reset by hardware. This button is dimmed when a product that does not support hardware reset is being used.
License : Click this button to set the license key. This button is dimmed when a product that does not require the setting of a license key is being used.
Option : Click this button to set the setup depending on each product. This button is dimmed when a product that does not require the setting of a setup depending on each product is being used.
Products Info : Displays information on the product selected from Products List.
License Stat : Displays license information on the product selected from Products List. It indicates whether a setup of a license is necessary or not.
A license is effective or an invalid indication is not given. OK : Clicking this button checks the connection of the product under
the conditions selected above. Before the user clicks this button, therefore, the product must be connected correctly. After checking the connection, a simple function test can be conducted.
To select a product from the Products List tree, select the deepest item in the tree. The new product is not selected if a higher-level item is selected. Whether the new product has been selected can be checked by noting the contents of the RTE display.
14

RTE for WIN32 Installation Manual (Rev.7.0)
After selecting all required items, click the OK button. After you confirm the connection with
the RTE system, the following dialog box appears.
When you click on OK, the dialog box appears, on which you are requested to confirm your
specification. If you choose No, the program is exited. If you choose Yes, the program starts
testing the functions of the RTE system.
If an error occurs during the function test, an error message is displayed in a dialog box.
See Chapter 6. ERROR MESSAGES AND REQUIRED RESPONSES for details of the error
message.
When the test ends normally, the following dialog box appears.
This is the end of the communication and basic-function tests.
[Notice] If an error occurs during installation or function test, and the cause of the error
cannot be found, send the following information to your support engineer.
* Model of the PC and version of Windows used
* Type of the RTE system and the way it is connected
* Location and other descriptions of the error
If the function test ends normally, but a connection error occurs during communication for
debugging, the type and version of the debugger should be included in the information
you will send to the support engineer.
“Check RTE2” rewrites the rte4w32.ini file (that saves setup), and the rte4w32.lic and rte4w32.key files (that save a license) under theWindows directory (under the directory where RTE for WIN32 isinstalled in Windows 7 or Windows Vista). In the Windows 7, Windows Vista, Windows XP, Windows 2000, or Windows NT 4.0 environment, in order to permit the user without administrator permission use of Check RTE2, it is necessary to changethe permission to access of these two files. The rte4w32.lic and rte4w32.key files are not created unless licenseinformation is registered.
15

RTE for WIN32 Installation Manual (Rev.7.0)
4.4. SETTING FOR RTE-XXXX-IE, RTE-XXXX-TP, RTE-XXXX-NBD, OR RTE-XXXX-IDB/NBD When the user selects xxxx-IE, xxxx-TP, xxxx-NBD, or xxxx-IDB/NBD from Products List of
Check RTE2, the following connection modes, that can be selected for I/F-1, appear in a pull-
down list box.
ISA I/F : This method should be selected if a host card for a desktop PC (PC/AT comp6
ptatible) is used. In this case, it is necessary to specify an I/O address in the I/F-
2 box. This method appear only when a host is PC/AT compatible(*1).
C-BUS I/F : This method should be selected if a host card for a desktop PC (NEC-PC98
except NX series) is used. In this case, it is necessary to specify an I/O address
in the I/F-2 box. This method appear only when a host is NEC-PC98 (except NX
series).
PC CARD : This method should be selected if a PC-Card (PCMCIA) interface card is used.
The I/F-2 box displays the currently assigned I/O address; you need not specify
an I/O address. This item is not displayed unless a PC-Card is mounted(*1).
PCI I/F : This method should be selected if a host card for a PCI-BUS is used. The I/F-2
box displays the currently assigned I/O address; you need not specify an I/O
address. This item is not displayed unless a host interface card for the PCI-BUS
is installed. It is not displayed for an NEC-PC98 computer (except the NX series
of computers) (*1).
LAN I/F : This method should be selected if a LAN is used. In this case, it is necessary to
specify the IP address of the RTE-2000(H)-TP to connect to in the I/F-2 box.
USB I/F : This method should be selected if USB is used. This item does not appear
unless the RTE-2000(H)-TP is connected to the host through USB. When
multiple RTE-2000(H)-TPs are connected to the host through USB, it is
necessary to specify the MAC address of the RTE-2000(H)-TP to connect to in
the I/F-2 box. The MAC address of the RTE-2000(H)-TP is provided on the label
at the back of it.
*1 : In Windows 7 64-bit version, ISA I/F, PC-CARD and PCI I/F are not shown (Refer to "1.4 SUPPORT FOR WINDOWS 7 64-BIT VERSION").
16

RTE for WIN32 Installation Manual (Rev.7.0)
4.5. SETTING FOR RTE-XXXX-PC OR RTE-XXXX-CB When the user selects xxxx-PC or xxxx-CB from Products List of Check RTE2, the following
connection modes, that can be selected for I/F-1, appear in a pull-down list box.
IO port : This connection method should be selected if a ISA-BUS is used. This item
is not displayed unless the board specified in the I/F-1 box is an ISA-BUS
board. In this case, it is necessary to specify an I/O address assigned to the
board in the I/F-2 box.
PCI : This connection method should be selected if a PCI-BUS is used. This item
is not displayed unless the board specified in the I/F-1 box is a PCI-BUS
board. It is not displayed for an NEC-PC98 computer (except the NX series
of computers). In this case, it is not necessary to specify an I/O address
because AUTO is displayed in the I/F-2 box.
COM1,2,3,4 :One of COM numbers should be selected if a serial port is used. In this case,
it is necessary to specify a baud rate in the I/F-2 box.
A pull-down list of parameters (I/O port addresses or baud rates) corresponding to the
specified connection method will appear in the I/F-2 box. Select an address and baud rate set
for the board. The baud rate must be within the range supported by the serial driver in the
personal computer.
In Windows 7 64-bit version, RTE-xxxx-PC and RTE-xxxx-CB are not supported (Refer to "1.4 SUPPORT FOR WINDOWS 7 64-BITVERSION").
17
RTE for WIN32 Installation Manual (Rev.7.0)
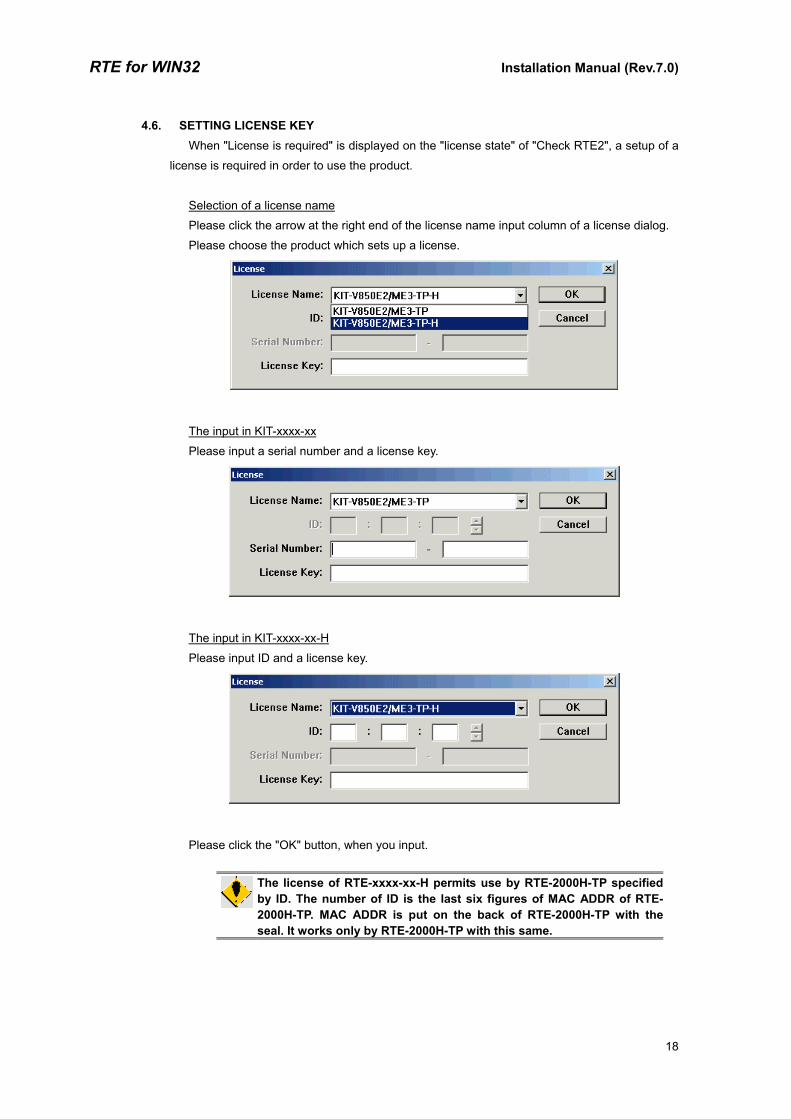
4.6. SETTING LICENSE KEY When "License is required" is displayed on the "license state" of "Check RTE2", a setup of a
license is required in order to use the product.
Selection of a license name
Please click the arrow at the right end of the license name input column of a license dialog.
Please choose the product which sets up a license.
The input in KIT-xxxx-xx
Please input a serial number and a license key.
The input in KIT-xxxx-xx-H
Please input ID and a license key.
Please click the "OK" button, when you input.
The license of RTE-xxxx-xx-H permits use by RTE-2000H-TP specified by ID. The number of ID is the last six figures of MAC ADDR of RTE-2000H-TP. MAC ADDR is put on the back of RTE-2000H-TP with the seal. It works only by RTE-2000H-TP with this same.
18

RTE for WIN32 Installation Manual (Rev.7.0)
5. DEVICE DRIVERS When the host interface is PCI, PC-Card (PCMCIA), or USB or when using the RTE-xxxx-
PC series with PCI bus slots, install the driver specific to the interface in addition to RTE for
WIN32.
This chapter explains how to install the host interface driver for each OS. 5.1. INSTALLING THE PC-CARD DRIVER IN THE WINDOWS 7 (32-bit) ENVIRONMENT
This section explains how to install the PC-Card driver under Windows 7 (32-bit). 5.1.1. INSTALLING THE PC-CARD DRIVER IN THE WINDOWS 7 (32-BIT)
ENVIRONMENT
1) Log in as a user with the administrator permission.
When logging in as a user without administrator permission, itbecomes necessary to input a user name and password of a user withadministrator permission during the installation procedure.
2) If RTE for WIN32 has not yet been installed, install the RTE for WIN32
3) Insert the PC-Card (PCMCIA) interface into the PC-Card socket, if it has not been done.
4) Upon activating the Device Manager, if the driver has not been installed, "KMC/MEC-
ICE-IF_1.0" is displayed with an exclamation mark (!) under "Other devices" as below.
Open the Device Manager as follows: Choose [Start menu]→[Control Panel]. Then click [Hardware and Sound] in the dialog box to be shown for clicking [Device Manager].
When the driver has been already installed, the Device Manager is the last to be displayed in this section.
5) Select "KMC/MEC-ICE-IF_1.0" on the Device Manager and then [Update Driver
Software…] from the [Action] menu.
19

RTE for WIN32 Installation Manual (Rev.7.0)
6) The "Update Driver Software] dialog box below opens next. Click [Browse my computer
for driver software].
7) The dialog box below opens next. Input the directory where RTE for WIN32 is installed
into the edit box of [Search for driver software in this location:] to click the [Next] button.
20

RTE for WIN32 Installation Manual (Rev.7.0)
8) The ”Windows Security” dialog box opens. Click [Install this driver software anyway].
9) The following dialog box appears after a certain amount of time once the installation of
driver software is started. Click the [Close] button.
21

RTE for WIN32 Installation Manual (Rev.7.0)
The installation of the PC-CARD driver is now completed. The status can be checked by the
Device Manager.
5.1.2. IF A DEVICE IS DELETED FROM THE DEVICE MANAGER If you have deleted KMC/MEC-ICE-IF_1.0 or RTE PC-Card Interface from the Device
Manager for some reason, KMC/MEC-ICE-IF_1.0 or RTE PC-Card Interface will no longer be
displayed on the Device Manager.
In this case, open the Device Manager, and then select Scan for hardware changes from the
Action menu to search through the plug and play devices. Alternatively, dismount the PC-Card
from the socket, and reinsert it. Once the PC-Card has been detected, the subsequent steps
are the same as those in Section 5.1.1 INSTALLING THE PC-CARD DRIVER IN THE
WINDOWS 7 (32-bit) ENVIRONMENT.
22

RTE for WIN32 Installation Manual (Rev.7.0)
5.2. INSTALLING THE PCI DRIVER IN THE WINDOWS 7 (32-bit) ENVIRONMENT This section explains how to install the PCI driver under Windows 7 (32-bit).
5.2.1. INSTALLING THE PCI DRIVER IN THE WINDOWS 7 (32-BIT) ENVIRONMENT 1) Log in as a user with the administrator permission.
When logging in as a user without administrator permission, itbecomes necessary to input a user name and password of a user with administrator permission during the installation procedure.
2) If RTE for WIN32 has not yet been installed, install RTE for WIN32.
3) Upon activating the Device Manager, if the driver has not been installed, "PCI Device" is
displayed with an exclamation mark (!) under "Other devices" as below.
Open the Device Manager as follows: Choose [Start menu]→[Control Panel]. Then click [Hardware and Sound] in the dialog box to be shown for clicking [Device Manager].
When the driver has been already installed, the Device Manager is thelast to be displayed in this section.
4) Select "PCI Device" on the Device Manager and then [Update Driver Software…] from
the [Action] menu.
23

RTE for WIN32 Installation Manual (Rev.7.0)
5) The "Update Driver Software] dialog box below opens next. Click [Browse my computer
for driver software].
6) The dialog box below opens next. Input the directory where RTE for WIN32 is installed
into the edit box of [Search for driver software in this location:] to click the [Next] button.
24

RTE for WIN32 Installation Manual (Rev.7.0)
7) The ”Windows Security” dialog box opens. Click [Install this driver software anyway].
8) The following dialog box appears after a certain amount of time once the installation of
driver software is started. Click the [Close] button.
25

RTE for WIN32 Installation Manual (Rev.7.0)
The installation of the PCI board driver is now completed. The status can be checked by the
Device Manager.
5.2.2. IF A DEVICE IS DELETED FROM THE DEVICE MANAGER If you have deleted PCI Device or RTE PCI Host Interface Card or RTE-PC Series from the
Device Manager for some reason, PCI Device or RTE PCI Host Interface Card or RTE-PC
Series will no longer be displayed on the Device Manager.
In this case, open the Device Manager, and then select Scan for hardware changes from the
Action menu to search through the plug and play devices. Once the PCI card has been
detected, the subsequent steps are the same as those in Section 5.2.1 INSTALLING THE PCI
DRIVER IN THE WINDOWS 7 (32-bit) ENVIRONMENT.
26
RTE for WIN32 Installation Manual (Rev.7.0)
5.3. INSTALLING THE USB DRIVER IN THE WINDOWS 7 ENVIRONMENT This section explains how to install the USB driver under Windows 7. The same installation
procedure is applied to Windows 7 32-bit version and 64-bit version.
When using the RTE-2000(H)-TP with the USB interface, it is not recommended to use USB 1.1. This is because USB 1.1 is notappropriate for efficient debugging since the debugger cannot respond quickly in USB 1.1.
5.3.1. INSTALLING THE USB DRIVER IN THE WINDOWS 7 ENVIRONMENT 1) Log in as a user with the administrator permission.
When logging in as a user without administrator permission, itbecomes necessary to input a user name and password of a user withadministrator permission during the installation procedure.
2) If RTE for WIN32 has not yet been installed, install RTE for WIN32.
3) Connect RTE-2000(H)-TP to the host via USB, if it has been disconnected.
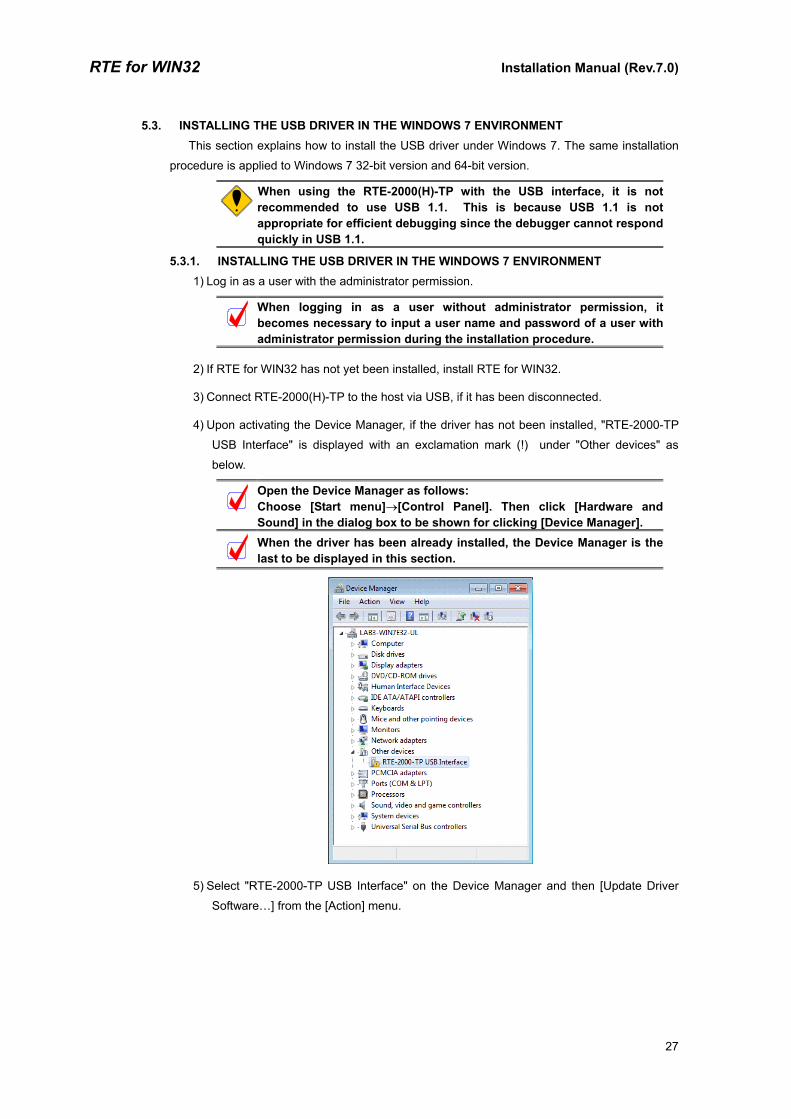
4) Upon activating the Device Manager, if the driver has not been installed, "RTE-2000-TP
USB Interface" is displayed with an exclamation mark (!) under "Other devices" as
below.
Open the Device Manager as follows: Choose [Start menu]→[Control Panel]. Then click [Hardware and Sound] in the dialog box to be shown for clicking [Device Manager].
When the driver has been already installed, the Device Manager is thelast to be displayed in this section.
5) Select "RTE-2000-TP USB Interface" on the Device Manager and then [Update Driver
Software…] from the [Action] menu.
27

RTE for WIN32 Installation Manual (Rev.7.0)
6) The "Update Driver Software] dialog box below opens next. Click [Browse my computer
for driver software].
7) The dialog box below opens next. Input the directory where RTE for WIN32 is installed
into the edit box of [Search for driver software in this location:] to click the [Next] button.
8) The ”Windows Security” dialog box opens. Click the [Install] button.
28

RTE for WIN32 Installation Manual (Rev.7.0)
9) The following dialog box appears after a certain amount of time once the installation of
driver software is started. Click the [Close] button.
The installation of the USB driver is now completed. The status can be checked by the
Device Manager.
5.3.2. IF A DEVICE IS DELETED FROM THE DEVICE MANAGER If you have deleted the USB driver from the Device Manager for some reason, the USB
device indicating the RTE-2000(H)-TP will no longer be displayed on the Device Manager.
In this case, select Scan for hardware changes from the Action menu of the Device Manager
or disconnect the USB cable from the RTE-2000(H)-TP and then connect it again after a few
moments. The USB device will be displayed on the Device Manager. The subsequent steps are
the same as those in Section "5.3.1 INSTALLING THE USB DRIVER IN THE WINDOWS 7
ENVIRONMENT".
29

RTE for WIN32 Installation Manual (Rev.7.0)
5.4. INSTALLING THE PC-CARD DRIVER IN THE WINDOWS VISTA ENVIRONMENT This section explains how to install the PC-Card driver under Windows Vista.
5.4.1. WHEN THE PC-CARD INTERFACE IS INSERTED INTO THE SOCKET FOR THE FIRST TIME
When you insert the PC-Card interface into the PC-Card socket for the first time, follow the
steps below to install the standard driver.
1) Log in as a user with the administrator permission.
When logging in as a user without administrator permission, itbecomes necessary to input a user name and password of a user with administrator permission during the installation procedure.
2) If RTE for WIN32 has not yet been installed, install the RTE for WIN32 before inserting
the PC-Card interface.
RTE for WIN32 may be installed when the following Found New Hardware dialog box opens.
3) Insert the PC-Card (PCMCIA) interface into the PC-Card socket. After a few moments,
the Found New Hardware dialog box appears. Click Locate and install driver software
(recommended).
When [Ask me again later] or [Don’t show this message again for this device] selected, follow the procedure instructed in ”5.4.2 INSTALLING A DRIVER THAT HAS NOT YET BEEN INSTALLED”.
When the User Account Control (UAC) function is active and the above selection is made, the User Account Control dialog box appears. Click the [Continue] button.
30

RTE for WIN32 Installation Manual (Rev.7.0)
4) The dialog box below opens after a driver software is searched for a certain amount of
time. Click [I don’t have the disc. Show me other options].
5) The dialog box below opens next. Click [Browse my computer for driver software
(advanced)].
31

RTE for WIN32 Installation Manual (Rev.7.0)
6) The dialog box below opens next. Input the directory where RTE for WIN32 is installed
into the edit box of [Search for driver software in this location:] to click the [Next] button.
7) The ”Windows Security” dialog box opens. Click [Install this driver software anyway].
8) The following dialog box appears after a certain amount of time once the installation of
driver software is started. Click the [Close] button.
32

RTE for WIN32 Installation Manual (Rev.7.0)
You have now finished detecting the PC-Card and installing the driver. You can check the
system status by the Device Manager.
Open the Device Manager as follows: Choose [Start Menu] → [Control Panel] and [Classic view] from the left pane to double-click [Device Manager].
5.4.2. INSTALLING A DRIVER THAT HAS NOT YET BEEN INSTALLED If the driver was not installed because, for example, the correct procedure was not followed,
install it by applying the following procedure.
If the driver has not been installed, an exclamation mark (!) is displayed beside KMC/MEC-
ICE-IF_1.0 in the Device Manager list.
33

RTE for WIN32 Installation Manual (Rev.7.0)
Open the Device Manager as follows: Choose [Start Menu] → [Control Panel] and [Classic view] from the left pane to double-click [Device Manager].
1) Log in as a user with the administrator permission.
When logging in as a user without administrator permission, itbecomes necessary to input a user name and password of a user with administrator permission during the installation procedure.
2) If RTE for WIN32 has not yet been installed, install RTE for WIN32.
3) Select KMC/MEC-ICE-IF_1.0 in the Device Manager list, and then select Update Driver
Software… from the Action menu.
4) The “Update Driver Software” dialog box is displayed. Click [Browse my computer for
driver software].
34

RTE for WIN32 Installation Manual (Rev.7.0)
5) The dialog box below opens next. Input the directory where RTE for WIN32 is installed
into the edit box of [Search for driver software in this location:] to click the [Next] button.
6) For the subsequent steps, see step 7) of Section 5.4.1 WHEN THE PC-CARD
INTERFACE IS INSERTED INTO THE SOCKET FOR THE FIRST TIME.
5.4.3. IF A DEVICE IS DELETED FROM THE DEVICE MANAGER If you have deleted KMC/MEC-ICE-IF_1.0 or RTE PC-Card Interface from the Device
Manager for some reason, KMC/MEC-ICE-IF_1.0 or RTE PC-Card Interface will no longer be
displayed on the Device Manager.
In this case, open the Device Manager, and then select Scan for hardware changes from the
Action menu to search through the plug and play devices. Alternatively, dismount the PC-Card
from the socket, and reinsert it. Once the PC-Card has been detected, the subsequent steps
are the same as those in Section 5.4.1 WHEN THE PC-CARD INTERFACE IS INSERTED
INTO THE SOCKET FOR THE FIRST TIME.
35

RTE for WIN32 Installation Manual (Rev.7.0)
5.5. INSTALLING THE PCI DRIVER IN THE WINDOWS VISTA This section explains how to install the PCI driver under Windows Vista
5.5.1. WHEN WINDOWS IS STARTED AFTER THE PCI BOARD IS INSERTED INTO THE PCI BUS SLOT FOR THE FIRST TIME
The following procedure should be applied when Windows Vista is activated after the RTE
series PCI board is inserted into the PCI bus slot for the first time.
1) Log in as a user with the administrator permission.
When logging in as a user without administrator permission, itbecomes necessary to input a user name and password of a user with administrator permission during the installation procedure.
2) If RTE for WIN32 has not yet been installed, install RTE for WIN32.
RTE for WIN32 may be installed when the following Found NewHardware dialog box opens.
3) After log in, the Found New Hardware dialog box appears. Click Locate and install driver
software (recommended).
When [Ask me again later] or [Don’t show this message again for this device] selected, follow the procedure instructed in ”5.5.2 INSTALLING A DRIVER THAT HAS NOT YET BEEN INSTALLED”.
When the User Account Control (UAC) function is active and the above selection is made, the User Account Control dialog box appears. Click the [Continue] button.
36

RTE for WIN32 Installation Manual (Rev.7.0)
4) The dialog box below opens after a driver software is searched for a certain amount of
time. Click [I don’t have the disc. Show me other options].
5) The dialog box below opens next. Click [Browse my computer for driver software
(advanced)].
37

RTE for WIN32 Installation Manual (Rev.7.0)
6) The dialog box below opens next. Input the directory where RTE for WIN32 is installed
into the edit box of [Search for driver software in this location:] to click the [Next] button.
7) The ”Windows Security” dialog box opens. Click [Install this driver software anyway].
8) The following dialog box appears after a certain amount of time once the installation of
driver software is started. Click the [Close] button.
38

RTE for WIN32 Installation Manual (Rev.7.0)
You have now finished detecting the PCI board and installing the driver. You can check the
system status by the Device Manager.
Open the Device Manager as follows: Choose [Start Menu] → [Control Panel] and [Classic view] from the left pane to double-click [Device Manager].
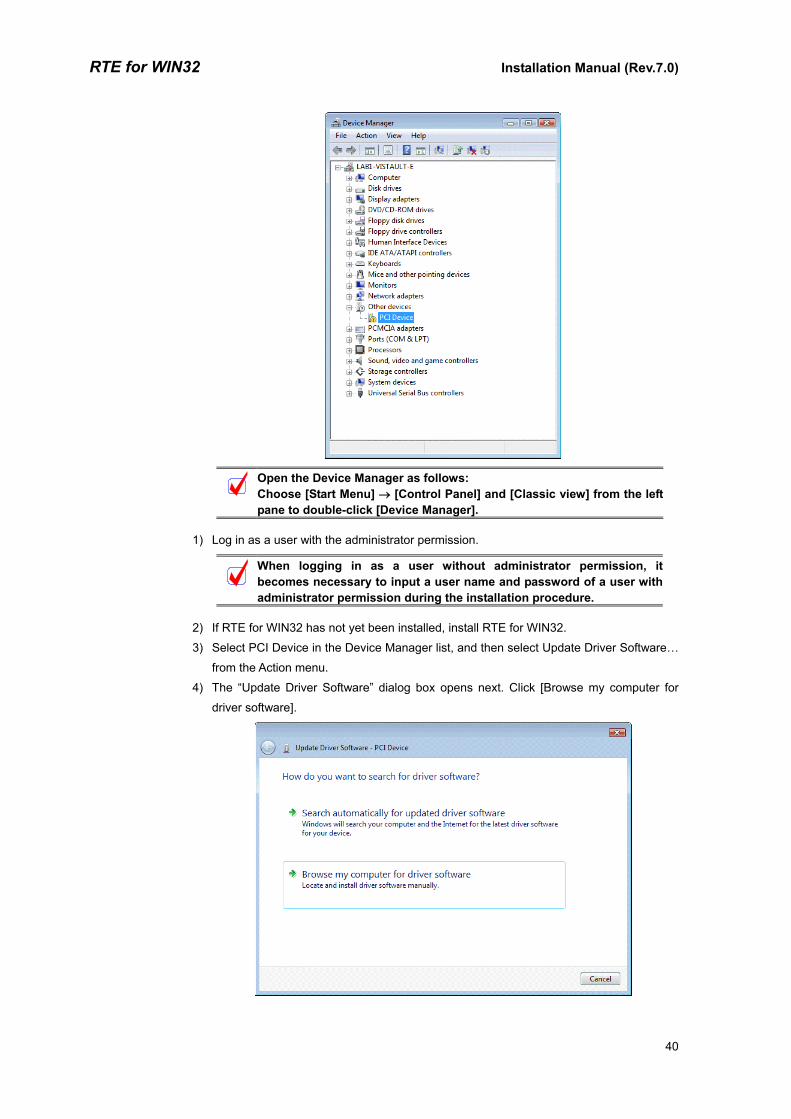
5.5.2. INSTALLING A DRIVER THAT HAS NOT YET BEEN INSTALLED If the PCI card interface is already installed in the PCI bus slot before the installation of
Windows Vista, or if the driver was not installed, for example, because the wrong procedure was
applied, install the driver according to the following procedure.
If the driver has not been installed, an exclamation mark (!) is displayed beside PCI Device
in the Device Manager list.
39
RTE for WIN32 Installation Manual (Rev.7.0)
Open the Device Manager as follows: Choose [Start Menu] → [Control Panel] and [Classic view] from the leftpane to double-click [Device Manager].
1) Log in as a user with the administrator permission.
When logging in as a user without administrator permission, itbecomes necessary to input a user name and password of a user withadministrator permission during the installation procedure.
2) If RTE for WIN32 has not yet been installed, install RTE for WIN32.
3) Select PCI Device in the Device Manager list, and then select Update Driver Software…
from the Action menu.
4) The “Update Driver Software” dialog box opens next. Click [Browse my computer for
driver software].
40

RTE for WIN32 Installation Manual (Rev.7.0)
5) The dialog box below opens next. Input the directory where RTE for WIN32 is installed
into the edit box of [Search for driver software in this location:] to click the [Next] button.
6) For the subsequent steps, see step 7) of Section 5.5.1 WHEN WINDOWS IS STARTED
AFTER THE PCI BOARD IS INSERTED INTO THE PCI BUS SLOT FOR THE FIRST
TIME.
5.5.3. IF A DEVICE IS DELETED FROM THE DEVICE MANAGER If you have deleted PCI Device or RTE PCI Host Interface Card or RTE-PC Series from the
Device Manager for some reason, PCI Device or RTE PCI Host Interface Card or RTE-PC
Series will no longer be displayed on the Device Manager.
In this case, open the Device Manager, and then select Scan for hardware changes from the
Action menu to search through the plug and play devices. Once the PCI card has been
detected, the subsequent steps are the same as those in Section 5.5.1 WHEN WINDOWS IS
STARTED AFTER THE PCI BOARD IS INSERTED INTO THE PCI BUS SLOT FOR THE FIRST
TIME.
41

RTE for WIN32 Installation Manual (Rev.7.0)
5.6. INSTALLING THE USB DRIVER IN THE WINDOWS VISTA ENVIRONMENT This section explains how to install the USB driver under Windows Vista.
When using the RTE-2000(H)-TP with the USB interface, it is not recommended to use USB 1.1. This is because USB 1.1 is notappropriate for efficient debugging since the debugger cannot respond quickly in USB 1.1.
5.6.1. WHEN THE RTE-2000(H)-TP IS CONNECTED TO THE HOST THROUGH USB FOR THE FIRST TIME
Upon initially connecting RTE-2000(H)-TP to the host via USB, refer to "5.5.1 WHEN
WINDOWS IS STARTED AFTER THE PCI BOARD IS INSERTED INTO THE PCI BUS SLOT
FOR THE FIRST TIME" because the driver installation procedure is the same as the one for
PCI board except the "Windows Security" dialog box to be shown.
As the following "Windows Security" dialog box appears. Click the [Install] button.
When the USB driver is successfully installed, the Device Manager screen as shown below
appears.
Open the Device Manager as follows: Choose [Start Menu] → [Control Panel] and [Classic view] from the left pane to double-click [Device Manager].
42

RTE for WIN32 Installation Manual (Rev.7.0)
5.6.2. INSTALLING THE DRIVER THAT HAS NOT YET BEEN INSTALLED If you cancel the installation of the USB driver before it completes, the USB driver is not
installed. At this time, the Device Manager screen as shown below appears.
In this case, select Scan for hardware changes from the Action menu of the Device Manager
or disconnect the USB cable from the RTE-2000(H)-TP and then connect it again after a few
moments. The Found New Hardware starts. The subsequent steps are the same as those in
Section 5.6.1 WHEN THE RTE-2000(H)-TP IS CONNECTED TO THE HOST THROUGH USB
FOR THE FIRST TIME.
5.6.3. WHEN THE DRIVER WAS DELETED FROM THE DEVICE MANAGER If you have deleted the USB driver from the Device Manager for some reason, the USB
device indicating the RTE-2000(H)-TP will no longer be displayed on the Device Manager.
In this case, select Scan for hardware changes from the Action menu of the Device Manager
or disconnect the USB cable from the RTE-2000(H)-TP and then connect it again after a few
moments. The Found New Hardware starts. The subsequent steps are the same as those in
Section 5.6.1 WHEN THE RTE-2000(H)-TP IS CONNECTED TO THE HOST THROUGH USB
FOR THE FIRST TIME.
43

RTE for WIN32 Installation Manual (Rev.7.0)
5.7. INSTALLING THE PC-CARD DRIVER IN THE WINDOWS XP ENVIRONMENT This section explains how to install the PC-Card driver under Windows XP.
In this manual, if there is no notice, Windows XP means both WindowsXP Professional and Windows XP Home Edition.
If the driver for a PC-Card made by Kyoto Micro Computer Co., Ltd. (here after referred to as "KMC") has already been installed, the driverembedding wizard may not be activated even if the Midas lab PC-Card interface is inserted into the PC-Card socket. In this case, use the KMC driver as is. RTE for WIN32 runs normally even with the KMC driver. If the Midas lab PC-Card has already been installed, replace the Midas lab driver with the KMC driver to enable the use of the KMC PC-Card. For details, see Section 5.7.4. KMC PC-CARD DRIVER.
5.7.1. WHEN THE PC-CARD INTERFACE IS INSERTED INTO THE SOCKET FOR THE FIRST TIME
When you insert the PC-Card interface into the PC-Card socket for the first time, follow the
steps below to install the standard driver.
1) Log in as a user with the administrator permission.
In Windows XP Home Edition, the user whose account type iscomputer administrator has administrator permission.
2) If RTE for WIN32 has not yet been installed, install the RTE for WIN32 before inserting
the PC-Card interface.
RTE for WIN32 may be installed when the following Found NewHardware Wizard dialog box opens.
3) Insert the PC-Card (PCMCIA) interface into the PC-Card socket. After a few moments,
the Found New Hardware Wizard dialog box appears. Select Install from a list or
specific location (Advanced), then click the Next> button.
44

RTE for WIN32 Installation Manual (Rev.7.0)
4) In the dialog box shown below, select only Include this location in the search. And input
the installation destination directory for RTE for WIN32 as the directory. Or, click the
Browse button, specify the installation destination directory for RTE for WIN32, then
click the Next> button.
5) The driver file is copied. Then, the dialog box shown below appears. Click the Finish
button.
You have now finished detecting the PC-Card and installing the driver. You can check the
system status by the Device Manager.
45

RTE for WIN32 Installation Manual (Rev.7.0)
Open the Device Manager as follows: Click Start → right click My Computer → click Properties. In System Properties, click the Hardware tab, then click the Device Manager button.
5.7.2. INSTALLING A DRIVER THAT HAS NOT YET BEEN INSTALLED If the driver was not installed because, for example, the correct procedure was not followed,
install it by applying the following procedure.
If the driver has not been installed, an exclamation mark (!) is displayed beside KMC/MEC-
ICE-IF 1.0 in the Device Manager list.
Open the Device Manager as follows: Click Start → right click My Computer → click Properties. In System Properties, click the Hardware tab, then click the Device Manager button.
1) Log in as a user with the administrator permission.
In Windows XP Home Edition, the user whose account type iscomputer administrator has administrator permission.
2) If RTE for WIN32 has not yet been installed, install RTE for WIN32.
3) Select KMC/MEC-ICE-IF 1.0 in the Device Manager list, and then select Properties from
the Action menu.
46

RTE for WIN32 Installation Manual (Rev.7.0)
4) The KMC/MEC-ICE-IF_1.0 Properties dialog box appears. Click the Reinstall Driver
button.
5) The Hardware Update Wizard dialog box appears. For the subsequent steps, see
Section 5.7.1. WHEN THE PC-CARD INTERFACE IS INSERTED INTO THE SOCKET
FOR THE FIRST TIME.
5.7.3. IF A DEVICE IS DELETED FROM THE DEVICE MANAGER If you have deleted KMC/MEC-ICE-IF 1.0 or RTE PC-Card Interface from the Device
Manager for some reason, KMC/MEC-ICE-IF 1.0 or RTE PC-Card Interface will no longer be
displayed on the Device Manager.
In this case, open the Device Manager, and then select Scan for hardware changes from the
Action menu to search through the plug and play devices. Alternatively, dismount the PC-Card
from the socket, and reinsert it. Once the PC-Card has been detected, the subsequent steps
are the same as those in Section 5.7.1. WHEN THE PC-CARD INTERFACE IS INSERTED
INTO THE SOCKET FOR THE FIRST TIME.
Open the Device Manager as follows: Click Start → right click My Computer → click Properties. In System Properties, click the Hardware tab, then click the Device Manager button.
47

RTE for WIN32 Installation Manual (Rev.7.0)
5.7.4. KMC PC-CARD DRIVER This section explains the procedure for replacing the PC-Card driver for RTE for WIN32 with
the PC-Card made by Kyoto Micro Computer Co., Ltd. (hereafter referred to as "KMC"), that
supports PARTNER-ETII/J/N64.
RTE for WIN32 runs normally even when the KMC driver has been installed. However, KMC
PARTNER-ETII/J/N64 does not run unless the KMC driver is installed. To use the RTE for
WIN32 and PARTNER-ETII/J/N64 on the same computer with the PC-Card interface, therefore,
the KMC PC-Card driver must be installed.
The following explains the procedure for replacing the PC-Card driver for RTE for WIN32
with the KMC driver.
If the PC-Card driver for RTE for WIN32 is installed, the RTE PC-Card Interface is displayed
when the Device Manager is started.
Open the Device Manager as follows: Click Start → right click My Computer → click Properties. In System Properties, click the Hardware tab, then click the Device Manager button.
1) Log in as a user with the administrator permission.
In Windows XP Home Edition, the user whose account type iscomputer administrator has administrator permission.
2) Execute the installer for the KMC PC-Card driver, and then extract the driver file.
3) Select the RTE PC-Card Interface from the Device Manager list, and then select
Properties from the Action menu.
48

RTE for WIN32 Installation Manual (Rev.7.0)
4) The RTE PC-Card Interface Properties dialog box appears. Select the Driver tab, then
click the Update Driver button.
5) The Hardware Update Wizard dialog box appears. Select Install from a list or specific
location (Advanced), then click the Next> button.
6) In the dialog box shown below, select "Don't search. I will choose the driver to install.",
then click the Next> button.
49

RTE for WIN32 Installation Manual (Rev.7.0)
7) In the dialog box shown below, click the Hard Disk button.
8) In the dialog box shown below, input the directory in which the KMC PC-Card driver is to
be extracted in the Copy manufacturer's files from text box. Or, click the Browse button,
specify the directory in which the KMC PC-Card driver is to be extracted, and then click
the OK button.
9) In the dialog box shown below, select the KMC driver and then click the Next> button.
10) In the dialog box shown below, click the Yes button.
50

RTE for WIN32 Installation Manual (Rev.7.0)
11) The driver file is copied. Then, the dialog box shown below appears. Click the Finish
button.
You have now finished detecting the board and installing the driver. You can check the
system status by the Device Manager.
Open the Device Manager as follows: Click Start → right click My Computer → click Properties. In System Properties, click the Hardware tab, then click the Device Manager button.
51

RTE for WIN32 Installation Manual (Rev.7.0)
5.8. INSTALLING THE PCI DRIVER IN THE WINDOWS XP This section explains how to install the PCI driver under Windows XP
In this manual, if there is no notice, Windows XP means both WindowsXP Professional and Windows XP Home Edition.
5.8.1. WHEN WINDOWS IS STARTED AFTER THE PCI BOARD IS INSERTED INTO THE PCI BUS SLOT FOR THE FIRST TIME
The following procedure should be applied when Windows XP is activated after the RTE
series PCI board is inserted into the PCI bus slot for the first time.
1) Log in as a user with the administrator permission.
In Windows XP Home Edition, the user whose account type iscomputer administrator has administrator permission.
2) If RTE for WIN32 has not yet been installed, install RTE for WIN32.
RTE for WIN32 may be installed when the following Found NewHardware Wizard dialog box opens.
3) After log in, the Found New Hardware Wizard dialog box appears. Select Install from a
list or specific location (Advanced), then click the Next> button.
4) In the dialog box shown below, select only Include this location in the search. And input
the installation destination directory for RTE for WIN32 as the directory. Or, click the
Browse button, specify the installation destination directory for RTE for WIN32, then
click the Next> button.
52

RTE for WIN32 Installation Manual (Rev.7.0)
5) The driver file is copied. Then, the dialog box shown below appears. Click the Finish
button.
You have now finished detecting the board and installing the driver. You can check the
system status by the Device Manager.
Open the Device Manager as follows: Click Start → right click My Computer → click Properties. In System Properties, click the Hardware tab, then click the Device Manager button.
53
RTE for WIN32 Installation Manual (Rev.7.0)
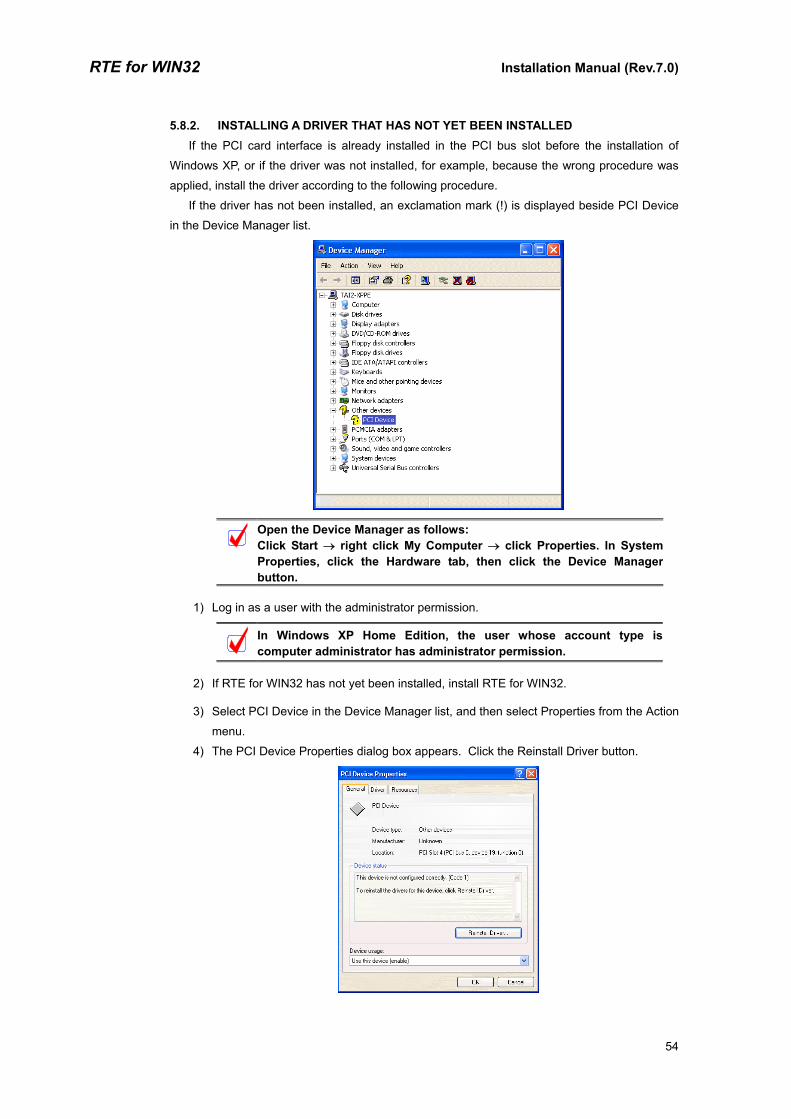
5.8.2. INSTALLING A DRIVER THAT HAS NOT YET BEEN INSTALLED If the PCI card interface is already installed in the PCI bus slot before the installation of
Windows XP, or if the driver was not installed, for example, because the wrong procedure was
applied, install the driver according to the following procedure.
If the driver has not been installed, an exclamation mark (!) is displayed beside PCI Device
in the Device Manager list.
Open the Device Manager as follows: Click Start → right click My Computer → click Properties. In System Properties, click the Hardware tab, then click the Device Manager button.
1) Log in as a user with the administrator permission.
In Windows XP Home Edition, the user whose account type iscomputer administrator has administrator permission.
2) If RTE for WIN32 has not yet been installed, install RTE for WIN32.
3) Select PCI Device in the Device Manager list, and then select Properties from the Action
menu.
4) The PCI Device Properties dialog box appears. Click the Reinstall Driver button.
54

RTE for WIN32 Installation Manual (Rev.7.0)
5) The Hardware Update Wizard dialog box appears. For the subsequent steps, see
Section 5.8.1. WHEN WINDOWS IS STARTED AFTER THE PCI BOARD IS INSERTED
INTO THE PCI BUS SLOT FOR THE FIRST TIME.
5.8.3. IF A DEVICE IS DELETED FROM THE DEVICE MANAGER If you have deleted PCI Device or RTE PCI Host Interface Card or RTE-PC Series from the
Device Manager for some reason, PCI Device or RTE PCI Host Interface Card or RTE-PC
Series will no longer be displayed on the Device Manager.
In this case, open the Device Manager, and then select Scan for hardware changes from the
Action menu to search through the plug and play devices. Once the PCI card has been
detected, the subsequent steps are the same as those in Section 5.8.1. WHEN WINDOWS IS
STARTED AFTER THE PCI BOARD IS INSERTED INTO THE PCI BUS SLOT FOR THE FIRST
TIME.
Open the Device Manager as follows: Click Start → right click My Computer → click Properties. In System Properties, click the Hardware tab, then click the Device Manager button.
55

RTE for WIN32 Installation Manual (Rev.7.0)
5.9. INSTALLING THE USB DRIVER IN THE WINDOWS XP ENVIRONMENT This section explains how to install the USB driver under Windows XP.
In this manual, if there is no notice, Windows XP means both Windows XP Professional and Windows XP Home Edition.
When using the RTE-2000(H)-TP with the USB interface, it is not recommended to use USB 1.1. This is because USB 1.1 is notappropriate for efficient debugging since the debugger cannot respond quickly in USB 1.1.
5.9.1. WHEN THE RTE-2000(H)-TP IS CONNECTED TO THE HOST THROUGH USB FOR THE FIRST TIME
When the RTE-2000(H)-TP is connected to the host through USB for the first time, install the
driver the same way as with a PCI board. See Section 5.8.1. WHEN WINDOWS IS STARTED
AFTER THE PCI BOARD IS INSERTED INTO THE PCI BUS SLOT FOR THE FIRST TIME.
When the USB driver is successfully installed, the Device Manager screen as shown below
appears.
Open the Device Manager as follows: Click Start → right click My Computer → click Properties. In System Properties, click the Hardware tab, then click the Device Manager button.
5.9.2. INSTALLING THE DRIVER THAT HAS NOT YET BEEN INSTALLED If you cancel the installation of the USB driver before it completes, the USB driver is not
installed. At this time, the Device Manager screen as shown below appears.
56
RTE for WIN32 Installation Manual (Rev.7.0)
In this case, select Scan for hardware changes from the Action menu of the Device Manager
or disconnect the USB cable from the RTE-2000(H)-TP and then connect it again after a few
moments. The Found New Hardware Wizard starts. The subsequent steps are the same as
those in Section 5.9.1. WHEN THE RTE-2000(H)-TP IS CONNECTED TO THE HOST
THROUGH USB FOR THE FIRST TIME.
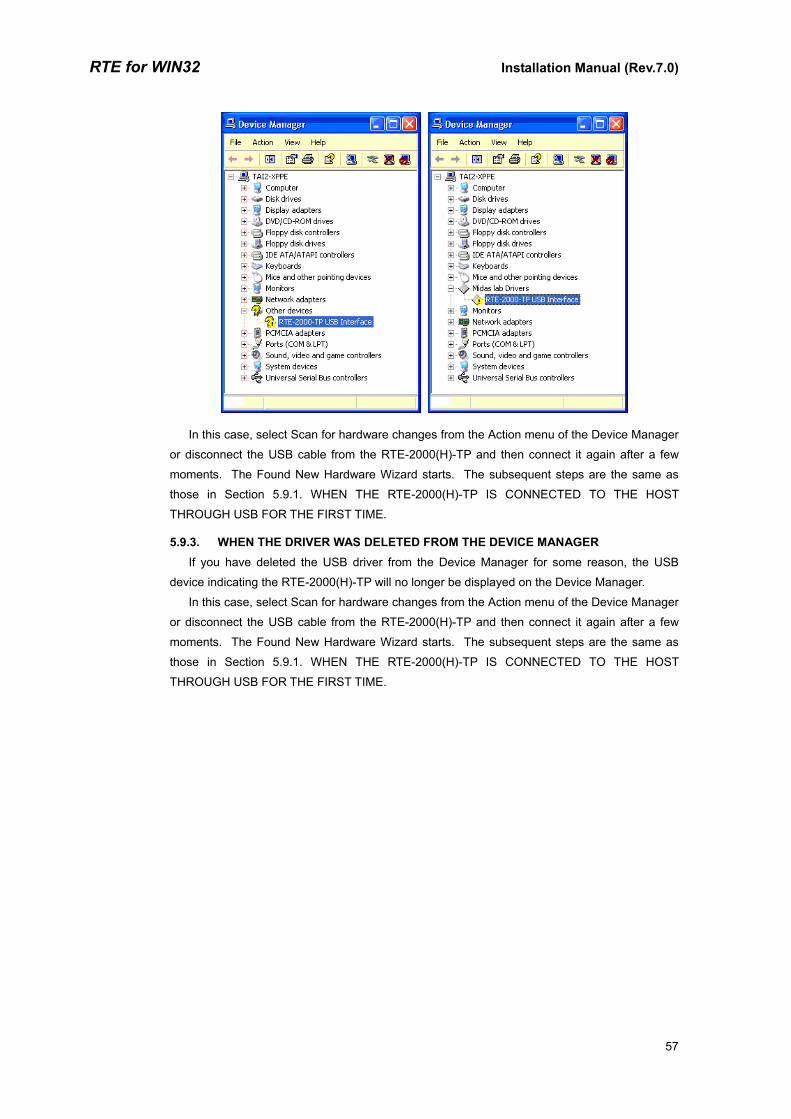
5.9.3. WHEN THE DRIVER WAS DELETED FROM THE DEVICE MANAGER If you have deleted the USB driver from the Device Manager for some reason, the USB
device indicating the RTE-2000(H)-TP will no longer be displayed on the Device Manager.
In this case, select Scan for hardware changes from the Action menu of the Device Manager
or disconnect the USB cable from the RTE-2000(H)-TP and then connect it again after a few
moments. The Found New Hardware Wizard starts. The subsequent steps are the same as
those in Section 5.9.1. WHEN THE RTE-2000(H)-TP IS CONNECTED TO THE HOST
THROUGH USB FOR THE FIRST TIME.
57

RTE for WIN32 Installation Manual (Rev.7.0)
5.10. INSTALLING THE PC-CARD DRIVER IN THE WINDOWS 98 ENVIRONMENT
This section explains how to install the PC-Card driver under Windows 98.
The PC-Card interface does not require a special driver, the standard driver is installed.
5.10.1. WHEN THE PC-CARD INTERFACE IS INSERTED INTO THE SOCKET FOR THE FIRST TIME
When you insert the PC-Card interface into the PC-Card socket for the first time, follow the
steps below to install the standard driver.
1) Insert the PC-Card (PCMCIA) interface into the PC-Card socket. Then, a dialog box
indicating that new hardware has been detected will appear. After a few moments, the
Add New Hardware Wizard dialog box appears. Click the Next> button.
If, upon inserting the PC-Card the New Hardware Found dialog does not appear or if, upon installing the card service the personal computer buzzes "BOO!", the PC-Card service may not be operating normally. See Section 5.24. WHEN THE PC CARD CANNOT BE RECOGNIZED(WINDOWS 95/98) and ensure that the card service is operating normally.
2) In the dialog box shown below, select Display a list of all the drivers in a specific location,
so you can select the driver you want, then click the Next> button.
58

RTE for WIN32 Installation Manual (Rev.7.0)
3) In the dialog box shown below, select Other devices, then click the Next> button.
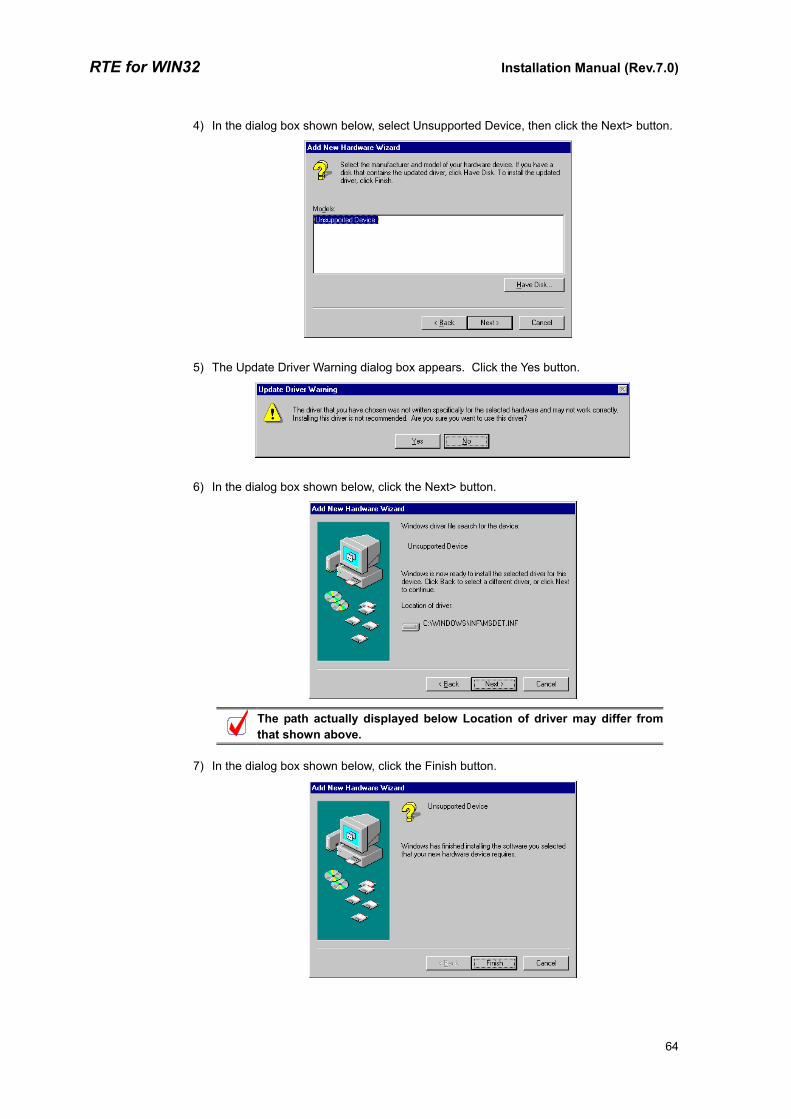
4) In the dialog box shown below, select Unsupported Device, then click the Next> button.
5) The Update Driver Warning dialog box appears. Click the Yes button.
6) In the dialog box shown below, click the Next> button.
The path actually displayed below Location of driver may differ fromthat shown above.
59

RTE for WIN32 Installation Manual (Rev.7.0)
7) In the dialog box shown below, click the Finish button.
You have now finished detecting the board and installing the driver. You can check the
system status by clicking the Device Manager tab in the System Properties dialog box displayed
by clicking Start, Settings, Control Panel, then System.
60

RTE for WIN32 Installation Manual (Rev.7.0)
5.10.2. INSTALLING A DRIVER THAT HAS NOT YET BEEN INSTALLED If the driver was not installed because, for example, the correct procedure was not followed,
install it by applying the following procedure.
After confirming that the driver has not been installed, click Start, Settings, then Control
Panel. Then, click System. After the System Properties dialog box appears, select the Device
Manager tab. On this tab, select Other devices. An exclamation mark (!) is displayed against
KMC/MEC-ICE-IF 1.0 as shown below.
1) In the dialog box shown above, select KMC/MEC-ICE-IF 1.0, then click the Properties
button.
2) The KMC/MEC-ICE-IF 1.0 Properties dialog box appears. Click the Reinstall Driver
button, or select the Driver tab, then click the Update Driver button.
61

RTE for WIN32 Installation Manual (Rev.7.0)
3) The Update Device Driver Wizard dialog box appears. For the subsequent steps, see
Section 5.10.1. WHEN THE PC-CARD INTERFACE IS INSERTED INTO THE SOCKET
FOR THE FIRST TIME.
5.10.3. IF A DEVICE IS DELETED FROM THE DEVICE MANAGER If you have deleted KMC/MEC-ICE-IF 1.0 or Unsupported Device from the Device Manager
for some reason, Other devices will no longer be displayed on the Device Manager tab of the
System Properties dialog box. Or, Other devices will remain displayed but it will not contain
KMC/MEC-ICE-IF 1.0 or Unsupported Device any longer.
In this case, click Start, Settings, Control Panel, then activate Add New Hardware to search
through the plug and play devices. Alternatively, dismount the PC-Card from the socket, and
reinsert it. Once the PC-Card has been detected, the subsequent steps are the same as those
in Section 5.10.1. WHEN THE PC-CARD INTERFACE IS INSERTED INTO THE SOCKET FOR
THE FIRST TIME.
62

RTE for WIN32 Installation Manual (Rev.7.0)
5.11. INSTALLING THE PCI DRIVER IN THE WINDOWS 98 ENVIRONMENT This section explains how to install the PCI driver under Windows 98.
Under the Windows 98 environment, the RTE series operate normally, regardless of whether
a PCI driver is or a standard driver is attached.
5.11.1. WHEN WINDOWS IS STARTED AFTER THE PCI BOARD IS INSERTED INTO THE PCI BUS SLOT FOR THE FIRST TIME
The following procedure should be applied when Windows 98 is activated after the RTE
series PCI board is inserted into the PCI bus slot for the first time.
1) When Windows 98 is activated, a dialog box indicating that new hardware has been
detected will appear. After a few moments, the Add New Hardware Wizard dialog box
appears. Click the Next> button.
2) In the dialog box shown below, select Display a list of all the drivers in a specific location,
so you can select the driver you want, and click the Next> button.
3) In the dialog box shown below, select Other devices, then click the Next> button.
63
RTE for WIN32 Installation Manual (Rev.7.0)
4) In the dialog box shown below, select Unsupported Device, then click the Next> button.
5) The Update Driver Warning dialog box appears. Click the Yes button.
6) In the dialog box shown below, click the Next> button.
The path actually displayed below Location of driver may differ fromthat shown above.
7) In the dialog box shown below, click the Finish button.
64

RTE for WIN32 Installation Manual (Rev.7.0)
This completes detection of the board and installation of the driver. You can check the
system status by clicking the Device Manager tab in the System Properties dialog box displayed
by clicking Start, Settings, Control Panel, then System.
65

RTE for WIN32 Installation Manual (Rev.7.0)
5.11.2. INSTALLING A DRIVER THAT HAS NOT YET BEEN INSTALLED If the PCI card interface is already installed in the PCI bus slot before the installation of
Windows 98, or if the driver was not installed, for example, because the wrong procedure was
applied, install the driver according to the following procedure.
After confirming that the driver has not yet been installed, click Start, Settings, then Control
Panel. Then, click System. After the System Properties dialog box appears, select the Device
Manager tab. On this tab, select Other devices. An exclamation mark (!) is displayed against
PCI Card, as shown below.
1) In the dialog box shown above, select PCI Card, then click the Properties button.
2) The PCI Card Properties dialog box appears. Click the Reinstall Driver button, or select
the Driver tab then click the Update Driver button on this tab.
66
RTE for WIN32 Installation Manual (Rev.7.0)
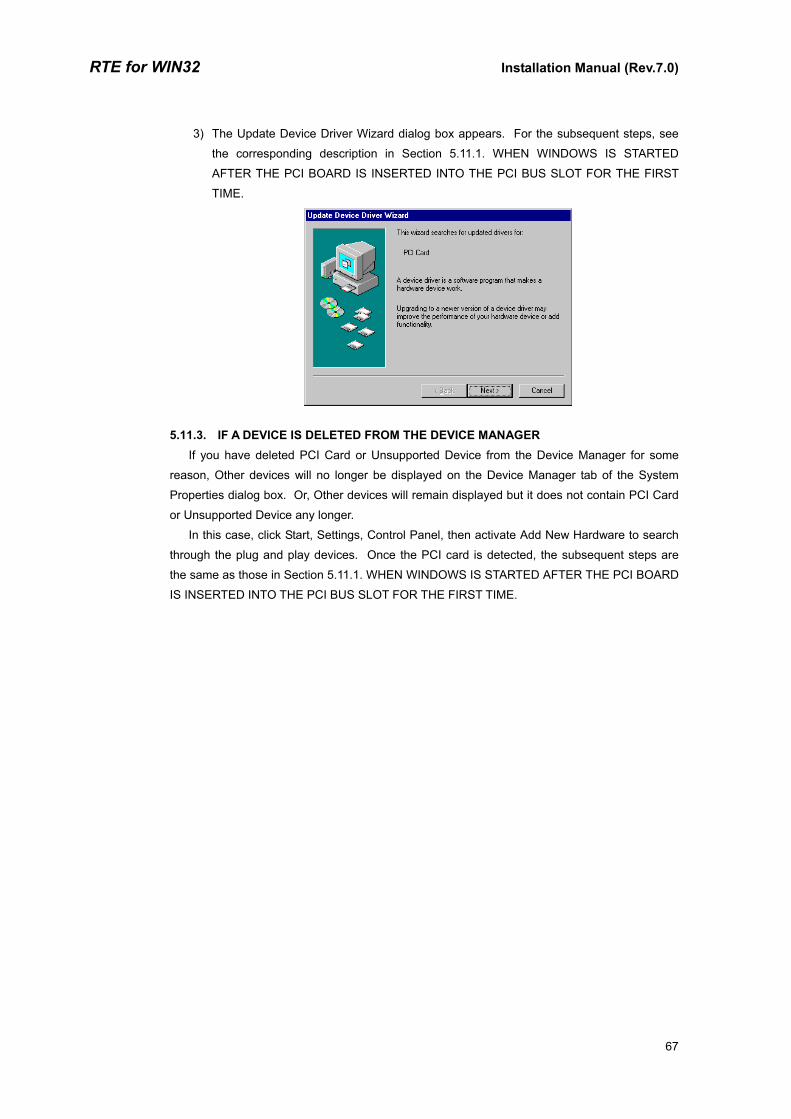
3) The Update Device Driver Wizard dialog box appears. For the subsequent steps, see
the corresponding description in Section 5.11.1. WHEN WINDOWS IS STARTED
AFTER THE PCI BOARD IS INSERTED INTO THE PCI BUS SLOT FOR THE FIRST
TIME.
5.11.3. IF A DEVICE IS DELETED FROM THE DEVICE MANAGER If you have deleted PCI Card or Unsupported Device from the Device Manager for some
reason, Other devices will no longer be displayed on the Device Manager tab of the System
Properties dialog box. Or, Other devices will remain displayed but it does not contain PCI Card
or Unsupported Device any longer.
In this case, click Start, Settings, Control Panel, then activate Add New Hardware to search
through the plug and play devices. Once the PCI card is detected, the subsequent steps are
the same as those in Section 5.11.1. WHEN WINDOWS IS STARTED AFTER THE PCI BOARD
IS INSERTED INTO THE PCI BUS SLOT FOR THE FIRST TIME.
67

RTE for WIN32 Installation Manual (Rev.7.0)
5.12. INSTALLING THE USB DRIVER IN THE WINDOWS 98 SECOND EDITION (SE) ENVIRONMENT
This section explains how to install the USB driver under Windows 98 SE.
The USB interface does not support Windows 98, which is older thanWindows 98 SE.
When using the RTE-2000(H)-TP with the USB interface, it is not recommended to use USB 1.1. This is because USB 1.1 is notappropriate for efficient debugging since the debugger cannot respondquickly in USB 1.1.
5.12.1. WHEN THE RTE-2000(H)-TP IS CONNECTED TO THE HOST THROUGH USB FOR THE FIRST TIME
When the RTE-2000(H)-TP is connected to the host through USB for the first time, install the
driver as described below.
1) If you have not yet installed RTE for WIN32, install it before connecting the RTE-
2000(H)-TP to the host with a USB cable.
RTE for WIN32 can be installed when the following Found NewHardware Wizard dialog box appears.
2) Connect the RTE-2000(H)-TP to the host with a USB cable. After a few moments, the
Add New Hardware Wizard dialog box appears. Click the Next> button.
3) In the dialog box shown below, select Search for the best driver for your device and
click the Next> button.
68
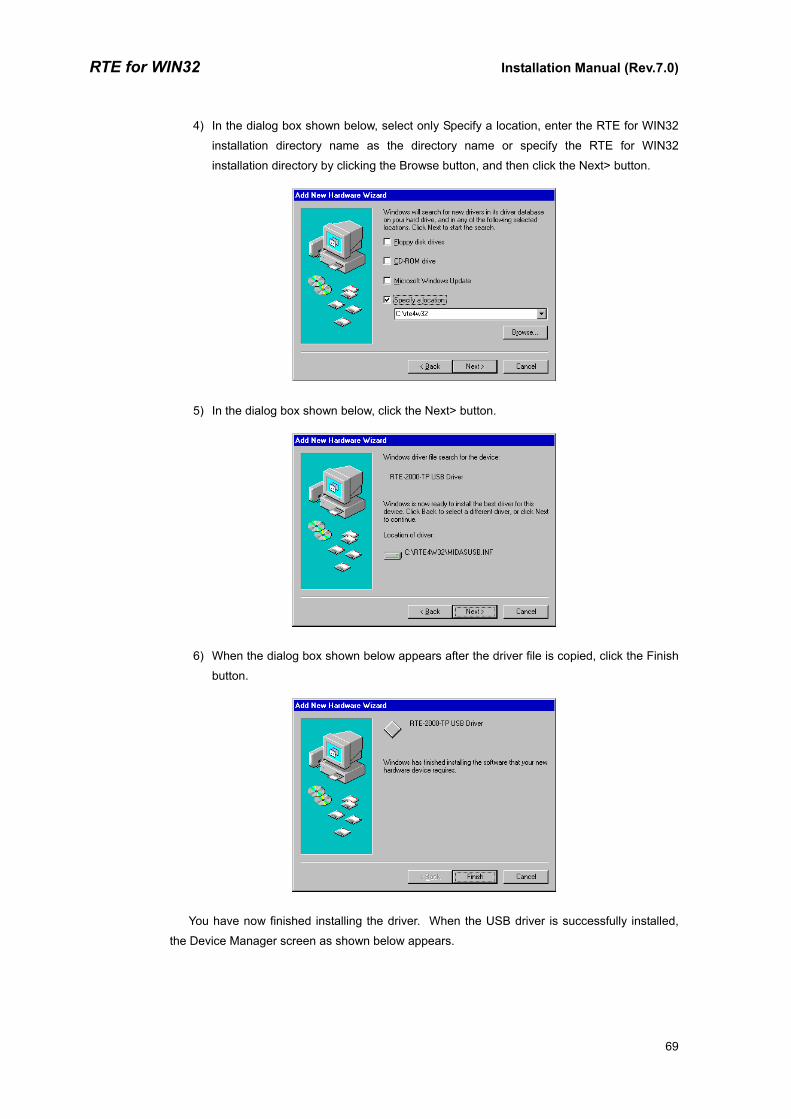
RTE for WIN32 Installation Manual (Rev.7.0)
4) In the dialog box shown below, select only Specify a location, enter the RTE for WIN32
installation directory name as the directory name or specify the RTE for WIN32
installation directory by clicking the Browse button, and then click the Next> button.
5) In the dialog box shown below, click the Next> button.
6) When the dialog box shown below appears after the driver file is copied, click the Finish
button.
You have now finished installing the driver. When the USB driver is successfully installed,
the Device Manager screen as shown below appears.
69

RTE for WIN32 Installation Manual (Rev.7.0)
Open the Device Manager as follows: Click Start → Settings → Control Panel. Double click the System icon. In System Properties, click the Device Manager tab.
5.12.2. INSTALLING THE DRIVER THAT HAS NOT YET BEEN INSTALLED If you cancel the installation of the USB driver before it completes or have deleted the driver
from the Device Manager, the USB driver for the RTE-2000(H)-TP will no longer be displayed in
the Device Manager.
In this case, click the Refresh button of the Device Manager or disconnect the USB cable
from the RTE-2000(H)-TP and then connect it again after a few moments. The Add New
Hardware Wizard starts. The subsequent steps are the same as those in Section 5.12.1.
WHEN THE RTE-2000(H)-TP IS CONNECTED TO THE HOST THROUGH USB FOR THE
FIRST TIME.
5.12.3. WHEN THE DRIVER IS NOT CORRECTLY INSTALLED When the USB driver is not correctly installed for some reason, the Device Manager screen
as shown below appears.
In this case, select RTE-2000-TP USB Interface in the Device Manager and click the
70

RTE for WIN32 Installation Manual (Rev.7.0)
Properties button.
In the RTE-2000-TP USB Interface Properties dialog box that appears, click the Reinstall
Driver button. Then the Update Device Driver Wizard dialog box appears. The subsequent
steps are the same as those in Section 5.12.1. WHEN THE RTE-2000(H)-TP IS CONNECTED
TO THE HOST THROUGH USB FOR THE FIRST TIME.
71

RTE for WIN32 Installation Manual (Rev.7.0)
5.13. INSTALLING THE PC-CARD DRIVER IN THE WINDOWS 2000 ENVIRONMENT This section explains how to install the PC-Card driver under Windows 2000.
If the driver for a PC-Card made by Kyoto Micro Computer Co., Ltd.(hereafter referred to as "KMC") has already been installed, the driverembedding wizard may not be activated even if the Midas lab PC-Card interface is inserted into the PC-Card socket. In this case, use the KMC driver as is. RTE for WIN32 runs normally even with the KMCdriver. If the Midas lab PC-Card has already been installed, replace the Midas lab driver with the KMC driver to enable the use of the KMC PC-Card. For details, see Section 5.13.4. KMC PC-CARD DRIVER.
5.13.1. WHEN THE PC-CARD INTERFACE IS INSERTED INTO THE SOCKET FOR THE FIRST TIME
When you insert the PC-Card interface into the PC-Card socket for the first time, follow the
steps below to install the standard driver.
1) Log in as a user with the administrator permission.
2) If RTE for WIN32 has not yet been installed, install the RTE for WIN32 before inserting
the PC-Card interface.
RTE for WIN32 may be installed when the following Found NewHardware Wizard dialog box opens.
3) Insert the PC-Card (PCMCIA) interface into the PC-Card socket. Then, a dialog box
indicating that new hardware has been detected will appear. After a few moments, the
Found New Hardware Wizard dialog box appears. Click the Next> button.
72

RTE for WIN32 Installation Manual (Rev.7.0)
4) In the dialog box shown below, select Search for a suitable driver for my device, then
click the Next> button.
5) In the dialog box shown below, select only Specify a location, then click the Next> button.
6) In the dialog box shown below, input the installation destination directory for RTE for
WIN32 in the Copy manufacturer's files from text box. Or, click the Browse button,
specify the installation destination directory for RTE for WIN32, and then click the OK
button.
73
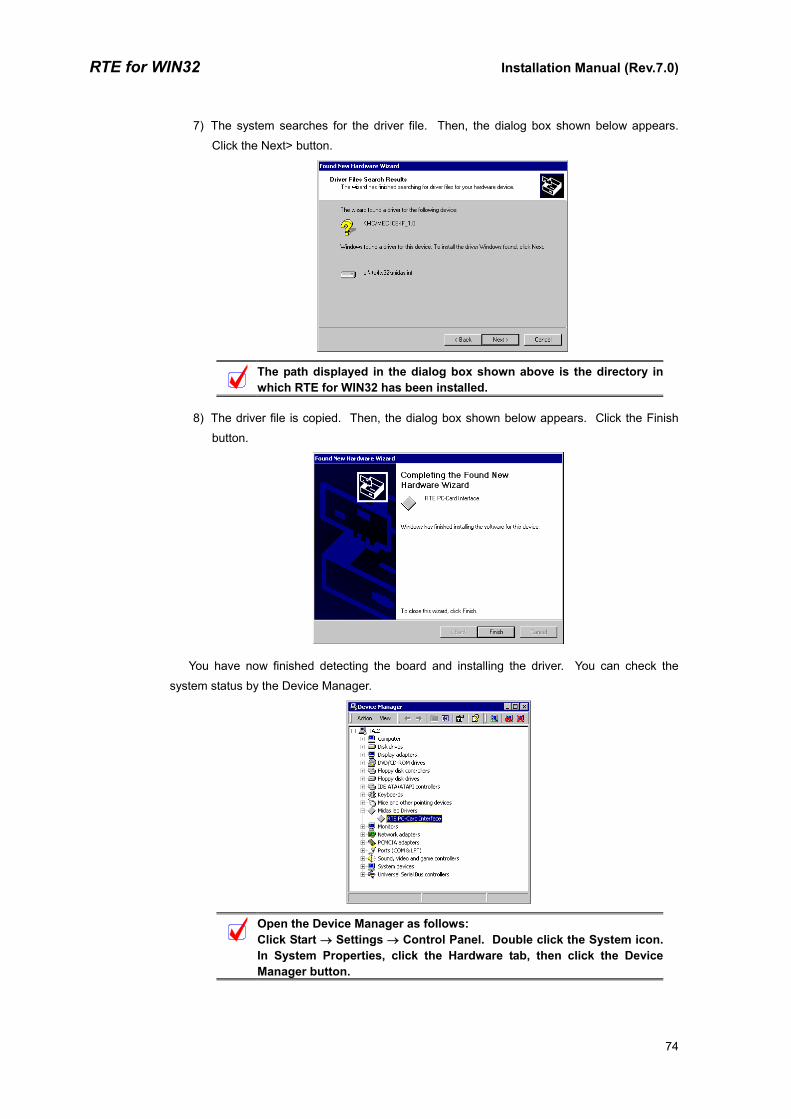
RTE for WIN32 Installation Manual (Rev.7.0)
7) The system searches for the driver file. Then, the dialog box shown below appears.
Click the Next> button.
The path displayed in the dialog box shown above is the directory inwhich RTE for WIN32 has been installed.
8) The driver file is copied. Then, the dialog box shown below appears. Click the Finish
button.
You have now finished detecting the board and installing the driver. You can check the
system status by the Device Manager.
Open the Device Manager as follows: Click Start → Settings → Control Panel. Double click the System icon. In System Properties, click the Hardware tab, then click the Device Manager button.
74

RTE for WIN32 Installation Manual (Rev.7.0)
5.13.2. INSTALLING A DRIVER THAT HAS NOT YET BEEN INSTALLED If the driver was not installed because, for example, the correct procedure was not followed,
install it by applying the following procedure.
If the driver has not been installed, an exclamation mark (!) is displayed beside KMC/MEC-
ICE-IF 1.0 in the Device Manager list.
Open the Device Manager as follows: Click Start → Settings → Control Panel. Double click the System icon. In System Properties, click the Hardware tab, then click the Device Manager button.
1) Log in as a user with the administrator permission.
2) If RTE for WIN32 has not yet been installed, install RTE for WIN32.
3) Select KMC/MEC-ICE-IF 1.0 in the Device Manager list, and then select Properties from
the Action menu.
4) The KMC/MEC-ICE-IF_1.0 Properties dialog box appears. Select the Driver tab, then
click the Update Driver button.
75

RTE for WIN32 Installation Manual (Rev.7.0)
5) The Upgrade Device Driver Wizard dialog box appears. For the subsequent steps, see
Section 5.13.1. WHEN THE PC-CARD INTERFACE IS INSERTED INTO THE SOCKET
FOR THE FIRST TIME.
5.13.3. IF A DEVICE IS DELETED FROM THE DEVICE MANAGER If you have deleted KMC/MEC-ICE-IF 1.0 or RTE PC-Card Interface from the Device
Manager for some reason, KMC/MEC-ICE-IF 1.0 or RTE PC-Card Interface will no longer be
displayed on the Device Manager.
In this case, click Start, Settings, Control Panel, then activate Add/Remove Hardware to
search through the plug and play devices. Alternatively, dismount the PC-Card from the socket,
and reinsert it. Once the PC-Card has been detected, the subsequent steps are the same as
those in Section 5.13.1. WHEN THE PC-CARD INTERFACE IS INSERTED INTO THE
SOCKET FOR THE FIRST TIME.
Open the Device Manager as follows: Click Start → Settings → Control Panel. Double click the System icon. In System Properties, click the Hardware tab, then click the Device Manager button.
76

RTE for WIN32 Installation Manual (Rev.7.0)
5.13.4. KMC PC-CARD DRIVER This section explains the procedure for replacing the PC-Card driver for RTE for WIN32 with
the PC-Card made by Kyoto Micro Computer Co., Ltd. (hereafter referred to as "KMC"), that
supports PARTNER-ETII/J/N64.
RTE for WIN32 runs normally even when the KMC driver has been installed. However, KMC
PARTNER-ETII/J/N64 does not run unless the KMC driver is installed. To use the RTE for
WIN32 and PARTNER-ETII/J/N64 on the same computer with the PC-Card interface, therefore,
the KMC PC-Card driver must be installed.
The following explains the procedure for replacing the PC-Card driver for RTE for WIN32
with the KMC driver.
If the PC-Card driver for RTE for WIN32 is installed, the RTE PC-Card Interface is displayed
when the Device Manager is started.
Open the Device Manager as follows: Click Start → Settings → Control Panel. Double click the System icon. In System Properties, click the Hardware tab, then click the Device Manager button.
1) Log in as a user with the administrator permission.
2) Execute the installer for the KMC PC-Card driver, and then extract the driver file.
3) Select the RTE PC-Card Interface from the Device Manager list, and then select
Properties from the Action menu.
77

RTE for WIN32 Installation Manual (Rev.7.0)
4) The RTE PC-Card Interface Properties dialog box appears. Select the Driver tab, then
click the Update Driver button.
5) The Upgrade Device Driver Wizard dialog box appears. Click the Next> button.
6) In the dialog box shown below, select Search for a suitable driver for my device, then
click the Next> button.
78
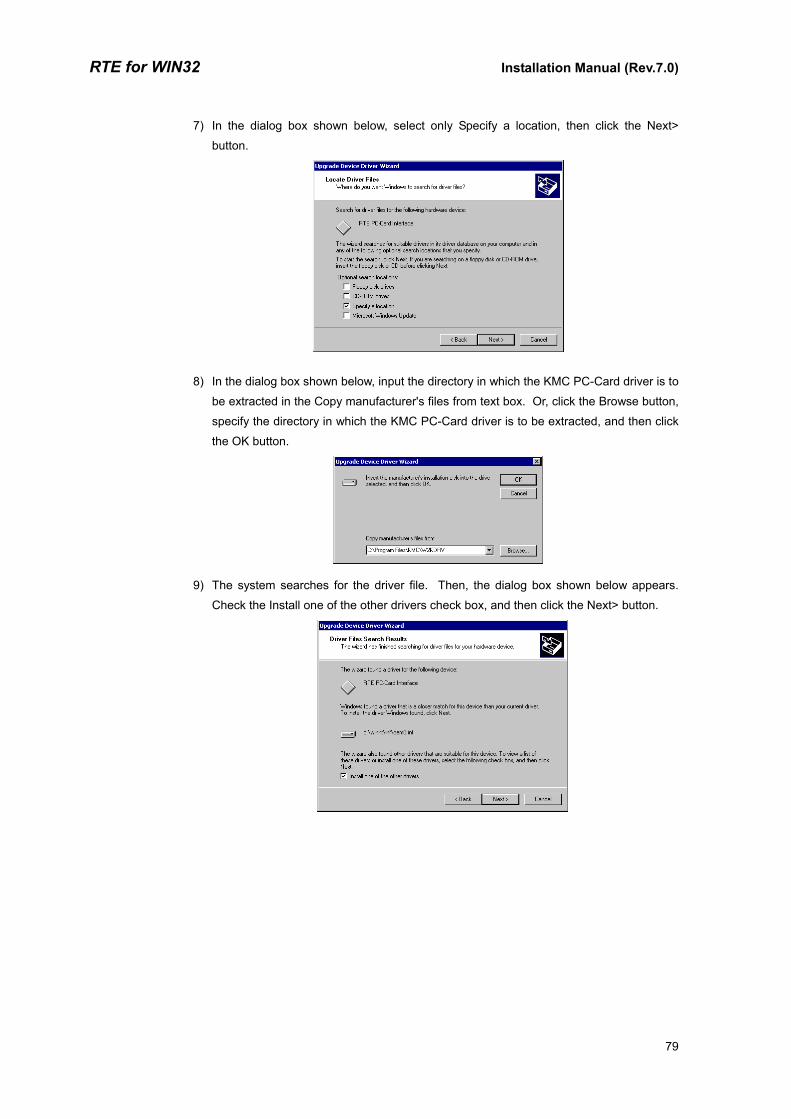
RTE for WIN32 Installation Manual (Rev.7.0)
7) In the dialog box shown below, select only Specify a location, then click the Next>
button.
8) In the dialog box shown below, input the directory in which the KMC PC-Card driver is to
be extracted in the Copy manufacturer's files from text box. Or, click the Browse button,
specify the directory in which the KMC PC-Card driver is to be extracted, and then click
the OK button.
9) The system searches for the driver file. Then, the dialog box shown below appears.
Check the Install one of the other drivers check box, and then click the Next> button.
79
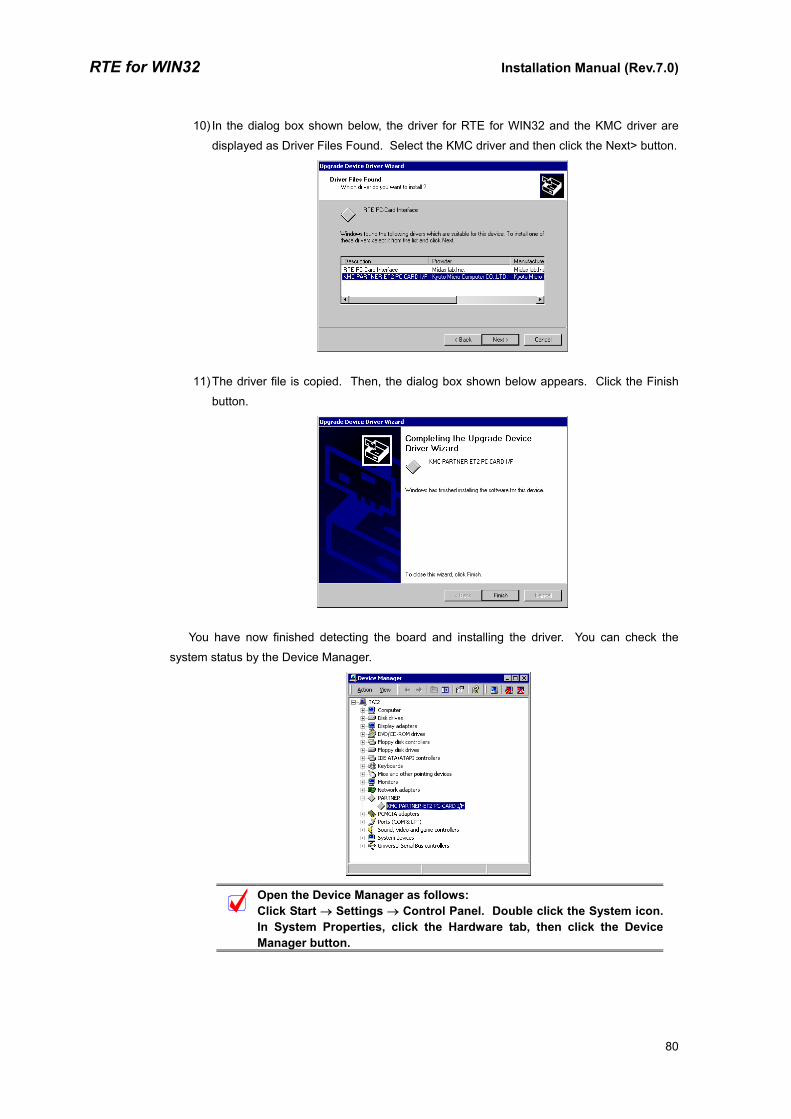
RTE for WIN32 Installation Manual (Rev.7.0)
10) In the dialog box shown below, the driver for RTE for WIN32 and the KMC driver are
displayed as Driver Files Found. Select the KMC driver and then click the Next> button.
11) The driver file is copied. Then, the dialog box shown below appears. Click the Finish
button.
You have now finished detecting the board and installing the driver. You can check the
system status by the Device Manager.
Open the Device Manager as follows: Click Start → Settings → Control Panel. Double click the System icon. In System Properties, click the Hardware tab, then click the Device Manager button.
80

RTE for WIN32 Installation Manual (Rev.7.0)
5.14. INSTALLING THE PCI DRIVER IN THE WINDOWS 2000 This section explains how to install the PCI driver under Windows 2000.
5.14.1. WHEN WINDOWS IS STARTED AFTER THE PCI BOARD IS INSERTED INTO THE PCI BUS SLOT FOR THE FIRST TIME
The following procedure should be applied when Windows 2000 is activated after the RTE
series PCI board is inserted into the PCI bus slot for the first time.
1) Log in as a user with the administrator permission.
2) If RTE for WIN32 has not yet been installed, install RTE for WIN32.
RTE for WIN32 may be installed when the following Found NewHardware Wizard dialog box opens.
3) After log in, a dialog box indicating that new hardware has been detected appears.
Then, after a short while, the Found New Hardware Wizard dialog box appears. Click
the Next> button.
4) In the dialog box shown below, select Search for a suitable driver for my device, then
click the Next> button.
81

RTE for WIN32 Installation Manual (Rev.7.0)
5) In the dialog box shown below, select only Specify a location, then click the Next>
button.
6) In the dialog box shown below, input the installation destination directory for RTE for
WIN32 in the Copy manufacturer's files from text box. Or, click the Browse button,
specify the installation destination directory for RTE for WIN32, and then click the OK
button.
7) The system searches for the driver file. Then, the dialog box shown below appears.
Click the Next> button.
The path displayed in the dialog box shown above is the directory in which RTE for WIN32 has been installed.
82

RTE for WIN32 Installation Manual (Rev.7.0)
8) The driver file is copied. Then, the dialog box shown below appears. Click the Finish
button.
You have now finished detecting the board and installing the driver. You can check the
system status by the Device Manager.
Open the Device Manager as follows: Click Start → Settings → Control Panel. Double click the System icon. In System Properties, click the Hardware tab, then click the Device Manager button.
83

RTE for WIN32 Installation Manual (Rev.7.0)
5.14.2. INSTALLING A DRIVER THAT HAS NOT YET BEEN INSTALLED If the PCI card interface is already installed in the PCI bus slot before the installation of
Windows 2000, or if the driver was not installed, for example, because the wrong procedure was
applied, install the driver according to the following procedure.
If the driver has not been installed, an exclamation mark (!) is displayed beside PCI Device
in the Device Manager list.
Open the Device Manager as follows: Click Start → Settings → Control Panel. Double click the System icon. In System Properties, click the Hardware tab, then click the Device Manager button.
1) Log in as a user with the administrator permission
2) If RTE for WIN32 has not yet been installed, install RTE for WIN32.
3) Select PCI Device in the Device Manager list, and then select Properties from the Action
menu.
4) The PCI Device Properties dialog box appears. Click the Reinstall Driver button, or
select the Driver tab, then click the Update Driver button.
84

RTE for WIN32 Installation Manual (Rev.7.0)
5) The Upgrade Device Driver Wizard dialog box appears. For the subsequent steps, see
Section 5.14.1. WHEN WINDOWS IS STARTED AFTER THE PCI BOARD IS
INSERTED INTO THE PCI BUS SLOT FOR THE FIRST TIME.
5.14.3. IF A DEVICE IS DELETED FROM THE DEVICE MANAGER If you have deleted PCI Device or RTE PCI Host Interface Card or RTE-PC Series from the
Device Manager for some reason, PCI Device or RTE PCI Host Interface Card or RTE-PC
Series will no longer be displayed on the Device Manager.
In this case, click Start, Settings, Control Panel, then activate Add/Remove Hardware to
search through the plug and play devices. Once the PCI card has been detected, the
subsequent steps are the same as those in Section 5.14.1. WHEN WINDOWS IS STARTED
AFTER THE PCI BOARD IS INSERTED INTO THE PCI BUS SLOT FOR THE FIRST TIME.
85

RTE for WIN32 Installation Manual (Rev.7.0)
5.15. INSTALLING THE USB DRIVER IN THE WINDOWS 2000 ENVIRONMENT This section explains how to install the USB driver under Windows 2000.
5.15.1. WHEN THE RTE-2000(H)-TP IS CONNECTED TO THE HOST THROUGH USB FOR THE FIRST TIME
When the RTE-2000(H)-TP is connected to the host through USB for the first time, install the
driver the same way as with a PCI board. See Section 5.14.1. WHEN WINDOWS IS STARTED
AFTER THE PCI BOARD IS INSERTED INTO THE PCI BUS SLOT FOR THE FIRST TIME.
When the USB driver is successfully installed, the Device Manager screen as shown below
appears.
Open the Device Manager as follows: Click Start → Settings → Control Panel. Double click the System icon. In System Properties, click the Hardware tab, then click the DeviceManager button.
5.15.2. INSTALLING THE DRIVER THAT HAS NOT YET BEEN INSTALLED
If you cancel the installation of the USB driver before it completes, the USB driver is not
installed. At this time, the Device Manager screen as shown below appears.
86

RTE for WIN32 Installation Manual (Rev.7.0)
In this case, select Scan for hardware changes from the Action menu of the Device Manager
or disconnect the USB cable from the RTE-2000(H)-TP and then connect it again after a few
moments. The Found New Hardware Wizard starts. The subsequent steps are the same as
those in Section 5.15.1. WHEN THE RTE-2000(H)-TP IS CONNECTED TO THE HOST
THROUGH USB FOR THE FIRST TIME.
5.15.3. WHEN THE DRIVER WAS DELETED FROM THE DEVICE MANAGER If you have deleted the USB driver from the Device Manager for some reason, the USB
device indicating the RTE-2000(H)-TP will no longer be displayed on the Device Manager.
In this case, select Scan for hardware changes from the Action menu of the Device Manager
or disconnect the USB cable from the RTE-2000(H)-TP and then connect it again after a few
moments. The Found New Hardware Wizard starts. The subsequent steps are the same as
those in Section 5.15.1. WHEN THE RTE-2000(H)-TP IS CONNECTED TO THE HOST
THROUGH USB FOR THE FIRST TIME.
87

RTE for WIN32 Installation Manual (Rev.7.0)
5.16. IDENTIFYING THE VERSION OF WINDOWS 95 There are basically two version of Windows 95: that version called OSR2 (hereafter referred
to as "Windows 95 (OSR2)" and the original Windows 95 (hereafter referred to as "Windows 95 (non-OSR2)". These two versions of Windows 95 adopt different procedures for installing
drivers. The procedure for each version of Windows 95 is explained in the following sections.
These two types of Windows 95 can be identified as follows:
1. Click Start, Setting, then Control Panel. Click System.
2. Check the version number which is displayed in the System section by choosing the
General tab in the System Properties dialog box (see the figure below). If the version
number is 4.00.950 B or 4.00.950 C, Windows 95 OSR2 is installed and running on
your PC. (Otherwise, 4.00.950 or 4.00.950a is displayed as the operating system
version number.)
5.17. INSTALLING THE PC-CARD DRIVER IN THE WINDOWS 95 (NON-OSR2) ENVIRONMENT
This section explains how to install the card driver under Windows 95 (non-OSR2).
The PC-Card interface does not require a special driver, the standard driver is installed.
The procedure for installing the standard driver is given below.
1) Insert the PC-Card interface into the PC-Card socket. Upon doing so, the new
hardware is detected and the New Hardware Found dialog appears. Click Select from a
list of alternate drivers then click the OK button. (With some personal computers, it may
take a short while for this dialog to appear.)
If, upon inserting the PC-Card the New Hardware Found dialog does not appear or if, upon installing the card service the personal computer buzzes "BOO!", the PC-Card service may not be operating normally. See Section 5.24. WHEN THE PC CARD CANNOT BE RECOGNIZED(WINDOWS 95/98) and ensure that the card service is operating normally.
88

RTE for WIN32 Installation Manual (Rev.7.0)
2) Next, the Select Hardware Type dialog appears. Click Other devices then click the OK
button.
3) Next, the Select Device dialog appears. Click Unsupported Device then click the OK
button. The driver for the card is installed and the PC-Card interface is recognized (the
personal computer beeps "PIPPO!" to indicate that the card has been recognized.)
89

RTE for WIN32 Installation Manual (Rev.7.0)
5.18. INSTALLING THE PCI DRIVER IN THE WINDOWS 95 (NON-OSR2) This section explains how to install the PCI driver under Windows 95 (non-OSR2).
The PCI board does not require a special driver, the standard driver is installed.
The procedure for installing the standard driver is given below.
1) After a PCI device has been installed, a dialog box that enables you to install a PCI
driver will appear when Windows 95 is started. In this dialog box, check Select from a
list of alternative drivers or Do not install a driver.
2) When Select from a list of alternative drivers is selected, select Unsupported Device
from Other devices.
3) Next, the Select Device dialog appears. Click Unsupported Device then click the OK
button.
90

RTE for WIN32 Installation Manual (Rev.7.0)
5.19. INSTALLING THE PC-CARD DRIVER IN THE WINDOWS 95 (OSR2) ENVIRONMENT This section explains how to install the PC-Card driver under Windows 95 (OSR2).
The PC-Card interface does not require a special driver, the standard driver is installed.
Follow the steps below to install a standard driver.
1) Insert the PC-Card (PCMCIA) interface into the PC-Card socket. Then, a dialog box
indicating that new hardware has been detected will appear. After a few moments, the
Update Device Driver Wizard dialog box will appear. Click the Next> button.
If, upon inserting the PC-Card the New Hardware Found dialog does not appear or if, upon installing the card service the personal computer buzzes "BOO!", the PC-Card service may not be operating normally. See Section 5.24. WHEN THE PC CARD CANNOT BE RECOGNIZED (WINDOWS 95/98) and ensure that the card service is operating normally.
2) A dialog box for driver search appears. After a few moments, a dialog box like that
shown below will appear. Then, click the Finish button.
91

RTE for WIN32 Installation Manual (Rev.7.0)
3) Click Start, Settings, then Control Panel. Then, click System. After the System
Properties dialog box appears, click the Device Manager tab. Other devices will appear
in the list. Double-click Other devices or click the + mark on the left, after which
KMC/MEC-ICE-IF 1.0 will be displayed. Click KMC/MEC-ICE-IF 1.0 then click the
Properties button.
KMC/MEC-ICE-IF 1.0 may appear with the ! mark. This is normal.
4) In the KMC/MEC-ICE-IF 1.0 Properties dialog box which appears, click the Driver tab
then click the Update Driver button.
92

RTE for WIN32 Installation Manual (Rev.7.0)
5) The Update Device Driver Wizard dialog box appears. Click the "No, select driver from
list" option then click the Next> button.
6) In the dialog box shown below, click Other devices then click the Next> button.
7) In the dialog box shown below, click Unsupported Device then click the Finish button.
By means of this operation, the driver is loaded, thus enabling the PC-Card service.
93

RTE for WIN32 Installation Manual (Rev.7.0)
8) By clicking the Device Manager tab in the System Properties dialog box, you may
confirm that KMC/MEC-ICE-IF 1.0 has changed to Unsupported Device without the !
mark.
94

RTE for WIN32 Installation Manual (Rev.7.0)
5.20. INSTALLING THE PCI DRIVER IN THE WINDOWS 95 (OSR2) ENVIRONMENT This section explains how to install the PCI driver under Windows 95 (OSR2).
The PCI board does not require a special driver, the standard driver is installed.
Follow the steps below to install a standard driver.
1) Insert the RTE series into the PCI bus and activate Windows 95. Then, a dialog box
indicating that new hardware has been detected will appear. After a few moments, the
Update Device Driver Wizard dialog box will appear. Click the Next> button.
2) A dialog box for driver search appears. After a few moments, a dialog box like that
shown below will appear. Then, click the Finish button.
95

RTE for WIN32 Installation Manual (Rev.7.0)
3) Click Start, Settings, then Control Panel. Then click System. After the System
Properties dialog box appears, click the Device Manager tab. Other devices will appear
in the list. Double-click Other devices or click the + mark on the left. PCI Card is
displayed. Choose PCI Card and click the Property button.
PCI Card may appear with the ! mark. This is normal.
4) The PCI Card Properties dialog box appears. Click the Driver tab, then click the Update
Driver button.
96

RTE for WIN32 Installation Manual (Rev.7.0)
5) The Update Device Driver Wizard dialog box appears. Click "No, select driver from list",
then click the Next> button.
6) In the dialog box shown below, click Other devices then click the Next> button.
7) In the dialog box shown below, click Unsupported Device then click the Finish button.
97

RTE for WIN32 Installation Manual (Rev.7.0)
8) By clicking the Device Manager tab in the System Properties dialog box, you may
confirm that PCI Card has changed to Unsupported Device without the ! mark.
98

RTE for WIN32 Installation Manual (Rev.7.0)
5.21. INSTALLING RTE I/O DRIVER IN THE WINDOWS XP, WINDOWS 2000, or WINDOWS NT 4.0 ENVIRONMENT
To use an interface (PC-Card, host card, I/O port, or PCI) to access I/O ports with Windows
XP, Windows 2000, or Windows NT 4.0, it is necessary to install an RTE I/O port driver. This
driver is installed and uninstalled automatically by setup.exe.
Check RTE2 creates the following entry as a registry key for the RTE I/O driver.
HKEY_LOCAL_MACHINE\System\CurrentControlSet\Services\RTEDEV
The name of the driver file is RTEDEV.SYS.
5.22. INSTALLING RTE PC-CARD DRIVER IN THE WINDOWS NT 4.0 ENVIRONMENT To use a PC-Card interface with Windows NT 4.0, it is necessary to install an RTE PC-Card
driver. This driver is installed by placing a check mark in the With PC-Card Driver check box in
the first dialog box that appears when setup.exe is started. It is uninstalled automatically when
setup.exe is executed to perform uninstallation.
Check RTE2 creates the following entry as a registry key for the RTE PC-Card driver.
HKEY_LOCAL_MACHINE\System\CurrentControlSet\Services\Pcmcia\DataBase\KMC/MEC\
The name of the driver file is RTEPCIF.SYS.
5.23. RESTRICTIONS ON PC-CARD INTERFACE IN WINDOWS NT 4.0 ENVIRONMENT When using a PC-Card interface in a Windows NT 4.0 environment, RTE for WIN32 will not
operate correctly unless the PC-Card interface is assigned I/O address 220H.
If the connection check of Check RTE2 fails when a PC-Card interface is being used in a
Windows NT 4.0 environment, check whether the PC-Card interface is assigned I/O address
220H.
If I/O address 220H is not assigned, the PC-Card interface can be assigned address 220H
by reassigning the other resources. The address allocation change differs depending on the
type of the resource assigned address 220H. Usually, the following procedure can be used:
• If an ISA bus card is assigned address 220H, its I/O address assignment can be
changed by setting a DIP switch or running a utility.
• The address assignment can be changed by using the software or installer supplied with
the driver for the resource currently assigned address 220H.
• If an on-board function of the motherboard or an internal function of a notebook-type
personal computer is assigned address 220H, the I/O address assignment can be
changed in the BIOS.
• If an on-board function of the motherboard or an internal function of a notebook-type
personal computer is assigned address 220H, the function can be disabled in the BIOS.
In this case, the PC-Card interface will be assigned address 220H when the personal
computer is next started (with its internal function disabled). If the computer is
subsequently shut down and the disabled function re-enabled, the function should be
assigned an address other than 220H.
99

RTE for WIN32 Installation Manual (Rev.7.0)
• If the resource assigned address 220H is a PCI board, remove the board and then start
the computer. The PC-Card interface will be assigned address 220H. If the computer is
subsequently shut down, the board re-installed, and the computer started again, the
board should be assigned to an address other than 220H.
Start the diagnosis program by selecting Start → Program → Administrative Tool → Windows NT Diagnosis and select I/O Port on the Resource tab to determine the I/O address assignment.
The sound card is often assigned I/O address 220H.
100

RTE for WIN32 Installation Manual (Rev.7.0)
5.24. WHEN THE PC CARD CANNOT BE RECOGNIZED (WINDOWS 95/98) If it proves difficult to recognize the PC-Card, this can usually be attributed to the PC-Card
service not operating normally. The reason for the card service not operating normally is usually
related to problems with that particular personal computer, such as the hardware settings. Note
that it is impossible to cover all such cases here.
Here, by explaining the handling of general problems, we hope to provide the user with
some hints on solving such problems.
5.24.1. WHEN THE NEW HARDWARE FOUND DIALOG BOX DOES NOT APPEAR If, when installing the driver for a particular card, the New Hardware Found dialog does not
appear or, when a driver for a particular card, previously installed by mistake, is to be replaced,
follow the procedure given below.
1) With the PC-Card interface inserted into the socket, click Start → Settings → Control
Panel → PC-Card (PCMCIA), such that the PC-Card (PCMCIA) Properties dialog
appears, then click the Socket Status tab.
2) Note the device name of the socket into which the PC-Card interface is inserted. (This is
Unsupported Device in the above figure, but will be different if the driver for other than
the correct PC-Card has been installed.)
3) Click Start → Settings → Control Panel → System such that the System Properties
dialog appears, then click the Device Manager tab. Search for and select the device
explained in 2).
4) Confirm that the device explained in 2) has been selected, then click the Remove button to erase the device. (Caution: Be particularly careful not to erase other than the invalid device.)
5) Remove the PC-Card interface from its socket, then re-insert it after a few seconds.
Then the New Hardware dialog box explained in the description of how to install the PC-
Card driver will open. After that, refer to the description of how to install the driver for
each OS.
101

RTE for WIN32 Installation Manual (Rev.7.0)
5.24.2. IF THE PERSONAL COMPUTER BUZZES "BOO!" WHEN THE PC CARD IS INSERTED
If, when the PC-Card interface is inserted into the socket, the personal computer buzzes
"BOO!", rather than beeps, the most probable cause is that the PC-Card service is not operating
normally. Possible reasons include other than the correct driver being selected when the
PC-Card service is installed, or an incorrect setting in the BIOS of the personal computer (such
as that for the ISA-BUS shared memory).
In such a case, refer to the manual supplied with the personal computer or the PC-Card
socket hardware, and ensure that the PC-Card service is operating normally.
102

RTE for WIN32 Installation Manual (Rev.7.0)
6. ERROR MESSAGES AND REQUIRED RESPONSES This section describes the error messages that may appear during the function test of RTE
for WIN32, and the required responses.
Can not open COMx:.
The specified serial port cannot be used.
Choose another serial port.
RTE-PC is not connected on I/O=XXXX.
The wrong I/O address was specified for the RTE-xxxx-PC.
Check the hardware connection of the RTE system.
Change the I/O address, or check the DIP switch setting.
Illegal number of data
Illegal data: xx yy != XX YY
The data returned from the RTE system is invalid.
It is likely that the port or cable is defective. Switch the RTE system and PC off and on
again, and retry the checking.
For a serial port, change the baud rate.
Can not send data.
Send time-out.
It is impossible to send data.
Make sure that power is supplied to the hardware of the RTE system.
Check the port connection.
Receive data error.
Data reception failed.
It is likely that serial communication is abnormal or that the cable is defective.
Receive time-out.
There is no response from the RTE system.
It is likely that serial communication is abnormal or that the cable is defective.
For the RTE-xxxx-IE, check the power and clock on the target CPU side.
Too many retry
A response form the RTE-xxxx-PC is invalid.
Click the OK button again, and retry the checking. If the situation does not change, switch
the RTE system and PC off and on again, and retry the checking.
If any other error is reported, refer to an applicable manual for the interface card in use.
103

RTE for WIN32 Installation Manual (Rev.7.0)
- Memo -
RTE for WIN32 Installation Manual M471MNL03
104