Embed Size (px)
Citation preview
Ø min. 25 mmØ max. 80 mm
W : min. 25 / max. 60 mm H : min. 25 / max. 80 mm
W : min. 25 / max. 60 mm H : min. 25 / max. 80 mm
W : min. 25 / max. 60 mm H : min. 25 / max. 80 mm
a x 1
ROOF MOUNT CYCLE CARRIER
Keep these instructions for future use.
Réf.I
mp.
: 056
003
/ A15
-1
= Max. 15 kg
product weight =3,4 kg
MPH
SPEEDLIMIT
70
b x 1 c x 2 d x 3
f x 3
g x 1
h x 3
i x 2
k x 1 l x 2
m x 1
e x 3
05x6ø
ø7
n x 3
1
Follow your roof bar fitting instructions (ideal spacing 700mm if possible)
AERO BARWING STYLE SQUARE BAR
1 m
=
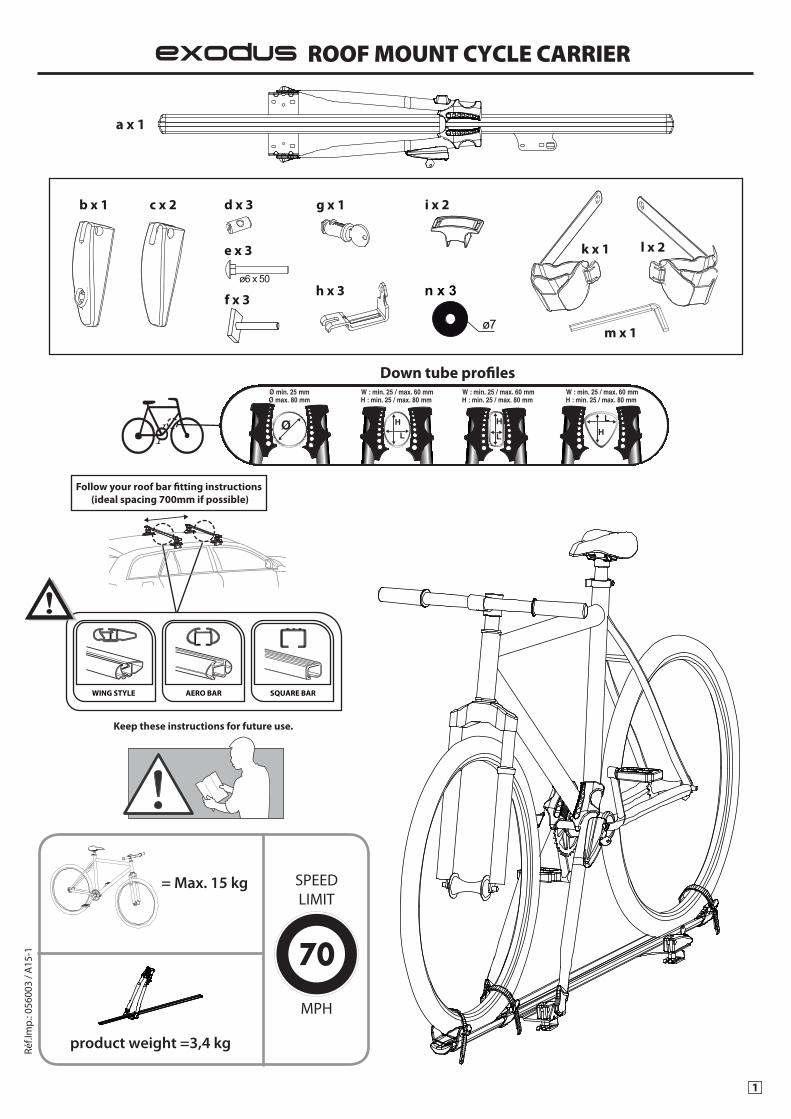
2
=
90°
5
b
g
x 1
6
b/c
d
x 3
m
8 Nm
m
1. Loosen the 4 bolts securing the mounting brackets to the wheel tray.2. With the carrier on the ground, place the bike onto the carrier with both wheels an even gap at either end of the wheel tray. Slide the clamping arm into the position where it will clamp the bike frame.
Remove the bike and tighten the two bolts to secure the clamping arm.
2
lock barrel
Assembly
Insert the lock barrel (g) into the quick release handle (b).
Insert the 3 cylindrical nuts (d) into the plastic quick release handles (b+c).
Adjust the rear mounting bracket so that it lines up with the roof bars as shown in the diagram.4
3
m
8 Nm
=
3
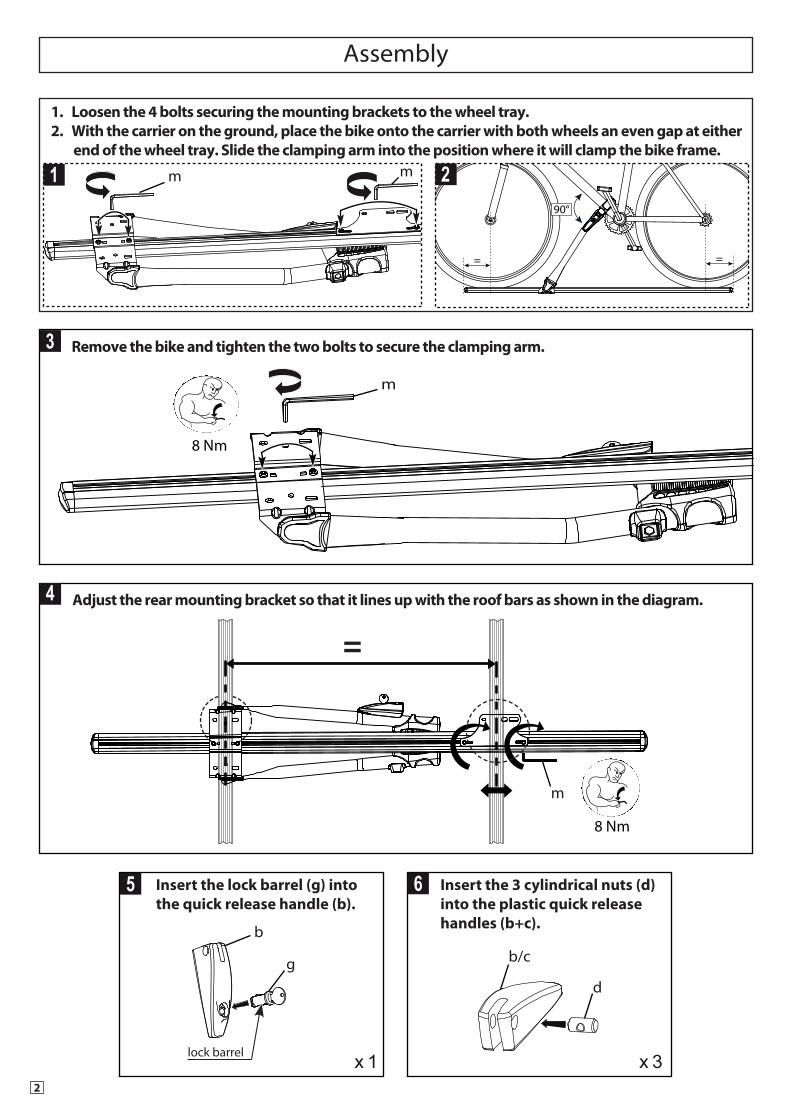
- Fitting the carrier to a vehicle with square roof bars (If your vehicle is f itted with aero style roof bars please skip to 7B) 7A
a
a
c
b
c
e
H
H
W max = 38mmH max = 22 mmW
SQUARE BAR
Insert the 3 round headed bolts (e) through the holes to the front of the carrier mounting brackets (x2 at the front and x1 at the rear). Screw the bolts onto the quick release levers 3-4 complete rotations.
W
Insert the roof bar clamps (h) into the mounting brackets of the carrier at the angle shown and ‘hook’ into place. (Insert the rear clamp into the middle slot)
square bar clamp
h
b
Rotate the clamps 90° to line up with the quick release bolt.
c
x 3 x 3
d Place the carrier onto the roof bars. Hook the clamps (h) under each roof bar and insert the round headed bolt (e) through the claw of the clamp (h).
x 3
e
3x
Tighten the clamps slightly by rotating the quick release lever clockwise. Close the quick release lever towards the rear of the carrier (step F) applying a force of around 8kg. You should here a click closing the lever, if this does not happen continue to tighten by rotating the lever clockwise.
f
8Kg
CLICK3x
When tight, lock the rear clamp by turning the key. Removal is the reverse of f itting.
Move on to step 8 to f it the bicycle.
4
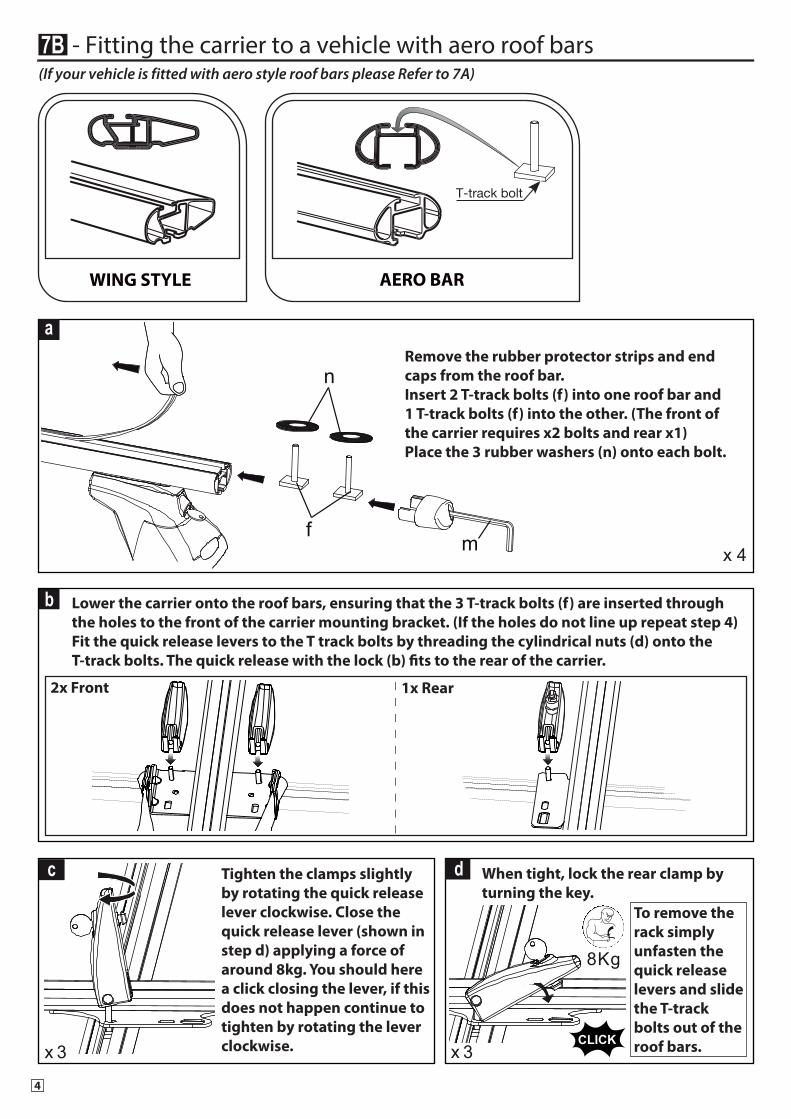
- Fitting the carrier to a vehicle with aero roof bars (If your vehicle is f itted with aero style roof bars please Refer to 7A)
7B
d
CLICK3x
8Kg
When tight, lock the rear clamp by turning the key.
To remove the rack simply unfasten the quick release levers and slide the T-track bolts out of the roof bars.
c
3x
Tighten the clamps slightly by rotating the quick release lever clockwise. Close the quick release lever (shown in step d) applying a force of around 8kg. You should here a click closing the lever, if this does not happen continue to tighten by rotating the lever clockwise.
WING STYLE AERO BAR
T-track bolt
b
2x Front 1x Rear
Lower the carrier onto the roof bars, ensuring that the 3 T-track bolts (f) are inserted through the holes to the front of the carrier mounting bracket. (If the holes do not line up repeat step 4)Fit the quick release levers to the T track bolts by threading the cylindrical nuts (d) onto the T-track bolts. The quick release with the lock (b) fits to the rear of the carrier.
fm
n
aRemove the rubber protector strips and end caps from the roof bar. Insert 2 T-track bolts (f) into one roof bar and 1 T-track bolts (f) into the other. (The front of the carrier requires x2 bolts and rear x1)Place the 3 rubber washers (n) onto each bolt.
x 4
5
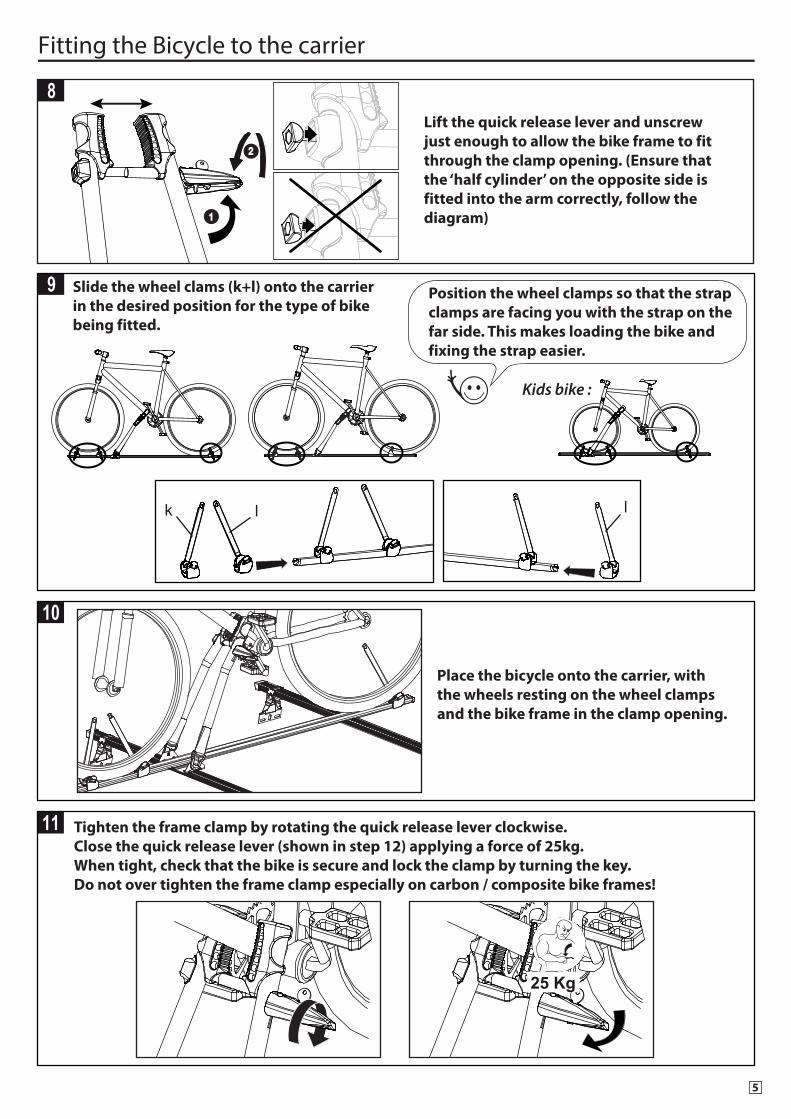
Fitting the Bicycle to the carrier
8
1
2
Lift the quick release lever and unscrew just enough to allow the bike frame to f it through the clamp opening. (Ensure that the ‘half cylinder’ on the opposite side is f itted into the arm correctly, follow the diagram)
9
Kids bike :
Slide the wheel clams (k+l) onto the carrier in the desired position for the type of bike being f itted.
Position the wheel clamps so that the strap clamps are facing you with the strap on the far side. This makes loading the bike and f ixing the strap easier.
llk
10
Place the bicycle onto the carrier, with the wheels resting on the wheel clamps and the bike frame in the clamp opening.
11 Tighten the frame clamp by rotating the quick release lever clockwise. Close the quick release lever (shown in step 12) applying a force of 25kg. When tight, check that the bike is secure and lock the clamp by turning the key. Do not over tighten the frame clamp especially on carbon / composite bike frames!
25 Kg
6
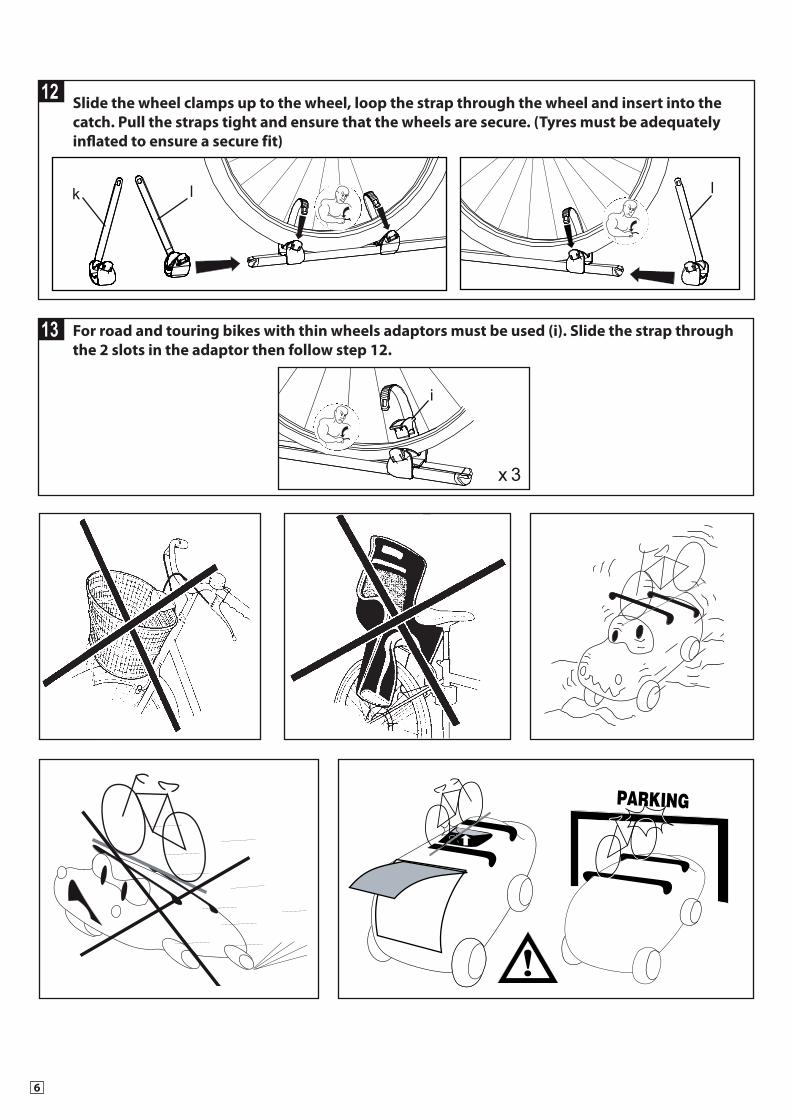
Slide the wheel clamps up to the wheel, loop the strap through the wheel and insert into the catch. Pull the straps tight and ensure that the wheels are secure. (Tyres must be adequately inflated to ensure a secure f it)
llk
For road and touring bikes with thin wheels adaptors must be used (i). Slide the strap through the 2 slots in the adaptor then follow step 12.
13
12
3x
i
Retain these instructions for future reference, andensure that any other users of the cycle carrier are familiar with the contents.
Please read the fitting instructions carefully.
Make sure that all parts are included in the package.
Prior to fitting ensure that the vehicle roof bars arefree from dirt and grime.
This cycle carrier is suitable for roof bars measuring less than 38mm in width and 22mm in depth.
Both wheels must be securely strapped to the carrier using the supplied straps.
IMPORTANT! Carrier clamping mechanisms mustalways be re-tightened after cycle has been mountedto the carrier.
After driving for a few miles STOP and check that allclamping mechanisms are secured and tight. Thismust be repeated at suitable intervals depending onthe nature of the road.
The maximum permissible roof loads must not beexceeded (see vehicle handbook for details of themaximum roof loads). The roof load will comprise ofthe weight of the load bars, the carrier plus additionalracks and the cycle load. Do not exceed a maximumload of 15kg per cycle carrier (1 adult cycle).
When using the carrier the driving handlingcharacteristics of your vehicle will change. Drivingtechniques should be altered to allow for this. Reducespeeds (max 70mph) and allow longer brakingdistances.
When fitted, the roof bars will affect your fueleconomy, therefore please remove when not in use.
Take care not to drive in low places such as garagesand multistorey car parks.
When positioning cycles on the carrier ensure thatthey do not project beyond the profile of the vehicleand that no part of the cycle can touch the paintwork.
The use of cycle carriers may be restricted in certaincountries outside the UK. Always check with therelevant national authorities prior to commencing yourjourney.
Do not put the car through an automatic car washwith the load carrier mounted.
Ensure this carrier is maintained and kept in goodworking order.
Ensure that all loose accessories such as baskets,lights, child seats are removed from the bicycle before fitting to the carrier.
Important Instructions
CONTACT US Halfords Ltd. Washford
Redditch B98 ODE
visit us at... www.halfords.comItem Code: 146591
7