Embed Size (px)
Citation preview
11
max. 800 mm / 31.49 inmax.
50 mm 1.96 in max.
50 mm 1.96 in
min.40 mm
1.96 inmin.
40 mm 1.96 in
WARNING
Installation Instructions - CassetteRead the instructions carefully before assembling and using the product. Assembling process can be completed by non-professionals. For indoor use only.
● Young children can strangle in the loop of pull cords, chains and tapes,and cords that operate window coverings.
● To avoid strangulation and entanglement,keep cords out of the reach of young children.Cords may become wrapped around a child’s neck
● Move beds, cots and furniture away from window covering cords.● Do not tie cords together.
Make sure cords do not twist together and form a loop.
Inside mount
Outside mount

22
1
Click!
3
Click!
2
1
2
Install the child safety device as specified in the childsafe manual.
WARNING
Wall mounted only
Place on chain side
33
1
1
3
2
2
1
2
43
1
3
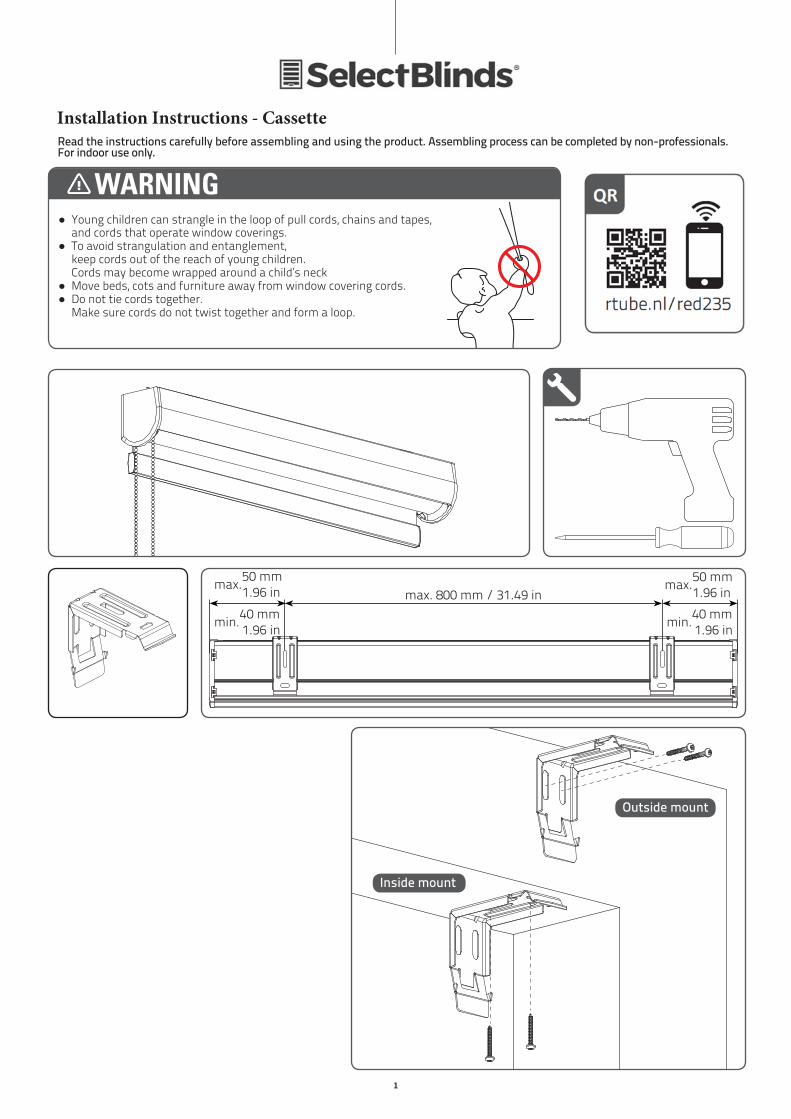
Removal
Only for wall mounting
1ABSOLUTE ROLLER BLIND 2.0 1
QR
rtube.nl/red233
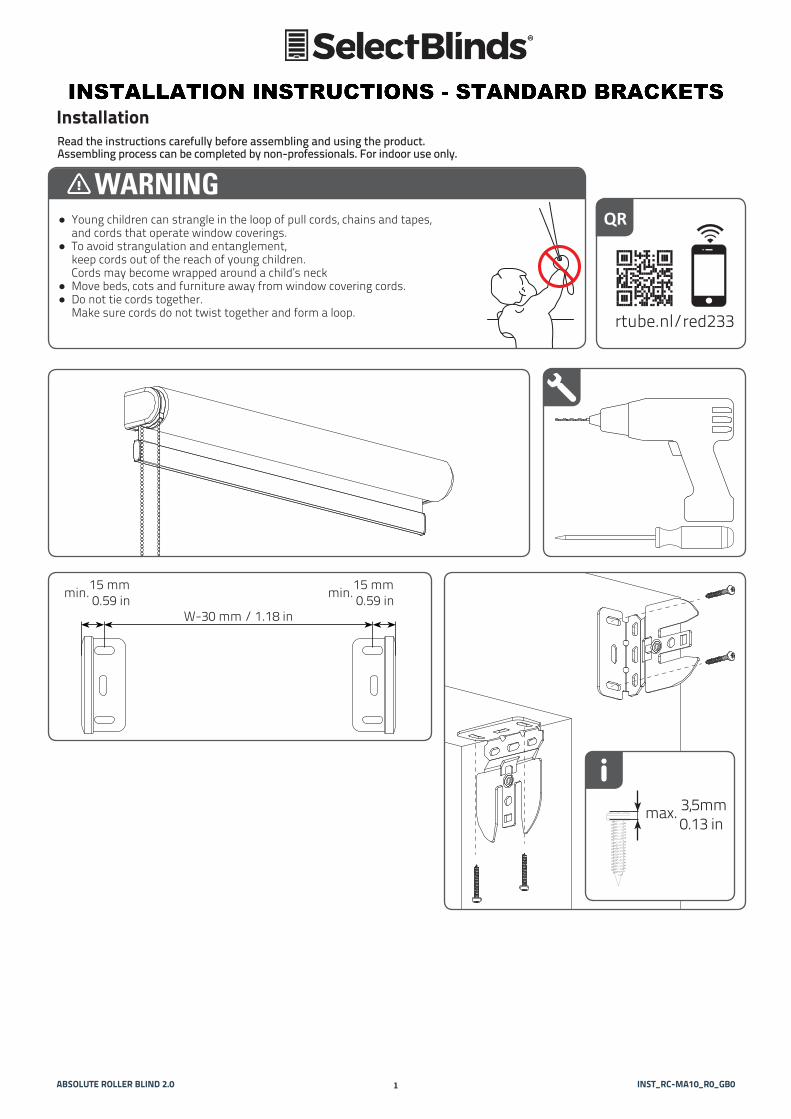
W-30 mm / 1.18 in
min.15 mm
0.59 in
max. 3,5mm 0.13 in
min.15 mm
0.59 in
INST_RC-MA10_R0_GB0
InstallationRead the instructions carefully before assembling and using the product. Assembling process can be completed by non-professionals. For indoor use only.
● Young children can strangle in the loop of pull cords, chains and tapes,and cords that operate window coverings.
● To avoid strangulation and entanglement,keep cords out of the reach of young children.Cords may become wrapped around a child’s neck
● Move beds, cots and furniture away from window covering cords.● Do not tie cords together.
Make sure cords do not twist together and form a loop.
WARNING
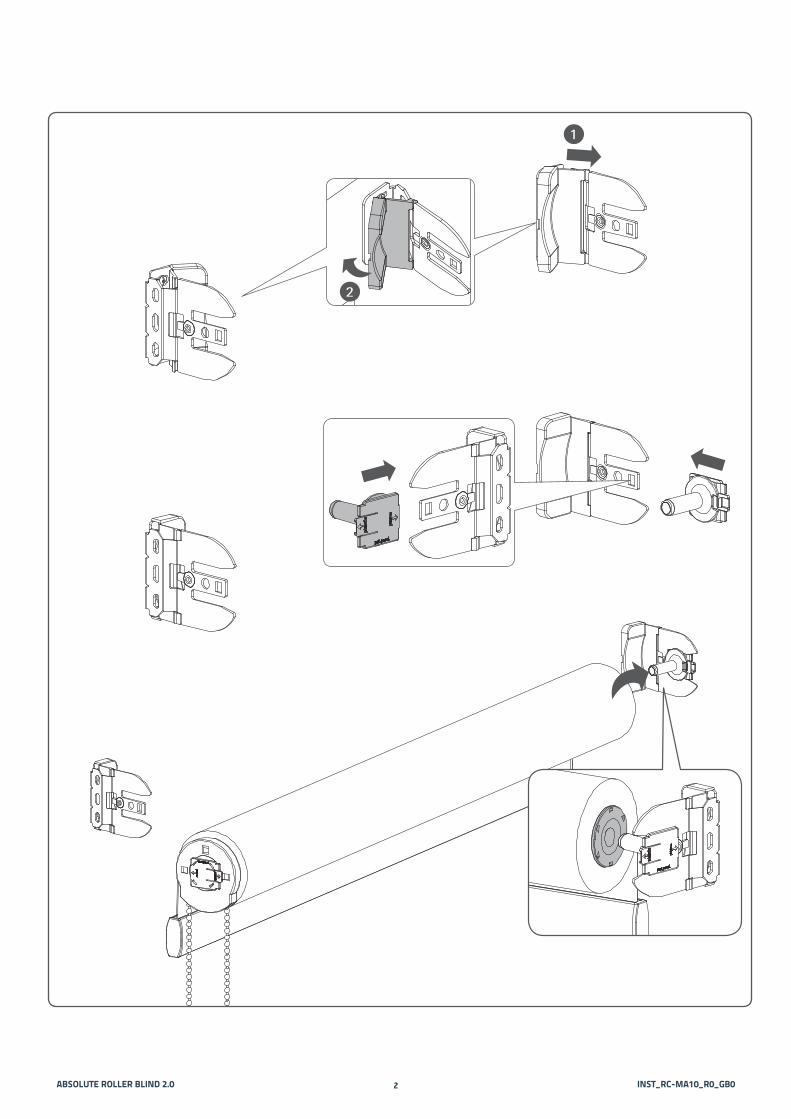
2ABSOLUTE ROLLER BLIND 2.0 2
1
2
INST_RC-MA10_R0_GB0
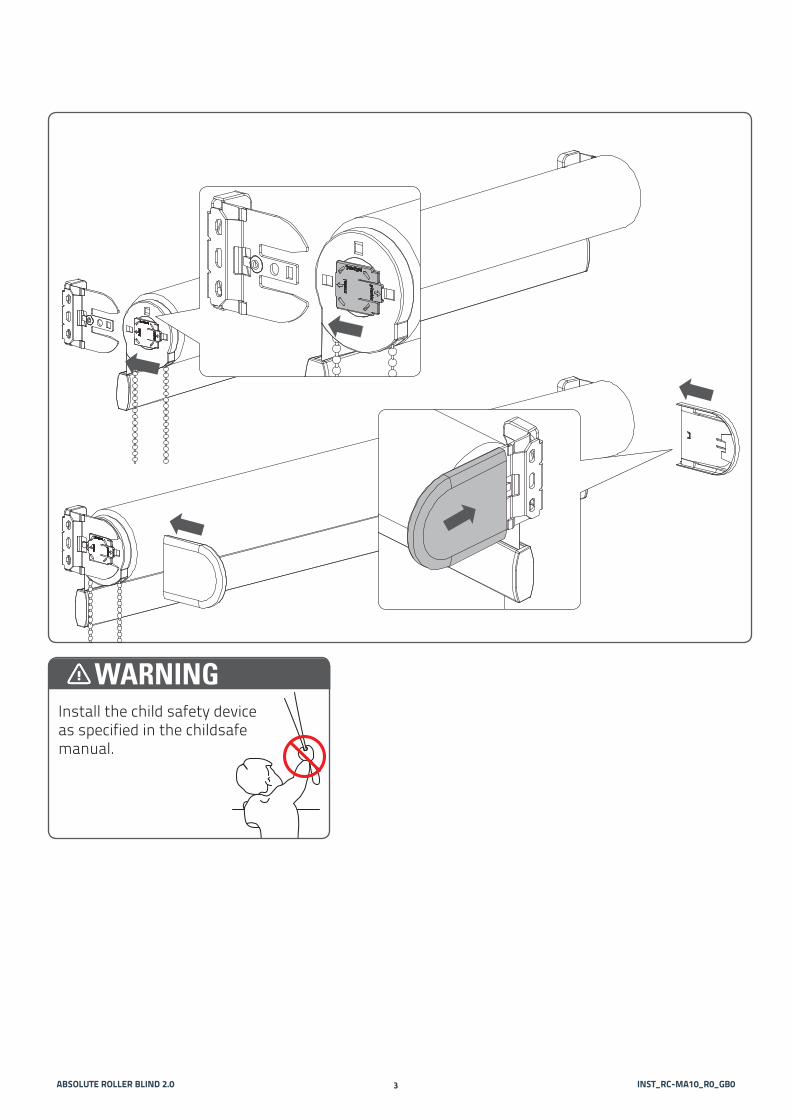
3ABSOLUTE ROLLER BLIND 2.0 3 INST_RC-MA10_R0_GB0
WARNINGInstall the child safety device as specified in the childsafe manual.
4ABSOLUTE ROLLER BLIND 2.0 4
1
2
1
2
INST_RC-MA10_R0_GB0
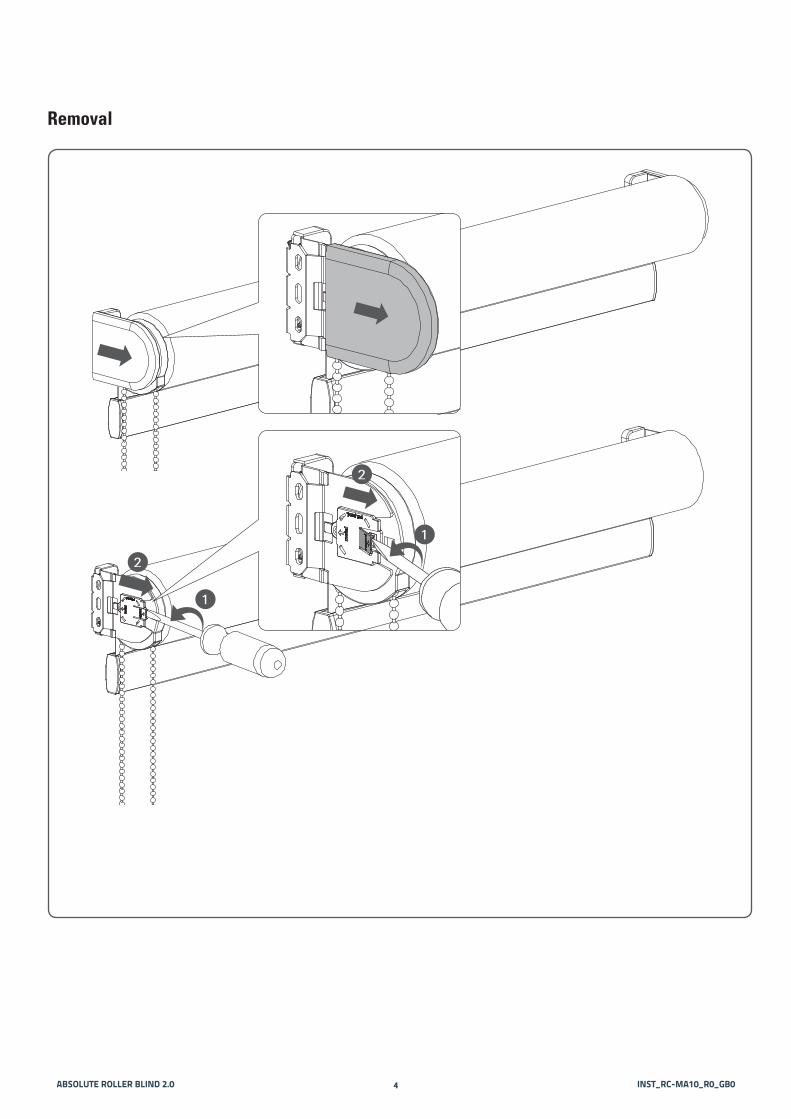
Removal
MN
1800
55_2
0180
726
2 31
2 31
B
C
1 2 3
A
WARNING
nside
A
nsideB
Outside oun d outside windowC
MN
1800
55_2
0180
726
2 31
2 31
B
C
1 2 3
A
WARNING
nside
A
nsideB
Outside oun d outside windowC
MN
1800
55_2
0180
726
2 31
2 31
B
C
1 2 3
A
WARNING
nside
A
nsideB
Outside oun d outside windowC
MN
1800
55_2
0180
726
2 31
2 31
B
C
1 2 3
A
WARNING
nside
A
nsideB
Outside oun d outside windowC
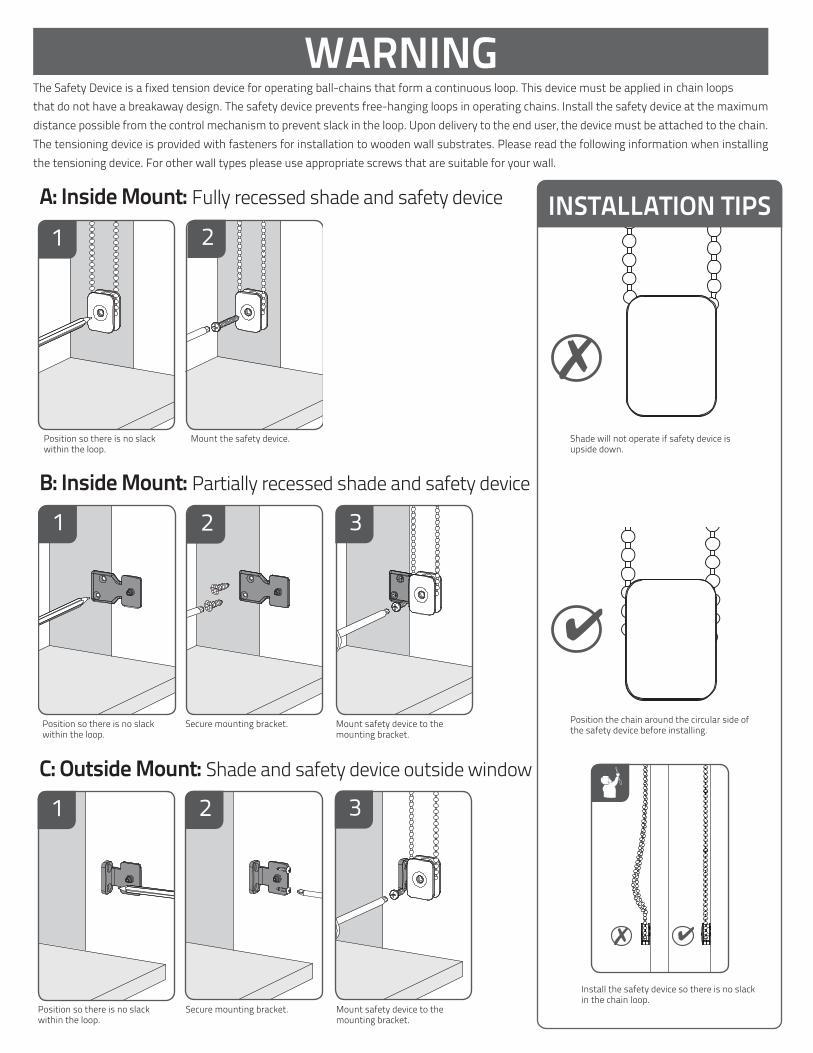
The Safety Device is a fixed tension device for operating ball-chains that form a continuous loop. This device must be applied in chain loops
that do not have a breakaway design. The safety device prevents free-hanging loops in operating chains. Install the safety device at the maximum
distance possible from the control mechanism to prevent slack in the loop. Upon delivery to the end user, the device must be attached to the chain.
The tensioning device is provided with fasteners for installation to wooden wall substrates. Please read the following information when installing
the tensioning device. For other wall types please use appropriate screws that are suitable for your wall.
WARNING
Position so there is no slack within the loop.
Mount the safety device.
A: Inside Mount: Fully recessed shade and safety device
B: Inside Mount: Partially recessed shade and safety device
C: Outside Mount: Shade and safety device outside window
Position so there is no slack within the loop.
Secure mounting bracket. Mount safety device to the mounting bracket.
Position so there is no slack within the loop.
Secure mounting bracket. Mount safety device to the mounting bracket.
INSTALLATION TIPS
Shade will not operate if safety device is upside down.
Position the chain around the circular side of the safety device before installing.
Install the safety device so there is no slack in the chain loop.
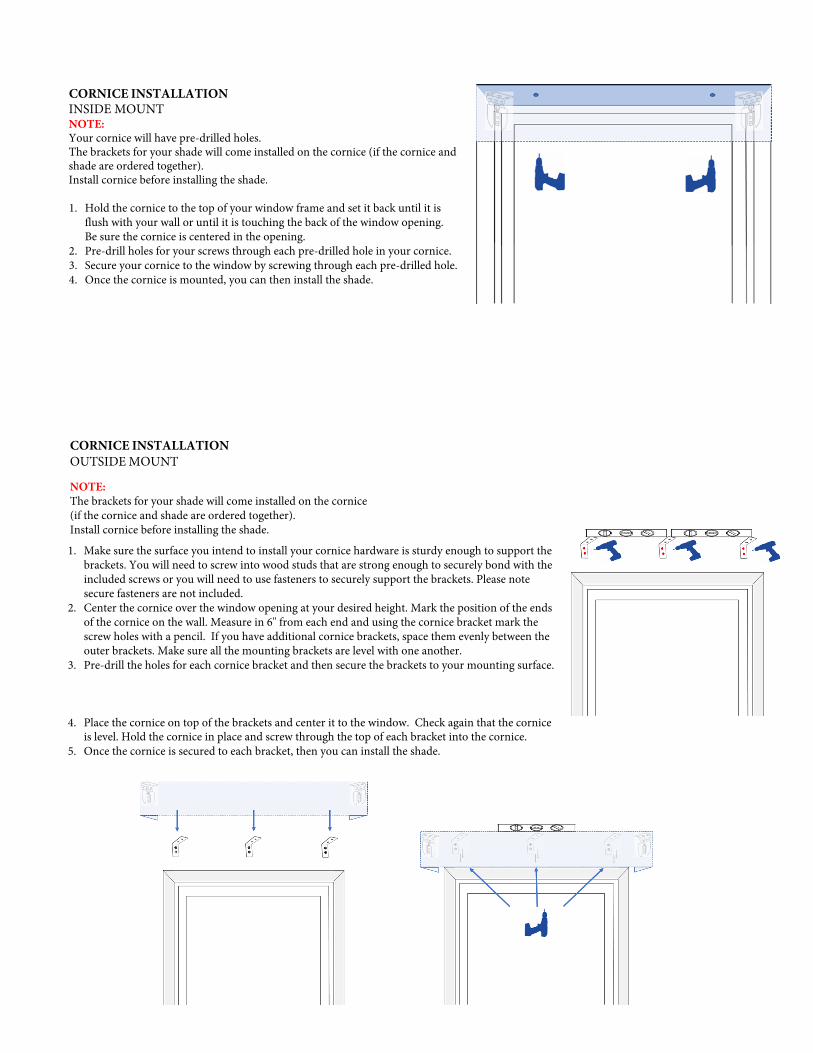
CORNICE INSTALLATIONINSIDE MOUNT NOTE:Your cornice will have pre-drilled holes. The brackets for your shade will come installed on the cornice (if the cornice and shade are ordered together).Install cornice before installing the shade.
1. Hold the cornice to the top of your window frame and set it back until it isflush with your wall or until it is touching the back of the window opening.Be sure the cornice is centered in the opening.
2. Pre-drill holes for your screws through each pre-drilled hole in your cornice.3. Secure your cornice to the window by screwing through each pre-drilled hole.4. Once the cornice is mounted, you can then install the shade.
CORNICE INSTALLATION OUTSIDE MOUNT
NOTE:The brackets for your shade will come installed on the cornice (if the cornice and shade are ordered together). Install cornice before installing the shade.
1. Make sure the surface you intend to install your cornice hardware is sturdy enough to support thebrackets. You will need to screw into wood studs that are strong enough to securely bond with theincluded screws or you will need to use fasteners to securely support the brackets. Please notesecure fasteners are not included.
2. Center the cornice over the window opening at your desired height. Mark the position of the endsof the cornice on the wall. Measure in 6" from each end and using the cornice bracket mark thescrew holes with a pencil. If you have additional cornice brackets, space them evenly between theouter brackets. Make sure all the mounting brackets are level with one another.
3. Pre-drill the holes for each cornice bracket and then secure the brackets to your mounting surface.
4. Place the cornice on top of the brackets and center it to the window. Check again that the corniceis level. Hold the cornice in place and screw through the top of each bracket into the cornice.
5. Once the cornice is secured to each bracket, then you can install the shade.
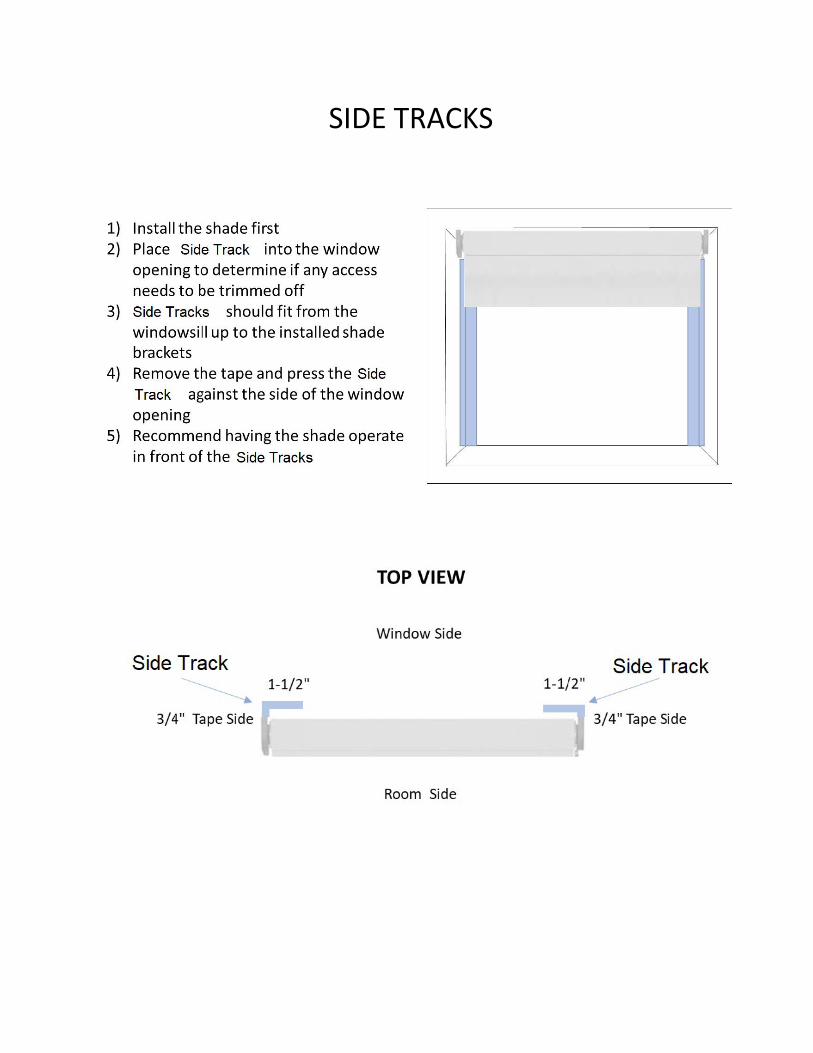
SIDE TRACKS