Embed Size (px)
Citation preview

Robotics
Module 1: Introduction to Robotics
PREPARED BY
IAT Curriculum Unit
August 2008
© Institute of Applied Technology, 2008

AT000 - Robotics
Module 1: Introduction to Robotics 2

AT000 - Robotics
Module 1: Introduction to Robotics 3
Module 1: Introduction to Robotics
Module Objectives
1. Introduce robots to students.
2. Understand the main components of a robot and their functionality.
3. Give examples on robots and their tasks.
4. Introduce LEGO MINDSTORMS NXT to students.
5. Explain NXT Brick functionality and menus
6. Explain functions of LEGO MINDSTORMS NXT Motors & Sensors.
7. Programming using NXT brick.
Module Contents
1 Introduction 4
What is a Robot? 4
Robots Movements Examples 4
2 Robots Components 5
3 LEGO MINDSTORMS NXT 7
What is LEGO MINDSTORMS NXT? 7
LEGO MINDSTORMS NXT Main Components 7
LEGO MINDSTORMS NXT Sensors 9
4 NXT Brick 11
NXT Brick Buttons & Menus 11
Learning Tasks -1 17
5 Introduction to LEGO MINDSTORMS NXT
Sensors and Motors
Learning Tasks -1

AT000 - Robotics
Module 1: Introduction to Robotics 4
1. Introduction
4. What is a Robot?!
A robot is a machine which senses, plans and acts in a way to
perform a task.
• Senses: collect information about the environment using
sensors like your eyes, ears, etc. • Plans: make decisions based on the information collected by
the sensors where the robot has a brain called microcontroller. • Acts: generate an action based on your decision, like
moving, speaking, etc.
4. Robots Movements Examples
Robots are able to move in different ways depending on its
task.
Examples on robot Movements:
• Rotate
• Convey
• Walk
• Swim
• Fly
• Bend, etc.

AT000 - Robotics
Module 1: Introduction to Robotics 5
Examples on Robots and their Movements:
Videos:
• Sony Robot
• Einstein • Rolling
• Snake
• Walking Robot
2. Robots Components
The robot may have the following
components to be able to perform a
task:
a. Physical Components: are the
components used to build a robot
and they are as follows:
� Microcontroller: is a
computer-on-a chip, they are
designed to execute only a
single specific task to control a
single system. The Microcontroller is the brain of the robot that can think and make decision- like your brain.
Fig. 1.1: Examples on Robots
and their Movements

AT000 - Robotics
Module 1: Introduction to Robotics 6
� Sensors: They are the robot
Senses like our eyes, ears,
mouth, nose and our skin.
Robots could sense the
environment using the sensors.
� Motors or Actuators: They are
the action parts which help the
robot to move or perform a
specific task, like our legs,
hands and voice.
� Other Components: like Gears,
axles, beams, connectors,
wires and wheels. The robot
will have other parts to support
the main physical component.
b. Software Component: it depends on
you, you will tell the robot what to
do under a certain condition and
you’ll assign tasks to the robot, how?
You will program it and download the program to its brain (Microcontroller)
to be able to perform the task you
want.
Fig. 1.2: Microcontroller – robots
brain
Fig. 1.3: Sensors – Human
senses
A
Microcontroller
is a Robot
MIND
AT000 - Robotics
Module 1: Introduction to Robotics 7
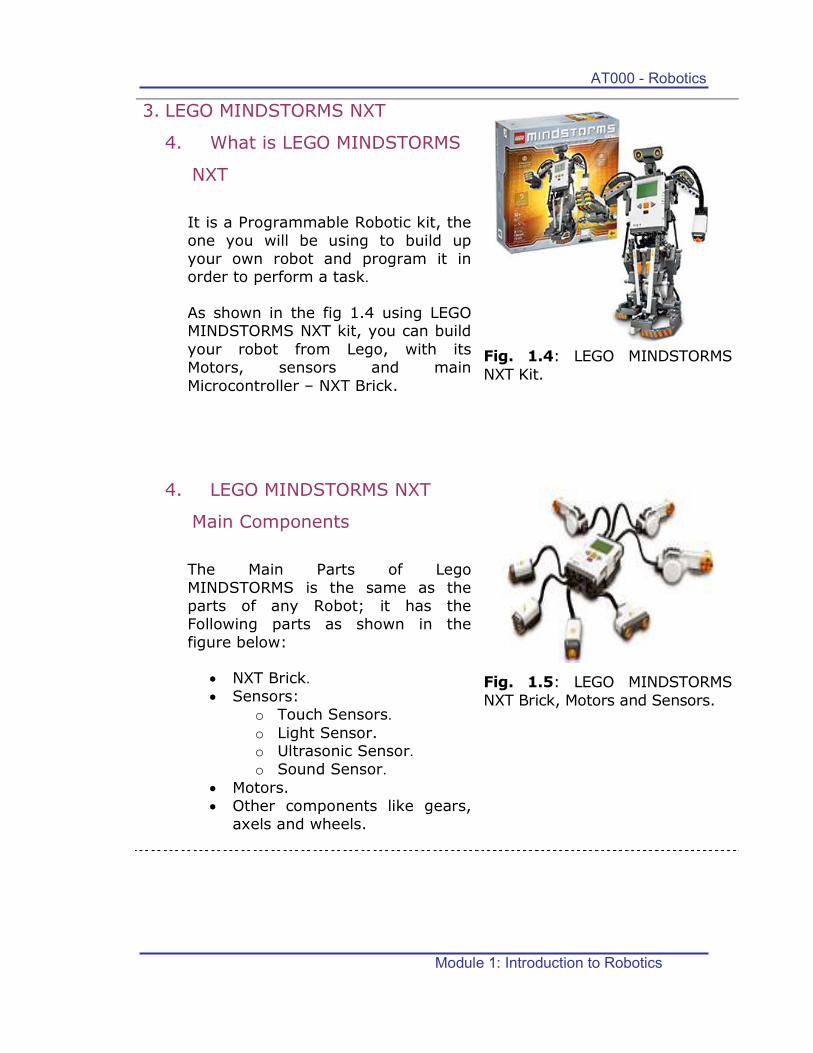
3. LEGO MINDSTORMS NXT
4. What is LEGO MINDSTORMS
NXT
It is a Programmable Robotic kit, the
one you will be using to build up
your own robot and program it in order to perform a task.
As shown in the fig 1.4 using LEGO MINDSTORMS NXT kit, you can build
your robot from Lego, with its
Motors, sensors and main
Microcontroller – NXT Brick.
Fig. 1.4: LEGO MINDSTORMS
NXT Kit.
4. LEGO MINDSTORMS NXT
Main Components
The Main Parts of Lego
MINDSTORMS is the same as the
parts of any Robot; it has the
Following parts as shown in the
figure below:
• NXT Brick.
• Sensors:
o Touch Sensors.
o Light Sensor. o Ultrasonic Sensor.
o Sound Sensor.
• Motors.
• Other components like gears,
axels and wheels.
Fig. 1.5: LEGO MINDSTORMS
NXT Brick, Motors and Sensors.
AT000 - Robotics
Module 1: Introduction to Robotics 8
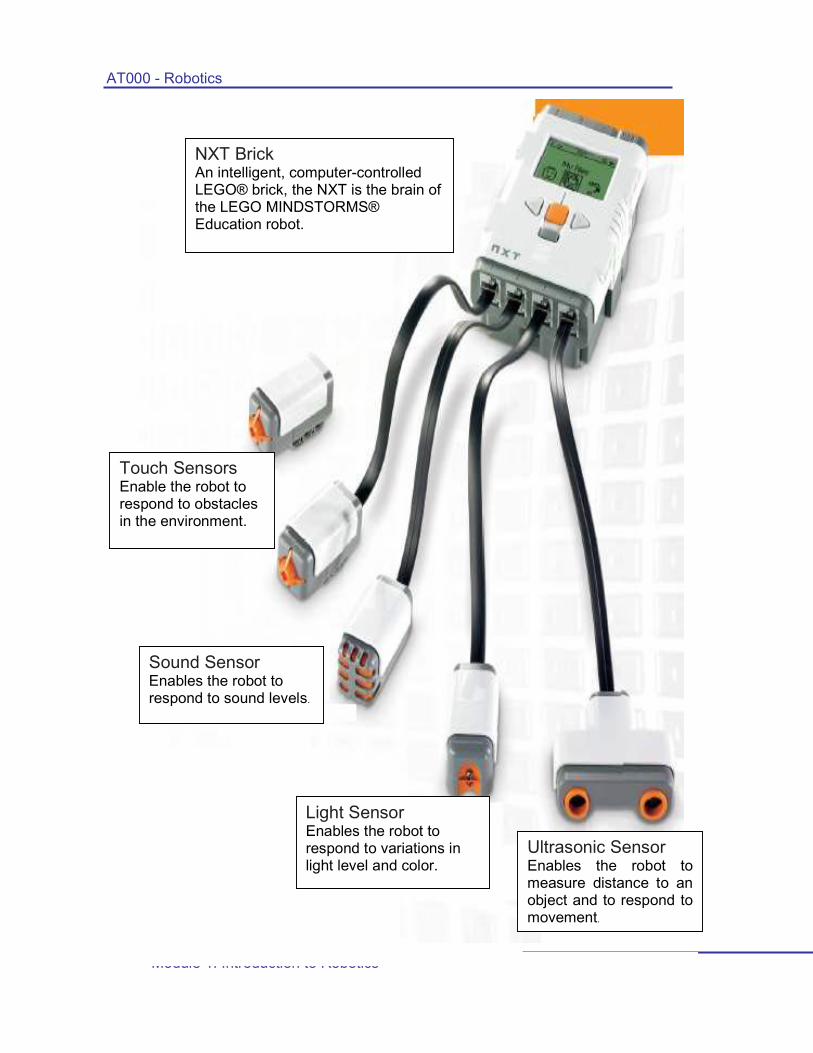
NXT Brick An intelligent, computer-controlled LEGO® brick, the NXT is the brain of the LEGO MINDSTORMS® Education robot.
Touch Sensors Enable the robot to respond to obstacles in the environment.
Sound Sensor Enables the robot to respond to sound levels.
Light Sensor Enables the robot to respond to variations in light level and color.
Ultrasonic Sensor Enables the robot to measure distance to an object and to respond to movement.

AT000 - Robotics
Module 1: Introduction to Robotics 9
4. LEGO MINDSTORMS NXT
Sensors
As mentioned before that each robot
has a brain which is the NXT brick for
LEGO MINDSTORMS NXT, shown in
figure 1.6.
The robot also has sensors which
helps the robot to detect the
surrounding environment just like
the way you do!! How?? See the
figure below.
Fig. 1.6: NXT Brick.
AT000 - Robotics
Module 1: Introduction to Robotics 10
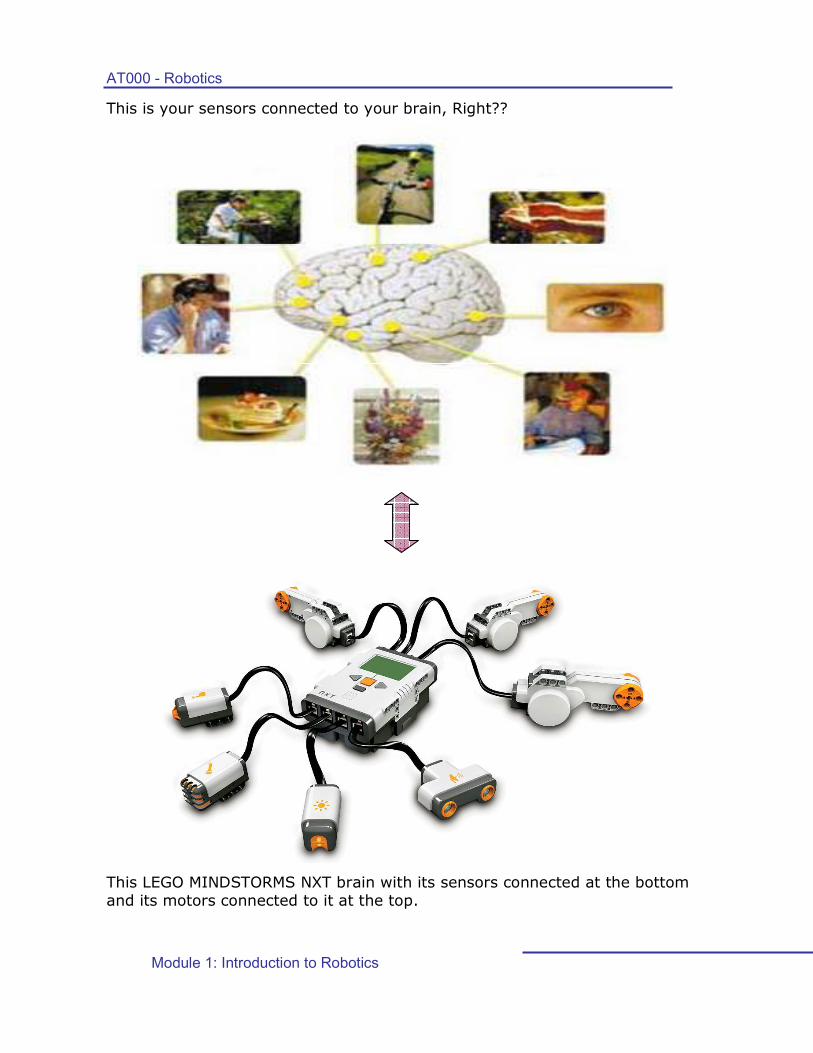
This is your sensors connected to your brain, Right??
This LEGO MINDSTORMS NXT brain with its sensors connected at the bottom
and its motors connected to it at the top.

AT000 - Robotics
Module 1: Introduction to Robotics 11
Sensors are Inputs for your program or the robot, so you can build actions using the information from the sensors. Motors are the outputs of the robot where the action is applied, depending on the sensors reading, Motor ports, Sensor Ports & USB port for downloading programs are shown in the figure below.
Fig. 1.7: Ports for Sensors on the NXT brick are shown in the figure below and numbered from 1-4.
Fig. 1.8: NXT brick Sensor ports.
Motor Ports Sensor Ports USB Port – PC
As shown in this figure- four
ports for the sensors.
The figure shows the default
connection of the sensors.

AT000 - Robotics
Module 1: Introduction to Robotics 12
Motors have three ports since there are three motors for each kit, the Motor ports are labeled A, B and C as shown in the figure below:
Fig. 1.9: NXT brick output (motor) ports.
The figure shows the default
motor connection in case when
a lamp is also connected.
Lamps
AT000 - Robotics
Module 1: Introduction to Robotics 13
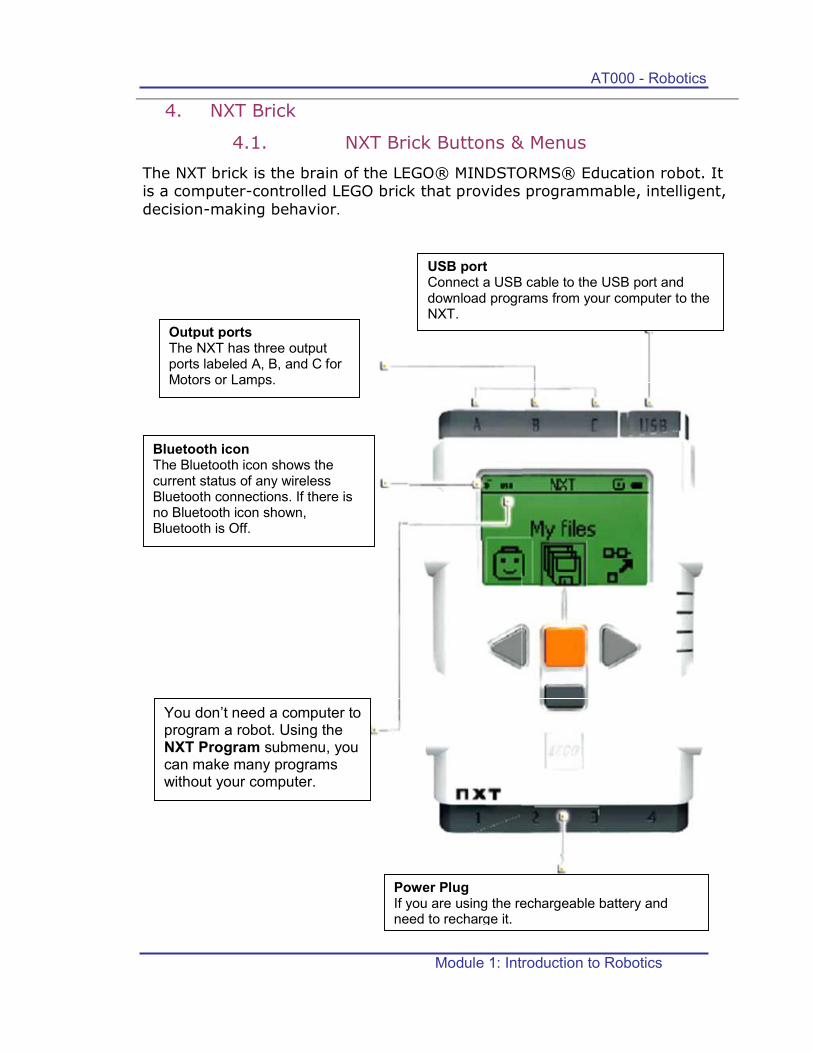
4. NXT Brick
4.1. NXT Brick Buttons & Menus
The NXT brick is the brain of the LEGO® MINDSTORMS® Education robot. It is a computer-controlled LEGO brick that provides programmable, intelligent,
decision-making behavior.
Output ports The NXT has three output ports labeled A, B, and C for Motors or Lamps.
USB port Connect a USB cable to the USB port and download programs from your computer to the NXT.
Bluetooth icon The Bluetooth icon shows the current status of any wireless Bluetooth connections. If there is no Bluetooth icon shown, Bluetooth is Off.
Power Plug If you are using the rechargeable battery and need to recharge it.
You don’t need a computer to program a robot. Using the NXT Program submenu, you can make many programs without your computer.

AT000 - Robotics
Module 1: Introduction to Robotics 14
Running icon When the NXT is turned on, the running icon spins. If the running icon stops spinning, the NXT has frozen and you must reset it.
Battery level The battery icon displays the NXT power level. When the battery power is low (below about 10% capacity), the battery icon flashes on and off.
Loudspeaker When sounds are included in a program, you can hear them through the Loudspeaker.
NXT buttons Orange: On/Enter. Light grey arrows: Navigation, left and right Dark Grey: Clear/Go back.
Input ports The NXT has four input ports for attaching sensors. The sensors must be attached to port 1, 2, 3, or 4.
Turning off your NXT Press the Dark Grey button until you see this screen. Press the Orange button to turn off the NXT. Press the Dark Grey button to go back to the NXT main menu.

AT000 - Robotics
Module 1: Introduction to Robotics 15
To Turn on the NXT
After turning on the NXT brick you will be
able to access its menus, to move between
menus use the triangle buttons NXT brick menus are as follows:
1. My files
2. NXT Program
3. Try Me 4. View
5. Settings
6. Bluetooth
Fig. 1.10: to switch on the NXT
brick.
Fig. 1.11: triangle buttons.
1. My Files
In the My Files submenu you can store all the programs that you have made on the
NXT or downloaded from your computer.
To Open My Files submenu click the orange
button of the NXT Brick, the following
subfolders will appear:
Fig. 1.12: My files menu.
Fig. 1.13: Orange button.
Software Files
Programs you have
downloaded from your computer.
NXT Files
Programs you have
made on the NXT.
Sound Files
Sounds that are part of
a program that you
download.

AT000 - Robotics
Module 1: Introduction to Robotics 16
2. NXT Program
You don’t need a computer to program a
robot. Using the NXT Program submenu, you can make many programs without
your computer.
Opening the NXT program will provide you
with the default connections for the Motors
& the Sensors as shown in figure 1.12.
Port 1: Touch Sensor Port 2: Sound Sensor
Port 3: Light Sensor
Port 4: Ultrasonic Sensor
Port B/C: L/R motors
You can start building your program by
clicking the orange button again; NXT
program will show you the list of actions
you could use to write a program, the
figure below shows the screen of the NXT
brick.
To go over the options for writing the
program use the NXT buttons
To select an action like Forward press the
NXT button .
Once you finish your program, you can run
it using the NXT button . You can save
your program and run it later.
x
Fig. 1.14: NXT Program menu.
Fig. 1.15: NXT Program menu –
default connections.
Fig. 1.16: NXT brick Programming options.

AT000 - Robotics
Module 1: Introduction to Robotics 17
3. Try Me
The Try Me feature allows you to
experiment with the Sensors and Motors
using programs that are ready to run.
Using Try me you could try the following:
� Try Sound: try the sound sensor.
� Try Touch: try the Touch Sensor � Try Light: try the light sensor.
� Try Ultrasonic: try the ultrasonic
sensor.
� Try Motor: try the Motors.
Fig. 1.17: Try Me Menu.
4. View
In the View submenu, you can do a quick
test of your Sensors and Motors and see
the current data for each.
Using View menu you could view the
following:
� Sound: view the sound strength and
level as a percentage.
� Touch: shows an indication
whenever the touch sensor is
pressed, released or bumped.
� Light: shows light strength of the
light sensor in different light
conditions and for different colors. � Distance: shows distance in cm or
inches using the ultrasonic sensors.
� Motor: shows the number of
rotations or degrees of a connected motor.
Fig. 1.18: Try Me Menu
5. Settings
In the Settings submenu, you can adjust
the different settings of the NXT, such as
Loudspeaker, volume or Sleep mode. In
this submenu, you can also delete the
programs that you have stored in the NXT
memory.
Fig. 1.19: Settings menu.

AT000 - Robotics
Module 1: Introduction to Robotics 18
Using the Settings menu you can adjust
the following:
� Sleep Mode: You can set your
NXT to be turned off after 2, 5,
10, 30 or 60 minutes when it is not being used.
� Change Volume: Here you can
adjust the volume of the NXT
speakers in a range of 0 (Off) to 4 (Loud).
� Delete all programs: You are
able to delete the programs from four subfolders: Software files,
NXT files, Sound files, and Try Me
files.
6. Bluetooth
� In the Bluetooth submenu, you can set
a wireless connection between your NXT
and other Bluetooth devices, such as
other NXT units, mobile phones, and computers.
� You can download programs without
using the USB cable
Fig. 1.20: Bluetooth menu.

AT000 - Robotics
Module 1: Introduction to Robotics 19
Learning Tasks -1:
5. Use the NXT brick View menu to do the following:
a. View the reading of the sound sensor in:
i. dB: all actual sound, including sounds too high or low for
the human ear to hear.
1. connect the sound sensor to one of the input ports 1-
4
2. View � Sound dB �Select the port the sensor is
connected to.
3. What kind of readings does the NXT brick shows?
……………………………………………………………………………………………………
……………………………………………………………………………………………………
4. What is the use of sound sensor?
……………………………………………………………………………………………………
……………………………………………………………………………………………………
ii. dBA: The sounds humans ears are able to hear.
1. Change the port the sensor is connected to. 2. View � Sound dBA �Select the port the sensor is
connected to.
3. What is the difference between the readings in dB
and dBA?
……………………………………………………………………………………………………
……………………………………………………………………………………………………
b. View the readings of the light sensor:
i. Connect the light sensor to one of the input ports for
reflected light readings. 1. View � Reflected light�Select the port the sensor is
connected to as shown in the figure below.

AT000 - Robotics
Module 1: Introduction to Robotics 20
2. Pass the light sensor over different colors and record
the values.
Color to test Sensor readings
3. What is the use of the light sensor in this case, is the sensor flood light on or off?
……………………………………………………………………………………………………
……………………………………………………………………………………………………
ii. Connect the light sensor for ambient light readings.
1. View � Ambient light�Select the port the sensor is
connected to as shown in the figure below.
2. the ambient light reads the light around the sensor,
so view the reading of the sensor for the following
cases:
Light Intensity Sensor readings
Dark
Medium light
Bright light
AT000 - Robotics
Module 1: Introduction to Robotics 21
3. Describe the reading of the light sensor for different
light intensities.
……………………………………………………………………………………………………
……………………………………………………………………………………………………
4. Is the sensor flood light on or off?
……………………………………………………………………………………………………
iii. Connect the light sensor to View light sensor readings 1. View � Light sensor �Select the port the sensor is
connected to.
2. View the readings for different light intensities. 3. What is the different between this reading and the
previous readings?
……………………………………………………………………………………………………
……………………………………………………………………………………………………
4. What is the light sensor used for?
1. …………………………………………………………………………………………………
2. …………………………………………………………………………………………………
c. View the readings of the touch Sensor:
i. Connect the touch sensor to one of the input ports.
ii. View � Touch �Select the port the sensor is connected to.
iii. Press and release.
iv. What is the reading for the following:
Sensor NXT brick readings
Pressed
Released
d. View the readings of the ultrasonic sensor:
i. Connect the ultrasonic sensor to an input port.
ii. View � ultrasonic cm �Select the port the sensor is
connected to.
iii. Change the distance between the sensor and a surface (for
example: your hand) & monitor the difference.

AT000 - Robotics
Module 1: Introduction to Robotics 22
iv. What does the ultrasonic sensor measures, what is the
unit?
……………………………………………………………………………………………………
……………………………………………………………………………………………………
v. Now under the View menu select ultrasonic inch, go
through the previous procedure and observe the difference
between the two readings, what is the unit of the
measurement?
……………………………………………………………………………………………………
……………………………………………………………………………………………………
e. View the readings of the motor rotations:
i. Connect the motor to one of the motors ports A-C.
ii. View � Select Motor rotations � select the port of the
motor.
iii. Rotate the motor manually by hand or by attaching a wheel
to the motor to rotate the motor as shown the figure below.
iv. What are the readings of the NXT brick and how it is
related to the motors rotations?
……………………………………………………………………………………………………
……………………………………………………………………………………………………
v. Now under View � Motor degrees � select the motor port.

AT000 - Robotics
Module 1: Introduction to Robotics 23
vi. Rotate the motor manually or as shown in the figure above,
rotate it clockwise and counter clockwise
vii. Monitor the readings of the NXT brick; describe the motor
readings as rotating in both directions.
…………………………………………………………………………………………………
…………………………………………………………………………………………………
…………
viii. What does the reading shows, what is the number
displayed on the NXT brick?
…………………………………………………………………………………………………
…………………………………………………………………………………………………
…………
5. Use Try me submenu & try the following:
a. Try touch sensor. i. Connect the touch sensor to its default port
(port 1).
ii. Use Try touch under Try Me menu to try the sensor.
iii. Press and release, describe what happens?
…………………………………………………………………………………………………
…………………………………………………………………………………………………
…………
b. Try Sound Sensor.
i. Connect the Sound Sensor to its default port (port2).
ii. Connect one of the motors to port B of the
NXT brick
iii. Use Try Sound under the Try Me menu to try the sensor
iv. Speak softly and then loudly, what is the relation between
the run of the motor & the sound level?
…………………………………………………………………………………………………
…………………………………………………………………………………………………
…………
c. Try Light Sensor
i. Connect the Light sensor to its default port
(port3)
ii. Under Try Me menu, run try Light to try the
sensor.
iii. Listen to the sound generated by the NXT brick while

AT000 - Robotics
Module 1: Introduction to Robotics 24
applying different colors & light levels to the light sensor.
iv. Explain the use of the light sensor with colors and different
light intensities?
……………………………………………………………………………………………………
…………………………………………………………………………………………………………………………………………………………………………………………………………
d. Try the Ultrasonic sensor i. Connect the ultrasonic sensor to its default
port (port4) Under Try Me menu, run try
Ultrasonic to try the sensor. ii. Listen to the sound generated by the NXT
brick while applying different distances to the ultrasonic
sensor
iii. What happens if you put your hand on the sensor? Describe
the relation between the sound as an alarm and the
distance applied to the sensor?
…………………………………………………………………………………………………
…………………………………………………………………………………………………
…………………………………………………………………………………………………
e. Try the Motor.
i. Connect one of the motors to port A.
ii. Run try motor from Try Me menu.
iii. Rotate the motor manually by your
hand and listen to the sound generated by the NXT brick,
start from low speed of rotating to fast speed of rotation,
and describe the sounds as increasing the speed of
rotation.
…………………………………………………………………………………………………
……………………………………………………………………………………………………………

AT000 - Robotics
Module 1: Introduction to Robotics 25
5. Introduction
Identify the parts shown in figure 1.21 and their names.
Motors
Ultrasonic Sensor Light Sensor Sound Sensors
Touch Sensor
NXT Brick
Cables
Fig. 1.21: MINDSTORMS NXT Components

AT000 - Robotics
Module 1: Introduction to Robotics 26
4. Sensors & Motors:
Sensors are Inputs for your program or robot, so you can build actions
using the information from the
sensors.
Motors are the outputs of the robot
where the action is applied, depending
on the sensors reading, motor ports,
Sensor Ports & USB port for
downloading programs are shown in
figure 1.22 (a-c).
Ports for Sensors on the NXT brick are
shown in the figure below and
numbered from 1-4.
Fig. 1.22 –a: Motor ports
Fig. 1.22 –b: Sensor ports
Fig. 1.22 –c: USB port – PC.
AT000 - Robotics
Module 1: Introduction to Robotics 27
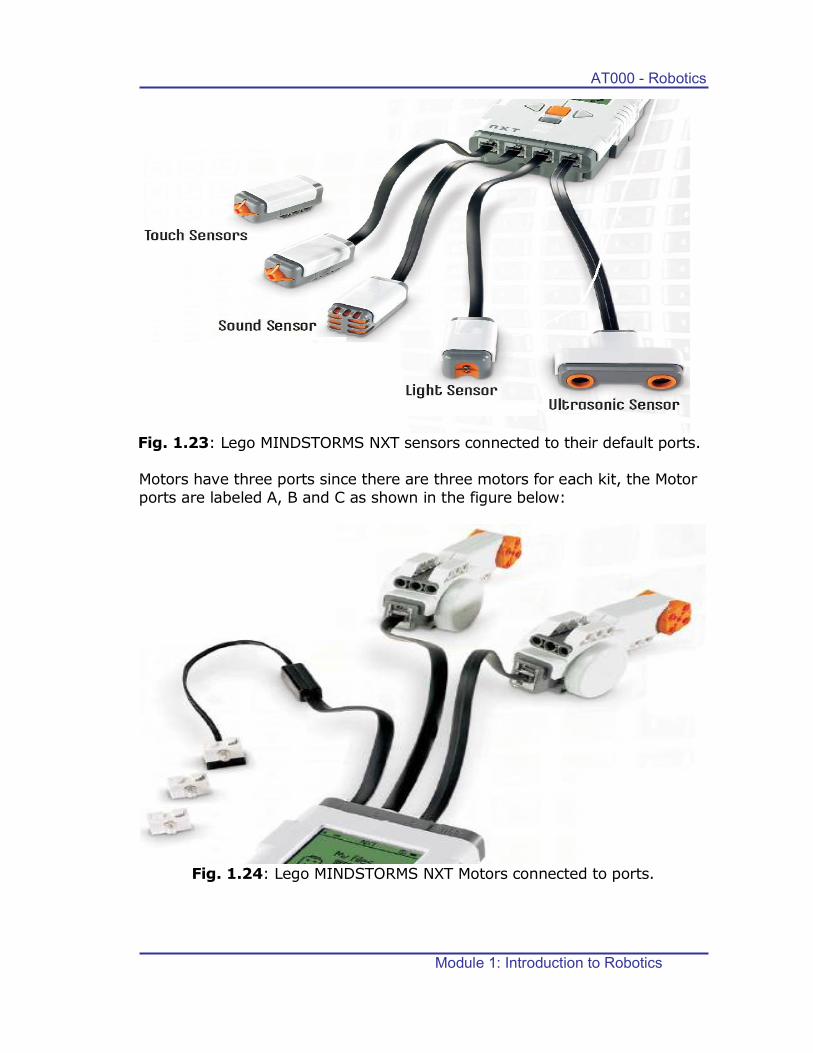
Fig. 1.23: Lego MINDSTORMS NXT sensors connected to their default ports.
Motors have three ports since there are three motors for each kit, the Motor
ports are labeled A, B and C as shown in the figure below:
Fig. 1.24: Lego MINDSTORMS NXT Motors connected to ports.

AT000 - Robotics
Module 1: Introduction to Robotics 28
Learning Task -2
OBJECTIVES: • Write a simple program using NXT program Menu.
• Save and run a program using NXT brick without the use of the
PC.
• Learn how to use the NXT menus: My files and NXT program.
MATERIALS (per group):
• LEGO MINDSTORMS NXT kit:
o NXT Brick.
o 3- Motors.
o 2-Touch Sensors.
o 1- Ultrasonic Sensor.
o 1-Light Sensor.
o 1-Sound Sensor.
o Cables.
Background:
7. My Files
To Open My Files submenu click the orange button of the NXT Brick
Software Files
Programs you have
downloaded from your
computer.
NXT Files
Programs you have
made on the NXT.
Sound Files
Sounds that are part of
a program that you
download.
In the My Files submenu you can store all the programs that you have made on the NXT or downloaded from your computer.

AT000 - Robotics
Module 1: Introduction to Robotics 29
8. NXT Program
Opening the NXT program will provide you with the default connections
for the Motors & the Sensors as shown in the figure below:
Port 1: Touch Sensor Port 2: Sound Sensor Port 3: Light Sensor Port 4: Ultrasonic Sensor Port B/C: L/R motors
You can start building your program by clicking the orange button
again; NXT program will show you the list of actions you could use to
write a program, the figure below shows the screen of the NXT brick.
You don’t need a computer to program a robot. Using the NXT Program submenu, you can make many programs without your computer.

AT000 - Robotics
Module 1: Introduction to Robotics 30
Task 1:
a) Using My files Menu go to sound files and run the following files:
a. GoodMorning
b. Have a nice day.
c. Good Job b) Using My files Menu open NXT files and see the files saved,
mention the name of two files:
a. ……………………………
b. ……………………………
c) Open the Software files submenu, do you have any files saved? If
there is no files why?
…………………………………………………………………………………………………… ……………………………………………………………………………………………………
Task 2:
a) Open the NXT Program Menu and do the following:
a. Program Description: program the robot to go back and
forth when the Touch Sensor is pressed.
i. First, the robot will move forward until the Touch
Sensor is pressed, and then it will move backwards.
ii. When its Touch Sensor is pressed again, the robot
will move forward once again. This will continue
indefinitely until you stop the program. b. From the description above a touch sensor in addition to
motors will be needed.
NOTE: when writing a program with NXT Brick, connect the
sensors and Motors to their default ports as described in the
previous page.
i. Connect motors to C & B.
ii. Connect the Touch Sensor to port 1.
c. Follow the procedure in the figure below:
AT000 - Robotics
Module 1: Introduction to Robotics 31
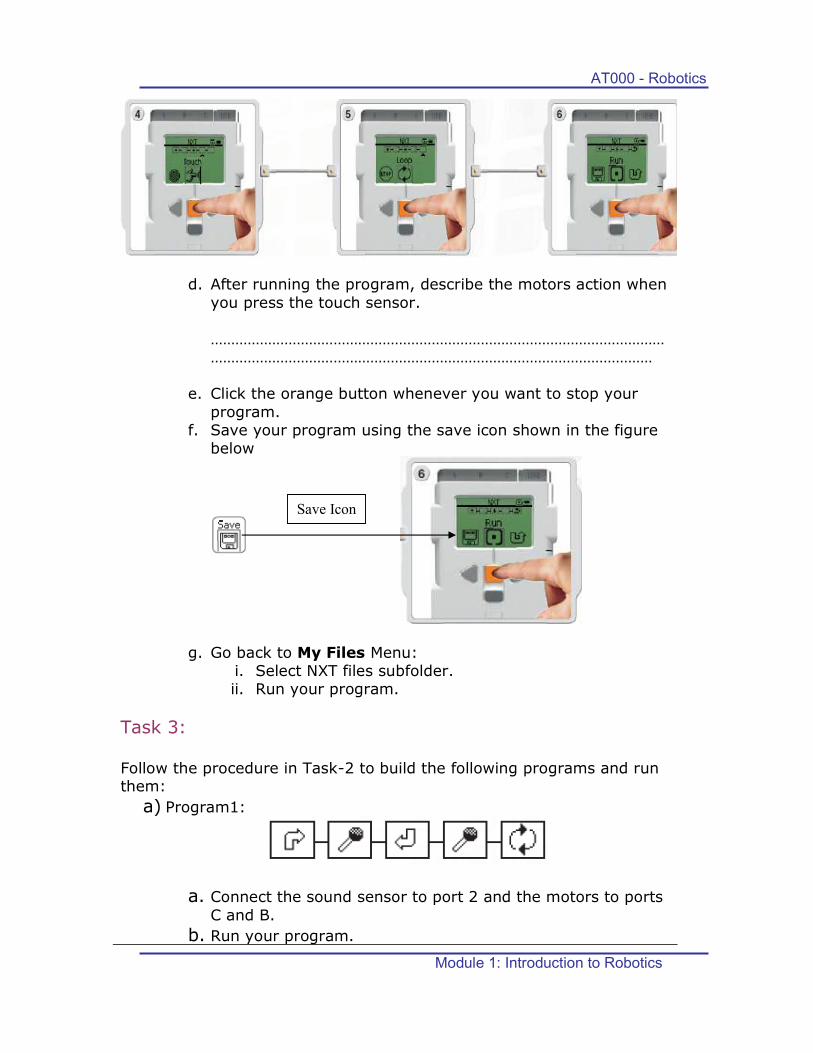
d. After running the program, describe the motors action when
you press the touch sensor.
…………………………………………………………………………………………………
………………………………………………………………………………………………
e. Click the orange button whenever you want to stop your
program.
f. Save your program using the save icon shown in the figure
below
Save Icon
g. Go back to My Files Menu:
i. Select NXT files subfolder.
ii. Run your program.
Task 3: Follow the procedure in Task-2 to build the following programs and run them:
a) Program1:
a. Connect the sound sensor to port 2 and the motors to ports
C and B. b. Run your program.

AT000 - Robotics
Module 1: Introduction to Robotics 32
c. Describe what is the program doing with sound sensor and
motors?
…………………………………………………………………………………………………
…………………………………………………………………………………………………
…………………………………………………………………………………………………
d. What is the effect of sound on the motors movement?
……………………………………………………………………………………………………………………………………………………………………………………………………
e. Stop your program.
b) Program 2:
a. Connect the sound sensor to port 2 and the motors to ports
C and B. b. Run your program. c. Describe what is the program doing with sound sensor and
motors? …………………………………………………………………………………………………
…………………………………………………………………………………………………
…………………………………………………………………………………………………
d. What is the effect of sound on the motors movement?
…………………………………………………………………………………………………
…………………………………………………………………………………………………
e. Stop your program.


![MODULE 1 QUIZ: BASICS OF INVESTMENTS - Quia MODULE QUIZZES [2014] ADVISOR TRAINING & DEVELOPMENT Page 1 MODULE 1 QUIZ: BASICS OF INVESTMENTS 1. What are the disadvantages of investing](https://img.pdfslide.us/doc/110x75/5ab916427f8b9ac10d8dc694/module-1-quiz-basics-of-investments-quia-module-quizzes-2014-advisor-training.jpg)