Embed Size (px)
Citation preview

AQUAPHOR RO-101 REVERSE OSMOSIS SYSTEM
System Tested and Certified by NSF International against NSF/ANSI Standard 58 for the reduction of claims specified on performance data sheet.
OWNER’S MANUAL
2 AQUAPHOR RO-101 REVERSE OSMOSIS SYSTEM
WarningPlease read this manual carefully before you proceed with the installation. Your failure to fol-
low any of the attached instructions or operating parameters may lead to the product’s failure and possible property damage.
Save the manual for future reference.
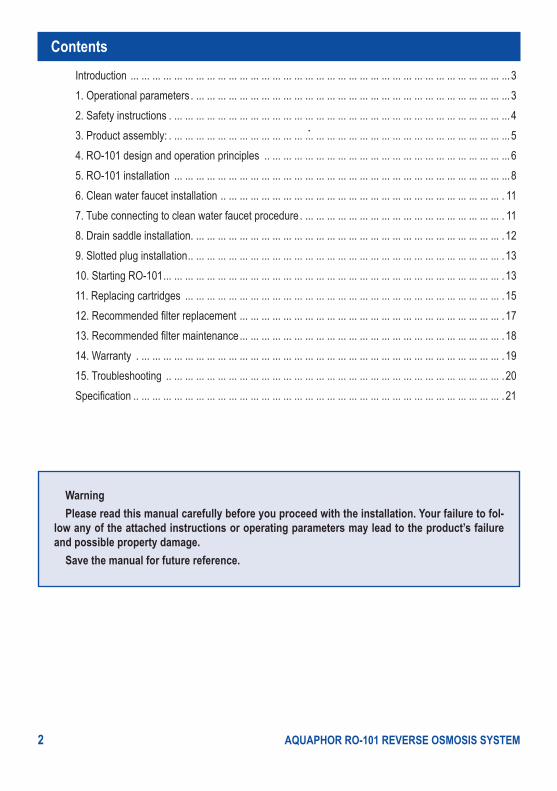
ContentsIntroduction ... ... ... ... ... ... ... ... ... ... ... ... ... ... ... ... ... ... ... ... ... ... ... ... ... ... ... ... ... ... ... ... ... ... ...31. Operational parameters . ... ... ... ... ... ... ... ... ... ... ... ... ... ... ... ... ... ... ... ... ... ... ... ... ... ... ... ... ...32. Safety instructions . ... ... ... ... ... ... ... ... ... ... ... ... ... ... ... ... ... ... ... ... ... ... ... ... ... ... ... ... ... ... ...43. Product assembly: . ... ... ... ... ... ... ... ... ... ... ... ... ... ... ... ... ... ... ... ... ... ... ... ... ... ... ... ... ... ... ...54. RO-101 design and operation principles .. ... ... ... ... ... ... ... ... ... ... ... ... ... ... ... ... ... ... ... ... ... ...65. RO-101 installation ... ... ... ... ... ... ... ... ... ... ... ... ... ... ... ... ... ... ... ... ... ... ... ... ... ... ... ... ... ... ...86. Clean water faucet installation .. ... ... ... ... ... ... ... ... ... ... ... ... ... ... ... ... ... ... ... ... ... ... ... ... ... . 117. Tube connecting to clean water faucet procedure . ... ... ... ... ... ... ... ... ... ... ... ... ... ... ... ... ... ... . 118. Drain saddle installation . ... ... ... ... ... ... ... ... ... ... ... ... ... ... ... ... ... ... ... ... ... ... ... ... ... ... ... ... .129. Slotted plug installation.. ... ... ... ... ... ... ... ... ... ... ... ... ... ... ... ... ... ... ... ... ... ... ... ... ... ... ... ... .1310. Starting RO-101... ... ... ... ... ... ... ... ... ... ... ... ... ... ... ... ... ... ... ... ... ... ... ... ... ... ... ... ... ... ... .1311. Replacing cartridges ... ... ... ... ... ... ... ... ... ... ... ... ... ... ... ... ... ... ... ... ... ... ... ... ... ... ... ... ... .1512. Recommended filter replacement ... ... ... ... ... ... ... ... ... ... ... ... ... ... ... ... ... ... ... ... ... ... ... ... .1713. Recommended filter maintenance... ... ... ... ... ... ... ... ... ... ... ... ... ... ... ... ... ... ... ... ... ... ... ... .1814. Warranty . ... ... ... ... ... ... ... ... ... ... ... ... ... ... ... ... ... ... ... ... ... ... ... ... ... ... ... ... ... ... ... ... ... .1915. Troubleshooting .. ... ... ... ... ... ... ... ... ... ... ... ... ... ... ... ... ... ... ... ... ... ... ... ... ... ... ... ... ... ... .20Specification .. ... ... ... ... ... ... ... ... ... ... ... ... ... ... ... ... ... ... ... ... ... ... ... ... ... ... ... ... ... ... ... ... ... .21
AQUAPHOR RO-101 REVERSE OSMOSIS SYSTEM 3
Thank you for your purchase of this Reverse Osmosis system AQUAPHOR RO-101. With proper installation and maintenance, this system will provide you with premium quality drinking water. The technology used in the Aquaphor RO enriches the filtered water with minerals in controlled quantities.
This water is highly beneficial for the body as it helps to normalize the physiological processes. If you have any questions or concerns, please contact our customer service department at 855 855 2299
or email [email protected]. We are always happy to answer any questions you may have regarding our product.
Introduction AQUAPHOR RO-101 operates by removing contaminants from water at the molecular level. By using your household water pressure to squeeze the water against a special membrane, the water molecules are sepa-rated from any impurities that exist.
Rejected dissolved solids are automatically rinsed away through the drain leaving you with only high-quality, delicious water for your use.
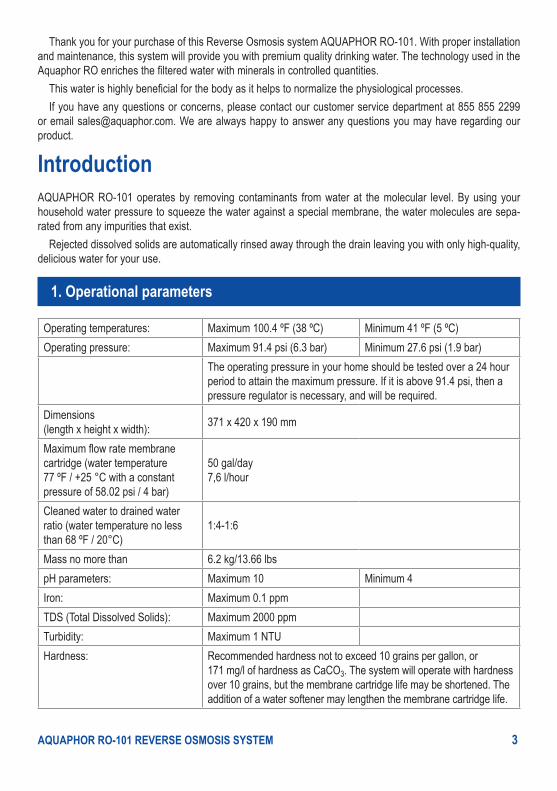
1. Operational parameters
Operating temperatures: Maximum 100.4 ºF (38 ºC) Minimum 41 ºF (5 ºC)Operating pressure: Maximum 91.4 psi (6.3 bar) Minimum 27.6 psi (1.9 bar)
The operating pressure in your home should be tested over a 24 hour period to attain the maximum pressure. If it is above 91.4 psi, then a pressure regulator is necessary, and will be required.
Dimensions(length х height х width): 371 х 420 х 190 mm
Maximum flow rate membrane cartridge (water temperature 77 ºF / +25 °С with a constant pressure of 58.02 psi / 4 bar)
50 gal/day7,6 l/hour
Cleaned water to drained water ratio (water temperature no less than 68 ºF / 20°С)
1:4-1:6
Mass no more than 6.2 kg/13.66 lbspH parameters: Maximum 10 Minimum 4Iron: Maximum 0.1 ppmTDS (Total Dissolved Solids): Maximum 2000 ppmTurbidity: Maximum 1 NTUHardness: Recommended hardness not to exceed 10 grains per gallon, or
171 mg/l of hardness as CaCO3. The system will operate with hardness over 10 grains, but the membrane cartridge life may be shortened. The addition of a water softener may lengthen the membrane cartridge life.

4 AQUAPHOR RO-101 REVERSE OSMOSIS SYSTEM
1. Operational parameters, Cont.
Table 1. The dependence of minimum necessary operating pressure of the water purifier from mineralization.
Mineralization , mg-equ/l
Minimum pressure
psi bar 2 29.01 24 36.26 2.56 43.51 38 58.02 4
10 87.02 6
ATTENTION
The efficiency of RO-101 depends on the incoming tap water mineralization and tap water pres-sure (please see Table 1). The recommended operation of RO-101 requires tap water pressure of at least 29.01 psi / 2 bar.When tap water pressure is less than illustrated in the Table 1, it is highly recommended to install a booster pump in order to obtain drainage ratio.
2. Safety instructions
Warning: RO-101 must be applied to potable water only.
It is highly recommended that a water treatment specialist is hired to install and maintain this appliance. When installing the appliance into a local water supply, it is recommended that you conduct a full water
analysis. If the water analysis does not correspond with the requirements, the life of the filtration and membrane cartridges may be significantly reduced. In this case, it is recommended to use auxiliary water treatment sys-tems (e.g. mechanical filter, de-ironing filter with, or alongside a water softener). It is recommended that you only use microbiological safe water with your Reverse Osmosis system appliance.
Caution: Do not use water that is microbiologically unsafe or water of unknown quality without adequate disinfection before or after using the appliance.
Caution: Reverse Osmosis water should not be run through copper tubing as the purity of the water will leach copper and cause an objectionable taste in the water. Additionally, it will form pinholes in the tubing. Be sure to follow any state or local regulations.
Caution: The Reverse Osmosis system is designed to be connected to cold water only. Never run warm or hot water through your appliance.
AQUAPHOR RO-101 REVERSE OSMOSIS SYSTEM 5
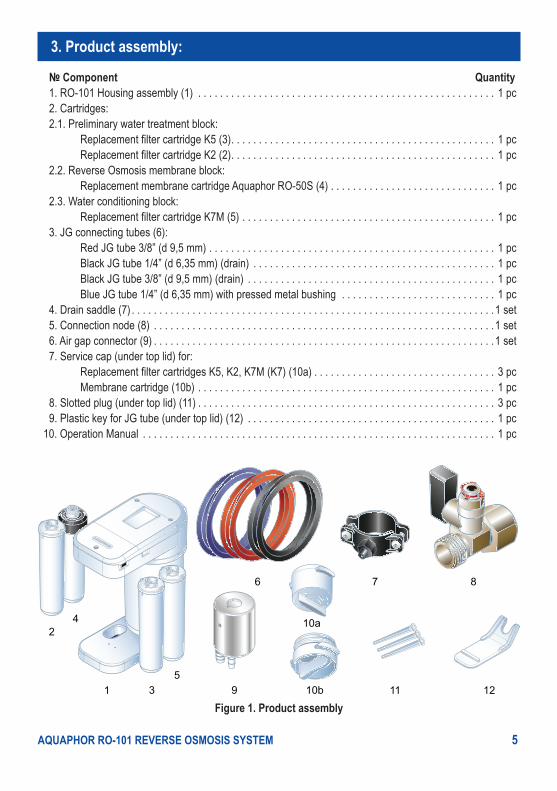
3. Product assembly:
№ Component Quantity 1. RO-101 Housing assembly (1) . . . . . . . . . . . . . . . . . . . . . . . . . . . . . . . . . . . . . . . . . . . . . . . . . . . . . . 1 pc2. Cartridges:2.1. Preliminary water treatment block:
Replacement filter cartridge K5 (3) . . . . . . . . . . . . . . . . . . . . . . . . . . . . . . . . . . . . . . . . . . . . . . . . 1 pcReplacement filter cartridge K2 (2) . . . . . . . . . . . . . . . . . . . . . . . . . . . . . . . . . . . . . . . . . . . . . . . . 1 pc
2.2. Reverse Osmosis membrane block:Replacement membrane cartridge Aquaphor RO-50S (4) . . . . . . . . . . . . . . . . . . . . . . . . . . . . . . 1 pc
2.3. Water conditioning block:Replacement filter cartridge K7М (5) . . . . . . . . . . . . . . . . . . . . . . . . . . . . . . . . . . . . . . . . . . . . . . 1 pc
3. JG connecting tubes (6):Red JG tube 3/8” (d 9,5 mm) . . . . . . . . . . . . . . . . . . . . . . . . . . . . . . . . . . . . . . . . . . . . . . . . . . . . 1 pcBlack JG tube 1/4” (d 6,35 mm) (drain) . . . . . . . . . . . . . . . . . . . . . . . . . . . . . . . . . . . . . . . . . . . . 1 pc Black JG tube 3/8” (d 9,5 mm) (drain) . . . . . . . . . . . . . . . . . . . . . . . . . . . . . . . . . . . . . . . . . . . . . 1 pcBlue JG tube 1/4” (d 6,35 mm) with pressed metal bushing . . . . . . . . . . . . . . . . . . . . . . . . . . . . 1 pc
4. Drain saddle (7) . . . . . . . . . . . . . . . . . . . . . . . . . . . . . . . . . . . . . . . . . . . . . . . . . . . . . . . . . . . . . . . . . .1 set5. Connection node (8) . . . . . . . . . . . . . . . . . . . . . . . . . . . . . . . . . . . . . . . . . . . . . . . . . . . . . . . . . . . . . .1 set6. Air gap connector (9) . . . . . . . . . . . . . . . . . . . . . . . . . . . . . . . . . . . . . . . . . . . . . . . . . . . . . . . . . . . . . .1 set7. Service cap (under top lid) for:
Replacement filter cartridges K5, K2, K7М (K7) (10a) . . . . . . . . . . . . . . . . . . . . . . . . . . . . . . . . . 3 pcMembrane cartridge (10b) . . . . . . . . . . . . . . . . . . . . . . . . . . . . . . . . . . . . . . . . . . . . . . . . . . . . . . 1 pc
8. Slotted plug (under top lid) (11) . . . . . . . . . . . . . . . . . . . . . . . . . . . . . . . . . . . . . . . . . . . . . . . . . . . . . . 3 pc9. Plastic key for JG tube (under top lid) (12) . . . . . . . . . . . . . . . . . . . . . . . . . . . . . . . . . . . . . . . . . . . . . 1 pc
10. Operation Manual . . . . . . . . . . . . . . . . . . . . . . . . . . . . . . . . . . . . . . . . . . . . . . . . . . . . . . . . . . . . . . . . 1 pc
Figure 1. Product assembly
6 AQUAPHOR RO-101 REVERSE OSMOSIS SYSTEM
3. Product assembly, Cont.
During transportation, the component parts are located under the top lid. To open the lid, please turn the three plastic latch screws on the cover 90 degrees counterclockwise (figure 2).
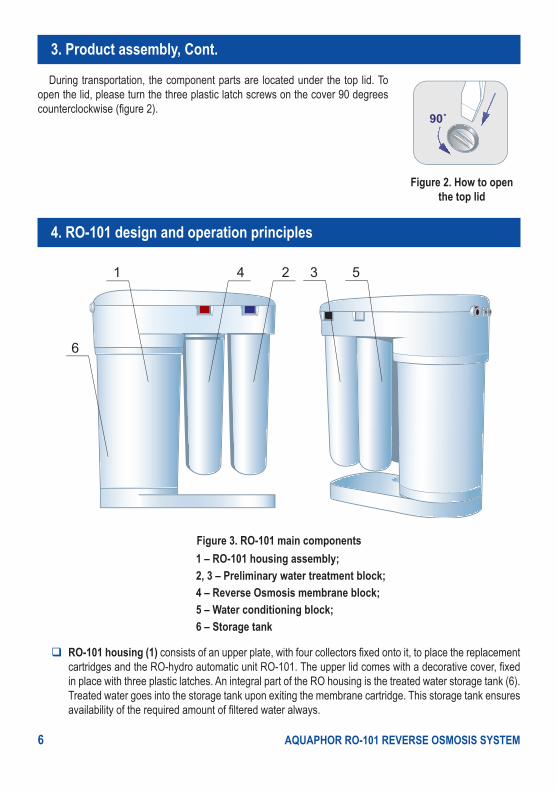
4. RO-101 design and operation principles
6
Figure 3. RO-101 main components 1 – RO-101 housing assembly; 2, 3 – Preliminary water treatment block; 4 – Reverse Osmosis membrane block; 5 – Water conditioning block; 6 – Storage tank
� RO-101 housing (1) consists of an upper plate, with four collectors fixed onto it, to place the replacement cartridges and the RO-hydro automatic unit RO-101. The upper lid comes with a decorative cover, fixed in place with three plastic latches. An integral part of the RO housing is the treated water storage tank (6). Treated water goes into the storage tank upon exiting the membrane cartridge. This storage tank ensures availability of the required amount of filtered water always.
Figure 2. How to open the top lid
AQUAPHOR RO-101 REVERSE OSMOSIS SYSTEM 7
4. RO-101 design and operation principles, Cont. � Preliminary water treatment block (2, 3) includes replacement filter cartridge K5 (3) and K2 (2). The
preliminary water treatment block removes any impurities that can damage membrane cartridge, such as ferric hydroxide and active chlorine.
� Reverse Osmosis membrane block (4) includes the replacement membrane cartridge Aquaphor RO-50S and purifies water by removing organic compounds, non-organic compounds, and salts while softening water.
� Water conditioning block (5) includes the mineralizing cartridge K7M. The water conditioning block eliminates unwanted odors and flavors from water while mineralizing the water.
Attention!
The mineralizing cartridge K7M can be replaced with the K7 cartridge.
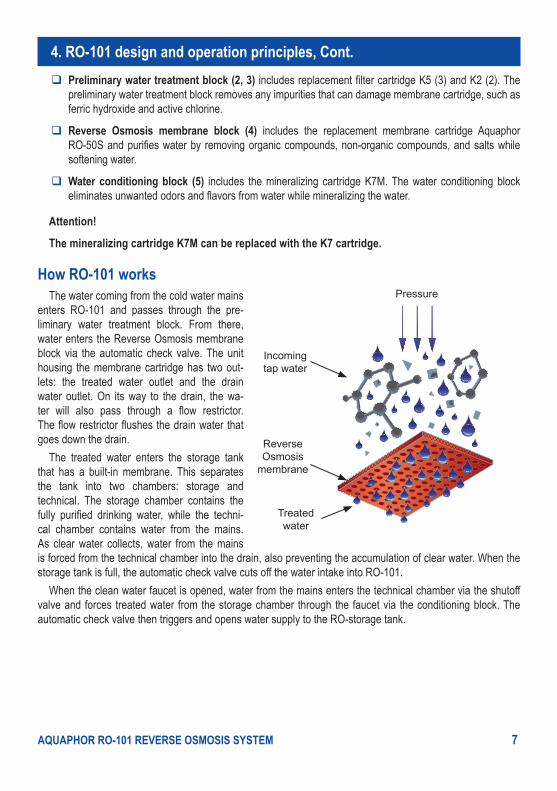
How RO-101 worksThe water coming from the cold water mains
enters RO-101 and passes through the pre-liminary water treatment block. From there, water enters the Reverse Osmosis membrane block via the automatic check valve. The unit housing the membrane cartridge has two out-lets: the treated water outlet and the drain water outlet. On its way to the drain, the wa-ter will also pass through a flow restrictor. The flow restrictor flushes the drain water that goes down the drain.
The treated water enters the storage tank that has a built-in membrane. This separates the tank into two chambers: storage and technical. The storage chamber contains the fully purified drinking water, while the techni-cal chamber contains water from the mains. As clear water collects, water from the mains is forced from the technical chamber into the drain, also preventing the accumulation of clear water. When the storage tank is full, the automatic check valve cuts off the water intake into RO-101.
When the clean water faucet is opened, water from the mains enters the technical chamber via the shutoff valve and forces treated water from the storage chamber through the faucet via the conditioning block. The automatic check valve then triggers and opens water supply to the RO-storage tank.
Pressure
Incoming tap water
Reverse Osmosis
membrane
Treated water
8 AQUAPHOR RO-101 REVERSE OSMOSIS SYSTEM
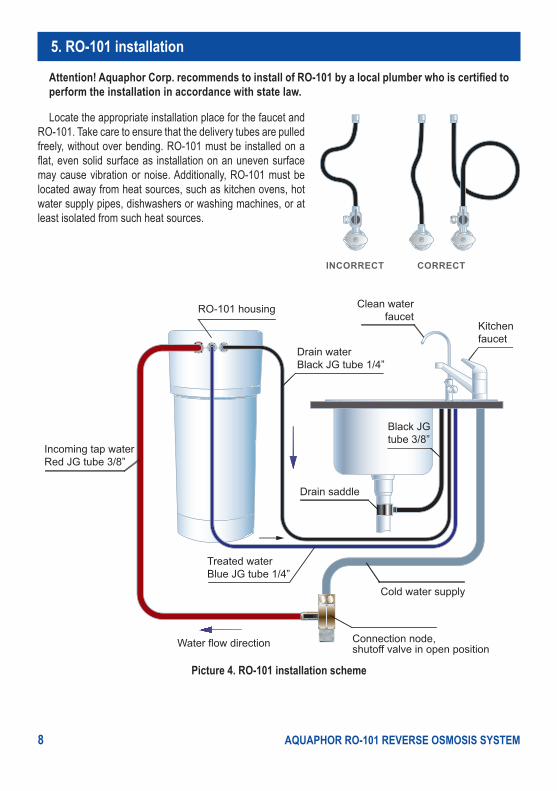
5. RO-101 installation
Attention! Aquaphor Corp. recommends to install of RO-101 by a local plumber who is certified to perform the installation in accordance with state law.
Locate the appropriate installation place for the faucet and RO-101. Take care to ensure that the delivery tubes are pulled freely, without over bending. RO-101 must be installed on a flat, even solid surface as installation on an uneven surface may cause vibration or noise. Additionally, RO-101 must be located away from heat sources, such as kitchen ovens, hot water supply pipes, dishwashers or washing machines, or at least isolated from such heat sources.
Treated waterBlue JG tube 1/4”
Connection node, shutoff valve in open position
Cold water supply
Water flow direction
Incoming tap waterRed JG tube 3/8”
Black JG tube 3/8”
RO-101 housing
Drain waterBlack JG tube 1/4”
Drain saddle
Kitchenfaucet
Clean water faucet
Picture 4. RO-101 installation scheme
AQUAPHOR RO-101 REVERSE OSMOSIS SYSTEM 9
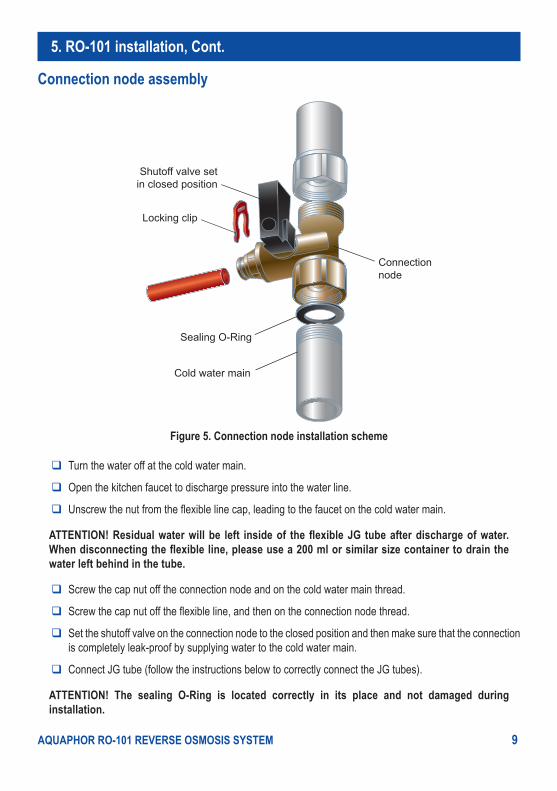
5. RO-101 installation, Сont.
Connection node assembly
Sealing O-Ring
Cold water main
Locking clip
Shutoff valve set in closed position
Connection node
Figure 5. Connection node installation scheme
� Turn the water off at the cold water main.
� Open the kitchen faucet to discharge pressure into the water line.
� Unscrew the nut from the flexible line cap, leading to the faucet on the cold water main.
ATTENTION! Residual water will be left inside of the flexible JG tube after discharge of water. When disconnecting the flexible line, please use a 200 ml or similar size container to drain the water left behind in the tube.
� Screw the cap nut off the connection node and on the cold water main thread.
� Screw the cap nut off the flexible line, and then on the connection node thread.
� Set the shutoff valve on the connection node to the closed position and then make sure that the connection is completely leak-proof by supplying water to the cold water main.
� Connect JG tube (follow the instructions below to correctly connect the JG tubes).
ATTENTION! The sealing O-Ring is located correctly in its place and not damaged during installation.
10 AQUAPHOR RO-101 REVERSE OSMOSIS SYSTEM
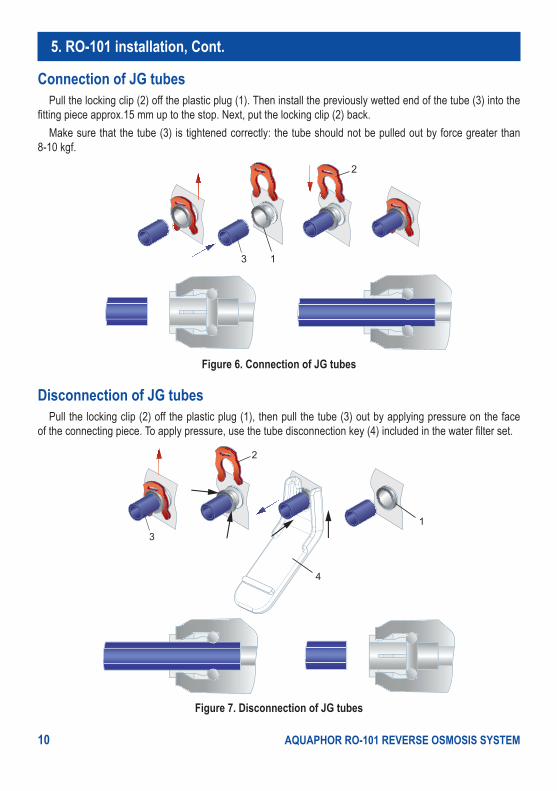
5. RO-101 installation, Сont.
Connection of JG tubesPull the locking clip (2) off the plastic plug (1). Then install the previously wetted end of the tube (3) into the
fitting piece approx.15 mm up to the stop. Next, put the locking clip (2) back. Make sure that the tube (3) is tightened correctly: the tube should not be pulled out by force greater than
8-10 kgf.
2
13
Figure 6. Connection of JG tubes
Disconnection of JG tubesPull the locking clip (2) off the plastic plug (1), then pull the tube (3) out by applying pressure on the face
of the connecting piece. To apply pressure, use the tube disconnection key (4) included in the water filter set.
2
1
4
3
Figure 7. Disconnection of JG tubes
AQUAPHOR RO-101 REVERSE OSMOSIS SYSTEM 11
6. Clean water faucet installation
Clean water faucet is not included in the Reverse Osmosis system Aquaphor RO-101 set.To install a clean water faucet, please use the instructions included with the faucet.
Attention! The water filter set includes the air gap assembly. Therefore, the clean water faucet should be selected with the following measurements: - threaded rod diameter: no more than 11 mm;- threaded rod length: no less than 80 mm;- fastener suitable for air-gap taps.
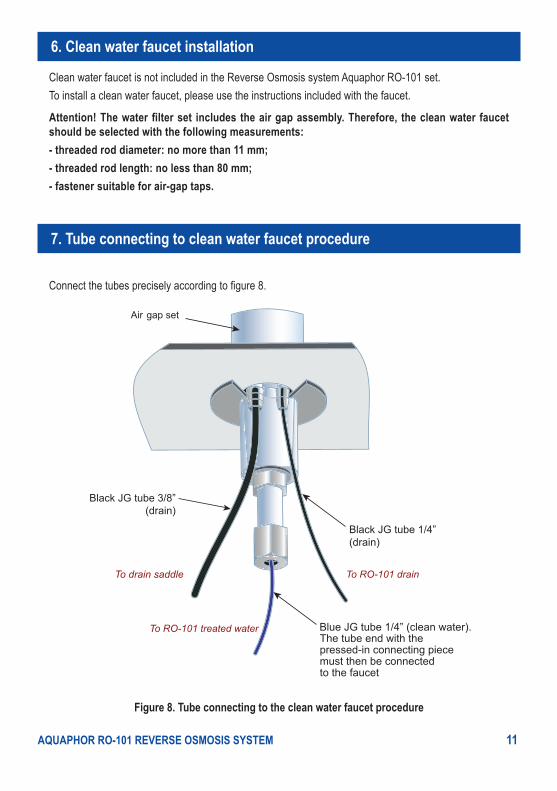
7. Tube connecting to clean water faucet procedure
Connect the tubes precisely according to figure 8.
Figure 8. Tube connecting to the clean water faucet procedure
12 AQUAPHOR RO-101 REVERSE OSMOSIS SYSTEM
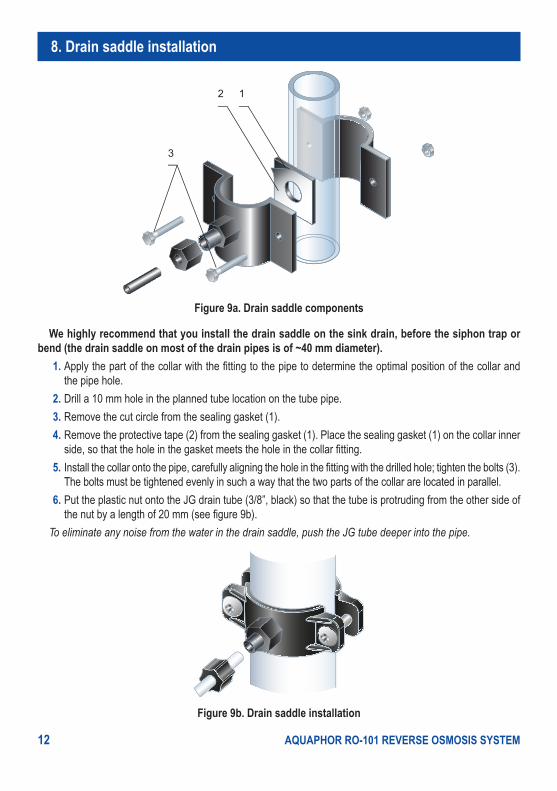
8. Drain saddle installation
Figure 9a. Drain saddle components
We highly recommend that you install the drain saddle on the sink drain, before the siphon trap or bend (the drain saddle on most of the drain pipes is of ~40 mm diameter).
1. Apply the part of the collar with the fitting to the pipe to determine the optimal position of the collar and the pipe hole.
2. Drill a 10 mm hole in the planned tube location on the tube pipe. 3. Remove the cut circle from the sealing gasket (1). 4. Remove the protective tape (2) from the sealing gasket (1). Place the sealing gasket (1) on the collar inner
side, so that the hole in the gasket meets the hole in the collar fitting. 5. Install the collar onto the pipe, carefully aligning the hole in the fitting with the drilled hole; tighten the bolts (3).
The bolts must be tightened evenly in such a way that the two parts of the collar are located in parallel. 6. Put the plastic nut onto the JG drain tube (3/8”, black) so that the tube is protruding from the other side of
the nut by a length of 20 mm (see figure 9b). To eliminate any noise from the water in the drain saddle, push the JG tube deeper into the pipe.
Figure 9b. Drain saddle installation
AQUAPHOR RO-101 REVERSE OSMOSIS SYSTEM 13
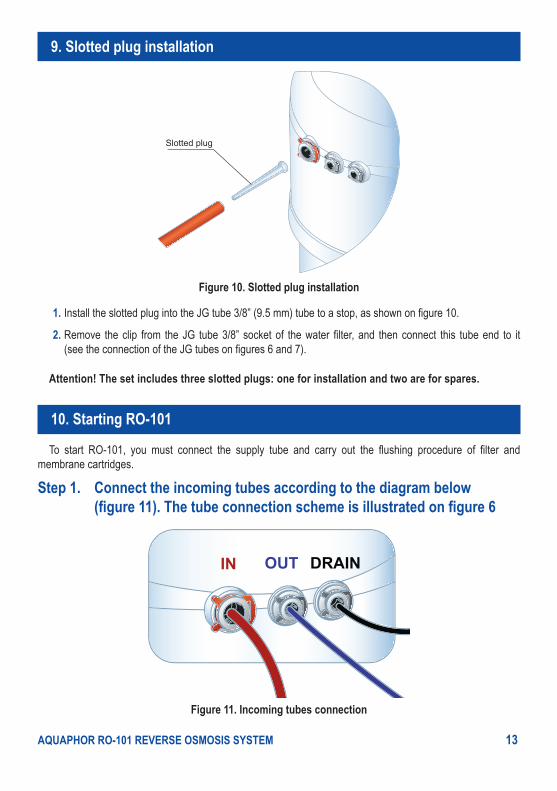
9. Slotted plug installation
Slotted plug
Figure 10. Slotted plug installation
1. Install the slotted plug into the JG tube 3/8” (9.5 mm) tube to a stop, as shown on figure 10.
2. Remove the clip from the JG tube 3/8” socket of the water filter, and then connect this tube end to it (see the connection of the JG tubes on figures 6 and 7).
Attention! The set includes three slotted plugs: one for installation and two are for spares.
10. Starting RO-101
To start RO-101, you must connect the supply tube and carry out the flushing procedure of filter and membrane cartridges.
Step 1. Connect the incoming tubes according to the diagram below (figure 11). The tube connection scheme is illustrated on figure 6
Figure 11. Incoming tubes connection

14 AQUAPHOR RO-101 REVERSE OSMOSIS SYSTEM
10. Starting RO-101, Сont.
Step 2. Preparing RO-101 for operation � Rotate the three latches 90 degrees in a counterclockwise direction and remove the water filter cap
(figure 2).
� Remove the service cap (figure 1; position 10b), which is located under the water filter cap.
� Remove the shrink film from the cartridges.
� Rinse the sealing O-Rings of the cartridges and service cap.
� Arrange the cartridges in the exact order, as demonstrated in Table 2. For convenience, the stop buttons of the collectors have the different color.
Table 2. Positions of RO-101 cartridges in preparation for operation
Stop button colors Cartridge type
BLACK K2
BLUE K5
RED Service Cap
WHITE K7М
� Set the shutoff valve on the connection node into the open position, as shown on figure 4.
� Leave the clean water faucet open for 10 minutes.
The noise during the flushing of the cartridges is not a defect.
� Close the clean water faucet.
Step 3. Flushing the membrane cartridge unit � Set the shutoff valve on the connection node into the closed position, as shown on figure 5.
� Remove the service plug and install membrane cartridge.
� Interchange the K5 and K2 cartridges.
� Turn the shutoff valve on the connection node into the open position.
� Open the clean water faucet, then wait for the water to start flowing.
� Let the water flush through RO-101 for 1 hour.*
� Close the clean water faucet.
* Depending on the storage, transportation and operation conditions, the complete flushing of membrane cartridge may take up to 24 hours.
AQUAPHOR RO-101 REVERSE OSMOSIS SYSTEM 15
10. Starting RO-101, Сont.
Step 4. Flushing the conditioning cartridge K7M � Close the clean water faucet and fill in the storage tank. This will take 30–50 minutes, depending on water
pressure.
� Open the clean water faucet and then wait until all of the water flows out from the storage tank.
� Repeat these steps two more times.
� Close the clean water faucet.
� When the tank is full, RO-101 is ready for operation.
Note: In total, the general flushing of filter and membrane cartridges and startup time will take you about 3 hours.
11. Replacing cartridges
The membrane cartridge service life directly depends on operation of the preliminary water treatment unit (cartridges K5 and K2). Therefore, it is always very important to replace the filtering cartridges in a timely manner.
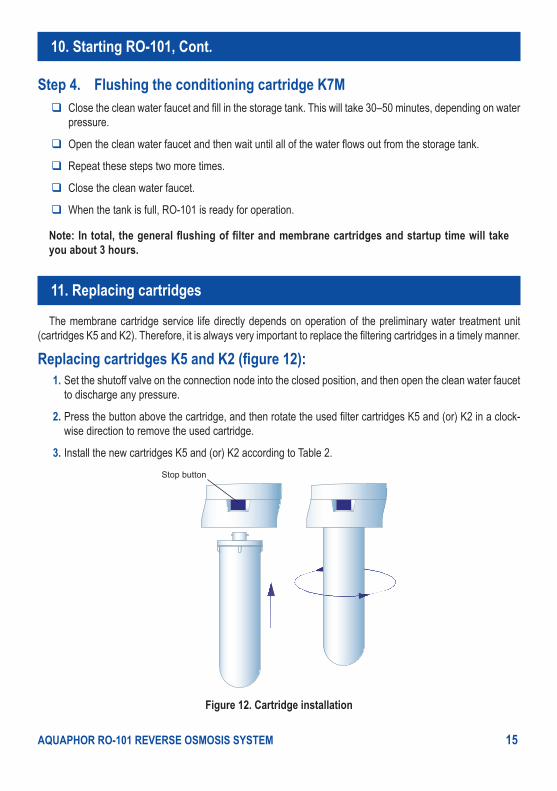
Replacing cartridges K5 and K2 (figure 12):1. Set the shutoff valve on the connection node into the closed position, and then open the clean water faucet
to discharge any pressure.
2. Press the button above the cartridge, and then rotate the used filter cartridges K5 and (or) K2 in a clock-wise direction to remove the used cartridge.
3. Install the new cartridges K5 and (or) K2 according to Table 2.Stop button
Figure 12. Cartridge installation
16 AQUAPHOR RO-101 REVERSE OSMOSIS SYSTEM
11. Replacing cartridges, Cont.
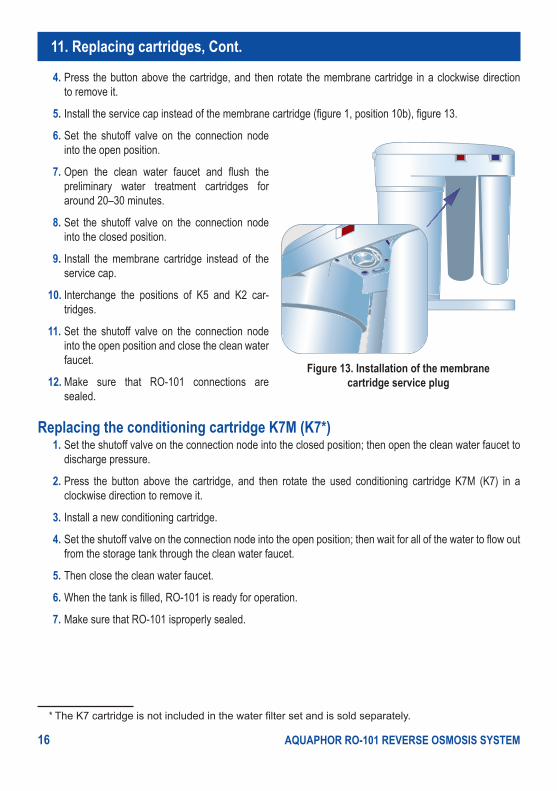
4. Press the button above the cartridge, and then rotate the membrane cartridge in a clockwise direction to remove it.
5. Install the service cap instead of the membrane cartridge (figure 1, position 10b), figure 13.
6. Set the shutoff valve on the connection node into the open position.
7. Open the clean water faucet and flush the preliminary water treatment cartridges for around 20–30 minutes.
8. Set the shutoff valve on the connection node into the closed position.
9. Install the membrane cartridge instead of the service cap.
10. Interchange the positions of K5 and K2 car-tridges.
11. Set the shutoff valve on the connection node into the open position and close the clean water faucet.
12. Make sure that RO-101 connections are sealed.
Replacing the conditioning cartridge K7М (K7*)1. Set the shutoff valve on the connection node into the closed position; then open the clean water faucet to
discharge pressure.
2. Press the button above the cartridge, and then rotate the used conditioning cartridge K7М (K7) in a clockwise direction to remove it.
3. Install a new conditioning cartridge.
4. Set the shutoff valve on the connection node into the open position; then wait for all of the water to flow out from the storage tank through the clean water faucet.
5. Then close the clean water faucet.
6. When the tank is filled, RO-101 is ready for operation.
7. Make sure that RO-101 isproperly sealed.
* The K7 cartridge is not included in the water filter set and is sold separately.
Figure 13. Installation of the membrane cartridge service plug
AQUAPHOR RO-101 REVERSE OSMOSIS SYSTEM 17
11. Replacing cartridges, Cont.
Replacing the membrane cartridge1. Set the shutoff valve on the connection node into the closed position, and then open the clean water faucet
to discharge pressure.
2. Press the button above the cartridge, and then rotate the used membrane cartridge in a clockwise direction to remove it.
3. Install a new membranecartridge in place of the removed one.
4. Turn the shutoff valve on the connection node to the open position.
5. Flush the water through RO-101 for duration of approximately 1 hour.*
6. Close the clean water faucet.
7. When the tank is filled, RO-101 is ready for operation.
8. Make sure that RO-101 is properly sealed.
ATTENTION! To avoid any incorrect installation of the membrane cartridge and the resulting loss of sealing of the RO-101 connections, it is not recommended to dissemble it without a fully quali-fied maintenance specialist. If the RO-101 connections are leaking, immediately close the tap on the connection unit and check the cartridges for correct installation.
12. Recommended filter replacement
The frequency at which the filter and membrane cartridges should be replaced depends on the quality of the water that enters the appliance. Contact your water treatment specialist for replacement filters and parts.
Note: The installation of the RO-101 appliance on a pre-treated water supply will greatly increase the life of its filters.
Table 3. Recommended filter replacement
Filter Cartridges Recommended Replace ment (months)Replacement filter cartridge K5 (1) 6 Replacement filter cartridge K2 (2) 6 Replacement membrane cartridge Aquaphor RO-50S (3) 12 Replacement filter cartridge K7M (4) 12
Once purchased, the cartridges can be stored for three years from the manufacturing date.
* Depending upon storage, transportation and operation conditions, complete flushing of the membrane cartridge may take up to 24 hours.
18 AQUAPHOR RO-101 REVERSE OSMOSIS SYSTEM
13. Recommended filter maintenance
The frequency at which the filter and membrane cartridges should be replaced depends on your tap water quality.
Note: Any filter that demonstrates reduced water production or a slower rate of flow is likely to be overdue for a change.
Warning: Shut off the water to the appliance before beginning any maintenance work.
Replacement of filter cartridge K5 (1)Reduces dirt and other sediment particle matter of 5 micron or larger in the incoming water. The replacement of the filter cartridge K5 is necessary every three to six months.
Replacement of filter cartridge K2 (2)This reduces free chlorine from the incoming water and protects the membrane from any chlorine degrada-
tion. Changing frequency of the replacement filter cartridge K2 should be based on the free chlorine levels in the incoming water.
If the free chlorine is 1 ppm or less, then the replacement filter cartridge K2 should be replaced once a year. If the free chlorine level is greater than 1 ppm, then the replacement filter cartridge K2 should be replaced once in every six months.
Replacement membrane cartridge Aquaphor RO-50S (3)The semi-permeable membrane cartridge (3) separates the majority of the remaining suspended solids and
most of the dissolved solids from the water molecules. These separated impurities are then washed down the drain.
The membrane cartridge (3) is critical for the effective reduction of total dissolved solids (TDS). The treated water should be tested periodically to verify that the appliance is performing satisfactorily. A noticeable change in water quality and taste may occur. If this happens, it is an indicator that a filter change is needed. Replace the membrane cartridge at least once a year.
Replacement filter cartridge K7M (4)The replacement filter cartridge K7M (4) is the final stage of filtration. It filters the water and enriches it with
useful minerals that improve not only the taste, but also maintains the correct drinking water salt balance. You should replace the post filter every 6 months.
AQUAPHOR RO-101 REVERSE OSMOSIS SYSTEM 19
14. Warranty
2 Year Limited WarrantyTo place the equipment under warranty, the warran-
ty registration card must be completed and returned by the original owner to the warrantor, AQUAPHOR®, within 30 days of installation. 199 Priscilla Road Woodmere, NY, USA 11598. www.aquaphor.com
Please visit our website and register your RO-101 at aquaphor.com/register for manufacturer’s warranty.Additional support and information is available at support.aquaphor.com
CoverageThis warranty covers the specified parts of the
AQUAPHOR® Reverse Osmosis system delivered to the original owner when the appliance is purchased from an AQUAPHOR® water treatment specialist.
Warrantor’s Performance and Length of Warranty
AQUAPHOR® warrants that upon receipt from the owner of any AQUAPHOR® assembly, valve assembly, storage tank, found to be defective in material or workmanship, AQUAPHOR® will repair or replace the defective item, at no charge for that item, for 2 years from date of manufacturing.
Note: Replacement cartridges are not warranted.Should a defect or malfunction occur, contact
your water treatment specialist. If you are unable to contact your water treatment specialist, then contact AQUAPHOR® at 855 855 2299.
All defective parts must be returned along with the equipment serial number and date of original installa-tion to an authorized AQUAPHOR® water treatment specialist or shipped directly to AQUAPHOR®.
PREPAID and replacement parts will be returned by AQUAPHOR® FREIGHT COLLECT. Please contact AQUAPHOR® at 855 855 2299 prior to shipping.
Further Exclusions and Limitations on Warranty:This warranty is null and void unless the appliance
was purchased from an AQUAPHOR® water treatment specialist.THERE ARE NO WARRANTIES OTHER THAN THOSE DESCRIBED IN THIS WARRANTY INSTRUMENT.
This warranty does not cover any service call or labor costs incurred with respect to the removal and replacement of any defective part or parts. AQUAPHOR® will not be liable for, nor will it pay service call or labor charges incurred or expended with respect to this warranty.
In the event the water supply being processed through this product contains bacterial iron, algae, sulfur, tannins, organic matter, or other unusual substances, then unless the appliance is represented as being capable of handling these substances in the appliance specifications, other special treatments of the water supply must be used to remove these substances before they enter this product. Otherwise, AQUAPHOR® shall have no obligations under this warranty.
This warranty does not cover damage to a part or parts of the appliance from causes such as fire, accidents, freezing, or unreasonable use, abuse, or neglect by the owner.
This warranty does not cover damage to a part or parts of the appliance resulting from improper installation. All plumbing connections should be made in accordance with all local codes and the installation instructions provided with the appliance. The warranty does not cover damage resulting from use with inadequate or defective plumbing; inadequate or defective water supply or pressure, or violation of applicable building and plumbing codes, laws, ordinances, or regulations.
THIS WARRANTY DOES NOT COVER INCIDENTAL, CONSEQUENTIAL, OR SECONDARY DAMAGES. ANY IMPLIED WARRANTIES ON THE PRODUCT DESCRIBED IN THIS WARRANTY WILL NOT BE EFFECTIVE AFTER THE EXPIRATION OF THIS WARRANTY.
No water treatment specialist, agent, representa-tive, or other person is authorized to extend or expand this limited warranty.
Some states do not allow limitations on how long an implied warranty lasts or the exclusion or limitation of incidental or consequential damages; therefore, the above limitations and exclusion may not apply to you. This warranty gives you specific legal rights, and you may also have other rights which vary from state to state.
20 AQUAPHOR RO-101 REVERSE OSMOSIS SYSTEM
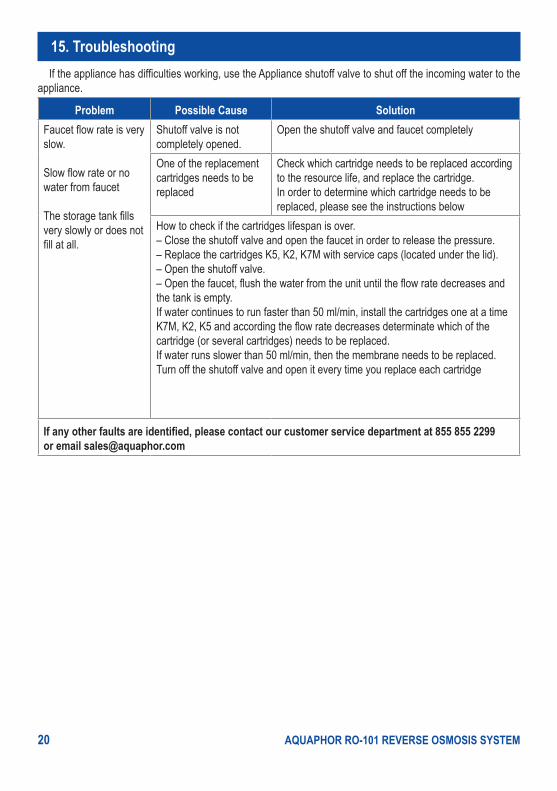
15. Troubleshooting If the appliance has difficulties working, use the Appliance shutoff valve to shut off the incoming water to the
appliance.
Problem Possible Cause SolutionFaucet flow rate is very slow.
Slow flow rate or no water from faucet
The storage tank fills very slowly or does not fill at all.
Shutoff valve is not completely opened.
Open the shutoff valve and faucet completely
One of the replacement cartridges needs to be replaced
Check which cartridge needs to be replaced according to the resource life, and replace the cartridge. In order to determine which cartridge needs to be replaced, please see the instructions below
How to check if the cartridges lifespan is over.– Close the shutoff valve and open the faucet in order to release the pressure.– Replace the cartridges K5, K2, K7M with service caps (located under the lid).– Open the shutoff valve.– Open the faucet, flush the water from the unit until the flow rate decreases and the tank is empty. If water continues to run faster than 50 ml/min, install the cartridges one at a time K7М, K2, K5 and according the flow rate decreases determinate which of the cartridge (or several cartridges) needs to be replaced. If water runs slower than 50 ml/min, then the membrane needs to be replaced. Turn off the shutoff valve and open it every time you replace each cartridge
If any other faults are identified, please contact our customer service department at 855 855 2299 or email [email protected]

AQUAPHOR RO-101 REVERSE OSMOSIS SYSTEM 21
Specification
Model Part # AQUAPHOR RO-101Membrane cartridge (3) ULPProduction Rates: Gallons per day1 Liters per day1
NSF gpd2 NSF lpd2
50 189.3 25.96 98.27
Water Pressure (Min-Max) psi (bar) 27.6–91.4 (1.9-6.3)Water Temperature (Min-Max) °F (°C) 41–100.4 (5–38)Chlorine Tolerance (ppm) 0Max. Hardness (Gr. pg) 10Max. Iron (ppm) < 0.1Max. Mang. (ppm) < 0.05pH Limit 4.0–10.0Max. TDS Limit (ppm) 2000Hydrogen Sulfide (ppm) 0.00Max. Turbidity (NTU) 1.0TDS Rejection Typical @ 60 psi (4.1 bar) NSF @ 50 psi (3.4 bar)
95–97% 96.7%
Storage – Gal. (l) 1.3 (5)Water Supply Municipal, Well3Treatment Stages 4Replacement filter cartridge K5 (1) 5 Micron SedimentReplacement filter cartridge K2 (2) CarbonblockReplacement filter cartridge K7M (4) Activated Carbon and MineralizerHeight – inches (mm) 16.5 (420)Width – inches (mm) 7.5 (190)Depth – inches (mm) 14.6 (371)Weight – lbs (kg) 13.66 (6.2)Efficiency Rating4 No less than 15%Recovery Rating5 No less than 33.63%Treated Water: Drain Water Ratio6 1:4–1:6
1 Treated water output is measured to atmosphere with incoming water at 77 °F (25 °C), 58.02 psi (4.0 bar), and 425 ppm TDS.
2 NSF production is measured against a pressure tank 5 psi (34 bar) backpressure, 77 °F (25 °C), 50 psi (3.4 bar) and 750 mg/l ± 40 mg/l TDS, 1 NTU turbidity 7.5 ± 0.5 pH, 1 US/cm.
3 Well water may require pre-treatment before using it in the RO-101.
4 Efficiency Rating means the percentage of the influent water to the system that is available to the user as reverse
osmosis treated water under operating conditions similar to typical daily usage.
5 Recovery Rating means the percentage of the influent water to the membrane portion of the system that is available to the user as reverse osmosis treated water when the system is operating without a storage tank or when the storage tank is bypassed.
6 Per manufacturer testing. This may vary.
22 AQUAPHOR RO-101 REVERSE OSMOSIS SYSTEM
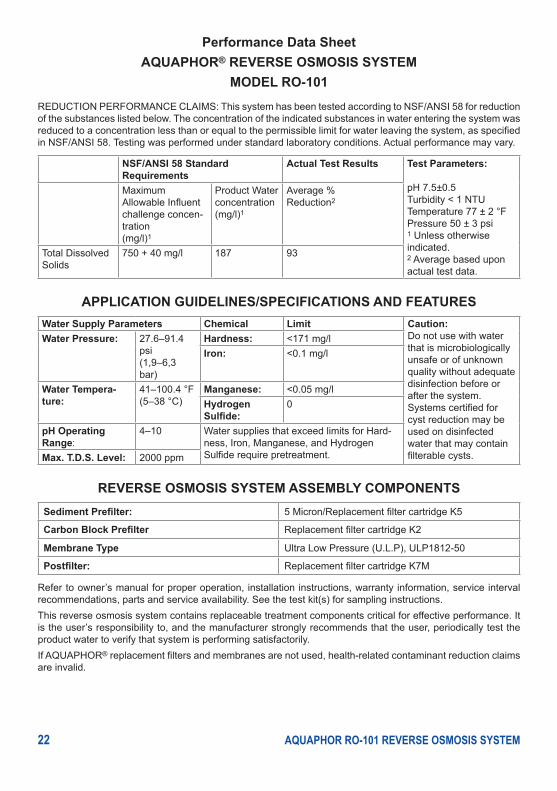
Performance Data SheetAQUAPHOR® REVERSE OSMOSIS SYSTEM
MODEL RO-101
REDUCTION PERFORMANCE CLAIMS: This system has been tested according to NSF/ANSI 58 for reduction of the substances listed below. The concentration of the indicated substances in water entering the system was reduced to a concentration less than or equal to the permissible limit for water leaving the system, as specified in NSF/ANSI 58. Testing was performed under standard laboratory conditions. Actual performance may vary.
NSF/ANSI 58 StandardRequirements
Actual Test Results Test Parameters:
pH 7.5±0.5Turbidity < 1 NTUTemperature 77 ± 2 °FPressure 50 ± 3 psi1 Unless otherwise indicated.2 Average based upon actual test data.
MaximumAllowable Influent challenge concen-tration(mg/l)1
Product Waterconcentration(mg/l)1
Average %Reduction2
Total Dissolved Solids
750 + 40 mg/l 187 93
APPLICATION GUIDELINES/SPECIFICATIONS AND FEATURESWater Supply Parameters Chemical Limit Caution:
Do not use with water that is microbiologically unsafe or of unknown quality without adequate disinfection before or after the system. Systems certified for cyst reduction may be used on disinfected water that may contain filterable cysts.
Water Pressure: 27.6–91.4 psi(1,9–6,3 bar)
Hardness: <171 mg/lIron: <0.1 mg/l
Water Tempera-ture:
41–100.4 °F(5–38 °C)
Manganese: <0.05 mg/lHydrogen Sulfide:
0
pH Operating Range:
4–10 Water supplies that exceed limits for Hard-ness, Iron, Manganese, and Hydrogen Sulfide require pretreatment.Max. T.D.S. Level: 2000 ppm
REVERSE OSMOSIS SYSTEM ASSEMBLY COMPONENTSSediment Prefilter: 5 Micron/Replacement filter cartridge K5
Carbon Block Prefilter Replacement filter cartridge K2
Membrane Type Ultra Low Pressure (U.L.P), ULP1812-50
Postfilter: Replacement filter cartridge K7M
Refer to owner’s manual for proper operation, installation instructions, warranty information, service interval recommendations, parts and service availability. See the test kit(s) for sampling instructions.This reverse osmosis system contains replaceable treatment components critical for effective performance. It is the user’s responsibility to, and the manufacturer strongly recommends that the user, periodically test the product water to verify that system is performing satisfactorily.If AQUAPHOR® replacement filters and membranes are not used, health-related contaminant reduction claims are invalid.
AQUAPHOR RO-101 REVERSE OSMOSIS SYSTEM 23
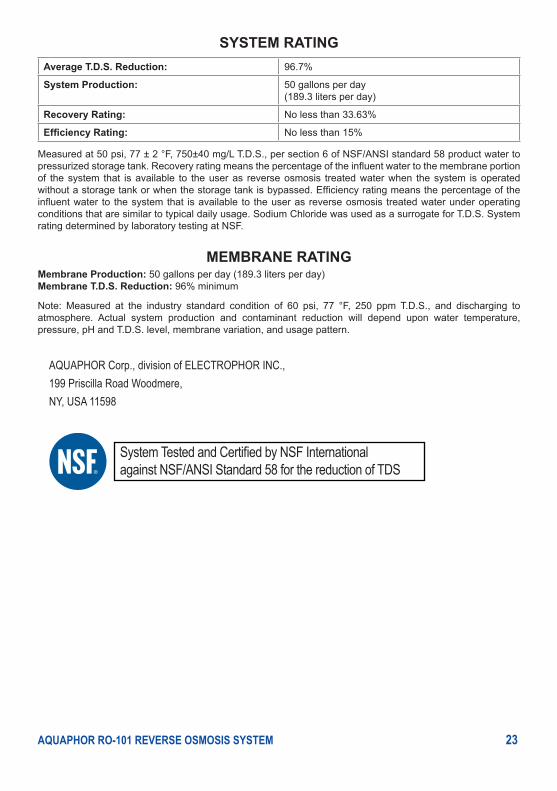
SYSTEM RATINGAverage T.D.S. Reduction: 96.7%
System Production: 50 gallons per day (189.3 liters per day)
Recovery Rating: No less than 33.63%
Efficiency Rating: No less than 15%
Measured at 50 psi, 77 ± 2 °F, 750±40 mg/L T.D.S., per section 6 of NSF/ANSI standard 58 product water to pressurized storage tank. Recovery rating means the percentage of the influent water to the membrane portion of the system that is available to the user as reverse osmosis treated water when the system is operated without a storage tank or when the storage tank is bypassed. Efficiency rating means the percentage of the influent water to the system that is available to the user as reverse osmosis treated water under operating conditions that are similar to typical daily usage. Sodium Chloride was used as a surrogate for T.D.S. System rating determined by laboratory testing at NSF.
MEMBRANE RATINGMembrane Production: 50 gallons per day (189.3 liters per day) Membrane T.D.S. Reduction: 96% minimum
Note: Measured at the industry standard condition of 60 psi, 77 °F, 250 ppm T.D.S., and discharging to atmosphere. Actual system production and contaminant reduction will depend upon water temperature, pressure, pH and T.D.S. level, membrane variation, and usage pattern.
AQUAPHOR Corp., division of ELECTROPHOR INC.,199 Priscilla Road Woodmere, NY, USA 11598
System Tested and Certified by NSF International against NSF/ANSI Standard 58 for the reduction of TDS
AQUAPHOR Corp., division of ELECTROPHOR INC.,199 Priscilla Road Woodmere,
NY, USA 11598© 2016
Warranty coupon RO-101
Serial #
Warranty PIN-code
Date of Sell
Seller’s stamp
Seller’s signature
Installation information
Installation is carried out:Name of the company which carried out installation:
Name of the service engineer:
Service engineer’s signature:
Client’s signature:
For installation, operational and technical maintenance, please, contact:
Please visit our website and register your RO-101 at aquaphor.com/register for manufacturer’s warranty.