Embed Size (px)
Citation preview

DOKUMENTDATO: 2015-05-21
REVIT PLUG-IN
Version 1.8

dRofus AS
Rådhusgata 17
0158 Oslo
Norway
Email: [email protected] Web: www.drofus.com
Tel: + 47 22 33 15 70

REVIT PLUG-IN
2
Table of Content
1. Overview .................................................................................................................. 4
2. Installation .............................................................................................................. 5
3. Rooms and Room Templates ............................................................................ 6
3.1. Synchronization ................................................................................................................. 6
3.2. Add image of room to dRofus .......................................................................................... 7 Naming of views ......................................................................................................................................... 8 Import 3D views as images ........................................................................................................................ 9
3.3. Track room changes .......................................................................................................... 9
3.4. Link existing rooms ......................................................................................................... 10
3.5. Selecting rooms in dRofus and Revit ............................................................................ 11 Selecting room in Revit from dRofus. ...................................................................................................... 11 Open RDS in dRofus from Revit................................................................................................................ 11
3.6. Import rooms to dRofus ................................................................................................. 11 What data is imported? ........................................................................................................................... 11 What rooms get imported?...................................................................................................................... 12 Where in dRofus to import them to? ....................................................................................................... 12
3.7. Working with multiple models........................................................................................ 13 Setup ........................................................................................................................................................ 13 Linking rooms ........................................................................................................................................... 14 Synchronizing rooms ............................................................................................................................... 14
3.8. Design options ................................................................................................................. 14
4. Areas ....................................................................................................................... 15
4.1. Overview ............................................................................................................................ 15
4.2. Linking areas to functions .............................................................................................. 15
5. Items ...................................................................................................................... 16
5.1. Overview ............................................................................................................................ 16
5.2. Linking Family Symbols to items in dRofus ................................................................. 16
5.3. Item image import from Revit to dRofus ...................................................................... 17
5.4. List of items in room ....................................................................................................... 17
5.5. Matched/linked Items ..................................................................................................... 20
5.6. Synchronizing item occurrence data ............................................................................ 21
5.7. Planned vs Designed Equipment ................................................................................... 22
5.8. Attribute configuration ................................................................................................... 23
5.9. Using parent/child relationship for Items. ................................................................... 23
5.10. Nested families and Sub Items .................................................................................. 23
5.11. Which objects are considered to belong to a room?............................................... 24
REVIT PLUG-IN
3
6. Attribute configurations ................................................................................... 25
6.1. General .............................................................................................................................. 25
6.2. Create new / edit a configuration .................................................................................. 26 Create a new configuration: ..................................................................................................................... 27 Edit a configuration: ................................................................................................................................. 27
7. Options ................................................................................................................... 28
8. Tips & Tricks ......................................................................................................... 30
8.1. General .............................................................................................................................. 30 Revit plug-in toolbar as floating window ................................................................................................. 30 Quick access toolbar ................................................................................................................................ 30 Room Reference....................................................................................................................................... 30 Create your own shortcuts ....................................................................................................................... 31
8.2. Shared parameters ......................................................................................................... 32
8.3. Permissions ...................................................................................................................... 32
9. Linked files ............................................................................................................ 33
9.1. Use cases.......................................................................................................................... 33
9.2. Create/update rooms from linked model ..................................................................... 33
9.3. Create/update spaces from linked model .................................................................... 34
10. Upload Ifc model ................................................................................................. 35
REVIT PLUG-IN
4
1.
The Revit plug-in for dRofus is an add-in for Revit to aid Revit users in keeping data in Revit up to date with dRofus. The current version of dRofus supports Revit, Revit Architecture and MEP 2013, 2014, 2015 and 2016
REVIT PLUG-IN
5
2.
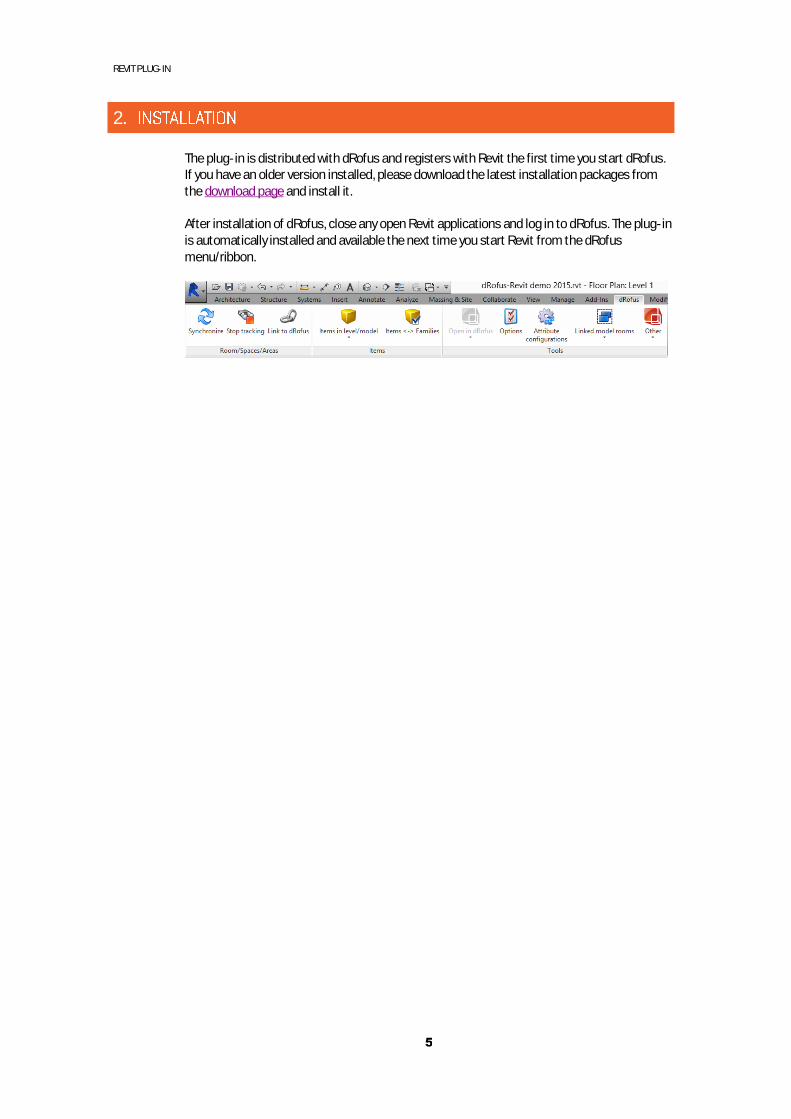
The plug-in is distributed with dRofus and registers with Revit the first time you start dRofus. If you have an older version installed, please download the latest installation packages from the download page and install it.
After installation of dRofus, close any open Revit applications and log in to dRofus. The plug-in is automatically installed and available the next time you start Revit from the dRofus menu/ribbon.
REVIT PLUG-IN
6
3.
3.1. Synchronization
This function will keep the room, space and area objects and schedules updated with data from dRofus.
On the dRofus side you can either synchronize against the rooms or the room templates (functions are described in the next chapter). Template synchronization enables you to start working with room template design before the project has a room list. This section will use room synchronization as an example but the same applies to the other types.
Data will be synchronized according to an attribute configuration which can be modified by a project administrator. This will control which parameters and how the data flows between dRofus and Revit.
To start the synchronization, choose Synchronize from the dRofus menu/ribbon in Revit. The first time you use it, you will be asked to log in to a dRofus database. Enter your login information and press OK.
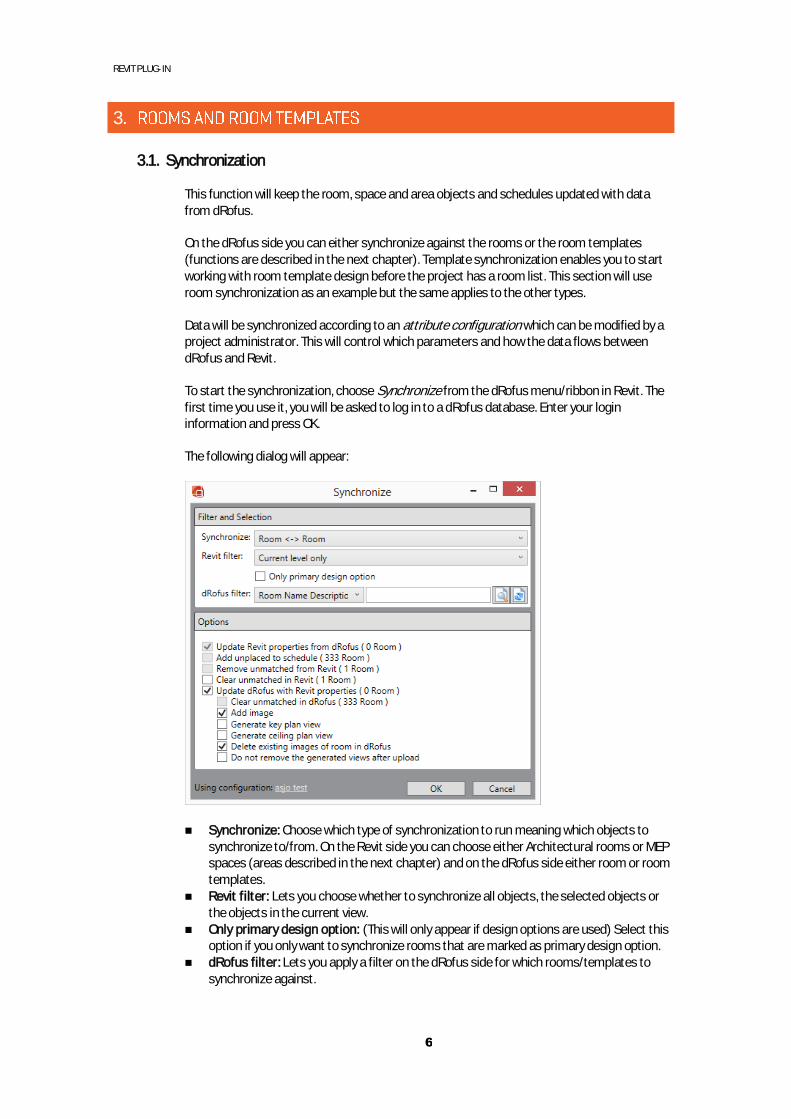
The following dialog will appear:
Synchronize: Choose which type of synchronization to run meaning which objects to synchronize to/from. On the Revit side you can choose either Architectural rooms or MEP spaces (areas described in the next chapter) and on the dRofus side either room or room templates.
Revit filter: Lets you choose whether to synchronize all objects, the selected objects or the objects in the current view.
Only primary design option: (This will only appear if design options are used) Select this option if you only want to synchronize rooms that are marked as primary design option.
dRofus filter: Lets you apply a filter on the dRofus side for which rooms/templates to synchronize against.
REVIT PLUG-IN
7
Example: Ch umber
Options: The number of objects each option applies to is listed behind the option. Update Revit properties from dRofus will update rooms in Revit with latest data
from dRofus. Only applies to matched rooms. This option cannot be unchecked. Add unplaced to schedule This will add all rooms from dRofus (based on the filter
above) that does not exist in the Revit room schedule. The existence of a room is based on the key attribute in the current room configuration.
Remove unmatched from Revit This will remove all rooms in the schedule that are not found in dRofus (based on the dRofus and Revit room filters you selected.
Clear unmatched in Revit. This will clear all dRofus information (properties written to Revit according to configuration) for room that are not matched against dRofus. This will enable you to remove outdated data from rooms that are not linked. This cannot be combined with the Remove option above.
Update dRofus with Revit properties This will update dRofus with information from the Revit room schedule based on the current room configuration.
Clear unmatched in dRofus: This will clear the properties in dRofus which is written from Revit, according to the configuration, for all rooms that are not matched in the model. This will allow you to clear out all outdated design information for rooms that are no longer present in the design. If you for instance remove a room which has written designed area to dRofus, not syncing with clear will not remove the designed area from dRofus and leave the wrong area sum.
WARNING: If you have a large project and you do not have all the rooms in one model, using this without a
dRofus filter (above) or the model segmentation feature (see 3.7), could result in clearing a lot of data
unintended. Be sure to add a filter according to which rooms are expected to be in your current model.
Add image Adds images of Revit rooms to dRofus. See below for description. Using configuration
See 6 for more information.
3.2. Add image of room to dRofus
When you check the "Add image of room" option when synchronizing rooms you can upload images from Revit to dRofus to use in reports etc. The images are from temporary views that are created in Revit.
You have the following options when uploading images:
Add image of room: Creates a detail floor plan view of each room. Generate key plan view: Creates a floor plan view for each room highlighting the room
on the level. Generate ceiling plan view: Generates a reflected ceiling plan view for each room. This
also sets the level for the room as underlay for the ceiling plan. Delete existing images of room in dRofus: If checked will remove any existing images
on the room in dRofus prior to uploading new ones. Do not remove the generated views after upload: The views that the images are
created from are normally deleted after they have been added in dRofus. If you would like to continue working on a view and e.g. tag it further, check this option. Later image uploads for that room will then reuse this view rather than creating a new one. You will need to delete it manually if you would like the plug-in to generate a new one.

REVIT PLUG-IN
8
When synchronizing current selection or current view, the image will be based on a view that is duplicated (with detailing) from the current view. This means that all settings, tags etc you see in your current view will be part of the image. If you are synchronizing images will be based on a blank view. In this case, once we create a view in Revit we also apply a view template to the view before export. This is done if view templates exist. The view templates have predefined names. See table below for naming of view templates and sample images:
Add detail image drofus-detail-view-template
Key plan drofus-key-plan-view-template
(and drofus-key-plan-highlight-style1 )
Ceiling plan drofus-detail-ceiling-plan-view-template
Naming of views
If you check the option "Do not remove the generated views after upload" the generated views are left in the model. The naming of the views contains the dRofus database ID of the room as the last part of the name. You can rename the view, as long as it ends with the ID in a parenthesis. This is what we use as key when uploading them to the database.
1 The first time we create a key plan we create an analysis display style named "drofus-key-plan-highlight-
style". You can modify this (Manage → Additional Setting → Analysis Display Style) if you would like to e.g.
have another highlight color than black.
REVIT PLUG-IN
9
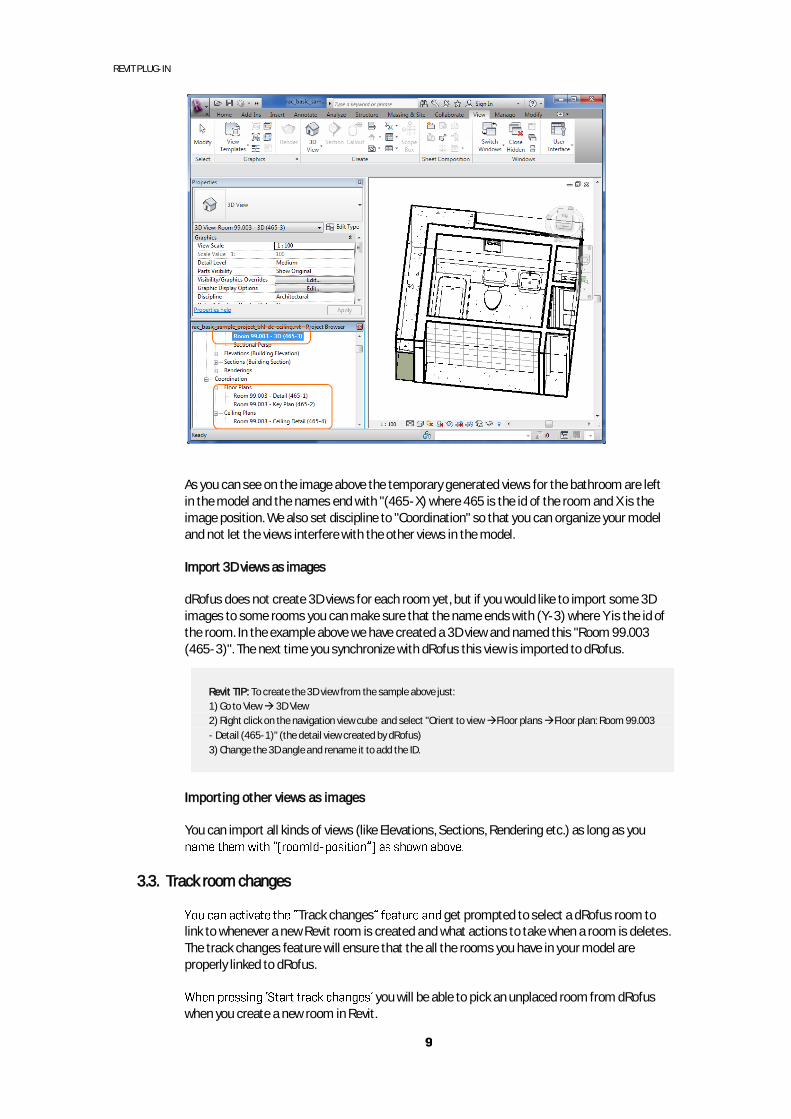
As you can see on the image above the temporary generated views for the bathroom are left in the model and the names end with "(465-X) where 465 is the id of the room and X is the image position. We also set discipline to "Coordination" so that you can organize your model and not let the views interfere with the other views in the model.
Import 3D views as images
dRofus does not create 3D views for each room yet, but if you would like to import some 3D images to some rooms you can make sure that the name ends with (Y-3) where Y is the id of the room. In the example above we have created a 3D view and named this "Room 99.003 (465-3)". The next time you synchronize with dRofus this view is imported to dRofus.
Revit TIP: To create the 3D view from the sample above just:
1) Go to View 3D View
2) Right click on the navigation view cube and select "Orient to view Floor plans Floor plan: Room 99.003
- Detail (465-1)" (the detail view created by dRofus)
3) Change the 3D angle and rename it to add the ID.
Importing other views as images
You can import all kinds of views (like Elevations, Sections, Rendering etc.) as long as you -
3.3. Track room changes
Track changes get prompted to select a dRofus room to link to whenever a new Revit room is created and what actions to take when a room is deletes. The track changes feature will ensure that the all the rooms you have in your model are properly linked to dRofus.
you will be able to pick an unplaced room from dRofus when you create a new room in Revit.
REVIT PLUG-IN
10
Select in Revit and place a room. to search for specific rooms to place. When
a room is placed in the model it will disappear from the list. You can search for rooms based on all the room core parameters, groups and RDS fields defined in dRofus.
with configuration simultaneously want to update dRofus with design information. What data will be updated is depending on which room configuration is chosen 6
You can also link an existing room in the Revit model to a room template in dRofus. Instead of searching for a room in the Rooms tab, select the Room Templates tab and search for a room template.
When you delete a room, you will be asked if you want to leave the room in the schedule and update dRofus with latest design information or if you want to delete the room in dRofus.The same actions that you have when you add/delete rooms will also apply when you cut, copy or paste a room. If this feature is turned off, it will still make sure that the key attribute is not copied when you do a copy paste operation.
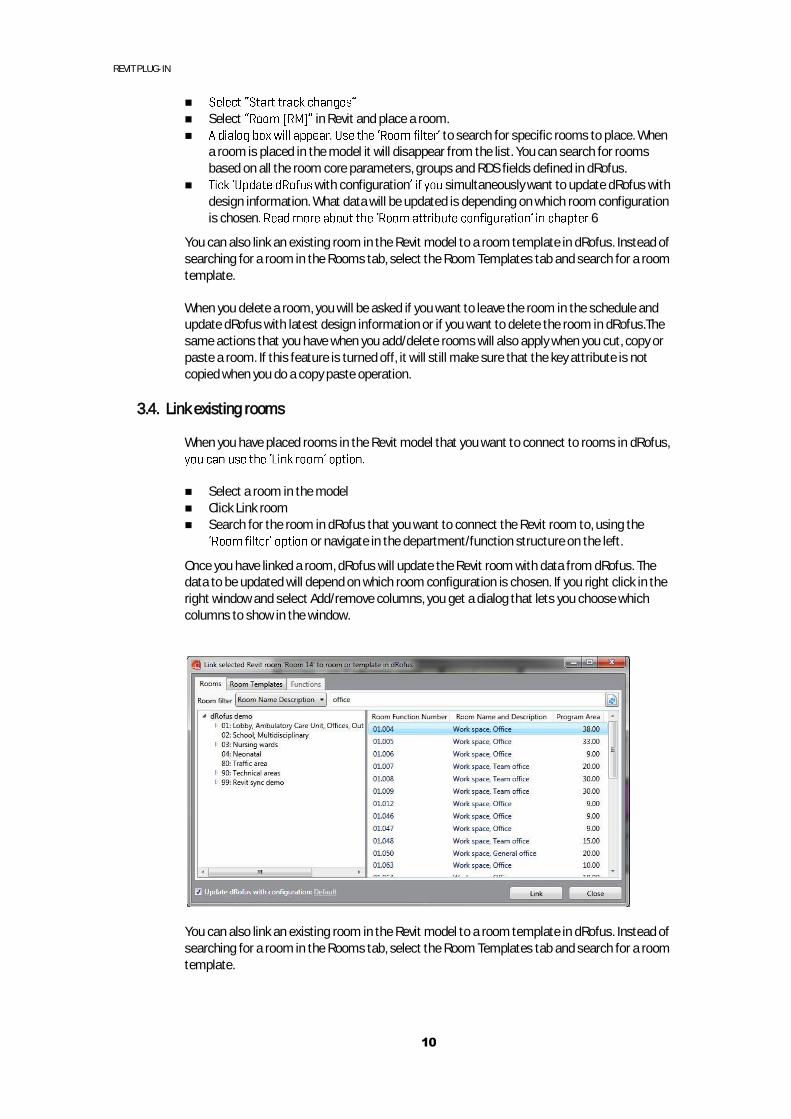
3.4. Link existing rooms
When you have placed rooms in the Revit model that you want to connect to rooms in dRofus,
Select a room in the model Click Link room Search for the room in dRofus that you want to connect the Revit room to, using the
or navigate in the department/function structure on the left.
Once you have linked a room, dRofus will update the Revit room with data from dRofus. The data to be updated will depend on which room configuration is chosen. If you right click in the right window and select Add/remove columns, you get a dialog that lets you choose which columns to show in the window.
You can also link an existing room in the Revit model to a room template in dRofus. Instead of searching for a room in the Rooms tab, select the Room Templates tab and search for a room template.
REVIT PLUG-IN
11
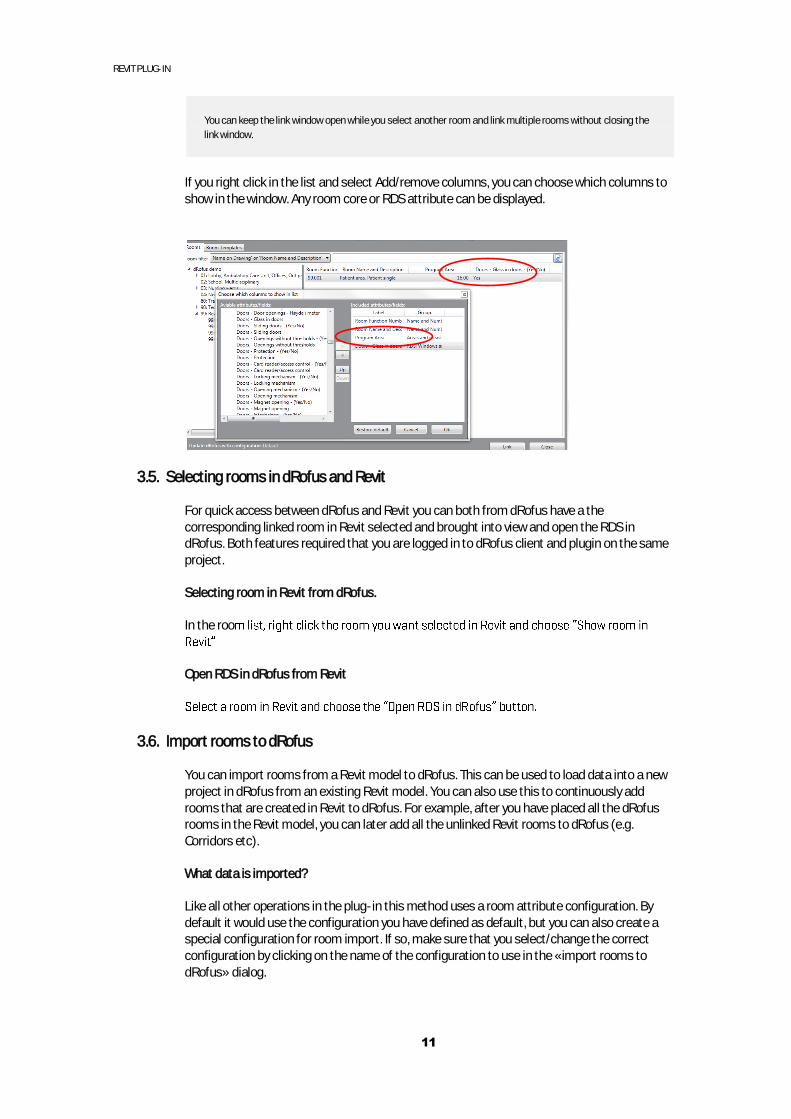
You can keep the link window open while you select another room and link multiple rooms without closing the
link window.
If you right click in the list and select Add/remove columns, you can choose which columns to show in the window. Any room core or RDS attribute can be displayed.
3.5. Selecting rooms in dRofus and Revit
For quick access between dRofus and Revit you can both from dRofus have a the corresponding linked room in Revit selected and brought into view and open the RDS in dRofus. Both features required that you are logged in to dRofus client and plugin on the same project.
Selecting room in Revit from dRofus.
In the roo
Open RDS in dRofus from Revit
3.6. Import rooms to dRofus
You can import rooms from a Revit model to dRofus. This can be used to load data into a new project in dRofus from an existing Revit model. You can also use this to continuously add rooms that are created in Revit to dRofus. For example, after you have placed all the dRofus rooms in the Revit model, you can later add all the unlinked Revit rooms to dRofus (e.g. Corridors etc).
What data is imported?
Like all other operations in the plug-in this method uses a room attribute configuration. By default it would use the configuration you have defined as default, but you can also create a special configuration for room import. If so, make sure that you select/change the correct configuration by clicking on the name of the configuration to use in the «import rooms to dRofus» dialog.
REVIT PLUG-IN
12
When importing rooms to dRofus it will «swap» the direction of all the elements in the configuration in order to write data from Revit to dRofus. If you for example have defined that notes on a room should go from dRofus to Revit in the selected configuration it will, when importing, import values from Revit to dRofus, including this attribute. Please note that it will not update any attributes that are read only in dRofus (gray in the attribute configuration editor). The only exception is name. If you have a configuration that defines that, Name should go from a read only attribute in dRofus (e.g. Room Name and Description) to Revit it will add the value from Name in Revit to Room Name in dRofus during import. After the import of the room is done it will then write the key from dRofus to Revit if you use a read only value in dRofus as key (e.g. Room Function Number or Room Id).
What rooms get imported?
Using the key from the selected configuration it will search for all rooms in the current model that has either a duplicate value for the key (e.g. Empty) or that is unique but not matched with a room in dRofus.
Where in dRofus to import them to?
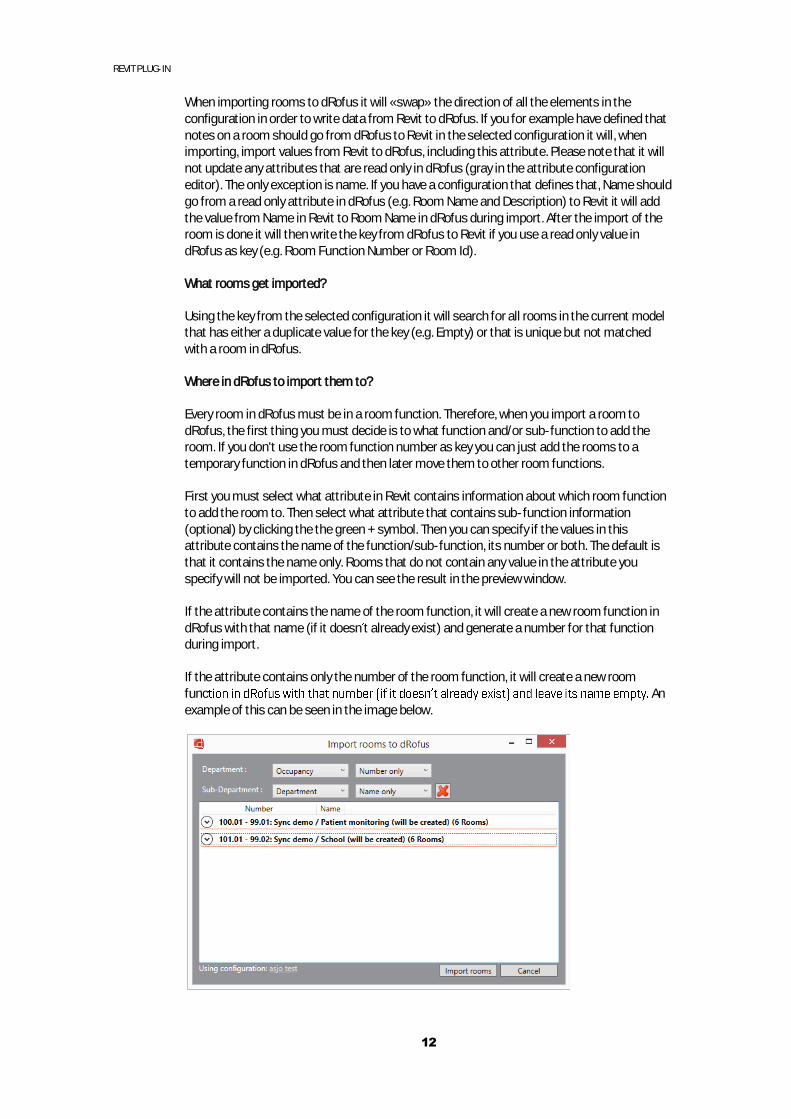
Every room in dRofus must be in a room function. Therefore, when you import a room to dRofus, the first thing you must decide is to what function and/or sub-function to add the room. If you don't use the room function number as key you can just add the rooms to a temporary function in dRofus and then later move them to other room functions.
First you must select what attribute in Revit contains information about which room function to add the room to. Then select what attribute that contains sub-function information (optional) by clicking the the green + symbol. Then you can specify if the values in this attribute contains the name of the function/sub-function, its number or both. The default is that it contains the name only. Rooms that do not contain any value in the attribute you specify will not be imported. You can see the result in the preview window.
If the attribute contains the name of the room function, it will create a new room function in dRofus with that name (if it doesn t already exist) and generate a number for that function during import.
If the attribute contains only the number of the room function, it will create a new room func An example of this can be seen in the image below.
REVIT PLUG-IN
13
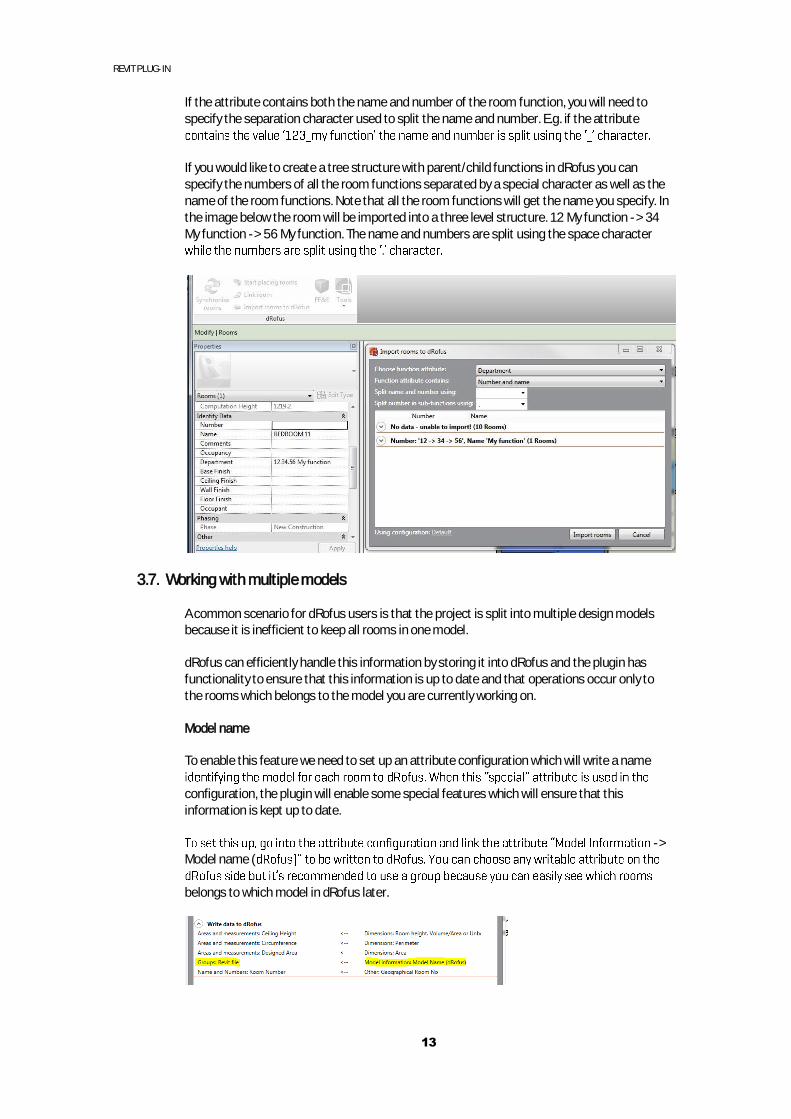
If the attribute contains both the name and number of the room function, you will need to specify the separation character used to split the name and number. E.g. if the attribute
If you would like to create a tree structure with parent/child functions in dRofus you can specify the numbers of all the room functions separated by a special character as well as the name of the room functions. Note that all the room functions will get the name you specify. In the image below the room will be imported into a three level structure. 12 My function -> 34 My function -> 56 My function. The name and numbers are split using the space character
3.7. Working with multiple models
A common scenario for dRofus users is that the project is split into multiple design models because it is inefficient to keep all rooms in one model.
dRofus can efficiently handle this information by storing it into dRofus and the plugin has functionality to ensure that this information is up to date and that operations occur only to the rooms which belongs to the model you are currently working on.
Model name
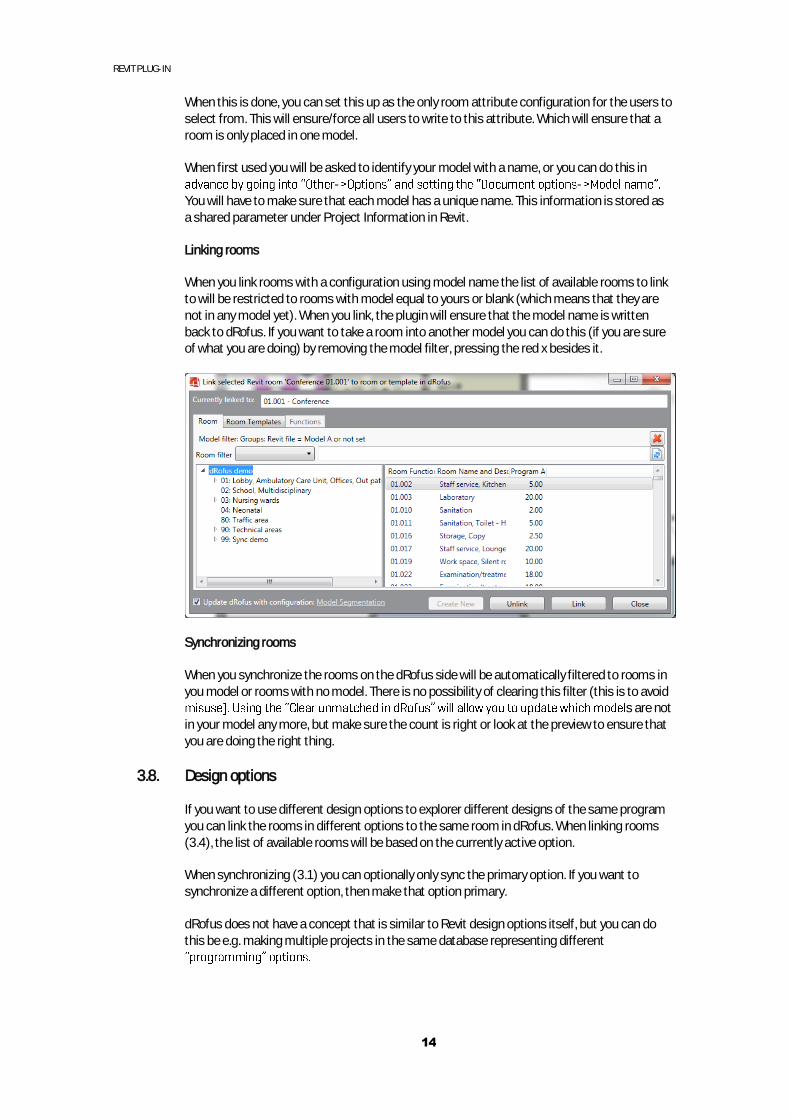
To enable this feature we need to set up an attribute configuration which will write a name
configuration, the plugin will enable some special features which will ensure that this information is kept up to date.
-> Model name (
belongs to which model in dRofus later.
REVIT PLUG-IN
14
When this is done, you can set this up as the only room attribute configuration for the users to select from. This will ensure/force all users to write to this attribute. Which will ensure that a room is only placed in one model.
When first used you will be asked to identify your model with a name, or you can do this in - -
You will have to make sure that each model has a unique name. This information is stored as a shared parameter under Project Information in Revit.
Linking rooms
When you link rooms with a configuration using model name the list of available rooms to link to will be restricted to rooms with model equal to yours or blank (which means that they are not in any model yet). When you link, the plugin will ensure that the model name is written back to dRofus. If you want to take a room into another model you can do this (if you are sure of what you are doing) by removing the model filter, pressing the red x besides it.
Synchronizing rooms
When you synchronize the rooms on the dRofus side will be automatically filtered to rooms in you model or rooms with no model. There is no possibility of clearing this filter (this is to avoid
s are not in your model any more, but make sure the count is right or look at the preview to ensure that you are doing the right thing.
3.8. Design options
If you want to use different design options to explorer different designs of the same program you can link the rooms in different options to the same room in dRofus. When linking rooms (3.4), the list of available rooms will be based on the currently active option.
When synchronizing (3.1) you can optionally only sync the primary option. If you want to synchronize a different option, then make that option primary.
dRofus does not have a concept that is similar to Revit design options itself, but you can do this be e.g. making multiple projects in the same database representing different
REVIT PLUG-IN
15
4.
4.1. Overview
With the Revit plug-in you will be able to synchronize information between Revit areas and dRofus functions. It is possible to link more than one Revit area to the same dRofus function. If the Area attribute configuration used specifies that the area value is to be synchronized to
of the area value for all the linked Revit areas.
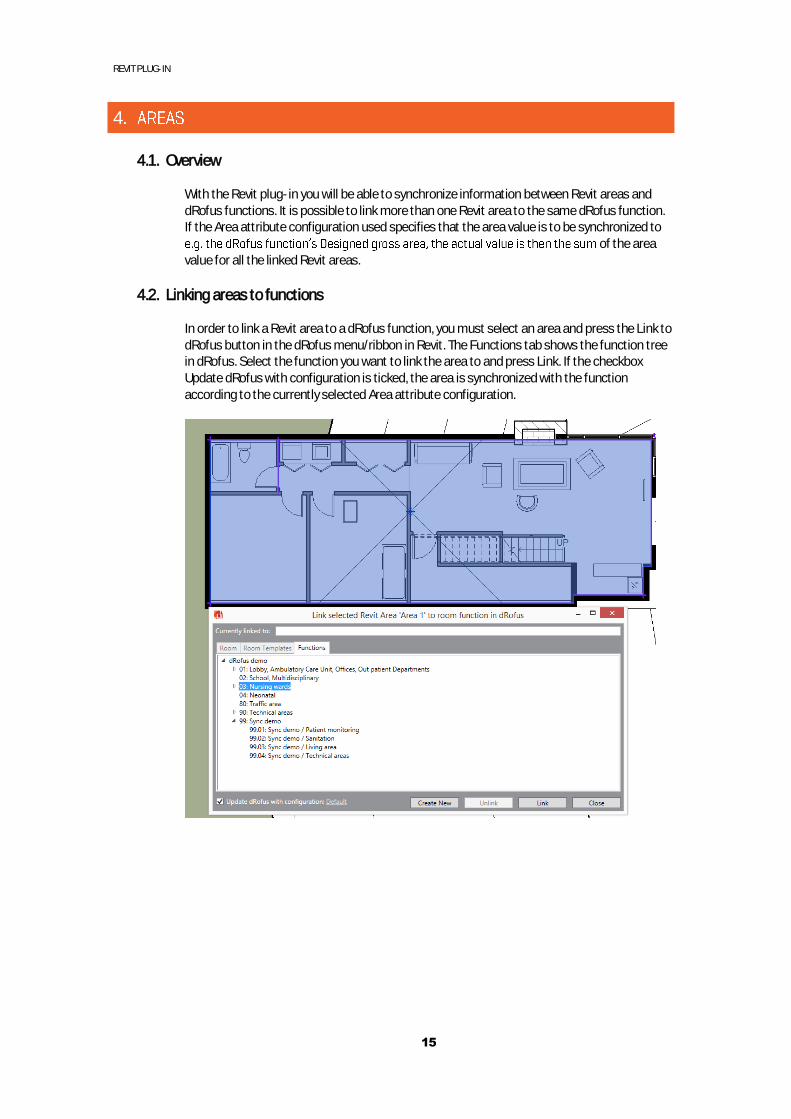
4.2. Linking areas to functions
In order to link a Revit area to a dRofus function, you must select an area and press the Link to dRofus button in the dRofus menu/ribbon in Revit. The Functions tab shows the function tree in dRofus. Select the function you want to link the area to and press Link. If the checkbox Update dRofus with configuration is ticked, the area is synchronized with the function according to the currently selected Area attribute configuration.
REVIT PLUG-IN
16
5.
5.1. Overview
With the Revit plug-in you will be able to synchronize information about dRofus items to Revit Family Symbols and keep equipment lists for Revit rooms and Revit spaces in sync. To use this you must first have the rooms and spaces synchronized and matched against dRofus. The Family Symbols must be matched one to one against items in dRofus. This chapter describes the equipment handling for rooms but the same applies for spaces.
5.2. Linking Family Symbols to items in dRofus
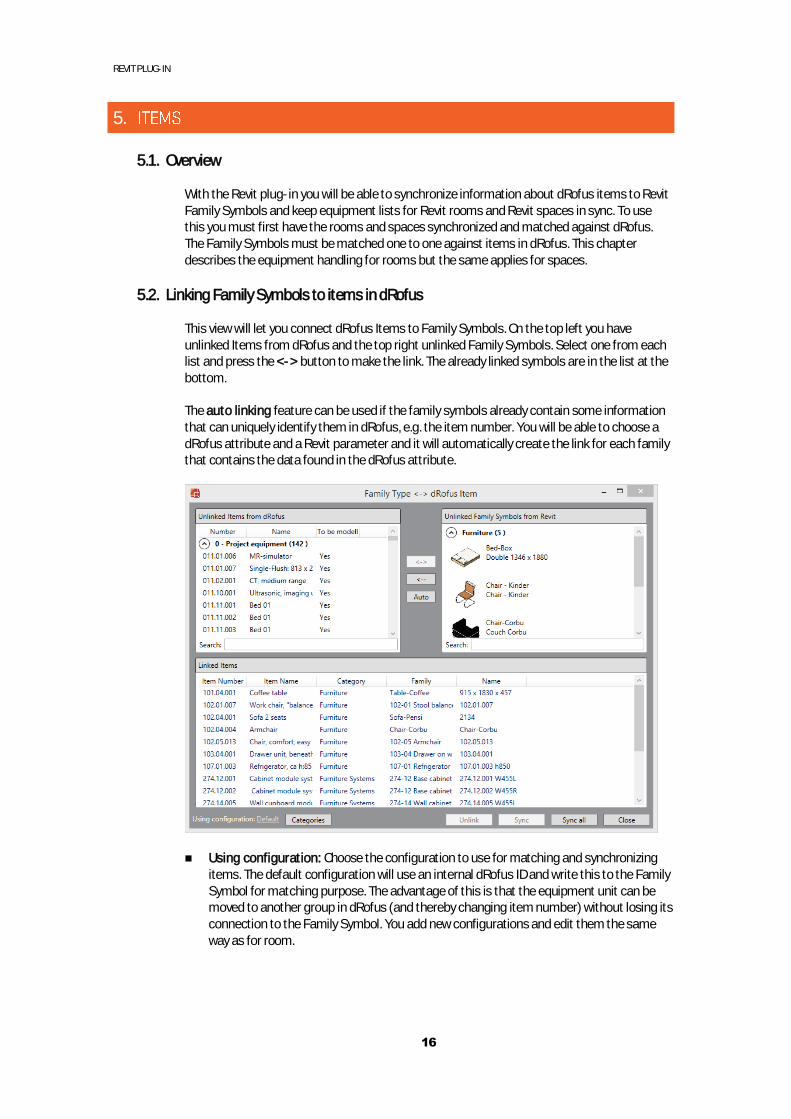
This view will let you connect dRofus Items to Family Symbols. On the top left you have unlinked Items from dRofus and the top right unlinked Family Symbols. Select one from each list and press the <-> button to make the link. The already linked symbols are in the list at the bottom.
The auto linking feature can be used if the family symbols already contain some information that can uniquely identify them in dRofus, e.g. the item number. You will be able to choose a dRofus attribute and a Revit parameter and it will automatically create the link for each family that contains the data found in the dRofus attribute.
Using configuration: Choose the configuration to use for matching and synchronizing items. The default configuration will use an internal dRofus ID and write this to the Family Symbol for matching purpose. The advantage of this is that the equipment unit can be moved to another group in dRofus (and thereby changing item number) without losing its connection to the Family Symbol. You add new configurations and edit them the same way as for room.
REVIT PLUG-IN
17
Categories: Choose which categories of family symbols should be included. This will affect both the list of family symbols you see in this view and which family symbols that are included when listing equipment in room. By default the Caseworks, Furniture, Furniture Systems and Pluming are included. If you have administration rights for dRofus you will be able to save a new default by clicking Save as default before you close the dialog. This will then affect all uses for this project/dataaffect the current session (until you close Revit or log into another database)
Unlink: Unlink the chosen linked item, removing the link information. Sync: Synchronize the selected family symbol. Sync all: Sync all linked family symbols Right-click options: Right click on a dRofus item or a linked item to add/remove
columns or export list to Excel.
5.3. Item image import from Revit to dRofus
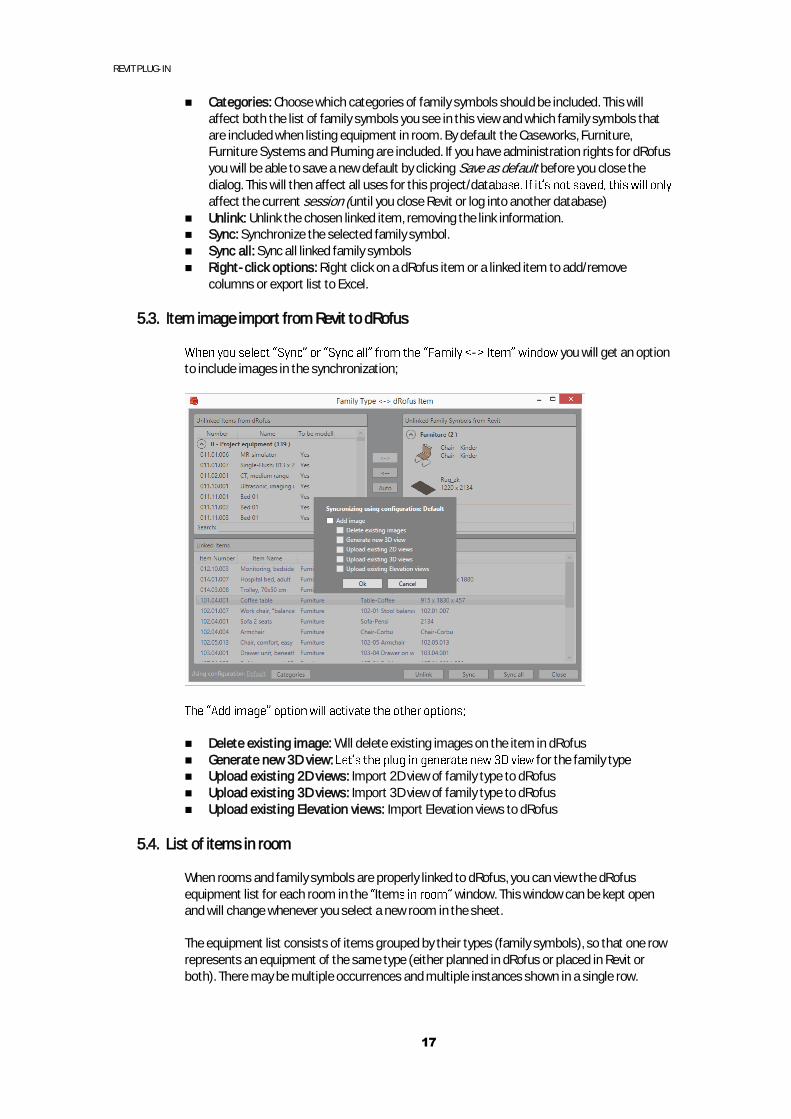
- you will get an option to include images in the synchronization;
Delete existing image: Will delete existing images on the item in dRofus Generate new 3D view: for the family type Upload existing 2D views: Import 2D view of family type to dRofus Upload existing 3D views: Import 3D view of family type to dRofus Upload existing Elevation views: Import Elevation views to dRofus
5.4. List of items in room
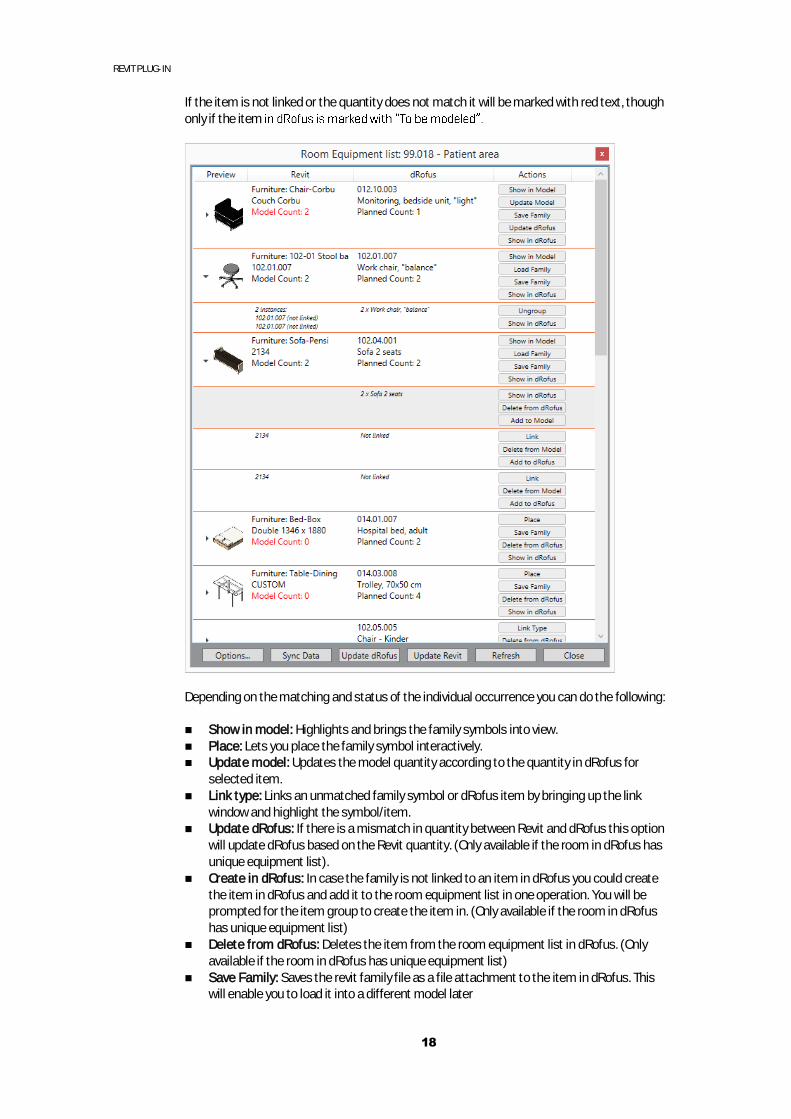
When rooms and family symbols are properly linked to dRofus, you can view the dRofus equipment list for each room in the Item window. This window can be kept open and will change whenever you select a new room in the sheet.
The equipment list consists of items grouped by their types (family symbols), so that one row represents an equipment of the same type (either planned in dRofus or placed in Revit or both). There may be multiple occurrences and multiple instances shown in a single row.
REVIT PLUG-IN
18
If the item is not linked or the quantity does not match it will be marked with red text, though only if the item
Depending on the matching and status of the individual occurrence you can do the following:
Show in model: Highlights and brings the family symbols into view. Place: Lets you place the family symbol interactively. Update model: Updates the model quantity according to the quantity in dRofus for
selected item. Link type: Links an unmatched family symbol or dRofus item by bringing up the link
window and highlight the symbol/item. Update dRofus: If there is a mismatch in quantity between Revit and dRofus this option
will update dRofus based on the Revit quantity. (Only available if the room in dRofus has unique equipment list).
Create in dRofus: In case the family is not linked to an item in dRofus you could create the item in dRofus and add it to the room equipment list in one operation. You will be prompted for the item group to create the item in. (Only available if the room in dRofus has unique equipment list)
Delete from dRofus: Deletes the item from the room equipment list in dRofus. (Only available if the room in dRofus has unique equipment list)
Save Family: Saves the revit family file as a file attachment to the item in dRofus. This will enable you to load it into a different model later
REVIT PLUG-IN
19
Load Family. If you do not have any linked family in your current model but a family file is found on the item, you could load it into your current model.
Ungroup: Separates two or more instances of a type into separate rows. Then you can manually link Revit instances to dRofus occurrences manually
Link: Link Revit instances to dRofus occurrences manually
In the bottom row of the window you can;
Sync data: Synchronize data on instances with dRofus occurrences. This will not affect quantities, only parameter values.
Update dRofus: Updates the quantites in dRofus according to Revit quantities. This will only work for rooms with unique equipment lists in dRofus.
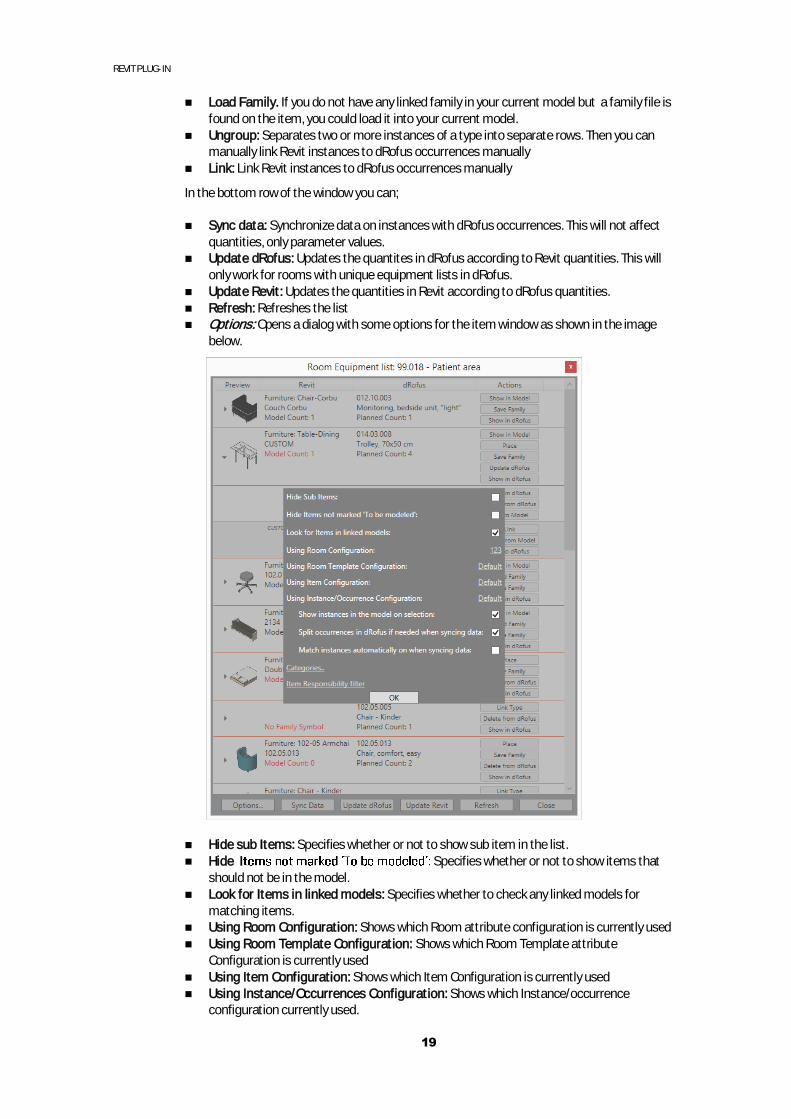
Update Revit: Updates the quantities in Revit according to dRofus quantities. Refresh: Refreshes the list Options: Opens a dialog with some options for the item window as shown in the image
below.
Hide sub Items: Specifies whether or not to show sub item in the list. Hide I Specifies whether or not to show items that
should not be in the model. Look for Items in linked models: Specifies whether to check any linked models for
matching items. Using Room Configuration: Shows which Room attribute configuration is currently used Using Room Template Configuration: Shows which Room Template attribute
Configuration is currently used Using Item Configuration: Shows which Item Configuration is currently used Using Instance/Occurrences Configuration: Shows which Instance/occurrence
configuration currently used.
REVIT PLUG-IN
20
Show instances in the model on selection: Will automatically highlight instances in the view when navigating the Room equipment list
Split occurrences in dRofus if needed when syncing data: Auto splits occurrences if it is linked/matched to instances that are pushing different values into dRofus (e.g. split if two different colors on instances are linked to the same occurrence in dRofus).
Match instances automatically when syncing data: Auto match if there are multiple occurrences and multiple instances of the same type, but matter which instance are linked to which occurrence
Categories: Choose which family categories in Revit to include in the items list. Items responsibility filter: Filter which responsibility groups
With the last two options (categories and responsibility filter) a user can filter on the equipment that he is interested in, e.g. plumbing fixtures, on both the Revit and dRofus side.
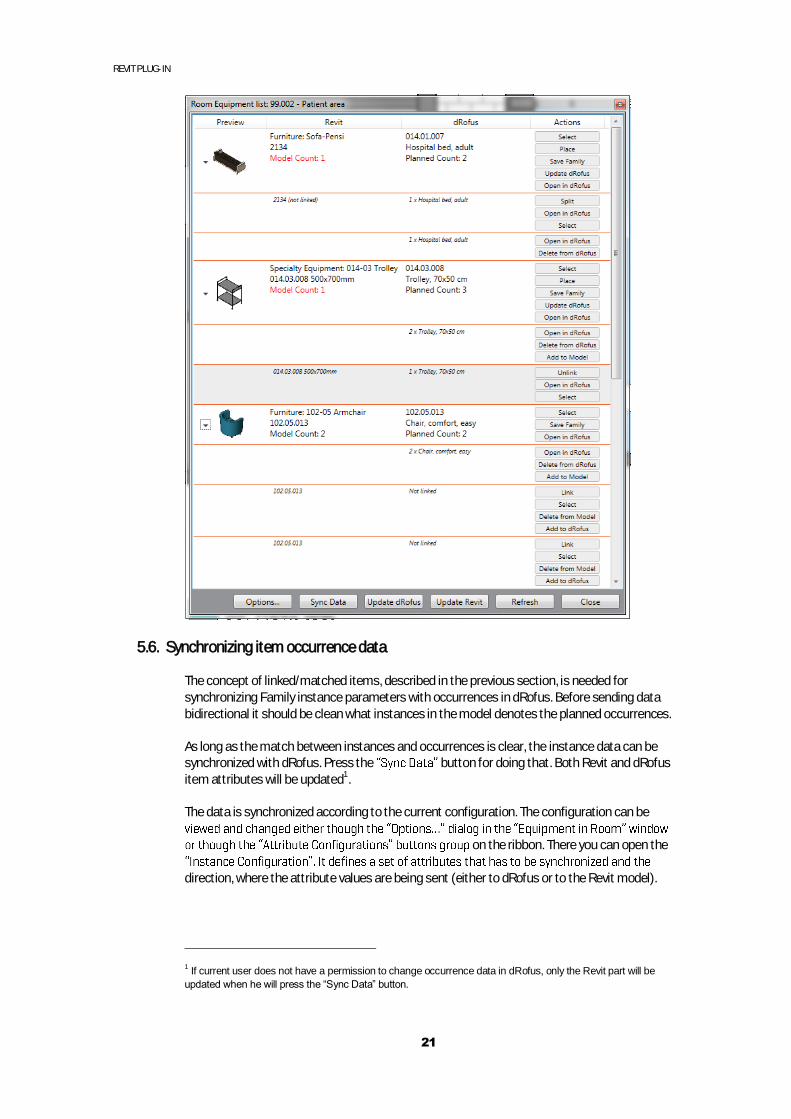
5.5. Matched/linked Items
You can expand the row that represents a single item type and see all the items of that type placed in the model and planned in dRofus. The items can either be linked/matched or unmatched. If the items are linked/matched, both model instances and occurrences planned in dRofus are shown together in one line. That means that these items can be synchronized and a quantity mismatch can be fixed either by changing the number of designed items or by adjusting the planned quantity in dRofus.
Some instances can be matched to an occurrence even though they are not linked to it explicitly. Instances and occurrences are matched automatically when there is no doubt which is which. There is no need to link them explicitly in that case in order to synchronize data or adjust quantity.
If instances are not shown together with the occurrences, you can link them by pressing the button of the instance row and then selecting the occurrence that you would like to link
to.
It is possible to ungroup linked/matched instances the grouped row. It can be useful if you decide to link the item occurrence to a different occurrence or to regroup them.
instances would be taken out of the group and unlinked.
REVIT PLUG-IN
21
5.6. Synchronizing item occurrence data
The concept of linked/matched items, described in the previous section, is needed for synchronizing Family instance parameters with occurrences in dRofus. Before sending data bidirectional it should be clean what instances in the model denotes the planned occurrences.
As long as the match between instances and occurrences is clear, the instance data can be synchronized with dRofus. Press the button for doing that. Both Revit and dRofus item attributes will be updated1.
The data is synchronized according to the current configuration. The configuration can be
on the ribbon. There you can open the
direction, where the attribute values are being sent (either to dRofus or to the Revit model).
1 If current user does not have a permission to change occurrence data in dRofus, only the Revit part will be
updated when he will press the “Sync Data” button.
REVIT PLUG-IN
22
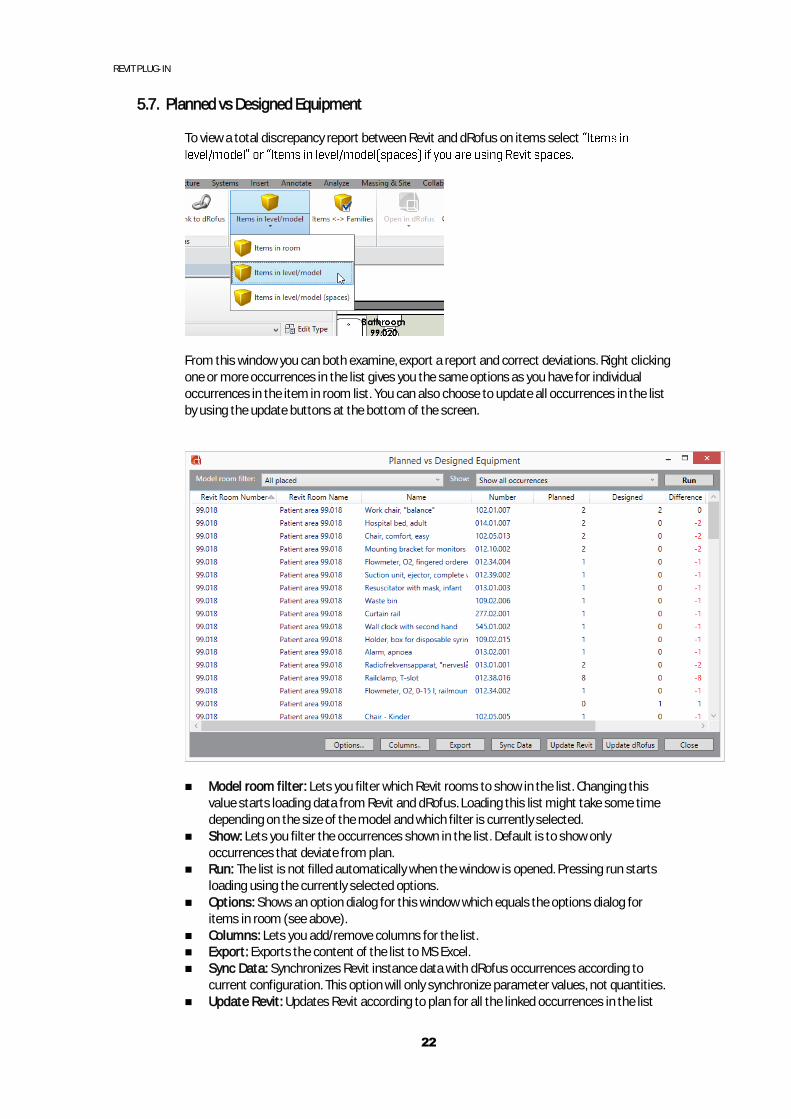
5.7. Planned vs Designed Equipment
To view a total discrepancy report between Revit and dRofus on items select
From this window you can both examine, export a report and correct deviations. Right clicking one or more occurrences in the list gives you the same options as you have for individual occurrences in the item in room list. You can also choose to update all occurrences in the list by using the update buttons at the bottom of the screen.
Model room filter: Lets you filter which Revit rooms to show in the list. Changing this value starts loading data from Revit and dRofus. Loading this list might take some time depending on the size of the model and which filter is currently selected.
Show: Lets you filter the occurrences shown in the list. Default is to show only occurrences that deviate from plan.
Run: The list is not filled automatically when the window is opened. Pressing run starts loading using the currently selected options.
Options: Shows an option dialog for this window which equals the options dialog for items in room (see above).
Columns: Lets you add/remove columns for the list. Export: Exports the content of the list to MS Excel. Sync Data: Synchronizes Revit instance data with dRofus occurrences according to
current configuration. This option will only synchronize parameter values, not quantities. Update Revit: Updates Revit according to plan for all the linked occurrences in the list
REVIT PLUG-IN
23
Update dRofus: Updates dRofus according to design for all the occurrences in the list.
5.8. Attribute configuration
You can make custom configurations that define which attributes from dRofus is written to the Revit Family Symbol and vice versa and how they are matched. See 25
Some important things to note:
Currently we only support project parameters, not parameters on the family itself. The workaround, to import family parameters, is to create project parameters with the same name as the family parameter for the desired category.
Using the database ID as key will allow you to reorganize the items catalog on the dRofus side without needing to re-link them in Revit.
Since each of the categories have some distinct parameters, it could be beneficial to create different configurations for different categories.
Item type data and Revit family type data are available in the -> Occurrence
data to Revit instances. From/to parameters on doors in Revit can be synced to dRofus occurrences
5.9. Using parent/child relationship for Items.
Using the parent/child relationships of items enables you to design either more general or specific than designed.
Designing more general will perhaps be the most common option. Take an example where you are planning computers and you have 10 different models in dRofus with different specifications for different needs. In the model however, all you need is to visually show that there is planned a PC on the desk, the technical specification is not visually presented anyway so you want to have one Family object that can represents all 10 models from dRofus. What you can do is to create a parent PC item in dRofus which you will link to a family in Revit. Then you create 10 child items which you will place in rooms in dRofus. The check for planned versus designed will accept the general family as a solution to the plan.
You can also do this the opposite way, which is linking the families to the child items in dRofus and use the parent item in the rooms in dRofus.
When you are planning the cabinets however, nd
item in dRofus with two children, left and right hinged cabinet, which will only exists to link the child items to families in Revit. Then use the parent item when planning the equipment in room. The designed versus plan check will accept the linked families as a proper solution to the general item in the plan.
5.10. Nested families and Sub Items
Nested families will show in the equipment windows if they are marked as , which also allow them to be scheduled. If not, they will not appear in the equipment list in Revit and will also be marked as missing in model if they are planned in dRofus. In case you are using sub-items Hide Sub Items in the options.
If planning with sub Items and are ub Itemsoption. This will only filter on the dRofus side and will report them as missing in plan even if they are in the model.
REVIT PLUG-IN
24
5.11. Which objects are considered to belong to a room?
dRofus does not uses the same approach when considering which instance is inside a room because this is slow and unpredictable from the API. Instead the plugin will look at the geometrical placement and see if it inside the boundary of the room objects. This can lead do some deviations in the behavior between Revit and dRofus. One case where this could be different is if the object is near or inside the wall and therefor outside the room boundary. You can set it to check outside this b
Options tion.
REVIT PLUG-IN
25
6.
6.1. General
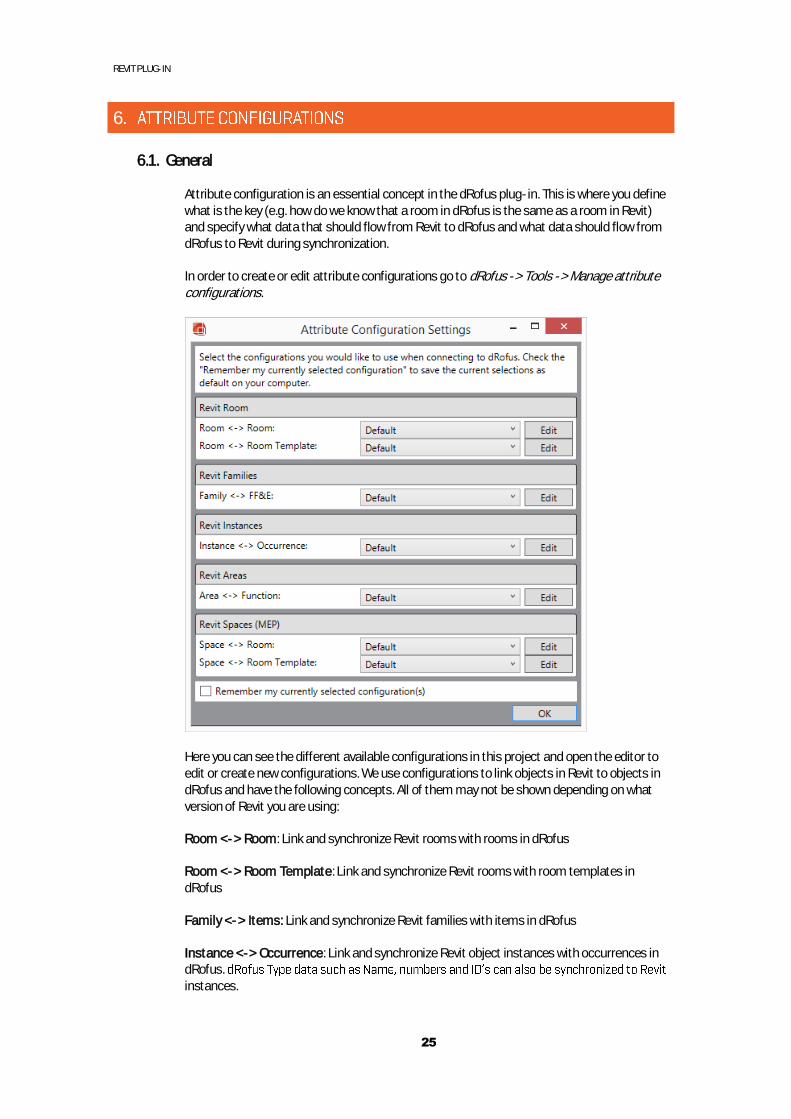
Attribute configuration is an essential concept in the dRofus plug-in. This is where you define what is the key (e.g. how do we know that a room in dRofus is the same as a room in Revit) and specify what data that should flow from Revit to dRofus and what data should flow from dRofus to Revit during synchronization.
In order to create or edit attribute configurations go to dRofus -> Tools -> Manage attribute configurations.
Here you can see the different available configurations in this project and open the editor to edit or create new configurations. We use configurations to link objects in Revit to objects in dRofus and have the following concepts. All of them may not be shown depending on what version of Revit you are using:
Room <-> Room: Link and synchronize Revit rooms with rooms in dRofus
Room <-> Room Template: Link and synchronize Revit rooms with room templates in dRofus
Family <-> Items: Link and synchronize Revit families with items in dRofus
Instance <-> Occurrence: Link and synchronize Revit object instances with occurrences in dRofus. instances.
REVIT PLUG-IN
26
Area <-> Function: Link and synchronize Revit areas with functions in dRofus
Space <-> Room Link and synchronize Revit spaces with rooms in dRofus (Available in Revit MEP and Revit ONE)
Space <-> Room Template: Link and synchronize Revit spaces with room templates in dRofus (Available in Revit MEP and Revit ONE)
The «Remember my currently selected configuration(s)» can be checked if you would like to use another configuration than the one that is defined as the standard/default. Note that this only applies to the current user and machine you are working on. If you would like to set another configuration as default for all users in the project, edit the configuration and mark it as default.
The plug-in always has one configuration called Default . This cannot be edited, but you can copy it and make changes to the copy. If you make another configuration default, the
will be hidden from this view.
Synchronize Revit rooms/spaces with room templates in dRofus has been found useful if you have separate
Revit Room template files, or if the room you are working on is not yet in the dRofus room list.
6.2. Create new / edit a configuration
In order to create a new or edit a configuration, open the configuration editor by clicking the edit button to the right of the type of configurations. To actually create, edit or delete these configuration you need administrative privileges in dRofus.
REVIT PLUG-IN
27
The edit dialog has three areas:
dRofus attribute: This is a list of all the available dRofus attributes that you can synchronize data to/from that is not already in the current configuration.
Revit attribute: This is a list of all the available Revit attributes (built-in, project and shared attributes) that you can synchronize data to/from that is not already in the current configuration.
Common for both lists of attributes: If the attribute has a (?) after it you can hold your mouse over to get a description of the attribute. If it is gray this means that it is a read only attribute in the plug-in and therefore can only synchronize data from this attribute and not to.
Linked attributes: This is a list of all the attributes in the current configuration.
Configuration properties: Here you can set:
Available to users: If this is checked all users can see/use this configuration. If not, only those who have administration rights can use this configuration.
Is default configuration: You can mark one of the configurations as default by selecting this. This means that it will be the default configuration used in all dialogs for this type (e.g. for rooms this will be default for synchronization, link room, place room etc.) for all users unless they have chosen another configuration and selected Remember my currently selected configu in the Manage attribute
configurations dialog.
Create a new configuration:
Create a new configuration by clicking create new, or copy to create a new based on the currently selected configuration. Not Default cannot be edited, but you can create your own version of this by selecting it and click copy.
Edit a configuration:
Remove an element: Select an element in the list of linked attributes and click «Unlink».
Add a key element: Select a dRofus attribute and a Revit attribute and click «Link ==». Every configuration must have one (and only one) key element.
Write data to dRofus: Select the attribute you would like to transfer to and from (to attribute must not be read only/ gray) and click «Link <--»
Write data to Revit: Select an attribute from dRofus. If you select an attribute in Revit you can choose «Link -->» or you can click «New -->». «New -->» will create a new shared parameter in Revit with the same name as the attribute in dRofus first time this configuration is used. See also 8.2 about shared parameters.
Family parameters are not supported. You will have to add the same shared parameter to project Oparameters
to get access to it.
REVIT PLUG-IN
28
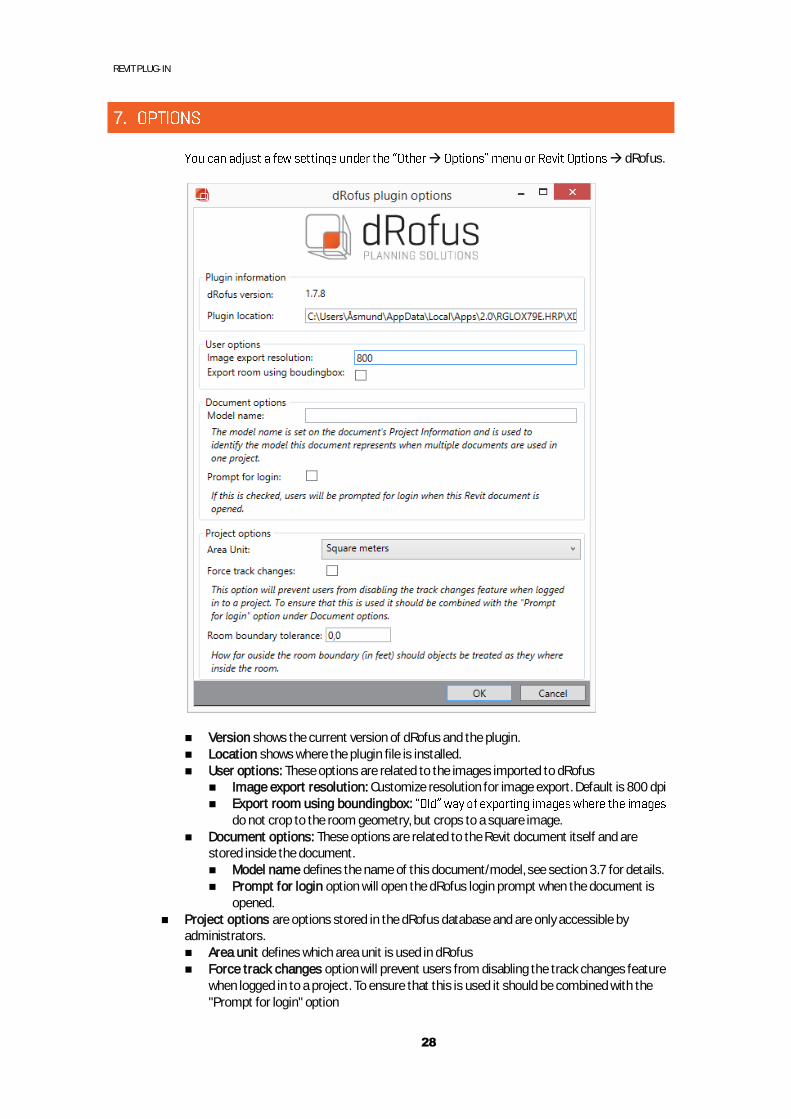
7.
dRofus.
Version shows the current version of dRofus and the plugin. Location shows where the plugin file is installed. User options: These options are related to the images imported to dRofus
Image export resolution: Customize resolution for image export. Default is 800 dpi Export room using boundingbox:
do not crop to the room geometry, but crops to a square image. Document options: These options are related to the Revit document itself and are
stored inside the document. Model name defines the name of this document/model, see section 3.7 for details. Prompt for login option will open the dRofus login prompt when the document is
opened. Project options are options stored in the dRofus database and are only accessible by
administrators. Area unit defines which area unit is used in dRofus Force track changes option will prevent users from disabling the track changes feature
when logged in to a project. To ensure that this is used it should be combined with the "Prompt for login" option
REVIT PLUG-IN
29
Room boundary see section 5.11
REVIT PLUG-IN
30
8.
8.1. General
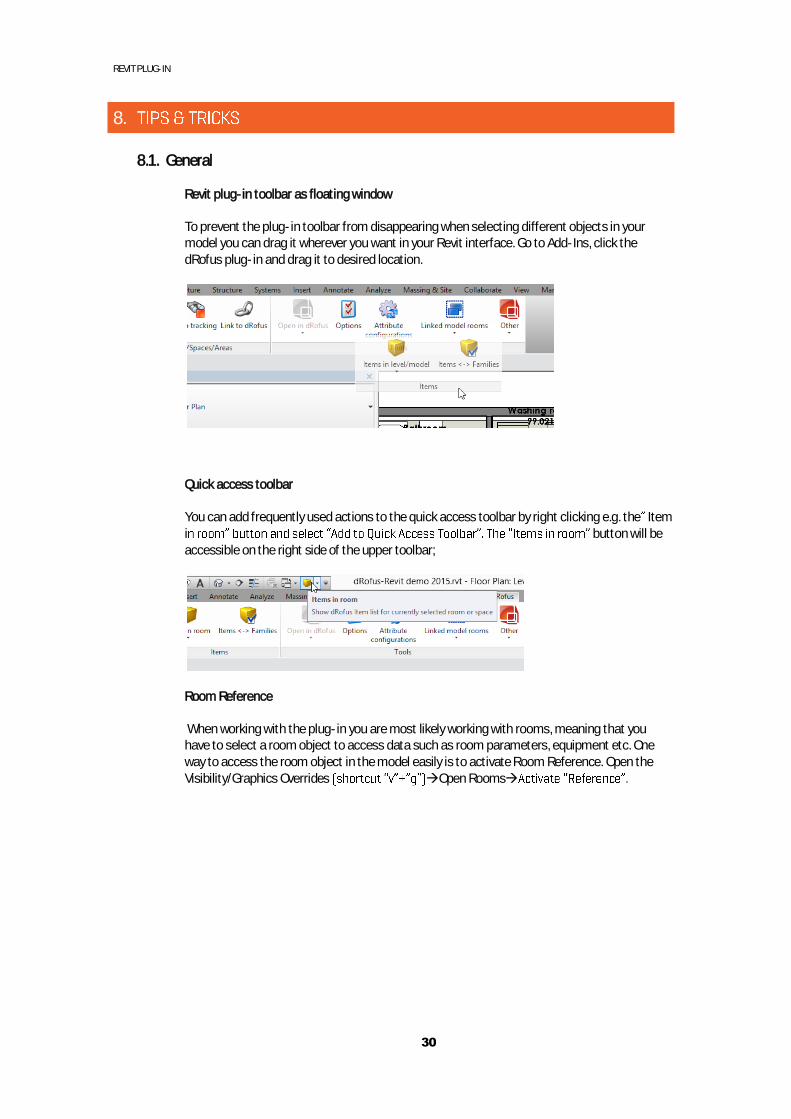
Revit plug-in toolbar as floating window
To prevent the plug-in toolbar from disappearing when selecting different objects in your model you can drag it wherever you want in your Revit interface. Go to Add-Ins, click the dRofus plug-in and drag it to desired location.
Quick access toolbar
You can add frequently used actions to the quick access toolbar by right clicking e.g. the Item i button will be accessible on the right side of the upper toolbar;
Room Reference
When working with the plug-in you are most likely working with rooms, meaning that you have to select a room object to access data such as room parameters, equipment etc. One way to access the room object in the model easily is to activate Room Reference. Open the Visibility/Graphics Overrides Open Rooms
REVIT PLUG-IN
31
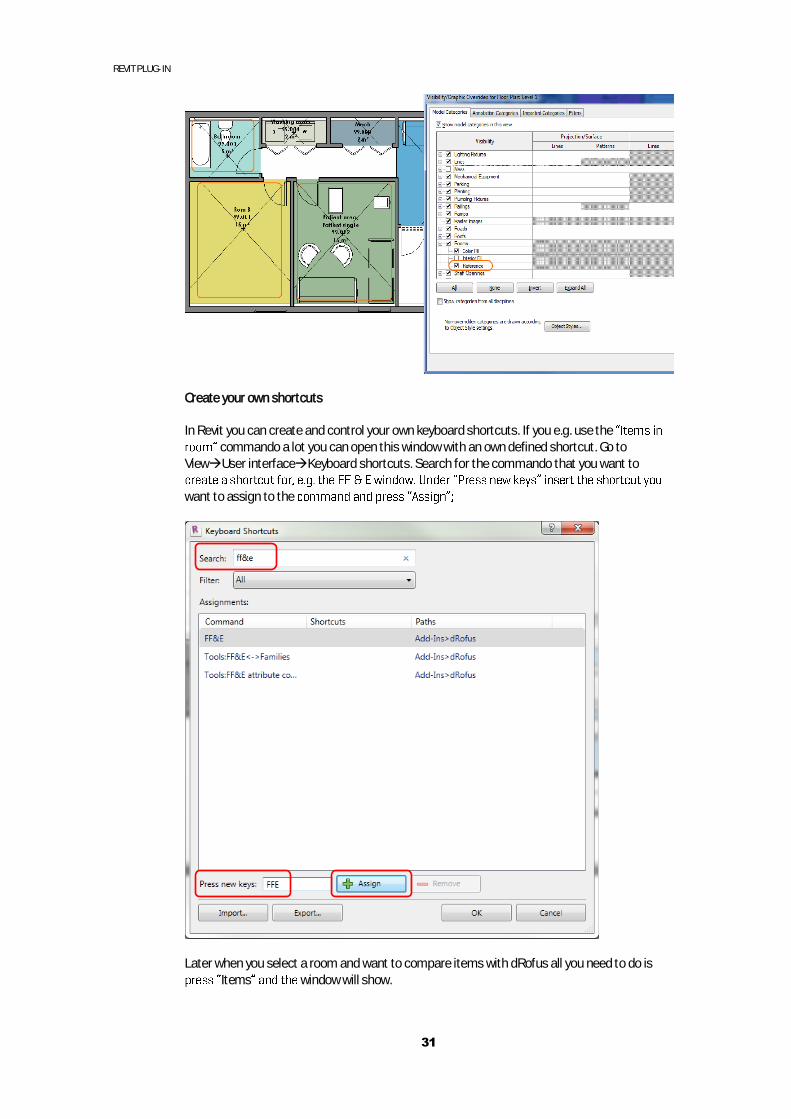
Create your own shortcuts
In Revit you can create and control your own keyboard shortcuts. If you e.g. use the commando a lot you can open this window with an own defined shortcut. Go to
ViewUser interfaceKeyboard shortcuts. Search for the commando that you want to
want to assign to the
Later when you select a room and want to compare items with dRofus all you need to do is Items window will show.
REVIT PLUG-IN
32
8.2. Shared parameters
Identification of parameters which attribute data is written to is purely based on names. It will search for parameters which have the same name as given in the configuration and if it
shared parameter internally by a Global ID so if you do the same parameter synchronization on two different machines and try to load data from one of the files in to another later, the information will end up in two different parameters.
For large organizations or groups of people working together on the same data it is very important to understand the implications of this.
at you want to take control of the shared parameters file yourself, creating the correct parameters in advance and share this file as a read-only file with others working on the same project or in the same organization.
The Revit plugin will not create new shared parameter if a project parameter with the same name exists in Revit.
8.3. Permissions
Permissions in the plugin follow the permissions you have in dRofus. This means that if you only have read permissions on rooms in dRofus, you will not be able to write any changes from Revit to dRofus, only from dRofus to Revit. Same goes for equipment and items.
To change and create attribute configurations you will need administrative privileges in dRofus.
REVIT PLUG-IN
33
9.
9.1. Use cases
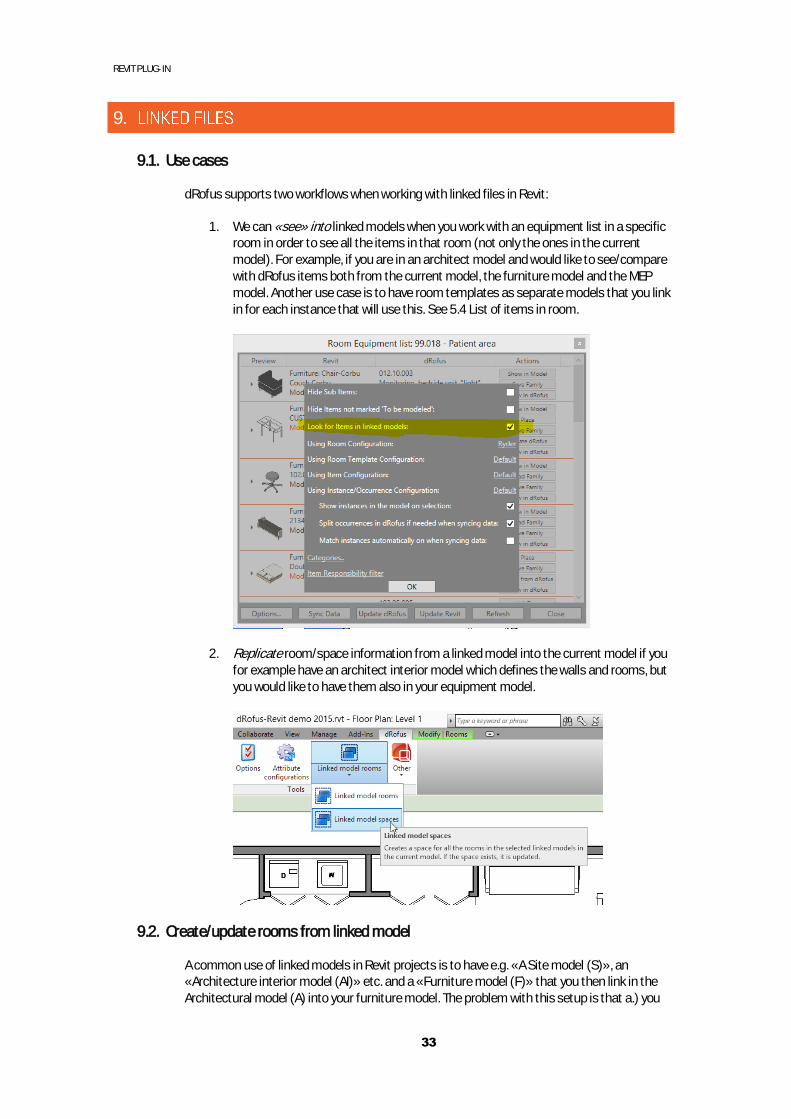
dRofus supports two workflows when working with linked files in Revit:
1. We can «see» into linked models when you work with an equipment list in a specific room in order to see all the items in that room (not only the ones in the current model). For example, if you are in an architect model and would like to see/compare with dRofus items both from the current model, the furniture model and the MEP model. Another use case is to have room templates as separate models that you link in for each instance that will use this. See 5.4 List of items in room.
2. Replicate room/space information from a linked model into the current model if you for example have an architect interior model which defines the walls and rooms, but you would like to have them also in your equipment model.
9.2. Create/update rooms from linked model
A common use of linked models in Revit projects is to have e.g. «A Site model (S)», an «Architecture interior model (AI)» etc. and a «Furniture model (F)» that you then link in the Architectural model (A) into your furniture model. The problem with this setup is that a.) you
REVIT PLUG-IN
34
cannot get good furniture schedules in Revit since they are all related to a floor level and not a room and b.) our «items in room» dialog only works if there is a room to select. You can therefore copy and update rooms from the architect model (who «owns» the rooms) into the furniture model.
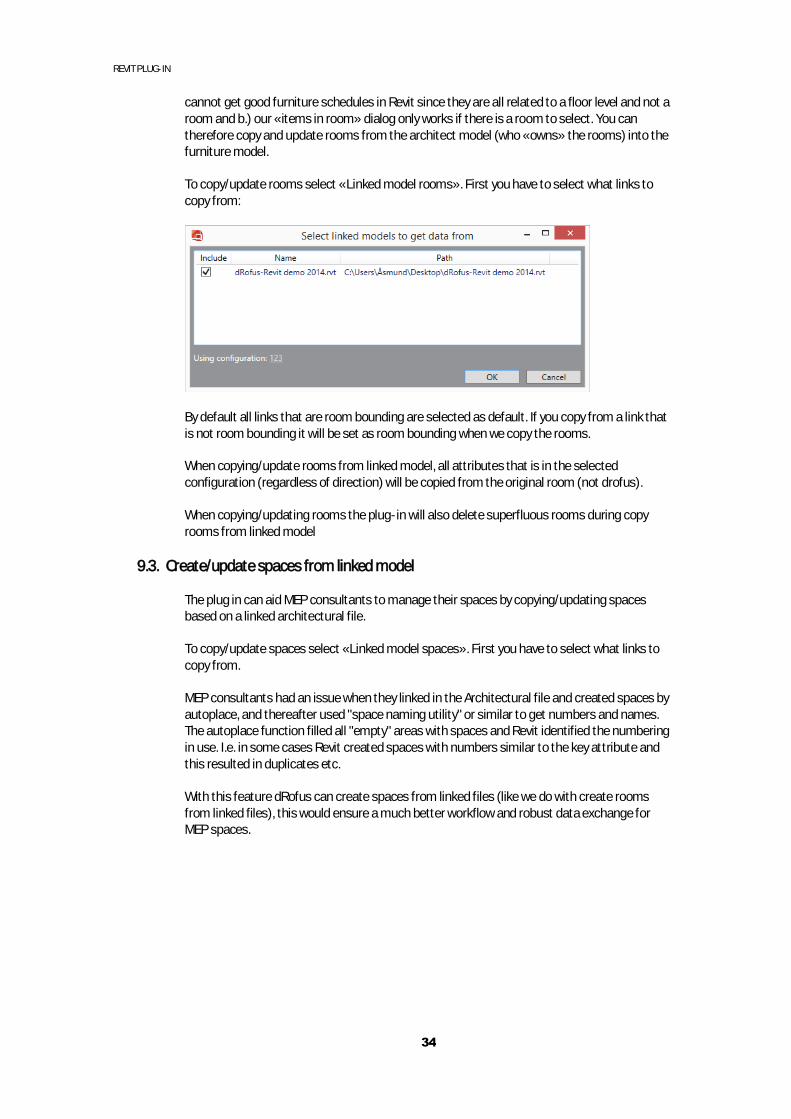
To copy/update rooms select «Linked model rooms». First you have to select what links to copy from:
By default all links that are room bounding are selected as default. If you copy from a link that is not room bounding it will be set as room bounding when we copy the rooms.
When copying/update rooms from linked model, all attributes that is in the selected configuration (regardless of direction) will be copied from the original room (not drofus).
When copying/updating rooms the plug-in will also delete superfluous rooms during copy rooms from linked model
9.3. Create/update spaces from linked model
The plug in can aid MEP consultants to manage their spaces by copying/updating spaces based on a linked architectural file.
To copy/update spaces select «Linked model spaces». First you have to select what links to copy from.
MEP consultants had an issue when they linked in the Architectural file and created spaces by autoplace, and thereafter used "space naming utility" or similar to get numbers and names. The autoplace function filled all "empty" areas with spaces and Revit identified the numbering in use. I.e. in some cases Revit created spaces with numbers similar to the key attribute and this resulted in duplicates etc.
With this feature dRofus can create spaces from linked files (like we do with create rooms from linked files), this would ensure a much better workflow and robust data exchange for MEP spaces.

REVIT PLUG-IN
35
10.
To upload an IFC model to the dRofus model server select OtherUpload IFC model;
This will push an IFC model of the open Revit model to the default model on th dRofus model server. If an IFC with the same name already exist on the model server, it will be replaced with a new.
Make sure that the rooms and items are linked with Revit rooms and families before you upload to get most out of the IFC functionality in dRofus.
This option requires write access to dRofus model server. For access contact your project dRofus administrator.
For more information on IFC features in dRofus, please see this document http://www.drofus.no/en/assets/files/Documents/user%20documentation/IFC%20support-en.pdf.