Embed Size (px)
Citation preview
For use only in the US
PENTAX Medical EC and EG Family Endoscopes One Instrument Channel, With and Without a Water Jet Channel
Reprocessing TrainingEvaluation Checklist
EC-2990Li
EC-3490Li
EC-3890Li
EC-3490TLi
EC-3490LK
EC-3890LK
EC-3890LZi
EC34-i10L
EC38-i10L
EG-1690K
EG-2490K
EG-2790K
EG-2990K
EG-3490K
EG-2790i
EG-2990i
EG27-i10
EG29-i10

– 2 –
INTRODUCTION
Introduction
This checklist is used to evaluate and document that a technician is following reprocessing protocols as instructed in the PENTAX Medical Reprocessing Instructions For Use (“IFU”) manual.
The reprocessing technician should perform all reprocessing steps, without referring to this checklist, while under observation of the evaluator. The evaluator will use this checklist to document whether the technician has completed each step. At the end of each section, the evaluator will note any deviations from the process.
The reprocessing protocol in this checklist is based on Reprocessing IFU, S022 R04 and optimized manual cleaning bulletin MK-626 Rev: C (EC Family endoscopes); and S019 R04 and optimized manual cleaning bulletin MK-625 Rev: C (EG Family endoscopes).
A physical copy of the Reprocessing IFU is shipped with new endoscopes. An electronic copy of the latest Reprocessing IFU can be downloaded from the PENTAX Medical Patient First Website, http://patientfirst.pentaxmedical.com. Contact your PENTAX Medical Representative to receive additional physical copies or to register for access to the website.
This checklist is for use with the following endoscope models:
EC Family: One instrument channel with water jet channel: EC-2990Li, EC-3490Li, EC-3890Li, EC-3490TLi, EC-3490LK, EC-3890LK, EC-3890LZi, EC34-i10L, EC38-i10L
EG Family: One instrument channel with water jet channel: EG-2990K, EG-3490K, EG-2990i, EG29-i10
One instrument channel without water jet channel: EG-1690K, EG-2490K, EG-2790K, EG-2790i, EG27-i10
This checklist applies to the single channel endoscopes, with or without a water jet channel, listed above. In Section 2 – Pre-Cleaning, Section 4 – Manual Cleaning, Section 6 – High-Level Disinfection, Section 7 – Rinsing, and Section 8 – Drying, the instruction steps are given for endoscopes with a water jet channel, and a note at the end of each section lists the steps that should be omitted and accessories that are not needed for endoscopes without a water jet channel. A separate Reprocessing Training Evaluation Checklist is available for EC and EG Family endoscopes with two instrument channels.
– 3 –
GENERAL INFORMATION
Procedure Information
Facility Name
Endoscope Model Number
Endoscope Serial Number
Procedure Identification No.
Procedure Date
Technician and Evaluator Information
Technician: Print Name
Signature
Date
Technician: Print Name
Signature
Date
Evaluator: Print Name
Signature
Date
– 4 –
TABLE OF CONTENTS
1 General Preparation ..........................................................................................................................5
2 Pre-Cleaning .......................................................................................................................................7
3 Leak Testing .......................................................................................................................................11
3-1-1. Leak Testing .......................................................................................................................11
3-1-2. Dry Leak Testing: ZUTR10002P Hand Held Leak Tester ...................................................12
3-1-3. Wet Leak Testing: ZUTR10002P Hand Held Leak Tester .................................................13
3-1-4. Wet Leak Testing: ZUTR10003P/WMP Automatic Leak Tester .......................................14
4 Manual Cleaning ................................................................................................................................16
4-1-1. Manual Cleaning .................................................................................................................16
4-1-2. Rinse After Manual Cleaning ..............................................................................................21
5 Accessories Cleaning .........................................................................................................................23
5-1-1. Accessories Cleaning (Batch Method) ...............................................................................23
5-1-2. Manual Cleaning Water Jet Channel Adapter ....................................................................25
6 Manual High-Level Disinfection .......................................................................................................27
6-1-1. Manual High-Level Disinfection .........................................................................................27
6-1-2. Preparation of Disinfectants ...............................................................................................30
6-1-3. Manual High-Level Disinfection .........................................................................................31
7 Rinsing After Manual Disinfection ...................................................................................................37
8 Drying ..................................................................................................................................................42
9 Storage ................................................................................................................................................46
10 Evaluation Results .............................................................................................................................48
11 Appendices .........................................................................................................................................49
11-1-1. Equipment Diagrams ........................................................................................................49
11-1-2. Approved Endoscope Components and Cleaning Accessories ......................................51
11-1-3. PENTAX Medical Documents ..........................................................................................51
12 References ..........................................................................................................................................52
– 5 –
GENERAL PREPARATION1
1-1-1. General Preparation
1) Reprocessing technician has completed the online training modules for reprocessing this endoscope.
2) Latest documentation and training materials are available for download at the PENTAX Medical Patient First Website, http://patientfirst.pentaxmedical.com.
3) The reprocessing instructions provided in the Reprocessing IFU, S022 R04 and S019 R04, are not valid for endoscopes repaired by a non-PENTAX Medical facility. If a non-PENTAX Medical, third-party organization has serviced this endoscope, please contact the servicing organization to obtain their validated reprocessing protocol and training support documentation. PENTAX Medical reprocessing protocols are not validated for endoscopes that have been repaired at a non-PENTAX Medical facility.
4) Facility is equipped with recommended PENTAX Medical cleaning brushes and other reprocessing accessories. PENTAX Medical reprocessing protocols are only validated with the cleaning accessories that are specified in the Reprocessing IFU. Use of cleaning brushes and accessories that are not approved by PENTAX Medical are up to the discretion of the customer. PENTAX Medical does not validate the effectiveness of cleaning with non-PENTAX Medical approved accessories. Please refer to the Reprocessing IFU or the PENTAX Medical Accessories Guide for a list of validated cleaning accessories.
5) Reference MK-352, list of compatible reprocessing systems/agents.
6) Confirm that the manufacturer of the Automated Endoscope Reprocessor (AER) has validated compatibility with the PENTAX Medical endoscope. If you are unsure of the AER validation status of a given PENTAX Medical endoscope model, please contact the AER manufacturer directly for confirmation.
7) Confirm availability of all required AER connectors associated with the PENTAX Medical endoscope. Note that connectors may differ across different scope models. Please refer to the AER manufacturer’s guidelines for connector compatibility.
– 6 –
Deviation Comments
No Deviation Deviation
GENERAL PREPARATION1
8) During reprocessing, always wear protective equipment (e.g., gloves, gowns, face masks, etc.) to minimize the risk of cross-contamination.
Deviation from Procedure
– 7 –
PRE-CLEANING 2
2-1-1. Pre-Cleaning
The initial steps in the reprocessing protocol begin in the procedure room immediately after removal of the insertion tube from the patient and prior to disconnecting the endoscope from the power source. Pre-cleaning should be performed at point of use, before bioburden has an opportunity to dry and before complete decontamination.1
The following is available prior to beginning the pre-cleaning process:
Endoscope component
• Inlet seal (OF-B190)
• Suction control valve (OF-B120)
• Air/water feeding valve (OF-B188)
Reprocessing accessory
• Water jet channel cleaning adapter (OE-C20) (for scopes with water jet channel only)
Other equipment
• Protective equipment such as gloves, gowns, face masks, etc., to minimize the risk of cross-contamination
• Detergent solution, Endozime® (Ruhof Corporation®)
• Water bottle and video processor
• External suction source
• 500mL basin
• Lint-free gauze
• 30mL luer slip syringe (for scopes with water jet channel only)
Confirm that the detergent is compatible for use with the PENTAX Medical endoscope. Please refer to the latest revision of PENTAX Medical Compatible Reprocessing Systems/Agents document, MK-352, for a complete list of detergents that have been validated for compatibility with PENTAX Medical endoscopes.
– 8 –
PRE-CLEANING2
1) Wear personal protective equipment.
2) Prepare 500mL of medical-grade, low-foaming, neutral-pH detergent in a beaker or small basin to the concentration and at the temperature recommended by the detergent manufacturer. In the case of Endozime® (Ruhof Corporation®, Mineola, NY), add 30mL of Endozime concentrate to one gallon of clean potable water at 68–86oF (20–30oC). Water may also be used for pre-cleaning.
3) Turn off the lamp switch of the video processor.
4) Immediately after removing the endoscope from the patient, gently wipe the entire length of the insertion tube three times using lint-free gauze soaked with detergent solution or water.
5) Ensure that the inlet seal (OF-B190) and suction control valve (OF-B120) are attached to the endoscope.
6) Ensure that a suction tube from an external suction source is connected to the endoscope suction nipple.
7) Ensure that the external suction source is turned on.
8) Place the distal end of endoscope into a basin, and aspirate the detergent solution through the suction channel by pressing suction control valve (OF-B120) for ten seconds.
9) Remove the distal end from the detergent solution or water, and aspirate air through the suction channel by pressing suction control valve (OF-B120) for ten seconds.
10) Turn off the external suction source.
11) Disconnect suction tube from the endoscope suction nipple.
12) Ensure that the air/water feeding valve (OF-B188) is attached to the endoscope.
Complete Not Complete
Complete Not Complete
Complete Not Complete
Complete Not Complete
Complete Not Complete
Complete Not Complete
Complete Not Complete
Complete Not Complete
Complete Not Complete
Complete Not Complete
Complete Not Complete
Complete Not Complete
– 9 –
PRE-CLEANING2
13) Ensure that the air/water feeding tube of the water bottle is attached to the endoscope air/water port.
14) Set the lever on the water bottle to the “Drain” position.
15) With the air pump of video processor ON and set to the HIGHEST pressure setting, flush the air channel with air by covering the hole in the top of air/water feeding valve (OF-B188) for ten seconds.
16) Place the distal end of endoscope into a basin.
17) Purge all water in the water channel by pressing the button of the air/water feeding valve (OF-B188) for ten seconds.
18) Turn the air pump of the video processor OFF, and disconnect the air/water feeding tube of water bottle from the endoscope air/water port.
19) Ensure that water jet check valve adapter (OE-C12) is attached to the endoscope. Attach irrigation tube (OF-B113) to water jet check valve adapter (OE-C12).
20) Place the distal end of the endoscope back into the basin of detergent solution or water.
21) Attach a syringe filled with detergent solution or water to irrigation tube (OF-B113), and flush the water jet channel with 15mL of detergent solution or water. Ensure that a stream of detergent solution or water exits the distal end of the endoscope.
22) While the distal end of the endoscope is still in the basin, use a syringe filled with air to flush the water jet channel with 35mL of air to purge residual detergent solution or water.
23) Transport the pre-cleaned endoscope and accessories to the cleaning room in a closed container.
Complete Not Complete
Complete Not Complete
Complete Not Complete
Complete Not Complete
Complete Not Complete
Complete Not Complete
Complete Not Complete
Complete Not Complete
Complete Not Complete
Complete Not Complete
Complete Not Complete
– 10 –
Deviation Comments
No Deviation Deviation
PRE-CLEANING2
Note:
1. The pre-cleaning procedure for PENTAX Medical Video Colonoscopes and Upper G.I. Endoscopes that have one instrument channel, but do not have a water jet channel is exactly the same as the one above, with the following changes:
• Omit Steps # 19–22 (inclusive).
• Water check valve adapter (OE-C12) and irrigation tube (OF-B113) are not needed for pre-cleaning.
Deviation from Procedure
– 11 –
LEAK TESTING3
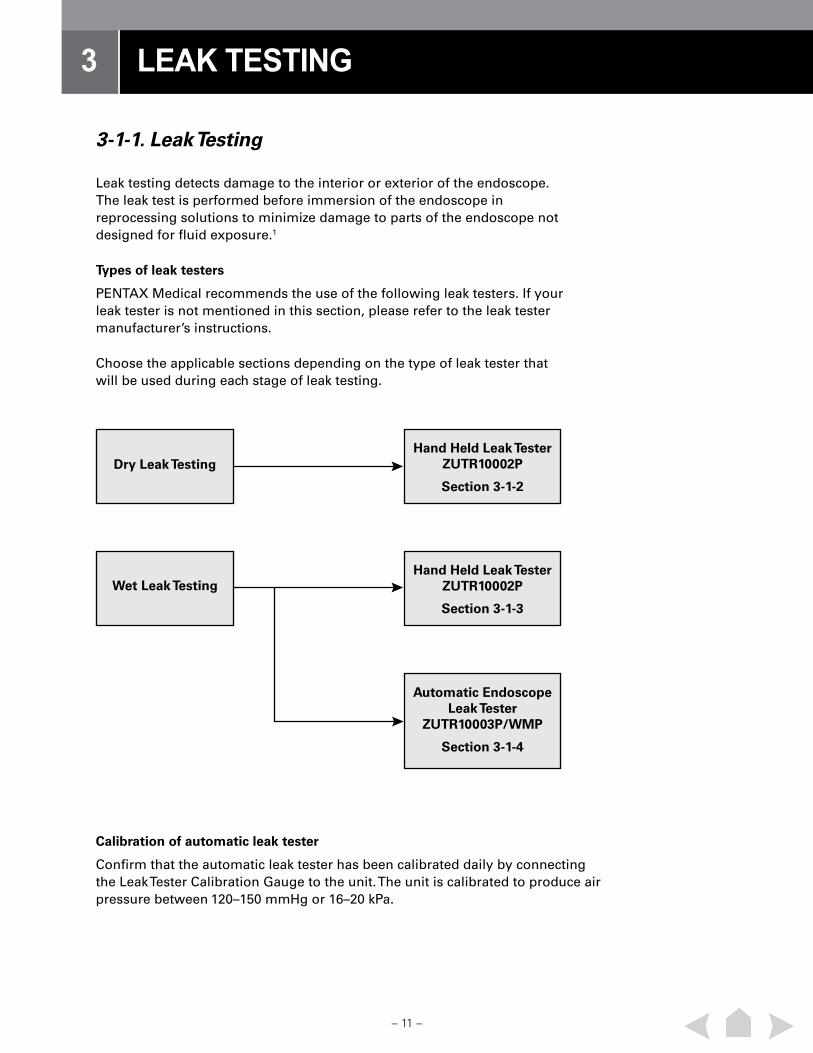
3-1-1. Leak Testing
Leak testing detects damage to the interior or exterior of the endoscope. The leak test is performed before immersion of the endoscope in reprocessing solutions to minimize damage to parts of the endoscope not designed for fluid exposure.1
Types of leak testers
PENTAX Medical recommends the use of the following leak testers. If your leak tester is not mentioned in this section, please refer to the leak tester manufacturer’s instructions.
Choose the applicable sections depending on the type of leak tester that will be used during each stage of leak testing.
Calibration of automatic leak tester
Confirm that the automatic leak tester has been calibrated daily by connecting the Leak Tester Calibration Gauge to the unit. The unit is calibrated to produce air pressure between 120–150 mmHg or 16–20 kPa.
Hand Held Leak TesterZUTR10002P
Section 3-1-2
Hand Held Leak TesterZUTR10002P
Section 3-1-3
Automatic Endoscope Leak Tester
ZUTR10003P/WMP
Section 3-1-4
Dry Leak Testing
Wet Leak Testing
– 12 –
LEAK TESTING3
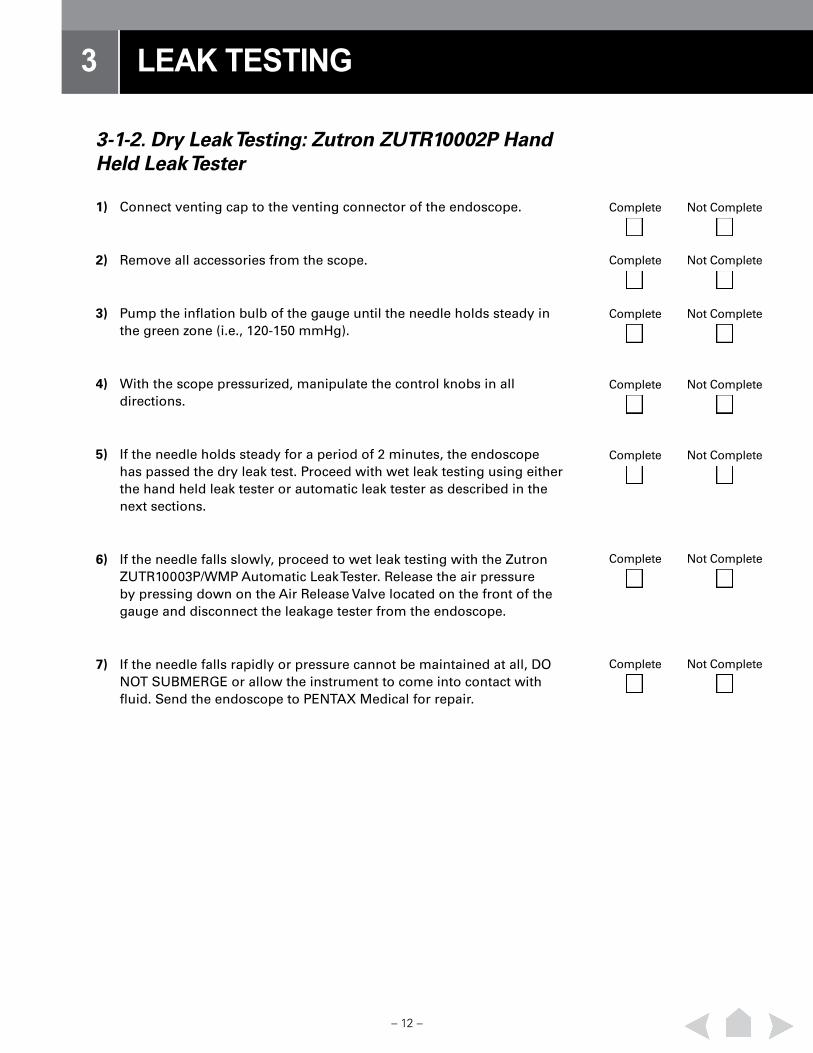
3-1-2. Dry Leak Testing: Zutron ZUTR10002P Hand Held Leak Tester
1) Connect venting cap to the venting connector of the endoscope.
2) Remove all accessories from the scope.
3) Pump the inflation bulb of the gauge until the needle holds steady in the green zone (i.e., 120-150 mmHg).
4) With the scope pressurized, manipulate the control knobs in all directions.
5) If the needle holds steady for a period of 2 minutes, the endoscope has passed the dry leak test. Proceed with wet leak testing using either the hand held leak tester or automatic leak tester as described in the next sections.
6) If the needle falls slowly, proceed to wet leak testing with the Zutron ZUTR10003P/WMP Automatic Leak Tester. Release the air pressure by pressing down on the Air Release Valve located on the front of the gauge and disconnect the leakage tester from the endoscope.
7) If the needle falls rapidly or pressure cannot be maintained at all, DO NOT SUBMERGE or allow the instrument to come into contact with fluid. Send the endoscope to PENTAX Medical for repair.
Complete Not Complete
Complete Not Complete
Complete Not Complete
Complete Not Complete
Complete Not Complete
Complete Not Complete
Complete Not Complete
– 13 –
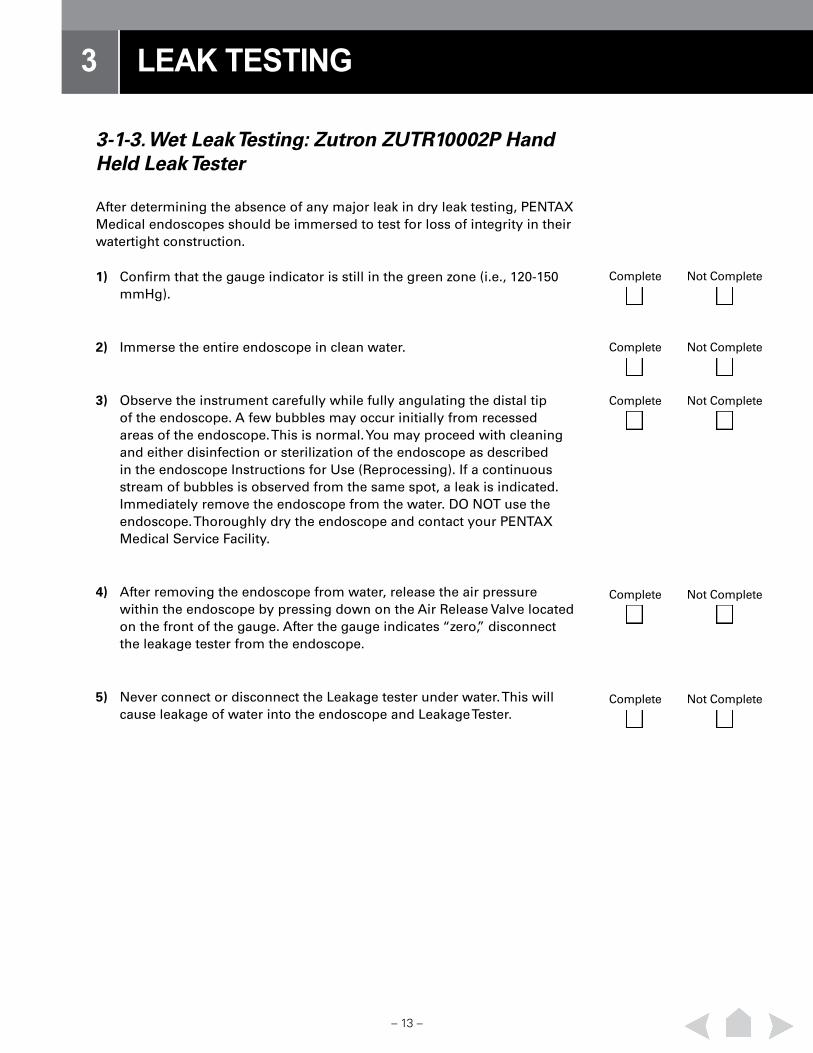
3-1-3. Wet Leak Testing: Zutron ZUTR10002P Hand Held Leak Tester
After determining the absence of any major leak in dry leak testing, PENTAX Medical endoscopes should be immersed to test for loss of integrity in their watertight construction.
1) Confirm that the gauge indicator is still in the green zone (i.e., 120-150 mmHg).
2) Immerse the entire endoscope in clean water.
3) Observe the instrument carefully while fully angulating the distal tip of the endoscope. A few bubbles may occur initially from recessed areas of the endoscope. This is normal. You may proceed with cleaning and either disinfection or sterilization of the endoscope as described in the endoscope Instructions for Use (Reprocessing). If a continuous stream of bubbles is observed from the same spot, a leak is indicated. Immediately remove the endoscope from the water. DO NOT use the endoscope. Thoroughly dry the endoscope and contact your PENTAX Medical Service Facility.
4) After removing the endoscope from water, release the air pressure within the endoscope by pressing down on the Air Release Valve located on the front of the gauge. After the gauge indicates “zero,” disconnect the leakage tester from the endoscope.
5) Never connect or disconnect the Leakage tester under water. This will cause leakage of water into the endoscope and Leakage Tester.
LEAK TESTING3
Complete Not Complete
Complete Not Complete
Complete Not Complete
Complete Not Complete
Complete Not Complete
– 14 –
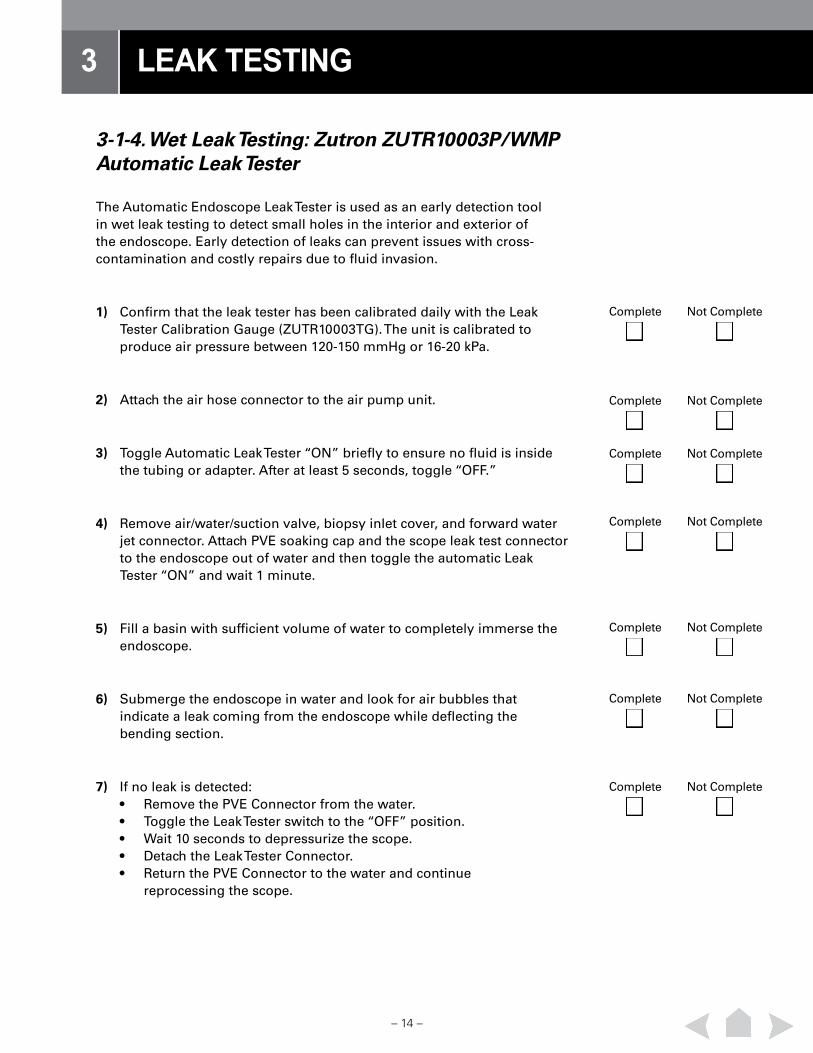
3-1-4. Wet Leak Testing: Zutron ZUTR10003P/WMP Automatic Leak Tester
The Automatic Endoscope Leak Tester is used as an early detection tool in wet leak testing to detect small holes in the interior and exterior of the endoscope. Early detection of leaks can prevent issues with cross-contamination and costly repairs due to fluid invasion.
1) Confirm that the leak tester has been calibrated daily with the Leak Tester Calibration Gauge (ZUTR10003TG). The unit is calibrated to produce air pressure between 120-150 mmHg or 16-20 kPa.
2) Attach the air hose connector to the air pump unit.
3) Toggle Automatic Leak Tester “ON” briefly to ensure no fluid is inside the tubing or adapter. After at least 5 seconds, toggle “OFF.”
4) Remove air/water/suction valve, biopsy inlet cover, and forward water jet connector. Attach PVE soaking cap and the scope leak test connector to the endoscope out of water and then toggle the automatic Leak Tester “ON” and wait 1 minute.
5) Fill a basin with sufficient volume of water to completely immerse the endoscope.
6) Submerge the endoscope in water and look for air bubbles that indicate a leak coming from the endoscope while deflecting the bending section.
7) If no leak is detected: • Remove the PVE Connector from the water. • Toggle the Leak Tester switch to the “OFF” position. • Wait 10 seconds to depressurize the scope. • Detach the Leak Tester Connector. • Return the PVE Connector to the water and continue reprocessing the scope.
LEAK TESTING3
Complete Not Complete
Complete Not Complete
Complete Not Complete
Complete Not Complete
Complete Not Complete
Complete Not Complete
Complete Not Complete
– 15 –
LEAK TESTING3
Deviation Comments
No Deviation DeviationDeviation from Procedure
8) If a leak is detected: • Remove the entire scope from the water. • Toggle the Leak Tester switch to the “OFF” position • Wait 10 seconds to depressurize the scope. • Detach the Leak Tester Connector. • Place the scope into a red biohazard bag marked “NOT DISINFECTED” • Return the scope to PENTAX Medical for service.
Complete Not Complete
– 16 –
MANUAL CLEANING4
4-1-1. Manual Cleaning
Manual cleaning of endoscopes is necessary prior to automated or manual disinfection. This is the most important step in removing the microbial burden from an endoscope. Retained debris may inactivate or interfere with the capability of the active ingredient of the chemical solution to effectively kill and/or inactivate microorganisms.
Items required:
Endoscope component
• Inlet seal (OF-B190)
Reprocessing accessory
• PVE soaking cap (OE-C9)
• Cleaning brush (CS6021T)
• Cleaning brush (CS-C9S)
• Cleaning adapter (OF-B153)
• Cleaning adapter (OF-G17)
• Water jet channel cleaning adapter (OE-C20) (for scopes with water jet channel only)
Other equipment
• Protective equipment such as gloves, gowns, face masks, etc., to minimize the risk of cross-contamination.
• Detergent solution, Endozime® (Ruhof Corporation®).
• Clean potable water.
• Basin sufficient in size to immerse the entire endoscope (at least 50cm in width x 40cm in depth x 15cm in height).
• Lint-free gauze.
• 30mL luer slip syringe.
• 50mL luer slip syringe.
– 17 –
MANUAL CLEANING4
1) Wear personal protective equipment.
2) Add the proper amount of detergent to the basin of water that was previously used for wet leak testing, and fully immerse the endoscope in the detergent solution.
3) While still immersed in detergent solution, wash the entire surface of the endoscope one time with a lint-free gauze. Use both brush heads of cleaning brush (CS-C9S) to remove soil from the distal tip and areas of the control body such as areas behind and in between the angulation knobs, the bases of the image control buttons, and the angulation lock lever and knob. If the endoscope remains soiled, wipe or brush its exterior surfaces one additional time.
4) Wash the surfaces of the suction control valve (OF-B120), air/water feeding valve (OF-B188), water jet check valve adapter (OE-C12), irrigation tube (OF-B113), and water jet check valve (OE-C14) three times with a lint-free cloth.
5) Wash the surfaces of cleaning brush (CS-C9S) for 30 seconds.
6) Brush the internal and external surfaces of the suction control valve (OF-B120) and air/water feeding valve (OF-B188) four times.
7) Brush the internal and external surfaces of water jet check valve adapter (OE-C12) and water jet check valve (OE-C14) four times.
8) Manipulate the valve mechanisms of the suction control valve (OF-B120) and air/water feeding valve (OF-B188) four times while completely immersed in detergent solution.
9) Inject 3mL of detergent solution into the lumens of the suction control valve (OF-B120) and air/water feeding valve (OF-B188).
10) Inject 3mL of detergent solution into the lumen of water jet check valve adapter (OE-C12).
11) Inject 10mL of detergent solution into the lumen of irrigation tube (OF-B113).
Complete Not Complete
Complete Not Complete
Complete Not Complete
Complete Not Complete
Complete Not Complete
Complete Not Complete
Complete Not Complete
Complete Not Complete
Complete Not Complete
Complete Not Complete
Complete Not Complete
– 18 –
MANUAL CLEANING4
12) If you have a bite block (OF-Z5), manually clean the bite block by brushing it three times with the large brush head of cleaning brush (CS-C9S), while it is immersed in detergent solution.
13) Soak all accessories, including the bite block (OF-Z5) if used, in detergent solution for the time and at the temperature recommended by the detergent manufacturer. In the case of Endozime, the time is three minutes.
14) Open the cap of inlet seal (OF-B190), and wash it two times with a lint-free gauze.
15) Insert the large brush head of cleaning brush (CS-C9S) into the instrument channel inlet until it cannot be advanced further. Repetitively move the brush back and forth while twisting it left and right for 10 seconds in order to scrub the entire surface of the instrument channel inlet.
16) Withdraw the brush from the inlet, and clean the debris from the bristles of the brush head by rubbing them with your fingers.
17) Insert the large brush head of cleaning brush (CS-C9S) into the suction cylinder until it cannot be advanced further. Repetitively move the brush back and forth while twisting it left and right for 10 seconds in order to scrub the entire inner surface of the suction cylinder.
18) Withdraw the brush from the cylinder and clean the debris from the bristles of the brush head by rubbing them with your fingers.
19) Insert the blue tip of cleaning brush (CS6021T) into the opening of the suction nipple, and gently pass the brush until the blue tip appears in the suction cylinder.
20) Grasp the blue tip of the brush shaft, and gently pull the brush from the suction cylinder until the brush heads exit the suction cylinder.
21) Clean the debris from the bristles of the brush heads by rubbing them with your fingers.
Complete Not Complete
Complete Not Complete
Complete Not Complete
Complete Not Complete
Complete Not Complete
Complete Not Complete
Complete Not Complete
Complete Not Complete
Complete Not Complete
Complete Not Complete
– 19 –
MANUAL CLEANING4
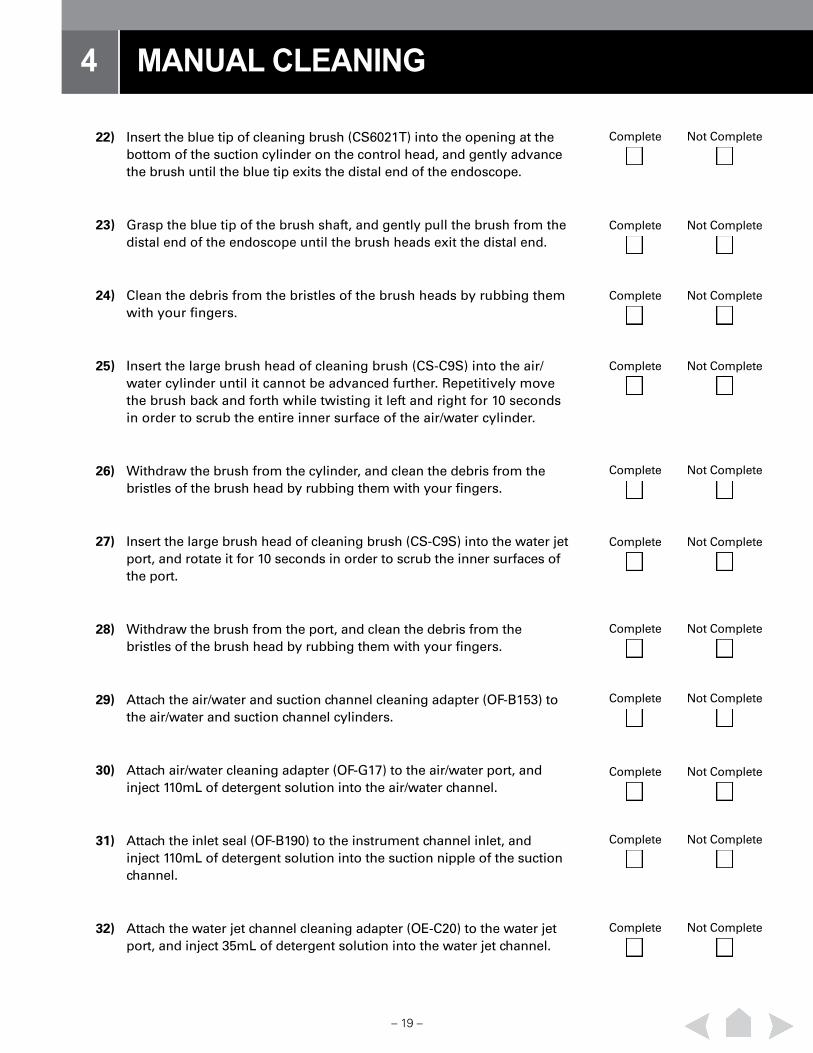
22) Insert the blue tip of cleaning brush (CS6021T) into the opening at the bottom of the suction cylinder on the control head, and gently advance the brush until the blue tip exits the distal end of the endoscope.
23) Grasp the blue tip of the brush shaft, and gently pull the brush from the distal end of the endoscope until the brush heads exit the distal end.
24) Clean the debris from the bristles of the brush heads by rubbing them with your fingers.
25) Insert the large brush head of cleaning brush (CS-C9S) into the air/water cylinder until it cannot be advanced further. Repetitively move the brush back and forth while twisting it left and right for 10 seconds in order to scrub the entire inner surface of the air/water cylinder.
26) Withdraw the brush from the cylinder, and clean the debris from the bristles of the brush head by rubbing them with your fingers.
27) Insert the large brush head of cleaning brush (CS-C9S) into the water jet port, and rotate it for 10 seconds in order to scrub the inner surfaces of the port.
28) Withdraw the brush from the port, and clean the debris from the bristles of the brush head by rubbing them with your fingers.
29) Attach the air/water and suction channel cleaning adapter (OF-B153) to the air/water and suction channel cylinders.
30) Attach air/water cleaning adapter (OF-G17) to the air/water port, and inject 110mL of detergent solution into the air/water channel.
31) Attach the inlet seal (OF-B190) to the instrument channel inlet, and inject 110mL of detergent solution into the suction nipple of the suction channel.
32) Attach the water jet channel cleaning adapter (OE-C20) to the water jet port, and inject 35mL of detergent solution into the water jet channel.
Complete Not Complete
Complete Not Complete
Complete Not Complete
Complete Not Complete
Complete Not Complete
Complete Not Complete
Complete Not Complete
Complete Not Complete
Complete Not Complete
Complete Not Complete
Complete Not Complete
– 20 –
MANUAL CLEANING4
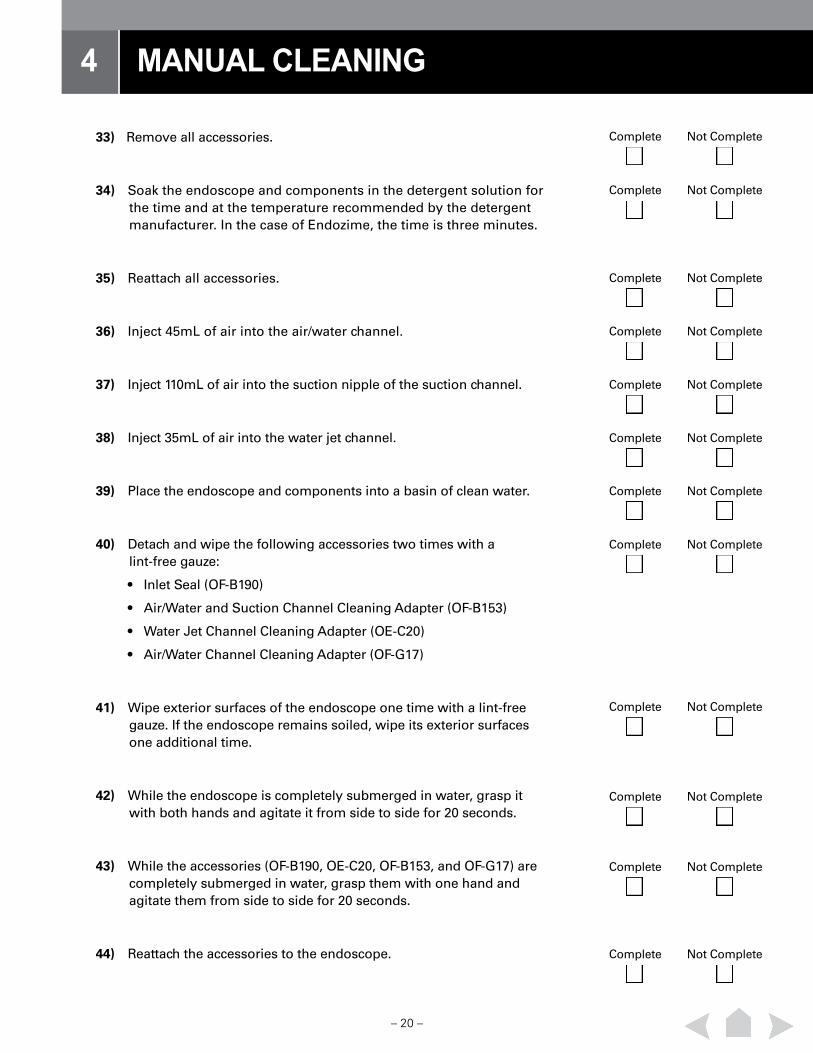
33) Remove all accessories.
34) Soak the endoscope and components in the detergent solution for the time and at the temperature recommended by the detergent manufacturer. In the case of Endozime, the time is three minutes.
35) Reattach all accessories.
36) Inject 45mL of air into the air/water channel.
37) Inject 110mL of air into the suction nipple of the suction channel.
38) Inject 35mL of air into the water jet channel.
39) Place the endoscope and components into a basin of clean water.
40) Detach and wipe the following accessories two times with a lint-free gauze:
• Inlet Seal (OF-B190)
• Air/Water and Suction Channel Cleaning Adapter (OF-B153)
• Water Jet Channel Cleaning Adapter (OE-C20)
• Air/Water Channel Cleaning Adapter (OF-G17)
41) Wipe exterior surfaces of the endoscope one time with a lint-free gauze. If the endoscope remains soiled, wipe its exterior surfaces one additional time.
42) While the endoscope is completely submerged in water, grasp it with both hands and agitate it from side to side for 20 seconds.
43) While the accessories (OF-B190, OE-C20, OF-B153, and OF-G17) are completely submerged in water, grasp them with one hand and agitate them from side to side for 20 seconds.
44) Reattach the accessories to the endoscope.
Complete Not Complete
Complete Not Complete
Complete Not Complete
Complete Not Complete
Complete Not Complete
Complete Not Complete
Complete Not Complete
Complete Not Complete
Complete Not Complete
Complete Not Complete
Complete Not Complete
Complete Not Complete
– 21 –
MANUAL CLEANING4
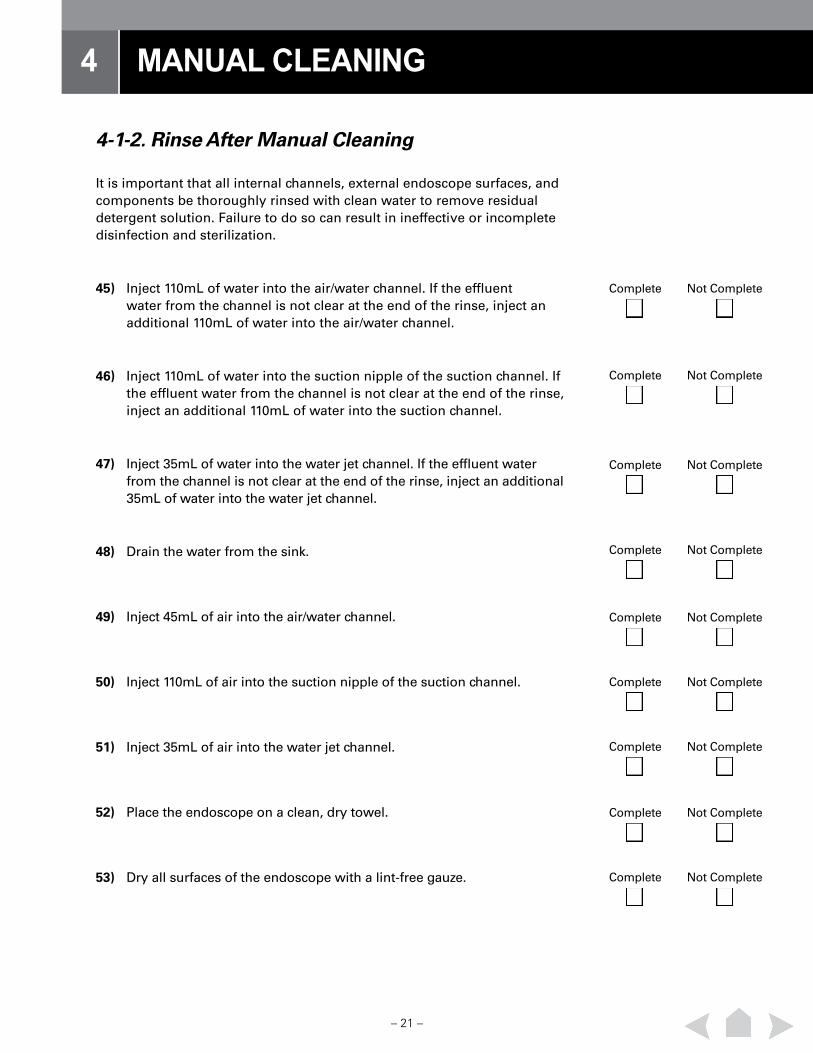
4-1-2. Rinse After Manual Cleaning
It is important that all internal channels, external endoscope surfaces, and components be thoroughly rinsed with clean water to remove residual detergent solution. Failure to do so can result in ineffective or incomplete disinfection and sterilization.
45) Inject 110mL of water into the air/water channel. If the effluent water from the channel is not clear at the end of the rinse, inject an additional 110mL of water into the air/water channel.
46) Inject 110mL of water into the suction nipple of the suction channel. If the effluent water from the channel is not clear at the end of the rinse, inject an additional 110mL of water into the suction channel.
47) Inject 35mL of water into the water jet channel. If the effluent water from the channel is not clear at the end of the rinse, inject an additional 35mL of water into the water jet channel.
48) Drain the water from the sink.
49) Inject 45mL of air into the air/water channel.
50) Inject 110mL of air into the suction nipple of the suction channel.
51) Inject 35mL of air into the water jet channel.
52) Place the endoscope on a clean, dry towel.
53) Dry all surfaces of the endoscope with a lint-free gauze.
Complete Not Complete
Complete Not Complete
Complete Not Complete
Complete Not Complete
Complete Not Complete
Complete Not Complete
Complete Not Complete
Complete Not Complete
Complete Not Complete
– 22 –
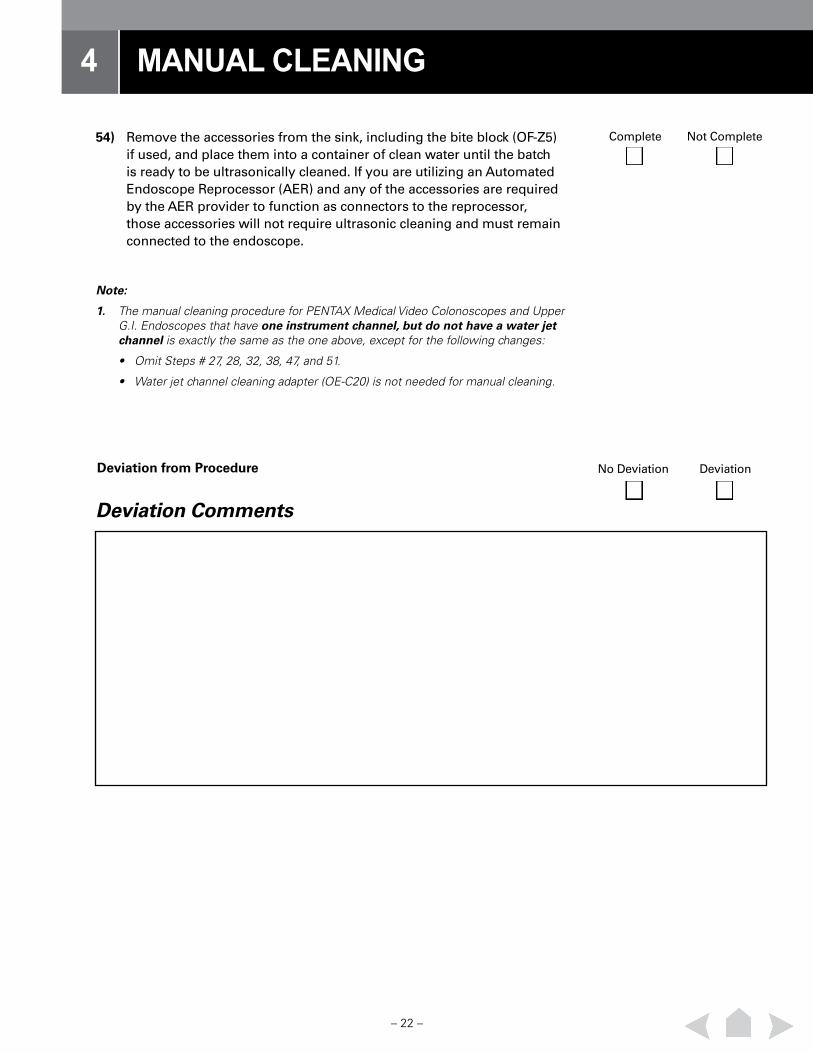
54) Remove the accessories from the sink, including the bite block (OF-Z5) if used, and place them into a container of clean water until the batch is ready to be ultrasonically cleaned. If you are utilizing an Automated Endoscope Reprocessor (AER) and any of the accessories are required by the AER provider to function as connectors to the reprocessor, those accessories will not require ultrasonic cleaning and must remain connected to the endoscope.
MANUAL CLEANING4
Note:
1. The manual cleaning procedure for PENTAX Medical Video Colonoscopes and Upper G.I. Endoscopes that have one instrument channel, but do not have a water jet channel is exactly the same as the one above, except for the following changes:
• Omit Steps # 27, 28, 32, 38, 47, and 51.
• Water jet channel cleaning adapter (OE-C20) is not needed for manual cleaning.
Deviation Comments
No Deviation DeviationDeviation from Procedure
Complete Not Complete
– 23 –
5-1-1. Accessories Cleaning (Batch Method)
1) Fill an ultrasonic cleaner basin with an appropriate volume of detergent solution that has been prepared in accordance with the detergent manufacturer’s instructions. In the case of Endozime, 30mL of Endozime concentrate are added to one gallon of clean potable water at 68–86°F (20–30°C).
2) Transfer the accessories to an ultrasonic cleaner basket.
3) Ultrasonically clean the accessories for five minutes within a frequency range of 40kHz +/– 6%.
4) First Rinse: Fill a sink basin with a sufficient volume of clean water to fully immerse the accessories, and transfer them from the ultrasonic cleaner to the basin.
5) While they are immersed in water, wipe all of the accessories two times with a lint-free cloth.
6) Place all of the accessories back into the ultrasonic cleaner basket, and agitate them under the water by repeatedly moving the basket from side to side for one minute. Set up the ultrasonic cleaner on a firm, dry, and level base.
7) Open the sink drain, and turn the faucet water ON. Manipulate the mechanism of each suction control valve (OF-B120) four times under the running water, and run 5mL of fresh water over and through the holes in the valve stem. As the rinsing of each valve is completed, place it to the side for subsequent rinses.
8) Manipulate the mechanism of each air/water feeding valve (OF-B188) four times under running water, and run 5mL of fresh water over and through the hole in the valve button. As the rinsing of each valve is completed, place it to the side for subsequent rinses.
9) Flush the lumen of each water jet check valve adapter (OE-C12) with 5mL of water. As the rinsing of each water jet check valve adapter (OE-C12) is completed, place it to the side for subsequent rinses.
ACCESSORIES CLEANING (Batch Method)5
Complete Not Complete
Complete Not Complete
Complete Not Complete
Complete Not Complete
Complete Not Complete
Complete Not Complete
Complete Not Complete
Complete Not Complete
Complete Not Complete
– 24 –
10) Flush the lumen of irrigation tube (OF-B113) with 15mL of water. As the rinsing of each irrigation tube (OF-B113) is completed, place it to the side for subsequent rinses.
11) Second – Fourth Rinse: Repeat Steps 4-10 three more times.
12) Purge the lumen of each suction control valve (OF-B120) with 5mL of air.
13) Purge the lumen of each air/water feeding valve (OF-B188) with 5mL of air.
14) Purge the lumen of each water jet check valve adapter (OE-C12) with 5mL of air.
15) Purge the lumen of each irrigation tube (OF-B113) with 15mL of air.
16) Dry all component surfaces with a clean lint-free gauze.
ACCESSORIES CLEANING (Batch Method)5
Complete Not Complete
Complete Not Complete
Complete Not Complete
Complete Not Complete
Complete Not Complete
Complete Not Complete
Complete Not Complete
Note:
1. If the manual cleaning procedure for PENTAX Medical accessories involves the use of an Automated Endoscope Reprocessor (AER) that requires the use of PENTAX Medical water check valve adapter (OE-C12) and irrigation tube (OF-B113) in the AER endoscope connector set, please omit the following steps in the procedure outlined above:
• Steps # 9, 10, 14, and 15.
– 25 –
5-1-2. Manual Cleaning Water Jet Cleaning Adapter
1) Wear personal protective equipment.
2) Prepare a basin of medical-grade, low-foaming, neutral-pH detergent in a beaker or small basin to the concentration and at the temperature recommended by the detergent manufacturer. In the case of Endozime, add 30mL of Endozime concentrate to one gallon of clean potable water at 68–86°F (20–30°C).
3) Fully immerse water jet channel cleaning adapter (OE-C20) in detergent solution, and keep it immersed for the duration of this cleaning procedure.
4) Wash all surfaces of water jet channel cleaning adapter (OE-C20) one time with a lint-free gauze. If water jet channel cleaning adapter (OE-C20) remains soiled, wipe its surfaces one additional time.
5) Using the large brush head of cleaning brush (CS-C9S), thoroughly brush debris from the ridged portion, water jet connector side, and luer-lock connector side of water jet channel cleaning adapter (OE-C20).
6) Insert cleaning brush (CS-C9S) into the water jet channel cleaning adapter (OE-C20) lumen from the luer-lock side, and brush the entire length of the lumen back and forth one time.
7) While fully immersed, ensure that there are no air bubbles on the surfaces of water jet channel cleaning adapter (OE-C20). If any bubbles are detected, flush them away with detergent solution using either a syringe or by agitating water jet channel cleaning adapter (OE-C20) side to side repeatedly with one hand while it is immersed in detergent solution.
8) Soak water jet channel cleaning adapter (OE-C20) in the detergent solution for the time and at the temperature recommended by the detergent manufacturer. In the case of Endozime, the time is three minutes.
ACCESSORIES CLEANING (Batch Method)5
Complete Not Complete
Complete Not Complete
Complete Not Complete
Complete Not Complete
Complete Not Complete
Complete Not Complete
Complete Not Complete
Complete Not Complete
– 26 –
9) Remove water jet channel cleaning adapter (OE-C20) from the detergent solution.
10) Prepare a basin of clean water, and immerse water jet channel cleaning adapter (OE-C20).
11) Wipe all exterior surfaces of water jet channel cleaning adapter (OE-C20) two times with a lint-free gauze in order to remove residual detergent solution.
12) While it is still completely immersed in water, grasp water jet channel cleaning adapter (OE-C20) with your hand and agitate it under the water by moving it side to side repeatedly for 20 seconds.
13) Remove water jet channel cleaning adapter (OE-C20) from the water and gently dry all of its surfaces with a clean lint-free gauze.
ACCESSORIES CLEANING (Batch Method)5
Deviation Comments
No Deviation DeviationDeviation from Procedure
Complete Not Complete
Complete Not Complete
Complete Not Complete
Complete Not Complete
Complete Not Complete
– 27 –
MANUAL HIGH-LEVEL DISINFECTION6
6-1-1. Manual High-Level Disinfection
High-level disinfection (HLD) is recognized as the standard for reprocessing of gastrointestinal endoscopes by SGNA, the American Society for Gastrointestinal Endoscopy (ASGE), the American College of Gastroenterology (ACG), the American Gastroenterological Association (AGA), the Association for Professionals in Infection Control and Epidemiology (APIC), and ASTM. Agencies such as the Centers for Disease Control and Prevention (CDC) and The Joint Commission (JC) recognize HLD as appropriate for gastrointestinal endoscopes.
High-level disinfection can be achieved either manually or automated by using an automated endoscope reprocessor (AER). Automated reprocessing can be utilized as an alternative to manual high-level disinfection described in this chapter. Endoscopic reprocessors standardize the disinfection process and decrease personnel exposure to high-level disinfectants (Rutala & Weber, 2004). It is necessary to follow all steps for manual cleaning of the endoscope prior to using an automated reprocessor (American Society for Gastrointestinal Endoscopy Quality Assurance in Endoscopy Committee et al., 2011). Also be sure to follow the automated reprocessor manufacturer’s guidelines for compatible reprocessor connectors.
Note:
Sterilization of endoscopes is optional. Please note that PENTAX Medical has not validated any currently available sterilization methods for flexible endoscopes.
Prior to high-level disinfection, the end user should confirm the minimum effective concentration (MEC) of reused disinfectant as per the manufacturer’s instructions.
WARNING• During the reprocessing process, always wear protective equipment (e.g., gloves,
gowns, face masks, etc.) to minimize the risk of cross-contamination.
• Prior to disinfection, it is imperative that any solutions previously used in the cleaning process be thoroughly rinsed and dried. Failure to do so can result in ineffective or incomplete disinfection.
• For high-level disinfection, use an appropriate disinfecting solution according to the instructions of the disinfectant manufacturer (temperature, concentration, time). Adhere to the instructions to accomplish effective and complete disinfection. The endoscope may be damaged if exposed to a disinfectant under conditions other than those specified by the disinfectant manufacturer.
• Use only a legally marketed disinfectant that has been tested according to the instructions provided by the manufacturer and found to be compatible by PENTAX Medical. A list of disinfectants that are compatible with PENTAX Medical endoscopes is contained in this manual.
• It is imperative that ALL internal channel surfaces of the channels be in contact with the disinfecting solution for the time period recommended by the manufacturer of the solution.
• Ideally, all final rinses should be performed with sterile water, or clean potable water, or the water that meets the requirements of the health-care facility.
– 28 –
WARNING (continued...)• Regardless of the quality of the rinse water used, it is essential
to perform a final alcohol rinse followed by forced air in order to completely dry the endoscope channels and prevent bacterial colonization and/or infections associated with waterborne microorganisms.
• The basin that is used to perform disinfectant immersion should be thoroughly cleaned prior to filling it with disinfectant solution.
• For scopes with water jet channel: Please note that the forward water jet channel must undergo all steps of the endoscope reprocessing procedure, regardless of whether it was used during a clinical procedure.
CAUTION• Prior to disinfection, attach PVE soaking cap (OE-C9). Failure to do so can
result in water invasion and damage to the endoscope. If the endoscope is disinfected without the PVE soaking cap attached, do not use the endoscope, and contact your local PENTAX Medical service facility or sales representative.
• Prior to disinfection, detach the ventilation cap (OF-C5). Failure to do so can result in damage to the endoscope. If the endoscope is disinfected with the ventilation cap attached, do not use the endoscope, and contact your local PENTAX Medical service facility or sales representative.
• During disinfection, never twist, rotate, or bend the insertion tube and umbilical cord excessively.
• In order to prevent damage to the endoscope, do not place any objects other than the reprocessing accessories described in this document when immersing the endoscope in the disinfection basin.
Note:
• For scopes with water jet channel: OE-C20 has been designed to leak slightly so as to ensure contact between all disinfecting fluids and the water jet channel port on the scope.
MANUAL HIGH-LEVEL DISINFECTION6
– 29 –
MANUAL HIGH-LEVEL DISINFECTION6
Items required:
Endoscope component
• Inlet seal (OF-B190)
Reprocessing accessories
• PVE soaking cap (OE-C9)
• Cleaning adapter (OF-B153)
• Cleaning adapter (OF-G17)
• Water jet channel cleaning adapter (OE-C20) (for scopes with water jet channel only)
Other equipment
• Protective equipment such as gloves, gowns, face masks, etc., to minimize the risk of cross-contamination.
• Disinfecting solution, Cidex Activated Dialdehyde Solution (Johnson & Johnson)
• Sterile water (preferred) or clean potable water
• 70–90% medical-grade ethyl or isopropyl alcohol
• Basin to immerse the entire endoscope (at least 50cm in width x 40cm in depth x 15cm in height)
• Sterile gauze
• 30mL luer slip syringe
• 50mL luer slip syringe
– 30 –
MANUAL HIGH-LEVEL DISINFECTION6
6-1-2. Preparation of Disinfectants
1) Wear personal protective equipment.
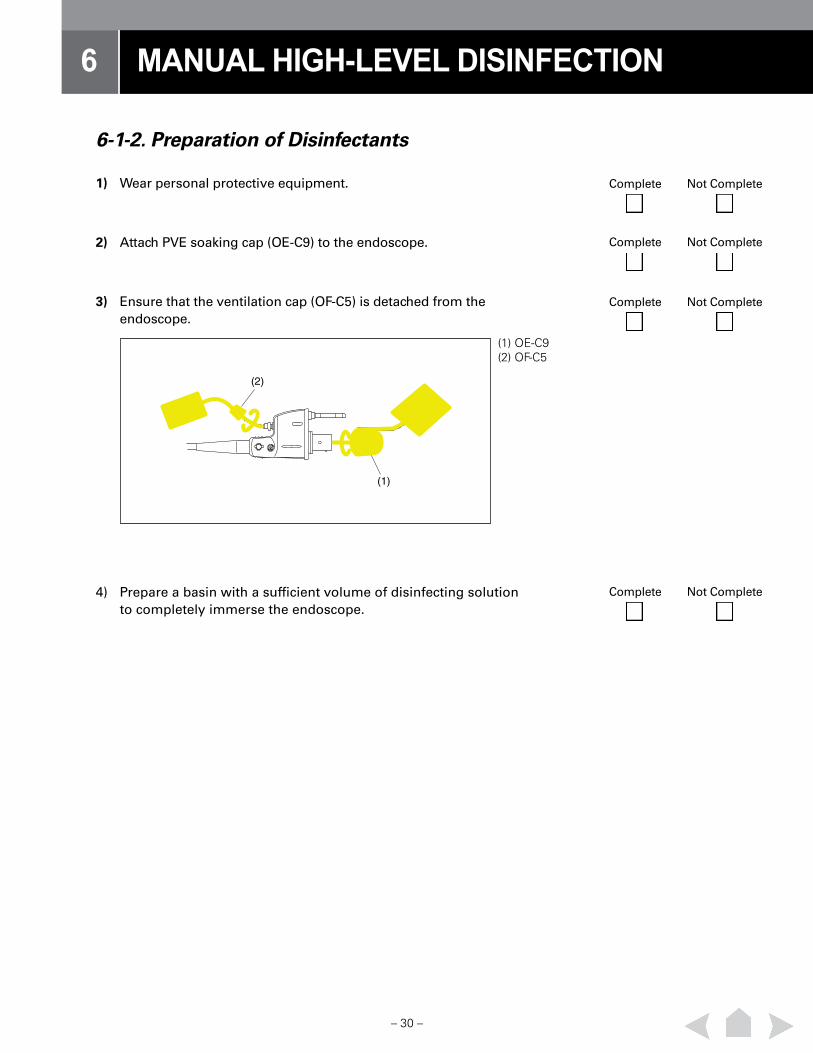
2) Attach PVE soaking cap (OE-C9) to the endoscope.
3) Ensure that the ventilation cap (OF-C5) is detached from the endoscope.
4) Prepare a basin with a sufficient volume of disinfecting solution to completely immerse the endoscope.
(2)
(1)
(1) OE-C9(2) OF-C5
Complete Not Complete
Complete Not Complete
Complete Not Complete
Complete Not Complete
– 31 –
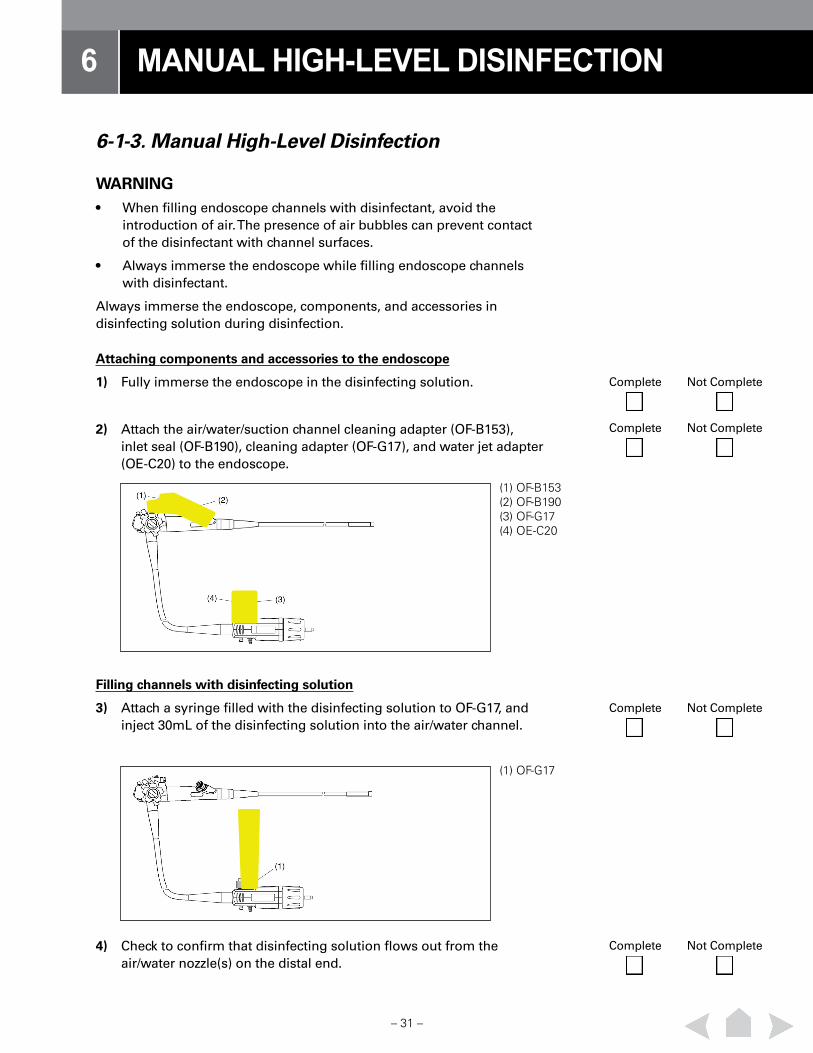
6-1-3. Manual High-Level Disinfection
WARNING • When filling endoscope channels with disinfectant, avoid the
introduction of air. The presence of air bubbles can prevent contact of the disinfectant with channel surfaces.
• Always immerse the endoscope while filling endoscope channels with disinfectant.
Always immerse the endoscope, components, and accessories in disinfecting solution during disinfection.
Attaching components and accessories to the endoscope
1) Fully immerse the endoscope in the disinfecting solution.
2) Attach the air/water/suction channel cleaning adapter (OF-B153), inlet seal (OF-B190), cleaning adapter (OF-G17), and water jet adapter (OE-C20) to the endoscope.
Filling channels with disinfecting solution
3) Attach a syringe filled with the disinfecting solution to OF-G17, and inject 30mL of the disinfecting solution into the air/water channel.
4) Check to confirm that disinfecting solution flows out from the air/water nozzle(s) on the distal end.
MANUAL HIGH-LEVEL DISINFECTION6
(1) OF-B153(2) OF-B190(3) OF-G17(4) OE-C20
(1) OF-G17
Complete Not Complete
Complete Not Complete
Complete Not Complete
Complete Not Complete
– 32 –
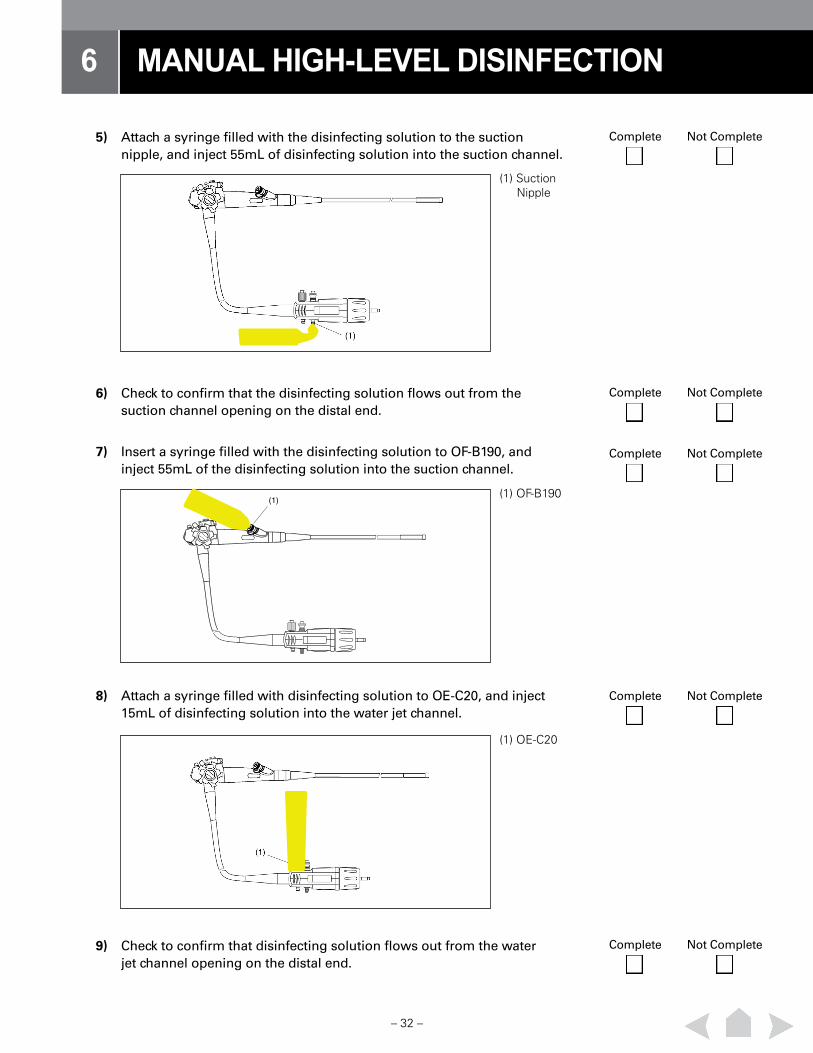
5) Attach a syringe filled with the disinfecting solution to the suction nipple, and inject 55mL of disinfecting solution into the suction channel.
6) Check to confirm that the disinfecting solution flows out from the suction channel opening on the distal end.
7) Insert a syringe filled with the disinfecting solution to OF-B190, and inject 55mL of the disinfecting solution into the suction channel.
8) Attach a syringe filled with disinfecting solution to OE-C20, and inject 15mL of disinfecting solution into the water jet channel.
9) Check to confirm that disinfecting solution flows out from the water jet channel opening on the distal end.
MANUAL HIGH-LEVEL DISINFECTION6
(1)
(1) Suction Nipple
(1) OF-B190
(1) OE-C20
Complete Not Complete
Complete Not Complete
Complete Not Complete
Complete Not Complete
Complete Not Complete
– 33 –
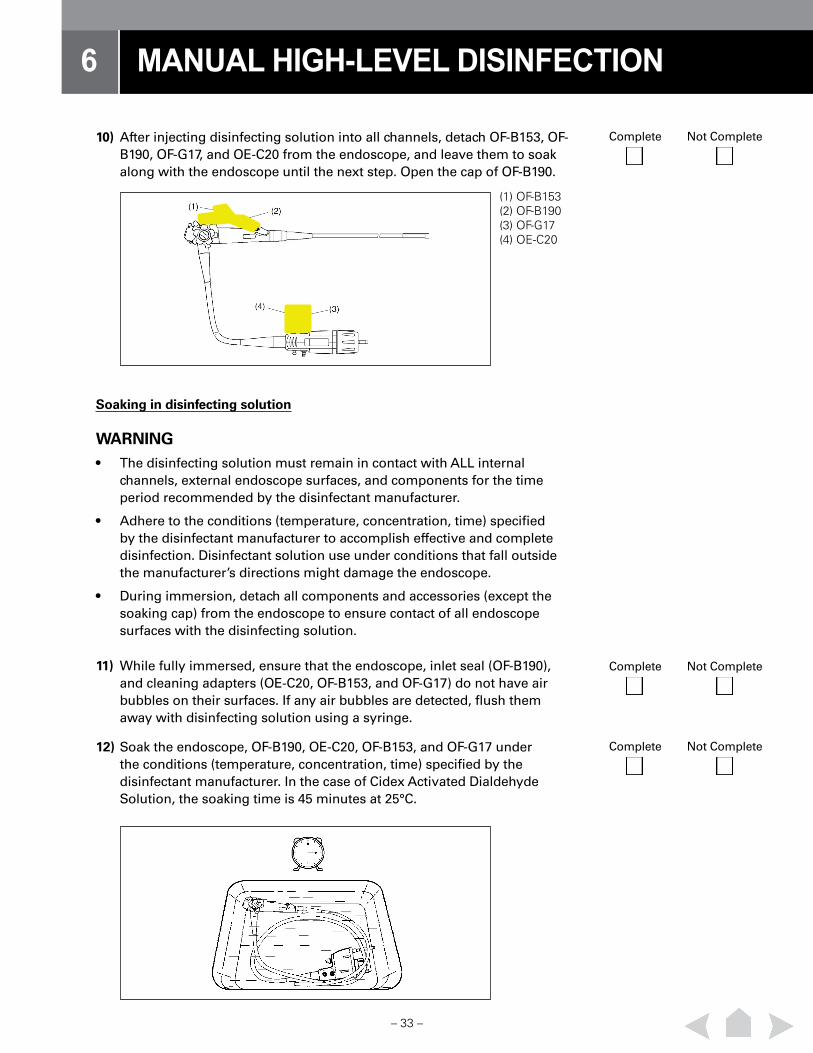
10) After injecting disinfecting solution into all channels, detach OF-B153, OF-B190, OF-G17, and OE-C20 from the endoscope, and leave them to soak along with the endoscope until the next step. Open the cap of OF-B190.
Soaking in disinfecting solution
WARNING • The disinfecting solution must remain in contact with ALL internal
channels, external endoscope surfaces, and components for the time period recommended by the disinfectant manufacturer.
• Adhere to the conditions (temperature, concentration, time) specified by the disinfectant manufacturer to accomplish effective and complete disinfection. Disinfectant solution use under conditions that fall outside the manufacturer’s directions might damage the endoscope.
• During immersion, detach all components and accessories (except the soaking cap) from the endoscope to ensure contact of all endoscope surfaces with the disinfecting solution.
11) While fully immersed, ensure that the endoscope, inlet seal (OF-B190), and cleaning adapters (OE-C20, OF-B153, and OF-G17) do not have air bubbles on their surfaces. If any air bubbles are detected, flush them away with disinfecting solution using a syringe.
12) Soak the endoscope, OF-B190, OE-C20, OF-B153, and OF-G17 under the conditions (temperature, concentration, time) specified by the disinfectant manufacturer. In the case of Cidex Activated Dialdehyde Solution, the soaking time is 45 minutes at 25°C.
MANUAL HIGH-LEVEL DISINFECTION6
(1) OF-B153(2) OF-B190(3) OF-G17(4) OE-C20
Complete Not Complete
Complete Not Complete
Complete Not Complete
– 34 –
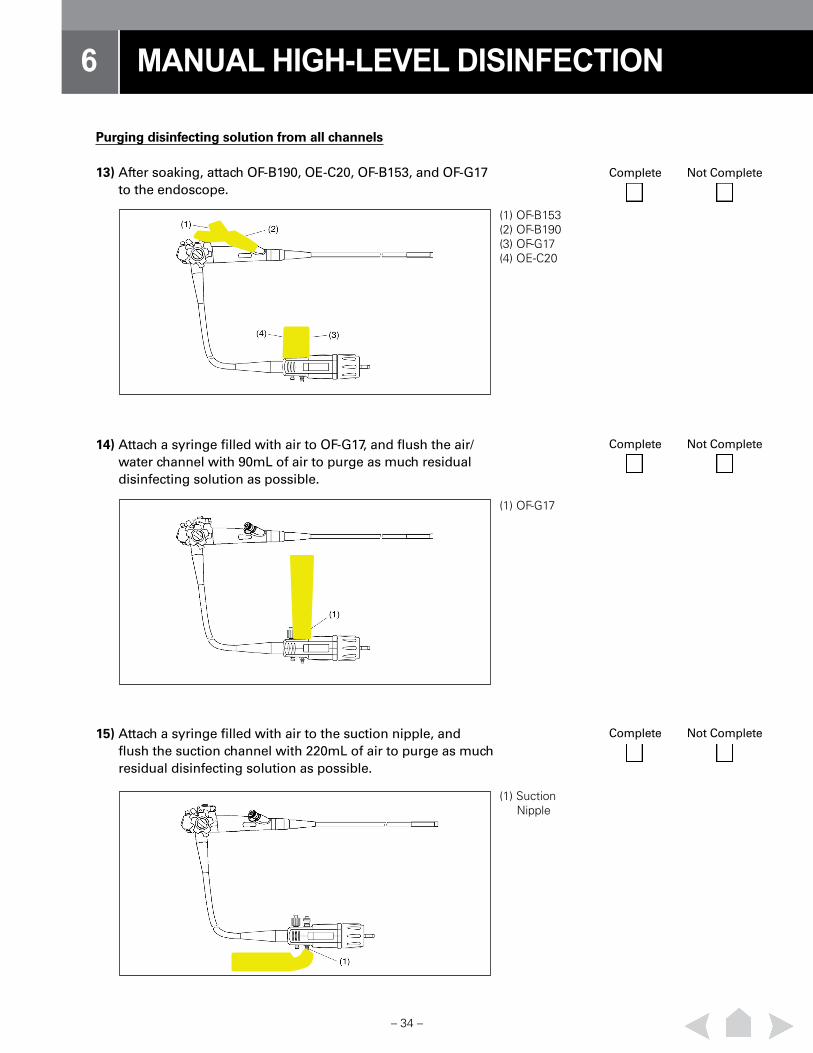
Purging disinfecting solution from all channels
13) After soaking, attach OF-B190, OE-C20, OF-B153, and OF-G17 to the endoscope.
MANUAL HIGH-LEVEL DISINFECTION6
15) Attach a syringe filled with air to the suction nipple, and flush the suction channel with 220mL of air to purge as much residual disinfecting solution as possible.
14) Attach a syringe filled with air to OF-G17, and flush the air/water channel with 90mL of air to purge as much residual disinfecting solution as possible.
(1) OF-B153(2) OF-B190(3) OF-G17(4) OE-C20
(1) OF-G17
(1) Suction Nipple
Complete Not Complete
Complete Not Complete
Complete Not Complete
– 35 –
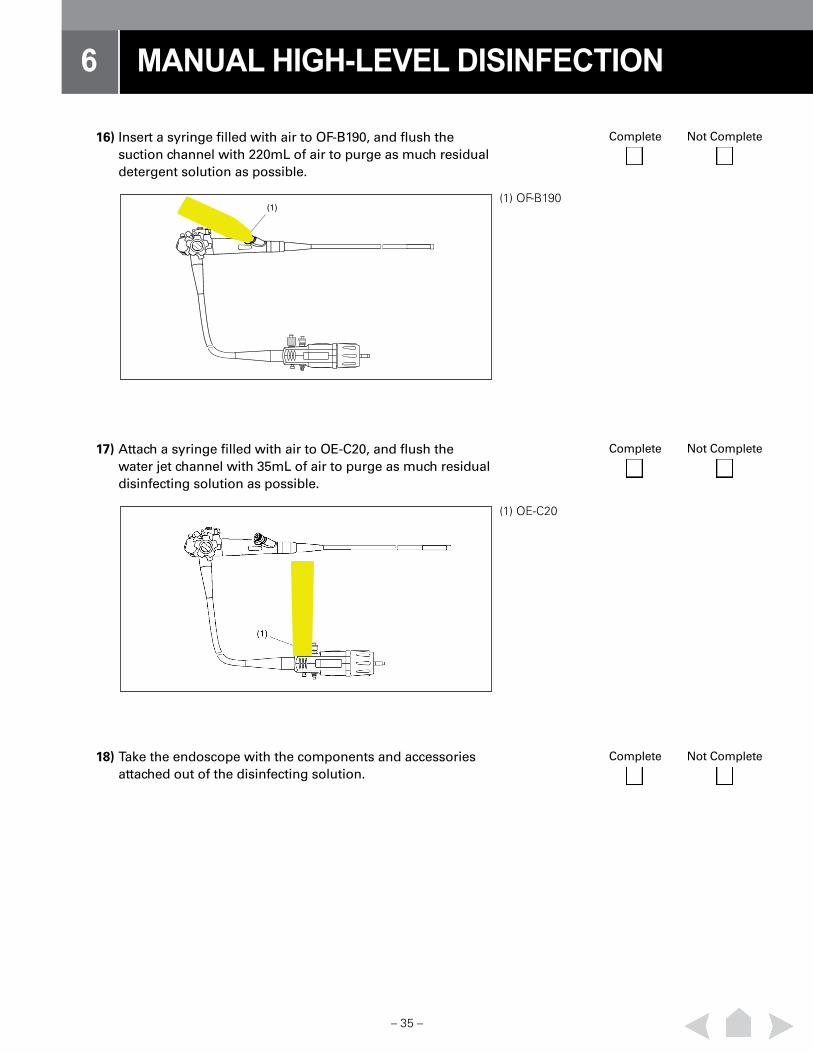
16) Insert a syringe filled with air to OF-B190, and flush the suction channel with 220mL of air to purge as much residual detergent solution as possible.
17) Attach a syringe filled with air to OE-C20, and flush the water jet channel with 35mL of air to purge as much residual disinfecting solution as possible.
18) Take the endoscope with the components and accessories attached out of the disinfecting solution.
MANUAL HIGH-LEVEL DISINFECTION6
(1)(1) OF-B190
(1) OE-C20
Complete Not Complete
Complete Not Complete
Complete Not Complete
– 36 –
MANUAL HIGH-LEVEL DISINFECTION6
Note:
1. The high-level disinfection procedure for PENTAX Medical Video Colonoscopes and Upper G.I. Endoscopes that have one instrument channel, but do not have a water jet channel is exactly the same as the one above, except for the following changes:
• Omit Steps # 8 and 17.
• Water jet channel cleaning adapter (OE-C20) is not needed in Steps # 2, 10, 11, 12, and 13.
Deviation Comments
No Deviation DeviationDeviation from Procedure
– 37 –
RINSING AFTER MANUAL DISINFECTION7
7-1-1. Rinsing After Manual Disinfection
Thoroughly rinse all surfaces and removable parts, and flush all channels of the endoscope and its removable parts with clean water according to disinfectant and endoscope manufacturer’s recommendations. Note that:
a) Rinsing prevents exposure and potential injury of skin and mucus membranes from chemical residue.
b) Fresh clean water should be used for each rinse of the endoscope.
c) Rinsing is required for manual high-level disinfection but may be completed in the AER. Refer to manufacturer’s instructions.
WARNING • Ideally, all final rinses should be performed with sterile water. However,
if sterile water is not used, use potable water or the water that meets the requirements of the health-care facility.
• The basin that is used to perform rinsing of the endoscope and accessories should be thoroughly cleaned prior to filling it with rinse water.
• The rinse volumes recommended for removing residual disinfectant from channels are sufficient for 14-day glutaraldehydes (Cidex Activated Dialdehyde Solution). If extended shelf-life glutaraldehydes are used, consult with the disinfectant manufacturer for details regarding recommended rinse water volumes.
First Rinse
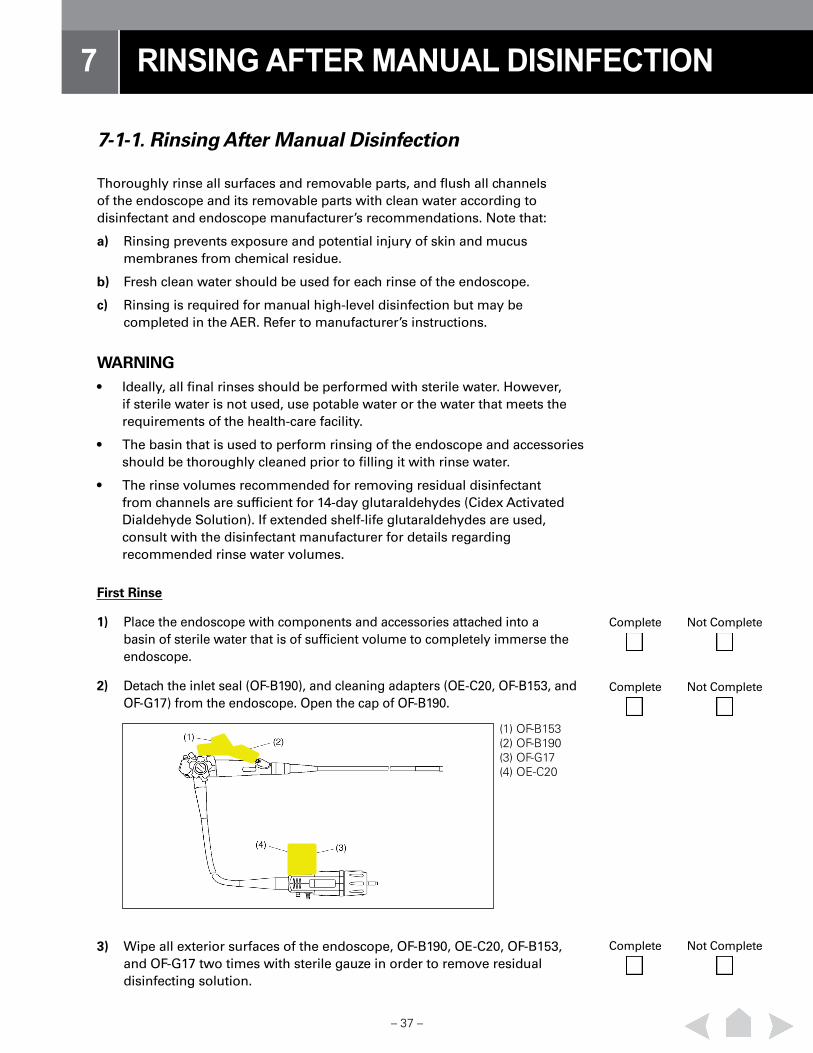
1) Place the endoscope with components and accessories attached into a basin of sterile water that is of sufficient volume to completely immerse the endoscope.
2) Detach the inlet seal (OF-B190), and cleaning adapters (OE-C20, OF-B153, and OF-G17) from the endoscope. Open the cap of OF-B190.
3) Wipe all exterior surfaces of the endoscope, OF-B190, OE-C20, OF-B153, and OF-G17 two times with sterile gauze in order to remove residual disinfecting solution.
(1) OF-B153(2) OF-B190(3) OF-G17(4) OE-C20
Complete Not Complete
Complete Not Complete
Complete Not Complete
– 38 –
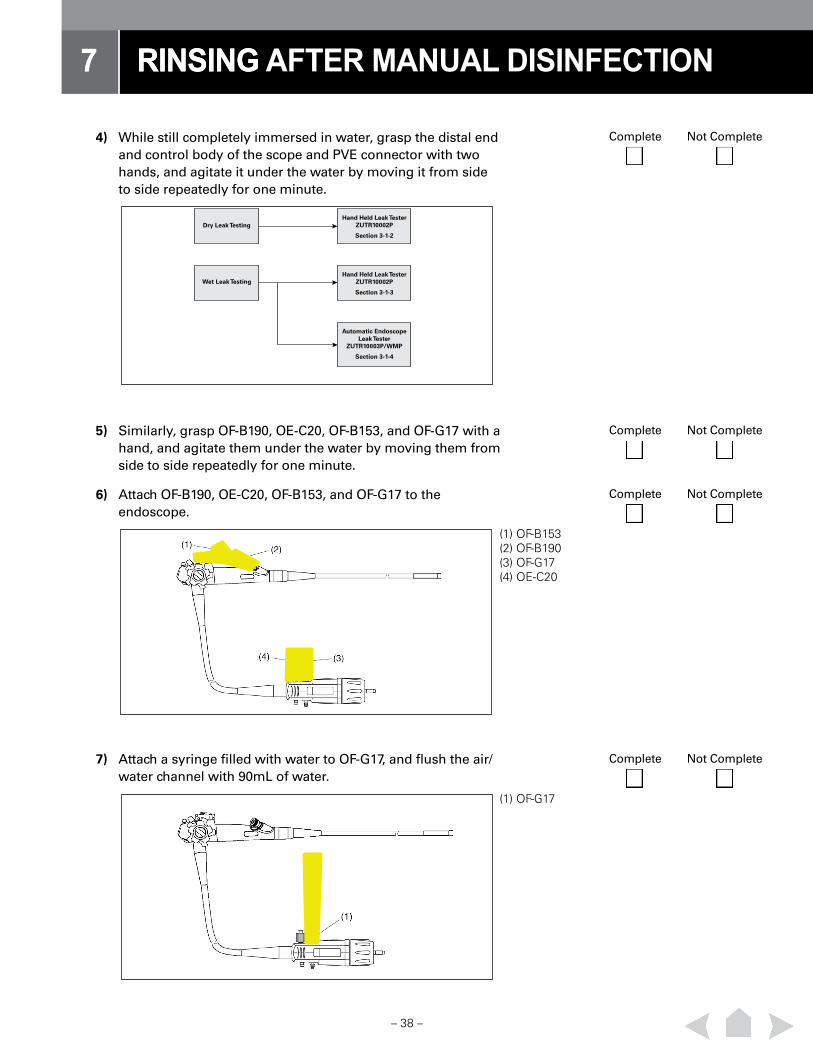
4) While still completely immersed in water, grasp the distal end and control body of the scope and PVE connector with two hands, and agitate it under the water by moving it from side to side repeatedly for one minute.
7) Attach a syringe filled with water to OF-G17, and flush the air/water channel with 90mL of water.
5) Similarly, grasp OF-B190, OE-C20, OF-B153, and OF-G17 with a hand, and agitate them under the water by moving them from side to side repeatedly for one minute.
6) Attach OF-B190, OE-C20, OF-B153, and OF-G17 to the endoscope.
RINSING7 RINSING AFTER MANUAL DISINFECTION7
Hand Held Leak TesterZUTR10002P
Section 3-1-2
Hand Held Leak TesterZUTR10002P
Section 3-1-3
Automatic Endoscope Leak Tester
ZUTR10003P/WMP
Section 3-1-4
Dry Leak Testing
Wet Leak Testing
(1) OF-G17
(1) OF-B153(2) OF-B190(3) OF-G17(4) OE-C20
Complete Not Complete
Complete Not Complete
Complete Not Complete
Complete Not Complete
– 39 –
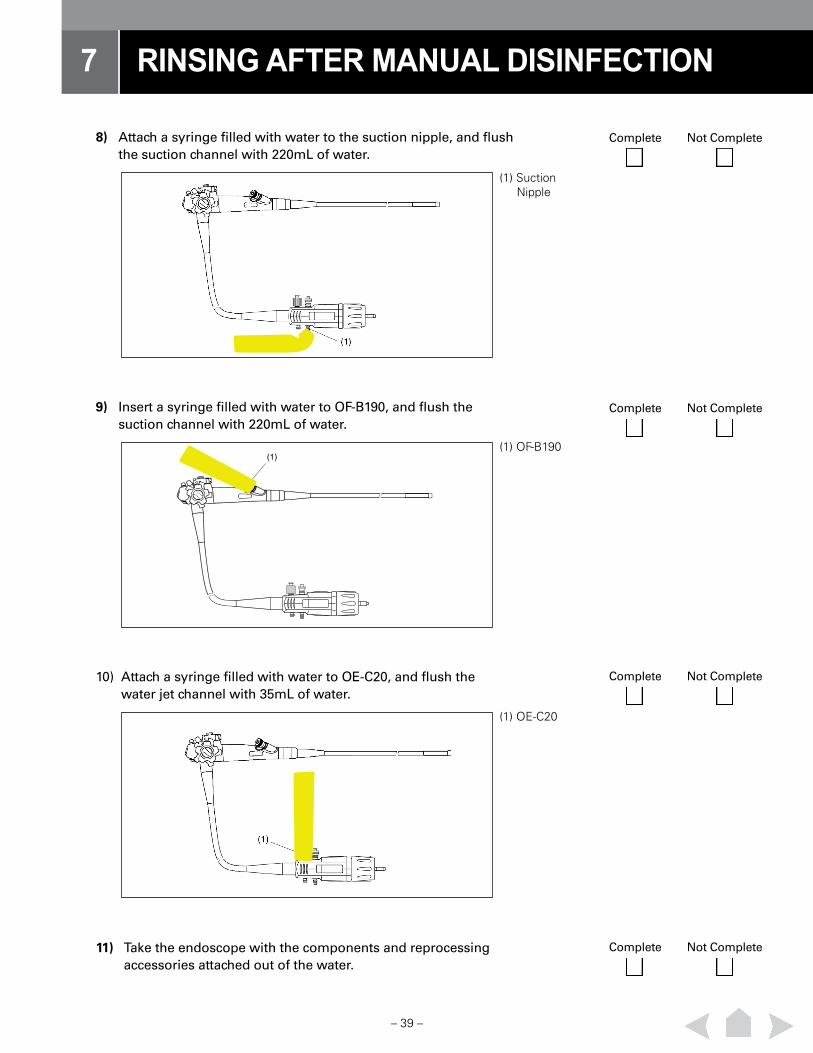
8) Attach a syringe filled with water to the suction nipple, and flush the suction channel with 220mL of water.
9) Insert a syringe filled with water to OF-B190, and flush the suction channel with 220mL of water.
10) Attach a syringe filled with water to OE-C20, and flush the water jet channel with 35mL of water.
11) Take the endoscope with the components and reprocessing accessories attached out of the water.
RINSING AFTER MANUAL DISINFECTION7
(1)
(1) Suction Nipple
(1) OF-B190
(1) OE-C20
Complete Not Complete
Complete Not Complete
Complete Not Complete
Complete Not Complete
– 40 –
RINSING AFTER MANUAL DISINFECTION7
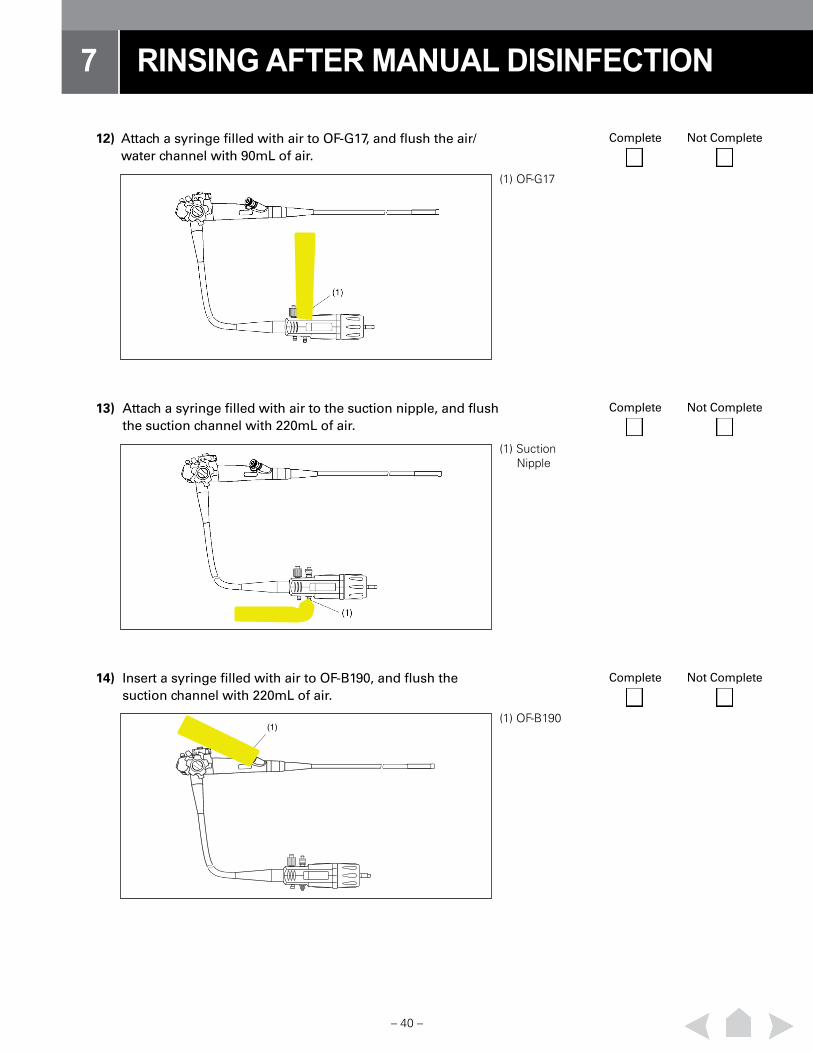
12) Attach a syringe filled with air to OF-G17, and flush the air/water channel with 90mL of air.
13) Attach a syringe filled with air to the suction nipple, and flush the suction channel with 220mL of air.
14) Insert a syringe filled with air to OF-B190, and flush the suction channel with 220mL of air.
(1)
(1) OF-G17
(1) Suction Nipple
(1) OF-B190
Complete Not Complete
Complete Not Complete
Complete Not Complete
– 41 –
RINSING AFTER MANUAL DISINFECTION7
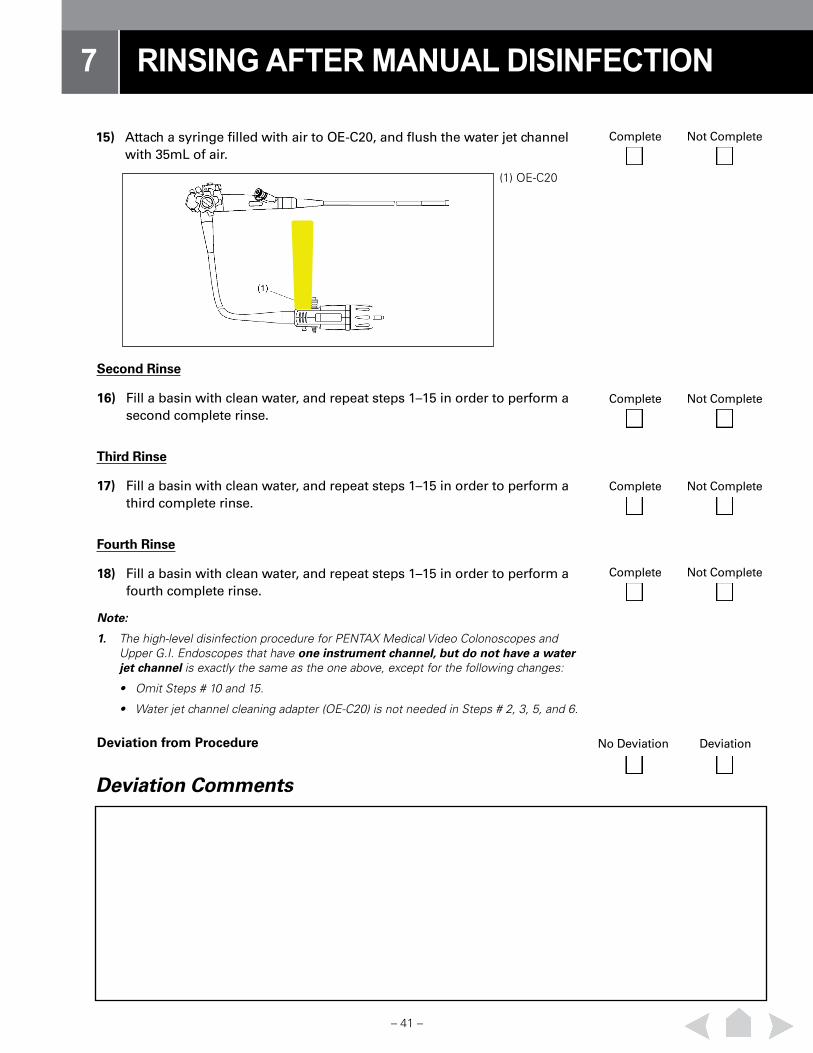
15) Attach a syringe filled with air to OE-C20, and flush the water jet channel with 35mL of air.
Second Rinse
16) Fill a basin with clean water, and repeat steps 1–15 in order to perform a second complete rinse.
Third Rinse
17) Fill a basin with clean water, and repeat steps 1–15 in order to perform a third complete rinse.
Fourth Rinse
18) Fill a basin with clean water, and repeat steps 1–15 in order to perform a fourth complete rinse.
Note:
1. The high-level disinfection procedure for PENTAX Medical Video Colonoscopes and Upper G.I. Endoscopes that have one instrument channel, but do not have a water jet channel is exactly the same as the one above, except for the following changes:
• Omit Steps # 10 and 15.
• Water jet channel cleaning adapter (OE-C20) is not needed in Steps # 2, 3, 5, and 6.
(1) OE-C20
Deviation Comments
No Deviation DeviationDeviation from Procedure
Complete Not Complete
Complete Not Complete
Complete Not Complete
Complete Not Complete
– 42 –
DRYING8
8-1-1. Drying
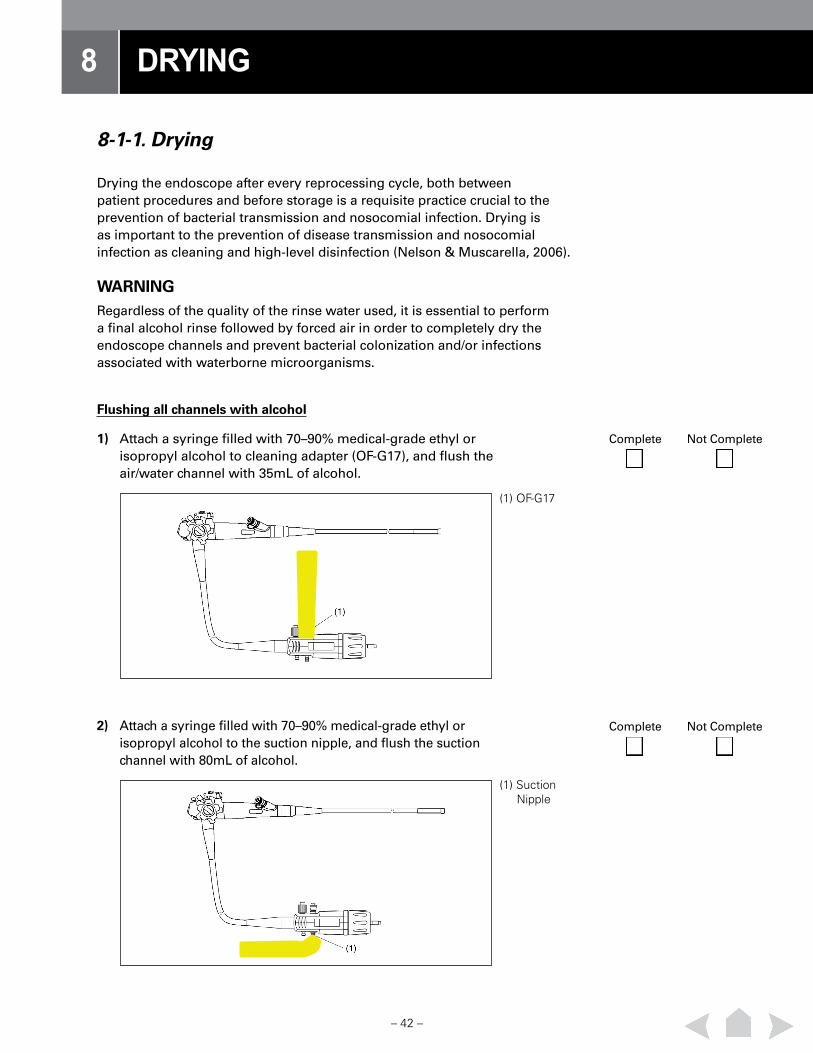
Drying the endoscope after every reprocessing cycle, both between patient procedures and before storage is a requisite practice crucial to the prevention of bacterial transmission and nosocomial infection. Drying is as important to the prevention of disease transmission and nosocomial infection as cleaning and high-level disinfection (Nelson & Muscarella, 2006).
WARNING Regardless of the quality of the rinse water used, it is essential to perform a final alcohol rinse followed by forced air in order to completely dry the endoscope channels and prevent bacterial colonization and/or infections associated with waterborne microorganisms.
Flushing all channels with alcohol
1) Attach a syringe filled with 70–90% medical-grade ethyl or isopropyl alcohol to cleaning adapter (OF-G17), and flush the air/water channel with 35mL of alcohol.
2) Attach a syringe filled with 70–90% medical-grade ethyl or isopropyl alcohol to the suction nipple, and flush the suction channel with 80mL of alcohol.
(1) OF-G17
(1) Suction Nipple
Complete Not Complete
Complete Not Complete
– 43 –
DRYING8
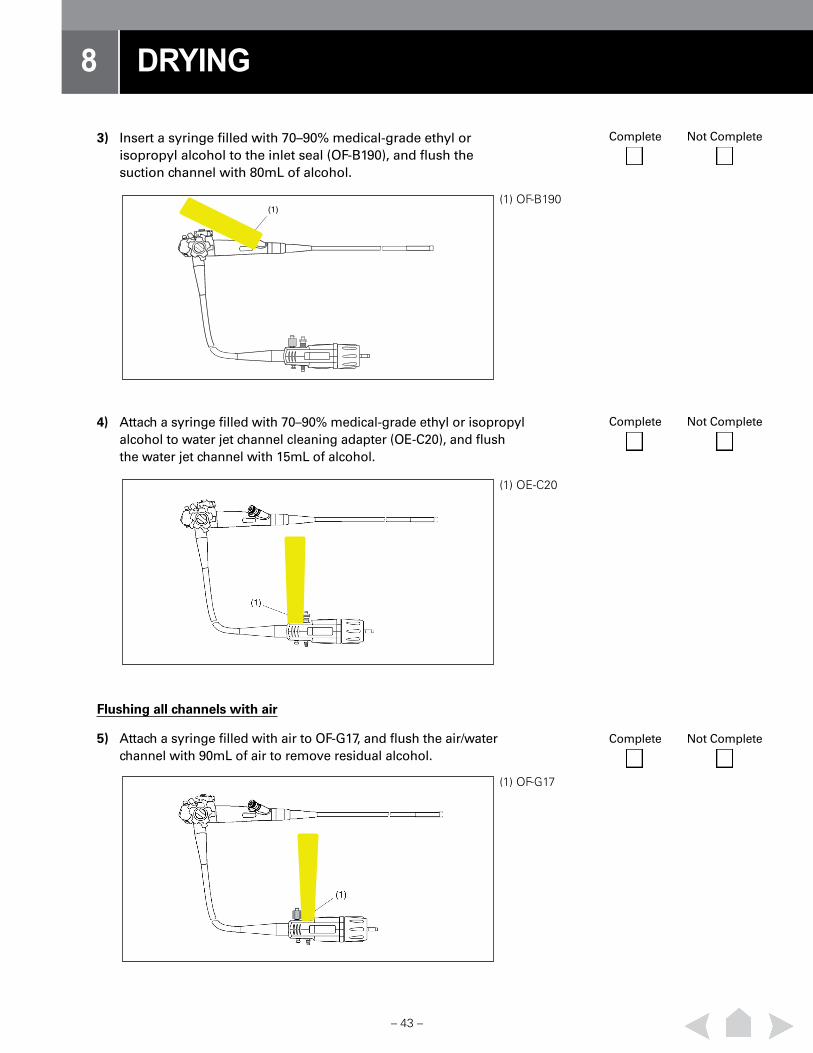
3) Insert a syringe filled with 70–90% medical-grade ethyl or isopropyl alcohol to the inlet seal (OF-B190), and flush the suction channel with 80mL of alcohol.
4) Attach a syringe filled with 70–90% medical-grade ethyl or isopropyl alcohol to water jet channel cleaning adapter (OE-C20), and flush the water jet channel with 15mL of alcohol.
Flushing all channels with air
5) Attach a syringe filled with air to OF-G17, and flush the air/water channel with 90mL of air to remove residual alcohol.
(1)
(1) OF-G17
(1) OE-C20
(1) OF-B190
Complete Not Complete
Complete Not Complete
Complete Not Complete
– 44 –
DRYING8
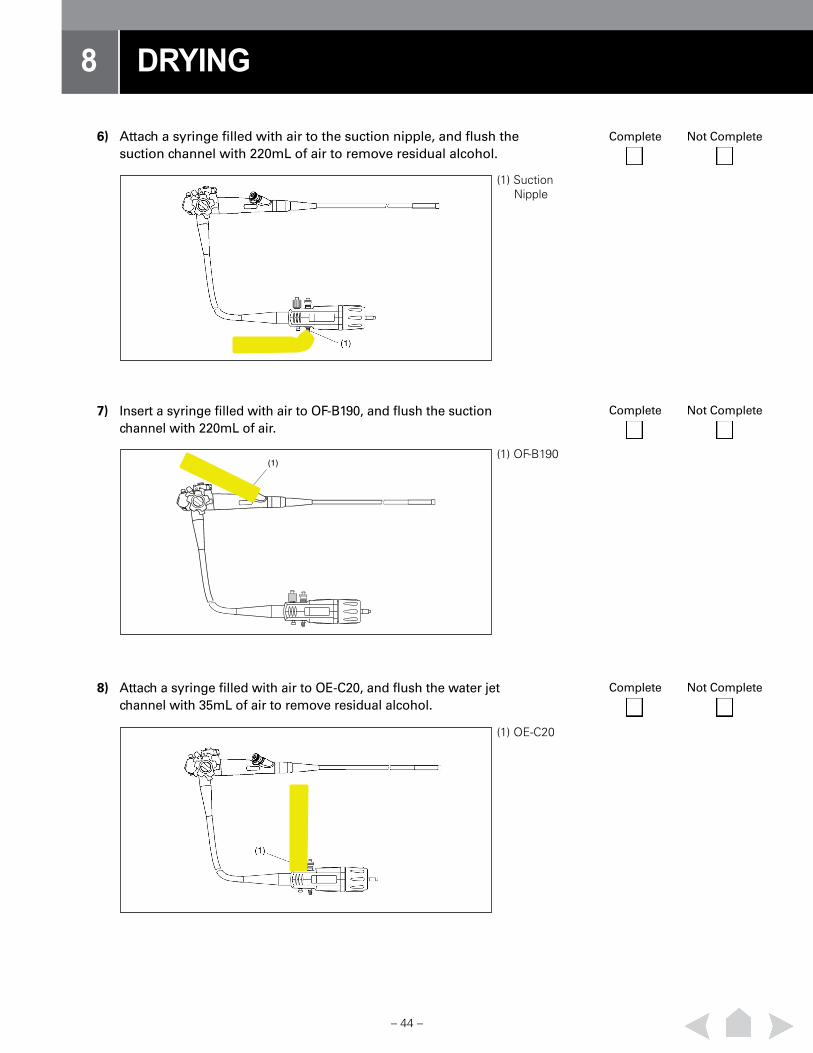
6) Attach a syringe filled with air to the suction nipple, and flush the suction channel with 220mL of air to remove residual alcohol.
7) Insert a syringe filled with air to OF-B190, and flush the suction channel with 220mL of air.
8) Attach a syringe filled with air to OE-C20, and flush the water jet channel with 35mL of air to remove residual alcohol.
(1)
(1) OE-C20
(1) OF-B190
(1) Suction Nipple
Complete Not Complete
Complete Not Complete
Complete Not Complete
– 45 –
DRYING8
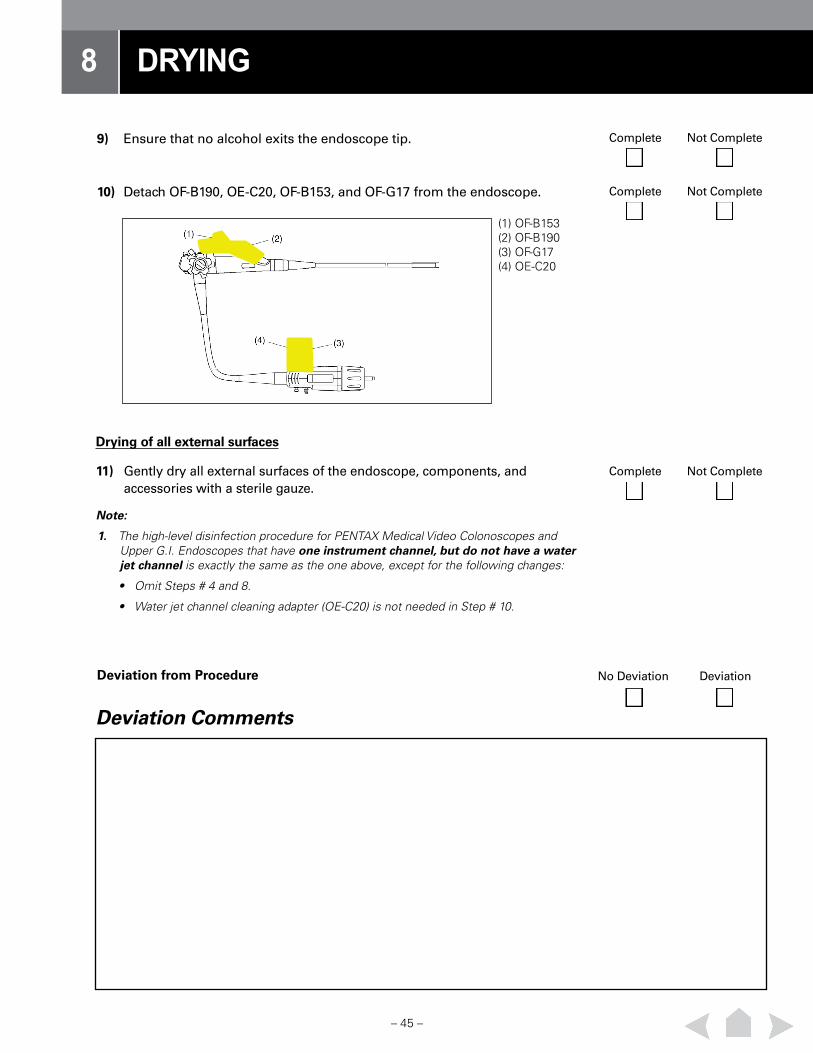
9) Ensure that no alcohol exits the endoscope tip.
10) Detach OF-B190, OE-C20, OF-B153, and OF-G17 from the endoscope.
Drying of all external surfaces
11) Gently dry all external surfaces of the endoscope, components, and accessories with a sterile gauze.
Note:
1. The high-level disinfection procedure for PENTAX Medical Video Colonoscopes and Upper G.I. Endoscopes that have one instrument channel, but do not have a water jet channel is exactly the same as the one above, except for the following changes:
• Omit Steps # 4 and 8.
• Water jet channel cleaning adapter (OE-C20) is not needed in Step # 10.
(1) OF-B153(2) OF-B190(3) OF-G17(4) OE-C20
Deviation Comments
No Deviation DeviationDeviation from Procedure
Complete Not Complete
Complete Not Complete
Complete Not Complete
– 46 –
STORAGE9
9-1-1. Storage
Endoscopes should be stored in a manner that will protect them from contamination. The storage area should be clean, well-ventilated, and dust free, thus discouraging any microbial contamination. Correct storage of the GI endoscope will prevent damage to the exterior of the instrument by protecting it from physical impact.
WARNING• Make sure that all removable components such as the air/water feeding
valve, suction control valve, water jet components, and inlet seal are detached from the endoscope. This will allow for better air circulation through the internal channels and permit thorough drying.
• NEVER store the endoscope, its components, and accessories in the carrying case, as this type of dark, humid, and unventilated environment is conducive to bacterial colonization, and increases the risk of cross-contamination. These cases are intended for transportation of the instrument, not storage.
CAUTION• NEVER store the endoscope in areas of high humidity, high temperatures or
in direct exposure to sunlight or X-rays.
• Avoid storage of the endoscope in cabinets, which have sharp edges, exposed nails/screws, etc. Contact with sharp objects can puncture, scratch or otherwise damage the endoscope.
• When utilizing heated disinfectants for reprocessing PENTAX Medical endoscopes, the instruments should be allowed to return to room temperature prior to use and/or further handling.
1) Following reprocessing, the endoscope may either be reused or placed in storage.
2) Prior to reuse, ensure that instrument has been properly inspected and fully prepared for the next clinical procedure.
3) Prior to storage, ensure that all internal channels, endoscope components, instrument surfaces, and accessories are thoroughly dry.
4) The endoscope should be hung in a clean, dry, well-ventilated storage cabinet at room temperature. The insertion tube and light guide cable should be hung and kept as straight as possible during storage.
Complete Not Complete
Complete Not Complete
Complete Not Complete
Complete Not Complete
– 47 –
STORAGE (continued...)
Deviation Comments
No Deviation DeviationDeviation from Procedure
– 48 –
10-1-1. Evaluation Results
10-1-1. Evaluator Comments
Evaluator Signature Date
EVALUATION RESULTS10
– 49 –
APPENDICES11
(1)
(2) (5)
(4)(7)
(6)
(8)
(11)(10)
(12)
(14)
(9)
(13)
(3)
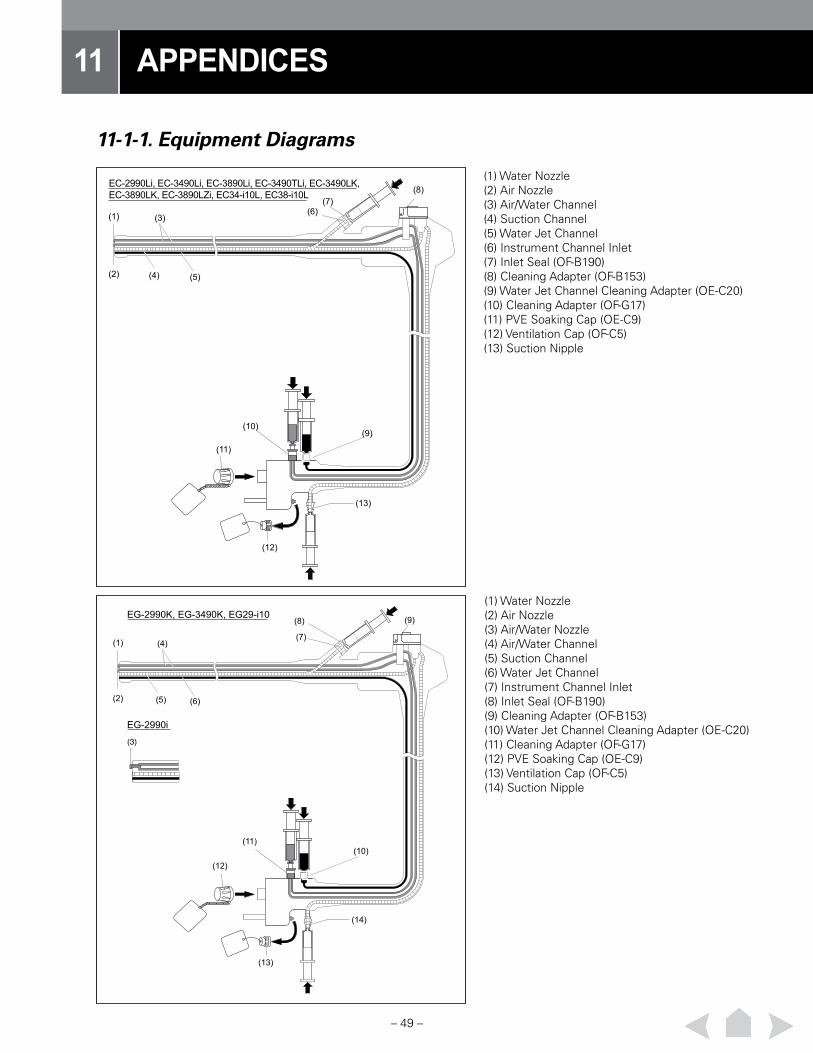
EG-2990i
EG-2990K, EG-3490K, EG29-i10(1) Water Nozzle(2) Air Nozzle(3) Air/Water Nozzle(4) Air/Water Channel(5) Suction Channel(6) Water Jet Channel(7) Instrument Channel Inlet(8) Inlet Seal (OF-B190)(9) Cleaning Adapter (OF-B153)(10) Water Jet Channel Cleaning Adapter (OE-C20)(11) Cleaning Adapter (OF-G17)(12) PVE Soaking Cap (OE-C9)(13) Ventilation Cap (OF-C5)(14) Suction Nipple
11-1-1. Equipment Diagrams
(1)
(2) (5)(4)
(7)(6)
(8)
(3)
(11)
(10)
(12)
(13)
(9)
EC-2990Li, EC-3490Li, EC-3890Li, EC-3490TLi, EC-3490LK,EC-3890LK, EC-3890LZi, EC34-i10L, EC38-i10L
(1) Water Nozzle(2) Air Nozzle(3) Air/Water Channel(4) Suction Channel(5) Water Jet Channel(6) Instrument Channel Inlet(7) Inlet Seal (OF-B190)(8) Cleaning Adapter (OF-B153)(9) Water Jet Channel Cleaning Adapter (OE-C20)(10) Cleaning Adapter (OF-G17)(11) PVE Soaking Cap (OE-C9)(12) Ventilation Cap (OF-C5)(13) Suction Nipple
– 50 –
APPENDICES11
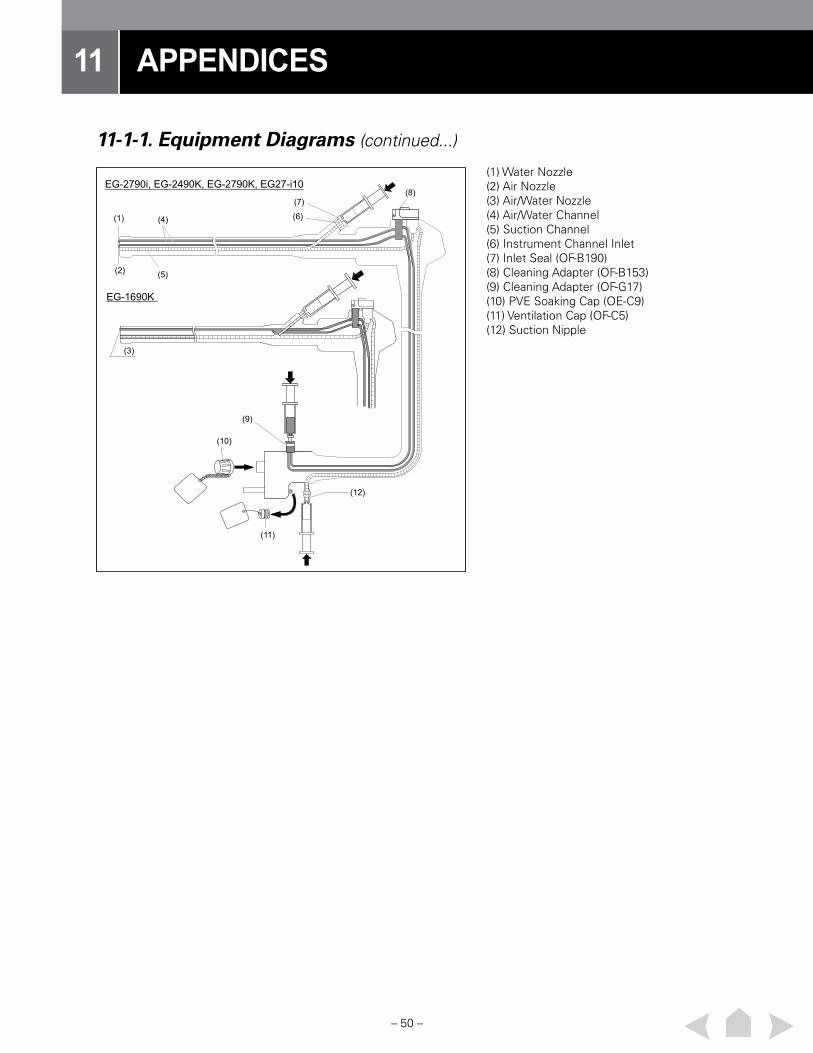
11-1-1. Equipment Diagrams (continued...)
(1)
(2) (5)
(6)
(7)(8)
(4)
(10)
(9)
(11)
(12)
(3)
EG-1690K
EG-2790i, EG-2490K, EG-2790K, EG27-i10(1) Water Nozzle(2) Air Nozzle(3) Air/Water Nozzle(4) Air/Water Channel(5) Suction Channel(6) Instrument Channel Inlet(7) Inlet Seal (OF-B190)(8) Cleaning Adapter (OF-B153)(9) Cleaning Adapter (OF-G17)(10) PVE Soaking Cap (OE-C9)(11) Ventilation Cap (OF-C5)(12) Suction Nipple
– 51 –
APPENDICES11
11-1-2. Approved Endoscope and Cleaning Accessories
Please reference most recent version of “PENTAX Medical Endoscopes Components & Cleaning Accessories Guide” book MK-677.
11-1-3. PENTAX Medical Reference Documents
All PENTAX Medical documents that are referenced in this checklist can be downloaded on the PENTAX Medical Patient First Website http://patientfirst.pentaxmedical.com.
– 52 –
1 Society of Gastroenterology Nurses and Associates, Inc. (2012) Standards of Infection Control in Reprocessing of Flexible Gastrointestinal Endoscopes [Practice Standard]. Chicago, IL: Author
12 REFERENCES
12-1-1. References

– 53 –
PENTAX Medical3 Paragon DriveMontvale, NJ 07645Phone + 1 800 431 5880Fax + 1 201 391 4189 www.pentaxmedical.com
Copyright 2015. All Rights Reserved. All company and product names and marks contained within are federally registered trademarks, trademarks or service marks of PENTAX of America, Inc. Product specifications are subject to change without notice, and without any obligation on the part of the manufacturer. MK-676 Rev: B