Embed Size (px)
Citation preview

Page 1
Reporting in the eMS
Guidance
For lead partners and partners
Version 1
December 2016
*Disclaimer: This is a living document and further content will be developed at a later stage.
Page 2
Table of Contents
LIST OF ABBREVIATIONS ..................................................................................... 3
CHAPTER 1 – GENERAL PRINCIPLES OF REPORTING .............................................. 4
1.1 Introduction................................................................................................................ 4
1.2 Reporting process ...................................................................................................... 4
1.3 Partner report............................................................................................................. 5
1.4 Project report ............................................................................................................. 5
1.5 Periods ....................................................................................................................... 5
CHAPTER 2 – PARTNER REPORT ........................................................................... 7
2.1 Accessing a partner report......................................................................................... 7
2.2 Generating a partner report....................................................................................... 7
2.3 Filling-in a partner report ......................................................................................... 10
2.4 Submitting a partner report ..................................................................................... 18
2.5 Other points ............................................................................................................. 19
CHAPTER 3 – PROJECT REPORT .......................................................................... 21
3.1 Needed user rights / privileges ................................................................................ 21
3.2 Generating a project report ..................................................................................... 21
3.3 Filling-in a project report .......................................................................................... 23
3.4 Submitting a project report ...................................................................................... 29
Annex 1 ........................................................................................................... 31

Page 3
LIST OF ABBREVIATIONS
AF - Application form
eMS – (Programme’s) Electronic monitoring system
ERDF - European Regional Development Fund
EU - European Union
FLC - First level control
FLC AB – First Level Control Approbation Body
JS - Joint Secretariat
LoE – list of expenditure
LP - Lead partner
LP FLC - Lead partner’s first level control
PP - Project partner
TEC - Total eligible costs
VAT - Value-added tax
WP - Work package

Page 4
CHAPTER 1 – GENERAL PRINCIPLES OF REPORTING
1.1 Introduction
This guidance consists of three chapters: General principles of reporting, Partner report and Project report. It is recommended to read all the chapters to understand how reporting works. However, to submit the report:
The project partners (PP) need to get accustomed with the chapter General Principles and Partner report
The lead partner (LP) needs to get accustomed with the chapter General Principles, Partner report and Project report
The reporting process is also presented in Session 11 on the Interact YouTube channel accessible here: https://www.youtube.com/playlist?list=PLvYGVfGv4leEn2QC4ztZAFAwlCQztWGyY
1.2 Reporting process
The reporting process consists in partners filling in partner reports which are then verified by their First Level Controllers (FLC) and when the costs are certified the reports are submitted to the LP who then prepares one single project report and submits it to the Joint Secretariat. The procedure is depicted below reflecting how the procedure looks for a project with 3 partners.
Figure 1 Reporting process in the eMS
Partner report (PP2)
FLC
Partner report (LP)
FLC
Project report
Joint Secretariat
Partner report (PP3)
FLC

Page 5
1.3 Partner report
Partner reports serve for providing information by partners to the LP which is then integrated into project report.
Partners (including LP) create their own partner reports.
Each partner report is verified by the partner’s FLC in the eMS.
The lead partner’s FLC is also expected to check the quality of the information provided by the other partners. Therefore, the LP FLC checklist includes extra questions.
Consequently, the FLC certified partner reports should be submitted first. Then the LP submits its own partner report to the FLC.
All the partners are required to submit a partner report. No empty reports should be submitted. The partner which does not want to claim any costs fills-out the report anyway and submits it to the lead partner directly.
Mistakenly created reports should be deleted.
1.4 Project report
LP creates the global project report where all partner reports will be integrated.
LP prepares the integrated activity report on the basis of activities provided by partners in the partner reports.
LP includes in the project report FLC certificates attached to partner reports. Financial data is automatically integrated in the project report.
No special LP FLC certificate will have to be filled in by the LP FLC (but extra questions in the LP's FLC checklist – see above).
The project report is submitted to the JS and assessed.
1.5 Periods
The project periods reflect the duration of the project and are defined in the Application Form in the Work Plan section.
Periods are automatically created based on the start and end date of the project.
In general, project periods start on 1st January and end on 31 December
The first period starts from the project start date and ends on 31 December.
The last project period starts on 1st January and ends at the project end date.
Usually a report covers a time span of 6 months, as partners are asked to report twice per period. Do not confuse project period (1 year) and reporting time span (6 months).
The partner reports must cover the same time span as project report.
Period 0 serves for reporting preparation costs. Period 0 is created and used by the JS only. Partners do no create any reports in Period 0.

Page 6
A project starting on 1 March 2016 and ending on 30 September 2018 would have the following division into reports and the following reporting deadlines:
Period
Reporting deadline
Period 0
(only for preparation costs, do not open any report there)
No report needs to be filled in and submitted for period 0.
Period 1: 1.03.2016 – 31.12.2016
Report 1.1 covering activities and expenditure in the following time span:
1.03.2016 – 30.06.2016
Report 1.1
To be submitted to the JS by 30.09.2016.
Report 1.2
1.07.2016 – 31.12.2016
Report 1.2
To be submitted by 31.03.2017
Period 2: 1.01.2017 – 31.12.2017
Report 2.1
1.01.2017 – 30.06.2017.
Report 2.1
To be submitted to the JS by 30.09.2017
Report 2.2
1.07.2017 – 31.12.2017
Report 2.2
To be submitted to the JS by 31.03.2018
Period 3: 1.01.2018 – 30.09.2018
Report 3.1
1.01.2018 – 30.06.2018
Report 3.1
To be submitted to the JS by 30.09.2018
Report 3.2
1.07.2018 – 30.09.2018
Report 3.2
To be submitted to the JS by 31.12.2019

Page 7
CHAPTER 2 – PARTNER REPORT
The reporting section becomes available to project partners as soon as the project has been contracted. Partner reports cover activities and expenditure of individual project partners and need to be verified by approved first level controllers (called FLC).
With strict deadlines for submitting the project reports to JS (by 31 March and 30 September of each year), the lead partner sets intermediary deadlines for the partners to submit their partner report. The partners need to respect these deadlines, making sure their reports are submitted and verified by their FLC in due time.
2.1 Accessing a partner report
To access a partner report, you first need be registered as a eMS user (1). Then, you need to be assigned by your lead partner (2).
(1) User self-registration via the publicly available registration form
You can register yourself in the system. After clicking on the “Register” button, the eMS sends a validation e-mail, which contains a validation link to the provided e-mail address. Clicking on this link validates the e-mail address in the eMS. Afterwards, you are able to log into the system.
(2) User Assignment
The User Assignment section of the Supplementary information enables the lead partner to assign specific user(s) to all project partners. Only users assigned to a PP are allowed to create and submit reports for partner reports.
Each partner can have multiple users and they will all have the same access to the partner report.
Please note that the lead partner can also allocate several users to access the project report. Those users will not be able to create a project report as currently only one user (the one accepted by JS in handover phase, or in case of automatic handover the same as lead applicant) has the lead partner role in the eMS.
Figure 2 Supplementary information - Partner User assignment
2.2 Generating a partner report
Once contracted, the overview of partner and project reports (‘Reporting overview’) will automatically displayed. Previously, before signing, you were directed to the application form.
Page 8
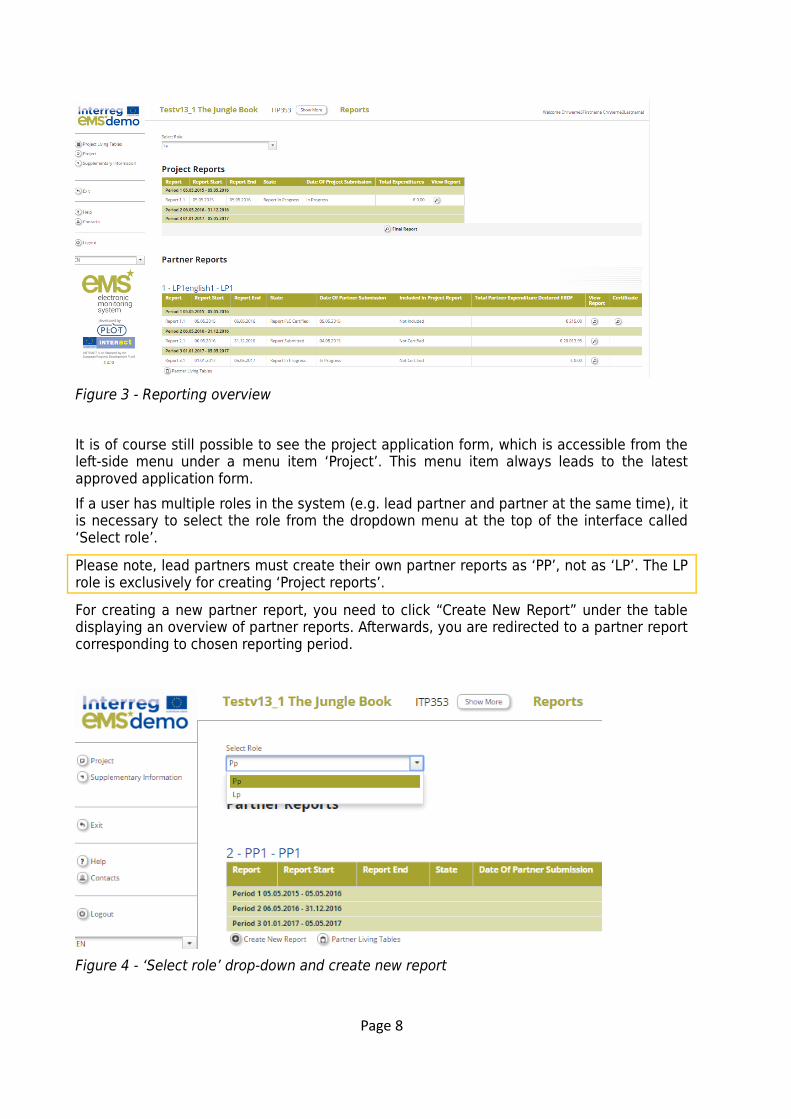
Figure 3 - Reporting overview
It is of course still possible to see the project application form, which is accessible from the left-side menu under a menu item ‘Project’. This menu item always leads to the latest approved application form.
If a user has multiple roles in the system (e.g. lead partner and partner at the same time), it is necessary to select the role from the dropdown menu at the top of the interface called ‘Select role’.
Please note, lead partners must create their own partner reports as ‘PP’, not as ‘LP’. The LP role is exclusively for creating ‘Project reports’.
For creating a new partner report, you need to click “Create New Report” under the table displaying an overview of partner reports. Afterwards, you are redirected to a partner report corresponding to chosen reporting period.
Figure 4 - ‘Select role’ drop-down and create new report

Page 9
Each partner report is given a number that consists of a period number and a report number.
Figure 5 - Partner report number showing reporting period and report number
Caution!
By default, it is possible to create just one report per period. As the NWE Programme asks two 6-monthly reports by period, you need to make sure the report is created for the relevant 6-month time span (1 January to 30 June, or 1 July to 31 December).
All the partners are required to submit a partner report. If there is no/not sufficient activity (or costs) to report on, the partner fills-out all other parts of the report (e.g. problems and deviations, activities if any, forecast for the next report). If not costs are claimed, the partner submits the report to the lead partner directly (not to the FLC).
Should you have mistakenly created a report, please delete it.
It is possible to delete a partner report as long as it is not submitted to the FLC. In order to delete the report, please click on ‘Delete report’ in the report menu to the left. All users assigned to the partner are able to create and to delete a partner report.
Figure 6 - Deleting partner reports
Lead partners can also view reports of all project partners, once they have been created by the partner. Lead partners can view also not submitted partner reports (saved reports).

Page 10
Figure 7 – To view partner reports, lead partners need to select the role ‘lead partner’.
In case the lead partner wants the right to also edit and submit partner reports, the lead partner user must be added to the partner as a user in the user assignment of the supplementary information.
Figure 8 - To edit partner reports, lead partners need to assign their user in the ‘user assignment’
2.3 Filling-in a partner report
Partner reports consist of several sections (i.e. ‘Partner report’, ‘List of expenditure’, Contribution and forecast’ and ‘Attachments’), each of which must be filled with information.
Fields in the partner report depend on the application form of the project (e.g. number of work packages, type of target groups, ….).
2.3.1 ‘Partner report’ Tab
Figure 9 - Navigation bar – Partner Report
The ‘Partner report’ section focuses on activities implemented throughout the reporting period. It contains general descriptions of activities as well as reporting per Work Package.
This section asks you to describe activities during the reporting period (‘Summary of partner’s work in this reporting period’).
To provide information on specific outputs, please select each applicable output from a drop-down which lists all outputs included in the AF.

Page 11
It is possible to upload documents for each output under ‘Output evidence’.
Please note, that the eMS is not a repository. All information to be provided by the partner to their FLC (e.g. invoices, procurement documents) must be given outside of the eMS. Check with your FLC which evidence is needed for outputs and deliverables as well, and how it should be submitted (electronically sent, attached to the report or hard support). Besides that, coordinate with the LP to make sure all relevant evidence is well included in the project report but not duplicated.
Figure 10 – Reporting on activities – summary and description of outputs
Partner reports also contain a section to provide information on the target groups reached. For each target group selected in the AF, information can be provided.
Figure 11 – Reporting on target groups – Open fields by pressing ’Add Target group’
Below you can report on individual work packages. The list of work packages depends on the work packages included in the approved application form. The example report shown below has the work package management and one implementation work package. You will see all work packages, even if you have not been assigned to a work package in the AF.
Reports of individual work packages should contain descriptions of activities, problems (if any) and information on individual deliverables with evidence in the form of an attachment.

Page 12
Deliverables are reported by clicking on ‘Add deliverable’ under the relevant work package. The drop-down shows all deliverables listed in the AF.
Figure 12 – Reporting per Work Package – add deliverable by pressing ‘Add deliverables’
2.3.2 'List of Expenditures (LoE)' tab
Figure 13 – Navigation bar – List of Expenditures
Financial reporting is done through the List of Expenditures (LoE) section. Partner and period are determined by the partner report itself (each report refers to just one partner and one period), the work package and budget line must be selected for every item in the LoE.
The following points should be respected:
Each invoice represents one single item reported in the List of Expenditure
Consequently, for staff costs, as a pay slip is considered as an invoice, each item in the List of Expenditure needs to be separated per person per month (as staff employed are usually paid on a monthly basis)
In order to reflect the staff costs budgeted in the AF, you may link your staff costs to several WPs when reporting on the implementation of the project. However, you may only select one WP per reported item (salary slip).
Example: If a person works 50% of the time on the WP Management and the other 50% on the WP Communication you may attribute three months of their cost to WP Management while the other three are attributed to WP Communication.

Page 13
Figure 14 – List of Expenditure – cost types
Real cost items
After clicking on ‘Add real cost’ a LoE appears, where the system asks you to give basic information on the cost item.
Figure 15 – Adding Expenditures
It is necessary to allocate each expenditure item to one budget line and one work package. It is also obligatory to indicate ‘Total Value of Item in Original Currency’ and ‘Declared amount in Original Currency’ as well as ‘Date of Payment’.
‘Total Value of Item in Original Currency’ and ‘Declared amount in Original Currency’
Example: The partner might declare in the LoE only a part related to the project (€1,000) of the overall invoice (€20,000) that was issued for consultancy services. The Total Value of Item in Original Currency will amount to €20,000 and the Declared amount in Original Currency will

Page 14
amount to €1,000.
It is possible to upload one or multiple attachments to each of the expenditure items by clicking the ‘Upload’ button. However, please do not upload any attachments (invoices, contracts, payslips etc.) unless you are explicitly asked to do so by FLC or JS.
Figure 16 – Uploading/downloading attachments in the List of Expenditure
It is possible to introduce expenditure in different currencies and the system converts it automatically into EUR using the currency conversion rate applicable at the moment of entering the information in the List of Expenditure.
Currencies other than Euro
Amounts introduced into the eMS in currencies different than EUR will automatically be re-calculated into EUR based on available exchange rates of the European Commission (http://ec.europa.eu/budget/contracts_grants/info_contracts/inforeuro/index_en.cfm).
The system recalculates the amounts several times – first time when the expenditure item is created and each time it is modified before submission. The value is updated when clicking on ‘check saved report’ and once more at the moment of submission of the report to the FLC. It is not modified ever again. Even if the report is reverted to the partner and re-submitted the exchange rate from the moment of submission to the FLC is the valid one.
In which currency should the expenditure be claimed?

Page 15
Expenditure Bookkeeping eMS
Euro Euro Euro
Other Euro
Other Euro Euro
Other Other
Flat Rates
If you have Staff cost and/or Office and administration flat rates approved in the application form, the system will automatically calculate flat rates based on relevant inputs into the List of Expenditures.
Please note, it is not possible to add real cost invoices to budget lines covered by flat rates. It is also not possible to modify the amount claimed based on flat rates (neither by project partner nor by any of the authorities verifying the report).
Figure 17 – Adding Expenditures – Flat rates
Additional options
In the LoE you should mark any expenditure spent outside (the Union part of) the programme area. Please note that it is possible to change this checkbox also during FLC check, if FLC considers it was checked incorrectly.
In case any of the expenditure is financed as in kind contribution, it should be marked as such in the LoE when adding the item.

Page 16
Figure 18 – Additional options in the List of Expenditure
Scrolling the LoE from left to right
The LoE can be scrolled by pressing the middle-mouse-button (press it and move around in the table).
Figure 19 – Scrolling the LoE
2.3.3 'Contribution and Forecast' tab
Figure 20 – Navigation bar – Contribution and Forecast
In the Contribution and Forecast section, you are asked to forecast spending for the next partner report and you need to provide information on the financial contribution. Moreover, in case of in kind contribution, you are requested to specify the in kind contribution.

Page 17
Figure 21 – Spending Forecast
The system calculates the total in kind contribution reported in the List of Expenditure (summing up all invoices where the checkbox ‘in kind’ is selected), only the description should be given by the partner here.
Figure 22 – In kind contribution
In this section you have to specify the source(s) of partner contribution matching the ERDF of the current report. The eMS gives the partner target amount (i.e. the total contribution calculated by deducting the fund co-financing from total eligible expenditure introduced in the List of Expenditures). The system proposes the same sources of contribution as specified in the application form.
The total value of contribution from all sources needs to correspond to the total amount of match-funding.
Caution! The system has a built-in check, which does not allow submitting a report where the sum of all sources of partner contribution does not correspond to the total amount of match-funding.
2.3.4 'Attachments' tab
Figure 23 – Navigation bar – Attachments
Partners are also allowed to upload additional attachments related to the entire report, e.g. should any other document (other than outputs and deliverables) be asked by the FLC or LP. Before uploading, make sure the upload is of relevance for the report. Never upload intermediary versions of deliverables or outputs, unless it has been asked specifically.
Always coordinate with the LP to make sure all relevant evidence is well included in the project report but not duplicated.
A list of all attachments uploaded in this section is shown here, including information on who uploaded which document and when.

Page 18
In order to upload a document, please click on the button ‘Upload’, the upload pop up will appear.
Figure 24 – Report attachments.
2.3.5 'Partner Finance Report' menu
Under the ‘Partner finance report’ menu item (left-side menu) you will find various financial tables summing up the declared expenditure. The tables are updated live with every new expenditure item.
Please note that ‘Currently reported’ column changes over time. Initially (when you are preparing the report), it is ‘amount to be declared to FLC’. After submission to FLC it becomes ‘amount declared to FLC’. It changes into ‘amount certified by FLC’ after the FLC certificate is issued and finally changes into ‘amount included in project finance report’ once the lead partner submits the project progress report with the relevant certificate to the JS.
Figure 25 – Partner finance report
2.4 Submitting a partner report
Before submitting a partner report, the saved report needs to be checked (analogically to checking the saved application form prior to submission) by clicking ‘Check Saved Report’ in the left-side menu.
Figure 26 - Checking Saved Report
When clicking on ‘Check saved report’, an automatic check will be made. Should there be

Page 19
some inaccuracies, the system will notify you about them. In case some of the rules are not fulfilled, an error message will appear and the partner will need to correct any wrong data.
Each time a report is saved, it needs to be checked again before submission. Only after the check is successful, the system will allow for the report to be submitted. The ‘Checked saved report’ button will be replaced with the ‘Submit report’ button.
Figure 27 – Submitting checked report
A submitted report is locked and the partner cannot modify it anymore. After submission, the partner report is forwarded to the FLC of the partner in question. For more information on the FLC role in the eMS, see the related guidance note.
2.5 Other points
The partner can see the status of the report on the reporting overview dashboard.
Never submit an empty report! Empty reports and mistakenly created report (reports created by mistake, or reports created for wrong periods) need to be deleted by the one who created it!
Figure 28 – Reporting overview – partner reports in various stages
A new partner report can be opened once the previous one has been submitted. It is currently not possible for the partner to open more than one report at the same time.

Page 20
Figure 29 – Reporting overview – After certification of reports by FLC, a magnifying glass appears to the right of the reports to access the FLC certificate.
Partner living tables
Partner living tables are financial tables at the partner level that summarise partner expenditure processed through all partner reports. Like all other living tables (i.e. project level and programme level), partner living tables grow over time as expenditure is declared by the project partner and processed by the various authorities.
You can use living tables to keep an overview on expenditure declared in partner reports. To access partner living tables, press the button under the partner report overview table.
Figure 30 – Accessing partner living tables

Page 21
CHAPTER 3 – PROJECT REPORT
Project reports are created by the lead partner, based on partner reports previously verified and certified by FLC:
The partners create, fill in their partner report for each project reporting period and submit it electronically. As all the partners, the lead partner, in its partner role, has also to create, fill in and submit its own report electronically.
Please see the chapter ‘Partner report’ for how to create and fill in partner reports.
The FLCs access the partner reports, verify and certify the amounts (the verified amounts are included in the FLC certificate).
The lead partner can access the partner reports and the FLC certificates of all partners in the eMS to fill in the project report.
Before submitting a project report, the lead partner needs to have his/her partner report checked by his/her FLC. The lead partner’s FLC will have to answer additional questions in the LP FLC checklist which relate to all partners’ expenditure. The documents for this verification will have to be provided to the LP FLC by the LP (either electronically or printed).
Consequently, the LP asks the partners to submit their reports first and only then have its and partners’ reports verified by the LP FLC.
The LP will have to include the FLC certificates of all the reporting partners (including the one issued for its own organisation).
There is no special LP FLC certificate to be signed by the LP FLC, only the related part of the checklist will have to be filled in.
3.1 Needed user rights / privileges
Project reports can only be created by the lead partner of a project, starting from the moment the project status is changed to ‘contracted’.
Caution!
Currently only one user has the lead partner role. Even if more users are allocated to the lead partner in the ‘Supplementary information/User assignment’ they do not have the right to create and/or submit the project reports. Such users can only work with partner reports of the lead partner. The only user having lead partner role is the one accepted by the JS in the Handover procedure. It is always possible to see which user is the lead partner for the project in the ‘Show more’ button at the top of the project/reporting view.
3.2 Generating a project report
Only lead partners can generate and submit project reports.
After the project has been contracted, the ‘Reports overview’ is the default view when accessing the project. In order to generate a project report, the lead partner needs to select the role ‘LP’ from the role dropdown. Each lead partner has two roles to select from ‘PP’ for

Page 22
creating own partner reports and ‘LP’. The LP role allows to see reports of all project partners and to create and submit the project report.
Figure 31 – Reporting overview - Generating a project report
The lead partner can see reports of other partners but he/she cannot create, modify, delete or submit them, unless he/she has been assigned to other partners as a user in the supplementary information ('User assignement' tab)
All partner reports have statuses from which users can find out if the report was already certified by the FLC and if yes, whether it was included in the project report. The lead partner can access the reports and the certificates of all partners via the partner reports overview
Figure 32 – Partner reports overview
For creating a new project report, you need to click “Create Report For” and select a project period (which have been set in the AF) for which you wish to create the 6-monthly activity report.
Each project report is given a number which consists of the Period number and the Report number (see example below).
Page 23
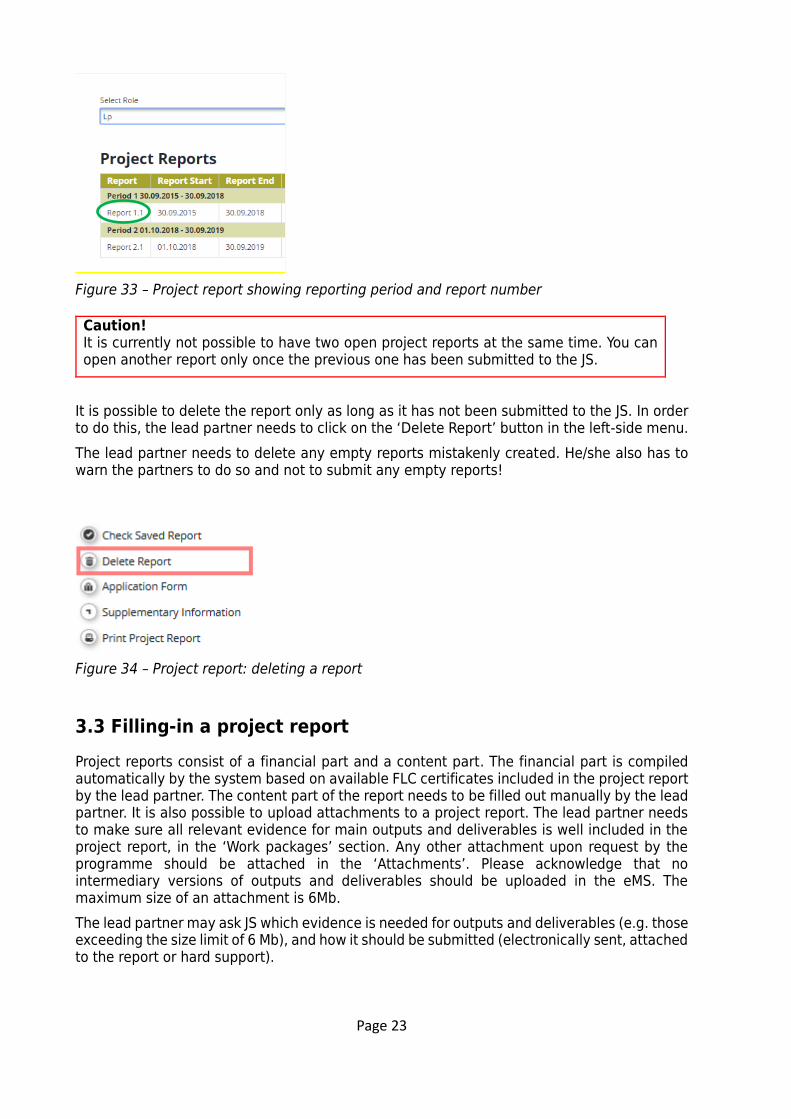
Figure 33 – Project report showing reporting period and report number
Caution! It is currently not possible to have two open project reports at the same time. You can open another report only once the previous one has been submitted to the JS.
It is possible to delete the report only as long as it has not been submitted to the JS. In order to do this, the lead partner needs to click on the ‘Delete Report’ button in the left-side menu.
The lead partner needs to delete any empty reports mistakenly created. He/she also has to warn the partners to do so and not to submit any empty reports!
Figure 34 – Project report: deleting a report
3.3 Filling-in a project report
Project reports consist of a financial part and a content part. The financial part is compiled automatically by the system based on available FLC certificates included in the project report by the lead partner. The content part of the report needs to be filled out manually by the lead partner. It is also possible to upload attachments to a project report. The lead partner needs to make sure all relevant evidence for main outputs and deliverables is well included in the project report, in the ‘Work packages’ section. Any other attachment upon request by the programme should be attached in the ‘Attachments’. Please acknowledge that no intermediary versions of outputs and deliverables should be uploaded in the eMS. The maximum size of an attachment is 6Mb.
The lead partner may ask JS which evidence is needed for outputs and deliverables (e.g. those exceeding the size limit of 6 Mb), and how it should be submitted (electronically sent, attached to the report or hard support).

Page 24
3.3.1 ‘Report’ Tab
Figure 35 – Project report: Sections of the report
The ‘Report’ section focuses on activities implemented throughout the reporting period. It contains general descriptions of activities as well as reporting per Work Package.
This section first asks you to describe activities during the reporting period (‘Highlights of main achievements’) in this reporting period and to include FLC certificates of project partners.
An overview of project main indicators (‘project main outputs achievement’) is also provided (see framed in green below). This table is automatically generated from information provided in the ‘Workpackages’ section of the report.
Figure 36 – Project report: Top part of the ‘Report’ Tab
You are then asked to provide information on the target groups reached as well as problems encountered and solutions found.

Page 25
Figure 37 – Project report: Middle part of the ‘Report’ Tab
At the bottom you will find an interface to provide information on horizontal principles and a tick box which can be used, at the end of the project, to indicate that the project has been fully implemented.
The section ‘reporting per workpackages overview’ can be used to access individual work packages.
Figure 38 – Project report: Bottom part of the ‘Report’ Tab
3.3.2 'Work packages' tab
Reporting per work package is the second part of the project report.
Report sections of individual work packages can be accessed either from the navigation bar ‘Work packages’ or from the table at the bottom of the page under the section ‘Report’.
Figure 39 – Navigation bar – Work packages

Page 26
Figure 40 – Reporting per Work package Overview table
In this section, you can describe the implementation of each work package in detail, incl. information on activities carried out and contributions by the project partners as well as information on any problems or deviations from the initial plan.
Here you also provide information on project output indicators and activities and deliveries. Reporting on deliverables, incl. upload of evidence of achievement is also part of reporting on work packages.
Figure 41 – Reporting on work packages
3.3.3 'FLC Certificates' tab
Financial reporting is done based on FLC certificates. All FLC certificates of all project partners, which were not yet included in any project report, are available to be included in the project report.
You can decide which of the available FLC certificates to include in the project report under ‘Include in project finance report’. Only the selected FLC certificates will be taken into account for project report.
FLC certificates, which are not included in one project report, can be included in another project report. The eMS does not check whether all the FLC certificates included in a project report by the LP refer to the same reporting period. This means that FLC certificates could originate from different reporting periods.

Page 27
Figure 42 – Including Partner FLC Certificates in a Project Report
Once the FLC certificates are selected to be added to the project report, they can be accessed from two places in the project report: navigation toolbar tab ‘Certificates’ or table ‘List of Partner FLC Certificates’ under ‘Reports’ tab. Under ‘Certificates’ only those selected will be visible.
Figure 43 – Navigation bar – FLC Certificates
The lead partner can access individual expenditure items of project partners in the List of Expenditure (LoE) and decrease the amount of single items if necessary. The LP can also decrease single expenditure items to zero, which means that the expenditure claimed by the project partner for this item will completely be excluded from the project report.
Figure 44 – Editing Expenditures by the lead partner
Expenditures can be edited by a lead partner directly in the item view form by setting the difference in the corresponding field (see Figure 9). The values previously inserted by a partner and by FLC (Budget Line, Work package, Internal Reference Number, Invoice Number, Invoice Date, Date of Payment, Currency, VAT) cannot be modified anymore.
Caution!

Page 28
The lead partner can only decrease items certified by FLC and cannot increase them.
The lead partner can also revert partner reports back to the FLC or to the partners. This might be necessary in case he/she notices a mistake, which is not in his/her authority to correct.
Figure 45 – Reverting Partner Reports from the lead partner to FLC or project partners
Reverting the report to a project partner means that the project partner needs to correct and re-submit the report to the FLC and then the FLC needs to re-certify the report.
Reverting the report to FLC level means that the FLC needs to re-certify the report but no corrections from the partner are necessary.
Caution! If the lead partner needs to revert his/her partner report, the JS needs to be contacted. The lead partner cannot revert his own report neither to FLC nor to the PP. If he does, the eMS displays error message at the top of the page and no action is performed by the system.
3.3.4 'Project Report Tables' tab
Figure 46 – Navigation bar – Project Report Tables
Here you can find various summary tables of the expenditure included in the project report. Please note that the tables are updated before the report is submitted. All the corrections done by the LP should be immediately visible in the tables.
Project report tables follow the same logic as those in the partner report but take into account all certificates included in the project report.
Please note that the ‘Currently reported’ column changes its values (and name) each time a project report changes a status. Before the report is submitted it is ‘amount to be declared to the JS’ and once it is submitted it changes into ‘amount declared to the JS’. Likewise, the column ‘Previously reported (certified by CA) also changes if new CA confirmations become available. After submission of the report to the JS, the values do not change anymore.

Page 29
Figure 47 – Project Report Tables
3.35. 'Attachments' tab
Figure 48 – Navigation bar – Attachments
All relevant evidence for main outputs and deliverables should be included in the project report, in the ‘Work packages’ section.
Should any additional attachments be relevant for the entire project report, the lead partner needs to upload them in this ‘Attachment’ section. The programme authorities may also ask you to upload specific attachments. Please acknowledge the maximum size of an attachment is 6Mb.
In order to do so, please use the ‘Attachments’ tab.
3.4 Submitting a project report
Before submitting a project report, the saved report needs to be checked (analogically to checking saved projects when submitting the application form) by clicking “Check Saved Report” in the left-side menu.
Once the report is successfully checked, it can be submitted by clicking ‘Submit Report’, which will appear instead of ‘Check Saved Report’ button.
Figure 49 – Checking and submitting project report
The project report is submitted to the JS. The report state is changed from ‘In process’ into ‘Report Submitted’ and a submission date is displayed in the overview table.

Page 30
Figure 50 – Report submitted
After submission, the lead partner can see the report but cannot modify it anymore.
A new project report can be opened once the previous one has been submitted to JS.

Page 31
Annex 1
List of warnings and automatic checks blocking the submission of partner and project reports