Embed Size (px)
Citation preview
Quick Reference Sheet
Reporting in SIMSQuick Reference Sheet
Selecting the Data Fields (Report Columns)Selecting the Data Fields (Report Columns)
PermissionsThe functionality, fields and data available in SIMS are dependant on the permissions assigned to you in System Manager.
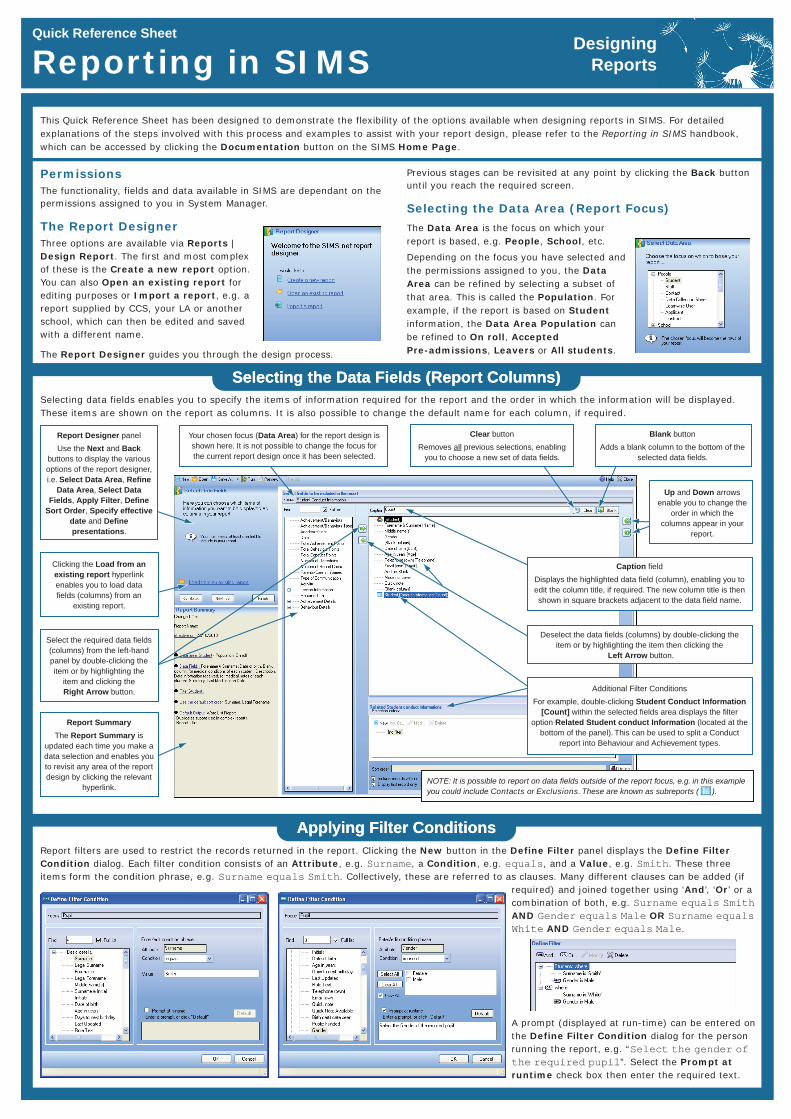
The Report DesignerThree options are available via Reports | Design Report. The first and most complex of these is the Create a new report option. You can also Open an existing report for editing purposes or Import a report, e.g. a report supplied by CCS, your LA or another school, which can then be edited and saved with a different name.
The Report Designer guides you through the design process.
Previous stages can be revisited at any point by clicking the Back button until you reach the required screen.
Selecting the Data Area (Report Focus)
The Data Area is the focus on which your report is based, e.g. People, School, etc.
Depending on the focus you have selected and the permissions assigned to you, the Data Area can be refined by selecting a subset of that area. This is called the Population. For example, if the report is based on Student information, the Data Area Population can be refined to On roll, Accepted Pre-admissions, Leavers or All students.
This Quick Reference Sheet has been designed to demonstrate the flexibility of the options available when designing reports in SIMS. For detailed explanations of the steps involved with this process and examples to assist with your report design, please refer to the Reporting in SIMS handbook, which can be accessed by clicking the Documentation button on the SIMS Home Page.
Selecting data fields enables you to specify the items of information required for the report and the order in which the information will be displayed. These items are shown on the report as columns. It is also possible to change the default name for each column, if required.
Report filters are used to restrict the records returned in the report. Clicking the New button in the Define Filter panel displays the Define Filter Condition dialog. Each filter condition consists of an Attribute, e.g. Surname, a Condition, e.g. equals, and a Value, e.g. Smith. These three items form the condition phrase, e.g. Surname equals Smith. Collectively, these are referred to as clauses. Many different clauses can be added (if
required) and joined together using ‘And’, ‘Or’ or a combination of both, e.g. Surname equals Smith AND Gender equals Male OR Surname equals White AND Gender equals Male.
A prompt (displayed at run-time) can be entered on the Define Filter Condition dialog for the person running the report, e.g. “Select the gender of the required pupil”. Select the Prompt at runtime check box then enter the required text.
DesigningReports
Blank button
Adds a blank column to the bottom of the selected data fields.
Deselect the data fields (columns) by double-clicking the item or by highlighting the item then clicking the
Left Arrow button.
NOTE: It is possible to report on data fields outside of the report focus, e.g. in this example you could include Contacts or Exclusions. These are known as subreports ( ).
Clear button
Removes all previous selections, enabling you to choose a new set of data fields.
Up and Down arrows enable you to change the
order in which the columns appear in your
report.
Select the required data fields (columns) from the left-hand panel by double-clicking the item or by highlighting the
item and clicking the Right Arrow button.
Clicking the Load from an existing report hyperlink enables you to load data fields (columns) from an
existing report.
Report Summary
The Report Summary is updated each time you make a data selection and enables you to revisit any area of the report design by clicking the relevant
hyperlink.
Your chosen focus (Data Area) for the report design is shown here. It is not possible to change the focus for the current report design once it has been selected.
Report Designer panel
Use the Next and Back buttons to display the various options of the report designer, i.e. Select Data Area, Refine
Data Area, Select Data Fields, Apply Filter, Define
Sort Order, Specify effective date and Define presentations.
Applying Filter ConditionsApplying Filter Conditions
Caption field
Displays the highlighted data field (column), enabling you to edit the column title, if required. The new column title is then shown in square brackets adjacent to the data field name.
Additional Filter Conditions
For example, double-clicking Student Conduct Information [Count] within the selected fields area displays the filter
option Related Student conduct Information (located at the bottom of the panel). This can be used to split a Conduct
report into Behaviour and Achievement types.
Quick Reference Sheet
This guide is based on the version of the software (7.136) in use at the time of publication.
© Capita Business Services Ltd 2010. All rights reserved.
No part of this publication may be reproduced, photocopied, stored on a retrieval system, translated or transmitted without the express written consent of the publisher.
Capita Children’s Services, Franklin Court,
Priory Business Park, Stannard Way, Bedford, MK44 3JZ
Tel: 01234 838080 http://www.sims.co.uk
Reporting in SIMS
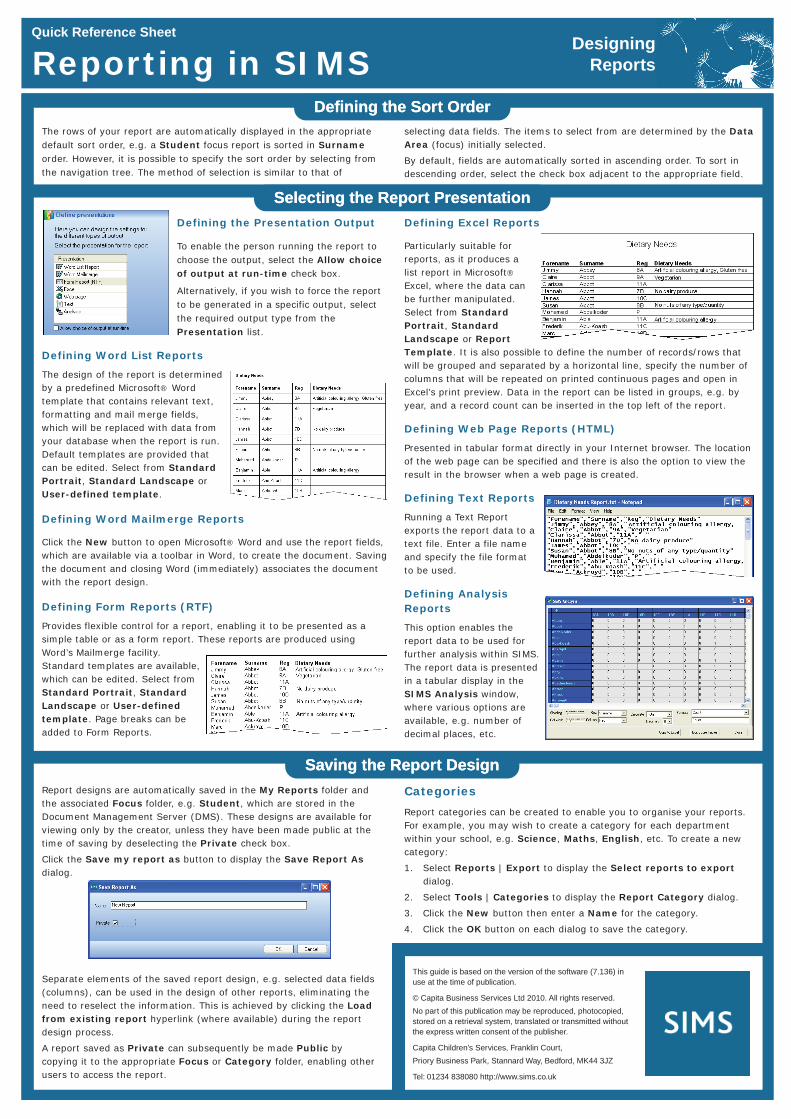
Defining the Sort OrderDefining the Sort OrderThe rows of your report are automatically displayed in the appropriate default sort order, e.g. a Student focus report is sorted in Surname order. However, it is possible to specify the sort order by selecting from the navigation tree. The method of selection is similar to that of
Report designs are automatically saved in the My Reports folder and the associated Focus folder, e.g. Student, which are stored in the Document Management Server (DMS). These designs are available for viewing only by the creator, unless they have been made public at the time of saving by deselecting the Private check box.
Click the Save my report as button to display the Save Report As dialog.
Separate elements of the saved report design, e.g. selected data fields (columns), can be used in the design of other reports, eliminating the need to reselect the information. This is achieved by clicking the Load from existing report hyperlink (where available) during the report design process.
A report saved as Private can subsequently be made Public by copying it to the appropriate Focus or Category folder, enabling other users to access the report.
Selecting the Report PresentationSelecting the Report Presentation
Defining the Presentation Output
To enable the person running the report to choose the output, select the Allow choice of output at run-time check box.
Alternatively, if you wish to force the report to be generated in a specific output, select the required output type from the Presentation list.
Defining Word List Reports
The design of the report is determined by a predefined Microsoft® Word template that contains relevant text, formatting and mail merge fields, which will be replaced with data from your database when the report is run. Default templates are provided that can be edited. Select from Standard Portrait, Standard Landscape or User-defined template.
Defining Word Mailmerge Reports
Click the New button to open Microsoft® Word and use the report fields, which are available via a toolbar in Word, to create the document. Saving the document and closing Word (immediately) associates the document with the report design.
Defining Form Reports (RTF)
Provides flexible control for a report, enabling it to be presented as a simple table or as a form report. These reports are produced using Word’s Mailmerge facility. Standard templates are available, which can be edited. Select from Standard Portrait, Standard Landscape or User-defined template. Page breaks can be added to Form Reports.
selecting data fields. The items to select from are determined by the Data Area (focus) initially selected.
By default, fields are automatically sorted in ascending order. To sort in descending order, select the check box adjacent to the appropriate field.
Categories
Report categories can be created to enable you to organise your reports. For example, you may wish to create a category for each department within your school, e.g. Science, Maths, English, etc. To create a new category:
1. Select Reports | Export to display the Select reports to export dialog.
2. Select Tools | Categories to display the Report Category dialog.
3. Click the New button then enter a Name for the category.
4. Click the OK button on each dialog to save the category.
DesigningReports
Defining Excel Reports
Particularly suitable for reports, as it produces a list report in Microsoft® Excel, where the data can be further manipulated. Select from Standard Portrait, Standard Landscape or Report Template. It is also possible to define the number of records/rows that will be grouped and separated by a horizontal line, specify the number of columns that will be repeated on printed continuous pages and open in Excel’s print preview. Data in the report can be listed in groups, e.g. by year, and a record count can be inserted in the top left of the report.
Defining Web Page Reports (HTML)
Presented in tabular format directly in your Internet browser. The location of the web page can be specified and there is also the option to view the result in the browser when a web page is created.
Defining Text Reports
Running a Text Report exports the report data to a text file. Enter a file name and specify the file format to be used.
Defining Analysis Reports
This option enables the report data to be used for further analysis within SIMS. The report data is presented in a tabular display in the SIMS Analysis window, where various options are available, e.g. number of decimal places, etc.
Saving the Report DesignSaving the Report Design