Embed Size (px)
Citation preview
5/13/2018 Renoise Tutorial - slidepdf.com
http://slidepdf.com/reader/full/renoise-tutorial 1/6
kemusic now Trackers
On the beaten track
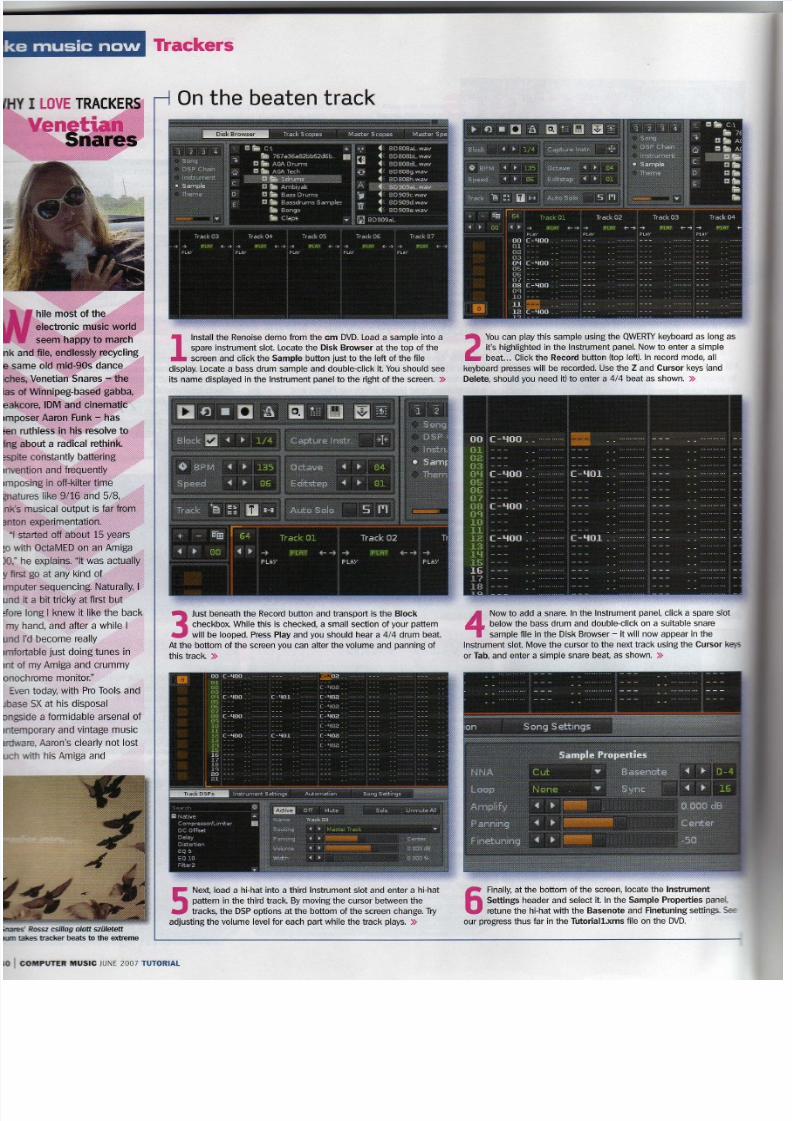
1nstal l the Renoise demo from the em DVD. Load a sample into a
spare instrument slot. Locate the Disk Browser at the top of the
screen and click the Sample button just to the left of the file
disp lay. Locate a bass drum sample and double-cl ick i t. Youshould see
i ts name disp layed in the Instrument panel to the r ight of the screen. »
2You can play this sample using the QWERlY keyboard as long
i t' s h ighl ighted in the Instrument panel . Now to enter a simple
beat. . . Click the Record button ( top lef t) . In record mode, a ll
keyboard presses wil l be recorded. Use the Z and Cursor keys (and
Delete, should you need it ) to enter a 4/4 beat as shown. »
3Just beneath the Record button and transport is the Block
checkbox. Whi le this is checked, a small section of your pattern
will be looped. Press Play and you should hear a 41 4 drum beat.
At the bottom of the screen you can alter the volume and panning of
this track. »
5Next, load a hi-hat in to a thi rd Instrument s lot and enter a h i-hat
pat tern in the thi rd track. By moving the cursor between the
tracks, the DSP opt ions at the bottom of the screen change. Try
adjusting the volume leve l for each part whi le the track p lays. »
4Now to add a snare. In the Inst rument panel, click a spare slo
be low the bass drum and double-c lick on a suitab le snare
sample f ile in the Disk Browser - it will now appear in the
Inst rument slot. Move the cursor to the next track using the Cursor k
or Tab, and enter a simple snare beat, as shown. »
6Final ly , a t the bottom of the screen, locate the Instrument
Sett ings header and select i t. In the Sample Propert ies panel ,
retune the h i-hat with the Basenote and Finetuning settings. S
our progress thus far in the Tutoriall.xms f ile on the DVD.
0' COMPUTER MUSIC JUNE 2007 TUTORIAL
5/13/2018 Renoise Tutorial - slidepdf.com
http://slidepdf.com/reader/full/renoise-tutorial 2/6
Bass at your fingertips
Trackers make musi
p() t~:MED roots, sti li choos
rot~'€l.'QUlk of his writing
engineeri'ng in modern ~c
so~re, his pE:lrsonaltoo
choiceb,eing B!9pgi~e,
b'Arou~'{
Am~forma
and started running the W~rslon.of oct~!?iP~Sol
that f6h~, while ,and th
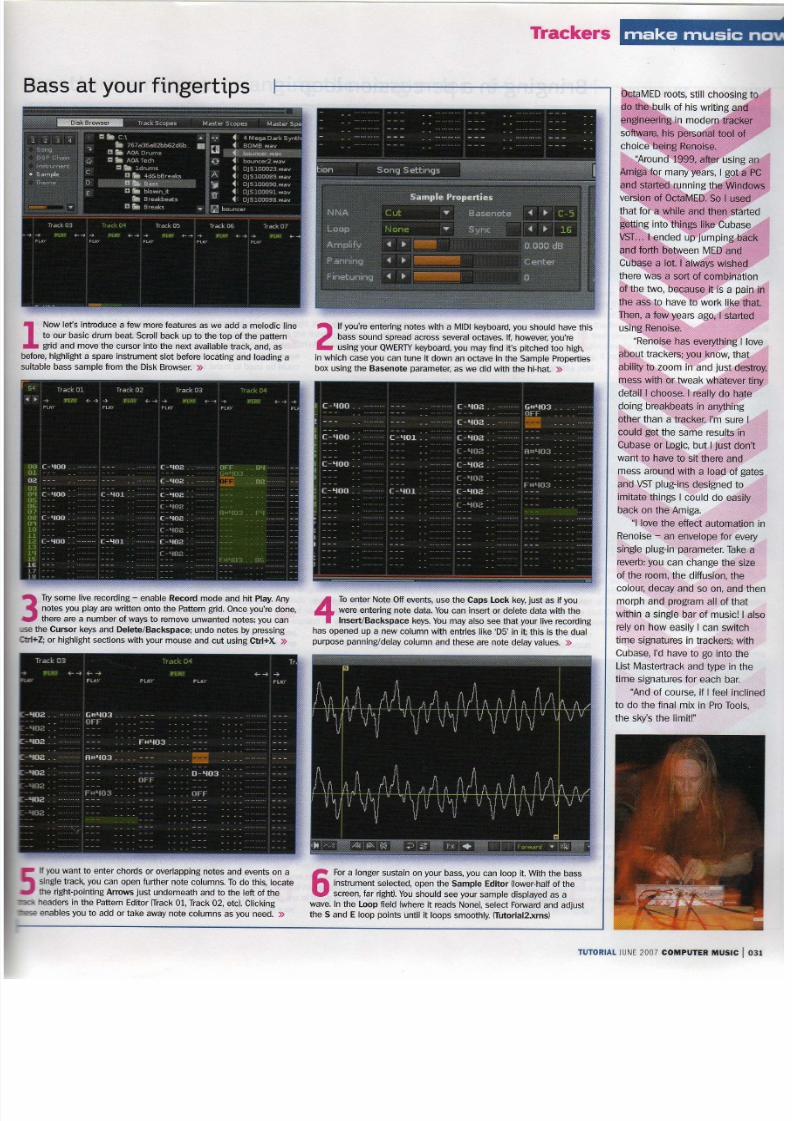
1ow let 's int roduce a few more features as we add a melodic line
to our basic drum beat . Scroll back up to the top of the pattern
gr id and move the cursor into the next avai lab le track, and, as
before, highl ight a spare instrument s lo t before locat ing and loading a
suitable bass sample from the Disk Browser. »
3Trysome l ive recording - enable Record mode and hi t Play. Any
notes you play are wri tten onto the Pattern grid . Once you 're done,
there are a number of ways to remove unwanted notes: you can
zse the Cursor keys and Dele te /Backspace; undo notes by pressing
Cb1+Z; or highl ight sections with your mouse and cut using Ctr l+X »
n you want to enter chords or overlapping notes and events on a
single track, you can open further note columns. Todo this, locate
the right-point ing Arrows just underneath and to the lef t o f the
headers in the Pattern Editor (Track 01, Track 02, etc). Clicking
:lESe enables you to add or take away note columns as you need. »
2I fyou 're enter ing notes with a MIDI keyboard, you should have this
bass sound spread across several octaves. If, however, you're
using your QWERTYkeyboard, you may find it's pitched too high,
in which case you can tune it down an octave in the Sample Properties
box using the Basenote parameter , as we did with the hi -hat. »
4To enter Note Of fevents, use the Caps Lock key, j ust as if you
were enter ing note data. You can inser t or delete data with the
Insert/Backspace keys. You may also see that your l ive recording
has opened up a new column with entries like '05' in it; this is the dual
purpose panning/delay column and these are note delay values. »
wahtto have
mess-~round with a load
ancl¥Sf plug-ins designed
imitate things I cOUld do .
back on th~'A~iga; . '
"Idove the effect autom
Renoise - an envelope fo
Singl7,~IUg-ih Pe[?rneter.
reverb: you can'ch~nge thof the room, the dif fusion,
colour, decay and so on,
morph and program ali of
wi thin a single bar.of mus
rely on how easily I can s
time signatures in trackers
Cubase, I 'd have to go int
List Mastertrack and type
t ime signatures for each b
"And of course, if I fee
to do the final mix in ProT
the sky's the limit!"
6For a longer sustain on your bass, you can loop it. With the bass
instrument selected, open the Sample Editor !lower-half of the
screen, far rlght l, You should see your sample disp layed as a
wave. In the Loop f ield (where i t reads None), select Forward and adjust
the Sand E loop points until i t loops smoothly. (TutoriaI2.xrns)
TUTORIAL JUNE 2007 COMPUTER MUS
5/13/2018 Renoise Tutorial - slidepdf.com
http://slidepdf.com/reader/full/renoise-tutorial 3/6
music now
exporting them as
arrange and mix dowpin.
Eventually he ·moved to,Tracker, which he
this day. "It 's just fun ...
to get a vibe going. Plus, I
look on people's faces
down to make a tune
up a screen full of
numbers ... i t always
trackers are a good
into music production,
back in the day when
USIC J UNE 200 7 T UT ORIAL
Trackers
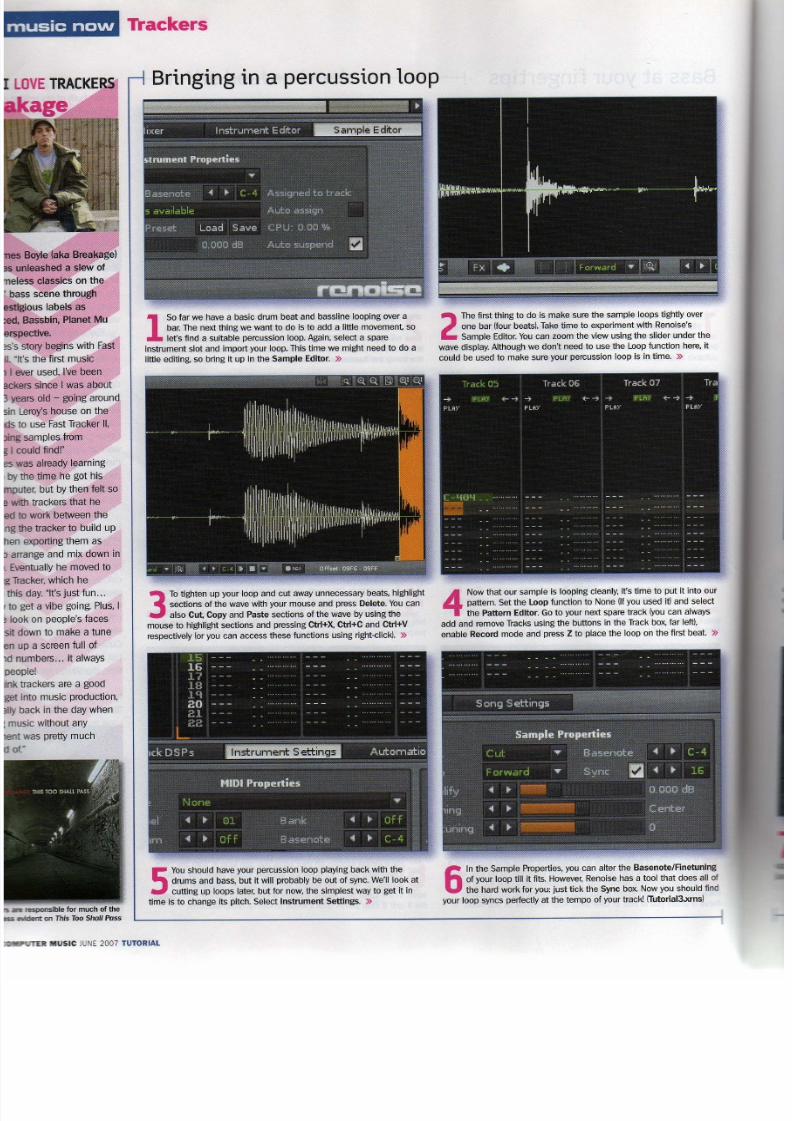
Bringing in a percussion loop
Io far we have a basic drum beat and bass line looping over a
bar. The next thing we want to do is to add a litt le movement, so
let's find a suitable percussion loop. Again, select a spare
instrument slot and import your loop. This time we might need to do a
l it tle edi ting, so bring i t up in the Sample Edi tor. »
2The f irst thing to do is make sure the sample loops tightly over
one bar Ifour beatsJ. Take time to experiment with Renoise's
Sample Edi tor. Youcan zoom the view using the slider under the
wave display. Al though we don 't need to use the Loop function here, i t
could be used to make sure your percussion loop is in time. »
3Tot ighten up your loop and cut away unnecessary beats, highl ight
sections of the wave with your mouse and press Delete. You can
also Cut, Copy and Paste sec tions of the wave by using the
mouse to highl ight sections and pressing Ctr l+)(, Ctr l+C and Ctr l+V
respectively lor you can access these functions using right-click). »
4Now that our sample is looping clean.Iy, i t 's t ime to put i t into our
pattern . Set the Loop function to None l if you used it )and select
the Pattern Editor . Go to your next spare track Iyou can always
add and remove Tracks using the buttons in the Track box, far lef t) ,
enable Record mode and press Z to place the loop on the first beat »
5You should have your percussion loop playing back with the
drums and bass, but it will probably be out of sync. We'll look at
cutt ing up loops later, but for now, the simplest way to get it in
t ime is to change i ts pi tch. Se lect Instrument Sett ings. »6
In the Sample Properties, you can alter the Basenote/Finetuning
of your loop till it f its. However, Renoise has a tool that does all of
the hard work for you: just tick the Sync box. Now you should f ind
your loop syncs perfectly at the tempo of your track! lTutoriaI3.xrns)
5/13/2018 Renoise Tutorial - slidepdf.com
http://slidepdf.com/reader/full/renoise-tutorial 4/6
t:
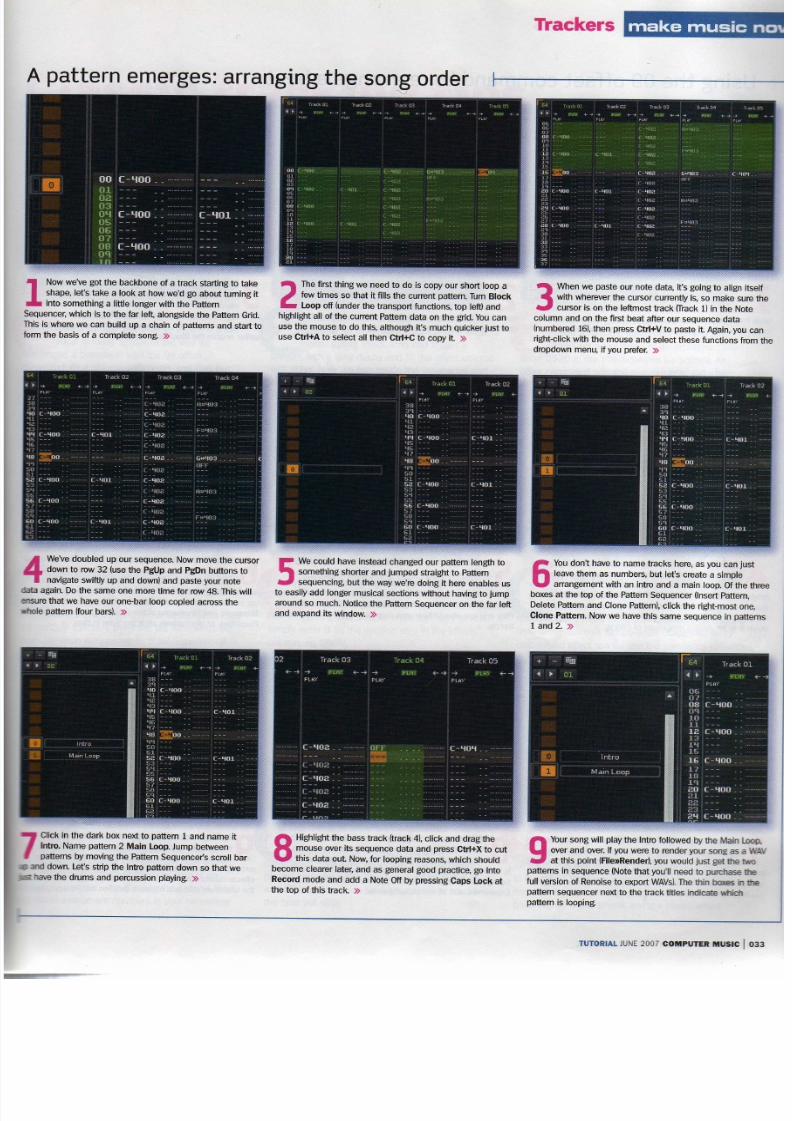
A pattern emerges: arranging the song order'-J
1ow we've got the backbone of a t rack start ing to take
shape, let 's take a look at how we'd go about tuming it
into something a l it tle longer with the Pattern
Sequencer , which is to the far lef t, alongside the Pattern Gr id.
This is where we can build up a chain of pattems and start to
form the basis of a complete song. )}
Trackers make musi
2The first thing we need to do is copy our short loop a
few t imes so that i t f ill s the cur rent pattern . Turn Block
Loop off (under the transport functions, top lef t) and
h ighl ight a ll o f the cur rent Pattern data on the grid. You can
use the mouse to do this, although it 's much quicker just to
use Ctrt+A to select all then Ctrt+C to copy it. »
4We've doubled .up our sequence. Now move the cursordown to row 32 (use the PgUp and PgDn buttons to
navigate swif tly up and down) and paste your note
data again. Do the same one more time for row 48. This will
3 IlSure that we have our one-bar loop copied across the
.mole pattern (four bars). »
Click in the dark box next to pattern 1 and name it
ln tro, Name pattern 2 Main loop. Jump between
pattems by moving the Pattern Sequencer's scrol l bar
aJd down. Let's strip the Intro pattern down so that we
- have the drums and percussion playing. »
5We could have instead changed our pattern length tosomething shorter and jumped straight to Pattern
sequencing, but the way we' re doing i t here enables us
to easily add longer musical sections without having to jump
around so much. Not ice the Pattern Sequencer on the far lef t
and expand its window. »
8H_ighlightthe bass track (track 4), click and drag the
mouse over its sequence data and press Ctrl+X to cut
this data out. Now, for looping reasons, which should
become clearer later, and as general good practice, go into
Record mode and add a Note -Off by pressing Caps lock at
the top of this t rack. »
3When we paste our note data, i t' s going to al
with wherever the cursor current ly is ,so make
cursor is on the le ftmost t rack (Track 1) in the
column and on the first beat after our sequence da
(numbered 16) , then press Ctr t+V to paste i t. Aga in,
right-c lick with the mouse and select these function
dropdown menu, i f you prefer. »
6You don't have to name tracks here, as you cleave them as numbers, but le t' s create a sim
arrangement wi th an in tro and a main loop. O
boxes at the top of the Pattern Sequencer Unsert P
Delete Pattern and Clone Pattern), click the right-mo
Clone Pattern. Now we have this same sequence i
1 and 2. »
9Your song wil l p lay the Intro followed by the M
over and over. I f you were to render your song
at this point (Filel lRender), you would just get
patterns in sequence (Note that you'l l need to purch
ful l version of Renoise to export WAVs).The thin box
pattern sequencer next to the track tit les indicate w
pattern is looping.
TUTORIAL JUNE 2007 COMPUTER MUS
5/13/2018 Renoise Tutorial - slidepdf.com
http://slidepdf.com/reader/full/renoise-tutorial 5/6
ke music no"" Trackers
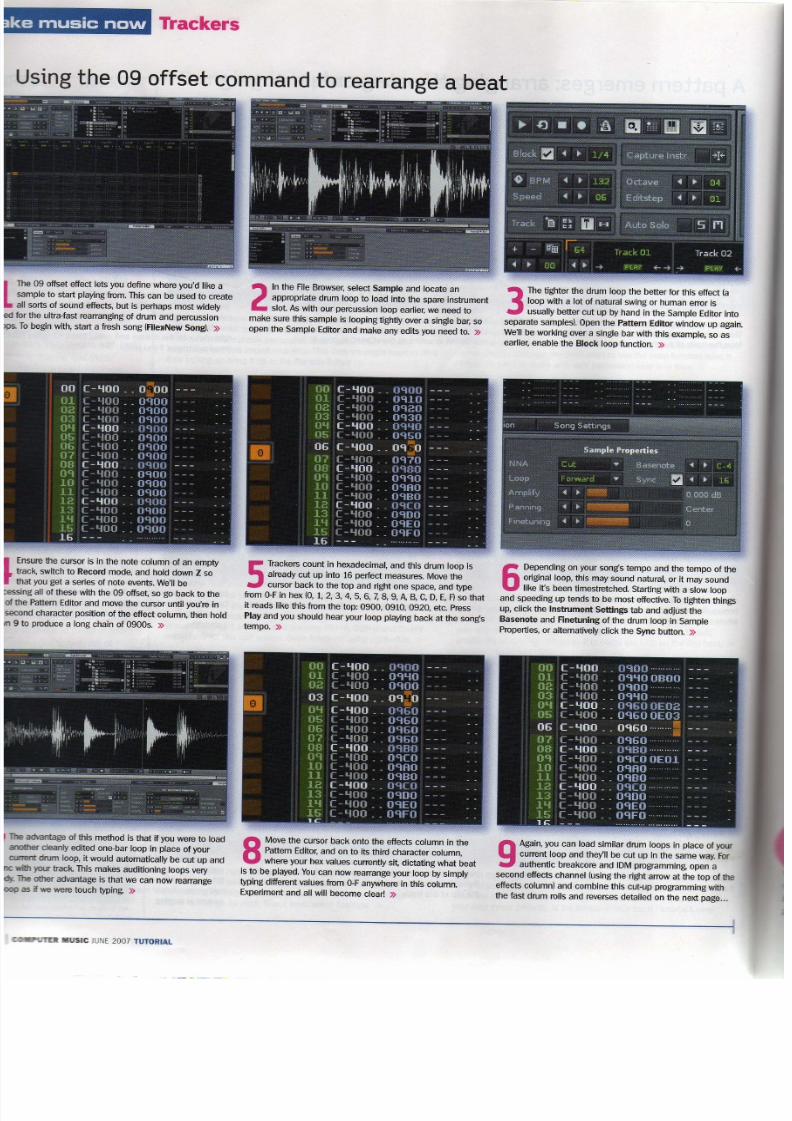
Using the 09 offset command to rearrange a beat
The 09 offset ef fect le ts you def ine where you'd like a
sample to start play ing from. This can be used to create
all sor ts o f sound effects, but is perhaps most widely
for the ultra-fast rearranging of drum and percussion
. To begin with, start a fresh song (Fi lellNew Song). »
TIle advantage of this method is that if you were to load
anoIber cleanly edi ted one-bar loop in place of your
curerrt drum loop, i t wou ld automat ical ly be cut up and
with your track. This makes auditioning loops very
The other advantage is that we can now rearrange
as i fwe were touch typing. »
2In the File Browser, select Sample and locate an
appropriate drum loop to load into the spare instrument
slot. As wi th our percussion loop ear lier , we need to
make sure this sample is loop ing t ightly over a sing le bar , so
open the Sample Edi tor and make any edi ts you need to. »
5Trackers count in hexadecimal , and this drum loop isal ready cut up into 16 perfect measures. Move the
cursor back to the top and right one space, and type
from O-Fin hex (0 , 1, 2, 3, 4, 5, 6, 7 , 8, 9, A, B, C, 0, E, F ) so that
i t reads like this from the top: 0900, 0910, 0920, e tc. Press
Play and you should hear your loop playing back at the song's
tempo. »
8Move the cursor back onto the effects column in the
Pattern Editor, and on to its third character column,
where your hex values currently sit, dictating what beat
is to be p layed. You can now rearrange your loop by simply
typing different values from O-Fanywhere in this column.
Experiment and all wil l become clear! »
3The tighter the drum loop the better for this effect (a
loop with a lot of natural swing or human error is
usual ly better cut up by hand in the Sample Edi tor in to
separate samples). Open the Pattern Editor window up aga
We'l l be working over a single bar wi th this example , so as
earlier, enable the Block loop function. .»
6Depending on your song 's tempo and the tempo of thor iginal loop, this may sound natura l, or it may sound
l ike it's been timestretched. Starting with a slow loop
and speeding up tends to be most ef fective . Tot ighten thing
up, c lick the Instrument Settings tab and adjust the
Basenote and Finetuning of the drum loop in Sample
Properties, or alternatively click the Sync button. »
9Again, you can load simi lar drum loops in p lace of you
current loop and they'll be cut up in the same way. Fo
authentic breakcore and 10M programming, open a
second effects channel (using the r ight arrow at the top of t
effects column) and combine this cut-up programming with
the fast drum rol ls and reverses detailed on the next page..
USIC JUNE 2007 TUTORIAL
5/13/2018 Renoise Tutorial - slidepdf.com
http://slidepdf.com/reader/full/renoise-tutorial 6/6
Trackers make music
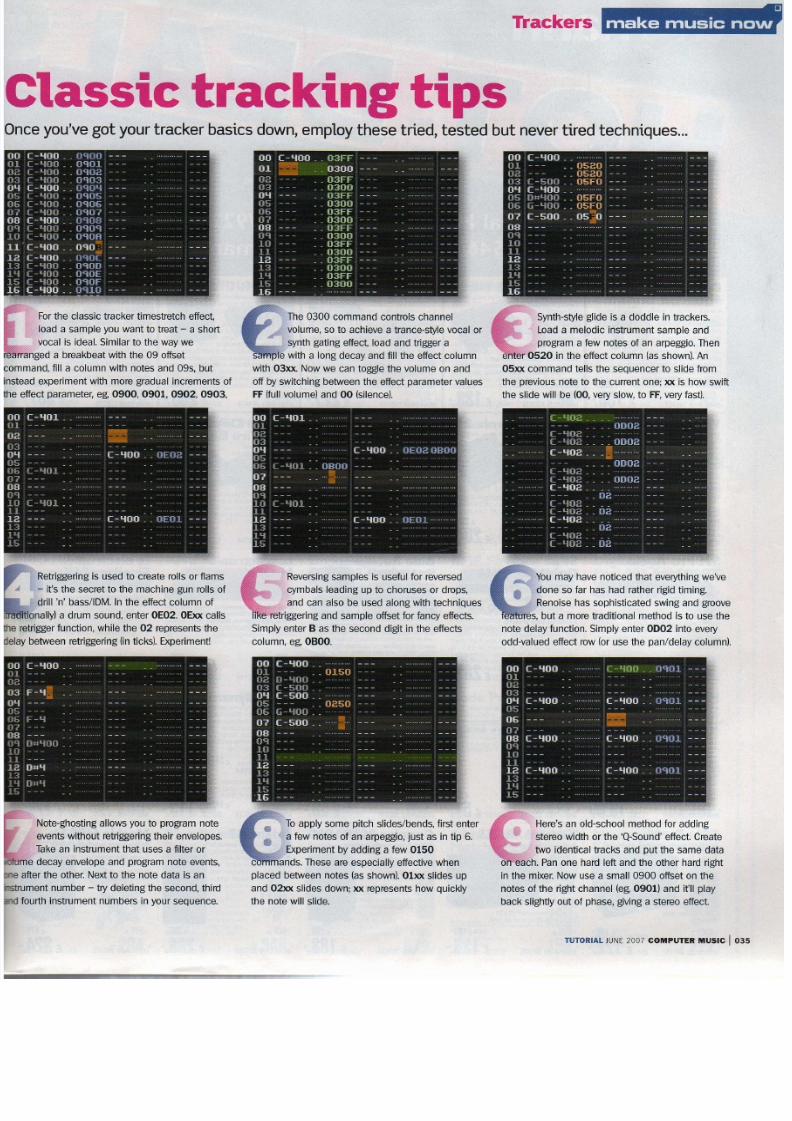
Classic tracking tipsO nce yo u've g ot yo ur trac ker ba sics do wn, em ploy the se trie d, te sted b ut n ev er ti.red te ch ni.qu es ...
For the classic tracker t imestretch effect,
load a sample you want to treat - a short
vocal is ideal. Similar to the way we
rA~fmlm'f~rla breakbeat with the 09 offset
experiment with more gradual increments of
effect parameter, eg, 0900, 0901, 0902, 0903,
Retriggering is used to create rolls or f lams
- it's the secret to the machine gun rolls of
dril l 'n' bass/IDM. In the effect column of
nally! a drum sound, enter O E02. O Exx calls
function, while the 02 represents the
between retriggering (in tlcksl Experiment!
Note-ghosting allows you to program note
events without retriggering their envelopes.
Take an instrument that uses a filter or
decay envelope and program note events,
after the other. Next to the note data is an
number - t ry deleting the second, thi rd
volume, so to achieve a trance-style vocal or
synth gat ing effect , load and trigger a
with a long decay and fill the ef fect column
with 03xx. Now we can toggle the volume on and
off by switching between the effect parameter values
FF(full volume! and 00 (silencel
Reversing samples is useful for reversed
cymbals leading up to choruses or drops,
and can also be used along with techniques
l tke-retrtggertng and sample offset for fancy effects.
Simply enter B as the second digit in the effects
column, eg, O B O O .
Toapply some pitch slides/bends, f irst enter
a few notes of an arpeggio, just as in tip 6.
Experiment by adding a few 0150
r'hrnni,,,nI1<: These are especially effective when
placed between notes (as shownl 01xx slides up
and 02xx slides down; xx represents how quickly
the note wil l s lide.
Load a melodic instrument sample and
program a few notes of an arpeggio. Then
Al1tp.r-()s:;m in the effect column (as shownl An
05xx command tells the sequencer to slide from
the previous note to the current one; xx is how swif
the sl ide wil l be (00, very slow, to FF,very fast! .
You may have noticed that everything we've
done so far has had rather rigid t iming.
Renoise has sophisticated swing and groov
res, but a more traditional method is to use the
note delay function. Simply enter 0002 into every
odd-valued effect row (or use the pan/delay columnl
Here's an old-school method for adding
stereo width or the 'Q-Sound' effect. Create
two ident ical tracks and put the same data
Pan one hard lef t and the other hard r ight
in the mixer. Now use a small 0900 offset on the
notes of the right channel (eg, 0901! and it 'll p lay
back slightly out of phase, giving a stereo ef fect .
TUTORIAL JUNE 2007 COMPUTER MUSIC