Embed Size (px)
Citation preview

Removing Pops, Click and Hiss from Analog Recordings Sometimes when you convert analog recordings to digital, the music includes pops and clicks, or tape player hiss. Roxio LP and Tape Assistant makes it easy to remove these noises to make your recordings much more enjoyable.
Getting Started:
1. Start in Creator, and then click “Music/Audio” in the Project Pane. The Music-Audio task list opens. Select “Digitize LPs and Tapes” on the left.
2. Connect your equipment. Roxio’s LP and Tape Assistant opens, displaying this Recording Setup How-To Guide, which details how to connect your equipment, choose your recording channel and adjust recording levels. Click the "Don't show me again" checkbox if you don't want to see the Guide again, and click "Close" to close the Guide.

3. Select Advanced Options. Click "Advanced Options" to view those controls.
4. Select your General options. In the “General” tab, select among these options. • If desired, click the “Limit recording to:” checkbox and choose the desired
duration. This is useful if you plan to start recording and then walk away and continue unattended.
• If desired, click the “Mute system sounds while recording” checkbox to disable system sounds on your computer like incoming mail beeps or other alarms. Otherwise, these will be included in the recorded audio.
• If desired, click the “Enable Preroll of” checkbox and choose a duration. When enabled, this option continually captures the audio for the configured duration, or ten seconds in the screen below. In this configuration, if you started your tape player and clicked the Record button within ten seconds, Roxio LP and Tape Assistant would capture the start of the first song.
• If desired, click the “Enable auto pause” checkbox, set the duration and enable or disable the “Silence may contain noise checkbox.” This is useful when you’ll be recording from multiple sources like different tapes or LPs and want Roxio LP and Tape Assistant to automatically stop recording while you’re switching sources.
• If desired, change the location of the Temporary files and file name prefix.
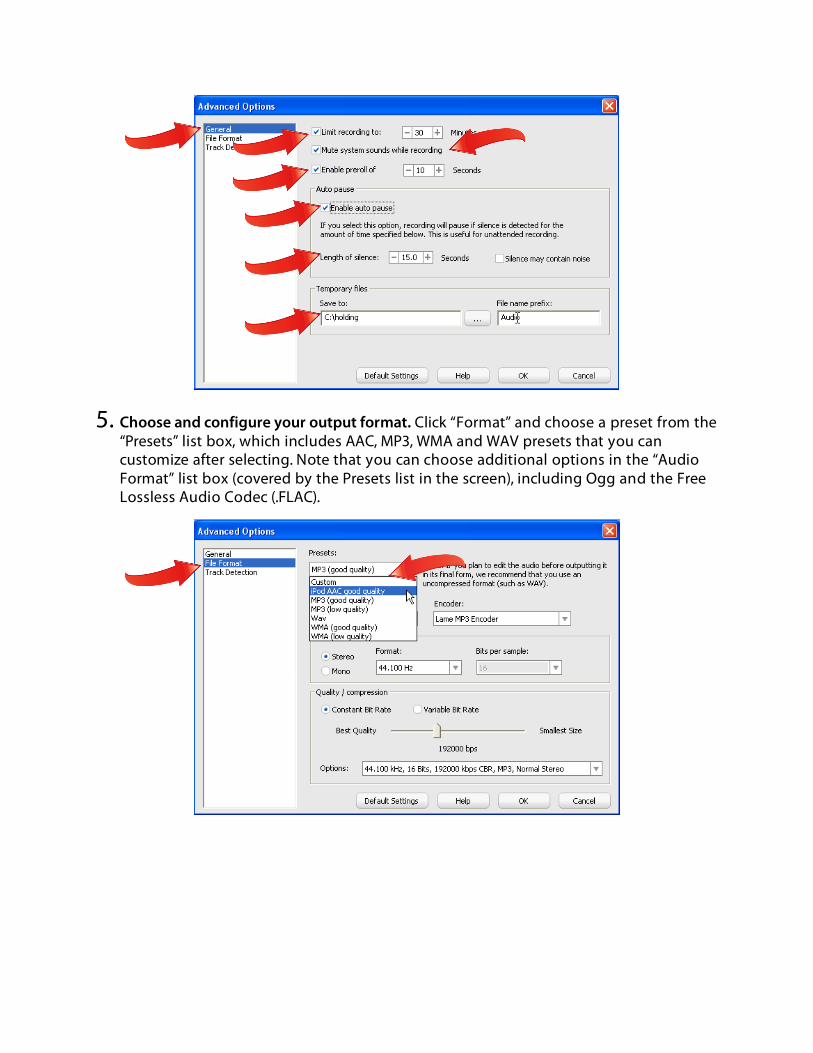
5. Choose and configure your output format. Click “Format” and choose a preset from the “Presets” list box, which includes AAC, MP3, WMA and WAV presets that you can customize after selecting. Note that you can choose additional options in the “Audio Format” list box (covered by the Presets list in the screen), including Ogg and the Free Lossless Audio Codec (.FLAC).

6. Choose your track insertion and detection options. Click “Track Detection” to view those options, which separate longer recordings into individual songs.
• If desired, click the “Automatically add a track separator on each pause” checkbox to add a track each time you pause recording.
• If desired, click the “Add Track Every” checkbox and customize the duration to add a track at regular intervals in the recording.
• If desired, click the “Enable track detection” checkbox and choose the desired options. This is useful when you’re recording multiple songs from a tape or LP in a single, long recording, since Roxio LP and Tape Assistant will separate the long recording into individual tracks.
• Once you’ve configured all options, click "OK" to close this dialog.
7. Choose your capture device and input. Choose the appropriate source from the “Capture From:” list box, and then the “Input” that matches where you connected the cable from your analog device, which typically is either the microphone or line input.

8. Set the recording level. Setting the optimum recording level is critical to recorded quality. If too low, the recorded audio may be difficult to hear, if too high, it may be distorted. You can set the recording volume level manually with the vertical slider shown below, but in most instances, you should let the software automatically set levels. To do so, play a louder song in your collection, and then click “Auto.” Roxio LP and Tape Assistant analyzes the incoming audio and sets the optimal level.
9. Start recording. To record, click the “Record” button and then start your turntable or tape player. The Record button toggles into the “Pause” button, which you can use to pause the recording. Once the song, album or tape is finished, click the “Stop” button to stop recording. Once you stop recording, click “Next” on the lower right hand corner of the screen (not shown in the figure below) to continue to the next step.
10. Diagnose any problems. Analyze the audio waveform, which is a valuable diagnostic tool. In the screen below, the waveform has good levels, meaning that the loudest regions in the audio approach the top and bottom in the left and right tracks.
• If most of the audio is crowded near the top and there are large flat regions
pressed against the maximum volume levels, you recorded at too loud a volume setting and your file is clipping. Re-record at a lower volume.
• If most of your audio is clustered around the centerline, with no peaks approaching the maximum levels, your volume was too low. Go back and record again, boosting volume in your player or in the software controls.
• If only one track has audio, either your setup is faulty or you’re recording from a mono source. If the latter, click the Mono radio button referred to in Step 5 and re-record.
• If the waveform has periodic, very short sharp peaks, like those below, they are usually cracks and pops, especially when recording from vinyl. I’ll clean those in the next step.

11. Clean the audio. Click “Clean” (see screen above) to open the Clean dialog. In the Clean dialog, you’ll see four controls.
These are their functions:
• Declicker – targets clicks like vinyl scratches. • Decrackler – targets crackling sound like old vinyl. • Denoiser – targets hiss and rumble, most commonly found on cassettes and other
tapes. • Noise – adjusts the intensity of the Denoiser.
Drag these controls up and down to adjust the settings, and then test the adjustments by clicking the “Play/Stop” button until you achieve the desired reduction in noise without distorting the underlying music or speech content.
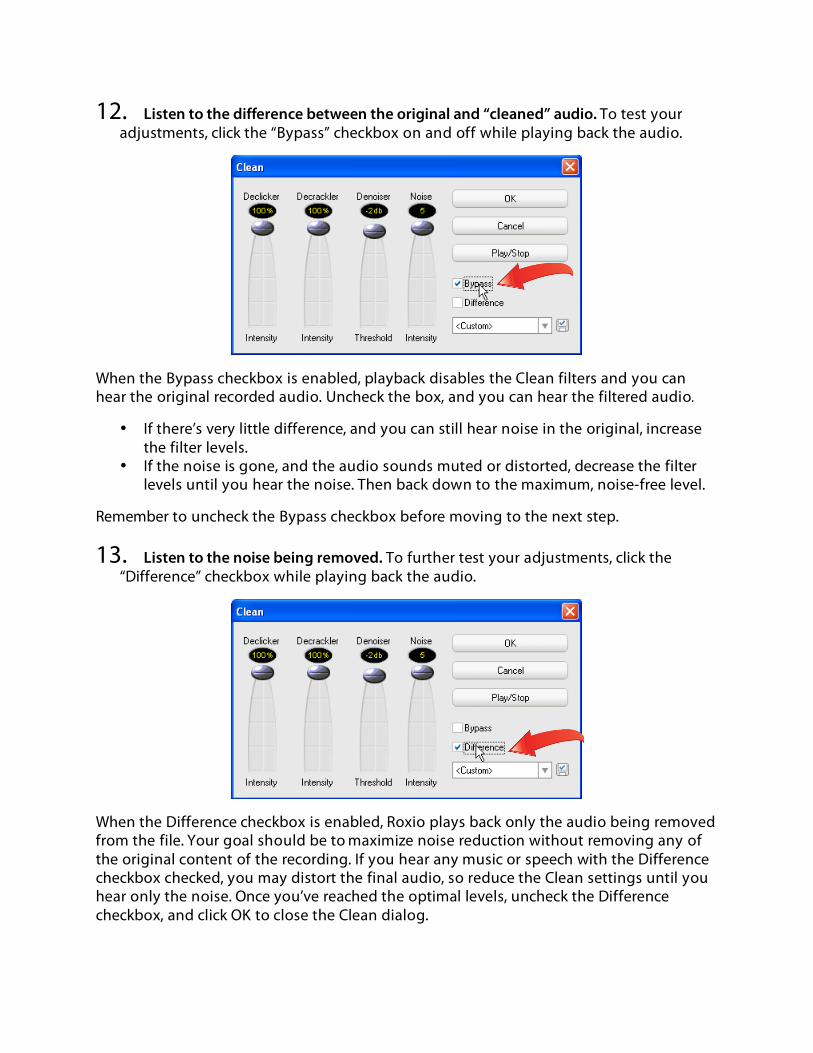
12. Listen to the difference between the original and “cleaned” audio. To test your adjustments, click the “Bypass” checkbox on and off while playing back the audio.
When the Bypass checkbox is enabled, playback disables the Clean filters and you can hear the original recorded audio. Uncheck the box, and you can hear the filtered audio.
• If there’s very little difference, and you can still hear noise in the original, increase the filter levels.
• If the noise is gone, and the audio sounds muted or distorted, decrease the filter levels until you hear the noise. Then back down to the maximum, noise-free level.
Remember to uncheck the Bypass checkbox before moving to the next step.
13. Listen to the noise being removed. To further test your adjustments, click the “Difference” checkbox while playing back the audio.
When the Difference checkbox is enabled, Roxio plays back only the audio being removed from the file. Your goal should be to maximize noise reduction without removing any of the original content of the recording. If you hear any music or speech with the Difference checkbox checked, you may distort the final audio, so reduce the Clean settings until you hear only the noise. Once you’ve reached the optimal levels, uncheck the Difference checkbox, and click OK to close the Clean dialog.

14. Add, delete or adjust track separations. To add a track, click the waveform at the desired location (the grey time indicator will move there) and then click the Add Track Separator icon. To delete a track separator, chose the track and click the Delete Track Separator icon. To delete a track, click the track and then the Delete icon.
15. Add tags to your songs. Click “Tags” to open the Roxio Edit Audio Tags window.
16. Add tags automatically with Music ID. You can enter title, artist and other information manually, or click ”Music ID” to search an online music database for these tags. Click Done to close the Edit Audio Tags window.

17. Optimize your audio. Note these other options, which open tools that let you “Enhance” sounds by adjusting bass and excite values and use the “Equalizer” to customize the sound to your liking. If desired, click the “Fade each track in & out” checkbox and set a duration. When you’re finished with these adjustments, click “Next” to save the captured tracks.
18. Output your audio. In the Output Tracks window, click “Burn Audio CD” to burn an Audio CD. If desired, check the “Add CD-Text to Audio CD” checkbox to add CD-Text to the CD. Click “Export Tracks” to export the tracks in AAC, MP3, Windows Media Audio and other formats. With both options, you can click the “Maximize Track Volumes” checkbox to make the maximum volume of all tracks uniform. To edit a track further in Roxio Sound Editor, click the track to select it, and then click “Sound Editor.”