Embed Size (px)
Citation preview

RemoteControl II
v3.00
User Manual
February 2010
Rem
oR
emo t
eteC
ontr
ol I
IC
ontr
ol I
I

RemoteControl II User Manual
© 2010 WinCESoft
All rights reserved. No parts of this work may be reproduced in any form or by any means - graphic, electronic, or mechanical, including photocopying, recording, taping, or information storage and retrieval systems - without the written permission of the publisher.Products that are referred to in this document may be either trademarks and/or registered trademarks of the respective owners. The publisher and the author make no claim to these trademarks.While every precaution has been taken in the preparation of this document, the publisher and the author assume no responsibility for errors or omissions, or for damages resulting from the use of information contained in this document or from the use of programs and source code that may accompany it. In no event shall the publisher and the author be liable for any loss of profit or any other commercial damage caused or alleged to have been caused directly or indirectly by this document.

Table of Contents1 Introduction.......................................................................................................................................62 System Requirements........................................................................................................................7
2.1 Supported Device Classes..........................................................................................................72.2 Supported Operating Systems....................................................................................................82.3 Required Memory......................................................................................................................82.4 Touch Display and hardware buttons.........................................................................................82.5 Supported Display Sizes............................................................................................................82.6 Supported Processors.................................................................................................................92.7 Infrared / IrDA Port (optional)...................................................................................................92.8 CF IR Extender Cards (optional).............................................................................................102.9 External IR Transmitters (optional).........................................................................................112.10 WLAN Module (optional).....................................................................................................112.11 Bluetooth Module (optional)..................................................................................................112.12 Desktop Computer with Windows, Linux or MAC- OS (optional).......................................11
3 Program Features.............................................................................................................................124 Program Installation........................................................................................................................13
4.1 Installation via ActiveSync......................................................................................................134.2 Manual installation by a CAB- file..........................................................................................144.3 First Launch of RemoteControl II...........................................................................................154.4 Activation of the full version...................................................................................................19
4.4.1 Creation of the Key Request File “RegInfo.txt”..............................................................195 Program De Installation...................................................................................................................226 Program Menus...............................................................................................................................23
6.1 File Menu.................................................................................................................................236.2 Edit Menu................................................................................................................................246.3 Help Menu...............................................................................................................................256.4 Panel Selection Menu..............................................................................................................25
7 Program Settings.............................................................................................................................267.1 Infrared / IrDA- Port Settings..................................................................................................26
7.1.1 Setting the Infrared / IrDA port........................................................................................267.1.2 Setting the IR Extender....................................................................................................277.1.3 Infrared Signal Transmit Priority.....................................................................................27
7.2 Network Settings......................................................................................................................287.2.1 The network connections.................................................................................................287.2.2 Creating a new Network Connection...............................................................................287.2.3 Testing a Network Connection.........................................................................................29
7.2.3.1 Ping Test...................................................................................................................297.2.3.2 HTTP Request Test...................................................................................................29
7.3 Display Settings.......................................................................................................................307.4 Time Format Settings...............................................................................................................317.5 Quick Help Settings.................................................................................................................317.6 Miscellaneous Settings............................................................................................................32
7.6.1 Auto Display Off..............................................................................................................327.6.2 Auto Power Off................................................................................................................327.6.3 Audio Settings..................................................................................................................337.6.4 Enable Edit Password.......................................................................................................33
RemoteControl II User Manual, © 2010 WinCESoft Page 3
8 Opening a Existing Remote Control Project...................................................................................359 Importing a Project File Package....................................................................................................3610 Creating a new Remote Control Project........................................................................................3911 Exporting a Project into a Project File Package............................................................................4012 Editing a Remote Control Project..................................................................................................42
12.1 Adding Panel Pages to a Project............................................................................................4312.1.1 Adding Existing Panel Pages.........................................................................................4412.1.2 Adding a new Panel Page...............................................................................................45
12.2 Define the Startup panel of a Project.....................................................................................4813 Editing a Panel Layout..................................................................................................................49
13.1 Opening the Panel- Layout Editor.........................................................................................4913.2 Adding a Soft Button, Bitmap or Text Label to a Panel Page................................................5213.3 Editing the Text Label of a Button.........................................................................................5413.4 Deleting Objects from a Panel...............................................................................................5513.5 Moving and Placing Objects in a Panel.................................................................................55
13.5.1 Moving Objects horizontally and vertically...................................................................5513.5.2 Moving Objects into Depth............................................................................................56
13.6 Using the Edit Raster.............................................................................................................5713.7 Locking Object Moves...........................................................................................................5713.8 Duplicating Objects in a Panel by Copy & Paste..................................................................5813.9 Changing the Panel Background Color and Background Bitmap.........................................5913.10 Setting a Default IR Device for a Panel Page......................................................................60
14 Editing a Button Layout................................................................................................................6114.1 Modify a Existing Button Layout..........................................................................................61
14.1.1 Using Bitmap Transparency...........................................................................................6314.2 Create a New Button Layout.................................................................................................64
15 Assigning Functions to Buttons.....................................................................................................6715.1 Assigning Functions to Soft Buttons.....................................................................................6715.2 Assigning Functions to Device Buttons.................................................................................69
16 Button and Macro Functions.........................................................................................................7316.1 Function “Call External Programs”.......................................................................................7416.2 Function “Call Macro”...........................................................................................................76
16.2.1 Editing Function Macros................................................................................................7716.2.1.1 Modifying Existing Macros....................................................................................7816.2.1.2 Creating new Macros..............................................................................................79
16.3 Function “Close RC-II”.........................................................................................................8116.4 Function “Hide RC-II”...........................................................................................................8116.5 Function “Jump to Panel”......................................................................................................8216.6 Function “Send HTTP Request”............................................................................................83
16.6.1 Some examples of valid URL paths...............................................................................8416.7 Function “Send IR Code”......................................................................................................8616.8 Function “Show Battery Gauge”...........................................................................................8716.9 Function “Show Memory Gauge”.........................................................................................8816.10 Function “Show Panel List”................................................................................................8916.11 Function “Show Time”........................................................................................................9016.12 Function “Toggle Fullscreen”..............................................................................................91
17 Learning new Infrared Commands................................................................................................9217.1 IR Quick Learn Mode............................................................................................................92
18 The Infrared Code Database..........................................................................................................9518.1 Creating new IR Database Entries.........................................................................................96
Page 4 RemoteControl II User Manual, © 2010 WinCESoft
18.2 Importing CCF IR Hex Codes.............................................................................................10218.2.1 Supported CCF IR Hex Code Formats........................................................................102
18.3 The CCF IR Hex Code Format............................................................................................10319 Designing Layouts on a PC.........................................................................................................10420 Network Application Examples...................................................................................................105
20.1 EventGhost...........................................................................................................................10520.1.1 HTTP Request Pattern for EventGhost:.......................................................................110
20.2 External IR Transmitter........................................................................................................11120.2.1 HTTP Request Pattern for IRTrans...............................................................................111
20.3 Home Automation Control...................................................................................................11220.3.1 HTTP Request Pattern for EZControl..........................................................................112
20.4 Set Top Boxes......................................................................................................................11320.4.1 HTTP Request Pattern for D-Box 2 and Dreambox.....................................................113
21 List of Tested Devices with included Infrared Port.....................................................................11422 Program Version History.............................................................................................................11623 Support........................................................................................................................................12424 Index............................................................................................................................................125
RemoteControl II User Manual, © 2010 WinCESoft Page 5

Chapter 1: Introduction
1 IntroductionRemoteControl II turns your mobile device into a configurable universal network and infrared touch screen remote control for your home automation and entertainment system.
It combines two powerful remote control systems in one application:
• Use the included wireless network capabilities of your mobile device to remote control network devices like Media PCs, Set Top Boxes, RF controllers, switches, light dimmers and external IR transmitters.
• Use the built in infrared / IrDA transmitter of your mobile device to control home entertainment devices like TVs, DVD and Blue-ray disk players. Learn new IR commands directly from any existing infrared remote control or import new IR codes in the common Phillips Pronto CCF IR format.
RC-II was created for mobile devices like PocketPCs / PDAs, Smart Phones, PNAs, Handheld PCs, and Web Tablets and allows the creation of a individual touch screen interface page for each controllable device with the included page editor.
Two sample interface designs for landscape touch screens
RC-II is available in three versions:
• RemoteContol II NET:For controlling network devices by a WLAN, Bluetooth or USB connection from your mobile device.
• RemoteContol II IR:For controlling devices directly by an infrared signal from the built in IR / IrDA port of your mobile device or a optional CF IR adapter.
• RemoteContol II PRO:This version combines all features of RemoteControl II NET and RemoteControl II IR.
Page 6 RemoteControl II, v3.00, User Manual, © 2010 WinCESoft

Chapter 2: System Requirements
2 System RequirementsRemoteControl II was created for mobile devices which use Microsoft's operating systems Windows CE / Pocket PC / Windows Mobile and Windows Embedded Compact.
2.1 Supported Device ClassesThere exist presently four mobile device classes with touch screen displays.
1. Smart Phones with and without keyboard:
2. Pocket PC / PDA / PNA / Windows Mobile devices:
3. Web Pads:
4. Handheld PCs with included keyboard
RemoteControl II, v3.00, User Manual, © 2010 WinCESoft Page 7

Chapter 2: System Requirements
2.2 Supported Operating SystemsSupported operating systems:
• Windows CE 3.0: Handheld PC 2000, Pocket PC 2000, Pocket PC 2002, Smartphone 2002
• Windows CE 4.x: Windows Mobile 2003 / 2003SE, bSquare Power Handheld
• Windows CE 5.x: Windows Mobile 5.0 - 6.5
• Windows CE 6.x: Windows Mobile 7.0. Not tested because still not available on consumer devices
Not supported operating systems:
• Windows CE 1.x
• Windows CE 2.x
2.3 Required MemoryMemory requirements:
• 4-6MB of free RAM• 2-4MB flash memory on the internal flash- disk, CF- card or SD- card.
2.4 Touch Display and hardware buttonsThe mobile device should have a touch display to use the user- interface panels and the layout editor, but this is not mandatory.
The device buttons are also programmable with any IR or network command.
2.5 Supported Display SizesSupported display sizes and orientations.
RemoteControl II was designed and tested with devices with the following display sizes:
• PocketPCs: 240x320, 480x640, 480x720 in portrait and landscape mode
• Smart phones: 240x320, 320x320, 640x480, 800x480
• Handheld PCs: 640x240
• Web Pads: 640x480 and 800x600 in portrait and landscape mode
• Other display sizes should work without problems
The display contents can be rotated to 0°, 90°, 180° and 270°.
Page 8 RemoteControl II, v3.00, User Manual, © 2010 WinCESoft

Chapter 2: System Requirements
2.6 Supported ProcessorsAlmost all mobile devices with Windows CE / Pocket PC / Windows Mobile / Windows Embedded Compact uses an ARM (Advanced RISC Machine) CPU.RemoteControl II works presently with all ARM- CPU's from Intel, Samsung, Texas Instruments, Qualcomm, Marvell, Motorola / Freescale, NVIDIA and others.Obsolete devices with Hitachi- SHx, MIPS and x86 CPU's are not supported.
2.7 Infrared / IrDA Port (optional)If your device has a built in IrDA / infrared port this can be used to send IR commands to your home entertainment devices and to learn new IR commands form your original IR remote controls.
Sending / receiving IR commands is supported by the following ARM CPUs:
• Intel StrongARM (SA1110, SA1100)
• Intel / Marvell XScale (PXA250, 255, 260, 270)
• Samsung (S3C2410, S3C2440, S3C2442)
• Texas Instruments OMAP (TI OMAP 720, TI OMAP 750, TI OMAP850)
A infrared port was mandatory for all PocketPCs until 2004. Therefore many devices with included IR port exists still today.
Used devices with the optionally included infrared port are available at eBay.com for €20 to €70 or U$30 to U$100.
RemoteControl II, v3.00, User Manual, © 2010 WinCESoft Page 9
Chapter 2: System Requirements
2.8 CF IR Extender Cards (optional)Optionally one of the following Compact Flash IR extender cards can be used on some devices to increase the infrared transmit range:
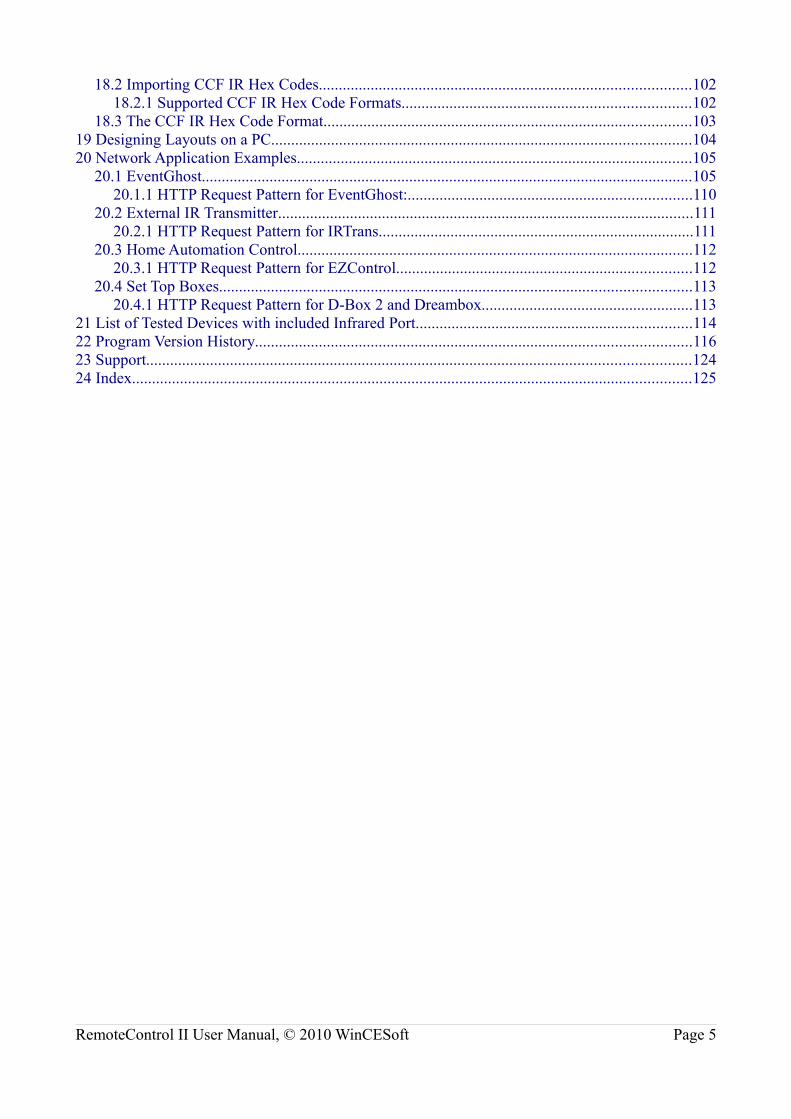
• Laser / Electric Dog PDA-IR Extender to increase the IR transmit range to 50feet.
This card was available from: http://www.laser.com and eBay
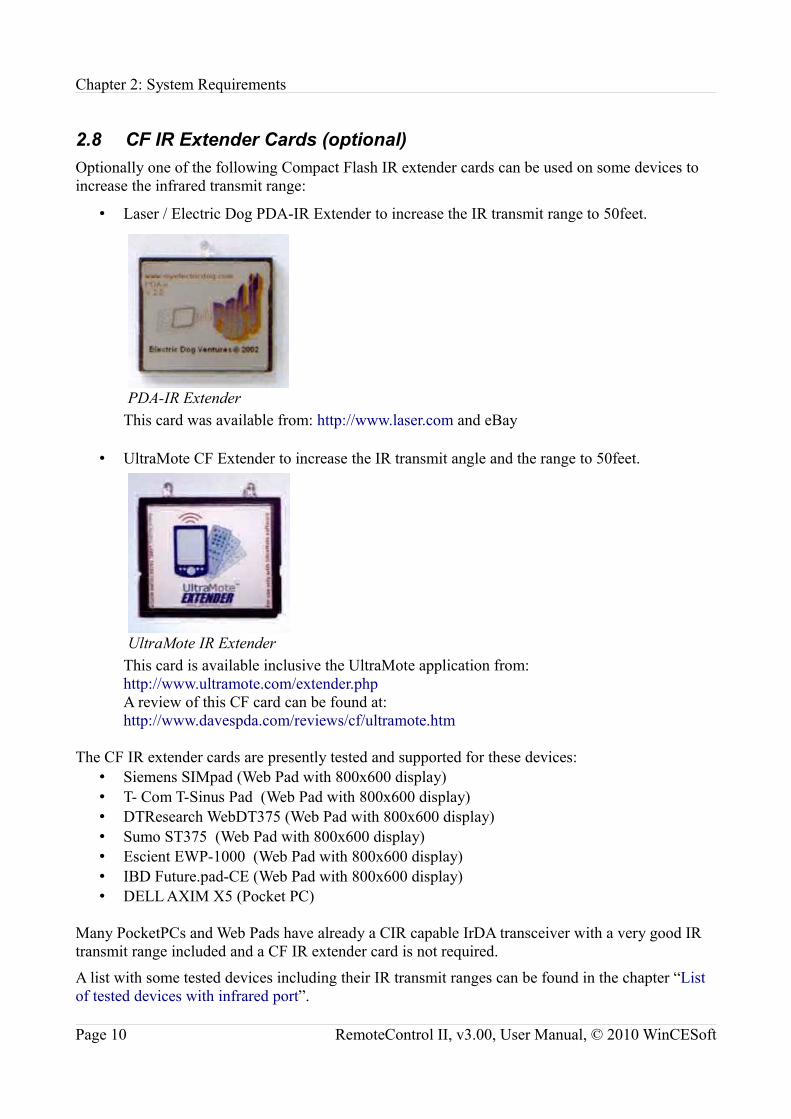
• UltraMote CF Extender to increase the IR transmit angle and the range to 50feet.
This card is available inclusive the UltraMote application from:http://www.ultramote.com/extender.php A review of this CF card can be found at: http://www.davespda.com/reviews/cf/ultramote.htm
The CF IR extender cards are presently tested and supported for these devices:• Siemens SIMpad (Web Pad with 800x600 display)• T- Com T-Sinus Pad (Web Pad with 800x600 display)• DTResearch WebDT375 (Web Pad with 800x600 display)• Sumo ST375 (Web Pad with 800x600 display)• Escient EWP-1000 (Web Pad with 800x600 display)• IBD Future.pad-CE (Web Pad with 800x600 display)• DELL AXIM X5 (Pocket PC)
Many PocketPCs and Web Pads have already a CIR capable IrDA transceiver with a very good IR transmit range included and a CF IR extender card is not required.
A list with some tested devices including their IR transmit ranges can be found in the chapter “List of tested devices with infrared port”.
Page 10 RemoteControl II, v3.00, User Manual, © 2010 WinCESoft
PDA-IR Extender
UltraMote IR Extender

Chapter 2: System Requirements
2.9 External IR Transmitters (optional)RemoteControl II can access external IR transmitters like USB-UIRT, GlobalCaché, Y.A.R.D. Tira2, Irman, WinLIRC and IRTrans by a WLAN, Ethernet, Bluetooth or USB- network connection.
2.10 WLAN Module (optional)If you would like to control devices via WLAN or send IR commands by an external IR transmitter like USB- UIRT (Universal Infrared Receiver Transmitter), a WLAN module is required. Most of the present mobile devices have already a WLAN or Bluetooth module included.
2.11 Bluetooth Module (optional)Same as WLAN module.A Bluetooth connection to a PC can be used to control PC applications or access external IR controller.
2.12 Desktop Computer with Windows, Linux or MAC- OS (optional)RemoteControl II can use a WLAN, Bluetooth or a USB- network- connection to send HTTP requests to any HTTP capable server application like EventGhost (www.EventGhost.org),
RemoteControl II, v3.00, User Manual, © 2010 WinCESoft Page 11
Chapter 3: Program Features
3 Program FeaturesWith RemoteControl II you have obtained a feature rich application to control you home entertainment and home automation system.
Some of it's unique features:
• Send commands via wireless network connectionsRC-II can send HTTP- requests via WLAN, Bluetooth or USB connections to network capable devices like Media PCs, Set Top boxes, IR transmitters and RF switches.
• Universal infrared remote controlRC-II can use the included IrDA/infrared port of your mobile device to send infrared signals to your home equipments like TV's, DVD-/Blu-ray players with a IR transmit range of 3 to 20 meters.
• Teachable infrared remote controlRC-II can learn new IR codes directly from your existent remote controls.New learned IR codes can be added to the IR code database.
• Configurable user interface with the included graphical layout editor.Create for each controllable device an individual user interface.
• Support of many bitmap formats (BMP, GIF, JPG, PNG) for the graphical user interface.
• Included IR database with predefined IR codes
• Support for macro functionsCreate a list with IR or network commands and send this with one click.
• Commands can be assigned to the soft buttons and the hardware keys of the device
• Quick learn mode for IR codesSimply touch any button to teach it a new IR code from your original remote control.
• Import and export of IR codes in the common Philips Pronto CCF IR hex format
• Auto power off and auto display off time configurable from 5s to endless
• Supports optionally CF IR extender cards to extend the IR transmit range
• Supports hi- resolution display mode on PocketPCs and smart phones with VGA display.
• Can call external applications including command line parameters. E.g. Internet Explorer with a link to a EPG website.
Page 12 RemoteControl II, v3.00, User Manual, © 2010 WinCESoft

Chapter 4: Program Installation
4 Program InstallationRemoteControl II is distributed in two variants:
1. As a Windows PC- set- up application in a ZIP- archive. E.g. RemoteControl_II_v3xx.ZIP
2. As a Windows CE- CAB- file. E.g. RemoteControl_II_v3xx.CAB
Both variants can be downloaded from http://www.WinCESoft.de or from the website of the distributor of the full version.
4.1 Installation via ActiveSyncThis is the standard method of Microsoft to install PocketPC or Smartphone applications to a mobile device.
For this, you should have already installed Microsoft's ActiveSync on your PC with Windows NT/2000/XP or the “Windows Mobile Device Center” on your PC with Windows Vista / 7.
These tools can be downloaded from: http://www.microsoft.com/windowsmobile/en-us/help/synchronize/device-synch.mspx
For the installation, connect your mobile device by a USB cable, serial cable or Bluetooth with your PC, double click on the ZIP- file and start the included set up exe file “RemoteControl_II_v3xx.exe”.
Then you have to answer some questions about the license agreement and where do you want to install RC-II on your mobile device.
The CAB installation file with RemoteControl II and some sample projects will be automatically copied by ActiveSync to your mobile device.
RemoteControl II, v3.00, User Manual, © 2010 WinCESoft Page 13

Chapter 4: Program Installation
4.2 Manual installation by a CAB- fileIf you don't have a Windows PC with ActiveSync or the Mobile Device Center, or if your ActiveSync cable is broken, you can install RC-II manually by using the CAB file “RemoteControl_II_v3xx.CAB”.
Copy the CAB file by a memory card onto your mobile device and double click on this file to install it.
You can download the CAB file from your retailer or from www.WinCESoft.de.
The CAB- file can also be found in the ActiveSync- program directory on your Windows PC.ActiveSync will extract the included CAB file from the setup exe and store this into the ActiveSync program directory. For example in “C:\Programs\Microsoft ActiveSync\RemoteControl II\RemoteControl_II_v3xx.CAB”
To install the contents of the CAB file, open the file explorer of your mobile device and double click on the file “RemoteControl_II_v3xx.CAB”.
The installer may ask you for the application location. You can install RC-II also on a removable storage card.
Page 14 RemoteControl II, v3.00, User Manual, © 2010 WinCESoft
Choose the installation location
Click on RemoteControl_II.CAB

Chapter 4: Program Installation
4.3 First Launch of RemoteControl IIAfter the successful installation you will be asked to start RC-II.
Alternatively you can find the RC-II program icon in the programs folder of your mobile device.
To launch RC-II click on the RC-II program icon.
At the first launch, RC-II will install some sample project files from the project archive “Setup_RCII.ZIP”.
Setup_RCII.ZIP contains some project files for devices with display sizes of
240x240, 240x320/480x640 (PocketPC portrait),
320x240/640x480 (PocketPC landscape),
640x240 (Handheld PC) and
800x600 (Web Pad).
If your device does not have one of the listed display resolutions, RC-II will try to load the next best matching project.
RemoteControl II, v3.00, User Manual, © 2010 WinCESoft Page 15
RC-II- icon in the programs folder
Project files import at the first launch
Chapter 4: Program Installation
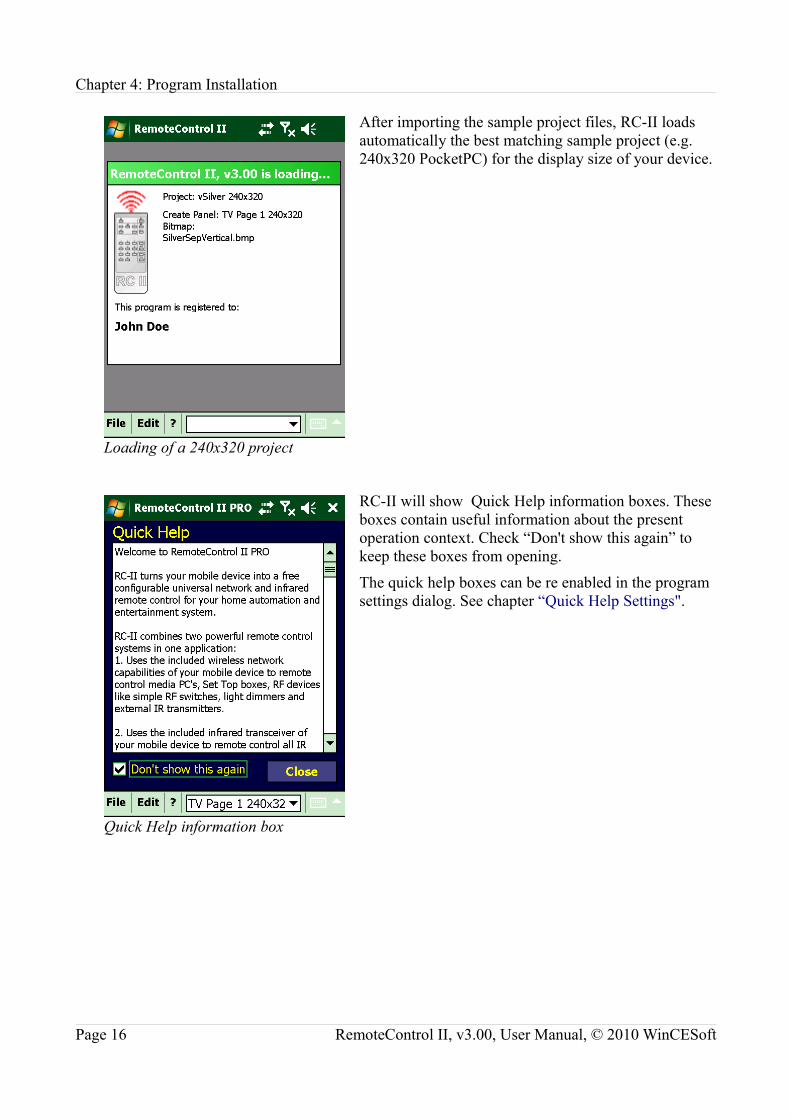
After importing the sample project files, RC-II loads automatically the best matching sample project (e.g. 240x320 PocketPC) for the display size of your device.
RC-II will show Quick Help information boxes. These boxes contain useful information about the present operation context. Check “Don't show this again” to keep these boxes from opening.
The quick help boxes can be re enabled in the program settings dialog. See chapter “Quick Help Settings".
Page 16 RemoteControl II, v3.00, User Manual, © 2010 WinCESoft
Loading of a 240x320 project
Quick Help information box

Chapter 4: Program Installation
RC-II will start per default with the full screen mode. In this mode, the start and program menus are not visible.
To leave the full screen mode there exist three methods:
1. By pressing the button “OK/Enter” of the device.This button has per default the function “Toggle Fullscreen” assigned.
2. By pressing the top right soft button on the screen. This button has the function “Toggle Fullscreen” in the sample projects assigned.
3. By calling the context sensitive pop up menu:For this, tap and hold with the stylus any area of the screen which is not covered with a soft button or text label.
RemoteControl II, v3.00, User Manual, © 2010 WinCESoft Page 17
RC-II in full- screen- mode
Tap and hold the stylus for >2sec.

Chapter 4: Program Installation
After two seconds a pop up menu will appear.
Select the function “Fullscreen” from this menu.
The start and program menus are now visible.
To disable the full screen mode at program start up you can change this by removing the option “Start in Fullscreen Mode” in the program settings dialog (see chapter “Display Settings”).
The included sample projects are good starting points to discover the functionality of RC-II and to create new page designs.
Page 18 RemoteControl II, v3.00, User Manual, © 2010 WinCESoft
The pop- up menu appears
Disabled full- screen- mode

Chapter 4: Program Installation
4.4 Activation of the full versionThe full version of RC-II is protected by a activation key. To get your personal key you have to send an activation key request file “RegInfo.txt” with your name and email address to [email protected]
4.4.1 Creation of the Key Request File “RegInfo.txt”Step 1:
To create the activation key request file, click on the “Request Activation Key” button.
If you have already received your personal key, click on the “Enter requested Activation Key” button.
Step 2:
Enter you name and email address and click on the “Next” button.
RemoteControl II, v3.00, User Manual, © 2010 WinCESoft Page 19
RC-II Program Activation
Enter your name and email address

Chapter 4: Program Installation
Step 3:
RC-II has now created and stored your activation request file to “\RegInfo.txt” and “\My Documents\RegInfo.txt” on you mobile device.
This file contains your given name, email address, the version number of RemoteControl II and a unique registration number.
To receive your activation key you have to send this by an email to [email protected].
For this you may use the email application of your mobile device or copy the file RegInfo.txt via ActiveSync or a memory card to a PC with a email client.
The activation key will be sent within 10 hours.
Step 4:
After receiving your activation key via email you have to click on the button “Enter requested Activation Key”, enter it into the text box and click on the “Next” button.
Page 20 RemoteControl II, v3.00, User Manual, © 2010 WinCESoft
Your key request file is ready
Enter the activation key

Chapter 4: Program Installation
In the last step you can choose to delete the trial version from your device to free some memory space.
If you have more than one device you have to create a key request file for each.
There is no additional license purchase required. All additional keys for your personal use are free.
RemoteControl II, v3.00, User Manual, © 2010 WinCESoft Page 21
Your key is valid

Chapter 5: Program De Installation
5 Program De InstallationTo de install RemoteControl II from you mobile device, you should first exit the program and then use the Remove Programs control panel of your mobile device. On Smartphones and PocketPCs you can find this at: Start- Menu → Settings → System → Remove Programs:
If you want also to delete your project files answer with “Yes”.
We suggest to make a backup of your project files before deleting them.
Page 22 RemoteControl II, v3.00, User Manual, © 2010 WinCESoft
Exit RemoteControl II Select RC-II and click on “Remove”
Delete also your project files ?

Chapter 6: Program Menus
6 Program MenusA short description of all menu functions.
6.1 File MenuMenu: New Project File...With this function a new remote control project can be created.A project contains a set of remote control panels.See chapter 10, “Creating a new Remote ControlProject”.
Menu: Open Project File...With this a existing project can be loaded.There are some preconfigured projects for typical mobile devices with different display resolutions.See chapter 8, “Opening a Existing Remote ControlProject”.
Menu: Import Project...With this function a project archive from other RC-II users or a backup of your own projects can be imported.
A project archive is a ZIP file which contains all files of a project.
This includes the used panel pages, IR codes, macros, buttons, fonts, bitmaps and network connections.
After importing a project, it can be loaded by the menu function “Open Project File...”.
You can find some some well designed project files from other RemoteControl II users at: http://wincesoft.de/html/skins.html
See: Import a Project Archive
Menu: Export Project...With this function all components of the active project can be stored into a ZIP archive.This is useful to create a backup or to share your project with other RemoteControl II users.
See chapter 40, “Exporting a Project into a Project File Package”.
Menu: ExitThis will exit the application. All modified panels will be saved automatically.
RemoteControl II, v3.00, User Manual, © 2010 WinCESoft Page 23
File Menu

Chapter 6: Program Menus
6.2 Edit MenuMenu: Edit Project...With this function you can add new panel pages to the current project. See chapter 12, “Editing a RemoteControl Project”.
Menu: Edit Panel...With this, the included panel editor can be opened.With the panel editor you can modify the panel- pages of your project. See chapter 13, ”Editing a PanelLayout”.
Menu: Edit IR Database...This opens the IR- code editor and code database.Here you can learn new IR codes from your original remote controls, import / export IR codes in the common Phillips- CCF- code format, edit and verify IR- code- sequences, assign function names, devices- classes and manufacturers to your codes.See chapter 18, ”The Infrared Code Database”.
Menu: IR Quick Learn...Activates the IR code quick learn mode.In this mode you can assign new IR codes to any soft and hardware buttons.Just click the teachable button and send the desired IR code from your original remote control to the IrDA/IR receiver of your mobile device. To exit the quick learn mode select this menu again.See chapter 17.1, “IR Quick Learn Mode”.
Menu: FullscreenToggle between the full screen and visible menus mode.
Menu: Jump to Panel...This opens a list with all panel pages of the loaded project.With this you can quickly jump to any page.This panel page list can be also opened by the pop up menu or a programmed soft or hard button with the assigned function “Show Panel List”. See chapter 16.10, “Function “Show Panel List””.
Menu: Settings...This opens the settings dialog of RemoteControl IIHere you can configure the IR-interface, network connections, display options and other program settings. See chapter 7, “Program Settings”.
Page 24 RemoteControl II, v3.00, User Manual, © 2010 WinCESoft
Chapter 6: Program Menus
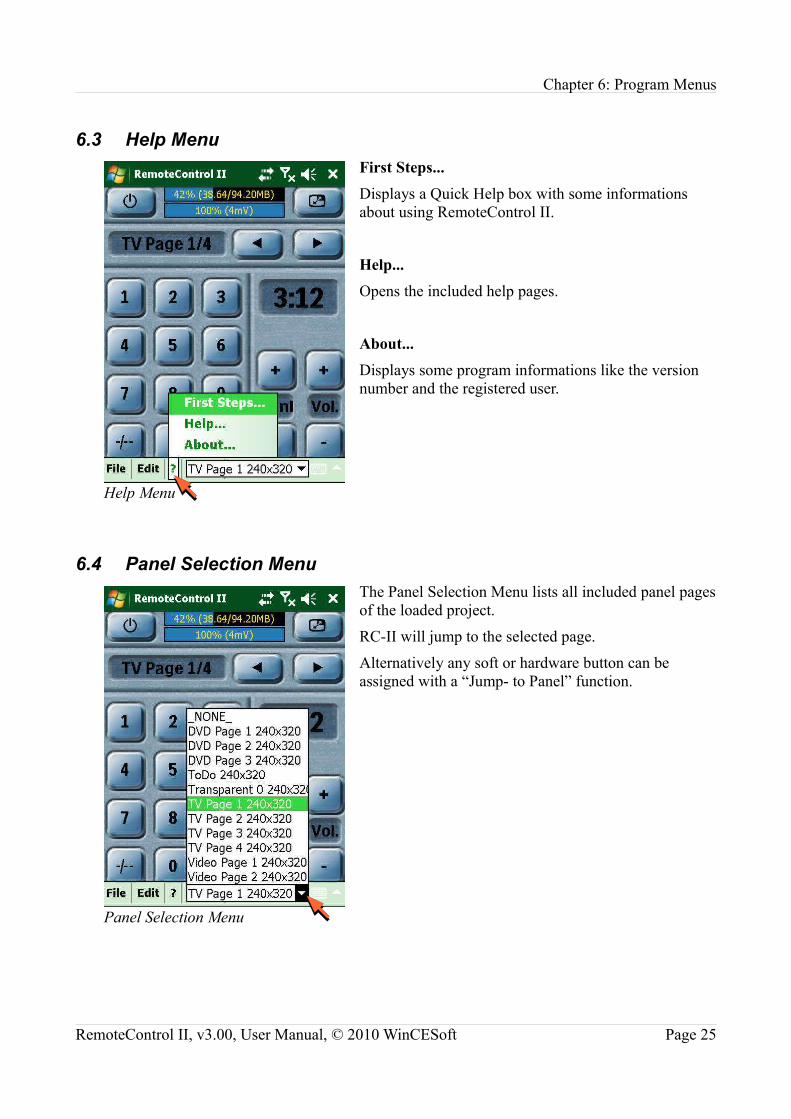
6.3 Help MenuFirst Steps...Displays a Quick Help box with some informations about using RemoteControl II.
Help...Opens the included help pages.
About...Displays some program informations like the version number and the registered user.
6.4 Panel Selection MenuThe Panel Selection Menu lists all included panel pages of the loaded project.
RC-II will jump to the selected page.
Alternatively any soft or hardware button can be assigned with a “Jump- to Panel” function.
RemoteControl II, v3.00, User Manual, © 2010 WinCESoft Page 25
Help Menu
Panel Selection Menu

Chapter 7: Program Settings
7 Program Settings
7.1 Infrared / IrDA- Port Settings
7.1.1 Setting the Infrared / IrDA portSelect raw or native IrDA port:If your mobile device has a IrDA / infrared port included, RC-II will try to detect and select the correct IR port automatically for you.
There may exist situations where this auto detection will not work. For this you can select the IR port manually.
You should select the serial port with the name “IrDA”, “Raw IrDA”, “Native IR”, “IR”, “Infrared Port” or similar.
“IrCOMM” should be not selected because this is a virtual device driver which is not directly connected to the IrDA transceiver hardware.
Page 26 RemoteControl II, v3.00, User Manual, © 2010 WinCESoft
IR Port Settings
List of found serial ports

Chapter 7: Program Settings
7.1.2 Setting the IR ExtenderIf you have inserted a CF IR extender card, you can choose one of the two available card types.
Supported CF IR extender cards:
• Laser- / Electric Dog PDA-IR Extender http://www.laser.com/?laserlink=ahpda-ir
• UltraMote CF Extenderhttp://www.ultramote.com/extender.php
Presently the CF IR extender card is supported by:
• Siemens SIMpad
• t- Com T-Sinus Pad
• DTResearch WebDT375
• Sumo ST375
• Escient EWP-1000
• IBD Future.pad-CE
• DELL AXIM X5
Many mobile devices have already a strong IR transmitter included and a CF IR extender card is not required.
7.1.3 Infrared Signal Transmit PriorityDue to the fact that Windows CE is a multitasking system, you can define the priority for each process.
If there is IR transmit problem, you should try to raise the priority of the send process.
If the touch screen input is freezing, you should try to lower the process priority.
The default value is 100. This value was tested with:
Dell AXIM x50v, Teklogix Psion Netbook Pro, Siemens SIMpad, H&W skeye.pad, Compaq's iPAQ, HP Jornada 720
But this may differ on other devices.
Good values for some devices:
Dell AXIM x3: 98, Dell AXIM x30: 98, HP iPAQ h2210: 98, HP iPAQ h3660: 20
For a complete list of tested mobile devices see chapter 21, “List of Tested Devices with includedInfrared Port”.
RemoteControl II, v3.00, User Manual, © 2010 WinCESoft Page 27
CF- IR- Extender card selection

Chapter 7: Program Settings
7.2 Network SettingsRC-II can access network devices via WiFi, Ethernet, USB and Bluetooth connections.
7.2.1 The network connectionsIn this dialog you can see all existing network connections.
A network connection consists of a connection name, a server name or IP address and a optional port number.
To create a new network connection click on the “Add” button.
To modify an existing entry, double tap on the connection name or select the name from the list and click on the “Modify” button.
To delete a connection select the name of the connection and click on the “Delete” button.
To test a connection select a connection from the list and click on the “Test” button. This will start a ping test.
7.2.2 Creating a new Network ConnectionTo create a new network connectio click on the “Add” button, can enter the name of the connection, the name or IP- address of the server and optionally the port- number of the connection.
Examples valid inputs:IP- address:192.168.0.101
IP-address with port- number 80:192.168.0.101:80
IP- address with port number and URL path:192.168.101:80/index.html
Host name with port number and URL path:Workstation:80/index.html?VolumeUp
Complete URL:www.google.com/index.html
Page 28 RemoteControl II, v3.00, User Manual, © 2010 WinCESoft
Network Parameters
List of Network Connections

Chapter 7: Program Settings
7.2.3 Testing a Network Connection
7.2.3.1 Ping TestButton “Ping Test”:The Ping test will send a ICMP echo request package to the target host and listen for the echo response.
The contents of the echo are verified and the response time is measured.
With the ping test some data will be sent to the server. The answer will be verified and the transmit time measured and listed.
7.2.3.2 HTTP Request TestButton “HTTP Test”:The HTTP request test sends a GET request to the web server and lists the contents of the received file.
The network connection definition should contain a valid html file path like:
192.168.101/index.html
or the http server may send a error message that the request was incomplete or the requested file could not be found.
RemoteControl II, v3.00, User Manual, © 2010 WinCESoft Page 29
Ping Network Connection Test
HTTP Request Test with answer

Chapter 7: Program Settings
7.3 Display Settings
Start in Fullscreen:Per default RC-II will start in full screen mode.In this mode, the start and program menus are not visible.
Use Hi- Res.:Most windows mobile devices have a QVGA (240x320) display.
If you have a Windows Mobile device with a VGA display (480x640), the panel graphics will be scaled per default by a factor of two.To use the full display resolution you can set this option.In the hi resolution mode the graphics of the loaded project will appear half the size as before.A program restart is required to use the new display resolution.
You can find some hi- resolution projects at www.WinCESoft.de.
Rotate display at program start:If your mobile device has the IR port on the left, right or bottom side, you can let RC-II rotate the display contents automatically in any direction at program start.
Page 30 RemoteControl II, v3.00, User Manual, © 2010 WinCESoft
Display Settings
Rotated display contents by 90°

Chapter 7: Program Settings
7.4 Time Format SettingsThe display format of the time can be configured in this dialog.
Display formats:
System format:The system default format is used.The system format can be changed in the regional settings of your device.
12h:11:30
12h + A / P:11:30 P
12h + AM / PM:11:30 PM
24h:23:30
7.5 Quick Help SettingsRC-II will show per default some quick help message boxes in some situation.
The boxes can be disabled by clicking on the “Don't show this again” check box.
Here you can enable the disabled help messages again.
RemoteControl II, v3.00, User Manual, © 2010 WinCESoft Page 31
Time Format Settings
Quick Help Settings

Chapter 7: Program Settings
7.6 Miscellaneous Settings
7.6.1 Auto Display OffRC-II can optionally power down the display back light and the TFT display without powering down the complete device.
This is useful if you are using a Bluetooth or WLAN connection because these are still powered on and will not disconnect from the WLAN access point.
The touch screen may also be disabled on some devices too.
To enable the display press on any device button.
This function is not supported by all devices.
“Never” will disable the auto display off .
The display power off time will extend if you click on the touch screen or press a device button.
7.6.2 Auto Power OffRC-II can optionally switch off the device if the user doesn't use it for some time.
This function will help to save battery power.
“Never” will disable the auto power off.
The auto power off time will reset if you click on the touch screen or press any device button.
Page 32 RemoteControl II, v3.00, User Manual, © 2010 WinCESoft
Choose the auto power off time
Choose the auto display off time

Chapter 7: Program Settings
7.6.3 Audio Settings
Enable Soft and Device Button Beep Sound:With this option RC-II will create a short beep noise when a soft or device button is pressed.
Enable System Touch Click Sound:Enable System Key Click Sound:Enable System Keyboard Autorepeat:This should be disabled if you want to send infrared codes by the internal IR port because the system click sounds and the autorepeat could affect the IR signal quality on some devices.
7.6.4 Enable Edit Password
With this function you can protect your remote control projects against modifications from other people.
After activating this option you have to enter a password to edit or create new projects.
RemoteControl II, v3.00, User Manual, © 2010 WinCESoft Page 33
Enter a password
Misc. Settings

Chapter 7: Program Settings
RC-II will ask for your password if you try open the layout editor, IR editor of if you try to add or remove a panel page from your project.
Page 34 RemoteControl II, v3.00, User Manual, © 2010 WinCESoft
Password protected layout editor

Chapter 8: Opening a Existing Remote Control Project
8 Opening a Existing Remote Control ProjectTo open a existing project, select “Open Project File...” from the file menu and choose one of the listed project file.
RC-II has some pre configured sample projects for different display sizes included.
In the following sample the project file “Lion” is loaded. This project is designed for a landscape 640x480 display. Perhaps you have to enable the hi- resolution display mode and rotate the display contents to 90° in the program settings.
Loaded Project “Lion”The Lion project package can be downloaded from the RC-II skins section at www.WinCESoft.de
RemoteControl II, v3.00, User Manual, © 2010 WinCESoft Page 35
Open a project file List of available project files

Chapter 9: Importing a Project File Package
9 Importing a Project File PackageA project file package is a ZIP archive which contains all dependent files of a remote control project. A project consists of the panel pages, bitmaps, fonts, IR codes, network connections and command macros.
You can find some project packages in the RC-II skins section at www.WinCESoft.de
To import a project package, select “Import Project...” from the file menu.
To prevent overwriting of existing files, you can select the option “Don't overwrite existing files”. With this enabled option, RC-II will ask for your permission for already existing files with different contents.
Page 36 RemoteControl II, v3.00, User Manual, © 2010 WinCESoft
Import a Project package
Option: Don't overwrite existing files

Chapter 9: Importing a Project File Package
Select the project package and press the top right OK button.RC-II imports the contents of the ZIP archive into its program directory.
After the import has finished you can open the new project file.
RemoteControl II, v3.00, User Manual, © 2010 WinCESoft Page 37
Choose the ZIP- project package Import in progress...
Import successfully finished Open the imported project file

Chapter 9: Importing a Project File Package
Each project package ZIP archive contains also a README.TXT file with some informations about the included project:This ZIP archive contains all components (IR codes, panels, buttons, macros, bitmaps, fonts...) of a RemoteControl II project.ProjectName: "Lion"Display: 640x480VersionRCII: 3.00VersionScript: 1.2Archived: 2009.03.25, 15:17:52This archive contains:Fonts: YES ( 1)Bitmaps: YES (200)Panels: YES ( 18)Buttons: YES (119)Macros: YES ( 94)IRCodes: YES ( 8)Network Connections: NO ( 0)You can import this archive with the "Import Project"- function of RC II (v3.0 or higher).
Page 38 RemoteControl II, v3.00, User Manual, © 2010 WinCESoft
Chapter 10: Creating a new Remote Control Project
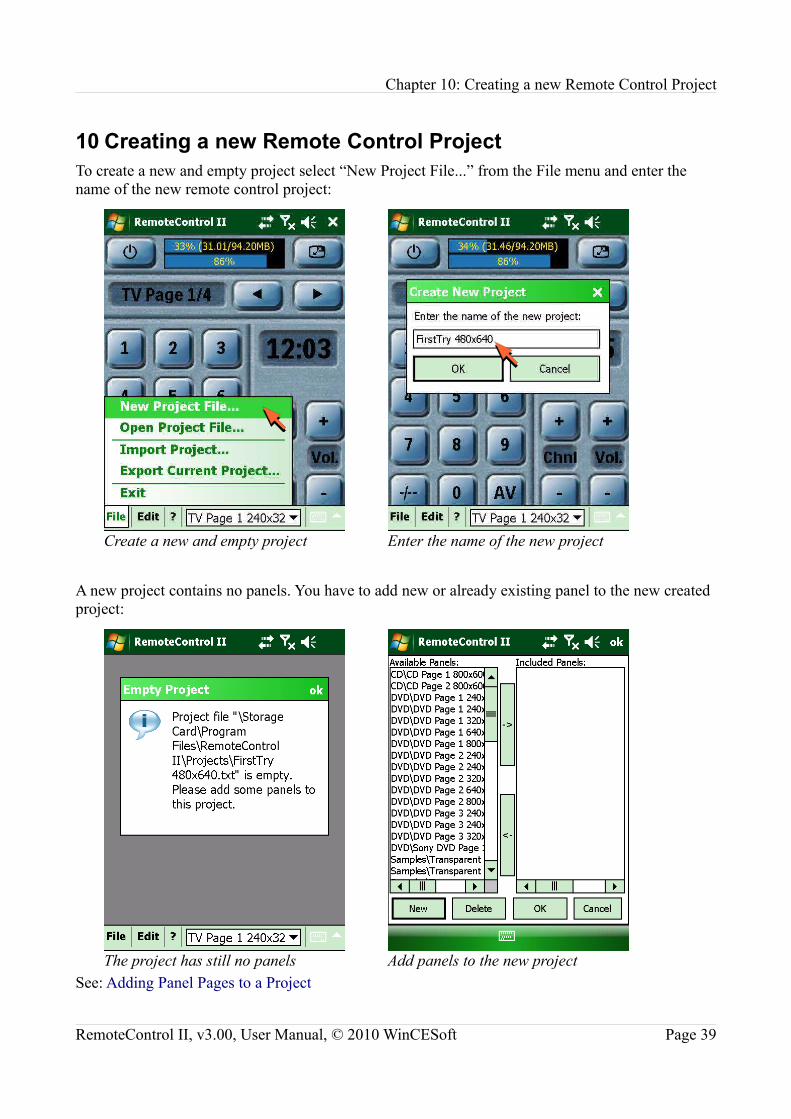
10 Creating a new Remote Control ProjectTo create a new and empty project select “New Project File...” from the File menu and enter the name of the new remote control project:
A new project contains no panels. You have to add new or already existing panel to the new created project:
See: Adding Panel Pages to a Project
RemoteControl II, v3.00, User Manual, © 2010 WinCESoft Page 39
Create a new and empty project
The project has still no panels
Enter the name of the new project
Add panels to the new project
Chapter 11: Exporting a Project into a Project File Package
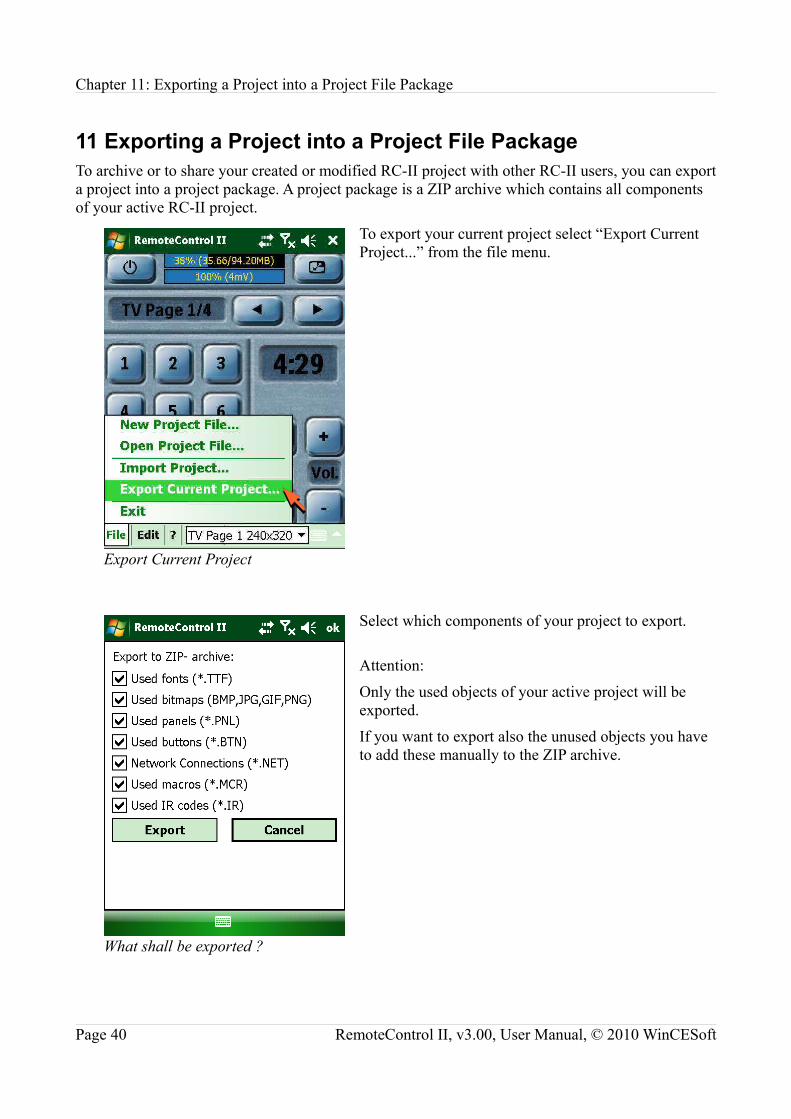
11 Exporting a Project into a Project File PackageTo archive or to share your created or modified RC-II project with other RC-II users, you can export a project into a project package. A project package is a ZIP archive which contains all components of your active RC-II project.
To export your current project select “Export Current Project...” from the file menu.
Select which components of your project to export.
Attention:
Only the used objects of your active project will be exported.
If you want to export also the unused objects you have to add these manually to the ZIP archive.
Page 40 RemoteControl II, v3.00, User Manual, © 2010 WinCESoft
Export Current Project
What shall be exported ?

Chapter 11: Exporting a Project into a Project File Package
Enter the file name of the project package and press the OK button at top right.
The file name extension “.ZIP” will be added automatically.
Your project will be saved into the given ZIP file:
RemoteControl II, v3.00, User Manual, © 2010 WinCESoft Page 41
File name of the project package
Your project is saved into a ZIP file Project was successfully exported

Chapter 12: Editing a Remote Control Project
12 Editing a Remote Control ProjectMost RC-II projects have more than one panel page included.
You can get a quick overview about the included pages of your project by opening the panel list or by opening the Panel Selection Menu.
Page 42 RemoteControl II, v3.00, User Manual, © 2010 WinCESoft
Calling the panel list via pop up menu
Calling the panel list via Edit → Jump to Panel...
Panel List Panel Selection Menu

Chapter 12: Editing a Remote Control Project
12.1 Adding Panel Pages to a ProjectTo manage the panel- pages of your project, select “Edit Project...” from the Edit menu.
This opens the project editor with two lists.
On the left side you can see all available panel pages, on the right side all included panel pages of your project.
The listed *.pnl- files can be found in the RC-II program- directory in the sub directory “Panels\”
RemoteControl II, v3.00, User Manual, © 2010 WinCESoft Page 43
Open the Project Editor
Project Editor

Chapter 12: Editing a Remote Control Project
12.1.1 Adding Existing Panel PagesWith the project editor you can manage which panels are included in your project.
To add existing panels from the left side to your project list on the right side, select the desired panels and press the right- arrow- button “->”.
To remove panels from your project, select the desired panels from the right list and press the left arrow button “<-”.
The selected panels are now part of your project.
Click on the “OK” button to leave the project editor.
Page 44 RemoteControl II, v3.00, User Manual, © 2010 WinCESoft
Select desired panels
Added panels in your project

Chapter 12: Editing a Remote Control Project
12.1.2 Adding a new Panel PageTo create a new panel page press the “New” button in the project editor.
Choose a device category for the new panel from the list or just enter any category name.
In this sample we want to create a new panel for a Sony DVD player.
RemoteControl II, v3.00, User Manual, © 2010 WinCESoft Page 45
Create a new panel- page
Choose a device category for the panel

Chapter 12: Editing a Remote Control Project
Enter a name for the panel. We choose “Sony DVD Page 1”.
Per default a blank panel page will be created.
You can choose to copy the layout of an existing panel with the option “Copy layout from existing Panel” and by selecting one from the list.
We want to create a new page from the scratch and don't copy the layout from a existing panel.
The new and empty panel was created.
Page 46 RemoteControl II, v3.00, User Manual, © 2010 WinCESoft
The new panel was created and saved
Enter a name for the new panel page

Chapter 12: Editing a Remote Control Project
After creating the new panel page, we have to add this to our project.
With a click on the “OK” button, the new blank panel page “Sony DVD Page 1” will be loaded and can be selected from the panel selection menu.
RemoteControl II, v3.00, User Manual, © 2010 WinCESoft Page 47
Select the new panel page New panel “Sony DVD Page 1”
Copy the new panel from the left ... … to the right list

Chapter 12: Editing a Remote Control Project
12.2 Define the Startup panel of a ProjectThe startup panel will be automatically displayed as the first page when you start RemoteControl II.
To define the startup panel page, click on one of the panels in the right list.
Page 48 RemoteControl II, v3.00, User Manual, © 2010 WinCESoft
Choose the startup panel
Chapter 13: Editing a Panel Layout
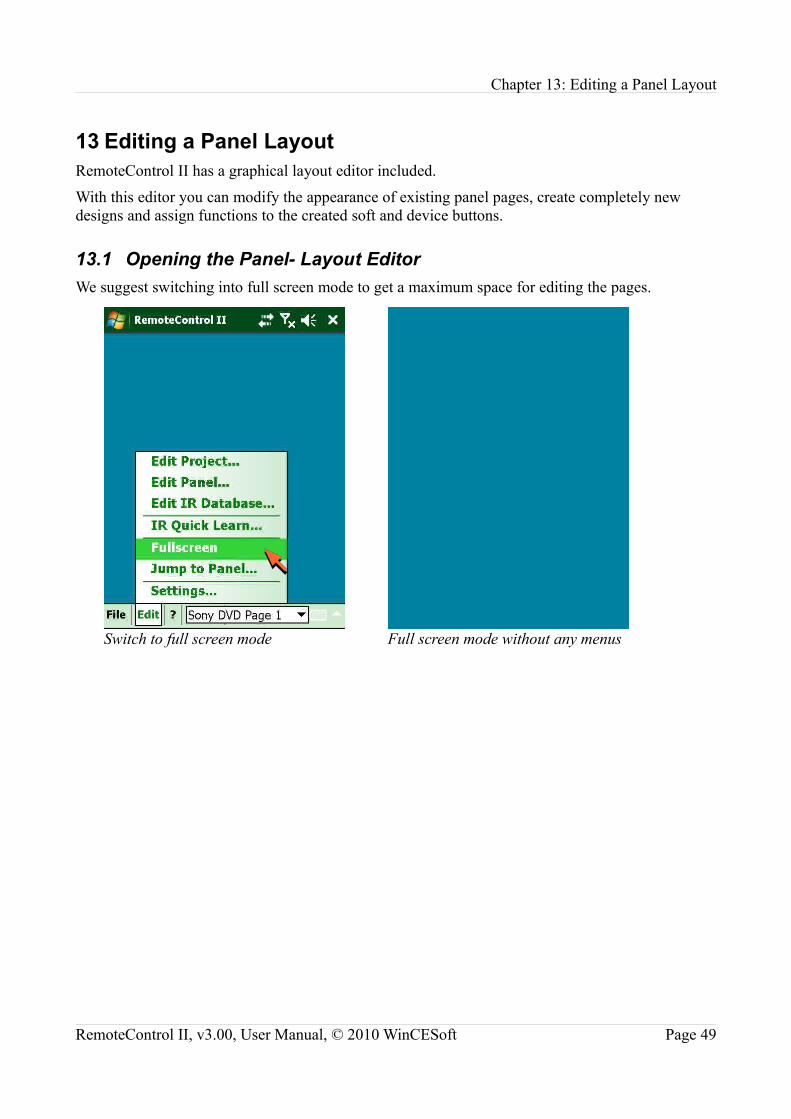
13 Editing a Panel LayoutRemoteControl II has a graphical layout editor included.
With this editor you can modify the appearance of existing panel pages, create completely new designs and assign functions to the created soft and device buttons.
13.1 Opening the Panel- Layout EditorWe suggest switching into full screen mode to get a maximum space for editing the pages.
RemoteControl II, v3.00, User Manual, © 2010 WinCESoft Page 49
Switch to full screen mode Full screen mode without any menus

Chapter 13: Editing a Panel Layout
If you tap and hold the stylus for more than two seconds on any point of the background, a pop up menu will appear. To open the layout editor select “Edit Panel...” from the pop up menu:
The context sensitive layout editor dialog “Objects Settings” should appear.
“Context sensitive” means that the contents of the dialog will depend on the selected object.
If you click on the blue background you will see the the settings and options of the background. If you click on a soft button or a text label you will see the settings and options of the soft button or text label etc.
The dialog can be dragged around by holding and moving the stylus on the title bar or the background of the dialog.
If you click on the top right “X” button, you can close the dialog and leave the layout editor.
Page 50 RemoteControl II, v3.00, User Manual, © 2010 WinCESoft
Select “Edit Panel...” from the menu To close the dialog click on the “X”

Chapter 13: Editing a Panel Layout
If you are in the edit mode and tap and hold the stylus for more than two seconds onto any point of the blue background, a pop up Menu will appear:
Paste Object:Will add a previously copied object to the panel.If you select a object instead of the background, “Copy Object” is displayed instead.
Add Object:This opens a button, bitmap and text label addition dialog.
Fullscreen:Enables / Disables the program and system menus.
Edit Panel:Leaves the layout editor.
Show Edit Panel:Shows / hides the Object Settings dialog.
Jump to Panel...:Displays a list with all panels of your project.
RemoteControl II, v3.00, User Manual, © 2010 WinCESoft Page 51
Pop up menu in edit mode

Chapter 13: Editing a Panel Layout
13.2 Adding a Soft Button, Bitmap or Text Label to a Panel PageTo add a new soft button, bitmap or text label to a panel page choose “Add Object” from the pop up menu or click on the “Add” button on the Object Settings- dialog.
This will open the object browser dialog:
The object browser shows a preview of the selected object.
Choose the desired object type:
Object Types:
Button:Adds a soft button with one of the predefined layout.
You can assign commands to any button. See chapter 15,”Assigning Functions to Buttons”.
Bitmap:Adds a bitmap without text label.
Text:Adds a text- label.The size and type of the used font can be assigned in a second step.
Page 52 RemoteControl II, v3.00, User Manual, © 2010 WinCESoft
Object browser
Select the desired object type
Chapter 13: Editing a Panel Layout
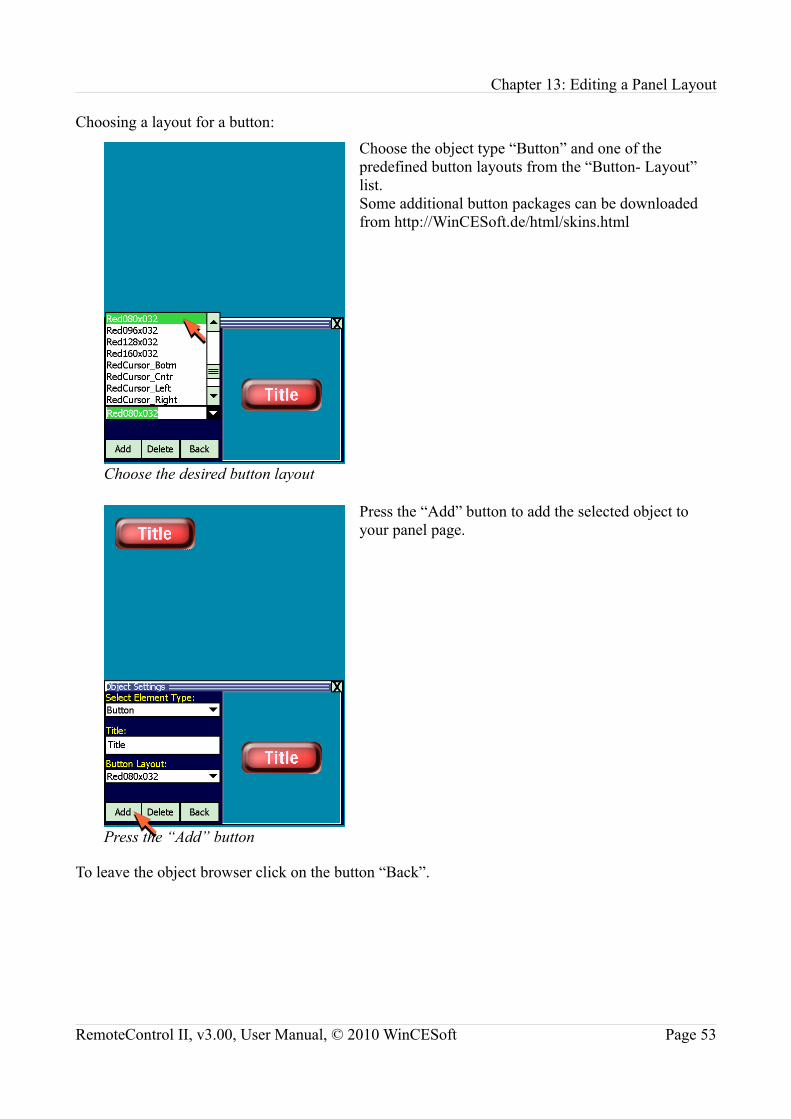
Choosing a layout for a button:
Choose the object type “Button” and one of the predefined button layouts from the “Button- Layout” list.Some additional button packages can be downloaded from http://WinCESoft.de/html/skins.html
Press the “Add” button to add the selected object to your panel page.
To leave the object browser click on the button “Back”.
RemoteControl II, v3.00, User Manual, © 2010 WinCESoft Page 53
Choose the desired button layout
Press the “Add” button
Chapter 13: Editing a Panel Layout
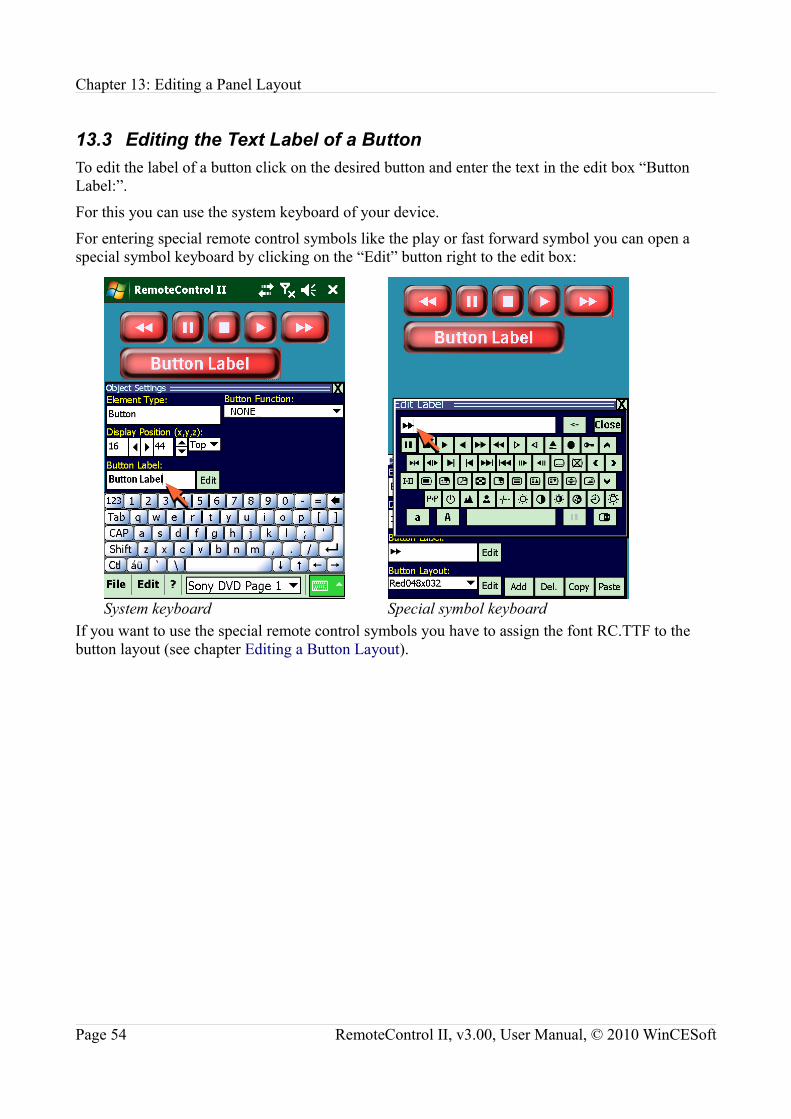
13.3 Editing the Text Label of a ButtonTo edit the label of a button click on the desired button and enter the text in the edit box “Button Label:”.
For this you can use the system keyboard of your device.
For entering special remote control symbols like the play or fast forward symbol you can open a special symbol keyboard by clicking on the “Edit” button right to the edit box:
If you want to use the special remote control symbols you have to assign the font RC.TTF to the button layout (see chapter Editing a Button Layout).
Page 54 RemoteControl II, v3.00, User Manual, © 2010 WinCESoft
System keyboard Special symbol keyboard

Chapter 13: Editing a Panel Layout
13.4 Deleting Objects from a PanelTo delete an object click on the object to select it and press “Delete” or click on the “Del.” button.
You can also use the “Delete Object” function from the context menu.
13.5 Moving and Placing Objects in a PanelAn object can be moved in three dimensions: Horizontally, vertically and into the depth.
13.5.1 Moving Objects horizontally and vertically.To move an object horizontally and vertically, click on the object and move it before the context menu pops up.
Alternatively you can click on an object, wait until the pop up menu appears an select “Move Object”.
To fine tune the position pixel wise you can use the positioning fields in the object settings dialog or use the cursor buttons of your device.
RemoteControl II, v3.00, User Manual, © 2010 WinCESoft Page 55
Delete a Object

Chapter 13: Editing a Panel Layout
13.5.2 Moving Objects into DepthTo change the depth layer of a object, select the object and the z position in the object settings dialog.
There exist three z positions:
Top: This places the object above all other objects with the position “center” and “bottom”.
Center:This places the object above all objects with the position “bottom” and under all objects with the position “top”
Bottom: This places the object under all objects with the position “center” and “top”.
Button A: Bottom
Button B: Center
Button C: Top
Button A: Center
Button B: Bottom
Button C: Top
Button A: Top
Button B: Bottom
Button C: Center
Page 56 RemoteControl II, v3.00, User Manual, © 2010 WinCESoft

Chapter 13: Editing a Panel Layout
13.6 Using the Edit RasterIt may be helpful to enable the edit raster to align objects to rows and columns.
To enable the raster set the “Show” check box, to snap the object to the raster set the “Snap” check box in the object settings dialog.
The raster size can be changed with the raster size edit boxes.
13.7 Locking Object MovesOnce you have finished placing all objects on your panel it may helpful to protect them from unintentional movement by hitting them with the stylus.
To lock the objects set the “Lock Objects” check box in the object settings dialog
The objects can still be moved pixel wise by using the cursor keys or the positioning fields in the object settings dialog.
RemoteControl II, v3.00, User Manual, © 2010 WinCESoft Page 57
Unaligned objects Enabled edit raster
Chapter 13: Editing a Panel Layout
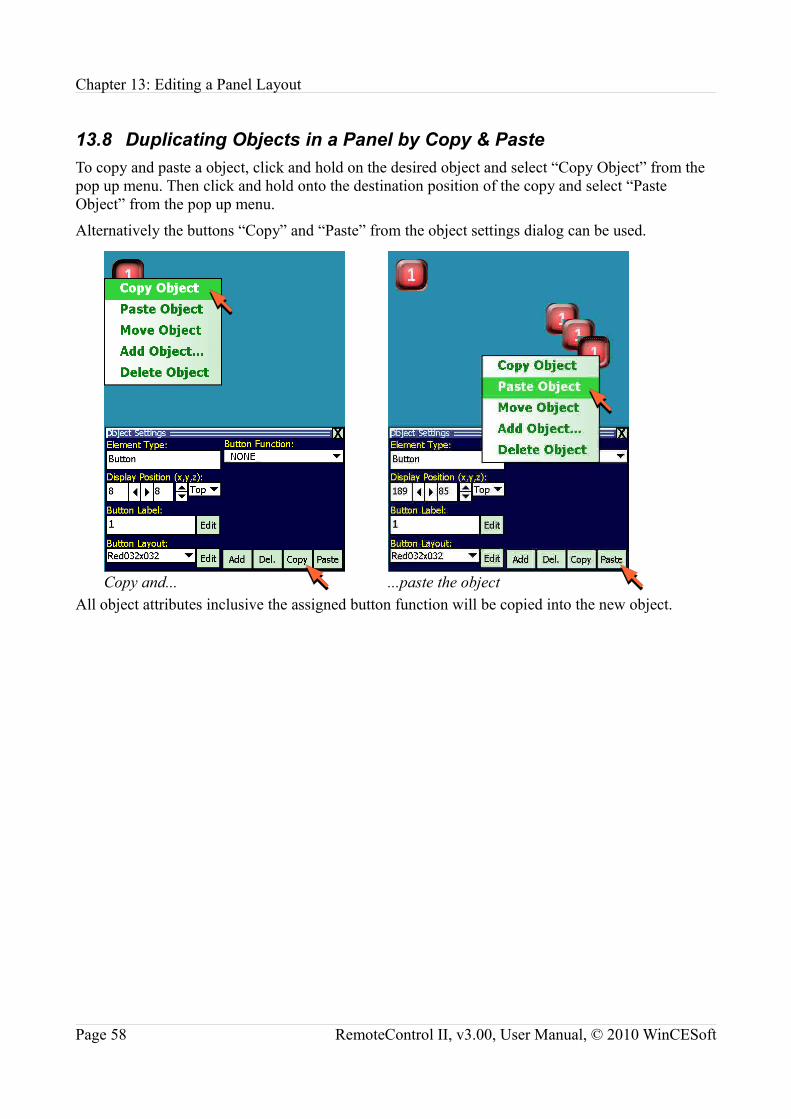
13.8 Duplicating Objects in a Panel by Copy & PasteTo copy and paste a object, click and hold on the desired object and select “Copy Object” from the pop up menu. Then click and hold onto the destination position of the copy and select “Paste Object” from the pop up menu.
Alternatively the buttons “Copy” and “Paste” from the object settings dialog can be used.
All object attributes inclusive the assigned button function will be copied into the new object.
Page 58 RemoteControl II, v3.00, User Manual, © 2010 WinCESoft
Copy and... ...paste the object

Chapter 13: Editing a Panel Layout
13.9 Changing the Panel Background Color and Background BitmapTo change the background, click on the background of the panel and choose a bitmap from the list.
To use a background color instead of a bitmap, choose from the bitmap list “_NONE_”, click on the button “Background Color” and choose a color.
RemoteControl II, v3.00, User Manual, © 2010 WinCESoft Page 59
Choose a background image
Choose “_NONE_” Choose a color for the background
Chapter 13: Editing a Panel Layout
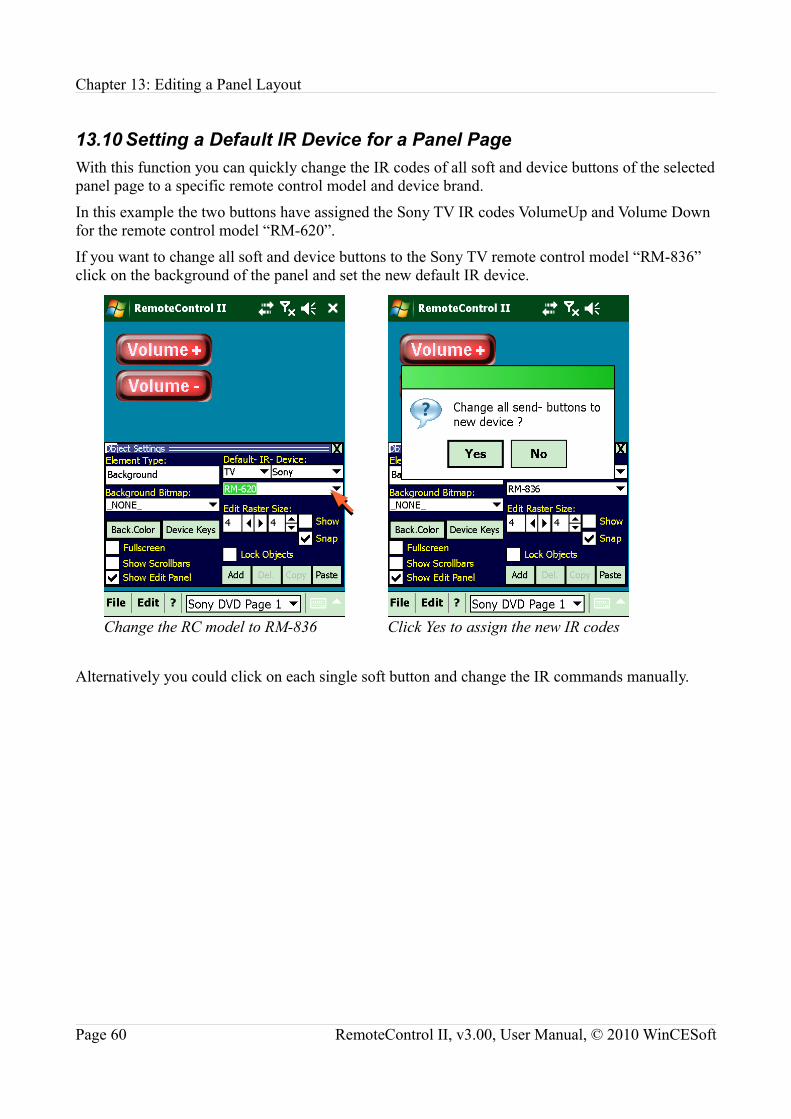
13.10 Setting a Default IR Device for a Panel PageWith this function you can quickly change the IR codes of all soft and device buttons of the selected panel page to a specific remote control model and device brand.
In this example the two buttons have assigned the Sony TV IR codes VolumeUp and Volume Down for the remote control model “RM-620”.
If you want to change all soft and device buttons to the Sony TV remote control model “RM-836” click on the background of the panel and set the new default IR device.
Alternatively you could click on each single soft button and change the IR commands manually.
Page 60 RemoteControl II, v3.00, User Manual, © 2010 WinCESoft
Change the RC model to RM-836 Click Yes to assign the new IR codes

Chapter 14: Editing a Button Layout
14 Editing a Button Layout
14.1 Modify a Existing Button LayoutTo edit the layout of a button select the desired button and click on the “Edit” button. This will open the button layout editor.
A button can have two states: Pressed and released.
For each of these two states a layout can be assigned.
To switch between the two states click on the “Position A” and “Position B” button:
RemoteControl II, v3.00, User Manual, © 2010 WinCESoft Page 61
Select the button and click on “Edit”
“Position A” for a released button “Position B” for a pressed button

Chapter 14: Editing a Button Layout
The font type, color, size and the text alignment and position offset can be modified for both button states:
To change the bitmap for a button state select one from the bitmap list.
You can add more bitmaps by copying them into the bitmaps directory in the RemoteControl II program folder (e.g. \Storage Card\Program Files\RemoteControl II\Bitmaps\).
Supported file formats are: BMP, GIF, JPG and PNG.
Page 62 RemoteControl II, v3.00, User Manual, © 2010 WinCESoft
Changing the text alignment Changing the font type
Changing the button bitmap
Chapter 14: Editing a Button Layout
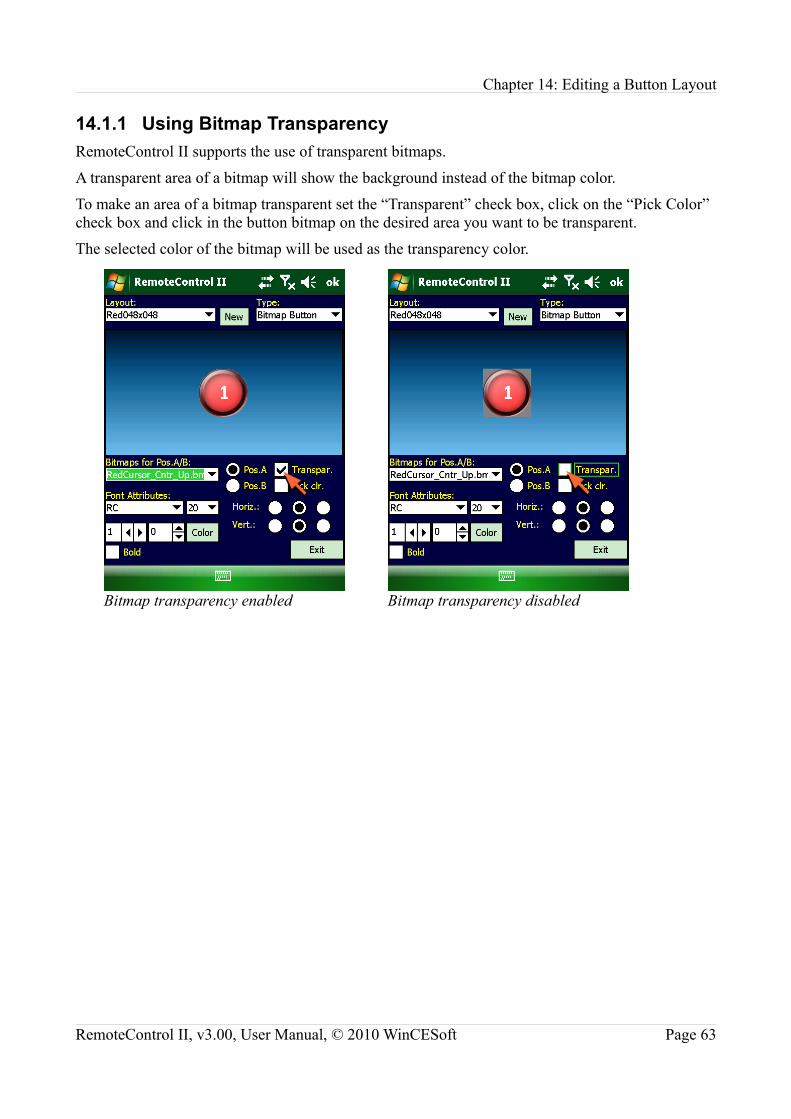
14.1.1 Using Bitmap TransparencyRemoteControl II supports the use of transparent bitmaps.
A transparent area of a bitmap will show the background instead of the bitmap color.
To make an area of a bitmap transparent set the “Transparent” check box, click on the “Pick Color” check box and click in the button bitmap on the desired area you want to be transparent.
The selected color of the bitmap will be used as the transparency color.
RemoteControl II, v3.00, User Manual, © 2010 WinCESoft Page 63
Bitmap transparency enabled Bitmap transparency disabled

Chapter 14: Editing a Button Layout
14.2 Create a New Button LayoutTo create a new button layout you need one or two button bitmaps for the pressed and released state.
Copy these bitmaps into the bitmap directory of the RemoteControl II program directory.
E.g. to \Storage Card\Program Files\RemoteControl II\Bitmaps\
Supported bitmap formats are BMP, GIF, JPG and PNG.
Step 1:
Add a new button with one of the existing layouts (e.g. “Battery 32”) to your panel.
Step 2:
Select the new added button and click on the “Edit” button to open the button layout editor.
Page 64 RemoteControl II, v3.00, User Manual, © 2010 WinCESoft
Add a new button with any layout
Select the new button and click on “Edit”
Chapter 14: Editing a Button Layout
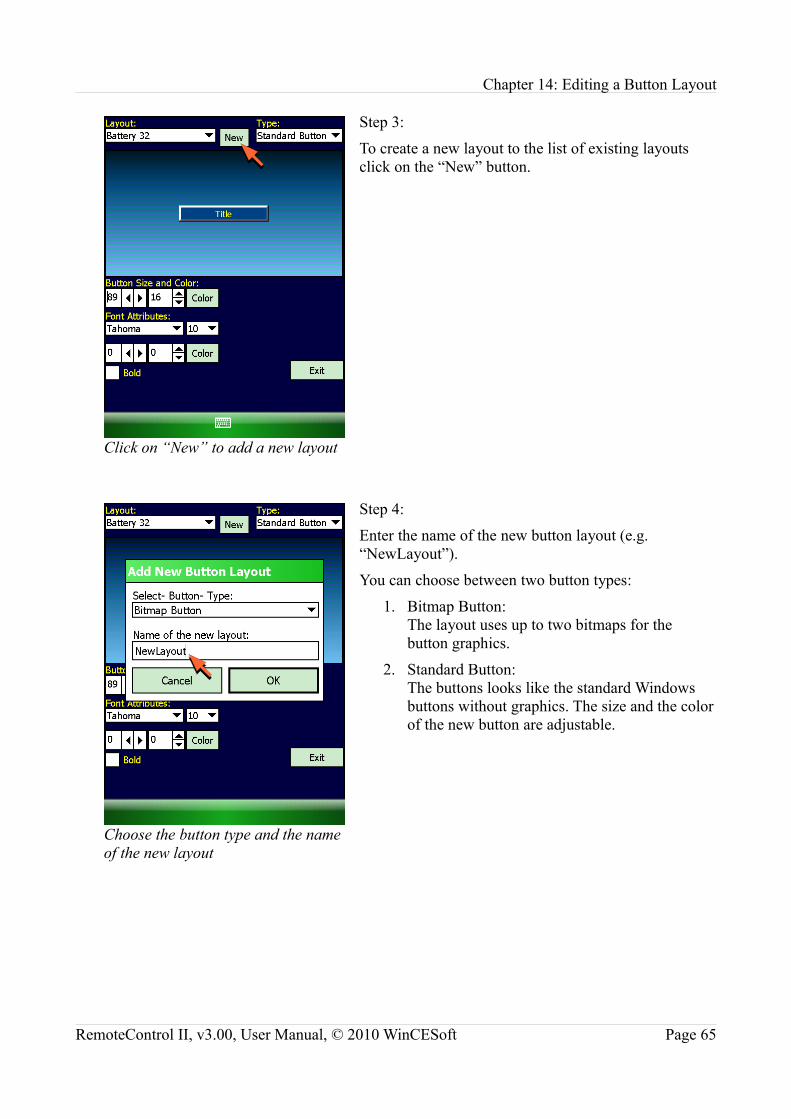
Step 3:
To create a new layout to the list of existing layouts click on the “New” button.
Step 4:
Enter the name of the new button layout (e.g. “NewLayout”).
You can choose between two button types:
1. Bitmap Button:The layout uses up to two bitmaps for the button graphics.
2. Standard Button:The buttons looks like the standard Windows buttons without graphics. The size and the color of the new button are adjustable.
RemoteControl II, v3.00, User Manual, © 2010 WinCESoft Page 65
Click on “New” to add a new layout
Choose the button type and the name of the new layout
Chapter 14: Editing a Button Layout
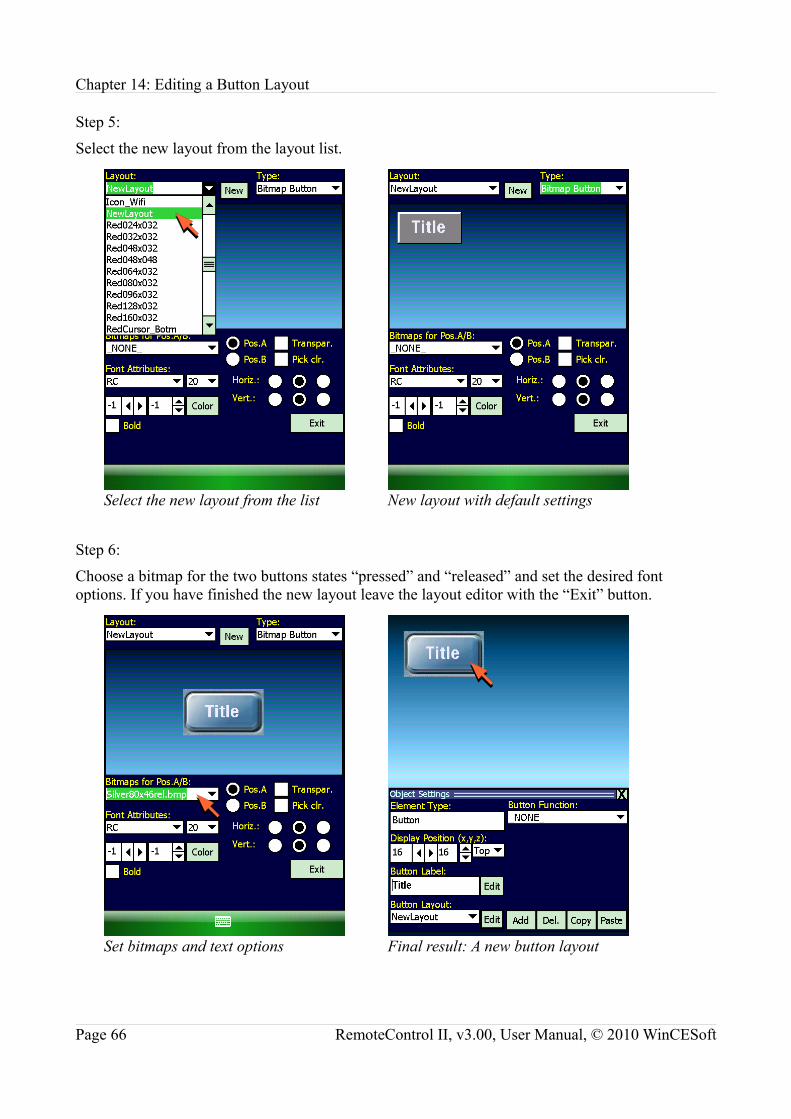
Step 5:
Select the new layout from the layout list.
Step 6:
Choose a bitmap for the two buttons states “pressed” and “released” and set the desired font options. If you have finished the new layout leave the layout editor with the “Exit” button.
Page 66 RemoteControl II, v3.00, User Manual, © 2010 WinCESoft
Select the new layout from the list New layout with default settings
Set bitmaps and text options Final result: A new button layout

Chapter 15: Assigning Functions to Buttons
15 Assigning Functions to ButtonsAfter finishing the layouts of the panels the included buttons needs to get their functionality.
All soft and device buttons can be assigned with several functions like sending a infrared command, sending a HTTP request to a server, jumping to another panel, calling an external applications inclusive command line parameters, swapping the full screen mode or exiting RC-II.
All functions are described in chapter 16, “Button and Macro Functions”.
15.1 Assigning Functions to Soft ButtonsStep 1:
To assign a function to a soft button select the desired button from the panel.
Per default a new button has assigned the function “_NONE_” (no function).
Step 2:
Select the desired function from the button function list.
RemoteControl II, v3.00, User Manual, © 2010 WinCESoft Page 67
Select the button to assign a function
Choose the button function

Chapter 15: Assigning Functions to Buttons
Step 3:
Set additional parameters for the selected button function.
For the function “Jump to panel” you have to choose the destination panel you want to display after clicking the assigned button.
The additional parameters depends on the selected function.
If you have selected the function “Send IR Code” you will need to choose the the parameters for the IR code you want to send (e.g. device type: “TV”, device brand: “Sony”, model number: “RM-836”. IR command: “Channel Up”).
Page 68 RemoteControl II, v3.00, User Manual, © 2010 WinCESoft
Set additional function parameters
Options for sending a IR command

Chapter 15: Assigning Functions to Buttons
15.2 Assigning Functions to Device ButtonsFor each panel the device buttons can be individually assigned with button functions.
If you swap to another panel the assigned button function will change to a new function set.
Per default the button Enter/OK has the function “Toggle Full Screen” assigned.
Step 1:
Click somewhere on the background of the panel to show the object settings for the selected panel.
To open the device button editor click on the button “Device Keys”
Step 2:
In the device button editor click on the button “Add” to create a new function assignment.
RemoteControl II, v3.00, User Manual, © 2010 WinCESoft Page 69
Click on the button “Device Keys”
Click on “Add” to assign a function

Chapter 15: Assigning Functions to Buttons
Step 3:
RemoteControl is now waiting for a button press on one of the device buttons.
Step 4:
Press any of the device buttons (e.g. the up arrow button).
RC-II will display the recognised button code.
If you have pressed the desired device button click on the “OK” button to leave the button scanner dialog.
Page 70 RemoteControl II, v3.00, User Manual, © 2010 WinCESoft
RC II is waiting for a button press
Press any button on your device

Chapter 15: Assigning Functions to Buttons
The recognized device button “UP ARROW” will be added to the list.
Per default the button has assigned the buttons function “_NONE_” (no function).
Step 5:
Now you can assign one of the button functions (e.g. “Send IR Code”).
RemoteControl II, v3.00, User Manual, © 2010 WinCESoft Page 71
Recognized device button
Choose a button function

Chapter 15: Assigning Functions to Buttons
Step 6:
Set the optional parameters for the assigned device button function.
Configure all desired device buttons.
To leave the device button editor click on the “Back” button.
Page 72 RemoteControl II, v3.00, User Manual, © 2010 WinCESoft
Set additional function parameters
Configure additional device buttons

Chapter 16: Button and Macro Functions
16 Button and Macro FunctionsFunctions can be assigned to soft- and device buttons and can be also called from function macros.
Overview of which functions are callable from soft buttons, device buttons and macros:
Function Available for Soft Buttons
Available for Device Buttons
Available for Macros
Call External Program yes no noCall Macro yes yes noClose RC II yes yes noHide RC II yes yes noJump to Panel yes yes yesSend HTTP Request yes yes yesSend IR Code yes yes yesShow Battery Gauge yes no noShow Memory Gauge yes no noShow Panel List yes yes noShow Time yes no noToggle Fullscreen yes yes noWait (for macros only) no no yes
RemoteControl II, v3.00, User Manual, © 2010 WinCESoft Page 73

Chapter 16: Button and Macro Functions
16.1 Function “Call External Programs”With this function a external application can be launched.
A command line parameter for the launching application can be attached.
Step 1:
Select the soft button to assign the button function and select the button function “Call External Program” from the function list.
Step 2:
To select the external application click on the “Browse” button.
This will open a file browser.
Select the desired application (e.g. the Internet Explorer iexplore.exe) and click on the OK button.
Page 74 RemoteControl II, v3.00, User Manual, © 2010 WinCESoft
Select the button function
Choose the external application

Chapter 16: Button and Macro Functions
Step 3:
Enter the optionally command line for the application.
If you call the Internet Explorer you could enter a URL to a on-line EPG service like “www.zingzing.co.uk”, “tvpixie.com/tv-listings”, “www.tvpal.co.uk”, “www.tvtv.de” or similar.
If you close the layout editor and click on the button with the new assigned button function, Internet Explorer will be launched and the web server with the URL “www.zingzing.co.uk” connected.
After closing the launched application RC-II will be visible again.
RemoteControl II, v3.00, User Manual, © 2010 WinCESoft Page 75
Enter the optionally command line
Launched IE with EPG
Chapter 16: Button and Macro Functions
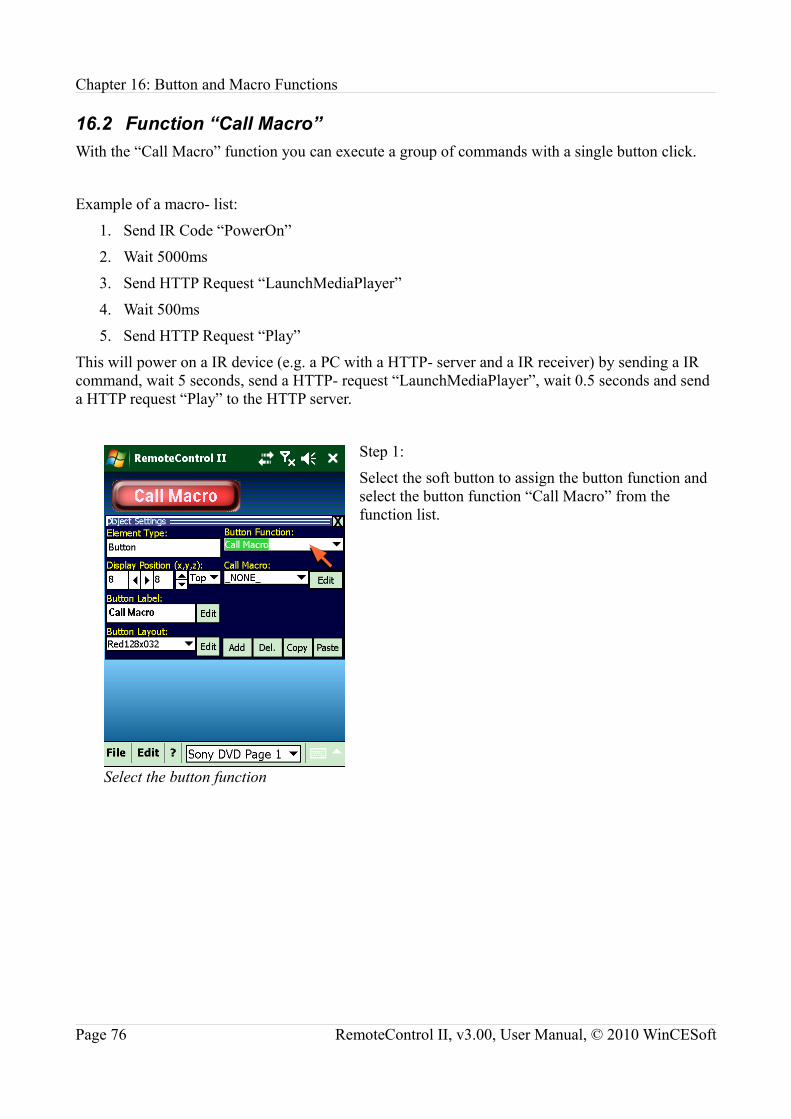
16.2 Function “Call Macro”With the “Call Macro” function you can execute a group of commands with a single button click.
Example of a macro- list:
1. Send IR Code “PowerOn”
2. Wait 5000ms
3. Send HTTP Request “LaunchMediaPlayer”
4. Wait 500ms
5. Send HTTP Request “Play”
This will power on a IR device (e.g. a PC with a HTTP- server and a IR receiver) by sending a IR command, wait 5 seconds, send a HTTP- request “LaunchMediaPlayer”, wait 0.5 seconds and send a HTTP request “Play” to the HTTP server.
Step 1:
Select the soft button to assign the button function and select the button function “Call Macro” from the function list.
Page 76 RemoteControl II, v3.00, User Manual, © 2010 WinCESoft
Select the button function

Chapter 16: Button and Macro Functions
Step 2:
Choose a predefined macro from the list of available macros
16.2.1 Editing Function MacrosTo modify existing or create new macro lists click on the button “Edit”. This will open the macro list editor.
RemoteControl II, v3.00, User Manual, © 2010 WinCESoft Page 77
Choose a macro from the list
Click on Edit

Chapter 16: Button and Macro Functions
16.2.1.1Modifying Existing MacrosIn the macro editor the list of function calls can be modified.
Choose the desired macro from the “Used Macro List” and the included functions calls will be listed.
To add a new function call to the list, place the cursor onto one of the already included function calls and click on the “add” button.
The new function will be inserted beneath the selected function.
The options of the selected function will be copied to the new function.
Page 78 RemoteControl II, v3.00, User Manual, © 2010 WinCESoft
Macro List Editor
Add a function to the macro list

Chapter 16: Button and Macro Functions
To change the function of the selected entry choose a new function from the function list.
16.2.1.2Creating new MacrosStep 1:
To create a new macro click on the “New” button.
RemoteControl II, v3.00, User Manual, © 2010 WinCESoft Page 79
Set the function of the new entry
For a new macro click on “New”

Chapter 16: Button and Macro Functions
Step 2:
Enter the name of the new macro and click on “OK”.
Step 3:
A new macro with a empty function list was created.
Click on the “Add” button to insert the desired function calls to the macro list.
Page 80 RemoteControl II, v3.00, User Manual, © 2010 WinCESoft
Enter the name of the new macro
New macro with empty function list

Chapter 16: Button and Macro Functions
16.3 Function “Close RC-II”“Close RC II” will close the RemoteControl II application.
This function has no additional options.
16.4 Function “Hide RC-II”On PocketPCs or Windows Mobile devices the application window of RC-II will be moved into the background.
On Windows CE devices the Window of RC-II will be minimized.
The window can be reactivated on PocketPCs by the task manager or by clicking on the RemoteControl II program icon.
On Windows CE devices by a click on the RC-II taskbar button.
This function has no additional options.
RemoteControl II, v3.00, User Manual, © 2010 WinCESoft Page 81
Function “Close RC II”
Function “Hide RC II”
Chapter 16: Button and Macro Functions
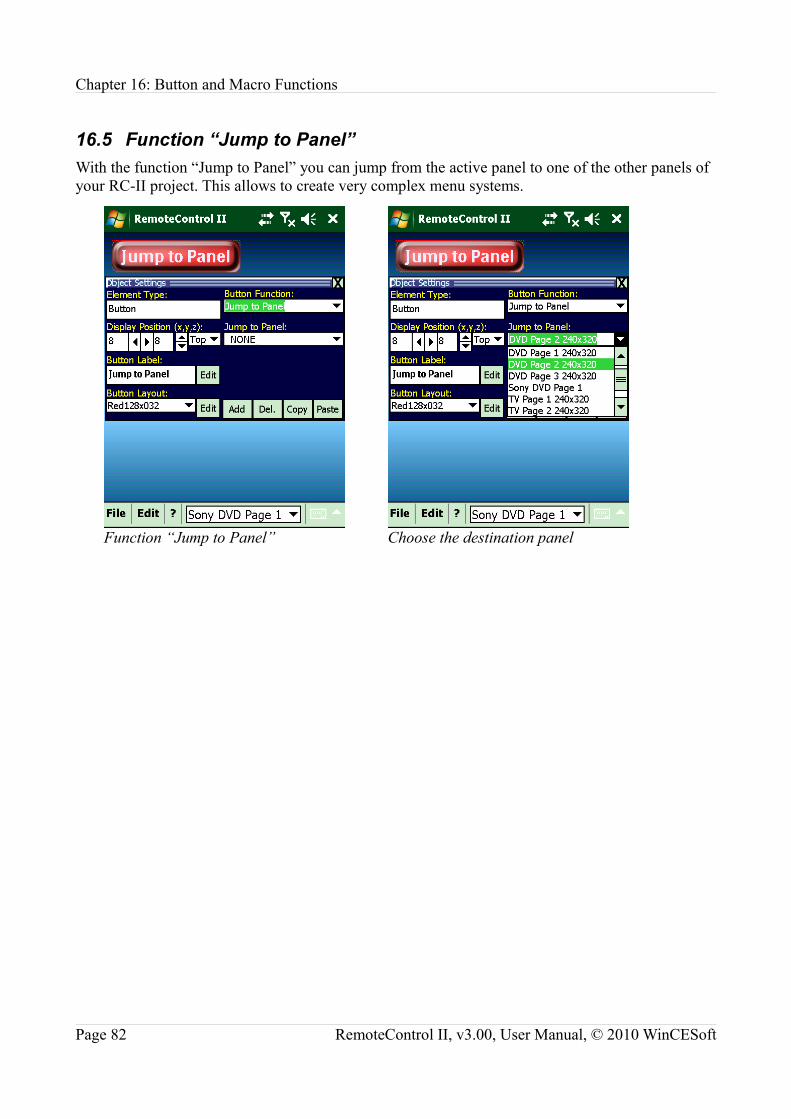
16.5 Function “Jump to Panel”With the function “Jump to Panel” you can jump from the active panel to one of the other panels of your RC-II project. This allows to create very complex menu systems.
Page 82 RemoteControl II, v3.00, User Manual, © 2010 WinCESoft
Function “Jump to Panel” Choose the destination panel
Chapter 16: Button and Macro Functions
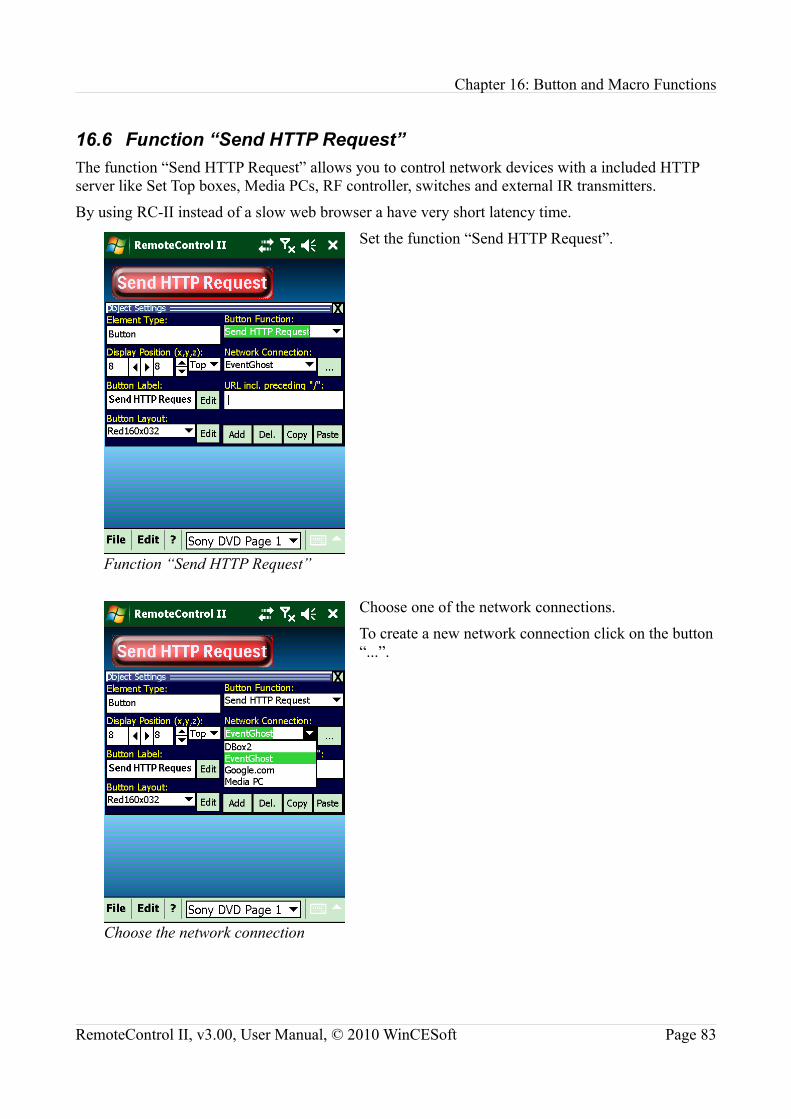
16.6 Function “Send HTTP Request”The function “Send HTTP Request” allows you to control network devices with a included HTTP server like Set Top boxes, Media PCs, RF controller, switches and external IR transmitters.
By using RC-II instead of a slow web browser a have very short latency time.
Set the function “Send HTTP Request”.
Choose one of the network connections.
To create a new network connection click on the button “...”.
RemoteControl II, v3.00, User Manual, © 2010 WinCESoft Page 83
Function “Send HTTP Request”
Choose the network connection
Chapter 16: Button and Macro Functions
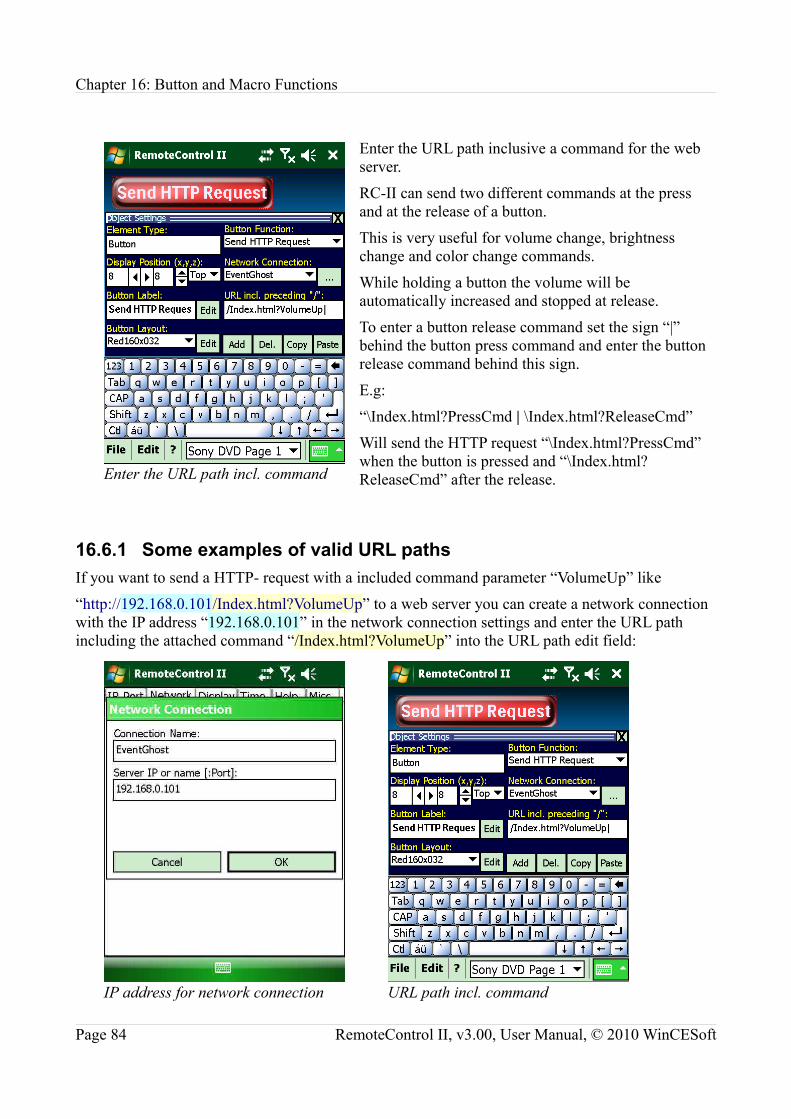
Enter the URL path inclusive a command for the web server.
RC-II can send two different commands at the press and at the release of a button.
This is very useful for volume change, brightness change and color change commands.
While holding a button the volume will be automatically increased and stopped at release.
To enter a button release command set the sign “|” behind the button press command and enter the button release command behind this sign.
E.g:
“\Index.html?PressCmd | \Index.html?ReleaseCmd”
Will send the HTTP request “\Index.html?PressCmd” when the button is pressed and “\Index.html?ReleaseCmd” after the release.
16.6.1 Some examples of valid URL pathsIf you want to send a HTTP- request with a included command parameter “VolumeUp” like
“http://192.168.0.101/Index.html?VolumeUp” to a web server you can create a network connection with the IP address “192.168.0.101” in the network connection settings and enter the URL path including the attached command “/Index.html?VolumeUp” into the URL path edit field:
Page 84 RemoteControl II, v3.00, User Manual, © 2010 WinCESoft
Enter the URL path incl. command
IP address for network connection URL path incl. command

Chapter 16: Button and Macro Functions
Alternatively the URL “http://192.168.0.101:80/Index.html?VolumeUp” can be split into “192.168.0.101:80/Index.html” for the network connection and “?VolumeUp” for the the URL edit field:
Splitting the URL “http://192.168.0.101/Index.html?VolumeUp” into
“192.168.0.101/Index.html?" and "VolumeUp” is also valid.
With this you only have to enter the HTTP- request commands without any “/” or “Index.html” or “?” in the prefix.
Please see chapter 20, “Network Application Examples” for further examples.
RemoteControl II, v3.00, User Manual, © 2010 WinCESoft Page 85
IP address incl. part of the URL path Second path of URL incl command

Chapter 16: Button and Macro Functions
16.7 Function “Send IR Code”If your device has a built in IR /IrDA port you can use this to send IR commands to your home equipment.
Most PocketPC and mobile phone devices until 2007 has a IrDA port included because of a requirement from Microsoft for these device types.
IrDA is primary used to connect the Windows CE device via ActiveSync to a laptop, IR printer or to use a mobile phone for a internet connection via GSM/GPRS/EDGE/UMTS.
On more recent Windows CE devices IrDA was substituted by Bluetooth.
Low priced devices with IrDA port are still available at eBay. We have listed some tested Windows CE devices in chapter 21, “List of Tested Devices with includedInfrared Port“
To assign a IR- send command to a button choose “Send IR Code” from the button function list.
Then choose the IR device type, the manufacturer, the remote control type and the IR command from the IR database.
If your IR device is still not included in the IR database you can add new IR codes to this database (see chapter 18, ”The Infrared Code Database”) or use the IR quick learn function instead. See chapter 17.1, “IR QuickLearn Mode”.
Page 86 RemoteControl II, v3.00, User Manual, © 2010 WinCESoft
Choose the IR device and command
Function “Set IR Code”

Chapter 16: Button and Macro Functions
16.8 Function “Show Battery Gauge”This function will display a remaining battery capacity text or alternatively a battery capacity bar on the selected button.
Select the function “Show Battery Gauge”
If you change the bitmap button to a standard button you can also display a battery capacity bar.
The predefined button layout “Battery” uses a standard button.
RemoteControl II, v3.00, User Manual, © 2010 WinCESoft Page 87
Function “Show Battery Gauge”
Capacity bar with a standard button

Chapter 16: Button and Macro Functions
By editing the button layout the dimensions and the color of the capacity bar can be modified.
16.9 Function “Show Memory Gauge”This function will use the selected button to display the used and free system memory of the device.
Select the function “Show Memory Gauge” from the button function list.
The layout can be also changed as described in the chapter 16.8, “Function “Show Battery Gauge””.
Page 88 RemoteControl II, v3.00, User Manual, © 2010 WinCESoft
Changing the dimensions of the bar Batter capacity bar with new layout
Function “Show Memory Gauge”

Chapter 16: Button and Macro Functions
16.10 Function “Show Panel List”With this function a jump list to all the included panel pages of the active RemoteControl II project can be displayed.
Select the function “Show Panel List” from the list of button functions.
With a click on the button with the assigned function a list with all panel pages is displayed.
Click one of the entries to jump to the desired panel.
RemoteControl II, v3.00, User Manual, © 2010 WinCESoft Page 89
Function “Show Panel List”
Opened panel jump list

Chapter 16: Button and Macro Functions
16.11 Function “Show Time”This function will display the system time on the selected button.
Select he function “Show Time” from the the list of button functions.
The format of the time text can be changed in the settings dialog of RemoteControl II:
Page 90 RemoteControl II, v3.00, User Manual, © 2010 WinCESoft
Function “Show Time”
Choose the time format New time format

Chapter 16: Button and Macro Functions
16.12 Function “Toggle Fullscreen”This function will toggle between the fullscreen and menu mode.
Select the function “Toggle Fullscreen” from the button function list.
With a click on the button the display will toggle between the menu- and fullscreen mode:
RemoteControl II, v3.00, User Manual, © 2010 WinCESoft Page 91
Function “Toggle Fullscreen”
Menu mode Fullscreen mode

Chapter 17: Learning new Infrared Commands
17 Learning new Infrared CommandsIf your device has a built in IR/IrDA port you can send IR commands to your home equipment and learn new commands from your original remote controls.
Most PocketPC and mobile phone devices until 2007 have a IrDA port included because of a requirement from Microsoft for these device types.
IrDA is primary used to connect the Windows CE device via ActiveSync to a laptop, IR printer or to use a mobile phone for a internet connection via GSM/GPRS/EDGE/UMTS.
On more recent Windows CE devices IrDA was substituted by Bluetooth.
Low priced devices with IrDA port are available at eBay. We have listed some tested Windows CE devices in chapter 21, “List of Tested Devices with included Infrared Port“
RemoteControl II supports three ways to learn new IR commands:
1. Using the quick learn mode described in chapter 17.1, “IR Quick Learn Mode”
2. Creating new devices and learning in the IR database described in chapter 18.1, “Creatingnew IR Database Entries”
3. By entering CCF IR hex codes into the IR database described in chapter 18.2, “ImportingCCF IR Hex Codes”
For learning new IR codes the IrDA COM port has to be first selected in the settings dialog (see chapter 7.1, “Infrared / IrDA- Port Settings”).
17.1 IR Quick Learn ModeThe easiest way to learn new IR codes from your original remote control is the “quick learn” mode.
For this, the panel page layout should be completed and all required soft buttons already included.
To start the IR quick learn mode click on the menu “Edit->IR Quick Learn...”.
Page 92 RemoteControl II, v3.00, User Manual, © 2010 WinCESoft
Start the IR quick learn mode

Chapter 17: Learning new Infrared Commands
RC-II will display a short instruction message on how to teach new IR codes.
If your original remote control uses a toggle code IR format set the “Learn toggle codes” option.
If you have learned from a remote control which uses the IR toggle code format without set this option, only every second sent command will be recognized from the controlled device.
Click on “OK” to start the quick learn mode.
Activate the fullscreen mode if the buttons you want to teach are not visible.
Click on the button you want to teach a new IR command.
RemoteControl II, v3.00, User Manual, © 2010 WinCESoft Page 93
Click on “OK” to start the IR teaching process
Optionally: Activate the fullscreen mode
Click on the button you want to teach a IR code
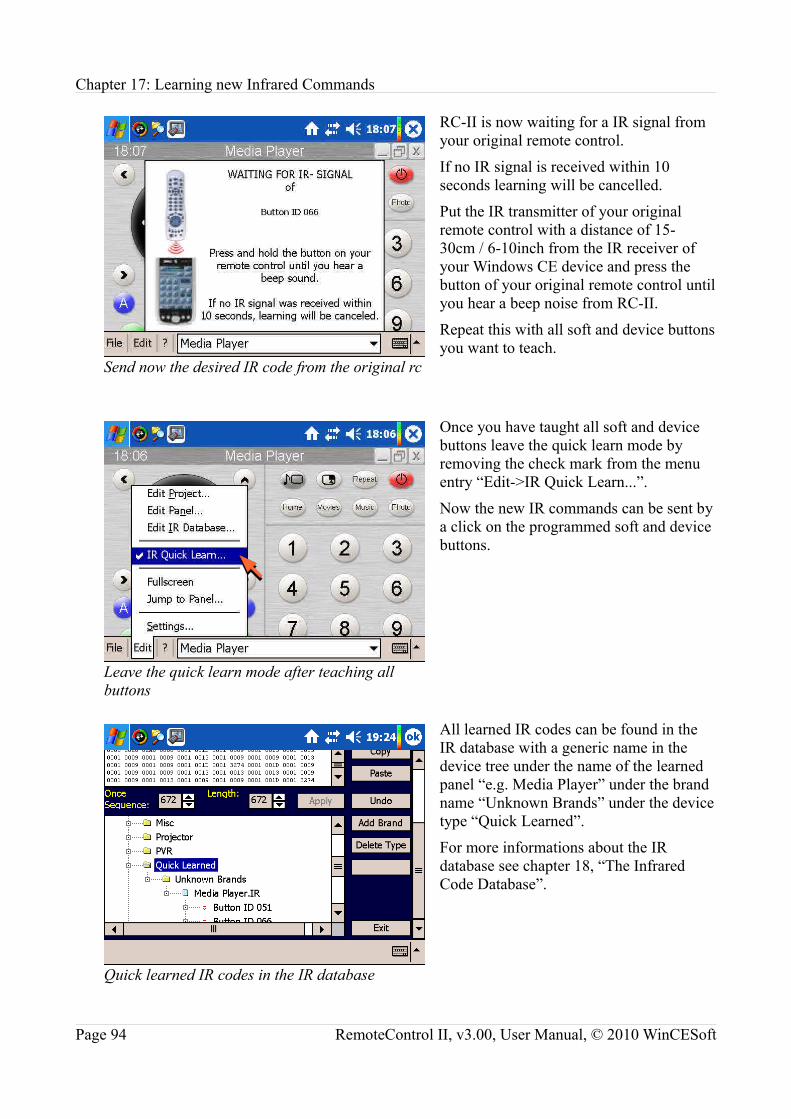
Chapter 17: Learning new Infrared Commands
RC-II is now waiting for a IR signal from your original remote control.
If no IR signal is received within 10 seconds learning will be cancelled.
Put the IR transmitter of your original remote control with a distance of 15-30cm / 6-10inch from the IR receiver of your Windows CE device and press the button of your original remote control until you hear a beep noise from RC-II.
Repeat this with all soft and device buttons you want to teach.
Once you have taught all soft and device buttons leave the quick learn mode by removing the check mark from the menu entry “Edit->IR Quick Learn...”.
Now the new IR commands can be sent by a click on the programmed soft and device buttons.
All learned IR codes can be found in the IR database with a generic name in the device tree under the name of the learned panel “e.g. Media Player” under the brand name “Unknown Brands” under the device type “Quick Learned”.
For more informations about the IR database see chapter 18, “The InfraredCode Database”.
Page 94 RemoteControl II, v3.00, User Manual, © 2010 WinCESoft
Send now the desired IR code from the original rc
Leave the quick learn mode after teaching all buttons
Quick learned IR codes in the IR database

Chapter 17: Learning new Infrared Commands
18 The Infrared Code DatabaseIn the IR database you can display and modifying existing IR codes, creating new IR code device collections and importing IR CCF hex codes.
To start the IR database click on the menu entry“Edit->Edit IR Database...”.
In the upper third you can see the pulse graph of the selected IR codes in the tree.
In the mid a editor window with the CCF IR hex code. Here you can modify existing codes or enter new IR- hex codes manually.
In the bottom you can see a tree with all IR codes.
The tree has the following structure:+-Device Type 1 (e.g. VCR, DVD, TV, etc.)| +-Device Manufacturer 1 (e.g. NEC, Kenwood, etc.) | +-Device Model 1 (e.g. RB-D1G)| +-IR Function 1 (e.g. “Channel Down”)| | +-IR Code 1| | +-IR Code 2 (Optional only for toggle codes)| | +-Some additional infos| +-IR Function 2 (e.g. “Channel Up”)| +-IR Function n... +-Device Type n...
RemoteControl II, v3.00, User Manual, © 2010 WinCESoft Page 95
Start the IR Database
The IR Database

Chapter 18: The Infrared Code Database
18.1 Creating new IR Database EntriesTo add new IR devices to the IR database there exist two methods:
1. By using the quick learn method described in chapter 17.1, “IR Quick Learn Mode”.The new IR codes are stored under the device type “Quick learned”, the manufacturer name will be always “Unknown Brands”, the model name will get the name of the panel where the taught buttons are included and the IR code functions will get a generic name like “Button ID 019” or “HardKey 195”.
2. By adding a new device type, manufacturer, device model and the names of the included IR codes manually.This method is preferred if you want to build a reusable IR- database because you have defined names for the device type, manufacturer, device model and IR codes instead of the generic names of the quick learn method.This method is also required if you want to import CCF IR hex codes into the database.
To add new IR codes to the IR database you have to select one of the existing device types in the tree or add a new device type category.
Step 1:
To add a new device type category select the root of the tree and click on the button “Add Type”.
Page 96 RemoteControl II, v3.00, User Manual, © 2010 WinCESoft
Add a new device type category

Chapter 18: The Infrared Code Database
Step 2:
RC-II will ask you for a new device type category. You can chose one of the predefined from the list or enter a new device type (e.g. “Video Games”).
Step 3:
To add a new device manufacturer name to the newly created device type category select the new device type in the tree and click on the “Add Brand” button.
RemoteControl II, v3.00, User Manual, © 2010 WinCESoft Page 97
Enter the new device type category
Add a device manufacturer name

Chapter 18: The Infrared Code Database
Step 4:
Choose one of the predefined manufacturer names from the list or enter a new name.
Step 5:
To add a new remote control to the manufacturer select the newly created manufacturer in the tree and click on the “Add RC” button.
Page 98 RemoteControl II, v3.00, User Manual, © 2010 WinCESoft
Enter the name of the brand
Add a new remote control
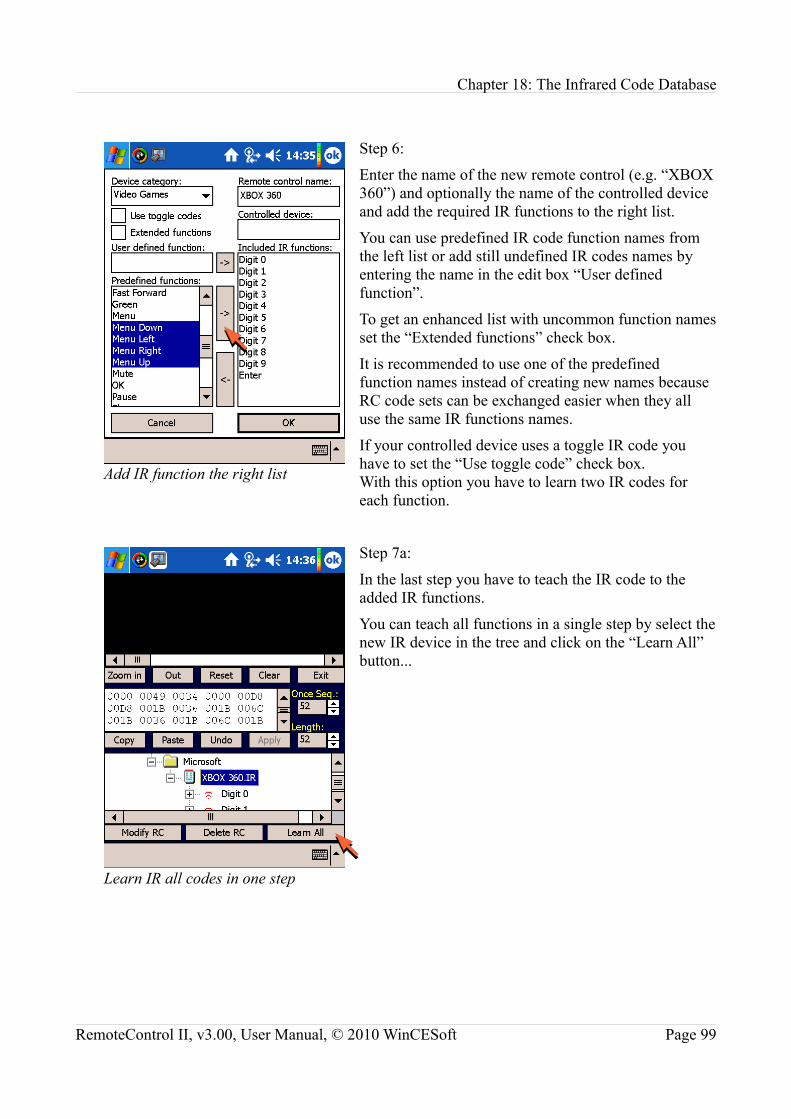
Chapter 18: The Infrared Code Database
Step 6:
Enter the name of the new remote control (e.g. “XBOX 360”) and optionally the name of the controlled device and add the required IR functions to the right list.
You can use predefined IR code function names from the left list or add still undefined IR codes names by entering the name in the edit box “User defined function”.
To get an enhanced list with uncommon function names set the “Extended functions” check box.
It is recommended to use one of the predefined function names instead of creating new names because RC code sets can be exchanged easier when they all use the same IR functions names.
If your controlled device uses a toggle IR code you have to set the “Use toggle code” check box.With this option you have to learn two IR codes for each function.
Step 7a:
In the last step you have to teach the IR code to the added IR functions.
You can teach all functions in a single step by select the new IR device in the tree and click on the “Learn All” button...
RemoteControl II, v3.00, User Manual, © 2010 WinCESoft Page 99
Add IR function the right list
Learn IR all codes in one step

Chapter 18: The Infrared Code Database
Step 7b:
...or teach each IR function step by step by selecting the
IR function from the tree and click the “Learn IR-Code” button.
Step 8:
RC-II is now waiting for a IR signal from your original remote control.
If no IR signal is received within 10 seconds learning will be cancelled.
Put the IR- transmitter of your original remote control with a distance of 15-30cm / 6-10inch from the IR- receiver of your Windows CE device and press the button of your original remote control until you hear a beep noise from RC-II.
If you have clicked on the “Learn All” button, RC-II will automatically ask for the next IR code until all codes of the new device are learned.
Page 100 RemoteControl II, v3.00, User Manual, © 2010 WinCESoft
Learn a single IR code
Send now the requested IR code

Chapter 18: The Infrared Code Database
Step 9:
In the last step you can verify and test the learned code by selecting the code in the tree and click on the “Send IR-Code“ button.
Here you can also verify and edit the IR code manually if you find any drop outs in the signal.
The red part of a signal is the looped signal, the green part a single shot signal.
There exist also IR codes which start with a single sequence and end with a looped sequence.
The looped sequence will be repeated until the soft or device button is released.
If the signal of the original remote control has to much drop outs, RC-II can't automatically detect the looped area of the IR signal.
If your mobile device behaves sluggish or freezes while sending a IR signal, the IR code may be very long (>3s). Try to relearn this IR code again or make only very short button presses on your original remote control while learning.
RemoteControl II, v3.00, User Manual, © 2010 WinCESoft Page 101
Test the code with “Send IR-Code”

Chapter 18: The Infrared Code Database
18.2 Importing CCF IR Hex CodesIf you don't have the original remote control any more or if you want to use special discrete IR codes you can import IR codes in the CCF IR hex format.
This format is used by the Phillips Pronto (http://www.pronto.philips.com/) and other remote controls.
Sample of a discrete Power ON IR hex code for a Sony TV:0000 0066 0000 000d 0061 0018 0018 0018 0030 0018 0030 0018 0030 0018 0018 0018 0030 0018 0018 0018 0030 0018 0018 0018 0018 0018 0018 0018 0018 0417You can find thousands of these CCF IR hex codes and layout files with included CCF IR hex codes at:
http://www.google.com/search?q=pronto+ccf+hex+0000
http://www.remotecentral.com/cgi-bin/files/rcfiles.cgi?area=pronto&db=discrete
http://www.remotecentral.com/cgi-bin/files/rcfiles.cgi?area=pronto&db=devices
If the desired IR code is not available as plain text but included in a Pronto CCF file you can extract the hex codes with the Phillips ProntoEdit layout editor or with this tool:
http://ccftools.free.fr/files/CCFTools%20Setup053_099_pre7.exe from http://ccftools.free.fr/
To import a IR hex- code into the RemoteControl II IR database:
1. Open the RC-II IR editor
2. Select a IR code from the IR codes list
3. Copy and paste the IR hex code into the edit field of the IR database and press the "apply" button
18.2.1 Supported CCF IR Hex Code FormatsThe following CCF IR hex formats are supported:
0000 – Raw oscillated code
0100 – Raw unmodulated code
5000 – RC5
5001 – RC5x
6000 – RC6 Mode 0
6001 - RC6x
Page 102 RemoteControl II, v3.00, User Manual, © 2010 WinCESoft

Chapter 18: The Infrared Code Database
18.3 The CCF IR Hex Code FormatThere exist many descriptions about the Pronto CCF IR hex format in the web.
I recommend reading these two documents if you want to know more about this IR code format.
Learned IR Code Display Format:http://www.the-gordons.net/homepage/Downloads/IRDocs.zip
Pronto IR Formats:http://www.hifi-remote.com/infrared/prontoirformats.pdf
RemoteControl II, v3.00, User Manual, © 2010 WinCESoft Page 103
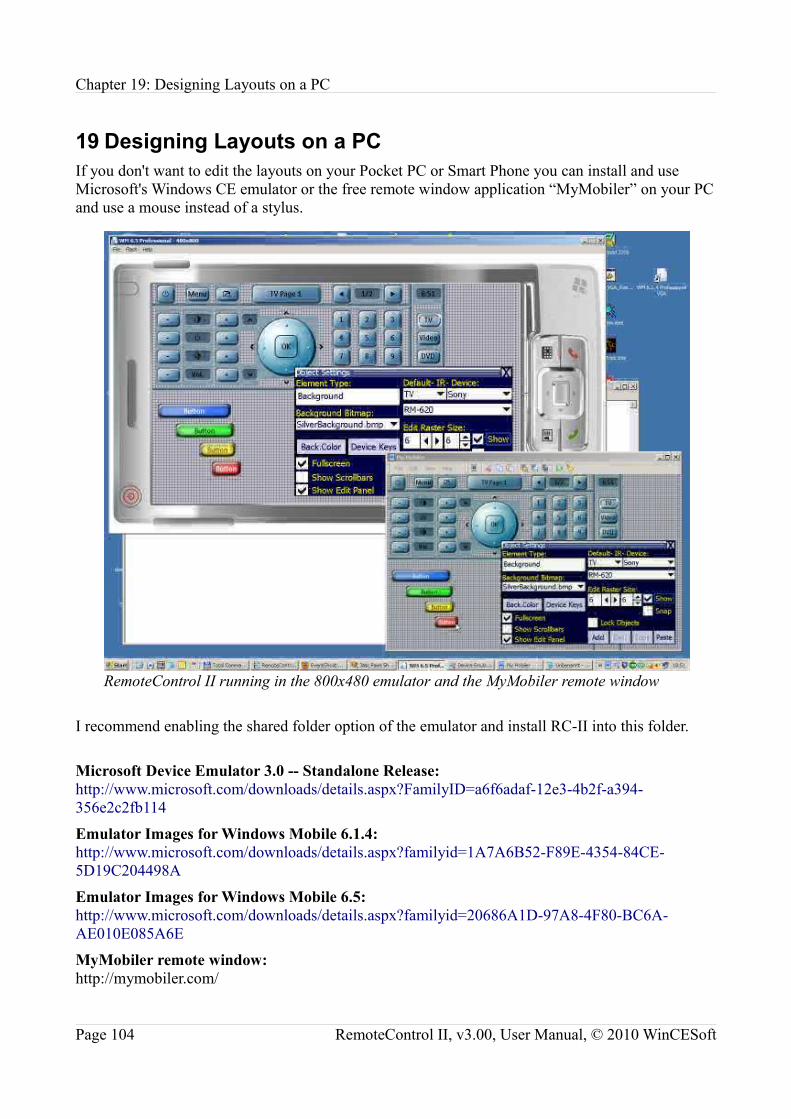
Chapter 19: Designing Layouts on a PC
19 Designing Layouts on a PCIf you don't want to edit the layouts on your Pocket PC or Smart Phone you can install and use Microsoft's Windows CE emulator or the free remote window application “MyMobiler” on your PC and use a mouse instead of a stylus.
I recommend enabling the shared folder option of the emulator and install RC-II into this folder.
Microsoft Device Emulator 3.0 -- Standalone Release:http://www.microsoft.com/downloads/details.aspx?FamilyID=a6f6adaf-12e3-4b2f-a394-356e2c2fb114
Emulator Images for Windows Mobile 6.1.4:http://www.microsoft.com/downloads/details.aspx?familyid=1A7A6B52-F89E-4354-84CE-5D19C204498A
Emulator Images for Windows Mobile 6.5:http://www.microsoft.com/downloads/details.aspx?familyid=20686A1D-97A8-4F80-BC6A-AE010E085A6E
MyMobiler remote window:http://mymobiler.com/
Page 104 RemoteControl II, v3.00, User Manual, © 2010 WinCESoft
RemoteControl II running in the 800x480 emulator and the MyMobiler remote window

Chapter 20: Network Application Examples
20 Network Application ExamplesBy using RC-II instead of a slow web browser a have very short latency time.
20.1 EventGhostA media PC can be controlled by using tools like EventGhost.
EventGhost is an advanced, easy to use and extensible automation tool for MS Windows. It can use different input devices like infrared or wireless remote controls to trigger macros, that on their part control a computer and its attached hardware. So it can be used to control a Media-PC with a normal consumer remote.
EventGhost is free open source software and can be downloaded from http://www.eventghost.org/
To control your PC by a WLAN or BT connection enable the webserver plugin of EventGhost:
RemoteControl II, v3.00, User Manual, © 2010 WinCESoft Page 105
To add the webserver plugin open Configuration->Add Plugin...

Chapter 20: Network Application Examples
Like all HTML servers this plugin requires a HTML file.
You can create a dummy HTML file “e.g. Index.html” with a text editor like notepad.exe and any contents like
Hello World from the Webserver :)and save this file into any directory (e.g. D:\Program Files\EventGhost\HTML-Files\) of your PC.
Page 106 RemoteControl II, v3.00, User Manual, © 2010 WinCESoft
Choose “Webserver” from the list
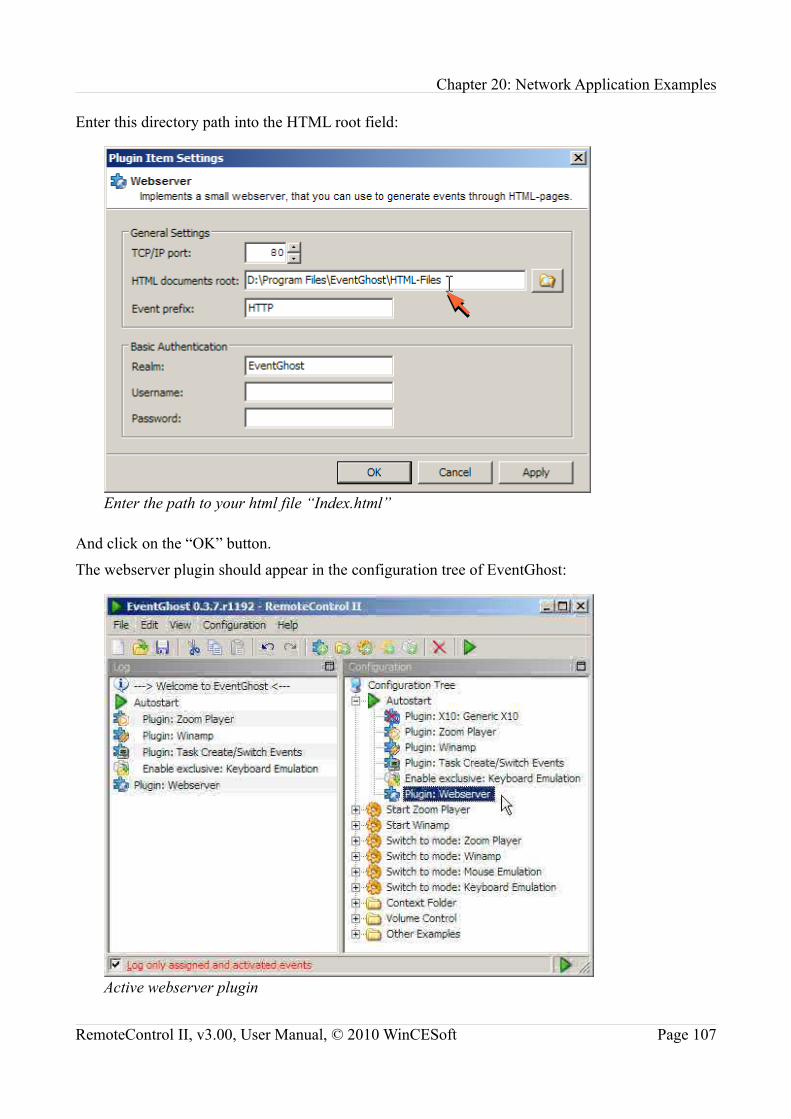
Chapter 20: Network Application Examples
Enter this directory path into the HTML root field:
And click on the “OK” button.
The webserver plugin should appear in the configuration tree of EventGhost:
RemoteControl II, v3.00, User Manual, © 2010 WinCESoft Page 107
Enter the path to your html file “Index.html”
Active webserver plugin

Chapter 20: Network Application Examples
To send events to EventGhost you have to create a network connection to your PC.
If your PC has the IP address “192.168.0.101” you have to create the network connection (e.g. “EventGhost”) with this IP address:
The port number “:80” is optionally and per default 80. Most web servers uses the port number 80.
Then assign to any soft or device button the function “Send HTTP Request” with the option “/Index.html?VolumeUp” or “/?VolumeUp”
This will send the HTTP- request “192.168.0.101:80/Index.html” with the event “VolumeUp” to the server.
Page 108 RemoteControl II, v3.00, User Manual, © 2010 WinCESoft
Add new network connection Added EventGhost connection
Assign the button command

Chapter 20: Network Application Examples
Leave the panel editor and click on the soft button to send the new created HTTP request “VolumeUp” to EventGhost.
Event Ghost should display the received event in the log window at the left side:
Now you can connect this event to any EventGhost action or macro like “Change Master Volume by +2%”.
Please read the EventGhost manual for further information.
You can also define auto repeat events.
A auto repeat event is repeated until the pressed button is released.
To send a VolumeUp auto repeat event enter“/?VolumeUp&withoutRelease” instead of“/?VolumeUp” as the HTTP- request parameter for a pressed button
and
“/?VolumeUp&ButtonRelease” for the released button.Enter these two commands separated by the “|” sign:“/?VolumeUp&withoutRelease|/?VolumeUp&ButtonRelease”The command in front of the “|” sign will be send at pressing the button and the command behind the “|” sign will be send after releasing the button.
RemoteControl II, v3.00, User Manual, © 2010 WinCESoft Page 109
Received “VolumeUp” event
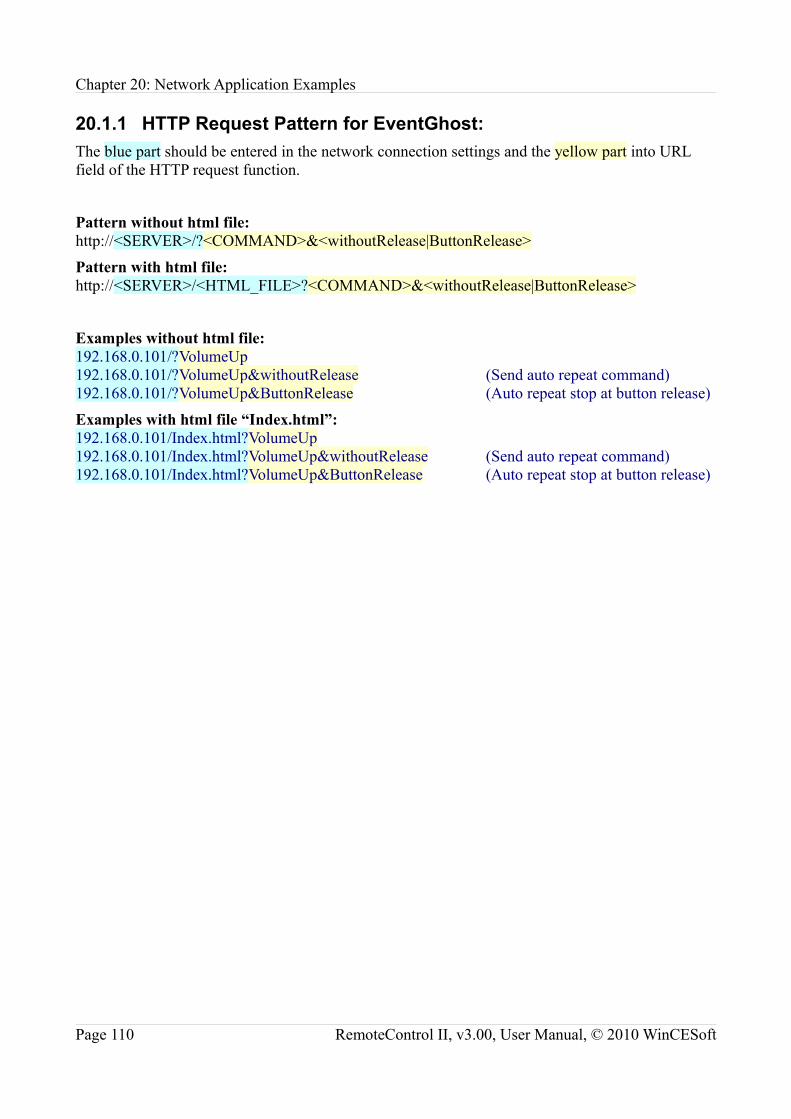
Chapter 20: Network Application Examples
20.1.1 HTTP Request Pattern for EventGhost:The blue part should be entered in the network connection settings and the yellow part into URL field of the HTTP request function.
Pattern without html file:http://<SERVER>/?<COMMAND>&<withoutRelease|ButtonRelease>
Pattern with html file:http://<SERVER>/<HTML_FILE>?<COMMAND>&<withoutRelease|ButtonRelease>
Examples without html file:192.168.0.101/?VolumeUp192.168.0.101/?VolumeUp&withoutRelease (Send auto repeat command)192.168.0.101/?VolumeUp&ButtonRelease (Auto repeat stop at button release)
Examples with html file “Index.html”:192.168.0.101/Index.html?VolumeUp192.168.0.101/Index.html?VolumeUp&withoutRelease (Send auto repeat command)192.168.0.101/Index.html?VolumeUp&ButtonRelease (Auto repeat stop at button release)
Page 110 RemoteControl II, v3.00, User Manual, © 2010 WinCESoft

Chapter 20: Network Application Examples
20.2 External IR TransmitterIf your mobile device doesn't have a included IR port you can use external IR transmitters like IRTrans from http://www.irtrans.de
This device has a included HTTP server and can be controlled by RemoteControl II via HTTP command requests.
20.2.1 HTTP Request Pattern for IRTransThe blue part should be entered in the network connection settings and the yellow part into URL field of the HTTP request function.
Pattern:http://<SERVER>/send.htm?remote=<remote>&command=<command>
Please read the IRTrans manuals for further informations:
http://www.irtrans.de/download/Docs/Ethernet_EN.pdf
http://www.irtrans.de/download/Docs/Installation%20und%20Bedienung%20IRTrans_EN-3.0.pdf
RemoteControl II, v3.00, User Manual, © 2010 WinCESoft Page 111
IRTrans from www.IRTrans.de

Chapter 20: Network Application Examples
20.3 Home Automation ControlThere exist home automation control devices with included HTTP server like the EZcontrol XS1 from www.EZcontrol.de
This device enables you to control RF devices like simple RF switches, light dimmers and rolling shutters by RemoteControl II via HTTP command requests.
20.3.1 HTTP Request Pattern for EZControlThe blue part should be entered in the network connection settings and the yellow part into URL field of the HTTP request function.
Pattern:http://<SERVER>/preset?switch=<NR>&value=<ON|OFF>
Examples:192.168.0.102/preset?switch=1&value=ON192.168.0.102/preset?switch=1&value=OFF
Page 112 RemoteControl II, v3.00, User Manual, © 2010 WinCESoft
EZControl XS1 from www.EZcontrol.de

Chapter 20: Network Application Examples
20.4 Set Top BoxesIf your set top box has a alternative operating system like Neutrino or Enigma installed you can control this by RemoteControl ll via the HTTP request function.
Description of the http- commands for Enigma:
http://wiki.tuxbox.org/wiki/index.php/Ehttp_api_doku
http://en.wikipedia.org/wiki/DreamBox
http://en.wikipedia.org/wiki/DBox2
20.4.1 HTTP Request Pattern for D-Box 2 and DreamboxThe blue part should be entered in the network connection settings and the yellow part into URL field of the HTTP request function.
D- Box 2 with rcem (RemoteControl Emulator)
Pattern:http://<SERVER>/control/rcem?<COMMAND>
Example:192.168.0.103/control/rcem?KEY_VOLUMEUP
D- Box 2 with rcsim: (Remote Control Simulator)
Pattern:http://<SERVER>/control/exec?Y_Tools&rcsim&<COMMAND>
Example:192.168.0.103/control/exec?Y_Tools&rcsim&KEY_VOLUMEUP
And another method:
Pattern:http://<SERVER>/fb/controlpanel.dbox2?<COMMAND>
Example:192.168.0.103/fb/controlpanel.dbox2?volumeplus
RemoteControl II, v3.00, User Manual, © 2010 WinCESoft Page 113

Chapter 21: List of Tested Devices with included Infrared Port
21 List of Tested Devices with included Infrared PortIf you want to send IR commands directly from your mobile device with RemoteControl II IR or RemoteControl II PRO, the device must have a IrDA port included. Most PocketPCs until 2007 have a IrDA port included because of a requirement from Microsoft. Used devices are available at eBay or or similar auction platforms for about €20 to €70 or U$30 to U$100.
Listed of tested devices with a built in IrDA / infrared port.
• Acer N30, N35, N50 • Cingular 8125 • Dell AXIM x3, x3i, IR- transmit range > 26feet/8m • Dell AXIM x5, IR- transmit range > 50feet/15m by using the supported CF IR extender • x30, x30i, x50, x50v, x51, x51v IR- transmit range > 22feet/7m • Dopod 818pro • Dopod 838 • DTResearch WebDT 370, 375, IR- transmit range > 50feet/15m by using the supported CF
IR extender • EPower EZpad • Fujitsu Siemens Pocket LOOX 410, 420, 600, 610, • Fujitsu Siemens Pocket LOOX 710, 718, 720, Incl. support of the included CIR port, IR-
transmit range > 26feet/8m • C550, N500, N520, N560, Incl. support of the included CIR port, IR- transmit range >
26feet/8m • Futurecom NETA 980 • HP iPAQ h3660, h3900, h3970, h2210, h2215, h1910, h1920, h3100, h3600, h3700, h5450,
h5500, h5100 • HP iPAQ rx3715 (Samsung CPU), IR- transmit range > 30feet/9m • HP Jornada 720, 728 • Höft & Wessel skeye pad SL • Höft & Wessel skeye.pad classic • HTC Himalaya • HTC Prophet • HTC TyTN • HTC Wizard • I-mate Jamin • imate K-Jam • IPM m810 • NEC MobilePro P300, 900, 900C • MDA II • MDA Vario • MobiNote EP8402 • Morio ETPad • Psion Teklogix NetBook Pro • RoverPC P3, P5, P6 • Qtek 1010, 2020, 7070 • Qtek S200
Page 114 RemoteControl II, v3.00, User Manual, © 2010 WinCESoft

Chapter 21: List of Tested Devices with included Infrared Port
• Qtek 9100 • Samsung i700 • Siemens AT&T Wireless SX56 • Siemens SIMpad SL4, CL4, IR- transmit range > 50feet/15m by using the supported CF IR
extender • SPV M3000 • Stampcomputer Stamp 8402 • Sumo ST370 • T-Com T-Sinus Pad • Toshiba e350, e355, e550G, e570, e740, e750, e755, e800, e805, Genio-e • ViewSonic V35, V37, Viewpad • VPA Compact S • VPA Compact II • XDA II • XDA Neo • XDA mini S • …
RC-II can use the IR port off all mobile devices with Intel StrongARM (SA1100, SA1110), Intel XScale (PXA250, PXA255, PXA260, PXA270), Samsung (S3C2410, S3C2440) or Texas Instruments (TI OMAP750, TI OMAP850) CPU.
RemoteControl II, v3.00, User Manual, © 2010 WinCESoft Page 115

Chapter 22: Program Version History
22 Program Version History
V3.00 (2010.02.21):
• Wireless network support added.Network devices like Media PC's, Set Top boxes and switches can now controlled via WLAN, Ethernet, Bluetooth or USB connections.
• RC-II is now available in three versions.RemoteContol II NET:For controlling network devices by a WLAN, Bluetooth or USB connection.RemoteContol II IR:For controlling devices directly by an infrared signal from the IR / IrDA port of your device or a CF IR adapter.RemoteContol II PRO:This version combines all features of RemoteControl II NET and RemoteControl IR.
• Windows Mobile 6.5 support added.
• A start panel page can be defined in the project editor.
• CF IR extender cards are working again.
• Support of device hard- buttons F1- F24.
• Enhanced device button handling.The alternative program launch functions of the Pocket PC- application- buttons are now disabled if they are used from RemoteControl II.
• 5000er CCF IR Hex codes are now supported.
• Auto Display Off function added. This will reduce the Bluetooth / WLAN reconnect time from 7-12s to 0s.
• Hardware buttons will change their function assignment with a new selected panel.
• TI-OMAP: Bluetooth and IR work now cooperatively at the same time.
• Configurable keyboard repeat, keyboard and touch click settings.
• Full screen release and restore problem fixed.If a external application is called while RC-II is in full screen mode, the called application was only partially visible.At external phone calls the phone application is now visible.
• SetupRCII.DLL:Optionally program launch after program installation added.Exits automatically RC II at program installation and de installation.Optionally deletion of the project files at program de installation added.Termination of the background process wcshlp.exe at program de installation added.
• Many bug fixes.
Page 116 RemoteControl II, v3.00, User Manual, © 2010 WinCESoft

Chapter 22: Program Version History
v2.12:
• PocketLOOX N520 / N560 battery warning message problem fixed. • Enhanced signal accuracy for devices with Intel XScale- CPU. • PNG bitmaps with alpha layer are now loaded correctly.
v2.11:
• New button function "Hide RC II": Minimizes the RemoteControl II- application window. • New button function "Close RC II": Quits RemoteControl II application. • Improved start-up speed.
v2.10:
• Button function controls are now refreshed when another function was selected. • Support for TI- OMAP 750 CPU's
v2.09:
• Complete rewrite of all bitmap import functions (BMP, JPG, GIF). • Support of the PNG (Portable Network Graphics)- bitmap format added. • Optimized memory management (50% less memory required, useful for large projects
(>20pages) with high resolution VGA background bitmaps) For some projects of RC II- user see here: RemoteControl II projects
• Support for devices with quadratic (240x240)- display. • 240x240 default skin added. • New button layout selector (starting the layout editor for changing the layout of a button is
not required any more). • Panel menu combo box fits now also in landscape mode. • Other bug fixes and enhancements.
v2.08:
• Some small bug fixes.
v2.07:
• Enhanced signal accuracy for devices with TI- OMAP CPU. • Support for devices with raw IrDA on port COM0. • Adjustable time format added. • Some other bug fixes.
v2.06:
• Bug fix: All sample projects should be importable also in the trial version of RC-II.
RemoteControl II, v3.00, User Manual, © 2010 WinCESoft Page 117

Chapter 22: Program Version History
• Import function supports now also projects with umlauts in the file and pathnames. • Also partially loaded panels are now visible. • Bug fix: Error message if the number of valid objects or panels is exceeded in the trial
version. • Sample projects cleaned and redundant bitmaps removed.
v2.05:
• Bug fix: "First Start-up"- problem on some WM 5 devices after installation solved.
v2.04:
• Support for devices with TI OMAP850 CPU added.Tested OMAP850 devices:-HTC Prophet-Qtek S200-Dopod 818pro-XDA Neo-SPV M600-I-mate Jamin-VPA Compact S-HTC Wizard-Qtek 9100-MDA Vario-XDA mini S-SPV M3000-imate K-Jam-T-Mobile MDA Vario-Dopod 838-VPA Compact II -Cingular 8125-and other
• Bug fix: IR- transmit buttons shouldn't freeze any more if a not supported CPU was detected.
• Quick Help for Layout editor added. • Time delay between IR teach requests added (prevents problems if you learn IR toggle
codes).
v2.03:
• Panel editor bug fixes: The position of a selected element was accidentally set to the position of the previous selected element.Panel editor bug fix: The last selected element was not automatically deselected after copy & paste.
Page 118 RemoteControl II, v3.00, User Manual, © 2010 WinCESoft

Chapter 22: Program Version History
v2.02:
• Support for devices with Samsung CPU (S3C2410, S3C2440) added. Tested on Acer N30, Acer N35, HP iPAQ rx3715.RC II supports now devices with Intel StrongARM (SA1100, SA1110), Intel XScale (PXA250, PXA255, PXA260, PXA270, PXA272) and Samsung (S3C2410, S3C2440) CPU's.
• Quick help function added. • IR- Signal accuracy for Intel PXA25x and PXA27x CPU based devices enhanced.
v2.01:
• IR signal optimizations for Intel PXA270 systems. Please re teach your IR codes again if you have any problems.
• Support for Pronto CCF 5000, 5001, 6000 and 6001 codes. • Improved accuracy for imported Pronto codes. • The transparent button skin package RCII_Transparent_Buttons.zip from the skins page can
now be imported without any error message. • Bug fix: Error message "Screen rotation is not supported by this device".
v2.00:
• IR support for MDA II, XDA II, VPA, Qtek 2020, HTC Himalaya and similar devices added.
• Support for 320x240 and 640x480 landscape mode (90° & 270° display rotation) added• Support for transparent bitmap- buttons added• Huge speed improvements for large background bitmaps. • Reduced memory usage. • The keyboard and start menu is now accessible in the IR database editor. • The background of text labels are now transparent. • Enhanced settings dialogue added. • Editor: Bitmap preview added. • Editor: Floating edit- windows added. • Editor: Copy & paste bug fix. • New button function: "Show panels list" for creating a pop-up menu with all available
panels.• Project import and export function (imports/exports all project files from/into a ZIP archive)
added. • New Context menu option to switch between panels in edit mode. • Comport description in IR Port selection added. • The Z- position (depth) of text- labels is now adjustable. • RC II doesn't freeze any more on non StrongARM or XScale devices. • Bug fix: The assign- button in the "Assign Device Keys"- dialogue doesn't work on HPCs. • Bug fix: IR Codes with a very short sequence length (<5) wasn't sent. • Bug fix: Switching between VGA high- and low- resolution mode works always now. • Windows Mobile 5 Bug fix: "IrDA- port COMx: doesn't exist or is in use!"- error fixed.
RemoteControl II, v3.00, User Manual, © 2010 WinCESoft Page 119
Chapter 22: Program Version History
• Windows Mobile 5 Bug fix: "Screen rotation is not supported by this device"- error fixed. • Tons of other bug fixes.
v1.18:
• Set-up- Error- Message: "The program you have installed may not display properly because it was designed for a previous version of Windows Mobile software." fixed
• Unified Handheld- and PocketPC- set-up files. One set-up file for all OS- variants.
v1.17:
• Bug fix: Activation of the hi- res. VGA mode doesn't work on devices with specific language- ID’s
v1.16:
• Bug fix: If RC II was installed on the internal flash storage, on some devices (iPAQ hx4700 and Dell x50v) the error messages "IrDA port COMx in use" and "Can't delete..." appears after deactivating the hi-res.- mode.
v1.15:
• Support for hi- res. PocketPCs (VGA) added. Tools like SE VGA are not required any more.• Display rotation for devices with IR transceivers at the bottom (e.g. iPAQ hx4700) added.• CF- IR- Extender support for Windows CE .NET4.2 SIMpads added.
v1.14
• CF- IR- extender card support for Dell AXIM x5 with "old" Windows CE 3.0. • Up to 32 commands per macro. • Automatic restore of needed RCII files (RCII_Help.exe and some help files). • Full screen start-up option added. • Optimized detection of high frequency IR carriers > 460kHz (BANG & OLUFSEN). • Increased transmit range of the WebDT 375 IR- extender. • Bug fix: In full screen mode, applications mapped to the device hardware keys do not launch
properly. • Bug fix: Scrollbars disappears in full screen edit mode. • Bug fix: Error Message "Unknown File Version xx, Please use a newer version of RCII.". • Bug fix: Soft- keyboard is now automatically activated in IR database.
v1.13ß
• Full screen start-up option added. • Optimized detection of high frequency IR carriers > 460kHz (BANG & OLUFSEN). • Increased transmit range of the WebDT 375 IR- extender.
Page 120 RemoteControl II, v3.00, User Manual, © 2010 WinCESoft

Chapter 22: Program Version History
• Bug fix: In full screen mode, applications mapped to the device hardware keys do not launch properly.
• Bug fix: Scrollbars disappears in full screen edit mode. • Bug fix: Error Message "Unknown File Version xx, Please use a newer version of RCII.". • Bug fix: Soft- keyboard is now automatically activated in IR database.
v1.12
• Support of the PocketLoox 710/720 CIR- port for a extended transmit range. • Call of external applications (e.g. internet explorer with EPG website). • IR- CF- extender card support for Dell AXIM X5. • Bug fix: Device key assign . • Bug fix: Handheld PC version: Task bar- show/hide- desktop- button works correct again. • Bug fix: Auto- suspend is disabled when RC II is in the background.
v1.11
• HPC Version bug fix: IR Database wasn't accessible.
v1.10
• IR CF Extender bug fix: Time between card power on and first IR pulses was to short. • IR CF Extender bug fix: SIMpad IR monitor LED was always off. • Pocket PC: Fonts de installation problem fixed. • New added object is now selected after an copy/paste operation. • In all dialogues the soft input panel is now automatically activated. • RC II can now be installed on external storage cards.
v1.09
• Pocket PC 2002 support added. • WM 2003SE VGA support added. • Support for WM 2003SE portrait and landscape display orientation added. • Pocket PC- full screen support added. • Panels with a size of up to 800x600 pixels can be edited also on PocketPCs. • Support for Pocket PC hot- buttons added. • Bitmap file format support for JPG and GIF added. • Auto- power- off function added. • IR- CF- extender card support for "DTResearch WebDT375", "Sumo ST375", "Escient
EWP-1000" and "IBD Future.pad-CE" added. • SIMpad: CF- IR- Extender card is now powered down after every IR- transmission. • Improved panel editor speed. • Some editor- bug fixes. • Graphical preview of the selected button- layout.
RemoteControl II, v3.00, User Manual, © 2010 WinCESoft Page 121

Chapter 22: Program Version History
• Improved IR. learn accuracy with PXA270 CPU's. • IR- Quick learn function for buttons and device keys added. • Editor context menus added. • Copy & paste function added. • New panels can be derived from existent panels. • Some bug fixes...
v1.08
• Support of CF- IR- extender cards (for SIMpad & t-Sinus pads) (Laser- / Electric Dog- PDA-IR-Extender & UltraMote CF- Extender) added.
• Configurable battery and memory gauge views added:Use the button type “Standard Button” and the button function “Battery”.
• Objects can be moved in edit mode with hardware cursor keys. • Support for bSquare Maui. • Range of adjustable transmit priority increased to +/- 100. • IR- Learn routine optimized: No drop-outs should appear any more. • Bug fix: New defined layouts doesn't appear in the "add element" dialogue. • Bug fix: File names in panel project editor was limited to 32 characters. • Bug fix: Panels doesn't appear if one panel could not be loaded.
v1.07
• Intel XScale (PXA263, PXA260, PXA255, PXA250) support added. • Screen size support for 640x480 & 800x480 displays added. • Adjustable transmit process priority added. • Bug fix: New included IR functions in the panel editor wasn't loaded immediately.
v1.06
• Support for display size of 640x240 (HP Jornada 720) added. • Device keys auto repeat and click disabled. • Some small bug fixes.
v1.05
• Endless loop in IR code transmit function fixed.
v1.04
• Philips Pronto- CCF IR hex code import/export added. • Programmable device buttons added. • More pause timing steps in macro editor added. • Bug fix: Button properties dialogue was hidden if you tap on the background in macro edit
Page 122 RemoteControl II, v3.00, User Manual, © 2010 WinCESoft

Chapter 22: Program Version History
mode. • Reduced memory requirements (from 10MB to 7MB free RAM)
v1.03
• Bug fix: IR code file format: Some IR codes was not saved correctly. • Faster button recognition. Now you can type much faster. • Slightly optimized IR record function. • More IR- code types are recognized now.
v1.03ß
• Support of "old" non burst IR codes. • Bug fix: Registry access (call of RegCloseKey() with correct handle). • Bug fix: Save of button functions "TIME" and "MENU" could cause failed load of the panel
file.
v1.02
• Bug fix: SIMpad- .NET4.0 reset suspend freeze problem solved. • Bug fix: Teach in function- repeat loop detection.
v1.01
• Increased IR- transmit range (50%-80%) • Optimized IR record function • TV/VCR channel panel added • Bug fix: Some very long pause sequences was saved to short.
v1.00
• The macro editor is now functional • On line help integrated • Support of up to 256 different bitmap objects instead of 64 • Support of up to 256 different button layouts instead of 64 • Support of up to 128 different fonts instead of 64 • Improved IR code loop timing. Now time critical devices should work also • Support for SIMpad with Windows CE .NET 4.0 image. No suspend- hang any more • Bug fix: re-initialisation of an bitmap button object if loading fails • Bug fix: 8/16bit IR code file format • Bug fix: new button layout can be selected even if no previous layout was existent
RemoteControl II, v3.00, User Manual, © 2010 WinCESoft Page 123

Chapter 22: Program Version History
v1.00ß (2004.02.23)
• First public BETA release of RemoteControl II with graphical layout editor, IR database and IR code learn functionality.
v0.01ß (2000.09.30)
• First working predecessor (RemoteControl I) with static interface. Support for Windows CE 3.0 devices with Intel Strong ARM SA1110 CPU.
23 SupportYou can find the newest version of RemoteControl II, this user manual, new project files and some how- to pages at our website: www.WinCESoft.de or www.WinCESoft.com
If there are any questions or suggestions you can reach us at: [email protected]
Please contact us also if you want to share your project files with other users.
Page 124 RemoteControl II, v3.00, User Manual, © 2010 WinCESoft

Chapter 24: Index
24 Index
IndexAActiveSync.......................................................13Adding a Bitmap..............................................52Adding a new Panel Page.................................45Adding a Soft Button........................................52Adding a Text Label.........................................52Adding Existing Panel Pages...........................44Adding Panel Pages to a Project.......................43Assigning Functions.........................................67Audio Settings..................................................33Auto Display Off..............................................32Auto Power Off................................................32Automation Tool.............................................105BBackground Bitmap..........................................59Background Color............................................59Bitmap Transparency........................................63Bluetooth..........................................................12Bluetooth Module.............................................11BMP.................................................................62bSquare Power Handheld...................................8Button Layout...................................................64Button States....................................................61CCAB- file..........................................................13Call External Programs....................................74Call Macro........................................................76CCF IR Hex Codes.........................................102CF IR Extender.................................................27CF IR Extender Cards......................................10Close RC-II......................................................81Context Sensitive Pop Up Menu......................17Copy Object......................................................58Create a new Button Layout.............................64Creating a new Project.....................................39DD-Box 2..........................................................113De Installation..................................................22Default IR Device.............................................60Deleting Objects...............................................55DELL AXIM....................................................27Designing Layouts on a PC............................104Display Back Light...........................................32
Display Settings................................................30Dreambox.......................................................113DTResearch WebDT375..................................27Duplicating Objects..........................................58EEDGE...............................................................86Edit IR Database...............................................24Edit Menu.........................................................24Edit Panel.........................................................24Edit Password Protection.................................33Edit Project.......................................................24Edit Raster........................................................57Editing a Button Layout...................................61Editing a Panel Layout.....................................49Editing a Project...............................................42Editing Function Macros..................................77Electric Dog PDA IR Extender........................27Enable Edit Password.......................................33Enable Soft and Device Button Beep Sound....33Enable System Key Click Sound......................33Enable System Keyboard Autorepeat...............33Enable System Touch Click Sound..................33Enigma............................................................113Escient EWP-1000...........................................27EventGhost.....................................................105Export Project...................................................23Exporting a Project...........................................40External IR Transmitter............................11, 111EZcontrol........................................................112FFile Menu.........................................................23First Launch of RemoteControl II....................15Full Screen Mode.............................................17GGIF...................................................................62GPRS................................................................86GSM.................................................................86HHandheld PC 2000.............................................8Handheld PCs ....................................................7Help Menu........................................................25Hi- Res. Display Mode.....................................30Hide RC-II........................................................81
RemoteControl II, v3.00, User Manual, © 2010 WinCESoft Page 125
Chapter 24: Index
Home Automation Control.............................112HTTP Request Test...........................................29HTTP Server.....................................................83IIBD Future.pad-CE..........................................27Import Project...................................................23Importing a Project File Package.....................36Importing CCF IR Hex Codes........................102Infrared / IrDA- Port Settings...........................26Infrared Code Database....................................95Infrared Port.......................................................9Infrared Signal Transmit Priority.....................27Installation........................................................13Intel StrongARM................................................9Intel XScale........................................................9IR Extender.......................................................27IR Functions.....................................................99IR Pulse Graph.................................................95IR Quick Learn.................................................24IR Quick Learn Mode.......................................92IR Toggle Codes...............................................93IrCOMM...........................................................26IrDA port..........................................................26IrDA Port............................................................9IRTrans............................................................111JJPG...................................................................62Jump to Panel.............................................24, 82KKey Click Sound..............................................33Keyboard Autorepeat........................................33LLaser CF IR Extender.......................................27Learning new Infrared Commands...................92Linux.................................................................11Locking Object Moves.....................................57Looped Sequence...........................................101MMAC- OS..........................................................11Manual installation by a CAB- file..................14Marvell XScale...................................................9Media PC........................................................105Miscellaneous Settings.....................................32Moving Objects................................................55Moving Objects into the Depth........................56NNetwork Connections.......................................28Network Settings..............................................28
Neutrino..........................................................113New Project File.........................................23, 39OObject Browser.................................................52Open Project File..............................................23Opening a Project.............................................35PPanel Background Color..................................59Panel Layout Editor..........................................49Panel List..........................................................42Panel Selection Menu.......................................25PDA....................................................................7Phillips Pronto................................................102Ping Test...........................................................29PNA....................................................................7PNG..................................................................62Pocket PC...........................................................7Pocket PC 2000..................................................8Pocket PC 2002..................................................8Program Features..............................................12Program Menus................................................23Program Settings..............................................26Project Editor....................................................43Project Packages ..............................................36QQuick Help.......................................................16Quick Help Settings..........................................31RRaw IrDA.........................................................26RC-II Skin Downloads.....................................35README.TXT................................................38RegInfo.txt........................................................19Required Memory...............................................8Rotate Display..................................................30SSamsung S3C2410.............................................9Samsung S3C2440.............................................9Samsung S3C2442.............................................9Save Battery Power..........................................32Send HTTP Request.........................................83Send IR Code...................................................86Set Top Boxes.................................................113Settings.............................................................24Setup_RCII.ZIP................................................15Show Battery Gauge.........................................87Show Memory Gauge.......................................88Show Panel List................................................89Show Time........................................................90
Page 126 RemoteControl II, v3.00, User Manual, © 2010 WinCESoft

Chapter 24: Index
Siemens SIMpad..............................................27SIMpad...........................................................123Single Sequence.............................................101Smart Phones......................................................7Start in Fullscreen Mode..................................30Startup Panel of a Project.................................48Sumo ST375.....................................................27Support...........................................................124Supported Device Classes..................................7Supported Display Sizes.....................................8Supported Operating Systems............................8Supported Processors.........................................9Symbol Keyboard.............................................54System Requirements.........................................7Tt- Com T-Sinus Pad..........................................27Testing a Network Connection.........................29Texas Instruments OMAP..................................9Text Label of a Button......................................54Time Format Settings.......................................31Toggle Fullscreen.............................................91Touch Click Sound...........................................33Transmit Priority..............................................27Transparency....................................................63Transparent Bitmaps.........................................63UUltraMote CF IR Extender...............................27
UMTS...............................................................86URL Paths........................................................84USB Network Connection................................11VVersion History...............................................116WWeb Pads............................................................7Webserver.......................................................105Windows CE 1.x.................................................8Windows CE 2.x.................................................8Windows CE 3.0.................................................8Windows CE 4.x.................................................8Windows CE 5.x.................................................8Windows CE 6.x.................................................8Windows Embedded Compact...........................9Windows Mobile................................................7Windows Mobile 2003.......................................8Windows Mobile 5.0..........................................8Windows Mobile 6.0..........................................8Windows Mobile 6.5..........................................8Windows Mobile 7.0..........................................8Windows Mobile Device Center......................13WLAN..............................................................12WLAN Module.................................................11ZZIP Archive......................................................37
RemoteControl II, v3.00, User Manual, © 2010 WinCESoft Page 127


![MPC8548E Configurable Development System … Configurable Development System Reference Manual, ... [4:0] ... MPC8548E Configurable Development System Reference Manual,](https://img.pdfslide.us/doc/110x75/5af028337f8b9ac62b8e4c0e/mpc8548e-configurable-development-system-configurable-development-system-reference.jpg)