Embed Size (px)
Citation preview

Release Notes MYOB AccountEdge v7
MYOB Licence Agreement
IMPORTANT–READ THIS CAREFULLY BEFORE PROCEEDING. This Product (consisting of the user documentation and the installation CD or other media containing the Software) is sold subject to the terms of a Software Licence Agreement, notification of which has been provided to you so that you are now legally bound by its conditions. The full terms of the Licence are included in the user documentation and the installation CD. HOWEVER, if the Licence Agreement contains anything of which you were not aware prior to purchasing the Product or do not agree to be bound by, DO NOT INSTALL THE SOFTWARE but return the Product to the reseller in its entirety and a full refund of the purchase price will be made. By installing the Software and keeping the Product you are confirming that you have purchased the Product subject to this Licence and are bound by its provisions.
Overview
These Release Notes describe how to upgrade your MYOB AccountEdge software.Complete these tasks to upgrade your software.
Upgrading from a pre-2004 version of your MYOB AccountEdge If you are upgrading from a pre-2004 version of your MYOB AccountEdge (version 3 or earlier), you need to activate your company file and upgrade your user accounts. When you have upgraded your company files and templates, refer to the support note ‘Upgrading from a pre-2004 version’ available from myob.com.au/supportnotes/upgradepre2004, for more information.
Task See
1 Install MYOB AccountEdge v7 page 2
2 Upgrade files in MYOB AccountEdge page 2
4 Read about new features in MYOB AccountEdge v7 page 6
© MYOB Technology Pty Ltd 2007

NOTE : MYOB Technical Support If you require technical assistance with MYOB AccountEdge, see ‘Technical support’ on page 4.
Installing MYOB AccountEdge v7
The procedure in this section is for installing MYOB AccountEdge v7 on a computer running Mac OS X operating system.
NOTE : Disable your virus scanner Installation of some components of MYOB AccountEdge may fail if you have a virus scanner running. We recommend you disable your virus scanner before installing the software. Once the software has been installed, you can re-enable your virus scanner.
To install MYOB AccountEdge
1 If your computer only allows users with administrator privileges to install programs, log in as administrator.
2 Save any open documents and close all programs. 3 Insert your MYOB AccountEdge CD into the drive. 4 Open the contents of the MYOB AccountEdge CD from the desktop and
double-click the Autostart icon.5 Follow the on-screen installation instructions. 6 When installation is complete, click Finish. Your default web browser displays
the What’s New in This Version topic from MYOB Help.7 If you disabled or uninstalled a virus scanner, enable or reinstall it.
Upgrading your files
Your company files created with a previous version of MYOB AccountEdge need to be upgraded to use new features. Customised reports, forms, letters and spreadsheets also need to be upgraded.Complete the following tasks for each company file.
Task Description See
1 Upgrade your company files page 3
2 Upgrade your customised templates page 4
2 RELEASE NOTES
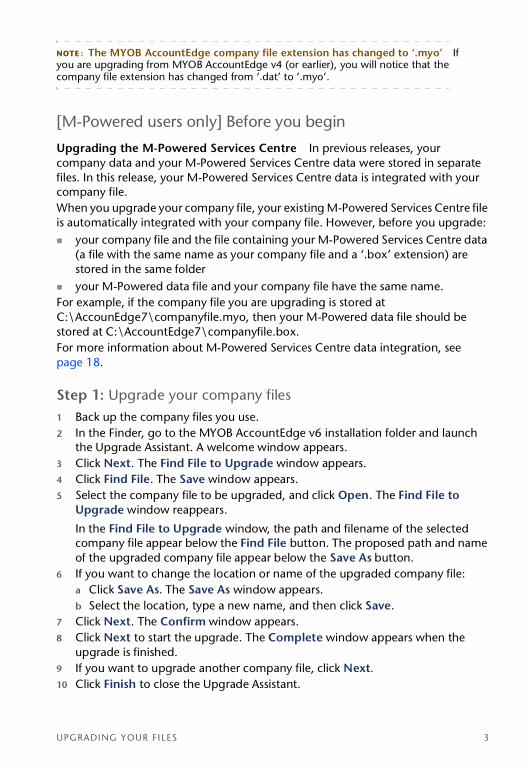
NOTE : The MYOB AccountEdge company file extension has changed to ‘.myo’ If you are upgrading from MYOB AccountEdge v4 (or earlier), you will notice that the company file extension has changed from ‘.dat’ to ‘.myo’.
[M-Powered users only] Before you begin
Upgrading the M-Powered Services Centre In previous releases, your company data and your M-Powered Services Centre data were stored in separate files. In this release, your M-Powered Services Centre data is integrated with your company file. When you upgrade your company file, your existing M-Powered Services Centre file is automatically integrated with your company file. However, before you upgrade:
your company file and the file containing your M-Powered Services Centre data (a file with the same name as your company file and a ‘.box’ extension) are stored in the same folderyour M-Powered data file and your company file have the same name.
For example, if the company file you are upgrading is stored at C:\AccounEdge7\companyfile.myo, then your M-Powered data file should be stored at C:\AccountEdge7\companyfile.box.For more information about M-Powered Services Centre data integration, see page 18.
Step 1: Upgrade your company files1 Back up the company files you use. 2 In the Finder, go to the MYOB AccountEdge v6 installation folder and launch
the Upgrade Assistant. A welcome window appears.3 Click Next. The Find File to Upgrade window appears.4 Click Find File. The Save window appears.5 Select the company file to be upgraded, and click Open. The Find File to
Upgrade window reappears.
In the Find File to Upgrade window, the path and filename of the selected company file appear below the Find File button. The proposed path and name of the upgraded company file appear below the Save As button.
6 If you want to change the location or name of the upgraded company file:a Click Save As. The Save As window appears.b Select the location, type a new name, and then click Save.
7 Click Next. The Confirm window appears.8 Click Next to start the upgrade. The Complete window appears when the
upgrade is finished.9 If you want to upgrade another company file, click Next. 10 Click Finish to close the Upgrade Assistant.
UPGRADING YOUR FILES 3

Step 2: Upgrade your customised templates If you customised reports, forms, letters, spreadsheets and BASlink setup using a previous version of MYOB AccountEdge, you need to upgrade these templates to continue using them in your new software version.1 In the Finder, locate the installation folder of your previous version of MYOB AccountEdge
(for example, the MYOB AccountEdge v6 folder) and open it. The installation folder contains these folders:
2 Open the corresponding MYOB AccountEdge v7 installation folder. 3 In the installation folder of the previous version, open a folder containing
customised templates (for example, the Forms folder). 4 Command-click only your custom template files.
NOTE : Avoid overwriting the latest standard templates The standard templates included with MYOB AccountEdge v7 may have improved features. Make sure you select only the templates that you created, ignoring the old standard templates, so that you do not accidentally overwrite upgraded standard templates in the version 7 installation folder.
5 Press and hold the Option key and drag-and-drop the selected template files over the corresponding folder (for example, Forms) in the MYOB AccountEdge v7 installation folder.
6 Repeat from step 2 for each folder containing customised templates.
Technical support
Calling MYOB Technical Support You can call MYOB Technical Support on 1300 555 123 from 7.30a.m. to 9.30p.m. Monday to Friday (AEST).
Technical support limitations Support is limited to the following MYOB product areas: installation, upgrade assistance, basic usability and basic
Folder File extension Description
Custom *.rpt User-customised report templates
Forms *.frm Standard and user-customised form templates
Letters *.dot Standard and user-customised Microsoft Word document templates
Sprdsht *.xlt Standard and user-customised Microsoft Excel spreadsheet templates
BASlink\Setup
*.bas User-customised BASlink templates
4 RELEASE NOTES
functionality, as described in MYOB product documentation. MYOB cannot resolve connectivity issues caused by third-party services, service providers, hardware or software, or networking problems. MYOB phone support does not cover inquiries on general accounting or taxation issues, nor does it include application consulting or training.
Getting support at MYOB websites Support Notes cover a variety of technical and general topics, ranging from installation problems to setting up and customising your MYOB software. You can search Support Notes 24 hours a day at myob.com.au/supportnotes. The MYOB website—myob.com.au—is frequently updated and contains news and links to many useful resources.
Accessing documentation from the installation CD
Your MYOB AccountEdge CD contains User Guide and Release Notes as PDFs. To access these documents follow the steps below.1 Insert the MYOB AccountEdge CD into the drive. 2 Open the contents of the MYOB AccountEdge CD and double-click the
autostart icon.3 Click Resources.
MYOB M-Powered ServicesM-Powered Services are subscription-based services that allow you to replace paper-based methods of making and receiving payments, and managing your funds, with efficient networked-based methods. For more information about subscribing to MYOB M-Powered Services, visit myob.com.au/m-powered/
ACCESSING DOCUMENTATION FROM THE INSTALLATION CD 5

New features
Feature See
Card Sync You can now synchronise your MYOB cards and your Address Book contacts. If you use Address Book to email and manage contact information, this feature makes it easier to keep your contacts up to date.
page 8
Remittance advices You can now email and print a remittance advice for the following transactions: • spend money• credit refunds (to customers)• pay suppliers.
page 12
Undo bank account reconciliation
If you have reconciled a transaction in error or deleted a previously reconciled transaction, you can now undo the previous account reconciliation.
page 13
Payroll To help you meet WorkChoices requirements, the following payroll enhancements have been added:• additional pay detail fields in employee cards• new window for recording employee termination
details• additional information included on pay advice
and paycheque stubs• new fields for recording start and finish times on
timesheets.
page 14
Create a purchase order from a sale
If you want to order items to fulfil a sale, you can create a purchase order using sales quote or sales order details that you have recorded.
page 16
Import and export features
You can now:• import and export contact logs• import and export custom lists• specify how you want to import timesheet data.
page 17
6 RELEASE NOTES

Show Me How new feature demonstration moviesYour MYOB AccountEdge provides Show Me How tutorial movies to demonstrate how to use many of the new features. The Show Me How movies run between one and four minutes.The movies in this release show you how to:
send remittance advicessynchronise MYOB cards and Address Book contactscreate a purchase order when recording a sale.
To view Show Me How movies
1 Go to the Help menu, choose What’s New in this Release and then choose New Feature Movies. The list of available movies appears.
2 Click the movie you want to view.
M-Powered Services Centre
The M-Powered Services Centre is now integrated with the company data file.
page 18
Other new features and software changes
• Record pre-dated recurring transactions• Search the Recurring Transaction List• Set a lock period date• Change to Transaction GST Codes report • Change to Receive Items journal• New Allocation Memo field details• New Payroll Verification report• New Purchases Register Open Item Receipts
report• Change to fringe benefits tax (FBT) reporting
exclusion threshold
page 18
Feature See
NEW FEATURES 7

Card Sync
If you use Address Book to manage contact information, you can synchronise your MYOB cards and your Address Book cards. This makes it easier for you to keep your MYOB cards and your Address Book cards up to date.
When you synchronise, new cards are added and existing cards, if modified, are updated. If the same field has been modified in both an MYOB card and an Address Book card, a conflict resolution window allows you to choose how you want to update the card.
You can synchronise card names, address details, email and web addresses and telephone, fax and mobile phone numbers. See online help for information on the fields that are synchronised.
Note that inactive cards are included in the synchronisation (for information on how to inactivate or reactivate your cards, see the user guide or online help).
NOTE : Show Me How movie If you want, you can view a Show Me How movie demonstrating this feature. For more information, see ‘Show Me How new feature demonstration movies’ on page 7.
Software required To synchronise MYOB cards and Address Book, you need Mac OS X 10.4 or later installed.
Back up your Address Book Synchronising your MYOB cards and your Address Book will change the details recorded in your Address Book. Back up your Address Book before synchronising. For more information, see Address Book Help.
Address Book group folders Address Book cards that are synchronised with MYOB cards are stored in MYOB group folders. These folders are created automatically when you synchronise for the first time.
NOTE : If you move cards to MYOB group folders If you move a card to an MYOB group folder (for example, from the All folder to the Customer folder) and you want to synchronise this card, you need to reset the synchronisation. See ‘Resetting the synchronisation’ on page 11.
8 RELEASE NOTES
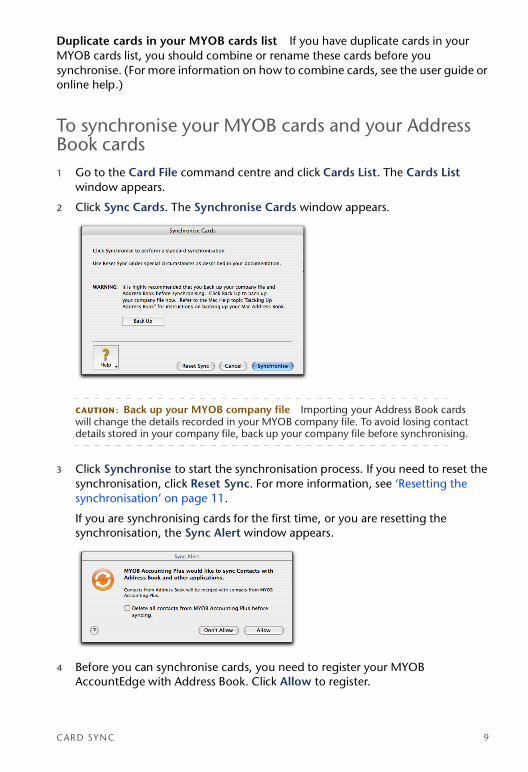
Duplicate cards in your MYOB cards list If you have duplicate cards in your MYOB cards list, you should combine or rename these cards before you synchronise. (For more information on how to combine cards, see the user guide or online help.)
To synchronise your MYOB cards and your Address Book cards1 Go to the Card File command centre and click Cards List. The Cards List
window appears.
2 Click Sync Cards. The Synchronise Cards window appears.
CAUTION : Back up your MYOB company file Importing your Address Book cards will change the details recorded in your MYOB company file. To avoid losing contact details stored in your company file, back up your company file before synchronising.
3 Click Synchronise to start the synchronisation process. If you need to reset the synchronisation, click Reset Sync. For more information, see ‘Resetting the synchronisation’ on page 11.
If you are synchronising cards for the first time, or you are resetting the synchronisation, the Sync Alert window appears.
4 Before you can synchronise cards, you need to register your MYOB AccountEdge with Address Book. Click Allow to register.
CARD SYNC 9

NOTE : Do not click the Don’t Allow button If you click Don’t Allow, you need to reset the synchronisation before you can synchronise cards. For more information, see ‘Resetting the synchronisation’ on page 11.
The synchronisation process starts.
NOTE : The time taken to synchronise will vary depending on the number of cards you have.
5 If a conflict occurs between the details recorded in your MYOB cards and the details recorded in your Address Book, the Conflict Resolver window appears. A conflict occurs when the same field has been updated in both your Address Book and your MYOB cards.
a Click Review Now. The Conflict Resolver window expands to show the card conflict.
b Select the correct contact information and click Done. c Repeat step b to resolve any other conflicts.
When you have resolved all conflicts, the Save conflict choices window appears.
d Click Sync Later. The Synchronisation Complete window appears.
CAUTION : Do not click the Sync Now button Do not click Sync Now unless you want to view the list of card conflicts again.
e Click OK. The Cards List window appears.
10 RELEASE NOTES

f Repeat the synchronisation process from step 3 on page 9.
6 When the synchronisation is complete, the Synchronisation Complete message appears.
7 Click OK. The Cards List window appears.
Deleting cards Cards are not deleted during synchronisation. This protects the details recorded in your company file and in your Address Book. If you want to delete a card, you must manually delete it in both your Address Book and your MYOB cards.
If you have deleted a card from only your MYOB cards or only your Address Book and you now want to synchronise the card, you need to reset the synchronisation.
Resetting the synchronisationIf any of the following has occurred since you last synchronised cards, you need to reset the synchronisation:
You deleted a card from your Address Book (but not from your MYOB cards) and you now want to synchronise this card.
You deleted a card from your MYOB cards (but not from your Address Book) and you now want to synchronise this card.
You deleted a group folder from your Address Book and you now want to synchronise MYOB cards of this type.
You moved an Address Book card to an MYOB group folder (for example, from the All folder to the Customer folder) and you want to synchronise this card.
You also need to reset the synchronisation if you clicked Don’t Allow in the Sync Alert window at step 3 in ‘To synchronise your MYOB cards and your Address Book cards’ on page 9.
To reset the synchronisation
You can reset the synchronisation by clicking Reset Sync in the Synchronise Cards window (see step 3 in ‘To synchronise your MYOB cards and your Address Book cards’ on page 9.)
CARD SYNC 11

Send remittance advices
You can advise suppliers or customers that you have paid a bill or made a refund by sending a remittance advice. A remittance advice can be printed or emailed for Spend Money, Credit Refunds and Pay Suppliers transactions.
NOTE : Show Me How movie If you want, you can view a Show Me How movie demonstrating this feature. For more information, see ‘Show Me How new feature demonstration movies’ on page 7.
You can print a remittance advice in the following ways:directly from the transaction window, when you record a transaction in the Spend Money, Settle Returns & Credits or Pay Bills windows.
later, in a batch, by selecting either To be Emailed, To be Printed or To be Printed and Emailed from the Remittance Advice Delivery Status field in the Spend Money, Settle Returns & Credits or Pay Bills windows.
For information on how to send remittance advices in a batch, see your user guide or online help.
If you want, you can customise the look of your remittance advices. For more information, see the ‘Forms’ chapter in your user guide.
12 RELEASE NOTES

Undo bank account reconciliations
If you have reconciled a bank account transaction in error or deleted a previously reconciled transaction, you can undo the previous bank account reconciliation. When you undo a reconciliation, all transactions for that period return to an unreconciled status.If the error was made in a reconciliation earlier than your last reconciliation, you can undo several reconciliation periods in succession in your current financial year. Note, when you undo an account reconciliation, you need to reconcile each transaction again and reprint your reconciliation reports.
Before you undo a reconciliation We recommend that you back up your company file before you undo a reconciliation. Then, if you decide that you shouldn’t have undone the reconciliation, you can restore the backup file.
NOTE : Purged transactions cannot be re-reconciled Do not undo a reconciliation for a period where transactions have been purged.
To undo an account reconciliation
1 Go to the Banking command centre and click Reconcile Accounts. The Reconcile Accounts window appears.
2 In the Account field, type or select the account for which you want to undo the reconciliation.
3 Click Undo Reconciliation. The Undo Last Reconciliation window appears, confirming the account and date of the reconciliation you are undoing.
4 Click Undo Reconciliation. A confirmation window appears.5 Click OK. The Reconcile Accounts window reappears.
UNDO BANK ACCOUNT RECONCILIATIONS 13

Payroll details
To help you meet WorkChoices requirements, the following payroll features have been enhanced.
Card Information windowYou must now assign an employment category and employment status to each of your employees.You enter these details in the Payroll Details view of the Card Information window.
Employment Details report Information from the employment category and status fields can be included on the Employment Details report (formerly called the Payroll List report), which is available in the Index to Reports window.
A When you enter a termination date, a zoom arrow ( ) appears next to the Termination Date field. Click the zoom arrow to enter the termination details for the employee. For more information, see ‘Enter termination details’ on page 15.
B Select the Employment Category: Permanent or Temporary.
C Select the Employment Status: Full Time, Part Time, Casual or Other.
A
BC
14 RELEASE NOTES
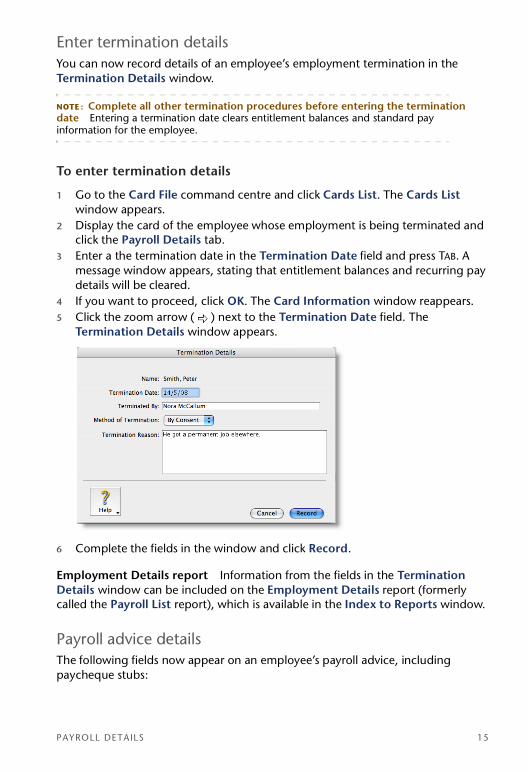
Enter termination detailsYou can now record details of an employee’s employment termination in the Termination Details window.
NOTE : Complete all other termination procedures before entering the termination date Entering a termination date clears entitlement balances and standard pay information for the employee.
To enter termination details
1 Go to the Card File command centre and click Cards List. The Cards List window appears.
2 Display the card of the employee whose employment is being terminated and click the Payroll Details tab.
3 Enter a the termination date in the Termination Date field and press TAB. A message window appears, stating that entitlement balances and recurring pay details will be cleared.
4 If you want to proceed, click OK. The Card Information window reappears.5 Click the zoom arrow ( ) next to the Termination Date field. The
Termination Details window appears.
6 Complete the fields in the window and click Record.
Employment Details report Information from the fields in the Termination Details window can be included on the Employment Details report (formerly called the Payroll List report), which is available in the Index to Reports window.
Payroll advice detailsThe following fields now appear on an employee’s payroll advice, including paycheque stubs:
PAYROLL DETAILS 15
hourly pay ratename of the superannuation fund current pay and year-to-date amounts for each superannuation payroll categorysuperannuation type for each superannuation payroll category.
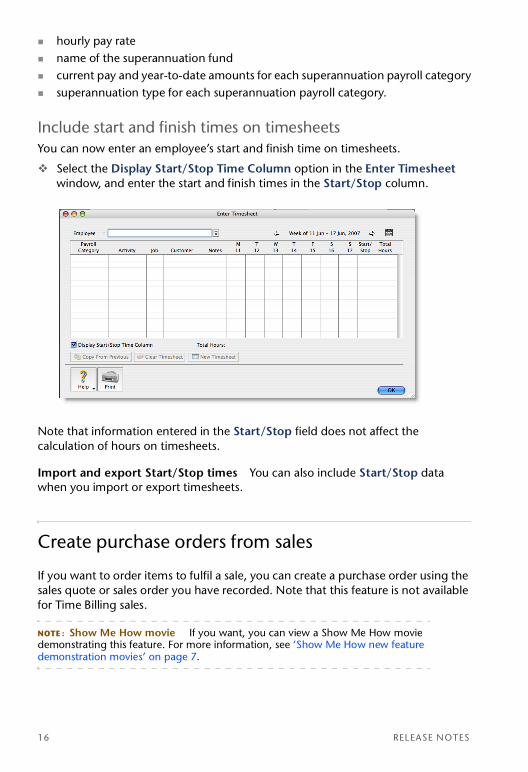
Include start and finish times on timesheetsYou can now enter an employee’s start and finish time on timesheets.
Select the Display Start/Stop Time Column option in the Enter Timesheet window, and enter the start and finish times in the Start/Stop column.
Note that information entered in the Start/Stop field does not affect the calculation of hours on timesheets.
Import and export Start/Stop times You can also include Start/Stop data when you import or export timesheets.
Create purchase orders from sales
If you want to order items to fulfil a sale, you can create a purchase order using the sales quote or sales order you have recorded. Note that this feature is not available for Time Billing sales.
NOTE : Show Me How movie If you want, you can view a Show Me How movie demonstrating this feature. For more information, see ‘Show Me How new feature demonstration movies’ on page 7.
16 RELEASE NOTES

To create a purchase order from an existing sale
1 Go to the Sales command centre and click Sales Register. The Sales Register window appears.
2 Locate and select:a quote—click the Quotes tab and select the quote you want to use.an order—click the Orders tab and select the order you want to use.
3 Click Create PO. The Purchases window appears, with the new purchase order displayed. The line items from the sales quote or order are automatically transferred to the new purchase order.
4 Enter a supplier’s name in the Supplier field. The supplier’s address details appear in the Ship to field and the name of the customer for whom the quote or order has been created appears in the Journal Memo field.
5 Enter a purchase price for each item.6 Make any changes you want to make. For example, you may want to change
the transaction date to today’s date, or add items to the order.7 Click Record. The new purchase order is created and the original sales quote or
order remains in the Sales Register window.
Import and export features
The following changes have been made to the import and export functions of MYOB AccountEdge.
Import and export contact logs and custom listsYou can now import and export contact logs and custom lists.
Go to the File menu and choose Import Data or Export Data and then select Contact Logs or Custom Lists.
For more information, see MYOB Help.
Specify how you want to import timesheet dataWhen importing timesheets, you now have the option to identify imported employee data by Card ID, Record ID or Co./Last name.
IMPORT AND EXPORT FEATURES 17

M-Powered Services Centre data file integration
The M-Powered Services Centre data file (.box file extension) is now integrated with the company file (.myo file extension). When you open your company file, the M-Powered Services Centre data file is activated. When you close or back up your company file, it is saved within the company file. When you upgrade your company file, your existing M-Powered Services Centre file is automatically integrated with your company file.
Other new features and software changes
Record pre-dated recurring transactionsYou can now record recurring transactions with a start date prior to the system date. However, you cannot:
set a start date that is earlier than the conversion dateset a start date that is earlier than the beginning of the current financial yearset a start date that is within a locked periodrecord pre-dated transactions automatically. This means that you cannot select the Automatically record this transaction when due and notify alert in the Edit Recurring Schedule window.
Search the Recurring Transaction ListThere are now two ways to find a recurring transaction in the Recurring Transaction List window. You can either:
sort the transactions by name, type or frequencysearch for a transaction by name, amount and next due date.
18 RELEASE NOTES

Set a lock period date You can now set a lock period date. Previously, you could only set a lock period for transactions that were posted before a particular month.
You can also set a lock period in the next financial year. You might do this, for example, to facilitate end-of-year accounting. Previously, you could only set a date within the current financial year. You set lock period dates in the Security tab of the Preferences window.
Change to Transaction Tax Codes report The Transaction Tax Codes report now sorts and presents transactions by account number. Previously, transactions were sorted by date.
Change to Receive Items journal When you record a supplier bill against a receive items transaction, the original receive items transaction is now reversed and locked.Reversing, rather than deleting the receive items transaction:
creates an audit trail entry, andprovides for consistent financial reporting for the period between the receipt of items and the receipt of a bill.
NOTE : Transaction date The date of the transaction that is recorded in the Receive Items Journal is the date the supplier bill is recorded.
New Allocation Memo field detailsThe Allocation Memo field on the Job Activity Detail report and Job Transactions report now displays additional information for most transaction types. The information that appears in the Allocation Memo field is sourced from the following transaction fields:
Description field (Item, Service, Professional and Miscellaneous sales and purchases)Notes field (Time Billing sales).
OTHER NEW FEATURES AND SOFTWARE CHANGES 19

A new Payroll Verification reportBefore you process your employees’ pays, you can view the details of each employee’s paycheque in the Payroll Verification report. This report shows wages, superannuation, entitlements, deductions, employer expenses and taxes. The report details are unique to each pay run, and available only from the Process Payroll assistant. It does not appear in the Index to Reports window.
New Purchase Register Open Item Receipts reportFor each open item receipt, this report displays the ordered, received and unbilled quantity and value of each item within a selected date range, for all suppliers or a selected supplier.
Change to fringe benefits tax (FBT) reporting exclusion threshold For the FBT year commencing 1 April 2007, the FBT reporting exclusion threshold increased from $1000 to $2000. As such, you only need to report grossed-up taxable fringe benefits amounts of $3740 (that is, $2001 / (1 - 0.465)) or more on payment summaries.
The option to install a compact set of help files is no longer availablePreviously, you could have chosen to install a compact set of help files for MYOB AccountEdge. In this release, the complete help file system will automatically be installed.
20 RELEASE NOTES
![ae getting started(istore size)community.myob.com/myob/attachments/myob/Account... · 6 GETTING STARTED 7 [AccountEdge Network Edition users only] Start FileConnect on host computer:](https://img.pdfslide.us/doc/110x75/5f879d003f266b516c217493/ae-getting-startedistore-size-6-getting-started-7-accountedge-network-edition.jpg)