Embed Size (px)
Citation preview

Teacher Guide
3 x 7
8 - 2

2
Table of contents Reflex overview 3
Math fact fluency - what is it? 3 Fact family approach 4 Individualized instruction 4 Game-based 5
Teaching with Reflex - FAQ's 6 Teachers - getting started 7
Adding your students 7
Student experience 8 Logging in 8 Typical Reflex session 9 Crabby's Fact Fair 9 Coaching 10 Fluency games (practice) 11 Tokens 11 Progress Tree 11 The Green Light 12 Summary 12
Teachers - monitoring student progress 13 Using reports 14 Filtering reports 15 Monitoring usage 15 Tracking fluency growth 16 Encouraging usage 19 Recognizing progress 20 Milestones and certificates 20 Email updates 21 Parent accounts 21
Quick reference guide 22 Who should use Reflex 22 Operation assignments 22 Logging in – teachers 22 Navigation tips 23 Creating classes 23 Changing a class name 24 Adding students to classes 24 Modifying student information 25 Deleting students 25 Transfer notifications 25 Reflex in Spanish and French 25 Logging in – students 26 Changing assignments 27 Sound 27 Green Light info 28 Using reports 28 Printing certificates 28 Customer support 28
© 2018 ExploreLearning®. All rights reserved.
Revised: July 2018

3
Reflex overview Welcome to ExploreLearning® Reflex®!
Reflex is an adaptive online system that helps students become fluent with their math facts. Students who struggle to answer basic problems like 15 – 6 and 8 × 7 will be able to answer these facts quickly and effortlessly after using Reflex.
The first part of this guide will introduce you to the ideas at the foundation of Reflex.
• Fact-family approach
• Individualized instruction
• Game-based setting
(Note: This teacher guide is mostly a “teaching tips” document, not a “how to” reference. If you’d prefer a more step-by-step, “how to” approach, see the Quick reference guide at the end of this document, or the Help Center found in www.reflexmath.com.)
But first, a key question: What is “math fact fluency,” and why does it matter?
Math fact fluency – what is it?
A student who is fluent can retrieve the correct answers to facts from memory almost instantly. A student who needs to stop and think about the answer to a math fact isn’t fluent with that fact, even if she eventually arrives at the correct answer.
Research has shown the importance of fluency for students. Multiple studies have shown that students who can automatically recall math facts are more capable problem solvers, learn new math skills more quickly, and are more likely to succeed in their future mathematics courses. The NCTM, National Math Advisory Panel, and others highlight math fact fluency as a central pillar of every student’s mathematics education.

4
Fact family approach
Reflex uses a fact family approach when teaching new facts. A fact family (sometimes called a number family) is a group of related facts that use the same numbers. There are both addition and subtraction fact families, and multiplication and division fact families.
Instead of learning addition facts and subtraction facts (or multiplication facts and division facts) as separate things, students learn them as two sides of the same coin, essentially. For example, if 8 ´ 12 = 96, then it must also be true that 96 ÷ 12 = 8.
This method has several advantages. It helps students understand the nature of inverse operations. It provides a less intimidating way to think about learning facts. (Instead of learning “169 multiplication and 156 division facts”, students learn “91 fact families.”) And, learning related facts together is ultimately easier and more efficient.
Individualized instruction
Reflex adapts itself to each individual student. Over the course of a student’s first few sessions, Reflex learns which facts and families the student is not yet fluent with. It uses this information when making instructional decisions for that student. This means that students won’t spend time learning facts that they already know.
Reflex also continually monitors student progress. What a student does today is based on how well they retained the lesson from yesterday. This ensures that every student is practicing the right facts at the right time.

5
Game-based
Attaining math fact fluency requires a lot of practice, but it doesn’t have to be boring!
In Reflex, practice occurs in fluency development games. These games are a lot of fun – and they’re designed to give students serious amounts of practice with answering facts. Students are also motivated to practice because the games are engaging and challenging.
The games are also smart. Since Reflex continually monitors student progress, it always knows the best facts to use in the games for each student, no matter which game (or games) the student chooses.

6
Teaching with Reflex – FAQ’s • Which students are ready for Reflex?
Any student in grade 2 or higher who understands the basic concepts behind addition and subtraction is ready for Reflex. Whether a student is fluent in many facts already, or none at all, Reflex will learn and adapt to the student’s level.
• Can I use Reflex with older students too?
Yes. Working on math fact fluency is usually associated with grades 2 through 6, but many older students struggle with math because they can’t recall their facts. Reflex can be used with these students as well.
• Is Reflex available in languages other than English?
Yes. Reflex is available for students in English, Spanish, or French. The default language is English. See the Quick reference guide at the end of this document to see how to change a student’s language settings.
• How much time does a typical Reflex session take?
A single Reflex session typically lasts 15 to 20 minutes, though some students may need longer to reach the Green Light. (Stress the importance of the Green Light! It means the student has completed a full session – assessment, coaching, and practice. Also, they cannot access the Reflex Store or modify their avatars before reaching the Green Light.)
• How frequently should a student use Reflex?
Shorter, more frequent sessions are more effective than longer, less frequent sessions. For example, a student who uses Reflex 5 times/week for 15 minutes will likely become fluent more quickly than a student who uses Reflex twice a week for 45 minutes.
• How can I integrate Reflex into my instructional program?
• In-class Reflex time – If you have enough computers to make it work, spend the first 15 minutes (or so) of every math period on Reflex.
• Reflex station(s) – Self-contained classrooms can set up math facts station(s) that students use throughout the day.
• Math intervention program – If your school has a math intervention program, dedicate 15 minutes of every session to Reflex.
• Reflex homework – You can assign students to work on Reflex outside of class, if they have computer access (at home, at the library, in a computer lab, etc.).
• Any other tips before I try this for the first time?
Use headphones! The instruction relies on audio (especially the first few lessons), and the games have sound effects and music. Headphones help maintain classroom sanity.

7
Teachers – getting started When you log in to Reflex for the first time, you will be taken to your Home screen. From here, you can visit the Help Center, or go directly to adding students.
Adding your students
When you click “Add Your Students to Reflex,” our system automatically creates your first class. (The class will be named “My First Class,” but you can change that later.) Then you will see either two or three options for adding students.
• Add a new student (manually)
• Add students from school roster (Note: This option is available only if your Reflex admin has uploaded a roster.)
• Import students from a .csv file (Note: The .csv file needs to be formatted exactly the way our system expects for this to work correctly. Click Help and then Sample CSV File to download a sample file, and use this as a template.)
See the Quick reference guide at the end of this document for more detailed instructions.
Next, let’s examine the student experience in Reflex.

8
Student experience You’ve got your classes and student accounts ready, and it’s time for your students to start using Reflex. What can your students expect?
Logging in
To log in, students will need to follow the steps below. (All information needed to log in is shown on the Student Login Cards, which you can print from the Manage Roster page.)
• Go to https://www.reflexmath.com/student and enter their teacher’s username.
• Select their class.
• Select their name.
• Enter their own password.
(Note: It is vitally important that each student always uses his or her own Reflex account. A student should never “borrow” another student’s login. Reflex constantly collects data on student responses. Sharing accounts, even for just a day, compromises that data. The student’s name and avatar appear at the lower right corner of the screen. Hopefully this will make it easier to quickly check that students are who they say they are!)
Once students are logged in, they will be greeted by Crabby, the friendly crustacean guide to Reflex. The first item of business for students on day one is creating their avatars (virtual representations of themselves). Their options will be fairly limited on the first day, so they can get started as soon as possible, but they will be able to customize their avatars much more in future sessions.
After creating a basic avatar, Crabby will walk students through their Reflex session.

9
Typical Reflex session
In general, after logging in, a typical Reflex session includes three parts:
• Crabby’s Fact Fair is a brief assessment that checks students’ fact knowledge and fluency progress.
• Coaching is where new facts and fact families are presented and practiced.
• Fluency Development Games are a set of fun yet challenging games students play to help build automaticity.
Crabby’s Fact Fair
Every Reflex session begins with Crabby’s Fact Fair, in which students answer math facts in a variety of carnival games. They are hosted by Dwight, a gruff but lovable rabbit carny. The Fact Fair is used to assess a student's current fluency level.
(Note: Some items in the Fact Fair only ask a student to type in a given number. These items measure the student’s typing speed. This is important because Reflex factors typing speed in when determining how quickly a student can answer a given fact.)
The initial assessment will span several sessions. After the initial assessment is done, the Fact Fair will assess how students are doing with facts that they have recently been taught. All data for the reports on students’ fluency and fact knowledge come from the Fact Fair. This also determines which fact families students will be coached on.
After completing Crabby’s Fact Fair, students are taken to Reflex Island, where they choose which game to play. (Note: At first, only two games are available, but as students work in Reflex and gain fluency, they will be able to unlock more games.)
First though, before the game begins, it is time for some coaching on new math facts.
10
Coaching
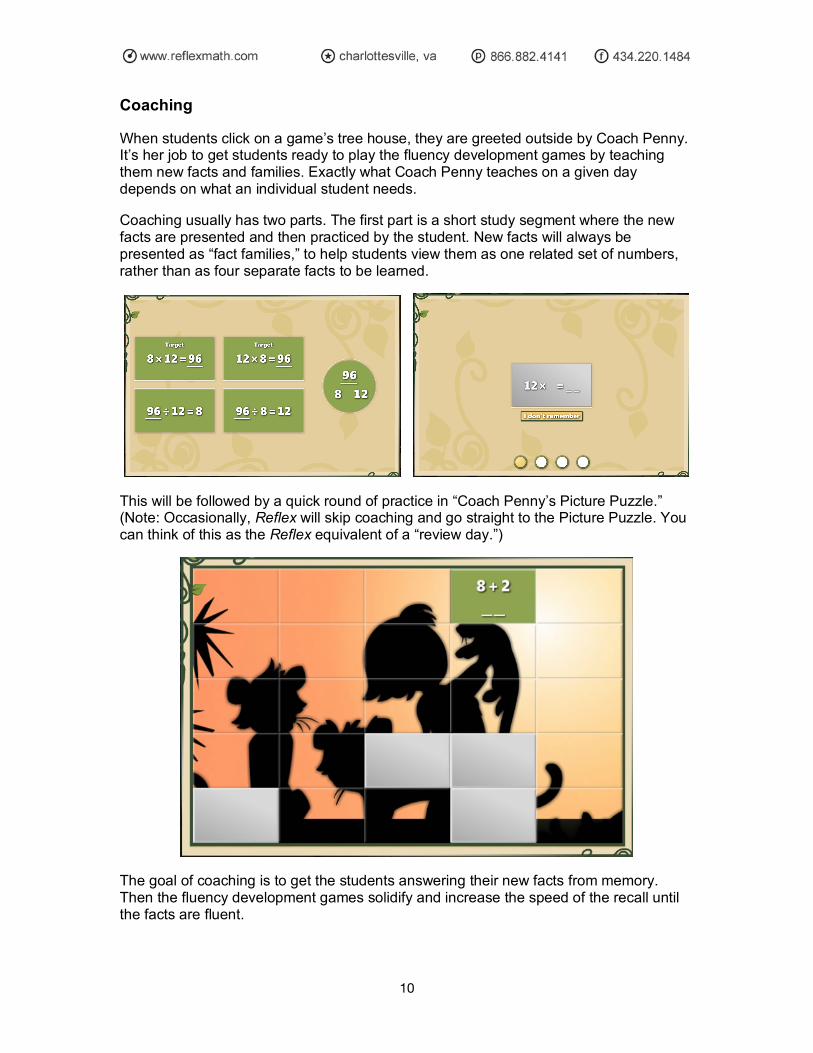
When students click on a game’s tree house, they are greeted outside by Coach Penny. It’s her job to get students ready to play the fluency development games by teaching them new facts and families. Exactly what Coach Penny teaches on a given day depends on what an individual student needs.
Coaching usually has two parts. The first part is a short study segment where the new facts are presented and then practiced by the student. New facts will always be presented as “fact families,” to help students view them as one related set of numbers, rather than as four separate facts to be learned.
This will be followed by a quick round of practice in “Coach Penny’s Picture Puzzle.” (Note: Occasionally, Reflex will skip coaching and go straight to the Picture Puzzle. You can think of this as the Reflex equivalent of a “review day.”)
The goal of coaching is to get the students answering their new facts from memory. Then the fluency development games solidify and increase the speed of the recall until the facts are fluent.

11
Fluency games (practice)
The fluency games are where students take facts that they have learned in coaching and answer them repeatedly, in a fun game context. All the games in Reflex use an adaptive engine to ensure that each student receives customized practice appropriate to his or her individual needs. It’s this “smart practice” that turns known facts into fluent facts.
When new students first log on to Reflex and go to the island, they have access to two games, “Ninja to the Stars” and “Wind Rider.” Additional games are unlocked gradually with continued usage. (A sign lets students know when the next game will be available.)
At any time, students can leave the game they’re playing. This will take them to the main island where they can choose another game. Don’t worry if students switch games frequently. There’s no instructional value in “sticking with one game.” Reflex makes sure that students get the practice they need, in any of the games.
Tokens
As students use Reflex, they earn tokens that can be used to buy in-game rewards. Students earn tokens for Crabby’s Fact Fair, Coaching, fluency games, and for becoming fluent with a new fact or family.
Students can spend their tokens in the Reflex Store, on Reflex Island. Be sure your students realize that the store does not “open” until they receive the Green Light, meaning that they have completed their “Daily Usage Requirement” for that day.
(Note: Students generally cannot receive more than 120 tokens in a day. This is meant to encourage shorter, daily practice, which is more effective than extra-long sessions.)
Progress Tree
During the third Reflex session, each student plants an acorn on Reflex Island. The resulting Progress Tree grows as the student becomes fluent with more math fact families. Once the tree reaches a certain size (usually after about 10 days), students can customize it with purchases from the Reflex store.
Clicking the Check Progress button brings up a cross-section view of the tree. Each ring in the cross section depicts the fluent fact families that have fueled the tree’s growth.

12
The Green Light
Once a student has answered a certain number of facts correctly on a given day, a Green Light illuminates in the upper right corner of the screen.
The ring around the outside of the Green Light fills in as students practice. This allows students to see their progress for the day. When the ring is complete, the student has met the Daily Usage Requirement, and the Green Light turns on.
Emphasize the importance of reaching the Green Light to your students. Once the Green Light is illuminated, students can know that they have reached the recommended daily minimum amount of practice for that day. Also, reaching the Green Light “unlocks” non-instructional activities such as browsing the store, or modifying their avatars or progress trees.
Here are some other notes to keep in mind related to the Green Light:
• Once the Green Light is illuminated, it will stay on for any subsequent sessions that day. If some students do not reach the Daily Usage Requirement in their first session of the day, they can log in later to pick up where they left off.
• Students can typically get to the Green Light in 15 minutes of concentrated use. Students who are new to Reflex may take longer than that, but the time should decrease with continued use. For students who struggle to reach the Green Light in the allotted time, we recommend Ninja to the Stars, Egyptian Conniption, and Swamp Chomper as games in which many facts can be solved very quickly.
• New games are unlocked only after a certain number of Green-Light sessions. Students will not receive credit for a session unless they reach the Green Light.
Summary
Although talking crabs, space ships, and math ninjas may be new to your classroom, you’ve probably noticed that at heart, Reflex operates on a familiar lesson structure:
Instruction Coaching
Practice Fluency development games
Assessment Crabby’s Fact Fair
If you are interested in more details on how Reflex works, see the Reflex White Paper in the Learn More: Research Behind Reflex section (www.reflexmath.com/research).
13
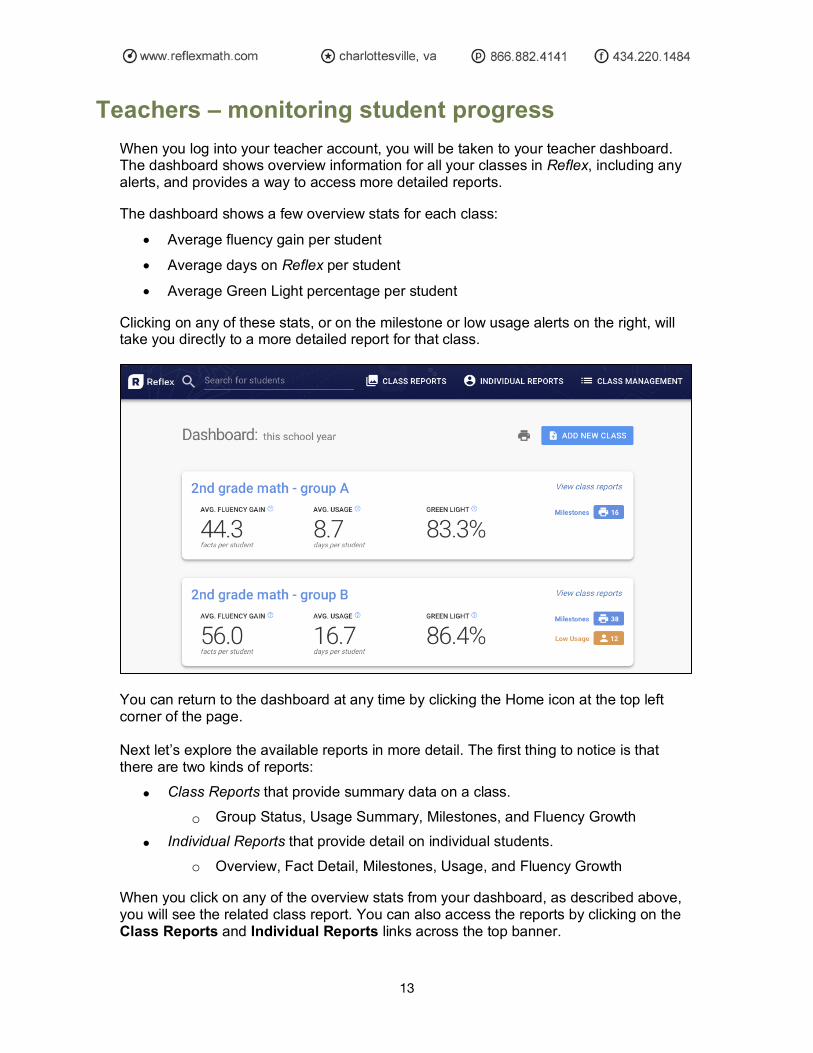
Teachers – monitoring student progress When you log into your teacher account, you will be taken to your teacher dashboard. The dashboard shows overview information for all your classes in Reflex, including any alerts, and provides a way to access more detailed reports.
The dashboard shows a few overview stats for each class:
• Average fluency gain per student
• Average days on Reflex per student
• Average Green Light percentage per student
Clicking on any of these stats, or on the milestone or low usage alerts on the right, will take you directly to a more detailed report for that class.
You can return to the dashboard at any time by clicking the Home icon at the top left corner of the page. Next let’s explore the available reports in more detail. The first thing to notice is that there are two kinds of reports:
• Class Reports that provide summary data on a class. o Group Status, Usage Summary, Milestones, and Fluency Growth
• Individual Reports that provide detail on individual students. o Overview, Fact Detail, Milestones, Usage, and Fluency Growth
When you click on any of the overview stats from your dashboard, as described above, you will see the related class report. You can also access the reports by clicking on the Class Reports and Individual Reports links across the top banner.

14
Using reports
Reflex provides a powerful reporting system that helps you monitor your students’ usage, track their progress, and reward their achievements.
Here are some general tips for using reports effectively:
• Click Class Reports or Individual Reports in the green bar to switch between those two options.
• Use the links below the green bar to select the specific report you want to view.
• Click the class name in the green bar to select a different class, or to select all of your classes combined.
• You can click on many of the report cells to get more detail.
• Every report can be printed to share with students, parents, or administrators.
That’s all you need to know to start exploring the different Reflex reports on your own! (Note: All of the reports are listed in the back of this guide, if you need a reference.)
For now, let’s look at how the different reports can help you do your job as a teacher.
15
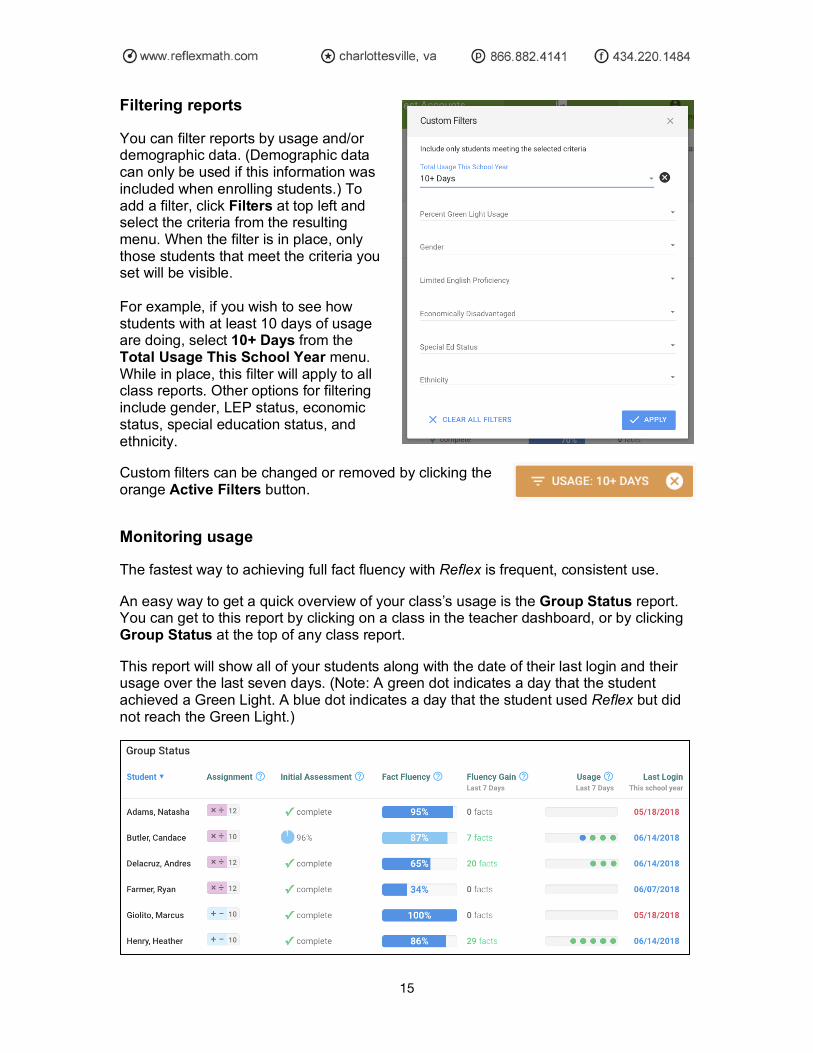
Filtering reports
You can filter reports by usage and/or demographic data. (Demographic data can only be used if this information was included when enrolling students.) To add a filter, click Filters at top left and select the criteria from the resulting menu. When the filter is in place, only those students that meet the criteria you set will be visible. For example, if you wish to see how students with at least 10 days of usage are doing, select 10+ Days from the Total Usage This School Year menu. While in place, this filter will apply to all class reports. Other options for filtering include gender, LEP status, economic status, special education status, and ethnicity.
Custom filters can be changed or removed by clicking the orange Active Filters button.
Monitoring usage
The fastest way to achieving full fact fluency with Reflex is frequent, consistent use.
An easy way to get a quick overview of your class’s usage is the Group Status report. You can get to this report by clicking on a class in the teacher dashboard, or by clicking Group Status at the top of any class report.
This report will show all of your students along with the date of their last login and their usage over the last seven days. (Note: A green dot indicates a day that the student achieved a Green Light. A blue dot indicates a day that the student used Reflex but did not reach the Green Light.)
16
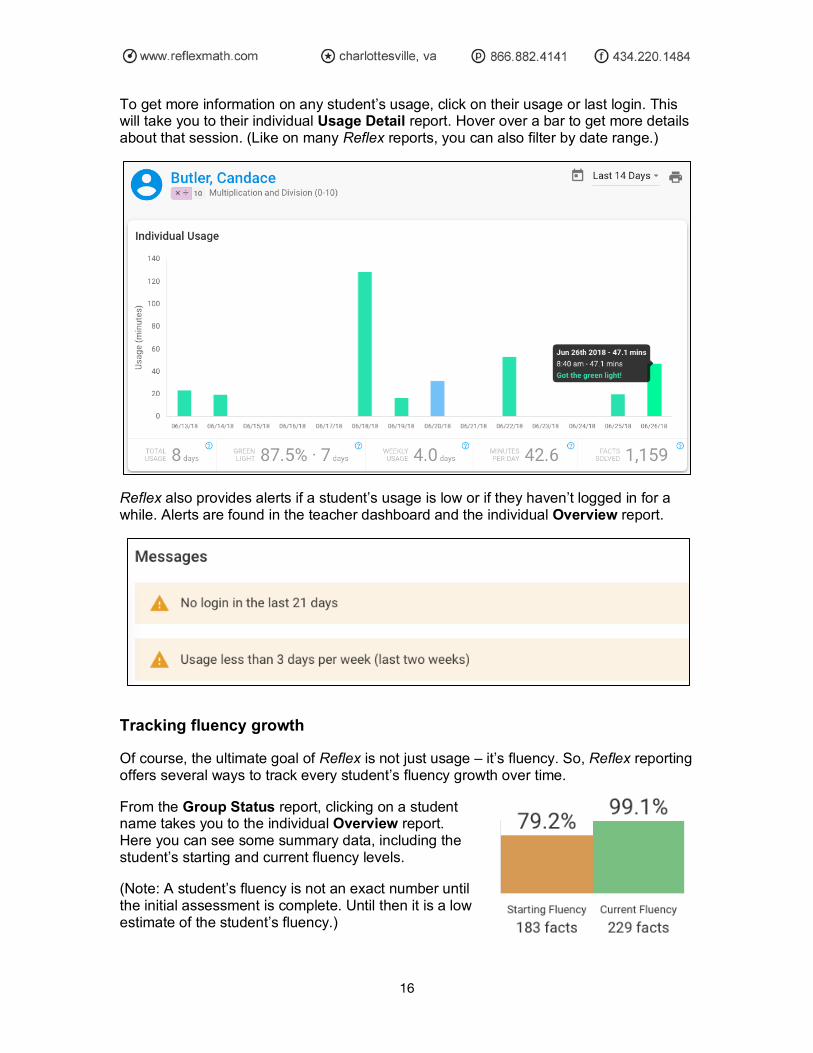
To get more information on any student’s usage, click on their usage or last login. This will take you to their individual Usage Detail report. Hover over a bar to get more details about that session. (Like on many Reflex reports, you can also filter by date range.)
Reflex also provides alerts if a student’s usage is low or if they haven’t logged in for a while. Alerts are found in the teacher dashboard and the individual Overview report.
Tracking fluency growth
Of course, the ultimate goal of Reflex is not just usage – it’s fluency. So, Reflex reporting offers several ways to track every student’s fluency growth over time.
From the Group Status report, clicking on a student name takes you to the individual Overview report. Here you can see some summary data, including the student’s starting and current fluency levels.
(Note: A student’s fluency is not an exact number until the initial assessment is complete. Until then it is a low estimate of the student’s fluency.)

17
To see which facts a student knows and doesn’t know, use the Fact Detail report. This report is available in both a fact family pyramid and a traditional “fact grid” format. If you click a fact family, a window will pop up to show you exactly which facts are fluent, not fluent, or unassessed. Students can also access this report by clicking their Student Avatar image and then selecting the Report Icon (four white squares). At the top right of the fact detail report are two arrows and a date. You can use the arrows to move forward or backward in time, and the report will update to reflect the student’s knowledge on the given date. This allows you to “step back in time” and see how a student’s fluency has changed in Reflex.

18
The Fluency Growth report provides another way to monitor a student’s fluency growth. The report graphs a student’s number of fluent facts over time, so you can actually “see” the growth toward fluency. You can choose to graph a student’s Fluency Gain (facts the student acquired in Reflex) or Total Fluent Facts (including initial fluency). Use the Date Range dropdown just above the graph to select the dates you want to see.
Additionally, by selecting the Show Usage checkbox, you can also see the student’s usage (the bar graph), in total minutes. (The minutes scale is shown on the right.)
In addition to individual reports, Reflex offers several Class Reports for full-class data. The Group Status report was mentioned above. Other whole-class reports include the Usage Summary report (below), a Milestones report (handy for printing certificates), and a Fluency Growth report that shows aggregated growth for the whole class.

19
The class Fluency Growth report is shown below. The bar graph, pie chart, and line graph all show the class’s aggregate growth from starting fluency to current fluency.
Encouraging usage
Reports provide a way to monitor student use of Reflex. But how can you as a teacher encourage consistent usage?
Stress to your students that being “good at math” is not just something you’re born with – it takes effort. Learning math facts is like learning to play a sport or a musical instrument. Athletes and musicians don’t practice for several hours in a row one day a week. They practice a little bit every day. That’s how students should learn their facts with Reflex.
You can also encourage students by talking to them about their experiences with Reflex:
• Ask students to share strategies they’ve learned for their favorite Reflex game.
• Create a friendly competition between classes to see which class can solve more problems or gain more total facts.
• Make a “leaderboard” to show the names of students who solve a large number of problems per week or who have a high average days/week usage.
• Post high scores for individual Reflex games.
• Schedule time for students to show off their avatars and progress trees.
• Celebrate both individual and classroom milestones (discussed later).

20
Recognizing progress
Students receive recognition within Reflex for both their effort and their progress. However, it’s certainly helpful and encouraging for you to do the same for both individual students and classes. If you print and post the class Fluency Summary chart, your students can track the class’s progress towards total fluency (without singling out individual students who might be less fluent). Progress can be communicated to parents by printing out a student’s individual Overview report. This will show both how hard the student has been working and their overall progress. Reflex also provides another way to recognize and reward progress – milestones.
Milestones and certificates
The Reflex reporting system tracks milestones for both individual students and classes. In general, there are two types of milestones:
• Those that mark effort – “3,000 Total Facts Solved!”
• Those that mark fluency progress – “50 New Fluent Facts!” For any milestone, you can print out a certificate to celebrate the accomplishment.
When a student hits a milestone, an alert appears his or her individual Overview report. To see all of a student’s milestones or to print certificates, use the Milestone individual report. Milestone alerts are also displayed on the teacher dashboard. Clicking on an alert takes you directly to the group Milestone report.

21
You can select the milestones you want to print certificates for by clicking the checkbox next to the milestone. Reflex also remembers which certificates you’ve already printed, so you can just click on the blue unprinted link and print all the unprinted ones. To view and print certificates for class milestones, select the class Milestone report. (You can also print certificates for individual students from this report.) Note: Milestone data is only available for the current school year. Before moving onto a new assignment, print any milestones that you don’t want to lose. Changing assignments can lead to milestones being deleted. Milestones are a great way to recognize and reward students. They can also be used to set goals for your class. You can challenge your class to solve a certain number of total facts by the end of the week. Use the reports to update your class about their progress towards meeting the challenge as the week goes by. Hopefully this will encourage usage and, ultimately, fluency!
Email updates
Reflex will send you periodic emails to help keep you updated on student progress. This email gives current fluency information for each student, along with current individual and class milestones. You will also receive an email when any of your students reaches 100% fluency in their current assignment. At any time, you can opt out of receiving these emails. To do this, go to your User Profile Settings and uncheck the Receive email reports box, then click Accept. You can sign up for emails again at any time by checking the box.
Parent accounts
Parents can keep track of their own child's progress in Reflex by signing up for a free parent account at www.reflexmath.com/parents. They will need to provide an email address, and then follow the steps to login and then get connected to their child. To complete the process and gain access to Reflex reports and status emails (for their child only), parents will need to know everything their student uses to login to Reflex – the child’s teacher’s username, class, and student’s password. They can get this information from the student, or from a parent account invitation that you can give them. To print parent account invitations, go to the Classes page, scroll to the bottom, click on Print, and select the option to print the parent invites. After they are signed up, parents can access their child's individual reports at any time to monitor their usage and progress.

22
Quick reference guide
Who should use Reflex
Any student who understands the concepts behind the operations (adding and subtracting, or multiplying and dividing) is ready to start building fluency. Generally, Reflex is recommended for students grades 2-8. For more details please see our Help Center article on what ages or grades are appropriate for Reflex.
Operation assignments
An assignment is an operation set and a range. The operation sets in Reflex are Addition and Subtraction and Multiplication and Division. For Addition and Subtraction, the only option for range is 0-10. For Multiplication and Division, you can choose a range of either 0-10 or 0-12. For more details please see our Help Center article on what assignment is appropriate for a student.
Logging in – teachers
Follow these steps to log in as a teacher:
1. Go to www.reflexmath.com, click Login, and choose Educator Login. (Note: You could also just go to www.reflexmath.com/teacher.)
2. Enter your username and password in
the spaces provided. (Note: If you forget your password, click the Forgot your password? link at the bottom of the dialog box.)
3. Click Login.
23
Navigation tips
From the main navigation bar across the top, you can select from these options:
Home: Click the Home icon at the top left corner at any time to return to your teacher dashboard.
Help: Access the Reflex Help Center, contact customer support, or access On-demand PD.
Profile: View and modify your personal information, try Reflex as a student
(no data is recorded), or logout.
The second navigation bar, just below the top one, offers these options:
Class Reports: View reports of aggregated whole-class data.
Individual Reports: View reports for individual students.
Class Management: Manage any of your classes. (Note: This is only present when you are on your teacher dashboard.)
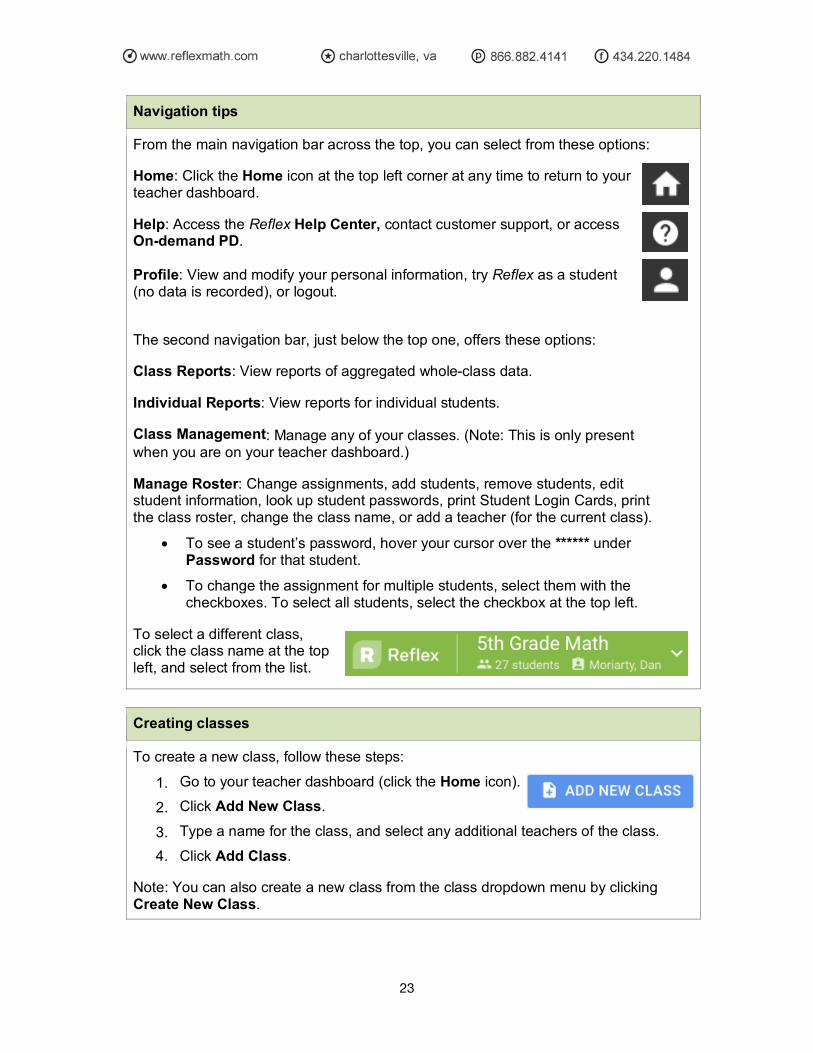
Manage Roster: Change assignments, add students, remove students, edit student information, look up student passwords, print Student Login Cards, print the class roster, change the class name, or add a teacher (for the current class).
• To see a student’s password, hover your cursor over the ****** under Password for that student.
• To change the assignment for multiple students, select them with the checkboxes. To select all students, select the checkbox at the top left.
To select a different class, click the class name at the top left, and select from the list.
Creating classes
To create a new class, follow these steps:
1. Go to your teacher dashboard (click the Home icon). 2. Click Add New Class. 3. Type a name for the class, and select any additional teachers of the class. 4. Click Add Class.
Note: You can also create a new class from the class dropdown menu by clicking Create New Class.

24
Changing a class name
To change a class name: 1. Click on Class Management or Manage Roster. 2. Click on Class Settings. 3. Edit class name. 4. Click Save.
Adding students to classes
If your school has a site license, your Reflex admin may have already uploaded students into the system. If so, you just need to select and add them. (If they are missing, contact your Reflex admin.)
1. Click on Class Management or Manage Roster. 2. Click Add Students. 3. Select the students you want to add to your class. 4. Click Add to Class.
If you have a teacher license, or if your school’s roster has not been uploaded, you will need to add your own students. You can do this individually or as a group.
1. Click on Class Management or Manage Roster. 2. Click Add Students. 3. Click Add New or Import. 4. To add students individually, click Add a New Student. 5. Fill in the fields (* indicates a required field) and click Add New Student.
• Note: If the student already has a Reflex account at another school in your district, you will be asked if you’d like to transfer his or her account to your school. (This preserves the student’s Reflex data.)
6. Click Add Another Student to add more. Click OK when you’re done.
To add students as a group, you will need to create a carefully formatted .csv file and then upload it:
4. Follow steps 1 thru 3 above. Then select Import Students from File. 5. Click Help and choose Sample .CSV File. (This downloads a template.) 6. Using the same format as the template, fill in your students’ information,
and save it as a .csv file. 7. When the file is ready, drag-and-drop it (or select it) into the given field. 8. Click Import Students.
• Note: Same note as above applies about pre-existing students.

25
Modifying student information
You can modify student information manually or via a .csv file. To modify student information manually, do the following:
1. Click on Class Management or Manage Roster. 2. Click on the name of the student you want to edit. 3. Click on the pencil to edit the name, grade, ID, password, or language. 4. Click Save.
To modify student information with a .csv file, follow the same steps given above in the Adding students to classes section. The difference is, if a student ID in the .csv file matches an existing student ID, that student’s information will be updated to match the new .csv file.
1. Create a .csv file (formatted like the template) with the updated information.
2. Click on Class Management or Manage Roster. 3. Click Add Students. 4. Click Add New or Import and choose Import Students from a File. 5. Drag and drop (or select) the .csv file into the field. 6. Click Import Students.
Deleting students
If you have a teacher license – you can delete students to free up available seats. Clicking Add/Remove Students gives you the option to delete students. But remember that when you delete a student, all of that student’s data is lost. You may want to print off any desired Reflex reports for the student before proceeding.
Transfer notifications
If any of your students have had their accounts transferred to another school, you will receive an email to notify you. If this transfer was a mistake, please notify your school’s Reflex administrator immediately.
Reflex in Spanish and French
To modify the language for a student, follow the same steps as given above.
1. Click on Class Management or Manage Roster. 2. Click on the name of the student you want to edit. 3. Click on the pencil and select English, Spanish, or French. 4. Click Save.

26
Logging in – students
When a class roster is complete, click Print Login Cards for each class. Pass out the login cards and tell students to keep them in their notebooks.
To log in, students will need to follow these steps: 1. Go to www.reflexmath.com, click Login, and choose Student Login. (Or
just go to www.reflexmath.com/student.)
2. Enter their teacher’s username.
3. Select a class. (Note: If you have only one class, this step is omitted.)
4. Select their name from the list of students in the class.
5. Enter their password, and click Submit.
27
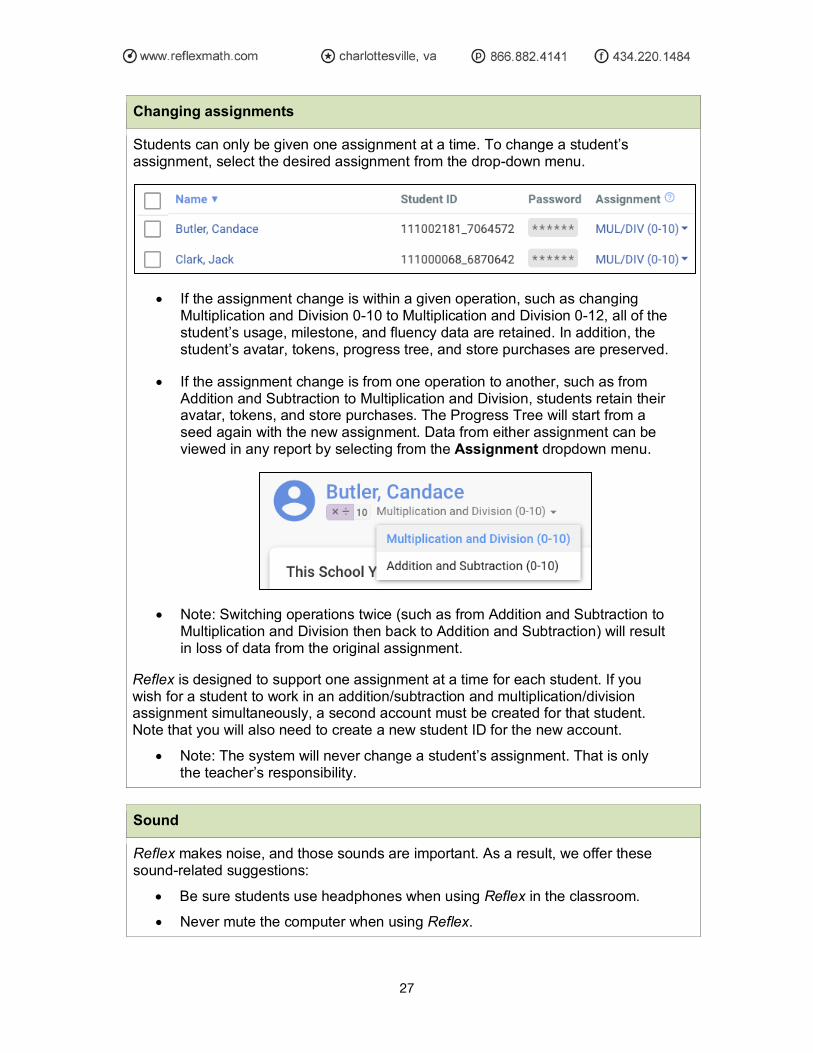
Changing assignments
Students can only be given one assignment at a time. To change a student’s assignment, select the desired assignment from the drop-down menu.
• If the assignment change is within a given operation, such as changing Multiplication and Division 0-10 to Multiplication and Division 0-12, all of the student’s usage, milestone, and fluency data are retained. In addition, the student’s avatar, tokens, progress tree, and store purchases are preserved.
• If the assignment change is from one operation to another, such as from Addition and Subtraction to Multiplication and Division, students retain their avatar, tokens, and store purchases. The Progress Tree will start from a seed again with the new assignment. Data from either assignment can be viewed in any report by selecting from the Assignment dropdown menu.
• Note: Switching operations twice (such as from Addition and Subtraction to Multiplication and Division then back to Addition and Subtraction) will result in loss of data from the original assignment.
Reflex is designed to support one assignment at a time for each student. If you wish for a student to work in an addition/subtraction and multiplication/division assignment simultaneously, a second account must be created for that student. Note that you will also need to create a new student ID for the new account.
• Note: The system will never change a student’s assignment. That is only the teacher’s responsibility.
Sound
Reflex makes noise, and those sounds are important. As a result, we offer these sound-related suggestions:
• Be sure students use headphones when using Reflex in the classroom. • Never mute the computer when using Reflex.
28
Green Light info
When students reach the Daily Usage Requirement on Reflex, a Green Light will come on in the upper right corner of the screen. This should take about 15 or 20 minutes. (Some of the earliest sessions might take slightly longer.)
The store and student avatar are only available once the Green Light is on.
Students can earn a maximum of 120 tokens per day.
Using reports
Access reports through the teacher dashboard or by clicking Reports in the main navigation bar.
There are two types of reports – individual and class. Click Class Reports or Individual Reports in the navigation bar to select which type you want.
Select a specific report by clicking one of the links just below the navigation bar.
You can view a class report for one class or for all your classes. Change classes by clicking on the class name, which is a dropdown menu. For combined data from all of your classes, click All Classes.
Many report cells can be clicked on to get more detail.
All reports can be printed.
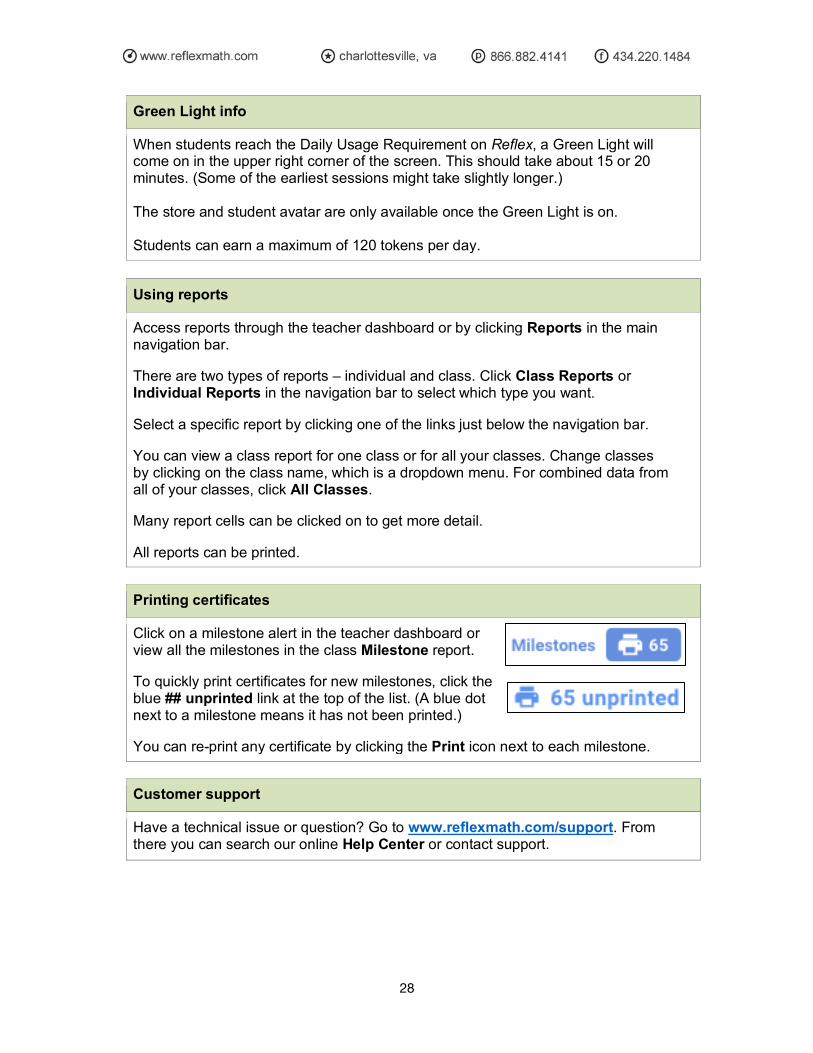
Printing certificates
Click on a milestone alert in the teacher dashboard or view all the milestones in the class Milestone report.
To quickly print certificates for new milestones, click the blue ## unprinted link at the top of the list. (A blue dot next to a milestone means it has not been printed.)
You can re-print any certificate by clicking the Print icon next to each milestone.
Customer support
Have a technical issue or question? Go to www.reflexmath.com/support. From there you can search our online Help Center or contact support.