Embed Size (px)
Citation preview
Receiving Goods for Agencies
Roles Involved: • Receivers
Summary:
Step-by-step instructions on the Receiving
process in PASSPort
Last Updated: January 27, 2020
2
1. Receiving Overview ......................................................................................................................................................................................................................... 3
2. Browse and Manage an Existing Receipt ...................................................................................................................................................................................... 4
3. Creating a New Receipt .................................................................................................................................................................................................................. 6
4. Returns Overview .............................................................................................................................................................................................................................. 10
5. Reconciliation Requests Overview ................................................................................................................................................................................................... 16
6. Create a Reconciliation Request from a Receipt ............................................................................................................................................................................ 17
7. Close Reconciliation Requests ........................................................................................................................................................................................................ 21
Accessing PASSPort
To access PASSPort and log in, go to http://cityshare.nycnet/passport
Note: While navigating PASSPort you are able to easily increase its font size and readability. To do this, click the “ctrl” and “+” keys simultaneously on your
keyboard. Each time you click these keys, your web browser will zoom in and PASSPort will resize accordingly. To reduce PASSPort’s font size,
simultaneously click the “ctrl” and “-“ keys.
Table of Contents
3
This user manual provides you with step-by-step instructions for completing the Receiving process in PASSPort.
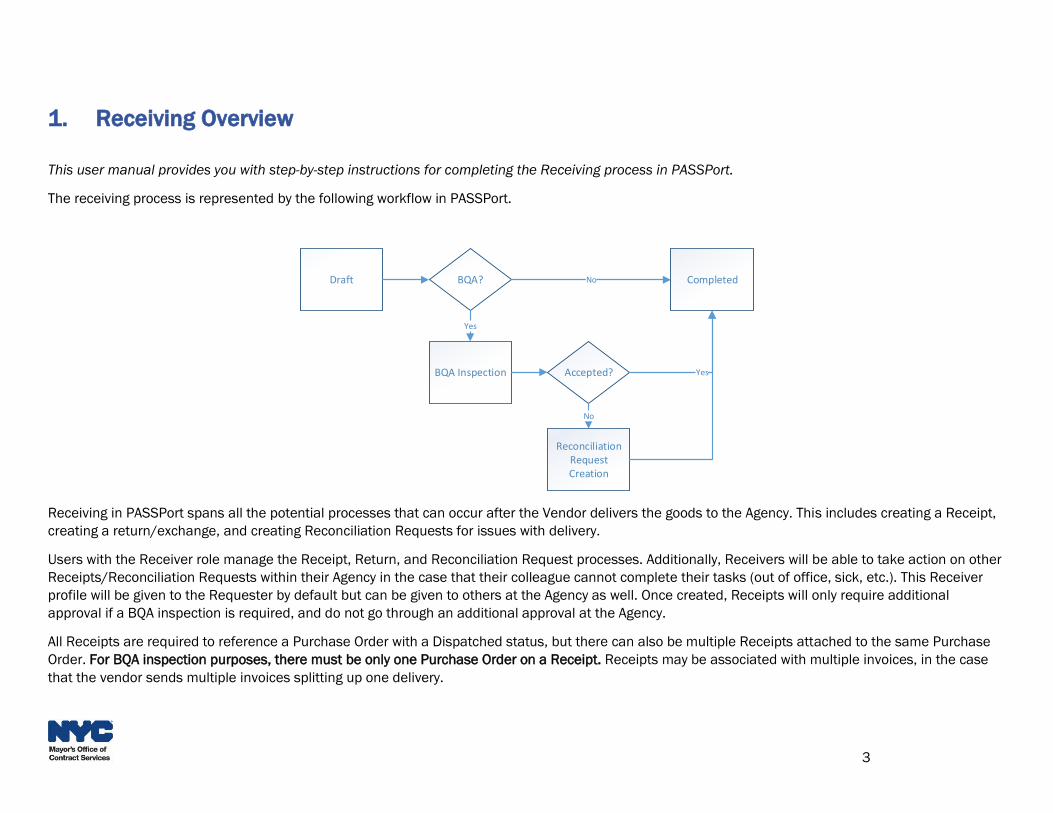
The receiving process is represented by the following workflow in PASSPort.
Draft BQA? Completed
BQA Inspection
Yes
No
Accepted? Yes
Reconciliation Request Creation
No
Receiving in PASSPort spans all the potential processes that can occur after the Vendor delivers the goods to the Agency. This includes creating a Receipt,
creating a return/exchange, and creating Reconciliation Requests for issues with delivery.
Users with the Receiver role manage the Receipt, Return, and Reconciliation Request processes. Additionally, Receivers will be able to take action on other
Receipts/Reconciliation Requests within their Agency in the case that their colleague cannot complete their tasks (out of office, sick, etc.). This Receiver
profile will be given to the Requester by default but can be given to others at the Agency as well. Once created, Receipts will only require additional
approval if a BQA inspection is required, and do not go through an additional approval at the Agency.
All Receipts are required to reference a Purchase Order with a Dispatched status, but there can also be multiple Receipts attached to the same Purchase
Order. For BQA inspection purposes, there must be only one Purchase Order on a Receipt. Receipts may be associated with multiple invoices, in the case
that the vendor sends multiple invoices splitting up one delivery.
1. Receiving Overview

4
Receipts are used to document what was received at the Agency, where, and when, and can either be for less than the entire Purchase Order amount (in
the case of a partial delivery or returns) or equal to the full Purchase Order amount. If there is an overage, a change order can be created if you want to
keep the good(s), which will require agency approval and completion of the receipt accounting for the additional goods from the updated Purchase Order.
Users with a Receiver profile can edit Receipts belonging to the Agencies they are assigned to as a user.
Follow the below steps to browse and manage Receipts.
2. Browse and Manage an Existing Receipt
1. From any page in
PASSPort click on
the ‘Receiving’
button at the top of
the page.
2. Click ‘Browse
Receipts’ to see the
list of your Agency’s
Receipts in all
statuses.
1
2
5
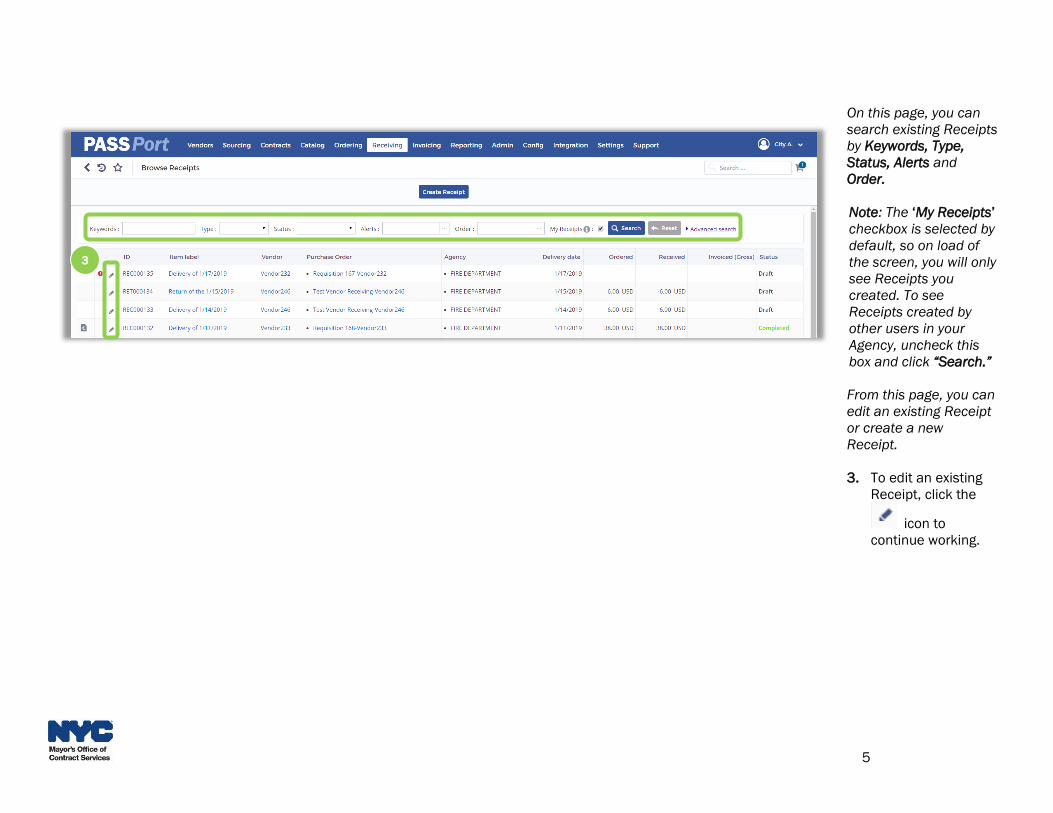
On this page, you can
search existing Receipts
by Keywords, Type,
Status, Alerts and
Order.
Note: The ‘My Receipts’
checkbox is selected by
default, so on load of
the screen, you will only
see Receipts you
created. To see
Receipts created by
other users in your
Agency, uncheck this
box and click “Search.”
From this page, you can
edit an existing Receipt
or create a new
Receipt.
3. To edit an existing
Receipt, click the
icon to
continue working.
3
6
There are several ways to create a Receipt in PASSPort. It is recommended you create a Receipt directly from the related Purchase Order, since certain
fields will be pulled directly from the PO onto the receipt, including the vendor, order, and order details.
Note: The Receipt must have the following to be submitted:
1) A linked PO with a Dispatched status
2) Line items that can be found on the original PO
3) Line items that are equal to or below the PO amount.
If any of these are missing, this will show up in the alerts frame as a blocking alert, and a return or Receipt edit will need to be made to successfully submit
the Receipt and push forward the workflow. Additionally, the Receipt will receive a blocking alert upon submission if the Receiver selected a date in the
future. Only the current date or a date in the past can be selected. Once submitted, the Receipt fields are no longer editable.
Follow the below steps to create a Receipt.
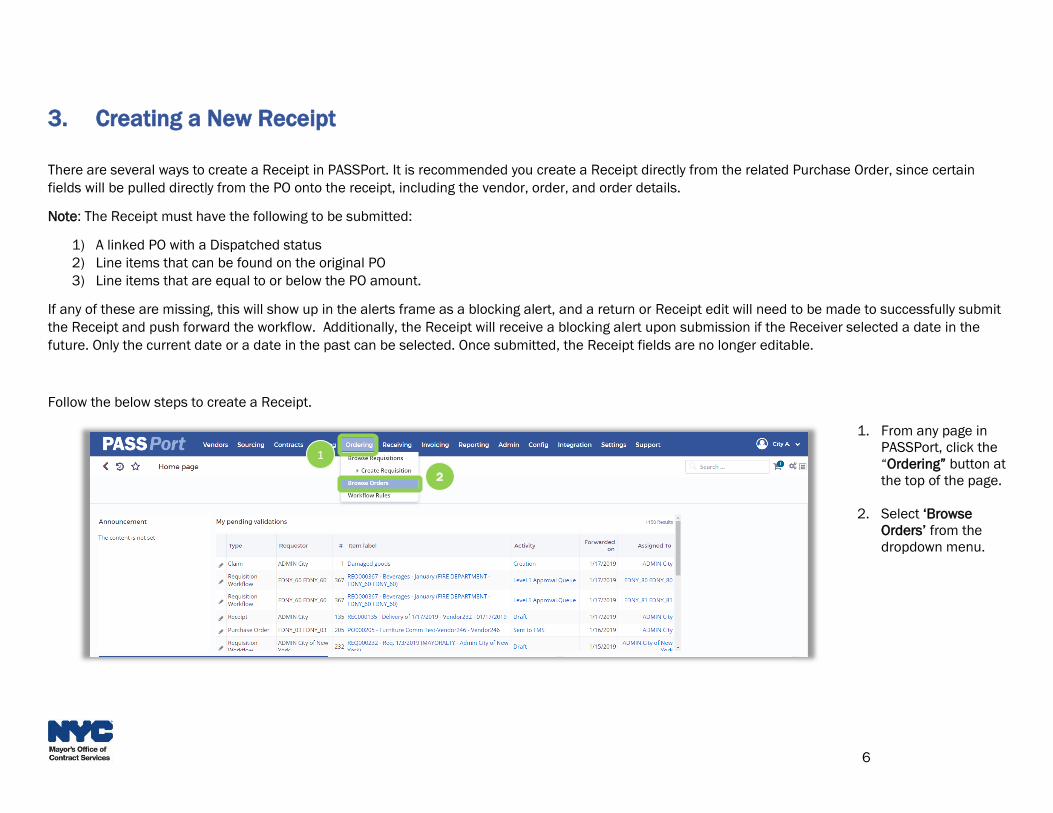
3. Creating a New Receipt
1. From any page in
PASSPort, click the
“Ordering” button at
the top of the page.
2. Select ‘Browse
Orders’ from the
dropdown menu.
1
2
0
0
0
7
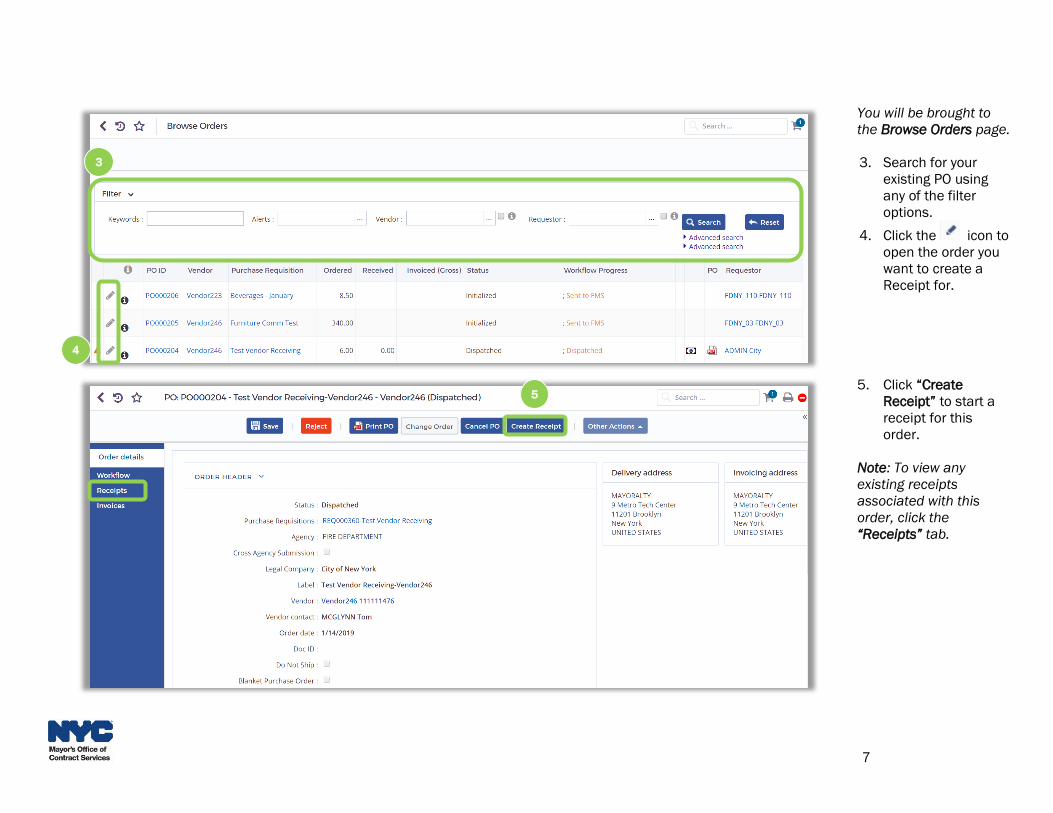
You will be brought to
the Browse Orders page.
3. Search for your
existing PO using
any of the filter
options.
4. Click the icon to
open the order you
want to create a
Receipt for.
5. Click “Create
Receipt” to start a
receipt for this
order.
Note: To view any
existing receipts
associated with this
order, click the
“Receipts” tab.
4
5
3
8
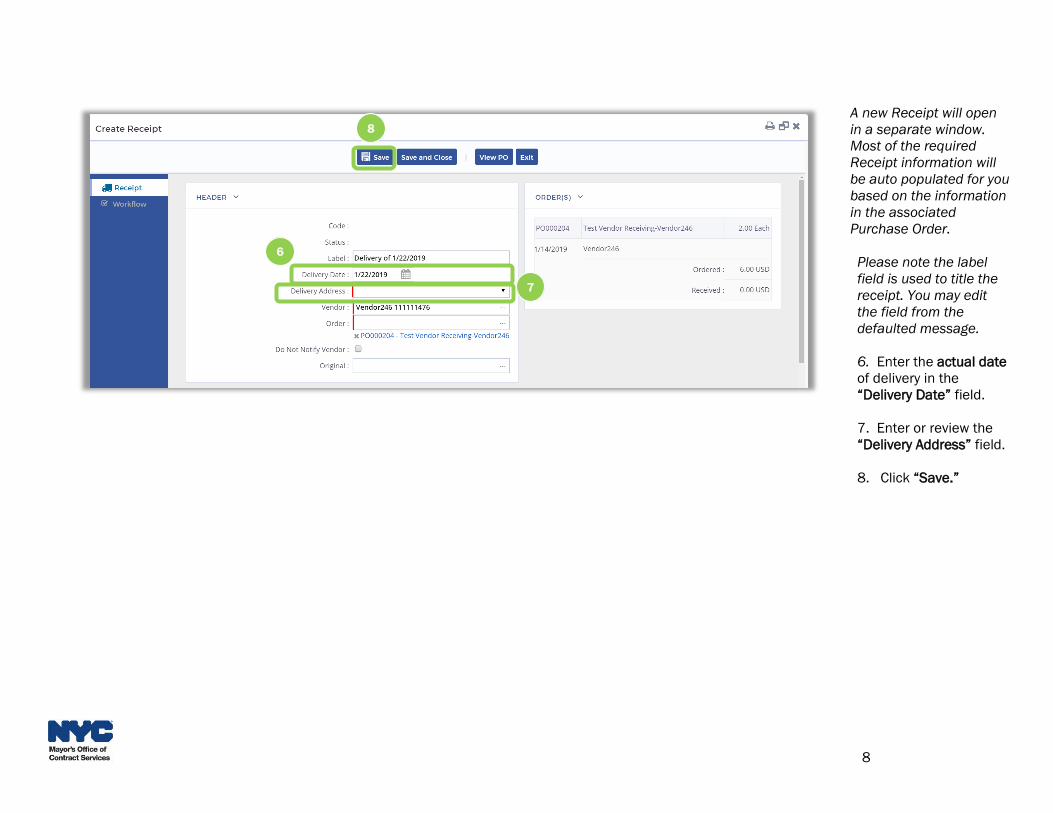
A new Receipt will open
in a separate window.
Most of the required
Receipt information will
be auto populated for you
based on the information
in the associated
Purchase Order.
Please note the label
field is used to title the
receipt. You may edit
the field from the
defaulted message.
6. Enter the actual date
of delivery in the
“Delivery Date” field.
7. Enter or review the
“Delivery Address” field.
8. Click “Save.”
7
8
6

9
9. If BQA Inspection is
required, check the box
on “Request BQA
Inspection” to request
their review. Checking
off this box will update
the status to “BQA
Inspection”.
Scroll down to view all
items associated with
the order and select
which items you want to
mark as received.
10. To edit the quantity
of an item received,
click the icon. (To
remove an item from the
Receipt, click the
icon).
11. To create a
Reconciliation Request,
click
“Create a Reconciliation
Request.”
Note: See the section on
Reconciliation Requests
(page 16) in this user
manual for more details.
12. Click “Submit” to
complete your
Receipt.
9
10
11
12
10
Returns can be used to send excess goods, damaged goods, or any unwanted goods back to the vendor, deducting the net amount of the Receipt in the
matching calculation. In the case that a Return occurs, the invoice (had it been received at that point) would be higher than the Receipt amount, and 4-way
matching would fail during the invoice workflow. In the case of the returns mentioned above, matching would not pass until the invoice was deducted to
match the net amount of the Receipt after the return. A return may also originate from a BQA inspection result.
It is always possible that the vendor might over-ship the goods ordered, or accidentally send your Agency the wrong goods. In the case that your Agency
receives more goods than the Purchase Order was for, there are 2 options: 1) return or 2) keep. If your Agency wants to return the goods, you would use the
“add ad hoc lines” button on the Receipt to add the non-Purchase Order items onto the Receipt, save, and then create a return for those items from the
Receipt.
If your Agency wants to keep the goods, the next steps depends on whether all the goods on the receipt are from 1) the same contract, or 2) from at least 2
different contracts. If the received goods were from the same contract, you can create a Change Order to update both the Purchase Order and
encumbrance with the new items, and then link the Receipt to the amended Purchase Order (all past Receipts and Invoices would also move over to the
new Purchase Order). If the goods were from a different contract, you would have to create a new requisition for those goods. Both scenarios require a full
approval process. When creating a new requisition, the Requestor would need to delineate that the goods have already been received by checking the “Do
Not Ship” checkbox, which will make the status of the delivered Purchase Order “Do Not Ship,” notifying the vendor to not send an additional delivery of
goods over what they've already sent.
Follow the below steps to create a Return.
4. Returns Overview
11
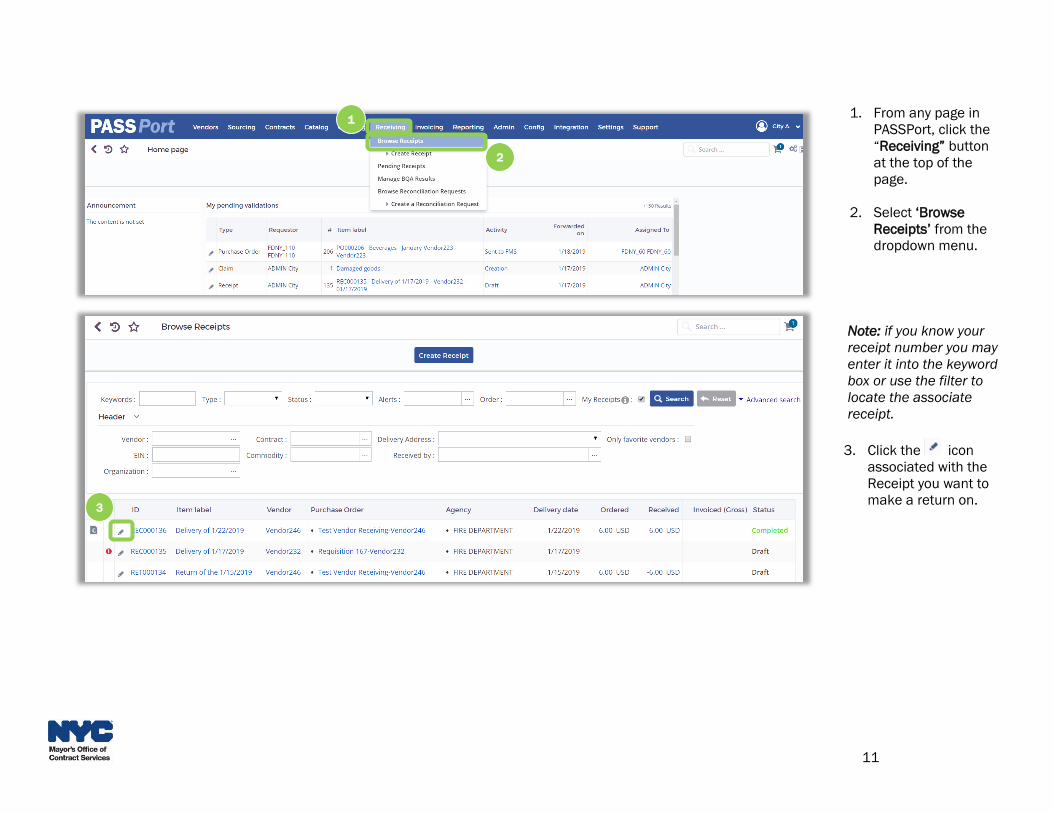
1. From any page in
PASSPort, click the
“Receiving” button
at the top of the
page.
2. Select ‘Browse
Receipts’ from the
dropdown menu.
Note: if you know your
receipt number you may
enter it into the keyword
box or use the filter to
locate the associate
receipt.
3. Click the icon
associated with the
Receipt you want to
make a return on.
1
2
3

12
4. Click “Create
Return” at the top
of the page.
4

13
You will be brought into
a Return with many of
the fields auto
populated based on the
information from the
Receipt.
5. Select the
“Shipping Address”
from the drop-down
menu.
6. Select the “Reason”
for the return using
the drop-down
menu.
7. Click “Save.”
5
6
7

14
8. The Return will
populate with the
items from the
Receipt. Remove
any items that do
not need to be
returned by clicking
the icon. You
may also return
some of a multi-
quality item by
clicking on the
icon and adjusting
the quality in the
pop up window.
Note: If you want an
item to be replaced or
exchanged, click the
checkbox in the
“Replace” column.
9. Click “Schedule
Return” to update
the status of the
Return to
“Scheduled.”
8
9
15
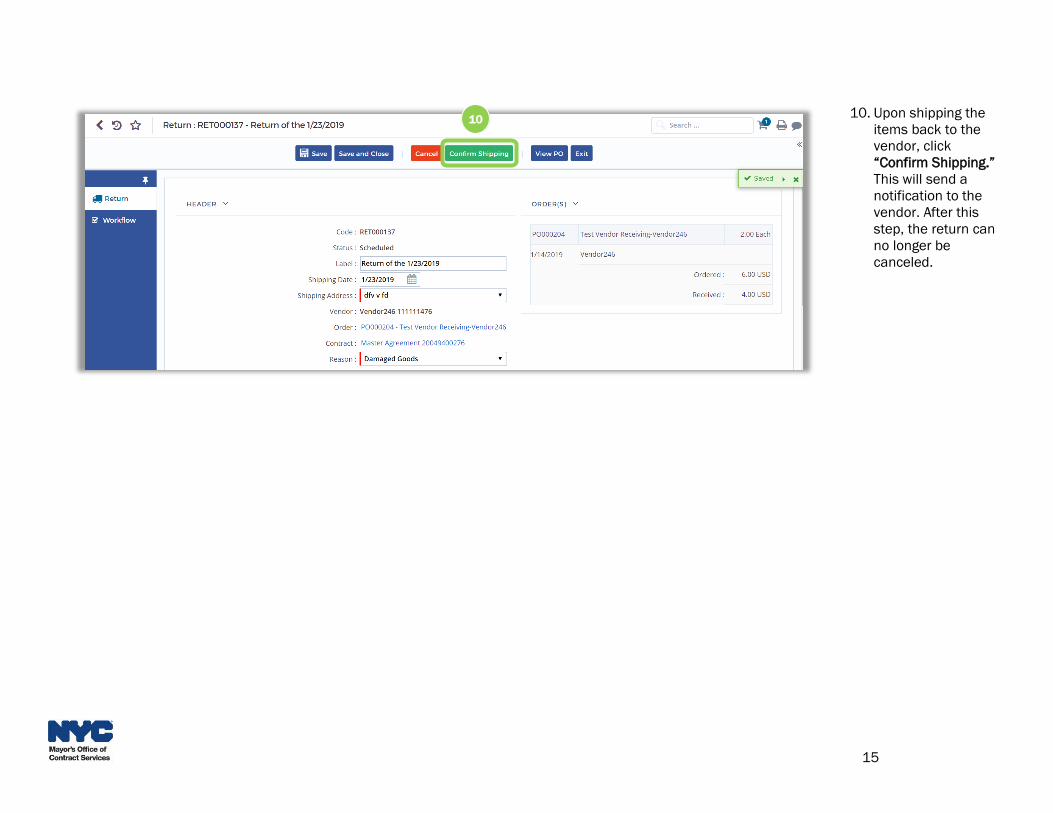
10. Upon shipping the
items back to the
vendor, click
“Confirm Shipping.”
This will send a
notification to the
vendor. After this
step, the return can
no longer be
canceled.
10

16
Reconciliation Requests can be used to request the deduction of an existing invoice for many scenarios such as quality issues, damages, late deliveries,
and pending replacements. It is a crucial step, as it blocks payments from occurring until the Reconciliation Request closed by its creator, signaling that
the issue has been resolved and the amounts being invoiced are correct. Reconciliation requests can also be created by BQA and closed by the appropriate
BQA Manager.
The Reconciliation Request will stay open until it is deemed resolved (i.e. the Agency user receives the invoice deduction/new items/etc.) and the
Reconciliation Request creator manually closes the Reconciliation Request. Users with the Receiver profile will be authorized to manage the Reconciliation
Requests process and will be able to act on other Reconciliation Requests within their organization in the case that their colleague cannot complete their
tasks (out of office, sick, etc.) If a Reconciliation Request is open, PASSPort will not allow the invoice to be fully approved, and payment will not be sent to
FMS. The invoicing workflow will check for any open Reconciliation Requests linked to the invoice or Receipt of that workflow and will wait for the
Reconciliation Request to be closed to push forward the workflow.
Reconciliation Requests can be created on their own, or they can be accompanied by a return, depending on the scenario. In the case that the goods
received are damaged, but are going to be kept, the user only needs to utilize a Reconciliation Request to request that the invoice get deducted for the
damages/quality issues. In the case that the DCAS Bureau of Quality Assurance (BQA) rejects the goods, a Reconciliation Request can be created by BQA to
block payment while the goods are then returned and replaced using a return. Once the goods are successfully replaced, the Reconciliation Request can be
closed, and payment can move forward.
It is best for Reconciliation Requests relating to returns to be created before the submission of the receipt, so any required deductions will be naturally
enforced by the 4-way match workflow.
5. Reconciliation Requests Overview
17
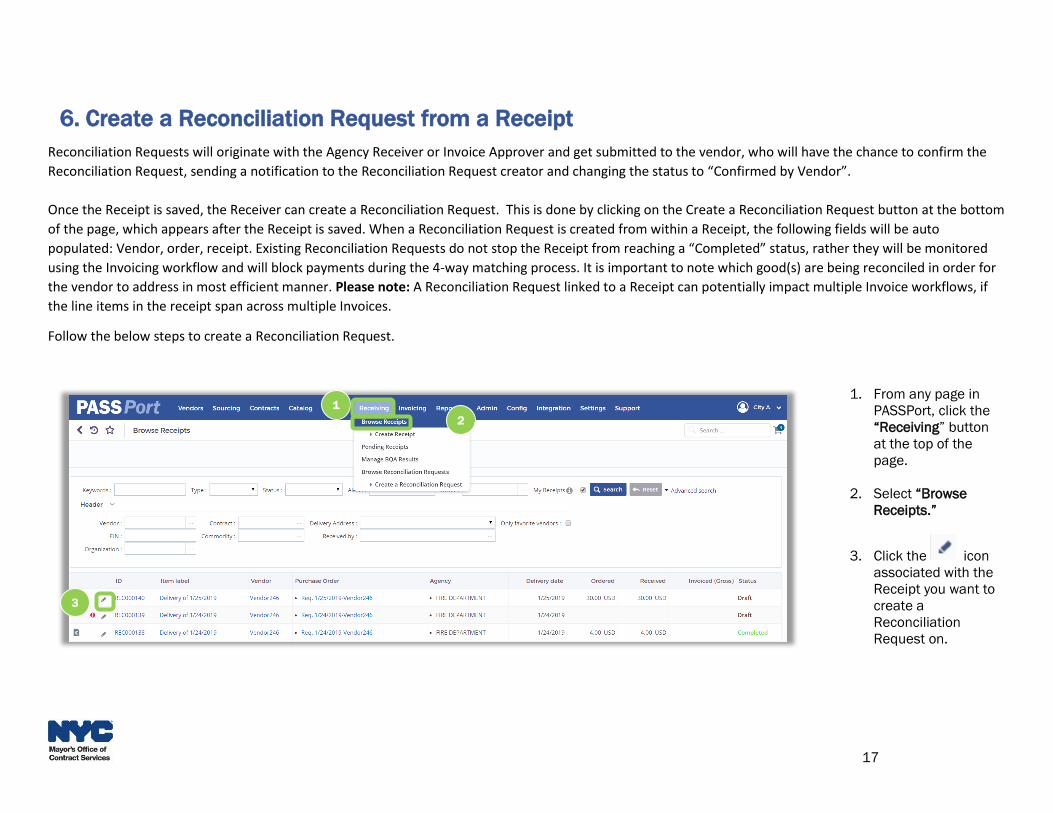
Reconciliation Requests will originate with the Agency Receiver or Invoice Approver and get submitted to the vendor, who will have the chance to confirm the
Reconciliation Request, sending a notification to the Reconciliation Request creator and changing the status to “Confirmed by Vendor”.
Once the Receipt is saved, the Receiver can create a Reconciliation Request. This is done by clicking on the Create a Reconciliation Request button at the bottom
of the page, which appears after the Receipt is saved. When a Reconciliation Request is created from within a Receipt, the following fields will be auto
populated: Vendor, order, receipt. Existing Reconciliation Requests do not stop the Receipt from reaching a “Completed” status, rather they will be monitored
using the Invoicing workflow and will block payments during the 4-way matching process. It is important to note which good(s) are being reconciled in order for
the vendor to address in most efficient manner. Please note: A Reconciliation Request linked to a Receipt can potentially impact multiple Invoice workflows, if
the line items in the receipt span across multiple Invoices.
Follow the below steps to create a Reconciliation Request.
6. Create a Reconciliation Request from a Receipt
1. From any page in
PASSPort, click the
“Receiving” button
at the top of the
page.
2. Select “Browse
Receipts.”
3. Click the icon
associated with the
Receipt you want to
create a
Reconciliation
Request on.
1
2
3
18
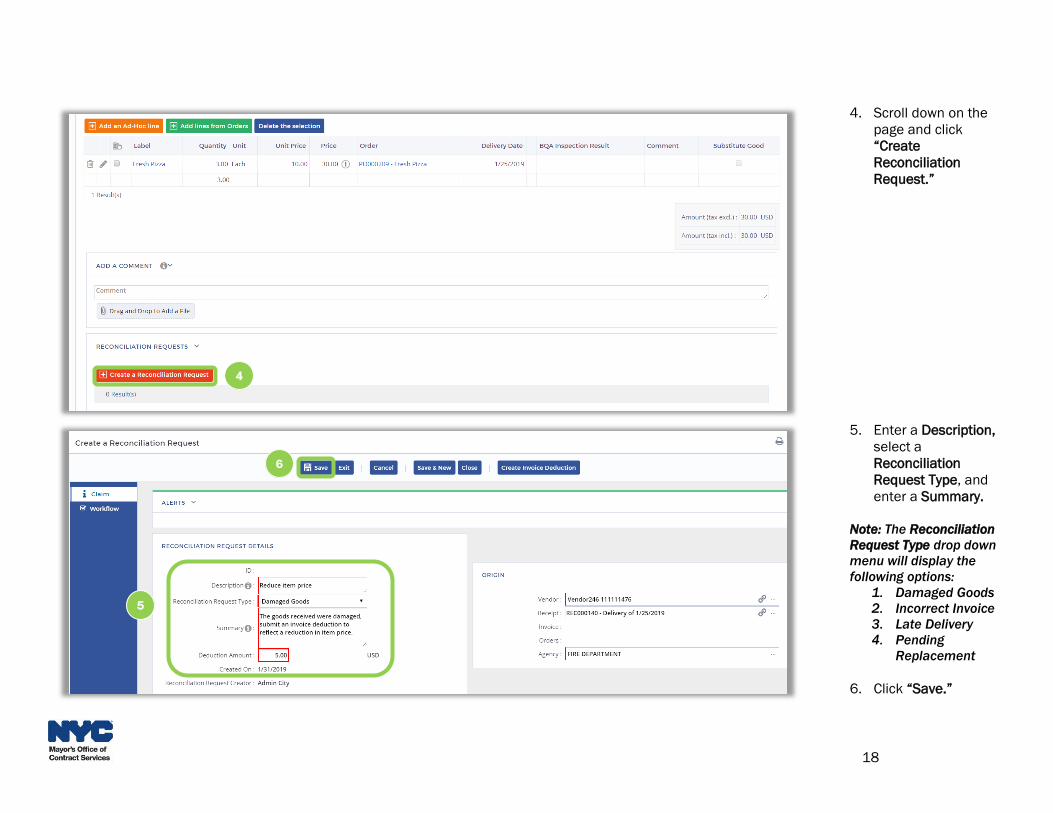
4. Scroll down on the
page and click
“Create
Reconciliation
Request.”
5. Enter a Description,
select a
Reconciliation
Request Type, and
enter a Summary.
Note: The Reconciliation
Request Type drop down
menu will display the
following options:
1. Damaged Goods
2. Incorrect Invoice
3. Late Delivery
4. Pending
Replacement
6. Click “Save.”
4
5
6
19
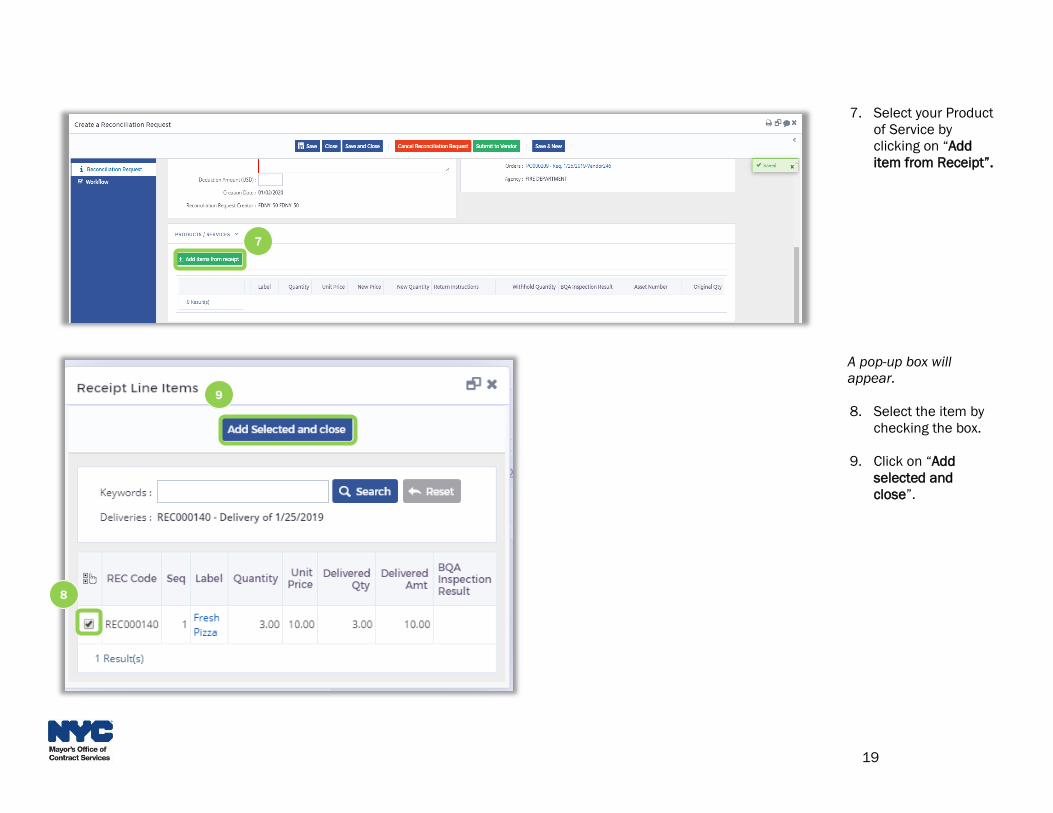
7. Select your Product
of Service by
clicking on “Add
item from Receipt”.
A pop-up box will
appear.
8. Select the item by
checking the box.
9. Click on “Add
selected and
close”.
7
8
9
20
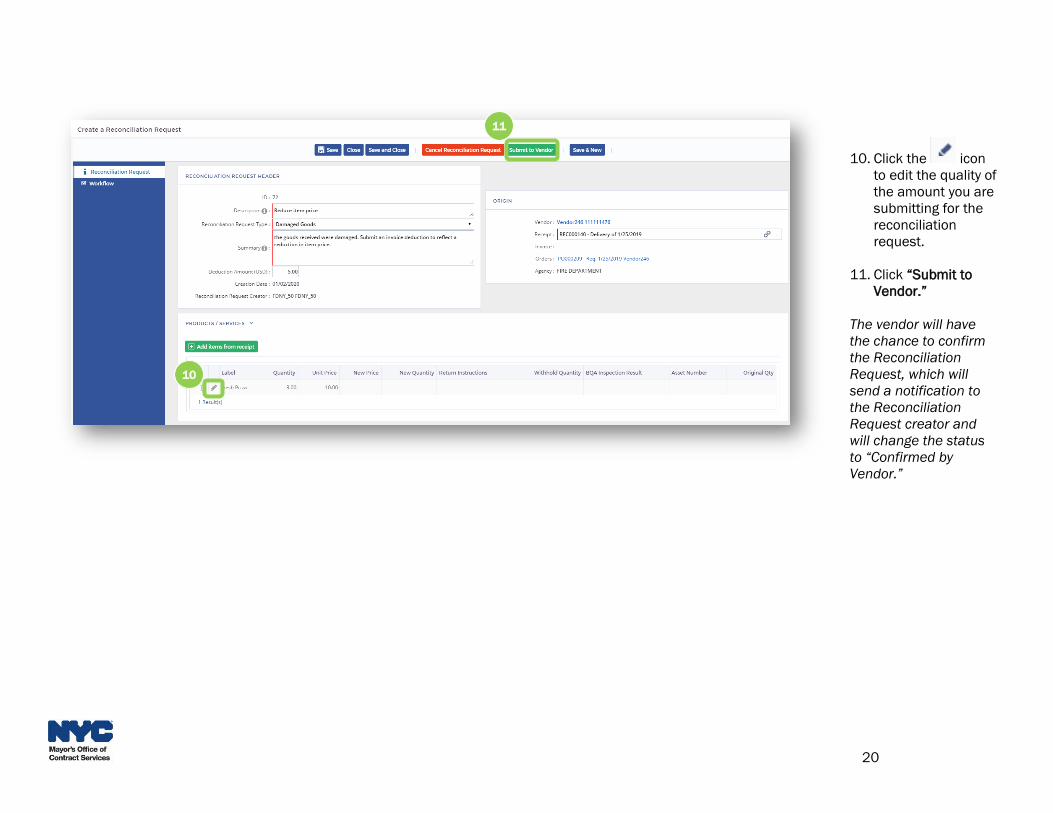
10. Click the icon
to edit the quality of
the amount you are
submitting for the
reconciliation
request.
11. Click “Submit to
Vendor.”
The vendor will have
the chance to confirm
the Reconciliation
Request, which will
send a notification to
the Reconciliation
Request creator and
will change the status
to “Confirmed by
Vendor.”
10
11
21
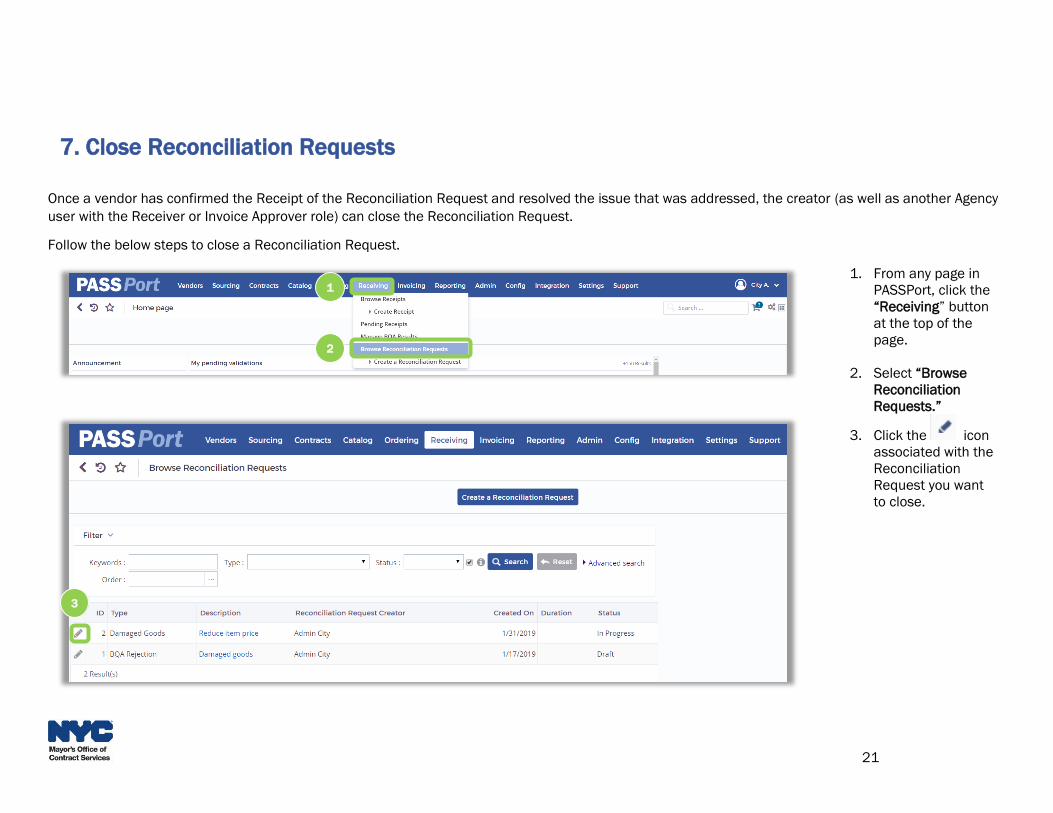
Once a vendor has confirmed the Receipt of the Reconciliation Request and resolved the issue that was addressed, the creator (as well as another Agency
user with the Receiver or Invoice Approver role) can close the Reconciliation Request.
Follow the below steps to close a Reconciliation Request.
7. Close Reconciliation Requests
1. From any page in
PASSPort, click the
“Receiving” button
at the top of the
page.
2. Select “Browse
Reconciliation
Requests.”
3. Click the icon
associated with the
Reconciliation
Request you want
to close.
1
2
3
22
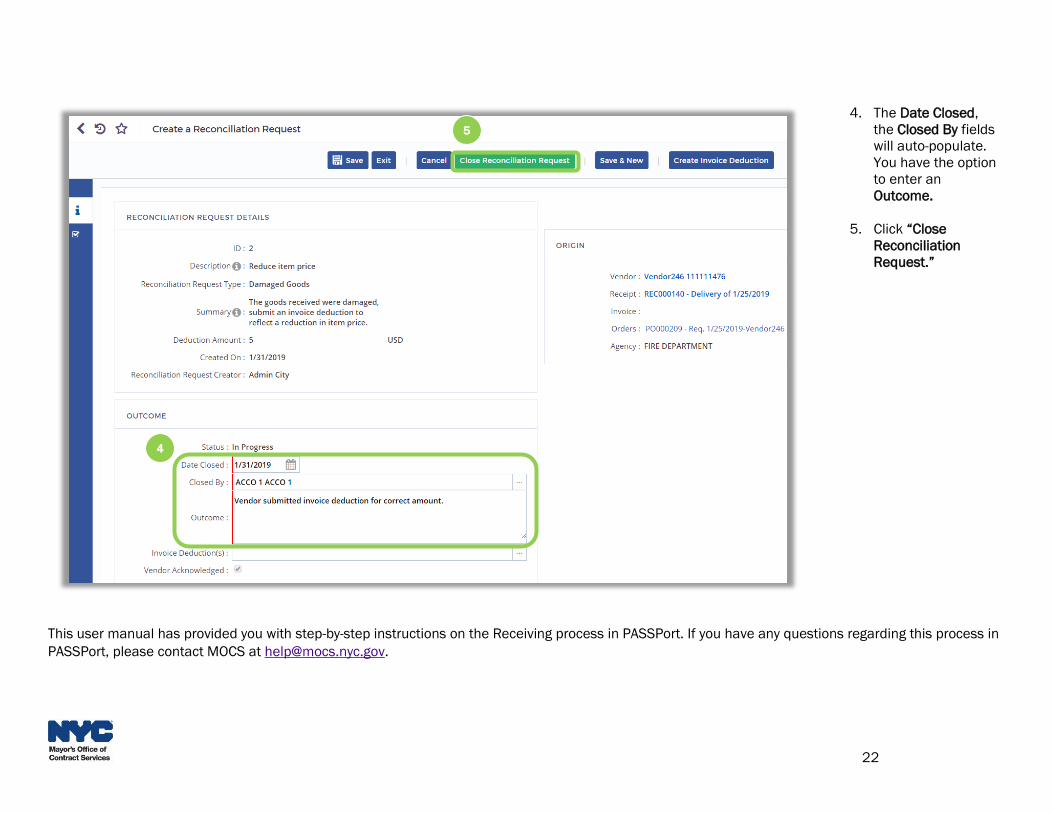
This user manual has provided you with step-by-step instructions on the Receiving process in PASSPort. If you have any questions regarding this process in
PASSPort, please contact MOCS at [email protected].
4. The Date Closed,
the Closed By fields
will auto-populate.
You have the option
to enter an
Outcome.
5. Click “Close
Reconciliation
Request.”
4
5