Embed Size (px)
Citation preview

Read the ExtensiveAutomationDocumentation
Release 20.0
ExtensiveAutomation
Oct 28, 2019


About
1 Extensive Automation 11.1 Concepts . . . . . . . . . . . . . . . . . . . . . . . . . . . . . . . . . . . . . . . . . . . . . . . 11.2 Usages . . . . . . . . . . . . . . . . . . . . . . . . . . . . . . . . . . . . . . . . . . . . . . . . 21.3 License . . . . . . . . . . . . . . . . . . . . . . . . . . . . . . . . . . . . . . . . . . . . . . . . 21.4 Author . . . . . . . . . . . . . . . . . . . . . . . . . . . . . . . . . . . . . . . . . . . . . . . . 21.5 Contact . . . . . . . . . . . . . . . . . . . . . . . . . . . . . . . . . . . . . . . . . . . . . . . . 3
2 Download 5
3 Changes Logs 73.1 Current version . . . . . . . . . . . . . . . . . . . . . . . . . . . . . . . . . . . . . . . . . . . . 73.2 Previous versions . . . . . . . . . . . . . . . . . . . . . . . . . . . . . . . . . . . . . . . . . . . 7
4 Client 174.1 The workspace . . . . . . . . . . . . . . . . . . . . . . . . . . . . . . . . . . . . . . . . . . . . 184.2 The analyzer . . . . . . . . . . . . . . . . . . . . . . . . . . . . . . . . . . . . . . . . . . . . . 264.3 Server Explorer . . . . . . . . . . . . . . . . . . . . . . . . . . . . . . . . . . . . . . . . . . . . 284.4 Settings . . . . . . . . . . . . . . . . . . . . . . . . . . . . . . . . . . . . . . . . . . . . . . . . 294.5 Complements . . . . . . . . . . . . . . . . . . . . . . . . . . . . . . . . . . . . . . . . . . . . . 30
5 Toolbox 355.1 Deployment . . . . . . . . . . . . . . . . . . . . . . . . . . . . . . . . . . . . . . . . . . . . . 365.2 More . . . . . . . . . . . . . . . . . . . . . . . . . . . . . . . . . . . . . . . . . . . . . . . . . 37
6 Web interface 416.1 Tests part . . . . . . . . . . . . . . . . . . . . . . . . . . . . . . . . . . . . . . . . . . . . . . . 416.2 Admin part . . . . . . . . . . . . . . . . . . . . . . . . . . . . . . . . . . . . . . . . . . . . . . 41
7 Get started 437.1 Connection to the server . . . . . . . . . . . . . . . . . . . . . . . . . . . . . . . . . . . . . . 437.2 Write a test . . . . . . . . . . . . . . . . . . . . . . . . . . . . . . . . . . . . . . . . . . . . . . 447.3 Write a scenario . . . . . . . . . . . . . . . . . . . . . . . . . . . . . . . . . . . . . . . . . . . 447.4 Execute a test . . . . . . . . . . . . . . . . . . . . . . . . . . . . . . . . . . . . . . . . . . . . 467.5 Result analysing . . . . . . . . . . . . . . . . . . . . . . . . . . . . . . . . . . . . . . . . . . . 467.6 Best practices . . . . . . . . . . . . . . . . . . . . . . . . . . . . . . . . . . . . . . . . . . . . . 47
8 Tests examples 49
i

8.1 Testcase (unit) . . . . . . . . . . . . . . . . . . . . . . . . . . . . . . . . . . . . . . . . . . . . 498.2 Testcase (suite) . . . . . . . . . . . . . . . . . . . . . . . . . . . . . . . . . . . . . . . . . . . . 498.3 variables . . . . . . . . . . . . . . . . . . . . . . . . . . . . . . . . . . . . . . . . . . . . . . . 508.4 Scenario . . . . . . . . . . . . . . . . . . . . . . . . . . . . . . . . . . . . . . . . . . . . . . . 518.5 Test campaign . . . . . . . . . . . . . . . . . . . . . . . . . . . . . . . . . . . . . . . . . . . . 528.6 Rest API . . . . . . . . . . . . . . . . . . . . . . . . . . . . . . . . . . . . . . . . . . . . . . . . 528.7 SSH controls . . . . . . . . . . . . . . . . . . . . . . . . . . . . . . . . . . . . . . . . . . . . . 548.8 Web browsers . . . . . . . . . . . . . . . . . . . . . . . . . . . . . . . . . . . . . . . . . . . . 548.9 Android mobile . . . . . . . . . . . . . . . . . . . . . . . . . . . . . . . . . . . . . . . . . . . . 57
9 Tests Snippets 619.1 Shared data between tests . . . . . . . . . . . . . . . . . . . . . . . . . . . . . . . . . . . . . . 619.2 Basics actions . . . . . . . . . . . . . . . . . . . . . . . . . . . . . . . . . . . . . . . . . . . . . 639.3 Data Generators . . . . . . . . . . . . . . . . . . . . . . . . . . . . . . . . . . . . . . . . . . . 659.4 Networks protocols . . . . . . . . . . . . . . . . . . . . . . . . . . . . . . . . . . . . . . . . . 679.5 User Interface . . . . . . . . . . . . . . . . . . . . . . . . . . . . . . . . . . . . . . . . . . . . 699.6 Checks . . . . . . . . . . . . . . . . . . . . . . . . . . . . . . . . . . . . . . . . . . . . . . . . 71
10 Global variables 7310.1 Add/delete a variable . . . . . . . . . . . . . . . . . . . . . . . . . . . . . . . . . . . . . . . . 7310.2 Describe environment test . . . . . . . . . . . . . . . . . . . . . . . . . . . . . . . . . . . . . . 7310.3 Import/export variables . . . . . . . . . . . . . . . . . . . . . . . . . . . . . . . . . . . . . . . 74
11 Assisted designs 7511.1 Framework Tabulation . . . . . . . . . . . . . . . . . . . . . . . . . . . . . . . . . . . . . . . . 7611.2 System tab . . . . . . . . . . . . . . . . . . . . . . . . . . . . . . . . . . . . . . . . . . . . . . 7711.3 Tabulation application . . . . . . . . . . . . . . . . . . . . . . . . . . . . . . . . . . . . . . . . 7811.4 Browser Tabulation . . . . . . . . . . . . . . . . . . . . . . . . . . . . . . . . . . . . . . . . . 8011.5 Android Tabulation . . . . . . . . . . . . . . . . . . . . . . . . . . . . . . . . . . . . . . . . . 82
12 Troubleshooting 8712.1 Errors codes . . . . . . . . . . . . . . . . . . . . . . . . . . . . . . . . . . . . . . . . . . . . . 8712.2 How to fix . . . . . . . . . . . . . . . . . . . . . . . . . . . . . . . . . . . . . . . . . . . . . . 87
13 Installation 8913.1 Server . . . . . . . . . . . . . . . . . . . . . . . . . . . . . . . . . . . . . . . . . . . . . . . . . 8913.2 Web Client . . . . . . . . . . . . . . . . . . . . . . . . . . . . . . . . . . . . . . . . . . . . . . 8913.3 Qt Client . . . . . . . . . . . . . . . . . . . . . . . . . . . . . . . . . . . . . . . . . . . . . . . 8913.4 Toolbox . . . . . . . . . . . . . . . . . . . . . . . . . . . . . . . . . . . . . . . . . . . . . . . . 8913.5 Plugins for client . . . . . . . . . . . . . . . . . . . . . . . . . . . . . . . . . . . . . . . . . . . 89
14 Administration 9114.1 Start/Stop of the server . . . . . . . . . . . . . . . . . . . . . . . . . . . . . . . . . . . . . . . 9114.2 Server status’s . . . . . . . . . . . . . . . . . . . . . . . . . . . . . . . . . . . . . . . . . . . . 9214.3 Server settings . . . . . . . . . . . . . . . . . . . . . . . . . . . . . . . . . . . . . . . . . . . . 92
15 Projects 9315.1 Add a project . . . . . . . . . . . . . . . . . . . . . . . . . . . . . . . . . . . . . . . . . . . . . 9315.2 Delete a project . . . . . . . . . . . . . . . . . . . . . . . . . . . . . . . . . . . . . . . . . . . 9315.3 Link a project to a user . . . . . . . . . . . . . . . . . . . . . . . . . . . . . . . . . . . . . . . 93
16 Users 9516.1 Add user . . . . . . . . . . . . . . . . . . . . . . . . . . . . . . . . . . . . . . . . . . . . . . . 9516.2 Delete a user . . . . . . . . . . . . . . . . . . . . . . . . . . . . . . . . . . . . . . . . . . . . . 96
ii

17 Troubleshooting 9717.1 Logs . . . . . . . . . . . . . . . . . . . . . . . . . . . . . . . . . . . . . . . . . . . . . . . . . . 9717.2 Frequently Asked Questions . . . . . . . . . . . . . . . . . . . . . . . . . . . . . . . . . . . . . 99
18 Tests definitions 10118.1 Test Unit . . . . . . . . . . . . . . . . . . . . . . . . . . . . . . . . . . . . . . . . . . . . . . . 10118.2 Test Suite . . . . . . . . . . . . . . . . . . . . . . . . . . . . . . . . . . . . . . . . . . . . . . . 10218.3 Test Plan . . . . . . . . . . . . . . . . . . . . . . . . . . . . . . . . . . . . . . . . . . . . . . . 10218.4 Test Global . . . . . . . . . . . . . . . . . . . . . . . . . . . . . . . . . . . . . . . . . . . . . . 102
19 The fundamentals 10319.1 Test case . . . . . . . . . . . . . . . . . . . . . . . . . . . . . . . . . . . . . . . . . . . . . . . 10319.2 Test steps . . . . . . . . . . . . . . . . . . . . . . . . . . . . . . . . . . . . . . . . . . . . . . . 10419.3 Cancellation of a test . . . . . . . . . . . . . . . . . . . . . . . . . . . . . . . . . . . . . . . . 10419.4 Adding trace . . . . . . . . . . . . . . . . . . . . . . . . . . . . . . . . . . . . . . . . . . . . . 10519.5 Data . . . . . . . . . . . . . . . . . . . . . . . . . . . . . . . . . . . . . . . . . . . . . . . . . . 10519.6 Put on hold . . . . . . . . . . . . . . . . . . . . . . . . . . . . . . . . . . . . . . . . . . . . . . 10719.7 Interaction with the tester . . . . . . . . . . . . . . . . . . . . . . . . . . . . . . . . . . . . . . 10719.8 Parameters of a test . . . . . . . . . . . . . . . . . . . . . . . . . . . . . . . . . . . . . . . . . 108
20 The tracability 11120.1 The events . . . . . . . . . . . . . . . . . . . . . . . . . . . . . . . . . . . . . . . . . . . . . . 11120.2 Test reports . . . . . . . . . . . . . . . . . . . . . . . . . . . . . . . . . . . . . . . . . . . . . . 11420.3 The logs . . . . . . . . . . . . . . . . . . . . . . . . . . . . . . . . . . . . . . . . . . . . . . . . 118
21 Interoperability 11921.1 Adapters . . . . . . . . . . . . . . . . . . . . . . . . . . . . . . . . . . . . . . . . . . . . . . . 11921.2 Third party tools . . . . . . . . . . . . . . . . . . . . . . . . . . . . . . . . . . . . . . . . . . . 12221.3 Agents . . . . . . . . . . . . . . . . . . . . . . . . . . . . . . . . . . . . . . . . . . . . . . . . 124
22 Test engine 12522.1 The scheduler . . . . . . . . . . . . . . . . . . . . . . . . . . . . . . . . . . . . . . . . . . . . 12522.2 Parallelized executions . . . . . . . . . . . . . . . . . . . . . . . . . . . . . . . . . . . . . . . 12722.3 Synchronized executions . . . . . . . . . . . . . . . . . . . . . . . . . . . . . . . . . . . . . . 12822.4 Distributed executions . . . . . . . . . . . . . . . . . . . . . . . . . . . . . . . . . . . . . . . . 129
23 Advanced examples 13123.1 SSH adapter . . . . . . . . . . . . . . . . . . . . . . . . . . . . . . . . . . . . . . . . . . . . . 13123.2 HTTP adapter . . . . . . . . . . . . . . . . . . . . . . . . . . . . . . . . . . . . . . . . . . . . 13223.3 Telnet adapter . . . . . . . . . . . . . . . . . . . . . . . . . . . . . . . . . . . . . . . . . . . . 13323.4 MySQL adapter . . . . . . . . . . . . . . . . . . . . . . . . . . . . . . . . . . . . . . . . . . . . 13423.5 SNMP adapter . . . . . . . . . . . . . . . . . . . . . . . . . . . . . . . . . . . . . . . . . . . . 13523.6 FTP adapter (s) . . . . . . . . . . . . . . . . . . . . . . . . . . . . . . . . . . . . . . . . . . . 13623.7 SFTP adapter . . . . . . . . . . . . . . . . . . . . . . . . . . . . . . . . . . . . . . . . . . . . . 13723.8 ChartJS librairies . . . . . . . . . . . . . . . . . . . . . . . . . . . . . . . . . . . . . . . . . . . 13823.9 “Text” parameter . . . . . . . . . . . . . . . . . . . . . . . . . . . . . . . . . . . . . . . . . . . 14023.10“Json” parameter . . . . . . . . . . . . . . . . . . . . . . . . . . . . . . . . . . . . . . . . . . . 14123.11“alias” parameter . . . . . . . . . . . . . . . . . . . . . . . . . . . . . . . . . . . . . . . . . . . 14123.12“global” parameter . . . . . . . . . . . . . . . . . . . . . . . . . . . . . . . . . . . . . . . . . . 14223.13“Dataset” parameter . . . . . . . . . . . . . . . . . . . . . . . . . . . . . . . . . . . . . . . . . 14223.14Using an agent . . . . . . . . . . . . . . . . . . . . . . . . . . . . . . . . . . . . . . . . . . . . 143
24 Requirements 14524.1 Server . . . . . . . . . . . . . . . . . . . . . . . . . . . . . . . . . . . . . . . . . . . . . . . . . 14524.2 Customer . . . . . . . . . . . . . . . . . . . . . . . . . . . . . . . . . . . . . . . . . . . . . . . 145
iii

24.3 Toolbox . . . . . . . . . . . . . . . . . . . . . . . . . . . . . . . . . . . . . . . . . . . . . . . . 146
25 Architecture 14725.1 Server . . . . . . . . . . . . . . . . . . . . . . . . . . . . . . . . . . . . . . . . . . . . . . . . . 14725.2 Graphic Client . . . . . . . . . . . . . . . . . . . . . . . . . . . . . . . . . . . . . . . . . . . . 14825.3 Agents . . . . . . . . . . . . . . . . . . . . . . . . . . . . . . . . . . . . . . . . . . . . . . . . 148
26 Specifications 14926.1 Version cycle . . . . . . . . . . . . . . . . . . . . . . . . . . . . . . . . . . . . . . . . . . . . . 14926.2 Server tree . . . . . . . . . . . . . . . . . . . . . . . . . . . . . . . . . . . . . . . . . . . . . . 14926.3 Data model . . . . . . . . . . . . . . . . . . . . . . . . . . . . . . . . . . . . . . . . . . . . . . 15026.4 Passwords management . . . . . . . . . . . . . . . . . . . . . . . . . . . . . . . . . . . . . . . 15026.5 File format . . . . . . . . . . . . . . . . . . . . . . . . . . . . . . . . . . . . . . . . . . . . . . 15126.6 Storage of test results . . . . . . . . . . . . . . . . . . . . . . . . . . . . . . . . . . . . . . . . 15226.7 Control Agents . . . . . . . . . . . . . . . . . . . . . . . . . . . . . . . . . . . . . . . . . . . . 15326.8 The server logs . . . . . . . . . . . . . . . . . . . . . . . . . . . . . . . . . . . . . . . . . . . . 154
27 Contributions 15527.1 Solution development . . . . . . . . . . . . . . . . . . . . . . . . . . . . . . . . . . . . . . . . 15527.2 Plugins development for servers . . . . . . . . . . . . . . . . . . . . . . . . . . . . . . . . . . 15527.3 Plugins development for qt client and agents . . . . . . . . . . . . . . . . . . . . . . . . . . . 15527.4 Documentation . . . . . . . . . . . . . . . . . . . . . . . . . . . . . . . . . . . . . . . . . . . . 156
28 API 15728.1 Authentication . . . . . . . . . . . . . . . . . . . . . . . . . . . . . . . . . . . . . . . . . . . . 15728.2 Usage example . . . . . . . . . . . . . . . . . . . . . . . . . . . . . . . . . . . . . . . . . . . . 15828.3 Ressources . . . . . . . . . . . . . . . . . . . . . . . . . . . . . . . . . . . . . . . . . . . . . . 158
iv

CHAPTER1
Extensive Automation
Welcome on the Extensive Automation project.
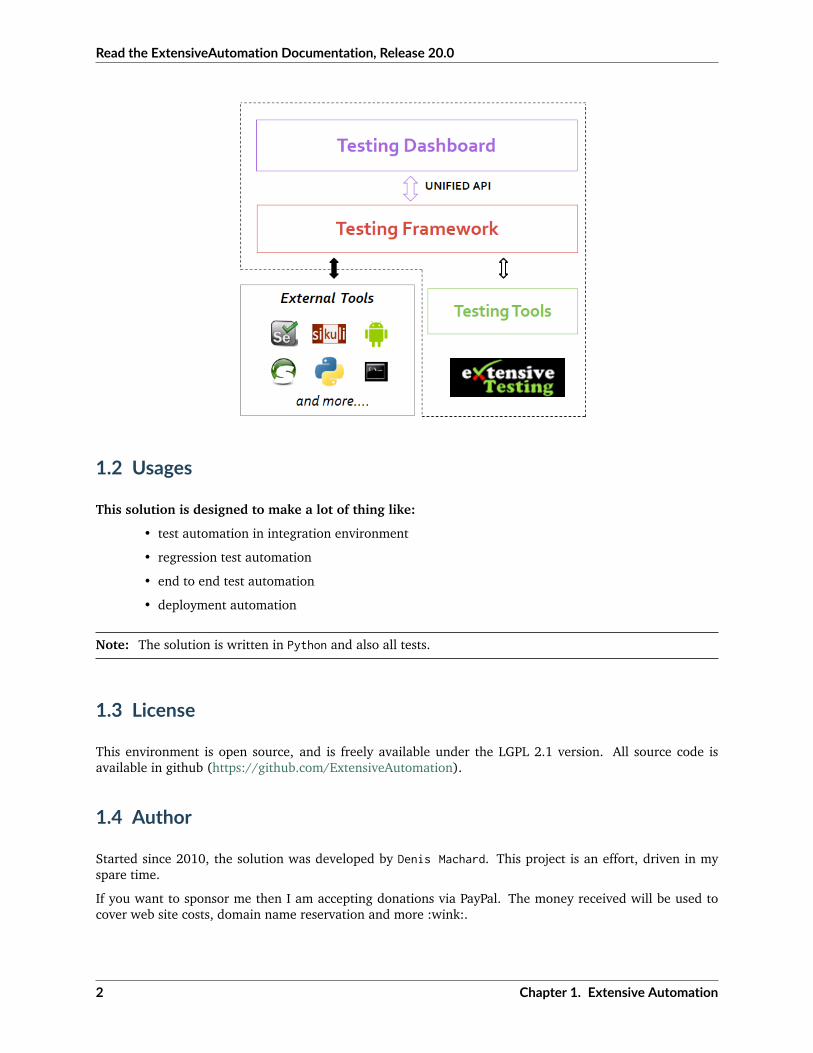
1.1 Concepts
ExtensiveAutomation is a generic automation framework for integration, regression and end-to-end usages.The framework provided a rich and collaborative workspace environment.
The project have several purposes since the creation:
• Unify all testing tools in one environnement
• Provide a complete testing dashboard
• Make automation easy
• Automate everything from anywhere.
• Provide a user friendly environment.
1
Read the ExtensiveAutomation Documentation, Release 20.0
1.2 Usages
This solution is designed to make a lot of thing like:
• test automation in integration environment
• regression test automation
• end to end test automation
• deployment automation
Note: The solution is written in Python and also all tests.
1.3 License
This environment is open source, and is freely available under the LGPL 2.1 version. All source code isavailable in github (https://github.com/ExtensiveAutomation).
1.4 Author
Started since 2010, the solution was developed by Denis Machard. This project is an effort, driven in myspare time.
If you want to sponsor me then I am accepting donations via PayPal. The money received will be used tocover web site costs, domain name reservation and more :wink:.
2 Chapter 1. Extensive Automation

Read the ExtensiveAutomation Documentation, Release 20.0
1.5 Contact
If you have any questions, you can contact me with:
• email [email protected]
• twitter https://twitter.com/Extensive_Auto
• from the google forum https://groups.google.com/forum/#!forum/extensive-automation-users
• github https://github.com/ExtensiveAutomation
1.5. Contact 3

Read the ExtensiveAutomation Documentation, Release 20.0
4 Chapter 1. Extensive Automation

CHAPTER2
Download
A complete release is generated every two months or less and each component can also evolve at its ownrate. The solution is made of several components.
The solution can be downloaded from the website https://www.extensiveautomation.org
The server is available throught several types of packages:
• from sources
• docker image
• tar.gz
• on pypi package
Plugins for server are available through:
• source on github
• on pypi package
The graphical client is available in portable version.
The toolbox is available in 2 modes:
• portable version
• command line
Note: Client and toolbox can be run on Windows and Linux, in 64bits only.
Warning: The server must be executed in Linux.
5

Read the ExtensiveAutomation Documentation, Release 20.0
Warning: Administrators rights can be necessary to execute properly the client or the toolbox.
6 Chapter 2. Download

CHAPTER3
Changes Logs
3.1 Current version
Note: Version 21.4.0 available since 10/28/2019
• test framework: info messages added on technical error
• test framework: task duration added in raw event
• some errors messages improved
• new specific python module for variables management
A complete release notes is available in the server package.
3.2 Previous versions
Version 21.3.0 available since 10/02/2019
• New function to get run details from REST API
• New integration tests added in the github worflow
• Project access granted to all projects for administrator
• Some bugs fixed
Version 21.2.0 available since 09/20/2019
• Some bugs fixed on the rest API
• PEP8 support
• New function to return all tasks from the rest API
Version 21.1.0 available since 08/25/2019
7
Read the ExtensiveAutomation Documentation, Release 20.0
• No more return settings file content from rest api
• Continue code cleanup
• Disable email test result notification on Windows platform
• Variables encryption database has been removed, prefer another way to do it.
• Salt used on user’s password is now re-generated each time during database creation
• Folders for projects are automatically created if missing during start of the server
• Users manager: default users can be now removed
• Cleanup on the model of the user table
• Default users, projects, and global variables can be now modified from json files
• Support remote ldap simple bind and ntlm authentication for user session
• Test library: test manipulator feature removed
Version 21.0.0 available since 08/10/2019
• Full support for python3 on server side and test framework
• Windows support for server side execution
• Backups folder removed from var, no more needed
• Reorganization of the project files with new python import
• Merge test interop in sut adapters
• New docker image of the server based python3
• New distribution for plugins server on pypi
• New distribution of the server on pypi
Version 20.0.0 available since 07/20/2019
• Image docker available
• Rest API: support for CORS feature
• No more automatic installation provided
• Maximum of dependancies with libraries removed
• No more plugins provided by default
• Probes features removed, replaced by agent
• MySQL database removed, replaced by sqlite
• Optimization of the framework to reduce the CPU usage
• New major version for the Qt client application, user interface improvment
• New major version for the toolbox
• New major version for the web interface, no more provided by default
• Several bugs fixed
Version 19.0.1 available since 08/09/2018
• Bug fix on deployment server, pip command integration
• New name ExtensiveAutomation for the solution
8 Chapter 3. Changes Logs
Read the ExtensiveAutomation Documentation, Release 20.0
• All tests files are stored in XML by default (no more zlib compression)
• Bugs fixes and improvement in REST API
• Initial docker support
• Python 2.6 no more supported on server side
• Cache preview from the client during test writing
• Simplification of tests parameters with “text” and “json”
• SQL queries optimization on server side
• Begin to support python 3.5 on server side
• The client is no more embedded in the server side by default
• New feature to set a security banner on login page of the web interface and app client
• Update of selenium in 3.13.0
• New major version for the app client
• New major version for the toolbox
Version 18.0.0 released on 02/11/2018
• API XmlRPC is removed from the server
• Big improvment of the API REST
• New major client based on the API Rest
• Full support of Qt5.9 for the toolbox and graphical client
• Full support of python 3.6 for the toolbox and graphical client
• Code cleanup
• Several bugs fixed
• Update of selenium in 3.9.0
• The toolbox is no more embedded in the server side by default
Version 17.1.0 released on 10/22/2017
• Improvment in the REST api
• New features in the test framework library
• Several bugs fixed
• Improvment of the graphical interface of the client
• Experimental Ubuntu Support for the graphical client
Version 17.0.0 released on 06/04/2017
• 64bits support by default for the client and toolbox
• New major features in the test framework library
• New swagger for the REST api
• Update of selenium 3 et 2 in the toolbox
• Several bugs fixed
Version 16.1.0 released on 03/30/2017
3.2. Previous versions 9

Read the ExtensiveAutomation Documentation, Release 20.0
• Several bugs fixed
• Improvment of the graphical interface of the client
• Installation improvment
Version 16.0.0 released on 25/02/2017
• Several bugs fixed
• Improvment of the REST api
• Changes on core server
• New features in the test framework library
• Optimization in server side to reduce the number of SQL requests
• Improvment of the graphical interface of the client
• 64bits Support for the graphical client and toolbox
Version 15.0.3 released on 04/11/2016
• Several bugs fixed
• New plugins for the graphical client
• Improvment of the REST API
• New features in the test framework library
• New interop module in test library
Version 14.0.0 released on 27/08/2016
• Several bugs fixed
• New features in the test framework library
• New major features on the REST api
• No more new feature in the XmlRPC api, just bug fix
• New features in the web interface
• Python2.7 no more supported on windows for the graphical client and toolbox
• Integration of the REST api in the graphical client
• Improvment of the graphical interface of the client
• New HP QC ALM plugin for the graphical client
Version 13.0.0 released on 23/06/2016
• Several bugs fixed
• New REST api on the server side
• New features in the test framework library
• Improvment in the core server
• Plugins support for the client and toolbox
• Improvment of the graphical interface of the client
Version 12.1.0 released on 29/04/2016
• Several bugs fixed
10 Chapter 3. Changes Logs

Read the ExtensiveAutomation Documentation, Release 20.0
• New features in the test framework library
• Minors update on the XmlRPC API
• Improvment of the graphical interface of the client
Version 12.0.0 released on 12/02/2016
• Several bugs fixed
• New features on the XmlRPC API
• New features in the test framework library
• New features in the web interface
Version 11.2.0 released on 22/11/2015
• Several bugs fixed
• New features in the test framework library
• Improvment of the scheduler
• New public repository for the test framework library
• Offline installation support
• Minor changes on the XmlRPC api
Version 11.1.0 released on 18/10/2015
• Several bugs fixed
• New features on the XmlRPC API
• New features on the web interface
Version 11.0.0 released on 14/09/2015
• Several bugs fixed
• New features in the web interface
• Merge of agents and probes in the toolbox
• Update in the XmlRPC API
• Python 3.4 support for the graphical client and toolbox
Version 10.1.0 released on 12/07/2015
• Several bugs fixed
• CentOS 4 et 5 no more supported
• New features in the test framework library
• New features in the web interface
Version 10.0.0 released on 28/05/2015
• Several bugs fixed
• New features in the web interface
• Minor changes in the core server
• Update of the documentations
• Improvment of the graphical interface of the client
3.2. Previous versions 11

Read the ExtensiveAutomation Documentation, Release 20.0
Version 9.1.0 released on 22/03/2015
• Several bugs fixed
• New features in the test framework library
• Product installation improved
• Improvment of the graphical interface of the client
Version 9.0.0 released on 05/01/2015
• Several bugs fixed
• New features in the test framework library
• Python 2.4 no more supported
• New features in the web interface
• Improvment of the graphical interface of the client
Version 8.0.0 released on 25/10/2014
• Several bugs fixed
• Improvment of the graphical interface of the client
• New features in the test framework library
• Minors changes in the XmlRPC API
• New features in the web interface
Version 7.1.0 released on 20/09/2014
• Several bugs fixed
• Documentations updated
• Optimization in server side to prepare a test
• New features in the core
• New features in the test framework library
• Improvment of the graphical interface of the client
Version 7.0.0 released on 08/08/2014
• Several bugs fixed
• Improvment in the scheduler
• Reverse proxy added on the front of the server
• Websockets support, activated by default
• New documentations
• tcp/443 used by default on all components
• SSL proxy support
• SSL used by default for agents and probes
• Improvment of the graphical interface of the client
Version 6.2.0 released on 02/06/2014
• Several bugs fixed
12 Chapter 3. Changes Logs

Read the ExtensiveAutomation Documentation, Release 20.0
• Agents update
• Minors changes in the XmlRPC API
• New features in the test framework library
• Improvment of the scheduler
Version 6.1.0 released on 25/04/2014
• Several bugs fixed
• New features in the web interface
• New features in the test framework library
• Agents improvments
Version 6.0.0 released on 23/03/2014
• Several bugs fixed
• New packages for adapters and libraries
• New features in the XmlRPC API
• New features in the test framework library
• No more link with the twisted library
• SSL support on XmlRPC api
• Proxy socks4 support
• Agents Support
Version 5.2.0 released on 12/01/2014
• Several bugs fixed
• New minors features in the core server
Version 5.1.0 released on 08/12/2013
• New features in the web interface
• Several bugs fixed
• New features in the test framework library
Version 5.0.0 released on 15/09/2013
• Several bugs fixed
• New major features in the test framework library
• Improvment of the scheduler
Version 4.2.0 released on 08/04/2013
• Several bugs fixed
• New features in the web interface
Version 4.1.0 released on 10/03/2013
• Several bugs fixed
• New features in the web interface
• CentOS 6 Support
3.2. Previous versions 13

Read the ExtensiveAutomation Documentation, Release 20.0
• Improvment of the scheduler
Version 4.0.0 released on 30/01/2013
• Several bugs fixed
• New features in the test framework library
• SSL support for the web interface
• New authentification method with sha1 and salt
• New features in the XmlRPC API
Version 3.2.0 released on 29/09/2012
• Several bugs fixed
• New features in the test framework library
Version 3.1.0 released on 14/07/2012
• Several bugs fixed
• New features in the test framework library
• Improvment of the scheduler
• New features in the XmlRPC API
Version 3.0.0 released on 09/06/2012
• Several bugs fixed
• New features in the XmlRPC API
• Improvment of the scheduler
• New repositories for adapters and backups
Version 2.2.0 released on 28/03/2012
• New majors features in the XmlRPC API
• Several bugs fixed
• New features in the test framework library
Version 2.0.0 released on 27/02/2012
• New features in the XmlRPC API
• Documentation added for the test framework and adapters
• Several bugs fixed
• Probes support
Version 1.2.0 released on 14/01/2012
• Improvment of the scheduler
• New features in the XmlRPC API
• New features in the test framework library
• Interface web added
• Several bugs fixed
Version 1.0.0 released on 13/12/2011
14 Chapter 3. Changes Logs

Read the ExtensiveAutomation Documentation, Release 20.0
• First official version
• CentOS 5 support
• Several bugs fixed
Version 0.1.0 released on 17/05/2010
• First beta
3.2. Previous versions 15

Read the ExtensiveAutomation Documentation, Release 20.0
16 Chapter 3. Changes Logs

CHAPTER4
Client
The client allows to write and execute automatic tests but also to analyze the results in real time or deferred.It also allows you to share tests in a simple and effective way. To use the client, you must have a user accountand be able to connect to the test server (tcp/443).
The client can also be used to develop extensions (adapters and libraries) to communicate with the systemto be tested or piloted.
Finally the graphical interface changes according to the level of access:
• tester level: write / execute tests, and analyze the results
• admin level: access to all features
• monitor level: read only access
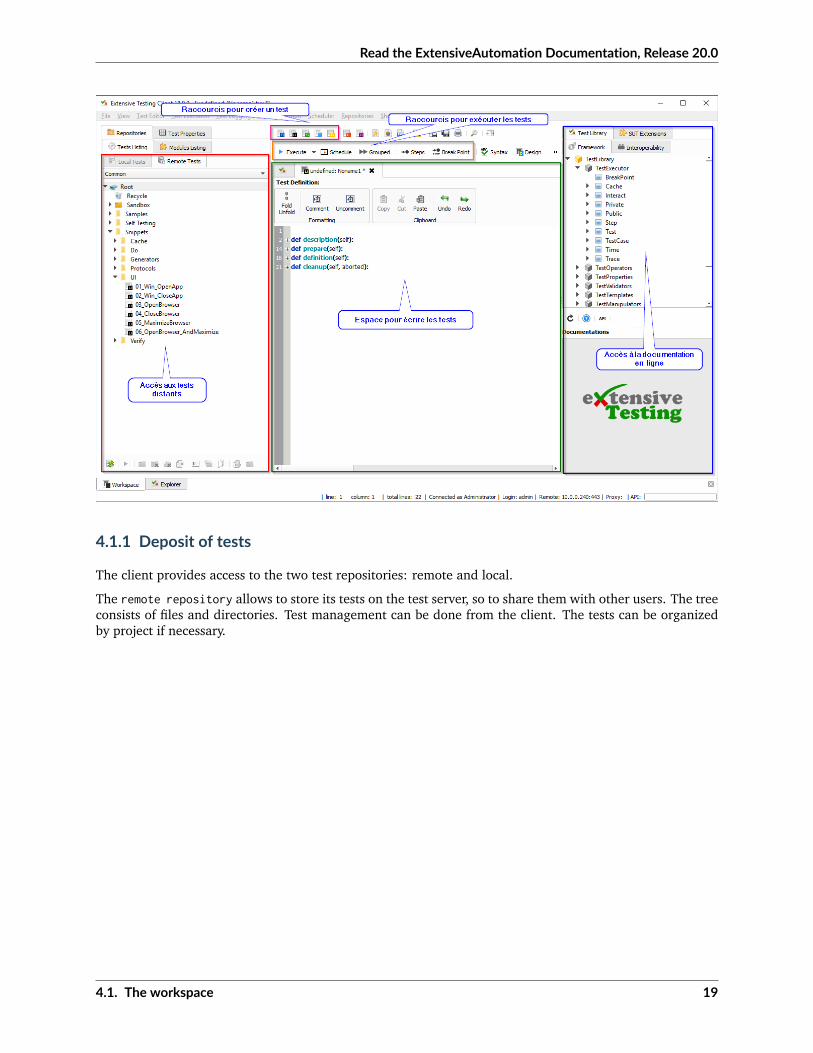
The interface is divided into 3 main parts:
• the workspace
• the analyzer
• the server explorer
17

Read the ExtensiveAutomation Documentation, Release 20.0
Note: The client is available on Windows and Linux, in 64bits mode
4.1 The workspace
The workspace is composed of 3 main parts:
• access to all file repositories
• access to test design
• online documentation
18 Chapter 4. Client
Read the ExtensiveAutomation Documentation, Release 20.0
4.1.1 Deposit of tests
The client provides access to the two test repositories: remote and local.
The remote repository allows to store its tests on the test server, so to share them with other users. The treeconsists of files and directories. Test management can be done from the client. The tests can be organizedby project if necessary.
4.1. The workspace 19

Read the ExtensiveAutomation Documentation, Release 20.0
Note: The Common project contains re-usable tests and various examples.
Note: The directories Recycle and Sandbox are reserved directories, delete them is impossible.
Note: It is possible to open a test by dragging and dropping the file to the writing space.
The local repository gives the possibility to store his tests on his post, so not shared. This feature is notenabled by default because it is not in the philosophy of the solution to use it. Nevertheless the deposit canbe activated through the user’s preferences.
Warning: Some features are missing in the local repository, its use is not recommended!
4.1.2 Depositing extensions
The client allows access to the depots of the extensions (adapters and libraries) and can also be used todevelop new ones, which will be stored there too. These extensions are organized by version.
20 Chapter 4. Client

Read the ExtensiveAutomation Documentation, Release 20.0
Note: The extensions are developed in Python.
4.1.3 Tests properties
The tests can be enriched with a number of properties. Available properties are:
• the description of the test (author, date of creation, etc . . . )
• incoming and outgoing variables
• the definition of agents and probes used by the test
The Test properties> Test Data> Inputs window contains the list of variables accessible from the test.Adding variables can be done by right clicking ‘Add parameter’.
4.1. The workspace 21

Read the ExtensiveAutomation Documentation, Release 20.0
Note: To insert a parameter into a test, just drag & drop.
Note: It is possible to choose the version of the adapters and libraries to use for the test
4.1.4 Textual design
The design of a scripting test is possible with unit and suite. This design mode requires knowledge indevelopment, i.e. python.
22 Chapter 4. Client
Read the ExtensiveAutomation Documentation, Release 20.0
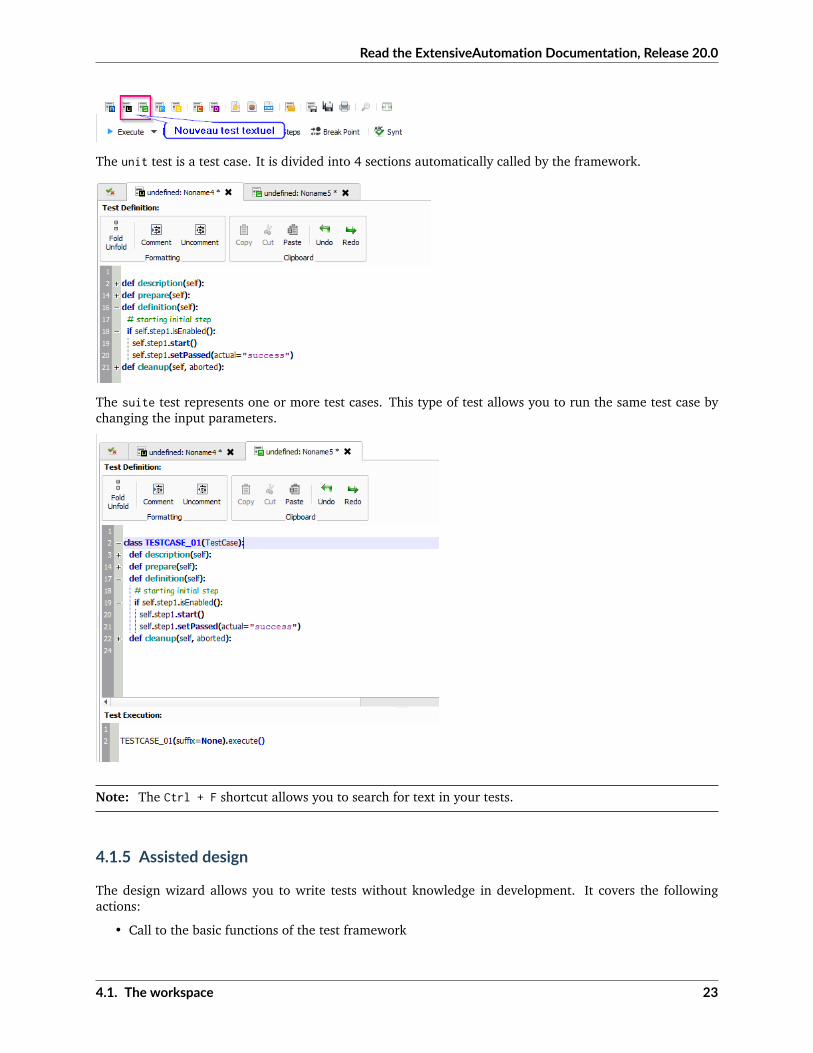
The unit test is a test case. It is divided into 4 sections automatically called by the framework.
The suite test represents one or more test cases. This type of test allows you to run the same test case bychanging the input parameters.
Note: The Ctrl + F shortcut allows you to search for text in your tests.
4.1.5 Assisted design
The design wizard allows you to write tests without knowledge in development. It covers the followingactions:
• Call to the basic functions of the test framework
4.1. The workspace 23

Read the ExtensiveAutomation Documentation, Release 20.0
• SSH test
• Application test with screenshot (based on the Sikuli project)
• Website test (based on the Selenium project)
• Android mobile app test
The wizard is to describe the actions to perform, and if desired export them to a test unit or suite.
4.1.6 Conditional design
Conditional design allows you to build scenarios or test campaigns. This approach does not require develop-ing knowledge. To perform this type of test, it is necessary to create a new plan or global test.
The test plan makes it possible to write test scenarios by including tests of the type unit or suite.
24 Chapter 4. Client

Read the ExtensiveAutomation Documentation, Release 20.0
The global test is used to describe test campaigns by including tests plan, unit or suite.
Note: It is possible to override the test parameters.
4.1.7 Online documentations
The online documentation is generated by the server, it describes the set of available functions in the testframework and the different extensions.
4.1. The workspace 25

Read the ExtensiveAutomation Documentation, Release 20.0
Note: A drag & drop from the documentation on a test automatically inserts the skeleton of the function.
4.2 The analyzer
The analyzer makes it possible to follow the execution of a test in real time or deferred. It makes it possibleto display all the events of the test and to facilitate the analysis of the errors.
26 Chapter 4. Client

Read the ExtensiveAutomation Documentation, Release 20.0
4.2.1 Visualization of events
Different types of events are possible (column event type):
• DEBUG
• INFO
• WARNING
• ERROR
• SEND
• RECEIVED
• STEP-STARTED
• STEP-PASSED
• STEP-FAILED
• MATCH-STARTED
• MATCH-INFO
• MATCH-STOPPED
• MATCH-EXCEEDED
Note: Filtering on the ERROR event allows you to quickly see why the test is in error.
4.2. The analyzer 27
Read the ExtensiveAutomation Documentation, Release 20.0
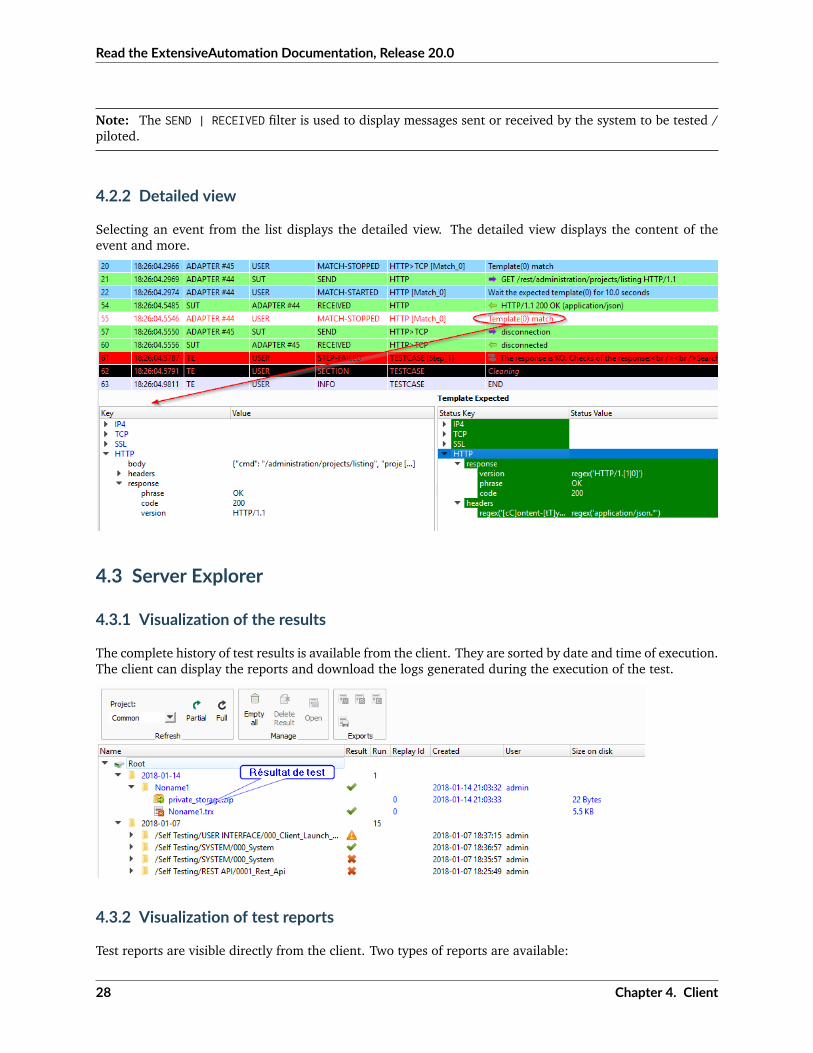
Note: The SEND | RECEIVED filter is used to display messages sent or received by the system to be tested /piloted.
4.2.2 Detailed view
Selecting an event from the list displays the detailed view. The detailed view displays the content of theevent and more.
4.3 Server Explorer
4.3.1 Visualization of the results
The complete history of test results is available from the client. They are sorted by date and time of execution.The client can display the reports and download the logs generated during the execution of the test.
4.3.2 Visualization of test reports
Test reports are visible directly from the client. Two types of reports are available:
28 Chapter 4. Client

Read the ExtensiveAutomation Documentation, Release 20.0
• advanced report
• simple report
Note: The reports are exportable in html, xml and csv formats.
4.4 Settings
Client behavior can be changed through the user’s preferences.
4.4. Settings 29

Read the ExtensiveAutomation Documentation, Release 20.0
Note: Preferences are stored in the settings.ini file.
4.5 Complements
It is possible to add plugins in the client. Plugins are to be added to the Plugins directory.
Plugins are accessible in the Plugins menu after restarting the client.
30 Chapter 4. Client

Read the ExtensiveAutomation Documentation, Release 20.0
Note: It is necessary to restart the client to take into account the plugins deployed.
4.5.1 HP ALM plugin
The HP ALM plugin allows you to export tests and results from the Extensive Client to HP ALM QualityCenter.This approach makes it possible to be independent with respect to QC.
The configuration of the plugin is done in the page ‘‘ Settings‘‘, it is necessary to configure at least:
• username
• the password
• the domain
• the project
To export a test, you must generate the test design from the client and click on the HP ALM plugin availableon the toolbar.
4.5. Complements 31

Read the ExtensiveAutomation Documentation, Release 20.0
The export of the results can be done from the archive exploration window, The plugin must be available inthe toolbar when a test report is loaded.
Note: The plugin is compatible with an HP ALM QC> = 12, the REST API is used.
4.5.2 Jenkins plugin
The Jenkins plugin does not do much in this version . . . It just provides a link to the web interface of itsfavorite Jenkins.
4.5.3 Shell Recorder Plugin
The Shell Recorder plugin allows you to import a sequence of shell commands into the design wizard andgenerate the associated test. It allows to replay easily a sequence of commands.
32 Chapter 4. Client

Read the ExtensiveAutomation Documentation, Release 20.0
The first step is to import an ssh session (from a putty terminal for example) from the clipboard or by directlyimporting a text file containing the sequence of shell commands.
The plugin automatically detects the prompt in the sequence to parse the associated commands and results.If the prompt is not detected, it can be changed manually.
4.5.4 SeleniumIDE Plugin
The use of the SeleniumIDE plugin involves basic use. It can convert a file saved with the SeleniumIDE pluginof firefox in the design assistant.
Tip: It is more efficient to use the live assistant to be in tune with the philosophy of the solution.
4.5. Complements 33

Read the ExtensiveAutomation Documentation, Release 20.0
34 Chapter 4. Client

CHAPTER5
Toolbox
The toolbox allows you to start agents on dedicated workstations.
• Agents are required to run tests with Selenium on dedicated workstations or to deport the executionof a test.
35

Read the ExtensiveAutomation Documentation, Release 20.0
5.1 Deployment
This window allows you to choose the agent or probe to start. The type of agent or probe to start can bechosen in the drop-down list. Finally, an agent or probe needs to be registered with the test server in orderto use it.
An agent will allow you to perform a distributed run of your tests. For example, an agent deployed on severalmachines will allow to run the same test on different environment to test or pilot.
The complete list of available agents are described in the Server Add-ons> Agents chapter.
Note: The agent name or probe must be unique for successful registration.
Tip: For a better visibility of the agents available, it is advisable to respect the following formalism for thenames:
[Agent | probe] [Environment] [prénom_testeur] [name] [instance-number]. . .
Example: agent.win.denis.socket01
36 Chapter 5. Toolbox

Read the ExtensiveAutomation Documentation, Release 20.0
Example of a deployed and running agent:
5.2 More
The toolbox can be enriched with new plugins.
5.2. More 37

Read the ExtensiveAutomation Documentation, Release 20.0
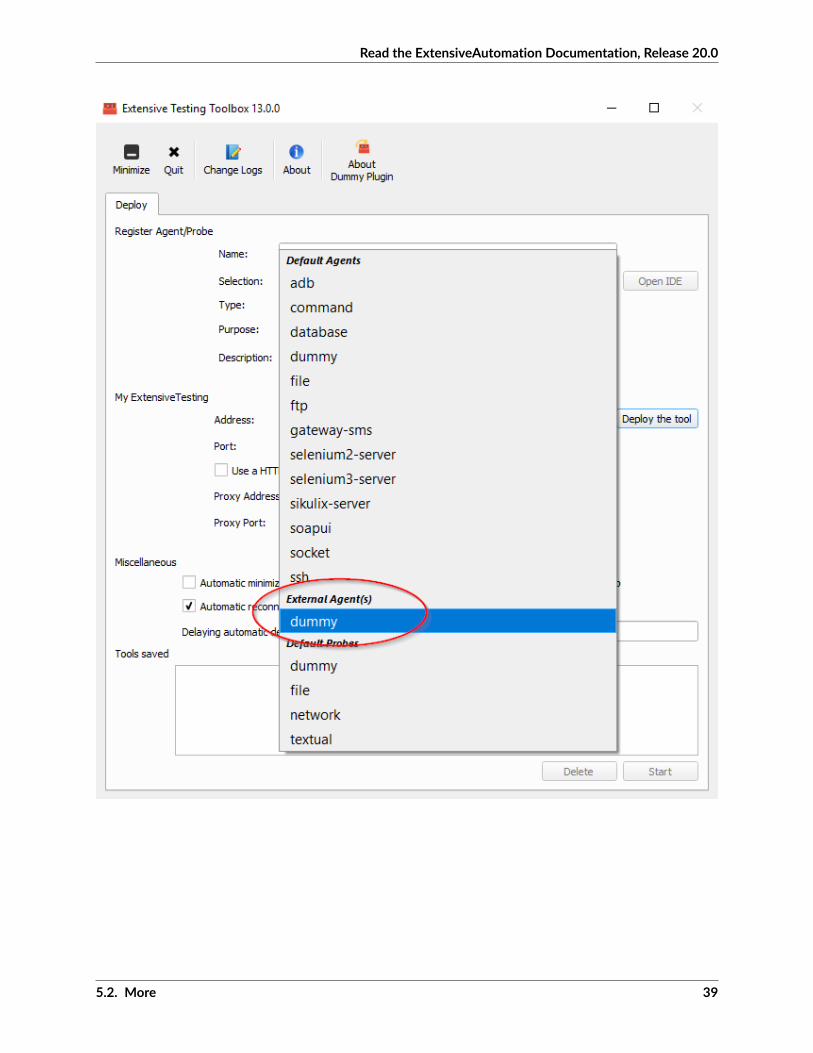
To do this, follow the procedure described in the chapter Contributions> Development plugins> Toolboxes.Plugins are to be dropped into the Plugins directory.
After restarting the toolbox, the add-in appears in the list of “external” agents
38 Chapter 5. Toolbox
Read the ExtensiveAutomation Documentation, Release 20.0
5.2. More 39

Read the ExtensiveAutomation Documentation, Release 20.0
40 Chapter 5. Toolbox

CHAPTER6
Web interface
6.1 Tests part
6.1.1 Global variables
The shared variables enable to describe your dataset. JSON format must be used. These variables are reach-able from all tests.
6.2 Admin part
6.2.1 Users
Users account must be created to use properly the product. The creation of users can be done through theweb interface or from the rest api.
Some parameters must be provided:
• username
• password
• privilegies (admin, monitor, tester)
• authorized projects
Note: Tests results can be received by email if the account is configured with an email.
41

Read the ExtensiveAutomation Documentation, Release 20.0
6.2.2 Projects
Tests files can be organized per project. The adding or removing of a project can be done from the webinterface or the REST api.
Note: The Common project exists by default and can be read from all users, this project cannot be removed.
42 Chapter 6. Web interface
CHAPTER7
Get started
7.1 Connection to the server
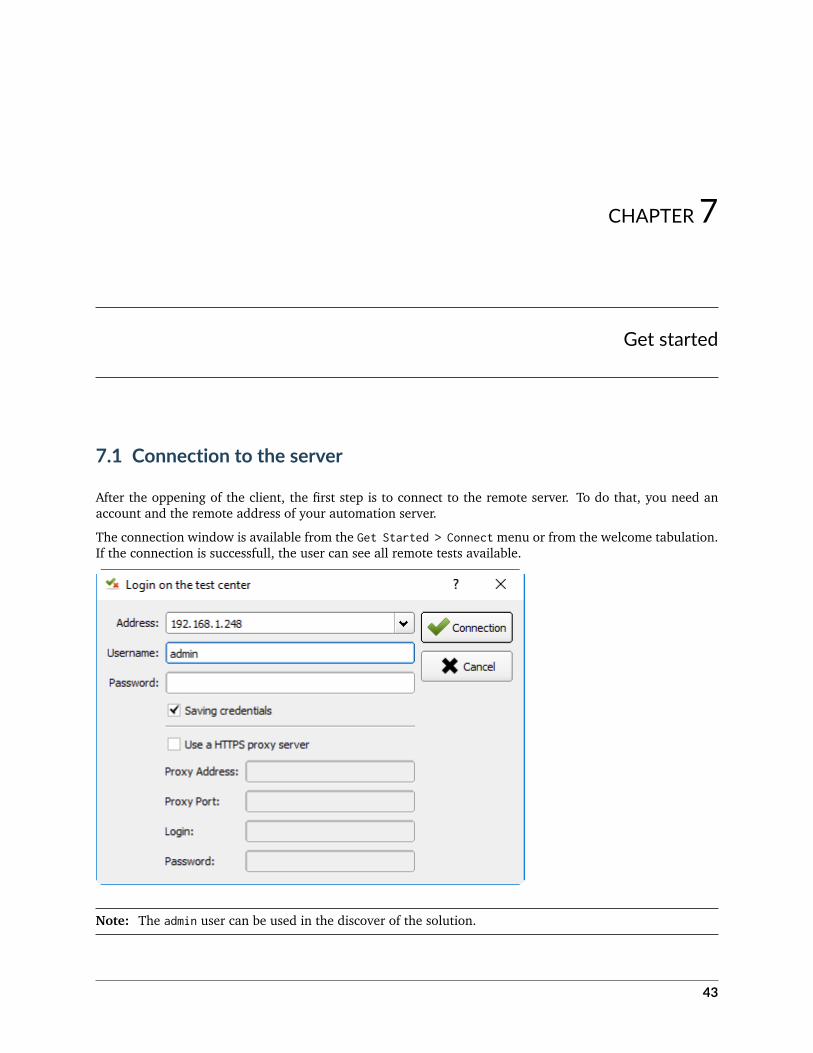
After the oppening of the client, the first step is to connect to the remote server. To do that, you need anaccount and the remote address of your automation server.
The connection window is available from the Get Started > Connect menu or from the welcome tabulation.If the connection is successfull, the user can see all remote tests available.
Note: The admin user can be used in the discover of the solution.
43
Read the ExtensiveAutomation Documentation, Release 20.0
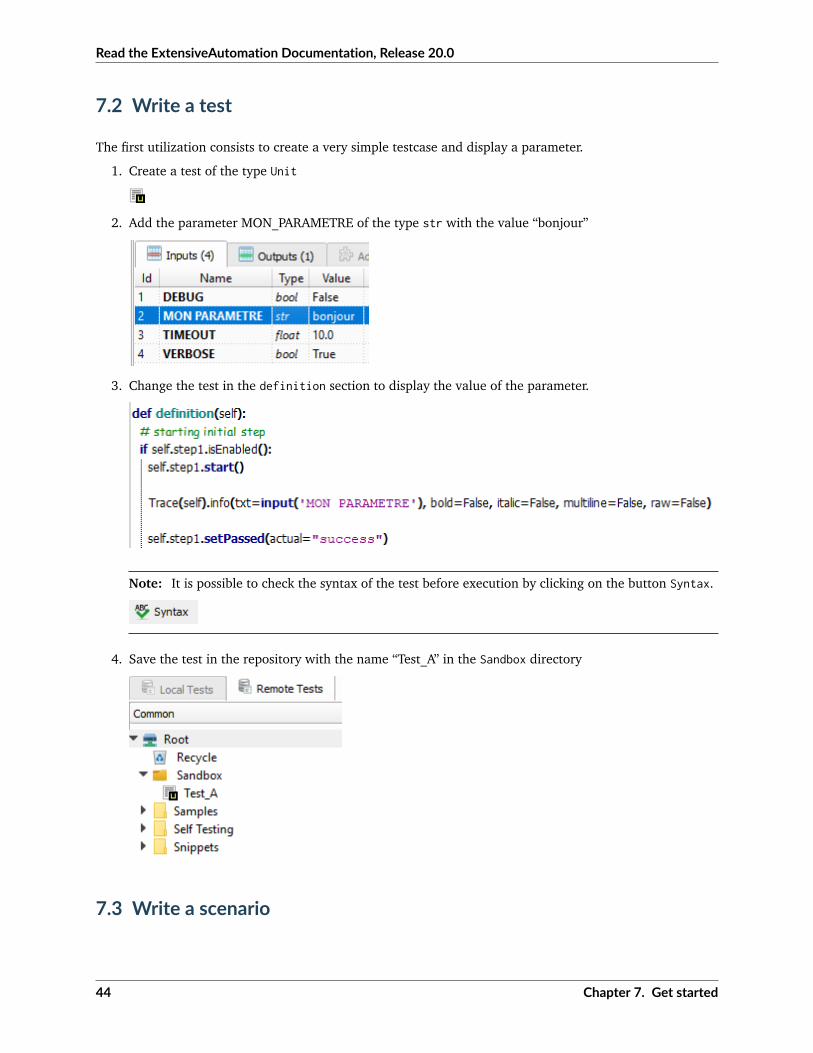
7.2 Write a test
The first utilization consists to create a very simple testcase and display a parameter.
1. Create a test of the type Unit
2. Add the parameter MON_PARAMETRE of the type str with the value “bonjour”
3. Change the test in the definition section to display the value of the parameter.
Note: It is possible to check the syntax of the test before execution by clicking on the button Syntax.
4. Save the test in the repository with the name “Test_A” in the Sandbox directory
7.3 Write a scenario
44 Chapter 7. Get started

Read the ExtensiveAutomation Documentation, Release 20.0
Note: This mini guide assumes that you have followed the chapter Writing a script test.
The following example explains how to create its first scenario with an overload of test variables.
1. Create a Plan type test.
2. Insert test “Test_A” in the scenario. Click on the Insert Child button and select the Test_A test.
3. After insertion, click on the Test_A test and insert the same test again.
4. Save the scenario in the test repository with the name “Scenario_A” in the Sandbox directory.
5. Add the parameter MON_PARAMETRE with the value “goodbye” at the scenario level.
Tip: Do not hesitate to define an alias for the name of the test to make the scenario more readable.
7.3. Write a scenario 45
Read the ExtensiveAutomation Documentation, Release 20.0
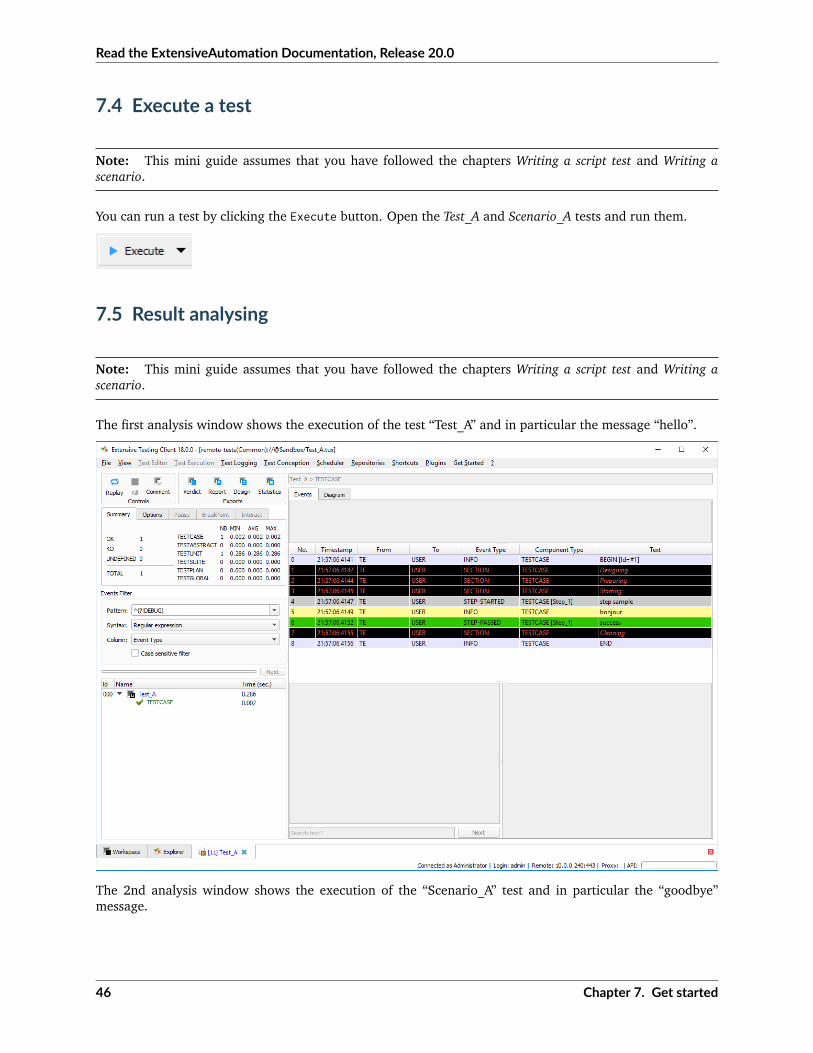
7.4 Execute a test
Note: This mini guide assumes that you have followed the chapters Writing a script test and Writing ascenario.
You can run a test by clicking the Execute button. Open the Test_A and Scenario_A tests and run them.
7.5 Result analysing
Note: This mini guide assumes that you have followed the chapters Writing a script test and Writing ascenario.
The first analysis window shows the execution of the test “Test_A” and in particular the message “hello”.
The 2nd analysis window shows the execution of the “Scenario_A” test and in particular the “goodbye”message.
46 Chapter 7. Get started

Read the ExtensiveAutomation Documentation, Release 20.0
This first usage shows how to run a test and a scenario as well as the overloading of the test variables.
7.6 Best practices
Tip: To keep readability in script type tests, do not use try / except. The framework catches all the exceptionsat its level.
Tip:
It is essential to take the time to declare the test steps because they allow
• quickly understand the test without the script.
• to have relevant and understandable test reports.
Tip: To facilitate the maintenance of your tests and make them reusable, you should not have hard value inyour test. It is necessary to systematically put them in test parameters, it is done for.
7.6. Best practices 47

Read the ExtensiveAutomation Documentation, Release 20.0
48 Chapter 7. Get started

CHAPTER8
Tests examples
8.1 Testcase (unit)
This example shows how to use a test case. A test case consists of 4 sections automatically executed by thetest framework as well as associated test parameters.
8.2 Testcase (suite)
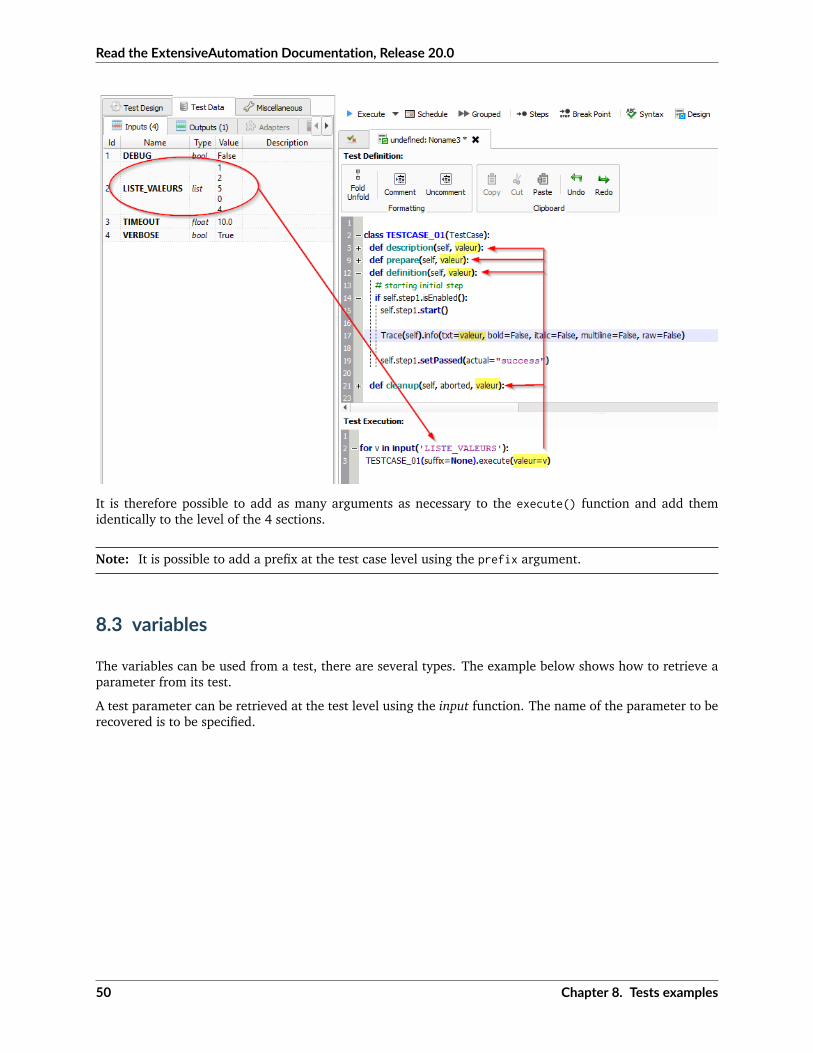
A test suite allows you to run several test cases afterwards. The example shows how to loop on a test casewhile modifying the incoming data.
49
Read the ExtensiveAutomation Documentation, Release 20.0
It is therefore possible to add as many arguments as necessary to the execute() function and add themidentically to the level of the 4 sections.
Note: It is possible to add a prefix at the test case level using the prefix argument.
8.3 variables
The variables can be used from a test, there are several types. The example below shows how to retrieve aparameter from its test.
A test parameter can be retrieved at the test level using the input function. The name of the parameter to berecovered is to be specified.
50 Chapter 8. Tests examples

Read the ExtensiveAutomation Documentation, Release 20.0
8.4 Scenario
A scenario allows you to run several test cases one after the other with result conditions between them. It ispossible to override the test parameters at the scenario level.
8.4. Scenario 51

Read the ExtensiveAutomation Documentation, Release 20.0
8.5 Test campaign
A campaign allows you to run multiple scenarios. It is possible to overload the test parameters at thecampaign settings level.
8.6 Rest API
To write a REST API test, it is recommended:
• to use the reusable test /Snippets/Protocols/02_Send_HTTP_CURL
Example:
The test calls the httpbin.org service in https and calls the ip service to get the client’s actual ip in json.
52 Chapter 8. Tests examples

Read the ExtensiveAutomation Documentation, Release 20.0
The scenario breaks down into several stages:
1. Preparation of the environment: description of the tested environment (address, net-work port, etc.) The environment is configured in the ENVIRONMENT parameter of thePREPARE ENVIRONMENT test (Id = 5)
{"PLATFORM": {
"CLUSTER": [{ "NODE": {
"COMMON": {"HOSTNAME": "httpbin"
},"INSTANCES": {
"HTTP": {"REST": {
"HTTP_DEST_HOST": "httpbin.org","HTTP_DEST_PORT": 443,"HTTP_DEST_SSL": true,"HTTP_HOSTNAME": "httpbin.org","HTTP_AGENT_SUPPORT": false,"HTTP_AGENT": null
}}
}}
}]
},"DATASET": [ ]}
2. If the environment preparation does not work then the scenario is stopped by calling thetest reusable Snippets/Do/02_Terminate (Id = 16)
3. A REST request is sent and the expected response is described using the reusable test/Snippets/Protocols/04_Send_JSON (Id = 30). If this step does not work then we cancelthe test (Id = 31)
The response received is verified by the framework and what was described by the tester inthe HTTP_RSP_BODY parameter
origin [!CAPTURE:EXTERNAL_IP:]
The configuration indicates that the response must verify that the `origin` key is present andsave the value in the cache with the ``EXTERNAL_IP`` key
4. The value received in the response is displayed with the reusable test ``Snippets/Cache/02_Log_→˓Cache`` (Id = 32)
Note: The example presented below is available in full in the test samples /Samples/Web_API/001_httpbin_rest.tpx.
8.6. Rest API 53

Read the ExtensiveAutomation Documentation, Release 20.0
8.7 SSH controls
To write an SSH test, it is advisable:
• to use the reusable test /Snippets/Protocols/01_Send_SSH
• to describe the target server in JSON (ip, account, password at least)
The test is broken down into several stages:
1. Loading the description (ip, account, password) of the target machine into the cache
2. Calling the /Snippets/Protocols/01_Send_SSH generic test to retrieve the server version The ver-sion (if found on the screen) is saved in the cache with the SERVER_VERSION key If the version isnot found, the test goes into error.
# checking server versionxtctl version.*Server version: [!CAPTURE:SERVER_VERSION:]\n.*
3. View the version from the cache.
Note: The complete example is available in the test samples /Self Testing/SYSTEM/000_System.tpx.
8.8 Web browsers
To write a web application test, you must:
• deploy a selenium agent on a machine with a firefox, chrome, internet explorer or edge browser
• have access to the source code of the web page from his browser
• have knowledge of xpath
• know the basics of HTML
The recommended approach for writing web tests is as follows:
• identify the number of pages displayed to script (and the possible reuse of these pages)
• identify the different sequence of pages to create the scenarios
• identify user paths
To perform this type of test, you must declare the agent that will be used
54 Chapter 8. Tests examples

Read the ExtensiveAutomation Documentation, Release 20.0
The writing of the tests is done through the assistant. It allows to describe the different stages and generatethe equivalent unit test. The sequence of pages are to be described in the flat tests. The user path is to bedefined in a global test.
The solution also recommends using only xpath to identify HTML elements.
The example below shows how to create a Google Account using a random name and first name.
Example of result:
8.8. Web browsers 55

Read the ExtensiveAutomation Documentation, Release 20.0
Tip: It is possible to use browser development tools to validate xpaths.
Note: The example presented below is available in full in the test samples /Samples/Tests_Gui/Selenium/.
Note: Selenium3 requires at least Java 8 on the client machine.
56 Chapter 8. Tests examples

Read the ExtensiveAutomation Documentation, Release 20.0
Browsers Version Selenium GeckoFirefox <47 Selenium 2 NonFirefox > 47 Selenium 3 OuiIE Selenium 3 N/AChrome Selenium 3 N/A
8.9 Android mobile
To write the test of a mobile application, you must:
• Have an Android mobile phone connected in USB on a PC
• Deploy an adb agent on a computer with an android mobile connected to it.
• Have access to the xml description of applications from the agent
Connecting the adb agent on the android mobile requires accepting the RSA key.
8.9. Android mobile 57

Read the ExtensiveAutomation Documentation, Release 20.0
58 Chapter 8. Tests examples

Read the ExtensiveAutomation Documentation, Release 20.0
After login, the agent displays a preview of the screen on the pc, it is possible to browse the interface fromthe agent and have the XML elements available in the page.
The writing of the tests is done with the assistant. It allows to describe the different stages and generate theequivalent unit test. It is essential to rely on the adb agent for have the list of available XML elements andattributes.
8.9. Android mobile 59

Read the ExtensiveAutomation Documentation, Release 20.0
Note: The complete example is available in test samples /Samples/Tests_Mobiles/03_PlayStore.tux.
Important: Enabling USB debug mode is required on the phone.
60 Chapter 8. Tests examples

CHAPTER9
Tests Snippets
The interest of reusable tests
• factorize the test database
• reuse the tests
• limit scripting to design scenarios
These types of tests are to be used in test plan mode.
9.1 Shared data between tests
9.1.1 Add in the cache a new data
Important: path of the reusable test /Snippets/Cache/01_Set_Cache.tux
This reusable test consists of saving a value in the data cache during the execution of a test.
Parameter(s) to configure:
The DATAS parameter contains the list of values to save with the format:
# my comment[!TO:CACHE:<MA_CLE>:];my value
Example
# Save misc data[!TO:CACHE:EXAMPLE:];hello world
# Save server information in the cache[!TO:CACHE:SERVER_DESCRIPTION:];[!FROM:INPUT:TEST_PURPOSE:]
61
Read the ExtensiveAutomation Documentation, Release 20.0
Note: It is possible to save several values with this test.
9.1.2 Display a value from the cache
Important: path of the reusable test /Snippets/Cache/02_Log_Cache.tux
This reusable test makes it possible to display the value of a key present in the cache during the execution ofthe test.
Parameter(s) to configure:
Parameters DescriptionMESSAGES Contains the list of parameters to log in the test
# display cache[!FROM:CACHE:EXAMPLE:]
# log timeout input[!FROM:INPUT:TIMEOUT:]
Note: It is possible to display multiple values at one time
9.1.3 Reset the cache
Important: path of the reusable test /Snippets/Cache/03_Reset_Cache.tux
This reusable test makes it possible to totally empty the cache. No parameters to configure.
Note: This test can be used when several scenarios are chained together in a global test.
9.1.4 Checking a value in the cache
Important: path of the reusable test /Snippets/Cache/04_Checking_Cache.tux
This reusable test makes it possible to check the value in a key present in the cache.
Parameter(s) to configure:
Parameters DescriptionCHECKING List of values to check in the cache
Operators available:
62 Chapter 9. Tests Snippets

Read the ExtensiveAutomation Documentation, Release 20.0
Parameters Descriptioncontains Check if the value contains a stringmatches Check if the value matches the regular expression== Check if the value equals! = Check if the value is different from> Check if the value is greater than< Check if the value is less than> = Check if the value is greater than<= Check if the value is less than
# Check if value contains the test string[!FROM:CACHE:EXAMPLE:] contains test
Note: It is possible to check multiple values at one time
9.1.5 Delete entry from the cache
Important: path of the reusable test /Snippets/Cache/02_Delete_Cache.tux
This reusable test is used to delete a entry in the cache according to the key.
Parameter(s) to configure:
Parameters DescriptionMESSAGES List of keys to delete
# delete the key EXEMPLE from the cache[!FROM:CACHE:EXEMPLE:]
Note: It is possible to delete several keys at one time
9.2 Basics actions
9.2.1 Hold on a test
Important: path of the reusable test /Snippets/Do/01_Wait.tux
This reusable test allows you to wait for xx seconds while the test runs.
Parameter(s) to configure:
Parameters DescriptionDURATION duration in seconds
9.2. Basics actions 63

Read the ExtensiveAutomation Documentation, Release 20.0
9.2.2 Stop a test
Important: path of the reusable test /Snippets/Do/02_Terminate.tux
This reusable test makes it possible to force the stopping of a scenario on error occurences.
Note: It is possible to customize the stop message by setting the variable STOP_TEST_MSG.
9.2.3 Load test environment
Important: path of the reusable test /Snippets/Do/03_Initilize.tux
This reusable test is used to load the test environment data into the cache (ip addresses, server accessaccount, etc.).
An environment is described with 4 levels:
• environment
• cluster
• node
• instance
An environment may consist of one or more clusters.
{"PLATFORM": {
"NOM_CLUSTER_1": [ .. ],"NOM_CLUSTER_2": [ .. ]
}}
A cluster consists of a list of nodes.
{"NOM_CLUSTER_1": [
{ "NOM_NOEUD_1": { .. },{ "NOM_NOEUD_2": { .. }
]}
A node consists of one or more instances.
{"NOM_NOEUD_1": {
"COMMON": { ... },"INSTANCES": {....}
}}
An instance is made up of several keys / values.
64 Chapter 9. Tests Snippets

Read the ExtensiveAutomation Documentation, Release 20.0
{"INSTANCES": {
"TYPE_INSTANCE_1": {"NOM_INSTANCE_1": { ...},"NOM_INSTANCE_2": { ...}
},"TYPE_INSTANCE_2": { ... }
}}
Parameter(s) to configure:
Parameters DescriptionENVIRONMENT Link to a shared variable or directly contains JSON.
Example of a test environment containing an http server with an instance of type rest. After loading into thecache, the REST instance is accessible by using the NODE_HTTP_REST key. All keys in COMMON are automaticallycopied to each instance.
{"PLATFORM": {
"CLUSTER": [{ "NODE": {
"COMMON": {"HOSTNAME": "httpbin"
},"INSTANCES": {
"HTTP": {"REST": {
"HTTP_DEST_HOST": "httpbin.org","HTTP_DEST_PORT": 443,"HTTP_DEST_SSL": true,"HTTP_HOSTNAME": "httpbin.org","HTTP_AGENT_SUPPORT": false,"HTTP_AGENT": null
}}
}}
}]
},"DATASET": [ ]}
The DATASET key can contain datasets.
9.3 Data Generators
9.3.1 Hash SHA
Important: path of the reusable test /Snippets/Generators/01_Gen_Sha.tux
9.3. Data Generators 65

Read the ExtensiveAutomation Documentation, Release 20.0
This reusable test is used to generate a hash of a value and store it in the cache.
Parameter(s) to configure:
Parameters DescriptionDATA_IN Hash character stringCACHE_KEY Key nameSHA Type of hash realize (sha1, sha256, sha512)
9.3.2 Hash MD5
Important: path of the reusable test /Snippets/Generators/02_Gen_Md5.tux
This reusable test is used to generate md5 hash and store it in the cache.
Parameter(s) to configure:
Parameters DescriptionDATA_IN Hash character stringCACHE_KEY Name of the key or the result will be saved in the cache
9.3.3 UUID
Important: path of the reusable test /Snippets/Generators/03_Gen_Uuid.tux
This reusable test is used to generate an uuid and store it in the cache.
Parameter(s) to configure:
Paramètres DescriptionCACHE_KEY Name of the key to save the result in the cache
9.3.4 BASE64
Important: path of the reusable test /Snippets/Generators/04_Gen_Base64.tux
This reusable test is used to encode or decode a string and store the result in the cache.
Parameter(s) to configure:
Parameters DescriptionCACHE_KEY Name of the key to save the result in the cacheDECODE Set to True to encodeENCODE To set to True to decodeURLSAFE Set to True if the result after encoding is to be used in an urlSTR_BASE64 Character string to encode / decode
66 Chapter 9. Tests Snippets
Read the ExtensiveAutomation Documentation, Release 20.0
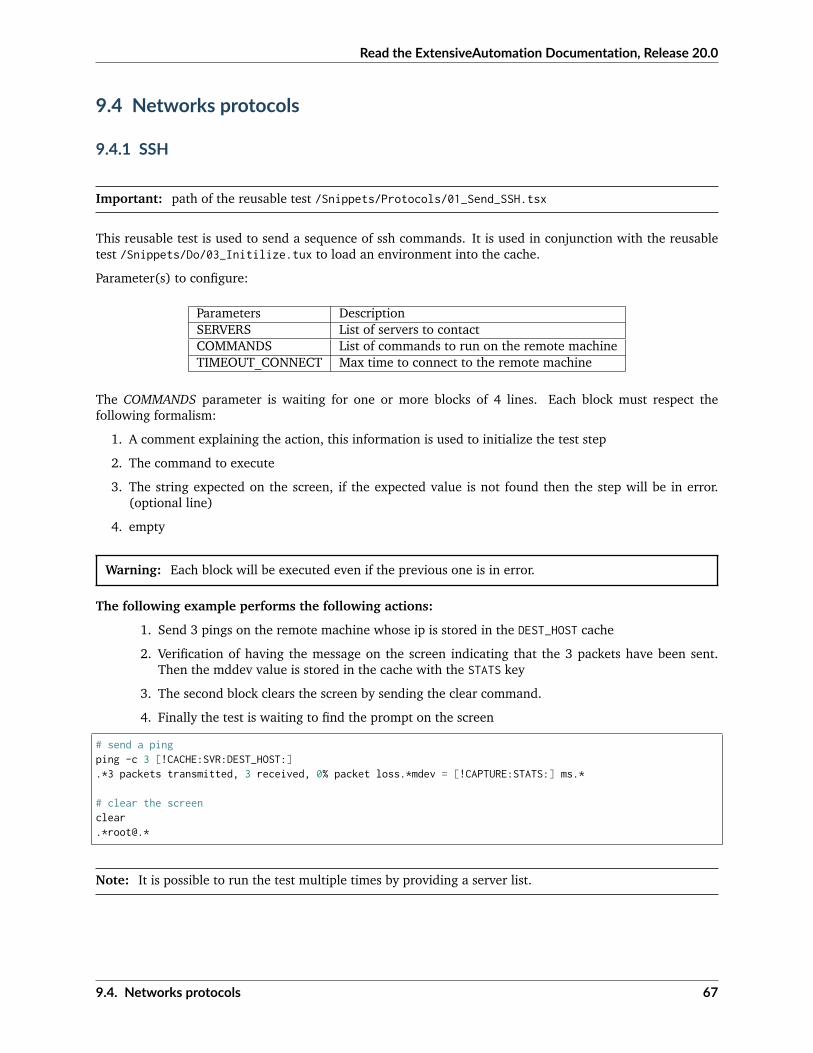
9.4 Networks protocols
9.4.1 SSH
Important: path of the reusable test /Snippets/Protocols/01_Send_SSH.tsx
This reusable test is used to send a sequence of ssh commands. It is used in conjunction with the reusabletest /Snippets/Do/03_Initilize.tux to load an environment into the cache.
Parameter(s) to configure:
Parameters DescriptionSERVERS List of servers to contactCOMMANDS List of commands to run on the remote machineTIMEOUT_CONNECT Max time to connect to the remote machine
The COMMANDS parameter is waiting for one or more blocks of 4 lines. Each block must respect thefollowing formalism:
1. A comment explaining the action, this information is used to initialize the test step
2. The command to execute
3. The string expected on the screen, if the expected value is not found then the step will be in error.(optional line)
4. empty
Warning: Each block will be executed even if the previous one is in error.
The following example performs the following actions:
1. Send 3 pings on the remote machine whose ip is stored in the DEST_HOST cache
2. Verification of having the message on the screen indicating that the 3 packets have been sent.Then the mddev value is stored in the cache with the STATS key
3. The second block clears the screen by sending the clear command.
4. Finally the test is waiting to find the prompt on the screen
# send a pingping -c 3 [!CACHE:SVR:DEST_HOST:].*3 packets transmitted, 3 received, 0% packet loss.*mdev = [!CAPTURE:STATS:] ms.*
# clear the screenclear.*root@.*
Note: It is possible to run the test multiple times by providing a server list.
9.4. Networks protocols 67
Read the ExtensiveAutomation Documentation, Release 20.0
Note: By default, the test waits for a maximum of 20 seconds to find the expected string. This value can beconfigured with the TIMEOUT parameter.
Note: By default, the test waits 10 seconds to connect to the remote server. This value can be configuredwith the TIMEOUT_CONNECT parameter.
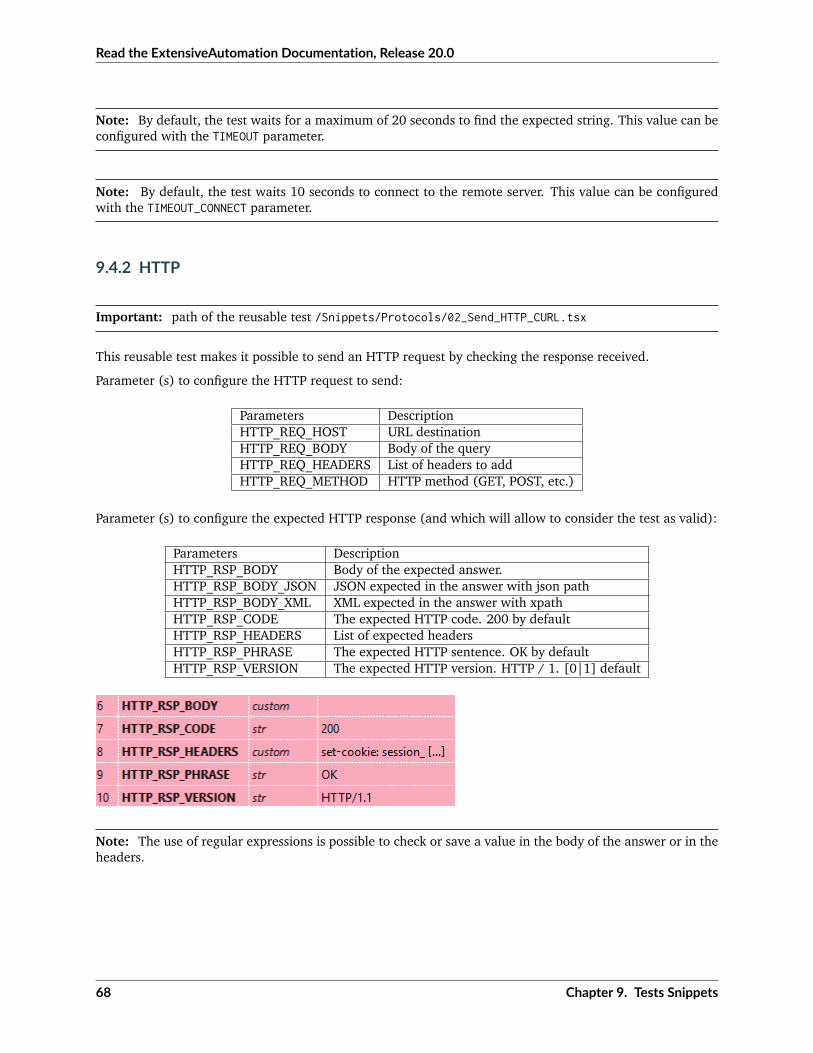
9.4.2 HTTP
Important: path of the reusable test /Snippets/Protocols/02_Send_HTTP_CURL.tsx
This reusable test makes it possible to send an HTTP request by checking the response received.
Parameter (s) to configure the HTTP request to send:
Parameters DescriptionHTTP_REQ_HOST URL destinationHTTP_REQ_BODY Body of the queryHTTP_REQ_HEADERS List of headers to addHTTP_REQ_METHOD HTTP method (GET, POST, etc.)
Parameter (s) to configure the expected HTTP response (and which will allow to consider the test as valid):
Parameters DescriptionHTTP_RSP_BODY Body of the expected answer.HTTP_RSP_BODY_JSON JSON expected in the answer with json pathHTTP_RSP_BODY_XML XML expected in the answer with xpathHTTP_RSP_CODE The expected HTTP code. 200 by defaultHTTP_RSP_HEADERS List of expected headersHTTP_RSP_PHRASE The expected HTTP sentence. OK by defaultHTTP_RSP_VERSION The expected HTTP version. HTTP / 1. [0|1] default
Note: The use of regular expressions is possible to check or save a value in the body of the answer or in theheaders.
68 Chapter 9. Tests Snippets

Read the ExtensiveAutomation Documentation, Release 20.0
9.5 User Interface
9.5.1 Open application in Windows
Important: path of the reusable test /Snippets/UI/01_Win_OpenApp.tux
This snippet enable to open a application on a Windows or Linux machine. The parameter AGENT_GUI mustbe configured with the agent to use.
Parameter(s) to configure:
Parameters DescriptionAPP_PATH Application path to open
9.5.2 Close an application in Windows
Important: path of the reusable test /Snippets/UI/02_Win_CloseApp.tux
This snippet enable to close a application on a Windows or Linux machine. The parameter AGENT_GUI mustbe configured with the agent to use.
Parameter(s) to configure:
Parameters DescriptionAPP_NAME Name of the application to close
9.5.3 Open a web browser
Important: path of the reusable test /Snippets/UI/03_OpenBrowser.tux
9.5. User Interface 69

Read the ExtensiveAutomation Documentation, Release 20.0
This snippet enable to open a browser on a Windows or Linux machine. The parameter AGENT_GUI_BROWSERmust be configured with the agent to use.
Parameter(s) to configure:
Parameters DescriptionLOADING_URL Website url to load
It’s possible to select the browser to user, the following browsers are supported:
• Firefox
• Chrome
• Internet Explorer
• Opera
• Edge
Note: the url must started with http:// or https://
9.5.4 Close a web browser
Important: path of the reusable test /Snippets/UI/03_CloseBrowser.tux
This snippet enable to close a browser on a Windows or linux machine. The parameter AGENT_GUI_BROWSERmust be configured with the agent to use.
70 Chapter 9. Tests Snippets

Read the ExtensiveAutomation Documentation, Release 20.0
9.6 Checks
9.6.1 XML checks
Important: path of the reusable test /Snippets/Verify/01_Check_XML.tux
This snippet enable to check a XML content with xpath.
Parameter(s) to configure:
Parameters DescriptionXML_STR raw XML to inspectXML_XPATH xpathXML_NAMESPACES namespaces definitions
Example of value for the XML_STR parameter:
<NewDataSet><Table>
<Country>France</Country><City>Le Touquet</City>
</Table><Table><Country>France</Country><City>Agen</City>
</Table><Table>
<Country>France</Country><City>Cazaux</City>
</Table><Table>
<Country>France</Country><City>Bordeaux / Merignac</City>
</Table><Table><Country>France</Country><City>Bergerac</City>
</Table></NewDataSet>
Example of value for the XML_XPATH parameter.
(//NewDataSet/Table)[1]/City [!CAPTURE:CITY:]
The value will be accessible from the cache with the CITY key.
9.6.2 JSON checks
Important: path of the reusable test /Snippets/Verify/01_Check_JSON.tux
This snippet enable to check JSON content with jsonpath
9.6. Checks 71

Read the ExtensiveAutomation Documentation, Release 20.0
Parameter(s) to configure:
Parameters DescriptionJSON_STR Json to inspectJSON_XPATH jsonpath
Example of value for the JSON_STR parameter:
{"args": {},"headers": {"Connection": "close","Host": "httpbin.org","User-Agent": "ExtensiveTesting"},"origin": "190.117.217.129","url": "https://httpbin.org/get"}
Example of value for the JSON_XPATH parameter.
headers.Connection [!CAPTURE:CX:]
The value will be accessible from the cache with the CX key.
72 Chapter 9. Tests Snippets

CHAPTER10
Global variables
Global variables (or shared variables) are sued to describe test environment. Variables are accesible from atest from the pamarater of the type global or list-global.
10.1 Add/delete a variable
The adding or removing of a variable can be done from the web interface or the REST API. JSON must beused in variable. There are autommatically availables from tests in properties.
10.2 Describe environment test
The description of a test environment must be respect the following rules. This type of init must be usedwith the reusable test /Snippets/Do/03_Initialize.tux
Node declaration SAMPLE_NODE:
{"COMMON": {
"HOSTNAME": "extensiveautomation"},"INSTANCES": {
"SSH": {"ADMIN": {
"SSH_DEST_HOST": "127.0.0.1","SSH_DEST_PORT": 22,"SSH_DEST_LOGIN": "root","SSH_DEST_PWD": "","SSH_PRIVATE_KEY": null,"SSH_PRIVATE_KEY_PATH": null,"SSH_AGENT_SUPPORT": false,"SSH_AGENT": {
(continues on next page)
73

Read the ExtensiveAutomation Documentation, Release 20.0
(continued from previous page)
"type": "ssh","name": "agent.ssh01"
}}
}}
}
Data test declaration SAMPLE_DATASET_AUTH:
{"login": "admin","password": ""
}
Environment declaration SAMPLE_ENVIRONMENT:
{"PLATFORM": {
"CLUSTER": [{ "NODE": "Common:SAMPLE_NODE" }
]},"DATASET": [
{ "AUTH": "Common:SAMPLE_DATASET_AUTH" }]
}
10.3 Import/export variables
It’s possible to export or import in mass the variables from REST API in CSV format
Warning: Variables are encoded in base64.
74 Chapter 10. Global variables

CHAPTER11
Assisted designs
The client contains a automation assistant to create tests without knownledge in development. The assistantcan be used for:
• Use the basic functions of the framework
• Execute system commands (ssh)
• Test applications with a heavy client
• Test web applications
• Run actions on an Android mobile
The test consists of a sequence of actions to perform. The wizard automatically generates a test unit ortest suite. An existing test (script) can be updated from the wizard too.
To add an action in the assistant, you have to
• select the action to perform
• configure it
• save the action
The wizard natively supports the use of the cache. It is therefore possible save or retrieve values from thecache.
Note: Il est possible de mélanger les différents types d’actions.
75

Read the ExtensiveAutomation Documentation, Release 20.0
Important: The wizard allows to generate tests in automatic mode but it is also possible to add its owncode inside with the USERCODE action.
11.1 Framework Tabulation
The framework tab allows you to use the basic functions of the test framework.
Example of a test done with the assistant:
1. Display the message “hello” in the test
2. Ask the user during the execution his first name and save it in the cache with the firstname key
3. Display the first name in the test log
4. Check from the cache if the first name contains a specific value.
List of available actions:
Note: In red, the essential actions.
LOG MESSAGE Displays an informational message during test executionLOG WARNING Display a warning message during test executionSET VALUE Saves a data in the cacheRESET CACHE Blank the cache completelyUSERCODE Add custom code in the testWAIT DURING Wait for xx secondsCHECK IF VALUE Check if the value contains a specific textASK SOMETHING Request a value to the user (interaction mode)
76 Chapter 11. Assisted designs

Read the ExtensiveAutomation Documentation, Release 20.0
11.2 System tab
The system tab allows you to execute commands on a remote server available via SSH.
Example of a test done with the assistant:
1. Opening the ssh session on the remote machine 192.186.1.251
2. Sending the text su -
3. Waits to detect the text Password: on the screen
4. Ask the user for the root password and store it in the cache with the pwd key
5. Send the root password using the value stored in the cache
6. Waiting to detect on the screen the connection prompt
7. Close the SSH connection.
List of available actions:
Note: In red, the essential actions.
OPEN SSH SESSION Open an SSH sessionCLOSE SESSION Close the sessionCLEAR SCREEN Blank screenSEND TEXT Send a string of charactersSEND SHORTCUT Sending a keyboard shortcut (to interrupt an action)CHECKING IF SCREEN Check if the screen contains specific text
11.2. System tab 77
Read the ExtensiveAutomation Documentation, Release 20.0
Note: Using the OPEN SSH SESSION action is mandatory before you can use the others available.
11.3 Tabulation application
The application tab allows you to automate rich applications by allowing:
• to simulate the keyboard
• to simulate the mouse
• search for graphic elements on the screen
• to search for text
Warning: an agent sikulix-server is needed to use the actions.
Example of a test done with the assistant:
1. Send the keyboard shortcut Win + R to open the run window
2. Write the text cmd
3. Send the Enter keyboard shortcut to open a cmd window.
4. Waiting to detect the icon of the cmd window
5. Write the text cls & ver to display the version of Windows
6. Send the Enter keyboard shortcut to validate
7. Send the keyboard shortcut Ctrl + A to select the text in the window
8. Send the keyboard shortcut Ctrl + C to copy the selected text to the clipboard
9. Get the text from the clipboard and save it in the cache
10. Displays the text copied from the cache
11. Write the exit text in the cmd window
12. Send the Enter keyboard shortcut to close the window.
78 Chapter 11. Assisted designs

Read the ExtensiveAutomation Documentation, Release 20.0
List of available actions:
Note: In red, the essential actions.
Mouse control
CLICK ON POSITION Click on the position (x, y)DOUBLE CLICK ON POSITION Double click on the position (x, y)RIGHT CLICK ON POSITION Right click on the position (x, y)MOUSE WHEEL DOWN Turn the mouse wheel downMOUSE WHEEL UP Turn the mouse wheel upMOVE TO POSITION Move the cursor to the position (x, y)
Keyboard control
TYPE TEXT Writes textTYPE PATH Writes text (to use for paths)TYPE PASSWORD Writes text (to be used to type a password)GET TEXT FROM CLIPBOARD Retrieves the text present in the clipboardKEYBOARD SHORTCUT Allows you to type a keyboard shortcut
String control
11.3. Tabulation application 79
Read the ExtensiveAutomation Documentation, Release 20.0
CLICK ON WORD Search a word on the screen and click on itDOUBLE CLICK ON WORD Search for a word on the screen and double-click on itRIGHT CLICK ON WORD Search for a word on the screen and right-click on itWAIT WORD Search a word until it appearsWAIT AND CLICK ON WORD Search a word until it appears and click on it
Image Control
CLICK ON IMAGE Search an image and click on itDOUBLE CLICK ON IMAGE Search an image and double-click on itRIGHT CLICK ON IMAGE Search an image and right-click on itWAIT IMAGE Search an image until you see it on the screenWAIT AND CLICK ON IMAGE Search an image until you see it on the screen and click on itHOVER MOUSE ON Find an image and move the mouse cursor over itDRAG IMAGE AND DROP TO Find an image and drag and drop to position (x, y)
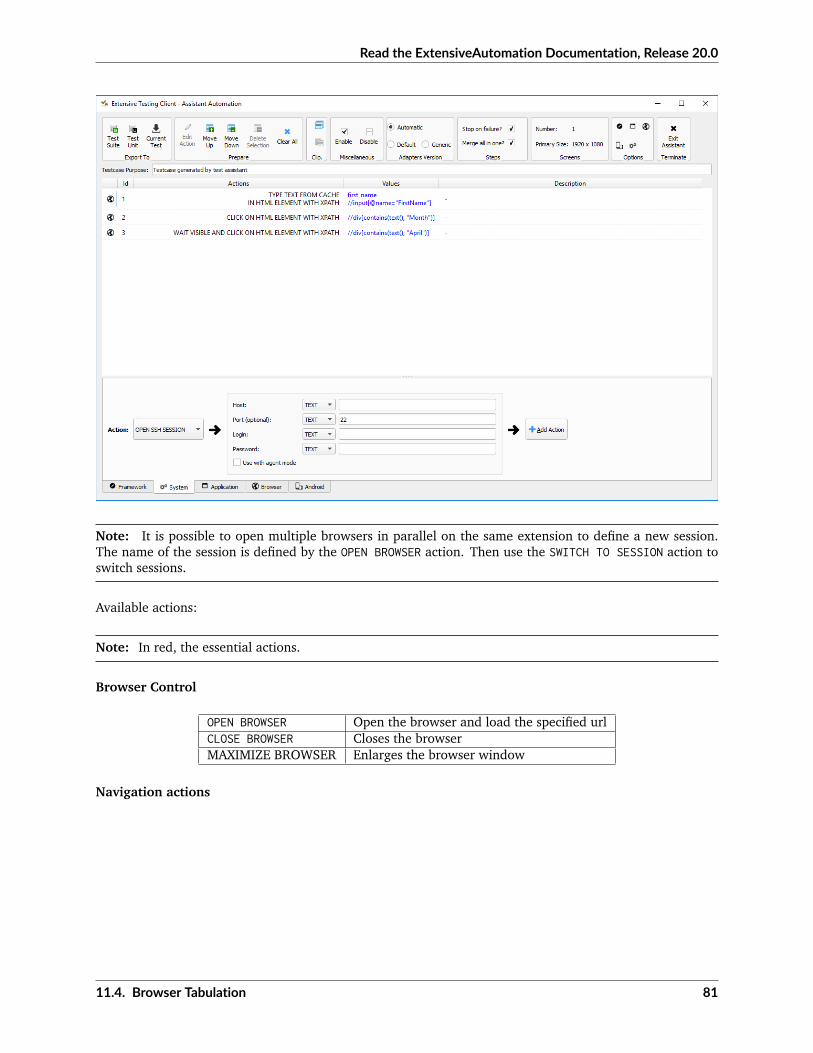
11.4 Browser Tabulation
The browser tab allows you to automate web applications by allowing:
• to control browsers (firefox, internet explorer, chrome, edge)
• to simulate the keyboard
Warning: an agent selenium3-server or selenium2-server is needed to use the actions.
Tip: To click on an HTML element, it is advisable to use systematically the WAIT VISIBLE AND CLICK ONHTML ELEMENT function.
Example of a test done with the assistant:
1. Get the name from the cache and send it to the HTML element found by the xpath
2. Click on the HTML element found by the xpath
3. Find the HTML element found by the xpath and click on it as soon as it is visible on the screen.
80 Chapter 11. Assisted designs
Read the ExtensiveAutomation Documentation, Release 20.0
Note: It is possible to open multiple browsers in parallel on the same extension to define a new session.The name of the session is defined by the OPEN BROWSER action. Then use the SWITCH TO SESSION action toswitch sessions.
Available actions:
Note: In red, the essential actions.
Browser Control
OPEN BROWSER Open the browser and load the specified urlCLOSE BROWSER Closes the browserMAXIMIZE BROWSER Enlarges the browser window
Navigation actions
11.4. Browser Tabulation 81

Read the ExtensiveAutomation Documentation, Release 20.0
REFRESH PAGE Refresh the pageGO BACK BackspaceGO FORWARD Go forwardACCEPT ALERT Validate the javascript alertDISMISS ALERT Dismiss the javascript alertCLOSE CURRENT WINDOW Closes the current windowSWITCH TO NEXT WINDOW Toggle on next windowSWITCH TO FRAME Toggle on the next frameSWITCH TO SESSION Toggles to another selenium sessionSWITCH TO WINDOW Toggle on the next frame
javascript actions
EXECUTE JAVASCRIPT ON HTML ELEMENT Allows you to inject javascript script on an html element
Actions on html elements
WAIT HTML ELEMENT Wait for the appearance of a precise HTML elementWAIT AND CLICK ON HTML ELEMENT Wait for the appearance of a precise HTML element and click
on itWAIT VISIBLE HTML ELEMENT Wait for an HTML element to be visible to the userWAIT NOT VISIBLE HTML ELEMENT Wait until an HTML element is not visible to the userWAIT VISIBLE AND CLICK ON HTMLELEMENT
Wait for an HTML element to be visible to the user and clickon it
HOVER ON HTML ELEMENT Move the mouse cursor over a specific HTML elementCLICK ON HTML ELEMENT Click on a specific HTML elementDOUBLE CLICK ON HTML ELEMENT Double click on a specific HTML elementCLEAR TEXT ON HTML ELEMENT Empty the text on a specific HTML elementSELECT ITEM BY TEXT Select item according to the text (for combolist or list)SELECT ITEM BY VALUE Select item according to the value attribute (for combolist or
list)
Text Recovery
GET TEXT ALERT Retrieves the text of an alert message javascriptGET TEXT FROM HTML ELEMENT Retrieves the text an exact html elementGET PAGE TITLE Retrieves the title of the pageGET PAGE URL Get the URL of the pageGET PAGE SOURCE CODE Get the source code page
Keyboard simulation
TYPE KEYBOARD SHORTCUT Sends a keyboard shortcut to a specific HTML elementTYPE TEXT ON HTML ELEMENT Sends text on a specific HTML element
11.5 Android Tabulation
The android tab allows you to automate mobile applications by enabling:
82 Chapter 11. Assisted designs

Read the ExtensiveAutomation Documentation, Release 20.0
• to simulate the keyboard
• to simulate the use of the fingers on the screen
• to control the system and the applications
Warning: an adb agent is needed to use the actions.
Overview of the agent
Example of a test done with the assistant:
1. Wake up the device
2. Unlock the device
3. Click on the HOME button
4. Stop the application
5. Click on the ‘Play Store‘ app to open it
6. Wait for the application to open and search the APPS & GAMES menu
7. Click on the text ENTERTAINMENT
8. Click on the menu MOVIES & TV
11.5. Android Tabulation 83
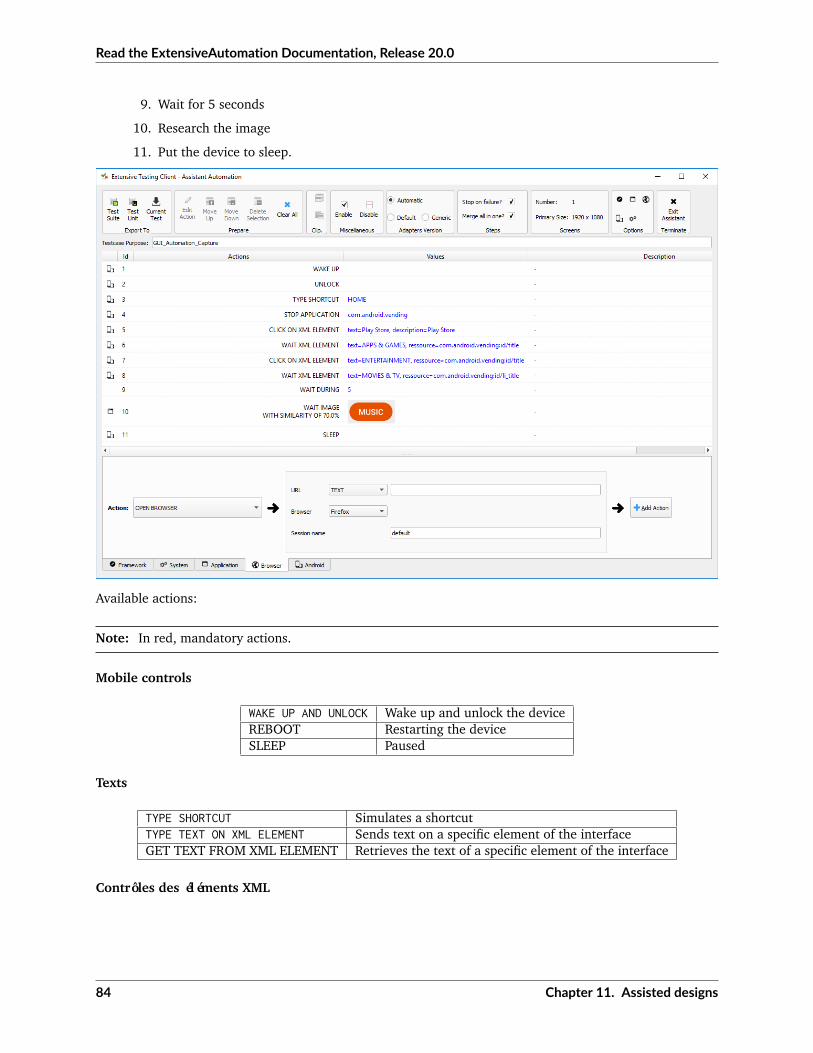
Read the ExtensiveAutomation Documentation, Release 20.0
9. Wait for 5 seconds
10. Research the image
11. Put the device to sleep.
Available actions:
Note: In red, mandatory actions.
Mobile controls
WAKE UP AND UNLOCK Wake up and unlock the deviceREBOOT Restarting the deviceSLEEP Paused
Texts
TYPE SHORTCUT Simulates a shortcutTYPE TEXT ON XML ELEMENT Sends text on a specific element of the interfaceGET TEXT FROM XML ELEMENT Retrieves the text of a specific element of the interface
Contrôles des éléments XML
84 Chapter 11. Assisted designs

Read the ExtensiveAutomation Documentation, Release 20.0
CLEAR XML ELEMENT Removes text from a specific element of the interfaceCLICK ON XML ELEMENT Click on a specific element of the interfaceLONG CLICK ON XML ELE-MENT
Long-term click on a specific element of the interface
WAIT AND CLICK ON XMLELEMENT
Wait for the appearance of a specific element of the interface and clickon it
Tap on screen
CLICK TO POSITION Click on the position x, yDRAG FROM POSITION Drag from position x1, y1 to x2, y2SWIPE FROM POSITION Swipe from position x1, y1 to x2, y2
11.5. Android Tabulation 85

Read the ExtensiveAutomation Documentation, Release 20.0
86 Chapter 11. Assisted designs

CHAPTER12
Troubleshooting
12.1 Errors codes
Framework error code
Error code DescriptionERR_TE_000 Generic error during test executionERR_TE_001 Generic error during testcase executionERR_TE_500 Generic error during script execution
Steps errors
Error code DescriptionERR_STP_001 The step is already started, the function start() is called several time in the test.ERR_STP_005 The test try to set the result bu the step is not started
Test properties errors
Error code DescriptionERR_PRO_004 The parameter name for input function does not exits
12.2 How to fix
12.2.1 Unable to generate the test design of a test
The generation of the description of a test does not works in some cases:
• bad version for adapters and libraries
• syntax error in the test
87

Read the ExtensiveAutomation Documentation, Release 20.0
• the cache is used in the step definition
88 Chapter 12. Troubleshooting

CHAPTER13
Installation
13.1 Server
Please refer to the README in github
13.2 Web Client
Please refer to the README in github
13.3 Qt Client
Please refer to the README in github
13.4 Toolbox
Please refer to the README in github
13.5 Plugins for client
Please refer to the README in github
89

Read the ExtensiveAutomation Documentation, Release 20.0
90 Chapter 13. Installation

CHAPTER14
Administration
14.1 Start/Stop of the server
If installation has been done with the pip command then the server can be controled with the followingcommand ./extensiveautomation. This command enables to
• start or stop the server
• check the status
• display the version
Use the following command to start the server ./extensiveautomation --start.
# ./extensiveautomation --start
Use the following command to stop the server ./extensiveautomation --stop.
# ./extensiveautomation --stop
Tip:
More details in logs about the start or stop procedure.
# tailf [....]/var/logs/output.log2014-12-06 11:00:54,092 - INFO - Extensive Automation successfully started (in 14 sec.)...2014-12-06 10:58:51,810 - INFO - Stopping server2014-12-06 10:58:51,911 - INFO - Extensive Automation successfully stopped!
91

Read the ExtensiveAutomation Documentation, Release 20.0
14.2 Server status’s
./extensiveautomation --status enable to check the status of the server, 3 states exists:
• starting: the server is starting
• running: the server is running properly
• stopped: the server is stopped
Tip: Don’t forget to check the status of your reverse proxy.
14.3 Server settings
The file settings.ini contains all parameters to configure the server. Parameters are separated in severalsections:
• Boot
• Notifications
• Client_Channel
• Agent_Channel
• WebServices
• TaskManager
• Network
• Paths
• Bin
• Server
• Bind
• Misc
• Database
• Trace
• Supervision
• Users_Session
92 Chapter 14. Administration

CHAPTER15
Projects
The solution is multi-project. It is therefore possible to organize the tests by projects and grant access rightsfor users.
Note: The Common project exists by default, it is accessible by all users and can not be deleted.
15.1 Add a project
Only an administrator can add a new project. Creating a project requires specifying its name and can bedone via the web interface or the API
15.2 Delete a project
Only an administrator can remove a project. This action can be done throught the web interface or the webapi.
Note: If the project is associated with a user, deletion is not allowed.
15.3 Link a project to a user
A user can access to several projects. From the profile of a user, you can select all the projects authorized.It’s possible to define the default one.
93

Read the ExtensiveAutomation Documentation, Release 20.0
94 Chapter 15. Projects

CHAPTER16
Users
The solution is multi-user, 3 users exists by default:
• Admin
• Tester
• Monitor
Note: The default password is password
Note: Don’t forget to disable default accounts in a production environment.
16.1 Add user
Only an administrator can add a new user. The creation of a user requires at least the following parametersand can be done via the web interface or the API
• username
• password
Note: Email is used by the solution to send test reports and results.
Note: It is possible to configure multiple email addresses for a user by separating them with ;
95

Read the ExtensiveAutomation Documentation, Release 20.0
16.2 Delete a user
Only an administrator can remove a user. This action can be done throught the web interface or the web api.
96 Chapter 16. Users

CHAPTER17
Troubleshooting
17.1 Logs
17.1.1 Server
The server logs are stored on [....]/var/logs/. The logs are set in INFO mode by default. The DEBUG levelcan be activated from the settings.ini file.
Note: It is possible to change the level of logs by doing an xtcl reload
17.1.2 Client
The client logs are available in <Program Files> /Extensive Automation Client/Logs/ The logs are set inINFO mode by default.
The DEBUG level can be activated from the client preferences.
97
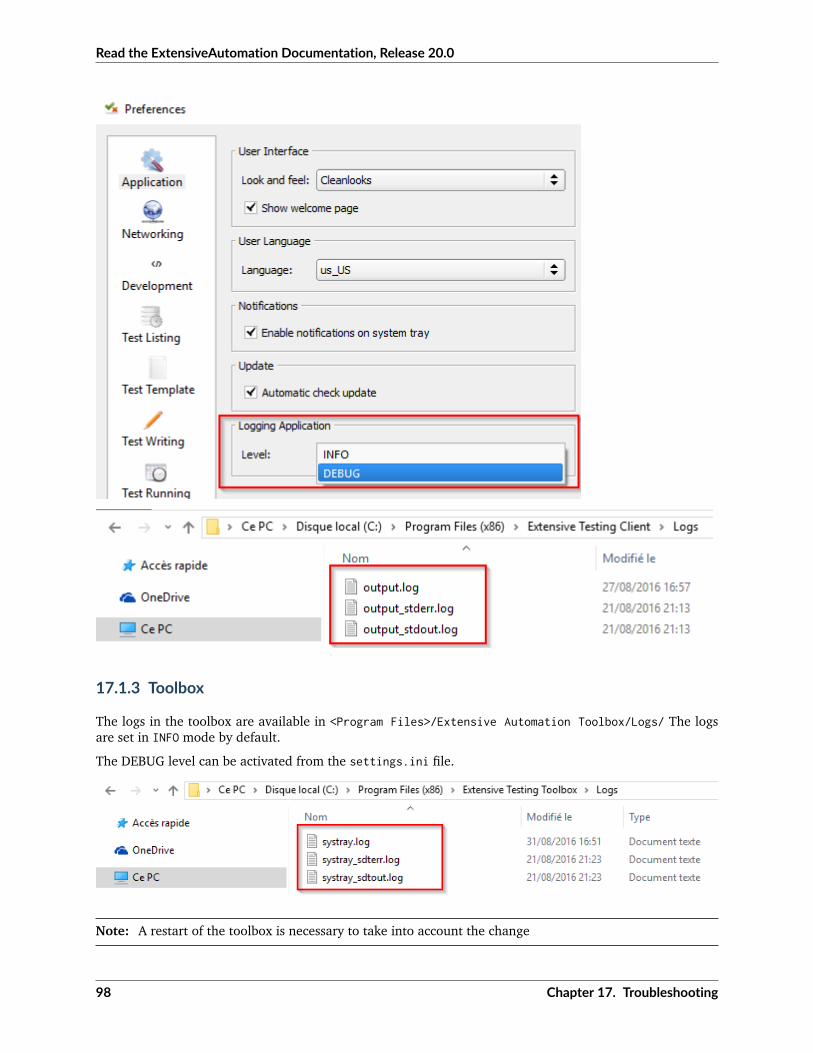
Read the ExtensiveAutomation Documentation, Release 20.0
17.1.3 Toolbox
The logs in the toolbox are available in <Program Files>/Extensive Automation Toolbox/Logs/ The logsare set in INFO mode by default.
The DEBUG level can be activated from the settings.ini file.
Note: A restart of the toolbox is necessary to take into account the change
98 Chapter 17. Troubleshooting

Read the ExtensiveAutomation Documentation, Release 20.0
17.2 Frequently Asked Questions
17.2.1 How to change the connection port of the client?
The destination port can be changed from the client preferences. Or directly from the settings.ini file.
17.2.2 View the server version?
./extensiveautomation --versionServer version: 21.0.0
What if my connection to the server does not work? ~~~~~~~~~~~~~~~~~~~~~~~~~~~~~~~~~~~~~~~~~~~~~~~~~~~~~~~~
If the connection from the client to the server does not work, an analysis is necessary.
The first thing to do is to connect to the server in SSH and execute the ./extensiveautomation --statuscommand to check if the server is running.
1. If the server is running then check:
• network connectivity in the client and the server
• a firewall blocking the https flow (443)
2. If the network connectivity is good and the server is working (or not), check the logs. The file is availablein the [....]/var/logs/output.log directory. You must look for messages of type ERROR
How to fix the error “hping3 is not installed”? ~~~~~~~~~~~~~~~~~~~~~~~~~~~~~~~~~~~~~~~~~~~~~~~~~~~~~~~~
This error occurs while running a test when the Pinger adapter is used. Indeed requires to have the hping3system library installed on the server.
You have to retrieve the sources from https://github.com/antirez/hping and compile them:
cd hping-masteryum install libpcap-devel-1.5.3-9.el7.x86_64ln -s /usr/include/pcap/bpf.h /usr/include/net/bpf.h./configuremakemake install
17.2. Frequently Asked Questions 99

Read the ExtensiveAutomation Documentation, Release 20.0
100 Chapter 17. Troubleshooting

CHAPTER18
Tests definitions
The solution is based on different types of tests for:
• enable the construction of advanced tests
• decrease the use of script
18.1 Test Unit
The test unit (tux) allows you to write a test case with several steps. This format is oriented development.
101

Read the ExtensiveAutomation Documentation, Release 20.0
18.2 Test Suite
The test suite (tsx) allows you to write several test cases with several steps. This format is orienteddevelopment.
18.3 Test Plan
The plan test (tpx) allows you to write test cases. The design is realized by nesting the tests abstract, unitand suite This test format requires no knowledge in development.
18.4 Test Global
The global test (tgx) allows you to write test campaigns. The preparation of the campaigns is carried outby importing the tests plans.
Note: It is also possible to import other types of tests.
102 Chapter 18. Tests definitions

CHAPTER19
The fundamentals
The test framework provides a framework for standardizing the creation of test cases.
The main features are:
• the support of test cases with steps
• Support extensions to communicate with the system to test or control
• automatic generation of test reports.
19.1 Test case
The creation of a test case in the solution is standardized.
A test case is divided into 4 sections:
• description: description of the different stages of the test
• prepare: preparation of adapters and libraries for communicating with the system to be tested orpiloted
• definition: test flow
• cleanup: cleaning phase
The result of a test case is automatically calculated by the framework when the test is completed accordingto the different stages defined.
There are 3 possible results:
• PASS: all the steps of the tests have been successfully executed
• FAILED: at least one step is in error after execution
• UNDEFINED: at least one step of the test has not been executed
103
Read the ExtensiveAutomation Documentation, Release 20.0
Note: The cleanup section is always called, even if there is an error.
19.2 Test steps
A test case is divided into sub-steps.
A step is defined by:
• a summary of the action to be carried out
• the detailed description of the action to be carried out
• the description of the expected result to validate the step.
The definition of the test steps must be done in the description section:
self.step1 = self.addStep(expected="Logged in",description="Login throught the rest api",summary="Login throught the rest api",enabled=True
)
The result of a step is to be specified in the definition section
Example to set the result to PASS or FAILED
self.step1.setPassed(actual="step executed as expected")
self.step1.setFailed(actual="error to run the step")
Warning: Do not forget to start a step with the function start otherwise it is not possible to put theresult.
Note: Do not forget to specify the result of a step, otherwise it will be considered as UNDEFINED.
Important: A step set to FAILED can not become PASS thereafter in a test.
19.3 Cancellation of a test
It is possible to force the execution of a test case by using the stop function in the description section ofyour test.
Test(self).interrupt(err="aborted by tester")
Using the stop feature will stop the test and automatically call the cleanup section of the test case. In thiscase, the aborted argument is set to True by the framework to indicate the cancellation of the test.
104 Chapter 19. The fundamentals

Read the ExtensiveAutomation Documentation, Release 20.0
def definition(self):Test(self).interrupt("bad response received")
def cleanup(self, aborted):if aborted: self.step1.setFailed(actual="%s" % aborted)
19.4 Adding trace
The framework provides some functions to add messages during the execution of a test.
The following levels are available:
• Example to display a message of type info
Trace(self).info(txt="hello world")
• Example to display a warning message
Trace(self).warning(txt="hello world")
• Example to display an error message
Trace(self).error(txt="hello world")
Note: If an error message is displayed then the result will automatically be set to FAILED.
Note: Messages appear automatically in the basic report.
19.5 Data
19.5.1 Public
A public space is available on the test server. This space makes it possible to provide files that are necessaryduring the execution of a test.
The files are stored in the [...]/var/public/ directory on the server.
Warning: This space is common to all projects configured on the server.
19.4. Adding trace 105

Read the ExtensiveAutomation Documentation, Release 20.0
19.5.2 Private
Private vault only exists while running a test. It can save logs generated or recovered during the executionof the test. These logs are automatically made available to the user in a zip file when the test is completed.They can be retrieved from the client or from the server API.
The logs are organized by directory:
• TC-TESTCASE directory - # <id_tc>: contains the logs generated by the test case
• ADP directory - # <id_id>: contains the logs generated by the different adapters used during thetest
Example to save the text hello world in a‘ my_logs‘ file from the test case
Private(self).saveFile(destname="my_logs", data="hello world")
Example to add text to an already existing log file
Private(self).appendFile(destname="my_logs", data="hello world2")
Note:
It is also possible to save files from an adapter. They will be automatically stored in a directorywith the name of the adapter.
19.5.3 Cache
The test framework allows caching of data in the key/value form. This function may be necessary to sharedata between tests when writing a scenario for example.
106 Chapter 19. The fundamentals

Read the ExtensiveAutomation Documentation, Release 20.0
Example to save a value in the cache
Cache().set(name="my_data", data="hello")
Read a value from the cache
my_data= Cache().get(name="my_data")Trace(self).warning(my_data)
Example to capture a data with a regular expression and with record in the cache
my_data="March, 25 2017 07:38:58 AM"
Cache().capture(data=my_data, regexp=".* (?P<TIME>\d{2}:\d{2}:\d{2}) .*")
Trace(self).info( txt=Cache().get(name="TIME") )
It is also possible to rely on a custom parameter to supply the regular expression.
.*session_id=[!CAPTURE:SESSIONID:];expires.*
or in greedy mode
.*session_id=[!CAPTURE:SESSIONID:.*?];.*
Important: The cache exists only during the execution of a test.
19.6 Put on hold
This function allows you to pause while running a test.
Example of holding for 10 seconds:
Time(self).wait(timeout=10)
Standby example until the current date and time match the specified date:
Time(self).waitUntil(dt='2016-09-12 02:00:00', fmt='%Y-%m-%d %H:%M:%S', delta=0)
19.7 Interaction with the tester
The framework makes it possible to write semi-automatic tests, ie in interaction mode. This function can beinteresting for a test in interactive mode (eg configuration of a device)
19.6. Put on hold 107

Read the ExtensiveAutomation Documentation, Release 20.0
Example asking the name of the person:
user_rsp = Interact(self).interact(ask="Your name?", timeout=30.0, default=None)
From the client, the Interact tab automatically appears to answer the question asked during the executionof the test. This window is available from the analysis window.
Note: If no response is provided within the interval, it is possible to provide a default value with the defaultargument.
19.8 Parameters of a test
19.8.1 Inputs
Input parameters are used to add variables to a test. They are configurable from the client.
There are several types of parameters:
The variables are accessible from a test with the input (...) function
input('DEBUG')
The text parameter
The text type is used to construct parameters that use other parameters or the cache. It is therefore possibleto use keywords that will be interpreted by the test framework at the time of execution.
List of available keywords:
Keywords Description[! INPUT::] Retrieves the value of a parameter present in the test[! CACHE::] Retrieves a value present in the cache
Note: The name of a parameter is unique and must be capitalized.
108 Chapter 19. The fundamentals

Read the ExtensiveAutomation Documentation, Release 20.0
19.8.2 The agents
The list of agents can be accessed from a test using the () key mode.
self.ADP_REST= SutAdapters.REST.Client(parent=self,destinationIp=input('HOST'),destinationPort=input('PORT'),debug=input('DEBUG'),sslSupport=input('USE_SSL'),agentSupport=input('SUPPORT_AGENT'),agent=input('AGENT_SOCKET'))
Define the agent parameter with json like that {‘name’: ‘agent1’, ‘type’: ‘socket’}
19.8.3 Import / export settings
The test parameters can be exported to a dedicated testconfig (tcx) file type. It is therefore possible toprepare the parameters without having the test.
19.8. Parameters of a test 109

Read the ExtensiveAutomation Documentation, Release 20.0
It is possible to import a configuration file into a test. The import will overwrite all the parameters if thename is the same.
110 Chapter 19. The fundamentals
CHAPTER20
The tracability
20.1 The events
The execution of a test is divided into events, all of these events are stored and can be viewed afterwards.An event can represent:
• an action performed by the test framework
• an action performed by the test
• a data item received by the system to be tested or checked.
• data to send to the system to test or control.
Event execution makes it possible to have robust tests thanks to the definition of observation intervals. Theapproach is to write the tests with the following formalism:
• I perform an action in my test.
• During a given interval, I look and compare all the events received with an expected.
• I decide on the next action
– after receiving the event I was waiting for
– or when the observation interval is over.
During the execution of a test, the framework captures all the events generated by the tested or pilotedsystem. The events are then converted and stored in a message called template.
A template is split into one or more layers. A layer is defined by a set of key/value. The value of a layercan be another layer too.
111

Read the ExtensiveAutomation Documentation, Release 20.0
20.1.1 Creating a template
Creating a template can be done using the TestTemplates test framework.
tpl = TestTemplates.TemplateMessage ()layer = TestTemplates.TemplateLayer (name = 'response')layer.addKey (name = 'code', data = '200')layer.addKey (name = 'msg', data = 'hello world')tpl.addLayer (layer = layer)
This template indicates that the event should contain:
• a layer called response and containing the key‘ code‘ and msg
• the key code must be strictly equal to the value 500
• the msg key must be strictly equal to the text hello world.
Example of an expected message visible from the graphical client:
112 Chapter 20. The tracability

Read the ExtensiveAutomation Documentation, Release 20.0
20.1.2 The operators
Operators are available to facilitate comparison of the models received.
Sample template using comparison operators:
tpl = TestTemplates.TemplateMessage()layer = TestTemplates.TemplateLayer(name='response')layer.addKey(name='code', data=TestOperators.LowerThan(x=500)))layer.addKey(name='msg', data=TestOperators.Contains(x="hello"))tpl.addLayer(layer=layer)
This template indicates that the event should contain:
• a layer called response and containing the key‘ code‘ and msg
• the code key must be less than 500
• the msg key must contain the text hello.
20.1.3 Visualization
The client can graphically display the comparison made by the framework.
20.1. The events 113

Read the ExtensiveAutomation Documentation, Release 20.0
Definition of the color code:
Green Perfect match between the value received and expectedRed The value received does not correspond to the expected valueYellow The expected value has not been verified
20.2 Test reports
After each run of a test, the framework automatically generates the associated test reports.
There are 2 type reports:
• An advanced report
• A basic report (accessible by default from the graphical client)
The reports are accessible from the client, the web interface or from the API.
Note: Reports can be exported in html, csv, xml and pdf format.
20.2.1 Advanced report
The advanced report displays information such as:
• the execution time of each test case
• the complete description of the test steps.
• performance statistics.
• the test parameters.
114 Chapter 20. The tracability

Read the ExtensiveAutomation Documentation, Release 20.0
It is possible to display variables in the test report by prefixing the variables:
• SUT_ Variables describing the version of the system to be tested or piloted
• DATA_ Variables describing specific data
• USER_ User variables
This feature can be useful for increasing the level of traceability in reports.
20.2. Test reports 115

Read the ExtensiveAutomation Documentation, Release 20.0
20.2.2 Basic report
The basic report summarizes the result of all test cases and reports.
116 Chapter 20. The tracability
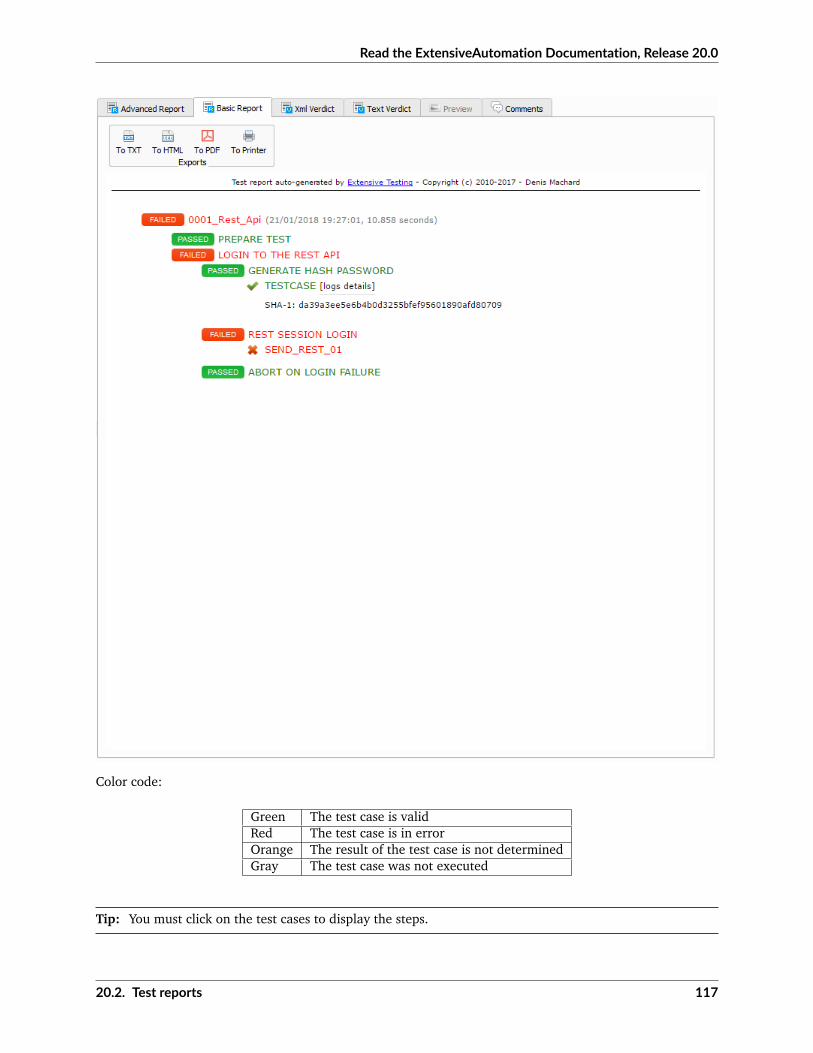
Read the ExtensiveAutomation Documentation, Release 20.0
Color code:
Green The test case is validRed The test case is in errorOrange The result of the test case is not determinedGray The test case was not executed
Tip: You must click on the test cases to display the steps.
20.2. Test reports 117

Read the ExtensiveAutomation Documentation, Release 20.0
Note: The messages displayed by the test with the Trace (self) .info () function are available in thereport by clicking on the [logs details] link.
Errors are also displayed by clicking on the [errors details] link.
20.3 The logs
The framework allows you to save logs while running a test and make them available quickly to the uses. Alladditional logs are zipped and accessible from the client or the API.
Note: For more details, read the chapter The fundamentals >> Data.
118 Chapter 20. The tracability

CHAPTER21
Interoperability
21.1 Adapters
The adapters allow communication with the system to be tested or piloted. The solution embeds several default adapters in different domains:
• network protocol support
• application level protocol support
• communication with databases
• systems interaction
• interaction with graphic interfaces
• telecom protocol support
Adapters have two modes of use:
• a direct mode: communication is done directly from the test server to the system to be controlled.
• an agent mode: the communication with the system to be controlled is done through an agentcommunicating with the test server.
Note: The Verbose mode is enabled by default on all adapters. This mode can be disabled to reduce thenumber of events during a test.
Note: The Debug mode is not enabled by default. It can be activated in case of problem.
Note: Tests axamples are provided in each plugins
List of adapters available by default:
119

Read the ExtensiveAutomation Documentation, Release 20.0
Adapters Agents DescriptionsCLI ssh Sniffer to send and receive ARP packetsWEB curl Sniffer to send and receive ICMP packetsGUI selenium2-server or selenium3-server or adb or sikulixserver | UI interactions
Others adapters but not provided by default:
21.1.1 Network Protocols
Adapters Agents DescriptionsARP socket Sniffer to send and receive ARP packetsICMP socket Sniffer to send and receive ICMP packetsEthernet socket Sniffer for sending and receiving Ethernet framesIP socket Sniffer for sending and receiving IPv4 packetsPinger not supported Machine life tests via ICMP, TCP or URLUDP / TCP socket Sniffer and UDP client and TCPNTP socket Client to request an NTP serverDNS not supported Resolver CustomerSNMP socket Receiving SNMPv2 Alarms
21.1.2 Network Protocols Applications
21.1.3 System commands
Adapters Agents DescriptionsDig Customer digCurl Customer curlNmap Nmap clientNcat Customer ncatOpenssl Openssl client
21.1.4 User Interfaces
Adapters Agents DescriptionsAdb adb Integration with the Android GatewaySelenium selenium2-server or selenium3-server Integration with the Selenium projectSikuli sikulix-server Integration with the SikuliX project
21.1.5 Data base
Adapters Agents DescriptionsMicrosoft SQL database Communication with a base of type Microsoft SQLMySQL database Communication with a MySQL/MariaDB databasePostgreSQL database Communication with a PostgreSQL database
120 Chapter 21. Interoperability

Read the ExtensiveAutomation Documentation, Release 20.0
21.1.6 System controls
21.1.7 Telecom Protocols
Adapters Agents DescriptionsSMS Gateway gateway-sms Receive or send SMS using an Android smartphoneSIP socket SIP PhoneRTP socket Module for sending and receiving audio and video streams
21.1.8 Encryption
AES Encryption or decryption supportBlowfish Encryption or decryption supportOpenSSL Execute SSL commandRC4 Encryption or decryption supportXOR Encryption or decryption supportRSA RSA Key Generator
21.1.9 Codecs
Base64 Encode or decode in base64 formatExcel Excel file readingG711A Encode or decode the audio codecG711U Encode or decode the audio codecJSON Encode or decode text in JSON formatXML Encode or decode text in XML format
21.1.10 Compression
GZIP Compression or decompression in GZIP format
21.1.11 Hashing
Checksum Checksum GeneratorHMAC Creating a hash md5, sha1 and sha256MD5 Creating a md5 hashSHA Creating a hash sha1, sha256 and sha512CRC32 Checksum Generator
21.1.12 Identifiant
SessionID Session Builder IDUUIDS UUID Generator (Universally Unique IDentifier)
21.1. Adapters 121

Read the ExtensiveAutomation Documentation, Release 20.0
21.1.13 Média
ChartsJS Visible graph generator in test reportsDialTones Tone generatorImage Manipulation of imagesNoise Noise generatorSDP Decodes or encodes SDP messagesWavContainer Creating audio file type WAVWaves Simple wave generator
21.1.14 Date
Today Retrieves today’s date
21.1.15 Security
Basic Decode or encode the authorizationDigest Decode or encode the authorizationHmac Decode or encode the authorizationOauth Decode or encode the authorizationWsse Decode or encode the authorizationCertificate Decodes certificates in a readable formatJWT Decode or encode tokens
21.1.16 Time
Timestamp Generate a timestamp or convert to a readable value
21.1.17 Units
Bytes Convert fromtes to readable
21.2 Third party tools
Git Clone / commit file on remote repositoryJira Ticket creationHP ALM QC Test run, ticket creation. Version 12 minimumExtensiveAutomation Test execution, variable creationJenkins Running tests before or after a buildVSphere VM creation or supression on VMware
122 Chapter 21. Interoperability

Read the ExtensiveAutomation Documentation, Release 20.0
Note:
The solution has a REST API, it can be driven also by these tools.
• Jenkins Plugin: https://wiki.jenkins.io/display/JENKINS/ExtensiveTesting+Plugin
21.2.1 HP ALM
This plugin allows you to export test results in the HP ALM tool. It can be used from an etst to export resultswithout user intervention.
Example of use:
::
HP ALM ——> Call REST API —–> AND ^ | | v | Execution of the requested test | v + <——–Push the result ——–+
21.2.2 Jenkins
This plugin allows to launch a build from the Extensive solution.
21.2.3 VSphere
This plugin allows you to control a VMware virtual environment. It can be used for:
• create virtual machines automatically
• remove machines
21.2.4 ExtensiveAutomation
This plugin makes it possible to make a link between several environment (dev, integration, qualification)by allowing to run tests from one environment to another.
21.2.5 Jira
This plugin makes it possible to create tickets following the execution of a test in the tool Jira.
21.2.6 Git
This plugin allows you to recover or push files from a source repository. It can be used as a prerequisite fora test.
21.2. Third party tools 123

Read the ExtensiveAutomation Documentation, Release 20.0
21.3 Agents
Agents are available from the toolbox. They are to be used together with the adapters
• to communicate with the system to test or control when it is not accessible live by the test server(ex: a web page)
• run a test on several different environments.
Note: The dummy agent is to be used as a basis for developing a new agent.
21.3.1 Network Protocols
socket Lets you start TCP / UDP socketsftp Connect to an FTP server(s)database Queries databases (MySQL, Microsoft SQL and PostgreSQL)ssh Connect to machines via SSH or SFTP
21.3.2 Systems
command Execute system commands on Windows or Linuxfile Allows you to recover files on Windows or Linux systems
21.3.3 Third party tools
sikulix-server Interactions with heavy applicationsselenium3-server Allows you to control the latest generation web browsersselenium2-server Allows you to control web browserssoapui Allows you to run SoapUI testsadb Allows you to control Android smartphonesgateway-sms Send or receive SMS
Note: Using the Selenium3-Server agent requires at least Java 8 on the machine.
124 Chapter 21. Interoperability

CHAPTER22
Test engine
22.1 The scheduler
22.1.1 Programming of performances
The scheduler present in the server makes it possible to program the execution of the tests in several ways.
• Run the test once in x_seconds or date_time
• Run the test several times at date_time.
• Run the test at each start time at finish time
• Run the test every hour at a specific hour
• Run the test every day at a precise hour
• Run the test once a week the day of the week at a specific hour
125

Read the ExtensiveAutomation Documentation, Release 20.0
Note: A recursive task will be automatically restarted by the server after a reboot.
22.1.2 Task Management
The following actions are available to manage tasks scheduled by users:
• cancel one or more tasks
• stop one or more tasks
• reprogram one or more tasks
• view the history of the performances.
All of its actions can be done from the heavy client or from the API.
126 Chapter 22. Test engine

Read the ExtensiveAutomation Documentation, Release 20.0
22.2 Parallelized executions
It is possible to run multiple tests in parallel using the Grouped function This function is available from theheavy client or from the API.
There are 2 options of executions:
• run tests one after the other (no link)
• or parallel execution
22.2. Parallelized executions 127

Read the ExtensiveAutomation Documentation, Release 20.0
Note: From the API, use the function /rest/tests/schedule/group.
{"test": [
"Common:/Samples/Tests_Unit/02_A.tux","Common:/Samples/Tests_Unit/03_B.tux"
],"postpone-at": [],"parallel-mode": False,"postpone-mode": False}
Important: There is no guarantee that the tests will start at the same time with this mode of execution.
22.3 Synchronized executions
22.3.1 Sharing adapters
The ‘‘ shared mode‘‘ feature allows you to reuse the same adapter in several test cases. This mode is to beused in a scenario (test plan) or a test suite with several test cases.
Here is an example of possible use:
• the scenario tests an application
• in the background, the scenario also checks the logs generated by the application
• It is therefore possible to influence the result of the test based on what is found in the logs.
128 Chapter 22. Test engine

Read the ExtensiveAutomation Documentation, Release 20.0
To enable shared mode, set the ‘‘ shared‘‘ parameter to True and give the adapter a name:
self.ADP_EXAMPLE = SutAdapters.Dummy.Adapter(parent=self,debug=False,name="MY_ADAPTER",shared=True
)
Note: It is important to give a name to its adapter because it makes finding it easier. If no name is given,the framework configures the adapter with a random name.
After initialization of the adapter it is possible to recover an adapter from another test case by searching forit by name.
self.ADP_EXAMPLE = self.findAdapter(name="MY_ADAPTER")if self.ADP_EXAMPLE is None: Test(self).interrupt("unable to find the adapter")
22.3.2 Sharing data
Since the cache is unique when a test (no matter the type) is performed, it is possible to exchange databetween several test cases.
A first test can record data in the cache and a 2nd test can retrieve the value stored by the 1st test.
22.3.3 Synchronization
Synchronized execution of several test cases is possible using a testplan. This scenario should contain:
• an observer test case
• one or more test cases running actions in the background
The observer test must be used to make the connection between the different adapters.
Important: The use of adapters in shared mode is mandatory.
Note: An example is available in the /Samples/Tests_Non_Sequential test samples.
22.4 Distributed executions
The solution allows for distributed executions using distributed agents across the networks.
22.4. Distributed executions 129

Read the ExtensiveAutomation Documentation, Release 20.0
130 Chapter 22. Test engine

CHAPTER23
Advanced examples
23.1 SSH adapter
The SSH adapter allows you to connect to remote servers using the SSH protocol.
The configuration of the adapter consists of indicating at least:
• the ip address of the remote server
• the remote server port (default 22)
• the user account
The adapter supports the following features:
• authentication by username and password
• key exchange authentication
Example of configuring the adapter in the prepared section of the test.
self.ADP_SSH = SutAdapters.SSH.Client(parent=self,login=input('LOGIN'),password=input('PWD'),destIp=input('DEST_IP'),destPort=input('DEST_PORT'),debug=input('DEBUG'),agentSupport=input('SUPPORT_AGENT')
)
Example to connect, to authenticate on a remote server and to disconnect:
connected = self.ADP_SSH.doConnect(timeout=input('TIMEOUT'),prompt='~]#'
)
(continues on next page)
131

Read the ExtensiveAutomation Documentation, Release 20.0
(continued from previous page)
if not connected: self.abort("ssh connect failed")self.info("SSH connection OK" )
disconnected = self.ADP.doDisconnect(timeout=input('TIMEOUT'))if not disconnected: self.abort("disconnect failed")self.info("SSH disconnection OK" )
Example to send a command on a remote machine:
rsp = self.ADP_SSH. doSendCommand(command='date',timeout=input('TIMEOUT'),expectedData=None,prompt='~]#'
)if rsp is None: self.abort("run command failed")self.warning( rsp )
Warning: SSH replies can be split into several events (this depends on the network). We must be carefulwhen waiting for a specific response, the use of a buffer may be necessary in this case.
Note: Examples are available in the /Samples/Tests_Adapters/05_SSH.tsx sample.
23.2 HTTP adapter
The HTTP adapter is used to send requests and inspect associated responses to a web server.
The configuration of the adapter consists of indicating at least:
• the ip address of the remote server
• the remote server port (default 80)
The adapter supports the following features:
• encryption tls of the communication
• the use of socks4, 5 proxy and http
• digest or basic authentication
• reassembly of responses chunked
Example of configuring the adapter in the prepared section of the test.
self.ADP_HTTP = SutAdapters.HTTP.Client(parent=self,debug=input('TRACE'),destinationIp=input('DST_IP'),destinationPort=input('DST_PORT'),sslSupport = input('SSL_SUPPORT'),agent=input('AGENT_SOCKET'),
(continues on next page)
132 Chapter 23. Advanced examples

Read the ExtensiveAutomation Documentation, Release 20.0
(continued from previous page)
agentSupport=input('SUPPORT_AGENT'))
Example to send a GET type query and a response with the 200 code.
rsp = self.ADP_HTTP.GET(uri="/",host=input('HOST'),timeout=input('TIMEOUT'),codeExpected=200
)if rsp is None:self.step1.setFailed(actual="bad response received")
else:self.step1.setPassed(actual="http response OK")
Example to send a GET type query and wait for a response that meets the following criteria:
• the version must end with 1.1
• the code must not contain the value 200
• the sentence must not contain the text Testing
• the body of the answer must contain the text google
• the response must contain a header containing the text server, regardless of the value
headersExpected = { TestOperators.Contains(needle='server'): TestOperators.Any() }
rsp = self.ADP_HTTP.GET(uri="/",host=input('HOST'),timeout=input('TIMEOUT'),versionExpected=TestOperators.Endswith(needle='1.1') ,codeExpected=TestOperators.NotContains(needle='200') ,phraseExpected=TestOperators.NotContains(needle='Testing') ,bodyExpected=TestOperators.Contains(needle='google') )headersExpected=headersExpected)
if rsp is None:self.step1.setFailed(actual="bad response received")
else:self.step1.setPassed(actual="http response OK")
23.3 Telnet adapter
The Telnet adapter is used to connect to machines with a telnet interface.
The configuration of the adapter consists of indicating at least:
• the ip address of the remote server
• the remote server port (default 23)
Example of configuring the adapter in the prepared section of the test.
23.3. Telnet adapter 133

Read the ExtensiveAutomation Documentation, Release 20.0
self.ADP_TELNET = SutAdapters.Telnet.Client(parent=self,destIp=input('TELNET_IP'),destPort=input('TELNET_PORT'),debug=input('DEBUG'),agentSupport=input('SUPPORT_AGENT'))
Example to connect or disconnect from the remote server
self.ADP_TELNET.connect()connected = self.ADP_TELNET.isConnected( timeout=input('TIMEOUT') )if not connected: Test(self).interrupt( 'unable to connect' )
self.ADP_TELNET.disconnect()disconnected = self.ADP_TELNET.isDisconnected( timeout=input('TIMEOUT') )if not disconnected: Test(self).interrupt( 'unable to disconnect' )
Example showing how to wait for the receipt of a particular text.
rsp = self.ADP_TELNET.hasReceivedData(timeout=input('TIMEOUT'),dataExpected=TestOperators.Contains(needle='Password:') ))
if rsp is None: Test(self).interrupt( 'Password prompt not found' )
Example to send data to the remote server
tpl = self.ADP_TELNET.sendData(dataRaw="exemple")
search for a particular text. To guard against this problem, we must add an intermediary buffer, there is acomplete example with the Catalyst adapter.
Note: An example is available in the test samples /Samples/Tests_Adapters/12_Telnet.tsx.
23.4 MySQL adapter
The MySQL adapter allows you to connect to a remote database.
The configuration of the adapter consists of indicating at least:
• the ip address of the remote server
• the remote server port (by default 3306)
• the user name
• the associated password
Example of configuring the adapter in the prepared section of the test.
self.ADP_MYSQL = SutAdapters.Database.MySQL(parent=self,host=input('HOST_DST'),user=input('MYSQL_LOGIN'),
(continues on next page)
134 Chapter 23. Advanced examples

Read the ExtensiveAutomation Documentation, Release 20.0
(continued from previous page)
password=input('MYSQL_PWD'),debug=input('DEBUG'),verbose=input('VERBOSE'),agent=input('AGENT_DB'),agentSupport=input('SUPPORT_AGENT'))
Example to connect or disconnect from the remote server:
self.ADP_MYSQL.connect(dbName=input('MYSQL_DB'), timeout=input('TIMEOUT'))
self.ADP_MYSQL.disconnect()
Example to execute an SQL query in the database:
query = 'SELECT id FROM `%s-users` WHERE login="admin"' % input('TABLE_PREFIX')self.ADP_MYSQL.query(query=query)rsp = self.ADP_MYSQL.hasReceivedRow(timeout=input('TIMEOUT'))
Note: An example is available in the /Samples/Tests_Adapters/15_Database.tsx test samples.
23.5 SNMP adapter
The SNMP adapter allows you to receive SNMP v1 or v2 alarms.
The configuration of the adapter consists of indicating at least:
• the listening address
• the listening port
Example of configuring the adapter in the prepared section of the test.
self.ADP_SNMP = SutAdapters.SNMP.TrapReceiver(parent=self,bindIp=get('SRC_IP'),bindPort=get('SRC_PORT'),debug=get('DEBUG'),agent=input('AGENT_SOCKET'),agentSupport=input('SUPPORT_AGENT'))
Example to start listening to the server
self.ADP_SNMP.startListening()listening = self.ADP_SNMP.udp().isListening( timeout=get('TIMEOUT') )if not listening: Test(self).interrupt( 'UDP not listening' )
Example to wait for the reception of an alarm:
trap = self.UDP_ADP.hasReceivedTrap(timeout=input('TIMEOUT'),version=SutAdapters.SNMP.TRAP_V1,
(continues on next page)
23.5. SNMP adapter 135

Read the ExtensiveAutomation Documentation, Release 20.0
(continued from previous page)
community=None,agentAddr=None,enterprise=None,genericTrap=None,specificTrap="17",uptime=None,requestId=None,errorStatus=None,errorIndex=None
)if trap is None: Test(self).interrupt("trap expected not received")
Note: An example is available in the /Samples/Tests_Adapters/18_SNMP.tsx test samples.
23.6 FTP adapter (s)
The FTP adapter allows you to connect to remote servers and supports the following functions:
• TLS connection
• Download or recover files or directories
• Add / delete and rename files or directories
• List the contents of a directory
• Detect the appearance of a file or directory with the support of regular expressions.
The configuration of the adapter consists of indicating at least:
• the ip address of the remote server
• the username to login
• the password
Example of configuring the adapter in the prepared section of the test.
self.ADP_FTP = SutAdapters.FTP.Client(parent=self,debug=input('DEBUG'),destinationIp=input('FTP_HOST'),user=input('FTP_USER'),password=input('FTP_PWD') ,agentSupport=input('SUPPORT_AGENT'))
Example to connect or disconnect from the FTP server:
self.ADP_FTP.connect(passiveMode=True)if self.ADP_FTP.isConnected(timeout=input('TIMEOUT')) is None:
Test(self).interrupt("unable to connect")
self.ADP_FTP.login()if self.ADP_FTP.isLogged(timeout=input('TIMEOUT')) is None:
(continues on next page)
136 Chapter 23. Advanced examples
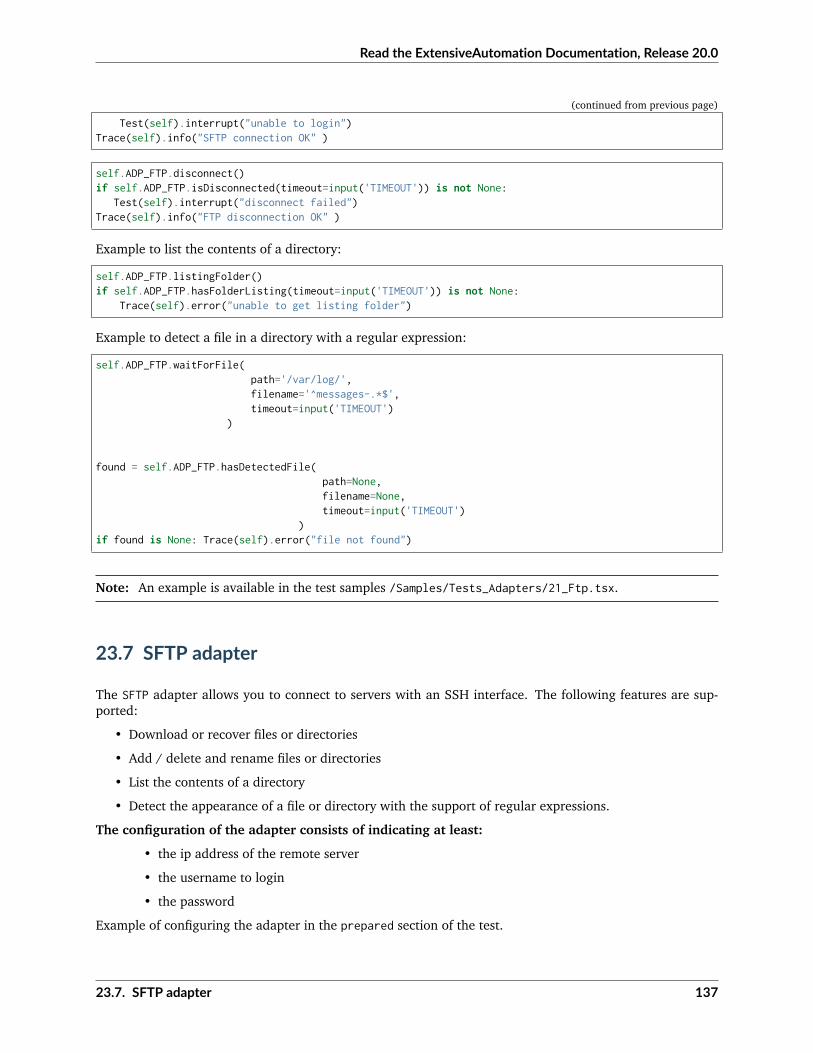
Read the ExtensiveAutomation Documentation, Release 20.0
(continued from previous page)
Test(self).interrupt("unable to login")Trace(self).info("SFTP connection OK" )
self.ADP_FTP.disconnect()if self.ADP_FTP.isDisconnected(timeout=input('TIMEOUT')) is not None:
Test(self).interrupt("disconnect failed")Trace(self).info("FTP disconnection OK" )
Example to list the contents of a directory:
self.ADP_FTP.listingFolder()if self.ADP_FTP.hasFolderListing(timeout=input('TIMEOUT')) is not None:
Trace(self).error("unable to get listing folder")
Example to detect a file in a directory with a regular expression:
self.ADP_FTP.waitForFile(path='/var/log/',filename='^messages-.*$',timeout=input('TIMEOUT')
)
found = self.ADP_FTP.hasDetectedFile(path=None,filename=None,timeout=input('TIMEOUT')
)if found is None: Trace(self).error("file not found")
Note: An example is available in the test samples /Samples/Tests_Adapters/21_Ftp.tsx.
23.7 SFTP adapter
The SFTP adapter allows you to connect to servers with an SSH interface. The following features are sup-ported:
• Download or recover files or directories
• Add / delete and rename files or directories
• List the contents of a directory
• Detect the appearance of a file or directory with the support of regular expressions.
The configuration of the adapter consists of indicating at least:
• the ip address of the remote server
• the username to login
• the password
Example of configuring the adapter in the prepared section of the test.
23.7. SFTP adapter 137

Read the ExtensiveAutomation Documentation, Release 20.0
self.ADP_SFTP = SutAdapters.SFTP.Client(parent=self,login=input('LOGIN'),password=input('PWD'),destIp=input('DEST_IP'),destPort=input('DEST_PORT'),debug=input('DEBUG'),agentSupport=input('SUPPORT_AGENT')
)
Example to connect and disconnect from the server:
connected = self.ADP_SFTP.doConnect(timeout=input('TIMEOUT'))if not connected: Test(self).interrupt("sftp connect failed")self.info("SFTP connection OK" )
disconnected = self.ADP_SFTP.doDisconnect(timeout=input('TIMEOUT'))if not disconnected: Test(self).interrupt("disconnect failed")self.info("SFTP disconnection OK" )
Example to list the contents of a directory:
self.ADP_SFTP.listingFolder(path="/var/log/",extended=False)
rsp = self.ADP_SFTP.hasFolderListing(timeout=input('TIMEOUT'))if rsp is None: Trace(self).error("unable to get listing folder")self.warning( rsp.get("SFTP", "result") )
Example to detect a file in a directory with a regular expression:
self.ADP_SFTP.waitForFile(path='/var/log/',filename='^messages-.*$',timeout=input('TIMEOUT')
)
found = self.ADP_SFTP.hasDetectedFile(path=None,filename=None,timeout=input('TIMEOUT')
)if found is None: Trace(self).error("file not found")
Note: An example is available in the test samples /Samples/Tests_Adapters/22_Sftp.tsx.
23.8 ChartJS librairies
The ChartJs adapter, based on the javascript library of the same name, allows you to generate graphics thatcan be integrated into an html page. The main interest of this library is to be able to integrate graphs in the
138 Chapter 23. Advanced examples

Read the ExtensiveAutomation Documentation, Release 20.0
test report.
Example configuration of the library in the prepared section of the test.
self.LIB_CHART = SutLibraries.Media.ChartJS(parent=self, name=None, debug=False)
Example to generate a bar chart and integrate it into the report
# génération de donnéeslabelsAxes = ["Red", "Blue", "Yellow", "Green", "Purple", "Orange"]dataA = [12, 19, 3, 5, 2, 3]dataB = [22, 49, 3, 5, 23, 3]legendDatas = ["tets", "test"]backgroundColor = '#4BC0C0'borderColor = '#36A2EB'
# génération du grahiquemyChart = self.LIB_CHART.barChart(
labelsAxes=labelsAxes,datas=[dataA, dataB],legendDatas=legendDatas,width=400,height=300,backgroundColors=[borderColor, backgroundColor],borderColors=[borderColor, backgroundColor],chartTitle="test"
)
# ajout du graphique dans le résultat de l'étapeself.step1.setPassed(actual="chart", chart=myChart)
The chart is automatically inserted into the advanced report.
23.8. ChartJS librairies 139

Read the ExtensiveAutomation Documentation, Release 20.0
23.9 “Text” parameter
The text parameter is used to construct values calling other variables.
For example, consider a test containing the following 2 variables:
• DEST_IP with the value 192.168.1.1
• DEST_PORT with the value 8080
The text type will allow us to build a 3rd variable
• DEST_URL with the value
The keyword [! INPUT: <VARIABLE_NAME:] allows calling another incoming variable. The framework willreplace at the time of execution of the test the various keywords with the associated value. We will obtainthe value https://192.168.1.1:8080/welcome for the variable DEST_URL.
To go further, it is also possible to add a value available from the cache. Assuming that the value “welcome?User = hello” is in the cache and accessible via the key “url_params”. It is possible to integrate in theparameter as below
Example of result after execution:
140 Chapter 23. Advanced examples

Read the ExtensiveAutomation Documentation, Release 20.0
23.10 “Json” parameter
todo
23.11 “alias” parameter
The alias parameter can be used to define a new name for an already existing parameter. This mechanismcan be used in plan test to avoid overloading all parameters with the same name.
Example of use
1. Before execution
Scenario (TIMEOUT_A(int)=2 seconds)---> Test 1 (TIMEOUT_A(int)=10 seconds)---> Test 2 (TIMEOUT_A(int)=30 seconds)---> Test 3 (TIMEOUT_A(int)=20 seconds)
2. After running the test
Scenario (TIMEOUT_A(int)=2 seconds)---> Test 1 (TIMEOUT_A(int)=2 seconds)---> Test 2 (TIMEOUT_A(int)=2 seconds)---> Test 3 (TIMEOUT_A(int)=2 seconds)
When executing the above scenario, test 1, 2 and 3 are automatically set to 2 seconds for the TIMEOUT_Aparameter. This is the behavior provided by the test framework.
How to do if you want the test 2 to keep the value 30 seconds against the test 1 and 2 inherit the valueof the scenario?
You have to use an alias parameter, they are not overloaded by the framework.
1. Before execution
Scenario (TIMEOUT_A(int)=2 seconds et TIMEOUT_B(int)=30 seconds)---> Test 1 (TIMEOUT_A(int)=10 seconds)---> Test 2 (TIMEOUT_A(alias)=TIMEOUT_B et TIMEOUT_B(int) = 0 seconds)---> Test 3 (TIMEOUT_A(int)=20 seconds)
2. After running the test
23.10. “Json” parameter 141

Read the ExtensiveAutomation Documentation, Release 20.0
Scenario (TIMEOUT_A(int)=2 seconds et TIMEOUT_B(int)=30 seconds)---> Test 1 (TIMEOUT_A(int)=2 seconds)---> Test 2 (TIMEOUT_A(alias)=TIMEOUT_B et TIMEOUT_B(int)= 30 seconds)---> Test 3 (TIMEOUT_A(int)=2 seconds)
23.12 “global” parameter
The global parameters are added from the web interface or from the REST API. They are global and acces-sible by all the tests in the same project. The expected value for this parameter is of JSON type.
A selection window in the graphical client allows you to select the parameter to be used in the test.
In the example below, the MY_SERVER test parameter contains the value of the IP key present in the variableglobal MY_SERVER which is itself present in the Common project.
Tip: To have a test parameter that contains a list of elements, use the list-global type.
23.13 “Dataset” parameter
The dataset parameter is used to import tdx files. A dataset file is just a text file, it can be created from thegraphical client and saved to the remote test repository.
Sample content of a dataset file with the csv format
142 Chapter 23. Advanced examples

Read the ExtensiveAutomation Documentation, Release 20.0
a;1;administratorb;2;tester
This file can be used in a test that is important in the settings.
Example to read the variable:
for d in input('DATA').splitlines():Trace(self).info( d )
23.14 Using an agent
To use an agent, you need two things:
• Deploy the toolbox and select the desired agent.
• Declare the agent in the test
• Configure the adapter to use the agent.
Agents are to be declared from the client in the tab Miscellaneous> Agents
Enabling agent mode on adapters is done with the agentSupport and agent arguments.
agentSupport=input('SUPPORT_AGENT'),agent=input('AGENT_SOCKET')
self.ADP_REST= SutAdapters.REST.Client(parent=self,destinationIp=input('HOST'),destinationPort=input('PORT'),debug=input('DEBUG'),sslSupport=input('USE_SSL'),agentSupport=input('SUPPORT_AGENT'),agent=input('AGENT_SOCKET'))
In the analysis window, it is possible to see the agent used for each event:
23.14. Using an agent 143

Read the ExtensiveAutomation Documentation, Release 20.0
Note: It is advisable to put in test parameter the use of the agent mode.
144 Chapter 23. Advanced examples

CHAPTER24
Requirements
24.1 Server
For now the server can only be run on a Linux environment. It can be run on a virtual or physical environ-ment.
Features Minimum RecommendedOS Linux or WindowsPython 2.7 or 3.xArch x86_64Memory 4GB 8 GBCPU 2 core 4 coreDisk ~10GB ~50GBNetwork 100Mb/s 1 Gbit/sUser Number 2 5
24.2 Customer
The client can be run on a Windows or Linux environment.
Features Minimum RecommendedOS Windows 7+ Linux CentOS 6.5+ Windows 10+ CentOS7+ or Ubuntu 17+Arch x86_64Memory 4GB 8GBDisk ~1GB ~2GB
Note: The 32-bit architecture is no longer supported since version 17.0.0. However it is still possible to
145

Read the ExtensiveAutomation Documentation, Release 20.0
compile the sources on a 32bits environment.
Important: The plugins for the client are only available for the Windows environment.
24.3 Toolbox
The toolbox can be run on a Windows or Linux environment.
Features Minimum RecommendedOS Windows 7+ Linux Windows 10+ LinuxArch x86_64Memory 4GB 8GBDisk ~1GB
Note: The 32-bit architecture is no longer supported since version 17.0.0. However it is still possible tocompile the sources on a 32bits environment.
Important: The plugins for the client are only available for the Windows environment.
146 Chapter 24. Requirements

CHAPTER25
Architecture
The solution is based on a client/server mode. The tests and adapters are centralized in a server that allowsto quickly provide the same test environment to all users.
The solution consists of several components:
• A scheduler
• A graphical client
• Agents
25.1 Server
The server consists of:
147

Read the ExtensiveAutomation Documentation, Release 20.0
• a reverse proxy (apache)
• a scheduler
• a REST API server
• the test framework
• adapters
• a web interface
25.2 Graphic Client
The graphical client uses a single tcp/8080 (https) stream between the client and the server. The stream isbidirectional and the client can:
• make calls to the server’s REST API
• receive events from the server via WebSockets.
25.3 Agents
An agent is compulsorily controlled by an adapter via the test server intermediary. It allows to deport thecommunication point with the system to test or control. Agents use a single tcp/8080 (https) stream tocommunicate with the server.
148 Chapter 25. Architecture

CHAPTER26
Specifications
26.1 Version cycle
The set of software packages for the solution follows the following rules for naming versions.
The version is divided into 3 digits (A.B.C)
• A: the 1st digit indicates the major version. Incrementation of this figure implies
– the addition of major features (with potentially a loss of compatibility with the previousversion)
– adding minor features
– bug fix
• B: The 2nd digit indicates a minor version. Incrementing this number indicates
– adding minor features
– bug fix
• C: the 3rd digit indicates a maintenance version. Incrementing this number indicates
– bug fix
26.2 Server tree
All files handled by the server are stored in the [....]/var/ directory.
scripts/serverengine/servercontrols/serverinterfaces/serverrepositories/
(continues on next page)
149

Read the ExtensiveAutomation Documentation, Release 20.0
(continued from previous page)
libs/testcreatorlibtestexecutorlib/sutadapters/var/
tests/testsresult/logs/tasks/
The tests are stored in the [....]/var/tests/ directory, they are organized by project ID.
26.3 Data model
A database is used by the server to store:
• the users of the solution
• the list of projects
• test data (project variables)
• statistics
• the history of executions
Tables Descriptionxtc-config Server Configurationxtc-projects List of projectsxtc-relations-projects Relationship between projects and usersxtc-users List of usersxtc-test-environment List of variables in JSON formatxtc-tasks-history History of tasks running on the server
26.4 Passwords management
No password (in plain text) is stored in the database. Using a hash is however used. The hash of thepassword is stored in the xtc-users table.
The algorithm used:
150 Chapter 26. Specifications

Read the ExtensiveAutomation Documentation, Release 20.0
26.5 File format
The tests are in XML format. There are several test formats:
• Xml Test Unit
• Xml Test Suite
• Xml Test Plan
• Global Xml Test
Common XML Structure
<?xml version="1.0" encoding="utf-8" ?><file>
<properties><descriptions>...</descriptions><inputs-parameters>...</inputs-parameters>
</properties></file>
Test Unit Xml
<?xml version="1.0" encoding="utf-8" ?><file>
<properties>....</properties><testdefinition><![CDATA[pass]]></testdefinition><testdevelopment>1448190694.813723</testdevelopment>
</file>
Test Suite Xml
<?xml version="1.0" encoding="utf-8" ?><file>
<properties>...</properties><testdefinition><![CDATA[pass]]></testdefinition><testexecution><![CDATA[pass]]></testexecution><testdevelopment>1448190717.236711</testdevelopment>
</file>
Test Plan Xml
<?xml version="1.0" encoding="utf-8" ?><file>
<properties>...</properties><testplan id="0">
<testfile><id>1</id><color /><file>Common:Defaults/testunit.tux</file><enable>2</enable><extension>tux</extension><alias /><type>remote</type><parent>0</parent><properties>....</properties><description />
</testfile>
(continues on next page)
26.5. File format 151
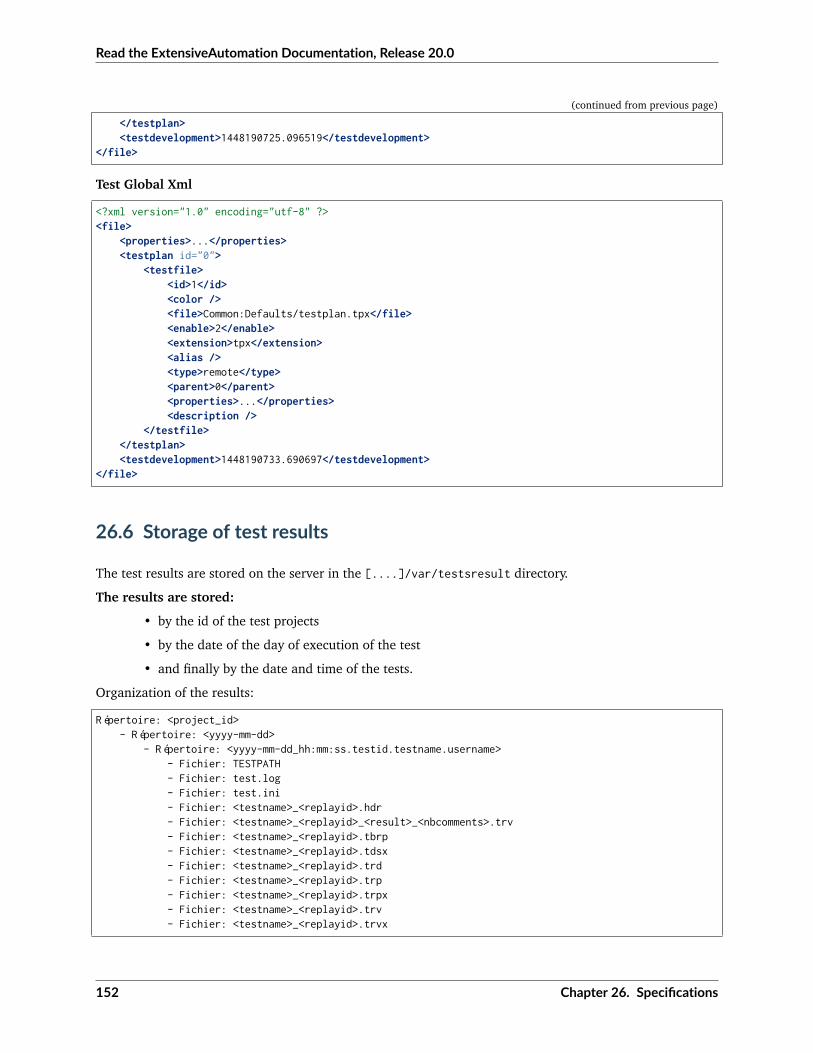
Read the ExtensiveAutomation Documentation, Release 20.0
(continued from previous page)
</testplan><testdevelopment>1448190725.096519</testdevelopment>
</file>
Test Global Xml
<?xml version="1.0" encoding="utf-8" ?><file>
<properties>...</properties><testplan id="0">
<testfile><id>1</id><color /><file>Common:Defaults/testplan.tpx</file><enable>2</enable><extension>tpx</extension><alias /><type>remote</type><parent>0</parent><properties>...</properties><description />
</testfile></testplan><testdevelopment>1448190733.690697</testdevelopment>
</file>
26.6 Storage of test results
The test results are stored on the server in the [....]/var/testsresult directory.
The results are stored:
• by the id of the test projects
• by the date of the day of execution of the test
• and finally by the date and time of the tests.
Organization of the results:
Répertoire: <project_id>- Répertoire: <yyyy-mm-dd>
- Répertoire: <yyyy-mm-dd_hh:mm:ss.testid.testname.username>- Fichier: TESTPATH- Fichier: test.log- Fichier: test.ini- Fichier: <testname>_<replayid>.hdr- Fichier: <testname>_<replayid>_<result>_<nbcomments>.trv- Fichier: <testname>_<replayid>.tbrp- Fichier: <testname>_<replayid>.tdsx- Fichier: <testname>_<replayid>.trd- Fichier: <testname>_<replayid>.trp- Fichier: <testname>_<replayid>.trpx- Fichier: <testname>_<replayid>.trv- Fichier: <testname>_<replayid>.trvx
152 Chapter 26. Specifications

Read the ExtensiveAutomation Documentation, Release 20.0
Description of files:
• TESTPATH contains the full path for the test result
• test.log contains the internal logs of the test, to be used to debug the test framework
• test.ini contains test-specific parameters
• <testname>_<replayid>.hdr represents the header of the test result
• <testname>_<replayid>_<result>_<nbcomments>.trv contains all the events generated during the ex-ecution of the tests
• <testname>_<replayid>.tbrp contains the basic report in html format
• <testname>_<replayid>.trp contains the full report in html
• <testname>_<replayid>.trv contains the results report in csv format
26.7 Control Agents
The control of the agents since a test is carried out through:
• the adapters
• and the server
The communication takes place with the exchange of some specific messages:
• init: allows to initialize an agent
• notify: send a message to the agent without waiting for a response
• reset: allows to reset the agent
• error: allows the agent to send an error to the adapter
• data: allows the agent to send data to the adapter
Direction of available communications:
• Agent -> server -> adapter -> test
• Test -> adapter -> server -> agent
AgentFunction Callback
Send an error message def sendError * request * dataSend a “notify” message def sendNotify * request *
dataSend a “data” message def sendData * request * dataReceiving an “init” message def onAgentInit * customer * tid * requestReceiving a “reset” mes-sage
def onAgentNotify * customer * tid * re-quest
Receiving a “notify” mes-sage
def onAgentReset * customer * tid * re-quest
26.7. Control Agents 153

Read the ExtensiveAutomation Documentation, Release 20.0
AdapterFunction Callback
Receiving an error message def receivedErrorFromAgent * dataReceiving a “notify” message def receivedNotifyFromAgent * dataReceiving a “data” message def receivedDataFromAgent * dataSend an “init” message def initAgent * dataSend a “reset” message def resetAgentSend a “notify” message def sendNotifyToAgent * data
26.8 The server logs
The server logs are located in the [....]/var/logs/ directory.
output.log server logs
154 Chapter 26. Specifications

CHAPTER27
Contributions
27.1 Solution development
27.1.1 Qt client application
Please refer to the ‘README < https://github.com/ExtensiveAutomation/extensiveautomation-appclient/blob/master/README.md>‘_
27.1.2 Toolbox
Please refer to the ‘README < https://github.com/ExtensiveAutomation/extensiveautomation-apptoolbox/blob/master/README.md>‘_
27.1.3 Server
Please refer to the README
27.2 Plugins development for servers
Please refer to the README
27.3 Plugins development for qt client and agents
Please refer to the README
155

Read the ExtensiveAutomation Documentation, Release 20.0
27.4 Documentation
The documentation is stored on github in the repository <https://github.com/ExtensiveAutomation/extensiveautomation.readthedocs.io>_. It is possible to contribute by applying for participation in the deposit.
The documentation is generated by the readthedocs <https://readthedocs.org/> _ service.
156 Chapter 27. Contributions

CHAPTER28
API
28.1 Authentication
Authentication in the API REST can be done with 2 methods:
• By using the function login to obtain a session cookie
• with basic auth
28.1.1 Basic
The basic auth must be used with the api key available through the web interface. The re-generation of theapi key can be done for now only on the server.
python extensiveautomation.py --apikey adminAPI Key ID: adminAPI Key Secret: d30278d49e4845e45daa748873e2171b14a0c55a
After that, add the header Authorization in your HTTP request.
Authorization: Basic base64(key_id:key_secret)
Note: With the basic auth, it’s not necessary to call the login function.
28.1.2 Session cookie
The authentication by cookie can be done by calling the function login to generate a cookie for the session.This cookie must be present on all next http request in the header Cookie.
157

Read the ExtensiveAutomation Documentation, Release 20.0
Cookie: session_id=NjQyOTVmOWNlMDgyNGQ2MjlkNzAzNDdjNTQ3ODU5MmU5M
28.2 Usage example
The REST api is available throught the tcp port 443 (https) with the uri /rest.
The following example show how to execute a test with the basic auth.
POST /rest/tests/schedule HTTP/1.1[...]Authorization: Basic YWRtaW46N2UwMDExY2I3Y2ZhMGQ1MjM4NGQ1YWYyM2QyODBiMjUyM2EzMTA3ZA==Content-Type: application/json; charset=utf-8[...]
{"project-id": 1,"test-extension": "tux","test-name": "01_Wait","test-path": "/Snippets/Do/","test-inputs": [ {"name": "DURATION", "type": "int", "value": 5} ]
}
Received response:
{"cmd": "/tests/schedule","message": "background""test-id": "a3f19398-b463-41e8-9e43-af86aac44a59","task-id": 17,"tab-id": 0"test-name": "01_Wait"
}
28.3 Ressources
Description of most important functions:
Authentication
Execute a test
Read the result of a test executed
158 Chapter 28. API