Embed Size (px)
Citation preview

Rasterizing vector and discrete data with the
Woods Hole Image Processing System Software
U. S. Geological Survey Open-File Report 93-530

UNITED STATES DEPARTMENT OF THE INTERIOR
GEOLOGICAL SURVEY
Rasterizing vector and discrete data
with the Woods Hole Image Processing System Software
by
Valerie Paskevich1
Open-File Report 93-530
This report is preliminary and has not been reviewed for conformity with U.S.Geological Survey Editorial standards. Use of tradenames is for purpose of iden-tification only and does not constitute endorsement by the U. S. Geological Sur-vey.
August 1993
1Woods Hole, MA. 02543

i
CONTENTS
Abstract 1
Introduction 1
Program PROJ 2
WHIPS programs 3
Rasterizing: Discrete Data 4Vector Data 7
Summary 12
APPENDIXES
A - WHIPS program documentation. 13
program summary list 15
derivative 17dk2dk 19filter 21grid_data 25linepic 29lowpass2b2 25median3 37mode3 39mode5 41pointpic 43qmos 47quickview 49raw2whips 51whips2raw 53
B - Cookbook Examples. 57
References 61

ii
FIGURES
1 - UTM map placed in image space. 3 2 - Portion ofwfla_bt.cdf with rasterized bathymetry 6 3 - Filtered image to produce complete coverage. 7 4 - Diagonal derivative of image. 7 5 - Rasterized vector coastline data for eastern Massachusetts. 10 6 - Combined coastline, bathymetry contours and map graticules. 12

1
Abstract
The Branch of Atlantic Marine Geology has been involved in collecting, processing and digitallymosaicking high and low resolution side-scan sonar data. Recent development of a UNIX-basedimage-processing software system referred to as the Woods Hole Image Processing System(WHIPS), includes a series of task specific programs for processing and enhancement of side-scansonar data. To extend the capabilities of the UNIX-based programs, development of digital map-ping techniques have also been developed. To more fully understand the geologic processes andinformation contained within the side-scan sonar mosaics, additional data need to be registered andsynthesized with the sonar mosaics. These additional data sets may be vector related, such as con-tour lines or map grid lines, or discrete single point sounding data such as bathymetry or magneticvalues obtained along a ship’s track. To accomplish this, a series of task specific programs alongwith various cookbook procedures have been developed and are described in this report.
Introduction
To process, map and digitally mosaic side-scan sonar data, the Branch is currently utilizing a seriesof task specific programs and procedures. The programs have been developed to run in a UNIXenvironment utilizing the UNIDATA NetCDF (Unidata, 1991) data access software and arereferred to as the Woods Hole Image Processing System (WHIPS) software (Paskevich, 1992).The programs and procedures described in this report have been developed and tested on a DataGeneral AViiON series workstation utilizing the DG/UX operating system. In addition to the AVi-iON, a large portion of the software has been ported and run on other systems including a DigitalEquipment Corporation (DEC) DECstation 3100 and 5000, and a SUN Sparcstation.
To provide additional insight and to aid in the interpretation of the side-scan sonar mosaics, it oftenis necessary to create additional datasets for comparison. For example, an additional image illus-trating the seafloor bathymetry for the sonar mosaic area may be desired. Once the bathymetryimage is created, the user may wish to drape the side-scan sonar data over the bathymetry for agiven area and produce a perspective image of the data for clearer interpretation of the sonar image.
Essentially there are two forms of rasterizing data to be used in creating an image file. The first isthe rasterizing of discrete data values as in single point data values, and is accomplished using pro-gram pointpic. These data values are identified by a geographic coordinate with an associatedvalue. The coordinate value may be recorded as integer or floating point and may represent anyone of a variety of data types such as gravity, magnetics, bathymetry, or grain-size analysis from alaboratory. When rasterizing this type of data, the geographic coordinates are used to place thevalue in it’s proper map and, subsequently, image space. Each data record, or point, is placed indi-vidually and the initially produced image may resemble nothing more than dot’s scattered about.
The second procedure involves the rasterization of vector data, and is accomplished using programlinepic. In this manner, the user supplies a series of geographic coordinates that comprise a linealong with a value to assign to the line. When rasterizing these data, a series of points are com-puted to connect the supplied coordinates and thereby produces a line within the image. The usersupplied value is then placed at the image coordinate. As the value is placed at adjacent coordi-nates between the user supplied coordinates, a line is completed and is represented by the user’svalue. This method may be used in a variety of ways such as rasterizing contour line information,ship’s track-lines or coastline information. Once this type of image has been created, the user maywish to combine the image with an existing image as a bathymetry contour line overlay.
Detailed examples utilizing these programs and procedures are presented here. Regardless of the

2
rasterization technique employed by the user, it may be desirable to apply additional processing orenhancement to the image. This report will present some alternative processing and enhancementtechniques the user may experiment with. It is assumed that the reader has some knowledge ofimage processing techniques.
The procedures for rasterizing data described in this report utilize the UNIX programproj (Even-den, 1990) version 3.1. Depending on the type of data being rasterized (i.e. discrete or vector), theuser will pass the output from programproj to eitherpointpic or linepic. Programproj providesthe cartographic scaling and projection of the geographic coordinate data and allows the user toselect from approximately 75 map projections for their final map product. The program is fullydocumented. The source code and documentation forproj may be obtained via anonymous ftp atcharon.er.usgs.gov (128.128.40.24). A new version ofproj (proj4.1) may also be obtained fromcharon. Though the procedures described in this report have not been tested utilizing the new ver-sion, there are no changes anticipated in the execution of the scripts described in this report.
Programproj operates as a standard UNIX filter utility. Input data may be piped directly intoproj .Output of the program is to std_out and would generally be piped directly to a final program in themapping/rasterizing procedure. The user must specify the properproj parameters to define theimage map to be created.
Program PROJ
Proj utilizes many optional parameters such as mapping spheroid selections. However, someparameters which are defined as optional in theproj documentation must be specified to accommo-date the format of the input data and properly format the output data. The optional parameterswhich must be specified are:
-f ‘%.0f’ Specifies the format string for writing the output values. Thisformat will round-up the cartesian values and output them asinteger values.
-r This option reverses the order of the input values from theexpected longitude-latitude values to latitude-longitude.
-s This option reverses the order of the output values from longi-tude-latitude to latitude-longitude.
Programproj supports approximately 75 cartographic projections. The user must properly specifyany of the projection specific parameters that may be required by the selected projection. It isessential that the user have a good understanding of the available map projections and the requiredprojection parameters to create the desired map. For more detailed cartographic characteristics ofthe projections, the user may refer to additional documentation (Snyder, 1987 or Snyder and Vox-land, 1989).
Before actual data processing begins, bothpointpic andlinepic start by reading the first four pairsof coordinates passed to it from programproj and creates the WHIPS netCDF image.Pointpicand linepic assumes that these initial pairs of values are the map boundaries in cartesian coordi-nates. With the four map corners known, the program computes the size of the image area. Sincethe image must be defined as a rectangle, the maximum coordinates are used to compute the imagesize. For some map projections (i.e. conic projections), the desired map area will be smaller thanthe actual image size because of the arc of the longitude lines. Figure 1 shows the typical place-

3
ment of a Universal Transverse Mercator (UTM) map in a defined image area and the map cornersare designated as pointsA, B, C andD.
WHIPS Programs
With the exception of programproj , programs utilized to complete the rasterization process andmapping are a subset of WHIPS. Complete documentation for the WHIPS programs utilized in themapping procedure, along with various utility programs, may be found in Appendix A. Those pro-grams would include:
derivative computes first order difference of an image
dk2dk creates a new WHIPS netCDF image file by extract-ing a sub-area from an existing WHIPS image.
filter applies a low-pass, high-pass, zero replacement ordivide filter to an image.
grid_data computes vector coordinates to draw map area gridlines.
linepic takes a vector file with geographic coordinates whichmake up a line and rasterizes the line data in a WHIPSnetCDF image file that represents a defined mapspace.
lowpass2b2 applies a 2-by-2 low-pass filter to a WHIPS image.
median3 applies a 3-by-3 median filter to a WHIPS image.
mode3 applies a 3-by-3 mode filter to a WHIPS image.
Figure 1 - UTM map placed in image space
number of lines
number of samplesimage origin (1,1)
A B
D C

4
mode5 applies a 5-by-5 mode filter to a WHIPS image.
pointpic take a file that contains projected geographic coordi-nates and an associated data value and places the datavalue in a WHIPS netCDF image file that represents adefined map space.
qmos Mosaics (overlays) the specified input file over thespecified output file. The program will either overlaywhere the input file has priority over the existing out-put file, where the output file has priority over theinput file, or average non-zero pixel values togetherfrom the input and existing output file.
quickview displays an 8-bit WHIPS netCDF image in an X-11window.
raw2whips converts a raw image data to a netCDF file for usewith WHIPS
whips2raw converts a WHIPS netCDF image file to a raw imagefile
Rasterizing Discrete Data
Rasterizing discrete data is perhaps the most common way to synthesize data for analysis and is, init’s general usage, a two-step procedure. In most cases various geophysical data (gravity, magnet-ics and bathymetry) collected as single point sources along a ship’s cruise track provide the sourceof the data. The steps to produce this example are summarized in Appendix B, cookbook example1.
To begin, the user must create the data file for processing. Thex andy coordinates must be the geo-graphic coordinates of the data value and must be recorded as signed decimal degrees with westlongitude and south latitude recorded as negative values. Thez-value will represent the user’s dataand may be recorded as an integer or floating point value.
As a practical example, assume the user wishes to process the bathymetric values recorded on apast cruise and create an image of the data for a specific map area, scale and projection. The usermust begin by collecting the necessary data. Within the Branch, data has been collected andarchived in various data formats over the years. Some UNIX utilities exist within the Branch forreading and re-formatting these various data formats. However, if a utility does not exist, it is theuser’s responsibility to properly format the data. In this example, the data file contains multiplerecords each with a geographic coordinate and an associated data value (z-value). The data fieldsmust be separated by one or more spaces or tabs. A sub-set of the example data file,farn3.bt, isshown below. In this example thez-value represents bathymetry data.
... ... 26.88940 -85.00830 1348 26.89260 -85.01040 1353 26.89550 -85.01250 1358 26.89860 -85.01460 1325 26.90170 -85.01690 1292 26.90460 -85.01900 1259

5
26.90770 -85.02110 1244 ... ...
Once the data has been accumulated, the second step is for the user to select theproj parameters todefine the map area. For this example, a Universal Transverse Mercator (UTM) map will be cre-ated. The map scale will be 175 meter pixel and the map boundaries will be 24o to 26o north lati-tude and 85o to 83.5o west longitude. At this point the user should create a data file which containsthe map corner coordinates. The map corner coordinates must be specified in the following order:
upper leftupper rightlower rightlower left
To illustrate this example, the filewfla_bounds.dat was created and contains the following infor-mation:
% more wfla_bounds.dat26 -8526 -83.524 -83.524 -85
Once the map boundaries are defined, the user specifies theproj parameters. As stated earlier,there are some optionalproj parameters that must be specified for proper processing to take place.In addition to the required parameters, the user must specify any projection specific values. Forthis example map projection, we must additionaly specify a central longitude. For the UTM projec-tion, theproj command line would be as follows:
proj +proj=utm +lon_0=-86 -r -s -m 1:175 -f ’%.0f’
In addition, the input files to be processed must be included on the program run-line. The filewhich contains the map corners must be specified before any data files. Once the boundary datafile has been specified any number of data files may be specified. This allows the user to produce acomposite image of multiple cruise data. The actualproj run-line may then be specified as:
proj +proj=utm +lon_0=-86 -r -s -m 1:175 -f ’%.0f’ \wfla_bounds.dat farn3.bt
The data contained in the input file will be processed byproj and output to the UNIX std_outdevice. As the data files are processed, the geographic coordinates are converted to meter coordi-nates. The data may be saved by specifying a data file or piped directly into programpointpic.
Directing the output ofproj to pointpic is recommended. In this manner, only temporary interme-diate data files are created which will help reduce the amount of disk space required for the pro-cessing. Because the output image is to contain bathymetry values, thepointpic option to create a16-bit output image must also be specified. By defining the output image as 16-bit, the program isable to store pixel values that are within the range of -32768 to 32767 in the output image. Thepointpic run-line, as it should be appended to theproj run-line, would look as follows:
|pointpic -b 16 -o wfla_bt.cdf

6
As programpointpic is executing, it accepts the output from programproj and places the datavalue (e.g. pixel values) in their proper image location. The program begins by reading the firstfour pairs of coordinates passed to it from programproj and creating the WHIPS netCDF image.Pointpic assumes that these values are the map boundaries in cartesian coordinates. With the fourmap corners known, the program then computes the size of the image area.
After the image size has been computed and the image has been created, the program continues byplacing the data values in their proper map space. Pixel cartesian coordinates which are outside ofthe defined map area and yet fall within the defined image area are placed in the output image. Theimage is filled on a pixel-by-pixel basis as the pixels are individually processed. Pixel values areplaced in the image regardless of any previous pixel that has been placed at the given coordinate.This results in coordinates with multiple values being overwritten regardless of any previous valueplaced at the position.
The WHIPS netCDF image created now contains the bathymetry values placed in their proper mapspace. A portion of the image,wfla_bt.cdf, created in this example is shown as Figure 2. The
bathymetry values that were placed within the image are seen as dots. As illustrated, the majorityof the image is still empty since the data coverage for the desired area is not complete. The brightvalues contain the larger dn_values or, in other words, represents the deeper ocean while the lightervalues represent the shallower ocean. At this point, the user may wish to apply additional process-ing to the image. One option is to apply a series of filters to fill the image. The user may choose
Figure 2 - Portion of wfla_bt.cdf with rasterized bathymetry.

7
from several available filters. Those filters include:filter , mode3 mode5, mean3 or lowpass2b2.
By applying a series of filters to the image, the user may fill the entire map area with data. Depend-ing on what filter is chosen and how it is applied by the user, the final result is an image that repre-sents a gridded distribution of the data. Though the filters do not statistically weight the data aswould be found in an actual gridding program, the user may still produce an image that represents afairly accurate depiction of the data distribution over the map area.
The image created in this example was filtered repeatedly to fill the entire map area with data.Once the entire image area was filled, a final low-pass filter was applied to smooth the data. Thefilters chosen were applied arbitrarily to fill the image as quickly as possible. In selecting the fil-ters, little concern was given to the actual data distribution and creation or placement of the newdata values. The user may wish to give more thought to the filters and filter sizes applied to theimage. The completed image is shown as Figure 3. A diagonal derivative computed from Figure 3
is shown as Figure 4. The images displayed as Figures 2, 3 and 4 have been converted from a 16-bit data range of 600 to 3500 to a an 8-bit data range for display purposes within this report.
Rasterizing Vector Data
Procedures to rasterize vector data are similar to those for rasterizing discrete data. However, thereare two major differences in rasterizing vector data as opposed to rasterizing discrete data. The firstand obvious difference is the desire to draw lines to connect coordinates rather than simply placingpixel values at a specified map coordinate within the image. A second major difference in process-ing a vector data file, is that the user must specify the value that is to be placed at each pixel loca-tion and therefore define the dn value that the line will represent.
Figure 3 - Filtered image to produce complete coverage.
Figure 4 - Diagonal derivative of image.

8
The user should begin by compiling the data to be rasterized. Once the data has been collected andproperly formatted, the user should define the map area. When the preliminary steps have beencompleted, the user may continue with the execution of the processing steps and creation of theimage.
The input data to be rasterized must contain a series of geographic coordinates. The coordinatesmay be in the DMS format acceptable by MAPGEN (Evenden and Botbol, 1985) though a simplesigned decimal degree specification is recommended. Consecutive pairs of geographic coordinatesare processed to produce a series of points and generate a line between the input coordinates. A filemay contain several line segments. The start of each new line segment must be indicated by arecord containing the MAPGEN command # -b.
As an example of rasterizing a vector data set, assume the user wishes to create an image whichcontains the coastline of a given area. The desired map area is 41o to 43o north latitude and 72o to69.5o west longitude and the final map is a UTM projection. The map scale is 500 meter pixels.Utilizing the MAPGEN programgetcoastand the available coastline files, we are able to extractthe vector information that will be used to draw the coastline. An excerpt of the example data setis shown below:
...
...# -b41.461536 -70.82484441.459483 -70.81604341.455376 -70.81340341.451269 -70.81809741.449215 -70.82396441.448922 -70.83071141.449509 -70.83833841.453322 -70.84215241.458896 -70.83892541.461243 -70.83276541.461536 -70.824844# -b41.448335 -70.85359341.442468 -70.853299......41.448335 -70.853593# -b41.429854 -70.92458441.423694 -70.92751841.420467 -70.93279841.420173 -70.94013241.424867 -70.94247941.429561 -70.93866641.431321 -70.93250541.435134 -70.92810541.438361 -70.92253141.433374 -70.92077141.429854 -70.924584
Once again utilizingproj to define the desired map area and convert the geographic coordinates to

9
their cartesian coordinates, the vector data file is input for processing. The data file containing themap boundaries must be specified prior to the actual data file. Asproj outputs the cartesian coordi-nates in meters, the data are directed to programlinepic.
Programlinepic is similar to programpointpic as it processes the first four pairs of coordinates itreceives. These coordinates must be the cartesian coordinates, in meters, of the map boundaries.From these four pairs of coordinates, the size of the image file is computed and the file is created ondisk. Subsequent data records are assumed to be the actual data file.
As each record of the data file is obtained, it is scanned to see if it contains any MAPGEN com-mand. A record with a MAPGEN command is any record that contains a pound sign (#) as the firstposition of the record. If the record is determined to be MAPGEN command, it is then furtherscanned to determine whether it contains the MAPGEN command -b to flag the start of a new linesegment. If the-b is found in the record, the program flags the next pair of coordinates processedas the beginning of a line segment. In plotting terms, the-b flags the program to pick up the penand proceed to the next coordinate before continuing to draw.
If the data record does not contain a MAPGEN command, it is assumed the data record contains apair of vector coordinates. The program reads the data file until it has obtained two consecutivepairs of vector coordinates. From these two pairs of coordinates, programlinepic computes thepoints necessary to generate a line connecting the supplied coordinates. The user specifieddn_value is then placed at the computed coordinates. Coordinates that fall outside of the imagearea are dropped producing a line clipped at the map boundaries.
To produce the example image described, theproj andlinepic run-lines are summarized below. Itis assumed that the coastline vector data has been previously retrieved and is stored in the filene_coast.dat.
% proj +proj=utm +lon_0=-69 -r -s -m 1:250 -f ’%.0f’ \ bounds2.dat ne_coast.dat | linepic -o ne_coast.pic
If the user does not have access to the Branch’s coastline files, they may easily create their ownfiles by map digitization and conversion of the data file with MAPGEN programmcoast. Programmcoast is available as part of the MAPGEN system and is documented via a UNIX man page dis-tributed with the software. Even if it is not the user’s intent to create a MAPGEN coastfile, easycreation of a vector file is all that is required to prepare a vector data file for rasterization.
The following image, Figure 5, was created using the same cartographic specifications and was cre-ated using the standard Branch coastline information from World Data Bank-II. Because the imageis significantly reduced for presentation here, it does not adequately illustrate the detail contained inthe coastline file. It is the users decision whether or not he or she wish to convert his or her vectordata to a coastline file, though conversion may help to reduce the impact on disk storage require-ments while still providing platform independence access.

10
The vector rasterization procedure may also be applied to data such as contour line and grid lineinformation. Separate images containing such information may then be combined together or withother image files to create a more complete map. To illustrate this type of procedure, an image con-taining coastline, bathymetry contour and grid line information was created and is shown as Figure6.
The final figure builds on the previous example. The map projection information remains thesame. The scale of the new map is 1000 meter pixels, and the map bounds of the area are 39o to 43o
north latitude and 72o to 68o west longitude. A new coastline image for the enlarged area is created,as well as, the additional images with bathymetry contours and grid line information. The coastlineinformation selected is the World Data Bank-II file and is accessed in the same manner as previ-ously described in Figure 5.
The bathymetry contour line information is retrieved from the Branchcoastline file, neatl_cnt,using the MAPGEN program getcoast. The user should be familiar with the availablecoastfiles.An important feature of these files is the assignment of feature codes which permits the selectiveretrieval of various information. The user should also be familiar with the content of the selectedcoastfiles since the use of feature codes is significantly different for those files containing coastlineinformation as compared to those files containing bathymetry contour information. For thosecoastfiles containing bathymetry contour information, the feature codes (-f), when utilized, areassigned to various contour levels. It is important to note that for the individual bathymetrycoast-files the feature codes and contour levels differ from file to file and the user should check the localsite documentation for specific codes and feature assignments. When utilizing the feature code onthegetcoast runline, specifying a single feature code or a range of feature codes, allows the user the
Figure 5 - Rasterized vector coastline data for eastern Massachusetts.

11
ability to extract selected information from the file. Not specifying a feature code on thegetcoastrunline will result in all the information contained in the file being extracted.
For convenience and the use of illustrative purposes here, all contour line data, regardless of featurecodes, will be extracted and combined as one image with a single dn value of 250 will be assignedto the lines. This contour file included the 20 through 200 meter contours at 20 meter intervals, andthe 300 through 3100 meter contour at 100 meter intervals. The run-line to extract the vector data,project the information, and create the image is shown below.
% getcoast -72 -68 39 43 -r \ /usr/coast/bathy/neatl_cnt | \ proj +proj=utm +lon_0=-71 \ -r -s -m 1:1000 -f ’%.0f’ bounds3.dat - | \ linepic -o neatl_cnt.pic -d 250
Generally it would be recommended to extract the individual contour line data separately for a sin-gle contour line. Extracting the vector information for each bathymetry contour level provides theability to assign a unique dn value to a specific contour line. Below is an example selecting onlythe 500 meter contour line information (-f 13) from theneatl_cnt file and assigning the dn value of25 to the line in the image created bylinepic. By designating a unique dn value to each contourline, the user will have the option of later color coding the individual contour lines or interpolatingbetween the lines to produce a bathymetric map of the area. Though creating individual imagesmay provide more options for combining various data sets, producing the individual imagesrequires multiplegetcoast, proj andlinepic executions.
% getcoast -72 -68 39 43 -r -f 13\ /usr/coast/bathy/neatl_cnt| proj +proj=utm +lon_0=-71 \ -r -s -m 1:1000 -f ’%.0f’ bounds3.dat - | \ linepic -o neatl_cnt0500.pic -d 25
The next procedure creates an image with grid lines for the map area. The map boundaries will beprovided by thebounds3.dat file. Rather than simply drawing a line from corner to corner of themap area, we will create a series of coordinates to draw the vector grid lines. In many cases, draw-ing a straight line between map corners is not appropriate because the grid line would not accu-rately represent the curvature of the selected projection. By producing a series of vectorcoordinates along the desired grid line, the line drawn will more accurately represent the projection.To simplify the creation of the vector coordinates a program,grid_data, has been developed. Theuser may utilize this program to automatically generate the vector coordinates as well as the inter-mediate grid lines between the map bounds. By default,grid_data will generate grid lines forevery degree of latitude and longitude between the map bounds.
% grid_data <bounds3.dat | proj +proj=utm +lon_0=-71 \ -r -s -m 1:1000 -f ’%.0f’ bounds3.dat - | \ linepic -o neatl_grid.pic -d 250
The coastline, bathymetry contour and grid line images were combined to create the image and isshown as Figure 6. The image shows the limits of the selected bathymetric file. The entire pro-

12
cessing script to produce this image can be found in Appendix B.
Summary
Programs and procedures presented here provide a simple method for rasterization of vector anddiscrete data to create an image that represents the data in a specific map scale and projection. Theexamples illustrate various options available to the user to create images that may be integratedwith other images or easily imported to other software packages.
Figure 6 - Combined coastline, bathymetry contours and map graticules.

Appendix A - 13
APPENDIX A
Woods Hole Image Processing System (WHIPS)
Program Documentation

Appendix A - 14

Appendix A - 15
WHIPS Programs
derivative computes first order difference of an image
dk2dk creates a new image file by extracting a sub-area from an existing image
filter applies a low-pass, high-pass, zero replacement or divide filter to an image
grid_data computes vector coordinates to draw map area grid lines.
linepic takes a vector file with geographic coordinates which make up a line and rasterizes the line data ina WHIPS netCDF image file that represents a defined map space.
lowpass2b2 applies a 2-by-2 low-pass filter to a WHIPS image
median3 applies a 3-by-3 median filter to a WHIPS image
mode3 applies a 3-by-3 mode filter to a WHIPS image.
mode5 applies a 5-by-5 mode filter to a WHIPS image.
pointpic takes a file that contains projected geographic coordinates and an associated data value and placesthe data value in a WHIPS netCDF image file that represents a define map space.
qmos mosaics (overlays) the specified input file over the specified output file. The program will eitheroverlay where the input file has priority over the existing output file, where the output file has prior-ity over the input file, or average non-zero pixel values together from the input and existing outputfile.
quickview displays an 8-bit WHIPS netCDF image in an X-11 window
raw2whips converts a raw image data file to a netCDF file for use with WHIPS
whips2raw converts a WHIPS netCDF image file to a raw image file

Appendix A - 16

derivative(1) derivative(1)
Appendix A - 17
NAME
derivative - compute first order difference of an image
SYNOPSIS
derivative -i input -o output [-h | -v | -d] [-a addback] [-H]
DESCRIPTION
Thederivative program computes a simple difference between adjacent pixels in an image. The derivativemay be computed in one of three directions: horizontal, vertical or diagonal. The user must specify the direc-tion of the derivative to be performed by selecting -h, -v or -d as part of the run-line.
The following run-line options must be specified and can appear in any order.
-i input_file
specifies the input file to be processed. The input file must be 8 or 16-bit image.
-o output_file
specifies the output file to be created.
-h | -v | -d
specifies which type of derivative to perform. Valid selections are horizontal (-h), vertical (-v) ordiagonal (-d).
The horizontal derivativeis processed on a line by line basis where the adjacent pixels of one single line aresubtracted from each other across the image line. The image lines are processed one at a time starting withthe first pixel of the image line to the last pixel of the image line with the following equation where ix is thesample of the image being processed.
line1[ix] = (line1[ix] - line1[ix+1]) + iaddback
A special case exists for the last sample of the image line because it has no adjacent value to be used in thecomputation. The last sample is computed as:
hder[ix] = hder[ix-1]
Thevertical derivative is computed using two consecutive image lines. The sample locations of the imageare subtracted from line to line. The first input image line is a special case scenario. This line is computed bysubtracting the individual sample from itself and is computed as:
line1[ix] = (line1[ix] - line1[ix]) + iaddback
or more simply as:
line1[ix] = iaddback
The remaining image lines of the input file are processed as:

derivative(1) derivative(1)
Appendix A - 18
line2[ix] = (line1[ix] - line2[ix]) + iaddback
The diagonal derivative is computed by subtracting the offset sample of one line from the sample of anotherline. The first line of the image file is a special circumstance and is computed as a horizontal derivative. Theremaining image lines are computed as:
line2[ix] = (line1[ix] - line2[ix+1]) + iaddback
A special circumstance exists for the last sample of each line. Those samples are computed as:
line2[ix] = line2[ix-1]
Options: The following run-line commands are optional to the execution of the program.
-a addback
specifies the addback value to be used by the program when computing the derivative. The defaultvalue is 127 for an 8-bit image and 4000 for a 16-bit image.
-H
displays the usage help information for the program. If this option is selected, the program ignoresany other run-line options specified.
RESTRICTIONS
The program accepts only 8 or 16-bit image files.
The output file to be created must not currently exist.
SEE ALSO
WHIPS(5)
DIAGNOSTICS
The program exit status is 0 if no errors are encountered during processing and the program completes pro-cessing.
BUGS
The 16-bit option of the program has not been completely tested.
AUTHOR/MAINTENANCE
Valerie Paskevich, USGS, Woods Hole, MA.

dk2dk(1) dk2dk(1)
Appenix A - 19
NAME
dk2dk - create a new WHIPS netCDF image file by extracting a sub-area from an existing image
SYNOPSIS
dk2dk -i input -o output-a sl,ss,nl,ns [-l linc] [-ssinc] [-H]
DESCRIPTION
Thedk2dk (disk-to-disk) program will create a new image file by extracting a user specified sub-area froman existing WHIPS netCDF image file. The sub-area is selected by specifying the-a option on the programrun-line. The image sub-area is specified by the starting line (sl), starting sample (ss), number of lines (nl)and number of samples (ns) to be extracted. Image area variables are specified relative to the image origin(sl=1 and ss=1) and is the upper left corner of the matrix.
The program can also be used to reduce or enlarge an input file by specifying the-l and/or-s run-lineoptions.
The following run-line options must be specified and can occur in any order.
-i input_file
specifies the input file to be processed. The input file may be 8, 16 or 32-bit.
-o output_file
specifies the output file to be created.
-a sl,ss,nl,ns
specifies the sub-area of the input file to be extracted. The sub-area is specified by entering the ori-gin as the starting line (sl) and starting sample (ss) of the area to be extracted and the number oflines (nl) and the number of samples (ns) to be extracted.
When specifying the sub-area, the user must specify the sl and ss values. The program will computedefault values for the nl and ns parameters as the remaining lines and samples in the input imagefrom the user specified starting position.
Option: The following run-line commands are optional to the execution of the program.
-l linc
specifies the line increment (linc) at which to output the lines from the input image sub-area. Avalue greater than one will reduce the input image sub-area. A value less than one will duplicate theinput image lines and expand the image area selected. For example, aline_increment of 2 wouldresult in every other line from the input sub-area being output. A line_increment of .5 would resultin every line from the input image sub-area being duplicated for output. The default line incrementvalue is 1.
-ssinc
specifies the sample increment (sinc) at which to output the samples from the input image sub-area. This option is similar to the line increment (-l) option. The default sample increment value is1.
-H
displays the usage help information for the program. If this option is selected, the program ignoresany other run-line options specified.

dk2dk(1) dk2dk(1)
Appenix A - 20
RESTRICTIONS
The output file to be created must not currently exist.
NOTES
This program should be used if the user wishes to extract and create a sub-area of the image portion of aWHIPS netCDF image file or a WHIPS netCDF side-scan sonar image. If the user wishes to extract a sub-area of the image portion of a WHIPS netCDF side-scan sonar image and retain the accompanying sonarheader information for the image lines, the user should use programssdk2dk.
If the user desires to extract only the image data from a WHIPS netCDF side-scan sonar image file and elim-inate the sonar header, they may use programdk2dk.
EXAMPLE
The first example would extract the GLORIA side-scan sonar imagery from a file removing the header infor-mation.
% dk2dk -i gloria.slr -o gloria.sub -a 1,129
The second example would reduce the input file by transferring every other line and sample to the outputfile.
% dk2dk -i mickey.pic -o mickey.sub -a 1,1 -l 2 -s 2
SEE ALSO
ssdk2dk(1)
WHIPS(5)
DIAGNOSTICS
The program exit status is 0 if no errors are encountered during processing and the program completes pro-cessing.
BUGS
The 16 and 32-bit options of the program have not been completely tested.
AUTHOR/MAINTENANCE
Valerie Paskevich, USGS, Woods Hole, MA.

filter(1) filter(1)
Appendix A - 21
NAME
filter - apply a low-pass, high-pass, zero replacement or divide filter to an image
SYNOPSIS
filter -i input -o output-b nl,ns [-l | -z | -L | -h | -d] options [-H]
DESCRIPTION
The filter program allows the user to select one of five filter operations and apply it to a WHIPS image. Thefilters are applied to the image by a moving boxcar. The boxcar (-b) is a user specified sampling size whichis two odd integer values that are not necessarily equal. The values represent the number of lines and sam-ples (nl,ns) to be considered when accumulating the sums. Pixel values at the center of the boxcar are mod-ified and are affected by the surrounding valid values. The boxcar totals are applied over the image startingat line_1/sample_1 to line_n/column_n. The boxcar is shifted left to right over the image line.
Valid data are specified by the user selecting the run-line option-v. The data values entered by the user willdefine the valid data range for processing. Values less than the minimum value or greater than the maximumvalue are considered non-valid and are not included in the operation of computing the boxcar totals. Speci-fying a valid data range may have other impacts on the selected filter. See the specific filter operationdescribed on the following pages.
Each pixel surrounding the center of the boxcar is compared to the low and high range before the filteringoperation is done. If the value of the original pixel falls outside of the valid range, it is not included in theboxcar sum and count. Boxcar totals represent the total of the valid pixel values and the number of validpoints surrounding the center of the boxcar. The original unchanged pixel values are used to calculate theboxcar totals.
A minimum number of valid data points (-m) are required to be contained within the boxcar totals before thefiltering process takes place. If there are less points in the boxcar than the user specified minimum, theresulting dn value will be set to zero on output for all filters. The default minimum value for this option is 1.The user may specify a value greater than or equal to 1 and less than or equal to the total boxcar size (nl *ns).
The minimum valid data points which must be contained in the filter may also be specified by selecting afraction (-f) of the boxcar which must contain valid data points. If this option is selected, the minimum validpoints is computed as:
((nl * ns) * fraction) + .5
For example, a 5-by-5 filter with a .5 fraction specified would then have to contain a minimum of 13 validdata points in the boxcar totals for the filter to be applied. This would have the same result as specifying-m13, but is easier to specify for large filters. If a fraction greater than one is specified, it is reset to one. If thecomputed value is less than one, it will be set to one as a default.
A coefficient value (-c) to expand the results of the data may also be specified. This is a real number whichis used by all filters to expand the range of the results of the filter operations. The default value is 1.
The following run-line options must be specified and can appear in any order.
-i input_file
specifies the input file to be processed. The input file may be an 8, 16 or 32-bit image.

filter(1) filter(1)
Appendix A - 22
-o output_file
specifies the output file to be created.
-b nl,ns
specifies the size of the boxcar by the number of lines (nl) and the number of samples (ns).
-l | -z | -L | -h | -d
specifies the type of filter to perform. Valid filter selections are low-pass (-l), low-pass filter withzero replacement (-z), low-pass filter changing only valid data (-L ), high-pass (-h) filter or divide (-d) filter.
The core to all the filtering operations is the computation of thelow-pass filter (LPF). The LPF is a smooth-ing spatial filter which is good at reducing noise and removing the high-frequency content of an image. TheLPF is computed by averaging the total valid pixels values in the pixelneighborhood. Theneighborhood isthe boxcar size specified by the user.
One consideration when developing a filtering program is how to deal with the edges of the image. As theboxcar begins and moves across the image, it is not properly centered and would not contain the propersums. One possibility is to ignore the edges, thereby reducing the image content. The approach taken in thisprogram is to compute the boxcar totals at the image edges by a folding/unfolding method. In essence, theprogram duplicates the neighboring pixels inside the edges, centered on the boxcar. As the boxcar movesaway from the edge and across to the center of the image, these duplicated values are removed and replacedby pixel values from the center of the image. As the boxcar meets the right and bottom edge of the image,the pixel values inside the edge are slowly duplicated back as if to fold the edge of the image back overitself. The variables for the individual filter are defined as:
(i,j) - The image coordinate of the pixel being computed. For line 29 and sample 12, the image coordinatewould be (29,12).
P(i,j) - The original pixel value of the input image at coordinate i,j.
S(i,j) - The sum of the points over the boxcar centered at i,j.
N(i,j) - The number of valid points within the boxcar surrounding the pixel being processed.
The LPF computation is defined below and is followed by a description of the individual filters.
LPF(i,j) = S(i,j)/N(i,j)
The low-pass filter(LPF) is a smoothing spatial filter. Only input image pixels values that fall within theuser specified valid data range and processing boxcar size are totaled and averaged to produce the LPF com-ponent. If the minimum valid points (-m or -f) for the boxcar are not satisfied, the output pixel is set equal tozero. If the minimum valid points have been satisfied, the LPF is applied regardless of the original pixelvalue. In other words, this option will modify all input pixel values. Thelow-pass filter is computed usingthe following equation:
LPF(i,j) = S(i,j)/N(i,j)
X(i,j) = COEF*LPF(i,j)

filter(1) filter(1)
Appendix A - 23
If the sum of the boxcar or the number of valid points contained in the boxcar is zero, the value returned bythe LPF computation will be zero.
The zero replacement filter(LPFZ) is alow-pass filter with one minor difference. That difference is thatduring the filtering process, only input pixel values equal to zero are modified. This allows the user anoption to fill in “holes” based on the value of surrounding pixels. If the user does not specify a valid rangefor computing the boxcar totals, the minimum valid value is automatically set to 1 to eliminate zeros fromthe boxcar totals. The minimum valid valueMUST be greater than zero.
The low-pass filter changing valid data only (LPFV) is also similar to thelow-pass filter described above inthe initial boxcar computations. The major difference is this option will only modify input pixel values thatfall between the valid minimum and maximum values specified by the user. If an input pixel value is lessthan the specified minimum value, the output pixel is set to 0 for all filters. If the input pixel value is greaterthan the maximum value, the output pixel value is set to the maximum allowed value for the bit type. For an8-bit image this value is 255, 16-bit is 32767 and 32-bit is set equal to FLT_MAX as defined in the file /usr/include/limits.h.
The high-pass filter(HPF) enhances the high-frequency details of an image. Edge enhancement of animage is also possible with the application of ahigh-pass filter. The HPF is computed using the low-pass fil-ter described above. The boxcar values are computed by totaling the input image pixel values that fallwithin the valid data range. Thehigh-pass filter (HPF) is computed as follows:
HPF(i,j) = NORM*(1-ADDBACK) + P(i,j)*COEF*(1+ADDBACK) - LPF(i,j)*COEF
Before computing thehigh-pass filter, the original pixel value is compared against the valid data range. Thehigh-pass filteris applied to the image coordinate only if the original pixel value falls within the valid datarange. If the original value is less than the specified minimum valid value, the output pixel is set equal tozero. If the input pixel value is greater than the maximum value, the output pixel value is set to the maximumallowed value for the bit type. For an 8-bit image this value is 255, 16-bit is 32767 and 32-bit is set equal toFLT_MAX as defined in the file /usr/include/limits.h.
Thedivide filter (DIV), when utilized by specifying a valid data range, will produce a binary image (0 or 255values) similar to a mask image. When the LPF component of the filter is greater than the maximum validvalue specified by the user, the input pixel will be output as 255. If the LPF component is computed as lessthan the minimum valid value specified by the user, the output pixel is zero. The resulting image would thenbe a “mask” of the valid values. Thedivide filter is computed as follows:
DIV(i,j) = COEF*(P(i,j)/LPF(i,j)) - NORM
Thedivide filter is applied to the image coordinate only if the original input pixel value falls within the validdata range. If the original value is less than the minimum value specified by the user, the output pixel valueis set equal to zero. If the input pixel value is greater than the maximum value, the output pixel value is setto the maximum allowed value for the bit type. For an 8- bit image this value is 255, 16-bit is 32767 and 32-bit is set equal to FLT_MAX as defined in the file /usr/include/limits.h.
It is recommended that the user apply the resulting DIV “mask” with caution. In some cases, the “mask”outlines are not continuous. When the “mask” is applied to the image, the discontinuous lines can result inportions of the image, which are to be preserved, being dropped during the masking operation.

filter(1) filter(1)
Appendix A - 24
Options: The following run-line commands are optional to the execution of the program.
-a addback
specifies the addback value which is used by the high-pass anddivide filters only.
-v minval,maxval
specifies theminimum andmaximumvalues (minval,maxval) to be used to define the valid datarange.
-c coef
specifies thecoefficient (coef) to be used during the filtering process to expand the results of thedata during filtering. The value specified may be a floating point value and may be any value theuser desires. The default coefficient value is 1.
-n norm
specifies thenormalization value(norm) used in thehigh-pass anddivide filter computations. Thedefaultnormalizationvalue for 8-bit image data is 127. For 16 or 32-bit data, the default value is 0.
-m mingood
specifies theminimum number of good points (mingood) that must be contained within the boxcarbefore the filter is applied. The default value is 1. This option may be superseded by specifying-f.
-f fraction_good
specifies the fraction of the boxcar (fraction_good) that must contain valid data points before thefilter is applied to the image coordinate. Specifying this option would override the-m option. Thefraction_good is specified as the percentage of the boxcar that must contain valid data points beforea filter can be applied.
-H
displays the usage help information for the program. If this option is selected, the program ignoresany other run-line options specified.
RESTRICTIONS
The output file to be created must not currently exist.
SEE ALSO
/usr/include/limits.h
lowpass2b2(1), median3(1), mode3(1), mode5(1), ssfilter(1)
WHIPS(5)
DIAGNOSTICS
The program exit status is 0 if no errors are encountered during processing and the program completes pro-cessing.
BUGS
The 8 and 16-bit options have been extensively tested. The 32-bit option has not been fully tested.
AUTHOR/MAINTENANCE
Valerie Paskevich, USGS, Woods Hole, MA.

grid_data(1) grid_data(1)
Appendix A - 25
NAME
grid_data - compute vector coordinates to draw map area grid lines
SYNOPSIS
grid_data <std_in >std_out [-P lat_intv] [-M lon_intv] [-C curve_intv] [-H]
DESCRIPTION
Thegrid_data program will compute a series of geographic coordinates at a specified interval between a setof user supplied map corners. These map corners are used as end-point coordinates to compute a series ofgeographic vector coordinates that represent the grid lines for the map area. The computed coordinates arethen used as vector coordinates to produce a grid line. The program computes additional coordinatesbetween the supplied map corners to produce a more accurate representation of the grid line for the selectedmap projection. Additionally, a series of vector coordinates are computed for each of the latitude (-P) andlongitude (-M ) intervals specified. Each grid graticule line output is indicated at the start of the line seg-ment by a comment line identifying the grid line, and theMAPGEN command line#-b.
The program input and output is viastd_in and std_out. This option was implemented to allow for piping ofthe data through a series of steps to facilitate a stream processing. The main goal of the program and theproposed processing are to generate a series of geographic vector coordinates for a given grid line, projectthose coordinates into a specified map space and rasterize the grid line(s) into a WHIPS netCDF image.Once the WHIPS image containing the grid has been created, it may be overlayed atop any other WHIPSnetCDF image representing the identical map area by programqmos.
Program input is through std_in. As stated above, the input to programgrid_data is four pairs of geo-graphic coordinates that represent the map corners. The map corner coordinates must be specified in thefollowing order:
upper left
upper right
lower right
lower left
A typical input file may look like:
42 -71 # upper left corner
42 -69 # upper right corner
41 -69 # lower right corner
41 -71 # lower left corner
By default, the grid line intervals (-M and-P) are every 1o and thecurve_intv (-C) is every .01o. Thecur-ve_intv helps produce a series of vector coordinates to better approximate the grid line. Assuming an exam-ple with map bounds of 41o to 42o latitude and -71o to -69o longitude, vector coordinates for every latitudeand longitude within the map corners will be produced. This grid interval would include 41o and 42o latitudeand -71o, -70o and -69o longitude. Along each grid line, the vectors would be computed at a .01o interval.This results in a series of 201 points between the -71o and -69o longitude coordinates being produced forevery latitude line output. A portion of the line information for latitude 41o is shown below.
# Latitude: 41.000000# -b 41.000000 -71.000000 41.000000 -70.990000 41.000000 -70.980000 41.000000 -70.970000

grid_data(1) grid_data(1)
Appendix A - 26
41.000000 -70.960000 41.000000 -70.950000 41.000000 -70.940000 41.000000 -70.930000 41.000000 -70.920000 41.000000 -70.910000 41.000000 -70.900000 41.000000 -70.890000 41.000000 -70.880000 41.000000 -70.870000 41.000000 -70.860000 41.000000 -70.850000 41.000000 -70.840000 41.000000 -70.830000 . . . . . . . . . 41.000000 -69.090000 41.000000 -69.080000 41.000000 -69.070000 41.000000 -69.060000 41.000000 -69.050000 41.000000 -69.040000 41.000000 -69.030000 41.000000 -69.020000 41.000000 -69.010000 41.000000 -69.000000# Latitude: 42.000000# -b 42.000000 -71.000000 42.000000 -70.990000 42.000000 -70.980000 . . . . . .
There are no required run-line options to be specified other than the UNIX std_in and std_out specifications.
Options: The following run-line commands are optional to the execution of the program.
-P lat_intv
specifies the interval (lat_intv) between the map latitude boundaries (parallels) at which to computeand output the latitude grid line vector coordinates. The value must be specified in decimaldegrees. The default value is 1. The grid line vector coordinates are processed starting with themap’s minimum latitude boundary. The grid line vectors for the remaining lines are then calculatedat the user requestedlat_intv until the computed line is greater than the maximum map latitudeboundary.
-M lon_intv
specifies the interval (lon_intv) between the map longitude boundaries (meridians) at which tocompute and output the longitude grid line vector coordinates. The value must be specified in dec-imal degrees. The default value is 1. The grid line vector coordinates are processed starting withthe map’s minimum longitude boundary. The grid line vectors for the remaining lines are then cal-

grid_data(1) grid_data(1)
Appendix A - 27
culated at the user requestedlon_intv until the computed line is greater than the maximum map lon-gitude boundary.
-C curve_intv
specifies the interval (curve_intv) at which to output line vector coordinates. The value may bespecified as decimal degrees. The defaultcurve_intv value is .01.
As the geographic vector coordinates for a given grid line are being computed and output, addi-tional coordinates between the end points are output. This is done to better represent the map gridline in various projections. Though some projections produce a square or rectangular map area(e.g. Mercator) where the graticule lines would be straight lines, simply drawing a connecting linebetween the map corner coordinates would be acceptable. However, in the case of a conic or cyn-lindrical projection, drawing a straight line to connect a pair of map coordinates which are theupper left and right corner would be incorrect since the grid line would not represent the true curve-ture of the graticule lines. By producing a line with additional geographic coordinates between theend-points, the grid line, when rasterized, will more accurately represent the map graticule lines.
See further explaination of specifying thecurve_intv value in theNOTES section.
-H
displays the usage help information for the program. If this option is selected, the program ignoresany other run-line options specified.
RESTRICTIONS
none known
NOTES
When specifying thecurve_intv (-C), it is important to specify a value that will evenly divide the latitudeand longitude intervals (-P and-M ) to assure that the map corner boundaries are output. The user shouldspecify acurve_intv (-C) which is an even increment of the map boundaries. One or two oddities may occurif the curve_intv is not an even increment of the map boundaries. One oddity which might occur is that theright longitude and top latitude may not be computed properly and therefore a line for these graticules maynot be drawn. A second oddity might be that latitude and longitude grid lines may not be drawn to intersecttheir respective map boundary counterpart. It may also be a possibility that the lines may be drawn to inter-sect and, possibly, extend beyond their boundary counterpart. To obtain the best drawn grid lines, the cur-ve_intv value should be at some interval such as .1, 01., .001 or .02.
EXAMPLE
The example below shows a simple application of the program to compute the default vector grid line coor-dinates for a given map area. The input file,bounds.dat, is shown below.
% grid_data <bounds.dat >grid.dat
% more bounds.dat42 -7142 -6941 -6941 -71
The following example illustrates how to utilizegrid_data along with programsproj andlinepic to gener-ate a WHIPS netCDF image file which contains an image of the grid line. Thebounds.dat file in this exam-ple is the same file as used in example 1.
% grid_data <bounds.dat | proj +proj=utm +lon_0=-69 -r -s \ -m 1:100 -f ’%.0f’ bounds.dat - | linepic -o grid.pic

grid_data(1) grid_data(1)
Appendix A - 28
SEE ALSO
linepic(1), proj(1), qmos(1)
WHIPS(5)
User’s Manual for MAPGEN (UNIX version): a method of transforming digital cartographic data to a map:U. S. Geological Survey Open-File Report 85-706, 134 p.
Cartographic Projection Procedures for the UNIX Environment - A User’s Manual: U. S. Geological SurveyOpen-File Report 90-284, 62p.
DIAGNOSTICS
The program exit status is 0 if no errors are encountered during processing and the program completes pro-cessing.
BUGS
None known.
AUTHOR/MAINTENANCE
Valerie Paskevich, USGS, Woods Hole, MA.

linepic(1) linepic(1)
Appendix A - 29
NAME
linepic - take a vector file with geographic coordinates which make up a line and rasterize the line data ina WHIPS netCDF image file that represents a defined map space.
SYNOPSIS
linepic -o output < std_in [-b bittyp] [-d line_value] [-H]
DESCRIPTION
Linepic will process the projected geographic coordinates of a line and produce an image which contains therasterized line information. This program and associated procedures provide a simple way to rasterize vari-ous vector line data (e.g. contours, coastlines, data interpretations) into an image. The output image file maybe 8, 16 or 32-bit image and can be specified by the user by selecting the-b option on the program run-line.The default is to create an 8-bit image.
The line represented by the vector data file may be one continous line segment or consist of two or more linesegments. If the line consists of more than one line segment, each line segment must begin with theMAP-GEN command line# -b. The program will compute the points necessary to connect the vector line coordi-nates and produce a continous line segment from point to point. The user may select the pixel value to beoutput to represent the data line by specifying the-d option on the program run-line. If the user does notspecify aline_value, the program defaults to outputting the line with a value of 255. The value specified bythe user must be appropriate for the output image bittype. If portions of the data file are to be represented bytwo or moreline_values, the file must be split and processed separately for each of the representative values.
The first four records of the input file must contain the map area bounds, in meters, for the user desired maparea. Subsequent data records must contain the latitude and longitiude geographic coordinates. The geo-graphic coordinate for each vector contained in the input file must have been previously converted by pro-gramproj to their meter coordinates for the selected map area. The map coordinates must be iny x (latitudelongitude) order and the coordinate pairs must be integer values.
Program input is through std_in. As stated above, the actual input to programlinepic is a vector data filewith geographic coordinates that represent a line and have been converted to meter values based on a spe-cific map projection and scale. The first four records of the input fileMUST BE the map corner coordinates,in meters, for the map projection and scale. The map corner coordinates must be specified in the followingorder:
upper left
upper right
lower right
lower left
For example, if the user desires to create a 1o x 2o map at a scale of 1:250 for an area bounded by 41o to 42o
latitude and -71o to -69o longitude for a simple UTM (Universal Transverse Mercator) map with a centrallongitude value of -69o, the first four records of the input file would contain the following information:
46515 334446496 500045385 500045405 3318
Programlinepic will begin by reading the first four pairs of coordinates from the input file. Once the pro-gram has obtained this information it will calculate the size of the image (number of lines and number ofsamples). When the size of the WHIPS netCDF image has been computed,linepic then creates the imagefile on disk and fills the image with blank lines before beginning to draw the vector line in the image.
The remainder of data in the input file must be the vector line coordinates whichlinepic will process. Pro-

linepic(1) linepic(1)
Appendix A - 30
gram linepic accepts and calculates the location (the actual image line and sample coordinate) within themap space for the line coordinates. When the program has obtained two consecutive pairs of points, the pro-gram will compute the series of points required todraw a continous line between the points. The user spec-ified line_value is placed in the computed image coordinates, on a pixel-by-pixel basis, creating a line ofdata. It is important to note that the pixel placement is done on a pixel-by-pixel basis. When multiple dnvalues are computed for the same location,linepic will always place the last pixel input in the output loca-tion regardless of the coordinates previous content.
Programproj is essential in creating the final map product. The user should be familiar with its usage andvarious options.Someproj options must be specified to create the proper data output for programlinepic.Those options include:-r, -s and-f ‘%,0f’ .
Many selected projections produce a conic or trapezoid map area while the output image is rectangular.Because the map area is placed in a rectangle defined to fit the largest dimension of the map area, the mapcorner coordinates will, in most cases, not relate to the image corners. To help the user better identify themap area within the image, the location of the map corners are reported to the program print file. Map cor-ner coordinates are reported as imageline, sample coordinates.
The following run-line options must be specified and can occur in any order.
-o output_file
specifies the output file to be created. The output file will be an 8-bit WHIPS image.
Options: The following run-line commands are optional to the execution of the program.
-b bittyp
specifies the bit type (bittyp) of the output file to be created. Valid selections are 8, 16 or 32. Thedefaultbittyp is 8.
-d line_value
specifies the dn value (line_value) of the pixels to be output to represent the line. The default out-put line_value is 255 for all output image bit types.
-H
displays the usage help information for the program. If this option is selected, the program ignoresany other run-line options specified.
RESTRICTIONS
The output file to be created must not currently exist.
The input meter coordinates must be recorded as integer values.
The maximum number of points which can be computed from any two consecutive coordinates is 10 plusthe larger of the number of samples or number of lines contained in the image.
EXAMPLE
The example below shows a simple execution of the program where the input file,200M_contour, will bepreviously processed byproj . The first four pairs of coordinates contained in the input file must be the pro-jected map area bounds.
% linepic -o map2.cdf <200M_contour -b 16 -d 200

linepic(1) linepic(1)
Appendix A - 31
The following is a typical example using programproj as a filter to assist in the processing and mapping ofthe user selected data. The data in this short example are coastline data which are to be mapped at 100 meterresolution to a Universal Transverse Mercator projection using a central longitude of -69o. The file,bound-s.dat, must contain the map corner coordinates and is shown below. The file,ne_coast, contains the linepoints as latitude and longitude coordinates. A small portion of the coastline data file to be processed islisted followingbounds.dat.
% proj +proj=utm +lon_0=-69 -r -s -m 1:100 -f ‘%.0f’ \ bounds.dat ne_coast | linepic -o ne_coast.pic -d 255
% more bounds.dat42 -71 # upper left corner42 -69 # upper right corner41 -69 # lower right corner41 -71 # lower left corner
% head -10 ne_coast# -b42.000000 -70.68927041.997201 -70.68227441.993974 -70.67699341.990161 -70.67200641.986641 -70.66643341.982827 -70.66261941.978427 -70.65968541.973440 -70.65645941.969626 -70.654112
The above procedure could have been accomplished by utilizing thegetcoast program ofMAPGEN . Thecoastline vector information for a given area can be extracted directly from a user specifiedcoastfile andpiped to the various programs for processing. An example of this procedure is shown below. The user maywish to verify the location of the coastline files on their particular system.
% getcoast -71 -69 41 42 -r /usr/coast/na/cil | \ proj +proj=utm +lon_0=-69 -r -s -m 1:100 -f ‘%.0f’ \ bounds.dat - | linepic -o bathy.pic
The last example and procedure shows howproj andlinepic can be used to generate a quick map grid. Themap grid will be every 30’ for the map area defined in the previous example. To accomplish this, a file withthe coordinates for the lines must be created. The filegrid.dat contains the coordinates for the 30’ intervals.Each grid line segment is marked at the start by a record containing theMAPGEN command# -b. Addi-tional coordinates between the map corners have been added to create a smoother, and hopefully, more accu-rate representation of the grid line. The files,ne_coast andgrid.pic, may later be combined using programqmos to create a composite image.
% proj +proj=utm +lon_0=-69 -r -s -m 1:100 -f ’%.0f’ \ bounds.dat grid.dat | linepic -o grid.pic -d 254
% more grid.dat# -b42 -7142 -70.5

linepic(1) linepic(1)
Appendix A - 32
42 -7042 -69.542 -69# -b41.5 -7141.5 -70.541.5 -7041.5 -69.541.5 -69# -b41 -7141 -70.541 -7041 -69.541 -69# -b42 -7141.5 -7141 -71# -b42 -70.541.5 -70.541 -70.5# -b42 -7041.5 -7041 -70# -b42 -69.541.5 -69.541 -69.5# -b42 -6941.5 -6941 -69
SEE ALSO
filter(1), grid_data(1), pointpic(1), proj(1), qmos(1)
WHIPS(5)
User’s Manual for MAPGEN (UNIX version): a method of transforming digital cartographic data to a map:U. S. Geological Survey Open-File Report 85-706, 134 p.
Cartographic Projection Procedures for the UNIX Environment - A User’s Manual: U. S. Geological SurveyOpen-File Report 90-284, 62p.
NOTE
The user may process individual line segments as separate files and combine the files withqmos.

linepic(1) linepic(1)
Appendix A - 33
DIAGNOSTICS
The program exit status is 0 if no errors are encountered during processing and the program completes pro-cessing.
BUGS
None known.
AUTHOR/MAINTENANCE
Valerie Paskevich, USGS, Woods Hole, MA.

linepic(1) linepic(1)
Appendix A - 34

lowpass2b2(1) lowpass2b2(1)
Appendix A - 35
NAME
lowpass2b2 - applies a 2 by 2 low-pass filter to an image
SYNOPSIS
lowpass2b2 -iinput -o output [-H]
DESCRIPTION
Programlowpass2b2 applies a small low-pass smoothing filter to an image. The low-pass filter consists of a2-by-2 moving boxcar. The image is smoothed by the filter with the boxcar applied starting at the upper leftorigin of the image and moving across each line of input data and down through the input image. With theexception of the first line and ending sample of each line, the filter is applied by computing the average of 4neighboring pixels with the result being stored in the lower left pixel. The filter is applied to the entireimage.
An example of how the program computes the pixel averages is as follows:
input output-------------- -------------
line 1:| 11 | 22 | | 11 | 22 |-------------- -------------
line 2:| 33 | 44 | | 28 | 44 |-------------- -------------
The first input image line is a special case and is smoothed by applying a 1-by-2 low-pass filter.
input output-------------------- ---------------------
line 1: | 11 | 22 | 33 | 44 | | 17 | 28 | 39 | .. |-------------------- ---------------------
line 2: | 33 | 44 | 55 | 66 | | 28 | 39 | 50 | .. |-------------------- ---------------------
The last sample of each line is also a special case and is processed as a 2-by-1 low-pass filter.
input output --------------- ----------------
line 1: | 11 | 22 | 44 | | 17 | 33 | 44 | --------------- ----------------
line 2: | 33 | 44 | 66 | | 28 | 88 | 55 | --------------- ----------------
line 3: | 55 | 66 | 88 | | 50 | 66 | 77 | --------------- ----------------
line 4: | 77 | 88 | 99 | | 72 | 85 | 94 | --------------- ----------------
The following run-line options must be specified and can occur in any order.

lowpass2b2(1) lowpass2b2(1)
Appendix A - 36
-i input_file
specifies the input file to be processed. The input file must be 8-bit.
-o output_file
specifies the output file to be created.
Options: The following run-line commands are optional to the execution of the program.
-H
displays the usage help information for the program. If this option is selected, the program ignoresany other run-line options specified.
RESTRICTIONS
The program accepts only 8-bit image files.
The output file to be created must not currently exist.
EXAMPLE
% lowpass2b2 -i gloria.vel -o gloria.2b2
SEE ALSO
filter(1), median3(1), mode3(1), mode5(1)
WHIPS(5)
DIAGNOSTICS
The program exit status is 0 if no errors are encountered during processing and the program completes pro-cessing.
AUTHOR/MAINTENANCE
Valerie Paskevich, USGS, Woods Hole, MA.

median3(1) median3(1)
Appendix A - 37
NAME
median3 - apply a 3-by-3 median filter to an image
SYNOPSIS
median3 -i input -o output [-z] [-H]
DESCRIPTION
The median3 program allows the user to apply a 3-by-3 median filter to a WHIPS image.Median3 willmodify the value centered on a 3-by-3 boxcar with the median value computed from the neighborhood dis-tribution. The neighborhood,n, consists of 9 values (3x3), and the median value is computed as ij = 5 =(n+1)/2 after the data has been arranged in increasing order.
The user may apply this program to fill zero values contained within an image by selecting the-z option onthe run-line. When this option is selected, only those pixel values from the input file equal to zero are mod-ified. However, all input pixel values, including those equal to zero, are used to compute the median value.
Median3 is most suitable for data that has a skewed distribution. However, the value obtained for themedian may not be representative if the individual items do not tend to cluster at the center of the distribu-tion.
Special processing takes place to handle the first and last lines of the image file. Adjacent lines are weightedto allow for unfolding to take place during the processing. When computing the 3-by-3 median of the firstimage line from the input file, the second line is read twice and used in the computation. To process the lastline contained in the image line, the next to last line is read twice and used for the computation.
In addition to the special line processing, the program applies a similar overlapping procedure to the samplesat the beginning and ending of each line. For the first and last samples contained in the image lines, theneighboring pixels are doubly weighted to allow for the foldover computations.
The following run-line options must be specified and can appear in any order.
-i input_file
specifies the input file to be processed. The input file may be 8, 16 or 32-bit image.
-o output_file
specifies the output file to be created.
Options: The following run-line commands are optional to the execution of the program.
-z
flags the program to apply the filter only when the center value of the neighborhood is zero. Thiswill allow the user to apply the 3-by-3 median filter as a zero only replacement filter.
-H
displays the usage help information for the program. If this option is selected, the program ignoresany other run-line options specified.

median3(1) median3(1)
Appendix A - 38
RESTRICTIONS
The output file to be created must not currently exist.
EXAMPLE
% median3 -i map.cdf -o map.med3
NOTES
Though a histogram method could be employed to calculate the median value for 8-bit data, the histogrammethod would be more difficult to implement for 16 and 32-bit data. Thereforemedian3 is set-up to sort(via the UNIX library function qsort) the data values and can be quickly applied to 16 and 32-bit data as wellas 8-bit.
SEE ALSO
lowpass2b2(1), filter(1), mode3(1), mode5(1)
WHIPS(5)
DIAGNOSTICS
The program exit status is 0 if no errors are encountered during processing and the program completes pro-cessing.
BUGS
The 16 and 32-bit options have not been thoroughly tested.
AUTHOR/MAINTENANCE
Valerie Paskevich, USGS, Woods Hole, MA.

mode3(1) mode3(1)
Appendix A - 39
NAME
mode3 - apply a 3-by-3 mode filter to an image
SYNOPSIS
mode3 -i input -o output [-z] [-Z] [-H]
DESCRIPTION
Themode3 program allows the user to apply a 3-by-3 mode filter to a WHIPS image.Mode3 will modifythe value centered on a 3-by-3 boxcar with the mode value computed from the neighborhood distribution.The neighborhood,n, consists of 9 values (3x3), and the mode value is the value which occurs most oftenwithin the neighborhood. In a neighborhood of 9 values it is possible that no mode value can be deter-mined. For example, 9 different values may occur within the neighborhood or 2 different values may occur4 times. When no mode value can be computed for the neighborhood, the input pixel value for that locationis output unchanged.
The user may apply this program to replace zero values contained within an image by selecting the-z optionon the run-line. When this option is selected, only those pixel values from the input file equal to zero aremodified. However, all input pixel values, including those equal to zero, are used to compute the modevalue.
In addition to the zero replacement option (-z), the user may select not to include the zero values from theimage when computing the mode value by selecting the-Z program option. When this option is selected,the zero values for the neighborhood are not included when totalling the occurrences of the unique values forthe neighborhood. The-z and-Z options are not mutually exclusive and may be selected individually ortogether during a single execution of the program. Selection of these program options is at the user’s discre-tion depending on the results he or she wishes to achieve.
Special processing takes place to handle the first and last lines of the image file. Adjacent lines are weightedto allow for unfolding to take place during the processing. When computing the 3-by-3 mode of the firstimage line from the input file, the second line is read twice and used in the computation. To process the lastline contained in the image line, the next to last line is read twice and used for the computation.
In addition to the special line processing, the program applies a similar overlapping procedure to the samplesat the beginning and ending of each line. For the first and last samples contained in the image lines, theneighboring pixels are doubly weighted to allow for the foldover computations.
The following run-line options must be specified and can appear in any order.
-i input_file
specifies the input file to be processed. The input file may be 8, 16 or 32-bit image.
-o output_file
specifies the output file to be created.
Options: The following run-line commands are optional to the execution of the program.
-z
flags the program to apply the filter only when the center value of the neighborhood is zero. This

mode3(1) mode3(1)
Appendix A - 40
will allow the user to apply the 3-by-3 mode filter as a zero only replacement filter.
-Z
flags program not to include zero values when computing the mode value. This option can be help-ful when trying to apply the mode as a zero replacement filter and the mode in some neigborhoodsare zero.
-H
displays the usage help information for the program. If this option is selected, the program ignoresany other run-line options specified.
RESTRICTIONS
The output file to be created must not currently exist.
EXAMPLE
The example below shows a simple execution of the program.
% mode3 -i map.cdf -o map.mode3
The example below shows a possible execution of the program to replace zero values within the image whileexcluding any zero values from the mode computation.
% mode3 -i map.cdf -o map.mode3zr -z -Z
NOTES
Though a histogram method could be employed to calculate the mode value for 8-bit data, that methodwould be more difficult to implement for 16 and 32-bit data. Thereforemode3 is set-up to sort (via theUNIX library function qsort) the data values and then count the number of times a unique value occurswithin the neighborhood. The program will then compute the mode value and this technique can be appliedto 16 and 32-bit data as well as 8-bit.
SEE ALSO
lowpass2b2(1), filter(1), median3(1), mode5(1)
WHIPS(5)
DIAGNOSTICS
The program exit status is 0 if no errors are encountered during processing and the program completes pro-cessing.
BUGS
The 16 and 32-bit options have not been thoroughly tested.
AUTHOR/MAINTENANCE
Valerie Paskevich, USGS, Woods Hole, MA.
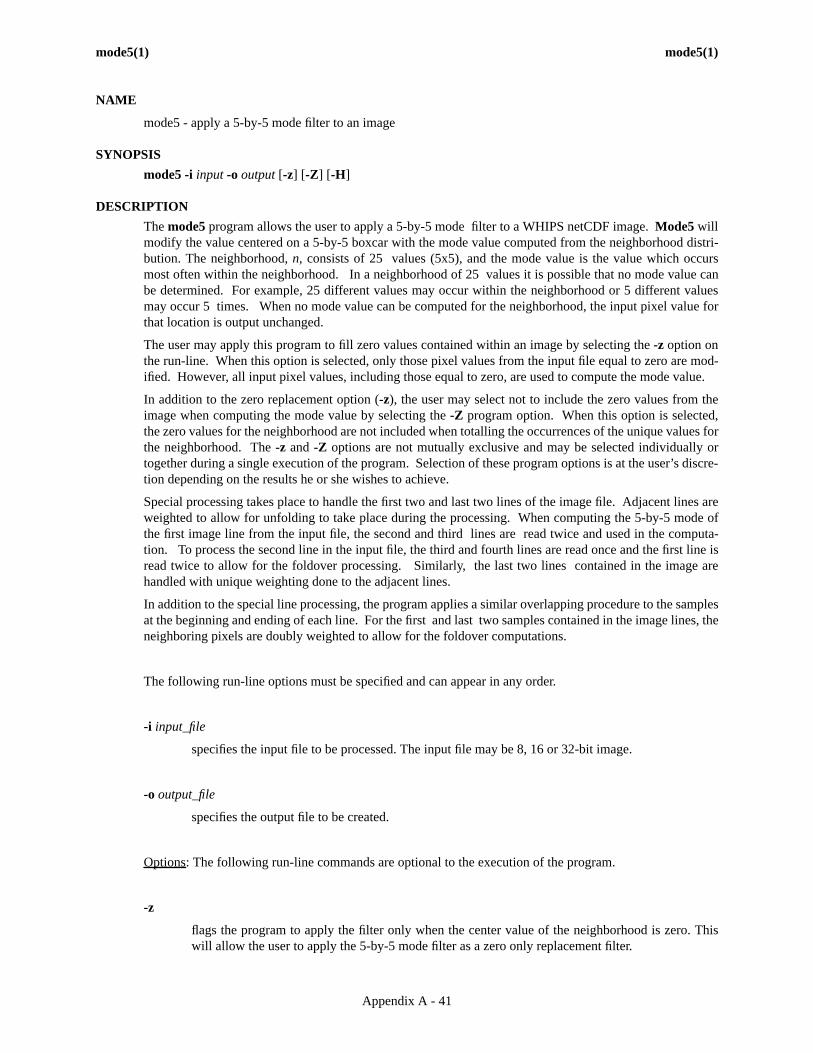
mode5(1) mode5(1)
Appendix A - 41
NAME
mode5 - apply a 5-by-5 mode filter to an image
SYNOPSIS
mode5 -i input -o output [-z] [-Z] [-H]
DESCRIPTION
Themode5 program allows the user to apply a 5-by-5 mode filter to a WHIPS netCDF image.Mode5 willmodify the value centered on a 5-by-5 boxcar with the mode value computed from the neighborhood distri-bution. The neighborhood,n, consists of 25 values (5x5), and the mode value is the value which occursmost often within the neighborhood. In a neighborhood of 25 values it is possible that no mode value canbe determined. For example, 25 different values may occur within the neighborhood or 5 different valuesmay occur 5 times. When no mode value can be computed for the neighborhood, the input pixel value forthat location is output unchanged.
The user may apply this program to fill zero values contained within an image by selecting the-z option onthe run-line. When this option is selected, only those pixel values from the input file equal to zero are mod-ified. However, all input pixel values, including those equal to zero, are used to compute the mode value.
In addition to the zero replacement option (-z), the user may select not to include the zero values from theimage when computing the mode value by selecting the-Z program option. When this option is selected,the zero values for the neighborhood are not included when totalling the occurrences of the unique values forthe neighborhood. The-z and-Z options are not mutually exclusive and may be selected individually ortogether during a single execution of the program. Selection of these program options is at the user’s discre-tion depending on the results he or she wishes to achieve.
Special processing takes place to handle the first two and last two lines of the image file. Adjacent lines areweighted to allow for unfolding to take place during the processing. When computing the 5-by-5 mode ofthe first image line from the input file, the second and third lines are read twice and used in the computa-tion. To process the second line in the input file, the third and fourth lines are read once and the first line isread twice to allow for the foldover processing. Similarly, the last two lines contained in the image arehandled with unique weighting done to the adjacent lines.
In addition to the special line processing, the program applies a similar overlapping procedure to the samplesat the beginning and ending of each line. For the first and last two samples contained in the image lines, theneighboring pixels are doubly weighted to allow for the foldover computations.
The following run-line options must be specified and can appear in any order.
-i input_file
specifies the input file to be processed. The input file may be 8, 16 or 32-bit image.
-o output_file
specifies the output file to be created.
Options: The following run-line commands are optional to the execution of the program.
-z
flags the program to apply the filter only when the center value of the neighborhood is zero. Thiswill allow the user to apply the 5-by-5 mode filter as a zero only replacement filter.

mode5(1) mode5(1)
Appendix A - 42
-Z
flags program not to include zero values when computing the mode value. This option can be help-ful when trying to apply the mode as a zero replacement filter and the mode in some neigborhoodsare zero.
-H
displays the usage help information for the program. If this option is selected, the program ignoresany other run-line options specified.
RESTRICTIONS
The output file to be created must not currently exist.
EXAMPLE
The example below shows a simple execution of the program.
% mode5 -i map.cdf -o map.mode5
The example below shows a possible execution of the program to replace zero values within the image whileexcluding any zero values from the mode computation.
% mode5 -i map.cdf -o map.mode5zr -z -Z
NOTES
Though a histogram method could be employed to calculate the mode value for 8-bit data, that methodwould be more difficult to implement for 16 and 32-bit data. Thereforemode5 is set-up to sort (via theUNIX library function qsort) the data values and then count the number of times a unique value occurswithin the neighborhood. The program will then compute the mode value and this technique can be appliedto 16 and 32-bit data as well as 8-bit.
SEE ALSO
lowpass2b2(1), filter(1), median3(1), mode3(1)
WHIPS(5)
DIAGNOSTICS
The program exit status is 0 if no errors are encountered during processing and the program completes pro-cessing.
BUGS
The 16 and 32-bit options have not been thoroughly tested.
AUTHOR/MAINTENANCE
Valerie Paskevich, USGS, Woods Hole, MA.

pointpic(1) pointpic(1)
Appendix A - 43
NAME
pointpic - take a file that contains projected geographic coordinates and an associated data value and placethe data value in a WHIPS netCDF image file that represents a defined map space.
SYNOPSIS
pointpic -o output < std_in [-b bittyp] [-H]
DESCRIPTION
Pointpic will take a data value (z) from a file which contains it’s geographic coordinates projected into amap space and place the data value in an image file that represents a definedmap for a specific area, projec-tion and scale. The data value associated with the geographic coordinate may be either an 8, 16 or 32-bitvalue. This program and accompanying procedure provides a simple way to rasterize discrete data valuesinto an image.
The first four records of the input file must contain the map area bounds, in meters, for the user desired maparea. Subsequent data records must contain the latitude, longitiude and data value (y,x,z). The geographiccoordinate for each data value contained in the input file must have been previously converted by programproj to their meter coordinates for the selected map area. The map coordinates must be iny x (latitude lon-gitude) order and the coordinate pairs must be integer values.
Program input is through std_in. As stated above, the actual input to programpointpic is a file of discretedata values each with an associated geographic coordinate which have been converted to meter values basedon a specific map projection and scale. The first four records of the input fileMUST BE the map cornercoordinates, in meters, for the map projection and scale. The map corner coordinates must be specified in thefollowing order:
upper left
upper right
lower right
lower left
For example, if the user desires to create a 2o x 1 1/2o map at a scale of 1:250 for an area bounded by 24o to26o latitude and -85o to -83.5o longitude for a simple UTM (Universal Transverse Mercator) map with a cen-tral longitude value of -86o, the first four records of the input file would contain the following information:
11508 280111521 340210634 342510622 2814
Programpointpic will begin by reading the first four pairs of coordinates from the input file. Once the pro-gram has obtained this information it will calculate the size of the image (number of lines and number ofsamples). When the size of the WHIPS netCDF image has been computed,pointpic then creates the imagefile on disk and fills the image with blank lines before beginning to place the pixel values in the image.
The remainder of data in the input file must be the pixel coordinates and values whichpointpic will place inthe appropriate map space. The information which follows must be the pixel coordinates, in meters, alongwith a pixel value. Programpointpic accepts and calculates the location (the actual image line and samplecoordinate) within the map space for the input pixel dn values. The program then places, on a pixel-by-pixelbasis, the dn values. It is important to note that the pixel placement is done on a pixel-by-pixel basis. Whenmultiple dn values are computed for the same location,pointpic will always place the last pixel input in theoutput location regardless of the coordinates previous content. At the program end, the minimum and max-imum dn values output will be reported to the program print file.
Programproj is essential in creating the final map product. The user should be familiar with its usage and

pointpic(1) pointpic(1)
Appendix A - 44
various options.Someproj options must be specified to create the proper data output for programpointpic.Those options include:-r, -s and-f ‘%,0f’ .
Many selected projections produce a conic or trapezoid map area while the output image is rectangular.Because the map area is placed in a rectangle defined to fit the largest dimension of the map area, the mapcorner coordinates will, in most cases, not relate to the image corners. To help the user better identify themap area within the image, the location of the map corners are reported to the program print file. Map cor-ner coordinates are reported as imageline, sample coordinates.
The following run-line options must be specified and can occur in any order.
-o output_file
specifies the output file to be created. The output file will be an 8-bit WHIPS image.
Options: The following run-line commands are optional to the execution of the program.
-b bittyp
specifies the bit type (bittyp) of the output file to be created. Valid selections are 8, 16 or 32. Thedefaultbittyp is 8.
-H
displays the usage help information for the program. If this option is selected, the program ignoresany other run-line options specified.
RESTRICTIONS
The output file to be created must not currently exist.
The input meter coordinates must be recorded as integer values.
EXAMPLE
The example below shows a simple execution of the program. The first four pairs of coordinates containedin the file,project.dat, must be the projected map area bounds.
% pointpic -o map2.cdf <projec.dat
The following is a typical example using programproj as a filter to assist in the processing and mapping ofthe user selected data. The data in this short example is bathymetry data which are to be mapped at 250meter resolution to a Universal Transverse Mercator projection using a central longitude of -86o. The file,bounds.dat, must contain the map corner coordinates and is show below. The filebathy.dat contains the lat-itude and longitude coordinates to be projected along with the bathymetry data values to be placed in theimage. A small portion of the bathymetry data file (bathy.dat) to be processed is listed followingbounds.-dat.
% proj +proj=utm +lon_0=-86 -r -s -m 1:250 -f ‘%.0f’ \ bounds.dat bathy.dat | pointpic -o bathy.pic -b 16
% more bounds.dat26 -85 # upper left corner26 -83.5 # upper right corner24 -83.5 # lower right corner24 -85 # lower left corner

pointpic(1) pointpic(1)
Appendix A - 45
% head -10 bathy.dat 26.30870 -84.85630 1318 26.31240 -84.85710 1317 26.31620 -84.85800 1326 26.32000 -84.85890 1335 26.32390 -84.85980 1345 26.32770 -84.86060 1348 26.33150 -84.86150 1352 26.33540 -84.86250 1356 26.33920 -84.86340 1393 26.34300 -84.86440 1430
SEE ALSO
filter(1), grid_data(1), linepic(1), median3(1), mode3(1), mode5(1)
proj(1), projss(1)
WHIPS(5)
User’s Manual for MAPGEN (UNIX version): a method of transforming digital cartographic data to a map:U. S. Geological Survey Open-File Report 85-706, 134 p.
Cartographic Projection Procedures for the UNIX Environment - A User’s Manual: U. S. Geological SurveyOpen-File Report 90-284, 62p.
NOTE
This program is similar to programprojss. The difference between this program andprojss is the ability ofpointpic to handle 8, 16 or 32-bit data.
DIAGNOSTICS
The program exit status is 0 if no errors are encountered during processing and the program completes pro-cessing.
BUGS
None known.
AUTHOR/MAINTENANCE
Valerie Paskevich, USGS, Woods Hole, MA.

pointpic(1) pointpic(1)
Appendix A - 46

qmos(1) qmos(1)
Appendix A - 47
NAME
qmos - quick mosaic of two WHIPS netCDF images
SYNOPSIS
qmos -i input -o output [-I | -O | -A] [-H]
DESCRIPTION
Program qmos will mosaic (overlay) the specified input file (-i) over the specified output (-o) file. The pro-gram will either overlay where the input file has priority over the existing output file (-I , program default),where the output file has priority (-O) over the input file, or average (-A) non-zero pixel values togetherfrom the input and existing output file.
The following run-line options must be specified and can occur in any order.
-i input_file
specifies the input file to be processed. The input file may be 8, 16 or 32-bit.
-o output_file
specifies the output file to be updated. The output filemust currently exist.
Options: The following run-line commands are optional to the execution of the program.
-I
flags the program that non-zero pixel values in the input file are to take precedence. This is the pro-gram default. When the input file takes precedence, the non-zero value of a specific pixel coordi-nate will be replaced by the non-zero input pixel value for that location.
-O
flags the program that non-zero pixel values in the output file are to take precedence. When theoutput file takes precedence, the non-zero value of a specific pixel coordinate will not be replacedby the non-zero input pixel value for that location.
-A
flags the program to average non-zero pixel values from the input and output files. When averagingof the files is selected, the non-zero pixel values for a specific image coordinate are averagedtogether and the output pixel value is replaced with the new value.
-H
displays the usage help information for the program. If this option is selected, the program ignoresany other run-line options specified.
RESTRICTIONS
The selected input and output file must be the same size.
Unlike the majority of WHIPS programs where the output file must not exist and is created by the applica-tion program,the output file to be modifiedmust currently exist for this application to execute successfully.
EXAMPLE
% qmos -o map.comp -i l26.map
SEE ALSO
WHIPS(5)

qmos(1) qmos(1)
Appendix A - 48
DIAGNOSTICS
The program exit status is 0 if no errors are encountered during processing and the program completes pro-cessing.
AUTHOR/MAINTENANCE
Valerie Paskevich, USGS, Woods Hole, MA.

quickview(1) quickview(1)
Appendix A - 49
NAME
quickview - displays an 8-bit WHIPS netCDF image in an X-11 window
SYNOPSIS
quickview -i input [-a sl,ss,nl,ns] [-c comp] -H]
DESCRIPTION
Program quickview will produce a simple and quick display of a WHIPS netCDF image in an X-11 window.The image, if necessary, will be automatically compressed to fit the image on the screen. If the image mustbe compressed, it will be compressed to present a proportional image and the compression ratio as 1:xx.xwill be displayed above the image. If the image is being displayed at full resolution, the word uncompressedwill be displayed above the image.
The 24-bit version of the program currently available on the Data General systems will display the line andsample coordinate relative to the actual image and the pixel value within a message box located below theimage. This option has not been implemented for the 8-bit display version of the program for the SUN orULTRIX computer systems.
The following run-line options must be specified and can occur in any order.
-i input_file
specifies the input file to be processed. The input file may only be 8-bit.
Options: The following run-line commands are optional to the execution of the program.
-a sl,ss,nl,ns
specifies the sub-area of the input file to be displayed. The sub-area is specified by entering the ori-gin as the starting line (sl) and starting sample (ss) of the area to be extracted and the number oflines (nl) and the number of samples (ns) to be extracted.
When specifying the sub-area, the user must specify thesl andss values. The program will computedefault values for thenl andns parameters as the remaining lines and samples in the input imagefrom the user specified starting position.
If the -c option is not specified, the program will automatically compute an image compression fac-tor, if necessary, to proportionally display the full sub-area selected.
-c comp
specifies a user selected compression factor (comp) at which to display the image. The programmust be able to display the complete image or selected sub-area using the specified compressionfactor.
The selection of a user specified compression factor may override the compression factor automati-cally computed by the program. By default, the program computes a compression factor to be usedto proportionally display the full image or user selected image sub-area. If the user specified com-pression factor is greater than or equal to the compression factor computed by the program, the userspecified compression factor will be used to display the image. Otherwise, the program computedcompression factor will be used. The program will always maintain the ability to proportionallydisplay the image, as well as displaying the entire image or sub-area selected.

quickview(1) quickview(1)
Appendix A - 50
-H
displays the usage help information for the program. If this option is selected, the program ignoresany other run-line options specified.
RESTRICTIONS
Quickview can only display an 8-bit image. The display device must be capable of displaying an 8-bitimage (i.e. the display device must be 8 or 24-bit deep).
NOTES
When utilizing this program on 8-bit displays, some “flashing” is done when the proper color table isinstalled. When the mouse is placed within the image window, an 8-bit, 256 grey-level color table isinstalled by the X-11 server. This color table replaces any previous color table and may result in any previ-ously displayed X-11 windows outside the image window to become invisible. Moving the cursor outsidethe quickview image window will result in the X-11 server restoring the default color table and restoringany previous X-11 windows that were displayed. When the program is exited, the default color table isrestored to the X-11 server.
EXAMPLE
% quickview -i gloria.cdf
SEE ALSO
WHIPS(5)
DIAGNOSTICS
The program exit status is 0 if no errors are encountered during processing and the program completes pro-cessing.
BUGS
none known
AUTHOR/MAINTENANCE
Valerie Paskevich, USGS, Woods Hole, MA.
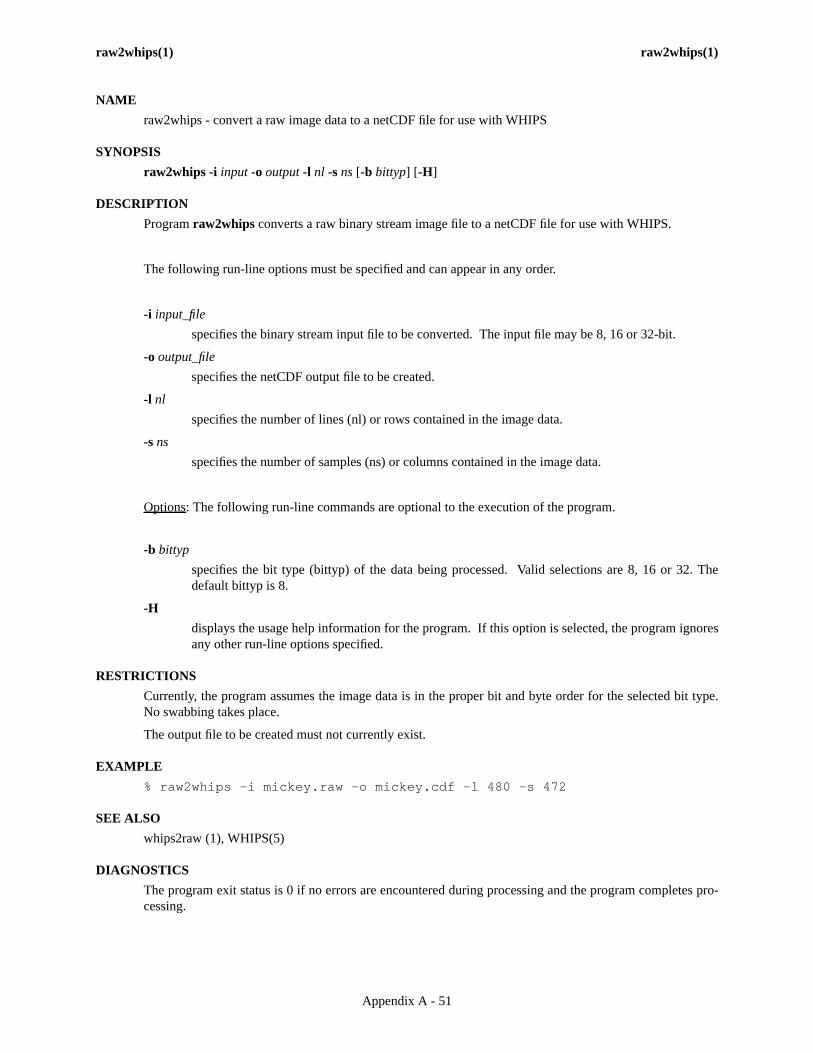
raw2whips(1) raw2whips(1)
Appendix A - 51
NAME
raw2whips - convert a raw image data to a netCDF file for use with WHIPS
SYNOPSIS
raw2whips -i input -o output-l nl -s ns [-b bittyp] [-H]
DESCRIPTION
Programraw2whips converts a raw binary stream image file to a netCDF file for use with WHIPS.
The following run-line options must be specified and can appear in any order.
-i input_file
specifies the binary stream input file to be converted. The input file may be 8, 16 or 32-bit.
-o output_file
specifies the netCDF output file to be created.
-l nl
specifies the number of lines (nl) or rows contained in the image data.
-s ns
specifies the number of samples (ns) or columns contained in the image data.
Options: The following run-line commands are optional to the execution of the program.
-b bittyp
specifies the bit type (bittyp) of the data being processed. Valid selections are 8, 16 or 32. Thedefault bittyp is 8.
-H
displays the usage help information for the program. If this option is selected, the program ignoresany other run-line options specified.
RESTRICTIONS
Currently, the program assumes the image data is in the proper bit and byte order for the selected bit type.No swabbing takes place.
The output file to be created must not currently exist.
EXAMPLE
% raw2whips -i mickey.raw -o mickey.cdf -l 480 -s 472
SEE ALSO
whips2raw (1), WHIPS(5)
DIAGNOSTICS
The program exit status is 0 if no errors are encountered during processing and the program completes pro-cessing.

raw2whips(1) raw2whips(1)
Appendix A - 52
BUGS
There appears to be a small problem when transferring files with less than 512 samples from MIPS unlessthe number of samples are evenly divisible by four. If this is a bug or merely a quirk, is not entirely known.One way around the problem is to either enlarge or truncate the file on MIPS so the number of samples isevenly divisible by four. Then create the raw image with the MIPS programEXPORT, transfer the file andconvert it withraw2whips. Files with image lines greater than 512 don’t seem to be a problem.
AUTHOR/MAINTENANCE
Valerie Paskevich, USGS, Woods Hole, MA.

whips2raw(1) whips2raw(1)
Appendix A - 53
NAME
whips2raw - convert a WHIPS netCDF image file to a raw image file
SYNOPSIS
whips2raw -i input -o output-l [-H]
DESCRIPTION
Programwhips2raw converts a WHIPS netCDF image file to a raw binary stream image file.
The following run-line options must be specified and can appear in any order.
-i input_file
specifies the netCDF file to be processed.
-o output_file
specifies the binary stream input file to be converted. The input file may be 8, 16 or 32-bit.
Options: The following run-line commands are optional to the execution of the program.
-H
displays the usage help information for the program. If this option is selected, the program ignoresany other run-line options specified.
RESTRICTIONS
none known
EXAMPLE
% whips2raw -i mickey.cdf -o mickey.raw
SEE ALSO
raw2whips(1), WHIPS(5)
DIAGNOSTICS
The program exit status is 0 if no errors are encountered during processing and the program completes pro-cessing.
BUGS
none known
AUTHOR/MAINTENANCE
Valerie Paskevich, USGS, Woods Hole, MA.

whips2raw(1) whips2raw(1)
Appendix A - 54

Appendix B - 55
APPENDIX B
Cookbook examples

Appendix B - 56

Appendix B - 57
COOKBOOK EXAMPLES
There are two forms of rasterizing data discussed in this report. The first is the rasterization of discrete data, and thesecond is the rasterization of vector data. This section provides a summary of the programs and procedures used toproduce the figures shown in this report. These processing steps may be used as a guide by the user in creating scriptsfor his or her own applications. A detailed description of the steps and procedures are not discussed here thoughcomments are interspersed among the processing commands for clarity. The commands to convert, extract and dis-play the figure images on an X-11 display are also listed. Programs and procedures utilized to convert the image to anEncapsulated PostScript (EPS) file for printing have not been included.
The first example illustrates a procedure to rasterize discrete data values and create a map representing the distribu-tion of bathymetry in a small area of the West Florida escarpment. The data used in this example are single pointsoundings collected during a survey of the area in 1985. The complete data coverage is an area from 29.2106o to23.8792o north and 88.2697o to 82.0021o west. The area to be mapped in this example is a subset of the full data setand will be defined by the bounds of 24o to 26o north and 85o to 83.5o west. This example covers the steps utilized infiltering the data to produce an image with complete bathymetry coverage. It is assumed that the data has been com-piled, properly formatted and stored in filefarn3.bt for processing.
Before beginning the rasterization process, two supplementary files must be created. The files may be created byinvoking the editor and will contain the map image geographic bounds & cartographic information. Though the usermay select to enter the information entirely on the run-line, creating the supplementary files before beginning the pro-cessing is highly recommended. Entering the information into a file will help reduce typographic errors and, ifneeded, provide access to the redundant information for additional processing.
The first file is thewfla_bounds.dat file and contains the map image geographic boundaries. The second file,utm-proj, contains the cartographic specifications for programproj . The UNIX command to display the contents of thosefiles and the file contents are shown below. Note the inclusion of thewfla_bounds.dat file on theproj run-line in fileutm-proj. Also note the specification of the optionalproj parameters, -r, -s and-f. Though these are optional param-eters for the execution ofproj , they are required specifications to complete the processing procedures discussed here.
- Supplemental files :
Once theproj parameters have been selected and the supplementary files have been created, processing of the datamay begin. The first command shows the procedure to convert the geographic coordinates to the selected cartesiansystem and creates a 16-bit WHIPS netCDF image. The following commands contained in the block show the pro-
Cookbook Example 1 - Rasterizing point data.
% more wfla_bounds.dat26 -8526 -83.524 -83.524 -85
% more utm-projproj +proj=utm +lon_0=-86 -r -s -m 1:250 -f ‘%.0f’ wfla_bounds.dat farn3.bt

Appendix B - 58
grams and procedures used to convert the 16-bit WHIPS netCDF image to an 8-bit WHIPS image and extract the sub-area used as the figure from the larger image. The command to display the 8-bit image in an X-11 window is alsoincluded.
- Figure 2:
A series of filters were applied to Figure 2,wfla_bt.cdf, to distribute the bathymetry data more completely throughoutthe image. The processing procedure applied and shown here is subjective to the wishes of the user. The filters andfilter sizes were chosen to fill the image as quickly as possible. The summary of the processing steps are meant to berepresentative of processing that can be applied to the image and should not to be considered the ultimate processingsolution.
- Figure 3:
% utm-proj | datapic -b 16 -o wfla_bt.cdf## convert the image to 8-bit and select the sub-area#% bit2bit -i wfla_bt.cdf -o wfla_bt.8bit -v 500,3500% dk2dk -i wfla_bt.8bit -o wfla_bt.sub -a 430,200,240,175## View the 8-bit subarea of the image on the workstation screen# with quickview. If it’s okay, remove the temporary files.#% quickview -i wfla_bt.sub% rm wfla_bt.8bit% rm wfla_bt.sub
% filter -i wfla_bt.cdf -o bt.lpfz1 -z -b 3,3% filter -i bt.lpfz1 -o bt.lpfz2 -z -b 3,3% filter -i bt.lpfz2 -o bt.lpfz3 -z -b 5,5% filter -i bt.lpfz3 -o bt.lpfz4 -z -b 23,23% filter -i bt.lpfz4 -o bt.lpfz5 -l -b 7,7 -v 500,3550% filter -i bt.lpfz5 -o bt.lpfz6 -z -b 7,7% filter -i bt.lpfz6 -o bt.lpfz7 -z -b 9,9% filter -i bt.lpfz7 -o bt.lpfz8 -z -b 15,15% filter -i bt.lpfz8 -o bt.lpfz9 -z -b 7,7% filter -i bt.lpfz9 -o bt.lpfz10 -z -b 11,11## The final smoothing filter#% filter -i bt.lpfz10 -o bt_16final.cdf -l -b 7,7% dk2dk -i bt_16final.cdf -o bt_16final.sub -a 430,200,240,175% minmaxdn -i bt_16final.sub% bit2bit -i bt_16final.sub -o figure03.cdf -v 600,3500% rm bt.lpfz1 bt.lpfz2 bt.lpfz3 bt.lpfz4 bt.lpfz5% rm bt.lpfz6 bt.lpfz7 bt.lpfz8 bt.lpfz9% rm bt_16final.sub

Appendix B - 59
Once the image has been completely filtered, a first-order derivative was produced from the bathymetry. The deriva-tive, shown as Figure 4, was produced with the following programs and their parameters are listed below. The deriv-ative is computed on the entire 16-bit WHIPS netCDF image. The sub-area, shown as Figure 4, was then extractedand converted from 16-bit to 8-bit and converted to an Encapsulated PostScript (EPS) file for printing purposes.
- Figure 4:
The final set of figures illustrate the ability to rasterize vector data to create several image files that can be combinedtogether. Generally, these rasterized vector data files are utilized as overlays. However, rasterized vector data, suchas contour lines, may be processed to produce representative images of the seafloor bathymetry. The format of thecoastline and bathymetric contour files utilized in this example are specific to the Branch of Atlantic Marine Geologyand were generated for compatibility with the MAPGEN system. The coastline information was created using theWorld Data BankII coastline vector information. The user should verify the location of thecoast files prior to follow-ing these examples.
For this example, the Branch’s available coastline data files were accessed to extract the required vector informationto draw the coastline information and create a WHIPS netCDF image file. The desired map area is 41o to 43o latitudeand 72o to 69.5o longitude. The final image will be created in a UTM projection with a map scale of 500 meters.Utilizing the MAPGEN programgetcoastand the available coastline file (/usr/coast/na/bdy), we are able to extractthe vector information that may be used to draw the coastline of eastern Massachusetts.
- Figure 5
% derivative -i bt.lpfz10 -o x04.dder -d% dk2dk -i x04.dder -o xfinal.sub -a 430,200,240,175% bit2bit -i xfinal.sub -o figure04.cdf -v 3950,4150% rm x04.dder% rm xfinal.sub
Cookbook Example 2 - Rasterizing vector data.
% more bounds2.dat43 -7243 -69.541 -69.541 -72
% more utm2-projproj +proj=utm +lon_0=-69 -r -s -m 1:250 -f ’%.0f’ bounds2.dat -
% getcoast -72 -69.5 41 43 -r /usr/coast/na/bdy | utm2-proj | \ linepic -o ne_coast.pic

Appendix B - 60
To create the final image, coastline, bathymetry contours and map graticules are combined to create one image. Thethree images are created individually and combined together using WHIPS programqmos. Map boundaries aredefined as map 39o to 43o latitude and 72o to 68o longitude.
Once again, before beginning, the supplementary files containing the geographic limits and the projection parametersof the map are created. Initially, the created filefigure06.pic contains only the coastline information for the area. Asthe additional overlays are created in filexx.pic, the information is combined withfigure06.pic to produce an imagewith the combined vector information.
- Figure 6:
% more bounds3.dat43 -7243 -6839 -6839 -72
% more utm3-projproj +proj=utm +lon_0=-71 -r -s -m 1:1000 -f ’%.0f’ bounds3.dat - |
## Do the coastlines and state boundaries#% getcoast -72 -68 39 43 -r -f 01 /usr/coast/na/cil | utm3-proj | \ linepic -o figure07.pic -d 254% getcoast -72 -68 39 43 -r /usr/coast/na/bdy | utm3-proj | \ linepic -o xx.pic -d 250% qmos -o figure07.pic -i xx.pic% rm -f xx.pic## Do the contour lines#% getcoast -72 -68 39 43 -r /usr/coast/bathy/neatl_cnt | utm3-proj | \ linepic -o xx.pic -d 225% qmos -o figure07.pic -i xx.pic% rm -f xx.pic## Do the grid lines#% grid_data <bounds3.dat | utm3-proj | linepic -o xx.pic -d 255% qmos -o figure07.pic -i xx.pic% rm -f xx.pic

61
REFERENCES
Evenden, Gerald I. and Botbol, Joseph Moses, 1985, User’s Manual for MAPGEN (UNIX ver-sion): a method of transforming digital cartographic data to a map, Open-File Report 85-706, 58pages plus appendixes on font codes and map projections.
Evenden, Gerald I., 1990, Cartographic Projection Procedures for the UNIX Environment - AUser’s Manual, Open-File Report 90-284, 62 p.
Paskevich, Valerie, 1992, Woods Hole Image Processing System Software Implementation: UsingNetCDF as a Software Interface for Image Processing, Open-File Report 92-25, 72 p.
Snyder, J.P., 1987, Map projections - A working manual: U.S. Geological Survey ProfessionalPaper 1395, 383 p.
Snyder, J.P. and Voxland, R.M., 1989, An album of map projections: U. S. Geological Survey Pro-fessional Paper 1453, 249 p.
Unidata Program Center, NetCDF User’s Guide: An Interface for Data Access, v1.11, March 1991,150 p.


![[Introduction] - WordPress.com · · 2012-06-25Chapter - Introduction Discrete Structures Samujjwal Bhandari 2 Introduction Discrete Mathematics deals with discrete objects. Discrete](https://img.pdfslide.us/doc/110x75/5b18f6f47f8b9a32258c36c3/introduction-2012-06-25chapter-introduction-discrete-structures-samujjwal.jpg)