Embed Size (px)
Citation preview

Radeon Developer PanelDocumentation
Release 1.5.1
AMD Developer Tools
May 16, 2019

Contents
1 Getting started on Windows 3
2 Getting started on Linux 5
3 How to profile your application 73.1 Profiling on a local system . . . . . . . . . . . . . . . . . . . . . . . . . . . . . . . . . . . . . . . . 73.2 Target application configuration . . . . . . . . . . . . . . . . . . . . . . . . . . . . . . . . . . . . . 93.3 Advanced Target application configuration . . . . . . . . . . . . . . . . . . . . . . . . . . . . . . . 93.4 Profiling modes . . . . . . . . . . . . . . . . . . . . . . . . . . . . . . . . . . . . . . . . . . . . . . 153.5 Capturing using the keyboard on Linux . . . . . . . . . . . . . . . . . . . . . . . . . . . . . . . . . 173.6 Profiling on a remote system . . . . . . . . . . . . . . . . . . . . . . . . . . . . . . . . . . . . . . . 18
4 Blacklisting applications 21
5 Using the Clock settings 23
6 The Connection log 25
7 The Radeon Developer Service 277.1 Radeon Developer Service for desktop developer system . . . . . . . . . . . . . . . . . . . . . . . . 277.2 Radeon Developer Service for headless GPU systems . . . . . . . . . . . . . . . . . . . . . . . . . 28
8 Known Issues 298.1 Cleanup After a RadeonDeveloperServiceCLI Crash . . . . . . . . . . . . . . . . . . . . . . . . . . 298.2 Windows Firewall Blocking Incoming Connections . . . . . . . . . . . . . . . . . . . . . . . . . . . 298.3 Disabling Linux Firewall . . . . . . . . . . . . . . . . . . . . . . . . . . . . . . . . . . . . . . . . . 328.4 Setting GPU clock modes on Linux . . . . . . . . . . . . . . . . . . . . . . . . . . . . . . . . . . . 328.5 Running the Panel with elevated privileges . . . . . . . . . . . . . . . . . . . . . . . . . . . . . . . 328.6 Radeon Developer Panel connection issues on Linux . . . . . . . . . . . . . . . . . . . . . . . . . . 328.7 Missing Timing Data for DirectX 12 Applications . . . . . . . . . . . . . . . . . . . . . . . . . . . 328.8 Radeon Developer Service Port numbers . . . . . . . . . . . . . . . . . . . . . . . . . . . . . . . . 358.9 Problems caused by the presence of non-AMD GPUs and non-AMD CPUs with integrated graphics . 35
i

ii
Radeon Developer Panel Documentation, Release 1.5.1
The Radeon Developer panel is part of a suite of tools that can be used by developers to optimize DirectX12 andVulkan applications for AMD GCN graphics hardware. The suite is comprised of the following software:
• Radeon Developer Mode Driver – This is shipped as part of the AMD public driver and supports the developermode features required for profiling and debugging.
• Radeon Developer Service (RDS) – A system tray application that unlocks the Developer Mode Driver featuresand supports communications with high level tools.
• Radeon Developer Service - CLI (Headless RDS) – A console (i.e. non-GUI) application that unlocks theDeveloper Mode Driver features and supports communication with high level tools.
• Radeon Developer Panel (RDP) – A GUI application that allows the developer to configure driver settings andgenerate profiles from DirectX12, Vulkan and OpenCL applications.
• Radeon GPU Profiler (RGP) – A GUI tool used to visualize and analyze the profile data.
This document describes how the Radeon Developer Panel can be used to profile frame-based applications onAMD GCN graphics hardware. The Radeon Developer Panel connects to the Radeon Developer Service inorder to collect a profile.
Note: By default, the driver allocates a maximum of 128 MB video memory per Shader Engine to capture RGPprofiles.
Contents 1

Radeon Developer Panel Documentation, Release 1.5.1
2 Contents
CHAPTER 1
Getting started on Windows
• To collect complete profiles for DirectX 12, run the script ‘AddUserToGroup.bat’ in the scripts folder. SeeMissing Timing Data for DirectX 12 Applications for more information
• You may want to blacklist certain applications so they don’t show up in the UI. For details, see Blacklistingapplications
3
Radeon Developer Panel Documentation, Release 1.5.1
4 Chapter 1. Getting started on Windows
CHAPTER 2
Getting started on Linux
• After installing the latest video driver, make sure that the current user is a member of the graphics group. Thiscan be done by typing: “sudo usermod -a -G video $LOGNAME” Where $LOGNAME is the user name. Logout and log back in again for this to take effect.
• Install the vulkan shared library by typing “sudo apt-get install libvulkan1” or by downloading the VulkanSDK from the LunarG website.
• Run the scripts/EnableSetClockMode.sh script to enable setting the GPU clock. See Setting GPU clock modeson Linux for more information
• If you wish to capture profiles using the keyboard hotkey, see Capturing using the keyboard on Linux
5
Radeon Developer Panel Documentation, Release 1.5.1
6 Chapter 2. Getting started on Linux
CHAPTER 3
How to profile your application
3.1 Profiling on a local system
IMPORTANT: The application you want to profile must NOT already be running. The panel needs to be configuredin advance of starting your application.
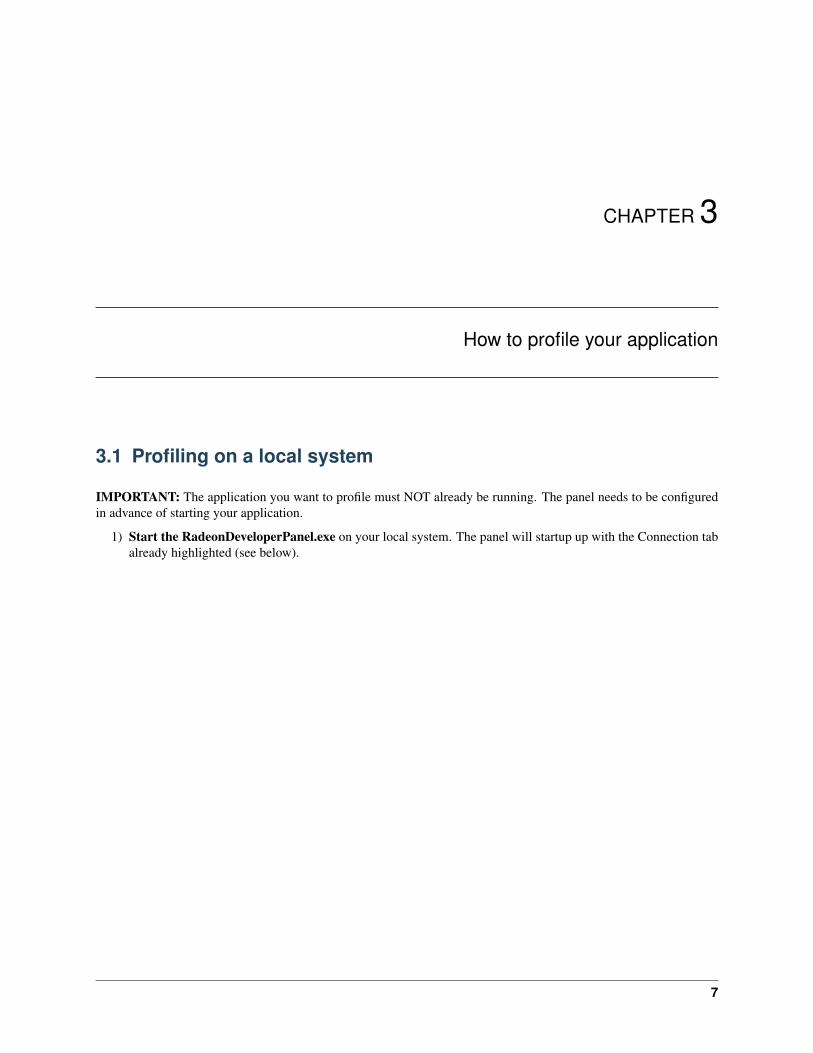
1) Start the RadeonDeveloperPanel.exe on your local system. The panel will startup up with the Connection tabalready highlighted (see below).
7
Radeon Developer Panel Documentation, Release 1.5.1
The UI has three main elements:
• Connection status – to the Radeon Developer Service (currently not connected)
• Recent connections – list shows a history of your previous connections
• New connection – section that allows you to make either a new local or remote connection
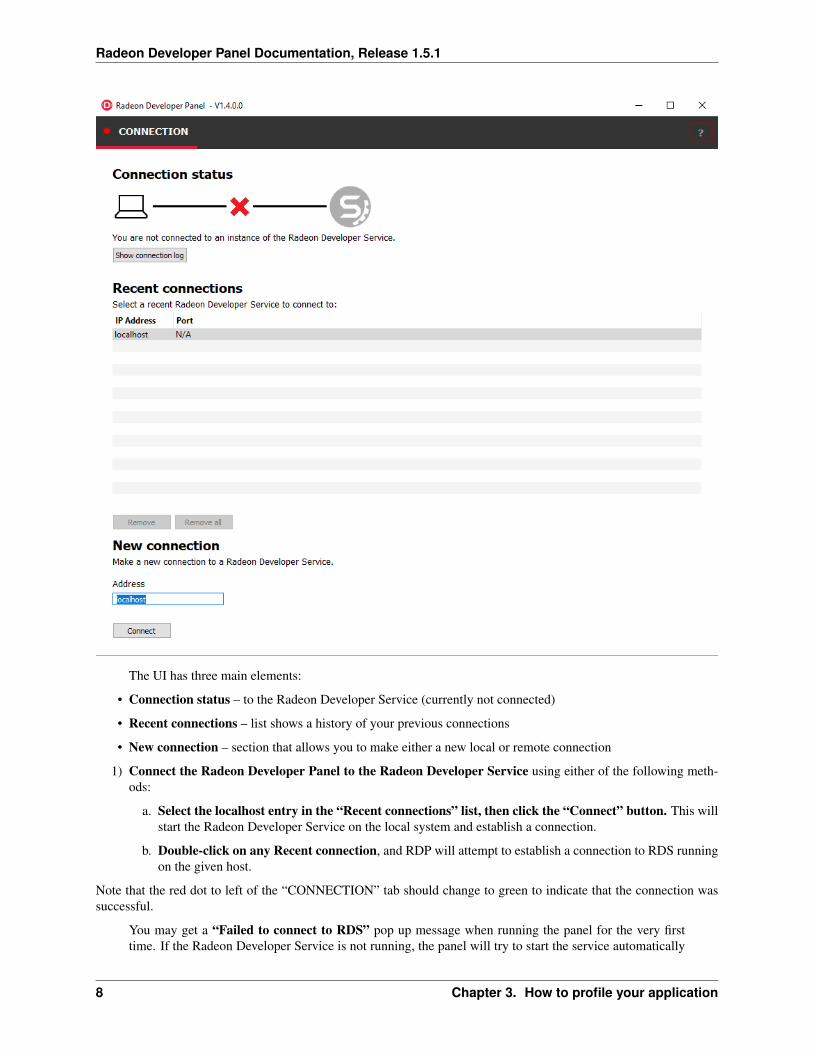
1) Connect the Radeon Developer Panel to the Radeon Developer Service using either of the following meth-ods:
a. Select the localhost entry in the “Recent connections” list, then click the “Connect” button. This willstart the Radeon Developer Service on the local system and establish a connection.
b. Double-click on any Recent connection, and RDP will attempt to establish a connection to RDS runningon the given host.
Note that the red dot to left of the “CONNECTION” tab should change to green to indicate that the connection wassuccessful.
You may get a “Failed to connect to RDS” pop up message when running the panel for the very firsttime. If the Radeon Developer Service is not running, the panel will try to start the service automatically
8 Chapter 3. How to profile your application
Radeon Developer Panel Documentation, Release 1.5.1
for local connections and this can fail due to Windows file permissions (the Radeon Developer Servicewill not be a known application to Windows and the program will not be permitted to start). If you seethis message try manually starting the “RadeonDeveloperService.exe” and connect again.
3.2 Target application configuration
Once a connection to RDS has been established, the Connection options are replaced with the Setup targetapplication view. This view allows target applications to be configured for profiling and other diagnosticoperations. RDP provides two modes for configuring target applications:
• Global mode (basic) – RDP detects and configures every graphics or compute based application that islaunched. This is the default mode when RDP is started.
• Advanced mode - Specific configurations can be applied to individual target applications or groups of targetapplications when they are launched.
Clicking the UI toggle switch below the Setup target application heading selects Global or Advanced mode.
Shown below is the user interface for the Global mode:
Before starting your application, make adjustments to the target application configuration settings. The Enableprofiling setting is enabled by default. Apply settings is disabled by default. In this mode, RDP will detect anytarget application when it is launched and switch to the Profiling tab if profiling is enabled.
3.3 Advanced Target application configuration
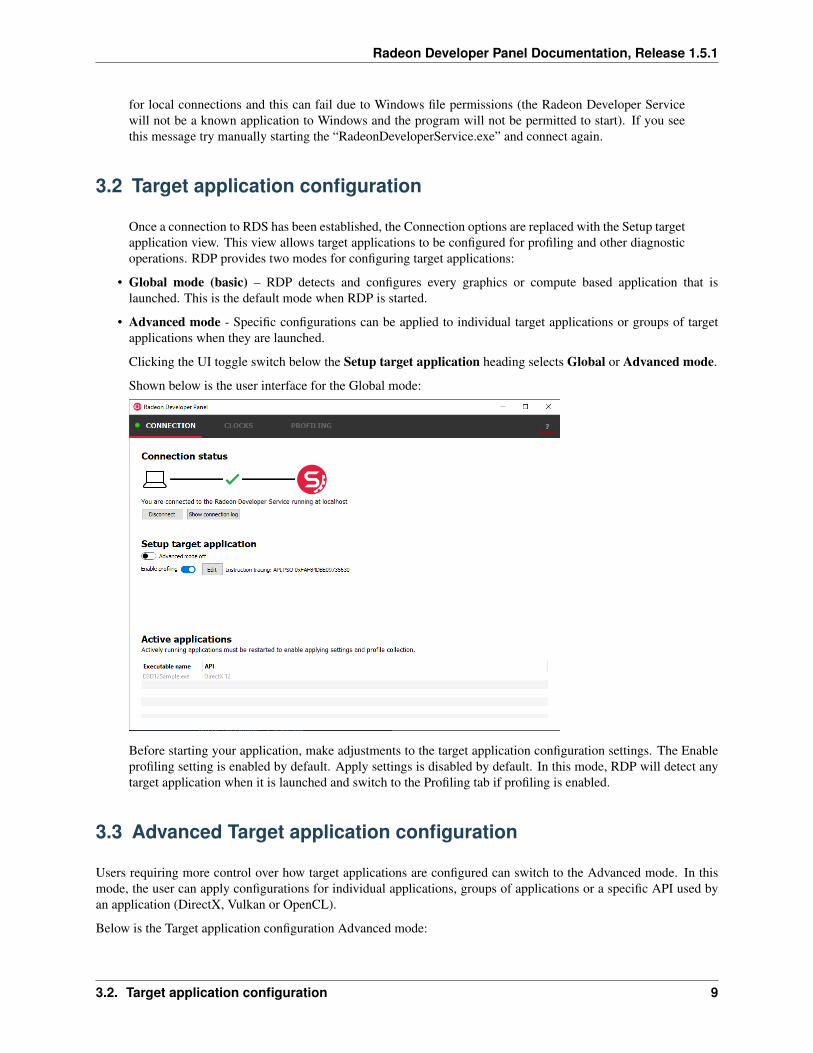
Users requiring more control over how target applications are configured can switch to the Advanced mode. In thismode, the user can apply configurations for individual applications, groups of applications or a specific API used byan application (DirectX, Vulkan or OpenCL).
Below is the Target application configuration Advanced mode:
3.2. Target application configuration 9
Radeon Developer Panel Documentation, Release 1.5.1
The following methods can be used to add entries to the target application configuration table:
a. Use the “. . . ” button to browse to the executable, or manually type it in the executable name textbox.
b. Use the executable name textbox to enter an asterisk ‘*’ which is used as a catch-all for any target applicationlaunched.
c. Select an active process within the Active Applications table, and click the “Add to targets” button. The processwill need to be restarted in order to apply settings at application startup, and to enable collection of RGP profiles.
Each row in the Target application configuration table contains configuration options applied to a target applicationor multiple applications. The row selected by RDP when a target application is launched is determined by the row’spreference (the top row is the highest preference) and three columns in the table:
1) Process name filter column - This is a filespec that must match the target application’s process name. Partialfilenames, asterisks and exact matching names are all considered while matching. For example, the following Processname filter strings will match a target application named “sample-release.exe”
• *
• *.exe
• sample*.exe
• *-release
• sample-release.exe
On Linux, the matching is case sensitive. On Windows case is ignored.
2) API filter column - RDP detects the API of driver clients initiated when a target application is launched. Therow in the target application configuration table is skipped if the API type of the application doesn’t match the APIfilter. Four modes of API filtering are provided: Include DirectX12, Include Vulkan, Include OpenCL or Include all(the default). Setting an API filter can be useful when an application contains more than one client with different API
10 Chapter 3. How to profile your application
Radeon Developer Panel Documentation, Release 1.5.1
types. RDP can be configured to filter out those clients with APIs which aren’t of interest. When used in conjunctionwith an asterisk for process name filters, multiple rows can each have different API filter (one row handling all DirectXapplications and one row handling all Vulkan applications, for example).
3) Enable column - An entire row can be disabled if it isn’t currently needed, but may be needed in the future. Therow will be excluded when RDP attempts to find a match for a target application that is launched. When a row isdisabled, the text is shaded light gray. Click the toggle switches in the row’s Enable columns to enable or disable thatentry.
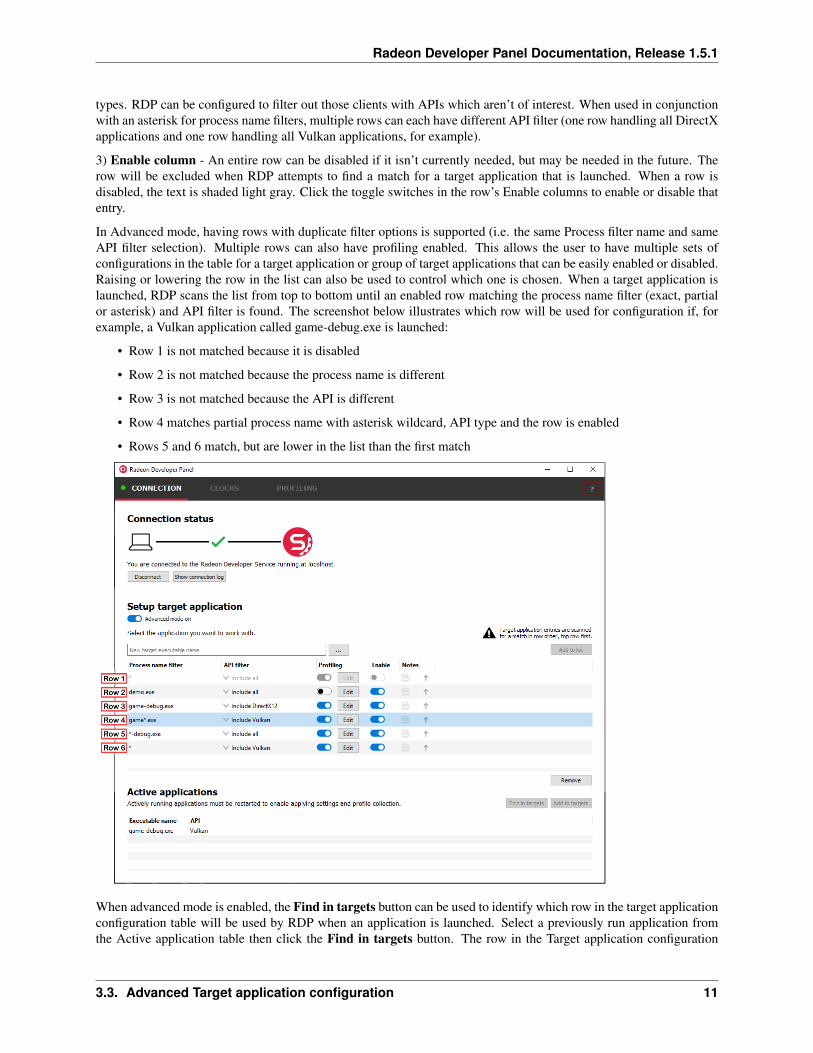
In Advanced mode, having rows with duplicate filter options is supported (i.e. the same Process filter name and sameAPI filter selection). Multiple rows can also have profiling enabled. This allows the user to have multiple sets ofconfigurations in the table for a target application or group of target applications that can be easily enabled or disabled.Raising or lowering the row in the list can also be used to control which one is chosen. When a target application islaunched, RDP scans the list from top to bottom until an enabled row matching the process name filter (exact, partialor asterisk) and API filter is found. The screenshot below illustrates which row will be used for configuration if, forexample, a Vulkan application called game-debug.exe is launched:
• Row 1 is not matched because it is disabled
• Row 2 is not matched because the process name is different
• Row 3 is not matched because the API is different
• Row 4 matches partial process name with asterisk wildcard, API type and the row is enabled
• Rows 5 and 6 match, but are lower in the list than the first match
When advanced mode is enabled, the Find in targets button can be used to identify which row in the target applicationconfiguration table will be used by RDP when an application is launched. Select a previously run application fromthe Active application table then click the Find in targets button. The row in the Target application configuration
3.3. Advanced Target application configuration 11
Radeon Developer Panel Documentation, Release 1.5.1
table that RDP will use when the application is launched again will be selected. If no match is found, all rows will bedeselected.
The row used is also automatically selected when the target application is launched.
The order of rows in the Target application configuration table can be adjusted using the up and down arrow icons inthe columns to the right. Clicking the up or down arrow moves the row up or down by one row. Holding the controlkey while clicking the up or down arrow moves the row to the top or bottom of the list. Alternatively, right clicking ona row will displays a context menu with options to reorder rows.
Clicking on the notes icon opens a notepad dialog box allowing the user to enter a brief description of the configurationdetails for the row. Hovering over the notes icon with the mouse will display a tooltip with the description entered.
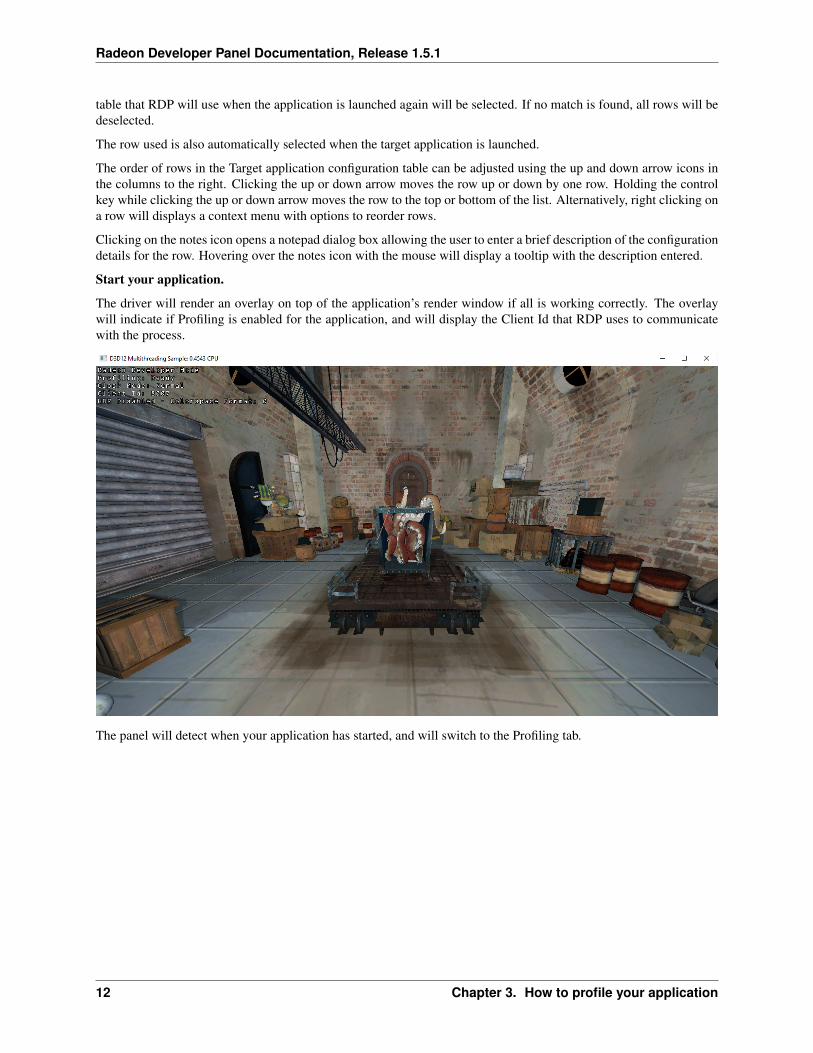
Start your application.
The driver will render an overlay on top of the application’s render window if all is working correctly. The overlaywill indicate if Profiling is enabled for the application, and will display the Client Id that RDP uses to communicatewith the process.
The panel will detect when your application has started, and will switch to the Profiling tab.
12 Chapter 3. How to profile your application
Radeon Developer Panel Documentation, Release 1.5.1
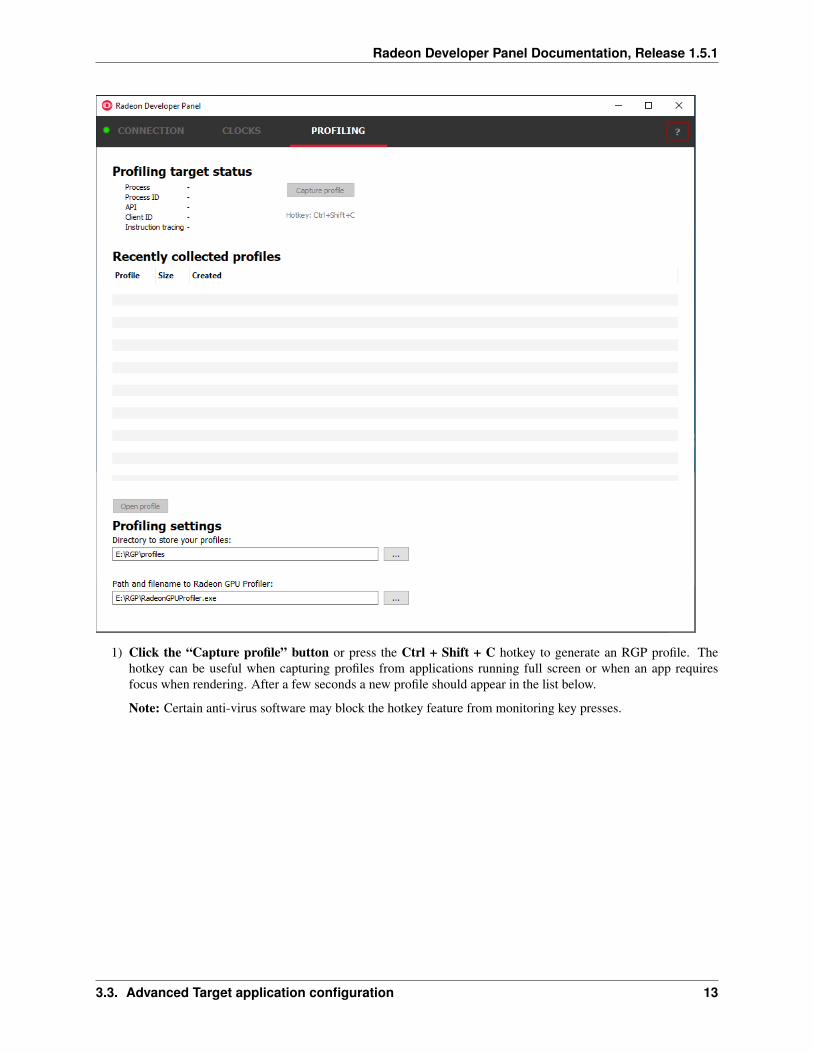
1) Click the “Capture profile” button or press the Ctrl + Shift + C hotkey to generate an RGP profile. Thehotkey can be useful when capturing profiles from applications running full screen or when an app requiresfocus when rendering. After a few seconds a new profile should appear in the list below.
Note: Certain anti-virus software may block the hotkey feature from monitoring key presses.
3.3. Advanced Target application configuration 13
Radeon Developer Panel Documentation, Release 1.5.1
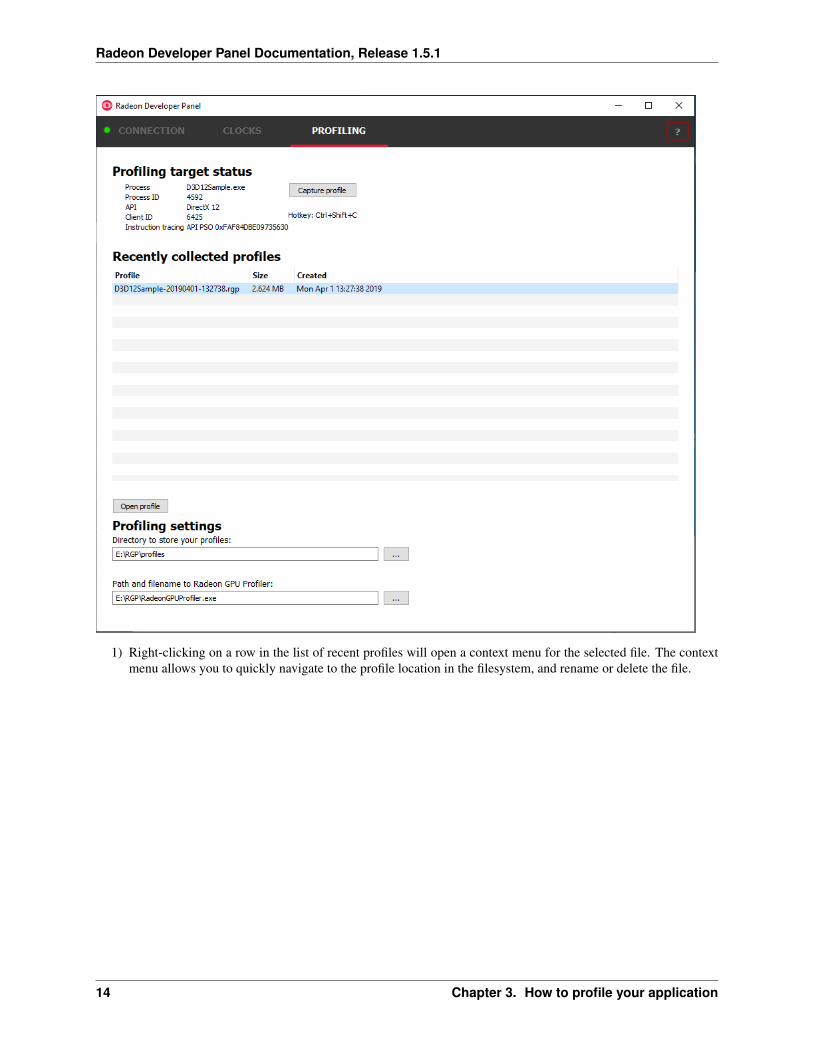
1) Right-clicking on a row in the list of recent profiles will open a context menu for the selected file. The contextmenu allows you to quickly navigate to the profile location in the filesystem, and rename or delete the file.
14 Chapter 3. How to profile your application
Radeon Developer Panel Documentation, Release 1.5.1
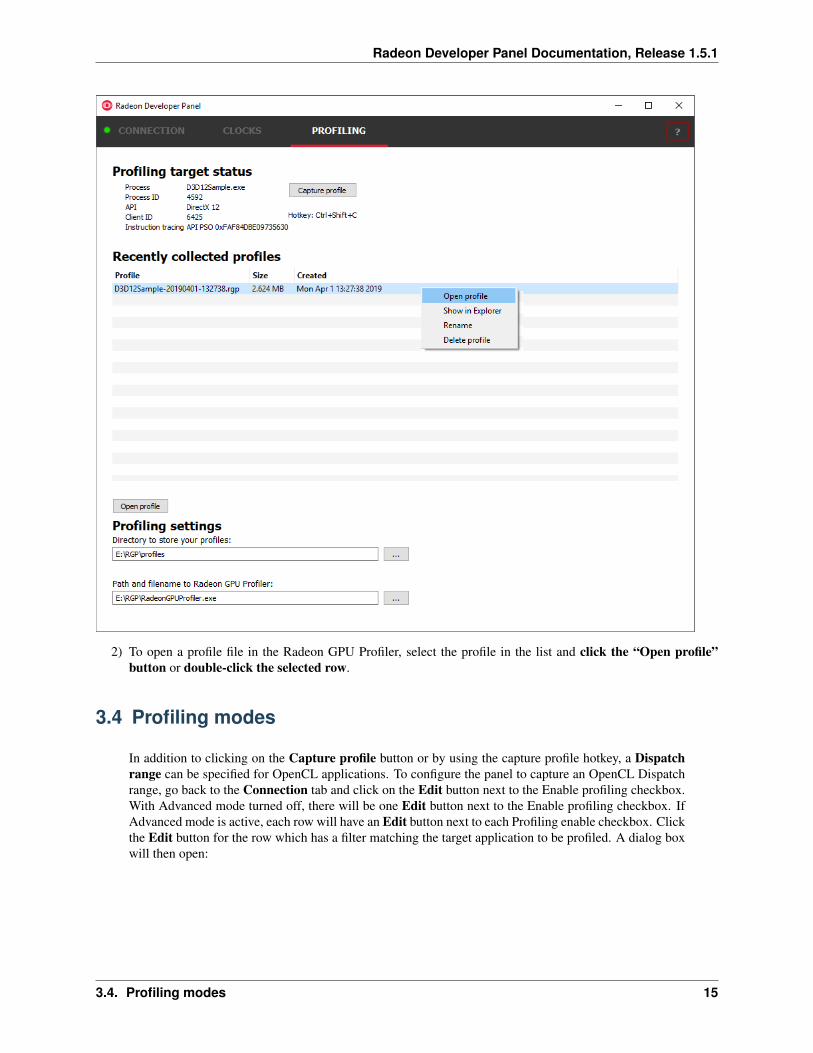
2) To open a profile file in the Radeon GPU Profiler, select the profile in the list and click the “Open profile”button or double-click the selected row.
3.4 Profiling modes
In addition to clicking on the Capture profile button or by using the capture profile hotkey, a Dispatchrange can be specified for OpenCL applications. To configure the panel to capture an OpenCL Dispatchrange, go back to the Connection tab and click on the Edit button next to the Enable profiling checkbox.With Advanced mode turned off, there will be one Edit button next to the Enable profiling checkbox. IfAdvanced mode is active, each row will have an Edit button next to each Profiling enable checkbox. Clickthe Edit button for the row which has a filter matching the target application to be profiled. A dialog boxwill then open:
3.4. Profiling modes 15
Radeon Developer Panel Documentation, Release 1.5.1
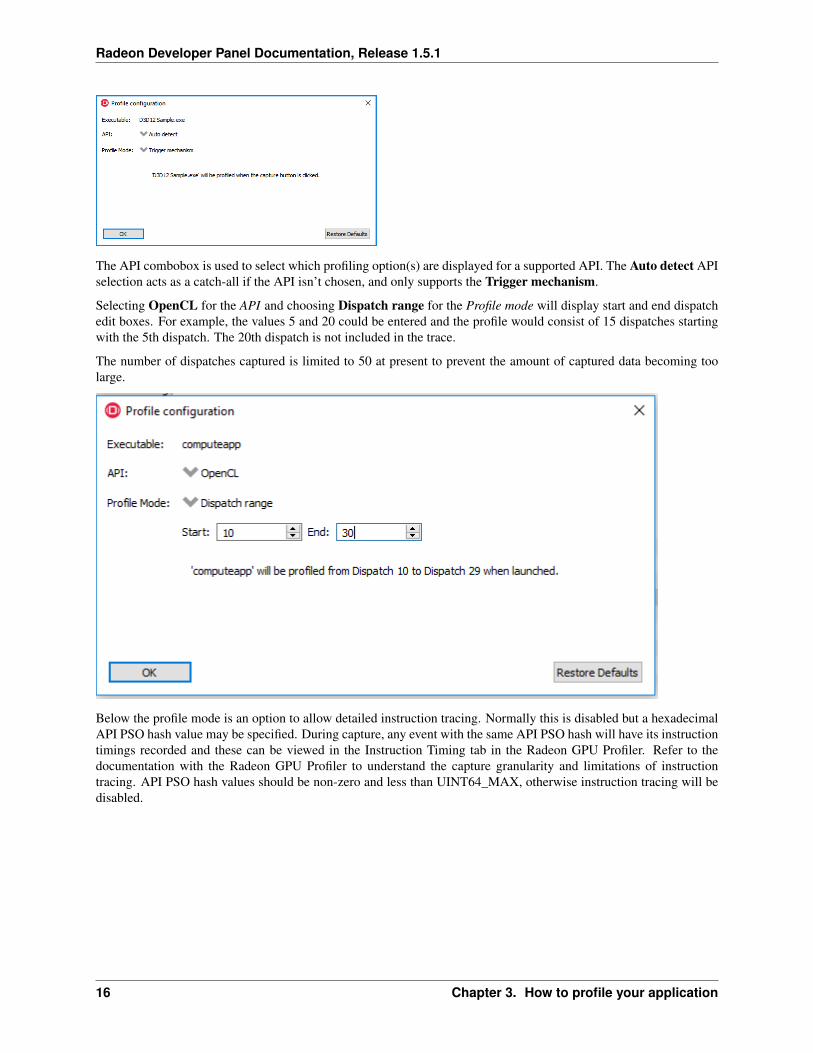
The API combobox is used to select which profiling option(s) are displayed for a supported API. The Auto detect APIselection acts as a catch-all if the API isn’t chosen, and only supports the Trigger mechanism.
Selecting OpenCL for the API and choosing Dispatch range for the Profile mode will display start and end dispatchedit boxes. For example, the values 5 and 20 could be entered and the profile would consist of 15 dispatches startingwith the 5th dispatch. The 20th dispatch is not included in the trace.
The number of dispatches captured is limited to 50 at present to prevent the amount of captured data becoming toolarge.
Below the profile mode is an option to allow detailed instruction tracing. Normally this is disabled but a hexadecimalAPI PSO hash value may be specified. During capture, any event with the same API PSO hash will have its instructiontimings recorded and these can be viewed in the Instruction Timing tab in the Radeon GPU Profiler. Refer to thedocumentation with the Radeon GPU Profiler to understand the capture granularity and limitations of instructiontracing. API PSO hash values should be non-zero and less than UINT64_MAX, otherwise instruction tracing will bedisabled.
16 Chapter 3. How to profile your application
Radeon Developer Panel Documentation, Release 1.5.1
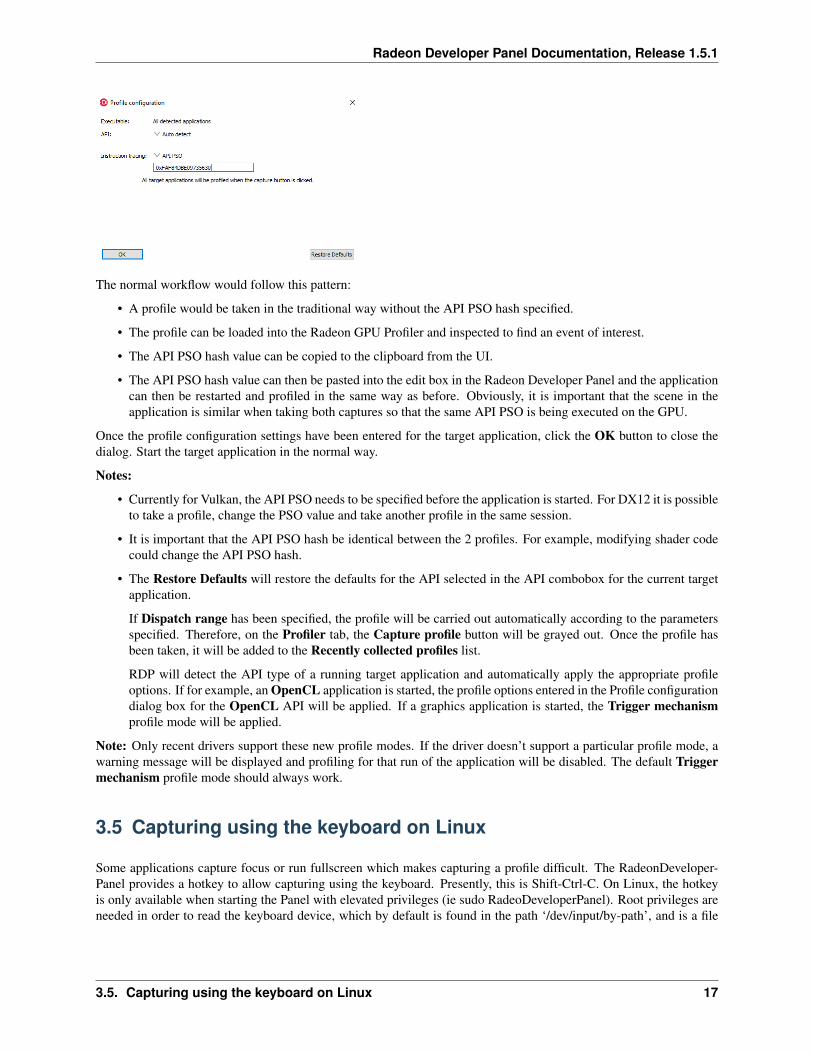
The normal workflow would follow this pattern:
• A profile would be taken in the traditional way without the API PSO hash specified.
• The profile can be loaded into the Radeon GPU Profiler and inspected to find an event of interest.
• The API PSO hash value can be copied to the clipboard from the UI.
• The API PSO hash value can then be pasted into the edit box in the Radeon Developer Panel and the applicationcan then be restarted and profiled in the same way as before. Obviously, it is important that the scene in theapplication is similar when taking both captures so that the same API PSO is being executed on the GPU.
Once the profile configuration settings have been entered for the target application, click the OK button to close thedialog. Start the target application in the normal way.
Notes:
• Currently for Vulkan, the API PSO needs to be specified before the application is started. For DX12 it is possibleto take a profile, change the PSO value and take another profile in the same session.
• It is important that the API PSO hash be identical between the 2 profiles. For example, modifying shader codecould change the API PSO hash.
• The Restore Defaults will restore the defaults for the API selected in the API combobox for the current targetapplication.
If Dispatch range has been specified, the profile will be carried out automatically according to the parametersspecified. Therefore, on the Profiler tab, the Capture profile button will be grayed out. Once the profile hasbeen taken, it will be added to the Recently collected profiles list.
RDP will detect the API type of a running target application and automatically apply the appropriate profileoptions. If for example, an OpenCL application is started, the profile options entered in the Profile configurationdialog box for the OpenCL API will be applied. If a graphics application is started, the Trigger mechanismprofile mode will be applied.
Note: Only recent drivers support these new profile modes. If the driver doesn’t support a particular profile mode, awarning message will be displayed and profiling for that run of the application will be disabled. The default Triggermechanism profile mode should always work.
3.5 Capturing using the keyboard on Linux
Some applications capture focus or run fullscreen which makes capturing a profile difficult. The RadeonDeveloper-Panel provides a hotkey to allow capturing using the keyboard. Presently, this is Shift-Ctrl-C. On Linux, the hotkeyis only available when starting the Panel with elevated privileges (ie sudo RadeoDeveloperPanel). Root privileges areneeded in order to read the keyboard device, which by default is found in the path ‘/dev/input/by-path’, and is a file
3.5. Capturing using the keyboard on Linux 17
Radeon Developer Panel Documentation, Release 1.5.1
ending with ‘event-kbd’. If this path doesn’t exist or the keyboard device has a different name, copy the KeyboardDe-vice.txt file from the docs directory to the root folder where these tools are located and edit this file so it contains thefull path and file name of the keyboard device on your system.
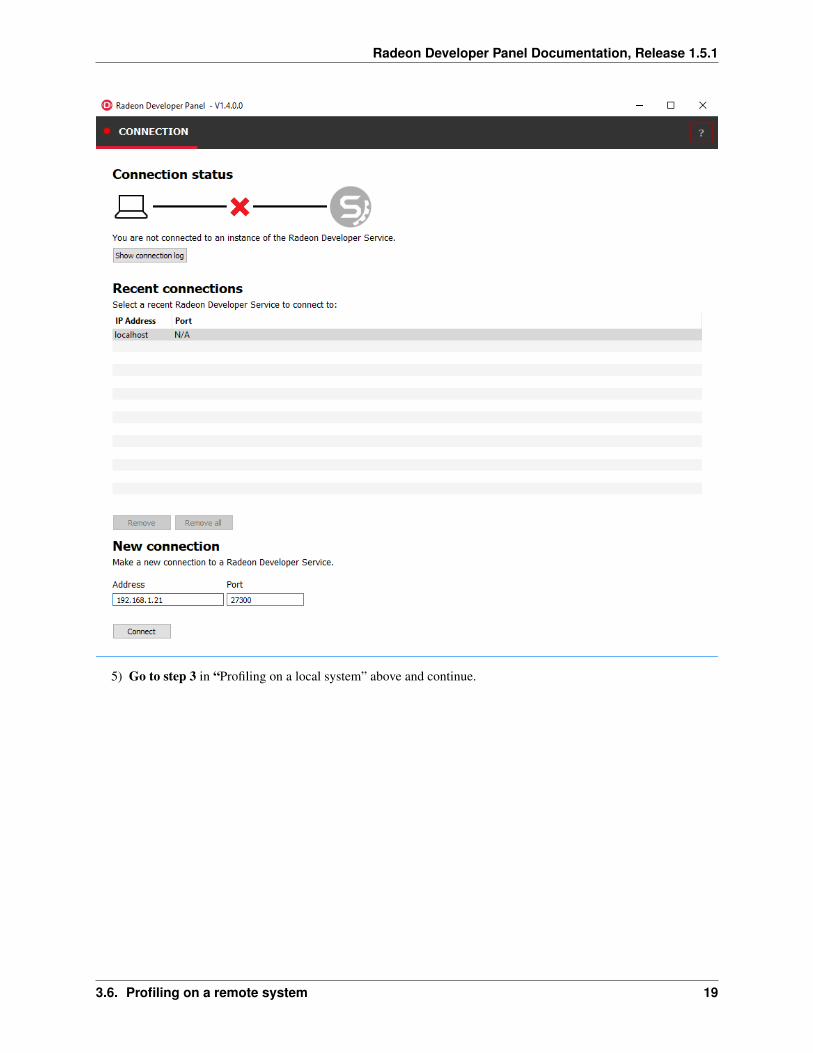
3.6 Profiling on a remote system
There are two variations of the Radeon Developer Service: The GUI based RadeonDeveloperService and the Radeon-DeveloperServiceCLI (command line interface). For headless operating systems which do not support a graphical userinterface, the RadeonDeveloperServiceCLI executable can be started from a terminal console window.
The following steps are used to connect the RadeoDeveloperPanel to a remote Radeon Developer Service:
1) Start the RadeonDeveloperService or RadeonDeveloperServiceCLI executable on the remote system.
a. NOTE: RadeonDeveloperServiceCLI is a command line version of the Radeon Developer Service thathas no UI components and is designed to run from the command line. Please note that no system tray iconwill appear when the command line version of the service is running.
2) Start the RadeonDeveloperPanel executable on your local system. The panel will start up with the Connectiontab already highlighted (see below).
3) In the New connection section, fill in the Address text box with the IP address of the remote system runningthe Radeon Developer Service.
4) Click the “Connect new” button. This will establish a connection to the remote system. The red dot to left ofthe “CONNECTION” tab should change to green to indicate that the connection was successful.
18 Chapter 3. How to profile your application
Radeon Developer Panel Documentation, Release 1.5.1
5) Go to step 3 in “Profiling on a local system” above and continue.
3.6. Profiling on a remote system 19

Radeon Developer Panel Documentation, Release 1.5.1
20 Chapter 3. How to profile your application
CHAPTER 4
Blacklisting applications
Sometimes it is useful to completely exclude certain background applications from being recognized anddisplayed in the Radeon Developer Panel. For example, Windows 10 has applications that use DirectX12 and when they are started can show up in the list of target applications. When first running thepanel, a default list of blacklisted applications is generated and written to ProcessBlacklist.txt in the folder:C:\Users\<user_name>\AppData\Roaming\RadeonDeveloperDriver. This file can be updated to include other ap-plications that are to be ignored. If the file is removed or isn’t present, a file containing a default list of blacklistedapplications will be added. A current list of blacklisted applications can be found from the open source DevDriverToolson github (https://github.com/GPUOpen-Tools/DevDriverTools) near the top of the file: sourceRDPSettingsRDPSet-tings.cpp
21
Radeon Developer Panel Documentation, Release 1.5.1
22 Chapter 4. Blacklisting applications
CHAPTER 5
Using the Clock settings
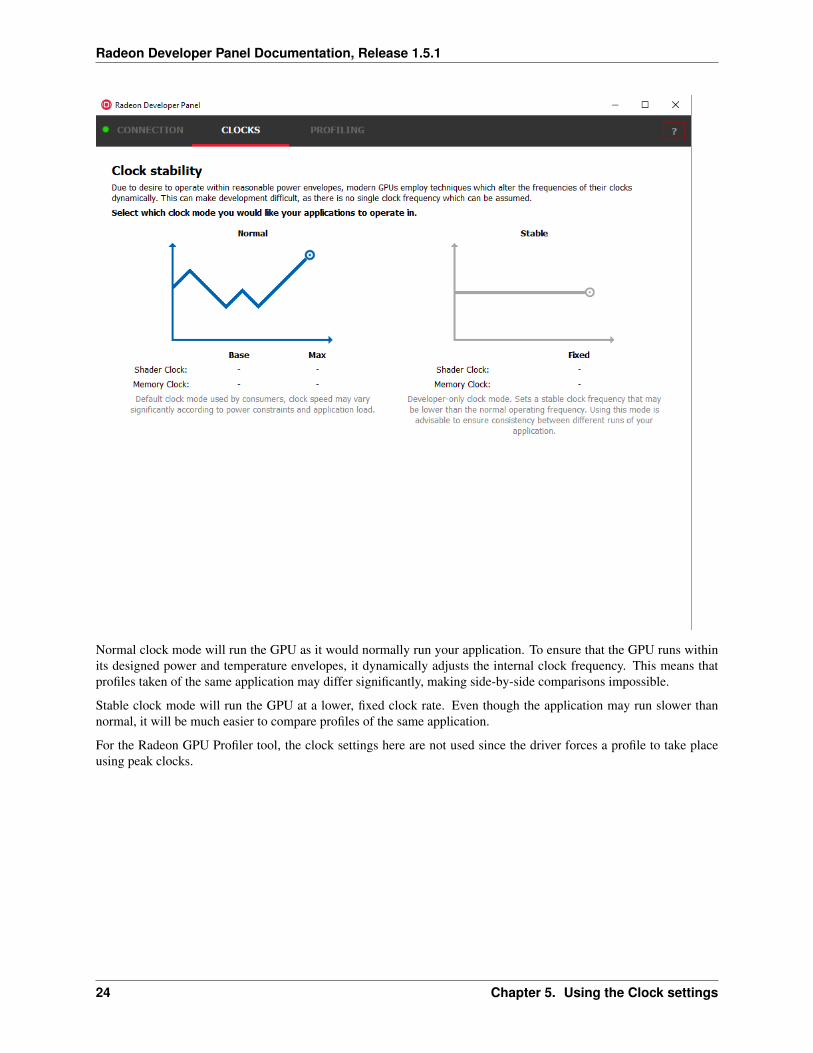
The Radeon developer Panel (RDP) allows the developer to select from a number of clock modes.
23
Radeon Developer Panel Documentation, Release 1.5.1
Normal clock mode will run the GPU as it would normally run your application. To ensure that the GPU runs withinits designed power and temperature envelopes, it dynamically adjusts the internal clock frequency. This means thatprofiles taken of the same application may differ significantly, making side-by-side comparisons impossible.
Stable clock mode will run the GPU at a lower, fixed clock rate. Even though the application may run slower thannormal, it will be much easier to compare profiles of the same application.
For the Radeon GPU Profiler tool, the clock settings here are not used since the driver forces a profile to take placeusing peak clocks.
24 Chapter 5. Using the Clock settings
CHAPTER 6
The Connection log
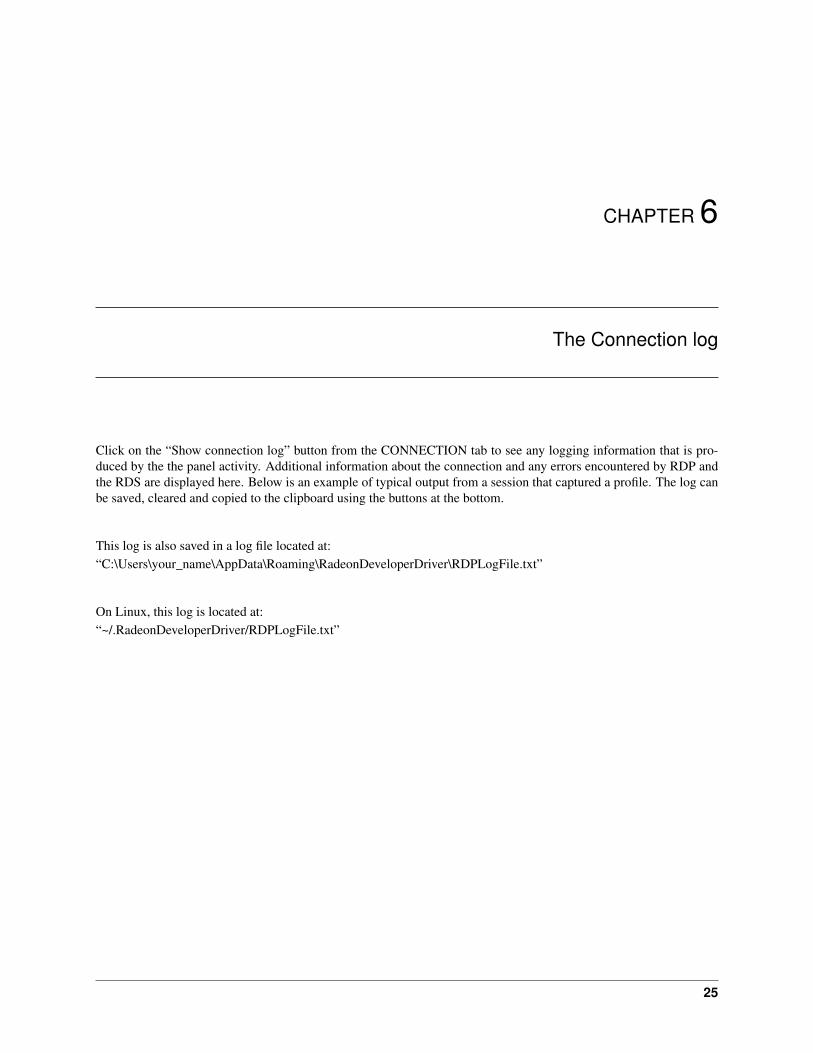
Click on the “Show connection log” button from the CONNECTION tab to see any logging information that is pro-duced by the the panel activity. Additional information about the connection and any errors encountered by RDP andthe RDS are displayed here. Below is an example of typical output from a session that captured a profile. The log canbe saved, cleared and copied to the clipboard using the buttons at the bottom.
This log is also saved in a log file located at:“C:\Users\your_name\AppData\Roaming\RadeonDeveloperDriver\RDPLogFile.txt”
On Linux, this log is located at:“~/.RadeonDeveloperDriver/RDPLogFile.txt”
25
Radeon Developer Panel Documentation, Release 1.5.1
26 Chapter 6. The Connection log
CHAPTER 7
The Radeon Developer Service
Two version of the Radeon developer service are provided, one with a configuration UI and system tray icon, and onedesigned for use with headless GPU system where no UI can be supported.
7.1 Radeon Developer Service for desktop developer system
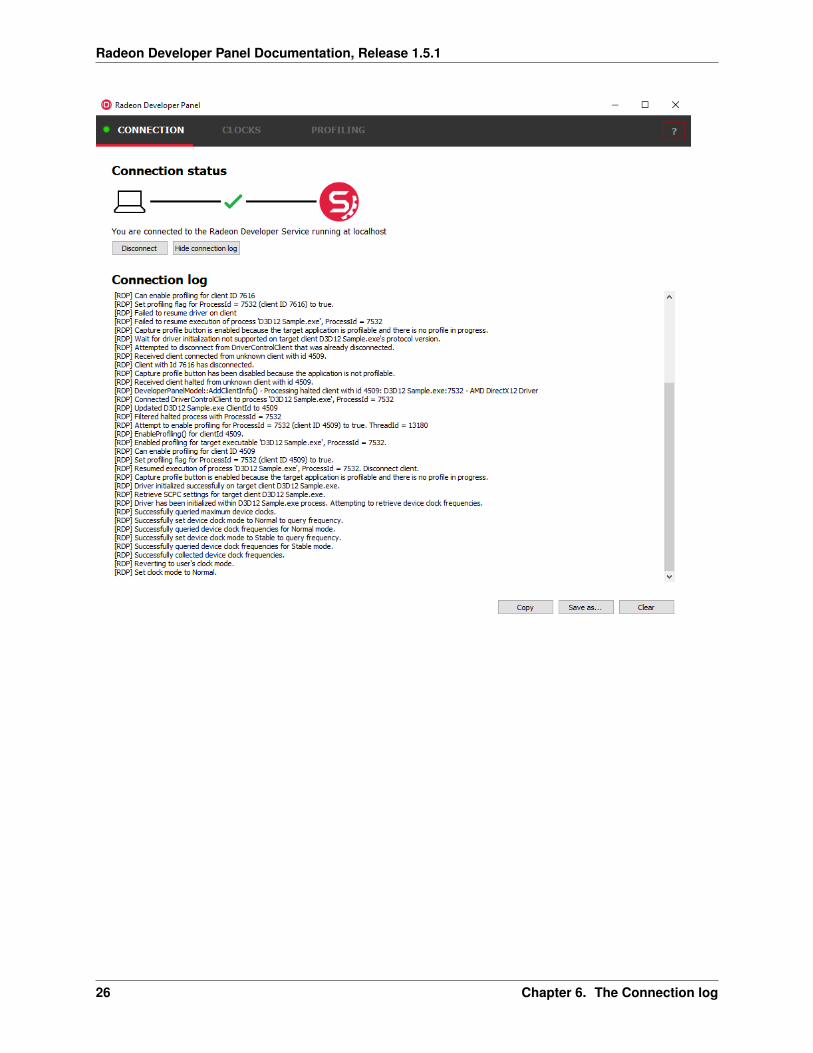
RadeonDeveloperService(.exe) – Can be used for general use where the system has a monitor and UI (e.g. desktopdevelopment machines). The Radeon Developer Service includes a configuration window containing basic serviceconfiguration settings and software info. Double click the Radeon Developer Service system tray icon to open theconfiguration window, or right-click on the system tray icon and select ‘configure’ from the context menu.
• Listen port – The port that the Radeon Developer Service uses to listen for incoming connections from a remoteRadeon Developer Panel. The default port is 27300. Altering the port will disconnect all existing sessions.The circular arrows icon to the right of the Listen port field can be clicked to reset the port to the default value.
• Version info – Software version information for the Radeon Developer Service.
Double click the Radeon Developer Service system tray icon again or right-click on the system tray icon and select‘configure’ from the context menu to close the configuration window.
Please note that when running both the Radeon Developer Panel and the Radeon Developer Service on the samesystem the communication between the two uses pipes, not sockets and ports, so setting the port has no effect.
27
Radeon Developer Panel Documentation, Release 1.5.1
7.2 Radeon Developer Service for headless GPU systems
RadeonDeveloperServiceCLI(.exe) – Command line version for use with headless GPU systems where no UI can beprovided. NOTE: This version can also run on a system that has a monitor and UI.
The following command line options are available for RadeonDeveloperServiceCLI:
1) – port <port number> Overrides the default listener port used by the service (27300 is the default).
Please note that the service will need to be explicitly started before starting the Radeon Developer Panel. If the serviceisn’t running, the Radeon Developer Panel will automatically start the UI version of the Radeon Developer Service,which may not be what is required.
28 Chapter 7. The Radeon Developer Service

CHAPTER 8
Known Issues
8.1 Cleanup After a RadeonDeveloperServiceCLI Crash
If the RadeonDeveloperServiceCLI executable crashes on Linux, shared memory may need to be cleaned up by run-ning the RemoveSharedMemory.sh script located in the script folder of the RGP release kit. Run the script withelevated privileges using sudo. If this fails to work, try starting the panel with elevated privileges.
8.2 Windows Firewall Blocking Incoming Connections
1) Deleting the settings file. If problems arise with connection or application histo-ries, these can be resolved by deleting the Radeon Developer Panel’s settings file at:“C:\Users\your_name\AppData\Roaming\RadeonDeveloperDriver\RDPSettings.xml”
on Windows. On Linux, the corresponding file is located at:
“~/.RadeonDeveloperDriver/RDPSettings.xml”
2) “Connection Failure” error message. This issue is sometimes seen when running the panel for the very firsttime. The panel tries to start the service automatically for local connections and this can fail. If you see thismessage try manually starting the “RadeonDeveloperService.exe” and connect again.
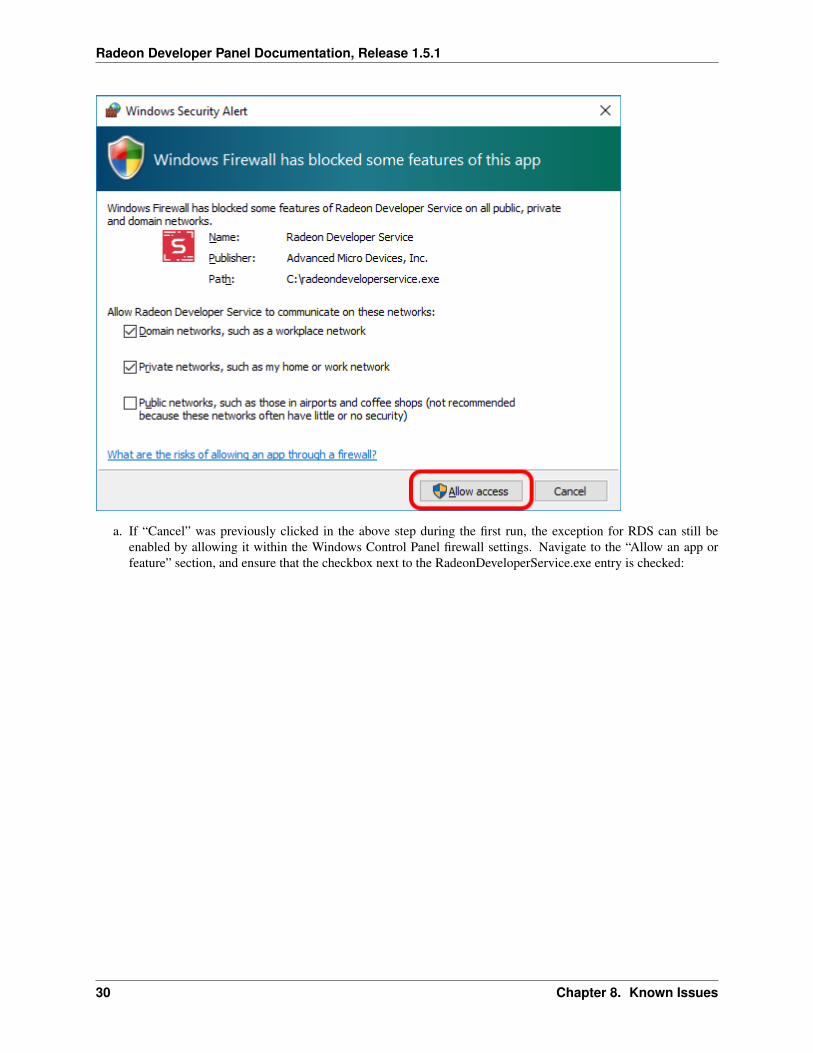
3) Remote connection attempts timing out. When running the Radeon Developer Service on Windows, theWindows Firewall may attempt to block incoming connection attempts from other machines. The best methodsof ensuring that remote connections are established correctly are:
a. Allow the RDS firewall exception to be created within the Windows Firewall when RDS is first started.Within the Windows Security Alert popup, enable the checkboxes that apply for your network configura-tion, and click “Allow access”.
29
Radeon Developer Panel Documentation, Release 1.5.1
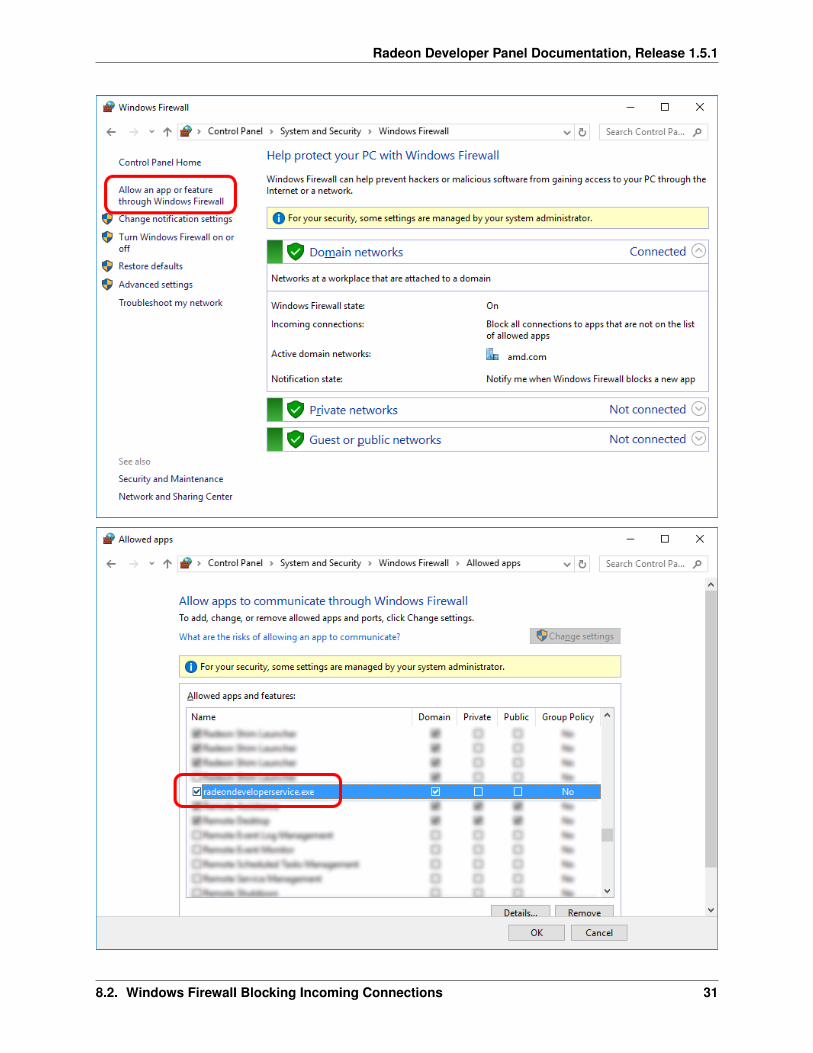
a. If “Cancel” was previously clicked in the above step during the first run, the exception for RDS can still beenabled by allowing it within the Windows Control Panel firewall settings. Navigate to the “Allow an app orfeature” section, and ensure that the checkbox next to the RadeonDeveloperService.exe entry is checked:
30 Chapter 8. Known Issues
Radeon Developer Panel Documentation, Release 1.5.1
8.2. Windows Firewall Blocking Incoming Connections 31
Radeon Developer Panel Documentation, Release 1.5.1
a. Alternatively, disable the Windows Firewall entirely will also allow RDS to be connected to.
NOTE The Windows firewall alert in no way indicates that the Radeon Developer tools are trying to commu-nicate to an AMD server over the internet. The Radeon Developer tools do not attempt to connect to a remoteAMD server of any description and do not send personal or system information over remote connections. TheRadeon Developer Panel needs to communicate with the Radeon Developer Service, which may or may not beon the same machine, and a connection needs to be made between the two (normally via a socket).
8.3 Disabling Linux Firewall
If the remote machine is running Linux and the “Connection Failure” error message is displayed, the Linux firewallmay need to be disabled. This is done by typing “sudo ufw disable” in a terminal. The firewall can be re-enabled aftercapturing by typing “sudo ufw enable”.
8.4 Setting GPU clock modes on Linux
Adjusting the GPU clock mode on Linux is accomplished by writing to/sys/class/drm/card<n>/device/power_dpm_force_performance_level, where <n> is the index of the card inquestion. By default this file is only modifiable by root, so the application being profiled would have to be run as rootin order for it to modify the clock mode. It is possible to modify the permissions for the file instead so that it can bewritten by unprivileged users. The Radeon GPU Profiler package includes the “scripts/EnableSetClockMode.sh”script which will allow setting GPU clock mode in cases where the target application is not, or cannot, run as root.Execute this script before running the Radeon Developer Service and target application, and the GPU clockmode can be updated correctly at runtime. This script needs to be run each time you reboot your machine; the filepermissions do not survive system reboots.
8.5 Running the Panel with elevated privileges
As previously mentioned, the panel only needs to be run with elevated privileges if the keyboard shortcut is neededfor capturing. On Ubuntu 18.04, a dialog box may pop up indicating that the RadeonDeveloperService is running inheadless mode. This is nothing to worry about and will not affect profiling in any way; it just means that the root shelldoesn’t have access to the system tray so is running without a user interface. The only downside is that there won’t bea ‘service’ icon available on the desktop.
8.6 Radeon Developer Panel connection issues on Linux
The Radeon Developer Panel may fail to start the Radeon Developer Service when the Connect button is clicked. Ifthis occurs, manually start the Radeon Developer Service, select localhost from the the Recent connections list andclick the Connect button again.
8.7 Missing Timing Data for DirectX 12 Applications
To collect complete profile datasets for DirectX 12 applications, the user account in Windows needs to be associatedwith the “Performance Log Users” group. If these privileges aren’t configured properly, profiles collected under theuser’s account may not include all timing data for GPU Sync objects.
32 Chapter 8. Known Issues
Radeon Developer Panel Documentation, Release 1.5.1
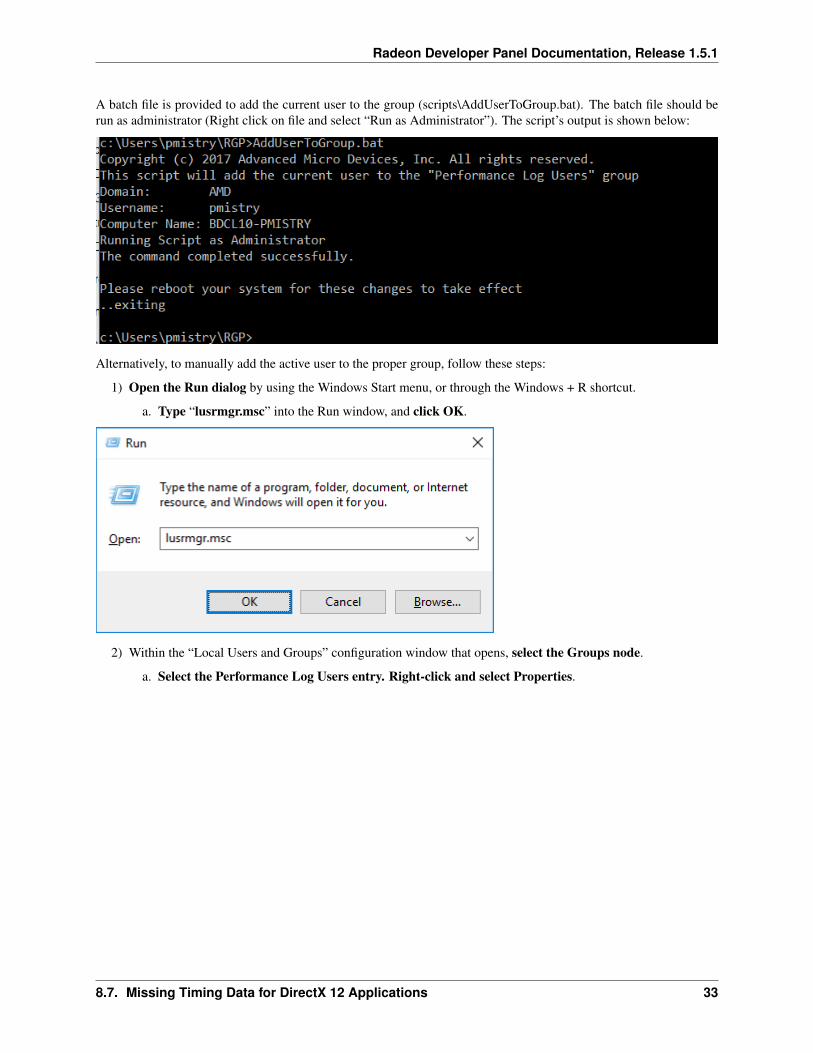
A batch file is provided to add the current user to the group (scripts\AddUserToGroup.bat). The batch file should berun as administrator (Right click on file and select “Run as Administrator”). The script’s output is shown below:
Alternatively, to manually add the active user to the proper group, follow these steps:
1) Open the Run dialog by using the Windows Start menu, or through the Windows + R shortcut.
a. Type “lusrmgr.msc” into the Run window, and click OK.
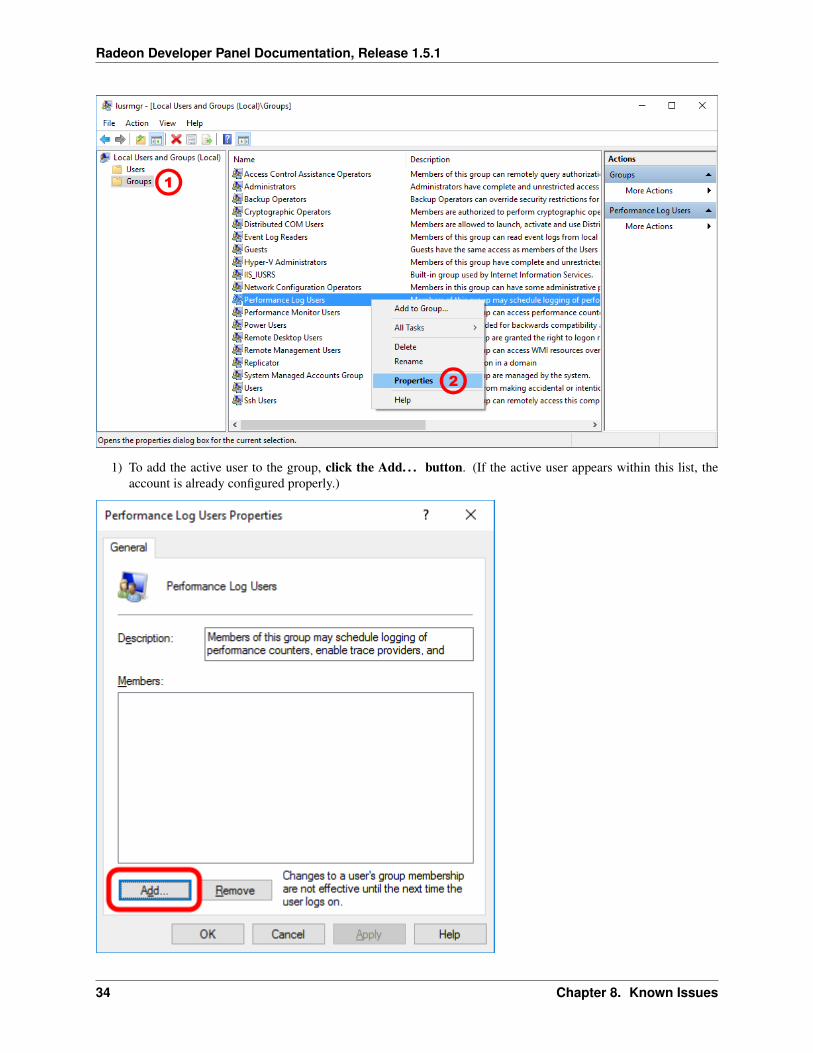
2) Within the “Local Users and Groups” configuration window that opens, select the Groups node.
a. Select the Performance Log Users entry. Right-click and select Properties.
8.7. Missing Timing Data for DirectX 12 Applications 33
Radeon Developer Panel Documentation, Release 1.5.1
1) To add the active user to the group, click the Add. . . button. (If the active user appears within this list, theaccount is already configured properly.)
34 Chapter 8. Known Issues
Radeon Developer Panel Documentation, Release 1.5.1
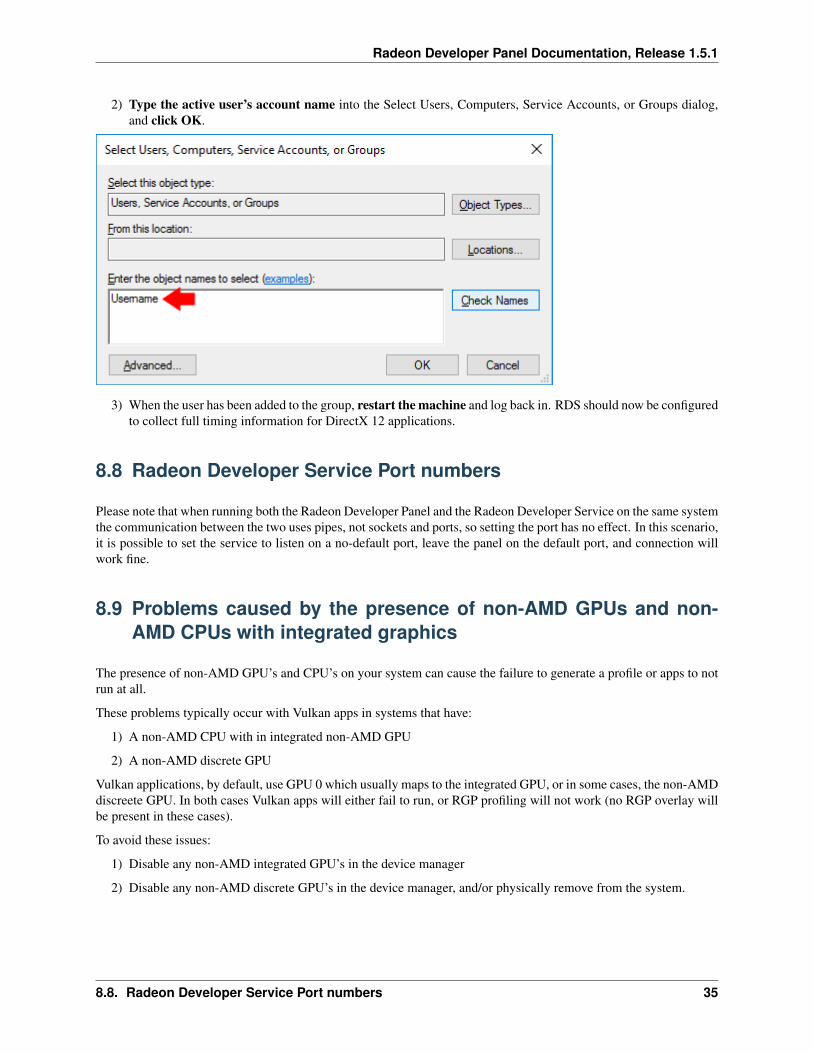
2) Type the active user’s account name into the Select Users, Computers, Service Accounts, or Groups dialog,and click OK.
3) When the user has been added to the group, restart the machine and log back in. RDS should now be configuredto collect full timing information for DirectX 12 applications.
8.8 Radeon Developer Service Port numbers
Please note that when running both the Radeon Developer Panel and the Radeon Developer Service on the same systemthe communication between the two uses pipes, not sockets and ports, so setting the port has no effect. In this scenario,it is possible to set the service to listen on a no-default port, leave the panel on the default port, and connection willwork fine.
8.9 Problems caused by the presence of non-AMD GPUs and non-AMD CPUs with integrated graphics
The presence of non-AMD GPU’s and CPU’s on your system can cause the failure to generate a profile or apps to notrun at all.
These problems typically occur with Vulkan apps in systems that have:
1) A non-AMD CPU with in integrated non-AMD GPU
2) A non-AMD discrete GPU
Vulkan applications, by default, use GPU 0 which usually maps to the integrated GPU, or in some cases, the non-AMDdiscreete GPU. In both cases Vulkan apps will either fail to run, or RGP profiling will not work (no RGP overlay willbe present in these cases).
To avoid these issues:
1) Disable any non-AMD integrated GPU’s in the device manager
2) Disable any non-AMD discrete GPU’s in the device manager, and/or physically remove from the system.
8.8. Radeon Developer Service Port numbers 35

![AMD Radeon™ HD 6450 - HISdigital1]… · Use of this copyright protection technology must be ... latest documentation. ii AMD Radeon™ HD 6450 ... 4.1 AMD Radeon HD 6450 Connections](https://img.pdfslide.us/doc/110x75/5b2d59c87f8b9ab66e8bd1cc/amd-radeon-hd-6450-1-use-of-this-copyright-protection-technology-must.jpg)