Embed Size (px)
Citation preview

Unicenter®
CA-Jobtrac™ Job Management
Planning and Implementation Guide for CA-Datacom/AD r11
r11
R0JOBT11PIE

This documentation and any related computer software help programs (hereinafter referred to as the“Documentation”) is for the end user's informational purposes only and is subject to change orwithdrawal by CA at any time.
This Documentation may not be copied, transferred, reproduced, disclosed, modified or duplicated, inwhole or in part, without the prior written consent of CA. This Documentation is confidential andproprietary information of CA and protected by the copyright laws of the United States and internationaltreaties.
Notwithstanding the foregoing, licensed users may print a reasonable number of copies of thedocumentation for their own internal use, and may make one copy of the related software as reasonablyrequired for back-up and disaster recovery purposes, provided that all CA copyright notices and legendsare affixed to each reproduced copy. Only authorized employees, consultants, or agents of the userwho are bound by the provisions of the license for the product are permitted to have access to suchcopies.
The right to print copies of the documentation and to make a copy of the related software is limited tothe period during which the applicable license for the Product remains in full force and effect. Shouldthe license terminate for any reason, it shall be the user's responsibility to certify in writing to CA that allcopies and partial copies of the Documentation have been returned to CA or destroyed.
EXCEPT AS OTHERWISE STATED IN THE APPLICABLE LICENSE AGREEMENT, TO THE EXTENTPERMITTED BY APPLICABLE LAW, CA PROVIDES THIS DOCUMENTATION “AS IS” WITHOUTWARRANTY OF ANY KIND, INCLUDING WITHOUT LIMITATION, ANY IMPLIED WARRANTIES OFMERCHANTABILITY, FITNESS FOR A PARTICULAR PURPOSE OR NONINFRINGEMENT. IN NOEVENT WILL CA BE LIABLE TO THE END USER OR ANY THIRD PARTY FOR ANY LOSS ORDAMAGE, DIRECT OR INDIRECT, FROM THE USE OF THIS DOCUMENTATION, INCLUDINGWITHOUT LIMITATION, LOST PROFITS, BUSINESS INTERRUPTION, GOODWILL, OR LOST DATA,EVEN IF CA IS EXPRESSLY ADVISED OF SUCH LOSS OR DAMAGE.
The use of any product referenced in the Documentation is governed by the end user's applicablelicense agreement.
The manufacturer of this Documentation is CA.
Provided with “Restricted Rights.” Use, duplication or disclosure by the United States Government issubject to the restrictions set forth in FAR Sections 12.212, 52.227-14, and 52.227-19(c)(1) - (2) andDFARS Section 252.227-7014(b)(3), as applicable, or their successors.
All trademarks, trade names, service marks, and logos referenced herein belong to their respectivecompanies.
Copyright © 2006 CA. All rights reserved.
CA Product References
This document references the following CA products:
■ Unicenter® CA-Jobtrac™ Job Management (Unicenter CA-Jobtrac)
■ Unicenter® AutoSys® Job Management (Unicenter AutoSys JM)
■ Unicenter® CA-Easytrieve® Report Generator (Unicenter CA-Easytrieve)
■ Unicenter® CA-MIM Resource Sharing (Unicenter CA-MIM)
■ Unicenter® CA-MII Data Sharing (Unicenter CA-MII)
■ Unicenter® CA-MIA Tape Sharing (Unicenter CA-MIA)
■ Unicenter® CA-MIA Message Sharing (Unicenter CA-MIC)
■ Unicenter® Network and Systems Management Job Management Option(Unicenter NSM JM Option)
■ Unicenter® CA-OPS/MVS® Event Management and Automation (UnicenterCA-OPS/MVS)
■ Unicenter® CA-Scheduler® Job Management (Unicenter CA-Scheduler)
■ Unicenter® CA-Spool™ Print Management (Unicenter CA-Spool)
■ Unicenter® Service Desk (Unicenter Service Desk)
■ Unicenter® CA-SYSVIEW® Realtime Perfomance Management (UnicenterCA-SYSVIEW)
■ Unicenter® Universal Job Management Agent (Unicenter Universal JobManagement Agent)
■ Unicenter® CA-View® Output Archival and Viewing (Unicenter CA-View)
■ Unicenter® CA-7™ Job Management (Unicenter CA-7)
■ Unicenter® CA-11™ Restart and Tracking (Unicenter CA-11)
■ Advantage™ CA-Datacom®/DB Database (Advantage CA-Datacom/DB)
■ AllFusion® CA-Panvalet® (AllFusion CA-Panvalet)
■ AllFusion® CA-Librarian® (AllFusion CA-Librarian)
■ eTrust® CA-ACF2™ Security (eTrust CA-ACF2)
■ eTrust® CA-Examine™ Auditing (eTrust CA-Examine)
■ eTrust® CA-Top Secret® Security (eTrust CA-Top Secret)
Contact Customer Support
For online technical assistance and a complete list of locations, primary servicehours, and telephone numbers, contact Customer Support athttp://ca.com/support.
iii

Contents
Chapter 1. Welcome . . . . . . . . . . . . . . . . . . . . . . . . . . . . . . . . 1CA-Datacom/AD . . . . . . . . . . . . . . . . . . . . . . . . . . . . . . . . . . . 2Features and Benefits . . . . . . . . . . . . . . . . . . . . . . . . . . . . . . . . 3
Production Scheduling Features . . . . . . . . . . . . . . . . . . . . . . . . 3Email . . . . . . . . . . . . . . . . . . . . . . . . . . . . . . . . . . . . . . . 4Unicenter Service Desk . . . . . . . . . . . . . . . . . . . . . . . . . . . . . 4REXX . . . . . . . . . . . . . . . . . . . . . . . . . . . . . . . . . . . . . . . 5Automatic Message Recognition . . . . . . . . . . . . . . . . . . . . . . . . 5System Command Scheduling . . . . . . . . . . . . . . . . . . . . . . . . . 5Specifying Additional Condition Codes . . . . . . . . . . . . . . . . . . . . 5JCL Management . . . . . . . . . . . . . . . . . . . . . . . . . . . . . . . . 6Sysout Archival . . . . . . . . . . . . . . . . . . . . . . . . . . . . . . . . . 6Other Benefits . . . . . . . . . . . . . . . . . . . . . . . . . . . . . . . . . . 6
Chapter 2. Overview of Components and Installation . . . . . . . . . . . 7Concepts . . . . . . . . . . . . . . . . . . . . . . . . . . . . . . . . . . . . . . . 8
Locations . . . . . . . . . . . . . . . . . . . . . . . . . . . . . . . . . . . . . 8CA-Datacom/AD DASD . . . . . . . . . . . . . . . . . . . . . . . . . . . . 11Unicenter CA-Jobtrac DASD . . . . . . . . . . . . . . . . . . . . . . . . . 12
Checkpoint Database . . . . . . . . . . . . . . . . . . . . . . . . . . . . 12Capture File Data Set . . . . . . . . . . . . . . . . . . . . . . . . . . . . 13Setup Files . . . . . . . . . . . . . . . . . . . . . . . . . . . . . . . . . . 13Calculate Database Size . . . . . . . . . . . . . . . . . . . . . . . . . . 14Differentiate Copies of Unicenter CA-Jobtrac . . . . . . . . . . . . . . 15
CA-Datacom Sharing . . . . . . . . . . . . . . . . . . . . . . . . . . . . . 16CA-Datacom/AD Sharing Overview . . . . . . . . . . . . . . . . . . . . 16Database Access Options . . . . . . . . . . . . . . . . . . . . . . . . . . 16Configuration Examples . . . . . . . . . . . . . . . . . . . . . . . . . . . 18
Libraries . . . . . . . . . . . . . . . . . . . . . . . . . . . . . . . . . . . . . 22Pre-Installation Considerations . . . . . . . . . . . . . . . . . . . . . . . . . . 24
Requirements . . . . . . . . . . . . . . . . . . . . . . . . . . . . . . . . . 24CA Common Services . . . . . . . . . . . . . . . . . . . . . . . . . . . . . 26
CA LMP . . . . . . . . . . . . . . . . . . . . . . . . . . . . . . . . . . . . 26CA-C . . . . . . . . . . . . . . . . . . . . . . . . . . . . . . . . . . . . . . 27CA-Datacom/AD . . . . . . . . . . . . . . . . . . . . . . . . . . . . . . . 27CA-Easytrieve . . . . . . . . . . . . . . . . . . . . . . . . . . . . . . . . 27CA-GSS . . . . . . . . . . . . . . . . . . . . . . . . . . . . . . . . . . . . 28CA-XPS . . . . . . . . . . . . . . . . . . . . . . . . . . . . . . . . . . . . 28CAICCI . . . . . . . . . . . . . . . . . . . . . . . . . . . . . . . . . . . . 28CAIENF . . . . . . . . . . . . . . . . . . . . . . . . . . . . . . . . . . . . 28CAISSF . . . . . . . . . . . . . . . . . . . . . . . . . . . . . . . . . . . . 29CAIRIM . . . . . . . . . . . . . . . . . . . . . . . . . . . . . . . . . . . . 29CAISDI/els - Service Desk Integration . . . . . . . . . . . . . . . . . . . 30CAIVPE . . . . . . . . . . . . . . . . . . . . . . . . . . . . . . . . . . . . 30ViewPoint . . . . . . . . . . . . . . . . . . . . . . . . . . . . . . . . . . . 30
Contents v
CA-Datacom/AD Considerations . . . . . . . . . . . . . . . . . . . . . . . . . 31Install a User SVC for CA-Datacom/AD . . . . . . . . . . . . . . . . . . 31Install the SVC with CAIRIM . . . . . . . . . . . . . . . . . . . . . . . . . 33Edit JCL . . . . . . . . . . . . . . . . . . . . . . . . . . . . . . . . . . . . . 36
IBM CBIPO . . . . . . . . . . . . . . . . . . . . . . . . . . . . . . . . . . 37Edit SAMPJCL Using the Supplied REXX Execs Under ISPF . . . . . 38
CA-Datacom/AD Product Installation . . . . . . . . . . . . . . . . . . . . 39Products Installed . . . . . . . . . . . . . . . . . . . . . . . . . . . . . . 39
List Libraries for CA-Datacom/AD Products in JCL . . . . . . . . . . . . 40Unicenter CA-Jobtrac Considerations . . . . . . . . . . . . . . . . . . . . . . 41
Subsystems . . . . . . . . . . . . . . . . . . . . . . . . . . . . . . . . . . 41JES Usage . . . . . . . . . . . . . . . . . . . . . . . . . . . . . . . . . . . 42Installation Tape Information . . . . . . . . . . . . . . . . . . . . . . . . . 43
CA Common Services Installation Tape . . . . . . . . . . . . . . . . . 43The CA-Datacom/AD Installation Tape . . . . . . . . . . . . . . . . . . 43The Unicenter CA-Jobtrac Installation Tape . . . . . . . . . . . . . . . 44The Latest Unicenter CA-Jobtrac Service Pack Tape . . . . . . . . . . 45
SMP/E Considerations . . . . . . . . . . . . . . . . . . . . . . . . . . . . 45Data Set Placement Considerations . . . . . . . . . . . . . . . . . . . . 46
CA-Datacom/AD Files . . . . . . . . . . . . . . . . . . . . . . . . . . . . 46Sysout Capture File . . . . . . . . . . . . . . . . . . . . . . . . . . . . . 46
Database Recovery Planning . . . . . . . . . . . . . . . . . . . . . . . . 47Common CA-Datacom/AD Terms . . . . . . . . . . . . . . . . . . . . . 47Log File and Recovery File . . . . . . . . . . . . . . . . . . . . . . . . . 48System Failure or CA-Datacom/AD MUF Failure . . . . . . . . . . . . 49DASD Failure or Disaster Recovery . . . . . . . . . . . . . . . . . . . . 49Backup Utilities . . . . . . . . . . . . . . . . . . . . . . . . . . . . . . . . 49Backup Types . . . . . . . . . . . . . . . . . . . . . . . . . . . . . . . . 50Backup Frequency . . . . . . . . . . . . . . . . . . . . . . . . . . . . . . 50Forward Recovery . . . . . . . . . . . . . . . . . . . . . . . . . . . . . . 50Disaster Recovery . . . . . . . . . . . . . . . . . . . . . . . . . . . . . . 51Other Products . . . . . . . . . . . . . . . . . . . . . . . . . . . . . . . . 52
Interfaces with Other Products . . . . . . . . . . . . . . . . . . . . . . . . 53AllFusion CA-Librarian . . . . . . . . . . . . . . . . . . . . . . . . . . . . 53AllFusion CA-Panvalet . . . . . . . . . . . . . . . . . . . . . . . . . . . . 53CA-Blockmaster . . . . . . . . . . . . . . . . . . . . . . . . . . . . . . . 53BrightStor CA-HyperBuf . . . . . . . . . . . . . . . . . . . . . . . . . . . 53Unicenter CA-MIM . . . . . . . . . . . . . . . . . . . . . . . . . . . . . . 53Unicenter CA-SYSVIEW . . . . . . . . . . . . . . . . . . . . . . . . . . 54Unicenter CA-View . . . . . . . . . . . . . . . . . . . . . . . . . . . . . . 54Unicenter CA-11 . . . . . . . . . . . . . . . . . . . . . . . . . . . . . . . 54Other Products Through CA-GSS . . . . . . . . . . . . . . . . . . . . . 54
System Considerations . . . . . . . . . . . . . . . . . . . . . . . . . . . . 55Security Considerations . . . . . . . . . . . . . . . . . . . . . . . . . . . . 55
Chapter 3. Worksheets . . . . . . . . . . . . . . . . . . . . . . . . . . . . . 59CA Common Services . . . . . . . . . . . . . . . . . . . . . . . . . . . . . . . 60CA-Datacom/AD Worksheets . . . . . . . . . . . . . . . . . . . . . . . . . . . 61
Installation JCL PROCedure Parameters . . . . . . . . . . . . . . . . . . 61
vi Planning and Implementation Guide
Data Set Naming Checklist Items . . . . . . . . . . . . . . . . . . . . . 61DASD and Tape Volume Names and Unit Types Checklist Items . . . 61SVC and LXX/FXX Checklist Items . . . . . . . . . . . . . . . . . . . . 63CA Common Services Checklist Items . . . . . . . . . . . . . . . . . . 64COBOL Compiles Checklist Items . . . . . . . . . . . . . . . . . . . . . 64Assembler and Link-Edits Checklist Items . . . . . . . . . . . . . . . . 65CICS Usage Checklist Items . . . . . . . . . . . . . . . . . . . . . . . . 65XCF Usage Checklist Items . . . . . . . . . . . . . . . . . . . . . . . . 66
Unicenter CA-Jobtrac Worksheets . . . . . . . . . . . . . . . . . . . . . . . . 67SAMPJCL . . . . . . . . . . . . . . . . . . . . . . . . . . . . . . . . . . . . 67Unicenter CA-Jobtrac Tape Install . . . . . . . . . . . . . . . . . . . . . . 68Unicenter CA-Jobtrac Customization STAGE1 Parameters . . . . . . . 70JOB Statements . . . . . . . . . . . . . . . . . . . . . . . . . . . . . . . . 72Database IDs . . . . . . . . . . . . . . . . . . . . . . . . . . . . . . . . . . 74Database Allocation . . . . . . . . . . . . . . . . . . . . . . . . . . . . . . 75CA-Datacom/AD File Names . . . . . . . . . . . . . . . . . . . . . . . . . 76Sysout Capture . . . . . . . . . . . . . . . . . . . . . . . . . . . . . . . . 77Upgrading from r3.5 . . . . . . . . . . . . . . . . . . . . . . . . . . . . . . 77CPM . . . . . . . . . . . . . . . . . . . . . . . . . . . . . . . . . . . . . . . 78CA Common Services and CA-GSS . . . . . . . . . . . . . . . . . . . . 78Unicenter CA-11 . . . . . . . . . . . . . . . . . . . . . . . . . . . . . . . . 79
Chapter 4. Installation Tasks . . . . . . . . . . . . . . . . . . . . . . . . . 81Install CA Common Services . . . . . . . . . . . . . . . . . . . . . . . . . . . 82Install CA-Datacom/AD . . . . . . . . . . . . . . . . . . . . . . . . . . . . . . 83Preparing for Installation . . . . . . . . . . . . . . . . . . . . . . . . . . . . . . 85
New Installations . . . . . . . . . . . . . . . . . . . . . . . . . . . . . . . . 85Upgrading Existing Products . . . . . . . . . . . . . . . . . . . . . . . . . 85
SAMPJCL Member Names . . . . . . . . . . . . . . . . . . . . . . . . . . . . 86Installation Sequence . . . . . . . . . . . . . . . . . . . . . . . . . . . . . . . 87Steps for All Installations . . . . . . . . . . . . . . . . . . . . . . . . . . . . . 88
Step 1. Allocate the SAMPJCL Library . . . . . . . . . . . . . . . . . . . 89Sample JCL . . . . . . . . . . . . . . . . . . . . . . . . . . . . . . . . . . 90
Step 2. Download Libraries . . . . . . . . . . . . . . . . . . . . . . . . . . 91Step 3. Rename SMP/E DDDEFs . . . . . . . . . . . . . . . . . . . . . . 91Step 4. Prepare the CA-Datacom/AD Custom Assemblies . . . . . . . . 92Step 5. Load CA-Datacom/AD SVC Using CAIRIM . . . . . . . . . . . . 92
New Installation Phase . . . . . . . . . . . . . . . . . . . . . . . . . . . . . . 93Step 1. Add BACKUP/LOAD/INIT PROC Members . . . . . . . . . . . . 94Step 2. Allocate CA-Datacom/AD Data Sets . . . . . . . . . . . . . . . . 94Step 3. Initialize and Load the CXX, LXX, and Databases . . . . . . . . 95Step 4. Start the MUF . . . . . . . . . . . . . . . . . . . . . . . . . . . . . 95Step 5. Run DDUPDATE, DDCFBLD, DBUTLTY INIT, and Populate DQ 96Step 6. Back Up CA-Datacom/AD Databases . . . . . . . . . . . . . . . 96Step 7. Shut Down the MUF . . . . . . . . . . . . . . . . . . . . . . . . . 97Step 8. Remove Unneeded Installation Files . . . . . . . . . . . . . . . 97
Demonstration Phase . . . . . . . . . . . . . . . . . . . . . . . . . . . . . . . 98Step 1. Start Up the MUF . . . . . . . . . . . . . . . . . . . . . . . . . . 98Step 2. Execute Sample CA-Datacom/AD Programs . . . . . . . . . . . 98
Contents vii
Step 3. Execute Sample Dynamic SQL Programs . . . . . . . . . . . . 98Step 4. Shut Down the MUF . . . . . . . . . . . . . . . . . . . . . . . . . 98
Post Installation Considerations . . . . . . . . . . . . . . . . . . . . . . . . . 99Set up Production Jobs . . . . . . . . . . . . . . . . . . . . . . . . . . . . 99Multi-User Facility Tuning . . . . . . . . . . . . . . . . . . . . . . . . . . 100Run the MUF as a Started Task . . . . . . . . . . . . . . . . . . . . . . 100
Install Unicenter CA-Jobtrac . . . . . . . . . . . . . . . . . . . . . . . . . . 101Step 1: Allocate and Load the SAMPJCL Library . . . . . . . . . . . . 101Step 2: Unload Documentation . . . . . . . . . . . . . . . . . . . . . . 102Step 3: Create SMP/E Libraries . . . . . . . . . . . . . . . . . . . . . . 102Step 4: Create the Target and Distribution Libraries . . . . . . . . . . 103Step 5: Create SMP PROC . . . . . . . . . . . . . . . . . . . . . . . . 103Step 6: Perform RECEIVE Processing . . . . . . . . . . . . . . . . . . 104Step 7: Perform APPLY Processing . . . . . . . . . . . . . . . . . . . . 104Step 8: Perform ACCEPT Processing . . . . . . . . . . . . . . . . . . 105Step 9: Ensure APF Authorization . . . . . . . . . . . . . . . . . . . . . 105Step 10: Update License Management Program (LMP) Key . . . . . . 105Step 11: Update CAIENF Database . . . . . . . . . . . . . . . . . . . . 106Step 12: CAIENF Startup Options . . . . . . . . . . . . . . . . . . . . . 106Step 13: Start CAIENF . . . . . . . . . . . . . . . . . . . . . . . . . . . 106Step 14: Create a Dummy IEAVMXIT Exit . . . . . . . . . . . . . . . . 106Step 15: (Optional) Install eTrust CA-Examine Interface . . . . . . . . 106Step 16: (Optional) Link AllFusion CA-Panvalet Modules . . . . . . . 107Step 17: (Optional) Link AllFusion CA-Librarian Modules . . . . . . . 107Step 18: (Optional) Install Critical Path Monitor (CPM) . . . . . . . . . 108Step 19: (Optional) Install the @JOBTRAC USS Command . . . . . . 109Step 20: (Optional) Install the JES2 Hold Usermod . . . . . . . . . . . 109
Chapter 5. Customization Job Streams . . . . . . . . . . . . . . . . . . 111STAGE1 Customization Job . . . . . . . . . . . . . . . . . . . . . . . . . . 112
Run the STAGE1 Job . . . . . . . . . . . . . . . . . . . . . . . . . . . . 112Required TRACMAC Parameters . . . . . . . . . . . . . . . . . . . . . 113Optional TRACMAC Parameters . . . . . . . . . . . . . . . . . . . . . 116
STAGE2 Installation Job Stream . . . . . . . . . . . . . . . . . . . . . . . . 118Run the STAGE2 Job . . . . . . . . . . . . . . . . . . . . . . . . . . . . 119Types of Data Sets Supported . . . . . . . . . . . . . . . . . . . . . . . 119Allocate Data Sets . . . . . . . . . . . . . . . . . . . . . . . . . . . . . . 120Description of the Unicenter CA-Jobtrac Database . . . . . . . . . . . 122About the Sysout Capture File . . . . . . . . . . . . . . . . . . . . . . . 123
Description of TRACMDS . . . . . . . . . . . . . . . . . . . . . . . . . 124Recommended Initial Data Set Sizes . . . . . . . . . . . . . . . . . . 124
Update Procedure Libraries . . . . . . . . . . . . . . . . . . . . . . . . 126Use JOBTRAnn to Set Global Options . . . . . . . . . . . . . . . . . . 127
New Options in Version . . . . . . . . . . . . . . . . . . . . . . . . . . 127Global Options in the STAGE2 Job Stream . . . . . . . . . . . . . . 127Location of JOBTRAnn . . . . . . . . . . . . . . . . . . . . . . . . . . 128Using Multiple JOBTRAnn Members . . . . . . . . . . . . . . . . . . 128
The JOBTRAnn Options . . . . . . . . . . . . . . . . . . . . . . . . . . 129AMRLCNT . . . . . . . . . . . . . . . . . . . . . . . . . . . . . . . . . 129
viii Planning and Implementation Guide
ARCBLK . . . . . . . . . . . . . . . . . . . . . . . . . . . . . . . . . . . 129ARCDSN . . . . . . . . . . . . . . . . . . . . . . . . . . . . . . . . . . 130ARCDSP . . . . . . . . . . . . . . . . . . . . . . . . . . . . . . . . . . 130ARCRTN . . . . . . . . . . . . . . . . . . . . . . . . . . . . . . . . . . 130ARCUNT . . . . . . . . . . . . . . . . . . . . . . . . . . . . . . . . . . 131ARM . . . . . . . . . . . . . . . . . . . . . . . . . . . . . . . . . . . . . 131AUNIT . . . . . . . . . . . . . . . . . . . . . . . . . . . . . . . . . . . . 133AUTOC . . . . . . . . . . . . . . . . . . . . . . . . . . . . . . . . . . . 133AUTOQ . . . . . . . . . . . . . . . . . . . . . . . . . . . . . . . . . . . 134CAPDMPS . . . . . . . . . . . . . . . . . . . . . . . . . . . . . . . . . 134CMDLIB . . . . . . . . . . . . . . . . . . . . . . . . . . . . . . . . . . . 135CPM . . . . . . . . . . . . . . . . . . . . . . . . . . . . . . . . . . . . . 136CPMAPPL . . . . . . . . . . . . . . . . . . . . . . . . . . . . . . . . . . 136DATELIB . . . . . . . . . . . . . . . . . . . . . . . . . . . . . . . . . . 137DBID . . . . . . . . . . . . . . . . . . . . . . . . . . . . . . . . . . . . . 137DEFAULT0 . . . . . . . . . . . . . . . . . . . . . . . . . . . . . . . . . 138DFSQUAL . . . . . . . . . . . . . . . . . . . . . . . . . . . . . . . . . . 138DISABLE . . . . . . . . . . . . . . . . . . . . . . . . . . . . . . . . . . 139DRDR . . . . . . . . . . . . . . . . . . . . . . . . . . . . . . . . . . . . 139DUMPUJV . . . . . . . . . . . . . . . . . . . . . . . . . . . . . . . . . 140E@DOMAIN . . . . . . . . . . . . . . . . . . . . . . . . . . . . . . . . 140ECLLATE . . . . . . . . . . . . . . . . . . . . . . . . . . . . . . . . . . 141ECLNODES . . . . . . . . . . . . . . . . . . . . . . . . . . . . . . . . . 141ECLWTO . . . . . . . . . . . . . . . . . . . . . . . . . . . . . . . . . . 142EMAILFROM . . . . . . . . . . . . . . . . . . . . . . . . . . . . . . . . 142EMAILSRV . . . . . . . . . . . . . . . . . . . . . . . . . . . . . . . . . 143EREPORT . . . . . . . . . . . . . . . . . . . . . . . . . . . . . . . . . 143EXECTRLR . . . . . . . . . . . . . . . . . . . . . . . . . . . . . . . . . 144FCSTDBID . . . . . . . . . . . . . . . . . . . . . . . . . . . . . . . . . 144INSERTRMS . . . . . . . . . . . . . . . . . . . . . . . . . . . . . . . . 145JCLTABL . . . . . . . . . . . . . . . . . . . . . . . . . . . . . . . . . . 146JESCMD . . . . . . . . . . . . . . . . . . . . . . . . . . . . . . . . . . 146JMFTABLE . . . . . . . . . . . . . . . . . . . . . . . . . . . . . . . . . 147LIBPGM . . . . . . . . . . . . . . . . . . . . . . . . . . . . . . . . . . . 147PRIORITY . . . . . . . . . . . . . . . . . . . . . . . . . . . . . . . . . . 148RAMAXCC . . . . . . . . . . . . . . . . . . . . . . . . . . . . . . . . . 148REMTCRED . . . . . . . . . . . . . . . . . . . . . . . . . . . . . . . . 149REPORT . . . . . . . . . . . . . . . . . . . . . . . . . . . . . . . . . . 149RERUN . . . . . . . . . . . . . . . . . . . . . . . . . . . . . . . . . . . 150RESTAGEABEND . . . . . . . . . . . . . . . . . . . . . . . . . . . . . 150RESTAGECAT . . . . . . . . . . . . . . . . . . . . . . . . . . . . . . . 151RESTAGECC . . . . . . . . . . . . . . . . . . . . . . . . . . . . . . . . 151RESTAGEJCLERR . . . . . . . . . . . . . . . . . . . . . . . . . . . . 151SCHENV . . . . . . . . . . . . . . . . . . . . . . . . . . . . . . . . . . 152SCLMAX# . . . . . . . . . . . . . . . . . . . . . . . . . . . . . . . . . . 152STATINTV . . . . . . . . . . . . . . . . . . . . . . . . . . . . . . . . . 153SUBROOT . . . . . . . . . . . . . . . . . . . . . . . . . . . . . . . . . 153SVQUAL . . . . . . . . . . . . . . . . . . . . . . . . . . . . . . . . . . . 153SYNCSYS1 . . . . . . . . . . . . . . . . . . . . . . . . . . . . . . . . . 154
Contents ix
SYNCSYS2 . . . . . . . . . . . . . . . . . . . . . . . . . . . . . . . . . 154SYNCSYS3 . . . . . . . . . . . . . . . . . . . . . . . . . . . . . . . . . 154SYNCTOL . . . . . . . . . . . . . . . . . . . . . . . . . . . . . . . . . . 155SYSDBID . . . . . . . . . . . . . . . . . . . . . . . . . . . . . . . . . . 155TNDOVLP . . . . . . . . . . . . . . . . . . . . . . . . . . . . . . . . . . 156TSCMDSPA . . . . . . . . . . . . . . . . . . . . . . . . . . . . . . . . . 156TSDSNSPA . . . . . . . . . . . . . . . . . . . . . . . . . . . . . . . . . 157TSMSGSPA . . . . . . . . . . . . . . . . . . . . . . . . . . . . . . . . . 157TSPGFSPA . . . . . . . . . . . . . . . . . . . . . . . . . . . . . . . . . 158WLMRSRC . . . . . . . . . . . . . . . . . . . . . . . . . . . . . . . . . 158XPLATRERUN . . . . . . . . . . . . . . . . . . . . . . . . . . . . . . . 159
Chapter 6. Customization Tasks . . . . . . . . . . . . . . . . . . . . . . 161Modify CA-Datacom/AD for Unicenter CA-Jobtrac . . . . . . . . . . . . . . 162
Startup Keywords for CUSMAC(DBDATIN1) . . . . . . . . . . . . . . . 162DBSIDPR Parameters . . . . . . . . . . . . . . . . . . . . . . . . . . . . 164
Alter the CA-Datacom/AD LXX and FXX . . . . . . . . . . . . . . . . . . . 165LXX . . . . . . . . . . . . . . . . . . . . . . . . . . . . . . . . . . . . . . 165FXX . . . . . . . . . . . . . . . . . . . . . . . . . . . . . . . . . . . . . . 166
Modify CA-GSS . . . . . . . . . . . . . . . . . . . . . . . . . . . . . . . . . . 167Step 1: Modify JCL . . . . . . . . . . . . . . . . . . . . . . . . . . . . . 167Step 2: Modify CA-GSS Parameters . . . . . . . . . . . . . . . . . . . 168
Parameters You Need to Modify . . . . . . . . . . . . . . . . . . . . . 168Step 3: Activate GoalNet . . . . . . . . . . . . . . . . . . . . . . . . . . 169Step 4: (Optional) Install REXX IMOD Sample Source . . . . . . . . . 170
Customize SYS1.PARMLIB . . . . . . . . . . . . . . . . . . . . . . . . . . . 171Set Up Default Authorization . . . . . . . . . . . . . . . . . . . . . . . . . . 174Set Up the JES3 Held Job Class . . . . . . . . . . . . . . . . . . . . . . . . 175Define Location Information (DYNAMLOC) and Initiation IMODs . . . . . 176Update Your TSO Procedures or CLIST . . . . . . . . . . . . . . . . . . . 180Set Global Options . . . . . . . . . . . . . . . . . . . . . . . . . . . . . . . . 184
Options on the CA-Jobtrac Global Options Panel . . . . . . . . . . . . 186Options on the Sysout Capture Options Panel . . . . . . . . . . . . . 195Options on the Library Definitions Panel . . . . . . . . . . . . . . . . . 199
Copy the PRODDATE Member . . . . . . . . . . . . . . . . . . . . . . . . . 201Copy the JMFSYM01 Member . . . . . . . . . . . . . . . . . . . . . . . . . 202Copy the RESOURCE Member . . . . . . . . . . . . . . . . . . . . . . . . 203Copy the EXCLPARM Member . . . . . . . . . . . . . . . . . . . . . . . . . 204Maintain Table Modules . . . . . . . . . . . . . . . . . . . . . . . . . . . . . 205Set Up AMR Support . . . . . . . . . . . . . . . . . . . . . . . . . . . . . . 208Create IPLTABLE Entries (Optional) . . . . . . . . . . . . . . . . . . . . . . 209Enable the SPACE Command . . . . . . . . . . . . . . . . . . . . . . . . . 214Integration with Unicenter CA-11 . . . . . . . . . . . . . . . . . . . . . . . . 215Set Up CA-JCLTrac . . . . . . . . . . . . . . . . . . . . . . . . . . . . . . . 218
Set Up a UCT . . . . . . . . . . . . . . . . . . . . . . . . . . . . . . . . 220Create the DB2 Objects . . . . . . . . . . . . . . . . . . . . . . . . . . 226Bind the DB2 Plans . . . . . . . . . . . . . . . . . . . . . . . . . . . . . 228Grant Authority . . . . . . . . . . . . . . . . . . . . . . . . . . . . . . . . 229
Use Other Sysout Capture Products . . . . . . . . . . . . . . . . . . . . . . 230
x Planning and Implementation Guide
Cross-Platform Scheduling . . . . . . . . . . . . . . . . . . . . . . . . . . . 232CA-GSS Server IMODs . . . . . . . . . . . . . . . . . . . . . . . . . . . 235Global Variables for Cross-Platform Scheduling . . . . . . . . . . . . . 236
Server IMOD Selection Globals . . . . . . . . . . . . . . . . . . . . . 236Status Tracking Server Globals (Service $UNITRKJT) . . . . . . . . 236Command Driver Globals (Service $UNIRCVJT) . . . . . . . . . . . 238Cross-Platform Server Globals (Service $UNIXPSJT) . . . . . . . . 239
Cross-Platform Server ($UNIXPSJT) Password Requirements Table 241Syntax Rules . . . . . . . . . . . . . . . . . . . . . . . . . . . . . . . . 241Keywords . . . . . . . . . . . . . . . . . . . . . . . . . . . . . . . . . . 242Processing . . . . . . . . . . . . . . . . . . . . . . . . . . . . . . . . . 243Examples . . . . . . . . . . . . . . . . . . . . . . . . . . . . . . . . . . 244
Alter the Event Console Logging Message Options . . . . . . . . . . . . . 245Update the GJTREMSG Source . . . . . . . . . . . . . . . . . . . . . . 247
Chapter 7. Startup and Verification . . . . . . . . . . . . . . . . . . . . . 251Initialization and Startup . . . . . . . . . . . . . . . . . . . . . . . . . . . . . 252
Initialize Internals . . . . . . . . . . . . . . . . . . . . . . . . . . . . . . 252Start the Unicenter CA-Jobtrac Task . . . . . . . . . . . . . . . . . . . 253Access Unicenter CA-Jobtrac . . . . . . . . . . . . . . . . . . . . . . . 253End the Unicenter CA-Jobtrac Task . . . . . . . . . . . . . . . . . . . . 253
Verification . . . . . . . . . . . . . . . . . . . . . . . . . . . . . . . . . . . . . 254Contents of IVP . . . . . . . . . . . . . . . . . . . . . . . . . . . . . . . 254
Chapter 8. Upgrading, Testing, Running Multiple Copies . . . . . . . 259General Procedure . . . . . . . . . . . . . . . . . . . . . . . . . . . . . 259Memory Requirements . . . . . . . . . . . . . . . . . . . . . . . . . . . 259
Release Compatibilities and Incompatibilities . . . . . . . . . . . . . . . . . 260Compatibilities . . . . . . . . . . . . . . . . . . . . . . . . . . . . . . . . 260Incompatibilities . . . . . . . . . . . . . . . . . . . . . . . . . . . . . . . 260r11 Features . . . . . . . . . . . . . . . . . . . . . . . . . . . . . . . . . 260
Conversion Notes . . . . . . . . . . . . . . . . . . . . . . . . . . . . . . . . 261Checkpoint and History . . . . . . . . . . . . . . . . . . . . . . . . . . . 261Capture . . . . . . . . . . . . . . . . . . . . . . . . . . . . . . . . . . . . 261PDS Data Sets . . . . . . . . . . . . . . . . . . . . . . . . . . . . . . . . 262TRACAUTH . . . . . . . . . . . . . . . . . . . . . . . . . . . . . . . . . 262
Upgrade Your Production from r3.5 to r11 . . . . . . . . . . . . . . . . . . 263Return to the Prior Release . . . . . . . . . . . . . . . . . . . . . . . . . . . 264
Return to r3.5 . . . . . . . . . . . . . . . . . . . . . . . . . . . . . . . . 264Reverse Conversion (Optional) . . . . . . . . . . . . . . . . . . . . . . 264
Run r3.5 Production and r11 Test System . . . . . . . . . . . . . . . . . . 265Run Multiple STCs on Same CPU . . . . . . . . . . . . . . . . . . . . . . . 266Run in a Shared Sysplex Environment . . . . . . . . . . . . . . . . . . . . 268
Appendix A. NJE Support . . . . . . . . . . . . . . . . . . . . . . . . . . 271Installation and Setup . . . . . . . . . . . . . . . . . . . . . . . . . . . . . . 272Job Submission . . . . . . . . . . . . . . . . . . . . . . . . . . . . . . . . . . 273Job Execution . . . . . . . . . . . . . . . . . . . . . . . . . . . . . . . . . . . 274Job Termination . . . . . . . . . . . . . . . . . . . . . . . . . . . . . . . . . 275
Contents xi
ISPF Interface . . . . . . . . . . . . . . . . . . . . . . . . . . . . . . . . . . . 276Batch Archiving and JTEZRPT . . . . . . . . . . . . . . . . . . . . . . . . . 277REXX Stack Information for NJE Jobs . . . . . . . . . . . . . . . . . . . . 278
Keywords . . . . . . . . . . . . . . . . . . . . . . . . . . . . . . . . . . . 278
Appendix B. Connecting Systems for Cross-Platform Scheduling . 279z/OS CAICCI Installation and Considerations . . . . . . . . . . . . . . . . . 280Remote Scheduler Installation and Considerations . . . . . . . . . . . . . 281
Index . . . . . . . . . . . . . . . . . . . . . . . . . . . . . . . . . . . . . . . . 283
xii Planning and Implementation Guide
Chapter 1. Welcome
This section contains the following topics:
CA-Datacom/AD . . . . . . . . . . . . . . . . . . . . . . . . . . . . . . . . . . . 2Features and Benefits . . . . . . . . . . . . . . . . . . . . . . . . . . . . . . . . 3
This guide describes how to install the CA proprietary software product,Unicenter CA-Jobtrac r11.
This guide is written for systems software programmers and personnelresponsible for the installation, implementation, and maintenance of UnicenterCA-Jobtrac.
This guide includes the CA-Datacom/AD installation steps to provide a morefocused and simplified installation for Unicenter CA-Jobtrac customers. TheCA-Datacom/AD Installation and Maintenance Guide is also included in thedocumentation set and contains more information.
Chapter 1. Welcome 1
CA-Datacom/AD
CA-Datacom/AD
Unicenter CA-Jobtrac uses Advantage CA-Datacom/DB as its database.Advantage CA-Datacom/DB is a fast database engine that allows for forwardrecovery, data integrity after a system outage, backup-while-open, and more.
CA-Datacom/AD is identical in every way to Advantage CA-Datacom/DB,except that you cannot create your own databases in CA-Datacom/AD.Otherwise, the operation and use of both CA-Datacom/AD and AdvantageCA-Datacom/DB are the same.
To avoid confusion, all references in the guides are to CA-Datacom/AD.
2 Planning and Implementation Guide
Features and Benefits
Features and Benefits
The Unicenter CA-Jobtrac primary function is to automate productionscheduling. Unicenter CA-Jobtrac schedules, submits, tracks, and recordsevents at the proper time, in exact sequence, the first and every time, with littleor no manual intervention.
Unicenter CA-Jobtrac creates schedules in two ways:
■ ISPF EDIT to code the member with SCL (Schedule Control Language).
■ GSO (Generate Schedules Online) panels that gather information andgenerate the SCL.
Production Scheduling Features
The following are features of the Unicenter CA-Jobtrac production schedulingcomponent:
■ Total automation of event scheduling. Once an event is defined to thesystem, no further action is required to schedule that event or set of events.
■ Dependency scheduling. Unicenter CA-Jobtrac schedules and submitsevents based on dependencies you define for each event. Schedulingdependencies determine if and when a given event is scheduled (forexample, on the last workday of each month). Execution dependenciesdetermine when a scheduled event is submitted (for example, after aspecified data set is created).
■ No complex calendar definitions. Scheduling parameters define thecycles, frequencies, and dependencies for each event in a logical,straightforward approach. Unlike schedulers that require you to build a dailyprocessing calendar for every day of the year, Unicenter CA-Jobtrac buildsa dynamic calendar each workday to process scheduled events.
■ Threshold scheduling. Unicenter CA-Jobtrac lets you set start, target, andabort times so that events execute at peak efficiency, without rigid timeschedules.
Chapter 1. Welcome 3
Features and Benefits
■ Mass schedule alterations. You can issue a single command to makesweeping adjustments to the current schedule. You can adjust submissiontimes forward or backward up to 24 hours for a specific event or allscheduled events.
■ Automatic JCL submission and event tracking. Once an event isscheduled, it is automatically submitted when all dependencies are satisfied.The event is then tracked through completion. Unicenter CA-Jobtrac alsosupports automatic JCL alteration in the form of overrides or datestatements.
■ On-demand event submission. Unicenter CA-Jobtrac accommodates thedynamic realities of production control. Using Unicenter CA-Jobtrac, you canquickly and easily add on-demand events to the schedule for UnicenterCA-Jobtrac processing.
■ Data set triggering. You can specify that the creation or update of a dataset triggers some event, such as event submission.
■ Distributed and decentralized scheduling. You can have one person pergroup take care of their scheduling needs (up to 254 separate locations), oryou can have one person take care of the scheduling needs of all groups.
■ Tape volume pull lists. Unicenter CA-Jobtrac indicates the tape volumesneeded for production during the processing day.
■ Production control tools. Unicenter CA-Jobtrac provides an array of onlineinquiries, error-checking and reporting capabilities, and status reports.Included are online event documentation, event history analysis, DASDspace analysis, schedule forecasting, and online or printed reports.
Unicenter CA-Jobtrac can send form emails to a specified list of addressesbased on the normal or abnormal completion of a job. This feature allowsmultiple addresses to be specified. You can use template emails to provideadditional text to include in your email. Standard email text is also included toprovide the job name, business group, version, and other job-relatedinformation.
Unicenter Service Desk
Unicenter Service Desk provides two kinds of alerts. The first reports failuresthat occur in an event (also called jobs) that is scheduled and monitored byUnicenter CA-Jobtrac such as job abends. The second reports conditions withinthe Unicenter CA-Jobtrac product itself that need to be reported such as file fullconditions.
4 Planning and Implementation Guide
Features and Benefits
REXX
Unicenter CA-Jobtrac takes full advantage of CA implementation of REXX. Youcan schedule REXX IMODs (Intelligent Modules) just as you have always donefor events, and you can use REXX IMODs as scheduling dependencies. UsingIMODs as dependencies adds unlimited power to Unicenter CA-Jobtrac bygiving you complete flexibility in deciding when to schedule an event.
To increase this power even more, @JOBTRAC was created. @JOBTRACgives you the ability to obtain information about the current schedule and tochange the current schedule using an IMOD. @JOBTRAC uses CA-GSS(Global SubSystem). CA-GSS interacts with other CA products, giving you theability to obtain information from even more sources and to provide UnicenterCA-Jobtrac information to them.
Automatic Message Recognition
The Unicenter CA-Jobtrac AMR (Automatic Message Recognition) facilityenables you to monitor system messages and prompts and to respond to themautomatically. For example, you can do the following:
■ Translate complex technical system messages into plain English messages.
■ Release an event or schedule for submission when a specified systemmessage is issued.
■ Schedule a response to an outstanding message.
■ Reply to system prompts.
System Command Scheduling
Unicenter CA-Jobtrac can issue any z/OS, JES, VTAM, or task modify (F)command automatically at scheduled times or at specific intervals. Even IPLscan be automated.
Specifying Additional Condition Codes
Unicenter CA-Jobtrac gives you ways to impose condition code processing on aprogram, job, job step, or procstep. Condition code processing checks forspecified condition codes being returned. If the condition code you define isviolated, Unicenter CA-Jobtrac imposes a dependency requiring you to checkthe event's output before successor events can be submitted.
Chapter 1. Welcome 5
Features and Benefits
JCL Management
Unicenter CA-Jobtrac offers various features that enhance JCL usage. Thesefeatures are:
■ AJO (Automatic JCL Override) automatically deletes or inserts specified JCLstatements when an event is submitted by Unicenter CA-Jobtrac.
■ JMF (JCL Management Facility) enables you to:
– Make global variable changes to JCL.
– Insert parameter statements or values into JCL.
– Provide date values based on the original schedule date or theprocessor clock.
– Allow date arithmetic for dynamic date variables.
– Allow input definitions from multiple PDS libraries.
– Use over 40 dynamic variable assignments for date and time values.
■ ADI (Automatic Date Insertion) can direct Unicenter CA-Jobtrac toautomatically insert JCL dates and repeated records in your events, andyou can specify that Unicenter CA-Jobtrac automatically calculate and insertdates in the record.
■ CA-JCLTrac performs basic JCL syntax checking and gathers informationabout your JCL usage and stores it in a DB2 database or in a JCL extractfile. You can then generate reports with the stored information. Additionally,CA-JCLTrac can forecast what your JCL will look like on any given day.
Sysout Archival
Unicenter CA-Jobtrac automatically captures and archives specified sysoutlistings, providing online access to recent sysouts and permanent archival totape. Additionally, Unicenter CA-Jobtrac interfaces with Unicenter CA-View, asysout archival and retrieval tool.
Other Benefits
Other important benefits include the following:
■ No IPLs are required for scheduler operation for most environments.
■ No dedicated hardware is required.
■ Unicenter CA-Jobtrac uses standard PDS files providing simplified scheduledefinition.
■ Interval processing to submit an event multiple times during a processingperiod.
6 Planning and Implementation Guide
Chapter 2. Overview of Componentsand Installation
This section contains the following topics:
Concepts . . . . . . . . . . . . . . . . . . . . . . . . . . . . . . . . . . . . . . . 8Pre-Installation Considerations . . . . . . . . . . . . . . . . . . . . . . . . . . 24CA-Datacom/AD Considerations . . . . . . . . . . . . . . . . . . . . . . . . . 31Unicenter CA-Jobtrac Considerations . . . . . . . . . . . . . . . . . . . . . . 41
Chapter 2. Overview of Components and Installation 7
Concepts
Concepts
The following topics introduce Unicenter CA-Jobtrac locations, data sets, andlibraries.
Locations
To effectively install and use Unicenter CA-Jobtrac, you need to understandUnicenter CA-Jobtrac locations.
A location groups Unicenter CA-Jobtrac entities and provides distributed controlover production. There are two types of locations:
■ Physical, such as New York and Chicago
■ Logical, such as accounting department and shipping department
The following Unicenter CA-Jobtrac entities have a location associated withthem:
■ Libraries
■ Users
■ Holiday calendars
■ Cyclic calendars
■ Workdays
■ Schedules
■ Events
Locations are defined by a location ID. The location ID is a three-digit codeused by Unicenter CA-Jobtrac to determine the following:
■ Which calendars, workdays, and libraries an event uses.
■ What functions a user can perform.
For example, if schedule PAYROLL1 has location 004 associated with it, it canonly access calendars, workdays, and libraries associated with location 004.
As another example, if Susan has only location 010 associated with her ID withdelete and add functions allowed, she can only delete an event with location010 associated with it.
Users can have multiple location IDs associated with them. All other entities inUnicenter CA-Jobtrac are associated with one location ID only.
Location 000 has a significant meaning in Unicenter CA-Jobtrac. The followingexplains its significance:
8 Planning and Implementation Guide
Concepts
■ In general, the default location is 000 (zero). This default is overridden bythe following:
– The JOBTRAnn option DEFAULT0 is set to NO rather than YES. IfDEFAULT0 is set to NO, no default location ID is assumed.
– A user has specified a default location using the PROFile command.
■ The 0ARCHIVE, 0SYSARCH, and 0JOBARCH tasks always have location000 associated with them.
Users have what is known as a default location. The default location ID isassigned by the user using the PROFile command. For a user, if a location IDis not specified for an activity, the user will use their default location ID.
For example, Bob has location 226, 040, and 111 associated with him. He hasassigned location 226 as his default location ID. He adds an event to thecurrent schedule, without specifying a location ID for the event. It is added witha location ID of 226, because that is Bob's default location.
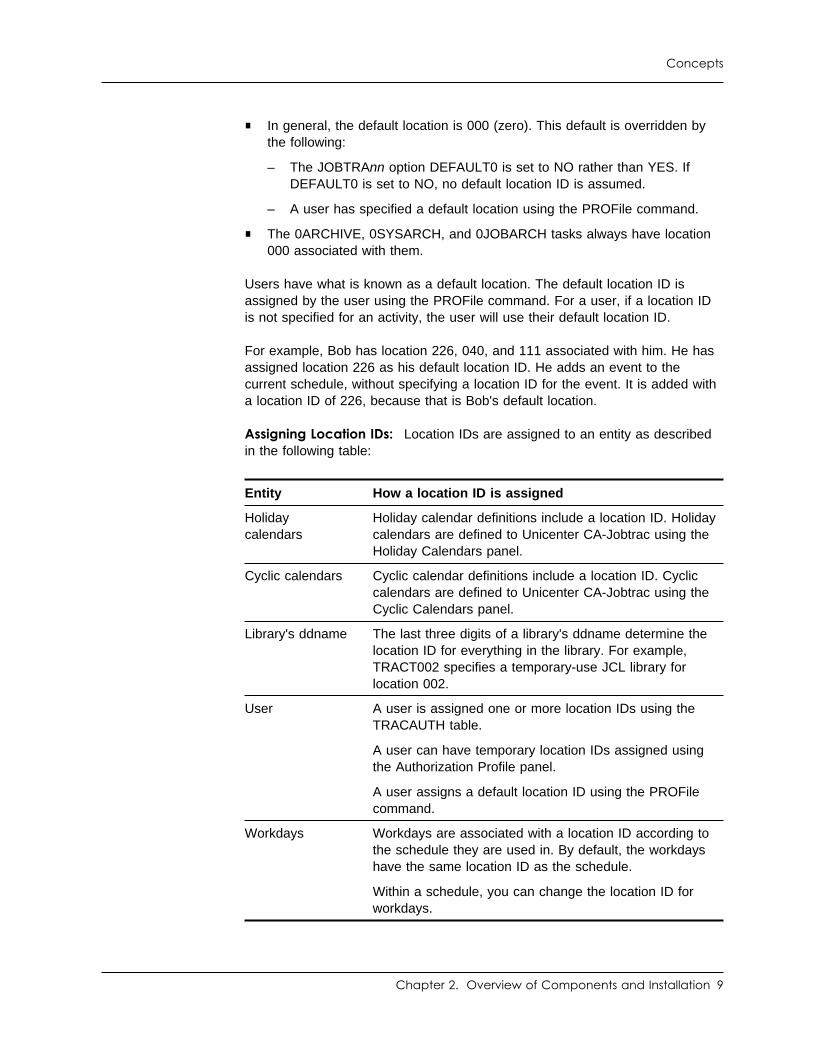
Assigning Location IDs: Location IDs are assigned to an entity as describedin the following table:
Entity How a location ID is assigned
Holidaycalendars
Holiday calendar definitions include a location ID. Holidaycalendars are defined to Unicenter CA-Jobtrac using theHoliday Calendars panel.
Cyclic calendars Cyclic calendar definitions include a location ID. Cycliccalendars are defined to Unicenter CA-Jobtrac using theCyclic Calendars panel.
Library's ddname The last three digits of a library's ddname determine thelocation ID for everything in the library. For example,TRACT002 specifies a temporary-use JCL library forlocation 002.
User A user is assigned one or more location IDs using theTRACAUTH table.
A user can have temporary location IDs assigned usingthe Authorization Profile panel.
A user assigns a default location ID using the PROFilecommand.
Workdays Workdays are associated with a location ID according tothe schedule they are used in. By default, the workdayshave the same location ID as the schedule.
Within a schedule, you can change the location ID forworkdays.
Chapter 2. Overview of Components and Installation 9
Concepts
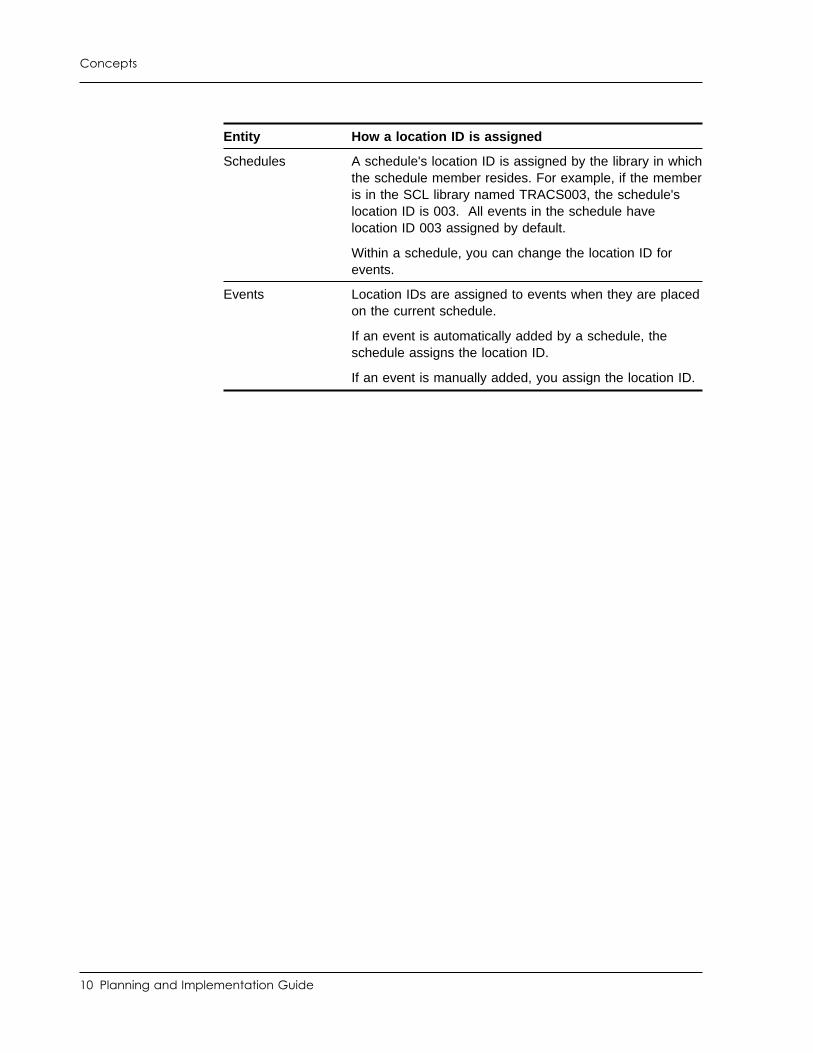
Entity How a location ID is assigned
Schedules A schedule's location ID is assigned by the library in whichthe schedule member resides. For example, if the memberis in the SCL library named TRACS003, the schedule'slocation ID is 003. All events in the schedule havelocation ID 003 assigned by default.
Within a schedule, you can change the location ID forevents.
Events Location IDs are assigned to events when they are placedon the current schedule.
If an event is automatically added by a schedule, theschedule assigns the location ID.
If an event is manually added, you assign the location ID.
10 Planning and Implementation Guide
Concepts
CA-Datacom/AD DASD
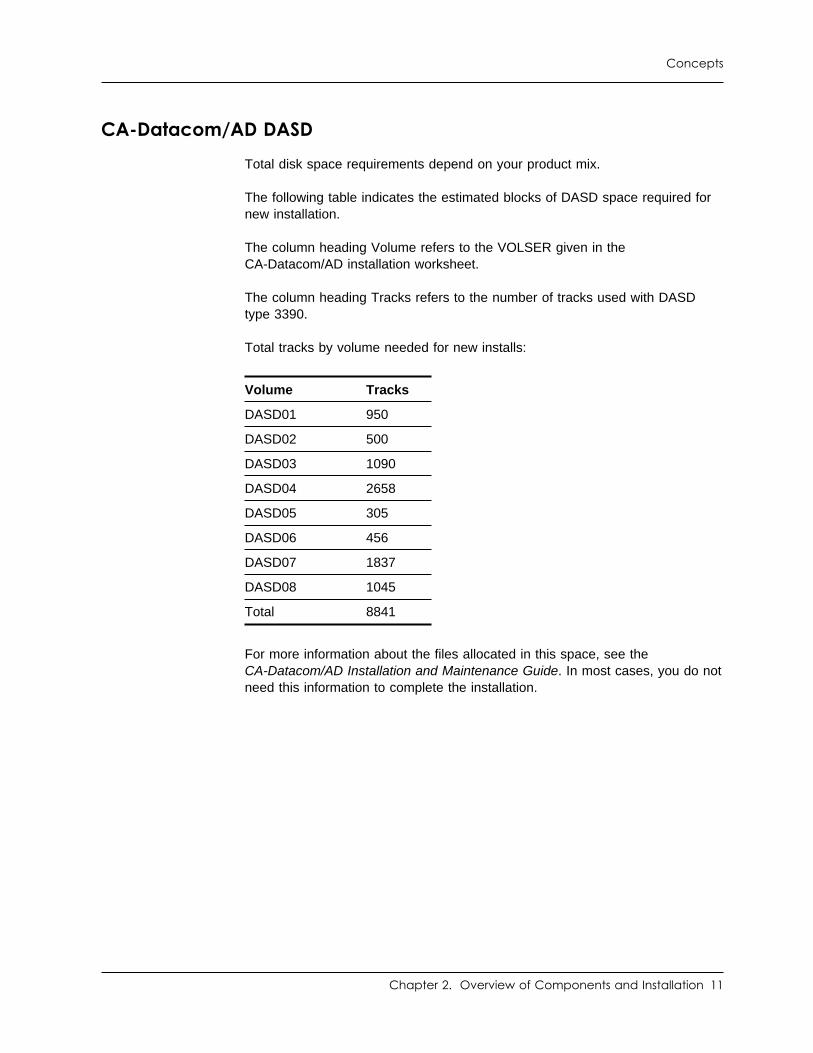
Total disk space requirements depend on your product mix.
The following table indicates the estimated blocks of DASD space required fornew installation.
The column heading Volume refers to the VOLSER given in theCA-Datacom/AD installation worksheet.
The column heading Tracks refers to the number of tracks used with DASDtype 3390.
Total tracks by volume needed for new installs:
For more information about the files allocated in this space, see theCA-Datacom/AD Installation and Maintenance Guide. In most cases, you do notneed this information to complete the installation.
Volume Tracks
DASD01 950
DASD02 500
DASD03 1090
DASD04 2658
DASD05 305
DASD06 456
DASD07 1837
DASD08 1045
Total 8841
Chapter 2. Overview of Components and Installation 11
Concepts
Unicenter CA-Jobtrac DASD
Unicenter CA-Jobtrac uses a number of data sets that store working data.
Checkpoint Database
Beginning with r11, most of the operational data resides in a database. Thisincludes the data that was stored in both the checkpoint file and the history filein previous releases. CA-Datacom/AD is a common component database that isincluded with Unicenter CA-Jobtrac r11 at no additional charge.
CA-Datacom/AD is distributed on a separate tape. The installation steps areincluded in “Install CA-Datacom/AD” on page 83. Unicenter CA-Jobtrac definestwo databases to CA-Datacom/AD: production and forecast. UnicenterCA-Jobtrac is assigned databases 161 and 162 as defaults.
The production database is used for all the normal processing of UnicenterCA-Jobtrac while running production scheduling. The forecast database is usedfor loading schedules outside production and for forecast reporting.
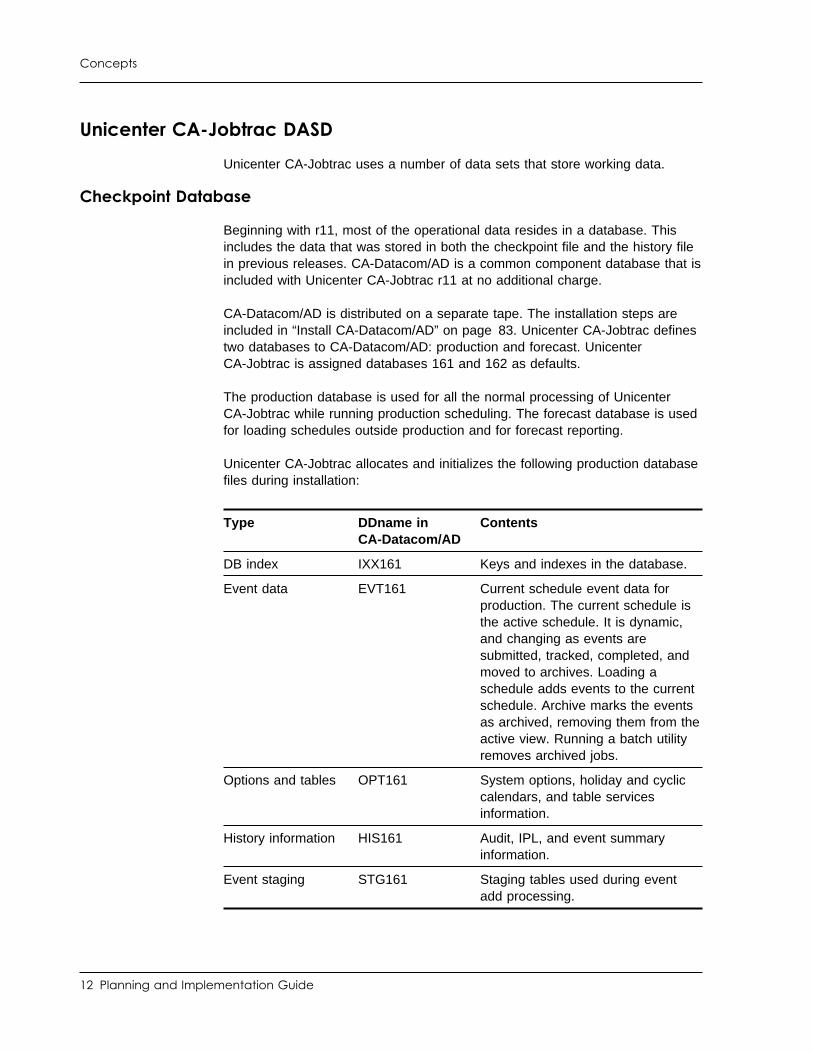
Unicenter CA-Jobtrac allocates and initializes the following production databasefiles during installation:
Type DDname inCA-Datacom/AD
Contents
DB index IXX161 Keys and indexes in the database.
Event data EVT161 Current schedule event data forproduction. The current schedule isthe active schedule. It is dynamic,and changing as events aresubmitted, tracked, completed, andmoved to archives. Loading aschedule adds events to the currentschedule. Archive marks the eventsas archived, removing them from theactive view. Running a batch utilityremoves archived jobs.
Options and tables OPT161 System options, holiday and cycliccalendars, and table servicesinformation.
History information HIS161 Audit, IPL, and event summaryinformation.
Event staging STG161 Staging tables used during eventadd processing.
12 Planning and Implementation Guide
Concepts
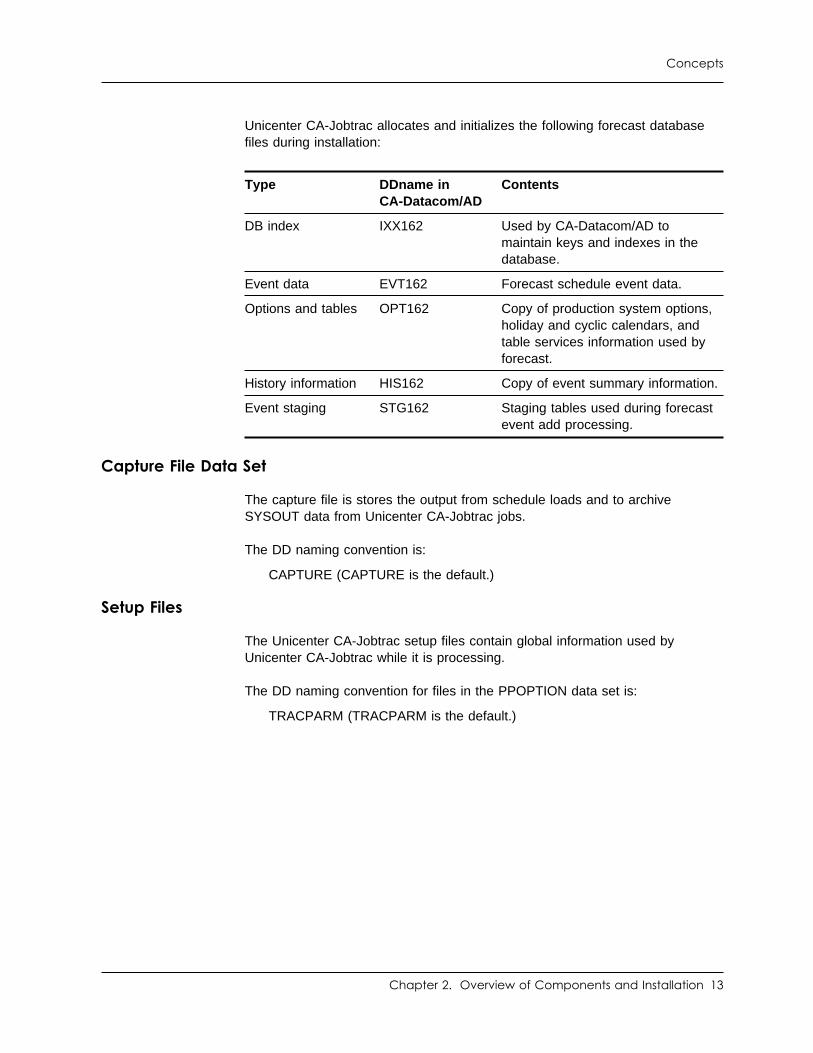
Unicenter CA-Jobtrac allocates and initializes the following forecast databasefiles during installation:
Type DDname inCA-Datacom/AD
Contents
DB index IXX162 Used by CA-Datacom/AD tomaintain keys and indexes in thedatabase.
Event data EVT162 Forecast schedule event data.
Options and tables OPT162 Copy of production system options,holiday and cyclic calendars, andtable services information used byforecast.
History information HIS162 Copy of event summary information.
Event staging STG162 Staging tables used during forecastevent add processing.
Capture File Data Set
The capture file is stores the output from schedule loads and to archiveSYSOUT data from Unicenter CA-Jobtrac jobs.
The DD naming convention is:
CAPTURE (CAPTURE is the default.)
Setup Files
The Unicenter CA-Jobtrac setup files contain global information used byUnicenter CA-Jobtrac while it is processing.
The DD naming convention for files in the PPOPTION data set is:
TRACPARM (TRACPARM is the default.)
Chapter 2. Overview of Components and Installation 13
Concepts
Calculate Database Size
The Unicenter CA-Jobtrac checkpoint and history data is maintained in aCA-Datacom/AD database. The physical files that make up a database arecalled data areas. Each data area contains a set of tables. For the UnicenterCA-Jobtrac database, four data areas are used.
EVTdbidIncludes the events data for both the current checkpoint and archivedhistory.
OPTdbidIncludes the options, calendars, and tables (JTS and internal) used byUnicenter CA-Jobtrac.
HISdbidIncludes the statistics, audit, and IPL records.
STGdbidIncludes the staging tables for schedule and event load processing.
Due the number of factors that can affect the database size, a spreadsheet isavailable to help you estimate the database size. The spreadsheet is availablefor download from the Unicenter CA-Jobtrac Product Home Page on the CASupportConnect website or can be received through an email by contactingUnicenter CA-Jobtrac Technical Support.
14 Planning and Implementation Guide
Concepts
Differentiate Copies of Unicenter CA-Jobtrac
One or more TRACPARM libraries can be defined for all the copies ofUnicenter CA-Jobtrac running on a system. The correct library to use isspecified on the TRACPARM DD statement in the Unicenter CA-Jobtrac startedtask procedure.
The following are members in the TRACPARM library:
JOBTRAnn (JOBTRA00 is the default.)
The JOBTRAnn member describes the environment in which UnicenterCA-Jobtrac operates and customizes how Unicenter CA-Jobtrac functions.
Multiple JOBTRAnn members can be defined. You can use each of thesemembers to test a different configuration of options, or to run multiple copies ofUnicenter CA-Jobtrac. To activate the options in a given JOBTRAnn member,issue the following modify command, where nn matches nn in the desiredJOBTRAnn member:
F taskname,OPTS=nn
RESOURCE (RESOURCE is the default.)
The RESOURCE member contains resource definitions you can assign toevents as dependencies.
TRAC310W is issued if no RESOURCE file is available. Unicenter CA-Jobtraccontinues processing.
Within the PPOPTION library, one RESOURCE member is defined for allcopies of Unicenter CA-Jobtrac running on a system.
EXCLPARM (EXCLPARM is the default.)
The EXCLPARM member defines mutually exclusive events.
Within the PPOPTION library, one EXCLPARM member is defined for all copiesof Unicenter CA-Jobtrac running on a system.
Chapter 2. Overview of Components and Installation 15
Concepts
CA-Datacom Sharing
Unicenter CA-Jobtrac r11 introduces the use of a relational database forcheckpoint and history data. CA-Datacom/AD, a common component version ofAdvantage CA-Datacom/DB, is distributed with CA products. CA-Datacom/ADuse is limited to only those databases used by CA products and cannot beused to create non-product databases. As a common component,CA-Datacom/AD is included with Unicenter CA-Jobtrac r11 at no additionalcost.
This section introduces some CA-Datacom concepts and database sharingoptions that you should consider in your installation planning.
CA-Datacom/AD Sharing Overview
The CA-Datacom/AD database achieves its high performance by caching datato limit the I/O performed. In a sysplex sharing a database, only oneCA-Datacom/AD Multi-User Facility (MUF) is active on one system of thesysplex to support all the systems. The database is accessible to all the sysplexsystems. Applications such as Unicenter CA-Jobtrac use the CA-Datacominterface to access the database. This interface locates the database and usesthe appropriate facility to transfer the database data to the application.Unicenter CA-Jobtrac does not need to know where the database is located.
Database Access Options
CA-Datacom/AD provides the following access options.
The fastest access to a CA-Datacom/AD database is through the product SVC.This can only be used if you are running Unicenter CA-Jobtrac on the samesystem image as the CA-Datacom/AD Multi-User Facility (MUF). Even ifanother access option is used to share the database, the CA-Datacom/AD SVCis required. On the system running the MUF, the SVC is used for access. If youdo not need to share the Unicenter CA-Jobtrac database, this method is all thatis needed.
If you plan to run Unicenter CA-Jobtrac in a sysplex with a primary submissionsystem and monitors to track the jobs in a shared JES spool environment,additional access options are required.
Almost as fast as the SVC is XCF, IBM's Cross-System Coupling Facility. Itshould be noted that this facility is a sysplex service and does not require acoupling facility. XCF is the best way to share the Unicenter CA-Jobtracdatabase. XCF is fast, easy to configure in CA-Datacom/AD, and provides aneasy way to disconnect and reconnect from Unicenter CA-Jobtrac if the MUFneeds to be moved or a failure on the MUF system occurs. XCF requires thatall systems that share the database using XCF must be in the same sysplex.
16 Planning and Implementation Guide
Concepts
In addition to the preceding access options, CA-Datacom/AD supports two otheroptions:
■ Network access using CAICCI.
CAICCI uses VTAM or TCP/IP to communicate between systems notconnected in a sysplex. This is much slower than XCF and is generally notneeded since Unicenter CA-Jobtrac supports access to other non-sysplexedsystems through its NJE support.
■ Data sharing through a coupling facility.
In a sysplex that shares a coupling facility, data access and updates can beperformed directly to the database from multiple systems, using the couplingfacility to coordinate database changes. This facility is considerably morecomplicated to set up and maintain than XCF and adds very little benefit forthe increased overhead and operational complexity.
We do not recommend using either of these options with Unicenter CA-Jobtrac.
CA-Datacom uses the fastest connection available when connecting to thedatabase, which is determined by the following conditions:
■ If the CA-Datacom/AD MUF is on the same LPAR, the SVC is used.
■ If the SVC cannot be used, XCF is defined and the MUF is available on anXCF connected LPAR, the XCF connection is used.
■ If neither of the previous methods is available and CAICCI is defined,CAICCI is used.
This connection method lets you define all the protocols that are used to accessa CA-Datacom/AD MUF once in the CA-Datacom/AD system identificationmodule, DBSIDPR, and use that same module in all the systems that aresharing the MUF, no matter what method is used for access. Even though theCA-Datacom/AD SVC cannot be used to access the database, it must beinstalled on each system that will run Unicenter CA-Jobtrac.
Chapter 2. Overview of Components and Installation 17
Concepts
Configuration Examples
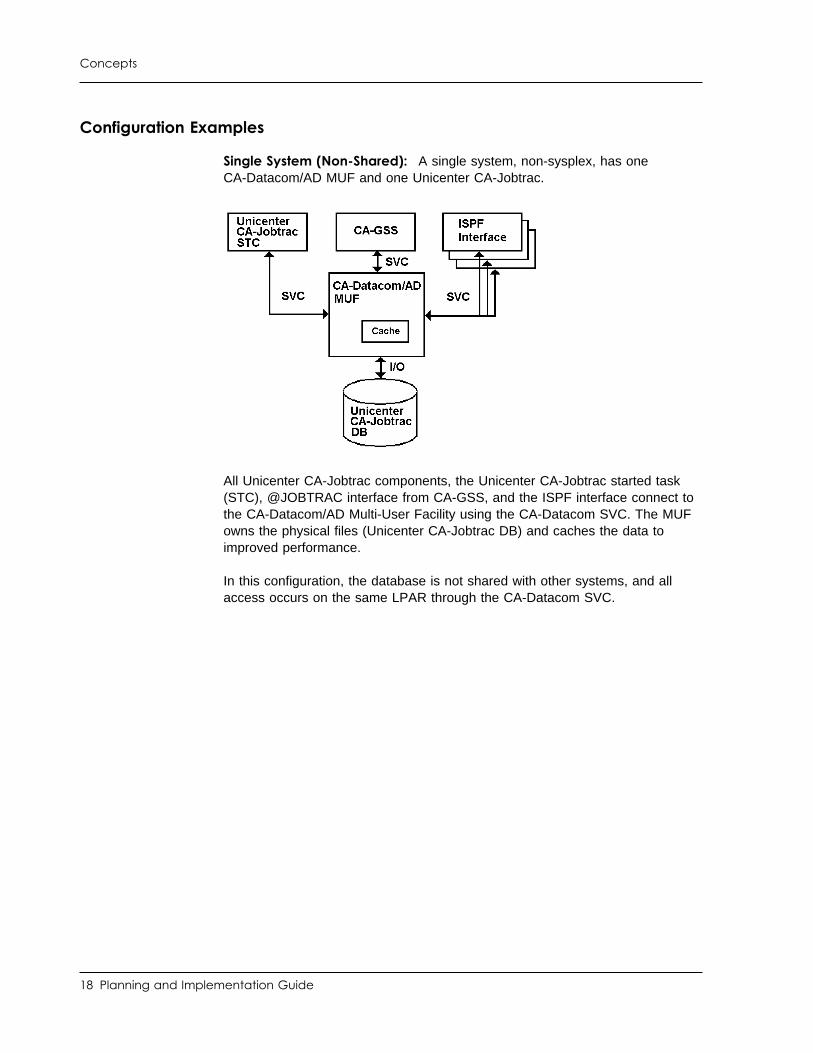
Single System (Non-Shared): A single system, non-sysplex, has oneCA-Datacom/AD MUF and one Unicenter CA-Jobtrac.
All Unicenter CA-Jobtrac components, the Unicenter CA-Jobtrac started task(STC), @JOBTRAC interface from CA-GSS, and the ISPF interface connect tothe CA-Datacom/AD Multi-User Facility using the CA-Datacom SVC. The MUFowns the physical files (Unicenter CA-Jobtrac DB) and caches the data toimproved performance.
In this configuration, the database is not shared with other systems, and allaccess occurs on the same LPAR through the CA-Datacom SVC.
18 Planning and Implementation Guide
Concepts
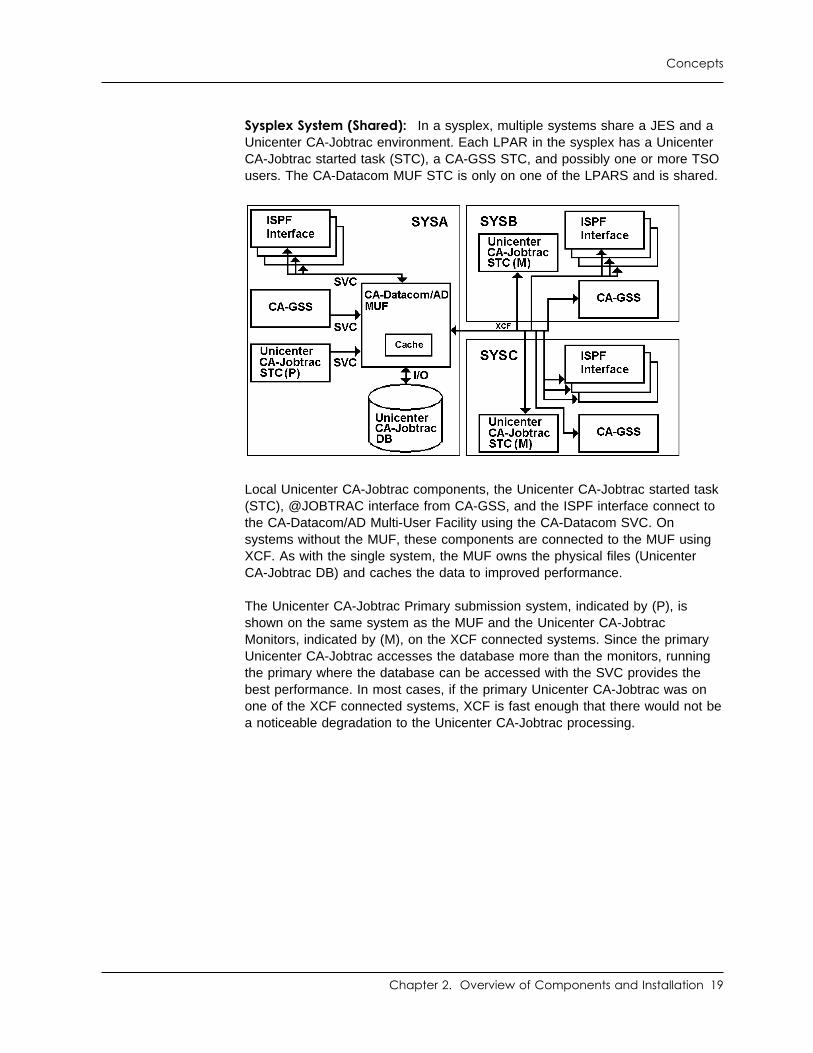
Sysplex System (Shared): In a sysplex, multiple systems share a JES and aUnicenter CA-Jobtrac environment. Each LPAR in the sysplex has a UnicenterCA-Jobtrac started task (STC), a CA-GSS STC, and possibly one or more TSOusers. The CA-Datacom MUF STC is only on one of the LPARS and is shared.
Local Unicenter CA-Jobtrac components, the Unicenter CA-Jobtrac started task(STC), @JOBTRAC interface from CA-GSS, and the ISPF interface connect tothe CA-Datacom/AD Multi-User Facility using the CA-Datacom SVC. Onsystems without the MUF, these components are connected to the MUF usingXCF. As with the single system, the MUF owns the physical files (UnicenterCA-Jobtrac DB) and caches the data to improved performance.
The Unicenter CA-Jobtrac Primary submission system, indicated by (P), isshown on the same system as the MUF and the Unicenter CA-JobtracMonitors, indicated by (M), on the XCF connected systems. Since the primaryUnicenter CA-Jobtrac accesses the database more than the monitors, runningthe primary where the database can be accessed with the SVC provides thebest performance. In most cases, if the primary Unicenter CA-Jobtrac was onone of the XCF connected systems, XCF is fast enough that there would not bea noticeable degradation to the Unicenter CA-Jobtrac processing.
Chapter 2. Overview of Components and Installation 19
Concepts
Shadow MUF Failover Recovery: Starting with CA-Datacom/AD r11, a newfacility was introduced to improve recovery in the event of a MUF or systemfailure. The Shadow MUF facility runs a special Shadow MUF on anothersystem in the sysplex. The Shadow MUF connects to the primary MUF throughXCF and does preliminary open processing for the databases that are onshared DASD between the systems. Once open processing is complete, theShadow monitors the processing of the primary to detect a failure. In mostcases, a failure can be positively detected, and the Shadow automaticallyassumes control. The Unicenter CA-Jobtrac Suspend and Resume processingis designed to work with the Shadow MUF to detect a failure and to reconnectautomatically to the new Primary with minimal delay.
The Shadow MUF implementation is not discussed in the Unicenter CA-Jobtracdocumentation. CA-Datacom/AD recommends that you implementCA-Datacom/AD XCF sharing before introducing the Shadow MUF into yourenvironment.
Note: For more information on the Shadow MUF configuration, seeCA-Datacom/AD Shadow MUF white paper at ca.com/datacom (click on theWhite Papers link). or contact CA-Datacom/AD Support for details.
20 Planning and Implementation Guide
Concepts
Suspend and Resume: In the sysplex example, with only one MUF sharedbetween several systems, there is the possibility that the MUF could becomeunavailable due to a planned or unplanned MUF or system outage.
To reduce the impact of a MUF outage, Unicenter CA-Jobtrac has SUSPENDand RESUME processing that will hold all of Unicenter CA-Jobtrac processinguntil the MUF is available again. Suspending Unicenter CA-Jobtrac can occur inthe following ways.
■ The SUSPEND operator command is issued. In this case, you have chosento suspend Unicenter CA-Jobtrac manually. Unicenter CA-Jobtrac remainssuspended until a RESUME command is entered. You can choose to usethis method in the event that you are planning to move the CA-Datacom/ADMUF and want to control the process manually. If you are running monitorsystems, you must enter the SUSPEND command (and RESUME) for eachMonitor Unicenter CA-Jobtrac, as well as the primary Unicenter CA-Jobtrac.
■ EOJ the CA-Datacom/AD MUF. If you issue the command to shut down theMUF, Unicenter CA-Jobtrac detects that the MUF is shutting down andautomatically suspends. Both the Primary and Monitor systems detect this.CA-Datacom/AD continues processing requests until all accessors haveclosed their connection, and then shuts down. TSO users of UnicenterCA-Jobtrac need to press Enter or exit the Unicenter CA-Jobtrac CLIST tofree their connection to the database. Following the suspend, UnicenterCA-Jobtrac enters auto resume processing to retry to connect to thedatabase. The EOJ'ed CA-Datacom/AD refuses any connection, so that theresume does not connect to CA-Datacom/AD until the MUF has beenrestarted, or the Shadow MUF assumes control.
■ MUF or System Failure. If a failure occurs, Unicenter CA-Jobtrac detectsthe failure and begins auto suspend. Unicenter CA-Jobtrac then enters autoresume processing to retry connecting to the database. Once the MUF isavailable or the Shadow MUF assumes control, Unicenter CA-Jobtracreconnects and continues processing.
All processing that is in progress when Unicenter CA-Jobtrac is suspendedcontinues processing from the same point when processing is resumed.Interactive processing, such as ISPF or operator commands, is not suspended.These commands receive a message that the Unicenter CA-Jobtrac issuspended.
Chapter 2. Overview of Components and Installation 21
Concepts
Libraries
Unicenter CA-Jobtrac uses a number of PDS-type libraries to store productionJCL, schedules, job documentation, date and JCL variables, and temporary-useJCL.
Each library is associated with a location. In this way, you can providedistributed control over production.
The following libraries are used in Unicenter CA-Jobtrac. The last three digits(nnn) of a library's ddname correspond to a location ID. All members in thelibrary are associated with that location ID by default. For example, TRACT002specifies a temporary-use JCL library for location 002.
Type DD NamingConvention
Contents
Date file DATELIB Each library contains a JMFSYM01and a PRODDATE member (defaultmember names). The JMFSYM01member contains JMF variabledefinitions. The PRODDATEmember contains ADI definitions.
Documentation TRACDnnn(TRACD000 isthe default.)
Each member contains the followingfor an event:
■ Information about an event youwant the operator to have.
■ Manual actions the operator is toperform.
Email Template TRACMnnn(TRACM000 isthe default.)
Each member contains an emailtemplate used when a notificationemail is sent.
JCL TRACJnnn(TRACJ000 isthe default.)
Each member contains theproduction JCL that is run forscheduled events.
Remote Password TRACRnnn(TRACR000 isthe default.)
Each member contains encrypteduser ID and password information forevents that are to be submitted to ascheduler or an agent on a remoteplatform.
SCL TRACSnnn(TRACS000 isthe default.)
Each member contains a schedulecontrol language data set.
22 Planning and Implementation Guide
Concepts
Type DD NamingConvention
Contents
Temporary-useJCL
TRACTnnn(TRACT000 isthe default.)
When you want to temporarilymodify JCL before running it, a copyof the production JCL is made andput in a temporary-use JCL librarymember. The event then uses theJCL from the temporary-use libraryrather than the JCL library.
Chapter 2. Overview of Components and Installation 23
Pre-Installation Considerations
Pre-Installation Considerations
Before starting the installation procedure, you should do the following:
■ Read the installation documentation.
■ Consider any known installation issues.
■ Complete pre-installation worklists to plan data set names, volumes, andother installation-specific information.
Requirements
The following sections describe the hardware and software required forsuccessful Unicenter CA-Jobtrac operation.
Unicenter CA-Jobtrac is supported on any IBM supported or IBM-compatiblemainframe computer capable of supporting unmodified releases of the indicatedoperating systems.
Unicenter CA-Jobtrac is supported under any IBM supported operating systemsand ISPF.
Unicenter CA-Jobtrac uses standard IBM interfaces to accomplish scheduling,sysout capture, and all other functions. There are no hooks, zaps to IBM code,or other nonstandard interactions with your operating system.
Unicenter CA-Jobtrac supports all devices supported by unmodified releases ofthe supported operating systems.
24 Planning and Implementation Guide
Pre-Installation Considerations
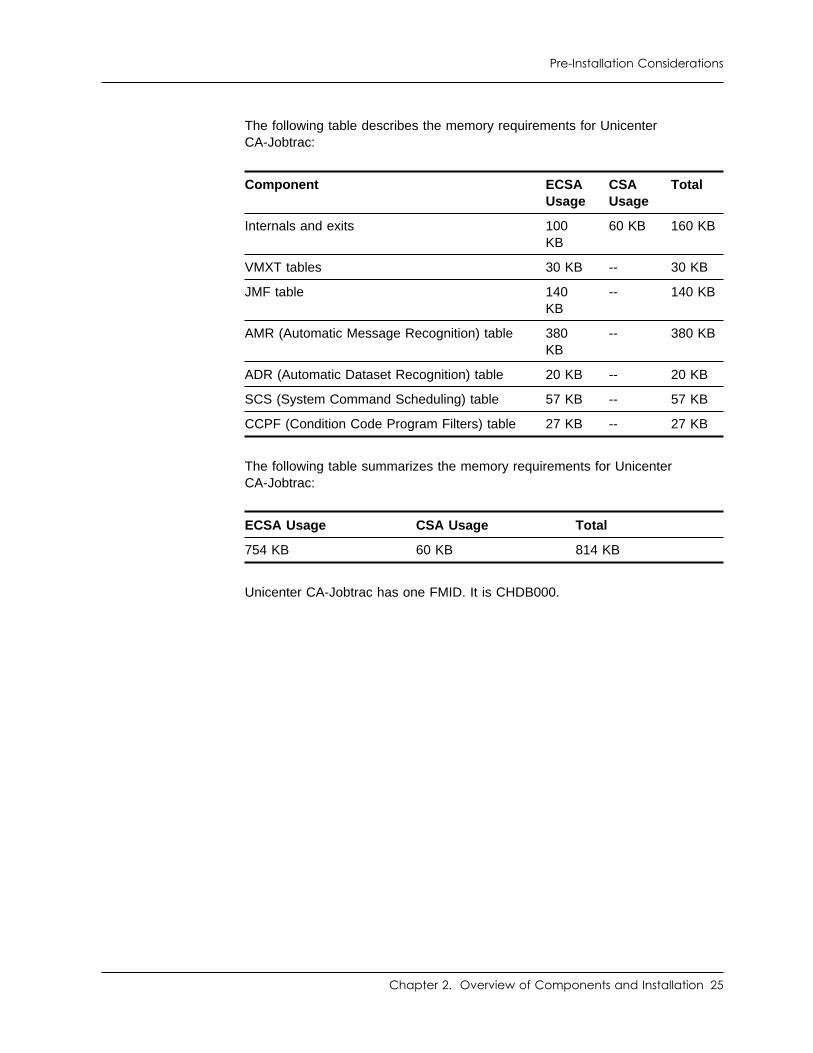
The following table describes the memory requirements for UnicenterCA-Jobtrac:
The following table summarizes the memory requirements for UnicenterCA-Jobtrac:
Unicenter CA-Jobtrac has one FMID. It is CHDB000.
Component ECSAUsage
CSAUsage
Total
Internals and exits 100KB
60 KB 160 KB
VMXT tables 30 KB -- 30 KB
JMF table 140KB
-- 140 KB
AMR (Automatic Message Recognition) table 380KB
-- 380 KB
ADR (Automatic Dataset Recognition) table 20 KB -- 20 KB
SCS (System Command Scheduling) table 57 KB -- 57 KB
CCPF (Condition Code Program Filters) table 27 KB -- 27 KB
ECSA Usage CSA Usage Total
754 KB 60 KB 814 KB
Chapter 2. Overview of Components and Installation 25
Pre-Installation Considerations
CA Common Services
Unicenter CA-Jobtrac requires the following CA Common Services:
■ CA LMP
■ CA-GSS/CA-GREXX
■ CAIENF
■ CAIRIM
■ CA-Datacom/AD
■ CA-C Runtime
■ CA-Easytrieve
■ CA-XPS
■ CAICCI
■ CAISSF
■ CAISDI/els
■ CAIVPE
■ ViewPoint
If other CA products are installed at your site, some of these services mayalready be installed.
This section presents an overview of each of these services.
Note: For more information, see the CA Common Services Getting Startedand Administrator Guide.
CA LMP
The CA License Management Program provides a standardized and automatedapproach to the tracking of licensed software. It uses common realtimeenforcement software to validate the client's configuration. CA LMP reports onactivities related to the license, usage and financials of CA products. Theroutines that accomplish this are integrated into the CAIRIM service.
26 Planning and Implementation Guide

Pre-Installation Considerations
CA-C
CA-C Runtime is a runtime facility with reentrant capabilities. Its modulararchitecture insulates CA-C Runtime programs from system and releasedependencies. There is little, if any, system-dependent code linked with theuser program, allowing for smaller user programs and easier maintenance.CA-C Runtime uses a memory manager to handle dynamic allocation requestsfor small pieces of storage, enabling fewer calls to be made on the operatingsystem resulting in faster allocation and deallocation.
CA-Datacom/AD
Unicenter CA-Jobtrac uses CA-Datacom/AD as its database. CA-Datacom/ADis a database engine that allows for forward recovery, data integrity after asystem outage, backup-while-open, and more.
CA-Easytrieve
The CA-Easytrieve reporting component is a report definition facility with thepower of a comprehensive programming system. CA-Easytrieve lets you modifyand print the contents and layout of predefined CA product reports in anEnglish-like language.
The CA-Easytrieve Common Component produces Unicenter CA-Jobtracreports. If you have the separately licensed product Unicenter CA-Easytrieve,you can use it for Unicenter CA-Jobtrac. Otherwise, you can use the no licensefee copy of CA-Easytrieve that is included with Unicenter CA-Jobtrac.
Chapter 2. Overview of Components and Installation 27
Pre-Installation Considerations
CA-GSS
The Global SubSystem (CA-GSS) is a product that offers software thatperforms across many of the CA product families. CA-GSS enables CAproducts to communicate with each other and is designed to help meet theincreasing need of data center operations for quick access to information frommany different sources. For example, CA-GSS lets Unicenter CA-Jobtracaccess data gathered by Unicenter CA-SYSVIEW. This information can be usedwhen determining how to schedule a particular job.
CA-XPS
CA-XPS is the Cross-Platform Scheduling router. It is used when a scheduler oran agent requests a job to be executed on z/OS. Requests are sent from ascheduler or an agent to CA-XPS, which then forwards the request to a specificscheduling product. CA-XPS lets multiple copies of Unicenter CA-Jobtrac (orUnicenter CA-7 or Unicenter CA-Scheduler) participate in cross-platformscheduling on the same z/OS image.
CAICCI
CAICCI, CAI Common Communications Interface, is a communications facilitythat enables CA solutions to communicate with one another. This facilityprovides a layer that isolates application software from the specifics of thecommunications environment.
CAIENF
CAIENF, CAI Event Notification Facility, is an operating system interfaceservice that enables CA solutions to obtain data from the operating system. Bycentralizing operating system interfaces within CAIENF, many features thatwere formerly available within a single solution can be shared across the entireproduct line.
28 Planning and Implementation Guide
Pre-Installation Considerations
CAISSF
The CAI Standard Security Facility (CAISSF) lets CA products offerstandardized security interfaces without regard to the particular needs ofunderlying access control software. CAISSF offers user authentication andresource access validation facilities, and can interface with CA security products(CA-ACF2 or eTrust CA-Top Secret) or compatible non-CA security products.CAISSF is a subservice contained within the CA z/OS Service code, S910(CAIRIM).
For CA security products, CAISSF features include:
■ A single security mechanism
■ Isolation of CA products from CA or vendor mechanisms
For non-CA security products, CAISSF features include:
■ Resource class translation
■ Access level translation
■ Selective logging of requests
■ Request type control
■ Message support for failed access
Note: CA-Datacom/AD requires CAISSF.
CAIRIM
CAIRIM, CAI Resource Initialization Manager, is the common driver for acollection of dynamic initialization routines that eliminate the need for userSVCs, SMF exits, subsystems, and other installation requirements commonlyencountered when installing systems software.
Chapter 2. Overview of Components and Installation 29
Pre-Installation Considerations
CAISDI/els - Service Desk Integration
CAISDI provides a set of services that open Unicenter Service Desk requestsfrom the z/OS environment. The requests can be opened directly by CAproducts, or they can be opened on their behalf, depending upon therequirements of each specific product using the interface. There are three maincomponents involved in this interface. Depending on each individual CA productusing CAISDI, one or more of these components will be required. In theconfiguration steps, you may choose to configure only the components youcurrently need.
Unicenter CA-Jobtrac uses the CAISDI/els (Event Library Support) componentfor its Unicenter Service Desk integration feature.
Note: For more information about this feature, see the Extended SchedulingServices Guide and the CA Common Services Getting Started guide.
CAIVPE
The CA Virtual Processing Environment (CAIVPE) is an interproduct Serviceused by CA products running under Advantage CA-Roscoe, TSO, or CICS. Itcontains monitor-specific code and lets your CA products run independently ofthe environment. The routines that accomplish this are grouped under the CAz/OS Service code, WU42. CAIVPE features include:
■ Making environment inquiries
■ Making terminal inquiries
■ Reading and writing directly from and to sequential files
■ Performing uppercase and lowercase translation
■ Issuing messages to both terminal and console
■ Checking runaway tasks
■ Dumping application-specific storage before giving control to the operatingsystem
Note: CA-Datacom/AD requires CAIVPE.
ViewPoint
Viewpoint is a windowed execution environment for mainframes. It usesSAA/CUA standards to enhance the integration of your CA products.
30 Planning and Implementation Guide
CA-Datacom/AD Considerations
CA-Datacom/AD Considerations
Review the following considerations before installing CA-Datacom/AD.
Install a User SVC for CA-Datacom/AD
CA-Datacom/AD requires the installation of a user SVC into the operatingsystem for CA-Datacom/AD. You can install the SVC using the CAIRIM serviceof CA Common Services. The module DBRIMPR that actually installs theCA-Datacom/AD SVC issues several informational messages and errormessages as needed.
Note: For these error and informational messages, their meanings, and anyaction you need to take, see the Advantage CA-Datacom/DB Message Guide.
First, determine a user SVC number that is available. User SVC numbers arebetween 200 and 255. The default SVC number for CA-Datacom/AD is 246. Todetermine which SVC numbers are available, either check with your systemsprogrammer or, if you have a version of CA-Datacom/AD or AdvantageCA-Datacom/DB installed, you can run a DBUTLTY job with the controlstatement REPORT MEMORY=MVS to obtain a list of all of the user SVCnumbers in your operating system. This report tells you which SVC numbersare unused and which are already being loaded as the CA-Datacom/AD SVC(along with the current release and maintenance level of that SVC code).
Note: For more information, see the REPORT MEMORY=MVS (SVC Report)in the Advantage CA-Datacom/DB DBUTLTY Reference Guide.
If you are installing CA-Datacom/AD for the first time, you must select acurrently available unused SVC number.
If you are installing a second copy of CA-Datacom/AD with the same versionnumber, another SVC number can be selected or the second CA-Datacom/ADenvironment can use the same SVC number, but use a different SUBID.
For example, the first CA-Datacom/AD environment may be using SVC 246with SUBID 0 whereas the second CA-Datacom/AD environment could useSVC 246 with SUBID 1. This way, depending upon which SVC/SUBIDcombination is referenced by the application program, communication isestablished with the desired CA-Datacom/AD environment.
Chapter 2. Overview of Components and Installation 31
CA-Datacom/AD Considerations
Each Advantage CA-Datacom SVC number can support up to 256 differentMUFs. This is managed through the use of a SUBID that is associated witheach SVC. Each MUF uses a unique SVC/SUBID combination that is definedthrough the DBSYSID macro which in turn generates a unique DBSIDPRmodule for that MUF. The DBSIDPR module is generated on-site as one of theCA-Datacom/AD common installation job steps. SUBID values range from 0through 255. All SUBID values except for 7, 8 and 9 are unrestricted on theamount of Extended Common Storage Area (ECSA) the MUF is allowed to use.
Note: For more information about SVCs and SUBIDs, see modifyingDBSIDPR parameters and establishing communication with z/OS in theAdvantage CA-Datacom/DB Database and System Administrator Guide.
If you are installing a different version of CA-Datacom/AD than is currentlyinstalled, there are two options available:
■ Select a new SVC number to use for this different version. This providesthe most isolation between versions available and completely eliminates anypossibility of a bad or corrupted SVC for one version impacting the otherversion. We recommend this method.
■ The CA-Datacom/AD use of SVC numbers is forward compatible but notbackward compatible. That is, CA-Datacom/AD r10 can use an r10 SVC oran r11 SVC, but CA-Datacom/AD r11 cannot use an r10 SVC. This methodallows all applications to reference the same SVC/SUBID as before withoutthe potential JCL changes needed to access a different version of theDBSIDPR module. If this method is selected, load the new SVC/SUBIDcode prior to beginning the CA-Datacom/AD install or upgrade. You alsoneed to specify the optional parameter of REINIT on the CAIRIM controlstatement. Refer to the following section for more information.
Important! To avoid unpredictable results, do not attempt for any reason tooverlay the existing r10 SVC with the r11 SVC if other DBUTLTY or MUFjobs are actively using it.
32 Planning and Implementation Guide
CA-Datacom/AD Considerations
Install the SVC with CAIRIM
The CAIRIM (CA Resource Initialization Manager) is the common driver in theCA Common Services for z/OS and OS/390 for a collection of dynamicinitialization routines. You can use it to install the Advantage CA-Datacom/DBSVC. For further information regarding the operation of CAIRIM, refer to theCA Common Services for z/OS and OS/390 Administrator Guide.
The installation tasks temporarily install the Advantage CA-Datacom/DB SVCinto your operating system environment. This SVC is valid only until the nextIPL. To install the SVC automatically during each IPL, perform the followingtasks. Refer to the CA Common Services for z/OS and OS/390 AdministratorGuide for other ways to use CAIRIM.
To install the SVC with CAIRIM:
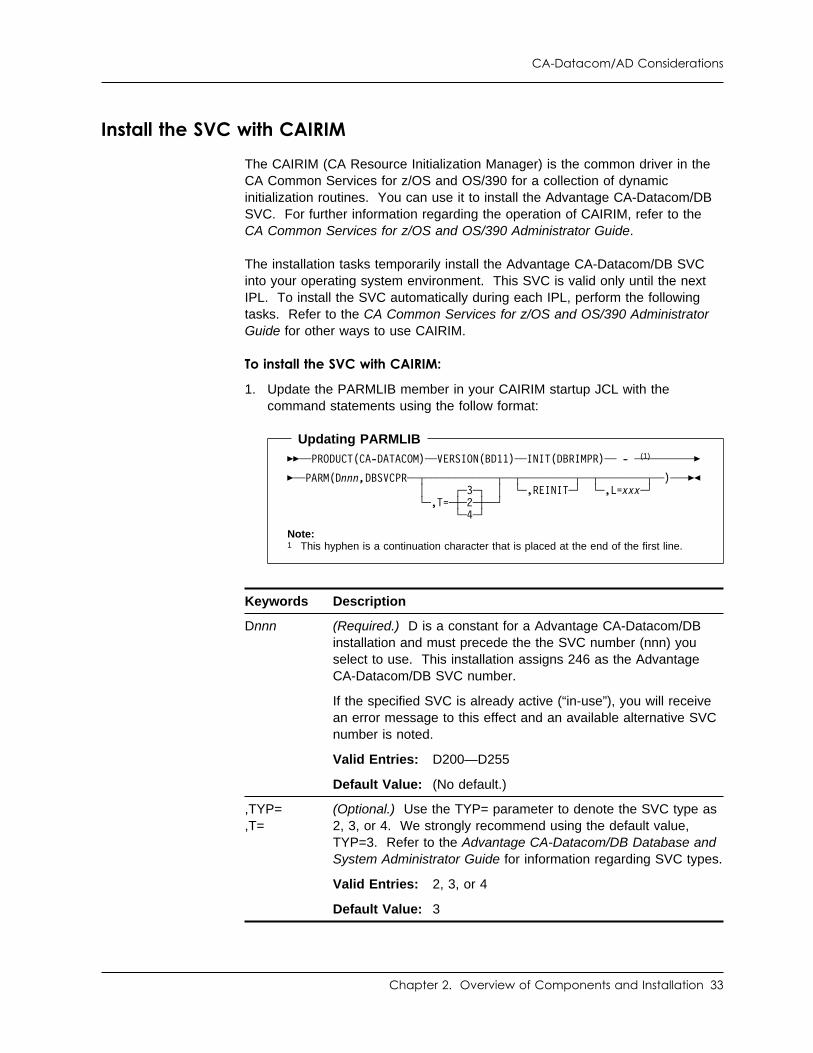
1. Update the PARMLIB member in your CAIRIM startup JCL with thecommand statements using the follow format:
Updating PARMLIB
��──PRODUCT(CA-DATACOM)──VERSION(BD11)──INIT(DBRIMPR)── - ───(1) ───────�
�─ ──PARM(Dnnn,DBSVCPR ──┬ ┬──────────── ──┬ ┬───────── ──┬ ┬──────── ─)───�� │ │┌ ┐─3─ └ ┘─,REINIT─ └ ┘──,L=xxx └ ┘──,T= ──┼ ┼─2─ └ ┘─4─
Note:1 This hyphen is a continuation character that is placed at the end of the first line.
Keywords Description
Dnnn (Required.) D is a constant for a Advantage CA-Datacom/DBinstallation and must precede the the SVC number (nnn) youselect to use. This installation assigns 246 as the AdvantageCA-Datacom/DB SVC number.
If the specified SVC is already active (“in-use”), you will receivean error message to this effect and an available alternative SVCnumber is noted.
Valid Entries: D200—D255
Default Value: (No default.)
,TYP=,T=
(Optional.) Use the TYP= parameter to denote the SVC type as2, 3, or 4. We strongly recommend using the default value,TYP=3. Refer to the Advantage CA-Datacom/DB Database andSystem Administrator Guide for information regarding SVC types.
Valid Entries: 2, 3, or 4
Default Value: 3
Chapter 2. Overview of Components and Installation 33
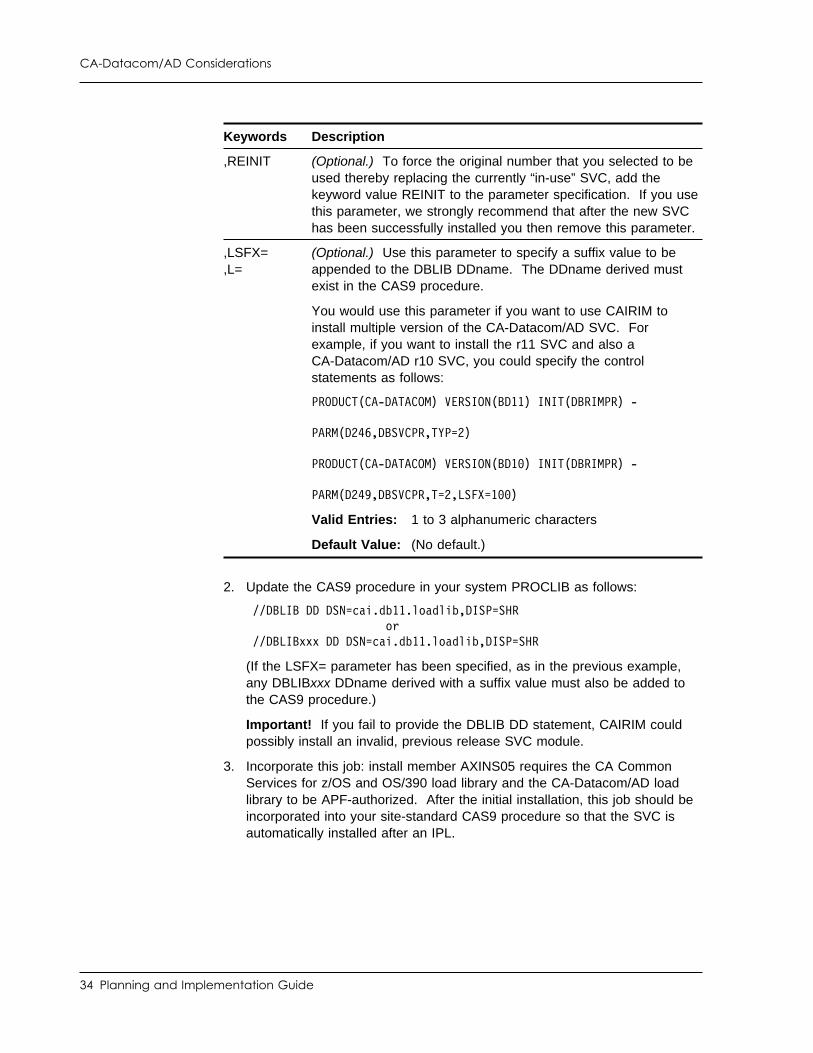
CA-Datacom/AD Considerations
2. Update the CAS9 procedure in your system PROCLIB as follows:
//DBLIB DD DSN=cai.db11.loadlib,DISP=SHR or //DBLIBxxx DD DSN=cai.db11.loadlib,DISP=SHR
(If the LSFX= parameter has been specified, as in the previous example,any DBLIBxxx DDname derived with a suffix value must also be added tothe CAS9 procedure.)
Important! If you fail to provide the DBLIB DD statement, CAIRIM couldpossibly install an invalid, previous release SVC module.
3. Incorporate this job: install member AXINS05 requires the CA CommonServices for z/OS and OS/390 load library and the CA-Datacom/AD loadlibrary to be APF-authorized. After the initial installation, this job should beincorporated into your site-standard CAS9 procedure so that the SVC isautomatically installed after an IPL.
Keywords Description
,REINIT (Optional.) To force the original number that you selected to beused thereby replacing the currently “in-use” SVC, add thekeyword value REINIT to the parameter specification. If you usethis parameter, we strongly recommend that after the new SVChas been successfully installed you then remove this parameter.
,LSFX=,L=
(Optional.) Use this parameter to specify a suffix value to beappended to the DBLIB DDname. The DDname derived mustexist in the CAS9 procedure.
You would use this parameter if you want to use CAIRIM toinstall multiple version of the CA-Datacom/AD SVC. Forexample, if you want to install the r11 SVC and also aCA-Datacom/AD r10 SVC, you could specify the controlstatements as follows:
PRODUCT(CA-DATACOM) VERSION(BD11) INIT(DBRIMPR) -
PARM(D246,DBSVCPR,TYP=2)
PRODUCT(CA-DATACOM) VERSION(BD1 ) INIT(DBRIMPR) -
PARM(D249,DBSVCPR,T=2,LSFX=1 )
Valid Entries: 1 to 3 alphanumeric characters
Default Value: (No default.)
34 Planning and Implementation Guide
CA-Datacom/AD Considerations
4. Run the DBUTLTY SVC Report (REPORT MEMORY=MVS) to verify yourwork after defining the SVC. See the Advantage CA-Datacom/DB Databaseand System Administrator Guide and the Advantage CA-Datacom/DBDBUTLTY Reference Guide for information on this report.
Important! You must install the SVC on every machine that might run theMulti-User Facility region, a DBUTLTY job, or make a database request throughthe Cross-System Coupling Facility (XCF).
Chapter 2. Overview of Components and Installation 35
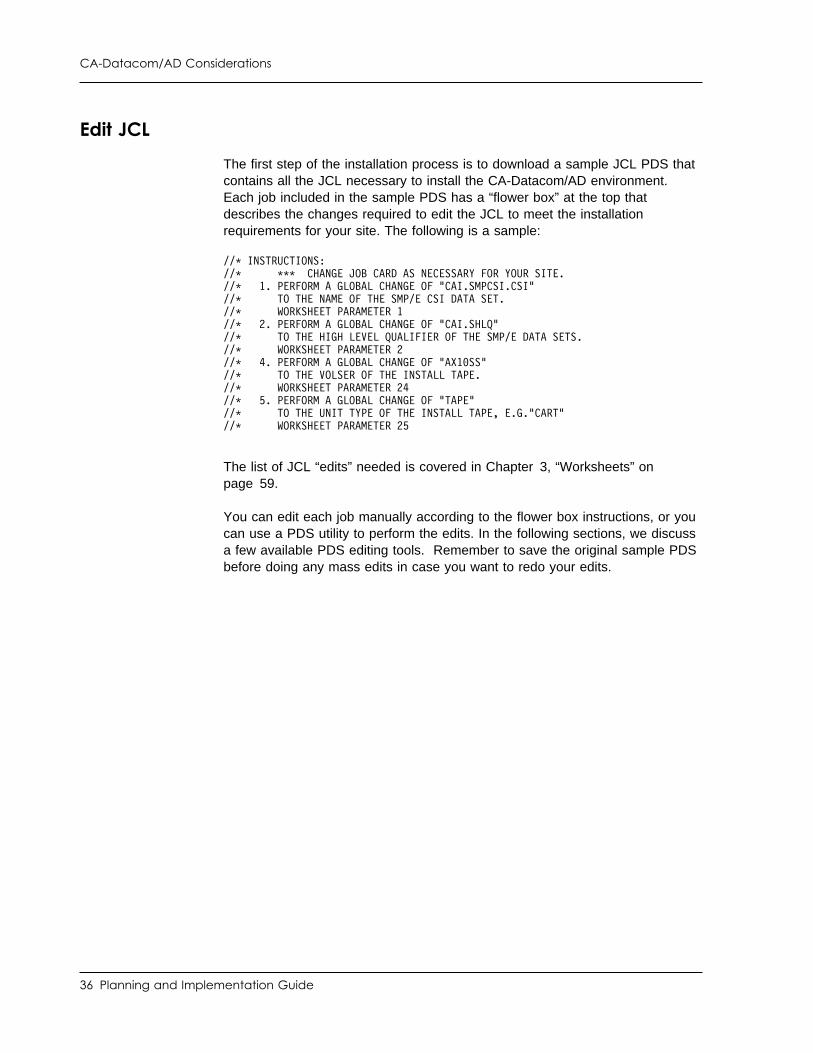
CA-Datacom/AD Considerations
Edit JCL
The first step of the installation process is to download a sample JCL PDS thatcontains all the JCL necessary to install the CA-Datacom/AD environment.Each job included in the sample PDS has a “flower box” at the top thatdescribes the changes required to edit the JCL to meet the installationrequirements for your site. The following is a sample:
//� INSTRUCTIONS://� ��� CHANGE JOB CARD AS NECESSARY FOR YOUR SITE.//� 1. PERFORM A GLOBAL CHANGE OF "CAI.SMPCSI.CSI"//� TO THE NAME OF THE SMP/E CSI DATA SET.//� WORKSHEET PARAMETER 1//� 2. PERFORM A GLOBAL CHANGE OF "CAI.SHLQ"//� TO THE HIGH LEVEL QUALIFIER OF THE SMP/E DATA SETS.//� WORKSHEET PARAMETER 2//� 4. PERFORM A GLOBAL CHANGE OF "AX1 SS"//� TO THE VOLSER OF THE INSTALL TAPE.//� WORKSHEET PARAMETER 24//� 5. PERFORM A GLOBAL CHANGE OF "TAPE"//� TO THE UNIT TYPE OF THE INSTALL TAPE, E.G."CART"//� WORKSHEET PARAMETER 25
The list of JCL “edits” needed is covered in Chapter 3, “Worksheets” onpage 59.
You can edit each job manually according to the flower box instructions, or youcan use a PDS utility to perform the edits. In the following sections, we discussa few available PDS editing tools. Remember to save the original sample PDSbefore doing any mass edits in case you want to redo your edits.
36 Planning and Implementation Guide
CA-Datacom/AD Considerations
IBM CBIPO
If you have the IBM CBIPO, there is a procedure using either the IPOUPDTE orthe CPPUPDTE utility to facilitate editing the install sample JCL job members.
You can review sample JCL PDS members @AXIPOJC, @AXIPOIN, and@AXIPDMY to use a batch program that globally changes the sample JCL PDSfor the parameter value strings to the desired values.
@AXIPOJCContains a sample job JCL to execute batch program.
@AXIPOINContains a sample parameter string to change SYSIN member.
@AXIPDMYContains a sample prerequisite member to rename for batch program use.
Use the sample member @AXIPOIN when using IPOUPDTE to edit theCA-Datacom/AD installation. The sample member provides the updateparameters in the specific order needed for the installation JCL editing. Also,make sure that each line of the sample input member (@AXIPOIN) is reviewedand updated with the appropriate worksheet value according to the comments(at the right of each line).
Since the batch JCL editing procedure changes all members, you may want tocreate a backup copy of the sample JCL PDS before executing @AXIPOJC.
If necessary, rename @AXIPDMY to $$$COIBM if such a member does notexist.
Although the global edit procedure eliminates the requirements for almost allmanual editing of install jobs, you should still review the instruction block ineach job for any optional changes.
Chapter 2. Overview of Components and Installation 37
CA-Datacom/AD Considerations
Edit SAMPJCL Using the Supplied REXX Execs Under ISPF
If you use ISPF, the SAMPJCL file contains two REXX execs to facilitate editingthe install sample JCL job members. You can use SAMPJCL PDS members$DCOMEDT and $EDITINP to make global changes in the SAMPJCL PDS forthe intended worksheet parameter strings.
$DCOMEDTContains a mainline REXX exec that is executed under ISPF.
$EDITINPContains a sample REXX exec that makes the global changes.
Member $DCOMEDT contains a reference to the SAMPJCL library on thesecond line of the exec. Simply replace the string CAI.SHLQ.SAMPJCL with thename of your SAMPJCL library.
Member $EDITINP contains an edit command for each worksheet item in theform of 'ISREDIT C "STRING1" "STRING2" ALL'. In each case, STRING1 representswhat is currently in the installation job members in the SAMPJCL PDS. ChangeSTRING2 so that the worksheet values for your installation are incorporated.
Once you have made the appropriate changes, simply issue the followingcommand from any ISPF panel:
TSO EXEC 'cai.shlq.sampjcl($DCOMEDT)'
Where cai.shlq.sampjcl is the name of your SAMPJCL library.
Although this global edit procedure eliminates the requirements for almost allmanual editing of the installation jobs, you should still review the instructionblock in each job for any optional changes.
38 Planning and Implementation Guide
CA-Datacom/AD Considerations
CA-Datacom/AD Product Installation
Normally, all CA products for the z/OS environment are installed using SMP/E.While CA-Datacom/AD still uses SMP/E in its installation and maintenance, theSMP/E portion of the installation of CA-Datacom/AD has been preinstalled foryou. This portion of the installation from the user's view consists only ofdownloading the preinstalled libraries and CSI from the product tape. The useris only required to rename the predefined DD definitions that occur in the CSIwith their site-specific data set naming conventions. All users, whether installingnew, or upgrading from the previous release, need to do this portion of theinstallation.
Important! Because of this preinstallation aspect, do not change the zonenames. Changing the zone names causes problems if any maintenance is tobe applied using SMP/E.
Periodically, standard maintenance/genlevel tapes for one or more of theCA-Datacom/AD products are distributed. Refer to the chapter about productmaintenance for more information.
Products Installed
CA-Datacom/AD consists of the following product components:
■ Advantage CA-Datacom/DB Database (with the Datadictionary component)
■ CA-Datacom/AD Database SQL Option
■ CA-Datacom/AD Database Option for CICS
■ Advantage CA-Dataquery for CA-Datacom
■ CA-IPC (Inter-Product Components)
The version and maintenance levels for these products are listed in the releaseletter that is shipped with the installation tape.
Chapter 2. Overview of Components and Installation 39

CA-Datacom/AD Considerations
List Libraries for CA-Datacom/AD Products in JCL
Additional samples for JCL and programs are provided in the CAIMAC installlibrary. You can copy and modify these samples for your specific requirements.
Any JOB statements should be coded to your site standards and specifications.All data set names and library names should be specified with the correctnames for the installation at your site. In many examples, a REGION= or SIZE=parameter is displayed in an EXEC statement. The value displayed should beadequate in most instances, but you can adjust the value to your specificneeds.
The libraries listed for searching must include the following in the order shown:
1. User libraries (CUSLIB) you may have defined for specially assembled andlinked tables, such as DBMSTLST, DBSIDPR, DDSRTLM, DQSYSTBL, orUser Requirements Tables (URTs)
2. CA-Datacom/AD base libraries (CAILIB): Advantage CA-Datacom/DB,Advantage CA-Datacom SQL Option, Advantage CA-Dataquery
3. CA Common Services base libraries
40 Planning and Implementation Guide
CA-Datacom/AD Considerations
Unicenter CA-Jobtrac Considerations
Review the following considerations before installing Unicenter CA-Jobtrac.
Subsystems
Unicenter CA-Jobtrac uses two subsystems: GOAL and JT11.
Important! Unicenter CA-Jobtrac must have CA-GSS installed. Although youcan run Unicenter CA-Jobtrac without CA-GSS active, the CA-GSS CAILIBmust be available to Unicenter CA-Jobtrac.
Note: CA-GSS is part of CA Common Services.
We require that you install CA-GSS prior to installing Unicenter CA-Jobtrac.
CA-GSS uses a subsystem named GOAL. It dynamically installs a subsystemwith this name.
This ISET is for the product IMODs shipped with Unicenter CA-Jobtrac.Unicenter CA-Jobtrac will not install properly if the ISET is not available.
You can use this ISET or define another for your own use. The UnicenterCA-Jobtrac installation procedure STAGE2 allocates and populates theUnicenter CA-Jobtrac required ISET data set.
CA-GSS must be set up to include networking support for all JES nodes inwhich Unicenter CA-Jobtrac is to be used for NJE support. This is done usingthe GoalNet features of CA-GSS.
Note: For information about GoalNet, see the CA Common Servicesdocumentation.
Chapter 2. Overview of Components and Installation 41
Unicenter CA-Jobtrac Considerations
JES Usage
All systems that run scheduled batch jobs must be able to communicate withthe Unicenter CA-Jobtrac checkpoint.
The VINITx task is required only for pre-JES console automation and possiblepre-JES startup data triggering functions. During initial testing orimplementation, you usually do not need to start VINITx during IPLs (SVINITx,PARM=IPL).
If you are using the BSPACE parameter in the CONDEF statement defined inthe JES2INIT file using characters @, #, or $, it will conflict with the internalverification procedure job JOBT@#$J. If you are using one of these characters,change it to a different character to avoid any problems.
To use JES3 with Unicenter CA-Jobtrac, add a SUBSYS(STC) statement toyour SMFPRMnn member in SYS1.PARMLIB. This statement can be specifiedas follows:
SUBSYS(STC,EXITS(IEFU83)
If you already have a SUBSYS(STC) statement, you do not need to change it.
The Unicenter CA-Jobtrac STC is active on all systems in the JES complex(shared spool environment).
You can think of Unicenter CA-Jobtrac as a logical extension to JES. JESmonitors a job from submission through printout, and Unicenter CA-Jobtracextends those boundaries to include scheduling, submission, execution, andhistorical archival. The JES checkpoint indicates only those jobs that arecurrently queued for execution or printing. The Unicenter CA-Jobtrac checkpointindicates events queued for submission, execution, or history archival.
Unicenter CA-Jobtrac works the same way with JES3 as it does with JES2,except that the queue class and JOB statement AUTO-SCHD features are notsupported. To AUTO-SCHD events in a JES3 system, you must use the stepmethod.
Note: For more information, see the Operator Guide.
Unicenter CA-Jobtrac does not scan the JES spool for job status. UnicenterCA-Jobtrac uses information from SMF exits and CAIENF to establish eventstatus.
If you must cycle JES2 or JES3, you must also cycle Unicenter CA-Jobtrac. Ifyou do not, Unicenter CA-Jobtrac will not work properly.
42 Planning and Implementation Guide
Unicenter CA-Jobtrac Considerations
Installation Tape Information
During the installation for Unicenter CA-Jobtrac, you will need to access up tothree installation tapes, and possibly one service pack tape (for UnicenterCA-Jobtrac). The tapes you may need are the following:
■ The CA Common Services installation tape
■ The CA-Datacom/AD installation tape
■ The Unicenter CA-Jobtrac installation tape
■ The latest Unicenter CA-Jobtrac service pack tape
CA Common Services Installation Tape
If you have not already installed all the common services components requiredfor Unicenter CA-Jobtrac r11, you will need to access this tape to install thesecomponents.
Note: For more information about this tape, see the CA Common ServicesGetting Started guide.
The CA-Datacom/AD Installation Tape
Unless CA-Datacom/AD r10 or higher is currently installed, you need to accessthis tape.
If you are an existing Advantage CA-Datacom/DB customer, you may choose touse the full product instead of the common component. We recommend thatyou install the CA-Datacom/AD even if you have the full product to avoid anymaintenance-level conflicts and limit the impact that may occur to yourproduction database environment.
Note: For more information about this tape, see the CA-Datacom/ADInstallation and Maintenance Guide.
Chapter 2. Overview of Components and Installation 43
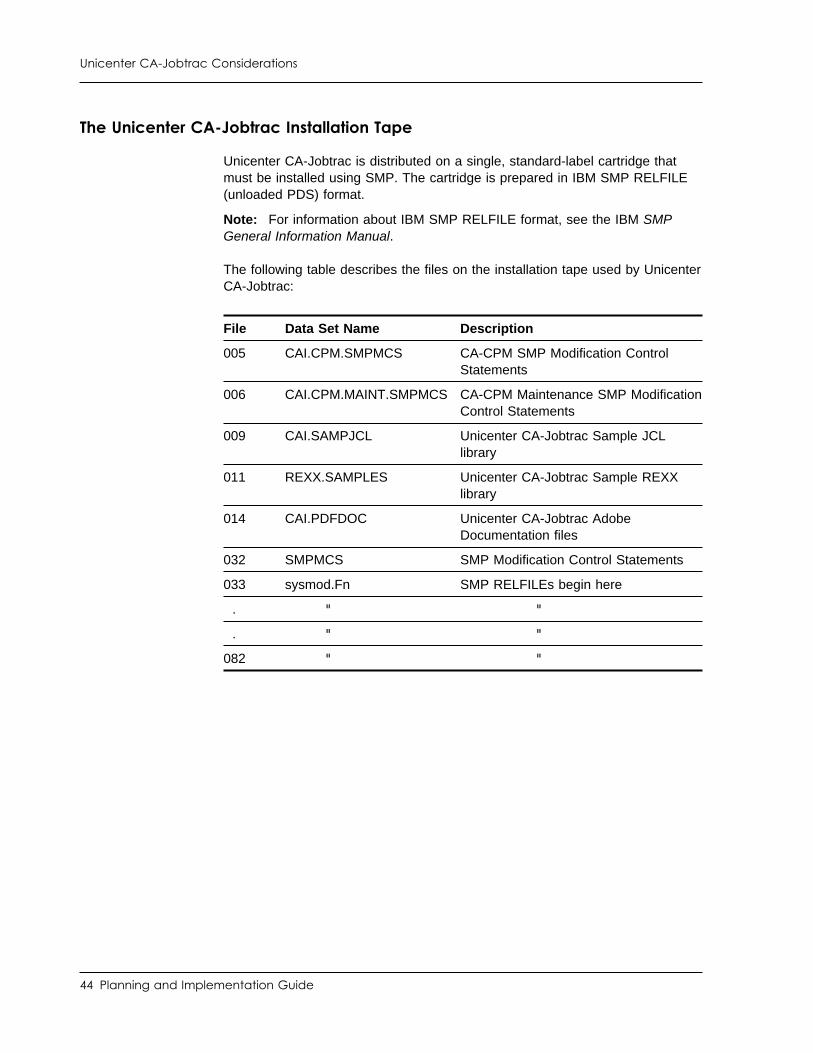
Unicenter CA-Jobtrac Considerations
The Unicenter CA-Jobtrac Installation Tape
Unicenter CA-Jobtrac is distributed on a single, standard-label cartridge thatmust be installed using SMP. The cartridge is prepared in IBM SMP RELFILE(unloaded PDS) format.
Note: For information about IBM SMP RELFILE format, see the IBM SMPGeneral Information Manual.
The following table describes the files on the installation tape used by UnicenterCA-Jobtrac:
File Data Set Name Description
005 CAI.CPM.SMPMCS CA-CPM SMP Modification ControlStatements
006 CAI.CPM.MAINT.SMPMCS CA-CPM Maintenance SMP ModificationControl Statements
009 CAI.SAMPJCL Unicenter CA-Jobtrac Sample JCLlibrary
011 REXX.SAMPLES Unicenter CA-Jobtrac Sample REXXlibrary
014 CAI.PDFDOC Unicenter CA-Jobtrac AdobeDocumentation files
032 SMPMCS SMP Modification Control Statements
033 sysmod.Fn SMP RELFILEs begin here
. " "
. " "
082 " "
44 Planning and Implementation Guide
Unicenter CA-Jobtrac Considerations
The Latest Unicenter CA-Jobtrac Service Pack Tape
Since some time may have passed between the time that Unicenter CA-Jobtracr11 was released and the time you implement the release, one or more servicepacks may be available. Service packs are cumulative and contain all themaintenance for the product since the base release. Only the latest servicepack tape is required. You should have received the latest service pack with thebase tape for Unicenter CA-Jobtrac. The description of this tape's contents aredescribed in the accompanying cover letter.
Maintenance for CA Common Services and for CA-Datacom/AD is included inthe installation tape for these components.
SMP/E Considerations
You use SMP/E to install Unicenter CA-Jobtrac. This manual assumes that youare familiar with SMP/E. If you have not previously installed program productsusing SMP/E, review this entire installation guide before you begin theinstallation.
Check with your SMP/E systems programmer if you have questions about yourSMP/E environment.
The installation creates new global, target, and distribution zones. Two cylindersof 3390 space for each CSI should be sufficient for Unicenter CA-Jobtracfunctions and allow for growth required by future maintenance.
Chapter 2. Overview of Components and Installation 45
Unicenter CA-Jobtrac Considerations
Data Set Placement Considerations
Carefully plan the placement of the following data sets.
CA-Datacom/AD Files
The most heavily used file in CA-Datacom/AD is the LXX file. The LXX, or theLog file, is updated each time a change is made to the database. This letsCA-Datacom/AD buffer updates to the actual database and still maintain dataintegrity in the event of an outage. Since this file is highly used, you shouldplace it so that it can be accessed efficiently.
None of the CA-Datacom/AD databases should be placed on packs that arehighly used, such as paging packs or JES spool packs. The most heavily useddata area in the Unicenter CA-Jobtrac database is the EVT161 file that containsthe active event processing data. Take care to ensure that this file also hasadequate performance.
Generally, CA-Datacom/AD databases are only accessed from one system inthe sysplex. A single accessing CA-Datacom/AD address space runs in thesysplex. Locally on this system, the database is accessed using an SVC. Whensharing a database with other systems in the sysplex, access to the databaseuses XCF. While the database can reside on any system in the sysplex, thebest performance is achieved when the database is running on the samesystem as the Unicenter CA-Jobtrac primary submission system.
Sysout Capture File
The sysout capture file stores captured sysouts for online viewing andsubsequent archival, printing, or deletion.
If you plan to use the sysout capture file as your primary sysout capturesystem, you should place it where your TSO users will get adequate responsetime.
If you plan to run Unicenter CA-Jobtrac on multiple systems that share DASD,the sysout capture file must be on a pack on your primary (event-submitting)Unicenter CA-Jobtrac system.
Most users will put it on shared DASD so that TSO users from each systemcan view sysouts. No reserves are issued against the sysout capture file. Youshould place the sysout capture file on a non-SMS managed volume.
More information:
“Use Other Sysout Capture Products” on page 230
46 Planning and Implementation Guide
Unicenter CA-Jobtrac Considerations
Database Recovery Planning
The database backup requirements you need depend on your plans forrecovery. This topic discusses backup and recovery at a high level.
Note: For more information about database backup, recovery, and utilities, seethe Reports, Maintenance, and Recovery Guide.
Common CA-Datacom/AD Terms
The following lists some common terms used when discussingCA-Datacom/AD.
pipeliningPipelining is caching database updates to reduce DASD activity and toincrease database access speed.
LXXThe LXX is the log file. The combination of LXX and pipelining preventsdata loss. All updates are logged directly to the LXX.
spillThe spill process removes LXX log entries that are no longer needed andcopies them to a RXX recovery file.
FXXThe FXX is the Force Recovery Area. The FXX is used with the LXX forstartup recovery.
RXXThe RXX is the recovery file. Actually a number of recovery files arecreated, generally as GDG tape files. Spilling the LXX creates the RXXfiles. These files can be used to run a forward recovery for a databasethat has been restored from a backup.
MUFThe MUF is the Multi-User Facility. This is the CA-Datacom/AD startedtask. Applications communicate though the MUF to access the databasetables.
loadA load is the process of reloading a database from a backup.
forward recoveryThe forward recovery process applies RXX recovery files to a databasethat has been loaded from a backup to restore the database to thepre-failure condition.
hot backupA hot backup is a fuzzy backup taken while the database is active andbeing updated.
Chapter 2. Overview of Components and Installation 47
Unicenter CA-Jobtrac Considerations
static backupA static backup is a backup taken while the database is closed and allactivity is stopped.
base or databaseA base or database is part of the MUF. In CA-Datacom/AD, a MUF canhave multiple databases, or bases as CA-Datacom/AD refers to them. Aunique database ID, DBID, identifies each base. Usually each product hasa single database. Unicenter CA-Jobtrac allocates two bases: one forUnicenter CA-Jobtrac processing and one for forecasting.
DBIDA DBID is a database ID. Each database in a MUF has a unique ID. TheDBID is a numeric value identifying the database. By default, theUnicenter CA-Jobtrac DBIDs are 0161 (production) and 0162 (forecast).
data areaThe data areas represent the physical files that make up a database.These data areas, with the database index, make up the physicaldatabase files. Unicenter CA-Jobtrac has four data areas, EVT, HIS, OPT,and STG. These are paired with the DBID to make up the DDNAME andfile name for these files. With the default of 161, the area DDNAMEs areEVT161, HIS161, OPT161, and STG161.
index areaThe index area exists in a database. Each database has a single index forall tables and areas in the base, known as the IXX. Like the areas, theIXX is paired with the DBID to make up the DDNAME and file name forthe index. With the default of 161, the index DDNAME is IXX161.
Log File and Recovery File
The CA-Datacom/AD log file, the LXX, is updated each time the database ischanged. CA-Datacom/AD pipelines updates to the database, keeping changesin storage until they can be written to the database in a group. This decreasesI/O to the database files and greatly increases the speed of access. The LXXrecords need to be kept in the log until the database changes are committed tothe database DASD. Once this is done, these records can be removed from theLXX to allow for adding more records.
The spill process removes completed records from the LXX file and writes themto a recovery file, the RXX. This process frees up space in the LXX and createsRXX recovery files that can be used to forward recover a restored database.The CA-Datacom/AD startup option, LOGRCV NO, establishes the creation ofthe recovery files. By default, this value is set to NEVER, which reuses the logfile and does not create the recovery file. LOGRCV YES indicates to use adedicated tape drive for the recovery file. Since this is not usually the bestsolution, the LOGRCV NO option indicates that no tape is allocated, and theRXX is created by running a spill job. During the installation customization, youare instructed to change LOGRCV to NO.
48 Planning and Implementation Guide
Unicenter CA-Jobtrac Considerations
System Failure or CA-Datacom/AD MUF Failure
The CA-Datacom/AD database started task is called the Multi-User Facility(MUF). With CA-Datacom/AD, a system outage or MUF failure is recoveredautomatically when the MUF is restarted. If the system where CA-Datacom/ADruns fails, when CA-Datacom/AD is restarted on the system after IPL, or on analternative system with shared DASD, the database is automatically recoveredto the point of failure. CA-Datacom/AD processes the LXX log file and bringsthe database up to date to the time of failure. This occurs without the need torestore from backup or to perform a manual recovery.
DASD Failure or Disaster Recovery
DASD failure recovery and disaster recovery both require that a databasebackup is available to restore the database. To prepare for these types offailures, you must take regular backups.
Backup Utilities
We recommend that you use the CA-Datacom/AD DBUTLTY utility to performbackups and restores for the Unicenter CA-Jobtrac database. Though it istechnically possible to use other backup utilities for backup and restore, we donot recommend it for the following reasons:
■ These utilities do not know the database structure.
■ The data areas and index for a database may be on multiple packs andtherefore may not be backed up at the same time.
■ Files may not be on the same backup tape if full pack backups are used.
■ Restoration and recovery of these files becomes more difficult.
The CA-Datacom/AD DBUTLTY backup backs up all components of a databasetogether ensuring that they are in sync with each other when they are restored.
Chapter 2. Overview of Components and Installation 49
Unicenter CA-Jobtrac Considerations
Backup Types
You can perform two types of backups for the Unicenter CA-Jobtrac database.
The hot backup can be done with the database active. This is a fuzzy backupand may contain incomplete updates. To restore from this type of backup, youmust perform a forward recovery using all the RXX recovery files created sincetaking the restored backup. This method produces the most accurately restoreddatabase. Once forward recovery is complete, the database is in the samestate as it was before the failure.
A static (or cold) backup requires closing the database and shutting down allUnicenter CA-Jobtrac started tasks, Primary and Monitors. This is a stablebackup taken at a single point in time. When a static backup is restored, thedatabase is complete as of the time the backup was taken. Forward recoverycan also be used to restore the static backup up to the time of failure, but it isnot required as it is with a hot backup.
If you do not perform forward recovery, the static backup can be used torestore your history, JTS tables, and calendars to the database and as well asthe checkpoint information at the time of the backup. Once restored and thecheckpoint has been examined, you may want to archive all the jobs to history,using the archive ALL,CLEAN option, so that you can start fresh with your jobschedules. This method does not provide a complete restore of the databasebut does restore tables that are not often changed. This method also provides aquicker method for getting Unicenter CA-Jobtrac up and running.
Backup Frequency
The longer the time between backups, the longer forward recovery takes torecover the database. To reduce this recovery time, we recommend taking thedatabase hot backups once a day.
Forward Recovery
If you have taken a hot backup, the forward recovery is required to havedatabase integrity. With a static backup, the database is complete if no forwardrecovery is done, but it is not current. It reflects the status in the system at thetime the backup was taken. Forward recovery requires that a final spill of thelog file, the LXX, be done to have a complete set of RXX recovery files. TheRXX files spilled since the backup was started must then be applied to thedatabase in the order they were created using the recovery job.
50 Planning and Implementation Guide
Unicenter CA-Jobtrac Considerations
Disaster Recovery
Disaster recovery (DR) varies depending on the hardware capabilities in yourorganization.
If you are mirroring your DASD to a DR remote site, and all the UnicenterCA-Jobtrac and CA-Datacom/AD files are included in that mirroring, recovery onthe DR site is the same as recovery from a system failure. The mirrored fileswould be present. By starting the CA-Datacom/AD MUF, CA-Datacom/ADwould use the LXX log file to perform recovery to the point of failure. UnicenterCA-Jobtrac could then be started with PARM=HOLD to let you examine thestate of your workload before releasing Unicenter CA-Jobtrac to resumeprocessing.
Some sites mirror locally, and periodically sever the mirror connections to allowfor a copy of all data at the same point in time. This is sometimes called a flashcopy. In this case, the LXX and the databases are captured at the sameinstance in time. If CA-Datacom/AD is started with these synchronized files, thedatabase is restored the same as in the system failure, but only to the pointthat the flash copy was taken. Once again, you should start UnicenterCA-Jobtrac with the PARM=HOLD to examine the state of jobs when the copywas taken before resuming processing.
If your DR planning is not using mirroring and you are planning to restore froma backup at your DR site, you must periodically send your backups offsite.
If you are taking hot backups, you must spill the LXX to the RXX following thebackup and keep the backup tape and this first RXX tape offsite to maintainyour database integrity. Having these two tapes together allows the database torestore to a stable point. In the event that the files need to be restored toanother site, the hot backup can be restored and the first tape applied toensure that all transactions are in a completed status. If all the RXX tapes aresent to the DR site, a nearly complete restore of the database can be done.The final updates that were still in the LXX log file may not be available toperform a complete restore. If the LXX is available, it should be spilled to a finalRXX before recovery. This brings the database up to the time of failure.
If you are unable to fully recover the database, either due to using a staticbackup with no recovery or a hot backup with incomplete recovery, the morestatic components of the database such as the history, audit, JTS tables, andcalendars are valuable to restore. The checkpoint data may not be as useful,and in a DR mode you may want to clear the schedule using an ArchiveALL,CLEAN and begin loading schedules from a particular point.
Chapter 2. Overview of Components and Installation 51
Unicenter CA-Jobtrac Considerations
Other Products
When planning your backup and recovery, you should consider other productsthat are sharing the same CA-Datacom/AD MUF. Only similar products shouldbe sharing this environment. The one other product that you may want in thesame MUF would be Unicenter CA-11. You should choose the same backupplan for all products that are sharng the same MUF because the RXX recoveryfile is for all products within the MUF. Since stopping Unicenter CA-11 can bedifficult, we recommend that you use a hot backup if these two products sharea single CA-Datacom/AD MUF. You can also include the backup of more thanone database in the backup job, so that you can choose to back up thedatabases for all products sharing a MUF in a single job.
Note: For more information about backup and recovery, see the Reports,Maintenance, and Recovery Guide.
52 Planning and Implementation Guide
Unicenter CA-Jobtrac Considerations
Interfaces with Other Products
Unicenter CA-Jobtrac interacts with other products as described in the followingsections.
AllFusion CA-Librarian
With Unicenter CA-Jobtrac, you can use an AllFusion CA-Librarian JCL libraryinstead of a standard PDS JCL library.
More information:
“Step 17: (Optional) Link AllFusion CA-Librarian Modules” on page 107
Chapter 5, “Customization Job Streams” on page 111
AllFusion CA-Panvalet
With Unicenter CA-Jobtrac, you can use a AllFusion CA-Panvalet JCL libraryinstead of a standard PDS JCL library.
More information:
“Step 16: (Optional) Link AllFusion CA-Panvalet Modules” on page 107
Chapter 5, “Customization Job Streams” on page 111
CA-Blockmaster
Exclude Unicenter CA-Jobtrac programs by adding the following to theCA-Blockmaster Exclude table:
BLMTABLE TYPE=E,PGM=GJC�BLMTABLE TYPE=E,PGM=GJTR�BLMTABLE TYPE=E,PGM=GJC3�BLMTABLE TYPE=E,PGM=JCL3�
BrightStor CA-HyperBuf
Exclude the Unicenter CA-Jobtrac files and programs.
MODE=EXCLUDE PROGRAM=GJTR�
Unicenter CA-MIM
Unicenter CA-MIM is a CA family of software products that makes sharingresources in multi-image and multi-system environments safe and efficient.Unicenter CA-MIM consists of Unicenter CA-MIA, Unicenter CA-MII, andUnicenter CA-MIC. Unicenter CA-MII is used to share DASD.
Chapter 2. Overview of Components and Installation 53
Unicenter CA-Jobtrac Considerations
Unicenter CA-SYSVIEW
Unicenter CA-SYSVIEW is a powerful system tool that enables you to accessinformation about your system and what is running on it. For example, you cancheck the amount of free space on a particular volume or determine theavailability of tape drives.
Unicenter CA-Jobtrac enables you to use Unicenter CA-SYSVIEW withoutexiting Unicenter CA-Jobtrac (use the Q line command). You can also useUnicenter CA-SYSVIEW with @JOBTRAC. To use Unicenter CA-SYSVIEWfrom Unicenter CA-Jobtrac, you must meet the following conditions:
■ You must be a licensed Unicenter CA-SYSVIEW user.
■ You must have Unicenter CA-SYSVIEW installed on your system.
■ Your TSO session must have access to the Unicenter CA-SYSVIEW ISPFprogram and its associated files.
For more information about the Unicenter CA-SYSVIEW interface, see theUnicenter CA-SYSVIEW installation manual. For more information about@JOBTRAC, see the REXX information in the Extended Scheduling ServicesGuide.
Unicenter CA-View
Unicenter CA-View is a SYSOUT archival and retrieval system that storescomputer output on either DASD or tape and retrieves that output on demand.
More information:
“About the Unicenter CA-View Interface” on page 230
Unicenter CA-11
When rerun/restart is required and Unicenter CA-11 is installed, you can accessrerun/restart information by using the R line command. This takes you to theUnicenter CA-11 primary menu, and you navigate through the range ofUnicenter CA-11 functions.
Other Products Through CA-GSS
The @JOBTRAC address environment that is available to CA-GSS is callableby other CA products that also use CA-GSS. This lets these products issuecommands to examine and modify the Unicenter CA-Jobtrac workload.Unicenter CA-OPS/MVS is an example of a product that uses this interface.
54 Planning and Implementation Guide
Unicenter CA-Jobtrac Considerations
System Considerations
You should consider the following system options before installing UnicenterCA-Jobtrac. Contact your systems programming staff for help.
■ Unicenter CA-Jobtrac must execute from an APF-authorized library.
■ SMF exits IEFUJV and IEFU83 must be active. They can be active throughan IEFBR14 program. For more information, see the customizingSYS1.PARMLIB member SMFPRMxx information in Chapter 6,“Customization Tasks” on page 161.
■ SMF record types 15, 26, 30, and 64 must be recorded. You can suppressthe actual writing of these records to your SMF data set by coding anIEFU83, IEFU84, or IEFU85 exit. The Unicenter CA-Jobtrac SAMPJCLlibrary contains a sample IEFU83 exit, named SAMPU83. This sample canalso be linked with aliases of IEFU84 and IEFU85. For more informationabout use of SMF records by Unicenter CA-Jobtrac, see Chapter 6,“Customization Tasks” on page 161. For linkage editing requirements forthe IEFU8x exits, see the appropriate IBM manuals.
■ Exit IEAVMXIT must be activated for AMR (Automatic MessageRecognition) triggers. For information about setting up the exit, seeChapter 6, “Customization Tasks” on page 161.
■ The Unicenter CA-Jobtrac-started task requires both SUBMIT and UPDATEauthority under your security system (eTrust CA-Top Secret, eTrustCA-ACF2, RACF, and so on).
■ DD statements can be added to your TSO logon procedures or CLISTs touse the ISPF/PDF features of Unicenter CA-Jobtrac. For information aboutupdating your TSO procedures, see Chapter 6, “Customization Tasks” onpage 161 and “Define Location Information (DYNAMLOC) and InitiationIMODs” on page 176.
■ If using CA-Datacom/AD security, Unicenter CA-Jobtrac STC and TSOusers that access Unicenter CA-Jobtrac need to be authorized to accessthe Unicenter CA-Jobtrac databases (161 and 162 by default).
Security Considerations
When installing and using Unicenter CA-Jobtrac, you must consider thefollowing:
■ Security needed to install and run the Unicenter CA-Jobtrac product
■ Security for using the Unicenter CA-Jobtrac features
Chapter 2. Overview of Components and Installation 55
Unicenter CA-Jobtrac Considerations
If your installation uses a security system, your security administrator mightneed to authorize you to perform the following tasks:
■ Allocate the installation libraries.
■ Allocate and update the SMP/E libraries.
■ Allocate the Unicenter CA-Jobtrac execution libraries (target libraries).
■ Allocate the Unicenter CA-Jobtrac distribution data sets.
■ Add the Unicenter CA-Jobtrac cataloged procedures to a system procedurelibrary.
■ Update the chosen APF linklist libraries in SYS1.PARMLIB when you areready for execution.
■ Enter the Unicenter CA-Jobtrac started task name in the appropriateauthorized task tables.
■ Give SUBMIT authority to the Unicenter CA-Jobtrac started task. Youshould give the Unicenter CA-Jobtrac task the same security attributes asproduction TSO user IDs.
■ Enable or disable TSO users to update JCL, SCL, TEMPJCL, and DOClibraries.
■ Obtain access to CA-Datacom/AD, if security is in effect.
If you are using a security system (such as eTrust CA-Top Secret, eTrustCA-ACF2, or RACF), give the Unicenter CA-Jobtrac started task SUBMITauthority.
Unicenter CA-Jobtrac uses the following methods to secure its use:
■ TRACAUTH table
■ TRACX26 user exit
You use only one of the methods for security. Regardless of the method youuse, the TRACAUTH table is still used to do the following:
■ Specify a name for a location (optional).
■ Specify which users are notified of abends and error conditions.
56 Planning and Implementation Guide
Unicenter CA-Jobtrac Considerations
The TRACAUTH table contains entries that do the following:
■ Define whether a user can perform specific Unicenter CA-Jobtrac functions.
■ Assign names to locations.
The TRACAUTH table is created using the @AUTH macro. During installation,you run the job ASMAUTH to create a default entry in the TRACAUTH table.The default entry is used for all TSO users not specifically defined in otherentries.
For information about defining entries in the TRACAUTH table and about theASMAUTH job, see Chapter 6, “Customization Tasks” on page 161.
The TRACX26 user exit is called by the Unicenter CA-Jobtrac ISPF dialog andby @JOBTRAC to verify a user's authority to view, update, add, delete, orpurge Unicenter CA-Jobtrac information. You can control access to thefollowing areas using the TRACX26 exit:
■ Events
■ Holiday and cyclic calendars
■ Global options
■ Online table services
■ Unicenter CA-Jobtrac captured sysout
Note: Take care using this exit. This is a client alteration of the product andmay cause unpredictable results if not properly coded and tested. The providedsample is only a sample.
Chapter 2. Overview of Components and Installation 57
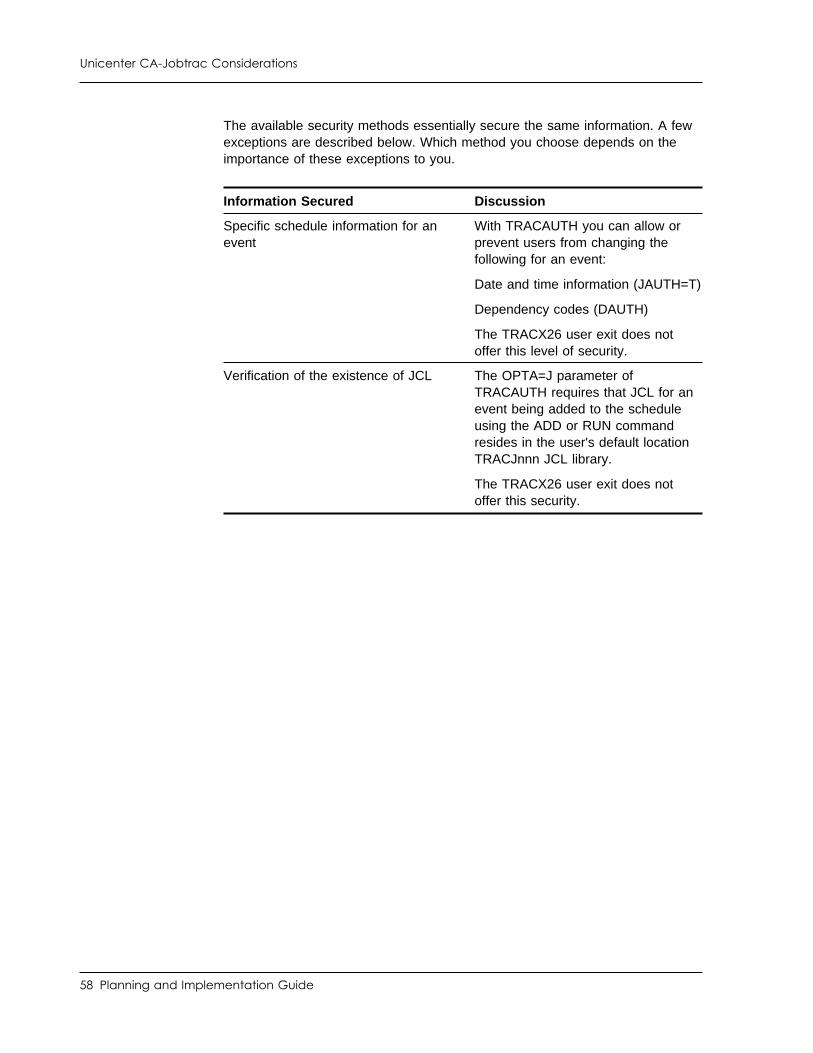
Unicenter CA-Jobtrac Considerations
The available security methods essentially secure the same information. A fewexceptions are described below. Which method you choose depends on theimportance of these exceptions to you.
Information Secured Discussion
Specific schedule information for anevent
With TRACAUTH you can allow orprevent users from changing thefollowing for an event:
Date and time information (JAUTH=T)
Dependency codes (DAUTH)
The TRACX26 user exit does notoffer this level of security.
Verification of the existence of JCL The OPTA=J parameter ofTRACAUTH requires that JCL for anevent being added to the scheduleusing the ADD or RUN commandresides in the user's default locationTRACJnnn JCL library.
The TRACX26 user exit does notoffer this security.
58 Planning and Implementation Guide
Chapter 3. Worksheets
This section contains the following topics:
CA Common Services . . . . . . . . . . . . . . . . . . . . . . . . . . . . . . . 60CA-Datacom/AD Worksheets . . . . . . . . . . . . . . . . . . . . . . . . . . . 61Unicenter CA-Jobtrac Worksheets . . . . . . . . . . . . . . . . . . . . . . . . 67
You should complete these worksheets before starting the installation process.This section contains checklists for the installation of CA-Datacom/AD andUnicenter CA-Jobtrac. Complete these checklists and use them during theproduct installations. These worksheets are designed to simplify specifyingparameters during the installation. The parameters identified on this worksheetare required for all installation job procedures. Default values have beensupplied for your convenience.
Chapter 3. Worksheets 59
CA Common Services
CA Common Services
The CA Common Services installation provides a worksheet. Check the CACommon Services (CCS) installation to obtain this worksheet. Even if youalready have the CCS installed, you may want to obtain the data setinformation from this worksheet for reference in installing CA-Datacom/AD.Complete this worksheet at this time.
60 Planning and Implementation Guide

CA-Datacom/AD Worksheets
CA-Datacom/AD Worksheets
You can reproduce this worksheet or print the CA-Datacom/AD SAMPJCL PDSmember @AXWKSHT.
Installation JCL PROCedure Parameters
These parameters are required for both new and upgrade install procedures:
Data Set Naming Checklist Items
Item Parameter Description
1 What data set name is used for the SMP/E CSI data set?Default: 'CAI.SMPCSI.CSI'Maximum length: 44 characters
2 What high-level qualifier is used to prefix the SMP/E and custom datasets?Default: 'CAI.SHLQ'Maximum length: 28 characters
3 What high-level qualifier is used to prefix the new CA-Datacom/ADdata sets? If upgrading, this parameter must be different fromworksheet item #6.Default: 'CAI.HLQ'Maximum length: 28 characters
4 What high-level qualifier is used to prefix the installation backup files?Default: 'CAI.INST'Maximum length: 28 characters
5 (Upgrade only.) What high-level qualifier is used to prefix the existingCA-Datacom/AD r10 SMP/E libraries?Default: 'CAI.PSHLQ'Maximum length: 28 characters
6 What high-level qualifier is used to prefix the existingCA-Datacom/AD data sets for upgrade installs?Default: 'CAI.PHLQ'Maximum length: 44 characters
DASD and Tape Volume Names and Unit Types Checklist Items
Item Parameter Description
7 What DASD volume serial name is to be used for theCA-Datacom/AD SMP/E data sets?Default: 'VOL=SER=DASD01,'Maximum length: 14 characters
Chapter 3. Worksheets 61
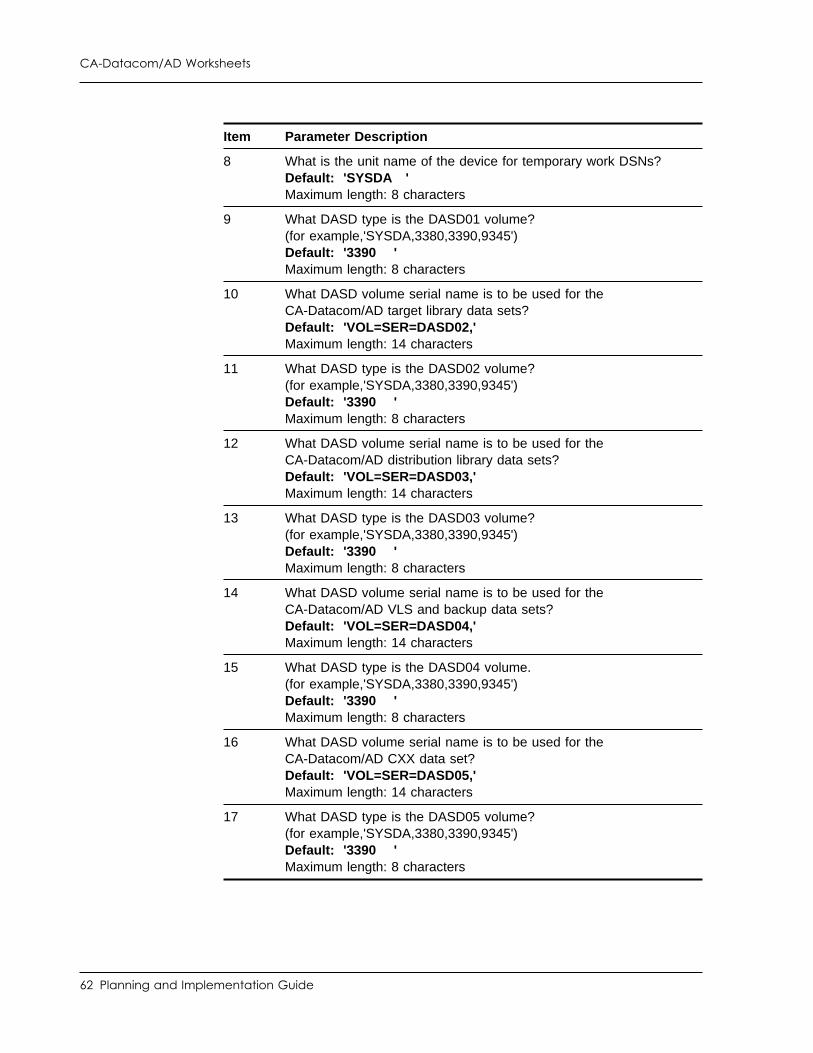
CA-Datacom/AD Worksheets
Item Parameter Description
8 What is the unit name of the device for temporary work DSNs?Default: 'SYSDA 'Maximum length: 8 characters
9 What DASD type is the DASD01 volume?(for example,'SYSDA,3380,3390,9345')Default: '3390 'Maximum length: 8 characters
10 What DASD volume serial name is to be used for theCA-Datacom/AD target library data sets?Default: 'VOL=SER=DASD02,'Maximum length: 14 characters
11 What DASD type is the DASD02 volume?(for example,'SYSDA,3380,3390,9345')Default: '3390 'Maximum length: 8 characters
12 What DASD volume serial name is to be used for theCA-Datacom/AD distribution library data sets?Default: 'VOL=SER=DASD03,'Maximum length: 14 characters
13 What DASD type is the DASD03 volume?(for example,'SYSDA,3380,3390,9345')Default: '3390 'Maximum length: 8 characters
14 What DASD volume serial name is to be used for theCA-Datacom/AD VLS and backup data sets?Default: 'VOL=SER=DASD04,'Maximum length: 14 characters
15 What DASD type is the DASD04 volume.(for example,'SYSDA,3380,3390,9345')Default: '3390 'Maximum length: 8 characters
16 What DASD volume serial name is to be used for theCA-Datacom/AD CXX data set?Default: 'VOL=SER=DASD05,'Maximum length: 14 characters
17 What DASD type is the DASD05 volume?(for example,'SYSDA,3380,3390,9345')Default: '3390 'Maximum length: 8 characters
62 Planning and Implementation Guide
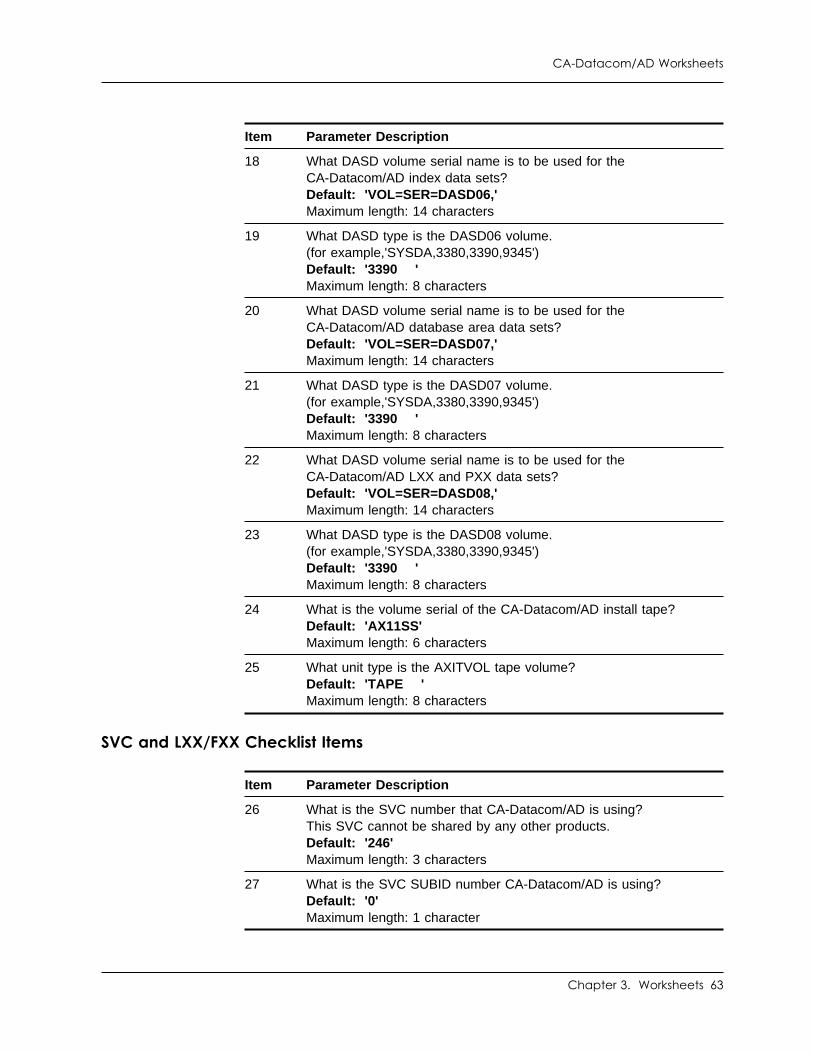
CA-Datacom/AD Worksheets
Item Parameter Description
18 What DASD volume serial name is to be used for theCA-Datacom/AD index data sets?Default: 'VOL=SER=DASD06,'Maximum length: 14 characters
19 What DASD type is the DASD06 volume.(for example,'SYSDA,3380,3390,9345')Default: '3390 'Maximum length: 8 characters
20 What DASD volume serial name is to be used for theCA-Datacom/AD database area data sets?Default: 'VOL=SER=DASD07,'Maximum length: 14 characters
21 What DASD type is the DASD07 volume.(for example,'SYSDA,3380,3390,9345')Default: '3390 'Maximum length: 8 characters
22 What DASD volume serial name is to be used for theCA-Datacom/AD LXX and PXX data sets?Default: 'VOL=SER=DASD08,'Maximum length: 14 characters
23 What DASD type is the DASD08 volume.(for example,'SYSDA,3380,3390,9345')Default: '3390 'Maximum length: 8 characters
24 What is the volume serial of the CA-Datacom/AD install tape?Default: 'AX11SS'Maximum length: 6 characters
25 What unit type is the AXITVOL tape volume?Default: 'TAPE 'Maximum length: 8 characters
SVC and LXX/FXX Checklist Items
Item Parameter Description
26 What is the SVC number that CA-Datacom/AD is using?This SVC cannot be shared by any other products.Default: '246'Maximum length: 3 characters
27 What is the SVC SUBID number CA-Datacom/AD is using?Default: '0'Maximum length: 1 character
Chapter 3. Worksheets 63
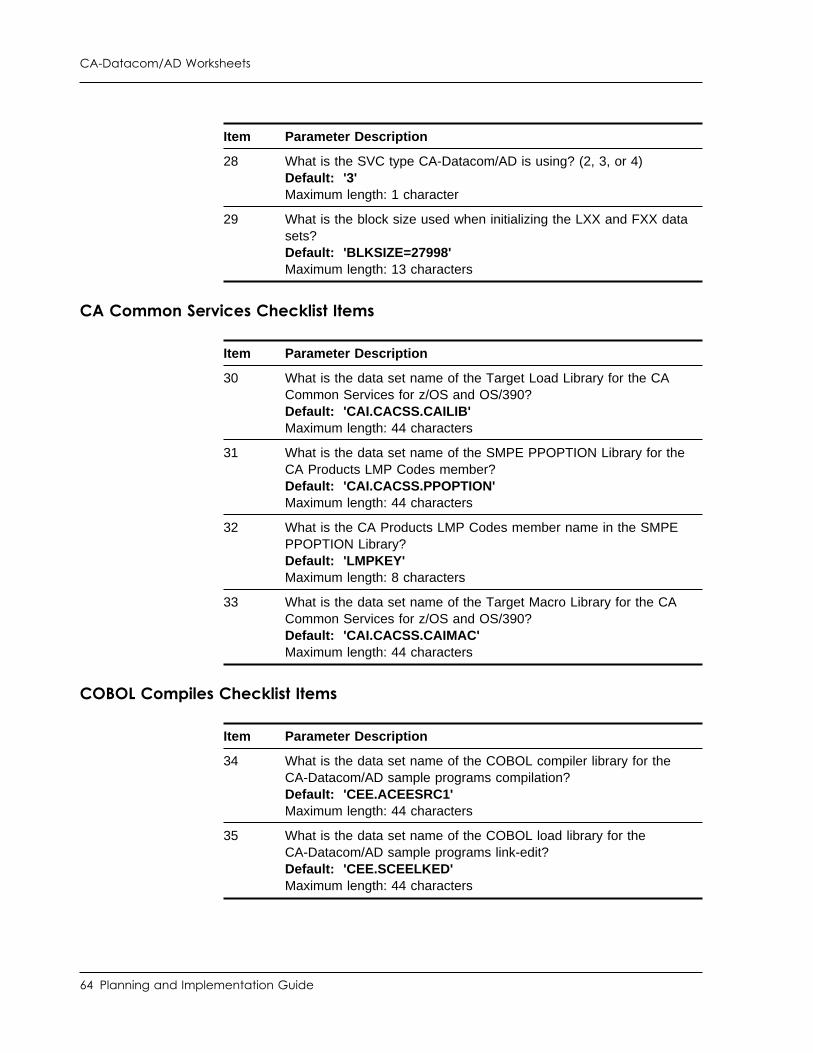
CA-Datacom/AD Worksheets
Item Parameter Description
28 What is the SVC type CA-Datacom/AD is using? (2, 3, or 4)Default: '3'Maximum length: 1 character
29 What is the block size used when initializing the LXX and FXX datasets?Default: 'BLKSIZE=27998'Maximum length: 13 characters
CA Common Services Checklist Items
Item Parameter Description
30 What is the data set name of the Target Load Library for the CACommon Services for z/OS and OS/390?Default: 'CAI.CACSS.CAILIB'Maximum length: 44 characters
31 What is the data set name of the SMPE PPOPTION Library for theCA Products LMP Codes member?Default: 'CAI.CACSS.PPOPTION'Maximum length: 44 characters
32 What is the CA Products LMP Codes member name in the SMPEPPOPTION Library?Default: 'LMPKEY'Maximum length: 8 characters
33 What is the data set name of the Target Macro Library for the CACommon Services for z/OS and OS/390?Default: 'CAI.CACSS.CAIMAC'Maximum length: 44 characters
COBOL Compiles Checklist Items
Item Parameter Description
34 What is the data set name of the COBOL compiler library for theCA-Datacom/AD sample programs compilation?Default: 'CEE.ACEESRC1'Maximum length: 44 characters
35 What is the data set name of the COBOL load library for theCA-Datacom/AD sample programs link-edit?Default: 'CEE.SCEELKED'Maximum length: 44 characters
64 Planning and Implementation Guide
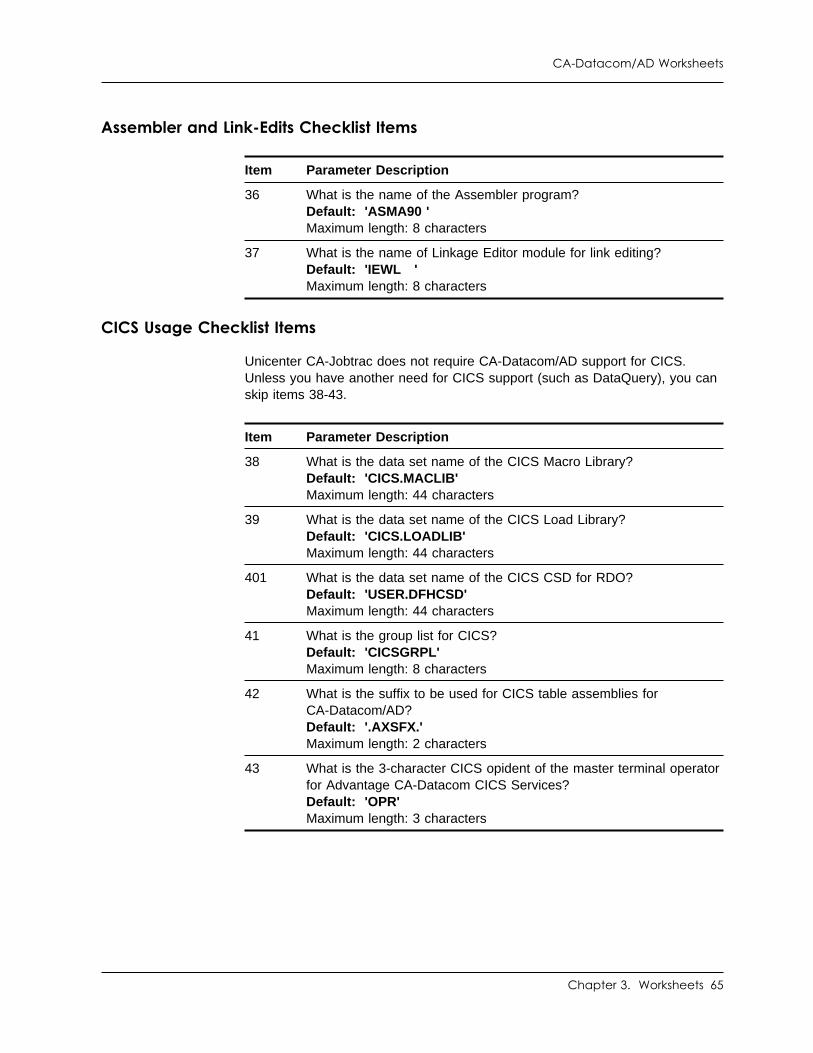
CA-Datacom/AD Worksheets
Assembler and Link-Edits Checklist Items
Item Parameter Description
36 What is the name of the Assembler program?Default: 'ASMA90 'Maximum length: 8 characters
37 What is the name of Linkage Editor module for link editing?Default: 'IEWL 'Maximum length: 8 characters
CICS Usage Checklist Items
Unicenter CA-Jobtrac does not require CA-Datacom/AD support for CICS.Unless you have another need for CICS support (such as DataQuery), you canskip items 38-43.
Item Parameter Description
38 What is the data set name of the CICS Macro Library?Default: 'CICS.MACLIB'Maximum length: 44 characters
39 What is the data set name of the CICS Load Library?Default: 'CICS.LOADLIB'Maximum length: 44 characters
401 What is the data set name of the CICS CSD for RDO?Default: 'USER.DFHCSD'Maximum length: 44 characters
41 What is the group list for CICS?Default: 'CICSGRPL'Maximum length: 8 characters
42 What is the suffix to be used for CICS table assemblies forCA-Datacom/AD?Default: '.AXSFX.'Maximum length: 2 characters
43 What is the 3-character CICS opident of the master terminal operatorfor Advantage CA-Datacom CICS Services?Default: 'OPR'Maximum length: 3 characters
Chapter 3. Worksheets 65
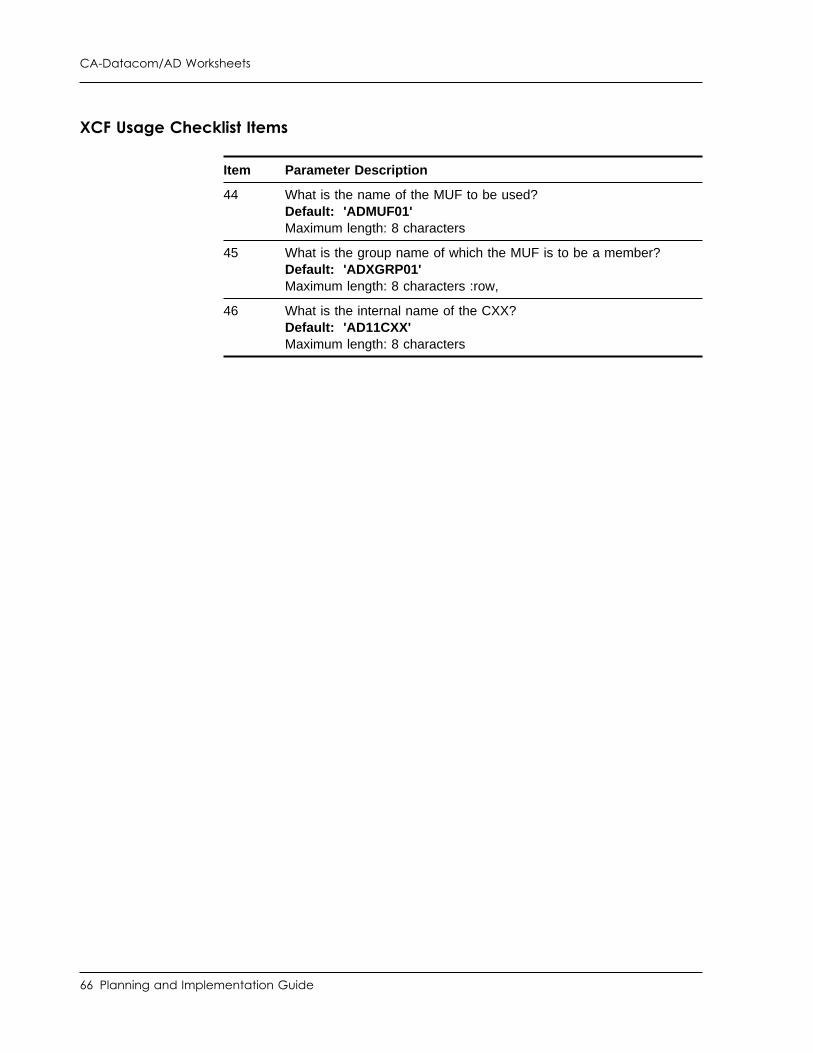
CA-Datacom/AD Worksheets
XCF Usage Checklist Items
Item Parameter Description
44 What is the name of the MUF to be used?Default: 'ADMUF01'Maximum length: 8 characters
45 What is the group name of which the MUF is to be a member?Default: 'ADXGRP01'Maximum length: 8 characters :row,
46 What is the internal name of the CXX?Default: 'AD11CXX'Maximum length: 8 characters
66 Planning and Implementation Guide
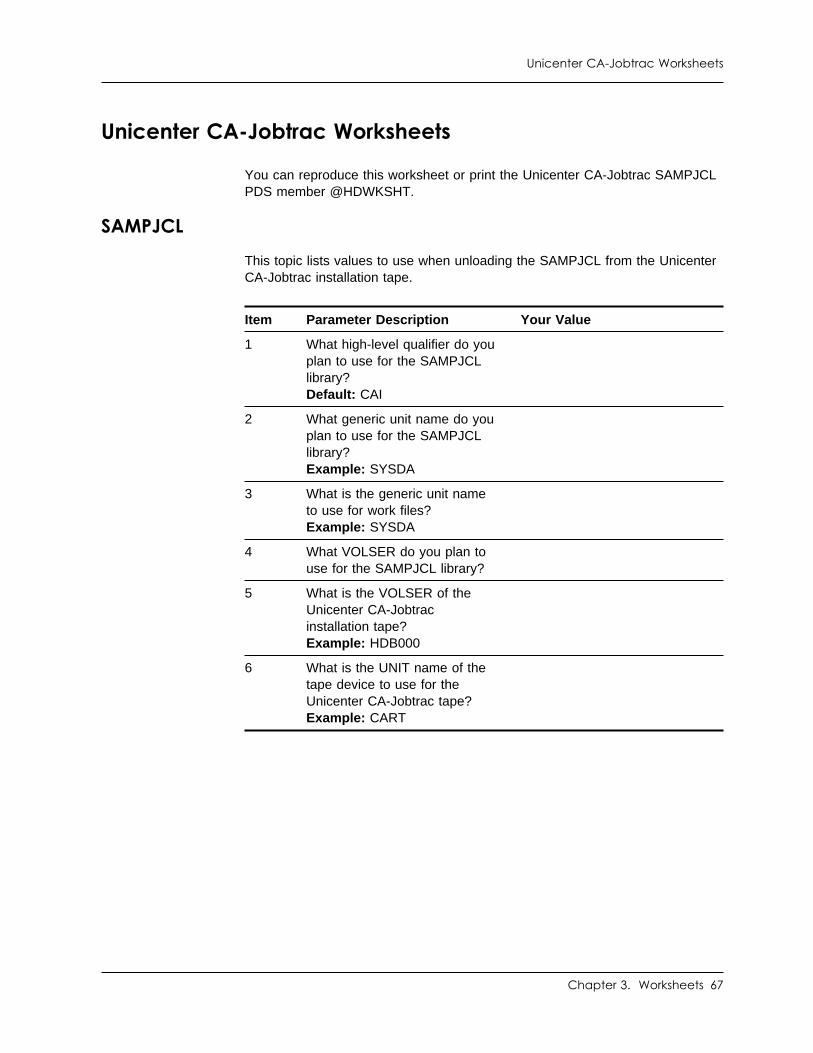
Unicenter CA-Jobtrac Worksheets
Unicenter CA-Jobtrac Worksheets
You can reproduce this worksheet or print the Unicenter CA-Jobtrac SAMPJCLPDS member @HDWKSHT.
SAMPJCL
This topic lists values to use when unloading the SAMPJCL from the UnicenterCA-Jobtrac installation tape.
Item Parameter Description Your Value
1 What high-level qualifier do youplan to use for the SAMPJCLlibrary?Default: CAI
2 What generic unit name do youplan to use for the SAMPJCLlibrary?Example: SYSDA
3 What is the generic unit nameto use for work files?Example: SYSDA
4 What VOLSER do you plan touse for the SAMPJCL library?
5 What is the VOLSER of theUnicenter CA-Jobtracinstallation tape?Example: HDB000
6 What is the UNIT name of thetape device to use for theUnicenter CA-Jobtrac tape?Example: CART
Chapter 3. Worksheets 67
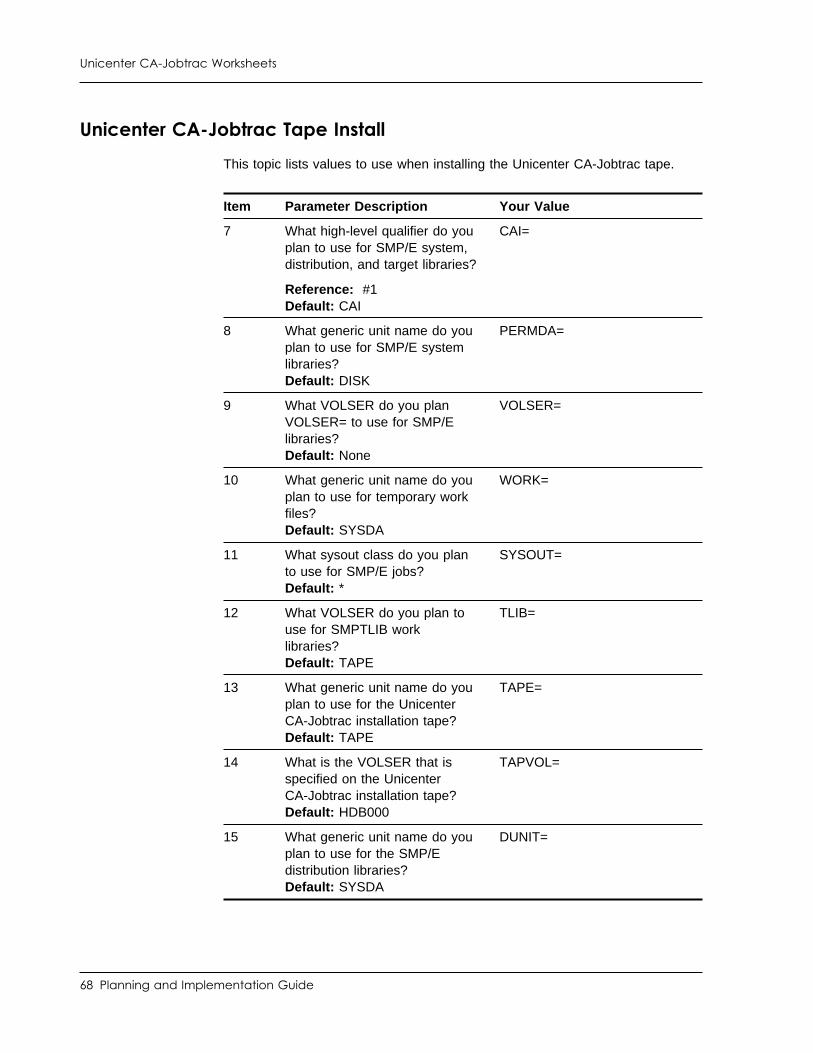
Unicenter CA-Jobtrac Worksheets
Unicenter CA-Jobtrac Tape Install
This topic lists values to use when installing the Unicenter CA-Jobtrac tape.
Item Parameter Description Your Value
7 What high-level qualifier do youplan to use for SMP/E system,distribution, and target libraries?
Reference: #1Default: CAI
CAI=
8 What generic unit name do youplan to use for SMP/E systemlibraries?Default: DISK
PERMDA=
9 What VOLSER do you planVOLSER= to use for SMP/Elibraries?Default: None
VOLSER=
10 What generic unit name do youplan to use for temporary workfiles?Default: SYSDA
WORK=
11 What sysout class do you planto use for SMP/E jobs?Default: *
SYSOUT=
12 What VOLSER do you plan touse for SMPTLIB worklibraries?Default: TAPE
TLIB=
13 What generic unit name do youplan to use for the UnicenterCA-Jobtrac installation tape?Default: TAPE
TAPE=
14 What is the VOLSER that isspecified on the UnicenterCA-Jobtrac installation tape?Default: HDB000
TAPVOL=
15 What generic unit name do youplan to use for the SMP/Edistribution libraries?Default: SYSDA
DUNIT=
68 Planning and Implementation Guide
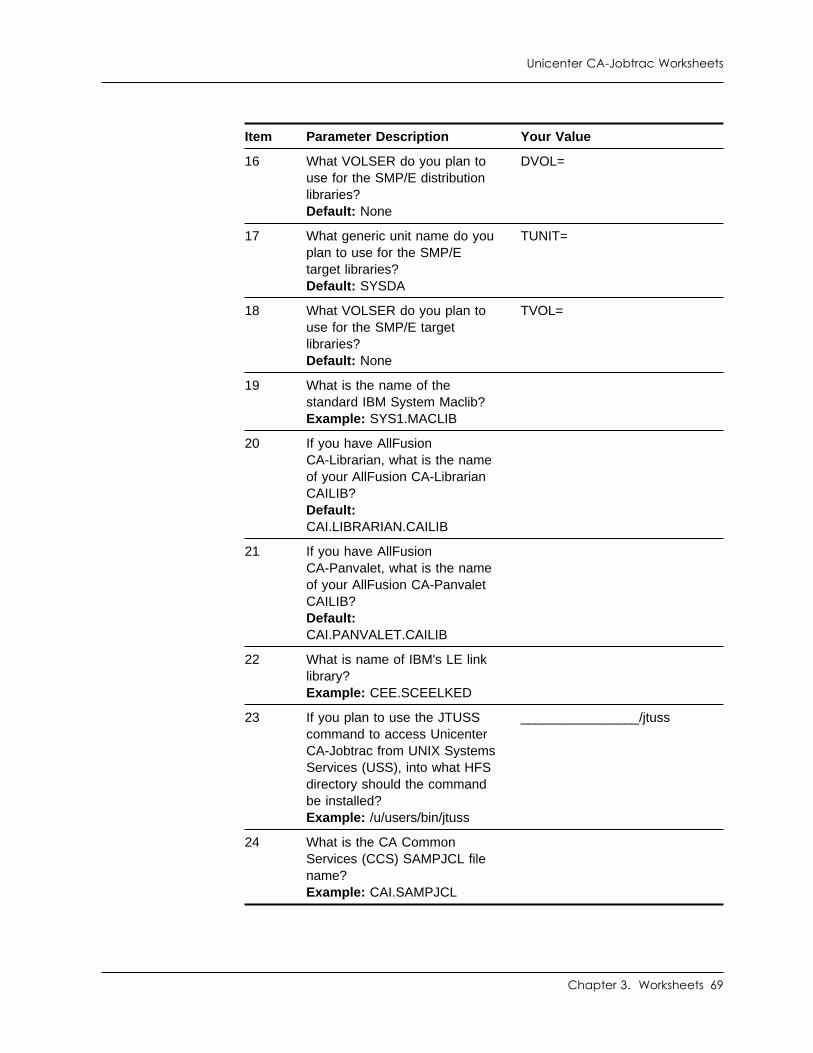
Unicenter CA-Jobtrac Worksheets
Item Parameter Description Your Value
16 What VOLSER do you plan touse for the SMP/E distributionlibraries?Default: None
DVOL=
17 What generic unit name do youplan to use for the SMP/Etarget libraries?Default: SYSDA
TUNIT=
18 What VOLSER do you plan touse for the SMP/E targetlibraries?Default: None
TVOL=
19 What is the name of thestandard IBM System Maclib?Example: SYS1.MACLIB
20 If you have AllFusionCA-Librarian, what is the nameof your AllFusion CA-LibrarianCAILIB?Default:CAI.LIBRARIAN.CAILIB
21 If you have AllFusionCA-Panvalet, what is the nameof your AllFusion CA-PanvaletCAILIB?Default:CAI.PANVALET.CAILIB
22 What is name of IBM's LE linklibrary?Example: CEE.SCEELKED
23 If you plan to use the JTUSScommand to access UnicenterCA-Jobtrac from UNIX SystemsServices (USS), into what HFSdirectory should the commandbe installed?Example: /u/users/bin/jtuss
________________/jtuss
24 What is the CA CommonServices (CCS) SAMPJCL filename?Example: CAI.SAMPJCL
Chapter 3. Worksheets 69
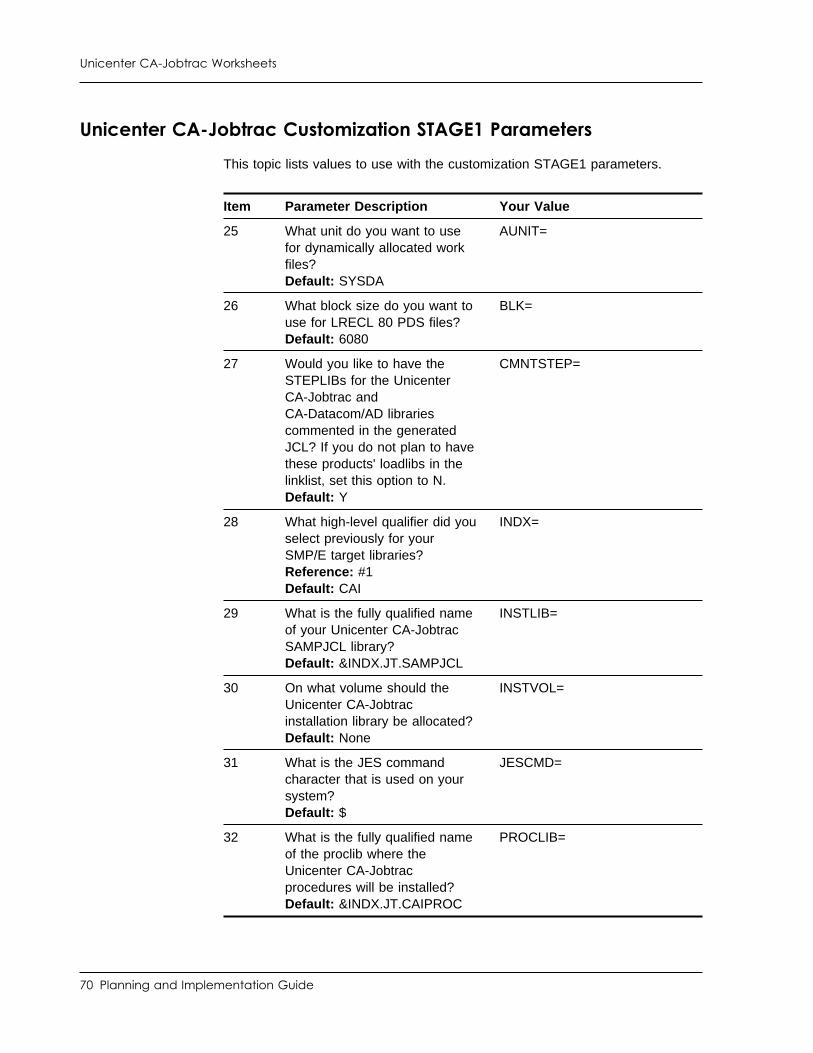
Unicenter CA-Jobtrac Worksheets
Unicenter CA-Jobtrac Customization STAGE1 Parameters
This topic lists values to use with the customization STAGE1 parameters.
Item Parameter Description Your Value
25 What unit do you want to usefor dynamically allocated workfiles?Default: SYSDA
AUNIT=
26 What block size do you want touse for LRECL 80 PDS files?Default: 6080
BLK=
27 Would you like to have theSTEPLIBs for the UnicenterCA-Jobtrac andCA-Datacom/AD librariescommented in the generatedJCL? If you do not plan to havethese products' loadlibs in thelinklist, set this option to N.Default: Y
CMNTSTEP=
28 What high-level qualifier did youselect previously for yourSMP/E target libraries?Reference: #1Default: CAI
INDX=
29 What is the fully qualified nameof your Unicenter CA-JobtracSAMPJCL library?Default: &INDX.JT.SAMPJCL
INSTLIB=
30 On what volume should theUnicenter CA-Jobtracinstallation library be allocated?Default: None
INSTVOL=
31 What is the JES commandcharacter that is used on yoursystem?Default: $
JESCMD=
32 What is the fully qualified nameof the proclib where theUnicenter CA-Jobtracprocedures will be installed?Default: &INDX.JT.CAIPROC
PROCLIB=
70 Planning and Implementation Guide
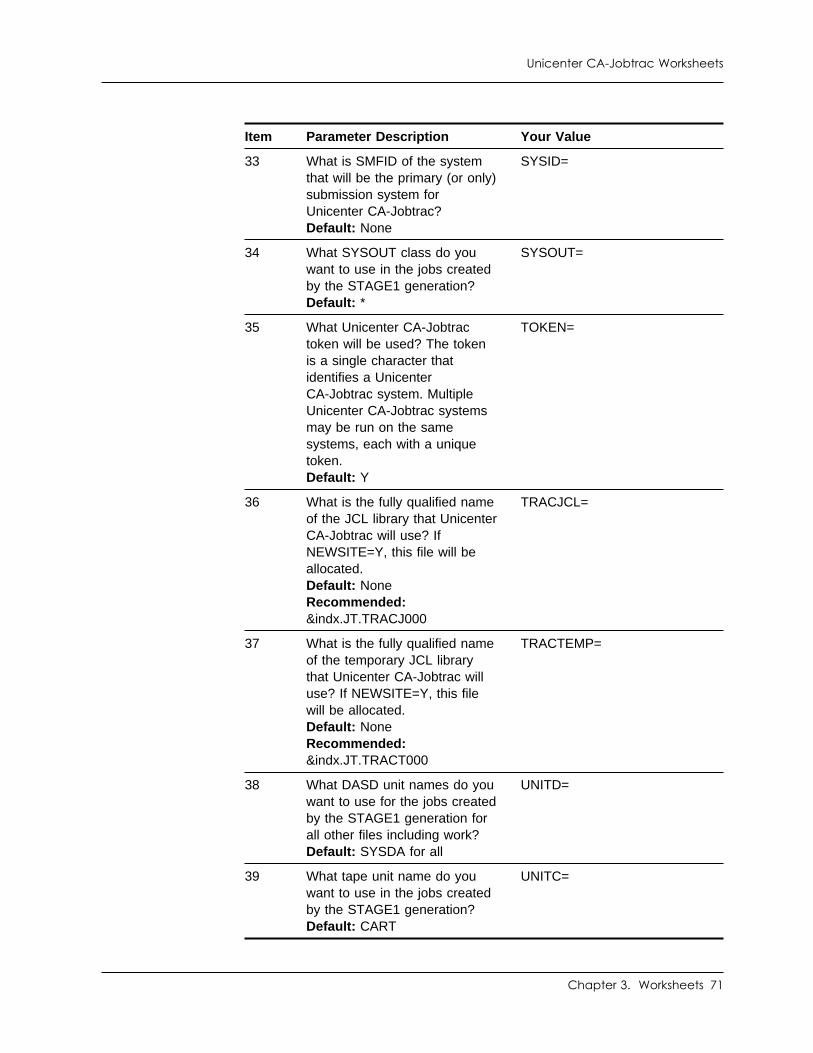
Unicenter CA-Jobtrac Worksheets
Item Parameter Description Your Value
33 What is SMFID of the systemthat will be the primary (or only)submission system forUnicenter CA-Jobtrac?Default: None
SYSID=
34 What SYSOUT class do youwant to use in the jobs createdby the STAGE1 generation?Default: *
SYSOUT=
35 What Unicenter CA-Jobtractoken will be used? The tokenis a single character thatidentifies a UnicenterCA-Jobtrac system. MultipleUnicenter CA-Jobtrac systemsmay be run on the samesystems, each with a uniquetoken.Default: Y
TOKEN=
36 What is the fully qualified nameof the JCL library that UnicenterCA-Jobtrac will use? IfNEWSITE=Y, this file will beallocated.Default: NoneRecommended:&indx.JT.TRACJ000
TRACJCL=
37 What is the fully qualified nameof the temporary JCL librarythat Unicenter CA-Jobtrac willuse? If NEWSITE=Y, this filewill be allocated.Default: NoneRecommended:&indx.JT.TRACT000
TRACTEMP=
38 What DASD unit names do youwant to use for the jobs createdby the STAGE1 generation forall other files including work?Default: SYSDA for all
UNITD=
39 What tape unit name do youwant to use in the jobs createdby the STAGE1 generation?Default: CART
UNITC=
Chapter 3. Worksheets 71
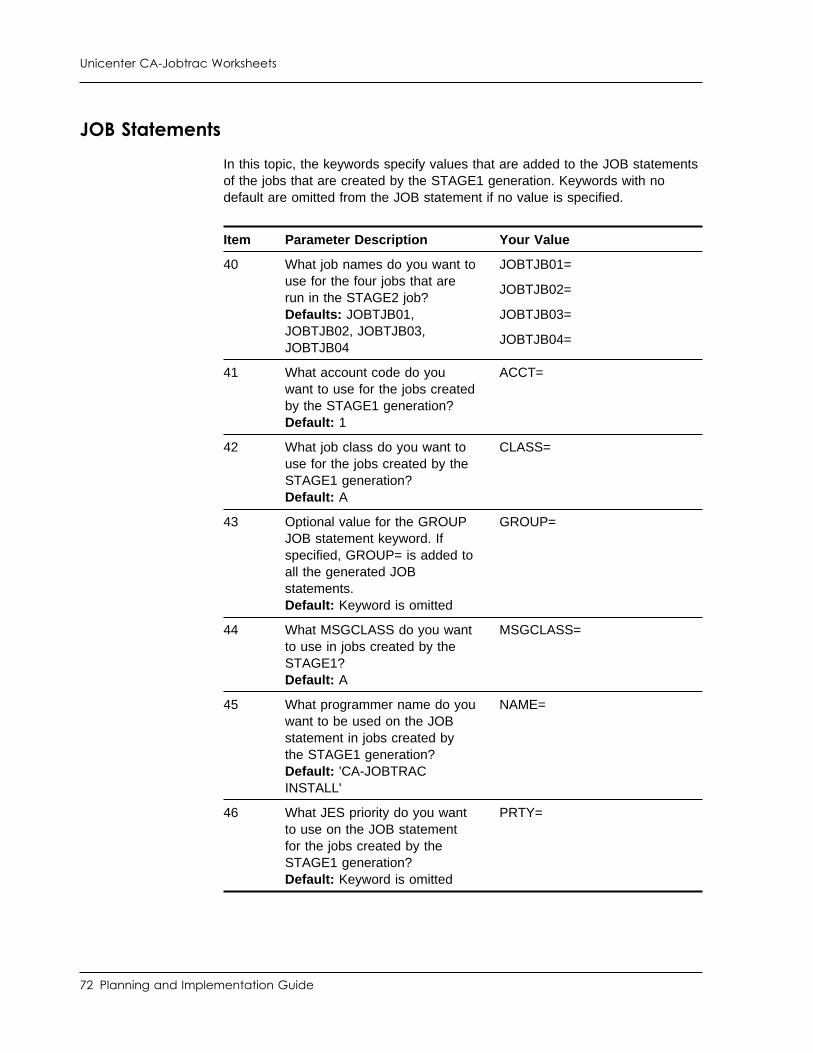
Unicenter CA-Jobtrac Worksheets
JOB Statements
In this topic, the keywords specify values that are added to the JOB statementsof the jobs that are created by the STAGE1 generation. Keywords with nodefault are omitted from the JOB statement if no value is specified.
Item Parameter Description Your Value
40 What job names do you want touse for the four jobs that arerun in the STAGE2 job?Defaults: JOBTJB01,JOBTJB02, JOBTJB03,JOBTJB04
JOBTJB01=
JOBTJB02=
JOBTJB03=
JOBTJB04=
41 What account code do youwant to use for the jobs createdby the STAGE1 generation?Default: 1
ACCT=
42 What job class do you want touse for the jobs created by theSTAGE1 generation?Default: A
CLASS=
43 Optional value for the GROUPJOB statement keyword. Ifspecified, GROUP= is added toall the generated JOBstatements.Default: Keyword is omitted
GROUP=
44 What MSGCLASS do you wantto use in jobs created by theSTAGE1?Default: A
MSGCLASS=
45 What programmer name do youwant to be used on the JOBstatement in jobs created bythe STAGE1 generation?Default: 'CA-JOBTRACINSTALL'
NAME=
46 What JES priority do you wantto use on the JOB statementfor the jobs created by theSTAGE1 generation?Default: Keyword is omitted
PRTY=
72 Planning and Implementation Guide
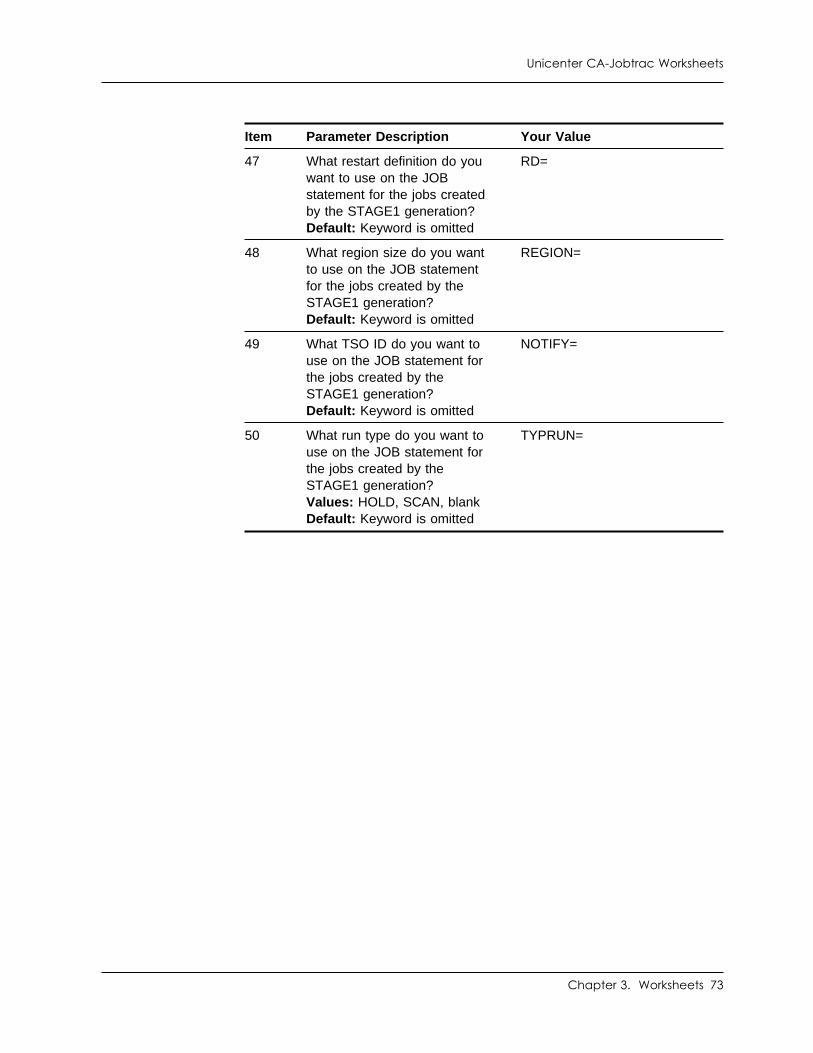
Unicenter CA-Jobtrac Worksheets
Item Parameter Description Your Value
47 What restart definition do youwant to use on the JOBstatement for the jobs createdby the STAGE1 generation?Default: Keyword is omitted
RD=
48 What region size do you wantto use on the JOB statementfor the jobs created by theSTAGE1 generation?Default: Keyword is omitted
REGION=
49 What TSO ID do you want touse on the JOB statement forthe jobs created by theSTAGE1 generation?Default: Keyword is omitted
NOTIFY=
50 What run type do you want touse on the JOB statement forthe jobs created by theSTAGE1 generation?Values: HOLD, SCAN, blankDefault: Keyword is omitted
TYPRUN=
Chapter 3. Worksheets 73
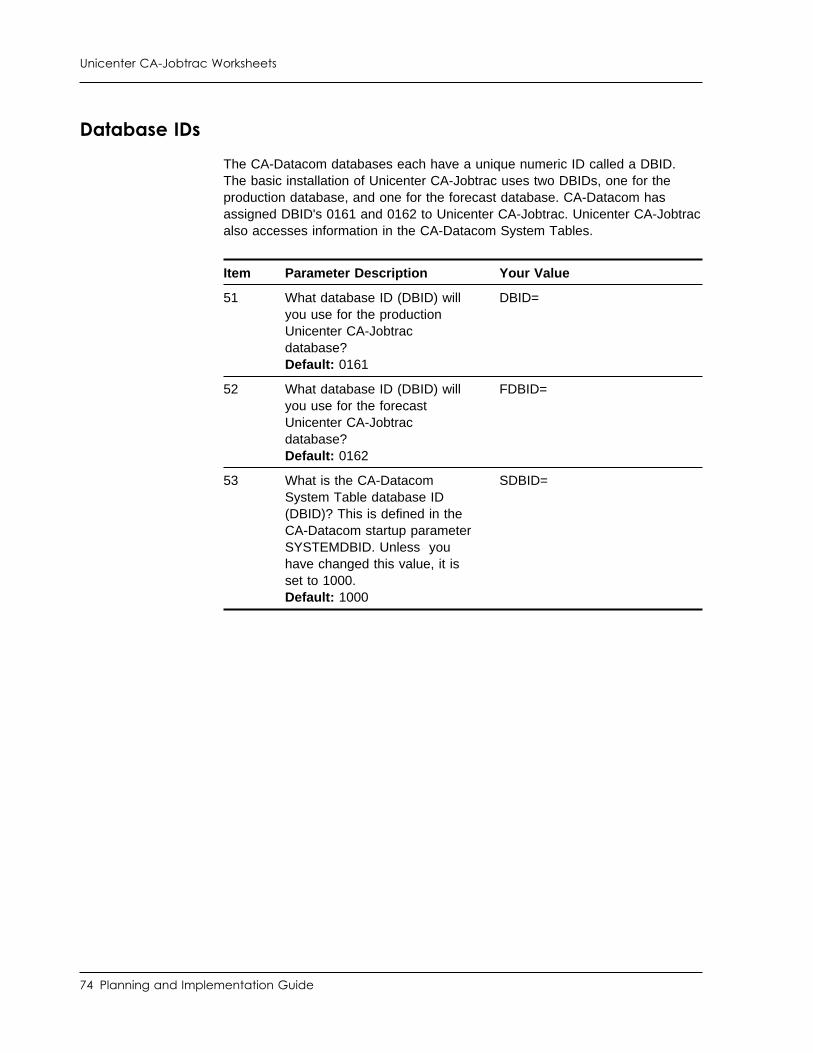
Unicenter CA-Jobtrac Worksheets
Database IDs
The CA-Datacom databases each have a unique numeric ID called a DBID.The basic installation of Unicenter CA-Jobtrac uses two DBIDs, one for theproduction database, and one for the forecast database. CA-Datacom hasassigned DBID's 0161 and 0162 to Unicenter CA-Jobtrac. Unicenter CA-Jobtracalso accesses information in the CA-Datacom System Tables.
Item Parameter Description Your Value
51 What database ID (DBID) willyou use for the productionUnicenter CA-Jobtracdatabase?Default: 0161
DBID=
52 What database ID (DBID) willyou use for the forecastUnicenter CA-Jobtracdatabase?Default: 0162
FDBID=
53 What is the CA-DatacomSystem Table database ID(DBID)? This is defined in theCA-Datacom startup parameterSYSTEMDBID. Unless youhave changed this value, it isset to 1000.Default: 1000
SDBID=
74 Planning and Implementation Guide
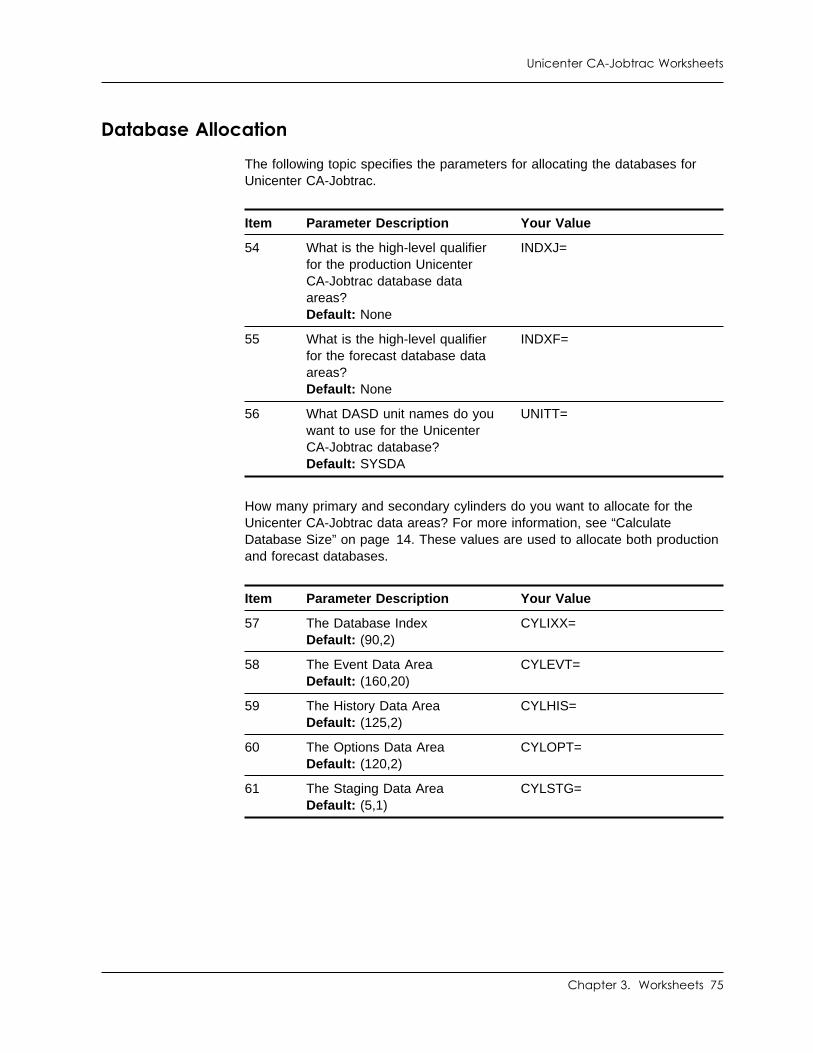
Unicenter CA-Jobtrac Worksheets
Database Allocation
The following topic specifies the parameters for allocating the databases forUnicenter CA-Jobtrac.
How many primary and secondary cylinders do you want to allocate for theUnicenter CA-Jobtrac data areas? For more information, see “CalculateDatabase Size” on page 14. These values are used to allocate both productionand forecast databases.
Item Parameter Description Your Value
54 What is the high-level qualifierfor the production UnicenterCA-Jobtrac database dataareas?Default: None
INDXJ=
55 What is the high-level qualifierfor the forecast database dataareas?Default: None
INDXF=
56 What DASD unit names do youwant to use for the UnicenterCA-Jobtrac database?Default: SYSDA
UNITT=
Item Parameter Description Your Value
57 The Database IndexDefault: (90,2)
CYLIXX=
58 The Event Data AreaDefault: (160,20)
CYLEVT=
59 The History Data AreaDefault: (125,2)
CYLHIS=
60 The Options Data AreaDefault: (120,2)
CYLOPT=
61 The Staging Data AreaDefault: (5,1)
CYLSTG=
Chapter 3. Worksheets 75
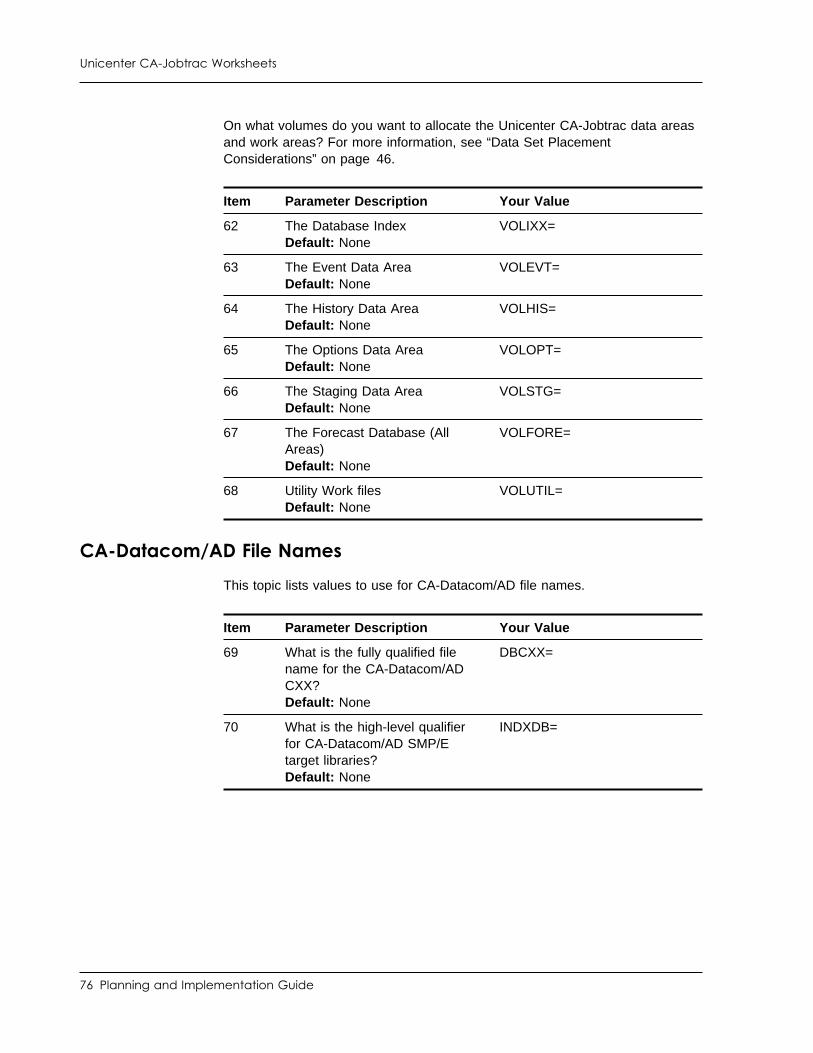
Unicenter CA-Jobtrac Worksheets
On what volumes do you want to allocate the Unicenter CA-Jobtrac data areasand work areas? For more information, see “Data Set PlacementConsiderations” on page 46.
Item Parameter Description Your Value
62 The Database IndexDefault: None
VOLIXX=
63 The Event Data AreaDefault: None
VOLEVT=
64 The History Data AreaDefault: None
VOLHIS=
65 The Options Data AreaDefault: None
VOLOPT=
66 The Staging Data AreaDefault: None
VOLSTG=
67 The Forecast Database (AllAreas)Default: None
VOLFORE=
68 Utility Work filesDefault: None
VOLUTIL=
CA-Datacom/AD File Names
This topic lists values to use for CA-Datacom/AD file names.
Item Parameter Description Your Value
69 What is the fully qualified filename for the CA-Datacom/ADCXX?Default: None
DBCXX=
70 What is the high-level qualifierfor CA-Datacom/AD SMP/Etarget libraries?Default: None
INDXDB=
76 Planning and Implementation Guide
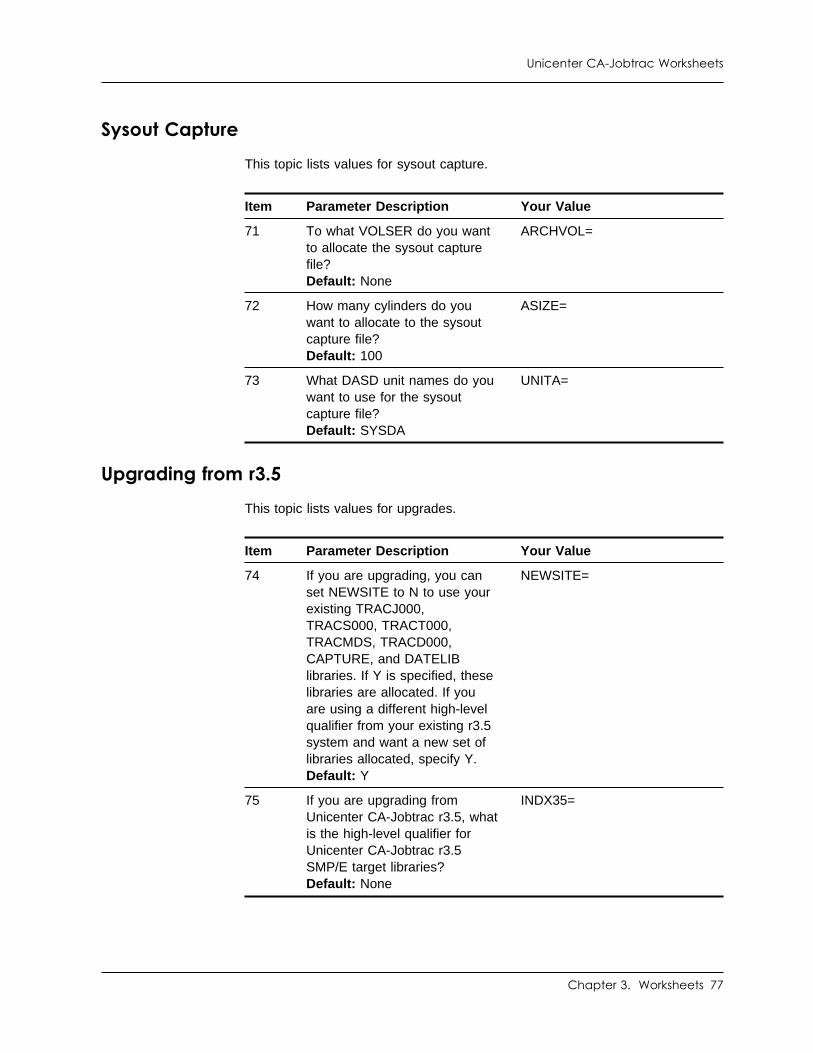
Unicenter CA-Jobtrac Worksheets
Sysout Capture
This topic lists values for sysout capture.
Item Parameter Description Your Value
71 To what VOLSER do you wantto allocate the sysout capturefile?Default: None
ARCHVOL=
72 How many cylinders do youwant to allocate to the sysoutcapture file?Default: 100
ASIZE=
73 What DASD unit names do youwant to use for the sysoutcapture file?Default: SYSDA
UNITA=
Upgrading from r3.5
This topic lists values for upgrades.
Item Parameter Description Your Value
74 If you are upgrading, you canset NEWSITE to N to use yourexisting TRACJ000,TRACS000, TRACT000,TRACMDS, TRACD000,CAPTURE, and DATELIBlibraries. If Y is specified, theselibraries are allocated. If youare using a different high-levelqualifier from your existing r3.5system and want a new set oflibraries allocated, specify Y.Default: Y
NEWSITE=
75 If you are upgrading fromUnicenter CA-Jobtrac r3.5, whatis the high-level qualifier forUnicenter CA-Jobtrac r3.5SMP/E target libraries?Default: None
INDX35=
Chapter 3. Worksheets 77
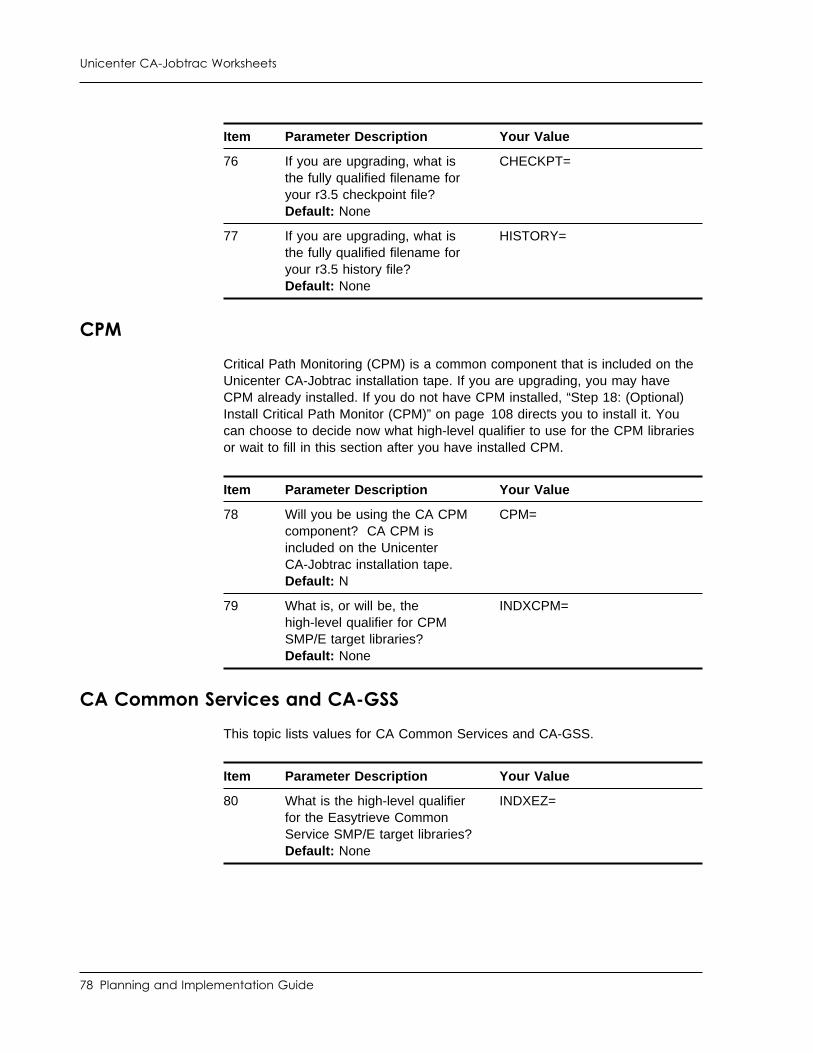
Unicenter CA-Jobtrac Worksheets
Item Parameter Description Your Value
76 If you are upgrading, what isthe fully qualified filename foryour r3.5 checkpoint file?Default: None
CHECKPT=
77 If you are upgrading, what isthe fully qualified filename foryour r3.5 history file?Default: None
HISTORY=
CPM
Critical Path Monitoring (CPM) is a common component that is included on theUnicenter CA-Jobtrac installation tape. If you are upgrading, you may haveCPM already installed. If you do not have CPM installed, “Step 18: (Optional)Install Critical Path Monitor (CPM)” on page 108 directs you to install it. Youcan choose to decide now what high-level qualifier to use for the CPM librariesor wait to fill in this section after you have installed CPM.
Item Parameter Description Your Value
78 Will you be using the CA CPMcomponent? CA CPM isincluded on the UnicenterCA-Jobtrac installation tape.Default: N
CPM=
79 What is, or will be, thehigh-level qualifier for CPMSMP/E target libraries?Default: None
INDXCPM=
CA Common Services and CA-GSS
This topic lists values for CA Common Services and CA-GSS.
Item Parameter Description Your Value
80 What is the high-level qualifierfor the Easytrieve CommonService SMP/E target libraries?Default: None
INDXEZ=
78 Planning and Implementation Guide
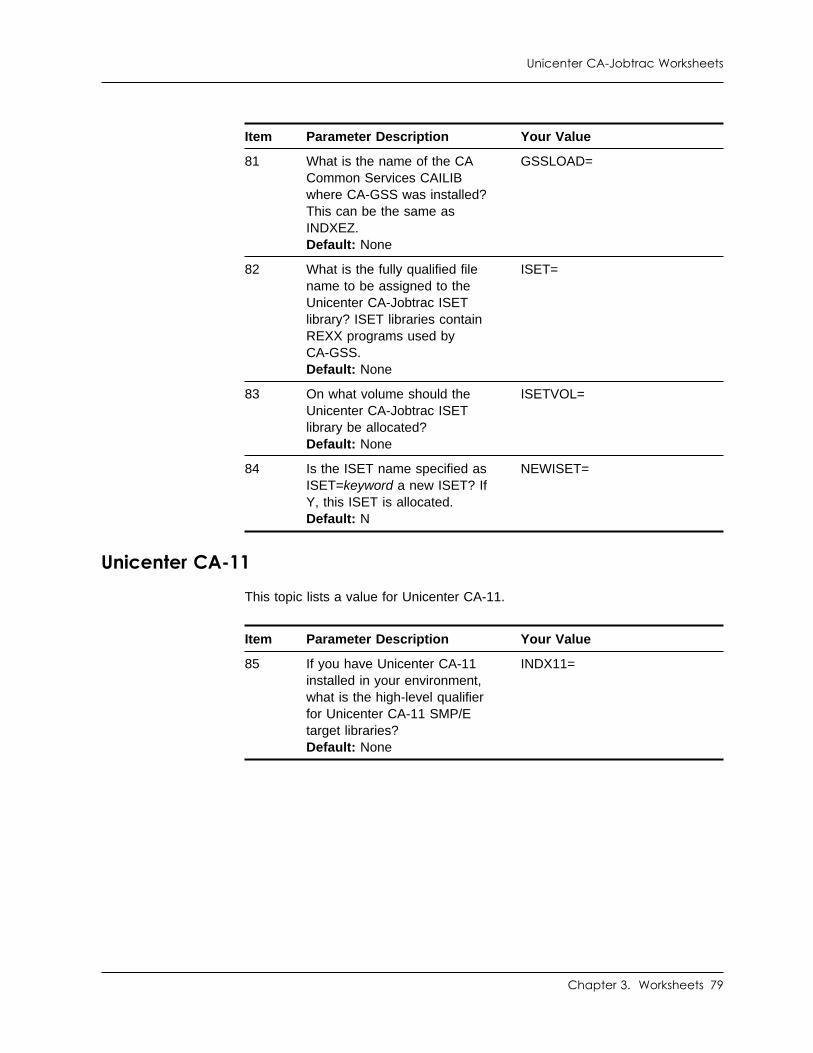
Unicenter CA-Jobtrac Worksheets
Item Parameter Description Your Value
81 What is the name of the CACommon Services CAILIBwhere CA-GSS was installed?This can be the same asINDXEZ.Default: None
GSSLOAD=
82 What is the fully qualified filename to be assigned to theUnicenter CA-Jobtrac ISETlibrary? ISET libraries containREXX programs used byCA-GSS.Default: None
ISET=
83 On what volume should theUnicenter CA-Jobtrac ISETlibrary be allocated?Default: None
ISETVOL=
84 Is the ISET name specified asISET=keyword a new ISET? IfY, this ISET is allocated.Default: N
NEWISET=
Unicenter CA-11
This topic lists a value for Unicenter CA-11.
Item Parameter Description Your Value
85 If you have Unicenter CA-11installed in your environment,what is the high-level qualifierfor Unicenter CA-11 SMP/Etarget libraries?Default: None
INDX11=
Chapter 3. Worksheets 79

Chapter 4. Installation Tasks
This section contains the following topics:
Install CA Common Services . . . . . . . . . . . . . . . . . . . . . . . . . . . 82Install CA-Datacom/AD . . . . . . . . . . . . . . . . . . . . . . . . . . . . . . 83Preparing for Installation . . . . . . . . . . . . . . . . . . . . . . . . . . . . . . 85SAMPJCL Member Names . . . . . . . . . . . . . . . . . . . . . . . . . . . . 86Installation Sequence . . . . . . . . . . . . . . . . . . . . . . . . . . . . . . . 87Steps for All Installations . . . . . . . . . . . . . . . . . . . . . . . . . . . . . 88New Installation Phase . . . . . . . . . . . . . . . . . . . . . . . . . . . . . . 93Demonstration Phase . . . . . . . . . . . . . . . . . . . . . . . . . . . . . . . 98Post Installation Considerations . . . . . . . . . . . . . . . . . . . . . . . . . 99Install Unicenter CA-Jobtrac . . . . . . . . . . . . . . . . . . . . . . . . . . 101
New SMP/E CSIs are created during the installation. You must install into newCSIs even if you have a previous release of Unicenter CA-Jobtrac installed.Changes in DLIB allocation prevent using the previous release's CSIs.
This chapter explains how to install Unicenter CA-Jobtrac using the IBM SMP/Eproduct. If you are not familiar with SMP/E, you should have an experiencedSMP/E consultant available. CA Technical Support also answers questionsabout SMP/E installation options.
Getting Help During Installation: Keep a copy of your installation listingsduring the installation process.
If you need assistance during Unicenter CA-Jobtrac installation, contact CATechnical Support (see the information about contacting Technical Support atthe beginning of this guide). Have your listings available when you call.
Chapter 4. Installation Tasks 81
Install CA Common Services
Install CA Common Services
You can skip this step if the required components were installed for another CAproduct. Unicenter CA-Jobtrac and CA-Datacom/AD require several commoncomponents from the CA Common Services installation tape. The following aredescribed in more detail in “CA Common Services” on page 26.
Using the CA Common Services Getting Started guide (available athttp://supportconnect.ca.com/sc/documentation), install and configure therequired components.
■ CA PROFILE
■ CA-C Runtime
■ CA-Easytrieve Service
■ CA-GREXX
■ CA-GSS
■ CA-XPS
■ CAICCI r1.1 or r2.1
■ CAIENF
■ CAIENF Utilities
■ CAIRIM
■ CAISDI/els
■ CAIVPE
■ ViewPoint
82 Planning and Implementation Guide
Install CA-Datacom/AD
Install CA-Datacom/AD
You can skip this step if CA-Datacom/AD r11 or later is already installed. If youplan to share a CA-Datacom/AD MUF with another product or application, see“Compatibility with CA-Datacom/AD” on page 83.
This documentation addresses new installations. For information aboutupgrades, see the CA-Datacom/AD documentation.
CA-Datacom/AD is a no-charge version of the CA database product AdvantageCA-Datacom/DB. CA-Datacom/AD has all of the functions of the full AdvantageCA-Datacom/DB product except that CA-Datacom/AD does not allow the use ofuser-defined databases.
SAMPJCL: In this topic, all references to SAMPJCL refer to theCA-Datacom/AD SAMPJCL data set.
Compatibility with CA-Datacom/AD: Unicenter CA-Jobtrac can share aCA-Datacom/AD MUF with other applications or can have its own MUF. Werecommend that Unicenter CA-Jobtrac has its own MUF for the followingreasons:
■ Unicenter CA-Jobtrac is a systems product that must be available 24x7.Other applications may require MUF shut down at times, which would makeUnicenter CA-Jobtrac unusable.
■ Unicenter CA-Jobtrac may impact performance of your existingCA-Datacom/AD (or Advantage CA-Datacom/DB) applications.
■ Unicenter CA-11 can use the same MUF, since it is closely tied toscheduling and has a similar requirement.
CA-Datacom/AD Compatibility with Advantage CA-Datacom/DB: If youare an existing Advantage CA-Datacom/DB customer and are considering usingyour existing installation, consider the following:
■ Your Advantage CA-Datacom/DB may not be at the correct maintenancelevel, and any maintenance that may need to be applied to supportUnicenter CA-Jobtrac will also affect your existing AdvantageCA-Datacom/DB systems.
■ If you are not licensed for Advantage CA-Datacom/DB on all systems thatwill run Unicenter CA-Jobtrac, you may be limited in your options for movingthe MUF to other systems. A database initialized using AdvantageCA-Datacom/DB cannot be opened by a CA-Datacom/AD system.
■ You still need a separate MUF as discussed previously in the topic“Compatibility with CA-Datacom/AD.”
■ If you choose to use your Advantage CA-Datacom/DB, you can skip thisstep.
Chapter 4. Installation Tasks 83
Install CA-Datacom/AD
Prior to starting this installation, be sure to read the cover letter and anyProduct Information Packets (PIPs) delivered with the installation tape. Youshould also review the applicable items on the SupportConnect website.
This chapter discusses, step-by-step, the procedures required to install,customize, and demonstrate CA-Datacom/AD r11 in the z/OS environment.Contents include:
■ SAMPJCL member names
■ Product options
■ Installation sequence
■ Steps for all installations
■ New installation phase
■ Demonstration phase
■ Post-installation considerations
Before you perform any installation activity, retrieve member @AXWKSHT fromthe sample JCL PDS or refer to Chapter 3, “Worksheets.” These procedureparameters are required for all CA-Datacom/AD installations. Ensure that eachparameter has a valid value.
Note: The DBRIMPR module that actually installs the CA-Datacom/AD SVCissues several informational messages and error messages as needed. Referto the Advantage CA-Datacom/DB Message Guide for these messages, theirmeanings, and any action you might need to take.
84 Planning and Implementation Guide
Preparing for Installation
Preparing for Installation
The procedures required for installation at your site depend on whether this is afirst time installation, or an upgrade.
New Installations
If you are installing CA-Datacom/AD for the first time, read this guide carefullybefore you begin the installation process. Some pre-installation considerationsapply directly to new installations.
After completing the steps commonly required for all installations (see “Stepsfor All Installations” on page 88), complete the “New Installation Phase” onpage 93.
When you finish the last step, you have completed your new installation. Verifythe successful installation of CA-Datacom/AD as shown in the “DemonstrationPhase” on page 98.
Upgrading Existing Products
This guide does not include upgrade instructions. If you are upgrading, use theCA-Datacom/AD Installation and Maintenance Guide to install the r11 release.When you have completed the upgrade, return to this guide to complete theinstallation of Unicenter CA-Jobtrac starting at “Install Unicenter CA-Jobtrac” onpage 101.
Chapter 4. Installation Tasks 85
SAMPJCL Member Names
SAMPJCL Member Names
The SAMPJCL member names can be easily identified during any installation.These names are constructed as follows:
1. Each name begins with AX to identify CA-Datacom/AD.
2. The next three characters identify the type of installation step (one of thefollowing):
■ INS indicates an installation step performed for all installations.
■ NEW indicates a step for new installations only.
■ UPG indicates a step for upgrade installations from r10 only.
■ FBK indicates a step for returning to the previous version environmentafter completing the upgrade jobs.
■ IVP indicates a step you execute to verify the installation.
3. The remainder of each name indicates the number of the step and caninclude a suffix.
If you have a job member that has a suffix along with a same-numbered jobmember that does not have a suffix, run the job member that has a suffixafter the job member without a suffix is complete.
R suffixindicates a restore of CA-Datacom/AD data sets from a previousbackup step.
X suffixindicates the step is conditional and is performed on in specificinstances. Read the step description to determine whether to includeit in your CA-Datacom/AD installation.
86 Planning and Implementation Guide
Installation Sequence
Installation Sequence
Sample jobs must be executed in sequential order by name and number. Besure to review, edit, execute, and complete each installation step beforeproceeding to the next step.
Follow these guidelines when installing:
1. SMP/E Installation Phase
Execute members whose names start with AXINS for all installations. Whenall AXINS jobs have executed successfully, the SMP/E phase of the productinstallation is complete.
2. New Installation Phase
If you are installing CA-Datacom/AD for the first time, execute the memberswhose names start with AXNEW. After all AXNEW jobs have executedsuccessfully, the CA-Datacom/AD r11 environment is ready for use.
3. Install Verification Phase
Execute members whose names start with AXIVP. When the AXIVP jobshave executed successfully, the CA-Datacom/AD r11 sample execution iscomplete.
4. Post Installation Phase
Make any CICS modifications necessary for your specific site. Verify theinstallation using Datadictionary online and Advantage CA-Dataquery.
Chapter 4. Installation Tasks 87
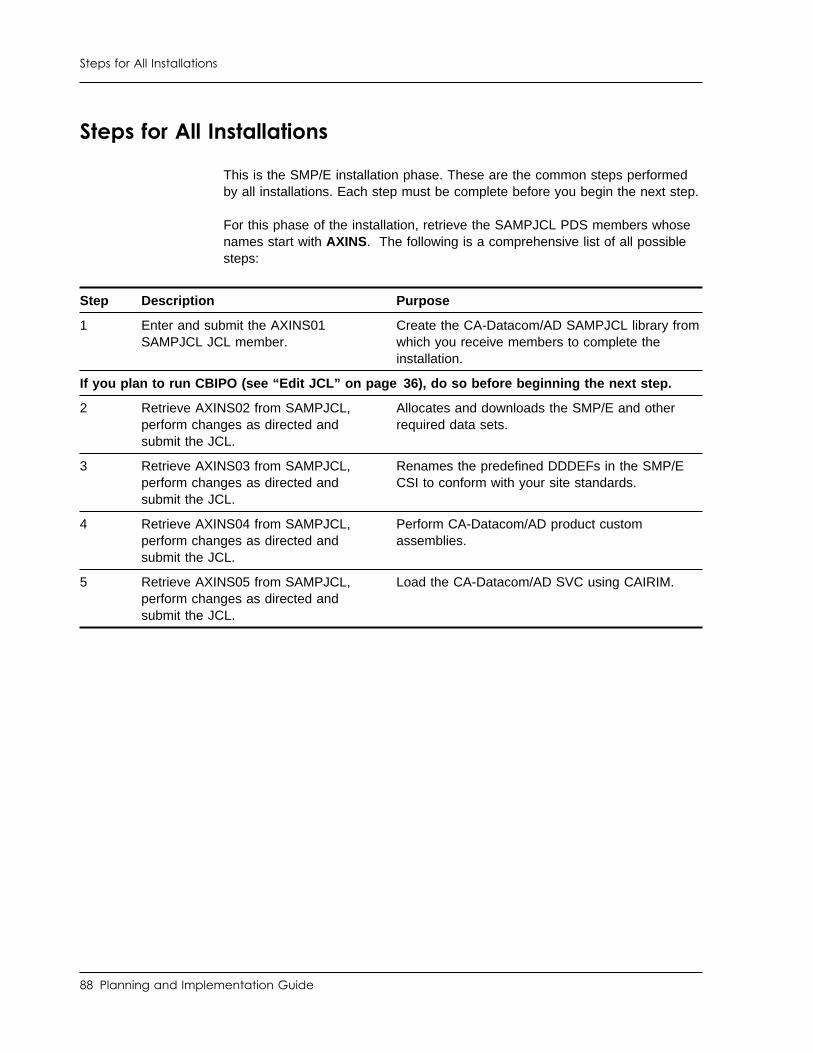
Steps for All Installations
Steps for All Installations
This is the SMP/E installation phase. These are the common steps performedby all installations. Each step must be complete before you begin the next step.
For this phase of the installation, retrieve the SAMPJCL PDS members whosenames start with AXINS. The following is a comprehensive list of all possiblesteps:
Step Description Purpose
1 Enter and submit the AXINS01SAMPJCL JCL member.
Create the CA-Datacom/AD SAMPJCL library fromwhich you receive members to complete theinstallation.
If you plan to run CBIPO (see “Edit JCL” on page 36), do so before beginning the next step.
2 Retrieve AXINS02 from SAMPJCL,perform changes as directed andsubmit the JCL.
Allocates and downloads the SMP/E and otherrequired data sets.
3 Retrieve AXINS03 from SAMPJCL,perform changes as directed andsubmit the JCL.
Renames the predefined DDDEFs in the SMP/ECSI to conform with your site standards.
4 Retrieve AXINS04 from SAMPJCL,perform changes as directed andsubmit the JCL.
Perform CA-Datacom/AD product customassemblies.
5 Retrieve AXINS05 from SAMPJCL,perform changes as directed andsubmit the JCL.
Load the CA-Datacom/AD SVC using CAIRIM.
88 Planning and Implementation Guide
Steps for All Installations
Step 1. Allocate the SAMPJCL Library
The sample JCL (SAMPJCL) library created in this step contains the JCL youneed to complete all subsequent installation steps. The JCL you submitexecutes IEFBR14 (to allocate your SAMPJCL PDS) and IEBCOPY (to load theSAMPJCL library from tape to disk).
To allocate the SAMPJCL library:
1. Use the sample JCL to create the SAMPJCL library.2. Make all required changes for your site as shown.3. Submit the JCL to complete this step.4. Review the output for successful completion. The expected condition code
is 00.
Note: You get the internal VOLSER from the external label on the tape.
If there is an abend, correct the JCL and repeat the job. This entire job can berepeated provided you either delete the SAMPJCL data set that was allocatedin this job, or change the high-level qualifier of the SAMPJCL data set.
Chapter 4. Installation Tasks 89
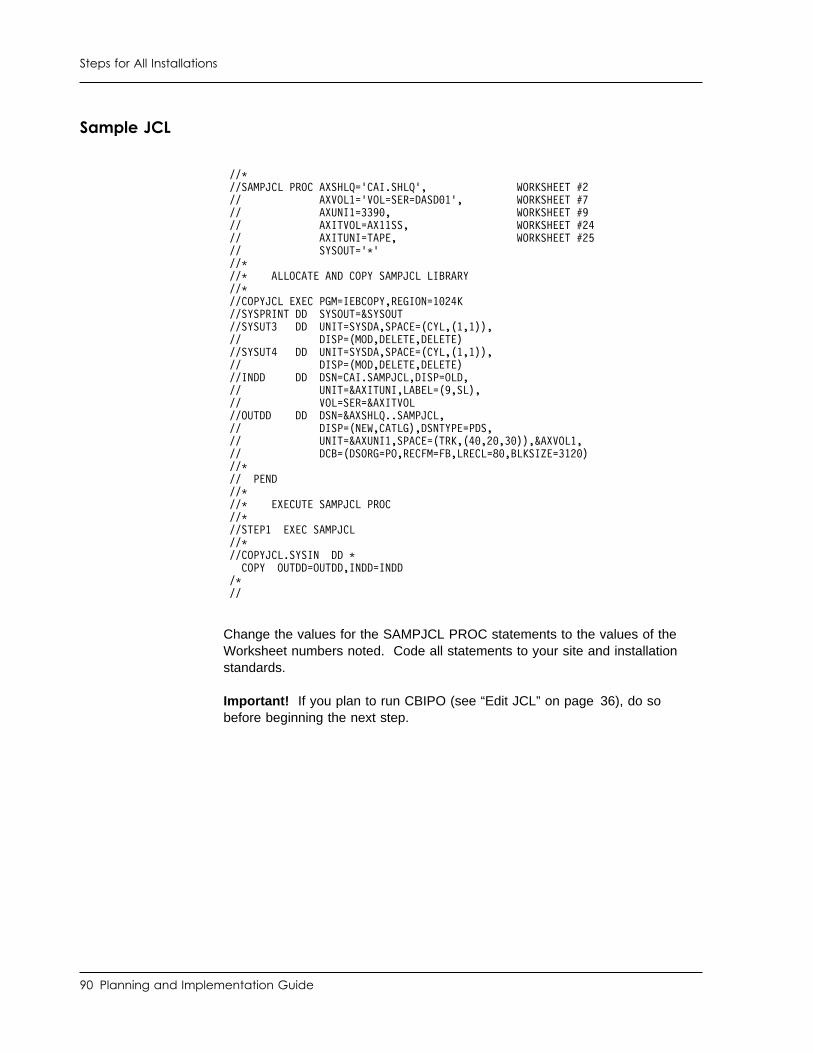
Steps for All Installations
Sample JCL
//� //SAMPJCL PROC AXSHLQ='CAI.SHLQ', WORKSHEET #2 // AXVOL1='VOL=SER=DASD 1', WORKSHEET #7 // AXUNI1=339 , WORKSHEET #9 // AXITVOL=AX11SS, WORKSHEET #24 // AXITUNI=TAPE, WORKSHEET #25 // SYSOUT='�' //� //� ALLOCATE AND COPY SAMPJCL LIBRARY //� //COPYJCL EXEC PGM=IEBCOPY,REGION=1 24K //SYSPRINT DD SYSOUT=&SYSOUT //SYSUT3 DD UNIT=SYSDA,SPACE=(CYL,(1,1)), // DISP=(MOD,DELETE,DELETE) //SYSUT4 DD UNIT=SYSDA,SPACE=(CYL,(1,1)), // DISP=(MOD,DELETE,DELETE) //INDD DD DSN=CAI.SAMPJCL,DISP=OLD, // UNIT=&AXITUNI,LABEL=(9,SL), // VOL=SER=&AXITVOL //OUTDD DD DSN=&AXSHLQ..SAMPJCL, // DISP=(NEW,CATLG),DSNTYPE=PDS, // UNIT=&AXUNI1,SPACE=(TRK,(4 ,2 ,3 )),&AXVOL1, // DCB=(DSORG=PO,RECFM=FB,LRECL=8 ,BLKSIZE=312 ) //� // PEND //� //� EXECUTE SAMPJCL PROC //� //STEP1 EXEC SAMPJCL //� //COPYJCL.SYSIN DD � COPY OUTDD=OUTDD,INDD=INDD /� //
Change the values for the SAMPJCL PROC statements to the values of theWorksheet numbers noted. Code all statements to your site and installationstandards.
Important! If you plan to run CBIPO (see “Edit JCL” on page 36), do sobefore beginning the next step.
90 Planning and Implementation Guide
Steps for All Installations
Step 2. Download Libraries
Note: This step uses the install tape.
This step allocates and downloads the CA-Datacom/AD SMP/E and otherrequired data sets. CA-Datacom/AD has been pre-installed using SMP/E sothat it is not necessary during the initial installation of the release untilmaintenance is required.
To download libraries:
1. Retrieve member AXINS02 from your SAMPJCL PDS.2. Make the required global changes (see the instruction block).3. Submit the JCL to complete this step.4. Review the output for successful completion. The expected condition code
is 00.
If there is an abend, correct the JCL and repeat the job. This entire job can berepeated. However, any PDS members that have been previously copied arenot replaced and results in a condition code other than 00.
Step 3. Rename SMP/E DDDEFs
This step executes GIMSMP to rename the predefined DDDEFs in the SMP/ECSI to your site-specific data set names.
To rename SMP/E DDDEFs:
1. Retrieve member AXINS03 from your SAMPJCL PDS.2. Make the required global changes (see the instruction block).3. Submit the JCL to complete this step.4. Review the output for successful completion. The expected condition code
is LE 04.
Note: Make certain that the zone names do not change. See“CA-Datacom/AD Product Installation” on page 39 for more information.
If there is an abend, correct the job and repeat. This job can be repeated at anytime.
Chapter 4. Installation Tasks 91
Steps for All Installations
Step 4. Prepare the CA-Datacom/AD Custom Assemblies
This step prepares the CA-Datacom/AD customized assemblies.
To prepare the CA-Datacom/AD custom assemblies:
1. Retrieve member AXINS04 from your SAMPJCL PDS.2. Make the required global changes (see the instruction block).3. Submit the JCL to complete this step.4. Review the output for successful completion. The expected condition code
is LE 04.
Review all of the CA-Datacom/AD startup option statements in the job step thatadds the Multi-User Facility startup PARMs member DBDATIN1 to theCUSMAC PDS.
Refer to the Advantage CA-Datacom/DB Database and System AdministratorGuide for a list of the Multi-User startup option that might be applicable to yourinstallation.
If any step in this job abends, correct the problem and repeat the job. This jobcan be repeated at any time.
Step 5. Load CA-Datacom/AD SVC Using CAIRIM
This step loads the CA-Datacom/AD SVC using CAIRIM. Be sure to review“Install a User SVC for CA-Datacom/AD” on page 31 before running this step.
To load the CA-Datacom/AD SVC using CAIRIM:
1. Retrieve member AXINS05 from your SAMPJCL PDS.2. Make the required global changes (see the instruction block).3. Submit the JCL to complete this step.4. Review the output for successful completion. The expected condition code
is 00.
This job can be repeated. However, repeated executions can require changesto the CAIRIM command statements. Review the section on installing an SVCbefore repeating.
We recommend that this job be incorporated into your site-standard CAS9procedure so that the CA-Datacom/AD SVC is automatically installed after anIPL.
92 Planning and Implementation Guide
New Installation Phase
New Installation Phase
The following is a comprehensive list of all possible steps for a newinstallation only. If this is your first time installing CA-Datacom/AD, performthese steps after completing those required by all installations.
For this phase of the installation, run the SAMPJCL PDS members whosenames start with AXNEW.
Step Description Purpose
1 Retrieve AXNEW01 from SAMPJCL,perform the changes as directed, andsubmit the JCL.
Add the backup/load/initialize PROC members andallocate backup files.
2 Retrieve AXNEW02 from SAMPJCL,perform the changes as directed, andsubmit the JCL.
Allocate the CA-Datacom/AD database data sets.
3 Retrieve AXNEW03 from SAMPJCL,perform the changes as directed, andsubmit the JCL.
Initialize and load the CXX, LXX, and theCA-Datacom/AD database data sets.
4 Retrieve AXNEW04 from SAMPJCL,perform the changes as directed, andsubmit the JCL.
Start the Multi-User Facility.
5 Retrieve AXNEW05 from SAMPJCL,perform the changes as directed, andsubmit the JCL, after starting theMulti-User Facility.
Update Datadictionary, reset the DatadictionaryHSD file, and populate the AdvantageCA-Dataquery database and CASYSTEMTABLES.
6 Retrieve AXNEW06 from SAMPJCL,perform the changes as directed, andsubmit the JCL.
Back up the CA-Datacom/AD r11 databases.
7 Retrieve AXNEW07 from SAMPJCL,perform the changes as directed, andsubmit the JCL.
Shut down the Multi-User Facility.
8 Retrieve AXNEW08 from SAMPJCL,perform the changes as directed, andsubmit the JCL.
Delete unneeded files after installation is complete.
Chapter 4. Installation Tasks 93
New Installation Phase
Step 1. Add BACKUP/LOAD/INIT PROC Members
This step adds the backup, load, and initialize CUSPROC members andallocates backup and VLS data sets.
To add BACKUP/LOAD/INIT PROC members:
1. Retrieve member AXNEW01 from your SAMPJCL PDS.2. Make the required global changes (see the instruction block).3. Submit the JCL to complete this step.4. Review the output for successful completion. The expected condition code
is 00.
If there is an abend, correct the JCL and repeat the job. This entire job can berepeated provided you either delete the data sets that were allocated in this job,or change the high-level qualifier for these data sets.
Step 2. Allocate CA-Datacom/AD Data Sets
This step executes IEFBR14 to allocate the CA-Datacom/AD database datasets.
To allocate CA-Datacom/AD data sets:
1. Retrieve member AXNEW02 from your SAMPJCL PDS.2. Make the required global changes (see the instruction block).3. Submit the JCL to complete this step.4. Review the output for successful completion. The expected condition code
is 00.
If there is an abend, correct the JCL and repeat the job. This entire job can berepeated provided you either delete the data sets that were allocated in this job,or change the high-level qualifier for these data sets. If you want to repeat thejob starting at a certain job step which had previously abended, resubmit thejob, modifying the job card to include a RESTART parameter such as:
RESTART=STEP2.xxxx
Where xxxx is the stepname in the PROC. Be sure you have reviewed, edited,executed, and completed this step before continuing.
94 Planning and Implementation Guide
New Installation Phase
Step 3. Initialize and Load the CXX, LXX, and Databases
This step executes DBUTLTY to initialize and load the Directory (CXX), LogArea (LXX), and Datadictionary database.
To initialize and load the CXX, LXX, and databases:
1. Retrieve member AXNEW03 from your SAMPJCL PDS.2. Make the required global changes (see the instruction block).3. Submit the JCL to complete this step.4. Review the output for successful completion. The expected condition code
is 00.
If any step in this jobs abends, correct the problem and repeat the job. This jobcan be repeated at any time. However, if this job is repeated after running anysubsequent jobs, (for example, AXNEW05), all subsequent jobs must berepeated as well. The Multi-User Facility must not be active when this job isrun.
Step 4. Start the MUF
This step executes DBMUFPR to start the Multi-User Facility.
To start the MUF:
1. Retrieve member AXNEW04 from your SAMPJCL PDS.2. Make the required global changes (see the instruction block).3. Submit the JCL to complete this step.
Note: This job remains active throughout the rest of the install anddemonstration steps. Code the class parameter in your job card per your siterequirements.
Review, edit, and execute this step before continuing.
Chapter 4. Installation Tasks 95
New Installation Phase
Step 5. Run DDUPDATE, DDCFBLD, DBUTLTY INIT, and Populate DQ
This step does the following:
■ Executes DDUPDATE to update Datadictionary, then executes DDCFBLDto reset the Datadictionary HSD file
■ Executes DBUTLTY to initializes the CASYSTEMTABLES and HISTORYdatabases
■ Populates the Advantage CA-Dataquery database.
You must start the Multi-User Facility prior to running this step. The Multi-UserFacility must be available for the rest of the installation and demonstrationsteps. When required, the Multi-User Facility can be terminated usingSAMPJCL member AD11STOP.
To run DDUPDATE, DDCFBLD, DBUTLTY INIT, and Populate DQ:
1. Retrieve member AXNEW05 from your SAMPJCL PDS.2. Make the required global changes (see the instruction block).3. Submit the JCL to complete this step.4. Review the output for successful completion. The expected condition code
is 00.
Note: If you receive a condition code 08 on this job because ofDatadictionary numbered message DDPNTF0003, indicating that in a -DELheader transaction you specified an entity-occurrence that does not exist inDatadictionary, go to the next install job. If you receive a condition code 08on this job because of an error other than Datadictionary numberedmessage DDPNTF0003, review the output to determine what correctiveaction to take.
If any step in this job abends, correct the problem and repeat the entire job.This job can be repeated at any time as needed.
Step 6. Back Up CA-Datacom/AD Databases
This step executes DBUTLTY to back up the CA-Datacom/AD databases (CXX,002, 003, 015).
To back up CA-Datacom/AD databases:
1. Retrieve member AXNEW06 from your SAMPJCL PDS.2. Make the required global changes (see the instruction block).3. Submit the JCL to complete this step.4. Review the output for successful completion. The expected condition code
is 00.
If any step in this job abends, correct the problem and repeat the entire job.This job can be repeated at any time as needed.
96 Planning and Implementation Guide
New Installation Phase
Step 7. Shut Down the MUF
(Optional.)
This step executes DBUTLTY to shutdown the Multi-User Facility. You canoptionally skip this step and continue to the demonstration steps.
To shut down the MUF:
1. Retrieve member AXNEW07 from your SAMPJCL PDS.2. Make the required global changes (see the instruction block).3. Submit the JCL to complete this step.4. Review the output for successful completion. The expected condition code
is 00.
Step 8. Remove Unneeded Installation Files
(Conditional.)
This step removes all files that are no longer needed after the installation iscomplete.
Note: Do not run this job until any CICS or other post-installation jobs havebeen completed.
To remove unneeded installation files:
1. Retrieve member AXNEW08 from your SAMPJCL PDS.2. Make the required global changes (see the instruction block).3. Submit the JCL to complete this step.4. Review the output for successful completion. The expected condition code
is 00.
Chapter 4. Installation Tasks 97
Demonstration Phase
Demonstration Phase
When you have finished all installation steps for your site, execute the followingjobs to demonstrate successful product installation for batch processing.
The SAMPJCL job member names begin with AXIVP and must be performed inthe following sequence.
Step 1. Start Up the MUF
As in the installation steps, edit and submit AD11STRT from the SAMPJCLlibrary. This executes DBUTLTY and DBMUFPR to startup the Multi-UserFacility.
Step 2. Execute Sample CA-Datacom/AD Programs
Edit and submit SAMPJCL member AXIVP01. This executes multiple programsfor CA-Datacom/AD execution.
Note: Ignore message code CSV003I if it appears.
Step 3. Execute Sample Dynamic SQL Programs
Edit and submit AXIVP02. This executes a dynamic SQL program forCA-Datacom/AD.
Step 4. Shut Down the MUF
Edit and submit SAMPJCL member AD11STOP. This executes DBUTLTY toshut down the Multi-User Facility.
When this is complete, you have verified successful installation of this product.
98 Planning and Implementation Guide
Post Installation Considerations
Post Installation Considerations
The following are post installation considerations.
Set up Production Jobs
SAMPJCL members AD11STRT, AD11STOP, AD11LXXS, and AD11PXXR canbe used to set production jobs for your site which are required on a daily basisto run the CA-Datacom/AD environment. You might want to make these jobsstandard PROCs or started tasks for your site.
SAMPJCL member AD11STRT starts up the CA-Datacom/AD environment.This job is a long running task that should be submitted to a job class without atime or CPU limit. This environment must be available for any access to theCA-Datacom/AD databases.
Note: You should run the AD11STRT job/STC (where STC refers to a StartedTask) at a priority just under the priority of the JES subsystem ifCA-Datacom/AD is being utilized with another CA system product such asUnicenter® CA-11™ or Unicenter® CA-Scheduler®.
SAMPJCL member AD11STOP shuts down the CA-Datacom/AD environment.
SAMPJCL member AD11LXXS spills the inactive Log Area (LXX) records to aRecovery File. If the CA-Datacom/AD Log Area fills up, update processingagainst the MUF is stopped until the records are spilled.
SAMPJCL member AD11PXXR prints out the Statistics and Diagnostics Area(PXX) that can be used for tuning or debugging purposes. A PXX report is alsoprinted during the shutdown of the Multi-User Facility.
SAMPJCL member AD11BKUP backs up the CA-Datacom/AD Directory (CXX)and databases to tape.
SAMPJCL member AD11LOAD restores the backed-up CXX and databasesfrom tape.
Chapter 4. Installation Tasks 99
Post Installation Considerations
Multi-User Facility Tuning
CUSMAC member DBDATIN1 and CAIMAC member DBDATIN2 contain thestartup and tuning parameters required by the Multi-User Facility at startup.Although the parameters in DBDATIN2 normally would not be changed, theycan be changed as required to optimize the execution of the Multi-User Facility.See the Advantage CA-Datacom/DB Database and System Administrator Guidefor more information about these parameters. Also see the CA-Datacom/ADImplementation Guide.
Run the MUF as a Started Task
You can, if preferred, run the Multi-User Facility (MUF) as a started task.
To run the MUF as a started task:
1. Move the AD11STRT procedure from the CUSPROC library to the systemprocedure library.
2. Enter the following console command:
S AD11STRT
In the previously shown console command, 6M is the default region size.This region size can be modified as needed.
100 Planning and Implementation Guide
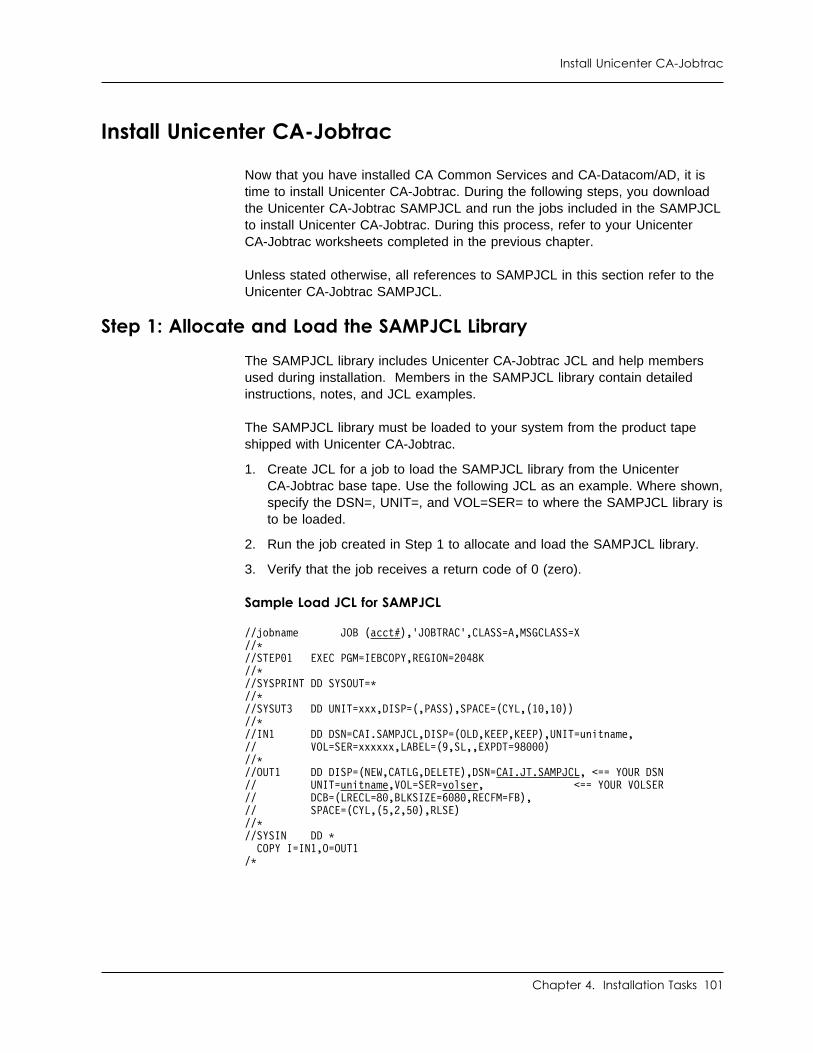
Install Unicenter CA-Jobtrac
Install Unicenter CA-Jobtrac
Now that you have installed CA Common Services and CA-Datacom/AD, it istime to install Unicenter CA-Jobtrac. During the following steps, you downloadthe Unicenter CA-Jobtrac SAMPJCL and run the jobs included in the SAMPJCLto install Unicenter CA-Jobtrac. During this process, refer to your UnicenterCA-Jobtrac worksheets completed in the previous chapter.
Unless stated otherwise, all references to SAMPJCL in this section refer to theUnicenter CA-Jobtrac SAMPJCL.
Step 1: Allocate and Load the SAMPJCL Library
The SAMPJCL library includes Unicenter CA-Jobtrac JCL and help membersused during installation. Members in the SAMPJCL library contain detailedinstructions, notes, and JCL examples.
The SAMPJCL library must be loaded to your system from the product tapeshipped with Unicenter CA-Jobtrac.
1. Create JCL for a job to load the SAMPJCL library from the UnicenterCA-Jobtrac base tape. Use the following JCL as an example. Where shown,specify the DSN=, UNIT=, and VOL=SER= to where the SAMPJCL library isto be loaded.
2. Run the job created in Step 1 to allocate and load the SAMPJCL library.
3. Verify that the job receives a return code of 0 (zero).
Sample Load JCL for SAMPJCL
//jobname JOB (acct#),'JOBTRAC',CLASS=A,MSGCLASS=X//�//STEP 1 EXEC PGM=IEBCOPY,REGION=2 48K//�//SYSPRINT DD SYSOUT=�//�//SYSUT3 DD UNIT=xxx,DISP=(,PASS),SPACE=(CYL,(1 ,1 ))//�//IN1 DD DSN=CAI.SAMPJCL,DISP=(OLD,KEEP,KEEP),UNIT=unitname,// VOL=SER=xxxxxx,LABEL=(9,SL,,EXPDT=98 )//�//OUT1 DD DISP=(NEW,CATLG,DELETE),DSN=CAI.JT.SAMPJCL, <== YOUR DSN// UNIT=unitname,VOL=SER=volser, <== YOUR VOLSER// DCB=(LRECL=8 ,BLKSIZE=6 8 ,RECFM=FB),// SPACE=(CYL,(5,2,5 ),RLSE)//�//SYSIN DD � COPY I=IN1,O=OUT1/�
Chapter 4. Installation Tasks 101
Install Unicenter CA-Jobtrac
Step 2: Unload Documentation
Product documentation is delivered in Adobe Acrobat format. The SAMPJCLlibrary includes a member to unload the documentation from the installationtape in Adobe Acrobat format. To unload the documentation from theinstallation tape, refer to SAMPJCL member ADOBEDOC.
The documentation is also available on the SupportConnect web site.
Step 3: Create SMP/E Libraries
This step creates all the SMP/E libraries and defines the SMP zones.
Member CAINITE5 in your Unicenter CA-Jobtrac SAMPJCL library contains theJCL for this step.
1. Review the JCL in the CAINITE5 procedure.
2. Modify the JCL parameters to meet your installation's needs.
3. Run the CAINITE5 job to create the SMP/E libraries. You should receive acompletion code of 04.
New SMP/E CSIs are created during the installation. You must install into newCSIs even if you have a previous release of Unicenter CA-Jobtrac installed.Changes in the SMP/E packaging structure prevent using the previous release'sCSIs.
Do not install into the same SMP/E environment as CA-Datacom/AD.CA-Datacom/AD uses a replacement maintenance methodology that conflictswith Unicenter CA-Jobtrac.
102 Planning and Implementation Guide
Install Unicenter CA-Jobtrac
Step 4: Create the Target and Distribution Libraries
This step creates all the SMP/E target and distribution libraries for UnicenterCA-Jobtrac.
Member HD11ALC in your Unicenter CA-Jobtrac SAMPJCL library contains theJCL for this step.
1. Review the JCL in the HD11ALC procedure.
2. Modify the JCL parameters to meet your installation's needs.
3. Run the HD11ALC job to create the SMP/E target and distribution libraries.You should receive a completion code of 0 (zero).
Step 5: Create SMP PROC
This step sets up the SMP/E PROC that will be used for all SMP/E processing.
Member CAIHD11 in your Unicenter CA-Jobtrac SAMPJCL library contains theJCL for this step.
1. Edit CAIHD11 in SAMPJCL.
2. Modify the PROC parms to specify required parameters. Do not change thePTF='DUMMY,' parameter.
3. Verify the macro libraries specified on the SYSLIB DDNAME.
4. Save the changes and move the CAIHD11 PROC into an available proclib.
Chapter 4. Installation Tasks 103
Install Unicenter CA-Jobtrac
Step 6: Perform RECEIVE Processing
This step performs RECEIVE processing for the Unicenter CA-Jobtrac baseFMID and all its functions.
Member HD11REC in your Unicenter CA-Jobtrac SAMPJCL library contains theJCL for this step.
1. Review the JCL in the HD11REC procedure.
2. Modify the JCL parameters to meet your installation's needs.
3. Run the HD11REC job to perform RECEIVE processing. You should receivea completion code of 0 (zero).
Step 7: Perform APPLY Processing
This step performs APPLY processing for Unicenter CA-Jobtrac.
Member HD11APP in your Unicenter CA-Jobtrac SAMPJCL library contains theJCL for this step.
1. Review the JCL in the HD11APP procedure.
2. Modify the JCL parameters to meet your installation's needs.
3. Run the HD11APP job to perform APPLY processing. Ensure you receive acompletion code of 0 (zero) or 4.
104 Planning and Implementation Guide
Install Unicenter CA-Jobtrac
Step 8: Perform ACCEPT Processing
This step performs ACCEPT processing for Unicenter CA-Jobtrac.
Member HD11ACC in your Unicenter CA-Jobtrac SAMPJCL library contains theJCL for this step.
1. Review the JCL in the HD11ACC procedure.
2. Modify the JCL parameters to meet your installation's needs.
3. Run the HD11ACC job to perform ACCEPT processing. You should receivea completion code of 0 (zero) or 4.
Step 9: Ensure APF Authorization
Important! Unicenter CA-Jobtrac modules must be executed from anAPF-authorized library.
Add the CAI CAILIB to the APFLIST or use IEBCOPY to move the UnicenterCA-Jobtrac modules from the installation CAILIB to an appropriate library andperform an LLA REFRESH if needed.
Note: CA-GSS CAILIB must be APF-authorized for the STAGE2 jobs to run.
Step 10: Update License Management Program (LMP) Key
This product is in compliance with CA License Management Program (LMP). Asa result, the PDS member referenced by the KEYS DD statement in the CAS9procedure must be updated with the information supplied on the LMP KeyCertificates for both Unicenter CA-Jobtrac and CA-Datacom/AD. The LMP KeyCertificates are included as part of your distribution package.
For more information about installing and tailoring the Unicenter CA-JobtracLMP Execution Key, see the CA Common Services Administrator Guide.
Chapter 4. Installation Tasks 105
Install Unicenter CA-Jobtrac
Step 11: Update CAIENF Database
SAMPJCL member HD11ENF defines events to CAIENF and makes themactive. CAIENF must be shut down to run the job. Do not restart it until soinstructed in “Step 13: Start CAIENF” on page 106.
Follow the directions in the SAMPJCL member to tailor the job and submit it.The job should end with a return code of zero.
Step 12: CAIENF Startup Options
SAMPJCL member ENFPARMS contains sample CAIENF startup options.ENFPARMS can be merged into the existing CAIENF startup options. Use care,since Unicenter CA-Jobtrac may not be the only CA product using CAIENF. Forinformation about the CAIENF startup options, see the CA Common ServicesAdministrator Guide.
Step 13: Start CAIENF
Start (or restart) CAIENF. If you are restarting CAIENF, use the followingREINIT option:
S CAIENF,,,REINIT
Step 14: Create a Dummy IEAVMXIT Exit
To use the Automatic Message Recognition (AMR) feature of UnicenterCA-Jobtrac, an IEAVMXIT exit must exist in your SYS1.LINKLIB data set. Verifythat this module is present. If you do not have this module, use job LINKMXITin the SAMPJCL library to create a dummy exit. For more information, see “SetUp AMR Support” on page 208.
Step 15: (Optional) Install eTrust CA-Examine Interface
eTrust CA-Examine audits the z/OS operating system and reports its findings tothe customer. Unicenter CA-Jobtrac has an interface to this product that is aload module residing in the Unicenter CA-Jobtrac load library (CAI.CAILIB). IfeTrust CA-Examine is installed at your site, part of the install process movesthe interface module, CAIXCHD$, from the Unicenter CA-Jobtrac load library tothe LPA library.
106 Planning and Implementation Guide
Install Unicenter CA-Jobtrac
Step 16: (Optional) Link AllFusion CA-Panvalet Modules
This step relinks the Unicenter CA-Jobtrac modules so that they include theAllFusion CA-Panvalet access method modules.
If you are not using Unicenter CA-Jobtrac to submit JCL from AllFusionCA-Panvalet, skip this step.
Member HD11LPAN in your Unicenter CA-Jobtrac SAMPJCL library containsthe JCL for this step.
1. Review the JCL in the HD11LPAN procedure.
2. Modify the JCL parameters to meet your installation's needs.
3. Run the HD11LPAN job to link the AllFusion CA-Panvalet modules. Youshould receive a completion code of 0 (zero).
Step 17: (Optional) Link AllFusion CA-Librarian Modules
This step relinks the Unicenter CA-Jobtrac modules so that they include theAllFusion CA-Librarian access method modules.
If you are not using Unicenter CA-Jobtrac to submit JCL from AllFusionCA-Librarian, skip this step.
Member HD11LLIB in your Unicenter CA-Jobtrac SAMPJCL library contains theJCL for this step.
1. Review the JCL in the HD11LLIB procedure.
2. Modify the JCL parameters to meet your installation's needs.
3. Run the HD11LLIB job to link the AllFusion CA-Librarian modules. Youshould receive a completion code of 0 (zero).
Chapter 4. Installation Tasks 107
Install Unicenter CA-Jobtrac
Step 18: (Optional) Install Critical Path Monitor (CPM)
CA Critical Path Monitor (CPM) is included with the installation tape in separatefiles. CA CPM provides the tools to monitor Unicenter CA-Jobtrac critical pathjob flows. These flows can be viewed using the CA CPM ISPF application thatis integrated with the Unicenter CA-Jobtrac. The Unicenter CA-Jobtrac CPMcommand can be used to invoke these panels.
The CA Critical Path Monitor Version 3.0 User Guide is included in thedocumentation for Unicenter CA-Jobtrac. This document includes informationabout installing and using CPM. The SAMPJCL member CPMJCL in theUnicenter CA-Jobtrac SAMPJCL creates a separate CA CPM SAMPJCL librarythat will be used to install and maintain CA CPM.
We recommend that you install CA CPM or update the maintenance for yourexisting CA CPM at this time.
1. If installing, modify and submit CPMJCL in the Unicenter CA-JobtracSAMPJCL. This job creates a separate SAMPJCL data set for CA CPM.The CA CPM SAMPJCL library contains jobs required to install CA CPM.
2. CA CPM installation or maintenance procedures must be performed asdescribed in the CA Critical Path Monitor Version 3.0 User Guide.
3. Retain CPM install data set information. This needs to be specified later inthe Stage1 job described in Chapter 5, “Customization Job Streams” onpage 111.
108 Planning and Implementation Guide
Install Unicenter CA-Jobtrac
Step 19: (Optional) Install the @JOBTRAC USS Command
The Unicenter CA-Jobtrac module JTUSS can be used to access UnicenterCA-Jobtrac from IBM's UNIX System Services using the @JOBTRACcommands currently used with CA-GSS and GJTRABTR. To implement thisfeature, the module must be linked with the IBM Language Environment forOS390 (LE390) and stored in a UNIX HFS system file. The object for themodule is distributed in CAIMAC. The SAMPJCL member HD11LUSS containsJCL to perform the link. Customize the JCL for your environment and submit itto install the command. Remembering that UNIX is case-sensitive, be sure tospecify the path for the command in the correct case. The HD11LUSS membercontains instruction for customizing the JCL.
Note: For more information about using the command and UNIX, see theExtended Scheduling Services Guide.
Step 20: (Optional) Install the JES2 Hold Usermod
If you use JES3, this step does not apply.
Unicenter CA-Jobtrac provides a USERMOD for customers that use JES2 andare using the AUTO-SCHD feature. AUTO-SCHD jobs are submitted fromoutside of Unicenter CA-Jobtrac and may be held in the JES2 input queue untilthe jobs requirements have been met. Traditionally, Unicenter CA-Jobtrac hasused the $HJ command to hold jobs during job conversion, but later releases ofJES2 delay the commands processing and can let the job start running beforethe command is processed. Applying USERMOD UM00001 lets UnicenterCA-Jobtrac hold jobs by setting flags directly in the JES2 control blocks.
Member HD11JES2 in your Unicenter CA-Jobtrac SAMPJCL library containsthe JCL for this step.
1. Review the JCL
2. Modify the JCL parameters as indicated, and as needed to meet yourinstallation's needs.
3. Run the HD11JES2 job to apply the UM00001 USERMOD to UnicenterCA-Jobtrac. You should receive a completion code of 00.
Note: For more information about the AUTO-SCHD feature, see the OperatorGuide.
Chapter 4. Installation Tasks 109

Chapter 5. Customization Job Streams
This section contains the following topics:
STAGE1 Customization Job . . . . . . . . . . . . . . . . . . . . . . . . . . 112STAGE2 Installation Job Stream . . . . . . . . . . . . . . . . . . . . . . . . 118
The following phases are necessary to customize, set up, and implementUnicenter CA-Jobtrac:
■ STAGE1 customization job stream - Covered in this chapter
■ STAGE2 installation job stream - Covered in this chapter
■ Customization tasks - Covered in the chapter "Customization Tasks"
■ Startup and verification tasks - Covered in the chapter "Startup andVerification"
The STAGE1 customization job stream invokes an installation macro calledTRACMAC, which generates the STAGE2 installation job stream. TheTRACMAC macro contains statements you use to name libraries and theirlocations, and to provide information for the STAGE2 job stream.
For more information, see “STAGE1 Customization Job” on page 112.
The STAGE2 job stream is necessary to install Unicenter CA-Jobtrac.
The STAGE2 job stream allocates Unicenter CA-Jobtrac data sets, updatesyour system-cataloged procedure library, and provides the installationverification procedure for Unicenter CA-Jobtrac.
For more information, see “STAGE2 Installation Job Stream” on page 118.
The STAGE1 customization job stream invokes an installation macro calledTRACMAC, which generates the STAGE2 job stream. The STAGE2 job streamis necessary to install Unicenter CA-Jobtrac.
The member STAGE1 in your SAMPJCL library is a sample of the assemblerJCL needed to create the STAGE2 job stream.
The STAGE1 job writes the STAGE2 job stream to the data set or PDSmember that you specify (default is the SAMPJCL). The STAGE2 job streamcontains procedure updates, an installation verification procedure, and JCL toallocate remaining Unicenter CA-Jobtrac libraries.
Chapter 5. Customization Job Streams 111
STAGE1 Customization Job
STAGE1 Customization Job
The STAGE1 customization job stream invokes an installation macro calledTRACMAC. TRACMAC defines numerous global values used to installUnicenter CA-Jobtrac and generate the STAGE2 job stream.
The STAGE2 job stream is created by incorporating all the variables specifiedin the STAGE1 customization. Four separate jobs are created, which can beindividually named by using the JOBNAMx variables:
JOBNAM1Creates and initializes the entire CA-Datacom/AD database environment.
JOBNAM2Creates and initializes the non-database files.
JOBNAM3Primarily creates the tailored run procedures and puts them into thePROCLIB.
JOBNAM4Primarily creates the tailored individual jobs needed to support themaintenance of Unicenter CA-Jobtrac and puts them into the SAMPJCLspecified.
Run the STAGE1 Job
Follow these steps to run the STAGE1 job stream:
1. Edit member STAGE1 in the SAMPJCL library.
2. Review the JCL carefully, making revisions to reflect your installation'srequirements.
3. Edit the STAGE1 parameter values to meet your installation requirements(see “Required TRACMAC Parameters” on page 113, and “OptionalTRACMAC Parameters” on page 116).
Note: By using the CMNTSTEP variable, you can select whether job stepexecution occurs for specified STEPLIBs or system default load libraries.This may be helpful depending on how you select to set up your installationprocess.
4. Be sure to specify your CAIMAC macro library in the SYSLIB DD statement.
5. Run the STAGE1 job to create the STAGE2 job stream.
6. Verify that the assembler return code from the STAGE1 job is 0 (zero). Ifthe return code is not 0, review the assembler output for messages thatindicate what caused the error.
A possible cause is bad or missing parameters. Another common cause ischanging a parameter and omitting the comma. All parameters except thelast one should be followed by a comma.
112 Planning and Implementation Guide
STAGE1 Customization Job
Required TRACMAC Parameters
The following describes the TRACMAC parameters that you must include (withdefaults underlined):
ARCHVOL=Defines the volser of the volume on which the sysout capture file is toreside. This volume must contain enough contiguous space to satisfy theASIZE= parameter.
ASIZE=100Defines the size in cylinders of the sysout capture file. This value must beat least 5.
CMNTSTEP=YSpecifies whether to comment the //STEPLIB DD statements in thegenerated JCL.
YSpecifies to comment the //STEPLIB DD statements.
NSpecifies not to comment the //STEPLIB DD statements.
CYLEVT='160,20'Defines the primary,secondary cylinder size for the EVT CA-Datacom/ADarea allocation on the volume specified by VOLEVT.
CYLHIS='125,2'Defines the primary,secondary cylinder size for the HIS CA-Datacom/ADarea allocation on the volume specified by VOLHIS.
CYLIXX='90,2'Defines the primary,secondary cylinder size for the IXX CA-Datacom/ADarea allocation on the volume specified by VOLIXX.
CYLOPT='120,2'Defines the primary,secondary cylinder size for the OPT CA-Datacom/ADarea allocation on the volume specified by VOLOPT.
CYLSTG='5,1'Defines the primary,secondary cylinder size for the STG CA-Datacom/ADarea allocation on the volume specified by VOLSTG.
DBCXX=Defines the high and mid-level name of the installation's CA-Datacom/AD.CXX control file.
DBID=0161Defines the CA-Datacom/AD DBID that uniquely identifies the productiondatabase.
FDBID=0162Defines the CA-Datacom/AD DBID that uniquely identifies the forecastdatabase.
Chapter 5. Customization Job Streams 113
STAGE1 Customization Job
INDX=CAIDefines the Unicenter CA-Jobtrac installation library high- and mid-levelqualifier to be used during allocation.
INDXDB=Defines the high and mid-level qualifier of the CA-Datacom/AD system files(CAILIB and CUSLIB).
INDXEZ=Defines the high and mid-level qualifier of the CA-Easytrieve system file(CAILIB).
INDXF=Defines the high and mid-level qualifier of the Unicenter CA-Jobtracforecast database CA-Datacom/AD area files.
INDXJ=CAIDefines the high-level qualifier for the CA-Datacom/AD areas containing theUnicenter CA-Jobtrac database.
INSTVOL=10Defines the VOLSER of the volume (INSTLIB) into which the STAGE2 jobis to place all Unicenter CA-Jobtrac installation libraries.
ISET=Defines the fully-qualified data set name of the IMOD ISET into whichUnicenter CA-Jobtrac sample and required production IMODs will beinstalled. For information about IMODs and ISETs, see the CA CommonServices documentation.
JOBNAM1=JOBTJB01Defines the job name to appear on the JOB statement of the first job,database setup.
JOBNAM2=JOBTJB02Defines the job name to appear on the JOB statement of the second job,non-database file setup.
JOBNAM3=JOBTJB03Defines the job name to appear on the JOB statement of the third job,PROCLIB setup.
JOBNAM4=JOBTJB04Defines the job name to appear on the JOB statement of the fourth job,SAMPJCL setup.
NAME='CA-JOBTRAC INSTALL'Defines the STAGE2 job stream programmer name field.
NEWSITE=YDefines whether this is a new installation. New installations should specifyY. Reinstallations will not reallocate runtime libraries if N is used.
SDBID=1000Defines the CA-Datacom/AD DBID that uniquely identifies theCA-Datacom/AD system files used by Unicenter CA-Jobtrac.
114 Planning and Implementation Guide
STAGE1 Customization Job
SYSID=Defines the SMF ID of your primary Unicenter CA-Jobtrac system. Theprimary system is the system on which all batch work will be submitted.
TOKEN=YDefines the Unicenter CA-Jobtrac system ID identifying the copy of thesystem.
TRACJCL=Defines the name of the library that is to contain the production JCL.
TRACTEMP=Defines the name of the library that is to contain the temporary-use JCL.
UNITA=SYSALLDADefines the unit specification for the sysout capture file. For relatedinformation, see the ARCHVOL parameter.
UNITC=CARTDefines the unit specification for the tape device on which to take databasebackups.
UNITD=SYSALLDADefines the unit specification for all remaining installation libraries and datasets. For related information, see the INSTVOL parameter.
UNITT=SYSALLDADefines the unit specification for the Unicenter CA-Jobtrac productiondatabase and the forecast CA-Datacom/AD database areas.
VOLEVT=Defines the VOLSER that the EVT area is to reside on.
VOLFORE=Defines the VOLSER that the forecast database is to reside on.
VOLHIS=Defines the VOLSER that the HIS area is to reside on.
VOLIXX=Defines the VOLSER that the IXX area is to reside on.
VOLOPT=Defines the VOLSER that the OPT area is to reside on.
VOLSTG=Defines the VOLSER that the STG area is to reside on.
VOLUTIL=Defines the VOLSER that space used by CA-Datacom/AD utilities is toreside on.
Chapter 5. Customization Job Streams 115
STAGE1 Customization Job
Optional TRACMAC Parameters
The following parameters are not required. Some have default values that allowthe successful generation of STAGE2 JCL. Default values are underlined. Youwill probably need to specify nondefault parameter values to conform to yourinstallation standards.
ACCT=1Defines a job accounting parameter. This parameter can containparentheses and commas.
AUNIT=SYSALLDADefines a unit name for batch/STC dynamic allocation. This name shouldbe the same as the unit name in the WORK DD statement in the JOBTRACprocedure and should be accessible to all users.
BLK=6080Defines the block size (BLKSIZE) assigned to all libraries with a logicalrecord length of 80 (LRECL=80) allocated in the Unicenter CA-Jobtracinstallation process.
CHECKPT=Defines the fully qualified data set name of your r3.5 checkpoint data set.
CLASS=ADefines the STAGE2 job stream execution class.
CPM=N|YSpecifies whether CA CPM is installed. If CPM=Y is specified, INDXCPM=must be specified.
GROUP=groupDefines the JCL GROUP keyword, if required.
GSSLOAD=Defines the fully-qualified load library name into which the CA-GSSassociated with this Unicenter CA-Jobtrac was installed. For informationabout CA-GSS load libraries, see the CA Common Services GettingStarted. If this parameter is omitted, it is assumed the CA-GSS loadmodules are in the system linklist.
HISTORY=Defines the fully qualified data set name of your r3.5 history file.
INDX35=Defines the high and midlevel qualifiers of your r3.5 CAILIB.
INDXCPM=Defines the high and mid-level qualifier of the CA CPM libraries (CAIISPM,CAIISPP, CAIISPT, and CAIPDSE).
INDX11=Defines the Unicenter CA-11 high-level index used on the Unicenter CA-11CAIISPM, CAIISPP, and CAILIB. If you have Unicenter CA-11 installed,specify this parameter.
116 Planning and Implementation Guide
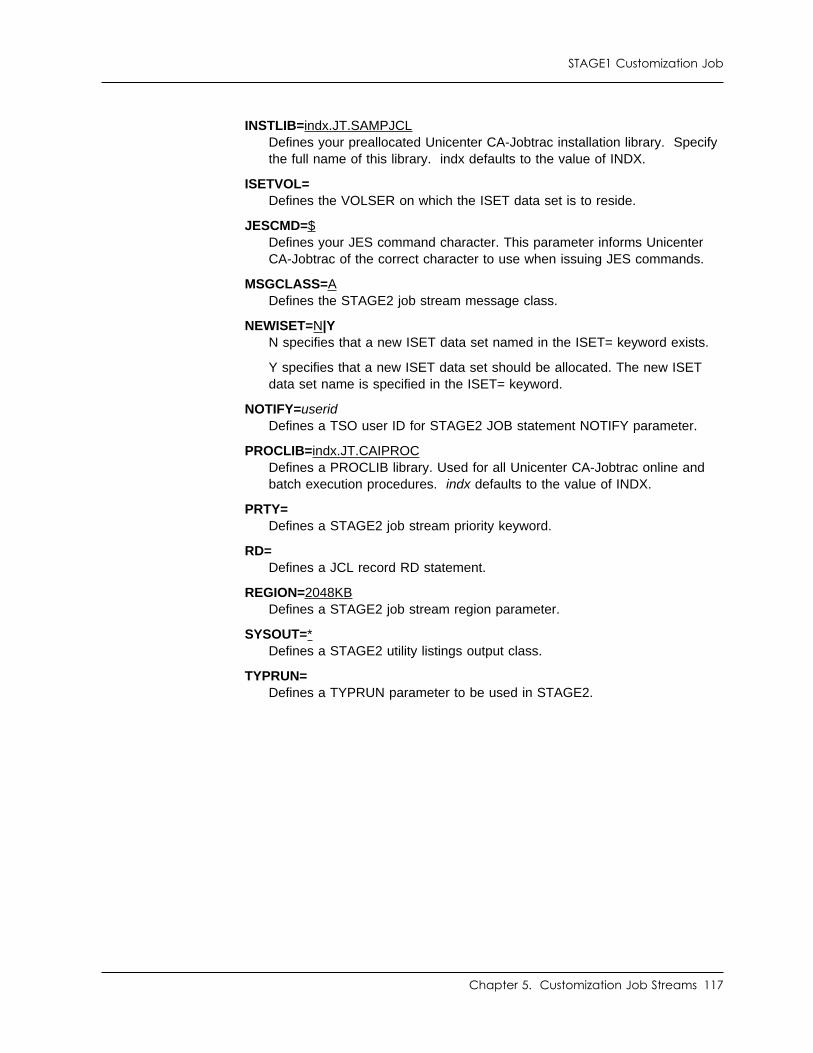
STAGE1 Customization Job
INSTLIB=indx.JT.SAMPJCLDefines your preallocated Unicenter CA-Jobtrac installation library. Specifythe full name of this library. indx defaults to the value of INDX.
ISETVOL=Defines the VOLSER on which the ISET data set is to reside.
JESCMD=$Defines your JES command character. This parameter informs UnicenterCA-Jobtrac of the correct character to use when issuing JES commands.
MSGCLASS=ADefines the STAGE2 job stream message class.
NEWISET=N|YN specifies that a new ISET data set named in the ISET= keyword exists.
Y specifies that a new ISET data set should be allocated. The new ISETdata set name is specified in the ISET= keyword.
NOTIFY=useridDefines a TSO user ID for STAGE2 JOB statement NOTIFY parameter.
PROCLIB=indx.JT.CAIPROCDefines a PROCLIB library. Used for all Unicenter CA-Jobtrac online andbatch execution procedures. indx defaults to the value of INDX.
PRTY=Defines a STAGE2 job stream priority keyword.
RD=Defines a JCL record RD statement.
REGION=2048KBDefines a STAGE2 job stream region parameter.
SYSOUT=*Defines a STAGE2 utility listings output class.
TYPRUN=Defines a TYPRUN parameter to be used in STAGE2.
Chapter 5. Customization Job Streams 117
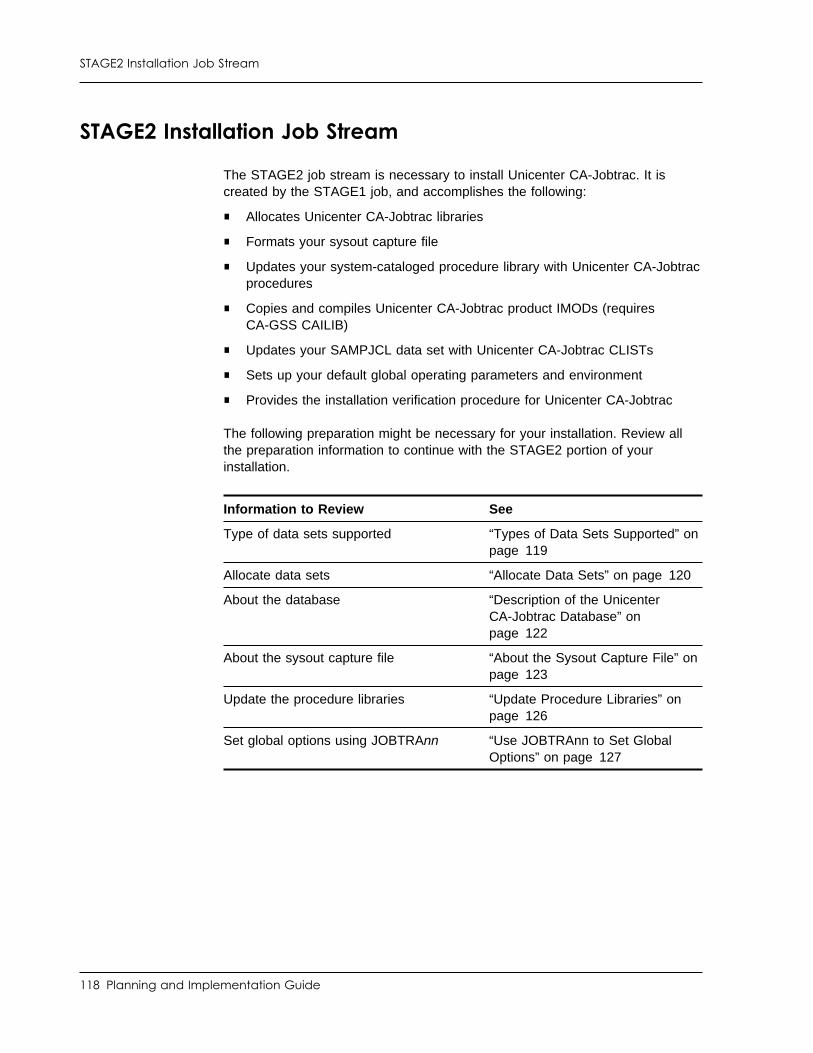
STAGE2 Installation Job Stream
STAGE2 Installation Job Stream
The STAGE2 job stream is necessary to install Unicenter CA-Jobtrac. It iscreated by the STAGE1 job, and accomplishes the following:
■ Allocates Unicenter CA-Jobtrac libraries
■ Formats your sysout capture file
■ Updates your system-cataloged procedure library with Unicenter CA-Jobtracprocedures
■ Copies and compiles Unicenter CA-Jobtrac product IMODs (requiresCA-GSS CAILIB)
■ Updates your SAMPJCL data set with Unicenter CA-Jobtrac CLISTs
■ Sets up your default global operating parameters and environment
■ Provides the installation verification procedure for Unicenter CA-Jobtrac
The following preparation might be necessary for your installation. Review allthe preparation information to continue with the STAGE2 portion of yourinstallation.
Information to Review See
Type of data sets supported “Types of Data Sets Supported” onpage 119
Allocate data sets “Allocate Data Sets” on page 120
About the database “Description of the UnicenterCA-Jobtrac Database” onpage 122
About the sysout capture file “About the Sysout Capture File” onpage 123
Update the procedure libraries “Update Procedure Libraries” onpage 126
Set global options using JOBTRAnn “Use JOBTRAnn to Set GlobalOptions” on page 127
118 Planning and Implementation Guide
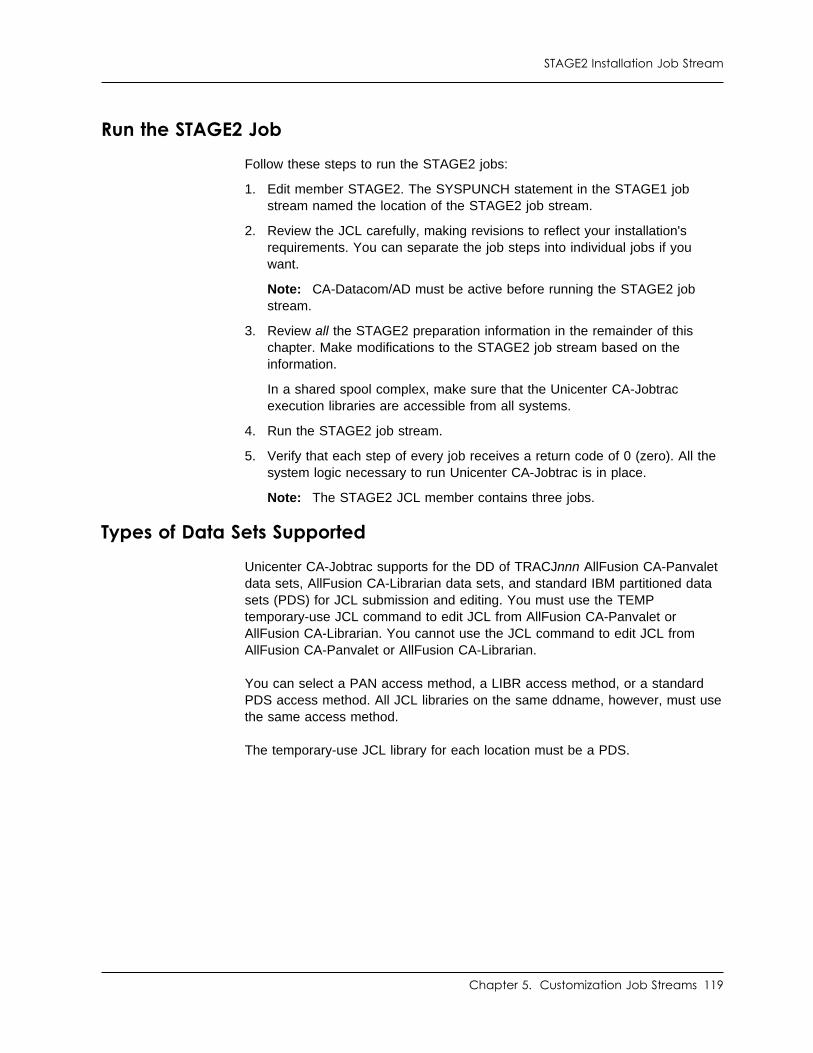
STAGE2 Installation Job Stream
Run the STAGE2 Job
Follow these steps to run the STAGE2 jobs:
1. Edit member STAGE2. The SYSPUNCH statement in the STAGE1 jobstream named the location of the STAGE2 job stream.
2. Review the JCL carefully, making revisions to reflect your installation'srequirements. You can separate the job steps into individual jobs if youwant.
Note: CA-Datacom/AD must be active before running the STAGE2 jobstream.
3. Review all the STAGE2 preparation information in the remainder of thischapter. Make modifications to the STAGE2 job stream based on theinformation.
In a shared spool complex, make sure that the Unicenter CA-Jobtracexecution libraries are accessible from all systems.
4. Run the STAGE2 job stream.
5. Verify that each step of every job receives a return code of 0 (zero). All thesystem logic necessary to run Unicenter CA-Jobtrac is in place.
Note: The STAGE2 JCL member contains three jobs.
Types of Data Sets Supported
Unicenter CA-Jobtrac supports for the DD of TRACJnnn AllFusion CA-Panvaletdata sets, AllFusion CA-Librarian data sets, and standard IBM partitioned datasets (PDS) for JCL submission and editing. You must use the TEMPtemporary-use JCL command to edit JCL from AllFusion CA-Panvalet orAllFusion CA-Librarian. You cannot use the JCL command to edit JCL fromAllFusion CA-Panvalet or AllFusion CA-Librarian.
You can select a PAN access method, a LIBR access method, or a standardPDS access method. All JCL libraries on the same ddname, however, must usethe same access method.
The temporary-use JCL library for each location must be a PDS.
Chapter 5. Customization Job Streams 119
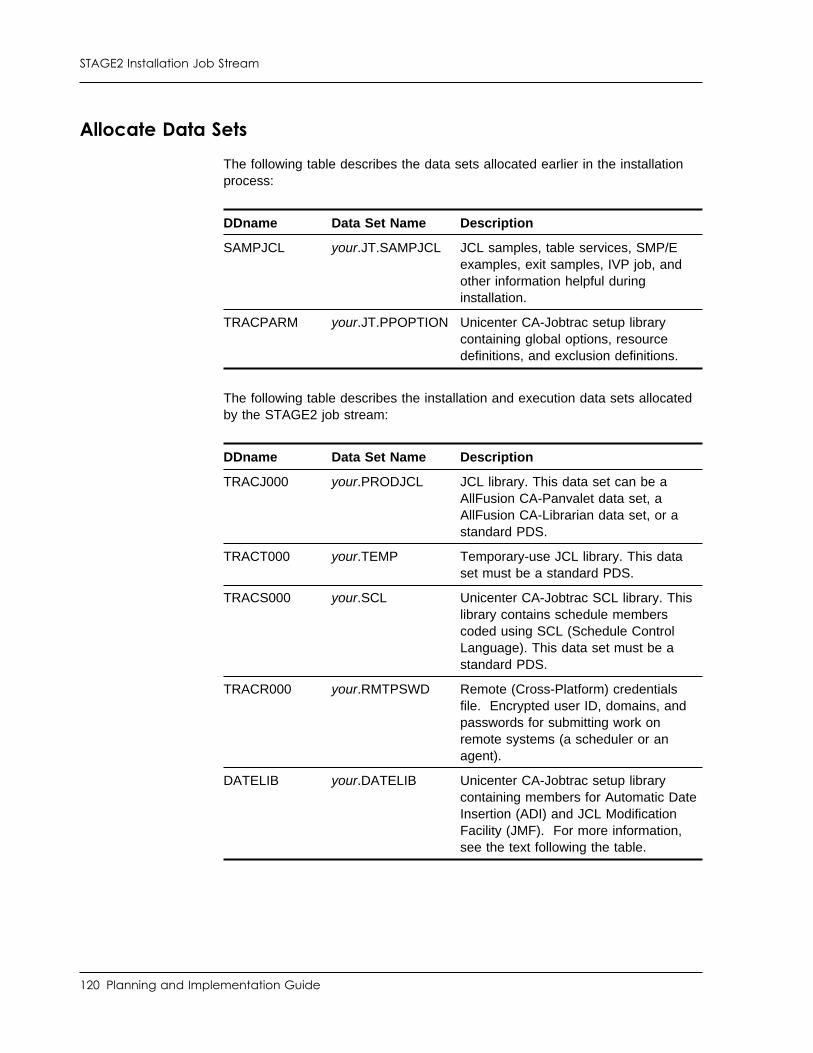
STAGE2 Installation Job Stream
Allocate Data Sets
The following table describes the data sets allocated earlier in the installationprocess:
The following table describes the installation and execution data sets allocatedby the STAGE2 job stream:
DDname Data Set Name Description
SAMPJCL your.JT.SAMPJCL JCL samples, table services, SMP/Eexamples, exit samples, IVP job, andother information helpful duringinstallation.
TRACPARM your.JT.PPOPTION Unicenter CA-Jobtrac setup librarycontaining global options, resourcedefinitions, and exclusion definitions.
DDname Data Set Name Description
TRACJ000 your.PRODJCL JCL library. This data set can be aAllFusion CA-Panvalet data set, aAllFusion CA-Librarian data set, or astandard PDS.
TRACT000 your.TEMP Temporary-use JCL library. This dataset must be a standard PDS.
TRACS000 your.SCL Unicenter CA-Jobtrac SCL library. Thislibrary contains schedule memberscoded using SCL (Schedule ControlLanguage). This data set must be astandard PDS.
TRACR000 your.RMTPSWD Remote (Cross-Platform) credentialsfile. Encrypted user ID, domains, andpasswords for submitting work onremote systems (a scheduler or anagent).
DATELIB your.DATELIB Unicenter CA-Jobtrac setup librarycontaining members for Automatic DateInsertion (ADI) and JCL ModificationFacility (JMF). For more information,see the text following the table.
120 Planning and Implementation Guide
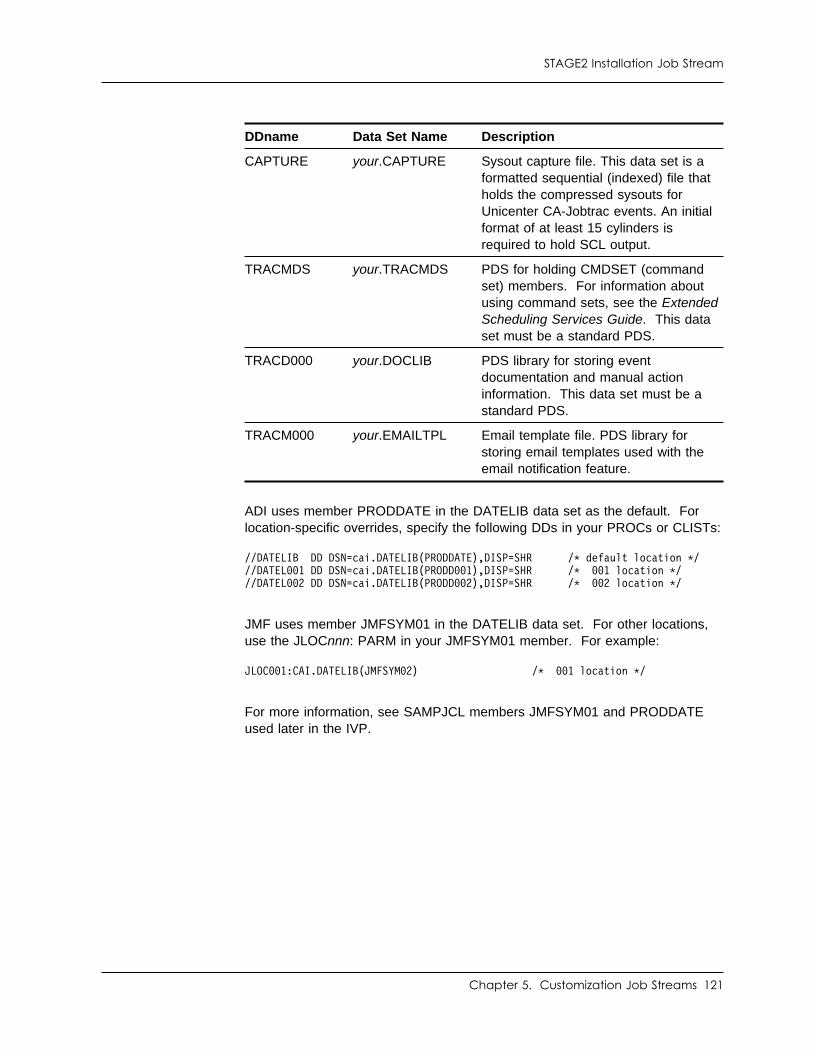
STAGE2 Installation Job Stream
ADI uses member PRODDATE in the DATELIB data set as the default. Forlocation-specific overrides, specify the following DDs in your PROCs or CLISTs:
DDname Data Set Name Description
CAPTURE your.CAPTURE Sysout capture file. This data set is aformatted sequential (indexed) file thatholds the compressed sysouts forUnicenter CA-Jobtrac events. An initialformat of at least 15 cylinders isrequired to hold SCL output.
TRACMDS your.TRACMDS PDS for holding CMDSET (commandset) members. For information aboutusing command sets, see the ExtendedScheduling Services Guide. This dataset must be a standard PDS.
TRACD000 your.DOCLIB PDS library for storing eventdocumentation and manual actioninformation. This data set must be astandard PDS.
TRACM000 your.EMAILTPL Email template file. PDS library forstoring email templates used with theemail notification feature.
//DATELIB DD DSN=cai.DATELIB(PRODDATE),DISP=SHR /� default location �///DATEL 1 DD DSN=cai.DATELIB(PRODD 1),DISP=SHR /� 1 location �///DATEL 2 DD DSN=cai.DATELIB(PRODD 2),DISP=SHR /� 2 location �/
JMF uses member JMFSYM01 in the DATELIB data set. For other locations,use the JLOCnnn: PARM in your JMFSYM01 member. For example:
JLOC 1:CAI.DATELIB(JMFSYM 2) /� 1 location �/
For more information, see SAMPJCL members JMFSYM01 and PRODDATEused later in the IVP.
Chapter 5. Customization Job Streams 121

STAGE2 Installation Job Stream
Description of the Unicenter CA-Jobtrac Database
The database is the key control point in the Unicenter CA-Jobtrac system. Thisincorporates checkpoint data, history data, and operational tables. UnicenterCA-Jobtrac uses the CA-Datacom/AD database to house this data.
CA-Datacom/AD is the common component version of AdvantageCA-Datacom/DB that is included with Unicenter CA-Jobtrac at no additionalcharge. This is a high-speed relational database that improves performance andreliability for Unicenter CA-Jobtrac by providing data caching, transactionlogging, automatic rollback and recovery for application or system failures, andoptionally the ability to perform backups while open, and retain transaction logsso that forward recovery can be done in the event of a DASD failure. TheCA-Datacom/AD's database started task is called a Multiple User Facility orMUF. A MUF can be shared in a Sysplex using XCF, a Coupling Facility, orthrough the network (not recommended).
Multiple copies of Unicenter CA-Jobtrac can run on the same system. AUnicenter CA-Jobtrac system is uniquely identified by a one-character token.This token is defined to the Unicenter CA-Jobtrac PROC, batch utilities, andISPF clist by specifying a dummy DD allocation as follows:
JOBTRACx DD DUMMY (in JCL)ALLOCATE FI(JOBTRACx) DUMMY (in ISPF)
The x in the ddname is the token that is used to identify this UnicenterCA-Jobtrac system. Each Unicenter CA-Jobtrac running on a system must havea unique token specified. We recommend that the token match the tasknamewith which Unicenter CA-Jobtrac is started. It can be A-U, W-Z, or 0-9.
In the Unicenter CA-Jobtrac database, the token is part of the data key. Thisallows you to use the same CA-Datacom/AD MUF and Unicenter CA-Jobtractables to support multiple Unicenter CA-Jobtrac instances just by using adifferent token to logically separate the data. When running multiple systems,you should consider the database size to ensure that it is large enough tosupport both all of the systems.
The checkpoint data contains all current schedule data. It is updated andmaintained by numerous components, including dynamic schedule processors,which can add a thousand events at a time, and hundreds of local and remoteTSO users who perform on-demand and exception processing. Jobs that arewaiting to run or currently executing, and jobs that have completed, but havenot been archived, make up the checkpoint data.
122 Planning and Implementation Guide
STAGE2 Installation Job Stream
The history data is the run history and audit data for Unicenter CA-Jobtrac. Jobhistory is added by the archive processing and can be viewed through the ISPFEvent History Display or through batch reporting. In addition, audit records thatdetail the changes made to event records by a user or operator are part of thehistory data.
Other operational tables are stored in the database. These include usermodifiable tables such as the Jobtrac Table Services (JTS) tables. Some tablesare only used for Unicenter CA-Jobtrac operation and therefore are not visibleto customers. These include schedule load staging tables and the timer table.
About the Sysout Capture File
The sysout capture file can be the largest Unicenter CA-Jobtrac data set, butbecause of the Unicenter CA-Jobtrac compaction routines and the EXCPaccess method, it uses its space the most efficiently. You can expect afour-to-one ratio of compression over the JES spool.
The size of the sysout capture file depends on how many jobs are processed,how many sysouts are captured, how many days are kept in the online capture,and the average line count of each listing. For example, 100 cylinders cancomfortably handle up to 1.5 million lines of sysouts. You can use this figure indetermining how many cylinders you actually need for your sysout archivalrequirements.
For a more detailed discussion, see the chapter "The Sysout Capture File" inthe Reports, Maintenance, and Recovery Guide.
CAPTURE your.CAPTURE Sysout capture file. (CAPTURE is the default)
This data set is a formatted sequential (indexed) file.
Messages Associated with Sysout Capture: Error routines automaticallyprompt the operator and temporarily stop operation if the capture file becomesfull during normal operation. The operator can optionally suspend capture orclose the file to tape and archive aged sysouts. The message identifier and anexplanation are found in the Operator Guide, along with appropriate replies.
Differentiating Copies of Unicenter CA-Jobtrac: The data set may beshared across systems but not within a single system.
Chapter 5. Customization Job Streams 123
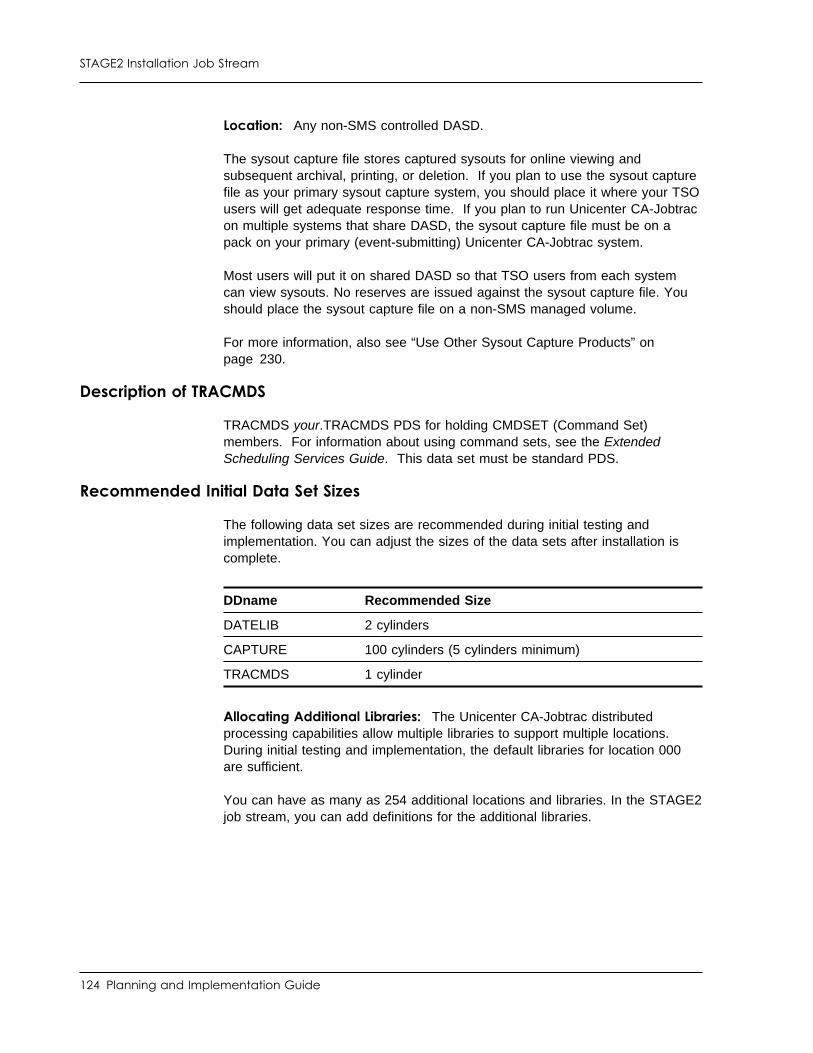
STAGE2 Installation Job Stream
Location: Any non-SMS controlled DASD.
The sysout capture file stores captured sysouts for online viewing andsubsequent archival, printing, or deletion. If you plan to use the sysout capturefile as your primary sysout capture system, you should place it where your TSOusers will get adequate response time. If you plan to run Unicenter CA-Jobtracon multiple systems that share DASD, the sysout capture file must be on apack on your primary (event-submitting) Unicenter CA-Jobtrac system.
Most users will put it on shared DASD so that TSO users from each systemcan view sysouts. No reserves are issued against the sysout capture file. Youshould place the sysout capture file on a non-SMS managed volume.
For more information, also see “Use Other Sysout Capture Products” onpage 230.
Description of TRACMDS
TRACMDS your.TRACMDS PDS for holding CMDSET (Command Set)members. For information about using command sets, see the ExtendedScheduling Services Guide. This data set must be standard PDS.
Recommended Initial Data Set Sizes
The following data set sizes are recommended during initial testing andimplementation. You can adjust the sizes of the data sets after installation iscomplete.
Allocating Additional Libraries: The Unicenter CA-Jobtrac distributedprocessing capabilities allow multiple libraries to support multiple locations.During initial testing and implementation, the default libraries for location 000are sufficient.
You can have as many as 254 additional locations and libraries. In the STAGE2job stream, you can add definitions for the additional libraries.
DDname Recommended Size
DATELIB 2 cylinders
CAPTURE 100 cylinders (5 cylinders minimum)
TRACMDS 1 cylinder
124 Planning and Implementation Guide
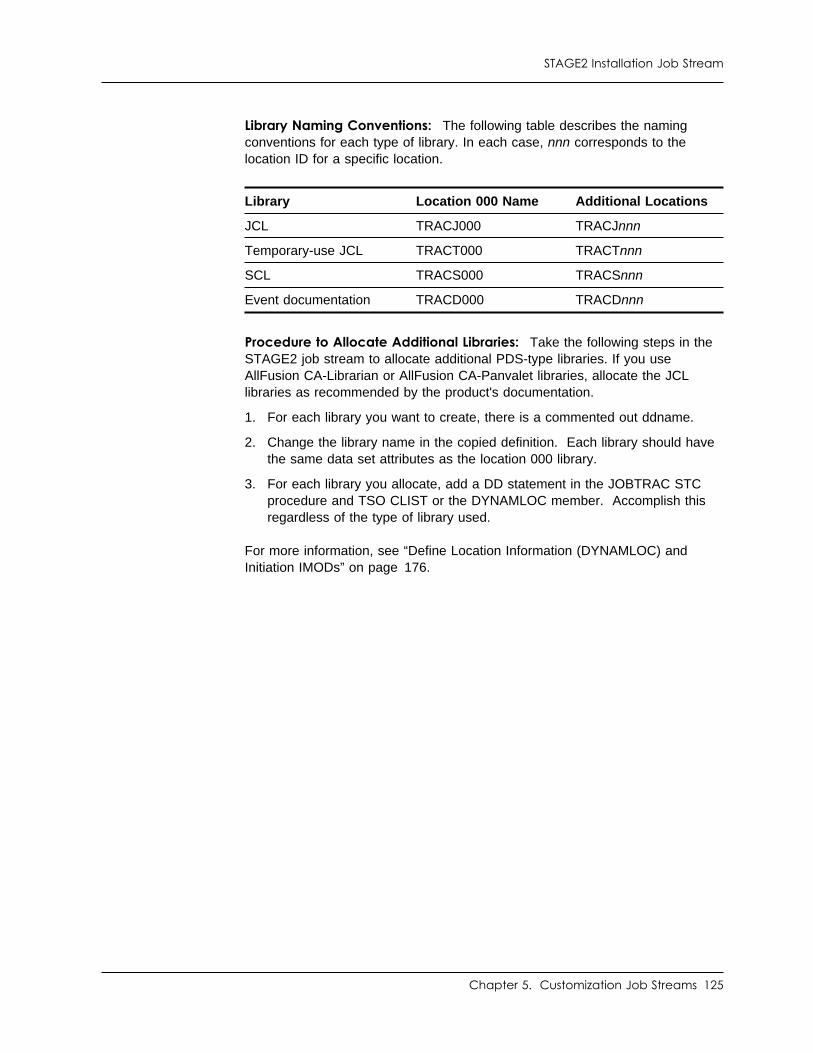
STAGE2 Installation Job Stream
Library Naming Conventions: The following table describes the namingconventions for each type of library. In each case, nnn corresponds to thelocation ID for a specific location.
Procedure to Allocate Additional Libraries: Take the following steps in theSTAGE2 job stream to allocate additional PDS-type libraries. If you useAllFusion CA-Librarian or AllFusion CA-Panvalet libraries, allocate the JCLlibraries as recommended by the product's documentation.
1. For each library you want to create, there is a commented out ddname.
2. Change the library name in the copied definition. Each library should havethe same data set attributes as the location 000 library.
3. For each library you allocate, add a DD statement in the JOBTRAC STCprocedure and TSO CLIST or the DYNAMLOC member. Accomplish thisregardless of the type of library used.
For more information, see “Define Location Information (DYNAMLOC) andInitiation IMODs” on page 176.
Library Location 000 Name Additional Locations
JCL TRACJ000 TRACJnnn
Temporary-use JCL TRACT000 TRACTnnn
SCL TRACS000 TRACSnnn
Event documentation TRACD000 TRACDnnn
Chapter 5. Customization Job Streams 125
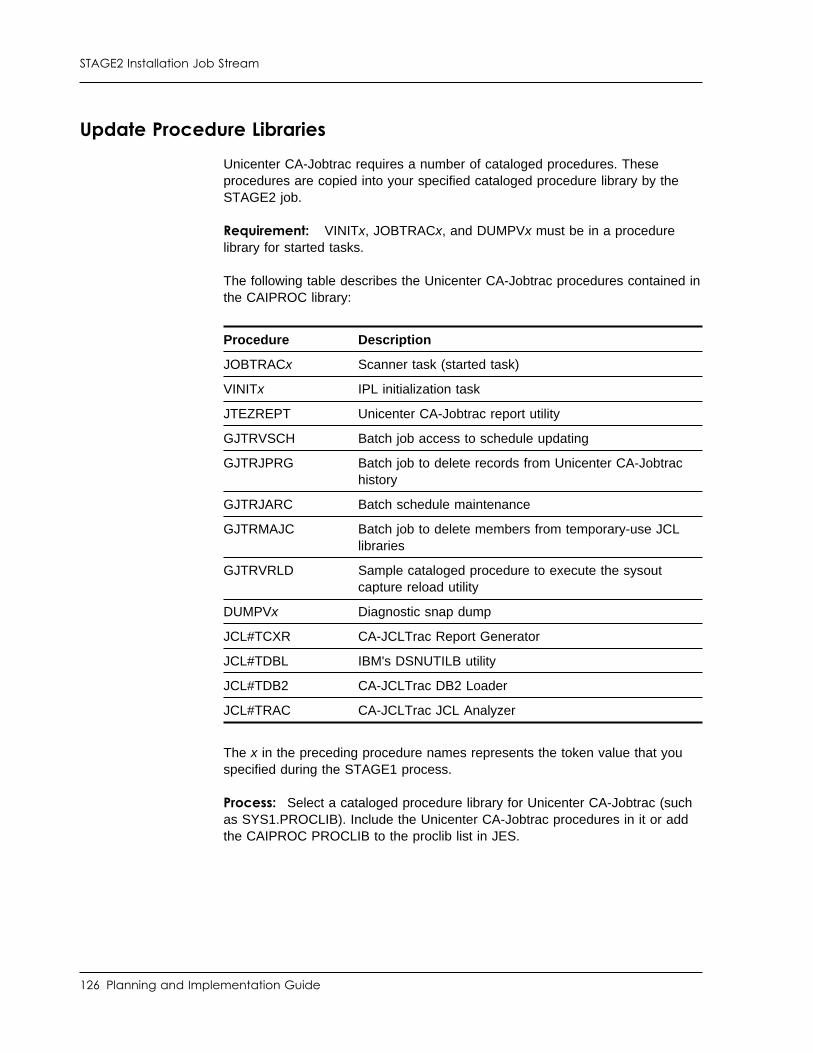
STAGE2 Installation Job Stream
Update Procedure Libraries
Unicenter CA-Jobtrac requires a number of cataloged procedures. Theseprocedures are copied into your specified cataloged procedure library by theSTAGE2 job.
Requirement: VINITx, JOBTRACx, and DUMPVx must be in a procedurelibrary for started tasks.
The following table describes the Unicenter CA-Jobtrac procedures contained inthe CAIPROC library:
The x in the preceding procedure names represents the token value that youspecified during the STAGE1 process.
Process: Select a cataloged procedure library for Unicenter CA-Jobtrac (suchas SYS1.PROCLIB). Include the Unicenter CA-Jobtrac procedures in it or addthe CAIPROC PROCLIB to the proclib list in JES.
Procedure Description
JOBTRACx Scanner task (started task)
VINITx IPL initialization task
JTEZREPT Unicenter CA-Jobtrac report utility
GJTRVSCH Batch job access to schedule updating
GJTRJPRG Batch job to delete records from Unicenter CA-Jobtrachistory
GJTRJARC Batch schedule maintenance
GJTRMAJC Batch job to delete members from temporary-use JCLlibraries
GJTRVRLD Sample cataloged procedure to execute the sysoutcapture reload utility
DUMPVx Diagnostic snap dump
JCL#TCXR CA-JCLTrac Report Generator
JCL#TDBL IBM's DSNUTILB utility
JCL#TDB2 CA-JCLTrac DB2 Loader
JCL#TRAC CA-JCLTrac JCL Analyzer
126 Planning and Implementation Guide
STAGE2 Installation Job Stream
Use JOBTRAnn to Set Global Options
Unicenter CA-Jobtrac global options describe global values and theenvironment in which Unicenter CA-Jobtrac operates.
Unicenter CA-Jobtrac global options are set using the JOBTRAnn member andby using the Unicenter CA-Jobtrac global options panels. Some options are setby the JOBTRAnn member only, some options are set using the global optionspanels only, and some options are set using either one. Additionally, some ofthe options set using JOBTRAnn are displayed on the global options panels,but you cannot set them on the panels.
For more information about the global options panels, see the chapter"Customization Tasks."
New Options in Version
The following options are new in this release of Unicenter CA-Jobtrac:
■ CPMAPPL
■ E@DOMAIN
■ ECLLATE
■ ECLNODES
■ ECLWTO
■ EMAILFROM
■ EMAILSRV
■ EREPORT
■ PRIORITY
■ STATINTV
■ REPORT
Global Options in the STAGE2 Job Stream
The STAGE2 job stream creates a default JOBTRAnn member in yourSAMPJCL data set. Before customizing, copy the sample to your PPOPTIONdata set. After running the STAGE2 job stream, you can change the values forthe JOBTRAnn options or add options not in the job stream.
Chapter 5. Customization Job Streams 127
STAGE2 Installation Job Stream
Location of JOBTRAnn
Member JOBTRAnn must reside in the PPOPTION library.
Using Multiple JOBTRAnn Members
By copying the default JOBTRAnn member, you can create more than oneJOBTRAnn member. The nn in each member is unique.
You can use each of these members to test a different configuration of options,or if running multiple copies of Unicenter CA-Jobtrac.
Once Unicenter CA-Jobtrac is started, you can activate some of the options in agiven JOBTRAnn member by issuing the following modify command. In thecommand, taskname is the name assigned to the Unicenter CA-Jobtrac youwant to affect, and nn matches nn in the desired JOBTRAnn member:
F taskname,OPTS=nn
128 Planning and Implementation Guide
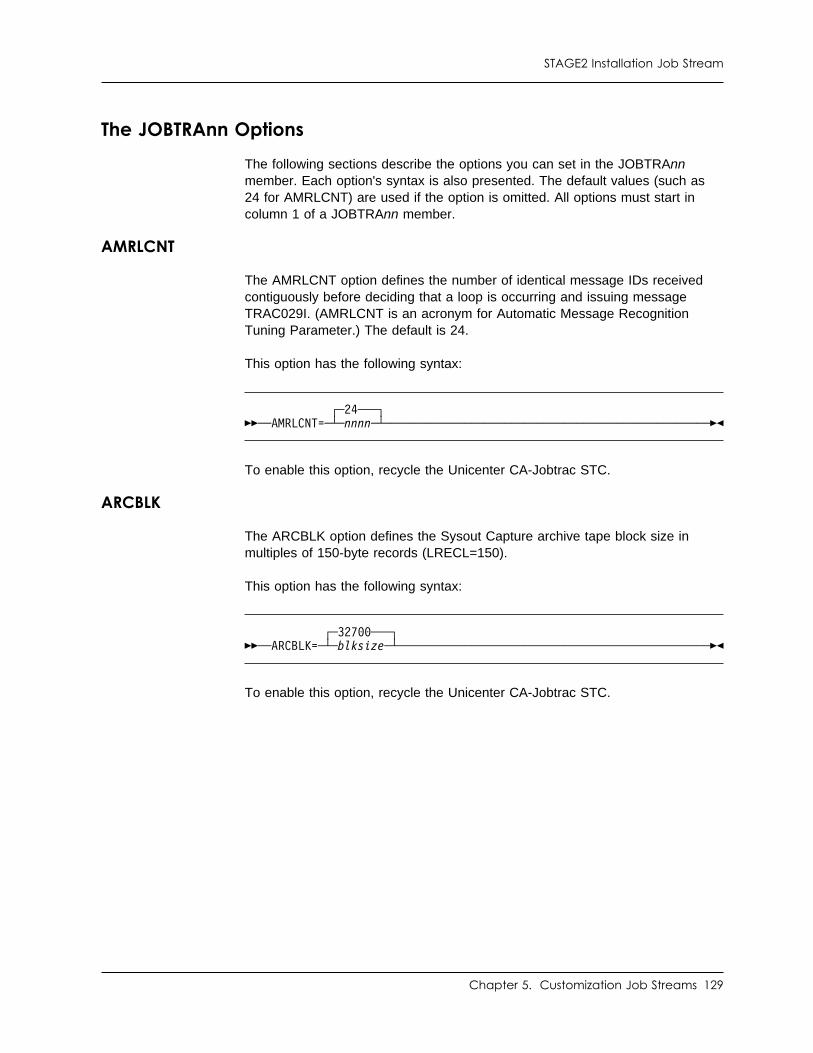
STAGE2 Installation Job Stream
The JOBTRAnn Options
The following sections describe the options you can set in the JOBTRAnnmember. Each option's syntax is also presented. The default values (such as24 for AMRLCNT) are used if the option is omitted. All options must start incolumn 1 of a JOBTRAnn member.
AMRLCNT
The AMRLCNT option defines the number of identical message IDs receivedcontiguously before deciding that a loop is occurring and issuing messageTRAC029I. (AMRLCNT is an acronym for Automatic Message RecognitionTuning Parameter.) The default is 24.
This option has the following syntax:
┌ ┐─24───��─ ──AMRLCNT= ──┴ ┴─nnnn─ ───────────────────────────────────────────────��
To enable this option, recycle the Unicenter CA-Jobtrac STC.
ARCBLK
The ARCBLK option defines the Sysout Capture archive tape block size inmultiples of 150-byte records (LRECL=150).
This option has the following syntax:
┌ ┐─327 ───��─ ──ARCBLK= ──┴ ┴─blksize─ ─────────────────────────────────────────────��
To enable this option, recycle the Unicenter CA-Jobtrac STC.
Chapter 5. Customization Job Streams 129
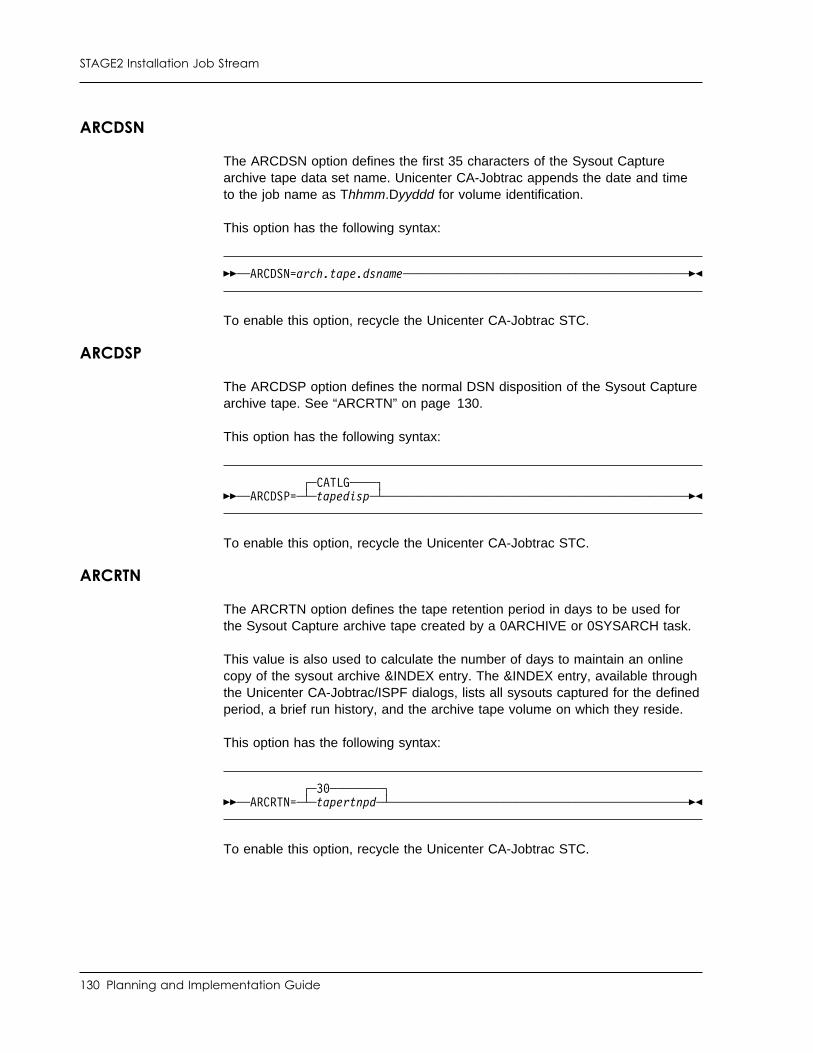
STAGE2 Installation Job Stream
ARCDSN
The ARCDSN option defines the first 35 characters of the Sysout Capturearchive tape data set name. Unicenter CA-Jobtrac appends the date and timeto the job name as Thhmm.Dyyddd for volume identification.
This option has the following syntax:
��─ ──ARCDSN=arch.tape.dsname ──────────────────────────────────────────��
To enable this option, recycle the Unicenter CA-Jobtrac STC.
ARCDSP
The ARCDSP option defines the normal DSN disposition of the Sysout Capturearchive tape. See “ARCRTN” on page 130.
This option has the following syntax:
┌ ┐─CATLG────��─ ──ARCDSP= ──┴ ┴─tapedisp─ ────────────────────────────────────────────��
To enable this option, recycle the Unicenter CA-Jobtrac STC.
ARCRTN
The ARCRTN option defines the tape retention period in days to be used forthe Sysout Capture archive tape created by a 0ARCHIVE or 0SYSARCH task.
This value is also used to calculate the number of days to maintain an onlinecopy of the sysout archive &INDEX entry. The &INDEX entry, available throughthe Unicenter CA-Jobtrac/ISPF dialogs, lists all sysouts captured for the definedperiod, a brief run history, and the archive tape volume on which they reside.
This option has the following syntax:
┌ ┐─3 ────────��─ ──ARCRTN= ──┴ ┴─tapertnpd─ ───────────────────────────────────────────��
To enable this option, recycle the Unicenter CA-Jobtrac STC.
130 Planning and Implementation Guide
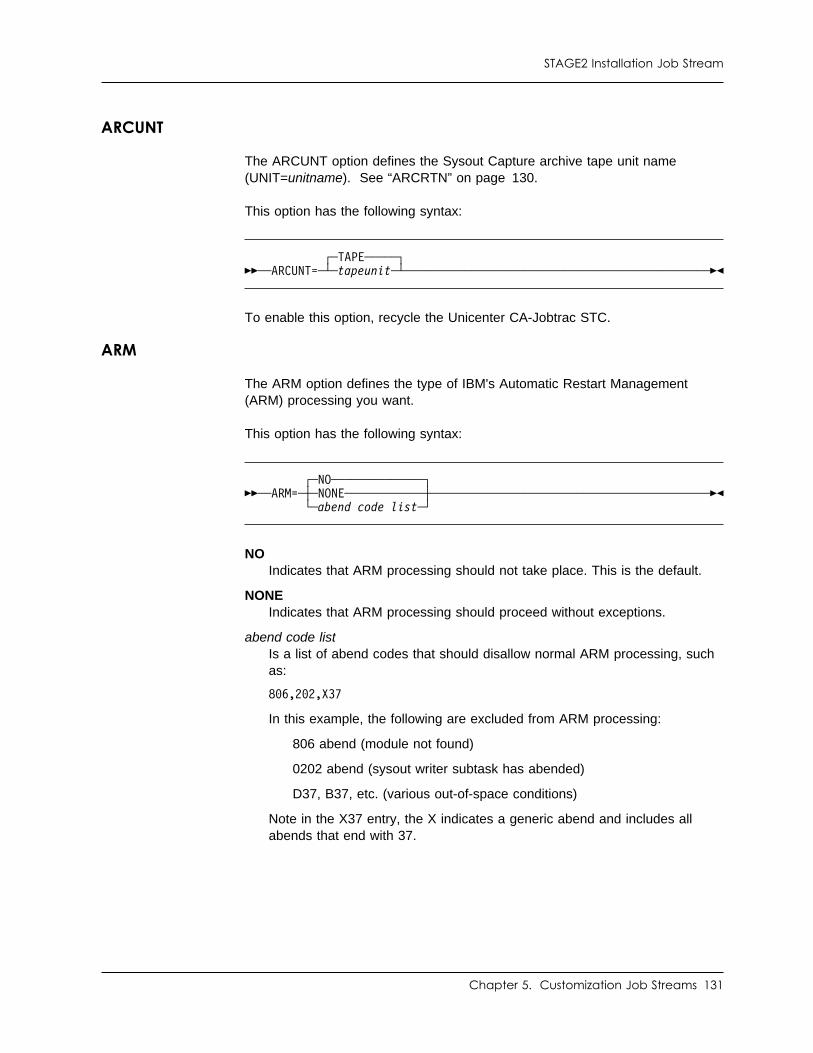
STAGE2 Installation Job Stream
ARCUNT
The ARCUNT option defines the Sysout Capture archive tape unit name(UNIT=unitname). See “ARCRTN” on page 130.
This option has the following syntax:
┌ ┐─TAPE─────��─ ──ARCUNT= ──┴ ┴─tapeunit─ ────────────────────────────────────────────��
To enable this option, recycle the Unicenter CA-Jobtrac STC.
ARM
The ARM option defines the type of IBM's Automatic Restart Management(ARM) processing you want.
This option has the following syntax:
┌ ┐─NO──────────────��─ ──ARM= ──┼ ┼─NONE──────────── ────────────────────────────────────────��
└ ┘─abend code list─
NOIndicates that ARM processing should not take place. This is the default.
NONEIndicates that ARM processing should proceed without exceptions.
abend code listIs a list of abend codes that should disallow normal ARM processing, suchas:
8 6,2 2,X37
In this example, the following are excluded from ARM processing:
806 abend (module not found)
0202 abend (sysout writer subtask has abended)
D37, B37, etc. (various out-of-space conditions)
Note in the X37 entry, the X indicates a generic abend and includes allabends that end with 37.
Chapter 5. Customization Job Streams 131
STAGE2 Installation Job Stream
ARM Processing for Unicenter CA-Jobtrac: Unicenter CA-Jobtrac offers aninterface to IBM's Automatic Restart Management feature (ARM). The ARMfeature allows for automatic restart in the event of a product failure, whichresults in termination. If you are currently using ARM, the Unicenter CA-Jobtracneeds may well be met with the default profile currently defined. For thepurpose of restarting Unicenter CA-Jobtrac with the same command thatoriginally started the product, the following may be used as an example.
To define the couple data set:
DEFINEDS SYSPLEX(PLEX79) DSN(COUPLE.ARM.XE79P) VOLSER(MVXE79) CATALOG DATA TYPE(ARM)
ITEM NAME(POLICY) NUMBER(5) ITEM NAME(MAXELEM) NUMBER(25) ITEM NAME(TOTELEM) NUMBER(2 ) DEFINEDS SYSPLEX(PLEX79) DSN(COUPLE.ARM.XE79A) VOLSER(TSO79A) CATALOG DATA TYPE(ARM)
ITEM NAME(POLICY) NUMBER(6) ITEM NAME(MAXELEM) NUMBER(35) ITEM NAME(TOTELEM) NUMBER(3 )
To define the policy:
DATA TYPE(ARM) REPORT(YES) DSN(COUPLE.ARM.XE79P)
DEFINE POLICY NAME(POLXE79A) REPLACE(YES) ELEMENT(�)
A startup parameter (ARM=) may be used to customize the restart criteria.
To enable this option, recycle the Unicenter CA-Jobtrac STC.
132 Planning and Implementation Guide
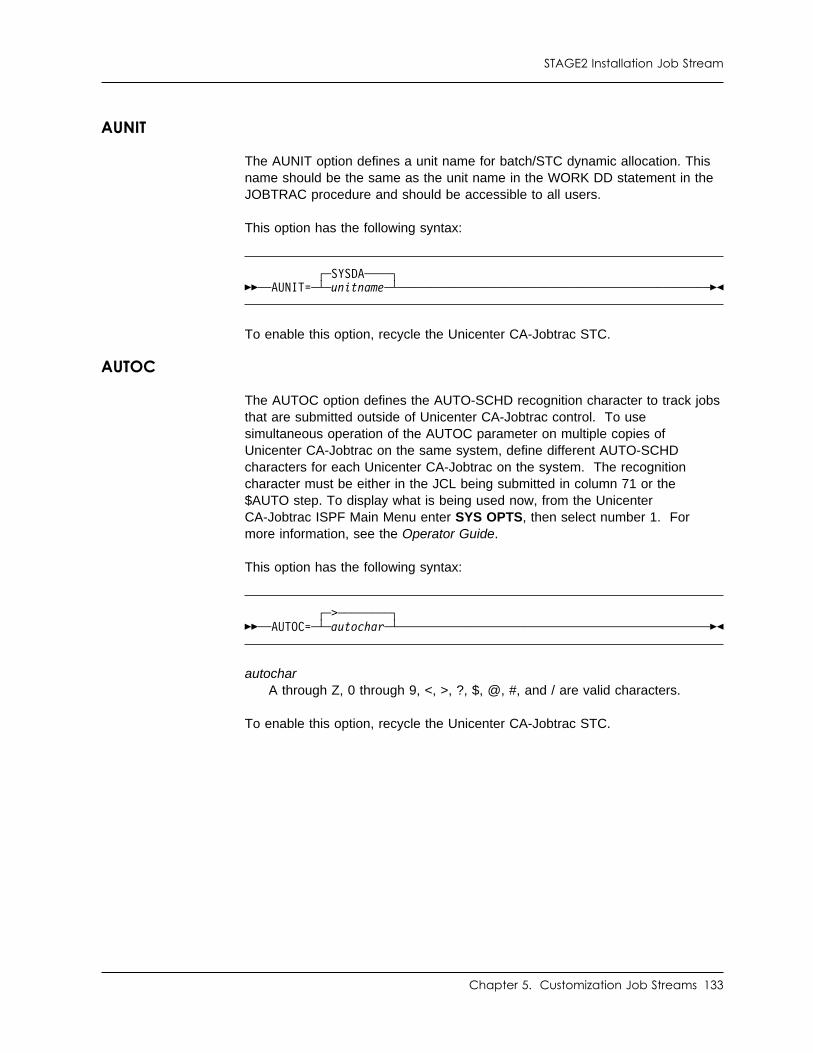
STAGE2 Installation Job Stream
AUNIT
The AUNIT option defines a unit name for batch/STC dynamic allocation. Thisname should be the same as the unit name in the WORK DD statement in theJOBTRAC procedure and should be accessible to all users.
This option has the following syntax:
┌ ┐─SYSDA────��─ ──AUNIT= ──┴ ┴─unitname─ ─────────────────────────────────────────────��
To enable this option, recycle the Unicenter CA-Jobtrac STC.
AUTOC
The AUTOC option defines the AUTO-SCHD recognition character to track jobsthat are submitted outside of Unicenter CA-Jobtrac control. To usesimultaneous operation of the AUTOC parameter on multiple copies ofUnicenter CA-Jobtrac on the same system, define different AUTO-SCHDcharacters for each Unicenter CA-Jobtrac on the system. The recognitioncharacter must be either in the JCL being submitted in column 71 or the$AUTO step. To display what is being used now, from the UnicenterCA-Jobtrac ISPF Main Menu enter SYS OPTS, then select number 1. Formore information, see the Operator Guide.
This option has the following syntax:
┌ ┐─>────────��─ ──AUTOC= ──┴ ┴─autochar─ ─────────────────────────────────────────────��
autocharA through Z, 0 through 9, <, >, ?, $, @, #, and / are valid characters.
To enable this option, recycle the Unicenter CA-Jobtrac STC.
Chapter 5. Customization Job Streams 133
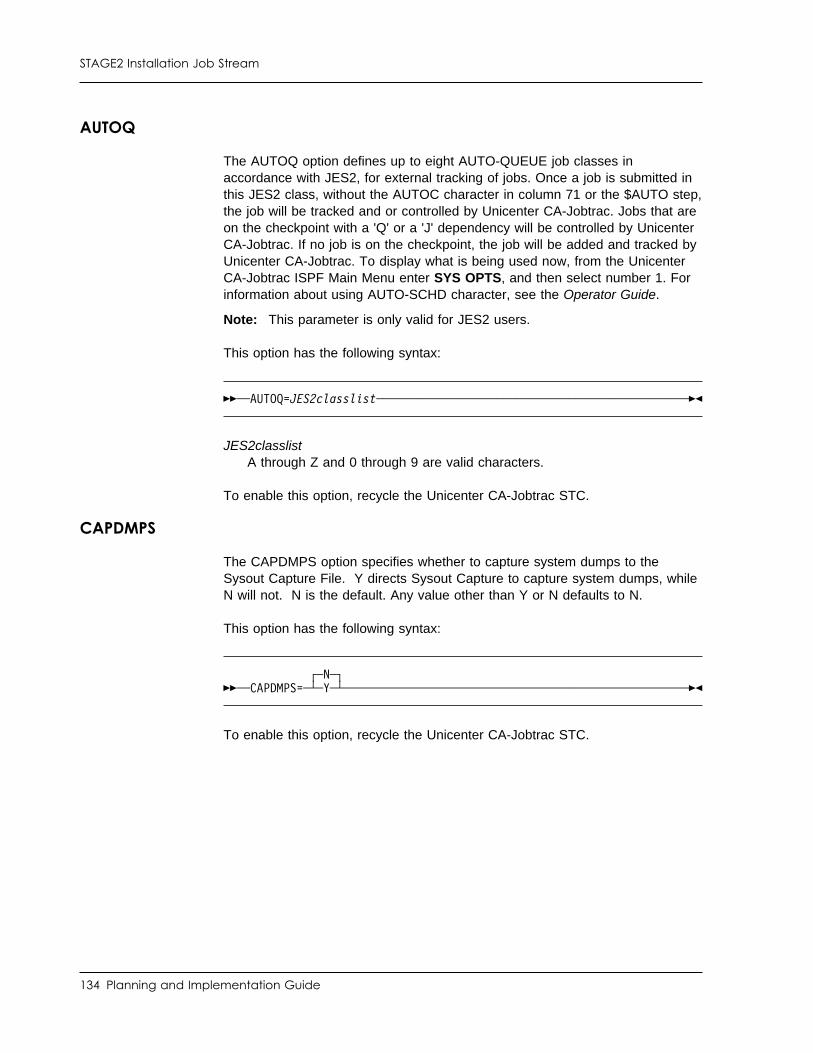
STAGE2 Installation Job Stream
AUTOQ
The AUTOQ option defines up to eight AUTO-QUEUE job classes inaccordance with JES2, for external tracking of jobs. Once a job is submitted inthis JES2 class, without the AUTOC character in column 71 or the $AUTO step,the job will be tracked and or controlled by Unicenter CA-Jobtrac. Jobs that areon the checkpoint with a 'Q' or a 'J' dependency will be controlled by UnicenterCA-Jobtrac. If no job is on the checkpoint, the job will be added and tracked byUnicenter CA-Jobtrac. To display what is being used now, from the UnicenterCA-Jobtrac ISPF Main Menu enter SYS OPTS, and then select number 1. Forinformation about using AUTO-SCHD character, see the Operator Guide.
Note: This parameter is only valid for JES2 users.
This option has the following syntax:
��─ ──AUTOQ=JES2classlist ──────────────────────────────────────────────��
JES2classlistA through Z and 0 through 9 are valid characters.
To enable this option, recycle the Unicenter CA-Jobtrac STC.
CAPDMPS
The CAPDMPS option specifies whether to capture system dumps to theSysout Capture File. Y directs Sysout Capture to capture system dumps, whileN will not. N is the default. Any value other than Y or N defaults to N.
This option has the following syntax:
┌ ┐─N─��─ ──CAPDMPS= ──┴ ┴─Y─ ──────────────────────────────────────────────────��
To enable this option, recycle the Unicenter CA-Jobtrac STC.
134 Planning and Implementation Guide
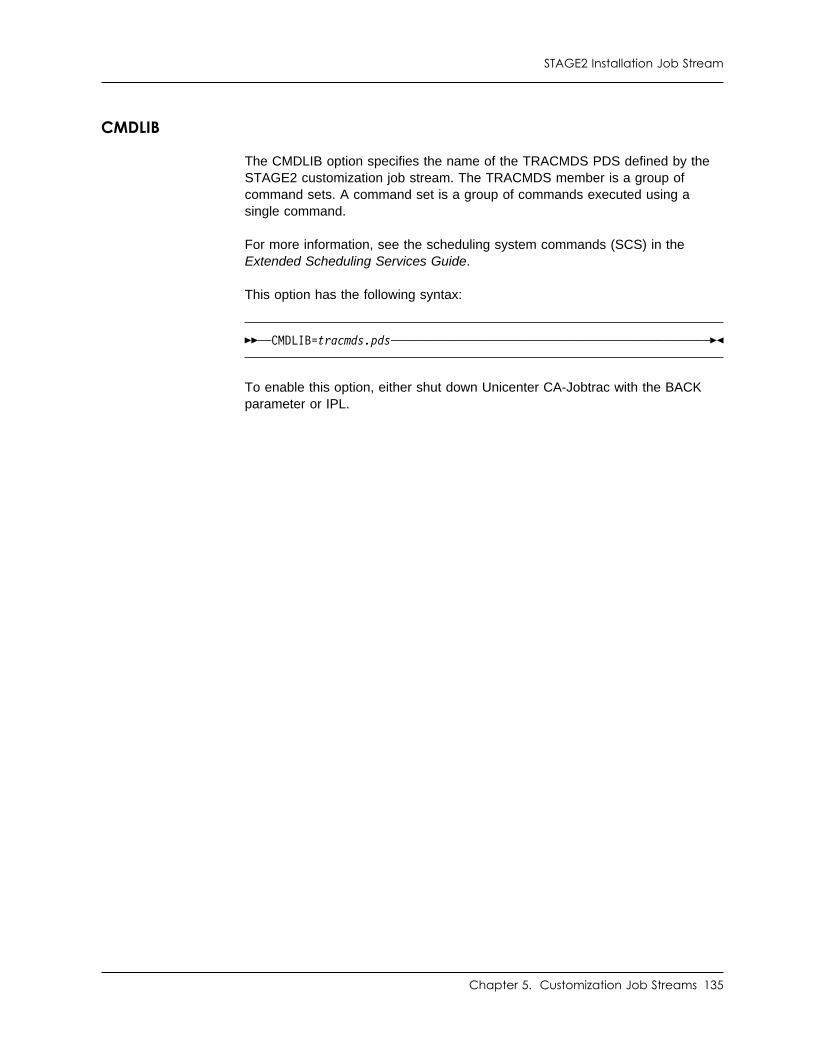
STAGE2 Installation Job Stream
CMDLIB
The CMDLIB option specifies the name of the TRACMDS PDS defined by theSTAGE2 customization job stream. The TRACMDS member is a group ofcommand sets. A command set is a group of commands executed using asingle command.
For more information, see the scheduling system commands (SCS) in theExtended Scheduling Services Guide.
This option has the following syntax:
��─ ──CMDLIB=tracmds.pds ───────────────────────────────────────────────��
To enable this option, either shut down Unicenter CA-Jobtrac with the BACKparameter or IPL.
Chapter 5. Customization Job Streams 135
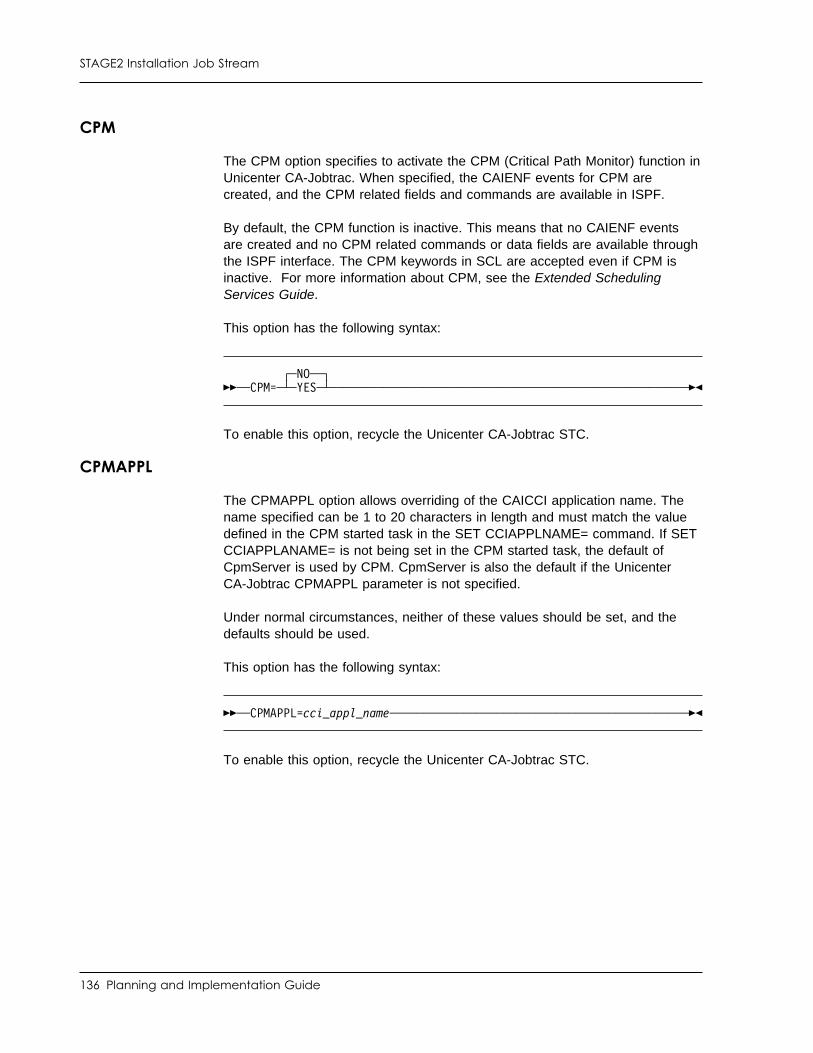
STAGE2 Installation Job Stream
CPM
The CPM option specifies to activate the CPM (Critical Path Monitor) function inUnicenter CA-Jobtrac. When specified, the CAIENF events for CPM arecreated, and the CPM related fields and commands are available in ISPF.
By default, the CPM function is inactive. This means that no CAIENF eventsare created and no CPM related commands or data fields are available throughthe ISPF interface. The CPM keywords in SCL are accepted even if CPM isinactive. For more information about CPM, see the Extended SchedulingServices Guide.
This option has the following syntax:
┌ ┐─NO──��─ ──CPM= ──┴ ┴─YES─ ────────────────────────────────────────────────────��
To enable this option, recycle the Unicenter CA-Jobtrac STC.
CPMAPPL
The CPMAPPL option allows overriding of the CAICCI application name. Thename specified can be 1 to 20 characters in length and must match the valuedefined in the CPM started task in the SET CCIAPPLNAME= command. If SETCCIAPPLANAME= is not being set in the CPM started task, the default ofCpmServer is used by CPM. CpmServer is also the default if the UnicenterCA-Jobtrac CPMAPPL parameter is not specified.
Under normal circumstances, neither of these values should be set, and thedefaults should be used.
This option has the following syntax:
��─ ──CPMAPPL=cci_appl_name ────────────────────────────────────────────��
To enable this option, recycle the Unicenter CA-Jobtrac STC.
136 Planning and Implementation Guide
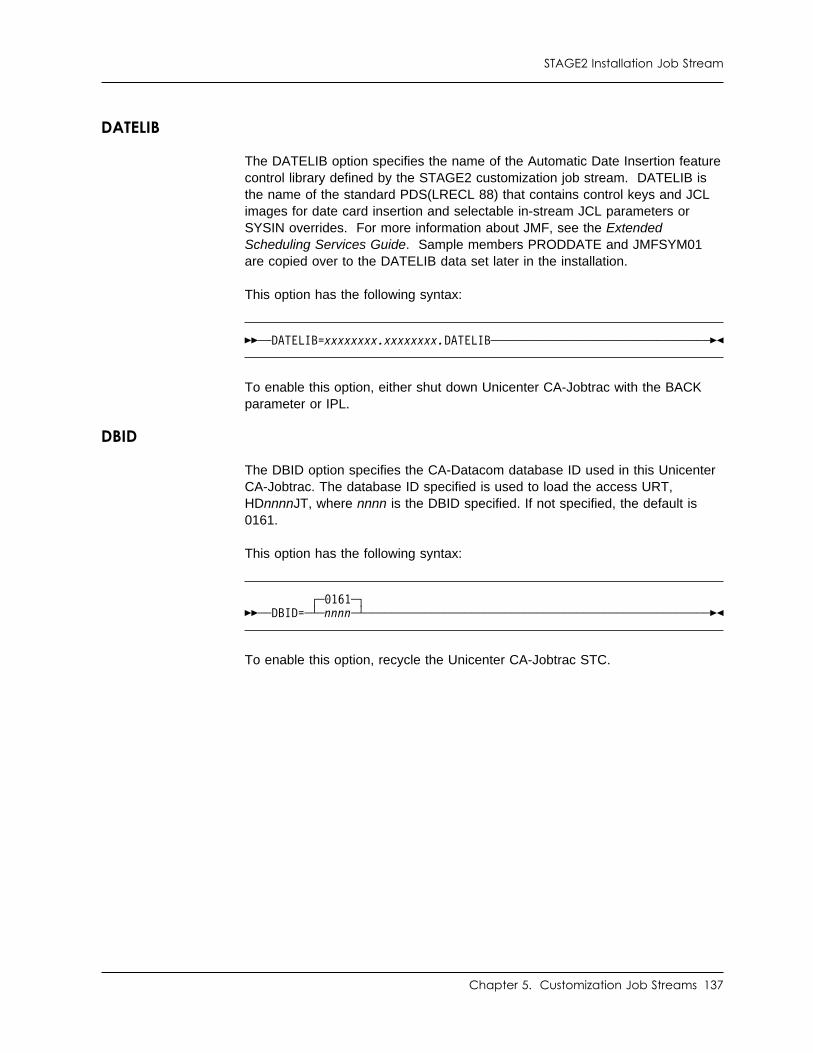
STAGE2 Installation Job Stream
DATELIB
The DATELIB option specifies the name of the Automatic Date Insertion featurecontrol library defined by the STAGE2 customization job stream. DATELIB isthe name of the standard PDS(LRECL 88) that contains control keys and JCLimages for date card insertion and selectable in-stream JCL parameters orSYSIN overrides. For more information about JMF, see the ExtendedScheduling Services Guide. Sample members PRODDATE and JMFSYM01are copied over to the DATELIB data set later in the installation.
This option has the following syntax:
��─ ──DATELIB= xxxxxxxx.xxxxxxxx.DATELIB ────────────────────────────────��
To enable this option, either shut down Unicenter CA-Jobtrac with the BACKparameter or IPL.
DBID
The DBID option specifies the CA-Datacom database ID used in this UnicenterCA-Jobtrac. The database ID specified is used to load the access URT,HDnnnnJT, where nnnn is the DBID specified. If not specified, the default is0161.
This option has the following syntax:
┌ ┐─ 161─��─ ──DBID= ──┴ ┴─nnnn─ ──────────────────────────────────────────────────��
To enable this option, recycle the Unicenter CA-Jobtrac STC.
Chapter 5. Customization Job Streams 137
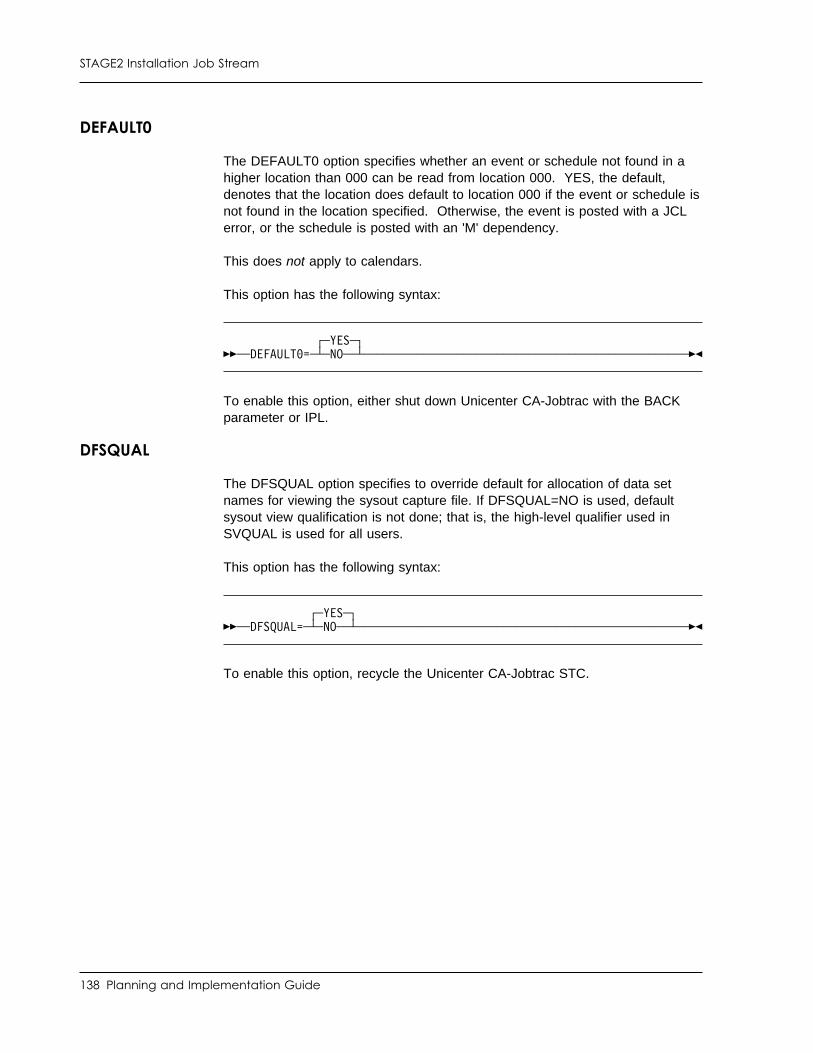
STAGE2 Installation Job Stream
DEFAULT0
The DEFAULT0 option specifies whether an event or schedule not found in ahigher location than 000 can be read from location 000. YES, the default,denotes that the location does default to location 000 if the event or schedule isnot found in the location specified. Otherwise, the event is posted with a JCLerror, or the schedule is posted with an 'M' dependency.
This does not apply to calendars.
This option has the following syntax:
┌ ┐─YES─��─ ──DEFAULT = ──┴ ┴─NO── ───────────────────────────────────────────────��
To enable this option, either shut down Unicenter CA-Jobtrac with the BACKparameter or IPL.
DFSQUAL
The DFSQUAL option specifies to override default for allocation of data setnames for viewing the sysout capture file. If DFSQUAL=NO is used, defaultsysout view qualification is not done; that is, the high-level qualifier used inSVQUAL is used for all users.
This option has the following syntax:
┌ ┐─YES─��─ ──DFSQUAL= ──┴ ┴─NO── ────────────────────────────────────────────────��
To enable this option, recycle the Unicenter CA-Jobtrac STC.
138 Planning and Implementation Guide
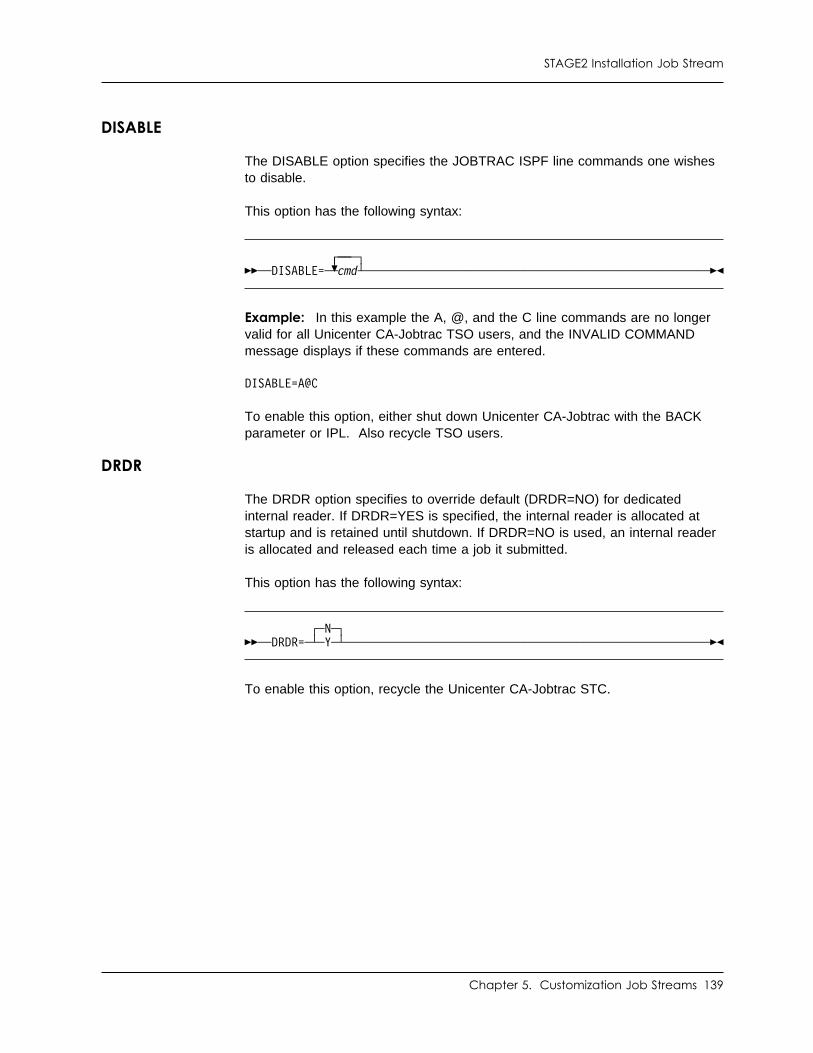
STAGE2 Installation Job Stream
DISABLE
The DISABLE option specifies the JOBTRAC ISPF line commands one wishesto disable.
This option has the following syntax:
┌ ┐─────��─ ──DISABLE= ───� ┴cmd ──────────────────────────────────────────────────��
Example: In this example the A, @, and the C line commands are no longervalid for all Unicenter CA-Jobtrac TSO users, and the INVALID COMMANDmessage displays if these commands are entered.
DISABLE=A@C
To enable this option, either shut down Unicenter CA-Jobtrac with the BACKparameter or IPL. Also recycle TSO users.
DRDR
The DRDR option specifies to override default (DRDR=NO) for dedicatedinternal reader. If DRDR=YES is specified, the internal reader is allocated atstartup and is retained until shutdown. If DRDR=NO is used, an internal readeris allocated and released each time a job it submitted.
This option has the following syntax:
┌ ┐─N─��─ ──DRDR= ──┴ ┴─Y─ ─────────────────────────────────────────────────────��
To enable this option, recycle the Unicenter CA-Jobtrac STC.
Chapter 5. Customization Job Streams 139
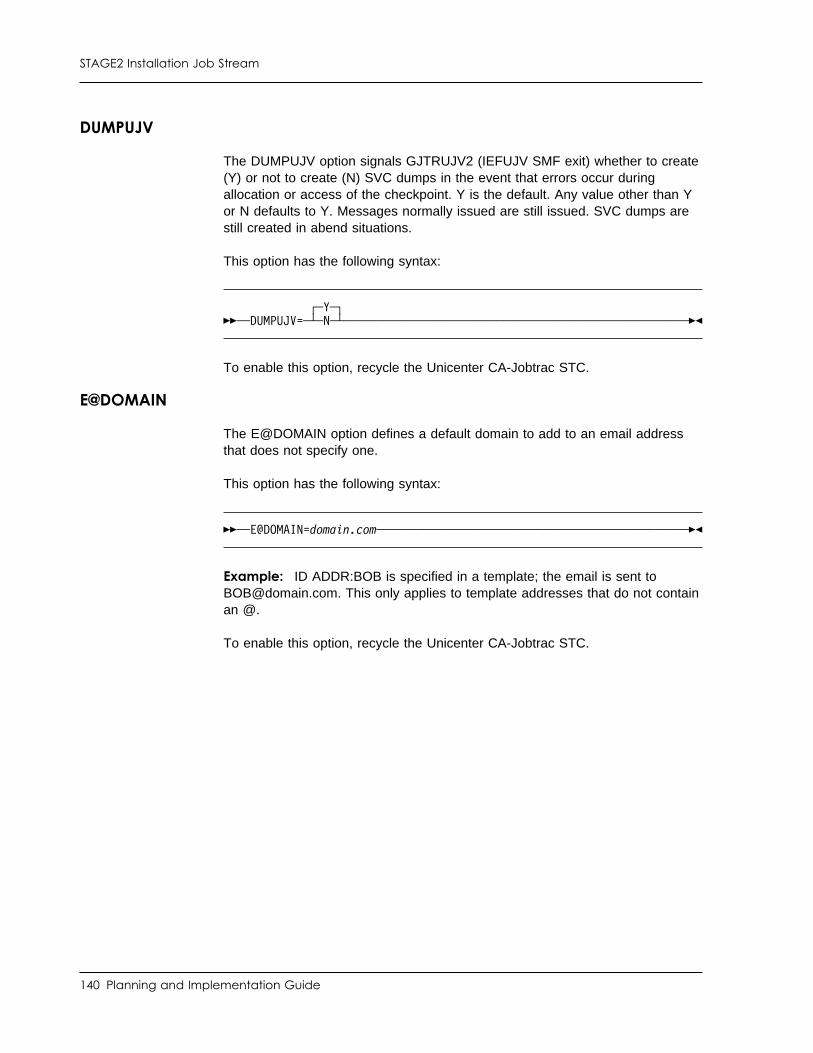
STAGE2 Installation Job Stream
DUMPUJV
The DUMPUJV option signals GJTRUJV2 (IEFUJV SMF exit) whether to create(Y) or not to create (N) SVC dumps in the event that errors occur duringallocation or access of the checkpoint. Y is the default. Any value other than Yor N defaults to Y. Messages normally issued are still issued. SVC dumps arestill created in abend situations.
This option has the following syntax:
┌ ┐─Y─��─ ──DUMPUJV= ──┴ ┴─N─ ──────────────────────────────────────────────────��
To enable this option, recycle the Unicenter CA-Jobtrac STC.
E@DOMAIN
The E@DOMAIN option defines a default domain to add to an email addressthat does not specify one.
This option has the following syntax:
��─ ──E@DOMAIN=domain.com ──────────────────────────────────────────────��
Example: ID ADDR:BOB is specified in a template; the email is sent [email protected]. This only applies to template addresses that do not containan @.
To enable this option, recycle the Unicenter CA-Jobtrac STC.
140 Planning and Implementation Guide
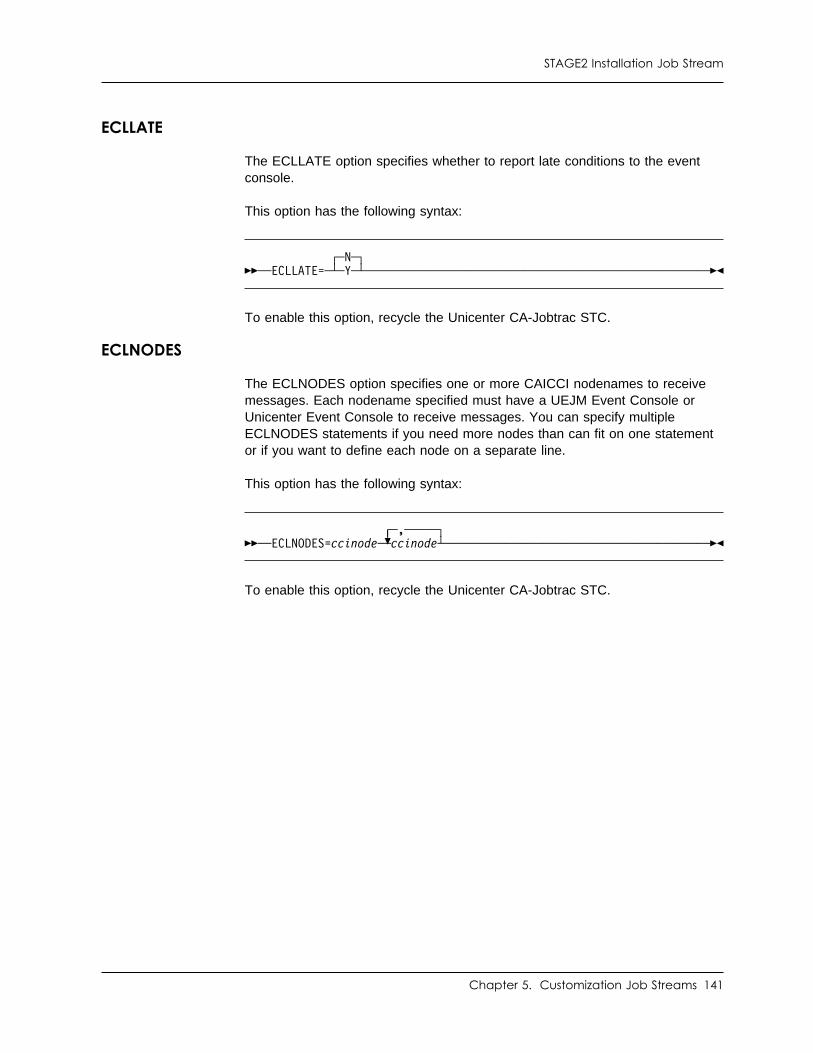
STAGE2 Installation Job Stream
ECLLATE
The ECLLATE option specifies whether to report late conditions to the eventconsole.
This option has the following syntax:
┌ ┐─N─��─ ──ECLLATE= ──┴ ┴─Y─ ──────────────────────────────────────────────────��
To enable this option, recycle the Unicenter CA-Jobtrac STC.
ECLNODES
The ECLNODES option specifies one or more CAICCI nodenames to receivemessages. Each nodename specified must have a UEJM Event Console orUnicenter Event Console to receive messages. You can specify multipleECLNODES statements if you need more nodes than can fit on one statementor if you want to define each node on a separate line.
This option has the following syntax:
┌ ┐─,─────��─ ──ECLNODES=ccinode ───� ┴ccinode ──────────────────────────────────────��
To enable this option, recycle the Unicenter CA-Jobtrac STC.
Chapter 5. Customization Job Streams 141
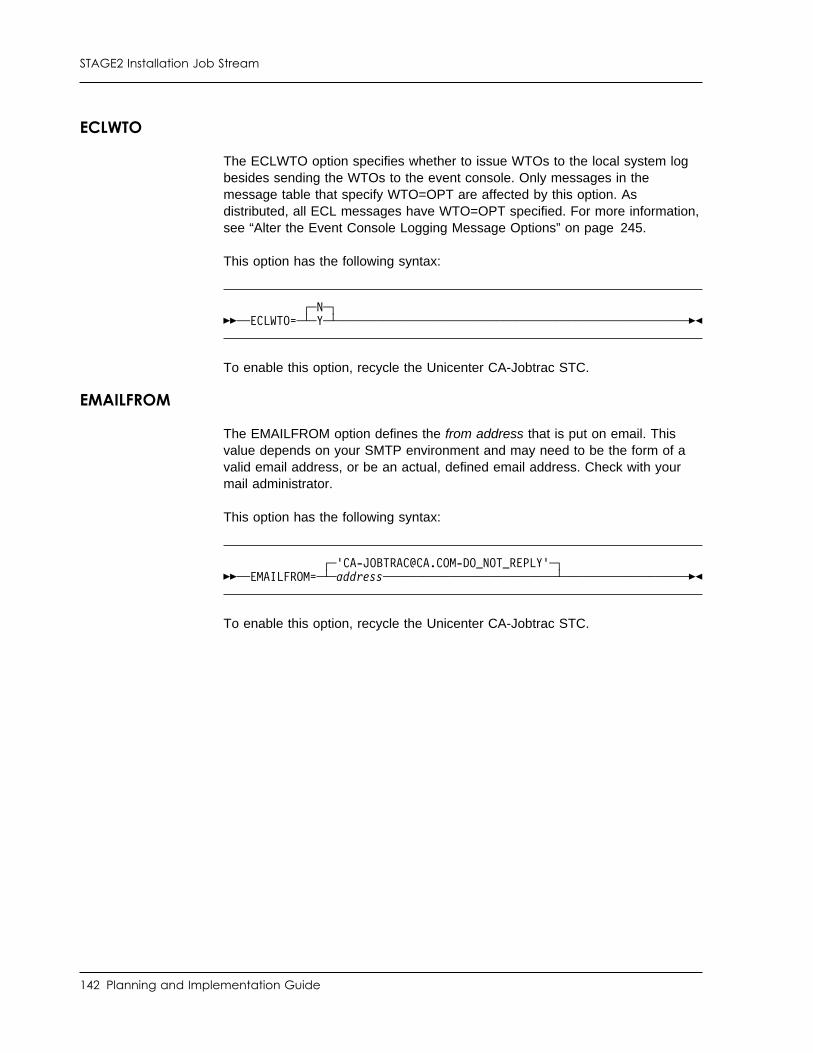
STAGE2 Installation Job Stream
ECLWTO
The ECLWTO option specifies whether to issue WTOs to the local system logbesides sending the WTOs to the event console. Only messages in themessage table that specify WTO=OPT are affected by this option. Asdistributed, all ECL messages have WTO=OPT specified. For more information,see “Alter the Event Console Logging Message Options” on page 245.
This option has the following syntax:
┌ ┐─N─��─ ──ECLWTO= ──┴ ┴─Y─ ───────────────────────────────────────────────────��
To enable this option, recycle the Unicenter CA-Jobtrac STC.
EMAILFROM
The EMAILFROM option defines the from address that is put on email. Thisvalue depends on your SMTP environment and may need to be the form of avalid email address, or be an actual, defined email address. Check with yourmail administrator.
This option has the following syntax:
┌ ┐─'[email protected]_NOT_REPLY'─��─ ──EMAILFROM= ──┴ ┴─address────────────────────────── ─────────────────��
To enable this option, recycle the Unicenter CA-Jobtrac STC.
142 Planning and Implementation Guide
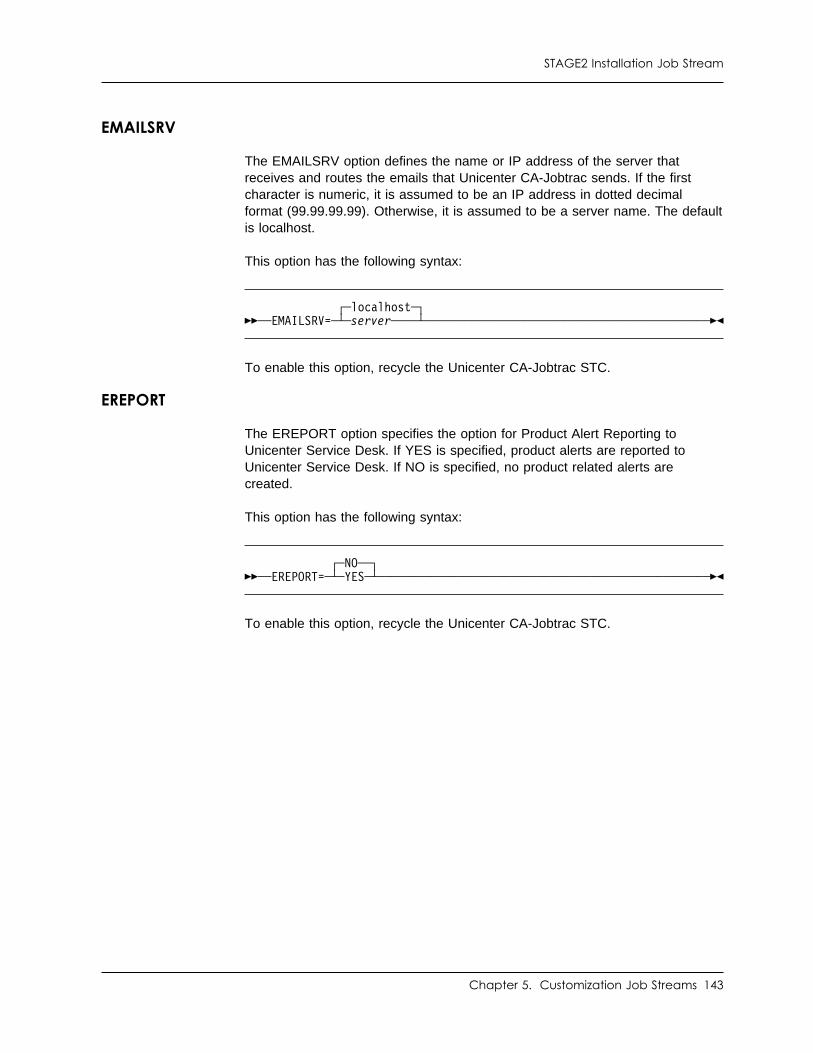
STAGE2 Installation Job Stream
EMAILSRV
The EMAILSRV option defines the name or IP address of the server thatreceives and routes the emails that Unicenter CA-Jobtrac sends. If the firstcharacter is numeric, it is assumed to be an IP address in dotted decimalformat (99.99.99.99). Otherwise, it is assumed to be a server name. The defaultis localhost.
This option has the following syntax:
┌ ┐─localhost─��─ ──EMAILSRV= ──┴ ┴─server──── ─────────────────────────────────────────��
To enable this option, recycle the Unicenter CA-Jobtrac STC.
EREPORT
The EREPORT option specifies the option for Product Alert Reporting toUnicenter Service Desk. If YES is specified, product alerts are reported toUnicenter Service Desk. If NO is specified, no product related alerts arecreated.
This option has the following syntax:
┌ ┐─NO──��─ ──EREPORT= ──┴ ┴─YES─ ────────────────────────────────────────────────��
To enable this option, recycle the Unicenter CA-Jobtrac STC.
Chapter 5. Customization Job Streams 143
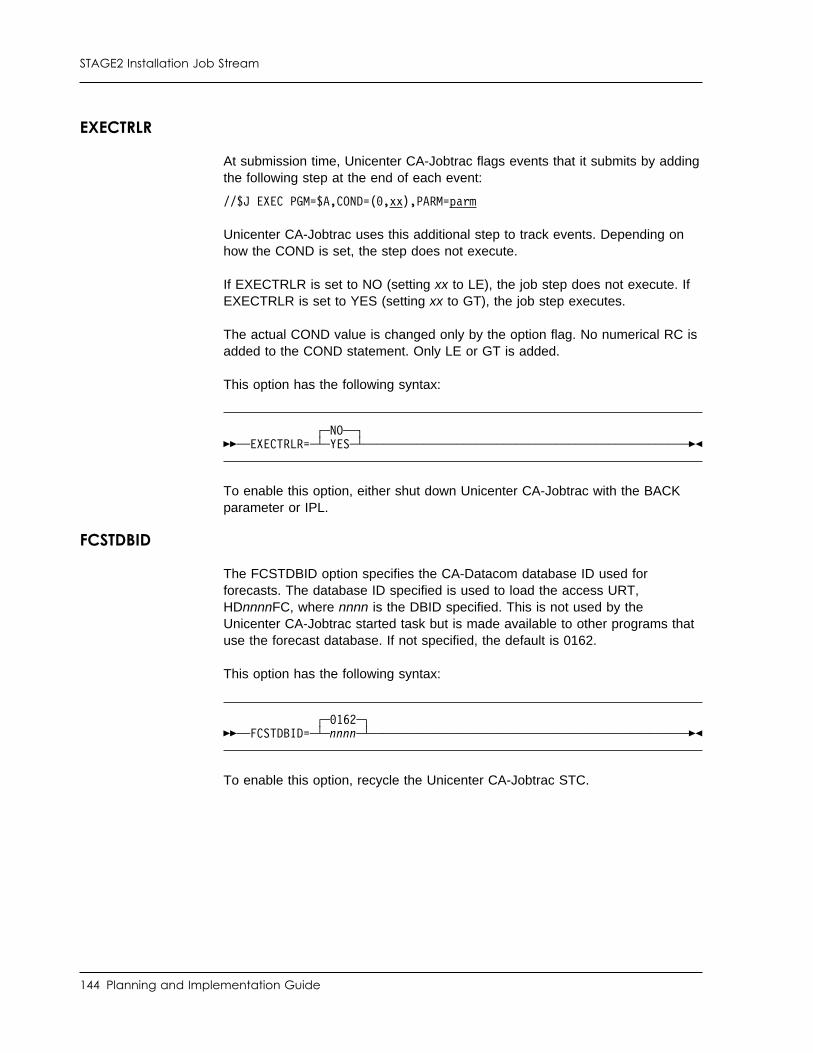
STAGE2 Installation Job Stream
EXECTRLR
At submission time, Unicenter CA-Jobtrac flags events that it submits by addingthe following step at the end of each event:
//$J EXEC PGM=$A,COND=( ,xx),PARM=parm
Unicenter CA-Jobtrac uses this additional step to track events. Depending onhow the COND is set, the step does not execute.
If EXECTRLR is set to NO (setting xx to LE), the job step does not execute. IfEXECTRLR is set to YES (setting xx to GT), the job step executes.
The actual COND value is changed only by the option flag. No numerical RC isadded to the COND statement. Only LE or GT is added.
This option has the following syntax:
┌ ┐─NO──��─ ──EXECTRLR= ──┴ ┴─YES─ ───────────────────────────────────────────────��
To enable this option, either shut down Unicenter CA-Jobtrac with the BACKparameter or IPL.
FCSTDBID
The FCSTDBID option specifies the CA-Datacom database ID used forforecasts. The database ID specified is used to load the access URT,HDnnnnFC, where nnnn is the DBID specified. This is not used by theUnicenter CA-Jobtrac started task but is made available to other programs thatuse the forecast database. If not specified, the default is 0162.
This option has the following syntax:
┌ ┐─ 162─��─ ──FCSTDBID= ──┴ ┴─nnnn─ ──────────────────────────────────────────────��
To enable this option, recycle the Unicenter CA-Jobtrac STC.
144 Planning and Implementation Guide
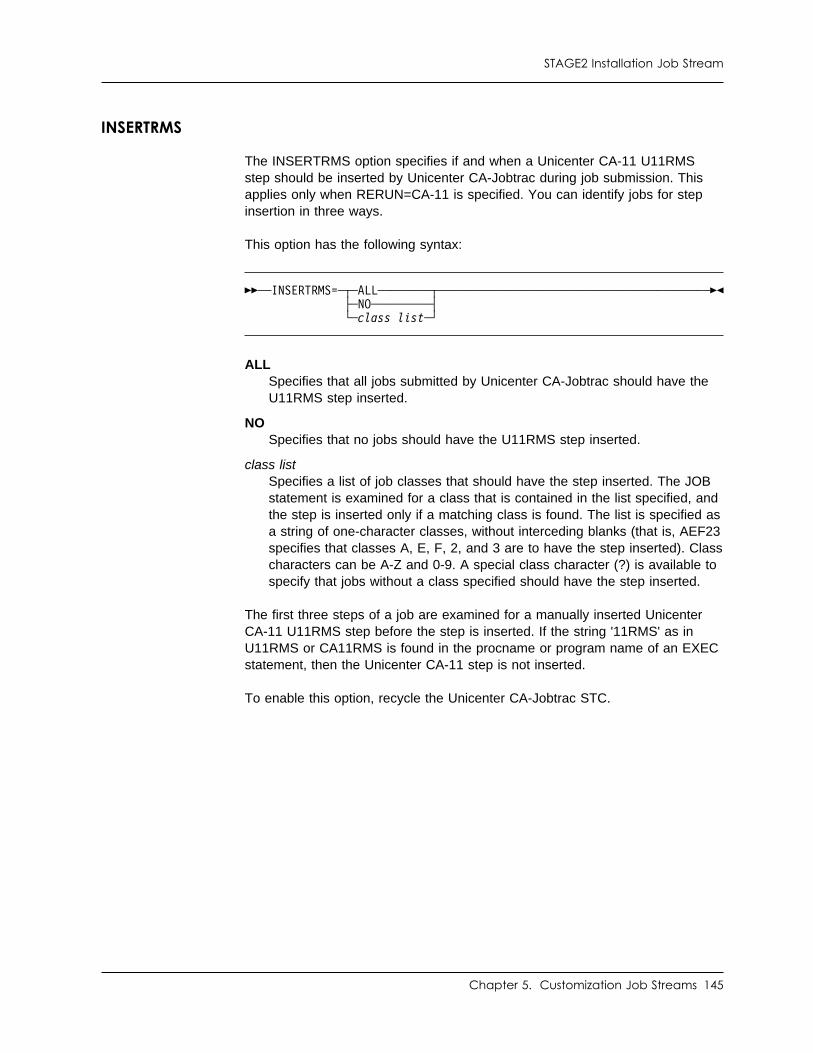
STAGE2 Installation Job Stream
INSERTRMS
The INSERTRMS option specifies if and when a Unicenter CA-11 U11RMSstep should be inserted by Unicenter CA-Jobtrac during job submission. Thisapplies only when RERUN=CA-11 is specified. You can identify jobs for stepinsertion in three ways.
This option has the following syntax:
��─ ──INSERTRMS= ──┬ ┬─ALL──────── ───────────────────────────────────────�� ├ ┤─NO───────── └ ┘─class list─
ALLSpecifies that all jobs submitted by Unicenter CA-Jobtrac should have theU11RMS step inserted.
NOSpecifies that no jobs should have the U11RMS step inserted.
class listSpecifies a list of job classes that should have the step inserted. The JOBstatement is examined for a class that is contained in the list specified, andthe step is inserted only if a matching class is found. The list is specified asa string of one-character classes, without interceding blanks (that is, AEF23specifies that classes A, E, F, 2, and 3 are to have the step inserted). Classcharacters can be A-Z and 0-9. A special class character (?) is available tospecify that jobs without a class specified should have the step inserted.
The first three steps of a job are examined for a manually inserted UnicenterCA-11 U11RMS step before the step is inserted. If the string '11RMS' as inU11RMS or CA11RMS is found in the procname or program name of an EXECstatement, then the Unicenter CA-11 step is not inserted.
To enable this option, recycle the Unicenter CA-Jobtrac STC.
Chapter 5. Customization Job Streams 145
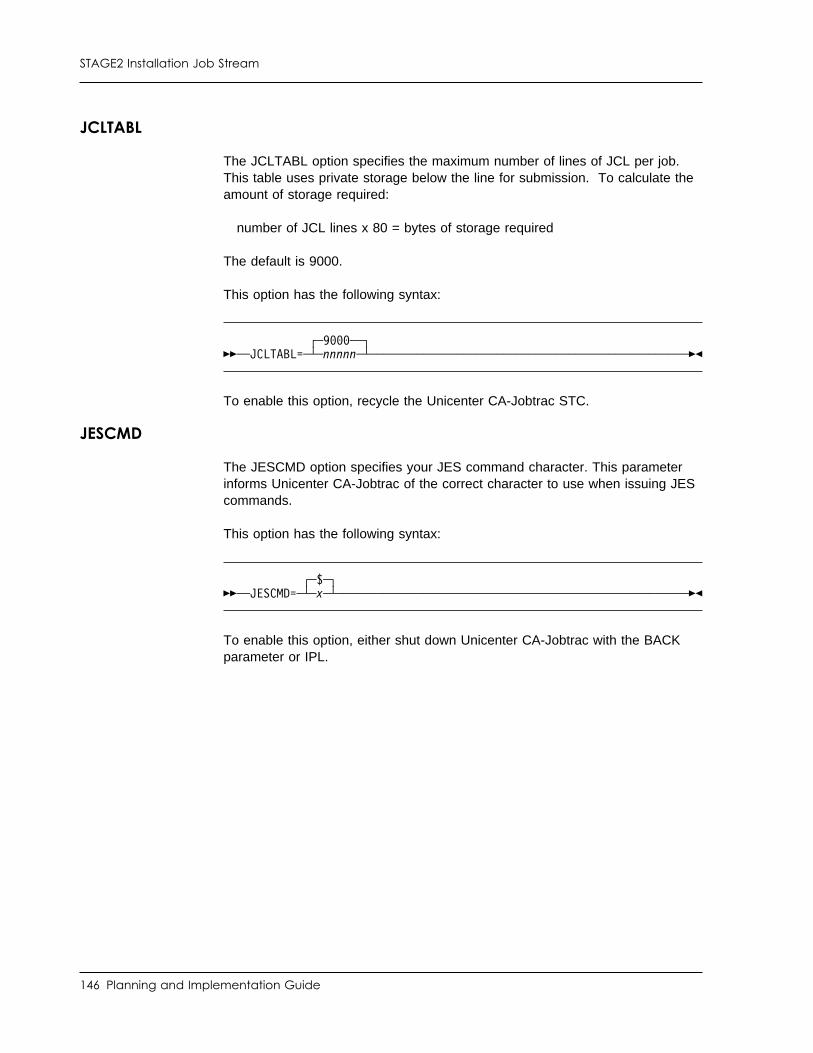
STAGE2 Installation Job Stream
JCLTABL
The JCLTABL option specifies the maximum number of lines of JCL per job.This table uses private storage below the line for submission. To calculate theamount of storage required:
number of JCL lines x 80 = bytes of storage required
The default is 9000.
This option has the following syntax:
┌ ┐─9 ──��─ ──JCLTABL= ──┴ ┴─nnnnn─ ──────────────────────────────────────────────��
To enable this option, recycle the Unicenter CA-Jobtrac STC.
JESCMD
The JESCMD option specifies your JES command character. This parameterinforms Unicenter CA-Jobtrac of the correct character to use when issuing JEScommands.
This option has the following syntax:
┌ ┐─$─��─ ──JESCMD= ──┴ ┴─x─ ───────────────────────────────────────────────────��
To enable this option, either shut down Unicenter CA-Jobtrac with the BACKparameter or IPL.
146 Planning and Implementation Guide
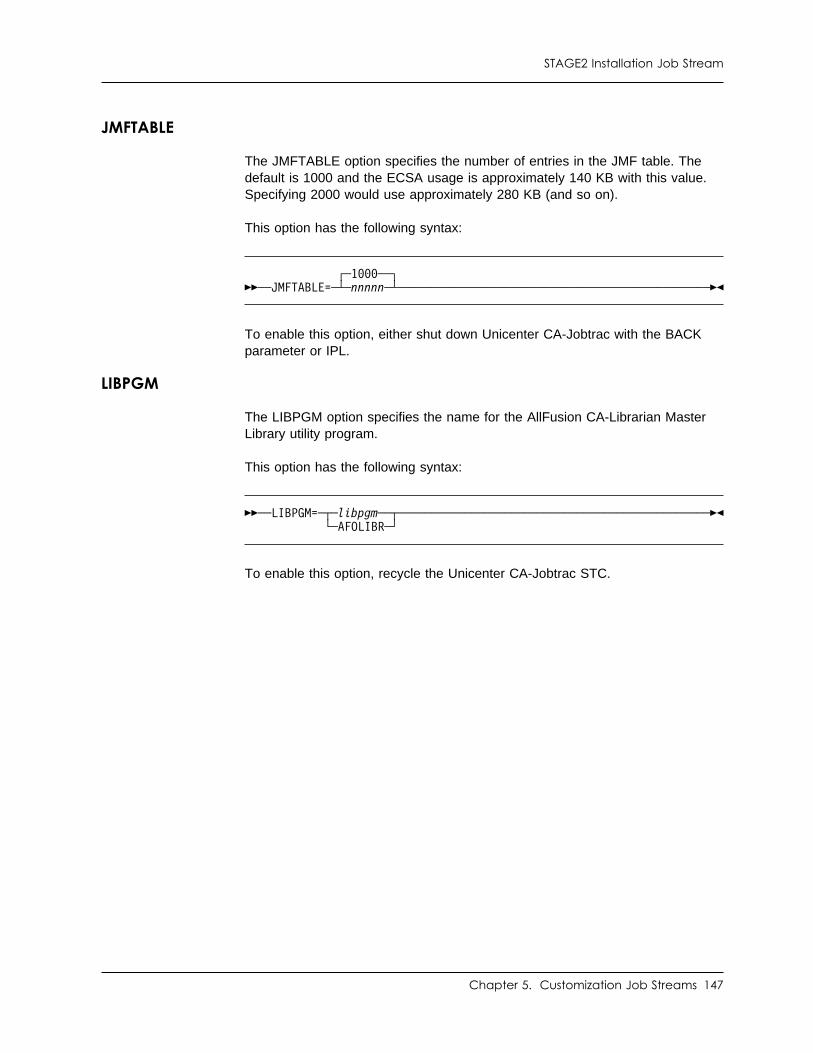
STAGE2 Installation Job Stream
JMFTABLE
The JMFTABLE option specifies the number of entries in the JMF table. Thedefault is 1000 and the ECSA usage is approximately 140 KB with this value.Specifying 2000 would use approximately 280 KB (and so on).
This option has the following syntax:
┌ ┐─1 ──��─ ──JMFTABLE= ──┴ ┴─nnnnn─ ─────────────────────────────────────────────��
To enable this option, either shut down Unicenter CA-Jobtrac with the BACKparameter or IPL.
LIBPGM
The LIBPGM option specifies the name for the AllFusion CA-Librarian MasterLibrary utility program.
This option has the following syntax:
��─ ──LIBPGM= ──┬ ┬─libpgm── ─────────────────────────────────────────────�� └ ┘─AFOLIBR─
To enable this option, recycle the Unicenter CA-Jobtrac STC.
Chapter 5. Customization Job Streams 147
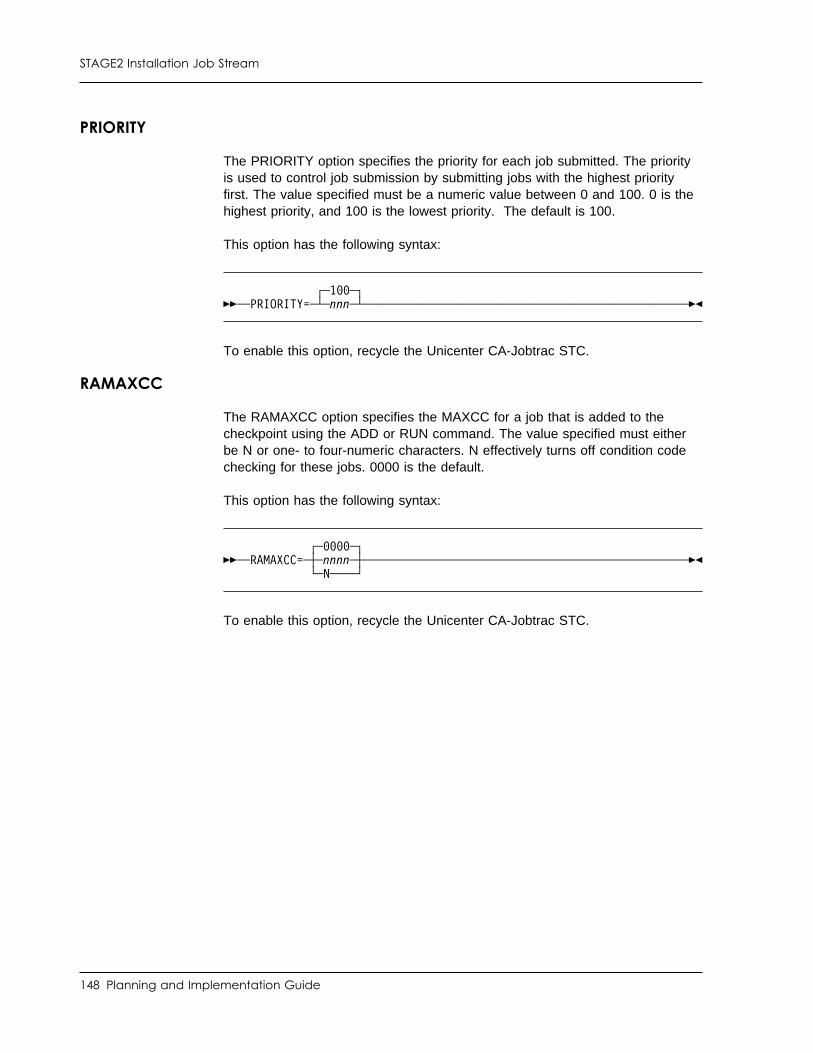
STAGE2 Installation Job Stream
PRIORITY
The PRIORITY option specifies the priority for each job submitted. The priorityis used to control job submission by submitting jobs with the highest priorityfirst. The value specified must be a numeric value between 0 and 100. 0 is thehighest priority, and 100 is the lowest priority. The default is 100.
This option has the following syntax:
┌ ┐─1 ─��─ ──PRIORITY= ──┴ ┴─nnn─ ───────────────────────────────────────────────��
To enable this option, recycle the Unicenter CA-Jobtrac STC.
RAMAXCC
The RAMAXCC option specifies the MAXCC for a job that is added to thecheckpoint using the ADD or RUN command. The value specified must eitherbe N or one- to four-numeric characters. N effectively turns off condition codechecking for these jobs. 0000 is the default.
This option has the following syntax:
┌ ┐─ ─��─ ──RAMAXCC= ──┼ ┼─nnnn─ ───────────────────────────────────────────────�� └ ┘─N────
To enable this option, recycle the Unicenter CA-Jobtrac STC.
148 Planning and Implementation Guide
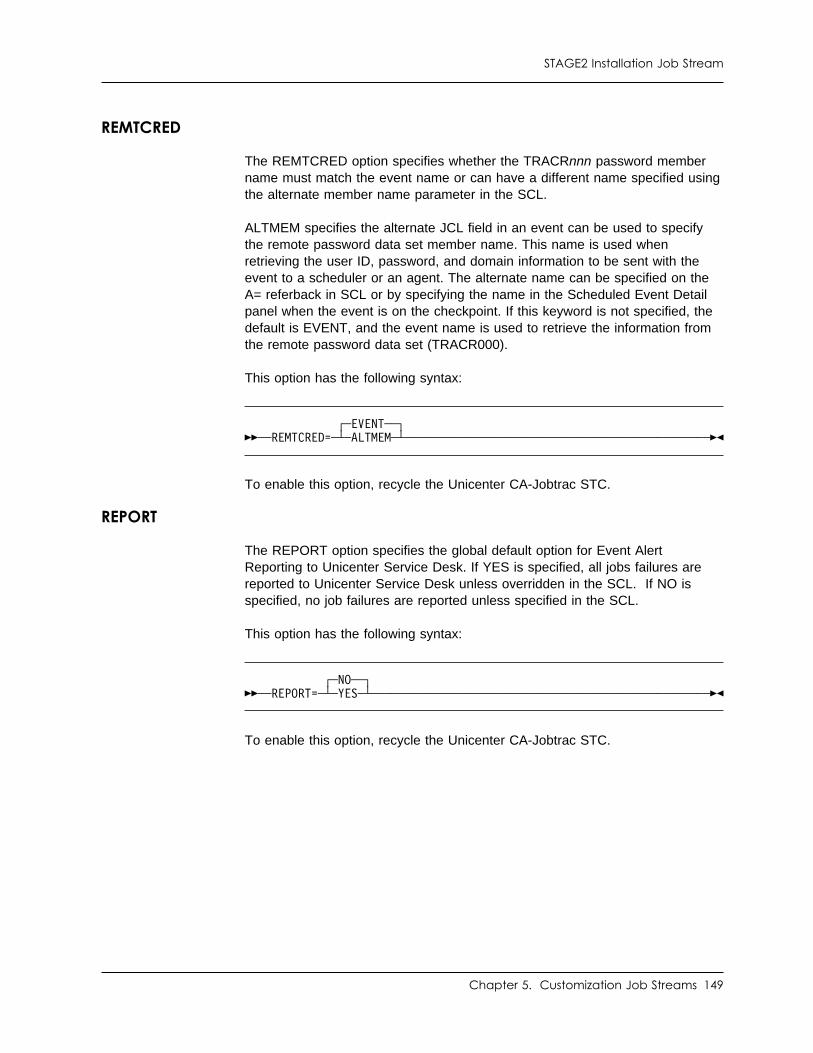
STAGE2 Installation Job Stream
REMTCRED
The REMTCRED option specifies whether the TRACRnnn password membername must match the event name or can have a different name specified usingthe alternate member name parameter in the SCL.
ALTMEM specifies the alternate JCL field in an event can be used to specifythe remote password data set member name. This name is used whenretrieving the user ID, password, and domain information to be sent with theevent to a scheduler or an agent. The alternate name can be specified on theA= referback in SCL or by specifying the name in the Scheduled Event Detailpanel when the event is on the checkpoint. If this keyword is not specified, thedefault is EVENT, and the event name is used to retrieve the information fromthe remote password data set (TRACR000).
This option has the following syntax:
┌ ┐─EVENT──��─ ──REMTCRED= ──┴ ┴─ALTMEM─ ────────────────────────────────────────────��
To enable this option, recycle the Unicenter CA-Jobtrac STC.
REPORT
The REPORT option specifies the global default option for Event AlertReporting to Unicenter Service Desk. If YES is specified, all jobs failures arereported to Unicenter Service Desk unless overridden in the SCL. If NO isspecified, no job failures are reported unless specified in the SCL.
This option has the following syntax:
┌ ┐─NO──��─ ──REPORT= ──┴ ┴─YES─ ─────────────────────────────────────────────────��
To enable this option, recycle the Unicenter CA-Jobtrac STC.
Chapter 5. Customization Job Streams 149
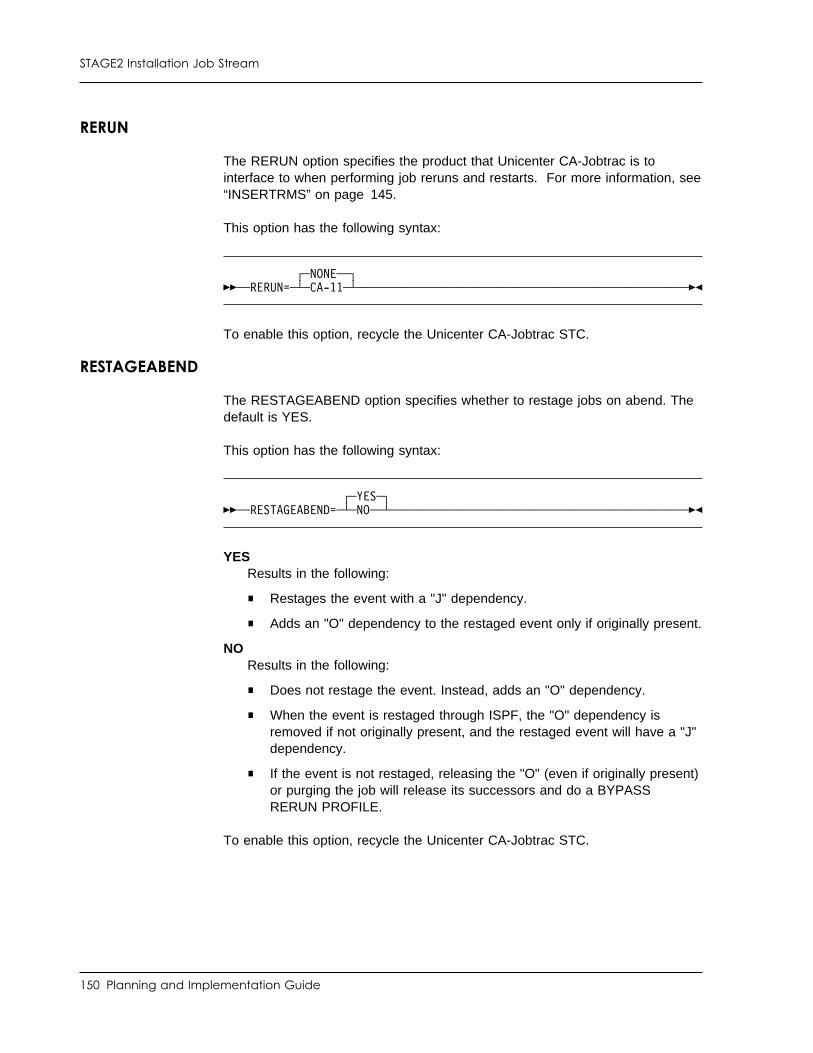
STAGE2 Installation Job Stream
RERUN
The RERUN option specifies the product that Unicenter CA-Jobtrac is tointerface to when performing job reruns and restarts. For more information, see“INSERTRMS” on page 145.
This option has the following syntax:
┌ ┐─NONE──��─ ──RERUN= ──┴ ┴─CA-11─ ────────────────────────────────────────────────��
To enable this option, recycle the Unicenter CA-Jobtrac STC.
RESTAGEABEND
The RESTAGEABEND option specifies whether to restage jobs on abend. Thedefault is YES.
This option has the following syntax:
┌ ┐─YES─��─ ──RESTAGEABEND= ──┴ ┴─NO── ───────────────────────────────────────────��
YESResults in the following:
■ Restages the event with a "J" dependency.
■ Adds an "O" dependency to the restaged event only if originally present.
NOResults in the following:
■ Does not restage the event. Instead, adds an "O" dependency.
■ When the event is restaged through ISPF, the "O" dependency isremoved if not originally present, and the restaged event will have a "J"dependency.
■ If the event is not restaged, releasing the "O" (even if originally present)or purging the job will release its successors and do a BYPASSRERUN PROFILE.
To enable this option, recycle the Unicenter CA-Jobtrac STC.
150 Planning and Implementation Guide
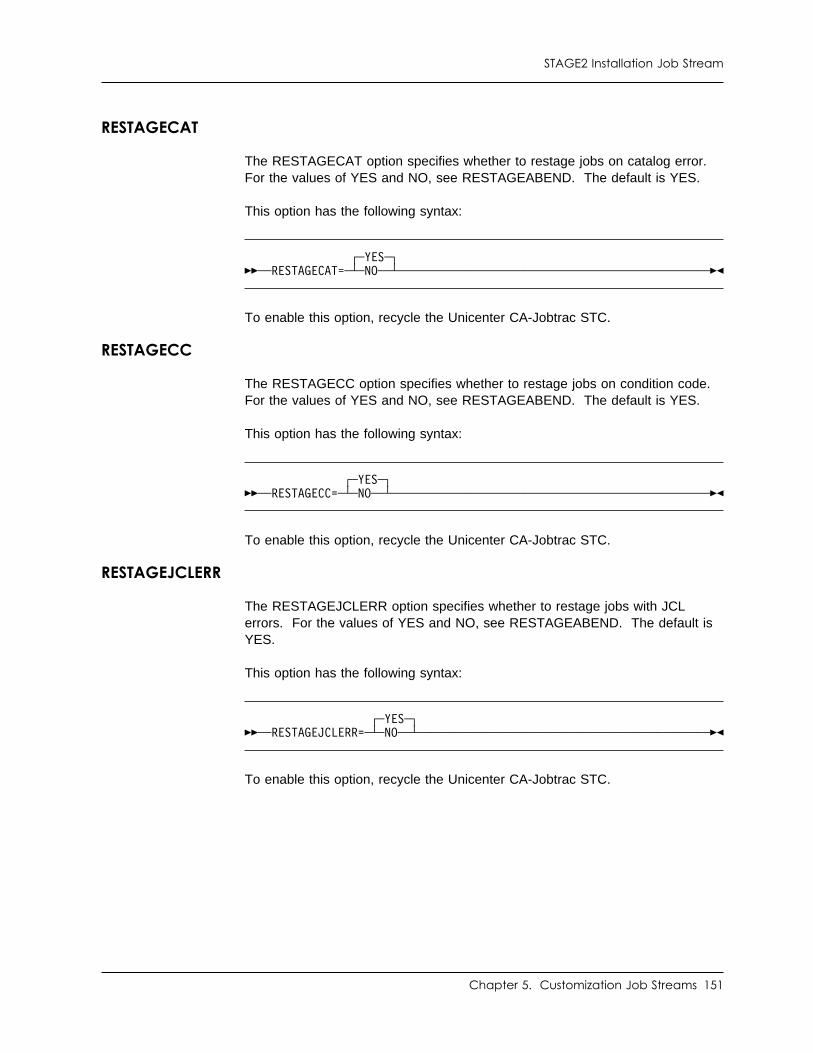
STAGE2 Installation Job Stream
RESTAGECAT
The RESTAGECAT option specifies whether to restage jobs on catalog error.For the values of YES and NO, see RESTAGEABEND. The default is YES.
This option has the following syntax:
┌ ┐─YES─��─ ──RESTAGECAT= ──┴ ┴─NO── ─────────────────────────────────────────────��
To enable this option, recycle the Unicenter CA-Jobtrac STC.
RESTAGECC
The RESTAGECC option specifies whether to restage jobs on condition code.For the values of YES and NO, see RESTAGEABEND. The default is YES.
This option has the following syntax:
┌ ┐─YES─��─ ──RESTAGECC= ──┴ ┴─NO── ──────────────────────────────────────────────��
To enable this option, recycle the Unicenter CA-Jobtrac STC.
RESTAGEJCLERR
The RESTAGEJCLERR option specifies whether to restage jobs with JCLerrors. For the values of YES and NO, see RESTAGEABEND. The default isYES.
This option has the following syntax:
┌ ┐─YES─��─ ──RESTAGEJCLERR= ──┴ ┴─NO── ──────────────────────────────────────────��
To enable this option, recycle the Unicenter CA-Jobtrac STC.
Chapter 5. Customization Job Streams 151
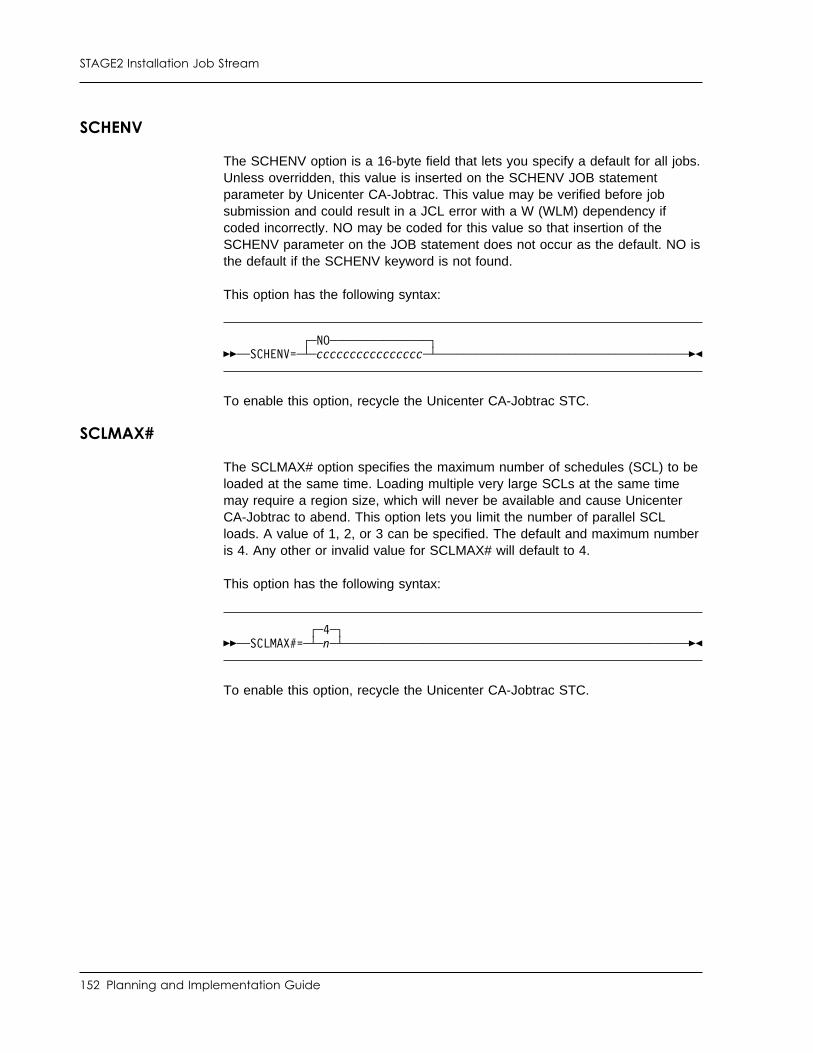
STAGE2 Installation Job Stream
SCHENV
The SCHENV option is a 16-byte field that lets you specify a default for all jobs.Unless overridden, this value is inserted on the SCHENV JOB statementparameter by Unicenter CA-Jobtrac. This value may be verified before jobsubmission and could result in a JCL error with a W (WLM) dependency ifcoded incorrectly. NO may be coded for this value so that insertion of theSCHENV parameter on the JOB statement does not occur as the default. NO isthe default if the SCHENV keyword is not found.
This option has the following syntax:
┌ ┐─NO───────────────��─ ──SCHENV= ──┴ ┴─cccccccccccccccc─ ────────────────────────────────────��
To enable this option, recycle the Unicenter CA-Jobtrac STC.
SCLMAX#
The SCLMAX# option specifies the maximum number of schedules (SCL) to beloaded at the same time. Loading multiple very large SCLs at the same timemay require a region size, which will never be available and cause UnicenterCA-Jobtrac to abend. This option lets you limit the number of parallel SCLloads. A value of 1, 2, or 3 can be specified. The default and maximum numberis 4. Any other or invalid value for SCLMAX# will default to 4.
This option has the following syntax:
┌ ┐─4─��─ ──SCLMAX#= ──┴ ┴─n─ ──────────────────────────────────────────────────��
To enable this option, recycle the Unicenter CA-Jobtrac STC.
152 Planning and Implementation Guide
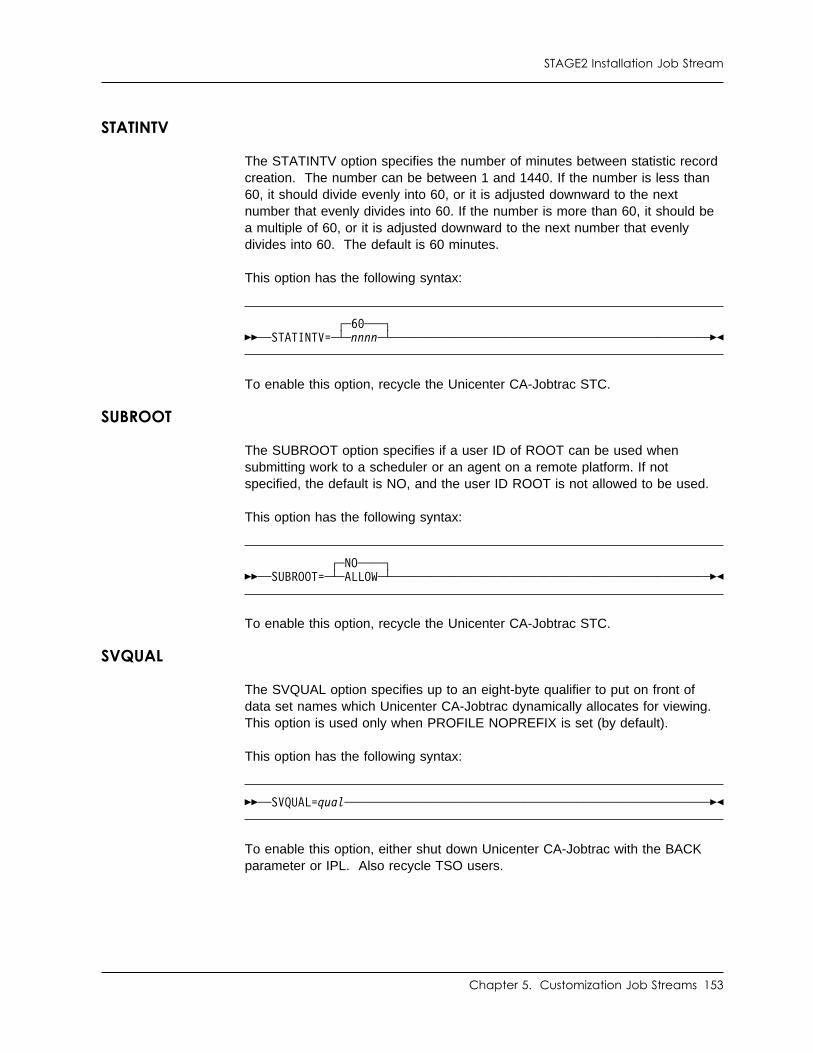
STAGE2 Installation Job Stream
STATINTV
The STATINTV option specifies the number of minutes between statistic recordcreation. The number can be between 1 and 1440. If the number is less than60, it should divide evenly into 60, or it is adjusted downward to the nextnumber that evenly divides into 60. If the number is more than 60, it should bea multiple of 60, or it is adjusted downward to the next number that evenlydivides into 60. The default is 60 minutes.
This option has the following syntax:
┌ ┐─6 ───��─ ──STATINTV= ──┴ ┴─nnnn─ ──────────────────────────────────────────────��
To enable this option, recycle the Unicenter CA-Jobtrac STC.
SUBROOT
The SUBROOT option specifies if a user ID of ROOT can be used whensubmitting work to a scheduler or an agent on a remote platform. If notspecified, the default is NO, and the user ID ROOT is not allowed to be used.
This option has the following syntax:
┌ ┐─NO────��─ ──SUBROOT= ──┴ ┴─ALLOW─ ──────────────────────────────────────────────��
To enable this option, recycle the Unicenter CA-Jobtrac STC.
SVQUAL
The SVQUAL option specifies up to an eight-byte qualifier to put on front ofdata set names which Unicenter CA-Jobtrac dynamically allocates for viewing.This option is used only when PROFILE NOPREFIX is set (by default).
This option has the following syntax:
��─ ──SVQUAL=qual ──────────────────────────────────────────────────────��
To enable this option, either shut down Unicenter CA-Jobtrac with the BACKparameter or IPL. Also recycle TSO users.
Chapter 5. Customization Job Streams 153
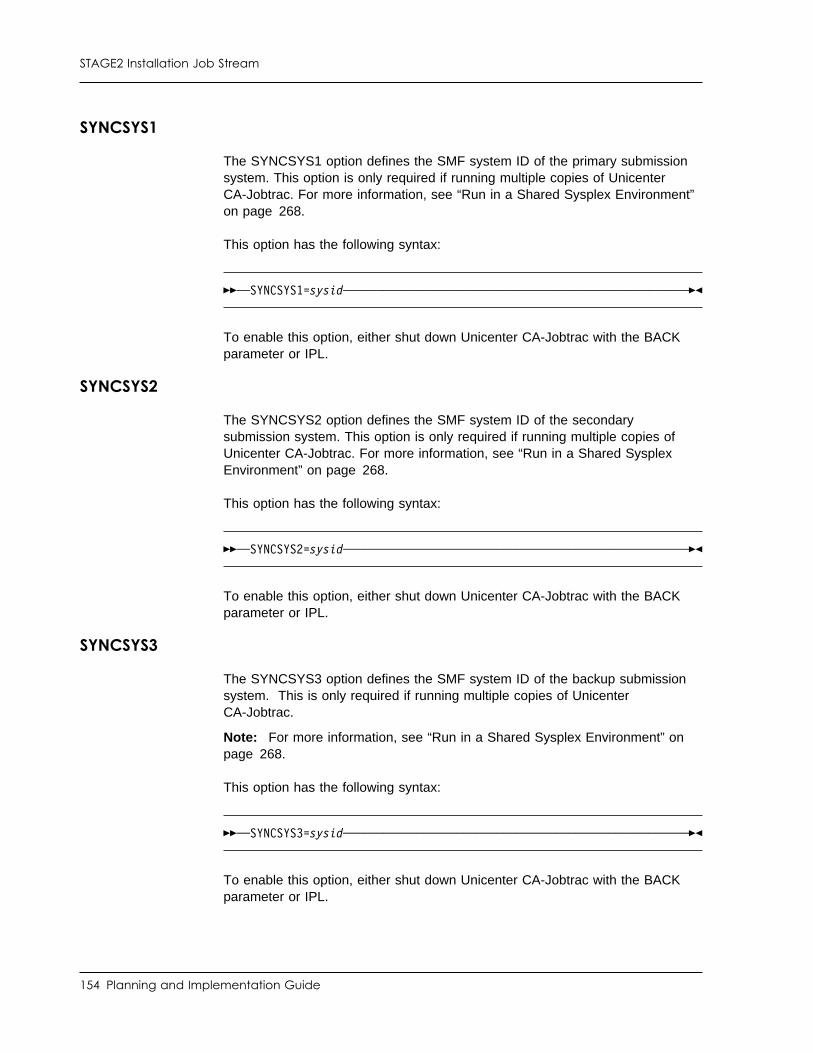
STAGE2 Installation Job Stream
SYNCSYS1
The SYNCSYS1 option defines the SMF system ID of the primary submissionsystem. This option is only required if running multiple copies of UnicenterCA-Jobtrac. For more information, see “Run in a Shared Sysplex Environment”on page 268.
This option has the following syntax:
��─ ──SYNCSYS1=sysid ───────────────────────────────────────────────────��
To enable this option, either shut down Unicenter CA-Jobtrac with the BACKparameter or IPL.
SYNCSYS2
The SYNCSYS2 option defines the SMF system ID of the secondarysubmission system. This option is only required if running multiple copies ofUnicenter CA-Jobtrac. For more information, see “Run in a Shared SysplexEnvironment” on page 268.
This option has the following syntax:
��─ ──SYNCSYS2=sysid ───────────────────────────────────────────────────��
To enable this option, either shut down Unicenter CA-Jobtrac with the BACKparameter or IPL.
SYNCSYS3
The SYNCSYS3 option defines the SMF system ID of the backup submissionsystem. This is only required if running multiple copies of UnicenterCA-Jobtrac.
Note: For more information, see “Run in a Shared Sysplex Environment” onpage 268.
This option has the following syntax:
��─ ──SYNCSYS3=sysid ───────────────────────────────────────────────────��
To enable this option, either shut down Unicenter CA-Jobtrac with the BACKparameter or IPL.
154 Planning and Implementation Guide

STAGE2 Installation Job Stream
SYNCTOL
The SYNCTOL option defines the number of seconds the primary submissionsystem can be idle. If the primary system is idle for more than the number ofseconds defined by SYNCTOL, the secondary system automatically issues aWTO to request primary event submission duties.
The operator can switch primary submission duties at any time by issuing theACTSYS=sysid modify command on the primary system. For information aboutswitching primary systems, see the Reports, Maintenance, and RecoveryGuide.
This option has the following syntax:
┌ ┐─3 ─��─ ──SYNCTOL= ──┴ ┴─nnn─ ────────────────────────────────────────────────��
To enable this option, either shut down Unicenter CA-Jobtrac with the BACKparameter or IPL.
SYSDBID
The SYSDBID option specifies the CA-Datacom database ID used for systemtables. This is specified in the SYSTEMDBID parameter in the CA-Datacomstartup parameters and defaults to 1000. The database ID specified is used toload the access URT, HDnnnnSY, where nnnn is the DBID specified. If notspecified, the default is 1000.
This option has the following syntax:
┌ ┐─1 ─��─ ──SYSDBID= ──┴ ┴─nnnn─ ───────────────────────────────────────────────��
To enable this option, recycle the Unicenter CA-Jobtrac STC.
Chapter 5. Customization Job Streams 155
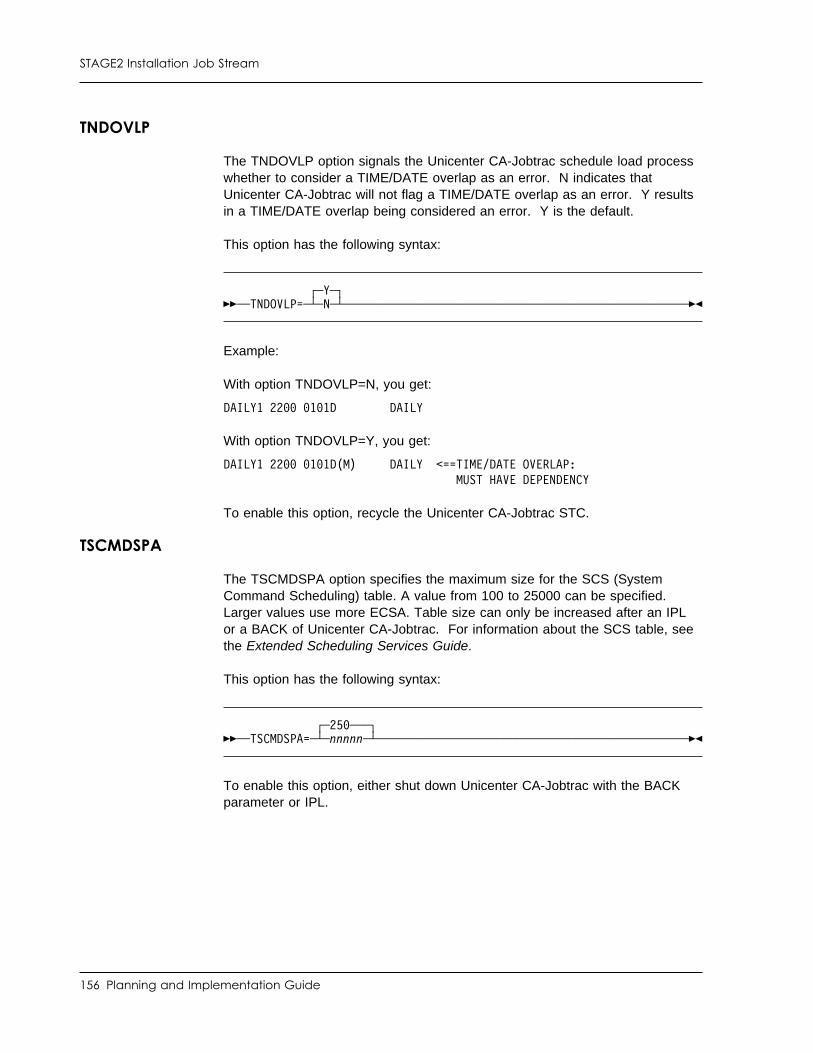
STAGE2 Installation Job Stream
TNDOVLP
The TNDOVLP option signals the Unicenter CA-Jobtrac schedule load processwhether to consider a TIME/DATE overlap as an error. N indicates thatUnicenter CA-Jobtrac will not flag a TIME/DATE overlap as an error. Y resultsin a TIME/DATE overlap being considered an error. Y is the default.
This option has the following syntax:
┌ ┐─Y─��─ ──TNDOVLP= ──┴ ┴─N─ ──────────────────────────────────────────────────��
Example:
With option TNDOVLP=N, you get:
DAILY1 22 1 1D DAILY
With option TNDOVLP=Y, you get:
DAILY1 22 1 1D(M) DAILY <==TIME/DATE OVERLAP:MUST HAVE DEPENDENCY
To enable this option, recycle the Unicenter CA-Jobtrac STC.
TSCMDSPA
The TSCMDSPA option specifies the maximum size for the SCS (SystemCommand Scheduling) table. A value from 100 to 25000 can be specified.Larger values use more ECSA. Table size can only be increased after an IPLor a BACK of Unicenter CA-Jobtrac. For information about the SCS table, seethe Extended Scheduling Services Guide.
This option has the following syntax:
┌ ┐─25 ───��─ ──TSCMDSPA= ──┴ ┴─nnnnn─ ─────────────────────────────────────────────��
To enable this option, either shut down Unicenter CA-Jobtrac with the BACKparameter or IPL.
156 Planning and Implementation Guide

STAGE2 Installation Job Stream
TSDSNSPA
The TSDSNSPA option specifies the maximum size for the ADR (AutomaticDataset Recognition) table. A value from 100 to 25000 can be specified.Larger values use more ECSA. Table size can only be increased after an IPLor a BACK of Unicenter CA-Jobtrac. For information about the ADR table, seethe Extended Scheduling Services Guide.
This option has the following syntax:
┌ ┐─1 ───��─ ──TSDSNSPA= ──┴ ┴─nnnnn─ ─────────────────────────────────────────────��
To enable this option, either shut down Unicenter CA-Jobtrac with the BACKparameter or IPL.
TSMSGSPA
The TSMSGSPA option specifies the maximum size for the AMR (AutomaticMessage Recognition) table. A value from 100 to 25000 can be specified.Larger values use more ECSA. Table size can only be increased after an IPLor a BACK of Unicenter CA-Jobtrac. For information about the AMR table, seethe Extended Scheduling Services Guide.
This option has the following syntax:
┌ ┐─25 ───��─ ──TSMSGSPA= ──┴ ┴─nnnnn─ ─────────────────────────────────────────────��
To enable this option, either shut down Unicenter CA-Jobtrac with the BACKparameter or IPL.
Chapter 5. Customization Job Streams 157
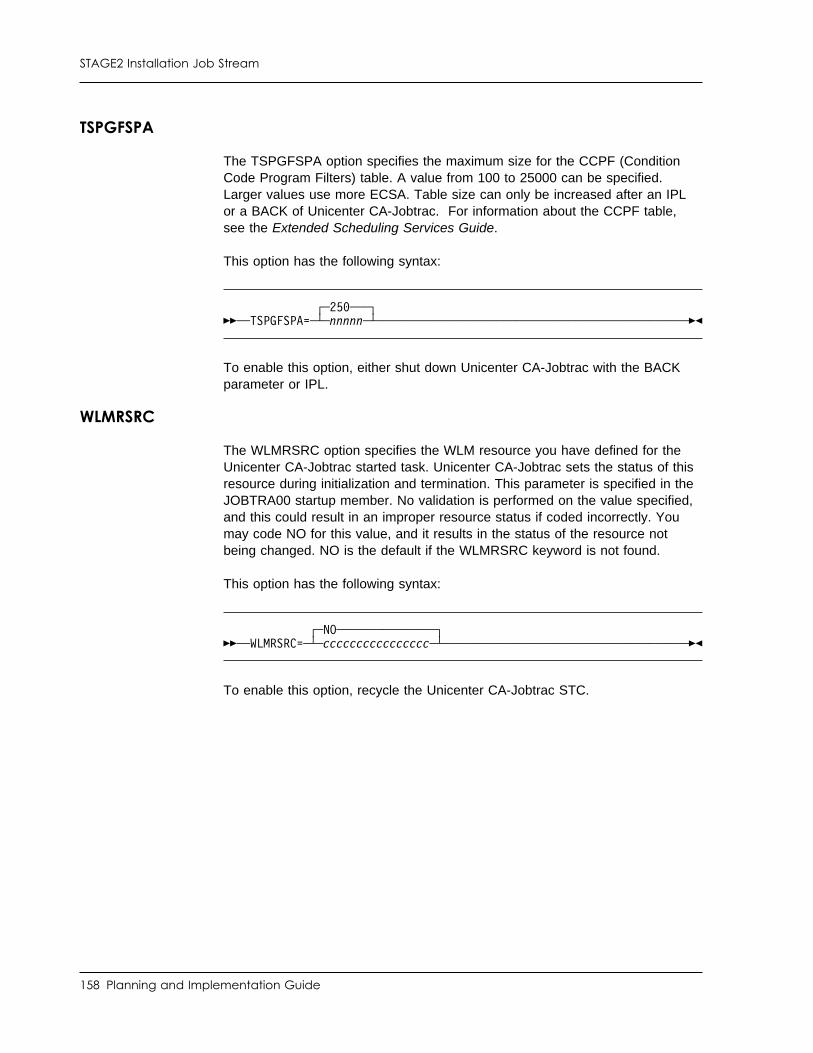
STAGE2 Installation Job Stream
TSPGFSPA
The TSPGFSPA option specifies the maximum size for the CCPF (ConditionCode Program Filters) table. A value from 100 to 25000 can be specified.Larger values use more ECSA. Table size can only be increased after an IPLor a BACK of Unicenter CA-Jobtrac. For information about the CCPF table,see the Extended Scheduling Services Guide.
This option has the following syntax:
┌ ┐─25 ───��─ ──TSPGFSPA= ──┴ ┴─nnnnn─ ─────────────────────────────────────────────��
To enable this option, either shut down Unicenter CA-Jobtrac with the BACKparameter or IPL.
WLMRSRC
The WLMRSRC option specifies the WLM resource you have defined for theUnicenter CA-Jobtrac started task. Unicenter CA-Jobtrac sets the status of thisresource during initialization and termination. This parameter is specified in theJOBTRA00 startup member. No validation is performed on the value specified,and this could result in an improper resource status if coded incorrectly. Youmay code NO for this value, and it results in the status of the resource notbeing changed. NO is the default if the WLMRSRC keyword is not found.
This option has the following syntax:
┌ ┐─NO───────────────��─ ──WLMRSRC= ──┴ ┴─cccccccccccccccc─ ───────────────────────────────────��
To enable this option, recycle the Unicenter CA-Jobtrac STC.
158 Planning and Implementation Guide
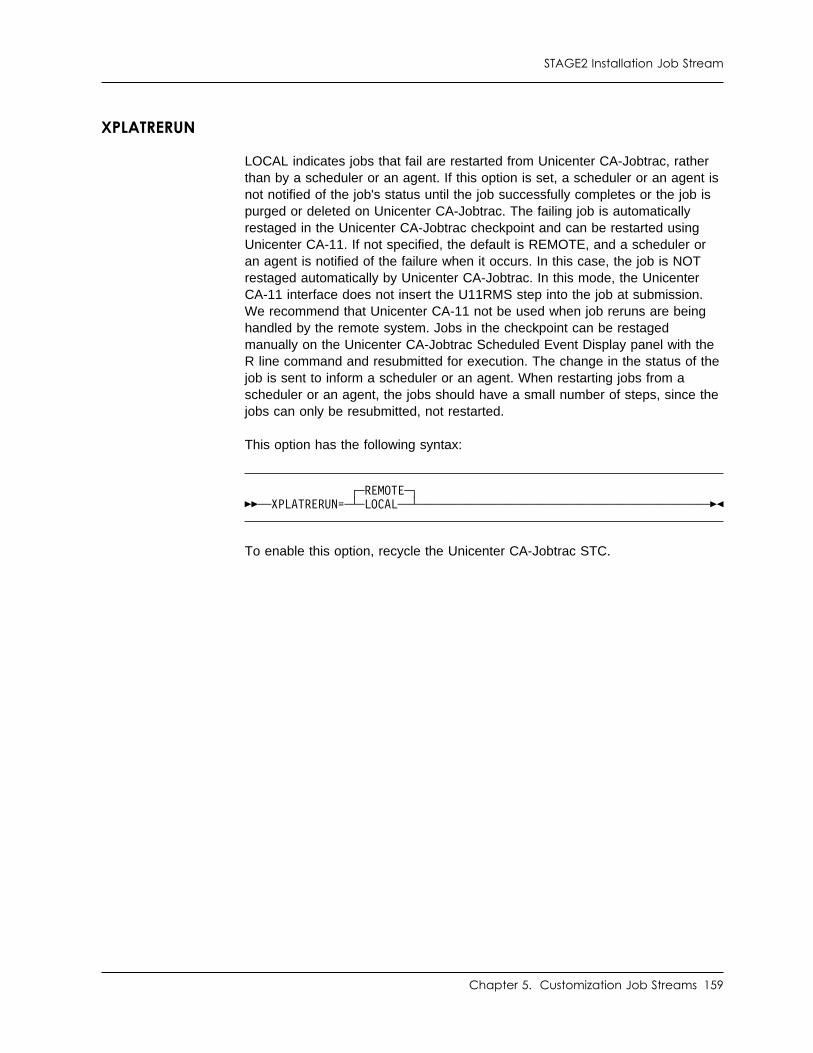
STAGE2 Installation Job Stream
XPLATRERUN
LOCAL indicates jobs that fail are restarted from Unicenter CA-Jobtrac, ratherthan by a scheduler or an agent. If this option is set, a scheduler or an agent isnot notified of the job's status until the job successfully completes or the job ispurged or deleted on Unicenter CA-Jobtrac. The failing job is automaticallyrestaged in the Unicenter CA-Jobtrac checkpoint and can be restarted usingUnicenter CA-11. If not specified, the default is REMOTE, and a scheduler oran agent is notified of the failure when it occurs. In this case, the job is NOTrestaged automatically by Unicenter CA-Jobtrac. In this mode, the UnicenterCA-11 interface does not insert the U11RMS step into the job at submission.We recommend that Unicenter CA-11 not be used when job reruns are beinghandled by the remote system. Jobs in the checkpoint can be restagedmanually on the Unicenter CA-Jobtrac Scheduled Event Display panel with theR line command and resubmitted for execution. The change in the status of thejob is sent to inform a scheduler or an agent. When restarting jobs from ascheduler or an agent, the jobs should have a small number of steps, since thejobs can only be resubmitted, not restarted.
This option has the following syntax:
┌ ┐─REMOTE─��─ ──XPLATRERUN= ──┴ ┴─LOCAL── ──────────────────────────────────────────��
To enable this option, recycle the Unicenter CA-Jobtrac STC.
Chapter 5. Customization Job Streams 159


Chapter 6. Customization Tasks
This section contains the following topics:
Modify CA-Datacom/AD for Unicenter CA-Jobtrac . . . . . . . . . . . . . . 162Alter the CA-Datacom/AD LXX and FXX . . . . . . . . . . . . . . . . . . . 165Modify CA-GSS . . . . . . . . . . . . . . . . . . . . . . . . . . . . . . . . . . 167Customize SYS1.PARMLIB . . . . . . . . . . . . . . . . . . . . . . . . . . . 171Set Up Default Authorization . . . . . . . . . . . . . . . . . . . . . . . . . . 174Set Up the JES3 Held Job Class . . . . . . . . . . . . . . . . . . . . . . . . 175Define Location Information (DYNAMLOC) and Initiation IMODs . . . . . 176Update Your TSO Procedures or CLIST . . . . . . . . . . . . . . . . . . . 180Set Global Options . . . . . . . . . . . . . . . . . . . . . . . . . . . . . . . . 184Copy the PRODDATE Member . . . . . . . . . . . . . . . . . . . . . . . . . 201Copy the JMFSYM01 Member . . . . . . . . . . . . . . . . . . . . . . . . . 202Copy the RESOURCE Member . . . . . . . . . . . . . . . . . . . . . . . . 203Copy the EXCLPARM Member . . . . . . . . . . . . . . . . . . . . . . . . . 204Maintain Table Modules . . . . . . . . . . . . . . . . . . . . . . . . . . . . . 205Set Up AMR Support . . . . . . . . . . . . . . . . . . . . . . . . . . . . . . 208Create IPLTABLE Entries (Optional) . . . . . . . . . . . . . . . . . . . . . . 209Enable the SPACE Command . . . . . . . . . . . . . . . . . . . . . . . . . 214Integration with Unicenter CA-11 . . . . . . . . . . . . . . . . . . . . . . . . 215Set Up CA-JCLTrac . . . . . . . . . . . . . . . . . . . . . . . . . . . . . . . 218Use Other Sysout Capture Products . . . . . . . . . . . . . . . . . . . . . . 230Cross-Platform Scheduling . . . . . . . . . . . . . . . . . . . . . . . . . . . 232Alter the Event Console Logging Message Options . . . . . . . . . . . . . 245
The following phases complete customization, set up, and implementation ofUnicenter CA-Jobtrac:
■ Customization tasks - Covered in this chapter
■ Startup and verification tasks - Covered in the chapter "Startup andVerification"
The customization tasks let you set up Unicenter CA-Jobtrac to meet yourinstallation's needs.
Note: For information about setting up user exits, see the Reports,Maintenance, and Recovery Guide.
Chapter 6. Customization Tasks 161
Modify CA-Datacom/AD for Unicenter CA-Jobtrac
Modify CA-Datacom/AD for Unicenter CA-Jobtrac
This topic describes the changes that you need to make to CA-Datacom/AD tosupport Unicenter CA-Jobtrac.
Startup Keywords for CUSMAC(DBDATIN1)
CA-Datacom/AD has a large number of startup parameters that you can modify.Very few of these parameters require changes, and we recommend that youuse the settings that were defined when CA-Datacom was installed for themajority of the parameters. These parameters are described in detail in theAdvantage CA-Datacom/DB Database and System Administrator Guide.
This section discuss only the few keywords that you need to be concerned within implementing Unicenter CA-Jobtrac. These keywords are specified in theCA-Datacom/AD CUSMAC(DBDATIN1).
MUF mufname
The MUF keyword gives a name to the MUF. You are required to specify thisname if you plan to share the Unicenter CA-Jobtrac database. XCF uses thismufname to allocate the CA-Datacom/AD address space in the sysplex. It isalways a good idea to specify this parameter, but it is required if the databaseis to be shared between systems. The optional parameters for the MUFkeyword are not described here since they need not be specified. The value is1-8 characters.
Later when the DBSIDPR module is discussed, this mufname is used to definethe XCF connection to the MUF.
TASKS number,size,,,xcf_tasks
The TASKS keyword defines the maximum number of tasks that are availablewith the CA-Datacom MUF to process database connections. Each connectionto the database requires a TASKS keyword. The size value should be specifiedas 32K. This a the required size for Unicenter CA-Jobtrac. The number is thetotal number of tasks that are available and includes the task specified in thexcf_tasks. The xcf_tasks is the number of tasks that are used for XCFconnection to the MUF. If you will have other products, such as UnicenterCA-11, using the same MUF, you must add the task required for UnicenterCA-11 to the values needed for these other products.
162 Planning and Implementation Guide
Modify CA-Datacom/AD for Unicenter CA-Jobtrac
To calculate the number of tasks needed, use the following formula:
xcf_tasks = (# of xcf connected Unicenter CA-Jobtracs * 14)+ (number of ISPF Unicenter CA-Jobtrac users * 3) + 50
number = xcf_tasks + 14 (for local) + (number of ISPF Unicenter CA-Jobtracusers * 3) + 50.
The extra 50 added to each value, 100 total, allows for batch utilities, reports,and some growth in ISPF users. If additional systems are added, you shouldcheck these values to ensure that enough tasks are specified.
XCFFROM jobname,XCF_group
The XCFFROM keyword defines an XCF group name to use for XCFconnections. This name is defined in the DBSIDPR module that is created toaccess the database. This name is 1-8 characters.
In addition, you can define the jobname that connects to the MUF. WithUnicenter CA-Jobtrac, we recommend that this be specified as * to allow all jobnames that use the group to connect. Since these "jobs" may also be TSO userIDs, it is not practical to limit access to the database to a single job name orname prefix.
LOGRCV option
The CA-Datacom/AD startup option, LOGRCV NO, establishes the creation ofthe recovery files. We recommend that you use the NO option.
By default, this value is set to NEVER, which reuses the log file and does notcreate the RXX recovery file. LOGRCV YES indicates to use a dedicated tapedrive for the recovery file. Since this is not usually the best solution, theLOGRCV NO option indicates that no tape is allocated, and the RXX is createdby running a spill job. The RXX recovery files are required to perform forwardrecovery on a database backup. The DBSPILL member of the UnicenterCA-Jobtrac SAMPJCL provides a sample spill job.
For more information about logging and spill processing, see the Reports,Maintenance, and Recovery Guide.
Chapter 6. Customization Tasks 163
Modify CA-Datacom/AD for Unicenter CA-Jobtrac
DBSIDPR Parameters
For an application to access a CA-Datacom/AD database, an access modulemust be created to define the methods to use. During the installation, aDBSIDPR module was created defining the SVC access. If you have a singleLPAR, this can be used as is. If you have multiple LPARs, you need toreassemble the DBSIDPR module to include the definitions for connecting usingXCF. For more information about modifying and reassembling this module, seethe Advantage CA-Datacom/DB Database and System Administrator Guide.
For Unicenter CA-Jobtrac, you only need to add the TOGROUP and TOMUFparameters if you are sharing the database. No other parameter changesshould be needed.
TOGROUP= defines the same group name that was defined in the XCFFROMparameter in the DBDATIN1 startup parameters for the MUF.
TOMUF= defines the mufname that was defined in the MUF parameter in theDDBDATIN1 startup parameters for the MUF.
The values in the TOGROUP and TOMUF must match the DBDATIN1 valuesfor the database to be accessible.
The following is an example of a DBSIDPR modified to include the XCFparameters TOMUF and TOGROUP.
TITLE 'DATACOM/AD - SYSTEM ID BLOCK' DBSYSID SVC=246,SUBID= , x TOMUF=ADMUF 1,TOGROUP=ADXGRP 1 END
164 Planning and Implementation Guide
Alter the CA-Datacom/AD LXX and FXX
Alter the CA-Datacom/AD LXX and FXX
CA-Datacom/AD has two files that you may need to adjust for UnicenterCA-Jobtrac, the LXX and the FXX.
LXX
The LXX is the log file for the CA-Datacom database. As distributed the LXX issized with the assumption that the recovery file, the RXX, will not be createdand that the LXX will wrap. As discussed in the overview of components andinstallation, we recommend that you create the recovery file, and therefore alsorecommend that you increase the size of the LXX. The size required dependson your workload and how frequently the spill job runs. Unicenter CA-Jobtracprovides you a sample job in member DBSPILL in the Unicenter CA-JobtracSAMPJCL data set. The more often you spill the LXX, the smaller the LXX youcan have. To help you estimate the LXX size, an MS Excel spreadsheet isavailable from the Unicenter CA-Jobtrac product page on SupportConnect. Werecommend that you download this spreadsheet to assist you with LXX sizing.
We recommend that you use a minimum of 300 cylinders.
CA-Datacom/AD issues the following message when the LXX is nearly full:
DB00308I LOG AREA IS nn% FULL, nnnnn BLOCKS SPILLABLE
You can choose to run the spill job at regular intervals such as every hour or tohave the job submitted in response to the DB00308I message. Your consoleautomation product or Unicenter CA-Jobtrac AMR facility can be set up tosubmit the DBSPILL job when the DB00308I message is issued.
The default warning percentage in 75%. This percentage is defined in theLOGSPILL keyword in the CA-Datacom/AD CUSMAC(DBDATIN1). If the LXXfills up, all database access stops until you run the spill job.
Note: For more information about the spill process, see the Reports,Maintenance, and Recovery Guide.
Chapter 6. Customization Tasks 165
Alter the CA-Datacom/AD LXX and FXX
To resize the LXX file, you need to perform the following steps:
1. Shut down CA-Datacom/AD normally, that is, P ADxxSTRT.
2. Find the DBLXX member of the Unicenter CA-Jobtrac SAMPJCL and reviewthe comments.
3. Rename your existing LXX data set to ...LXX.OLD.
4. Change the //LXX DD statement to specify the new size. You may want tochange TRK to CYL to specify the size in cylinders.
5. Locate the input control statement similar to the following:
INIT AREA=LXX,BLKSIZE=27998
6. Ensure that the size in the BLKSIZE= matches the block size used for theFXX.
7. Run this DBLXX job.
Before restarting CA-Datacom/AD, read the following information about FXX.
FXX
The FXX, known as the Force Log Area, is initialized at installation to support50 tasks. Unicenter CA-Jobtrac usually requires more than 50 tasks. In aprevious topic, you defined the TASKS parameter to CA-Datacom/AD. Youneed to allow for at least as many tasks in the FXX as were specified in theTASKS keyword. You may want to specify a number larger than the TASKSvalue to prevent having to change this number in the future.
To update the FXX, you need to perform the following steps:
1. Shut down CA-Datacom/AD normally, that is, P ADxxSTRT.
2. Find the DBFXX member of the Unicenter CA-Jobtrac SAMPJCL andreview the comments.
3. Locate the input control statement similar to the following:
INIT AREA=FXX,BLKSIZE=27998,TASKS=300
4. Specify a TASKS= value at least as large as the value specified in theCA-Datacom/AD TASKS startup parameter.
5. The size in the BLKSIZE= must match the block size used for the LXX.
6. Run this DBFXX job.
7. Restart CA-Datacom/AD.
166 Planning and Implementation Guide
Modify CA-GSS
Modify CA-GSS
Unicenter CA-Jobtrac uses CA-GSS facilities to extend its capabilities and toprovide you with fully customizable support for job scheduling. Also, UnicenterCA-Jobtrac information is made available to other CA-GSS client software,including that provided by you. For more information, see the CA CommonServices Getting Started guide.
Step 1: Modify JCL
If the Unicenter CA-Jobtrac load library (CAILIB) is not in a LINKLIST library,include it as a STEPLIB in the CA-GSS PROC. Also if the CA-Datacom/ADCUSLIB and CAILIB are not in LINKLIST, they also need to be added to theSTEPLIB. The following example shows the STEPLIB for CA-GSS when nolibraries are in LINKLIST:
//STEPLIB DD DSN=cai.gss.CAILIB,DISP=SHR// DD DSN=cai.jobtrac.CAILIB,DISP=SHR// DD DSN=cai.datacom.CUSLIB,DISP=SHR// DD DSN=cai.datacom.CAILIB,DISP=SHR
As needed, you can predefine the Unicenter CA-Jobtrac tokens to CA-GSS. Ifyou do not, it will be dynamically allocated when needed. Multiple DDstatements, defining multiple checkpoint data sets, can be specified if desired.The issuer of ADDRESS JOBTRAC commands will specify which token (andhence, which Unicenter CA-Jobtrac) will be affected by the commands.
Be sure that the token part of the ddname (n of JOBTRACn) matches theUnicenter CA-Jobtrac token ID for the associated Unicenter CA-Jobtrac. Anexample follows:
//JOBTRACY DD DUMMY//JOBTRAC3 DD DUMMY
If you are planning to use the cross-platform scheduling feature, it requiresadditional JCL changes and parameters. For more information, see“Cross-Platform Scheduling” on page 232. We recommend that the additionalchanges be made after the initial setup of CA-GSS is completed.
Chapter 6. Customization Tasks 167
Modify CA-GSS
Step 2: Modify CA-GSS Parameters
As needed, modify the CA-GSS initialization parameters that affect CA-GSS'Unicenter CA-Jobtrac support. The JOBTRAC member of the CA-GSSPPOPTION data set contains examples of these parameters.
Remember that:
■ Most parameters in the JOBTRAC member are commented out. To activateone of them, replace its leading asterisk (*) with a blank.
■ You can copy the JOBTRAC member's contents to your RUNPARMmember, or you can simply provide an INCLUDE JOBTRAC statement.
■ “Parameters You Need to Modify” on page 168 provides a summary ofeach parameter you need to modify. For a complete description of aCA-GSS initialization parameter, see the CA Common Servicesdocumentation.
Parameters You Need to Modify
ADDRESSMakes the ADDRESS environments provided on the Unicenter CA-Jobtracdistribution tape as load modules available to REXX IMODs. Rememberthat:
■ CA-distributed IMODs expect the address name JOBTRAC. If you useanother name, use the ALTNAME parameter to define JOBTRAC.
■ The MAXTASK argument limits the number of IMODs that maysimultaneously use the ADDRESS environment.
■ The names of load modules reflect the names as shipped on theUnicenter CA-Jobtrac tape. You must ensure that these load modulesreside in an APF-authorized library that is accessible to CA-GSS.
ISETIdentifies ISETs (IMOD libraries that are included on the UnicenterCA-Jobtrac tape).
168 Planning and Implementation Guide
Modify CA-GSS
JESNODEIdentifies the JES2 NJE node name in a multi-CPU environment where thiscopy of CA-GSS is executing.
CA-GSS currently requires this information in parametric form becausethere is no reliable way of obtaining the information directly from JES2 (thetechniques required are version and option dependent).
WTOExecutes the MSG_TRAC845 IMOD whenever the Unicenter CA-JobtracTRAC845E message is issued.
This IMOD, which is provided in the CA-GSS sample ISET, issues amulti-line WTO that explains the TRAC845E message in detail. The IMODthen sets an internal flag so that the multi-line message will not be reissueduntil the next time CA-GSS is initialized.
Step 3: Activate GoalNet
If you are operating in a multi-CPU environment, with or without shared DASDor running Unicenter CA-Jobtrac in an NJE environment, you may want toactivate GoalNet so that Unicenter CA-Jobtrac can exchange informationbetween multiple systems. For more information setting up GoalNet, see theCA Common Services documentation.
Chapter 6. Customization Tasks 169
Modify CA-GSS
Step 4: (Optional) Install REXX IMOD Sample Source
The Unicenter CA-Jobtrac installation tape contains a library of REXXSAMPLES that can be used with Unicenter CA-Jobtrac and CA-GSS. To installthese samples:
1. Modify job REXXCOPY in SAMPJCL to specify the volser and tape unittype for the Unicenter CA-Jobtrac installation tape, where indicated.
2. Submit REXXCOPY. This job will do the following:
a. Allocate PDS JT.SAMPREXX.
b. Copy the samples from the tape to JT.SAMPREXX.
c. Allocate VSAM ISET JT.SAMPISET.
d. Copy the IMODS from JT.SAMPREXX to JT.SAMPISET.
e. Compile the IMODs and place them in Test status. Test status preventsthe IMODs from loading automatically in CA-GSS.
3. Add an ISET statement for JT.SAMPISET to the RUNPARM, JOBTRAC, orISET member of the CA-GSS PPOPTION data set. A sample ISETstatement for the data set would look like the following:
ISET JOBTRAC DSN cai.JT.SAMPISET LOAD -DESC /CA-JOBTRAC SAMPLE IMODs/ SSID isrv
For specific RUNPARM control statement formats, see the CA CommonServices documentation.
170 Planning and Implementation Guide
Customize SYS1.PARMLIB
Customize SYS1.PARMLIB
Unicenter CA-Jobtrac extracts tracking information during event queuing,execution, and termination. It uses SMF type-30 records and builds dynamicinterfaces to exits IEFUJV and IEFU83. Exit IEAVMXIT is used to provide AMR(Automatic Message Recognition) services.
This section describes how to set up these exits.
Setting up IEAVMXIT is described on “Set Up AMR Support” on page 208.
Type-30: SMF type-30 records are created at job step termination and at jobtermination. Unicenter CA-Jobtrac uses these records to monitor jobcompletion.
Types 15 and 64: SMF record types 15 and 64 monitor data set activity.Unicenter CA-Jobtrac uses these records for data set triggering.
Type-26: Job purges create SMF type-26 records. Unicenter CA-Jobtrac usesthese records to monitor purged jobs.
Suppressing the Writing of Records: If you prefer not to keep the SMFrecords after Unicenter CA-Jobtrac uses them, you can suppress the writing ofthe record to the SMF data set by coding an IEFU83, IEFU84, or IEFU85 exit.The SAMPJCL library contains a sample IEFU83 exit. This sample can also belinked with aliases of IEFU84 and IEFU85. For linkage editing requirements forthe IEFU8x exits, see the appropriate IBM manuals.
Remember that if you suppress the records, they are not captured in your SMFdata sets. The system still creates the records in an SMF buffer, UnicenterCA-Jobtrac reads them, and then Unicenter CA-Jobtrac deletes them.
Important! If you specify a JES subsystem ('SUBSYS(JES')), you must includethe SMF record types and exits described in the following procedure. If you donot, Unicenter CA-Jobtrac will not track events correctly.
Chapter 6. Customization Tasks 171
Customize SYS1.PARMLIB
Procedure: Follow these steps to customize SYS1.PARMLIB memberSMFPRMxx and set up required exits:
1. Make sure exits IEFUJV and IEFU83 are set up in your system. You canuse an IEFBR14 dummy exit for any exit not already in your system. Thesample member LINKSMF in the SAMPJCL library shows how to set up adummy exit.
All exits, including IEFBR14 dummies, should be linked as RENT andREUS.
2. Make sure exits IEFUJV and IEFU83 are included in LPALIB.
Exit IEFUJV must be in LPALIB to ensure proper Unicenter CA-Jobtracoperation. Exit IEFU83 must be in LPALIB for proper control of dynamicDSN triggering tables. Unicenter CA-Jobtrac operates correctly but with lessfunction when IEFU83 is not present.
3. Make sure that Unicenter CA-Jobtrac will function with the SMFconfiguration in SYS1.PARMLIB member SMFPRMxx. The minimumconfiguration is shown in the following:
SYS(TYPE(15,26,3 ,64),EXITS(IEFUJV,IEFU83))
SUBSYS(STC,EXITS(IEFU29,IEFU83,IEFU84))
4. Perform an IPL with CLPA before starting Unicenter CA-Jobtrac if youadded any exits to SYS1.LPALIB.
5. Suppress any of the following record SMF types 15, 26, 30, or 64 if you donot want to record them by coding an IEFU83, IEFU84, or IEFU85 exit. TheUnicenter CA-Jobtrac SAMPJCL library contains a sample IEFU83 exit,named SAMPU83. This sample can also be linked with aliases of IEFU84and IEFU85. For linkage editing requirements for the IEFU8x exits, see theappropriate IBM manuals.
6. Perform an F JOBTRAC,BACK command before refreshing SMF if you arerefreshing SMF exits dynamically.
172 Planning and Implementation Guide
Customize SYS1.PARMLIB
Example SYS1.PARMLIB Member SMFPRMxx: The following figure is anexample of a SYS1.PARMLIB SMFPRMxx member:
ACTIVE /� ACTIVE SMF RECORDING �/DSNAME(SYS1.MAN1,SYS1.MAN2,SYS1.MAN3) /� ETS MAN1 AND MAN2 �/NOPROMPT /� NO OPERATOR PROMPT �/REC(PERM) /� TYPE 17 PERM RECORDS ONLY �/MAXDORM(3 ) /� WRITE AN IDLE BUFFER AFTER 3 MIN �/STATUS( 1 ) /� WRITE SMF STATS AFTER 1 HOUR �/JWT( 2 ) /� 522 AFTER 2 HOURS �/SID(B1) /� SYSTEM ID IS B1 �/NOLISTDSN /� NO DATASET LISTING �/SYS(TYPE( :255),EXITS(IEFU83,IEFU84,IEFUJV, IEFUJP,IEFUSO,IEFUTL,IEFU29),INTERVAL( 15 ),DETAIL)
SUBSYS(STC,EXITS(IEFU29,IEFU83,IEFU84), INTERVAL(SMF,SYNC))
/� WRITE ALL RECORDS AS THE SYSTEM DEFAULT, TAKE ALL KNOWNEXITS. THERE ARE NO DEFAULT INTERVAL RECORDS WRITTEN.ONLY SUMMARY TYPE 32 RECORDS ARE WRITTEN FOR TSO.NOTE:FOR JES2, JES EXITS ARE CONTROLLED BY JES. FORJES3, THE EXITS ARE CONTROLLED BY SMF. �/
/� WRITE ALL RECORDS AS BY SYSTEM DEFAULT, TAKE ONLY THREEEXITS, NOTE:IEFU29 EXECUTES IN THE MASTER ASID WHICH IS ASTC ADDRESS SPACE SO IEFU29 MUST BE ON FOR STC. USE ALL OTHERSYS PARAMETERS AS A DEFAULT �/
Chapter 6. Customization Tasks 173
Set Up Default Authorization
Set Up Default Authorization
The Unicenter CA-Jobtrac TRACAUTH table is used to do the following:
■ Define the Unicenter CA-Jobtrac functions a user can perform
■ Assign names to locations
■ Define who the system notifies of abends and errors
The table is created by including @AUTH macro statements in the ASMAUTHjob. ASMAUTH is then assembled and linked. You can modify the table at anytime, even when Unicenter CA-Jobtrac is running.
Authorization Alternative: Instead of using the TRACAUTH table, you canuse the TRACX26 user exit to interface to your system's security software. Forinformation, see the TRACX26 exit in the Reports, Maintenance, and RecoveryGuide.
Using @JOBTRAC?: A user ID assigned to the Unicenter CA-Jobtrac startedtask must be added to the TRACAUTH table to allow @JOBTRAC (ADDRESSJOBTRAC) to pass security checking.
Important! Before modifying the TRACAUTH table for your needs, you shouldassemble and link it for use with the Unicenter CA-Jobtrac verificationprocedure, IVP. If you do not, the IVP will not work properly. The necessaryprocedures follow.
TRACAUTH Table Used for Verification: Take the following steps to modifythe TRACAUTH table:
1. Edit member ASMAUTH in the SAMPJCL library.
2. Review the JCL carefully, making revisions to reflect your installation'srequirements.
3. Run the ASMAUTH job to assemble and link the TRACAUTH table.
4. The TRACAUTH table is automatically loaded when Unicenter CA-Jobtrac isstarted. If you are modifying the table when Unicenter CA-Jobtrac isrunning, issue the following command to load the modified table:
F taskname,AUTH
Note: For more information setting up custom authorizations, see TRACAUTHsecurity in the Reports, Maintenance, and Recovery Guide.
174 Planning and Implementation Guide
Set Up the JES3 Held Job Class
Set Up the JES3 Held Job Class
Requirement: If you have not already assigned a sysout hold class forUnicenter CA-Jobtrac, your JES3 system programmer must use the JESinitialization parameters to do so. You cannot use the sysout capture file untilthe sysout hold class for Unicenter CA-Jobtrac is defined.
JES3 Requirement: For JES3 you need to define the sysout class as follows:
SYSOUT,CLASS=J,TYPE=(PRINT),HOLD=EXTWTR
Optionally add the following:
,DEST=LOCAL
Chapter 6. Customization Tasks 175
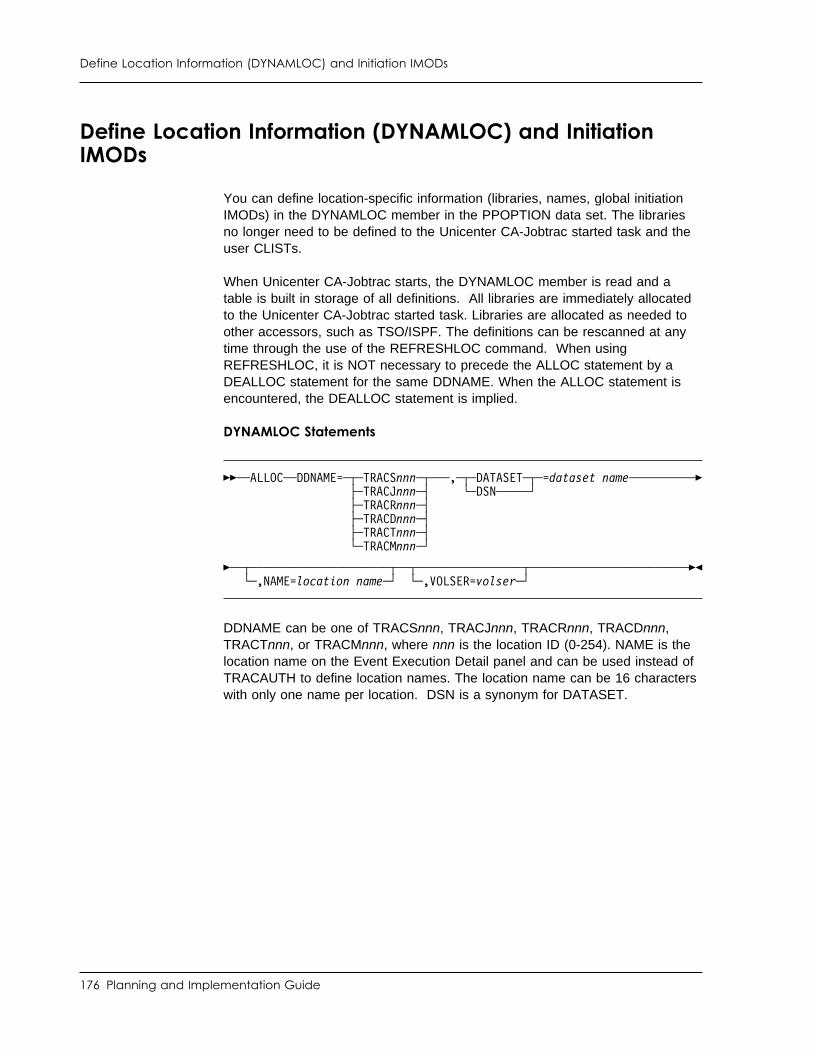
Define Location Information (DYNAMLOC) and Initiation IMODs
Define Location Information (DYNAMLOC) and InitiationIMODs
You can define location-specific information (libraries, names, global initiationIMODs) in the DYNAMLOC member in the PPOPTION data set. The librariesno longer need to be defined to the Unicenter CA-Jobtrac started task and theuser CLISTs.
When Unicenter CA-Jobtrac starts, the DYNAMLOC member is read and atable is built in storage of all definitions. All libraries are immediately allocatedto the Unicenter CA-Jobtrac started task. Libraries are allocated as needed toother accessors, such as TSO/ISPF. The definitions can be rescanned at anytime through the use of the REFRESHLOC command. When usingREFRESHLOC, it is NOT necessary to precede the ALLOC statement by aDEALLOC statement for the same DDNAME. When the ALLOC statement isencountered, the DEALLOC statement is implied.
DYNAMLOC Statements
��──ALLOC─ ──DDNAME= ──┬ ┬──TRACSnnn ──, ──┬ ┬─DATASET─ =dataset name ─────────�├ ┤──TRACJnnn └ ┘─DSN─────├ ┤──TRACRnnn├ ┤──TRACDnnn├ ┤──TRACTnnn└ ┘──TRACMnnn
�─ ──┬ ┬───────────────────── ──┬ ┬──────────────── ───────────────────────��└ ┘──,NAME=location name └ ┘──,VOLSER=volser
DDNAME can be one of TRACSnnn, TRACJnnn, TRACRnnn, TRACDnnn,TRACTnnn, or TRACMnnn, where nnn is the location ID (0-254). NAME is thelocation name on the Event Execution Detail panel and can be used instead ofTRACAUTH to define location names. The location name can be 16 characterswith only one name per location. DSN is a synonym for DATASET.
176 Planning and Implementation Guide
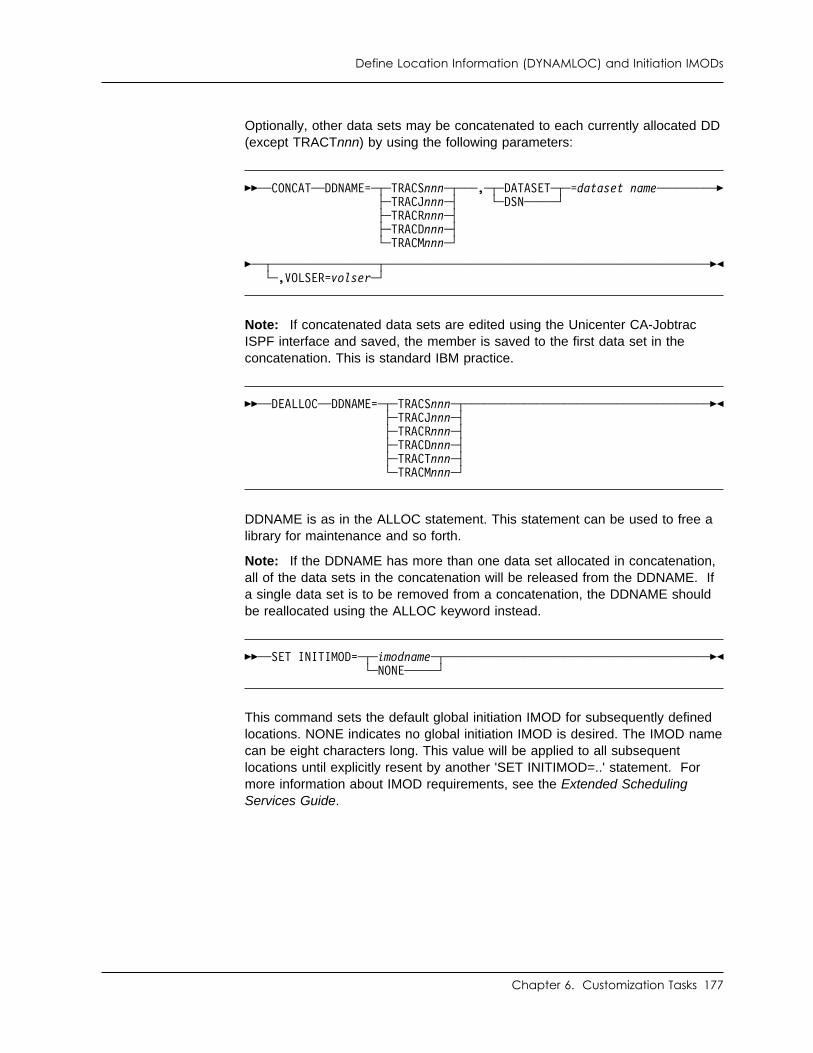
Define Location Information (DYNAMLOC) and Initiation IMODs
Optionally, other data sets may be concatenated to each currently allocated DD(except TRACTnnn) by using the following parameters:
��──CONCAT─ ──DDNAME= ──┬ ┬──TRACSnnn ──, ──┬ ┬─DATASET─ =dataset name ────────�├ ┤──TRACJnnn └ ┘─DSN─────├ ┤──TRACRnnn├ ┤──TRACDnnn└ ┘──TRACMnnn
�─ ──┬ ┬──────────────── ────────────────────────────────────────────────��└ ┘──,VOLSER=volser
Note: If concatenated data sets are edited using the Unicenter CA-JobtracISPF interface and saved, the member is saved to the first data set in theconcatenation. This is standard IBM practice.
��──DEALLOC─ ──DDNAME= ──┬ ┬──TRACSnnn ───────────────────────────────────��├ ┤──TRACJnnn├ ┤──TRACRnnn├ ┤──TRACDnnn├ ┤──TRACTnnn└ ┘──TRACMnnn
DDNAME is as in the ALLOC statement. This statement can be used to free alibrary for maintenance and so forth.
Note: If the DDNAME has more than one data set allocated in concatenation,all of the data sets in the concatenation will be released from the DDNAME. Ifa single data set is to be removed from a concatenation, the DDNAME shouldbe reallocated using the ALLOC keyword instead.
��─ ──SET INITIMOD= ──┬ ┬─imodname─ ──────────────────────────────────────�� └ ┘─NONE─────
This command sets the default global initiation IMOD for subsequently definedlocations. NONE indicates no global initiation IMOD is desired. The IMOD namecan be eight characters long. This value will be applied to all subsequentlocations until explicitly resent by another 'SET INITIMOD=..' statement. Formore information about IMOD requirements, see the Extended SchedulingServices Guide.
Chapter 6. Customization Tasks 177
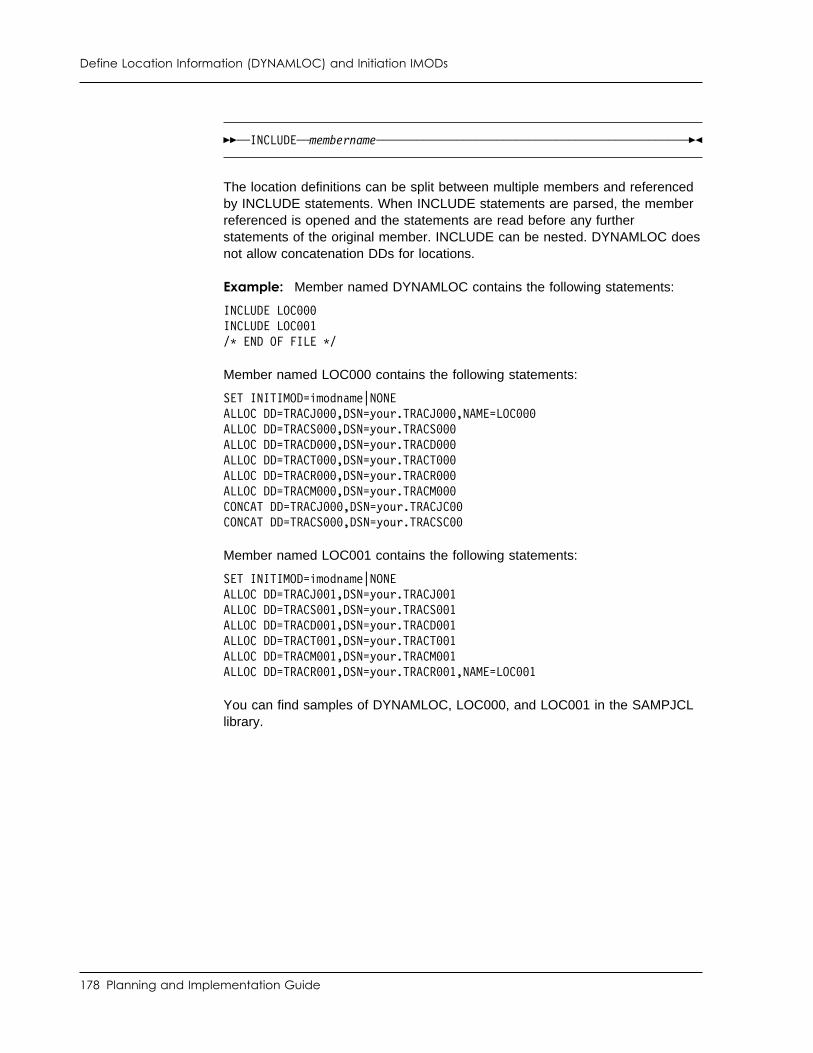
Define Location Information (DYNAMLOC) and Initiation IMODs
��──INCLUDE──membername───────────────────────────────────────────────��
The location definitions can be split between multiple members and referencedby INCLUDE statements. When INCLUDE statements are parsed, the memberreferenced is opened and the statements are read before any furtherstatements of the original member. INCLUDE can be nested. DYNAMLOC doesnot allow concatenation DDs for locations.
Example: Member named DYNAMLOC contains the following statements:
INCLUDE LOC INCLUDE LOC 1/� END OF FILE �/
Member named LOC000 contains the following statements:
SET INITIMOD=imodname|NONEALLOC DD=TRACJ ,DSN=your.TRACJ ,NAME=LOC ALLOC DD=TRACS ,DSN=your.TRACS ALLOC DD=TRACD ,DSN=your.TRACD ALLOC DD=TRACT ,DSN=your.TRACT ALLOC DD=TRACR ,DSN=your.TRACR ALLOC DD=TRACM ,DSN=your.TRACM CONCAT DD=TRACJ ,DSN=your.TRACJC CONCAT DD=TRACS ,DSN=your.TRACSC
Member named LOC001 contains the following statements:
SET INITIMOD=imodname|NONEALLOC DD=TRACJ 1,DSN=your.TRACJ 1ALLOC DD=TRACS 1,DSN=your.TRACS 1ALLOC DD=TRACD 1,DSN=your.TRACD 1ALLOC DD=TRACT 1,DSN=your.TRACT 1ALLOC DD=TRACM 1,DSN=your.TRACM 1ALLOC DD=TRACR 1,DSN=your.TRACR 1,NAME=LOC 1
You can find samples of DYNAMLOC, LOC000, and LOC001 in the SAMPJCLlibrary.
178 Planning and Implementation Guide
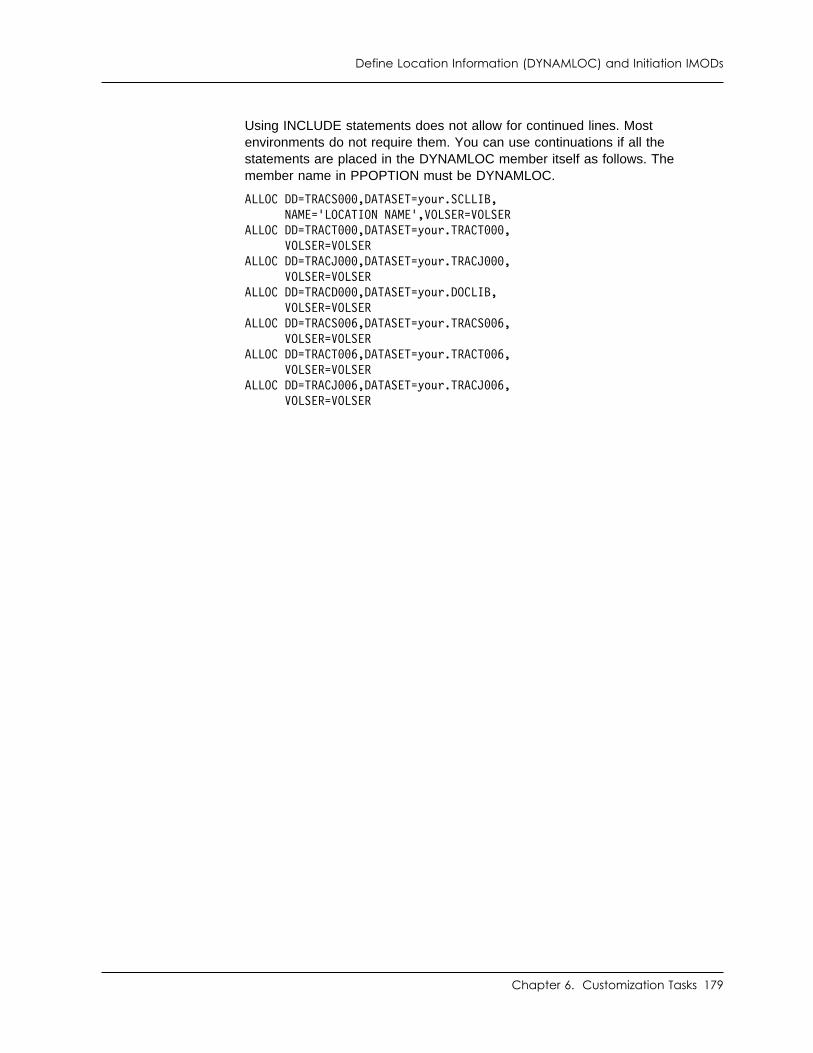
Define Location Information (DYNAMLOC) and Initiation IMODs
Using INCLUDE statements does not allow for continued lines. Mostenvironments do not require them. You can use continuations if all thestatements are placed in the DYNAMLOC member itself as follows. Themember name in PPOPTION must be DYNAMLOC.
ALLOC DD=TRACS ,DATASET=your.SCLLIB, NAME='LOCATION NAME',VOLSER=VOLSERALLOC DD=TRACT ,DATASET=your.TRACT , VOLSER=VOLSERALLOC DD=TRACJ ,DATASET=your.TRACJ , VOLSER=VOLSERALLOC DD=TRACD ,DATASET=your.DOCLIB, VOLSER=VOLSERALLOC DD=TRACS 6,DATASET=your.TRACS 6, VOLSER=VOLSERALLOC DD=TRACT 6,DATASET=your.TRACT 6, VOLSER=VOLSERALLOC DD=TRACJ 6,DATASET=your.TRACJ 6, VOLSER=VOLSER
Chapter 6. Customization Tasks 179
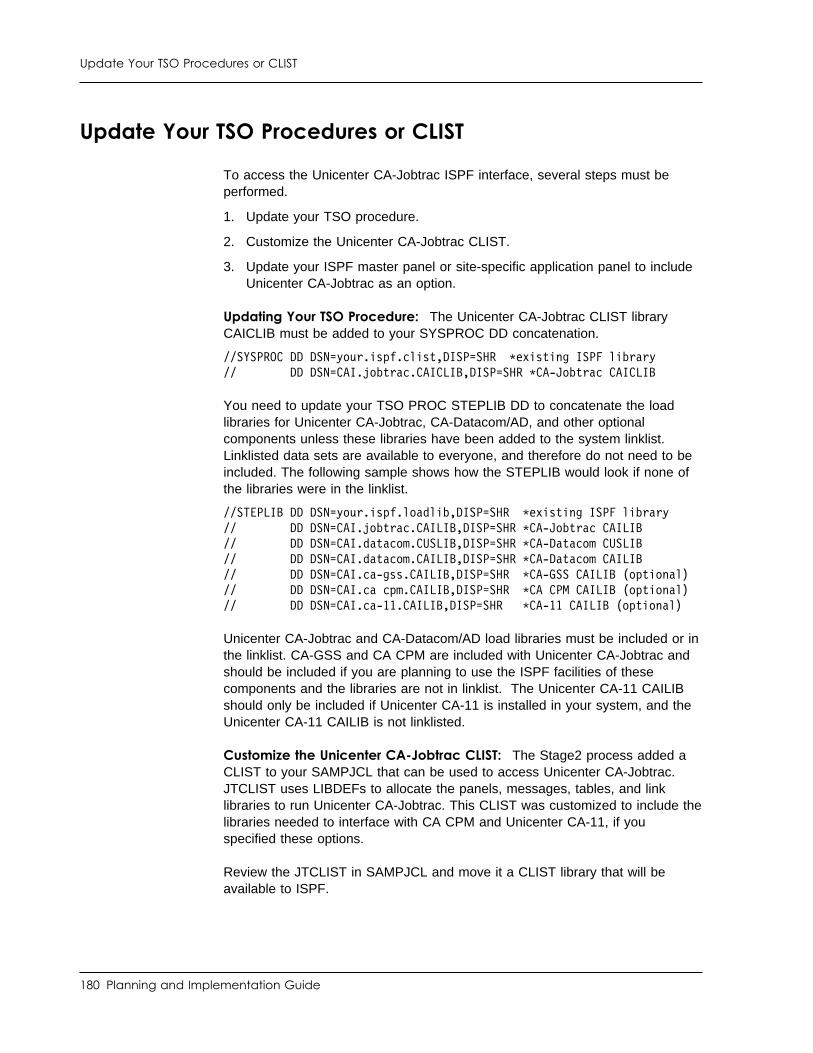
Update Your TSO Procedures or CLIST
Update Your TSO Procedures or CLIST
To access the Unicenter CA-Jobtrac ISPF interface, several steps must beperformed.
1. Update your TSO procedure.
2. Customize the Unicenter CA-Jobtrac CLIST.
3. Update your ISPF master panel or site-specific application panel to includeUnicenter CA-Jobtrac as an option.
Updating Your TSO Procedure: The Unicenter CA-Jobtrac CLIST libraryCAICLIB must be added to your SYSPROC DD concatenation.
//SYSPROC DD DSN=your.ispf.clist,DISP=SHR �existing ISPF library// DD DSN=CAI.jobtrac.CAICLIB,DISP=SHR �CA-Jobtrac CAICLIB
You need to update your TSO PROC STEPLIB DD to concatenate the loadlibraries for Unicenter CA-Jobtrac, CA-Datacom/AD, and other optionalcomponents unless these libraries have been added to the system linklist.Linklisted data sets are available to everyone, and therefore do not need to beincluded. The following sample shows how the STEPLIB would look if none ofthe libraries were in the linklist.
//STEPLIB DD DSN=your.ispf.loadlib,DISP=SHR �existing ISPF library// DD DSN=CAI.jobtrac.CAILIB,DISP=SHR �CA-Jobtrac CAILIB// DD DSN=CAI.datacom.CUSLIB,DISP=SHR �CA-Datacom CUSLIB// DD DSN=CAI.datacom.CAILIB,DISP=SHR �CA-Datacom CAILIB// DD DSN=CAI.ca-gss.CAILIB,DISP=SHR �CA-GSS CAILIB (optional)// DD DSN=CAI.ca cpm.CAILIB,DISP=SHR �CA CPM CAILIB (optional)// DD DSN=CAI.ca-11.CAILIB,DISP=SHR �CA-11 CAILIB (optional)
Unicenter CA-Jobtrac and CA-Datacom/AD load libraries must be included or inthe linklist. CA-GSS and CA CPM are included with Unicenter CA-Jobtrac andshould be included if you are planning to use the ISPF facilities of thesecomponents and the libraries are not in linklist. The Unicenter CA-11 CAILIBshould only be included if Unicenter CA-11 is installed in your system, and theUnicenter CA-11 CAILIB is not linklisted.
Customize the Unicenter CA-Jobtrac CLIST: The Stage2 process added aCLIST to your SAMPJCL that can be used to access Unicenter CA-Jobtrac.JTCLIST uses LIBDEFs to allocate the panels, messages, tables, and linklibraries to run Unicenter CA-Jobtrac. This CLIST was customized to include thelibraries needed to interface with CA CPM and Unicenter CA-11, if youspecified these options.
Review the JTCLIST in SAMPJCL and move it a CLIST library that will beavailable to ISPF.
180 Planning and Implementation Guide
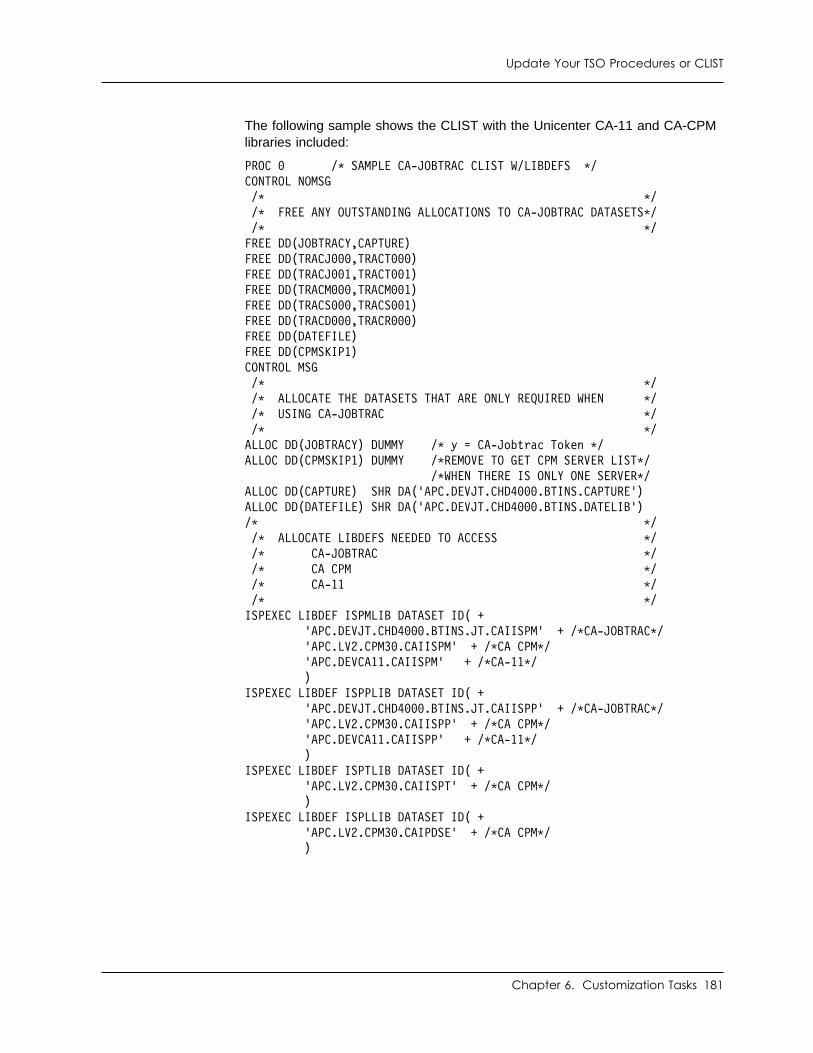
Update Your TSO Procedures or CLIST
The following sample shows the CLIST with the Unicenter CA-11 and CA-CPMlibraries included:
PROC /� SAMPLE CA-JOBTRAC CLIST W/LIBDEFS �/CONTROL NOMSG /� �/ /� FREE ANY OUTSTANDING ALLOCATIONS TO CA-JOBTRAC DATASETS�/ /� �/FREE DD(JOBTRACY,CAPTURE)FREE DD(TRACJ ,TRACT )FREE DD(TRACJ 1,TRACT 1)FREE DD(TRACM ,TRACM 1)FREE DD(TRACS ,TRACS 1)FREE DD(TRACD ,TRACR )FREE DD(DATEFILE)FREE DD(CPMSKIP1)CONTROL MSG /� �/ /� ALLOCATE THE DATASETS THAT ARE ONLY REQUIRED WHEN �/ /� USING CA-JOBTRAC �/ /� �/ALLOC DD(JOBTRACY) DUMMY /� y = CA-Jobtrac Token �/ALLOC DD(CPMSKIP1) DUMMY /�REMOVE TO GET CPM SERVER LIST�/
/�WHEN THERE IS ONLY ONE SERVER�/ALLOC DD(CAPTURE) SHR DA('APC.DEVJT.CHD4 .BTINS.CAPTURE')ALLOC DD(DATEFILE) SHR DA('APC.DEVJT.CHD4 .BTINS.DATELIB')/� �/ /� ALLOCATE LIBDEFS NEEDED TO ACCESS �/ /� CA-JOBTRAC �/ /� CA CPM �/ /� CA-11 �/ /� �/ISPEXEC LIBDEF ISPMLIB DATASET ID( + 'APC.DEVJT.CHD4 .BTINS.JT.CAIISPM' + /�CA-JOBTRAC�/
'APC.LV2.CPM3 .CAIISPM' + /�CA CPM�/ 'APC.DEVCA11.CAIISPM' + /�CA-11�/ )ISPEXEC LIBDEF ISPPLIB DATASET ID( + 'APC.DEVJT.CHD4 .BTINS.JT.CAIISPP' + /�CA-JOBTRAC�/
'APC.LV2.CPM3 .CAIISPP' + /�CA CPM�/ 'APC.DEVCA11.CAIISPP' + /�CA-11�/ )ISPEXEC LIBDEF ISPTLIB DATASET ID( +
'APC.LV2.CPM3 .CAIISPT' + /�CA CPM�/ )ISPEXEC LIBDEF ISPLLIB DATASET ID( +
'APC.LV2.CPM3 .CAIPDSE' + /�CA CPM�/ )
Chapter 6. Customization Tasks 181
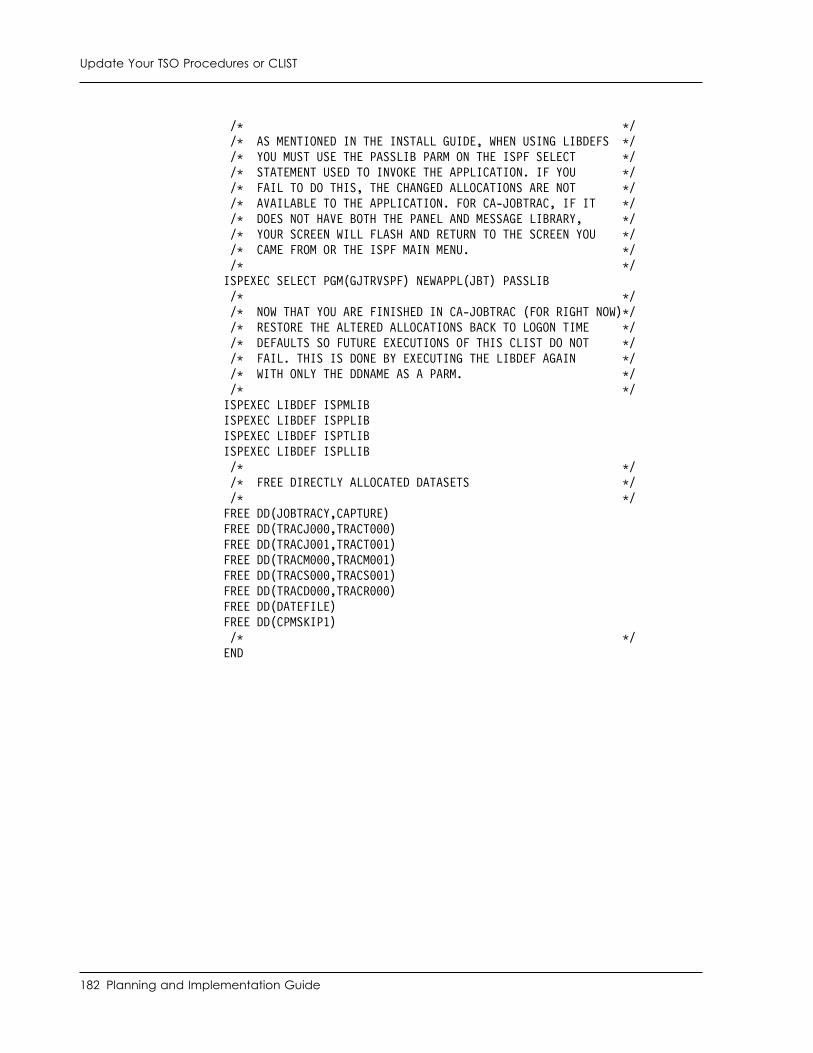
Update Your TSO Procedures or CLIST
/� �/ /� AS MENTIONED IN THE INSTALL GUIDE, WHEN USING LIBDEFS �/ /� YOU MUST USE THE PASSLIB PARM ON THE ISPF SELECT �/ /� STATEMENT USED TO INVOKE THE APPLICATION. IF YOU �/ /� FAIL TO DO THIS, THE CHANGED ALLOCATIONS ARE NOT �/ /� AVAILABLE TO THE APPLICATION. FOR CA-JOBTRAC, IF IT �/ /� DOES NOT HAVE BOTH THE PANEL AND MESSAGE LIBRARY, �/ /� YOUR SCREEN WILL FLASH AND RETURN TO THE SCREEN YOU �/ /� CAME FROM OR THE ISPF MAIN MENU. �/ /� �/ISPEXEC SELECT PGM(GJTRVSPF) NEWAPPL(JBT) PASSLIB /� �/ /� NOW THAT YOU ARE FINISHED IN CA-JOBTRAC (FOR RIGHT NOW)�/ /� RESTORE THE ALTERED ALLOCATIONS BACK TO LOGON TIME �/ /� DEFAULTS SO FUTURE EXECUTIONS OF THIS CLIST DO NOT �/ /� FAIL. THIS IS DONE BY EXECUTING THE LIBDEF AGAIN �/ /� WITH ONLY THE DDNAME AS A PARM. �/ /� �/ISPEXEC LIBDEF ISPMLIBISPEXEC LIBDEF ISPPLIBISPEXEC LIBDEF ISPTLIBISPEXEC LIBDEF ISPLLIB /� �/ /� FREE DIRECTLY ALLOCATED DATASETS �/ /� �/FREE DD(JOBTRACY,CAPTURE)FREE DD(TRACJ ,TRACT )FREE DD(TRACJ 1,TRACT 1)FREE DD(TRACM ,TRACM 1)FREE DD(TRACS ,TRACS 1)FREE DD(TRACD ,TRACR )FREE DD(DATEFILE)FREE DD(CPMSKIP1) /� �/END
182 Planning and Implementation Guide
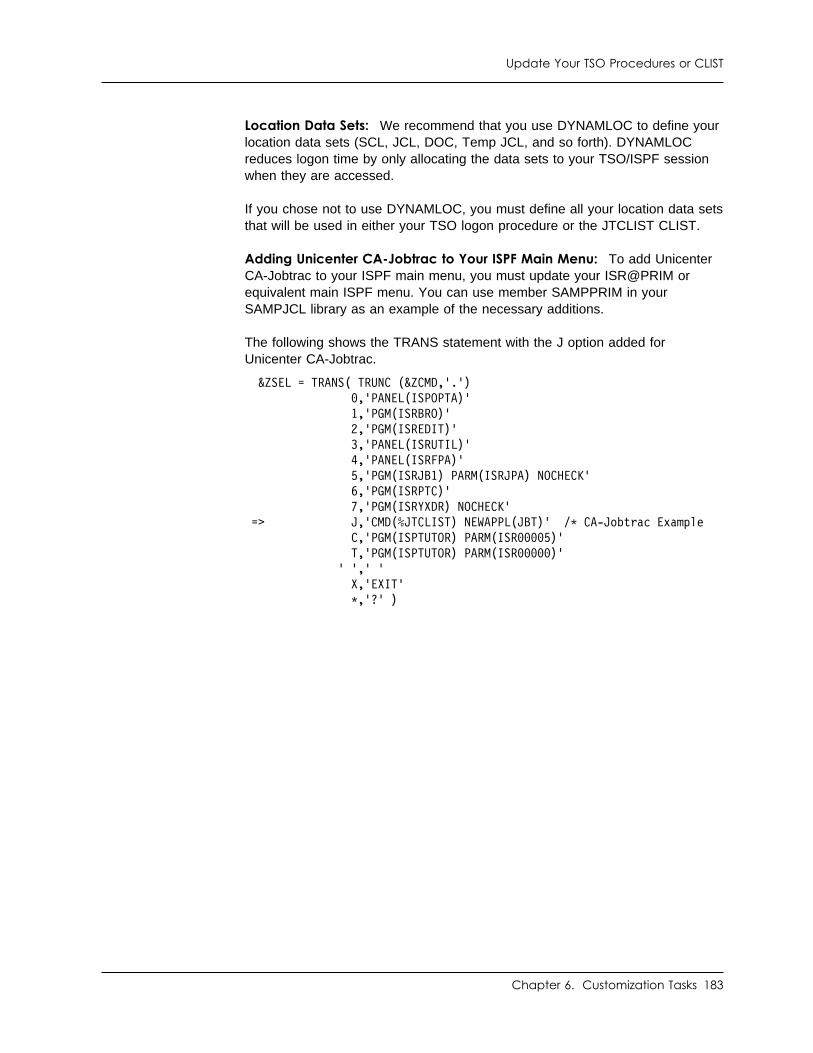
Update Your TSO Procedures or CLIST
Location Data Sets: We recommend that you use DYNAMLOC to define yourlocation data sets (SCL, JCL, DOC, Temp JCL, and so forth). DYNAMLOCreduces logon time by only allocating the data sets to your TSO/ISPF sessionwhen they are accessed.
If you chose not to use DYNAMLOC, you must define all your location data setsthat will be used in either your TSO logon procedure or the JTCLIST CLIST.
Adding Unicenter CA-Jobtrac to Your ISPF Main Menu: To add UnicenterCA-Jobtrac to your ISPF main menu, you must update your ISR@PRIM orequivalent main ISPF menu. You can use member SAMPPRIM in yourSAMPJCL library as an example of the necessary additions.
The following shows the TRANS statement with the J option added forUnicenter CA-Jobtrac.
&ZSEL = TRANS( TRUNC (&ZCMD,'.') ,'PANEL(ISPOPTA)' 1,'PGM(ISRBRO)' 2,'PGM(ISREDIT)' 3,'PANEL(ISRUTIL)' 4,'PANEL(ISRFPA)'
5,'PGM(ISRJB1) PARM(ISRJPA) NOCHECK' 6,'PGM(ISRPTC)' 7,'PGM(ISRYXDR) NOCHECK' => J,'CMD(%JTCLIST) NEWAPPL(JBT)' /� CA-Jobtrac Example C,'PGM(ISPTUTOR) PARM(ISR 5)' T,'PGM(ISPTUTOR) PARM(ISR )'
' ',' ' X,'EXIT' �,'?' )
Chapter 6. Customization Tasks 183
Set Global Options
Set Global Options
Unicenter CA-Jobtrac global options describe global values and theenvironment in which Unicenter CA-Jobtrac operates.
Unicenter CA-Jobtrac global options are set using the Unicenter CA-Jobtracglobal options panels and the JOBTRAnn member. Some options are set usingthe global options panels only, some by the JOBTRAnn member only, andsome options are set using either one. Additionally, some of the options setusing JOBTRAnn are displayed on the global options panels, but they cannotbe set on the panels.
Note: For more information about the JOBTRAnn member, see customizationjob streams in this guide.
Requirement: To access the options panels, the Unicenter CA-Jobtracinternal control blocks must be initialized. Since some of these options, such asthe GSS Subsys name, should be specified before starting UnicenterCA-Jobtrac for the first time, we recommend that you run the VINITx procedurewith PARM=INIT to initialize the Unicenter CA-Jobtrac internals without startingthe Unicenter CA-Jobtrac started task. The VINITx procedure was set up in thechapter "Customization Job Streams." The following command can be issuedto run VINITx.
S VINITx,PARM=INIT
For information about using VINITx, see the chapter "Startup and Verification."
Follow these steps to change global options using the global options panels:
1. Start Unicenter CA-Jobtrac. For information about starting UnicenterCA-Jobtrac, see the chapter "Startup and Verification."
2. Issue the SYS OPTS command from any Unicenter CA-Jobtrac display todisplay the Global Options Menu.
3. Select option A, All of the Above.
The Unicenter CA-Jobtrac Global Options panel appears, which is the firstin the series of global options panels.
Instead of option A, you can select a specific options panel if you want tochange a selected option.
4. Change entries on the CA-Jobtrac Global Options panel so that the optionsare set as required for your installation. For a description of the options,see “Options on the CA-Jobtrac Global Options Panel” on page 186.
Press Enter to save your changes, or press the End PF key to exit withoutsaving your changes. The Sysout Capture Options panel appears.
184 Planning and Implementation Guide
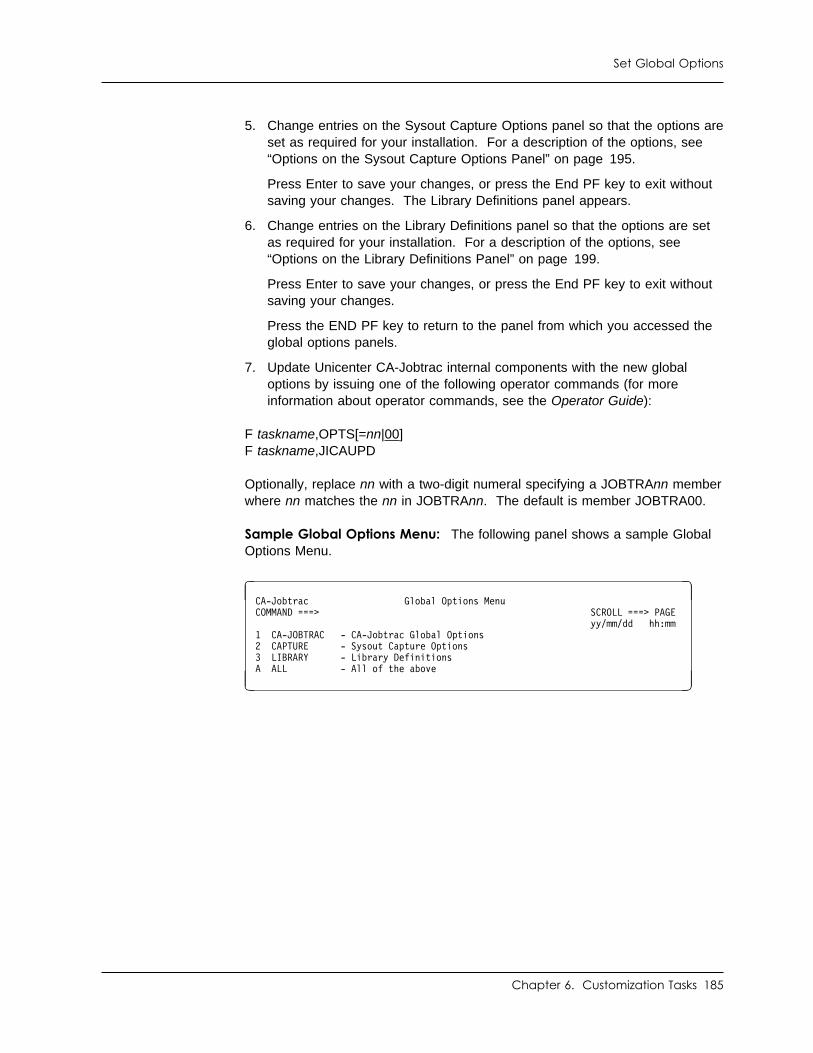
Set Global Options
5. Change entries on the Sysout Capture Options panel so that the options areset as required for your installation. For a description of the options, see“Options on the Sysout Capture Options Panel” on page 195.
Press Enter to save your changes, or press the End PF key to exit withoutsaving your changes. The Library Definitions panel appears.
6. Change entries on the Library Definitions panel so that the options are setas required for your installation. For a description of the options, see“Options on the Library Definitions Panel” on page 199.
Press Enter to save your changes, or press the End PF key to exit withoutsaving your changes.
Press the END PF key to return to the panel from which you accessed theglobal options panels.
7. Update Unicenter CA-Jobtrac internal components with the new globaloptions by issuing one of the following operator commands (for moreinformation about operator commands, see the Operator Guide):
F taskname,OPTS[=nn|00]F taskname,JICAUPD
Optionally, replace nn with a two-digit numeral specifying a JOBTRAnn memberwhere nn matches the nn in JOBTRAnn. The default is member JOBTRA00.
Sample Global Options Menu: The following panel shows a sample GlobalOptions Menu.
� �CA-Jobtrac Global Options MenuCOMMAND ===> SCROLL ===> PAGE yy/mm/dd hh:mm1 CA-JOBTRAC - CA-Jobtrac Global Options2 CAPTURE - Sysout Capture Options3 LIBRARY - Library DefinitionsA ALL - All of the above
� �
Chapter 6. Customization Tasks 185
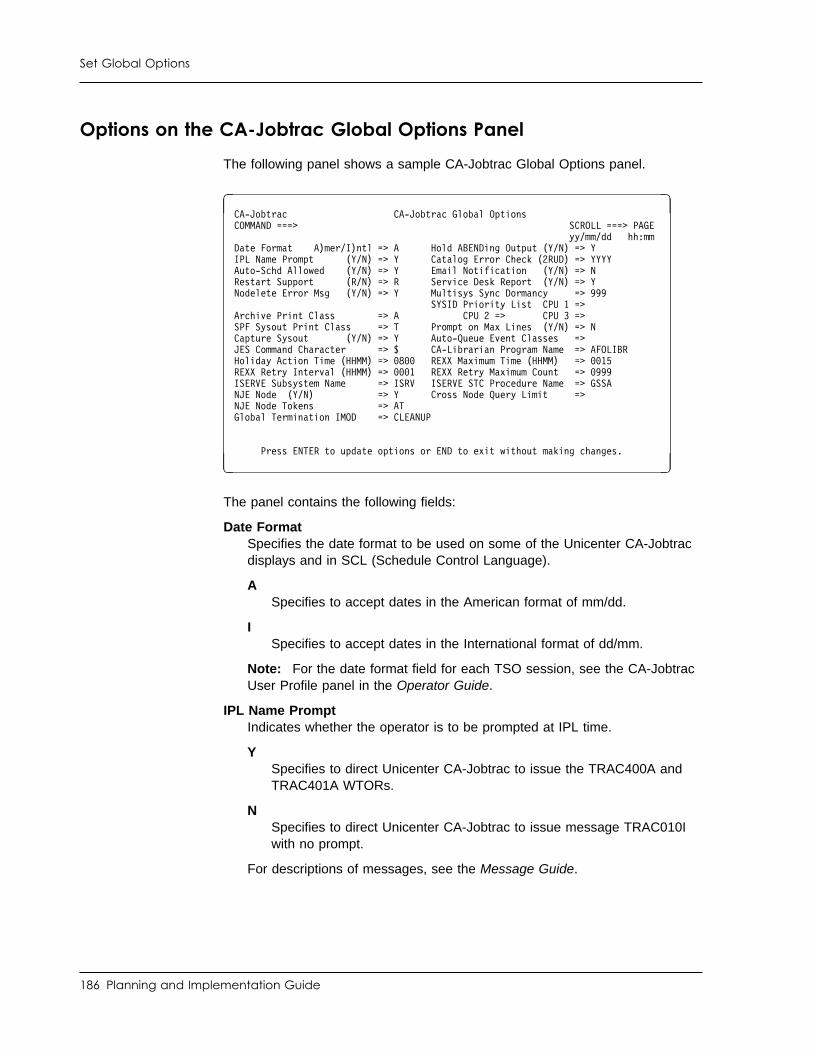
Set Global Options
Options on the CA-Jobtrac Global Options Panel
The following panel shows a sample CA-Jobtrac Global Options panel.
� �CA-Jobtrac CA-Jobtrac Global OptionsCOMMAND ===> SCROLL ===> PAGE yy/mm/dd hh:mmDate Format A)mer/I)ntl => A Hold ABENDing Output (Y/N) => YIPL Name Prompt (Y/N) => Y Catalog Error Check (2RUD) => YYYYAuto-Schd Allowed (Y/N) => Y Email Notification (Y/N) => NRestart Support (R/N) => R Service Desk Report (Y/N) => YNodelete Error Msg (Y/N) => Y Multisys Sync Dormancy => 999
SYSID Priority List CPU 1 =>Archive Print Class => A CPU 2 => CPU 3 =>SPF Sysout Print Class => T Prompt on Max Lines (Y/N) => NCapture Sysout (Y/N) => Y Auto-Queue Event Classes =>JES Command Character => $ CA-Librarian Program Name => AFOLIBRHoliday Action Time (HHMM) => 8 REXX Maximum Time (HHMM) => 15REXX Retry Interval (HHMM) => 1 REXX Retry Maximum Count => 999ISERVE Subsystem Name => ISRV ISERVE STC Procedure Name => GSSANJE Node (Y/N) => Y Cross Node Query Limit =>NJE Node Tokens => ATGlobal Termination IMOD => CLEANUP
Press ENTER to update options or END to exit without making changes.� �
The panel contains the following fields:
Date FormatSpecifies the date format to be used on some of the Unicenter CA-Jobtracdisplays and in SCL (Schedule Control Language).
ASpecifies to accept dates in the American format of mm/dd.
ISpecifies to accept dates in the International format of dd/mm.
Note: For the date format field for each TSO session, see the CA-JobtracUser Profile panel in the Operator Guide.
IPL Name PromptIndicates whether the operator is to be prompted at IPL time.
YSpecifies to direct Unicenter CA-Jobtrac to issue the TRAC400A andTRAC401A WTORs.
NSpecifies to direct Unicenter CA-Jobtrac to issue message TRAC010Iwith no prompt.
For descriptions of messages, see the Message Guide.
186 Planning and Implementation Guide
Set Global Options
AUTO-SCHD AllowedSpecifies whether the AUTO-SCHD feature is supported. For completeinformation about the AUTO-SCHD feature, see the Operator Guide.
YSpecifies to direct Unicenter CA-Jobtrac to dynamically add any eventthat is submitted (by any means) with a special AUTO-SCHD characterto the Unicenter CA-Jobtrac current schedule if the event is not alreadyscheduled.
NSpecifies to prevent addition of AUTO-SCHD events to the UnicenterCA-Jobtrac current schedule.
For more information, see “AUTOC” on page 133 and “AUTOQ” onpage 134.
Restart SupportSpecifies the restart/rerun system to be used. The following values areavailable:
RSpecifies to direct the restart system (Unicenter CA-11) to perform steprestarts. For more information, see the Unicenter CA-11 documentation.
NSpecifies that no restart automation is in use.
Nodelete Error MessageSpecifies whether to direct Unicenter CA-Jobtrac to send the followingnondeletable message to the operator console when a scheduled UnicenterCA-Jobtrac event ends with an abend, JCL error, condition code exception,or NOT CATALOGED 2 error:
TRACWARN - JOB jobname STEP:stepname ABENDED, CODE=abcode(or COND CODE=ccode or CATALOG ERROR NOTED)
If a reader JCL error occurs or an operator purges an event, the followingFLUSHED message is issued:
TRACWARN - JOB jobname FLUSHED, DID NOT EXECUTE.
YSpecifies to send these messages.
NSpecifies to suppress these messages.
Archive Print ClassSpecifies a print class if you archive to print. Microfiche users should beaware that Unicenter CA-Jobtrac sorts sysouts by job name and places afull frame separator page between sysouts on the archive tape for offlinemicrofiche and between sysouts in the print queue for online microfiche.
Chapter 6. Customization Tasks 187
Set Global Options
SPF Sysout Print ClassWhen viewing sysouts in Unicenter CA-Jobtrac/ISPF, you can print a copyof any listing. The sysout class you specify in this field is the output class ofthe TSO copy.
Capture SysoutSpecifies your method of capturing sysout:
YSpecifies to direct Unicenter CA-Jobtrac to capture sysouts for onlineviewing.
NSpecifies to direct Unicenter CA-Jobtrac to bypass sysout capture. (Youshould specify N if you want Unicenter CA-View to handle the sysoutcapture.)
The capture classes are defined on the Sysout Capture Options panel.Even if you set this field to N, you must specify a primary capture class. Itis used for all schedule captures.
Unicenter CA-Jobtrac attempts to spool ANY SYSOUT of a UnicenterCA-Jobtrac-submitted event if Y is selected in the global options. All outputclasses should be specified in the Sysout Capture Options to be spooledproperly. If not defined in the Sysout Capture Options, UnicenterCA-Jobtrac issues these warning messages:
TRAC 98W WAITING FOR SYSOUT, JOB: eventname -NONE FOUND IN ANY CLASS YET
TRAC 99W SYSOUT NOT FOUND, eventname BYPASSED.
JES Command CharacterDefines the prefix character you will use to indicate that a consolecommand is to be processed by JES.
This option is set in member JOBTRAnn (see the chapter "CustomizationJob Streams"). You cannot change this option on the CA-Jobtrac GlobalOptions panel.
188 Planning and Implementation Guide
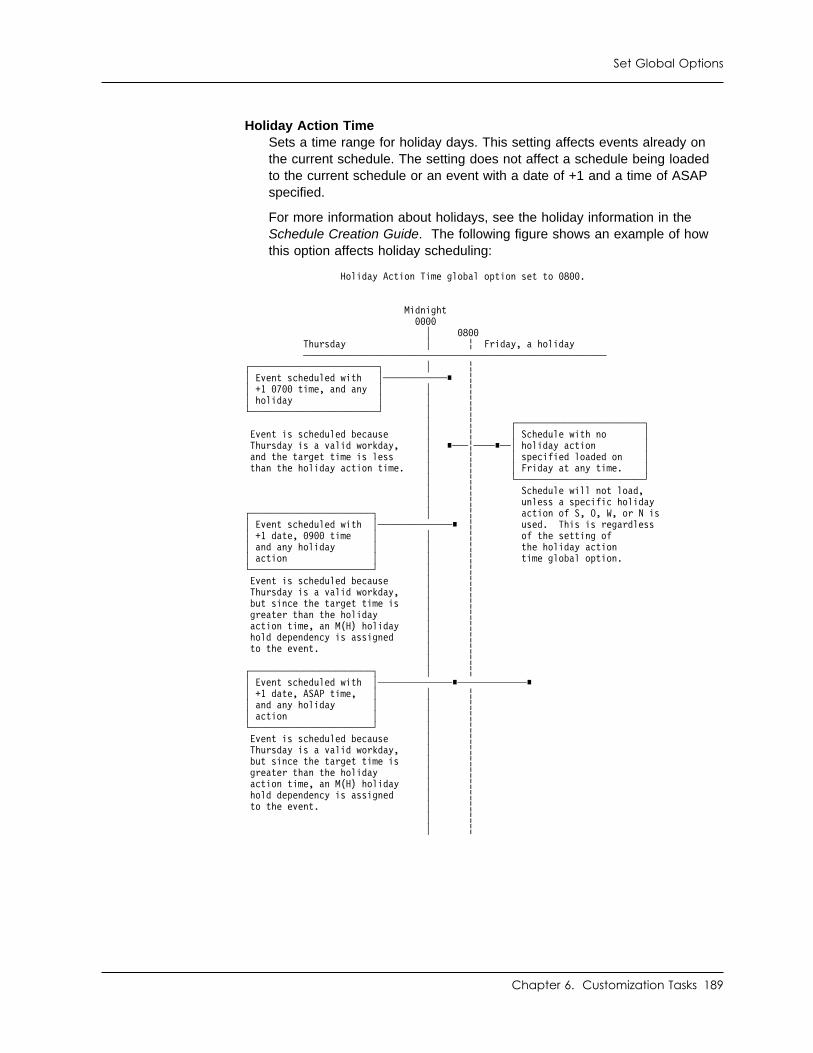
Set Global Options
Holiday Action TimeSets a time range for holiday days. This setting affects events already onthe current schedule. The setting does not affect a schedule being loadedto the current schedule or an event with a date of +1 and a time of ASAPspecified.
For more information about holidays, see the holiday information in theSchedule Creation Guide. The following figure shows an example of howthis option affects holiday scheduling:
Holiday Action Time global option set to 8 .
Midnight │ 8
Thursday │ ¦ Friday, a holiday ─────────────────────────────────────────────────────────┌────────────────────────┐ │ ¦│ Event scheduled with │────────────■ ¦│ +1 7 time, and any │ │ ¦│ holiday │ │ ¦└────────────────────────┘ │ ¦
│ ¦ ┌────────────────────────┐ Event is scheduled because │ ¦ │ Schedule with no │ Thursday is a valid workday, │ ■───¦────■──│ holiday action │ and the target time is less │ ¦ │ specified loaded on │ than the holiday action time. │ ¦ │ Friday at any time. │
│ ¦ └────────────────────────┘│ ¦ Schedule will not load,│ ¦ unless a specific holiday
┌───────────────────────┐ │ ¦ action of S, O, W, or N is│ Event scheduled with │──────────────■ ¦ used. This is regardless│ +1 date, 9 time │ │ ¦ of the setting of│ and any holiday │ │ ¦ the holiday action│ action │ │ ¦ time global option.└───────────────────────┘ │ ¦ Event is scheduled because │ ¦ Thursday is a valid workday, │ ¦ but since the target time is │ ¦ greater than the holiday │ ¦ action time, an M(H) holiday │ ¦ hold dependency is assigned │ ¦ to the event. │ ¦ │ ¦┌───────────────────────┐ │ ¦│ Event scheduled with │──────────────■─────────────■│ +1 date, ASAP time, │ │ ¦│ and any holiday │ │ ¦│ action │ │ ¦└───────────────────────┘ │ ¦ Event is scheduled because │ ¦ Thursday is a valid workday, │ ¦ but since the target time is │ ¦ greater than the holiday │ ¦ action time, an M(H) holiday │ ¦ hold dependency is assigned │ ¦ to the event. │ ¦ │ ¦ │ ¦
Chapter 6. Customization Tasks 189
Set Global Options
REXX Retry IntervalSpecifies the amount of time an environmental dependency waits beforeexecuting again. This option is used with the REXX Retry Maximum Countoption. This option applies to environmental dependencies. For informationabout using this option effectively, see the REXX information in theExtended Scheduling Services Guide.
ISERVE Subsystem NameSpecifies the name of the CA-GSS IMOD Facility (CA-GSS subsystem) tosend REXX IMOD and environmental dependency requests to. You canhave multiple subsystems defined. The Unicenter CA-Jobtrac REXX facilitychecks whether the subsystem is running. If not running, the facilityattempts to start the subsystem. If the facility cannot start the subsystem,an error message is issued.
NJE NodeSpecifies whether to activate the Unicenter CA-Jobtrac NJE support for thisinstance of Unicenter CA-Jobtrac on this system image. If you specify Y,the NJE Node Tokens field becomes significant.
NJE Node TokensA Unicenter CA-Jobtrac token is the x in JOBTRACx DD statement. Thetoken identifies and differentiates individual copies of Unicenter CA-Jobtrac.
In this field, you specify which of the Unicenter CA-Jobtrac events arerecognized by this Unicenter CA-Jobtrac. This is done by listing up to 39tokens. If you leave this field blank, all tokens (that is all events from allUnicenter CA-Jobtracs) are processed by this Unicenter CA-Jobtrac. If youleave the field blank, do one of the following:
■ Only start up one NJE-capable Unicenter CA-Jobtrac on any singlesystem image
■ Specify non-overlapping tokens for each Unicenter CA-Jobtrac running
The JES /*ROUTE or /*XEQ statements identify an event as an NJE event.
If you explicitly specify tokens and you submit NJE jobs to the submittingnode itself, you should specify the token of the submitting UnicenterCA-Jobtrac itself in the token list.
The specified NJE nodes apply only to the NJE events for the UnicenterCA-Jobtracs that are specified as being NJE nodes. All other UnicenterCA-Jobtrac instances recognize only their own tokens.
Global Termination IMODSpecifies the name of the global termination IMOD. The use of a globaltermination IMOD is optional.
The global termination IMOD executes after each event. The executiontakes place immediately after Unicenter CA-Jobtrac recognizes thetermination of an event, but before Unicenter CA-Jobtrac calls user exitTRACX09 or releases successors.
190 Planning and Implementation Guide
Set Global Options
This order of execution permits the IMOD to alter the status or attributes ofthe event from within the IMOD using @JOBTRAC (ADDRESS JOBTRAC).For example, you can add an output release dependency to prevent therelease of successors until some user action is taken. The execution of theIMOD does not prevent Unicenter CA-Jobtrac from processing other events.Consequently, multiple instances of the global termination IMOD canexecute at the same time for different events.
Hold ABENDing OutputSpecifies whether to direct Unicenter CA-Jobtrac to issue a $HJnnnnmessage immediately at termination for any event that ends in an abend,condition code check, or catalog error. This prevents accidental printing ofoutput.
YSpecifies to issue the $HJnnnn message.
NSpecifies not to issue the $HJnnnn message.
Catalog Error CheckDefines the Unicenter CA-Jobtrac response to IBM messages indicatingcatalog errors in a batch job. Each of the four characters in the field can beset to Y (yes) or N (no) and correspond to the positional codes 2RUD,which are described in the following:
2Not cataloged 2
RNot recataloged
UNot uncataloged
DNot deleted
If the code is set to Y, Unicenter CA-Jobtrac checks for these messages incaptured sysouts. If the message is found, Unicenter CA-Jobtrac imposesan output release dependency (code O) on the event. The operator mustthen issue the A line command to remove the O dependency and releaseany successors.
If the code is set to N, Unicenter CA-Jobtrac will not check for thesemessages.
Chapter 6. Customization Tasks 191
Set Global Options
Email NotificationSpecifies whether to send emails. For complete information about theemail feature, see the Extended Scheduling Services Guide.
YSpecifies to direct Unicenter CA-Jobtrac to send emails atpredetermined events.
NSpecifies to disable the email feature.
For more information, see the Extended Scheduling Services Guide.
Service Desk ReportSpecifies whether to open Unicenter Service Desk requests for selectedjobs that have unsuccessful completion and for other Unicenter CA-Jobtracproblems that may have a major impact.
YSpecifies to open Unicenter Service Desk requests.
NSpecifies to disable the Unicenter Service Desk feature.
Multisys Sync DormancyThis option is used only in multi-system installations.
A Unicenter CA-Jobtrac started task runs on each system in a shared JESspool environment. If for any reason the primary system (the onedesignated to submit events) fails, the secondary system (the one next inpriority) prompts the operator and requests dynamic transfer of primaryduties (event submission, sysout capture, and so on) to the next system.
The Multisys Sync Dormancy field indicates the number of seconds theprimary system can be inactive before the secondary system prompts theoperator for a decision.
This option is set in member JOBTRAnn (see the chapter "CustomizationJob Streams"). You cannot change this option on the CA-Jobtrac GlobalOptions panel.
192 Planning and Implementation Guide
Set Global Options
SYSID Priority ListIndicates the priority sequence of the SMF IDs for one to three systems in ashared spool environment. System 1 is the primary CPU and assumes theduties of event submission and sysout management. System 2 is thesecondary system and assumes control if system 1 loses communicationwith system 2. If both system 1 and system 2 are down, system 3 takescontrol.
If primary roles are transferred and the failing system comes back up, itassumes a secondary role until the operator issues an ACTSYS=sysidcommand to restore or reassign the primary system. For information aboutswitching primary systems, see the Reports, Maintenance, and RecoveryGuide.
This option is set in member JOBTRAnn (see the chapter "CustomizationJob Streams"). You cannot change this option on the CA-Jobtrac GlobalOptions panel.
Prompt On Max LinesSpecifies whether to issue a TRAC196A WTOR each time it reaches theline limit for a single job in a given class. You can limit the line count oneach output class during sysout capture (see the Sysout Capture Optionspanel on “Options on the Sysout Capture Options Panel” on page 195).
YSpecifies to issue the WTOR.
NSpecifies to suppress the WTOR.
Auto-Queue Job ClassesSpecifies up to eight auto-queue job classes for external submission of JCLfor jobs scheduled by Unicenter CA-Jobtrac with dependency code Q. Anevent submitted in one of these classes will be flushed with a JCL error ifthe event is not already on the schedule with a Q dependency code. Forinformation about using auto-queue job classes, see the Operator Guide.
This option is set in member JOBTRAnn (see the chapter "CustomizationJob Streams"). You cannot change this option on the CA-Jobtrac GlobalOptions panel.
CA-Librarian Program NameIn installations that use AllFusion CA-Librarian for JCL editing andsubmission, the Master Library utility program has a customer-definedprogram name. This field indicates the batch utility program name.
This option is set in member JOBTRAnn (see the chapter "CustomizationJob Streams"). You cannot change this option on the CA-Jobtrac GlobalOptions panel.
Chapter 6. Customization Tasks 193
Set Global Options
REXX Maximum TimeIndicates the maximum amount of elapsed time a REXX IMOD orenvironmental dependency can run before it is considered to be in a loop. Ifthe maximum amount of time is exceeded, the REXX IMOD orenvironmental dependency is canceled. Use zero to denote there is no timelimit. For information about using this option effectively, see the REXXinformation in the Extended Scheduling Services Guide.
REXX Retry Maximum CountIndicates the number of times an environmental dependency executes,trying to satisfy its condition. This option is used with the REXX RetryInterval option. This option applies to environmental dependencies. Forinformation about using this option effectively, see the REXX information inthe Extended Scheduling Services Guide.
ISERVE STC Procedure NameIdentifies the name of procedure to use to bring up the subsystem if thesubsystem specified in the ISERVE Subsystem Name field is not running.
Cross Node Query LimitWhen using the Cross Node Query panel, to query events across multipleNJE nodes, a time limit for the query can be imposed.
This field specifies a global time limit for the query. Specify the time limit inminutes, up to two digits. When the time limit expires, the query ends andthe information obtained to that point appears. A user can also specify alocal time limit. If the user's specified time limit is more than the global timelimit, the global time limit is used.
If you leave this field blank or specify 0, no time limit is imposed.
194 Planning and Implementation Guide
Set Global Options
Options on the Sysout Capture Options Panel
The Sysout Capture Options panel lets you define up to four sysout captureclasses with different processing characteristics.
How the JES Hold Output Command Affects Sysout Capture: The JEShold output command is issued as soon as possible. When this occurs dependson if you are using the Unicenter CA-Jobtrac sysout capture feature. Thefollowing table explains when the command is issued:
Note: For more information, see “CAPDMPS” on page 134.
First Definition: The first definition (class 1) is the primary definition. It is usedfor all schedule captures.
The first Output Capture Class field must be specified, even if you are notcapturing sysout (Capture Sysout field on the CA-Jobtrac Global Options panelset to N). Class A is a good class to use since it is not held anywhere, andUnicenter CA-Jobtrac does not capture nonheld sysout.
Using the SysoutCapture Feature?
When the Hold Output Command Is Issued
No The hold output command is issued as soon as the jobfailure is detected, while the job is still running. Holdoutput commands keep output writers from accessing theoutput. Output writers include the TSO OUTPUTcommand (that report the job has no held output at somelevels) and capture packages such as Unicenter CA-Viewor Unicenter CA-Spool. Packages such as UnicenterCA-SYSVIEW can view the output.
Yes Unicenter CA-Jobtrac cannot hold the job at the momentthe job fails, or it could not capture the job's output.Instead, Unicenter CA-Jobtrac holds the job at the pointthat the capture subtask is told to begin work on it. Thiscan be several seconds after the job ends, so nonheldsysout could be printed or spooled to some other writer.
A better approach in this case is to ensure that all thesysouts created by your Unicenter CA-Jobtrac jobs areheld sysouts. Then specify the Unicenter CA-Jobtracsysout capture options to requeue the output to theoriginal class if you desire. The sysout capture processorwill detect the failure and will leave the output from failedjobs alone (in the sysout held class).
Chapter 6. Customization Tasks 195
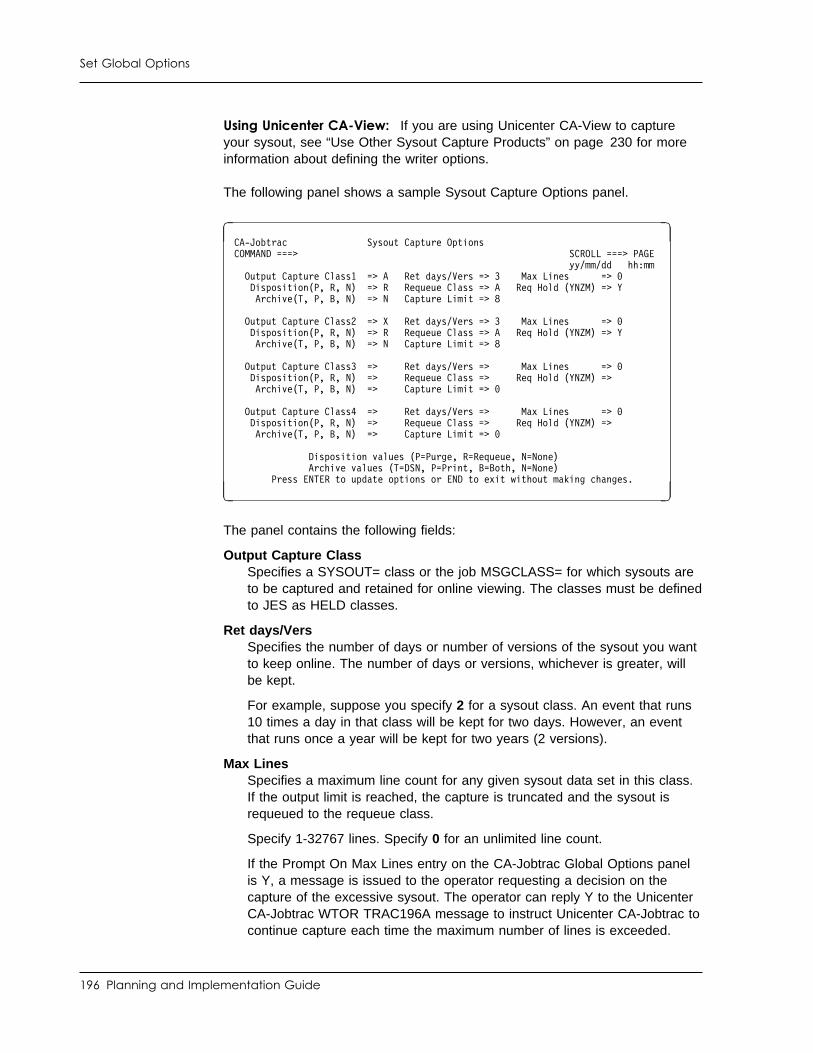
Set Global Options
Using Unicenter CA-View: If you are using Unicenter CA-View to captureyour sysout, see “Use Other Sysout Capture Products” on page 230 for moreinformation about defining the writer options.
The following panel shows a sample Sysout Capture Options panel.
� �CA-Jobtrac Sysout Capture OptionsCOMMAND ===> SCROLL ===> PAGE yy/mm/dd hh:mmOutput Capture Class1 => A Ret days/Vers => 3 Max Lines => Disposition(P, R, N) => R Requeue Class => A Req Hold (YNZM) => YArchive(T, P, B, N) => N Capture Limit => 8
Output Capture Class2 => X Ret days/Vers => 3 Max Lines => Disposition(P, R, N) => R Requeue Class => A Req Hold (YNZM) => YArchive(T, P, B, N) => N Capture Limit => 8
Output Capture Class3 => Ret days/Vers => Max Lines => Disposition(P, R, N) => Requeue Class => Req Hold (YNZM) =>Archive(T, P, B, N) => Capture Limit =>
Output Capture Class4 => Ret days/Vers => Max Lines => Disposition(P, R, N) => Requeue Class => Req Hold (YNZM) =>Archive(T, P, B, N) => Capture Limit =>
Disposition values (P=Purge, R=Requeue, N=None)Archive values (T=DSN, P=Print, B=Both, N=None)
Press ENTER to update options or END to exit without making changes.� �
The panel contains the following fields:
Output Capture ClassSpecifies a SYSOUT= class or the job MSGCLASS= for which sysouts areto be captured and retained for online viewing. The classes must be definedto JES as HELD classes.
Ret days/VersSpecifies the number of days or number of versions of the sysout you wantto keep online. The number of days or versions, whichever is greater, willbe kept.
For example, suppose you specify 2 for a sysout class. An event that runs10 times a day in that class will be kept for two days. However, an eventthat runs once a year will be kept for two years (2 versions).
Max LinesSpecifies a maximum line count for any given sysout data set in this class.If the output limit is reached, the capture is truncated and the sysout isrequeued to the requeue class.
Specify 1-32767 lines. Specify 0 for an unlimited line count.
If the Prompt On Max Lines entry on the CA-Jobtrac Global Options panelis Y, a message is issued to the operator requesting a decision on thecapture of the excessive sysout. The operator can reply Y to the UnicenterCA-Jobtrac WTOR TRAC196A message to instruct Unicenter CA-Jobtrac tocontinue capture each time the maximum number of lines is exceeded.
196 Planning and Implementation Guide
Set Global Options
Disposition (P,R,N)Specifies a sysout disposition of P, R, or N for normal (non-abending) jobs.The following explains each disposition:
PPurges captured sysouts from the JES queue
RRequeues captured sysouts to the sysout requeue class in held statusafter successful capture
NRetains captured sysouts in their held message class after capture
Requeue ClassSpecifies the output class to which you want all requeue requests sent. Itshould be a print class that is not held. Unicenter CA-Jobtrac places a holdon each requeued event. Scheduled events that abend have all theiroutput requeued to this class after it is successfully captured.
You can also use this parameter to reroute output to another sysoutarchival product. If you are using another sysout archival product, see yourproduct's documentation to see if the class you specify must be a heldclass.
Req Hold (YNZM)Indicates whether to hold requeued sysout data. The following are validvalues:
YHolds the sysout data regardless of whether the maximum lines orcapture limit is exceeded.
NHolds the sysout data if the maximum lines or capture limit is exceeded.Otherwise, the sysout data is not held.
ZDoes not hold the sysout data if the maximum lines or capture limit isexceeded. Otherwise, the sysout data is held.
MDoes not hold the sysout data regardless of whether the maximum linesor capture limit is exceeded.
Chapter 6. Customization Tasks 197
Set Global Options
Archive (T,P,B,N)Indicates your archival choice using one of the following:
TSpecifies that a copy of any sysout not already archived be put on tapewhen a 0ARCHIVE or 0SYSARCH task is executed (see the ExtendedScheduling Services Guide for information about scheduling dynamicmaintenance).
PSpecifies that a copy of any sysout not already archived be spooled tothe Archive Print Class defined on the CA-Jobtrac Global Options panelwhen a 0ARCHIVE or 0SYSARCH task is executed. This option isdesigned for online microfiche output. Both the archive tape and thespooled copy are sorted into job name sequence and contain separatorpages and header information suitable for fiche titling.
BSpecifies that both a tape backup and a print-spooled copy be createdfor any sysout not already archived when a 0ARCHIVE or 0SYSARCHtask is executed.
NSpecifies no archival or backup of sysouts when a 0ARCHIVE or0SYSARCH task is executed.
You should always make a tape backup if Unicenter CA-Jobtrac is the onlysysout archival tool in use. Unicenter CA-Jobtrac utilities provide forrecovery of aged sysouts from the archive tapes.
Capture LimitSpecifies the number of sysout data sets that are to be captured for a givenevent. For example, specify 255 to capture all sysouts in the class. If youspecify 3, only the first three sysouts found in the output capture class arecaptured. All remaining sysouts are requeued to the requeue class.
Capturing the first three sysouts is useful with job-level message classoutput, where the first three MSGCLASS sysouts are usually (to the extentindicated by MSGLEVEL):
■ The JES job log
■ Converted JCL listing
■ Step execution/allocation log
Additional sysouts are normally sent by the user to SYSOUT=*. So, tocapture only the MSGCLASS listing and requeue all SYSOUT=* output, youcould specify a capture limit of three.
198 Planning and Implementation Guide
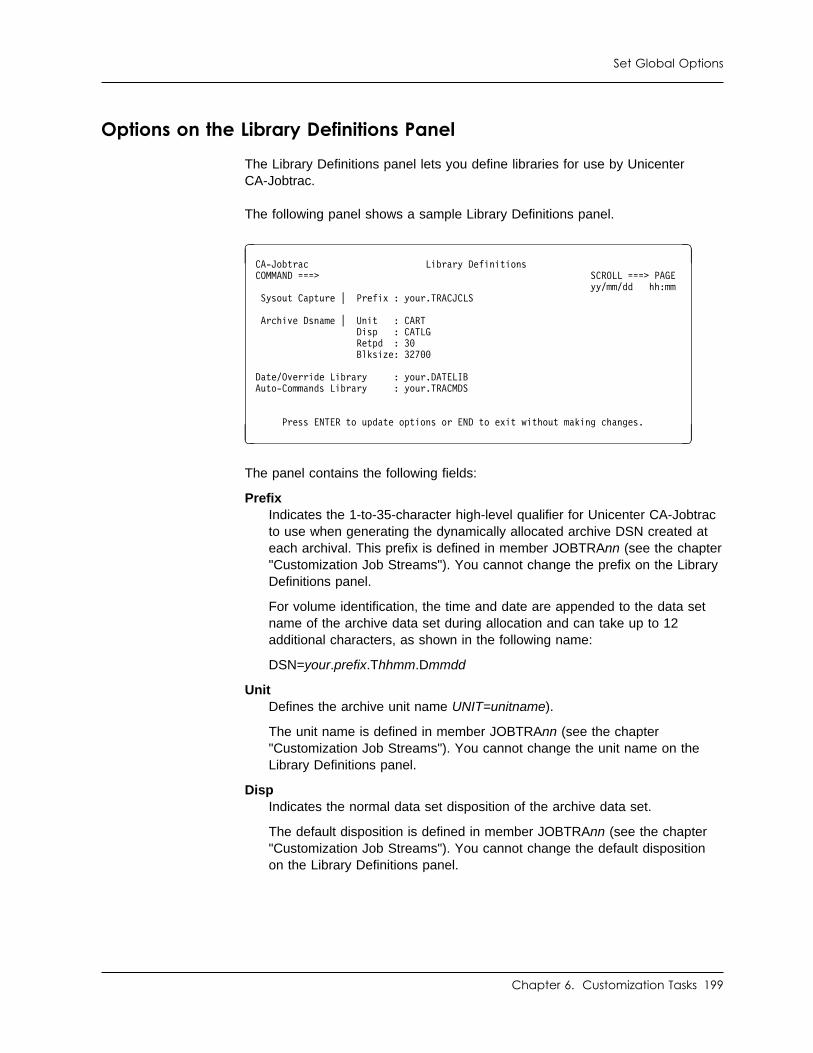
Set Global Options
Options on the Library Definitions Panel
The Library Definitions panel lets you define libraries for use by UnicenterCA-Jobtrac.
The following panel shows a sample Library Definitions panel.
� �CA-Jobtrac Library DefinitionsCOMMAND ===> SCROLL ===> PAGE yy/mm/dd hh:mm Sysout Capture | Prefix : your.TRACJCLS
Archive Dsname | Unit : CART Disp : CATLG Retpd : 3 Blksize: 327
Date/Override Library : your.DATELIBAuto-Commands Library : your.TRACMDS
Press ENTER to update options or END to exit without making changes.� �
The panel contains the following fields:
PrefixIndicates the 1-to-35-character high-level qualifier for Unicenter CA-Jobtracto use when generating the dynamically allocated archive DSN created ateach archival. This prefix is defined in member JOBTRAnn (see the chapter"Customization Job Streams"). You cannot change the prefix on the LibraryDefinitions panel.
For volume identification, the time and date are appended to the data setname of the archive data set during allocation and can take up to 12additional characters, as shown in the following name:
DSN=your.prefix.Thhmm.Dmmdd
UnitDefines the archive unit name UNIT=unitname).
The unit name is defined in member JOBTRAnn (see the chapter"Customization Job Streams"). You cannot change the unit name on theLibrary Definitions panel.
DispIndicates the normal data set disposition of the archive data set.
The default disposition is defined in member JOBTRAnn (see the chapter"Customization Job Streams"). You cannot change the default dispositionon the Library Definitions panel.
Chapter 6. Customization Tasks 199

Set Global Options
RetpdIndicates the retention period in days to be used for the archive data setcreated by a 0ARCHIVE or 0SYSARCH task.
This value is also used to calculate the number of days to maintain anonline copy of the sysout archive &INDEX entry. The &INDEX entry,available through the Unicenter CA-Jobtrac/ISPF dialogs, lists all sysoutscaptured for the defined period, a brief run history, and the volume onwhich they reside.
The retention period is defined in member JOBTRAnn (see the chapter"Customization Job Streams"). You cannot change the retention period onthe Library Definitions panel.
BlksizeIndicates the archive data set block size, in a multiple of 150-byte records(LRECL=150).
The block size is defined in member JOBTRAnn (see the chapter"Customization Job Streams"). You cannot change the block size on theLibrary Definitions panel.
Date/Override LibrarySpecifies the name of the standard PDS (LRECL=88) that is to containcontrol keys and JCL images for date card insertion and selectablein-stream JCL parameters or SYSIN overrides.
This library is allocated during execution of the STAGE2 job stream.
This library is required for proper allocation of JMF (JCL ManagementFacility) at Unicenter CA-Jobtrac startup time. For more information aboutJMF, see the Extended Scheduling Services Guide.
If this DSN is not specified when the JOBTRAC task is started, UnicenterCA-Jobtrac issues a TRAC669E DSN: message.
Auto-Commands LibraryIndicates the name of the standard PDS (LRECL=80) that containsmembers called command sets. Each command set consists of a list ofrelated commands.
You can schedule execution of a command set or respond to some eventwith a command set.
For more information about operator commands, see the Operator Guide.For more information about command set scheduling, see the ExtendedScheduling Services Guide.
200 Planning and Implementation Guide
Copy the PRODDATE Member
Copy the PRODDATE Member
The ADI (Automatic Date Insertion) feature uses the PRODDATE member toautomatically insert JCL date records and other repeated records into yourevents. This is required for running the IVPADI job later on in the IVP. Forcomplete information about using ADI, see the Extended Scheduling ServicesGuide.
Procedure: Follow these steps to copy member PRODDATE from thecai.SAMPJCL to your DATELIB library member DATELIB:
1. Ensure that the CA-Jobtrac global options panels have been updated,particularly the Library Definitions panel, which defines the date file toUnicenter CA-Jobtrac. If global options or the JOBTRA00 member havebeen updated, proceed to Step 2. If not, update the global options, and thenexit and reenter Unicenter CA-Jobtrac.
2. Issue the following command from the CA-Jobtrac primary panel to editmember PRODDATE in your DATELIB library:
DATES
3. Issue the ISPF copy command, and copy the cai.SAMPJCL memberPRODDATE.
4. Exit the edit panel using the END command or the END PF key.
Multiple ADI Members: You can define additional automatic date insertion(ADI) members to supplement your production DATELIB. This is useful whenyou have multiple JCL libraries or when your users have limited access to JCLlibraries.
The additional members reside in your date insertion library and are specifiedon separate ddnames in your JOBTRAC startup procedure. You must also addthese ddnames to your TSO logon procedure or CLIST.
To add the members to the JOBTRAC startup procedure, use a ddname ofDATELxxx, where xxx is the three-digit numeric location ID.
Sample: The following figure shows sample JCL for additional ADI members:
//DATELIB DD DSN=YOUR.PROD.DATEFILE(PRODDATE),DISP=SHR <= FOR LOCATION //DATEL 4 DD DSN=YOUR.PROD.DATEFILE(DATEL 4),DISP=SHR <= FOR LOCATION 4
Chapter 6. Customization Tasks 201
Copy the JMFSYM01 Member
Copy the JMFSYM01 Member
The JMF (JCL Management Facility) feature uses the JMFSYM01 member toallow the centralization and control of variable JCL information by eliminatingdaily updating of production JCL streams. This is required to be able to run theIVP later. For more information about using JMF, see the Extended SchedulingServices Guide.
Procedure: Follow these steps to copy member JMFSYM01 from thecai.SAMPJCL to your DATELIB library member JMFSYM01.
1. Ensure that the CA-Jobtrac global options panels have been updated fromthe previous step.
2. Issue the following command from the CA-Jobtrac primary panel to editmember JMFSYM01 in your DATELIB library:
JMF
3. Issue the ISPF copy command, and copy the cai.SAMPJCL memberJMFSYM01.
4. Exit the edit panel using the END command or the END PF key.
202 Planning and Implementation Guide
Copy the RESOURCE Member
Copy the RESOURCE Member
The RESOURCE feature uses the resource conditions and assigns a one- ortwo-digit ID code to each definition by coding statements in the RESOURCEmember in your Unicenter CA-Jobtrac PPOPTION library. (For moreinformation, see the Extended Scheduling Services Guide.)
Procedure: Follow these steps to copy member RESOURCE from thecai.SAMPJCL to your PPOPTION data set.
1. Issue the ISPF copy command, and copy the cai.SAMPJCL memberRESOURCE.
All statements in this member are samples and are comments.
2. Issue the following command from the CA-Jobtrac primary panel to editmember RESOURCE in your PPOPTION library:
PARMS RESOURCE
3. Exit the edit panel using the END command or the END PF key.
Note: TRAC310W is issued if no RESOURCE file is available. UnicenterCA-Jobtrac continues processing.
Chapter 6. Customization Tasks 203
Copy the EXCLPARM Member
Copy the EXCLPARM Member
The EXCLUDE PARAMETER feature lists the event names or event prefixesthat are grouped for mutual exclusion recognition in the EXCLPARM member inyour Unicenter CA-Jobtrac PPOPTION library. (For more information, see theExtended Scheduling Services Guide.)
Procedure: Follow these steps to copy member EXCLPARM from thecai.SAMPJCL to your PPOPTION data set:
1. Issue the ISPF copy command, and copy the cai.SAMPJCL memberEXCLPARM.
2. All statements in this member are samples and are comments.
3. Issue the following command from the CA-Jobtrac primary panel to editmember EXCLPARM in your PPOPTION library:
PARMS EXCLPARM
4. Exit the edit panel using the END command or the END PF key.
204 Planning and Implementation Guide
Maintain Table Modules
Maintain Table Modules
Some of the tables used by Unicenter CA-Jobtrac exist as load modules. Othertables exist as online tables. Load modules must be assembled and linked asdescribed here. The online tables are maintained using the online table servicesdescribed in the Extended Scheduling Services Guide.
The online table services are used to schedule events based on data setsclosing, create automatic message replies, schedule system commands, andspecify additional condition code checking for events.
Assembler Members: If you do not use SMP/E to maintain your tablemodules, use the assembly and link JCL provided in SAMPJCL. The followingtable names the SAMPJCL member to use for each table module.
CA-JCLTrac User Control Table: The CA-JCLTrac User Control Table(GJC3TUCT) shipped with Unicenter CA-Jobtrac does not have any entries init. Some of the CA-JCLTrac functions require entries in the table. Beforeassembling the table, make the necessary entries in it.
For more information about creating the necessary entries, see “Set Up a UCT”on page 220.
Use Member To Assemble Table Name
ASMAUTH TRACAUTH table TRACAUTH
ASMMSGT Automatic MessageRecognition table foruse at IPL time
IPLTABLE
ASMEXIT Unicenter CA-Jobtracuser exits
N/A
ASMUCT CA-JCLTrac UserControl Table
GJC3TUCT
Chapter 6. Customization Tasks 205
Maintain Table Modules
Converting Existing Modules to Online Tables: With the exception of theAMR table named IPLTABLE, all existing AMR, ADR, and SCS modules areconverted to online tables. IPLTABLE remains a load module.
For information about creating it, see “Create IPLTABLE Entries (Optional)” onpage 209. The conversion can take place in two ways—upon initialization orby request.
When an existing module is initialized using the Unicenter CA-Jobtrac TableServices panels, it is automatically converted from the existing module format tothe new table format.
You can also convert modules prior to initialization by viewing the module onthe online panels (see the Extended Scheduling Services Guide).
While it is not necessary to convert modules prior to their initialization, it is agood idea to do so. This ensures that the existing modules are workingcorrectly, since the load modules did not have error detection abilities. Theonline tables do have error detection abilities.
Security for Online Tables: Security for the online tables is provided throughthe use of:
■ The TRACAUTH table OPTA parameter (see “Set Up Default Authorization”on page 174)
■ Your security package to secure program modules
■ Unicenter CA-Jobtrac user exit TRACX26
206 Planning and Implementation Guide
Maintain Table Modules
Using Your Security Package: To use your security package, secure the useand function of the following modules:
GJTRTSIFAccesses the entire online table service.
GJTRTSTAActivates online tables.
GJTRTSMCUpdates or modifies the command (SCS) tables.
GJTRTSMDUpdates or modifies the automatic data set recognition (ADR) tables.
GJTRTSMFUpdates or modifies the condition code (CCPF) tables.
GJTRTSMMUpdates or modifies the message (AMR) tables.
GJTRTSVCViews the active SCS table.
GJTRTSVDViews the active ADR table.
GJTRTSVFViews the active CCPF table.
GJTRTSVMViews the active AMR table.
GJTRTSVRHandles all submission tasks within Unicenter CA-Jobtrac.
GJTRMSTRHandles all table setup and job submission setup. Includes callingsubroutines.
Chapter 6. Customization Tasks 207
Set Up AMR Support
Set Up AMR Support
To use the AMR (Automatic Message Recognition) feature, you must set upexit IEAVMXIT.
This is done by ensuring IEAVMXIT is present in your SYS1.LINKLIB. IfIEAVMXIT is not present, use member LINKMXIT in the Unicenter CA-JobtracSAMPJCL library to link it into SYS1.LINKLIB.
All exits, including IEFBR14 dummies, should be linked as RENT and REUS.Exit IEAVMXIT is used and must be linked with AMODE 31.
Disabling AMR Support: While Unicenter CA-Jobtrac is running, issuing any KM,UEXIT=Y/N or K M,AMRF=Y/N command disables AMR support.
For information about reactivating AMR support, contact Technical Support.Also see AMR recovery procedures in the Reports, Maintenance, and RecoveryGuide. For information about contacting Technical Support, see the informationat the beginning of this guide.
208 Planning and Implementation Guide
Create IPLTABLE Entries (Optional)
Create IPLTABLE Entries (Optional)
This section describes how to create an IPLTABLE, which is an AutomaticMessage Recognition table for use at IPL time. Unlike other AMR tables, theIPLTABLE cannot be created using the online table services as described in theExtended Scheduling Services Guide. This section contains the followinginformation:
■ Statements used to describe the table
■ Procedure used to create the table
■ Example of an IPLTABLE job
@AMRGEN Statement Syntax: @AMRGEN statements are used to describethe IPLTABLE. The @AMRGEN END statement identifies the end of the@AMRGEN statements.
The statement has the following format:
@AMRGEN 'msgtext[//]msgtextcont' [,option=value]...@AMRGEN END
@AMRGENInvokes the @AMRGEN assembler macro to create an entry in thestorage-resident AMR table. Required.
'msgtext[//]msgtextcont'Specifies a message ID, message text, or portion of the message text that,when issued, triggers the defined event. Replace msgtext with a messageID, message text, or portion of the message text. The msgtext must beenclosed in single quote marks (').
//Represents any portion of the message (two forward slashes) in themessage text. For example, you want to automate a response to themessage with ID IEF238D. The text accompanying this message ID canvary, and you want to respond only to the message that includes the textDEVICE NAME. You can specify 'IEF238D//DEVICE NAME' as themessage text to trigger some response.
Any message that begins with IEF238D and includes DEVICE NAMEtriggers the specified event, regardless of the text between the message IDand the key text. You can use this feature to scan a message for key textwithout having to determine how many characters from the beginning of themessage the key text begins (see MSGOFF).
Chapter 6. Customization Tasks 209
Create IPLTABLE Entries (Optional)
option=valueOptional elements. Adds conditions to the definition. Specify one or moreoptions per @AMRGEN statement. Specify only one value per option. Fora description of each option, see the following:
ACT=A|C|N|P|R|S|W|XSpecifies the action to be triggered when the specified message isissued and any other conditions are satisfied. The following values areavailable:
AAdds the trigger job to the current schedule with a manualdependency (dependency code M). If the trigger job is already onthe current schedule, no action is taken.
CIssues the command specified by CMD=.
NMakes the message nondeletable and highlights it on the consoledisplay.
PPurges the trigger job from the current schedule. The trigger job isremoved from the current schedule, and any successors arereleased from predecessor dependency on the trigger job. If thetrigger job is not on the current schedule, no action is taken.
RAdds the trigger job to the current schedule with no dependencies.The trigger job is submitted immediately. If the trigger job is alreadyon the current schedule, the manual dependency (dependencycode M) is removed from the job.
SSuppresses the message from appearing on the system console.
WIssues the WTOR reply specified by CMD=.
XTakes user exit TRACX04. Any reply is generated by the exitprogram. This exit is no longer supported and may not work infuture versions.
CHGMSG='chgtext'Specifies the text to be used in place of the original system messagetext. You can specify which part of the original message to replace (seeCHGOFF). Specify the new message text. You must enclose the newtext in single quote marks ('). No ACT= parameter is required for thisaction.
210 Planning and Implementation Guide
Create IPLTABLE Entries (Optional)
CHGOFF=nnSpecifies the offset (number of characters) from the beginning of theoriginal system message where the new message text specified byCHGMSG= is to begin. Offset 00 is the beginning of the message;offset 01 is the second character of the message; and so on.
Specify a two-digit number specifying the offset value. If you do notspecify this parameter, the default offset value 00 is assumed.
CJOB=createjobSpecifies the job that must issue the message or cause the message tobe issued. If the specified job does not issue or cause the message tobe issued, the defined event is not triggered. Specify the name of thejob that must issue or cause the message.
If CJOB is not included in the statement, any job, TSO session, orstarted system task can issue or cause the message.
CMD='syscmd'Specifies the system command or WTOR reply to be issued byUnicenter CA-Jobtrac in response to the message specified by msgtext.Specify a command or WTOR reply. You must enclose the command orreply in single quote marks (').
If ACT=C is specified (see ACT=), the command or reply is issued as astandard command. If ACT=W is specified, the command or reply isissued as a WTOR reply and is automatically appended with the properID (for example, R nn,syscmd, where nn is the number of the messageto which the reply is being made).
You can specify an entry to schedule the command to be issued at thetime specified by the System Command Scheduling facility. To do so,include this parameter as follows:
CMD='SCHD#nnn,syscmd'
The command specified by syscmd will be issued at the time defined bya System Command Scheduling statement with the SCHD#nnnparameter. For more information about using System CommandScheduling, with Automatic Message Recognition see the ExtendedScheduling Services Guide.
MSGOFF=nnSpecifies the offset (number of characters) from the beginning of themessage where the specified msgtext begins. Offset 00 is thebeginning of the message; offset 01 is the second character of themessage, and so on.
Use a two-digit number specifying the offset value. If you do not specifythis parameter, the default offset value 00 is assumed.
Chapter 6. Customization Tasks 211
Create IPLTABLE Entries (Optional)
PROCP=processp|mm/dd/yySpecifies a process period or date during which the specified messagemust be issued to trigger an event. For example, PROCP=MONDAYspecifies that the message must be issued on a Monday or no event istriggered.
Use any valid process period keyword (except UDEF). See theReference Summary.
You can specify a fixed date in the form mm/dd/yy, where mm is atwo-digit number representing a month (01-12), dd is a two-digit numberrepresenting a day of the month (01-31), and yy is a two-digit numberrepresenting a year (00-99). For example, to specify May 11, 2006,you would use PROCP=05/11/06.
You can replace any part of the date with ** to define a generic date.For example, PROCP=08/**/06 specifies any day during August, 2006;PROCP=**/15/** specifies the 15th day of any month during any year.
SYSID=sysidSpecifies the system on which the specified action is to be performed.Specify the ID of the system. If not specified, the event is performed onall systems.
TJOB=triggerjobSpecifies the name of the job to be acted upon by the triggered event.
TOD=hhmm{hhmm}Specifies the time of day range during which the message must beissued. If the message is not issued during the specified time range,the event is not triggered. If no TOD= is specified, the message canappear at any time of day.
Use the form hhmm to specify a time of day, where hh is a two-digitnumber representing the hour (01-23) and mm is a two-digit numberrepresenting the minute of the hour (00-59).
If you specify TOD=hhmmhhmm, the message must be issued betweenthe time specified by the first hhmm and the time specified by thesecond hhmm. For example, TOD=01001100 specifies that themessage must be issued between 1 a.m. and 11 a.m. You can specifytime ranges that cross over midnight (for example, TOD=22000300).
If only one hhmm is specified, it is used as the start of the time rangeand 2359 is assigned as the end of the time range. For example,TOD=2030 is the same as TOD=20302359.
@AMRGEN ENDRequired keywords. Specifies the end of the list of @AMRGEN statementsin the job.
212 Planning and Implementation Guide
Create IPLTABLE Entries (Optional)
Syntax Rules
■ A space must separate @AMRGEN from the remainder of the statement.
■ Commas separate remaining elements of the statement from each other.
■ The statement must begin in column 10 of the record.
■ Any alphanumeric character in column 72 of a record indicates that thefollowing record is a continuation record.
■ Continuation records must begin in column 16.
■ You can include any number of @AMRGEN statements in the job member.
■ The last statement in the job member must be an @AMRGEN ENDstatement.
Procedure: To use the IPLTABLE and the VINITx procedure together, usethe following procedure:
1. Locate sample member IPLTABLE in your SAMPJCL library. This is thesample IPLTABLE, which you can use as a model.
2. Locate sample member ASMIPLT in your SAMPJCL library. Use this job toassemble and link IPLTABLE into your Unicenter CA-Jobtrac CAILIB library.
3. Run the job.
4. After you have successfully linked the IPLTABLE into your CAILIB library,you may need to issue the following command:
F LLA,REFRESH
Your new IPLTABLE is now ready for use at IPL time.
Chapter 6. Customization Tasks 213
Enable the SPACE Command
Enable the SPACE Command
Users must add GJTRUCBS to the AUTHTSF, AUTHCMD, and AUTHPGMtable in the IKJTSOxx member of your SYS1.PARMLIB to enable the SPACEcommand.
Use the TSO PARMLIB command to update the TSO system values.
214 Planning and Implementation Guide
Integration with Unicenter CA-11
Integration with Unicenter CA-11
This topic describes the Unicenter CA-Jobtrac and Unicenter CA-11 changesneeded to implement a seamless interface between these two products. Thefeatures provided by this integration include the following:
■ Automatic insertion of the Unicenter CA-11 U11RMS step during theUnicenter CA-Jobtrac job submission. Insertion of the step can be controlledby job class. Step insertion parameters are retrieved from the UnicenterCA-11 options table.
■ Integration of the Unicenter CA-Jobtrac ISPF online with Unicenter CA-11 toupdate the Unicenter CA-11 database when Unicenter CA-Jobtrac Delete(D) and Purge (P) commands are issued.
■ Integration of the Unicenter CA-Jobtrac ISPF online to the Unicenter CA-11ISPF online to display the Unicenter CA-11 ISPF panels when a UnicenterCA-Jobtrac Rerun (R) command is issued. The job name of the job selectedin Unicenter CA-Jobtrac is passed to the Unicenter CA-11 online. UnicenterCA-Jobtrac recognizes when the selected job is set up through theUnicenter CA-11 online for restart, and releases the job when you return tothe Unicenter CA-Jobtrac panels. Restart cancel or force complete actionsfor the selected job are also detected by Unicenter CA-Jobtrac.
Installation Requirements:
Note: A supported release of Unicenter CA-11 is required.
The Unicenter CA-Jobtrac PPOPTION initialization member (JOBTRAxx) mustbe updated to include the RERUN= and INSERTRMS= keywords described in“RERUN” on page 150 and “INSERTRMS” on page 145.
To use the Unicenter CA-11 ISPF restart panel from the Unicenter CA-JobtracISPF panels, you must allocate the Unicenter CA-11 libraries to your ISPFsession. You can do this in one of two ways:
■ Add the Unicenter CA-11 CAIISPM and CAIISPP to your ISPMLIB andISPPLIB allocations, respectively, in your TSO PROC or ISPF startupCLIST. The TCLIST3 CLIST distributed in the SAMPJCL library is normallyused with this configuration and must be in a library defined to theSYSPROC DD of your ISPF session.
■ Use the LIBDEF CLIST in the SAMPJCL library to allocate these librariesdynamically. This CLIST must be in the library defined to the SYSPROC DDof your ISPF session.
Chapter 6. Customization Tasks 215
Integration with Unicenter CA-11
In either case, the JTRCCA11 CLISTs must be copied from SAMPJCL to alibrary defined to the SYSPROC DD of your ISPF session.
If you specified the INDX11= keyword in the STAGE1 job, the Unicenter CA-11libraries were added to the LIBDEF and JTRCCA11 CLISTs that were placed inthe SAMPJCL data set. Otherwise, customization of these CLISTs is required.
If you are planning to use the Unicenter CA-11 step insertion, verify that theUnicenter CA-11 options table (U11OPT) has appropriate values specified forthe INSRTPC and INSRTPM keywords. The values specified on thesekeywords are used to build the inserted step JCL. Also, the keyword INSRTOPshould be set to NO if step insertion is to be done only by UnicenterCA-Jobtrac. For more information about the Unicenter CA-11 Options Table,see the the Unicenter CA-11 Systems Programmer Guide.
The INCLUDE statement is used in execution JCL to specify the name of aPDS member containing JCL statements that you want included (inserted) atthe position of the INCLUDE statement. The PDS member can contain anycombination of control statements, JOBLIBs, DDs, PROCs, EXECs, SYSINdata, non-JCL, and so forth. When the job entry subsystem on the executionnode converts and interprets the JCL stream, the INCLUDE statement isremoved, and the JCL statements contained in the specified PDS member areinserted in the JCL stream.
Products that interact with JCL PRIOR to the expansion of PROCs and/orINCLUDEs do not "see" the contents of the unexpanded members, andtherefore cannot process them. This includes products such as UnicenterCA-Jobtrac that are used to schedule job submission. Presubmission syntaxchecking, JCL validation, Unicenter CA-11 step insertion, and other similarfacilities are limited to the data available when these processes occur. Forinstance, a referback to JCL within a PROC cannot be adequately validatedprior to the expansion of the PROC. In addition, insertion of the UnicenterCA-11 RMS step as the first executable job step may not be accurately done ifan INCLUDE statement is placed prior to the first EXEC statement. It dependsupon the contents of the PDS member that is included during expansion. If theincluded JCL statements contain one or more EXEC statements, then theUnicenter CA-11 RMS control step is not physically the first step of the job.
216 Planning and Implementation Guide
Integration with Unicenter CA-11
Be aware that Unicenter CA-11 does not process JCL statements that areplaced before the Unicenter CA-11 RMS control step. Fortunately, UnicenterCA-Jobtrac implements the automatic Unicenter CA-11 RMS step insertionfeature as an option. With this option turned on, Unicenter CA-Jobtrac searchesthe JCL for the first EXEC or PROC statement and inserts the RMS step priorto that statement. Unicenter CA-Jobtrac also checks to see if a UnicenterCA-11 RMS step is already present. If it is, the insertion does not take place.Any INCLUDE statement prior to the first EXEC or PROC statement is ignored,and the RMS step is inserted after the INCLUDE statement. If this would resultin the Unicenter CA-11 RMS control step NOT being inserted as the first EXECin the job (that is, because the INCLUDEd JCL contains one or more EXECstatements), you should hard-code the RMS step in the appropriate location toensure that it will be the first EXEC even after INCLUDE statements areexpanded.
Starting with r3.5, Unicenter CA-Jobtrac inserts the Unicenter CA-11 RMScontrol step prior to any INCLUDE statement positioned before the first EXECstatement. This was done to ensure that the Unicenter CA-11 RMS step wasthe first EXEC statement in the job. However, subsequent customer feedbackwith this approach and the intent of CA to maintain consistency acrossmainframe scheduling products allow Unicenter CA-Jobtrac to performUnicenter CA-11 RMS step insertion as it did previously in r3.4.
Chapter 6. Customization Tasks 217
Set Up CA-JCLTrac
Set Up CA-JCLTrac
CA-JCLTrac is the JCL analysis component of Unicenter CA-Jobtrac.
CA-JCLTrac uses the operating system's own JCL C/I routines to performsyntax analysis, create records that you can load into DB2 tables, and generatecross-reference reports.
To use CA-JCLTrac, complete the following:
■ Set up a UCT, User Control Table, (optional)
■ Set up DB2 tables (optional)
■ Enable CA-JCLTrac
Setting Up a UCT: A UCT (User Control Table) provides control information forthe dynamic allocation of the JCL and procedure libraries. It accomplishes thefollowing:
■ Associates a Unicenter CA-Jobtrac location with a JCL library
■ Identifies nonstandard ddnames in your JES started task
■ Matches a job class with its JES PROCLIB concatenation
Note: You are not required to build a UCT. The default tables are usuallysufficient.
For more information about setting up a UCT, see “Set Up a UCT” onpage 220.
Setting Up DB2 Tables: You can use the CA-JCLTrac feature of UnicenterCA-Jobtrac to extract JCL information and store it in DB2 tables. Theinformation can then be used to create reports about your JCL.
If you plan to use CA-JCLTrac for this purpose, complete this section to set upthe DB2 tables.
The following list outlines the steps that you must take to set up the DB2database. The following pages explain the steps in detail.
1. Create the DB2 objects (see “Create the DB2 Objects” on page 226)
2. Bind the DB2 plans (see “Bind the DB2 Plans” on page 228)
3. Grant access and select authority (see “Grant Authority” on page 229)
218 Planning and Implementation Guide
Set Up CA-JCLTrac
Enabling CA-JCLTrac: To enable CA-JCLTrac, add GJC3MCII to theAUTHTSF, AUTHCMD, and AUTHPGM table in the IKJTSOxx member of yourSYS1.PARMLIB.
Use the TSO PARMLIB command to update the TSO system values.
Enabling Automatic JCL Checking: Automatic JCL checking requires theuse of the JCLAUTO macro. This macro is installed with Unicenter CA-Jobtracas a CLIST in the Unicenter CA-Jobtrac CAICLIB library.
What is JCLAUTO?: JCLAUTO is an edit macro that redefines the END andSAVE ISPF/PDF edit commands. JCLAUTO changes the commands to invokethe CA-JCLTrac JCL Analyzer prior to saving the member you are editing.
If a JCL error is found, the JCL is not saved, and a CA-JCLTrac message isissued. For more information about CA-JCLTrac, see the Extended SchedulingServices Guide.
Invoking JCLAUTO: JCLAUTO is invoked in one of the following ways:
■ Through the use of the Unicenter CA-Jobtrac TRACX29 user exit (see thesample in SAMPJCL)
■ Making it the initial macro for a user's edit session. This is accomplishedwith the IMACRO edit command (see the IBM manual ISPF/PDF Edit andEdit Macros).
■ Executing it while in an edit session
Disabling Syntax Checking: Once JCLAUTO is invoked, it remains in effectfor the duration of the edit session. If you want to disable syntax checking,execute the following command:
JCLAUTO OFF
Chapter 6. Customization Tasks 219
Set Up CA-JCLTrac
Set Up a UCT
A UCT (User Control Table) provides control information. It accomplishes thefollowing:
■ Associates a Unicenter CA-Jobtrac location with a JCL library
■ Identifies nonstandard ddnames
■ Matches a JCL job class with its JES PROCLIB concatenation
When a UCT is Required: A UCT is required when you do the following:
■ Request dynamic allocation of JCL libraries (DYNAMJ keyword withTYPRUN(JCLSCAN) or TYPRUN(EXTRACT))
■ Request dynamic allocation of procedure libraries (DYNAMD keyword) anduse nonstandard PROCLIB ddnames in your JES started task
■ Use different JES PROCLIB concatenations for different job classes
Setting Up a UCT: You create entries in a UCT with the @JCLUCT macro andits statements. The following are the @JCLUCT statements:
■ CLASS
■ DSNAME
■ DDNAME
■ END
Syntax Used: The following sections show the syntax of the @JCLUCTstatements. The following rules apply to the syntax:
■ Italics are used to denote a variable. Replace the variable with the indicatedinformation.
■ Lowercase letters denote optional portions of literals. You do not have toinclude them. For example, for DSName, you only have to use DSN in thestatement.
■ [Brackets] indicate an option. You do not have to include in the statementwhat is shown in brackets.
■ Punctuation that is shown must be used.
220 Planning and Implementation Guide
Set Up CA-JCLTrac
How to Set Up and Use a UCT: By default, a UCT is always used. Thedefault name is GJC3TUCT. If you want to use a UCT with a different name,use the UCT keyword.
Take the following steps to create and use a UCT:
1. Decide if you need to create a UCT. (Usually, you will need to use one.) Ifyou need to create a UCT, continue with the following steps. See “Set Up aUCT” on page 220.
2. Create entries in a UCT using the @JCLUCT statements. See “CLASSStatement” on page 222 through “@JCLUCT Macro Examples” onpage 225.
3. Compile the UCT using the member ASMUCT in your SAMPJCL library.
4. Include the UCT keyword in your JCL to:
■ Explicitly specify the use of the GJC3TUCT UCT (this table is used ifyou do not include the UCT keyword)
■ Specify a UCT named something other than GJC3TUCT
For information about the UCT keyword, see CA-JCLTrac in the ExtendedScheduling Services Guide.
Chapter 6. Customization Tasks 221
Set Up CA-JCLTrac
CLASS Statement: CLASS statements match a job class with its JESPROCLIB concatenation. Specify up to 35 class statements.
CLASS statements have the following syntax:
[name] @JCLUCT CLASS,jobclass,ddname
nameAssigns a CSECT name to the UCT. It must appear on the first @JCLUCTmacro only.
The default is GJC3TUCT.
@JCLUCTIdentifies this line as a @JCLUCT statement.
CLASSRequired literal. Defines this statement as a CLASS definition.
jobclassSpecifies the job class. Use 0-9 or A-Z. Define a job class once only.
ddnameSpecifies the ddname of the JES PROCLIB concatenation used by the jobclass.
For omitted job classes, the default ddname is
■ PROC00 for JES2
■ IATPLBST for JES3
222 Planning and Implementation Guide
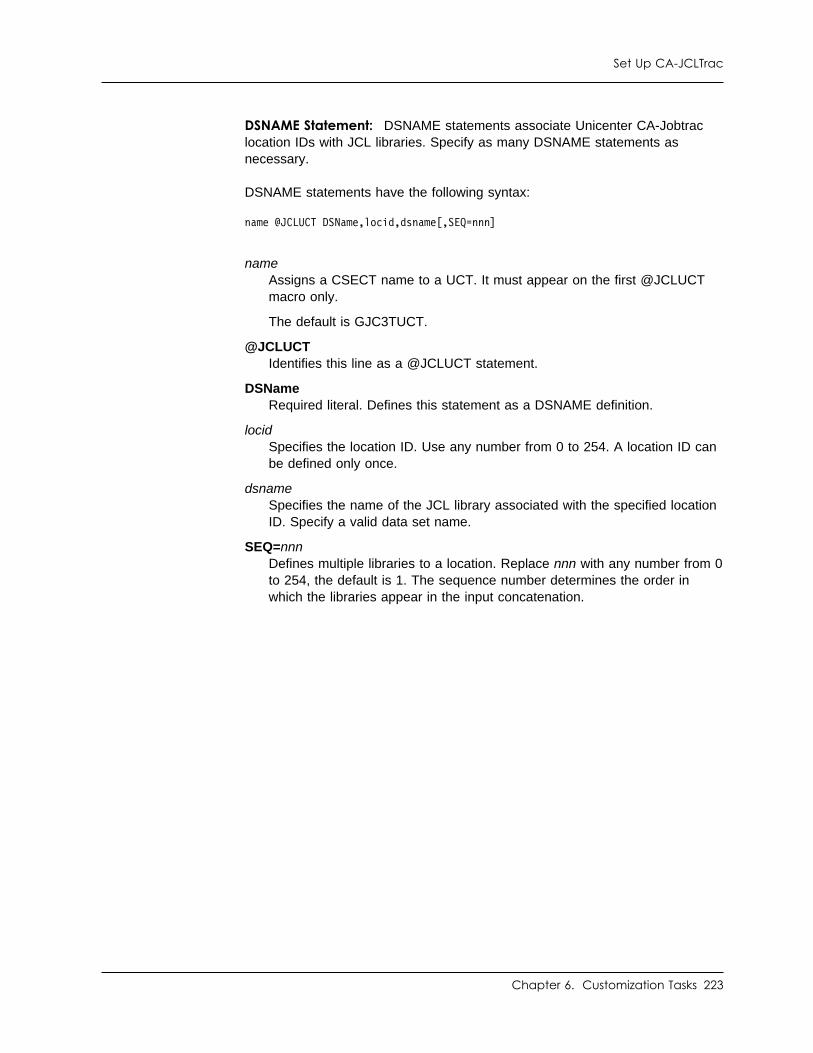
Set Up CA-JCLTrac
DSNAME Statement: DSNAME statements associate Unicenter CA-Jobtraclocation IDs with JCL libraries. Specify as many DSNAME statements asnecessary.
DSNAME statements have the following syntax:
name @JCLUCT DSName,locid,dsname[,SEQ=nnn]
nameAssigns a CSECT name to a UCT. It must appear on the first @JCLUCTmacro only.
The default is GJC3TUCT.
@JCLUCTIdentifies this line as a @JCLUCT statement.
DSNameRequired literal. Defines this statement as a DSNAME definition.
locidSpecifies the location ID. Use any number from 0 to 254. A location ID canbe defined only once.
dsnameSpecifies the name of the JCL library associated with the specified locationID. Specify a valid data set name.
SEQ=nnnDefines multiple libraries to a location. Replace nnn with any number from 0to 254, the default is 1. The sequence number determines the order inwhich the libraries appear in the input concatenation.
Chapter 6. Customization Tasks 223
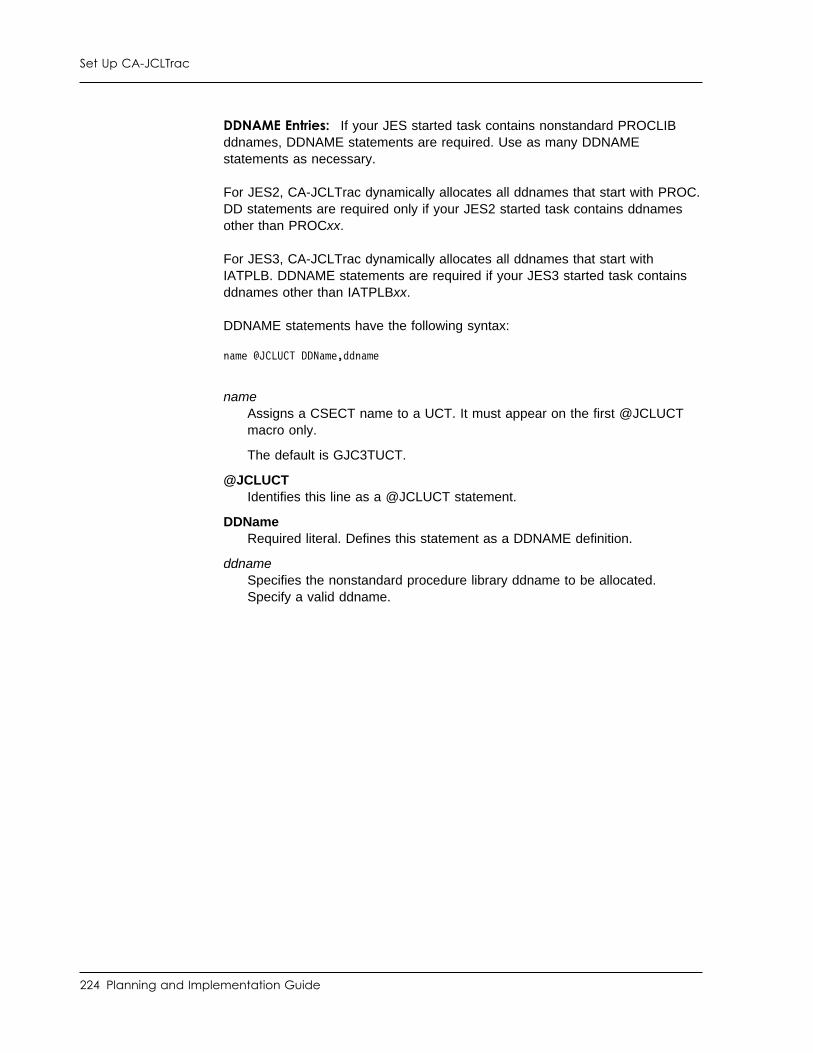
Set Up CA-JCLTrac
DDNAME Entries: If your JES started task contains nonstandard PROCLIBddnames, DDNAME statements are required. Use as many DDNAMEstatements as necessary.
For JES2, CA-JCLTrac dynamically allocates all ddnames that start with PROC.DD statements are required only if your JES2 started task contains ddnamesother than PROCxx.
For JES3, CA-JCLTrac dynamically allocates all ddnames that start withIATPLB. DDNAME statements are required if your JES3 started task containsddnames other than IATPLBxx.
DDNAME statements have the following syntax:
name @JCLUCT DDName,ddname
nameAssigns a CSECT name to a UCT. It must appear on the first @JCLUCTmacro only.
The default is GJC3TUCT.
@JCLUCTIdentifies this line as a @JCLUCT statement.
DDNameRequired literal. Defines this statement as a DDNAME definition.
ddnameSpecifies the nonstandard procedure library ddname to be allocated.Specify a valid ddname.
224 Planning and Implementation Guide
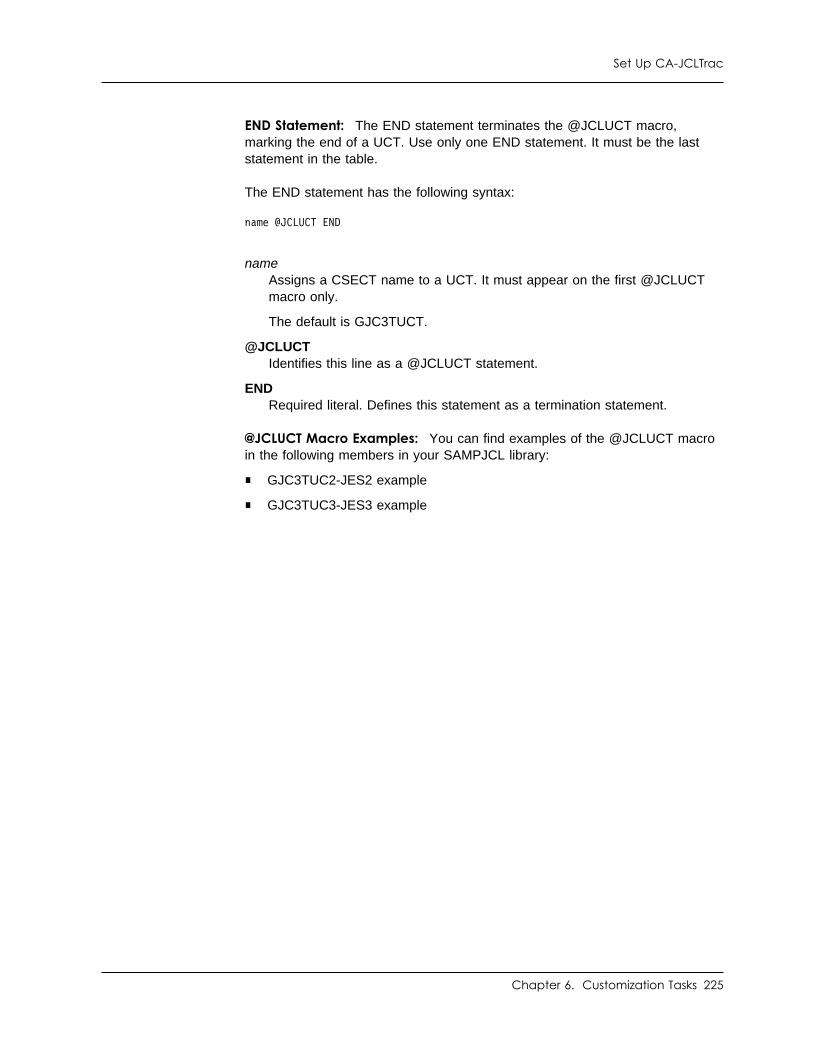
Set Up CA-JCLTrac
END Statement: The END statement terminates the @JCLUCT macro,marking the end of a UCT. Use only one END statement. It must be the laststatement in the table.
The END statement has the following syntax:
name @JCLUCT END
nameAssigns a CSECT name to a UCT. It must appear on the first @JCLUCTmacro only.
The default is GJC3TUCT.
@JCLUCTIdentifies this line as a @JCLUCT statement.
ENDRequired literal. Defines this statement as a termination statement.
@JCLUCT Macro Examples: You can find examples of the @JCLUCT macroin the following members in your SAMPJCL library:
■ GJC3TUC2-JES2 example
■ GJC3TUC3-JES3 example
Chapter 6. Customization Tasks 225
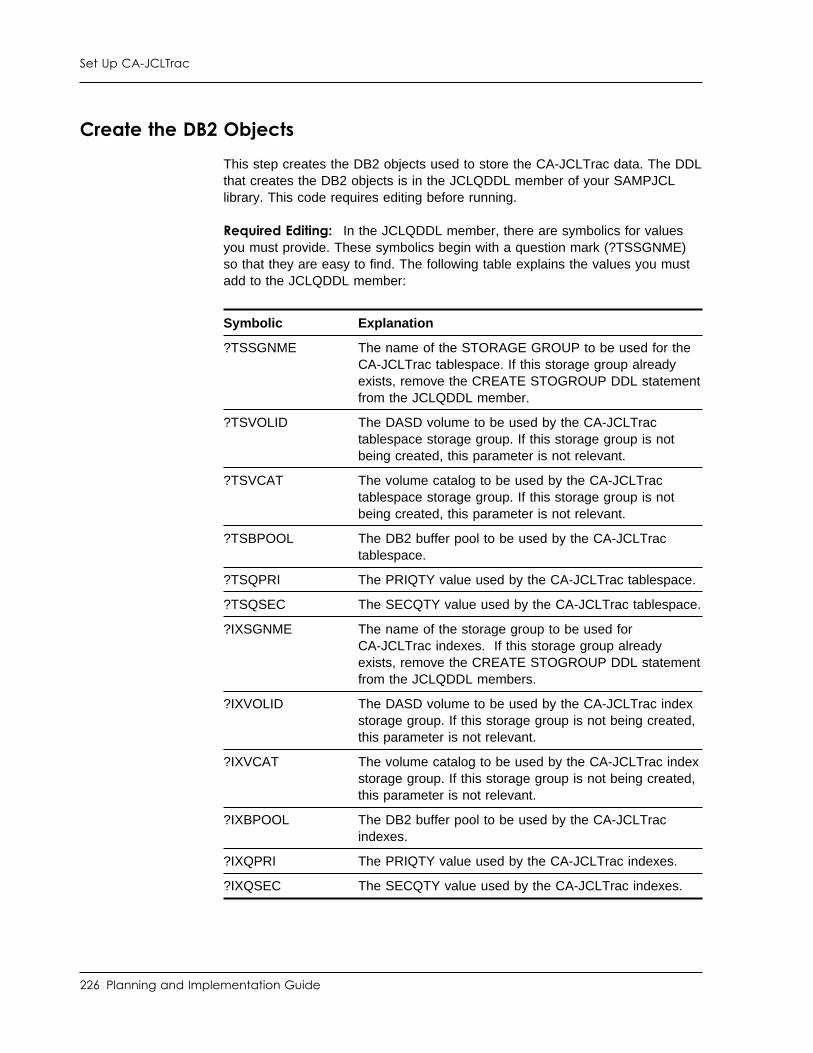
Set Up CA-JCLTrac
Create the DB2 Objects
This step creates the DB2 objects used to store the CA-JCLTrac data. The DDLthat creates the DB2 objects is in the JCLQDDL member of your SAMPJCLlibrary. This code requires editing before running.
Required Editing: In the JCLQDDL member, there are symbolics for valuesyou must provide. These symbolics begin with a question mark (?TSSGNME)so that they are easy to find. The following table explains the values you mustadd to the JCLQDDL member:
Symbolic Explanation
?TSSGNME The name of the STORAGE GROUP to be used for theCA-JCLTrac tablespace. If this storage group alreadyexists, remove the CREATE STOGROUP DDL statementfrom the JCLQDDL member.
?TSVOLID The DASD volume to be used by the CA-JCLTractablespace storage group. If this storage group is notbeing created, this parameter is not relevant.
?TSVCAT The volume catalog to be used by the CA-JCLTractablespace storage group. If this storage group is notbeing created, this parameter is not relevant.
?TSBPOOL The DB2 buffer pool to be used by the CA-JCLTractablespace.
?TSQPRI The PRIQTY value used by the CA-JCLTrac tablespace.
?TSQSEC The SECQTY value used by the CA-JCLTrac tablespace.
?IXSGNME The name of the storage group to be used forCA-JCLTrac indexes. If this storage group alreadyexists, remove the CREATE STOGROUP DDL statementfrom the JCLQDDL members.
?IXVOLID The DASD volume to be used by the CA-JCLTrac indexstorage group. If this storage group is not being created,this parameter is not relevant.
?IXVCAT The volume catalog to be used by the CA-JCLTrac indexstorage group. If this storage group is not being created,this parameter is not relevant.
?IXBPOOL The DB2 buffer pool to be used by the CA-JCLTracindexes.
?IXQPRI The PRIQTY value used by the CA-JCLTrac indexes.
?IXQSEC The SECQTY value used by the CA-JCLTrac indexes.
226 Planning and Implementation Guide
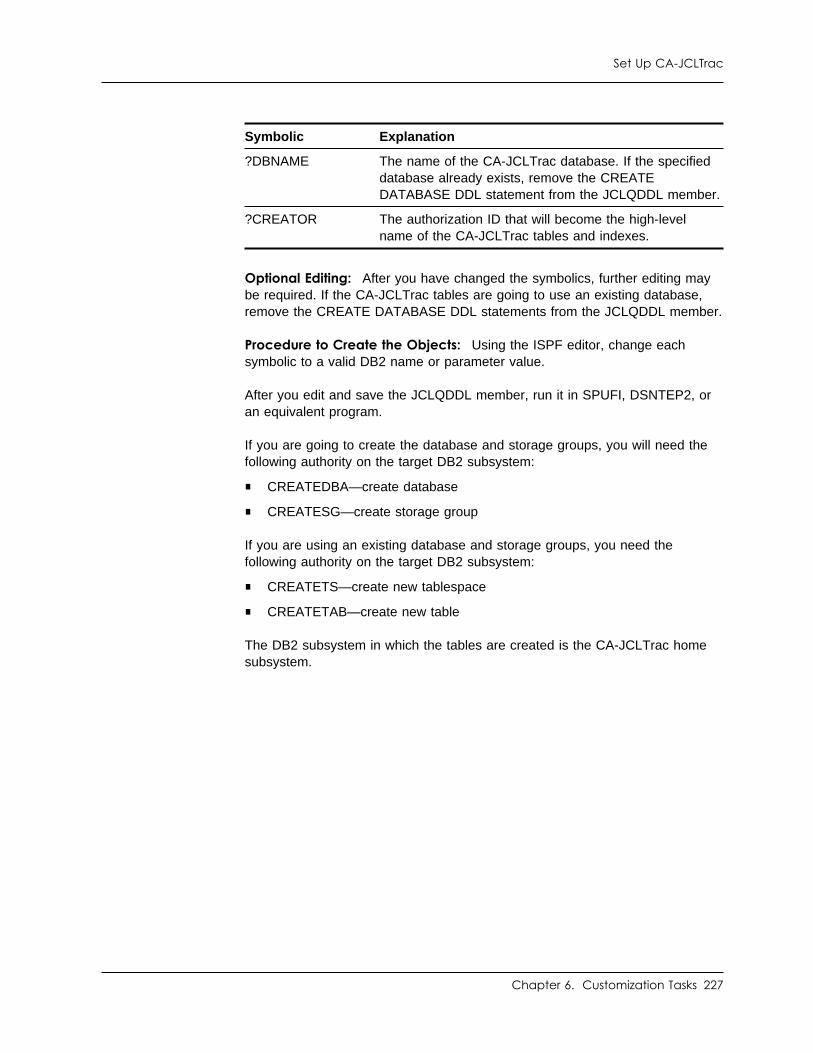
Set Up CA-JCLTrac
Optional Editing: After you have changed the symbolics, further editing maybe required. If the CA-JCLTrac tables are going to use an existing database,remove the CREATE DATABASE DDL statements from the JCLQDDL member.
Procedure to Create the Objects: Using the ISPF editor, change eachsymbolic to a valid DB2 name or parameter value.
After you edit and save the JCLQDDL member, run it in SPUFI, DSNTEP2, oran equivalent program.
If you are going to create the database and storage groups, you will need thefollowing authority on the target DB2 subsystem:
■ CREATEDBA—create database
■ CREATESG—create storage group
If you are using an existing database and storage groups, you need thefollowing authority on the target DB2 subsystem:
■ CREATETS—create new tablespace
■ CREATETAB—create new table
The DB2 subsystem in which the tables are created is the CA-JCLTrac homesubsystem.
Symbolic Explanation
?DBNAME The name of the CA-JCLTrac database. If the specifieddatabase already exists, remove the CREATEDATABASE DDL statement from the JCLQDDL member.
?CREATOR The authorization ID that will become the high-levelname of the CA-JCLTrac tables and indexes.
Chapter 6. Customization Tasks 227
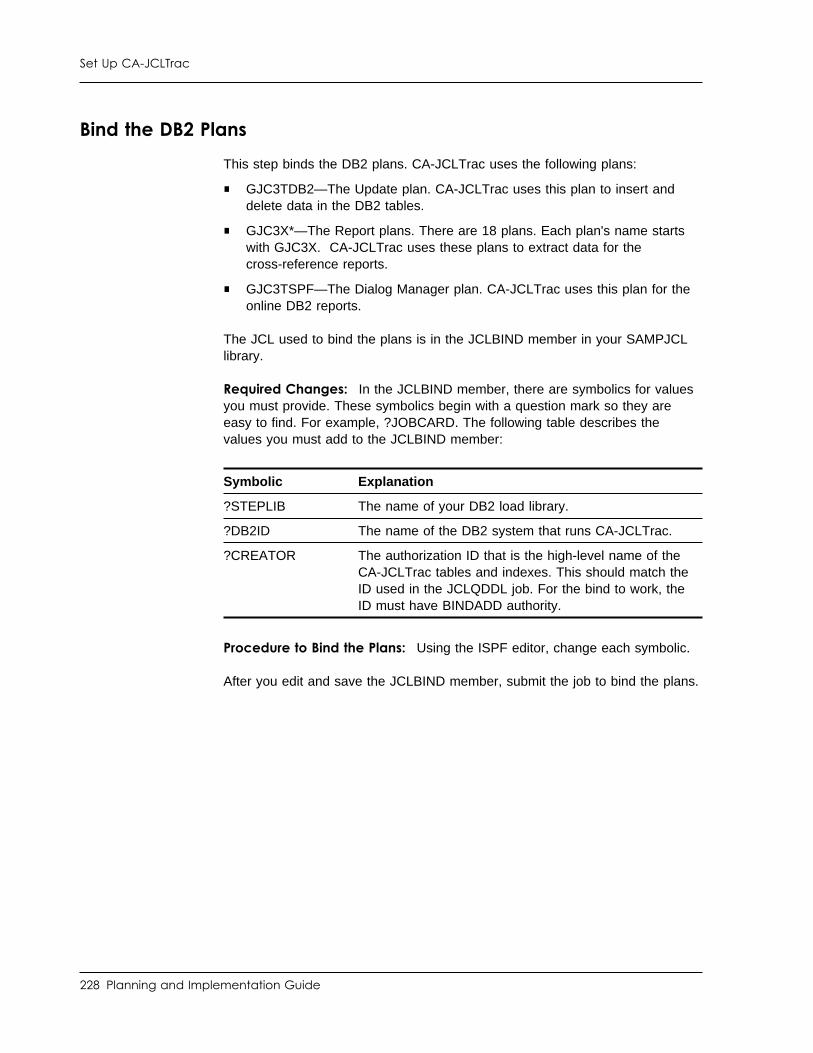
Set Up CA-JCLTrac
Bind the DB2 Plans
This step binds the DB2 plans. CA-JCLTrac uses the following plans:
■ GJC3TDB2—The Update plan. CA-JCLTrac uses this plan to insert anddelete data in the DB2 tables.
■ GJC3X*—The Report plans. There are 18 plans. Each plan's name startswith GJC3X. CA-JCLTrac uses these plans to extract data for thecross-reference reports.
■ GJC3TSPF—The Dialog Manager plan. CA-JCLTrac uses this plan for theonline DB2 reports.
The JCL used to bind the plans is in the JCLBIND member in your SAMPJCLlibrary.
Required Changes: In the JCLBIND member, there are symbolics for valuesyou must provide. These symbolics begin with a question mark so they areeasy to find. For example, ?JOBCARD. The following table describes thevalues you must add to the JCLBIND member:
Procedure to Bind the Plans: Using the ISPF editor, change each symbolic.
After you edit and save the JCLBIND member, submit the job to bind the plans.
Symbolic Explanation
?STEPLIB The name of your DB2 load library.
?DB2ID The name of the DB2 system that runs CA-JCLTrac.
?CREATOR The authorization ID that is the high-level name of theCA-JCLTrac tables and indexes. This should match theID used in the JCLQDDL job. For the bind to work, theID must have BINDADD authority.
228 Planning and Implementation Guide
Set Up CA-JCLTrac
Grant Authority
Various authorities must be granted to use the CA-JCLTrac plans and tables.This section explains what those authorities are and how to grant them.
Granting Authority to Create Reports: To use the CA-JCLTrac report plansto create reports, you must grant execute and select authority to the appropriateusers. Select authority is necessary because the report plans use dynamicSQL. The SQL statements used to grant execute and select authority are in theJCLQRPT member in your SAMPJCL library.
In the SQL are the symbolics ?AUTHID and ?CREATOR. ?AUTHID is the ID ofthe person receiving the authority. If you intend to grant general access to theCA-JCLTrac tables, use an ID of PUBLIC. ?CREATOR is the authorization IDthat is the high-level name of the CA-JCLTrac tables. Using the ISPF editor,replace the symbolics with valid authorization IDs.
After you edit and save the JCLQRPT member, run it in SPUFI, DSNTEP2, oran equivalent program.
Granting Authority to Update and Load Tables: To update and load theCA-JCLTrac tables, you must grant execute and load authority to theappropriate users. The SQL statements used to grant execute and loadauthority are in the JCLQUPD member in your SAMPJCL library.
In the SQL are the symbolics ?DBNAME and ?AUTHID. ?AUTHID is the ID ofthe person receiving the authority. ?DBNAME is the name of the database forwhich authority is being granted. Using the ISPF editor, replace the symbolicswith a valid database name and authorization ID.
After you edit and save the JCLQUPD member, run it in SPUFI, DSNTEP2, oran equivalent program.
Chapter 6. Customization Tasks 229
Use Other Sysout Capture Products
Use Other Sysout Capture Products
The Unicenter CA-Jobtrac primary function is to automate productionscheduling. The purpose of the Sysout Capture feature is for short timestorage of sysouts only. Long term storage should utilize an outputmanagement product such as CA-View.
If you already have a sysout capture product of another kind, you can directUnicenter CA-Jobtrac to requeue each listing to the other product as it capturesthe copy for on-schedule viewing.
For more information about requeueing sysouts, see the Requeue Classdescription in “Options on the Sysout Capture Options Panel” on page 195.
About the Unicenter CA-View Interface: Unicenter CA-Jobtrac can interfacewith the CA Unicenter CA-View product, r11 and higher.
To use the Unicenter CA-View interface, you must be able to run UnicenterCA-View from ISPF. This means that the Unicenter CA-View load libraries mustbe either in a LNKLSTnn library or in a library named in the STEPLIB DDstatement of the user's logon procedure. The Unicenter CA-View panels mustbe accessible. For more information, see the Unicenter CA-View GettingStarted.
Accessing Unicenter CA-View in Unicenter CA-Jobtrac: The first time youuse the 0 (zero) line command or the Unicenter CA-View primary command,Unicenter CA-Jobtrac prompts you for the high-level name of a UnicenterCA-View database. When you respond, Unicenter CA-Jobtrac saves the namein your Unicenter CA-Jobtrac user profile. The next time you issue a 0 linecommand or Unicenter CA-View primary command, Unicenter CA-Jobtrac usesthe high-level name that it saved to determine which database to access. Formore information about these commands, see the Operator Guide.
230 Planning and Implementation Guide
Use Other Sysout Capture Products
Enabling the Unicenter CA-View Interface: To enable the UnicenterCA-View feature, take the following steps:
1. Format a capture file. We recommend 5 cylinders (the minimum).
2. Specify N for the Capture Sysout field on the CA-Jobtrac Global Optionspanel. This tells Unicenter CA-Jobtrac to bypass sysout capture and toroute it to the Unicenter CA-View output class.
3. Specify a class that does not get held (A, for example) for the OutputCapture Class 1 field on the Sysout Capture Options panel. This tellsUnicenter CA-Jobtrac not to hold any sysout.
4. Specify a number of days to keep schedule captures in the Ret Days/Versfield on the Sysout Capture Options panel. This tells Unicenter CA-Jobtracto save schedule captures for the specified number of days.
5. Specify whatever you want for the remaining fields in the first capture classdefinition (class 1). Unicenter CA-Jobtrac uses this primary definition forschedule captures, and it must be defined.
For more information about the CA-Jobtrac Global Options and Sysout CaptureOptions panels, see “Set Global Options” on page 184.
Chapter 6. Customization Tasks 231
Cross-Platform Scheduling
Cross-Platform Scheduling
If you plan to implement the remote scheduling to a scheduler or an agent, thefollowing are required:
■ CA-GSS
■ CA-XPS
■ CA Common Services
■ CAICCI must be configured with a TCPIPGW protocol TCP/IP gateway. Forsyntax and additional information, see the CA Common ServicesAdministrator Guide. A sample CAICCI configuration file might look like:
SYSID(localname) PROTOCOL(TCPIPGW) NODE(TCPIPGW,ip-address:port,retry,remotename) - optional CONNECT(remotename) - optional
■ TCP/IP must exist on one of the z/OS systems to communicate with theremote platform (such as UNIX). CAICCI can route work throughout yourSNA network to reach other z/OS systems.
■ If you plan to implement remote scheduling to Unicenter CA-Jobtrac from ascheduler or an agent, the following is also required:
– CAIENF must be installed. CAIENF must be active for status to bereturned to a scheduler or an agent. CA-XPS DCM(CAL2DCM2) mustbe installed into the CAIENF database.
– CA-XPS must be installed. For more information, see the CA CommonServices Administrator Guide.
232 Planning and Implementation Guide
Cross-Platform Scheduling
Procedure: The following steps are required to implement cross-platformscheduling:
1. CAICCI must be configured with a TCPIPGW protocol TCP/IP gateway. Forsyntax and information, see the CA Common Services Administrator Guide.
2. Allocate the tracking checkpoint by running the job in the ALCUNICKmember of SAMPJCL (required).
This DD MUST be added to the CA-GSS PROC on the CHKPOINT ddnamein a following step.
3. Add the statements from the PPOPTION member JOBTRAC to theCA-GSS PPOPTION member JOBTRAC.
See “Global Variables for Cross-Platform Scheduling” on page 236.
4. Edit the CA-GSS PROC (YS28GSSA) and add the following DD statement:
//CHKPOINT DD DISP=SHR,DSN=your.unijtckp <-specify
5. (Optional) Allocate remote platform security location data set.
A location data set (TRACRnnn) can optionally be defined to UnicenterCA-Jobtrac to contain user ID, domain, and password information that isused when submitting events to a scheduler or an agent on remotesystems. A remote password data set may be defined for each location.
The members contained in this data set are encrypted to prevent browsing.The members are created and updated through the PASSWORD commandthat is available from the Unicenter CA-Jobtrac ISPF facility. The data setscan be allocated using the following JCL or what is in SAMPJCL memberSTAGE2.
//name JOB//STEP1 EXEC PGM=IEFBR14//TRACRnnn DD DSN=your.TRACR,DISP=(,CATLG),// DCB=(RECFM=FB,LRECL=8 ,BLKSIZE=6 8 ),SPACE=(TRK,(15,15,1 )),// UNIT=uuuuu,VOL=SER=vvvvv
Chapter 6. Customization Tasks 233
Cross-Platform Scheduling
Once allocated, you must add the data set to the DYNAMLOC PPOPTIONmember. Use the REFRESHLOC operator command to add the data setwithout restarting Unicenter CA-Jobtrac. REFRESHLOC is described in theOperator Guide. DYNAMLOC allocation is described in “Define LocationInformation (DYNAMLOC) and Initiation IMODs” on page 176.
Note: The same password data set may be used by multiple locations, butmultiple password data sets cannot be concatenated to a single TRACRnnnddname.
For information about updating this data set, see the PASSWORD ISPFonline command in the Operator Guide. For information about optionalmember name processing, see “REMTCRED” on page 149.
6. Password requirements rules file (optional).
For cross-platform work being routed to Unicenter CA-Jobtrac from otherplatforms, an optional table is available to specify the passwordrequirements for the sending system. This allows for systems to beidentified as "trusted" or "untrusted" systems. This table can reside in any80-character LRECL data set and may be a member of a PDS. The dataset is referenced, as shown in the following, by ddname XPSPSWD in theCA-GSS PROC. This table is described in “Cross-Platform Server($UNIXPSJT) Password Requirements Table” on page 241.
//XPSPSWD DD DISP=SHR,DSN=CAI.XPSPSWD
You are asked in the following step to specify a data set for the XPSPSWDDD. If you decide not to use this table, the file can be specified as:
//XPSPSWD DD DUMMY
This disables password requirement checking.
7. Shut down and restart CA-GSS to pick up the new CHKPOINT DD.
8. Shut down and restart Unicenter CA-Jobtrac to pick up the new DDs.
234 Planning and Implementation Guide
Cross-Platform Scheduling
CA-GSS Server IMODs
The following describes server IMODs used by cross-platform scheduling.
$UNITRKJT service and $UNI_TRACK IMOD cross-platform tracker. Remoteexecution status tracker. This server handles receiving the status for commandsthat have been sent to a scheduler or an agent for execution by UnicenterCA-Jobtrac.
$UNIXPSJT service and $UNI_REMOTE IMOD cross-platform server. Thisserver handles both receiving request and return status to a scheduler or anagent for requests sent from a scheduler or an agent to Unicenter CA-Jobtrac.This task is described in “Cross-Platform Server ($UNIXPSJT) PasswordRequirements Table” on page 241.
$UNIRCVJT service and $UNI_RECEIVE IMOD Command driver. This serverpreprocesses commands, and next starts an IMOD to update UnicenterCA-Jobtrac with the request.
Unicenter CA-Jobtrac starts these services during initialization if the&UNI.$JT2UNI and &UNI.$UNI2JT globals are set to a Y value. These globalsare described later in this chapter. Unicenter CA-Jobtrac invokes IMOD$UNIJT_INIT at startup to check the status of the server IMODs and define andstart the IMODs as needed. You can execute this IMOD manually using theCA-GSS SCHEDULE operator command or GSSEDIT to start these serviceIMODs. You can also control these tasks using CA-GSS operator commands.
Some of the CA-GSS commands of interest include:
■ To display defined servers:
F GSSA,SERVER DISPLAY
■ To display all active IMODs (including servers):
F GSSA,DISPLAY ACTIVE
■ To stop a server IMOD with the service name $UNITRKJT:
F GSSA,SERVER STOP $UNITRKJT
■ To start a server IMOD with the service name $UNITRKJT:
F GSSA,SERVER START $UNITRKJT
■ To run the $UNIJT_INIT IMOD:
F GSSA,SCHEDULE $UNIJT_INIT
Chapter 6. Customization Tasks 235
Cross-Platform Scheduling
Global Variables for Cross-Platform Scheduling
This topic describes the CA-GSS globals that are used with the cross-platformscheduling server IMODs.
Server IMOD Selection Globals
GLOBVAL &UNI.$UNI2JT /Y/
Controls the starting of the server IMODs that are used for scheduler toUnicenter CA-Jobtrac processing. If Y is specified as the value, the IMODservices $UNIXPSJT and $UNIRCVJT are started whenever UnicenterCA-Jobtrac is started or the $UNIJT_INIT IMOD is executed. Any value otherthan Y prevents the server IMOD from starting.
GLOBVAL &UNI.$JT2UNI /Y/
Controls the starting of the server IMODs that are used for UnicenterCA-Jobtrac to a scheduler or an agent processing. If Y is specified as thevalue, the IMOD service $UNITRKJT is started whenever Unicenter CA-Jobtracis started, or the $UNIJT_INIT IMOD is executed. Any value other than Yprevents the server IMOD from starting.
Status Tracking Server Globals (Service $UNITRKJT)
GLOBVAL &UNI.$UNITRKJT.MON /JOBTRAC/
Specifies the monitor name to be used to identify Unicenter CA-Jobtrac whenrequests are received from a scheduler. If multiple CA scheduling products areinstalled and Unicenter CA-Jobtrac is not the primary receiver of requests, thisdiffers from &UNI.$UNIXPSJT.MON described in the following. A monitor namecan be specified in the File field using the MONITOR keyword following the jobname when a job is being scheduled from a scheduler. In most cases, thevalue of JOBTRAC is appropriate.
This global is required.
236 Planning and Implementation Guide
Cross-Platform Scheduling
GLOBVAL &UNI.$UNITRKJT.IMOD /$JOBT_REMTTRACK/
Specifies the IMOD to invoke when status information is received from ascheduler. This value must be specified with the value of $JOBT_REMTTRACKand should not be changed.
This global is required.
GLOBVAL &UNI.$UNITRKJT.SCAN /15/
Specifies the number of seconds between controlled services. These servicesinclude testing for operator shutdown requests, physical updates to thecheckpoint file that is being updated at all times in memory, and queryingremote locations for job completion statistics. This value may range from 01 to60. If this value is not supplied, a default of 15 seconds is used.
GLOBVAL &UNI.$UNITRKJT.EXTTABLE/data set.name/
Specifies the name of a sequential data set or the member name of a PDS inwhich the external events are defined.
This global is optional.
GLOBVAL &UNI.$UNITRKJT.DEBUG /DEBUG/
Enables debug for this task. If this global is set to the value DEBUG, this tasklogs information about processing to DDs DEBUGTRK and SNAPTRK. If theseDDs are not present in the GSS PROC, setting this global has no effect. Werecommend that debug only be turned on at the request of Technical Supportsince the volume of debug information can be large.
Chapter 6. Customization Tasks 237
Cross-Platform Scheduling
Command Driver Globals (Service $UNIRCVJT)
GLOBVAL &UNI.$UNIRCVJT.MON /JOBTRAC/
Specifies the monitor name to be used to identify Unicenter CA-Jobtrac whenrequests are received from a scheduler. If multiple CA scheduling products areinstalled and Unicenter CA-Jobtrac is not the primary receiver of requests, thisdiffers from &UNI.$UNIXPSJT.MON described in the following. A monitor namecan be specified in the File field using the MONITOR keyword following the jobname when a job is being scheduled from a scheduler. In most cases, thevalue of JOBTRAC is appropriate.
This global is required.
GLOBVAL &UNI.$UNIRCVJT.IMOD /$JOBT_REMTCMD/
Specifies the IMOD that is invoked when a request from a scheduler isreceived. This value must be specified as is.
This global is required.
GLOBVAL &UNI.$UNIRCVJT.SCAN /15/
Specifies the number of seconds between controlled services. These servicesinclude testing for operator shutdown requests. This value may range from 01to 60. If this value is not supplied, a default of 15 seconds is used.
GLOBVAL &UNI.$UNIRCVJT.DEBUG /DEBUG/
Enables debug for this task. If this global is set to the value DEBUG, this tasklogs information about processing to DDs DEBUGRCV and SNAPRCV. If theseDDs are not present in the GSS PROC, setting this global has no effect. Werecommend that debug only be turned on at the request of Technical Supportsince the volume of debug information can be large.
238 Planning and Implementation Guide
Cross-Platform Scheduling
Cross-Platform Server Globals (Service $UNIXPSJT)
GLOBVAL &UNI.$UNIXPSJT.MON /JOBTRAC/
Specifies the monitor name to be used to identify Unicenter CA-Jobtrac whenrequests are received from a scheduler. If multiple CA scheduling products areinstalled and Unicenter CA-Jobtrac is not the primary receiver of requests, thisdiffers from &UNI.$UNIXPSJT.MON described in the following. A monitor namecan be specified in the File field using the MONITOR keyword following the jobname when a job is being scheduled from a scheduler. In most cases, thevalue of JOBTRAC is appropriate.
This global is required.
GLOBVAL &UNI.$UNIXPSJT.SCAN /15/
Specifies the number of seconds between controlled services. These servicesinclude testing for operator shutdown requests, physical updates to thecheckpoint file that is being updated at all times in memory, and queryingremote locations. This value may range from 01 to 60. If this value is notsupplied, a default of 15 seconds is used.
GLOBVAL &UNI.$UNIXPSJT.DEBUG /pc/
Sets current Print (p) and Console (c) trace code settings for this task. ThePrint trace code controls both print and snap output. The Console trace codecontrols what WTOs are issued to the z/OS console. The print and snap DDsare defined in the GSS PROC as XPSPRINT and XPSSNAP.
Chapter 6. Customization Tasks 239
Cross-Platform Scheduling
Valid trace code values are:
0 Do not issue any trace WTOs. This value is only honored for theConsole trace code. If entered for the Print trace code, it isinterpreted the same as a code of 1.
1 Normal messages/WTOs. These messages indicate XPS systemstartup and shutdown. They also indicate when communication withremote systems is first established and if such communication islost.
2 Communication messages/WTOs. Besides the messages issued fortrace code 1, messages relating to CCI communications with othersystems are issued. Also, if the snap DD is available, snap dumpsare taken of the storage areas related to CCI control blocks andrecords.
3 Feedback messages/WTOs. Besides the messages issued for tracecode 2, messages relating to XPS CAIENF feedback events areissued. Also, if the XPS snap DD is available, snap dumps are takenof the storage areas related to CAIENF control blocks and feedbackrecords in addition to the communication area snaps.
4 Program path messages/WTOs. Besides the messages issued fortrace code 3, messages relating to internal XPS processing areissued. Also, if the XPS snap DD is available, snap dumps are takenof the storage areas related to XPS control blocks in addition to thecommunication and feedback related snaps.
Note: Trace code 4 should only be used at the direction ofTechnical Support since it produces a significant number ofmessages.
5-9 Currently, trace codes 5 through 9 do not have specific definitions. Ifentered, they are interpreted the same as trace code 4.
GLOBVAL &UNI.$UNIXPSJT.AGE /30/
Specifies the maximum age for Checkpoint entries. Entries older than thenumber of days specified will be deleted. This value may range from 01 to 999.If this value is not supplied, a default of 30 days is used.
240 Planning and Implementation Guide
Cross-Platform Scheduling
Cross-Platform Server ($UNIXPSJT) Password Requirements Table
The password requirement rules for the cross-platform server on z/OS definewhen a password must accompany an explicit user ID in a cross-platformrequest. Using this table you can discriminate between trusted and non-trustedsystems when receiving requests. That is, if you are confident that requestsfrom a given system have already gone through security checks to ensure thatthe user ID passed with the request should be honored, you can specify a ruleso that the cross-platform server will accept the user ID without a password.For other systems that are not 'trusted' you can write rules so that any requestfrom them which contains a user ID must also carry a password that can bevalidated by the cross-platform server. Requests received from these systemsthat have a user ID but no password are automatically rejected.
Password Requirement Rules are defined in a data set pointed to by theXPSPSWD DD statement in the GSS PROC. This data set is a sequential fileconsisting of fixed 80-byte records (physical sequential or a member of a PDS).The records can be blocked or unblocked. If the XPSPSWD DD statement isnot present, or contains no valid rules, the default processing is to accept allrequests without checking for the presence of passwords.
When the cross-platform server goes through initialization processing, itattempts to locate and parse the Password Requirement Rules. If found, theserules are stored in an in-storage table that is accessed during normalprocessing. Changes made to the rules do not take effect until the server isreinitialized. For information about stopping and starting CA-GSS serverIMODs, see “CA-GSS Server IMODs” on page 235.
Syntax Rules
■ Lines beginning with a blank or an asterisk (*) are considered commentlines.
■ Each individual rule must be contained on a single line between columns 1through 71. Continuation lines are not supported.
■ The rule definition consists of a series of keywords/values beginning incolumn 1, separated by commas with no embedded blanks.
Chapter 6. Customization Tasks 241
Cross-Platform Scheduling
Keywords
NODE=caicci-node-nameIdentifies the one- to eight-character CAICCI Node name that aCross-Platform request can be received from. It must be specified as aspecific name or an asterisk (*), which indicates all nodes. If not specified,the default is NODE=*, indicating all nodes.
MONITOR=monitor-nameIdentifies the seven-character scheduling system monitor name that aCross-Platform request can be received from. It must be specified as aspecific name or an asterisk (*), which indicates all monitor names. In caseswhere a given node may have multiple scheduling systems (such asproduction and test copies of Unicenter CA-Jobtrac), the NODE andMONITOR combination will uniquely identify a specific scheduling system. Ifnot specified, the default is MONITOR=*, indicating all monitor names.
ID=user-idIdentifies the one- to eight-character user ID that may be passed with aCross-Platform request. It must be specified as a specific name or anasterisk (*), which indicates all user IDs. If not specified, the default is ID=*,indicating all user IDs.
PSWD=YES|NOIndicates whether a Cross-Platform request that matches theNODE/MONITOR/ID parameters of the rule must have a password toaccompany the user ID in the request.
YES (or Y)Indicates that such requests must have a password. If not specified,the default is PSWD=YES.
NO (or N)Indicates that passwords are optional for such requests.
242 Planning and Implementation Guide
Cross-Platform Scheduling
Processing
When the server receives a cross-platform request, it checks to determine if therequest contains an explicit user ID.
■ If the request does not contain a user ID, a password requirement check isnot made.
■ If the request contains both a user ID and a password, a passwordrequirement check is not made.
■ If the request contains a user ID but no password, a password requirementcheck is made.
The XPS Router attempts to find the 'best match' between the current requestand the Password Requirement Rule Table based upon the NODE, MONITOR,and user ID. A match with a rule that specifies a specific NODE, MONITOR,and/or user ID takes precedence over a generic rule. If multiple rules equallymatch a request, the rules that require a password take precedence over thosethat do not. If no match is found in the table, the request is allowed to proceedwithout a password.
Chapter 6. Customization Tasks 243
Cross-Platform Scheduling
Examples
NODE=A 4IENF,MONITOR=JOBTRAC,ID=�,PSWD=YES
The preceding rule indicates that any request from CAICCI node A04IENF,scheduling system JOBTRAC, must have a password if it contains an explicituser ID.
NODE=�,ID=MASTER,PSWD=YES
The preceding rule indicates that any request that contains a user ID ofMASTER must have a password, regardless of what CAICCI node orscheduling system sent the request. The default for MONITOR= is * if it is notspecified.
NODE=A 4IENF,ID=TESTUSER,PSWD=NO
The preceding rule indicates that a request from CAICCI node A04IENF with auser ID of TESTUSER is not required to have a password associated with it.
NODE=A 4IENF,ID=�,PSWD=YESNODE=�,ID=TESTUSER,PSWD=NO
If a request is received from CAICCI node A04IENF with a user ID ofTESTUSER, it partially matches on both of the preceding rules. The secondrule takes precedence since a specific ID match takes precedence over aspecific NODE match. A password is not required.
NODE=A 4IENF,MONITOR=�,ID=�,PSWD=YESNODE=�,MONITOR=JOBTRAC,ID=�,PSWD=NO
If a request is received from CAICCI node A04IENF, scheduling systemJOBTRAC with any user ID it partially matches on both of the preceding rules.In this case the matches have equal weight (NODE or MONITOR specific, userID generic). In the case of a tie, the rule that requires a password takesprecedence over one which does not. A password is required.
244 Planning and Implementation Guide
Alter the Event Console Logging Message Options
Alter the Event Console Logging Message Options
The Event Console Logging feature routes selected Unicenter CA-Jobtracmessages to one or more Unicenter Enterprise Job Management EventConsoles or Unicenter Event Consoles. The messages that are generated aredefined in a load module, GJTREMSG. Defaults are set for the messages, andno modifications are required.
If you want, you can customize this module to do the following:
■ Change the default colors and attributes for each message severity.
■ Change the color and attribute for a specific message.
■ Change the fixed portion of the message text.
■ Specify whether specific messages should be WTO'ed.
■ Specify whether specific messages should be sent to the event console.
Chapter 6. Customization Tasks 245
Alter the Event Console Logging Message Options
Before changing the GJTREMSG module, copy the source fromCAIMAC(GJTREMSG) to a separate non-SMP/E controlled library. Oncechanged, the module can be added to Unicenter CA-Jobtrac by using thefollowing job to apply the module as USERMOD UM00002. Usermods shouldnever be accepted. This lets them be restored and re-applied if maintenance ora Unicenter CA-Jobtrac PTF ever needs to update this module.
//UM 2 JOB ...//�������������������������������������������������������//� �//� APPLY CA-JOBTRAC UM 2 USERMOD FOR ECL MESSAGES �//� �//� THE FOLLOWING JCL USES YOUR EXISTING CA-JOBTRAC �//� SMP/E PROC. �//� �//� 1. SPECIFY A JOBCARD �//� 2. SPECIFY YOUR SOURCE DATASET AND MEMBER ON THE �//� '//EMSG DD' STATEMENT AT THE BOTTOM. �//� 3, RUN AND CHECK THE OUTPUT FOR ERRORS. �//� �//�������������������������������������������������������//HD11APP EXEC CAIHD11 /� INVOKE CA-JOBTRAC SMP PROCEDURE//�//SMPPTFIN DD �++USERMOD (UM 2).++VER (Z 38) FMID(CHDB ) PRE(xxxxxxxx).++SRC(GJTREMSG) DISTLIB(CHDB XLD) SYSLIB(CAIMAC) DISTMOD(CHDB LLD) TXLIB(EMSG)./�//�//SMPCNTL DD � SET BDY(GLOBAL). RECEIVE SELECT(UM 2). SET BDY(CAITGT). APPLY SELECT(UM 2)./�//EMSG DD DISP=SHR,DSN=USER.PDS(GJTREMSG) <-YOUR SOURCE
246 Planning and Implementation Guide
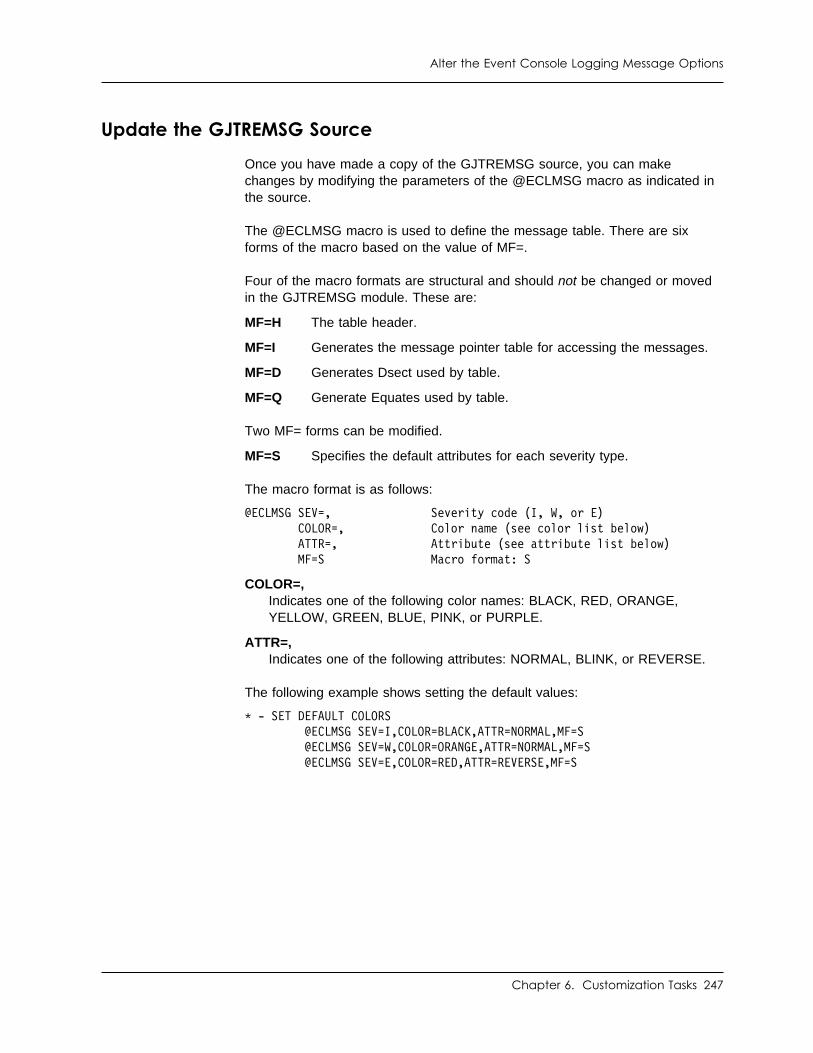
Alter the Event Console Logging Message Options
Update the GJTREMSG Source
Once you have made a copy of the GJTREMSG source, you can makechanges by modifying the parameters of the @ECLMSG macro as indicated inthe source.
The @ECLMSG macro is used to define the message table. There are sixforms of the macro based on the value of MF=.
Four of the macro formats are structural and should not be changed or movedin the GJTREMSG module. These are:
MF=H The table header.
MF=I Generates the message pointer table for accessing the messages.
MF=D Generates Dsect used by table.
MF=Q Generate Equates used by table.
Two MF= forms can be modified.
MF=S Specifies the default attributes for each severity type.
The macro format is as follows:
@ECLMSG SEV=, Severity code (I, W, or E)COLOR=, Color name (see color list below)ATTR=, Attribute (see attribute list below)MF=S Macro format: S
COLOR=,Indicates one of the following color names: BLACK, RED, ORANGE,YELLOW, GREEN, BLUE, PINK, or PURPLE.
ATTR=,Indicates one of the following attributes: NORMAL, BLINK, or REVERSE.
The following example shows setting the default values:
� - SET DEFAULT COLORS @ECLMSG SEV=I,COLOR=BLACK,ATTR=NORMAL,MF=S @ECLMSG SEV=W,COLOR=ORANGE,ATTR=NORMAL,MF=S @ECLMSG SEV=E,COLOR=RED,ATTR=REVERSE,MF=S
Chapter 6. Customization Tasks 247
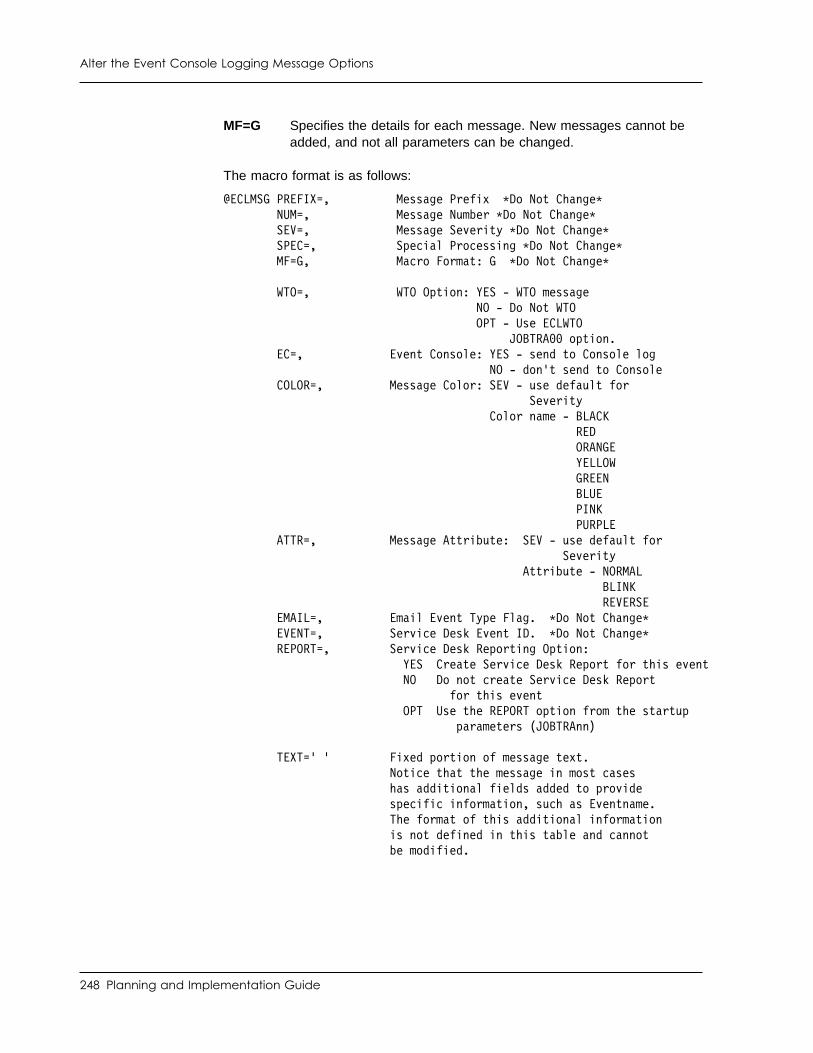
Alter the Event Console Logging Message Options
MF=G Specifies the details for each message. New messages cannot beadded, and not all parameters can be changed.
The macro format is as follows:
@ECLMSG PREFIX=, Message Prefix �Do Not Change�NUM=, Message Number �Do Not Change�SEV=, Message Severity �Do Not Change�SPEC=, Special Processing �Do Not Change�MF=G, Macro Format: G �Do Not Change�
WTO=, WTO Option: YES - WTO messageNO - Do Not WTOOPT - Use ECLWTO
JOBTRA option.EC=, Event Console: YES - send to Console log
NO - don't send to ConsoleCOLOR=, Message Color: SEV - use default for
SeverityColor name - BLACK
RED ORANGE YELLOW GREEN BLUE PINK PURPLE
ATTR=, Message Attribute: SEV - use default for Severity
Attribute - NORMAL BLINK REVERSE
EMAIL=, Email Event Type Flag. �Do Not Change�EVENT=, Service Desk Event ID. �Do Not Change�REPORT=, Service Desk Reporting Option:
YES Create Service Desk Report for this eventNO Do not create Service Desk Report
for this eventOPT Use the REPORT option from the startup
parameters (JOBTRAnn)
TEXT=' ' Fixed portion of message text.Notice that the message in most caseshas additional fields added to providespecific information, such as Eventname.The format of this additional informationis not defined in this table and cannot
be modified.
248 Planning and Implementation Guide
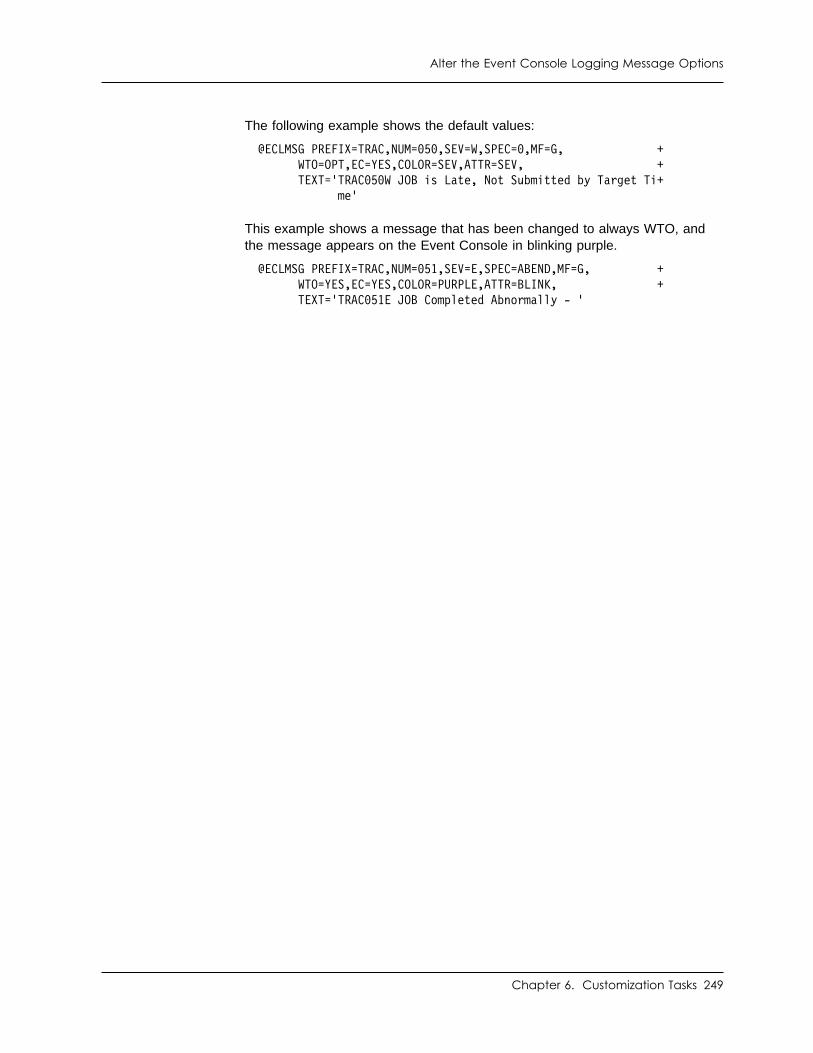
Alter the Event Console Logging Message Options
The following example shows the default values:
@ECLMSG PREFIX=TRAC,NUM= 5 ,SEV=W,SPEC= ,MF=G, + WTO=OPT,EC=YES,COLOR=SEV,ATTR=SEV, +
TEXT='TRAC 5 W JOB is Late, Not Submitted by Target Ti+ me'
This example shows a message that has been changed to always WTO, andthe message appears on the Event Console in blinking purple.
@ECLMSG PREFIX=TRAC,NUM= 51,SEV=E,SPEC=ABEND,MF=G, + WTO=YES,EC=YES,COLOR=PURPLE,ATTR=BLINK, +
TEXT='TRAC 51E JOB Completed Abnormally - '
Chapter 6. Customization Tasks 249

Chapter 7. Startup and Verification
This section contains the following topics:
Initialization and Startup . . . . . . . . . . . . . . . . . . . . . . . . . . . . . 252Verification . . . . . . . . . . . . . . . . . . . . . . . . . . . . . . . . . . . . . 254
A verification procedure is included that you can use to verify that UnicenterCA-Jobtrac is functioning properly. Use of the supplied IVP assumes you havecompleted the SMP/E installation process, the Unicenter CA-Jobtrac installationprocess (STAGE1 and STAGE2), and the customization tasks described in thechapter "Customization Tasks." If you have not completed these steps, youmust do so before using the supplied IVP. This verification procedure is referredto as IVP.
Before Running IVP: Before you can run IVP, you must have completed theinstall and customization steps up to this point and start Unicenter CA-Jobtrac,and you must follow the steps in this chapter for the IVP to work correctly.
This chapter discusses these issues.
Chapter 7. Startup and Verification 251
Initialization and Startup
Initialization and Startup
This topic covers multiple ways of initializing Unicenter CA-Jobtrac internals,starting the Unicenter CA-Jobtrac task, accessing Unicenter CA-Jobtrac, andending the Unicenter CA-Jobtrac task.
Initialize InternalsS VINITx,PARM=IPL,SUB=MSTR
Important! You must use this method of initializing Unicenter CA-JobtracONLY during an IPL when using an IPLTABLE.
Automatically Processing IPL Messages: The VINITx procedure forUnicenter CA-Jobtrac initialization can be run under the Master Subsystem tolet some table processing to begin early in the IPL process, even before JES isstarted. With the use of a special AMR table called IPLTABLE, you canprocess received messages and issue commands and schedule or trigger batchjobs.
By default, Unicenter CA-Jobtrac loads the IPLTABLE during IPL and switchesto the regular AMR table after 15 minutes. If you do not want to wait the 15minutes, you can activate a table using the online table services (for moreinformation, see the Extended Scheduling Services Guide).
For information about the IPLTABLE, see the chapter "Customization Tasks."For information about the other AMR tables, see the Extended SchedulingServices Guide.
Using Unicenter CA-Jobtrac at Initialization Time: If you do not want to usethe IPLTABLE processing feature, add this command to SYS1.PARMLIBmember IEACMDxx:
S JOBTRAC[.taskname,PARM=IPL]
This command starts the specified Unicenter CA-Jobtrac and initializes theUnicenter CA-Jobtrac internals. The optional PARM=IPL parameter lets the IPLmessage prompt to the console operator as described in the global optionsinformation in the chapter "Customization Tasks."
Restrictions on Using VINITx: Since VINITx running under the MasterSubsystem (SUB=MSTR) is started so early in the IPL process, very fewresources are available. For example, tasks running at this point in the IPLknow only about data sets that are cataloged in the master catalog. Therefore,any data sets that must be accessed at this time must be cataloged in themaster catalog.
For other VINITx commands, see the Operator Guide.
252 Planning and Implementation Guide
Initialization and Startup
Start the Unicenter CA-Jobtrac Task
Important! Unicenter CA-Jobtrac requires CA-GSS to be present to use its fullfunctionality. Minimally, the CA-GSS CAILIB MUST be present. If it is notpresent, Unicenter CA-Jobtrac will not start.
Procedure: If you do not start Unicenter CA-Jobtrac during your IPL, you cando so manually. To start the Unicenter CA-Jobtrac task, enter the followingcommand on each system in the shared spool complex:
S JOBTRAC[.taskname]
Important! Normally, Unicenter CA-Jobtrac startup processing by defaultbegins submitting jobs/events, but since the checkpoint database was justformatted, no jobs/events will submit.
Access Unicenter CA-Jobtrac
From ISPF: To access Unicenter CA-Jobtrac from ISPF, select the option setup by your systems programmer.
With a CLIST: To access Unicenter CA-Jobtrac using a CLIST, enter thefollowing command, which executes the initialization CLIST created by theSTAGE2 job stream:
EX your.CA-Jobtrac.SAMPJCL(TCLIST3)orEX your.CA-Jobtrac.SAMPJCL(LIBDEF)
The function of TCLIST3 is to allow entry into Unicenter CA-Jobtrac until yourISPF menu has been updated to include Unicenter CA-Jobtrac as a selectablemenu item (see the information about adding Unicenter CA-Jobtrac to yourISPF Main Menu in the chapter "Customization Tasks").
End the Unicenter CA-Jobtrac Task
To end the Unicenter CA-Jobtrac task, enter the following command:
P taskname
Chapter 7. Startup and Verification 253
Verification
Verification
This topic covers the contents and use of the installation verification procedure.
Contents of IVP
The Installation Verification Procedure (IVP) supplied with the product consistsof an internal verification procedure, a dynamic schedule, JMF, ADI, AJO, andCA-Easytrieve report testing, and a series of events to be scheduled. All IVPmembers can be found in your SAMPJCL library.
Members Supplied: The Unicenter CA-Jobtrac IVP members supplied andtheir contents are described in the following tables:
All other jobs will need their JOB statements.
SCL Member Contains
IVP001 Unicenter CA-Jobtrac Dynamic Schedule SCL
JCL Member Contains ModifyJOBStatement
IVPADI Sample ADI job Yes
IVPAJO Sample AJO job Yes
IVPJMF Sample JMF job Yes
JOBT@#$J Internal verification procedure that testsUnicenter CA-Jobtrac and related IBM exitsto see that they are installed and active
No
JREPI1 Sample JTEZREPT - List Schedule Yes
JREPI2 Sample JTEZREPT - List History Yes
TESTI1 IEFBR14 Yes
TESTI2 IEFBR14 Yes
TESTI3 IEFBR14 Yes
Dynamic Task Contains Modify JOBstatement
0ARCHIVE Tests event and sysout archival,dynamic task scheduling
No
254 Planning and Implementation Guide
Verification
IVP Assumptions: The IVP assumes the following environment:
■ The IVP001 schedule member resides in the location 001 SCL library. Thismember must be defined as the TRACS001 SCL library in the UnicenterCA-Jobtrac started task. The STAGE2 installation job stream created aUnicenter CA-Jobtrac started task with TRACS001 pointing to the librarydefined for the INSTLIB keyword.
■ The Unicenter CA-Jobtrac started task procedure in your procedure librarycontains a TRACJ001 DD statement naming the same data set as in thelast item above. This DD statement defines the JCL library for location ID001 and contains the IVP events JOBT@#$J, TESTI1, TESTI2, TESTI3,IVPAJO, IVPJMF, IVPADI, JREPI1 and JREPI2. The ISPF CLIST for usingUnicenter CA-Jobtrac should also allocate this data set, or it should beincluded in your TSO logon procedure.
■ The ASMAUTH customization event must also run to generate a defaultTRACAUTH table with a default location ID of 1. This is needed becausethe IVP001 schedule member schedules events for location ID 001.
■ The IVPAJO member must have the PRODDATE member sample in thecai.SAMPJCL library copied over to the DATELIB data set created by theSTAGE2 JCL. Member IVPJMF must have the JMFSYM01 samplemember from the cai.SAMPJCL copied over to the DATELIB data set.
■ The JTEZREPT procedure as created in STAGE2 customization exists in anexecutable form in an accessible procedure library.
■ Because the 0ARCHIVE dynamic task will be scheduled as part of the IVP,you might need a tape drive if you have chosen to archive sysouts to tapeas specified on the Sysout Capture Options panel (global options).
Chapter 7. Startup and Verification 255
Verification
Using Other Libraries: If you decide to use libraries other than thosegenerated during initial installation, modify the Unicenter CA-Jobtrac startedtask procedure or use a different TRACAUTH table. You should ensure that:
■ IVP001 exists in the SCL library defined as TRACS001 in your JOBTRACSTC task. It can be copied from your SAMPJCL installation library ifnecessary.
■ IVP001 schedules all events to a location ID to which you are authorized bywhatever TRACAUTH table you are using.
■ The JCL members TESTI1, TESTI2, TESTI3, IVPAJO, IVPJMF, IVPADI,JREPJ1, JREPI2, and JOBT@#$J exist in the JCL library for the location IDto which you have scheduled them. They can be copied from the SAMPJCLinstallation library if necessary.
■ The proper data set definition exists for the JCL library in both the UnicenterCA-Jobtrac started task procedure and your TSO session (either allocatedin your Unicenter CA-Jobtrac CLIST or added to your logon procedure) orthe DYNAMLOC member.
■ If you change the name of the internals verification procedure job(JOBT@#$J), it must be five to eight characters ending with @#$J. It is notrecommended.
Procedure: Follow the steps below to use the supplied IVP:
1. Modify the JCL supplied for the sample jobs to meet your installationrequirements. Check the TESTII1, TESTI2, TESTI3, IVPAJO, IVPJMF,IVPADI, JREPI1, JREPI2, and JOBT@#$J jobs for JOB statement updates.To view sysouts, make sure the specified MSGCLASS is one of the sysoutcapture classes you specified on the Sysout Capture Options panel (globaloptions) and the Capture Sysout option on the CA-Jobtrac Global Optionspanel is set to Y.
2. Enter the Unicenter CA-Jobtrac ISPF interface and issue the followingcommand in the COMMAND field on the CA-Jobtrac primary panel to beginexecution of the IVP. All Unicenter CA-Jobtrac commands require dynamicschedule names and task names starting with 0 (zero).
RUN IVP 1,L= 1
The command loads the dynamic schedule's SCL and performs syntaxchecking of the input. You can follow the progress of the schedule load bypressing Enter and watching the Current Event Status field on the right sideof the panel. To view the output of the schedule, you can tab to theschedule name and enter the O (Output) line command.
3. When the schedule is loaded, enter RALL or D in the COMMAND field andpress Enter. This command displays all events on the schedule (after initialinstallation, only the IVP events should be displayed).
256 Planning and Implementation Guide
Verification
4. The Dep Codes (dependency) field for TESTI1 should have a manual (M)dependency. Tab to event TESTI1, enter the A (release dependency) linecommand, and press Enter. The A command releases the manualdependency and lets Unicenter CA-Jobtrac submit the event.
Each event will run after its predecessor completes, in the followingsequence:
TESTI1 Releases TESTI2 upon successful completion
TESTI2 Releases TESTI3 upon successful completion
TESTI3 Releases JOBT@#$T
JOBT@#$T Releases IVPADI upon successful completion
IVPADI Releases IVPAJO upon successful completion
IVPAJO Releases IVPJMF upon successful completion
IVPJMF Releases JREPI1 upon successful completion
JREPI1 Releases the 0ARCHIVE task upon successful completion
0ARCHIVE Releases JREPI2 upon successful completion
JREPI2 Last event
The following describes the members:
IVP001Tests dynamic schedule loading and Unicenter CA-Jobtrac/ISPF onlineprocessing.
TESTI1, TESTI2, and TESTI3Tests event submission, tracking, and sysout capture (IEFBR14).
JOBT@#$JTests to see the dynamic exits of Unicenter CA-Jobtrac.
IVPADITests the Automatic Date Insertion abilities of Unicenter CA-Jobtrac.Check the output to see if the comments match with the dayssubmission date.
IVPAJOTests the Automatic JCL Override abilities of Unicenter CA-Jobtrac.Check the output of this job to see that the STEPNAME is the day ofthe week this job has submitted. This should be todays.
IVPJMFTests the JCL Modification Functions. Check the output of this job tosee that the Dates in the comments are correct.
JREPI1Tests the JTEZREPT utility checkpoint reporting features.
JREPI2Tests the JTEZREPT utility history reporting features.
Chapter 7. Startup and Verification 257
Verification
0ARCHIVETests event and sysout archival, dynamic task scheduling and is not amember of SAMPJCL; it is a dynamic task used for UnicenterCA-Jobtrac file maintenance.
5. If you selected the tape option during customization, the 0ARCHIVEdynamic task might require a tape mount. After the 0ARCHIVE task hascompleted, the TESTI1, TESTI2, TESTI3, AVPADI, IVPAJO, IVPJMF,JREPI1, and the 0ARCHIVE events that just completed will be deleted fromthe current schedule and moved to history.
6. Unicenter CA-Jobtrac signals that each event is complete by indicatingCOMPLETED in the Current Event Stat field on the panel. Until UnicenterCA-Jobtrac finishes capturing an event's sysouts, an * (asterisk) appears tothe right of the date at the end of the event's record. To view an event'ssysouts after the * disappears, tab to the event and enter the O (output) linecommand.
Press the END PF key or enter the END command to return to theScheduled Event Display panel. At any time, you can select the detail panelto view an event's schedule detail by using the S (select) line command.
Messages Received: The following sequence of messages should appear onthe JES JOB LOG for the JOBT@#$J job. These messages indicate successfulexecution of the IVP. If you do not receive these messages, the installation ofthe Unicenter CA-Jobtrac internals was not successful.
If you are running multiple copies of Unicenter CA-Jobtrac, in any combination,you might receive duplicates of the GJTR exit messages.
IEF1961 GJTRIVP2 - IEFUJV EXIT DETECTED THE IVP JOBGJTRIVP2 - IEFUJV EXIT DETECTED THE IVP JOBGJTRIVP2 - IEAVMXIT DETECTED THE IVP WTO@#$J - GJTRIVP2 - THIS TESTS THE WTO INTERFACE
258 Planning and Implementation Guide
Chapter 8. Upgrading, Testing, RunningMultiple Copies
This section contains the following topics:
Release Compatibilities and Incompatibilities . . . . . . . . . . . . . . . . . 260Conversion Notes . . . . . . . . . . . . . . . . . . . . . . . . . . . . . . . . 261Upgrade Your Production from r3.5 to r11 . . . . . . . . . . . . . . . . . . 263Return to the Prior Release . . . . . . . . . . . . . . . . . . . . . . . . . . . 264Run r3.5 Production and r11 Test System . . . . . . . . . . . . . . . . . . 265Run Multiple STCs on Same CPU . . . . . . . . . . . . . . . . . . . . . . . 266Run in a Shared Sysplex Environment . . . . . . . . . . . . . . . . . . . . 268
When using all the functions and features to their fullest, Unicenter CA-Jobtracfunctions as an operating system for production control. You should treat a newVersion of Unicenter CA-Jobtrac just as you would a new Version of any majorproduct. Do your installation and testing at times that allow the most thoroughtesting with the least impact on your data center.
General Procedure
You should test Unicenter CA-Jobtrac Version just as you tested the priorVersion of Unicenter CA-Jobtrac when you first installed it. You should scheduleroutine maintenance, backups, archives, and so on, using Unicenter CA-JobtracVersion for several days. Take time to familiarize yourself with the newfunctions and facilities. When you are comfortable with Version, make it yourproduction system.
Memory Requirements
If you plan to run previous Versions of Unicenter CA-Jobtrac with Version, takeinto account the amount of CSA the previous Versions will need. Each previousVersion requires at least 150 KB below the line. Extended CSA (above the line)will also grow.
Note: The CSA is reused whenever Unicenter CA-Jobtrac is stopped andrestarted under normal circumstances. The expanded CSA is not released orreused when Unicenter CA-Jobtrac is backed out of the system using the 'FJOBTRAC,BACK' operator command. New storage is acquired following abackout of Unicenter CA-Jobtrac.
Chapter 8. Upgrading, Testing, Running Multiple Copies 259
Release Compatibilities and Incompatibilities
Release Compatibilities and Incompatibilities
To ensure that you do not obtain Unicenter CA-Jobtrac prior Version loadmodules from the linklist libraries during testing, you need to STEPLIB to yourr11 load library in your STC, TSO logon procedure, and all batch jobs executingUnicenter CA-Jobtrac programs. Also, due to new SCL keywords, werecommend that SCL libraries are kept separately.
Note: If you are using production SCL and JCL libraries, you might getduplicate production JCL submitted. We recommend that you use different SCLand JCL libraries.
Compatibilities
The following features in r3.5 are compatible with r11:
■ All schedules are fully supported. However, since we have updated syntaxchecking for schedule loads, we recommend that you test all yourproduction SCL. Also, you should not add new r11 features to yourproduction schedules until you have accepted r11 as a production system.
■ All date card formats are compatible.
■ All JCL override formats are compatible.
■ All TRACAUTH table definitions are supported.
Incompatibilities
The r3.5 programs cannot share or access the r11 database files. Also, r11programs cannot share or access the r3.5 checkpoint files.
If you use user exits 01, 03, 06, 09, 10, 13, 16, 20, 22, 23, and 30, you need torewrite them to process the new data formats. For exit specifications, see theReports, Maintenance, and Recovery Guide.
r11 Features
You cannot install r11 into the same SMP/E CSI, target, and DLIB libraries asr3.5 of Unicenter CA-Jobtrac. r11 is compatible with other CA products.
260 Planning and Implementation Guide
Conversion Notes
Conversion Notes
This topic provides conversion notes on Unicenter CA-Jobtrac files.
Checkpoint and History
This step performs the conversion from the JFST access method toCA-Datacom/AD database tables.
Member Used: The JCL for this step is in member CONVERT in yourUnicenter CA-Jobtrac SAMPJCL library.
Procedure: Take the following steps to convert to CA-Datacom/AD databasetables:
1. Unicenter CA-Jobtrac r11 must be initialized for the token to which you areconverting. If you have previously started Unicenter CA-Jobtrac r11 on thesystem since the IPL, this has performed the initialization. If you have not orare converting to another token, you can run the VINITx PROC with thetoken (x) specified in the //JOBTRACx DD DUMMY.
2. The Stage1 and Stage2 processes created this member so that all optionalparameters are already incorporated in this member. However, review theJCL in the CONVERT member to verify accuracy.
3. Modify the JCL if needed. The JOBTRACx and JOBHISTx DDs should havethe r3.5 checkpoint and history files you are planning to convert. You canchange the token that will be used in the new database by changing thetoken value on these two DD statements. Assume that your current token isX, that your checkpoint file is named CAI.JOBTRACX.CHECKPT, and thathistory file is named CAI.JOBTRACX.HISTORY. You would then specify thefollowing:
//JOBTRACZ DD DSN=CAI.JOBTRACX.CHECKPT,DISP=SHR//JOBHISTZ DD DSN=CAI.JOBTRACX.HISTORY,DISP=SHR
The r3.5 checkpoint and history data for token X is converted into the r11database for token Z. As mentioned in Step 1, Unicenter CA-Jobtrac wouldhave to be initialized for token Z by having run the JOBTRACZ jobs or theVINITZ job with the //JOBTRACZ DD DUMMY.
4. Run the CONVERT job to perform the conversion.
Capture
The capture file format has not changed. If you want a new capture file, build itwith GJTRVFMT and point OLDCAP to the old capture file, or you can use ther3.5 capture file.
Chapter 8. Upgrading, Testing, Running Multiple Copies 261
Conversion Notes
PDS Data Sets
All JCL files and SCL DSNs can be copied to new libraries or used as they arefor the Unicenter CA-Jobtrac r11 STC, PROCs, and CLIST.
TRACAUTH
If you are using the Unicenter CA-Jobtrac internal security TRACAUTH table,your r3.5 version of this module is compatible with r11. You can copy yourexisting TRACAUTH module from your r3.5 CAILIB to your r11 CAILIB to keepyour existing TRACAUTH definitions.
262 Planning and Implementation Guide
Upgrade Your Production from r3.5 to r11
Upgrade Your Production from r3.5 to r11
We recommend that you use the same tokens from r3.5 for the new UnicenterCA-Jobtrac r11. You can use the following as a guideline to upgrade fromUnicenter CA-Jobtrac r3.5 to Unicenter CA-Jobtrac r11.
To upgrade your production from r3.5 to r11
1. Complete the Unicenter CA-Jobtrac Version installation procedure.
2. Issue the Unicenter CA-Jobtrac HOLD command (F stcname,HOLD). Nextshut down Unicenter CA-Jobtrac r3.5 (P stcname).
3. Submit backup jobs for the checkpoint, capture, and jobhist files.
Note: See r3.5 SAMPJCL for sample JCL.
If using linklist, make sure that your Unicenter CA-Jobtrac r11 CAILIBreplaces the old Unicenter CA-Jobtrac r3.5 TRACLINK loadlib and refreshLLA.
4. Make sure that all the ddnames for the checkpoint and jobhist files reflectthe correct names in your PROCs, CLISTs, and batch jobs executingUnicenter CA-Jobtrac programs. The JOBTRACx ddname should be a DDDUMMY.
5. You need to either IPL or back out the internals of Unicenter CA-Jobtrac (SVINIT3,PARM=BACK). When using the BACK command, see the OperatorGuide for details.
6. Start the CA-Datacom/AD MUF (S stcname).
7. Start the new Unicenter CA-Jobtrac Version STC (S stcname).
8. Log on to Unicenter CA-Jobtrac Version and issue the STATUS commandto verify Version.
9. Test the installation with the verification procedures in Chapter 7, “Startupand Verification” on page 251.
10. Release the production workload from r11 (F stcname,RELEASE).
Chapter 8. Upgrading, Testing, Running Multiple Copies 263
Return to the Prior Release
Return to the Prior Release
Use these procedures to return to a prior Version of Unicenter CA-Jobtrac.
Return to r3.5
Perform the following steps to return to r3.5:
1. Shut down Unicenter CA-Jobtrac r11 with a BACK (F stcname,BACK) orIPL. Put the Unicenter CA-Jobtrac r3.5 CAILIB back in the linklist (if that iswhere it was). Refresh LLA if needed.
Note: When using the BACK command, see the Operator Guide fordetails.
2. Make sure that all the ddnames for the checkpoint, jobhist, and capture filesreflect the correct names in your PROCs, CLISTs, and batch jobs executingUnicenter CA-Jobtrac programs.
3. Edit any of your schedules that had been updated to use new r11 keywordsand comment them out or remove them.
4. Do one of the following:
■ Use the Unicenter CA-Jobtrac r11 capture file
■ Use the old DSNs from Unicenter CA-Jobtrac r3.5
■ RESTORE the files from the backup files from Unicenter CA-Jobtracr3.5 for the checkpoint, capture, and jobhist files from the backupscreated when upgrading from r3.5.
5. Start Unicenter CA-Jobtrac r3.5 (S stcname).
Reverse Conversion (Optional)
As part of the backoff procedure, perform this step to convert CA-Datacom/ADdatabase tables to JFST checkpoint and history files.
Member Used: The JCL for this step is in member CONVERTB in yourUnicenter CA-Jobtrac SAMPJCL library.
To reverse the file conversion:
1. The Stage1 and Stage2 processes created this member so that mostoptional parameters are already incorporated in this member. However,there are parameters that need to be changed before running this job. Referto the comments in the CONVERTB member to make appropriate changes.
2. Modify the JCL.
3. Run the CONVERTB job to perform the reverse conversion.
264 Planning and Implementation Guide
Run r3.5 Production and r11 Test System
Run r3.5 Production and r11 Test System
We recommend the following procedures to run r3.5 production and r11 testsystem:
1. When starting the Unicenter CA-Jobtrac r11 installation, you need to do thefolllowing:
a. Choose a new token.
b. Create a new CA-GSS subsystem ID.
c. Choose a new AUTOSCHD character.
d. Create new STC procedure, CLIST, and any batch jobs executingUnicenter CA-Jobtrac programs using the new CAILIB as a STEPLIB,all new ddnames, and tokens.
Note: The JOBTRAxx member in PPOPTION data set needs theappropriate options set for the AUTOSCHD character since they are initiallyset to the default values. Also check other options that you want to set.
2. Files
a. Token: JOBTRACx DD DUMMY must be specified in the JCL for r11.You must use a new token for the new database.
b. Capture: Start with a new, empty capture data set.
3. Start the new Unicenter CA-Jobtrac STC r11.
4. Log on to Unicenter CA-Jobtrac r11.
5. Perform the installation verification procedures in Chapter 7, “Startup andVerification” on page 251.
6. Test the new Unicenter CA-Jobtrac r11.
Chapter 8. Upgrading, Testing, Running Multiple Copies 265
Run Multiple STCs on Same CPU
Run Multiple STCs on Same CPU
Use the following procedure to run multiple Unicenter CA-Jobtrac STCs on thesame CPU:
1. Do not change any of the production Unicenter CA-Jobtrac PARMs or datasets in the STC, PROCs, DYNAMLOC member, or CLIST.
2. Ensure that you have a new Unicenter CA-Jobtrac token and a new SSIDfor CA-GSS.
3. Update your logon CLIST for the new JOBTRACy and GSSx and anyPROCs that use Unicenter CA-Jobtrac programs.
//JOBTRACy DD DUMMY//CAPTURE DD DISP=SHR,DSN=your.new.capture
4. Create a new JOBTRACy PROC with a unique name such as JOBTRACy.Add a //STEPLIB DD to this PROC if needed.
5. (Optional) Create a new PPOPTION. This is not necessary, butRESOURCE and EXCLPARM would be shared otherwise.
6. You can still use the existing TRACSnnn, TRACJnnn, TRACDnnn,TRACTnnn, or TRACRnnn files if you would like. However, we suggest youjust copy the existing production copies into a unique set of files for theJOBTRACy PROC.
This recommendation is good sense, but Unicenter CA-Jobtrac will have noproblem sharing these libraries.
7. MAKE SURE AMPLE CSA AND ECSA IS AVAILABLE if running multiplecopies of Unicenter CA-Jobtrac.
8. AUTO-SCHD character and class must be unique to each UnicenterCA-Jobtrac.
9. CA-GSS Considerations
a) You must create a new GSSx PROC to go with the new JOBTRACyPROC.
b) GSSx will execute PGM=SRVSYS. Add a //STEPLIB new.CAILIB tothis PROC if needed. Add a //JOBTRACy DD DUMMY
c) GSSx can still use existing IMODS but must have a different SSNAMEdefined such as SSNAME IS11.
266 Planning and Implementation Guide
Run Multiple STCs on Same CPU
10. In JOBTRACy GLOBAL OPTIONS you must define the GSSx started taskand the SSNAME IS11. (RUNPARM member.)
Important! DO NOT USE SSNAME AS EXISTING PRODUCTIONCA-GSS!
(Unicenter CA-Jobtrac uses that SSID. If CA-GSS tries to use the sameone, it will not work, except possibly if CA-GSS can be guaranteed to be upfirst. Do not risk it.)
11. You must copy the production Unicenter CA-Jobtrac PARMs (JOBTRA00)to the new JOBTRACy PPOPTION file. No changes should be required.
12. If you are using Unicenter CA-11 you must add the RERUN=CA-11 PARMand the INSERTRMS=x, where x is class to be monitored by UnicenterCA-11, into the JOBTRA00 member of the PPOPTION for JOBTRACy.
13. Create a new logon CLIST for the JOBTRACy logon. It should have all thenew files allocated just like the original production CLIST. You will berequired to add the CAILIB for the new JOBTRACy as a STEPLIB orISPLLIB.
Files should be allocated as they are for the new STC, not the old CLIST.ISPLLIB is not sufficient. STEPLIB is necessary for CAILIB. This can lead tovery sneaky bugs, where modules from different levels are executed atdifferent times.
You cannot log on in split screen to multiple copies of UnicenterCA-Jobtrac.
14. Start JOBTRACy on the system. It loads the hooks dynamically and shouldstart up GSSx as well.
Chapter 8. Upgrading, Testing, Running Multiple Copies 267
Run in a Shared Sysplex Environment
Run in a Shared Sysplex Environment
Unicenter CA-Jobtrac can control the workload across multiple systems in asysplex. You must start Unicenter CA-Jobtrac on each system where you wouldlike the workload to be monitored. For example, SYS1 is the primary UnicenterCA-Jobtrac. The primary system is where all event submission takes place.SYS2 and SYS3 are your secondary monitor systems. The monitor systems donot submit any events. They monitor the events that run on the system that aresubmitted by the primary system.
The primary and monitor systems share a CA-Datacom/AD database.CA-Datacom/AD must be customized to allow the database to be shared. Formore information about the required changes, see “Modify CA-Datacom/AD forUnicenter CA-Jobtrac” on page 162. You may have already setupCA-Datacom/AD for this support. Review your CA-Datacom/AD setup to ensurethat you made these changes. The following summarizes the requirement forestablishing the Sysplex Sharing environment in CA-Datacom/AD:
Note: If you have already installed CA-Datacom/AD and have implementedthe Shadow MUF feature, some of the following statements may be different.For more information about the Shadow MUF configuration, see theCA-Datacom/AD Shadow MUF white paper at ca.com/datacom (click on theWhite Papers link).
In the CA-Datacom/AD startup parameters in CUSMAC(DBDATIN1), be sureyou have correctly defined the following keywords:
MUFDefines the name of the CA-Datacom/AD MUF. This name is required whensharing the MUF.
TASKSDefines the maximum number of CA-Datacom/AD internal tasks to beavailable. Each connection to the database requires a task. This numberincludes a separate value for those sessions that are connecting throughXCF. The XCF value is also added to the total number of task.
XCFFROMDefines the XCF group name to be used to share the MUF. This parameterlets you specify a specific job name that can connect to the MUF. ForUnicenter CA-Jobtrac, the job name must be specified as *.
During the installation of CA-Datacom/AD, module DBSIDPR was created. Thiswas assembled to define the MUF address space that will be connected to andthe methods that can be used to connect to it. For XCF sharing, the followingparameters must be added to the DBSYSID macro in the DBSIDPR assemblyand module must be reassembled to include them.
268 Planning and Implementation Guide
Run in a Shared Sysplex Environment
TOMUFDefines the name of the MUF that is connected to by the application(Unicenter CA-Jobtrac). This must match the MUF parameter defined in theCA-Datacom/AD startup parameters (described previously).
TOGROUPDefines the XCF group that is used to connect to the MUF. This must matchthe value specified in the XCFFROM keyword in the CA-Datacom/ADstartup parameters (described previously).
For more information about setting up CA-Datacom/AD for sharing, see “ModifyCA-Datacom/AD for Unicenter CA-Jobtrac” on page 162.
Here are some Unicenter CA-Jobtrac considerations when running UnicenterCA-Jobtrac in a Sysplex environment:
■ Define the primary and secondary monitor systems in the JOBTRAnnmember of the PPOPTION data set by using the keywords SYNCSYS1,SYNCSYS2, and SYNCSYS3. SYNCSYS1 defines the primary system.SYNCSYS2 and SYNCSYS3 define the secondary monitor systems. Eachkeyword points to the SMF system ID of the appropriate system.
Note: Updating the options SYNCSYS1 through SYNCSYS3 requires thatUnicenter CA-Jobtrac on each system be recycled to switch the primary.The SMF system IDs defined in the JOBTRAnn member are stored in thedatabase. Recycling Unicenter CA-Jobtrac has no effect on what is storedin the database. To switch the primary system, you must use the modifycommand
F stcname,ACTSYS=xxxx
■ Also you can view the primary and secondary definitions from ISPF bylooking at the SYSID priority list (SYS OPTS) on the Unicenter CA-Jobtracglobal options panel.
■ You can have separate JES spools on your systems or a shared JES spoolenvironment.
■ Unicenter CA-Jobtrac database and capture files are shared between theprimary and secondaries.
■ All tokens for the DD statements must be the same.
The following Unicenter CA-Jobtrac message displays in the JES log on theprimary system.
CA-JOBTRAC - PRIMARY SUBMISSION SYSTEM (CA11) TOKEN(B)RELEASE(11.00) LV(SP00).
The following Unicenter CA-Jobtrac message displays in the JES log on thesecondary systems.
CA-JOBTRAC - AUTOMATION MONITOR SYSTEM (CA31) TOKEN(B)RELEASE(11.00) LV(SP00).
Chapter 8. Upgrading, Testing, Running Multiple Copies 269
Run in a Shared Sysplex Environment
Changing Primary Submission System: Unicenter CA-Jobtrac lets youchange the primary system. For more information about the conditions andconcerns for performing this switch, see the Reports, Maintenance, andRecovery Guide.
270 Planning and Implementation Guide
Appendix A. NJE Support
This section contains the following topics:
Installation and Setup . . . . . . . . . . . . . . . . . . . . . . . . . . . . . . 272Job Submission . . . . . . . . . . . . . . . . . . . . . . . . . . . . . . . . . . 273Job Execution . . . . . . . . . . . . . . . . . . . . . . . . . . . . . . . . . . . 274Job Termination . . . . . . . . . . . . . . . . . . . . . . . . . . . . . . . . . 275ISPF Interface . . . . . . . . . . . . . . . . . . . . . . . . . . . . . . . . . . . 276Batch Archiving and JTEZRPT . . . . . . . . . . . . . . . . . . . . . . . . . 277REXX Stack Information for NJE Jobs . . . . . . . . . . . . . . . . . . . . 278
Appendix A. NJE Support 271
Installation and Setup
Installation and Setup
Consider the following when installing and setting up CA-GSS:
■ Unicenter CA-Jobtrac NJE support requires CA-GSS. CA-GSS must be setup to include networking support for all JES nodes in which UnicenterCA-Jobtrac is to be used for NJE support. This is done using the GoalNetfeatures of CA-GSS. For information about GoalNet, see the CA CommonServices Getting Started and the CA Common Services AdministratorGuide.
■ The CA-Jobtrac global options panel of the CA-Jobtrac global options menuincludes two fields for NJE support: NJE NODE (Y/N) and NJE NodeTokens (see Options on the CA-Jobtrac global options panel in this guidefor more information). The NJE NODE option lets you specify whether toactivate the Unicenter CA-Jobtrac NJE support for this instance of UnicenterCA-Jobtrac on this system image. If you specify Y, the NJE Node Tokensfield becomes significant.
■ A Unicenter CA-Jobtrac token is the x in the Jobtracx DD statement. Thetoken identifies and differentiates individual copies of Unicenter CA-Jobtrac.In the NJE Node Tokens field, you specify which Unicenter CA-Jobtracevents are recognized by this Unicenter CA-Jobtrac. This is done by listingup to 39 tokens. If you leave this field blank, all tokens (that is all eventsfrom all copies of Unicenter CA-Jobtrac) are processed by this UnicenterCA-Jobtrac. If you leave the field blank, do one of the following:
– Only start up one NJE-capable Unicenter CA-Jobtrac on any singlesystem image
– Specify nonoverlapping tokens for each Unicenter CA-Jobtrac running
The JES /*ROUTE or /*XEQ statements identify an event as an NJE event.
If you explicitly specify tokens and you submit NJE jobs to the submittingnode itself, you should specify the token of the submitting UnicenterCA-Jobtrac itself in the token list.
The specified NJE nodes apply only to the NJE events for the copies ofUnicenter CA-Jobtrac that are specified as being NJE nodes. All otherUnicenter CA-Jobtrac instances recognize only their own tokens.
■ NJE systems require all Unicenter CA-Jobtracs to be primary UnicenterCA-Jobtracs and not monitor Unicenter CA-Jobtracs. It is important to usea SYSOUT package in an NJE environment. Unicenter CA-Jobtrac can onlysuccessfully capture sysout in an NJE environment if the JES job numberranges on the submitting and executing nodes do not overlap and output isreturned to the submitting node in a timely manner (less than 15 seconds).
272 Planning and Implementation Guide
Job Submission
Job Submission
Consider the following when submitting jobs:
■ AUTO-SCHD jobs running on an NJE node are not supported.
■ DUMMY jobs running on an NJE node are not supported.
■ In an NJE environment, if NOTIFY is specified, only users on the node onwhich the NJE job is run will be notified of abend or error conditions for thatnode based on information in the TRACAUTH table defined for that node.
■ Use JES /*ROUTE XEQ or /*XEQ control statements to route NJE jobs toother nodes. NJE jobs must use the JES /*ROUTE XEQ or /*XEQ controlstatements for Unicenter CA-Jobtrac to recognize them as NJE jobs.Unicenter CA-Jobtrac cannot properly track a manually rerouted job after ithas already gone through JES conversion.
■ Additional data in the form of dummy DD statements is added to theUnicenter CA-Jobtrac trailer step for NJE jobs.
■ In an NJE environment, only events and resources (executiondependencies) on the local node are checked before an event can besubmitted. In other words, when an event is to be submitted on a remotenode and references other events and resources (execution dependencies)on the remote node, those other events and resources will not be checkedby Unicenter CA-Jobtrac in determining an event's eligibility for submission.
■ In an NJE environment, exclusion rules only work within a local node.
■ In an NJE environment, generic resources only work within a local node.
■ In an NJE environment, the CCPF table on the executing system is theCCPF table used for checking condition codes.
■ In an NJE environment, the AMR table only works on the local node.
■ In an NJE environment, the ADR table only works on the local node.
■ NJE job status is available through the ISPF interface.
■ TRACX09 is invoked at both the submitting and executing node.
Appendix A. NJE Support 273
Job Execution
Job Execution
Consider the following when executing jobs:
■ The NJE job will be tracked by Unicenter CA-Jobtrac.
■ An NJE surrogate checkpoint record is added to the remote UnicenterCA-Jobtrac checkpoint data set for tracking, display, and recovery purposes.
■ The NJE surrogate contains a subset of the information from the actualcheckpoint record. The information is viewable but not modifiable by theUnicenter CA-Jobtrac ISPF interface user.
■ When the NJE job actually begins execution on the executing node, thesubmitting node's Unicenter CA-Jobtrac ISPF display will indicate itsexecuting status.
■ Any Notifies as specified in the TRACAUTH table will only be done on theexecuting node as defined in the executing node's TRACAUTH.
■ TRACX09 is invoked at both the submitting and executing node.
274 Planning and Implementation Guide

Job Termination
Job Termination
Consider the following about terminating jobs:
■ Successful or unsuccessful termination of a job will result in the passing ofthe termination status back to the originating node. Once the status isposted at the originating node, normal Unicenter CA-Jobtrac processingoccurs.
■ If the return of the termination status of a job back to its originating node issuccessful, the NJE surrogate checkpoint record is automatically deleted atthe executing node. No history information is copied to the history databaseat the executing node. History information is copied to the history databaseat the submitting node.
■ If the returning of termination status is unsuccessful for whatever reason (forexample, networking error, originating node down), the NJE surrogaterecord is retained on the checkpoint. It is used to attempt to retry thereturning of status at the next Unicenter CA-Jobtrac startup.
■ The NJE surrogate can only be removed by the successful return of statusor the next Unicenter CA-Jobtrac job archive run with the ALL option.
■ It is important to use a SYSOUT package in an NJE environment. UnicenterCA-Jobtrac can only successfully capture sysout in an NJE environment ifthe JES job number ranges on the submitting and executing nodes do notoverlap and output is returned to the submitting node in a timely manner(less than 15 seconds).
Appendix A. NJE Support 275
ISPF Interface
ISPF Interface
Consider the following about the ISPF interface:
■ NJE jobs in Awaiting Execution or Executing status have a Scheduled EventDisplay status of N-status-nodename, SYS=ssss where status is eitherNAWT for Awaiting Execution or EXE for Executing, nodename is theremote JES node name and ssss is the submitting system's SMF systemID.
■ The event execution detail display for executing or completed jobs displaysthe JES node if the job was an NJE job.
■ NJE jobs running on the executing node have an NJE surrogate checkpointrecord. The status on the Scheduled Event Display for these submitted NJEjobs includes an N instead of a J preceding the JES job number.
■ Only a subset of the normal line commands on the Scheduled EventDisplay are available for remotely-submitted NJE jobs. The line commandsavailable are: @, *, ?, N, O, P, Q, S, and 0 (zero).
■ When the S line command is used to Select an NJE submitted job, the newNJE Execution Detail panel appears that contains a subset of theinformation normally available when selecting an event for display. The newfields that appear on this panel for any NJE submitted jobs are the JESNode Name of the submitting node, the GSS Node Name of the submittingnode, the Original Version Number of this job on the submitting node, andNJE status. For more information about the NJE Execution Detail panel, seethe Operator Guide.
■ The P (purge) line command can be used to release an NJE job on thesubmitting node when it is in a hung condition with either an NAWT or EXEstatus because the NJE node failed to post the termination status. Thepurge command resets the completion status and places an Output Releaseon the job. You can now perform other appropriate actions against the job.
■ On displays of times for NJE jobs on either the submitting or executingnodes, time zone differences are taken into consideration and all times areadjusted to reflect local time.
■ When selecting events to display on the Scheduled Event Display, aN=nodename command is available. Specifying this command with thedesired JES node name limits the display to NJE jobs submitted to or fromthe designated node.
■ The K= primary command supports two selection types of N and S. The Ncode selects for display only NJE jobs on this node submitted to othernodes, while the S code selects only NJE surrogate jobs, those jobs whichhave been remotely submitted from another node.
276 Planning and Implementation Guide
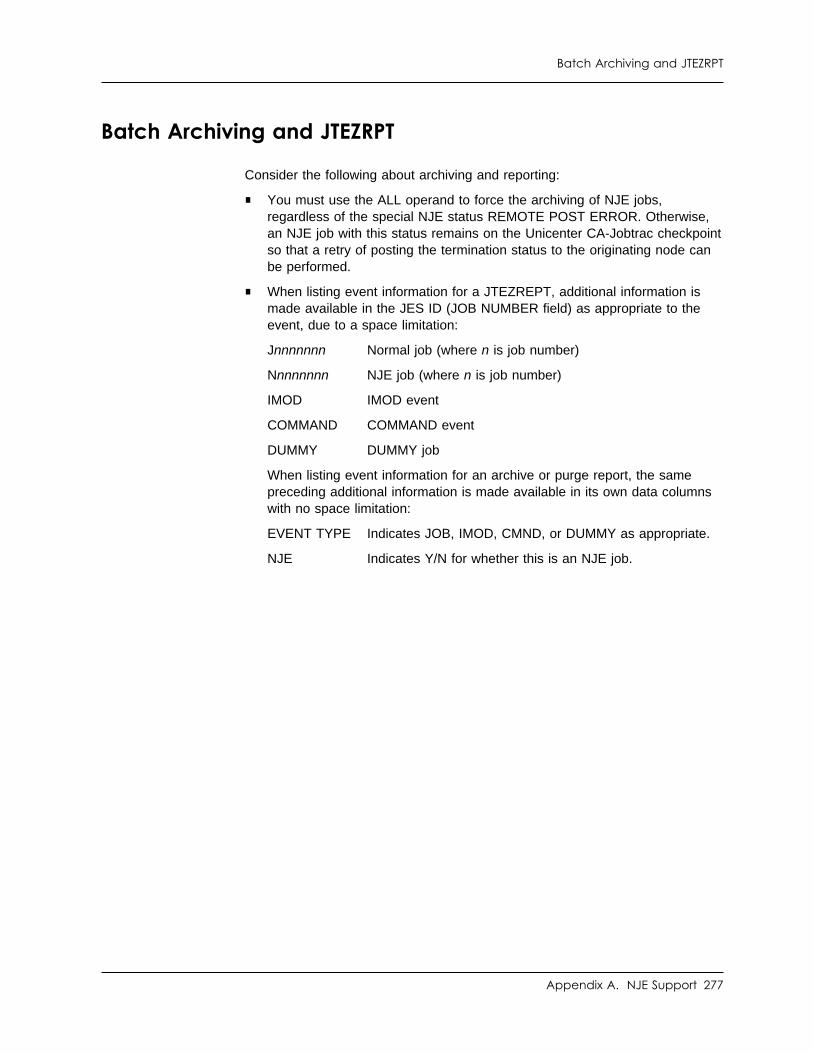
Batch Archiving and JTEZRPT
Batch Archiving and JTEZRPT
Consider the following about archiving and reporting:
■ You must use the ALL operand to force the archiving of NJE jobs,regardless of the special NJE status REMOTE POST ERROR. Otherwise,an NJE job with this status remains on the Unicenter CA-Jobtrac checkpointso that a retry of posting the termination status to the originating node canbe performed.
■ When listing event information for a JTEZREPT, additional information ismade available in the JES ID (JOB NUMBER field) as appropriate to theevent, due to a space limitation:
Jnnnnnnn Normal job (where n is job number)
Nnnnnnnn NJE job (where n is job number)
IMOD IMOD event
COMMAND COMMAND event
DUMMY DUMMY job
When listing event information for an archive or purge report, the samepreceding additional information is made available in its own data columnswith no space limitation:
EVENT TYPE Indicates JOB, IMOD, CMND, or DUMMY as appropriate.
NJE Indicates Y/N for whether this is an NJE job.
Appendix A. NJE Support 277
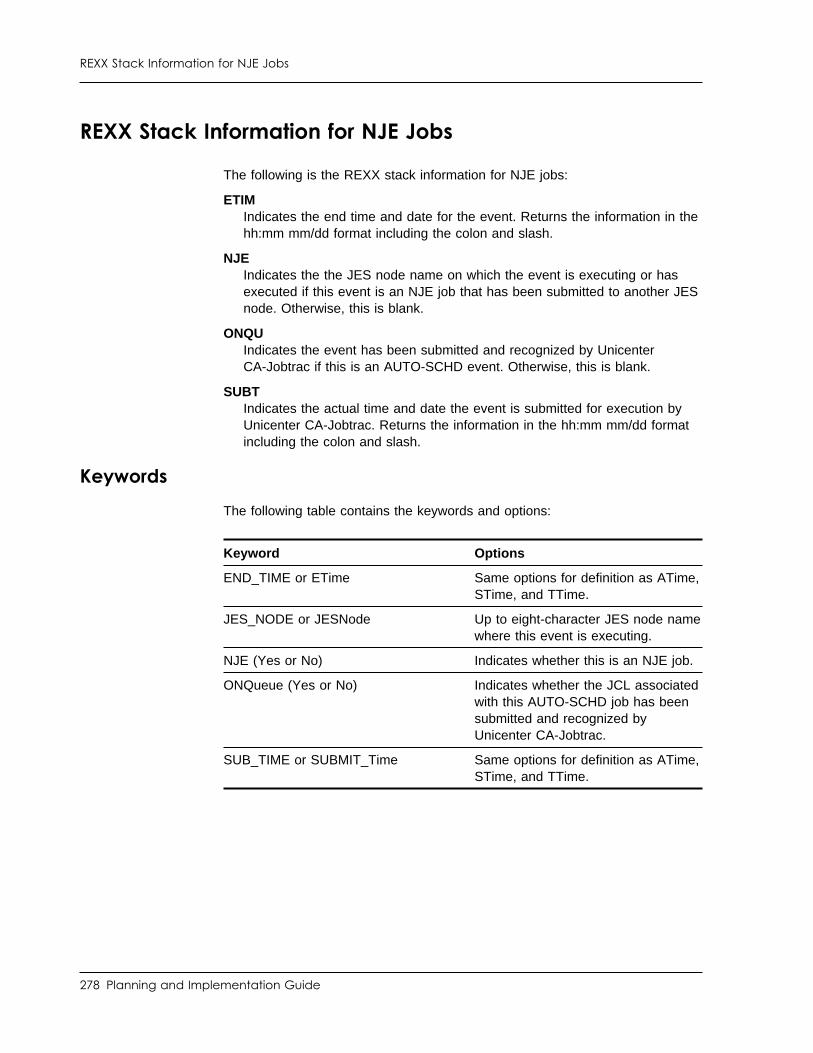
REXX Stack Information for NJE Jobs
REXX Stack Information for NJE Jobs
The following is the REXX stack information for NJE jobs:
ETIMIndicates the end time and date for the event. Returns the information in thehh:mm mm/dd format including the colon and slash.
NJEIndicates the the JES node name on which the event is executing or hasexecuted if this event is an NJE job that has been submitted to another JESnode. Otherwise, this is blank.
ONQUIndicates the event has been submitted and recognized by UnicenterCA-Jobtrac if this is an AUTO-SCHD event. Otherwise, this is blank.
SUBTIndicates the actual time and date the event is submitted for execution byUnicenter CA-Jobtrac. Returns the information in the hh:mm mm/dd formatincluding the colon and slash.
Keywords
The following table contains the keywords and options:
Keyword Options
END_TIME or ETime Same options for definition as ATime,STime, and TTime.
JES_NODE or JESNode Up to eight-character JES node namewhere this event is executing.
NJE (Yes or No) Indicates whether this is an NJE job.
ONQueue (Yes or No) Indicates whether the JCL associatedwith this AUTO-SCHD job has beensubmitted and recognized byUnicenter CA-Jobtrac.
SUB_TIME or SUBMIT_Time Same options for definition as ATime,STime, and TTime.
278 Planning and Implementation Guide
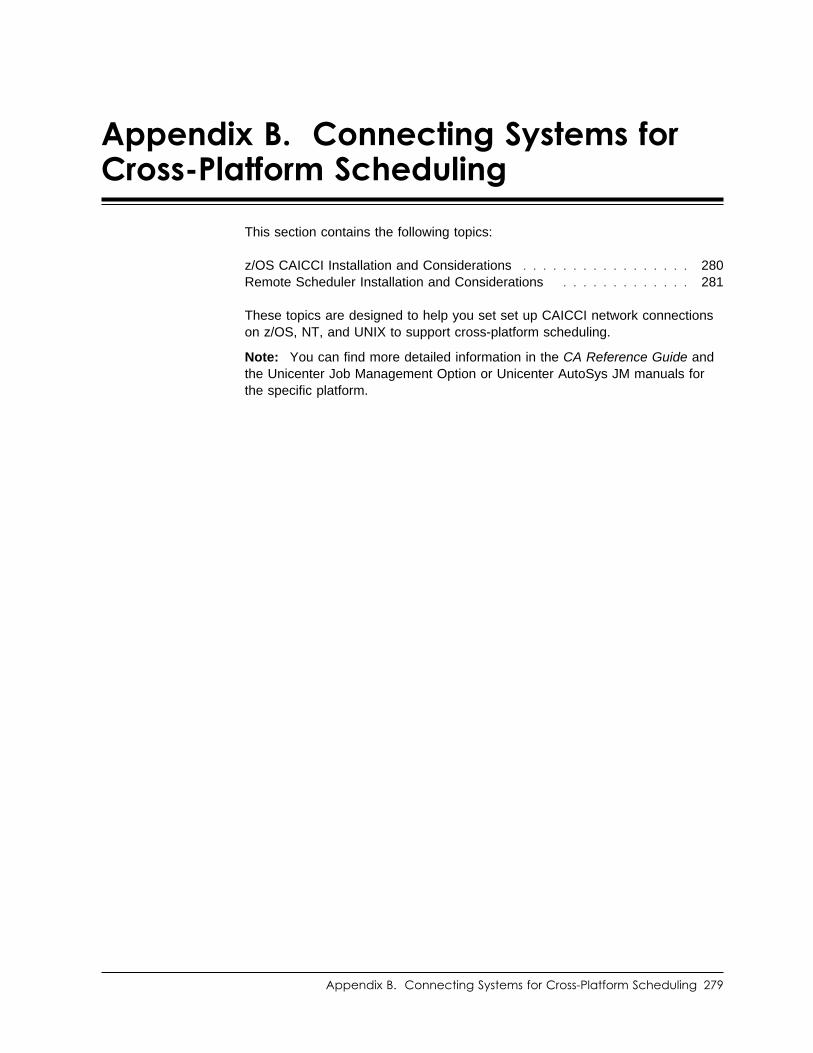
Appendix B. Connecting Systems forCross-Platform Scheduling
This section contains the following topics:
z/OS CAICCI Installation and Considerations . . . . . . . . . . . . . . . . . 280Remote Scheduler Installation and Considerations . . . . . . . . . . . . . 281
These topics are designed to help you set set up CAICCI network connectionson z/OS, NT, and UNIX to support cross-platform scheduling.
Note: You can find more detailed information in the CA Reference Guide andthe Unicenter Job Management Option or Unicenter AutoSys JM manuals forthe specific platform.
Appendix B. Connecting Systems for Cross-Platform Scheduling 279
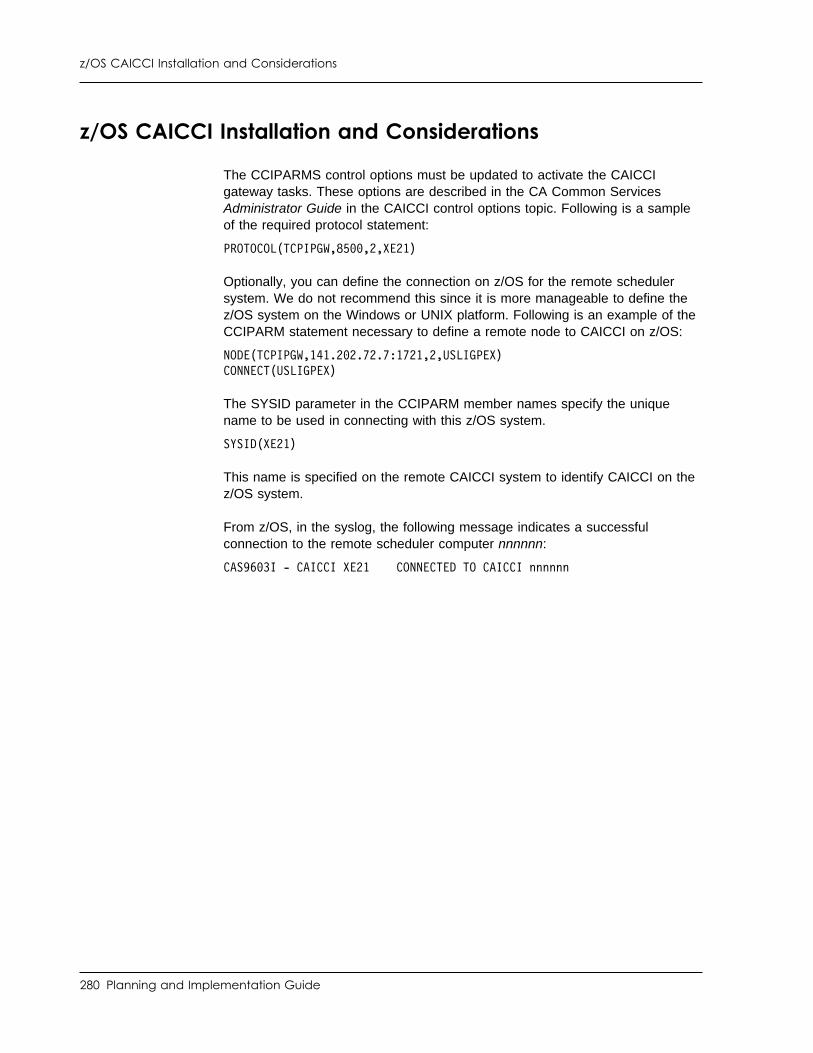
z/OS CAICCI Installation and Considerations
z/OS CAICCI Installation and Considerations
The CCIPARMS control options must be updated to activate the CAICCIgateway tasks. These options are described in the CA Common ServicesAdministrator Guide in the CAICCI control options topic. Following is a sampleof the required protocol statement:
PROTOCOL(TCPIPGW,85 ,2,XE21)
Optionally, you can define the connection on z/OS for the remote schedulersystem. We do not recommend this since it is more manageable to define thez/OS system on the Windows or UNIX platform. Following is an example of theCCIPARM statement necessary to define a remote node to CAICCI on z/OS:
NODE(TCPIPGW,141.2 2.72.7:1721,2,USLIGPEX)CONNECT(USLIGPEX)
The SYSID parameter in the CCIPARM member names specify the uniquename to be used in connecting with this z/OS system.
SYSID(XE21)
This name is specified on the remote CAICCI system to identify CAICCI on thez/OS system.
From z/OS, in the syslog, the following message indicates a successfulconnection to the remote scheduler computer nnnnnn:
CAS96 3I - CAICCI XE21 CONNECTED TO CAICCI nnnnnn
280 Planning and Implementation Guide
z/OS CAICCI Installation and Considerations
Remote Scheduler Installation and Considerations
CAICCI connections must be defined on the remote system. This is describedin the documentation for Unicenter AutoSys JM, Unicenter Job ManagementOption, or Unicenter Universal Job Management Agent. For information aboutCAICCI setup, see your scheduling product's documentation.
Appendix B. Connecting Systems for Cross-Platform Scheduling 281

Index
Special Characters@AMRGEN statement 209
Aabending event output, holding 191ACCEPT processing 105accessing the product 253AD11STOP 98AD11STRT 98ADD
PROC members 94ADD command 148address, email 142Adobe Acrobat PDFs 102Advantage CA-Datacom/DB 2, 83
SVC, installing 33Advantage CA-Roscoe 30AllFusion CA-Librarian
interface 53modules 107support 193
AllFusion CA-Panvaletinterface 53modules 107
Allocatingdata sets 94SAMPJCL library 89
AMR support 208APF authorization 105APPLY processing 104archive tape
block size 200disposition 199high-level qualifier 199retention period 200unit 199
archiving NJE jobs 277ARM (Automatic Restart Management
processing) 131auto-queue job classes 193AUTO-SCHD, allowing 187automatically scheduling events using JCL,
allowing 187
AXINS02 91AXINS03 91AXINS04 92AXINS05 92AXIVP01 98AXIVP02 98AXNEW01 94AXNEW02 94AXNEW03 95AXNEW04 95AXNEW05 96AXNEW06 96AXNEW07 97AXNEW08 97
Bbacking up
databases 47, 96backup types 50
CCA Common Services
CA LMP 26CA-C 27CA-Easytrieve 27CA-GSS 28CA-XPS 28CAICCI 28CAIENF 28CAIRIM 29installing 82overview 26ViewPoint 30
CA Common Services for z/OS and OS/390 33CA LMP 26CA-Blockmaster 53CA-C 26, 27CA-Datacom/AD 27
backup and recovery 47database 122database files 12DBID option 137FCSTDBID option 144modifications 162Multi-User Facility 83
Index 283
CA-Datacom/AD (continued)overview 2, 27placement considerations 46security 56SYSDBID option 155terms 47
CA-Easytrieve 27CA-GSS
accessing other products 54and NJE 271and Unicenter CA-Jobtrac 41modifying 167overview 28requirements 232
CA-HyperBuf 53CA-JCLTrac
DB2 setup for 218enabling 219UCT setup 218user control table 205user control table setup 218
CA-Jobtrac Global Options panel 186CA-XPS 28CAICCI 28, 232, 279
and Event Console 245overriding application name 136
CAIENF 28, 106CAIMAC library 13CAIRIM 29, 33, 36CAISSF 29, 36CAIVPE 30CAS9 procedure 105catalog error response 191CBIPO 37checkpoint database
description 12, 122RAMAXCC JOBTRAnn Option 148
CICSusing CAIVPE 30
CLASS statement 222CLIST allocations, updating 180cold backup 50command set scheduling, PDS for 200COMMNDxx, modifying 252Common installation steps 88condition code checking 148conversion
notes on files 261overview 259
Cover letter 84
CPM 136Critical Path Monitor (CPM) 108cross node query, NJE 194cross-platform scheduling
connecting systems 279global variables 236IMODs 235implementing 232
CSV003I 98customization job, STAGE1 112
DDASD requirements 6
3390 11disk space for CA-Datacom/AD 11space requirements 11
data setsallocated by STAGE2 job stream 120allocating 120placement considerations 46recommended initial sizes 124
database ID 137DBID option 137forecasts 144system tables 155
date format 186date library 22DB2
binding plans for CA-JCLTrac 228creating objects for CA-JCLTrac 226granting authority for CA-JCLTrac 229setup for CA-JCLTrac 218
DBMUFPR 95, 98DBRIMPR 31DBUTLTY 96, 97, 98
INIT/LOAD databases 95Reset HSD 96
DDCFBLD 96DDDEF, defining 103DDNAME statement 224Demonstration phase 98dependencies, types of 3disaster recovery 49distribution libraries, creating 103documentation libraries 22documentation, unloading 102domain, default 140Downloading
installation libraries from tape 91
284 Planning and Implementation Guide

DSNAME statement 223DYNAMLOC 176
Eediting SAMPJCL
REXX Execs 38email
domain, default 140from address 142library 22, 121mail server address 143notification 192
END statement 225ending Unicenter CA-Jobtrac 253environmental dependency
maximum running time 194number of retries 194retry interval 190
eTrust CA-Examine interface 106Event Alert Reporting 149Event Console
nodenames to receive messages 141reporting late conditions 141routing messages 245sending WTOs 142
Examplesallocating SAMPJCL library 90
Executingsample programs 98
execution dependencies, definition of 3exits, setting up 172
Fforecast database 13forecast database ID 144forward recovery 50fuzzy backup 47
Gglobal JCL variables library 22global options
in JOBTRAnn 127setting using ISPF interface 184
global termination IMOD 190global variables 236GoalNet 169
Hhardware requirements 24history data 12, 123holiday action time 189hot backup 47
IIEACMDxx, modifying 252IEAVMXIT, setting up 208IEFBR14 89, 94IMOD, global termination 190IMODs
CA-GSS server 235INIT IMOD 177Initializing
CXX, LXX and databases 95initializing internals 252initiation IMODs 176installation
common steps 88—92allocating SAMPJCL library 89downloading CA-Datacom/AD libraries 91linking INIT programs 92loading CA-Datacom/AD SVC 92preparing CA-Datacom/AD custom
assemblies 92renaming SMP/E DDEFs 91
demonstrationexecute CA-Datacom/AD programs 98execute dynamic SQL programs 98shut down Multi-User Facility 98start up Multi-User Facility 98steps 98
new 85, 93—97adding PROC members 94allocating CA-Datacom/AD data sets 94allocating/loading CXX, LXX, databases 95backing up databases 96remove unneeded files 97Reset HSD 96shut down Multi-User Facility 97starting Multi-User Facility 95
post-install considerationsMulti-User Facility as started task 100Multi-User Facility tuning 100setting up production jobs 99
sequenceNew Installation Phase 87Post Installation Phase 87SMP/E Installation Phase 87
Index 285
installation (continued)sequence (continued)
Verification Phase 87SVC 31verification phase
steps 98installation job stream, STAGE2 118installation verification procedure 254installing Unicenter CA-Jobtrac 1internals, initializing 252IPL prompt field 186IPLTABLE
@AMRGEN statements 209creating 209maintaining 205procedure 213syntax rules 213table 205
ISERVEstarting procedure 194subsystem name 190
ISPFmain menu, adding Unicenter CA-Jobtrac to 183NJE considerations 276using to set global options 184
IVP (Installation Verification Procedure) 254
JJCL
enabling automatic checking 219enabling checking 219sample for loading JCLDOC 101
JCL Editing 36JCL libraries 22, 119JCL requirements 40JCLDOC library
description of 101loading from the product tape 101sample JCL for loading 101
JCLTCTL table 205JES
cycling 42interaction 42
JES command character 188JES held job class, defining 175JES SYSOUT class 175JMF PDS 200job class, defining 175job classes 193
job priority 148JOBTRAC task, security authorization required
for 56JOBTRAnn
description of options 129setting options 127using multiple 128
Kkey, LMP 105KEYS DD statement 105
Llibraries 22
allocating 89libraries for CA-Datacom/AD products 40Library Definitions panel 199library or PDS management 119linking
AllFusion CA-Librarian modules 107AllFusion CA-Panvalet modules 107
Linking INIT programs 92LMP key 105Loading
CXX, LXX and databases 95Loading CA-Datacom/AD SVC 92location IDs
000 8assigning 9default 9description 8
locations, understanding 8log file (CA-Datacom/AD) 48LXX 48
Mmail server address 143memory requirements 6, 25messages
and Event Console 245messages, deletable 187mirroring 51modules, converting to tables 206MUF keyword 162multi-CPUs and primary Unicenter CA-Jobtrac
system 192Multi-User Facility 83, 122
new installation 95sharing 16
286 Planning and Implementation Guide
Multi-User Facility (continued)shutting down 98started task (running as) 100starting up 96, 98tuning 100
multiple copies of Unicenter CA-Jobtrac 122, 268
NNaming conventions
for SAMPJCL members 86New installation phase 93—97NJE
cross node query limit 194node token, specifying 190support 190, 271
Ooptions in JOBTRAnn 127Overview
new install 93
Ppassword requirement rules 241PDFs 102PDS for command set scheduling 200PDS for JMF 200PDS member 105PDS or library management 119pre-installation considerations 24preinstallation considerations 36Preparing CA-Datacom/AD custom assemblies 92primary Unicenter CA-Jobtrac 192, 193print class archive 187priority for jobs 148procedure libraries, updating 126proclibs, updating 126Product Information Packets (PIPs) 84product tape 104Production jobs
setting up 99products installed 39purging records 126
RRECEIVE processing 104REINIT keyword (CAIRIM install of SVC) 33remote
password library 22
remote (continued)password location entity 9scheduling 232
Remove unneeded files 97Renaming SMP/E DDEFs 91reporting with Unicenter Service Desk 143, 149requirements
hardware 24software 24
restart support 187reverse conversion 264REXX Execs 38REXX IMOD, maximum running time 194ROOT user ID 153routing messages to Event Console 245RUN command 148running multiple copies of Unicenter
CA-Jobtrac 268
SS910 36SAMPJCL
allocating 89member names 86PDS sample 90
scheduling dependencies 3SCL libraries 22security 56setting job priority 148shadow MUF 21shared database 162Shut down
Multi-User Facilitydemonstration phase 98installation step 97
SMF records, suppressing writing of 171SMFPRMxx
customizing 171example 173
SMP/EACCEPT processing 105APPLY processing 104considerations 45distribution libraries, creating 103installing with 81linking AllFusion CA-Librarian modules 107linking AllFusion CA-Panvalet modules 107RECEIVE processing 104target libraries, creating 103
Index 287
software requirements 24SPACE command 214spill 47STAGE1 customization job 112STAGE2 installation job stream 118Start up
Multi-User Facility 96, 98Started task (Multi-User Facility)starting Unicenter CA-Jobtrac 253static backup 48statistic records 153Steps for SMP/E phase 88SUBROOT keyword 153subsystems 41Subsystems (MVS) 36Supervisor call (SVC) 33, 36SUSPEND and RESUME commands 21sysout capture
defining classes for 195enabling 188line limit specification 193requeue to another product 197size specification 113Unicenter CA-View interface for 230unit specification 113volser specification 113
sysout capture filecreation of 120data set placement considerations 46determining size, general 123messages associated with 123setting up 123
Sysout Capture Options panel 195sysout print class 188system options, installation considerations 55
Ttables 205target libraries, creating 103TASKS keyword 163TCP/IP 232, 280templates, email 22, 121temporary-use JCL libraries 22termination IMOD 190token 167, 272TRACAUTH table
assembling 205converting 262description 174
TRACMAC parametersoptional 116required 113
TRACMnnn 22TRACRnnn 22TSO 30TSO procedures
updating 180
UUCT keyword, use of 221UCT setup for CA-JCLTrac 218Unicenter CA-11
and CA-Datacom/AD 52high-level index 116INSERTRMS option 145interface 215RERUN option 150
Unicenter CA-MIM 53Unicenter CA-View 54, 230Unicenter Service Desk 143, 149Unicenter Service Desk reporting 192UNIX 279unloading documentation 102updating LMP key 105Upgrades
existing products 85upgrading 259user control table
CLASS statement 222creating 221DDNAME statement 224DSNAME statement 223END statement 225example 225explained 220for CA-JCLTrac 205setup for CA-JCLTrac 218using 221
VVerification phase 98ViewPoint 30VINITx procedure 252
WWorksheet 84
288 Planning and Implementation Guide

WTOs using Event Console 142
XXCF connections 162XCFFROM keyword 163XPLATRERUN option 159
Index 289


