Embed Size (px)
Citation preview

CAROUSEL®_ OVER THE RANGECONVECTmON CROWAVE OVEN
R-1820/Ro1821OPERATRON MANUAL
R4820 R-1821
Featuring:
Carousel® Cooking System
Microwave/Hood System
Convection Cooking .System
Sensor Temp CookingAuto-Touch ® Control Panel
Minute Plus
CompuCook TM
CompuDefrost

FOR YOUR PROTECTION...
To aid in reporting this convection microwave oven in case of loss or
theft, please record below the model number and serial number located
on the unit. We also suggest you record all of the information listed andretain for future reference.
MODEL NUMBER
DATE OF PURCHASE
Dealer
Address
State
Service Station
Address
State
SERIAL NUMBER
City
Zip Phone
cityzip.........Phone
TOLL FREE SERVICE INFORMATION:
For your nearest Sharp Authorized Service Station, call toll-free:
800-447-4700
Please review SERVICE CALL CHECK on page 30 before callingfor service.
WARRANTY VALI DATION
Dealers who sell microwave ovens are required to register the location of all ovens sold with themanufacturer°
The warranty registration card required by the U.So Department of Health and Human Services
(DHHS) for recordkeeping is provided on the outer carton of your Sharp Microwave Oven and
should be completed and returned by your dealer to register your purchase_ If your dealer should
fail to return this card, please send it to Sharp Electronics Corporation. If you sell a microwaveoven or purchase one through an original owner, you are required to notify the manufacturer°

LIMmTED WARRANTY
Sharp Electronics Corporation warrants to the first consumer purchaser, for a period of two years from thedate of purchase, that this home microwave oven (the "Product"), when shipped in its original container, willbe free from defective workmanship and materials, and agreesthat it will, at its option, either repair the defector replace the defective Product or part thereof at no charge to the purchaser for parts or labor in thepurchaser's home. This warranty continuesfor an additional five years, for atotal of seven years, with respectto the magnetron tube contained in the Product for parts only; labor and service are not provided free ofcharge for this additional period.
This warranty does not apply to any appearance item of the product or to accessories, rubber or plastic parts,the turntable, the turntable support, light bulbs or glass parts or any printed materials° This warranty doesnot apply to any product the exterior of which has been damaged or defaced, which has been subjected tocommercial use, misuse, abnormal handling, improper installation, or which has been altered or modifiedin design or construction. Thiswarranty does not apply outside the United States, its territories or possessions°
In order to enforce the rights under this limited warranty, the purchaser should provide proof of purchase to
a Sharp Service Dealer or Station. To find out the location of the nearest Sharp Service Dealer or Station, call
Sharp toll-free at 800-447-4700°
The limited warranty described above is in addition to whatever implied warranties may be granted topurchasers by law.. To the extent permitted by applicable law, ALL IMPLIED WARRANTIES INCLUDINGTHE WARRANTIES OF MERCHANTABILITY AND FITNESSFOR USEARELIMITED TO A PERIOD OF TWO
YEARS FROM THE DATE OF PURCHASE° Some states do not allow limitations on how tong an impliedwarranty lasts, so the above limitation may not apply to you.
Neither the salespersonnel of the seller nor any other person is authorized to make any warranties other thanthose described above, orto extend the duration of anywarranties beyond the time periods described above,on behalf of Sharp Electronics Corporation..
The warranties described above shall be the sole and exclusive remedy available to the purchaser° Correctionof defects, in the manner and for the period of time described above, shall constitute complete fulfillmentof all liabilities and responsibilities of Sharp Electronics Corporation to the purchaser with respect to theProduct, and shall constitute full satisfaction of all claims, whether based on contract, negligence, strictliability or otherwise, In no event shall Sharp Electronics Corporation be liable, or in anyway be responsible,for any damages or defects in the Product which were caused by repairs or attempted repairs performed byanyone other than a Sharp Service Dealer or Station. Nor shall Sharp Electronics Corporation be liable orin any way responsible for any incidental or consequential economic or property damage_ Some states donot allow the exclusion of incidentia Ior consequential damage, so the above exclusion may not apply to you.
THIS WARRANTY GIVES YOLJSPECIFICLEGAL RlGHTS_ YOU MAY ALSO HAVE OTHER RIGHTS WHICHMAY VARY FROM STATETO STATE_
2

SHARP ELECTRONICS CORPORATIONSharp Plaza, Mahwah, New Jersey 07430-2135
Dear Sharp Customer:
We are pleased that you've chosen a Sharp Carousel Ii Convection Microwave Oven. Now
that you have decided to join the millions of microwave oven owners, we at Sharp want you to get the
maximum enjoyment and user from your Sharp oven,
Before you use your oven for the first time, please read this book carefully. It is very importantthat you understand and follow this Operation Manual. Your entire family should know how tooperate the oven correctly so each of you can easily use and benefit from the oven.
This manual is a companion to your Sharp Carousel Convection Microwave Cookbook° Referto both frequently as you learn to use your oven.
Sharp's home economics staff is eager to help if you have questions.
On any correspondence, please indicate:
* the model number of your oven°* your complete mailing address.* your telephone number - home and business
(Please include area code and zip code.)
Best Wishes I
Susan Edwards
Sharp Test KitchenSharp PlazaMahwah, NJ 07430-2135

CONTENTS
For Your Protection .............................................................I
Warranty Validation ............................................................t
Limited Warranty ....................................................... 2Letter to Sharp Customer .................................................3
Contents ....................................................................... 4
Specifications .............................................................. 4
Important Safety Instructions .................................. 5
Grounding Instructions ........................................ 6
Precautions to Avoid Possible Exposure to
Excessive Microwave Energy ........................... 6
Oven Diagram ...................................................... 7Touch Control Panel ............................................. 8
Accessories ......................................................... 8
Optional Accessories ......................................... 8
Operation of Auto-Touch Control Panel .......... 9To Set the Clock ................................................... 9
Minute Timer ...................................................... 10
Stop/Clear ........................................................... I 0
Microwave Cooking
Time Cooking ....................................................... 10Pause .................................................................._,,, 11
CompuDefrost ............................................... 11
CompuDefrost Chart ............................................13Easy Reheat ......................................................... 14
Easy Reheat Chart ...................................... 14
SPEC[FBCAT[ONS:
Temperature Probe Cooking .....................................t 5
To Cook with Temperature Probe .......................16
To Monitor Temperature ................................. 16Sensor Temp ................................................. 17
Sensor Temp Chart ...................................... 17
Convection and Automatic Mix Cooking ...... 18To Cook with Convection .................................. 19
To Cook with Automatic Mix ........................... 19
To Preheat and Cook with Convection ...... 20
To Preheat and Cook with Automatic
Mix ..........................................................................20
To Sequence Cook with Automatic Mix ....... 20
Convection Cooking Using TemperatureProbe ....................................................... 21
Automatic Mix Cooking Using
Temperature Probe ................................... 21
Convection and Microwave Cooking .......... 22
Broiling ............................................................... 23Slow Cook ........................................................ 24
Minute Plus ......................................................... 24
CompuCook .................................................. 25
To Cook with CompuCook ..................................25
CompuCook Chart ................................................ 26Auto Start .......................................................... 26
Cautious Reminders .............................................. 27
Condensation ........................................................ 27
Cleaning and Care ...................................................... 28Service Call Check ........................................... 30
AC Line Voltage :AC Power Required:
Output Power:MicrowaveConvection Heater
Outside Dimentions
Cavity DimentionsWeightHood LampHood Fan
Single phase 120V, 60 Hz, A.C. onlyI _6 kW (Microwave)
1.6 kW (Convection)
700 W (2000 cc water load), 2450 MHzt350 W29-7/8"(W), 16-I/2"(H), 15"(D)13-5/8"(W), 8-3/8"(H), 13-1/2"(D)Approx. 74 lbs.2 lamps (40W x 2, incandescent lamp)Horizontal discharge 310 C°F_MoVertical discharge 300 C.F.M_
In compliance with standards set by:FCC - Federal Communications Commission Authorized
DHHS - Complies with Department of Health and Human Services (DHHS) Rule, CFR, Title 21, Chapter I,Subchapter L
(_- This symbol on the nameplate means the product is listed by Underwriter's Laboratories,
Carousel and Auto-Touch are registered trademarks of Sharp Electronics Corporation
4

mMPORTANT SAFETY JNSTRUCTmONS
When using electrical appliances, basic safety precautions should be followed, including the following:
WARNING - To reduce the risk of burns, electric shock, fire, injury to persons or exposure to excessive
microwave energy:
Io Read all instructions before using the appliance°2. Visually check after unpacking:
Remove all packing material from the oven cavity,Check the oven for any damage, such as misaligned door, damaged gaskets around door ordents inside the oven cavity or on the door, If there is any damage, please do not operate theoven until it has been checked by a Sharp Authorized Service Station and any repairs made,if necessary,
3_ Read and follow the specific "PRECAUTIONS TO AVOI D POSSIBLE EXPOSURE
TO EXCESSIVE MICROWAVE ENERGY" on page 6.
4o This appliance must be grounded. Connect only to properly grounded outlet. See "GROUND-
ING INSTRUCIIONS" on page 6_
5o Install or locate this appliance only in accordance with the provided installation instructions.6. Some products such as whole eggs and sealed containers - for example, closed glass jars - may
explode and should not be heated in this oven.7. Use this appliance only for its intended use as described in this manual.8. As with any appliance, close supervision is necessary when used by children°9. Do not operate this appliance if it has a damaged cord or plug, if it is not working properly, or if it
has been damaged or dropped.i0o This appliance should be serviced only by qualified service personnel° Contact nearest Sharp
Authorized Service Station for examination, repair or adjustment.1I. Do not block or cover any openings on the appliance,12o Do not use outdoors°
13, Do not immerse cord or plug in water.14,. Keep cord away from heated surfaces.15. Do not let cord hang over edge of table or counter,16o See door surface cleaning instructions on page 28.17. To reduce the risk of fire in oven cavity:
a. Do not overcook food. Carefully attend appliance if paper, plastic, or other combustiblematerials are placed inside the oven to facilitate cooking.
bo Remove wire twist-ties from paper and plastic bags before placing bag i n oven.co If materials inside oven should ignite, keep oven door closed, turn oven off, and discon-
nect the power cord, or shut off power at the fuse or circuit breaker panel.18. The appliance is specifically designed to heat or cook foods and is not intended for industrial or
laboratory use, Do not attempt to heat corrosive chemicals in the microwave oven.19.. Do not use your conventional gas or electric range as a space heater when a Sharp Over the
Range Oven is installed above it. The intense heat produced may damage the ovem
SAVE THESE iNSTRUCTIONS
S

GROUNDING INSTRLJCTmONSThis appliance must be grounded_ In the event of an electrical short circuit, grounding reduces the risk of electricshock by providing an escape path for the electric current. This appliance is equipped with acord having agroundingwire with a grounding plug. The plug must be plugged into an outlet that is properly installed and grounded.
WAR N IN G-Improperuse of the grounding plug can result in a riskof electric shock.
Consult a qualified electrician or serviceman if groundinginstructions are not completely understood or if doubt existsas to whether the appliance is properly grounded,
If it is necessary to use an extension cord, use only a 3-wire extension cord that has a 3-blade grounding plug anda 3-slot receptacle that will accept the plug on the appliance. The marked rating of the extension cord should be AC115-I 20 Volt, 15 Amp_ or more.
iLI
DO NOT UNDER ANY CIRCUMSTANCES CUT OR REMOVE THE ROL;ND GROUNDING
PRONG FROM THE PLUG.
PRECAUTIONS TO AVOID POSSIBLE EXPOSURETO E×CESS[VE MICROWAVE ENERGY
(a) Do not attempt to operate this oven with the door open since open-door operation can result in harmfulexposure to microwave energy. It is important not to defeat or tamper with the safety interlocks.
(b) Do not place any object between the oven front face and the door or allow soil or cleaner residue toaccumulate on sealing surfaces_
(c) Do not operate the oven if it is damaged. It is particularly important that the oven door close properly andthat there is no damage to the:
(i) door (bent), (2) hinges and latches (broken or loosened), (.3)door seals and sealing surfaces.
(d) The oven should not be adjusted or repaired by anyone except properly qualified service personnel
(e) Do not operate the oven with the temperature probe caught between the oven front face and the door_
6

OVEN DIAGRAM
13 12 11
11 2 6 7
10
9
8
14
15 16
I. Oven door with see-through window2. Temperature probe receptacle.3. Grease filters,
4. Hood lamps.
5, Removable temperature probe,6, One touch door opener.
Door latches.
8. Auto-Touch control panel.
9, Lighted digital display.I0, Ventilation openings.11, Removable turntable.
12, Oven lamp.,
13, Convection air openings.14. Turntable support. (It must be placed under the removable turntable.)15. Broiling trivet.
16, Baking rack_
7
TOUCH-CONTROL PANE[.
II
u
_
_
MINUTE PLUS
-- EASY REHEAT
2t Ro_L mulfinDinner p/ale
3 VegelaNesCa*_ero_e5 Soup
I med1_te1 cup1 cup1 cup
COMPU DEFROST
_ oa'_t beet= porkSleeks, ChO_S3 Ground me._t
_ Chickmn, whe_Chicken pieces
COMPU COOK
1 Brol_ hamDurgem2 Broi+_ chicken3 Roasl cl-,tck_n
,__oasfIutkwL_zyef C_J._e_,
b Bread, toav,ss
o,°,o.]1_ TEMP
| Roast b_'! (Rare)2 Roe.s! beef (Mm:_)3 Roasl beet (Weld
_ oas| _kTurkey breast
6 Caeeerolo7 Simmer
TEMP --
FAN j/HOOD LAMP J
tc°NwcII Ro,Ll/c KsL°wLOW MIX HIGH MIX
BAKE ROAST
300"F
7375"F
CLOCK
I1
II3150'F 275"F
325"F 350"F
4OO'F 425"F
© [ T'MER450*F PAUSE
l I STOPHIGH/LOW ON CLEAR START
OFF OFF
' ' 1I 1 --8 9 10 1 I 12
ACCESSORIES
-13
-14
15
16
17
FEATURES
1,, Lighted digital display
2° Indicators
3o MINUTE PLUS pad
4o EASY REHEAT pad
5_ COMPU DEFROSTpad
6. COMPU COOK pad
7o SENSOR TEMP pad
8. FAN padPressonce for High andtwice for Low,
Pressagain for Off.
9, HOOD LAMP padPush alternately for Onand Off,
0. TEMP pad
1, STOP/CLEAR pad
2, START pad
3_ Cooking Functlon pads
4, Number and Tempera-ture selection pads
5. TIMER/PAUSE pad
t6, AUTO START/CLOCKpad
17. Variable CookingControl pads
The following accessories are designed especially for use in this oven,,
The racks are for convection and combination cooking only; do not use for microwave cooking alone°
Do not substitute similar types of racks for these specially designed ones°
Baking RackThis rack is used for two-layer cooking,
such as layer cakes, muffins, etc,
Broiling TrivetUsed for roasting or broilingto allow juices to drain awayfrom food.
OPTIONAL ACCESSORIES .- - If your dealer does not stock these items, they can be ordered directly fromyour SHARP Accessories and Supplies Center, For location of the nearest center, call toll-free I-800-642-2122.
I. Charcoal Filter Kit (RK-210). Required when hood exhaust is recirculated,, See Installation Instructions°2. Filler Pane] Kit (RK-2S0), LJsedwhen installing the unit in a 36" or 42" opening,. The 3" panels come in pairs.
8

Operation of Auto-Touch ® Control Panel
Your new Sharp Auto-Touch convection microwave oven uses a microp_, the electronic brain that providesa wide variety of cooking programs which could not be achieved by _tional cont.01 methods. The operationof the oven is controlled by touching the appropriate pads arranged on l_ surface of the corm'ol panel.An entry signal tone should be heard each time you touch the control panel to make a correct entry. If you do nothear this sound:
I) You have not used enough pressure in touching the pad.2) You have made more entries than the control panel will accept.3) You have made an incorrect entry.
In addition to the ent--D,signal tone, an audible signal will sound for approximately 2 seconds at the end of the cookingcycle.After cooking or using the minute timer, the time of day will appear on the display."/',,take. sure the oven is_ into a 3-pronged 115-120 volt household o.,'tlet. When the oven is plugged in,
the display will show _, flashing on and off each second. Touch the STOP/CLEARpad: _ will appear°* You cannot program the o,_n if the door is not closed fimlly_'_ This oven can be programmed for up to 4 automatic sequence& (EX.:Microwave !v'ed - Microwave High - Pause
- High Mix RoasO
* During cooking, the program cannot be changed until the STOPICLEAR pad is touched twice. All functions arelocked in to prevent accidental changes.
" During cooking, when the door is opened, the cooking time in the readout automatically stops. The cookingtime starts to count down again when the door is closed and the START pad is touched.
* I! the electrical power to your microwave oven is interrupted, the display will intermittently show _ afterthe power is reinstated. If this occurs during cooking, the program will be erased° Simply reset the_or thecorrect time of day and reprogram.
[ To Set the Clock ]
* Suppose you want to enter the correct time of day 12:30 (A.M. or PoM.)
NOTE: 1o "[his
,
[Step I
2,1
_ 3, I
Procedure
Touch _e AUTO START/CLOCK pad°
Enter the correct time of day by touch-ing the nurr_rs in sequer'_eo
Touch AUTO START/CLOCK pad again_
Pad Order
ct£r_
[ _ii_ SrANr 1
is a 12 hour clock. _ will appear in the readouti_ttempt to enter an incorrect clockt_me.. For example, if you try to en_r 8:6! or 13:00, [ /_RRORI and tie incorrect clock time willappear repeatedly° To erase 1..ERROR l, touch the STOP/CLEARpad. tfyou accidently ouch morethan 4 number pads, the last 4 numbers you have touct-_ will appear on the display,
If the oven is in cooking or minute timer mode and you wish to know the time of day, simply touch theAUTO STARTiCLC__Kpad_ As long as your finger is touching the pad, tie time wilt be displayed.This checking operation does not interfere with the cooking time, oven temperature, or minutetimer.
9

Minute Timer [The Au1_Touch c_'_'ol panel can be used as a timer up to 99 minutes, 99 seconds. There is no cooking involved." Suppose you want to make a 3 minute long distance phone call.
Procedure
Io Enter desired time,• , , , , , i , , , L, , , ,
2. Touch TIMER!PAUSE pad.
Pad Order
DDD, L ,| i, ,ll ,,,' ,,,,, ,,,,,,,',,, '
To cancel the minute timer during operation, touch the STOPICLEARpad and the time of day will reappear.
! Stop/Clear [Use the STOP/CLEAR pad to:1. Eraseif a mistake is made during programming.2o Cancel minute timer_
3. Stop the oven temporarily during cooking.4. Cancel a program during cooking, touch twice.
[ MICROWAVE COOKIING ]
[Cooking by Time l
There are five :_set power levels:Approximate percentage of microwave power for each power level:
HIGH 100%MED HIGH 70%MED 50%MED LOW/DEFROST 30°/oLOW 10%
When using other than High, it is normal to hear the mag_ cycle on and off.
"Suppose you want to heat soup for 2 minutes 30 seconds at MEDIUM.
Step
Z
.3.
Procedure
Enter desired cooking timex
Select desired variable cookingcontrol setting.
Touch START pad.
t[
Pad Order
UED],, ,,, ,,,, ,..... ,........
START ]
Your oven can be programmed for up to four sequences for cooking. First touch tirr_ and then the cookingmcxJe. For example _ program a second sequence of I minute 30 seconds at HIGH:
Step
3_
4,
i5,
Procedure
After step 2, enter desired time forthe second cooking time.
TcxJch the HIGH pad,
Touch the START pad.
Pad Order
10
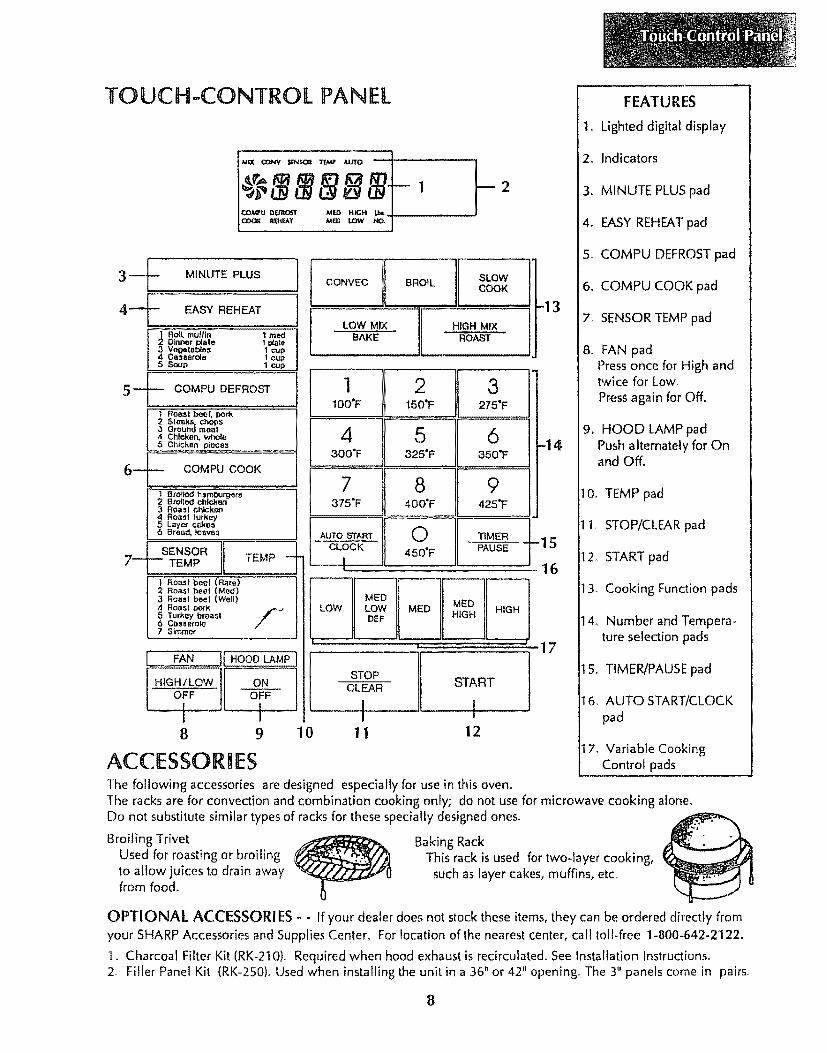
NOTE: if you accidently touch the wrong Variable Cooking C._rol pad, immediately touch the correct pad°The last pad touched will be the setting the oven accepts_ For example, if you touch MED HIGH padand then immediately touch MED pad, the oven will cook at MEDIUM.If HIGH is selected as the final sequence, it is not necessary to touch t_ HIGH pad.If HIGH is programmed as the first, second, or third sequence, the HIGH pad must be touched°PAUSE cannot be program,'ned as the first oooking sequerkgeor usectalone_ If PAUSE is used asthe first sequence, the oven will begin counting down as a minute timer.
[Pause ]
PAUSEallows you to stop the oven between stagesto stir, turn food over or add ingredients during the cooking
' Suppose you want to cook soup for 5 minutes at HIGH, stir and continue to cook for 3 minutes at MEDIUM.
stepl
I.
2_
4_
5..r •
6_
Procedure
Enter desired cooking time for I_ first stage.
Select desired variable cooking control setting.
Toach TIMElY,/PAUSEpad°
Enter desired cooking lime for second stage.
Pad0_
..........71 Openthe doorandstir_jp.Close the door°
HIGH
PAUSE
"::-:.................... _ ,,,J,,,,,,,,, ,, ,, ,,,, ,,,,,,u ........
Select desired variable cooking control setting. [ Mw Ir i
When the firststa_finishes, an audible signalwill sound 4 times and theoven will stop. [_will be displayed. .............
Touch S_ART pad. [ START ]
cL._m_u Defrost l
Your oven has special function keys to defrost meats and poultry faster and bettor. Cc_puDefrost automaticallydefrosts roast beef, pork, steaks, chops, ground meat, whole chicken and chicken pieces. Each key has 3 defrostingstages.
'Suppose you ,want to defrost a 2 Ib, steak with C.ompuDefrost
Smp
.,
Procedure
Touch COMPU DEFROST pad
Select desired CornpuE_frost setting_Touch 2 to defrost steak.
Pad Order
[O-,¢_PU DEFROST1
Display
ZZooD[ CD-2
Lbs.will flash on and off
11

Step
3.
4_
5_
7,_
8.
Procedure
Touch number pads to enter weight.
Touch START pad.,
Open the door. Turn steak over and shieldany warm portions. Close the door_
Touch START pad.,
Open the door. Shield any warm portions.Close the door,
Touch START pad.
Pad Order
N @
START [
Display
l 2.BCOMPU DEFROST Lb6,
Lbs. stops flashing and remains ondisplay,
When the 1st stage finishes, an audiblesignal will sound 4 times and oven wi!
•will be displayed repeatedly.
and be dis-p_repeat_ will
5.00OOMPU DEFROST MEDO00K
When the second stage finishes, anaudible signal will sound 4 times andoven will stop. _ [ COVER] and
wilt be displayed repeatedly°
_and _ will be dis-played repeatedly.
COOK _ U2_t
When the 3rd stage finishes, an audiblesignal will sound. I COVEKlandlSTAND
will be displayed contin__usly._ .......
Open oven door or touch STOP/CtEAR pad. The time of day will reappear on the display.
NOTE:i. The weight can be entered in 0.1 lb.. increments. Pounds must be rounded off to the nearest tenth of a pound.(Example: ! ,7.5 Ibs. should be rounded off to 1.8 Ibs,,)
2. Foods weighing more or less than the quantity listed in the chart should be defrosted following guidelines in thecookbook. If the incorrect weight is entered and START pad is touched,_and incorrect weight will be displayedrepeatedly. The STOP/CLEARpad has to be touched to reprogram the oven.
3. Elevatewhole chicken or roast on a microwave safe roasting rack or inverted saucer seton a microwave safe utilitydish. Defrost roasts with fat side down, turn over when oven signal£
12

[CompuDefrost Chart]
Setting Food Quantity
1 Roast 2.5 to 6.0 lbs.Beef,Pork
Display Procedure Comment
tCOVER"[
* After the 1st stage, turn over Let stand, covered,and shield the warm portions 30-45 minuteswith aluminum foil,
*After the 2nd stage, if thereare warm portions, shieldwith aluminum foil.
Steaks
Chops0.5 to 4.0 Ibs. _ _ * After the Ist stage, turn over Let stand, covered,
k?,OVERI _ and shield the warm portions 10-I 5 minutes.with aluminum foil.
Fish "After the 2nd stage, if thereare warm portions, shieldwith aluminum foil,
Ground 0°5 to 3°0 Ibs. __ 'Remove anythawed pieces Let stand, covered,meat _ _ after each stage. 5-I0 minutes.
Chicken,whore
Chicken
pieces
2.5 to 6.0 Ibs. _ _ * After the Ist stage, turn overand shield the warm portionswith aluminum foil.
•After the 2nd stage, if there
_ are warm portions, shieldwith aluminum foil.
o.s to 3,0 lbs.I:A,RRNGI
_[,ARRNG I "After 2nd stage, if there are
_ warm or thawed portions,rearrange or remove,
Remove gibletsbefore freezingpoultry,,
Let stand covered,30-5,5 minutes,
Let stand, covered,10-t 5 minutes,
NOTE: Check foods when oven signals. After the final stage, small sections may still be icy° Let stand to continuethawing Do not cook until all ice crystals are thawed.
Shielding roasts and steaks prevents cooking from occuring before the center of the food is defrosted°
Use small strips of aluminum foil to shield edges and thinner sections of the food°
13

The Easy Reheat allows you to reheat many of your favorite foods automatically without setting the time or powerlevel.
"Suppose you want to reheat a dinner plate.
Step
I.
2_
3_
Procedure
Touch EASY REHEAT pad_
Select desired EASYREHEAT setting°Touch 2 to reheat dinner plate.
Touch START pad.
Pad Order
EASY REHEAT
%
START
Display
REHEAT,,, u, ,
2REHEAT
3.00COOK REHEAT
The cooking time will count down to zero. When the timer reaches zero, all indicators will go out and an audiblesignal will sound. The time of day will reappear on the display.
Setting Food Quantity Procedure
I
2
3
4
5
Roll, Muffin
Dinner plate
Vegetables
Casserole
Soup
1 medium
I plate
I cup
1 cup
I cup
Wrap in paper towel,
Place meaty portions and bulky vegetables tooutside of dish° Cover with waxed paper°
Cover; stir before serving_
Cover; stir before serving°
Cover; stir before serving,
Time*
15 sec,
3 minso
I mins, 50 secs.
3 mins.
2 mins. 30 secs.
"Times are given for your reference, when you select Easy Reheat, the heating time will appear on display andcountdown. You can use these settings for other foods you may prepare,
NOTE: I. Foodscan be covered with waxed paper or vented plastic wrap. Temperature of foods covered with plasticwrap tend to be slightly higher than those covered with waxed paper,
2. When placing casserole on plate for reheating, pat with spoon to I to 1 I/2 inches thick,3o Slice meat for reheating on dinner plate.4. Stir items after removing from oven, if possible_
14
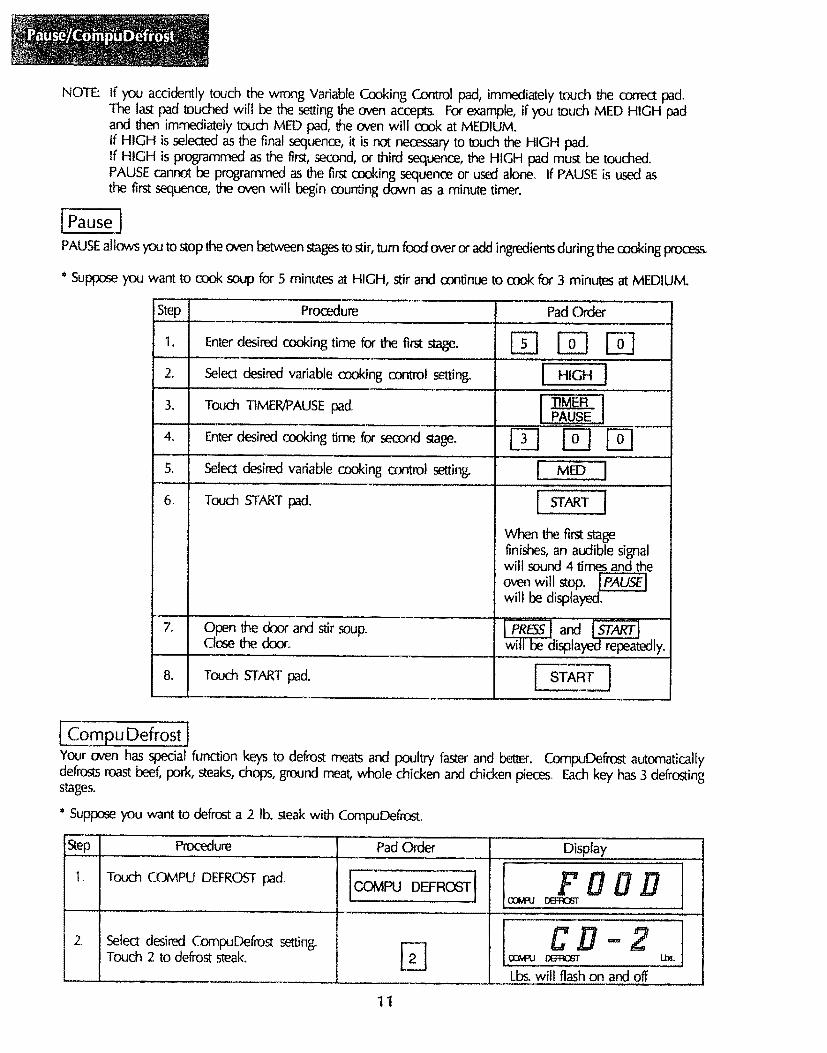
Temperature Probe Cookin_
Your oven is equipped with a removable temperature probe.
Suggested cooking and serving temperatures a re given throughout the cookbook,
Please refer to the beginning of each chapter and to individual recipes for
temperature guidelines.
Probe Plug(A)
To Use the Temperature ProbeI. Insert the pointed metal thermometer portion (B) of the temperature Cord
probe into the food. It is easier to position the probe correctly if this is (C)
done while the food is outside the oven. Be sure to insert the probe at least
213 of the length of the thermometer portion (B) into the food. Thermometer
For casseroles, place the thermometer in the center of the food. When (B)cooking meats, insert in the center of the meatiest portion away from bone Handleor fatty sections For poultry, insert the probe between the inner thigh and
the body of the bird.
2 Place the food on the turntable inside the oven,
3 Insert the probe plug (A) into the receptacle in the top center of the oven cavity (ceiling of the oven).Be sure the probe is securely inserted. This portion rotates as the food turns on the the turntable.
4, Avoid placing the rubber cord (C) directly on or in the food.
5, Program the oven for cooking by temperature or with Sensor Temp.
When the food reaches the programmed temperature, the oven will turn off automatically, Reposition the probe
to check temperature. Repeat the same program. If the temperature is low, cooking will continue until the correct
temperature is reached, If the temperature is correct, the oven will shut off. The time of day will reappear onthe display°
6 Remove the probe plug from the receptacle before removing the food from the ovem
Use and Care of Temperature Probe1, DO NOT OPERATE THE OVEN EMPTY WITH THE TEMPERATURE PROBE INSIDE, TO AVOID THIS
POSSIBILITY, DO NOT LEAVE THE PROBE 1N THE OVEN WHEN NOT IN USE
2. The temperature probe should be unplugged and removed from the oven when not in use° Store the probe ina safe, convenient place outside the oven.
3.,Carefully wash the temperature probe in warm sudsy water and wipe dry,,4, "[he temperature probe should never be allowed to touch the interior walls or door of the oven
5,, Do not use the temperature probe when using a browning dish,
6, This temperature probe is designed specifically for use in this oven,, Do not substitute any other probe for thisone_ The probe cannot be used in other microwave ovens.
7, Avoid harsh treatment of the probe, Do not drop the probe tt is a thermometer Handle it carefully,
8 Potho[ders may be needed when removing the temperature probe.
9, Do not remove the probe from the receptacle or from the food by pulling on the cord, Use the insulated handle,10 Do not try to force the temperature probe into solidly frozen food.
1t, Temperatures are displayed in the range of 90°F to 230°F. The maximum temperature which can be entered is200°E If a temperature more than 200°F or less than 90°F is set, _and the incorrect temperature will
appear on the display, The STOP/CLEAR pad must be touched in order to reprogram the oven,
t 2. Temperature readings are given for some recipes which should be cooked covered, lfyou wish to use the probe,
cover the food with clear plastic wrap and insert the probe through the plastic wrap,,
13, You will often notice a change in the temperature after stirring. This is normal and occurs in conventional cookingalso
14 Recommended cooking or serving temperatures are given for those recipes in your cookbook where cooking by
temperature is appropriate, You may choose to cook by either time or temperature.
15
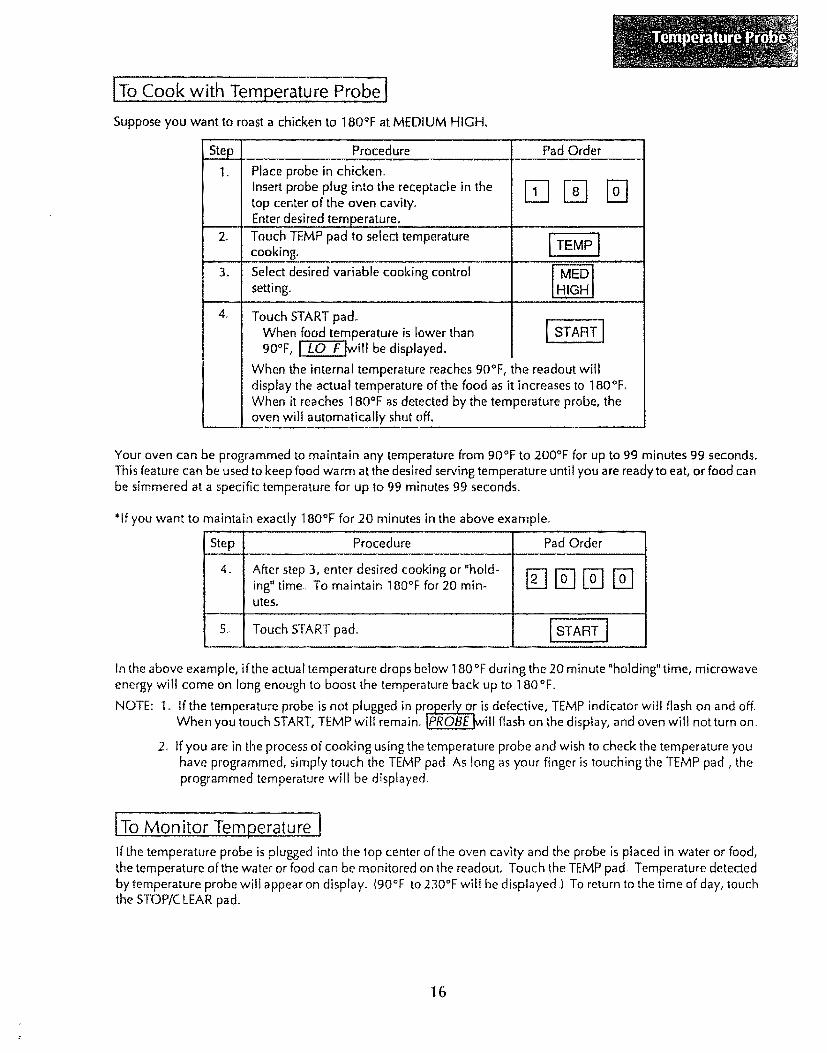
ITo Cook with Temperature Probe]
Suppose you want to roast a chicken to 180°F at MEDIUM HIGHo
Step
i.
2_
,, ,,. ,
3.
Procedure
Place probe in chicken,,
Insert probe plug into the receptacle in the
top center of the oven cavity.Enter desired temperature.
Touch TEMP pad to select temperaturecooking.
Select desired variable cooking control
setting°
Touch START pad°When food temperature is lower than90°F, _will be displayed.
Pad Order
D%N
START[
When the internal temperature reaches 90°F, the readout willdisplay the actual temperature of the food as it increases to 180°F.When it reaches 180°F as detected by the temperature probe, theoven will automatically shut off.
Your oven can be programmed to maintain any temperature from 90°F to 200°F for up to 99 minutes 99 seconds.
This feature can be used to keep food warm at the desired serving temperature until you are ready to eat, or food can
be simmered at a specific temperature for up to 99 minutes 99 seconds.
*If you want to maintain exactly 180°F for 20 minutes in the above example°
istep" ' Pioce u; ' 8ide; .......4. After step 3, enter desired cookin 8 or "hold-
ing" time. To maintain 180°F for 20 min- _ _ _
utes..
5, Touch START pa& [ START ]
In the above example, if the actual temperature drops below 180 °F during the 20 minute "holding" time, microwave
energy will come on long enough to boost the temperature back up to 180 %°
NOTE: !,, If the temperature probe is not plugged in pro e _r is defective, TEMP indicator will flash on and off.When you touch START,TEMP wil! remain. IPROBEIwill flash on the display, and oven will not turn on
2., tf you are in the process of cooking using the temperature probe and wish to check the temperature youhave programmed, simply touch the TEMP pad, As long as your finger is touching the TEMP pad, theprogrammed temperature will be displayed.
[To Monitor Temperature I
lfthe temperature probe is plugged into the top center of the oven cavity and the probe is placed in water or food,
the temperature of the water or food can be monitored on the readouL Touch the TEMP pad. Temperature detected
by temperature probe will appear on display. (90% to 230°F will be displayed.) To return to the time of day, touchthe STOP/CLEAR pad.
16

[Sensor TempiSensor Temp 1-6 automatically cooks roasts, poultry and casseroles to an exact internal doneness. The finishedtemperatures are already calculated°Sensor Temp 7 is used for slow cooking It will bring the food quickly up to temperature and maintain it for up to4 hours°
"Suppose you want to cook a beef roast to medium doneness:
Procedure
Place probe in the meat. Place meat in the oven.insert probe plug into the receptacle in the topcenter of the oven cavity_ Close the door° Touch
--_ SENSOR T"_,4P pad, .............................
Z Select desired Sensor Temp setting_ Touch 2 to rookroast to medium
3. Touch START pad,
When the intemal temperature reaches 100°F, thereadout will display tffe actual temperature of thefood as it increases to 130°F. The oven will auto-matically shut off and _and _ will
. be displayed _peatedly,
Pad Order
SENSORI_MP I
%
Display
SBISC_
FOOD
T-.2
i'uix _ _ ...............
T 2COOK
Open oven door or touch STOP/CLEAR pad. The time of day will reappear on the display.
NOTE: if you touch the wrong Sensor Temp setting, retouch the correct setting°
SENSOR TEMP CHART
Place roasts and turkey breasts on broiling trivet. Place shallow glass baking dish under meat if you want to savedrippings for gravy° Using small strips of aluminum foil, shield edges of roasts from beginning to assure perfect results_Foil strips should not touch probe or rack.. Select Sensor Temp setting. Oven will signal when final temperature isreached° Reposition probe and reprogram. If the temperature is low, cooking will continue until temperature isreached° if the temperature is correct, the oven will shut off,
Food Setting internalTemperature Comments
Roast beef (rare)
Roast beef (medium)
Roast beef (well done)
RoastPork
Turkey breast
Casserole with cooked
ingredients
Simmer Lsauces,stews)
I 120°F
2 130°F
3 150°F
4 170°F
5 170%
6 160%
7 180°F
Stand, covered, 10 rain
Stand, covered, 10 min,
Stand, covered, 15 min.
Stand, covered, 10 mino
Stand, covered, 10 rain.
Cover with lid or plasticwrap
Hold for maximum of 4 hr*
Cooking Mode
HIGH MIX 325°F
HIGH MIX 325°F
HIGH MIX 325°F
HIGH MIX 325°F
HIGH MIX 325°F
MICROWAVE
MICROWAVE
* If you want to simmer food for less than 4 hours, stop oven after desired simmer time,
17

[Convection and Automatic Mix Cooking[
This section of the Operation Manual gives you helpful hints for convection and combination cooking. Please consultyour Sharp Carousel Convection Cookbook for more specific cooking instructions and procedures.
Recommended
Metal turntable
Baking RackBroiling trivetMetal baking pans
Utensils:
Aluminum foilcontainers
Heat resistantglassComing Ware'_
Ovenable paper board containers (follow manufa_rer's instructions)
Convection Cooking
During convection heating, hot air is circulated throughout the oven cavity to brown and crisp foods quickly andevenly. This oven can be programmed for ten different convection cooking temperatures for up to 99 minutes 99seconds.
The oven should not be used without the turntable in place, and it should never be restricted so that it cannot rotate.You may remove the turntable when preheating the oven and when preparing food to be c_ked directly on theturntable.
Helpful Hints:
I. Foods may be cooked either directly on the turntable or with the rack or trivet on the turntable.2_ Do not cover turntable, broiling trivet or baking rack with aluminum foil. It interferes with the flow of air that
cooks the food.
3. Round pizza pans are excellent cooking vessels for many convection-only items. Choose pans that do r_at haveextended handles.
4. Hot dogs cooked on the broiling trivet may be turned over to give an even, grilled appearance.
Automatic Mix Cooking:
This oven has two preprogrammed settings that make it easy to cook with both convection heat and microwaveautomatically.
with the exception of those foods that cook best by convection heating alone, rn_ foods are well suited 1_ mixcooking using either LOW MIXiBAK£ or H]GH MIX/ROAST_
The marriage of these two cooking methods produces juicy meats, moist and tender cakes, and fine textured breads,
allwithjusttherightamount ofbrowningand crispness,
Helpful Hints:
1. Meats may be roasted directly on the broiling trivet or in a shallow roasting pan on the trivet on the tumtable.
2. Less tender cuts of beef can be roasted and tenderized using oven cooking bags.
3 When baking, check for doneness after time has elapsed. If not completely done, let stand in oven for a fewminutes to complete cooking.
NOTE:
During mix baking some metal baking utensils may cause arcing when thay come in contact with _e turntable, ovenwalls or _1 accessory racks. Arcing is a discharge of electricity that occurs when microwaves come in contactwith metal If arcing occurs, place a heat resistant dish (Pyrex_pie plate, glass pizza dish or dinner plate) betweenthe pan and the turntable or trivet, tf arcing occurs with other baking utensils, discontinue their use for combinationcooking,
18

[To Cook with Convection ]*Suppose you want to cook at 350°F for 20 minutes°
Step
,
3,
Procedure
Enter desired cooking time°
Touch CONVECTION pad_
Enter desired temperature°
Touch START pad
Pad Order
%%%
[
[
i
CONVEC
START 1
Display
20 OO
CONV
_ F
ODNV
_ 350F
I OON¥
_ 20. o0COOK
NOTE: If you are cooking with convection or automatic mix and you wish to check the temperature you haveprogrammed, simply touch the CONVECTION pad° The programmed temperature wilt be displayedas long as the CONVECTION pad is touched°
[To Cook with Automatic Mix ]
*Suppose you want to bake a cake for 20 minutes on LOW MIX/BAKE_
-_-! Procedure
Enter desired cooking timer
Touch LOW MIX/BAKE pad_
Touch START pad.
t. I
2. I
' I
3. !
,m
Pad Order
D lq IZ]rqLOW MIX ]BAKE
NOTE: To cook on HIGH MIX/ROAST setting, use the above procedure, touching HIGH MIX/ROAST padin Step 2.
*Suppose you want to bake a double crust pie for 30 minutes on HIGH MIX/ROAST at 400 °F (change temperature).
Procedure Pad Order
1. Enter desired cooking time,
2_ Touch HIGH MIX/ROAST pad.
3o Enter desired temperature.
4. Touch START pad.
DDDFqJ .......... _ ,,,
I HIGH MIX_"
[ ,oo;START
19

To Preheat and Cook with Convection [
Your oven can be programmed to combine preheating and convection cooking or preheating and automatic mixcooking operations. You can preheat at the same temperature as the convection temperature or the automatic mixtemperature or change it to a higher or lower temperature."Suppose you want to preheat the oven to 325°F then cook for 20 minutes at 325°F.
Step
i.
24
m
3o
4o
Procedure
Touch CONVECTION pad. I
I
Pad Order
CONVEC [
325°F ]
i 5.[[
l!=iI
Touch desired preheat temperature pad.
Enter desired cooking time.
Touch START pad.When the oven reaches the programmedtemperature, the Convection Fan Symbolwill stop flashing and begin rotating and anaudible signal wilt sound 4 times, and thetemperature wi![ be displayed."
Open door.Place _odin oven. Close door,Touch START pad°
%%%D
[ START ]
START
Display
CONY
_NV
3251;"OONV
20 OO
_and _will bedisplayed repeatedly,r CONY
s25r
I ONV i20. DO
• At this point the oven is preheated tf the oven door is not opened, the oven wilt begin temperature holdingoperation. The oven will automatically hold at the preheat temperature for 15 minutes. After this time haselapsed,an audible signal wilt sound and the oven will turn off. The time of day will reappear on the display.
NOTE: If youare in the process of preheating and wish to check the actual oven temperature, follow Steps1through3 above, then touch the CONVECTION pad and the desired cooking temperature pad.The cooking temperature will appear on the display. Continue with Steps4 and 5.
[To Preheat and Cook with Automatic Mix I
"Supposeyou want to preheat the oven to 325°F and bake a pie for 20 minutes on HIGH MIX!ROAST.See"To Preheat and Cook with Convection" above. Touch HIGH MIX/ROAST pad after step 3. Continue with steps4 and 5o
NOTE: If you wish to preheat and cook at a different automatic mix cooking temperature, follow"To Preheat andCook with Automatic Mix', after touching HIGH MIX/ROAST pad, touch the desired cooldng temperaturepad. The cooking temperature will appear on the display_ Continue with steps 4 and S.
1To Sequence Cook with Automatic Mix]
Your oven can be programmed for up to four sequences for cooking. First touch time and then cooking mode° IfHIGH MIX or LOW MIX are a desired cooking mode, first touch time, then HIGH MIX or LOW MIX and then atemperature pad.
20

[Convection Cooking Using Temperature Probe I
The Temperature Probe can be used also during convection cooking or automatic mix cooking to cook food to aninternal temperature of 90°F to 200°F.When the desired food temperature has been reached, the oven wilt turn off automatically.
"Suppose you want to cook a roast at 325°F (convection temperature) until it reaches 150°F (food temperature),
Step
I.
3.
Procedure Pad Order Display
Place probe in meat. Insert probe plug into
the receptacle in the top center of the oven
cavity'.
Touch number pads for desired food tempera-ture.
Touch TEMP pad.
Touch CONVECTION pad,,
Touch convection temperature for desiredoven temperature. (Ex. 325%)
Touch START pad.
TEMP ]
CONVEC ]
325oF
START ]
CONV TEMP
F
CONV TEMP
325F
When food temperature islower than 90°F:
CONV TEt_F'
LflFC.OOK
When the internal temperature reaches 90°F, the readout wilt display the actual temperature to the foodas it increases to 150°F,
IAutomatic Mix Cooking .Using Temperature Probe l
*Suppose you want to cook a roast on HIGH MIX/ROAST until it reaches 150°FoSee "Convection Cooking Using Temperature Probe" above. Touch HIGH MIXIROAST instead of CONVECTIONpad in Step :3, eliminate Step 4, and touch START.
21

!Convection and Microwave Cooking I
Your oven can be programmed to combine convection and microwave cooking operations_
"Suppose you want to bake chicken pieces at 350°F for 15 minutes and then cook at MEDIUM for 3 minutes.
Step
Io
2_
3_
4_
5_
,,
Procedure
Enter desired convection cooking time_
Touch CONVECTION pad,
Enter desired convection temperature.
Enter desired microwave cooking control
setting,
Select variable cooking control setting°
Touch START pad_
CONVEC
l °F 1
%%D
MED
START ]
Display
15 00
CONV
_ 350F
l 3.00MED
i o"v15.COOK
The timer begins to countdown to zero, When it reaches
zero, the display changes:
COOK
The timer counts down the
microwave time to zero,
22

[ Broiling]Preheating is automatic when the BROIL setting is used. Only actual cooking time is entered; the oven signals whenit is preheated to 450°E Use broil for steaks, chops, chicken pieces and many other foods. Seeyour Sharp CarouselConvection Cookbook for suggestions and cooking time°*Suppose you want to broil a steak for I5 minutes.
i Step
i 1.
2,
3_
m
4.
Procedure
Entermaximum broiling time.
Touch BROIl. pad. No food in oven.
Touch START pad.
When oven temperature reaches 450°F, the Convec-tion Fan Symbol will stop flashing and begin rotating°An audible signal will sound 4 times°*
Open door.Place food in oven. Close door.Touch START pad.
Pad Order
[ BDD
BROIL !
START ]
START }
Display
15 O0
CONV
450F
_and _will
be displayed repeatedly.DOP'ONV
450FOK
CONV
15. O0
* Oven will maintain 450°F for 15 minutes after signal sounds and Convection Fan Symbol begins to rotate° If the-door is not opened (food placed in oven) within 15 minutes, The oven will automatically cut off.
Although timer is set for the maximum broiling time as direded in Step 1, check food at minimum timerecommended in the chart. This stepwill eliminate the need to completely reprogram the oven if additional timeis needed° Simply close the oven door and touch START to continue.
23

[Slow Cook]The SLOW COOK setting is preset for 300°F for 4 hours. It isdesigned for foods which cook longer than 99 minutes99 seconds at 300°F or lesso Foods suchas baked beans or stews are best cooked slowly at low temperatures_ TheSLOW COOK feature expands the length of cooking time to a maximum of 4 hours at 300 °F or lower. It adds to theoverall versatility of your new Convection Microwave ovem When using this setting, no cooking time is entered;you will need to time the food manually.
*Suppose you want to change oven temperature from 300°F to 275°F,
Step Procedure Pad Order
2_
Touch SLOW COOK pad.
Enter desired oven temperature if you want tochange from 300°F.
Touch START pad.
L
[
[
SLOW ICOOK
275°F I
START '!
Display
I_ONV
300£'
CONV
275F,_
IN3_
@ 275£'
Convection Fan Symbolwil! begin to rotate,
After 4 hours an audible signal will sound. All indicators will go out. The time of day will appear on the display.If the oven door is opened or the STOPICLEAR pad is touched during the SLOW COOK cycle, the program will becancelled and the oven will turn off. If you need to check food, open the oven door and check or stir. After closingthe door, touch SLOW COOK, lower temperature if needed, and touch START to reactivate the oven,When changing SLOW COOK temperature, a temperature above 300°F cannot be entered_
[Minute Plus ]Minute Plus allows you to cook for a minute at HIGH by simply touching the Minute Plus pad. You can also extendcooking time in multiples of I minute by repeatedly touching the Minute Plus pad during the cooking program ofmicrowave, convection or combination cooking.
=Supposeyou want to heat a cup of soup for one minute.
Procedure
L__. J Touch MINUTE PLUS pad.
Pad Order
t MINUTE PLUS J
NOTE: t. Minute Plus can only be entered within I minute after cooking, closing the door, touching STOP/CLEARpad or during cooking° Minute Plus cannot be used to start the oven if any program is on the display.
2, The cooking time can be increased in multiples of t minute by repeatedly touchingthe Minute Plus padduring a cooking program of microwave, convection or combination cooking and during maintainingtemperature with the prober Minute Plus cannot be used with EasyReheat, Sensor Temp, CompuDe-frost, Compu Cook and Slow Cook.
24

C mpuCook ]CompuCaak will automatically compute the oven temperature, microwave power and cooking time for baking,roasting, and broiling, It is based on specific foods and the quantity or weight of the fao&
To Cook With CompuCook=Suppose you want to use CompuCook to cook a 6.95 pound chicken°=
Step
1.
2_
3_
Procedure
Touch COMPU COOK pad.
Select food category for CompuCook.Touch 3 to cook Roast Chicken.
Touch number pads to enter weight°
Touch the START pad.4_
Pad Order
[OOMPUooo }
%
START
Display
FOOD
MiX
CC = 3COMPU Lbs,
Lbs. will flash on and off.
MIX
7.0OOMPU Lbu,
Lbs. stops flashing.
CO_dCOOK
57.
Convection fan symbol willrotate.
After cooking, [COVER ] and _will be displayed repeatedly.Open oven door or touch STOP/CLEAR pad. The time of day will reappear on the display,If the cooking time for any CompuCook food is more than one hour, I H and the minutes will appear on the display.When the countdown reaches one hour (60 minutes), minutes and seconds will appear on the display and continueto count down.
NOTE: I_ Use foods listed in the CompuCook Section of the control panel.2. CompuCook works with foods at normal storage temperature. For example, chicken would be at
refrigerator temperature and cakes and bread would be at room temperature°3, Foods weighing more or lessthan the quantity listed in the chart should be cooked following guidelines
in the cookbook. If you enter an incorrect quantity and touch the START pad, _and the incor-rect quantity will appear alternately on the display.
4 The weight or quantity can be entered for each CompuCook Setting_ The unit, pounds (Lbso)or quantity(No.), will appear on the display. For example, turkey would be calculated in pounds and hamburgerpatties would be quantity.
5, Pounds must be rounded off to the nearest tenth of a pound (Example: 5A5 lbs. should be rounded offto 5.5 IbsJ
6 Preheat is automatic with CC-1 (Hamburgers, broiled) and CC-2 (chicken, broiled). When the ovenreaches the desired temperature, an audible signal will sound 4 times; place the food in the oven andtouch START°
7. All foods can be seasoned, as desired, before cooking begins.8 If the door is opened during CompuCook, shut door and touch START pad to resume cooking_
25

[ CompuCook Chart lCompu
Food
Hamburgers,broiled
Chicken,broiled
Chicken,
roast
Turkey
Cake layers
Bread loaves
Cook
Setting
t
2
3
4
5
6
Auto Start ]
Amount
2-8 pieces
0.5 - 3.5 Ibs.
;h5 - 7.5 Ibs.
6,5 - 9.0 Ibs_
I - 2 layers
I - 2 loaves
Unit
Number of_atties
Pounds
Pounds
Pounds
Number oflayers
Number ofloaves
Procedure
Season, as desired°Place on broiling trivet.
Season, as desired.
Place on broiling trivet.
Season, as desired.Place on broiling trivet.
Season, as desired. If stuffed,add i -2 ibs. for stuffingdepending on size of bird°Place on broiling trivet.
One or two 9-inch roundmetal cake pans, greased,
One or two 9 x 5 metal loaf
pans, greased°
Comments
Patties should be 1/4 lb.each, 1/2-inch thick,
Chicken next to bone
should no longer be pink.
Let stand, covered withfoil, 10 to 15 minutes.
Let stand, covered withfoil, I 0 - I S minutes.
Cool t0 minutes in pan onwire rack; remove frompan° Complete cooling onwire rack.
Remove from pans immedi-ately. Cool on wire racks.
if you wish to program your oven to begin cooking automatically at a designated time of day, follow this proce-dure:"Suppose you ,want to start cooking a stew for 20 minutes on MEDIUM at 4:30 this afternoon.Before setting, check to make sure the clock is showing the correct time of day.
Step Procedure Pad Order..... _,,,,
1. Enter the desired start time°
2_
.
Touch AUTO START/CLOCK pad.
Enter desired cooking program.
Touch START pad°
DG3 ,, i.... Z K_k
AuTo STARTCLOCK
DDDDI .......,,i
LL
START I
NOTE: The Auto Start feature can be used for any of the programs except CompuDefrost and Minute PlusoOnce you have correctly programmed the oven for Auto Start, the correct time of day (not the AutoStart time)will appear on the display. To check the programmed Auto Start time, touch the AUTOSTART/CLOCK pad.The programmed Auto Start time will appear as long as your finger is touching the pad. Checldng the AutoStart time will not interfere with the operation of the oven.To cancel Auto Start, simply touch the STOP/CLEAR pad twice°
26

CAUTIOUS REMINDERSDo not operate the oven empty in the microwave mode, Either food or water should always be in the ovenduring operation to absorb microwave energy°
,, Limit use of metal to those specific examples given in the utensil section of your cookbook, Generally, metalshould not be used during operations of microwave mode only. Metal utensils can be used for convectionand combination cooking.
Aluminum foil can be used for shielding to prevent overcooking or overdefrosting. Pieces should be smalland smooth. Never allow to touch oven wall or door.
3_
4_
5_
6o
7_
Do not cookeggs in the shell° Pressurewill build up insidethe shel! and it will explode. Do not reheatcookedeggs unless they are scrambled or chopped. Puncture the egg yoke before cooking eggs.
Avoid canning in the microwave oven; harmful bacteria may not be destroyed,
Do not heat oil or fat for deep frying.
Pierce the "skin" of potatoes, whole squash, apples, or any fruit or vegetable with a skin covering beforecooking.
Popcorn may be cooked in a special microwave popcorn popper. Follow popper manufacturer's instructionscarefully. Microwave popped corn produces a lower yield than conventional popping; there will be anumber of unpopped kernels. Do not use oil unless specified by the manufacturer.
Popcorn bagged especially for the microwave oven can also be used, Follow package directions carefullyand never exceed the suggested times, usually five minutes° Elevatebag on an inverted glasspie plate, Whenpopping slows to one or two seconds between pops, remove from the oven, Do not try to re-pop unpoppedkernels°
,
Never use a regular paper bag or glass utensil for popping corn,
Do not use paper towels, plates, or other utensils made from recycled paper for microwave cooking.Recycled paper products may contain impurities which could cause the paper to ignite during microwavecooking.
. Do not use plastic or styrofoam utensils for microwave cooking if the oven is hot from convection cooking.The utensils may melt.
I 0. Unlike microwave-only ovens, all convection microwave ovens have the tendency to become hot on thecabinet and oven door, as do conventional ovens and convection-only ovens° Be careful when touchingparts other than the control panel during or immediately following convection cooking.
CONDENSATIONOccasionally some foods will causethe oven to"sweat"_ The humidityand moisture in food will influence the amountof moisture in the oven. Generally, covered foods will not cause asmuch condensation as uncovered foods, Be surethe vents are not blocked.
Condensation is a normal part of microwave cooking.
The door seal is designed to prevent leakage of microwave energy during cooking, The door seal does not need tobe airtight in order to accomplish this. Occasionally moisture may appear around the oven door. You may be ableto see some small areas of light or feel air movement around the oven door. None of these situations are abnormalor necessarily indicate the oven is }eaking microwave energy.
27

CLEANUNG AND CARE[ExleriorlThe outside surfaceis precoated metal and plastic. Clean the outside with mild soap and water; rinse and dry witha soft cloth. Do not use any type of household or abrasive cleaner.
[interior]
The oven walls, ceiling, and floor are stainless steel. For easy cleaning, wipe up any splatters or spills with a soft,damp cloth or sponge after each use or clean with mild detergent and water.For heavier soil, use a mild cleaner such as Soft Scrub ® or Bon Ami ® following manufacturer's instructions.Commercial oven cleaner, preferably the brush-on type can be used following manufacturer's instructions. Applyto stainless wails, floor, ceiling or turntable only. Do not use spray-on oven cleaner, it may damage internal parts.Plastic or nylon scouring sponges or pads recommended for use on Teflon" and Silverstone* can be used on the ovenwalls, ceiling or turntable. Be sure to rinse cavity with adamp cloth or sponge after cleaning to remove completelyall cleaner residue° Dry with a soft cloth°Do not use harsh abrasives.
* DuPont's registeredtrademark.
The turntable and turntable support can be removed for easy cleaning. Wash the turntable and turntable in mild,sudsy water; for stubborn stains, use a mild cleanser and scouring sponge as described above. The turntable andturntable support are dishwasher-proof.Foods with high acidity, such as tomatoes and lemons, will cause the porcelain enamel turntable to discolor. Donot cook highly acidic foods directly on the turntable; if spills occur, wipe up immediately.The turntable motor shaft is not sealed, so excess water or spills should not be allowed to stand in this area.
DI-67Wipe the window on both sides with a damp cloth to remove any spills or spatters. Metal parts will be easier tomaintain if wiped frequently with a damp cloth. Avoid the use of harsh abrasives.
[Touch Control Panei:JCare should be taken in cleaning the touch control panel. If the control panel becomes soiled, open the oven doorbefore cleaning° This will inactivate the control panel. Wipe the panel with a cloth dampened slightly with wateronly and dry with a soft cloth° Do not scrub or use any sort of chemical cleansers.
[Grease Filters: ]Filters should be cleaned at least once a month. Never operate your hood without the filters in place.
io Pull the tab toward the front of the oven, down slightly and remove the filter. Repeat for other filter.2o Soak the filters in a sink or dish pan filled with hot water and detergent.
DO NOT use ammonia or other alkali; they will react with the filter material and darken it.3_ Agitate and scrub with a brush to remove embedded dirt.4, Rinse thoroughly and shake dry.5. Replace by fittingthe filter back into the opening° Push back and up into place°
Grease
28

1. To replace hood lamps, first disconnect power to the oven at the circuit breaker panel or by unplugging.2o Push the cover by hand and slide it toward the back, and open the front side. (Seeillustration.)3_ Replace only with Sharp Part Number RLMPTAO37WREO available from aSharp Service Station or equivalent
40 watt bulb available at most hardware stores or lighting centers° DO NOr USEA BULB LARGERTHAN 40WATTS.
|l
I-lOOa Lamps ........ ---
4o Slide cover back into place. The glass covering the lamps may become hot. Do not touch the glass whilehood lamps are in use, Do not use hood lamps for long term use.
[Charcoal Filter Kit: JCharcoal filter kit, Sharp Part Number RK-210 is used for non-vented, recirculated installation. The filter should bechanged every 6 to 12 months depending on use°
1. Disconnect power to the oven at the circuit breaker panel or by unplugging° (See illustration below.)2. Remove louver mounting screw from top center location on top of cabinet,3_ Push DOWN at two (2) positions (A) and UP at position (B) to unhook louver from unit and remove.4_ Change the charcoal filter.,5, Snap louver back in place and replace the screw.
Louver Mounting ScrewLouver (removed)
Charcoal Filter
(A)
Oven Lamp Cover Screw
(B)
Remove the louver per instructions1 - 3 above and charcoal filter, if used°4.. Remove and save one Phillips head screw from oven tamp cover,5. Remove old lamp and replace only with Sharp Part Number RLMPTAO36WREO available from Sharp Service
Station or equivalent 30 watt lamp available from most hardware stores and lighting centers° DO NOT USEBULB LARGER THAN 30 WATTS.
6. Replace the oven lamp cover, PhiIIips head screw and charcoal filter (if used); snap louver back into place andreplace louver mounting screw.
I Uood:lThe hood fan will automatically start when heat rises from range surface units_ This protects the oven from excessivetemperature rise. Fan will stay on until temperature decreases. Fanstarts automatically at low speed_ You can selecteither HIGH or LOW speeds, Fan cannot be manually turned off during this time.
PRECAUTIONS FOR PROPER USE:
!. DO NOT leave range unattended while using high temperatures_ Automatic fan may start and provideexcessive air to the surface units. This may cause spattering or boil-over_
2o Avoid burning food.3o Keep grease filters clean.
29

SERVICE CALL CHECK
Please check the following before calling service:
Io Does the display light? Yes No
2, When the door is opened, does the oven lamp light? Yes No
If"No" is the answer for both, please check the wall socket and breaker, If both the wall socket and breakerare functioning properly, CONTACT YOUR NEARESTSHARP AUTHORIZED SERVICESTATION.
Please check the following if "Yes" is the answer to either of the above questions:
3. Place one cup of water in a glass measuring cup in the oven and close the door securely, Oven light should gooff if the door is closed properly.
Program the oven for three minutes on HIGH, Touch these pads:
Ao Does the oven lamp light? Yes No
B° Does the cooling fan work? Yes No
(Put your hand over the top ventilation openings.)
C. Does the turntable rotate? It is normal for the turntable Yes No
to turn in either direction.
D. Do COOK and HIGH indicators light? Yes No
E. At the end of 3 minutes, is the water bubbling? Yes No
4, Remove the water from the oven and program:
A. Do CONV, Fan Symbol, and COOK light?
DDDJ CONVEC ]
450°F ]
START ]
Yes No
B, After the oven shuts off, is the inside of the oven hot? Yes No
If "NO" is the answer to any of the above questions, PLEASECONTACT YOUR NEAREST SHARP AUTHORIZEDSERVICE STATION.
3O

SHARP ELECTRONICS CORPORATIONSharp Plaza, Mahwah, New Jersey 07430 Phone (201) 529-8200
TINSEA440W RR0 -D91 Printed in USA