Embed Size (px)
Citation preview

8/8/2019 Quick Installation Guide-For Mac FI8904W
http://slidepdf.com/reader/full/quick-installation-guide-for-mac-fi8904w 1/17
Quick Installation Guide
Quick Installation Guide—For Mac users
Packing List1) IP CAMERA X 1 2) Wi-Fi Antenna (only available for wireless model)
3) DC Power Supply X 1 4) Network Cable X 1
5) Mounting bracket×1 6) CD X 1 (Include IPCAM user manual、IP camera tool)
7) Quick Installation Guide X 1
Quick Installation Guide Flow Chart
Software Installation
Login the camera
Wireless LAN Settings
DDNS Service Settings
Hardware Installation
1 Hardware Installation
(1) Open the package
- 1 -

8/8/2019 Quick Installation Guide-For Mac FI8904W
http://slidepdf.com/reader/full/quick-installation-guide-for-mac-fi8904w 2/17
Quick Installation Guide
Figure 1.0
(2) Connect the Antenna.
Figure 1.1
(3) Plug the network cable and power.
The green light on the cable will turn on and the yellow light will blink.
- 2 -
Figure 1.2
8/8/2019 Quick Installation Guide-For Mac FI8904W
http://slidepdf.com/reader/full/quick-installation-guide-for-mac-fi8904w 3/17
Quick Installation Guide
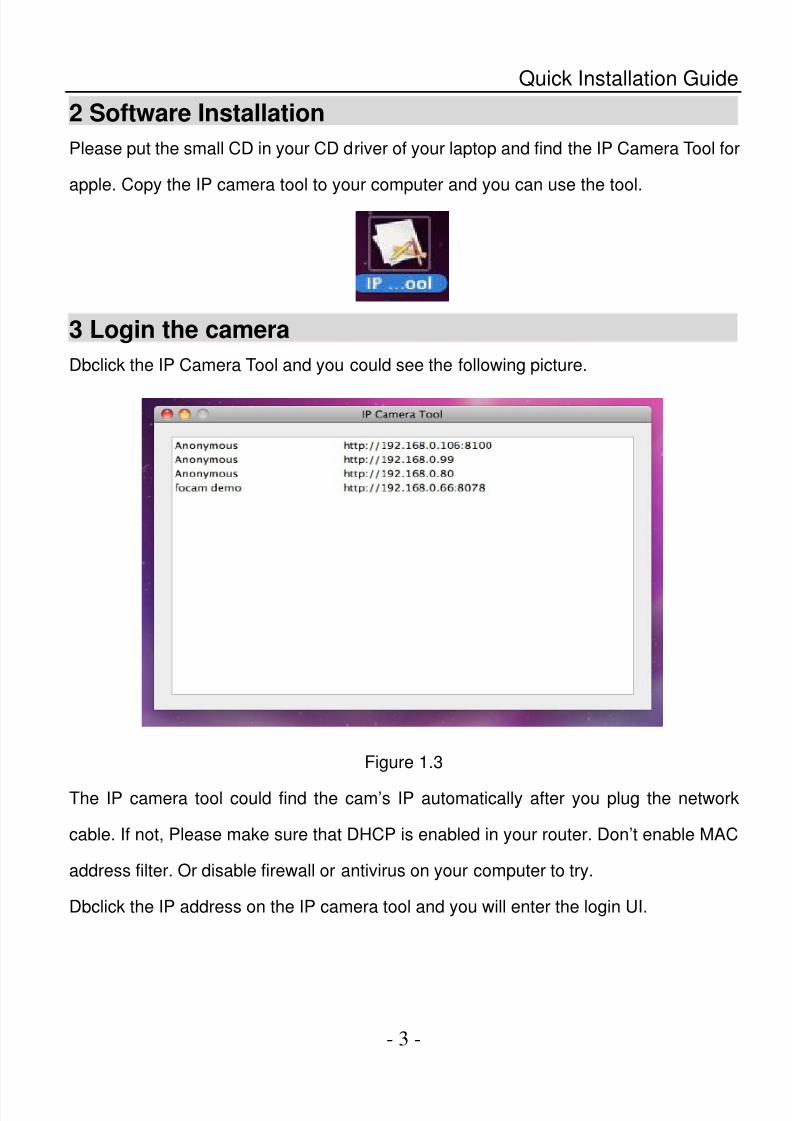
2 Software Installation
Please put the small CD in your CD driver of your laptop and find the IP Camera Tool for
apple. Copy the IP camera tool to your computer and you can use the tool.
3 Login the camera
Dbclick the IP Camera Tool and you could see the following picture.
Figure 1.3
The IP camera tool could find the cam’s IP automatically after you plug the network
cable. If not, Please make sure that DHCP is enabled in your router. Don’t enable MAC
address filter. Or disable firewall or antivirus on your computer to try.
Dbclick the IP address on the IP camera tool and you will enter the login UI.
- 3 -

8/8/2019 Quick Installation Guide-For Mac FI8904W
http://slidepdf.com/reader/full/quick-installation-guide-for-mac-fi8904w 4/17
Quick Installation Guide
Figure 1.4
Fill in user name and password and choose the second login.
Figure 1.5
The browser will prompt you enter the camera’s user name and password. Please fill in
admin and choose Log in. You can see the device status.
- 4 -

8/8/2019 Quick Installation Guide-For Mac FI8904W
http://slidepdf.com/reader/full/quick-installation-guide-for-mac-fi8904w 5/17
Quick Installation Guide
Figure 1.6
Click Live Video. You can see living video.
Figure 1.7
4 Wireless LAN Settings
(1) Please choose Device Management and click Wireless LAN Settings.
- 5 -
Then choose Using Wireless LAN.

8/8/2019 Quick Installation Guide-For Mac FI8904W
http://slidepdf.com/reader/full/quick-installation-guide-for-mac-fi8904w 6/17
Quick Installation Guide
Click Scan button and the camera will detect WIFI device around it.
It could also find your router and show it in the list. (Figure 1.9)
Figure 1.8
If the camera could not find some WIFI device, please click the scan button again. Make
sure that the time between the first scan and the second scan is more than 1~2 minute.
Figure 1.9
(2) Click the SSID of your router in the list, the corresponding information (SSID &
Encryption) will be filled in the following boxes automatically.
You only need fill in share key.
- 6 -

8/8/2019 Quick Installation Guide-For Mac FI8904W
http://slidepdf.com/reader/full/quick-installation-guide-for-mac-fi8904w 7/17
Quick Installation Guide
Figure 2.0
Make sure that SSID, Encryption and share key are exactly the same with your router.
Figure 2.1
- 7 -

8/8/2019 Quick Installation Guide-For Mac FI8904W
http://slidepdf.com/reader/full/quick-installation-guide-for-mac-fi8904w 8/17
Quick Installation Guide
Figure 2.2
Please click Submit after finish these settings, the camera will reboot.
Plug out the network cable after you click submit about 10 seconds.
The camera will work on WIFI after reboot.
Note: If your camera could not connect WIFI, please see FAQ in user manual.
5 DDNS Service Settings
5.1 Static IP user
Static IP users need not set DDNS service settings for remote access. When finished
the connection of camera in LAN and port forwarding. (Figure 3.6/3.7) You can access
the camera directly from Internet by the WAN IP and port number. There are two ways
to obtain your WAN IP.
Obtain the WAN IP from Website
Please enter these strings in your browser: http://www.whatismyip.com.The webpage at
this address will show you the current WAN IP.
- 8 -

8/8/2019 Quick Installation Guide-For Mac FI8904W
http://slidepdf.com/reader/full/quick-installation-guide-for-mac-fi8904w 9/17
Quick Installation Guide
Figure 2.3
Obtain the WAN IP address from the router
You can find the WAN IP in your router. Normally, it is in system status.
Take the WRT54G router of LINKSYS for example,
1) Obtain the IP address of the router(LAN gateway address),user name and
password for login the router from the network administrator,
2) Enter the LAN IP address of the router (LINKSYS WRT54G, such as: default LAN
IP is 192.168.1.1) in the address bar of the IE to login the router; Open the Status
page to find out the WAN address of the router. In this example, the address is
183.37.28.254.
Access the IP Camera from the Internet
You can access the IP Camera from the Internet. (remote access)
Enter WAN IP address and port number in the browser to login the camera.
For example: Http:// 183.37.28.254:85
Note: Make sure the Port mapping is success. You can do port mapping by two ways.
1) Enter setting page of the router which camera connect with to enable UPNP
function. Then login the camera as administrator, choose UPnP Settings to
enable UPNP and make sure the state is “UPnP success”.
2) Do port forwarding manually. (details: Figure 3.6/3.7)
- 9 -
If your router has Virtual server, it is used to do port mapping. Please add the camera’s

8/8/2019 Quick Installation Guide-For Mac FI8904W
http://slidepdf.com/reader/full/quick-installation-guide-for-mac-fi8904w 10/17
Quick Installation Guide
LAN IP and port which you set in basic network settings to the Virtual map list.
5.2 How to set DDNS Service Settings (For dynamic IP user)
(1) Please first visit www.dyndns.com to get an account.
Choose Sign up FREE to get a free account.
Figure 2.4
Next, choose Sign Up under free.
Figure 2.5
Please set as the following picture.
- 10 -

8/8/2019 Quick Installation Guide-For Mac FI8904W
http://slidepdf.com/reader/full/quick-installation-guide-for-mac-fi8904w 11/17
Quick Installation Guide
Figure 2.6
Then choose Add To Cart.
Figure 2.7
Set the following information as the picture below.
- 11 -

8/8/2019 Quick Installation Guide-For Mac FI8904W
http://slidepdf.com/reader/full/quick-installation-guide-for-mac-fi8904w 12/17
Quick Installation Guide
Figure 2.8
The website will send you an email to your mailbox just set.
Figure 2.9
Please click the link in your email to activate your account.
Or copy the link and paste it to the browser to activate the account. Make sure that
your account was activated or DDNS settings will be failed.
- 12 -

8/8/2019 Quick Installation Guide-For Mac FI8904W
http://slidepdf.com/reader/full/quick-installation-guide-for-mac-fi8904w 13/17
Quick Installation Guide
Figure 3.0
You will see the following picture. Click Activate services>>
Figure 3.1
All the settings are finished until you see the following picture. (Figure 3.2)
You can see your host name in the list.
Please remember the host name, user name and password; they are needed when you
set DDNS service settings of your camera.
- 13 -

8/8/2019 Quick Installation Guide-For Mac FI8904W
http://slidepdf.com/reader/full/quick-installation-guide-for-mac-fi8904w 14/17
Quick Installation Guide
Figure 3.2
(2) Basic Network Settings
We need set a static IP for the camera when do DDNS service settings.
Login your camera and set basic network settings as the picture below.
Figure 3.3
Here make sure that your camera is in the same subnet as your router. In other words,
keep the first three sections the same with your router or your computer.
Gateway is your router’s LAN IP. You can find DNS server in your router, if you don’t
know the DNS server; you can also find it in local area connection of your computer.
(details: see user manual—Basic network settings)
- 14 -
Normally, it contains your computer’s LAN IP, gateway, DNS server.

8/8/2019 Quick Installation Guide-For Mac FI8904W
http://slidepdf.com/reader/full/quick-installation-guide-for-mac-fi8904w 15/17
Quick Installation Guide
Please click submit after finish these settings, the camera will reboot.
(3) DDNS service settings
Please set DDNS service settings as follows. Use the DDNS domain name you get from
the dyndns website.
Figure 3.4
Please click submit after fill in all the information. The camera will reboot.
Please login in the camera again to check if DDNS settings is succeed.
Figure 3.5
(4) How to do port forwarding.
Login your router; find the right place to do port forwarding.
Here use a Linksys router for example.
- 15 -
You can do single port forwarding. Set as the following picture. (Figure 3.6)

8/8/2019 Quick Installation Guide-For Mac FI8904W
http://slidepdf.com/reader/full/quick-installation-guide-for-mac-fi8904w 16/17
Quick Installation Guide
Figure 3.6
You can also choose port range forwarding.
In order to forward the port successfully, we recommend you can set both of the start
port and end port as the same port number. Add the camera’s LAN IP and port (Figure
3.3) in the list of port forwarding page.
Figure 3.7
Please do not forget to save these settings when you finish them.
(5) After finish all these settings above, you can use DDNS domain name and port
number to login your camera at any place.
- 16 -
For example, use strings http://foscamipcamera.dyndns.org:8100 to login the camera.

8/8/2019 Quick Installation Guide-For Mac FI8904W
http://slidepdf.com/reader/full/quick-installation-guide-for-mac-fi8904w 17/17
Quick Installation Guide
Here foscamipcamera.dyndns.org is the DDNS Host, 8100 is camera’s port.
Figure 3.8
Conclusion
Other detail settings, please consult user manual.
- 17 -