Embed Size (px)
Citation preview
Quest® vWorkspace 7.2Microsoft Hyper-V Quick Start Guide

© 2010 Quest Software, Inc.ALL RIGHTS RESERVED.
This guide contains proprietary information protected by copyright. The software described in this guide is furnished under a software license or nondisclosure agreement. This software may be used or copied only in accordance with the terms of the applicable agreement. No part of this guide may be reproduced or transmitted in any form or by any means, electronic or mechanical, including photocopying and recording for any purpose other than the purchaser's personal use without the written permission of Quest Software, Inc.
The information in this document is provided in connection with Quest products. No license, express or implied, by estoppel or otherwise, to any intellectual property right is granted by this document or in connection with the sale of Quest products. EXCEPT AS SET FORTH IN QUEST'S TERMS AND CONDITIONS AS SPECIFIED IN THE LICENSE AGREEMENT FOR THIS PRODUCT, QUEST ASSUMES NO LIABILITY WHATSOEVER AND DISCLAIMS ANY EXPRESS, IMPLIED OR STATUTORY WARRANTY RELATING TO ITS PRODUCTS INCLUDING, BUT NOT LIMITED TO, THE IMPLIED WARRANTY OF MERCHANTABILITY, FITNESS FOR A PARTICULAR PURPOSE, OR NON-INFRINGEMENT. IN NO EVENT SHALL QUEST BE LIABLE FOR ANY DIRECT, INDIRECT, CONSEQUENTIAL, PUNITIVE, SPECIAL OR INCIDENTAL DAMAGES (INCLUDING, WITHOUT LIMITATION, DAMAGES FOR LOSS OF PROFITS, BUSINESS INTERRUPTION OR LOSS OF INFORMATION) ARISING OUT OF THE USE OR INABILITY TO USE THIS DOCUMENT, EVEN IF QUEST HAS BEEN ADVISED OF THE POSSIBILITY OF SUCH DAMAGES. Quest makes no representations or warranties with respect to the accuracy or completeness of the contents of this document and reserves the right to make changes to specifications and product descriptions at any time without notice. Quest does not make any commitment to update the information contained in this document.
If you have any questions regarding your potential use of this material, contact:
Quest Software World HeadquartersLEGAL Dept5 Polaris WayAliso Viejo, CA 92656www.quest.comemail: [email protected]
Refer to our Web site for regional and international office information.
Patents
This product includes patent pending technology.
Trademarks
Quest, Quest Software, the Quest Software logo, AccessManager, ActiveRoles, Aelita, Akonix, Benchmark Factory, Big Brother, BridgeAccess, BridgeAutoEscalate, BridgeSearch, BridgeTrak, BusinessInsight, ChangeAuditor, CI Discovery, Defender, DeployDirector, Desktop Authority, Directory Analyzer, Directory Troubleshooter, DS Analyzer, DS Expert, Foglight, GPOADmin, Help Desk Authority, Imceda, IntelliProfile, InTrust, Invirtus, iToken, JClass, JProbe, LeccoTech, LiteSpeed, LiveReorg, LogADmin, MessageStats, Monosphere, NBSpool, NetBase, NetControl, Npulse, NetPro, PassGo, PerformaSure, Point, Click, Done!, Quest vToolkit, Quest vWorkSpace, ReportADmin, RestoreADmin, ScriptLogic, SelfServiceADmin, SharePlex, Sitraka, SmartAlarm, Spotlight, SQL Navigator, SQL Watch, SQLab, Stat, StealthCollect, Storage Horizon, Tag and Follow, Toad, T.O.A.D., Toad World, vAutomator, vConverter, vEcoShell, VESI, vFoglight, vPackager, vRanger, vSpotlight, vStream, vToad, Vintela, Virtual DBA, VizionCore, Vizioncore vAutomation Suite, Vizioncore vEssentials, Vizioncore vWorkflow, WebDefender, Webthority, Xaffire, and XRT are trademarks and registered trademarks of Quest Software, Inc in the United States of America and other countries. Other trademarks and registered trademarks are property of their respective owners.
Quest vWorkspace Microsoft Hyper-V Quick Start GuideUpdated - December 2010Software Version - 7.2

CONTENTS
ABOUT THIS GUIDE . . . . . . . . . . . . . . . . . . . . . . . . . . . . . III
CONVENTIONS . . . . . . . . . . . . . . . . . . . . . . . . . . . . . . III
ABOUT QUEST SOFTWARE . . . . . . . . . . . . . . . . . . . . . . . . . . IVCONTACTING QUEST SOFTWARE . . . . . . . . . . . . . . . . . . . IV
CONTACTING QUEST SUPPORT . . . . . . . . . . . . . . . . . . . . IV
OVERVIEW . . . . . . . . . . . . . . . . . . . . . . . . . . . . . . . . . . . 1REQUIREMENTS . . . . . . . . . . . . . . . . . . . . . . . . . . . . . . . . 2INSTALL COMPONENTS . . . . . . . . . . . . . . . . . . . . . . . . . . . . 3
DOWNLOAD VWORKSPACE. . . . . . . . . . . . . . . . . . . . . . . 3
ON THE MICROSOFT HYPER-V HOST . . . . . . . . . . . . . . . . 4
Requirements for the Broker Helper Service. . . . . . . . . . . 4
INSTALL THE QUEST BROKER HELPER SERVICE . . . . . . . . . . 5
CONNECTION BROKER VIRTUAL MACHINE. . . . . . . . . . . . . . 6
Install the Connection Broker . . . . . . . . . . . . . . . . . . . . . 6
ADD A MICROSOFT HYPER-V HOST . . . . . . . . . . . . . . . . . . . .10CREATE A NEW COMPUTER GROUP. . . . . . . . . . . . . . . . . . . . .12CREATE VIRTUAL DESKTOPS IN A COMPUTER GROUP. . . . . . . . . .17INSTALL PNTOOLS . . . . . . . . . . . . . . . . . . . . . . . . . . . . . .19CREATE A MANAGED APPLICATION . . . . . . . . . . . . . . . . . . . . .20LICENSING VWORKSPACE . . . . . . . . . . . . . . . . . . . . . . . . . .23ON THE MICROSOFT WINDOWS MACHINE . . . . . . . . . . . . . . . .25
INSTALL THE VWORKSPACE CONNECTOR . . . . . . . . . . . . . .25
CONFIGURE VWORKSPACE APPPORTAL . . . . . . . . . . . . . . .26
LAUNCH VWORKSPACE APPPORTAL . . . . . . . . . . . . . . . . .30
i

Quest vWorkspace
ii
Microsoft Hyper-V Quick Start Guide
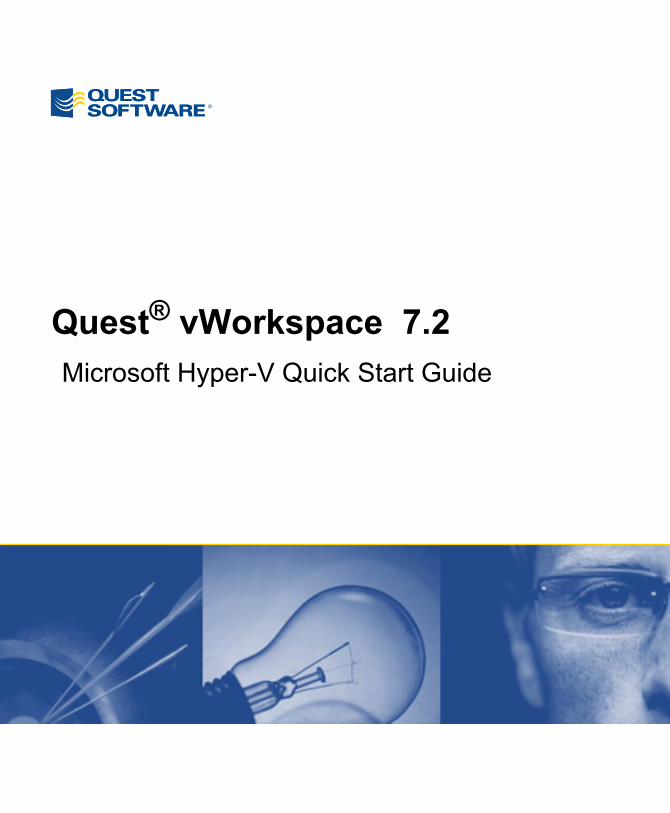
About This GuideThis document has been prepared to assist you in becoming familiar with Quest vWorkspace in an Microsoft Hyper-V environment. The Microsoft Hyper-V Quick Start Guide contains the information required to install and use vWorkspace. It is intended for network administrators, consultants, analysts, and any other IT professionals using the product.
Conventions
In order to help you get the most out of this guide, we have used specific formatting conventions. These conventions apply to procedures, icons, keystrokes and cross-references:
ELEMENT CONVENTION
Select This word refers to actions such as choosing or highlighting various interface elements, such as files and radio buttons.
Bolded text Interface elements that appear in Quest Software products, such as menus and commands.
Italic text Used for comments.
Bold Italic text Used for emphasis.
Blue text Indicates a cross-reference. When viewed in Adobe® Reader®, this format can be used as a hyperlink.
Used to highlight additional information pertinent to the process being described.
Used to provide Best Practice information. A best practice details the recommended course of action for the best result.
Used to highlight processes that should be performed with care.
+ A plus sign between two keystrokes means that you must press them at the same time.
| A pipe sign between elements means that you must select the elements in that particular sequence.
iii
Quest vWorkspace
About Quest SoftwareNow more than ever, organizations need to work smart and improve efficiency. Quest Software creates and supports smart systems management products — helping our customers solve everyday IT challenges faster and easier. Visit www.quest.com for more information.
Contacting Quest SoftwareEmail [email protected]
Mail Quest Software, Inc.World Headquarters5 Polaris WayAliso Viejo, CA 92656USA
Web site www.quest.com
Refer to our Web site for regional and international office information.
Contacting Quest Support
Quest Support is available to customers who have a trial version of a Quest product or who have purchased a Quest product and have a valid maintenance contract. Quest Support provides unlimited 24x7 access to SupportLink, our self-service portal. Visit SupportLink at http://support.quest.com/.
From SupportLink, you can do the following:
• Retrieve thousands of solutions from our online Knowledgebase
• Download the latest releases and service packs
• Create, update and review Support cases
View the Global Support Guide for a detailed explanation of support programs, online services, contact information, and policy and procedures. The guide is available at: http://support.quest.com/.
iv
OverviewQuest vWorkspace manages, provisions, and brokers connections, transforming the desktop infrastructure into an on-demand service with optimized user experience for LAN and WAN. Quest vWorkspace delivers virtual applications and desktops from multiple hypervisors, Remote Desktop Session Hosts (Terminal Servers) and blade PCs through a single user access point and management center.
This document describes the requirements and the installation and configuration steps to test Quest vWorkspace in a Microsoft Hyper-V environment. The following procedures are detailed:
• Download Quest vWorkspace software
• Meet Broker Helper Service requirements for Hyper-V requirements
• Install the Quest Broker Helper Service for Hyper-V
• Meet Firewall Requirements for the Broker Helper Service
• Install the Connection Broker
• Enter Customer Information
• Add a Microsoft Hyper-V Host
• Create a New Computer Group
• Import Hyper-V hosted desktops to a computer group
• Publish a virtual desktop
• Use Evaluation Licenses
• Install PNTools
• Install the vWorkspace Connector
• Configure AppPortal
• Use AppPortal to connect to a Virtual Desktop
Please note that this document is not a replacement for the vWorkspace Administration Guide or other official documentation from the Quest Software Desktop Virtualization Group. This document serves to provide step by step instructions to start evaluating the features of Quest vWorkspace.
Significant experience with Microsoft Hyper-V is expected in order to properly create the virtual machines on the Microsoft Hyper-V host and perform the related configuration tasks.
Moderate experience with Quest vWorkspace is recommended.
Quest vWorkspace
RequirementsThe following requirements are based upon the installation scenario depicted in this guide. Your actual system requirements may differ based upon your environment. For more information on supported system requirements, see vWorkspace System Requirements.
Review the following requirements prior to starting the installation and configuration process.
Microsoft Windows Server 2008 R2 with Hyper-V role Enabled — The integration of vWorkspace with Microsoft Hyper-V requires a Microsoft Windows Server 2008 server with the Hyper-V role installed. Administrative access to the Hyper-V server is required.
The Hyper-V server must be joined to the same domain as the virtual machines that it is hosting. This Hyper-V host should, at a minimum, host the following virtual machines. The creation of virtual machines on Hyper-V is beyond the scope of this document.
Microsoft Windows 7 virtual machine — This virtual machine is used as the virtual desktop.
Microsoft Windows 2008 R2 virtual machine — This virtual machine is used to host the vWorkspace Connection Broker.
Physical Microsoft Windows XP\Vista\7 machine — This machine is used as the client machine. Although a virtual machine can also be used as the client machine, this document assumes a physical machine as the client machine to enable an optimal evaluation experience.
An Active Directory environment — A user must be created in AD to complete the steps detailed in this document.
2
Microsoft Hyper-V Quick Start Guide
Install Components
Download vWorkspace
You can download vWorkspace from the following web sites:
• http://support.quest.com
Use the following steps to download the vWorkspace software from the Quest SupportLink web site.
1. Enter the URL http://support.quest.com.
2. Enter your SupportLink login information.
If you do not have a user account, you can create one by selecting Register.
3. Click Product Downloads.
4. Enter vWorkspace into the Product Name field, and then click Go.
5. Select the version that you want to download from the Product Version section.
6. Click Logout when you have completed the process.
An account name and password is required to access downloads from the Quest SupportLink web site.
Download and install any vWorkspace updates, hotfixes, or maintenance releases that are applicable to your version of vWorkspace.
3

Quest vWorkspace
On the Microsoft Hyper-V Host
Requirements for the Broker Helper Service
1. Check if Microsoft .Net Framework 3.5 or later is installed on the Hyper-V host. Microsoft.Net Framework 3.5 or later is required for the Broker Helper service for Hyper-V.
2. If Microsoft .Net Framework 3.5 or later is not installed, add it by one of the following ways:
a) In the Server Manager application go to Add Features to add Microsoft .Net Framework.
b) Install by running the following command from an elevated command prompt or run box.
SERVERMANAGERCMD -INSTALL NET-Framework-Core
3. Check if Microsoft Windows PowerShell is installed on the Hyper-V host. Windows PowerShell is required for the Broker Helper service for Hyper-V.
4. If Windows PowerShell is not installed, add it one of the following ways:
a) In the Server Manager application go to Add Features to add Windows Powershell.
b) Install by running the following command from an elevated command prompt or run box.
SERVERMANAGERCMD -INSTALL Powershell
4
Microsoft Hyper-V Quick Start Guide
Install the Quest Broker Helper Service
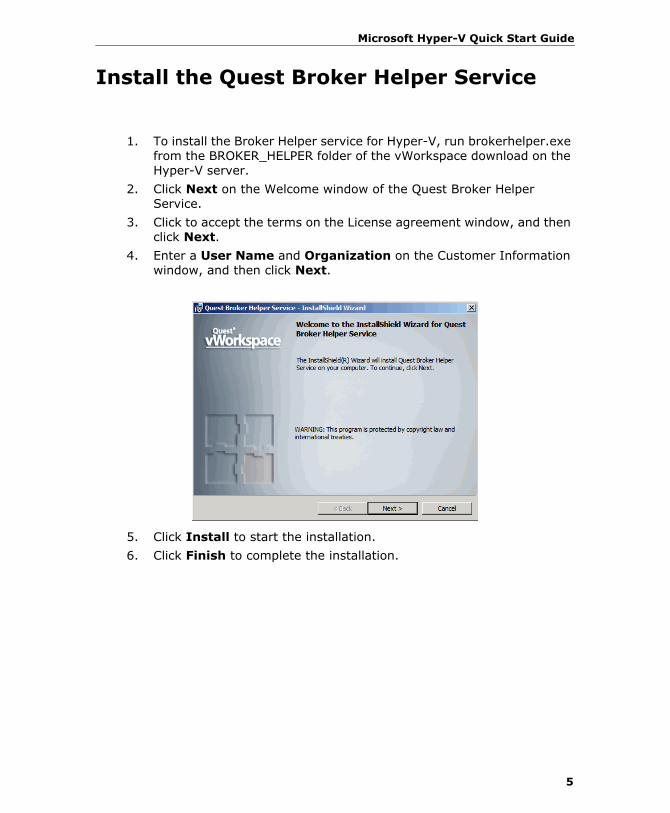
1. To install the Broker Helper service for Hyper-V, run brokerhelper.exe from the BROKER_HELPER folder of the vWorkspace download on the Hyper-V server.
2. Click Next on the Welcome window of the Quest Broker Helper Service.
3. Click to accept the terms on the License agreement window, and then click Next.
4. Enter a User Name and Organization on the Customer Information window, and then click Next.
5. Click Install to start the installation.
6. Click Finish to complete the installation.
5
Quest vWorkspace
Connection Broker Virtual Machine
Install the Connection Broker
1. Copy the downloaded vWorkspace (32- bit or 64-bit Edition) to the designated machine.
2. Extract the vWorkspace72 zip file.
3. Double-click start.exe from the extracted folder.
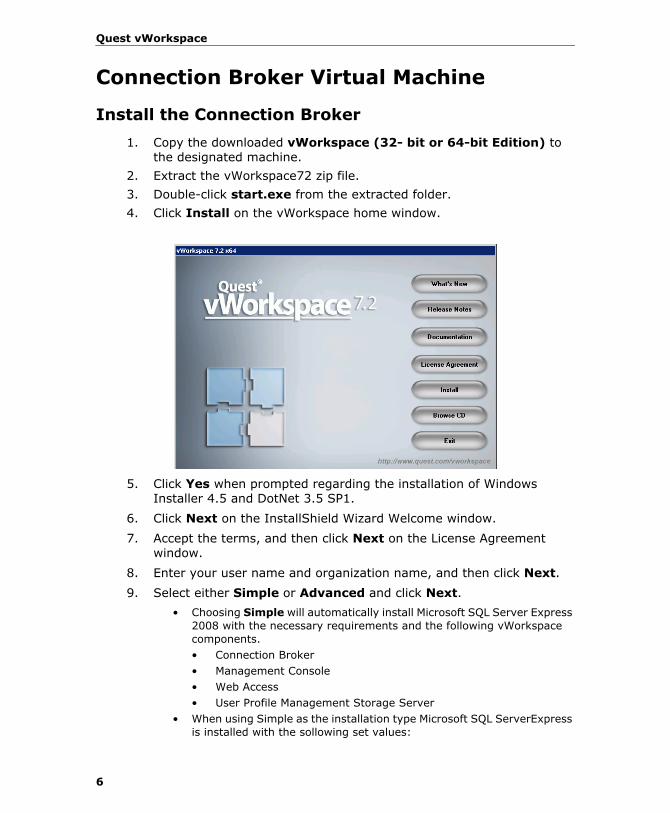
4. Click Install on the vWorkspace home window.
5. Click Yes when prompted regarding the installation of Windows Installer 4.5 and DotNet 3.5 SP1.
6. Click Next on the InstallShield Wizard Welcome window.
7. Accept the terms, and then click Next on the License Agreement window.
8. Enter your user name and organization name, and then click Next.
9. Select either Simple or Advanced and click Next.
• Choosing Simple will automatically install Microsoft SQL Server Express 2008 with the necessary requirements and the following vWorkspace components. • Connection Broker• Management Console• Web Access• User Profile Management Storage Server
• When using Simple as the installation type Microsoft SQL ServerExpress is installed with the sollowing set values:
6
Microsoft Hyper-V Quick Start Guide
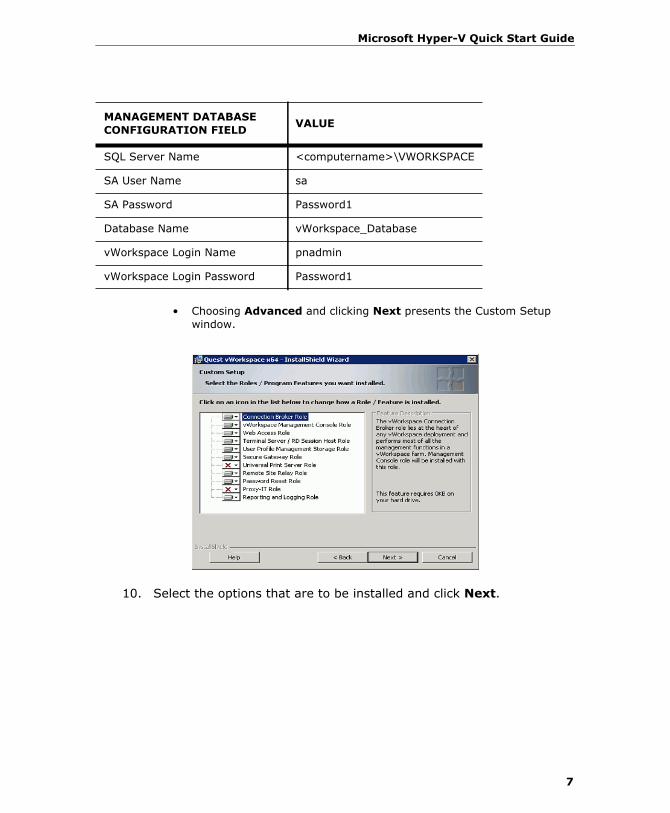
• Choosing Advanced and clicking Next presents the Custom Setup window.
10. Select the options that are to be installed and click Next.
MANAGEMENT DATABASECONFIGURATION FIELD
VALUE
SQL Server Name <computername>\VWORKSPACE
SA User Name sa
SA Password Password1
Database Name vWorkspace_Database
vWorkspace Login Name pnadmin
vWorkspace Login Password Password1
7
Quest vWorkspace
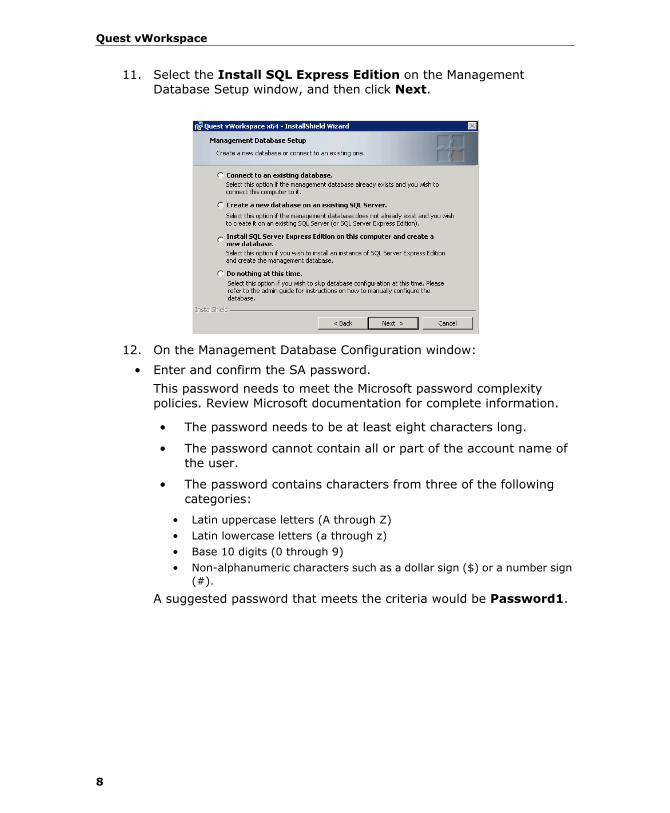
11. Select the Install SQL Express Edition on the Management Database Setup window, and then click Next.
12. On the Management Database Configuration window:
• Enter and confirm the SA password.
This password needs to meet the Microsoft password complexity policies. Review Microsoft documentation for complete information.
• The password needs to be at least eight characters long.
• The password cannot contain all or part of the account name of the user.
• The password contains characters from three of the following categories:
• Latin uppercase letters (A through Z)• Latin lowercase letters (a through z)• Base 10 digits (0 through 9)• Non-alphanumeric characters such as a dollar sign ($) or a number sign
(#).
A suggested password that meets the criteria would be Password1.
8
Microsoft Hyper-V Quick Start Guide
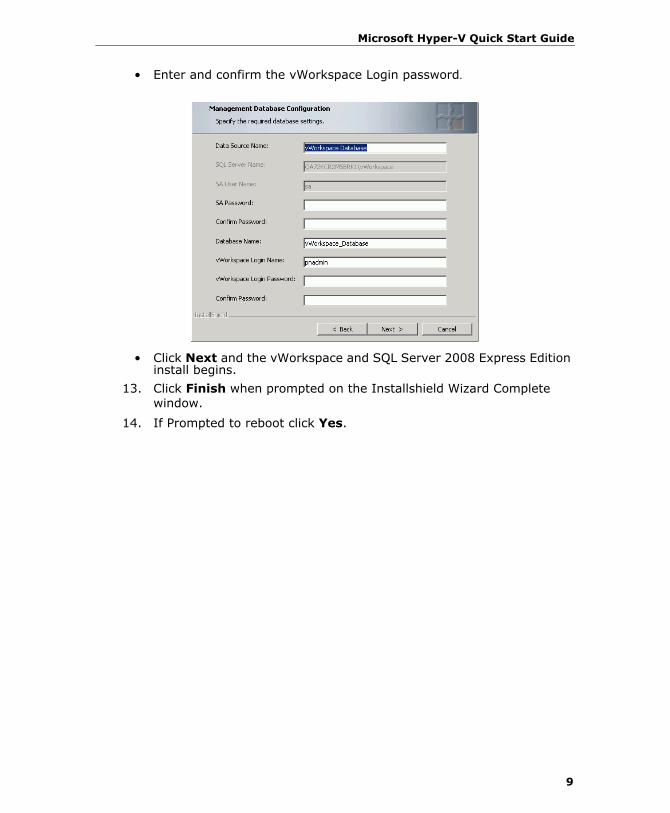
• Enter and confirm the vWorkspace Login password.
• Click Next and the vWorkspace and SQL Server 2008 Express Edition install begins.
13. Click Finish when prompted on the Installshield Wizard Complete window.
14. If Prompted to reboot click Yes.
9
Quest vWorkspace
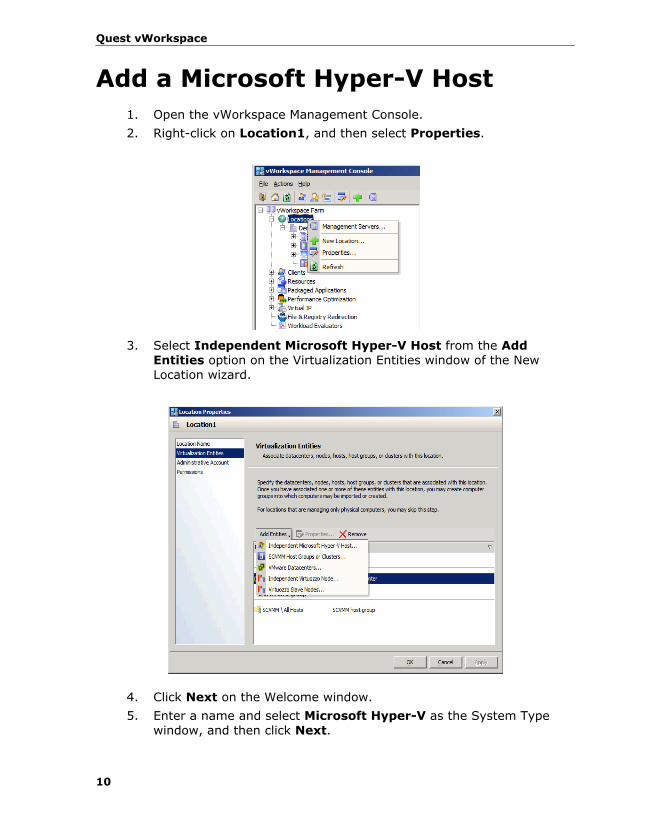
Add a Microsoft Hyper-V Host1. Open the vWorkspace Management Console.
2. Right-click on Location1, and then select Properties.
3. Select Independent Microsoft Hyper-V Host from the Add Entities option on the Virtualization Entities window of the New Location wizard.
4. Click Next on the Welcome window.
5. Enter a name and select Microsoft Hyper-V as the System Type window, and then click Next.
10
Microsoft Hyper-V Quick Start Guide
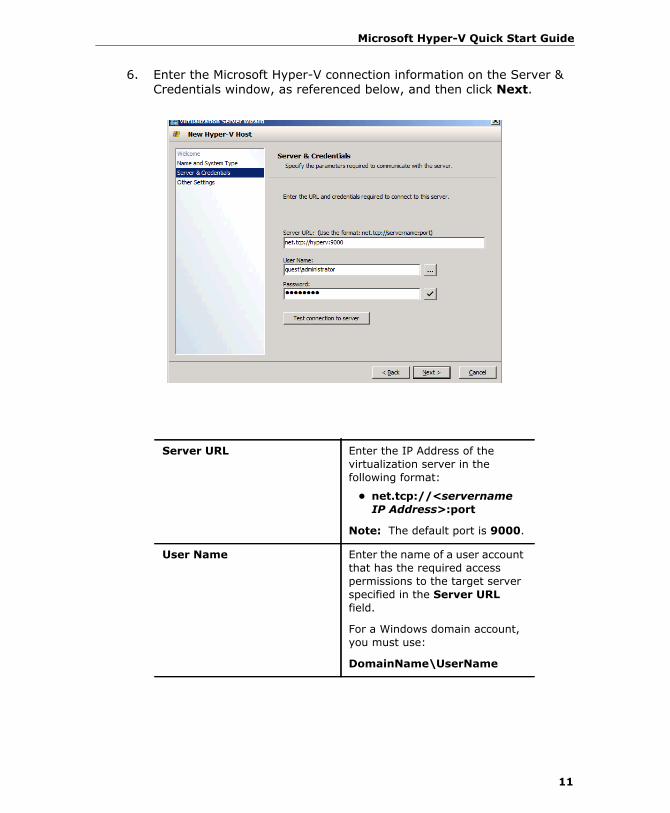
6. Enter the Microsoft Hyper-V connection information on the Server & Credentials window, as referenced below, and then click Next.
Server URL Enter the IP Address of the virtualization server in the following format:
• net.tcp://<servername IP Address>:port
Note: The default port is 9000.
User Name Enter the name of a user account that has the required access permissions to the target server specified in the Server URL field.
For a Windows domain account, you must use:
DomainName\UserName
11
Quest vWorkspace
7. Click Finish on the Other Settings window. Do not make any changes on this window.
8. Click Close on the Virtualization Servers window.
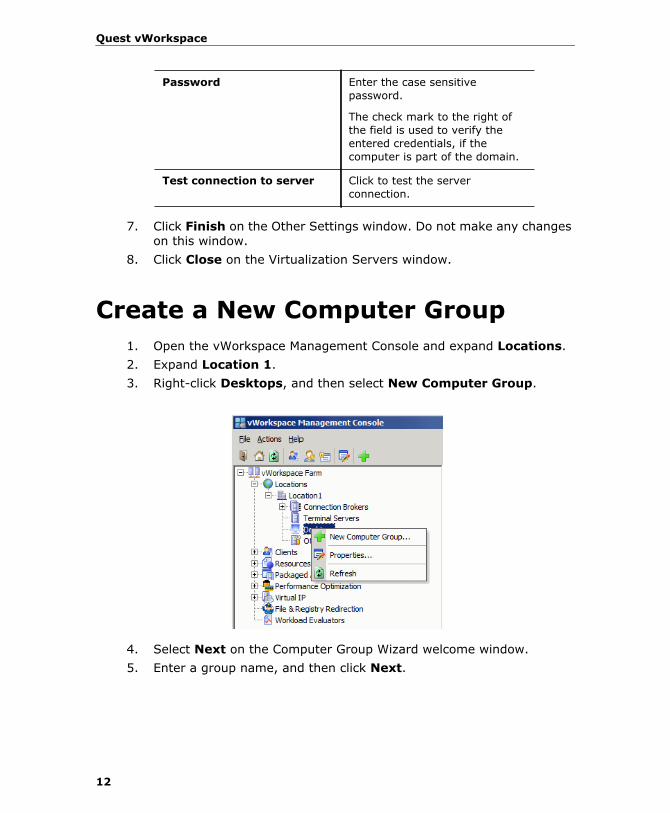
Create a New Computer Group1. Open the vWorkspace Management Console and expand Locations.
2. Expand Location 1.
3. Right-click Desktops, and then select New Computer Group.
4. Select Next on the Computer Group Wizard welcome window.
5. Enter a group name, and then click Next.
Password Enter the case sensitive password.
The check mark to the right of the field is used to verify the entered credentials, if the computer is part of the domain.
Test connection to server Click to test the server connection.
12
Microsoft Hyper-V Quick Start Guide
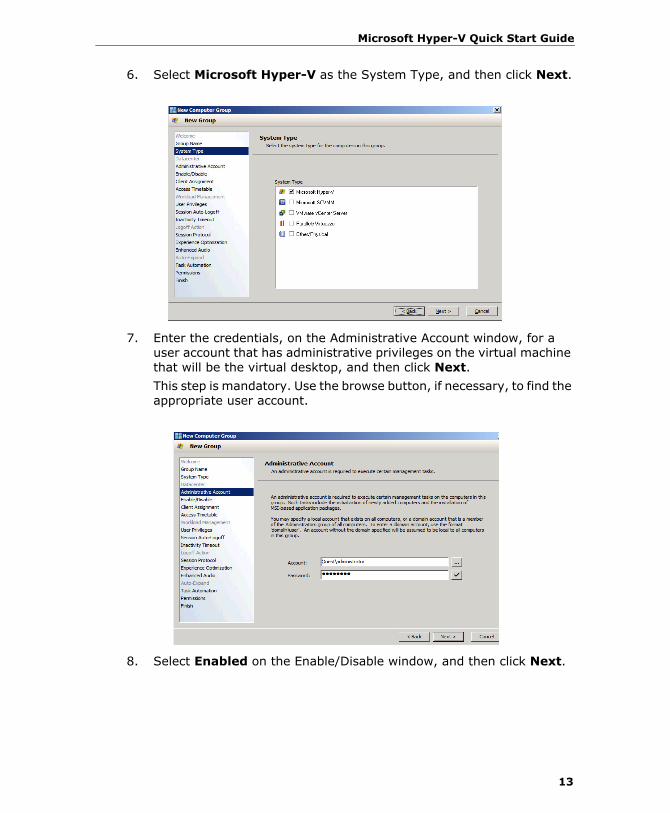
6. Select Microsoft Hyper-V as the System Type, and then click Next.
7. Enter the credentials, on the Administrative Account window, for a user account that has administrative privileges on the virtual machine that will be the virtual desktop, and then click Next.
This step is mandatory. Use the browse button, if necessary, to find the appropriate user account.
8. Select Enabled on the Enable/Disable window, and then click Next.
13

Quest vWorkspace
9. Select Temporary on the Client Assignment window, and then click Next.
10. Click Next on the Access Timetable window.
This allows unlimited access to the computers in this group.
11. Select None on the User Privileges window, and then click Next.
12. Select Next to accept the defaults for Session Auto-Logoff.
13. Select Next on the Inactivity Timeout window to not have the computers in this group be power managed by vWorkspace.
14. Select Next on the Session Protocol window to choose RDP as the remote display protocol used for computers hosted in this group.
14
Microsoft Hyper-V Quick Start Guide
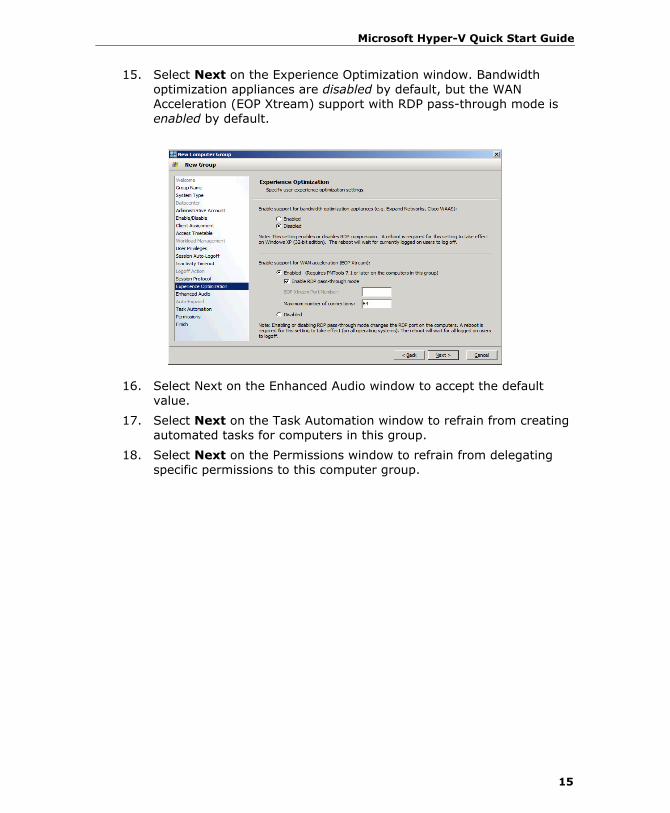
15. Select Next on the Experience Optimization window. Bandwidth optimization appliances are disabled by default, but the WAN Acceleration (EOP Xtream) support with RDP pass-through mode is enabled by default.
16. Select Next on the Enhanced Audio window to accept the default value.
17. Select Next on the Task Automation window to refrain from creating automated tasks for computers in this group.
18. Select Next on the Permissions window to refrain from delegating specific permissions to this computer group.
15
Quest vWorkspace
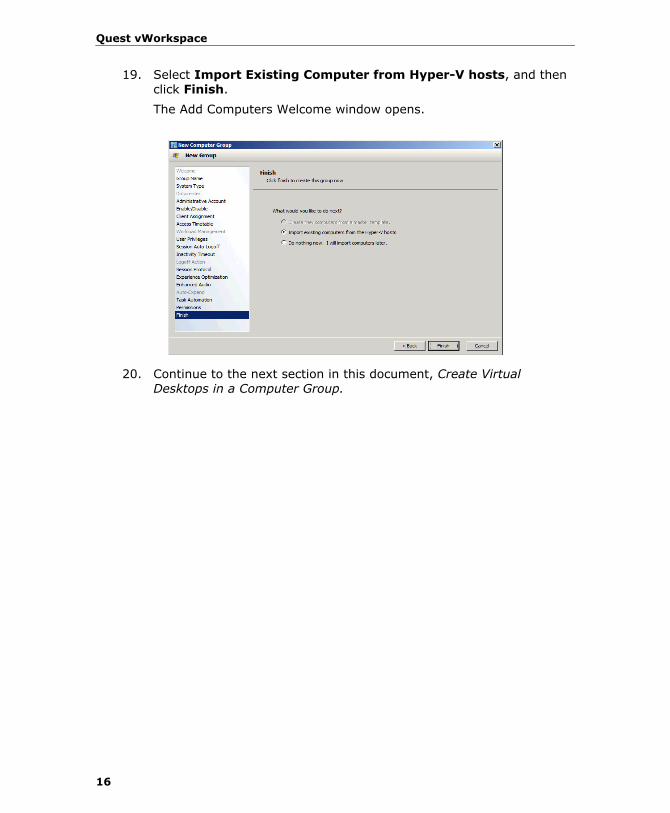
19. Select Import Existing Computer from Hyper-V hosts, and then click Finish.
The Add Computers Welcome window opens.
20. Continue to the next section in this document, Create Virtual Desktops in a Computer Group.
16

Microsoft Hyper-V Quick Start Guide
Create Virtual Desktops in a Computer GroupThe last step of the previous section should have started the Import/Re-sync Computers wizard. This wizard can also be started by right-clicking the computer group under Desktops in the vWorkspace Management Console, and then select Import/Re-sync Computers.
1. Verify that Import computers into group is selected, and then click Next.
17
Quest vWorkspace
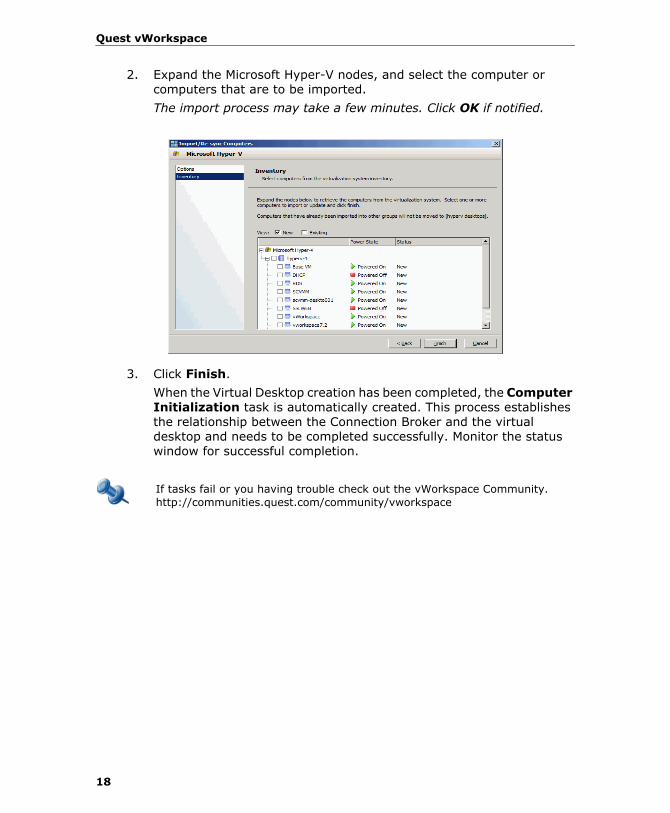
2. Expand the Microsoft Hyper-V nodes, and select the computer or computers that are to be imported.
The import process may take a few minutes. Click OK if notified.
3. Click Finish.
When the Virtual Desktop creation has been completed, the Computer Initialization task is automatically created. This process establishes the relationship between the Connection Broker and the virtual desktop and needs to be completed successfully. Monitor the status window for successful completion.
If tasks fail or you having trouble check out the vWorkspace Community.http://communities.quest.com/community/vworkspace
18
Microsoft Hyper-V Quick Start Guide
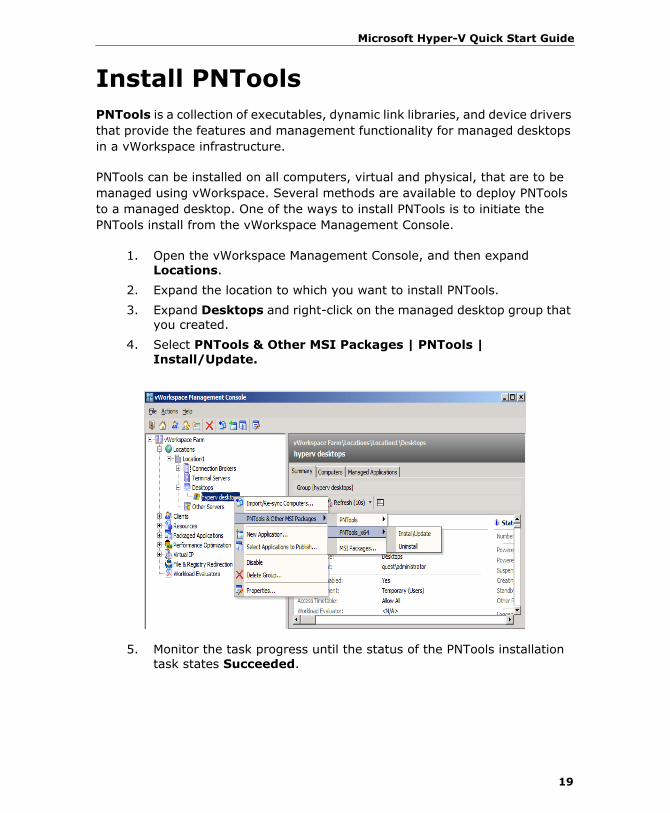
Install PNToolsPNTools is a collection of executables, dynamic link libraries, and device drivers that provide the features and management functionality for managed desktops in a vWorkspace infrastructure.
PNTools can be installed on all computers, virtual and physical, that are to be managed using vWorkspace. Several methods are available to deploy PNTools to a managed desktop. One of the ways to install PNTools is to initiate the PNTools install from the vWorkspace Management Console.
1. Open the vWorkspace Management Console, and then expand Locations.
2. Expand the location to which you want to install PNTools.
3. Expand Desktops and right-click on the managed desktop group that you created.
4. Select PNTools & Other MSI Packages | PNTools | Install/Update.
5. Monitor the task progress until the status of the PNTools installation task states Succeeded.
19
Quest vWorkspace
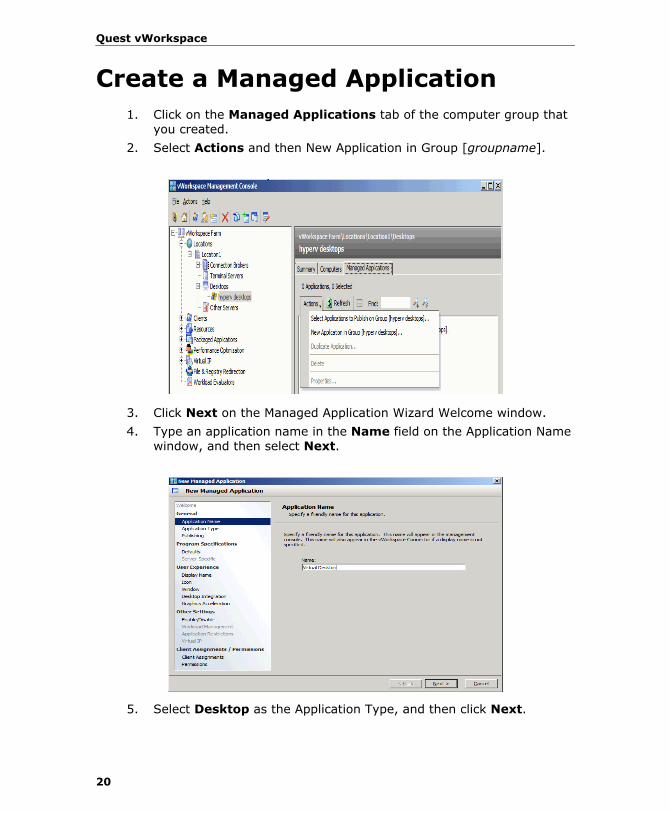
Create a Managed Application1. Click on the Managed Applications tab of the computer group that
you created.
2. Select Actions and then New Application in Group [groupname].
3. Click Next on the Managed Application Wizard Welcome window.
4. Type an application name in the Name field on the Application Name window, and then select Next.
5. Select Desktop as the Application Type, and then click Next.
20

Microsoft Hyper-V Quick Start Guide
6. Select Managed Computer Group, and then select the managed group that you created on the Publishing window, and then click Next.
7. Type a name in the Display Name field on the Display Name window, and then click Next.
8. Click Next on the Icon window.
9. Click Next on the Desktop Integration window.
10. Select Disabled on the Graphics Acceleration window, and then click Next.
For more information on Graphics Acceleration, please refer to the vWorkspace Administration Guide, Graphics Acceleration section.
11. Select Enabled on the Enable/Disable window, and then click Next.
21

Quest vWorkspace
12. Click the blue plus sign on the Client Assignment window. The Select Clients window opens.
13. Click the green plus sign on the Select Clients window.
22
Microsoft Hyper-V Quick Start Guide
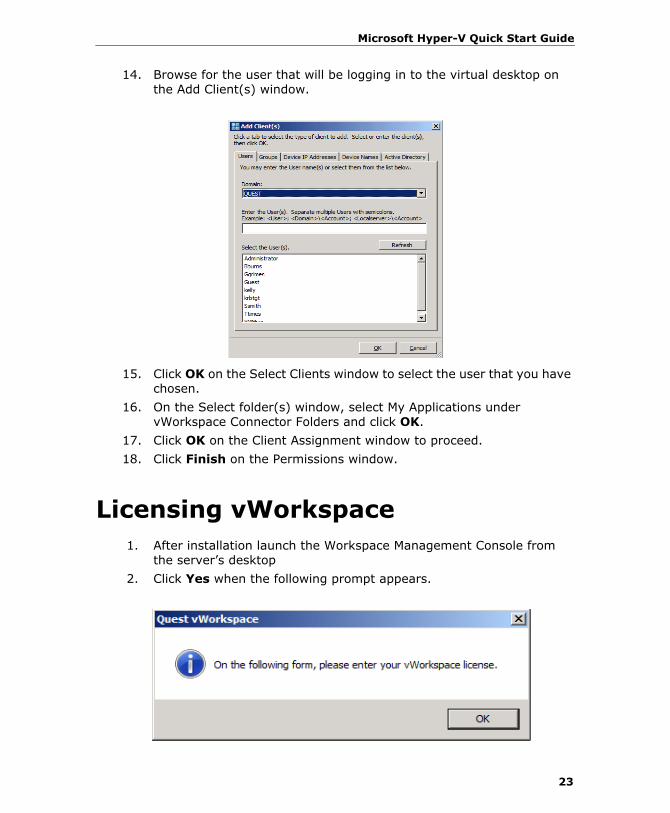
14. Browse for the user that will be logging in to the virtual desktop on the Add Client(s) window.
15. Click OK on the Select Clients window to select the user that you have chosen.
16. On the Select folder(s) window, select My Applications under vWorkspace Connector Folders and click OK.
17. Click OK on the Client Assignment window to proceed.
18. Click Finish on the Permissions window.
Licensing vWorkspace1. After installation launch the Workspace Management Console from
the server’s desktop
2. Click Yes when the following prompt appears.
23
Quest vWorkspace
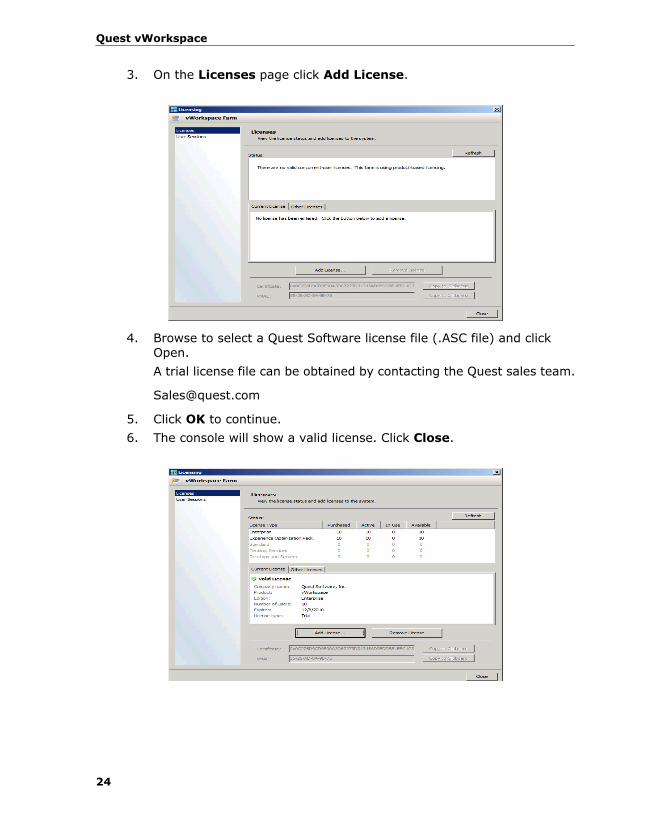
3. On the Licenses page click Add License.
4. Browse to select a Quest Software license file (.ASC file) and click Open.
A trial license file can be obtained by contacting the Quest sales team.
5. Click OK to continue.
6. The console will show a valid license. Click Close.
24

Microsoft Hyper-V Quick Start Guide
On the Microsoft Windows Machine
Install the vWorkspace Connector1. Copy the VASClient32.exe you obtained from the vWorkspace web
site to the Windows XP client machine. Double-click VASClient32.exe to start installation.
2. Select Next on the vWorkspace Connector Install Shield Wizard window.
3. Read and select to accept the terms in the license agreement, and then click Next.
4. Enter your user name and organization and click Next.
5. Click Next on the Destination Folder window.
6. Click Next on the Credentials Pass-Through window.
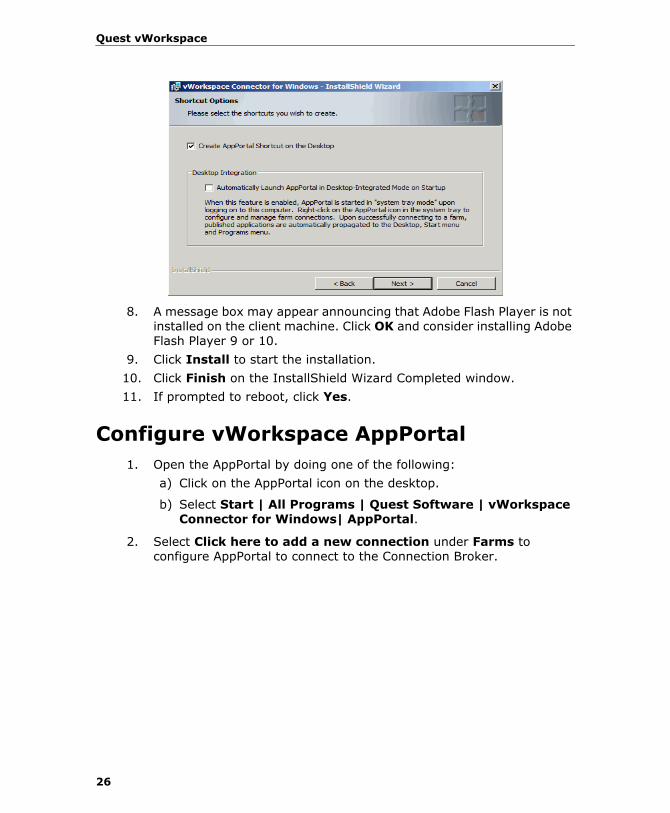
7. Verify Create AppPortal Shortcut on the Desktop is selected, and then click Next.
25
Quest vWorkspace
8. A message box may appear announcing that Adobe Flash Player is not installed on the client machine. Click OK and consider installing Adobe Flash Player 9 or 10.
9. Click Install to start the installation.
10. Click Finish on the InstallShield Wizard Completed window.
11. If prompted to reboot, click Yes.
Configure vWorkspace AppPortal1. Open the AppPortal by doing one of the following:
a) Click on the AppPortal icon on the desktop.
b) Select Start | All Programs | Quest Software | vWorkspace Connector for Windows| AppPortal.
2. Select Click here to add a new connection under Farms to configure AppPortal to connect to the Connection Broker.
26

Microsoft Hyper-V Quick Start Guide
vWorkspace allows for automatic configuration of vWorkspace Connectors. This is beyond the scope of this document. Please refer to the vWorkspace Administration Guide for more information.
3. Click Next on the Select Farm window.
4. Select Allow me to manually specify all configuration parameters on the Configuration Source window, and then click Next.
27
Quest vWorkspace
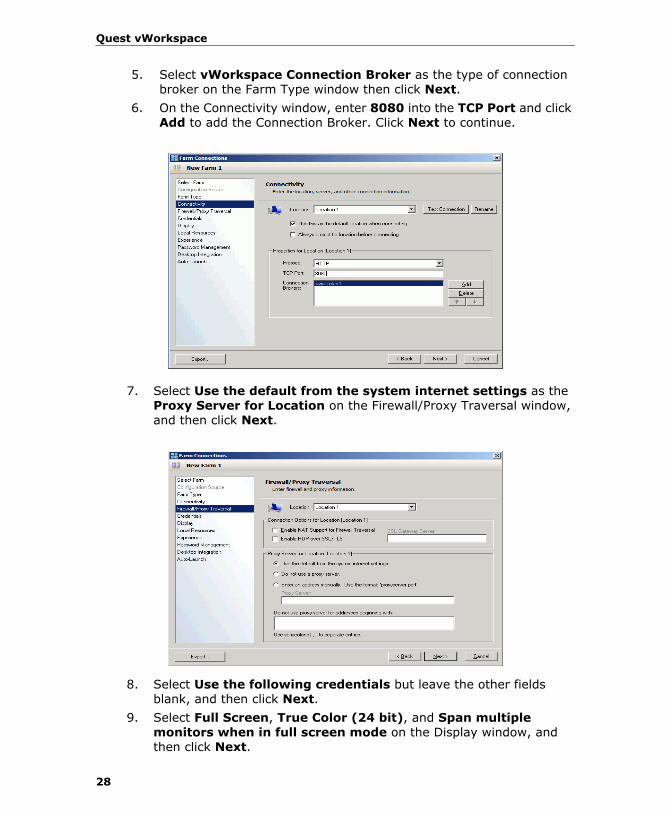
5. Select vWorkspace Connection Broker as the type of connection broker on the Farm Type window then click Next.
6. On the Connectivity window, enter 8080 into the TCP Port and click Add to add the Connection Broker. Click Next to continue.
7. Select Use the default from the system internet settings as the Proxy Server for Location on the Firewall/Proxy Traversal window, and then click Next.
8. Select Use the following credentials but leave the other fields blank, and then click Next.
9. Select Full Screen, True Color (24 bit), and Span multiple monitors when in full screen mode on the Display window, and then click Next.
28
Microsoft Hyper-V Quick Start Guide
10. Select the following on the Local Resources window, and then click Next.
• Remote audio - Bring to Local Computer
• Keyboard - On the local computer
• Local devices - USB Devices, Clipboard, Universal Printers
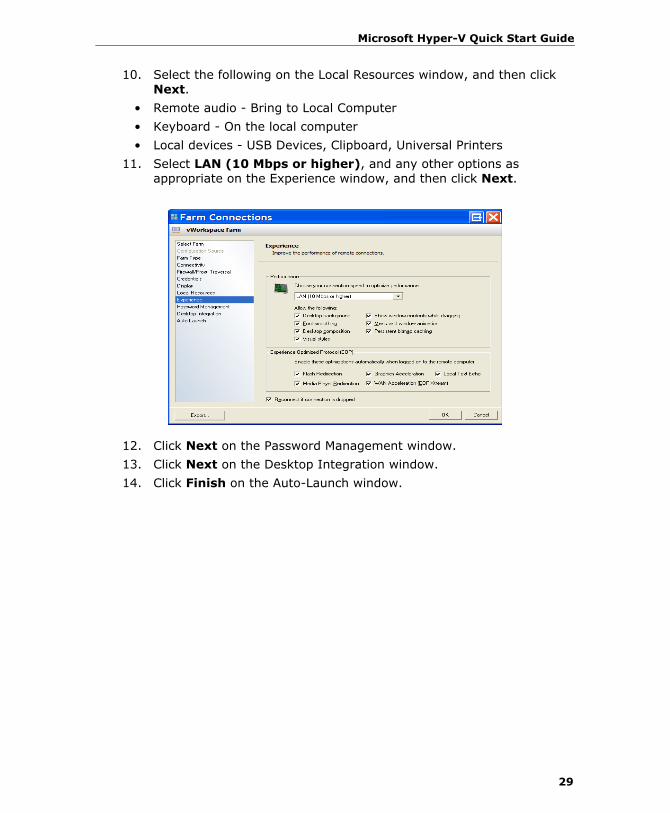
11. Select LAN (10 Mbps or higher), and any other options as appropriate on the Experience window, and then click Next.
12. Click Next on the Password Management window.
13. Click Next on the Desktop Integration window.
14. Click Finish on the Auto-Launch window.
29
Quest vWorkspace
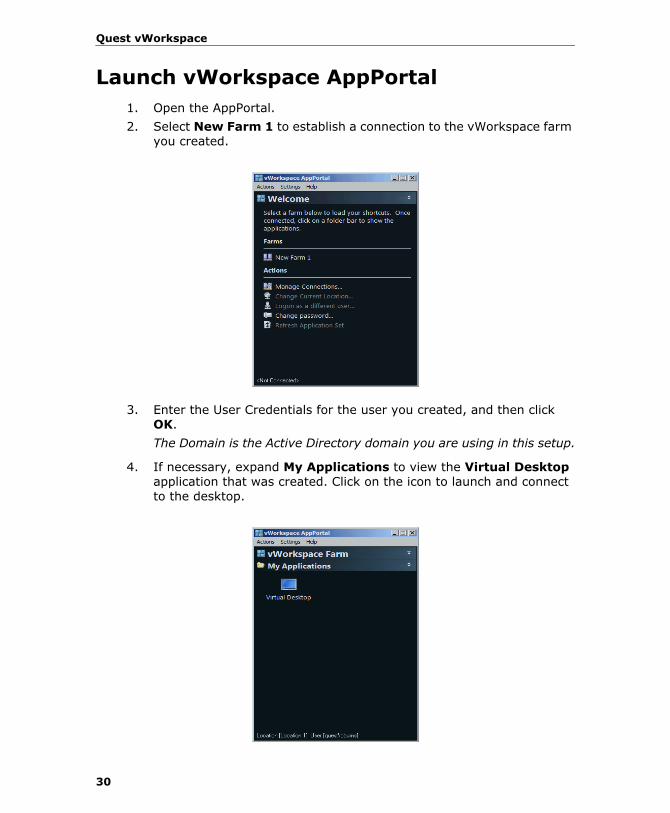
Launch vWorkspace AppPortal1. Open the AppPortal.
2. Select New Farm 1 to establish a connection to the vWorkspace farm you created.
3. Enter the User Credentials for the user you created, and then click OK.
The Domain is the Active Directory domain you are using in this setup.
4. If necessary, expand My Applications to view the Virtual Desktop application that was created. Click on the icon to launch and connect to the desktop.
30