Embed Size (px)
Citation preview
Quest ActiveRoles Quick Connect
Quest One Quick Connect for AS/400
Version 1.1
Installation and Configuration Guide
September 2011

Page 2
Contents
Introduction ......................................................................................................................... 3
Pre-requisites ....................................................................................................................... 3
Platform Support .................................................................................................................. 3
Operating Constraints ........................................................................................................... 3
Licensing ............................................................................................................................. 3
How to Install and Configure the AS/400 Connector .................................................................. 4
Installing the Quest One Quick Connect for AS/400 Connector Software ...................................... 4
Verifying the Connector Installation ..................................................................................... 5
Adding a New AS/400 Connector ............................................................................................ 5
Configuring the AS/400 Connector Attributes ........................................................................... 8
Additional Considerations ................................................................................................... 8
Creating the Quest One Quick Connect Mappings ................................................................... 9
For User Synchronization ................................................................................................. 9
For Group Synchronization ............................................................................................ 10
Creating a Workflow ........................................................................................................ 11
Example - Creating a Workflow ......................................................................................... 12
Provisioning (Groups)....................................................................................................... 12
Provisioning (Users) ......................................................................................................... 13
Updating (Groups) ........................................................................................................... 13
Updating (Users) ............................................................................................................. 14
Deprovisioning (Groups) ................................................................................................... 15
Deprovisioning (Users) ..................................................................................................... 15
Configuring AS/400 Password Synchronization ....................................................................... 16

Page 3
Introduction This document describes how to install, create and configure the AS/400 Connector into an existing
Quest One Quick Connect system.
Please refer to the Quest One Quick Connect documentation on http://support.quest.com for
additional information and guidance on Quest One Quick Connect.
Pre-requisites Ensure that the following installation pre-requisites are met before installing Quest One Quick
Connector for AS/400:
Quick Connect Sync Engine version 5.0 must be fully installed, licensed and functional.
The AS/400 server must have LDAP directory services installed and configured.
An LDAP service account must be created on your AS/400 server which has the appropriate
permissions to administer users and groups on this platform.
A valid AS/400 license is required during the installations routine.
For additional information and guidance on Quick Connect Sync Engine v5.0, please refer to the
ActiveRoles Quick Connect documentation on http://support.quest.com.
Platform Support The AS/400 connector has been verified for synchronization against the following AS/400 versions:
AS/400 v6r1
AS/400 v5r2
The AS/400 connector should be installed on Windows Server 2008 or later.
Operating Constraints
All spaces written to the os400-profile attribute are automatically removed to prevent an
error at the AS/400. The AS/400 does not support spaces in this attribute.
There is a limit of 10 characters for profile names, e.g. groups and users, on the AS/400.
Licensing The following Quest One Quick Connect components do not require a license:
Quick Connect Sync Engine, including these built-in connectors:
Active Directory Connector
AD LDS (ADAM) Connector
Quest ActiveRoles Server Connector
Quest One Identity Manager Connector
Capture Agent
Management Shell
However, you must supply an appropriate license file to install and use Quest One Quick
Connect for AS/400. To obtain a license file for a Quest One Quick Connect package, please contact
Quest Software.
Page 4
How to Install and Configure the AS/400
Connector The AS/400 Connector is distributed in a standard Microsoft MSI format which contains the required
files to install and configure the AS/400 Connector in an existing Quest One Quick Connect
environment.
The following sections describe:
installing the Quest One Quick Connect for AS/400 Connector software
adding a new the AS/400 connector, by defining the AS/400 connection details
configuring the AS/400 connector attributes that will be synchronized from Active Directory
to AS/400
configuring AS/400 password synchronization.
Installing the Quest One Quick Connect for
AS/400 Connector Software This section describes how to install the AS/400 Connector on Windows Server 2008 or above, or
on an existing installation of Quest One Quick Connect:
1. To start the installation for:
- 32-bit systems, double click the QuickConnectForAS400_x86.msi installation routine.
- 64-bit systems, double click the QuickConnectForAS400_x64.msi installation routine.
2. The Welcome Wizard starts. Click Next.
3. Read the license agreement, check the “I accept the terms in the license agreement”
box, then click Next.
4. Enter your name and organization.
5. Click browse to navigate to your license file, select your license, then click Next.
6. Click Install.
The files will be copied to your system. On completion of the installation, you will be prompted to
restart your Quest One Quick Connect Service.
Page 5
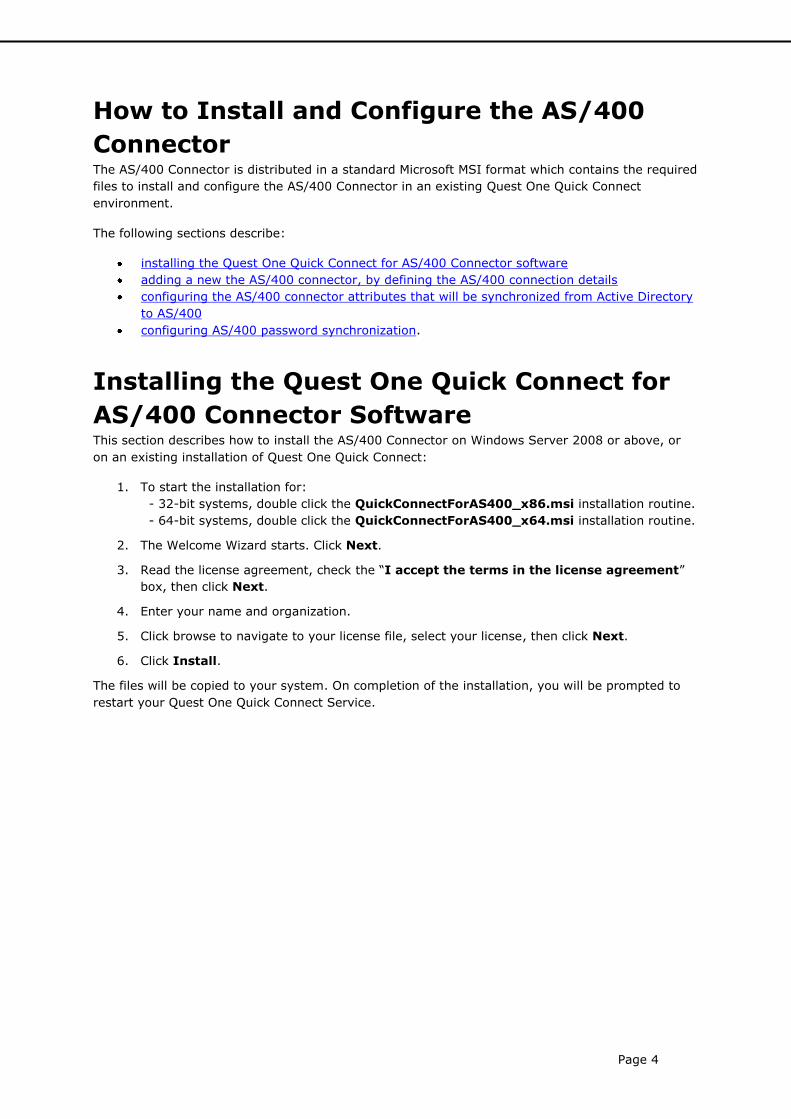
Verifying the Connector Installation To verify the AS/400 Connector installation, click About in the top right-hand corner of the Quick
Connect Console. The About Quick Connect screen is displayed. If the installation was
successful, the AS/400 connector is included in the list of installed connectors.
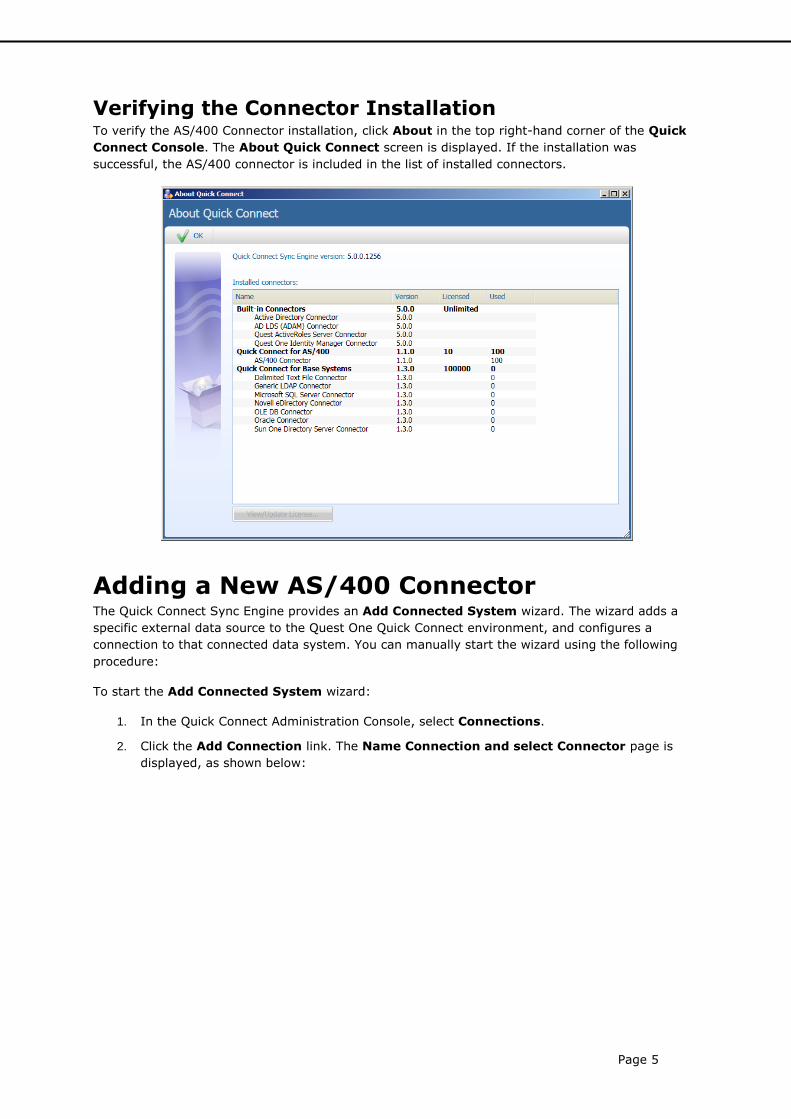
Adding a New AS/400 Connector The Quick Connect Sync Engine provides an Add Connected System wizard. The wizard adds a
specific external data source to the Quest One Quick Connect environment, and configures a
connection to that connected data system. You can manually start the wizard using the following
procedure:
To start the Add Connected System wizard:
1. In the Quick Connect Administration Console, select Connections.
2. Click the Add Connection link. The Name Connection and select Connector page is
displayed, as shown below:

Page 6
3. Enter a Connection name.
4. In the Use the specified connector field, choose the AS/400 Connector from the drop
down list.
5. When establishing a connection to an AS/400 LDAP directory service, the wizard prompts
you to complete the Specify connection settings for LDAP directory service.
6. On the Specify connection settings for AS400 page, specify the AS/400 LDAP service to
connect to and the account that the application will use to access the AS/400 LDAP service.
This page is similar to the following screen:

Page 7
On the Specify connection settings for AS400 page:
1. In the Server field, type the fully qualified DNS name of the AS/400 server running the
LDAP service.
2. In the Port field, type the AS/400 LDAP communication port number in use by the service.
(The default port numbers are 389 for non SSL and 636 for SSL encrypted data).
3. In the User name field, specify the user name of account under which the application will
access the AS/400 LDAP directory service. In the User password field, specify the
password of user account under which the application will access the AS/400 LDAP directory
service.
We recommend that you check the Use SSL checkbox if synchronizing sensitive data
between connectors.
4. Optionally, click Test Connection to verify that the credentials provided can access the
AS/400 LDAP service.
5. Click Finish.

Page 8
Configuring the AS/400 Connector
Attributes The following attributes have been verified for synchronization with this release, in addition to the
password synchronization attribute. Other attributes can be synchronized by Quest One Quick
Connect, provided the attribute types are maintained between platforms (see Operating
Constraints).
Type of attribute Active Directory Attribute AS/400 Attribute
User sAMAccountName os400-profile
User Any string field os400-text
Group sAMAccountName os400-profile
Group member os400-groupmember
For a full list of AS/400 Connector attributes, please refer to the Quest One Quick Connect for
AS/400 Release Notes.
Additional Considerations The AS/400 operating system does not have any concept of groups as discrete entities. Instead, an
administrator creates a user profile which is to be used as a group profile. Other user profiles are
then linked to this via the GrpPrf or SupGrpPrf parameters of the ChgUsrPrf command. The
GrpPrf value maps to the os400-grpprf attribute in the AS/400 schema, while the SupGrpPrf
value maps to the os400-supgrpprf attribute. The AS/400 Quick Connect “Mappings” must be
defined for users and groups to enable full user and group synchronization.
The instructions on the following pages describe how to create an Active Directory to AS/400 user /
group synchronization workflow.

Page 9
Creating the Quest One Quick Connect Mappings You will need to create two mappings to enable user and group synchronization between Active
Directory and the AS/400.
For User Synchronization
Firstly, define the AS/400 Connector as described in the previous section, then:
1. Click the Mapping tab.
2. Click Add mapping pair at the top of the screen.
3. A new Wizard starts.
4. Click Specify… and select your Active Directory connector from the list.
5. Click Finish.
6. Verify that the system object type is defined as User (user), then click Next.
7. In the Target Connect system section, click Specify….
8. Select your AS/400 connector from the list.
9. Click Finish.
10. Verify that the system object type is os400-usrprf, then click Finish.
11. On the main Mapping screen, select your newly created pair.
12. Click Add mapping rule. The Define Mapping Rule wizard starts.
13. Click Attribute… for your Active Directory connector and select the sAMAccountName attribute for your Active Directory attribute.
14. Click OK.
15. Click Attribute… for your AS/400 connector and select the os400-profile attribute for your AS/400 attribute.
16. Click OK.
17. Click Add mapping rule. The Define Mapping Rule wizard starts.
18. Click Attribute… for your Active Directory connector and select the sAMAccountName attribute for your Active Directory attribute.
19. Click OK.
20. Click Attribute… for your AS/400 connector and select the os400-grpprf attribute for
your AS/400 attribute.
21. Click OK.
22. Click Map now.

Page 10
For Group Synchronization
Firstly define the AS/400 Connector described in the previous section, then:
1. Click the Mapping tab.
2. Click Add mapping pair at the top of the screen.
3. A new Wizard starts.
4. Click Specify… and select your Active Directory connector from the list.
5. Click Finish.
6. Verify that the system object type is defined as Group (group), then click Next.
7. In the Target Connect system section, select Specify….
8. Select your AS/400 connector from the list.
9. Click Finish.
10. Verify that the system object type is os400-usrprf, then click Finish.
11. On the main Mapping screen, select your newly created pair.
12. Click Add mapping rule. The Define Mapping Rule wizard starts.
13. Click Attribute… for your Active Directory connector and select the sAMAccountName attribute for your Active Directory attribute.
14. Click OK.
15. Click Attribute… for your AS/400 connector and select the os400-profile attribute for
your AS/400 attribute.
16. Click OK.
17. On the main Mapping screen, click Add mapping rule. The Define Mapping Rule wizard starts.
18. Click Attribute… for your Active Directory connector and select the member attribute for your Active Directory attribute.
19. Click OK.
20. Click Attribute… for your AS/400 connector and select the os400-groupmember attribute for your AS/400 attribute.
21. Click OK.
22. Click Map now.
When you have completed these steps, your mapping will be similar to the following example:

Page 11
Creating a Workflow Workflows are designed for three key areas:
Provision
Update
Deprovision
Provision – Creates objects in the target connected data systems based on the changes made
to specific objects in the source connected system. When creating a new object, Quest One Quick
Connect assigns initial values to the object attributes based on the attribute population rules
you have configured.
Update – Changes the attributes of objects in the target connected data systems based on the
changes made to specific objects in the source connected system. To define the objects that will
participate in the update operation you can use object mapping rules.
Deprovision – Modifies or removes objects in the target connected data systems after their
counterparts have been disconnected from the source connected system. Quest One Quick Connect
can be configured to remove objects permanently or change them to a specific state.

Page 12
Example - Creating a Workflow This example demonstrates how to create a workflow from Active Directory to your AS400.
Provisioning (Groups) We will start by synchronizing the Active Directory groups to the AS400:
1. Navigate to the Workflow tab on the main menu.
2. Click Add workflow.
3. Enter a description for your workflow, for example Sync Active Directory to AS400.
4. Click the Sync Active Directory to AS400 workflow step hyperlink.
5. Click Add synchronization step.
6. Click Provision and then click Next.
7. From the Source connected system section, click Specify….
8. A new Wizard starts.
9. Select your Active Directory Connector and click Finish.
10. The Active Directory source object type: is currently set to User (user). Change this to Group (group) by entering the word group.
11. Specify any Specific Provision Criteria, e.g. only members of a specific OU are
synchronized.
12. Click Next.
13. In the Target connected system: field, click Specify…, and then locate your AS/400 connector and click Finish.
14. The object type in the target object system field should be prefilled by Quest One Quick Connect to os400-usrprf.
15. Click Next.
16. In the Specify provisioning rules section, click Attribute.
17. In the Source attribute: field, click Select…, locate sAMAccountName and click OK.
18. In the Target attribute: field, click Attribute, then Select, locate os400-profile and click OK. (*)
19. Click OK.
20. Specify an initial password for the newly create group.
21. Click Finish to complete this synchronization step.

Page 13
Provisioning (Users) This example demonstrates how to synchronize the Active Directory users to the AS400.
1. Navigate to the Workflow tab.
2. Click Add synchronization.
3. Click Provision and then Next.
4. From the Source connected system section, click Specify….
5. A new Wizard starts.
6. Select your Active Directory Connector and click Finish.
7. The Active Directory source object type: is currently set to User (user). Do not change
this value.
8. Specify any Specific Provision Criteria, e.g. only members of a specific OU are synchronized.
9. Click Next.
10. In the Target connected system: field, click Specify…, and then locate to your AS/400 connector and click Finish.
11. The object type in the Target object system field is prefilled by Quest One Quick Connect to os400-usrprf.
12. Click Next.
13. In the Specify provisioning rules section, click Attribute.
14. In the Source attribute: field, click Select… , locate sAMAccountName and click OK.
15. In the Target attribute: field, click Attribute, then Select, locate os400-profile and click OK. (*)
16. Click OK.
17. Specify an initial password for newly create group.
18. Click Finish to complete this synchronization step.
When these steps are completed successfully, all new users or groups in your Active Directory
system will be synchronized via Quest One Quick Connect to your AS/400 server.
Updating (Groups) This example demonstrates how to synchronize the users Active Directory attribute(s) group
membership to the AS/400.
1. Navigate to the Workflow tab.
2. Click Add synchronization step.
3. Click Update and then click Next.
4. From the Source connected system section, click Specify….
5. A new Wizard starts.
6. Select your Active Directory Connector and click Finish.
7. The source object type: is currently set to User (user). Change this to Group (group) and click OK.
8. Specify any Updating Criteria, e.g. only members of an OU are synchronized.

Page 14
9. Click Next.
10. In the Target connected system section, click Specify…, and then locate your AS/400 connector.
11. Click Finish.
12. The Target object type is prefilled by Quest One Quick Connect to os400-usrprf.
13. Click Next.
14. In the Specify updating rules section, click the Attribute. (*)
15. The Direct Synchronization screen is displayed. In the Source attribute: section, click Select, locate member and click OK.
16. The Target attribute: field is automatically set to os400-groupmember.
17. Click OK.
18. Click Finish to complete this synchronization step.
Updating (Users) This example demonstrates how to synchronize the Active Directory mail attribute, the users Active
Directory email address, to the AS/400 text attribute (os400-text).
1. Navigate to the Workflow tab.
2. Click Add synchronization step.
3. Click Update and then Next.
4. From the Source connected system section, click Specify….
5. A new Wizard starts.
6. Select your Active Directory Connector and click Finish.
7. The Source object type is currently set to User (user).
8. Specify any Update Criteria, e.g. only members of an OU are synchronized.
9. Click Next.
10. In the Target connected system section, click Specify…, and then locate your existing AS/400 connector.
11. Click Finish. The Target object type is prefilled by Quest One Quick Connect to os400-usrprf.
12. Click Next.
13. In the Specify updating rules section, click Attribute. (*)
14. The Direct Synchronization screen is displayed. In the Source attribute: section, click Select…, locate mail and click OK.
15. In the Target attribute: field, click Select… and enter os400-text and click OK.
16. Click Finish to complete this synchronization step.
(*) At this stage in the configuration procedure, you can configure as many attribute mappings
between AS/400 and Active Directory as required for your infrastructure. The items specified in this
guide are examples only. For more information, please refer to Operating Constraints.
When these steps are completed successfully, any modifications to your existing users or groups
will be synchronized with your AS/400.

Page 15
Deprovisioning (Groups) This example demonstrates how to deprovision groups.
1. Navigate to the Workflow tab.
2. Click Add synchronization step.
3. Click Deprovision and then Next.
4. In the Source connected system section, click Specify….
5. Select your Active Directory Connector and click Finish.
6. Modify the Source Object type to group.
7. In the Deprovision target if: section, check the Source object is deleted or is out of
synchronization scope checkbox.
8. Alternatively, configure the Source object meets these criteria as required.
9. Click Next.
10. In the Target connected system: field, click Specify….
11. Locate your AS/400 connector and complete the steps in the Wizard.
12. The Target object type is prefilled automatically to os400-usrprf.
13. Click Next.
14. Select Delete target object.
15. Click Finish to complete this synchronization step.
Deprovisioning (Users) This example demonstrates how to deprovision users.
1. Navigate to the Workflow tab.
2. Click Add synchronization step.
3. Click Deprovision and then Next.
4. In the Source connected system section, click Specify….
5. Select your Active Directory Connector and click Finish.
6. Verify the Source object type is set to user.
7. In the Deprovision target if: section, check the Source object is deleted or is out of synchronization scope checkbox.
8. Alternatively, configure the Source object meets these criteria as required.
9. Click Next.
10. In the Target connected system: field, click Specify….
11. Locate your AS/400 connector and complete the steps in the Wizard.
12. The Target object type is prefilled automatically to os400-usrprf.
13. Click Next.
14. Select Delete target object.
15. Click Finish to complete this synchronization step.

Page 16
Configuring AS/400 Password
Synchronization Passwords are only captured from Active Directory when the Quest One Quick Connect capture
module is installed. Note that password synchronization is possible in one direction only, from
Active Directory to AS400.
Please refer to Automated Password Synchronization in the Quest One Quick Connect v5
documentation for further configuration information.
To enable password synchronization from Active Directory to AS/400:
1. Navigate to the Quest One Quick Connect Administration Console.
2. Click the Password Sync tab.
3. Click Add password sync rule.
4. Click Specify….
5. Select your Active Directory Connector and click Finish.
6. Click Next.
7. Click Specify….
8. Select your AS/400 Connector and click Finish.
9. Optionally configure the Password Sync Settings….
10. Click Finish.