Embed Size (px)
Citation preview

QualysGuard® Version 4.7Evaluator’s Guide
Qualys, Inc.1600 Bridge Parkway
Redwood Shores, CA 940651 (650) 801 6100
www.qualys.com
Copyright 2002-2006 by Qualys, Inc. All Rights Reserved.
Qualys and QualysGuard are registered trademarks of Qualys, Inc. The Qualys logo is a trademark of Qualys, Inc. All other trademarks are the property of their respective owners.
Qualys, Inc. 1600 Bridge Parkway Redwood Shores, CA 94065 1 (650) 801 6100
Dear Evaluator,
First, thank you for taking the time to evaluate QualysGuard. Today you must do everything to protect your network from the myriad of new threats, discovered almost every day. Although you need to fully evaluate a solution for your enterprise time is not on your side. You need a solution now and your risk increases every day you wait. We have produced this Evaluator’s Guide to help you use your time more efficiently.
Toward that end, we had several objectives for this document. One was for it to be reasonably concise. In addition, it had to be structured to enable you to apply the primary functions – mapping, scanning, reporting, and remediation – while offering you the option to explore deeper into sub-functions.
The Evaluator’s Guide helps you test the product highlights without limiting your options. We urge you to apply QualysGuard to a network of your choice. That is the only way to get a true sense of its capabilities. For demonstration purposes, Qualys has an Internet facing network with a handful of IP addresses that you may want to scan first before scanning your chosen network. Please feel free to do that. We will be happy to provide you with the current IP addresses.
At various steps in the Evaluator’s Guide, you will see procedures and screen shots designed to simplify every aspect from authentication to remediation. Also there will be references to sections in the QualysGuard online help, which is available from every location in the user interface, for more details.
One of the biggest hurdles in using an enterprise software vulnerability management solution is the installation and deployment. With QualysGuard, this is eliminated. You interact with the solution using a Web browser that allows you to log onto QualysGuard to start the mapping, scanning, reporting, and remediation processes.
Should you have any questions during this process please contact your Qualys representative or Qualys Support by email at [email protected] or by phone at +1 (866) 801 6161.
Again, thank you for evaluating QualysGuard.
Sincerely,
Qualys, Inc.
Table of Contents
QualysGuard in Perspective ........................................................................... 6
On Demand Vulnerability Management ............................................................................................. 6Can be deployed immediately .............................................................................................................. 6A look at how QualysGuard works...................................................................................................... 7KnowledgeBase ....................................................................................................................................... 8Security Operations Centers .................................................................................................................. 8Internet Scanners ..................................................................................................................................... 8Scanner Appliances................................................................................................................................. 8Secure Internet Interface (SII) ................................................................................................................ 8
Getting Started................................................................................................ 9
Logging In ................................................................................................................................................ 9Installing Your Scanner Appliance..................................................................................................... 10Creating Network Domains ................................................................................................................ 10Adding Hosts for Scanning ................................................................................................................. 10You’re Now Ready................................................................................................................................ 11
Step 1: Mapping Your Network ................................................................... 12
Running a Map ...................................................................................................................................... 12Scheduling Maps................................................................................................................................... 15Comparing Maps................................................................................................................................... 15Mapping Summary ............................................................................................................................... 17
Step 2: Scanning for Vulnerabilities............................................................ 18
Starting a Scan ....................................................................................................................................... 19Scan Results............................................................................................................................................ 22Selective Scanning................................................................................................................................. 25Scheduling Scans ................................................................................................................................... 25Trusted Scanning................................................................................................................................... 27Scanning Summary ............................................................................................................................... 27
Step 3: Reporting .......................................................................................... 28
Creating a Report Template................................................................................................................. 28Trend Analysis and Differential Reporting....................................................................................... 29Downloading Reports .......................................................................................................................... 30Business Risk Reporting....................................................................................................................... 31Risk Matrix Reporting .......................................................................................................................... 33Payment Card Industry (PCI) Compliance Module ........................................................................ 33Dashboard .............................................................................................................................................. 35

Contents
Step 4: Remediation...................................................................................... 37
Remediation Policy ............................................................................................................................... 37Automatic Ticket Creation................................................................................................................... 38Manual Ticket Creation........................................................................................................................ 40Remediation Reporting ........................................................................................................................ 41Remediation Ticket Update Notification........................................................................................... 43Remediation Summary......................................................................................................................... 43
QualysGuard in Retrospect .......................................................................... 44
Asset Management................................................................................................................................ 44User Management ................................................................................................................................. 46Asset Search Portal................................................................................................................................ 49QualysGuard KnowledgeBase ............................................................................................................ 51OVAL (Open Vulnerability and Assessment Language)................................................................ 51CVSS (Common Vulnerability Scoring System)............................................................................... 52Summary ................................................................................................................................................ 53
Wrap-up.......................................................................................................... 54
Secure Vulnerability Management ..................................................................................................... 54Discovery and Vulnerability Assessment.......................................................................................... 54Prioritized Remediation ....................................................................................................................... 54Compliance Reporting.......................................................................................................................... 55Interoperability...................................................................................................................................... 55On-Demand Approach......................................................................................................................... 55
QualysGuard Evaluator’s Guide 5
QualysGuard in Perspective
QualysGuard is an on demand vulnerability management solution. It plays a vital role in network security and compliance management. The prospect of malfeasance via a network has spurred considerable innovation in network security. Virtually all industry analysts agree that network security should be a product of multiple interventions – virus detection, firewalls, and vulnerability management. Most analysts also agree that vulnerability management is a critical intervention without which virus detection and firewalls may offer a false sense of security.
One leading analyst wrote “Security demands will drive a new focus on highly proactive vulnerability management. Near-continuous scanning will rapidly become a standard enterprise requirement as security administrators struggle to stay ahead of vulnerabilities that are introduced by software vendors, as well as configuration errors committed by internal personnel.1” As you will see, QualysGuard is designed to meet all the needs this analyst describes for enterprise deployments.
On Demand Vulnerability Management
Vulnerabilities are weaknesses in process, administration, or technology that can be exploited to compromise your IT security. Vulnerability Assessment, a key element of Vulnerability Management, is a preemptive attempt to find such vulnerabilities and to eliminate or mitigate them before they can be exploited. Vulnerability Management is broader than Vulnerability Assessment. At a minimum, it is a process that involves discovery of all systems attached to a network, vulnerability identification and analysis of all or portions of the “discovered” network, reporting of findings, remedy of weaknesses, and confirmation that remedies or workarounds have been applied. Vulnerability Management is a continuous process. Any changes to policies or network configurations will inevitably create new weaknesses. And, even in the event of no change, new vulnerabilities are being uncovered daily, and must be acted upon to maintain a high level of security.
Can be deployed immediately
On-demand, service-based vulnerability management involves a trusted third-party as opposed to acquiring, installing, supporting, and maintaining a product-based solution. QualysGuard is an on-demand, service-based vulnerability management solution.
Users access QualysGuard through authorized access to its Web service-based delivery architecture, allowing users to immediately direct its action and to hit the ground running. QualysGuard secure architecture is updated daily with new vulnerability audits, and quarterly with new product features – seamlessly to subscribers. The costs of ownership is assumed by Qualys and distributed across a large subscriber base. Thus, users benefit from an immediately deployable vulnerability management capability at much below the cost of an internal, product-based solution.
1. Gartner Research, SPA-21-3634, 19 November 2003
QualysGuard in PerspectiveA look at how QualysGuard works
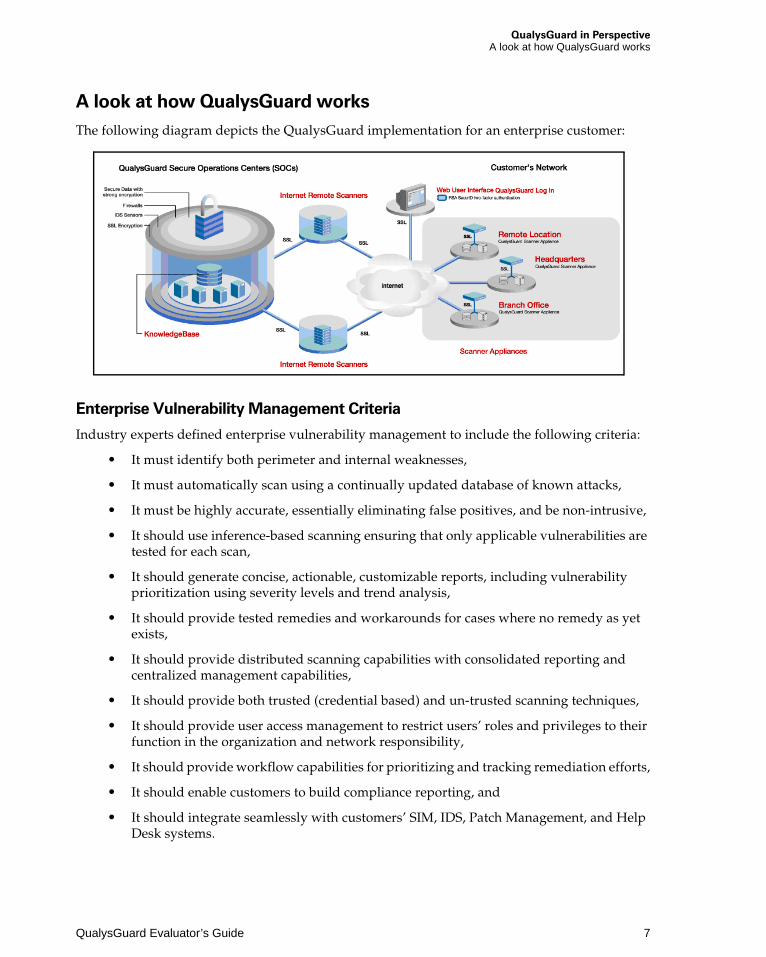
A look at how QualysGuard works
The following diagram depicts the QualysGuard implementation for an enterprise customer:
Enterprise Vulnerability Management Criteria
Industry experts defined enterprise vulnerability management to include the following criteria:
• It must identify both perimeter and internal weaknesses,
• It must automatically scan using a continually updated database of known attacks,
• It must be highly accurate, essentially eliminating false positives, and be non-intrusive,
• It should use inference-based scanning ensuring that only applicable vulnerabilities are tested for each scan,
• It should generate concise, actionable, customizable reports, including vulnerability prioritization using severity levels and trend analysis,
• It should provide tested remedies and workarounds for cases where no remedy as yet exists,
• It should provide distributed scanning capabilities with consolidated reporting and centralized management capabilities,
• It should provide both trusted (credential based) and un-trusted scanning techniques,
• It should provide user access management to restrict users’ roles and privileges to their function in the organization and network responsibility,
• It should provide workflow capabilities for prioritizing and tracking remediation efforts,
• It should enable customers to build compliance reporting, and
• It should integrate seamlessly with customers’ SIM, IDS, Patch Management, and Help Desk systems.
QualysGuard Evaluator’s Guide 7

QualysGuard in PerspectiveKnowledgeBase
There are special benefits when using the Web as a deployment system. It is accessible from any Web browser. It can scale instantly as a customer’s network grows. It enables distributed scanning for all locations. It delivers immediate updates for new threats. It results in highest accuracy of scans. And it eliminates software installation and maintenance burdens.
KnowledgeBase
The core of QualysGuard is its KnowledgeBase. It contains the intelligence that powers QualysGuard vulnerability management. It is updated daily with signatures for new vulnerabilities, validated patches, fixes for false positives, and other data that continuously improves its effectiveness.
Security Operations Centers
The KnowledgeBase resides inside our Security Operations Centers (SOCs), which provide secure storage and processing of vulnerability data on an n-tiered architecture of load-balanced application servers. All computers and racked equipment are isolated from other systems in a locked vault.
Internet Scanners
Our Internet scanners carry out perimeter scanning for customers. These scanners are located in various worldwide locations, and they communicate with our SOCs through secure (SSL) links. These remote scanners begin by building an inventory of protocols found on each machine undergoing an audit. After discovering the protocols, the scanner detects which ports are attached to services, such as Web servers, databases, and e-mail servers. At that point, the scanners initiate an inference-based vulnerability assessment, based on vulnerabilities that could actually be present (due to operating system and configurations) to quickly identify true vulnerabilities and minimize false positives.
Scanner Appliances
To map domains and scan IPs behind the firewall, QualysGuard Scanner Appliances are installed by customers, in a distributed manner, for global enterprise scanning. These are client-side, plug-in devices that gather security audit data inside the firewall, and provide secure communications with our SOCs. These appliances use a hardened operating-system kernel designed to prevent any attacks. In addition, they contain no services or daemons that are exposed to the network. These devices poll the SOCs for software updates and new vulnerability signatures, and process job requests. They do not retain scan results; instead, the results are securely encrypted with unique customer keys, transmitted, and stored at redundant SOCs.
Secure Internet Interface (SII)
Users interact with QualysGuard through its Secure Internet Interface. Any standard Web browser permits users to navigate the QualysGuard user interface, launch scans, examine audit report data, and manage the account. Secure communications are assured via HTTPS (SSLv3) encryption. All vulnerability information, as well as report data, is encrypted with unique customer keys to guarantee confidentiality of information and make them unreadable by anyone other than those with proper customer authorization.
8 QualysGuard Evaluator’s Guide
Getting Started
All of your interactions with QualysGuard will be through the Secure Internet Interface. After registration for the trial, you will receive an email with a secure link to a user name and password. This is a one-time-only link. Once you have connected to the Web page, neither you nor anyone else can do so a second time. This protects you in the event someone intercepts your email. Your login is permanent and assigned by QualysGuard. The password is a randomly generated “strong” password. Your login is fixed but you can change your password if you wish (go to Preferences—>Account—>Change Password). For help in changing your password, select the “Quick Help” button in the upper right-hand corner of the Change Password page.
Logging In
With your login and password, you can now gain access to QualysGuard. Simply select the link https:qualysguard.qualys.com or go to the Qualys home page at www.qualys.com and select “Customer Login” from the top right corner. Enter your login and password and select “Login.”
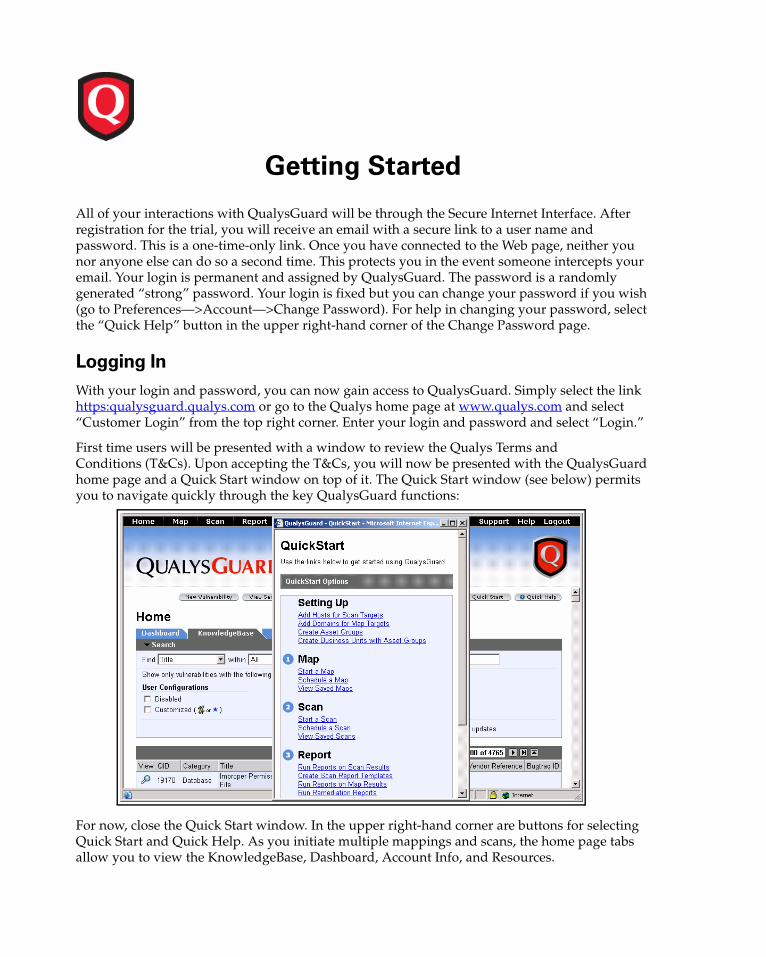
First time users will be presented with a window to review the Qualys Terms and Conditions (T&Cs). Upon accepting the T&Cs, you will now be presented with the QualysGuard home page and a Quick Start window on top of it. The Quick Start window (see below) permits you to navigate quickly through the key QualysGuard functions:
For now, close the Quick Start window. In the upper right-hand corner are buttons for selecting Quick Start and Quick Help. As you initiate multiple mappings and scans, the home page tabs allow you to view the KnowledgeBase, Dashboard, Account Info, and Resources.
Getting StartedInstalling Your Scanner Appliance
Installing Your Scanner Appliance
By installing a Scanner Appliance within your network, you will have the ability to do vulnerability assessments for your entire network. As already described, the scanner appliance features a hardened OS kernel, is highly secure, and stores no data. It’s recommended best practice that you create dedicated user accounts for installing scanner appliances, so that changes in account status do not affect scanner appliance availability. For the purpose of this review, you will simply install your scanner appliance using the same login and password you are currently using. Refer to the QualysGuard Scanner Appliance Quick Start Guide and follow the three installation steps. The QualysGuard Scanner Appliance User Guide you received will help you resolve any installation issues.
Creating Network Domains
QualysGuard uses a domains concept for its network mapping process. “Domain” in this context is our name for a DNS entry, for a netblock, or for a combination.
To create such a domain, you select the sub-tab “Domains” below the tabs on your Preferences—>Assets page. Then, select “Add Domain” using the button in the upper right-hand corner. Here you will specify a domain or a netblock of IPs. Once you have typed them into the New Domains sub-window, you select “Add” at the bottom of the page. Again, a window will open reminding you that you must have permission to discover (map) the specified domains and netblocks. Click “OK”. You will be returned to the Domains list, and the added domains will now be shown.
When specifying domains, you may add existing domain names recognizable by DNS servers on your network, such as “mycompany.com”. Also you have the option to add a self-defined domain called “none” with a netblock. Mapping with the “none” domain allows you to map multiple, distinct netblocks on your network. To add the “none” domain, follow the instructions in the Mapping with the “None” Domain document on the sub-tab “Tips & Techniques” on your Home—>Resources page.
Qualys provides a demo domain called “qualys-test.com” for network mapping. This domain may already be in your QualysGuard account. If not you can add it yourself from the Domains list. Note that the devices in the demo domain reside in Qualys Security Operations Centers, so the QualysGuard Internet scanners can be used for mapping this domain.
Adding Hosts for Scanning
In preparation for scanning, you need to tell QualysGuard which IP addresses and/or ranges you wish to scan. From the main menu on top, select “Preferences.” You will now see the Preferences page. Note the tab choice, and select “Assets.” On the Assets page, select the “Add Hosts” button in the upper right-hand corner and select “IP Tracked Hosts” from the drop-down menu. You’ll notice that you also have the option to add hosts tracked by DNS and NetBIOS hostname, which allows for reporting host scan results in dynamic networking environments. For example, you may want to use DNS or NetBIOS hostname tracking if the hosts on your network are assigned IP addresses dynamically through DHCP. See the online help for complete details.
10 QualysGuard Evaluator’s Guide

Getting StartedYou’re Now Ready
The Add Hosts page will appear. In the window area titled “Host IPs” enter the IPs for which you have permission to scan and set any additional host attributes. Then, at the bottom of the Web page, select the “Add” button. Another window will open asking you to verify that you are authorized to scan the IP addresses you are adding. Select “OK”. The Preferences page will now return to your display, and the newly added hosts will be added to the current list.
Alternatively, you can discover the devices on your network starting from a domain or netblock. Then add the IPs to your account using the workflow from the Map results. For assistance with this, see the help topic “Reading Map Reports” under Reporting in the online help system.
You’re Now Ready
At this point, you should have successfully obtained authorization, logged in, created domains for mapping, added hosts for scanning, and are ready to begin mapping and scanning. If any of the preceding steps failed to provide results similar to those in this setup section, please email or call Qualys Support before continuing.
The sections to follow walk you through the primary funtions of QualysGuard, including mapping, scanning, reporting and remediation.
QualysGuard Evaluator’s Guide 11

Step 1: Mapping Your Network
Before you can map a portion of your network, you have to tell QualysGuard how you would like it to perform that mapping. This is called a “Network Map Profile.”
On the Preferences page select the “Options” tab, and then select the “New Profile” button in the upper right-hand corner. A New Profile page will open. Give the new profile a title, such as “Network A Map”.
Scroll down and select the “Map” tab, and on the page that opens select “Perform Live Host Sweep” and “Exclude Hosts Only Discovered Via DNS.” The options selected will allow you to map a domain and identify hosts in the netblock, and will exclude hosts that are solely discovered thru DNS. Select “Netblock Hosts only” if you are mapping an internal domain or the “None” domain with internal IPs. Feel free later to try different selections for your map profile, but for now, select the “Save” button at the end of the page.
Running a Map
Now you are almost ready to run your first map. Select “Map” from the top menu bar. On the Map page that appears, scroll down to Domains and select “Select Domains.” Select the domain you created and select “Add.” It will now appear in the “Target Domains” field. Under Map Settings, in the field “Option Profile” select your new option profile (e.g. “Network A Map”). In the field above it, “Title”, name the map “First Map”. Note that the field “Scanner Appliance” appears when your account includes a scanner appliance. When present, select the name of your scanner appliance (required for mapping private use internal IPs) or External for the external scanners. Then select “Start Map.”
You will see a Map Status page with a moving chevron indicator that shows mapping is taking place. When the mapping is complete, you will see the moving chevron replaced with a “Mapping Completed” message. Also, the QualysGuard system will send you a map summary email to the address with which you registered.
On the Map Status page, look below at the Domain area and select the “Graphic” button. QualysGuard will now prepare a diagrammatic representation of the map. Following is an example:

Step 1: Mapping Your NetworkRunning a Map
If you double click on any host, you will see a table with its pertinent network information, as shown below. The table provides basic information on the discovered host, its OS, and how it was identified:
Now, on the Map Results page select the “Text Mode” button in the upper right-hand corner. A new Map Results page will open in a text format. The next page shows an example of a map in Text Mode. The sample map was generated for the “None” domain. At the top portion of the page is a “Results Summary.” Take a look at yours and note the information completeness.
QualysGuard Evaluator’s Guide 13

Step 1: Mapping Your NetworkRunning a Map
Now scroll down the page to see the tabular list of hosts discovered along with legend information that indicates “Approved,” “Scannable,” “Live,” and “Netblock.”
Below this are workflow buttons that allow you to select hosts and assign them to groups, and to designate approved hosts. These are powerful workflow functions that work as follows:
• “Add to Asset Group” enables managers to group various portions of sub-networks together, so that a business unit manager can manage vulnerabilities on any assets associated with his or her group (see a more detailed view in the Asset Management section.).
• “Approve” allows managers to approve discovered devices and establish a baseline for the network. This baseline can be used when comparing future maps in order to quickly pinpoint rogue systems or unapproved hosts.
14 QualysGuard Evaluator’s Guide

Step 1: Mapping Your NetworkScheduling Maps
Scheduling Maps
In the previous instance, you ran a map on demand. You can also schedule mappings, periodically, that require no human intervention. To schedule a mapping, return to the Preferences page, select the “Schedules” tab, and then the “Schedule Map” button in the upper right-hand corner. Give the scheduling task a title, such as “First Map Schedule”. Your name should appear in the Task Owner field. In the Target area, select “Select Domains,” then choose a domain and select “Add”. That domain will now appear in the domain target field. Then scroll down and pick start date, frequency, and any other options. Select “Quick Help” in the upper right-hand corner for assistance with available settings. When finished, select “Save.”
Now QualysGuard will repeat that mapping as scheduled, and each time it completes the mapping, it will send you a summary email with a secure link to the Map Results page for that mapping. As you will see later, repeated mapping coupled with reporting on prior map results, a manager can quickly see any changes to the domain due to any new or rogue devices.
Comparing Maps
You can easily run successive maps over some arbitrary time-period and immediately see both anticipated and unanticipated changes. You can also compare a map against Approved IPs.
To run a Map Report, you would use the following steps:
1 Go to Report—>Map Reports and select a domain with a netblock, then click “Next”.
2 Select the two maps you want to compare, or select one map and your Approved IPs list, and click “Run”.
QualysGuard Evaluator’s Guide 15

Step 1: Mapping Your NetworkComparing Maps
When you compare one map to the Approved IPs list, the result is an Unknown Device Report, showing approved vs. rogue devices on your network. See example below.
Unknown Device Report: when you compare a map to Approved IPs
16 QualysGuard Evaluator’s Guide
Step 1: Mapping Your NetworkMapping Summary
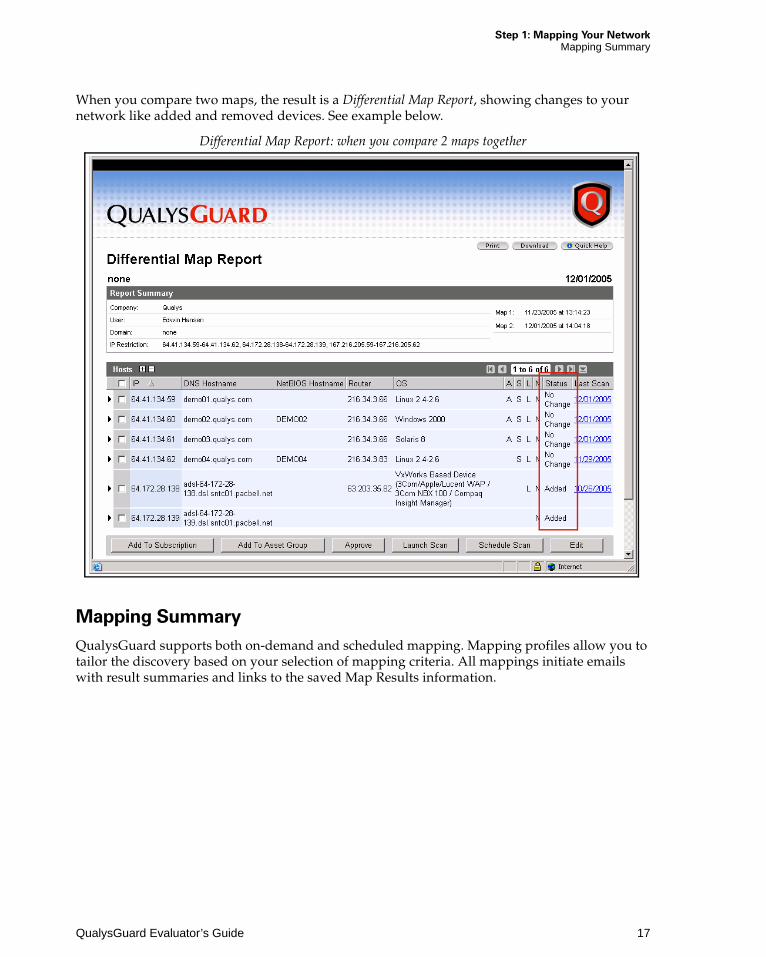
When you compare two maps, the result is a Differential Map Report, showing changes to your network like added and removed devices. See example below.
Differential Map Report: when you compare 2 maps together
Mapping Summary
QualysGuard supports both on-demand and scheduled mapping. Mapping profiles allow you to tailor the discovery based on your selection of mapping criteria. All mappings initiate emails with result summaries and links to the saved Map Results information.
QualysGuard Evaluator’s Guide 17

Step 2: Scanning for Vulnerabilities
As with mapping, scanning requires that you complete an Option Profile, or that you select default profile options. You will do so by first selecting the “Options” tab on the Preferences page, then selecting the “New Profile” button in the upper right-hand corner.
As you did with mapping, give the profile a name, such as “First Scan” and select the “Set this as the default…scans” check box. Scrolling down, leave the default for TCP and UDP Ports as “Standard Scan”.
Here you are going to use the Scanner Appliance to do an internal scan, so leave the “Scan Dead Hosts” and “Load Balancer Detection” check boxes unchecked. Also, leave the Password Brute Forcing set at “No Brute Forcing.” Lastly, select “Enable Windows Authentication” and select “Save”. You will now be returned to the Preferences page, and the new scan profile will be listed as shown:
You have the option to enable trusted scanning to increase the number of vulnerabilities that can be detected. Trusted scanning is supported for Windows, Unix, Oracle, and SNMP systems. See Trusted Scanning on page 27 for more information on this feature. To use trusted scanning, you must create authentication records for target hosts. Each record defines credentials to be used for authentication to certain IPs.
To define a Windows record, return to the Preferences page, select the “Options” tab and then select the “Authentication” sub-tab. Then select the “New Record” button in the upper right-hand corner and select “Windows” from the drop-down menu. On the New Windows Record page, give the record a name. Enter the Windows domain name in the “Domain (user selected IPs)” field, then enter your Windows account credentials – user name and password (twice). Note

Step 2: Scanning for VulnerabilitiesStarting a Scan
that you also have the option to allow the service to automatically attempt authentication on all hosts it discovers for a domain. To select this option, enter the Windows domain name in the “Domain (service detected IPs)” field.
In the IPs section, select the IPs and IP ranges that will be covered and then select “Add.” These should be IPs within the network that your scanner appliance may scan. Lastly, select “Save.” You will be returned to the Preferences page and the new record will now be listed. For more information on trusted scanning, refer to the “Trusted Scanning” section under “Network Analysis (Scans)” in the online help for detailed information.
Now you are ready to define the assets you will scan. Select “Scan” from the upper menu and this will take you to the Scan page. You will notice the Asset Groups section under the “Launch Scan” tab. Asset Groups provide a way to logically organize assets for vulnerability management and reporting. As a best practice we recommend that you group your assets, although you can start scanning target hosts by IP address.
To create an Asset Group, select “New Asset Group” in the upper right corner. On the New Asset Group page give your asset group a title, such as “First Asset Group.” There are tabs where you define asset group properties. On the IPs tab, select the IPs or IP ranges that will be the target for your scan and select “Add.” Again, these should be IPs within the network that your scanner appliance may scan. On the “Scanner Appliances” tab, select your scanner appliance and add it to the “Scanner Appliances Added to Group” list. The “Business Info” tab is where you assign a business impact level to the asset group. You will notice that QualysGuard automatically assigns a High business impact level to a new asset group. Select “Save.”
Now return to the Launch Scan page by selecting “Scan” from the upper menu. Your new Asset Group will be listed. Refer to the “Assets and Business Units” section (later in this document) for more information on grouping assets and adding business units to reflect an enterprise’s existing organizational structure.
Starting a Scan
Now you are ready to run your first scan. Select “Scan” from the upper menu. Select a target Asset Group (e.g. First Asset Group). You can also enter IPs or IP ranges in the “Target IPs/Range” field. Enter a title for the scan, such as “Internal Asset Scan,” and make sure that the “Option Profile” field shows your new scan profile (e.g. First Scan). Also, you can pick the scanner appliance for running the scan in the “Scanner Appliance” field, or let the system use the default scanner associated with the asset group that you are scanning. [Note: If you are using the demo IPs, you must select External in this field.]
Now, select “Start Scan”.
QualysGuard Evaluator’s Guide 19

Step 2: Scanning for VulnerabilitiesStarting a Scan
Once the scan begins, you will see the Scan Status page which is updated every 60 seconds with scan status information.
During the scan, you can go to the Scan page, select the “Running Scans” tab and see the scan task status:
You can cancel a running scan by selecting the red button ( ) or pause a scan by selecting the blue pause ( ) button. When a scan is paused, results from scanned hosts are made available for viewing on the “Saved Scans” tab and a green resume button ( ) appears in place of the blue pause button. When you resume a paused scan, the scan task will pick up where it left off.
Select the View icon to view the scan status. The next page shows a scan status display you would see, showing how you can monitor scan progress and view results for finished scans:
20 QualysGuard Evaluator’s Guide

Step 2: Scanning for VulnerabilitiesStarting a Scan
When the scan is complete, you will receive a message like this:
Now, click “OK” and a Scan Results page will be displayed.
QualysGuard Evaluator’s Guide 21

Step 2: Scanning for VulnerabilitiesScan Results
Scan Results
Your scan results for completed scans are always available on the Scan page (on the “Saved Scans” tab) and on the Report page (on the “Scan Reports” tab).
At the top is the Report Summary:
Scrolling down, you will see the Summary of Vulnerabilities:
22 QualysGuard Evaluator’s Guide

Step 2: Scanning for VulnerabilitiesScan Results
Scrolling down further you will see the Operating Systems Detected:
Below are the Services Detected:
Then what follows are detailed results sorted by host and characterized by operating system. Detailed results for your internal hosts will be shown in this section of the report. This host details section shows there were 179 total vulnerabilities associated with IP 10.10.10.114 running Windows NT 4.0.
Each detailed report will have total vulnerabilities followed by line item details for each vulnerability, its severity, and port information.
QualysGuard Evaluator’s Guide 23

Step 2: Scanning for VulnerabilitiesScan Results
If you click on the title of a vulnerability, QualysGuard provides a comprehensive description of it showing threat, impact, solution, compliance and result details. For example, by clicking on the following Microsoft ActiveX vulnerability, you would see this:
24 QualysGuard Evaluator’s Guide

Step 2: Scanning for VulnerabilitiesSelective Scanning
If applicable, vulnerability details may include compliance information for various government and industry-specific regulations, including SOX, HIPAA and GLBA, and the CobIT information technology standard. The example below shows compliance information for QID 45067 which has compliance information for all 4 types.
If a vulnerability check is not associated with any of the compliance types, then “Not Applicable” appears under Compliance in your scan results.
Selective Scanning
To perform a scan on individual vulnerabilities, you can tune the option profile for the scanner to only scan for selective vulnerabilities. This can be done in the “Vulnerability Detection” section of the scan profile. Choose the “Custom” option and click the “Configure” button to select the vulnerabilities of choice. When saved, this scan profile will only perform audits for the vulnerabilities selected – a very useful feature to check for the most recent worm outbreak, or the latest vulnerabilities announced by Microsoft on the second Tuesday of every month. For more details, see “About Scanning your Network” under “Network Analysis (Scans)” in the online help.
Scheduling Scans
As you saw with mapping, scanning can also be scheduled. Again, you return to the Preferences page, select the “Schedules” tab and select the “Schedule Scan” button in the upper right-hand corner. The Schedule Scan page is very similar to the Schedule Map page. You give the schedule a title, select scan targets, and then choose a start time, occurrence and recurrence frequency.
By scheduling scans in conjunction with reports that combine historical data, managers can see vulnerability trends over time. This provides a good executive-level view of current state of vulnerabilities, and progress being made in remediation – a key element for regulatory compliance reporting.
QualysGuard Evaluator’s Guide 25

Step 2: Scanning for VulnerabilitiesScheduling Scans
There are several scheduling options available as shown below. This scan task runs monthly, the first Saturday of every month, starting at 1 AM Pacific Time (GMT-8). You have the option of observing Daylight Saving Time (DST). Select “Quick Help” in the upper right corner for assistance with setting up your scheduled task.
Add a title for ease of identification
Select target asset groups and/or IPs and IP ranges
Select a start time and effective date, with the option to observe daylight saving time
Select run time threshold to either none, pause or cancel
Select daily, weekly or monthly occurrence
Select no end date or set the number of times this task should run
Select a scanner appliance or default scanner
Select an option profile with scan preferences
26 QualysGuard Evaluator’s Guide
Step 2: Scanning for VulnerabilitiesTrusted Scanning
Trusted Scanning
Trusted Scanning allows organizations to systematically audit their network infrastructure all the way down to individual PCs without the burden of deploying agents on every desktop and server. Also, it ensures compliance with internal security policies. QualysGuard supports trusted Scanning for Windows, Unix, Oracle and SNMP systems.
Using the Trusted Scanning feature, QualysGuard has the ability to gather more system intelligence on target hosts, increasing the number of vulnerabilities that can be detected. See the “Trusted Scanning” section in the online help for more information, including setup instructions (Help—>Network Analysis (Scans)—>Trusted Scanning).
To see the impact of Windows trusted scanning, first make sure you have defined Windows trusted host login information under Preferences—>Options—>Authentication. Using one of your scan profiles, such as the “First Scan” profile you may have created earlier. Edit that profile in the “Authentication” section by checking the “Enable Windows Authentication” check box and running a scan, then un-checking “Enable Windows Authentication” and running a scan. You should see that the Authenticated scan provides much greater information.
Scanning Summary
QualysGuard supports both on-demand and scheduled scanning. Scanning profiles allow you to tailor the scan based on your selection of scanning criteria. All scans initiate emails with results summaries and links to the saved Scan Results information.
QualysGuard Evaluator’s Guide 27

Step 3: Reporting
One area that distinguishes QualysGuard from other Vulnerability Management solutions is its very flexible, comprehensive reporting capabilities. Most other solutions produce rigid reports that reflect, one-for-one, whatever data they have gathered during a scan. There are few, if any, mechanisms for filtering, regrouping, or synthesizing the data into higher levels of information abstraction. QualysGuard reports, on the other hand, like quality business intelligence reporting, permit filtering and sorting that allows data to be viewed in different ways.
QualysGuard reports consist of the following basic components:
• Network assets (IPs and/or Asset Groups) included in the report,
• Graphs and charts showing overall summaries and network security status,
• Trending analysis for a given network,
• Information about discovered vulnerabilities, and
• Filtering and sorting options to provide many different views of the data.
You take advantage of this reporting flexibility by creating versatile report templates which then determine what scan data is used in reporting.
Creating a Report Template
From any page, select “Report” from the top menu bar. Then select “New Template” in the upper right-hand corner.
Your report can be tailored in thousands of different ways, and we suggest you try some different combinations of options to see the resulting reports. Begin by giving your report a title, such as “First Scan Report.” Then, go down the list of options in display, and when you are finished, select “Run” at the bottom. You will notice that if you began your options by asking for only “Status” data, then later on, trend-oriented options will be grayed out. On the other hand, if you select “Trend and Status” these options then become available.
The “Display”, “Filter” and “Services and Ports” tabs each provide different reporting options. As you complete them, the buttons at the bottom of the page allow you to “Save As,” “Save,” “Run,” or “Cancel”. Thus, you can create on-the-fly reports that give you a snapshot, or you can create templates you will use repeatedly, and therefore will want to save.
To see details about available template options, see the “Template Options” section in the online help (Help—>Reporting—>Scan Reports—>Working with Templates—>Template Options).
Step 3: ReportingTrend Analysis and Differential Reporting
Trend Analysis and Differential Reporting
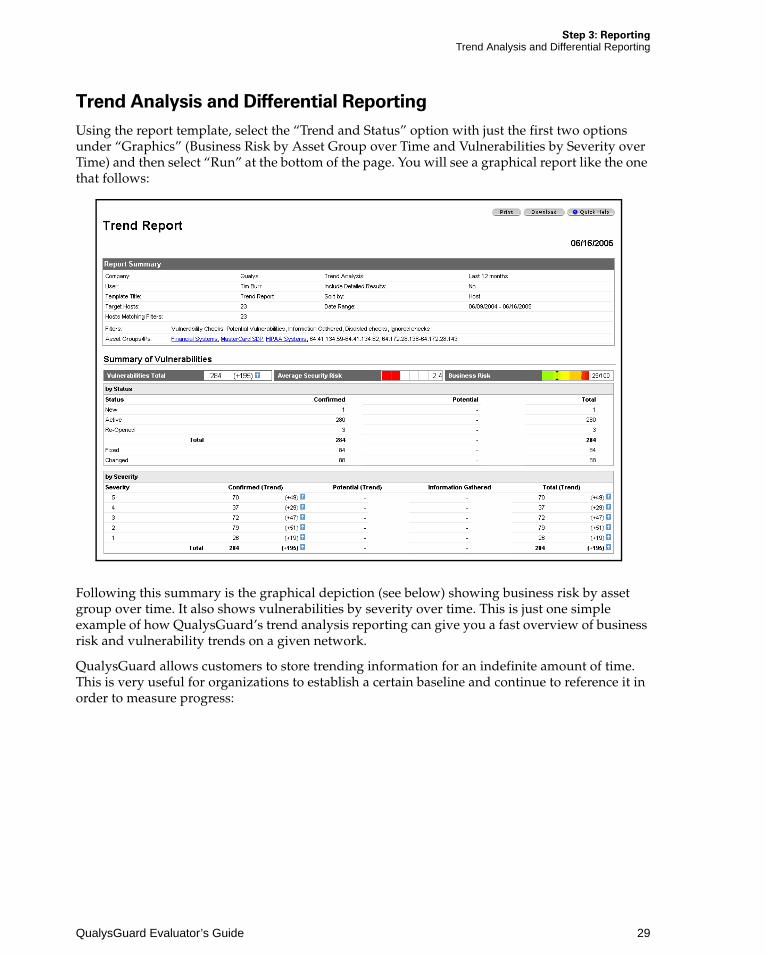
Using the report template, select the “Trend and Status” option with just the first two options under “Graphics” (Business Risk by Asset Group over Time and Vulnerabilities by Severity over Time) and then select “Run” at the bottom of the page. You will see a graphical report like the one that follows:
Following this summary is the graphical depiction (see below) showing business risk by asset group over time. It also shows vulnerabilities by severity over time. This is just one simple example of how QualysGuard’s trend analysis reporting can give you a fast overview of business risk and vulnerability trends on a given network.
QualysGuard allows customers to store trending information for an indefinite amount of time. This is very useful for organizations to establish a certain baseline and continue to reference it in order to measure progress:
QualysGuard Evaluator’s Guide 29

Step 3: ReportingDownloading Reports
Downloading Reports
Users can schedule scans and maps. Upon completion, you can run reports at any time or download reports directly. This allows secure distribution of reports. QualysGuard does not email reports to users directly from the product for security reasons. Instead, users can download them in PDF, ZIP, MHT, and XML formats at their own discretion. The concept of downloading a report directly from the “Scan Reports” tab, as depicted in the following screen, streamlines the report generation process especially for large networks with lots of scan data.
30 QualysGuard Evaluator’s Guide

Step 3: ReportingBusiness Risk Reporting
Business Risk Reporting
One of the key functions of a Vulnerability Management solution is remediation reporting and tracking. To do this in the most efficient way, there needs to be some way of associating network assets with various business operations, so that the severity of vulnerability is correlated with business security exposure in order to arrive at a metric for business risk.
QualysGuard automates this process while enabling users to tailor it to their enterprise. The system provides a default definition, but it also allows users to modify it to better reflect their own internal metrics.
You customize the business risk calculations by going first to the Preferences page, selecting the “Setup” tab, and then selecting the “Business Risk” sub-tab. On the left side is Business Risk, and it is defined by a matrix with Business Impact columns and Security Risk rows. So, for example, a security risk of 5 has a business risk of 9 if the asset is associated with a low impact business operation. On the other hand, it would have a business risk of 100 if associated with a critical impact operation. The Business Risk set up page below illustrates this:
QualysGuard Evaluator’s Guide 31

Step 3: ReportingBusiness Risk Reporting
You can assign Business Impact values to any asset group you have created. To do this, you go to the Preferences page and select the “Asset Groups” tab. Here you will see the asset groups listed along with their IPs, domains, business impact, user, and last update. You can change the business impact definition by selecting the edit icon, selecting the “Business Info” tab, then setting the Business Impact level. Change it to some other identification, so if it was “Critical,” change it to “Medium”. Afterward, select “Save”.
Note how changing the Business Impact level changes the previous trend and status report results, particularly the Business Risk metric:
32 QualysGuard Evaluator’s Guide

Step 3: ReportingRisk Matrix Reporting
Risk Matrix Reporting
With the almost daily identification of new vulnerabilities and the daily update by Qualys of our KnowledgeBase you can instantly quantify exposure to new threats. Even before launching a scan you can run the Risk Matrix report against your existing scan data for potentials risks. Select the vulnerability you want to test. Vulnerabilities are sorted by most recent update. You can also search for a particular vulnerability by name, keywords in the threat description, impact or solution, CVD ID, QID (Qualys ID), or vendor reference. You can also select specific Asset Groups or IP ranges to target areas of your network.
This Risk Matrix report is run from the Home page by selecting the “Risk Matrix” button. You are then taken to the Risk Matrix Report options page where you can select the vulnerability that you would like to scan and the target areas of your network for the report. Then scroll down and select “Run” to generate the report. This report example shows results for the vulnerability identified under the Report Summary – QID 86674:
Payment Card Industry (PCI) Compliance Module
Qualys is certified to help merchants and their consultants evaluate the security of credit card payment systems that process, transmit and store MasterCard and Visa account data, and achieve compliance with the Payment Card Industry (PCI) Data Security Standard.
The PCI Security Standards Council requires banks, online merchants and Member Service Providers (MSPs) to protect cardholder information by adhering to a set of data security requirements outlined in the PCI Data Security Standard. Founding members of the PCI Security Standards Council are American Express, Discover Financial Services, JCB, MasterCard Worldwide and Visa International.
QualysGuard Evaluator’s Guide 33
Step 3: ReportingPayment Card Industry (PCI) Compliance Module
The Payment Card Industry (PCI) Data Security requirements apply to all members, merchants, and service providers that store, process or transmit cardholder data.
The QualysGuard PCI Solution
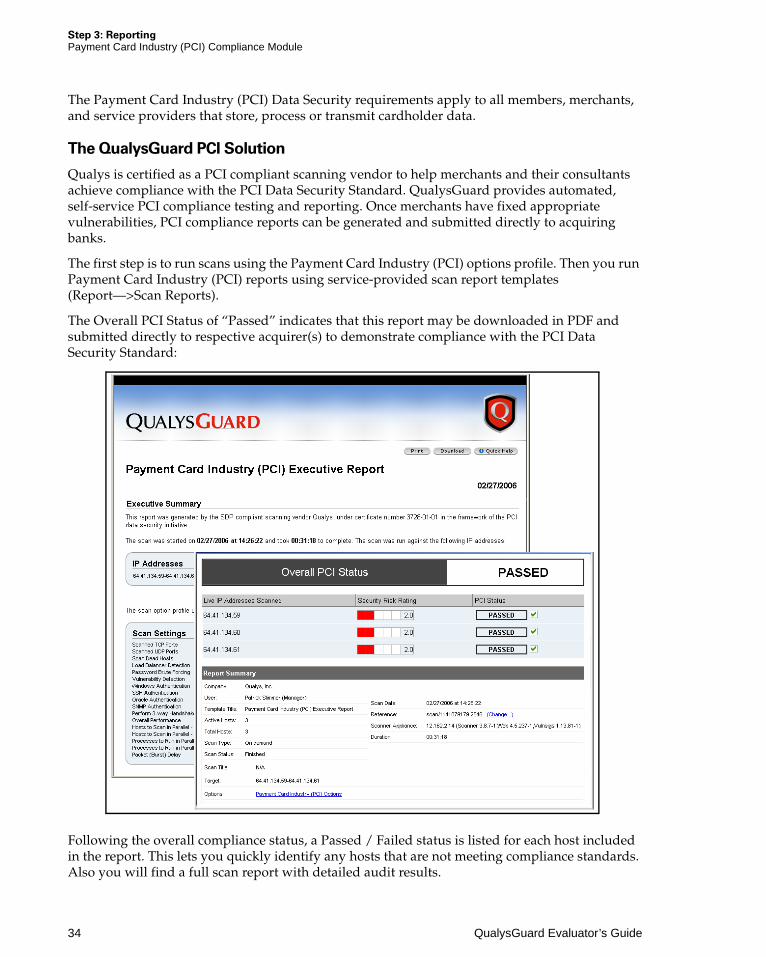
Qualys is certified as a PCI compliant scanning vendor to help merchants and their consultants achieve compliance with the PCI Data Security Standard. QualysGuard provides automated, self-service PCI compliance testing and reporting. Once merchants have fixed appropriate vulnerabilities, PCI compliance reports can be generated and submitted directly to acquiring banks.
The first step is to run scans using the Payment Card Industry (PCI) options profile. Then you run Payment Card Industry (PCI) reports using service-provided scan report templates (Report—>Scan Reports).
The Overall PCI Status of “Passed” indicates that this report may be downloaded in PDF and submitted directly to respective acquirer(s) to demonstrate compliance with the PCI Data Security Standard:
Following the overall compliance status, a Passed / Failed status is listed for each host included in the report. This lets you quickly identify any hosts that are not meeting compliance standards. Also you will find a full scan report with detailed audit results.
34 QualysGuard Evaluator’s Guide

Step 3: ReportingDashboard
Dashboard
As a security professional or any member of the executive team being able to see a snapshot of your security posture that is tailored to your requirements and provides you with an automated approach to:
• Centralize security
• Measure risk
• Prioritize tasks
• Track remediation
• Enforce compliance
The QualysGuard dashboard provides a quick one-page, printable summary of your overall security posture. The dashboard displays user-configurable graphs and lists. To view your dashboard, select the “Dashboard” tab from the Home page:
QualysGuard Evaluator’s Guide 35

Step 3: ReportingDashboard
The dashboard is user configurable. All you have to do is click “Configure” from your dashboard to make changes to the information included in any of the graphs and lists:
Note that you can also configure dashboard settings by going first to the Preferences page, selecting the “Setup” tab, and then selecting the “Dashboard” sub-tab.
36 QualysGuard Evaluator’s Guide

Step 4: Remediation
Discovering all network assets, scanning various assets for vulnerabilities, and reporting what was found are all critical aspects of Vulnerability Management. As the last piece, having now found those vulnerabilities, you need to eliminate or mitigate them.
QualysGuard provides a remediation ticketing capability similar to trouble tickets created by a support call center. You, as a manager, can control the policies surrounding such tickets, and assign the responsibility for fixing them. QualysGuard will note when tickets have been created, and will track in subsequent scans any remediation changes. Manual trouble ticket creation does not scale in an enterprise network with thousands of hosts and vulnerabilities. Therefore, this process is automated via remediation policies, allowing customers to automatically create tickets upon scan completion and assign them to the appropriate user within the organization. Additionally, customers can automate trouble ticket integration into their helpdesk systems using the QualysGuard API. QualysGuard ships with out-of-the-box integration with Remedy AR System HelpDesk.
Remediation Policy
Remediation tickets are created by you (as a manager) by selecting “Remediation” from the top menu bar, then selecting the “Policy” tab. The rules in your remediation policy determine how tickets will be created and to whom tickets will be assigned. A sample policy with multiple rules is shown below:
Optionally Unit Managers may be granted permission to create business unit specific remediation policies. The rules for business unit policies may be seen under the column “Business Unit”. The ones displayed as Unassigned are rules for the global policy, created by managers for the subscription.

Step 4: RemediationAutomatic Ticket Creation
To allow a Unit Manager to create a business unit remediation policy, go to Preferences—>Users and edit the user’s account. Under Extended Permissions you can check the “Create/edit remediation policy” box and save the change. See User Management on page 46 for more information on adding users.
When you go to the “Policy” tab for the first time there are no rules. You can create policy rules appropriate to the organization’s existing security policy. You need to add at least one rule before QualysGuard will automatically create tickets. To do this, select “New Rule” in the upper right corner. On the New Rule page, give the rule a title, such as “First Rule.” Then leave the default options checked and select “Save.”
The new rule will now show up in the rules list as “First Rule”. This sample rule results in tickets being created when vulnerability severity levels 4 and 5 are detected. The tickets will be assigned to the user who launched the scan resulting in the detection.
Note that you can also define the rule condition to be based on Qualys ID or QID. Select the “Configure” button. When the Select Vulnerabilities page appears, clear the “Selected Vulnerabilities” check box and then select the appropriate QIDs and click “OK.”
Automatic Ticket Creation
Now that you have explored the remediation capabilities and created a remediation policy, you are ready to run a scan to create tickets. Launch a scan as you did before. See Starting a Scan on page 19 for assistance.
38 QualysGuard Evaluator’s Guide

Step 4: RemediationAutomatic Ticket Creation
When your scan completes, go back to the Remediation page by selecting “Remediation” on the top menu bar. Tickets that are in “Open” state and assigned to you are listed. Use the Search feature to find tickets based on various ticket, host and vulnerability attributes. Enter your search criteria and then select “Search” to update the list of tickets.
Click any ticket # to view ticket details and make changes. The Edit Ticket page will appear. The following example is for ticket #2758 which is in Open/Reopened state.
QualysGuard Evaluator’s Guide 39

Step 4: RemediationManual Ticket Creation
Scrolling down, you will see vulnerability details and a ticket history. You can also reassign the ticket to someone else, add comments, and so on. The ticket history includes actions taken on the ticket automatically by the service such as when the vulnerability was discovered, when it was fixed, and the remediation policy rule that resulted in the ticket creation. Actions taken by users are also included.
Verification is done automatically as scan results become available. You also have the option to launch a verification scan directly from the Edit Ticket page. This option is available for tickets on IP tracked hosts. This is especially useful if you’ve applied a fix for a vulnerability and want to immediately verify that the fix resolved the issue. To do so, select the “Scan” button in the top right corner of the Edit Ticket page. You will be redirected to the Launch Scan page with certain scan settings pre-populated. For example, the scan title will be “Verification Scan – Remediation Ticket <number>.” If applicable, select a scanner appliance to apply to the task, and then select “Start Scan.” Remember, many tickets may be updated as a result of scanning a single host.
Manual Ticket Creation
As already discussed, it is best practice to create one or more remediation policies for the subscription to automate the ticket creation process. With a remediation policy in place, tickets are created automatically by the service when detected vulnerabilities match conditions specified in policy rules.
QualysGuard also has the functionality for out-of-band ticket creation. Users can manually create tickets for any host/vulnerability/port combination directly from Automatic scan reports. For example, you may manually create a ticket for a vulnerability not addressed by the policy.
To manually create a ticket, generate an Automatic scan report (e.g. “Technical Report”) and scroll down to the Detailed Results. Identify the host and vulnerability you want to create a ticket for and place your cursor over the red cross . Then select “Create ticket” from the drop-down menu as shown below:
40 QualysGuard Evaluator’s Guide

Step 4: RemediationRemediation Reporting
The Create Ticket page appears where you must determine who the ticket should be assigned to and set a deadline for ticket resolution. The history log for a manually created ticket shows that the ticket was created by a user rather than by the service. Also noted is the date and time of the ticket creation.
Note that the “Create ticket” option does not appear if a ticket already exists for the vulnerability instance. In this case, a “View/edit ticket” option appears instead.
Remediation Reporting
A large network will likely have a very large number of remediation tickets associated with it at any point in time. Thus, any user may also have a large number of tickets. One way for a manager to understand the progress and compliance with remediation policy is to use QualysGuard to initiate a remediation report.
Select “Report” on the top menu bar, then select the “Remediation Reports” tab. QualysGuard displays a page with four report choices:
• Executive Report
• Tickets per Vulnerability
• Tickets per User
• Tickets per Asset Group
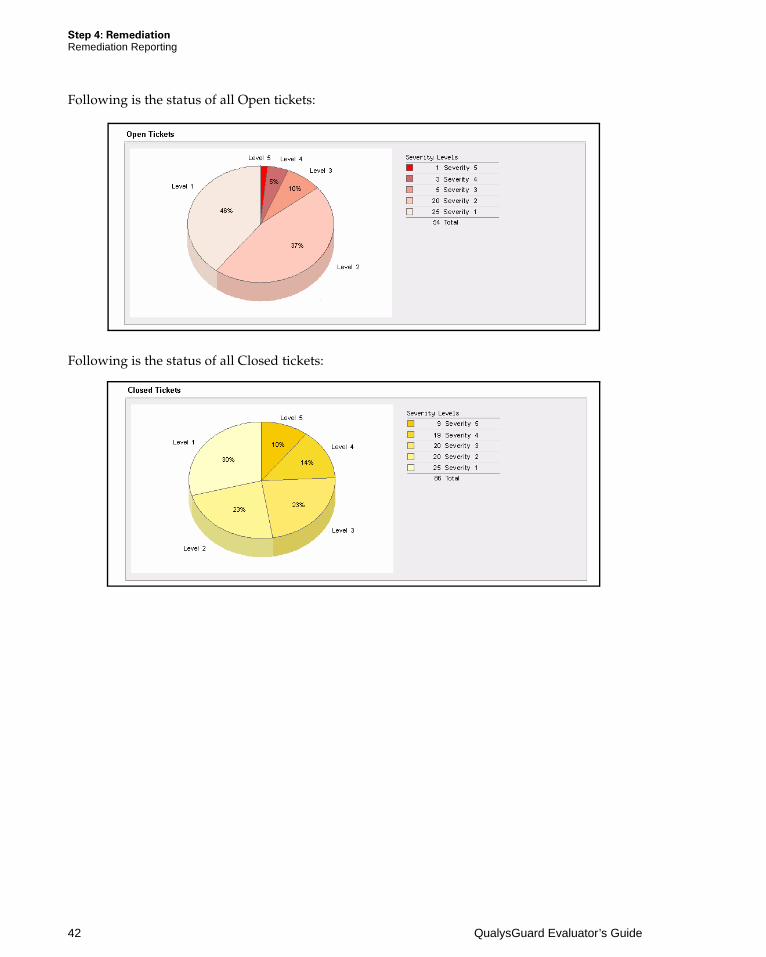
Select “Executive Report” by selecting the icon in the “Run” column next to it. This will open an Executive Report showing the overall remediation progress for a given network. Use the “Select Asset Groups” link to select your scanned assets, and leave the default “All tickets” selected. Then select “OK”. QualysGuard will then run an Executive Report like the one shown below:
QualysGuard Evaluator’s Guide 41
Step 4: RemediationRemediation Reporting
Following is the status of all Open tickets:
Following is the status of all Closed tickets:
42 QualysGuard Evaluator’s Guide

Step 4: RemediationRemediation Ticket Update Notification
Then you can see the ticket state changes over time:
Feel free to run the other three remediation reports to see the information that QualysGuard returns.
Remediation Ticket Update Notification
You can choose to receive daily remediation ticket updates in your user account. The email notification identifies the status and changes to the tickets in your account over the past day. Tickets assigned to you and tickets based on assets in your account are included.
Remediation Summary
QualysGuard provides a remediation process that allows you to close the loop in your Vulnerability Management process. This is done with powerful capabilities, such as automatic ticket generation, that separates QualysGuard from other solutions.
QualysGuard Evaluator’s Guide 43

QualysGuard in Retrospect
What you have experienced using QualysGuard so far are many of its basic capabilities. One of QualysGuard’s most noteworthy capabilities has to do with how managers group the various assets, assign users with differing roles and access levels, and use scheduled mapping and scanning to produce trend and analysis reports over time.
Asset Management
You can organize assets into asset groups and business units, assign them business impact levels, and so on. From the Preferences page, select the “Asset Groups” tab to view your asset groups. Select “New Asset Group” to add a new asset group. Asset grouping offers great flexibility, allowing you to assign assets to multiple asset groups.
By clicking on the icon to the left of an asset group, you can view the information associated with it. For example, here is the information for Financial Systems:

QualysGuard in RetrospectAsset Management
Optionally you may wish to go one step further and organize asset groups into business units. By doing so, you can grant management responsibilities to dedicated Unit Managers. Unit Managers are tasked with overseeing assets and users within their respective business units. See the “Business Units” section in the online help for more information (Help—>Account Setup—>Assets—>Business Units).
QualysGuard Evaluator’s Guide 45

QualysGuard in RetrospectUser Management
Following is a typical example of how an enterprise might segregate their assets into user-defined business units in QualysGuard:
User Management
After you create asset groups, and optionally business units, you can add users and create Unit Managers responsible for the business units. Next we will introduce you to how account management works and how easily it can be applied.
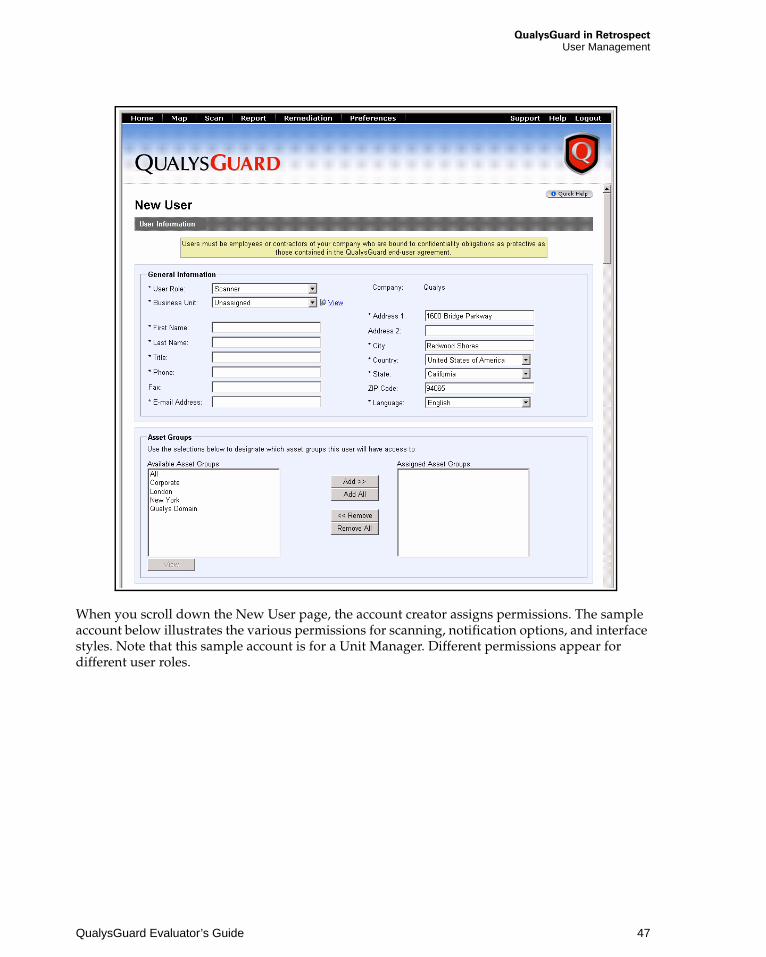
On the Preferences page, by selecting the “Users” tab, and selecting “New User” in the upper right-hand corner, you can add users to your account, assign them roles, and associate them with business units.
When you add a new user, the New User page appears as shown:
46 QualysGuard Evaluator’s Guide
QualysGuard in RetrospectUser Management
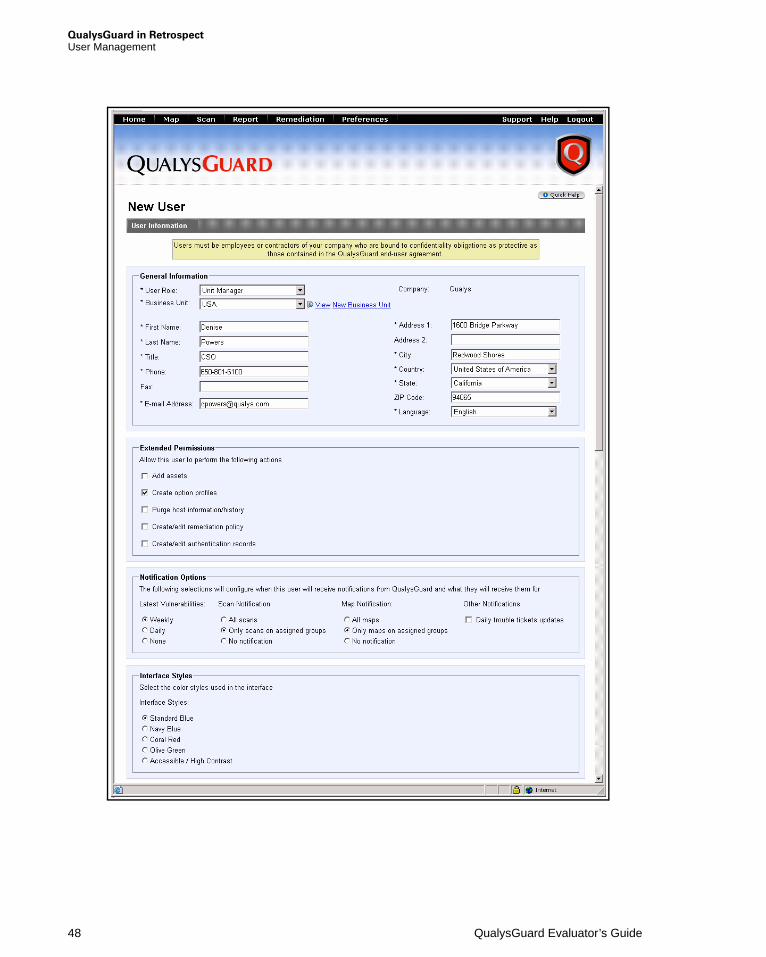
When you scroll down the New User page, the account creator assigns permissions. The sample account below illustrates the various permissions for scanning, notification options, and interface styles. Note that this sample account is for a Unit Manager. Different permissions appear for different user roles.
QualysGuard Evaluator’s Guide 47
QualysGuard in RetrospectUser Management
48 QualysGuard Evaluator’s Guide

QualysGuard in RetrospectAsset Search Portal
Users in QualysGuard can be created in a hierarchical manner with various roles and privileges. A typical QualysGuard deployment will have multiple users with multiple business units as depicted in the following chart:
QualysGuard provides great flexibility in defining users, asset groups, and business units to reflect the organizational structure and business requirements for the enterprise. See “Account Setup” in the online help for further information (Help—>Account Setup).
Asset Search Portal
During the scanning process, the scanning engine attempts to gather information about target hosts, including the host’s operating system, open TCP and UDP ports and services running on open ports. The asset search portal enables you to search through scan results to find hosts based on this type of information. You can search for hosts with a certain tracking method, operating system, port number, service or detected vulnerability. You can also search for hosts scanned within a particular time-frame.
To perform an asset search, select the “Asset Search Portal” tab on the “Report” page. Then identify your search target (asset groups and/or IPs), define host attributes and select “Search”. The following example shows an asset search on the group “New York” for all Linux hosts running the HTTP service.
QualysGuard Evaluator’s Guide 49

QualysGuard in RetrospectAsset Search Portal
Asset search results appear in a separate browser window so you can launch several queries at the same time. You have the option to print asset search results and download them in PDF, ZIP, MHT and CSV formats. As shown below, two hosts matched the criteria specified in the sample asset search. See the online help for more information on asset search results and workflow actions.
50 QualysGuard Evaluator’s Guide

QualysGuard in RetrospectQualysGuard KnowledgeBase
QualysGuard KnowledgeBase
QualysGuard includes the most comprehensive KnowledgeBase of vulnerability signatures in the industry and approaches a six sigma quality rate (less than 3.4 defects per million scans, or 99.9997% accuracy). Automatic, daily updates to the Vulnerability KnowledgeBase give users the ability to scan for the latest threats. To view the KnowledgeBase, go to the KnowledgeBase tab (Home—>KnowledgeBase).
The following information appears for each vulnerability: QID (Qualys ID), category, title, severity level, CVE ID, vendor reference and Bugtraq ID. View vulnerability details to see additional information including Threat, Impact, Compliance and Solution descriptions. Use the Search feature to quickly find particular vulnerabilities.
OVAL (Open Vulnerability and Assessment Language)
OVAL is an international standard to check for the presence of vulnerabilities and configuration issues on computer systems. QualysGuard supports OVAL versions 4.0, 4.1 and 4.2.
Add OVAL vulnerabilities to the KnowledgeBase by selecting “Home” on the top menu bar and then selecting the “New Vulnerability” button. Paste in XML for an OVAL vulnerability definition. You may enter OVAL vulnerability definitions for Windows registry tests, Windows file tests and compound tests.
QualysGuard Evaluator’s Guide 51

QualysGuard in RetrospectCVSS (Common Vulnerability Scoring System)
Once added, your new vulnerability is available for scanning and reporting. QualysGuard assigns each OVAL vulnerability a unique QID (Qualys ID) and lists the vulnerability in the OVAL category as shown below:
CVSS (Common Vulnerability Scoring System)
QualysGuard supports CVSS, the emerging open standard for vulnerability scoring (using a scale of 1 – 10). CVSS was commissioned by the National Infrastructure Advisory Counsel (NIAC) and is currently maintained by FIRST. CVSS is widely supported by security organizations and vendors including: CERT, Mitre, Cisco, Symantec, Microsoft and Qualys. The following values are needed to calculate a CVSS score for a vulnerability: Base Score, Temporal Score and Environmental metrics.
52 QualysGuard Evaluator’s Guide

QualysGuard in RetrospectSummary
A Base Score measures the fundamental, unchanging qualities of a vulnerability. The Base score is provided by the service and assigned to vulnerabilities.
A Temporal Score measures the time dependent qualities of a vulnerability, which may change over time. The Temporal score is provided by the service and assigned to vulnerabilities.
Two Environmental Metrics (Collateral Damage Potential and Target Distribution) measure the implementation and environment specific qualities of a vulnerability. Users define environmental metrics in asset groups. The environmental metrics defined for an asset group apply to all hosts in the asset group.
The sample below shows a final CVSS score of 5.7 for QID 90267 on IP 64.41.134.60. See the vulnerability details for the CVSS Base and Temporal scores assigned to the vulnerability and the environmental metrics assigned to the host’s asset group.
Summary
QualysGuard includes many advanced features that take you beyond common Vulnerability Management. The asset management capabilities provide the user powerful tools to manage and organize their assets. The Policy Compliance SDK and its application library provides a framework for you to develop specific applications for your compliance requirements. The KnowledgeBase provides the ability to always scan for the latest threats and report security risk using supported industry standards. We encourage you, if you have time, to try other QualysGuard capabilities and drive into greater detail than we have covered.
QualysGuard Evaluator’s Guide 53
Wrap-up
Now that you are in the process of your evaluation it is time to think about your key requirements and prioritize them. Some of the key strengths that differentiate QualysGuard are:
Secure Vulnerability Management
When managers add new users and assign roles to them, QualysGuard uses the role-based permissions to grant users access to vulnerability data (manage, scan, or read only). Additionally, every bit of data scanned is stringently encrypted before being transported to the Qualys SOC. All of your account data stored in redundant SOCs is also encrypted and unreadable by anyone without account authorization. QualysGuard is the only VM solution that encrypts vulnerability data for customers – a security requirement for enterprise customers as well as a key requirement for Sarbanes-Oxley compliance.
Discovery and Vulnerability Assessment
As you saw first hand, QualysGuard is easy to set up and to use in initiating mapping (or discovery) and scanning (or vulnerability assessment). Our process is similar to that used by the best consultants exercising best practices. As such, it is non-intrusive yet effective and accurate. It leaves no vulnerability uncovered and so provides comprehensive discovery and analysis. Qualys is continuously improving its already very low level of false positives, so our assessments are accurate to a very high degree – reaching six sigma quality level in terms of accuracy and low false positives.
The KnowledgeBase core upon which QualysGuard relies is updated several times each day, and new vulnerabilities and their signatures are added in daily.
Prioritized Remediation
With the flexibility to tailor business risk metrics, and the ability to modify business impact levels, you can closely match business risk results with actual business risk exposures. This is critical for creating an effective, priority-oriented approach to remediation.
It is the combination of vulnerability severity AND business impact that determines both the level of business risk and the order of remediation priority.
When a user is assigned a remediation ticket, it is associated with a specific vulnerability. That user can easily and quickly identify the vulnerability, its threat level and impact, and find the remedy or workaround to eliminate or mitigate it.
Wrap-upCompliance Reporting
Compliance Reporting
QualysGuard provides default, customizable reports for achieving compliance with a wide variety of security standards and regulations, including Payment Card Industry (PCI) Data Security Standard, HIPAA, GLBA, SB 1386, Sarbanes-Oxley, the CobIT information technology standard and others. QualysGuard is certified by MasterCard for PCI Compliance auditing and reporting. When appropriate vulnerabilities are fixed per the PCI standard, the QualysGuard PCI Executive report may be submitted directly to the acquiring bank for certification. Using QualysGuard’s reporting engine and API, you can produce custom compliance reports where you build a custom policy and run reports against this policy.
Interoperability
Although QualysGuard provides all the capabilities to handle vulnerability management on its own, it also provides APIs and integration tools that enable built-in integration with existing call center/help desk systems such as Remedy AR System, leading SIM/SEM solutions such as Symantec SESA V2, and patch management systems such as Citadel and PatchLink. These QualysGuard integration tools provide customers interoperability with security solutions deployed in their organization, allowing them to build a custom workflow for scanning and remediation.
QualysGuard is the leading security auditing solution for Cisco Network Admission Control (NAC). QualysGuard for NAC provides on demand auditing of hosts as they attempt to gain access to the network. Audit results are automatically mapped to a policy that is used by the NAC architecture to restrict host access based on each host’s security posture. QualysGuard for NAC interoperates with the Cisco NAC architecture and equipment as available. For more information, please visit www.qualys.com/nac.
On-Demand Approach
To implement a Vulnerability Management process with best practices and to identify and remediate critical vulnerabilities in a timely manner – this requires the ability to discover changes to a network within a short time after they have occurred. It relies on comprehensive and accurate vulnerability assessments with a minimum of false positives. Because all network assets and vulnerabilities are not equal, the process needs a way to establish meaningful priorities for addressing the vulnerabilities that are found. And, it must have a way to track and report on remediation efforts to provide a real measure of progress and reduced threat levels. QualysGuard addresses all these enterprise requirements with its on demand approach. And since QualysGuard is delivered as an on demand service, there is no infrastructure to deploy or manage. For more information, please visit www.qualys.com.
QualysGuard Evaluator’s Guide 55