Embed Size (px)
Citation preview
20030127
VMware vCenter™ Lab Manager 4 Evaluator’s GuideInstalling, Con�guring, and Deploying Lab Manager 4
E V A L U A T O R ' S G U I D E
2
E valuator’s guidEVMware VCenter™ Lab Manager 4 eVaLuator’s guide
Contents
1. Getting Started . . . . . . . . . . . . . . . . . . . . . . . . . . . . . . . . . . . . . . . . . . . . . . . . 3
1.1 about this guide. . . . . . . . . . . . . . . . . . . . . . . . . . . . . . . . . . . . . . . . . . . . . . . . . . . . . . . . . . . . . . . . . . . . . . . . . . . . . . . . . . . 3
1.2 Help and support during the evaluation. . . . . . . . . . . . . . . . . . . . . . . . . . . . . . . . . . . . . . . . . . . . . . . . . . . . . . . . . . . . 3
2. What is VMware vCenter Lab Manager? . . . . . . . . . . . . . . . . . . . . . . . . . . . . . . . . 4
3. System Requirements . . . . . . . . . . . . . . . . . . . . . . . . . . . . . . . . . . . . . . . . . . . . 5
3.1 Hardware requirements . . . . . . . . . . . . . . . . . . . . . . . . . . . . . . . . . . . . . . . . . . . . . . . . . . . . . . . . . . . . . . . . . . . . . . . . . . . 5
3.2 software requirements . . . . . . . . . . . . . . . . . . . . . . . . . . . . . . . . . . . . . . . . . . . . . . . . . . . . . . . . . . . . . . . . . . . . . . . . . . . . 5
3.3. software installations and Configurations . . . . . . . . . . . . . . . . . . . . . . . . . . . . . . . . . . . . . . . . . . . . . . . . . . . . . . . . . . 6
3.4. VMware vCenter Lab Manager installation and Configuration. . . . . . . . . . . . . . . . . . . . . . . . . . . . . . . . . . . . . . . 7
3.5 Creating Virtual Machine templates . . . . . . . . . . . . . . . . . . . . . . . . . . . . . . . . . . . . . . . . . . . . . . . . . . . . . . . . . . . . . . . . 8
4. Lab Manager Evaluation Tasks . . . . . . . . . . . . . . . . . . . . . . . . . . . . . . . . . . . . . 12
4.1. setting up organizations and workspaces. . . . . . . . . . . . . . . . . . . . . . . . . . . . . . . . . . . . . . . . . . . . . . . . . . . . . . . . . 13
4.2. Creating Multi-VM Configurations . . . . . . . . . . . . . . . . . . . . . . . . . . . . . . . . . . . . . . . . . . . . . . . . . . . . . . . . . . . . . . . . 17
4.3 sharing Configurations with other users . . . . . . . . . . . . . . . . . . . . . . . . . . . . . . . . . . . . . . . . . . . . . . . . . . . . . . . . . . 20
4.4 Moving Configurations across workspaces . . . . . . . . . . . . . . . . . . . . . . . . . . . . . . . . . . . . . . . . . . . . . . . . . . . . . . . . 23
5. Next Steps . . . . . . . . . . . . . . . . . . . . . . . . . . . . . . . . . . . . . . . . . . . . . . . . . . 26
5.1. VMware Contact information . . . . . . . . . . . . . . . . . . . . . . . . . . . . . . . . . . . . . . . . . . . . . . . . . . . . . . . . . . . . . . . . . . . . . 26
5.2. Providing Feedback . . . . . . . . . . . . . . . . . . . . . . . . . . . . . . . . . . . . . . . . . . . . . . . . . . . . . . . . . . . . . . . . . . . . . . . . . . . . . . 26
6. Glossary. . . . . . . . . . . . . . . . . . . . . . . . . . . . . . . . . . . . . . . . . . . . . . . . . . . . 27
7. VMware vCenter Lab Manager Evaluation Worksheet . . . . . . . . . . . . . . . . . . . . . . 28
3
E valuator’s guidEVMware VCenter™ Lab Manager 4 eVaLuator’s guide
1. getting started1.1 About this GuideThe purpose of this document is to support a self-guided, hands-on evaluation of VMware vCenter™ Lab Manager 4. This document is intended to provide IT professionals with the necessary information to install, configure, and deploy VMware vCenter Lab Manager in a VMware vSphere™ environment.
This guide will walk you through some key use cases for VMware vCenter Lab Manager to help you conduct a successful product evaluation. A worksheet provided at the end of this guide will help you track your progress.
A glossary of terms is also available to help explain unfamiliar terms.
1.2 Help and Support during the EvaluationThis guide is not meant to be a substitute for product documentation. For detailed information regarding installation, configuration, administration, and usage of VMware products, please refer to the online documentation. You may also consult the online Knowledge Base if you have any additional questions. Should you require further assistance, please contact a VMware sales representative or channel partner.
Below are some links to online resource, documentation and self-help tools:
VMware vSphere and VMware vCenter Server Resources:
• Product Overview
• Product Documentation
• VMware vSphere™ 4 Documentation (including hardware compatibility guides)
• WhitePapersandTechnicalPapers
• VMware vSphere Evaluator’s Guide
VMware vCenter Lab Manager Resources:
• Product Overview
• Product Documentation
• Installation Guide
• User’s Guide
• VMware vCenter Lab Manager Community
• Support Knowledge Base
4
E valuator’s guidEVMware VCenter™ Lab Manager 4 eVaLuator’s guide
2. What is vMware vCenter lab Manager?VMware vCenter Lab Manager, part of the VMware vCenter family of management products, provides on-demand access and automated management of the internal cloud for dev/test. Application Owners, Development and Test, Support and Training teams can provision application environments in seconds and manage a library of common system configurations through a self-service portal under IT control.
Lab Manager enforces policy-based access control, optimizes utilization of shared infrastructure, and avoids resource conflict in a multi-user environment eliminating repetitive provisioning and ad-hoc management tasks for IT.
Designed for enterprise scalability, best-in-class performance, and seamless integration with VMware vSphere, Lab Manager enables higher service levels, faster time to market and simplified IT administration.
The key features of VMware vCenter Lab Manager are:
• SelfServicePortal–Setup,capture,andre-configuremulti-VMsystemconfigurationsinseconds
• VirtualMachineImageLibrary–Provideanarchiveofcommonlyusedsystemconfigurationswhile reducing storage footprints
• Organizations–Optimizedresourceutilizationofsharedinfrastructure,bettercontrolandcompliancewithIT policy
• EnterpriseScalability–Providesbestinclassperformanceandscalabilityfromlocaltoglobaldeployments.
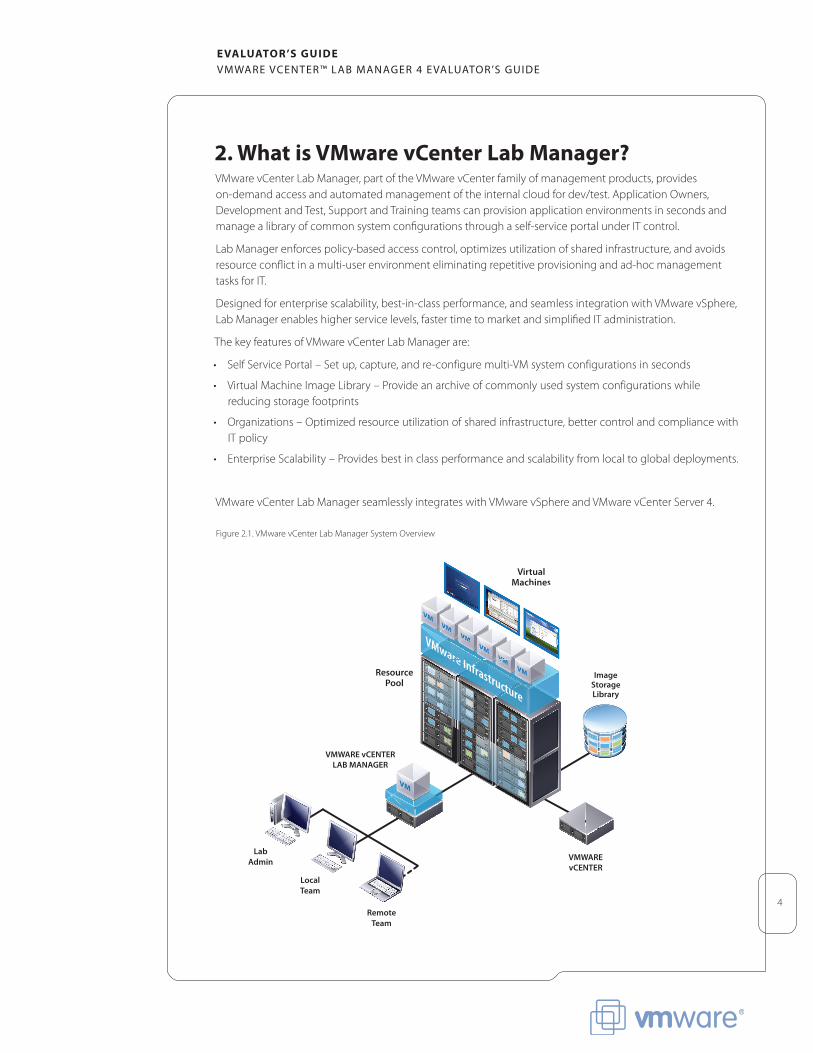
VMware vCenter Lab Manager seamlessly integrates with VMware vSphere and VMware vCenter Server 4.
Figure 2.1. VMware vCenter Lab Manager System Overview
Remote Team
LocalTeam
LabAdmin
ImageStorage Library
VMWARE vCENTER
VMWARE vCENTER LAB MANAGER
VirtualMachines
ResourcePool
VMware Infrastructure
VMVM
VMVM
VMVM
VM
VirtualMachines
arewaare Iwa
VMVMMMVMVMMM
VMVMMM
MVMMM
5
E valuator’s guidEVMware VCenter™ Lab Manager 4 eVaLuator’s guide
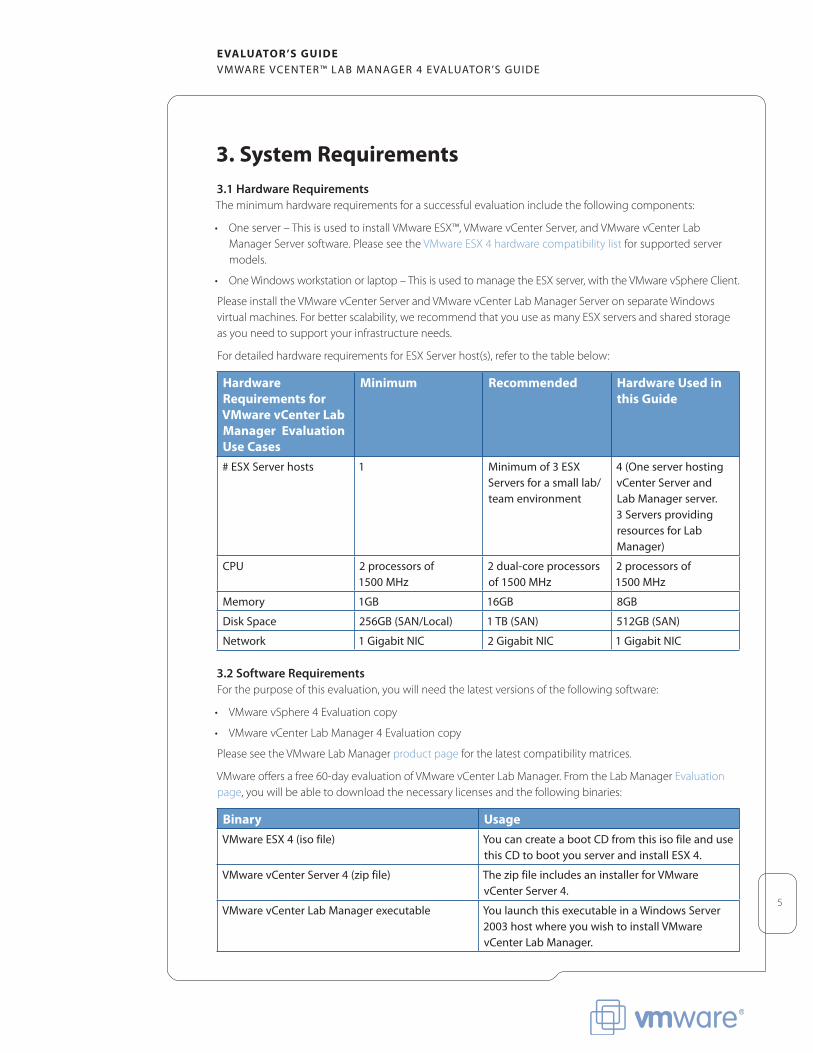
3. system requirements3.1 Hardware RequirementsThe minimum hardware requirements for a successful evaluation include the following components:
• Oneserver–ThisisusedtoinstallVMwareESX™,VMwarevCenterServer,andVMwarevCenterLabManager Server software. Please see the VMwareESX4hardwarecompatibilitylist for supported server models.
• OneWindowsworkstationorlaptop–ThisisusedtomanagetheESXserver,withtheVMwarevSphereClient.
PleaseinstalltheVMwarevCenterServerandVMwarevCenterLabManagerServeronseparateWindowsvirtualmachines.Forbetterscalability,werecommendthatyouuseasmanyESXserversandsharedstorageas you need to support your infrastructure needs.
FordetailedhardwarerequirementsforESXServerhost(s),refertothetablebelow:
Hardware requirements for vMware vCenter lab Manager Evaluation use Cases
Minimum recommended Hardware used in this guide
# esX server hosts 1 Minimum of 3 esX servers for a small lab/team environment
4 (one server hosting vCenter server and Lab Manager server. 3 servers providing resources for Lab Manager)
CPu 2 processors of 1500 MHz
2 dual-core processors of 1500 MHz
2 processors of 1500 MHz
Memory 1gb 16gb 8gb
disk space 256gb (san/Local) 1 tb (san) 512gb (san)
network 1 gigabit niC 2 gigabit niC 1 gigabit niC
3.2 Software RequirementsFor the purpose of this evaluation, you will need the latest versions of the following software:
• VMwarevSphere4Evaluationcopy
• VMwarevCenterLabManager4Evaluationcopy
Please see the VMware Lab Manager product page for the latest compatibility matrices.
VMware offers a free 60-day evaluation of VMware vCenter Lab Manager. From the Lab Manager Evaluation page, you will be able to download the necessary licenses and the following binaries:
Binary usageVMware esX 4 (iso file) You can create a boot Cd from this iso file and use
this Cd to boot you server and install esX 4.
VMware vCenter server 4 (zip file) the zip file includes an installer for VMware vCenter server 4.
VMware vCenter Lab Manager executable You launch this executable in a windows server 2003 host where you wish to install VMware vCenter Lab Manager.
6
E valuator’s guidEVMware VCenter™ Lab Manager 4 eVaLuator’s guide
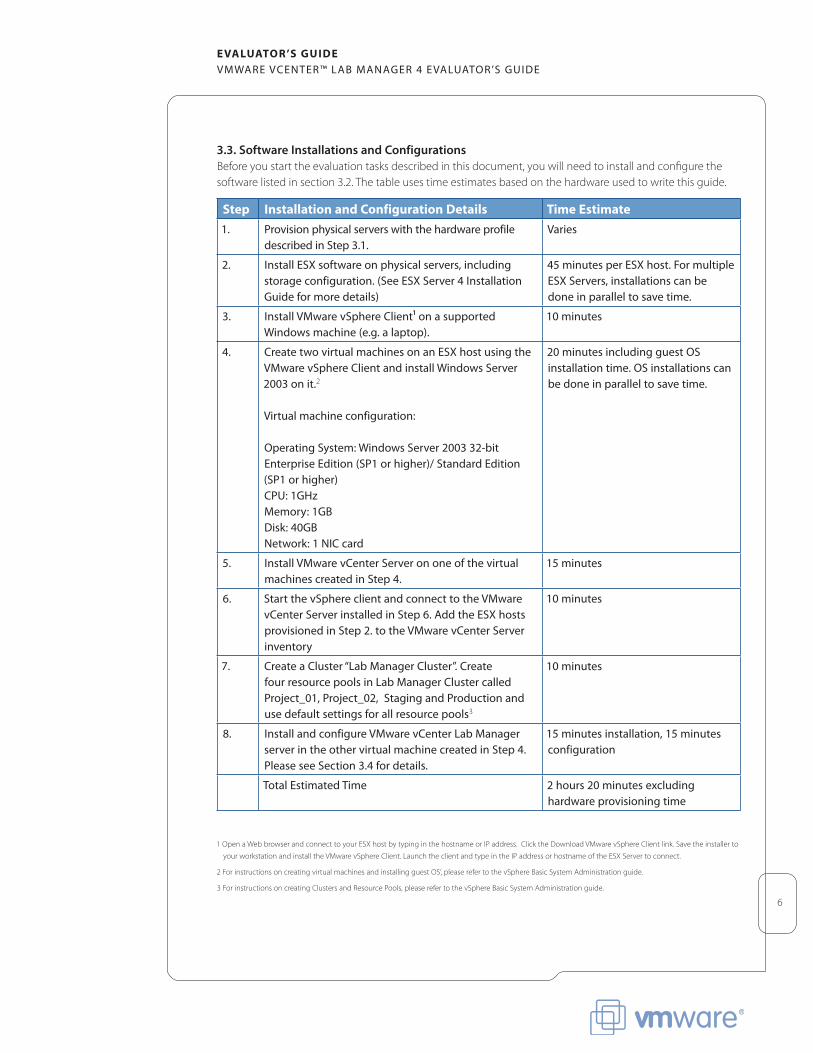
3.3. Software Installations and ConfigurationsBefore you start the evaluation tasks described in this document, you will need to install and configure the software listed in section 3.2. The table uses time estimates based on the hardware used to write this guide.
step installation and Configuration details time Estimate1. Provision physical servers with the hardware profile
described in step 3.1.Varies
2. install esX software on physical servers, including storage configuration. (see esX server 4 installation guide for more details)
45 minutes per esX host. For multiple esX servers, installations can be done in parallel to save time.
3. install VMware vsphere Client1 on a supported windows machine (e.g. a laptop).
10 minutes
4. Create two virtual machines on an esX host using the VMware vsphere Client and install windows server 2003 on it.2
Virtual machine configuration:
operating system: windows server 2003 32-bit enterprise edition (sP1 or higher)/ standard edition (sP1 or higher)CPu: 1gHzMemory: 1gbdisk: 40gbnetwork: 1 niC card
20 minutes including guest os installation time. os installations can be done in parallel to save time.
5. install VMware vCenter server on one of the virtual machines created in step 4.
15 minutes
6. start the vsphere client and connect to the VMware vCenter server installed in step 6. add the esX hosts provisioned in step 2. to the VMware vCenter server inventory
10 minutes
7. Create a Cluster “Lab Manager Cluster”. Create four resource pools in Lab Manager Cluster called Project_01, Project_02, staging and Production and use default settings for all resource pools3
10 minutes
8. install and configure VMware vCenter Lab Manager server in the other virtual machine created in step 4. Please see section 3.4 for details.
15 minutes installation, 15 minutes configuration
total estimated time 2 hours 20 minutes excluding hardware provisioning time
1OpenaWebbrowserandconnecttoyourESXhostbytypinginthehostnameorIPaddress.ClicktheDownloadVMwarevSphereClientlink.Savetheinstallerto
yourworkstationandinstalltheVMwarevSphereClient.LaunchtheclientandtypeintheIPaddressorhostnameoftheESXServertoconnect.
2 For instructions on creating virtual machines and installing guest OS’, please refer to the vSphere Basic System Administration guide.
3 For instructions on creating Clusters and Resource Pools, please refer to the vSphere Basic System Administration guide.
7
E valuator’s guidEVMware VCenter™ Lab Manager 4 eVaLuator’s guide
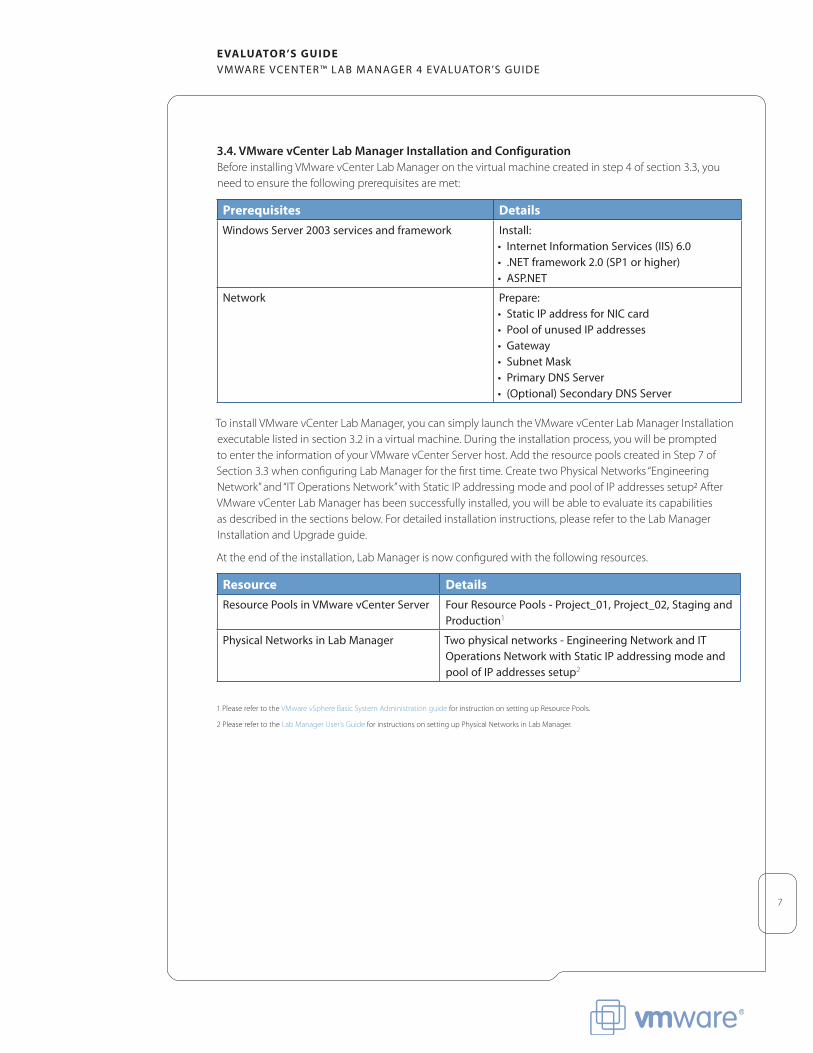
3.4. VMware vCenter Lab Manager Installation and ConfigurationBefore installing VMware vCenter Lab Manager on the virtual machine created in step 4 of section 3.3, you need to ensure the following prerequisites are met:
Prerequisites detailswindows server 2003 services and framework install:
• Internet Information Services (IIS) 6.0• .NET framework 2.0 (SP1 or higher)• ASP.NET
network Prepare:• Static IP address for NIC card• Pool of unused IP addresses• Gateway• Subnet Mask• Primary DNS Server• (Optional) Secondary DNS Server
To install VMware vCenter Lab Manager, you can simply launch the VMware vCenter Lab Manager Installation executable listed in section 3.2 in a virtual machine. During the installation process, you will be prompted to enter the information of your VMware vCenter Server host. Add the resource pools created in Step 7 of Section 3.3 when configuring Lab Manager for the first time. Create two Physical Networks “Engineering Network” and “IT Operations Network” with Static IP addressing mode and pool of IP addresses setup2 After VMware vCenter Lab Manager has been successfully installed, you will be able to evaluate its capabilities as described in the sections below. For detailed installation instructions, please refer to the Lab Manager Installation and Upgrade guide.
At the end of the installation, Lab Manager is now configured with the following resources.
resource detailsresource Pools in VMware vCenter server Four resource Pools - Project_01, Project_02, staging and
Production1
Physical networks in Lab Manager two physical networks - engineering network and it operations network with static iP addressing mode and pool of iP addresses setup2
1 Please refer to the VMware vSphere Basic System Administration guide for instruction on setting up Resource Pools.
2 Please refer to the Lab Manager User’s Guide for instructions on setting up Physical Networks in Lab Manager.
8
E valuator’s guidEVMware VCenter™ Lab Manager 4 eVaLuator’s guide
3.5 Creating virtual Machine templates Templates are basic building blocks in Lab Manager to create multi-tier virtual machine configurations. Templates can be created from scratch in Lab Manager, or imported from VMware vCenter Server or an SMB file server.
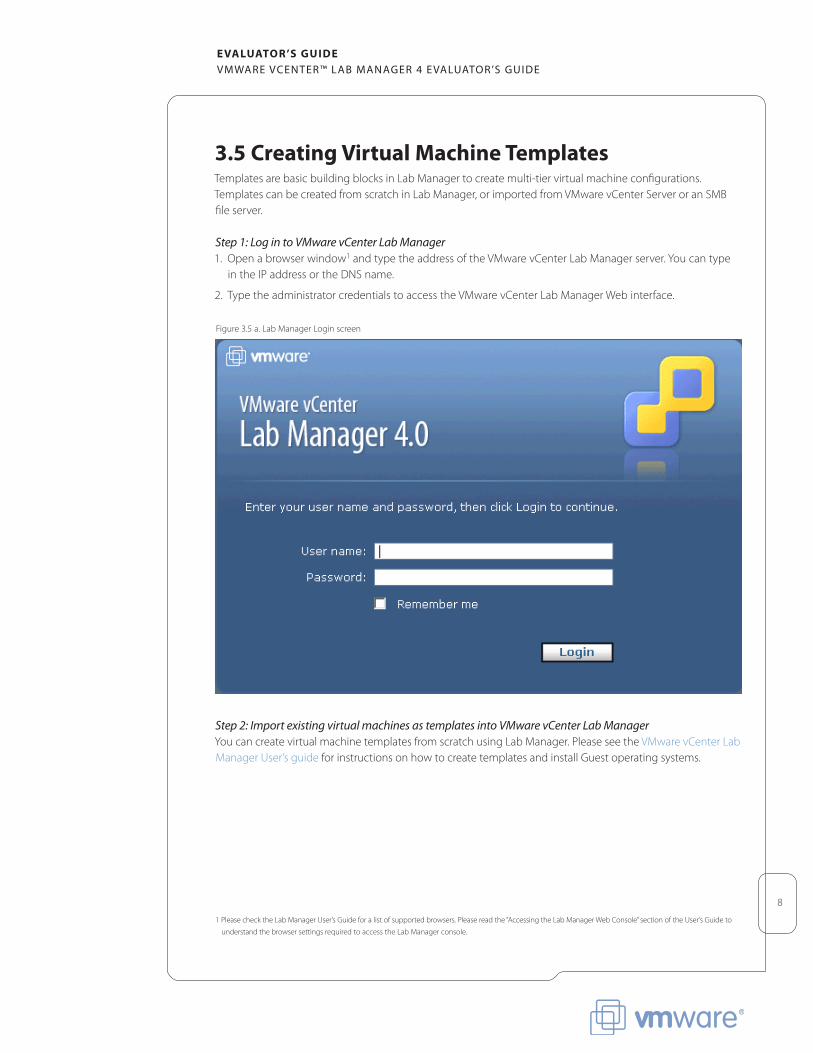
Step 1: Log in to VMware vCenter Lab Manager1. Open a browser window1 and type the address of the VMware vCenter Lab Manager server. You can type
in the IP address or the DNS name.
2. TypetheadministratorcredentialstoaccesstheVMwarevCenterLabManagerWebinterface.
Figure 3.5 a. Lab Manager Login screen
Step 2: Import existing virtual machines as templates into VMware vCenter Lab ManagerYou can create virtual machine templates from scratch using Lab Manager. Please see the VMware vCenter Lab Manager User’s guide for instructions on how to create templates and install Guest operating systems.
1PleasechecktheLabManagerUser’sGuideforalistofsupportedbrowsers.Pleasereadthe“AccessingtheLabManagerWebConsole”sectionoftheUser’sGuideto
understand the browser settings required to access the Lab Manager console.
9
E valuator’s guidEVMware VCenter™ Lab Manager 4 eVaLuator’s guide
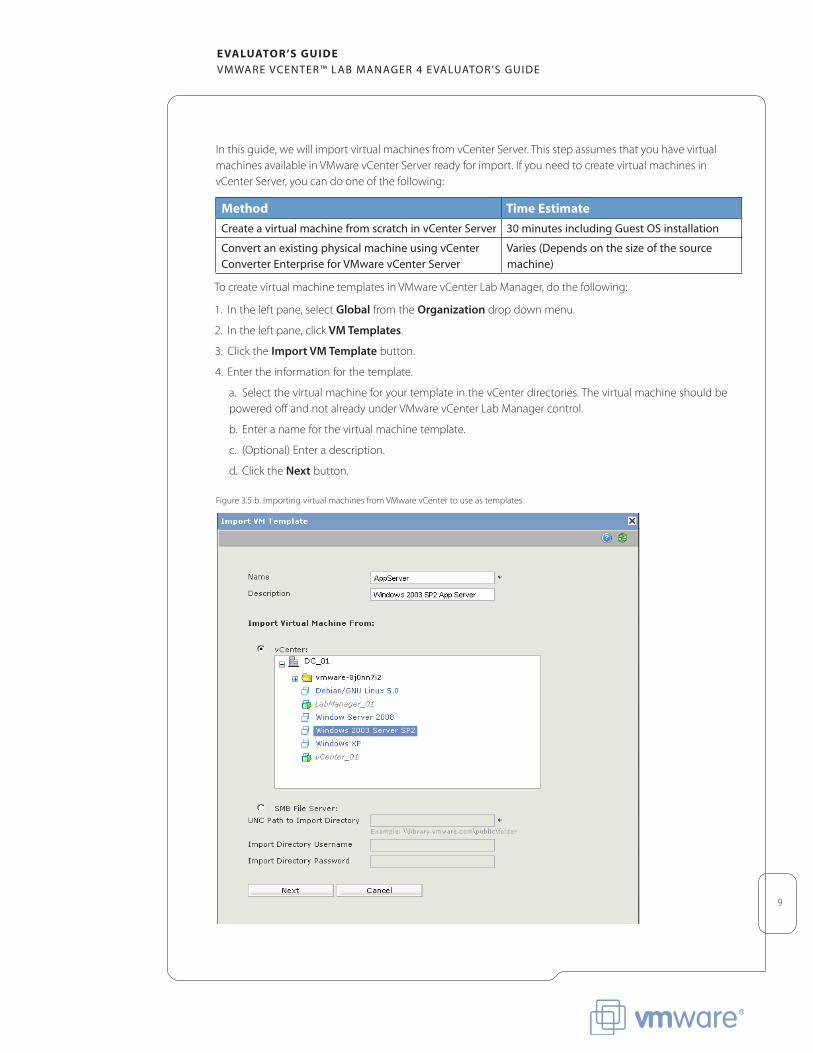
In this guide, we will import virtual machines from vCenter Server. This step assumes that you have virtual machines available in VMware vCenter Server ready for import. If you need to create virtual machines in vCenter Server, you can do one of the following:
Method time EstimateCreate a virtual machine from scratch in vCenter server 30 minutes including guest os installation
Convert an existing physical machine using vCenter Converter enterprise for VMware vCenter server
Varies (depends on the size of the source machine)
To create virtual machine templates in VMware vCenter Lab Manager, do the following:
1. In the left pane, select Global from the Organization drop down menu.
2. In the left pane, click VM Templates.
3. Click the Import VM Template button.
4. Enter the information for the template.
a. Select the virtual machine for your template in the vCenter directories. The virtual machine should be powered off and not already under VMware vCenter Lab Manager control.
b. Enter a name for the virtual machine template.
c. (Optional) Enter a description.
d. Click the Next button. Figure 3.5 b. Importing virtual machines from VMware vCenter to use as templates
10
E valuator’s guidEVMware VCenter™ Lab Manager 4 eVaLuator’s guide
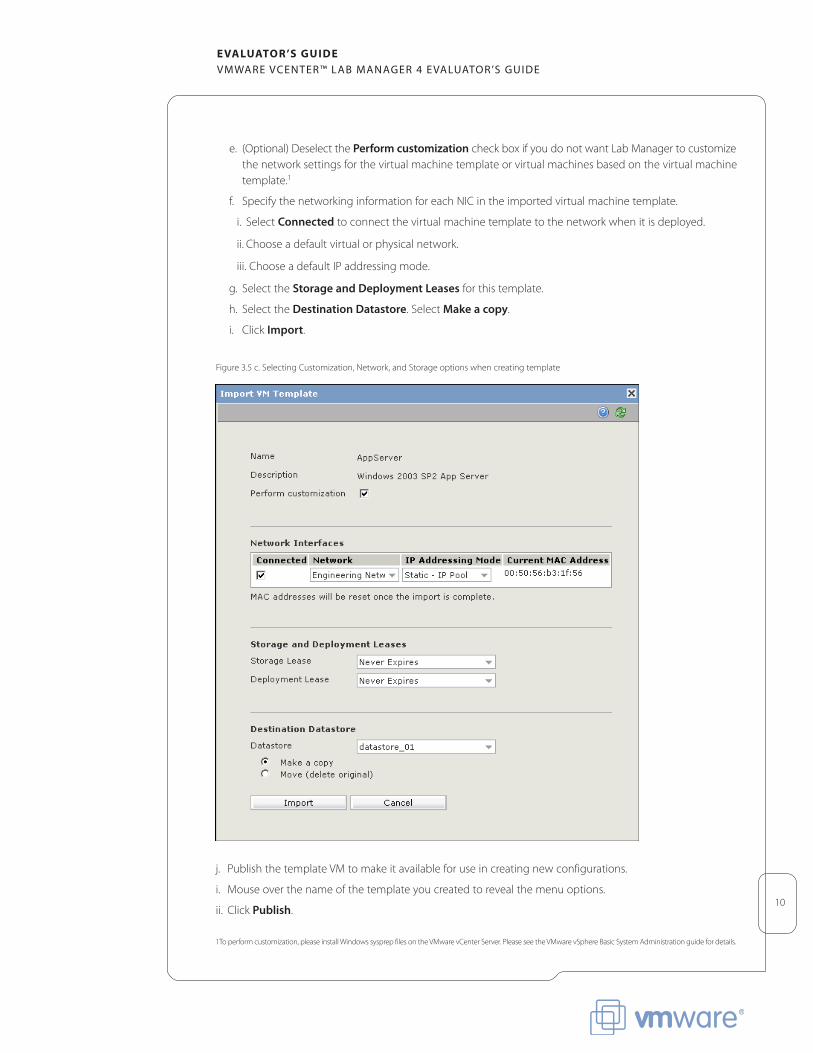
e. (Optional) Deselect the Perform customization check box if you do not want Lab Manager to customize the network settings for the virtual machine template or virtual machines based on the virtual machine template.1
f. Specify the networking information for each NIC in the imported virtual machine template.
i. Select Connected to connect the virtual machine template to the network when it is deployed.
ii. Choose a default virtual or physical network.
iii. Choose a default IP addressing mode.
g. Select the Storage and Deployment Leases for this template.
h. Select the Destination Datastore. Select Make a copy.
i. Click Import.
Figure 3.5 c. Selecting Customization, Network, and Storage options when creating template
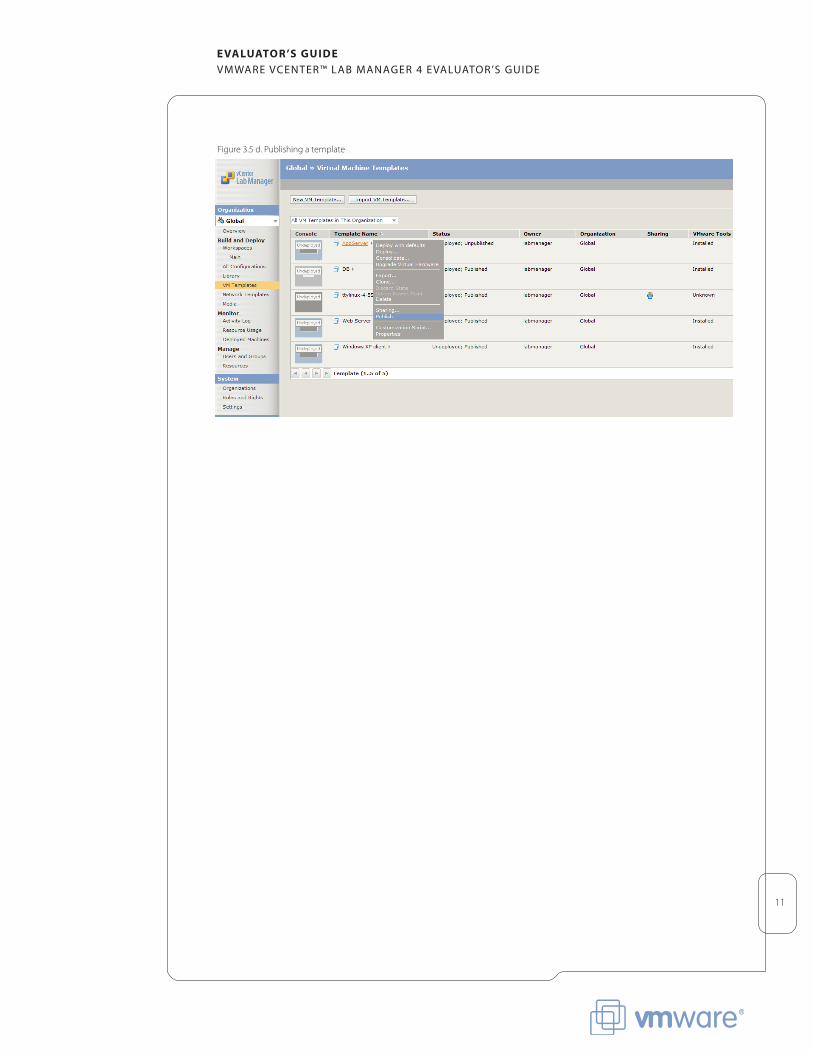
j. Publish the template VM to make it available for use in creating new configurations.
i. Mouse over the name of the template you created to reveal the menu options.
ii. Click Publish.
1Toperformcustomization,pleaseinstallWindowssysprepfilesontheVMwarevCenterServer.PleaseseetheVMwarevSphereBasicSystem Administration guide for details.
11
E valuator’s guidEVMware VCenter™ Lab Manager 4 eVaLuator’s guide
Figure 3.5 d. Publishing a template
12
E valuator’s guidEVMware VCenter™ Lab Manager 4 eVaLuator’s guide
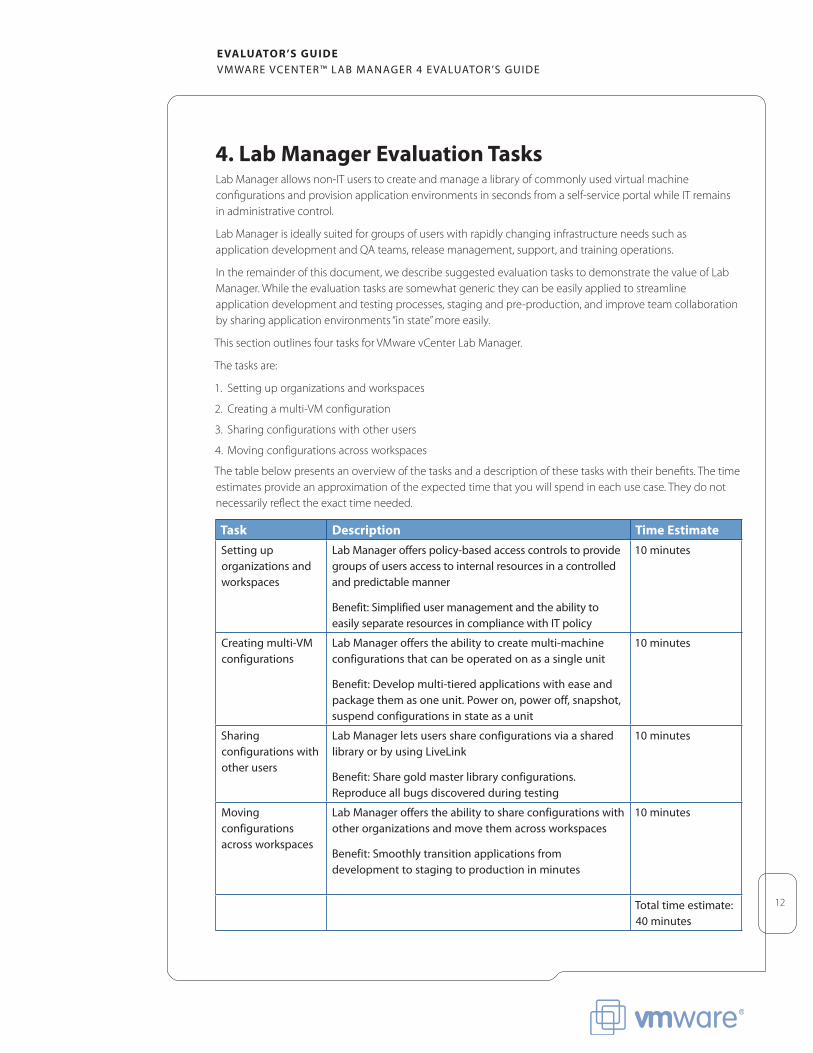
4. lab Manager Evaluation tasksLab Manager allows non-IT users to create and manage a library of commonly used virtual machine configurations and provision application environments in seconds from a self-service portal while IT remains in administrative control.
Lab Manager is ideally suited for groups of users with rapidly changing infrastructure needs such as application development and QA teams, release management, support, and training operations.
In the remainder of this document, we describe suggested evaluation tasks to demonstrate the value of Lab Manager.Whiletheevaluationtasksaresomewhatgenerictheycanbeeasilyappliedtostreamline application development and testing processes, staging and pre-production, and improve team collaboration by sharing application environments “in state” more easily.
This section outlines four tasks for VMware vCenter Lab Manager.
The tasks are:
1. Setting up organizations and workspaces
2. Creating a multi-VM configuration
3. Sharing configurations with other users
4. Moving configurations across workspaces
The table below presents an overview of the tasks and a description of these tasks with their benefits. The time estimates provide an approximation of the expected time that you will spend in each use case. They do not necessarily reflect the exact time needed.
task description time Estimatesetting up organizations and workspaces
Lab Manager offers policy-based access controls to provide groups of users access to internal resources in a controlled and predictable manner
benefit: simplified user management and the ability to easily separate resources in compliance with it policy
10 minutes
Creating multi-VM configurations
Lab Manager offers the ability to create multi-machine configurations that can be operated on as a single unit
benefit: develop multi-tiered applications with ease and package them as one unit. Power on, power off, snapshot, suspend configurations in state as a unit
10 minutes
sharing configurations with other users
Lab Manager lets users share configurations via a shared library or by using LiveLink
benefit: share gold master library configurations. reproduce all bugs discovered during testing
10 minutes
Moving configurations across workspaces
Lab Manager offers the ability to share configurations with other organizations and move them across workspaces
benefit: smoothly transition applications from development to staging to production in minutes
10 minutes
total time estimate: 40 minutes
13
E valuator’s guidEVMware VCenter™ Lab Manager 4 eVaLuator’s guide
4.1. Setting up Organizations and WorkspacesVMware vCenter Lab Manager allows you to create multiple organizations each with multiple workspaces, which include resources and users. You can use these organizations and workspaces to control which users have access to which resources. Lab Manager has access to the resources of the VMware vCenter Server to which it is connected. A system administrator can assign some or all of these resources to an organization. Users in that organization only have access to their assigned resources. An organization can have dedicated resources or share resources with other organizations. In an organization, an administrator can create workspaces and assign some or all of the organization resources to each workspace. A workspace can have dedicated resources or share resources with other workspaces. These levels of granularity provide the system administrator with substantial control over compute, memory, network, and storage resources.
Lab Manager is pre-configured with an organization named Default. A system administrator can change theDefaultorganizationsandcreateadditionalorganizations.Wewillbecreatingtwoneworganizations:Engineering and IT Operations.
In this task, you will create two organizations: Engineering and IT Operations and assign resources to each of these organizations. You can assign some or all of the resources associated with a Lab Manager installation to an organization. Users in that organization only have access to those resources. An organization can have dedicated resources or share resources with other organizations.
In the Engineering organization, you will perform tasks that demonstrate how easy it is to develop applications inside Lab Manager. Once you are done developing the application, you will then proceed to transfer your application to the IT organization for staging and production.
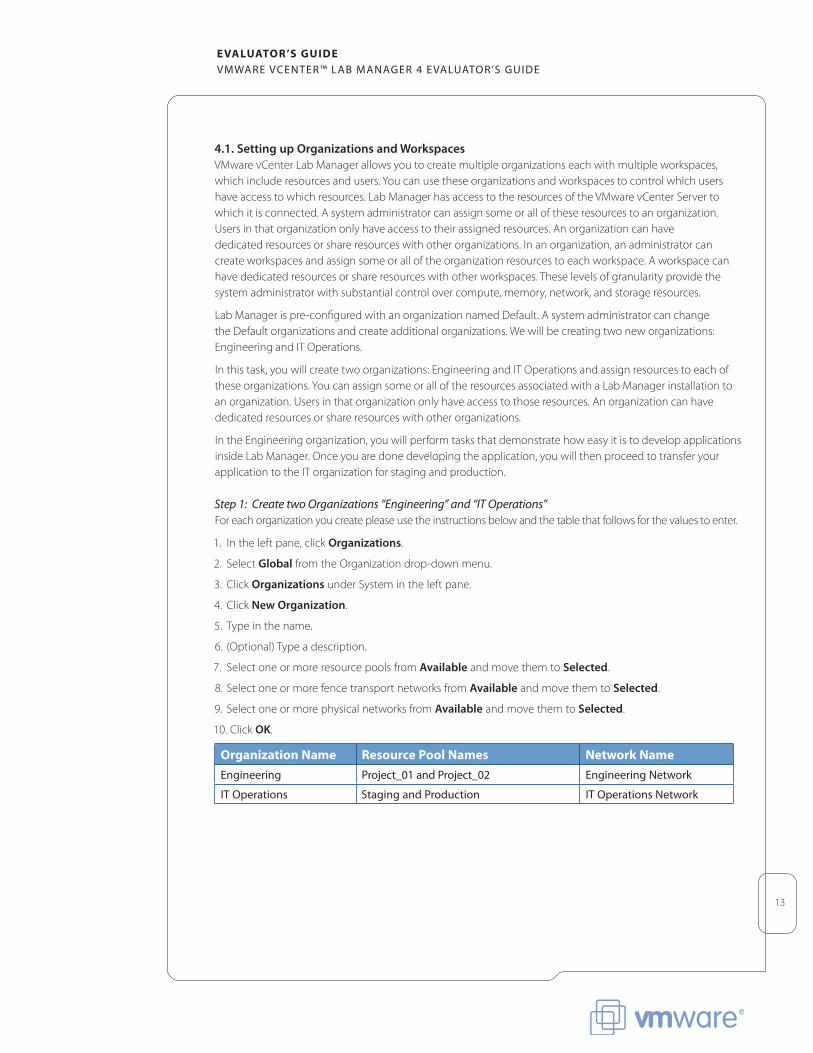
Step 1: Create two Organizations “Engineering” and “IT Operations”For each organization you create please use the instructions below and the table that follows for the values to enter.
1. In the left pane, click Organizations.
2. Select Global from the Organization drop-down menu.
3. Click Organizations under System in the left pane.
4. Click New Organization.
5. Type in the name.
6. (Optional) Type a description.
7. Select one or more resource pools from Available and move them to Selected.
8. Select one or more fence transport networks from Available and move them to Selected.
9. Select one or more physical networks from Available and move them to Selected.
10. Click OK.
organization Name resource Pool Names Network Nameengineering Project_01 and Project_02 engineering network
it operations staging and Production it operations network
14
E valuator’s guidEVMware VCenter™ Lab Manager 4 eVaLuator’s guide
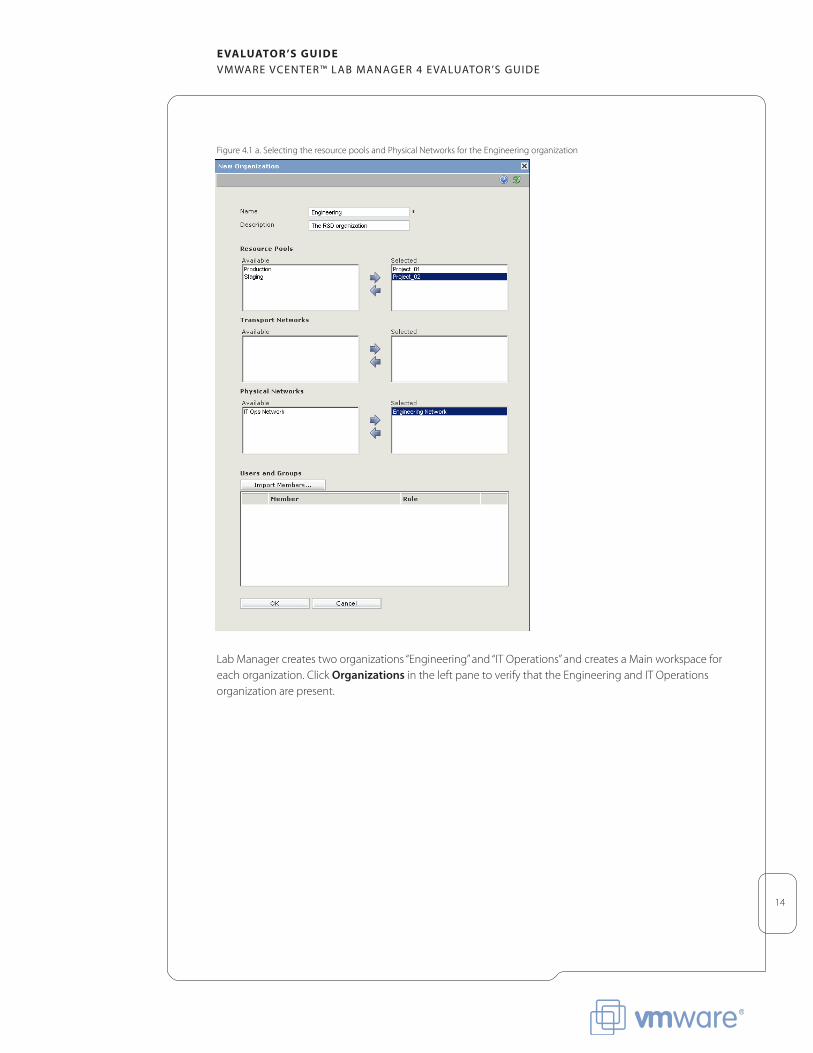
Figure 4.1 a. Selecting the resource pools and Physical Networks for the Engineering organization
Lab Manager creates two organizations “Engineering” and “IT Operations” and creates a Main workspace for each organization. Click Organizations in the left pane to verify that the Engineering and IT Operations organization are present.
15
E valuator’s guidEVMware VCenter™ Lab Manager 4 eVaLuator’s guide
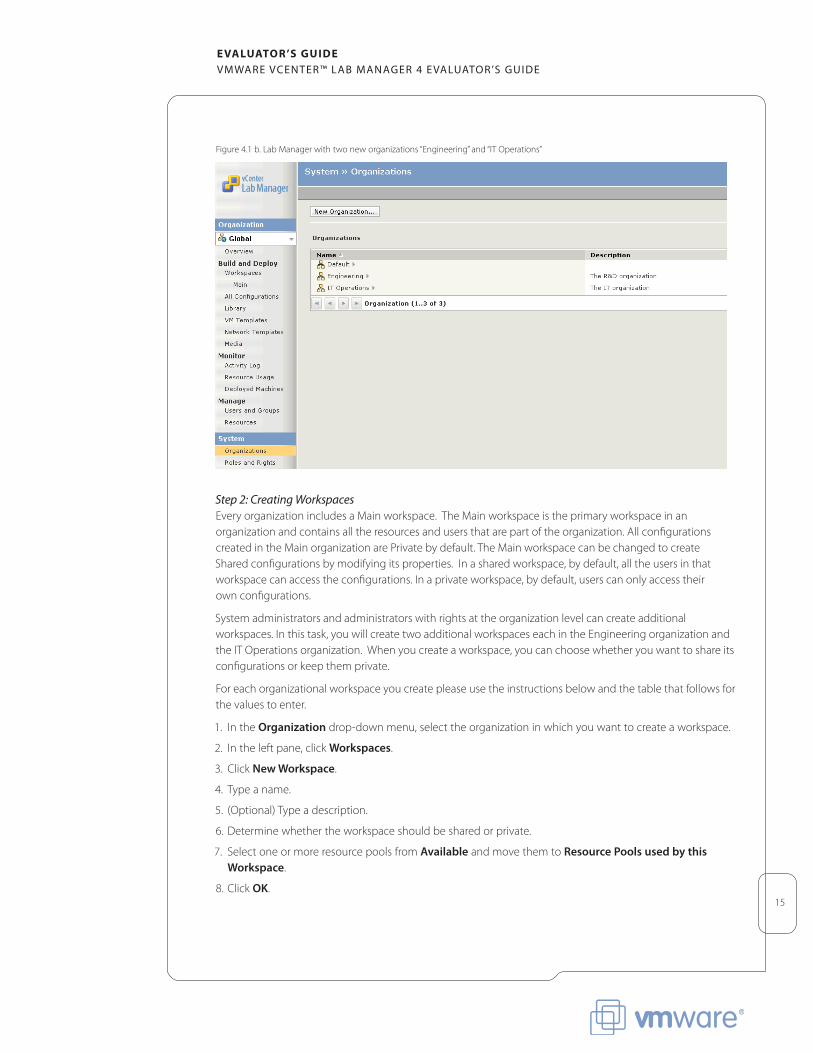
Figure 4.1 b. Lab Manager with two new organizations “Engineering” and “IT Operations”
Step 2: Creating Workspaces Every organization includes a Main workspace. The Main workspace is the primary workspace in an organization and contains all the resources and users that are part of the organization. All configurations created in the Main organization are Private by default. The Main workspace can be changed to create Shared configurations by modifying its properties. In a shared workspace, by default, all the users in that workspace can access the configurations. In a private workspace, by default, users can only access their own configurations.
System administrators and administrators with rights at the organization level can create additional workspaces. In this task, you will create two additional workspaces each in the Engineering organization and theITOperationsorganization.Whenyoucreateaworkspace,youcanchoosewhetheryouwanttoshareitsconfigurations or keep them private.
For each organizational workspace you create please use the instructions below and the table that follows for the values to enter.
1. In the Organization drop-down menu, select the organization in which you want to create a workspace.
2. In the left pane, click Workspaces.
3. Click New Workspace.
4. Type a name.
5. (Optional) Type a description.
6. Determine whether the workspace should be shared or private.
7. Select one or more resource pools from Available and move them to Resource Pools used by this Workspace.
8. Click OK.
16
E valuator’s guidEVMware VCenter™ Lab Manager 4 eVaLuator’s guide
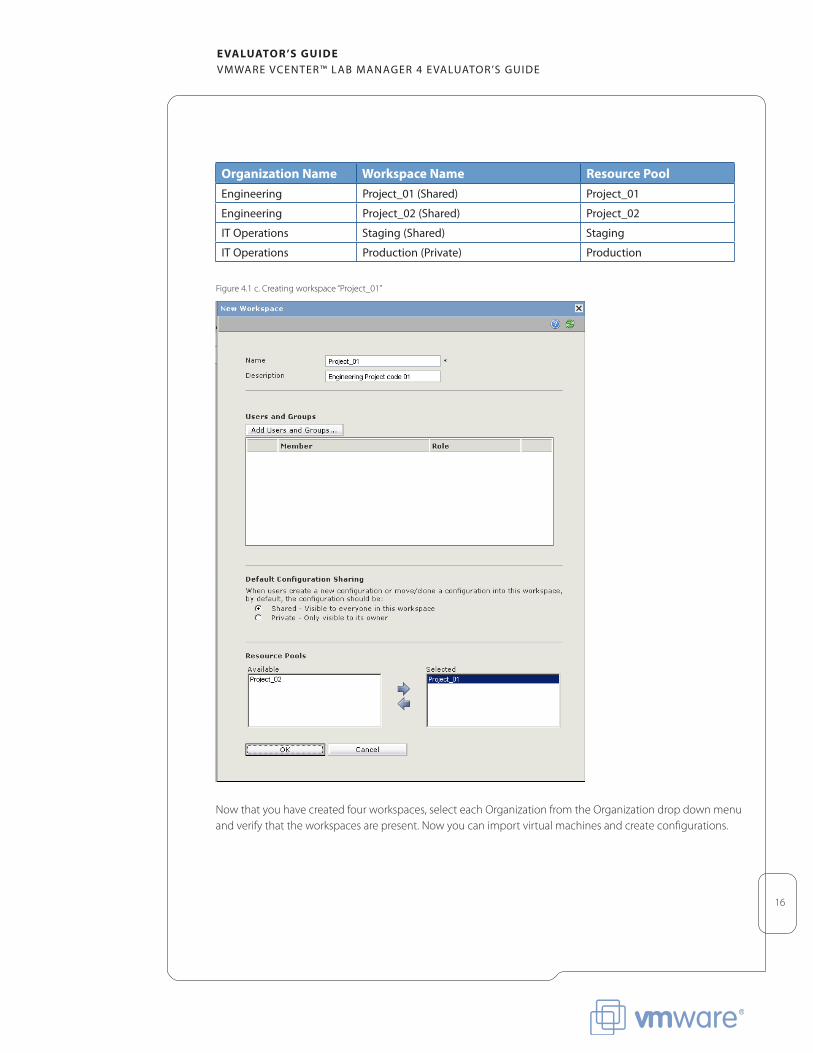
organization Name Workspace Name resource Poolengineering Project_01 (shared) Project_01
engineering Project_02 (shared) Project_02
it operations staging (shared) staging
it operations Production (Private) Production
Figure 4.1 c. Creating workspace “Project_01”
Now that you have created four workspaces, select each Organization from the Organization drop down menu and verify that the workspaces are present. Now you can import virtual machines and create configurations.
17
E valuator’s guidEVMware VCenter™ Lab Manager 4 eVaLuator’s guide
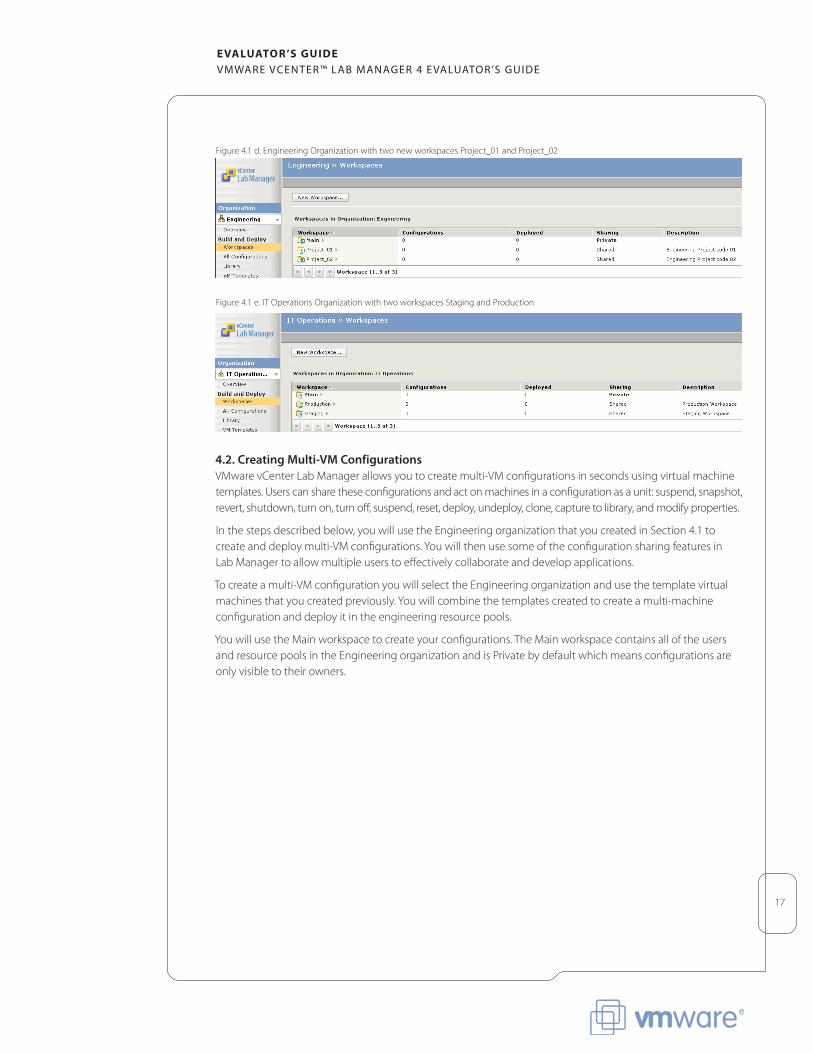
Figure 4.1 d. Engineering Organization with two new workspaces Project_01 and Project_02
Figure 4.1 e. IT Operations Organization with two workspaces Staging and Production
4.2. Creating Multi-VM Configurations VMware vCenter Lab Manager allows you to create multi-VM configurations in seconds using virtual machine templates. Users can share these configurations and act on machines in a configuration as a unit: suspend, snapshot, revert, shutdown, turn on, turn off, suspend, reset, deploy, undeploy, clone, capture to library, and modify properties.
In the steps described below, you will use the Engineering organization that you created in Section 4.1 to create and deploy multi-VM configurations. You will then use some of the configuration sharing features in Lab Manager to allow multiple users to effectively collaborate and develop applications.
To create a multi-VM configuration you will select the Engineering organization and use the template virtual machines that you created previously. You will combine the templates created to create a multi-machine configuration and deploy it in the engineering resource pools.
You will use the Main workspace to create your configurations. The Main workspace contains all of the users and resource pools in the Engineering organization and is Private by default which means configurations are only visible to their owners.
18
E valuator’s guidEVMware VCenter™ Lab Manager 4 eVaLuator’s guide
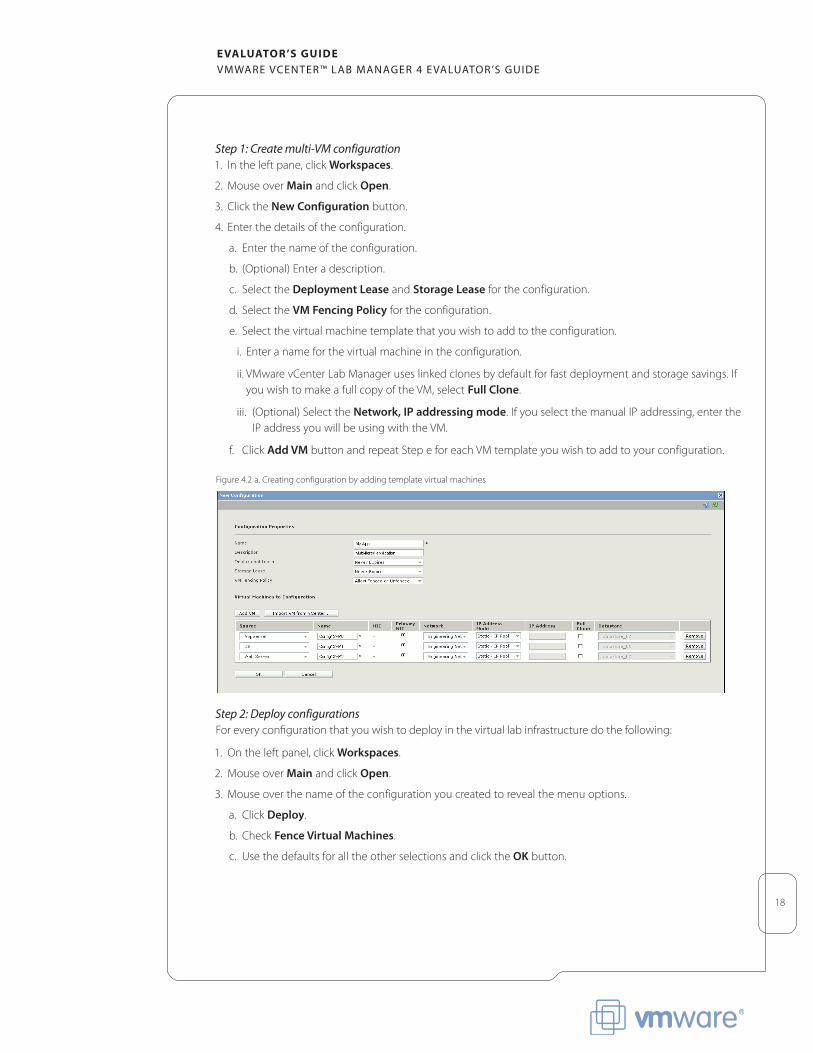
Step 1: Create multi-VM configuration 1. In the left pane, click Workspaces.
2. Mouse over Main and click Open.
3. Click the New Configuration button.
4. Enter the details of the configuration.
a. Enter the name of the configuration.
b. (Optional) Enter a description.
c. Select the Deployment Lease and Storage Lease for the configuration.
d. Select the VM Fencing Policy for the configuration.
e. Select the virtual machine template that you wish to add to the configuration.
i. Enter a name for the virtual machine in the configuration.
ii. VMware vCenter Lab Manager uses linked clones by default for fast deployment and storage savings. If you wish to make a full copy of the VM, select Full Clone.
iii. (Optional) Select the Network, IP addressing mode. If you select the manual IP addressing, enter the IP address you will be using with the VM.
f. Click Add VM button and repeat Step e for each VM template you wish to add to your configuration.
Figure 4.2 a. Creating configuration by adding template virtual machines
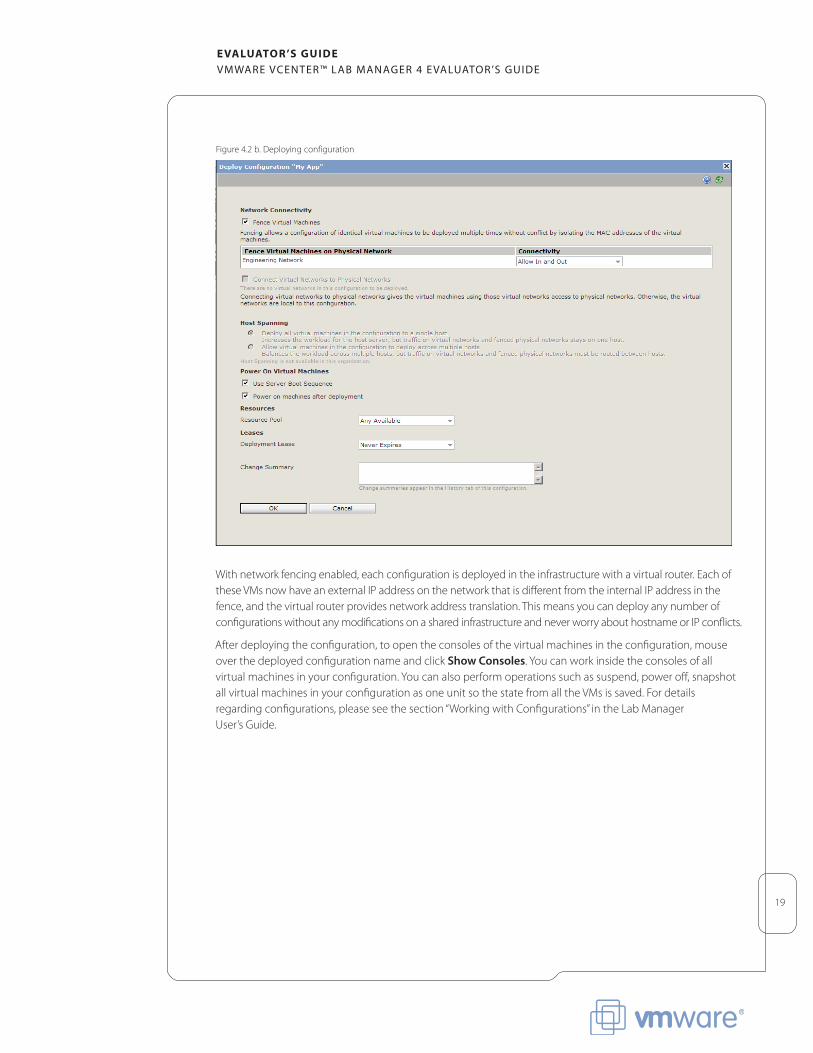
Step 2: Deploy configurations For every configuration that you wish to deploy in the virtual lab infrastructure do the following:
1. On the left panel, click Workspaces.
2. Mouse over Main and click Open.
3. Mouse over the name of the configuration you created to reveal the menu options.
a. Click Deploy.
b. Check Fence Virtual Machines.
c. Use the defaults for all the other selections and click the OK button.
19
E valuator’s guidEVMware VCenter™ Lab Manager 4 eVaLuator’s guide
Figure 4.2 b. Deploying configuration
Withnetworkfencingenabled,eachconfigurationisdeployedintheinfrastructurewithavirtualrouter.Eachofthese VMs now have an external IP address on the network that is different from the internal IP address in the fence, and the virtual router provides network address translation. This means you can deploy any number of configurations without any modifications on a shared infrastructure and never worry about hostname or IP conflicts.
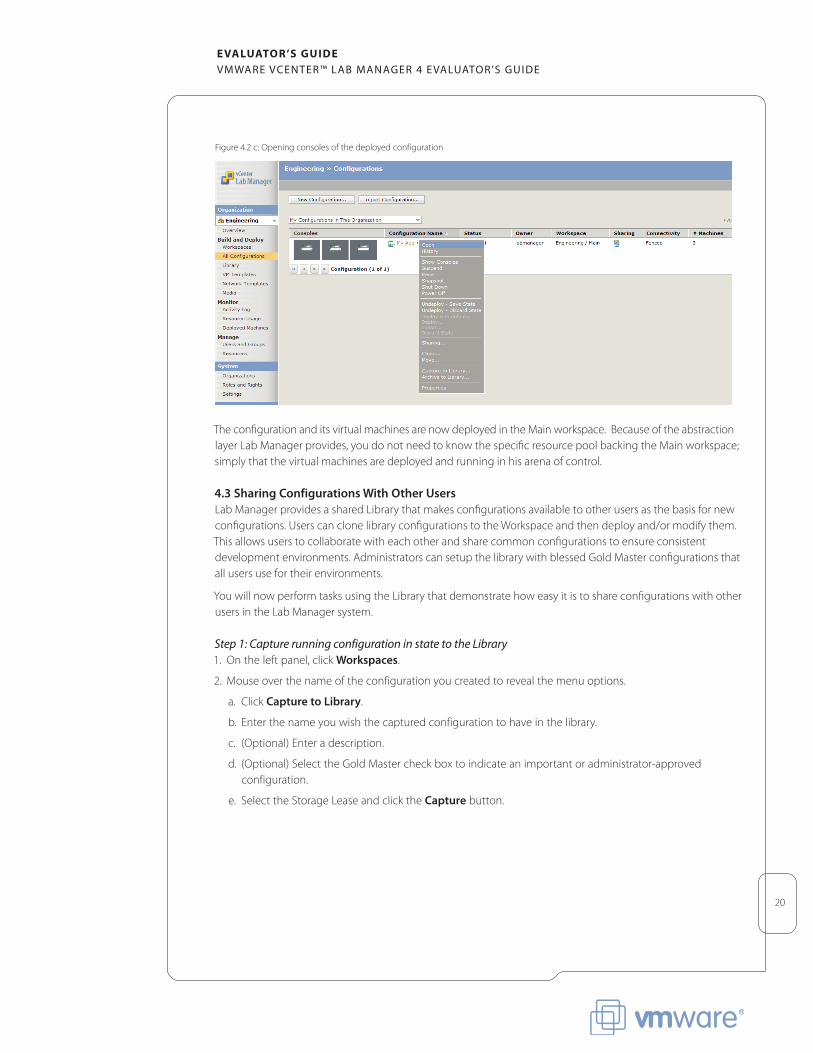
After deploying the configuration, to open the consoles of the virtual machines in the configuration, mouse over the deployed configuration name and click Show Consoles. You can work inside the consoles of all virtual machines in your configuration. You can also perform operations such as suspend, power off, snapshot all virtual machines in your configuration as one unit so the state from all the VMs is saved. For details regardingconfigurations,pleaseseethesection“WorkingwithConfigurations”intheLabManager User’s Guide.
20
E valuator’s guidEVMware VCenter™ Lab Manager 4 eVaLuator’s guide
Figure 4.2 c: Opening consoles of the deployed configuration
The configuration and its virtual machines are now deployed in the Main workspace. Because of the abstraction layer Lab Manager provides, you do not need to know the specific resource pool backing the Main workspace; simply that the virtual machines are deployed and running in his arena of control.
4.3 Sharing Configurations With Other Users Lab Manager provides a shared Library that makes configurations available to other users as the basis for new configurations.UserscanclonelibraryconfigurationstotheWorkspaceandthendeployand/ormodifythem.This allows users to collaborate with each other and share common configurations to ensure consistent development environments. Administrators can setup the library with blessed Gold Master configurations that all users use for their environments.
You will now perform tasks using the Library that demonstrate how easy it is to share configurations with other users in the Lab Manager system.
Step 1: Capture running configuration in state to the Library1. On the left panel, click Workspaces.
2. Mouse over the name of the configuration you created to reveal the menu options.
a. Click Capture to Library.
b. Enter the name you wish the captured configuration to have in the library.
c. (Optional) Enter a description.
d. (Optional) Select the Gold Master check box to indicate an important or administrator-approved configuration.
e. Select the Storage Lease and click the Capture button.
21
E valuator’s guidEVMware VCenter™ Lab Manager 4 eVaLuator’s guide
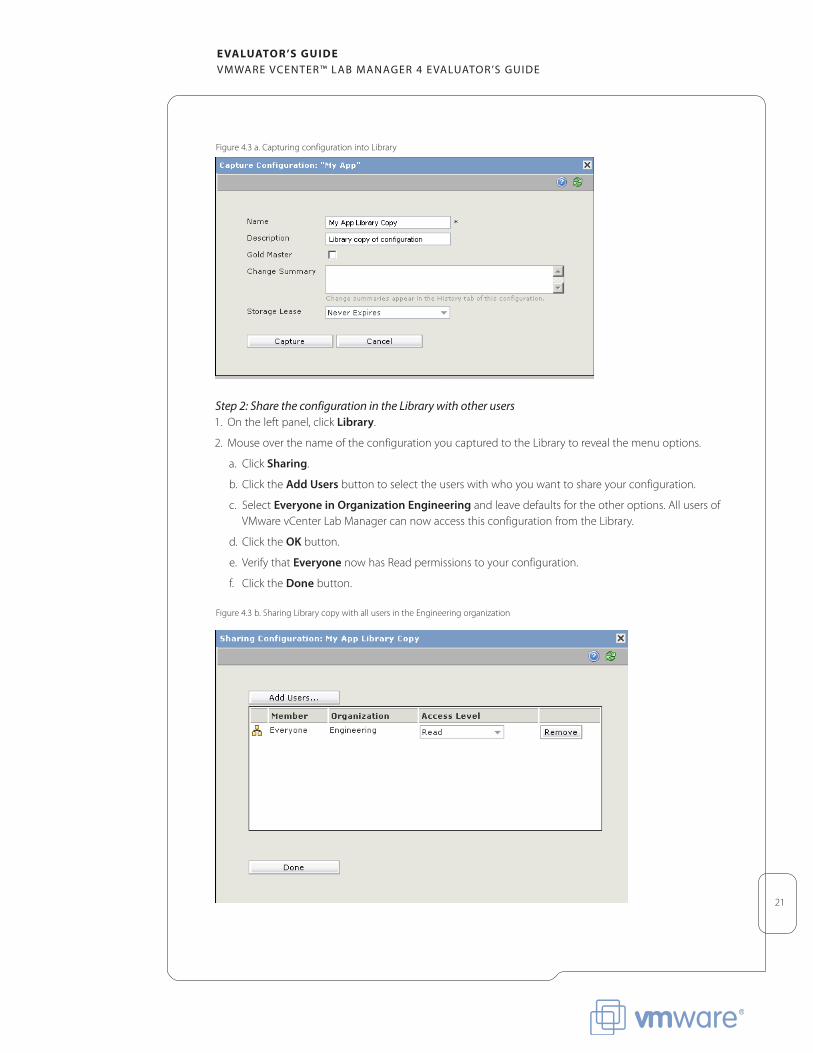
Figure 4.3 a. Capturing configuration into Library
Step 2: Share the configuration in the Library with other users1. On the left panel, click Library.
2. Mouse over the name of the configuration you captured to the Library to reveal the menu options.
a. Click Sharing.
b. Click the Add Users button to select the users with who you want to share your configuration.
c. Select Everyone in Organization Engineering and leave defaults for the other options. All users of VMware vCenter Lab Manager can now access this configuration from the Library.
d. Click the OK button.
e. Verify that Everyone now has Read permissions to your configuration.
f. Click the Done button. Figure 4.3 b. Sharing Library copy with all users in the Engineering organization
22
E valuator’s guidEVMware VCenter™ Lab Manager 4 eVaLuator’s guide
You can now proceed to create a LiveLink of the shared library configuration. LiveLink is a feature of VMware vCenter Lab Manager that allows you to capture a running configuration in state and publish a unique URL. Other users use the URL to access the configuration and deploy with a single mouse click.
This feature in Lab Manager that allows developers and QA testers in the Engineering organization to collaborateandtroubleshootdifficulttoreproduceproblems.WiththeLiveLinkfeatureinLabManager,QAengineers can freeze a system configuration and capture it in the library. At this point, they will generate the LiveLinkandsendtheLiveLinkbyemailtothedevelopersworkingontheproduct.Whenthedevelopersclickon the LiveLink in their email, it will take them to the Lab Manager system and allow them to deploy into their workspace a linked clone of the library configuration. This ensures that every defect that QA engineers find is now captured in its reproduced state and engineers can deploy these defects into their workspaces while QA engineers can run other tests.
You will now perform the task of generating a LiveLink, see how easy and efficient it is to do developement and QA work in Lab Manager.
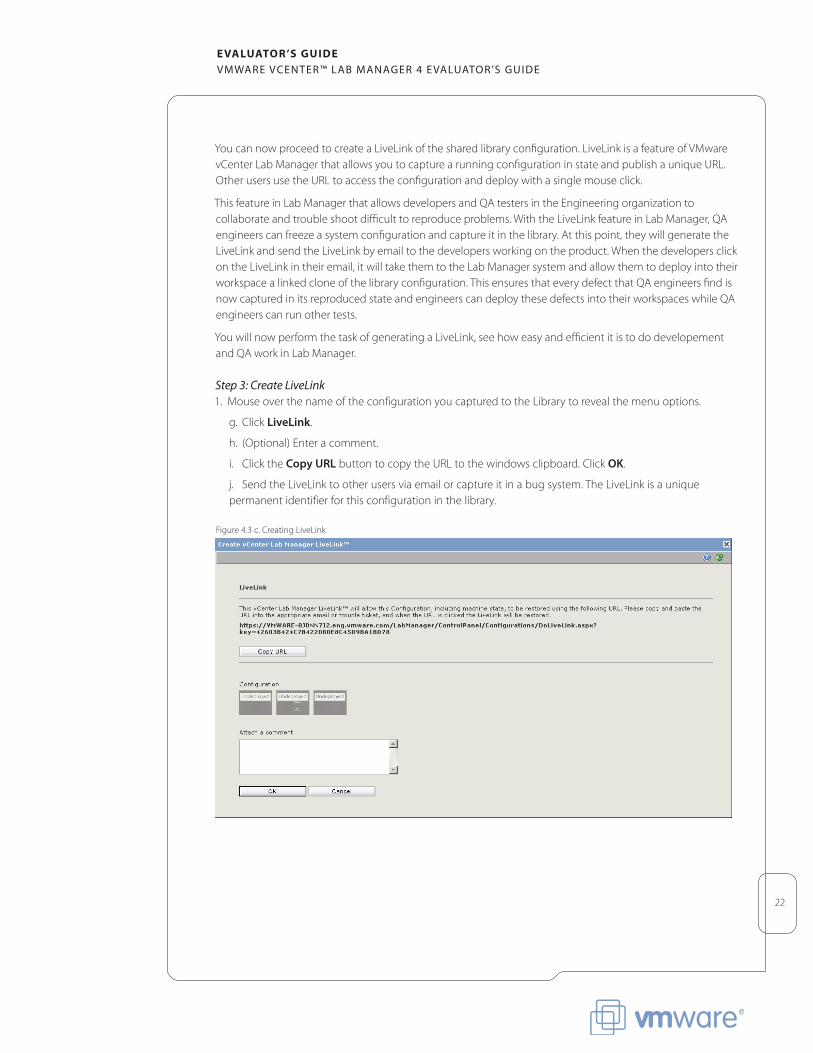
Step 3: Create LiveLink1. Mouse over the name of the configuration you captured to the Library to reveal the menu options.
g. Click LiveLink.
h. (Optional) Enter a comment.
i. Click the Copy URL button to copy the URL to the windows clipboard. Click OK.
j. Send the LiveLink to other users via email or capture it in a bug system. The LiveLink is a unique permanent identifier for this configuration in the library.
Figure 4.3 c. Creating LiveLink
23
E valuator’s guidEVMware VCenter™ Lab Manager 4 eVaLuator’s guide
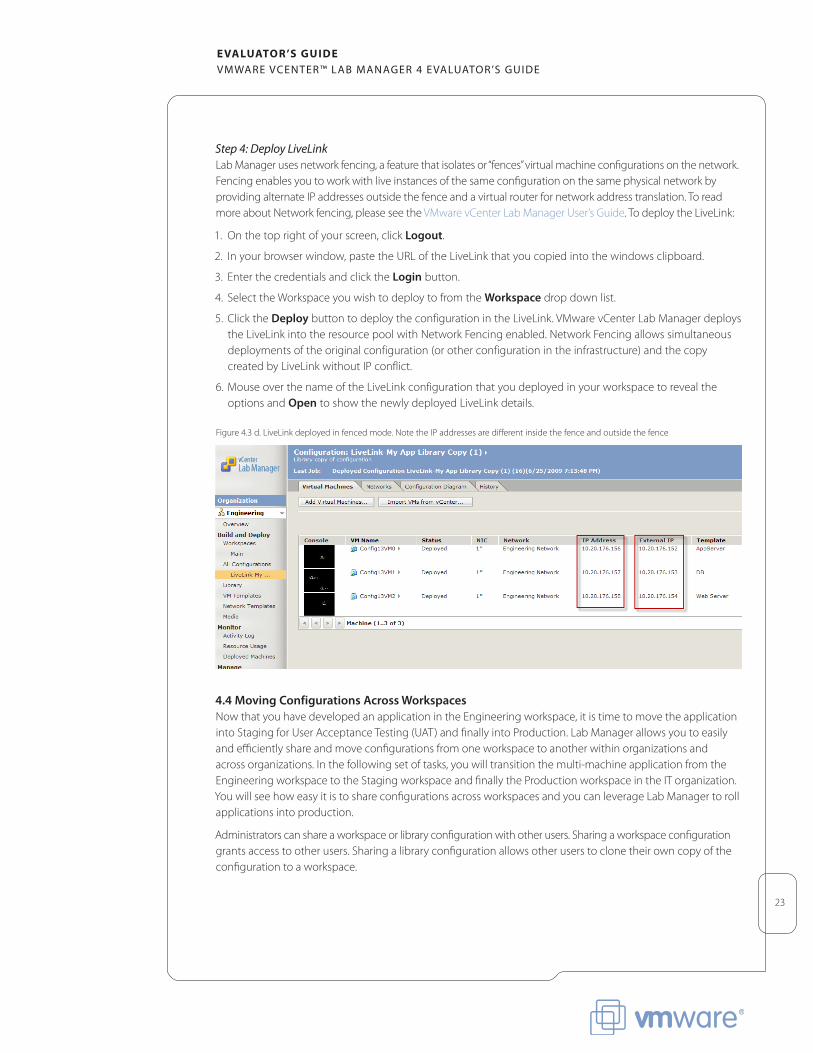
Step 4: Deploy LiveLinkLab Manager uses network fencing, a feature that isolates or “fences” virtual machine configurations on the network. Fencing enables you to work with live instances of the same configuration on the same physical network by providing alternate IP addresses outside the fence and a virtual router for network address translation. To read more about Network fencing, please see the VMware vCenter Lab Manager User’s Guide. To deploy the LiveLink:
1. On the top right of your screen, click Logout.
2. In your browser window, paste the URL of the LiveLink that you copied into the windows clipboard.
3. Enter the credentials and click the Login button.
4. SelecttheWorkspaceyouwishtodeploytofromtheWorkspace drop down list.
5. Click the Deploy button to deploy the configuration in the LiveLink. VMware vCenter Lab Manager deploys the LiveLink into the resource pool with Network Fencing enabled. Network Fencing allows simultaneous deployments of the original configuration (or other configuration in the infrastructure) and the copy created by LiveLink without IP conflict.
6. Mouse over the name of the LiveLink configuration that you deployed in your workspace to reveal the options and Open to show the newly deployed LiveLink details.
Figure 4.3 d. LiveLink deployed in fenced mode. Note the IP addresses are different inside the fence and outside the fence
4.4 Moving Configurations Across WorkspacesNow that you have developed an application in the Engineering workspace, it is time to move the application into Staging for User Acceptance Testing (UAT) and finally into Production. Lab Manager allows you to easily and efficiently share and move configurations from one workspace to another within organizations and across organizations. In the following set of tasks, you will transition the multi-machine application from the Engineering workspace to the Staging workspace and finally the Production workspace in the IT organization. You will see how easy it is to share configurations across workspaces and you can leverage Lab Manager to roll applications into production.
Administrators can share a workspace or library configuration with other users. Sharing a workspace configuration grants access to other users. Sharing a library configuration allows other users to clone their own copy of the configuration to a workspace.
24
E valuator’s guidEVMware VCenter™ Lab Manager 4 eVaLuator’s guide
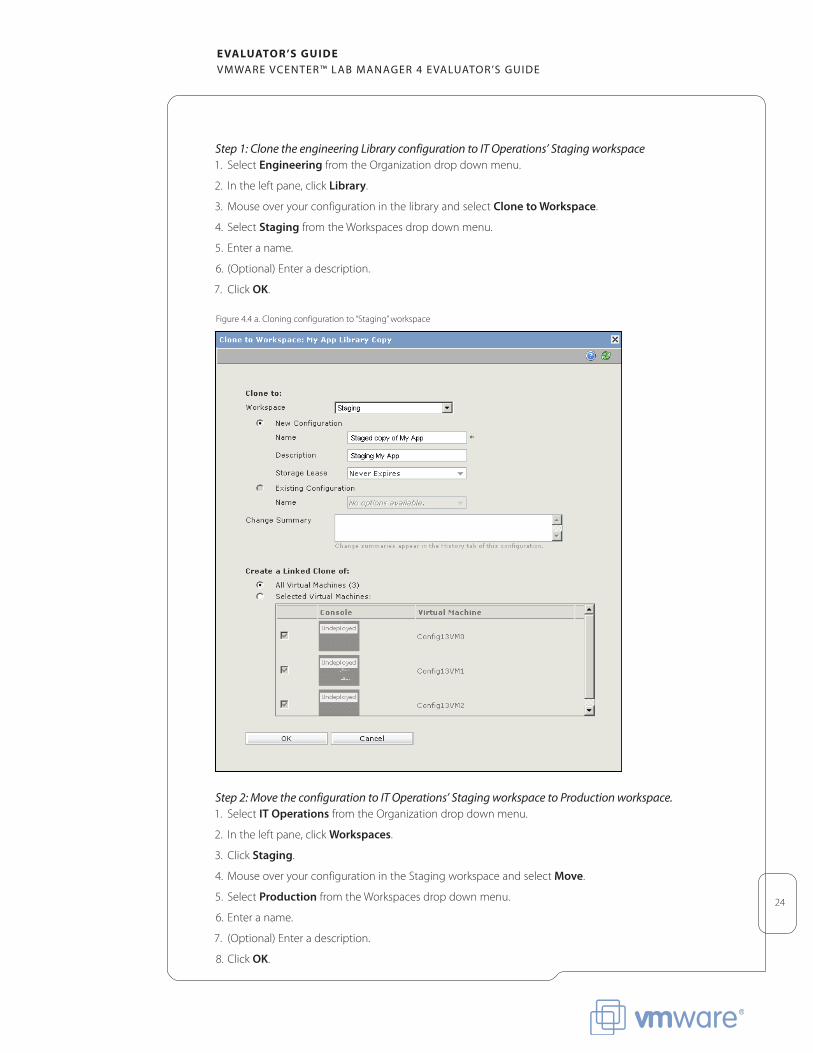
Step 1: Clone the engineering Library configuration to IT Operations’ Staging workspace1. Select Engineering from the Organization drop down menu.
2. In the left pane, click Library.
3. Mouse over your configuration in the library and select Clone to Workspace.
4. Select StagingfromtheWorkspacesdropdownmenu.
5. Enter a name.
6. (Optional) Enter a description.
7. Click OK. Figure 4.4 a. Cloning configuration to “Staging” workspace
Step 2: Move the configuration to IT Operations’ Staging workspace to Production workspace.1. Select IT Operations from the Organization drop down menu.
2. In the left pane, click Workspaces.
3. Click Staging.
4. Mouse over your configuration in the Staging workspace and select Move.
5. Select ProductionfromtheWorkspacesdropdownmenu.
6. Enter a name.
7. (Optional) Enter a description.
8. Click OK.
25
E valuator’s guidEVMware VCenter™ Lab Manager 4 eVaLuator’s guide
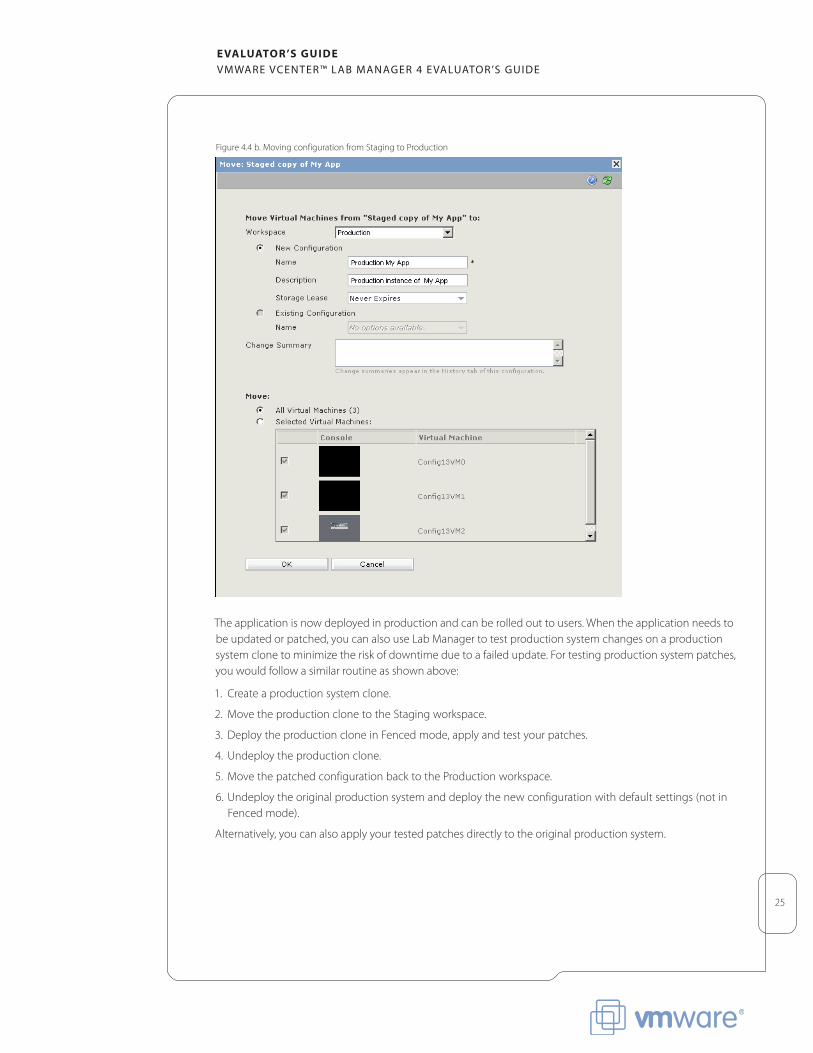
Figure 4.4 b. Moving configuration from Staging to Production
Theapplicationisnowdeployedinproductionandcanberolledouttousers.Whentheapplicationneedstobe updated or patched, you can also use Lab Manager to test production system changes on a production system clone to minimize the risk of downtime due to a failed update. For testing production system patches, you would follow a similar routine as shown above:
1. Create a production system clone.
2. Move the production clone to the Staging workspace.
3. Deploy the production clone in Fenced mode, apply and test your patches.
4. Undeploy the production clone.
5. Move the patched configuration back to the Production workspace.
6. Undeploy the original production system and deploy the new configuration with default settings (not in Fenced mode).
Alternatively, you can also apply your tested patches directly to the original production system.
26
E valuator’s guidEVMware VCenter™ Lab Manager 4 eVaLuator’s guide
5. Next stepsAs you can see, Lab Manager is an extremely flexible and powerful solution to streamline workflows, improve team collaboration, and automate routine tasks. The examples shown above illustrate some key use cases for this product. As you deploy Lab Manager in your environment, you may discover new ways to make your life easier. Please refer to the Lab Manager User’s Guide for more details.
WehopeyouenjoyusingVMwarevCenterLabManager.
5.1. VMware Contact Information For additional information or to purchase VMware vCenter Lab Manager, VMware’s global network of solutions providers is ready to assist. If you would like to contact VMware directly, you can reach a sales representative at 1-877-4VMWARE(650-475-5000outsideNorthAmerica)[email protected],pleaseinclude the state, country, and company name from which you are inquiring. You can also purchase VMware vCenter Lab Manager 4 online.
5.2. Providing FeedbackVMware appreciates your feedback on the material included in this guide, and in particular, would be grateful for any guidance on the following topics:
• Howusefulwastheinformationinthisguide?
• Whatotherspecifictopicswouldyouliketoseecovered?
• Overall,howwouldyouratethisguide?
Please send your feedback to [email protected], with “VMware vCenter Lab Manager 4 Evaluator’s Guide” in the subject line. Thank you for your help in making this guide a valuable resource.
VMware vCenter Lab Manager 4 Evaluators Guide:
Revision 20090709
27
E valuator’s guidEVMware VCenter™ Lab Manager 4 eVaLuator’s guide
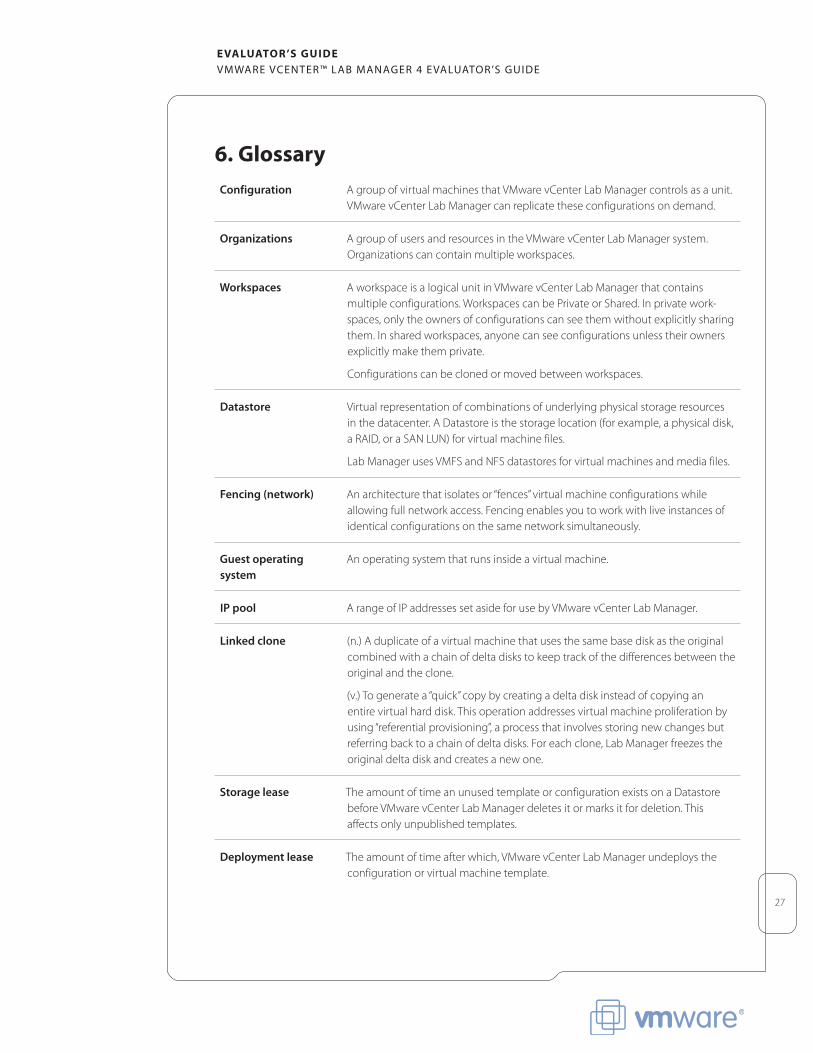
6. glossaryConfiguration A group of virtual machines that VMware vCenter Lab Manager controls as a unit.
VMware vCenter Lab Manager can replicate these configurations on demand.
Organizations A group of users and resources in the VMware vCenter Lab Manager system. Organizations can contain multiple workspaces.
Workspaces A workspace is a logical unit in VMware vCenter Lab Manager that contains multipleconfigurations.WorkspacescanbePrivateorShared.Inprivatework-spaces, only the owners of configurations can see them without explicitly sharing them. In shared workspaces, anyone can see configurations unless their owners explicitly make them private.
Configurations can be cloned or moved between workspaces.
Datastore Virtual representation of combinations of underlying physical storage resources in the datacenter. A Datastore is the storage location (for example, a physical disk, a RAID, or a SAN LUN) for virtual machine files.
Lab Manager uses VMFS and NFS datastores for virtual machines and media files.
Fencing (network) An architecture that isolates or “fences” virtual machine configurations while allowing full network access. Fencing enables you to work with live instances of identical configurations on the same network simultaneously.
Guest operating system
An operating system that runs inside a virtual machine.
IP pool A range of IP addresses set aside for use by VMware vCenter Lab Manager.
Linked clone (n.) A duplicate of a virtual machine that uses the same base disk as the original combined with a chain of delta disks to keep track of the differences between the original and the clone.
(v.) To generate a “quick” copy by creating a delta disk instead of copying an entire virtual hard disk. This operation addresses virtual machine proliferation by using “referential provisioning”, a process that involves storing new changes but referring back to a chain of delta disks. For each clone, Lab Manager freezes the original delta disk and creates a new one.
Storage lease The amount of time an unused template or configuration exists on a Datastore before VMware vCenter Lab Manager deletes it or marks it for deletion. This affects only unpublished templates.
Deployment lease The amount of time after which, VMware vCenter Lab Manager undeploys the configuration or virtual machine template.
28
E valuator’s guidEVMware VCenter™ Lab Manager 4 eVaLuator’s guide
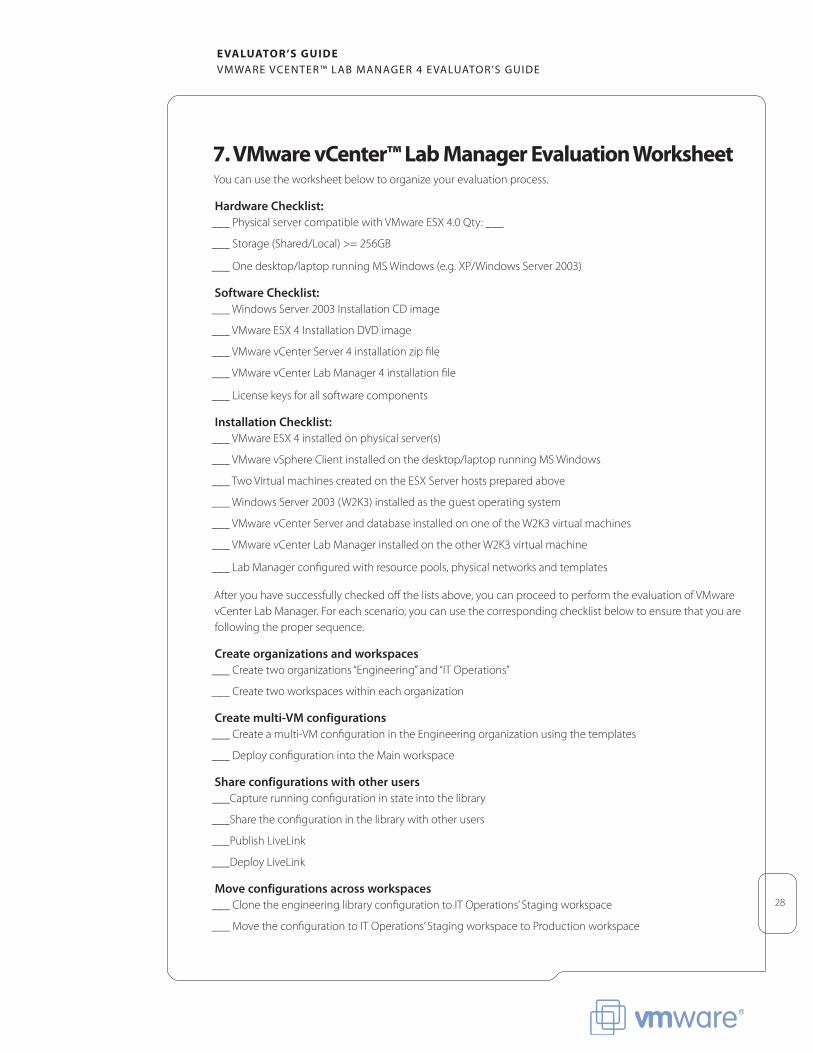
7. vMware vCenter™ lab Manager Evaluation WorksheetYou can use the worksheet below to organize your evaluation process.
Hardware Checklist:___PhysicalservercompatiblewithVMwareESX4.0Qty:___
___ Storage (Shared/Local) >= 256GB
___Onedesktop/laptoprunningMSWindows(e.g.XP/WindowsServer2003)
Software Checklist:___WindowsServer2003InstallationCDimage
___VMwareESX4InstallationDVDimage
___ VMware vCenter Server 4 installation zip file
___ VMware vCenter Lab Manager 4 installation file
___ License keys for all software components
Installation Checklist:___VMwareESX4installedonphysicalserver(s)
___VMwarevSphereClientinstalledonthedesktop/laptoprunningMSWindows
___TwoVirtualmachinescreatedontheESXServerhostspreparedabove
___WindowsServer2003(W2K3)installedastheguestoperatingsystem
___VMwarevCenterServeranddatabaseinstalledononeoftheW2K3virtualmachines
___VMwarevCenterLabManagerinstalledontheotherW2K3virtualmachine
___ Lab Manager configured with resource pools, physical networks and templates
After you have successfully checked off the lists above, you can proceed to perform the evaluation of VMware vCenter Lab Manager. For each scenario, you can use the corresponding checklist below to ensure that you are following the proper sequence.
Create organizations and workspaces___ Create two organizations “Engineering” and “IT Operations”
___ Create two workspaces within each organization
Create multi-VM configurations___ Create a multi-VM configuration in the Engineering organization using the templates
___ Deploy configuration into the Main workspace
Share configurations with other users ___Capture running configuration in state into the library
___Share the configuration in the library with other users
___Publish LiveLink
___Deploy LiveLink
Move configurations across workspaces___ Clone the engineering library configuration to IT Operations’ Staging workspace
___ Move the configuration to IT Operations’ Staging workspace to Production workspace
VMware, Inc. 3401 Hillview Ave Palo Alto CA 94304 USA Tel 877-486-9273 Fax 650-427-5001 www.vmware.comCopyright © 2009 VMware, Inc. All rights reserved. This product is protected by U.S. and international copyright and intellectual property laws. VMware products are covered by one or more patents listed at http://www.vmware.com/go/patents.
VMware is a registered trademark or trademark of VMware, Inc. in the United States and/or other jurisdictions. All othermarks and names mentioned herein may be trademarks of their respective companies. VMW_09Q2_EG_LabManager4_P29_R1