Embed Size (px)
Citation preview

Mai
nten
ance
and
Tr
oubl
esho
otin
g
STEP1
Intro
duct
ion
STEP2
STEP3
Bef
ore
usin
g th
e pr
inte
rU
sing
onl
y th
is p
rinte
r (N
o P
C)
www.brother.com
QL-650TD
User's Guide
You must set up the hardware and install the driver before you can use the printer.Please read this manual before you use the printer. Keep the CD-ROM in a convenient place so you can use it quickly if you need to.
LB8728001A
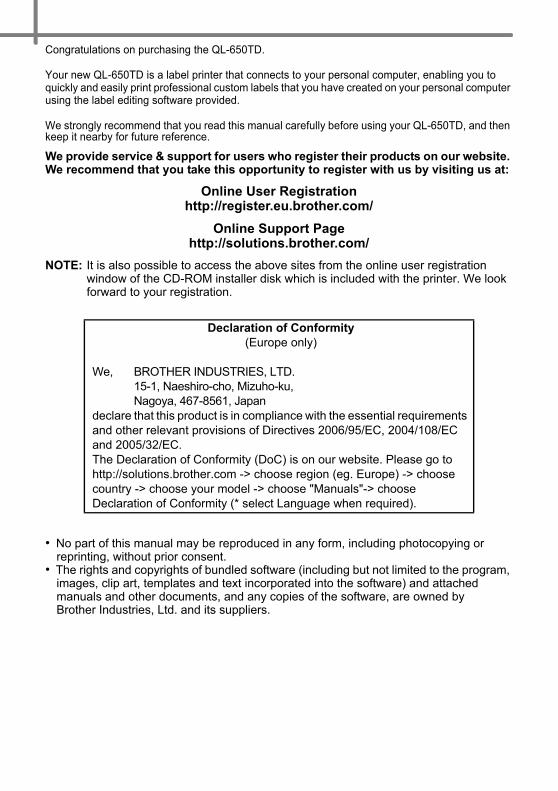
Congratulations on purchasing the QL-650TD.
Your new QL-650TD is a label printer that connects to your personal computer, enabling you to quickly and easily print professional custom labels that you have created on your personal computer using the label editing software provided.
We strongly recommend that you read this manual carefully before using your QL-650TD, and then keep it nearby for future reference.
We provide service & support for users who register their products on our website. We recommend that you take this opportunity to register with us by visiting us at:
Online User Registration http://register.eu.brother.com/
Online Support Page http://solutions.brother.com/
NOTE: It is also possible to access the above sites from the online user registration window of the CD-ROM installer disk which is included with the printer. We look forward to your registration.
• No part of this manual may be reproduced in any form, including photocopying or reprinting, without prior consent.
• The rights and copyrights of bundled software (including but not limited to the program, images, clip art, templates and text incorporated into the software) and attached manuals and other documents, and any copies of the software, are owned by Brother Industries, Ltd. and its suppliers.
Declaration of Conformity(Europe only)
We, BROTHER INDUSTRIES, LTD. 15-1, Naeshiro-cho, Mizuho-ku, Nagoya, 467-8561, Japan
declare that this product is in compliance with the essential requirements and other relevant provisions of Directives 2006/95/EC, 2004/108/EC and 2005/32/EC.The Declaration of Conformity (DoC) is on our website. Please go to http://solutions.brother.com -> choose region (eg. Europe) -> choose country -> choose your model -> choose "Manuals"-> choose Declaration of Conformity (* select Language when required).
Mai
nten
ance
and
Tr
oubl
esho
otin
g
TEP1
TEP2
TEP3
Bef
ore
usin
g th
e pr
inte
rU
sing
onl
y th
is p
rinte
r (N
o P
C)
S
S
S
Introduction ••••••••••••••••••••••••••••••••••••••••••••••••••••••••••••••••••••• 1Manuals ••••••••••••••••••••••••••••••••••••••••••••••••••••••••••••••••••••••••••••••••••• 2Symbols Used in this Manual ••••••••••••••••••••••••••••••••••••••••••••••••••••••••• 2Safety Precautions •••••••••••••••••••••••••••••••••••••••••••••••••••••••••••••••••••••• 3General Precautions •••••••••••••••••••••••••••••••••••••••••••••••••••••••••••••••••••• 6
Before using the printer ••••••••••••••••••••••••••••••••••••••• 9Parts Checklist ••••••••••••••••••••••••••••••••••••••••••••••••••••••••••••••••• 10Parts Description••••••••••••••••••••••••••••••••••••••••••••••••••••••••••••••• 11
Main Printing Unit•••••••••••••••••••••••••••••••••••••••••••••••••••••••••••••••••••••••• 11Connecting the power supply ••••••••••••••••••••••••••••••••••••••••••••••• 12
LCD •••••••••••••••••••••••••••••••••••••••••••••••••••••••••••••••••••••••••••••••••••••••• 13Manual operation button ••••••••••••••••••••••••••••••••••••••••••••••••••••••••••••••• 15
Installing the DK Roll •••••••••••••••••••••••••••••••••••••••••••••••••••••••••• 16Applicable DK Rolls ••••••••••••••••••••••••••••••••••••••••••••••••••••••••••••••••••••• 16Installing the DK Roll•••••••••••••••••••••••••••••••••••••••••••••••••••••••••••••••••••• 16
Attaching the paper guide•••••••••••••••••••••••••••••••••••••••••••••••••••• 17Using Interface Cable••••••••••••••••••••••••••••••••••••••••••••••••••••••••• 18Setting clock/language/units••••••••••••••••••••••••••••••••••••••••••••••••• 19Procedure for creating a label ••••••••••••••••••••••••••••••••••••••••••••••• 21
Creating and printing a label without using your computer•••••••••••••••••••••••••••••••••••••••••••••••••• 23Creating a label •••••••••••••••••••••••••••••••••••••••••••••••••••••••••••••••• 24
1. Selecting a template ••••••••••••••••••••••••••••••••••••••••••••••••••••••••••••••••• 242. Printing a label •••••••••••••••••••••••••••••••••••••••••••••••••••••••••••••••••••••••• 25
Other convenient functions •••••••••••••••••••••••••••••••••••••••••••••••••• 26Editing a template: Menu 1/12 •••••••••••••••••••••••••••••••••••••••••••••••••••••••• 26Changing the date used for templates: Menu 2/12 ••••••••••••••••••••••••••••••• 27Preview the label content before printing: Menu 3/12 •••••••••••••••••••••••••••• 28Specifying the number of copies: Menu 4/12 •••••••••••••••••••••••••••••••••••••• 29Printing labels with label numbers: Menu 5/12 •••••••••••••••••••••••••••••••••••• 29Printing a list of templates: Menu 6/12 •••••••••••••••••••••••••••••••••••••••••••••• 31Setting the clock: Menu 7/12 •••••••••••••••••••••••••••••••••••••••••••••••••••••••••• 31Cut the roll automatically when printing: Menu 8/12 •••••••••••••••••••••••••••••• 32Setting the language: Menu 9/12••••••••••••••••••••••••••••••••••••••••••••••••••••• 32Set the unit of measure (inch or mm): Menu 10/12 ••••••••••••••••••••••••••••••• 33Adjusting the contrast of LCD: Menu 11/12 •••••••••••••••••••••••••••••••••••••••• 33Hiding/showing the preset templates: Menu 12/12 ••••••••••••••••••••••••••••••• 34Locking the Menu button••••••••••••••••••••••••••••••••••••••••••••••••••••••••••••••• 34Uploading templates/messages from your computer••••••••••••••••••••••••••••• 34Concerning the download of message •••••••••••••••••••••••••••••••••••••••••••••• 34
Table of Contents
STEP 1STEP 1
STEP 2STEP 2
Maintenance and Troubleshooting •••••••••••••••••••••••••• 35Maintenance •••••••••••••••••••••••••••••••••••••••••••••••••••••••••••••••••••• 36
Print head maintenance •••••••••••••••••••••••••••••••••••••••••••••••••••••••••••••••• 36Roller maintenance ••••••••••••••••••••••••••••••••••••••••••••••••••••••••••••••••••••• 36Label outlet maintenance •••••••••••••••••••••••••••••••••••••••••••••••••••••••••••••• 37Replacing the cutter unit ••••••••••••••••••••••••••••••••••••••••••••••••••••••••••••••• 38Replacing the lithium clock battery••••••••••••••••••••••••••••••••••••••••••••••••••• 39
Troubleshooting•••••••••••••••••••••••••••••••••••••••••••••••••••••••••••••••• 42Potential types of problems•••••••••••••••••••••••••••••••••••••••••••••••••••••••••••• 42Error messages (what they mean) ••••••••••••••••••••••••••••••••••••••••••••••••••• 43Reset the Printer••••••••••••••••••••••••••••••••••••••••••••••••••••••••••••••••••••••••• 44Main specifications •••••••••••••••••••••••••••••••••••••••••••••••••••••••••••••••••••••• 45
STEP 3STEP 3
1
Intro
duct
ion
Mai
nten
ance
and
Tr
oubl
esho
otin
g
TEP1
TEP2
TEP3
Bef
ore
usin
g th
e pr
inte
rU
sing
onl
y th
is p
rinte
r (N
o P
C)
S
S
S
Compilation and Publication Notice
Under the supervision of Brother Industries, Ltd., this manual has been compiled and published, covering the latest product’s descriptions and specifications.
The contents of this manual and the specifications of this product are subject to change without notice.
Brother reserves the right to make changes without notice in the specifications and materials contained herein and shall not be responsible for any damages (including consequential) caused by reliance on the materials presented, including but not limited to typographical and other errors relating to the publication.
© 2010 Brother Industries, Ltd.
Trademarks
The Brother logo is a registered trademark of Brother Industries, Ltd.
Microsoft and Windows are registered trademarks of Microsoft Corporation in the U.S. and other countries.
Macintosh and Mac OS are registered trademarks of Apple Inc. in the United States and other countries.
The printer includes the software module "USBPRINT.SYS" and "USBMON.DLL" in which Microsoft Corporation wholly retains its rights and interests.
Adobe and Adobe Reader are registered trademarks of Adobe Systems Incorporated.
QR code is a registered trademark of DENSO WAVE INCORPORATED.
All other terms and brand and product names mentioned in this User's Guide areregistered trademarks of their respective companies.
Shipment of the Printer
If for any reason you must ship your printer, carefully package the printer to avoid any damage during transit.
We recommend that you save and use the original packaging. The printer should also be adequately insured with the carrier.
Introduction
Introduction2
The following manuals are provided to help you use the printer correctly and to utilize its features. Be sure to read this manual before using the printer.
User's Guide (This manual)Read this manual first. It gives information which should be read before using the printer, such as cautions and setup, and the procedures for printing labels without using your computer. It also explains how to clean the printer, and how to perform some troubleshooting.
Software Installation GuideIt explains how to install the bundled software to be used on a personal computer.It also describes the uninstallation of the software.
Software User's Guide (PDF Manual)It explains how to create labels using the software supplied with the printer, by installing it on a computer before connecting the printer to the computer.
• To browse the Software User's Guide (PDF Manual), you need to install Adobe® Reader® or Adobe® Acrobat® Reader®. (For Mac®, the standard "Preview" program bundled with the OS can also be used.)
• When using Windows®, this manual can be viewed from the P-touch Setup application when it is run from the CD-ROM. Additionally, this manual may be viewed from the Start menu if it is installed on the computer.
• When using Mac, refer to the PDF files in the [Manuals] folder on the CD-ROM supplied with the printer.
The symbols used throughout this guide are as follows:
This symbol indicates information or directions that should be followed. If ignored, the result may be injury, damage, or failed operations.
This symbol indicates information or directions that can help you better understand and use the printer more efficiently.
Manuals
Symbols Used in this Manual
3
Intro
duct
ion
Mai
nten
ance
and
Tr
oubl
esho
otin
g
TEP1
TEP2
TEP3
Bef
ore
usin
g th
e pr
inte
rU
sing
onl
y th
is p
rinte
r (N
o P
C)
S
S
S
To prevent injury and damage, important notes are explained using various symbols. The symbols and their meanings are as follows:
The symbols used in this manual are as follows:
Warning Tells you what to do to avoid the risk of injury.
Caution Tells you about procedures you must follow to prevent damage to the printer.
The incorrect setup icon alerts you to devices and operations that are not compatible with the printer (e.g. the figure on the left indicates a warning against disassembly).
The special instructions icon indicates operations to be carried out (e.g. the figure on the left shows removal of the power plug from the power outlet).
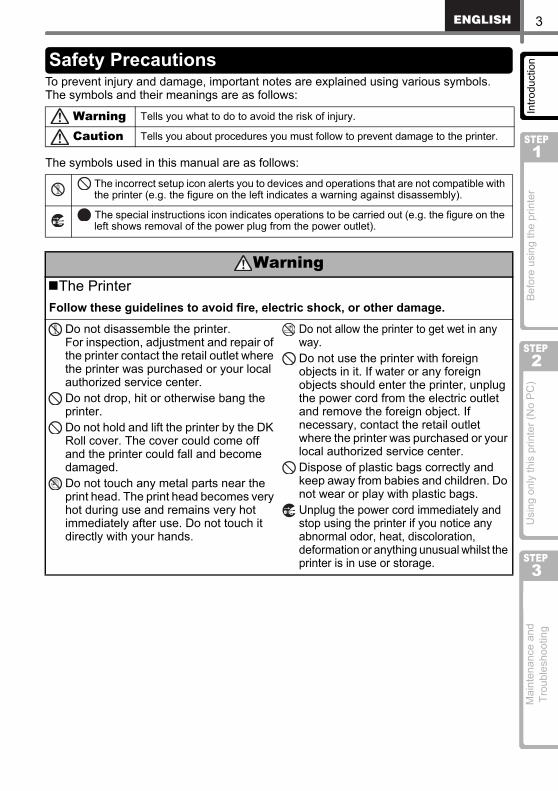
WarningThe Printer
Follow these guidelines to avoid fire, electric shock, or other damage.
Do not disassemble the printer. For inspection, adjustment and repair of the printer contact the retail outlet where the printer was purchased or your local authorized service center. Do not drop, hit or otherwise bang the printer.Do not hold and lift the printer by the DK Roll cover. The cover could come off and the printer could fall and become damaged.Do not touch any metal parts near the print head. The print head becomes very hot during use and remains very hot immediately after use. Do not touch it directly with your hands.
Do not allow the printer to get wet in any way.Do not use the printer with foreign objects in it. If water or any foreign objects should enter the printer, unplug the power cord from the electric outlet and remove the foreign object. If necessary, contact the retail outlet where the printer was purchased or your local authorized service center. Dispose of plastic bags correctly and keep away from babies and children. Do not wear or play with plastic bags.Unplug the power cord immediately and stop using the printer if you notice any abnormal odor, heat, discoloration, deformation or anything unusual whilst the printer is in use or storage.
Safety Precautions
Introduction4
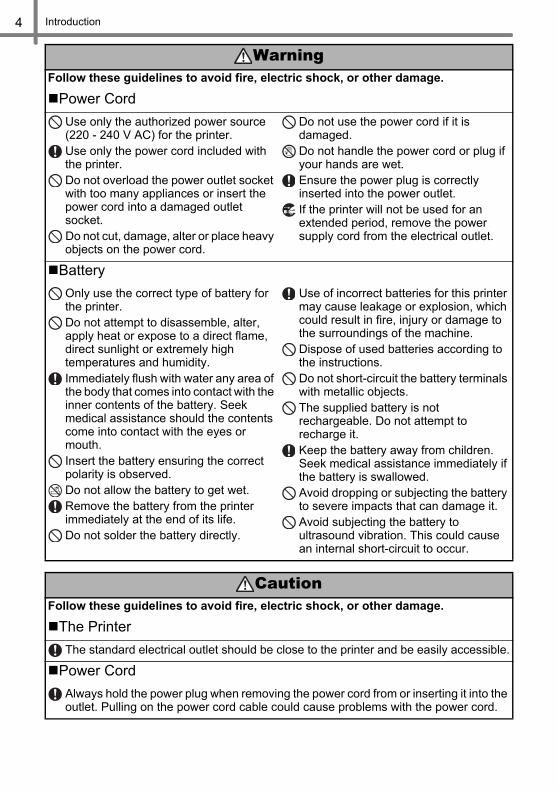
Follow these guidelines to avoid fire, electric shock, or other damage.
Power Cord Use only the authorized power source (220 - 240 V AC) for the printer.Use only the power cord included with the printer.Do not overload the power outlet socket with too many appliances or insert the power cord into a damaged outlet socket. Do not cut, damage, alter or place heavy objects on the power cord.
Do not use the power cord if it is damaged. Do not handle the power cord or plug if your hands are wet.Ensure the power plug is correctly inserted into the power outlet. If the printer will not be used for an extended period, remove the power supply cord from the electrical outlet.
BatteryOnly use the correct type of battery for the printer.Do not attempt to disassemble, alter, apply heat or expose to a direct flame, direct sunlight or extremely high temperatures and humidity.Immediately flush with water any area of the body that comes into contact with the inner contents of the battery. Seek medical assistance should the contents come into contact with the eyes or mouth.Insert the battery ensuring the correct polarity is observed.Do not allow the battery to get wet.Remove the battery from the printer immediately at the end of its life.Do not solder the battery directly.
Use of incorrect batteries for this printer may cause leakage or explosion, which could result in fire, injury or damage to the surroundings of the machine. Dispose of used batteries according to the instructions.Do not short-circuit the battery terminals with metallic objects.The supplied battery is not rechargeable. Do not attempt to recharge it.Keep the battery away from children. Seek medical assistance immediately if the battery is swallowed.Avoid dropping or subjecting the battery to severe impacts that can damage it.Avoid subjecting the battery to ultrasound vibration. This could cause an internal short-circuit to occur.
CautionFollow these guidelines to avoid fire, electric shock, or other damage.
The PrinterThe standard electrical outlet should be close to the printer and be easily accessible.
Power CordAlways hold the power plug when removing the power cord from or inserting it into the outlet. Pulling on the power cord cable could cause problems with the power cord.
Warning
5
Intro
duct
ion
Mai
nten
ance
and
Tr
oubl
esho
otin
g
TEP1
TEP2
TEP3
Bef
ore
usin
g th
e pr
inte
rU
sing
onl
y th
is p
rinte
r (N
o P
C)
S
S
S
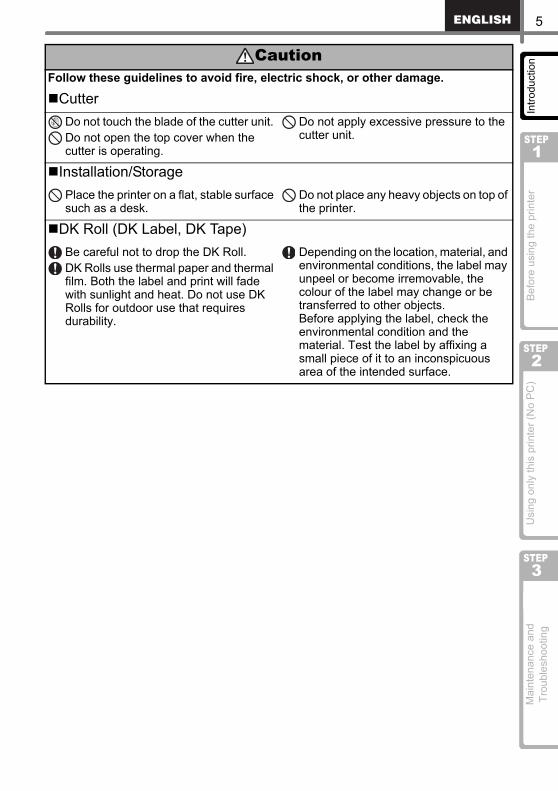
Follow these guidelines to avoid fire, electric shock, or other damage.
Cutter Do not touch the blade of the cutter unit. Do not open the top cover when the cutter is operating.
Do not apply excessive pressure to the cutter unit.
Installation/Storage Place the printer on a flat, stable surface such as a desk.
Do not place any heavy objects on top of the printer.
DK Roll (DK Label, DK Tape)Be careful not to drop the DK Roll. DK Rolls use thermal paper and thermal film. Both the label and print will fade with sunlight and heat. Do not use DK Rolls for outdoor use that requires durability.
Depending on the location, material, and environmental conditions, the label may unpeel or become irremovable, the colour of the label may change or be transferred to other objects. Before applying the label, check the environmental condition and the material. Test the label by affixing a small piece of it to an inconspicuous area of the intended surface.
Caution
Introduction6
The Printer• The printer is a precision machine. Do not drop, hit or otherwise bang the printer.• Do not lift the printer by the DK Roll compartment cover. The cover could come off and
the printer could fall and become damaged.• The printer may malfunction if left near a television, radio, etc. Do not use the printer near
any machine that can cause electromagnetic interference.• Do not expose the printer to direct sunlight or near heaters or other hot appliances, in
any location exposed to extremely high or low temperatures, high humidity or dusty locations. Doing so could cause the machine to malfunction.
• Do not use paint thinner, benzene, alcohol or any other organic solvents to clean the printer. Doing so may cause damage to the surface finish. Use a soft, dry cloth to clean the printer.
• Do not place any heavy objects or objects containing water on top of the printer. If water or any foreign object enters the printer, contact the retail outlet where the printer was purchased or your local authorized service center. If you continue to use the printer with water or a foreign object in the printer, the printer may be damaged or personal injury could result.
• Do not touch the cutter. Personal injury could result. Take special care when changing the cutter unit.
• Do not insert any objects into or block the label output slot, USB port, or serial port.• Do not place any metal parts near the print head. The print head becomes very hot
during use and remains very hot immediately after use. Do not touch it directly with your hands.
• Use only the interface cable (USB cable) included with the printer.• When not in use for an extended period, remove the DK Roll from the printer.• Do not attempt to print labels while the DK Roll cover is open.• Never disassemble the printer or allow it to get wet to avoid possible fire or electrical
shock. Do not remove the power cord from or insert it into the electrical outlet with wet hands. Doing so could cause an electrical shock or fire.
• If a paper jam should occur due to a build up of adhesive on the paper guide surface, unplug the power cord from the electrical outlet and wipe away the adhesive buildup on the paper guide surface with a cloth dipped in ethanol or isopropyl (rubbing) alcohol. It is recommended that you clean the paper guide when replacing the cutter unit.
Power Cord• Use only the AC power cord included with the printer.• If the printer will not be used for an extended period, remove the power supply cord from
the electrical outlet.• Always hold the plug when removing the power cord from or inserting it into the outlet.
Do not pull on the cord. The wire in the cord may become damaged.• You should position the printer near an easily accessible, standard electrical socket.
DK Roll (DK Label and DK Tape)• Use only genuine Brother accessories and supplies (with , marks). Do not use any
unauthorized accessories or supplies.• If the label is attached to a wet, dirty, or oily surface, it may peel off easily. Before
applying the label, clean the surface to which the label will be applied.• DK Roll uses thermal paper and thermal film so that ultraviolet rays, wind, and rain may
cause the colour of the label to fade and the ends of the label to peel off.• Do not expose the DK Rolls to direct sunlight, high temperatures, high humidity, or dust.
Store in a cool, dark place. Use the DK Rolls soon after opening the package.
General Precautions
7
Intro
duct
ion
Mai
nten
ance
and
Tr
oubl
esho
otin
g
TEP1
TEP2
TEP3
Bef
ore
usin
g th
e pr
inte
rU
sing
onl
y th
is p
rinte
r (N
o P
C)
S
S
S
• Scratching the printed surface of the label with your finger nails or metal objects, or touching the printed surface with hands dampened by water, sweat, or medicated cream, etc., can cause the colour to change or fade.
• Do not apply labels to any persons, animals, or plants.• As the end of the DK Roll is designed to not adhere to the label spool, the last label may
not be cut properly. If this happens, remove the remaining labels, insert a new DK Roll, and reprint the last label. Note: To account for this, the number of DK Labels included on each DK Roll may be more than indicated on the package.
• When peeling a DK Label, some portion of the label may remain. Remove the remaining portion before attaching a new label.
• Some DK Rolls use permanent adhesive for their labels. These labels cannot be easily peeled off once attached.
• Prior to using CD/DVD labels, be sure to follow the instructions in your CD/DVD player's instruction manual regarding applying CD/DVD labels.
• Do not use CD/DVD labels in a slot loading CD/DVD player, for example a CD player in a car where the CD is slid into a slot in the CD player.
• Do not peel off the CD/DVD label once it is applied to the CD/DVD, a thin surface layer may come off, resulting in damage to the disk.
• Do not apply CD/DVD labels to CD/DVD disks designed for use with ink jet printers. Labels peel off these disks easily and using disks with peeled labels can result in loss or damage of data.
• When applying CD/DVD labels, use the applicator included with the CD/DVD label rolls. failure to do so could cause damage to the CD/DVD player.
• User's shall take full responsibility for applying CD/DVD labels. Brother accepts no responsibility for any loss or damage of data caused by the inappropriate use of CD/DVD labels.
CD-ROM and Software• Do not scratch or subject the CD-ROM to high or low temperatures.• Do not put heavy objects on the CD-ROM or apply force to the CD-ROM.• The software contained on the CD-ROM is meant for use with the printer only. See
License on CD for further details. This software may be installed on multiple personal computers for use in an office, etc.
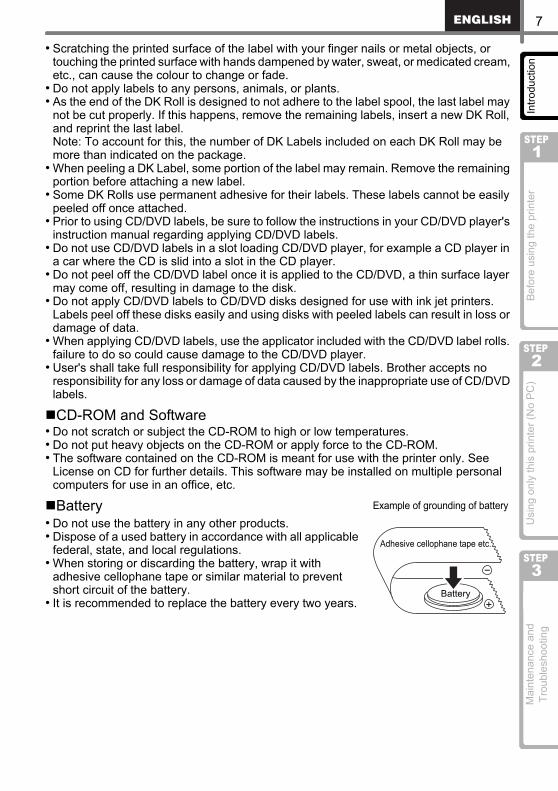
Battery• Do not use the battery in any other products. • Dispose of a used battery in accordance with all applicable
federal, state, and local regulations. • When storing or discarding the battery, wrap it with
adhesive cellophane tape or similar material to prevent short circuit of the battery.
• It is recommended to replace the battery every two years.
Adhesive cellophane tape etc.
Battery
Example of grounding of battery
Introduction8
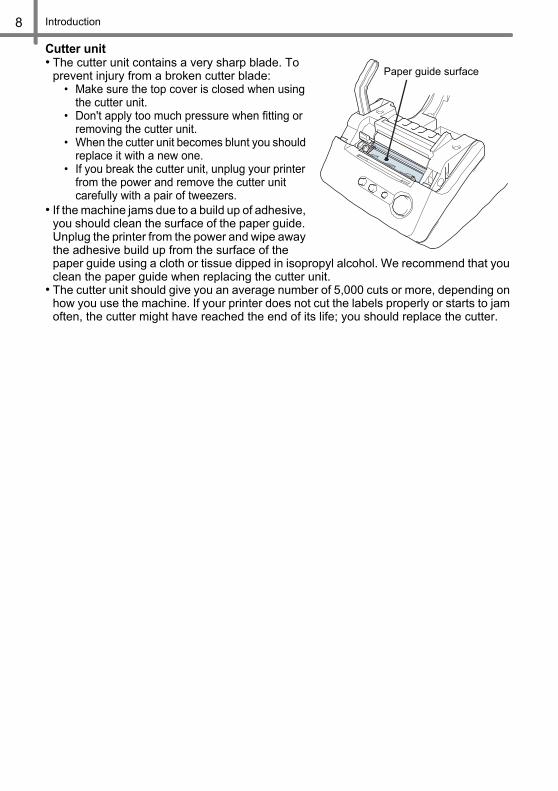
Cutter unit• The cutter unit contains a very sharp blade. To
prevent injury from a broken cutter blade: • Make sure the top cover is closed when using
the cutter unit.• Don't apply too much pressure when fitting or
removing the cutter unit.• When the cutter unit becomes blunt you should
replace it with a new one.• If you break the cutter unit, unplug your printer
from the power and remove the cutter unit carefully with a pair of tweezers.
• If the machine jams due to a build up of adhesive, you should clean the surface of the paper guide. Unplug the printer from the power and wipe away the adhesive build up from the surface of the paper guide using a cloth or tissue dipped in isopropyl alcohol. We recommend that you clean the paper guide when replacing the cutter unit.
• The cutter unit should give you an average number of 5,000 cuts or more, depending on how you use the machine. If your printer does not cut the labels properly or starts to jam often, the cutter might have reached the end of its life; you should replace the cutter.
Paper guide surface
9
STEP 1STEP 1 Intro
duct
ion
Mai
nten
ance
and
Tr
oubl
esho
otin
g
STEP1
TEP2
TEP3
Bef
ore
usin
g th
e pr
inte
rU
sing
onl
y th
is p
rinte
r (N
o PC
)
S
S
Before using the printer
Parts Checklist Page 10
Parts Description Page 11
Connecting the power supply Page 12
Installing the DK Roll Page 16
Attaching the paper guide Page 17
Using Interface Cable Page 18
Setting clock/language/units Page 19
1
2
3
4
5
6
7
Procedure for creating a label Page 218
STEP 1 Before using the printer10
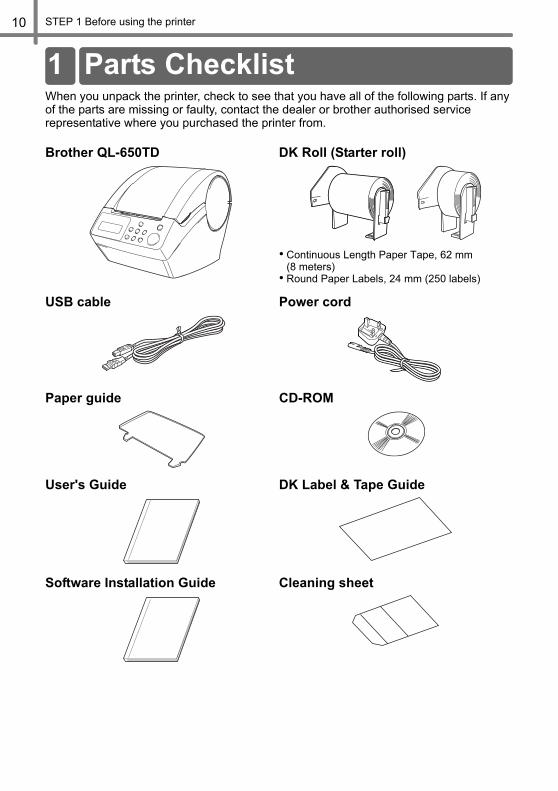
When you unpack the printer, check to see that you have all of the following parts. If any of the parts are missing or faulty, contact the dealer or brother authorised service representative where you purchased the printer from.
Brother QL-650TD DK Roll (Starter roll)
• Continuous Length Paper Tape, 62 mm (8 meters)
• Round Paper Labels, 24 mm (250 labels)
USB cable Power cord
Paper guide CD-ROM
User's Guide DK Label & Tape Guide
Software Installation Guide Cleaning sheet
1 Parts Checklist

11
Intro
duct
ion
Mai
nten
ance
and
Tr
oubl
esho
otin
g
TEP1
Intro
duct
ion
TEP2
TEP3
Bef
ore
usin
g th
e pr
inte
rU
sing
onl
y th
is p
rinte
r (N
o PC
)
S
S
S
Front View
When not in use, close the DK Roll cover to prevent dust and debris from accumulating inside the printer.
Back View
Parts Description2Main Printing Unit
DK Roll cover Roll release lever
LCDManual operation button
Printing unit
Roller
Cutter unit
Time display
Up arrow button
Template number: addition and subtraction settings are available
: Menu button has been locked
ON/OFF button
Date display
Down arrow button
Print button
Cut button
Feed button
Menu button
ESC buttonOK button
LCD and manual operation button(For details, see Next page.)
Serial portUSB port
Power cord slot

STEP 1 Before using the printer12
When using the printer on Windows®, do not connect the printer to the PC before installing the software on the PC.
1 Connect the AC power cord into the printer.
2 Insert the power plug into the AC outlet.• Before inserting the plug, check the outlet
is 220 - 240 V AC.• Locate the printer near the outlet so that the power
plug can be pulled out easily if required.• When inserting or pulling out the power cord, be sure
to hold the power plug and not the cable.
Connecting the power supply3
Power cord Slot
Power cord
13
Intro
duct
ion
Mai
nten
ance
and
Tr
oubl
esho
otin
g
TEP1
Intro
duct
ion
TEP2
TEP3
Bef
ore
usin
g th
e pr
inte
rU
sing
onl
y th
is p
rinte
r (N
o PC
)
S
S
S
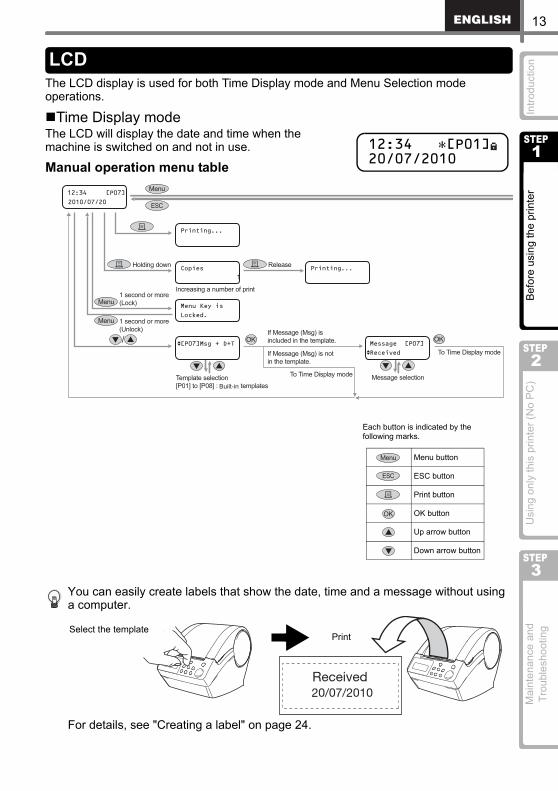
The LCD display is used for both Time Display mode and Menu Selection mode operations.
Time Display modeThe LCD will display the date and time when the machine is switched on and not in use.
Manual operation menu table
LCD
12:34 [P01]20/07/2010
Each button is indicated by the following marks.
Menu button
ESC button
Print button
OK button
Up arrow button
Down arrow button
Menu
ESC
OK
You can easily create labels that show the date, time and a message without using a computer.
For details, see "Creating a label" on page 24.
Select the templatePrint
STEP 1 Before using the printer14
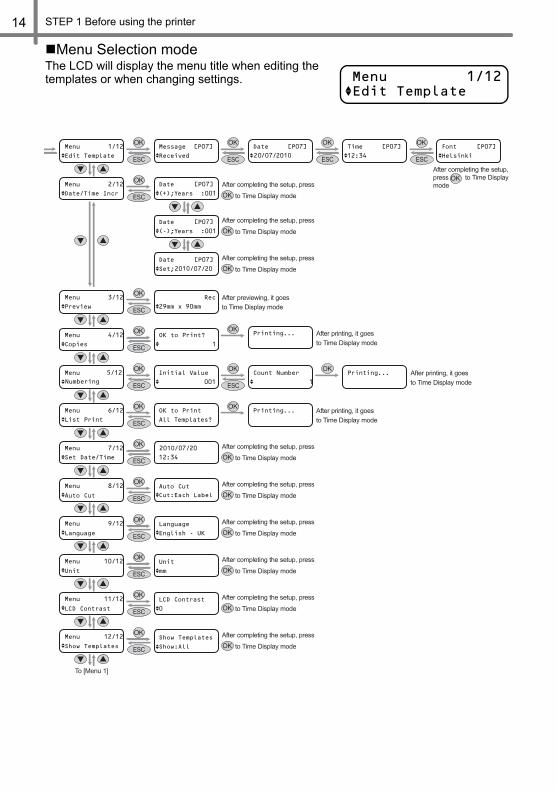
Menu Selection modeThe LCD will display the menu title when editing the templates or when changing settings. Menu 1/12
Edit Template

15
Intro
duct
ion
Mai
nten
ance
and
Tr
oubl
esho
otin
g
TEP1
Intro
duct
ion
TEP2
TEP3
Bef
ore
usin
g th
e pr
inte
rU
sing
onl
y th
is p
rinte
r (N
o PC
)
S
S
S
The function of each button is shown below:
Name Function
ON/OFF button
( )
Turns the printer ON or OFF. The button also lights up or blinks depending on the printer status.
Print button ( )
Starts printing.
Cut button ( )
Cuts the printed label. This button is used when "Auto Cut" is set to "OFF". For details, see "Cut the roll automatically when printing: Menu 8/12" on page 32.
Feed button
( )
• When using DK Die-cut Labels: feeds the DK Label Roll to the beginning of the first label. If this button is held for more than one second, the DK Label Roll is fed to the beginning of the next label.
• When using DK Continuous Tapes: feeds 25.4 mm of the DK Label Roll.• If there is no DK Label Roll installed, the mode changes to a cleaning mode
and the roller rotates for 8 mm. If this button is held for more than one second, the roller rotates for 100 mm.
Menu buttonSwitch between the Time Display mode (normal mode) and Menu Selection mode (when making settings).
In order to avoid changing the template setting, the Menu button can be locked. For details, see "Locking the Menu button" on page 34.
ESC button The setting is canceled and the screen returns to the previous mode or screen.
OK button Accepts the selected mode or setting value.
Up/down arrow button ( / )
Changes the menu or setting value.
Manual operation button
LED lamp Status
OFFThe power is turned OFF.
ONThe power is turned ON.
Blinks rapidly An error has occurred.For details on troubleshooting, see "Troubleshooting" on page 42.
Blinks slowlyThe printer is processing data.
Turns OFF after blinking 10 times
A system error has occurred. Turn the printer OFF, wait 30 seconds and then turn it ON again. If this does not clear the error you should contact your dealer or a Brother authorised service centre.
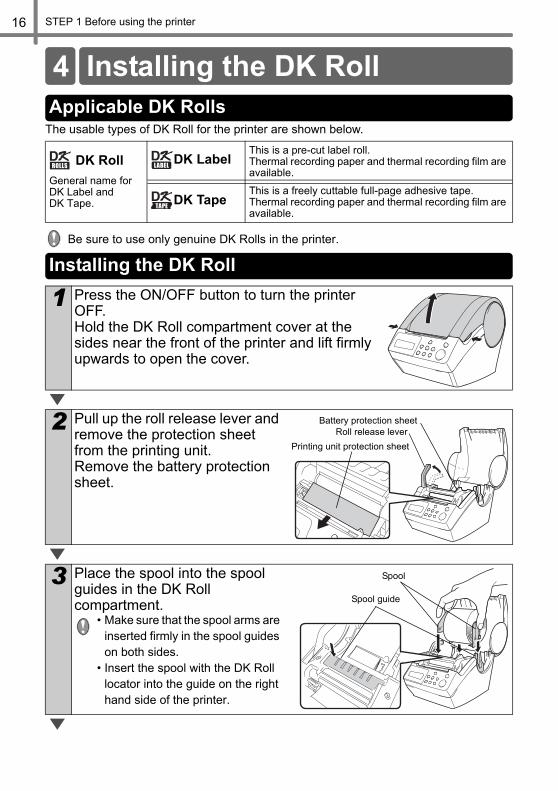
STEP 1 Before using the printer16
The usable types of DK Roll for the printer are shown below.
Be sure to use only genuine DK Rolls in the printer.
DK RollGeneral name for DK Label and DK Tape.
DK LabelThis is a pre-cut label roll. Thermal recording paper and thermal recording film are available.
DK TapeThis is a freely cuttable full-page adhesive tape.Thermal recording paper and thermal recording film are available.
1 Press the ON/OFF button to turn the printer OFF. Hold the DK Roll compartment cover at the sides near the front of the printer and lift firmly upwards to open the cover.
2 Pull up the roll release lever and remove the protection sheet from the printing unit. Remove the battery protection sheet.
3 Place the spool into the spool guides in the DK Roll compartment.
• Make sure that the spool arms are inserted firmly in the spool guides on both sides.
• Insert the spool with the DK Roll locator into the guide on the right hand side of the printer.
Installing the DK Roll4Applicable DK Rolls
Installing the DK Roll
Roll release leverPrinting unit protection sheet
Battery protection sheet
Spool
Spool guide

17
Intro
duct
ion
Mai
nten
ance
and
Tr
oubl
esho
otin
g
TEP1
Intro
duct
ion
TEP2
TEP3
Bef
ore
usin
g th
e pr
inte
rU
sing
onl
y th
is p
rinte
r (N
o PC
)
S
S
S
The printer contains a paper guide which can hold up to 10 individual label sheets.
4 Check that the roll release lever is in the up position.Thread the end of the DK Roll into the slot immediately in front of the cutter.
When unable to thread the end of the DK Roll fully into the slot, thread it as far as possible. Lower the roll release lever and close the cover, then press the Feed button ( ) to set the roll.
5 Push down the roll release lever and close the DK Roll cover.
1 Attach the paper guide to the front of the printer as shown on the right.
You will need to remove the paper guide if you wish to print and cut more than 10 labels at a time.
Roll release lever
Printing unitCutter
Attaching the paper guide5Paper guide
STEP 1 Before using the printer18
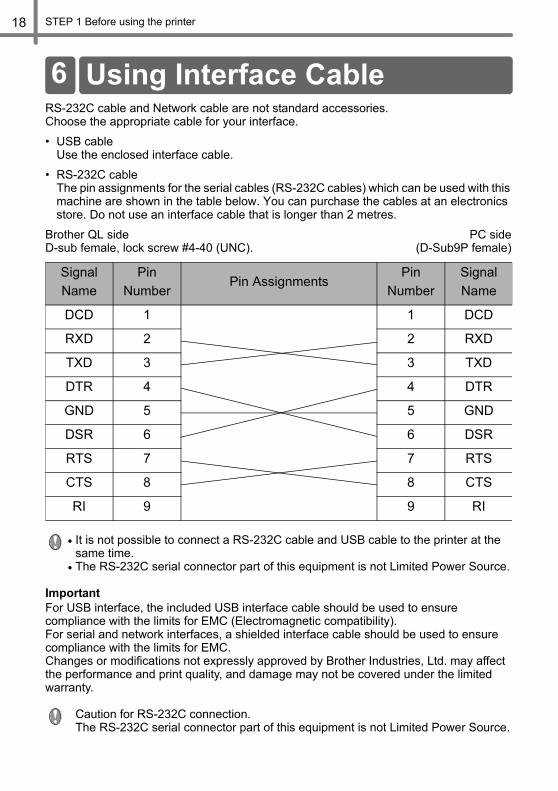
RS-232C cable and Network cable are not standard accessories.Choose the appropriate cable for your interface.
• USB cable Use the enclosed interface cable.
• RS-232C cable The pin assignments for the serial cables (RS-232C cables) which can be used with this machine are shown in the table below. You can purchase the cables at an electronics store. Do not use an interface cable that is longer than 2 metres.
Brother QL side PC sideD-sub female, lock screw #4-40 (UNC). (D-Sub9P female)
• It is not possible to connect a RS-232C cable and USB cable to the printer at the same time.
• The RS-232C serial connector part of this equipment is not Limited Power Source.
ImportantFor USB interface, the included USB interface cable should be used to ensure compliance with the limits for EMC (Electromagnetic compatibility).For serial and network interfaces, a shielded interface cable should be used to ensure compliance with the limits for EMC.Changes or modifications not expressly approved by Brother Industries, Ltd. may affect the performance and print quality, and damage may not be covered under the limited warranty.
Caution for RS-232C connection. The RS-232C serial connector part of this equipment is not Limited Power Source.
Using Interface Cable6
Signal Name
Pin Number
Pin AssignmentsPin
NumberSignal Name
DCD 1 1 DCD
RXD 2 2 RXD
TXD 3 3 TXD
DTR 4 4 DTR
GND 5 5 GND
DSR 6 6 DSR
RTS 7 7 RTS
CTS 8 8 CTS
RI 9 9 RI
19
Intro
duct
ion
Mai
nten
ance
and
Tr
oubl
esho
otin
g
TEP1
Intro
duct
ion
TEP2
TEP3
Bef
ore
usin
g th
e pr
inte
rU
sing
onl
y th
is p
rinte
r (N
o PC
)
S
S
S
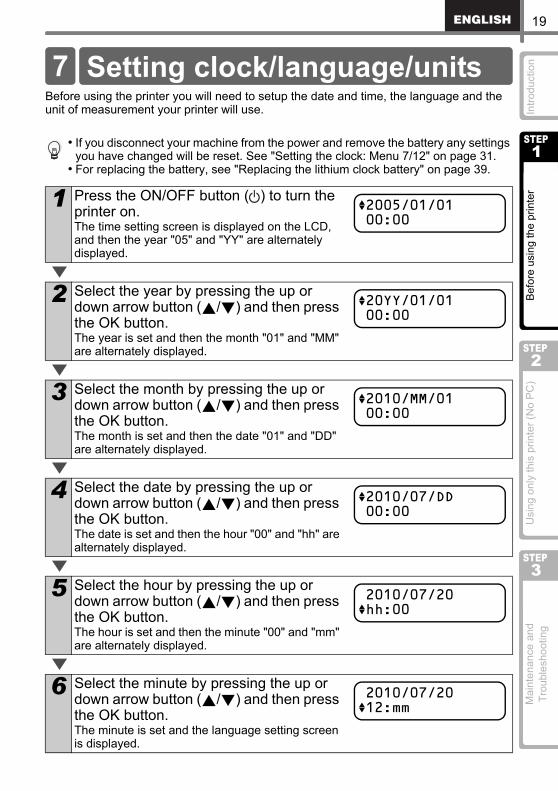
Before using the printer you will need to setup the date and time, the language and the unit of measurement your printer will use.
• If you disconnect your machine from the power and remove the battery any settings you have changed will be reset. See "Setting the clock: Menu 7/12" on page 31.
• For replacing the battery, see "Replacing the lithium clock battery" on page 39.
1 Press the ON/OFF button ( ) to turn the printer on.The time setting screen is displayed on the LCD, and then the year "05" and "YY" are alternately displayed.
2 Select the year by pressing the up or down arrow button ( / ) and then press the OK button.The year is set and then the month "01" and "MM" are alternately displayed.
3 Select the month by pressing the up or down arrow button ( / ) and then press the OK button.The month is set and then the date "01" and "DD" are alternately displayed.
4 Select the date by pressing the up or down arrow button ( / ) and then press the OK button.The date is set and then the hour "00" and "hh" are alternately displayed.
5 Select the hour by pressing the up or down arrow button ( / ) and then press the OK button.The hour is set and then the minute "00" and "mm" are alternately displayed.
6 Select the minute by pressing the up or down arrow button ( / ) and then press the OK button.The minute is set and the language setting screen is displayed.
Setting clock/language/units7
2005/01/0100:00
20YY/01/0100:00
2010/MM/0100:00
2010/07/DD00:00
2010/07/20hh:00
2010/07/2012:mm
STEP 1 Before using the printer20
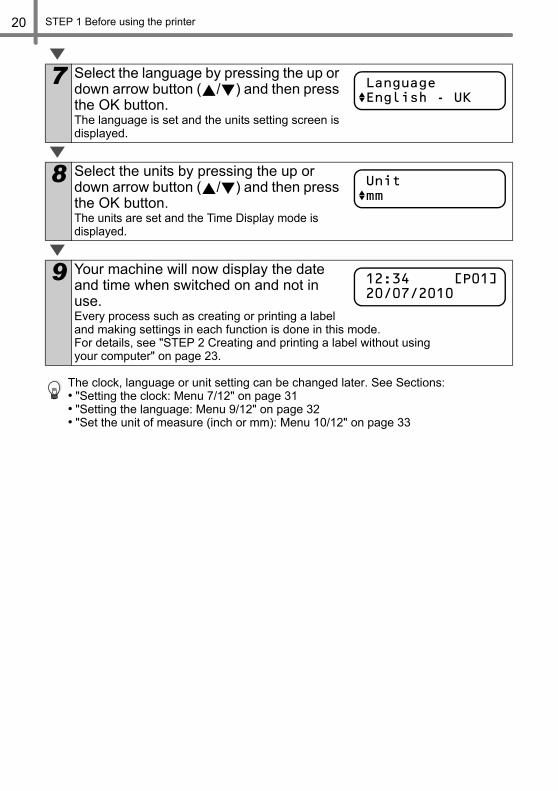
The clock, language or unit setting can be changed later. See Sections:• "Setting the clock: Menu 7/12" on page 31• "Setting the language: Menu 9/12" on page 32• "Set the unit of measure (inch or mm): Menu 10/12" on page 33
7 Select the language by pressing the up or down arrow button ( / ) and then press the OK button.The language is set and the units setting screen is displayed.
8 Select the units by pressing the up or down arrow button ( / ) and then press the OK button.The units are set and the Time Display mode is displayed.
9 Your machine will now display the date and time when switched on and not in use.Every process such as creating or printing a label and making settings in each function is done in this mode.For details, see "STEP 2 Creating and printing a label without using your computer" on page 23.
LanguageEnglish - UK
Unitmm
12:34 [P01]20/07/2010
21
Intro
duct
ion
Mai
nten
ance
and
Tr
oubl
esho
otin
g
TEP1
Intro
duct
ion
TEP2
TEP3
Bef
ore
usin
g th
e pr
inte
rU
sing
onl
y th
is p
rinte
r (N
o PC
)
S
S
S
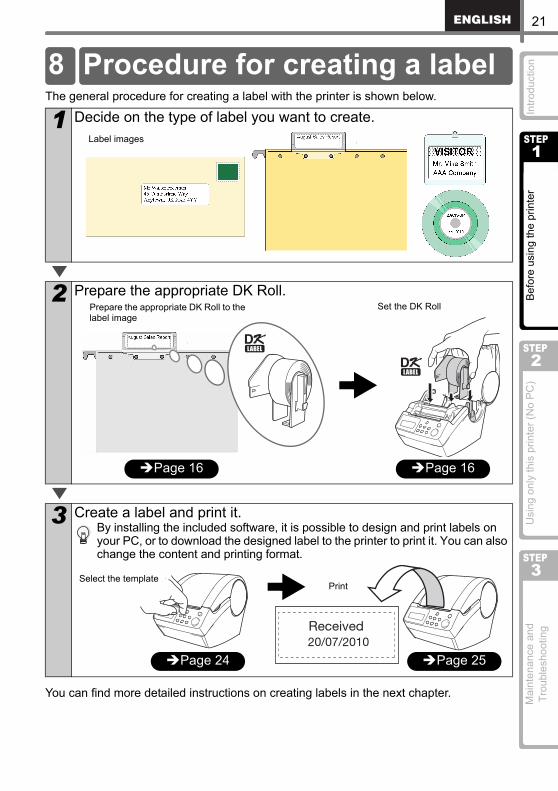
The general procedure for creating a label with the printer is shown below.
You can find more detailed instructions on creating labels in the next chapter.
1 Decide on the type of label you want to create.
2 Prepare the appropriate DK Roll.
3 Create a label and print it.By installing the included software, it is possible to design and print labels on your PC, or to download the designed label to the printer to print it. You can also change the content and printing format.
Procedure for creating a label8
Label images
Set the DK Roll
Page 16
Prepare the appropriate DK Roll to the label image
Page 16
Select the templatePrint
Page 25Page 24

STEP 1 Before using the printer22
23
STEP 2STEP 2
Mai
nten
ance
and
Tr
oubl
esho
otin
g
STEP1
Intro
duct
ion
TEP2
TEP3
Bef
ore
usin
g th
e pr
inte
rU
sing
onl
y th
is p
rinte
r (N
o P
C)
S
S
Creating and printing a label without using your computer
This printer has eight built-in templates for your convenience, you may select the template you want from these templates by scrolling up or down ( / ) and then press the Print button. You may also download additional templates created in P-touch Editor 5. This is for PC only and not available for Mac.
Using only this printer (No PC)
Creating a label
Other convenient functions
1. Selecting a template Page 24
2. Printing a label Page 25
Editing a template: Menu 1/12 Page 26
Changing the date used for templates: Menu 2/12 Page 27
Preview the label content before printing: Menu 3/12 Page 28
Specifying the number of copies: Menu 4/12 Page 29
Printing labels with label numbers: Menu 5/12 Page 29
Printing a list of templates: Menu 6/12 Page 31
Setting the clock: Menu 7/12 Page 31
Cut the roll automatically when printing: Menu 8/12 Page 32
Setting the language: Menu 9/12 Page 32
Set the unit of measure (inch or mm): Menu 10/12 Page 33
Adjusting the contrast of LCD: Menu 11/12 Page 33
Hiding/showing the preset templates: Menu 12/12 Page 34
Locking the Menu button Page 34
Uploading templates/messages from your computer Page 34
1
2
STEP 2 Creating and printing a label without using your computer24
After deciding the type of label you want to create you need to choose a suitable DK Roll (see "Installing the DK Roll" on page 16).
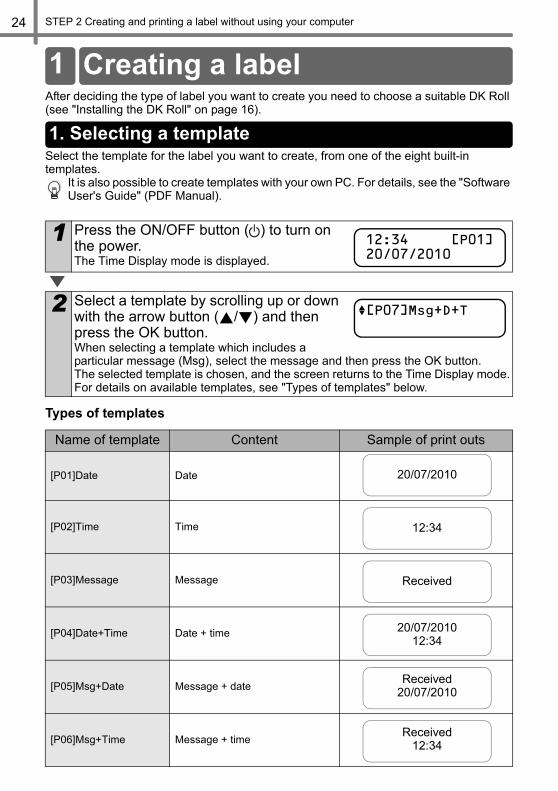
Select the template for the label you want to create, from one of the eight built-in templates.
It is also possible to create templates with your own PC. For details, see the "Software User's Guide" (PDF Manual).
Types of templates
1 Press the ON/OFF button ( ) to turn on the power.The Time Display mode is displayed.
2 Select a template by scrolling up or down with the arrow button ( / ) and then press the OK button.When selecting a template which includes a particular message (Msg), select the message and then press the OK button.The selected template is chosen, and the screen returns to the Time Display mode.For details on available templates, see "Types of templates" below.
Name of template Content Sample of print outs
[P01]Date Date
[P02]Time Time
[P03]Message Message
[P04]Date+Time Date + time
[P05]Msg+Date Message + date
[P06]Msg+Time Message + time
Creating a label1
1. Selecting a template
12:34 [P01]20/07/2010
[P07]Msg+D+T
20/07/2010
12:34
Received
20/07/201012:34
Received20/07/2010
Received12:34
25
Mai
nten
ance
and
Tr
oubl
esho
otin
g
TEP1
TEP2
TEP3
Bef
ore
usin
g th
e pr
inte
rU
sing
onl
y th
is p
rinte
r (N
o P
C)
Intro
duct
ion
S
S
S
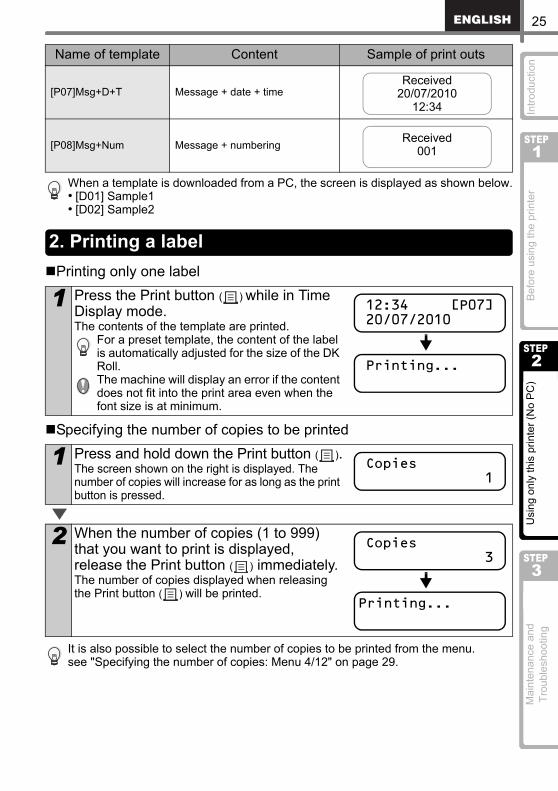
When a template is downloaded from a PC, the screen is displayed as shown below.• [D01] Sample1• [D02] Sample2
Printing only one label
Specifying the number of copies to be printed
It is also possible to select the number of copies to be printed from the menu. see "Specifying the number of copies: Menu 4/12" on page 29.
[P07]Msg+D+T Message + date + time
[P08]Msg+Num Message + numbering
1 Press the Print button ( ) while in Time Display mode.The contents of the template are printed.
For a preset template, the content of the label is automatically adjusted for the size of the DK Roll.The machine will display an error if the content does not fit into the print area even when the font size is at minimum.
1 Press and hold down the Print button ( ).The screen shown on the right is displayed. The number of copies will increase for as long as the print button is pressed.
2 When the number of copies (1 to 999) that you want to print is displayed, release the Print button ( ) immediately.The number of copies displayed when releasing the Print button ( ) will be printed.
Name of template Content Sample of print outs
Received20/07/2010
12:34
Received001
2. Printing a label
12:34 [P07]20/07/2010
Printing...
Copies 1
Copies 3
Printing...
STEP 2 Creating and printing a label without using your computer26
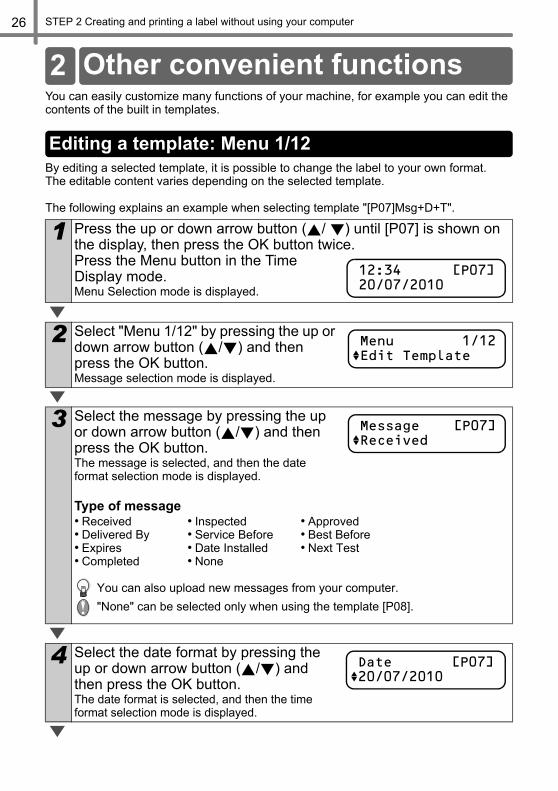
You can easily customize many functions of your machine, for example you can edit the contents of the built in templates.
By editing a selected template, it is possible to change the label to your own format.The editable content varies depending on the selected template.
The following explains an example when selecting template "[P07]Msg+D+T".
1 Press the up or down arrow button ( / ) until [P07] is shown on the display, then press the OK button twice.Press the Menu button in the Time Display mode.Menu Selection mode is displayed.
2 Select "Menu 1/12" by pressing the up or down arrow button ( / ) and then press the OK button.Message selection mode is displayed.
3 Select the message by pressing the up or down arrow button ( / ) and then press the OK button.The message is selected, and then the date format selection mode is displayed.
Type of message• Received • Inspected • Approved• Delivered By • Service Before • Best Before• Expires • Date Installed • Next Test• Completed • None
You can also upload new messages from your computer."None" can be selected only when using the template [P08].
4 Select the date format by pressing the up or down arrow button ( / ) and then press the OK button.The date format is selected, and then the time format selection mode is displayed.
Other convenient functions2
Editing a template: Menu 1/12
12:34 [P07]20/07/2010
Menu 1/12Edit Template
Message [P07]Received
Date [P07]20/07/2010
27
Mai
nten
ance
and
Tr
oubl
esho
otin
g
TEP1
TEP2
TEP3
Bef
ore
usin
g th
e pr
inte
rU
sing
onl
y th
is p
rinte
r (N
o P
C)
Intro
duct
ion
S
S
S
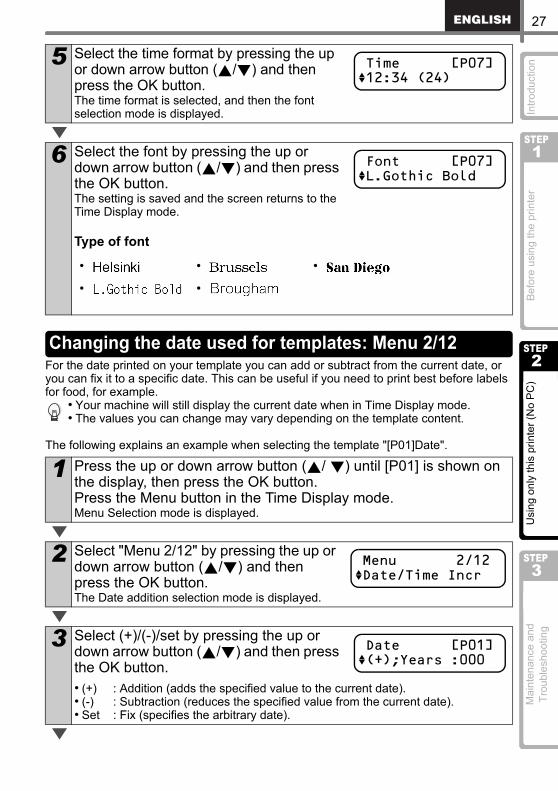
For the date printed on your template you can add or subtract from the current date, or you can fix it to a specific date. This can be useful if you need to print best before labels for food, for example.
• Your machine will still display the current date when in Time Display mode.• The values you can change may vary depending on the template content.
The following explains an example when selecting the template "[P01]Date".
5 Select the time format by pressing the up or down arrow button ( / ) and then press the OK button.The time format is selected, and then the font selection mode is displayed.
6 Select the font by pressing the up or down arrow button ( / ) and then press the OK button.The setting is saved and the screen returns to the Time Display mode.
Type of font
1 Press the up or down arrow button ( / ) until [P01] is shown on the display, then press the OK button.Press the Menu button in the Time Display mode.Menu Selection mode is displayed.
2 Select "Menu 2/12" by pressing the up or down arrow button ( / ) and then press the OK button.The Date addition selection mode is displayed.
3 Select (+)/(-)/set by pressing the up or down arrow button ( / ) and then press the OK button.• (+) : Addition (adds the specified value to the current date).• (-) : Subtraction (reduces the specified value from the current date).• Set : Fix (specifies the arbitrary date).
Time [P07]12:34 (24)
Font [P07]L.Gothic Bold
• • •
• •
Changing the date used for templates: Menu 2/12
Menu 2/12Date/Time Incr
Date [P01](+);Years :000
STEP 2 Creating and printing a label without using your computer28
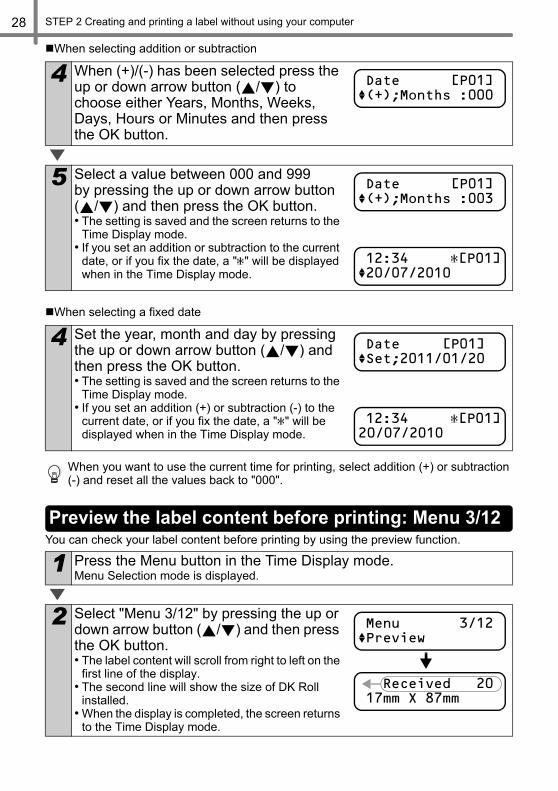
When selecting addition or subtraction
When selecting a fixed date
When you want to use the current time for printing, select addition (+) or subtraction (-) and reset all the values back to "000".
You can check your label content before printing by using the preview function.
4 When (+)/(-) has been selected press the up or down arrow button ( / ) to choose either Years, Months, Weeks, Days, Hours or Minutes and then press the OK button.
5 Select a value between 000 and 999 by pressing the up or down arrow button ( / ) and then press the OK button.• The setting is saved and the screen returns to the
Time Display mode.• If you set an addition or subtraction to the current
date, or if you fix the date, a " " will be displayed when in the Time Display mode.
4 Set the year, month and day by pressing the up or down arrow button ( / ) and then press the OK button.• The setting is saved and the screen returns to the
Time Display mode.• If you set an addition (+) or subtraction (-) to the
current date, or if you fix the date, a " " will be displayed when in the Time Display mode.
1 Press the Menu button in the Time Display mode.Menu Selection mode is displayed.
2 Select "Menu 3/12" by pressing the up or down arrow button ( / ) and then press the OK button.• The label content will scroll from right to left on the
first line of the display.• The second line will show the size of DK Roll
installed.• When the display is completed, the screen returns
to the Time Display mode.
Date [P01](+);Months :000
Date [P01](+);Months :003
12:34 [P01]20/07/2010
Date [P01]Set;2011/01/20
12:34 [P01]20/07/2010
Preview the label content before printing: Menu 3/12
Menu 3/12Preview
Received 2017mm X 87mm
29
Mai
nten
ance
and
Tr
oubl
esho
otin
g
TEP1
TEP2
TEP3
Bef
ore
usin
g th
e pr
inte
rU
sing
onl
y th
is p
rinte
r (N
o P
C)
Intro
duct
ion
S
S
S
When you choose a template that includes numbering you need to enter the starting number and how much you want that number to increase each time you print the label.
For details on downloaded templates, see the "Software User's Guide" (PDF Manual).
1 Press the Menu button in the Time Display mode.Menu Selection mode is displayed.
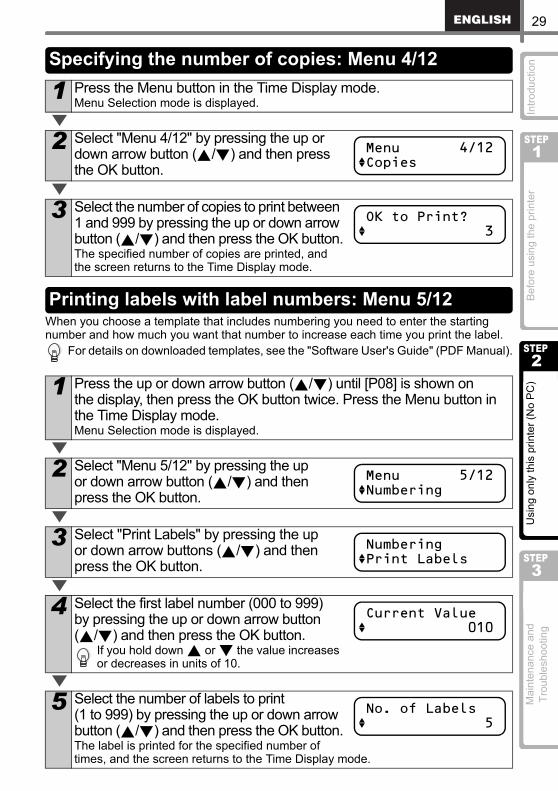
2 Select "Menu 4/12" by pressing the up or down arrow button ( / ) and then press the OK button.
3 Select the number of copies to print between 1 and 999 by pressing the up or down arrow button ( / ) and then press the OK button.The specified number of copies are printed, and the screen returns to the Time Display mode.
1 Press the up or down arrow button ( / ) until [P08] is shown on the display, then press the OK button twice. Press the Menu button in the Time Display mode.Menu Selection mode is displayed.
2 Select "Menu 5/12" by pressing the up or down arrow button ( / ) and then press the OK button.
3 Select "Print Labels" by pressing the up or down arrow buttons ( / ) and then press the OK button.
4 Select the first label number (000 to 999) by pressing the up or down arrow button ( / ) and then press the OK button.
If you hold down or the value increases or decreases in units of 10.
5 Select the number of labels to print (1 to 999) by pressing the up or down arrow button ( / ) and then press the OK button.The label is printed for the specified number of times, and the screen returns to the Time Display mode.
Specifying the number of copies: Menu 4/12
Menu 4/12Copies
OK to Print? 3
Printing labels with label numbers: Menu 5/12
Menu 5/12Numbering
NumberingPrint Labels
Current Value 010
No. of Labels 5
STEP 2 Creating and printing a label without using your computer30
Printing a sequential label
Printing more than one sequential label
Resetting the sequential number
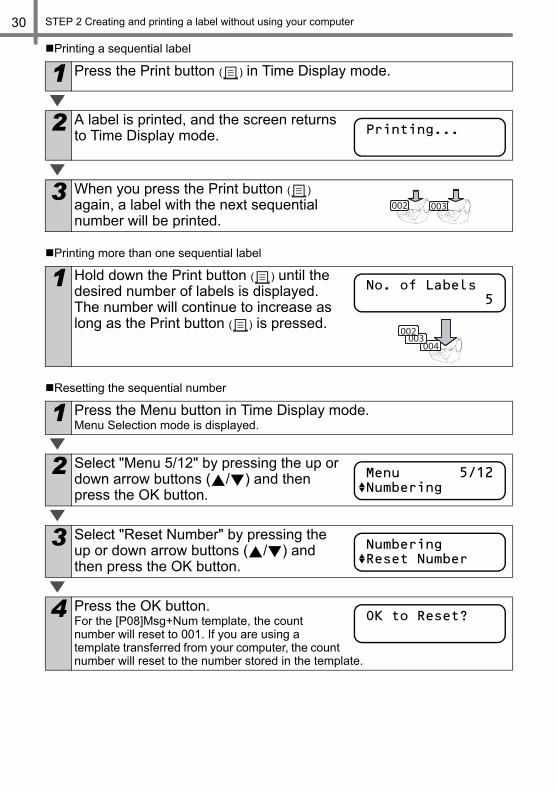
1 Press the Print button ( ) in Time Display mode.
2 A label is printed, and the screen returns to Time Display mode.
3 When you press the Print button ( ) again, a label with the next sequential number will be printed.
1 Hold down the Print button ( ) until the desired number of labels is displayed. The number will continue to increase as long as the Print button ( ) is pressed.
1 Press the Menu button in Time Display mode.Menu Selection mode is displayed.
2 Select "Menu 5/12" by pressing the up or down arrow buttons ( / ) and then press the OK button.
3 Select "Reset Number" by pressing the up or down arrow buttons ( / ) and then press the OK button.
4 Press the OK button.For the [P08]Msg+Num template, the count number will reset to 001. If you are using a template transferred from your computer, the count number will reset to the number stored in the template.
Printing...
No. of Labels 5
Menu 5/12Numbering
NumberingReset Number
OK to Reset?
31
Mai
nten
ance
and
Tr
oubl
esho
otin
g
TEP1
TEP2
TEP3
Bef
ore
usin
g th
e pr
inte
rU
sing
onl
y th
is p
rinte
r (N
o P
C)
Intro
duct
ion
S
S
S
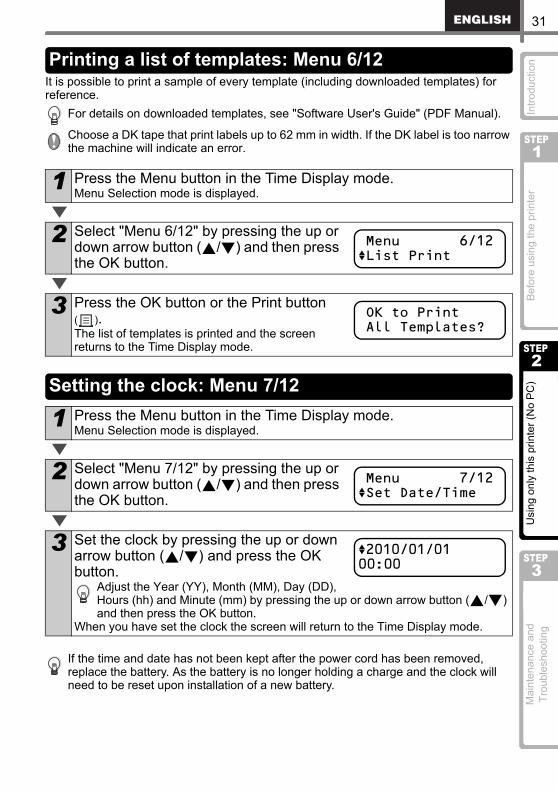
It is possible to print a sample of every template (including downloaded templates) for reference.
For details on downloaded templates, see "Software User's Guide" (PDF Manual).
Choose a DK tape that print labels up to 62 mm in width. If the DK label is too narrow the machine will indicate an error.
If the time and date has not been kept after the power cord has been removed, replace the battery. As the battery is no longer holding a charge and the clock will need to be reset upon installation of a new battery.
1 Press the Menu button in the Time Display mode.Menu Selection mode is displayed.
2 Select "Menu 6/12" by pressing the up or down arrow button ( / ) and then press the OK button.
3 Press the OK button or the Print button ( ).The list of templates is printed and the screen returns to the Time Display mode.
1 Press the Menu button in the Time Display mode.Menu Selection mode is displayed.
2 Select "Menu 7/12" by pressing the up or down arrow button ( / ) and then press the OK button.
3 Set the clock by pressing the up or down arrow button ( / ) and press the OK button.
Adjust the Year (YY), Month (MM), Day (DD), Hours (hh) and Minute (mm) by pressing the up or down arrow button ( / ) and then press the OK button.
When you have set the clock the screen will return to the Time Display mode.
Printing a list of templates: Menu 6/12
Menu 6/12List Print
OK to PrintAll Templates?
Setting the clock: Menu 7/12
Menu 7/12Set Date/Time
2010/01/0100:00
STEP 2 Creating and printing a label without using your computer32
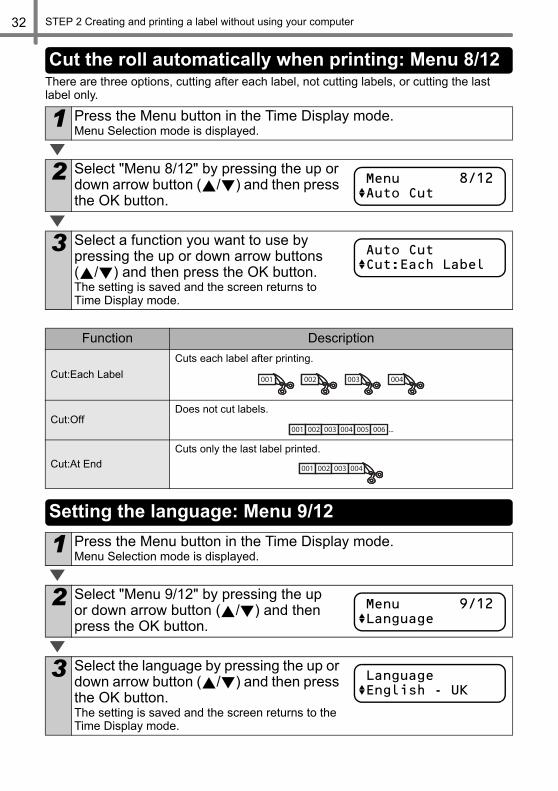
There are three options, cutting after each label, not cutting labels, or cutting the last label only.
1 Press the Menu button in the Time Display mode.Menu Selection mode is displayed.
2 Select "Menu 8/12" by pressing the up or down arrow button ( / ) and then press the OK button.
3 Select a function you want to use by pressing the up or down arrow buttons ( / ) and then press the OK button.The setting is saved and the screen returns to Time Display mode.
Function Description
Cut:Each LabelCuts each label after printing.
Cut:OffDoes not cut labels.
Cut:At EndCuts only the last label printed.
1 Press the Menu button in the Time Display mode.Menu Selection mode is displayed.
2 Select "Menu 9/12" by pressing the up or down arrow button ( / ) and then press the OK button.
3 Select the language by pressing the up or down arrow button ( / ) and then press the OK button.The setting is saved and the screen returns to the Time Display mode.
Cut the roll automatically when printing: Menu 8/12
Menu 8/12Auto Cut
Auto CutCut:Each Label
001 002 003 004
001 002 003 004 005 006 ...
001 002 003 004
Setting the language: Menu 9/12
Menu 9/12Language
LanguageEnglish - UK
33
Mai
nten
ance
and
Tr
oubl
esho
otin
g
TEP1
TEP2
TEP3
Bef
ore
usin
g th
e pr
inte
rU
sing
onl
y th
is p
rinte
r (N
o P
C)
Intro
duct
ion
S
S
S
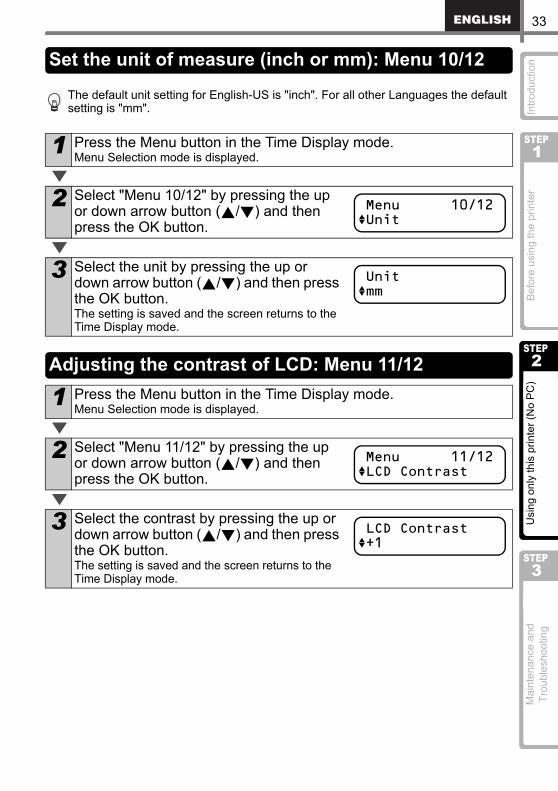
The default unit setting for English-US is "inch". For all other Languages the default setting is "mm".
1 Press the Menu button in the Time Display mode.Menu Selection mode is displayed.
2 Select "Menu 10/12" by pressing the up or down arrow button ( / ) and then press the OK button.
3 Select the unit by pressing the up or down arrow button ( / ) and then press the OK button.The setting is saved and the screen returns to the Time Display mode.
1 Press the Menu button in the Time Display mode.Menu Selection mode is displayed.
2 Select "Menu 11/12" by pressing the up or down arrow button ( / ) and then press the OK button.
3 Select the contrast by pressing the up or down arrow button ( / ) and then press the OK button.The setting is saved and the screen returns to the Time Display mode.
Set the unit of measure (inch or mm): Menu 10/12
Menu 10/12Unit
Unitmm
Adjusting the contrast of LCD: Menu 11/12
Menu 11/12LCD Contrast
LCD Contrast+1
STEP 2 Creating and printing a label without using your computer34
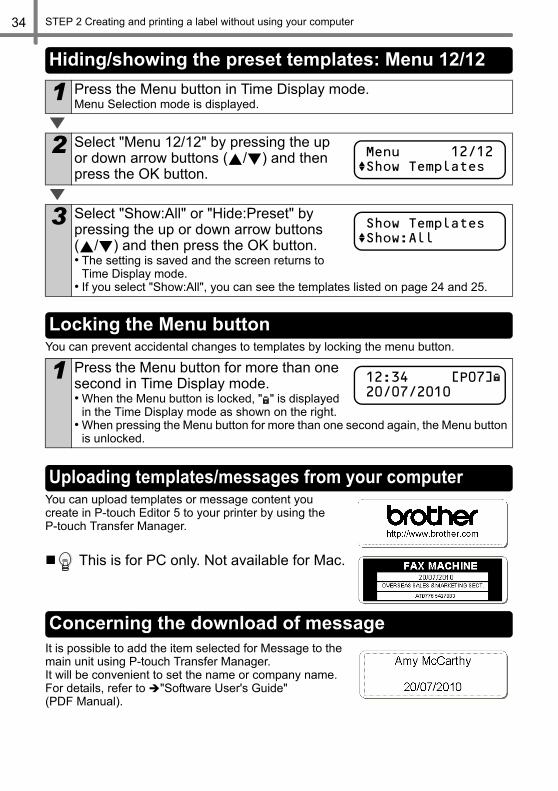
You can prevent accidental changes to templates by locking the menu button.
You can upload templates or message content you create in P-touch Editor 5 to your printer by using the P-touch Transfer Manager.
This is for PC only. Not available for Mac.
It is possible to add the item selected for Message to the main unit using P-touch Transfer Manager.It will be convenient to set the name or company name.For details, refer to "Software User's Guide" (PDF Manual).
1 Press the Menu button in Time Display mode.Menu Selection mode is displayed.
2 Select "Menu 12/12" by pressing the up or down arrow buttons ( / ) and then press the OK button.
3 Select "Show:All" or "Hide:Preset" by pressing the up or down arrow buttons ( / ) and then press the OK button.• The setting is saved and the screen returns to
Time Display mode.• If you select "Show:All", you can see the templates listed on page 24 and 25.
1 Press the Menu button for more than one second in Time Display mode.• When the Menu button is locked, " " is displayed
in the Time Display mode as shown on the right.• When pressing the Menu button for more than one second again, the Menu button
is unlocked.
Hiding/showing the preset templates: Menu 12/12
Menu 12/12Show Templates
Show TemplatesShow:All
Locking the Menu button
12:34 [P07]20/07/2010
Uploading templates/messages from your computer
Concerning the download of message
STEP 3STEP 3
Mai
nten
ance
and
Tr
oubl
esho
otin
g
STEP1
Intro
duct
ion
TEP2
TEP3
Bef
ore
usin
g th
e pr
inte
rU
sing
onl
y th
is p
rinte
r (N
o P
C)
35
S
S
Maintenance and TroubleshootingThis section of the guide explains how to properly maintain this printer so as to ensure many years of reliable service.This section also covers how to troubleshoot potential problems and how to read and understand error messages.
Maintenance
Troubleshooting
Print head maintenance Page 36
Roller maintenance Page 36
Label outlet maintenance Page 37
Replacing the cutter unit Page 38
Replacing the lithium clock battery Page 39
Potential types of problems Page 42
Error messages (what they mean) Page 43
Reset the Printer Page 44
1
2
Main specifications Page 45
STEP 3 Maintenance and Troubleshooting36
Maintenance of the printer needs only to be done when required. However, some environments will require that maintenance should be done more frequently (e.g. in dusty conditions).
The DK Roll (thermal recording paper type) used with the printer is designed to clean the print head automatically. When the DK Roll passes the print head during printing and label feeding, the print head is cleaned.
Clean the roller using the cleaning sheet (available separately).The printer contains only one cleaning sheet.
When doing maintenance on the roller, be sure to use the cleaning sheet supplied exclusively for this printer. If using other cleaning sheets, the surface of the roller may be damaged and may cause a malfunction.
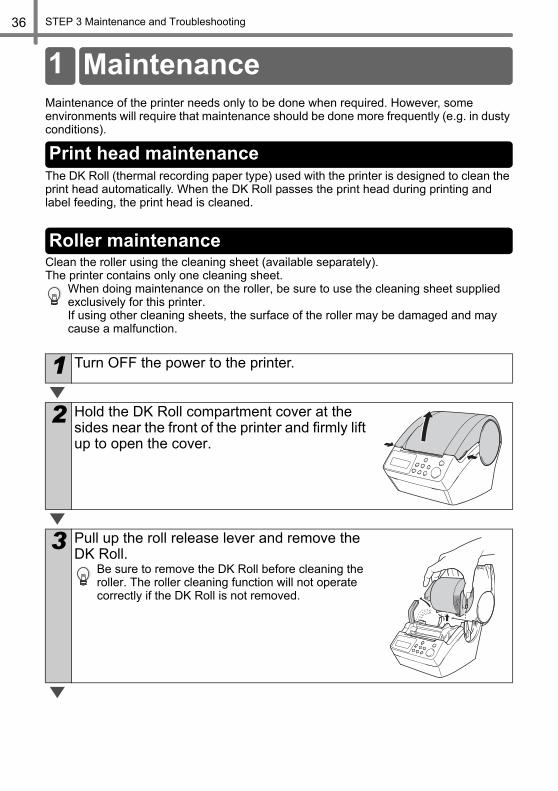
1 Turn OFF the power to the printer.
2 Hold the DK Roll compartment cover at the sides near the front of the printer and firmly lift up to open the cover.
3 Pull up the roll release lever and remove the DK Roll.
Be sure to remove the DK Roll before cleaning the roller. The roller cleaning function will not operate correctly if the DK Roll is not removed.
Maintenance1
Print head maintenance
Roller maintenance
37
Mai
nten
ance
and
Tr
oubl
esho
otin
g
TEP1
Intro
duct
ion
TEP2
TEP3
Bef
ore
usin
g th
e pr
inte
rU
sing
onl
y th
is p
rinte
r (N
o P
C)
S
S
S
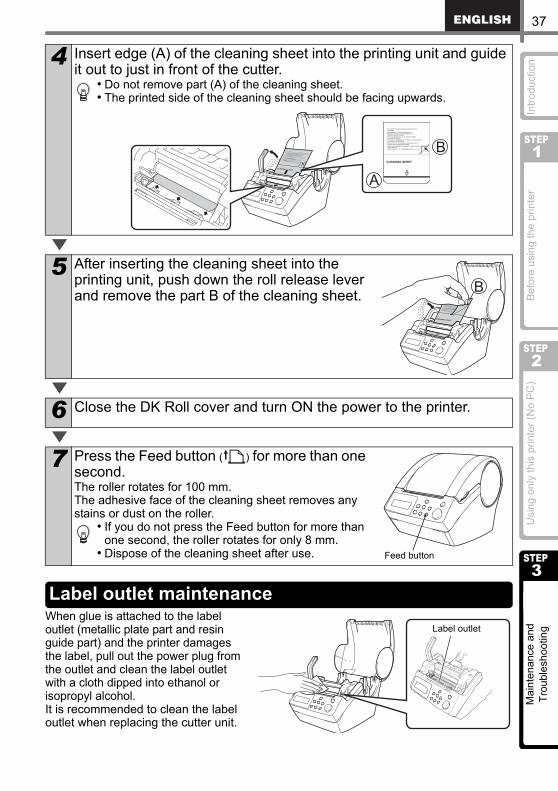
When glue is attached to the label outlet (metallic plate part and resin guide part) and the printer damages the label, pull out the power plug from the outlet and clean the label outlet with a cloth dipped into ethanol or isopropyl alcohol.It is recommended to clean the label outlet when replacing the cutter unit.
4 Insert edge (A) of the cleaning sheet into the printing unit and guide it out to just in front of the cutter.
• Do not remove part (A) of the cleaning sheet.• The printed side of the cleaning sheet should be facing upwards.
5 After inserting the cleaning sheet into the printing unit, push down the roll release lever and remove the part B of the cleaning sheet.
6 Close the DK Roll cover and turn ON the power to the printer.
7 Press the Feed button ( ) for more than one second.The roller rotates for 100 mm.The adhesive face of the cleaning sheet removes any stains or dust on the roller.
• If you do not press the Feed button for more than one second, the roller rotates for only 8 mm.
• Dispose of the cleaning sheet after use. Feed button
Label outlet maintenanceLabel outlet

STEP 3 Maintenance and Troubleshooting38
Eventually the cutting blade on the cutter unit will become dull (blunt) and need to be replaced. At the appropriate time, purchase a new replacement cutter unit and install it according to the following procedure.
1 Check that the cutter unit is located at the home position.
2 Turn OFF the power to the printer and pull out the power cord from the wall outlet.
3 Open the DK Roll cover and pull the roll release lever to the up position. Remove the DK Roll.
4 Lift up the cutter cover.
5 Using a cross-head screwdriver, loosen the screw which holds the cutter blade unit in-place.
The screw securing the cutter unit should not be completely removed. Simply loosen it to remove the cutter unit from the printer.
Replacing the cutter unit
39
Mai
nten
ance
and
Tr
oubl
esho
otin
g
TEP1
Intro
duct
ion
TEP2
TEP3
Bef
ore
usin
g th
e pr
inte
rU
sing
onl
y th
is p
rinte
r (N
o P
C)
S
S
S
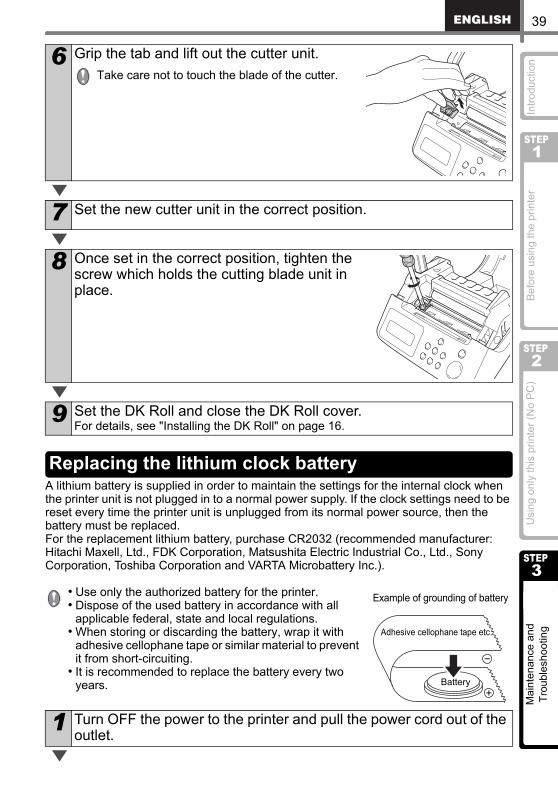
A lithium battery is supplied in order to maintain the settings for the internal clock when the printer unit is not plugged in to a normal power supply. If the clock settings need to be reset every time the printer unit is unplugged from its normal power source, then the battery must be replaced. For the replacement lithium battery, purchase CR2032 (recommended manufacturer: Hitachi Maxell, Ltd., FDK Corporation, Matsushita Electric Industrial Co., Ltd., Sony Corporation, Toshiba Corporation and VARTA Microbattery Inc.).
• Use only the authorized battery for the printer.• Dispose of the used battery in accordance with all
applicable federal, state and local regulations.• When storing or discarding the battery, wrap it with
adhesive cellophane tape or similar material to prevent it from short-circuiting.
• It is recommended to replace the battery every two years.
6 Grip the tab and lift out the cutter unit.Take care not to touch the blade of the cutter.
7 Set the new cutter unit in the correct position.
8 Once set in the correct position, tighten the screw which holds the cutting blade unit in place.
9 Set the DK Roll and close the DK Roll cover.For details, see "Installing the DK Roll" on page 16.
1 Turn OFF the power to the printer and pull the power cord out of the outlet.
Replacing the lithium clock battery
Adhesive cellophane tape etc.
Battery
Example of grounding of battery
STEP 3 Maintenance and Troubleshooting40
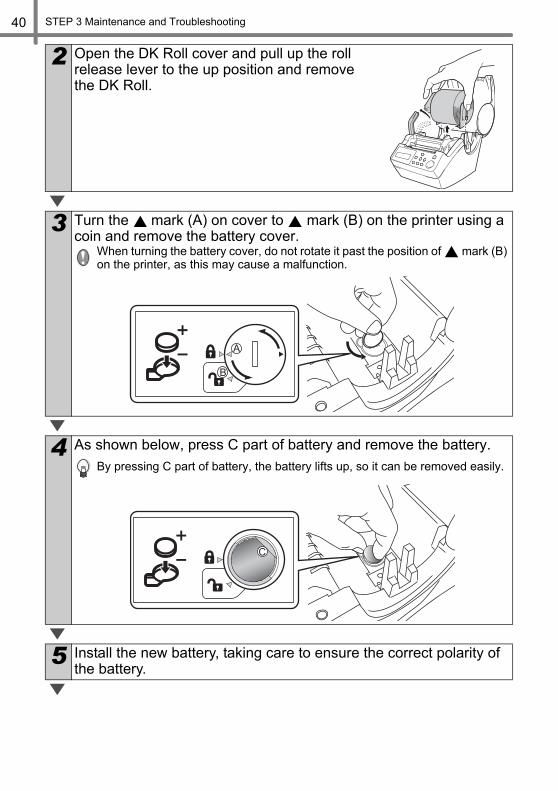
2 Open the DK Roll cover and pull up the roll release lever to the up position and remove the DK Roll.
3 Turn the mark (A) on cover to mark (B) on the printer using a coin and remove the battery cover.
When turning the battery cover, do not rotate it past the position of mark (B) on the printer, as this may cause a malfunction.
4 As shown below, press C part of battery and remove the battery.By pressing C part of battery, the battery lifts up, so it can be removed easily.
5 Install the new battery, taking care to ensure the correct polarity of the battery.
41
Mai
nten
ance
and
Tr
oubl
esho
otin
g
TEP1
Intro
duct
ion
TEP2
TEP3
Bef
ore
usin
g th
e pr
inte
rU
sing
onl
y th
is p
rinte
r (N
o P
C)
S
S
S
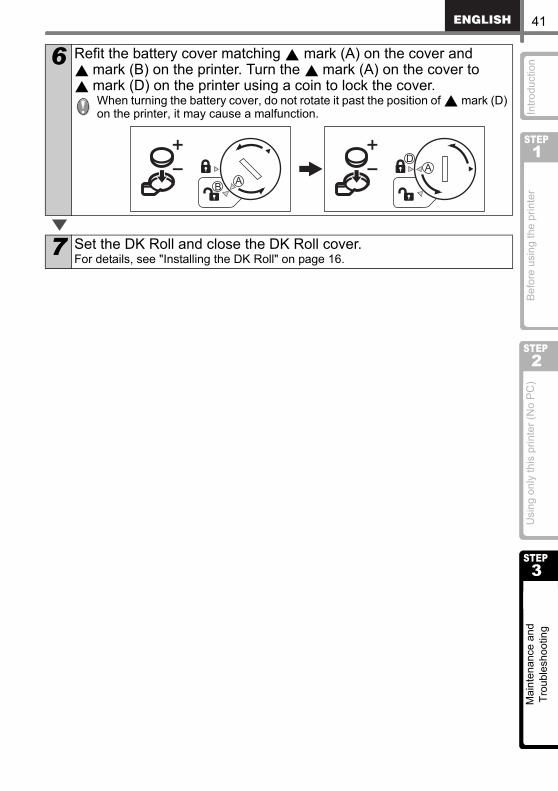
6 Refit the battery cover matching mark (A) on the cover and mark (B) on the printer. Turn the mark (A) on the cover to mark (D) on the printer using a coin to lock the cover.
When turning the battery cover, do not rotate it past the position of mark (D) on the printer, it may cause a malfunction.
7 Set the DK Roll and close the DK Roll cover.For details, see "Installing the DK Roll" on page 16.
STEP 3 Maintenance and Troubleshooting42
If problems occur while using this printer, the following may help you to solve the problems:
Problem Solution
• Cannot print• Printing error
is displayed
• Is the USB cable disconnected? Check the USB cable is connected properly.
• Is the DK Roll properly set? If it is not set properly, remove the DK Roll and set it again.
• Is the DK Roll used up?• Is the DK Roll cover open?
Check the roll cover is closed properly.• Are both the USB cable and RS-232C cables connected to the
printer at the same time? Connect only one cable which is used to communicate with the printer.
• LED lamp does not light up
• Is the power cord connected properly? Check the power cord is connected properly. If it is connected properly, try to connect it to another outlet.* If the problem is not resolved after trying these solutions, contact your local
distributor or Brother Call Center.
• LED lamp is blinking
• For details, see "Manual operation button" on page 15.• Does a system error (the LED turns off after blinking 10 times)
occur? Turn OFF the power to the printer wait 30 seconds and then turn it ON again. If the problem is not resolved after trying this solution, contact your local distributor or Brother Call Center.
• The print quality is poor
• Is the print head or roller damaged or stained? The print head is cleaned when using the DK Roll (thermal recording paper), however, dust or stains from the roller may collect on the print head. In this case, clean the roller. For details, see "Roller maintenance" on page 36.
• Data transmission error is displayed on PC
• Is the correct port selected? Check that the correct port is selected from [print to the port below] in printer property dialog box.
• The clock stops when unplugging the power cord
• Is the battery protection sheet removed? Remove the battery protection sheet.
• Is the battery installed? Put a new battery in the machine.
• The battery has run out of power. Replace it with a new battery.
Troubleshooting2
Potential types of problems
43
Mai
nten
ance
and
Tr
oubl
esho
otin
g
TEP1
Intro
duct
ion
TEP2
TEP3
Bef
ore
usin
g th
e pr
inte
rU
sing
onl
y th
is p
rinte
r (N
o P
C)
S
S
S
• The label gets jammed around the cutter unit
• The label is not ejected properly after printing
• Is the cutter blade getting dull (blunt)? Does the cutter error occur frequently? Replace the cutter unit. For details, see "Replacing the cutter unit" on page 38.
• Have foreign objects or dust got onto the roller? Clean the roller using the cleaning sheet. For details, see "Roller maintenance" on page 36.
• Is the label outlet stained? Remove stains from the label outlet. For details, see "Label outlet maintenance" on page 37.
• The icon of P-touch Add-In is not displayed on Microsoft® Word
• Is Microsoft® Outlook® running? Have you selected Microsoft® Word as your email editor? Due to limitations of the program, the Add-In of Microsoft® Word® is unable to be used with above settings. Quit Microsoft® Outlook®, and restart Microsoft® Word.
Error message Cause Solution
System ErrorNo.*!
A system error has occurred. Contact your service representative.
Please CloseCover!
The DK Roll cover is open. Close the DK Roll cover and repeat the operation.
Cutter Error!
The cutter is not located at the home position.
Turn off the printer, wait 30 seconds and then turn the printer on again.If the problem cannot be corrected, contact your service representative.
Paper Cannotbe Fed!
The DK Roll is misfeeding or has run out.
Set the DK Roll properly again. If the DK Tape has run out, fit a new roll.
Roll End! The DK roll has run out. Set a new DK Label Roll.
Please InsertLabel Roll!
Printing or cutting is operated without setting DK Roll.
Set the DK Roll.
Please Insert*****!
The printing is being operated without setting DK Roll or without setting the DK Roll of the correct size.
Make sure you have set the correct size DK Roll for the template or label layout you are trying to print.
Please Insert62mm!
List Print is applicable for 62 mm continuous length roll.
Set 62 mm DK Tape.
Problem Solution
Error messages (what they mean)
STEP 3 Maintenance and Troubleshooting44
]
No SettingApplicable Data!
When selecting the template which does not include the date and time settings, it is not possible to set addition or subtraction of date and time.
Select the template which includes date and time object and then set it.
No NumberingApplicable Data!
When selecting the template which does not include the numbering object, the numbering printing cannot be operated.
Select the template which includes the numbering object.
TransmissionError!
An error has occurred when receiving data from your computer.
Check that the cable is properly connected and ensure the power is turned on. Then repeat the operation.
No Editing Applicable Data!
The selected template does not include items for which it is possible to change the settings.
Unable to change the settings.
Length Limit! The data which is about to print does not fit the label size.
Select bigger label size or modify its contents and settings.
Problem Solution
• I would like to clear the printer settings and the data transferred from the PC
Turn the printer OFF by pressing the ON/OFF button. Hold the Up arrow button ( ) and the Feed button ( ) while pressing the ON/OFF button. Release all the buttons when the display shows "OK to Reset?" then press the OK button. All downloaded data and setting transferred from the PC are cleared. The printer is reset. The clock and date settings are not cleared with this action.
Error message Cause Solution
Reset the Printer
45
Mai
nten
ance
and
Tr
oubl
esho
otin
g
TEP1
Intro
duct
ion
TEP2
TEP3
Bef
ore
usin
g th
e pr
inte
rU
sing
onl
y th
is p
rinte
r (N
o P
C)
S
S
S
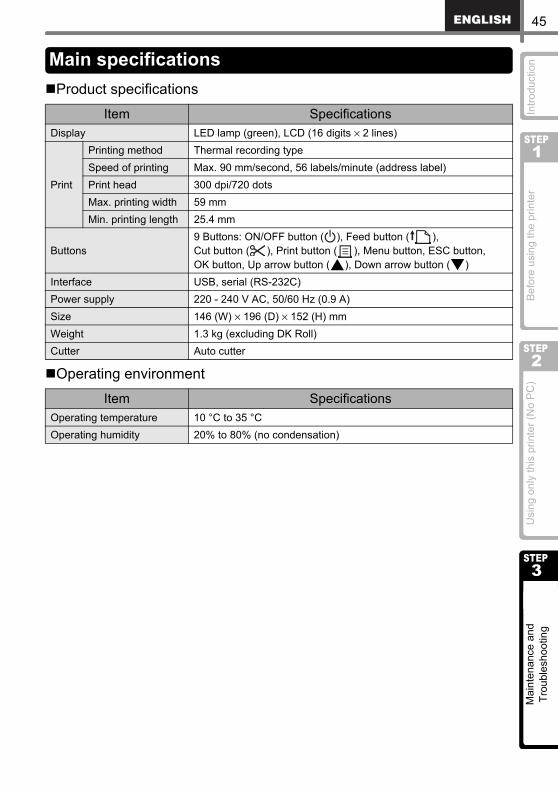
Product specifications
Operating environment
Item SpecificationsDisplay LED lamp (green), LCD (16 digits × 2 lines)
Printing method Thermal recording typeSpeed of printing Max. 90 mm/second, 56 labels/minute (address label)Print head 300 dpi/720 dotsMax. printing width 59 mmMin. printing length 25.4 mm
Buttons9 Buttons: ON/OFF button ( ), Feed button ( ), Cut button ( ), Print button ( ), Menu button, ESC button, OK button, Up arrow button ( ), Down arrow button ( )
Interface USB, serial (RS-232C)Power supply 220 - 240 V AC, 50/60 Hz (0.9 A)Size 146 (W) × 196 (D) × 152 (H) mmWeight 1.3 kg (excluding DK Roll)Cutter Auto cutter
Item SpecificationsOperating temperature 10 °C to 35 °COperating humidity 20% to 80% (no condensation)
Main specifications