Embed Size (px)
Citation preview
7/23/2019 QG_D02-00-011P_TX300_RFC2544_C00-2
http://slidepdf.com/reader/full/qgd02-00-011ptx300rfc2544c00-2 1/12
The Veri f icat ion Experts
Q
ui c k R e
f e r e n c e G ui d e
VePAL TX300
T R A N S P O R T
7/23/2019 QG_D02-00-011P_TX300_RFC2544_C00-2
http://slidepdf.com/reader/full/qgd02-00-011ptx300rfc2544c00-2 2/12
VePAL TX300Quick Reference Guide
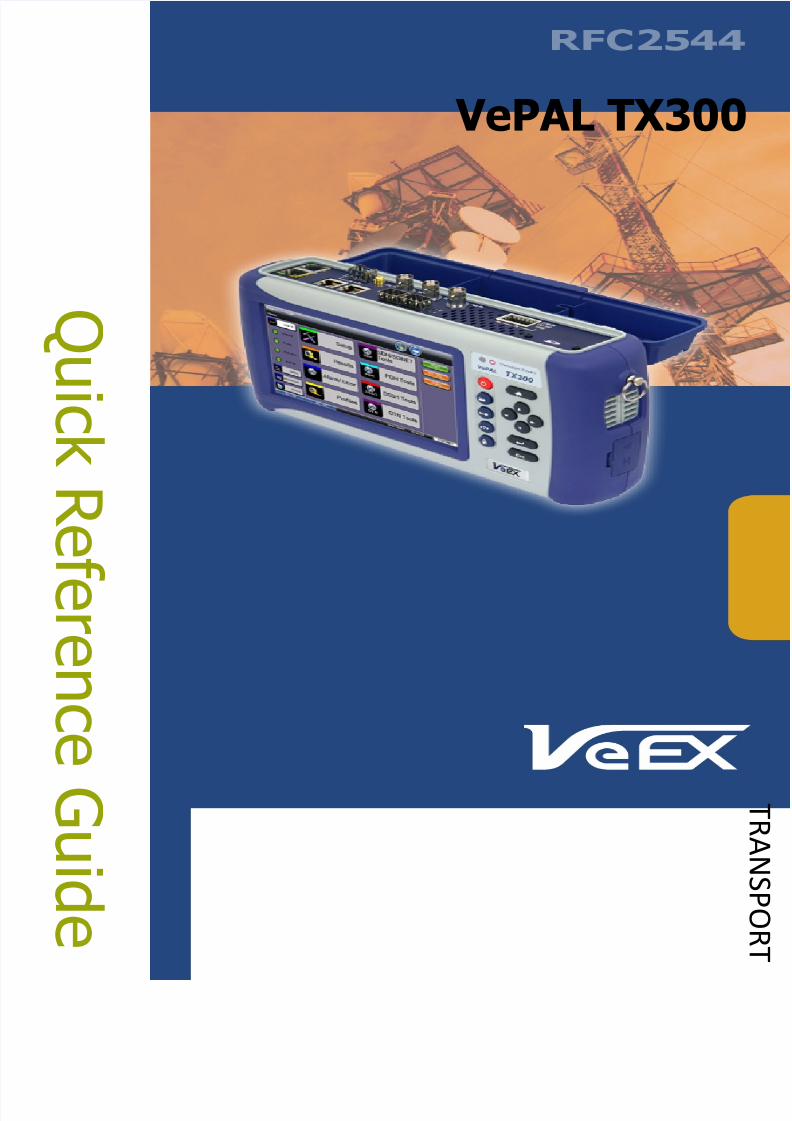
O T N / 1 0 G E / S D H /
P D H
t e s t p o r t s
1 0 / 1 0
0 / 1 0 0 0 B a s e - T a n d
1 0 0 0 B a s e - X t e s t p o r t s
N a v i g a t i o n
C o n t r o l
F i e l d R e p l a
c e a b l e S m a r t
L i - I o n
B a t t e r y
7 ” C o l o
r
T o u c h S c r e e n
Q u i c k K e y s
D C
I n p u t
E t h e r n e t
U S B
TX300 Test Set
7/23/2019 QG_D02-00-011P_TX300_RFC2544_C00-2
http://slidepdf.com/reader/full/qgd02-00-011ptx300rfc2544c00-2 3/12
VePAL TX300Quick Reference Guide
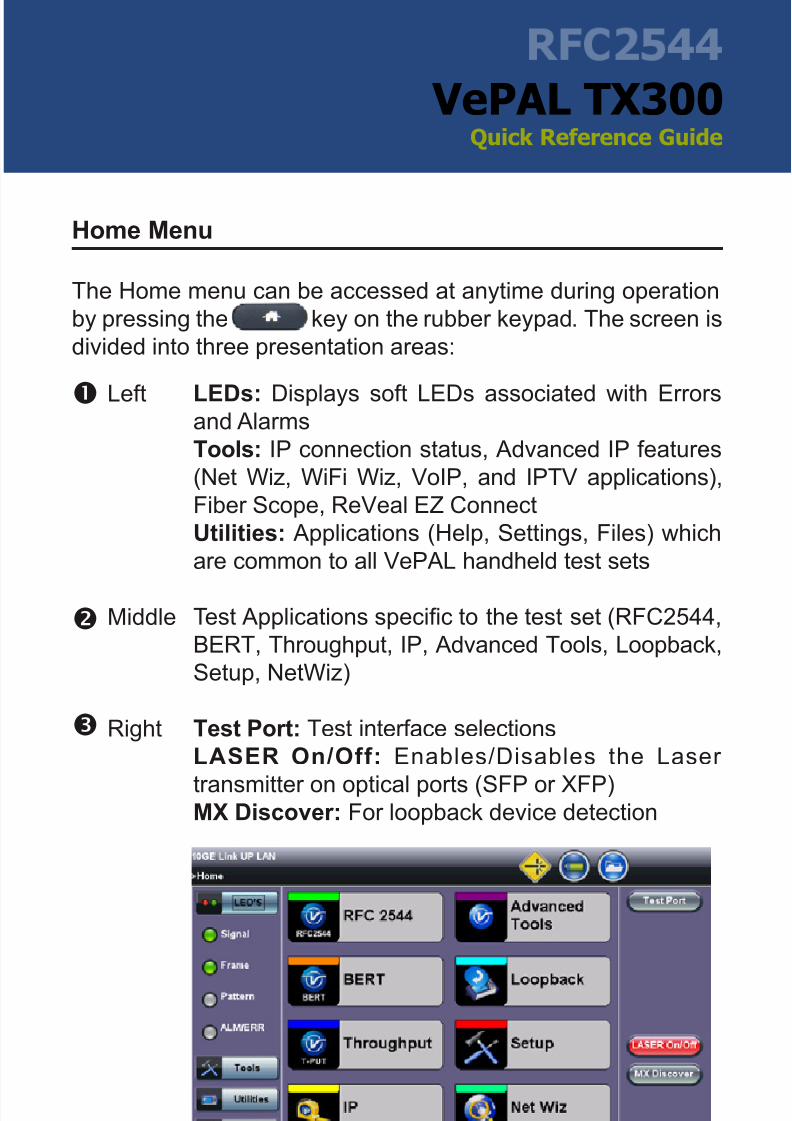
The Home menu can be accessed at anytime during operation
by pressing the Home key on the rubber keypad. The screen is
divided into three presentation areas:
Left
Middle
Right
Home Menu
LEDs: Displays soft LEDs associated with Errorsand Alarms
Tools: IP connection status, Advanced IP features
(Net Wiz, WiFi Wiz, VoIP, and IPTV applications),
Fiber Scope, ReVeal EZ Connect
Utilities: Applications (Help, Settings, Files) which
are common to all VePAL handheld test sets
Test Applications specic to the test set (RFC2544,
BERT, Throughput, IP, Advanced Tools, Loopback,
Setup, NetWiz)
Test Port: Test interface selections
LASER On/Off: Enables/Disables the Laser
transmitter on optical ports (SFP or XFP)MX Discover: For loopback device detection
7/23/2019 QG_D02-00-011P_TX300_RFC2544_C00-2
http://slidepdf.com/reader/full/qgd02-00-011ptx300rfc2544c00-2 4/12
VePAL TX300Quick Reference Guide
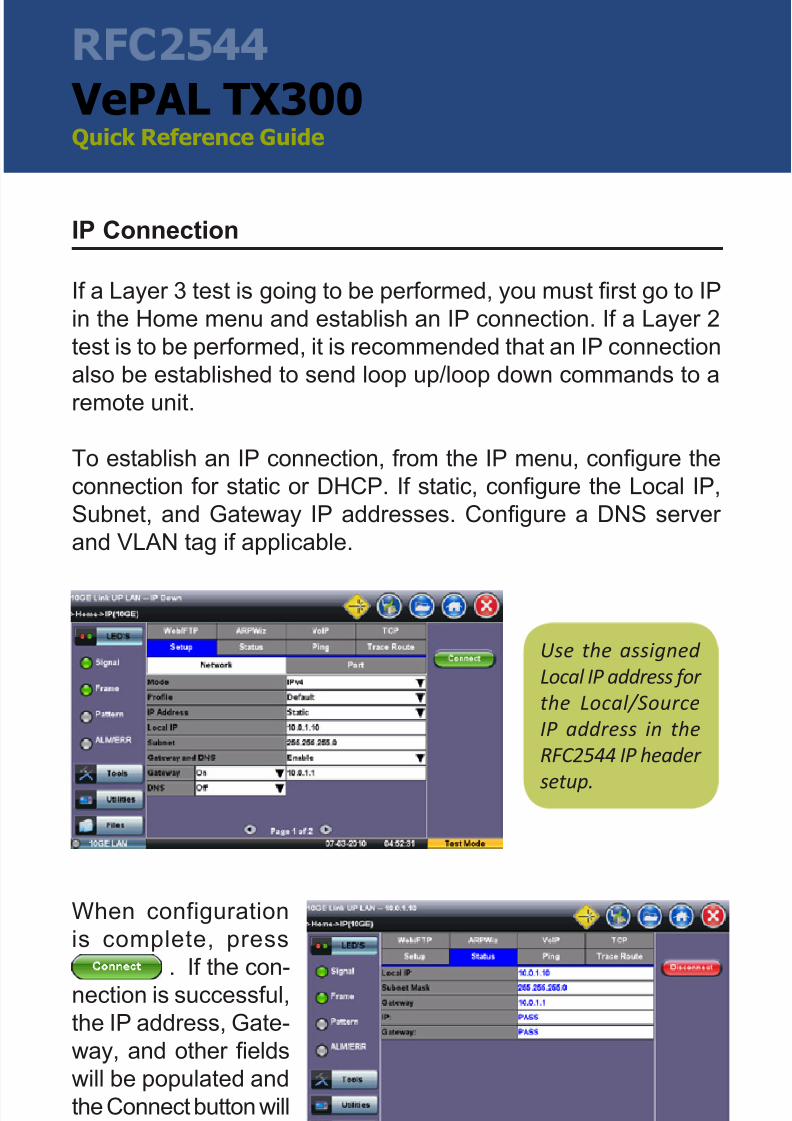
If a Layer 3 test is going to be performed, you must rst go to IP
in the Home menu and establish an IP connection. If a Layer 2
test is to be performed, it is recommended that an IP connection
also be established to send loop up/loop down commands to a
remote unit.
To establish an IP connection, from the IP menu, congure the
connection for static or DHCP. If static, congure the Local IP,
Subnet, and Gateway IP addresses. Congure a DNS server
and VLAN tag if applicable.
IP Connection
Use the assigned
Local IP address for
the Local/Source
IP address in the
RFC2544 IP header
setup.
When configuration
is complete, press
. . If the con-
nection is successful,
the IP address, Gate-
way, and other elds
will be populated and
the Connect button will
toggle to Disconnect.
7/23/2019 QG_D02-00-011P_TX300_RFC2544_C00-2
http://slidepdf.com/reader/full/qgd02-00-011ptx300rfc2544c00-2 5/12
VePAL TX300Quick Reference Guide
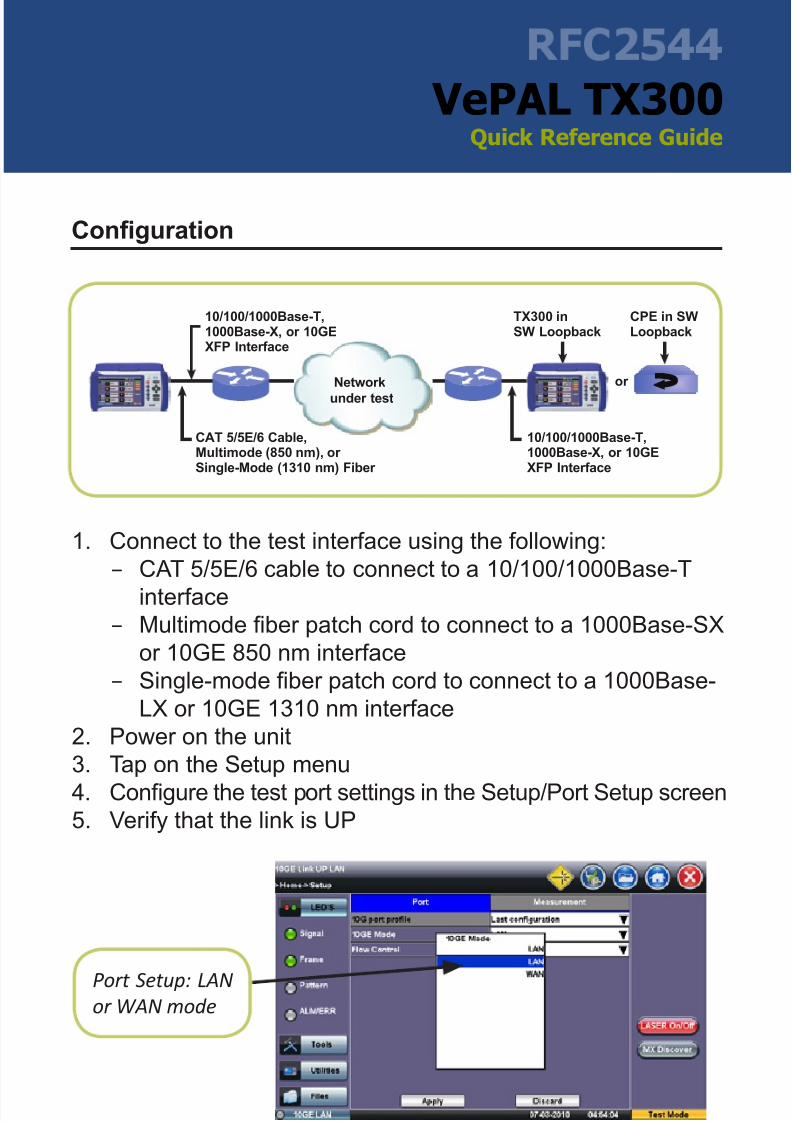
1. Connect to the test interface using the following:
− CAT 5/5E/6 cable to connect to a 10/100/1000Base-T
interface − Multimode ber patch cord to connect to a 1000Base-SX
or 10GE 850 nm interface
− Single-mode ber patch cord to connect to a 1000Base-
LX or 10GE 1310 nm interface
2. Power on the unit
3. Tap on the Setup menu
4. Congure the test port settings in the Setup/Port Setup screen5. Verify that the link is UP
Conguration
Port Setup: LANor WAN mode
6. Tap or press Esc on the keypad to return to the Homemenu.
TX300 inSW Loopback
CPE in SWLoopback
10/100/1000Base-T,1000Base-X, or 10GEXFP Interface
CAT 5/5E/6 Cable,Multimode (850 nm), or Single-Mode (1310 nm) Fiber
Network
under test
10/100/1000Base-T,1000Base-X, or 10GEXFP Interface
or
7/23/2019 QG_D02-00-011P_TX300_RFC2544_C00-2
http://slidepdf.com/reader/full/qgd02-00-011ptx300rfc2544c00-2 6/12
VePAL TX300Quick Reference Guide
Conguration (cont’d)
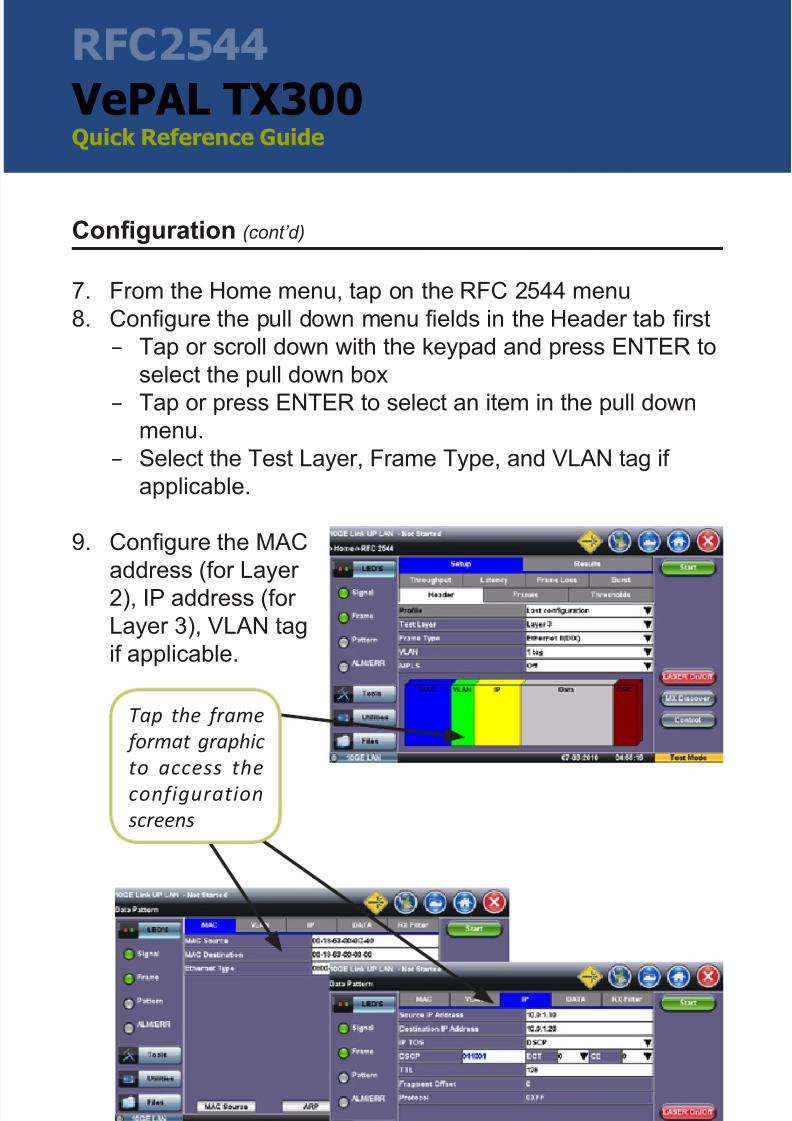
7. From the Home menu, tap on the RFC 2544 menu
8. Congure the pull down menu elds in the Header tab rst
− Tap or scroll down with the keypad and press ENTER to
select the pull down box
−
Tap or press ENTER to select an item in the pull down
menu.
− Select the Test Layer, Frame Type, and VLAN tag if
applicable.
9. Congure the MAC
address (for Layer
2), IP address (forLayer 3), VLAN tag
if applicable.
Tap the frame
format graphic
to access the
configuration
screens
7/23/2019 QG_D02-00-011P_TX300_RFC2544_C00-2
http://slidepdf.com/reader/full/qgd02-00-011ptx300rfc2544c00-2 7/12
VePAL TX300Quick Reference Guide
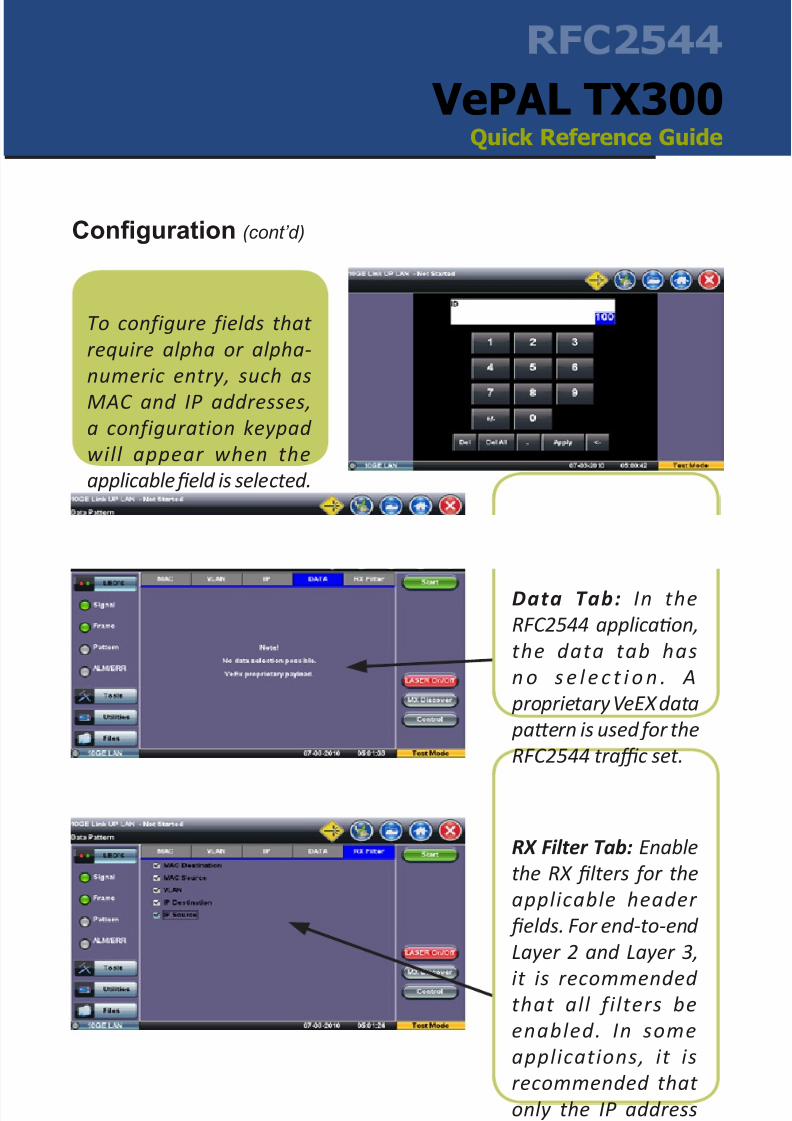
RX Filter Tab: Enable
the RX lters for the
applicable header
elds. For end-to-end
Layer 2 and Layer 3,
it is recommendedthat all filters be
enabled. In some
applications, it is
recommended that
only the IP address
lters be enabled; for
example an IP routed
test scenario.
Conguration (cont’d)
Data Tab: In the
RFC2544 applicaon,
the data tab has
n o s e l e c t i o n . A
proprietary VeEX data
paern is used for the
RFC2544 trac set.
To configure fields that
require alpha or alpha-
numeric entry, such as
MAC and IP addresses,
a configuration keypad
will appear when the
applicable eld is selected.
7/23/2019 QG_D02-00-011P_TX300_RFC2544_C00-2
http://slidepdf.com/reader/full/qgd02-00-011ptx300rfc2544c00-2 8/12
VePAL TX300Quick Reference Guide
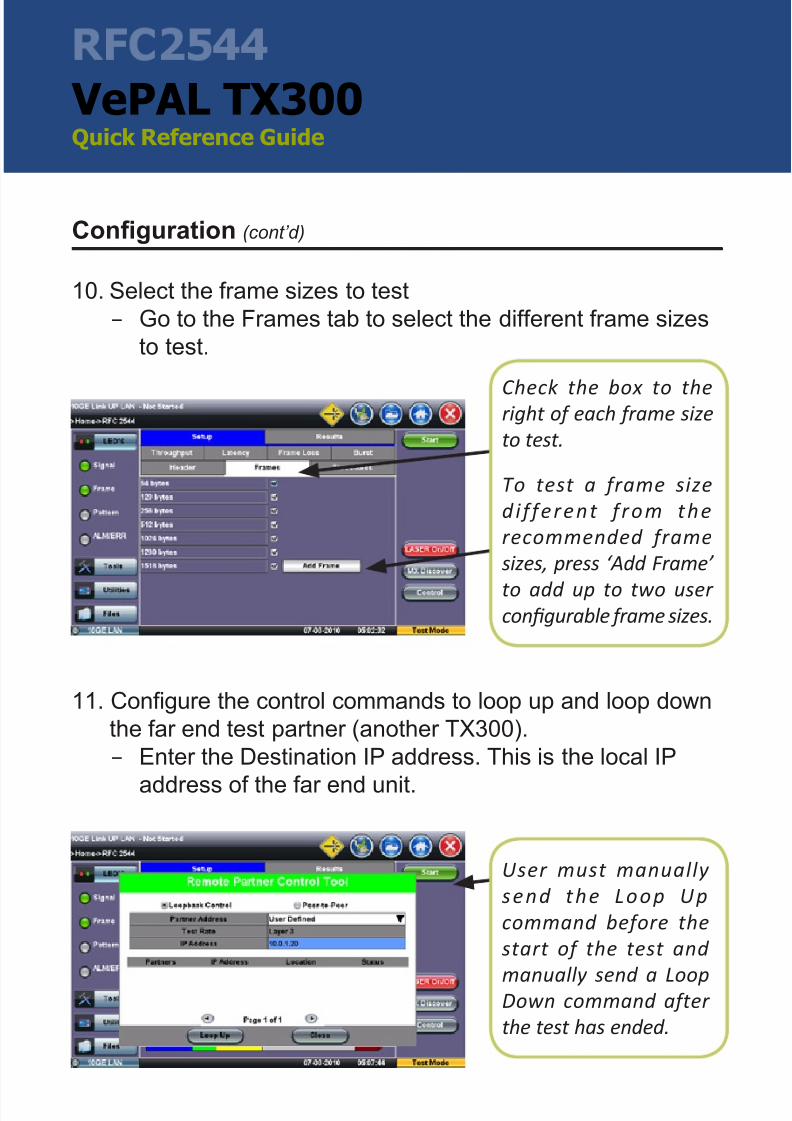
Conguration (cont’d)
Check the box to theright of each frame size
to test.
To test a frame size
d i f ferent f rom the
recommended frame
sizes, press ‘Add Frame’
to add up to two usercongurable frame sizes.
User must manually
send the Loop Up
command before the
start of the test and
manually send a LoopDown command after
the test has ended.
10. Select the frame sizes to test
− Go to the Frames tab to select the different frame sizes
to test.
11. Congure the control commands to loop up and loop down
the far end test partner (another TX300).
− Enter the Destination IP address. This is the local IP
address of the far end unit.
Note: If the far end test partner is already in loopback mode
(precongured locally at the far end), there is no need to make
use of the Control window.
7/23/2019 QG_D02-00-011P_TX300_RFC2544_C00-2
http://slidepdf.com/reader/full/qgd02-00-011ptx300rfc2544c00-2 9/12
VePAL TX300Quick Reference Guide
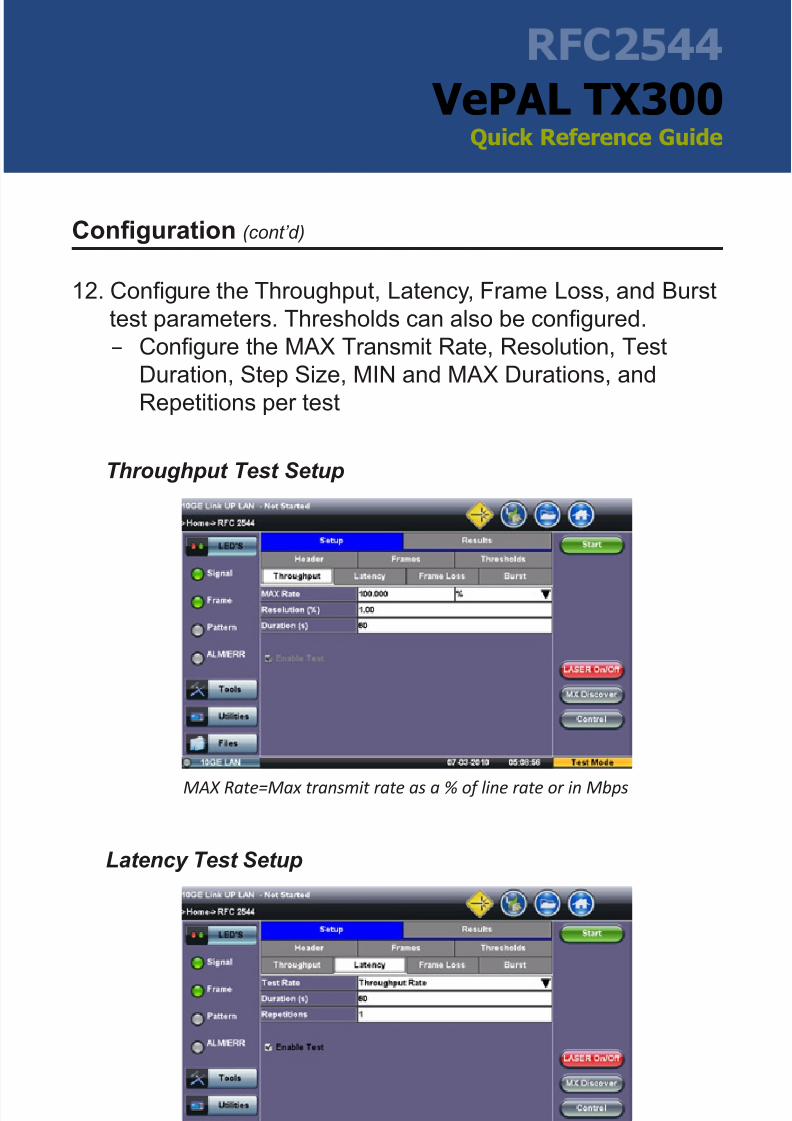
Throughput Test Setup
Latency Test Setup
Conguration (cont’d)
12. Congure the Throughput, Latency, Frame Loss, and Burst
test parameters. Thresholds can also be congured.
− Congure the MAX Transmit Rate, Resolution, Test
Duration, Step Size, MIN and MAX Durations, and
Repetitions per test
MAX Rate=Max transmit rate as a % of line rate or in Mbps
Latency can be tested at the Throughput Rate or a congurableCustom rate
7/23/2019 QG_D02-00-011P_TX300_RFC2544_C00-2
http://slidepdf.com/reader/full/qgd02-00-011ptx300rfc2544c00-2 10/12
VePAL TX300Quick Reference Guide
Conguration (cont’d)
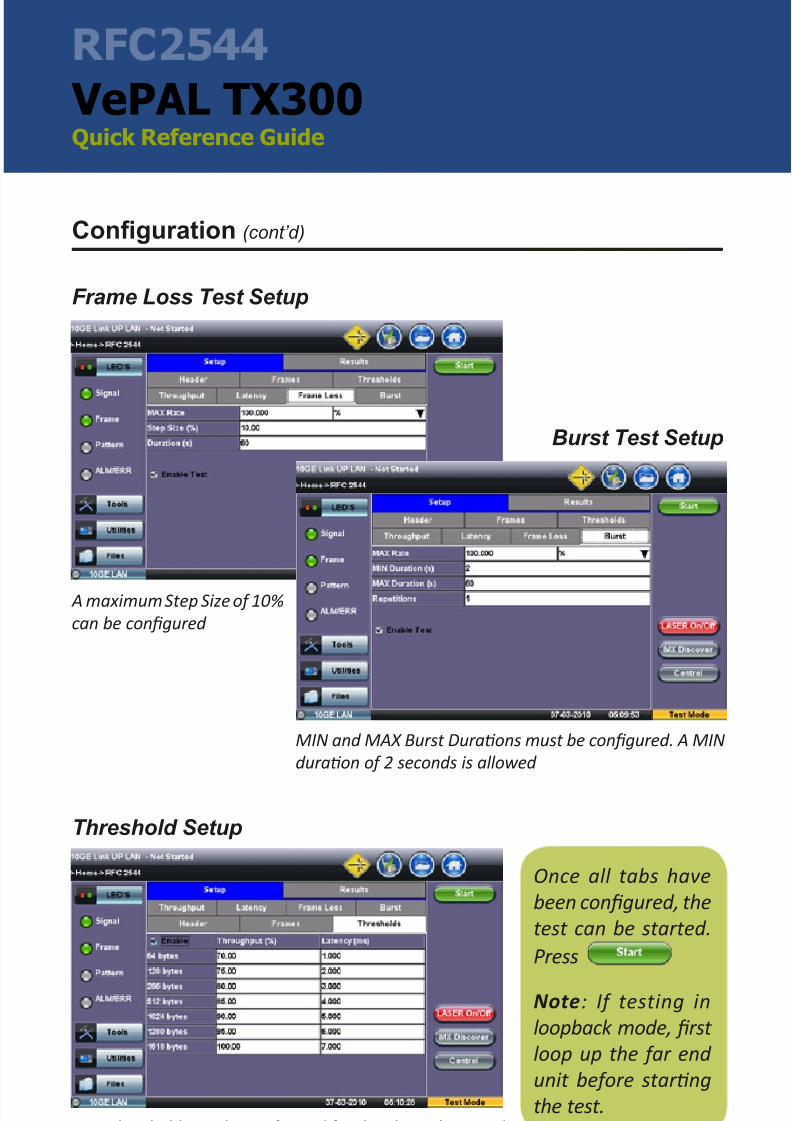
Threshold Setup
A maximum Step Size of 10%
can be congured
Frame Loss Test Setup
Burst Test Setup
User thresholds can be congured for the Throughput and
Latency tests. If enabled, pass/fail criteria will be applied.
MIN and MAX Burst Duraons must be congured. A MIN
duraon of 2 seconds is allowed
Once all tabs have
been congured, the
test can be started.
Press
Note: If testing in
loopback mode, rst
loop up the far end
unit before starng
the test.
7/23/2019 QG_D02-00-011P_TX300_RFC2544_C00-2
http://slidepdf.com/reader/full/qgd02-00-011ptx300rfc2544c00-2 11/12
VePAL TX300Quick Reference Guide
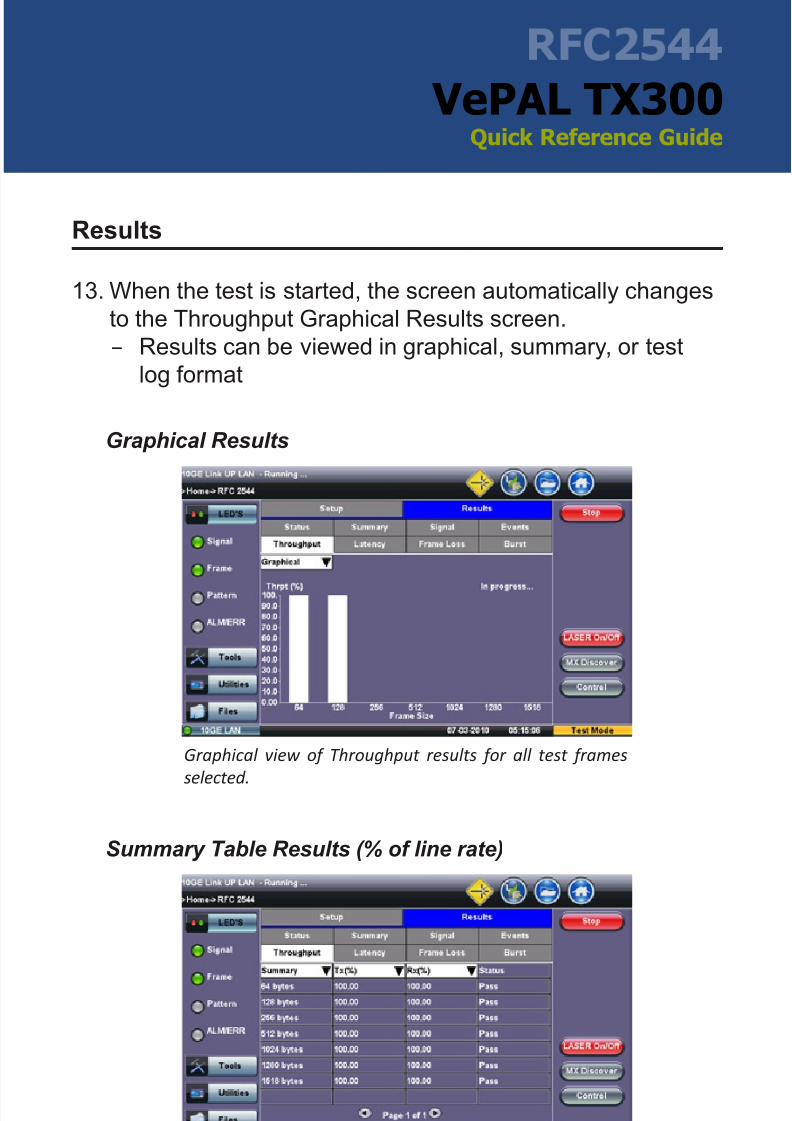
Graphical Results
Summary Table Results (% of line rate)
Results
13. When the test is started, the screen automatically changes
to the Throughput Graphical Results screen.
− Results can be viewed in graphical, summary, or test
log format
Graphical view of Throughput results for all test frames
selected.
Table view of Throughput results in % of line rate. To change
the results viewing format, select from the pull down menu.
7/23/2019 QG_D02-00-011P_TX300_RFC2544_C00-2
http://slidepdf.com/reader/full/qgd02-00-011ptx300rfc2544c00-2 12/12
VePAL TX300Quick Reference Guide
The Veri f icat ion Experts
VeEX Inc.2827 Lakeview CourtFremont, CA 94538 USA Tel: +1.510.651.0500Fax: +1.510.651.0505
© 2011 VeEX Inc. All rights reserved.
VeEX is a registered trademark of VeEX Inc. The
information contained in this document is accurate.
However, we reserve the right to change any
contents at any time without notice. We accept no
responsibility for any errors or omissions. In case of
discrepancy, the web version takes precedence over
any printed literature D02-00-011P C00 2011/04
Results (cont’d)
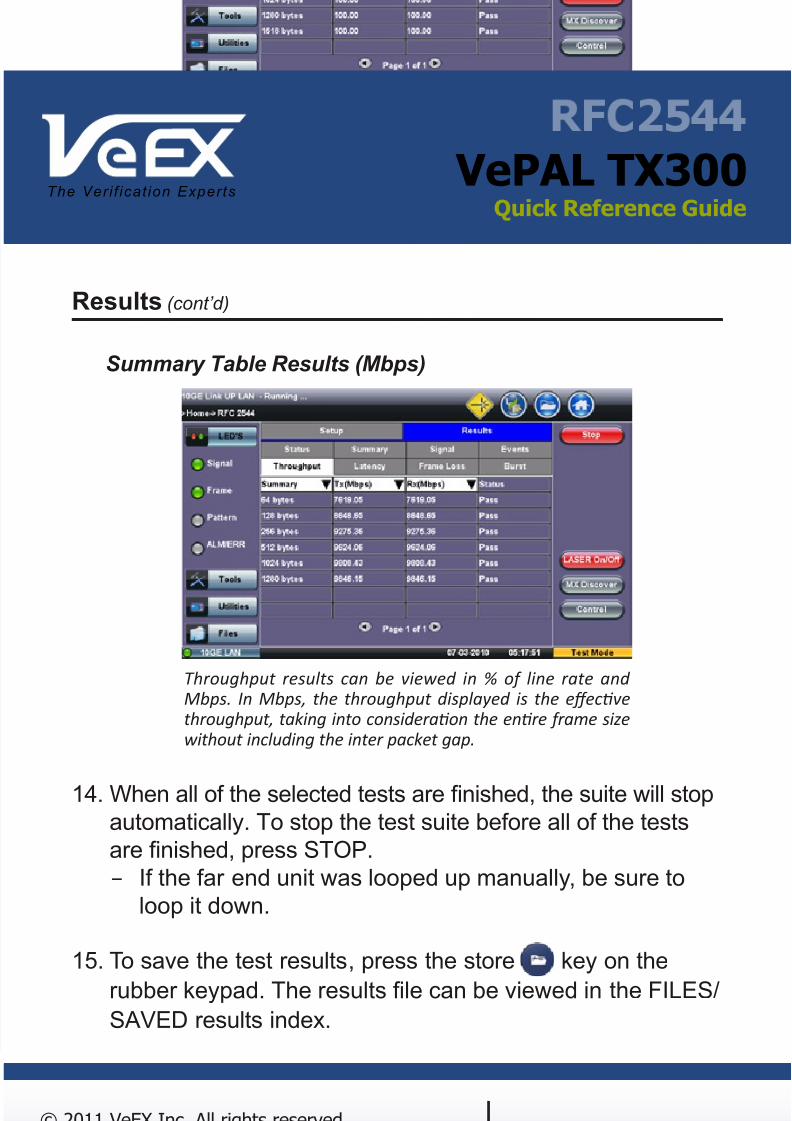
14. When all of the selected tests are nished, the suite will stop
automatically. To stop the test suite before all of the tests
are nished, press STOP.− If the far end unit was looped up manually, be sure to
loop it down.
15. To save the test results, press the store key on the
rubber keypad. The results le can be viewed in the FILES/
SAVED results index.
Throughput results can be viewed in % of line rate andMbps. In Mbps, the throughput displayed is the eecvethroughput, taking into consideraon the enre frame sizewithout including the inter packet gap.
Summary Table Results (Mbps)


![00 01 10 11 s[1] 00 11 u 1 /c 1 (1) c 1 (2) 00 01 10 11 s[2] 00 11 01 10 u 2 /c 2 (1) c 2 (2) 00 01 10 11 s[3] 00 11 10 01 00 11 10 u 3 /c 3 (1) c 3 (2)](https://img.pdfslide.us/doc/110x75/56649d2c5503460f94a0239c/00-01-10-11-s1-00-11-u-1-c-1-1-c-1-2-00-01-10-11-s2-00-11-01-10-u.jpg)