Embed Size (px)
Citation preview

QCT4BORDERS AND CORNERS
TUTORIAL
No part of this publication may be reproduced, stored in a retrieval systemor tranmitted in any form by any means, electronic, mechanical,
photocopying, scanning or otherwise except as permitted by the prior written permission of the author.
© July 2018 Sandra W. Wilbourne “The Midnight Quilter” In Collaboration With The Grace Company All Rights Reserved
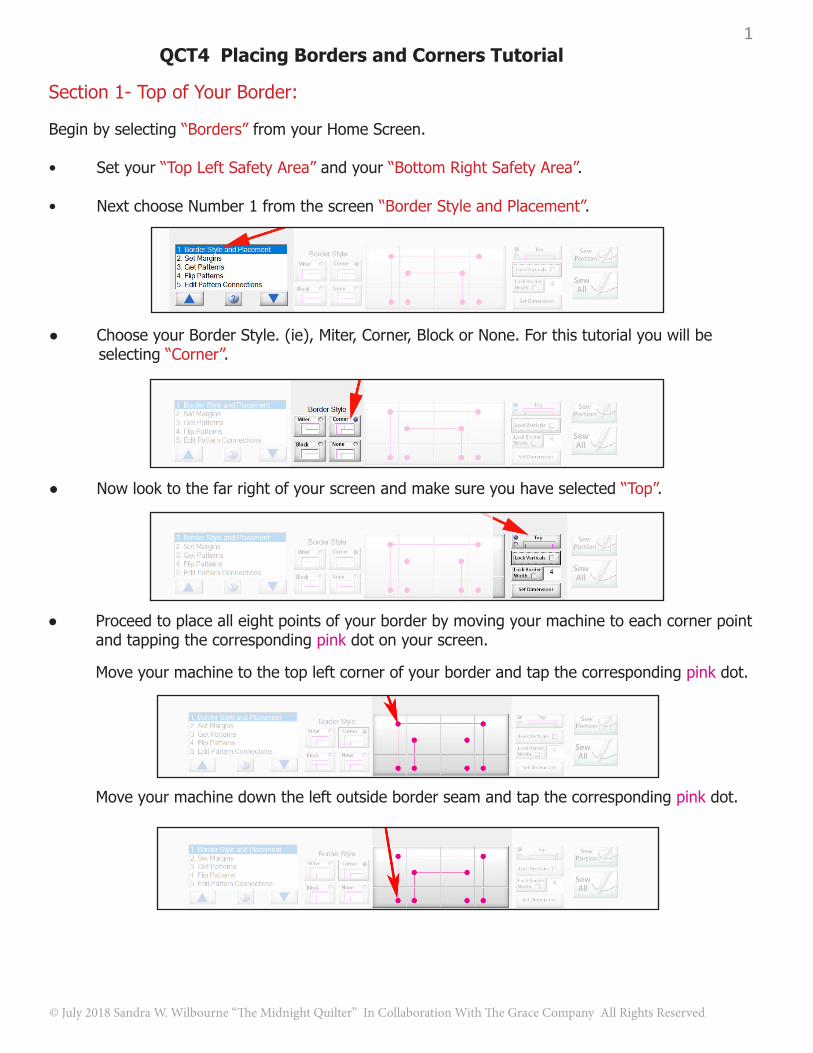
QCT4 Placing Borders and Corners Tutorial
Section 1- Top of Your Border:
Begin by selecting “Borders” from your Home Screen.
• Setyour“Top Left Safety Area” and your “Bottom Right Safety Area”.
• NextchooseNumber1fromthescreen“Border Style and Placement”.
● ChooseyourBorderStyle.(ie),Miter,Corner,BlockorNone.Forthistutorialyouwillbe selecting “Corner”.
● Nowlooktothefarrightofyourscreenandmakesureyouhaveselected “Top”.
● Proceedtoplacealleightpointsofyourborderbymovingyourmachinetoeachcornerpoint and tapping the corresponding pinkdot on your screen.
Moveyourmachinetothetopleftcornerofyourborderandtapthecorrespondingpinkdot.
Moveyourmachinedowntheleftoutsideborderseamandtapthecorrespondingpink dot.
© July 2018 Sandra W. Wilbourne “The Midnight Quilter” In Collaboration With The Grace Company All Rights Reserved
1

Moveyourmachinetotheleftinsidebordercornerseamandtapthecorrespondingpink dot.
Moveyourmachinedowntheleftinsideborderseamandtapthecorrespondingpink dot.
Moveyourmachinetothetoprightoutsidecornerofyourborderandtapthecorresponding pink dot.
Moveyourmachinedowntherightoutsideborderseamandtapthecorrespondingpink dot.
Moveyourmachinetorightinsidebordercornerseamandtapthecorrespondingpink dot.
Moveyourmachinedowntheinsideborderseamandtapthecorrespondingpinkdot.
• NextChooseNumber2“SetMargins”and tap the yellowlocktounlockit.
2
© July 2018 Sandra W. Wilbourne “The Midnight Quilter” In Collaboration With The Grace Company All Rights Reserved

• Undermarginsselect“outer” and tap the blue “+”marktillyoureachthedesiredmargin.(Wesuggest0.500)foryouroutermarginonyourfirstborder.Thiswillallowforyourbinding.
• Continuesettingmarginsbytapping“inner” and again tapping the blue “+” to reach your desiredmargin.(Oursuggestionis0.125)Pleasenote:thatwesuggestthatallsubsequentbordermarginsbothinnerandouterbesetat0.125.
• NextChooseNumber3“Get Patterns”Nowyouarereadytoselectyourpattern.Lookslightly to your right on the screen and select “Corner”thiswillopenyourstoredpatterns.SelectGold Patterns. Then go into the Gold Border Set. Select a corner pattern from your library and tap open.
Ifthesystemasksifyouwouldliketooptimizeyourpattern,select“No”andyourcornerpatternwillbe placed in your border.
Youarenowreadytoselectyourborderpattern.Lookatthebottomleftofthescreen;slightlytoyour right and select “Border”thiswillopenyourstoredpatterns.Hereyouwillneedtoselectthecorrespondingborderpatterntothecornerpatternyoupreviouslyselectedfromyourlibraryandtap open.
Ifthesystemasksifyouwouldliketooptimizeyourpattern,select“No”andyourcornerpatternwillbe placed in your border.
3
© July 2018 Sandra W. Wilbourne “The Midnight Quilter” In Collaboration With The Grace Company All Rights Reserved
Please Note:Youwillgetthismessagebecauseyouareusingapurchasedpatternandhavenotimported the pattern.
Please Note:Youwillgetthismessagebecauseyouareusingapurchasedpatternandhavenotimported the pattern.
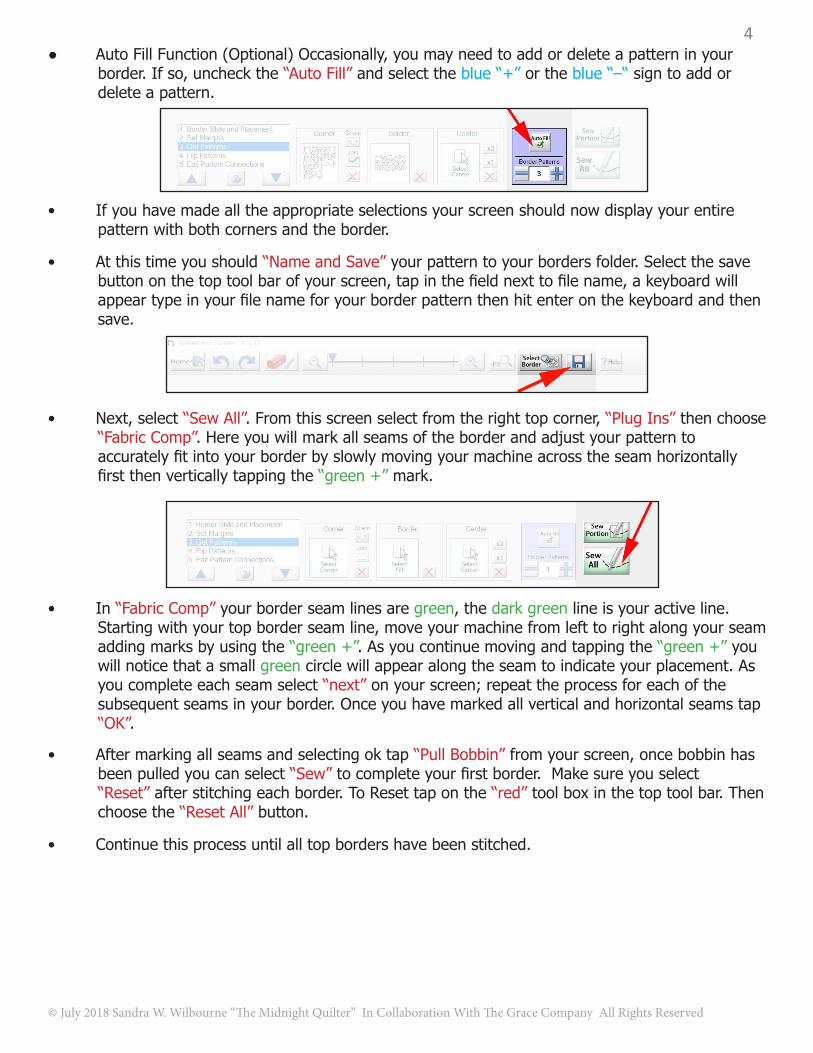
● AutoFillFunction(Optional)Occasionally,youmayneedtoaddordeleteapatterninyourborder.Ifso,uncheckthe“AutoFill” and select the blue “+” or the blue “–“ sign to add or delete a pattern.
• Ifyouhavemadealltheappropriateselectionsyourscreenshouldnowdisplayyourentirepatternwithbothcornersandtheborder.
• Atthistimeyoushould“NameandSave”yourpatterntoyourbordersfolder.Selectthesavebuttononthetoptoolbarofyourscreen,tapinthefieldnexttofilename,akeyboardwillappeartypeinyourfilenameforyourborderpatternthenhitenteronthekeyboardandthensave.
• Next,select“SewAll”.Fromthisscreenselectfromtherighttopcorner,“Plug Ins” then choose “FabricComp”.Hereyouwillmarkallseamsoftheborderandadjustyourpatterntoaccuratelyfitintoyourborderbyslowlymovingyourmachineacrosstheseamhorizontallyfirstthenverticallytappingthe“green +” mark.
• In“FabricComp” your border seam lines are green,thedarkgreenlineisyouractiveline.Startingwithyourtopborderseamline,moveyourmachinefromlefttorightalongyourseamaddingmarksbyusingthe“green +”.Asyoucontinuemovingandtappingthe“green +” youwillnoticethatasmallgreencirclewillappearalongtheseamtoindicateyourplacement.As you complete each seam select “next”onyourscreen;repeattheprocessforeachofthesubsequentseamsinyourborder.Onceyouhavemarkedallverticalandhorizontalseamstap “OK”.
• Aftermarkingallseamsandselectingoktap“Pull Bobbin”fromyourscreen,oncebobbinhas been pulled you can select “Sew”tocompleteyourfirstborder.Makesureyouselect “Reset” after stitching each border. To Reset tap on the “red”toolboxinthetoptoolbar.Then choose the “Reset All” button.
• Continuethisprocessuntilalltopbordershavebeenstitched.
4
© July 2018 Sandra W. Wilbourne “The Midnight Quilter” In Collaboration With The Grace Company All Rights Reserved

Section2-BottomofYourBorder:
Please note that instructions for the Bottom of Your Border may seem redundant but it is important thatyoufollowthemspecificallytoensureproperplacementandstitchingofyourpattern.
• Setyour“Top Left Safety Area” and your “Bottom Right Safety Area”.
• NextchooseNumber1fromthescreen“Border Style and Placement”.
● ChooseyourBorderStyle.(ie),Miter,Corner,BlockorNone.Forthistutorialyouwillbe selecting “Corner”.
● Nowlooktothefarrightofyourscreenandmakesureyouhaveselected “Bottom”.
● Proceedtoplacealleightpointsofyourborderbymovingyourmachinetoeachcornerpoint and tapping the corresponding pinkdot on your screen.
Moveyourmachinetothebottomleftoutsidecornerofyourborderandtapthecorrespondingpinkdot.
Moveyourmachineuptheleftoutsideborderseamandtapthecorrespondingpink dot.
● Onceagainbeginbyselecting “Borders” from your Home Screen.
5
© July 2018 Sandra W. Wilbourne “The Midnight Quilter” In Collaboration With The Grace Company All Rights Reserved

Moveyourmachinetotheleftinsidebordercornerseamandtapthecorrespondingpink dot.
Moveyourmachineuptheleftinsideborderseamandtapthecorrespondingpink dot.
Moveyourmachinetotheoutsidebottomrightcornerofyourborderandtapthe corresponding pink dot.
Moveyourmachineuptherightoutsideborderseamandtapthecorrespondingpink dot.
Moveyourmachinetorightinsidebordercornerseamandtapthecorrespondingpink dot.
Moveyourmachineuptherightinsideborderseamandtapthecorrespondingpinkdot.
• NextChooseNumber2“SetMargins”and tap the yellowlocktounlockit.
6
© July 2018 Sandra W. Wilbourne “The Midnight Quilter” In Collaboration With The Grace Company All Rights Reserved

• Undermarginsselect“outer” and tap the blue “+”marktillyoureachthedesiredmargin.(Wesuggest0.500)foryouroutermarginonyourfirstborder.Thiswillallowforyourbinding.
• Continuesettingmarginsbytapping“inner” and again tapping the blue “+” to reach your desiredmargin.(Oursuggestionis0.125)Pleasenote:thatwesuggestthatallsubsequentbordermarginsbothinnerandouterbesetat0.125.
• NextChooseNumber3“Get Patterns”Nowyouarereadytoselectyourpattern.Lookslightly to your right on the screen and select “Corner”thiswillopenyourstoredpatterns.SelectGold Patterns. Then go into the Gold Border Set. Select a corner pattern from your library and tap open.
Please Note:Youwillgetthismessagebecauseyouareusingapurchasedpatternandhavenotimported the pattern.
Youarenowreadytoselectyourborderpattern.Lookatthebottomleftofthescreen;slightlytoyour right and select “Border”thiswillopenyourstoredpatterns.Hereyouwillneedtoselectthecorrespondingborderpatterntothecornerpatternyoupreviouslyselectedfromyourlibraryandtap open.
Ifthesystemaskifyouwouldliketooptimizeyourpattern,select“No”andyourborderpatternwillbe placed in your border.
7
© July 2018 Sandra W. Wilbourne “The Midnight Quilter” In Collaboration With The Grace Company All Rights Reserved
Please Note:Youwillgetthismessagebecauseyouareusingapurchasedpatternandhavenotimported the pattern.
Ifthesystemasksifyouwouldliketooptimizeyourpattern,select“No”andyourcornerpatternwillbe placed in your border.

● AutoFillFunction(Optional)Occasionally,youmayneedtoaddordeleteapatterninyourborder.Ifso,uncheckthe“AutoFill” and select the blue “+” or the blue “–“ sign to add or delete a pattern.
• Ifyouhavemadealltheappropriateselectionsyourscreenshouldnowdisplayyourentirepatternwithbothcornersandtheborder.• Atthistimeyoushould“NameandSave”yourpatterntoyourbordersfolder.Selectthesavebuttononthetoptoolbarofyourscreen,tapinthefieldnexttofilename,akeyboardwillappear,typeinyourfilenameforyourborderpatternthenhitenteronthekeyboardandthensave.
• Next,select“SewAll”.Fromthisscreenselectfromtherighttopcorner,“Plug Ins” then choose “FabricComp”.Hereyouwillmarkallseamsoftheborderandadjustyourpatterntoaccuratelyfitintoyourborderbyslowlymovingyourmachineacrosstheseamhorizontallyfirstthenverticallytappingthe“green +” mark.
• In“FabricComp” your border seam lines are green,thedarkgreenlineisyouractiveline.Startingwithyourtopborderseamline,moveyourmachinefromlefttorightalongyourseamaddingmarksbyusingthe“green +”.Asyoucontinuemovingandtappingthe“green +” youwillnoticethatasmallgreencirclewillappearalongtheseamtoindicateyourplacement.As you complete each seam select “next”onyourscreen;repeattheprocessforeachofthesubsequentseamsinyourborder.Onceyouhavemarkedallverticalandhorizontalseamstap “OK”.• Aftermarkingallseamsandselectingoktap“Pull Bobbin”fromyourscreen,oncebobbinhas been pulled you can select “Sew”tocompleteyourfirstborder.Makesureyouselect “Reset” after stitching each border. To Reset tap on the “red”toolboxinthetoptoolbar.Then choose the “Reset All” button.• Continuethisprocessuntilallbottombordershavebeenstitched.
● Pleasenote:Thiswillapplytothe “bottom border only”.Somepatternswillnotbeaffectedbythefollowinghoweveroccasionallyyoumayneedto“Flip”your corner pattern so that itwillcorrectlyalignbecausesomepatternswillhaveaparticulardirection.Mostofthesepatternswillbeeasytorecognizevisually.ToaccomplishthisyouwillneedtoselectNumber 4 “FlipPatterns” and under “Corners”check“FlipLeft”and“FlipRight”.
8
© July 2018 Sandra W. Wilbourne “The Midnight Quilter” In Collaboration With The Grace Company All Rights Reserved

Section3-TheTopofYourSideBorder
● Select“Borders” from your home screen.• Setyour“Top Left Safety Area” and your “Bottom Right Safety Area”.• NextchooseNumber1fromthescreen“Border Style and Placement”.
● ChooseyourBorderStyle.(ie),Miter,Corner,BlockorNone.Forthistutorialyouwillbe selectling “Corner”.
● Nowlooktothefarrightofyourscreenandtap“LockVerticals”;lookdirectlyaboveLockVerticalsandselect“Top Border”.
● Proceedtoplaceonly 4cornersofyourborderbymovingyourmachinetoeachcornerpoint and tapping the corresponding pink dot on your screen. Moveyourmachinetothetopleftoutsidecornerofyourborderandtapthe corresponding pinkdot.
Moveyourmachinetotheleftinsidebordercornerseamandtapthecorrespondingpink dot.
● Nowthatyouhavestitchedthetopborder,quiltedthecenterofyourquiltwitheitherapantographorablockpatternandstitchedyourbottomborderyouarereadytostitchthe sides of your border.●Youwillbeginbyremovingthequiltfromyourframeandrotatingittothesideand reattaching it to your frame.
● Onceyouhaverotatedandreattachedyourquilttoyourframeyouarereadytobegin.
9
© July 2018 Sandra W. Wilbourne “The Midnight Quilter” In Collaboration With The Grace Company All Rights Reserved

Moveyourmachinetothetopoutsiderightcornerofyourborderandtapthecorresponding pink dot.
Moveyourmachinetorightinsidebordercornerseamandtapthecorrespondingpink dot.
• NextChooseNumber2“SetMargins”and tap the yellowlocktounlockit.
• Undermarginsselect“outer” and tap the blue “+”marktillyoureachthedesiredmargin.(We suggest0.500)foryouroutermarginonyourfirstborder.Thiswillallowforyourbinding.
• Continuesettingmarginsbytapping“inner” and again tapping the blue “+” to reach your desiredmargin.(Oursuggestionis0.125)Pleasenote:thatwesuggestthatallsubsequentbordermarginsbothinnerandouterbesetat0.125.
● Onceyourinnerandoutermarginshavebeenset,lookslightlytotherightonyourscreenandyourwillsee“CustomBorderArea”;noticethe“Left Edge” and the “Right Edge”.Youwillnowneedtomanuallymoveyourmachinetotheleftendingpointofyourcornerstitchingandtap “Left Edge”.Nextmanuallymoveyourmachinetotherightendingpointofyourcorner stitching and tap “Right Edge”youhavenowsetyourstitchingboundary.
10
© July 2018 Sandra W. Wilbourne “The Midnight Quilter” In Collaboration With The Grace Company All Rights Reserved

• NextChooseNumber3“Get Patterns”andchoosethepreviouslystitchedborderandtab open.
● Next,tap“SewAll”.Fromthisscreenselectfromtherighttopcorner,“Plug In” then choose “FabricComp”.Hereyouwillonlymarkthetopandbottomseamsoftheborderbyslowlymovingyourmachineacrosstheseamhorizontallytappingthe“green +”mark.Rememberthisprocedureadjustyourpatterntoaccuratelyfitintoyourborder.
● Note:JustaReminder:In“FabricComp” your border seam lines are green,thedarkgreen lineisyouractiveline.Startingwithyourtopborderseamline,moveyourmachinefromlefttorightalongyourseamaddingmarksbyusingthe“green +”.Asyoucontinuemovingandtap ping the “green +”youwillnoticethatasmallgreen circlewillappearalongtheseamto indicate your placement. As you complete each seam select “next”onyourscreen;repeattheprocessforeachbottomseaminyourborder.Onceyouhavemarkedyourtopandbottom seams only tap “OK”.• Aftertappingokchoose“Pull Bobbin”fromyourscreen,oncebobbinhasbeenpulledyoucan select “Sew”tocompleteyourfirstsideborder.Makesureyouselect“Reset” after stitching each border. To Reset tap on the redtoolboxinthetoptoolbar.Thenselectthe “Reset All” button.
● AutoFillFunction(Optional)Occasionally,youmayneedtoaddordeleteapatterninyourborder.Ifso,uncheckthe“AutoFill” and select the blue “+” or the blue “–“ sign to add or delete a pattern.
● Ifyouhavemadealltheappropriateselectionsyourscreenshouldnowdisplayyourpatterncorrectlyplacedwithinbothpreviouslystitchedcorners.
• Continuethisprocessuntilalltop“side”bordershavebeenstitched.
Section 4- Bottom of Your Side Border● Nowthatyouhavestitchedthetophalfofyoursideborder,youwillneedtoagainselect “Borders” from your home screen.
• Setyour“Top Left Safety Area” and your “Bottom Right Safety Area”.
• NextchooseNumber1fromthescreen“Border Style and Placement”.
11
© July 2018 Sandra W. Wilbourne “The Midnight Quilter” In Collaboration With The Grace Company All Rights Reserved

● ChooseyourBorderStyle.(ie),Miter,Corner,BlockorNone.Forthistutorialyouwillbe selectling “Corner”.
● Nowlooktothefarrightofyourscreenandtap“LockVerticals”;lookdirectlyaboveLockVerticalsandselect“Bottom Border”.
● Proceedtoplaceonly 4cornersofyourborderbymovingyourmachinetoeachcornerpoint and tapping the corresponding pink dot on your screen.
Moveyourmachinetotheoutsidebottomleftcornerofyourborderandtapthecorresponding pinkdot.
Moveyourmachinetotheleftinsidebordercornerseamandtapthecorrespondingpink dot.
Moveyourmachinetotheoutsidebottomrightcornerofyourborderandtapthe corresponding pink dot.
Moveyourmachinetorightinsidebordercornerseamandtapthecorrespondingpink dot.
12
© July 2018 Sandra W. Wilbourne “The Midnight Quilter” In Collaboration With The Grace Company All Rights Reserved

• Undermarginsselect“outer” and tap the blue “+”marktillyoureachthedesiredmargin.(We suggest0.500)foryouroutermarginonyourfirstborder.Thiswillallowforyourbinding.
• Continuesettingmarginsbytapping“inner” and again tapping the blue “+” to reach your desiredmargin.(Oursuggestionis0.125)Pleasenote:thatwesuggestthatallsubsequentbordermarginsbothinnerandouterbesetat0.125.
● Onceyourinnerandoutermarginshavebeenset,lookslightlytotherightonyourscreenandyourwillsee“CustomBorderArea”;noticethe“Left Edge” and the “Right Edge”.Youwillnowneedtomanuallymoveyourmachinetotheleftendingpointofyourcornerstitchingandtap “Left Edge”.Nextmanuallymoveyourmachinetotherightendingpointofyourcorner stitching and tap “Right Edge”youhavenowsetyourstitchingboundary.
• NextChooseNumber3“Get Patterns”andchoosethepreviouslystitchedborderandtab open.
13
© July 2018 Sandra W. Wilbourne “The Midnight Quilter” In Collaboration With The Grace Company All Rights Reserved
• NextChooseNumber2“SetMargins”and tap the yellowlocktounlockit.

• Aftermarkingallseamsandselectingoktap“Pull Bobbin”fromyourscreen,oncebobbinhas been pulled you can select “Sew”tocompleteyourfirstborder.Makesureyouselect “Reset” after stitching each border. To Reset tap on the “red”toolboxinthetoptoolbar.Then choose the “Reset All” button.
• ContinuethisprocessuntilallBottombordershavebeenstitched.
● AutoFillFunction(Optional)Occasionally,youmayneedtoaddordeleteapatterninyourborder.Ifso,uncheckthe“AutoFill” and select the blue “+” or the blue “–“ sign to add or delete a pattern.
● Ifyouhavemadealltheappropriateselectionsyourscreenshouldnowdisplayyourpatterncorrectlyplacedwithinbothpreviouslystitchedcorners.
● Next,tap“SewAll”.Fromthisscreenselectfromtherighttopcorner,“Plug In” then choose “FabricComp”.Hereyouwillonlymarkthetopandbottomseamsoftheborderbyslowlymovingyourmachineacrosstheseamhorizontallytappingthe“green +”mark.Rememberthisprocedureadjustyourpatterntoaccuratelyfitintoyourborder.
● Note:JustaReminder:In“FabricComp” your border seam lines are green,thedarkgreen lineisyouractiveline.Startingwithyourtopborderseamline,moveyourmachinefromlefttorightalongyourseamaddingmarksbyusingthe“green +”.Asyoucontinuemovingand tapping the “green +”youwillnoticethatasmallgreen circlewillappearalongtheseamto indicate your placement. As you complete each seam select “next”onyourscreen;andrepeattheprocessforeachbottomseaminyourborder.Onceyouhavemarkedyourtopand bottom seams only tap“OK”.
CONGRATULATIONS!!!
YOUHAVECOMPLETEDSTITCHINGTHEBORDER(S)ANDCORNER(S)ONYOURQUILT!!
14
© July 2018 Sandra W. Wilbourne “The Midnight Quilter” In Collaboration With The Grace Company All Rights Reserved