Embed Size (px)
Citation preview

Feature Overview and Configuration GuidePublic Key Infrastructure (PKI)
IntroductionThe processes that provide data security on the Internet rely fundamentally on
mathematical procedures known as Asymmetric Encryption Algorithms. The main
distinguishing characteristic of Asymmetric Encryption Algorithms is that they have two
encryption keys, public and private, which are used to encrypt and decrypt data.
The private key is known only to the owner of that key, and should never be revealed to
anyone else. Each private key has a specific companion public key, that can be safely
shared with anyone. Data encrypted by the private key can be decrypted by the public
key. So, if an entity shares its public key, but not its private key, others can send encrypted
messages to it. They use the public key to encrypt the data they send, which the recipient
can decrypt using its private key.
In a way, a public key is an identifier for the person, organization or machine that is at one
end of an exchange of encrypted data communication. When the public key is sent out, it
effectively says "this is me, and I am the valid owner of the corresponding private key".
But, how can you trust that entity sending you its public key REALLY is the valid owner of
the corresponding private key, and really is who it says it is? You need to be very sure of
who you are conversing with if you are going to send them sensitive information like credit
card details, banking login credentials, or other private information.
Public Key Infrastructure (PKI) is a set of procedures, policies, servers, protocols, and
special files that build up a system that enables Internet users to trust the identity of those
from whom they receive public keys. The most popular PKI currently in use on the Internet
is a system called X.509.
This guide:
Introduces asymmetric encryption, and explains how it protects data communications
Describes some of the core elements of the X.509 PKI
Explains what aspects of the X.509 PKI are implemented in the AlliedWare Plus
software
Provides examples for configuring AlliedWare Plus to interact with an X.509 PKI, and
to use this for setting up trusted, secure communication channels.
x alliedtelesis.comC613-22093-00 REV A

Public Key Infrastructure (PKI)
ContentsIntroduction ........................................................................................................................ 1
Products and software version that apply to this guide .............................................. 3
Securing Data Communications ........................................................................................ 4
Encryption.................................................................................................................... 4
Asymmetric encryption................................................................................................ 5
Validation ..................................................................................................................... 7
Certificate signing........................................................................................................ 9
Tamper prevention ..................................................................................................... 10
Certificate chains ....................................................................................................... 11
Checking certificate validity....................................................................................... 13
AlliedWare Plus PKI Implementation................................................................................ 14
The work flow for using PKI on AlliedWare Plus........................................................ 14
Setting the Organization and Common Name........................................................... 20
Migrating and Destroying Trustpoints .............................................................................. 21
Migrate a trustpoint to another system ..................................................................... 21
Destroy a trustpoint ................................................................................................... 23
The Legacy Trustpoint "local" .......................................................................................... 23
Migrating the legacy “local” trustpoint ...................................................................... 23
Automatic creation of the “local” trustpoint by RADIUS ........................................... 24
Commands for Monitoring the State of PKI on the Device.............................................. 24Using PKI for Secure Communications............................................................................ 25
RADIUS over TLS (RadSec)....................................................................................... 25
Enrol local RADIUS users against a local self-signed CA ......................................... 28
Syslog over TLS ....................................................................................................... 31
Securing a Web-authentication Connection .................................................................... 32
Main components of a secure web-authentication connection ................................ 32
Using an external self-signed CA .............................................................................. 34
Using a local self-signed CA...................................................................................... 39
Configuring the IP address for the web-authentication server.................................. 41
Troubleshooting ......................................................................................................... 42
Using the AR-Series Firewall GUI to securely manage the firewall.................................. 42
Accessing and installing the latest GUI file ............................................................... 42
Setting the Firewall GUI to use a local or external CA............................................... 44
Configuring the OCSP Responder ................................................................................... 45
Introduction................................................................................................................ 45
Creating the CA, Server, and client certificates ......................................................... 46
Generating the OCSP certificate ............................................................................... 46
Create a text file containing the certificates status information ................................ 47
Starting the OCSP Responder................................................................................... 47
Testing the OCSP Responder.................................................................................... 47
Page 2 |
Public Key Infrastructure (PKI)
Products and software version that apply to this guide
This guide applies to AlliedWare Plus products that support PKI, running software version
5.4.7 or later.
However, support and implementation of PKI varies between products. To see whether a
product supports a feature or command, see the following documents:
The product’s Datasheet
The product’s Command Reference
These documents are available from the above links on our website at alliedtelesis.com
Feature support may change in later software versions. For the latest information, see the
above documents.
Products and software version that apply to this guide | Page 3

Public Key Infrastructure (PKI)
Securing Data CommunicationsIn secure data transactions, there are three important requirements that must be satisfied:
1. Encryption—scrambling the contents of the packets with a sufficiently uncrackable algorithm, so that anyone eavesdropping on the conversation cannot work out the actual contents of the packets.
2. Validation—ensuring that the participants in the transaction are who they say they are.
3. Tamper prevention—ensuring that the packets that are transferred are not altered along the way.
The most popular method currently in use for achieving all three of these requirements in a
reliable manner is the use of public/private key pairs, backed up with X.509 certificates.
Let us look at how this method works, and how it reliably achieves all the three
requirements. This explanation will gradually introduce elements of the X.509 PKI - such
as certificates, certificate authorities, certificate revocation - and describe where they fit
into the process of enabling trusted secure data communication.
Encryption
Most encryption methods require an algorithm and a key (or multiple keys). The
encrypting device feeds the data and key(s) into the encryption algorithm and scrambles
the data. The decrypting device feeds the encrypted data and the same key(s) into the
companion decryption algorithm, and recovers the original unscrambled data.
The important point is that both ends of the conversation need to have the same key(s).
The distribution of the key(s) is a tricky problem to solve.
If the keys are shared at the start of the data transaction, they would have to be sent in an
unencrypted form (as encrypted communication cannot begin until the keys are
exchanged). But, then an eavesdropper would be able to see the keys, and steal them.
Having stolen the keys, the eavesdropper could decrypt all the data transferred in the
session, and the encryption was pointless.
The keys could be shared by some other completely separate means—sent in an SMS
message, written on paper and sent in the post, couriered on a Flash stick etc. But these
methods are all rather slow and manual—and prone to human error. Moreover, they are
still somewhat vulnerable to interception and key stealing.
It would be most desirable to have a completely secure way of exchanging keys at the
start of the data session itself. Surprising as it may seem, there is actually a way to
achieve this. The piece of magic that makes this possible is known as asymmetric
encryption.
Page 4 | Encryption

Public Key Infrastructure (PKI)
Asymmetric encryption
Asymmetric encryption algorithms are ones in which the key used to decrypt the data is
different to that which is used to encrypt the data. These algorithms use key pairs. Data
encrypted with one member of the pair can only be decrypted with the other member of
the pair, and vice versa.
Figure 1: Asymmetric encryption
At first glance, this might not seem to be so powerful. In fact it might appear that we have
simply introduced a new class of overly complicated encryption algorithms. But with the
addition of one more simple idea, asymmetric encryption becomes very powerful.
Public/private pairs
The additional idea is to treat the key pair as a public/private pair. The public member of
the pair is freely distributed, with no attempt to hide it from eavesdroppers, because its
only job is to encrypt. The private member of the key pair is never divulged. The owner of
the key never reveals it to anyone. The private key is required to decrypt anything that has
been encrypted by the public key.
Let us examine why this concept of public/private key pairs is so powerful. The best way
to examine it is to consider an example data transaction. In fact, let us consider a very
familiar transaction that almost all of us have experienced, and which uses public/private
keys (even if we had not realized it). The example transaction is that of using your credit
card to buy goods from an e-commerce website.
When your computer begins its session with a secure website:
1. The web server sends you its public encryption key.
2. Your computer then computes a key that will be used as the encryption key for the rest of the data session. Note that the encryption algorithm that will be used for the rest of the data session is a standard symmetric algorithm; it is only the key exchange that is secured by the asymmetric algorithm. Your computer computes a key that will be used for the subsequent encrypted data session.
3. Then, your computer encrypts this key using the public key that the web server sent to it.
Data Network
Original Message
Original Message
Encrypted Message
Encrypted Message
Decryption Algorithm
Encryption Algorithm
Key 1 Key 2
Asymmetric encryption | Page 5

Public Key Infrastructure (PKI)
4. This encrypted key is then transmitted to the web server. It does not matter who intercepts this message, and takes a copy of it; the only key that can decrypt the message is the web server's private key.
5. Then, the web server uses its private key to decrypt the message. Only the web server has a copy of the private key, so no eavesdropper will be able to decrypt the message and learn the key that you and the web server will be using for your data transfer.
Figure 2: Public/private key pairs
The asymmetric encryption algorithms, along with the idea of treating the keys as a
public/private pair, securely transfer the key for a data session.
That is encryption dealt with. Now let us look at how adding X.509 certificates into the
process satisfies the validation requirement.
Encrypted message
Your PC Sends public key ofasymmetric algorithm
Public Key
Web server
Sends the encrypted encryption key to the web server
PC and web server enter into an encrypted data session, using asymmetric encryption algorithm, and the key they securely shared
Calculates a key to be used for the actual data transfer session
Encrypts this keyusing the public keysent from the webserver
Decrypts the encrypted key, using its private key for the asymmetric algorithm
Page 6 | Asymmetric encryption
Public Key Infrastructure (PKI)
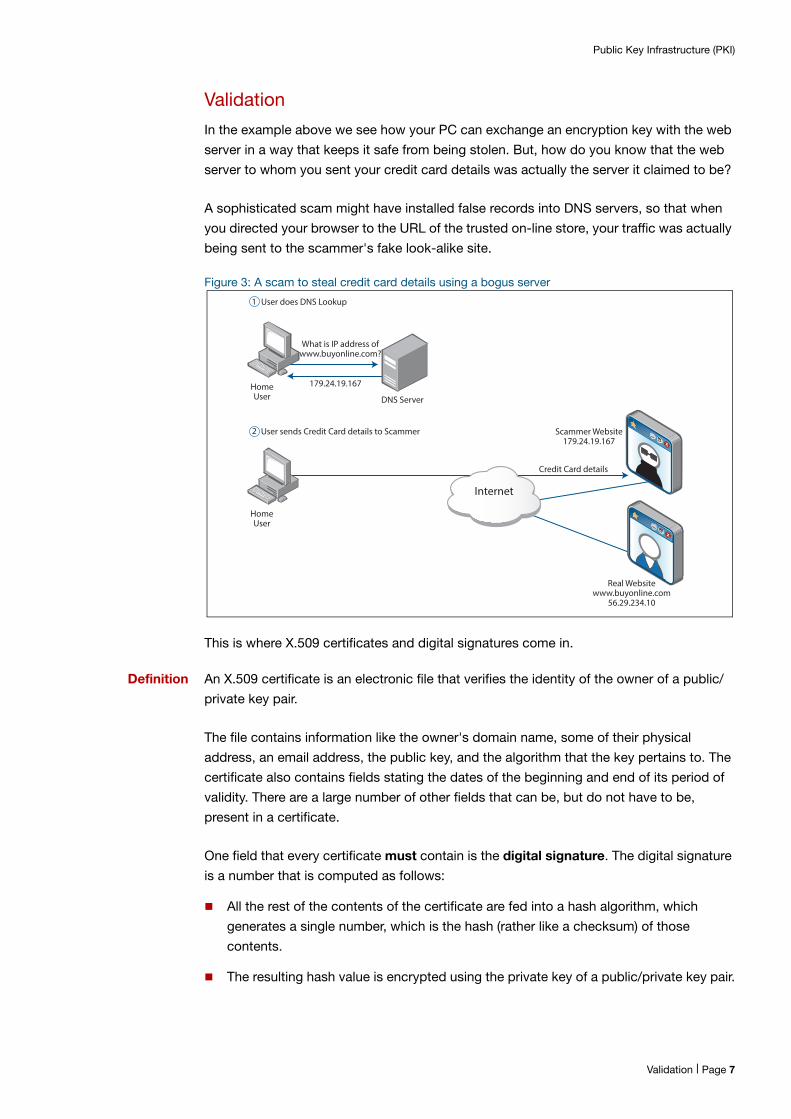
Validation
In the example above we see how your PC can exchange an encryption key with the web
server in a way that keeps it safe from being stolen. But, how do you know that the web
server to whom you sent your credit card details was actually the server it claimed to be?
A sophisticated scam might have installed false records into DNS servers, so that when
you directed your browser to the URL of the trusted on-line store, your traffic was actually
being sent to the scammer's fake look-alike site.
Figure 3: A scam to steal credit card details using a bogus server
This is where X.509 certificates and digital signatures come in.
Definition An X.509 certificate is an electronic file that verifies the identity of the owner of a public/
private key pair.
The file contains information like the owner's domain name, some of their physical
address, an email address, the public key, and the algorithm that the key pertains to. The
certificate also contains fields stating the dates of the beginning and end of its period of
validity. There are a large number of other fields that can be, but do not have to be,
present in a certificate.
One field that every certificate must contain is the digital signature. The digital signature
is a number that is computed as follows:
All the rest of the contents of the certificate are fed into a hash algorithm, which
generates a single number, which is the hash (rather like a checksum) of those
contents.
The resulting hash value is encrypted using the private key of a public/private key pair.
Home User
Real Websitewww.buyonline.com
56.29.234.10
Credit Card details
Scammer Website179.24.19.167
Home User DNS Server
What is IP address ofwww.buyonline.com?
179.24.19.167
User does DNS Lookup
User sends Credit Card details to Scammer
1
2X
X
Internet
Validation | Page 7

Public Key Infrastructure (PKI)
Most importantly, the private key used in the creation of the signature is typically not the
certificate owner's private key. Instead it is the private key of a third party—a highly
trusted entity known as a Certification Authority (CA).
The fact that the certificate has been signed by this CA proves that this CA is satisfied that
the certificate owner is who they claim to be. The CA has signed the certificate and given
it to the owner.
Figure 4: Digital signature
But, how does your PC know the signature is valid? It is just a number contained in a file,
so how can your PC work out that this number was encrypted by the CA?
To do so, your PC needs to already have a copy of the CA's own certificate for the private
key they used for signing the web server's certificate. In fact, most PC operating systems
ship with a set of X.509 certificates from a number of highly trusted certification
authorities. The CA's certificate will, of course, contain the CA's public key. Using this
public key, your PC decrypts the signature. Then, the PC can calculate the hash on the
rest of the contents of the certificate, and check that this matches the decrypted
signature.
Figure 5: Verifying the CA certificate
73a40b9f7...
73a40b9f7...7a4c92e...
Hash Algorithm
Encryption Algorithm
Key Owner
PublicKey
Hash Value
SignedCertificate
a017bc59f62... 7a4c92e...
Signature
UnsignedCertificate
Private Key
PublicKey
CA’s Signature
Hash Algorithm
Decryption Algorithm
5a72fe139...
User
Hash Value
a017bc59f62... 7a4c92e...Signature
Certificatewithoutsignature
CA’s PublicKey
CA’sCertificate
a017bc59f62...
Do these two Values match?
Page 8 | Validation

Public Key Infrastructure (PKI)
If this all checks out, then your PC:
knows that the web server's certificate was signed by the CA it claims to have been
signed by.
knows that the CA is satisfied that the website is who they claim to be.
will follow suit, and trust that the website is who they claim to be.
Certificate signing
But, you might be thinking, once the website sends out a copy of its certificate, then
anybody can get hold of it, including scammers. Couldn't the scammers just send out the
stolen certificate of the website they are spoofing?
In fact, you would be correct. A certificate is fully available to the public domain. But, the
really important point is that only the true owner of the certificate has a copy of the private
key corresponding to the public key contained in the certificate. So if the scammer sent a
stolen certificate to your PC, then certainly your PC would initially trust the scammer's
site. But, when your PC sent the scammer an encryption key encrypted with the
certificate's public key, the scammer would not possess the necessary private key to
decrypt the key sent from your PC. So, the actual data transfer session would not be able
to proceed.
Figure 6: Unsuccessful data transfer session
It is probably not entirely accurate to say that a certificate verifies the identity of the entity
that sends the certificate to you.
Definition A more accurate statement is that the certificate verifies the identity of the possessor of
the private key corresponding to the certificate's public key.
The certificate prevents a scammer from creating their own public/private key pair, and
then sending out a certificate containing the public member of that key pair, but showing
A
A73a40b9f7...
Your PC
Stolen Certificate
CertificateValidated
Fake Website
Encryption key encrypted with certificate’s public key
Fake websitecannot decryptthis key
X
PublicKey
Certificate signing | Page 9
Public Key Infrastructure (PKI)
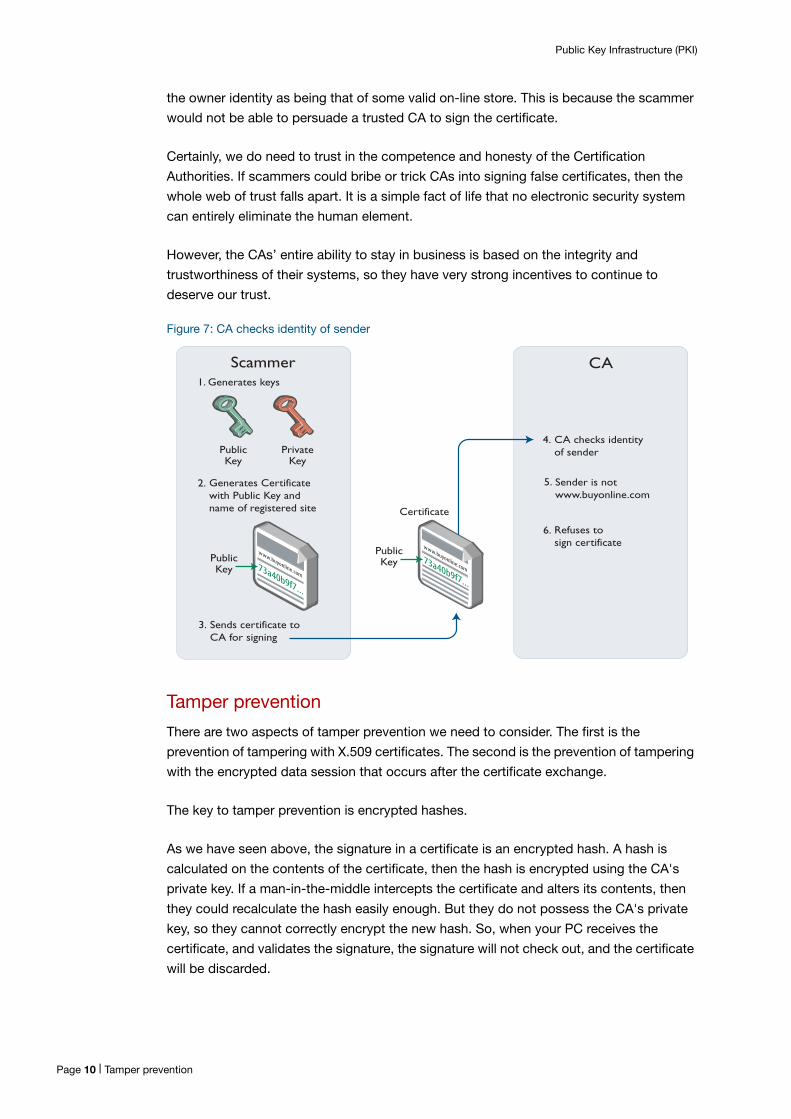
the owner identity as being that of some valid on-line store. This is because the scammer
would not be able to persuade a trusted CA to sign the certificate.
Certainly, we do need to trust in the competence and honesty of the Certification
Authorities. If scammers could bribe or trick CAs into signing false certificates, then the
whole web of trust falls apart. It is a simple fact of life that no electronic security system
can entirely eliminate the human element.
However, the CAs’ entire ability to stay in business is based on the integrity and
trustworthiness of their systems, so they have very strong incentives to continue to
deserve our trust.
Figure 7: CA checks identity of sender
Tamper prevention
There are two aspects of tamper prevention we need to consider. The first is the
prevention of tampering with X.509 certificates. The second is the prevention of tampering
with the encrypted data session that occurs after the certificate exchange.
The key to tamper prevention is encrypted hashes.
As we have seen above, the signature in a certificate is an encrypted hash. A hash is
calculated on the contents of the certificate, then the hash is encrypted using the CA's
private key. If a man-in-the-middle intercepts the certificate and alters its contents, then
they could recalculate the hash easily enough. But they do not possess the CA's private
key, so they cannot correctly encrypt the new hash. So, when your PC receives the
certificate, and validates the signature, the signature will not check out, and the certificate
will be discarded.
1. Generates keys
Generates Certificate with Public Key and name of registered site
2.
Refuses to sign certificate
6.
Sender is notwww.buyonline.com
5.
CA checks identity of sender
4.
Sends certificate toCA for signing
3.
PublicKey
PrivateKey
73a40b9f7...
www.buyonline.com
PublicKey
Certificate
73a40b9f7...
www.buyonline.com
PublicKey
Scammer CA
Page 10 | Tamper prevention

Public Key Infrastructure (PKI)
In the subsequent encrypted data transaction, the web server and your PC can agree to
use a hash algorithm like MD5 or SHA to calculate a hash on each packets’ contents prior
to encryption. The hash value can then be included in the packet, and encrypted along
with the rest of the packet. Again, if the content of the packet is altered somewhere along
its journey, the hash will not be able to be re-encrypted correctly (as only your PC and the
web server know the encryption key).
When the packet arrives at its destination, the hash contained in the altered packet will no
longer be correct, and the packet will be discarded.
Figure 8: Tamper prevention using encrypted hashes
Certificate chains
In the section “Certificate signing” above, there was an explanation that an end-user
certificate will be signed by a CA, and that the PC receiving the certificate will also have a
copy of the CA's certificate, which verifies the CA's private key. This explanation implies a
two-step certificate chain:
1. www.buyonline.com certificate is signed by CA
2. CA's certificate verifies the identity of the CA.
In fact, there is no requirement that a certificate chain have only two steps. It is quite
possible that the CA certificate that verifies the private key used to sign the
www.buyonline.com certificate is, itself, signed by a higher-level CA's private key.
That certificate must in turn be authenticated by checking its signature. If the CA
certificate is signed by another entity, the CA is an intermediate CA, and its certificate
must in turn be verified using the next higher level CA.
At some point, this chain of verification eventually must end at a trusted self-signed
certificate, also known as a Root CA certificate. A root certificate is signed by itself (the
signature is decrypted using the public key contained within the certificate). It may only be
validated for consistency with itself. The application must implicitly trust that the
Hash Algorithm
Encryption Algorithm
Decryption Algorithm
Hash Algorithm
Decrypted Packet
a017bc59f...
Sender
Inserted into Packet
Hash Value
a017bc59f62...
Copied
Packet beforehash
Hash Value
a017bc59f62...
Hash
Do these two Values match?
Encrypted Packet containing hash
Encrypted Packet
Receiver
a017bc59f...
a017bc59f...
a017bc59f...
HashRemoved
Certificate chains | Page 11

Public Key Infrastructure (PKI)
certificate is valid. This is generally accomplished by having end users manually control
the verification and installation of root certificates, or by the certificates being bundled
with trusted operating system software.
Figure 9: Certificate chain
Commercial CAs will often use an intermediate CA in order to protect the root private key
from exposure. When an intermediate CA is used to sign certificates, only the
intermediate private key is needed; the root private key may remain locked away in off-line
storage.
So, what happens is:
The organisation that owns the CA will create their root public/private key, and a self-
signed certificate for this key pair. This is the Root CA certificate and root key pair.
Then, they create another public/private key pair. These are the intermediate CA key
pair. A certificate is created for this key pair, and signed by the Root CA key.
The Root CA private key is stored in a location that is not network accessible, and any
copy of it is removed from any network accessible locations, so it is thoroughly secure.
The intermediate CA private key is used for signing clients' certificates. The validity of
the intermediate CA is backed up by the Root CA, but the Root CA private key does
not need to be involved in the process of signing the clients' certificates.
If an intermediate CA private key is ever stolen, it can be declared invalid (the term in
X.509-speak is 'revoked') and a new intermediate CA key-pair created, along with a
new certificate signed by the Root CA's private key.
Entity ‘A’End-Entity Certificate
- Subject = Entity ‘A’- Issuer = Entity ‘B’
Entity ‘B’Intermediate CA Certificate
- Subject = Entity ‘B’- Issuer = Entity ‘C’
Entity ‘C’Root CA Certificate
- Subject = Entity ‘C’- Issuer = Entity ‘C’
Implicitly trusted byapplications
Signed by
Signed by
Signed by
Page 12 | Certificate chains
Public Key Infrastructure (PKI)
Checking certificate validity
As mentioned above, it is possible for a private key corresponding to a trusted certificate
to be stolen. If this happens, then the certificate effectively become worthless. The whole
value of a certificate lies in the fact that you can trust the holder of the private key that
corresponds to the certificate's public key. Once a private key has been stolen, then you
have no idea whose hands that private key has fallen into, and therefore no reason to trust
anyone who does hold that private key.
In that case, devices that use X.509 certificates to secure data communications need a
way to know that a previously trusted certificate is now worthless, and should no longer
be treated as implying any trust at all.
The X.509 PKI does provide a mechanism by which devices can learn of certificates that
should no longer be trusted. The process is referred to as revoking the certificates.
There are two ways that a device can check if a certificate has been revoked:
1. The original method is the use of Certificate Revocation Lists (CRLs). As a CA revokes certificates, it adds the revoked certificates to a CRL. When a device receives a certificate signed by a particular CA, it can request the CRL from that CA, and check whether or not the certificate it just received is in the CRL. If the certificate is in the CRL, then the device should not proceed to establish a communication session with the peer which sent it the certificate.
2. Because CRLs are potentially unwieldy (for some long-established CAs, the CRLs have grown to Megabytes in size), an alternative method has been developed, called Online Certificate Status Protocol (OCSP). With OCSP, the device sends to the CA some details of the certificate it has received, and the CA responds with a verdict on whether or not the certificate is still valid. This is a quicker, easier method than that of the CA sending out the full list of its revoked certificates.
The AlliedWare Plus implementation of X.509 uses OCSP. For more information on OCSP
see "Configuring the OCSP Responder" on page 45.
Checking certificate validity | Page 13

Public Key Infrastructure (PKI)
AlliedWare Plus PKI ImplementationIn AlliedWare Plus, certificates and keys are stored in containers called trustpoints.
Within a trustpoint, the certificates form a chain that ends in a single Root CA certificate.
The Root CA certificate’s private key is also stored in the trustpoint, if the certificate is
locally self-signed (i.e. if the certificate was generated and signed on the local device).
Server keys are stored outside of trustpoints since they may be shared by multiple
entities.
Figure 10: Trustpoints and keys
AlliedWare Plus allows you to create multiple trustpoints, and to use local (self-signed)
certificates or external certificates signed by other CAs.
The work flow for using PKI on AlliedWare Plus
The standard work flow for the user is to:
1. create a trustpoint
2. authenticate it (create or import the Root CA certificate)
3. enroll the local server (create the server certificate)
4. then configure applications to use the trustpoint
Server-Cert
int-CA-Cert
Root-CA-Cert
Trustpoint ‘x’ Trustpoint ‘y’
Server Keys
Server-Cert
Root-CA-Cert
Page 14 | The work flow for using PKI on AlliedWare Plus

Public Key Infrastructure (PKI)
The use cases below describe several common scenarios, including the creation and use
of certificates from a local self-signed certificate authority, and the use of certificates from
an external certificate authority.
Creating a trustpoint based on a local self-signed certificate
Use the following commands to create a trustpoint based on a local self-signed
certificate:
Step 1. enable
config terminal
Use these commands to enter configuration mode after logging in. PKI commands require
maximum user privileges to execute.
Step 2. crypto pki trustpoint raleigh
This command declares a trustpoint named “raleigh” and enters trustpoint configuration
mode. You can use any name (so long as the first character is alphanumeric, and all
characters are alphanumeric, underscores, dashes, or periods). The name “local” is
special; if it is used, the trustpoint is assumed to use a local self-signed certificate
authority, and the CA is automatically authenticated when the trustpoint is created. This is
to retain consistency with legacy behavior. For all other trustpoint names, this command
just instantiates the trustpoint by initializing its storage container.
Step 3. enrollment selfsigned
This command declares that trustpoint will use a local self-signed certificate authority. It
affects the authentication process (the creation of the trusted root certificate) and the
server enrollment process (the creation of the server certificate), but doesn’t immediately
cause any action to be taken. In other words, this command does not result in certificate
generation; it only affects how certificate generation will be done later. The keyword ‘self-
signed’ is a bit of a misnomer since all root certificates are self-signed, however, this is the
industry standard term for locally generated CAs.
Step 4. rsakeypair raleigh-server-key
This command declares that the trustpoint will use the keypair raleigh-server-key when
enrolling the server (creating the server certificate). This command doesn’t result in the
creation of the keypair. If the keypair does not exist, it will be created when you enter the
crypto pki enroll command in a later step. You can specify the bit length of the key in this
command, but the length parameter will be ignored if the key already exists and has a
different length.
Step 5. exit
This command exits trustpoint configuration mode.
The work flow for using PKI on AlliedWare Plus | Page 15

Public Key Infrastructure (PKI)
Step 6. crypto pki authenticate raleigh
This command initiates creation of the local self-signed root certificate. This involves
generating a 2048-bit public/private keypair for the CA. This keypair is distinct from the
keypair used for the server certificate. You cannot use existing keypairs generated by the
crypto key generate rsa command as the CA key, since CA keys should always be
unique. The key is then used in the creation of the self-signed root certificate.
The subject name of the root certificate incorporates the serial number of the device, to
help ensure uniqueness.
Step 7. crypto pki enroll raleigh
This command initiates creation of the server certificate. For a trustpoint with a local self-
signed certificate authority, this is a single-step process. It creates a server certificate for
the local device using the RSA keypair specified in the trustpoint parameters. If the
keypair specified in the rsakeypair command does not exist, it will be created at this
point. If the rsakeypair command has not been executed for this trustpoint, then a
keypair will be created at this point, and given the name of the trustpoint.
By default, the subject name of the server certificate has the CN (common name) field set
to the fully qualified domain name of the system, since that is commonly required when
other systems validate the subject name. However, you can substitute a subject name of
your choice by using the subject command in trustpoint-configuration mode. This
command is described later in this guide.
At this point, the Trustpoint is set up. It contains the:
trustpoint's self-signed root certificate
root RSA public/private keys.
trustpoint's own server certificate, signed by the root private key.
The following figure shows the commands entered in the above example, and the
responses returned by the CLI.
awplus>enableawplus#config terminalEnter configuration commands, one per line. End with CNTL/Z.awplus(config)#crypto pki trustpoint raleigh% Created trustpoint "raleigh".awplus(ca-trustpoint)#enrollment selfsigned awplus(ca-trustpoint)#rsakeypair raleigh-server-keyawplus(ca-trustpoint)#exitawplus(config)#crypto pki authenticate raleigh% Successfully authenticated trustpoint "raleigh".awplus(config)#crypto pki enroll raleigh% Using private key "raleigh-server-key"...% Successfully enrolled the local server.
Page 16 | The work flow for using PKI on AlliedWare Plus
Public Key Infrastructure (PKI)
Creating a trustpoint based on an external Certificate Authority
This scenario assumes that the external certificate authority has a Root CA certificate and
an intermediate (subordinate) CA certificate.
The steps in this process are described in detail below.
Step 1. enable
configure terminal
These are the commands to enter configuration mode after logging in. PKI commands
require maximum user privileges to execute.
Step 2. crypto pki trustpoint christchurch
This command declares a trustpoint named “christchurch” and enters trustpoint
configuration mode. You can use any name (so long as the first character is alphanumeric,
and all characters are alphanumeric, underscores, dashes, or periods). The name “local”
is special; if it is used, the trustpoint is assumed to use a local self-signed certificate
authority, and the CA is automatically authenticated when the trustpoint is created. This is
to retain consistency with legacy behavior. For all other trustpoint names, this command
just instantiates the trustpoint by initializing its storage container.
Step 3. enrollment terminal
This command declares that the trustpoint will use certificates that are cut-and-pasted
into the system at the terminal. It affects the authentication process (the importing of the
trusted root certificate) and the server enrollment process (the importing of the server
certificate), but doesn’t immediately cause any action to be taken. In other words, this
command does not result in certificate generation; it only affects how certificate
generation will be done later.
Step 4. exit
exit
These commands exit trustpoint configuration mode and return you to privileged exec
mode.
Step 5. crypto pki authenticate christchurch
This command causes the system to prompt for the external certificate authority’s root
certificate to be pasted to the terminal, in Privacy Enhanced Mail (PEM) format. The file
begins with a the flag “------BEGIN CERTIFICATE------” and ends with the flag “------ END
CERTIFICATE------”. In between is a base-64 encoded representation of the certificate.
The system detects the start and end flags as they are entered. When you have pasted
the complete file, the system ensures that the certificate is valid.
So, you will need to have a copy of the external CA's root certificate at hand, in PEM
format.
The work flow for using PKI on AlliedWare Plus | Page 17

Public Key Infrastructure (PKI)
The command displays the certificate subject and issuer. It also displays the certificate
fingerprint (a cryptographic hash of the certificate contents) so that you may manually
verify the authenticity of the certificate (presuming that the fingerprint is available from the
CA on an out-of-band channel). Alternatively, you could pre-enter the fingerprint (using the
fingerprint command in trustpoint configuration mode; this is described later in this
guide), in which case the certificate is accepted without prompting.
Step 6. crypto pki enroll christchurch
This command initiates creation of the server certificate for this trustpoint. Because this
trustpoint uses an external certificate authority, this is a two-step process. The enroll
command results in the creation of a Certificate Signing Request (CSR), which is
displayed at the terminal in PEM format. You should cut-and-paste this file, and transmit it
to the external CA.
Step 7. crypto pki import christchurch pem
In this example, the external certificate authority uses two levels of CA certificates: a root
certificate and an intermediate certificate. On the local system, you need to import both
the intermediate certificate and the server certificate from the external CA. Both import
operations are accomplished with the same command syntax. The intermediate certificate
must be imported first, since the system cannot validate the server certificate without it.
Similar to the authenticate operation for the root certificate, you must cut-and-paste the
certificate PEM file at the terminal, and the system prompts you to verify the certificate
fields and its fingerprint. (In fact, import may be used in place of authenticate to import
the root certificate for external CAs; the commands behave in largely the same manner.
authenticate has the advantage of being similar to the local self-signed trustpoint, from a
command flow perspective, import has the advantage of being able to import PEM files
directly from an external URL.)
Step 8. crypto pki import christchurch pem
Enter the same import command a second time to import the server certificate that has
been received back from the CA after having been signed. Again, you cut-and-paste a
certificate file at the terminal, then verify the certificate’s fields and fingerprint.
At this point, the Trustpoint is set up. It contains the:
external CA's root certificate
external CA's intermediate certificate
trustpoint's own server certificate, signed by the CA's intermediate key.
trustpoint's own public/private keys.
Page 18 | The work flow for using PKI on AlliedWare Plus
Public Key Infrastructure (PKI)
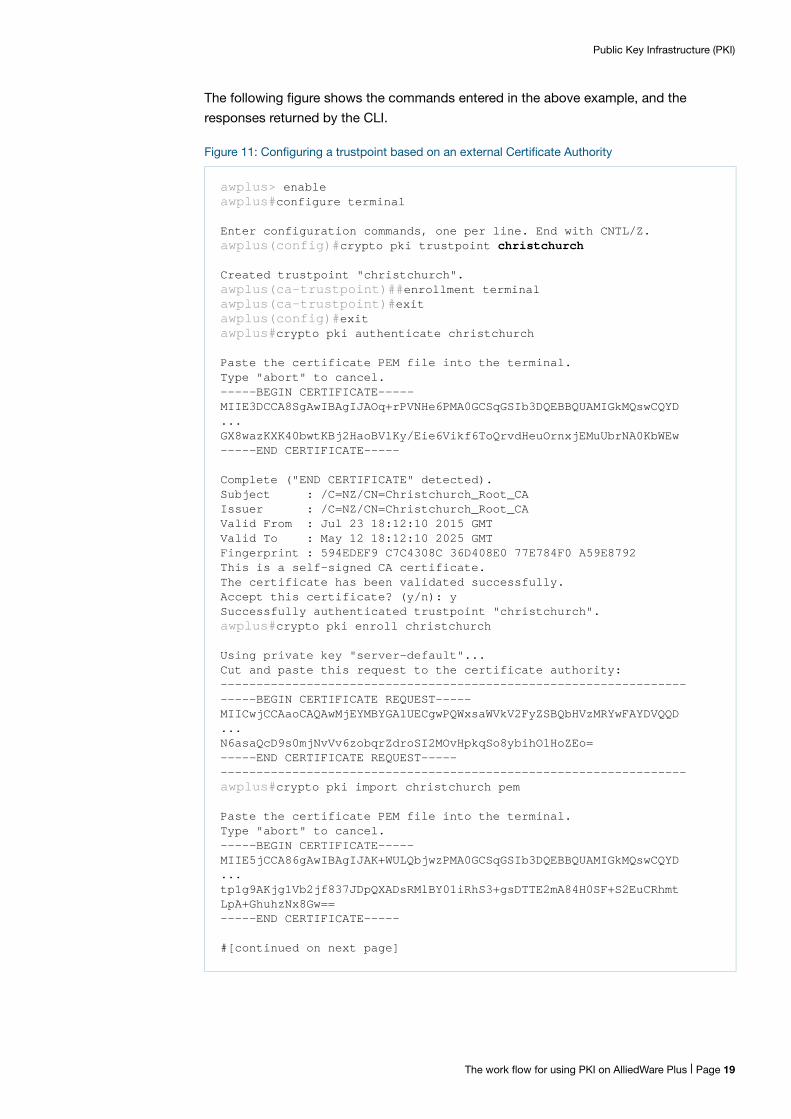
The following figure shows the commands entered in the above example, and the
responses returned by the CLI.
Figure 11: Configuring a trustpoint based on an external Certificate Authority
awplus> enableawplus#configure terminal
Enter configuration commands, one per line. End with CNTL/Z.awplus(config)#crypto pki trustpoint christchurch
Created trustpoint "christchurch".awplus(ca-trustpoint)##enrollment terminalawplus(ca-trustpoint)#exitawplus(config)#exitawplus#crypto pki authenticate christchurch
Paste the certificate PEM file into the terminal.Type "abort" to cancel.-----BEGIN CERTIFICATE-----MIIE3DCCA8SgAwIBAgIJAOq+rPVNHe6PMA0GCSqGSIb3DQEBBQUAMIGkMQswCQYD...GX8wazKXK40bwtKBj2HaoBVlKy/Eie6Vikf6ToQrvdHeuOrnxjEMuUbrNA0KbWEw-----END CERTIFICATE-----
Complete ("END CERTIFICATE" detected).Subject : /C=NZ/CN=Christchurch_Root_CAIssuer : /C=NZ/CN=Christchurch_Root_CAValid From : Jul 23 18:12:10 2015 GMTValid To : May 12 18:12:10 2025 GMTFingerprint : 594EDEF9 C7C4308C 36D408E0 77E784F0 A59E8792This is a self-signed CA certificate.The certificate has been validated successfully.Accept this certificate? (y/n): ySuccessfully authenticated trustpoint "christchurch".awplus#crypto pki enroll christchurch
Using private key "server-default"...Cut and paste this request to the certificate authority:----------------------------------------------------------------------BEGIN CERTIFICATE REQUEST-----MIICwjCCAaoCAQAwMjEYMBYGA1UECgwPQWxsaWVkV2FyZSBQbHVzMRYwFAYDVQQD...N6asaQcD9s0mjNvVv6zobqrZdroSI2MOvHpkqSo8ybihO1HoZEo=-----END CERTIFICATE REQUEST----------------------------------------------------------------------awplus#crypto pki import christchurch pem
Paste the certificate PEM file into the terminal.Type "abort" to cancel.-----BEGIN CERTIFICATE-----MIIE5jCCA86gAwIBAgIJAK+WULQbjwzPMA0GCSqGSIb3DQEBBQUAMIGkMQswCQYD...tp1g9AKjg1Vb2jf837JDpQXADsRMlBY01iRhS3+gsDTTE2mA84H0SF+S2EuCRhmtLpA+GhuhzNx8Gw==-----END CERTIFICATE-----
#[continued on next page]
The work flow for using PKI on AlliedWare Plus | Page 19

Public Key Infrastructure (PKI)
Setting the Organization and Common Name
You can set the distinguished name string used for the subject field in the server
certificate. The name is used when enrolling the server (generating the server certificate or
server certificate signing request).
To do so, use the following command in trustpoint configuration mode:
awplus(ca-trustpoint)#subject-name <name>
The name is specified as a variable number of fields, where each field begins with a
forward-slash character (“/”). Each field is of the form “XX=value” where “XX” is the
abbreviation of the node type in the tree. Supported values are “O” (organization) and
“CN” (common name). For a server certificate, many applications require that the network
name of the server matches the common name in the server’s certificate.
Complete ("END CERTIFICATE" detected).Subject : /C=NZ/CN=Christchurch_Signing_CAIssuer : /C=NZ/CN=Christchurch_Root_CAFingerprint : AE2D5850 9867D258 ABBEE95E 2E0E3D81 60714920This is an intermediate CA certificate.The certificate has been validated successfully.Accept this certificate? (y/n): yThe certificate was successfully imported.awplus#crypto pki import christchurch pem
Paste the certificate PEM file into the terminal.Type "abort" to cancel.-----BEGIN CERTIFICATE-----MIIDXTCCAkUCCQCGKcNPqv+aTzANBgkqhkiG9w0BAQUFADCBrjELMAkGA1UEBhMC...UTNvtYju2SYDnBizxJWg6uF2vrPClNfQh4TXBNhul64Dg+mQ5UUwsQ31V3focd46pQ==-----END CERTIFICATE-----
Complete ("END CERTIFICATE" detected).Subject : /O=AlliedWare Plus/CN=awplus.atg.lcIssuer : /C=NZ/CN=Christchurch_Signing_CAValid From : Sep 3 18:45:01 2015 GMTValid To : Oct 10 18:45:01 2020 GMTFingerprint : 5A81D34C 759CC4DA CFCA9F65 0303AD83 410B03AFThis is a server certificate.The certificate has been validated successfully.Accept this certificate? (y/n): yThe certificate was successfully imported.
Page 20 | Setting the Organization and Common Name
Public Key Infrastructure (PKI)
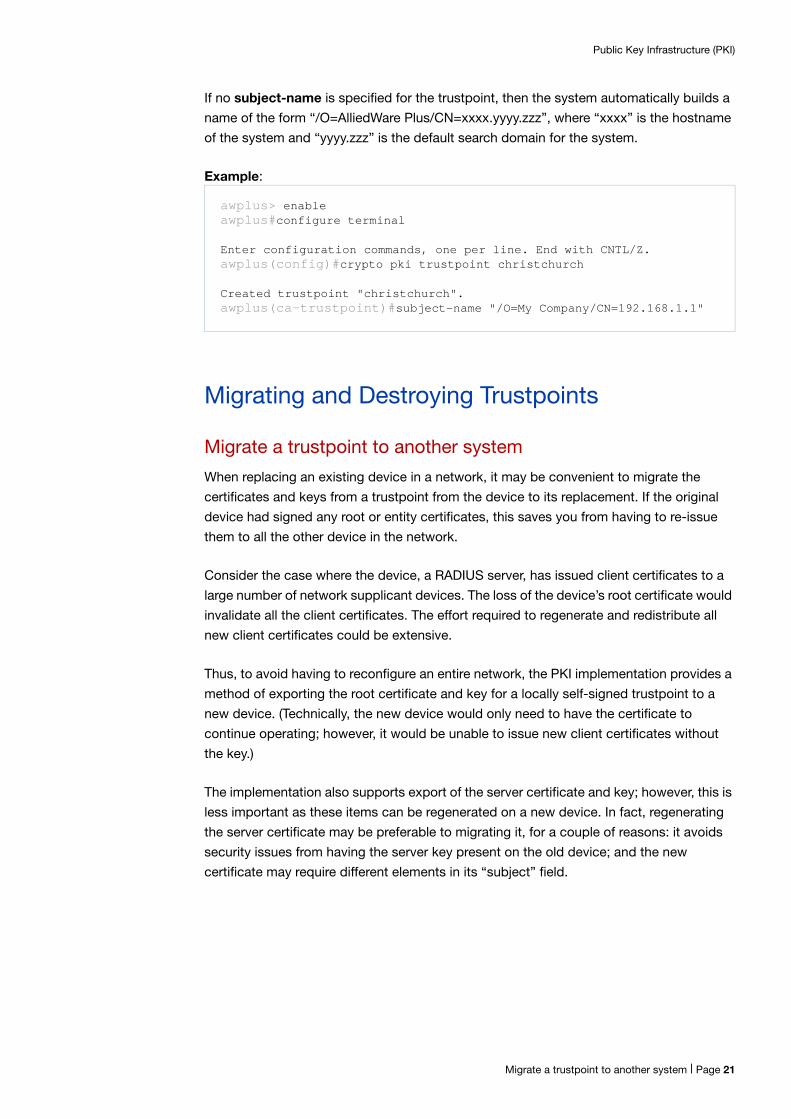
If no subject-name is specified for the trustpoint, then the system automatically builds a
name of the form “/O=AlliedWare Plus/CN=xxxx.yyyy.zzz”, where “xxxx” is the hostname
of the system and “yyyy.zzz” is the default search domain for the system.
Example:
Migrating and Destroying Trustpoints
Migrate a trustpoint to another system
When replacing an existing device in a network, it may be convenient to migrate the
certificates and keys from a trustpoint from the device to its replacement. If the original
device had signed any root or entity certificates, this saves you from having to re-issue
them to all the other device in the network.
Consider the case where the device, a RADIUS server, has issued client certificates to a
large number of network supplicant devices. The loss of the device’s root certificate would
invalidate all the client certificates. The effort required to regenerate and redistribute all
new client certificates could be extensive.
Thus, to avoid having to reconfigure an entire network, the PKI implementation provides a
method of exporting the root certificate and key for a locally self-signed trustpoint to a
new device. (Technically, the new device would only need to have the certificate to
continue operating; however, it would be unable to issue new client certificates without
the key.)
The implementation also supports export of the server certificate and key; however, this is
less important as these items can be regenerated on a new device. In fact, regenerating
the server certificate may be preferable to migrating it, for a couple of reasons: it avoids
security issues from having the server key present on the old device; and the new
certificate may require different elements in its “subject” field.
awplus> enableawplus#configure terminal
Enter configuration commands, one per line. End with CNTL/Z.awplus(config)#crypto pki trustpoint christchurch
Created trustpoint "christchurch".awplus(ca-trustpoint)#subject-name "/O=My Company/CN=192.168.1.1"
Migrate a trustpoint to another system | Page 21

Public Key Infrastructure (PKI)
The steps to transfer a trustpoint called "Raleigh" from one device to another, via a TFTP
server are as below:
Step 1. Export the root certificate and keys from the original device:
crypto pki export raleigh pkcs12 ca tftp://backup/raleigh.pk12
This command packages the root certificate and its associated private key into a
PKCS#12-formatted file for export. The system will prompt you to enter a passphrase,
which will be used to encrypt the private key. This command may only be used for locally
self-signed CAs. To export the certificate for an external CA, use the following command instead:
crypto pki export <trustpoint> pem
Step 2. Create a new trustpoint on the new device:
crypto pki trustpoint newraleigh
This command declares a trustpoint named “newraleigh” on the destination system.
Step 3. Import the root certificate:
crypto pki import newraleigh pkcs12 ca tftp://backup/raleigh.pk12
This command imports the root certificate and its associated private key from the
specified PKCS#12 file to a trustpoint. The system will prompt you to enter the same
passphrase that was used to encrypt the private key during the “export” operation.
Output 1: Source system commands and output
Output 2: Destination system commands and output
awplus>enableawplus#crypto pki export raleigh pkcs12 ca tftp://backup/raleigh.pk12% Enter an export passphrase, or "abort" to cancel.*****% Enter the export passphrase again.*****% Exporting...% Successfully exported the trustpoint key and certificate.
awplus>enableawplus#config terminalEnter configuration commands, one per line. End with CNTL/Z.awplus(config)#crypto pki trustpoint newraleigh% Created trustpoint "newraleigh".awplus(ca-trustpoint)#exitawplus(config)#crypto pki import newraleigh pkcs12 ca tftp://backup/raleigh.pk12% Importing...% Enter the import passphrase.*****% The certificate has been validated successfully.% Successfully imported the trustpoint.
Page 22 | Migrate a trustpoint to another system

Public Key Infrastructure (PKI)
Step 4. If you wish, you can also transfer the trustpoint's server certificate and private key, using the following command on the original device
crypto pki export raleigh pkcs12 server tftp://backup/raleigh_server.pk12
And, the corresponding command on the destination device:
crypto pki import newraleigh pkcs12 server tftp://backup/raleigh_server.pk12
Destroy a trustpoint
Destroying a trustpoint involves removing all the certificates associated with the trustpoint
from Flash memory storage. If the trustpoint is a local self-signed CA, then the private key
associated with the root certificate is also removed. The consequence of this is that all
certificates signed by the Root CA become invalid, including RADIUS user certificates that
may have been issued and exported to client devices. Therefore, this is not an action to
take lightly.
For trustpoints with imported root certificates, the consequences are not as severe. The
root certificate may be re-imported from its original source, and the local server may be
re-enrolled. The server private key is not destroyed along with the trustpoint (since the
same key may be used for server enrollments across multiple trustpoints), so the previous
key may be re-used if desired.
The Legacy Trustpoint "local"
Migrating the legacy “local” trustpoint
Prior to v5.4.6-1.1, AlliedWare Plus supported only one trustpoint. This was an
automatically created trustpoint with the name local. The file system structure used in the
legacy trustpoint is different to that used in the user-created trustpoints.
If your system already contains a trustpoint named “local” from a legacy configuration,
and you want to use that trustpoint in a new configuration, you do not have to re-create it.
Instead, you can just enter the command crypto pki trustpoint local, and the system will
copy the previous certificates and keys into the new file locations.
This will make the trustpoint named “local” usable just as though it were a user-created
trustpoint. The migration will occur on the first invocation of the command crypto pki
trustpoint local.
awplus>enableawplus#config terminalEnter configuration commands, one per line. End with CNTL/Z.awplus(config)#no crypto pki trustpoint raleigh% Destroyed trustpoint "raleigh".
Destroy a trustpoint | Page 23

Public Key Infrastructure (PKI)
Automatic creation of the “local” trustpoint by RADIUS
In the legacy implementation, the trustpoint named “local” was automatically created,
authenticated, and enrolled by the local server when the local RADIUS server was
instantiated (with the command radius-server local). From v5.4.6-1.1 onwards, this no
longer occurs. If a configuration file contains the command radius-server local
command, but the system does not already have a trustpoint named “local” with an
enrolled server on the Flash memory, then EAP-TLS and PEAP will not function. This
should not be an issue when upgrading an existing device, but, for a new device, PKI
must be configured before RADIUS EAP-TLS and PEAP can be used.
Commands for Monitoring the State of PKI on the DeviceThere are a number of show commands, listed below. For more details of these
commands, and their output, please see the Command Reference for your product.
show crypto key hostkey [dsa|rsa|rsa1]
show crypto key mypubkey rsa [<keylabel>]
show crypto key pubkey-chain knownhosts [<1-65535>]
show crypto key pubkey-chain knownhosts [vrf <vrf-name>|global] [<1-65535>]
show crypto key pubkey-chain userkey <username> [<1-65535>]
show crypto key userkey <username> [dsa|rsa|rsa1]
show crypto pki certificates [<trustpoint>]
crypto pki enrollment user <username>
show crypto pki trustpoint [<trustpoint>]
show crypto pki trustpoints
Page 24 | Automatic creation of the “local” trustpoint by RADIUS

Public Key Infrastructure (PKI)
Using PKI for Secure Communications
The previous sections have described how to set up trustpoints.
Having set up a trustpoint, how do you make use of the certificates and keys that have
been created? The following sections illustrate some examples of how to make use of a
trustpoint once it has been created.
RADIUS over TLS (RadSec)
RadSec is an extension to the RADIUS authentication protocol that uses TLS as the
transport protocol. It provides improved security over the standard RADIUS protocol by:
ensuring that protocol messages are encrypted, preventing external entities from
snooping usernames and passwords
using X.509 certificate chains for identity validation and encrypted key exchange
AlliedWare Plus uses a RadSecProxy to act as an intermediary between local
applications that use standard RADIUS UDP datagrams and external entities that use
RadSec. RadSecProxy converts UDP datagrams into messages carried over TLS, and
vice versa.
The TLS connection supports secure renegotiation, and if the connection is broken
unintentionally then it recovers automatically after restoration of the connection.
RadSecProxy works for both the client and server sides of the RADIUS exchange.
Secure User Authentication with Remote RADIUS Server
On the client side, the switch should be configured to communicate by using a client
proxy instance. The client RadSecProxy application is called the RadSecProxy AAA
application, because it enables the use of RadSec for local authentication, authorization,
and accounting operations using a remote RadSec server.
The steps for creating a client-side RadSecProxy (AAA) instance within the AlliedWare
Plus device are given below. The device will use RadSec to authenticate local login
sessions with remote RADIUS.
RADIUS over TLS (RadSec) | Page 25

Public Key Infrastructure (PKI)
Prerequisites:
A trustpoint (named “christchurch” in this example), authenticated to an external self-
signed CA, is present on the system
The device has been enrolled to the trustpoint
An IPv4 interface or an IPv4 interface with DNS has been configured on the system
The user names and passwords for remote users exist on the remote RADIUS Server
The RadSec Server running on the remote machine is using version 1.6.7 or higher
The configuration file for the RadSec Server running on the remote machine has been
changed to ensure that it acts as a:
Client for receiving TLS connection/data on Port 2083
Client to receive replies from FreeRADIUS on Port 11812
Server to pass on RADIUS requests to FreeRADIUS Server on Port 1812
Result:
A RadSecProxy process that communicates to a remote RadSec Server called
radsecserver.local. The steps in this process are described below.
Step 1. enable
configure terminal
These are the commands to enter configuration mode after logging in. PKI commands
require maximum user privileges to execute.
Step 2. radius-secure-proxy aaa
This command enters the configuration mode for the RadSecProxy AAA application.
Step 3. server radsecserver.local (or IP Address of Remote RADIUS Server)
This command adds a RadSec server with the domain name “radsecserver.local” to the
RadSecProxy AAA application. Note that this name must be resolvable to an IPv4 address
by DNS, or connection attempts to the server will fail. (The system will repeatedly attempt
to reconnect to the server, so configuring an unresolvable address will result in
unnecessary CPU usage.) The domain name must match the name provided in the
server’s X.509 certificate, or the connection will fail. You can configure this server to
bypass this check by adding the parameters name-check off to this command.
Step 4. server trustpoint christchurch
This command specifies that the trustpoint “christchurch” should be used for the
RadSecProxy AAA application. To use multiple trustpoints, you can specify more than one
trustpoint in the command, or execute the command multiple times.
Step 5. exit
This command exits RadSecProxy AAA configuration mode.
Page 26 | RADIUS over TLS (RadSec)
Public Key Infrastructure (PKI)
Step 6. aaa authentication login default group radius local
This command configures user login authentication to use the predefined group "radius"
(representing all configured RADIUS servers, including RadSec servers), falling back to
the local user database if no servers could be contacted. Once this command is
executed, subsequent login sessions will be authenticated using RadSec.
Step 7. exit
This command exits configuration mode.
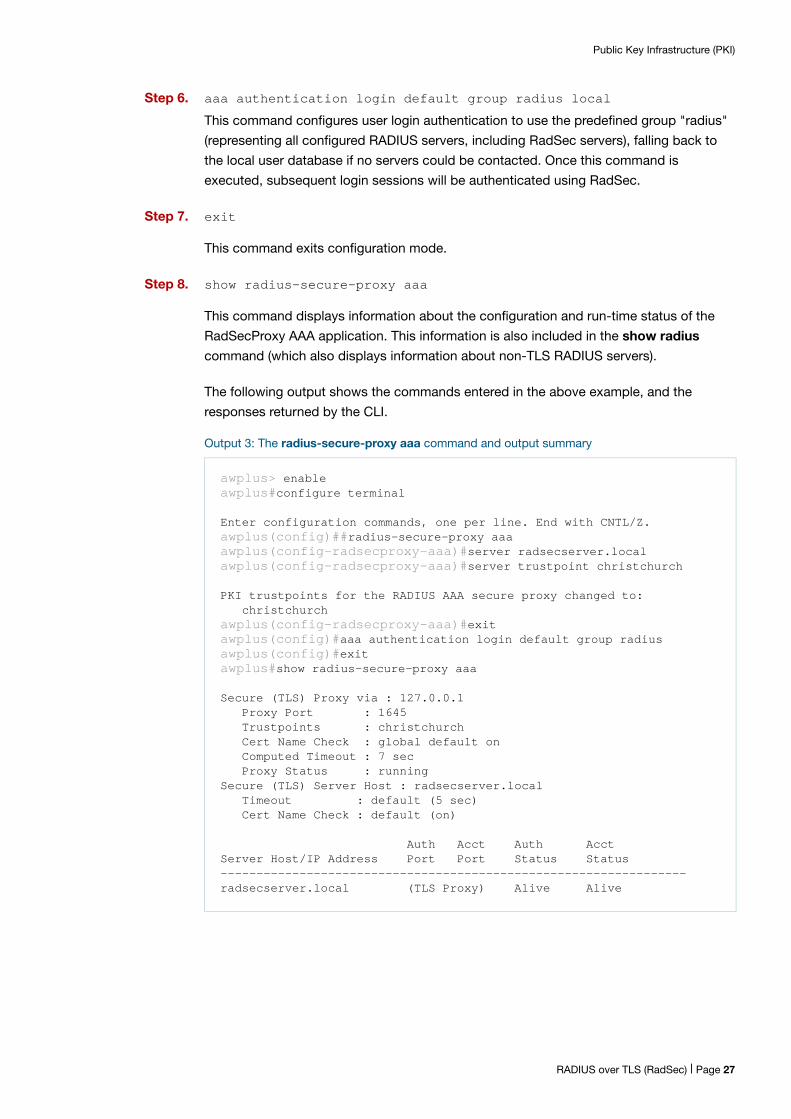
Step 8. show radius-secure-proxy aaa
This command displays information about the configuration and run-time status of the
RadSecProxy AAA application. This information is also included in the show radius
command (which also displays information about non-TLS RADIUS servers).
The following output shows the commands entered in the above example, and the
responses returned by the CLI.
Output 3: The radius-secure-proxy aaa command and output summary
awplus> enableawplus#configure terminal
Enter configuration commands, one per line. End with CNTL/Z.awplus(config)##radius-secure-proxy aaaawplus(config-radsecproxy-aaa)#server radsecserver.localawplus(config-radsecproxy-aaa)#server trustpoint christchurch
PKI trustpoints for the RADIUS AAA secure proxy changed to: christchurchawplus(config-radsecproxy-aaa)#exitawplus(config)#aaa authentication login default group radiusawplus(config)#exitawplus#show radius-secure-proxy aaa
Secure (TLS) Proxy via : 127.0.0.1 Proxy Port : 1645 Trustpoints : christchurch Cert Name Check : global default on Computed Timeout : 7 sec Proxy Status : runningSecure (TLS) Server Host : radsecserver.local Timeout : default (5 sec) Cert Name Check : default (on)
Auth Acct Auth AcctServer Host/IP Address Port Port Status Status-----------------------------------------------------------------radsecserver.local (TLS Proxy) Alive Alive
RADIUS over TLS (RadSec) | Page 27

Public Key Infrastructure (PKI)
Validating the RadSec Proxy
Use the following command to verify the configuration and status of the RadSecProxy:
show radius-secure-proxy aaa
Enrol local RADIUS users against a local self-signed CA
When using a local self-signed CA, certificate-based RADIUS clients (supplicants) require
certificates that have been signed by the local CA. The process of generating a private key
for the client and creating a certificate associated with it can all be done on the AlliedWare
Plus device, on behalf of the client. This process is called “enrolling” the RADIUS user.
The local system does not enroll RADIUS users for external CAs, because the CA itself
must perform that task. It is technically feasible to generate private keys and certificate
signing requests on behalf of a RADIUS user, to be transmitted to the external CA, but the
local system would really only be operating as a middleman. It is a more direct procedure
if the supplicant devices generate keys and CSRs on their own and communicate directly
with the external CA.
Prerequisites: A local self-signed trustpoint (named raleigh in this example).
Output: PKCS#12 files containing private keys and public certificates for all RADIUS
users defined on the system.
The steps and commands used in this process are described below.
Step 1. enableconfig terminal
These are the standard commands to enter configuration mode after logging in. PKI
commands require maximum user privileges to execute.
Step 2. radius-server localserver enable
awplus#show radius-secure-proxy aaa
Secure (TLS) Proxy via : 127.0.0.1 Proxy Port : 1645 Trustpoints : christchurch Cert Name Check : global default on Computed Timeout : 7 sec Proxy Status : runningSecure (TLS) Server Host : 192.168.1.2 Timeout : default (5 sec) Cert Name Check : off
Auth Acct Server Host/IP Address Server Type Status Status ---------------------------------------------------------------------192.168.1.2 (TLS Proxy) Alive Alive
Page 28 | Enrol local RADIUS users against a local self-signed CA

Public Key Infrastructure (PKI)
These are the commands to enter RADIUS server configuration mode and enable the
RADIUS server daemon.
Step 3. no server trustpoint local
By default, the RADIUS server is associated with trustpoint named “local”, meaning that it
will use the CA and server certificates from “local” for TLS authentication. Using the no
server trustpoint command removes the association from “local”.
Step 4. server trustpoint raleigh
This command declares that the local RADIUS server should use the trustpoint “raleigh”
for CA and server certificates. It is possible to specify multiple trustpoints for use with the
RADIUS server. RADIUS will use the first trustpoint’s CA and server certificates when
asserting its identity to the peer device in a TLS connection, but will use certificates from
all specified trustpoints to verify connections received from peers.
In typical usage, both the local RADIUS server and the peer devices use the same root
certificate, so only one trustpoint is needed. However, it is possible for the local server’s
certificate to be signed by one CA and the peer device’s certificate to be signed by a
different CA. If that is the case, you should configure the server to use two trustpoints.
Configure the one containing the local server’s certificate first.
Step 5. user raduser1 password mypassword1user raduser2 password mypassword2exit
These are the commands to declare RADIUS users and specify their passwords, and to
exit RADIUS server configuration mode.
Step 6. crypto pki enroll raleigh local-radius-all-users
This command creates private keys and certificates for RADIUS clients. These certificates
are not used directly on the local system; rather, they are intended to be exported to client
devices (e.g. port authentication supplicants or wireless clients). Such devices will send
the certificates as part of TLS connection establishment, where the local system can
validate them by checking if they were signed by the local trustpoint’s CA.
This command packages the keys and certificates into PKCS#12 files for export. Within
the files, the private keys are encrypted, with a passphrase that the system prompts you
to enter at the command-line. This passphrase is intended to be used when unpacking
the files on the client device. The passphrase is not stored anywhere; if it is lost, you need
to re-enroll the user.
Individual users may be specified instead of “local-radius-all-users”, for example: crypto
pki enroll raleigh user raduser1
Enrol local RADIUS users against a local self-signed CA | Page 29

Public Key Infrastructure (PKI)
Step 7. crypto pki export raleigh pkcs12 raduser1 tftp://wd1/r1.pk12crypto pki export raleigh pkcs12 raduser2 tftp://wd2/r2.pk12
This command exports PKCS#12 file that were generated from the RADIUS user
enrollment in the previous step. It copies the file corresponding to the given user to the
specified URL. (Note that if the user happens to be named “ca” or “server”, you must
enter the user name as “user:ca” or “user:server”, respectively.)
The following figure shows the commands entered in the above example, and the
responses returned by the CLI.
Figure 12: Enrolling local RADUIS users against a local self-signed CA
awplus>enableawplus#config terminalEnter configuration commands, one per line. End with CNTL/Z.awplus(config)#radius-server localawplus(config-radsrv)#server enableawplus(config-radsrv)#no server trustpoint local% Current trustpoints for the local RADIUS server:% (None)awplus(config-radsrv)#server trustpoint raleigh% Current trustpoints for the local RADIUS server:% raleighawplus(config-radsrv)#user raduser1 password mypassword1awplus(config-radsrv)#user raduser2 password mypassword2awplus(config-radsrv)#exitawplus(config)#crypto pki enroll raleigh local-radius-all-users% Enter an export passphrase, or "abort" to cancel.*****% Enter the export passphrase again.*****% Generating a user private key for "raduser1"...% Successfully enrolled user "raduser1".% Generating a user private key for "raduser2"...% Successfully enrolled user "raduser2".% The PKCS#12 files are ready to export.awplus(config)#awplus(config)#crypto pki export raleigh raduser1 tftp://wd1/r1.pk12% Exporting...% Successfully exported the file.awplus(config)#crypto pki export raleigh raduser2 tftp://wd2/r2.pk12% Exporting...% Successfully exported the file.
Page 30 | Enrol local RADIUS users against a local self-signed CA

Public Key Infrastructure (PKI)
Syslog over TLS
Syslog over TLS uses certificates for establishing connections. Both the AlliedWare Plus
device (the syslog client) and the Syslog server need certificates that are signed by the
same CA.
The steps that need to be performed on the AlliedWare Plus device are:
Step 1. Create a trustpoint.
Step 2. Authenticate it to the external CA
Step 3. Create the Certificate Signing Request (CSR).
Step 4. Export the CSR to the CA
Step 5. Import the signed certificate back from the CA
Step 6. Configure the Syslog process on the device to make a secure connection, using this trustpoint.
Steps 1 - 5 are described above, in the section "Creating a trustpoint based on an
external Certificate Authority" on page 17.
The commands to perform step 6 are as follows:
Tell the syslog process to use the trustpoint you have created:
awplus(config)#log trustpoint myLoggingTrustpoint
Configure the device to send encrypted log messages to a remote Syslog Server using
TLS
awplus(config)#log host <syslog-server-IP-address> secure
Set the logging severity level (for example, critical, debugging, etc.) for the log
messages. This determines the type of messages that will be sent to the remote Syslog
Server
awplus(config)#log host <syslog-server-IP-address> level debuggingawplus(config)#exit
Syslog over TLS | Page 31

Public Key Infrastructure (PKI)
Securing a Web-authentication ConnectionWeb-authentication, also known as Captive Portal, is a simple way to provide secure
guest-user access to a network. It is used in a wide range of environments including Wi Fi
hot spots, hotels, universities, and business centers.
In basic terms, if the web-authenticating switch detects unauthorized users web
browsing, then it re-directs them to a web-authentication login page. At this point, they
are required to enter a username and password before they can begin to web browse. The
web-authenticating switch then interacts with a RADIUS server.
The web-authentication service can be configured to use a non-secure HTTP or secure
HTTPS connection. Secure HTTPS connections can either use locally created self-signed
certificates or externally created certificates.
Previously, when using external certificates, users were required to prepare a file
(consisting of a server certificate and a private key) and import it to their AlliedWare Plus
switch. However, the new PKI infrastructure allows seamless use of server certificates
(signed by the external CA certificate) without preparing and importing files consisting of a
server certificate and private key.
Main components of a secure web-authentication connection
The following components are required for setting up a secure HTTPS connection
between a web-authentication server (AlliedWare Plus switch) and a web-authentication
client:
1. Web-authentication server: an AlliedWare Plus switch with software version 5.4.7 or later.
2. Web-authentication client: a remote device with a web browser installed, e.g. Google Chrome or Firefox.
3. To use an external CA: An external CA certificate and a web-authentication server certificate created on an AlliedWare Plus switch and signed by an external CA for installation on the AlliedWare Plus switch and remote Linux box.
4. To use a local self-signed CA: A local self-signed CA certificate and web-authentication server certificate, created on an AlliedWare Plus switch for installation on the web-authentication client.
Page 32 | Main components of a secure web-authentication connection

Public Key Infrastructure (PKI)
Setup
An AlliedWare Plus switch (web-authentication server) connected to a web-authentication
client.
Figure 13: Simple web-authentication setup
Port numbers used for secure and non-secure connections
The AlliedWare Plus switch is connected to the web-authentication client via port 443
(secure) and port 80 (non-secure).
Figure 14: Port numbers used for secure and non-secure connections
Web-authentication Server
Web-authenticationClient
Web-authentication Server
Web-authenticationClient
443(Secure)
Web-authenticationServer
Web-authentication Client
80(Non-Secure)
Main components of a secure web-authentication connection | Page 33
Public Key Infrastructure (PKI)
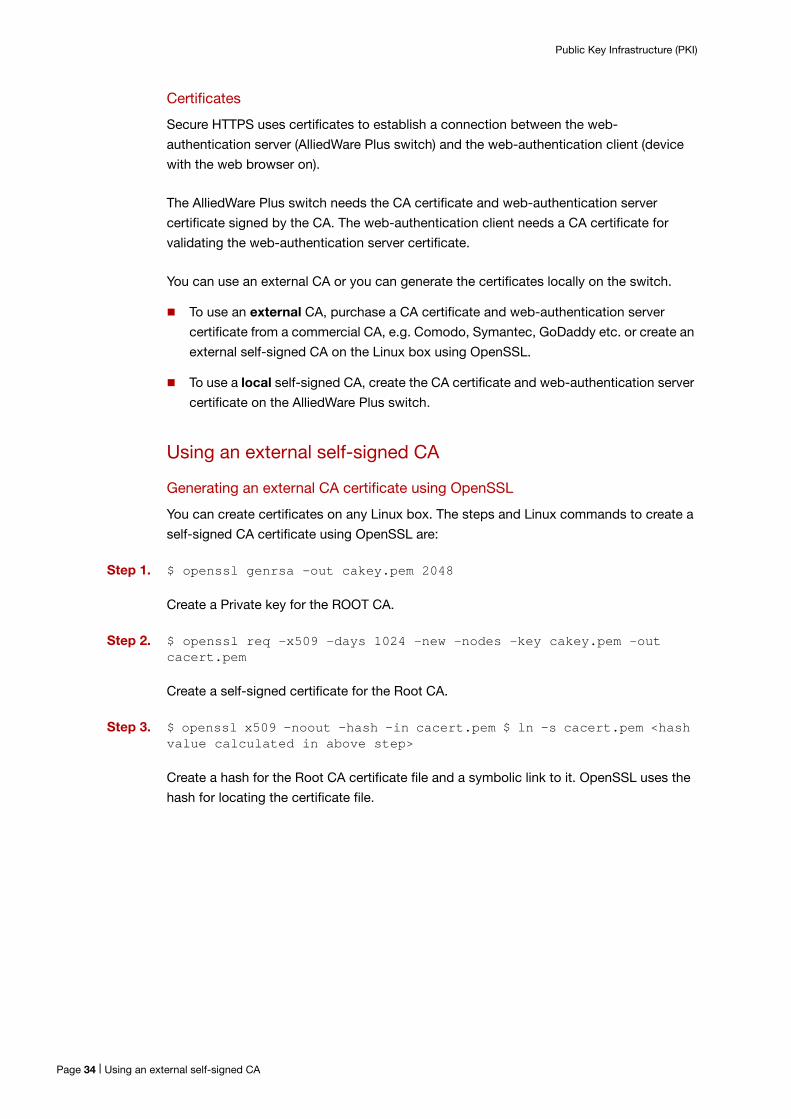
Certificates
Secure HTTPS uses certificates to establish a connection between the web-
authentication server (AlliedWare Plus switch) and the web-authentication client (device
with the web browser on).
The AlliedWare Plus switch needs the CA certificate and web-authentication server
certificate signed by the CA. The web-authentication client needs a CA certificate for
validating the web-authentication server certificate.
You can use an external CA or you can generate the certificates locally on the switch.
To use an external CA, purchase a CA certificate and web-authentication server
certificate from a commercial CA, e.g. Comodo, Symantec, GoDaddy etc. or create an
external self-signed CA on the Linux box using OpenSSL.
To use a local self-signed CA, create the CA certificate and web-authentication server
certificate on the AlliedWare Plus switch.
Using an external self-signed CA
Generating an external CA certificate using OpenSSL
You can create certificates on any Linux box. The steps and Linux commands to create a
self-signed CA certificate using OpenSSL are:
Step 1. $ openssl genrsa -out cakey.pem 2048
Create a Private key for the ROOT CA.
Step 2. $ openssl req -x509 -days 1024 -new -nodes -key cakey.pem -out cacert.pem
Create a self-signed certificate for the Root CA.
Step 3. $ openssl x509 -noout -hash -in cacert.pem $ ln -s cacert.pem <hash value calculated in above step>
Create a hash for the Root CA certificate file and a symbolic link to it. OpenSSL uses the
hash for locating the certificate file.
Page 34 | Using an external self-signed CA

Public Key Infrastructure (PKI)
Generating and installing the external web-authentication server certificate
Perform the following steps on the AlliedWare Plus switch:
1. Create a trustpoint e.g. externalauthweb
2. Authenticate it to the external CA.
3. Create the Certificate Signing Request (CSR).
4. Create the web-authentication server certificate (signed by the CA) on the client using CSR.
5. Import the web-authentication server certificate on the AlliedWare Plus switch.
The steps and commands used in this process are described below.
Step 1. awplus(config)#crypto pki trustpoint externalauthweb
awplus(ca-trustpoint)#enrollment terminal
awplus(ca-trustpoint)#end
Create a Trustpoint for use with the external CA and name it externalauthweb
Step 2. awplus#crypto pki authenticate externalauthweb
Paste the contents of cacert.pem into the command line when prompted to do so. This is
the PEM file that you generated earlier on the Linux box.
Step 3. awplus#crypto pki enroll externalauthweb
Create a Certificate Signing Request (CSR) for the web-authentication server on the
AlliedWare Plus switch. It will be displayed in the terminal in PEM format.
Step 4. On the Linux box, save/copy the CSR in a file, i.e. x930.csr. Create a client certificate for
the AlliedWare Plus switch by executing the following command on the Linux box:
$ openssl x509 -req -days 1024 -in x930.csr -CA cacert.pem -CAkey cakey.pem -CAcreateserial -out toe.pem
Print the contents of the web-authentication server certificate by executing the cat
toe.pem command.
Step 5. awplus#crypto pki import externalauthweb pem
Import the web-authentication server certificate onto the AlliedWare Plus switch, i.e. paste
the contents of toe.pem into the command line when prompted to do so.
Using an external self-signed CA | Page 35

Public Key Infrastructure (PKI)
Installing the CA certificate on the client
To trigger the authentication attempt, clients use a web browser. Secure web browser
connections require a signed CA certificate to validate the server certificate sent to them
by the web-authentication server.
Obtain the CA certificate (cacert.pem) from the relevant systems administrator and copy it
onto your client. Then import it into your web browser. The procedure below provides
instructions for importing the signed CA certificate into Google Chrome or Firefox (please
consult the official documentation for other web browsers).
For Google Chrome
1. Go to Tools > Extensions
2. Click Settings and then Show Advanced Settings
3. Click Manage Certificates under HTTPS/SSL
4. Click Authorities in the Certificates Manager window
5. Click Import and select the file containing the CA certificate
For Firefox 1. Go to Edit > Preferences > Advanced > Certificates
2. Click View Certificates
3. Click Import and select the file containing the CA certificate
Configuring the web-authentication server on the AlliedWare Plus switch to use the external CA
To configure the web-authentication server on the switch to use the external CA authority,
use the following command:
awplus(config)#auth-web-server trustpoint externalauthweb
The following figure shows the output for the command show running-config using the
external CA.
Page 36 | Using an external self-signed CA

Public Key Infrastructure (PKI)
Figure 15: Output for the command show running-config using the external CA
awplus#show running-config !service password-encryption!hostname awplus!no banner motd!username manager privilege 15 password 8 $1$bJoVec4D$JwOJGPr7YqoExA0GVasdE0!no service ssh!platform hwfilter-size ipv4-limited-ipv6!service telnet!no service httphttp trustpoint appweb externalauthweb!no clock timezone!snmp-server!crypto pki trustpoint externalauthweb enrollment terminal subject /CN=192.168.1.12!radius-server host 127.0.0.1 key test!aaa authentication enable default localaaa authentication login default localaaa authentication auth-web default group radius !radius-server local server enable nas 127.0.0.1 key test group admin attribute Service-Type Administrative-User user manager encrypted password b4XLHHgxqoyrLchXkAs6+vna5HFN1ybm8eGSb1NKiYk= user pen encrypted password qMiD6Gy9u6WqRia6/nuMWfbCBRxPoui/z1/Wuk6jqhE= user test encrypted password UukoSyvxY2v9iWXm8e/JMDJd9iIc3RPyY09lGOb3pA4= group admin!stack virtual-chassis-id 3952
[continued on next page...]
Using an external self-signed CA | Page 37

Public Key Infrastructure (PKI)
stack virtual-chassis-id 3952!ip domain-lookup!!!no service dhcp-server!!!no ip multicast-routing!spanning-tree mode rstp!service power-inlineauth-web-server ipaddress 192.168.1.12auth-web-server ssl hybridauth-web-server trustpoint externalauthweblacp global-passive-mode enableno spanning-tree rstp enable!switch 1 provision x510-28!access-list hardware acl_webauth send-to-cpu ip any 192.168.1.12/24!interface port1.0.1-1.0.2 switchport switchport mode access!interface port1.0.3 switchport switchport mode access access-group acl_webauth auth-web enable!interface port1.0.4-1.0.26 switchport switchport mode access!interface vlan1 ip address 192.168.1.12/24!line con 0 exec-timeout 0 0line vty 0 4 exec-timeout 0 0!end
Page 38 | Using an external self-signed CA

Public Key Infrastructure (PKI)
Using a local self-signed CA
It is possible to create local self-signed CA and web-authentication server certificates on
AlliedWare Plus products. The procedure and commands for creating a local self-signed
CA certificate and a web-authentication server certificate is given below:
Step 1. Create the RSA key pair for use with the web-authentication server certificate
Step 2. Create a trustpoint to use a local self-signed CA
Step 3. Create a local self-signed Root CA certificate
Step 4. Create a web-authentication server certificate using the RSA keypair specified in the trustpoint parameters
Exporting a local self-signed CA certificate to the web-authentication client
The web-authentication client requires the CA certificate for validating the web-
authentication server certificate. The contents of the local self-signed CA certificate can
be printed by executing the following command:
awplus#crypto pki export localauthweb pem
These contents should be copied in a file e.g. cacert.pem and imported into the web-
authentication client, i.e. Google Chrome, using the procedure detailed in "Installing the
CA certificate on the client" on page 36.
awplus> enableawplus#crypto key generate rsa label local-authweb-server-key 2048Generating 2048-bit key...Created the key "local-authweb-server-key".
awplus#configure terminalEnter configuration commands, one per line. End with CNTL/Z.awplus(config)#crypto pki trustpoint localauthwebCreated trustpoint "localauthweb".awplus(ca-trustpoint)#enrollment selfsignedawplus(ca-trustpoint)#rsakeypair local-authweb-server-keyawplus(ca-trustpoint)#subject "/CN=192.168.1.12"awplus(ca-trustpoint)#exitawplus(config)#exit
awplus#crypto pki authenticate localauthwebGenerating 2048-bit key for root certificate...Successfully authenticated trustpoint "localauthweb".
awplus#crypto pki enroll localauthwebUsing private key "localauthweb"...Successfully enrolled the local server.
Using a local self-signed CA | Page 39

Public Key Infrastructure (PKI)
Configuring the web-authentication server on an AlliedWare Plus switch to use the local self-signed CA
To commands to configure the AlliedWare Plus switch to use the local self-signed CA, i.e
trustpoint localauthweb for the web-authentication server are:
awplus(config)#no auth-web-server trustpoint externalauthweb
awplus(config)#auth-web-server trustpoint localauthweb
Figure 16: The show output for using the local self-signed CA
awplus#show running-config !service password-encryption!hostname awplus!no banner motd!username manager privilege 15 password 8 $1$bJoVec4D$JwOJGPr7YqoExA0GVasdE0!no service ssh!platform hwfilter-size ipv4-limited-ipv6!service telnet!no service httphttp trustpoint appweb localauthweb!no clock timezone!snmp-server!crypto pki trustpoint localauthweb enrollment terminal subject /CN=192.168.1.12!radius-server host 127.0.0.1 key test!!aaa authentication enable default localaaa authentication login default localaaa authentication auth-web default group radius !radius-server local server enable nas 127.0.0.1 key test group admin attribute Service-Type Administrative-User user manager encrypted password b4XLHHgxqoyrLchXkAs6+vna5HFN1ybm8eGSb1NKiYk= user pen encrypted password qMiD6Gy9u6WqRia6/nuMWfbCBRxPoui/z1/Wuk6jqhE= user test encrypted password UukoSyvxY2v9iWXm8e/JMDJd9iIc3RPyY09lGOb3pA4= group admin
![continued on next page...]
Page 40 | Using a local self-signed CA
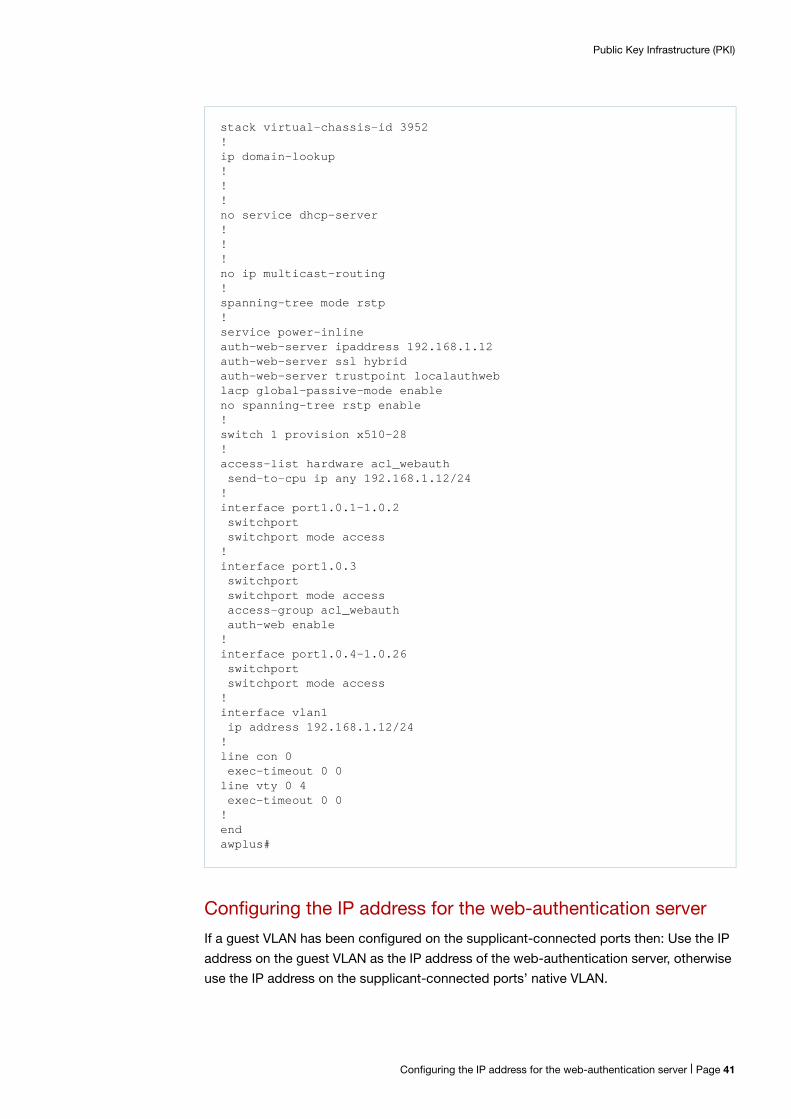
Public Key Infrastructure (PKI)
Configuring the IP address for the web-authentication server
If a guest VLAN has been configured on the supplicant-connected ports then: Use the IP
address on the guest VLAN as the IP address of the web-authentication server, otherwise
use the IP address on the supplicant-connected ports’ native VLAN.
stack virtual-chassis-id 3952!ip domain-lookup!!!no service dhcp-server!!!no ip multicast-routing!spanning-tree mode rstp!service power-inlineauth-web-server ipaddress 192.168.1.12auth-web-server ssl hybridauth-web-server trustpoint localauthweblacp global-passive-mode enableno spanning-tree rstp enable!switch 1 provision x510-28!access-list hardware acl_webauth send-to-cpu ip any 192.168.1.12/24!interface port1.0.1-1.0.2 switchport switchport mode access!interface port1.0.3 switchport switchport mode access access-group acl_webauth auth-web enable!interface port1.0.4-1.0.26 switchport switchport mode access!interface vlan1 ip address 192.168.1.12/24!line con 0 exec-timeout 0 0line vty 0 4 exec-timeout 0 0!endawplus#
Configuring the IP address for the web-authentication server | Page 41
Public Key Infrastructure (PKI)
Troubleshooting
Here are some common issues - and suggested solutions:
The CA certificate has not been imported into the web browser for validation of the
web-authentication server certificate.
The Common Name in the certificate has not been configured correctly.
The Fire Fox web browser sends multiple “Close Notify” alerts to the web-
authentication server before the end of a normal TLS session. Use Google Chrome to
avoid multiple “Close Notify” alerts.
Using the AR-Series Firewall GUI to securely manage the firewallThe Firewall GUI allows you to configure entities (zones, networks and hosts) and then
create firewall, NAT, and traffic-control rules for managing traffic between these entities.
You can also configure and customize advanced firewall features like Application control
and web control, as well as threat management features such as Intrusion Prevention,
Malware protection, and Antivirus, for a comprehensive security solution.
Accessing and installing the latest GUI file
This section describes how to access the firewall GUI, to manage and monitor your
AR-Series firewall.
The GUI provides setup of the firewall, enabling the configuration of entities (Zones,
Networks and Hosts) and then creating firewall and NAT rules for traffic between these
entities. Advanced firewall features can be enabled, configured and customized for a
comprehensive security solution, such as Application control and Web control, as well as
threat management features such as Intrusion Prevention, Malware protection, and
Antivirus. Various other features can be managed through the GUI, and the dashboard
provides at-a-glance monitoring of traffic, application use, and threat protection statistics.
If your AR-Series firewall came with the GUI pre-installed, perform the following steps to
browse to the GUI:
Step 1. Connect to any of the LAN switch ports
Step 2. Open a web browser and browse to https://192.168.1.1.
This is the pre-configured IP address of VLAN1. The default username is manager and the default password is friend.
If your AR-Series firewall did not come with the GUI pre-installed, perform the following
steps through the command-line interface:
Page 42 | Troubleshooting

Public Key Infrastructure (PKI)
Step 1. Create one or more IP interfaces and assign them IP addresses, including configuring WAN connectivity.
For information about configuring PPP, see the PPP Feature Overview and Configuration Guide. For information about configuring IP, see the IP Feature Overview and Configuration Guide.
Step 2. If you plan to enable the firewall functionality, first create a firewall rule to allow traffic from the Update Manager to pass through the firewall.
This is needed because AR-Series firewalls block all traffic by default. The following figure shows a recommended example configuration, when WAN connectivity is through ppp0:
Step 3. Use the following command to download and install the GUI:
awplus#update webgui now
Step 4. Enable the HTTP service:
awplus#configure terminal
awplus(config)#service http
Step 5. Log into the GUI.
Start a browser and browse to the firewall IP address, using HTTPS. You can access the GUI via any reachable IP address on any interface.
The GUI starts up and displays a login screen. Log in with your username and password.
For more information about using the GUI, see Getting Started with the UTM Firewall GUI.
zone public network wan ip subnet 0.0.0.0/0 interface ppp0 host ppp0 ip address dynamic interface ppp0
firewall rule 10 permit dns from public.wan.ppp0 to public.wan rule 20 permit https from public.wan.ppp0 to public.wan protect
Accessing and installing the latest GUI file | Page 43

Public Key Infrastructure (PKI)
Setting the Firewall GUI to use a local or external CA
Step 1. Create the CA and Firewall certificates as described in:
"Generating and installing the external web-authentication server certificate" on page 35
"Creating a trustpoint based on a local self-signed certificate" on page 15
Step 2. Enable the web GUI on the Firewall using the following commands:
Setting the Firewall GUI to use local self-signed CAs
Step 1. Configure the Firewall GUI to use local self-signed CA using the following commands:
Step 2. Confirm that the Firewall GUI works with the local self-signed CA.
Check for errors by typing the IP address of the Firewall in the web browser and then by configuring the Firewall security features e.g. IPS, Web Control etc. from the GUI.
Setting the Firewall GUI to use external self-signed CAs
Step 1. Configure the Firewall GUI to use external self-signed CAs using the following commands:
Step 2. Confirm that the Firewall GUI works with the external self-signed CA.
Check for errors by typing the IP address of Firewall in the web browser and then by configuring the UTM Firewall Security Features e.g. IPS, Web Control etc. from the GUI.
awplus#configure terminal Enter configuration commands, one per line. End with CNTL/Z.awplus(config)#service http
awplus#configure terminal Enter configuration commands, one per line. End with CNTL/Z.awplus(config)#http trustpoint localappweb
awplus#configure terminal Enter configuration commands, one per line. End with CNTL/Z.awplus(config)#http trustpoint externalappweb
Page 44 | Setting the Firewall GUI to use a local or external CA

Public Key Infrastructure (PKI)
Configuring the OCSP ResponderThis section describes how to configure the OCSP Responder for verification of the CA,
client, and Server certificates.
Introduction
An OCSP Responder is used for real-time verification of certificates. The OCSP client
(AlliedWare Plus switch) sends a request to the OCSP Responder (a server typically run by
the certificate issuer) for verification of a certificate's status. The OCSP Responder checks
the request to ensure that it contains all the information required for the processing of the
request. If the request meets all the criteria then the Responder checks its list of revoked
certificates and sends back a reply to the client.
The OpenSSL OCSP tool can be used for setting up the OCSP Responder.
Building blocks
The following components are required to set up an OCSP Responder:
CA, Responder, and client certificates for installation on the AlliedWare Plus switch
A remote Linux box with OpenSSL installed on it
An AlliedWare Plus switch running software release 5.4.6-1 or above
Setup
The setup consists of an AlliedWare Plus switch (for example an x930 switch) connected
to an OCSP Responder running on a Linux Box.
OCSP Responderon LINUX Box
Connected via a mutually agreed port number
x930
Introduction | Page 45

Public Key Infrastructure (PKI)
Creating the CA, Server, and client certificates
First, make changes to the OpenSSL configuration file: In the openssl.cnf file, add a new line to the [ usr_cert ] stanza and also create a
new stanza [ v3_OCSP ]as shown below:
Create the CA, Server, and client certificates - as described in "Using an external
self-signed CA" on page 34.
Generating the OCSP certificate
On the Linux box, generate a private key and OCSP signing certificate for the OCSP
Responder with the OSCP signing attributes:
Step 1. Create a root private key
$ openssl genrsa -out oc.key 2048
Step 2. Create a CSR
$ openssl req -new -nodes -key oc.key -out oc.csr
Step 3. Create a configuration file, i.e ‘oc.cnf’ with the following elements:
authorityInfoAccess = OCSP;URI:http://192.168.1.2:8888
basicConstraints = CA:FALSE
extendedKeyUsage = OCSPSigning
Step 4. Create a certificate for the OCSP Responder which is signed by the CA
$ openssl x509 -req -days 1024 -in oc.csr -CA cacert.pem -CAkey cakey.pem -CAcreateserial -extfile oc.cnf -out oc.pem
[ usr_cert ]authorityInfoAccess = OCSP;URI:http://<IP Address of OCSP Responder>:Port Number
[ v3_OCSP ]basicConstraints = CA:FALSEkeyUsage = nonRepudiation, digitalSignature, keyEnciphermentextendedKeyUsage = OCSPSigning
Page 46 | Creating the CA, Server, and client certificates
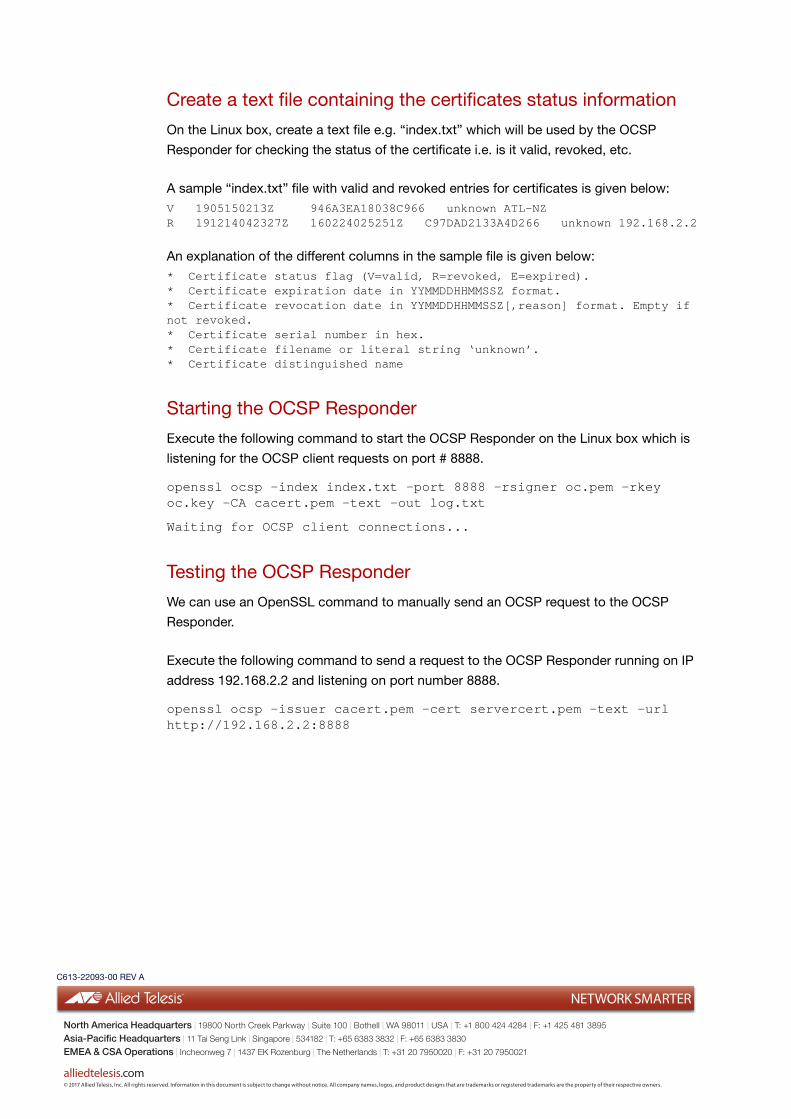
Create a text file containing the certificates status information
On the Linux box, create a text file e.g. “index.txt” which will be used by the OCSP
Responder for checking the status of the certificate i.e. is it valid, revoked, etc.
A sample “index.txt” file with valid and revoked entries for certificates is given below:V 1905150213Z 946A3EA18038C966 unknown ATL-NZR 191214042327Z 160224025251Z C97DAD2133A4D266 unknown 192.168.2.2
An explanation of the different columns in the sample file is given below:* Certificate status flag (V=valid, R=revoked, E=expired).* Certificate expiration date in YYMMDDHHMMSSZ format.* Certificate revocation date in YYMMDDHHMMSSZ[,reason] format. Empty if not revoked.* Certificate serial number in hex.* Certificate filename or literal string ‘unknown’.* Certificate distinguished name
Starting the OCSP Responder
Execute the following command to start the OCSP Responder on the Linux box which is
listening for the OCSP client requests on port # 8888.
openssl ocsp -index index.txt -port 8888 -rsigner oc.pem -rkey oc.key -CA cacert.pem -text -out log.txt
Waiting for OCSP client connections...
Testing the OCSP Responder
We can use an OpenSSL command to manually send an OCSP request to the OCSP
Responder.
Execute the following command to send a request to the OCSP Responder running on IP
address 192.168.2.2 and listening on port number 8888.
openssl ocsp -issuer cacert.pem -cert servercert.pem -text -url http://192.168.2.2:8888
C613-22093-00 REV A
NETWORK SMARTER
alliedtelesis.com
North America Headquarters | 19800 North Creek Parkway | Suite 100 | Bothell | WA 98011 | USA | T: +1 800 424 4284 | F: +1 425 481 3895
Asia-Pacific Headquarters | 11 Tai Seng Link | Singapore | 534182 | T: +65 6383 3832 | F: +65 6383 3830
EMEA & CSA Operations | Incheonweg 7 | 1437 EK Rozenburg | The Netherlands | T: +31 20 7950020 | F: +31 20 7950021
© 2017 Allied Telesis, Inc. All rights reserved. Information in this document is subject to change without notice. All company names, logos, and product designs that are trademarks or registered trademarks are the property of their respective owners.


![[Confidence] Fuzz your way into web server's zoo](https://img.pdfslide.us/doc/110x75/55c5dcc4bb61ebc93b8b4668/confidence-fuzz-your-way-into-web-servers-zoo.jpg)