Embed Size (px)
Citation preview
Push-to-talk Android User Guide (v8.0)
PTT Android User Guide
2
PTT 8.0 Android - Table of Contents
1 Activating PTT on your Android device ............................................................................... 4
How to activate PTT on your Android Smartphone ........................................... 4
How to activate PTT on your Android Tablet .................................................... 4
How to Logout and Login to the PTT Service ................................................... 4
2 Getting to know the PTT Home Screen ............................................................................... 5
3 PTT Contacts ...................................................................................................................... 6
Corporate Only & Public-Corporate Subscribers .............................................. 6
How to Add a PTT Contact .............................................................................. 7
How to Add a PTT Contact from the PTT Home screen ................................... 8
How to Delete a PTT Contact .......................................................................... 8
How to Add Avatars to PTT Contacts ............................................................... 8
4 PTT Groups ........................................................................................................................ 9
PTT Group Options .......................................................................................... 9
How to Add a PTT Group ................................................................................. 9
How to Delete a PTT Group ............................................................................. 9
Talkgroup Scanning ........................................................................................10
4.4.1 How to add a corporate group to the scan list and set priority level .................10
4.4.2 How to turn Scanning On ................................................................................10
4.4.3 How to turn Scanning Off ................................................................................11
4.4.4 How to change priority to a corporate group in the scan list ............................11
4.4.5 How to remove a corporate group from the scan list? .....................................11
5 PTT Favourite Contacts & Groups .....................................................................................12
How to Add a Favourite PTT Contact/Group ...................................................12
How to Remove a Contact/Group from the PTT Favourites List ......................12
6 How to Review & Clear PTT History ...................................................................................13
7 Making PTT Calls ...............................................................................................................14
Making PTT Calls from the PTT Contacts or PTT Groups Tab ........................14
Making a PTT call or group call using the dedicated PTT Hard-Button ............14
Making PTT Calls using Manual Dial ...............................................................15
Making PTT Calls from the PTT Home Screen ...............................................15
7.4.1 Using the Call icon located on the bottom bar: ................................................15
7.4.2 Using the contact or group call history list: ......................................................16
PTT Android User Guide
3
Making a Quick Group Call from the PTT Contacts List ..................................16
8 PTT Alerts ..........................................................................................................................17
9 PTT Search ........................................................................................................................17
10 PTT Presence Status .........................................................................................................17
How to change your Presence Status .............................................................17
How to block incoming PTT Calls using your Presence Status........................18
11 Supervisory Override .........................................................................................................18
12 Privacy Mode .....................................................................................................................18
13 PTT Over Wi-Fi ..................................................................................................................19
14 PTT Display Icons ..............................................................................................................20
15 PTT Settings ......................................................................................................................21
PTT Android User Guide
4
Activating PTT on your Android device
How to activate PTT on your Android Smartphone
Once the device is turned on follow the steps below to activate the PTT service:
Step 1- For devices preloaded with PTT, Go to Apps > Push-to-talk. This will navigate to Google Play store. Press ‘Update’ to install the App.
Step 2- For devices not preloaded with PTT, Go to Google Play store and search for ‘Bell Push-to-talk’. Install the application on your handset.
Step 3- Once the application has installed on the device Select Menu > Push-to-talk > Select Yes to activate PTT service.
Once the activation is completed, you will receive a notification stating ‘Client successfully activated’. The PTT service will retrieve PTT contacts and groups if they exist for your company or corporation automatically at this point. Your PTT presence status will also be visible in your Notifications panel as ‘AVAILABLE’.
How to activate PTT on your Android Tablet
Step 1 – Ensure you have a tablet specific PTT plan for your Android tablet
Step 2 – Download the PTT application from the Google Play Store by searching for “Bell Push-to-talk”, and follow on-screen instructions to install.
Step 3 – Once installed, open the PTT app and select Yes to disable battery optimization and select Accept to accept the End User License Agreement.
Step 4 – Select Yes when prompted to Activate your PTT service
Step 5 – Contact your company’s Corporate Administrator to obtain your tablet activation code via email
Step 6 – Once obtained, enter the activation code when prompted by the application
Step 7 – PTT application will then automatically download your company’s contacts and groups at this point and log in to the service.
How to Logout and Login to the PTT Service
To logout of the PTT service, go to the PTT settings menu by selecting “More” from the bottom
bar. Scroll through the Settings menu to reach “Miscellaneous” settings. Then select “Logout”
and “Yes” to confirm. After logging-out of the PTT service a icon is displayed to indicate you are
no longer available.
To log back into PTT, simply re-open the PTT application.
PTT Android User Guide
5
Getting to know the PTT Home Screen
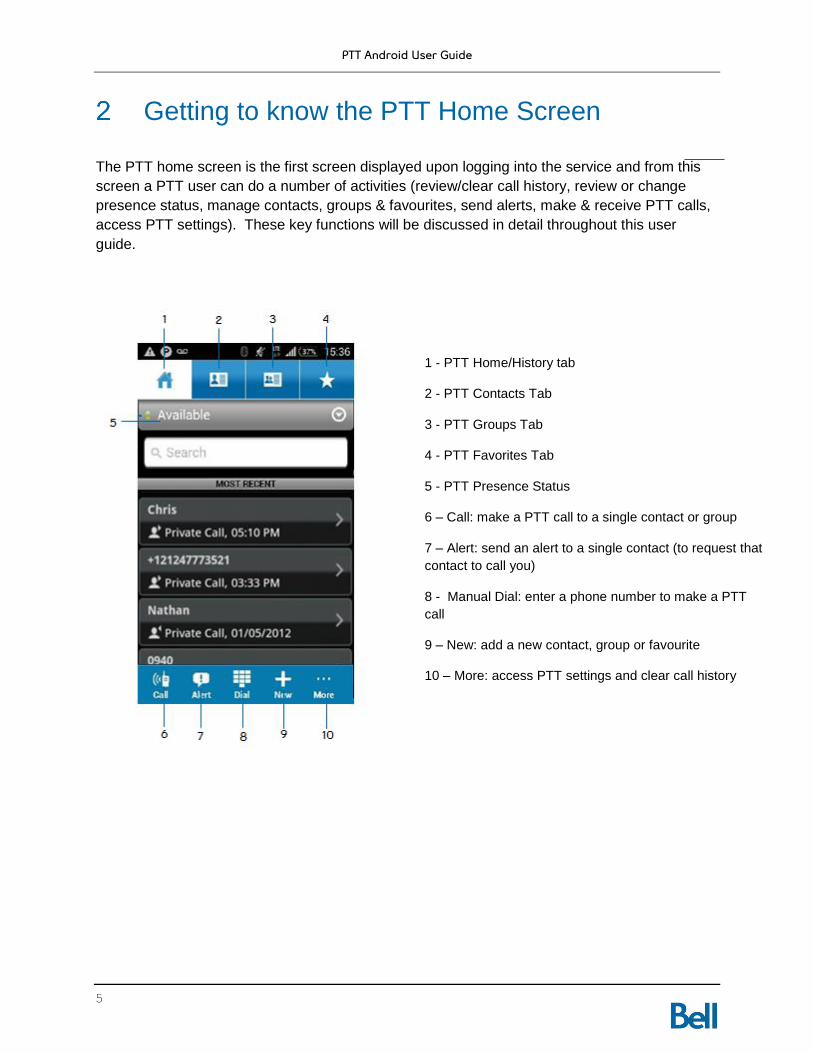
The PTT home screen is the first screen displayed upon logging into the service and from this
screen a PTT user can do a number of activities (review/clear call history, review or change
presence status, manage contacts, groups & favourites, send alerts, make & receive PTT calls,
access PTT settings). These key functions will be discussed in detail throughout this user
guide.
1 - PTT Home/History tab
2 - PTT Contacts Tab
3 - PTT Groups Tab
4 - PTT Favorites Tab
5 - PTT Presence Status
6 – Call: make a PTT call to a single contact or group
7 – Alert: send an alert to a single contact (to request that
contact to call you)
8 - Manual Dial: enter a phone number to make a PTT
call
9 – New: add a new contact, group or favourite
10 – More: access PTT settings and clear call history
PTT Android User Guide
6
PTT Contacts
Corporate Only & Public-Corporate Subscribers
PTT subscribers can be categorized as Corporate Only or a Public-Corporate by their Corporate
Administrator (CA) from the Corporate Administrator Tool (CAT).
Corporate Only subscriber contacts and groups are managed via the CAT (corporate
administrator tool) interface. The CA determines what type of settings & permissions each PTT
user will have.
Corporate contacts are created by the CA for the corporation and are automatically pushed
down to the Corporate Subscriber. The CA can create a maximum of 1000 corporate contacts
and 100 corporate groups (each containing up to 250 members per group).
Public contacts are created directly on the device by Public-Corporate subscribers. A total of
300 public contacts and 30 public groups (each containing a maximum of 30 members) can be
created on the device by the PTT user.
A Corporate Only subscriber will be able to:
Make corporate PTT calls
Initiate a corporate fixed PTT group call
Initiate a PTT quick group call to other corporate contacts
Change availability status
Send alerts to other corporate contacts
Add contacts and groups as favourites
Log off
A Corporate Only subscriber will not be able to:
Create any contacts or groups
Add group members to a group
Edit contacts or groups. The user can only add contacts and groups as favourites
Delete any contacts or groups and its members.
Edit your PTT name.
A Public-Corporate subscriber will be able to:
Create groups with other public contacts
Create group with mix of public and corporate contacts
Rename public contacts, groups or any group members
Delete public contacts
Delete any groups created by the PTT subscriber
Make PTT calls to public and corporate contacts
Initiate a PTT quick group call to public contacts
PTT Android User Guide
7
Initiate a PTT quick group call to a mix of corporate and public contacts
Initiate a PTT fixed group call to a mix of corporate and public contacts
Send alerts to public and corporate contacts
Add contacts and groups as favourites
Change availability status
Edit your PTT name
How to Add a PTT Contact
Corporate PTT contacts will be pushed automatically to a device. PTT users can also add PTT
contacts directly into the device if they have permission (i.e. depending on the Corporate
settings for a business noted in Section 3.1, the PTT user may or may not be allowed to add
new PTT contacts to the PTT Contacts list).
How to Add a PTT Contact from PTT Contacts tab:
Step 1- From the PTT Home screen select the PTT Contacts tab at the top of the screen
Step 2- Once on this screen select the Add icon on the bottom left-hand side. A pop-up
will appear with the options to Import Contact or add New Contact.
The Import Contact option will allow the PTT user to add a contact to their PTT contacts
list that already exists in their device phonebook. The New Contact option will allow the
PTT user to manually input the contact’s name and phone number.
Step 3 – a) If the Import Contact option is selected, the device phonebook contact list will
appear. Scroll through the list select the desired contact.
b) If the New Contact option is selected go to step 4
Step 4 –The New Contact screen will now appear. If the New Contact option was
selected (in step 3), the name and number fields will be empty and must be manually
inputted. If the Import Contact option was chosen, the name and number input box will
be pre-populated with the contact name and number, with the option of making further
edits to these fields if required.
The PTT user will also be able to assign an avatar or colour to a contact at this point, as
well as add the contact to the user’s favourite list.
Step 5- Select Save to save the contact to the PTT Contacts list.
PTT Android User Guide
8
How to Add a PTT Contact from the PTT Home screen
Step 1- From the PTT Home screen select the new icon located on the bottom bar.
Step 2- A pop-up screen will appear with three options- select either Import Contact or
New Contact
Step 3- Select the desired entry method and follow instructions noted in Section 4.1,
Step 2.
How to Delete a PTT Contact
It is important to note that depending on the Corporate settings for a business (noted in Section
3) the PTT user may or may not be allowed to delete PTT contacts. Contacts that have been
entered manually by the PTT user can be deleted, but those pushed to the device by the CA
cannot.
Step 1 – Select the PTT Contact tab and scroll through the contact list to locate the
contact that the user would like to delete.
Step 2 – Once the desired contact is located, select the checkbox next to the contact
name.
Step 3 – Select More from the bottom bar and select Delete
Step 4 – A confirmation pop-up screen will appear, select Yes to confirm contact deletion
and No to cancel.
How to Add Avatars to PTT Contacts
PTT users can add an “avatar” or an icon to help identify or distinguish their contacts from each
other.
To add an avatar to a particular contact:
Step 1 - Select the PTT Contact tab and scroll through the contact list to locate desired
contact.
Step 2 – Once the contact is located, select the checkbox next to the contact name and
select Details from the bottom bar.
Step 3 – Select Edit from the bottom bar and then select the Icon graphic located under
View Options.
Step 4 – Select an icon and select Save.
PTT Android User Guide
9
PTT Groups
Creating a new group is a quick way to reach multiple contacts simultaneously.
Please note that the options below may not be available to all users depending on the
Corporate settings (see Section 3.1 for more information).
PTT Group Options
To access PTT groups, Select the PTT Groups tab. The Groups tab by default contains the list
of groups that the PTT user is a part of. From this screen the end-user can select a group and
initiate a group call.
The PTT user can also select the check box next to a group name to reveal several group
management options in the bottom bar:
Call - Initiate a PTT Group call
History - View the PTT Group call history (calls, alerts, etc)
Details - View Group Details, edit group details or delete group
Scan List – Set Talkgroup Scanning priority levels 1 through 3 or no priority
How to Add a PTT Group
Step 1 - Select the PTT Group tab
Step 2- Select Add from the bottom bar to be taken to the New Group screen.
Step 3- Enter the new group name, add members to the group, and add identifiers
(icon, color, favourites if desired).
Step 4- Select Save. The new group will now appear in the PTT Group list
How to Delete a PTT Group
Step 1 - Go to the PTT Group tab and scroll through the group list to locate desired
group to be deleted.
Step 2 – Once the group is located, select the checkbox next to the group name and
select Delete from the bottom bar.
Step 3 – A confirmation pop-up screen will appear, select Yes to confirm group deletion
and No to cancel.
PTT Android User Guide
10
Talkgroup Scanning
The Talkgroup Scanning feature enables a PTT user to monitor (or scan) activity and
communicate with a subset of up to 16 corporate groups. This subset of corporate groups is
also known as a scan list. Scan lists are usually maintained and pushed out to devices by a CA
by the CAT, but Talkgroup scanning management functionality is available from the handset as
well.
When a call is active on a group within the scan list, the PTT user automatically joins that call
and can participate. When the call ends, the PTT user joins the next active call in progress from
the scan list.
While Talkgroup scanning is turned on, calls from other groups not on the scan list are not
delivered. Direct PTT calls and Quick Group calls are not affected, Talkgroup Scanning does
not prevent a user from originating or receiving a call to any contact, Quick Group or group.
4.4.1 How to add a corporate group to the scan list and set priority level
Step 1 - Select the PTT Groups tab.
Step 2- Select the checkbox next to the desired group name and select Scan List from
the bottom bar.
Note: If the Scan List option does not appear in the bottom bar after the checkbox has
been selected, this indicates that the group selected is not a Corporate Group.
Step 3 – Set a priority level to the group (“Set Priority 1”, “Set Priority 2”, “Set Priority 3”),
or add the group to the scan list with no priority.
The PTT user will then receive a message indicating that the scan list is being updated.
Once the group is successfully added to the device’s scan list, the user will be taken
back to the PTT Groups page and the Scan List icon will be displayed next to the group
name in the bottom right corner.
4.4.2 How to turn Scanning On
Step 1 –Select the PTT Groups tab.
Step 2 – Select Scan Off from the bottom bar.
Note: If the Scan Off option is not visible in the bottom bar, this indicates that there are no corporate groups assigned to this particular device.
The scan list section will now be displayed on top of the group list and the scan list icon will now be visible on the top left hand corner of the PTT Groups tab.
PTT Android User Guide
11
4.4.3 How to turn Scanning Off
Step 1 - Select the PTT Groups tab.
Step 2 – Select Scan On from the bottom bar.
The scan list icon will no longer be visible on the PTT Groups tab and scanning has
successfully been turned off.
4.4.4 How to change priority to a corporate group in the scan list
Step 1 – To change the priority level of a group that is on the device’s scan list, select
the PTT groups tab.
Step 2- Select the checkbox next to the desired group name and select Scan List from
the bottom bar.
Step 3 –The PTT user can then set priority levels 1 through 3 to the group (“Set Priority
1”, “Set Priority 2”, “Set Priority 3”) or select No Priority.
Once the PTT user selects the desired option from the pop-up menu, another pop-up will
appear indicating that the scan list is being updated.
Once the priority group level has been successfully edited, the user will be taken back to
the PTT Groups page and the Scan List icon (or if applicable, the priority level icon) will
be displayed next to the group name in the bottom right corner.
4.4.5 How to remove a corporate group from the scan list?
Step 1 – Go to the PTT Groups tab.
Step 2 - Select the checkbox next to the desired group name and select Scan List from the bottom bar.
Step 3 – Select Remove from the pop-up menu
PTT Android User Guide
12
PTT Favourite Contacts & Groups
PTT users can choose to create both favourite contacts lists & favourite groups lists for quick access to their frequently called contacts and groups.
How to Add a Favourite PTT Contact/Group
Step 1 - Go to the PTT Contacts or Groups tab.
Step 2 – Select the checkbox next to the desired Contact/Group
Step 3 – Select “Details” from the bottom bar
Step 4 – Select “Edit” from the bottom bar
Step 5 – Select the star under the word “Favourite” (the star should then turn blue once selected)
Step 6 – Select “Save”.
How to Remove a Contact/Group from the PTT Favourites List
Step 1 - Go to the PTT Favourites tab
Step 2 - Find the contact/group that you’d like removed from the PTT favourites list.
Step 3 – Select the checkbox located next to the contact/group
Step 4 – Select “More” from the bottom bar
Step 5 – Select “Unfavourite”.
PTT Android User Guide
13
How to Review & Clear PTT History
The PTT Home screen logs all recent PTT call activity and call history. From the home screen,
the PTT user can view details about the call type, as well as the time and date that the call took
place.
By selecting the arrow located on the furthest right side of the call history line item, the PTT user
can review full call history with that particular contact or group.
To clear PTT call history:
Step 1 - Select the arrow on the right hand side of the call history item
Step 2 – Select the “Delete” option from the bottom bar
Step 3 – Select the “X” next to each line item you’d like to delete to delete calls
individually, or select “Delete All” to clear the entire PTT history with that particular
contact or group
Step 4 – Select “Yes” to confirm.
PTT Android User Guide
14
Making PTT Calls
A PTT user can make or receive a one-to-one or one-to-many group call at any time with their
device. PTT calls can be made directly from the PTT home screen, or from the contacts, groups
or favourites tab:
Making PTT Calls from the PTT Contacts or PTT Groups Tab
Step 1- Go to the PTT Contacts tab or the PTT Groups tab to display the list of PTT
contacts/groups.
Step 2- Scroll to the contact/group you want to call and either select the contact to be
taken directly to the PTT call screen or select checkbox next to the contact and then
select Call in the bottom bar
Step 3 – Once on the PTT call screen, press and hold the PTT floor icon. The icon will
turn green and an audible “chirp” will sound. You may now speak.
Step 4- Release the PTT floor icon (remove your finger from the screen) when you have
finished speaking to release the “floor” so that the recipient(s) of the call can speak.
Step 5- To end the call touch the End Call button at the bottom of the screen.
Making a PTT call or group call using the dedicated PTT Hard-Button
Certain devices have a dedicated hard button located on the side of their physical PTT device.
This hard button can be utilized instead of pressing and holding the PTT floor icon to make PTT
calls.
Step 1- Go to the PTT Contacts tab or the PTT Groups tab to display the list of PTT
contacts/groups.
Step 2- Scroll to the contact/group you want to call and either select the contact to be
taken directly to the PTT call screen or select checkbox next to the contact and then
select Call in the bottom bar
Step 3 – Once on the PTT call screen, press and hold the dedicated PTT hard-button
located on the side of the device. The PTT floor icon will turn green and an audible
“chirp” will sound. You may now speak.
Step 4- Release the PTT floor icon by letting go of the PTT hard button when you have
finished speaking so that the recipient(s) of the call can speak.
Step 5- To end the call touch the End Call button at the bottom of the screen.
PTT Android User Guide
15
Making PTT Calls using Manual Dial
Step 1- To make a PTT call using manual dial, select the manual dial icon from the
bottom of the PTT Home screen
Step 2- Input the PTT contact’s phone number and select the PTT Call icon located next
to the phone number input field.
Step 3 – Once on the PTT call screen, press and hold the PTT floor icon or the
dedicated PTT hard-button located on the side of the device (not available on all
devices). The PTT floor icon will turn green and an audible “chirp” will sound. You may
now speak.
Step 4- Release the PTT floor icon by letting go of the PTT floor icon or PTT hard button
when you have finished speaking so that the recipient of the call can speak.
Step 5- To end the call touch the End Call button at the bottom of the screen.
Making PTT Calls from the PTT Home Screen
A PTT user has 2 ways to initiate a group call from their home screen:
7.4.1 Using the Call icon located on the bottom bar:
Step 1 – Select the Call icon
Step 2 – Select “Call Contact” or “Call Group”
Step 3 – Select the contact or group you’d like to call by selecting the checkbox next to the contact/group name
Step 4 – Select the Call icon to initiate the PTT call screen
Step 5 – Once on the PTT call screen, press and hold the PTT floor icon or the dedicated PTT hard-button located on the side of the device (not available on all devices). The PTT floor icon will turn green and an audible “chirp” will sound. You may now speak.
Step 6- Release the PTT floor icon by letting go of the PTT floor icon or PTT hard button when you have finished speaking so that the recipient of the call can speak.
Step 7- To end the call touch the End Call button at the bottom of the screen.
PTT Android User Guide
16
7.4.2 Using the contact or group call history list:
Step 1 – Select the contact or group you’d like to call under the “Most Recent” or
“History” section on the home screen.
Step 2 – You should now be on the PTT call screen. Press and hold the PTT floor icon
or the dedicated PTT hard-button located on the side of the device (not available on all
devices). The PTT floor icon will turn green and an audible “chirp” will sound. You may
now speak.
Step 3- Release the PTT floor icon by letting go of the PTT floor icon or PTT hard button
when you have finished speaking so that the recipient of the call can speak.
Step 4- To end the call touch the End Call button at the bottom of the screen.
Making a Quick Group Call from the PTT Contacts List
A PTT user can quickly make a single call to many contacts by initiating a Quick Group call.
This is unlike making a regular group call because the PTT user creates a temporary group
simply selecting contacts from their PTT contacts tab:
Step 1- Select the PTT Contacts tab
Step 2- Select the contacts you’d like to make quick group call to by selecting the
checkbox to the left of the contacts name
Step 3- Once all the contacts are chosen, select Call on the bottom bar.
Step 4 – You should now be on the PTT call screen. Press and hold the PTT floor icon
or the dedicated PTT hard-button located on the side of the device (not available on all
devices). The PTT floor icon will turn green and an audible “chirp” will sound. You may
now speak.
Step 5- Release the PTT floor icon by letting go of the PTT floor icon or PTT hard button
when you have finished speaking so that the recipient of the call can speak.
Step 6- To end the call touch the End Call button at the bottom of the screen.
A PTT call cannot be made to any contact that is set to “Do Not Disturb” status or who is offline.
If a PTT call has no response from both parties (initiator & receiver) the call will automatically
time-out and disconnect after approximately 15 seconds.

PTT Android User Guide
17
PTT Alerts
PTT Alerts are the equivalent of “pinging” a contact on an instant messaging or chat tool. It is a
fast and easy way for a PTT user to reach out to one of their PTT contacts and to let them know
that they wish to speak with them. It is a great way of getting a contacts attention in a more
discreet way and allows the contact the option of responding immediately or waiting to return
the PTT Alert.
How to initiate a PTT Alert:
Step 1- Select the PTT Contacts tab.
Step 2- Choose the contact to send a PTT Alert to by checking off the box to the left of the
desired contacts name.
Step 3- Select “Alert” from the bottom bar
A PTT Alert can only be received by PTT users whose presence status is Available or Do Not
Disturb
PTT Search
PTT search is available in the PTT Home Screen, the PTT Contacts tab, the PTT groups tab
and the PTT Favourites tab. To search for a contact or group within each tab, simply input the
contact or group name in the Search field. Search results will populate under the search field as
they’re found.
PTT Presence Status
The PTT presence status is a visual indicator that allows other users to immediately and at a
glance identify the current status of a PTT user’s device captured by a green (Available), red
(Do Not Disturb) or gray (Not Available) indicator. The Do Not Disturb status prevents PTT calls
from being received. The Not Available status occurs when the PTT user logs out of the PTT
application or if the device is turned off or in a poor coverage area.
How to change your Presence Status
To change your presence status from Available to Do Not Disturb or from Do Not Disturb to
Available:
Step 1 - Go to the PTT Home screen.
PTT Android User Guide
18
Step 2 - Directly below the Home, Contacts, Groups and Favourite tabs is the presence
status indicator. Select “Available” or “Do Not Disturb” to trigger the presence status pop-
up.
Step 3 - The presence status pop-up box will appear. Select Available or Do Not
Disturb. Your presence indicator colour and status should’ve now changed.
Each time a PTT status change is made it will update automatically to all users that have you as
a PTT contact.
How to block incoming PTT Calls using your Presence Status
PTT users have the option of blocking incoming calls. To do this PTT presence status must be
set to Do Not Disturb. Refer to section 8 for instructions.(Note: Instant Personal Alerts are still
sent).
Supervisory Override
The Supervisory Override feature allows a designated supervisor to take the floor (and start
speaking) at any time during a group call, even when someone else is speaking. A supervisor
can be assigned only by an administrator through the Corporate Administrator Tool (CAT). A
special supervisor icon is displayed next to the name of a group with a supervisor and next to
the supervisor’s name.
If you are a designated supervisor, you can simply use the PTT call button to take the floor any
time and start speaking.
Privacy Mode
Privacy Mode determines how and where the audio of an incoming PTT call will sound when the
device call ringer setting is set to Silent or Vibrate.
To change your Privacy Mode settings, simply select More from the PTT Home screen bottom
bar and then select Settings. Scroll down and select Privacy Mode:
Off: ignores the phone setting if set to Silent or Vibrate and will output PTT calls
based on the current volume setting and speakerphone on/off setting.
Mute: Incoming calls will not sound though the phone speaker if phone is set to
Silent or Vibrate.
Earpiece: Incoming calls will not sound through the phone speaker, but instead will
come through the phone earpiece if the phone is set to Silent or Vibrate.
PTT Android User Guide
19
PTT Over Wi-Fi
The PTT application can be configured so that calls can be sent/received even when the PTT
user is on a Wi-Fi network. When PTT over Wi-Fi is enabled, the PTT application will use Wi-Fi
when Wi-Fi is available. When PTT over Wi-Fi is disabled from the application, but the PTT
device has Wi-Fi turned on, PTT calls will be sent/received using the cellular network
connection while using Wi-Fi for other device tasks.
How to Enable/Disable PTT over Wi-Fi:
Step 1 – From the PTT Home Screen, select the More option and then select Settings
Step 2 – Scroll down the settings list until you see the Miscellaneous header
Step 3 – Select the toggle next to Wi-Fi to turn Wi-Fi on or off.
PTT will not default back to using the mobile network if both PTT over Wi-Fi is enabled and Wi-Fi on the device is enabled.
When connecting to a public Wi-Fi Hotspot, ensure that the device has been successfully verified and the terms and conditions are accepted. PTT will only sign-in/function when the Wi-Fi Hotspot grants internet access after establishing a connection.
PTT Android User Guide
20
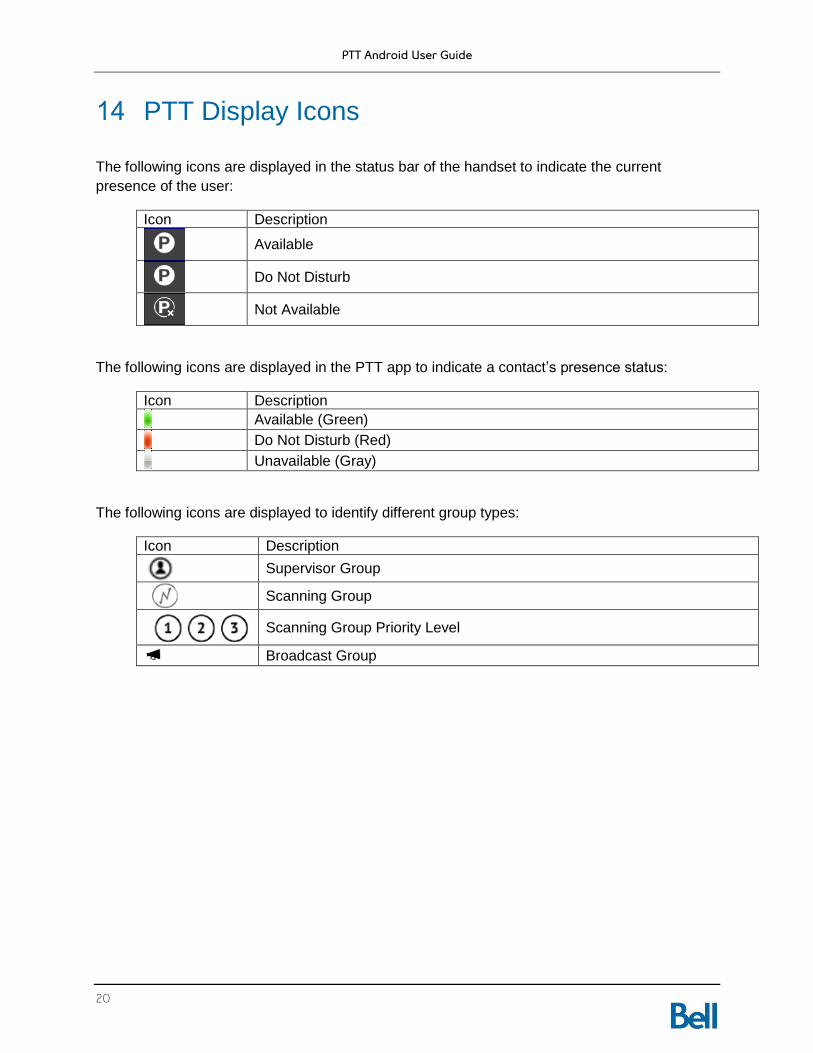
PTT Display Icons
The following icons are displayed in the status bar of the handset to indicate the current
presence of the user:
Icon Description
Available
Do Not Disturb
Not Available
The following icons are displayed in the PTT app to indicate a contact’s presence status:
Icon Description
Available (Green)
Do Not Disturb (Red)
Unavailable (Gray)
The following icons are displayed to identify different group types:
Icon Description
Supervisor Group
Scanning Group
Scanning Group Priority Level
Broadcast Group
PTT Android User Guide
21
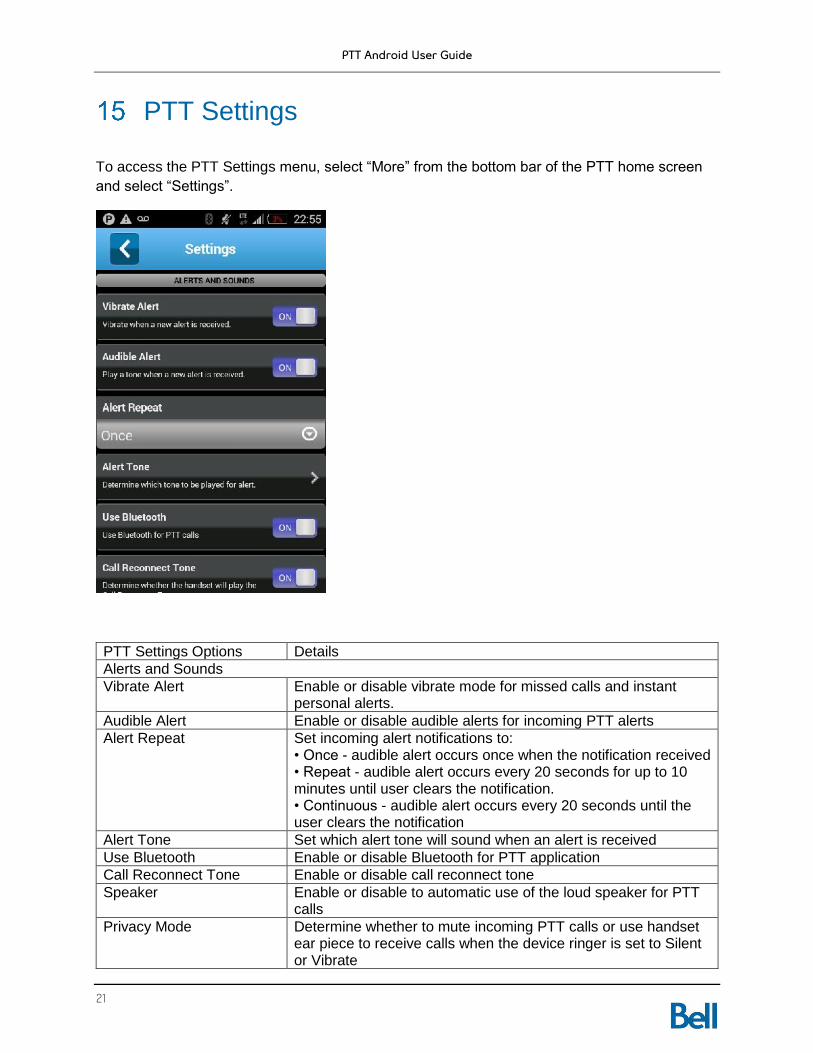
PTT Settings
To access the PTT Settings menu, select “More” from the bottom bar of the PTT home screen
and select “Settings”.
PTT Settings Options Details
Alerts and Sounds
Vibrate Alert Enable or disable vibrate mode for missed calls and instant personal alerts.
Audible Alert Enable or disable audible alerts for incoming PTT alerts
Alert Repeat Set incoming alert notifications to: • Once - audible alert occurs once when the notification received • Repeat - audible alert occurs every 20 seconds for up to 10 minutes until user clears the notification. • Continuous - audible alert occurs every 20 seconds until the user clears the notification
Alert Tone Set which alert tone will sound when an alert is received
Use Bluetooth Enable or disable Bluetooth for PTT application
Call Reconnect Tone Enable or disable call reconnect tone
Speaker Enable or disable to automatic use of the loud speaker for PTT calls
Privacy Mode Determine whether to mute incoming PTT calls or use handset ear piece to receive calls when the device ringer is set to Silent or Vibrate
PTT Android User Guide
22
Notification Control
Instant Personal Alert Enable or disable IPA notification
Missed Call Alert Enable or disable missed call alert notification
Information
Avatar Choose whether to show or hide pictures for Contacts and Groups
Contact/Group Colour Assign colours to contacts and groups for distinction
Display Name Edit the existing display name
My PTT Number Displays your mobile number
Capacity View the contacts, groups and favourites storage capacity
About View the details of the PTT application
Privacy Policy
Miscellaneous
Contact Sorting Sort alphabetically or by availability
Auto Start Enable or disable starting PTT automatically every time handset is turned on
Show tutorial View tutorial for PTT functionality
Restore Default Settings Restore PTT settings back to the original state when application was first installed
Logout Logout from PTT session
Wi-Fi Enable or disable PTT using Wi-Fi when available
![PTT Multicasting Scheme [호환 모드] · 2 New PTT Group Add by Mouse right button click 3PTTGrouppg Name Setting 4 PTT Group Number Setting 5 PTT Server Setting 6 PTT Group Session](https://img.pdfslide.us/doc/110x75/5f727989ade5745a8a06acb0/ptt-multicasting-scheme-eeoe-2-new-ptt-group-add-by-mouse-right-button.jpg)