Embed Size (px)
Citation preview

PS6500 Storage ArraysHardware Maintenance110-0118-EN-R2
ii
Copyright 2010 Dell, Inc. All rights reserved.
Dell is a trademark of Dell, Inc.
EqualLogic is a registered trademark.
All trademarks and registered trademarks mentioned herein are the property of their respective owners.
Information in this document is subject to change without notice.
Reproduction in any manner whatsoever without the written permission of Dell is strictly forbidden.
August 2010
Part Number: 110-0118-EN Rev. 2

i
Table of Contents
Preface ...................................................................................................................................................... iiiAudience ................................................................................................................................................................... iiiOrganization ............................................................................................................................................................. iiiOverview of Dell EqualLogic Products ................................................................................................................... iiiRelated Documentation ..............................................................................................................................................vTechnical Support and Customer Service ..................................................................................................................vWarranty Information ................................................................................................................................................vi
1 Basic Array Information ................................................................................................................................... 1-1Field Replaceable Components............................................................................................................................... 1-1Array Bezel and Front Panel ................................................................................................................................... 1-2
Hardware Status LEDs ..................................................................................................................................... 1-3LCD Panel Display ........................................................................................................................................... 1-4Enclosure Switch Settings ................................................................................................................................ 1-6
Array Back Panel .................................................................................................................................................... 1-6Serial Number Label ............................................................................................................................................... 1-6Protecting Hardware from Electrostatic Discharge................................................................................................. 1-7Removing and Installing the Bezel ......................................................................................................................... 1-8Opening and Closing the Chassis Cover ................................................................................................................. 1-9Using the Cable Management System .................................................................................................................. 1-10Turning on Power to an Array............................................................................................................................... 1-13Shutting Down and Turning Off Power to an Array............................................................................................. 1-13Returning Hardware .............................................................................................................................................. 1-14
2 Maintaining Disk Drives.................................................................................................................................... 2-1Disk Drive LEDs..................................................................................................................................................... 2-1Disk Drive Status .................................................................................................................................................... 2-2Disk Drive Numbering ............................................................................................................................................ 2-3Array Behavior When a Disk Drive Fails ............................................................................................................... 2-3Disk Drive Requirements ........................................................................................................................................ 2-4Removing Disk Drives ............................................................................................................................................ 2-4Installing Disk Drives.............................................................................................................................................. 2-7
3 Maintaining Control Modules........................................................................................................................... 3-1Identifying the Control Module............................................................................................................................... 3-1Interpreting Control Module LEDs......................................................................................................................... 3-1Identifying Control Module Failures....................................................................................................................... 3-3Understanding Failover Behavior ........................................................................................................................... 3-3Maintaining Control Module Firmware .................................................................................................................. 3-3Control Module Handling Requirements ................................................................................................................ 3-4Removing a Control Module................................................................................................................................... 3-4Installing a Control Module .................................................................................................................................... 3-6Replacing the MicroSD Card .................................................................................................................................. 3-7
Removing the MicroSD Card ........................................................................................................................... 3-8Inserting the MicroSD Card.............................................................................................................................. 3-9
Network Requirements and Recommendations .................................................................................................... 3-10Connecting Network Cables.................................................................................................................................. 3-11

PS6500 Hardware Maintenance
ii
4 Maintaining Power Supply and Cooling Modules .......................................................................................... 4-1Power Supply and Cooling Module LEDs.............................................................................................................. 4-1Power Supply and Cooling Module Status ............................................................................................................. 4-2Array Behavior When a Power Supply Fails .......................................................................................................... 4-2Power Requirements and Recommendations.......................................................................................................... 4-3Removing a Power Supply and Cooling Module.................................................................................................... 4-3Installing a Power Supply and Cooling Module ..................................................................................................... 4-4
5 Maintaining Channel Cards.............................................................................................................................. 5-1Channel Card LEDs ................................................................................................................................................ 5-1Channel Card Status ................................................................................................................................................ 5-2Array Behavior When a Channel Card Fails........................................................................................................... 5-2Channel Card Handling Requirements.................................................................................................................... 5-3Replacing a Channel Card....................................................................................................................................... 5-3
Removing a Channel Card................................................................................................................................ 5-3Inserting a Channel Card .................................................................................................................................. 5-4
6 Maintaining the EIP Card................................................................................................................................. 6-1EIP Card LEDs........................................................................................................................................................ 6-1EIP Card Status ....................................................................................................................................................... 6-3Array Behavior When an EIP Card Fails ................................................................................................................ 6-3EIP Card Handling Requirements ........................................................................................................................... 6-3Replacing the EIP Card ........................................................................................................................................... 6-3
A Array Technical Specifications ....................................................................................................................... A-1
Index ................................................................................................................................................................Index-1

iii
Preface
This manual describes how to maintain the PS6500 storage array hardware, including disks, channel cards, EIP card, control modules, and power supply and cooling modules. It also provides basic information about operating an array.
AudienceThis manual is designed for administrators responsible for installing or maintaining PS6500 array hardware. Administrators are not required to have extensive network or storage system experience. However, it may be useful to understand:
• Basic networking concepts
• Current network environment
• Disk storage space requirements
• RAID configurations
• Disk storage management
Note: Although this manual provides examples of using PS6500 arrays in some common network configurations, detailed information about setting up a network is beyond its scope.
OrganizationThis manual is organized as follows:
• Chapter 1, Basic Array Information, describes the PS6500 array front and back panels and technical specifications, in addition to basic array operations.
• Chapter 2, Maintaining Disk Drives, describes how to obtain disk drive status and how to install and remove disk drives.
• Chapter 3, Maintaining Control Modules, describes how to obtain control module status, how to install and remove a control module, and how to replace the micro SD card.
• Chapter 4, Maintaining Power Supply and Cooling Modules, describes how to obtain module status and how to install and remove a module.
• Chapter 5, Maintaining Channel Cards, describes how to obtain channel card status and how to install and remove a channel card.
• Chapter 6, Maintaining the EIP Card, describes how to obtain Enclosure Interface Processor (EIP) card status and how to install and remove an EIP card.
• Appendix A, Array Technical Specifications, lists the environmental and physical specifications for the array.
Overview of Dell EqualLogic ProductsThank you for your interest in Dell EqualLogic™ PS Series storage products. We hope you will find them intuitive and simple to configure and manage.

PS6500 Hardware Maintenance Preface
iv
PS Series arrays optimize resources by automating performance and network load balancing. Additionally, PS Series arrays offer all-inclusive array management software, host software, and free firmware updates. The features and products described next are available at no additional cost.
PS Series Array Software• Firmware - Installed on each array, PS Series firmware software allows you to manage your storage
environment and provides capabilities such as volume snapshots, cloning, and replication to ensure data hosted on the arrays is protected in the event of an error or disaster.
- Group Manager GUI: Provides a graphical user interface for managing a group.
- Group Manager CLI: Provides a command line interface for managing a group.
• Manual Transfer Utility (MTU) – Runs on Windows and Linux systems and enables you to use physical media to securely transfer large amounts of data to a replication partner, facilitating replication and preventing network congestion.
Host Software for Windows• Host Integration Tools
- Remote Setup Wizard (RSW): Initializes new PS Series arrays, configures host connections to PS Series groups, and configures and manages multipathing.
- Multipath I/O Device Specific Module (MPIO DSM): Includes a connection awareness-module that understands PS Series network load balancing and facilitates host connections to PS Series volumes.
- VSS and VDS Provider Services: Allows 3rd party backup software vendors to perform off-host backups.
- Auto-Snapshot Manager/Microsoft Edition (ASM/ME): Uses PS Series snapshots, cloning, and replication to provide point-in-time protection of critical data for supported applications, including SQL Server, Exchange Server, Hyper-V, and NTFS file shares.
• SAN HeadQuarters (SANHQ): Provides centralized monitoring, historical performance trending, and event reporting for multiple PS Series groups.
Host Software for VMware• Storage Adapter for Site Recovery Manager (SRM): Allows SRM to understand and recognize PS Series
replication for full SRM integration.
• Auto-Snapshot Manager/VMware Edition (ASM/VE): Integrates with VMware Virtual Center and PS Series snapshots to allow administrators to enable Smart Copy protection of Virtual Center folders, datastores, and virtual machines.
Current Customers Please Note: You may not be running the latest versions of the tools and software listed above. If you are under a valid warranty or support agreement for your PS Series array, you are entitled to obtain the latest updates and new releases as they become available.
PS6500 Hardware Maintenance Preface
v
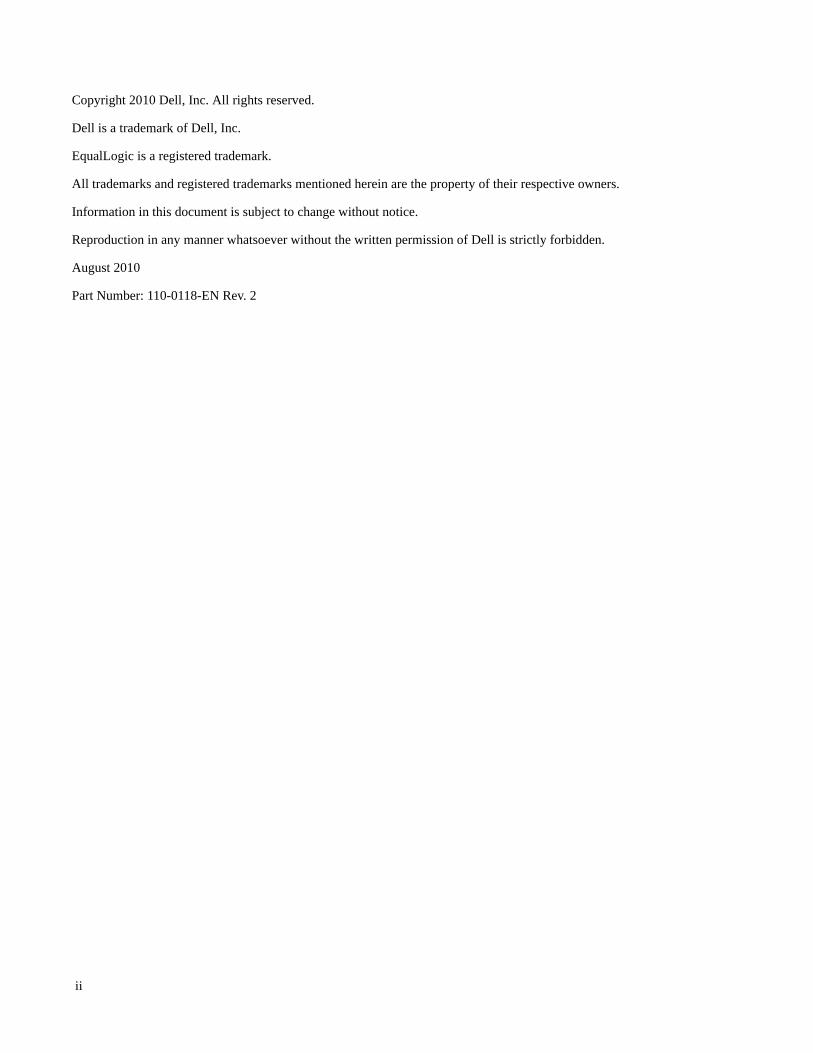
Related DocumentationFor detailed information about PS Series arrays, groups, volumes, array software, and host software, see the following documentation:
Technical Support and Customer ServiceDell's support service is available to answer your questions about PS Series arrays. If you have an Express Service Code, have it ready when you call. The code helps Dell's automated-support telephone system direct your call more efficiently.
Contacting Dell
Dell provides several online and telephone-based support and service options. Availability varies by country and product, and some services may not be available in your area.
For customers in the United States, call 800-945-3355.
PS6500 Hardware Maintenance Preface
vi
Note: If you do not have an Internet connection, you can find contact information on your purchase invoice, packing slip, bill, or Dell product catalog.
Use the following procedure to contact Dell for sales, technical support, or customer service issues:
1. Visit support.dell.com or the Dell support URL specified in information provided with the Dell product.
2. Select your locale. Use the locale menu or click on the link that specifies your country or region.
3. Select the required service. Click the "Contact Us" link, or select the Dell support service from the list of services provided.
4. Choose your preferred method of contacting Dell support, such as e-mail or telephone.
Online Services
You can learn about Dell products and services using the following procedure:
1. Visit www.dell.com (or the URL specified in any Dell product information).
2. Use the locale menu or click on the link that specifies your country or region.
Warranty InformationThe PS6500 array warranty is included in the shipping box. For information about registering a warranty, visit support.dell.com/EqualLogic.

1–1
1 Basic Array Information
This chapter includes information about the location and basic operation of the replaceable components in a PS6500 storage array, technical specifications, power on and off operations, and how to return failed components.
Field Replaceable ComponentsThe PS6500 array includes the field-replaceable components shown in Figure 1-1.
Figure 1-1: Field-Replaceable Components
You access disk drives, channel cards, and the EIP card from the front of the array. You must remove the bezel and open the chassis cover to access these components. See Removing and Installing the Bezel on page 1-8 and Opening and Closing the Chassis Cover on page 1-9.
You access control modules and power supply and cooling modules from the rear of the array.
Figure 1-1 DescriptionControl modules. A PS6500 array includes two control modules.
Power supply and cooling modules. A PS6500 array includes three power supply and cooling modules.
EIP card. A PS6500 array includes one EIP card.
Channel cards. A PS6500 array includes two channel cards.
Disk drives. A PS6500 array includes 48 disk drives. Drives are protected with spare disks and RAID.

PS6500 Hardware Maintenance Basic Array Information
1-2
If a field-replaceable component fails, contact your PS Series support provider for information about obtaining a replacement component.
Notes: Do not remove a component until you are ready to replace it. Do not operate the array for a long time with a component removed.
To maintain adequate cooling, keep the PS6500 chassis cover closed when possible. If you must open the cover to access the disk drives, channel cards, or EIP card, minimize the time that the cover is open.
Array Bezel and Front PanelFigure 1-2 shows the bezel of a PS6500 array. The bezel conceals the array front panel and the power switch, deterring a user from inadvertently turning off power to the array.
Figure 1-2: PS6500 Bezel
You must unlock and remove the bezel to view the front panel, as described in Removing and Installing the Bezel on page 1-8.
Figure 1-3 shows the array front panel.
Figure 1-3: PS6500 Front Panel
Figure 1-3 DescriptionPower button. The power button is lit (blue) when you connect at least two power supply and cooling modules to a source of power.
LCD Panel. If a hardware problem occurs, the affected component and a short description will appear in the LCD panel. See LCD Panel Display on page 1-4.

PS6500 Hardware Maintenance Basic Array Information
1-3
Hardware Status LEDs
Figure 1-4 shows a detail view of the hardware status LEDs.
Figure 1-4: PS6500 Hardware Status LEDs
Hardware status LEDs. These LEDs indicate when hardware problems occur. These LEDs can also be seen when the bezel is installed. See Hardware Status LEDs on page 1-3.
Disk drive LEDs. These LEDs indicate when a drive is present and disk drive activity. See Disk Drive LEDs on page 2-1.
Cam screws. The two cam screws secure the array front panel to the chassis cover.
Chassis handles. The handles are used to pull out the chassis, opening the cover and exposing the disk drives, channel cards, and EIP card.
Figure 1-4 DescriptionIndicator Status Description
Array power Off No power.
Green Normal operation.
Yellow Array is not turned on (standby mode).
Power supply and cooling modules
Off Normal operation.
Flashing orange Module removed.
Orange Power supply failure, fan failure, or upper or lower temperature limit exceeded.
Control modules Off Normal operation.
Flashing orange Module removed or upper or lower temperature limit exceeded.
Orange Module failure.
Disk drives Off Normal operation.
Flashing yellow One or more disk drive failures.
Yellow Array is running in standby mode.
Channel cards Off Normal operation.
Flashing yellow Channel card removed.
Yellow Channel card failure.
Figure 1-3 Description
PS6500 Hardware Maintenance Basic Array Information
1-4
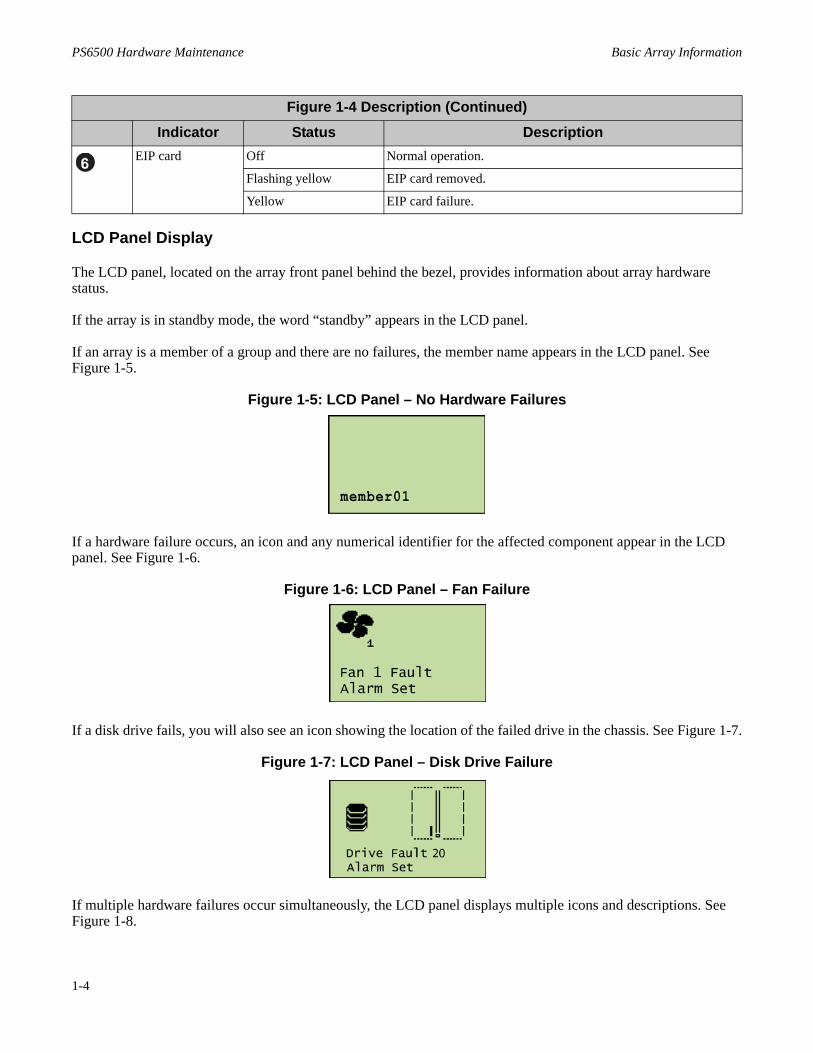
LCD Panel Display
The LCD panel, located on the array front panel behind the bezel, provides information about array hardware status.
If the array is in standby mode, the word “standby” appears in the LCD panel.
If an array is a member of a group and there are no failures, the member name appears in the LCD panel. See Figure 1-5.
Figure 1-5: LCD Panel – No Hardware Failures
If a hardware failure occurs, an icon and any numerical identifier for the affected component appear in the LCD panel. See Figure 1-6.
Figure 1-6: LCD Panel – Fan Failure
If a disk drive fails, you will also see an icon showing the location of the failed drive in the chassis. See Figure 1-7.
Figure 1-7: LCD Panel – Disk Drive Failure
If multiple hardware failures occur simultaneously, the LCD panel displays multiple icons and descriptions. See Figure 1-8.
EIP card Off Normal operation.
Flashing yellow EIP card removed.
Yellow EIP card failure.
Figure 1-4 Description (Continued)Indicator Status Description
PS6500 Hardware Maintenance Basic Array Information
1-5
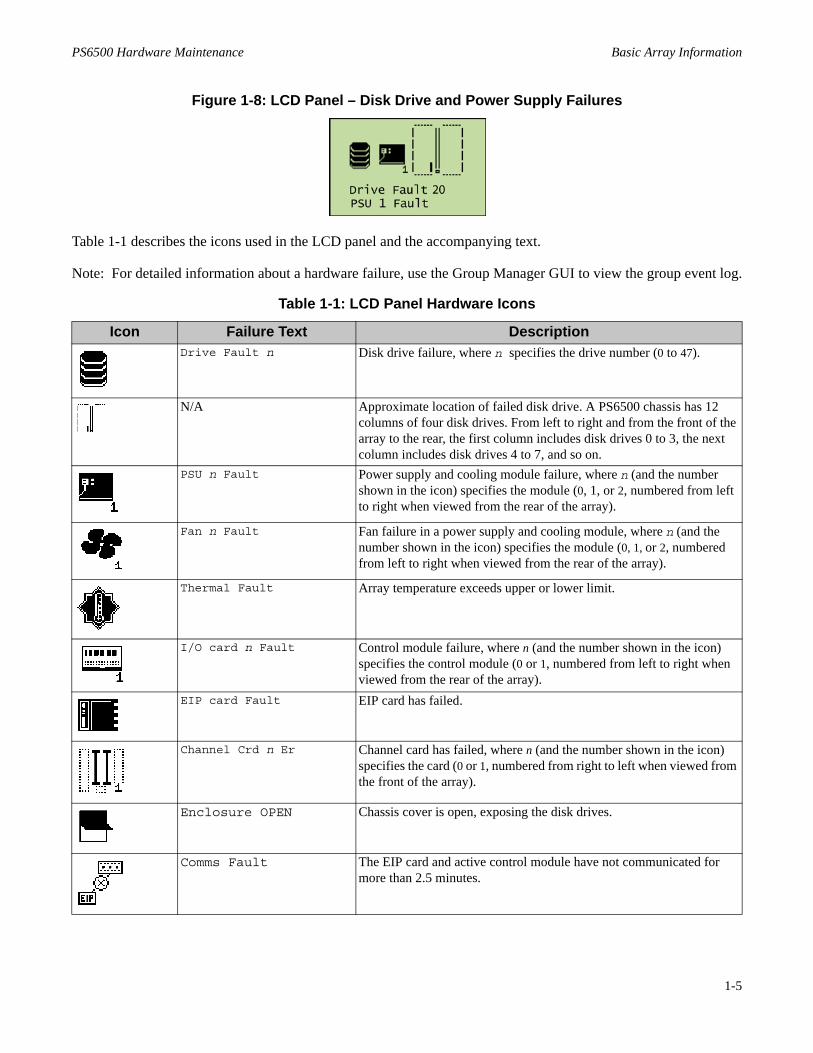
Figure 1-8: LCD Panel – Disk Drive and Power Supply Failures
Table 1-1 describes the icons used in the LCD panel and the accompanying text.
Note: For detailed information about a hardware failure, use the Group Manager GUI to view the group event log.
Table 1-1: LCD Panel Hardware Icons
Icon Failure Text DescriptionDrive Fault n Disk drive failure, where n specifies the drive number (0 to 47).
N/A Approximate location of failed disk drive. A PS6500 chassis has 12 columns of four disk drives. From left to right and from the front of the array to the rear, the first column includes disk drives 0 to 3, the next column includes disk drives 4 to 7, and so on.
PSU n Fault Power supply and cooling module failure, where n (and the number shown in the icon) specifies the module (0, 1, or 2, numbered from left to right when viewed from the rear of the array).
Fan n Fault Fan failure in a power supply and cooling module, where n (and the number shown in the icon) specifies the module (0, 1, or 2, numbered from left to right when viewed from the rear of the array).
Thermal Fault Array temperature exceeds upper or lower limit.
I/O card n Fault Control module failure, where n (and the number shown in the icon) specifies the control module (0 or 1, numbered from left to right when viewed from the rear of the array).
EIP card Fault EIP card has failed.
Channel Crd n Er Channel card has failed, where n (and the number shown in the icon) specifies the card (0 or 1, numbered from right to left when viewed from the front of the array).
Enclosure OPEN Chassis cover is open, exposing the disk drives.
Comms Fault The EIP card and active control module have not communicated for more than 2.5 minutes.
PS6500 Hardware Maintenance Basic Array Information
1-6
Enclosure Switch Settings
Enclosure switches are located between the disk drives and the power supply and cooling modules. You access the switches by removing the bezel and opening the chassis cover.
Each switch is numbered. Do not change the following default switch settings:
• 4 - On
• 9 - On
• 10 - Off
• 11 - On
The other switches are not used.
A switch is on when it is in the position closest to the rear of the chassis. A switch is off when it is in the position closest to the front of the chassis.
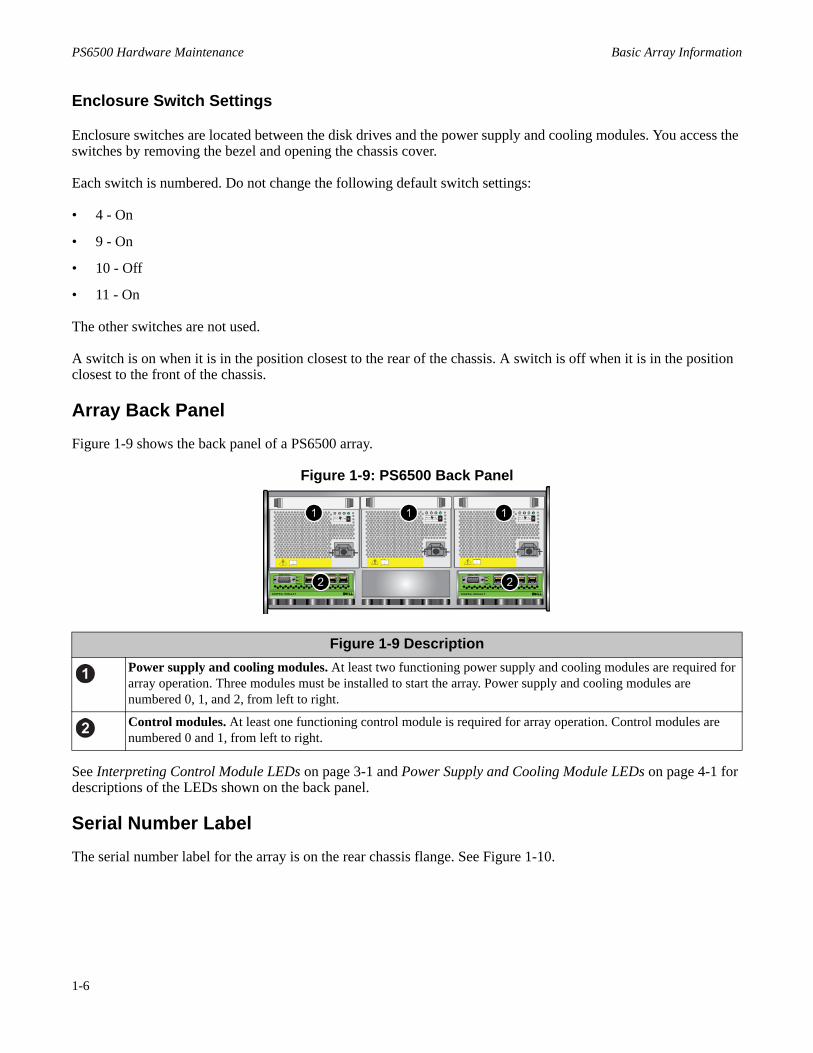
Array Back PanelFigure 1-9 shows the back panel of a PS6500 array.
Figure 1-9: PS6500 Back Panel
See Interpreting Control Module LEDs on page 3-1 and Power Supply and Cooling Module LEDs on page 4-1 for descriptions of the LEDs shown on the back panel.
Serial Number LabelThe serial number label for the array is on the rear chassis flange. See Figure 1-10.
Figure 1-9 DescriptionPower supply and cooling modules. At least two functioning power supply and cooling modules are required for array operation. Three modules must be installed to start the array. Power supply and cooling modules are numbered 0, 1, and 2, from left to right.
Control modules. At least one functioning control module is required for array operation. Control modules are numbered 0 and 1, from left to right.

PS6500 Hardware Maintenance Basic Array Information
1-7
Figure 1-10: Serial Number Label
The serial number is also displayed in the Group Manager GUI. See the Group Administration manual for more information.
Protecting Hardware from Electrostatic DischargeWhen handling the array chassis, disk drives, channel cards, EIP card, or control modules, you must use an electrostatic protection device to prevent electrostatic discharge. Always store hardware where it is protected from electrostatic discharge.
An electrostatic wrist strap is supplied in the array shipping box.
To use the wrist strap:
1. Connect the steel snap on the coil cord to the stud on the elastic band. See Figure 1-11.
Figure 1-11: Using an Electrostatic Wrist Strap
2. Fit the band closely around your wrist.
3. Connect the banana plug to ground, or attach the plug to the alligator clip and connect the clip to a grounded device, such as an ESD mat or the metal frame of a grounded piece of equipment.

PS6500 Hardware Maintenance Basic Array Information
1-8
Removing and Installing the BezelYou must remove the bezel to access the array front panel, which shows the LCD panel and disk activity LEDs and provides access to the power button. Also, you must remove the bezel to access the cam screws that lock the chassis cover.
To unlock and remove the bezel:
1. Insert the bezel key and turn it clockwise to unlock the bezel. See Figure 1-12.
Figure 1-12: Unlocking the Bezel
2. Push the bezel release latch up to disengage the bezel from the chassis. See Figure 1-13.
Figure 1-13: Pushing Up the Bezel Release Latch
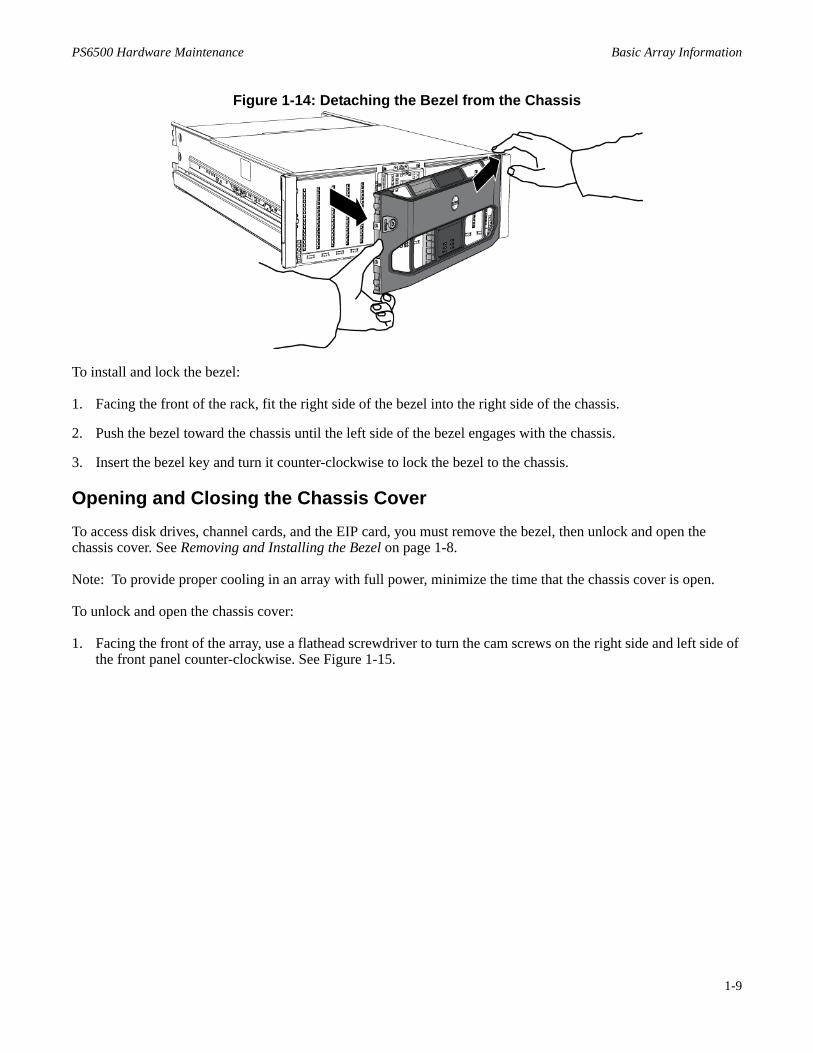
3. Hold the bezel and pull the bezel away from the chassis. See Figure 1-14.
PS6500 Hardware Maintenance Basic Array Information
1-9
Figure 1-14: Detaching the Bezel from the Chassis
To install and lock the bezel:
1. Facing the front of the rack, fit the right side of the bezel into the right side of the chassis.
2. Push the bezel toward the chassis until the left side of the bezel engages with the chassis.
3. Insert the bezel key and turn it counter-clockwise to lock the bezel to the chassis.
Opening and Closing the Chassis CoverTo access disk drives, channel cards, and the EIP card, you must remove the bezel, then unlock and open the chassis cover. See Removing and Installing the Bezel on page 1-8.
Note: To provide proper cooling in an array with full power, minimize the time that the chassis cover is open.
To unlock and open the chassis cover:
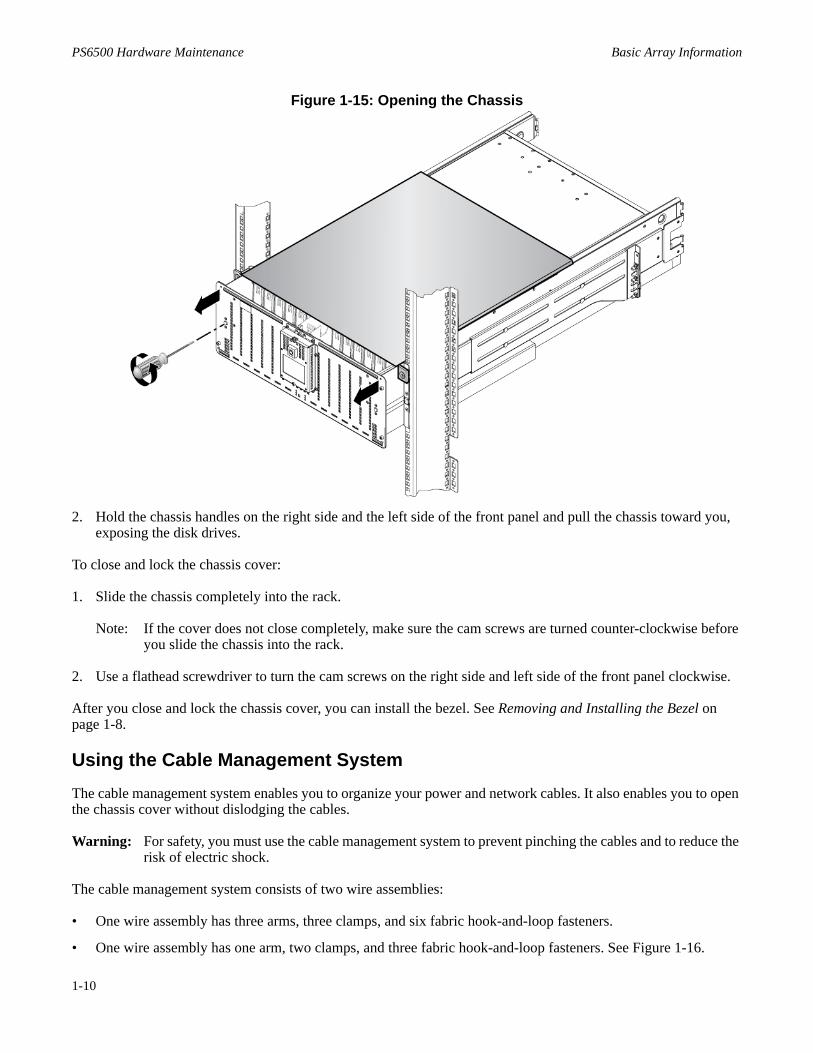
1. Facing the front of the array, use a flathead screwdriver to turn the cam screws on the right side and left side of the front panel counter-clockwise. See Figure 1-15.
PS6500 Hardware Maintenance Basic Array Information
1-10
Figure 1-15: Opening the Chassis
2. Hold the chassis handles on the right side and the left side of the front panel and pull the chassis toward you, exposing the disk drives.
To close and lock the chassis cover:
1. Slide the chassis completely into the rack.
Note: If the cover does not close completely, make sure the cam screws are turned counter-clockwise before you slide the chassis into the rack.
2. Use a flathead screwdriver to turn the cam screws on the right side and left side of the front panel clockwise.
After you close and lock the chassis cover, you can install the bezel. See Removing and Installing the Bezel on page 1-8.
Using the Cable Management SystemThe cable management system enables you to organize your power and network cables. It also enables you to open the chassis cover without dislodging the cables.
Warning: For safety, you must use the cable management system to prevent pinching the cables and to reduce the risk of electric shock.
The cable management system consists of two wire assemblies:
• One wire assembly has three arms, three clamps, and six fabric hook-and-loop fasteners.
• One wire assembly has one arm, two clamps, and three fabric hook-and-loop fasteners. See Figure 1-16.
PS6500 Hardware Maintenance Basic Array Information
1-11
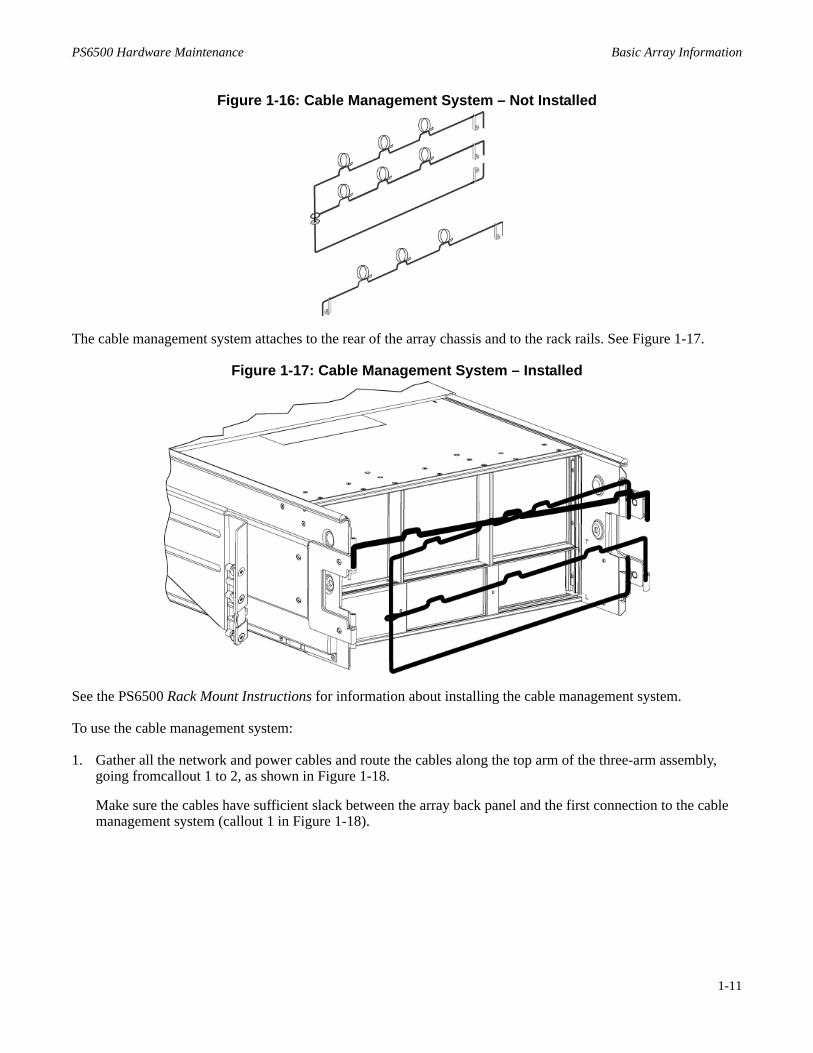
Figure 1-16: Cable Management System – Not Installed
The cable management system attaches to the rear of the array chassis and to the rack rails. See Figure 1-17.
Figure 1-17: Cable Management System – Installed
See the PS6500 Rack Mount Instructions for information about installing the cable management system.
To use the cable management system:
1. Gather all the network and power cables and route the cables along the top arm of the three-arm assembly, going fromcallout 1 to 2, as shown in Figure 1-18.
Make sure the cables have sufficient slack between the array back panel and the first connection to the cable management system (callout 1 in Figure 1-18).
PS6500 Hardware Maintenance Basic Array Information
1-12
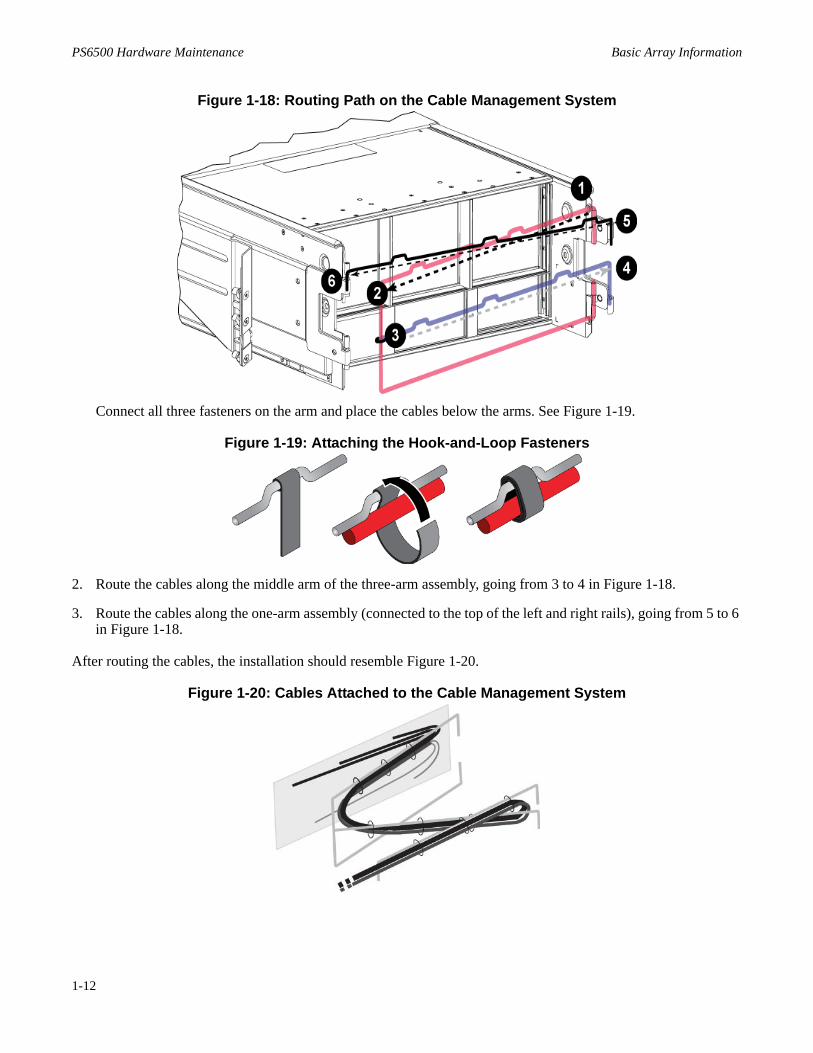
Figure 1-18: Routing Path on the Cable Management System
Connect all three fasteners on the arm and place the cables below the arms. See Figure 1-19.
Figure 1-19: Attaching the Hook-and-Loop Fasteners
2. Route the cables along the middle arm of the three-arm assembly, going from 3 to 4 in Figure 1-18.
3. Route the cables along the one-arm assembly (connected to the top of the left and right rails), going from 5 to 6 in Figure 1-18.
After routing the cables, the installation should resemble Figure 1-20.
Figure 1-20: Cables Attached to the Cable Management System

PS6500 Hardware Maintenance Basic Array Information
1-13
Turning on Power to an ArrayThere are two power modes for a PS6500 array:
• Standby mode. An array enters standby mode if you turn off power, but two or more functioning power supply and cooling modules are connected to a source of power. In standby mode, the array is fully grounded, and some array components are supplied with power. For example, the power button is lit and the LCD panel displays “standby.” However, disks and control modules are not supplied with power, and the array is not operational.
• Full-power mode. An array enters full-power mode when you push the power button on an array that is currently in standby mode. All components and modules are supplied with power and the array becomes operational.
To turn on power completely and restart an array:
1. Make sure three power supply and cooling modules are installed, and make sure at least two modules are connected to a source of power, ideally on different circuits.
2. Remove the bezel, as described in Removing and Installing the Bezel on page 1-8.
3. Press the blue power button on the front panel.
When the array restart completes, if the array is a member of a group, the LCD panel will show the member name.
Shutting Down and Turning Off Power to an ArrayAlthough a PS Series array includes hot-swappable hardware components, in some cases, you must cleanly shut down the array and turn off power in order to perform maintenance.
Notes: When you shut down an array that is a member of a group, any volumes with data on the array will be set offline until the array is restarted. This may affect initiators that are connected to the volumes.
Turning off power to an array will clear any messages on the LCD panel. Record any information shown in the panel before turning off power.
To shut down and turn off power to an array:
1. Use one of the following procedures:
• Use telnet or SSH to connect to an IP address assigned to a functioning network interface on the array. Do not connect to the group IP address.
• Use the serial cable shipped with the array to connect the serial port on the active control module (the ACT LED will be green) to a console or a computer running a terminal emulator.

PS6500 Hardware Maintenance Basic Array Information
1-14
The serial connection must have the following characteristics:– 9600 baud – One STOP bit– No parity– 8 data bits– No flow control
2. When prompted, log in to a group administration account with read-write access, such as the grpadmin account.
3. Enter the shutdown command.
4. When it is safe to turn off the array, remove the bezel and press the blue power button on the front panel.
If you are using a serial connection to shut down an array, it is safe to turn off power when the “press any key” message appears. (Pressing any key will restart both control modules.)
If you are using a network connection, the session will be disconnected before the array is fully shut down. It is safe to turn off power when the ACT LED on each control module is off (not lit).
5. To fully remove power from the array, disconnect each power supply from its power source. Note that the array will no longer be grounded if you disconnect all the power cables.
Note: If you turn off power to an array, but two or more functioning power supply and cooling modules are connected to a source of power, the array will enter standby mode.
For information about turning on power and restarting an array, see Turning on Power to an Array on page 1-13.
Returning HardwareYou must return hardware in the original packaging or in authorized packaging. Returning hardware in unauthorized packaging may void your warranty.
If you receive a replacement part from your PS Series support provider, return the failed hardware in the packaging in which the replacement part was shipped.
Contact your PS Series support provider for more information about returning hardware.
Login: grpadminPassword: xxxxxxx
Welcome to Group Manager Copyright 2010 Dell, Inc.
> shutdown
2–1
2 Maintaining Disk Drives
Each PS6500 array includes 48 hot-swappable disk drives. See the PS Series Release Notes for the latest information about disk drive support.
You access disk drives from the front of the array after removing the bezel and opening the chassis cover. See Removing and Installing the Bezel on page 1-8 and Opening and Closing the Chassis Cover on page 1-9.
Disk Drive LEDsThere are several LEDs on a PS6500 array that indicate the status of disk drives:
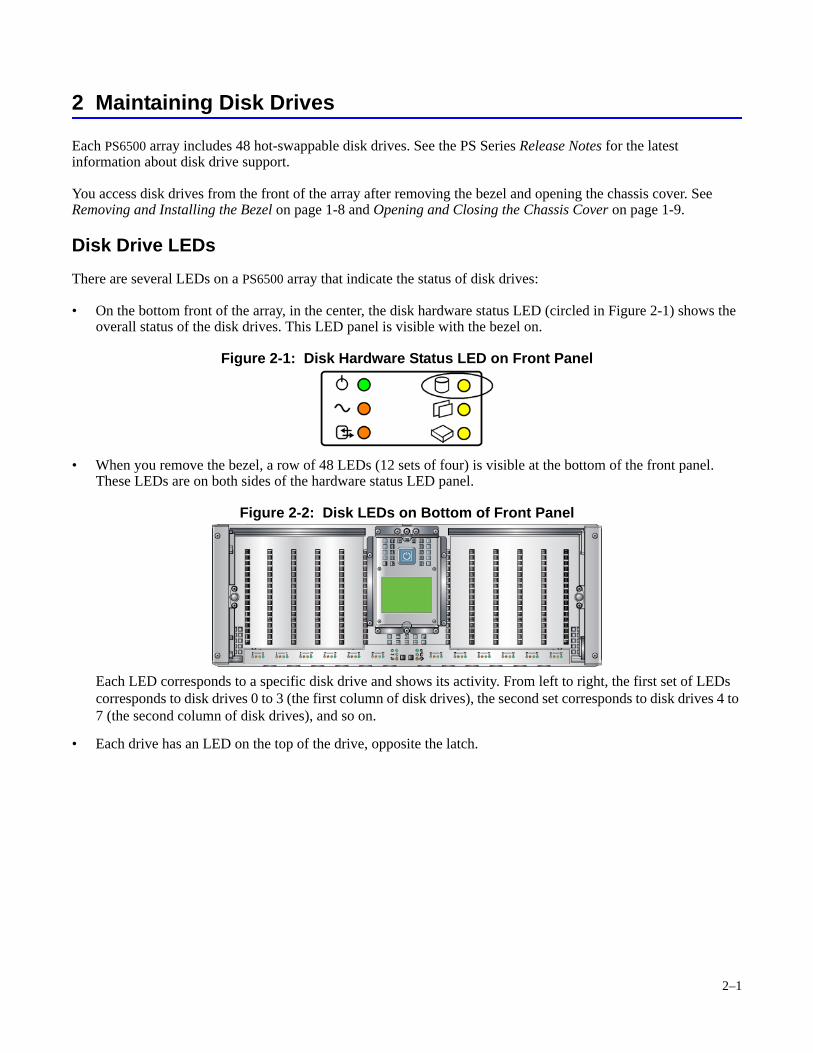
• On the bottom front of the array, in the center, the disk hardware status LED (circled in Figure 2-1) shows the overall status of the disk drives. This LED panel is visible with the bezel on.
Figure 2-1: Disk Hardware Status LED on Front Panel
• When you remove the bezel, a row of 48 LEDs (12 sets of four) is visible at the bottom of the front panel. These LEDs are on both sides of the hardware status LED panel.
Figure 2-2: Disk LEDs on Bottom of Front Panel
Each LED corresponds to a specific disk drive and shows its activity. From left to right, the first set of LEDs corresponds to disk drives 0 to 3 (the first column of disk drives), the second set corresponds to disk drives 4 to 7 (the second column of disk drives), and so on.
• Each drive has an LED on the top of the drive, opposite the latch.
PS6500 Hardware Maintenance Maintaining Disk Drives
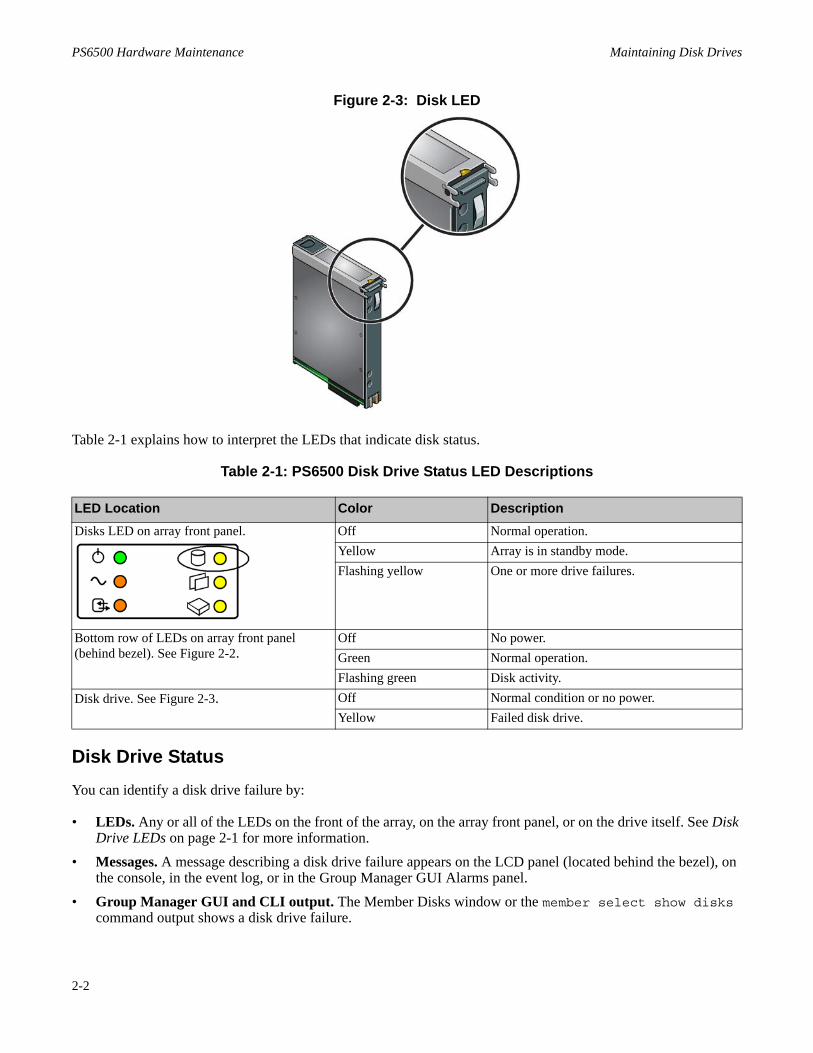
2-2
Figure 2-3: Disk LED
Table 2-1 explains how to interpret the LEDs that indicate disk status.
Table 2-1: PS6500 Disk Drive Status LED Descriptions
Disk Drive StatusYou can identify a disk drive failure by:
• LEDs. Any or all of the LEDs on the front of the array, on the array front panel, or on the drive itself. See Disk Drive LEDs on page 2-1 for more information.
• Messages. A message describing a disk drive failure appears on the LCD panel (located behind the bezel), on the console, in the event log, or in the Group Manager GUI Alarms panel.
• Group Manager GUI and CLI output. The Member Disks window or the member select show disks command output shows a disk drive failure.
LED Location Color DescriptionDisks LED on array front panel. Off Normal operation.
Yellow Array is in standby mode.Flashing yellow One or more drive failures.
Bottom row of LEDs on array front panel (behind bezel). See Figure 2-2.
Off No power.Green Normal operation.Flashing green Disk activity.
Disk drive. See Figure 2-3. Off Normal condition or no power.Yellow Failed disk drive.

PS6500 Hardware Maintenance Maintaining Disk Drives
2-3
If a disk drive fails, contact your PS Series support provider for a replacement.
Disk Drive NumberingDisk drives are numbered from 0 to 47, starting from the left side of the array, going front to back. Disk drives 0 to 3 comprise the first column of disk drives, disk drives 4 to 7 comprise the second column of disk drives, and so on. See Figure 2-4.
Figure 2-4: PS6500 Disk Drive Numbering
Array Behavior When a Disk Drive FailsHow an array handles a disk drive failure depends on whether a spare disk drive is available and whether the failed drive was in a degraded RAID set.
• If a spare disk drive is available, it automatically replaces the failed disk. Performance is normal after reconstruction completes.
• If a spare disk drive is not available and the failed disk drive is in a RAID set with no previous disk drive failure, the RAID set becomes degraded. Performance may be impaired.
• If a spare disk drive is not available and the failed disk drive is in a RAID set that is already degraded, data may be lost and must be recovered from a backup.
Replace a failed disk drive as soon as possible. Contact your PS Series support provider for a replacement.

PS6500 Hardware Maintenance Maintaining Disk Drives
2-4
Disk Drive RequirementsFollow these disk drive handling requirements:
• Protect disk drives from electrostatic discharge. When handling a disk drive, always wear an electrostatic wrist strap or a similar protective device. See Protecting Hardware from Electrostatic Discharge on page 1-7.
• Handle disk drives carefully. Hold a disk drive only by the plastic part of the carrier. Do not handle a disk drive solely by the release lever.
• Insert a disk drive properly. Do not force a disk drive into a slot. Make sure the disk release latch is oriented toward the rear of the array.
• Warm disk drives to room temperature before installation. For example, let a disk drive sit overnight before installing it in an array.
• Do not remove a disk drive from its carrier. This action will void your warranty and support contract.• Maintain array cooling. When installing disks in an array with power, maintain adequate cooling by
minimizing the time that the chassis cover is open. Do not remove a failed disk until you are ready to replace it. • Install the same type of disk drives. Install only disk drives of the same capacity, speed, and spin rate in an
array.
If an array contains disk drives with different sizes, in some cases, the smallest disk drive in the array will determine how much space can be used on each disk. For example, if the smallest disk drive is 400GB, only 400GB of space will be available for use on each disk.
• Do not remove a functioning disk drive from an array. If you remove a spare disk drive, replace it as soon as possible.
• Store disk drives properly. Store replacement disk drives in the packaging in which they were shipped.
Removing Disk DrivesTo remove a disk drive from an array:
1. Identify the drive you want to remove. You can obtain this information from the event log and the disk LEDs. See Disk Drive LEDs on page 2-1 and Figure 2-4.
2. Use an electrostatic wrist strap or a similar protective device. See Protecting Hardware from Electrostatic Discharge on page 1-7.
3. Remove the bezel. See Removing and Installing the Bezel on page 1-8.
4. Unlock and open the chassis cover. See Opening and Closing the Chassis Cover on page 1-9.
5. Confirm the disk drive you want to remove. The LED on a failed disk drive will be lit (yellow).
Note: The LED on the failed disk is closer to the release latch for the adjacent disk than it is to the release latch on the failed disk. See Figure 2-5.

PS6500 Hardware Maintenance Maintaining Disk Drives
2-5
Figure 2-5: Identifying and Removing the Correct Drive
6. Open the disk drive release lever by sliding the latch toward the front of the array and pulling up the latch arm. This will disengage the disk drive from the slot.
7. Wait 30 seconds to allow the disk drive to stop spinning and the heads to land.

PS6500 Hardware Maintenance Maintaining Disk Drives
2-6
8. Holding the sides of the disk drive, pull up and remove the drive from the slot.
Caution: Do not pull the drive up by the lever. See Figure 2-6.
Figure 2-6: Wrong Way to Hold a Disk Drive

PS6500 Hardware Maintenance Maintaining Disk Drives
2-7
Return the failed drive in the packaging in which the replacement drive was shipped. Contact your PS Series support provider for information about returning hardware.
Installing Disk DrivesTo install a disk drive in an array:
1. Use an electrostatic wrist strap or a similar protective device. See Protecting Hardware from Electrostatic Discharge on page 1-7.
2. Remove the bezel. See Removing and Installing the Bezel on page 1-8.
3. Unlock and open the chassis cover. See Opening and Closing the Chassis Cover on page 1-9.
4. Install the replacement drive as follows:
a. Open the disk drive release lever by sliding the latch toward the front of the array and lifting up the latch arm.
b. Hold the replacement disk drive by the plastic carrier and position the disk drive so that the latch is toward the rear of the array (where the power supplies and control modules are). Start to insert the drive (1).
PS6500 Hardware Maintenance Maintaining Disk Drives
2-8
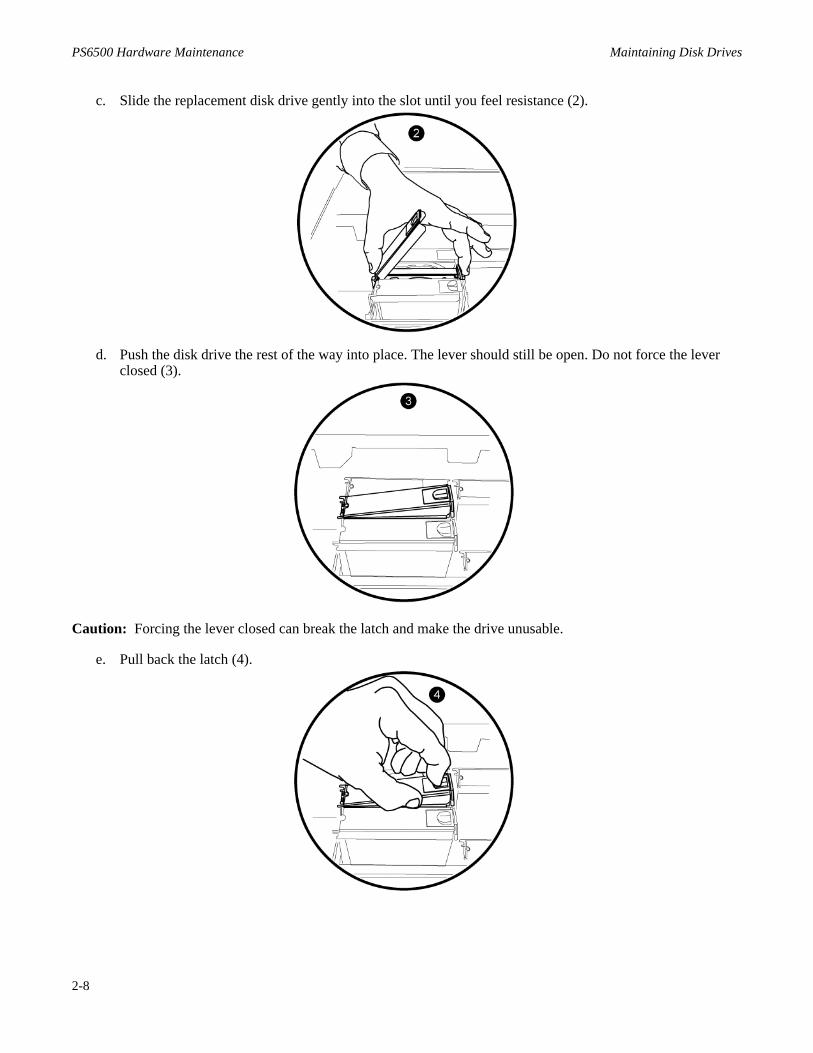
c. Slide the replacement disk drive gently into the slot until you feel resistance (2).
d. Push the disk drive the rest of the way into place. The lever should still be open. Do not force the lever closed (3).
Caution: Forcing the lever closed can break the latch and make the drive unusable.
e. Pull back the latch (4).

PS6500 Hardware Maintenance Maintaining Disk Drives
2-9
f. Holding the latch open, lower the lever until the drive is fully seated and flush with the other drives (5). Keep holding the latch open.
g. Push the latch forward (6).
h. Make sure it engages with the slot in the drive carrier (7).
9. Close and lock the chassis cover. See Opening and Closing the Chassis Cover on page 1-9.
10. Reinstall the bezel. See Removing and Installing the Bezel on page 1-8.
Make sure the new disk drive is operational. See Disk Drive Status on page 2-2 for more information.

PS6500 Hardware Maintenance Maintaining Disk Drives
2-10
If you install a disk drive in an array that is an active group member, the drive will be automatically configured into a RAID set when you close the chassis.
If you install a disk drive during RAID reconstruction or verification, the drive will not be configured until the operation completes.
3–1
3 Maintaining Control Modules
A PS6500 array includes two hot-swappable control modules. One functioning control module is required for array operation. You access control modules from the rear of the array.
Each control module includes:
• Four Ethernet ports, one of which can be used as a dedicated management port if you configure a management network
• A serial connector (for use if there is no network access to the array)• A field-replaceable microSD card containing the PS Series firmware
Cache and NVRAM batteries are not field replaceable. If a control module fails, or for information about replacing a cache or NVRAM battery, contact your PS Series service provider.
Only one control module is active (serving network traffic) at one time. The secondary (redundant) control module mirrors cache data from the active control module. If the active control module fails, the secondary will take over network operations.
Caution: Do not mix control module types in an array. Always make sure both control modules are the same type and color. See the latest PS Series Release Notes for information about other supported control modules.
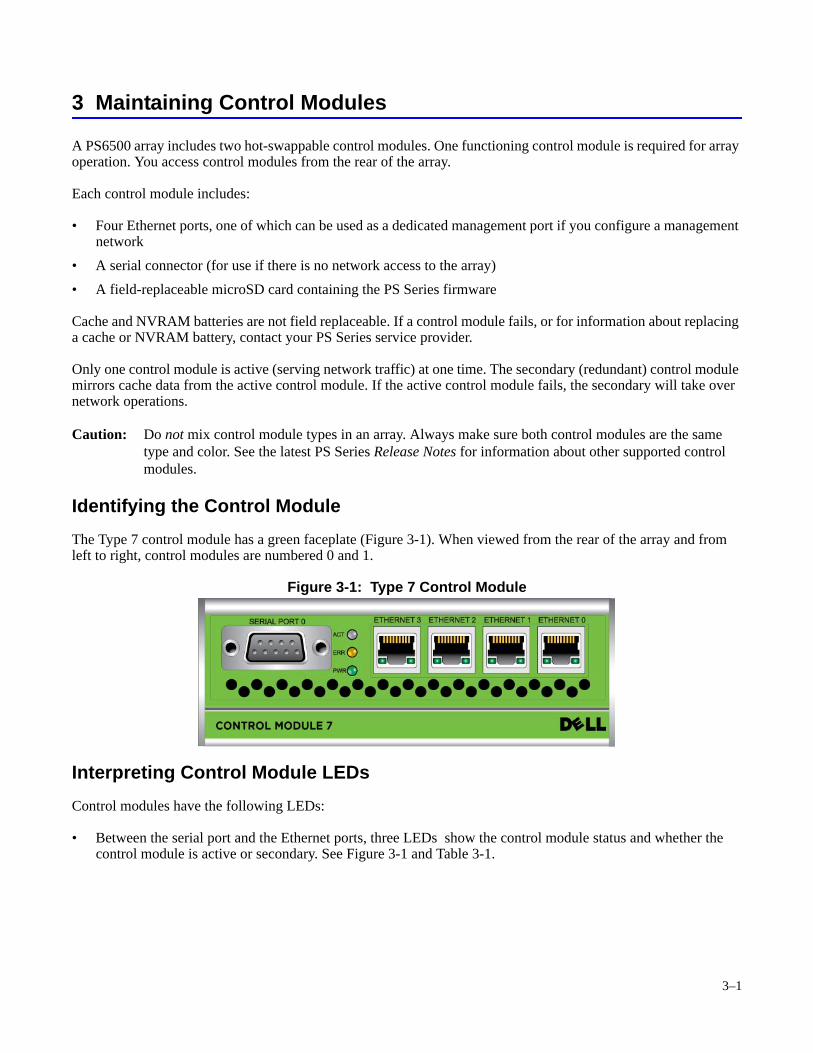
Identifying the Control ModuleThe Type 7 control module has a green faceplate (Figure 3-1). When viewed from the rear of the array and from left to right, control modules are numbered 0 and 1.
Figure 3-1: Type 7 Control Module
Interpreting Control Module LEDsControl modules have the following LEDs:
• Between the serial port and the Ethernet ports, three LEDs show the control module status and whether the control module is active or secondary. See Figure 3-1 and Table 3-1.

PS6500 Hardware Maintenance Maintaining Control Modules
3-2
• Each Ethernet port has two LEDs that show the network interface status. See Figure 3-1 and Table 3-2.
In addition, on the bottom front of the array, in the center, the control module hardware status LED (circled in Figure 3-2) shows the status of all the control modules. Table 3-3 describes their status conditions.
Figure 3-2: Control Module Hardware Status LED on Front Panel
Table 3-1: Control Module LED Descriptions
LED Location Color Description
ACT LED
Off No power, secondary control module is not synchronized with active control module, or error condition.
Green Active control module (serving network I/O).Orange Secondary control module. Cache is synchronized with
active control module.
ERR LED
Off Normal operation or no power.Red Array is starting up or error condition.
PWR LED
Off No power.Green Power.
Table 3-2: Ethernet Port LED Descriptions
Ethernet Port LEDs Color DescriptionLeft side of each port. Off No power or not connected to network.
Green Connected to network.
Right side of each port. Off No power, not transmitting, or not receiving.Green Transmitting or receiving.
Table 3-3: Control Module Hardware Status LED States
Color DescriptionOff Normal operation.Flashing orange Control module removed or temperature limit exceeded.Orange Control module failure.

PS6500 Hardware Maintenance Maintaining Control Modules
3-3
Identifying Control Module FailuresYou can identify a failure in a control module by:
• LEDs. If a control module fails, the control module hardware status LED on the array is orange or flashing orange, and the LEDs on the control module indicate the failure as described in Interpreting Control Module LEDs on page 3-1.
• Messages. A message on the LCD panel (located behind the bezel), on the console, in the event log, or in the Group Manager GUI Alarms panel describes a control module failure.
• Group Manager GUI and CLI output. The Member Controllers window or the member select show controllers command output shows the control module status not installed.
Understanding Failover BehaviorOnly one control module is active (serving network traffic) at one time. Each control module includes a battery-backed write cache for storing recently-used data. For redundancy, the cache on the secondary control module mirrors the data that is stored in the cache on the active control module.
Each control module has four ports: Ethernet 0, Ethernet 1, Ethernet 2, and Ethernet 3. The active control module can use a network interface only if there is a cable connected to the port on the active control module. Therefore, you should connect a cable to the network interface port on each control module to make sure that both control modules can access an interface.
A PS Series array provides two types of network failure protection:
• Network connection failover. If multiple network interfaces are configured and one network interface fails, iSCSI initiators that were connected to the failed interface can reconnect to the group IP address and be redirected to a functioning interface. For example, if Ethernet 0 and Ethernet 1 are connected to a network, and Ethernet 0 becomes disabled, initiators that were connected to Ethernet 0 can be redirected to Ethernet 1.
• Control module failover. If the active control module fails, the secondary control module automatically takes over and becomes active. Control module failover is transparent to applications, but iSCSI initiators must reconnect to the group IP address. If both control modules fail, the array will not operate.
Replace a failed control module as soon as possible. Contact your PS Series support provider for a replacement.
Maintaining Control Module FirmwareA PS6500 array includes two control modules, each with a microSD card running the array firmware. You should run the latest firmware version to take advantage of new product features and enhancements.
Caution: Both control modules must be running the same firmware version; otherwise, only one control module will be functional. When you use the update command procedure, both control modules are updated to the same firmware version.
Group members should run the same firmware version; otherwise, only the functionality common to all versions will be available in the group. See the PS Series Release Notes for information about mixed-firmware groups.
If you are upgrading a control module or replacing a failed microSD card, make sure to order the correct PS Series firmware version. If you are replacing a failed control module, remove the microSD card from the failed control module and install it in the replacement control module. This will make sure that you keep the correct firmware.
PS6500 Hardware Maintenance Maintaining Control Modules
3-4
To display the firmware version running on an array, examine the GUI Member Controllers window or use the CLI member select show controllers command.
Control Module Handling RequirementsFollow these control module handling guidelines:
• Protect control modules from electrostatic discharge. When handling a control module, always wear an electrostatic wrist strap or use a similar protective device. See Protecting Hardware from Electrostatic Discharge on page 1-7.
• Do not remove a control module from an array while the control modules are synchronizing. When synchronization completes, a console message will appear. Also, the ACT LED on the secondary control module will be orange.
• Do not leave a control module slot empty. In an array with one control module, always attach a blank face plate to the empty control module slot.
• Store control modules properly. Store a control module in its original packaging or in an antistatic bag or place the control module on a surface protected from electrostatic discharge.
Removing a Control ModuleIf a control module fails, replace it with a functioning control module as soon as possible. Do not remove a failed control module until you are ready to replace it. You can temporarily remove a functioning control module to replace a micro SD card.
Note: For proper cooling, do not leave a control module slot empty. If an array will operate for a long time with only one control module, you must install a blank control module in the empty slot. You can order a blank control module from your PS Series array service provider.
You can remove a control module without shutting down the array if the remaining control module has at least one connected and functioning network interface. However, if you remove the active control module (the LED labeled ACT will be green), there will be a short interruption as failover to the secondary control module occurs.
Otherwise, if possible, cleanly shut down the array before removing the module, as described in Shutting Down and Turning Off Power to an Array on page 1-13.
If you remove the active control module, there will be a short interruption as failover to the secondary control module occurs.
Caution: Do not remove a control module from an array while the control modules are still synchronizing. A message will appear on the console when synchronization completes. The ACT LED on the secondary control module will be orange when synchronization completes.
Before removing a control module:
• Attach an electrostatic wrist strap, as described in Protecting Hardware from Electrostatic Discharge on page 1-7.
• Disconnect any serial or network cables attached to the control module. Optionally, re-attach the network cables to the functioning control module to provide uninterrupted data access.
PS6500 Hardware Maintenance Maintaining Control Modules
3-5
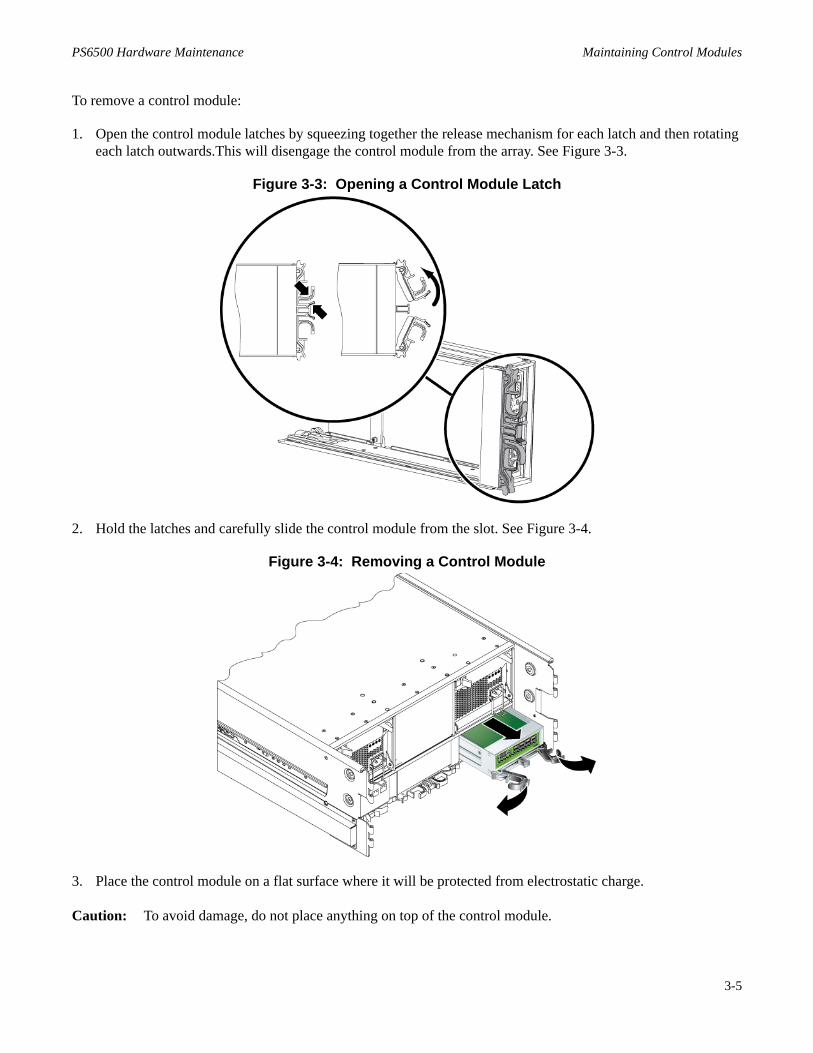
To remove a control module:
1. Open the control module latches by squeezing together the release mechanism for each latch and then rotating each latch outwards.This will disengage the control module from the array. See Figure 3-3.
Figure 3-3: Opening a Control Module Latch
2. Hold the latches and carefully slide the control module from the slot. See Figure 3-4.
Figure 3-4: Removing a Control Module
3. Place the control module on a flat surface where it will be protected from electrostatic charge.
Caution: To avoid damage, do not place anything on top of the control module.

PS6500 Hardware Maintenance Maintaining Control Modules
3-6
4. If you are replacing a failed control module, remove the micro SD card from the failed control module as described in Replacing the MicroSD Card on page 3-7 and install it in the replacement control module. This will make sure that the new control module is running the correct firmware.
Do not operate an array with an empty control module slot.
Return the failed control module in the packaging in which the replacement module was shipped. Contact your PS Series support provider for information about returning hardware.
Installing a Control ModuleYou can install a control module without shutting down the array.
Caution: Do not mix control module types in an array.
Control modules are oriented horizontally in the array, with the label text right-side up (serial port to the left and the Ethernet ports to the right), as shown in Figure 3-5.
Figure 3-5: Correct Control Module Orientation
To install a control module:
1. Attach an electrostatic wrist strap or a similar protective device. See Protecting Hardware from Electrostatic Discharge on page 1-7.
2. Open the control module latches by squeezing together the release mechanism for each latch and then rotating both latches outwards. See Figure 3-3.
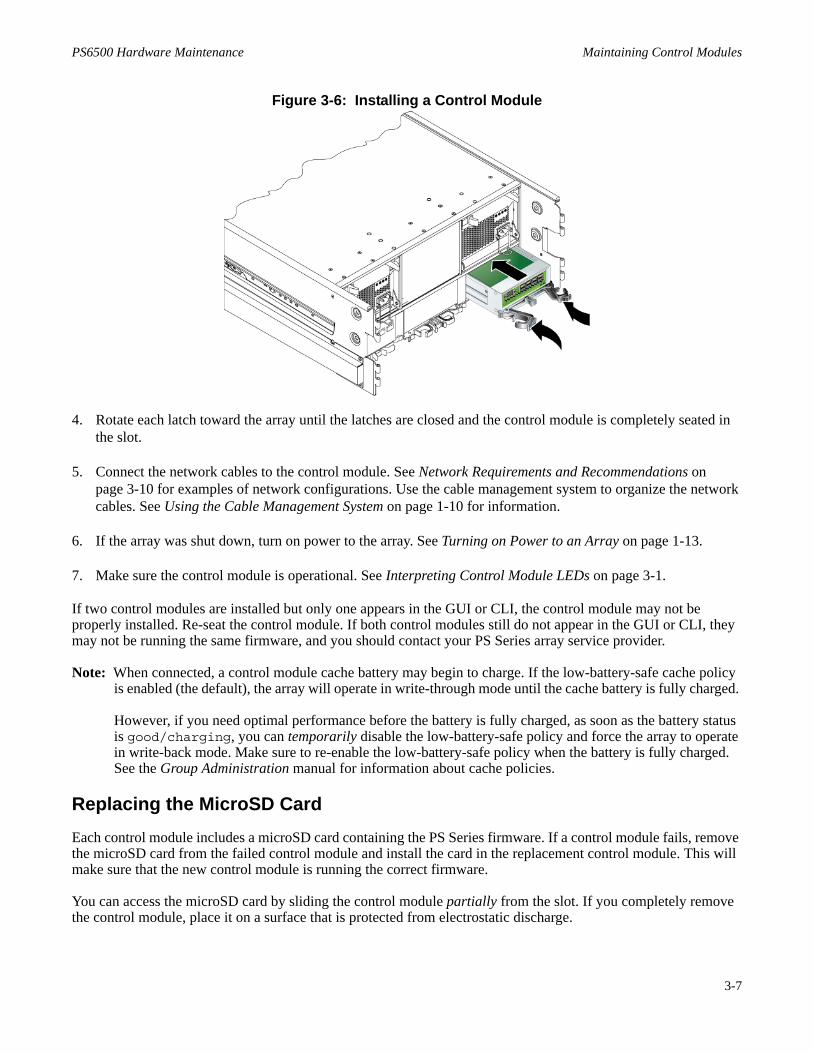
3. Hold the latches and slide the control module into the slot until you feel resistance. See Figure 3-6.
PS6500 Hardware Maintenance Maintaining Control Modules
3-7
Figure 3-6: Installing a Control Module
4. Rotate each latch toward the array until the latches are closed and the control module is completely seated in the slot.
5. Connect the network cables to the control module. See Network Requirements and Recommendations on page 3-10 for examples of network configurations. Use the cable management system to organize the network cables. See Using the Cable Management System on page 1-10 for information.
6. If the array was shut down, turn on power to the array. See Turning on Power to an Array on page 1-13.
7. Make sure the control module is operational. See Interpreting Control Module LEDs on page 3-1.
If two control modules are installed but only one appears in the GUI or CLI, the control module may not be properly installed. Re-seat the control module. If both control modules still do not appear in the GUI or CLI, they may not be running the same firmware, and you should contact your PS Series array service provider.
Note: When connected, a control module cache battery may begin to charge. If the low-battery-safe cache policy is enabled (the default), the array will operate in write-through mode until the cache battery is fully charged.
However, if you need optimal performance before the battery is fully charged, as soon as the battery status is good/charging, you can temporarily disable the low-battery-safe policy and force the array to operate in write-back mode. Make sure to re-enable the low-battery-safe policy when the battery is fully charged. See the Group Administration manual for information about cache policies.
Replacing the MicroSD CardEach control module includes a microSD card containing the PS Series firmware. If a control module fails, remove the microSD card from the failed control module and install the card in the replacement control module. This will make sure that the new control module is running the correct firmware.
You can access the microSD card by sliding the control module partially from the slot. If you completely remove the control module, place it on a surface that is protected from electrostatic discharge.
PS6500 Hardware Maintenance Maintaining Control Modules
3-8
You can partially or completely remove a control module without shutting down the array if the remaining control module has at least one connected and functioning network interface. If you remove the active control module (the LED labeled ACT will be green), there will be a short interruption as failover to the secondary control module occurs.
Before replacing a micro SD card:
• Attach an electrostatic wrist strap, as described in Protecting Hardware from Electrostatic Discharge on page 1-7.
• See Replacing the MicroSD Card on page 3-7 for instructions on removing a control module.
Caution: Be careful not to damage the circuit board. Do not use sharp instruments to remove the microSD card.
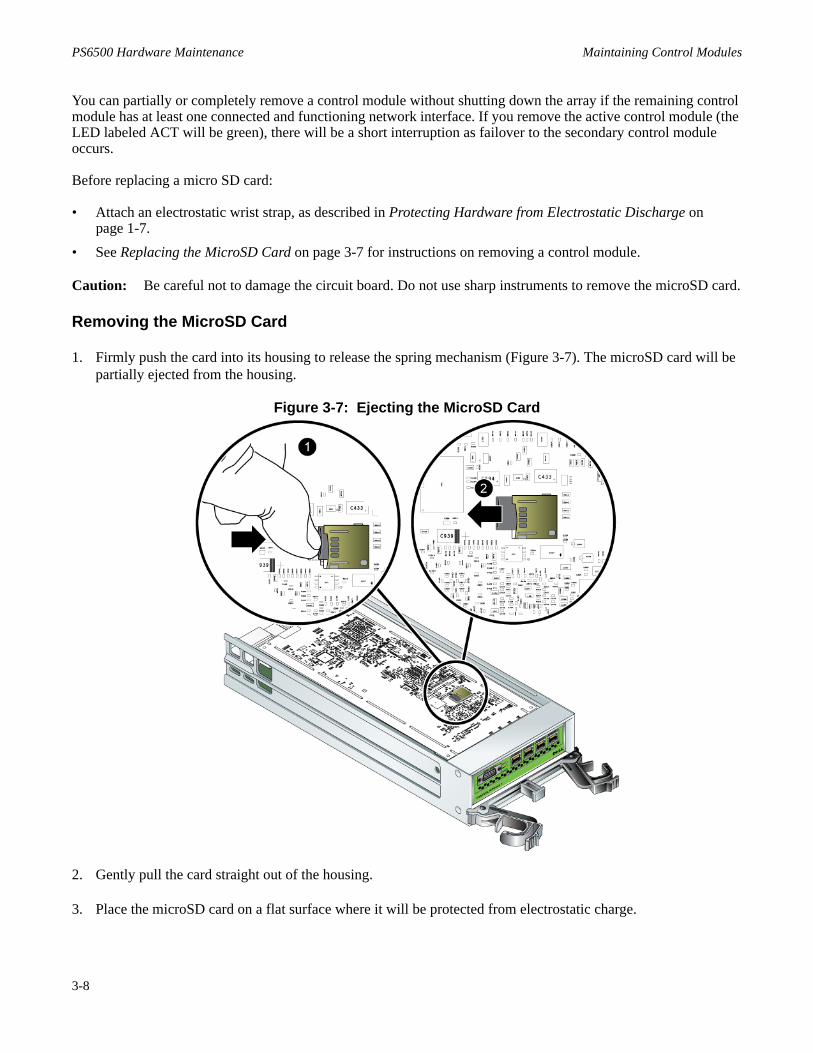
Removing the MicroSD Card
1. Firmly push the card into its housing to release the spring mechanism (Figure 3-7). The microSD card will be partially ejected from the housing.
Figure 3-7: Ejecting the MicroSD Card
2. Gently pull the card straight out of the housing.
3. Place the microSD card on a flat surface where it will be protected from electrostatic charge.

PS6500 Hardware Maintenance Maintaining Control Modules
3-9
Inserting the MicroSD Card
1. Align the replacement microSD card so the arrow on the card points towards the housing (Figure 3-8).
2. Firmly press the card into the housing until it clicks into place. Make sure you cannot pull it out.
Figure 3-8: Inserting the MicroSD Card
3. Install the control module. See Installing a Control Module on page 3-6.
After you replace the micro SD card, make sure the control module is operational. See Interpreting Control Module LEDs on page 3-1.

PS6500 Hardware Maintenance Maintaining Control Modules
3-10
Network Requirements and RecommendationsThe minimum network configuration for a PS Series array consists of a connection between Ethernet 0 on each control module and a computer or a network switch. To increase performance and availability, configure multiple network interfaces on an array and connect them to multiple switches.
Dell recommends that you follow the guidelines in Table 3-4. In addition, all the usual rules for proper network configuration apply to group members. General network configuration is beyond the scope of this manual.
Table 3-4: Network Recommendations
Recommendation Description
Switched Gigabit Ethernet network
Connect arrays and hosts to a switched network and make sure that all network connections between hosts and arrays are Gigabit Ethernet. Although an array can operate at 10 or 100 Mbits, performance will be slower than when using a Gigabit Ethernet switch.
Multiple network connections For increased bandwidth and availability, connect all the network interfaces on both control modules to multiple network switches.The switches must be connected using interswitch links. The links must have sufficient bandwidth to handle the iSCSI traffic.After connecting the network interfaces, use the Group Manager GUI or CLI to assign an IP address and netmask to each interface.
Access to the group IP address In a multi-subnet group, each configured network interface should have access to the subnet on which the group IP address resides.
Redundant network paths Using a multipathing solution helps to make sure that no single point of failure exists between computers and arrays.
For replication, a reliable, adequately sized network link
For effective and predictable replication, make sure that the network link between the primary and secondary groups is reliable and provides sufficient bandwidth for copying data.
No STP functionality on switch ports that connect end nodes
If possible, do not use Spanning-Tree Protocol (STP) on switch ports that connect end nodes (iSCSI initiators or storage array network interfaces). However, if you must use STP or RSTP (preferable to STP), you should enable the port settings (available on some switches) that let the port immediately transition into STP forwarding state upon link up. This functionality can reduce network interruptions that occur when devices restart, and should only be enabled on switch ports that connect end nodes.You can use Spanning-Tree for a single-cable connection between switches, or trunking for multi-cable connections between switches.
Flow Control enabled on switches and NICs
Enable Flow Control on each switch port and NIC that handles iSCSI traffic. PS Series arrays will correctly respond to Flow Control.
Unicast storm control disabled on switches
Disable unicast storm control on each switch that handles iSCSI traffic, if the switch provides this feature. However, the use of broadcast and multicast storm control is encouraged on switches.
Jumbo Frames enabled Enable Jumbo Frames on each switch and NIC that handles iSCSI traffic.VLANs Configure switches to use VLANs to separate iSCSI SAN traffic from other network
traffic.

PS6500 Hardware Maintenance Maintaining Control Modules
3-11
Connecting Network CablesA PS6500 must have at least one and can have up to four active network connections at one time. Multiple network connections are recommended for performance and availability.
In addition, network cables must be routed though the cable management system. See the PS6500 Rack Mount Instructions for information on installing the cable management system.
Connect cables to network interfaces as follows:
• For copper-based networks, use Category 5E or Category 6 cables with RJ45 connectors. Use Category 5 cables if they meet the TIA/EIA TSB95 standard.
• Connect interfaces in this order: Ethernet 0, Ethernet 1, Ethernet 2, and Ethernet 3.• For maximum redundancy, connect at least two interfaces to different network switches.• To provide connectivity if a control module fails, connect a cable to the first interface port on each control
module. For example, connect a cable to Ethernet 0 on CM0 and to Ethernet 0 on CM1.
At a minimum, connect network cables to Ethernet 0 on both control modules and then connect the cables to a network switch. See Figure 3-9.
Figure 3-9: Minimum Network Configuration
Although this configuration protects against control module failover, it is still a potential point of failure (for example, if the network cable connected to the active control module is disconnected). Therefore, it is recommended that you connect multiple network interfaces to different switches.
For maximum bandwidth and availability, connect network cables to all the network interfaces on both control modules and then connect the cables to different network switches that have interswitch links with sufficient bandwidth for iSCSI traffic. See Figure 3-10.

PS6500 Hardware Maintenance Maintaining Control Modules
3-12
Figure 3-10: Recommended PS6500 Network Configuration

4–1
4 Maintaining Power Supply and Cooling Modules
A PS6500 array includes three hot-swappable, redundant power supply and cooling modules. All three power supply and cooling modules must remain installed.
Two functioning power supply and cooling modules connected to a source of power are required for array operation. You access power supply and cooling modules from the rear of the array.
Power Supply and Cooling Module LEDsPower supply and cooling modules have the following LEDs:
• On the bottom front of the array, in the center, the power supply and cooling module hardware status LED (circled in Figure 4-1) shows the status of all the power supply and cooling modules. This LED panel is visible with the bezel on.
Figure 4-1: Power Supply Hardware Status LED on Front Panel
• Each power supply and cooling module has four LEDs that show the module status. See Figure 4-2.
Figure 4-2: Power Supply and Cooling Module LEDs
The LCD panel on the front panel (located behind the bezel) provides additional information about module failures.
The power supply and cooling module LEDs are described in Table 4-1.
PS6500 Hardware Maintenance Maintaining Power Supply and Cooling Modules
4-2
Power Supply and Cooling Module StatusYou can identify a failure on a power supply and cooling module by:
• LEDs. The power supply and cooling module hardware status LED is orange or flashing orange. In addition, an LED on a power supply and cooling module is orange. See Power Supply and Cooling Module LEDs on page 4-1.
• Messages. A message on the LCD panel (located behind the bezel), on the console, in the event log, or in the Group Manager GUI Alarms panel describes a power supply and cooling module failure.
• Group Manager GUI and CLI output. The Member Enclosure window or the member select show enclosure command output shows a power supply and cooling module failure.
When facing the rear of the array, power supply and cooling modules are numbered 0, 1, and 2 from left to right. See Figure 1-9.
Array Behavior When a Power Supply FailsIf one power supply and cooling module fails, the array will continue to operate as long as two modules are functioning and connected to power. Otherwise, the array will shut down automatically.
If a power supply and cooling module fails, contact your PS Series support provider for a replacement.
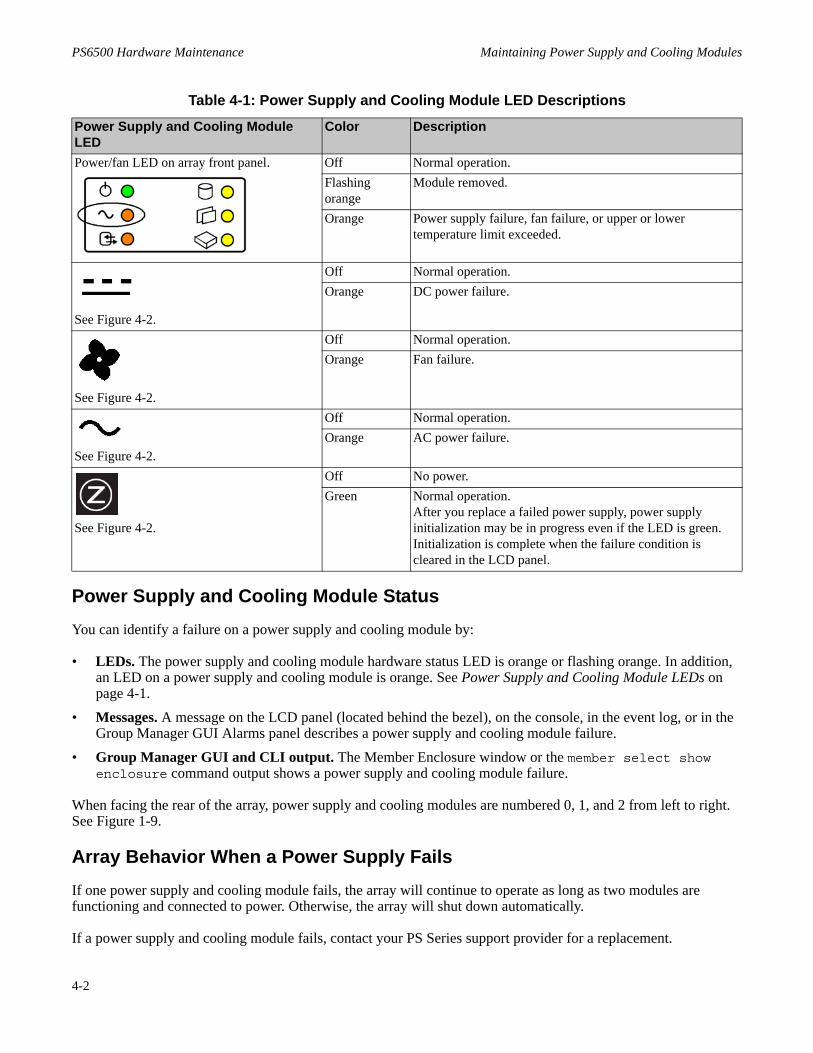
Table 4-1: Power Supply and Cooling Module LED Descriptions
Power Supply and Cooling Module LED
Color Description
Power/fan LED on array front panel. Off Normal operation.Flashing orange
Module removed.
Orange Power supply failure, fan failure, or upper or lower temperature limit exceeded.
See Figure 4-2.
Off Normal operation.Orange DC power failure.
See Figure 4-2.
Off Normal operation.Orange Fan failure.
See Figure 4-2.
Off Normal operation.Orange AC power failure.
See Figure 4-2.
Off No power.Green Normal operation.
After you replace a failed power supply, power supply initialization may be in progress even if the LED is green. Initialization is complete when the failure condition is cleared in the LCD panel.

PS6500 Hardware Maintenance Maintaining Power Supply and Cooling Modules
4-3
Caution: You should replace a faulty power supply and cooling module with a functioning module as soon as possible because another module failure will cause the array to shut down.
Notes: Do not remove a failed power supply until you are ready to replace it. If the array loses power, it will not power up unless all three power supplies are present.
Power Requirements and RecommendationsAt a minimum, two functioning power supply and cooling modules, connected to one or more power sources, are required for proper operation. Also, you cannot turn on full power to an array unless three modules are installed.
For a highly-available power configuration, Dell recommends that you:
• Connect the three power supply and cooling modules to different power sources on separate circuits. See Figure 4-3.
• Connect two power supplies to an uninterruptible power supply (UPS) system and connect the other power supply to a different power source.
Notes: If your array was shipped with power cables, use these cables to meet safety requirements. Otherwise, contact your PS Series support provider or reseller for power cable information. See Appendix A for information about voltage requirements.
Figure 4-3: Recommended PS6500 Power Configuration
Removing a Power Supply and Cooling ModuleYou can remove a failed power supply and cooling module without affecting array operation if two modules are functioning and connected to power. Otherwise, if possible, cleanly shut down the array before removing the failed module. See Shutting Down and Turning Off Power to an Array on page 1-13.

PS6500 Hardware Maintenance Maintaining Power Supply and Cooling Modules
4-4
Note: You can detach one side of the cable management system from the rear chassis flange and carefully pull it away from the rear of the array to provide access to the power supply and cooling modules.
To remove a power supply and cooling module:
1. Disconnect any power cables from the module.
2. Squeeze together the module latches to release the handle and then rotate the handle downwards. This disengages the module from the chassis. See Figure 4-4 (module shown alone for clarity).
Figure 4-4: Opening the Handle
3. Hold the handle and carefully slide the module from the slot. See Figure 4-5.
Figure 4-5: Removing a Power Supply and Cooling Module
When you replace a failed power supply and cooling module, return the module in the packaging in which the replacement module was shipped. Contact your PS Series support provider for information about returning hardware.
Installing a Power Supply and Cooling ModuleTo install a power supply and cooling module:
1. Orient the power supply and cooling module so that the power plug is at the bottom.
PS6500 Hardware Maintenance Maintaining Power Supply and Cooling Modules
4-5
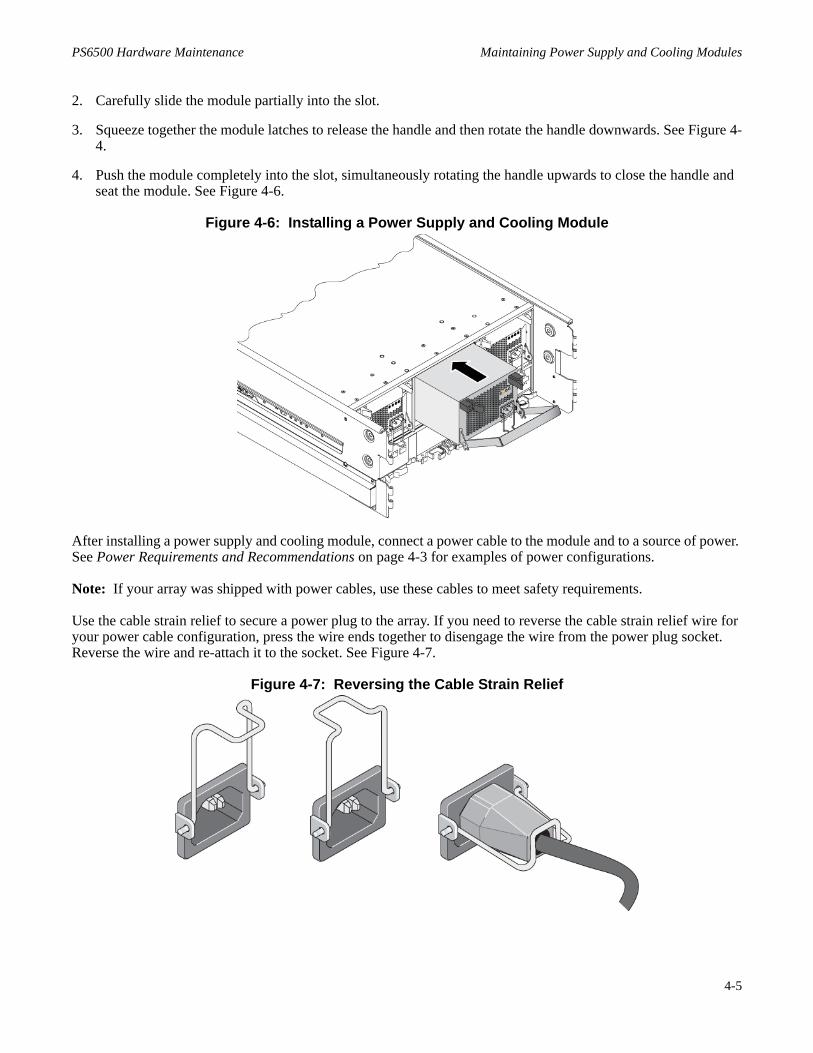
2. Carefully slide the module partially into the slot.
3. Squeeze together the module latches to release the handle and then rotate the handle downwards. See Figure 4-4.
4. Push the module completely into the slot, simultaneously rotating the handle upwards to close the handle and seat the module. See Figure 4-6.
Figure 4-6: Installing a Power Supply and Cooling Module
After installing a power supply and cooling module, connect a power cable to the module and to a source of power. See Power Requirements and Recommendations on page 4-3 for examples of power configurations.
Note: If your array was shipped with power cables, use these cables to meet safety requirements.
Use the cable strain relief to secure a power plug to the array. If you need to reverse the cable strain relief wire for your power cable configuration, press the wire ends together to disengage the wire from the power plug socket. Reverse the wire and re-attach it to the socket. See Figure 4-7.
Figure 4-7: Reversing the Cable Strain Relief

PS6500 Hardware Maintenance Maintaining Power Supply and Cooling Modules
4-6
In addition, use the cable management system to organize your power cables. See Using the Cable Management System on page 1-10 for more information.
Note: If you detached one side of the cable management system from the rear chassis flange for better access, re-attach it.
If the array was shut down, turn on power to the array. See Turning on Power to an Array on page 1-13.
Make sure the new module is operational. See Power Supply and Cooling Module Status on page 4-2.
Caution: After installing a power supply and cooling module, wait until the new module initializes before removing the other module. Once connected to a source of power, module initialization generally completes in one to ten seconds. Initialization is complete when the LCD panel (located behind the bezel) no longer shows the module failure.
5–1
5 Maintaining Channel Cards
A PS6500 array includes two hot-swappable, redundant channel cards. Channel cards distribute connections from the control modules to the disk drives. Each channel card has redundant paths to all the disk drives for high availability. One functioning channel card is required for array operation.
Warning: Before replacing a channel card, contact your PS Series support provider for important information.
You access channel cards from the front of the array after removing the bezel and opening the chassis cover. See Removing and Installing the Bezel on page 1-8 and Opening and Closing the Chassis Cover on page 1-9. Viewed from the front of the array, channel card 0 is on the right side, and channel card 1 is on the left side of the array.
Channel Card LEDsThe following LEDs indicate channel card status:
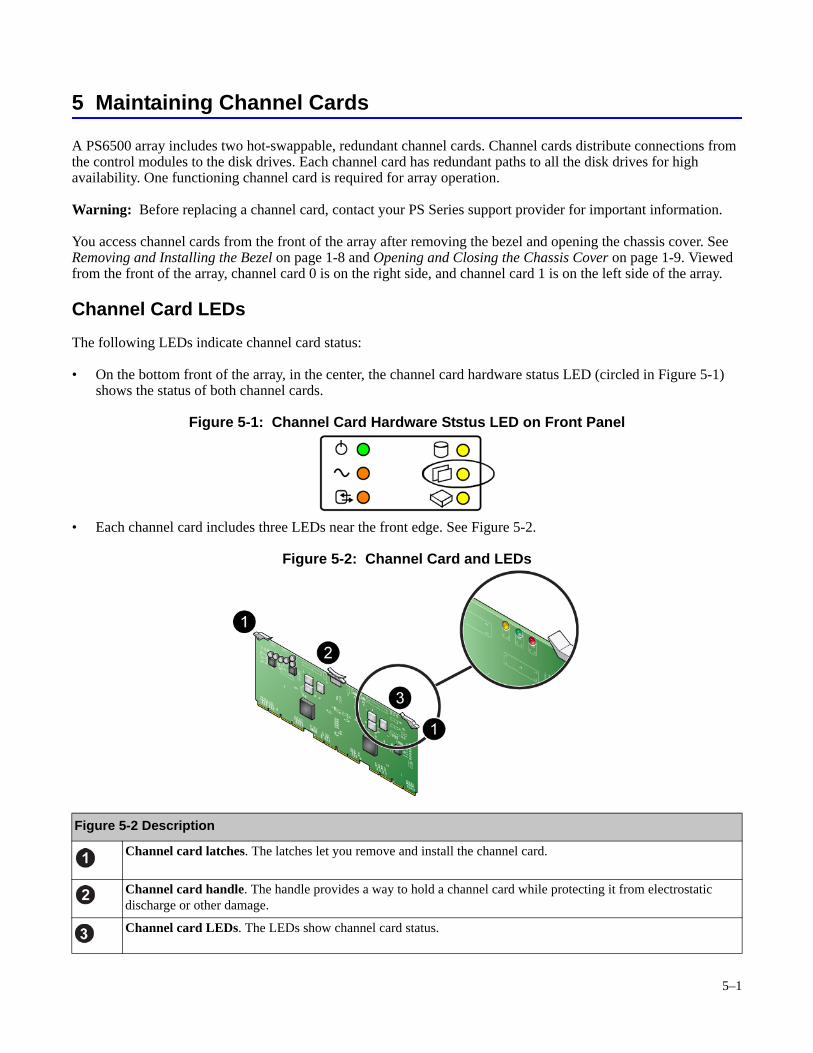
• On the bottom front of the array, in the center, the channel card hardware status LED (circled in Figure 5-1) shows the status of both channel cards.
Figure 5-1: Channel Card Hardware Ststus LED on Front Panel
• Each channel card includes three LEDs near the front edge. See Figure 5-2.
Figure 5-2: Channel Card and LEDs
Figure 5-2 Description
Channel card latches. The latches let you remove and install the channel card.
Channel card handle. The handle provides a way to hold a channel card while protecting it from electrostatic discharge or other damage.
Channel card LEDs. The LEDs show channel card status.

PS6500 Hardware Maintenance Maintaining Channel Cards
5-2
Channel card LEDs are described in Table 5-1. The LCD panel on the front panel (located behind the bezel) shows additional information about channel card failures.
Channel Card StatusYou can identify a channel card failure by:
• LEDs. The channel card hardware status LED is yellow and the middle or rear LED on the channel card is flashing green quickly. The front LED on the channel card may also be yellow. See Channel Card LEDs on page 5-1.
• Messages. A message on the LCD panel (located behind the bezel), on the console, in the event log, or in the Group Manager GUI Alarms panel describes a channel card failure.
• Group Manager GUI and CLI output. The Member Controllers window or the member select show channelcards command output shows a failure.
If a channel card fails, contact your PS Series support provider for a replacement.
Array Behavior When a Channel Card FailsIf a channel card fails, the array will continue to operate. If both channel cards fail, the array will no longer operate.
Replace a failed channel card as soon as possible. Contact your PS Series support provider for a replacement.
Note: Do not remove a failed channel card until you are ready to replace it.
Table 5-1: Channel Card LED Descriptions
LED Location Color DescriptionChannel cards LED on array front panel. Off Normal operation.
Flashing yellow Channel card removed.Yellow Channel card failure.
Front of the channel card. See Figure 5-2. Off Normal operation.Yellow Reset or hot swap error.
Middle of the channel card. See Figure 5-2. Off No power.Slow flashing green Normal operation.Fast flashing green Initialization error.
Rear of the channel card. See Figure 5-2. Off No power.Slow flashing green Normal condition.Fast flashing green Initialization error.

PS6500 Hardware Maintenance Maintaining Channel Cards
5-3
Channel Card Handling RequirementsFollow these channel card handling requirements:
• Protect channel cards from electrostatic discharge. When handling a channel card, always wear an electrostatic wrist strap or a similar protective device. See Protecting Hardware from Electrostatic Discharge on page 1-7.
• Handle channel cards carefully. Hold a channel card only by the plastic handle or latches. Do not force a channel card into a slot.
• Store channel cards properly. Store a channel card in its original packaging or in an antistatic bag or place the channel card on a surface protected from electrostatic discharge.
Replacing a Channel CardYou can replace a failed channel card without affecting array operation if the second card is installed and functioning. Otherwise, if possible, cleanly shut down the array before removing the channel card, as described in Shutting Down and Turning Off Power to an Array on page 1-13.
Notes: After you install a channel card, wait 60 seconds before removing the other channel card to allow the channel cards to initialize.
For proper array cooling, minimize the time that the chassis cover is open.
Do not remove a failed channel card until you are ready to replace it.
Removing a Channel Card
1. Use an electrostatic wrist strap or a similar protective device. See Protecting Hardware from Electrostatic Discharge on page 1-7.
2. Remove the bezel. See Removing and Installing the Bezel on page 1-8.
3. Unlock and open the chassis cover. See Opening and Closing the Chassis Cover on page 1-9.
4. Open the two channel card latches by rotating each latch upwards. This action will disengage the channel card from the chassis. See Figure 5-3.

PS6500 Hardware Maintenance Maintaining Channel Cards
5-4
Figure 5-3: Opening the Channel Card Latches
5. Hold the channel card by the plastic handle and carefully pull up, sliding the channel card from the slot. See Figure 5-4. Make sure you place the channel card where it is protected from electrostatic discharge.
Figure 5-4: Removing a Channel Card
Inserting a Channel Card
1. Hold the replacement channel card by the handle and orient the card as shown in Figure 5-2, with the channel card LEDs toward the front of the chassis.
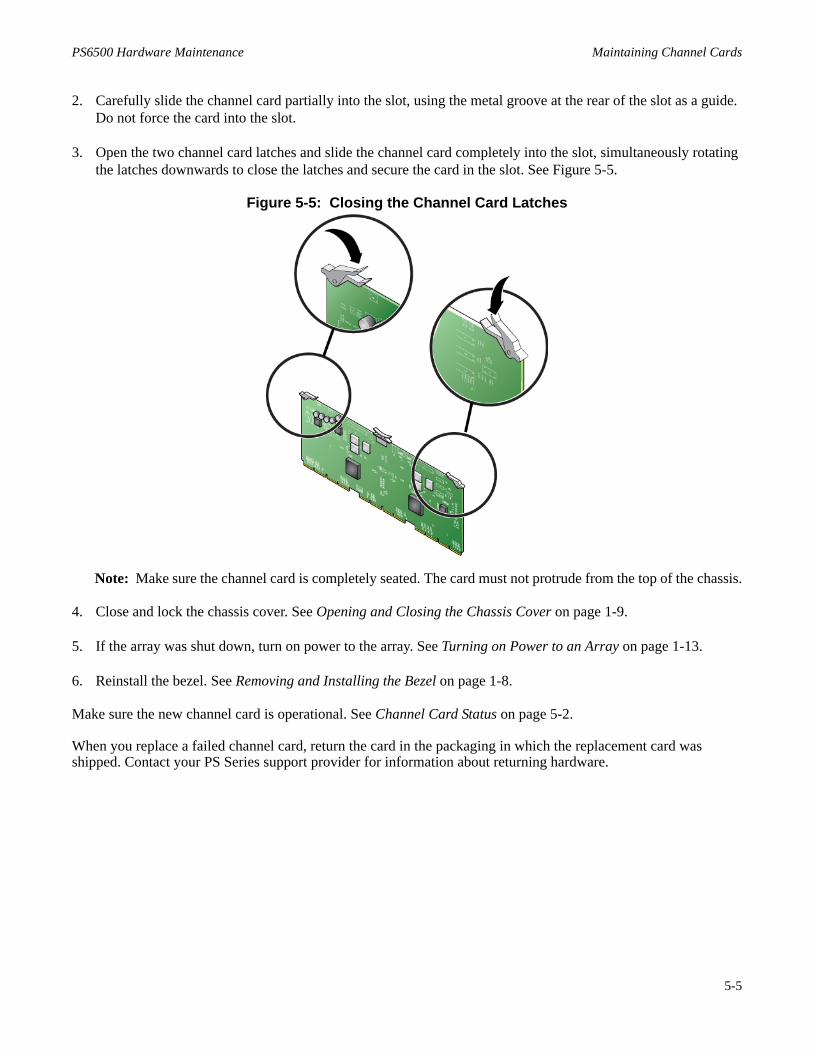
PS6500 Hardware Maintenance Maintaining Channel Cards
5-5
2. Carefully slide the channel card partially into the slot, using the metal groove at the rear of the slot as a guide. Do not force the card into the slot.
3. Open the two channel card latches and slide the channel card completely into the slot, simultaneously rotating the latches downwards to close the latches and secure the card in the slot. See Figure 5-5.
Figure 5-5: Closing the Channel Card Latches
Note: Make sure the channel card is completely seated. The card must not protrude from the top of the chassis.
4. Close and lock the chassis cover. See Opening and Closing the Chassis Cover on page 1-9.
5. If the array was shut down, turn on power to the array. See Turning on Power to an Array on page 1-13.
6. Reinstall the bezel. See Removing and Installing the Bezel on page 1-8.
Make sure the new channel card is operational. See Channel Card Status on page 5-2.
When you replace a failed channel card, return the card in the packaging in which the replacement card was shipped. Contact your PS Series support provider for information about returning hardware.

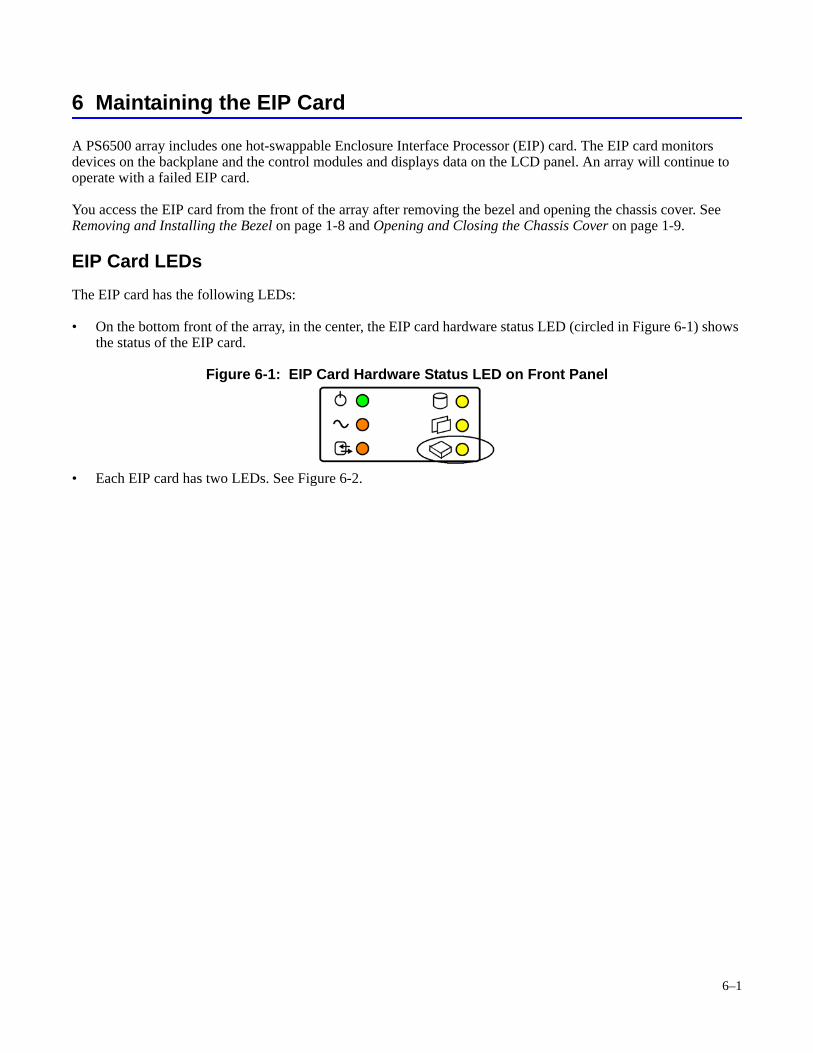
6–1
6 Maintaining the EIP Card
A PS6500 array includes one hot-swappable Enclosure Interface Processor (EIP) card. The EIP card monitors devices on the backplane and the control modules and displays data on the LCD panel. An array will continue to operate with a failed EIP card.
You access the EIP card from the front of the array after removing the bezel and opening the chassis cover. See Removing and Installing the Bezel on page 1-8 and Opening and Closing the Chassis Cover on page 1-9.
EIP Card LEDsThe EIP card has the following LEDs:
• On the bottom front of the array, in the center, the EIP card hardware status LED (circled in Figure 6-1) shows the status of the EIP card.
Figure 6-1: EIP Card Hardware Status LED on Front Panel
• Each EIP card has two LEDs. See Figure 6-2.

PS6500 Hardware Maintenance Maintaining the EIP Card
6-2
Figure 6-2: EIP Card and LEDs
The EIP card LEDs are described in Table 6-1. The LCD panel on the front panel (located behind the bezel) shows additional information about EIP card failures.
Figure 6-2 DescriptionMounting bracket. The bracket provides a way to hold an EIP card while protecting it from electrostatic discharge or other damage.LEDs. The LEDs show the EIP card status.
Thumbscrew. The thumbscrew secures the EIP card to the chassis.
Table 6-1: EIP Card LED Descriptions
EIP Card LED and Location Color DescriptionEIP card LED on array front
panel.
Off Normal operation.Flashing yellow Card removed.Yellow EIP card failure.
Invalid ID LED on EIP card. See Figure 6-2. Off Not used.Fault LED on EIP card. See Figure 6-2. Off Normal operation.
Yellow Failure.
PS6500 Hardware Maintenance Maintaining the EIP Card
6-3
EIP Card StatusYou can identify an EIP card failure by:
• LEDs. The EIP card hardware status LED is yellow, and the Fault LED on the EIP card is yellow. See EIP Card LEDs on page 6-1.
• Messages. A message on the LCD panel (located behind the bezel), on the console, in the event log, or in the Group Manager GUI Alarms panel describes an EIP card failure.
• Group Manager GUI and CLI output. The Member Enclosure window or member select show enclosure command output shows a failure.
Array Behavior When an EIP Card FailsIf an EIP card fails, the array will continue to operate. Contact your PS Series support provider for a replacement. Replace a failed EIP card as soon as possible.
Note: Do not remove a failed EIP card until you are ready to replace it.
EIP Card Handling RequirementsFollow these EIP card handling requirements:
• Protect the EIP card from electrostatic discharge. When handling an EIP card, always wear an electrostatic wrist strap or a similar protective device. See Protecting Hardware from Electrostatic Discharge on page 1-7.
• Handle EIP cards carefully. Hold an EIP card only by the mounting bracket. Do not force an EIP card into a slot.
• Store EIP cards properly. Store an EIP card in its original packaging or in an antistatic bag or place the EIP card on a surface protected from electrostatic discharge.
Replacing the EIP CardYou can replace a failed EIP card without affecting array operation.
Notes: For proper array cooling, minimize the time that the chassis is open.
Do not remove a failed EIP card until you are ready to replace it.
To remove an EIP card:
1. Use an electrostatic wrist strap or a similar protective device. See Protecting Hardware from Electrostatic Discharge on page 1-7.
2. Remove the bezel. See Removing and Installing the Bezel on page 1-8.
3. Unlock and open the chassis. See Opening and Closing the Chassis Cover on page 1-9.
4. Use a Phillips screwdriver to release the EIP card thumbscrew shown in Figure 6-3.

PS6500 Hardware Maintenance Maintaining the EIP Card
6-4
Figure 6-3: Removing the EIP Card Thumbscrew
5. Hold the EIP card mounting bracket and carefully pull up and slide the card from the chassis. See Figure 6-4.
Figure 6-4: Removing the EIP Card
6. Make sure you place the EIP card where it is protected from electrostatic discharge.

PS6500 Hardware Maintenance Maintaining the EIP Card
6-5
To install a new EIP card:
1. Hold the replacement EIP card by the mounting bracket and orient the card in the direction shown in Figure 6-3, with the thumbscrew toward the front of the array.
2. Carefully slide the replacement EIP card completely into the slot. Use the metal groove on the rear of the slot as a guide. Do not force the card into the slot. Make sure the card is completely seated. The card should not protrude from the top of the chassis.
3. Use a Phillips screwdriver to gently tighten the EIP card thumbscrew.
Note: The array will emit an audible signal when the EIP card boots.
4. Close and lock the chassis cover. See Opening and Closing the Chassis Cover on page 1-9.
5. If the array was shut down, turn on power to the array. See Turning on Power to an Array on page 1-13.
6. Reinstall the bezel. See Removing and Installing the Bezel on page 1-8.
Make sure that the new EIP card is operational. See EIP Card Status on page 6-3.
When you replace a failed EIP card, return the card in the packaging in which the replacement card was shipped. Contact your PS Series support provider for information about returning hardware.

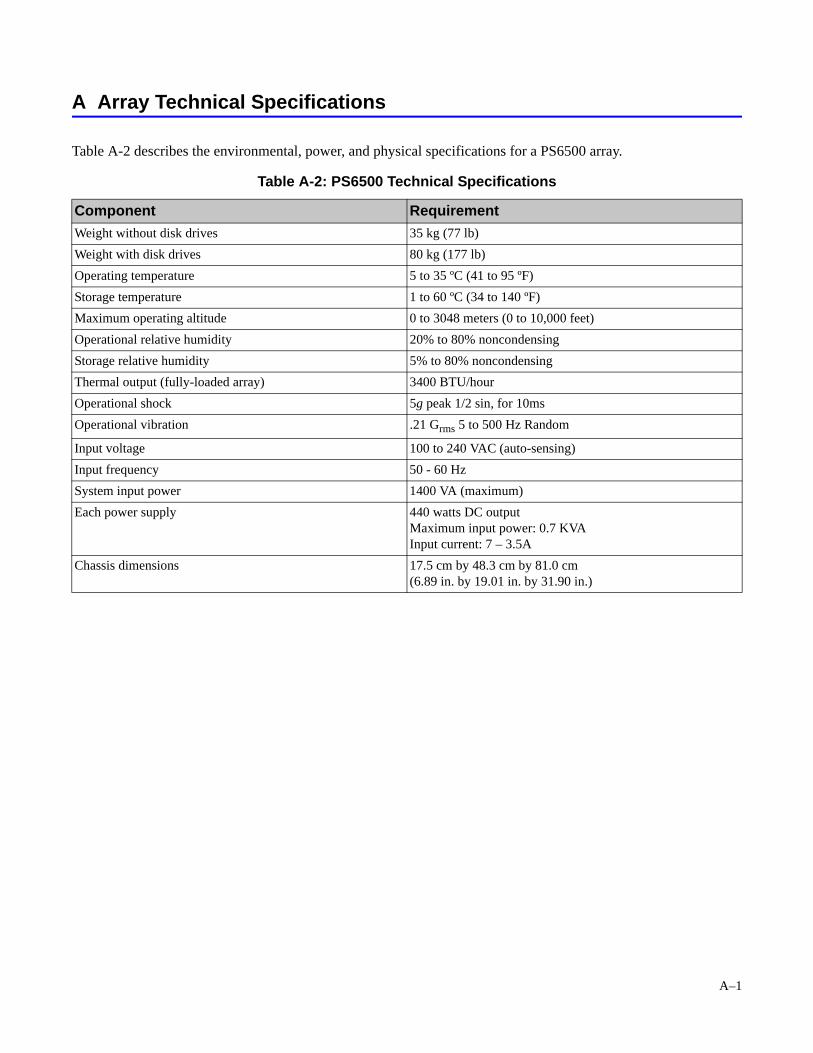
A–1
A Array Technical Specifications
Table A-2 describes the environmental, power, and physical specifications for a PS6500 array.
Table A-2: PS6500 Technical Specifications
Component RequirementWeight without disk drives 35 kg (77 lb)Weight with disk drives 80 kg (177 lb)Operating temperature 5 to 35 ºC (41 to 95 ºF)Storage temperature 1 to 60 ºC (34 to 140 ºF)Maximum operating altitude 0 to 3048 meters (0 to 10,000 feet)Operational relative humidity 20% to 80% noncondensingStorage relative humidity 5% to 80% noncondensingThermal output (fully-loaded array) 3400 BTU/hourOperational shock 5g peak 1/2 sin, for 10msOperational vibration .21 Grms 5 to 500 Hz Random
Input voltage 100 to 240 VAC (auto-sensing)Input frequency 50 - 60 HzSystem input power 1400 VA (maximum)Each power supply 440 watts DC output
Maximum input power: 0.7 KVAInput current: 7 – 3.5A
Chassis dimensions 17.5 cm by 48.3 cm by 81.0 cm (6.89 in. by 19.01 in. by 31.90 in.)


Index–1
IndexAaccessing field replaceable modules 1-1array
back panel 1-6batteries 3-1bezel
description 1-2installing 1-8removing 1-8
cable management system 1-10channel cards 5-1control module restriction 3-6control modules 3-1cooling modules 4-1cooling requirement 1-2disk drives 2-1EIP card 6-1enclosure switches 1-6environmental requirements A-1fans 4-1field-replaceable modules 1-1firmware 3-3front panel 1-2installing bezel 1-8installing channel cards 5-3installing disk drives 2-7installing EIP card 6-3installing power supply and cooling modules 4-4LEDs 1-2, 2-1, 3-1, 4-1network connection guidelines 3-10opening and closing cover 1-9power requirements A-1power supplies 4-1power supply connections 4-3powering off 1-13powering on 1-13protecting from discharge 1-7removing bezel 1-8removing channel cards 5-3removing control modules 3-4removing disk drives 2-4removing EIP card 6-3removing power supply and cooling modules 4-3restarting 1-13shutdown procedure 1-13specifications A-1
Bback panel, description 1-6batteries
charging 3-7servicing 3-1
bezelinstalling 1-9locking 1-9removing 1-8unlocking 1-8
Ccable management system, using 1-10, 3-7, 4-6cable strain relief, using 4-6cables, network
connecting 3-7, 3-11supported 3-11
cables, powerconnecting 4-6
cables, serialconnecting 1-13
channel cardsdescription 5-1handling requirements 5-3identifying failures 5-2installing 5-4interpreting LED 5-1locating 5-1maintaining 5-1protecting 5-3removing 5-3replacing 5-3verifying operation 5-5
control modulesbatteries 3-1charging cache battery 3-7checking proper installation 3-7failover behavior 3-3failure indications 3-3firmware identification 3-3firmware requirements 3-3, 3-7handling requirements 3-4LEDs 3-1locating 3-1microSD card
moving 3-6replacing 3-3, 3-4, 3-7
removing 3-4restriction on mixing 3-1, 3-6synchronizing 3-4types 3-1verifying operational status 3-7
coolingindications of failure 4-2initialization 4-6installing module 4-4LEDs 4-1

PS6500 Hardware Maintenance Index
Index-2
locating modules 4-2removing module 4-3requirements 4-2verifying operational status 4-6
cover (chassis), opening and closing 1-9Ddisk drives
accessing 2-7correct handling 2-6failure behavior 2-3failure indicators 2-2identifying 2-3incorrect handling 2-6installing 2-7LEDs 2-1maintenance 2-1numbering 2-3protecting 2-4removing 2-4requirements 2-4status 2-2supported configurations 2-4verifying operational status 2-9
EEIP card
identifying failures 6-3interpreting LEDs 6-1maintaining 6-1replacing 6-3verifying operation 6-5
electrostatic discharge, avoiding 1-7electrostatic wrist strap, using 1-7enclosure interface processor card, see EIP cardenclosure switches, default settings 1-6environmental requirements A-1Ffailover
control module 3-3network connection 3-3port 3-3
failure indicationschannel cards 5-2control modules 3-3cooling 4-2disks 2-2EIP card 6-3power 4-2
fansfailure indications 4-2initialization 4-6installing module 4-4LEDs 4-1locating modules 4-2
maintaining 4-1removing module 4-3verifying operational status 4-6
field replaceable moduleshow to access 1-1
firmwareidentifying 3-3, 3-4requirements 3-3, 3-7
Flow Control recommendation 3-10front panel, description 1-2full-power mode, defined 1-13GGigabit Ethernet recommendation 3-10Hhardware
power supply connections 4-3hosts
Flow Control recommendation 3-10Jumbo Frames recommendation 3-10
JJumbo Frames recommendation 3-10LLCD panel
description 1-4location 1-2
LEDschannel card 5-1control module 3-1cooling modules 4-1disk drives 2-1EIP card 6-1locating 1-2network interfaces 3-1power supplies 4-1
Mmember
increasing bandwidth 3-10multipath I/O recommendation 3-10network connection guidelines 3-10subnet access recommendation 3-10
microSD cardfirmware requirements 3-3identifying firmware 3-3moving 3-6, 3-7replacing 3-3, 3-4, 3-7
Nnetwork
configuration examples 3-11connection guidelines 3-10failure protection 3-3improving performance 3-10increasing availability 3-11increasing performance 3-11

PS6500 Hardware Maintenance Index
Index-3
minimum configuration 3-11recommendations 3-10, 3-11recommended configuration 3-11requirements 3-10, 3-11
network cables 3-11connecting 3-11
network interfacesconfiguring 3-10LEDs 3-1
Ppower
full-power mode 1-13standby mode 1-13turning off 1-13turning on 1-13
power cablesrestriction 4-5using strain relief 4-6
power suppliescable strain relief 4-6connecting array 4-3indications of failure 4-2initialization 4-6installing 4-4LEDs 4-1locating modules 4-2maintaining 4-1removing module 4-3requirements 4-2using UPS systems 4-3verifying operational status 4-6
Rrequirements
channel cards 5-3control modules 3-4cooling 4-1disk drives 2-4EIP card 6-3environmental A-1firmware 3-3hardware handling 1-7network 3-11physical A-1power 4-1, A-1power cables 4-5
Sserial cable
connecting 1-13serial number label
location 1-6shutting down an array 1-13Spanning-Tree Protocol recommendation 3-10standby mode
LCD panel indication 1-4LED indication 1-3
standby mode, defined 1-13status
channel card 5-2control modules 3-3cooling 4-2disk drives 2-2EIP card 6-3power supplies 4-2
switches, recommendationsFlow Control 3-10Jumbo Frames 3-10Spanning-Tree Protocol 3-10unicast storm control 3-10VLAN 3-10
Uunicast storm control recommendation 3-10UPS systems 4-3VVLAN recommendation 3-10